

Page 1

Troubleshooting
This chapter includes:
■ "Automatic Diagnostic Tools" on page 7-2
■ "Paper Jams" on page 7-4
■ "Output Quality Problems" on page 7-26
■ "Maintenance" on page 7-31
■ "Moving and Repacking the System" on page 7-51
■ "Web Links" on page 7-57
WorkCentre® C2424 Copier-Printer
Copyright © 2005 Xerox Corporation. All Rights Reserved.
7-1
Page 2

Automatic Diagnostic Tools
7
Automatic Diagnostic Tools
Xerox provides several automatic diagnostic tools to help you produce and maintain print
quality.
This section includes:
■ "Control Panel Help Button" on page 7-2
■ "PhaserSMART Technical Support" on page 7-2
■ "PrintingScout" on page 7-3
Control Panel Help Button
Your system’s control panel provides you with information and troubleshooting help. When an
error or warning condition occurs, the control panel displays a message informing you of the
problem. In many cases, the control panel also displays an animated graphic showing the
location of the problem, such as the location of a paper jam.
To view information about how to fix the problem, press the control panel’s Help button,
which is labeled with a “?” symbol. You can press the Help button at any time to get additional
information about the message or menu displayed on the control panel.
Back
Enter
2424-15
PhaserSMART Technical Support
PhaserSMART Technical Support is an automated, Internet-based support system. Use your
default web browser to send diagnostic information from your printer to our web site for
analysis. PhaserSMART Technical Support examines the information, diagnoses the problem,
and proposes a solution. If the problem is not resolved with the solution, PhaserSMART
Technical Support assists you in opening a Service Request with Xerox Customer Support.
To access PhaserSMART Technical Support:
1. Open your browser and go to www.phaserSMART.com
2. Enter your system’s IP address in the browser window.
3. Follow the instructions on the screen.
.
WorkCentre® C2424 Copier-Printer
7-2
Page 3

Automatic Diagnostic Tools
PrintingScout
PrintingScout is a tool that is installed with your Windows printer driver. It automatically
checks the printer status when you send a print job. If the printer is unable to print your job,
PrintingScout automatically displays a message on your computer screen to let you know that
the printer needs attention. The message also explains how to fix the problem.
Note
PrintingScout is available from the Windows printer driver for printer connected to the
network via TCP/IP.
WorkCentre® C2424 Copier-Printer
7-3
Page 4
Paper Jams
This section includes:
■ "Jam at the Exit Cover" on page 7-4
■ "Jam at the Exit Path" on page 7-9
■ "Jam at the Front Cover" on page 7-12
■ "Jam at Tray 2, 3, or 4" on page 7-18
■ "Jam at the Document Feeder" on page 7-22
Note
For safety information, go to Getting Started/User Safety on the
User Documentation CD-ROM.
Videos are available with instructions for clearing paper jams. Videos are located
on the User Documentation CD-ROM and at www.xerox.com/office/
c2424support.
Paper Jams
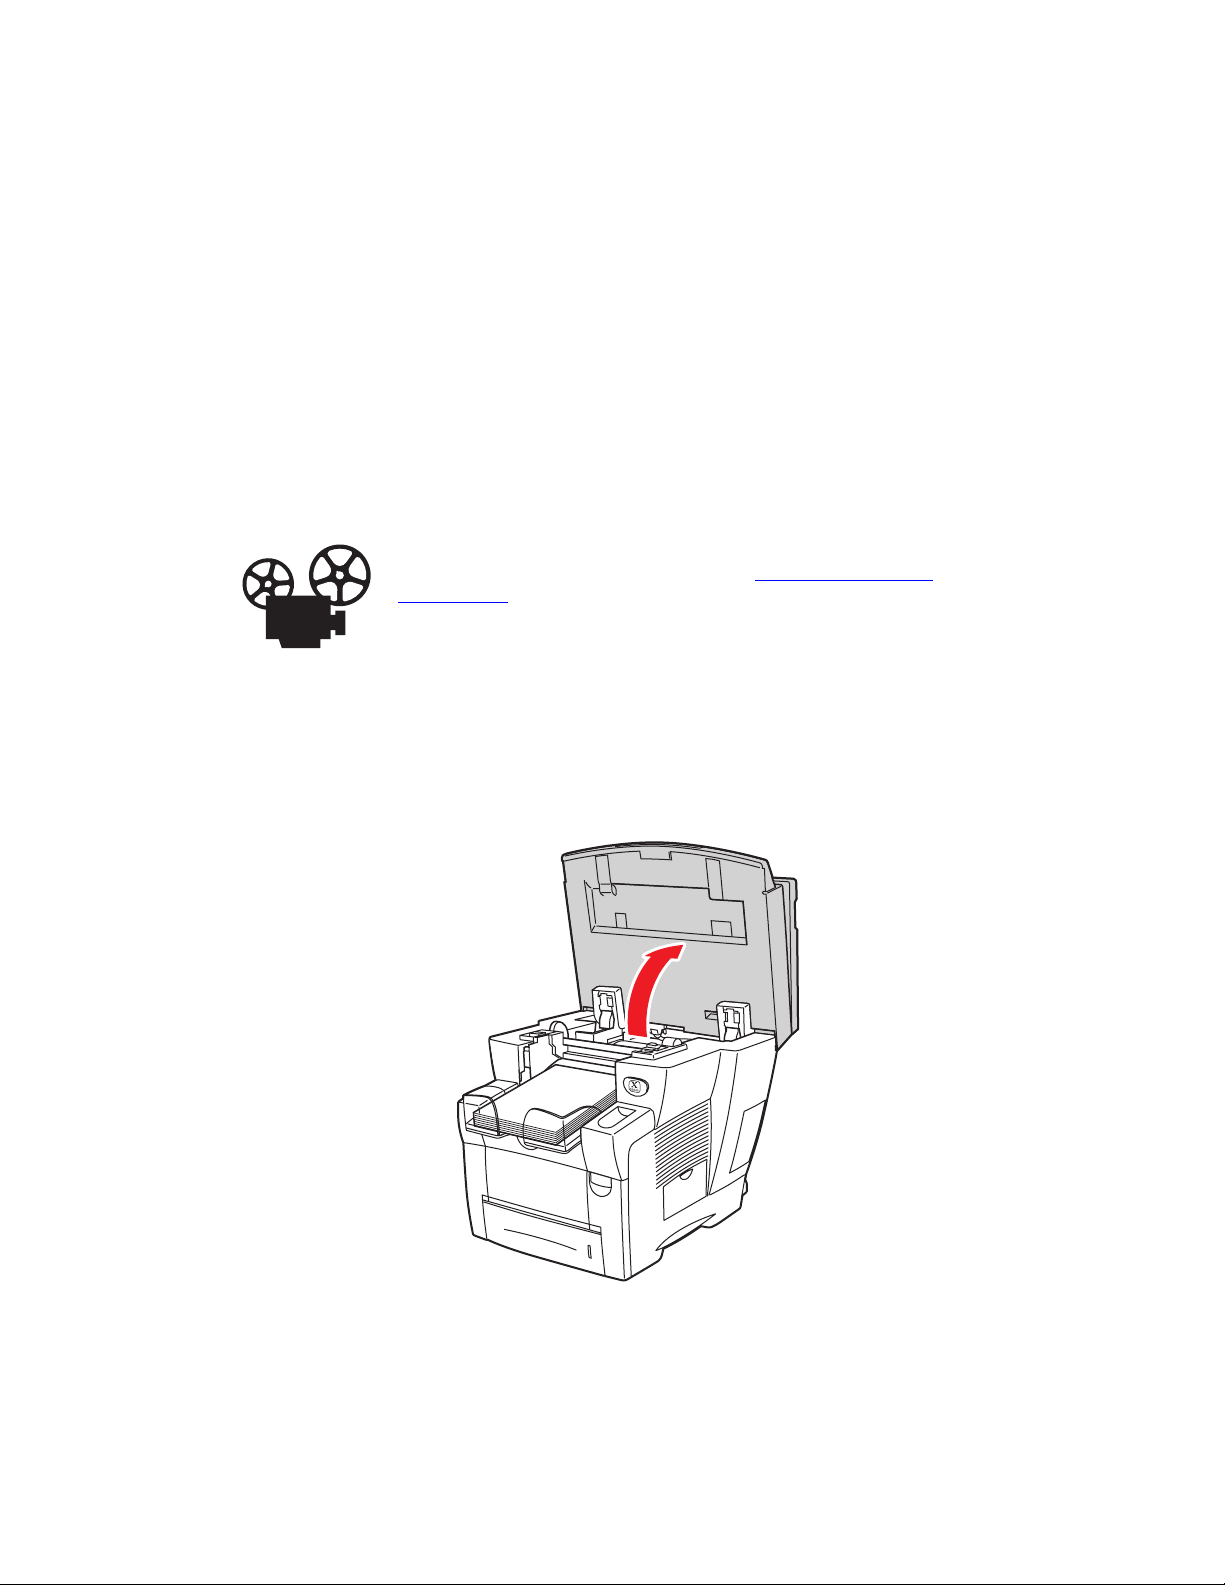
Jam at the Exit Cover
Follow these steps to clear the jam.
1. Lift the control panel.
2424-189
WorkCentre® C2424 Copier-Printer
7-4
Page 5
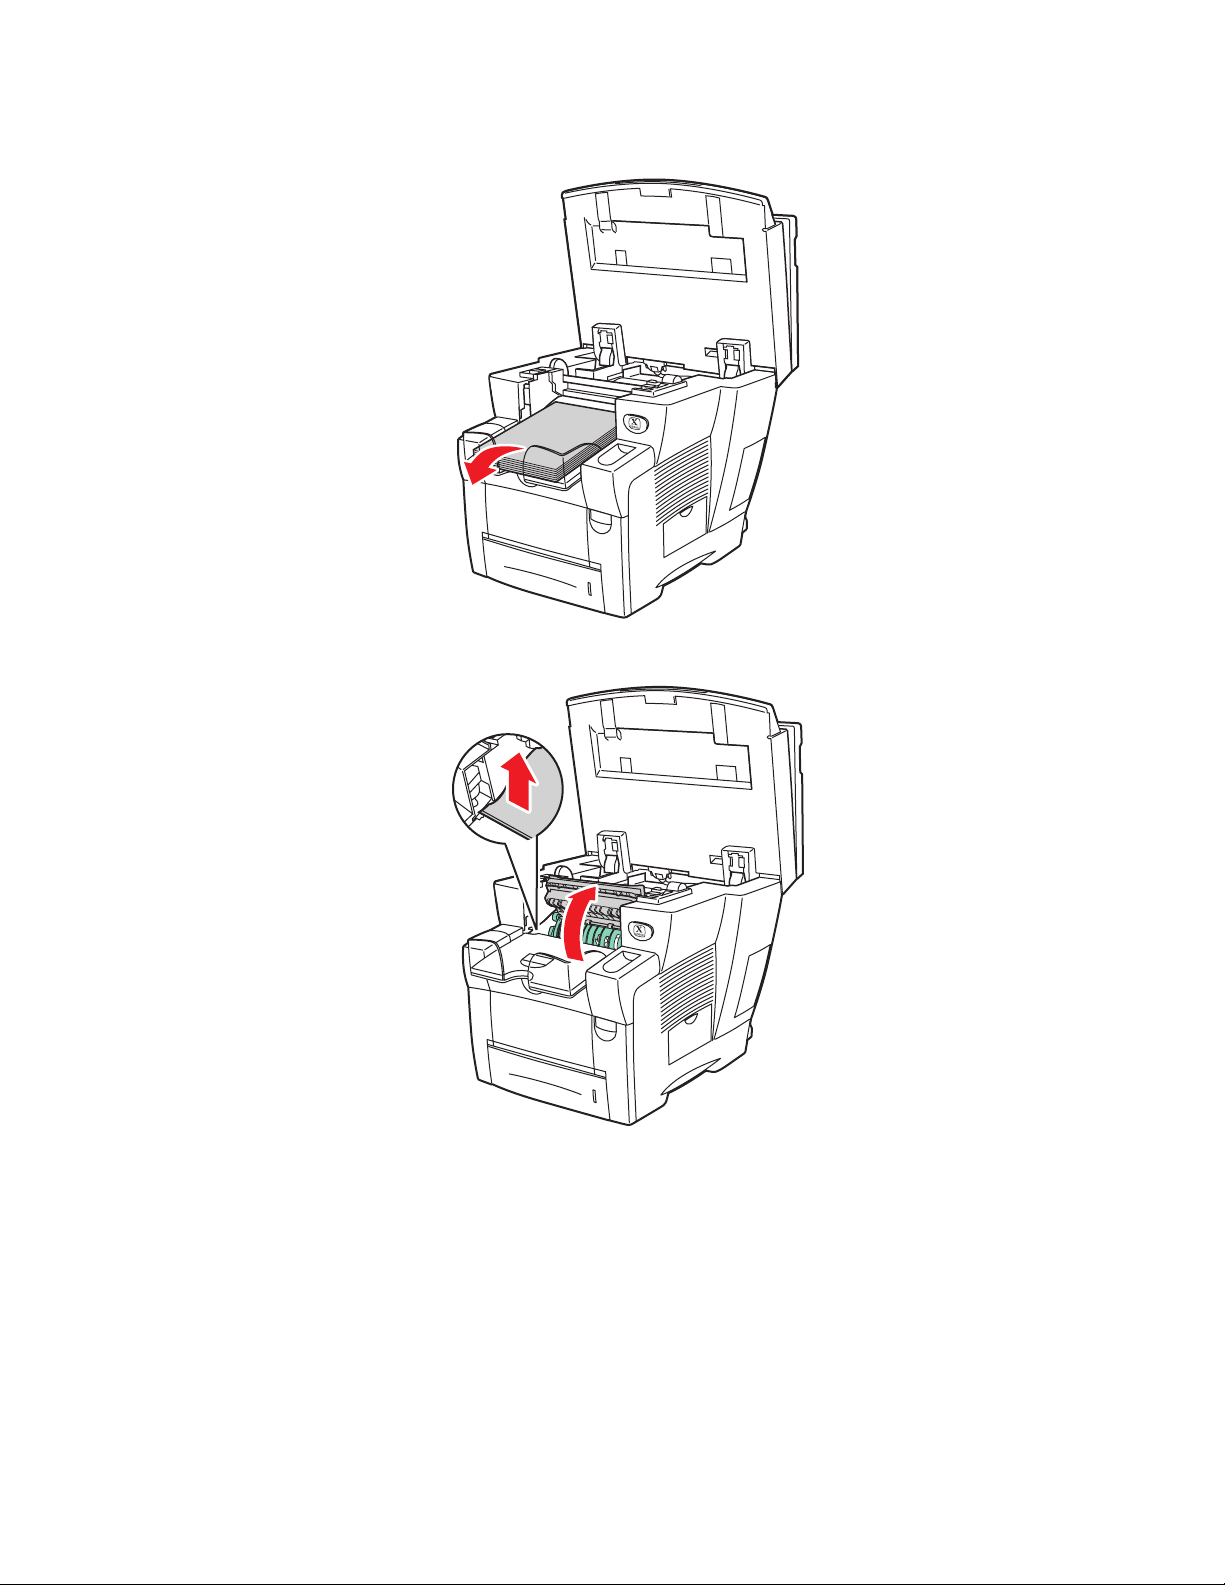
2. Remove paper from the output tray.
8
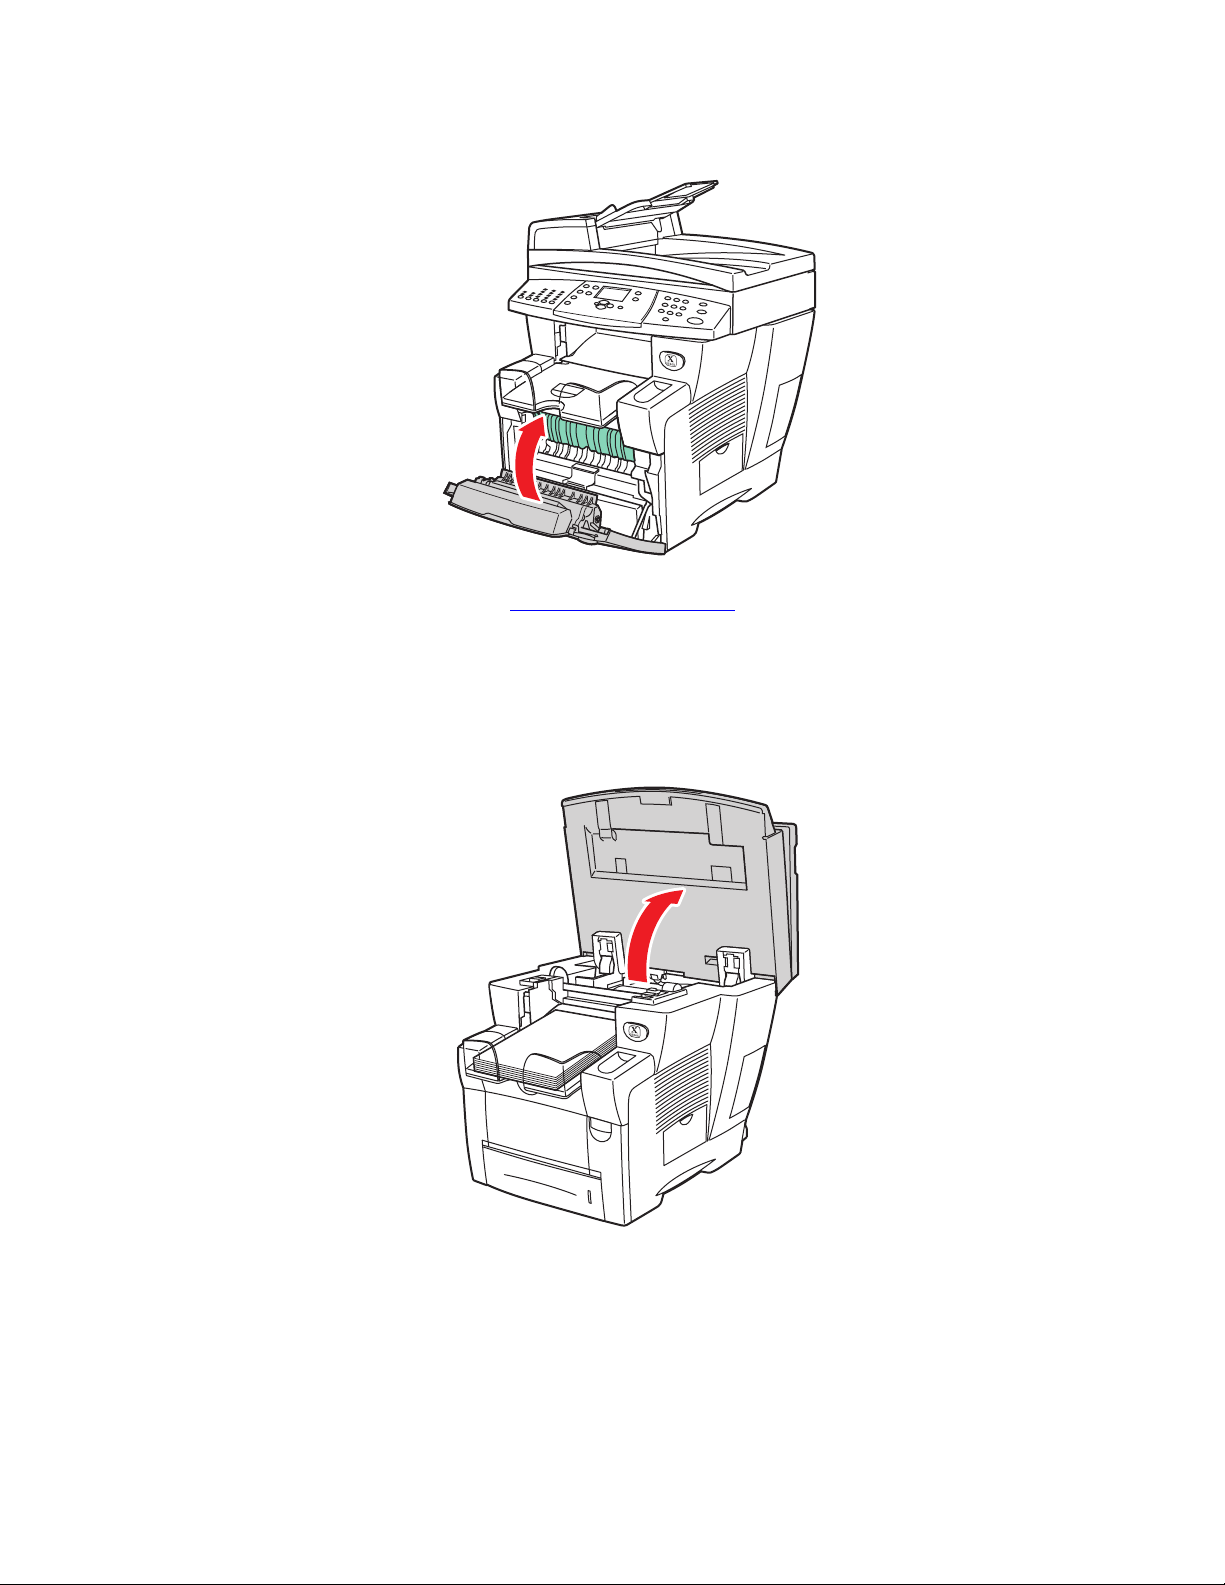
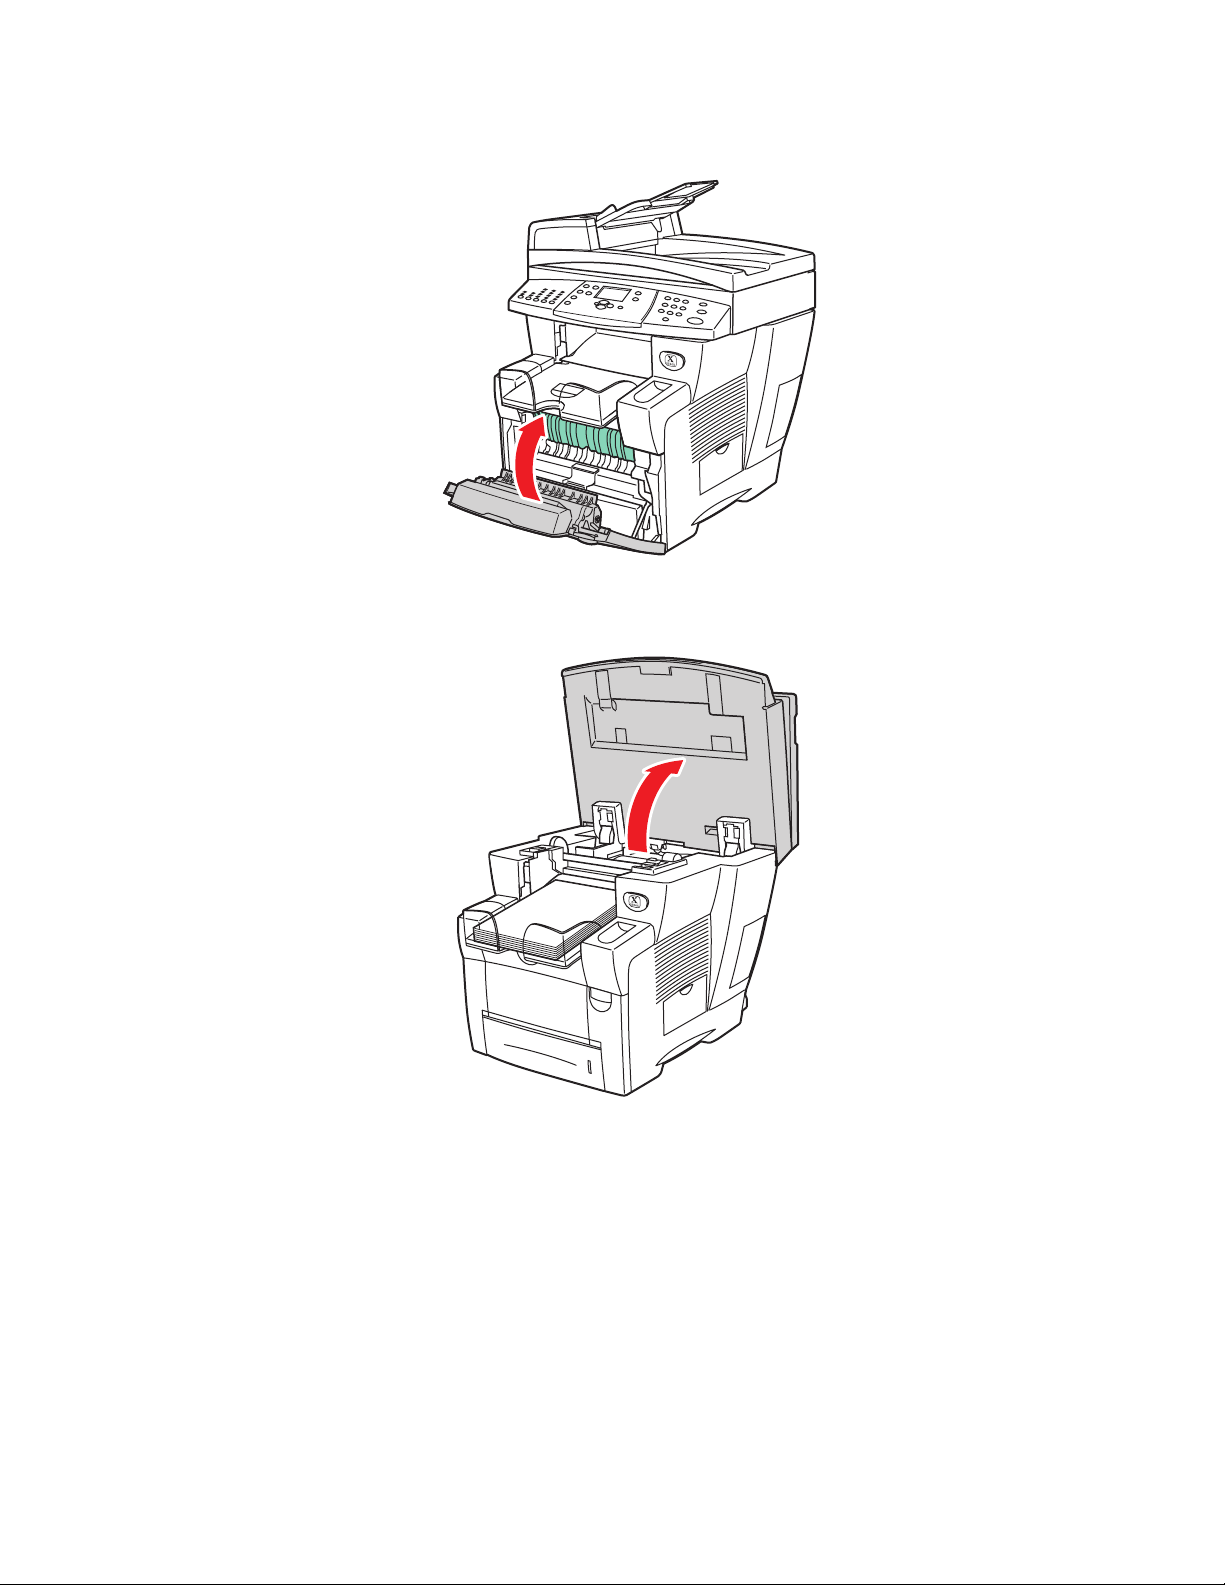
3. Open the exit cover.
Paper Jams
2424-01
2424-019
WorkCentre® C2424 Copier-Printer
7-5
Page 6
Paper Jams
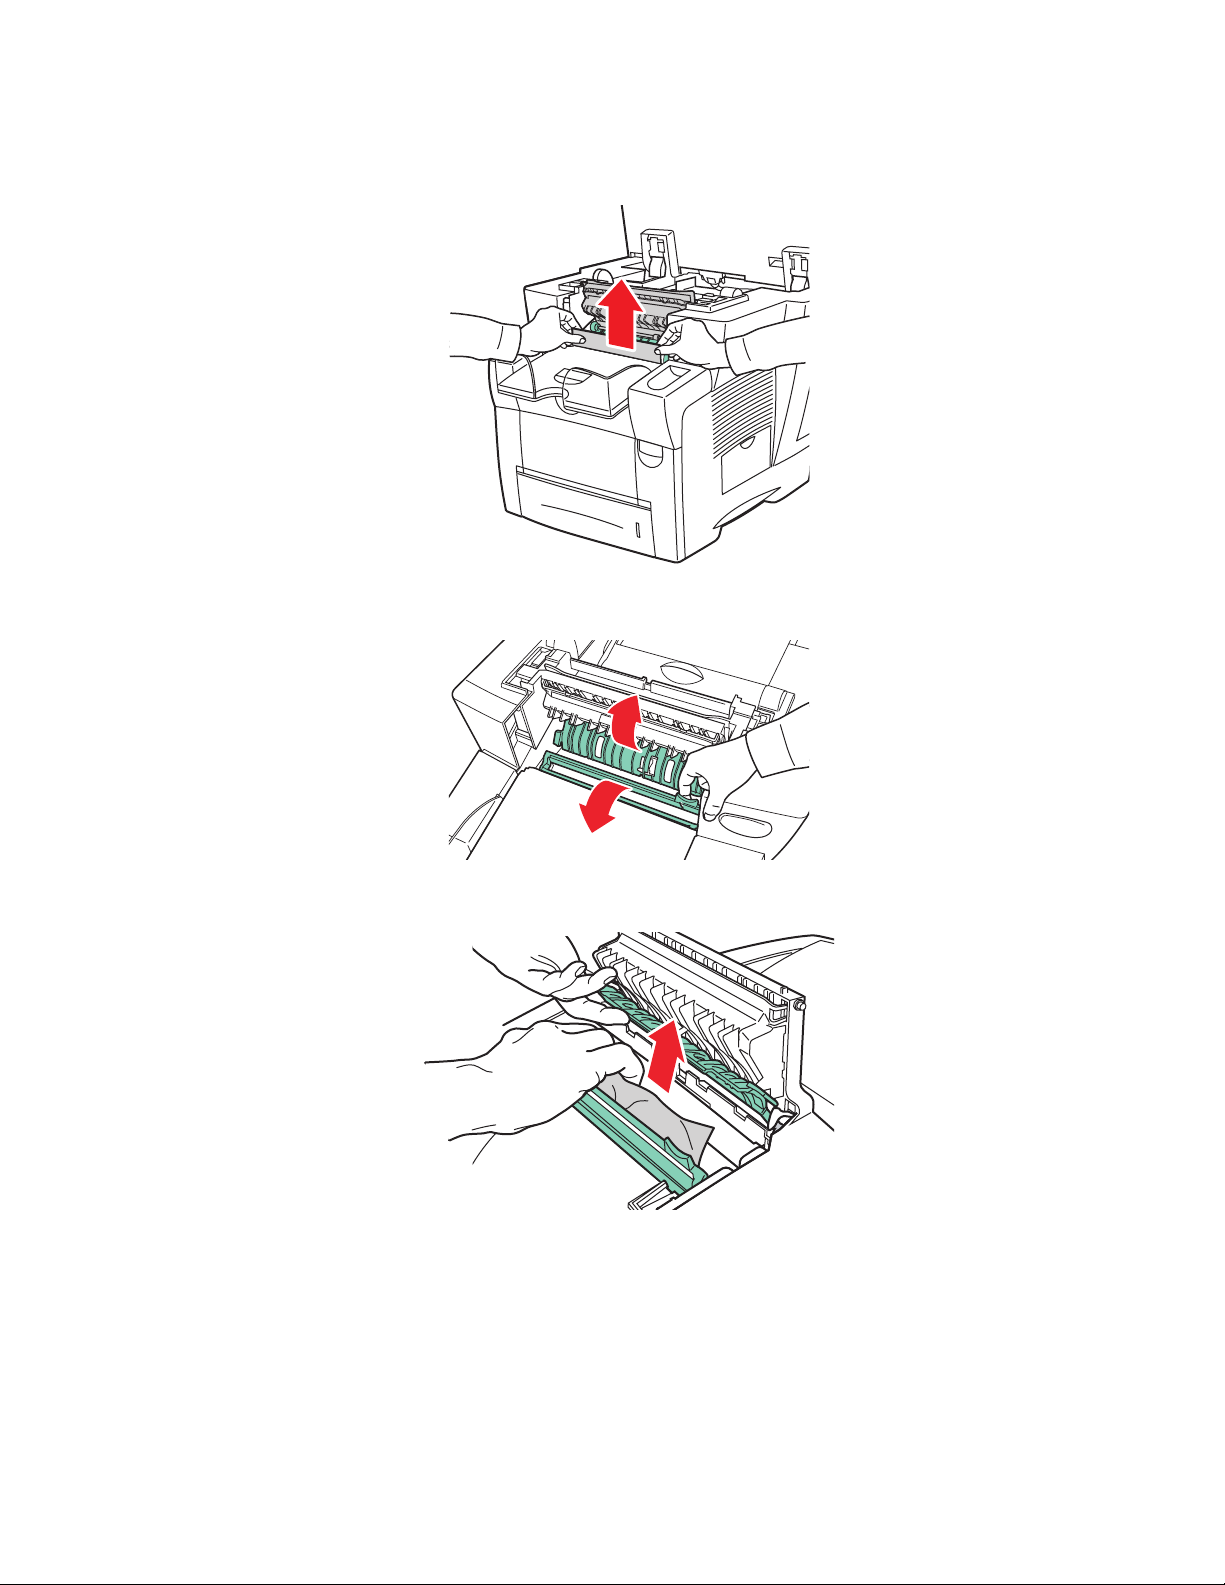
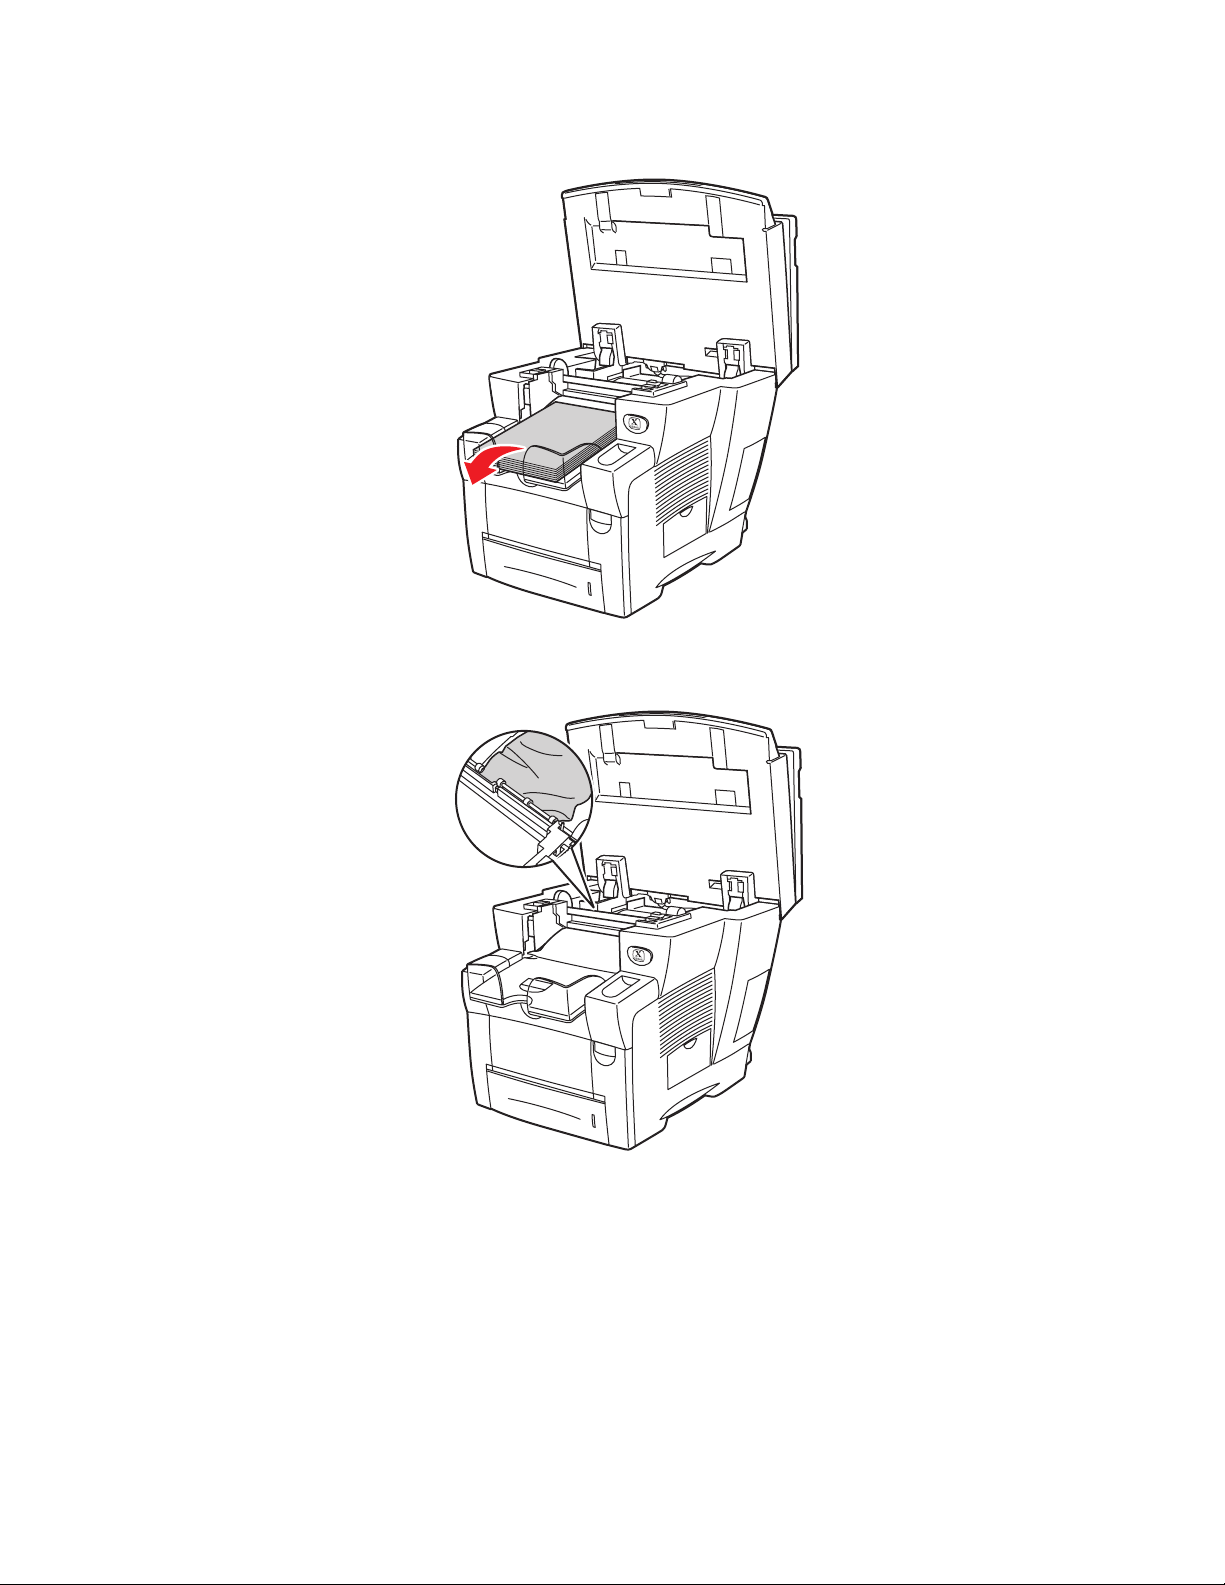
4. Pull the jammed paper slowly out of the system. Verify that any torn pieces of paper are
removed.
2424-020
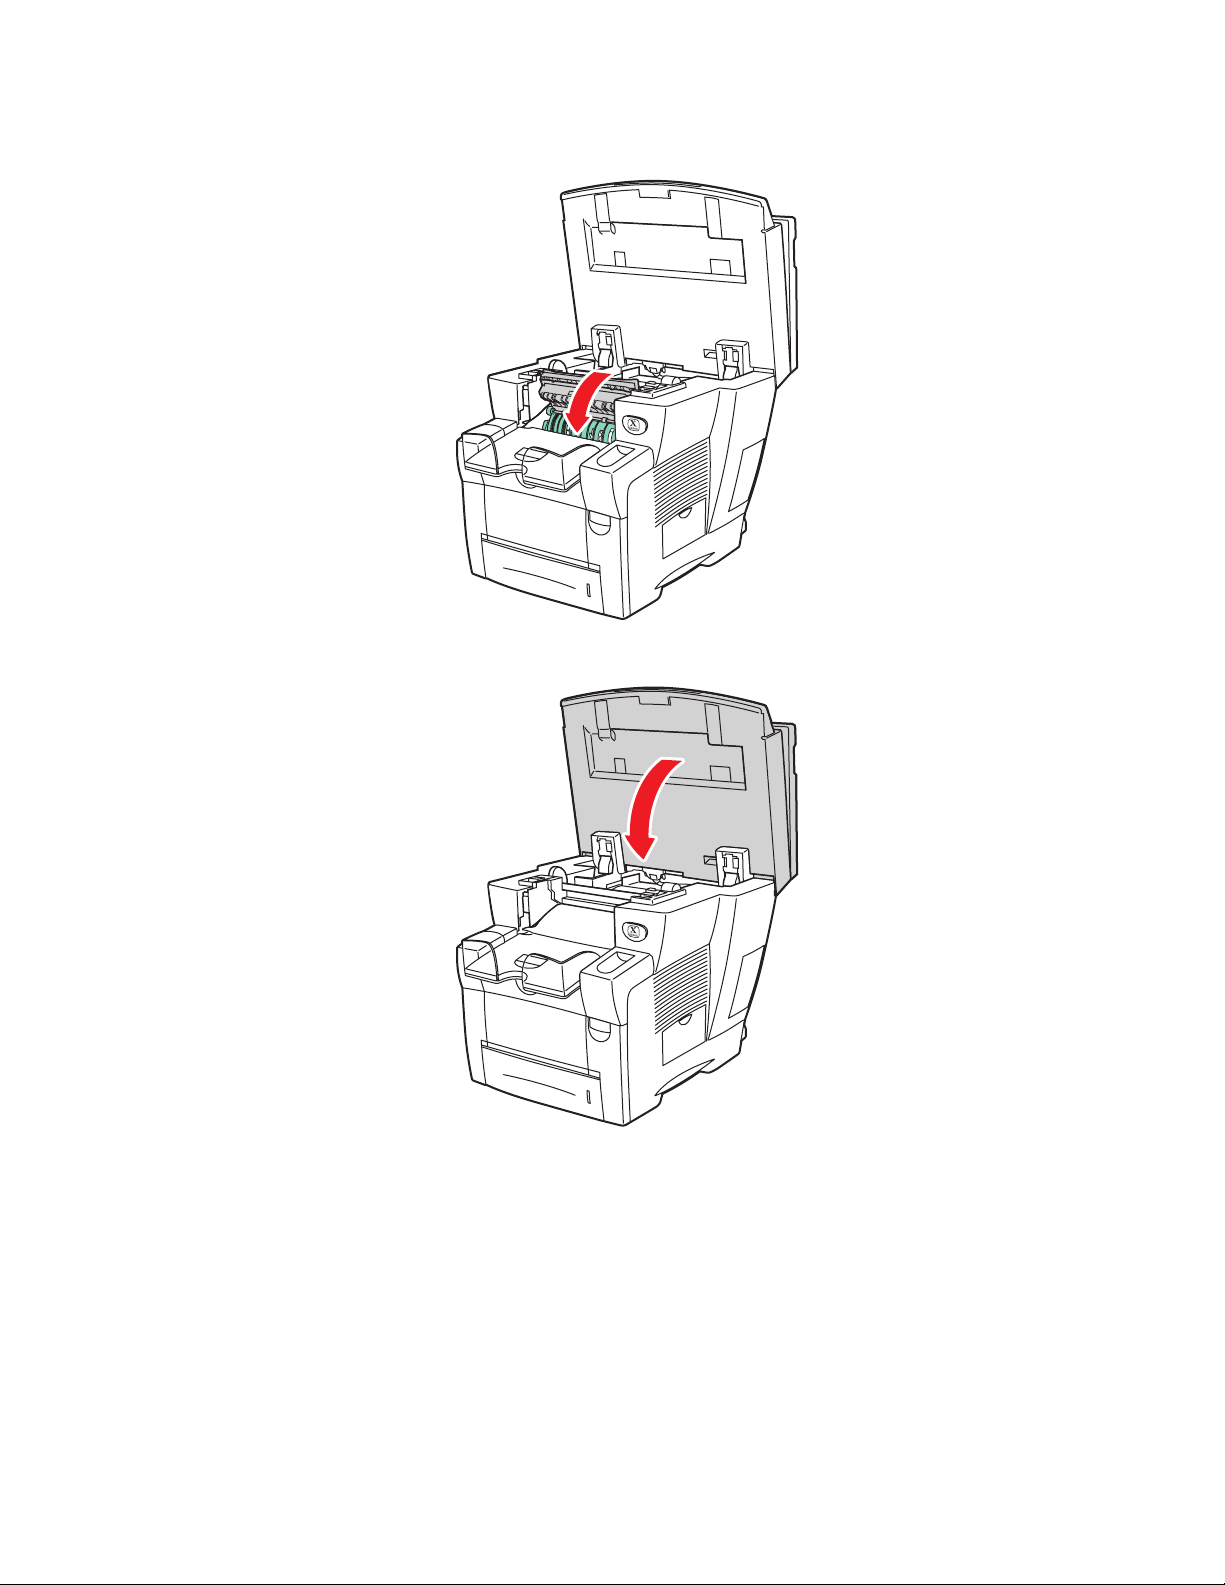
5. If you did not find paper in Steps 1–4, lift up the green paper guides.
6. Remove jammed paper.
2424-044
2424-021
WorkCentre® C2424 Copier-Printer
7-6
Page 7

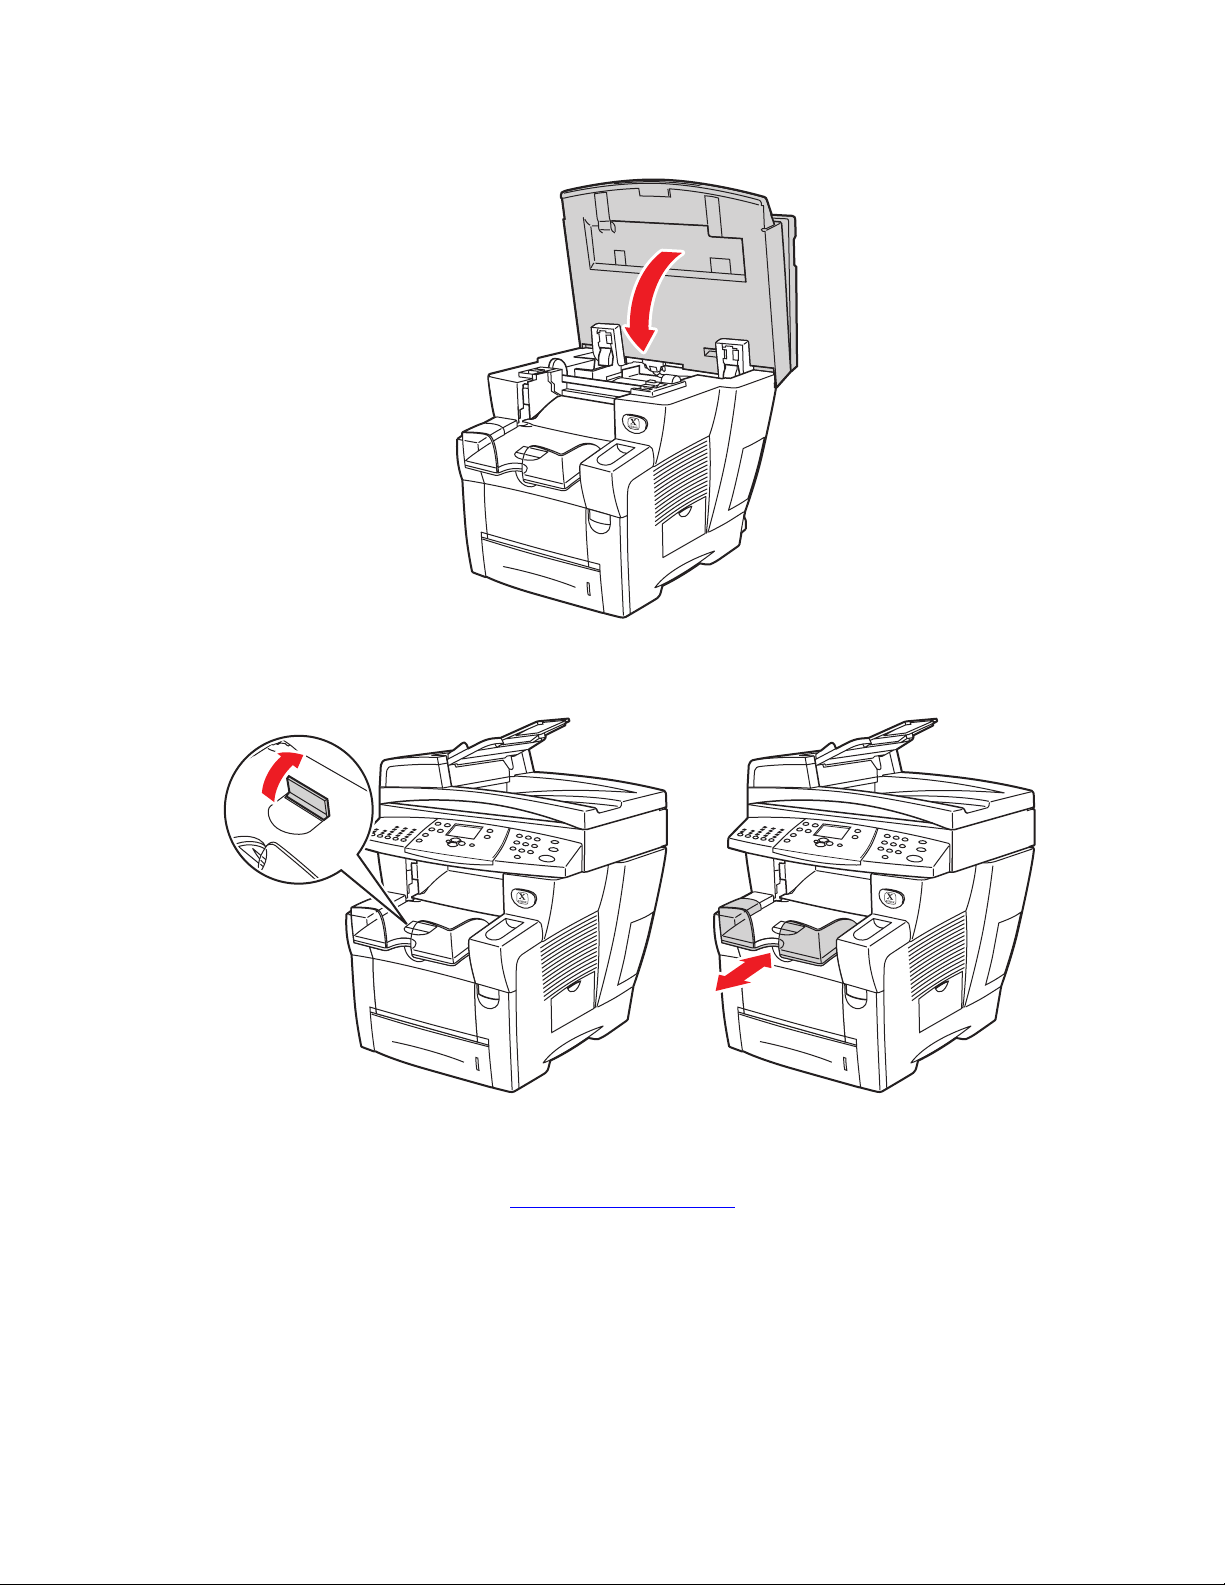
7. Close the exit cover.
6
Paper Jams
2424-022
8. Close the control panel.
2424-01
WorkCentre® C2424 Copier-Printer
7-7
Page 8
Paper Jams
9. If you did not find paper in Steps 1–8, follow these steps.
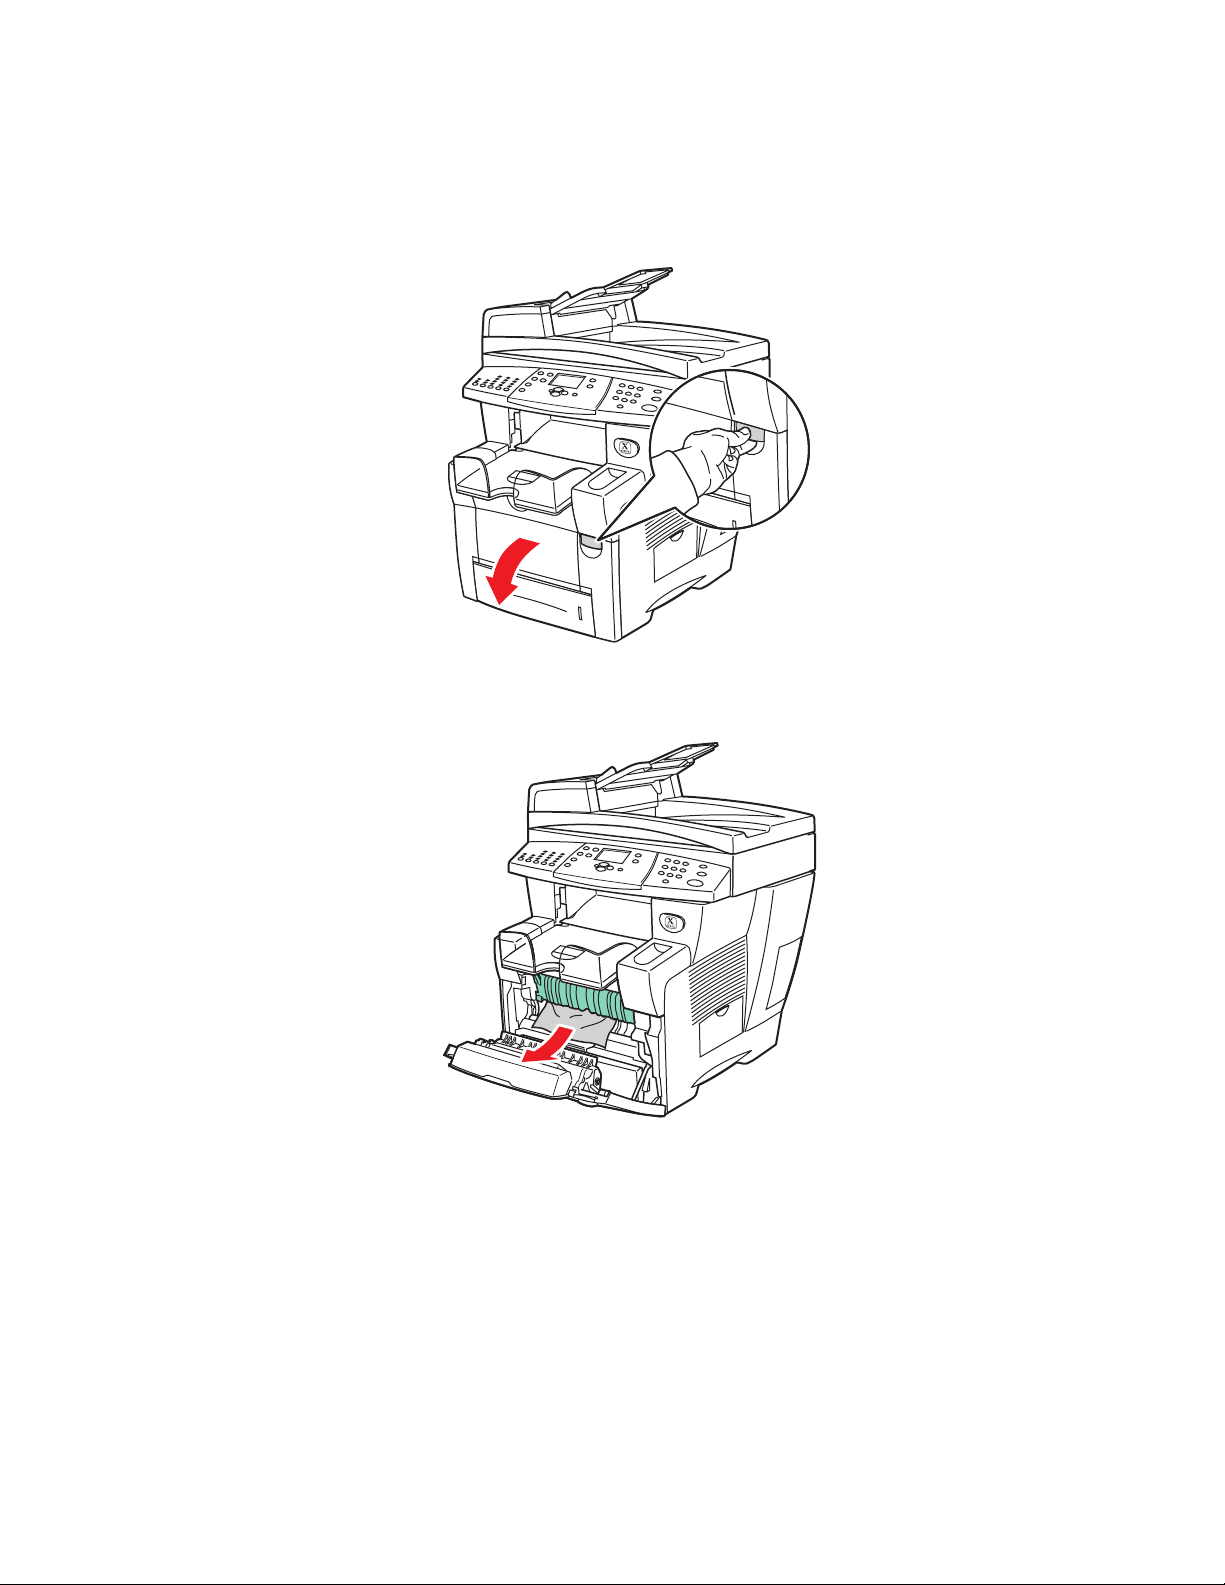
a. Pull up the latch on the front of the system to open the front cover.
2424-023
b. Pull the jammed paper slowly out of the system. Verify that any torn pieces of paper
are removed.
2424-025
WorkCentre® C2424 Copier-Printer
7-8
Page 9
c. Close the front cover.
For additional information, go to www.phaserSMART.com.
Paper Jams
2424-026
Jam at the Exit Path
Follow these steps to clear the jam.
1. Lift the control panel.
2424-189
WorkCentre® C2424 Copier-Printer
7-9
Page 10
Paper Jams
8
3
2. Remove paper from the output tray.
2424-01
3. Pull the jammed paper slowly out of the system. Verify that any torn pieces of paper are
removed.
2424-05
WorkCentre® C2424 Copier-Printer
7-10
Page 11
4. Close the control panel.
6
6
Paper Jams
2424-01
5. Adjust the output tray for short or long media.
2424-18
For media shorter than 190 mm (7.5 in.), flip up the
paper stop.
For media longer than 297 mm (11.7 in.),
extend the output tray.
For additional information, go to www.phaserSMART.com
2424-056
.
WorkCentre® C2424 Copier-Printer
7-11
Page 12
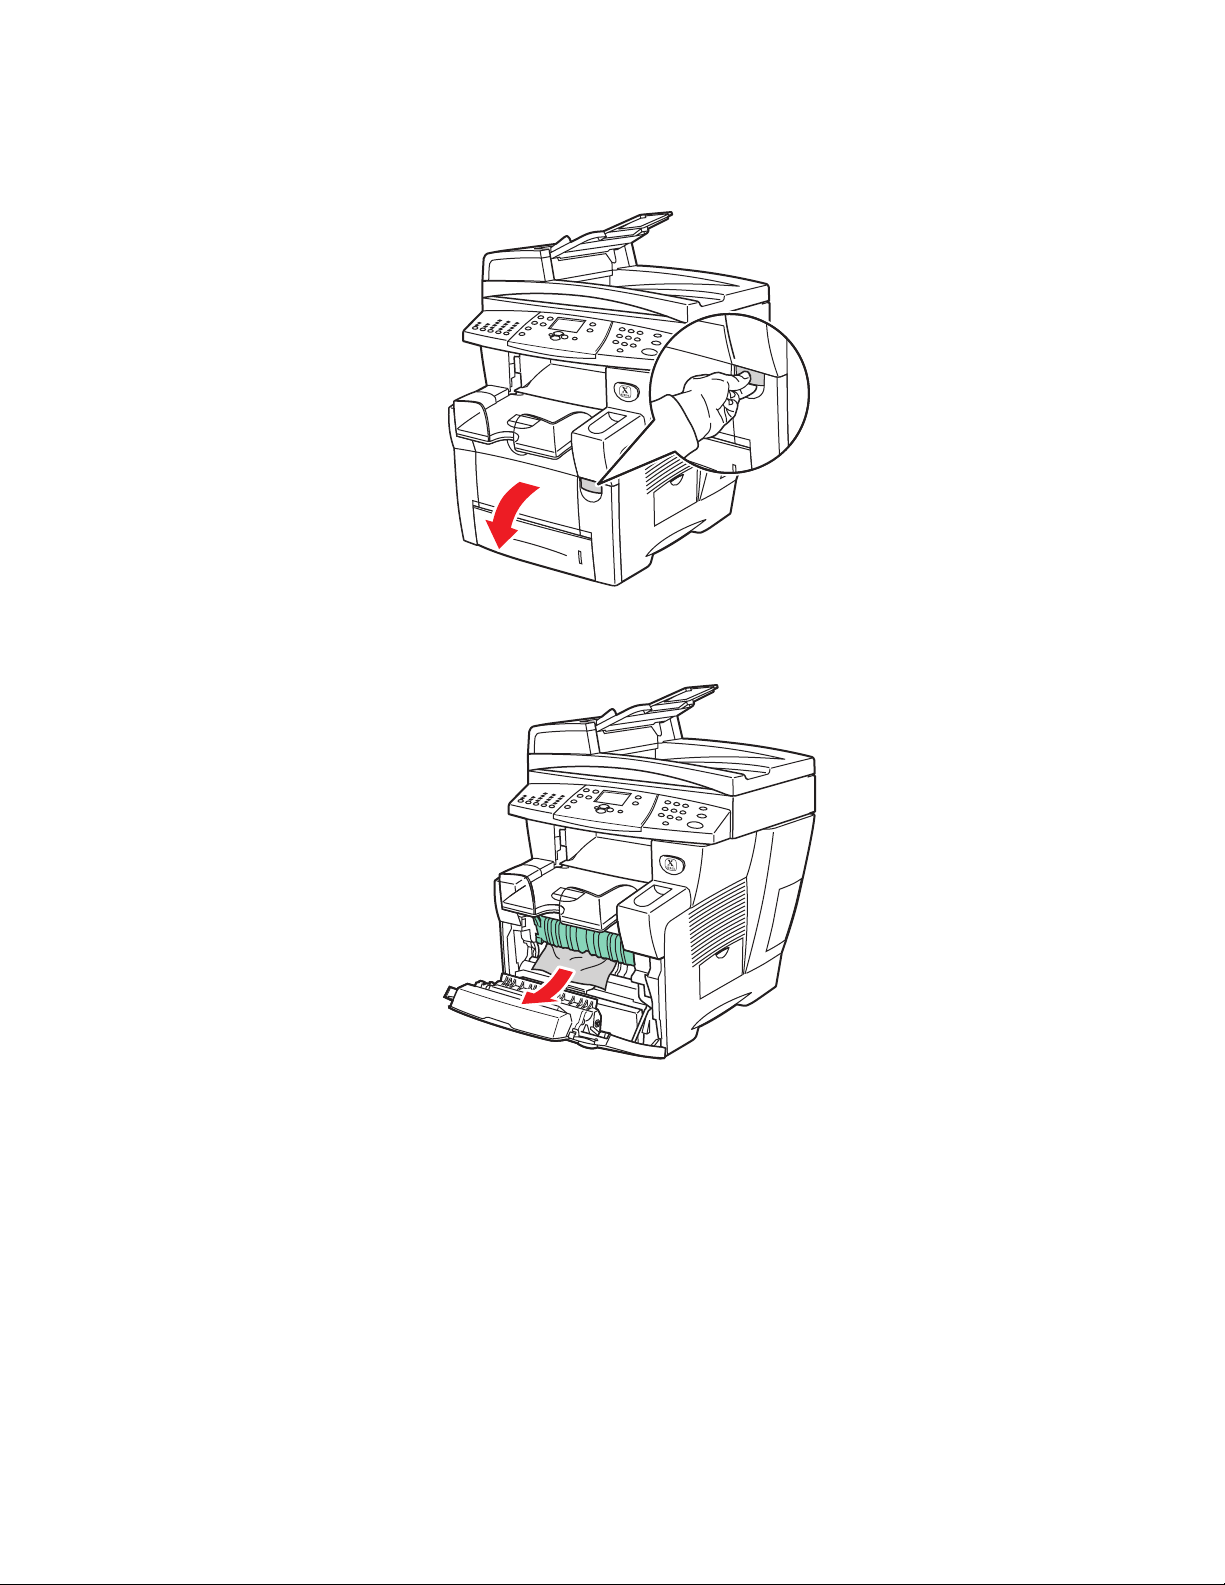
Jam at the Front Cover
Follow these steps to clear the jam.
1. Pull up the latch on the front of the system to open the front cover.
2424-023
Paper Jams
2. Pull the jammed paper slowly out of the system. Verify that any torn pieces of paper are
removed.
2424-025
WorkCentre® C2424 Copier-Printer
7-12
Page 13
3. Close the front cover.
4. If you did not find paper in Step 2, follow these steps.
a. Lift the control panel.
Paper Jams
2424-026
2424-189
WorkCentre® C2424 Copier-Printer
7-13
Page 14

b. Remove paper from the output tray.
8
c. Open the exit cover.
Paper Jams
2424-01
2424-019
WorkCentre® C2424 Copier-Printer
7-14
Page 15

Paper Jams
d. Pull the jammed paper slowly out of the system. Verify that any torn pieces of paper
are removed.
2424-020
e. Lift up the green paper guides.
f. Remove jammed paper.
2424-044
2424-021
WorkCentre® C2424 Copier-Printer
7-15
Page 16
g. Close the exit cover.
6
Paper Jams
2424-022
h. Close the control panel.
2424-01
WorkCentre® C2424 Copier-Printer
7-16
Page 17
Paper Jams
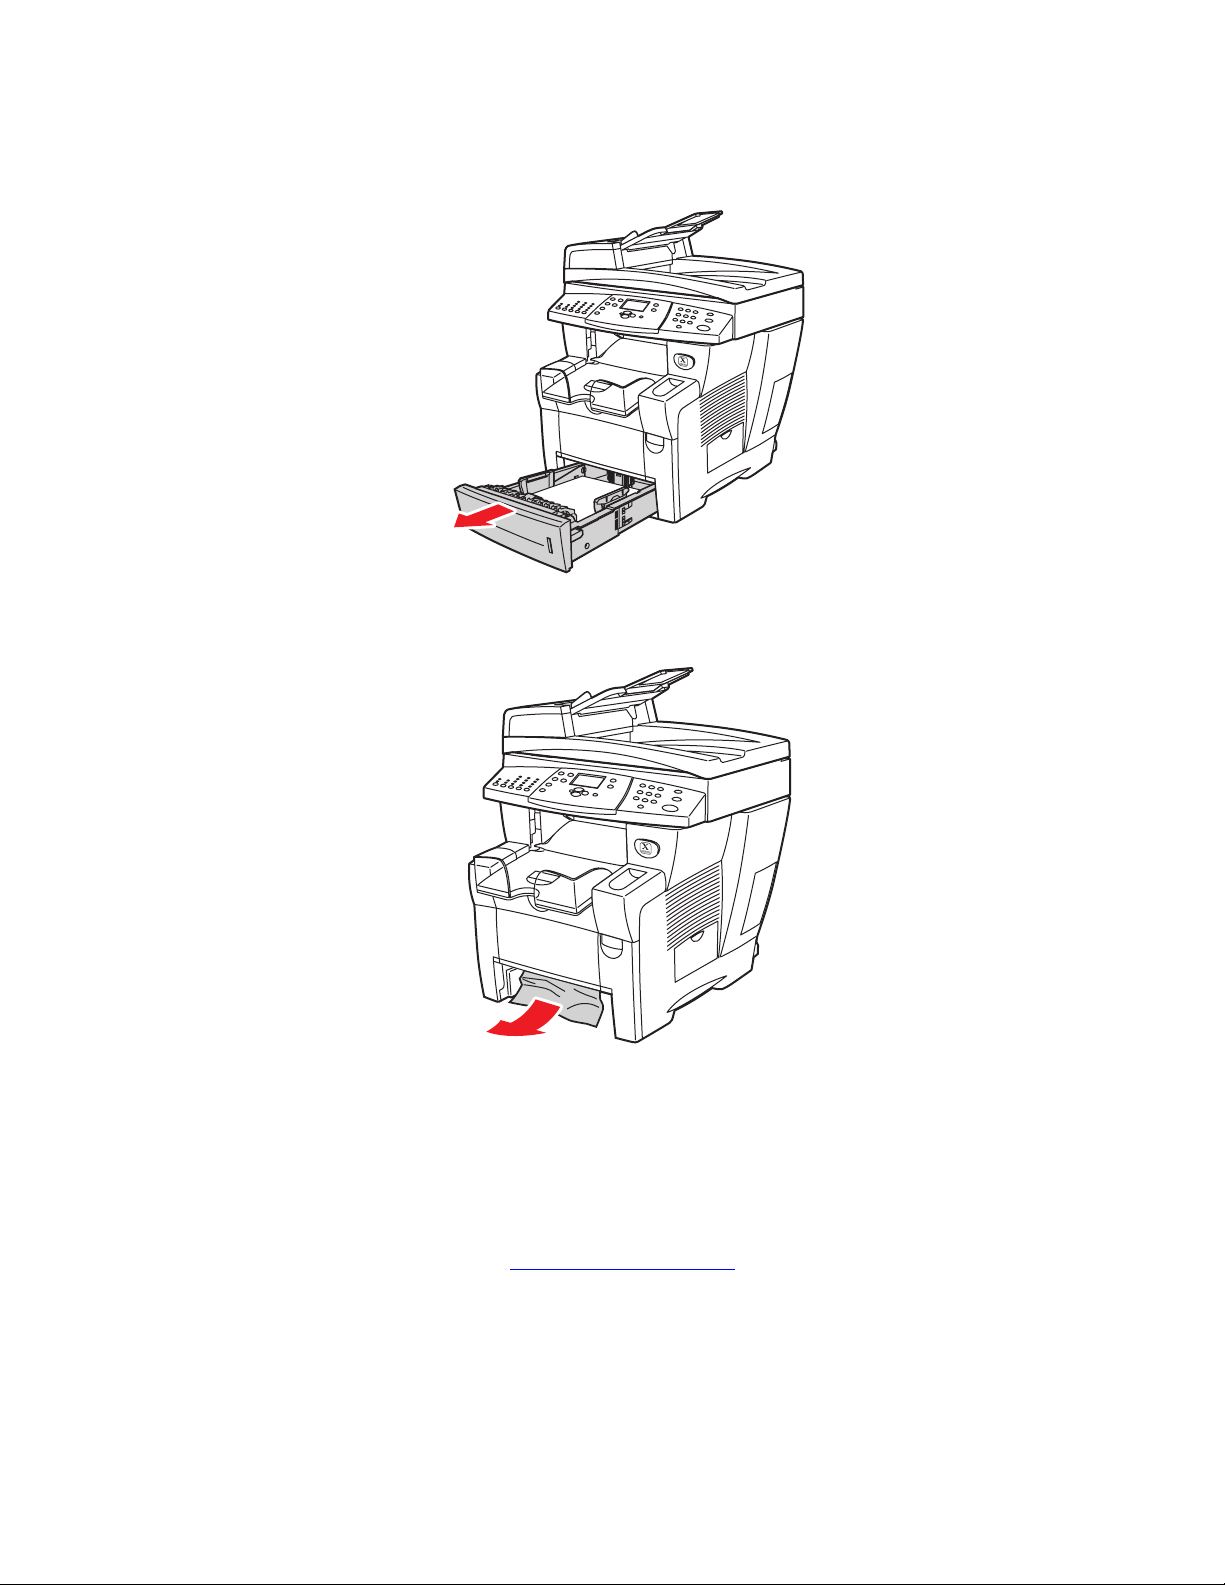
5. If you did not find jammed paper in the previous steps, follow these steps.
a. Pull Tray 2 completely out of the system and remove the jammed paper.
2424-043
b. Pull the jammed paper slowly out of the system. Verify that any torn pieces of paper
are removed.
2424-028
c. Replace all trays and push each one completely to the back of the system.
Note
Use only the approved paper type, weight, and size for the tray. Custom size paper can
be used in Tray 1 only.
For additional information, go to www.phaserSMART.com
.
WorkCentre® C2424 Copier-Printer
7-17
Page 18

Jam at Tray 2, 3, or 4
Follow these steps to clear the jam for the tray specified on the control panel.
1. Pull the tray specified on the control panel completely out of the system.
2424-043
Paper Jams
2. Remove the top sheet from the tray.
2424-027
3. Verify that the paper is loaded correctly in the tray. Adjust the length and side paper
guides.
a. Press the sides of the length guide and slide the guide until the arrow on the guide
matches the appropriate paper size and clicks into place.
WorkCentre® C2424 Copier-Printer
7-18
Page 19

Paper Jams
b. Slide the side guides until the arrows on the guides match the appropriate paper size
and the guides click into place.
2424-003
Note
When the paper guides are adjusted correctly, there may be a small space between the
paper and the guides.
4. Remove jammed paper inside the system tray slot. Verify that any torn pieces of paper are
removed.
2424-028
WorkCentre® C2424 Copier-Printer
7-19
Page 20

Paper Jams
5. Insert the tray into the tray slot and push it completely to the back of the system.
2424-004
6. If you did not find jammed paper in Step 4, follow these steps.
a. Pull up the latch on the front of the system to open the front cover.
2424-023
WorkCentre® C2424 Copier-Printer
7-20
Page 21

Paper Jams
b. Pull the jammed paper slowly out of the system. Verify that any torn pieces of paper
are removed.
2424-025
c. Close the front cover.
2424-026
Note
Use only the approved paper type, weight, and size for the tray. Custom size paper can be
used in Tray 1 only.
For additional information, go to www.phaserSMART.com
.
WorkCentre® C2424 Copier-Printer
7-21
Page 22

Jam at the Document Feeder
Follow these steps to clear the jam.
1. Remove the originals from the document feeder and catch tray.
Paper Jams
2. Open the jam access cover on the document feeder.
2424-054
2424-045
WorkCentre® C2424 Copier-Printer
7-22
Page 23

3. Remove jammed paper from the document feeder.
4. Close the jam access cover on the document feeder.
Paper Jams
2424-046
2424-047
WorkCentre® C2424 Copier-Printer
7-23
Page 24

5. Open the document feeder.
Paper Jams
2424-048
6. Remove jammed paper from under the document feeder or from the document glass, if
any.
2424-049
WorkCentre® C2424 Copier-Printer
7-24
Page 25

7. Close the document feeder.
Paper Jams
2424-187
8. Reinsert paper in the document feeder.
For additional information, go to www.phaserSMART.com
2424-051
.
WorkCentre® C2424 Copier-Printer
7-25
Page 26

Output Quality Problems
Output Quality Problems
Your system is designed to produce consistently high-quality color copies, prints, and scanned
images. If you observe print-quality problems, use the information in this section to
troubleshoot the problems.
■ "Solving Print-Quality Problems" on page 7-27
■ "Diagnosing Copy-Quality Problems" on page 7-29
■ "Solving Scan-Quality Problems" on page 7-29
Some settings directly control the quality of your prints and copies.
■ For print jobs, select the desired print-quality mode and color correction in the printer
driver; see the “Advanced Options” section in the Printing chapter of this guide.
■ For copy jobs, select the output quality and original type by pressing the Output Quality
button and Original Type button on the left side of the control panel; see the Copying
chapter of this guide.
Caution
Damage caused by using unsupported paper, transparencies, and other specialty media is
not covered by the Xerox warranty, service agreement, or Total Satisfaction Guarantee.
The Total Satisfaction Guarantee is available in the United States and Canada. Coverage
may vary outside these areas; please contact your local representative for details.
For information on supported paper types and weights, see the “Supported Papers” section in
the Loading Media chapter of this guide.
For more information, go to the infoSMART Knowledge Base at www.xerox.com/office/
c2424infoSMART.
WorkCentre® C2424 Copier-Printer
7-26
Page 27

Solving Print-Quality Problems
Problem Solution
Output Quality Problems
Transparency Images Are Too Light or Too
Dark
Smudges or Smears
Smudges or smears appear on the page.
■ Verify that the paper type is set to transparency in
the computer software application or the printer
driver.
■ For a list of transparency part numbers, print the
“Paper Tips” page.
a. On the control panel, press the System Setup
button.
b. In the Menu, select Information.
c. Select Information Pages, then press Enter.
d. Select Paper Tips Page, then press Enter.
1. Run the Remove Print Smears procedure:
a. On the control panel, press the System Setup
button.
b. In the menu, select Information, then press
the Enter button.
c. Select Troubleshooting, then press the
Enter button.
d. Select Print Quality Problems, then press
the Enter button.
e. Select Remove Print Smears, then press the
Enter button.
The system will clean the ink from the rollers by
running several sheets of paper through the
system.
2. Repeat Step 1 up to 3 times if the smears still
appear.
3. If the problem continues, verify that a supported
paper type is being used; see the Loading Media
chapter of this guide.
4. If the problem continues, clean the wiper blade in
the Maintenance Kit:
a. Open the side door on the right panel.
b. Remove the orange maintenance kit.
c. Wipe the clear plastic wiper blade with a lint-
free cloth.
d. Replace the maintenance kit.
e. Close the side door.
For more information, see “Cleaning the
Maintenance Kit Wiper Blade” on page 45.
WorkCentre® C2424 Copier-Printer
7-27
Page 28

Solving Print-Quality Problems (Continued)
Problem Solution
Output Quality Problems
Random Light Stripes
One or more color bars are missing on the test
page.
Light Stripes Test
Predominate Light Stripes
All four color bars are missing on the test page.
1. Run the Eliminate Light Stripes procedure:
a. On the control panel, press the System Setup
button.
b. In the menu, select Information, then press
the Enter button.
c. Select Troubleshooting, then press the
Enter button.
d. Select Print Quality Problems, then press
the Enter button.
e. Select Eliminate Light Stripes, then press
the Enter button.
2. Repeat Step 1 up to 3 times if the stripes still
appear.
3. If the problem continues, turn off the system for at
least 4 hours. When you turn on the system,
repeat Step 1 if necessary.
4. If the problem continues, follow the steps for
Predominate Light Stripes.
1. Lift the control panel, remove paper from the
output tray, then lift the exit cover.
2. Inspect the paper-exit area for debris. If
necessary, remove the debris.
3. Clean the paper release blade:
a. Lift the green guide.
b. Wipe the white plastic paper release blade
with a lint-free cloth.
For more information, see “Cleaning the Paper
Release Blade” on page 41.
4. Close the exit cover and close the control panel.
5. Clean the wiper blade in the Maintenance Kit:
a. Open the side door on the right panel.
b. Remove the orange maintenance kit.
c. Wipe the clear plastic wiper blade with a lint-
free cloth.
d. Replace the maintenance kit.
e. Close the side door.
For more information, see “Cleaning the
Maintenance Kit Wiper Blade” on page 45.
6. If the problem continues, follow the steps for
Random Light Stripes.
WorkCentre® C2424 Copier-Printer
7-28
Page 29

Output Quality Problems
Diagnosing Copy-Quality Problems
When a copy job displays poor image quality, determine if the problem is with the scanner
function or the printer function of the system as follows:
1. Print the Menu Map.
a. At the control panel, press the System Setup button.
b. Select Information, then press the Enter button.
c. Select Menu Map, then press the Enter button.
2. View the printed Menu Map pages, then select one of these options:
■ If the printed pages display poor print-quality, the problem is with the printer function;
see "Solving Print-Quality Problems" on page 7-27.
■ If the printed pages do not display poor print-quality, the problem is with the scanning
function; see "Solving Scan-Quality Problems" on page 7-29.
Solving Scan-Quality Problems
Problem Solution
Smudges or Smears
Smudges or smears appear on the copy or in
the image file.
The document glass or document feeder may contain
debris or paper residue which affects the output of a
copy or scan job.
1. Clean the document glass:
a. Lift the document feeder.
b. Dampen a soft cloth or cotton swab with
isopropyl alcohol (90%).
c. Wipe the document glass with the cloth or
cotton swab.
d. Close the document feeder.
2. Clean the document feeder:
a. Dampen a soft cloth or cotton swab with
isopropyl alcohol (90%).
b. Open the jam access door on the document
feeder.
c. Wipe the feeding roller and inside the
document feeder with the cloth or cotton swab.
d. Close the jam access door.
e. Lift the document feeder.
f. Wipe the underside of the document feeder
with the cloth or cotton swab.
g. Close the document feeder.
WorkCentre® C2424 Copier-Printer
7-29
Page 30

Solving Scan-Quality Problems (Continued)
Problem Solution
Output Quality Problems
Background color, text, or images on
copied page are too light or too dark.
Press the Clear/Clear All button to reset the default
settings.
If the problem continues, adjust one or more of these
settings:
■ Lighten/Darken: Lightens or darkens the text or
image in color copies.
■ Auto Suppression: Minimizes the sensitivity of
the scanner to variations in light background
colors. This is useful when scanning or copying 2sided originals on thin paper that shows some of
the text or images from the back side of the paper.
■ Contrast: Increases or decreases the contrast of
the image when it is copied:
To adjust the settings:
1. At the control panel, press the Copy button.
2. Select Lighten/Darken, Auto Suppression, or
Contrast, then press the Enter button.
3. Do one of the following:
■ Lighten/Darken: Press the Up Arrow or Down
Arrow button to scroll to a whole number from
Lightest (-3) to Darkest (+3), then press the
Enter button.
■ Auto Suppression: Select either On or Off, then
press the
■ Contrast: Press the Up Arrow or Down Arrow
Enter button.
button to scroll to a whole number from Lowest
(-3) to Highest (+3) contrast, then press the
Enter button.
4. Copy the page again. If copy problems continue,
repeat these steps.
WorkCentre® C2424 Copier-Printer
7-30
Page 31

Maintenance
Maintenance
This section includes:
■ "Adding Ink" on page 7-32
■ "Emptying the Waste Tray" on page 7-36
■ "Replacing the Maintenance Kit" on page 7-39
■ "Cleaning the Paper Release Blade" on page 7-41
■ "Cleaning the Maintenance Kit Wiper Blade" on page 7-45
■ "Cleaning the Outside of the System" on page 7-47
■ "Cleaning the Document Glass and Document Feeder" on page 7-47
For safety information, see Appendix A of this guide.
Your system needs little maintenance to keep it producing quality prints. Besides adding ink,
you will eventually need to replace the maintenance kit. Order an extra maintenance kit
(standard capacity or extended capacity) when the control panel displays a warning that the
maintenance kit is nearing the end of its life. You must replace the kit when the control panel
displays an error message to replace the maintenance kit.
To view the life remaining and installation date of the maintenance kit:
1. On the control panel, press the System Setup button.
2. In the menu, select Information, then press the Enter button.
3. Select Supplies Info, then press the Enter button.
4. Select Maintenance Kit Life, then press the Enter button.
For information about supplies, go to www.xerox.com/office/c2424supplies
includes installation instructions with the packaging.
. Each supply
WorkCentre® C2424 Copier-Printer
7-31
Page 32

Maintenance
Adding Ink
You can load ink any time the system is idle, or when the control panel displays the Ink low or
Add Ink message.
Videos are available with instructions for adding ink. Videos are located on the
User Documentation CD-ROM and at www.xerox.com/office/c2424support
Note
To minimize waste ink and optimize performance, leave the printer on all the time.
■ Keep ink in its packaging until you are ready to use it.
■ Identify ink by shape, not color.
■ To avoid ink jams, never insert broken ink sticks into the ink-loading bins.
Caution
Use of other than Genuine Xerox WorkCentre C2424 Solid Ink may affect print quality
and system reliability. It is the only ink designed and manufactured under strict quality
controls by Xerox for specific use with this system. The Xerox Warranty, Service
Agreements, and Total Satisfaction Guarantee do not cover damage, malfunction, or
degradation of performance caused by use of non-Xerox supplies, or the use of Xerox
supplies not specified for this system.
.
Note
The Total Satisfaction Guarantee is available in the United States and Canada.
Coverage may vary outside these areas; please contact your local representative for
details.
WorkCentre® C2424 Copier-Printer
7-32
Page 33

Follow these steps to load ink.
2
1. Lift the control panel.
Maintenance
2424-01
2. Open the ink cover.
2424-013
3. Determine which ink-loading bin appears low. A label above each bin indicates the color
of ink in that bin.
4. Remove the ink stick from its packaging.
WorkCentre® C2424 Copier-Printer
7-33
Page 34

Maintenance
5. Place the ink stick into the opening of the appropriate ink-loading bin. Each ink stick is
uniquely shaped to fit into the correct ink-loading bin. Do not force the ink stick into the
ink-loading bin.
1
2
3
4
2424-014
6. Close the ink cover.
2424-015
WorkCentre® C2424 Copier-Printer
7-34
Page 35

7. Close the control panel.
6
Maintenance
2424-01
To order ink, contact your local reseller or visit the Xerox web site at
www.xerox.com/office/c2424supplies
. Instructions are included on the package.
WorkCentre® C2424 Copier-Printer
7-35
Page 36

Maintenance
Emptying the Waste Tray
Empty the green waste tray (labeled B) when the control panel displays a message stating that
the waste tray is full.
Videos are available with instructions for emptying the waste tray. Videos are
located on the User Documentation CD-ROM and at www.xerox.com/office/
c2424support.
Caution
The system’s interior may be hot. Do not touch the hot surfaces!
1. Open the side door.
2424-035
WorkCentre® C2424 Copier-Printer
7-36
Page 37

2. Pull the green waste tray (labeled B) completely out of the system.
Caution
The waste tray may be hot; handle it carefully!
Maintenance
2424-036
3. Empty the waste tray into a waste container. Waste ink can be discarded as normal office
waste.
2424-037
WorkCentre® C2424 Copier-Printer
7-37
Page 38

4. Insert the waste tray and push it completely into the system.
2424-038
Note
The waste tray must be out of the system for more than 5 seconds or you will continue
to receive a Empty Waste Tray message on the control panel.
Maintenance
5. Close the side door.
2424-039
Caution
Do not attempt to reuse the waste ink in the printer; it may damage the printer. This
damage is not covered under the printer warranty.
WorkCentre® C2424 Copier-Printer
7-38
Page 39

Maintenance
Replacing the Maintenance Kit
The orange maintenance kit (labeled A) contains a maintenance roller that keeps the surface of
the imagining drum clean and oiled.
Videos are available with instructions for replacing the maintenance kit. Videos
are located on the User Documentation CD-ROM and at www.xerox.com/office/
c2424support.
Note
Order a new maintenance kit when the control panel displays a message telling you that
the maintenance kit is nearing the end of its life. To order a new maintenance kit, contact
your local reseller or visit the Xerox web site at www.xerox.com/office/c2424supplies.
Instructions are included with the new maintenance kit.
Caution
The system’s interior may be hot. Do not touch the hot surfaces!
The system stops printing and displays an error message when the maintenance kit needs
replacement.
To replace the maintenance kit:
1. Open the side door.
2424-035
WorkCentre® C2424 Copier-Printer
7-39
Page 40

2. Pull the orange maintenance kit (labeled A) completely out of the system.
2424-033
3. Insert a new maintenance kit.
Maintenance
2424-034
WorkCentre® C2424 Copier-Printer
7-40
Page 41

4. Close the side door.
Cleaning the Paper Release Blade
Maintenance
2424-039
1. Lift the control panel.
2424-189
WorkCentre® C2424 Copier-Printer
7-41
Page 42

2. Remove paper from the output tray.
8
3. Open the exit cover.
Maintenance
2424-01
2424-019
WorkCentre® C2424 Copier-Printer
7-42
Page 43

Maintenance
4. Tilt up the green paper guide toward the front of the system.
8400-042
5. Clean the white plastic paper release blade on the green paper guide by wiping it with a
pre-soaked alcohol cloth (using 90 percent isopropyl alcohol).
2424-156
6. After the paper release blade is clean, put the green paper guide back in its original
position.
2424-159
WorkCentre® C2424 Copier-Printer
7-43
Page 44

7. Close the exit cover.
6
Maintenance
2424-022
8. Close the control panel.
2424-01
WorkCentre® C2424 Copier-Printer
7-44
Page 45

Cleaning the Maintenance Kit Wiper Blade
0
The maintenance kit contains a wiper blade that removes excess ink.
1. Open the side door.
2424-035
Maintenance
2. Pull the orange maintenance kit (labeled A) completely out of the system.
2424-033
3. Use a lint-free cloth to clean the top and upper edges of the flexible plastic wiper blade
located next to the roller.
2424-16
WorkCentre® C2424 Copier-Printer
7-45
Page 46

4. Reinstall the maintenance kit.
5. Close the side door.
Maintenance
2424-034
2424-039
WorkCentre® C2424 Copier-Printer
7-46
Page 47

Maintenance
Cleaning the Outside of the System
You can clean the outside of the system with a soft, damp, cloth. You can use a cloth
moistened with a mild neutral detergent to remove stains; do not spray detergent directly onto
the system.
Warning
To prevent electric shock, turn the system off and unplug the power cord from the
electrical outlet before cleaning the system.
Do not use a vacuum cleaner to clean the system. Do not lubricate the system with oil.
Cleaning the Document Glass and Document Feeder
Periodically clean the document glass and document feeder to remove debris or paper residue,
which may affect the quality of your copies and scanned images.
To clean the document glass:
1. Lift the document feeder.
2424-048
2. Dampen a soft cloth or cotton swab with isopropyl alcohol (using 90 percent isopropyl
alcohol).
WorkCentre® C2424 Copier-Printer
7-47
Page 48

3. Wipe the document glass with the cloth or cotton swab.
Maintenance
2424-050
4. Close the document feeder.
WorkCentre® C2424 Copier-Printer
7-48
Page 49

Maintenance
To clean the document feeder:
1. Dampen a soft cloth or cotton swab with isopropyl alcohol (using 90 percent isopropyl
alcohol).
2. Open the jam access door on the document feeder.
2424-045
3. Wipe the feeding roller and inside the document feeder with the cloth or cotton swab.
2424-161
WorkCentre® C2424 Copier-Printer
7-49
Page 50

4. Close the jam access door.
2424-047
5. Lift the document feeder.
6. Wipe the underside of the document feeder with the cloth or cotton swab.
Maintenance
7. Close the document feeder.
WorkCentre® C2424 Copier-Printer
2424-162
7-50
Page 51

Moving and Repacking the System
Moving and Repacking the System
This section includes:
■ "Running the WorkCentre C2424 Copier-Printer Shut-Down Procedure" on page 7-51
■ "Moving the System Within the Office" on page 7-52
■ "Repacking the System for Shipment" on page 7-53
For safety information, see Appendix A of this guide or go to Getting Started/User Safety on
the User Documentation CD-ROM.
Videos are available with instructions for repacking the scanner unit and for
repacking the document feeder. Videos are located on the User Documentation
CD-ROM and at www.xerox.com/office/c2424support
Follow these guidelines to move the system within the office or to prepare it for shipment.
Caution
Parts of the system are hot. To avoid personal injury or damage to the system, allow the
ink to solidify. Run the shut-down procedure to cool the system quickly.
.
Running the WorkCentre C2424 Copier-Printer Shut-Down Procedure
Run the shut-down procedure before moving or shipping the system.
1. Turn off the system using the power switch located under the interface cover on the right
side of the system.
2424-031
2. Within 10 seconds, select Shutdown for Moving System at the control panel, then
press the Enter button.
WorkCentre® C2424 Copier-Printer
7-51
Page 52

Moving and Repacking the System
3. Wait for the system to complete the cool-down cycle. The fan runs until the ink solidifies.
Caution
If you turn off the system but do not select Shutdown for
0
Moving System, the fan does not run, so you must wait
longer for the ink to solidify. Wait at least 30 minutes for
the system to cool completely before moving or packing it.
30
4. After the fan stops running and the system shuts down, unplug the system.
Caution
Never move the system if you receive a Power Down Error-Head not Parked
message at the system’s control panel. This message means the system is not ready to be
moved. If the printhead is not locked, the system can be damaged during shipment. For
more information, go to the Support web site at www.xerox.com/office/c2424support
Moving the System Within the Office
1. Run the shut-down procedure so the ink solidifies. See page 7-51.
2. Close the system’s door and covers.
3. Always use two people to lift the system. Each person should have:
■ One hand grasp the hand hold on the side of the system.
■ The other hand grasp the hand hold on the back of the system as shown.
.
Caution
If the system has optional trays 3 or 4, lift the system off the trays.
42 kg
93 lbs.
2424-109
WorkCentre® C2424 Copier-Printer
7-52
Page 53

Moving and Repacking the System
Repacking the System for Shipment
1. Secure the scanhead shipping restraint on the left side of the scanner to lock the scanhead.
al
in
rig
O
ype
T
s
ic
h
ut
p
a
tp
r
u
G
O
ity
l
a
u
Q
d
s
o
e
Pr
-R
i
H
d
e
s
2-Sided
n
a
h
n
E
d
r
a
d
n
a
t
S
t
s
a
F
Color
Mode
B/W
utput
O
Color
Uncollated
Collated
2424-107
Caution
Shipping the scanner with the scanhead unlocked can damage the scanner.
2. Remove the maintenance kit and waste tray:
a. Open the side door on the right side of the system.
b. Remove the orange maintenance kit and place it in a plastic bag for shipping.
c. Remove the green waste tray, empty the waste, then place the tray in a plastic bag for
shipping.
2424-033
Maintenance Kit Waste Tray
Caution
Shipping the system with the maintenance kit and waste tray installed can damage the
system.
WorkCentre® C2424 Copier-Printer
7-53
2424-036
Page 54

Moving and Repacking the System
3. Run the shut-down procedure so the ink solidifies. See "Running the WorkCentre C2424
Copier-Printer Shut-Down Procedure" on page 7-51.
4. Close the system’s door and covers.
5. Remove the document feeder and package it separately from the rest of the system.
a. Disconnect the cable between the document feeder and the scanner.
b. Raise the document feeder.
2424-048
c. Pinch the hinges, then lift the document feeder away from the document glass.
1
2
2424-110
WorkCentre® C2424 Copier-Printer
7-54
Page 55

Moving and Repacking the System
6. Remove the scanner and package it separately from the rest of the system.
a. Disconnect the cable between the scanner and the rest of the system.
b. Using a pen, slide both of the scanner latches to the unlocked position, then slide the
scanner back and lift it away from the system.
7. Fold the stabilizers in toward the system.
2424-116
2424-187
WorkCentre® C2424 Copier-Printer
7-55
Page 56

Moving and Repacking the System
8. Have two people lift the system. Each person should have:
■ One hand grasp the hand hold on the side of the system.
■ The other hand grasp the hand hold on the back of the system as shown.
30 kg
66 lbs.
2424-108
Caution
If the system has optional Trays 3 or 4, lift the system off the trays.
9. Repack the system using the original packing material and boxes or a Xerox repackaging
kit. Additional instructions for repacking the system are provided in the repackaging kit. If
you do not have all the original packaging, or are unable to repackage the system, contact
your local Xerox service representative.
Caution
Failure to repackage the system properly for shipment can result in damage to the
system. Damage to the system caused by improper moving is not covered by the
Xerox warranty, service agreement, or Total Satisfaction Guarantee. The Total
Satisfaction Guarantee is available in the United States and Canada. Coverage may
vary outside these areas; please contact your local representative for details.
WorkCentre® C2424 Copier-Printer
7-56
Page 57

Web Links
Web Links
Xerox provides several web links that offer additional help on your WorkCentre C2424
Copier-Printer. A set of Xerox links is installed in your web browser’s Favorites folder when
you install the Xerox printer drivers on your computer. The Troubleshooting tab in your
Windows printer driver also includes useful links.
Use the following web sites to obtain more information.
Resource Link
To access PhaserSMART Technical Support, which
automatically diagnoses problems on your networked
WorkCentre C2424 system and proposes solutions:
To access the infoSMART Knowledge Base (which is
used by Xerox Customer Support staff) to find solutions
for issues such as error codes, print quality, paper jams,
software installation, networking, and more:
To view technical support information for your
WorkCentre C2424 system, including access to
PhaserSMART Technical Support, Technical Support via
email, driver downloads, documentation, videos,
tutorials, and much more.
To order supplies for your WorkCentre C2424 system: www.xerox.com/office/c2424supplies
To link to a color resource for tools and information such
as interactive tutorials, color printing templates, helpful
tips, and customized features to meet your individual
needs:
To find your local sales and support center: www.xerox.com/office/contacts
To register your system: www.xerox.com/office/register
To view the Material Safety Data Sheet: www.xerox.com/office/msds
To view information about recycling supplies: www.xerox.com/gwa
www.phasersmart.com
www.xerox.com/office/c2424infoSMART
www.xerox.com/office/c2424support
www.colorconnection.xerox.com
WorkCentre® C2424 Copier-Printer
7-57
 Loading...