

Page 1

00-SFXM750.book Page 1 Friday, August 18, 2000 1:30 PM
Quick
Reference
Guide
701P31954
DocuPrint M750/M760
Page 2
00-SFXM750.book Page 2 Friday, August 18, 2000 1:30 PM
Page 3
00-SFXM750.book Page iii Friday, August 18, 2000 1:30 PM
Table of Contents
QUICK REFERENCE GUIDE
1.
BASIC INFORMATION
Basic Information 1-1
Printer Components and Parts 1-1
Printer Components 1-2
Connections 1-2
Control Panel 1-2
Printer Components 1-3
Paper Thi ckness Dial 1-3
Print Heads 1-3
Printer Components 1-4
2.
HOW TO PRINT
How to Print 2-1
How to Print 2-2
Printing Banners 2-3
Printing Cards 2-4
Printing Envelopes 2-5
Printing A Single Envelope 2-5
Quick Reference Guide
iii
Page 4
00-SFXM750.book Page iv Friday, August 18, 2000 1:30 PM
Printing Several Envelopes 2-6
Printing Iron-On 2-7
Printing Labels 2-8
Printing Photographs 2-9
Printing Transparencies 2-10
3.
MAINTENANCE
Maintaining Your Printer 3-1
Changing an Ink Cartridge 3-2
Cleaning and Aligning the Print Head 3-5
Cleaning the Print Head 3-5
Changing the Print Head 3-6
Printing a Test Print 3-6
4.
TROUBLESHOOTING
Troubleshooting 4-1
Error Indicators 4-2
Error Indicators 4-3
Paper Feeding Problems 4-4
Print Quality Problems 4-5
Print Quality Problems 4-7
Printer Problems 4-9
Printer Problems 4-11
Printer Problems 4-12
Printer Problems 4-13
5.
SERVICE AND SUPPORT
Service and Support 5-1
Ordering Supplies 5-2
Ink Cartridge/Print Head Re-Order Numbers 5-2
Quick Reference Guide
iv
Page 5

00-SFXM750.book Page 1 Friday, August 18, 2000 1:30 PM
BASIC INFORMATION
Chapter One
1
Basic Information
To find more complete information about your
printer, refer to the Online User Guide. To access
the Online User Guide, select
Start>Programs>Xerox DocuPrint M750/
M760>User Guide.
Printer Components and Parts
1. AC power cord
2. CD, Getting Started Guide, Quick Reference
Guide, a Warranty Card (in most countries).
3. M750/M760 color printer
4. Output tray
5 . P a p e r t r a y
6. Print heads (2)
7. Ink cartridges (4)
BASIC
INFORMATION
11
Quick Reference Guide
1.1
Page 6
00-SFXM750.book Page 2 Friday, August 18, 2000 1:30 PM
PRINTER COMPONENTS
Printer Components
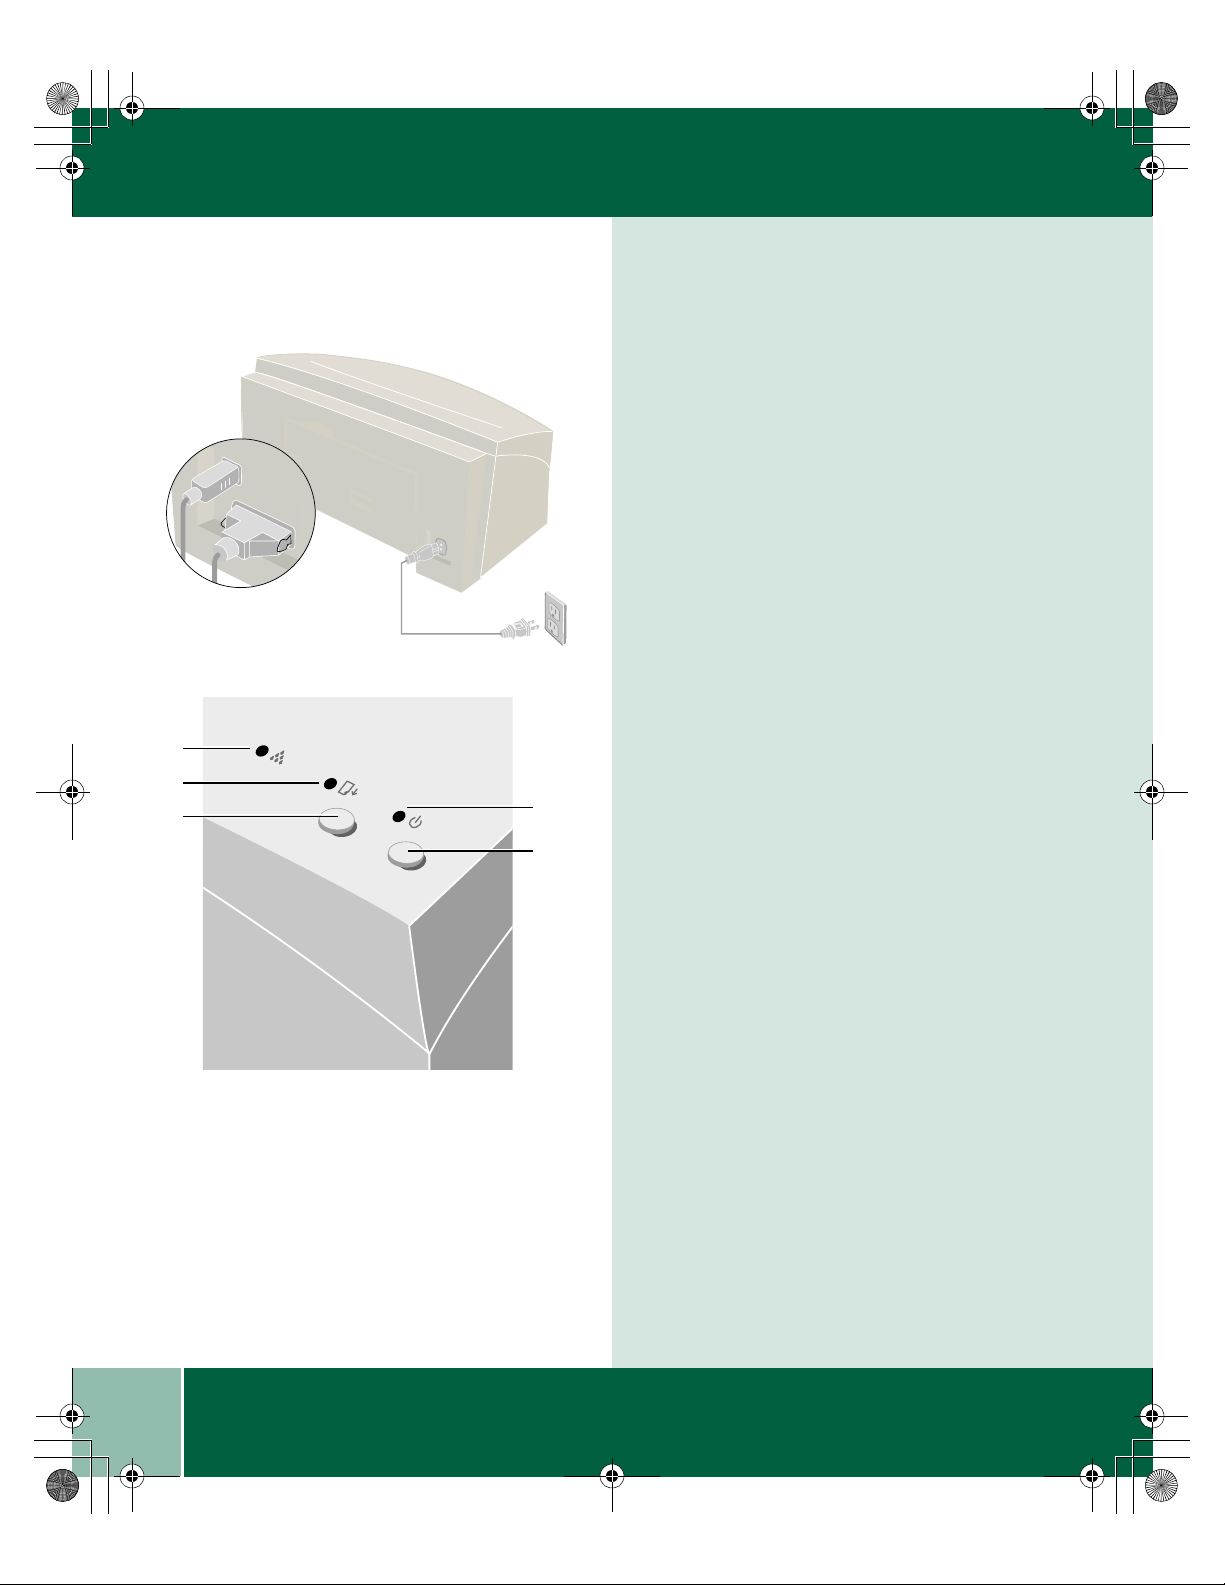
Connections
1. AC power cord
1
2
3
2
3
1
4
5
2. USB cable -OR- 3. Parallel cable
Control Panel
1. Ink status light:
• Fast blink - Ink cartridge missing,
wrong ink cartridge, or out of ink
• Slow blink - Cover open or low ink
2. Paper status light:
• Fast blink - Out of paper or paper jam
3. Resume bu t ton:
• Resumes printing after clearing a paper
jam or loading paper
• Prints a test page
1.2
4. Power light:
• Light on - Power on
• Light off - Power off
• Slow blink -Incoming data
5. Power butto n:
• Power on
• Low power mode
Quick Reference Guide
Page 7
00-SFXM750.book Page 3 Friday, August 18, 2000 1:30 PM
PRINTER COMPONENTS
Printer Components
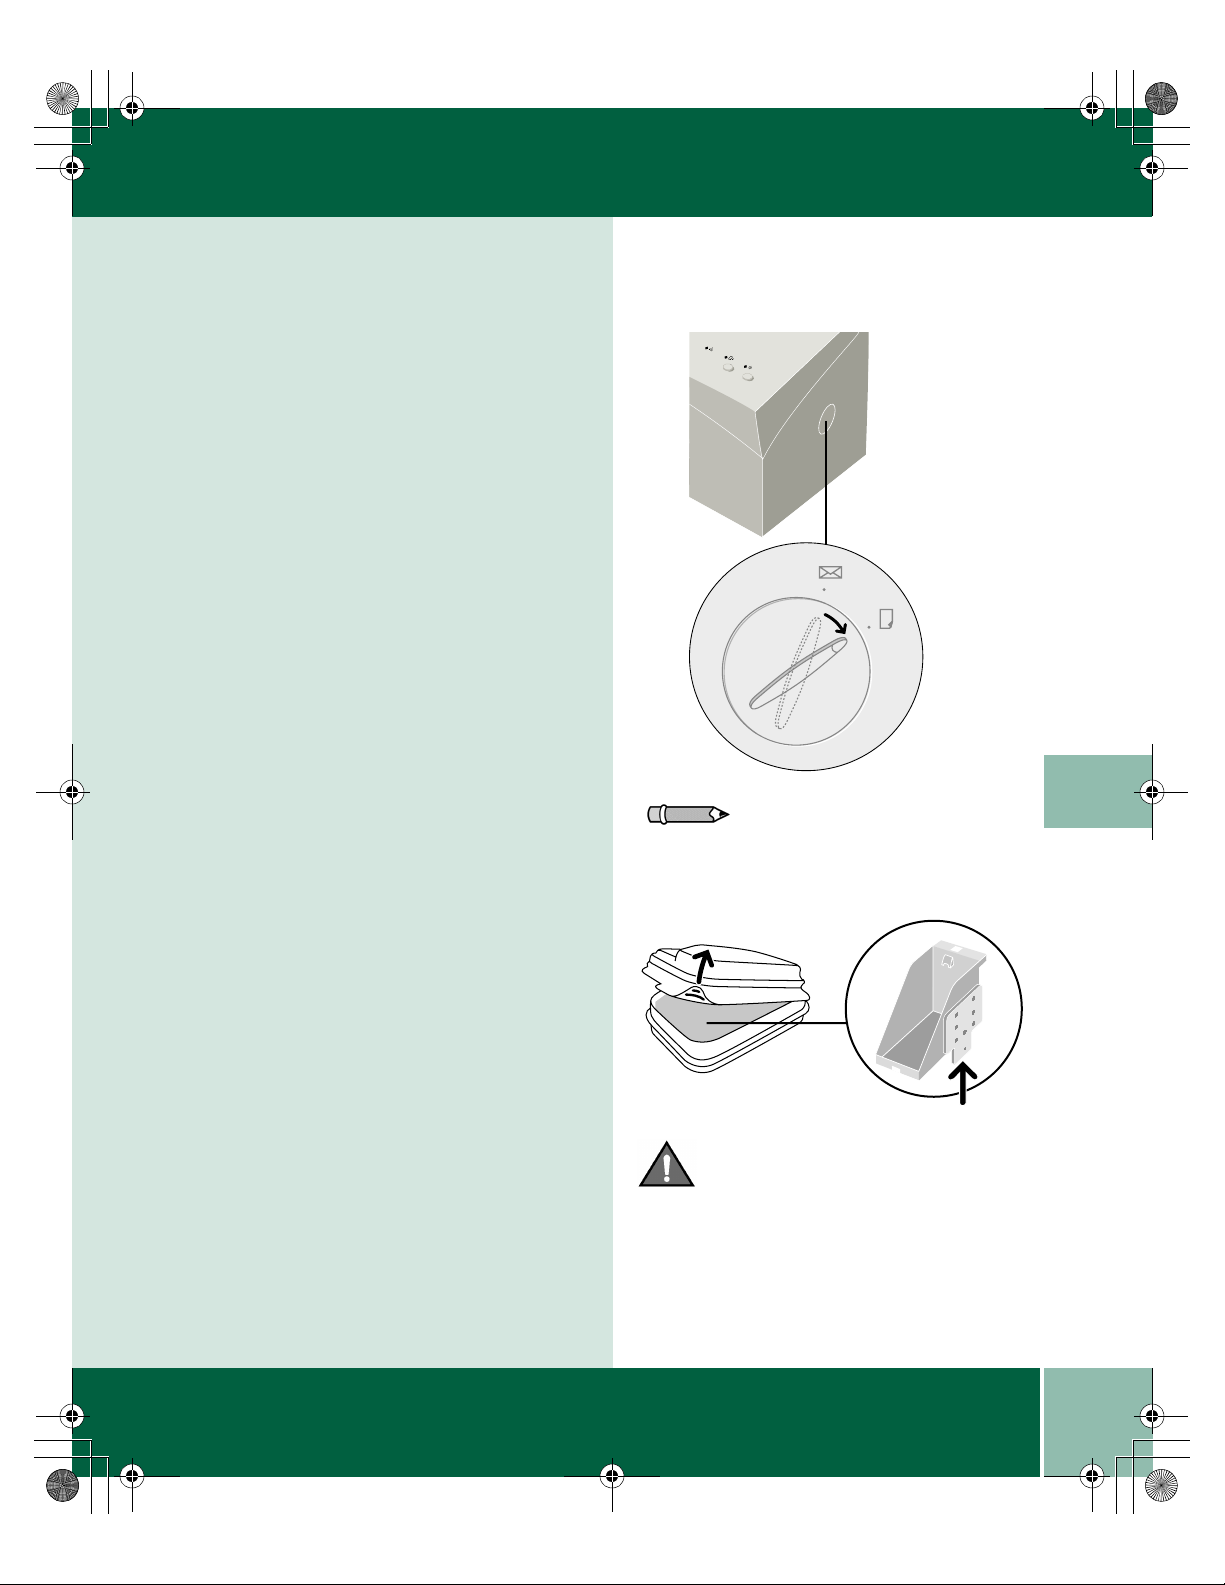
Paper Thickness Dial
The paper thickness dial allows you to choose
envelope or paper printing. An envelope icon
shows the setting for envelope printing and a
paper icon shows the setting for paper printing.
Print Heads
This edge of the print head can be easily damaged.
When you remove it, be careful not to set it down
on this edge.
1
Note: Always keep the dial in the paper
position, except when printing envelopes.
Caution: Be careful not to set print heads down
on this edge, as they damage easily.
Quick Reference Guide
1.3
Page 8
o
cuPrin
t
M
7
5
0
DocuPri
n
t
M7
5
0
00-SFXM750.book Page 4 Friday, August 18, 2000 1:30 PM
PRINTER COMPONENTS
Printer Components
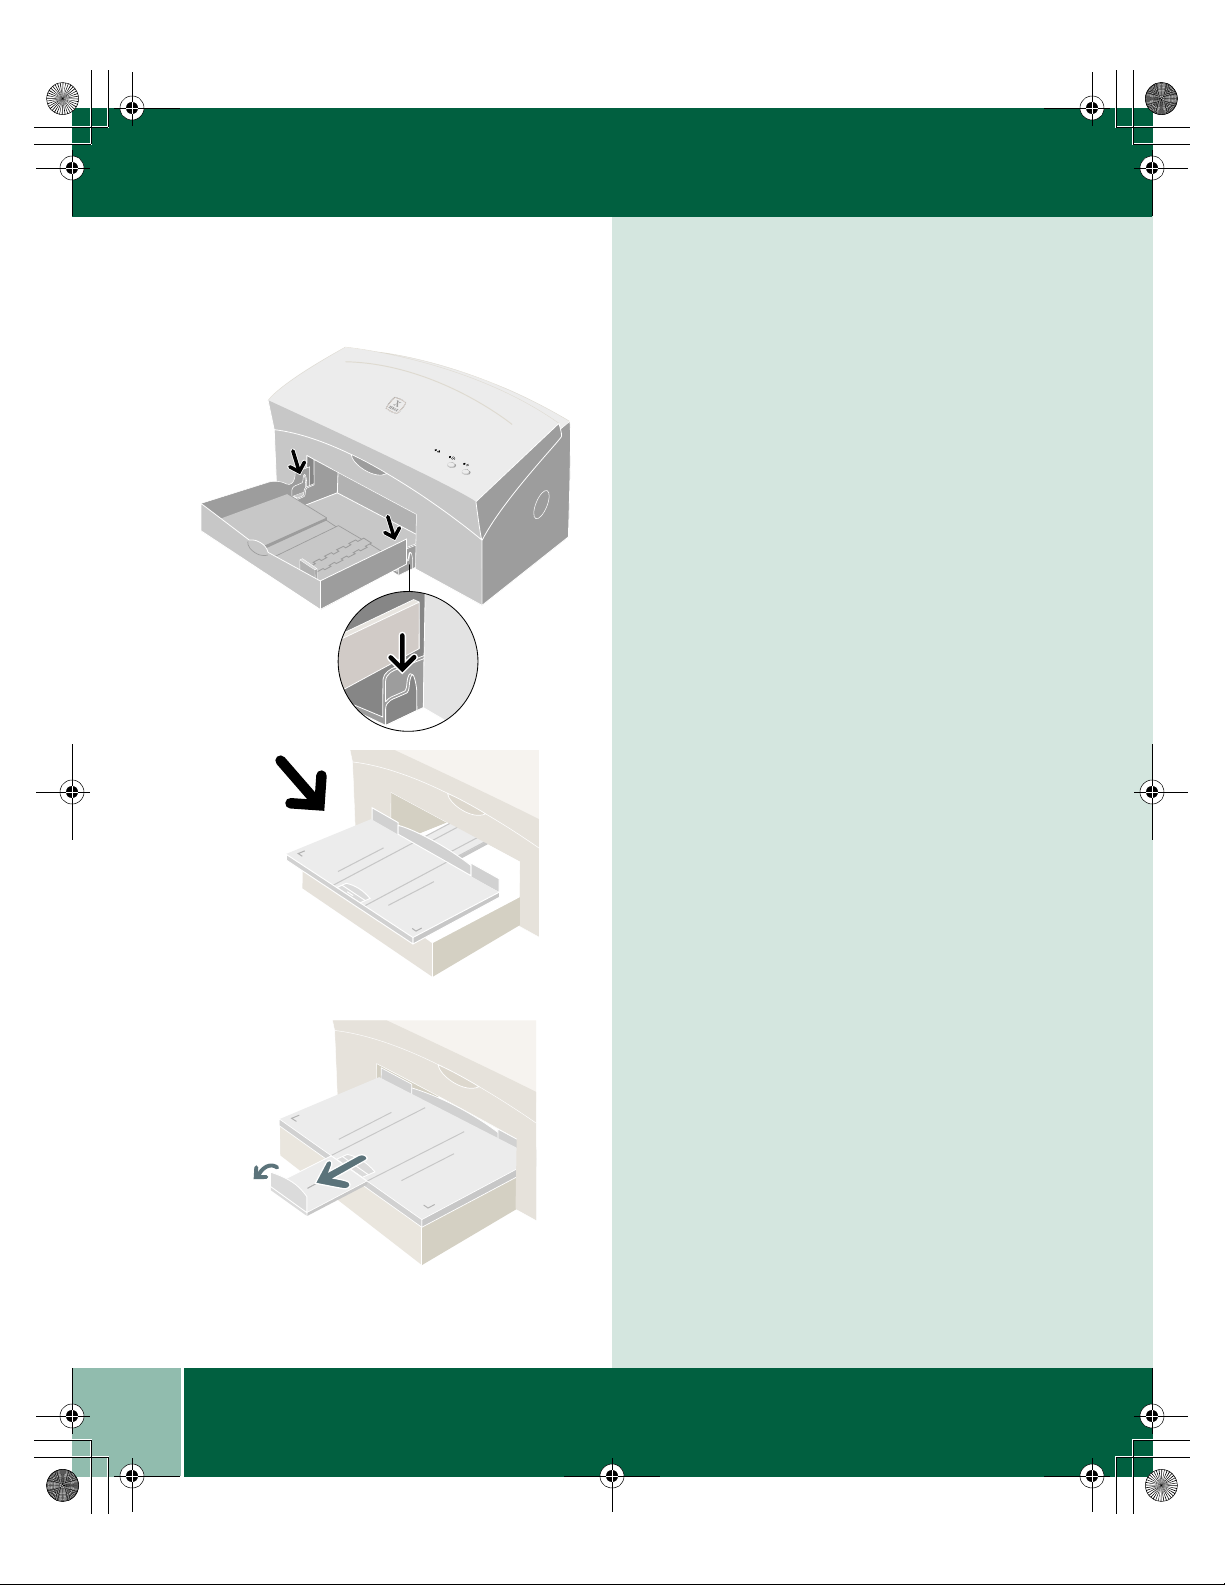
Paper Tray
D
o
cu
Print
M75
0
The paper tray lowers onto the printer.
Output Tray
The output tray rests on the top of the paper tray
and slides into the printer.
1.4
Output Tray Extension
The output tray extension pulls out and flips up.
Quick Reference Guide
Page 9
00-SFXM750.book Page 5 Friday, August 18, 2000 1:30 PM
PRINTER COMPONENTS
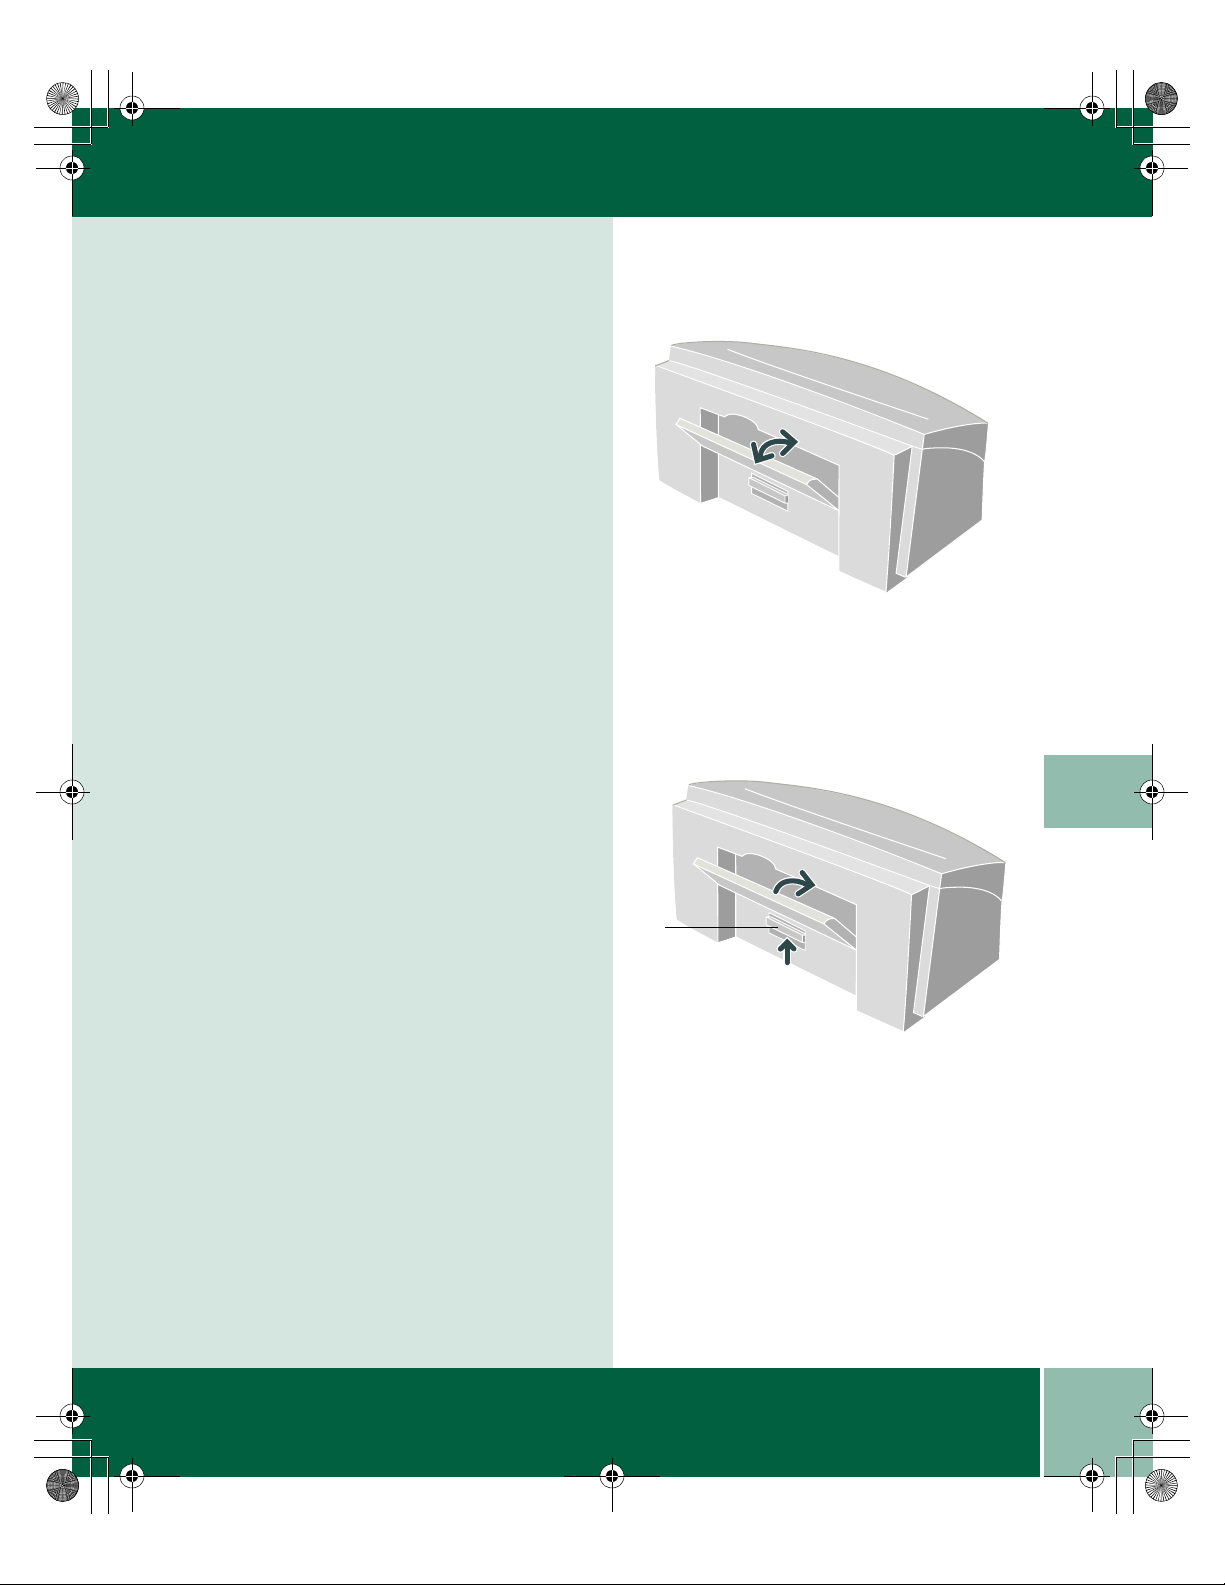
Bypass Tray
The bypass tray feeds one sheet at a time. The
bypass tray is used for banner paper, envelopes,
and heavy weight media. The bypass tray is
located on the back of the printer. To use the
bypass tray, flip it down.
Rear Access Door
1. The rear access door is located on the back of
the printer underneath the bypass tray. The
bypass door must be closed before you can open
the rear access door. The rear access door is
available to help you clear paper jams.
1
1
Quick Reference Guide
1.5
Page 10
00-SFXM750.book Page 6 Friday, August 18, 2000 1:30 PM
PRINTER COMPONENTS
1.6
Quick Reference Guide
Page 11

How to Print
HOW TO PRINT
233
Chapter Two
HOW TO PRINT
This chapter contains the following information:
• How to print
• Printing banners
• Printing cards
• Printing envelopes
• Printing iron-on
• Printing labels
• Printing photographs
• Printing transparencies
2
Quick Reference Guide
2.1
Page 12

HOW TO PRINT
Tip: The eXpress mode is specially designed to
print good quality significantly faster than the
normal mode. To take advantage of eXpress mode
printing we suggest you set the printer default for
print quality to the eXpress mode. This way it will
always be available when you print. Simply do the
following:
How to Print
Open the document you want to print and select
1
File: Print.
Select Properties, then select the following
2
options. When you have finished making your
selections, choose OK to print:
• Copies: Type how many copies you want to
print.
• Orientation: Choose Portrait or Landscape.
For Windows 95/98
1. Select Start>Settings>Printers.
2. Click on DocuPrint M750 or DocuPrint M760.
3. Select Properties.
4. Select Printer/Output tab.
5. Select eXpress in the Print quality menu.
6. Click on OK to save settings.
For Windows NT/2000
1. Select Start>Settings>Printers.
2. Right click onDocuPrint M750 or DocuPrint
M760 printer.
3. Select Document Defaults for Windows NT) or
Printer Preferences (Windows 2000).
4. Select Paper/Output tab.
5. Select eXpress in the Print Quality menu.
6. Click on OK to save settings.
• Print Order: Check Collate or Reverse print
order.
• Print Document As:
- Brilliant Color (photos, graphics, and text)
- Greyscale (black and white)
• Paper size: Choose the size of the paper you
want to print on.
• Paper source: Choose either Tray 1 or the
Bypass tray (a flip tray located on the back
of the printer)
• Paper type: Choose the type of paper you
want to print on.
• Print quality:
- Draft: Draft print quality and fastest printing
speed.
- eXpress: This special feature is designed for
printing good quality business graphics
faster.
- Normal: Best overall print quality and speed.
- Best: Best print quality, but prints less
quickly.
2.2
Saved settings: Choose from pre-set options.
Quick Reference Guide
Page 13
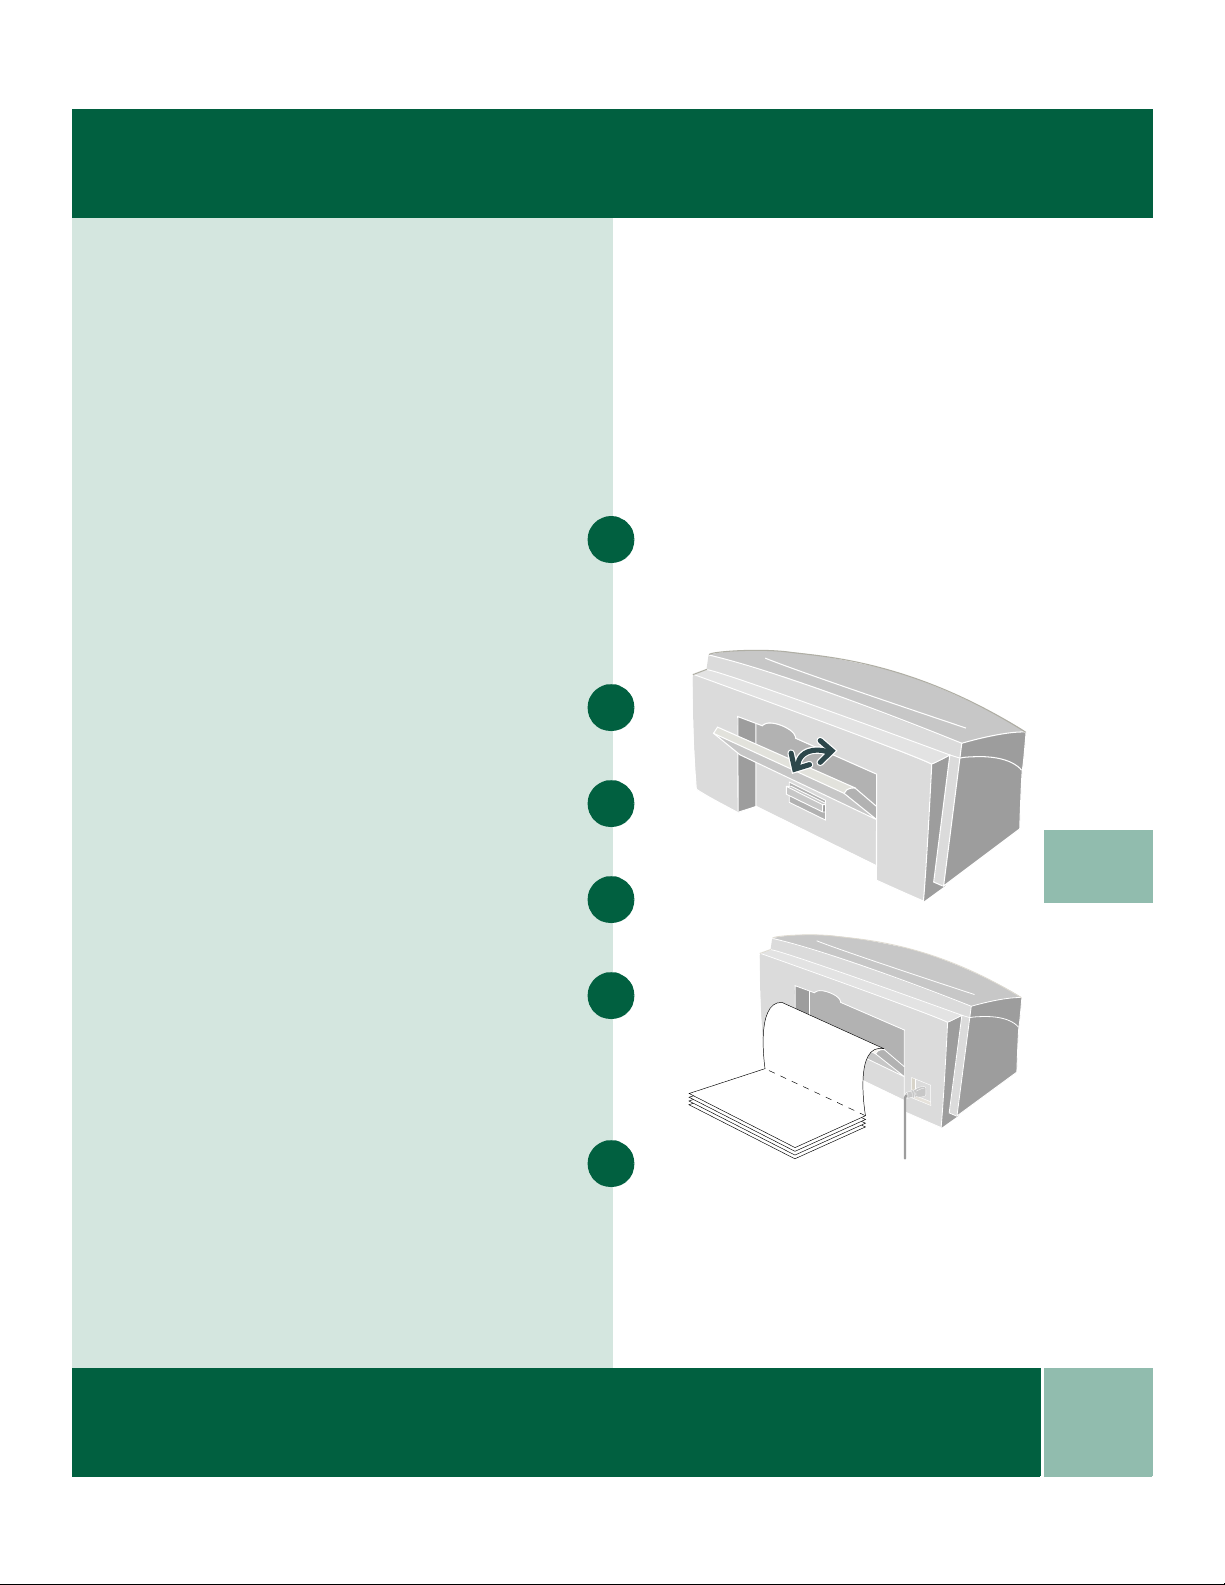
Printing Banners
PRINTING BANNERS
For printing banners we recommend you use 20
lb. or 70 gm
of banner paper through the bypass tray.
After you open your document and select File:
Print, click on the Properties button, then the
Paper/Output tab, then select Banner in the
Paper size listbox. In the paper source list box
select bypass tray.
Tear off the number of sheets you will need to
print your banner (5 maximum).
Tear off the perforated edges, if the paper has any
and fan the stack to separate the edges.
Open the bypass tray , which is located on the
back of the printer.
2
paper. You can feed up to five sheets
1
2
3
2
4
Place the unattached edge into the bypass tray slot
on the back of the printer. Push the paper down
until resistance is met. If inserted correctly, the
banner feeds into the printer, then pauses until you
click OK to print.
Sheets will continue to feed until printing is
complete.
5
6
Quick Reference Guide
2.3
Page 14
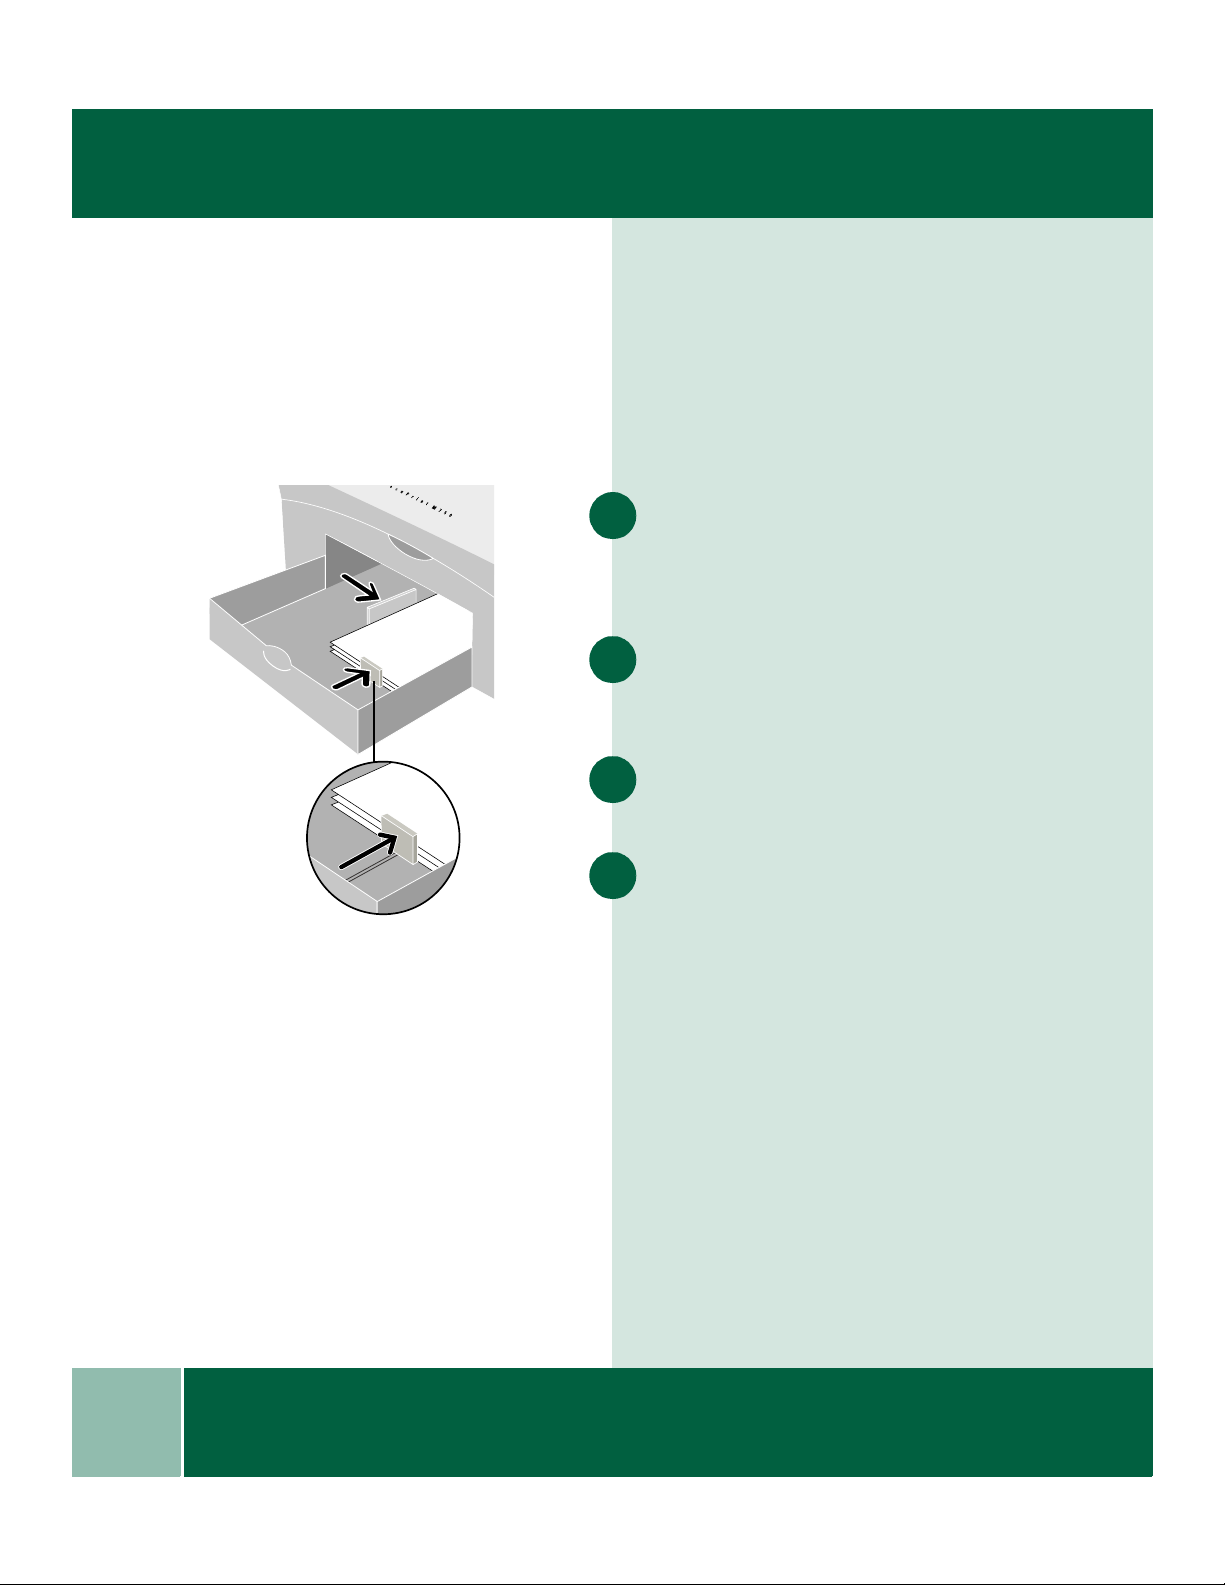
PRINTING CARDS
Printing Cards
You can use your printer to print index cards,
postcards, and birthday cards. Choose any card
size in the Paper size selection menu or use the
Custom selection to print on other card sizes not
found in the selection menu.
After you open your document and select File:
1
Print, click on the Properties button, then the
Paper/Output tab, then select the desired size in
the Paper size listbox.
Remove any other media in the paper tray and
2
place up to 30 cards in Tray 1. Place the cards in
the right side of the tray.
Pull the paper length guide all the way out. Pull
3
the gray tab on the end of the adjuster up.
2.4
Quick Reference Guide
Adjust the guides snugly against the cards and
4
print.
Page 15
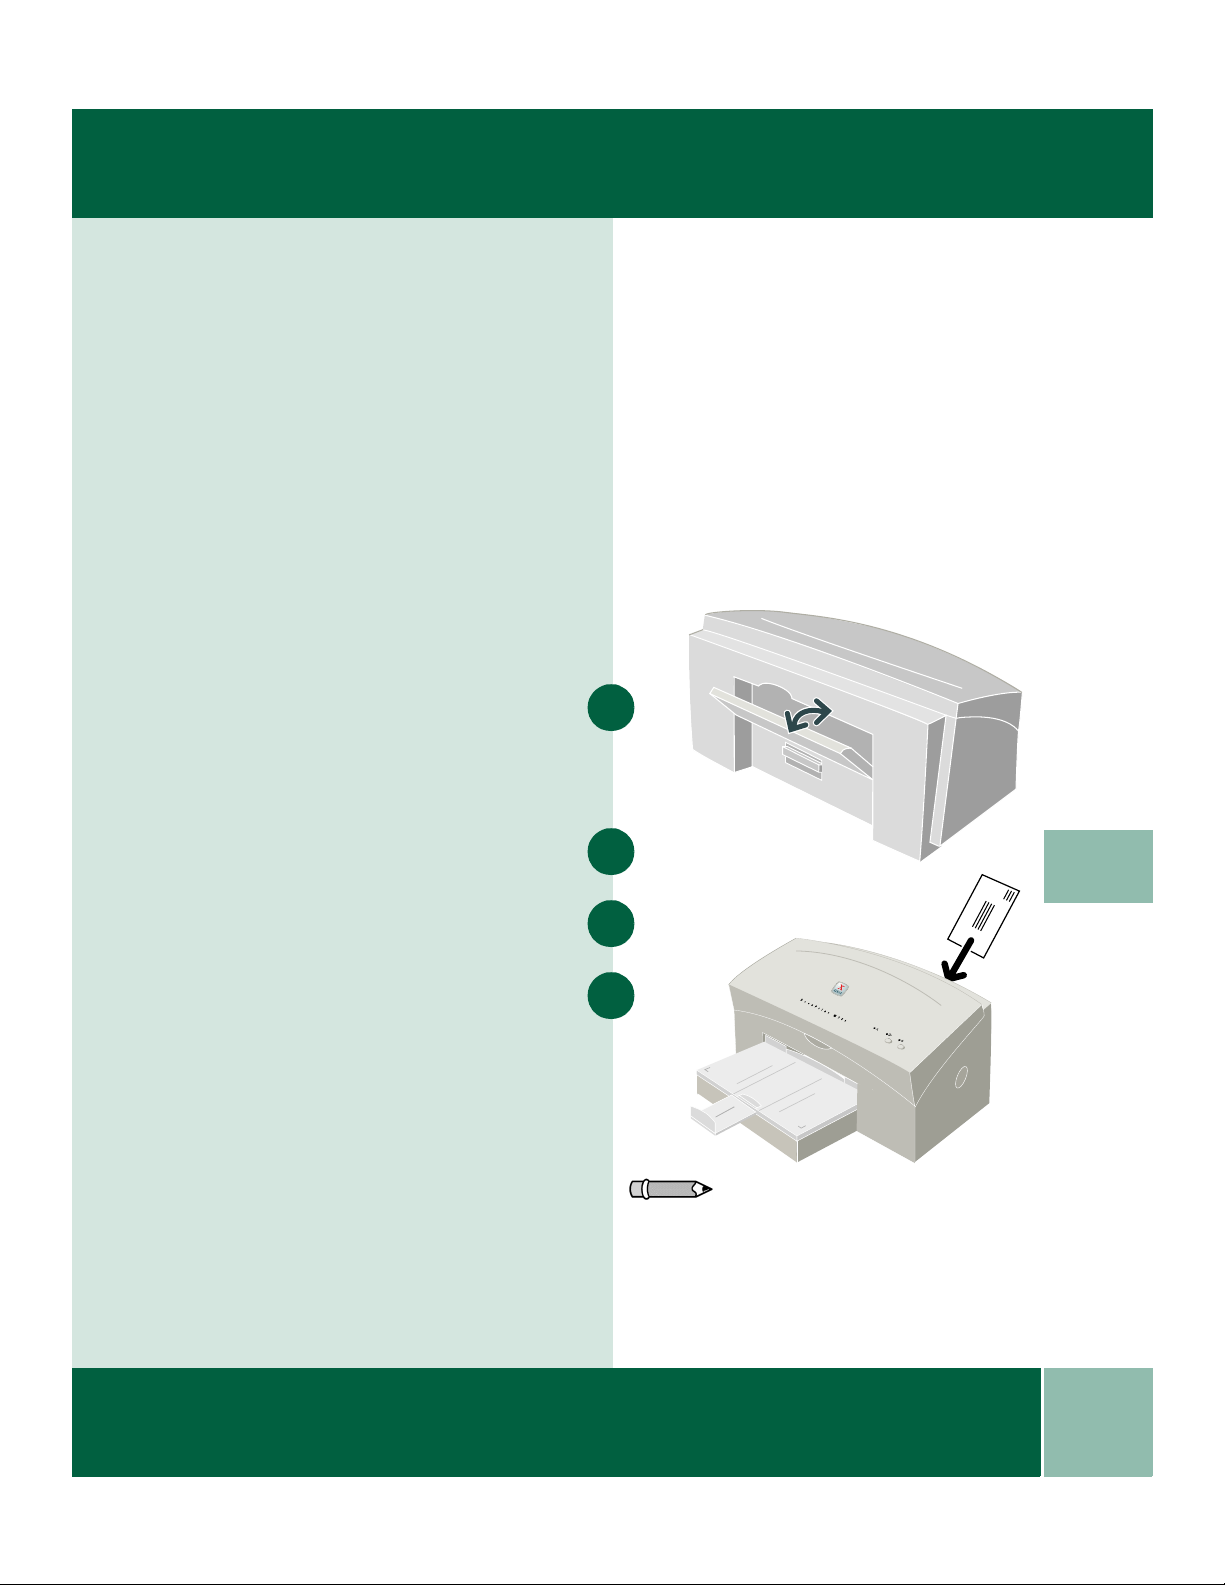
PRINTING ENVELOPES
N
Printing Envelopes
There are two methods you can use for printing
envelopes:
• For printing a single envelope use the bypass
tray on the back of the printer.
For printing several envelopes use the regular
paper tray.
Printing A Single Envelope
On the right side of the printer turn the paper
thickness dial to envelope.
Open your document and select File: Print, click
on the Properties button, then Paper/Output tab,
then select the envelope size in the Paper size
listbox.
In the Paper source listbox, choose bypass tray.
Open the bypass tray on the back of the printer.
Insert the envelope with the addressable side
facing up and the flap pointing toward the left
side. If inserted correctly the envelope feeds into
the printer, then pauses until you click OK to
print.
1
2
2
3
4
ote: If you find that the printing on your envelope
is not correct, try reversing the orientation of the
envelope and print again. After printing, remember
to change the dial back to the paper position.
Quick Reference Guide
2.5
Page 16

PRINTING SEVERAL ENVELOPES
M
7
5
0
Note: When envelopes are completed: Remember
to change the Paper/Output properties back before
printing any documents. Turn the paper thickness
guide back to paper/normal. Replace the envelopes
with paper.
Printing Several Envelopes
On the right side of the printer turn the paper
1
thickness dial to envelope.
After you open your document and select File:
2
Print, click on the Properties button, then the
Paper/Output tab, then select the envelope size
in the Paper size listbox.
Remove any other media from the paper tray.
3
Pull the paper length guide all the way out. Pull
4
the gray tab on the end of the adjuster up.
Insert the envelopes addressable side down with
the flap of the envelope pointing toward the left
5
side.
Note: If you find that the printing on your
envelope is not correct, try reversing the
orientation of the envelope and print again.
2.6
Quick Reference Guide
Adjust the guides snugly against the envelopes
6
and print.
Page 17

PRINTING IRON-ON
ocuP
r
int
M
7
5
0
Printing Iron-On
You can use the Iron-Transfer feature to put an
image on to shirts or other cloth material. All you
need is iron-on transfer paper, which you can buy
at most computer or office supply stores.
After you open the document you want to transfer
to the shirt, select File: Print.
Click on the Properties button, then the Paper/
Output tab, then select Iron-on transfer in the
Paper type listbox. The image will automatically
be flipped so that the image you see on the shirt
will be as you see it on the PC screen.
Load the transfer paper, printable side down, in
Tray 1. Refer to the instructions included with the
iron-on transfer paper to determine the side to
print on.
Adjust the guides snugly against the transfer paper
and print the image.
Follow the instructions included with the iron-on
transfer paper to transfer the image to the shirt.
1
2
3
2
4
5
Quick Reference Guide
2.7
Page 18

PRINTING LABELS
ocuP
r
int
M
7
5
0
Tip: First print the image on plain paper. Place
the print on top of a sheet of labels and hold up to
the light. You should be able to check that the print
is properly aligned on the labels. If not, make the
proper adjustments in your application.
Printing Labels
You can use your M750/M760 printer to print
sheets of labels. Use only US letter or A4-sized
labels. For best results use labels that are
specifically designed for ink jet printers.
After you open your document and select File:
1
Print, click on the Properties button, then the
Paper/Output tab, then select Plain paper in the
Paper type listbox.
Fan the edges of the label sheets to separate them.
2
Remove any other paper in Tray 1 and load up to
3
30 sheets of labels face down.
2.8
Quick Reference Guide
Adjust the paper guides snugly against the stack
4
and print.
Page 19

PRINTING PHOTOGRAPHS
o
cu
P
rin
t
M
7
5
0
Printing Photographs
For best results use Xerox photo gloss paper.
Note: If printing multiple copies, remove each sheet
promptly and allow it to dry before handling.
After you open your document and select File:
Print, click on the Properties button, then the
Paper/Output tab, then click on the Paper/
Output tab, and select Photo quality glossy
paper in the Paper type listbox. The print quality
automatically changes to Best.
Remove any other media and place the paper in
Tray 1 with the glossy side down and print.
1
2
2
Quick Reference Guide
2.9
Page 20

PRINTING TRANSPARENCIES
-
o
cuPrint
M
7
5
0
Printing Transparencies
For best results use a Xerox ink jet transparency
or a transparency specifically designed for ink jet
printers. Do not use transparencies designed for
laser printers. Using these will cause the ink to
smear.
After you open your document and select File:
1
Print, then click on the Properties button, then
the Paper/Output tab, and select Ink jet
transparency in the Paper type listbox.
In the Print quality listbox select eXpress or
2
Best. The eXpress mode will give you good
quality and print faster. Best will print slower, but
will give you the highest quality for your
overhead presentation.
Note: Make sure you place transparencies rough
side down in the tray. Also, remember that
transparencies take longer to dry than plain paper.
Allow for longer drying time before handling.
Remove any other media and place up to 30
3
transparencies in Tray 1 with the rough side down.
If your transparency has an adhesive strip you can
peel it off after printing. You can print with the
adhesive strip facing either way.
Adjust the guides against the transparencies and
4
print.
2.10
Quick Reference Guide
Page 21

00-SFXM750.book Page 1 Friday, August 18, 2000 1:30 PM
MAINTAINING YOUR PRINTER
Chapter Three
3
Maintaining Your Printer
This chapter contains the following information:
• Changing an ink cartridge
• Cleaning and aligning the print head
• Changing the print head
MAINTENANCE
3
Quick Reference Guide
3.1
Page 22

4
3
2
4
3
2
00-SFXM750.book Page 2 Friday, August 18, 2000 1:30 PM
CHANGING AN INK CARTRIDGE
Changing an Ink Cartridge
You can change an ink cartridge using the
Maintenance tab in the Status window:
Open the Maintenance tab by selecting: Start
1
>Settings > Printers. Select the DocuPrint
M750/M760 icon.
Select Printer > Properties. Select the Paper/
2
Output tab and click on the Status button, then
select the Maintenance tab.
Click the Change button. A window opens,
3
prompting you to select the item you are
installing. Choose a color ink cartridge. Click
OK. Open the printer cover. The print head moves
to the center of the printer.
Remove the empty ink cartridge from the print
4
head by pushing the tab forward and rocking the
cartridge out.
3.2
Quick Reference Guide
Page 23

00-SFXM750.book Page 3 Friday, August 18, 2000 1:30 PM
CHANGING AN INK CARTRIDGE
Remove the new ink cartridge from its package.
Slowly remove the protective strip from the
cartridge in the direction of the arrow.
5
Caution: Do not touch the uncovered opening in
the ink cartridge, as ink will get on your hands.
3
Quick Reference Guide
3.3
Page 24

4
3
00-SFXM750.book Page 4 Friday, August 18, 2000 1:30 PM
CHANGING AN INK CARTRIDGE
Caution: Do not force the ink cartridge
into the print head.
Insert the ink cartridge into the correct location on
6
the color print head. The ink cartridges and
corresponding locations are color-coded and
numbered.
3.4
Quick Reference Guide
Snap the ink cartridge into position.
7
Close the printer cover and select Finish.
8
Page 25

00-SFXM750.book Page 5 Friday, August 18, 2000 1:30 PM
CLEANING AND ALIGNING THE PRINT HEAD
Cleaning and Aligning the Print Head
Cleaning the Print Head
The clean function is used to restore the print head
when the nozzles become dirty or clogged with
dried ink.
Open the Maintenance tab by selecting: Start
>Settings > Printers. Select the DocuPrint
M750/M760 icon.
Select Printer > Properties. Select the Paper/
Output tab and click on the Status button, then
select the Maintenance tab.
Select Clean… to display the Clean Print Head
window.
Select the black print head, color print head, or
both, depending on which you want to clean.
When you select Clean, the printer cleans the
selected print head(s). This button is disabled if
neither head is checked.
Aligning the Print Head
Open the Maintenance tab by selecting: Start
>Settings > Printers. Select the DocuPrint
M750/M760 icon.
1
2
3
4
5
3
1
Select Printer > Properties. Select the Paper/
Output tab and click on the Status button, then
select the Maintenance tab.
Select Align… to display the Align Print Head
window and follow the instructions that display.
2
3
Quick Reference Guide
3.5
Page 26
00-SFXM750.book Page 6 Friday, August 18, 2000 1:30 PM
CHANGING THE PRINT HEAD
Changing the Print Head
Open the Maintenance tab by selecting: Start
1
>Settings > Printers. Select the DocuPrint
M750/M760 icon.
Select Printer > Properties. Select the Paper/
2
Output tab and click on the Status button, then
select the Maintenance tab.
Select Change… to display the Change window
3
and follow the instructions that display.
Printing a Test Print
A test print is useful for checking print quality and
checking that your printer is functioning
normally.
Print a test print by pressing and holding the
1
Resume button for more than two seconds.
3.6
Quick Reference Guide
Page 27
00-SFXM750.book Page 1 Friday, August 18, 2000 1:30 PM
TROUBLESHOOTING
Chapter Four
4
Troubleshooting
This chapter contains the following information:
• Error indicators
• Paper feeding problems
• Print quality problems
• Printer problems
TROUBLESHOOTING
4
Quick Reference Guide
4.1
Page 28

00-SFXM750.book Page 2 Friday, August 18, 2000 1:30 PM
ERROR INDICATORS
Error Indicators
Symptom
All lights blinking
Green power light is
blinking slowly
Red resume light is
blinking fast
DiagnosDia
• The print carriage isn't centering properly. To clear a carriage
position error:
1. Open the printer cover and clear any obstructions.
2. Make sure the color ink cartridges are seated properly by
3. If the error still continues, call the Xerox Customer Support
• A self-test or system error. To correct a system error unplug the
power cord to the printer, then reconnect the power cord. If this
doesn’t resolve the problem, call the Xerox Customer Support
Center.
• The printer is warming up.
• The printer is receiving data.
• Out of paper or paper di d not feed p roperl y. Check p aper tray or
check the paper path.
Diagnosis and/or Solution
pressing the end of each cartridge to snap it into position.
Center.
gnosis and ors
4.2
Quick Reference Guide
Page 29
00-SFXM750.book Page 3 Friday, August 18, 2000 1:30 PM
ERROR INDICATORS
Error Indicators
Symptom
Red ink light is blinking
fast
Red ink light is blinking
slowly
DiagnosDia
• The printer is out of ink. Change the ink cartridge.
• There are no ink tank(s) installed. Install an ink cartridge.
• There are no print head(s) installed. Install a new print head.
• A different ink brand is being used. Get Xerox brand ink
cartridges and change the ink cartridges.
• The printer cover is open, close the cover.
Diagnosis and/or Solution
gnosis and ors
Quick Reference Guide
4
4.3
Page 30
00-SFXM750.book Page 4 Friday, August 18, 2000 1:30 PM
PAPER FEEDING PROBLEMS
Paper Feeding Problems
Symptom
Paper sticks together
More than one sheet of
paper being fed
Paper skews or buckles
Transparencies stick
together in the paper exit
DiagnosDia
• Make sure there isn't too much paper in the tray. Depending on
the thickness of your paper, the paper tray can hold up to 150
sheets of paper.
• Make sure you are using the correct type of paper. Remove
paper from the feeder and flex or fan the paper.
• Humid conditions may cause some paper to stick together.
• There may be different types of paper in the tray. Load paper of
only one type, size, and weight.
• Make sure there isn’t too much paper in the tray. Depend i ng on
the thickness of your paper, the feeder can hold up t o 150 sheets
of paper.
• Try another t yp e of paper. Make s ur e t he p aper i s no t bow ed in
the tray.
• Make sure the paper guides are adjusted snugly against the
paper.
• Use only transparencies specially designed for an ink jet
printer.
Diagnosis and/or Solution
gnosis and ors
4.4
• Remove each transparency as it leaves the printer.
Envelopes skew or fail to
feed correctly
Problem feeding glossy
paper
Quick Reference Guide
• Make sure that the paper guide is against the left side of the
envelopes.
• There are many different glossy papers available on the market
which range in thickness. Xerox recommends using Kodak
glossy paper with the M750 and M760 printers for optimum
feed performance.
Page 31
00-SFXM750.book Page 5 Friday, August 18, 2000 1:30 PM
PRINT QUALITY PROBLEMS
Print Quality Problems
Symptom
Printed do cument is bla nk
Note: Do not disconnect
the power cord from the
wall outlet.
Light or blurred characters
DiagnosDia
• Print a test print by pressing and holding the Resume button for
more than two seconds. If the test print is good check the printer
cable or the PC.
• If the test print is blank try cleaning the print heads up to 3
times using the Clean function found in the Maintenance tab of
the printer driver.
• If the printer has been left without power for more than a few
hours remove the print heads and clean with a damp cloth. Use
a clean cloth, dampened only with water, to gently clean the
nozzles (the copper-colored area on the bottom of the print
head). When cleaning the color print heads, wipe the nozzles in
only one direction so that the colors do not mix.
• You may be using Draft quality. Try selecting a better print
quality mode in the Paper/Output tab, under Print quality.
(Normal, eXpress, Best)
• The ink cartridge may be running out of ink. Replace the Ink
cartridge if the ink light is blinking.
• Make sure you are using good quality paper. Try another type
of paper.
Diagnosis and/or Solution
gnosis and ors
• You may be printing on the wrong side of the paper.
• The print head may need cleaning. Clean the print head up to 3
times using the Clean function found in the Maintenance tab of
the printer driver.
• If not printing on envelopes, make sure Paper thickness dial on
the side of the printer is in the paper position.
Quick Reference Guide
4
4.5
Page 32

00-SFXM750.book Page 6 Friday, August 18, 2000 1:30 PM
PRINT QUALITY PROBLEMS
Print Quality Problems
Symptom
Envelope printing smudges
or streaks
Printed image is clipped or
off the edge of the media
Smudged or dark characters • Try another type of paper. Make sure the paper is straight and
Vertical straight lines are
broken or jagged in tables,
borders, and graphs
Printed color is
significantly different from
screen colors
DiagnosDia
• Make sure the Paper Thickness dial on the right side of the
printer is in the envelope position.
• Change the document margins in the application that you are
using to be within the recommended printable area: 3mm
• Make sure you selected the correct Paper size on the Paper/
Output tab.
unwrinkled.
• Let ink dry before handling the paper. In the Paper/Output tab,
change the Print quality setting to Normal or eXpress quality
mode.
• The print heads may be mis-aligned. Align the print heads using
the Align function found in the Maintenance tab of the printer
driver.
• One or more of the color ink cartridges have run out of ink.
Install a new ink cartridge.
• The print head may need cleaning. Clean the print head up to 3
times using the Clean function found in the Maintenance tab of
the printer driver.
Diagnosis and/or Solution
gnosis and ors
4.6
Black and white is printing
instead of expected color
printing
Quick Reference Guide
• The print settings may be incorrect. Check that printing is not
set to Greyscale in the Paper/Output tab.
Page 33
00-SFXM750.book Page 7 Friday, August 18, 2000 1:30 PM
PRINT QUALITY PROBLEMS
Print Quality Problems
Symptom
Color print quality is poor • Try using a different kind of paper.
Printer carriage moves, but
no characters are printing
Unexpected characters are
printed or characters are
missing
Color images are fuzzy,
colors overlap, dark bands
Horizontal white lines in
solids or characters
DiagnosDia
• Make sure that the Paper Type setting in the Page/Output tab is
correct for the type of paper loaded.
• Change the Print Quality setting in the Paper/Output tab to
Normal or Best.
• If printing text, the black ink cartridge may be out of ink. If the
ink status light is blinking change the black ink cartridge.
• Make sure your application has the M750/M760 selected as the
default printer.
• The printer cable may not be securely connected to the printer
and the computer, or the printer cable may not the correct type.
Check the printer cable.
• The print head may need cleaning. Clean the print head up to 3
times using the Clean function found in the Maintenance tab of
the printer driver.
• The print heads are mis-aligned. Align the print heads using the
Align function found in the Maintenance tab of the printer
driver.
• The print head may need cleaning. Clean the print head up to 3
times using the Clean function found in the Maintenance tab of
the printer driver.
• The ink cartridge may be running out of ink. Replace the ink
cartridge.
• If printing on transparencies, try changing the fill pattern in
your application software.
• If connected to a power strip, keep the power to the pr inter on at
all times. The printer requires a small amount of power to
prevent the ink in the nozzles from drying.
Diagnosis and/or Solution
gnosis and ors
4
Quick Reference Guide
4.7
Page 34

00-SFXM750.book Page 8 Friday, August 18, 2000 1:30 PM
PRINT QUALITY PROBLEMS
Print Quality Problems
Symptom
When making multiple
prints from the bypass tray,
prints have fine white lines
Transparency print quality
is poor
Solid black areas on my
prints are light and do not
stand out
DiagnosDia
• Try changing the paper source from bypass to Tray 1. You can
still feed paper through the bypass tray. The system
automatically feeds from the bypass tray when paper is inserted
into the by-pass slot.
• Make sure you have selected Transparency from the paper/
output property page.
• Check to make sure you are printing on the rough side of the
transparency.
• Make sure you are using ink jet transparencies.
• The black density is dependent on the paper you are using as
well as the print mode you have selected. If you are not
satisfied with the black density of your print, choose a higher
quality print mode or pick a different paper to improve the
density.
Diagnosis and/or Solution
gnosis and ors
4.8
Quick Reference Guide
Page 35

00-SFXM750.book Page 9 Friday, August 18, 2000 1:30 PM
PRINTER PROBLEMS
Printer Problems
Symptom
Printer does not print
Note: Switch boxes can
interrupt the
communication
between the printer and
your PC.
DiagnosDia
• A paper jam has occurred. If this is the case, the paper ligh t will
be blinking.
• Print a test prin t by pres sing an d ho lding the Resume button for
more than two seconds. If the test print is good, the problem is
most likely not with the printer.
• The USB or parallel cable is not connected properly.
• The USB or parallel cable is defective. Swap the cab le with one
known to work. If necessary, replace the cable.
• If using a parallel cable, ensure that it is IEEE std 1284 - 1994
compliant.
• The printer port is configured incorrectly. Check the printer
settings in Windows to make certain that the print job is being
sent to the correct port (for example, LPT1).
• The printer may be configured incorrectly within the PC
application. Check the application to verify that all print
settings are correct.
• The printer driver may be incorrectly installed. Uninstall the
existing printer driver, and re-install the printer driver.
Diagnosis and/or Solution
gnosis and ors
4.9
Quick Reference Guide
Page 36

00-SFXM750.book Page 10 Friday, August 18, 2000 1:30 PM
PRINTER PROBLEMS
Printer Problems
Symptom
Paper feed problems
Printed do cument does not
match selected printer
settings
DiagnosDia
• Out of paper. Add paper.
• When the red Resume light is blinking fast, it may indicate a
paper jam. Clear the paper jam and press the Resume butto n on
the front of the printer.
• Remove all paper from the paper tray, fan the paper and
reinstall it in the paper tray. Press and release the Resume
button to continue the print job. If paper misfeeds continue,
remove the stack of paper, turn i t over , and reinstall the paper in
the paper tray. Then press and release the Resume button to
continue the print job.
• Paper has not been loaded properly. Remove and re-insert the
paper correctly.
• There is too much paper in the paper tray. Remove some paper.
• Some PC software applications override the settings selected on
the M750/M760 printer driver. In this case, choose the desired
settings from the software application.
Diagnosis and/or Solution
gnosis and ors
Quick Reference Guide
4
4.10
Page 37

00-SFXM750.book Page 11 Friday, August 18, 2000 1:30 PM
PRINTER PROBLEMS
Printer Problems
Symptom
Printed document is blank
Note: Do not disconnect
the power cord from the
wall outlet.
Printed page is partly blank • The page orientation setting may be incorrect in the print driver.
DiagnosDia
• Print a test prin t by pres sing an d ho lding the Resume button for
more than two seconds. If the test print is go od check the printer
cable or the PC.
• If the test print is blank try cleaning the print heads up to 3
times using the Clean funct ion foun d in the Maintenan ce tab of
the printer driver.
• If the printer has been left without power for more than a few
hours remove the print heads. Use a clean cloth, dampened o nly
with water, to gently clean the nozzles (the copper-colored area
on the bottom of the print he ad). When clean ing the color print
heads, wipe the nozzles in only one direction so that the colors
do not mix.
Change the page orientation in the Print Setup dialog box.
• The actual paper size and the paper size settings in the printer
driver do not match. Load the correct paper in the printer or
change the paper size selection in the printer driver.
• The printer cable may be incorrect. If not USB, the printer cable
type should be IEEE std 1284 - 1994 compliant.
Diagnosis and/or Solution
gnosis and ors
4.11
• One of the ink cartridges may be empty. Change the ink
cartridge.
Quick Reference Guide
Page 38

00-SFXM750.book Page 12 Friday, August 18, 2000 1:30 PM
PRINTER PROBLEMS
Printer Problems
Symptom
Printer prints extra
characters, wrong data, or
prints incorrect characters
Printer produces
meaningless characters or
symbols
Bi-directional
communications error
appears in the status
window
DiagnosDia
• The printer cable may be connected improperly. Check the
cable connection.
• There may be a problem with the printer driver software. Exit
Windows and reboot the computer. Turn printer off and on to
purge old data from printer buffer.
• The printer cable may be incorrect. Parallel printer cable type
should be IEEE std 1284 - 1994 compliant.
• Printer cable may be too long. Printer cable should be less than
6 feet long.
• If printer is connected through a switch box or scanner try
connecting directly to PC.
• Your parallel cable may not be IEEE 1284-1994 compliant.
• The parallel cable may not be securely connected to the printer
or PC.
• Make sure your application has the M750/M760 Printer
selected as the default.
• Verify that your printer is plugged in to AC power.
• Verify your parallel cable is IEEE1284-1994 compliant.
• Ensure that your PC is set for ECP or Bi-directional mode.
Running ECP with DMA turned on may cause problems with
bi-di error status. Turn DMA off when using ECP. On some
model PC's you can not turn off DMA. Try setting the
Windows device driver to "printer mode". Contact your
computer manufacturer or TEAM XRX 1-800-832-6979 for
assistance.
Diagnosis and/or Solution
gnosis and ors
4
Quick Reference Guide
4.12
Page 39

00-SFXM750.book Page 13 Friday, August 18, 2000 1:30 PM
PRINTER PROBLEMS
Printer Problems
Symptom
Printer prints very slowly • Yo u may be u sing B est mode print quality. Change the Print
DiagnosDia
Quality setting in the print driver to Normal or eXpress.
• Close all applications not needed to print the job.
• If you are using Wi ndows 95/98/NT 4.0, the Spooling Setting
may be set incorrectly. Select: Start > Settings > Printers.
Click the M750/M760 icon with the right mouse button, select
Properties, click the Details tab, and then click the Spool
Settings button. Select the desired spool setting from the
available choices.
• The Temp (Temporary) folder on your hard drive may contain
too many files. Delete *.tmp and *.prn files stored in C:
\Windows\Temp or your PC’s hard dri ve.
• If installing an NT driver, NT will set the driver's spool data
format to RAW. The user must manually change it to
PMJOURNAL to get much better speed from the driver. Go to
the printer properties by selecting Start> Settings> Printers
then right click on M750 or M760 and select Properties. Go to
the Details tab then select the Spool Settings button. Ensure
that the Spool Data Format is set to PMJOURNAL instead of
RAW or EMF then select OK.
Diagnosis and/or Solution
gnosis and ors
4.13
• Print speed is a function of document size and document
complexity. Print speed can also be effected by the speed of
your PC.
• If you are using Windows 98 or Windows 2000 try printing
from the USB port.
• If using the parallel port ensure it is in ECP mode.
Quick Reference Guide
Page 40

00-SFXM750.book Page 14 Friday, August 18, 2000 1:30 PM
PRINTER PROBLEMS
Quick Reference Guide
4
4.14
Page 41

00-SFXM750.book Page 1 Friday, August 18, 2000 1:30 PM
SERVICE AND SUPPORT
Chapter Five
5
Service and Support
If you are unable to solve a problem using this
guide or the printer driver Online Guide, do one
of the following:
•Browse to:
http:/WWW.XEROX.COM
• In the U.S. and Canada Call the Xerox
Customer Support Center at:
1-800-TEAM XRX (1-800-832-6979)
If possible, call from a telephone near your PC
and the printer. Make sure that both yo ur PC and
your printer are turned on.
SERVICE AND
SUPPORT
5
Quick Reference Guide
5.1
Page 42
00-SFXM750.book Page 2 Friday, August 18, 2000 1:30 PM
ORDERING SUPPLIES
Before calling, have the following information
ready:
• M750/M760 serial number, which is located
on the back of the printer.
• Your operating system version (Windows
95/98, NT 4.0, 2000)
• Amount of memory in your PC.
• Information about the problem, including
description of the problem, any error
messages and any steps you have taken to
solve the problem.
Ordering Supplies
Order Xerox DocuPrint M750/760 supp l ies from
your local Xerox dealer or representative.
Ink Cartridge/Print Head Re-Order
Numbers
High capacity black ink cartridge (700
page yield)
Black Ink Cartridge (400 page yield) Y100
Cyan Ink Cartridge Y101
Magenta Ink Cartridge Y102
Yellow Ink Cartridge Y103
Ink Cartridge Multi Pack (4) Y104
Black Printhead P100
Color Printhead P1 05
H100
5.2
Quick Reference Guide
Page 43
00-SFXM750.book Page 1 Friday, August 18, 2000 1:30 PM
Index
INDEX
QUICK REFERENCE
GUIDE
A
Alignment, Print Head ...........................3-5
B
Banners, Printing ...................................2-3
Bypass Tray ...........................................1-5
C
Cards, Printing .......................................2-4
Changing
Ink Cartridge ...................................3-2
Print Head .......................................3-6
Cleaning, Print head ............................... 3-5
Connections ........................................... 1-2
Control Panel ................................. ..... ...1-2
D
Door, Rear Access ................................. 1-5
Quick Reference Guide
I-1
Page 44

00-SFXM750.book Page 2 Friday, August 18, 2000 1:30 PM
INDEX
E
Envelopes
Printing Several ...............................2-6
Printing Single .................................2-5
Error Indicators, Diagnosis &/or Solution 4-2
I
Ink Cartridge
Changing .........................................3-2
Re-Order Numbers ..........................5-2
Iron-On, Printing ....................................2-7
L
Labels, Printing ......................................2-8
O
Online UserGuide, Accessing ................1-1
Output Tray ............................................1-4
Output Tray Extension ...........................1-4
P
Output Tray Extension ....................1-4
Paper Thickness Dial .......................1-3
Paper Tray .......................................1-4
Print Heads ......................................1-3
Rear Access Door ............................1-5
Printer Problems , Diagno sis &/or So lut ion 4-8
Printing ...................................................2-1
Banners ............................................2-3
Cards ................................................2-4
Envelopes ........................................2-5
Iron-On ............................................2-7
Labels ..............................................2-8
Photographs .....................................2-9
Several Envelopes ...........................2-6
Single Envelope ...............................2-5
Problem Diagnosis & Solution ...............4-1
Error Indicators ...............................4-2
Paper Feeding ..................................4-4
Print Quality ....................................4-5
Printer ..............................................4-8
R
Rear Access Door ...................................1-5
I-2
Paper Feeding Problems, Diagnosis &/or
Solution .............................................4-4
Paper Thickness Dial ..............................1-3
Paper Tray ..............................................1-4
Print Head
Alignment ........................................3-5
Changing .........................................3-6
Cleaning ..........................................3-5
Re-Order Numbers ..........................5-2
Print Quality Problems,
Diagnosis &/or Solution ...................4-5
Printer Components and Parts ................1-1
Bypass Tray .....................................1-5
Connections .....................................1-2
Control Panel ...................................1-2
Output Tray .....................................1-4
Quick Reference
S
Service and Support ................................5-1
Customer Support Center ................5-1
Ink Cartridge Re-Order
Numbers ....................................5-2
Ordering Supplies ............................5-2
Print Head Cartridge Re-Order Numbers
5-2
Web Address ...................................5-1
Supplies, Ordering ..................................5-2
T
Transparencies, Printing .......................2-10
 Loading...