

Page 1

March 2012
How Eye-Fi Works
Overview Flowcharts
Page 2

© 2012 Visioneer, Inc. (A Xerox Trademark Licensee)
All rights reserved. XEROX®, XEROX and Design®, and DocToMe™ are registered trademarks of Xerox Corporation in the United States
and/or other countries. BR1694
Document Version: 05-0873-000 (March 2012)
Visioneer® is a registered trademark of Visioneer, Inc. in the United States and other countries.
Windows® is a registered trademark of Microsoft Corporation.
Android™ is a trademark of Google, Inc. Picasa™ is a trademark of Google, Inc.
Universal Serial Bus is a trademark of USB Implementers Forum, Inc. *USB-IF) in the U.S. and other countries and is used under license.
iOS® is a registered trademark of Cisco.
Eye-Fi® is a registered trademark of Eye-Fi Inc.
All other products mentioned herein may be trademarks of their respective companies and are hereby acknowledged.
Page 3
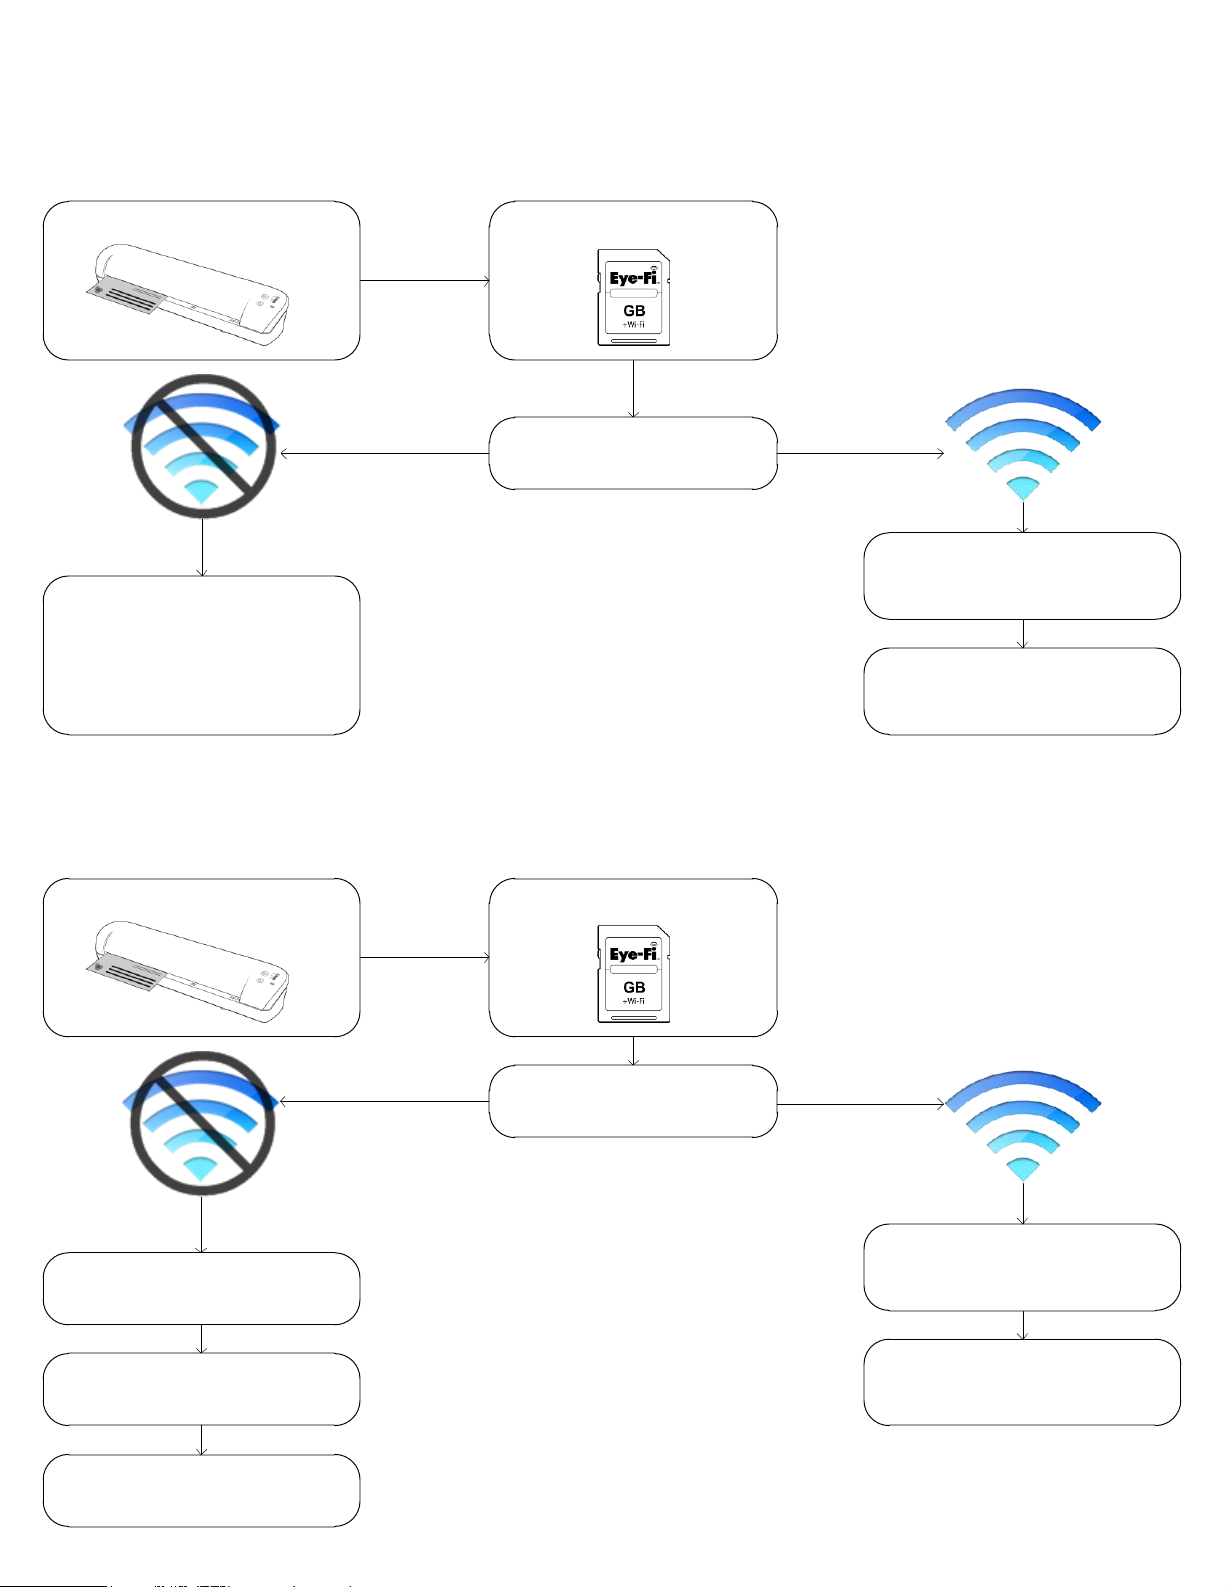
How Eye-Fi Works
Scan and send files to a computer (with Eye-Fi Center installed)
Scan an item
Wi-Fi network is not found. The
next time the scanner is powered
on, the Eye-Fi card will look for a
wireless network again and if
found, copy any files that have not
previously been transferred
Image is saved to the Eye-Fi
card
The Eye-Fi card looks for a
configured wireless network
Wi-Fi network is found and the
files are copied to the Eye-Fi
servers
The Eye-Fi servers transfer the file
to your computer through the EyeFi Helper utility
Scan and send files to a mobile device (with a mobile app installed)
Scan an item
The Eye-Fi card deploys a Wi-Fi
network (Direct Mode)
Mobile device connects to the EyeFi card’s Wi-Fi network
Image is saved to the Eye-Fi
card
The Eye-Fi card looks for a
configured wireless network
Wi-Fi network is found and the
files are copied to the Eye-Fi
servers
The Eye-Fi servers transfer the files
into the mobile app on your device
The files are copied into the
mobile app on your device
Page 4

Overview for the Eye-Fi Center, Eye-Fi Helper, and Eye-Fi
View
Eye-Fi Center
Configure these settings when the card is attached to your computer:
(using an SDHC memory card reader or in the scanner connected with its USB cable and powered on)
Networks (Wi-Fi networks, Direct Mode, Public Hotspots)
Transfer Modes (Selective Transfer, Endless Memory)
Configure these settings anytime:
Where Photos (JPG) and RAW (PDF) files are saved on your computer,
configure online file sharing for scanned files (facebook, flickr, ftp,
mobileme, Picasa, snapfish, Evernote, and so on), enable Eye-Fi View,
set notifications, and enable Relayed Transfer
View your files when your computer is set as
the destination to receive the scanned images.
(Not applicable when the card has been set to
send images to your mobile device)
Eye-Fi Helper Stays connected to your Eye-Fi
account and synchronizes your
Eye-Fi Center settings with your
Eye-Fi account on the server.
Also relays images from the
server to your computer when
your computer is set as the
destination for files.
Eye-Fi View
Images can be viewed online using an Internet
browser at www.eye.fi by logging into your account
(only when Eye-Fi View has been enabled in the
Eye-Fi Center or online)
Please click on the help button in the Eye-Fi Center application to launch the Eye-Fi online help containing detailed information about the
Eye-Fi software and configuration options.
Page 5
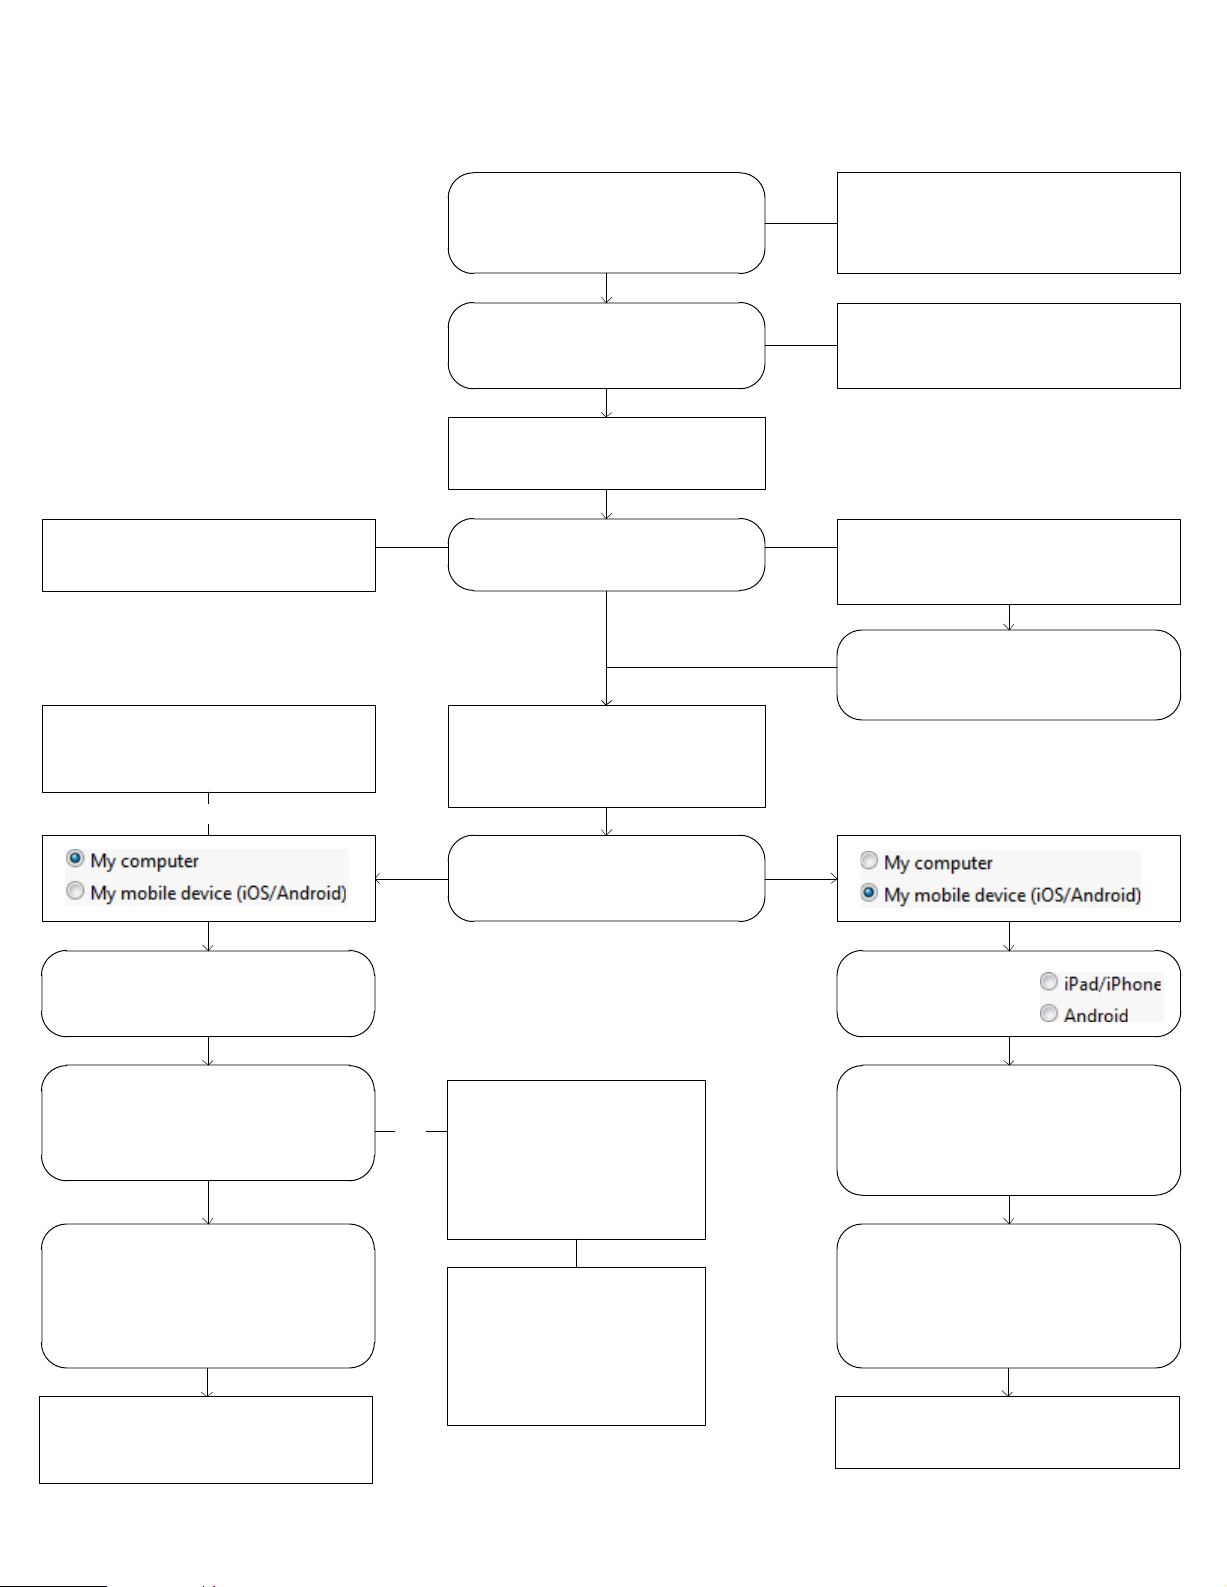
Overview of Installing the Eye-Fi Software and Setting
the Initial Card Options
The Eye-Fi card is now registered and
activated to your Eye-Fi account
Do not select My computer unless
you have your wireless network login
information
Note
Attach the Eye-Fi card to the
computer (in the scanner or use an
SDHC memory card reader)
Launch the installer for your
operating system from the Eye-Fi
card
Eye-Fi Helper starts and Eye-Fi
Center opens
Log into Eye-Fi account or create
account
Follow configuration prompts onscreen to set initial Eye-Fi card file
transfer options
The Eye-Fi card is detected as a disc
drive and contains the setup program
for the software you need to install on
your computer.
The latest installer automatically
downloads if the computer has
Internet access
Eye-Fi Center checks and downloads
Eye-Fi card firmware if an update is
available online
If prompted, update the
Eye-Fi card firmware following the
steps on-screen
Select your wireless network and
input the password
Either leave the default selection to
set file sharing later, or select the
second option and choose the file
share site that you use.
Close the window and power cycle
the scanner (or remove the Eye-Fi
card from the memory card reader, if
you are using one, and then insert it
into the scanner)
Go to flowchart overview of how file
transfer to a Computer and Online
works
Note
Choose where to send files (My
computer or My mobile device)
If you enable file sharing
you will need your account
information for the site you
choose (ex: Picasa). Follow
the dialogues on screen to
setup this feature.
Creating an account, using
the site, and the purpose of
file sharing is outside the
scope of these documents
and will not be discussed in
detail.
Select your mobile
device type
Click Continue through each
successive screen
(Do not download the mobile app at
this time. Instead, follow the flow for
mobile devices)
Close the Window and power cycle
the scanner (or remove the Eye-Fi card
from the memory card reader, if you
are using one, and then insert it into
the scanner)
Go to flowchart of overview of how
file transfer to a Mobile Device works
Page 6

Overview of How File Transfer to a Computer and Online
Works with Wi-Fi
When the scan is complete the image
is saved to the Eye-Fi Card. The Eye-Fi
card then looks for a configured wireless
network.
Network found
The Eye-Fi card copies the files to
your account on the Eye-Fi servers
The Eye-Fi server checks your
account settings for where to send
the files.
JPG files are sent to the
location(s) you configured
for Photos in the Eye-Fi
Center application
Is Eye-Fi View
enabled?
Computer
Network not found
Yes
The next time the scanner is powered
on, the Eye-Fi card will look for a
wireless network again and if found,
transfer images that have not
previously been transferred
All files can be viewed online at
www.eye.fi (up to 7 days with a
free account or permanently with
a premium account)
All files are transferred to a folder on your
computer. The files can be opened from that
folder and viewed in the Eye-Fi Center
application.
PDF files are sent to the
location(s) you configured
for RAWs in the Eye-Fi
Center application
File share site
The files are sent to the file sharing
site you configured in the Eye-Fi
Center.
For PDF files these include: ftp sites
and Evernote
File share site
Computer
The files are sent to the file sharing site you
configured in the Eye-Fi Center.
For JPG files these include: facebook, flickr, ftp
sites, mobileme, Picasa, snapfish, Evernote, and
so on
If the option to upload images to
the computer is also selected,
images are sent to the computer
as well as the online site.
Page 7

Overview of How Mobile Devices Work with Wi-Fi and
Direct Mode
This is an overview only. Detailed setup instructions, including setting up Direct Mode, are in the wireless scanning chapter of the
scanner’s user guide.
Eye-Fi mobile app is available
for both Android and iOS
Using the Eye-Fi mobile app?
Tap Photos and RAW photos
Tap Switch to [your device]
Download and install the mobile
application to your device from the
application store
Insert the Eye-Fi card in the scanner
and turn on the power.
Input your Eye-Fi account login
credentials to connect to your Eye-Fi
account on the servers
Tap your Eye-Fi Card in the Pairing
screen
Eye-Fi Helper relays this information
from the server to the Eye-Fi Center
application and then the computer is
no longer the destination for files
Xerox DocToMe™ is available for
iOS only at this time
(we recommend you use this
application if it is available for your
device)
Using Xerox DocToMe?
Tap Pair With This Card
Photos and RAW files
are automatically set
to be sent to the
mobile device when
you pair to the card
Wi-Fi network is found and the
files are copied to the Eye-Fi
servers
The Eye-Fi servers transfer the
files into the mobile app on
your device
Scan an item
Image is saved to the
Eye-Fi card. The card then
looks for a configured
wireless network.
Note
If you are using Xerox DocToMe™ , and this is the
first time you are connecting to the Eye-Fi card’s
Direct Mode network, you will need to select the
Eye-Fi network in the Wi-Fi Settings for your
mobile device first. Please refer to the scanner’s
user guide for instructions on setting up Direct
Mode for first time use.
Not foundFound
The Eye-Fi card deploys a Wi-Fi
network (Direct Mode)
Mobile device connects to the
Eye-Fi card’s Wi-Fi network
The files are copied into the
mobile app on your device
 Loading...