

Page 1

88XX Series Folder Operator Manual
D692103X
Rev 1.6
Page 2

Table of Contents
Table of Contents...........................................................................................1
Notes ..............................................................................................................2
Safety Notes...................................................................................................3
Folder Overview ...............................................................................................4
Reference Information ...................................................................................4
Folded Print Dimensions................................................................................4
Rotation..........................................................................................................4
Media .............................................................................................................4
Printing...........................................................................................................5
Feeding...........................................................................................................5
Title Block Input Position..............................................................................5
Folded Package Output Orientation...............................................................6
Output Style ...................................................................................................6
Folding Style Definitions...............................................................................6
Reference Symbols ........................................................................................7
Folder Description .........................................................................................8
Folder Options ...............................................................................................9
Sizes Reference Chart..................................................................................10
Folding Styles ..............................................................................................11
Operating Hints ..............................................................................................14
Folding Hints ...............................................................................................14
Numeric Control Panel ................................................................................15
Alphanumeric Control Panel........................................................................15
Switching on the Folder...............................................................................16
Operator Menu ...............................................................................................17
Fan Programs Submenu ...............................................................................18
Cross Programs Submenu............................................................................19
Face Submenu..............................................................................................20
Stacker Submenu..........................................................................................21
Punching Submenu ......................................................................................22
Manual Feed Submenu ................................................................................23
Counter Submenu ........................................................................................ 24
Manual Feed Procedure ................................................................................ 25
Folding Using Host Or Scanner.................................................................... 27
How to Recognize Title Block and Document Orientation ........................ 27
Using the RTL Drivers ................................................................................ 28
Using the Scanner........................................................................................ 29
Scanner Job Templates................................................................................ 31
AccXES Client Tools .................................................................................. 32
Advanced Settings....................................................................................... 35
Suspending the Print Queue .................................................................... 3636
Notes........................................................................................................ 3737
Jam Clearance Procedures........................................................................ 3838
Message Display...................................................................................... 3838
Introduction to Jam Clearance Procedures.............................................. 4040
Safety Bridge Lever................................................................................. 4040
Clearing Bridge Jams ..............................................................................4141
Clearing Fan Folder Jams........................................................................ 4141
Clearing Upper and Lower Pocket Jams ................................................. 4242
Clearing Mobile Roller Jams................................................................... 4343
Clearing Cross Folder Jam ...................................................................... 4444
Problem Solving ......................................................................................... 4646
Miscellaneous Information........................................................................ 4848
Specifications .......................................................................................... 4848
Folding..................................................................................................... 4949
Configuration........................................................................................... 4949
FCC Compliance in the USA .................................................................. 5050
EME Compliance in Canada ................................................................... 5050
Conformitè EEM Au Canada .................................................................. 5050
September 2001 88XX Series Folder Operator Manual 1
Page 3

Notes
_______________________________________________________________________________________________________________________
_______________________________________________________________________________________________________________________
_______________________________________________________________________________________________________________________
_______________________________________________________________________________________________________________________
_______________________________________________________________________________________________________________________
_______________________________________________________________________________________________________________________
_______________________________________________________________________________________________________________________
_______________________________________________________________________________________________________________________
_______________________________________________________________________________________________________________________
_______________________________________________________________________________________________________________________
_______________________________________________________________________________________________________________________
_______________________________________________________________________________________________________________________
_______________________________________________________________________________________________________________________
_______________________________________________________________________________________________________________________
_______________________________________________________________________________________________________________________
_______________________________________________________________________________________________________________________
_______________________________________________________________________________________________________________________
_______________________________________________________________________________________________________________________
_______________________________________________________________________________________________________________________
_______________________________________________________________________________________________________________________
_______________________________________________________________________________________________________________________
_______________________________________________________________________________________________________________________
_______________________________________________________________________________________________________________________
_______________________________________________________________________________________________________________________
_______________________________________________________________________________________________________________________
_______________________________________________________________________________________________________________________
_______________________________________________________________________________________________________________________
_______________________________________________________________________________________________________________________
_______________________________________________________________________________________________________________________
September 2001 88XX Series Folder Operator Manual 2
Page 4

Safety Notes
Your Folder has been designed and tested to meet strict safety
requirements. These include safety agency examinations and approval,
as well as compliance of established environmental standards.
Please read the following instructions carefully before operating the
UNIVERSAL Folder. Refer to them as needed, to ensure the continued
safe operation of your folder.
Follow all warnings and instructions that are marked on, or supplied
with, your folder.
The power supply cord is the disconnecting device for this equipment.
Make sure that the installation is near the socket outlet and that it is
easily accessible.
Do not allow anything to rest on the power cord. Do not locate the
folder where someone will step on the cord.
Never spill liquid of any kind on the folder.
Never remove any covers or guards that require a tool for removal.
There are no areas within these covers that can be serviced by the
operator.
Unplug this equipment from the wall outlet before cleaning the exterior.
Always use materials that are specifically designated for the Universal
Folder. Use of other materials may result in poor performance and
could create a hazardous situation.
Do not use aerosol cleaners.
Never use supplies or cleaning materials for purposes other than for
which they are intended. Keep all supplies and materials out of the
reach of children.
To avoid the risk of electric shock, contact your electrician to replace
the outlet if you are unable to insert the plug into the outlet.
Never use a ground adapter plug to connect the folder to a power source
that lacks a ground connection terminal.
This folder should be operated from the type of power source indicated
on the marking label at the power source. If you are not sure of the type
of power available, consult your power company.
Never attempt any maintenance function that is not specified in this
operator manual.
Never disable any interlock switches. This equipment is designed to
prevent operator access to unsafe areas. The covers, the guards, and the
interlock switches are provided to ensure that the system will not
operate with the covers open.
Under the following conditions, unplug the Folder from the wall outlet
and refer all servicing to qualified service personnel:
• When the power cord is damaged or frayed
• If liquid has been spilled into the product
• If the folder has been exposed to rain or water
• If the folder is producing unusual noises or odors
• If the folder or the cabinet has been damaged
If you need additional safety information concerning the folder or
XEROX supplied materials, call your authorized XEROX dealer.
September 2001 88XX Series Folder Operator Manual 3
Page 5

Folder Overview
Rotation
Reference Information
To help you understand the Universal Folder, some of the commonly
used terms are explained below.
Folded Print Dimensions
(a) Fan Fold
This is the first accordion fold.
(b) Cross Fold
This is the second fold and it is at a right angle to the first fold.
(m) Margin
Binding margin for archive and punching
(p) Panel
Total length (a+m)
When the Optional Bridge Rotation
feature is installed, the print orientation
can be turned, or rotated 90 degrees, in a
clockwise direction. This will be
performed automatically to facilitate
folding specific output package styles.
Maximum print dimensions for this
operation are given below.
X = only media rolls 22” - 594mm - 24” - 620mm
Y = with title block location 1 and 2 between 409 and 460
Y = with title block location 3 and 4 only media rolls 17”- 420mm -18”
Feeding direction
X
Y
Media
The folder was designed to operate with Bond (ordinary), 18-22 lbs (75100gsm) paper. Paper that does not meet this specification will result
in poor folding performance and an increased occurrence of jams.
All non-Bond (ordinary paper) Media delivered by the printer will not
be folded, but it will be automatically bypassed and stacked on the
bridge.
Mylar or Polyester Film should not be allowed to enter the folder. This
m
a
p
b
will cause a jam and may result in equipment damage.
The number and placement of folds is based on the type of fold selected
and the paper size. Refer to the Folding Style Reference Charts for
details on how the folds will look.
September 2001 88XX Series Folder Operator Manual 4
Page 6
Printing
Title Block Input Position
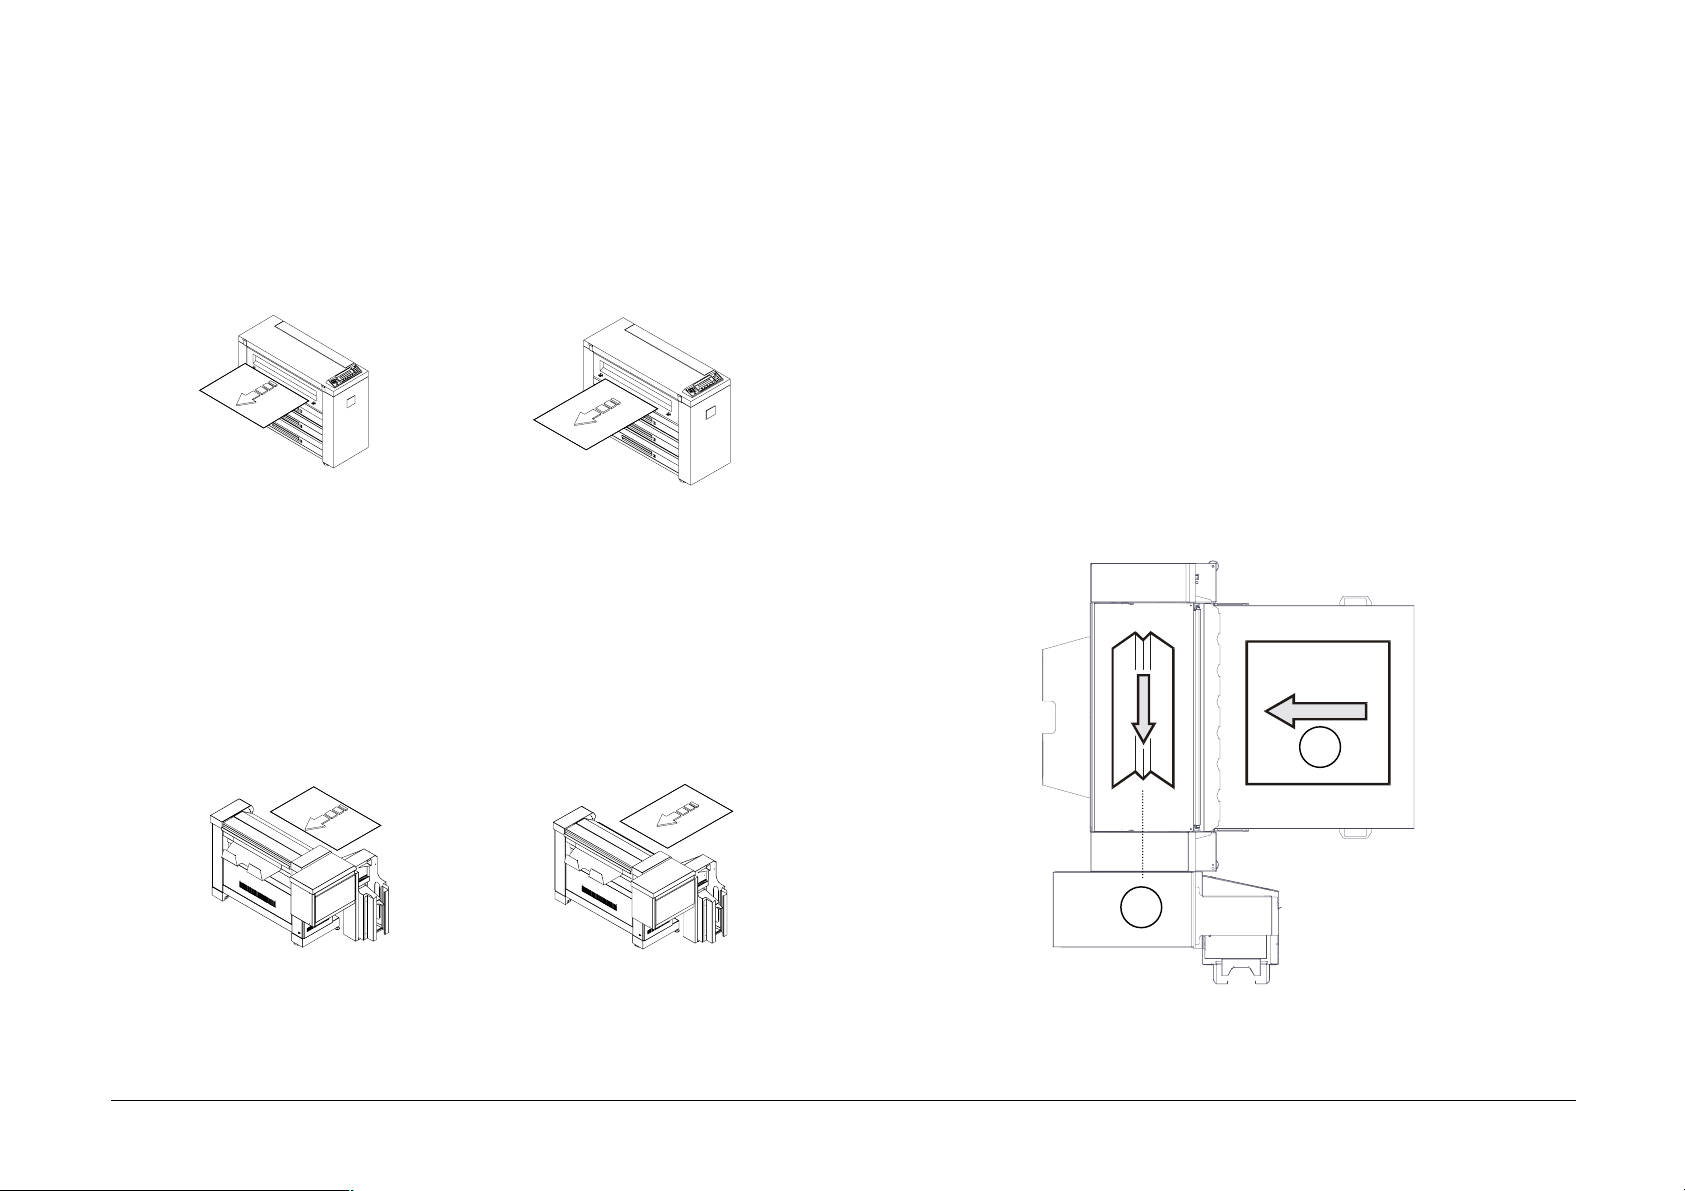
The prints exit from the printer in two different ways. The term 'leading'
is used for the print edge that exits the printer into the Bridge:
LEL (Long Edge Leading) SEL (Short Edge Leading)
111128
Feeding
After the Bridge Transport (with or without rotation), the copy will be
fed into the folder in two ways. The term 'feeding' is used for when the
print exits the bridge and goes into the folder: The 'C'/A2 size print
exits the printer Long Edge Leading and with the optional rotation. It
enters the Folder with Short Edge Feeding. This is the only example
where a distinction between leading and feeding is important.
LEF (Long Edge Feeding) SEF (Short Edge Feeding)
The Title block can be located in four different corners of the print, as
shown in the illustration below.
The Title block position number is always relative to the feeding
direction, which is indicated by the gray arrow.
These two symbols will be used throughout this manual to indicate
where the Title block position is, and where it is necessary to locate the
Title block to obtain the correct folding operation. This will help you to
understand the operation of the Folder.
The symbol (A) will be used when prints require fan folding and the
symbol (B) when prints require cross folding.
3
4
2
1
4
1
3
A
2
B
LEF means that the print enters into Fan Folder long edge feeding
SEF means that the print enters into Fan Folder short edge feeding
September 2001 88XX Series Folder Operator Manual 5
Page 7
Folded Package Output Orientation
Folding Style Definitions
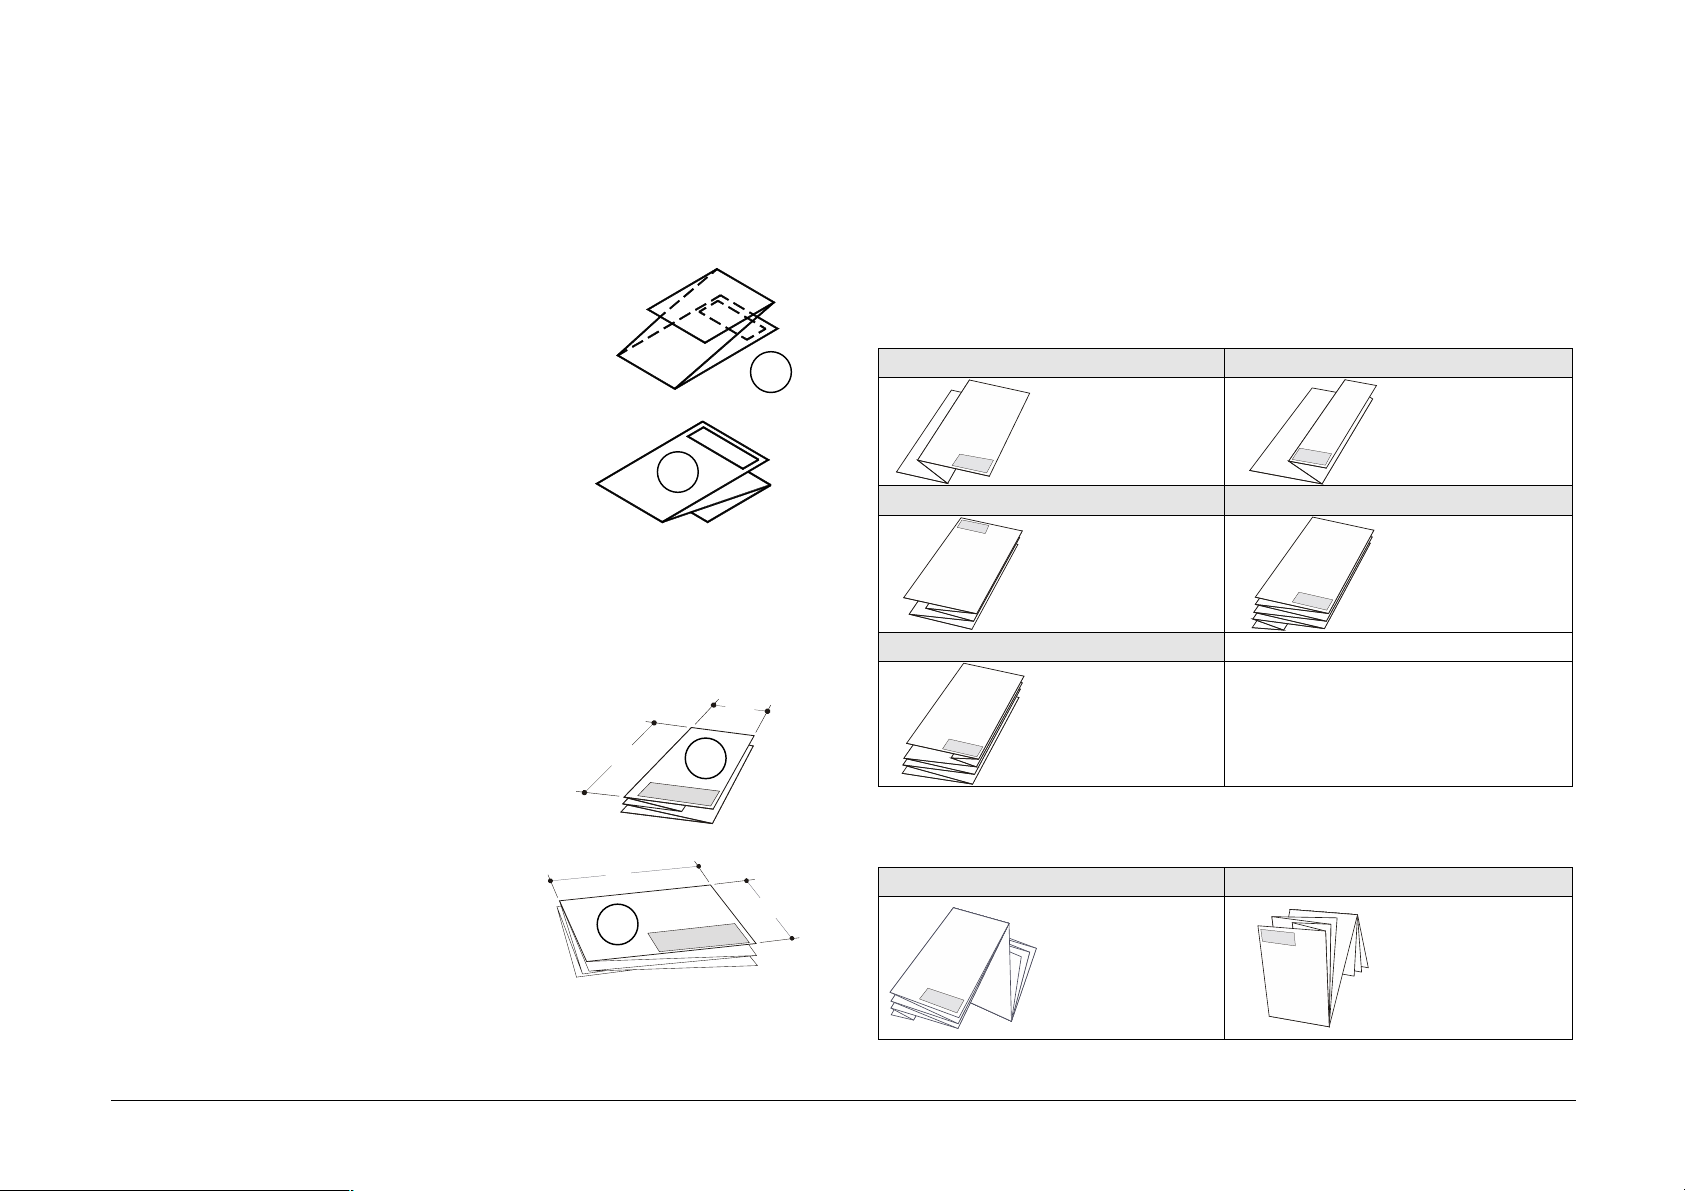
The Title block Input Position will define the Folded Package Output
Orientation.
All prints entering the folder with the Title
block in positions 1 and 2 will be delivered in
the output bin with the title page “Face
Down”. See illustration (1).
1
All prints entering the Folder with the Title
block in positions 3 and 4 will be delivered in
2
the output bin with the title page “Face Up”.
See illustration (2).
Output Style
The folder folds all prints into an A/A4
size where the Title block appears aligned
to the shortest edge of the folded package
(1) or aligned to the longest edge of the
folded package (2).
The print that exits, as shown in
illustration (1), is called “Portrait Style”
where a<b.
The print that exits, as shown in
illustration (2), is called “Landscape
Style” where a>b.
b
a
2
a
1
b
Depending on the appearance of the folding package, the folding style
owns to a particular typology.
The 88XX Series Folder, folds in these way:
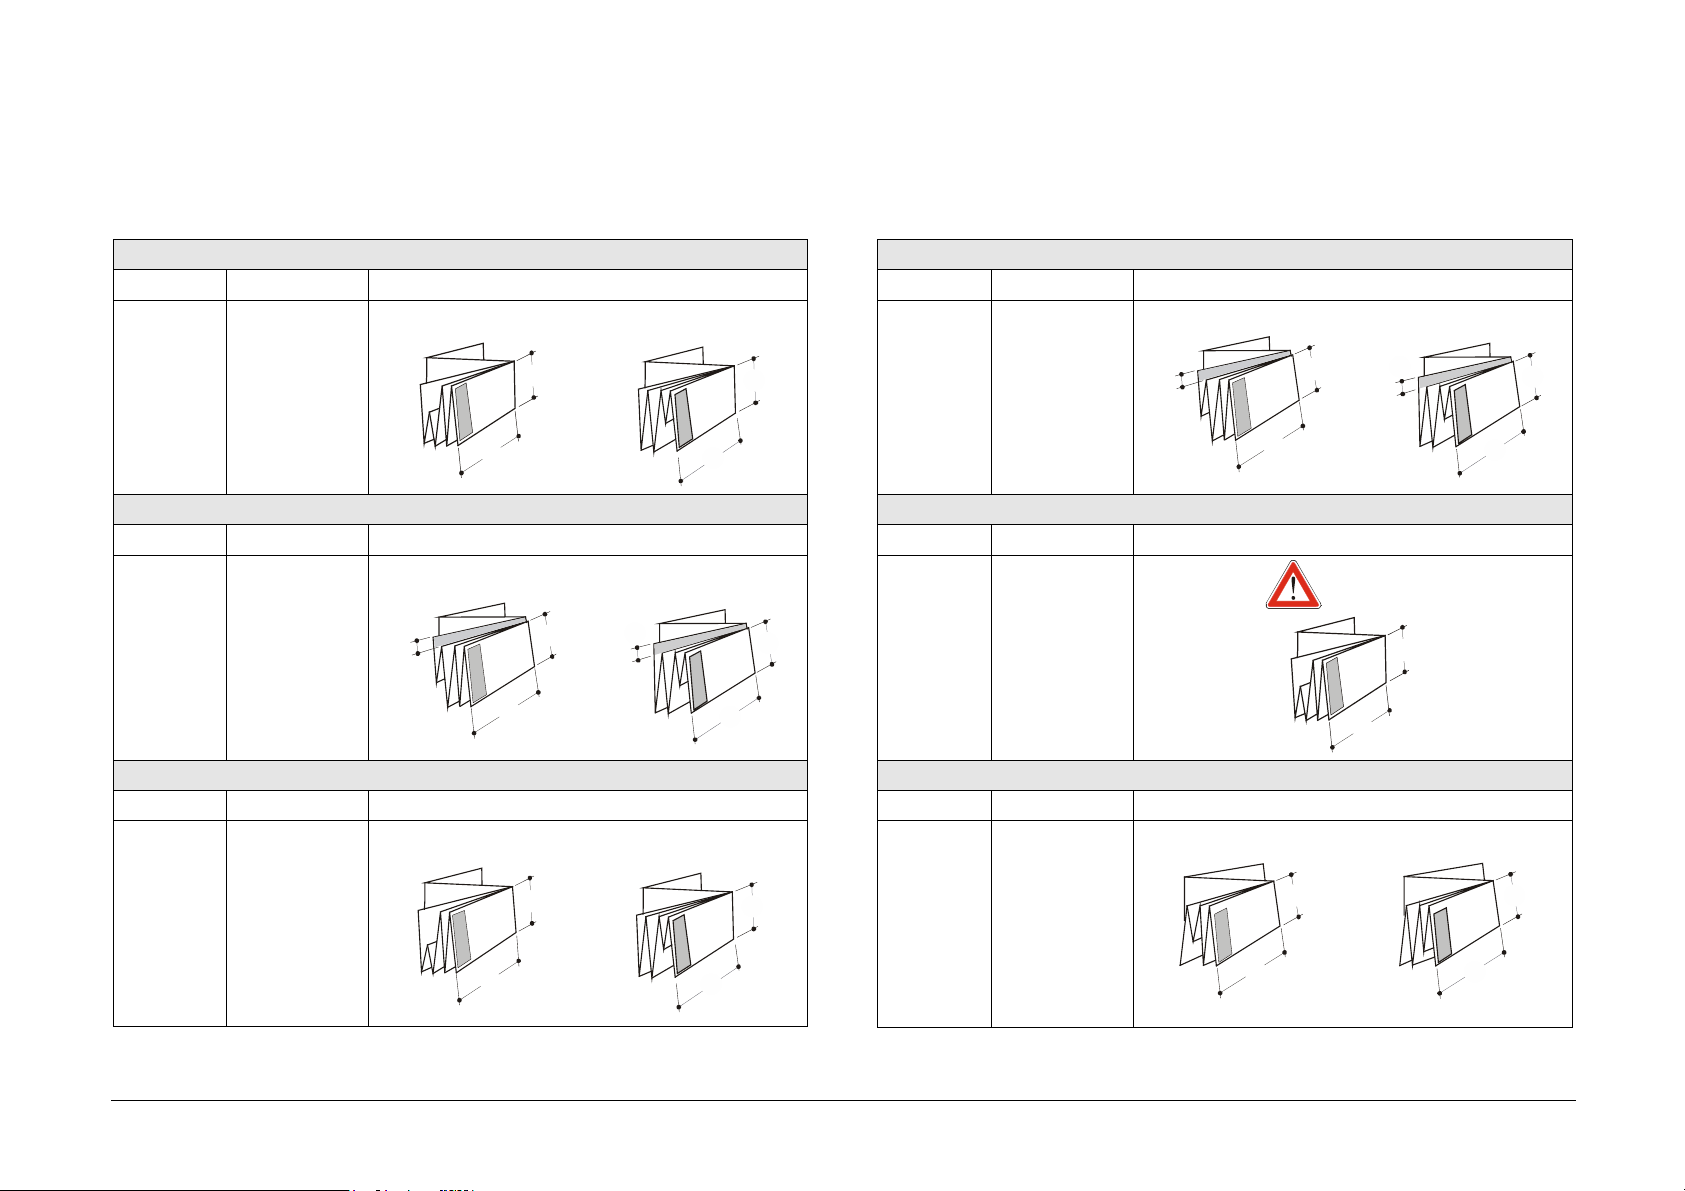
Fan Folding Style definitions
Full Front Full Back
The cover page
is as wide as the
folding depth.
The back page
is as wide as the
folding depth.
Ericsson Halfback
Full front with
binding margin
on the cover
page
Full front with a
compensation
pre-fold in the
end
Internal Compensation
Full front and
full back with
compensation
pre-fold inside
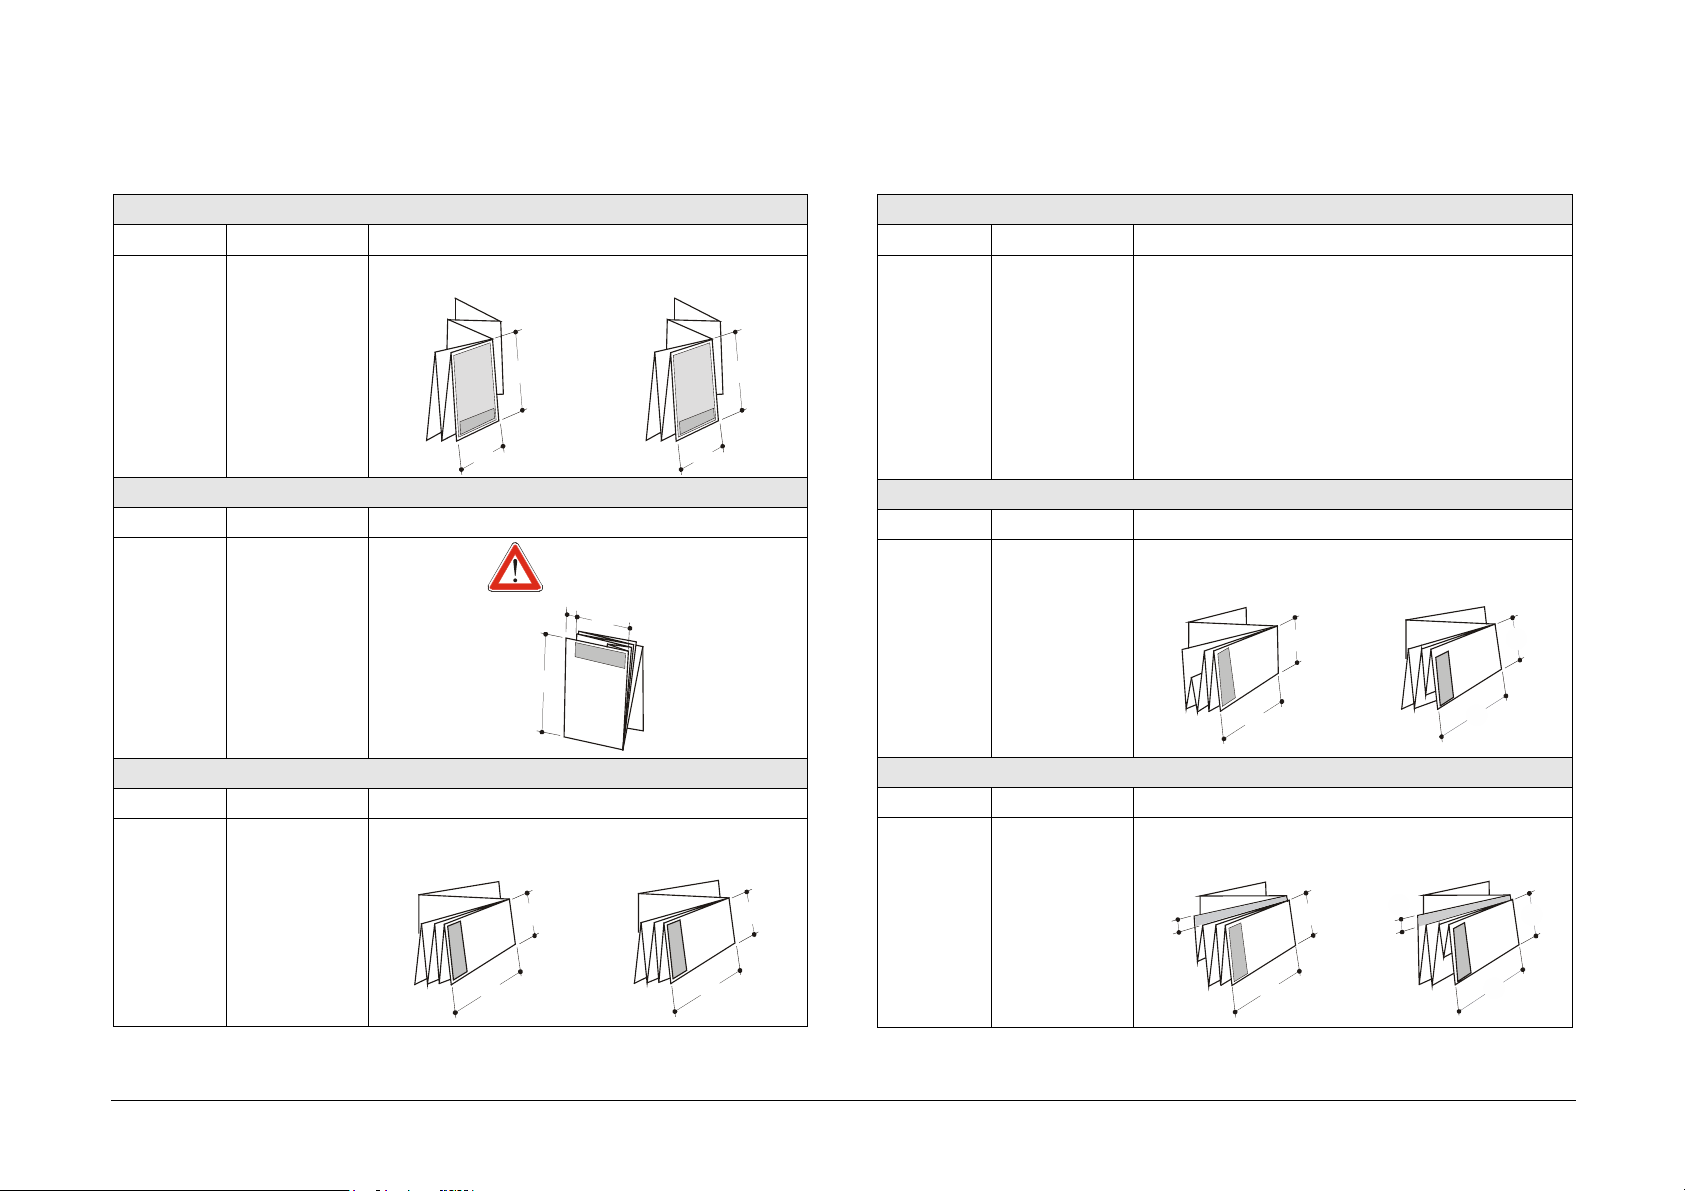
Cross Folding Style definitions
Z Fold back from the top Z Fold back from bottom
The cover page
The cover page
is as wide as the
folding depth.
is not full, but
the back page is
as wide as the
folding depth.
September 2001 88XX Series Folder Operator Manual 6
Page 8

Reference Symbols
Folder Messages
To differentiate the messages of the Numeric Control Panel and the
messages of the Alphanumeric Control Panel, they will appear in this
manual with the following different characters:
Numeric Control Panel “IDLE” messages: idle
Alphanumeric Control Panel “IDLE” message: IDLE
Acronyms
Acronyms are used throughout this documentation to denote common
terminology.
ACT AccXES Client Tools
DIN Deutsch International Norm
AFNOR
ANSI American National Standard Institute
ARCH Architectural
September 2001 88XX Series Folder Operator Manual 7
Page 9
N
R
N
N
E
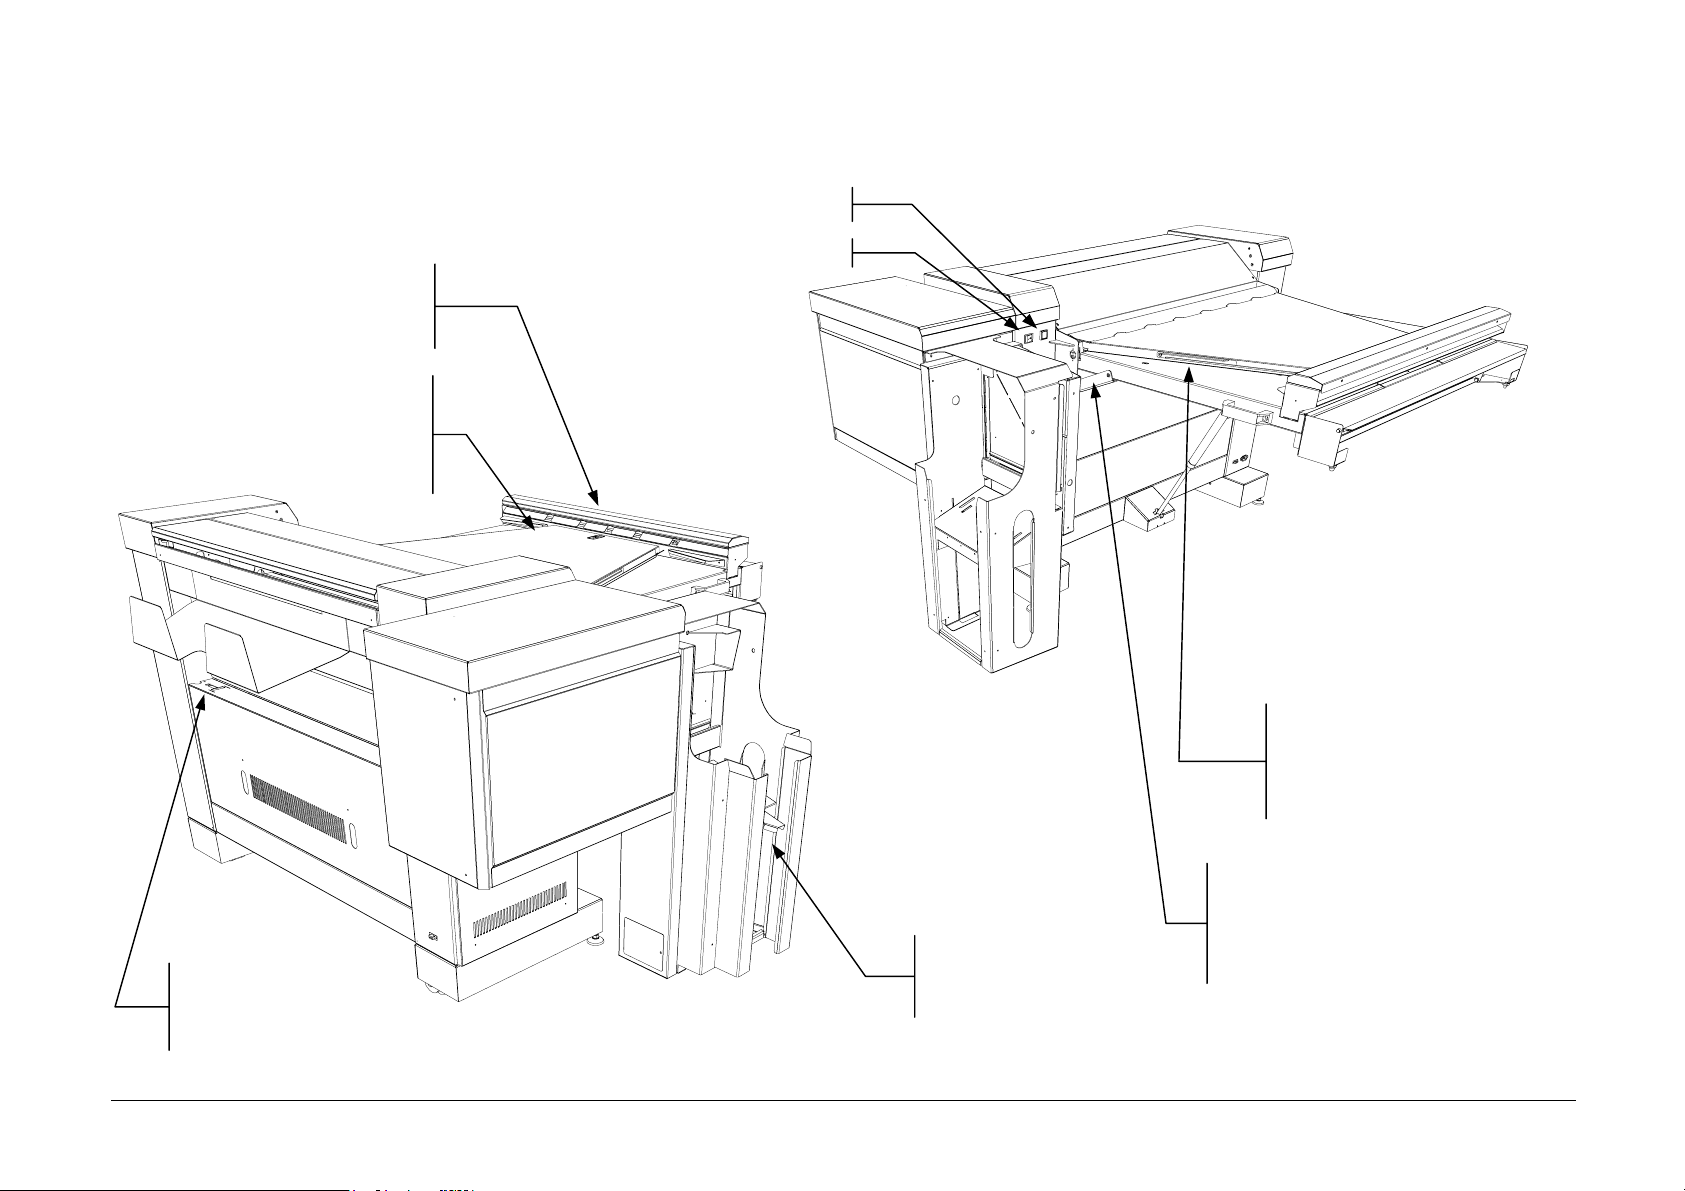
Folder Description
111328
ON-FOLDED PRINT DRIV
Feeds the print over the bridge
in the no-fold operation
BRIDGE DOOR
Opens to remove media jams.
Unfolded prints are delivered
to the top surface.
ESET BUTTO
ON/OFF BUTTO
SAFETY LEVER
Insures that the bridge door
remains open while removing
media jams.
SAFETY LEVER
Insures that the bridge
remains fixed in the upright
position when lifted
CONTROL PANEL
Used to select folding
OUTPUT BIN
Folded prints are
delivered here
features and diagnostic
September 2001 88XX Series Folder Operator Manual 8
Page 10
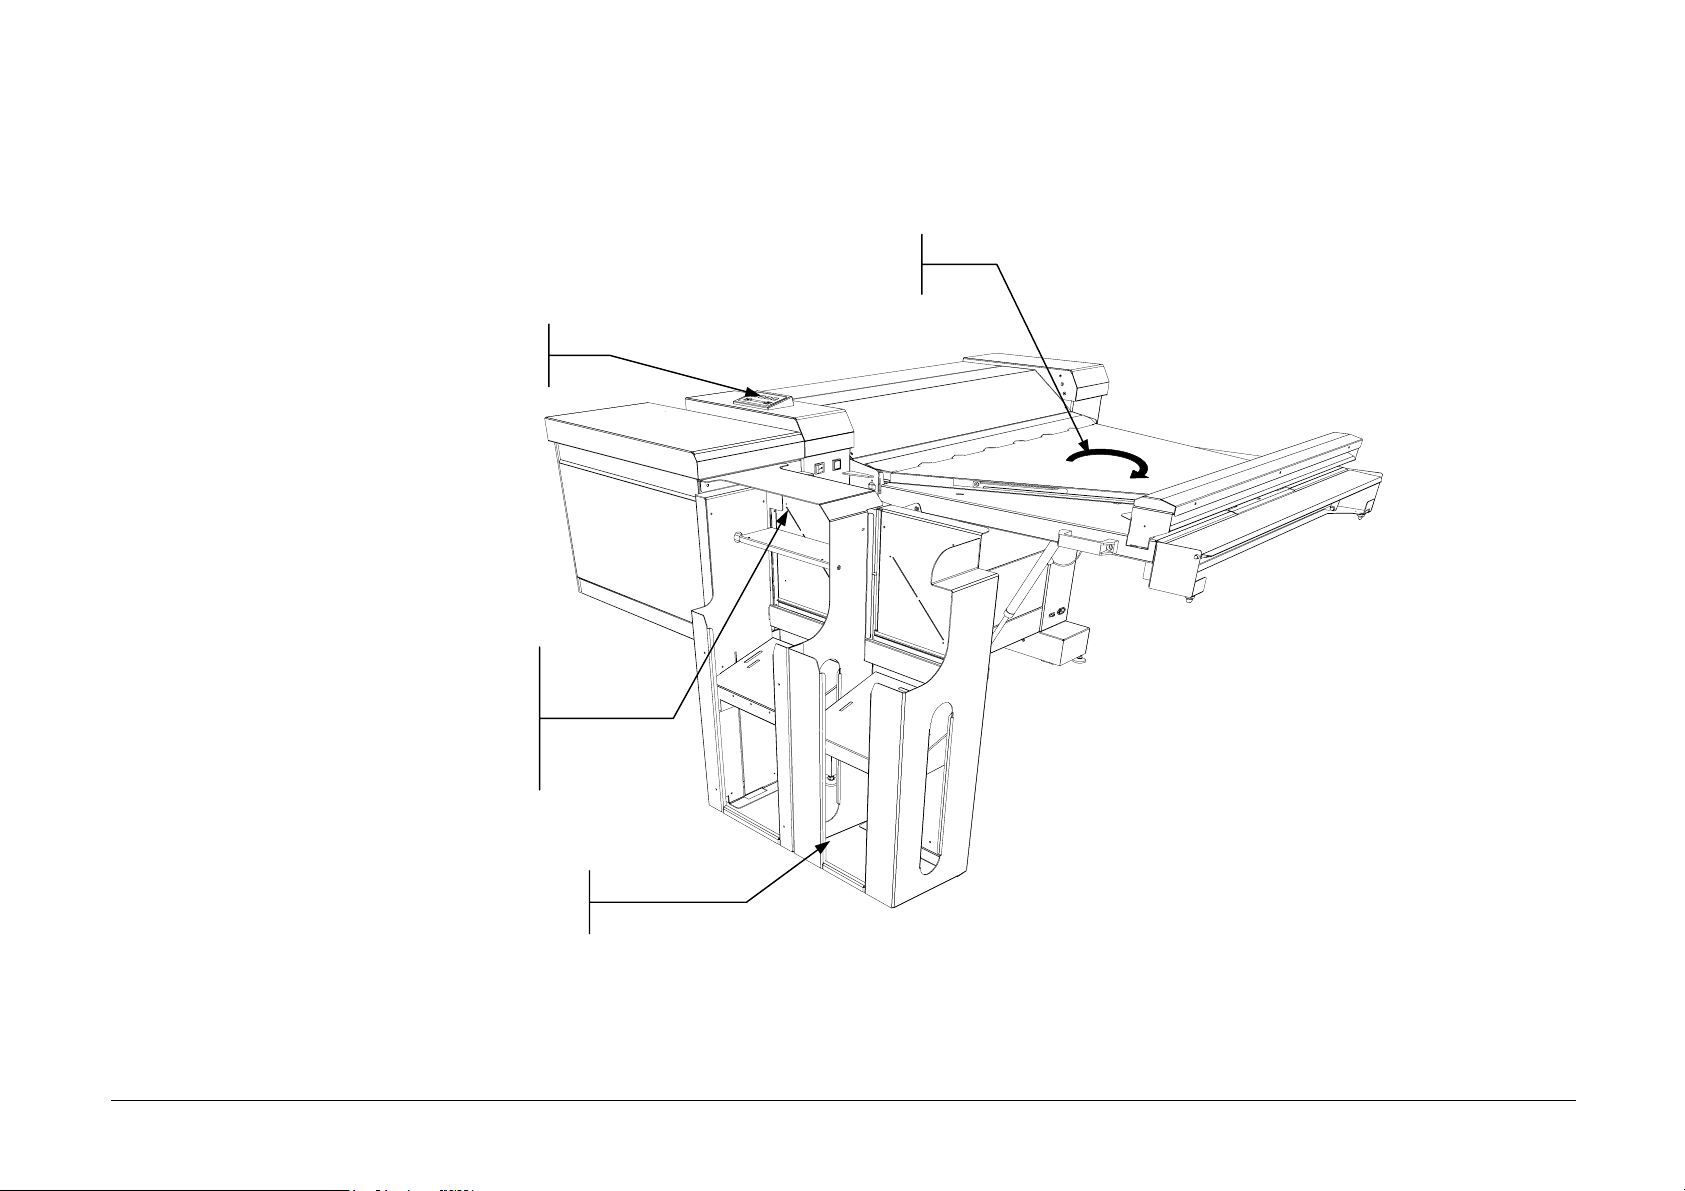
Folder Options
P
E
N
N
112674
OPTIONAL BRIDGE ROTATIO
Provides a 90° degree rotation of A2/C size
ALPHANUMERIC
CONTROL
OPTIONAL
UNCHING DEVIC
Punching of three or
four holes in the
binding margin
OPTIONAL
SECOND BI
September 2001 88XX Series Folder Operator Manual 9
Page 11
Sizes Reference Chart
Ansi Architectural Iso Ericsson French Afnor
E - 44x34inches E - 48x36inches A0 - 1189x841mm A0 - 1189x841mm A0 - 1189x900mm A0 - 841x1189mm
D - 34x22inches D - 36x24inches A1 - 841x594mm A1 - 841x594mm A1 - 841x600mm A1 - 841x594mm
C - 22x17inches C - 24x18inches A2 - 594x420mm A2 - 594x420mm A2 - 594x420mm A2 - 420x594mm
B - 17x11inches B - 18x12inches A3 - 420x297mm A3 - 420x297mm A3 - 420x297mm A3 - 420x297mm
A - 11x8.5inches A - 12x9inches A4 - 210x297mm A4 - 297x210mm A4 - 210x297mm A4 - 210x297mm
September 2001 88XX Series Folder Operator Manual 10
Page 12
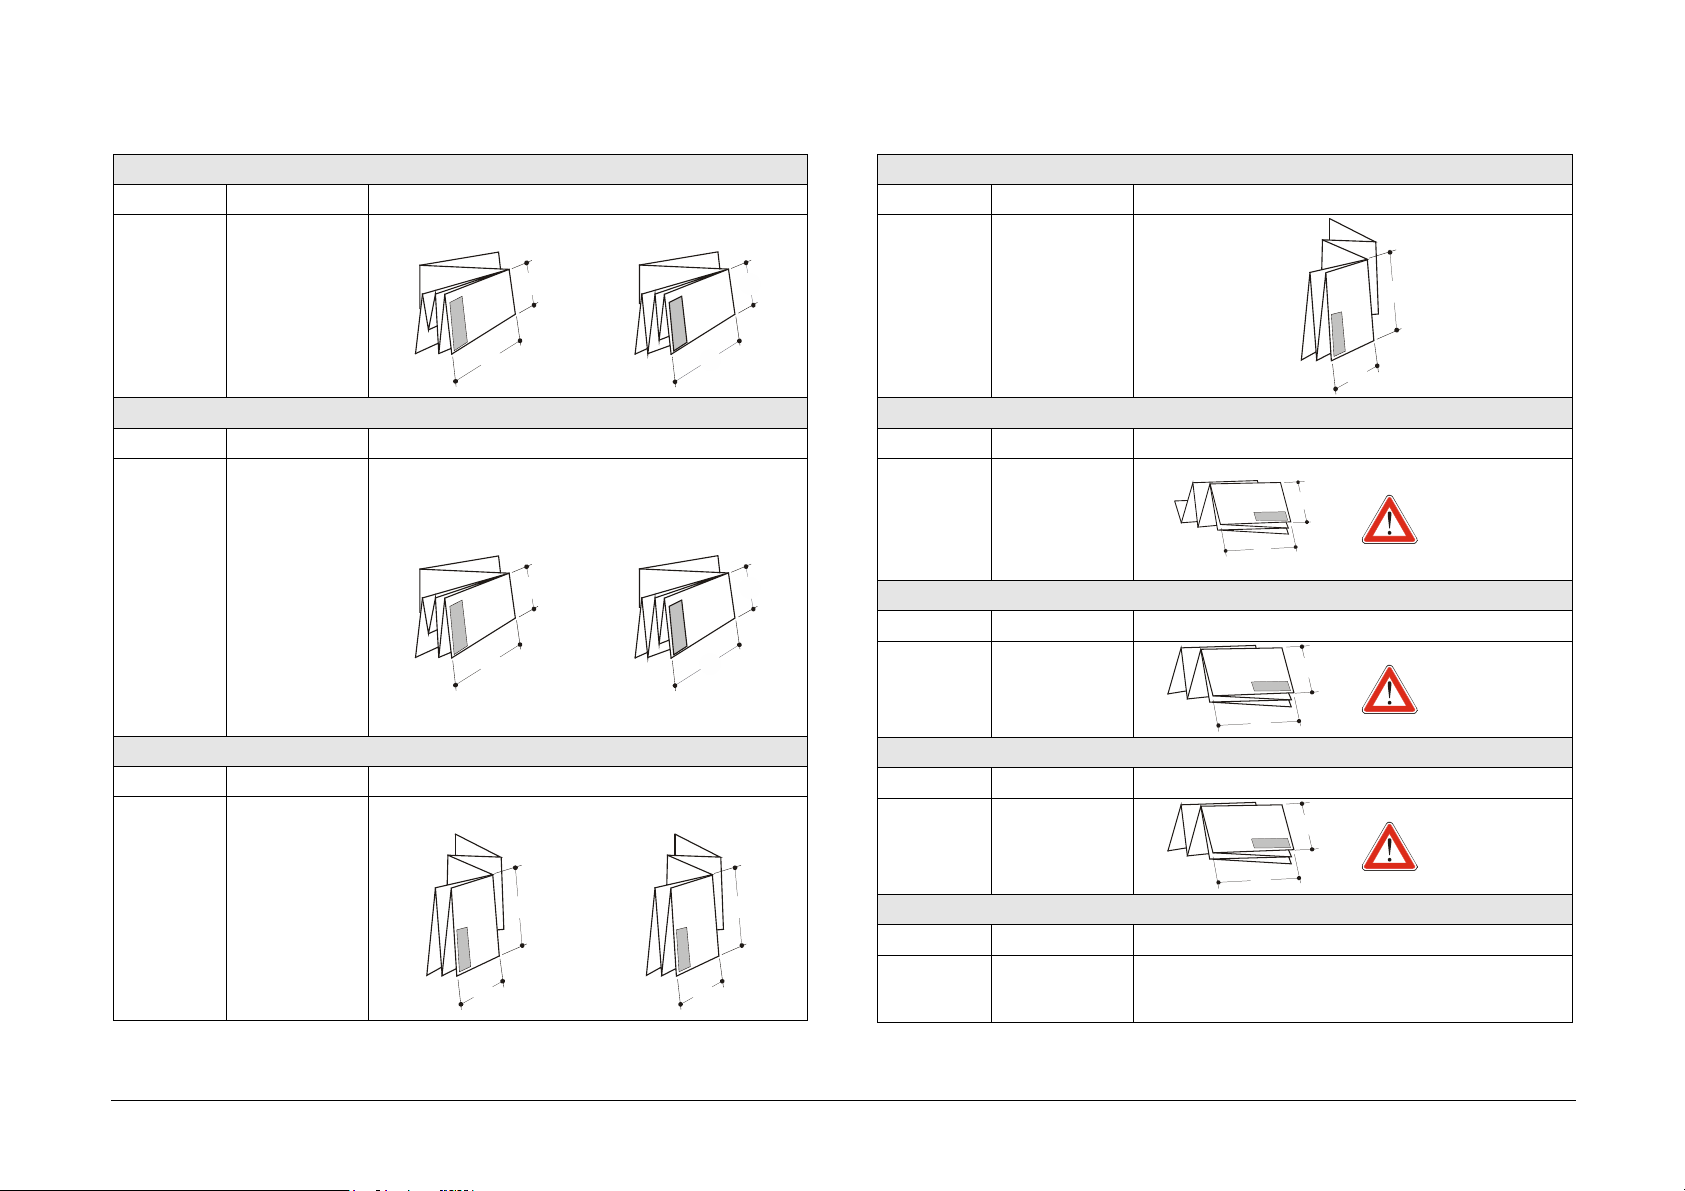
Folding Styles
Program 185
Message Dimensions Appearance
Face Up
U1-01
185
a=185mm
b=297mm
a
b
Program 185+25
Message Dimensions Appearance
Face Up
U1-02
a=185mm
m
a
m
b=297mm
185+25
m=25mm
b
Program 190
Message Dimensions Appearance
Face Up
Face Down
b
Face Down
b
Face Down
Program 190+20
Message Dimensions Appearance
Face Up
a
U1-04
a=190mm
m
a
Face Down
m
a
b=297mm
190+20
m=20mm
b
b
Program 198
Message Dimensions Appearance
Face Up only
a
U1-05
198
a=198mm
b=297mm
a
b
Program 210
Message Dimensions Appearance
Face Up
Face Down
U1-03
190
a=190mm
b=297mm
a
b
a
b
U1-06
210
a=210mm
b=297mm
a
b
a
b
September 2001 88XX Series Folder Operator Manual 11
Page 13
Program AFNOR
Message Dimensions Appearance
Face Up
a=297/210
U1-07
AFNOR
b=210/297
only perfect
sizes±2mm
a
Face Down
a
Program CUSTOM
Message Dimensions Appearance
U1-10
TBD TBD
CUSTOM
b
Program ERICSSON
Message Dimensions Appearance
Face Down only
m
a
b
U1-08
ERICSSON
a=190mm
b=297mm
m=20mm
Program FRENCH
Message Dimensions Appearance
Face Up
U1-09
FRENCH
a=210mm
b=300mm
a
b
b
Face Down
b
Program 7 ½”
Message Dimensions Appearance
U1-11
7½”
a=7 ½”
b=11”or ##
Face Up
a
b
Face Down
a
b
Program 7 ½” + M
Message Dimensions Appearance
Face Up
a
U1-12
7½”+1”
a=7 ½”
b=11” or ##
m=1”
m
a
b
Face Down
m
a
b
September 2001 88XX Series Folder Operator Manual 12
Page 14
Program 8 ½”
Message Dimensions Appearance
Program 12” WALLET
Message Dimensions Appearance
Face Up
U1-13
8½”
a=8 ½”
b=11” or ##
a
b
Program 9”
Message Dimensions Appearance
Face Up
U1-14
9”
a=9”
b=12” or ##
a
b
Program 11” WALLET
Message Dimensions Appearance
Face Up
U1-15
WALLET
11”
a=11 or 8 ½”
b=8 ½ or 11”
only perfect
a
sizes±2mm
b
Face Down
b
Face Down
b
Face Down
b
a
U1-16
WALLET
12”
a=12 or 9”
b=9 or 12”
only perfect
sizes±2mm
a
b
Program 7 ½” LANDSCAPE
Message Dimensions Appearance
U1-17
7½”
LANDSCAPE
a
a=7 ½/11”
b=11/7 ½”or ##
Program 8 ½” LANDSCAPE
a
Face Down only
b
Message Dimensions Appearance
U1-18
8½”
LANDSCAPE
a=8 ½/11”
b=11/8 ½”or ##
a
Face Down only
b
Program 9” LANDSCAPE
Message Dimensions Appearance
U1-19
a=9/12”
9”
LANDSCAPE
a
b=12/9”or ##
Program NO FOLD
a
Face Down only
b
Message Dimensions Appearance
U1-20
NONE BYPASSED ON THE BRIDGE
NO FOLD
September 2001 88XX Series Folder Operator Manual 13
Page 15

Operating Hints
Before printing, be sure that:
− The media rolls are positioned correctly in the center of the IOT.
− The lead edges on the paper rolls are straight. If necessary, trim the
edge.
− The doors are not opened, and that the folding program on the folder
is not changed during folding.
− The bridge is in the correct operating position. The bridge must be
fully down.
THE 88XX FOLDER FOLDS ONLY PRINTS DELIVERED
FROM RECOGNIZED ROLLS. REFER TO “
Procedure” SUBMENU FOR A LIST OF SUPPORTED ROLLS
Manual Feed
Folding Hints
Sizes
The 88XX Series Folder processes nearly all sizes with all folding
styles. However, some folding styles require, for a better result, a
particular size. Other folding styles only work with a particular kind of
style, as described below.
− Afnor and French Styles can be used with documents ISO, Afnor,
and French.
To obtain a perfect Afnor folded print, use only Afnor sizes with
perfect dimensions (±2mm).
− Ericsson style can be used with ISO and Ericsson sizes.
To obtain a perfect Ericsson folded print, use only Ericsson sizes.
− Wallet 11” style can be used with Ansi and Architectural size.
To obtain a perfect Wallet 11” folded print, use only Ansi sizes
with perfect dimensions (±2mm).
− Wallet 12” styles can be used with Ansi and Architectural sizes.
To obtain a perfect Wallet 12” folded print, use only Architectural
sizes with perfect dimensions (±2mm).
− All the other styles could be used with all kind of sizes except the
Ericsson and French sizes.
Face delivery
When a job is created, it could be sent to the folder with delivery Face
up or Face Down. All the documents, with all the folding programs, can
be processed by the folder so that they exit Face Up or Down.
Exceptions are the Ericsson and 198 folding programs.
− In order to create a correct job Face Up, exclude the style Ericsson
and the Landscape styles because they produce folded prints always
Face Down.
− In order to create a correct job Face Down, exclude the style 198
because it produces folded prints always Face Up.
Refer to the section “Folding Using Host Or Scanner” for a complete
description of job management.
September 2001 88XX Series Folder Operator Manual 14
Page 16

Numeric Control Panel
The following explains the manual selection of features/functions of the
Folder using the Standard and Alphanumeric Control Panels. For
network access of these functions, refer to “AccXES Client Tools User
Guide”, or the “Web Printer Manager Tool User Guide”.
The Numeric Control Panel is the manual means used to communicate
with the Folder. Located on the back panel of the Folder, it contains a
red four-digit display, three buttons and two LED indicators and is
available on all folders. [See the 8825/8830 Printer Operator Manual
for Finishing Communications using the Printer User Interface.]
The buttons are used by the Operator to select the folding program and
by Service while in the diagnostic mode. The red four-digit display will
indicate Fold Program Codes and the Error/Alarm Codes, as shown in
the illustration.
Scroll Keys
XXXX
Enter key
Alphanumeric Control Panel
The Alphanumeric Control Panel is the manual means used to
communicate with the folder, and is standard when the folder is used
with the 8855 Printer.
This control panel, which is located on the left front side of the folder,
consists of an alphanumeric display and six different buttons.
Reset key:
• Performs POST (Power On Self Test) if it is kept
pressed for less than two seconds
• Performs Manual Ejecting Procedure if kept pressed
for more than two seconds. Its activation enables
rollers to eject paper jams. To exit, wait five seconds
and then keep the Reset key pressed for less than two
seconds.
The two LED, (red and green) show the status of the folder:
− The red LED indicates when the folder is busy, when it is not ready
to fold, when it is performing a self-test, or that the alarm status is
under network control
− The green LED indicates that the folder is idle and ready to fold.
Scroll Keys
Enter Key
Pause toggle key. This is used to put the Folder in pause
mode, thereby entering into the Operator Menu.
Exit Key
September 2001 88XX Series Folder Operator Manual 15
Page 17

Switching on the Folder
At power on, the Firmware release will be displayed for two seconds:
− as a code in the Numeric Control Panel [RX.XX ]
− as a message in the Alphanumeric Control Panel “REV. X.XX“
When 2 - 3 seconds has expired, the control panels will show either
“idle”, an alarm status or (if the system has already submitted a job), the
program selected.
− as a code in the Numeric Control Panel [ le], [A-XX] or [P-XX].
− as a message in the Alphanumeric Control Panel “IDLE”,
“190+20” or “DOOR OPEN”
During the folding process, error messages will be displayed:
− as a code in the Numeric Control Panel [E-XX]
− as a message in the Alphanumeric Control Panel
Code Message Code Message
a-
DOOR OPEN a-07 ENCODER OR M2 MOTOR FAULT
01
a-02BRIDGE SENSORS
COVERED
a-03UPPER POCKET
SENSOR COVERED
a-04LOWER POCKET
SENSOR COVERED
a-05CROSS POCKETS
SENSOR COVERED
a-
24V MISSING a-12 SECOND BIN FULL
06
Other errors
Code Description
Not settable value. Folder could generate unexpected
S
folding styles due to particular value situation.
Is not possible to adjust the style
a-08 STEP MOTORS FAULT
a-09 NOT IMPLEMENTED
a-10 NOT IMPLEMENTED
a-11 FIRST BIN FULL
Code Message Code Message
p-00 NO FOLD P-10 CUSTOM
p-01 185 p-11 7,5”
p-02 185+25 p-12 7,5”+1”
p-03 190 P-13 8,5”
p-04 190+20 P-14 9”
p-05 198 p-15 WALLET 11”
p-06 210 p-16 WALLET 12”
p-07 AFNOR p-17 7,5” LANDSCAPE
p-08 ERICSSON p-18 8,5” LANDSCAPE
p-09 FRENCH p-19 9” LANDSCAPE
Code Message
e-01 ENTRY ALARM 1
e-02 ENTRY ALARM 2
e-03 BRIDGE ALARM
e-04 ROTATION ALARM
e.-05 POCKETS ALARM
e-06 FOLDING ALARM 1
e-07 FOLDING ALARM 2
e-08 FOLDING ALARM 3
e-09 FAN FOLDER EXIT ALARM
e-10 TRANSPORT ALARM
e-11 CROSS ENTRY ALARM
e-12
e-13 NOT FOLDABLE
E-14 NOT AVAILABLE SELECTION
E-15 LAPS WITHOUT ADJUSTMENT
E-16
E-17 PROGRAM NOT SELECTABLE
CROSS EXIT ALARM
CROSS EXIT ALARM W/PUNCHING
Note : l SENSOR COVERED ¡ SENSOR UNCOVERED
September 2001 88XX Series Folder Operator Manual 16
Page 18

Operator Menu
Without any selection in the AccXES Client Tools, the setting in this
menu are considered as default for the folding process.
To access the first level of the menu structure, set the Folder in “Pause
Mode”. Press the “Pause” key on the Alphanumeric Control Panel, or
press “Enter” in the Numeric Control Panel.
Use the scroll keys to select the operator submenu. The service
submenu is protected by a password.
Press the “Enter” key to enter the selected menu and to access the
second level of the structure.
112616
Pause
Operator
Service
Exit
u
Fan
program
f
e
185
185+25
190
190+20
198
210
Afnor
u 1.02
u 1.03
u 1.04
u 1.05
u 1.06
u 1.07
u 1.08
French
u 1.09
Custom
7.5"
u 1.01
u 1.10
u 1.11
u 1
7.5"+1"
8.5"
9"
Wall et
11"
Wall et
12"
7.5"
landscap e
8.5"
landscap e
9"
landscap e
No fold
Exit
u 1.12
u 1.13
u 1.14
u 1.15
u 1.16
u 1.17
u 1.18
u 1.19
u 1.20
u 1.00
Cross
program
Standard
Equal
Cross
off
Exit
Here the default option will be displayed with a decimal point located
after the final number in the Numeric Control Panel display
[u1.06.]. On the Alphanumeric Control Panel, the selection flashes.
Use the scroll keys to select the desired option.
The following pages show a complete description of these submenus.
If the Folder does not support a particular function, then this selection
will not be allowed. (This would happen if the operator chooses
“punching” without the optional punching installed).
u 2
u 2.01
u 2.02
u 2.03
u 2.00
Face
Face dw
Don't
care
Exit
u 3
u 3.01
u 3.02
u 3.03
u 3.00
Stacker
Stacker
Sorter
Bin 1
Bin 2
Bin 3
Exit
u 4
u 4.01
u 4.02
u 4.03
u 4.04
u 4.05
u 4.00
Punching
Punching
on
Punching
off
Exit
u 5
u 5.01
u 5.02
u 5.00
Manual
feed
Title block
location
Standard
sizes
Roll
Length
Auto
length
Feed in
Exit
u 6.01
u 6.02
u 6.03
u 6.04
u 6.05
u 6.06
u 6.00
u 6
Counter
Copies
folded
Exit
u 7
u 7.01
u 7.00
Exit
u 0
September 2001 88XX Series Folder Operator Manual 17
Page 19

Fan Programs Submenu
u
Use this submenu to select the folding program for manual feed
operations.
1. Go to the “Fan Programs” submenu
Fan
programs
u 1
in the Numeric Control Panel in the Alphanumeric Control Panel
u OPERATOR
U1 FAN PROGRAMS
2. The default option is shown :
In the Numeric Control Panel In the Alphanumeric Control Panel
10 6
Lower right dot flashing
3. Use the scroll key to select the desired program and press “Enter” to
select it. The “Custom” folding program can be selected by the
operator but its values, (fan folding depth, cross folding depth and
margin), can be changed only by the Xerox Customer Service
Engineer.
4. Select “EXIT” [ u1.00 ] to rise one level
210
185
185+25
190
190+20
198
210
Afnor
French
Custom
7.5"
u 1.01
u 1.02
u 1.03
u 1.04
u 1.05
u 1.06
u 1.07
u 1.08
u 1.09
u 1.10
u 1.11
7.5"+1"
8.5"
9"
Wallet
11"
Wallet
12"
7.5"
landscape
8.5"
landscape
9"
landscape
No fold
Exit
u 1.12
u 1.13
u 1.14
u 1.15
u 1.16
u 1.17
u 1.18
u 1.19
u 1.20
u 1.00
September 2001 88XX Series Folder Operator Manual 18
Page 20

Cross Programs Submenu
u
Use this submenu to select the cross folding options.
1. Go to the “Cross Programs” submenu
in the Numeric Control Panel in the Alphanumeric Control Panel
u OPERATOR
U2 CROSS PROGRAMS
2. The default option is shown :
in the Numeric Control Panel in the Alphanumeric Control Panel
20 2
STANDARD
Lower right dot flashing
3. Use the scroll key to select the desired option and press “Enter” to
select it.
With selecting “STANDARD” [ u2.01 ], for example,
6-7”
an E size print (36”x48”) with a program 8.5”x11” will
be folded with an output dimension 8.5”x11”. The length
of each panel (b) is not equal.
11”
The same print could be folded with the same fan
program with the option “EQUAL” [ u2.02 ] because
the folder automatically divides the width of the print to
obtain equal panels.
The purpose of the “EQUAL” option is to obtain a folded print
more flat and folded with one less cross fold. That is why it does not
work with all sizes and styles. Only when a few millimeters of the
cross folding depth is modified, is it possible to obtain a folded print
without prefolds. The “EQUAL” option does not produce results
with Ericsson, Afnor, French and Wallets program (some of these
styles already have an output equal). Besides, it is possible to fold
equal panels only with some kind of paper rolls.
ROLL UNI/DIN fold depth ANSI/ARCH fold depth
914 (36”) 305 305
900 300 300
864 297 288
610 305 305
Selecting “CROSS OFF” [ u2.03 ] will
Cross
programs
bypass the Cross Folder. The print will be fan
folded only and stacked in the Rear Print
Tray.
To activate the cross folder after a “Cross
Off” selection, select one of the two options:
“Standard” or “Equal”.
4. Select EXIT [ u2.00 ] to rise one level.
Equal
Standard
Cross
off
Exit
11,3” - 12”
u 2
u 2.01
u 2.02
u 2.03
u 2.00
September 2001 88XX Series Folder Operator Manual 19
Page 21

Face Submenu
u
Use this menu to obtain the folded prints Face Up or Face Down in the
print tray.
1. Go to the “Face” submenu.
in the Numeric Control Panel in the Alphanumeric Control Panel
u OPERATOR
U3 FACE
2. The default option is shown :
in the Numeric Control Panel in the Alphanumeric Control Panel
30 1
Lower right dot flashing
3. Use the scroll key to select the desired option and press Enter to
select it.
Select “FACE UP” [U3.01] to obtain all the folded prints oriented
face up.
FACE UP
Selecting “DON’T CARE” [U3.03] tells the folder to accept every
print with all possible title block locations and orientations
LEF/SEF. With this selection the output orientation could be either
Face Up or Face Down.
4. Select EXIT [ u3.00 ] to rise one level.
5. Turn off the folder and then switch it on to activate the
modification.
Face
u 3
u 3.01
Face
down
Don't
care
Exit
u 3.02
u 3.03
u 3.00
Select “FACE DOWN” [U3.02] to obtain all the folded prints
oriented face down.
September 2001 88XX Series Folder Operator Manual 20
Page 22

Stacker Submenu
u
Use this submenu to define how the folder organizes the prints in the
output bins.
1. Go to the “Stacker” submenu.
in the Numeric Control Panel in the Alphanumeric Control Panel
u OPERATOR
U4 STACKER
2. The default option is shown:
in the Numeric Control Panel in the Alphanumeric Control Panel
40 1
Lower right dot flashing
3. Use the scroll keys to find the desired option and press “Enter” to
select it.
− “STACKER” [ U4.01 ]
The prints will be stacked in the first bin until it’s full and then
will be directed to the second bin if available. When all the bins
are full, the folder stops the print queue. Once the prints are
removed the print queue restarts.
STACKER
− “SORTER” [ u4.02]
The prints will be stacked alternately, one for each bin. The sorter
mode is a mechanical collation useful to print one job with more
copies and find them divided in more then one bin. When all the
bins are full, the folder stops the print queue. Once the prints are
removed the print queue restarts.
− “BIN 1” [ u4.03] “BIN 2” [ u4.04] “BIN 3” [ u4.05]
The prints will be stacked only in the selected bin, when this bin
is full, the folder stops the print queue. Once the prints are
removed, the print queue restarts.
− .SELECT EXIT [ u4.00 ] to rise one level.
Stacker
If an option is not available, the code E14 “NOT AVAILABLE SELECTION”
will appear.
Stacker
Sorter
Bin 1
Bin 2
Bin 3
Exit
u 4
u 4.01
u 4.02
u 4.03
u 4.04
u 4.05
u 4.00
September 2001 88XX Series Folder Operator Manual 21
Page 23

Punching Submenu
u
Use this submenu to activate the punching system if it is available.
1. Go to the “Punching” submenu.
in the Numeric Control Panel in the Alphanumeric Control Panel
u OPERATOR
U5 PUNCHING
2. The default option is shown.
in the Numeric Control Panel in the Alphanumeric Control Panel
5 0 2
Lower right dot flashing
PUNCHING OFF
If an option is not available, code E-14 “NOT AVAILABLE
SELECTION,” will appear.
WARNING!
The punching device is available only with programs:
185 with margin 25mm
190 with margin 20mm
7.5 with margin 1”
WARNING!
The activation/deactivation of the punching by PC works only if
on the folder is selected the option “Punching On”.
If the selection on the PC do not produce any effect on the
punching device, set ”Punching on” on the folder control panel.
Punching
u 5
3. Use the scroll key to select the desired option and press “Enter” to
select it.
4. Select EXIT [ u5.00 ] to rise one level.
Punching
on
Punching
off
Exit
u 5.01
u 5.02
u 5.00
September 2001 88XX Series Folder Operator Manual 22
Page 24

Manual Feed Submenu
A
Use this submenu to set the size and the title block location of the print
that has to be manually fed.
1. Go to the “Manual Feed” submenu.
in the Numeric Control Panel in the Alphanumeric Control Panel
u OPERATOR
U6 MANUAL FEED
2. Enter the last level of the menu to set:
− “TITLE BLOCK LOCATION” [ u6.01 ]
Set the title block location. Press ”Enter” to access the following
options:
− LOCATION 1 [ 01 ]
− LOCATION 2 [ 02 ]
− LOCATION 3 [ 03 ]
− LOCATION 4 [ 04 ]
− “LENGTH” [ U6.04 ]
If the size is not standard, it is possible
to set the length in this submenu.
− “AUTOLENGTH” [ U6.05 ]
Automatic length detection, future
option.
− Select FEED IN [ u6.06 ] to activate
the entry flap and to set the folder ready
to be Manual Feed.
− Select EXIT [ u6.00 ] to rise one level.
For a complete description of the
“Manual Feed” procedure, refer to the
next pages: “Manual Feed Procedure”
Manual
feed
Title block
location
Standard
sizes
Roll
Length
uto
length
Feed in
Exit
u 6
u 6.01
u 6.02
u 6.03
u 6.04
u 6.05
u 6.06
u 6.00
− “STANDARD” [ U6.02 ]
Use this selection for standard sizes.
− “ROLL” [ U6.03 ]
Use this menu to set the roll width if the size is not standard.
September 2001 88XX Series Folder Operator Manual 23
Page 25

Counter Submenu
Use this submenu to view the number of copies folded since the last
power on.
3. Go to the “Counter” submenu.
in the Numeric Control Panel in the Alphanumeric Control Panel
Counter
u OPERATOR
U7 COUNTER
4. Enter the last level of the menu to see:
− “COPIES FOLDED” [ U7.01 ]
− Enter this submenu to view the number of copies folded since
the last folder power on. Switching the folder off, will reset the
number.
Copies
folded
Exit
u 7
u 7.01
u 7.00
September 2001 88XX Series Folder Operator Manual 24
Page 26

Manual Feed Procedure
The following Manual Feed Mode sequence describes the detailed steps
to be used, and where to find supporting information:
1. Refer to Fan Programs Submenu and Cross Programs Submenu to
select the folded output package style and to return to complete the
set up process*.
2. Choose optional finishing features, holes and bin usage. Go to
Punching Submenu and Stacker Submenu*.
3. Enter the Manual Feed Procedure submenu to set the location of the
title block and the size of the document*.
Enter the “TITLE BLOCK LOCATION” submenu [ U6.01 ].
Select the corner in which you will locate the title block.
− LOCATION 1 [ 01 ]
− LOCATION 2 [ 02 ]
− LOCATION 3 [ 03 ]
− LOCATION 4 [ 04 ]
Input the Document size in one of the two method below:
A. If the document conforms to one of the listed multinational
configurations, simply select a Standard size as follows:
Go to the “STANDARD” submenu [ U6.02 ] and press “Enter”
to access to the three submenus.
− ISO [ ISO ]
− ANSI [ ansi ]
− ARCH [ arch ]
4
1
3
2
Select the desired standard and press “Enter.”
− Select ISO sizes: A3, A2, A1, A0
− Select ANSI sizes: B, C, D, E
− Select ARCH sizes: B, C, D, E
B. If the document does not conform to one of any multinational
configurations listed before, provide the length information as
follows.
Go to the “ROLL” submenu [ U6.03 ], press “Enter” to access
to the list of available rolls. Scroll until the desired roll size
appears and press “Enter” to set it.
The folder accepts rolls between 280mm and 914mm, which are
chosen from the ones listed in the table below.
Alphanumeric
Control Panel
11” 11 ‘
297 297
12” 12 ‘
420 420
17” 17 ‘
18” 18 ‘
22” 22 ’
594 594
24” 24 ‘
620 620
30” 30 ‘
841 841
34” 34 ‘
900 900
36” 36 ‘
Numeric
Control Panel
Description
280mm 11inches
297mm
305mm 12inches
420mm
432mm 17inches
457mm
559mm 22inches
594mm
610mm 24inches
620mm
762mm 30inches
841mm
864mm 34inches
900mm
914mm
* The folder shows as default the last selection made by the operator.
September 2001 88XX Series Folder Operator Manual 25
Page 27

Go to the “LENGTH” submenu [ U6.03 ].
Press “Enter” to show the number of the last length selected. To
modify the length value, use the Scroll keys. When you have
reached the desired value, press “Enter”.
On the Alphanumeric Control Panel, the selection of the length
is easier:
− Use the Scroll keys to increase/decrease the length of 1mm
steps.
− Depressing the “Pause” key and actuating the Scroll keys
will increase/decrease only the firsts two digits. This method
will allow faster access to the desired value.
4. After the last setting, go to the “FEED IN” message [U6.06], but
do not press “Enter”. Let the display show “FEED IN” message,
which allows the Bridge Entry Flap to go down.
5. Lift the bridge level to the top of the printer as shown in the picture.
The safety lever will support it.
Bridge in offline
position with 8830
6. From the top of the printer, feed the document into the folder. When
the entry sensor is actuated, the bridge starts feeding the print.
112763
FEED THE PRINTS ALWAYS WITH THE TITLE BLOCK:
LOCATION 4 FOR ISO/AN SI/ARCH SIZES
LOCATION 1 FOR AFNOR
LOCATION 2 FOR ERICSSON
FEED THE PRINTS ALWAYS SEF (SHORT EDGE
FEEDING)
September 2001 88XX Series Folder Operator Manual 26
Page 28

Folding Using Host Or Scanner
How to Recognize Title Block and Document Orientation
Before the folding process can begin, the Folder must receive
information that defines the Size, the Title block location, the Output
Style, and the selection of the other available finishing options. Under
normal operation, the RTL driver, the ADI driver, or the AccXES
Client Tools provide this information automatically through a serial
communications interface.
Refer to the “XES Synergix 8825/8830/8850 Controller Setup Manual
for Firmware x.x” for more detail on how it works.
All the selections made on any of the drivers listed above, will override
the selection made on the Web Printer Manager Tool (Web PMT).
The selections made on the Web PMT, without modification from the
drivers, will override the selection made on the folder control panel.
If the selection of the Title Block position is not specified through the
driver, and no default is selected in the Web PMT, the folder considers
the setting of its control panel.
The selections made on the folder control panel are considered also
when working in the Manual Feed Procedure, or when using the driver
some finishing option is set as “default”. Refer to the Advanced
Settings section.
In the AccXES Client Tools section, some folding procedures are
explained in detail.
Each document has to follow printer or folder rules before it is printed.
The AccXES Controller manages the orientation of the document and
applies the printer rules (like type of media roll loaded) and folder rules
(like preferred feeding direction, such as Short Edge Feeding).
For example, the E/A0 are landscape documents with the Title Block in
the Lower Right corner. They are printed with a 90° rotation by the
AccXES controller, in short edge feeding, with the title block corner 4.
The selection of the Title Block field on ACT must be Lower Right
because this is the original orientation of the document.
TIP: To view a print with the original orientation, print the document
reduced by 90% (type 10% on ACT), selecting a roll size bigger than
the reduced document. Select Folding Method Bypass and fix rotation
to 0 degrees. This step enables the AccXES Controller to print the
document following any rules.
Print reduced of 90%
Left
Left
Upper
Rigth
Lower
Rigth
Upper
Left
Lower
Left
Upper
Rigth
Lower
Rigth
Upper
Lower
The picture shows the document orientation as it appears on the screen
and as it could exit from the printer following any rules.
September 2001 88XX Series Folder Operator Manual 27
Page 29

Using the RTL Drivers
The procedure shows how to print and fold a document directly from
the native application using the Windows RTL driver.
1. Open any application. Open the document to be printed and folded.
2. Access to the Print menu, which is usually inside the file pulldown
menu. Select the 88XX Printer.
3. Click on the “Property” button to set the options for the 88XX
Printer.
4. Select the Job tab. Go to the Finishing field:
− Select “Folder Bypass” to print the document without finishing.
− Select “Printer Default.”
− Select “User Defined” to manually choose the folding
parameters. Click on the “Settings” button.
− Choose the Folding Program.
− Use the checkbox “Cross” to activate/deactivate the Cross
Folder.
− The “Margin” checkbox also does not affect the folder
working. The binding margin depends on the Folding
Method selected.
Select folding method 185+25, 190+20, or 7.5+1 to obtain a
folded print with the binding margin.
Untagging the checkbox “Margin,” with the folding
methods with margin, does not deactivate the margin.
− To activate the punching, choose a program with margin
(185+25, 190+20, 7.5+1) and tag the checkbox “Punch”.
Untag the checkbox to deactivate punching.
Tagging the checkbox “Punch,” with folding methods
without margin, does not activate the punching device.
The activation/deactivation of the punching by PC works
only when the “Punching On” option is selected on the
folder control panel.
September 2001 88XX Series Folder Operator Manual 28
Page 30

− Select the Sort Bin where the folded print must be stacked. The
selection “default” lets the folder use the setting defined in the
Stacker Submenu, which is in the folder control panel.
− Choose the Title Block location.
Select the location of the title block as it appears in the document
that you have on the screen.
Using the Scanner
This procedure considers a standard A1/D size, without scale
modification or other scanner options. Refer to the “XES Synergix
8825/8830/8850/8855 Digital Solution User Guide” for more details on
Scanner usage.
1. Get the A1 ISO document.
2. Select mode “Copier” on the Scanner Keyboard.
3. Click on the “Finisher” button on the Scanner keyboard:
− Choose the Fold Program.
− Choose the Tab Options.
− Choose the Punch Options.
Always select “Use Program Settings”.
If the punching option is present, it must be selected on the folder
control panel. See Punching Submenu.
− Margin Option
Always select “Use Program Settings”. The binding margin
depends on the folding program selected.
− Cross Fold Option
5. Click the “OK” button and print the document.
Select “Always Off” to deactivate the cross folder. Select “Use
Program Settings” to activate the cross folder.
− Punch Option
To activate the punching, choose a program with margin
(185+25, 190+20, 7.5+1) and select “Always On”. Select
“Always Off” to deactivate the punching.
September 2001 88XX Series Folder Operator Manual 29
Page 31

Selecting “ Always On,” with folding methods without margin,
k
does not activate the punching device.
The activation/deactivation of the punching works only if on the
folder control panel the “Punching On” option is selected.
− Title Block Location
Choose the location of the title block. With this information, the
AccXES will provide a correct document feeding orientation to
satisfy the folding requests.
− Choose Sort Bin to select where the folded print must be stacked.
The selection “default” lets the folder use the setting defined in
the Stacker Submenu, which is in the folder control panel.
How to Recognise the Title Block Location
The picture below shows the document feeding orientation.
The correct selection in the picture is “Upper Right”.
To avoid misunderstanding, the operator is helped by a label showing a
sample document laid on the Scanner.
Do not be concerned about the inversion of Left and Right because the
label considers a document turned upside down.
Simply lay the document on the Scanner in the correct position (upside
down) and look on the label to understand which will be the title block
location. Refer to the picture below and notice that the selection must
be UR “Upper Right”.
112624
Upper
Rigth
Upper
Left
4. Look at the “Advanced Setting” section for more options.
5. Exit from the “Finisher” menu and feed the document.
Label
Lower
Rigth
Lower
Left
Title Bloc
September 2001 88XX Series Folder Operator Manual 30
Page 32

Scanner Job Templates
The “Job Template” option is used to simplify the finisher use.
All of the finisher settings can be stored in nine different Job
Templates. (refer to the “XES Synergix 8825/8830/8850/8855 Digital
Solution User Guide” for details).
By recalling a template number, all of the selections that are stored
(Folding method, Cross, Punch, Title Block Location…) are
automatically set.
A good way to create the templates is to refer to the standard Title
Block Location numbering as shown in the picture below.
Upper
41
Rigth
Lower
Rigth
Upper
Left
Lower
Left
23
With these four templates it is easy to manage different sizes that have
to be folded with the same folding method.
Depending on the size orientation, the only thing to do is to recall the
template with the proper Title Block Location. All of the sizes fed in
different ways will result folded with the same Face Orientation.
Job template
4
Job template
3
Job template
1
Job template
2
Using the other templates, it is possible to save another finisher setting
1. Set all of the options and Title Block Location to Upper Right.
2. Save the Job Template as “4”
3. Change only the Title Block Location to Upper Left and save
another Job Template as “1”.
4. Create the templates “2” and “3” in the same way.
with the four title block combinations.
The procedure works only with standard sizes.
For non standard sizes the only possible locations are:
Location 4 Upper Right - Face Up
Location 2 Lower Left - Face Down
September 2001 88XX Series Folder Operator Manual 31
Page 33

AccXES Client Tools
Sometimes the document exits the printer with a different orientation
from the orientation on the screen.
Using this procedure, is possible to understand how the native
application produces the print files and creates files that respect the
desired orientation.
How to organize the jobs
When using the ACT, the operator has to manage lots of files. That is
why it is important for the operator to have the files named so that some
finishing information is easy to understand from the file names without
having to open the files to view the image orientation.
People who print the files from the document native application, could
supply all the necessary informations in the file name.
For example if the document is an A1 size Landscape with Title Block
in the Lower Right corner:
A1 SIZE
LANDSCAPE
The file name could be:
“DOCUMENT NAME - A1 LANDSCAPE LOWER RIGHT.XXX”
or shortened
“DOCUMENT NAME-A1 LAND LR.XXX”
This way the operator with the ACT can set all the finishing
requirements simply by looking at the file name.
Consider that sometimes the orientation on the screen does not
correspond to the orientation of the file printed. Refer to the “How to
Recognize Title Block and Document Orientation” paragraph to
understand how your application produces the files. Then supply the
original orientation with the original position of the Title Block.
Face Up or Down - advantages and disadvantages
A print job could be folded and stacked Face Up or Down depending on
the operator choice. These two selections have advantages and
disadvantages:
Face Up:
− Higher folding quality.
− Visible Title Block in the folded print basket.
− Need to reverse print order to obtain the job sorted correctly.
Face Down:
− Folded package Full Back and Full Front (no prefold in the end).
− Not visible Title Block in the folded print basket.
− No need to reverse the print order.
September 2001 88XX Series Folder Operator Manual 32
Page 34

Similar Document Job
This procedure describes the steps to print and fold four ISO
documents. Only the finishing options are considered; other printing
options are explained in the “AccXES Client Tools User Guide”.
1. Open AccXES Client Tools.
2. Insert four documents, for example, A0, A1, A2, A3.
3. Click on the Job Options icon and choose the Finishing Tab to set
the folder options.
Here it is possible to select the Folder Type, the Folding Method,
the Sort Bin, and the Title Block.
− Choose the Folder Type “88XX Series Folder Rel #.##”.
− Choose the Folding Method to select the output package
dimensions (a x b).
In this field it is possible to select nineteen folding methods; the
description appears in the text box when the method is selected.
With the Bypass folding method the print is not folded and
stacked on bridge.
September 2001 88XX Series Folder Operator Manual 33
Page 35

− Choose Sort Bin to select where the folded print must be stacked.
The selection “default” lets the folder use the setting defined in
the Stacker Submenu, which is in the folder control panel.
With the selection “Bin #,” the print will be delivered in the
specified bin. The ACT overrides the folder settings.
Mixed Document Job
In the previous paragraph, every document of the job has the same
orientation (LANDSCAPE/PORTRAIT) and same title block corner.
− Title Block. Inform the system where the title block is located in
the document.
The AccXES controller uses this information to orient the
document properly for the folder to obtain the correct output.
By using a document viewer application it is possible to identify
the right corner.
For example, with a standard ISO A0 document, the title block is
located in Lower Right corner in landscape orientation.
− Use the checkbox “Cross” to activate or bypass the cross folder.
− To activate the punching, choose a program with margin
(185+25, 190+20, 7.5+1) and tag the checkbox “Punch”.
Untag the checkbox to deactivate punching.
Tagging the checkbox “Punch,” with folding methods without
margin, does not activate the punching device.
− The “Margin” checkbox also does not affect the folder working.
The binding margin depends upon the Folding Method selected.
Select folding method 185+25, 190+20 or 7.5+1 to obtain a
folded print with the binding margin.
Untagging the checkbox “Margin,” with any of these folding
methods, does not deactivate the margin.
The next procedure shows, step by step, how to create a mixed
document job consisting of documents with different orientation.
1. Open AccXES Client Tools.
2. Insert the following documents:
− A1 ISO, A3 ISO, A2 ISO (Landscape Lower Right) and an A0
Afnor (Landscape Upper Rigth).
4. Look to the Advanced Settings section for more details regarding
bin usage, Face Up or Down, Punching , and Cross Programs.
5. Press the Submit icon to print and fold the documents of our job.
September 2001 88XX Series Folder Operator Manual 34
Page 36

3. Click on the Job Options icon and choose the Finishing Tab to set
the folder options.
Advanced Settings
− Choose the Folder Type.
− Choose the Folding Method “AFNOR”
− Choose the Sort Bin.
− Choose the Title Block “Lower Right”
The document A0 AFNOR, in landscape orientation, has the Title
Block in Upper Right corner.
You can now specify only this document’s Title Block corner
location by double clicking on the document name on the Document
Submit Tool. Then select the Transform Tab. Unselect the “Use
Default” box. Then select the Title Block location from the Title
Block drop down menu.
Other specific selections can only be made on the folder control panel:
− Face Up/Down.
Go to Face Submenu and select the face orientation. The entire job
will be delivered into the bin with the specified orientation.
The same job could be submitted both Face Down and Face Up; if
some Folding Styles ,or some size, do not support the selected face
orientation it will be automatically folded in the other orientation.
Refer to the Problem Solving table to troubleshoot face orientation
problems.
For example, the folding style 198 only supports Face up. It will be
folded face up even if it is included in a job face down
Remember that selecting Face Up is necessary to revert the print
order to obtain a folded job sorted in the correct way.
− Bin usage
Go to the Stacker Submenu and select how to use the bins.
The “Stacker mode” and the “Sorter mode” can only be selected on
the folder. It is not necessary to restart the AccXES Controller. Just
choose “default” in the Sort Bin field and the AccXES Client Tools
will consider only the selections made on the folder control panel.
− Cross Folder Program
Go to the Cross Programs Submenu to choose between “Standard”
and “Equal”. It is not necessary to restart AccXES Controller or set
any option on ACT, only use the folder control panel.
− Punching
Remember that it is possible to activate/deactivate the punching
from a PC only if on the folder control panel you select “Punching
On”. If the folder control panel is set to “Punching Off”, the
selection on the PC will not affect the punching device.
September 2001 88XX Series Folder Operator Manual 35
Page 37

Suspending the Print Queue
When the system is printing and folding a job, it is possible to suspend
the print queue as follows:
− The folder control panel shows the program in use (for example
185 [ p.01 ] ).
− Press the “Pause” key on the Alphanumeric Control Panel or the
“Enter” key on the Numeric Control Panel.
− The displays show “PAUSE” [ paus ], and the print queue stops.
− Pressing the same key again, the print queue will restart.
The keys “Pause” and “Enter” mentioned above, suspend
the queue only if the system is working and the display
shows the program selected. When the system is in “Idle”
status, these keys have their normal function which is to set the system
in Pause Mode in order to enter the Operator menu.
It could be useful to suspend the queue for many reasons: if a job
consisting of a lot of prints is wrong, suspending the job allows the
operator to delete the entire queue using the ACT.
To do this, select the “Printer Queue” tab in ACT. Select the second
toolbar button to update the print que status. Select (highlight) all of
the listed files. Select the Delete toolbar button to remove them from
the print queue.
September 2001 88XX Series Folder Operator Manual 36
Page 38

Notes
_______________________________________________________________________________________________________________________
_______________________________________________________________________________________________________________________
_______________________________________________________________________________________________________________________
_______________________________________________________________________________________________________________________
_______________________________________________________________________________________________________________________
_______________________________________________________________________________________________________________________
_______________________________________________________________________________________________________________________
_______________________________________________________________________________________________________________________
_______________________________________________________________________________________________________________________
_______________________________________________________________________________________________________________________
_______________________________________________________________________________________________________________________
_______________________________________________________________________________________________________________________
_______________________________________________________________________________________________________________________
_______________________________________________________________________________________________________________________
_______________________________________________________________________________________________________________________
_______________________________________________________________________________________________________________________
_______________________________________________________________________________________________________________________
_______________________________________________________________________________________________________________________
_______________________________________________________________________________________________________________________
_______________________________________________________________________________________________________________________
_______________________________________________________________________________________________________________________
_______________________________________________________________________________________________________________________
_______________________________________________________________________________________________________________________
_______________________________________________________________________________________________________________________
_______________________________________________________________________________________________________________________
September 2001 88XX Series Folder Operator Manual 37
Page 39

Jam Clearance Procedures
Message Display
Messages will be displayed on the Alphanumeric Control Panel, or a
code will be displayed on the Numeric Control Panel. The message will
scroll from right to left.
Alarm messages and the required actions are listed below.
a-01 DOOR OPEN
Close door.
a-02 BRIDGE SENSORS COVERED
Remove media jam from Bridge and press Reset. Refer to the Clearing
Bridge Jams procedure.
a-03 UPPER POCKET SENSOR COVERED
Remove media jam from Upper Pocket and press “Reset”. Refer to the
Clearing Upper and Lower Pocket Jams procedure.
a-04 LOWER POCKET SENSOR COVERED
Remove media jam from Lower Pocket and press “Reset”. Refer to the
Clearing Upper and Lower Pocket Jams procedure.
a-05 CROSS POCKETS SENSOR COVERED
Remove media jam from Cross Folder. . Refer to the Clearing Cross
Folder Jam procedure.
a-06 24V MISSING
a-07 ENCODER OR M2 MOTOR FAULT
Check if all the doors are closed and press “Reset”. If the message
returns, call for service.
a-08 STEP MOTORS FAULT
Clear the paper jam, Reset the folder. If the alarm occurs again, call for
service.
a-09
TBD
a-10
TBD
a-11 FIRST BIN FULL
Empty basket and press “Reset”.
a-12 SECOND BIN FULL
Empty basket and press “Reset”.
a-07 ENCODER OR M2 MOTOR FAULT
Check if all the doors are closed and press “Reset”. If the message
returns, call for service.
September 2001 88XX Series Folder Operator Manual 38
Page 40

Error messages and the required actions are listed below.
e-01 ENTRY ALARM 1
Remove the paper jam between the printer exit and the folder entry. Press
“Reset”.
e-02 ENTRY ALARM 2
TBD
e-03 BRIDGE ALARM
Remove the paper from the bridge and press “Reset”. Refer to the
Clearing Bridge Jams procedure.
e-04 ROTATION ALARM
Remove the paper from the bridge and press “Reset”. Refer to the
Clearing Bridge Jams procedure.
e.-05 POCKETS ALARM
Perform the Clearing Fan Folder Jams procedure, or check for a jam in
the pockets. Refer to the Clearing Upper and Lower Pocket Jams
procedure.
e-06 FOLDING ALARM 1
Perform the Clearing Fan Folder Jams procedure, or check for a jam in
the pockets. Refer to the Clearing Upper and Lower Pocket Jams
procedure.
e-07 FOLDING ALARM 2
e-10 TRANSPORT ALARM
Open the Lower Pocket and remove a jam from Conveyor Belt. Refer to
the Clearing Upper and Lower Pocket Jams procedure.
e-11 CROSS ENTRY ALARM
Perform the Clearing Fan Folder Jams procedure or remove a jam
manually. Refer to the Clearing Cross Folder Jam procedure.
e-12 CROSS EXIT ALARM
Perform the Clearing Fan Folder Jams procedure, or remove the jam
manually. Refer to the Clearing Cross Folder Jam procedure.
e-13 NOT FOLDABLE
Print not foldable, see Problem Solving
E-14 NOT AVAILABLE SELECTION
The selection made regards a not installed part (KIT), or future options.
E-15 LAPS WITHOUT ADJUSTMENT
E-16
TBD
E-17 PROGRAM NOT SELECTABLE
Perform the Clearing Fan Folder Jams procedure, or check for a jam in
the pockets. Refer to the Clearing Upper and Lower Pocket Jams
procedure.
e-08 FOLDING ALARM 3
Perform the Clearing Fan Folder Jams procedure, or check for a jam in
the pockets. Refer to the Clearing Upper and Lower Pocket Jams
procedure.
e-09 FAN FOLDER EXIT ALARM
Remove a jam from Upper Pocket or Conveyor Guide. Refer to the
Clearing Upper and Lower Pocket Jams procedure.
September 2001 88XX Series Folder Operator Manual 39
Page 41

Introduction to Jam Clearance Procedures
Safety Bridge Lever
A series of corrective procedures are to be used by the operator to clear
jams.
Note: If a jam occurs during a multi-print procedure, the bridge flap
goes up and the folder goes into the Pause Mode. This operation is
covered fully in the Pause Mode Procedure.
The following pages will give you the detailed steps to take when you
are clearing a jam. The folder will inform the operator where the jam is
located by using an alarm tone and the message display:
• A single tone if jam occurs in the Bridge
• A double tone if the jam occurs in the Fan Section
• A triple tone if the jam occurs in the Cross Section
To avoid larger jams, perform the Automated Eject Procedure. Keep the
Reset key pressed for more than two seconds. Then when the reset key is
pressed, the rollers start. If the reset key is pressed for less than two
seconds, after a five-second delay, the folder exits the Manual Eject
Procedure.
If the Manual Eject Procedure does not succeed in removing the paper
jam, follow the procedures on the following pages.
To tilt up the bridge:
1. Disengage the Bridge Hook (8855 only) .
2. Using the handle, tilt up the bridge, ensuring that the lever lowers
down into the slot under control.
3. Check that the safety lever is latched in the correct position.
BE CAREFUL
If the safety lever is not latched in the correct position, the bridge could
drop down and cause serious damage to the machine or to the operator.
To let down the bridge:
1. Release the bridge safety lever.
2. Lower the bridge to the horizontal
position.
3. Make sure that the bridge engages
the printer brackets.
111378
September 2001 88XX Series Folder Operator Manual 40
Page 42

Clearing Bridge Jams
When the folder emits a single alarm tone and stops, there is probably a
strip of media stuck on the bridge.
B
A
Clearing Fan Folder Jams
Manual Eject Procedure
When the folder emits a double tone, there is a jam located in the Fan
Folder. The folder will try to clear the jammed print automatically. If the
print is not cleared, perform the following steps.
1. Press and hold the “Reset” key for more than two seconds. The
rollers will then rotate, and the Control Display will show the
message “MANUAL EJECT - PLEASE SURVEY THE
FOLDER”
2. Release the Reset key to stop the rollers, (Press the “Reset” key to
restart the rollers.)
− The jammed print should exit the folder.
3. When the jam has been cleared, wait five seconds and press the
“Reset” key for less than two seconds to return the folder to normal
operating conditions.
112619
To clear the jam:
NOTE. If the print is not cleared, proceed with Clearing Upper and
Lower Pocket Jams or Clearing Mobile Roller Jams.
1. Open the bridge door (A).
2. Insert the safety lever (B).
3. Remove the media.
4. Close the bridge door.
5. Press Reset.
September 2001 88XX Series Folder Operator Manual 41
Page 43

Clearing Upper and Lower Pocket Jams
If the jam cannot be cleared using the Fan
Folder Jam Clearance Procedure, switch Off the
Folder and open the upper or the lower pockets.
Clearing Upper Pocket Jams
A
B
112611
Clearing Lower Pocket Jams
112617
D
C
3. If the print is jammed in to the lower pocket,
open the Conveyor Guide (D) and open the
Lower Mobile Guide by releasing the two
112611
1. Raise the upper pocket cover (A).
2. Open the Mobile Guide Cover using the two
latches (B).
3. Remove the jammed media.
112617
1. Move the latch (C) on the center of the door
downward to access the transport belt.
2. Remove the jammed media.
latches.
4. Remove the jammed media close the door
and press Reset
4. If media cannot be removed, follow Clearing
Mobile Roller Jam procedure.
September 2001 88XX Series Folder Operator Manual 42
Page 44

Clearing Mobile Roller Jams
When a media jam occurs near the Mobile Pinch
Roller, the Mobile Pinch Roller can be removed
as follows:
112617
A
B
1. Switch off the Folder.
2. Open the door (B) and remove the conveyor
guide .(A)
112501
C
D
3. Unscrew the Adjusting Pin .(D)
4. Pull the lever block anchor (C) down on
each side while supporting the mobile roller.
E
5. Remove the mobile pinch roller and the jam.
6. Note: after the roller is reinstalled, tighten
the Adjusting Pin until it stops, to put the
spring under pressure. Then check and
insure the belt (E) is correctly positioned on
the pulley.
7. Remount all and press “Reset”
September 2001 88XX Series Folder Operator Manual 43
Page 45

Clearing Cross Folder Jam
Only for folders with TAG3
If a jam occurs in the cross folder and it is not clearable with the
Manual Eject Procedure, it is possible to remove the knife group and
one of the entry shafts to access to the jammed print.
112821/2/3
1. Open the Cross Right Door (A).
2. Try to remove the jam. If not possible, unscrew the three knobs (B)
(two on the lower side and 1 on the upper one) and start pulling the
knife outward.
B
A
September 2001 88XX Series Folder Operator Manual 44
Page 46

3. Check that the harnesses coming from the hole (D) are free to
follow the Knife Assembly movement and lay all of the group down
on the floor.
112824
4. Try to remove the jam. If not possible, operate on the spring support
(E) to remove the entry shaft.
E
D
5. Remove the jam.
6. Remount all the parts.
Be sure that the Knife harnesses go down in the hole (D) when
C
remounting the Knife Assembly.
7. Close the Cross Right Door and press “Reset”.
September 2001 88XX Series Folder Operator Manual 45
Page 47

Problem Solving
SYMPTOM CAUSE SOLUTION
Folder does not switch on. A. Power source is off. A. Ensure that the power cord is connected.
Folder does not display message “IDLE”. A. The POST (Power On Self-Test) has been
completed with a negative result.
Alarm message A. Subsystem or sensor failure during the Power
On Self-Test.
Folding on the leading edge is not parallel. A. The print is not cut squarely. A. Follow the instructions in the 8830 Printer
Incorrect documents face orientation, or folder
showing “NOT FOLDABLE” message.
A. Wrong Title Block information
B. Size not deliverable with the selected
orientation.
C. The document is not standard.
D. Size not foldable
A. Verify jam or alarm status.
A. Follow the alarm and jam clearance
procedure.
Operator Manual to reload the media.
A. Check the job for a mistake regarding the
Title Block corner indication.
B. Check the job for:
• Ericsson program that produces an output
always Face Down independently from
the Face selection.
• 198 program that produces an output
always Face Up independently from the
Face selection.
• Or change document orientation.
C. Obtain the original orientation of the
document following the proper procedure
and then rotate manually the document in the
document rotation option.
D. If all the settings are ok, probably the size
could not be folded due to is dimensions.
September 2001 88XX Series Folder Operator Manual 46
Page 48

SYMPTOM CAUSE SOLUTION
A2/C size with Title Block folded inside (E-
17).
With the Double Bin configuration, the size
does not fall in the bin 1 even if the operator
selection is Bin 1.
The folder keeps showing a Folding Method
on the control panel and the system is stopped.
A. Folder without rotation and IOT without paper
roll 420 (17/18”).
A. The first bin is full.
B. The sizes that exit the Cross Folder in vertical
position (Wallet, Afnor) are always stacked in
the second bin.
A. Probably a job queue is stopped or waiting to
be sent to the printer.
A. Scan A2/C size LEL with Title Block
leading edge and print LEL. Sheet delivered
always Face Down output Landscape.
A. Empty the first bin.
B. Try to set the work so that the sizes that exit
the Cross Folder in vertical position are
included in the job that has to be stacked in
the second bin.
A. Perform the Suspending the Print Queue
procedure.
September 2001 88XX Series Folder Operator Manual 47
Page 49

Miscellaneous Information
A
A
Technical Specification
Specifications
Space Requirement
With 8830/8825 Printer With 8855 Printer
A (Depth) = 2130 mm / 83 ¾ inches
B (Height) = 1030 mm / 40 ½ inches
C (Width) = 1850 mm / 73 inches
961mm
B
A (Depth) = 2610 mm / 102 ¾ inches
B (Height) = 1030 mm / 40 ½ inches
C (Width) = 1850 mm / 73 inches
969mm
B
Voltage Requirements :
− 115 Vac ± 10% (60Hz)
− 230 Vac ± 10% (50Hz)
Power Consumption:
− 4/8 A 50/60Hz
− 0.6 A (standby)
Audible Noise
Impulse Average Continuous
69 dBA max. 65 dBA max. ( run )
NEGLIGIBLE NEGLIGIBLE (stand by)
Environmental
− Relative Humidity : 35% to 85%
− Temperature 60 to 90° Fahrenheit (15.5° to 32 ° Celsius)
Paper
− Bond (ordinary), 18-22lbs (75-100gsm)
Minimum size :
− 8½ inch x 11 inch (US A size)
− 210 mm x 297 mm (European A4 size)
C
C
Maximum size :
− 36 inch x 142 inch (US) panel 8 ½”
− 914 mm x 3600 mm (European) panel 210mm
Weight :
− 330 Kg (727 lb.)
Weight :
− 288 Kg (634 lb.)
September 2001 88XX Series Folder Operator Manual 48
Page 50

Folding
Print sizes
− ANSI, ARCH sizes : A (pass through), B, C, D, E
− ISO, Afnor, Ericcson sizes : A4 (pass through), A3, A2, A1, A0
Longitudinal folding panel ANSI, ARCH:
− 7 ½ “, 8 ½ “, 9”, 11”, 12” (6½ inches to 12 inches)
− Margin between 0 to 2 inches (step 5 mm)
Longitudinal folding panel (E0):
− 185mm, 190mm, 198mm, 210mm, 297mm, (165mm to 305mm)
− Margin between 0 to 30 mm (step 5 mm)
Cross folding panel - cross (E0/US):
− 210mm/8½”, 297mm/11”, 305/12”mm (between 165 to 305mm)
Configuration
Where possible, the Universal Folder is available with the standard
configuration, and has the ability to add the following additional
options:
Rotation:
• The Rotation enables the Folder to rotate the A2/C size. This allows
the folder to be combined with a printer that has three media rolls. It
can then make five standard sizes without the need to replace the
media roll.
Punching:
• The Punching Device is a tool to make 3 or 4 holes automatically in
the binding margin of the folded print. The Punching option requires
the installation of the Rotation Bridge.
Alphanumeric Control Panel:
• The Alphanumeric Control Panel is available for the user who
wishes to have full feature selection, remotely from the system client
tools. This Alphanumeric Control Panel is included when the folder
is installed with the 8855 printer.
Second Output Bin:
• The Second Output Bin increases the capacity of the folder up to
200A0/E.
• The Second Output Bin also avoids system stops: if the first bin is
full, the system still goes on stacking the prints in the second bin.
Listed below, are the five possible configurations to increase the
capability of the folder. Every optional will be indicated with a letter:
Rotation = R
2nd basket = B2
Punching = H3/H4 (under development)
Control Panel option = C
• The second bin also increases the system speed when two copies of a
job are needed: the Sorter Mode allows printing two copies of a
document and sorts them one per bin. In this way the printer
optimizes the rolls usage because it does not print all of the job twice
with changing the roll for every document. Instead, it prints
sequentially two copies of each document without loosing time due
to changing the rolls.
Configuration 2nd Basket Punching Rotation
STANDARD NO NO NO
STANDARD - R NO NO YES
STANDARD - B2 YES NO NO
STANDARD - R - B2 YES NO YES
STANDARD - R - Hn - B2 NO YES YES
September 2001 88XX Series Folder Operator Manual 49
Page 51

FCC Compliance in the USA
EME Compliance in Canada
WARNING: This equipment has been tested and found to comply
with the limits for a Class A computing device pursuant to Subpart J of
Part 15 FCC Rules.
This equipment generates, uses, and can radiate radio frequency energy.
If it is not installed and used in accordance with the instruction manual,
it may cause interference with radio communications. These limits are
designed to provide reasonable protection against such interference
when operated in a commercial environment. Operation of this
equipment in a residential area is likely to cause interference, in which
case the user, at his own expense, will be required to take whatever
measures may be required to correct the interference.
This digital apparatus does not exceed the Class A limits for radio noise
emissions from digital apparatus set out in the radio interference
regulations of the Canadian Department of Communications.
Conformitè EEM Au Canada
Cet appareil numérique est conforms aux limites d'emission de bruits
radioélectriques pour les appareils de classe A stipulées dens le
Règiement sur le brouillage radiodiectrique du Ministére des
Communications du Canada.
September 2001 88XX Series Folder Operator Manual 50
 Loading...