


XES Synergix™ Controller
8855 Setup Manual for
Firmware 7.0

This page left intentionally blank.

Safety Information
Your AccXES™ controller has been designed and tested to meet strict
safety requirements. These include safety agency examination, approval,
and compliance with established environmental standards.
Please read the following instructions carefully before operating the
controller and refer to them as needed to ensure the continued safe
operation of the product.
Follow all warnings and instructions marked on or supplied with the product.
Unplug the controller from the wall outlet before cleaning the exterior.
Always use materials specifically designated to clean the controller exterior.
Other materials may result in poor performance and could create a
hazardous situation.
Do not use aerosol cleaners. Follow the instructions in this operator manual
for the proper cleaning methods.
Never use supplies or cleaning materials for purposes other than those for
which they were intended. Keep all supplies and materials out of the reach
of children.
Do not use this product near water, wet locations, or outdoors.
This product is equipped with a three-wire, grounding-type plug (i.e., a plug
having a grounding pin). This plug will only fit into a grounding-type power
outlet. This is a safety feature. To avoid the risk of electric shock, contact
your electrician to replace the receptacle if you are unable to insert the plug
into the outlet.
Never use a ground adapter plug to connect the controller to a power source
that lacks a ground connection terminal.
The power supply cord is the disconnect device for this equipment.
Make sure that the installation is near the socket outlet and is easily
accessible.
Do not allow anything to rest on the power cord. Do not locate the
controller where someone can step on the cord.
Slots and openings in the controller are provided for ventilation. To ensure
reliable operation of the controller and to protect it from overheating, these
openings should never be placed near a radiator or heat register. The
controller should not be placed in a built-in installation unless proper
ventilation is provided.
Never push objects of any kind into the openings of the controller as they may
touch dangerous voltage points or short out parts, resulting in a risk of fire or
electric shock.
Never spill liquid of any kind on the controller.
Never remove any covers or guards that require a tool for removal. There
are no operator serviceable areas within these covers.
Never attempt any maintenance function that is not specified in this operator
manual.
Unplug the controller from the power outlet and refer servicing to qualified
service personnel under the following conditions:
• When the power cord is damaged or frayed.
• If liquid has been spilled into the product.
• If the controller has been exposed to rain or water.
• If the controller is producing unusual noises or odors.
• If the cabinet has been damaged.
• If you need additional safety information concerning the controller or
supplied materials, you may call Xerox Engineering Systems.
This product should be operated from the type of power source indicated
on the marking label. If you are not sure of the type of power available,
consult your local power company.
XES Synergix 8855 Controller Setup Manual for Firmware 7.0 i

XES Synergix 8855 Controller Setup Manual for Firmware 7.0 ii
EMC Notices
Australia/New Zealand
Changes or modifications to this equipment not specifically approved by Fuji
Xerox Australia Pty. Limited may void the user's authority to operate this
equipment.
Shielded cables must be used with this equipment to maintain compliance
with the Radiocommunications Act 1992.
European Union
WARNING
This is a Class A product. In a domestic environment this product may
cause radio interference in which case the user may be required to take
adequate measures.
Changes or modifications to this equipment not specifically approved by
Xerox Europe may void the user's authority to operate this equipment.
Shielded cables must be used with this equipment to maintain compliance
with the EMC Directive (89/336/EEC).
WARNING
In order to allow this equipment to operate in proximity to Industrial,
Scientific and Medical (ISM) equipment, the external radiation from ISM
equipment may have to be limited or special mitigation measures taken.
Canada
This Class "A" digital apparatus complies with Canadian ICES-003.
Cet appareil numérique de la classe "A" est conforme à la norme NMB-003
du Canada.
Continued on next page.

EMC Notices (continued)
Japan
This is a Class A product based on the standard of the Voluntary Control
Council for Interference by Information Technology Equipment (VCCI). If this
equipment is used in a domestic environment, radio disturbance may arise.
When such trouble occurs, the user may be required to take corrective
actions.
Changes or modifications to this equipment not specifically approved by Fuji
Xerox Limited may void the user's authority to operate this equipment.
Shielded cables must be used with this equipment to maintain compliance
with the Voluntary Control Council for Interference by Information Technology
Equipment regulations.
USA
This equipment has been tested and found to comply with the limits for a
Class A digital device, pursuant to Part 15 of the FCC Rules. These limits
are designed to provide reasonable protection against harmful interference
when the equipment is operated in a commercial environment. This
equipment generates, uses, and can radiate radio frequency energy and, if
not installed and used in accordance with the instruction manual, may cause
harmful interference to radio communications. Operation of this equipment in
a residential area is likely to cause harmful interference in which case the
user will be required to correct the interference at his own expense.
Changes or modifications to this equipment not specifically approved by the
Xerox Corporation may void the user's authority to operate this equipment.
Shielded cables must be used with this equipment to maintain compliance
with FCC regulations.
XES Synergix 8855 Controller Setup Manual for Firmware 7.0 iii

XES Synergix 8855 Controller Setup Manual for Firmware 7.0 iv
Trademark Notices
XEROX®, XES™, Synergix™, The Document Company, and the identifying
product names and numbers herein are trademarks of XEROX
CORPORATION.
PostScript is a trademark of Adobe Systems Incorporated.
AutoCAD is a registered trademark of Autodesk, Inc.
ADI is a registered trademark of Autodesk, Inc.
®
HDI is an acronym for Heidi
trademark of Autodesk, Inc.
HP-GL/2 is a trademark of Hewlett-Packard Company.
Windows 95, Windows 98, Windows NT, and Windows 2000 are registered
trademarks of Microsoft Corporation.
Device Interface. Heidi is a registered

Contents
Safety Information ............................................................................ i
EMC Notices..................................................................................... ii
Australia/New Zealand.....................................................................ii
European Union...............................................................................ii
Canada............................................................................................ii
Japan.............................................................................................. iii
USA ................................................................................................iii
Trademark Notices ......................................................................... iv
Purpose of This Manual .................................................................. 1
Viewing the Test Prints ................................................................... 1
Setting the Controller Port Defaults................................................. 2
Setting up the Ten Custom Print Job Defaults ................................ 2
Floor Space Requirements ............................................................. 3
Power Requirements....................................................................... 3
Power Locations.............................................................................. 4
Controller Ports Location................................................................ 5
Front Panel LEDs............................................................................. 6
I/O Download of Firmware Upgrades ............................................. 7
Controller Specifications ................................................................ 8
Physical Characteristics.................................................................. 8
Electrical Requirements.................................................................. 8
Agency Approvals........................................................................... 8
Hardware Specifications ................................................................. 8
I/O Ports ......................................................................................... 8
Job Printing and Processing Specifications ................................. 9
Network Protocols ..................................................................................... 9
Platforms supported .................................................................................. 9
Auto Port Sensing .....................................................................................9
Client Software.......................................................................................... 9
PC/DOS platform: .....................................................................................9
PC/Windows 95 and Windows 98 platforms:............................................ 9
PC/Windows NT 4.0 and Windows 2000 platforms: ................................. 9
UNIX platform:......................................................................................... 10
Job Control Language ............................................................................. 10
Job Spooling/Queue................................................................................10
Data Formats ..........................................................................................10
Compression types (for applicable raster formats): ................................ 10
Compression ........................................................................................... 10
Job Queue Management......................................................................... 10
Long plot.................................................................................................. 10
Auto format recognition ........................................................................... 10
Color Support .......................................................................................... 10
Extended Processing Options ................................................................. 11
Number of copies .................................................................................... 11
Electronic Collation.................................................................................. 11
Folding and Stacking...............................................................................11
Palettes and Patterns .............................................................................. 11
Preparing the Serial Port............................................................... 12
The Host Serial Port ................................................................................ 12
Enable Controller Serial Port................................................................... 12
Software Supported................................................................................. 12
PC/WINDOW S 95 AND WINDOWS 98 PLATFORM: .......................12
PC/WINDOW S NT 4.0 AND W INDOWS 2000 PLATFORMS: ..........12
UNIX PLATFORM:.............................................................................. 12
Data Formats Supported......................................................................... 13
Serial Cable Description.......................................................................... 13
CABLE PART NUMBERS ..................................................................13
Preparing the Parallel Port............................................................ 14
Parallel Port.............................................................................................14
Software Supported:................................................................................ 14
PC/WINDOW S 95 AND WINDOWS 98 PLATFORMS: ..................... 14
PC/WINDOW S NT 4.0 AND W INDOWS 2000 PLATFORMS: ..........14
DATA FORMATS SUPPORTED ........................................................14
Parallel Cable Description .......................................................................14
Preparing the Host SCSI Port ....................................................... 15
Ultra SCSI Port (Host)............................................................................. 15
Enable Controller SCSI Port.................................................................... 15
XES Synergix 8855 Controller Setup Manual for Firmware 7.0 v

XES Synergix 8855 Controller Setup Manual for Firmware 7.0 vi
Software Supported ................................................................................ 15
Data Formats Supported......................................................................... 15
SCSI Cable Description .......................................................................... 15
Preparing the 10/100 Ethernet Port .............................................. 16
Overview .................................................................................................16
Enable Controller Ethernet Port ..............................................................16
Network Protocols Supported: ................................................................ 17
TCP/IP ................................................................................................17
Software Supported: ............................................................................... 17
PC/WINDOW S 95 AND WINDOWS 98 PLATFORMS: ..................... 17
PC/WINDOW S NT 4.0 AND W INDOWS 2000 PLATFORMS: .......... 17
UNIX PLATFORM:.............................................................................. 17
Data Formats Supported......................................................................... 17
Ethernet Cable Description .....................................................................17

Purpose of This Manual
The purpose of this manual is to provide information to aid in connecting the
AccXES Controller to remote workstations to the 8855 System.
Refer to the Web Printer Manager Tool (PMT) User Guide for specific
instructions on configuring the controller using the Web PMT.
This manual includes the following sections:
• Floor Space Requirements.
• Power Requirements.
• Power Connections. If you are not familiar with the controller power
switch, ports refer to the figures.
• Controller Port Locations. Locate all the ports to be used. Refer to
instructions in this manual on preparing each port.
• Controller Specifications.
• I/O Download of Firmware Upgrades.
• Enabling Ports and Port Specifications.
The reference sets of the test print pages should be stored with the machine
service log, behind the service door of the XES Synergix 8855 printer.
NOTE: The printer must have bond paper installed to enable the printing of
any test print. When bond paper is not present (vellum or film only installed
in the printer) the test print must be canceled.
Viewing the Test Prints
When power is switched on, the controller sends a test print to the printer.
The purpose of test prints is to provide a record of current system settings for
use in daily operations, Network Communications setup, and restoration of
desired parameters in cases of unexpected change (such as through
accidental use of the Restore Factory Default utility). Test print sets should
be saved at the following times:
• When the initial install is complete and default settings are defined.
• Anytime default settings are changed.
XES Synergix 8855 Controller Setup Manual for Firmware 7.0 1

XES Synergix 8855 Controller Setup Manual for Firmware 7.0 2
Setting the Controller Port Defaults
The AccXES controller will operate with one, two, or all ports active. A 10/100
Ethernet interface, supporting TCP/IP is standard on the controller.
To prepare the AccXES controller to print:
• Connect cables and interface devices to the appropriate ports, then refer
to Viewing the System Configuration Defaults section of this document
for instructions on activating the port(s).
• Load your workstation with the desired client software to manage the job
flow to the selected port(s). The software manuals contain install
instructions for each of the platforms, so use the correct procedure.
• Additional network setup information is contained in the XES Synergix
8825/8830/8855 Network Administrator’s Guide that was shipped with
your 8855 System.
Note: Changes to controller parameters require up to 60 seconds to be
written to the system memory. When setting changes have been made, and
especially after a Factory Default Reset, wait 60 seconds for the changes to
take effect.
Setting up the Ten Custom Print Job Defaults
Ten sets of custom job defaults may be assigned and stored for future use.
These custom job default values may be entered remotely. Use a workstation
with the appropriate software loaded (for example, Microsoft Internet Explorer
browser) to access the Web Printer Manager Tool. When using this method,
refer to the Web Printer Manager Tool (PMT) User Guide for the procedure
required to access the Miscellaneous Page of the Web PMT. The custom job
defaults are labeled "Active User Setup" on this page.

Floor Space Requirements
(
)
(
)
Power Requirements
The controller requires the minimum floor space shown in this figure
6 inches (15 cm)
12 inch
31cm
AccXES
Controller
Figure 1 - Floor Space Requirements
24 inch
61 cm
The front of the
controller shall be
visible to the operator.
The controller requires the following, depending on source power:
• 15 ampere at 115 volts
• 7 amperes at 220 volts
XES Synergix 8855 Controller Setup Manual for Firmware 7.0 3

XES Synergix 8855 Controller Setup Manual for Firmware 7.0 4
Power Locations
The positions of the power connection and power switch are shown in this
figure.
Power Switch
AC Input
Figure 2 - Power Connection

Controller Ports Location
Parallel
10/100
Ethernet
Host Serial
VPI
Host SCSI
Folder Connection
Scanner SCSI
UI Data
Figure 3 -Port Connections on Rear
XES Synergix 8855 Controller Setup Manual for Firmware 7.0 5
Printer Interface
UI Power

XES Synergix 8855 Controller Setup Manual for Firmware 7.0 6
Front Panel LEDs
The controller has four status LEDs in on the front panel. The functions of
these LED’s are as follows:
• LED1 – Color Green, labeled “Ready” –Indicates the controller is
powered-up and ready to process incoming jobs.
• LED2 – Color Green, labeled “Busy” –Indicates the controller is busy
processing a job.
• LED3 – Color Yellow, labeled “Mismatch” –Indicates either a media
mismatch has occurred and is blocking the job queue or a Job
Accounting error has occurred.
• LED4 – Color Red, named “Attention” –Indicates an printer or finisher
fault occurred, or a paper jam, or out of toner or media, or a
communications problem with one of the devices.
During power-on self-test (POST), the AccXES software turns on LEDs 2,3,
and 4. After POST has successfully completed, LEDs 2,3, and 4 are
extinguished and LED 1 is turned on. If POST did not successfully complete
and the controller is not able to go into “Ready” state, all four LEDs are
extinguished.
LED1 LED3
LED2
LED4
Figure 4 - Location of LEDs

I/O Download of Firmware Upgrades
It is possible to upgrade the firmware version with new releases by sending a
file to the controller over the network, serial or parallel cable connection.
Customers can download new firmware releases from the internet or can
acquire the files on a CD-ROM. If obtaining the firmware from the internet,
go to www.xes.com and follow the instructions provided.
Use the Document Submission Tool (part of AccXES Client Tools) or Web
Printer Manager Tool to send the firmware upgrade file to the controller. Note
that the Web PMT includes a useful Upload File button on the "Upload File"
page to assist in sending the new firmware upgrade to the controller.
When the firmware upgrade is sent to the controller, the Ready LED
extinguishes and the Busy LED will illuminate. After the firmware upgrade is
complete, the controller will re-boot showing the re-boot pattern (all LEDs on
except for Ready).
Note: The controller must be connected to the printer and both devices
powered to successfully download firmware.
Note: Print out a full set of test prints BEFORE performing the upgrade as
settings may be returned to their Factory Defaults and you may lose your
custom settings for the Active Parameters set. For Active Parameters Set
information, see “Setting the Active Parameters Option” in this manual.
XES Synergix 8855 Controller Setup Manual for Firmware 7.0 7

XES Synergix 8855 Controller Setup Manual for Firmware 7.0 8
I/O Ports
Controller Specifications
Serial Two 9 pin serial ports provided. The scanner uses one when this
option is connected. The second is used as an input port for
receiving data via serial port connection.
Physical Characteristics
Parallel (IEEE 1284 Compliant) High-density port connector provided.
The controller is a tower positioned adjacent to the XES Synergix 8855
Printer.
Electrical Requirements
100 - 250 VAC auto-ranging power supply.
Agency Approvals
Safety: UL 1950, CA22.2 No. 950 (CUL), EN 60950 (CE Mark)
EMC: CE Mark, FCC Class A, Canada Radio Interference Regulations
Class A, VCCI Class 1
Hardware Specifications
CPU Power PC 740 operating at 200 Mhz clock speed.
RAM Maximum RAM is 192 MB
Hard disk Ultra SCSI, 7200 rpm internal hard disk drive
SCSI 50-pin SCSI Connector provided.
VPI 37 pin D Connector provided.
Scanner 68-pin SCSI Connector provided.
Ethernet Built-in 10/100 Ethernet Network Interface: RJ-45 connection,
supporting TCP/IP only.
Note: An optional, external Ethernet adapter, attached to the
Controller's parallel port, provides additional support for TCP/IP,
IPX/SPX, and NetBEUI protocols. Contact your XES sales or
service representative for specific ordering and setup
information.

• AccXES Client Tools
• Web Printer Manager Tool
Job Printing and Processing Specifications
Network Protocols
TCP/IP only on the 10/100 Ethernet port.
TCP/IP, IPX/SPX and NetBEUI on the optional, external Ethernet
Adapter.
Platforms supported
SUN: OS and Solaris
PC: Windows 95 / Windows 98 / Windows NT 4.0 / Windows 2000
Auto Port Sensing
Yes. Ports may also be enabled or disabled remotely.
Client Software
PC/Windows NT 4.0 and Windows 2000 platforms:
• HP RTL/HP-GL/2 Print Driver
• ADI Drivers for AutoCAD R13/14
• HDI Drivers for AutoCAD 2000 and 2000i
• PostScript PPD System Print Driver
• AccXES Client Tools
• Web Printer Manager Tool
PC/DOS platform:
• No longer supported
PC/Windows 95 and Windows 98 platforms:
• HP RTL Print Driver
• ADI Drivers for AutoCAD R13/14
• HDI Drivers for AutoCAD 2000 and 2000i
• PostScript PPD System Print Driver
XES Synergix 8855 Controller Setup Manual for Firmware 7.0 9

XES Synergix 8855 Controller Setup Manual for Firmware 7.0 10
Job Queue Management
Job Printing and Processing Specifications (continued)
UNIX platform:
• tftp puts
• telnet
• lpr/lpd support
• Access Client Tools
• Web Printer Manager Tool
Job Control Language
HP-PJL with custom extensions.
Job Spooling/Queue
Job input buffering is internal to the controller.
Data Formats
HP-GL, HP-GL2, HP-RTL, CalComp 906 /907 /951 /PCI, TIFF 6.1,
NIRS, Cals 1 & 2, Versatec Raster, XES 150 emulation, CGM, C4,
Filenet, VCGL, VDS (Ordered Vector, Blocked Raster, Compacted
Raster, Versatec Random Format), Adobe PostScript 3 with PDF
(optional)
Single prioritized queue, adjustable priority, job canceling, queue
monitoring provided.
Long plot
Up to 6 Meters (19.7 feet) with 64 Mbytes memory installed.
Up to 16 Meters (52.5 feet) maximum with additional memory.
Auto format recognition
Yes
Color Support
All supported data formats which are color capable (TIFF, HP-RTL,
HPGL/GL2, CGM, CalComp, NIRS) will be processed and converted to
grayscale using a proprietary half-toning algorithm supporting 256 gray
levels.
Color input in PostScript is converted to grayscale using the same
halftone matrix with 128 gray levels.
Compression types (for applicable raster formats):
CCITT G4, G3-ID, G3-2D, Packbits, RLE, Seed Row, Adaptive.
Compression
Hardware lossless Starlite 3410 chip provided.

Job Printing/Processing Specifications (continued)
Number of copies
1 to 999
Extended Processing Options
• Autoscaling
• Autorotation
• Auto Size Detect
• Banner Sheets
• Rotation (0, 90, 180, 270)
• Scaling (10% to 999%)
• Justification
• Margins
• Raster Stamps
• Labeling
• Page Composition/Plot Overlay
• Mirror
• Vector Halftone
• Media Mismatch Management
• Plot Nesting
Electronic Collation
More than 200 E. (Assumes 10:1 compression ratio.)
Folding and Stacking
Optional Online Folder is available. Optional Stacker is available with a
capacity of 500 prints.
Palettes and Patterns
8 user-defined pen palettes and 1 read-only factory default palette. User
defines pen color, width, and pattern for up to 256 pens. 64 patterns
(128 shading patterns, 16 random patterns, 15 user defined patterns).
Each pen attribute is individually controllable.
• Control Panel Lockout
• Scan-to-Net (DDS option)
• Job Accounting (DDS option)
XES Synergix 8855 Controller Setup Manual for Firmware 7.0 11

XES Synergix 8855 Controller Setup Manual for Firmware 7.0 12
Software Supported
Preparing the Serial Port
PC/WINDOWS 95 AND WINDOWS 98 PLATFORM:
• HP RTL Print Driver
The Host Serial Port
This port requires a null modem serial cable to be connected from the
controller host serial port to the workstation serial port. It is necessary to use
the appropriate software drivers or system commands to send jobs to the
controller.
The controller serial host interface port supports user-definable Baud Rate,
Flow Control, and Parity.
Enable Controller Serial Port
Use the Printer_Defaults> Ports menu of the Web PMT to select the Baud
Rate, Flow Control, and Parity to match those set at the workstation.
• ADI Drivers for AutoCAD R13/14
• HDI Drivers for AutoCAD 2000 and 2000i
• PostScript PPD System Print Driver
• Document Submission Tool (part of AccXES Client Tools)
PC/WINDOWS NT 4.0 AND WINDOWS 2000 PLATFORMS:
• HP RTL/HP-GL/2 Print Driver
• ADI Drivers for AutoCAD R13/14
• HDI Drivers for AutoCAD 2000 and 2000i
• PostScript PPD System Print Driver
• Document Submission Tool (part of AccXES Client Tools)
UNIX PLATFORM:
Does not apply to the serial port.
Figure 5 – Typical Web PMT page, showing the serial port setup

Preparing the Serial Port (continued)
Data Formats Supported
• HP-GL, HP-GL/2
• HP-RTL
• TIFF, NIRS
• CALS 1 & 2
• CalComp 906/907/951PCI with Electrostatic extensions
• CGM
• VCGL
• VDS
• C4
• Filenet
• Versatec Raw Raster
• PostScript 3 with PDF (option)
Serial Cable Description
The serial cable should be wired as a null modem with a standard 9 pin D
connector at the controller end and a connector to match the workstation
serial port connector at the host end.
CABLE PART NUMBERS
600T02058 Serial Cable, 9-pin to 9-pin
600T02073 Null Modem Adapter
XES Synergix 8855 Controller Setup Manual for Firmware 7.0 13

XES Synergix 8855 Controller Setup Manual for Firmware 7.0 14
DATA FORMATS SUPPORTED
• HP-GL, HP-GL/2
Preparing the Parallel Port
Parallel Port
This port requires connecting a parallel cable between your workstation
parallel port and the controller parallel port. An appropriate software print
driver or system command is necessary to direct jobs to the printer.
• HP-RTL
• TIFF, NIRS
• CALS 1 & 2
• CalComp 906/907/951 PCI with Electrostatic extensions
• CGM
• VCGL
• VDS
• C4
• Filenet
• PostScript 3 with PDF(option)
Software Supported:
Parallel Cable Description
PC/WINDOWS 95 AND WINDOWS 98 PLATFORMS:
• HP RTL Print Driver
• ADI Drivers for AutoCAD R13/14
• HDI Drivers for AutoCAD 2000 and 2000i
• PostScript PPD System Print Driver
• Document Submission Tool (part of AccXES Client Tools)
The cable connector is a standard, “mini-Centronics” P1284C connector.
A ten foot, high density P1284A to P1284C cable is available (Xerox part
number 98S03302).
The maximum length of the parallel cable must not exceed 12 feet (3.66 m).
PC/WINDOWS NT 4.0 AND WINDOWS 2000 PLATFORMS:
• HP RTL/HP-GL/2 Print Driver
• ADI Drivers for AutoCAD R13/14
• HDI Drivers for AutoCAD 2000 and 2000i
• PostScript PPD System Print Driver (NT 4.0 only)
• Document Submission Tool (part of AccXES Client Tools)
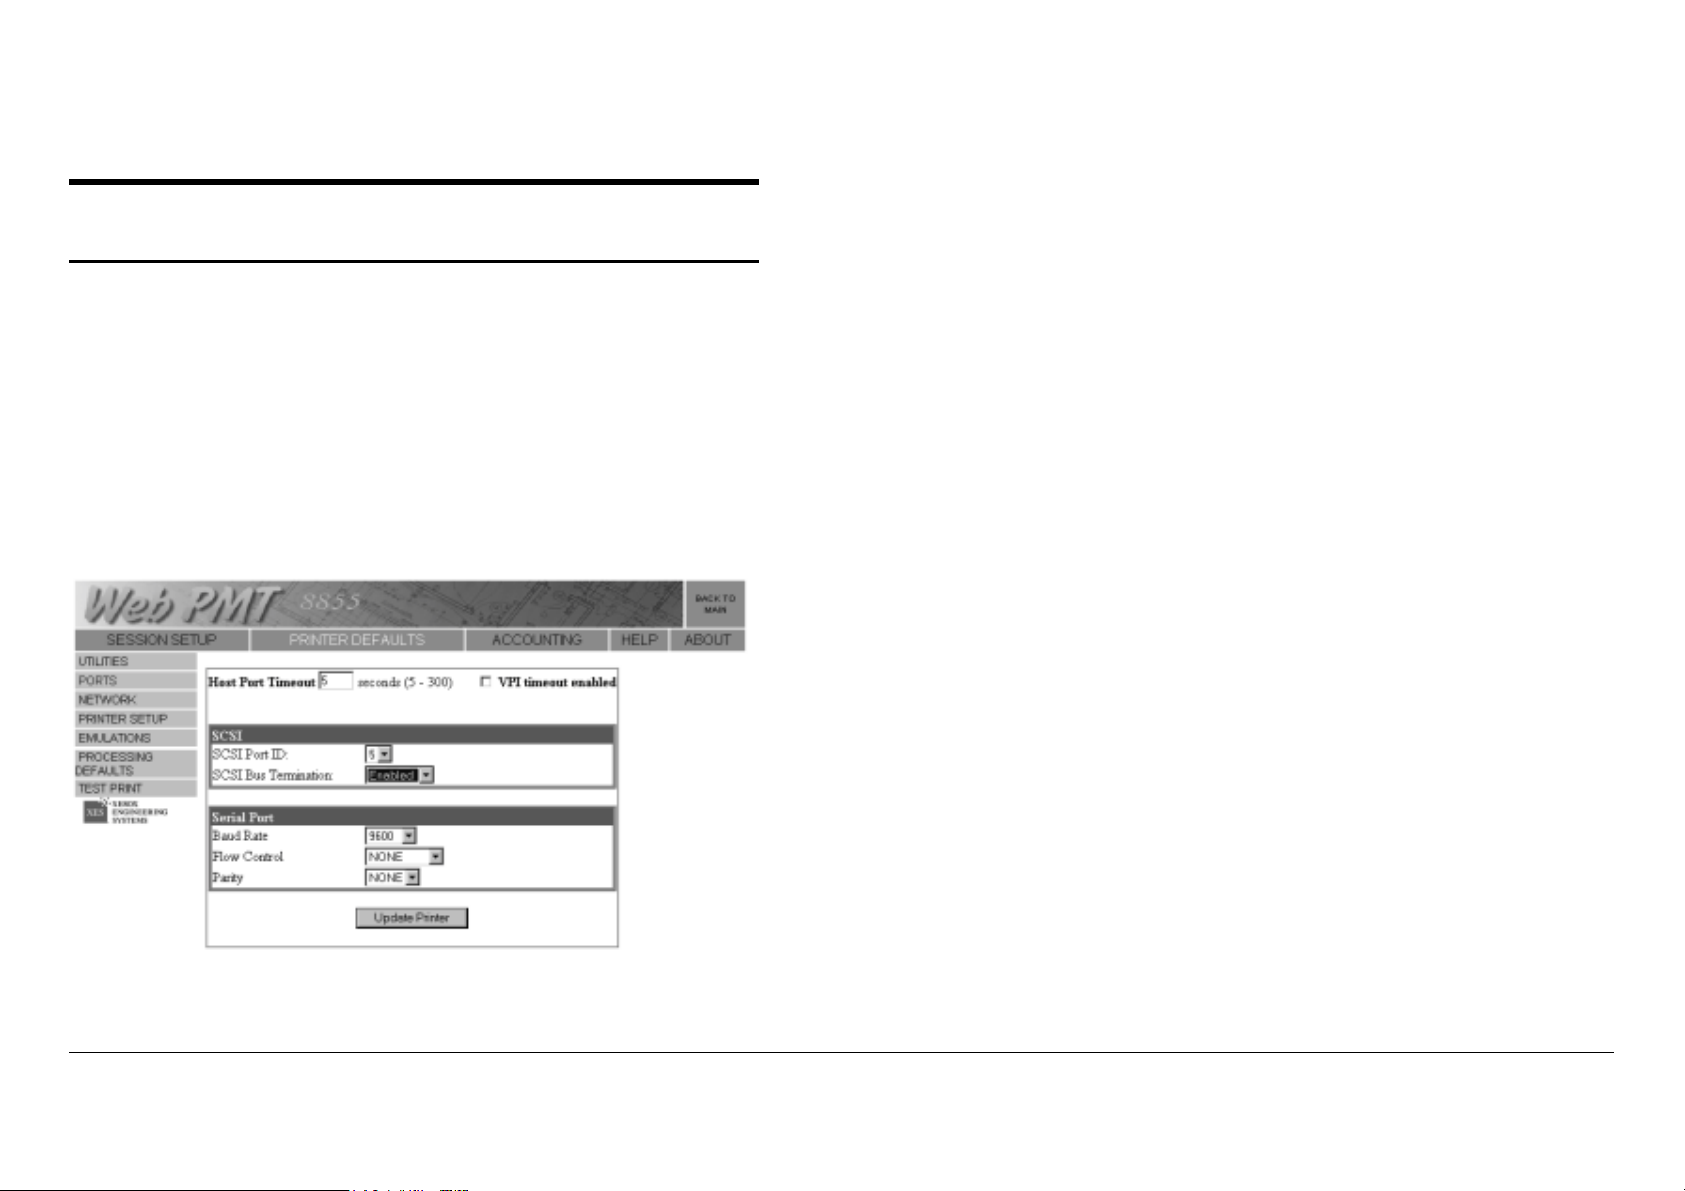
Preparing the Host SCSI Port
Software Supported
• ServeWare Version 2.42 or later.
• VGS (in Xerox 150 Emulation Mode)
Ultra SCSI Port (Host)
To use this port your workstation must have a SCSI interface card and
appropriate software installed and operating.
Enable Controller SCSI Port
Use the Printer_Defaults>Ports menu of the Web PMT to set a device
number compatible with your workstation and to disable the termination. By
default, the host SCSI port bus termination is enabled.
Data Formats Supported
• Xerox 150 Emulation
• Versatec Raw Raster
• VDS
• VCGL
SCSI Cable Description
The SCSI cable must not exceed a maximum length of 9.75 feet (3 meters).
Figure 6 – Typical Web PMT, Ports Setup Page
XES Synergix 8855 Controller Setup Manual for Firmware 7.0 15

XES Synergix 8855 Controller Setup Manual for Firmware 7.0 16
Note: Save the TCP/IP Recovery file to the workstation hard drive. The
file is necessary to re-enter the Ethernet settings if they become corrupt.
Preparing the 10/100 Ethernet Port
Overview
The controller contains an embedded 10/100Mhz Ethernet network interface
port.
Enable Controller Ethernet Port
Use the Printer_Defaults>Network>TCP-IP menu of the Web PMT to set the
net mask, IP address, gateway.
Refer to the Web Printer Manager Tool User Guide for full instructions .
Figure 8 - Typical Screen for Saving a Recovery file in Web PMT
Figure 7 - Typical Web PMT, TCP-IP Setup Page

Network Protocols Supported:
TCP/IP
• lpr and lpd
• ftp and tftp
• telnet
• port 2000 monitor
Preparing the 10/100 Ethernet Port (continued)
Data Formats Supported
• HP-GL, HP-GL2
Software Supported:
PC/WINDOWS 95 AND WINDOWS 98 PLATFORMS:
• RTL Print Driver
• ADI Drivers for AutoCAD R13/14
• HDI Drivers for AutoCAD 2000 and 2000i
• PostScript PPD System Print Driver
• AccXES Client Tools
• Web Printer Manager Tool
PC/WINDOWS NT 4.0 AND WINDOWS 2000 PLATFORMS:
• RTL/GL/2 Print Driver
• ADI Drivers for AutoCAD R13/14
• HDI Drivers for AutoCAD 2000 and 2000i
• PostScript PPD System Print Driver
• AccXES Client Tools
• Web Printer Manager Tool
UNIX PLATFORM:
• Web Printer Manager Tool
• tftp puts
• lpr/lpd support
• AccXES Client Tools
• HP-RTL
• CalComp 906 /907 /951 /PCI
• TIFF 6.1
• NIRS
• Cals 1 & 2
• CGM
• VCGL
• VDS
• C4
• Filenet
• PostScript 3 with PDF (option)
Ethernet Cable Description
Category 5 cable with RJ-45 connectors.
XES Synergix 8855 Controller Setup Manual for Firmware 7.0 17

XES Synergix 8855 Controller Setup Manual for Firmware 7.0 18
This page left intentionally blank.

This page left intentionally blank.

Prepared by:
Xerox Corporation
Global Knowledge & Language Services
800 Phillips Road
Building 845-17S
Webster, New York 14580-9791
USA
©2001 XESystems, Inc. All rights reserved.
Printed in the United States of America
®
XEROX
, XES Synergix 8855 and 8855 Digital Solution, the digital box icon,
AccXES, and the acronym XES are trademarks of Xerox Corporation.
701P36856 April 2001
 Loading...