

Page 1

XES Synergix
8825/8830
Printer Operator Manual
701P19710 November 2000
Page 2

FCC Compliance
In the USA
Class A
This equipment has been tested and found to comply with the limits for a Class A
digital device, pursuant to Part 15 of the FCC rules. These limits are designed to
provide reasonable protection against harmful interference when the equipment is
operated in a commercial environment. This equipment generates, uses, and can
radiate radio frequency energy and, if not installed and used in accordance with the
instruction manual, may cause harmful interference to radio communication.
Operation of this equipment in a residential area is likely to cause harmful
interference, in which case the user will be required to correct the interference at
their own expense.
If necessary, the user should consult the dealer or an experienced radio/television
technician for additional suggestions. The user may find the following booklet
prepared by the Federal Communications Commission helpful:
How to Identify and resolve Radio-TV Interference Problems
Stock Number: 004-000-00345-4.
EME Compliance in Canada
This digital apparatus does not exc eed the Class A limits for radio noise emiss ions
from digital apparatus s et out in the radio interference regulations of the Canadian
Department of Communications.
Page 3

Trademark Acknowledgments
XEROX®, XES™, Synergix™, The Document Company, and the identifying product
names and numbers herein are trademarks of XEROX CORPORATION.
®
Windows NT
trademarks of Microsoft Corporation.
Internet Explorer is a copyright protected program of Microsoft Corporation.
Microsoft
PowerPoint is a trademark of Microsoft Corporation.
Netscape is a registered trademark of Netscape Communications Corporation.
CorelDRAW is a registered trademark of Corel Corporation.
PostScript is a trademark of Adobe Systems Incorporated.
HP-GL/2 is a trademark of Hewlett-Packard Company.
AutoCAD is a registered trademark of Autodesk, Inc.
ADI is a registered trademark of Autodesk, Inc.
HDI is an acronym for Heidi
Autodesk, Inc.
, Windows® 95, Windows® 98, and Windows® 2000 are registered
®
Word is a copyright protected program of Microsoft Corporation.
®
Device Interface. Heidi is a registered trademark of
Page 4

Introduction
Congratulations on acquiring your new XES Synergix 8825/8830 Printer. We look
forward to supporting you and helping you to increase your printing productivity. The
integrated features, the ease of operation, and the reliability of your new equipment
will allow you to concentrate on your business and leave the printing to your Printer
or Digital Document System.
This operator manual provides the information that you need to become familiar with
the features, documentation components, operations, and specifications of the
equipment that you purchased.
Be sure to check the XES Web Site (XES.com)
for the latest documentation and firmware
upgrades.
Our support group is available to you for further assistance. The following
information will be needed when you call:
Customer Account Name:
Customer Account Number:
Machine Type: XES Synergix 8825/8830 Printer
Printer Serial Number:
FOR SERVICE ON YOUR PRINTER:
Local Phone Number:
A Customer Service Support Representative will assist you in keeping your Printer
operating and, if required, will arrange for a Customer Service Engineer to inspect
your system and restore its performance.
FOR PURCHASE OF OTHER EQUIPMENT AND SUPPLIES:
Local Phone Number (Equipment)
Local Phone Number (Supplies)
A Sales Representative will assist you in evaluating your needs for other xerographic
equipment that can further increase your productivity.
Page 5

TABLE OF CONTENTS
SAFETY NOTES................................................................. 2
PRINTER OVERVIEW........................................................ 5
Left Side View.................................................................. 5
Right Side View................................................................ 6
Front View........................................................................ 7
Control Panel................................................................... 8
POWER ON/OFF................................................................ 9
Switching On and Off....................................................... 9
Power Saver, and Rest Mode........................................ 10
MEDIA INFORMATION..................................................... 11
Loading the Roll Media.................................................. 11
Media View Menu........................................................... 15
MANUAL BYPASS FEED................................................. 18
OFF LINE MENUS............................................................ 19
General Information .......................................................19
Printer Menu - Entry....................................................... 20
1. Audible Indicators................................................... 21
2. Timers....................................................................22
3. Printer Adjustments (Density).................................24
4. Finisher Settings.....................................................25
5. Diagnostics............................................................. 26
6. Billing Meters.......................................................... 27
PROBLEM SOLVING........................................................ 28
Status Codes.................................................................. 28
Media Jams.................................................................... 29
Error Messages.............................................................. 30
Checking for the Loss of Power ..................................... 31
Print Quality.................................................................... 32
CARE................................................................................33
Replacing the Toner Cartridge....................................... 33
Replacing the Waste Bottle............................................ 36
Required Tasks.............................................................. 37
Calling for Service.......................................................... 37
Ordering Supplies...........................................................38
PRODUCT SPECIFICATIONS.......................................... 39
XES Synergix 8825/8830 Printer Operator Manual 1
Page 6

SAFETY NOTES
XES Synergix 8825/8830 Printer Operator Manual 2
Your Printer has been designed and tested to meet strict safety
requirements. These include safety agency examination and
approval and compliance with established environmental standards.
Please read the following instructions carefully before operating the
Printer and refer to them as needed to ensure the continued safe
operation of your printer.
Follow all warnings and instructions that are marked on or supplied
with the product.
Unplug the printer from the wall outlet before cleaning the exterior.
Always use materials specifically designated for the Printer. Use of
other materials may result in poor performance and could create a
hazardous situation.
Do not use aerosol cleaners. Follow the instructions in this operator
manual for the correct cleaning methods.
Never use supplies or cleaning materials for purposes other than
what they were intended. Keep all supplies and materials out of the
reach of children.
Do not use this product near water, wet locations, or outdoors.
This product is equipped with a three-wire, grounding-type plug (i.e.,
a plug having a grounding pin). This plug will only fit into a
grounding-type power outlet. This is a safety feature. To avoid the
risk of electric shock, contact your electrician to replace the
receptacle if you are unable to insert the plug into the outlet.
Never use a ground adapter plug to connect the printer to a power
source that lacks a ground connection terminal.
This product should be operated from the type of power source that
is indicated on the label. If you are not sure of the type of power
available, consult your local power company.
The power supply cord is the disconnecting device for this
equipment. Make sure that the installation is near the socket outlet
and is easily accessible.
Do not allow anything to rest on the power cord. Do not locate the
printer where someone will step on the cord.
(continued)
Page 7

SAFETY NOTES (continued)
Slots and openings in the cabinet and in the back and bottom of the
printer are provided for ventilation. To ensure reliable operation of
the printer and to protect it from overheating, never position the
printer so that these openings are near a radiator or heat register.
The printer should not be placed in a built-in installation unless
adequate ventilation is provided.
Never push objects of any kind into the slots of the printer in order
to avoid touching dangerous voltage points or short out parts that
could result in a risk of fire or electric shock.
Never spill liquid of any kind on the printer.
Never remove any covers or guards that require a tool for removal.
There are no operator serviceable areas within these covers.
Never attempt any maintenance function that is not specified in this
operator manual.
Never defeat the interlock switches. Your printer is designed to
prevent operator access to unsafe areas. The covers, the guards,
and the interlock switches are provided to ensure that the system
will not operate when the covers are open.
Unplug the printer from the wall outlet and refer all servicing to
qualified service personnel under the following conditions:
When the power cord is damaged or frayed.
If liquid has been spilled into the printer.
If the printer has been exposed to rain or water.
If the printer is producing unusual noises or odors.
If the printer or the cabinet has been damaged.
If you need additional safety information concerning the Printer or
supplied materials, you may call the following toll-free number:
1-800-828-6571.
(continued)
XES Synergix 8825/8830 Printer Operator Manual 3
Page 8
SAFETY NOTES (continued)
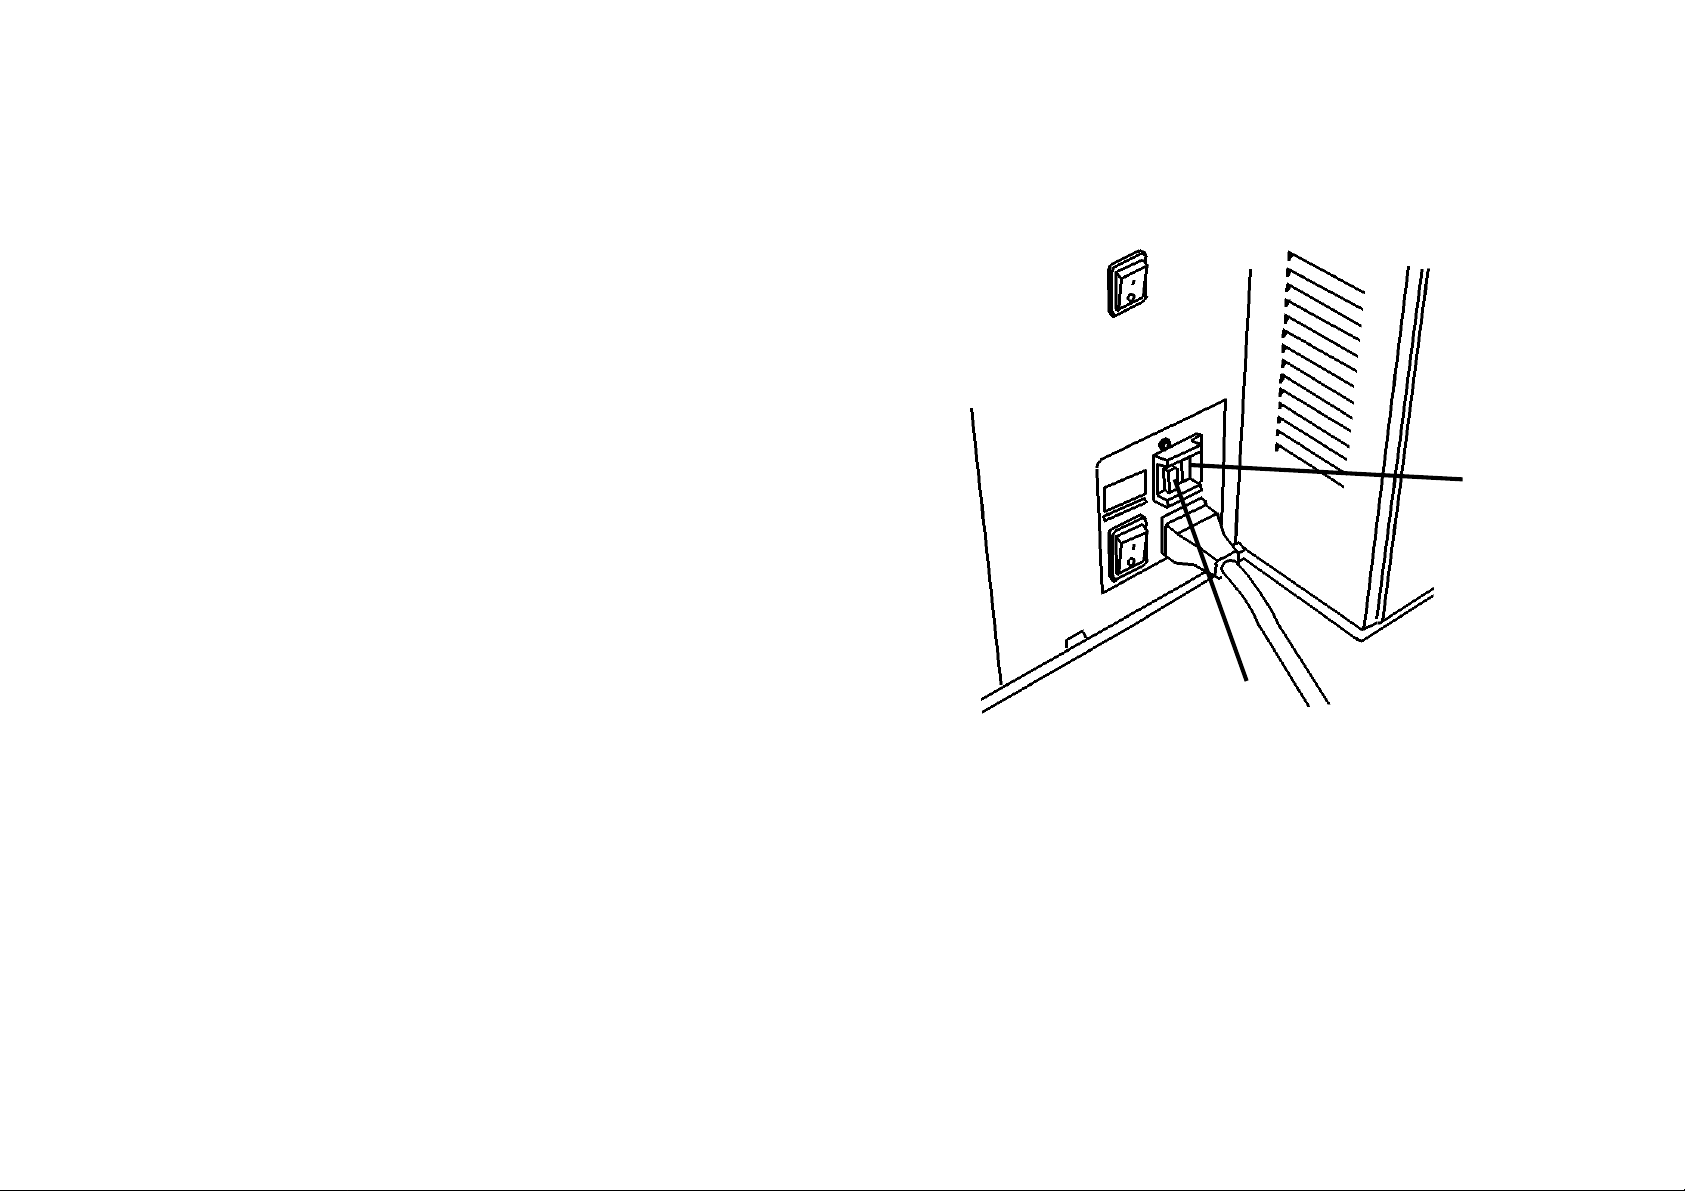
GROUND FAULT PROTECTION
The printer is equipped with an additional safety feature, a Ground
Fault Interrupter (GFI). This safety device will remove all power to
the printer if an electrical fault is detected by the GFI.
In the event that power is interrupted to the printer, locate the GFI
safety device located on the right side of the printer next to the
power cord:
Check that a red indicator appears in the window (A) of the safety
device as shown opposite.
If no indicator is present, press and release the black RESET button
(B). The red indicator should appear in the window, and power
should be restored to the printer.
If the device interrupts power to the printer again, or if power is not
restored by performing the above procedure, call Xerox Service to
correct the problem.
XES Synergix 8825/8830 Printer Operator Manual 4
A
BB
Page 9

PRINTER OVERVIEW
LEFT SIDE VIEW
Output Tray
Supports the prints
in the exit area.
Control Panel
Make keypad entries
and read the printer
status and messages
here.
Drawer 1 (Top)
Open to load paper
rolls and to clear
media jams.
Drawer 2 (Middle)
Open to load paper
rolls and to clear
media jams.
(Optional on the
8825.)
Drawer 3 (Bottom)
Open to load paper
rolls and to clear
media jams. (Not
available on the
8825.)
Cut Sheet Feed-In
Shelf
Insert the cut sheets
here to bypass the roll
media in drawers.
Lower the cover to
remove jammed media.
(Optional on the 8825.)
Front Door
Provides an access
to the waste toner
bottle.
XES Synergix 8825/8830 Printer Operator Manual 5
Page 10

PRINTER OVERVIEW
RIGHT SIDE VIEW
Cutter Drawer
Open to clear
media jams in
the cutter.
XES Synergix 8825/8830 Printer Operator Manual 6
Toner Supply
Access Cover
Open to
replace the
toner cartridge.
Controller Option
Interfaces to the client/host
and formats incoming
prints.
Controller
On/Off Switch
Switches the
controller on
and off.
Printer On/Off
Switch
Switches the
printer on and
off.
Power Cord
Connection
Connect the
power cord here
and to a suitable
outlet.
Ground Fault Protector
Removes power to printer
if an electrical fault is
detected.
Page 11

PRINTER OVERVIEW
FRONT VIEW (front door open)
Toner Waste
Container
Replace at
stated
intervals.
XES Synergix 8825/8830 Printer Operator Manual 7
Page 12
PRINTER OVERVIEW
XES Synergix 8825/8830 Printer Operator Manual 8
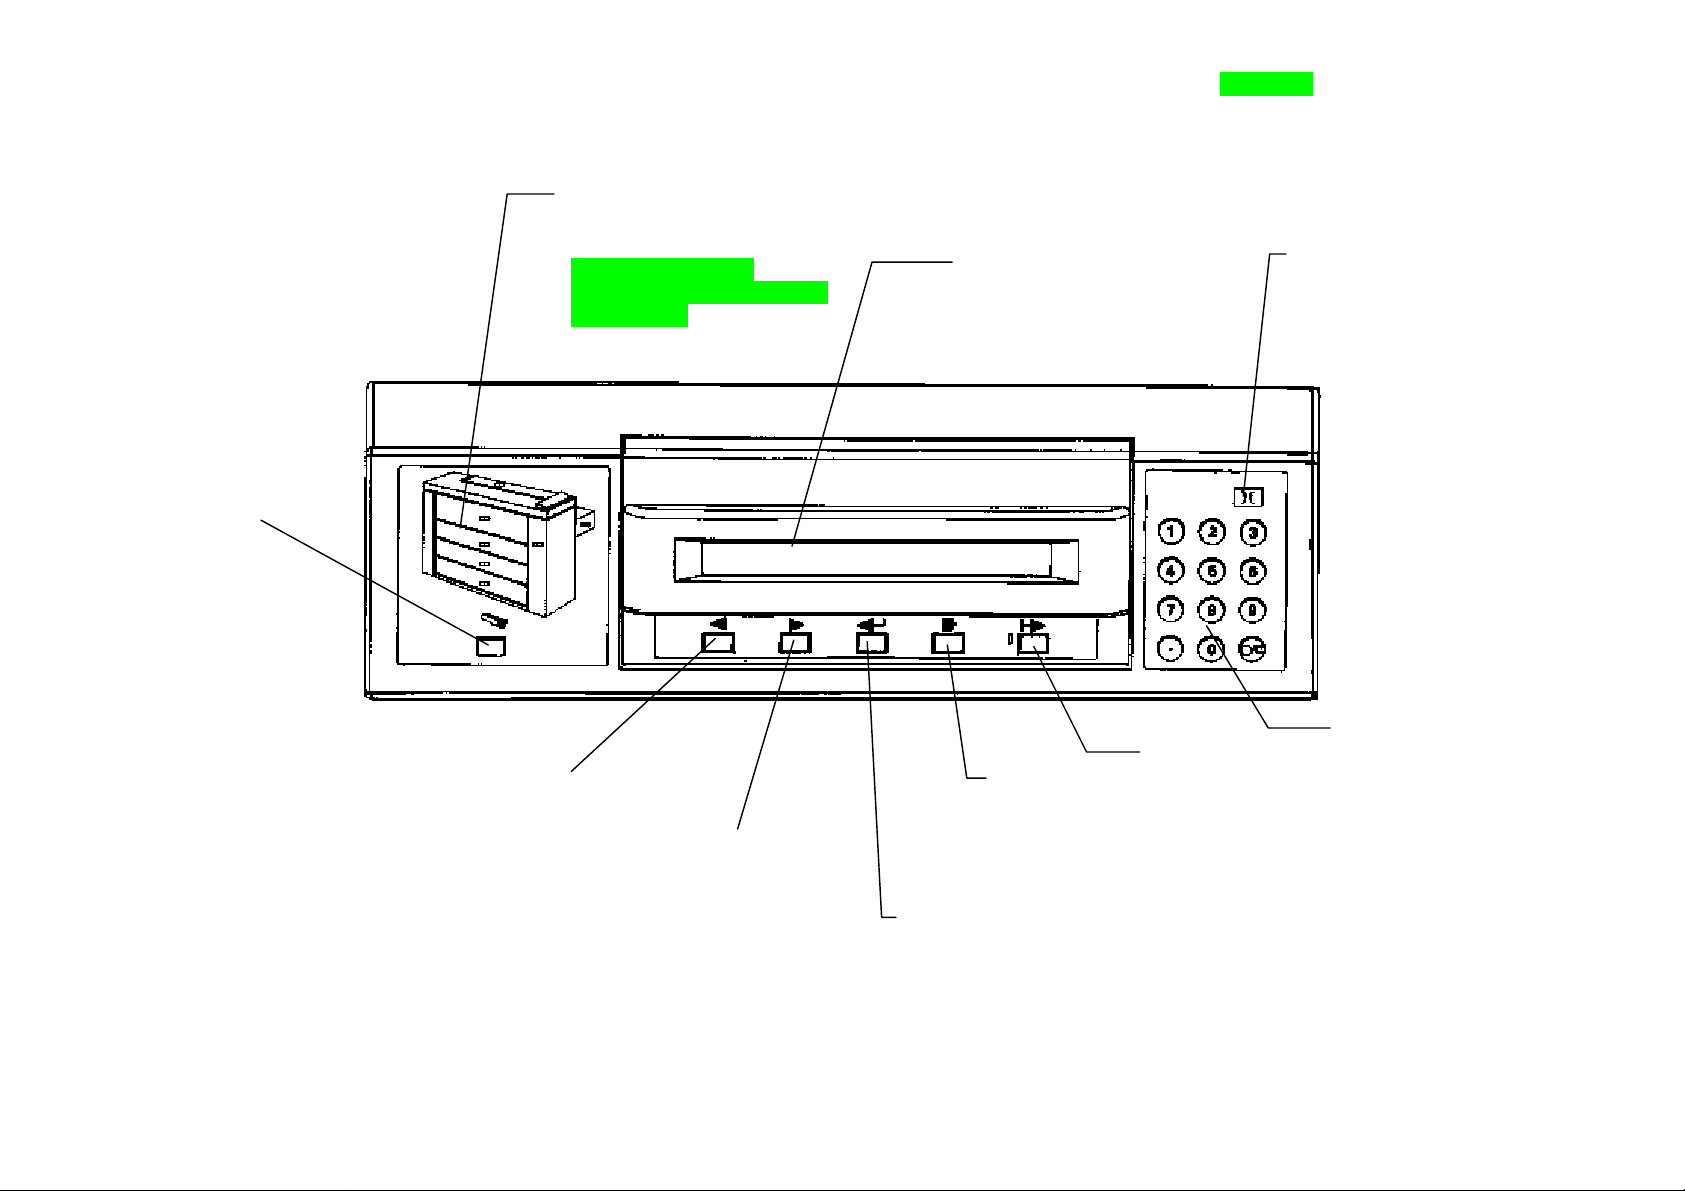
CONTROL PANEL
Media Button
Activates the Media
Menu to select the
size and the type of
media that is loaded
in printer.
Previous Button
Press to move
backward through the
printer menus and
selections.
Graphic Display
Indicates the jam locations
and any open doors.
(Note; The LED on
Drawers 3 will not be present
on the 8825.)
Next Button
Press to move
forward through the
printer menus and
selections.
Message Display
Provides 2 lines by 40
character alphanumeric
display of printer status
and menus.
Exit Button
Press to exit
from the printer
menus and
selections.
Enter Button
Press to enter the
printer menus and to
store the selections.
Off-line Button
and LED
Press to turn off
the LED and take
the printer off line.
Language Button
Selects a secondary
language for the
message display
(option).
Numeric
Keypad and
Cancel/Clear
(C/c) Button
Page 13
POWER ON/OFF
Switching On and Off
B
A
Switching On
Note: Load media in the drawers
before switching on the power or
after the printer is ready to print
.
1. Press the Printer power switch
(A) to the on (I ) position.
2. Press the power switch (B) for
the Controller (if installed) to the
on (I ) position.
PRINTER IS WARMING UP
L9......L0
• The printer will count down briefly from L9 to L0 while the fuser is
warming up to the operating temperature.
• After the count down is complete, the printer will be On Line and ready to
print.
Switching Off
1. Press the Controller power switch
(B) to the Off (0) position.
2. Press the printer power switch (A)
to the off (0) position
XES Synergix 8825/8830 Printer Operator Manual 9
Page 14

POWER ON/OFF
Power Saver, Rest Modes
XES Synergix 8825/8830 Printer Operator Manual 10
POWER SAVER MODE FUSER IS AT LOW
POWER. PRESS [ENTER] TO WARM UP PRINTER
The printer will go through two stages of power conservation after a
preprogrammed time interval of no print activity or control panel activity:
1) POWER SAVER MODE
Using the printer menu, you can adjust the time interval that the printer remains
in the Ready mode from 5 to 50 minutes. After this preset interval, the printer
will enter the Power Saver mode. Refer to the Off Line Menus section of this
manual for instructions.
REST MODE FUSER IS OFF
PRESS [ENTER] TO WARM UP PRINTER.
2) REST MODE
In the Rest mode, a minimum of power is supplied to the printer.
Using the printer menu, you can adjust the time interval that the printer
remains in the Power Saver mode from 15 to 150 minutes. After this preset
interval, the printer will enter the Rest mode. Refer to the Off Line Menus
section of this manual for instructions.
A print request returns the printer to the on-line mode.
Page 15
MEDIA INFORMATION
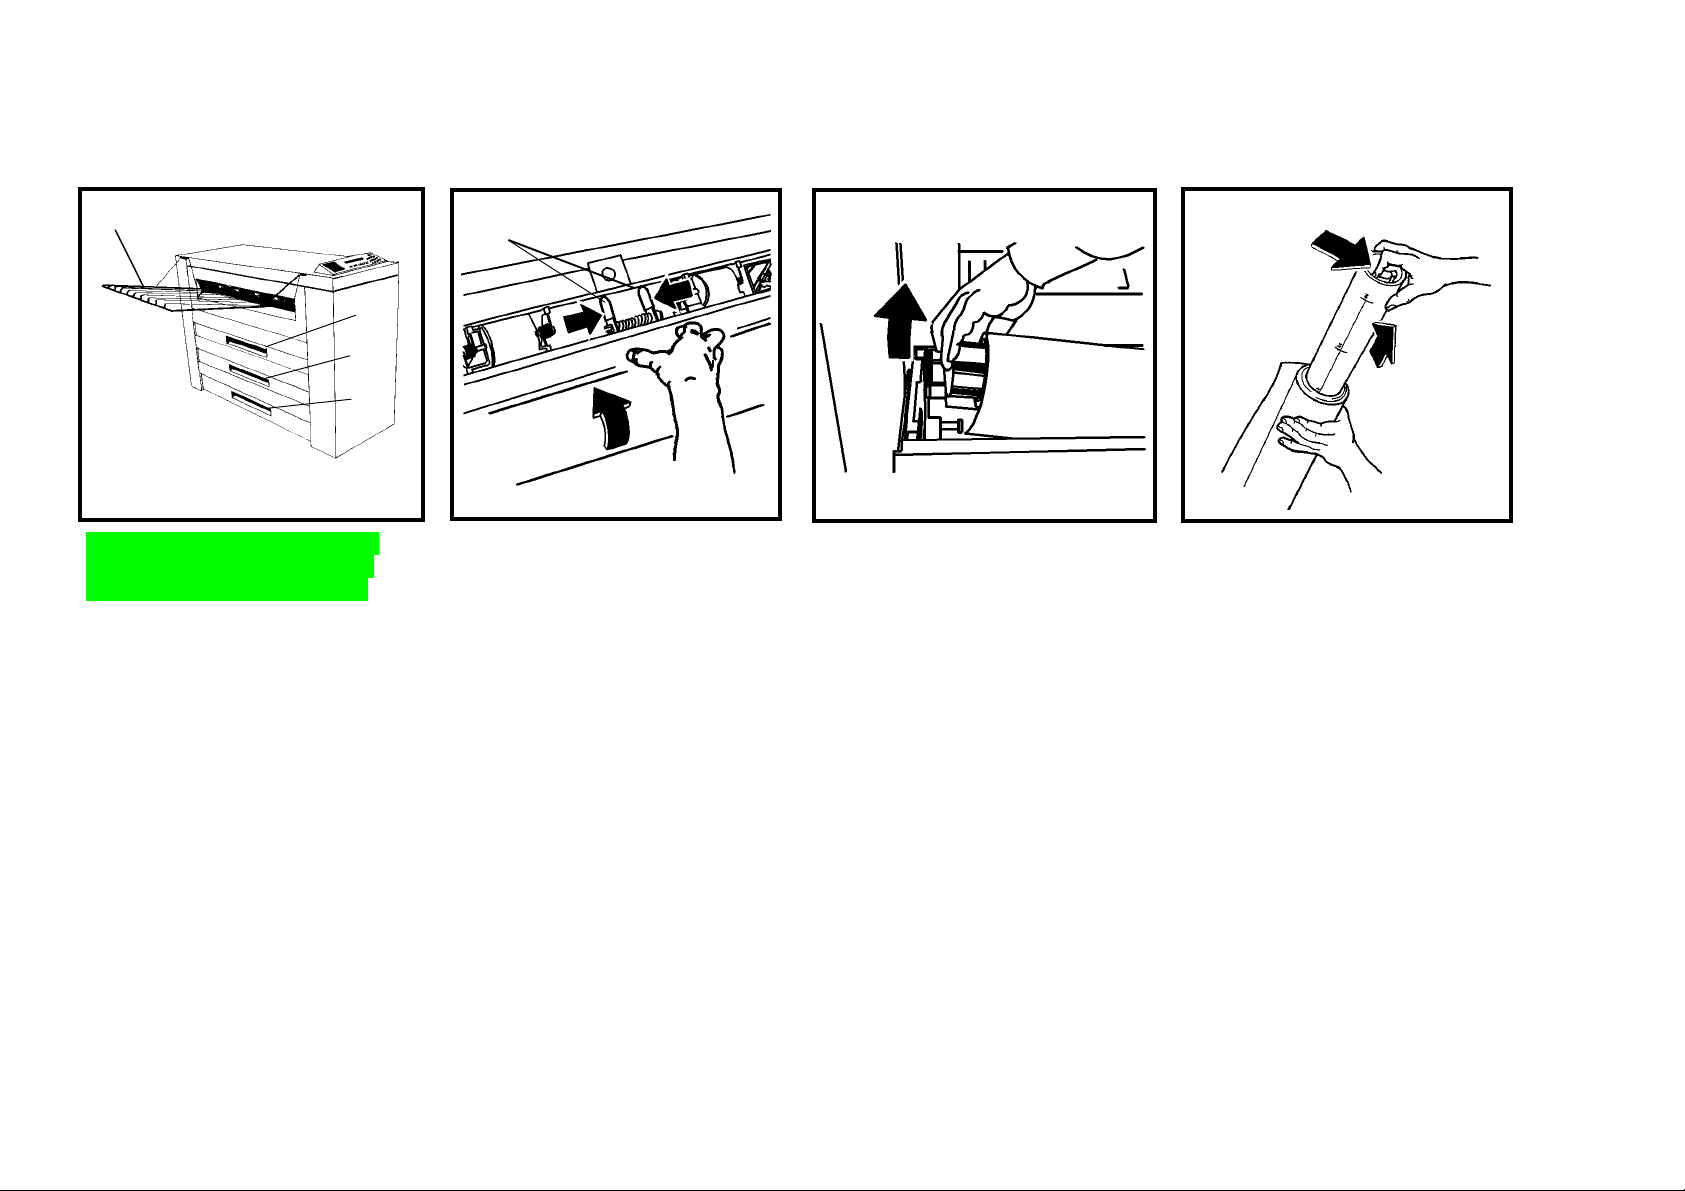
Loading the Rolls of Media
A
1
3
Note: Load media in the drawers
before switching on the power or
after the printer is ready to print.
1. Raise the output tray (A) if
necessary and then lift the
handle in order to pull out the
Media Roll Drawer 1, 2 (Optional
on 8825), or 3 (Not available 0n
8825).
A
2. Squeeze the two knobs (A)
together in order to release the
latch.
3. Rotate the roll to rewind the
remaining media onto the roll.
4. Lift out the used roll of media.
5. Stand the roll assembly on end.
6. Squeeze the lever at the end of
the Media Roll Support Tube
and remove the tube from the
used roll of media.
XES Synergix 8825/8830 Printer Operator Manual 11
Page 16

MEDIA INFORMATION
Loading the Rolls of Media
XES Synergix 8825/8830 Printer Operator Manual 12
7. Slide the Media Roll Support
Tube into the new roll of media.
8. Squeeze the lever at the end of
the Media Roll Support Tube,
and slide the tube into the roll
until the size indicators on the
tube match the size of the roll.
9. Lift the new roll into the media
drawer, lead edge down and in.
10. Ensure that the Media Roll Support Tube is seated correctly on the
support rollers.
11. Remove the tape from the lead edge of the media roll.
NOTE: Ensure that all of the glue from the tape is removed from the media.
Page 17

MEDIA INFORMATION
Loading the Rolls of Media
12. If the lead edge of the roll is torn
or uneven, trim off the lead edge
of the media.
NOTE: Trimming is usually not
necessary for a new roll of media.
13. Squeeze the two knobs on the
Baffle and lift up to open the
Baffle.
14. Rotate the media roll to feed the
media under the Baffle and
beyond the registration window
(A).
NOTE: Ensure that the lead edge of
the media is flat and is not folded
over itself.
15. Squeeze the two knobs on the
Baffle and lower the Baffle into
place.
XES Synergix 8825/8830 Printer Operator Manual 13
16. Center the lead edge of the
media in the registration window.
Page 18

MEDIA INFORMATION
Loading the Rolls of Media
XES Synergix 8825/8830 Printer Operator Manual 14
17. Press down on the center of the
baffle in order to lock the Baffle
into position.
NOTE: Ensure that the lead edge of
the media is still aligned in the
registration window.
18. Push in the Media Roll Drawer.
19. Refer to instructions on the
following page in order to
program the Media View Menu
for the media you loaded in the
drawer.
20. Lower the output tray.
Page 19

MEDIA INFORMATION
A
Media View Menu
INITIALIZING MEDIA SUPPLY PRESS [MEDIA] TO CHANGE
MEDIA TYPE/WIDTH, [EXIT IF NO CHANGE
After opening a media drawer and/or loading the m edia, the printer mess age
will prompt you to change the size and type of media in the Media View Menu.
The Media button on the Control Panel is the means of access to the Media
View Menu. The Media View Menu contains three submenus:
• Media Source
• Media Size
• Media Type
1. Press the Media button (A) in order to access the Media View Menu from
the on-line or off-line mode.
XES Synergix 8825/8830 Printer Operator Manual 15
Page 20

MEDIA INFORMATION
[
Media View Menu (cont.)
XES Synergix 8825/8830 Printer Operator Manual 16
MEDIA IN <ROLL 1> IS 36.0 INCH BOND
ENTER] TO CHANGE
2. Press the Next or the Previous button in order to scroll through the current
media selections:
• Roll 1
• Roll 2 (Optional on the 8825)
• Roll 3 (Not available on the 8825)
• Bypass Shelf (Optional on the 8825)
NOTE: Media size selection does not apply to the Bypass Shelf.
3. Press the Enter button in order to select a media source.
SELECT MEDIA WIDTH <36.0 INCH>
4. Press the Next or the Previous button in order to scroll through the media
sizes.
• Press the Enter button in order to select a media size:
5. Press the Exit button in order to go back to the media source selection.
<11.0 INCH>
<12.0 INCH>
<17.0 INCH>
<18.0 INCH>
<22.0 INCH>
<24.0 INCH>
<30.0 INCH>
<34.0 INCH>
<36.0 INCH>
<297 mm.>
<353 mm.>
<420 mm.>
<500 mm.>
<594 mm.>
<620 mm.>
<707 mm.>
<750 mm.>
<841 mm.>
<860 mm.>
<880 mm.>
<900 mm.>
Page 21

MEDIA INFORMATION
Media View Menu
SELECT MEDIA TYPE <BOND>
6. Press the Next or the Previous button in order to scroll through the media
types:
• Bond (ordinary)
• Vellum/Tracing
• Film
7. Press the Enter button in order to select the media type
8. Press the Media button in order to return to the on-line or off-line mode.
XES Synergix 8825/8830 Printer Operator Manual 17
Page 22

XES Synergix 8825/8830 Printer Operator Manual 18
A
MANUAL BYPASS FEED
The Manual Bypass Feed is standard equipment for the 8830. The Manual Bypass Feed is optional equipment for the 8825
• When the correct media is not
loaded for an incoming print job,
you may manually bypass the
media drawers and load cut-sheet
media of the required size on the
Cut Sheet Feed-In Shelf.
• Minimum size is 8.5 X 11 inch (A4)
fed Short-Edge-Feed (SEF).
1. Raise the Output Tray (A) up and
2. Center the media between the
3. Feed the lead edge of the media
B
out of the way.
size indicators on the Cut Sheet
Feed-In Shelf (B).
squarely into the printer until the
media stops.
Page 23

OFF-LINE MENUS
Printer Menu
The printer has two off-line menus that customize the printer to meet your
particular application.
The Printer Menu allows you to customize the printer to meet your special
requirements. The Controller Menu (available only on Printers with a
Controller installed) allows you to configure the controller to meet your
specific requirements.
The Printer Menu contains six submenus, with one or more features per
submenu, that allows you to control the operation of the printer:
1. Audible Indicators: This submenu has two features which activate an
audible beeper for system events and keypad
actuation’s.
2. Timers: This submenu sets the time intervals for the Power
Saver and Rest mode.
3. Printer Adjustments: The print density can be increased or
decreased.
4. Finisher Settings: This submenu enables you to specify the finisher
configuration type.
5. Diagnostics One of the three features allows you to run a test
print in the off-line mode. Another feature displays a
record of printer faults. A third feature is for use by
the Service Representative and is password
protected.
6. Billing Meters These two meters provide records of the length and
area of prints produced.
XES Synergix 8825/8830 Printer Operator Manual 19
Page 24

OFF-LINE MENUS
Printer Menu - Entry
PRINTER MENU
<AUDIBLE INDICATORS>
1. Press the Off-line button in order to enter the off-line mode.
• The Message Display indicates PRINTER MENU <AUDIBLE
INDICATORS>, which is the first Printer submenu.
2. Press the Next button in order to scroll through the other submenus.
3. Press the On-line button in order to return to the On-line mode.
XES Synergix 8825/8830 Printer Operator Manual 20
NOTE: For printers with the Controller installed, refer to the XES Synergix
8825/8830 Controller Setup Manual to enter the Printer Menu.
Page 25

OFF-LINE MENUS
Printer Menu - Audible Indicator s
AUDIBLE INDICATORS
<KEYPRESS = ON>
1. When <AUDIBLE INDICATORS > is displayed on the Control Panel,
press the Enter button.
2. Press the Enter button to select the KEYPRESS=ON feature (or press
Next to select the ALARM ON feature and go to step 6).
3. Press the Next (or the Previous) button in order to switch the feature ON
or OFF.
4. Press the Enter button in order to enter your selection.
press Exit if no change is required.
AUDIBLE INDICATORS
<ALARM = ON>
5. Press the Next button to display the next feature.
6. Press Enter to select the ALARM ON feature.
7. Press the Next (or the Previous) button in order to switch the feature ON
or OFF.
8. Press the Enter button in order to enter your selection or
press Exit if no change is required.
9. Press Exit to return to the AUDIBLE INDICATORS submenu.
XES Synergix 8825/8830 Printer Operator Manual 21
Page 26

OFF-LINE MENUS
Printer Menu - Timers
XES Synergix 8825/8830 Printer Operator Manual 22
TIMERS
<READY TO POWER SAVER = xx MINUTES)>
7. When TIMERS is displayed on the Control Panel, press the Enter button
to display the first feature.
8. Press the Enter button to select the READY TO POWER SAVER feature
(or press Next to select the (next) TIMERS feature and go to step 6 to
select the next feature).
READY TO POWER SAVER = xx MINUTES
INPUT NEW TIME (5 - 50) and [ENTER]
3. Press the Next (or Previous) button in order to scroll through the range of
values (the value of 0 will prevent the printer from entering the Power
Saver mode).
4. Press the Enter button in order to enter your selection or
press Exit if no change is required.
5. Press the Next button to display the next feature.
Page 27

OFF-LINE MENUS
Printer Menu - Timers (cont.)
TIMERS
< POWER SAVER TO REST = xxx MINUTES)>
11. Press Enter to select the POWER SAVER TO REST feature.
POWER SAVER TO REST = xxx MINUTES
INPUT NEW TIME (15 - 150) and [ENTER]
7. Press the Next (or Previous) button in order to scroll through the range of
values.
8. Press the Enter button in order to enter your selection or
press Exit if no change is required.
9. Press the Exit button in order to return to the TIMERS submenu.
XES Synergix 8825/8830 Printer Operator Manual 23
Page 28

OFF-LINE MENUS
Printer Menu - Printer Adjustments
XES Synergix 8825/8830 Printer Operator Manual 24
PRINTER ADJUSTMENTS
<DENSITY = xx >
7. When PRINTER ADJUSTMENTS is displayed on the Control Panel, press
the Enter button to display the first feature.
8. Press the Enter button to select the DENSITY feature.
DENSITY = xx
ENTER NEW VALUE (0 - 10)
3. Press the Next (or Previous) button in order to scroll through the range of
values.
4. Press the Enter button in order to enter your selection or
press Exit if no change is required.
5. Press the Exit button in order to return to the PRINTER ADJUSTMENTS
submenu.
Page 29

OFF-LINE MENUS
Printer Menu - Finisher Settings
FINISHER SETTINGS
<FINISHER CONFIG TYPE = NONE>
7. When FINISHER SETTINGS is displayed on the Control Panel, press the
Enter button to display the first feature.
8. Press the Enter button to select the FINISHER feature, or go to step 5 to
select the next feature.
FINISHER CONFIG TYPE = <001>
3. Press the Next (or the Previous) button in order to scroll through the
available settings.
4. Press the Enter button in order to enter your selection, or
press Exit if no change is required.
NOTE: Refer to the Folder User Guide for the appropriate value.
5. Press the Exit button in order to return to the FINISHER SETTINGS
submenu.
XES Synergix 8825/8830 Printer Operator Manual 25
Page 30

OFF-LINE MENUS
Printer Menu - Diagnostics
XES Synergix 8825/8830 Printer Operator Manual 26
DIAGNOSTICS
<TEST PLOT>
1. When DIAGNOSTICS is displayed on the Control Panel, press the Enter
button to display the first feature.
2. Press the Enter button to select the <TEST PLOT> feature.
TEST PLOT
PRINT FROM <ROLL x>
3. Press the Next (or Previous) button in order to scroll through the available
settings (Roll 1, Roll 2 (Optional for the 8825), Roll 3 (Not available for the
8825), BYPASS (Optional for the 8825).
4. Press the Enter button in order to enter your selection, or
press Exit if no change is required.
5. Press the Exit button in order to return to the DIAGNOSTICS submenu.
NOTE: There are two other features in the submenu that are reserved for the
Service Representative. The diagnostic feature is protected by a password.
Page 31

OFF-LINE MENUS
Printer Menu - Billing Meters
BILLING METERS
<METER A xxxxxxx SQUARE FEET>
1. When BILLING METERS is displayed on the Control Panel, press the
Enter button to display the Meter A. screen.
2. Press the Enter button to view to total count of Meter A.
3. Press Exit to return to the Printer Menu.
BILLING METERS
<METER B xxxxxxx FEET
4. Press the Next (or the Previous) button to display the total count of Meter
B.
5. Press the Exit to return to the Printer Menu.
XES Synergix 8825/8830 Printer Operator Manual 27
Page 32

PROBLEM SOLVING
Status Codes
The Printer has been designed with the user in mind; therefore, very few
problems will be encountered. But, should the printer not operate correctly, it
has the ability, in most cases, to advise the user how to solve the problem.
The Control Panel displays advise the user of problems and how to correct
them.
• The Graphic Fault Display flashes the appropriate LED(s ) at the loc ation of
any problems.
• The Message Display shows the Status Code that is associated with any
problem. The Message Display also shows the instructions for correcting
the problem.
When a problem occurs, take the following actions:
• Observe the Control Panel displays.
• Observe the location of any flashing indicators on the Graphic Fault
Display and follow the instructions on the Message Display.
• If a Status Code is present on the Message Display, refer to the table on
this page for further corrective action.
• If the problem or malfunction continues, call for service.
Status Codes
The following Status Codes may appear on the Message Display. Follow the
instructions in the table below before calling for service.
Status
Code
C0.-- This code indicates a cutter problem. Follow the instructions on
the Message Display.
C1.-- This code indicates a problem with Roll 1. Follow the instructions
on the Message Display.
C2.-- This Code indicates a problem with Roll 2 (Optional for the 8825).
Follow the instructions on the Message Display.
Explanation
XES Synergix 8825/8830 Printer Operator Manual 28
8825). Follow the instructions on the Message Display.
C4.-- This code indicates a problem at the Cut Sheet Bypass (Optional
for the 8825). Follow the instructions on the Message Display.
E2.-- This code indicates a problem in the paper path. Follow the
instructions on the Message Display.
E4.-- This code indicates a problem in the fuser area. Follow the
instructions on the Message Display.
E5.-- This code indicates an interlock problem. Follow the instructions
on the Message Display.
E6.-- This code indicates a problem in the paper path. Follow the
instructions on the Message Display.
E7.-- Communication failure with the Controller. Switch the printer and
controller off, wait a few seconds, then switch them on.
E9.-- Switch the printer off. Wait a few seconds, then switch the printer
on.
F1.-- This code indicates a problem in the finisher. Follow the
instructions on the Message Display.
F2.-- This code indicates a problem in the finisher. Follow the
instructions on the Message Display.
J1.01 This code indicates that the Toner Cartridge should be replaced.
Refer to the CARE section, Replacing the Toner Cartridge.
J2.02 This code indicates that the Toner Cartridge is not installed
correctly. Refer to the CARE section, Replacing the Toner
Cartridge.
LL.-- Switch the printer off. Wait a few seconds, then switch the printer
on.
U1.01 Call for service.
C3.-- This code indicates a problem with Roll 3 (Not available on the
Page 33

PROBLEM SOLVING
Media Jams
When a media jam occurs, the printer stops.
The Graphic Fault Display flashes an LED in the area where the fault has
occurred. At the same time, a Status Code appears on the Message Display.
The Message Display will also show the correct action to take in order to clear
the jam:
1. Follow the instructions on the Message Display.
2. If the jammed media is visible, try to pull the media gently out of the printer
and discard the media.
• If the media cannot be removed easily, or if it tears and only part of the
sheet is removed, continue with this procedure.
WARNING
Do not touch the fuser (red) roll inside the printer while
performing the following steps. The fuser roll is very hot
and can cause severe burns.
A
3. Lower the Cut Sheet Media Shelf (A).
4. Reach carefully into the printer and remove the jammed media.
5. If the media has been torn, remove all of the pieces.
6. After all of the jammed media has been removed, close the shelf/cover
and go to step 8.
7. If the jammed media is not visible from the left side of the printer, close
the shelf/cover and go to the right side of the printer.
XES Synergix 8825/8830 Printer Operator Manual 29
Page 34

XES Synergix 8825/8830 Printer Operator Manual 30
PROBLEM SOLVING
Media Jams Error Messages
ERROR MESSAGE PROBLEM SOLUTION
CHECK FOLDER
FOLDER
COMMUNICATIONS
B
A
8. Unlatch (A) and open (B) the Cutter Drawer.
9. Locate and remove any media from the Cutter area.
10. Close the Cutter Drawer.
11. The printer will resume printing when all jam locations have been cleared.
If the problem continues, call for service.
ERROR #17
F2-01 CHECK
FOLDER
FOLDER
COMMUNICATIONS
ERROR #01
Finisher Config Type
enabled but no folder is
installed.
Finisher Config Type
enabled but no folder is
installed.
1. Press the
ONLINE/OFFLINE
button to take the
printer OFFLINE.
2. Refer to Finisher
Settings on page
27 and reset the
value to NONE
1. Switch OFF the
Printer.
2. Wait 5 seconds and
switch ON the
printer
3. As soon as the
Printer Firmware
Version message is
displayed, press the
ONLINE/OFFLINE
button to take the
printer OFFLINE.
4. Refer to Finisher
Settings on page
27 and reset the
value to NONE
Page 35

PROBLEM SOLVING
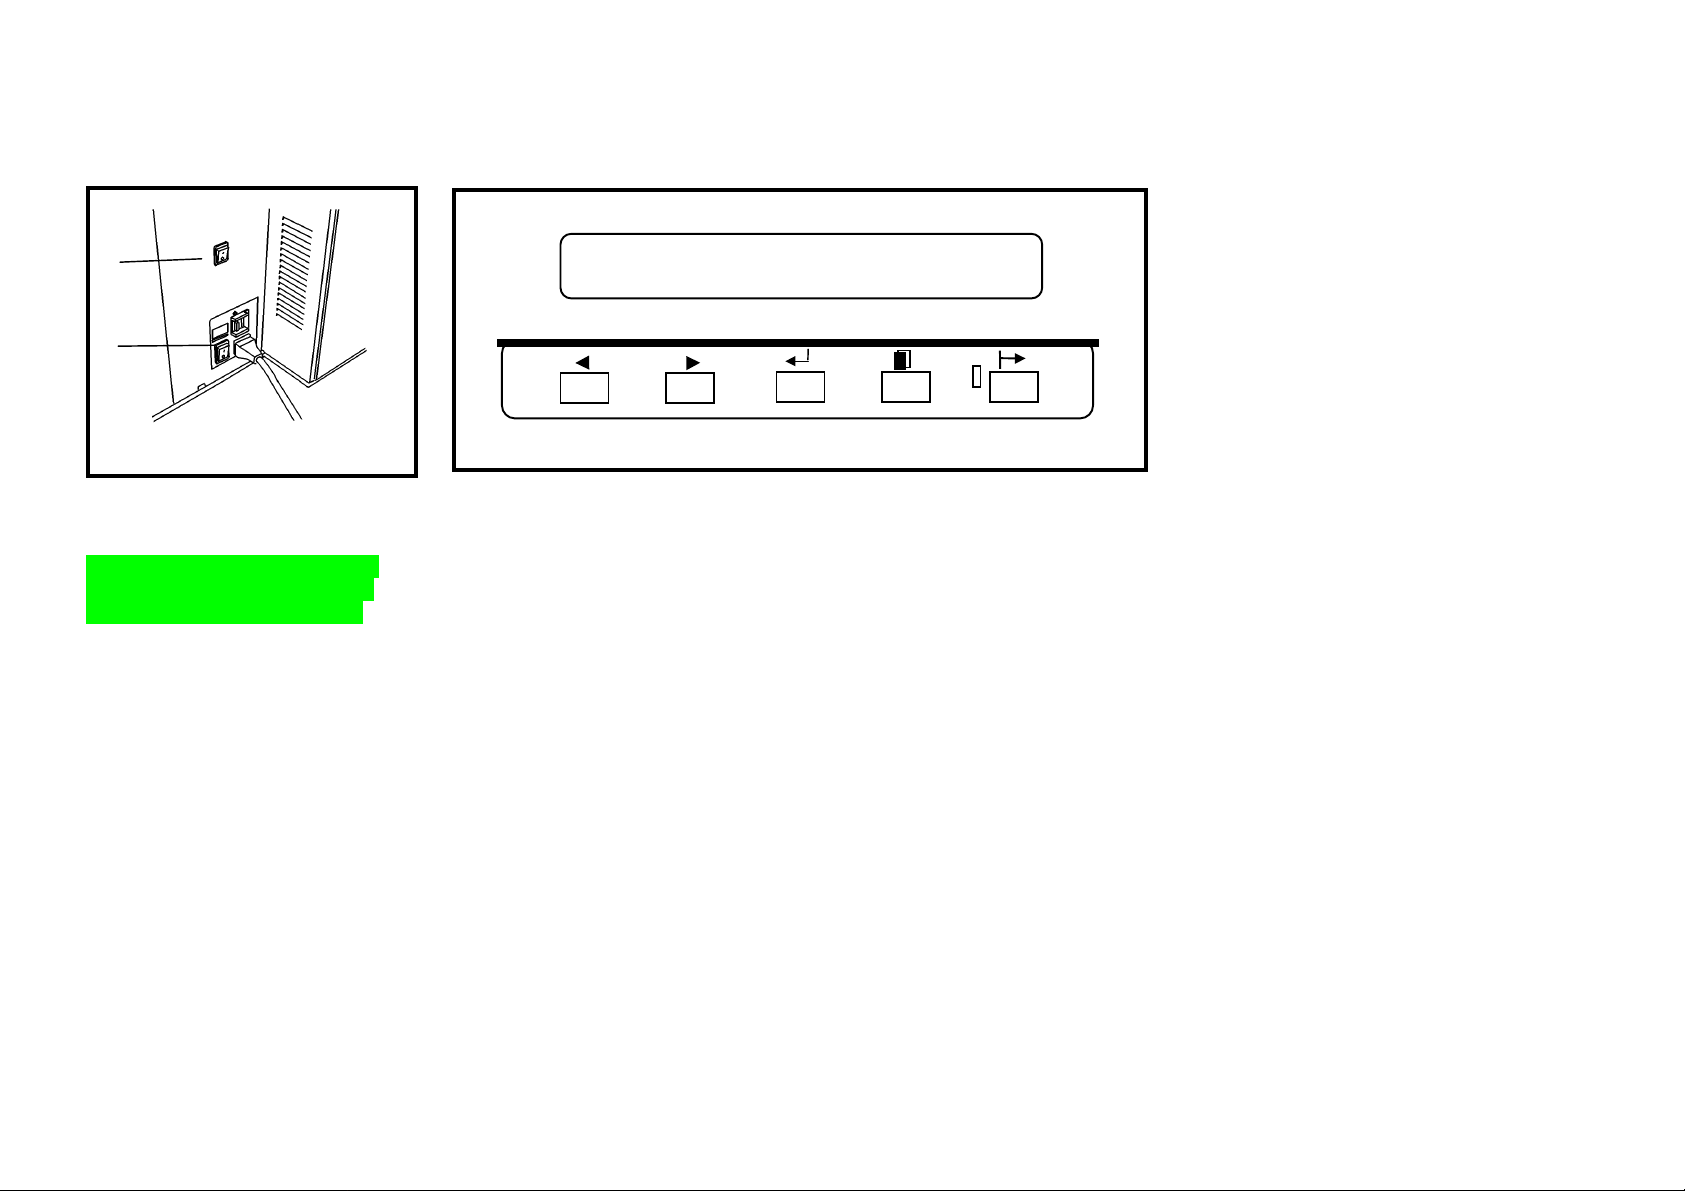
Checking for Loss of Power
If there is a loss of power to the printer, go to the right side of the printer and
locate the point where the power cord goes into the printer. Next to the power
cord is a Ground Fault Protector, as shown in the illustration. Ensure that the
power cord is plugged into the wall outlet and follow the instructions on the
label (A).
If power is not restored after you have followed the instructions, call for
service.
A
XES Synergix 8825/8830 Printer Operator Manual 31
Page 36

PROBLEM SOLVING
Print Quality
Problem
Prints are
partially
deleted.
Prints are
light
overall.
If the media is damp, replace it.
Go to the Printer Menu , Printer Adjustments, and adjust the
density.
XES Synergix 8825/8830 Printer Operator Manual 32
Media Tips
• Close and seal the media package when the media is not in use.
What to Do
• Store the media in a cool, dry environment.
• Store roll media on end.
• Store the cut sheet media flat, not on edge.
For reliable printer operation and print quality, the following types of print
media are recommended:
NOTE: Be sure to set up the Media View Menu according to the size and
type of media you are using.
• BOND PAPER: Substance 20 to substance 24 xerographic roll
paper or cut sheets are recommended for normal
usage.
• VELLUM: Substance 20 vellum is recommended.
• FILM: 4 mil thickness, double matte, heat stable film is
recommended.
Page 37

CARE
X
l
Replacing the Toner Cartridge
1. Open the Toner Supply Access
Cover.
2. Open the Toner Replacement
package.
• Remove the Toner cartridge
replacement.
• Remove the Toner Waste
Bottle.
CAUTION
Toner identified for use in the XES
Synergix 8825/8830 Printer is a twocomponent material made
specifically for this printer. Use of
Toner that is not indicated for the
ES Synergix 8825/8830 Printer wil
cause damage to the printer.
A
3. Slide door (A) in the direction
shown in order to expose the
dispenser patch.
B
4. Pull the plunger (B) and lift the
front end of the Toner Cartridge.
5. Release the plunger and rest the
cartridge on the plunger
mechanism
XES Synergix 8825/8830 Printer Operator Manual 33
Page 38

CARE
Replacing the Toner Cartridge
XES Synergix 8825/8830 Printer Operator Manual 34
6. Lift the used Toner Cartridge out
of the printer; try not to tilt the
cartridge too much in order to
avoid spilling toner.
7. Discard the used Toner
Cartridge in the Toner
Replacement package.
8. Hold the new Toner Cartridge
horizontally and shake it side to
side 10 or 12 times, as shown
above.
9. Install the end of the cartridge
with the red cover tape into the
rear of the printer.
NOTE: Ensure that the red cover
tape is facing up.
Page 39

CARE
p
Replacing the Toner Cartridge
A
10. Lower the Toner Cartridge into
position while pushing the
plunger (A) toward the front of
the printer, then release the
plunger.
11. Rotate the Toner Cartridge back
and forth until the cartridge locks
into position in the rear drive
collar.
B
A
CAUTION
Remove the red cover tape
carefully. Do not remove the clear,
erforated seal.
12. Remove the red cover tape (A)
from the Toner Cartridge; do not
remove the seal (B) under the
tape.
13. Close the cover. 14. Close the Toner Supply Access
Cover on the printer.
XES Synergix 8825/8830 Printer Operator Manual 35
Page 40

CARE
Replacing the Toner Waste Bottle
A
C
XES Synergix 8825/8830 Printer Operator Manual 36
B
1. Open the Front Door and
remove the Toner Waste Bottle
(A).
2. Seal the used Toner Waste
Bottle (B) with the stopper (C)
attached to the side of the bottle.
3. Attach the stopper to the side of
the new Toner Waste Bottle.
4. Install the new Toner Waste
Bottle.
5. Close the Front Door.
6. Discard the used Toner Waste
Bottle in the Toner Replacement
package and dispose of the
package in an approved waste
container.
Page 41

CARE
Required Tasks Calling for Service
Perform the following tasks, as required:
CAUTION
Toner identified for use in the XES Synergix 8825/8830 Printer is a
two-component material made specifically for this printer. Use of
Toner that is not indicated for the XES Synergix 8825/8830 Printer
will cause damage to the printer.
• Replace the Toner W aste Bottle each time a new Toner Cartr idge is installed.
Refer to Replacing the Toner Cartridge in this section of the operator manual.
CAUTION
Do not reuse the contents of the Toner Waste Bottle. Reuse of this
material will cause damage to the printer.
• Empty the water periodically from the collection bottle loc ated inside the Front
Door of the printer.
A
• Clean the outside surfaces of the printer, us ing a cleaning c loth dampened with
mild soap and water. Do not pour or spray liquid directly on to any part of the
printer.
When a Status Code appears on the Message Display and the problem
that caused it is not cleared by following the instructions shown on the
Message Display, call for service after first taking the following steps:
1. Write down the Status Code and any message on the Message
Display, note any flashing LED indicators, and a brief description of
the problem.
2. The Serial Number (A) can be found inside the front cover of this
manual, or open the Front Door of the printer and refer to the
illustration above to locate and write down the serial number.
3. If print quality is the problem, take a print sample to the phone with
you in order to help in describing the problem.
4. Refer to the inside of the front cover of this manual for the local
number to call for service.
XES Synergix 8825/8830 Printer Operator Manual 37
Page 42

CARE
Ordering Supplies
When ordering supplies, please be prepared to give the following information:
• Your equipment model number: XES Synergix 8825/8830 Printer
• Your XES customer number: _____________
• Item description and quantities required
Supplies Order List
• Toner Cartridge and Toner Waste Bottle (part number 6R891, Europe
6R90268)
CAUTION
Toner identified for use in the XES Synergix 8825/8830 Printer is a
two-component material made specifically for this printer. Use of
Toner that is not indicated for the XES Synergix 8825/8830 Printer
will cause damage to the printer.
XES Synergix 8825/8830 Printer Operator Manual 38
• Xerox papers, vellums, and film are available in various sizes, weights, and
grades to meet your printing needs.
Pre-packaged Supplies
• 8830: Two Toner Cartridges (one installed) and one Toner W aste Bottle have
been shipped with the printer for your convenience at installation.
8825: One Toner Cartridge and Waste Bottle are provided, installed in the
•
printer.
Page 43

Product Specifications
(
)
XES Synergix 8825/8830 Printer
24”
(610 mm)
43”
(1092 mm)
57”
(1448 mm)
Printer Dimensions
Weight: 8830: 650 lbs. (295kg)
8825 (1 drawer): 620 lbs (281kg)
8825 (2 drawer): 635 lbs (286kg)
Height: 43 inches (1092 mm)
Width: 23 inches (584 mm)
Depth: 57 inches (1448 mm)
24”
(610
Top View
117”
(2972 mm)
36”
914 mm
36”
(914 mm)
Minimum Room Space Requirements
83”
(2108 mm)
XES Synergix 8825/8830 Printer Operator Manual 39
Page 44

Product Specifications
XES Synergix 8825/8830 Printer
XES Synergix 8825/8830 Printer Operator Manual 40
Electrical Specifications
105 - 125 VAC (Nominal 60 Hz)
210 - 225 VAC (Nominal 50 Hz)
20 Amp dedicated circuit
Power Consumption
120 Watts: (Power Saver Mode)
1000 Watts (heaters on - standby)
690 Watts (Ready Mode)
1840 Watts (running)
Heat Dissipation
6,270 BTU (running)
Warm-up Time: 2 minutes
Environmental Requirements
Temperature: 60° F (10° C) to 80° F
(27° C)
Humidity: 20% to 80% Relative
Humidity
Maximum Elevation: 7000 feet (2133 m)
above sea level
Media Specifications:
Media Type:
Bond (20 lb.)
Vellum (20 lb.)
Film (4 mil.)
Tracing (4 mil)
Media Size:
Roll Feed - 11 inches to 36 inches (279.4 mm to
914.4 mm) width (3 (76.2 mm) inches core
diameter to 6.7 inches (170.2 m m ) O .D.) (Roll 2
is optional for the 8825, Roll 3 is not available
for the 8825).
Manual Bypass Feed (optional for the 8825) -
11 inch to 36 inch (279.4 mm to 914.4 mm)
Print Size:
Minimum Cut Sheet - 8.5 X 11 inches (216 mm
x 279 mm)
Minimum Roll Feed - 11 X 8.5 inches (279 mm
x 216 mm)
Maximum Length - 48ft, (15.2 m) (Standard with
the 8825/8830 Controller) 80 ft (24.4 m)
(Optional)
Audible Noise
67 dBA) Maximum
.
Page 45

Product Specifications
XES Synergix 8825/8830 Printer
8825 Prints per Minute (Bond Media):
Size Portrait Landscape
E/A0 2.0 - D/A1 3 4.0
C/A2 4.1 5.5
B/A3 6.2 8
A/A4 - - 8
First print out time for a D (A1) size print is 20
seconds.
8830 Prints per Minute (Bond Media):
Size Portrait Landscape
E/A0 3.0 - D/A1 4.5 6.0
C/A2 6.0 8.0
B/A3 8.5 11.0
A/A4 - - 11.0
First print out time for a D (A1) size print is 20
seconds
XES Synergix 8825/8830 Printer Operator Manual 41
Page 46

XES Synergix 8825/8830 Printer Operator Manual 42
Page 47

Prepared by:
Xerox Corporation
Global Knowledge & Language Services
800 Phillips Road
Building 845-17S
Webster, New York 14580-9791
USA
©2000 XEROX CORPORATION. All rights reserved.
Printed in the United States of America.
®
XEROX
, XES™, Synergix™, and the digital box icon, AccXes, and acronym, XES
are trademarks of Xerox Corporation. ©XES Systems Inc. 2000. All other product
names mentioned herein are trademarks of there respective companies. All rights
reserved.
701P19710 November 2000
Page 48

Prepared by:
Xerox Corporation
Global Knowledge & Language Services
800 Phillips Road
Building 845-17S
Webster, New York 14580-9791
USA
©2000 XEROX CORPORATION. All rights reserved.
Printed in the United States of America.
®
XEROX
, XES™, Synergix™, and the digital box icon, AccXes, and acronym, XES
are trademarks of Xerox Corporation. ©XES Systems Inc. 2000. All other product
names mentioned herein are trademarks of there respective companies. All rights
reserved.
701P19710 November 2000
 Loading...