

Page 1
P H A S E R® 8 6 0
COLOR PRINTER
User Guide
Page 2

Phaser® 860 Color Printer
User Guide
071-0726-00
June 2001
Page 3

Copyright © 2001 Xerox Corporation. Unpublished rights reserved under the copyright
laws of the United States. Contents of this publication may not be reproduced in any
form without permission of Xerox Corporation.
®
, PhaserShare®, ColorStix®II, the TekColor® icon, Made For Each Other®,
Phaser
DocuPrint
®
, WorkSet®, Ethernet®, the stylized X, and XEROX® are registered trademarks
of Xerox Corporation. PhaserLink™, PhaserPort™, PhaserPrint™, PhaserSym™,
PhaserTools™, infoSMART™, and the TekColor™ name are trademarks of Xerox
SM
Corporation. TekColor Care
and RealSUPPORTSM are service marks of Xerox
Corporation.
®
, Acrobat®, Acrobat® Reader, Illustrator®, PageMaker®, Photoshop®, and
Adobe
PostScript
®
, ATM®, Adobe Garamond®, Birch®, Carta®, Mythos®, Quake®, and Tekton®
are registered trademarks and Adobe Jenson™, Adobe Brilliant Screens™ technology,
and IntelliSelect™ are trademarks of Adobe Systems Incorporated or its subsidiaries
which may be registered in certain jurisdictions.
®
, LaserWriter®, LocalTalk®, Macintosh®, Mac® OS, AppleTalk®, TrueType2®,
Apple
Apple Chancery
®
, Chicago®, Geneva®, Monaco®, and New York® are registered
trademarks, and QuickDraw™ is a trademark of Apple Computer Incorporated.
Marigold™ and Oxford™ are trademarks of AlphaOmega Typography.
Avery™ is a trademark of Avery Dennison Corporation.
®
Software is a registered trademark of FTP Software, Incorporated.
FTP
®
and HP-GL® are registered trademarks of Hewlett-Packard Corporation.
PCL
Hoefler Text was designed by the Hoefler Type Foundry.
®
ITC Avant Guard Gothic
®
Symbol
, ITC Zapf Chancery®, and ITC Zapf Dingbats® are registered trademarks of
, ITC Bookman®, ITC Lubalin Graph®, ITC Mona Lisa®, ITC
International Typeface Corporation.
Bernhard Modern™, Clarendon™, Coronet™, Helvetica™, New Century Schoolbook™,
Optima™, Palatino™, Stempel Garamond™, Times™, and Univers™ are trademarks of
Linotype-Hell AG and/or its subsidiaries.
®
MS-DOS
Wingdings™ in TrueType
and Windows® are registered trademarks of Microsoft Corporation.
®
format is a product of Microsoft Corporation. WingDings is a
trademark of Microsoft Corporation and TrueType is a registered trademark of Apple
Computer, Inc.
Albertus™, Arial™, Gill Sans™, Joanna™, and Times New Roman™ are trademarks of
Monotype Corporation.
®
Antique Olive
is a registered trademark of M. Olive.
Eurostile™ is a trademark of Nebiolo.
®
and NetWare® are registered trademarks of Novell, Incorporated.
Novell
®
Sun
, Sun Microsystems®, and Sun Microsystems Computer Corporation® are registered
trademarks of Sun Microsystems, Incorporated.
®
SPARC
is a registered trademark of SPARC International, Incorporated.
SPARCstation™ is a trademark of SPARC International, Incorporated, licensed
exclusively to Sun Microsystems, Incorporated.
®
is a registered trademark in the US and other countries, licensed exclusively
UNIX
through X/Open Company Limited.
Other marks are trademarks or registered trademarks of the companies with which they
are associated.
Page 4

PANTONE® Colors generated by the Phaser 860 Color Printer are four- and/or
three-color process simulations and may not match PANTONE-identified solid color
standards. Use current PANTONE Color Reference Manuals for accurate colors.
PANTONE Color simulations are only obtainable on this product when driven by
qualified Pantone-licensed software packages. Contact Pantone, Inc. for a current list of
qualified licensees. All trademarks noted herein are either the property of Xerox
Corporation, Pantone, Inc., or their respective companies. © Pantone, Inc., 1988.
Page 5

Contents
Printer Warranty . . . . . . . . . . . . . . . . . . . . . . . . . . . . . . . . . . vii
User safety summary . . . . . . . . . . . . . . . . . . . . . . . . . . . . . . . x
Printer Parts and Supplies . . . . . . . . . . . . . . . . . . . . . . . . . . . 1
Customer-Replaceable Consumables (CRCs) . . . . . . . . . . . . . . . . . . . . . 1
Customer-Replaceable Units (CRUs) . . . . . . . . . . . . . . . . . . . . . . . . . . . . . 2
Accessories . . . . . . . . . . . . . . . . . . . . . . . . . . . . . . . . . . . . . . . . . . . . . . . . . . 3
Paper and specialty media . . . . . . . . . . . . . . . . . . . . . . . . . . . . . . . . . . . . . 5
Front Panel . . . . . . . . . . . . . . . . . . . . . . . . . . . . . . . . . . . . . . . 8
Features . . . . . . . . . . . . . . . . . . . . . . . . . . . . . . . . . . . . . . . . . 10
Print quality modes . . . . . . . . . . . . . . . . . . . . . . . . . . . . . . . . . . . . . . . . 11
TekColor™ color corrections . . . . . . . . . . . . . . . . . . . . . . . . . . . . . . . . . . . 12
Paper and Print Media . . . . . . . . . . . . . . . . . . . . . . . . . . . . . 13
Paper tips . . . . . . . . . . . . . . . . . . . . . . . . . . . . . . . . . . . . . . . . . . . . . . . . . 13
Supported media . . . . . . . . . . . . . . . . . . . . . . . . . . . . . . . . . . . . . . . . . . . . 13
Print area of supported paper sizes . . . . . . . . . . . . . . . . . . . . . . . . . . . . . 15
Loading Trays . . . . . . . . . . . . . . . . . . . . . . . . . . . . . . . . . . . . . 17
Loading the Standard Paper/Transparency Tray . . . . . . . . . . . . . . . . . . 17
Loading the Optional High-Capacity Paper Tray . . . . . . . . . . . . . . . . . . 19
Loading the Optional High-Capacity Transparency/Label Tray . . . . . . 22
Loading the Optional Legal Paper Tray . . . . . . . . . . . . . . . . . . . . . . . . . 23
Manual-Feed Printing . . . . . . . . . . . . . . . . . . . . . . . . . . . . . . 26
Printing on Special Media . . . . . . . . . . . . . . . . . . . . . . . . . . . 29
Printing on Phaser High-Resolution Photo Paper . . . . . . . . . . . . . . . . . 29
Printing on labels and business cards . . . . . . . . . . . . . . . . . . . . . . . . . . . 30
Printing on transparencies . . . . . . . . . . . . . . . . . . . . . . . . . . . . . . . . . . . . 32
Printing on envelopes . . . . . . . . . . . . . . . . . . . . . . . . . . . . . . . . . . . . . . . . 34
Printing on letterhead paper . . . . . . . . . . . . . . . . . . . . . . . . . . . . . . . . . . 38
Printing Two-Sided Jobs . . . . . . . . . . . . . . . . . . . . . . . . . . . . 39
User Guide
v
Page 6

Troubleshooting Print Quality . . . . . . . . . . . . . . . . . . . . . . . 42
Band of color(s) missing . . . . . . . . . . . . . . . . . . . . . . . . . . . . . . . . . . . . . . 42
Smudges or smears appear on the print . . . . . . . . . . . . . . . . . . . . . . . . .45
Images are too light or too dark . . . . . . . . . . . . . . . . . . . . . . . . . . . . . . . . 46
Paper Jams . . . . . . . . . . . . . . . . . . . . . . . . . . . . . . . . . . . . . . 47
Jam prevention tips . . . . . . . . . . . . . . . . . . . . . . . . . . . . . . . . . . . . . . . . . . 47
Clearing jams . . . . . . . . . . . . . . . . . . . . . . . . . . . . . . . . . . . . . . . . . . . . . . . 47
Paper jam — Open exit cover to clear . . . . . . . . . . . . . . . . . . . . . . . . . . . 48
Paper jam - Open front cover to clear . . . . . . . . . . . . . . . . . . . . . . . . . . .52
Paper jam - Remove upper tray or paper tray to clear . . . . . . . . . . . . . .53
Paper jam - Remove middle tray to clear . . . . . . . . . . . . . . . . . . . . . . . . 53
Paper jam - Remove lower tray to clear . . . . . . . . . . . . . . . . . . . . . . . . . 54
Paper jam, incorrect size - Open exit cover to clear . . . . . . . . . . . . . . . .54
Paper jam - Retry manual feed . . . . . . . . . . . . . . . . . . . . . . . . . . . . . . . . 55
Maintenance and Cleaning . . . . . . . . . . . . . . . . . . . . . . . . . 56
Adding ink . . . . . . . . . . . . . . . . . . . . . . . . . . . . . . . . . . . . . . . . . . . . . . . . . 56
Emptying the waste tray . . . . . . . . . . . . . . . . . . . . . . . . . . . . . . . . . . . . . . 58
Replacing the Maintenance Kit . . . . . . . . . . . . . . . . . . . . . . . . . . . . . . . . . 61
Cleaning the Rapid Release Guide . . . . . . . . . . . . . . . . . . . . . . . . . . . . . . 62
Cleaning the maintenance drawer wiper blade . . . . . . . . . . . . . . . . . . . 65
Cleaning the exit rollers . . . . . . . . . . . . . . . . . . . . . . . . . . . . . . . . . . . . . . 66
Cleaning the paper-feed rollers . . . . . . . . . . . . . . . . . . . . . . . . . . . . . . . . 66
Moving and Shipping the Printer. . . . . . . . . . . . . . . . . . . . . 68
Moving the printer within the office . . . . . . . . . . . . . . . . . . . . . . . . . . . .68
Shipping the printer . . . . . . . . . . . . . . . . . . . . . . . . . . . . . . . . . . . . . . . . . .69
Getting Help . . . . . . . . . . . . . . . . . . . . . . . . . . . . . . . . . . . . . 71
Xerox web sites . . . . . . . . . . . . . . . . . . . . . . . . . . . . . . . . . . . . . . . . . . . . . 72
Customer support centers . . . . . . . . . . . . . . . . . . . . . . . . . . . . . . . . . . . . 74
Specifications. . . . . . . . . . . . . . . . . . . . . . . . . . . . . . . . . . . . . 75
Material Safety Data Sheet for ColorStix®II Ink. . . . . . . . . . . . . . . . . . . . 75
Material Safety Data Sheet for Silicone Intermediate
Material Safety Data Sheet for CleanTex® Alcopad . . . . . . . . . . . . . . . . 80
Transfer Layer Fluid . . . . . . . . . . . . . . . . . . . . . . . . . . . . . . . . . . . 77
Index . . . . . . . . . . . . . . . . . . . . . . . . . . . . . . . . . . . . . . . . . . . 85
vi
Phaser 860 Color Printer
Page 7

Printer Warranty
Xerox warrants that the Phaser 860 Printer will be free from defects in materials and
workmanship for a period of one (1) year from the date of shipment. If the product
proves defective during the warranty period, Xerox, at its option, will:
(1) repair the product by means of telephone support or on-site service at no charge for
parts or labor,
(2) replace the product with a comparable product, or
(3) refund the amount paid for the product, less a reasonable allowance for usage, upon
its return.
Under this product warranty, the Customer must notify Xerox or its authorized service
representative of the defect before the expiration of the warranty period. To obtain
service under this warranty, the Customer must first contact Xerox Telephone Support
personnel or that of its authorized service representative. Telephone Support personnel
will work to resolve issues professionally and quickly, however the Customer must
reasonably assist Xerox or its authorized representative.
If telephone support is unsuccessful, Xerox or its authorized service representative will
provide warranty repair at the Customer's site without charge as provided below.
Service is available within the customary on-site service area in the United States
■
and Canada for products purchased in the United States and Canada.
Inside the European Economic Area, service is available within the customary
■
on-site service area for products purchased in the EEA.
Outside the US, Canada, & EEA, service is available within the customary on-site
■
service area in the country of purchase.
Xerox reserves the right to charge for on-site service in exceptional cases.
■
A description of the customary on-site service area may be obtained from the local Xerox
Customer Support Center or authorized Xerox distributor. On-site service is at Xerox or
its authorized service representative’s sole discretion and is considered an option of last
resort.
Supplies
If the Customer’s product contains features that enable Xerox or its authorized service
representative to diagnose and repair problems with the product remotely, Xerox may
request that the Customer allow such remote access to the product.
In the maintenance of the product, Xerox may use new or equivalent to new parts or
assemblies for equal or improved quality. All defective parts and assemblies become the
property of Xerox. Xerox, at its option, may request the return of these parts.
User Guide
vii
Page 8

Consumables Warranty
Xerox warrants that ColorStix® II Ink will be free from defects in materials and
workmanship for a period of one (1) year from date of installation. All other Customer
Replaceable Consumables (CRCs) will be covered for a period of ninety (90) days
(six (6) months where longer periods are required by law) from the date of installation,
but not more than one (1) year from date of shipment. Under this warranty, the
Customer must notify Xerox or its authorized service representative of the defect before
the expiration of the warranty period. XEROX MAY REQUIRE THAT THE DEFECTIVE
CRC BE RETURNED TO A DESIGNATED XEROX DEPOT OR THE XEROX
REPRESENTATIVE FROM WHICH THE CRC WAS ORIGINALLY PURCHASED. Claims
will be handled according to the current Xerox procedure.
These warranties shall not apply to any defect, failure or damage caused by improper
use or improper or inadequate maintenance and care. Xerox shall not be obligated under
these warranties:
a. to repair damage resulting from attempts by personnel other than Xerox
representatives to install, repair or service the product unless directed by a
Xerox representative;
b. to repair damage, malfunction, or degradation of performance resulting from
improper use or connection to incompatible equipment or memory;
c. to repair damage, malfunction, or degradation of performance caused by the
use of non-Tektronix/Xerox printer supplies or consumables or the use of
Tektronix/Xerox supplies not specified for use with this printer;
d. to repair a product or CRC that has been modified or integrated with other
products when the effect of such modification or integration increases the
time or difficulty of servicing the product or CRC;
e. to perform user maintenance or cleaning or to repair damage, malfunction,
or degradation of performance resulting from failure to perform user
maintenance and cleaning as prescribed in published product materials;
f. to repair damage, malfunction, or degradation of performance resulting from
use of the product in an environment not meeting the operating
specifications set forth in the user manual;
g. to repair this product after the limit of its duty cycle has been reached; all
service thereafter shall be billed on a time and material basis;
h. to replace CRCs that have been refilled, are used up, abused, misused, or
tampered with in any way.
viii
Phaser 860 Color Printer
Page 9

THE ABOVE WARRANTIES ARE GIVEN BY XEROX WITH RESPECT TO THIS
PRODUCT AND ITS CUSTOMER REPLACEABLE CONSUMABLES IN LIEU OF ANY
OTHER WARRANTIES, EXPRESS OR IMPLIED. XEROX AND ITS VENDORS
DISCLAIM ANY IMPLIED WARRANTIES OF MERCHANTABILITY OR FITNESS FOR A
PARTICULAR PURPOSE OR ANY SIMILAR STANDARD IMPOSED BY APPLICABLE
LEGISLATION. XEROX'S RESPONSIBILITY TO REPAIR, REPLACE, OR OFFER A
REFUND FOR DEFECTIVE PRODUCTS AND CUSTOMER REPLACEABLE
CONSUMABLES IS THE SOLE AND EXCLUSIVE REMEDY PROVIDED TO THE
CUSTOMER FOR BREACH OF THESE WARRANTIES. XEROX AND ITS VENDORS
WILL NOT BE LIABLE FOR ANY INDIRECT, SPECIAL, INCIDENTAL OR
CONSEQUENTIAL DAMAGES (INCLUDING LOSS OF PROFITS) IRRESPECTIVE OF
WHETHER XEROX OR THE VENDOR HAS ADVANCE NOTICE OF THE POSSIBILITY
OF SUCH DAMAGES.
Some states, provinces, and countries do not allow the exclusion or limitation of
incidental or consequential damages or exclusions or limitations on the duration of
implied warranties or conditions, so the above limitations or exclusions may not apply
to you. This warranty gives you specific legal rights, and you may also have other rights
that vary by state, province, or country.
For the software warranty please see the end user license agreement included with the
software.
In certain geographies this product is warranted by Fuji Xerox. This statement of
warranty does not apply in Japan – please refer to the warranty statement provided in
the Japanese user manual for products purchased in Japan.
If you are an Australian consumer, you should be aware that the Trade Practices Act
1974 and equivalent State and Territory legislation (collectively "the Acts") contain
special provisions designed to protect Australian consumers. Nothing in any Fuji Xerox
warranty material excludes or limits the application of any provision of any of the Acts,
where to do so would contravene the Acts or cause any part of this warranty to be void.
In this warranty material, an implied condition or warranty, the exclusion of which from
a contract with a "Consumer" (as defined in the Acts) would contravene any provision of
the Acts or cause any part or all of this warranty to be void, is called a "Non-excludable
Condition". To the full extent permitted by law, Fuji Xerox’s sole and total liability to
the customer for a breach of any Non-excludable Condition (including for any
consequential loss suffered by the customer) is limited, except as otherwise stated
herein, to (at Fuji Xerox’s option) replacing or repairing the goods, or resupplying, or
paying the cost of the resupply of, the services, in respect of which the breach occurred.
Subject to the above, all conditions and warranties which would or might otherwise be
implied in a Consumer contract, whether by operation of statute, inference from
circumstances, industry practice or otherwise, are excluded.
Supplies
User Guide
ix
Page 10

User safety summary
Your printer and the recommended consumable supplies have been designed and tested
to meet strict safety requirements. Attention to the following notes will ensure the
continued safe operation of your printer.
Electrical Safety
Use the power cord supplied with your printer.
■
Do not use a ground adapter plug to connect the printer to a power source
■
receptacle that lacks a ground connection terminal.
Plug the power cord directly into a properly-grounded electrical outlet. Do not use
■
an extension cord. If you do not know whether an outlet is grounded, ask an
electrician to check the outlet.
Warning
Avoid the potential of severe electrical shock by ensuring the printer is
properly grounded.
Do not place the printer where people may step on the power cord.
■
Do not place objects on the power cord.
■
Do not obstruct the ventilation openings. These openings are provided to prevent
■
overheating of the printer.
Warning
Do not push objects into slots or openings on the printer. Making contact
with a voltage point or shorting out a part could result in fire or electrical
shock.
If you notice unusual noises or odors, switch off the printer power immediately.
■
Disconnect the power cord from the electrical outlet. Call an authorized service
representative to correct the problem.
The power cord is attached to the printer as a plug-in device at the back of the
■
printer. In the event it is necessary to remove all electrical power from the printer,
disconnect the power cord from the power receptacle.
Note
Leaving the printer on all the time is recommended for optimum
performance, and does not pose a safety hazard.
If any of the following conditions occur, switch off the printer power immediately,
■
disconnect the power cord, and call an authorized service representative.
The power cord is damaged or frayed.
■
Liquid has spilled into the printer.
■
x
Phaser 860 Color Printer
Page 11

The printer is exposed to water.
■
Any part of the printer is damaged.
■
Maintenance Safety
Do not attempt any maintenance procedure that is not specifically described in the
■
documentation supplied with your printer.
Do not use aerosol cleaners. The use of supplies that are not approved may cause
■
poor performance and could create a dangerous condition.
Do not remove the covers or guards that are fastened with screws unless you are
■
installing optional equipment and are specifically instructed to do so. Power
should be OFF when performing these installations. Except for user-installable
options, there are no parts that you can maintain or service behind these covers.
Operational Safety
Your printer and supplies were designed and tested to meet strict safety requirements.
These include safety agency examination, approval, and compliance with established
environmental standards.
Your attention to the following safety guidelines will help to ensure the continued safe
operation of your printer.
Use the material and supplies specifically designed for your printer. The use of
■
unsuitable materials may result in poor performance and possibly a hazardous
situation.
Follow all warnings and instructions marked on, or supplied with, the printer,
■
options, and supplies.
Place the printer in a dust-free area where the temperature range is 50 degrees F to
■
90 degrees F (10 degrees C to 32 degrees C) and the relative humidity is 10 percent
to 85 percent.
Place the printer in an area where there is adequate space for ventilation, operation, and
servicing. The recommended minimal spacing is:
Supplies
45.72 cm (18 in.) above the printer
■
10.16 cm (4 in.) behind the printer
■
10.16 cm (4 in.) on each side of the printer
■
unrestricted access in front of the printer, for access to the trays
■
Do not block or cover the slots or openings on the printer. Without adequate ventilation,
the printer may overheat.
Place the printer on a level surface (no more than a 3 degree tilt).
■
For optimum performance, use the printer at elevations below 2,400 meters
■
(7,874 ft.).
Do not place the printer near a heat source.
■
Do not place the printer in direct sunlight.
■
Do not place the printer in line with the cold air flow from an air conditioning
■
system.
User Guide
xi
Page 12
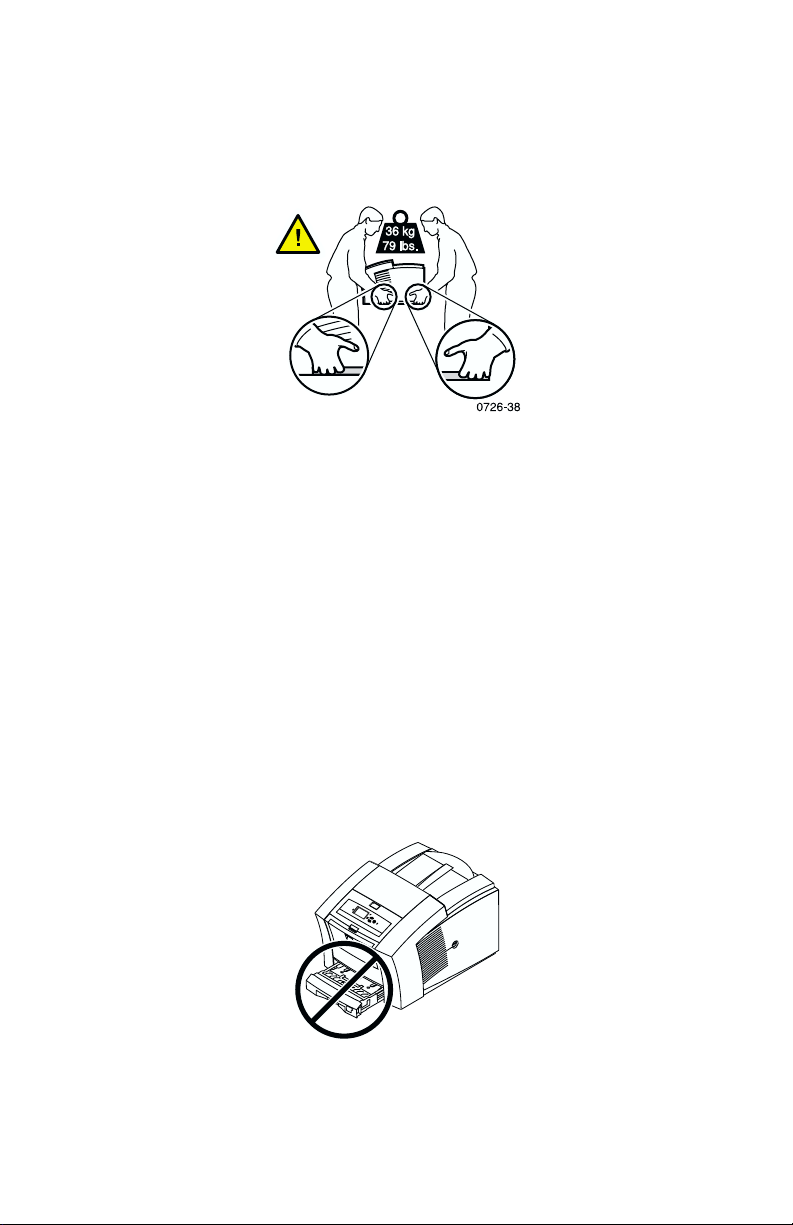
Place the printer on a level, solid surface with adequate strength for the weight of
■
the machine. The base printer weight without any packaging materials is 36 kg
(79 pounds).
The printer is heavy, and must be lifted by two people. The illustration below
■
shows the proper technique for lifting the printer.
Exercise care in moving or relocating the printer. It is front heavy and could tip
■
forward. Follow the recommended procedure when moving the printer from one
location to another. Refer to the Phaser 860 Setup Instructions and page 68 of this
User Guide.
Do not place any liquids on the printer.
■
Warning
Be careful when working in areas inside the printer identified with a
warning symbol. These areas may be very hot and could cause personal
injury.
Wait 10-15 seconds between switching the printer off and on.
■
Keep hands, hair, neckties, etc., away from the exit-feed rollers.
■
Do not remove a paper tray while printing, even if the paper tray is not being used
■
for the current print job. All trays must be in place for media to be fed through the
printer’s paper path.
0726-39
xii
Phaser 860 Color Printer
Page 13
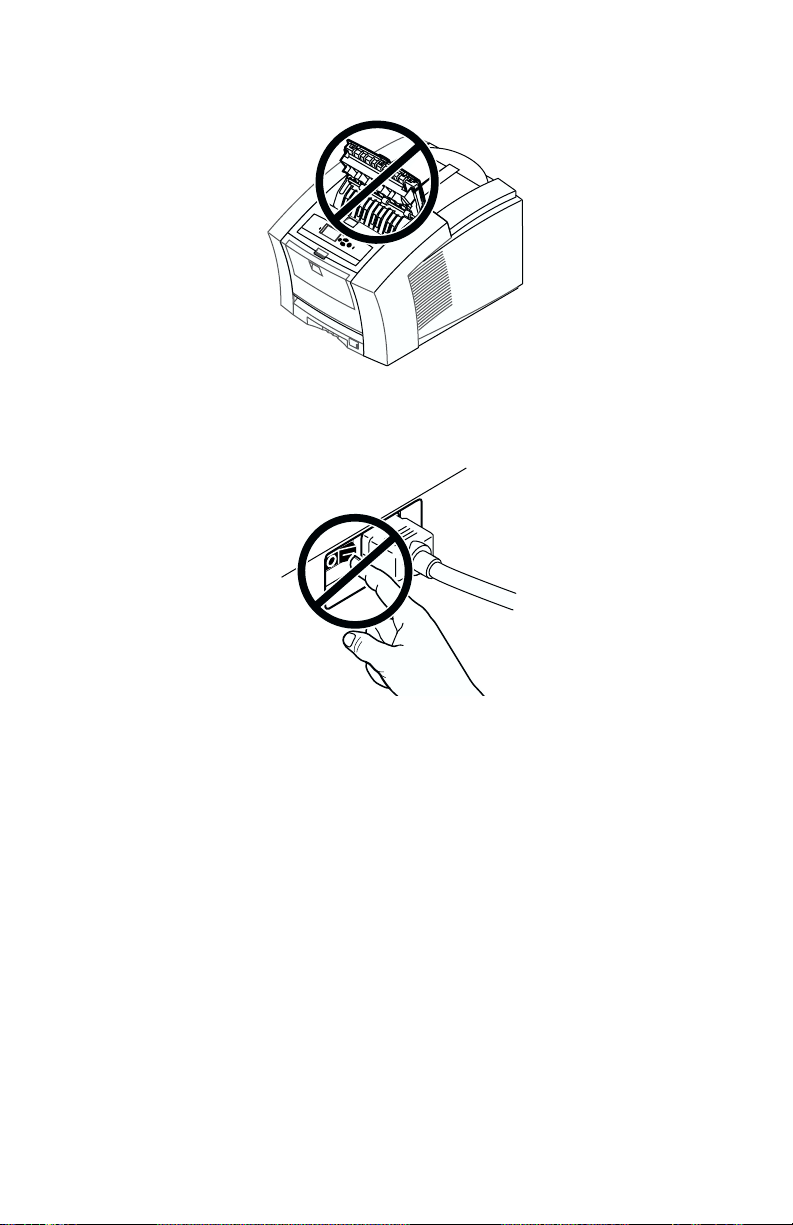
Do not open the covers while printing.
■
Do not switch off the printer power while printing.
■
0726-40
Supplies
0726-41
Do not move the printer while printing. Refer to page 68 for instructions for
■
moving the printer.
User Guide
xiii
Page 14
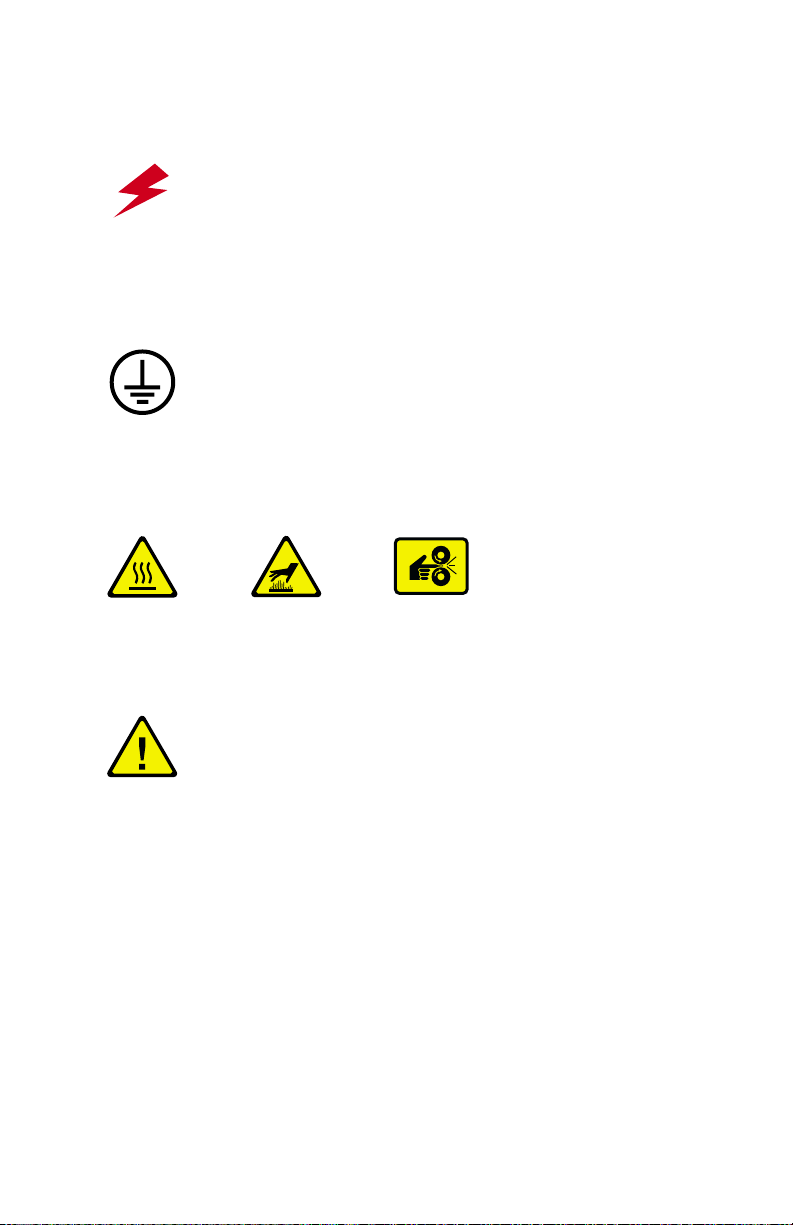
Symbols as marked on product:
DANGER high voltage:
4525-101
Protective ground (earth) terminal:
4525-102
Hot surface on or in the printer. Use caution to avoid personal injury:
4525-103
Use caution. Refer to the manual(s) for information:
4525-106
4525-104
4525-105
Warning
If the product loses the ground connection, usage of knobs and controls (and
other conductive parts) can cause an electrical shock. Electrical products
may be hazardous if misused.
Warning
For your protection, do not defeat any door switches.
xiv
Phaser 860 Color Printer
Page 15
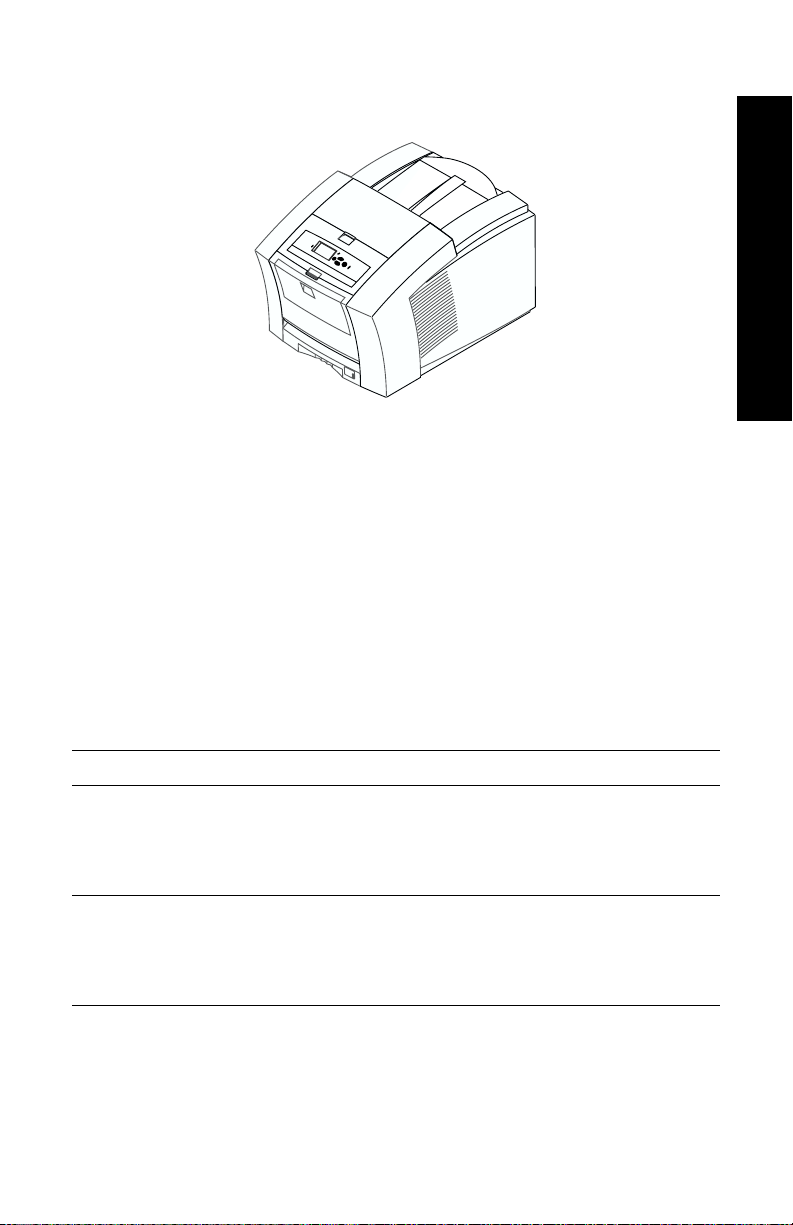
Printer Parts and Supplies
0726-59
Note
Inside the printer, all handles and points of user interaction
are green. Disposable parts in the Maintenance Kit are
orange.
To order supplies and accessories, contact your local dealer or visit the
Xerox web site:
www.xerox.com/officeprinting/supplies/
Parts/Supplies
Customer-Replaceable Consumables (CRCs)
Maintenance Kits
Item Part Number
Extended Maintenance Kit
■ Replacement maintenance roller and counter
■ Life up to 40,000 pages or 15 months, whichever comes
first
Standard Maintenance Kit
■ Replacement maintenance roller and counter
■ Life up to 10,000 pages or 15 months, whichever comes
first
User Guide
016-1932-00
016-1933-00
1
Page 16

Phaser 860 ColorStix® II Ink
Item Part Number
3 Free Black ColorStix II ink 016-1902-01
5 Black ColorStix II ink 016-2019-00
5 Cyan ColorStix II ink 016-2020-00
5 Magenta ColorStix II ink 016-2021-00
5 Yellow ColorStix II ink 016-2022-00
Parts/Supplies
5 Cyan ColorStix II ink plus 2 Free Black Colorstix II ink 016-1903-01
5 Magenta ColorStix II ink plus 2 Free Black ColorStix II ink 016-1904-01
5 Yellow ColorStix II ink plus 2 Free Black ColorStix II ink 016-1905-01
2 Cyan ColorStix II ink plus 1 Free Black ColorStix ink II 016-1906-01
2 Magenta ColorStix II ink plus 1 Free Black ColorStix II ink 016-1907-01
2 Yellow ColorStix II ink plus 1 Free Black ColorStix II ink 016-1908-01
Customer-Replaceable Units (CRUs)
Replacement and Cleaning Items
Item Part Number
Waste Tray for Maintenance Drawer 436-0415-00
Maintenance Drawer (includes Standard Maintenance Kit) 436-0414-00
Rapid Release Guide 650-4214-00
Output Tray Extension
■ Use when print from the Legal Paper Tray
Cleaning Kit
■ Package of 5 alcohol wipes
2
Phaser 860 Color Printer
381-0497-00
016-1845-00
Page 17

Accessories
Trays
Item Size Part Number
Standard Paper/Transparency Tray
■ Holds 200 sheets of paper
■ Holds 50 sheets of labels
■ Holds 50 transparencies
Legal Paper Tray
■ Holds 200 sheets of legal paper
A/Letter (U. S.)
A4 (Metric Letter)
Legal (U. S.) 436-0413-00
436-0409-00
436-0410-00
Parts/Supplies
High-Capacity Transparency/
Label Tray
■ Holds 175 transparencies
■ Holds 100 sheets of labels
A/Letter (U. S.)
A4 (Metric Letter)
436-0411-00
436-0412-00
High-Capacity Paper Tray Assembly
Item Part Number
■ Holds 500 sheets of Letter-size or A4-size paper
■ Increased paper-printing capacity
■ Increased printing versatility and convenience
■ Up to two High-Capacity Paper Tray Assemblies can be
used
Printer Station
Item Part Number
■ Ergonomic surface height
■ Provides storage for supplies
■ Movable for easy access to rear cables
860LTA
ZCARTA
User Guide
3
Page 18

Internal Hard Drive
Item Part Number
■ 5-Gbyte capacity
■ Collation, downloaded fonts, forms and overlays
860HD
functionality (requires the DP Feature Set also)
■ Proof Print, Saved Print, and Secure Print functionality
(requires the DP Feature Set also)
Parts/Supplies
Upgrades
Item Part Number
N Feature Set
■ Adds 10/100T Ethernet support to Phaser 860B
860FN
(non-network) configuration
■ This upgrade is needed (along with 860FP) to upgrade
a Phaser 860B configuration to the DP Feature Set.
DP Feature Set
■ Upgrades a Phaser 860N to a Phaser 860DP
■ High Resolution/Photo print-quality mode,
860FP
1200 x 600 dpi
■ Automatic two-sided printing capability
■ Additional 64 Mbytes of memory (128 Mbytes total)
■ Proof Print, Saved Print, and Secure Print functionality
(requires the internal hard drive also)
■ Quick Collate functionality (requires the internal hard
drive also)
■ Page Pipelining
Phaser® Memory
Features Size Part Numbers
■ Guaranteed performance
■ Faster image processing
■ Up to 192 Mbytes maximum
64 Mbytes
128 Mbytes
The printer has two memory slots. When adding memory, you can use
64-Mbyte and 128-Mbyte DIMMs in combination.
4
Phaser 860 Color Printer
ZMC64
ZMC128
Page 19

Parallel Cables
Item Part Number
Parallel cable
■ 3 meters long
■ Use to connect your computer to the printer’s
012-1468-00
high-density parallel port
Parallel adapter
■ Use to connect a low-density parallel cable to the
013-0299-00
printer’s high-density parallel port
Paper and specialty media
Xerox Phaser paper, transparencies, labels, and business cards have
been developed and tested specifically for use in your Phaser 860 color
printer. They will provide optimal print quality, reliability, and
durability.
Xerox Phaser Professional Printing Paper
Item Size Description Part Number
Parts/Supplies
Phaser Premium Color
Printing Paper
2
90 g/m
(24 lb. bond paper)
Phaser Premium Color
Printing Paper
2
90 g/m
(24 lb. bond
paper)
Phaser 860 Glossy
Coated Paper
148 g/m
2
(100 lb. text)
Phaser 860 Glossy
Coated Paper
148 g/m
2
(100 lb. book)
Phaser Premium Cover
Paper 160 g/m
2
(60 lb. cover)
User Guide
A/Letter (U. S.)
8.5 x 11 in.
A4 (Metric Letter)
210 x 297 mm
A/Letter (U. S.)
8.5 x 11 in.
A4 (Metric Letter)
210 x 297 mm
A/Letter (U. S.)
8.5 x 11 in.
500 sheets 016-1368-00
500 sheets 016-1369-00
100 sheets 016-1936-00
100 sheets 016-1937-00
100 sheets 016-1823-00
5
Page 20

Xerox Phaser Professional Printing Paper (cont'd.)
Item Size Description Part Number
Phaser Premium Cover
Paper
160 g/m
2
(60 lb. cover)
A4 (Metric Letter)
210 x 297 mm
100 sheets 016-1824-00
Phaser High Resolution
Photo Paper
170 g/m
Parts/Supplies
Phaser High Resolution
Photo Paper
170 g/m
2
2
A/Letter (U. S.)
8.5 x 11 in.
A4 (Metric)
210 x 297 mm
25 sheets 016-1808-00
25 sheets 016-1809-00
Phaser 860 Transparency Film
Item Size Description Part Number
Premium A/Letter (U. S.)
50 sheets 016-1876-00
8.5 x 11 in.
Premium A4 (Metric Letter)
50 sheets 016-1877-00
210 x 297 mm
Standard A/Letter (U. S.)
50 sheets 016-1874-00
8.5 x 11 in.
Standard A4 (Metric Letter)
50 sheets 016-1875-00
210 x 297 mm
Color Printing Labels
Size Description Part Number
A/Letter (U. S.)
8.5 x 11 in.
100 sheets; 30 labels per sheet
(each label: 1 x 2-5/8 in.)
016-1812-00
A/Letter (U. S.)
8.5 x 11 in.
A4 (Metric Letter)
210 x 297 mm
A4 (Metric Letter)
210 x 297 mm
6
100 sheets; 6 labels per sheet
(each label: 3-1/3 x 4 in.)
100 sheets; 14 labels per sheet
(each label: 38.1 x 99.1 mm)
100 sheets; 8 labels per sheet
(each label: 67.1 x 99.1 mm)
Phaser 860 Color Printer
016-1813-00
016-1814-00
016-1815-00
Page 21

Premium Die-cut Business Cards
Size Description Part Number
A/Letter (U. S.)
8.5 x 11 in.
A4 (Metric Letter)
210 x 297 mm
25 sheets;
10 pre-cut cards per sheet
heavyweight: 190 g/m
25 sheets;
10 pre-cut cards per sheet
heavyweight: 190 g/m
2
(70 lb.)
2
(70 lb.)
016-1898-00
Parts/Supplies
016-1899-00
User Guide
7
Page 22
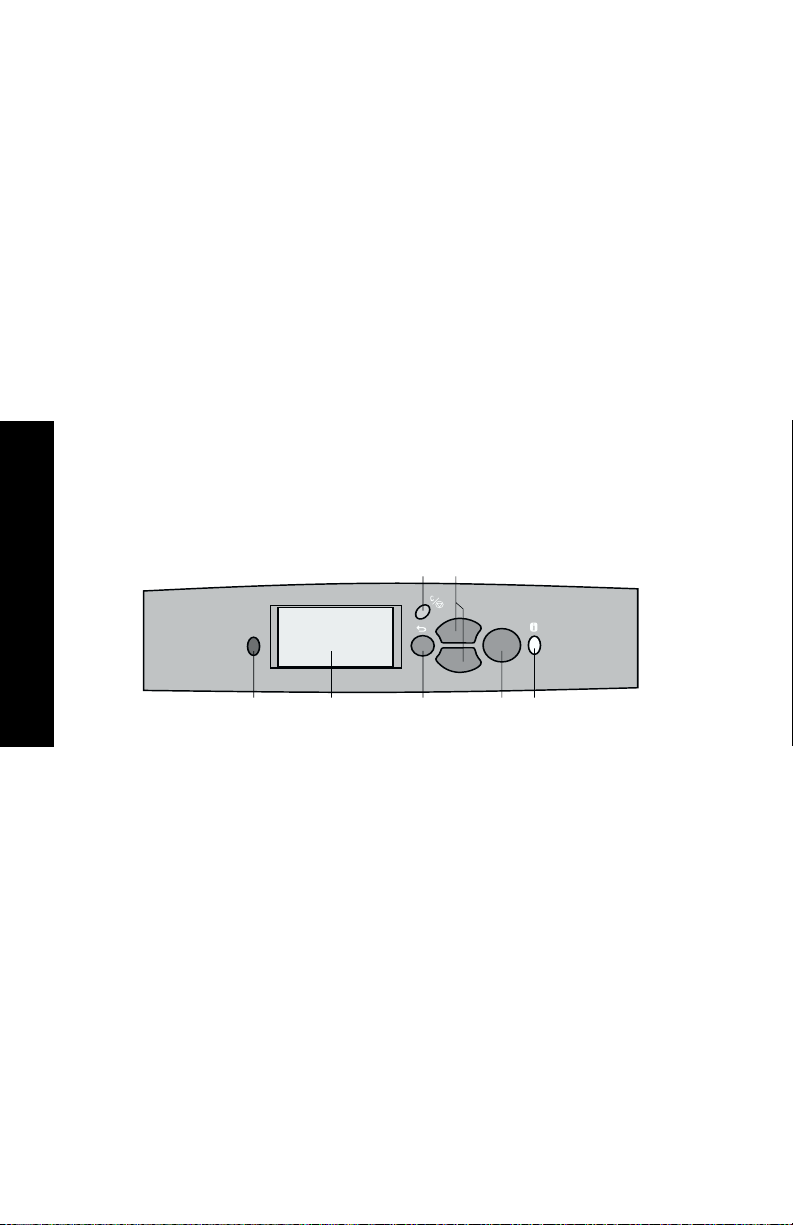
Front Panel
The front panel:
■
Displays the printer’s operating status (Ready to Print, Printing).
■
Alerts you to load paper, replace consumables, and clear jams.
■
Enables you to print reports and information pages.
■
Enables you to access tools and information pages to help
troubleshoot problems.
■
Enables you to change printer and network settings; (driver
settings override settings set on the printer’s front panel).
■
Enables you to print Secure Print, Proof Print, and Saved Print
jobs that you have stored on the printer’s hard disk; (refer to the
printer driver help for more information).
Parts of the front panel
Front Panel
5
Phaser 860
OK
123467
0726-42
1. Status indicator light — green when operating correctly; red when
there is a problem
2. Display screen
3. Cancel Print key — cancels the current print job
4. Back key — returns the display to the previous menu
5. Scroll Up and Scroll Down keys — scrolls through the front panel
menus
6. OK key — selects the highlighted menu setting
7. Information key — (press at any time) displays additional
information on the message or menu on the display screen
8
Phaser 860 Color Printer
Page 23

Printing a Menu Map
The Menu Map shows you where features, such as the information
pages, are located in the front panel’s menu structure.
1. With Menus highlighted, press the OK key.
2. Scroll to Print Menu Map by pressing the Scroll Up or Scroll
Down key.
3. Press the OK key.
Printing information pages
A large amount of useful information is stored in your printer as
printable pages. Access these pages from the Printable Pages Menu:
1. With Menus highlighted, press the OK key.
2. Scroll to Printable Pages Menu by pressing the Scroll Up or Scroll
Down key.
3. Press the OK key.
4. Scroll to the desired information page (such as Print Quality
Tips).
5. Press the OK key.
Front Panel
Front panel error conditions
When the front panel prompts you that there is a paper jam, it
describes the location of the jam. Refer to page 47 for information on
clearing jams.
When the front panel prompts you that a supply is low or needs to be
replaced, make sure that you have replacements on hand. Refer to
page 1 for ordering information.
User Guide
9
Page 24

Features
Your Phaser 860 Color Printer comes with many useful features to help
you create the best possible printed documents. You can access the
printer features in the printer driver, which you use when you send a
print job to the printer. To ensure that you have access to all of the
printer features, make sure you have installed the printer driver that
comes on your Phaser 860 Printer CD-ROM. Updated printer drivers
are also available on the Xerox web site:
www.xerox.com/officeprinting
Note
You can also set some of the features on the printer’s front
panel. The settings in the printer driver override the front
panel settings.
The following features are described in this manual:
■
Print quality mode — see page 11
■
TekColor correction — see page 12
■
2-sided printing — see page 39
■
Legal paper printing — see page 23
For information on the following features, refer to the printer driver
help or the Advanced Features and Troubleshooting Guide, which is
available on your Printer CD-ROM:
■
Secure prints, proof prints, and saved prints
■
Separation pages
■
Multiple pages on a single sheet of paper
■
Booklet printing
■
Negative images
Features
■
Mirror images
■
Scaling
■
Watermarks
10
Phaser 860 Color Printer
Page 25

Print quality modes
You can choose between different print quality modes to obtain the
best combination of speed and print quality for your job.
Print quality mode Maximum speed*
Fast Color
■ Fastest color print mode
■ Ink-saving mode since prints lighter than
Standard mode
■ Useful for text and business graphics
■ Ideal for previewing work
■ Produces fast, high-quality
transparencies
Standard
■ General-purpose mode for color printing
■ Produces vibrant, saturated prints with
smooth color transitions
■ Suitable for most office uses and images
■ Best quality mode for printing
transparencies
Enhanced
■ Balance of high quality and fast speed
■ Increases color saturation compared to
Standard mode
■ Smoothest and brightest large-area fills
■ Useful for printing paper copies of
overhead presentations
High Resolution/Photo
■ Highest-quality color prints
■ Richest color and near-photographic
detail
■ Makes very fine lines, sharp edges, and
small text sharper
■ 1200 x 600 dpi
■ Printer must have the DP Features Set
(or must be a DX model)
16 ppm Paper
7 ppm Transparency
10 ppm Paper
3.5 ppm Transparency
6 ppm Paper
3.5 ppm Paper
‡
‡
Supplies Features
* Approximate number of pages per minute based on prints with margins of .5 in. or greater; does not
include image processing time.
‡
Transparencies are printed in Standard mode.
User Guide
11
Page 26

TekColor™ color corrections
You can select a color correction to match particular press
specifications or match your computer screen’s colors. Otherwise,
select Automatic to let the printer automatically pick the best color
correction for elements in your document.
Color correction Description
Automatic
sRGB Display
Vivid Color
None
SWOP Press
Euroscale Press
Commercial Press
SNAP Press
DIC
Toyo
FujiProof
Black and White
Features
■ Automatically optimizes the color correction for
each element (text, graphics, and photographs)
on the page
■ Closely approximates the colors on a standard
display screen
■ Produces the brightest possible colors and makes
blues appear less purple
■ Doesn’t use a color correction so the colors you
specified in the application for your job are not
altered
■ Use when you have specified colors from the
PANTONE® Color Chart
■ Matches U.S. press standards using the
Specification for Web Offset Publications
■ Emulates the Euroscale 4-color process press
mode
■ Emulates a 4-color process commercial press
mode
■ Matches the standards for printing on uncoated
and newsprint papers using the Specifications
for Non-Heat Advertising Printing
■ Matches Dai Nippon printing inks on coated
paper
■ Matches commercial Toyo printing inks on
coated paper
■ Matches the Fuji Color Art System for
commercial North American proofs
■ Produces a black-and-white version of a
document
■ Colors converted to grayscale
■ Use to print page masters for photocopying in
black-and-white
12
Phaser 860 Color Printer
Page 27

Paper and Print Media
Paper tips
■
Only use the supported paper types, sizes, and weights.
■
Do not use perforated paper.
■
Store the paper on a flat surface, in a relatively low-humidity
environment.
■
Avoid storing paper in such a way as to cause wrinkling, bending,
curling, etc.
■
Do not unwrap paper until you are ready to use it, and rewrap any
paper you are not using.
■
Do not expose paper to direct sunlight.
■
Do not expose paper to high humidity, since moisture can affect
feed reliability.
■
Handle transparencies by the edges and with both hands to avoid
fingerprints and creases, which can result in poor print quality.
■
Always use the manual-feed slot for envelopes.
Supported media
Refer to the following table for the supported paper and media types,
sizes, and weights and the correct trays to load that media. You can
also print the Paper Tips Page from the printer’s front panel, which
lists the supported paper types and sizes.
Paper and Print Media
User Guide
13
Page 28

Supported paper and print media
Media Type/Size/Weight
Bond or equivalent
Letter or A4
60-120 g/m
Bond or equivalent
Letter or A4
120-150 g/m
(32-40 lbs.)
Paper and Print Media
Bond or equivalent
Executive or A5
60-150 g/m
Bond or equivalent
Legal
75-105 g/m
Heavy paper/cover stock
150-160 g/m
(40-60 lbs.)
Heavy paper/cover stock
176 - 216 g/m
(65-80 lbs.)
Coated or glossy paper
Letter or A4
2
(16-32 lbs.)
2
‡
2
(16-40 lbs.)
2
(20-28 lbs)
2
‡
Standard
Paper/
Transpar-
ency Tray *
(1)
•
(1)
•
High-
Capacity
Paper
Tray **
High-
Capacity
Transparency
/Label Tray *
Legal
Paper
Tray *
Manual
-Feed
Slot
••
•
•
••
(1)
•
2
(1)
•
•
•
•
High-Resolution Photo
paper; Letter or A4
Short-grained paper
Letter or A4
105-150 g/m
Transparencies
‡
Labels
Business Cards
Envelopes
(1) Tray switch set to Paper
(2) Tray switch set to Transparency
(3) Tray switch set to Label
‡ Print single sided only
* If your printer has more than one tray, this is the Upper Tray
** Middle or Lower Tray
*** See page 16 for acceptable envelope sizes and types
***
‡
2
(28-40 lbs.)
‡
‡
‡
•
•
•
•
(1)
(1)
(2)
(1)
14
•
•
(2)
•
•
(3)
•
•
•
•
Phaser 860 Color Printer
Page 29
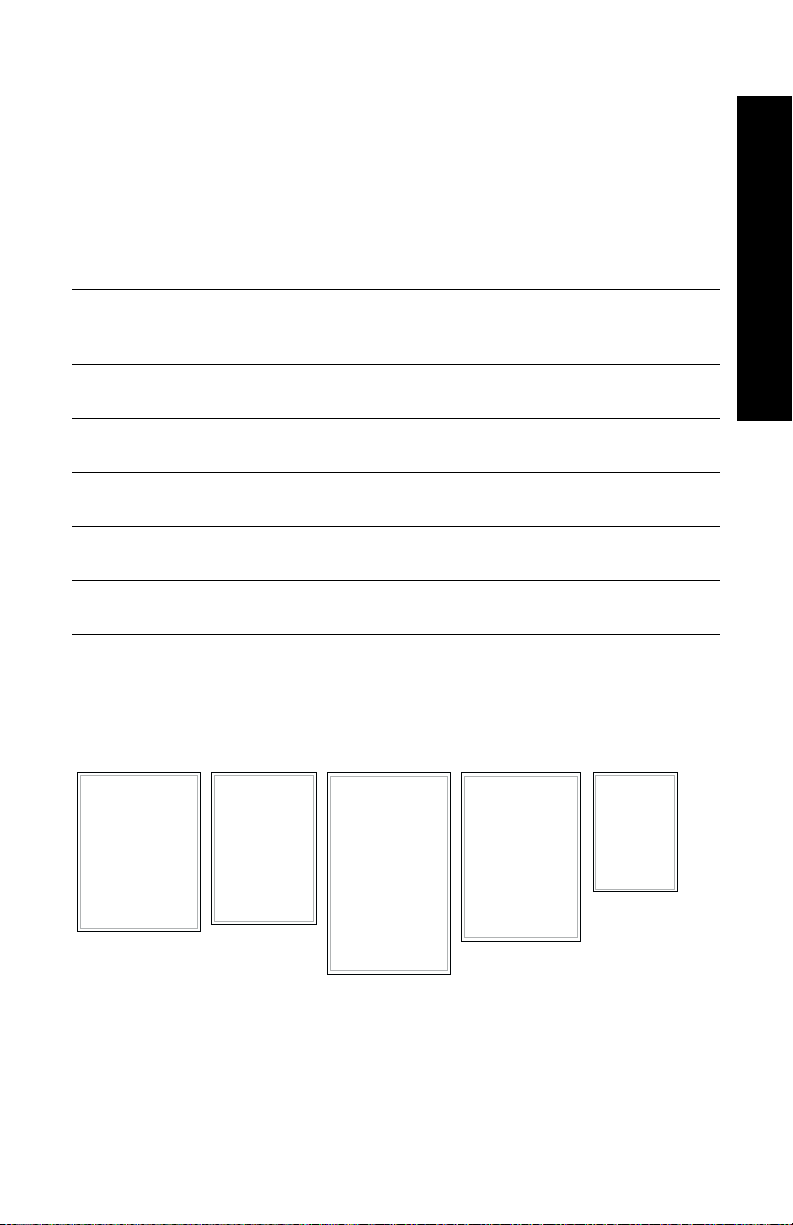
Print area of supported paper sizes
The image area of a print is slightly smaller than the paper size. You
may need to adjust the page margins in your application software to
match the print area. When sending a job to the printer, select the
paper size in the printer driver.
Print area of supported paper sizes
Paper and Print Media
Paper* Sheet size Print area
Letter
1.
Executive
2.
Legal
3.
A4
4.
A5
5.
* Transparencies are available in Letter-size and A4-sizes only.
215.9 x 279.4 mm
(8.5x11in.)
184 x 267 mm
(7.25 x 10.5 in.)
215.9 x 355.6 mm
(8.5x14in.)
210 x 297 mm
8.27 x 11.7 in.)
148 x 210 mm
(5.83 x 8.27 in.)
205.9 x 269.4 mm
(8.1 x 10.6 in)
174 x 253 mm
(6.85 x 9.95 in.)
205.9 x 304.8 mm
(8.1x12in.)
200 x 287 mm
(7.87x11.3in.)
138 x 196 mm
(5.43x7.72in.)
Top/
bottom
margins
5mm
(.2 in.)
7mm
(.275 in.)
25.4 mm
(1.0 in.)
5mm
(.2 in.)
7mm
(.275 in.)
Left/
right
margins
5mm
(.2 in.)
5mm
(.2 in.)
5mm
(.2 in.)
5mm
(.2 in.)
5mm
(.2 in.)
To determine which tray to use for these paper sizes, refer to page 14.
3
541 2
User Guide
0726-43
15
Page 30
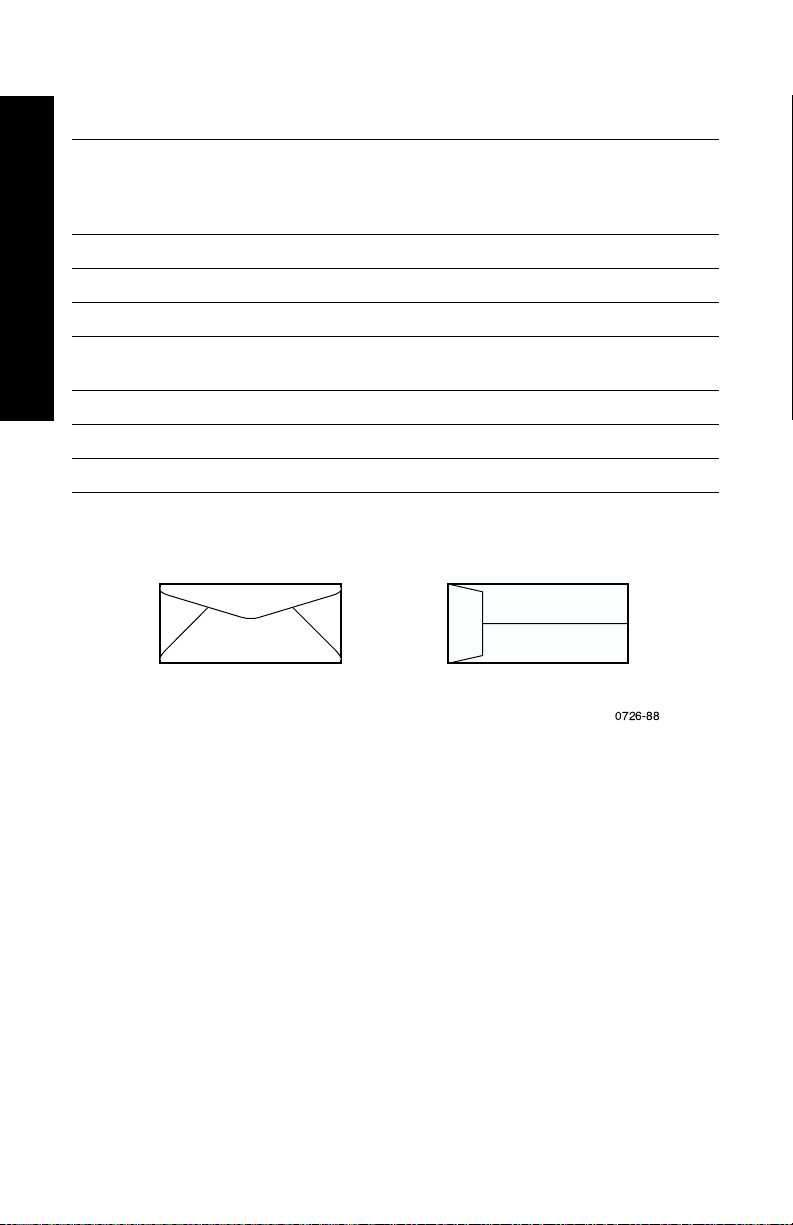
To print on envelopes, use the manual-feed slot; see page 34.
Print area of supported envelope sizes
Top/
Envelopes Envelope size Print area
#10 (U. S.) 4.13 x 9.5 in. 3.73 x 8.95 in. .2 in. .275 in.
#6.75 (U. S.) 3.65 x 6.5 in. 3.25 x 5.95 in. .2 in. .275 in.
Monarch (U. S.) 3.875 x 7.5 in. 3.475 x 6.95 in. .2 in. .275 in.
C5 162 x 229 mm 152 x 197 mm 5 mm 7 mm
Paper and Print Media
DL 110 x 220 mm 100 x 206 mm 5 mm 7 mm
Choukei 3 Gou 120 x 235 mm 110 x 221 mm 5 mm 7 mm
Choukei 4 Gou 90 x 205 mm 80 x 191 mm 5 mm 7 mm
A
CD
CD
B
bottom
margins
(A/B)
A
B
Left/
right
margins
(C/D)
25 mm
0726-88
16
Phaser 860 Color Printer
Page 31

Loading Trays
For a list of the recommended paper, transparencies, and labels that
can be used in each type of tray, refer to page 14.
Loading the Standard Paper/Transparency Tray
You can also refer to the labels inside the tray for loading instructions.
1. Pull out the tray.
2. Load the print media.
■
One-sided job — Load paper with the side to be printed face
up. Load letterhead paper face up with the letterhead toward
the front of the tray. Load transparencies with the side to be
printed face up and the notch in the back-right corner of the
tray.
■
Two-sided job — Load paper with the side to be printed first
face down. Place letterhead paper face down with the
letterhead toward the back of the tray. For more information
on two-sided printing, refer to page 39.
Loading Trays
Note
Make sure that you place the paper or transparencies under
the tabs in the back of the tray.
User Guide
0726-54
17
Page 32

3. Observe the fill lines on the left side of the tray. Don't load paper
T
ra
n
s
p
a
re
n
c
y
P
a
p
e
r
T
r
a
n
s
p
a
r
e
n
c
y
P
a
p
e
r
above the Paper fill line. Don't load transparencies or labels above
the Transparency/Label fill line.
Paper
Transparency /
Label
Paper
Transparency /
Label
0726-02
4. If you loaded paper, make sure that the tray switch on the
front-right side of the tray is set to Paper (forward position). If you
loaded transparencies, make sure that the tray switch is set to
Transparency (back position).
Paper Transparency
T
ra
n
s
p
a
r
e
n
c
y
L
a
b
e
Loading Trays
l
0726-04
5. Slide the tray back into the printer.
0726-03
T
r
a
n
s
p
a
r
e
n
c
y
L
a
b
e
l
0726-05
0726-06
Note
Do not place paper that was printed on one side back into the
printer to print on the second side. Pre-printed pages may
stick together.
18
Phaser 860 Color Printer
Page 33

Loading the Optional High-Capacity Paper Tray
The optional high-capacity paper tray assembly is located under the
base printer. You can have one or two high-capacity paper tray
assemblies. The trays are then called the Middle Tray and Lower Tray
in the printer driver software.
Note
Do NOT load transparencies in a high-capacity tray.
You can refer to the labels inside the tray for paper-loading
instructions.
1. Pull out and completely remove the tray.
Loading Trays
0726-12
2. If there is any paper remaining in the tray, remove it.
Note
Do not re-use the remaining paper in a high-capacity paper
tray. If that paper is not damaged, it may be used in the
standard paper tray (upper tray).
3. Open a new ream of paper. Remove any bent or torn sheets of
paper from the ream.
User Guide
19
Page 34

4. Slide the ream of paper into the tray so that the paper rests up
against the angled paper stop at the rear of the tray. The stack of
paper should assume the same angle as the paper stop.
Note
Don't load paper above the fill line on the left side of the tray.
Loading Trays
0726-10
Note
If you are loading letterhead and printing on one side of the
paper, place the paper face up with the letterhead toward the
front of the tray. For two-sided jobs, place the letterhead
paper face down with the letterhead toward the back of the
tray.
5. Remove any sheets that are damaged.
20
0726-77
Phaser 860 Color Printer
Page 35

6. Tilt the back left corner of the tray downward slightly and shake
the tray front-to-back several times until the paper is uniformly
aligned along the left side of the tray and rear paper stop.
0726-11
7. Re-insert the tray in the printer.
0726-13
Loading Trays
User Guide
21
Page 36

Loading the Optional High-Capacity
Transparency/Label Tray
The optional high-capacity transparency/label tray replaces the
standard paper/transparency tray in the printer. It holds up to
100 sheets of labels or 175 transparencies (instead of 50 for the
standard tray).
You can refer to the labels inside the tray for loading instructions.
1. Pull out the tray.
2. Load transparencies with the side to be printed face up and the
notch in the back-right corner of the tray.
Load labels with the side to be printed face up.
0726-54
Loading Trays
Note
Make sure that you place the labels or transparencies under
the tabs in the back of the tray.
3. Observe the fill lines on the left side of the tray. Don't load
transparencies above the Transparency fill line. Don't load labels
above the Label fill line.
22
Phaser 860 Color Printer
Page 37

4. If you loaded transparencies, make sure that the tray switch on the
Transparency
Label
Transparency
Label
front-right side of the tray is set to Transparency (back position).
If you loaded labels, make sure that the tray switch is set to Label
(forward position).
Transparency Label
Transparency
Label
0726-78
Transparen
cy
Labe
l
0726-81
5. Slide the tray back into the printer.
0726-06
Note
Do not use two-sided printing for transparencies or labels.
Loading the Optional Legal Paper Tray
The optional legal paper tray replaces the standard paper/transparency
tray in the printer.
Loading Trays
You can refer to the labels inside the tray for paper-loading
instructions.
1. Pull out the tray.
User Guide
23
Page 38

2. Load the print media.
■
One-sided job — Load paper with the side to be printed face
up. Load letterhead paper face up with the letterhead toward
the front of the tray.
■
Two-sided job — Load paper with the side to be printed first
face down. Place letterhead paper face down with the
letterhead toward the back of the tray. For more information
on two-sided printing, refer to page 39.
0726-47
3. Observe the fill line on the left side of the tray. Don't load paper
above the fill line.
Note
Loading Trays
Make sure that you place the paper under the tabs in the back
of the tray.
4. Slide the tray back into the printer.
0726-06
5. To print on this paper, be sure to select Legal for the Paper Size in
the printer driver.
24
Phaser 860 Color Printer
Page 39

Note
If necessary, install the Output Tray Extension into the holes
on the back of the printer. This extension keeps your
legal-size paper from falling off the printer after it is printed.
0726-70
Loading Trays
User Guide
25
Page 40

Manual-Feed Printing
For a list of the recommended papers, transparencies, labels, and
business cards that can be used in the manual-feed slot, refer to
page 14.
You can print one-sided or two-sided jobs from the manual-feed slot.
For more information on two-sided printing, refer to page 39. Refer to
page 38 for instructions on loading letterhead in the manual-feed slot.
Transparencies and envelopes can only be printed on one side; refer to
page 32 and page 34 for more information.
1. In the printer driver, select Manual Feed-Paper or
Manual Feed-Transparency as the Paper Source.
Note
You also use the printer driver to select whether to print on
one side or two sides.
2. Send the job to the printer.
3. If necessary, open the manual-feed slot.
Manual Feed
26
0726-61
Phaser 860 Color Printer
Page 41

4. If necessary, adjust the guide on the right side of the slot for
Letter-size (and Legal-size) or A4-size paper.
LETTER
LETTER
A4
EXECUTIVE
A5
0726-66
A4
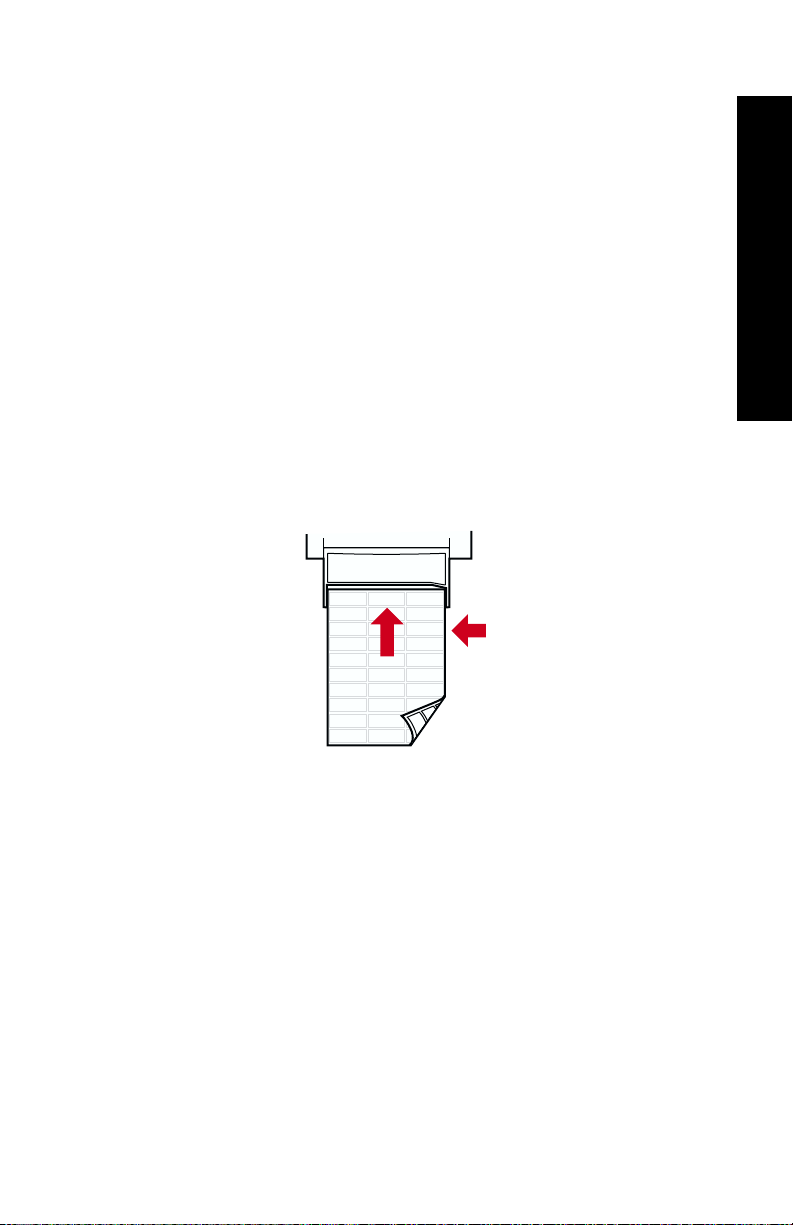
5. When the front panel displays the Waiting for Manual Feed
prompt, insert one sheet or envelope into the manual feed slot
until the printer pulls it in.
Align the paper, transparency, or envelope along the left side of
the slot. For transparencies, make sure the notch is along the right
side and enters last.
■
One-sided job — The top of the sheet enters first and the side
to be printed is face down, as shown in the following
illustrations.
■
Two-sided job — The top of the sheet enters last and the side
to be printed first is face up.
Supplies Manual Feed
User Guide
27
Page 42

0726-55
6. Check the first print to make sure the image placement is correct.
7. Wait for the front panel to display the prompt again before
inserting the next sheet.
0726-46
Manual Feed
28
Phaser 860 Color Printer
Page 43

Printing on Special Media
In addition to bond paper, the printer can print on the following
special media:
■
Phaser High-Resolution Photo Paper
■
Phaser Labels and Phaser Business Cards — see page 30
■
Phaser 860 Transparencies — see page 32
■
Envelopes — see page 34
■
Letterhead paper — see page 38
Printing on Phaser High-Resolution Photo Paper
The Phaser High-Resolution Photo Paper can be printed on one side
only, since it has a Xerox logo on the reverse side. Refer to page 5 for
more information.
1. You can either:
■
Place up to 50 sheets of the photo paper face up in the
standard paper/transparency tray. Make sure that the tray
switch is set to Paper (forward position).
Special Media
■
Choose to manually feed the paper. Don’t place the photo
paper in the manual-feed slot until you are prompted by the
printer’s front panel to do so.
2. In the printer driver:
■
Select the tray containing the high-resolution photo paper
(Upper Tray) or Manual Feed-Paper.
■
Select one-sided printing.
■
Select High-Resolution/Photo for the Print Quality mode.
3. Send the job to the printer.
4. If you selected Manual Feed-Paper, wait until the printer’s front
panel prompts you, then insert the first sheet face down in the
manual-feed slot. Wait until you are prompted again before
adding the next sheet.
User Guide
29
Page 44

Printing on labels and business cards
Transparency
Label
Guidelines
■
Use only Phaser 860 Printer Color Printing Labels or Xerox Phaser
Premium Business Cards; refer to page 6 for more information.
■
If any of the labels or business cards on a sheet are missing, do not
use that sheet; it may damage printer components.
■
Special Media
Keep labels and business cards in a cool, dry place. Never store
labels and business cards in a high-humidity environment; labels
and business cards stored under such conditions will jam in the
printer.
■
Store unused labels and business cards flat in their containers.
■
Rotate stock frequently. Long periods of storage can cause the
labels and business cards to curl and jam the printer.
■
Print only on one side of the sheet of labels or business cards.
Method for printing on labels or business cards
1. If your application has a setting for labels, use it as a template.
Otherwise, refer to the instructions included with the labels or
business cards for margin settings.
2. To print on labels, you can either:
■
Place sheets of labels face up in the standard
paper/transparency tray (up to 50 sheets) or high capacity
transparency/label tray (up to 100 sheets). Make sure the tray
switch is set to Paper or Label (forward position).
30
Transparency
Label
0726-81
Phaser 860 Color Printer
Page 45
■
Choose to manually feed the labels. Don’t place the labels in
the manual-feed slot until you are prompted by the printer’s
front panel to do so.
To print on business cards, use the manual-feed slot. Don’t place
the sheet of business cards in the manual-feed slot until you are
prompted by the printer’s front panel to do so.
3. In the printer driver:
■
Select the tray containing the labels (Upper Tray) or select
Manual Feed-Paper.
■
Select one-sided printing.
4. Send the job to the printer.
5. If you selected Manual Feed-Paper, wait until the printer’s front
panel prompts you, then insert the first sheet of labels or business
cards face down in the manual-feed slot. Wait until you are
prompted again before adding the next sheet.
Special Media
User Guide
0726-71
31
Page 46

Printing on transparencies
Transparency
Paper
Note
Use only Phaser 860 Premium or Standard Transparencies.
Refer to page 6 for more information. Handle transparencies
by the edges and with both hands to avoid fingerprints and
creases, which can cause poor print quality.
To print on transparencies:
Special Media
1. You can either:
■
Place transparencies in the standard paper/transparency tray
(up to 50 sheets) or high capacity transparency/label tray (up
to 175 sheets) so that the notch of the transparencies is in the
back-right corner of the tray. Make sure the tray switch is set
to Transparency (back position).
Transparency
Label
0726-73
■
Choose to manually feed the transparencies. Don’t place a
transparency in the manual-feed slot until you are prompted
by the printer’s front panel to do so.
2. In the printer driver:
■
Select the tray containing the transparencies (Upper Tray) or
Manual Feed-Transparency.
■
Select one-sided printing.
3. Send the job to the printer.
32
Phaser 860 Color Printer
Page 47

4. If you selected Manual Feed-Transparency, wait until the
printer’s front panel prompts you, then insert the first sheet into
the manual-feed slot so that the notch of the transparency is on
the right side and enters the manual-feed slot last. Wait until you
are prompted again before adding the next transparency.
0726-62
Special Media
User Guide
33
Page 48

Printing on envelopes
Guidelines
■
Use only the recommended envelope sizes (see page 16)
■
No windows or metal clasps
■
No exposed gummed surfaces
■
For best results, use light-weight, laser-quality envelopes
Special Media
■
Single-sided printing only
■
Keep unused envelopes in their original packaging to avoid dust
and humidity, which can affect print quality and cause wrinkling
■
When prompted, load a single envelope in the manual-feed slot,
aligning it along the left side
General method for printing on envelopes
1. In your application, create a document matching the
measurements of the envelope; refer to page 16 for the print area
and margins of supported envelopes.
Note
Many applications include a tool for creating an envelope. If
you are using Microsoft WORD, refer to page 35 when using
Windows or page 36 when using a Macintosh. When using
other Macintosh applications, refer to page 37. For other
applications, refer to your application’s documentation.
2. From your application or printer driver, make these selections:
■
Set the orientation to Landscape.
■
Select your envelope size.
■
Select Manual Feed-Paper as the Paper Source.
■
If your application has a tool for creating envelopes, select
the feed method that matches the illustration in Step 4.
3. Send the job to the printer
34
Phaser 860 Color Printer
Page 49

4. When the printer’s front panel prompts you, insert the envelope
in the manual-feed slot:
■
Short side enters first.
■
Flap is face up and closed.
0726-63
Printing envelopes from Microsoft WORD for Windows
1. From the Tools menu, select Envelopes and Labels.
2. In the Envelopes and Labels dialog box, click the Envelopes tab
and type the delivery and return addresses.
3. Click the Feed icon.
4. On the Printing Options tab, select all of the following:
■
Face Down
■
Clockwise Rotation
■
For Feed From, select Manual Feed Paper.
■
Envelope feed on left icon:
Special Media
0726-82
5. Click the Envelope Options tab, select your envelope size in the
Envelope size drop-down list, and click the OK button.
6. In the Envelopes and Labels dialog box, click the Print button.
7. When the printer’s front panel prompts you, insert the envelope
in the manual-feed slot.
User Guide
35
Page 50

Printing envelopes from Microsoft WORD on a Macintosh
1. From the Tools menu, select Envelopes and Labels.
2. In the Envelopes and Labels dialog box, click the Envelopes tab
and type the delivery and return addresses.
3. Click the Feed icon.
4. On the Printing Options tab, select all of the following:
■
Face Down
Special Media
■
Clockwise Rotation
■
Use Envelope Feeder
■
Envelope feed on left icon:
0726-82
5. Click the Envelope Options tab, select your envelope size in the
Envelope size drop-down list, and click the OK button.
6. In the Envelopes and Labels dialog box, click the Print button.
7. In the Page Setup dialog box, select all of the following
Page Attributes:
■
Paper: select your envelope size.
■
Orientation: select Landscape.
8. From the drop-down menu, select PostScript Options, and make
the following selections:
■
Flip Horizontal
■
Flip Vertical
9. Click the OK button.
10. In the Print dialog box, in General options, select Manual Feed
Paper for Paper Source and click the Print button.
11. When the printer’s front panel prompts you, insert the envelope
in the manual-feed slot.
36
Phaser 860 Color Printer
Page 51

Printing envelopes from other applications on a Macintosh
Follow the instructions in the application documentation. If the
envelope address prints upside-down, change the Page Setup settings
in your printer driver before printing on another envelope:
1. From the File menu, select Page Setup.
2. Select the following Page Attributes:
■
Paper: select your envelope size.
■
Orientation: select Landscape.
3. From the drop-down menu, select PostScript Options, and make
the following selections:
■
Flip Horizontal
■
Flip Vertical
4. Click the OK button.
5. From the File menu, select Print.
6. For Paper Source, select Manual Feed Paper.
7. Click Print button.
8. When the printer’s front panel prompts you, insert the envelope
in the manual-feed slot.
Special Media
User Guide
37
Page 52

Printing on letterhead paper
Letterhead paper can be printed on one side or two sides. Refer to
page 14 for the weights and sizes of paper you can use.
1. You can either:
■
Place the letterhead paper in the standard paper/
transparency tray (with the tray switch set to Paper) or a high
capacity paper tray.
Special Media
2. In the printer driver:
3. Send the job to the printer.
One-sided job — place the letterhead paper face up with the
letterhead towards the front of the tray.
Two-sided job — place the letterhead paper face down with
the letterhead towards the back of the tray.
■
Choose to manually feed the paper. Don’t place the paper in
the manual-feed slot until you are prompted by the printer’s
front panel to do so.
■
Select the tray containing the letterhead paper or
Manual Feed-Paper.
■
Select either one-sided printing or two-sided printing.
4. If you selected Manual Feed-Paper, wait until the printer’s front
panel prompts you before inserting the paper.
One-sided job — Place the letterhead paper face down with the
letterhead entering the manual-feed slot first.
Two-sided job — Place the letterhead paper face up with the
letterhead entering the manual-feed slot last.
Wait until you are prompted again before adding the next sheet of
paper.
38
Phaser 860 Color Printer
Page 53

Printing Two-Sided Jobs
You can have the printer automatically print two-sided (duplex) jobs
using Letter-size, A4-size, or Legal-size paper in the paper trays or the
manual-feed slot. Refer to page 14 for the weights and types of paper
you can use.
Do not print two-sided jobs on transparencies, labels, business cards,
envelopes, heavy paper, card stock, index stock, or high-resolution
photo paper.
Caution
Do not place paper that was printed on one side back into the
printer to print on the second side. Pre-printed pages may
stick together and not feed properly.
When you print any job, you can use the printer driver to select the
orientation of the images on the page: Portrait or Landscape. When
you print two-sided jobs, you also select the binding preference, which
determines how the pages turn; refer to the table on page 41 for the
wording used in the printer drivers.
Portrait Landscape
0726-65
0726-64
2-Sided Printing
User Guide
39
Page 54

Printing two-sided jobs
1. You can either:
■
Place the paper in the standard paper/transparency tray (with
the tray switch set to Paper), legal tray, or a high capacity
paper tray, depending on its size. If you are printing on
letterhead, refer to page 38.
■
Choose to manually feed the paper. Don’t place the paper in
the manual-feed slot until you are prompted by the printer’s
front panel to do so.
2. In the printer driver:
■
Select the tray containing the paper or Manual Feed-Paper.
■
Select two-sided printing. Refer to the table on page 41 for
the wording used in the printer drivers.
3. Send the job to the printer.
4. If you selected Manual Feed-Paper, wait until the printer’s front
panel prompts you, then insert the first sheet of paper in the
manual-feed slot. Wait until you are prompted again before
adding the next sheet.
Note
2-Sided Printing
When the printer prints a two-sided job, the paper partially
exits then is fed back in to print on the second side. To avoid
paper jams, do not touch the paper before it completely exits
the printer.
40
Phaser 860 Color Printer
Page 55

Setting the printer driver for two-sided printing
Macintosh
LaserWriter 8.6
or
LaserWriter 8.7
Windows 95
or
Windows 98
Windows 2000
Windows NT
1. From the File menu, select Print, and then
select Layout.
2. Select Print on Both Sides.
3. Select a binding preference.
1. From the
2. Click the
3. On the
File
menu, select
Properties
Setup
tab, select
4. Check or uncheck
1. From the
2. Click the
3. On the
Long Edge
1. From the
2. Click the
3. On the
File
menu, select
Properties
Layout
tab, select either
Flip on Short Edge
or
File
menu, select
Properties
Page Setup
button.
Bind on Top Edge
button.
button.
tab, select either
Print
.
Print on 2 sides
.
Print
.
Flip on
.
Print
.
.
Long Edge or Short Edge.
2-Sided Printing
User Guide
41
Page 56

Troubleshooting Print Quality
Band of color(s) missing
0726-87
Determine whether the problem occurs for some colors or all colors by
printing the Diagnostic Pages from the printer’s front panel:
1. With Menus highlighted, press the OK key.
2. Scroll to Printable Pages Menu by pressing the Scroll Up or Scroll
Down key.
3. Press the OK key.
4. Scroll to Print Diagnostic Pages.
5. Press the OK key.
Note
You can also print the Diagnostic Pages from the
Troubleshooting tab in the driver.
Print Quality
42
Phaser 860 Color Printer
Page 57

Band of colors prints correctly Band of one color (magenta) missing
6 7 8 9 101112 13
6 7 8 10111213
1 2 34 6 7 89 101112 13141516 17181920 21222324 25262728 29303132 33343536 3738394041 42434445 46474849 50515253 54555657 58596061 62636465 6667686970717273747576777879808182838485868788
5
123456 7 89 1011 1213141516 17181920 21222324 25262728 29303132 33343536 37383940 4142434445 46474849 50515253 54555657 58596061 62636465 66676869 70717273747576777879808182838485868788
123456 7 89 1011 1213141516 17181920 21222324 25262728 29303132 33343536 37383940 4142434445 46474849 50515253 54555657 58596061 62636465 66676869 70717273747576777879808182838485868788
123456 7 89 1011 1213141516 17181920 21222324 25262728 29303132 33343536 37383940 4142434445 46474849 50515253 54555657 58596061 62636465 66676869 70717273747576777879808182838485868788
1 2 34 6 7 89 101112 13141516 17181920 21222324 25262728 29303132 33343536 3738394041 42434445 46474849 50515253 54555657 58596061 62636465 6667686970717273747576777879808182838485868788
5
123456 7 89 1011 1213141516 17181920 21222324 25262728 29303132 33343536 37383940 4142434445 46474849 50515253 54555657 58596061 62636465 66676869 70717273747576777879808182838485868788
1234567 8 10111213141516171819202122232425262728293031323334353637383940414243444546474849505152535455565758596061626364656667686970717273 74757677 78798081 8283848586 8788
123456 7 89 1011 1213141516 17181920 21222324 25262728 29303132 33343536 37383940 4142434445 46474849 50515253 54555657 58596061 62636465 66676869 70717273747576777879808182838485868788
One or more color bars are missing
1. On the front panel, select Eliminate Light Stripes to clean the
printhead and print a test print:
a. With Menus highlighted, press the OK key.
b. Scroll to Support Menu by pressing the Scroll Up or Scroll
Down key.
c. Press the OK key.
d. Scroll to Improve Print Quality?.
e. Press the OK key.
f. Scroll to Eliminate Light Stripes.
g. Press the OK key.
Note
0726-83
Supplies Print Quality
You can also select Eliminate Light Stripes from the
Troubleshooting tab in the driver.
2. If there is still a color band missing, repeat Step 1. Repeat up to
three times in a row, if necessary.
3. If the problem persists:
a. Turn off the printer for at least 4 hours.
b. When you turn on the printer, print the Diagnostic Pages
and, if necessary, select Eliminate Light Stripes.
User Guide
43
Page 58

All four color bars are missing in the test print
1 2 34 6 7 89 101112 13141516 17181920 21222324 25262728 29303132 33343536 3738394041 42434445 46474849 50515253 54555657 58596061 62636465 6667686970717273747576777879808182838485868788
5
123456 7 89 1011 1213141516 17181920 21222324 25262728 29303132 33343536 37383940 4142434445 46474849 50515253 54555657 58596061 62636465 66676869 70717273747576777879808182838485868788
1234567 8 10111213141516171819202122232425262728293031323334353637383940414243444546474849505152535455565758596061626364656667686970717273 74757677 78798081 8283848586 8788
123456 7 89 1011 1213141516 17181920 21222324 25262728 29303132 33343536 37383940 4142434445 46474849 50515253 54555657 58596061 62636465 66676869 70717273747576777879808182838485868788
0726-86
1. If needed, clean the Rapid Release Guide; see page 62 for
instructions.
2. If needed, clean the wiper blade on the maintenance drawer; see
page 65 for instructions.
3. Inspect the printer's paper-exit area for debris. If needed, clean the
exit rollers; see page 66 for instructions.
4. If needed, clean the printhead and print a test print.
a. Select Eliminate Light Stripes on the front panel (as
described on page 43) or on the Troubleshooting tab in the
driver.
b. Examine the test print.
c. If there is still a color band missing, repeat Steps a and b.
Repeat up to three times in a row, if necessary.
5. If the problem persists:
a. Turn off the printer for at least 4 hours.
b. When you turn on the printer, print the Diagnostic Pages
and, if necessary, select Eliminate Light Stripes.
Print Quality
44
Phaser 860 Color Printer
Page 59

Smudges or smears appear on the print
0726-85
■
On the front panel, select Remove Print Smears. Repeat as
needed.
a. With Menus highlighted, press the OK key.
b. Scroll to Support Menu by pressing the Scroll Up or Scroll
Down key.
c. Press the OK key.
d. Scroll to Improve Print Quality?.
e. Press the OK key.
f. Scroll to Remove Print Smears.
g. Press the OK key.
■
Be sure to use paper supported by the printer. For a list of
recommended paper types, see page 14 or print the Paper Tips
Page from the front panel's Printable Pages Menu.
■
If needed, clean the wiper blade on the maintenance drawer; see
page 65 for instructions.
■
If ink or debris is visible on the exit rollers, clean the rollers; see
page 66 for instructions.
■
If ink or debris is visible on the paper-feed rollers, clean the
rollers; see page 66 for instructions.
Supplies Print Quality
User Guide
45
Page 60

Transparency
Paper
T
ra
n
s
p
a
re
n
c
y
P
a
p
e
r
Images are too light or too dark
■
Pull out the tray and check the position of the switch on the
front-right side of the tray. Push it forward for paper (or labels)
and backward for transparencies. After setting the switch
correctly, slide the tray back in.
Paper (or Label) Transparency
T
r
a
n
s
p
a
r
e
n
c
y
L
a
b
e
l
■
Select another print quality mode in the printer driver, then print
0726-04
the job again; refer to page 11.
■
Select another color correction in the printer driver, then print the
job again; refer to page 12.
T
ra
n
s
p
a
r
e
n
c
y
L
a
b
e
l
0726-05
Print Quality
46
Phaser 860 Color Printer
Page 61

Paper Jams
Jam prevention tips
■
Use only the recommended papers, transparencies, labels, and
business cards. For more information, refer to page 14.
■
Use clean, undamaged paper.
■
Load paper from a newly opened package.
■
Don't add paper above the tray's fill line.
■
If paper is still jamming, flip the paper over in the paper tray.
■
Clean the printer's rollers if they are visibly dirty.
For more information, print the Help Guide from the printer’s front
panel (as described on page 9) or visit the Xerox Customer Support
website at
www.xerox.com/officeprinting/support
Clearing jams
When there is a paper jam, the printer’s front panel displays a message
about the jam location and information on how to clear the jam.
Jams
User Guide
47
Page 62

Paper jam — Open exit cover to clear
Caution
Do not use tools to remove jammed paper from the exit area.
Using tools in this area could damage the printer's imaging
surface.
Jams
Solution 1
If the paper has partially exited the printer at the exit slot:
1. Using both hands, remove the jammed paper. If it cannot be
removed easily, refer to Solution 2.
0726-16
2. Remove the entire sheet of paper; any pieces left in the printer
may cause more jams.
48
Phaser 860 Color Printer
Page 63

Solution 2
If the paper has partially exited the printer but cannot be removed
easily:
1. Open the exit cover.
0726-17
2. Using both hands, remove the jammed paper. If the paper is still
caught inside the printer, skip to Solution 3 (Step 2).
Jams
0726-18
3. Remove the entire sheet of paper; any pieces left in the printer
may cause more jams.
4. Close the exit cover.
User Guide
49
Page 64

Solution 3
If the paper is caught under the Rapid Release Guide:
1. Open the exit cover.
2. Lift the green paper guide.
Jams
Caution
Handle the Rapid Release Guide carefully to avoid bending
or damaging the clear plastic edge.
0726-19
3. Lift up on the green tabs and remove the Rapid Release Guide.
Do not use any sharp objects in this area of the printer.
0726-20
50
Phaser 860 Color Printer
Page 65

4. Remove the jammed paper.
0726-21
5. Make sure the thin, white dust shield is lying on top of the metal
shaft. Then, reinstall the Rapid Release Guide, pressing down on
the green tabs to snap the guide into place.
Jams
Note
Verify that the Rapid Release Guide is fully installed by
gently tugging on it. If it isn’t snapped into place, it may
cause jams and print quality problems.
6. Close the exit cover.
User Guide
0726-22
51
Page 66

Paper jam - Open front cover to clear
1. Open the front cover.
Jams
0726-23
2. Using both hands, remove the jammed paper.
3. If there is any resistance to removing the jammed paper, turn the
green thumbwheel to help feed the paper.
0726-24
4. Remove the entire sheet of paper; any pieces of paper left in the
printer may cause more jams.
5. Close the front cover.
52
Phaser 860 Color Printer
Page 67

Paper jam - Remove upper tray or paper tray to clear
1. Completely remove the upper tray or paper tray.
2. Using both hands, carefully remove the jammed paper.
0726-25
3. Re-insert the upper tray or paper tray.
Paper jam - Remove middle tray to clear
1. Completely remove the middle tray.
2. Using both hands, carefully remove the jammed paper.
Jams
3. Re-insert the middle tray.
User Guide
0726-26
53
Page 68

Paper jam - Remove lower tray to clear
1. Completely remove the lower tray.
2. Using both hands, carefully remove the jammed paper.
Jams
0726-27
3. Re-insert the lower tray.
Paper jam, incorrect size - Open exit cover to clear
The printer may be trying to print on the wrong size paper. Before
clearing the jam, verify that the paper loaded in the source tray is the
correct size and is within specifications. Refer to page 14 for
information on supported paper sizes and types.
Caution
Do not use tools to remove jammed paper from the exit area.
Using tools in this area could damage the printer's imaging
surface.
Follow the steps that start on page 48 to remove the jam from the exit
area.
54
Phaser 860 Color Printer
Page 69

Paper jam - Retry manual feed
1. Using both hands, remove the jammed paper, transparency, label,
or business card sheet.
0726-28
2. Verify that the paper (or other media) is the correct size and is
within specifications; refer to page 14.
3. Verify that the manual-feed slot is fully extended by gently
pushing it downward.
4. When prompted by the display message, reinsert only one sheet of
paper or one envelope. Use both hands to guide the sheet until
you feel the printer grab the sheet. Make sure that you insert the
sheet or envelope properly, so it is along the left edge of the slot
and it enters the printer straight and evenly. Be especially careful
to properly line up envelopes and small-size papers.
Jams
User Guide
0726-55
55
Page 70

Maintenance and Cleaning
Adding ink
Refer to page 2 for information on Phaser 860 ColorStix II ink.
Caution
Use only Phaser 860 ColorStix® II ink; the use of other ink
or ink designed for other Phaser® color printers may affect
print quality and reliability. Xerox warranties and service
contracts do not cover damage, malfunction, or degradation
of performance caused by the use of non-Xerox supplies or
consumables, or the use of Xerox supplies not specified for
use with this printer.
Ink tips
■
Keep ink in its packaging until you are ready to use it.
■
To avoid ink jams, never insert broken ink sticks into the
Maintenance
ink-loading bins.
Loading ink
You can load ink any time the printer is idle, or when the front panel
displays the Ink low or Ink out message.
1. Open the top cover.
0726-14
56
Phaser 860 Color Printer
Page 71

2. Determine which ink-loading bin needs ink. A label above each
bin indicates the color and color number of that bin.
3. Remove the ink stick from its packaging.
Note
Because the magenta, cyan, and black ink sticks are all dark,
refer to its color number; this number corresponds to the bin
for that the color. Yellow ink sticks may have a mottled
appearance that doesn’t affect print quality.
4. Place the ink stick into the opening of the appropriate ink-loading
bin. Do not force the ink stick into the ink-loading bin.
Note
Each ink stick is uniquely shaped to fit into the correct
ink-loading bin. Insert the ink stick's narrow end first.
Maintenance
5. Close the top cover.
The front panel may read Warming Up until the printer is ready
for printing.
User Guide
57
Page 72

Emptying the waste tray
Empty the waste tray when the front panel displays a message stating
that the waste tray is full.
Note
To minimize waste ink and optimize performance, leave the
printer on all the time.
Caution
The printer’s interior may be hot. Do not touch the hot
surfaces!
1. Open the front cover.
Maintenance
0726-23
2. Pull out the maintenance drawer (labeled A), if it is not locked.
0726-33
58
Phaser 860 Color Printer
Page 73

Note
The maintenance drawer is locked during the warm-up cycle
whenever the printer is turned on and while the ink
cools after the Eliminate Light Stripes troubleshooting
routine. If the maintenance drawer is locked, close all covers
and wait 15 minutes before repeating steps 1 and 2.
3. Lift the waste tray (labeled B) from the maintenance drawer. The
waste tray may be hot; handle it carefully!
0726-49
4. Empty the waste tray by gently twisting the tray or tapping it on
the sides of a waste container. Ink is non-toxic and can be
discarded as normal office waste.
Maintenance
0726-56
5. Re-insert the waste tray in the maintenance drawer. Make sure the
tray is seated flat in the drawer.
0726-34
User Guide
59
Page 74

6. Re-insert the maintenance drawer in the printer.
7. Close the front cover.
Note
Do not attempt to reuse the waste ink in the printer; it may
damage the printer. This damage is not covered under the
printer warranty.
Maintenance
60
Phaser 860 Color Printer
Page 75

Replacing the Maintenance Kit
The Maintenance Kit is a consumable that consists of the maintenance
roller (labeled C1) that maintains the surface of the imaging drum and
counter (labeled C2). The kit is located in the maintenance drawer
(labeled A), which is accessed from the printer's front cover.
0726-51
Order a new Maintenance Kit when the front panel displays a message
telling you that the Maintenance Kit is low. Replace it when the front
panel displays a message telling you to replace the Maintenance Kit.
Depending on your print volume and average ink coverage, order
either the Standard Maintenance Kit or the Extended Maintenance Kit;
refer to page 2 for more information.
Maintenance
Caution
The printer’s interior may be hot. Do not touch the hot
surfaces!
For replacement instructions, refer to the detailed, illustrated
instructions included with the new Maintenance Kit.
User Guide
61
Page 76

Cleaning the Rapid Release Guide
1. Open the exit cover.
2. Tilt up the green paper guide.
Maintenance
0726-17
Caution
62
0726-19
Handle the Rapid Release Guide carefully to avoid bending
or damaging the clear plastic edge.
Phaser 860 Color Printer
Page 77

3. Remove the Rapid Release Guide by lifting up on the green tabs.
Do not use any sharp objects in this area of the printer.
0726-20
4. Gently clean the plastic Rapid Release Guide by wiping it with a
pre-soaked alcohol cloth (using 90% isopropyl alcohol).
0726-37
Maintenance
User Guide
63
Page 78

5. Make sure the thin, white dust shield is lying on top of the metal
shaft. Then, reinstall the Rapid Release Guide, pressing down on
the green tabs to snap the guide into place.
0726-22
Note
Verify that the Rapid Release Guide is fully installed by
gently tugging on it. If it isn’t snapped into place, it may
cause jams and print quality problems.
Maintenance
6. Close the exit cover.
64
Phaser 860 Color Printer
Page 79

Cleaning the maintenance drawer wiper blade
1. Open the front cover.
0726-23
2. Remove the maintenance drawer (labeled A).
0726-33
Maintenance
3. Use a lint-free cloth to clean the top and upper edges of the
flexible plastic wiper blade located on the top of the maintenance
drawer between the roller and waste tray.
0726-60
4. Replace the maintenance drawer and close the front cover.
User Guide
65
Page 80

Cleaning the exit rollers
1. Open the exit cover.
2. Clean the exit rollers using a pre-soaked alcohol cloth (using 90%
isopropyl alcohol). To turn the rollers, turn the green
thumbwheel.
0726-53
3. Close the exit cover.
Maintenance
Cleaning the paper-feed rollers
1. Open the front cover.
66
0726-23
Phaser 860 Color Printer
Page 81

2. Remove the maintenance drawer (labeled A).
0726-33
3. To clean the rollers in rows 1, 2, and 3, use a pre-soaked alcohol
cloth (using 90% isopropyl alcohol). To turn the rollers in rows 1
and 3, turn the green thumbwheel.
1
2
3
0726-36
4. Clean any ink from the polished metal guide (located between
rollers 1 and 2) using a pre-soaked alcohol cloth (using 90%
isopropyl alcohol).
5. Replace the maintenance drawer and close the front cover.
Maintenance
User Guide
67
Page 82

Moving and Shipping the Printer
Moving the printer within the office
1. Close all of the printer’s doors and covers.
2. Turn off the printer using the power switch located on the rear
panel.
0726-80
3. Immediately use the front panel to scroll down to Shut Down for
Moving Printer and press the OK key before the front panel goes
blank; (you only have 4 seconds).
4. Wait for the printer to complete its cool-down period, during
which the ink solidifies, making the printer safe to move. This
takes at least 20 minutes with the fan running.
Note
If you did not select Shut Down for Moving Printer, wait at
least 30 minutes before moving the printer to ensure the
printer is safe to move.
5. After the ink has cooled, unplug the printer.
6. Remove the upper paper tray to provide a place for your hands
Moving
when lifting the printer.
Note
Always move the printer separately from its High-Capacity
Paper Tray Assembly.
68
Phaser 860 Color Printer
Page 83

7. Have two people move the printer to the new location.
Shipping the printer
To prepare the printer for shipment, complete steps 1 through 5
starting on page 68, then:
1. Open the front cover.
Supplies Moving
0726-23
2. Remove the Maintenance Drawer (labeled A) and place it in a
plastic bag for storage.
0726-33
User Guide
69
Page 84

Caution
Always remove the Maintenance Drawer before shipping the
printer. Shipping the printer with the Maintenance Drawer
installed will damage the printer.
3. Close the front cover.
4. Place the printer in its original shipping carton and use the
original packing material to pack it. If you don’t have the original
carton or packing material, order replacement packaging from
Xerox (part number 065-0594-00).
5. To avoid shipping damage, refer to the instructions on the
printer’s CD-ROM or the following Xerox web site:
www.xerox.com/officeprinting/support
Moving
70
Phaser 860 Color Printer
Page 85

Getting Help
Refer to the following resources for information about your printer.
Printer CD-ROM
The printer’s auto-running CD-ROM guides you to the various
resources available for installing and learning more about your Phaser
color printer.
■
Read Me release notes
■
Printer drivers
■
Driver installers (for Mac and Windows)
■
Phaser 860 Color Printer User Guide (this manual)
■
Advanced Features and Troubleshooting Manual
■
Setup Guide poster
■
How-to videos
■
Networking information
■
Cleaning instructions
■
Consumables instructions
■
Repacking instructions
■
Adobe Acrobat Reader (for reading the PDF files)
■
Adobe Type Manager (ATM)
Getting Help
Advanced Network Management Tools CD-ROM
This CD-ROM contains network management tools, including
CentreWare DP, Unix tools, and the Font Downloader application.
Printer’s front panel and internal pages
You can press the Information key at any time to get additional
information about the message displayed on the front panel.
Use the Printable Pages menu to print internal pages that give
information about the printer configuration, supplies information,
paper tips, etc. Refer to page 9 for instructions.
User Guide
71
Page 86

Windows driver and driver help system
If you are using Windows 95, Windows 98, Windows 2000, or
Windows NT, install the driver from the Printer CD-ROM and access
the printer driver to:
■
Link to relevant web sites from the Troubleshooting tab.
■
View information about the printer features on the driver tabs
by clicking the Help button on the tab.
Getting Help
■
View troubleshooting information by clicking a Help button,
then selecting the Troubleshooting Guide.
To access the Phaser 860 printer driver:
1. Click Start, select Settings, then click Printers.
2. In the Printers folder, right-click the icon for your Phaser 860
printer.
3. From the popup menu, select Properties.
Xerox web sites
www.xerox.com/officeprinting/
■
Product and supplies information
■
Downloading printer drivers
■
Finding your local reseller
■
Online documentation
www.xerox.com/officeprinting/infoSMART/
The infoSMART™ knowledge base is the same troubleshooting
knowledge base used by Xerox Customer Support staff to provide the
latest technical information on:
■
Application issues
■
Networking issues
■
Printer errors
■
Print-quality issues
■
Troubleshooting
72
Phaser 860 Color Printer
Page 87

www.colorconnection.xerox.com/
This site helps you get the most from your color printer:
■
Interactive tutorials, color printing templates, and helpful
tips for using your printer and favorite software applications.
■
Easy access to online technical support.
■
Customized features to meet your individual needs.
CentreWare IS
www.xerox.com/officeprinting/products/860/sprt.html
then click the CentreWare link
■ View manuals describing how to control printer settings and view
your printer’s status using any web browser
■ Link to information about CentreWare IS
■ Requires network connection via TCP/IP
Other online services
Subscribe to email update notices: www.colorconnection.xerox.com/
Technical Support: www.xerox.com/officeprinting/support
Getting Help
To find a local reseller
See www.xerox.com/officeprinting/contacts for the most updated
information.
U. S.
1-800-835-6100
User Guide
Canada
1-877-662-9338
Outside U.S. and
Canada
Contact your local
Xerox office for a list of
local resellers
73
Page 88

Customer support centers
See www.xerox.com/officeprinting/support for the most updated contact
information.
U. S. and Canada
1-800-835-6100
Argentina
54-114-378-5444
Australia
1-800-811-177
Getting Help
Austria
017956 7083
Belgium-Dutch
070 222 047
Belgium-French
070 222 045
Bolivia
+(5913)472662
Brazil
0800-21-8400
Caribbean
(305)716-3925 (Miami)
Central America
(305)716-3925 (Miami)
Chile
800-200-600
Colombia
571-636-3011
Denmark
7010 7288
Ecuador
+593 (2) 503 444
Finland
0800 11 8388
France
0825 393 490
Germany
01 805 004392
Ireland
1890 925 050
Italy
199 112 088
Japan
+81 03 3448 3040
Korea
82(2) 528 4661
Luxembourg
34 2080 8035
Mexico
50 (3) 615 4748
Netherlands
0900 202 1154
New Zealand
0 800 449 177
Norway
8150 0308
Peru
(511) 265 7328
Puerto Rico
1-800-835-6100
Singapore
1-800-356-5565
ASEAN
+65 251 3006
Spain
902 160 236
Sweden
0771 1788 08
Switzerland
0845 845 107
Taiwan
2 2757 1567
Thailand
2 645 3600
UK
0870 241 3459
Venezuela
+58(2)265-2625
74
Phaser 860 Color Printer
Page 89

Specifications
Material Safety Data Sheet for ColorStix®II Ink
SECTION 1- PRODUCT IDENTIFICATION
Trade Names Xerox Part No.
ColorStix®II Ink, Black 016-1902-00, 016-1902-50
ColorStix
ColorStix®II Ink, Magenta 016-1904-00, 016-1907-00
ColorStix
Four color "rainbow" pack 016-1909-00
Supplies Start-up Kit 860 SS 00, 860 SS 01
Product Use: XEROX Phaser® 860 color printers
SECTION 2 - INFORMATION ON INGREDIENTS
Xerox Phaser
fatty amide waxes, resins, and dyes. The specific identity of ingredients is
withheld as a trade secret.
ColorStix
regulations. This Material Safety Data Sheet is provided as a customer service.
SECTION 3 - HAZARDS IDENTIFICATION
ROUTES OF EXPOSURE: Skin
POTENTIAL HEALTH EFFECTS
Immediate Effects: None are known, when used as intended in Phaser®860
Chronic Effects: None are known
SIGNS AND SYMPTOMS OF EXPOSURE: None are known.
MEDICAL CONDITIONS AGGRAVATED BY EXPOSURE: None are known.
®
II Ink, Cyan 016-1903-00, 016-1906-00
®
II Ink, Yellow 016-1905-00, 016-1908-00
®
860 ColorStix®II are a proprietary blend of polyethylene and
®
II solid inks are considered articles under Hazard Communication
Color Printers. See Section 11 for toxicology test information.
Specifications
SECTION 4 - FIRST AID MEASURES
EYES: Contact unlikely. If particles get into eyes, flush thoroughly with water.
INGESTION: Not applicable
INHALATION: Not applicable
SKIN: Wash skin thoroughly with soap and water
SECTION 5 - FIRE FIGHTING MEASURES
FLASH POINT: > 221 degrees C (>429 degrees F), Pensky-Martens closed
tester
FIRE & EXPLOSION HAZARDS: These inks will burn. During a fire, irritating
and toxic gases may be generated by thermal decomposition or combustion.
EXTINGUISHING MEDIA: All extinguishing agents classified as B and C are
effective, including dry powder(s), carbon dioxide, and halon.
User Guide
75
Page 90

FIRE FIGHTING INSTRUCTIONS: Avoid inhalation of smoke. As in any fire,
wear self-contained breathing apparatus, pressure demand, MSHA/NIOSH
approved, and full protective gear.
SECTION 6 - ACCIDENTAL RELEASE MEASURES
SPILL OR LEAK: Not applicable
SECTION 7 - HANDLING AND STORAGE
HANDLING: No special precautions, when used as intended.
STORAGE: Avoid high temperatures. Keep ink below 60 degrees C
(140 degrees F)
SECTION 8 - EXPOSURE CONTROL - PERSONAL PROTECTION
EXPOSURE GUIDELINES: None established.
ENGINEERING CONTROLS/PERSONAL PROTECTION: No special personal
protection indicated, when used as intended.
SECTION 9 - PHYSICAL AND CHEMICAL PROPERTIES
APPEARANCE/ODOR: Waxy solid. Black, blue, red, or yellow in color/Faint
odor
SOLUBILITY IN WATER: Insoluble
MELTING POINT: Approximately 100 degrees C (212 degrees F)
SPECIFIC GRAVITY (Water = 1): Approximately 1, @ 25 degrees C
(77 degrees F)
Specifications
SECTION 10 - STABILITY AND REACTIVITY
STABILITY: Stable.
CONDITIONS TO AVOID: Temperatures above 200 degrees C (392 degrees F)
INCOMPATIBILITY WITH OTHER MATERIALS: None
HAZARDOUS POLYMERIZATION: Will not occur
HAZARDOUS DECOMPOSITION PRODUCTS: Material may decompose into
toxic byproducts when heated to temperatures above 200 degrees C
(392 degrees F).
SECTION 11 - TOXICOLOGICAL INFORMATION
TOXICITY: Oral LD
SKIN IRRITATION: Primary Dermal Irritation Index = 0.0; not skin irritants.
CARCINOGENICITY: Components not listed by IARC, NTP, or OSHA.
SECTION 12 - ECOLOGICAL INFORMATION
No known impact
76
>5 g/kg (rats); practically non-toxic
50
Phaser 860 Color Printer
Page 91

SECTION 13 - DISPOSAL CONSIDERATIONS
This product is not a hazardous waste as specified in 40CFR261. TCLP below
hazardous waste levels set by EPA. State and local waste disposal
requirements, however, may be more restrictive. Manage and dispose of waste
in accordance with all federal, state, and local regulations.
SECTION 14 - TRANSPORT INFORMATION
DOT: Not regulated.
SECTION 15 - REGULATORY INFORMATION
TSCA: This material has been manufactured in compliance with the EPA
Toxic Substances Control Act (TSCA).
RCRA (Resource Conservation and Recovery Act): Not a hazardous waste as
specified in 40CFR261. TCLP below hazardous waste levels set by EPA.
SECTION 16 - OTHER INFORMATION
Original preparation date: 10/5/00
Xerox Corporation
Office Printing Business
Environmental, Health & Safety
P.O. Box 1000
Mail Stop 60-512
Wilsonville, Oregon 97070
Safety Information: 800-828-6571
Health Information: 716-422-2177
Specifications
Material Safety Data Sheet for Silicone Intermediate Transfer Layer Fluid
SECTION 1- PRODUCT IDENTIFICATION
Trade Name: Xerox Silicone Intermediate Transfer Layer Fluid, impregnated
into printer's maintenance roller.
Xerox part number 016-1933-00 (replacement standard maintenance kit)
Xerox part number 016-1932-00 (replacement extended maintenance kit)
Product Use: Xerox Phaser
SECTION 2 - INFORMATION ON INGREDIENTS
Xerox Silicone Intermediate Transfer Layer Fluid is a proprietary blend of
silicone oils. Specific identities of components, and their percentage
composition, are withheld as a trade secret.
User Guide
®
860 color printers
77
Page 92

SECTION 3 - HAZARDS IDENTIFICATION
ROUTES OF EXPOSURE: Skin, eyes
POTENTIAL HEALTH EFFECTS: Health effects from this product are expected
to be negligible, when product is used as intended in Xerox Phaser
Color Printers.
Immediate Effects:
Inhalation: Not an expected route of entry
Skin: May cause mild irritation.
Eyes: May cause mild irritation.
Ingestion: Not an expected route of exposure.
Chronic Effects: None known or expected.
SIGNS AND SYMPTOMS OF EXPOSURE
Mild skin or eye irritation.
MEDICAL CONDITIONS AGGRAVATED BY EXPOSURE
None known
SECTION 4 - FIRST AID MEASURES
INHALATION: Not a route of exposure for this product.
EYES: Flush thoroughly with water. Seek medical attention if symptoms
occur.
SKIN: Wash thoroughly with soap and water. Seek medical attention if
symptoms of irritation occur.
INGESTION: Not a route of exposure for this product.
SECTION 5 - FIRE FIGHTING MEASURES
FLASH POINT: Flash point of fluid is 226 degrees C, Pensky-Martens
closed-cup tester.
Specifications
EXTINGUISHING MEDIA: All extinguishing agents classified as B and C are
effective, including dry powder(s), CO
FIRE FIGHTING INSTRUCTIONS: As for any fire, wear self-contained
breathing apparatus, pressure demand, MSHA/NIOSH approved, and
protective gear.
FIRE AND EXPLOSION HAZARDS. During a fire, irritating and toxic
substances may be generated by thermal decomposition or combustion. No
unusual fire hazards expected.
, and halon.
2
®
860
SECTION 6 - ACCIDENTAL RELEASE MEASURES
SPILL OR LEAK: Fluid is impregnated into maintenance roller. Small
amounts (ie., drops) may result from normal handling. Absorb and place in
an appropriate disposal container. Clean spills thoroughly because residue
can be slippery.
SECTION 7 - HANDLING AND STORAGE
HANDLING: Wash hands with soap and water after contact. Clean spills per
SECTION 6.
STORAGE: No special requirements.
78
Phaser 860 Color Printer
Page 93

SECTION 8 - EXPOSURE CONTROL - PERSONAL PROTECTION
No special protection indicated when used as intended.
SECTION 9 - PHYSICAL AND CHEMICAL PROPERTIES
APPEARANCE: Clear liquid impregnated into maintenance roller.
ODOR: Mild
SOLUBILITY IN WATER: No data
SPECIFIC GRAVITY: Specific gravity of fluid is 0.97 (water=1)
SECTION 10 - STABILITY AND REACTIVITY
STABILITY: Stable.
INCOMPATIBILITY WITH OTHER MATERIALS: Strong oxidizing agents
HAZARDOUS DECOMPOSITION PRODUCTS: At elevated temperatures,
formaldehyde may be generated.
HAZARDOUS POLYMERIZATION: Will not occur.
SECTION 11 - TOXICOLOGICAL INFORMATION
No toxicology data on mixture
SECTION 12 - ECOLOGICAL INFORMATION
Not available.
SECTION 13 - DISPOSAL CONSIDERATIONS
Fluid is not listed as RCRA hazardous waste. Dispose of in accordance with
federal, state, and local regulations.
SECTION 14 - TRANSPORT INFORMATION
DOT: Not regulated.
SECTION 15 - REGULATORY INFORMATION
The following information pertains to the ingredients of Xerox Silicone
Intermediate Transfer Layer Fluid:
TSCA (Toxic Substances Control Act): Listed in the TSCA inventory as
verified by our suppliers.
RCRA (Resource Conservation and Recovery Act): Not listed as RCRA
hazardous wastes.
The ingredients of this fluid are not listed as carcinogenic by OSHA, IARC or
NTP.
Specifications
User Guide
79
Page 94

SECTION 16 - OTHER INFORMATION
Original preparation date:10/3/00
Xerox Corporation
Office Printing Business
Environmental, Health & Safety
P.O. Box 1000
Mail Stop 60-512
Wilsonville, Oregon 97070
Safety Information: 800-828-6571
Health Information: 716-422-2177
Material Safety Data Sheet for CleanTex® Alcopad
SECTION 1 – PRODUCT IDENTIFICATION
Trade name: Xerox Part Number:
Alcopad 016-1845-00
Product identification numbers: 806B, 806C, 806H, 806T, 806Z, 806
Chemical name and synonyms: Isopropyl Alcohol
Chemical formula: CH
Emergency telephone numbers: CHEMTREC (Transportation): 1-800-424-9300
Product Use: Xerox Phaser® 860 Color Printer
SECTION 2 – INFORMATION ON INGREDIENTS
Component CAS# % OSHA PEL (ppm) ACGIL TLV (ppm)
Isopropyl alcohol 67-63-0 91.0 400 400
Specifications
Deionized water 7732-18-5 9.0 NA NA
CH(OH)CH
2
3
SECTION 3 – HAZARDS IDENTIFICATION
Product is distributed as a single-use, presaturated pad, in which all the liquid
is absorbed by the applicator. Isopropyl alcohol is a flammable liquid. Eye
contact will cause local irritation and burning sensations with possible injury
if not removed promptly. Repeated or prolonged contact with skin may
produce irritation and cause dermatitis. Exposure above TLV may cause
irritation of respiratory tract and eyes along with headaches, dizziness and
CNS effects. May be harmful if swallowed.
Carcinogenicity (OSHA/NTP/IARC/ACGIH): Not Listed.
Medical Conditions Aggravated by Exposure: Not Listed.
SECTION 4 – FIRST AID MEASURES
EYE CONTACT: Flush with water for 15 minutes, including under eyelids.
Get Medical help.
SKIN CONTACT: Flush with water.
INHALATION: Remove to fresh air. Keep at rest. Restore and/or support
breathing as needed. Get prompt Medical attention.
INGESTION: In the unlikely event of ingestion of a wiper, first aid measures
should focus on removal of the object and preventing choking. Once
removed, keep affected person at rest. Call physician immediately.
80
Phaser 860 Color Printer
Page 95

SECTION 5 – FIRE-FIGHTING MEASURES
FLASH POINT (TCC): 56 degrees F
FLAMMABLE LIMITS (% BY VOLUME): LEL: NA UEL: NA
AUTOIGNITION TEMPERATURE degrees F (degrees C): NA
EXTINGUISHING MEDIA: Isopropyl-alcohol fires may be extinguished using
carbon dioxide, dry chemical or alcohol foam. Water may be used to cool
containers exposed to the fire.
UNUSUAL FIRE OR EXPLOSION HAZARDS: Isopropyl alcohol may release
vapors which may ignite at or above flash point.
NFPA RATING: HEALTH (1)
FLAMMABILITY (3)
REACTIVITY (0)
Formulation is classified as an OSHA Class IB Flammable Liquid
NA = Not Available
SECTION 6 – ACCIDENTAL RELEASE MEASURES
Since the isopropyl-alcohol solution is completely absorbed by the applicator
and the amount of isopropyl alcohol per applicator is small, the chance of a
significant spill occurring is small. In the event however, that a significant
amount of liquid is released, ventilate the area, especially low areas where
vapors may collect, and remove all sources of ignition. Cleanup personnel
need protection against liquid contact and vapor inhalation.
SECTION 7 – HANDLING AND STORAGE
Store in a clean, cool, ventilated area away from sources of ignition and
oxidizing agents. Handle and store in a manner suitable for an OSHA class IB
Flammable Liquid. Electrical services must meet applicable codes. Use
non-sparking tools.
Specifications
SECTION 8 – EXPOSURE CONTROL – PERSONAL PROTECTION
Provide ventilation to maintain TLV. Use non-sparking tools. Avoid
inhalation of vapors, contact with eyes and repeated or prolonged contact with
skin. Do not take internally.
SECTION 9 – PHYSICAL AND CHEMICAL PROPERTIES
BOILING POINT (80 degrees C) (180 degrees F)
% VOLATILE BY VOLUME @ 25 degrees C: 100
VAPOR PRESSURE (mmHg @ 25 degrees C): 33
EVAPORATION RATE (BUTYL ACETATE-1) >1
VAPOR DENSITY (AIR = 1): <1
FORM: liquid
% SOLUBLE IN WATER @ 25 degrees C: 100
ODOR: alcohol
SPECIFIC GRAVITY (G/CC @ 25 degrees C): 0.79
APPEARANCE OF LIQUID: clear
User Guide
81
Page 96

SECTION 10 – STABILITY AND REACTIVITY
STABILITY: Stable
HAZARDOUS POLYMERIZATION: Will not occur.
INCOMPATIBILITIES / CONDITIONS TO AVOID: Caustics, amines,
alkanolamines, aldehydes, ammonia, strong oxidizing agents and
chlorinated compounds.
HAZARDOUS DECOMPOSITION PRODUCTS: Carbon monoxide
SECTION 11 – TOXICOLOGICAL INFORMATION
Not Available
SECTION 12 – ECOLOGICAL INFORMATION
Not Available.
SECTION 13 – DISPOSAL CONSIDERATIONS
Follow Federal, State and Local Regulations.
SECTION 14 – TRANSPORT INFORMATION
DOT CLASSIFICATION: Not Regulated.
Proper Shipping Name:
Hazard Class:
UN Number:
Packing Group:
Hazard Labeling:
IATA / ICAO CLASSIFICATION: Not Regulated.
Specifications
Proper Shipping Name:
Hazard Class:
UN Number:
Packing Group:
Hazard Labeling:
IMDG CLASSIFICATION: Not Regulated.
Proper Shipping Name:
Hazard Class
IMDG Page #
Packing Group:
Flash Point (degrees C):
Marine Pollutant:
SECTION 15 – REGULATORY INFORMATION
SARA TITLE III REPORTING:
Toxic Chemical (Section 313): Not Listed.
Extremely Hazardous Substance: Not Listed.
Section 302, 304, 311, 312)
Hazard Class:
Chronic Health: Yes
Acute Health: Yes
82
Phaser 860 Color Printer
Page 97

Fire Hazard: Yes
Pressure Hazard: No
Reactivity Hazard: No
TSCA INVENTORY STATUS: All components listed are on the TSCA
inventory.
SECTION 16 – OTHER INFORMATION
The information provided herein is compiled from internal reports and data
from professional publications. It is furnished without warranty of any kind,
expressed or implied. It is intended solely to assist in evaluating suitability
and proper use of the material and in implementing safety precautions and
procedures. Employees should use this information as a supplement to other
information gathered by them and must make independent determination of
suitability and completeness of information from all sources to assure proper
use of these materials. All information used must be determined by the user to
be in accordance with applicable federal, state and local laws and regulations.
Prepared by:
CleanTex Products
33 Murray Hill Drive
Nanuet, NY 10954
June 1997
Specifications
User Guide
83
Page 98

Specifications
84
Phaser 860 Color Printer
Page 99

Index
Numerics
2-sided jobs 39
A
accessories
ordering information 1
adding ink 56
alcohol wipes
material safety data sheet 80
Automatic color correction 12
B
Back key 8
binding preference 39
Black and White color correction 12
business cards 14
part numbers 7
printing on 30
storing 30
C
Cancel Print key 8
cart for printer
part number 3
carton for shipping 70
caution symbol xiv
CD-ROM for printer 71
CentreWare IS 73
cleaning 56
exit rollers 66
paper-feed rollers 66
Rapid Release Guide 62
wiper blade in maintenance drawer 65
cleaning kit
part number 2
CleanTex Alcopad
material safety data sheet 80
Supplies Index
User Guide
85
Page 100

clearing jam
in manual-feed slot 55
incorrect size 54
open exit cover to clear 48
open front cover to clear 52
remove middle tray to clear 53
remove upper tray to clear 53
remover lower tray to clear 54
clearing jams 47
color connection 73
color corrections 12
colors missing 42
colors of ink sticks 57
ColorStix II ink
loading 56
material safety data sheet 75
part numbers 2
Commercial Press color correction 12
consumables
adding ink 56
Maintenance Kit 61
warranty viii
counter in maintenance kit 61
cover paper
part numbers 6
D
danger symbol xiv
dark prints 46
diagnostic pages 42
DIC color correction 12
DP Feature Set
part number 4
drivers
location 71
uses 72
duplex printing 39
Index
E
electrical safety x
elevation xi
eliminate light stripes 43
Enhanced print quality mode 11
86
Phaser 860 Color Printer
 Loading...