

Page 1

Customer Release Notes
FreeFlow Express to Print, Makeready, Process Manager,
Web Services, Print Manager, and Output Manager, version 8.0
for the Xerox 700 Digital Color Press with Integrated Fiery
Color Server, version 1.5
This document contains information about the installation and use of FreeFlow Express
to Print, Makeready, Process Manager, Web Services, Print Manager, and Output
Manager, version 8.0, for the Xerox 700 Digital Color Press with Integrated Fiery
Color Server, version 1.5.
The term “Integrated Fiery Color Server” is used to refer to the Xerox 700 Digital Color
Press with Integrated Fiery Color Server, version 1.5. The term “digital press” refers to
the Xerox 700 Digital Color Press.
To connect user computers running FreeFlow applications to the Integrated Fiery Color
Server, you must download an enablement file. The enablement file for this product is
1-13R6ES.ps.
Download the FreeFlow enablement file to the Integrated Fiery Color Server from WebTools
or www.xerox.com. Once installed on the Integrated Fiery Color Server, the FreeFlow
enablement file runs transparently, allowing you to connect to and submit jobs to the
Integrated Fiery Color Server using FreeFlow applications. It enables users to use the entire
suite of FreeFlow applications with the Integrated Fiery Color Server.
The Integrated Fiery Color Server, version 1.5 fully supports the following Freeflow
applications:
• FreeFlow Express to Print
• FreeFlow Makeready
• FreeFlow Process Manager
• FreeFlow Web Services
• FreeFlow Print Manager
• FreeFlow Output Manager
NOTE: Although the installation method is similar to the way many patches are installed on
the Integrated Fiery Color Server, the FreeFlow enablement file is not a patch, and does not
fix a defect.
For instructions on downloading and installing the FreeFlow enablement file, see
“Installation” on page 3.
Copyright 2009 © Electronics for Imaging, Inc.
Part Number: 45087442
15 September 2009
Page 2

Before printing Before printing to the Integrated Fiery Color Server, verify the following:
• The FreeFlow IPP enablement file is installed on the Integrated Fiery Color Server.
To verify enablement, print a Configuration page and verify that the Update Information
section includes the file name: 1-13R6ES.
For information about printing a Configuration page, see Configuration and Setup.
For instructions on downloading and installing the FreeFlow enablement file, see
“Installation” on page 3.
• Integrated Fiery Color Server software is installed on the client workstation.
For instructions on installing and using the Integrated Fiery Color Server, see the
documentation that accompanies the server.
• FreeFlow Express to Print, Makeready, Process Manager, Web Services, Print Manager,
or Output Manager, version 8.0 are installed on the FreeFlow system.
Setting the print path
Use the following procedure to set up a FreeFlow application to print to the Integrated Fiery
Color Server.
Page 2
TO SET UP A FREEFLOW APPLICATION TO PRINT TO THE INTEGRATED FIERY COLOR SERVER
1 From the FreeFlow Printer Registration application, select Add.
The Add Printer Wizard dialog box appears.
2 Enter the IP address of the Integrated Fiery Color Server and click Identify Configuration to
automatically detect the Printer Model and Controller/Server Type.
NOTE: If the network cannot automatically detect the digital press and Integrated Fiery Color
Server, do the following:
• Select Xerox 700 Digital Color Press from the Printer Model list.
• Select Integrated Fiery Color Server 1.5 IPP from the Print Controller/Server Type list.
• Follow the Printer Registration instructions to complete the printer installation.
Page 3

Installation Obtaining the FreeFlow enablement file
The FreeFlow enablement file is available from WebTools or www.xerox.com.
The enablement file applies to the entire suite of FreeFlow applications, which includes
FreeFlow Express to Print, Makeready, Process Manager, Web Services, Print Manager, and
Output Manager, version 8.0.
Installing the Fiery FreeFlow enablement file
You can apply the enablement file directly through System Updates. To download the file to
the Integrated Fiery Color Server, use the following procedure.
TO INSTALL THE FREEFLOW ENABLEMENT FILE
1 To access Integrated Fiery Color Server WebTools, start your Internet or intranet browser and
type the DNS name or IP address of the Integrated Fiery Color Server.
2 Click the Configure tab.
3 Click Check for Product Updates.
Page 3
4 Click Yes on the Security Information window.
5 Click the link for the FreeFlow patch.
6 Save the zipped file to the desktop.
7 Unzip the file to the desktop.
8 Import the patch file, 1-13R6ES.ps, with Command WorkStation to the Integrated Fiery Color
Server Direct queue.
Wait approximately 60 seconds after the patch file is downloaded/imported before rebooting
the system. This ensures that the patch file is completely processed.
9 From Command WorkStation, select Shut Down, and then select Reboot System.
Allow the Integrated Fiery Color Server to restart without interruption.
10 When the Integrated Fiery Color Server reaches Idle, print a Configuration page and verify
that the Update Information section includes the file name: 1-13R6ES.
Page 4

Latest features Spot Color Matching
The FreeFlow enablement supports Spot Color Matching. With the Spot Color Matching
print option, you can determine how spot colors are printed at the Integrated Fiery Color
Server:
• Spot Color Matching On uses color tables built into the Integrated Fiery Color Server to
simulate the spot color with the closest equivalent available using the CMYK toners of the
digital press connected to the Integrated Fiery Color Server. If your Integrated Fiery Color
Server supports the Spot-On application in ColorWise Pro Tools, you can customize the
spot color definitions used by ColorWise.
• Spot Color Matching Off instructs the Integrated Fiery Color Server to simulate the spot
color using CMYK equivalents defined by the spot color manufacturer. These are the same
CMYK values used by applications that include spot color libraries. This CMYK
combination is then printed with the CMYK Simulation setting you choose, such as
SWOP or DIC.
Virtual printers
The FreeFlow enablement supports Fiery Virtual Printers, which allow you to print to the
Integrated Fiery Color Server using predefined settings saved as a special print queue. The
Fiery administrator can create virtual printers and publish them so that users can access them
on the network. For information about using virtual printers, see Command WorkStation
Additional Information in Utilities, which is part of the user documentation set.
Page 4
NOTE: After you create a new Fiery Virtual Printer, you must restart the Integrated Fiery
Color Server to register the new virtual printer with FreeFlow Print Path.
Tab printing Tab printing
Tab printing is supported for both full-cut and precut tabs. Precut tabs are supported for both
Page Inserts and Exception Pages. When used for Page Inserts, they map to the Fiery Insert
Tab feature found under Mixed Media. When used for Exception Pages, they map to the
Fiery Page Range feature found under Mixed Media.
For information about using Mixed Media, see Command WorkStation Additional
Information in Utilities, which is part of the user documentation set.
Printing Raster Document Object files that contain precut tabs
The Integrated Fiery Color Server supports precut tabs in FreeFlow applications such as
Makeready. To ensure that the text prints on tabs, send the job directly to the Integrated
Fiery Color Server without changing the settings in Job Properties.
If the print job is sent as an RDO (raster document object) file, or processed through Xerox
PostScript conversion, the size is not predefined, but the job prints correctly.
NOTE: Tabs must be programmed as 9 x 11-inch precut tabs, not 8.5 x11-inch.
Page 5

Page 5
NOTE: The file must be saved with the .RDO extension. If you override the job name found
in Job Notes, make sure that the job name ends with the .RDO extension. An RDO file that
contains precut tabs must print to the Fiery Print queue or Hold queue.
Limitations and workarounds
FreeFlow Print Manager
staple options
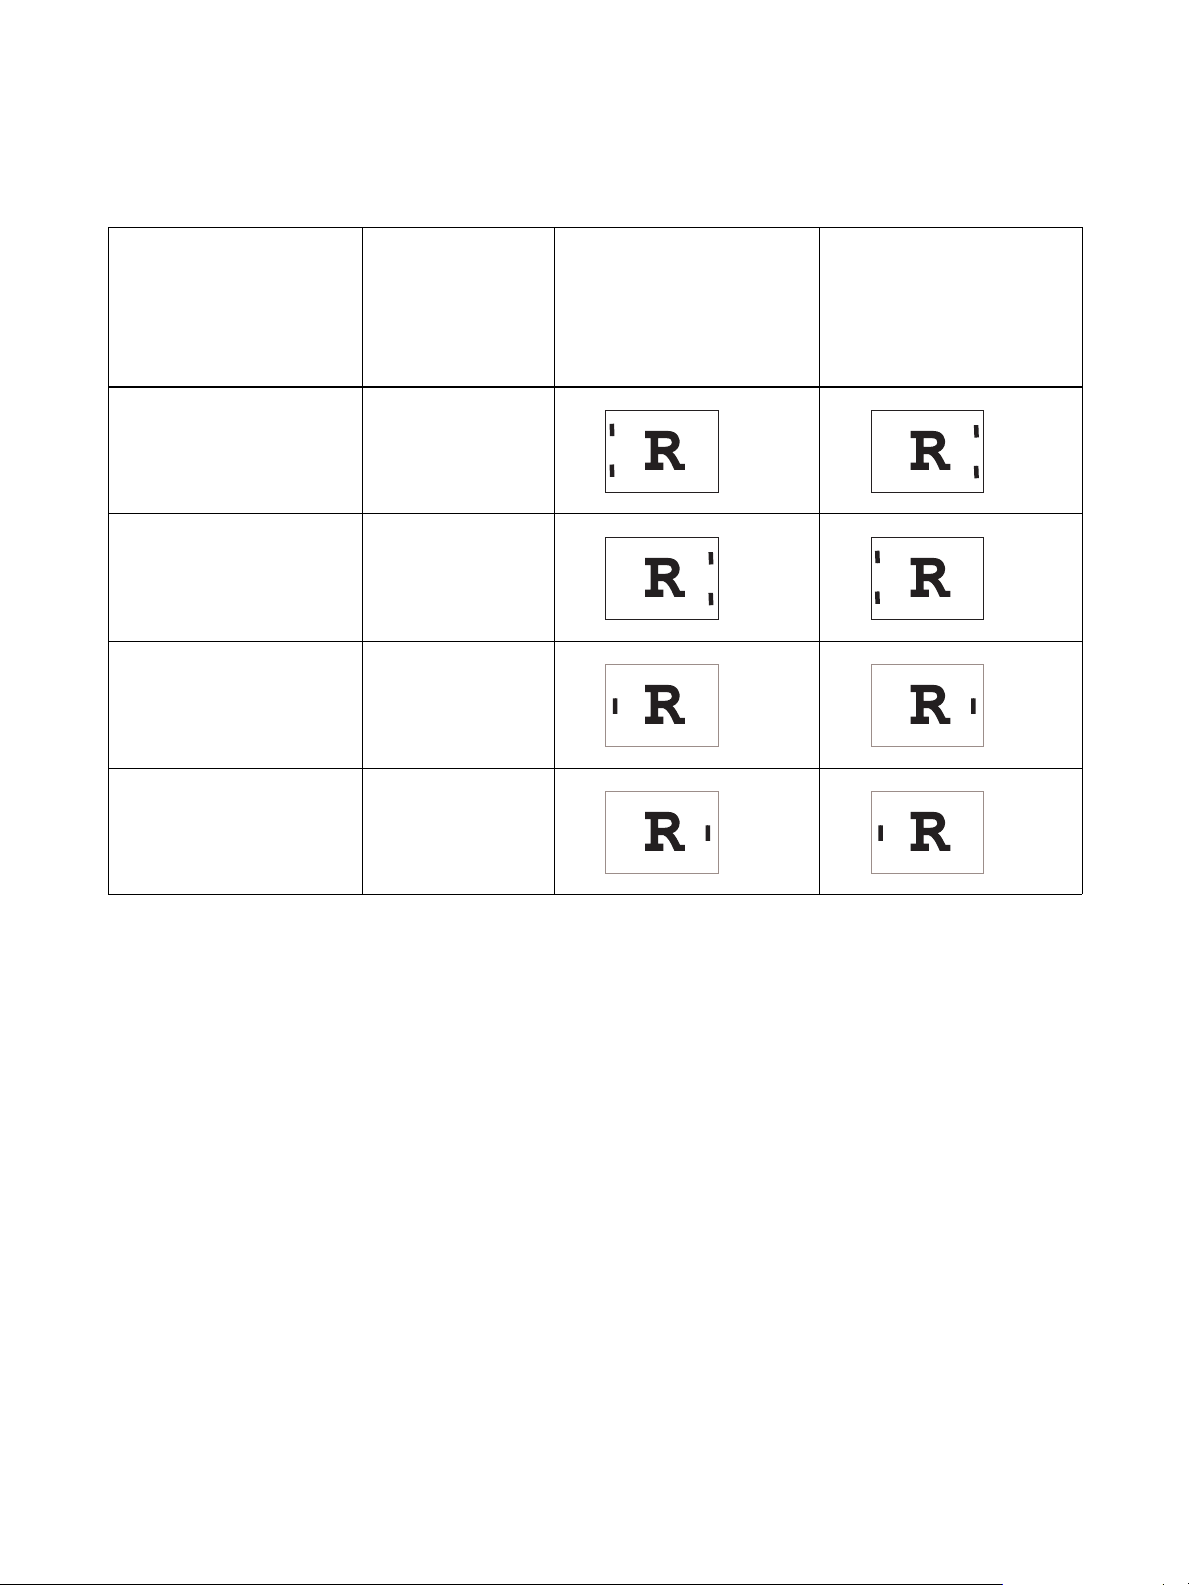
Stapling landscape jobs
Certain staple settings for Landscape jobs staple in the opposite corner than you specify when
printing to the digital press from a Integrated Fiery Color Server IPP print path, as follows:
• 1 Staple - Top Right Landscape prints as 1 Staple - Top Left Landscape
• 1 Staple - Top Left Landscape prints as 1 Staple - Top Right Landscape
To avoid this, from FreeFlow, select:
• 1 Staple - Top Right Landscape to staple the upper-eft corner of the Landscape page
or select:
• 1 Staple - Top Left Landscape to staple the upper-right corner of the Landscape page
To staple Landscape jobs of all paper sizes correctly from FreeFlow applications, send the job
to the Fiery Hold queue and change the job’s Orientation to Landscape at the Integrated
Fiery Color Server before releasing to print. For details, see the following table.
Command
WorkStation
staple options
Staple Position for Landscape
jobs with Orientation
set to OFF
(Orientation is set to OFF for all
jobs sent from FreeFlow Print
Manager)
Staple Position for Landscape
jobs with Orientation
set to Landscape
(Select Landscape for Orientation
from Command WorkStation
Job Properties)
1 Staple - Top Left Landscape Left Top Single
1 Staple - Top Right Landscape Right Top Single
2 Staples - Left Portrait Left Double Does not staple
Page 6
Page 6
FreeFlow Print Manager
staple options
2 Staples - Top Portrait Top Double
2 Staples - Bottom Portrait Bottom Double
Center Staple - Top Portrait Top Center
Center Staple - Bottom Portrait Bottom Center
Command
WorkStation
staple options
Staple Position for Landscape
jobs with Orientation
set to OFF
(Orientation is set to OFF for all
jobs sent from FreeFlow Print
Manager)
Staple Position for Landscape
jobs with Orientation
set to Landscape
(Select Landscape for Orientation
from Command WorkStation
Job Properties)
Page 7
Page 7
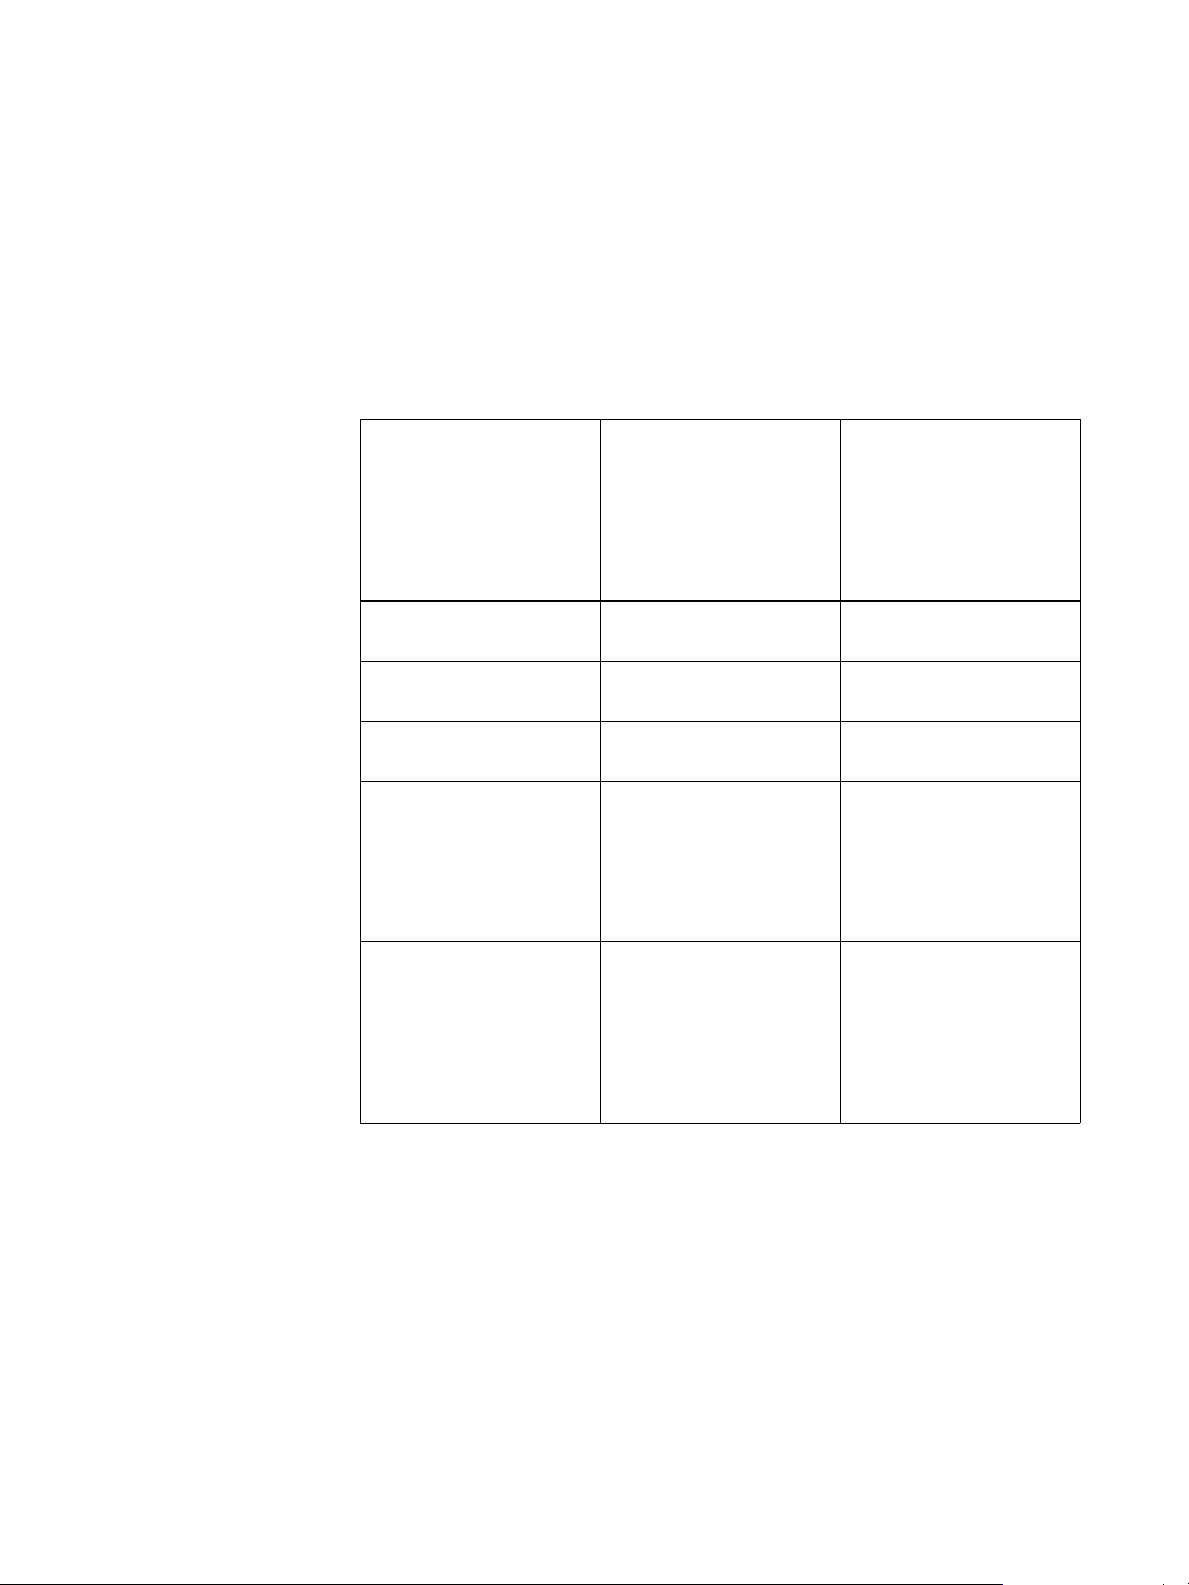
Punch options for Landscape jobs
Certain punch settings for Landscape jobs punch in the opposite side than you specify when
printing to the digital press from a FreeFlow client application.
To apply punch on Landscape jobs of all paper sizes correctly from FreeFlow applications,
send the job to the Fiery Hold queue and change the job’s Orientation to Landscape at the
Integrated Fiery Color Server before releasing to print. For details, see the following table.
FreeFlow Print Manager
Finishing punch settings
Punch - Left Portrait Punch Position: Left
Punch - Right Portrait Punch Position: Right
Punch - Top Portrait Punch Position: Top
Coil Punch - Top Landscape
NOTE: To print a job as Coil
Punch-Top Landscape, you
must send the job from the
FreeFlow Print Manager to the
Fiery Hold queue.
Coil Punch - Bottom
Landscape
NOTE: To print a job as Coil
Punch-Bottom Landscape, you
must send the job from the
FreeFlow Print Manager to the
Fiery Hold queue.
Command WorkStation Job
Properties Finishing tab
punch settings
2 Hole punch
2 Hole punch
2 Hole punch
Punch Position: Top
Advanced-LTR Punch
NOTE: Change the Punch
Position from Left to Top.
Punch Position: Top
Advanced-LTR Punch
NOTE: Change the Punch
Position from Left to Top.
On the Layout tab, select the
Rotate 180 check box.
Final output Punch Position
for Landscape jobs with
Orientation set to
Landscape
(Select Landscape for
Orientation from Command
WorkStation Job Properties)
Left 2 Hole punch
Right 2 Hole punch
Top 2 Hole punch
Top Co il Pun c h
Bottom Coil Punch
Page 8

Page 8
Output Tray names
FreeFlow output locations correspond to different output tray names in the Integrated Fiery
Color Server user interface. The following table lists these equivalents.
FreeFlow Print Manager Integrated Fiery Color Server
Printer’s Default Printer’s Default
Automatic AutoSelect
Top Tray Offset Catch Tray (OCT), HCS Top Tray,
or D4 Finisher Top Tray
Stacker D4 Finisher Stacker Tray or HCS Stacker
Stacker 2 D4 Finisher Stacker
Jobs without finishing are delivered to the HCS Top Tray or HCS Stacker Tray, if attached.
Jobs with finishing are delivered to the Finisher Top Tray or Finisher Stacker Tray.
Jobs with Coil Punch are delivered to the HCS Top Tray or HCS Stacker Tray, if attached;
otherwise, they are sent to the Finisher trays.
Using Integrated Fiery Color Server FreeForm Masters from FreeFlow
FreeFlow Background Forms map to the Integrated Fiery Color Server variable data printing
Use Master feature.
TO USE A FREEFORM MASTER FROM FREEFLOW
1 Select Background Form on the FreeFlow Image Adjustment tab.
2 Type the form master number, as assigned on the Integrated Fiery Color Server, in the
FreeFlow Form Name dialog box. Do not type the master file name.
PCL print jobs cannot be set on the Integrated Fiery Color Server over IPP (Internet Printing Protocol)
PCL files that contain job programming are not supported by the Integrated Fiery Color
Server from FreeFlow. If job programming is required for your job, use the Integrated Fiery
Color Server PCL printer driver.
Page 9

Page 9
Production print path
The FreeFlow production print path supports the following job formatting options for TIFF,
RDO, and JPEG file formats:
• Orientation
•Page Layout
• Reduce/Enlarge
• Rotation
To achieve similar results for PDF and PostScript files, send the job to the Integrated Fiery
Color Server Hold queue and use Command WorkStation Job Properties to select similar
options.
Black-and-white image quality when scanning
When sending a black-and-white scan job imported from FreeFlow Makeready and printed
from FreeFlow Print Manager - Advanced Print Path, for the best printed result, turn off
ColorWise before sending the scan job.
To turn off ColorWise in FreeFlow, select Image Quality > Output Color, and then set
CMYK Emulation to ColorWise OFF.
To turn off ColorWise in Command WorkStation, click the Color tab, click Expert Settings,
and then set CMYK Simulation Profile to ColorWise OFF.
Reprinting Raster Document Object jobs from Command WorkStation
Reprinting an RDO job from Command WorkStation causes a Load Paper condition.
To correct this issue, install the Fiery server patch 1-13WCPW.
Printing Z Fold half sheet - Right Bind, Print Inside finish option
When you print Z Fold half sheet - Right Bind, Print Inside finish option combined with any
Multi Finish option, the job is printed with the finish applied to the Left Bind of the page.
Page 10

Page 11

Notes de mise à jour client
FreeFlow Express to Print, Makeready, Process Manager,
Web Services, Print Manager et Output Manager, version 8.0
pour la Xerox 700 Digital Color Press avec Integrated Fiery
Color Server, version 1.5
Ce document contient des informations concernant l’installation et l’utilisation
de FreeFlow Express to Print, Makeready, Process Manager, Web Services, Print Manager
et Output Manager, version 8.0 avec la version 1.5 de la Xerox 700 Digital Color Press
avec Integrated Fiery Color Server.
Le terme « Integrated Fiery Color Server » désigne la Xerox 700 Digital Color Press avec
Integrated Fiery Color Server, version 1.5. Le terme « presse numérique » désigne la
Xerox 700 Digital Color Press.
Pour connecter les ordinateurs utilisateur exécutant des applications FreeFlow à l’Integrated
Fiery Color Server, vous devez télécharger un fichier d’activation. Le fichier d’activation
de ce produit est 1-13R6ES.ps.
Ce fichier peut être téléchargé sur l’Integrated Fiery Color Server à partir des WebTools
ou du site www.xerox.com. Une fois installé sur l’Integrated Fiery Color Server, le fichier
d’activation FreeFlow s’exécute de manière transparente pour vous permettre de vous
connecter et de soumettre les tâches à l’Integrated Fiery Color Server à l’aide des applications
FreeFlow. Il permet d’utiliser l’intégralité des applications FreeFlow avec l’Integrated Fiery
Color Server.
L’Integrated Fiery Color Server, version 1.5 prend totalement en charge les applications
FreeFlow suivantes :
• FreeFlow Express to Print
• FreeFlow Makeready
• FreeFlow Process Manager
• FreeFlow Web Services
• FreeFlow Print Manager
• FreeFlow Output Manager
REMARQUE : Bien que la méthode d’installation soit très similaire à la manière dont
de nombreux correctifs sont installés sur l’Integrated Fiery Color Server, le fichier d’activation
FreeFlow n’est pas un correctif et ne sert pas à résoudre un problème.
Pour savoir comment télécharger et installer le fichier d’activation FreeFlow,
voir « Installation », à la page 13.
Copyright 2009 © Electronics for Imaging, Inc.
Référence : 45087442
15 septembre 2009
Page 12

Avant d’imprimer Avant d’imprimer sur l’Integrated Fiery Color Server, vérifiez ce qui suit :
• Le fichier d’activation FreeFlow IPP est installé sur l’Integrated Fiery Color Server.
Pour le vérifier, imprimez une page de configuration et assurez-vous que la section de mise
à jour des informations contient le nom de fichier suivant : 1-13R6ES.
Pour plus d’informations sur l’impression d’une page de configuration, voir Configuration
et installation. Pour savoir comment télécharger et installer le fichier d’activation FreeFlow,
voir « Installation », à la page 13.
• Le logiciel Integrated Fiery Color Server est installé sur le poste de travail client.
Pour plus d’informations sur l’installation et l’utilisation de l’Integrated Fiery Color
Server, reportez-vous à la documentation de ce serveur.
• Le système FreeFlow est équipé de FreeFlow Express to Print, Makeready,
Process Manager, Web Services, Print Manager ou Output Manager, version 8.0.
Définition du chemin d’impression
Procédez comme suit pour configurer une application FreeFlow de façon à imprimer
sur l’Integrated Fiery Color Server.
Page 12
POUR CONFIGURER UNE APPLICATION FREEFLOW DE FAÇON À IMPRIMER
VIA L’INTEGRATED FIERY COLOR SERVER
1 A partir de l’application FreeFlow Printer Registration, cliquez sur Ajouter (Add).
L’Assistant Ajout d’imprimante s’affiche.
2 Saisissez l’adresse IP de l’Integrated Fiery Color Server et cliquez sur Identify Configuration
(Identifier la configuration) afin de détecter automatiquement le modèle d’imprimante et
le type de serveur/contrôleur.
REMARQUE : Si le réseau ne parvient pas à détecter automatiquement la presse numérique
et l’Integrated Fiery Color Server, procédez comme suit :
• Sélectionnez Xerox 700 Digital Color Press dans la liste des modèles d’imprimante.
• Sélectionnez Integrated Fiery Color Server 1.5 IPP dans la liste des contrôleurs
d’impression/types de serveur.
• Suivez les instructions de Printer Registration pour terminer l’installation de l’imprimante.
Page 13

Installation Obtention du fichier d’activation FreeFlow
Le fichier d’activation FreeFlow est disponible depuis les WebTools ou sur le site
www.xerox.com.
Ce fichier s’applique à l’intégralité des applications FreeFlow, parmi lesquelles
FreeFlow Express to Print, Makeready, Process Manager, Web Services, Print Manager
et Output Manager, version 8.0.
Installation du fichier d’activation Fiery FreeFlow
Le fichier d’activation peut être installé directement via Mises à jour système. Pour télécharger
le fichier vers l’Integrated Fiery Color Server, suivez la procédure ci-dessous.
POUR INSTALLER LE FICHIER D’ACTIVATION DE FREEFLOW
1 Pour accéder aux WebTools de l’Integrated Fiery Color Server, lancez votre navigateur Internet
ou intranet et saisissez le nom DNS ou l’adresse IP de l’Integrated Fiery Color Server.
2 Cliquez sur l’onglet Configure.
3 Cliquez sur Vérifier les mises à jour produit.
Page 13
4 Cliquez sur Yes (Oui) dans le fenêtre des informations relatives à la sécurité.
5 Cliquez sur le lien du correctif FreeFlow.
6 Enregistrez le fichier compressé sur le Bureau.
7 Décompressez-le.
8 Importez le correctif 1-13R6ES.ps à l’aide de la Command WorkStation vers la queue Direct
de l’Integrated Fiery Color Server.
Attendez environ 60 secondes après le téléchargement/l’importation du correctif pour
redémarrer le système. Cela garantit le traitement complet du correctif.
9 A partir de la Command WorkStation, sélectionnez Shut Down (Arrêter), puis Reboot
System (Redémarrer système).
Laissez l’Integrated Fiery Color Server redémarrer sans l’interrompre.
10 Lorsque l’Integrated Fiery Color Server affiche Au repos, imprimez une page de configuration
et assurez-vous que la section de mise à jour des informations contient le nom du fichier
d’activation : 1-13R6ES.
Page 14

Page 14
Nouvelles fonctions
Correspondance tons directs
L’activation de FreeFlow permet la prise en charge de l’option d’impression Correspondance
tons directs. Celle-ci permet d’agir sur la manière dont les tons directs sont imprimés sur
l’Integrated Fiery Color Server:
• Lorsqu’elle est activée, l’option Correspondance tons directs utilise les tables
colorimétriques intégrées à l’Integrated Fiery Color Server afin de simuler un ton direct
par l’équivalent le plus proche pouvant être obtenu avec les toners CMJN de la presse
numérique connectée à l’Integrated Fiery Color Server. Si l’Integrated Fiery Color Server
prend en charge l’application Spot-On de ColorWise Pro Tools, il est possible de
personnaliser les définitions de tons directs à l’aide de ColorWise.
• Lorsque l’option Correspondance tons directs est désactivée, l’Integrated Fiery Color
Server simule le ton direct avec les équivalents CMJN définis par l’éditeur du ton direct.
Il s’agit alors des valeurs CMJN utilisées par les applications comportant des bibliothèques
de tons directs. Cette combinaison CMJN est ensuite imprimée avec le paramètre de
simulation CMJN que vous avez défini, SWOP ou DIC par exemple.
Imprimantes virtuelles
L’activation FreeFlow prend en charge les imprimantes virtuelles Fiery, qui permettent
d’imprimer sur l’Integrated Fiery Color Server avec des paramètres prédéfinis enregistrés
en tant que file d’impression spécifique. L’administrateur Fiery peut créer des imprimantes
virtuelles et les publier pour que les utilisateurs puissent y avoir accès sur le réseau.
Pour plus d’informations sur l’utilisation des imprimantes virtuelles, voir la section
Command WorkStation du manuel Utilitaires (documentation utilisateur).
Impression d’intercalaires
REMARQUE : Après avoir créé une nouvelle imprimante virtuelle Fiery, vous devez redémarrer
l’Integrated Fiery Color Server afin d’enregistrer cette nouvelle imprimante dans FreeFlow
Print Path.
Impression d’intercalaires
L’impression d’intercalaires avec ou sans onglet est prise en charge. Les intercalaires avec
onglet sont compatibles avec les fonctions d’insertion de page et les pages d’exception.
Utilisés pour l’insertion de page, ils correspondent à la fonction d’insertion d’onglets des
Supports mixtes Fiery. Utilisés pour les pages d’exception, ils correspondent à la fonction
d’étendue de pages des Supports mixtes Fiery.
Pour plus d’informations sur l’utilisation des Supports mixtes, voir la section
Command WorkStation du manuel Utilitaires (documentation utilisateur).
Page 15

Page 15
Impression de fichiers RDO (Raster Document Object) contenant des intercalaires avec onglet
L’Integrated Fiery Color Server prend en charge les intercalaires avec onglet dans les
applications FreeFlow comme Makeready. Pour que le texte s’imprime bien sur les onglets,
envoyez la tâche directement à l’Integrated Fiery Color Server sans modifier ses paramètres
dans les propriétés de la tâche.
Si la tâche d’impression est envoyée sous la forme d’un fichier RDO (Raster Document Object)
ou traitée via une conversion PostScript Xerox, le format n’est pas prédéfini, mais la tâche
s’imprime correctement.
REMARQUE : Les onglets doivent être programmés au format 9 x 11 pouces et
non 8,5
REMARQUE : Le fichier doit être enregistré avec l’extension .RDO. Si vous écrasez le
nom trouvé dans Notes de tâches, assurez-vous que le nom de la tâche se termine par
l’extension .RDO. Un fichier RDO qui contient des intercalaires avec onglet doit être
imprimé vers la queue Impression ou Attente du Fiery.
x 11 pouces.
Solutions aux problèmes de limitation
Agrafage des tâches en orientation paysage
Certains paramètres d’agrafage des tâches en orientation paysage sont dans le coin opposé
à celui spécifié, lorsque vous imprimez sur la presse numérique à partir d’un chemin
d’impression IPP de l’Integrated Fiery Color Server. Ainsi, les tâches avec :
• 1 agrafe en haut à droite en paysage sortent avec 1 agrafe en haut à gauche,
• 1 agrafe en haut à gauche en paysage sortent avec 1 agrafe en haut à droite.
Pour éviter cela, depuis FreeFlow, sélectionnez :
• l’agrafage simple en haut à droite en paysage pour agrafer le coin supérieur gauche de la
page en orientation paysage,
ou sélectionnez :
• l’agrafage simple en haut à gauche en paysage pour agrafer le coin supérieur droit de la
page en orientation paysage.
Pour agrafer correctement les tâches en orientation paysage de tous les formats papier à partir
des applications FreeFlow, envoyez la tâche vers la queue Attente du Fiery et modifiez son
orientation sur l’Integrated Fiery Color Server (sélectionnez le mode Paysage) avant de lancer
l’impression. Pour plus de détails, reportez-vous au tableau ci-dessous.
Page 16

Page 16
Options d’agrafage
de FreeFlow Print Manager
1 agrafe - Paysage en haut à gauche Simple en haut à gauche
1 agrafe - Paysage en haut à droite Simple en haut à droite
2 agrafes - Portrait à gauche Double à gauche Aucun agrafage
2 agrafes - Portrait-Haut Double en haut
Options d’agrafage de la
Command WorkStation
Position d’agrafage pour les
tâches dont l’orientation
Paysage est désactivée
(L’orientation est désactivée pour
toutes les tâches envoyées à partir
de FreeFlow Print Manager)
Position d’agrafage pour les
tâches dont l’orientation
Paysage est activée
(Sélectionnez l’orientation Paysage
à partir des propriétés de la tâche
de la Command WorkStation.)
2 agrafes - Portrait-Bas Double en bas
Agrafage au centre - Portrait-Haut En haut au milieu
Agrafage au centre - Portrait-Bas En bas au milieu
Page 17

Page 17
Options de perforation des tâches en orientation paysage
Avec certains paramètres de perforation des tâches en orientation paysage, les perforations
sont effectuées du mauvais côté lorsque l’on imprime sur la presse numérique depuis une
application cliente FreeFlow.
Pour perforer correctement les tâches en orientation paysage sur tous les formats papier à
partir des applications FreeFlow, envoyez la tâche vers la queue Attente du Fiery et modifiez
son orientation sur l’Integrated Fiery Color Server (sélectionnez le mode Paysage) avant
de lancer l’impression. Pour plus de détails, reportez-vous au tableau ci-dessous.
Options de perforation
de FreeFlow Print Manager
Perforation - Portrait à gauche Position de la perforation :
Perforation - Portrait à droite Position de la perforation :
Perforation - Portrait-Haut Position de la perforation :
Coil Punch (Perforation de
reliure à spirale) - Paysage-Haut
REMARQUE : Pour imprimer
une tâche en Coil Punch
(Perforation de reliure à spirale)
- Paysage-Haut, vous devez
l’envoyer vers la queue Attente
du Fiery à partir de FreeFlow
Print Manager.
Options de perforation
de l’onglet Finition des
propriétés de la tâche de
la Command WorkStation
Gauche 2 perforations
Droite 2 perforations
Haute 2 perforations
Position de la perforation :
HautePerforation LTR avancée
REMARQUE : Changez la
position de perforation de
Gauche en Haute.
Position finale de
perforation pour les tâches
en orientation paysage
(Sélectionnez l’orientation
Paysage à partir des propriétés
des tâches de la
Command WorkStation)
A gauche, 2 perforations
A droite, 2 perforations
En haut, 2 perforations
Perforation de reliure à spirale
en haut
Coil Punch (Perforation de
reliure à spirale) - Paysage-Bas
REMARQUE : Pour imprimer
une tâche en Coil Punch
(Perforation de reliure à spirale)
- Paysage-Bas, vous devez
l’envoyer vers la queue Attente
du Fiery à partir de FreeFlow
Print Manager.
Position de la perforation :
HautePerforation LTR avancée
REMARQUE : Changez la
position de perforation de
Gauche en Haute. Dans
l’onglet Mise en page, activez la
case à cocher Rotation 180.
Perforation de reliure à spirale
en bas
Page 18

Page 18
Noms des bacs
Les emplacements de sortie de FreeFlow correspondent à des noms de réceptacles différents
sur l’interface utilisateur de l’Integrated Fiery Color Server. Le tableau suivant présente
leséquivalences:
FreeFlow Print Manager Integrated Fiery Color Server
Imprimante par défaut Imprimante par défaut
Sélection Autosélection
Bac supérieur Bac de réception décalé (OCT), Bac supérieur du
HCS ou Bac supérieur du module de finition D4
Stacker Bac stacker du module de finition D4 ou
Stacker du HCS
Stacker 2 D4 Finisher Stacker (Stacker du module
de finition D4)
Les tâches sans finition sont envoyées vers le bac supérieur du HCS ou le bac du stacker HCS
s’ils sont connectés. Les tâches avec finition sont envoyées vers le bac supérieur du module
de finition ou le bac stacker du module de finition.
Les tâches avec perforation de reliure à spirale sont déposées dans le bac supérieur du HCS ou
le bac du stacker HCS si ceux-ci sont connectés. Si ce n’est pas le cas, elles sont déposées dans
les bacs du module de finition.
Utilisation de maquettes Integrated Fiery Color Server FreeForm à partir de FreeFlow
La fonction Background Forms (Maquettes d’arrière-plan) de FreeFlow correspond à l’option
d’impression de données variables Utiliser maquette de l’Integrated Fiery Color Server.
POUR UTILISER UNE MAQUETTE FREEFORM À PARTIR DE FREEFLOW
1 Sélectionnez Background Form (Maquette d’arrière-plan) dans l’onglet Image Adjustment
(Réglage de l’image) de FreeFlow.
2 Saisissez le numéro de maquette, tel qu’il est attribué sur l’Integrated Fiery Color Server,
dans la boîte de dialogue Form Name (Nom de maquette) de FreeFlow. Ne saisissez pas le
nom de la maquette.
Les tâches d’impression PCL ne peuvent pas être paramétrées sur l’Integrated Fiery Color Server avec le protocole d’impression IPP (Internet Printing Protocol)
Les fichiers PCL avec programmation des tâches ne sont pas pris en charge par l’Integrated
Fiery Color Server à partir de FreeFlow. Utilisez le pilote d’imprimante PCL de l’Integrated
Fiery Color Server si la programmation des tâches est requise.
Page 19

Page 19
Chemin d’impression de production
Le chemin d’impression de production de FreeFlow prend en charge les options de formatage
suivantes pour les fichiers TIFF, RDO et JPEG :
• Orientation
• Mise en page
• Réduction/Agrandissement
• Rotation
Pour obtenir des résultats semblables avec les fichiers PDF et PostScript, envoyez la tâche à la
queue Attente de l’Integrated Fiery Color Server et sélectionnez les options équivalentes
dans les propriétés de la tâche de la Command WorkStation.
Qualité d’image en noir et blanc lors de la numérisation
Lorsque vous envoyez une tâche de numérisation en noir et blanc importée à partir de
FreeFlow Makeready et imprimée via FreeFlow Print Manager - Advanced Print Path,
désactivez ColorWise avant d’envoyer la tâche. Vous obtiendrez ainsi une qualité
d’impression optimale.
Pour désactiver ColorWise dans FreeFlow, sélectionnez Qualité de l’image > Output
Color (Couleur de sortie), puis paramétrez CMYK Emulation (Emulation CMJN)
sur ColorWise NON.
Pour désactiver ColorWise dans la Command WorkStation, cliquez sur l’onglet Couleur,
Paramètres professionnels et paramétrez l’option Profil de simulation CMJN sur
ColorWise NON.
Réimpression des tâches RDO (Raster Document Object) depuis la Command WorkStation
La réimpression d’une tâche RDO depuis la Command WorkStation entraîne une demande
de chargement de papier. Pour résoudre ce problème, installez le correctif du serveur
Fiery 1-13WCPW.
Impression d’une demi-feuille avec pli en Z, reliure à droite et option d’impression à l’intérieur
Lorsque vous imprimez une demi-feuille présentant un pli en Z ainsi qu’une reliure à droite et
dont l’option d’impression à l’intérieur est spécifiée avec une option de finition multiple, la
tâche s’imprime avec des paramètres de finition appliqués au niveau de la reliure gauche.
Page 20

Page 21

Note di release per l’utente
FreeFlow Express to Print, Makeready, Process Manager,
Web Services, Print Manager e Output Manager, versione 8.0
per Xerox 700 Digital Color Press con Integrated Fiery
Color Server, versione 1.5
Questo documento contiene informazioni relative all’installazione e all’uso di FreeFlow
Express to Print, Makeready, Process Manager, Web Services, Print Manager e Output
Manager, versione 8.0, per Xerox 700 Digital Color Press con Integrated Fiery
Color Server, versione 1.5.
Il termine “Integrated Fiery Color Server” viene utilizzato per fare riferimento a Xerox 700
Digital Color Press con Integrated Fiery Color Server, versione 1.5. Il termine “macchina da
stampa digitale” fa riferimento a Xerox 700 Digital Color Press.
Per collegare i computer che utilizzano le applicazioni FreeFlow a Integrated Fiery Color
Server, è necessario scaricare un file di attivazione. Il file di attivazione per questo prodotto
è 1-13R6ES.ps.
Scaricare il file di attivazione FreeFlow su Integrated Fiery Color Server da WebTools o
www.xerox.com. Una volta installato su Integrated Fiery Color Server, il file di attivazione
FreeFlow consentirà di collegarsi a Integrated Fiery Color Server e di inviare lavori utilizzando
le applicazioni FreeFlow. Consente agli utenti di utilizzare l’intera suite di applicazioni
FreeFlow con Integrated Fiery Color Server.
Integrated Fiery Color Server, versione 1.5 supporta totalmente le seguenti applicazioni
FreeFlow:
• FreeFlow Express to Print
• FreeFlow Makeready
• FreeFlow Process Manager
• FreeFlow Web Services
• FreeFlow Print Manager
• FreeFlow Output Manager
NOTA: Sebbene il metodo di installazione sia simile al procedimento utilizzato per
l’installazione di molte patch su Integrated Fiery Color Server, il file di attivazione FreeFlow
non è una patch e non corregge un difetto.
Per le istruzioni su come scaricare ed installare il file di attivazione FreeFlow, vedere
“Installazione” a pagina 23.
Copyright 2009 © Electronics for Imaging, Inc.
Numero parte: 45087442
15 settembre 2009
Page 22

Prima della stampa Prima di stampare su Integrated Fiery Color Server, verificare quanto segue:
• Il file di attivazione IPP di FreeFlow deve essere installato su Integrated Fiery Color Server.
Per verificare l’attivazione, stampare una pagina di configurazione e controllare che nella
sezione delle informazioni di aggiornamento sia indicato il nome del file: 1-13R6ES.
Per informazioni sulla stampa della pagina di configurazione, vedere il manuale
Configurazione e impostazione. Per le istruzioni su come scaricare ed installare il file di
attivazione FreeFlow, vedere “Installazione” a pagina 23.
• Il software per Integrated Fiery Color Server deve essere installato sulla stazione di lavoro
client. Per le istruzioni relative all’installazione e all’uso di Integrated Fiery Color Server,
vedere la documentazione fornita con il server.
• FreeFlow Express to Print, FreeFlow Makeready, Process Manager, Web Services,
Print Manager o Output Manager, versione 8.0 devono essere installati sul sistema
FreeFlow.
Impostazione del percorso di stampa
Per configurare la stampa su Integrated Fiery Color Server da un’applicazione FreeFlow,
utilizzare la procedura seguente.
Pagina 22
PER CONFIGURARE LA STAMPA SU INTEGRATED FIERY COLOR SERVER DA UN’APPLICAZIONE FREEFLOW
1 Dall’applicazione FreeFlow Printer Registration, selezionare Add (Aggiungi).
Viene visualizzata la finestra di dialogo di installazione della stampante.
2 Immettere l’indirizzo IP di Integrated Fiery Color Server e fare clic su Identify Configuration
(Individua configurazione) per rilevare automaticamente il modello di stampante e il tipo di
controller/server.
NOTA: Se la rete non riesce a rilevare automaticamente la macchina da stampa digitale e
Integrated Fiery Color Server, fare quanto segue:
• Selezionare Xerox 700 Digital Color Press dall’elenco dei modelli delle stampanti.
• Come tipo di server/controller di stampa, selezionare Integrated Fiery Color Server 1.5
IPP.
• Seguire le istruzioni di Printer Registration per completare l’installazione della stampante.
Page 23

Installazione File di attivazione di FreeFlow
Il file di attivazione di FreeFlow è disponibile da WebTools o dal sito www.xerox.com.
Il file di attivazione è applicabile all’intera suite di applicazioni FreeFlow che comprende:
FreeFlow Express to Print, Makeready, Process Manager, Web Services, Print Manager e
Output Manager, versione 8.0.
Installazione del file di attivazione di Fiery FreeFlow
È possibile applicare il file di attivazione direttamente da Aggiornamenti Sistema. Per scaricare
il file su Integrated Fiery Color Server, attenersi alla seguente procedura.
PER INSTALLARE IL FILE DI ATTIVAZIONE DI FREEFLOW
1 Per accedere a WebTools di Integrated Fiery Color Server, avviare il browser per Internet o
Intranet ed immettere il nome DNS o l’indirizzo IP di Integrated Fiery Color Server.
2 Fare clic sulla scheda Configura.
3 Fare clic su Verifica aggiornamenti recenti.
Pagina 23
4 Fare clic su Sì nella finestra Avviso di protezione.
5 Fare clic sul collegamento alla patch di FreeFlow.
6 Salvare il file compresso .zip sul desktop.
7 Decomprimere il file .zip sul desktop.
8 Importare il file patch, 1-13R6ES.ps, con Command WorkStation nella coda diretta di
Integrated Fiery Color Server.
Attendere circa 60 secondi dopo lo scaricamento/importazione del file della patch prima di
reinizializzare il sistema. In questo modo, la patch viene elaborata completamente.
9 Da Command WorkStation, selezionare Chiudi sessione, quindi selezionare Riavvia il sistema.
Attendere che Integrated Fiery Color Server si riavvii senza interruzioni.
10 Quando Integrated Fiery Color Server visualizza lo stato In attesa, stampare una pagina di
configurazione e verificare che nella sezione delle informazioni di aggiornamento sia
indicato il nome del file: 1-13R6ES.
Page 24

Funzioni recenti Corrispondenza tinte piatte
L’attivazione di FreeFlow supporta la funzione Corrispondenza tinte piatte. Con l’opzione di
stampa Corrispondenza tinte piatte, è possibile stabilire come devono essere stampate le tinte
piatte su Integrated Fiery Color Server:
• Quando è attivata, l’opzione Corrispondenza tinte piatte usa le tabelle dei colori
incorporate in Integrated Fiery Color Server per simulare la tinta piatta con l’equivalente
più simile disponibile utilizzando i toner CMYK della macchina da stampa digitale
collegata a Integrated Fiery Color Server. Se Integrated Fiery Color Server supporta
l’applicazione Spot-On in ColorWise Pro Tools, è possibile personalizzare le definizioni
delle tinte piatte utilizzate da ColorWise.
• Se disattivata, l’opzione Corrispondenza tinte piatte indica a Integrated Fiery Color Server
di simulare la tinta piatta con gli equivalenti CMYK definiti dal produttore della stessa.
Questi sono gli stessi valori CMYK utilizzati dalle applicazioni che dispongono di librerie
delle tinte piatte. Questa combinazione CMYK viene poi stampata con l’impostazione
Simulazione CMYK che si seleziona, come SWOP o DIC.
Stampanti virtuali
Pagina 24
Stampa dei separatori
L’abilitazione FreeFlow ora supporta le stampanti virtuali Fiery, che consentono di stampare
su Integrated Fiery Color Server con impostazioni predefinite salvate in una coda di stampa
speciale. L’amministratore di Fiery può creare le stampanti virtuali e pubblicarle in modo da
consentire agli utenti di accedervi in rete. Per informazioni sull’uso delle stampanti virtuali,
vedere Funzioni aggiuntive di Command WorkStation nel manuale Programmi di utilità, che
fa parte della documentazione per l’utente.
NOTA: Dopo aver creato una nuova stampante virtuale Fiery, è necessario riavviare Integrated
Fiery Color Server per registrare la nuova stampante virtuale in FreeFlow Print Path.
Stampa dei separatori
È disponibile la stampa dei separatori pretagliati e tagliati. I separatori pretagliati possono
essere utilizzati sia per l’inserimento di pagine che per le pagine di eccezione. Quando sono
utilizzati per l’inserimento di pagine, sono richiamati dalla funzione Inserimento separatori di
Fiery sotto Supporti misti. Quando sono utilizzati per le pagine di eccezione, sono richiamati
dalla funzione Intervallo pagine di Fiery sotto Supporti misti.
Per informazioni sull’uso di Supporti misti, vedere Funzioni aggiuntive di Command
WorkStation nel manuale Programmi di utilità, che fa parte della documentazione per
l’utente.
Page 25

Pagina 25
Stampa di file RDO (Raster Document Object) contenenti separatori pretagliati
Integrated Fiery Color Server supporta i separatori pretagliati nelle applicazioni FreeFlow
come Makeready. Per assicurarsi che il testo venga stampato sui separatori, inviare il lavoro
direttamente su Integrated Fiery Color Server senza modificare le impostazioni in Proprietà
del lavoro.
Se il lavoro di stampa viene inviato come file RDO (Raster Document Object) o elaborato
con la conversione PostScript di Xerox, il formato non è predefinito, ma il lavoro viene
stampato correttamente.
NOTA: I separatori devono essere programmati come separatori pretagliati di formato 9 x 11
pollici, non 8,5
NOTA: Il file deve essere salvato con l’estensione .RDO. Se si sostituisce il nome del lavoro
trovato in Note sul lavoro, accertarsi che il nome del lavoro abbia come estensione .RDO. Un
file RDO contenente separatori pretagliati deve essere stampato sulla coda di stampa o sulla
coda di attesa di Fiery.
x 11 pollici.
Limitazioni e soluzioni
Graffatura di lavori con orientamento orizzontale
Alcune impostazioni di graffatura per i lavori con orientamento orizzontale applicano le graffe
nell’angolo opposto a quello specificato quando si stampa sulla macchina da stampa digitale
da un percorso di stampa IPP di Integrated Fiery Color Server come indicato:
• 1 graffa in alto a destra orizzontale stampa come 1 graffa in alto a sinistra orizzontale
• 1 graffa in alto a sinistra orizzontale stampa come 1 graffa in alto a destra orizzontale
Per ovviare al problema, da FreeFlow, selezionare:
• 1 Staple - Top Right Landscape (1 graffa - in alto a destra orizzontale) per applicare la
graffa in alto a sinistra della pagina con orientamento orizzontale
oppure selezionare:
• 1 Staple - Top Left Landscape (1 graffa - in alto a sinistra orizzontale) per applicare la
graffa in alto a destra della pagina con orientamento orizzontale
Per eseguire correttamente la graffatura dei lavori con orientamento orizzontale di qualsiasi
formato dalle applicazioni FreeFlow, inviare il lavoro nella coda di attesa di Fiery e cambiare
l’orientamento in Orizzontale su Integrated Fiery Color Server prima di rilasciarlo per la
stampa. Per i dettagli, vedere la seguente tabella.
Page 26

Pagina 26
Opzioni di graffatura di
FreeFlow Print Manager
1 Staple - Top Left Landscape
(1 graffa in alto a sinistra
orizzontale)
1 Staple - Top Right Landscape
(1 graffa in alto a destra
orizzontale)
2 Staples - Left Portrait
(2 graffe a sinistra verticale)
Opzioni di graffatura
di Command
WorkStation
Singola in alto a sinistra
Singola in alto a destra
Doppia a sinistra Senza graffatura
Posizione graffe per lavori con
orientamento orizzontale con
Orientamento impostato su No
(l’orientamento è disattivato (No)
per tutti i lavori inviati da FreeFlow
Print Manager)
Posizione graffe per lavori
con orientamento orizzontale
con Orientamento impostato
su Orizzontale
(selezionare Orizzontale come
Orientamento dalla finestra
Proprietà del lavoro di Command
Wor kS ta tion )
2 Staples - Top Portrait
(2 graffe in alto verticale)
2 Staples - Bottom Portrait
(2 graffe in basso verticale)
Center Staple - Top Portrait
(Centrale in alto verticale)
Center Staple - Bottom Portrait
(Centrale in basso verticale)
Doppia in alto
Doppia in basso
Centrale in alto
Centrale in basso
Page 27

Pagina 27
Opzioni di perforatura per i lavori con orientamento orizzontale
Alcune impostazioni di perforatura per i lavori con orientamento orizzontale praticano i fori
sul lato opposto a quello specificato quando si stampa sulla macchina da stampa digitale da
un’applicazione FreeFlow client.
Per eseguire correttamente la perforatura sui lavori con orientamento orizzontale di qualsiasi
formato dalle applicazioni FreeFlow, inviare il lavoro alla coda di attesa di Fiery e cambiare
l’orientamento in Orizzontale su Integrated Fiery Color Server prima di rilasciarlo per la
stampa. Per i dettagli, vedere la seguente tabella.
Impostazioni di perforatura
di FreeFlow Print Manager
Punch - Left Portrait
(Foro - sinistra verticale)
Punch - Right Portrait
(Foro - destra verticale)
Punch - Top Portrait
(Foro - in alto verticale)
Coil Punch - Top Portrait
(Foro spirale - in alto verticale)
NOTA: Per stampare un lavoro
con perforatura a spirale in alto
verticale, è necessario inviare
il lavoro da FreeFlow Print
Manager nella coda di
stampa di Fiery.
Impostazioni di perforatura
dalla scheda Finitura
di Proprietà del lavoro
di Command WorkStation
Posizione perforatura: Sinistra
2 fori
Posizione perforatura: Destra
2 fori
Posizione perforatura:
Superiore 2 fori
Posizione perforatura:
Superiore
Perforatura avanzata-LTR
NOTA: Cambiare
l’impostazione Posizione
perforatura da Sinistra
in Superiore.
Posizione fori su stampa
finale per i lavori con
orientamento orizzontale
con l’opzione Orientamento
impostata su Orizzontale
(selezionare Orizzontale come
Orientamento dalla finestra
Proprietà del lavoro di
Command WorkStation)
Sinistra 2 fori
Destra 2 fori
Superiore 2 fori
Top Co il Pun c h
(Foro spirale in alto)
Coil Punch - Bottom
Landscape (Foro spirale - in
basso orizzontale)
NOTA: Per stampare un lavoro
con perforatura a spirale in
basso orizzontale, è necessario
inviare il lavoro da FreeFlow
Print Manager nella coda
di stampa di Fiery.
Posizione perforatura:
Superiore
Perforatura avanzata-LTR
NOTA: Cambiare
l’impostazione Posizione
perforatura da Sinistra in
Superiore. Nella scheda Layout,
selezionare la casella Ruota
di 180.
Bottom Coil Punch
(Foro spirale in basso)
Page 28

Pagina 28
Nomi dei vassoi di uscita
Alcune destinazioni di uscita in FreeFlow sono indicate con nomi diversi nell’interfaccia
utente di Integrated Fiery Color Server. La seguente tabella riporta gli equivalenti.
FreeFlow Print Manager Integrated Fiery Color Server
Printer’s Default (Valore predefinito
della stampante)
Automatic (Automatico) Autoselezione
Top Tray (Vassoio superiore) Vassoio copie alternate, Vassoio superiore HCS
Stacker (Raccoglicopie) Vassoio raccoglicopie finitore D4 o Raccoglicopie
Stacker 2 (Raccoglicopie 2) Raccoglicopie finitore D4
Valore predefinito della stampante
oppure Vassoio superiore finitore D4
ad alta capacità (HCS)
I lavori senza finitura vengono depositati nel vassoio superiore HCS o vassoio raccoglicopie
HCS, se installato. I lavori con finitura vengono depositati nel vassoio superiore del finitore o
vassoio raccoglicopie del finitore.
I lavori con perforatura a spirale vengono depositati nel vassoio superiore HCS o nel vassoio
raccoglicopie HCS, se installato, altrimenti, vengono inviati ai vassoi del finitore.
Uso dei master FreeForm di Integrated Fiery Color Server da FreeFlow
I moduli di sfondo di FreeFlow sono associati alla funzione Usa master per la stampa di dati
variabili di Integrated Fiery Color Server.
PER USARE UN MASTER FREEFORM DA FREEFLOW
1 Selezionare Background Form (Modulo sfondo) sulla scheda Image Adjustment
(Regola immagine) di FreeFlow.
2 Digitare il numero di master del modulo, assegnato su Integrated Fiery Color Server,
nella finestra di dialogo Form Name (Nome modulo) di FreeFlow. Non digitare il nome del
file master.
I lavori di stampa PCL non possono essere impostati su Integrated Fiery Color Server su IPP (Internet Printing Protocol)
I file PCL contenenti istruzioni di programmazione non sono supportati da Integrated Fiery
Color Server su FreeFlow. Se il lavoro richiede una programmazione, utilizzare il driver di
stampa PCL di Integrated Fiery Color Server.
Page 29

Pagina 29
Production Print Path
FreeFlow Production Print Path supporta le seguenti opzioni di formattazione per i formati
file TIFF, RDO e JPEG:
• Orientation (Orientamento)
• Page Layout (Layout di pagina)
• Reduce/Enlarge (Riduzione/ingrandimento)
• Rotation (Rotazione)
Per ottenere risultati simili per i file PDF e PostScript, inviare il lavoro nella coda di attesa di
Integrated Fiery Color Server e usare Proprietà dl lavoro di Command WorkStation per
selezionare opzioni simili.
Qualità immagine in bianco e nero per le scansioni
Quando si invia un lavoro di scansione in bianco e nero importato da FreeFlow Makeready e
stampato da FreeFlow Print Manager - Advanced Print Path, per avere i migliori risultati di
stampa, disattivare ColorWise prima di inviare il lavoro di scansione.
Per disattivare ColorWise in FreeFlow, selezionare Image Quality (Qualità immagine) >
Output Color (Colore di uscita), quindi impostare CMYK Emulation (Emulazione CMYK)
su ColorWise OFF (ColorWise non attivo).
Per disattivare ColorWise in Command WorkStation, fare clic sulla scheda Colore, fare clic
su Impostazioni Expert, quindi impostare Profilo di simulazione CMYK su ColorWise non
attivo.
Ristampa di lavori RDO (Raster Document Object) da Command WorkStation
La ristampa di un lavoro RDO da Command WorkStation provoca una condizione che
richiede di caricare la carta. Per ovviare al problema, installare la patch del server Fiery
1-13WCPW.
Stampa di un lavoro con foglio a metà piegatura a Z - con opzione di rilegatura a destra, stampa interno
Quando si stampa un lavoro con foglio a metà piegatura a Z - con opzione di rilegatura a
destra, stampa interno combinato con una qualsiasi opzione di finitura multipla, il lavoro
viene stampato con la finitura applicata sul lato di rilegatura sinistro della pagina.
Page 30

Page 31

Release-Informationen
FreeFlow Express to Print, Makeready, Process Manager,
Web Services, Print Manager und Output Manager, Version 8.0,
für das Drucksystem Xerox 700 Digital Color Press
mit integriertem Fiery Color Server, Version 1.5
Dieses Dokument enthält Hinweise zum Installieren der FreeFlow Komponenten
Express to Print, Makeready, Process Manager, Web Services, Print Manager und
Output Manager, Version 8.0, im Hinblick auf das Drucksystem Xerox 700 Digital
Color Press mit integriertem Fiery Color Server, Version 1.5, sowie Hinweise zur
Verwendung dieser Komponenten.
Der Begriff „integrierter Fiery Color Server“ bezieht sich auf das Drucksystem
Xerox 700 Digital Color Press mit integriertem Fiery Color Server, Version 1.5.
Der Begriff „Digitaldruckmaschine“ bezieht sich auf die Digitaldruckmaschine
Xerox 700 Digital Color Press.
Damit ein Computer im Netzwerk, auf dem die FreeFlow Anwendungssoftware
ausgeführt wird, die Verbindung zum integrierten Fiery Color Server herstellen kann,
muss eine Aktivierungsdatei geladen werden. Die Aktivierungsdatei für dieses Produkt
hat den Dateinamen „1-13R6ES.ps“.
Die Aktivierungsdatei für FreeFlow kann mit mithilfe der WebTools oder von der Website
www.xerox.com auf den integrierten Fiery Color Server heruntergeladen werden. Nach der
Installation auf dem integrierten Fiery Color Server wird die Aktivierungsdatei für FreeFlow
transparent ausgeführt, sodass Sie in den FreeFlow Anwendungsprogrammen die Verbindung
zum integrierten Fiery Color Server herstellen und Aufträge übergeben können. Das heißt,
dass Sie die komplette FreeFlow Anwendungssoftware in Verbindung mit dem integrierten
Fiery Color Server verwenden können.
Der integrierte Fiery Color Server, Version 1.5, unterstützt die folgenden Freeflow
Anwendungsprogramme in vollem Umfang:
• FreeFlow Express to Print
• FreeFlow Makeready
• FreeFlow Process Manager
• FreeFlow Web Services
• FreeFlow Print Manager
• FreeFlow Output Manager
HINWEIS: Die Aktivierungsdatei für FreeFlow wird auf dem integrierten Fiery Color Server
zwar ähnlich wie Patch-Software installiert; bei der Aktivierungsdatei für FreeFlow handelt
es sich aber nicht um eine Patch-Datei, mit der ein ‚Problem behoben’ wird.
Die Anleitung zum Herunterladen und Installieren der Aktivierungsdatei für FreeFlow finden
Sie im Abschnitt Installation auf Seite 33.
Copyright 2009 © Electronics for Imaging, Inc.
Artikelnummer: 45087442
15. September 2009
Page 32

Seite 32
Vorbereitung für den Druckbetrieb
Vergewissern Sie sich, dass die folgenden Schritte ausgeführt wurden, bevor Sie Aufträge
zum Drucken an den integrierten Fiery Color Server senden:
• Auf dem integrierten Fiery Color Server wurde die IPP-Aktivierungsdatei für FreeFlow
installiert. Drucken Sie zu diesem Zweck eine Konfigurationsseite; die Software wurde
aktiviert, wenn im Abschnitt mit den Update-Informationen der folgende Name
aufgelistet ist: 1-13R6ES.
Die Anleitung zum Drucken der Konfigurationsseite finden Sie im Dokument
Konfiguration und Setup. Die Anleitung zum Herunterladen und Installieren der
Aktivierungsdatei für FreeFlow finden Sie im Abschnitt Installation auf Seite 33.
• Die Anwendungssoftware für den integrierten Fiery Color Server wurde auf der ClientWorkstation installiert. Die Anleitung zum Installieren der Anwendungssoftware für
den integrierten Fiery Color Server und Anleitungen zu ihrer Verwendung enthält die
Dokumentation des Servers.
• Auf dem FreeFlow System sind die Komponenten FreeFlow Express to Print, Makeready,
Process Manager, Web Services, Print Manager und Output Manager in der Version 8.0
installiert.
Einrichten des Druckpfads
Damit Sie Aufträge aus FreeFlow Anwendungsprogrammen auf dem integrierten Fiery Color
Server drucken können, müssen Sie die folgenden vorbereitenden Schritte ausführen.
FREEFLOW ANWENDUNGSSOFTWARE FÜR DRUCKAUSGABEN AUF DEM INTEGRIERTEN
F
IERY COLOR SERVER EINRICHTEN
1 Wählen Sie „Add“ (Hinzufügen) in der FreeFlow Komponente „Printer Registration“
(Druckerregistrierung).
Daraufhin wird der Assistent zum Hinzufügen eines Druckers gestartet.
2 Geben Sie die IP-Adresse des integrierten Fiery Color Servers ein und klicken Sie auf
„Identify Configuration“ (Konfiguration identifizieren), damit das Druckermodell und
der Controller- bzw. Servertyp automatisch ermittelt werden.
HINWEIS: Führen Sie die folgenden Schritte aus, falls die Digitaldruckmaschine und
der integrierte Fiery Color Server im Netzwerk nicht automatisch erkannt werden:
• Wählen Sie die Digitaldruckmaschine Xerox 700 Digital Color Press
in der Liste der Druckermodelle.
• Wählen Sie „Integrated Fiery Color Server 1.5 IPP“ in der Liste der
Controller-/Servertypen.
• Führen Sie die Druckerinstallation zu Ende; befolgen Sie dazu die Anleitungen
der Assistenzfunktion für die Druckerregistrierung.
Page 33

Installation Abrufen der Aktivierungsdatei für FreeFlow
Die Aktivierungsdatei für FreeFlow kann mithilfe der WebTools oder von der Website
www.xerox.com abgerufen werden.
Diese Aktivierungsdatei gilt für alle FreeFlow Anwendungsprogramme:
FreeFlow Express to Print, Makeready, Process Manager, Web Services, Print Manager
und Output Manager, Version 8.0.
Installieren der Fiery FreeFlow Aktivierungsdatei
Sie können die Aktivierungsdatei mit dem Dienstprogramm System-Update direkt anwenden
und aktivieren. Führen Sie die folgenden Schritte aus, um die Datei auf den integrierten Fiery
Color Server herunterzuladen.
FREEFLOW AKTIVIERUNGSDATEI INSTALLIEREN
1 Greifen Sie auf die WebTools auf dem integrierten Fiery Color Server zu. Starten Sie dazu
einen Internet- oder Intranetbrowser und geben Sie in das Adressfeld die IP-Adresse oder
den DNS-Namen des integrierten Fiery Color Servers ein.
Seite 33
2 Öffnen Sie die Registerkarte „Konfigurieren“.
3 Klicken Sie auf „Updates für Produkt suchen“.
4 Klicken Sie im Fenster mit dem Sicherheitshinweis auf „Ja“.
5 Klicken Sie auf den Link für die FreeFlow Patch-Software.
6 Speichern Sie die ZIP-Datei auf Ihrem Schreibtisch/Desktop.
7 Entpacken Sie die ZIP-Datei und speichern Sie Ihren Inhalt ebenfalls auf Ihrem
Schreibtisch/Desktop.
8 Starten Sie die Anwendung Command WorkStation und importieren Sie die Patch-Datei
„1-13R6ES.ps“. Geben Sie dabei die direkte Verbindung auf dem integrierten Fiery Color
Server als Ziel an.
Warten Sie, nachdem die Patch-Datei importiert/heruntergeladen wurde, noch etwa
1 Minute und booten Sie danach das System neu. Durch die Wartezeit stellen Sie sicher,
dass die Patch-Datei vollständig verarbeitet werden kann.
9 Booten Sie das System neu. Wählen Sie dazu „Server neu booten“ in der Anwendung
Command WorkStation.
Warten Sie, bis der Neustart des integrierten Fiery Color Servers komplett beendet wurde;
greifen Sie nicht in den Startvorgang ein.
10 Drucken Sie, wenn auf dem integrierten Fiery Color Server die Meldung „Bereit“ angezeigt
wird, die Konfigurationsseite und vergewissern Sie sich, dass auf der gedruckten Konfigurationsseite im Bereich mit den Aktualisierungsinformationen der Name der installierten
Aktivierungsdatei enthalten ist: 1-13R6ES.
Page 34

Seite 34
Neueste Funktionen
Spot-Farbabstimmung
Mit der FreeFlow Aktivierung wird nun auch die Spot-Farbabstimmung unterstützt. Mit der
Option „Spot-Farbabstimmung“ können Sie die Art und Weise bestimmen, wie Spot-Farben
(Sonder-/Schmuckfarben) auf dem integrierten Fiery Color Server gedruckt werden.
• Wenn Sie die Option „Spot-Farbabstimmung“ mit der Einstellung „Ein“ aktivieren,
wird jede Spot-Farbe auf der Basis der auf dem integrierten Fiery Color Server residenten
Farbtabellen mit dem bestgeeigneten Äquivalent simuliert, das mit den CMYK-Tonern
der Digitaldruckmaschine mit dem integrierten Fiery Color Server erzeugt werden kann.
Wenn der integrierte Fiery Color Server die Komponente Spot-On der ColorWise Pro
Tools unterstützt, können Sie die von ColorWise herangezogenen Spot-Farbdefinitionen
gezielt für Ihre Zwecke anpassen.
• Indem Sie die Option „Spot-Farbabstimmung“ mit der Einstellung „Aus“ deaktivieren,
weisen Sie den integrierten Fiery Color Server an, Spot-Farben auf der Basis der CMYKÄquivalente zu simulieren, die vom Hersteller definiert werden. Es handelt sich dabei um
dieselben CMYK-Werte, die in Anwendungsprogrammen verwendet werden, die SpotFarbbibliotheken umfassen. Diese CMYK-Kombinationen werden unter Verwendung
der für die Option „CMYK-Simulationsverfahren“ gewählten Einstellung gedruckt
(z.B. SWOP oder DIC).
Virtuelle Drucker
Die FreeFlow Anwendungssoftware unterstützt nun auch in der Fiery Umgebung definierte
virtuelle Drucker. Virtuelle Drucker bieten Anwendern die Möglichkeit, Aufträge unter
Verwendung vordefinierter Druckoptionseinstellungen an eine vorgegebene Druckverbindung
auf dem integrierten Fiery Color Server zu senden. Virtuelle Drucker können von einem für
den integrierten Fiery Color Server verantwortlichen Administrator definiert und freigegeben
werden, sodass Anwender über das Netzwerk auf sie zugreifen können. Weitere Hinweise zur
Arbeit mit virtuellen Druckern finden Sie im Dokument Dienstprogramme der Anwender-
dokumentation in den Abschnitten über die Anwendung Command WorkStation.
Druckausgaben mit Registerseiten
HINWEIS: Nachdem Sie in der Fiery Umgebung einen neuen virtuellen Drucker erstellt
haben, müssen Sie den integrierten Fiery Color Server neu starten, damit dieser neue
virtuelle Drucker im FreeFlow Druckpfad registriert wird.
Druckausgaben mit Registerseiten
Für das Drucken von Registerseiten können Sets mit vorgeschnittenen oder komplett zugeschnittenen Tabs verwendet werden. Medien mit vorgeschnittenen Tabs werden sowohl
als Einleger (Page Inserts) als auch als Ausnahmeseiten (Exception Pages) unterstützt.
Als Einleger definierte Registerseiten werden in Definitionen umgesetzt, die in der Fiery
Umgebung über die Option „Neuer Einleger“ im Bereich „Gemischte Medien“ angezeigt
werden. Als Ausnahmeseiten definierte Registerseiten werden in Definitionen umgesetzt,
die in der Fiery Umgebung über die Option „Neuer Seitenbereich“ im Bereich „Gemischte
Medien“ angezeigt werden.
Page 35

Seite 35
Weitere Hinweise zu gemischten Medien finden Sie im Dokument Dienstprogramme der
Anwenderdokumentation in den Abschnitten über die Anwendung Command WorkStation.
Drucken von RDO-Dateien mit vorgeschnittenen Registermedien
Der integrierte Fiery Color Server unterstützt die Verwendung von Registermedien mit
vorgeschnittenen Tabs in Makeready und anderen FreeFlow Anwendungsprogrammen.
Damit sichergestellt ist, dass die Registertexte auf die Tabs gedruckt werden, müssen Sie
den Auftrag direkt an den integrierten Fiery Color Server senden, ohne seine Auftragseigenschaften in der Anwendung Command WorkStation zu ändern.
Wenn der Auftrag im Format RDO (Raster Document Object) gesendet oder mit der
Xerox-Funktion für die PostScript-Konvertierung verarbeitet wird, wird der Auftrag
korrekt gedruckt, obwohl die Größe in diesem Fall nicht vordefiniert ist.
HINWEIS: Die Registerseiten müssen im Format „9 x 11 Inch, vorgeschnitten“
programmiert sein (nicht im Format „8,5
HINWEIS: Die Datei muss mit der Dateierweiterung „.RDO“ gespeichert werden. Wenn
Sie den Namen ändern, der in den Job Notes (auftragsspezifische Notizen) enthalten ist,
müssen Sie darauf achten, dass der Auftragsname die Namenserweiterung „.RDO“ aufweist.
Eine RDO-Datei, die vorgeschnittene Registermedien umfasst, kann außerdem nur an die
Fiery Warteschlange „Drucken“ oder „Halten“ gesendet werden.
x 11 Inch“).
Funktionseinschränkungen
und behebende
Maßnahmen
Heften querformatiger Aufträge
Wenn Sie unter Verwendung eines für den integrierten Fiery Color Server definierten IPPPfads einen querformatigen Auftrag auf der Digitaldruckmaschine drucken und ihn heften
lassen, erfolgt das Heften bei bestimmten Hefteinstellungen nicht in der von Ihnen angegebenen Ecke, sondern in der gegenüber liegenden Ecke, z.B.:
• Festlegung: „Heftermodus = Einfach, rechts oben“ und „Ausrichtung = Querformat“
Ausgabe: Einfache Heftung links oben und Ausrichtung im Querformat
• Festlegung: „Heftermodus = Einfach, links oben“ und „Ausrichtung = Querformat“
Ausgabe: Einfache Heftung rechts oben und Ausrichtung im Querformat
Als Abhilfe können Sie in FreeFlow die folgende Festlegung treffen:
• Wählen Sie „1 Staple – Top Right Landscape“ (Einfach, rechts oben / Querformat),
wenn der querformatige Auftrag links oben geheftet werden soll. ODER
• Wählen Sie „1 Staple - Top Left Landscape“ (Einfach, links oben / Querformat),
wenn der querformatige Auftrag rechts oben geheftet werden soll.
Damit ein querformatiger Auftrag aus FreeFlow Anwendungsprogrammen unabhängig von
der jeweiligen Papiergröße korrekt gedruckt wird, müssen Sie den Auftrag an die Fiery Warteschlange „Halten“ senden und seine Ausrichtung auf dem integrierten Fiery Color Server
in „Querformat“ ändern, bevor Sie ihn zum Drucken freigeben (siehe folgende Tabelle).
Page 36

Hefteinstellungen in
FreeFlow Print Manager
Hefteinstellungen
in Anwendung
Command
WorkStation
Heftposition bei querformatigem Auftrag ohne Angabe
der Ausrichtung (Einstellung
„Aus“)
(„Ausrichtung = Aus“ wird für
alle Aufträge aus FreeFlow
Print Manager festgelegt.)
Seite 36
Heftposition bei querformatigem Auftrag bei Festlegung
„Ausrichtung = Querformat“
(„Ausrichtung = Querformat“
kann im Fenster „Auftragseigenschaften“ der Anwendung
Command WorkStation festgelegt
werden.)
1 Staple - Top Left Landscape
(Einfach, links oben //
Querformat)
1 Staple - Top Right Landscape
(Einfach, rechts oben //
Querformat)
2 Staples - Left Portrait
(Doppelt, links //
Hochformat)
2 Staples - Top Portrait
(Doppelt, oben //
Hochformat)
2 Staples - Bottom Portrait
(Doppelt, unten //
Hochformat)
Einfach, links oben
Einfach, rechts oben
Doppelt, links Kein Heften
Doppelt, oben
Doppelt, unten
Center Staple - Top Portrait
(Mitte, oben //
Hochformat)
Center Staple - Bottom Portrait
(Mitte, unten //
Hochformat)
Mitte oben
Mitte unten
Page 37

Seite 37
Einstellungen für Lochung bei querformatigen Aufträgen
Bei bestimmten Einstellungen für das Lochen werden querformatige Aufträge nicht entlang
der Kante gelocht, die bei der Ausgabe auf der Digitaldruckmaschine aus einem FreeFlow
Anwendungsprogramm verwendet wird, sondern entlang der gegenüber liegenden Kante.
Damit ein querformatiger Auftrag aus FreeFlow Anwendungsprogrammen unabhängig von
der jeweiligen Papiergröße korrekt gelocht wird, müssen Sie den Auftrag an die Fiery Warteschlange „Halten“ senden und seine Ausrichtung auf dem integrierten Fiery Color Server
in „Querformat“ ändern, bevor Sie ihn zum Drucken freigeben (siehe folgende Tabelle).
Locheinstellungen in
FreeFlow Print Manager
Punch - Left Portrait
(Lochen links // Hochformat)
Punch - Right Portrait
(Lochen rechts // Hochformat)
Punch - Top Portrait
(Lochen oben // Hochformat)
Coil Punch - Top Landscape
(Spirallochung oben //
Querformat)
HINWEIS: Zum Drucken
mit der Festlegung „Coil
Punch-Top Landscape“ muss
ein Auftrag aus FreeFlow
Print Manager an die Fiery
Warteschlange „Halten“
gesendet werden.
Locheinstellungen in
Anwendung Command
WorkStation
(Auftragseigenschaften >
Finishing)
Lochposition: Links
2-Lochung
Lochposition: Rechts
2-Lochung
Lochposition: Oben
2-Lochung
Lochposition: Oben
Erweiterte Lochung 8,5
bzw. A4
x 11
HINWEIS: Ändern Sie die
Einstellung der Druckoption
„Lochposition“ von „Links“
in „Oben“.
Endgültige Lochposition bei
querformatigem Auftrag bei
Festlegung „Ausrichtung =
Querformat“
(„Ausrichtung = Querformat“
kann im Fenster „Auftragseigenschaften“ der Anwendung
Command WorkStation festgelegt werden.)
2 Löcher links
2 Löcher rechts
2 Löcher oben
Spirallochung oben
Coil Punch - Bottom
Landscape
(Spirallochung unten //
Querformat)
HINWEIS: Zum Drucken
mit der Festlegung „Coil
Punch-Bottom Landscape“
muss ein Auftrag aus FreeFlow
Print Manager an die Fiery
Warteschlange „Halten“
gesendet werden.
Lochposition: Oben
Erweiterte Lochung 8,5
bzw. A4
x 11
HINWEIS: Ändern Sie die
Einstellung der Druckoption
„Lochposition“ von „Links“ in
„Oben“. Aktivieren Sie auf der
Seite „Layout“ das Kontrollkästchen „Drehen um 180°“.
Spirallochung unten
Page 38

Seite 38
Bezeichnungen für Ausgabe-/Ablagefächer
Für bestimmte Ausgabeziele bzw. Ausgabe-/Ablagefächer werden in der FreeFlow Umgebung
andere Bezeichnungen verwendet als in der Umgebung des integrierten Fiery Color Servers.
In der folgenden Tabelle sind die Entsprechungen einander gegenüber gestellt.
FreeFlow Print Manager Integrierter Fiery Color Server
Druckerstandard Druckerstandard
Automatic
(Automatisch)
Top Tray OCT (Versatzausgabefach), Oberes HCS-Fach
Stacker Finisher-Staplerfach (Finisher D4) ODER
Stacker 2 Finisher-Staplerfach (Finisher D4)
Automatisch auswählen
ODER Oberes Finisherfach (Finisher D4)
HCS-Stacker-Fach
Aufträge ohne aktivierte Endverarbeitungsoptionen werden an das obere HCS-Fach
bzw. an das HCS-Stacker-Fach ausgegeben (sofern verfügbar). Aufträge mit aktivierten
Endverarbeitungsoptionen werden an das obere Finisher-Fach bzw. an das FinisherStaplerfach ausgegeben (sofern verfügbar).
Aufträge mit Spirallochung werden an das obere HCS-Fach oder das HCS-Stacker-Fach
geleitet; falls diese nicht verfügbar sind, erfolgt die Ablage in einem Finisher-Fach.
Verwenden von FreeForm Master-Dateien des integrierten Fiery Color Servers in FreeFlow
Hintergrundformulare (Background Forms) der FreeFlow Umgebung werden auf dem integrierten Fiery Color Server in Einstellungen der für den variablen Datendruck verwendeten
Option „Master-Datei verwenden“ umgesetzt.
FREEFORM MASTER-DATEI AUS FREEFLOW VERWENDEN
1 Wählen Sie „Background Form“ (Hintergrundformular) auf der FreeFlow Registerkarte
„Image Adjustment“ (Bildanpassung).
2 Geben Sie in das Feld „Form Name“ (Formularname) die Nummer einer FreeForm
Master-Datei ein, die auf dem integrierten Fiery Color Server definiert wurde. Geben
Sie nicht den Namen oder die Bezeichnung der Master-Datei ein.
Keine Möglichkeit zum Konfigurieren von PCL-Aufträgen auf integriertem Fiery Color Server bei Verwendung von IPP (Internet Printing Protocol)
PCL-Dateien, die Elemente für die Auftragsprogrammierung enthalten, werden vom integrierten Fiery Color Server in Kombination mit FreeFlow nicht unterstützt. Verwenden Sie
den PCL-Druckertreiber für den integrierten Fiery Color Server, wenn für einen Auftrag
Programmierelemente erforderlich sind.
Page 39

Seite 39
Druckpfad für Produktion
Der Druckpfad für die FreeFlow Produktion unterstützt die folgenden Formatieroptionen
für Aufträge in den Formaten TIFF, RDO und JPEG:
• Orientation (Ausrichtung)
• Page Layout (Seitenlayout)
• Reduce/Enlarge (Verkleinern/Vergrößern)
• Rotation (Drehung)
Für Dateien in den Formaten PDF und PostScript können Sie vergleichbare Ergebnisse
erzielen, wenn Sie sie an die Warteschlange „Halten“ des integrierten Fiery Color Servers
senden und im Fenster „Auftragseigenschaften“ der Anwendung Command WorkStation
die entsprechenden Druckoptionen festlegen.
Bildqualität bei Schwarzweißscans
Wenn Sie einen schwarzweißen Scanauftrag senden, der aus FreeFlow Makeready
importiert und mit FreeFlow Print Manager und der Funktion für den erweiterten
Druckpfad (Advanced Print Path) gedruckt wurde, müssen Sie vor dem Senden des
Scanauftrags ColorWise deaktivieren, um ein optimales Druckergebnis zu erzielen.
Zum Deaktivieren von ColorWise in FreeFlow müssen Sie „Image Quality > Output
Color“ (Bildqualität > Ausgabefarbe) wählen und für die Option „CMYK Emulation“
(CMYK-Emulation) die Einstellung „ColorWise OFF“ (ColorWise Aus) wählen.
Zum Deaktivieren von ColorWise in der Anwendung Command WorkStation müssen
Sie die Seite „Farbe“ öffnen, auf „Profi-Einstellungen“ klicken und für die Option
„CMYK-Simulationsprofil“ die Einstellung „ColorWise Aus“ wählen.
Druckwiederholung eines RDO-Auftrags in Anwendung Command WorkStation
Wenn Sie in der Anwendung Command WorkStation die Druckausgabe eines Auftrags im
Format RDO (Raster Document Objekt) wiederholen, wird die Fehlermeldung angezeigt,
dass Papier eingelegt werden muss. Zur Behebung dieses Problems müssen Sie die PatchDatei „1-13WCPW“ für den integrierten Fiery Color Server installieren.
Drucken eines FreeFlow Auftrags mit Festlegung „Z Fold half sheet - Right Bind, Print Inside“
Wenn Sie in FreeFlow für einen Auftrag die Einstellung „Z-Fold Half Sheet - Right Bind
print inside“ (Z-Falz (Halber Bogen) // Bindung rechts // Innen) festlegen und diese Festlegung mit einer Option kombinieren, die eine Mehrfachweiterverarbeitung bewirkt,
erfolgt das Finishing der Seiten tatsächlich entlang der linken Kante.
Page 40

Page 41

Notas de la versión para el cliente
FreeFlow Express to Print, Makeready, Process Manager,
Web Services, Print Manager y Output Manager, versión 8.0
para el Xerox 700 Digital Color Press con Integrated Fiery
Color Server, versión 1.5
Este documento contiene información acerca de la instalación y uso de FreeFlow Express
to Print, Makeready, Process Manager, Web Services, Print Manager y Output Manager,
versión 8.0, para el Xerox 700 Digital Color Press con Integrated Fiery Color Server,
versión 1.5.
El término “Integrated Fiery Color Server” se utiliza para hacer referencia al Xerox 700
Digital Color Press con Integrated Fiery Color Server, versión 1.5. El término “digital press”
hace referencia a la Xerox 700 Digital Color Press.
Para conectar las computadoras de usuario que ejecutan aplicaciones FreeFlow para el
Integrated Fiery Color Server, debe descargar el archivo de activación. El archivo de
activación para este producto es 1-13R6ES.ps.
Descargue el archivo de activación de FreeFlow al Integrated Fiery Color Server desde
WebTools o www.xerox.com. Una vez instalado en el Integrated Fiery Color Server,
el archivo de activación de FreeFlow se ejecuta de forma transparente, lo que permite la
conexión y envío de trabajos al Integrated Fiery Color Server mediante las aplicaciones de
FreeFlow. Permite a los usuarios utilizar el conjunto completo de aplicaciones FreeFlow
con el Integrated Fiery Color Server.
El Integrated Fiery Color Server, versión 1.5 es totalmente compatible con las aplicaciones
siguientes de Freeflow:
• FreeFlow Express to Print
• FreeFlow Makeready
• FreeFlow Process Manager
• FreeFlow Web Services
• FreeFlow Print Manager
• FreeFlow Output Manager
NOTA: Aunque el método de instalación es muy similar al de la instalación de muchos
módulos de actualización instalados en el Integrated Fiery Color Server, el archivo de
activación de FreeFlow no es un módulo porque no arregla un defecto.
Para obtener instrucciones acerca de cómo descargar e instalar el archivo de activación
de FreeFlow, consulte “Instalación” en la página 43.
Copyright 2009 © Electronics for Imaging, Inc.
Número de referencia: 45087442
15 de septiembre de 2009
Page 42

Antes de imprimir Antes de imprimir al Integrated Fiery Color Server, compruebe lo siguiente:
• Que el archivo de activación IPP de FreeFlow esté instalado en el Integrated Fiery Color
Server. Para verificar si está instalado el archivo de activación, imprima una página
Configuración y compruebe que la sección Información de actualización incluya el
nombre de archivo: 1-13R6ES.
Para obtener información para la impresión de la página Configuración, consulte
Instalación y configuración. Para obtener instrucciones acerca de cómo descargar e
instalar el archivo de activación de FreeFlow, consulte “Instalación” en la página 43.
• Que el software del Integrated Fiery Color Server esté instalado en la estación de trabajo
cliente. Para obtener instrucciones acerca de la instalación y la utilización del Integrated
Fiery Color Server, consulte la documentación que se suministra con el servidor.
• Que FreeFlow Express to Print, Makeready, Process Manager, Web Services,
Print Manager o Output Manager, versión 8.0 estén instalados en el sistema FreeFlow.
Configuración de la ruta de impresión
Utilice el siguiente procedimiento para configurar una aplicación FreeFlow para imprimir
al Integrated Fiery Color Server.
Página 42
PARA CONFIGURAR UNA APLICACIÓN FREEFLOW PARA IMPRIMIR AL INTEGRATED FIERY COLOR SERVER
1 En la aplicación FreeFlow Printer Registration, seleccione Add (Agregar).
Aparece el cuadro de diálogo Add Printer Wizard (Asistente para agregar impresora).
2 Introduzca la dirección IP del Integrated Fiery Color Server y haga clic en Identify
Configuration (Identificar configuración) para detectar automáticamente el Modelo de
impresora y el Tipo de controlador/servidor de impresión.
NOTA: Si la red no puede detectar automáticamente la digital press y el Integrated Fiery Color
Server, realice las operaciones siguientes:
• Seleccione la Xerox 700 Digital Color Press en la lista Printer Model (Modelo de
impresora).
• Seleccione Integrated Fiery Color Server 1.5 IPP en la lista Print Controller/Server Type
(Tipo de controlador/servidor de impresión).
• Siga las instrucciones de Printer Registration (Registro de impresora) para completar la
instalación de la impresora.
Page 43

Instalación Obtención del archivo de activación de FreeFlow
El archivo de activación de FreeFlow está disponible en WebTools o www.xerox.com.
El archivo de activación se aplica a todo el conjunto de aplicaciones FreeFlow, que incluye
FreeFlow Express to Print, Makeready, Process Manager, Web Services, Print Manager y
Output Manager, versión 8.0.
Instalación del archivo de activación de Fiery FreeFlow
Puede aplicar el archivo de activación directamente a través de Actualizaciones del sistema.
Para descargar el archivo en el Integrated Fiery Color Server, utilice el siguiente
procedimiento.
PARA INSTALAR EL ARCHIVO DE ACTIVACIÓN DE FREEFLOW
1 Para entrar en Integrated Fiery Color Server WebTools, inicie su navegador de Internet o
intranet e introduzca el nombre DNS o la dirección IP del Integrated Fiery Color Server.
2 Haga clic en la pestaña Configurar.
3 Haga clic en Buscar actualizaciones de producto.
Página 43
4 Haga clic en Sí en la ventana de información de seguridad.
5 Haga clic en el enlace del módulo de FreeFlow.
6 Guarde el archivo comprimido en su escritorio.
7 Descomprima el archivo en su escritorio.
8 Importe el archivo del módulo, 1-13R6ES.ps, con Command WorkStation a la cola Directa
del Integrated Fiery Color Server.
Espere aproximadamente 60 segundos después de descargar/importar el archivo del módulo
antes de rearrancar el sistema. Así se garantiza que el archivo de módulo de actualización se
procese completamente.
9 En Command WorkStation, seleccione Cerrar y después seleccione Reiniciar sistema.
Deje que el Integrated Fiery Color Server se reinicie sin interrumpir el proceso.
10 Cuando el Integrated Fiery Color Server muestre Libre, imprima una página Configuración
y verifique que la sección Información de actualización incluya el nombre del archivo:
1-13R6ES.
Page 44

Página 44
Funciones más recientes
Coincidencia de colores planos
La activación de FreeFlow admite la Coincidencia de colores planos. Con la opción
Coincidencia de colores planos, puede determinar cómo se imprimen los colores planos
en el Integrated Fiery Color Server.
• Coincidencia de colores planos - Sí utiliza tablas de color incorporadas en el Integrated
Fiery Color Server para simular los colores planos con sus equivalentes más cercanos
usando tóners CMYK de la digital press conectada al Integrated Fiery Color Server.
Si su Integrated Fiery Color Server admite la aplicación Spot-On de ColorWise Pro Tools,
puede personalizar las definiciones de colores planos utilizadas por ColorWise.
• Coincidencia de colores planos - No indica al Integrated Fiery Color Server que debe
simular los colores planos utilizando los equivalentes CMYK definidos por el fabricante
del color plano. Éstos son los mismos valores CMYK definidos en las aplicaciones que
se incluyen en las bibliotecas de colores planos. Esta combinación CMYK se imprime
después con el valor de Simulación CMYK que haya seleccionado, por ejemplo SWOP
oDIC.
Impresoras virtuales
La activación de FreeFlow admite las Impresoras virtuales del Fiery, que permiten imprimir
al Integrated Fiery Color Server utilizando las configuraciones predefinidas guardadas como
una cola de impresión especial. El administrador del Fiery puede crear impresoras virtuales
y publicarlas de forma que los usuarios pueden usarlas en la red. Para obtener información
acerca de la utilización de las impresoras virtuales, consulte la Información adicional de
Command WorkStation en Utilidades, que es parte del conjunto de documentación del
usuario.
Impresión de pestañas
NOTA: Después de crear una nueva impresora virtual Fiery, debe reiniciar el Integrated
Fiery Color Server para registrar la nueva impresora virtual con FreeFlow Print Path.
Impresión de pestañas
La impresión con pestañas se admite tanto para pestañas cortadas completas como
precortadas. Las pestañas precortadas se admiten tanto en los insertos de página como en las
páginas de excepción. Cuando se utilizan para los insertos de página, se asignan a la función
Insertar pestaña del Fiery dentro de Papeles mezclados. Cuando se utilizan para las páginas
de excepción, se asignan a la función Insertar pestaña del Fiery dentro de Papeles mezclados.
Para obtener información acerca de la utilización de los Papeles mezclados, consulte la
Información adicional de Command WorkStation en Utilidades, que es parte del conjunto
de documentación del usuario.
Page 45

Página 45
Impresión de archivos RDO que contienen pestañas precortadas
El Integrated Fiery Color Server admite las pestañas precortadas en aplicaciones FreeFlow
como Makeready. Para garantizar que el texto se imprima en las pestañas, envíe el trabajo
directamente al Integrated Fiery Color Server sin cambiar la configuración en Propiedades
del trabajo.
Si el trabajo de impresión se envía como un archivo RDO (raster document object - objeto del
documento de trama), o se procesa a través de la conversión PostScript de Xerox, el tamaño no
se predefine, pero el trabajo se imprime correctamente.
NOTA: Las pestañas deben programarse como pestañas precortadas de 9 x 11-pulg., no como
8,5
x 11-pulg.
NOTA: El archivo debe guardarse con la extensión .RDO. Si redefine el nombre del trabajo
que se encuentra en Job Notes (Notas del trabajo), asegúrese que el nombre del trabajo
termina con la extensión .RDO. El archivo RDO que contiene pestañas precortadas debe
imprimirse a la cola Impresión o a la cola En espera del Fiery.
Limitaciones y soluciones temporales
Engrapado de trabajos horizontales
Algunas configuraciones de grapas en trabajos horizontales se engrapan en la esquina contraria
a la que especifique al imprimir a la digital press desde una ruta de impresión IPP del
Integrated Fiery Color Server, como se indica a continuación:
• 1 Staple - Top Right Landscape (1 grapa - Arriba derecha horizontal) se imprime como
1 Staple - Top Left Landscape (1 grapa - Arriba izquierda horizontal)
• 1 Staple - Top Left Landscape (1 grapa - Arriba izquierda horizontal) se imprime como
1 Staple - Top Right Landscape (1 grapa - Arriba derecha horizontal)
Para evitar esto, en FreeFlow, seleccione:
• 1 Staple - Top Right Landscape (1 grapa - Arriba derecha horizontal) para engrapar
en la esquina superior izquierda de la página horizontal
o seleccione:
• 1 Staple - Top Left Landscape (1 grapa - Arriba izquierda horizontal) para engrapar
en la esquina superior derecha de la página horizontal
Para engrapar correctamente los trabajos horizontales de todos los tamaños de papel desde
las aplicaciones FreeFlow, envíe el trabajo a la cola En espera del Fiery y cambie la orientación
del trabajo a Horizontal en el Integrated Fiery Color Server antes de enviarlo a imprimir.
Para obtener más detalles, consulte la siguiente tabla.
Page 46

Página 46
Opciones de engrapado
de FreeFlow Print Manager
1 Staple - Top Left Landscape
(1 grapa - Arriba izquierda
vertical)
1 Staple - Top Right Landscape
(1 grapa - Arriba derecha
horizontal)
2 Staples - Left Portrait
(2 grapas - Izquierda vertical)
2 Staples - Top Portrait
(2 grapas - Arriba Vertical)
Opciones
de engrapado
de Command
WorkStation
Una grapa arriba
a la izquierda
Una grapa arriba
a la derecha
Dos grapas a
la izquierda
Dos grapas arriba
Posición de engrapado para
trabajos Horizontales con el
valor OFF (NO) en Orientación
(La orientación está configurada
como OFF (NO) en todos los
trabajos enviados desde FreeFlow
Print Manager)
No se engrapa
Posición de engrapado para
trabajos Horizontales con el
valor Horizontal en Orientación
(Seleccione Horizontal en la
opción Orientación desde
Propiedades del trabajo de
Command WorkStation)
2 Staples - Bottom Portrait
(2 grapas - Abajo Vertical)
Center Staple - Top Portrait
(Grapa en el centro - Arriba
vertical)
Center Staple - Bottom Portrait
(Grapa en el centro - Abajo
Ve rt ic al )
Dos grapas abajo
Arriba en el centro
Abajo en el centro
Page 47

Página 47
Opciones de perforación de trabajos horizontales
Algunos valores de perforación en los trabajos horizontales se perforan en el lado contrario
al que se especifica al imprimir en la digital press desde una aplicación cliente FreeFlow.
Para aplicar correctamente la perforación en los trabajos horizontales con todos los tamaños de
papel desde las aplicaciones FreeFlow, envíe el trabajo a la cola En espera del Fiery y cambie la
orientación del trabajo a Horizontal en el Integrated Fiery Color Server antes de enviarlo a
imprimir. Para obtener más detalles, consulte la siguiente tabla.
Valores de perforación de
terminación de FreeFlow
Print Manager
Punch - Left Portrait
(Perforación - Izquierda
vertical)
Punch - Right Portrait
(Perforación - Derecha vertical)
Punch - Top Portrait
(Perforación - Arriba vertical)
Coil Punch - Top Landscape
(Perforación Espiral - Superior
horizontal)
NOTA: Para imprimir un
trabajo como Coil Punch-Top
Landscape (Perforación Espiral
- Superior horizontal), debe
enviar el trabajo desde FreeFlow
Print Manager a la cola En
espera del Fiery.
Valores de perforación de
la pestaña Terminación
en Propiedades del trabajo
de Command WorkStation
Posición de perforación:
Izquierda
Perforación de 2 orificios
Posición de perforación:
Derecha
Perforación de 2 orificios
Posición de perforación:
Superior
Perforación de 2 orificios
Posición de perforación:
Superior
Perforación avanzada-Carta
NOTA: Cambie el valor de
Posición de perforación de
Izquierda a Superior.
Posición de perforación de
la salida final para trabajos
Horizontales con el valor
Horizontal en Orientación
(Seleccione Horizontal en la
opción Orientación desde
Propiedades del trabajo de
Command WorkStation)
Perforación de 2 orificios
izquierda
Perforación de 2 orificios
derecha
Perforación de 2 orificios
superior
Top Coil Punch (Perforación
espiral superior)
Coil Punch - Bottom
Landscape (Perforación espiral Inferior horizontal)
NOTA: Para imprimir un
trabajo como Coil PunchBottom Landscape (Perforación
espiral-Inferior horizontal),
debe enviar el trabajo desde
FreeFlow Print Manager a la
cola En espera del Fiery.
Posición de perforación:
Superior
Perforación avanzada-Carta
NOTA: Cambie el valor de
Posición de perforación de
Izquierda a Superior. En la
pestaña Diseño, active la casilla
de verificación Girar 180.
Bottom Coil Punch
(Perforación espiral inferior)
Page 48

Página 48
Nombres de bandejas de salida
Algunas ubicaciones de salida de FreeFlow se corresponden con nombres de bandeja de salida
diferentes en la interfaz de usuario del Integrated Fiery Color Server. En la tabla siguiente se
enumeran las equivalencias.
FreeFlow Print Manager Integrated Fiery Color Server
Printer’s Default (Por omisión
de la impresora)
Automatic (Automático) Sel. auto. de bandeja
Top Tray (Bandeja superior) Bandeja de desplazamiento (OCT), Bandeja
Stacker (Apilador) Bandeja apiladora de acabadora D4 o Bandeja
Stacker 2 (Apilador 2) Bandeja apiladora de acabadora D4
Por omisión de la impresora
superior de HCS o Bandeja superior de acabadora
D4
apiladora de HCS
Los trabajos sin terminación se envían a la Bandeja superior HCS o Bandeja apiladora HCS, si
están instaladas. Los trabajos con terminación se envían a la Bandeja superior de acabadora o a
la Bandeja apiladora de acabadora.
Los trabajos con perforación espiral se envían a la Bandeja superior de HCS o Bandeja
apiladora de HCS, si están instaladas, en caso contrario se envían a las bandejas de acabadora.
Utilización de archivos maestros del Integrated Fiery Color Server FreeForm desde FreeFlow
Los formularios de fondo (Background Forms) de FreeFlow se correlacionan con la función
Usar archivo maestro de la impresión de datos variables del Integrated Fiery Color Server.
PARA UTILIZAR UN ARCHIVO MAESTRO DE FREEFORM DESDE FREEFLOW
1 Seleccione Background Form (Formulario de fondo) en la pestaña Image Adjustment
(Ajuste de imagen) de FreeFlow.
2 Escriba el número de archivo maestro de formulario, tal como se asignó en el Integrated
Fiery Color Server, en el cuadro de diálogo Form Name (Nombre de formulario) de
FreeFlow. No escriba el nombre del archivo maestro.
Los trabajos de impresión PCL no pueden configurarse en el Integrated Fiery Color Server a través de IPP (Internet Printing Protocol)
Los archivos PCL que contienen programación de trabajos que no se admiten en el Integrated
Fiery Color Server desde FreeFlow. Utilice el controlador de impresora PCL del Integrated
Fiery Color Server si su trabajo requiere programación de trabajos.
Page 49

Página 49
Ruta de impresión de producción
La ruta de impresión de producción de FreeFlow admite las siguientes opciones de formato
de trabajos para los formatos de archivo TIFF, RDO y JPEG:
• Orientation (Orientación)
• Page Layout (Diseño de páginas)
• Reduce/Enlarge (Reducir/Aumentar)
• Rotation (Rotación)
Para conseguir resultados similares con archivos PDF y PostScript, envíe el trabajo a la
cola En espera del Integrated Fiery Color Server y utilice Propiedades del trabajo de
Command WorkStation para seleccionar opciones similares.
Calidad de las imágenes en blanco y negro durante la exploración
Cuando se envía un trabajo de exploración en blanco y negro importado desde FreeFlow
Makeready e impreso en FreeFlow Print Manager - Advanced Print Path, para obtener un
mejor resultado de impresión, desactive ColorWise antes de enviar el trabajo de exploración.
Para desactivar ColorWise en FreeFlow, seleccione Image Quality (Calidad de imagen) >
Output Color (Color de salida) y a continuación, seleccione ColorWise OFF (ColorWise
NO) en la opción CMYK Emulation (Emulación CMYK).
Para desactivar ColorWise en Command WorkStation, haga clic en la pestaña Color, haga clic
en Valores expertos y a continuación, seleccione ColorWise No en la opción Perfil de
simulación CMYK.
Reimpresión de trabajos RDO desde Command WorkStation
La reimpresión de un trabajo RDO desde Command WorkStation causa una condición de
Cargue papel. Para corregir este problema, instale el módulo del servidor Fiery 1-13WCPW.
Impresión con Plegado en Z de media hoja - Encuadernación derecha con opción de terminación de impresión interior
Al imprimir con Plegado en Z de media hoja con encuadernación derecha, opción de
terminación de impresión de interior combinada con cualquier opción de terminación
múltiple, el trabajo se imprime con la terminación aplicada a la encuadernación izquierda
de la página.
Page 50

Page 51

Notas de versão do cliente
FreeFlow Express to Print, Makeready, Process Manager,
Web Services, Print Manager e Output Manager, versão 8.0
para a Xerox 700 Digital Color Press com Integrated Fiery
Color Server, versão 1.5
Este documento contém informações sobre a instalação e a utilização do FreeFlow
Express to Print, Makeready, Process Manager, Web Services, Print Manager e Output
Manager, versão 8.0, para a Xerox 700 Digital Color Press com Integrated Fiery
Color Server, versão 1.5.
O termo “Integrated Fiery Color Server” é utilizado para referir-se à Xerox 700 Digital Color
Press com Integrated Fiery Color Server, versão 1.5. O termo “impressora digital” refere-se
à Xerox 700 Digital Color Press.
Para conectar computadores de usuários que estejam executando aplicativos do FreeFlow
no Integrated Fiery Color Server, é preciso descarregar um arquivo de ativação. O arquivo
de ativação desse produto é o 1-13R6ES.ps.
Descarregue o arquivo de ativação do FreeFlow no Integrated Fiery Color Server a partir
do WebTools ou do site www.xerox.com. Uma vez que esteja instalado no Integrated Fiery
Color Server, o arquivo de ativação do FreeFlow executa de maneira transparente, permitindo
conectar e enviar tarefas para o Integrated Fiery Color Server utilizando os aplicativos do
FreeFlow. Ele permite que os usuários utilizem o pacote completo de aplicativos do FreeFlow
com o Integrated Fiery Color Server.
O Integrated Fiery Color Server, versão 1.5 suporta totalmente os seguintes aplicativos
do FreeFlow:
• FreeFlow Express to Print
• FreeFlow Makeready
• FreeFlow Process Manager
• FreeFlow Web Services
• FreeFlow Print Manager
• FreeFlow Output Manager
NOTA: Embora o método de instalação seja semelhante ao modo em que muitos patches são
instalados no Integrated Fiery Color Server, o arquivo de ativação do FreeFlow não é um
patch e não corrige um defeito.
Para obter instruções sobre como descarregar e instalar o arquivo de ativação do FreeFlow,
consulte “Instalação” na página 53.
Copyright 2009 © Electronics for Imaging, Inc.
Número da peça: 45087442
15 de setembro de 2009
Page 52

Antes de imprimir Antes de imprimir no Integrated Fiery Color Server, verifique o seguinte:
• O arquivo de ativação de IPP do FreeFlow é instalado no Integrated Fiery Color Server.
Para verificar a ativação, imprima uma Página de configuração e verifique se a seção
Atualizar informações inclui o nome do arquivo: 1-13R6ES.
Para obter informações sobre como imprimir uma página de configuração, consulte
Configuração e instalação. Para obter instruções sobre como descarregar e instalar o
arquivo de ativação do FreeFlow, consulte “Instalação” na página 53.
• O software do Integrated Fiery Color Server é instalado na estação de trabalho do cliente.
Para obter instruções sobre como instalar e utilizar o Integrated Fiery Color Server,
consulte a documentação que acompanha o servidor.
• FreeFlow Express to Print, Makeready, Process Manager, Web Services, Print Manager
ou Output Manager, versão 8.0 estão instalados no sistema FreeFlow.
Configuração do caminho de impressão
Utilize o procedimento a seguir para configurar um aplicativo do FreeFlow para imprimir
no Integrated Fiery Color Server.
Página 52
PARA CONFIGURAR UM APLICATIVO DO FREEFLOW PARA IMPRIMIR NO INTEGRATED FIERY COLOR SERVER
1 No aplicativo FreeFlow Printer Registration, selecione Add (Adicionar).
A caixa de diálogo Assistente para adicionar impressora é exibida.
2 Digite o endereço IP do Integrated Fiery Color Server e clique em Identificar configuração
para detectar automaticamente o modelo da impressora e o tipo de controlador/servidor.
NOTA: Se a rede não puder detectar automaticamente a impressora digital e o Integrated Fiery
Color Server, execute o seguinte procedimento:
• Selecione Xerox 700 Digital Color Press na lista Modelo de impressora.
• Selecione Integrated Fiery Color Server 1.5 IPP na lista Controlador da impressora/Tipo
de servidor.
• Siga as instruções no Printer Registration para concluir a instalação da impressora.
Page 53

Instalação Obtenção do arquivo de ativação do FreeFlow
O arquivo de ativação do FreeFlow está disponível no WebTools ou em www.xerox.com.
O arquivo de ativação aplica-se ao pacote completo de aplicativos do FreeFlow, que inclui
o FreeFlow Express to Print, Makeready, Process Manager, Web Services, Print Manager
e Output Manager, versão 8.0.
Instalação do arquivo de ativação do Fiery FreeFlow
O arquivo de ativação pode ser aplicado diretamente por meio da opção Atualizações do
sistema. Para descarregar o arquivo no Integrated Fiery Color Server, utilize o procedimento
aseguir.
PARA INSTALAR O ARQUIVO DE ATIVAÇÃO DO FREEFLOW
1 Para acessar o Integrated Fiery Color Server WebTools, inicie o navegador de Internet
ou intranet e digite o nome DNS ou o endereço IP do Integrated Fiery Color Server.
2 Clique na guia Configurar.
3 Clique em Verificar atualizações do produto.
Página 53
4 Clique em Sim na janela Security Information (Informações sobre segurança).
5 Clique no link do patch do FreeFlow.
6 Salve o arquivo compactado na área de trabalho.
7 Descompacte o arquivo na área de trabalho.
8 Importe o arquivo patch, 1-13R6ES.ps, com a Command WorkStation, para a fila Direta
do Integrated Fiery Color Server.
Aguarde aproximadamente 60 segundos após o arquivo patch ser descarregado/importado,
antes de reiniciar o sistema. Isso garante o processamento completo do arquivo patch.
9 Na Command WorkStation, selecione Shut Down (Desligar) e Reboot System (Reinicializar
osistema).
Não interrompa o Integrated Fiery Color Server enquanto ele estiver sendo reiniciado.
10 Quando o Integrated Fiery Color Server ficar Ocioso, imprima uma Página de configuração
e verifique se a seção Atualizar informações inclui o nome do arquivo: 1-13R6ES.
Page 54

Página 54
Recursos mais recentes
Correspondência de cores exatas
A ativação do FreeFlow suporta a Correspondência de cores exatas. Com a opção de impressão
Correspondência de cores exatas, é possível determinar como as cores exatas são impressas
no Integrated Fiery Color Server:
• A Correspondência de cores exatas ativada utiliza tabelas de cores incorporadas no
Integrated Fiery Color Server para simular a cor exata com a equivalente mais próxima
disponível utilizando os toners CMYK da impressora digital conectada ao Integrated Fiery
Color Server. Se o Integrated Fiery Color Server suportar o aplicativo Spot-On no
ColorWise Pro Tools, é possível personalizar as definições de cores exatas utilizadas
pelo ColorWise.
• A Correspondência de cores exatas desativada instrui o Integrated Fiery Color Server a
simular a cor exata utilizando equivalentes de CMYK definidas pelo fabricante de cores
exatas. Estes são os mesmos valores de CMYK utilizados por aplicativos que incluem
bibliotecas de cores exatas. Esta combinação de CMYK é impressa com a configuração
Simulação CMYK escolhida, como SWOP ou DIC.
Impressoras virtuais
A ativação do FreeFlow suporta as Impressoras virtuais do Fiery, que permitem imprimir
no Integrated Fiery Color Server utilizando configurações predefinidas salvas como uma fila
de impressão especial. O administrador do Fiery pode criar impressoras virtuais e publicá-las
para que os usuários possam acessá-las na rede. Para obter informações sobre como utilizar
impressoras virtuais, consulte Informações adicionais da Command WorkStation em
Utilitários, que faz parte do conjunto de documentação do usuário.
Impressão de separadores
NOTA: Depois de criar uma nova Impressora virtual do Fiery, você precisa reiniciar
o Integrated Fiery Color Server para registrar a nova impressora virtual com o caminho
de impressão do FreeFlow.
Impressão de separadores
A impressão de separadores é suportada em separadores completamente cortados e
pré-cortados. Os separadores pré-cortados são suportados para inserções de página e páginas
de exceção. Quando utilizados para inserções de página, eles são mapeados para o recurso
Inserir separador do Fiery, encontrado em Mídia mista. Quando utilizados para páginas
de exceção, eles são mapeados para o recurso Intervalo de páginas do Fiery, encontrado em
Mídia mista.
Para obter informações sobre como utilizar a Mídia mista, consulte Informações adicionais
da Command WorkStation em Utilitários, que faz parte do conjunto de documentação
do usuário.
Page 55

Página 55
Impressão de arquivos RDO (Raster Document Object) que contêm separadores pré-cortados
O Integrated Fiery Color Server suporta separadores pré-cortados em aplicativos do FreeFlow,
como o Makeready. Para garantir que o texto seja impresso nos separadores, envie a tarefa
diretamente para o Integrated Fiery Color Server sem alterar as configurações em Propriedades
da tarefa.
Se a tarefa de impressão for enviada como um arquivo RDO (Raster Document Object)
ou processada por meio da conversão Xerox PostScript, o tamanho não será predefinido,
mas a tarefa será impressa corretamente.
NOTA: Os separadores devem ser programados como separadores pré-cortados de 9 x 11 pol,
e não 8,5
NOTA: O arquivo deve ser salvo com uma extensão .RDO. Se você substituir o nome da tarefa
encontrado em Notas da tarefa, certifique-se de que o nome da tarefa termine com a
extensão .RDO. Um arquivo RDO que contenha os separadores pré-cortados deve imprimir
para a fila Impressão ou para a fila Em espera do Fiery.
x 11 pol.
Limitações e alternativas
Grampeamento de tarefas de paisagem
Determinadas configurações de grampeamento para tarefas em Paisagem grampeiam no canto
oposto que você especificar ao imprimir na impressora digital, a partir de um caminho
de impressão IPP do Integrated Fiery Color Server, da seguinte maneira:
• 1 grampo - paisagem - topo direito são impressas como 1 grampo - paisagem topo esquerdo
• 1 grampo - paisagem - topo esquerdo são impressas como 1 grampo - paisagem topo direito
Para evitar isso, no FreeFlow, selecione:
• 1 grampo - paisagem - topo direito para grampear o canto superior esquerdo da página
de Paisagem
ou selecione:
• 1 grampo - paisagem - topo esquerdo para grampear o canto superior direito da página
de Paisagem
Para grampear tarefas em Paisagem de todos os tamanhos de papel corretamente nos
aplicativos do FreeFlow, envie a tarefa para a fila Em espera do Fiery e altere a Orientação
da tarefa para Paisagem no Integrated Fiery Color Server antes de liberá-la para impressão.
Para obter detalhes, consulte a tabela a seguir.
Page 56

Página 56
Opções de grampeamento
da FreeFlow Print Manager
1 grampo - paisagem topo esquerdo
1 grampo - paisagem topo direito
2 grampos - retrato esquerdo Duplo à esquerda Não grampeia
2 grampos - retrato topo Topo duplo
Opções de grampeamento
da Command WorkStation
Simples - topo esquerdo
Simples - topo direito
Posição do grampo para tarefas
em Paisagem com a Orientação
configurada como DESLIG.
(A Orientação está configurada
como DESLIG. para todas as
tarefas enviadas do FreeFlow Print
Manager)
Posição do grampo para tarefas
em Paisagem com a Orientação
configurada como Paisagem
(Selecione Paisagem para
Orientação em Propriedades da
tarefa na Command WorkStation)
2 grampos - retrato inferior Inferior duplo
Grampo no centro retrato topo
Grampo no centro retrato inferior
Top o c en tr o
Inferior centro
Page 57

Página 57
Opções de perfuração para tarefas em Paisagem
Determinadas configurações de perfuração para tarefas em Paisagem perfuram no lado oposto
que você especificar ao imprimir na impressora digital a partir de um aplicativo cliente
do FreeFlow.
Para perfurar as tarefas em Paisagem de todos os tamanhos de papel corretamente nos
aplicativos do FreeFlow, envie a tarefa para a fila Em espera do Fiery e altere a Orientação
da tarefa para Paisagem no Integrated Fiery Color Server antes de liberá-la para impressão.
Para obter detalhes, consulte a tabela a seguir.
Configurações de perfuração
do FreeFlow Print Manager
Perfuração - retrato esquerda Posição do furo: esquerda
Perfuração - retrato direita Posição do furo: direita
Perfuração - retrato superior Posição do furo: Superior
Coil Punch (Perfuradora) paisagem superior
NOTA: Para imprimir uma
tarefa como Coil Punch
(Perfuradora) - paisagem
superior, é necessário enviar
a tarefa a partir do FreeFlow
Print Manager para a fila
Em espera do Fiery.
Configurações de perfuração
na guia Acabamento de
Propriedades da tarefa
da Command WorkStation
2 furos
2 furos
2 furos
Posição do furo: Superior
Perfuração avançada-CARTA
NOTA: Altere a Posição do
furo de Esquerda para Superior.
Posição do furo da saída
final para tarefas de
Paisagem com Orientação
definida como Paisagem
(Selecione Paisagem para
Orientação em Propriedades da
tarefa na Command
Work St at ion )
2 furos à esquerda
2 furos à direita
2 furos na parte superior
Top Coil Punch (Perfuradora
superior)
Coil Punch (Perfuradora) paisagem inferior
NOTA: Para imprimir uma
tarefa como Coil Punch
(Perfuradora) - paisagem
inferior, é necessário enviar
a tarefa a partir do FreeFlow
Print Manager para a fila
Em espera do Fiery.
Posição do furo: Superior
Perfuração avançada-CARTA
NOTA: Altere a Posição do
furo de Esquerda para Superior.
Na guia Layout, marque a caixa
de seleção Girar 180.
Bottom Coil Punch
(Perfuradora inferior)
Page 58

Página 58
Nomes das bandejas de saída
Os locais de saída do FreeFlow correspondem a diferentes nomes de bandejas de saída na
interface de usuário do Integrated Fiery Color Server. A tabela a seguir lista essas
equivalências.
FreeFlow Print Manager Integrated Fiery Color Server
Padrão da impressora Padrão da impressora
Automático Seleção automática
Bandeja superior Bandeja saída desloc. (OCT), Bandeja superior
do HCS ou Bandeja superior do módulo de
acabamento D4
Empilhador Bandeja de empilhamento do módulo de
acabamento D4 ou empilhador do HCS
Empilhador 2 D4 Finisher Stacker (Empilhamento do módulo
de acabamento D4)
As tarefas sem acabamento são impressas na bandeja superior do HCS ou na bandeja do
empilhador HCS, se conectadas. As tarefas com acabamento são impressas na bandeja
superior do módulo de acabamento ou na bandeja de empilhamento do módulo
de acabamento.
As tarefas com Coil Punch (Perfuradora) são impressas na Bandeja superior do HCS ou na
Bandeja do empilhador HCS, se conectadas. Caso contrário, elas são enviadas para as bandejas
do Módulo de acabamento.
Uso do Integrated Fiery Color Server FreeForm Masters do FreeFlow
O Background Form (Formulário de fundo) do FreeFlow mapeiam para o recurso Usar mestre
da impressão de dados variáveis do Integrated Fiery Color Server.
PARA UTILIZAR UM MESTRE FREEFORM DO FREEFLOW
1 Selecione Background Form (Formulário de fundo) na guia Image Adjustment (Ajuste de
imagem) do FreeFlow.
2 Digite o número do mestre do formulário, conforme atribuído no Integrated Fiery Color
Server, na caixa de diálogo Form Name (Nome do formulário) do FreeFlow. Não digite o nome
do arquivo mestre.
Não é possível configurar tarefas de impressão PCL no Integrated Fiery Color Server em IPP (Internet Printing Protocol)
Os arquivos que contêm a programação de tarefas não são suportados pelo Integrated Fiery
Color Server no FreeFlow. Se a programação de tarefas for necessária para a sua tarefa, utilize
o driver de impressora PCL do Integrated Fiery Color Server.
Page 59

Página 59
Caminho de impressão da produção
O caminho de impressão da produção do FreeFlow suporta as seguintes opções de formatação
de tarefas para os formatos de arquivo TIFF, RDO e JPEG:
•Orientação
• Layout de página
• Redução/ampliação
•Rotação
Para alcançar resultados semelhantes para arquivos PDF e PostScript, envie a tarefa para a fila
Em espera do Integrated Fiery Color Server e utilize Propriedades da tarefa na Command
WorkStation para selecionar opções semelhantes.
Qualidade da imagem em preto e branco ao digitalizar
Ao enviar uma tarefa de digitalização em preto e branco importada do FreeFlow Print
Manager e impressa no FreeFlow Print Manager - Advanced Print Path, para obter o melhor
resultado impresso, desative o ColorWise antes de enviar a tarefa de digitalização.
Para desativar o ColorWise no FreeFlow, selecione Qualidade da imagem > Output Color
(Cor de saída) e configure CMYK Emulation (Emulação CMYK) como ColorWise Deslig.
Para desativar o ColorWise na Command WorkStation, clique na guia Cor e em
Configurações para especialistas e configure Perfil de simulação CMYK como
ColorWise Deslig.
Reimpressão de tarefas RDO (Raster Document Object) na Command WorkStation
A reimpressão de uma tarefa RDO na Command WorkStation provoca um problema
de carregamento de papel. Para corrigir esse problema, instale o patch 1-13WCPW
do servidor Fiery.
Impressão com a opção de acabamento Meia folha com dobra em Z – Encad. à direita
com impressão dentro
Quando você imprime com a opção de acabamento Meia folha com dobra em Z – Encad.
à direita com impressão dentro combinada com qualquer opção de acabamento múltiplo,
a tarefa será impressa com o acabamento aplicado à encadernação à esquerda da página.
Page 60

Page 61

Versienotities voor de klant
FreeFlow Express to Print, Makeready, Process Manager,
Web Services, Print Manager en Output Manager, versie 8.0
voor de Xerox 700 Digital Color Press met Integrated Fiery
Color Server, versie 1.5
Dit document bevat informatie over de installatie en het gebruik van FreeFlow Express
to Print, Makeready, Process Manager, Web Services, Print Manager en Output Manager,
versie 8.0, voor de Xerox 700 Digital Color Press met Integrated Fiery Color Server,
versie 1.5.
Met de term “Integrated Fiery Color Server” wordt altijd de Xerox 700 Digital Color Press
met Integrated Fiery Color Server, versie 1.5 bedoeld. De term digitale pers verwijst naar
de Xerox 700 Digital Color Press.
Als u gebruikerscomputers waarop FreeFlow-toepassingen worden uitgevoerd, wilt
verbinden met de Integrated Fiery Color Server, moet u een activeringsbestand
downloaden. Het activeringsbestand voor dit product is 1-13R6ES.ps.
Download het FreeFlow-activeringsbestand naar de Integrated Fiery Color Server via
WebTools of www.xerox.com. Als het FreeFlow-activeringsbestand eenmaal op de Integrated
Fiery Color Server is geïnstalleerd, kunt u zonder problemen verbinding maken met en taken
verzenden naar de Integrated Fiery Color Server met behulp van FreeFlow-toepassingen.
Met het activeringsbestand kunnen gebruikers de volledige reeks FreeFlow-toepassingen
met de Integrated Fiery Color Server gebruiken.
De Integrated Fiery Color Server, versie 1.5 ondersteunt volledig de volgende
FreeFlow-toepassingen:
• FreeFlow Express to Print
• FreeFlow Makeready
• FreeFlow Process Manager
• FreeFlow Web Services
• FreeFlow Print Manager
• FreeFlow Output Manager
OPMERKING: Hoewel de installatiemethode vrijwel identiek is aan de manier waarop
vele patches op de Integrated Fiery Color Server worden geïnstalleerd, is het FreeFlowactiveringsbestand geen patch en worden hiermee geen problemen opgelost.
Raadpleeg “Installatie” op pagina 63 voor instructies voor het downloaden en installeren
van het FreeFlow-activeringsbestand.
Copyright 2009 © Electronics for Imaging, Inc.
Bestelnummer: 45087442
15 september 2009
Page 62

Pagina 62
Voor het afdrukken Voordat u afdrukt naar de Integrated Fiery Color Server moet u het volgende controleren:
• Het FreeFlow IPP-activeringsbestand is op de Integrated Fiery Color Server geïnstalleerd.
Om dit te controleren, drukt u een configuratiepagina af en kijkt u of het gedeelte
Update-informatie de volgende bestandsnaam vermeldt: 1-13R6ES.
Raadpleeg Configuratie en instellingen voor informatie over het afdrukken van een
configuratiepagina. Raadpleeg “Installatie” op pagina 63 voor instructies voor het
downloaden en installeren van het FreeFlow-activeringsbestand.
• De Integrated Fiery Color Server-software is op het clientwerkstation geïnstalleerd.
Raadpleeg de documentatie bij de server voor instructies om de Integrated Fiery Color
Server te installeren en te gebruiken.
• FreeFlow Express to Print, Makeready, Process Manager, Web Services, Print Manager
of Output Manager, versie 8.0 zijn op het FreeFlow-systeem geïnstalleerd.
Het afdrukpad instellen
Volg de onderstaande procedure om een FreeFlow-toepassing in te stellen om naar
de Integrated Fiery Color Server af te drukken.
EEN FREEFLOW-TOEPASSING INSTELLEN OM NAAR DE INTEGRATED FIERY COLOR SERVER AF TE DRUKKEN
1 Selecteer Add (Toevoegen) in de toepassing FreeFlow Printer Registration.
Het dialoogvenster Wizard Printer toevoegen wordt weergegeven.
2 Voer het IP-adres van de Integrated Fiery Color Server in en klik op Identify Configuration
(Configuratie identificeren) om automatisch printermodel en controller/servertype
te detecteren.
OPMERKING: Als het netwerk de digitale pers en de Integrated Fiery Color Server niet
automatisch kan detecteren, gaat u als volgt te werk:
• Selecteer Xerox 700 Digital Color Press in de lijst met printermodellen.
• Selecteer Integrated Fiery Color Server 1.5 IPP in de lijst met afdrukcontrollers/
servertypen.
• Volg de aanwijzingen van Printer Registration om de installatie van de printer te voltooien.
Page 63

Installatie Het FreeFlow-activeringsbestand verkrijgen
Het FreeFlow-activeringsbestand is verkrijgbaar via WebTools of www.xerox.com.
Het activeringsbestand geldt voor de volledige reeks FreeFlow-toepassingen, waaronder
FreeFlow Express to Print, Makeready, Process Manager, Web Services, Print Manager en
Output Manager, versie 8.0.
Het Fiery FreeFlow-activeringsbestand installeren
U kunt het activeringsbestand direct via System Updates toepassen. U kunt het bestand
naar de Integrated Fiery Color Server downloaden volgens onderstaande procedure.
HET FREEFLOW-ACTIVERINGSBESTAND INSTALLEREN
1 Open Integrated Fiery Color Server WebTools door uw internet- of intranetbrowser te starten
en de DNS-naam of het IP-adres van de Integrated Fiery Color Server te typen.
2 Klik op het tabblad Configureren.
3 Klik op Zoeken naar updates van het product.
Pagina 63
4 Klik op Ja in het venster Security Information (Beveiligingsinformatie).
5 Klik op de koppeling voor de FreeFlow-patch.
6 Sla het zipbestand op het bureaublad op.
7 Pak het bestand op het bureaublad uit.
8 Importeer het patchbestand 1-13R6ES.ps met Command WorkStation in de wachtrij Direct
van de Integrated Fiery Color Server.
Wacht ongeveer 60 seconden na het downloaden/importeren van het patchbestand voordat
u het systeem reboot. Dit zorgt ervoor dat het patchbestand volledig is verwerkt.
9 Selecteer Shut Down (Afsluiten) en vervolgens Reboot System (Systeem rebooten)
in Command WorkStation.
Laat de Integrated Fiery Color Server opnieuw starten zonder onderbreking.
10 Wanneer de Integrated Fiery Color Server de toestand Niet-actief bereikt, drukt u een
configuratiepagina af en controleert u of het gedeelte Update-informatie de volgende
bestandsnaam vermeldt: 1-13R6ES.
Page 64

Nieuwste functies Steunkleuraanpassing
De FreeFlow-activering ondersteunt Steunkleuraanpassing. Met de afdrukoptie
Steunkleuraanpassing kunt u bepalen hoe steunkleuren op de Integrated Fiery Color Server
worden afgedrukt:
• Als u Steunkleuraanpassing instelt op Aan worden ingebouwde kleurtabellen in
de Integrated Fiery Color Server gebruikt om de steunkleur te simuleren met het
dichtstbijzijnde beschikbare equivalent met behulp van de CMYK-toners van de digitale
pers die is aangesloten op de Integrated Fiery Color Server. Als uw Integrated Fiery Color
Server de toepassing Spot-On in ColorWise Pro Tools ondersteunt, kunt u de door
ColorWise gebruikte steunkleurdefinities aanpassen.
• Als u Steunkleuraanpassing instelt op Uit simuleert de Integrated Fiery Color Server de
steunkleur met behulp van CMYK-equivalenten die zijn gedefinieerd door de
steunkleurfabrikant. Dit zijn dezelfde CMYK-waarden die worden gebruikt door
toepassingen die steunkleurbibliotheken bevatten. Deze CMYK-combinatie wordt
vervolgens afgedrukt met de gekozen instelling voor CMYK-simulatieprofiel,
bijvoorbeeld SWOP of DIC.
Pagina 64
Tabbladen afdrukken
Virtuele printers
Het FreeFlow-activeringsbestand ondersteunt Fiery Virtuele printers, waarmee u kunt
afdrukken naar de Integrated Fiery Color Server met vooraf gedefinieerde instellingen die zijn
opgeslagen als een speciale afdrukwachtrij. De beheerder van de Fiery kan virtuele printers
maken en publiceren zodat gebruikers deze via het netwerk kunnen openen. Raadpleeg het
onderdeel Aanvullende informatie over Command WorkStation in Hulpprogramma’s in het
pakket met gebruikersdocumentatie voor informatie over het gebruik van virtuele printers.
OPMERKING: Nadat u een nieuwe virtuele Fiery-printer hebt gemaakt, moet u de Integrated
Fiery Color Server opnieuw starten om de nieuwe virtuele printer te registreren bij FreeFlow
Print Path.
Tabbladen afdrukken
Afdrukken op tabbladen wordt ondersteund voor zowel volledig gesneden als voorgesneden
tabbladen. Voorgesneden tabbladen worden ondersteund voor zowel ingevoegde pagina’s als
uitzonderingspagina’s. Wanneer voorgesneden tabbladen worden gebruikt voor ingevoegde
pagina’s, horen deze bij de Fiery-functie Tabblad invoegen onder Gemengde media.
Wanneer voorgesneden tabbladen worden gebruikt voor uitzonderingspagina’s, horen deze bij
de Fiery-functie Paginabereik onder Gemengde media.
Raadpleeg het onderdeel Aanvullende informatie over Command WorkStation in
Hulpprogramma’s in het pakket met gebruikersdocumentatie voor informatie over het gebruik
van gemengde media.
Page 65

Pagina 65
Raster Document Object-bestanden met voorgesneden tabbladen afdrukken
De Integrated Fiery Color Server ondersteunt voorgesneden tabbladen in FreeFlowtoepassingen zoals Makeready. Als u wilt zorgen dat de tekst wordt afgedrukt op tabbladen,
verzendt u de taak rechtstreeks naar de Integrated Fiery Color Server zonder de instellingen
ervan te wijzigen in Taakeigenschappen.
Als de afdruktaak wordt verzonden als een RDO-bestand (rasterdocumentobject) of wordt
verwerkt via Xerox PostScript-conversie, wordt het formaat niet vooraf gedefinieerd, maar
wordt de taak correct afgedrukt.
OPMERKING: Tabbladen moeten worden geprogrammeerd als voorgesneden tabbladen
van 9
x 11 inch, niet 8,5 x 11 inch.
OPMERKING: Het bestand moet worden opgeslagen met de extensie .RDO. Als u de taaknaam
die u aantreft in de taakopmerkingen overschrijft, moet u zorgen dat de taaknaam eindigt met
de extensie .RDO. Een RDO-bestand dat voorgesneden tabbladen bevat, moet worden
afgedrukt naar de afdrukwachtrij of de blokkeringswachtrij van de Fiery.
Beperkingen en oplossingen
Taken met liggende afdrukstand nieten
Bij bepaalde nietinstellingen voor taken met liggende afdrukstand wordt in de
tegenovergestelde hoek dan opgegeven geniet wanneer wordt afgedrukt naar de digitale pers
vanaf een Integrated Fiery Color Server IPP-afdrukpad, en wel op de volgende manier:
• 1 nietje - boven rechts liggend wordt afgedrukt als 1 nietje - boven links liggend
• 1 nietje - boven links liggend wordt afgedrukt als 1 nietje - boven rechts liggend
U kunt dit vermijden door vanuit FreeFlow het volgende te selecteren:
• 1 nietje - boven rechts liggend als u de linkerbovenhoek van de liggende pagina wilt nieten
of:
• 1 nietje - boven links liggend als u de rechterbovenhoek van de liggende pagina wilt nieten
Verzend de taak naar de blokkeringswachtrij van de Fiery en wijzig de Afdrukstand van de
taak in Liggend op de Integrated Fiery Color Server alvorens de taak vrij te geven voor
afdrukken om taken met liggende afdrukstand van alle papierformaten op de juiste manier te
nieten vanuit FreeFlow-toepassingen. Raadpleeg de volgende tabel voor meer informatie.
Page 66

Pagina 66
Nietopties van FreeFlow
Print Manager
1 nietje - boven links liggend Links boven enkel
1 nietje - boven rechts liggend Rechts boven enkel
2 nietjes - links staand Links dubbel Wordt niet geniet
2 nietjes - boven staand Boven dubbel
Nietopties
van Command
WorkStation
Nietpositie voor liggende
afdruktaken met Afdrukstand
ingesteld op Uit
(Afdrukstand is ingesteld op Uit
voor alle taken die vanuit FreeFlow
Print Manager worden verzonden)
Nietpositie voor liggende
afdruktaken met Afdrukstand
ingesteld op Liggend
(Selecteer Liggend bij Afdrukstand
vanuit Taakeigenschappen van
Command WorkStation)
2 nietjes - onder staand Onder dubbel
Nieten in het midden boven staand
Nieten in het midden onder staand
Boven midden
Onder midden
Page 67

Pagina 67
Perforatieopties voor liggende taken
Bij bepaalde perforatie-instellingen voor taken met liggende afdrukstand wordt aan de
tegenovergestelde zijde van de opgegeven zijde geperforeerd wanneer naar de digitale pers
wordt afgedrukt vanuit een FreeFlow-clienttoepassing.
Verzend de taak naar de blokkeringswachtrij van de Fiery en wijzig de Afdrukstand van de
taak in Liggend op de Integrated Fiery Color Server alvorens de taak vrij te geven voor
afdrukken om taken met liggende afdrukstand van alle papierformaten op de juiste manier te
perforeren vanuit FreeFlow-toepassingen. Raadpleeg de volgende tabel voor meer informatie.
Perforatie-instellingen
onder Afwerking in
FreeFlow Print Manager
Perforeren - links staand Perforeerpositie: Links
Perforeren - rechts staand Perforeerpositie: Rechts
Perforeren - boven staand Perforeerpositie: Boven
Coil Punch (Rolperforatie) boven liggend
OPMERKING: Als u een taak
wilt afdrukken als Coil Punch
(Rolperforatie) - boven liggend,
moet u deze vanuit FreeFlow
Print Manager verzenden naar
de blokkeringswachtrij van
de Fiery.
Perforatie-instellingen
op tabblad Afwerking in
Taakeigenschappen
van Command WorkStation,
2 gaten
2 gaten
2 gaten
Perforeerpositie: Boven
Geavanceerd perforeren 8,5
OPMERKING: Wijzig de
instelling voor Perforeerpositie
van Links in Boven.
Perforeerpositie van
uiteindelijke uitvoer voor
liggende afdruktaken met
Afdrukstand ingesteld op
Liggend
(Selecteer Liggend bij
Afdrukstand vanuit
Taakeigenschappen van
Command WorkStation)
2 gaten links
2 gaten rechts
2 gaten boven
Top Co il Pun c h
x 11
(Rolperforatie boven)
Coil Punch (Rolperforatie) onder liggend
OPMERKING: Als u een taak
wilt afdrukken als Coil Punch
(Rolperforatie) - onder liggend,
moet u deze vanuit FreeFlow
Print Manager verzenden naar
de blokkeringswachtrij van
de Fiery.
Perforeerpositie: Boven
Geavanceerd perforeren 8,5
x 11
OPMERKING: Wijzig de
instelling voor Perforeerpositie
van Links in Boven. Schakel het
selectievakje 180 roteren op het
tabblad Opmaak in.
Bottom Coil Punch
(Rolperforatie onder)
Page 68

Pagina 68
Namen van opvangbakken
FreeFlow-uitvoerlocaties komen overeen met verschillende namen van opvangbakken in de
gebruikersinterface van de Integrated Fiery Color Server. De volgende tabel geeft deze
equivalenten weer.
FreeFlow Print Manager Integrated Fiery Color Server
Standaardwaarden van printer Standaardwaarden van printer
Automatisch Automatisch selecteren
Bovenste lade Opvangbak met verschuiving (OCT), Bovenste
lade HCS of bovenste D4-afwerkopvangbak
Stapelaar D4 stapel-afwerkopvangbak of HCS-stapelaar
Stapelaar 2 D4 Finisher Stacker (D4 stapel-afwerkeenheid)
Taken zonder afwerking worden uitgevoerd in de bovenste lade HCS of in de HCS-stapellade,
indien bevestigd. Taken met afwerking worden uitgevoerd in de bovenste afwerkopvangbak of
in de stapel-afwerkopvangbak.
Taken met rolperforaties worden uitgevoerd in de bovenste lade HCS of in de HCSstapellade, indien bevestigd. Anders worden deze taken naar de laden van de afwerkeenheid
verzonden.
Integrated Fiery Color Server FreeForm-masters gebruiken in FreeFlow
Background Forms (Achtergrondformulieren) van FreeFlow horen bij de functie
Master gebruiken van Integrated Fiery Color Server voor het afdrukken van taken met
variabele gegevens.
EEN FREEFORM-MASTER GEBRUIKEN VANUIT FREEFLOW
1 Selecteer Background Form (Achtergrondformulier) op het tabblad Image Adjustment
(Beeldaanpassing) van FreeFlow.
2 Typ in het dialoogvenster Form Name (Formuliernaam) van FreeFlow het masternummer
van het formulier dat is toegekend in de Integrated Fiery Color Server. Typ niet de naam van
het masterbestand.
PCL-afdruktaken kunnen op de Integrated Fiery Color Server niet worden ingesteld via IPP (Internet Printing Protocol)
PCL-bestanden die taakprogrammering bevatten, worden niet ondersteund door
de Integrated Fiery Color Server vanuit FreeFlow. Gebruik het PCL-printerstuurprogramma
van de Integrated Fiery Color Server als taakprogrammering voor uw taak is vereist.
Page 69

Pagina 69
Production Print Path
FreeFlow Production Print Path ondersteunt de volgende taakopmaakopties voor TIFF-,
RDO- en JPEG-bestandsindelingen:
•Afdrukstand
• Paginaopmaak
• Verkleinen/vergroten
• Rotatie
Als u vergelijkbare resultaten wilt bereiken voor PDF- en PostScript-bestanden, verzendt u
de taak naar de blokkeringswachtrij van de Integrated Fiery Color Server en gebruikt
u Taakeigenschappen in Command WorkStation om vergelijkbare opties te selecteren.
Zwart-wit beeldkwaliteit bij scannen
Wanneer u een zwart-wit scantaak verzendt die is geïmporteerd vanuit FreeFlow Makeready
en afgedrukt vanuit FreeFlow Print Manager - Advanced Print Path (Geavanceerd afdrukpad)
voor een optimaal afdrukresultaat, moet u ColorWise uitschakelen alvorens de taak
te verzenden.
Als u ColorWise wilt uitschakelen in FreeFlow, selecteert u Beeldkwaliteit > Output
Color (Uitvoerkleur) en stelt u CMYK Emulation (CMYK-emulatie) in op ColorWise uit.
Als u ColorWise wilt uitschakelen in Command WorkStation, klikt u op het tabblad Kleur,
klikt u op Instellingen en stelt u CMYK-simulatieprofiel in op ColorWise uit.
Raster Document Object-taken opnieuw afdrukken vanuit Command WorkStation
Het opnieuw afdrukken van een RDO-taak vanuit Command WorkStation leidt tot
de toestand Load Paper (Plaats papier). U kunt dit probleem verhelpen door de
Fiery-serverpatch 1-13WCPW te installeren.
Afdrukken met de afwerkoptie Z Fold half sheet - Right Bind, Print Inside (Half vel met Z-vouw - Rechts inbinden, naar binnen afdrukken)
Wanneer u bij het afdrukken van een taak de afwerkoptie Z Fold half sheet - Right Bind,
Print Inside (Half vel met Z-vouw - Rechts inbinden, naar binnen afdrukken) combineert
met een meervoudige afwerkingsoptie, wordt de afwerking toegepast op de linkse inbindkant
van de pagina.
Page 70

 Loading...