

Page 1
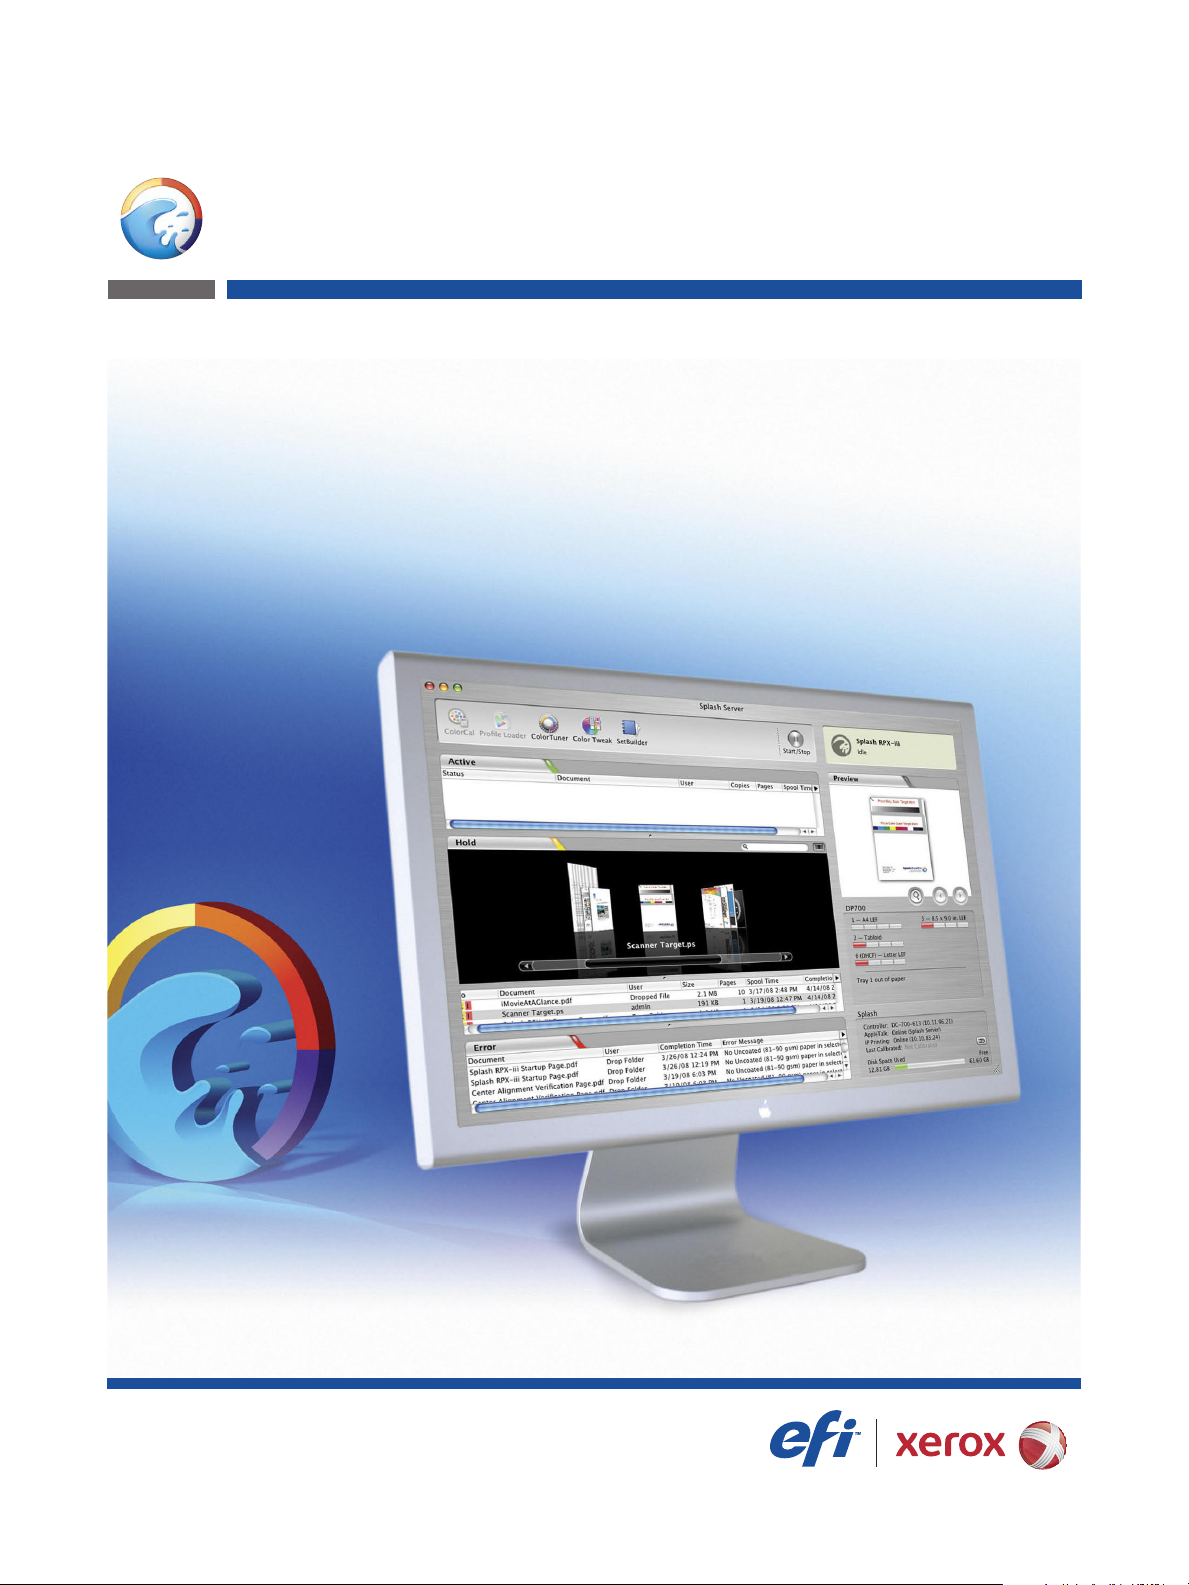
Splash RPX-iii
Xerox 700 Digital Color Press
Getting Started
Page 2

© 2008 Electronics for Imaging, Inc. The information in this publication is covered
under Legal Notices for this product.
45073094
7 May 2008
Page 3

CONTENTS
CONTENTS
CONTENTS 3
INTRODUCTION 5
Contents of this kit 5
Terminology and conventions 6
About the documentation 6
Overview of the EFI Splash RPX-iii 7
About the EFI Splash RPX-iii software 7
Server system requirements 8
Client computer requirements 9
Networking support 9
Preparing to print 9
Connecting the EFI Splash RPX-iii to the Fiery 11
Connecting the EFI Splash RPX-iii using Direct Connect 11
Connecting the EFI Splash RPX-iii using Network Connect 13
INSTALLING THE SPLASH RPX-iii SERVER SOFTWARE 16
Installing the Splash RPX-iii Server Software 16
Configuring Mac OS X for the EFI Splash RPX-iii 20
Labeling the EFI Splash RPX-iii 25
Calibrating the EFI Splash RPX-iii 26
INSTALLING USER SOFTWARE ON A WINDOWS COMPUTER 27
Installing the Splash Printer Delete Utility from the Splash RPX-iii
User Software and Documentation DVD 27
Page 4

CONTENTS 4
INSTALLING USER SOFTWARE ON A MAC OS COMPUTER 28
Installing Splash Server Remote from the Splash RPX-iii User Software
and Documentation DVD 28
Installing Splash Remote Scan from the Splash RPX-iii User Software
and Documentation DVD 29
Configuring Splash Remote Scan 29
Installing the EFI Splash RPX-iii Font Downloader Utility from the
Splash RPX-iii User Software and Documentation DVD 30
Installing Print Kiosk from the Splash RPX-iii User Software
and Documentation DVD 30
Copying CopyCal Target files from the Splash RPX-iii User Software
and Documentation DVD 31
Installing EFI Splash RPX-iii Remote Utilities 31
Configuring the Calibration Station (ColorCal) 32
INSTALLING USER SOFTWARE USING FILE SHARING 33
INSTALLING AND USING ACROBAT READER 37
Installing Acrobat Reader 37
Using Acrobat Reader 37
INDEX 39
Page 5
INTRODUCTION
INTRODUCTION 5
This document explains how to connect the Splash RPX-iii Xerox 700 Digital Color Press
and provides installation instructions for the Splash RPX-iii Xerox 700 Digital Color Press
server software. It also explains how to install client software utilities.
The Splash RPX-iii Xerox 700 Digital Color Press does not require a qualified technician to
install, connect, and set up the hardware and software.
This document assumes that the Xerox EX Print Server for the Xerox 700 Digital Color Press
has already been installed by a certified service technician.
NOTE: Detailed information about the Apple Macintosh computer is beyond the scope of this
document. For more information, specifically about operating, servicing, and troubleshooting
the Macintosh computer, see the Macintosh User’s Guide.
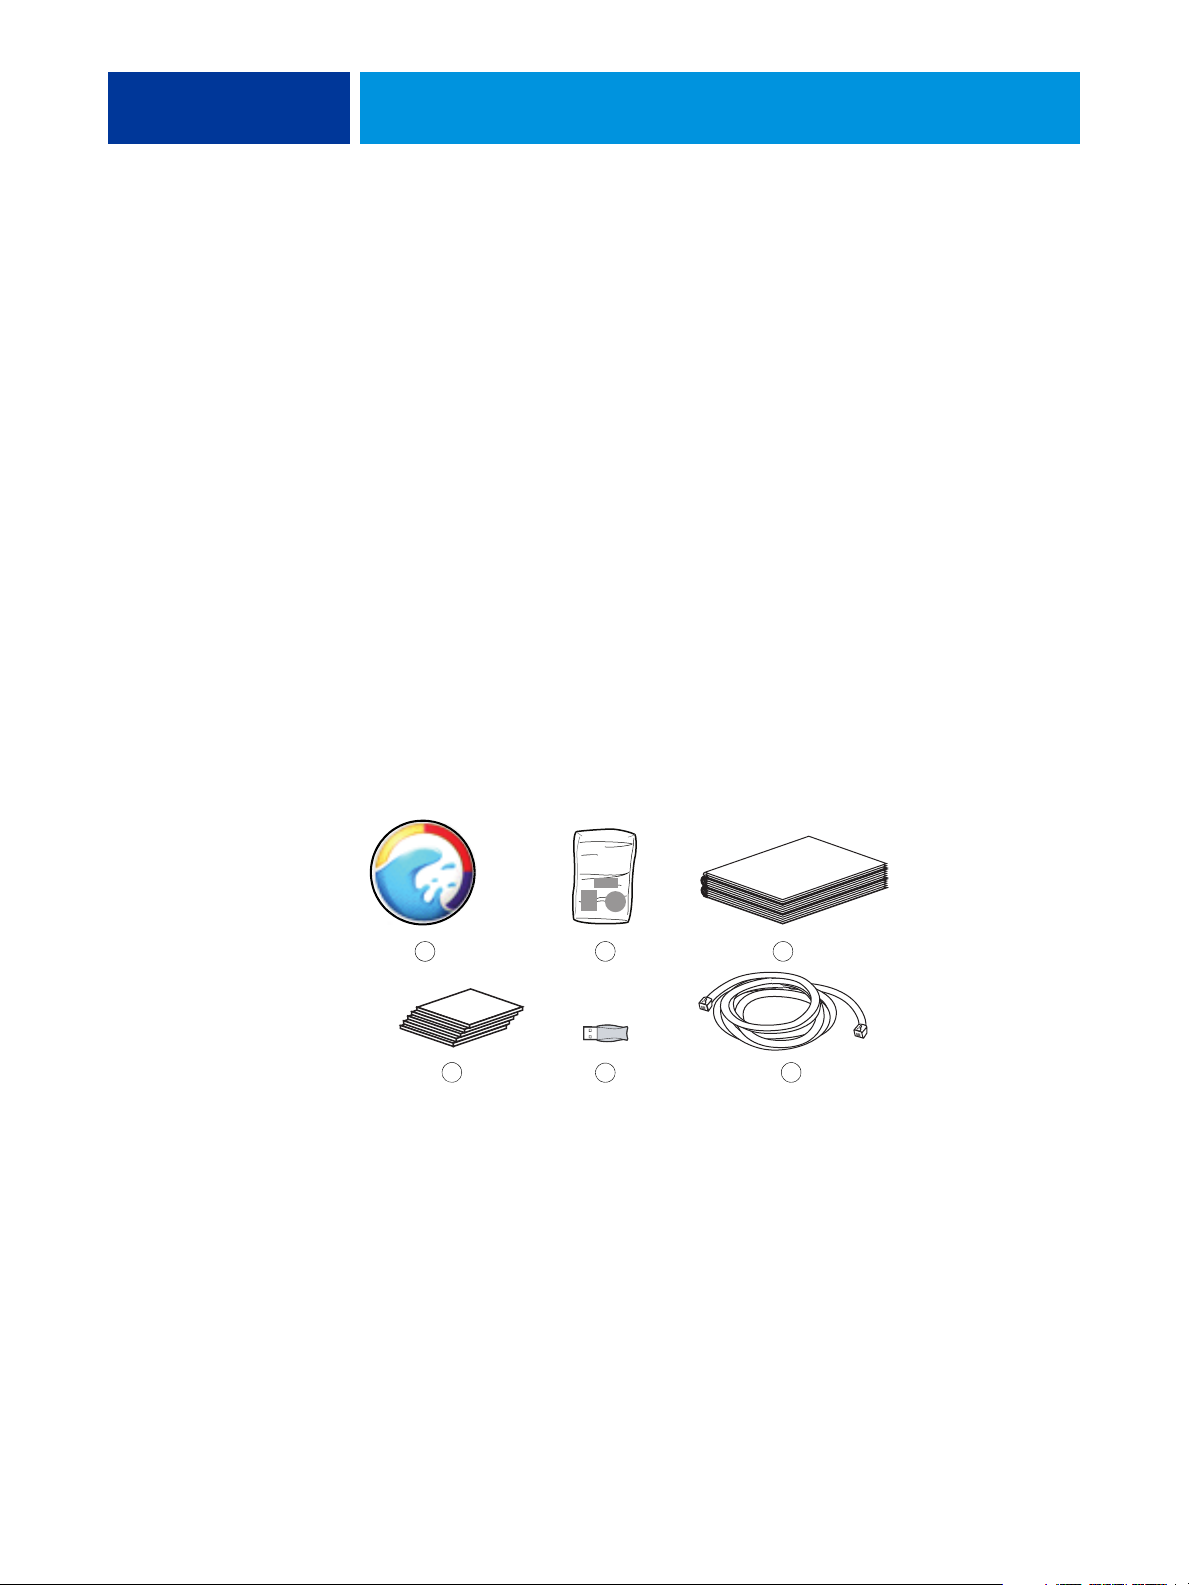
Contents of this kit
1 Mouse pad
2 Logo labels, bagged
3 Printed materials
4 Media pack
5Dongle
6 Ethernet crossover cable
The Splash RPX-iii Xerox 700 Digital Color Press kit contains the following:
1 2 3
4 6
5
The media pack includes:
• EFI Splash RPX-iii Server Software DVD
• EFI Splash RPX-iii User Software and Documentation DVD
Page 6

INTRODUCTION 6
Terminology and conventions
This document uses the following terminology and conventions.
Term or convention Refers to
Digital press Xerox 700 Digital Color Press
EFI Splash RPX-iii Splash RPX-iii Xerox 700 Digital Color Press
Fiery Xerox EX Print Server and Integrated Fiery Color Server
Mac OS Mac OS X
Titles in italics Other documents in this set
Windows Microsoft Windows 2000, Windows XP, Windows Server 2003,
About the documentation
Windows Vista
The EFI Splash RPX-iii documentation consists of the following:
• Getting Started provides instructions for installing and connecting the EFI Splash RPX-iii.
It also explains how to install client software utilities.
•The Configuration Guide explains the basic configuration and administration of the EFI
Splash RPX-iii for the supported platforms and network environments.
•The Job Management Guide explains the EFI Splash RPX-iii print features, functions, and
job management options. It also describes the utilities provided for use with the EFI
Splash RPX-iii.
•The Color Guide explains how to manage color output on the EFI Splash RPX-iii. It
provides information about how to calibrate the EFI Splash RPX-iii and set color print
options from Windows and Mac OS computers.
•The Printing Guide describes how to install the printer drivers on Windows and Mac OS
computers, establish printing connections for different networks, and begin printing from
users’ computers.
•The Troubleshooting Guide provides information to help troubleshoot the EFI
Splash RPX-iii.
• ReadMe_Installing Printer Drivers for EFI Splash RPX-iii provides a quick reference for
installing the EFI Splash RPX-iii printer drivers.
•Printed Customer Release Notes provide last-minute product information and workarounds
for some of the problems you may encounter.
Page 7

INTRODUCTION 7
Overview of the EFI Splash RPX-iii
The following sections describe the software included with the EFI Splash RPX-iii.
About the EFI Splash RPX-iii software
The Splash RPX-iii Server Software DVD contains the following software:
Splash RPX-iii Server Software
For instructions on installing the Splash RPX-iii Server Software, see page 16.
The EFI Splash RPX-iii User Software and Documentation DVD contains the following
software:
Splash Mac OS Client allows you to print to the EFI Splash RPX-iii from Macintosh client
computers. Splash Mac OS Client includes the following:
• Printer drivers allow you to print files to the EFI Splash RPX-iii.
• Splash Remote Scan and Twain plug-in enables the EFI Splash RPX-iii to operate as a
high-resolution color scanner.
• Splash Server Remote allows you to view and manage the EFI Splash RPX-iii server
remotely from a Mac OS X computer.
• CopyCal Target files allows you to copy files to your computer for EFI Splash RPX-iii
calibration.
• Adobe Acrobat Reader allows you to view and print the PDF files in the Splash Online
Documentation folder.
Splash Windows Client allows you to print to the EFI Splash RPX-iii from Windows client
computers. Splash Windows Client includes the following:
• Printer drivers allow you to print files to the EFI Splash RPX-iii.
• Splash Remote Scan and TWAIN plug-in enables the EFI Splash RPX-iii to operate as
a high-resolution color scanner.
• Splash Printer Delete Utility allows you to remove printer drivers from Windows
computers.
• CopyCal Target files allow you to copy these files to your computer for EFI Splash RPX-iii
calibration.
• Adobe Acrobat Reader allows you to view and print the PDF files in the Splash Online
Documentation folder.
For instructions on how to install printer drivers, see the Printing Guide.
For instructions on installing Mac OS user software, see “Installing User Software on a
Mac OS Computer” on page 28.
Page 8

INTRODUCTION 8
For instructions on installing Windows user software, see “Installing User Software on a
Windows Computer” on page 27.
For instructions on installing Adobe Acrobat Reader, see “Installing and using Acrobat
Reader” on page 37.
Server system requirements
The EFI Splash RPX-iii requires the following minimum system configuration:
• Processor
Intel Mac or G5 Mac
•Operating system
Mac OS v10.4.11 or later
•CPU
Single or dual 2GHz processor(s)
•Memory
1.0 GB SDRAM minimum
For memory installation instructions, see the Macintosh User’s Guide.
• Hard disk drive
60 GB minimum
•Media drive
Combo (DVD-R/CD-RW) or SuperDrive (DVD-RW/CD-RW)
• Monitor
Apple-compatible color monitor with 1024
• Built-in Ethernet connection(s)
Two (for Direct Connect)
One (for Network Connect)
x 768 resolution
Page 9

INTRODUCTION 9
Client computer requirements
The EFI Splash RPX-iii user software requires the following minimum system configurations.
Minimum requirements for Mac OS Windows
Operating system Mac OS X v10.2 or later Windows 2000 Professional with Service Pack 4
Splash Remote Scan Mac OS X v10.2.4 or later
Splash Printer Delete Utility Not supported
Splash Server Remote Mac OS X v10.4 or later Not supported
Splash Font Downloader Mac OS X v10.3.9 or later Not supported
Windows XP (recommended with Service Pack 2)
Windows XP (64-bit version)
Windows Server 2003 Standard Edition, Enterprise
Edition, or Datacenter Edition (must be the 32-bit
version)
Windows Vista
Networking support
The EFI Splash RPX-iii can receive and process jobs received from clients on the following
networks:
• AppleTalk (EtherTalk)
• UNIX and Windows (via TCP/IP LPD)
• Bonjour (via TCP/IP LPD)
• Novell NetWare 5 and 6 via TCP/IP (NDS Print Queue, NDPS)
• Port 9100 (via NetComX)
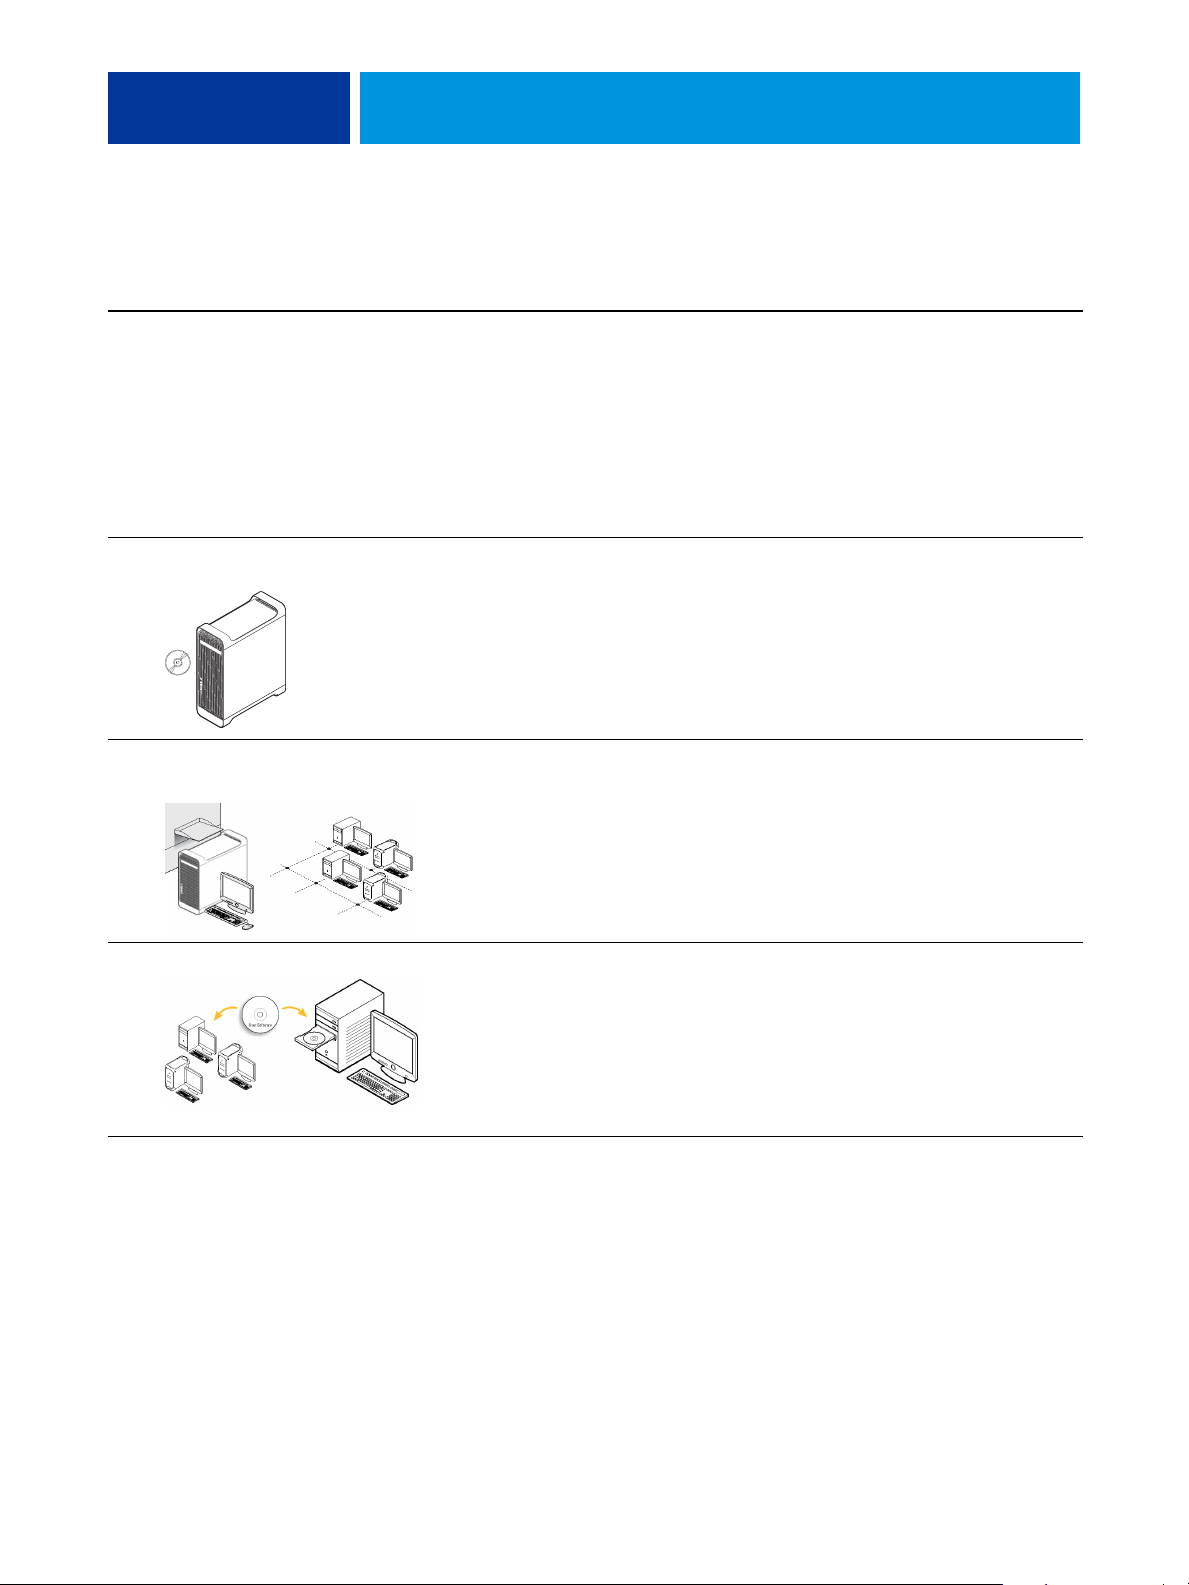
Preparing to print
If you intend to set up a direct connection to the Fiery, make sure that the Fiery is installed
and that a Startup Page has been printed. You also need to connect the EFI Splash RPX-iii to
the Fiery using the Ethernet crossover cable. This connection is described as Direct Connect.
If you do not require Direct Connect, the EFI Splash RPX-iii and the Fiery are connected to
your network independently. This connection is described as Network Connect. For more
information about Direct Connect and Network Connect, see “Connecting the EFI
Splash RPX-iii to the Fiery” on page 11.
For either connection, perform the tasks in the following table to set up the EFI
Splash RPX-iii for printing.
NOTE: Direct Connect is supported only with a digital press with an integrated Fiery.
A stand-alone Fiery must use Network Connect.
Page 10
INTRODUCTION 10
To set up the EFI Splash RPX-iii for printing, perform the following tasks:
Step Task Reference
1
Connect the Macintosh
by Direct Connect or
Network Connect.
2
Install EFI Splash RPX-iii
Server Software.
For Direct Connect, attach the Ethernet
crossover cable from the EFI
Splash RPX-iii to the Fiery.
If your configuration does not require
Direct Connect and uses Network
Connect, the Fiery may already be
installed on the network. Connect the
EFI Splash RPX-iii to the Fiery over the
network.
Install Splash RPX-iii Server Software
on the EFI Splash RPX-iii.
Configure the Macintosh for EFI
Splash RPX-iii.
For information, see “Connecting the EFI
Splash RPX-iii to the Fiery” on page 11.
For more information, see “Configuring
Mac OS X for the EFI Splash RPX-iii” on
page 20.
3
Configure network settings for the EFI
Splash RPX-iii printing environment.
4
Prepare users for printing. At each computer from which
users print:
• Install user software and copy
color files.
• Install the appropriate printer files
and connect to one or more print
connections.
For information about configuring the EFI Splash RPX-iii for optimal printing in your
particular environment, see the Printing Guide and the Color Guide.
For information about configuring
network settings, see the Configuration
Guide.
For more information, see “Installing User
Software on a Mac OS Computer” on
page 28 or “Installing User Software on a
Windows Computer” on page 27.
For information about installing printer
drivers and printing from client computers,
see the Printing Guide.
Page 11
INTRODUCTION 11
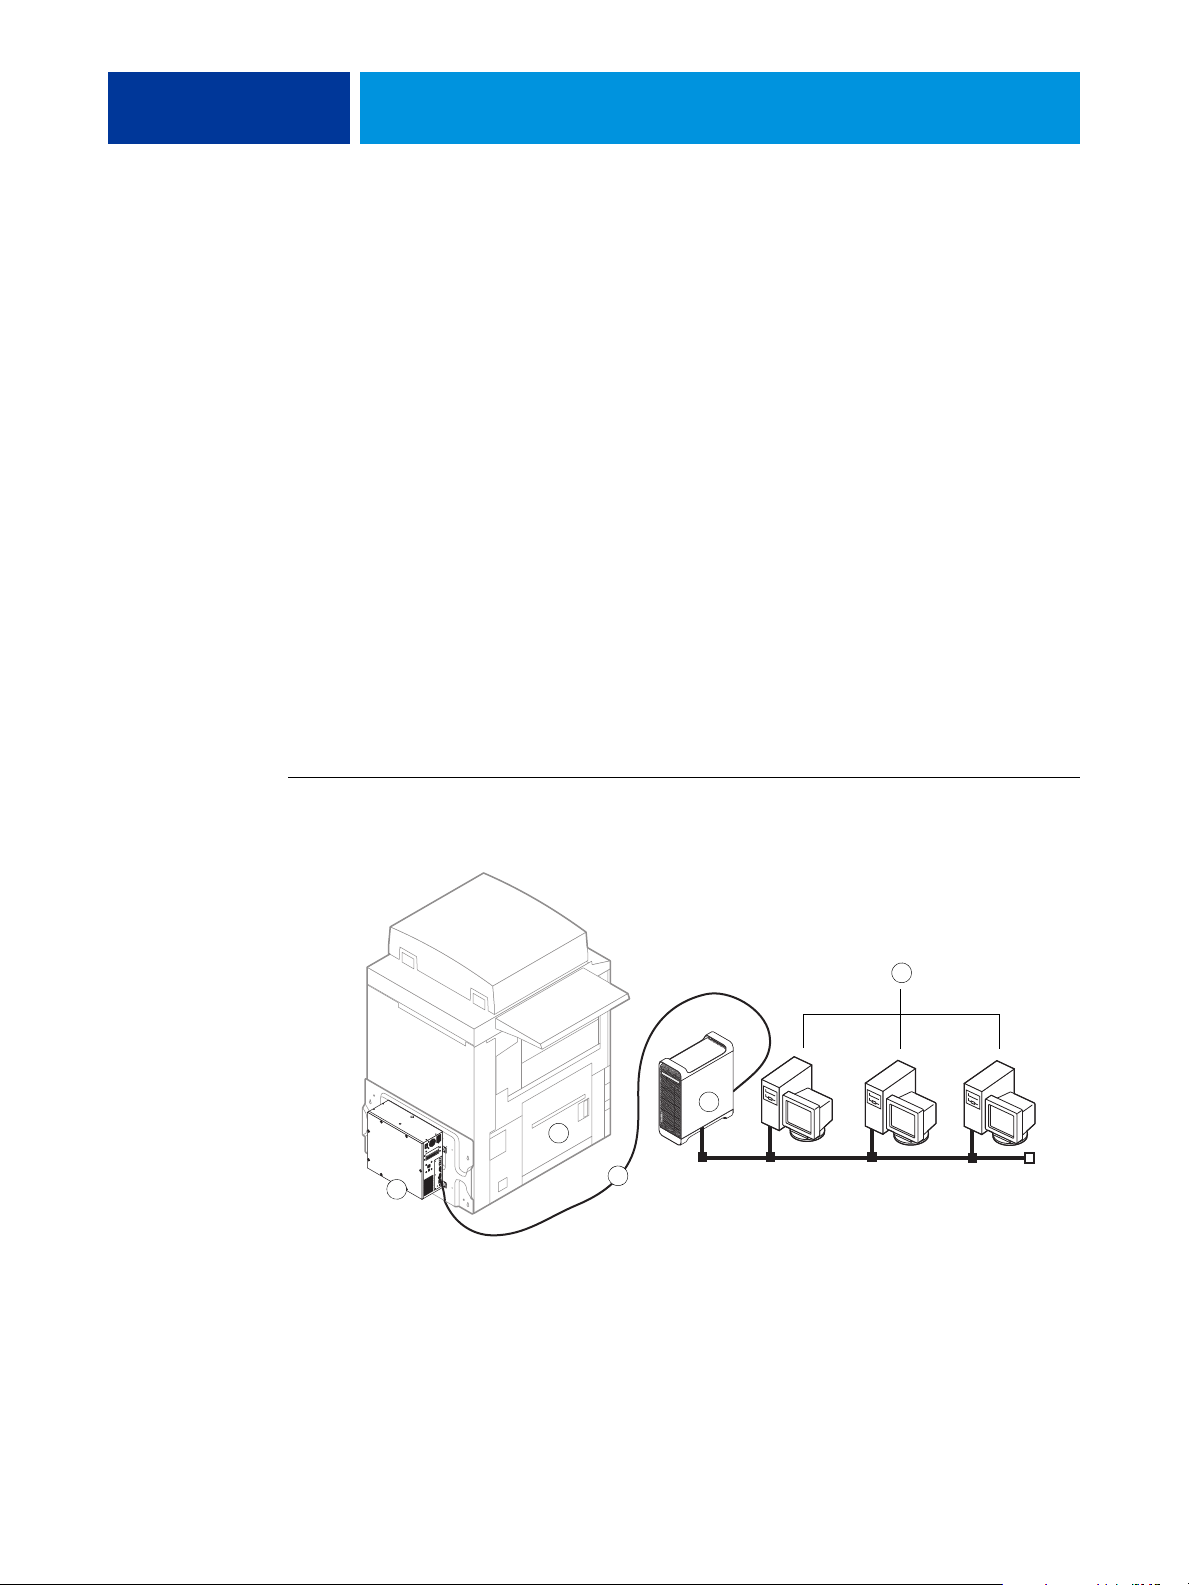
Connecting the EFI Splash RPX-iii to the Fiery
The EFI Splash RPX-iii supports direct connection to the Fiery or a connection over the
network. After the initial connection is made, the EFI Splash RPX-iii automatically
reconnects to the same Fiery each time it is started.
If you prefer not to expose the Fiery on the network, follow the procedure for Direct
Connect. To expose the Fiery on the network, follow the procedure for a non-dedicated print
environment.
Connecting the EFI Splash RPX-iii using Direct Connect
Direct Connect allows the EFI Splash RPX-iii to access the Fiery via an Ethernet crossover
cable provided with the EFI Splash RPX-iii. Use Direct Connect if you want the EFI
Splash RPX-iii (but not the Fiery) to be visible on the network, thus providing a dedicated
print environment. Direct Connect provides higher and more consistent performance than
Network Connect.
NOTE: Direct Connect is supported only with a digital press with an integrated Fiery. A stand-
alone Fiery must use Network Connect.
1Fiery
2 Xerox 700 Digital
Color Press
3 Ethernet crossover cable
4 EFI Splash RPX-iii
5 Networked computers
or workstations
NOTE: Two built-in Ethernet ports are required to use Direct Connect.
TO CONNECT THE EFI SPLASH RPX-iii TO THE FIERY VIA DIRECT CONNECT
4
2
1
1 Make sure that the Xerox 700 Digital Color Press LEDs are not reporting errors.
2 Connect the EFI Splash RPX-iii to the Ethernet network using the Built-in Ethernet Port 1, as
described in the Macintosh User’s Guide.
3
5
Page 12
1 Macintosh (EFI
Splash RPX-iii) back panel
2 Ethernet crossover cable
3Fiery
INTRODUCTION 12
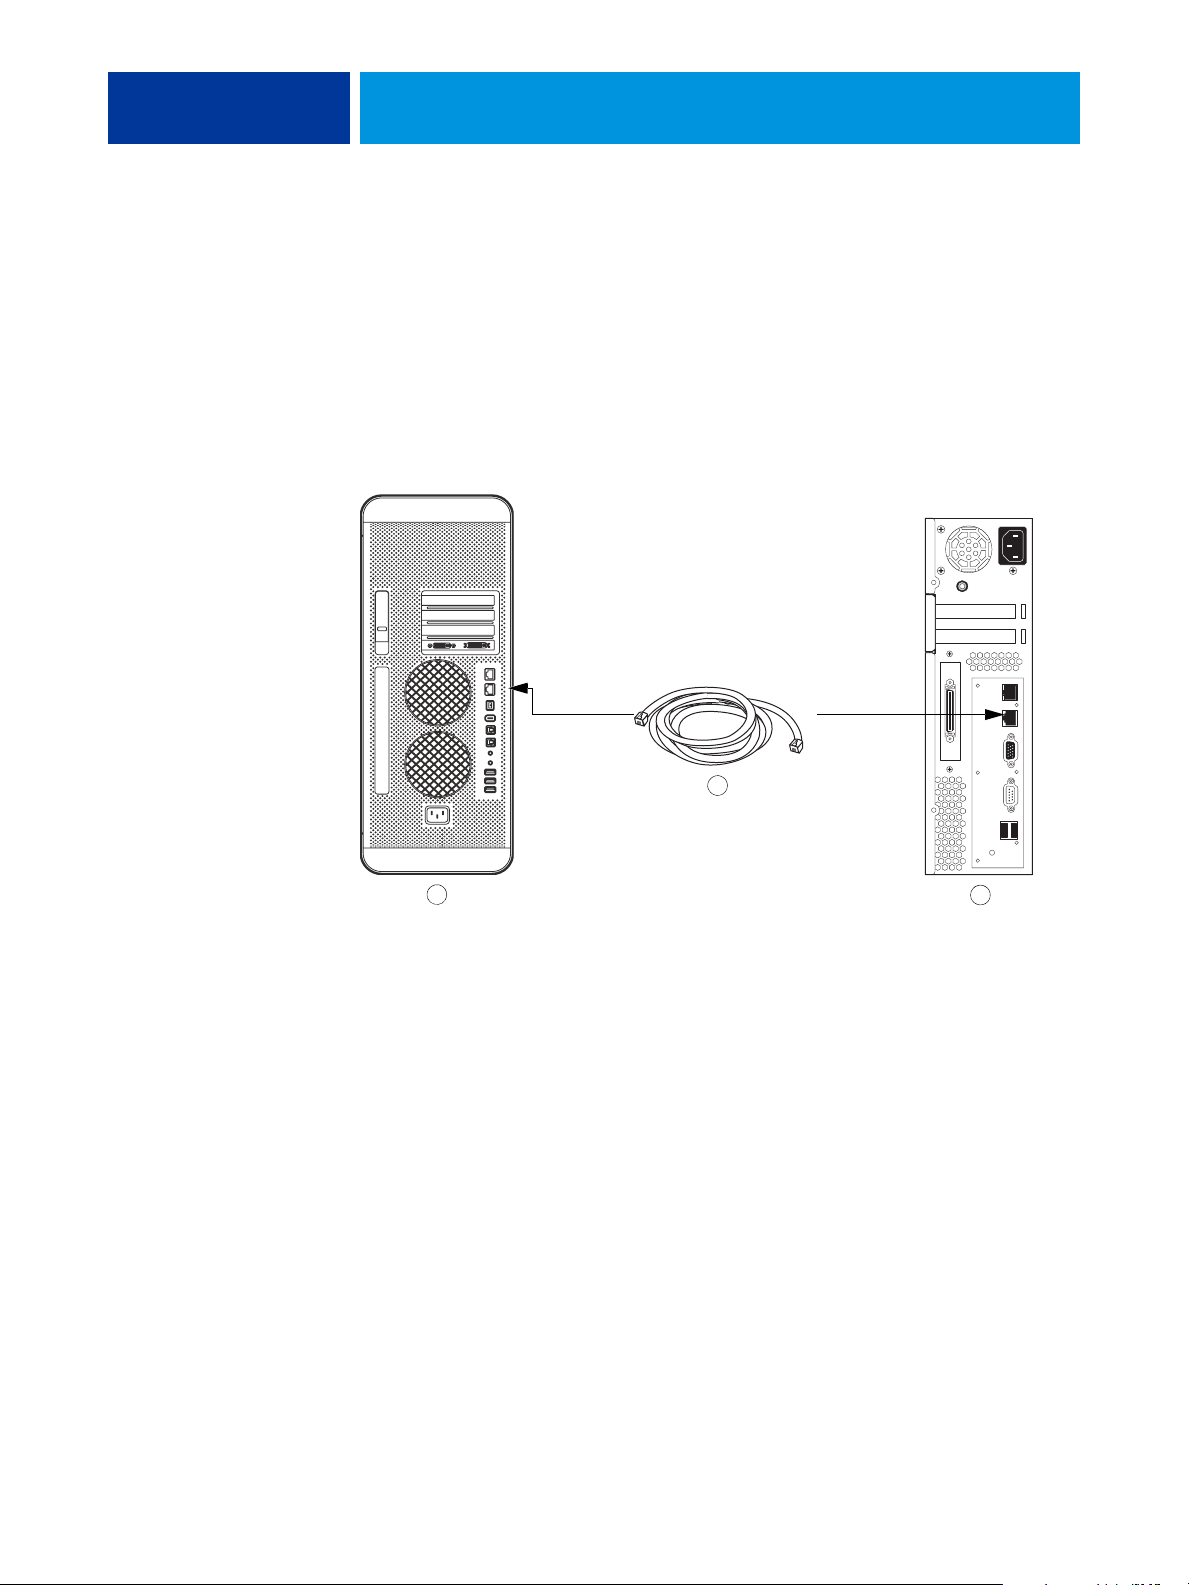
3 Locate the Ethernet crossover cable provided with the EFI Splash RPX-iii.
NOTE: The Ethernet crossover cable may look similar to the network cable. The cables are not
interchangeable. Do not swap them. The Ethernet crossover cable is labeled to help you
identify it. Ensure that you attach the correct cable to the EFI Splash RPX-iii and the Fiery.
4 Connect one end of the Ethernet crossover cable to the Built-in Ethernet port 2 on the EFI
Splash RPX-iii.
5 Connect the other end of the Ethernet crossover cable to the Ethernet Port on the Fiery,
the bottom of the two Ethernet ports, as indicated in the following illustration.
2
1
3
Page 13

1 Macintosh (EFI
Splash RPX-iii) back panel
2Dongle
INTRODUCTION 13
6 Attach the dongle to an available USB port on the back of the EFI Splash RPX-iii.
2
1
You are now ready to install Splash RPX-iii Server Software. To install server software, see
“Installing the Splash RPX-iii Server Software” on page 16.
NOTE: Before installing the Splash RPX-iii Server Software, make sure that the Fiery Start
Page prints, and that the TCP/IP settings for the Fiery are configured correctly. For more
information, see the Troubleshooting Guide.
Connecting the EFI Splash RPX-iii using Network Connect
Network Connect allows the EFI Splash RPX-iii to access the digital press over the network,
providing a non-dedicated print environment. Use Network Connect to use the features and
workflow of the EFI Splash RPX-iii and Fiery at the same time.
To optimize performance using Network Connect, the configuration of the Fiery and EFI
Splash RPX-iii should be located on the same Gigabit switch.
Page 14
1 Xerox 700 Digital
Color Press
2Fiery
3 EFI Splash RPX-iii
4 Networked computers
or workstations
INTRODUCTION 14
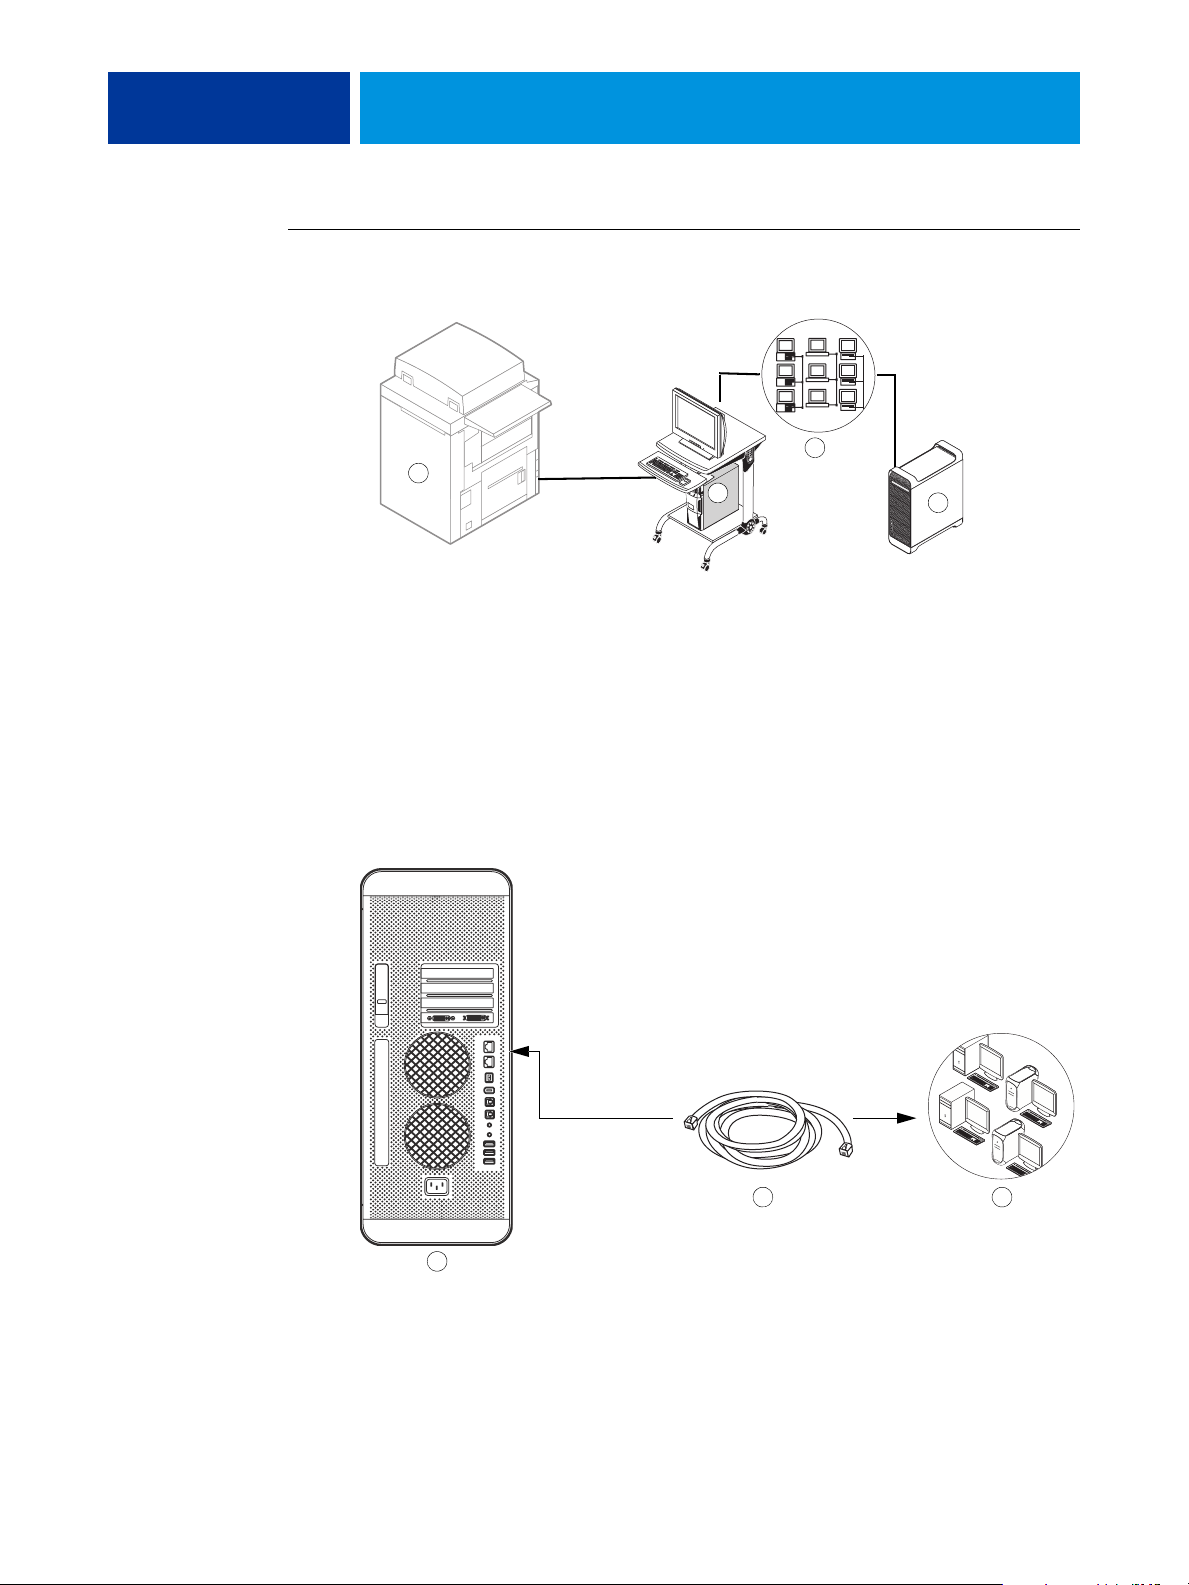
TO CONNECT THE EFI SPLASH RPX-iii TO THE NETWORK VIA NETWORK CONNECT
3
1
2
1 Make sure that the Xerox 700 Digital Color Press is not reporting errors.
2 Print the Fiery System Settings list for future reference.
4
1 Macintosh (EFI
Splash RPX-iii) back panel
2 Network Ethernet cable
3Network
The EFI Splash RPX-iii may download a software update that will reset the system settings.
3 Locate the network Ethernet cable.
4 Connect one end of the network Ethernet cable to the Ethernet port on the EFI Splash RPX-iii.
If the Macintosh has two Ethernet ports, use port 1.
5 Connect the other end of the network Ethernet cable to the Ethernet network, as described in
the Macintosh User’s Guide.
32
1
Page 15

1 Macintosh (EFI
Splash RPX-iii)
2Dongle
INTRODUCTION 15
6 Attach the dongle to an available USB port on the back of the EFI Splash RPX-iii.
2
1
You are now ready to install Splash RPX-iii Server Software. To install server software, see
“Installing the Splash RPX-iii Server Software” on page 16.
NOTE: Before installing the Splash RPX-iii Server Software, make sure that the Fiery Start
Page prints, and that the TCP/IP settings for the Fiery are configured correctly. For more
information, see the Troubleshooting Guide.
Page 16

INSTALLING THE SPLASH RPX-iii SERVER SOFTWARE 16
INSTALLING THE SPLASH RPX-iii SERVER SOFTWARE
This chapter describes how to convert the Macintosh into a Splash RPX-iii Xerox 700 Digital
Color Press by installing server software.
Installing the Splash RPX-iii Server Software
The procedures in this section describe how to install the Splash RPX-iii Server Software.
NOTE: If this is the first time you are using the Macintosh, use the Setup Assistant to set up an
administrator account on your system.
TO INSTALL THE SPLASH RPX-III SERVER SOFTWARE
1 Insert the Splash RPX-iii Server Software DVD into the DVD drive of the EFI Splash RPX-iii.
2 Double-click the EFI Splash RPX-iii Server icon that appears on the desktop.
3 Double-click the EFI Splash RPX-iii.mpkg icon.
The EFI Splash RPX-iii installer screen appears.
Page 17

INSTALLING THE SPLASH RPX-iii SERVER SOFTWARE 17
4 Click Continue.
The Software License Agreement screen appears.
5 Click Continue and click Agree.
The Select a Destination screen appears.
Page 18

INSTALLING THE SPLASH RPX-iii SERVER SOFTWARE 18
6 Choose the Macintosh hard disk drive (by default named “Macintosh HD” or “Splash HD”) as
the volume on which to install the Splash RPX-iii Server Software, and then click Continue.
The Installable options screen appears.
NOTE: Select Use European Defaults to set color profile preferences to those standard in
Europe, rather than those standard in the U.S.
7 Click Install, type a password, if prompted, and then click Continue.
The Splash folder installs automatically in the Applications folder on the EFI Splash RPX-iii
hard disk. Installation may take several minutes.
8 When you are prompted, click Restart.
The Macintosh restarts and the EFI Splash RPX-iii server automatically starts.
9 Select Direct Connect or Network Connect.
Page 19

INSTALLING THE SPLASH RPX-iii SERVER SOFTWARE 19
If you have only one Ethernet connection, the Direct Connect option appears unavailable
(dimmed).
10 For Direct Connect, you are already connected to the Fiery and do not need to select the Fiery.
If prompted, select the Fiery or type the IP address manually.
11 After you successfully connect to the Fiery, click OK in the dialog box that appears.
You have successfully converted the Macintosh into a Splash RPX-iii Print Server.
To configure your system, proceed to “Configuring Mac OS X for the EFI Splash RPX-iii” on
page 20.
Page 20

INSTALLING THE SPLASH RPX-iii SERVER SOFTWARE 20
Configuring Mac OS X for the EFI Splash RPX-iii
To set up the Splash RPX-iii Print Server, configure System Preferences to optimize the
efficiency of the Splash RPX-iii Server Software. The following lists the default configuration
settings for the EFI Splash RPX-iii.
•
Energy Saver: Never put the computer to sleep
•
Account/Login items: Auto launch EFI Splash RPX-iii
•
Built-In Ethernet 1: AppleTalk on
•
Built-In Ethernet 2: Direct Connect only
•
File Sharing: File Sharing and Windows Sharing on
For more information, see “Installing User Software using File Sharing” on page 33.
Unless File Sharing or AppleTalk is enabled, the System Preferences are already configured
correctly, except for Dock Size settings. Use the following procedure to configure the Dock
Size.
NOTE: The EFI Splash RPX-iii server can run on Mac OS 10.4 or Mac OS 10.5. Differences
between the two operating systems are noted in the following instructions.
TO CONFIGURE DOCK SETTINGS
1 Choose System Preferences from the Apple menu.
2 Mac OS 10.5: Click the Dock icon.
Mac OS 10.4: Click Show All, and then click the Dock icon.
3 If necessary, resize the Dock window.
If the Dock Size is set to Large, it obscures the bottom of the Dock window when it is
displayed on the desktop.
Page 21

INSTALLING THE SPLASH RPX-iii SERVER SOFTWARE 21
4 Drag the Dock Size slider to the approximate position shown in the following illustration.
Mac OS 10.5:
Mac OS 10.4:
Page 22

INSTALLING THE SPLASH RPX-iii SERVER SOFTWARE 22
TO CONFIGURE THE EFI SPLASH RPX-iii FOR APPLETALK PRINTING
1 Choose System Preferences from the Apple menu on the EFI Splash RPX-iii, and then choose
Network Preferences.
2 Mac OS 10.5: Click Advanced and click AppleTalk.
Mac OS 10.4: Choose Built-in Ethernet from the Show menu, and then click the AppleTalk tab.
3 Select the Make AppleTalk Active option.
4 If more than one zone is displayed, select the appropriate AppleTalk Zone.
5 Click Apply Now (Mac OS 10.4) or OK (Mac OS 10.5).
6 To verify these settings, print a Configuration page (see page 24).
Page 23

1 Splash Server user
2 Login Items
3‘+’ icon
INSTALLING THE SPLASH RPX-iii SERVER SOFTWARE 23
TO CONFIGURE THE SPLASH RPX-iii TO LAUNCH ON STARTUP
1 Choose System Preferences from the Apple Menu.
The System Preferences dialog box appears.
2 Select Accounts.
Mac OS 10.5:
2
1
1 Splash Server user
2 Login Items
3‘+’ icon
3
Mac OS 10.4:
2
1
3
3 Select the Splash Server user.
4 Click Login Items.
5 Click the ‘+’ icon.
Page 24

INSTALLING THE SPLASH RPX-iii SERVER SOFTWARE 24
6 Select Applications, Splash Folder, and then Splash Server.
7 Click Add.
8 Exit the System Preferences menu.
TO PRINT A CONFIGURATION PAGE
1 With EFI Splash RPX-iii launched, choose Login from the Server menu.
The Login dialog box appears.
2 Type the Administrator password and click OK.
NOTE: By default, no password is assigned and the Password field is blank. If a password is
required, consult your EFI Splash RPX-iii administrator.
3 Choose Print Configuration Page from the File menu.
The EFI Splash RPX-iii sends the Configuration page to the Fiery.
Page 25

INSTALLING THE SPLASH RPX-iii SERVER SOFTWARE 25
Labeling the EFI Splash RPX-iii
After configuring the Splash RPX-iii Print Server, place the labels included in the EFI
Splash RPX-iii media pack on the Macintosh. The labels help identify the Macintosh as a
Splash RPX-iii Print Server.
TO PLACE LABELS ON THE SPLASH RPX-iii
• Place the labels provided with this kit in the locations shown in the following illustration.
NOTE: The following illustration is an example. The label locations may not be appropriate
for all Macintosh computers.
Macintosh front panel
Page 26

INSTALLING THE SPLASH RPX-iii SERVER SOFTWARE 26
Calibrating the EFI Splash RPX-iii
For optimal color printing results, calibrate the EFI Splash RPX-iii at least once daily.
For information about calibrating the EFI Splash RPX-iii, see the Color Guide.
For information about setting up calibration reminders, see the Job Management Guide.
Page 27

INSTALLING USER SOFTWARE ON A WINDOWS COMPUTER 27
INSTALLING USER SOFTWARE ON A WINDOWS COMPUTER
This chapter describes installing and configuring Windows computers with the EFI
Splash RPX-iii user software.
For information about installing printer drivers, see the Printing Guide.
NOTE: Before installing the software, close all open applications.
Installing the Splash Printer Delete Utility from the Splash RPX-iii User Software and Documentation DVD
The following procedures describe how to install the Splash Printer Delete Utility from the
Splash RPX-iii User Software and Documentation DVD. To install the software using file
sharing, see “Installing User Software using File Sharing” on page 33.
TO INSTALL THE SPLASH PRINTER DELETE UTILITY FROM THE SPLASH RPX-III USER SOFTWARE AND
D
OCUMENTATION DVD
1 Insert the Splash RPX-iii User Software and Documentation DVD into the CD/DVD-ROM drive
on your computer.
The DVD contains a .zip file of the utility:
Remote Utilities\SplashPrinterDeleteUtility-Windows.zip.
2 Double-click the zip file on your desktop and run the installer.
3 Click setup.exe, located in Splash Printer Delete Utility\Splash Printer Delete Utility.
4 Follow the on-screen instructions.
For information about using the Splash Printer Delete Utility, see the Printing Guide.
Page 28

INSTALLING USER SOFTWARE ON A MAC OS COMPUTER 28
INSTALLING USER SOFTWARE ON A MAC OS COMPUTER
This chapter describes installing and configuring Mac OS computers with the EFI
Splash RPX-iii user software. It also describes how to copy color files on computers where
users will use them.
For information about installing printer drivers, see the Printing Guide.
Installing Splash Server Remote from the Splash RPX-iii User Software and Documentation DVD
The following procedures describe how to install the Splash Server Remote application from
the Splash RPX-iii User Software and Documentation DVD. To install the software using file
sharing, see page 33.
NOTE: Splash Server Remote is only supported on Mac OS computers running v10.4 or later.
TO INSTALL SPLASH SERVER REMOTE FROM THE SPLASH RPX-III USER SOFTWARE AND DOCUMENTATION DVD
1 Insert the Splash RPX-iii User Software and Documentation DVD into the CD/DVD-ROM drive
on your computer.
2 Select the Splash Server Remote icon in the Remote Utilities folder and copy it to the
Applications folder on your computer.
Splash Server Remote is now installed on your computer. To configure Splash Server Remote,
use the following procedure.
TO CONFIGURE SPLASH SERVER REMOTE
1 Double-click the Splash Server Remote icon that you copied to your computer.
2 Select the EFI Splash RPX-iii and type the EFI Splash RPX-iii IP address or select it from the
list, if available.
3 Click Connect.
For information about using Splash Server Remote, see the Job Management Guide.
Page 29

INSTALLING USER SOFTWARE ON A MAC OS COMPUTER 29
Installing Splash Remote Scan from the Splash RPX-iii User Software and Documentation DVD
The following procedures describe how to install the Splash Remote Scan application and the
TWAIN plug-in from the Splash RPX-iii User Software and Documentation DVD. To install
the software by using file sharing, see “Installing User Software using File Sharing” on
page 33.
TO INSTALL SPLASH REMOTE SCAN AND THE TWAIN PLUG-IN FROM THE SPLASH RPX-III
U
SER SOFTWARE AND DOCUMENTATION DVD
1 Insert the Splash RPX-iii User Software and Documentation DVD into the CD/DVD-ROM drive
on your computer.
2 Double-click the Splash Remote Scan.pkg installer in the Remote Utilities folder.
3 Follow the on-screen instructions.
For information about using Splash Remote Scan and the TWAIN plug-in, see
the Job Management Guide.
Configuring Splash Remote Scan
The first time you start Splash Remote Scan, you must configure the connection to the EFI
Splash RPX-iii. To configure the connection, you must have the correct IP address. Make
sure that the EFI Splash RPX-iii is registered in a Domain Name Server (DNS) on your
network.
TO CONFIGURE THE CONNECTION TO THE EFI SPLASH RPX-iii
1 Start Splash Remote Scan.
The Configuration dialog box appears.
2 In the Server Name (or IP Address) field, type the EFI Splash RPX-iii IP address or DNS name.
3 Select Use Nickname and type another name to distinguish the EFI Splash RPX-iii.
This name does not have to match the actual Server Name of the EFI Splash RPX-iii.
4 Type the name of the device connected to the EFI Splash RPX-iii.
NOTE: The device name is case-sensitive. Ask your network administrator for this name.
For more information, see the Configuration Guide.
5 Click the green arrow to add the EFI Splash RPX-iii to My Splash List.
6 Click OK.
Page 30

INSTALLING USER SOFTWARE ON A MAC OS COMPUTER 30
Installing the EFI Splash RPX-iii Font Downloader Utility from the Splash RPX-iii User Software and Documentation DVD
The following procedure describes how to install the EFI Splash RPX-iii Font Downloader
Utility from the Splash RPX-iii User Software and Documentation DVD.
TO INSTALL FONT DOWNLOADER FROM THE SPLASH RPX-III USER SOFTWARE AND DOCUMENTATION DVD
1 Insert the Splash RPX-iii User Software and Documentation DVD into the CD/DVD-ROM drive
on your computer.
2 Double-click the Splash Font Downloader icon in the Utilities folder.
3 Follow the on-screen instructions.
For information about downloading fonts, see the Configuration Guide.
Installing Print Kiosk from the Splash RPX-iii User Software and Documentation DVD
The Print Kiosk application allows automatic printing of a variety of file types from CDs
or other removable media. Print Kiosk runs on Mac OS X only. When started, Print Kiosk
runs silently until a disk (CD, DVD, USB drive, and so forth) is inserted. Print Kiosk
automatically searches the drive and presents a dialog box that enables you to select files to
print. For InDesign and Quark XPress, Print Kiosk also provides advanced diagnostics
(“preflighting”), file repair, and font installation.
TO INSTALL PRINT KIOSK FROM THE SPLASH RPX-III USER SOFTWARE AND DOCUMENTATION DVD
1 Insert the Splash RPX-iii User Software and Documentation DVD into the CD/DVD-ROM drive
on your computer.
2 Double-click the Splash Print Kiosk.mpkg file in the Utilities folder.
3 Follow the on-screen instructions.
For information about using Print Kiosk, see Job Management Guide.
Page 31

INSTALLING USER SOFTWARE ON A MAC OS COMPUTER 31
Copying CopyCal Target files from the Splash RPX-iii User Software and Documentation DVD
You can copy CopyCal Target color files from the Splash RPX-iii User Software and
Documentation DVD to your hard disk. Use the CopyCal Targets files to calibrate the digital
press.
TO COPY COPYCAL TARGET FILES FROM THE SPLASH RPX-III USER SOFTWARE AND DOCUMENTATION DVD
1 Insert the Splash RPX-iii User Software and Documentation DVD into the CD/DVD-ROM drive
on your computer.
2 Double-click the CopyCal Target folder in the Utilities folder, and then select the CopyCal
Targets files.
3 Copy the files to your computer.
For information about using CopyCal Target files, see the Color Guide.
Installing EFI Splash RPX-iii Remote Utilities
You can also install the following utilities with the EFI Splash RPX-iii Remote Utilities
Installer:
• Print driver (for information about how to install printer drivers, see the Printing Guide.)
• Print Kiosk
• Calibration Station (a remote version of ColorCal and calibration support available only
through the EFI Splash RPX-iii Remote Utilities Installer)
•Font Downloader
• EFI Splash RPX-iii Remote
• Remote Scan
The EFI Splash RPX-iii Remote Utilities Installer is available on the Splash Server DVD and
the Splash RPX-iii User Software and Documentation DVD, and in the Splash Installer
Downloads folder on the Splash Server.
TO INSTALL REMOTE UTILITIES WITH THE EFI SPLASH RPX-iii REMOTE UTILITIES INSTALLER
1 Insert the Splash RPX-iii User Software and Documentation DVD into the CD/DVD-ROM drive
on your computer.
2 Double-click the EFI Splash RPX-iii Remote Utilities icon in the Utilities folder.
3 Follow the on-screen instructions.
Page 32

INSTALLING USER SOFTWARE ON A MAC OS COMPUTER 32
Configuring the Calibration Station (ColorCal)
The Calibration Station allows you to configure a single ColorCal application on the Splash
Server, or remotely from another Mac OS computer, to drive calibration for multiple Splash
Servers in a batch format. You must first define a list of Splash Servers and calibrations to be
performed at each Splash Server. Once you specify the batch calibration, ColorCal prints all
of the targets to all of the Splash Servers in the list, which are then gathered up and scanned or
measured in any order. Once each target is scanned or measured, ColorCal updates the
calibration corresponding to the scanned or measured target on the matching remote Splash
Server.
The first time you start ColorCal, you must configure the connection to at least one Splash
Server. To configure the connection, you must have the correct IP address. Make sure that the
Splash Server is registered in a Domain Name Server (DNS) on your network.
For instructions on how to configure the Calibration Station and ColorCal, see the Color
Guide.
Page 33

INSTALLING USER SOFTWARE USING FILE SHARING 33
INSTALLING USER SOFTWARE USING FILE SHARING
The following procedures describe how to configure the EFI Splash RPX-iii for Mac OS
software installation by file sharing the Splash folder, and how to access that folder by
connecting to file sharing.
Once you connect to file sharing, the following software archives are available for download:
Mac OS X
• RPX-iii MacOS X Drivers.zip: Installer for printer drivers for Mac OS X clients
• SplashServerRemote.zip: Splash Server Remote application
• SplashRemoteScan.pkg.zip: Installer for Splash Remote Scan application
Windows
• RPX-iii Windows Drivers.zip: Printer drivers for Windows clients
• SplashRemoteScan-Windows.zip: Installer for Splash Remote Scan application
• SplashWinPrinterDelete.zip: Uninstall tool for Windows printer drivers
NOTE: The EFI Splash RPX-iii server can run on Mac OS 10.4 or Mac OS 10.5. Differences
between the two operating systems are noted in the following instructions.
Page 34

INSTALLING USER SOFTWARE USING FILE SHARING 34
TO CONFIGURE THE EFI SPLASH RPX-iii FOR MAC OS SOFTWARE INSTALLATION USING FILE SHARING
(MAC OS 10.4)
1 On the EFI Splash RPX-iii, choose System Preferences from the Apple menu and click the
Sharing folder.
The Sharing dialog box appears.
2 Select Personal File Sharing, Windows Sharing, and Personal Web Sharing, and then
click Start.
3 Close the Sharing dialog box.
Page 35

INSTALLING USER SOFTWARE USING FILE SHARING 35
TO CONFIGURE THE EFI SPLASH RPX-iii FOR MAC OS SOFTWARE INSTALLATION USING FILE SHARING
(MAC OS 10.5)
1 Choose System Preferences from the Apple menu.
2 Select Sharing.
3 Select File Sharing and click Options.
4 Select the Share files and folders using AFP option.
5 Select the Share files and folders using SMB option.
6 Select the name of the user account that will share files and type the password for that user.
7 Click Done.
Mac OS users can now download and install Splash client installers through the Apple
file sharing network. Windows users can download and install client installers through a
Windows network.
Page 36

INSTALLING USER SOFTWARE USING FILE SHARING 36
TO CONNECT TO FILE SHARING FOR ACCESS TO THE SPLASH FOLDER (MAC OS X)
1 Choose Connect to Server from the Finder “Go” menu.
2 In the Connect to Server dialog box, type the EFI Splash RPX-iii IP address or browse to the
EFI Splash RPX-iii.
3 Select Guest in the File Server Connect dialog box and click Connect.
The EFI Splash RPX-iii Mac OS computer name appears in the list of available shared
systems.
4 Select the shared system and click OK.
NOTE: Multiple volumes may appear in the list of available shared systems. Select the volume
that contains Mac_User_SW.
5 Select the OSX folder.
All installable software is listed in the Splash Installer Downloads folder.
6 Choose the software or files that you want to install over the network.
Repeat this installation procedure for each Mac OS X computer connected to the network.
For information about installing software on your Mac OS X computer, see page 28.
TO CONNECT TO FILE SHARING FOR ACCESS TO THE SPLASH FOLDER (WINDOWS)
1 Double-click or right-click My Network Places.
2 Click Search for computers.
3 Type the EFI Splash RPX-iii IP address in the Computer name field and click Search.
4 Double-click the EFI Splash RPX-iii.
If prompted, type the EFI Splash RPX-iii administrator name and password.
5 Choose the software or files that you want to install over the network.
Repeat this installation procedure for each Windows computer connected to the network.
For information about installing software on your Windows computer, see page 27.
Page 37

INSTALLING AND USING ACROBAT READER 37
INSTALLING AND USING ACROBAT READER
For your convenience, the Splash RPX-iii User Software and Documentation DVD includes
a web link to “Get Acrobat Reader.” The available version features enhanced capabilities
for full rule-based searches across the entire documentation set.
Installing Acrobat Reader
To install Acrobat Reader, use the GetAcrobatReader.html file on the Splash RPX-iii
User Software and Documentation DVD.
Using Acrobat Reader
The PDF files provided on the Splash RPX-iii User Software and Documentation DVD can
be viewed or printed using Acrobat Reader (or Acrobat). Once Acrobat Reader is installed,
double-click a file with a PDF icon to open the file. With the advanced search capability
of the version of Acrobat Reader provided, you can search for a word or phrase across the
entire documentation set or examine all of the documents within a specific language folder on
the DVD.
For more information about using the features of Acrobat Reader, see the application’s
online Help.
NOTE: You can view the documentation from the Splash RPX-iii User Software and
Documentation DVD or copy a language folder to your computer. If you copy the files to
your computer, be sure to keep all the files in the language folder. Do not rename the files, or
the cross-reference links will not work properly.
Page 38

Page 39

INDEX
INDEX 39
A
Acrobat Reader
installing 37
using with online documentation 37
C
calibrating 26
Calibration Station 32
ColorCal 32
configuring
Mac OS X system preferences 20
server for File Sharing 34, 35
Splash Remote Scan 29
connecting
Direct Connect 11
Network Connect 11
CopyCal Target files
Mac OS 31
D
Direct Connect
about 11
connecting 11
Dock Size 21
documentation, about 6
F
File Sharing 33
File Sharing connecting on
Mac OS X 36
Windows 36
Font Downloader Utility,
installing 30
I
installing
Splash Printer Delete Utility 27
Splash Server Remote 28
user software on Mac OS 28
user software on Windows 16
using File Sharing 33
K
Kiosk see Print Kiosk
kit contents 5
L
labeling 25
M
Mac OS X, configuring 20
Mac OS, installing user software 28
media package 5
N
Network Connect
about 11
connecting 11
network support 9
Networking support 9
O
overview
client software 7
server software 7
P
preparing to print 9
Print Kiosk, installing 30
R
Remote Scan 9
Remote Utilities Installer 31
requirements
client computer 9
server system 8
S
server startup 23
software overview 7
Splash Font Downloader 9
Splash Printer Delete Utility 9, 27
Splash Remote Scan 29
Splash Server Remote 9, 28
Page 40

INDEX 40
T
terminology 6
W
Windows, installing user software 16
 Loading...