

Page 1

Xerox EX Print Server, Powered by Fiery
for the Xerox 700 Digital Color Press
®
,
Workflow Examples
Page 2

© 2008 Electronics for Imaging, Inc. The information in this publication is covered
under Legal Notices for this product.
45069924
23 April 2008
Page 3

CONTENTS
CONTENTS
CONTENTS 3
INTRODUCTION 5
Terminology and conventions 5
About this document 6
MIXED MEDIA 7
What is Mixed Media? 7
Example: Workflow with Mixed Media 7
Items required for this example 8
IMPOSITION 11
What is imposition? 11
Example: Workflow with imposition 11
Items required for this example 12
PPML WITH IMPOSITION 15
What is PPML and how do you impose it? 15
Example: PPML workflow with imposition 15
Items required for this example 16
VARIABLE DATA PRINTING WITH FREEFORM 19
What is variable data printing? 19
Variable data printing languages 19
Sending variable data jobs to the EX Print Server 19
What is FreeForm and how is it used with variable data print jobs? 20
Example: Variable data workflow using FreeForm 20
Items required for this example 21
Page 4

CONTENTS 4
VARIABLE DATA PRINTING WITH FREEFORM 2 AND MIXED MEDIA 24
What is FreeForm 2 and how is it used with variable data print jobs? 24
What is Mixed Media and how can it be used in variable data print jobs? 24
Example: Variable data workflow with FreeForm 2 and Mixed Media 25
Items required for this example 26
HOT FOLDERS 29
What is a Hot Folder? 29
Example: Workflow with Hot Folders 29
Items required for this example 30
COMPOSE WITH PAPER CATALOG 33
What is Compose? 33
What is Paper Catalog and how is it used with Compose? 34
Example: Tab Workflow with Compose and Paper Catalog 34
Items required for this example 35
TERMS 39
INDEX 41
Page 5
INTRODUCTION
Terminology and conventions
INTRODUCTION 5
This document provides examples of complex printing scenarios and an overview of the
EX Print Server features used in the examples. The example workflows illustrate how
you can combine features to create jobs. Each workflow includes cross-references to help
you locate more information about performing each task.
For information about supported operating systems and system requirements, see Welcom e .
This document uses the following terminology and conventions.
Term or convention Refers to
Aero EX Print Server (in illustrations and examples)
Digital press Xerox 700 Digital Color Press
EX Print Server Xerox EX Print Server, Powered by Fiery
Color Press
Mac OS Apple Mac OS X
Titles in italics Other documents in this set
Windows Microsoft Windows 2000, Windows XP, Windows Server 2003,
Windows Vista
Topics for which additional information is available by starting
Help in the software
Tips and information
Important information
Important information about issues that can result in physical
harm to you or others
®
, for the Xerox 700 Digital
Page 6

INTRODUCTION 6
About this document
This document covers the following topics:
• Mixed Media concepts and how Mixed Media is used in an example workflow
• Variable Data Printing (VDP) concepts with FreeForm and how VDP is used in an
example workflow using FreeForm
• Imposition concepts with PPML (Personalized Print Markup Language) and how
imposition is used in an example variable data printing workflow using Impose
and PPML
• Printing to a Hot Folder on the network and an example workflow using Hot Folders
• Compose and Paper Catalog concepts and how to create a job with Compose and
Paper Catalog
• Definitions for popular applications and printing terms used in this document
Page 7

MIXED MEDIA
What is Mixed Media?
MIXED MEDIA 7
This chapter provides an overview of Mixed Media and an example workflow that includes
Mixed Media.
The Mixed Media feature allows you to print ranges of pages on different types of media.
For example, you can use Mixed Media to specify a heavy stock for the cover, add blank pages,
insert colored media on designated pages, and specify duplex pages within a single print
job. Specify Mixed Media settings when you print a job from an application with the
printer driver. Define and modify the Mixed Media settings of jobs already sent to the
EX Print Server from Command WorkStation or define Mixed Media settings in the Hot
Folders application.
For more information about Mixed Media, see Utilities.
Example: Workflow with Mixed Media
A geology professor at Ocean Crest University wants to print her new course book for the fall
semester. The new course book consists of eight chapters. She wants her students to be able to
find the information they want easily and quickly. To ensure this, each chapter divider in the
book is printed on heavy media. The chapter text is printed on plain media and the front and
back covers are printed on heavy media.
The professor sends her request, along with the book file in PDF (Portable Document
Format) (Geology101.pdf), to the university’s in-house production department.
Page 8
MIXED MEDIA 8
The following diagram illustrates the components of the course book.
Back cover
printed
on heavy
media
Chapter dividers
on heavy media
Chapters
printed on
plain media
Front cover
printed on
heavy media
Completed course book
Items required for this example
• Geology101.pdf
• EX Print Server
• Command WorkStation with Mixed Media
• Heavy media for the front and back covers
• Heavy media for chapter dividers
• Plain media for the chapter text
For information about supported media types, see Print Options.
NOTE: The EX Print Server supports PDF versions 1.2 through 1.7.
Page 9
MIXED MEDIA 9
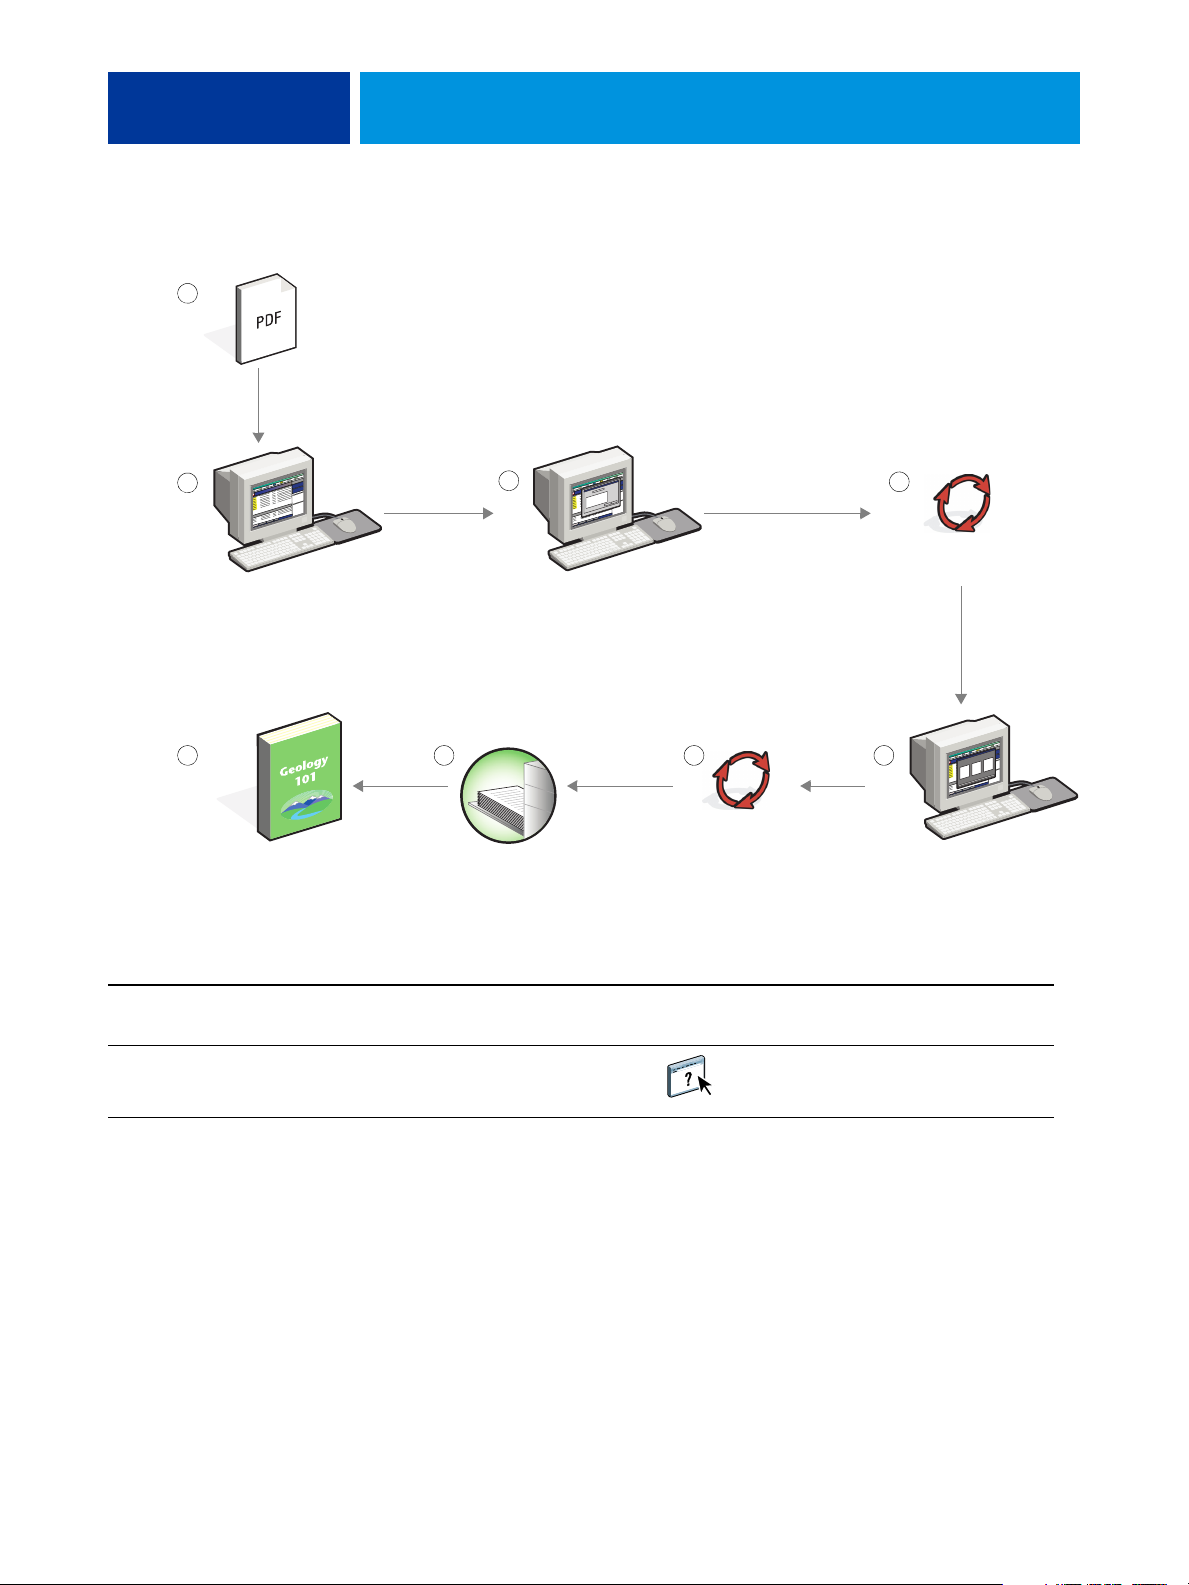
Mixed Media workflow
1
2
3
EX Print Server
Step Task For more information
1
The professor creates the PDF and sends the file to
the university’s in-house production department.
4
EX Print Server
578 6
2
The operator in the production department downloads
Command WorkStation Help
the file to Command WorkStation.
Page 10

MIXED MEDIA 10
Step Task For more information
3
4
5
The operator selects the job in Command WorkStation,
chooses Properties from the Actions menu, clicks the Media
icon on the Job Properties toolbar, and scrolls down to Mixed
Media. The operator applies the following settings:
a) From New Page Range, the operator types 2, 32, 64, 98,
124 for the page range (the pages that divide the chapters),
specifies a heavy media, indicates which tray contains the
heavy media, clicks Add Definition, and clicks Close.
b) From New Insert, the operator specifies inserting a blank
page after the last page to distinguish the end of the print
job, clicks Insert, and clicks Close.
c) From Define Cover, the operator specifies front and back
covers that print on front only, cover stock, and the tray
for the media, and clicks OK.
d) The operator clicks the Layout icon and specifies duplex,
clicks OK, and then saves the file.
The operator processes and holds the job. Command WorkStation Help
The operator previews the job. Command WorkStation Help
Utilities
6
The operator prints the job.
Command WorkStation Help
NOTE: The operator can also print one set as a proof
before printing multiple copies.
7
8
The operator retrieves the job from the digital press.
The job is printed with a front and back cover and
dividers for each chapter.
To use Mixed Media in Command WorkStation, your downloaded file must be a non-raster
file. To remove raster information from a file in Command WorkStation, right-click the file
and select Remove Raster Data.
You can duplicate this workflow with a PostScript file instead of a PDF. You can also specify
inserting tabs. For example, instead of specifying heavy media for the chapter dividers, you
can specify tabs and print chapter numbers on each tab. For more information about printing
with tabs, see Utilities.
Page 11

IMPOSITION
What is imposition?
IMPOSITION 11
This chapter provides an overview of imposition and an example workflow using imposition.
Imposition is the process of arranging individual pages of a book, booklet, or brochure on a
large sheet. The pages are laid out such that when the sheet is printed, folded, and cut, the
pages are in the correct orientation and order.
The EX Print Server supports Impose. Impose is a server-based imposition application that
allows you to edit and assemble entire documents on the EX Print Server before you process
the files.
For more information about imposition, see Command WorkStation Help.
Example: Workflow with imposition
The manager of Company ABC wants to make sure she has enough business cards to
distribute when she is managing her company’s booth at the Consumer Electronics Show.
She has sent out a request to a local print shop to print 600 cards.
The print shop imposes her business cards on an 11
incorporates text on the back, the job must be duplexed. Company ABC’s standard
business card size is 2
on one 11
x 17 page.
x 3.25. The print shop calculates that they can impose 25 cards
x 17 page. Since the card design
Page 12

IMPOSITION 12
{
The following graphic illustrates how the business cards are imposed.
5 columns
11 x 17 page
5 rows
2 x 3.25 business card
Items required for this example
• Card.pdf
• EX Print Server
• Command WorkStation with Impose (requires a dongle)
•11
x 17 heavy media, such as card stock
For information about supported media types, see Print Options.
• Paper cutter
NOTE: The EX Print Server supports PDF versions 1.2 through 1.7.
Page 13

IMPOSITION 13
Imposition workflow
1
2 3 4
8 7
6
Step Task For more information
1
2
Company ABC creates the 2 x 3.25 business card, saves
it as Card.pdf, and then sends the file to the print shop.
The operator at the print shop downloads the file
Printing from Windows
Printing from Mac OS
Command WorkStation Help
to Command WorkStation.
5
EX Print Server
Page 14

IMPOSITION 14
Step Task For more information
3
The operator selects the job in Command WorkStation,
chooses Impose from the Actions menu, and then applies
the following settings.
a) From the Sheet bar, the operator specifies 11 x 17,
landscape, and duplex.
b) From the Layout bar, the operator specifies five rows and
Utilities
NOTE: These instructions use points as an example.
You can change the unit measurements in Command
WorkStation Preferences.
Command WorkStation Help.
five columns, turns on printer’s marks, and sets the offset
horizontal and vertical printer’s marks to 0.125 pt.
c) From the Scale bar, the operator specifies the scale
at 100%.
d) From the Finishing bar, the operator specifies gang up
repeat and then saves the job.
4
The operator selects Card.pdf.dbp in Command WorkStation
Command WorkStation Help
and selects Preview.
5
6
7
8
The operator prints the job. Command WorkStation Help
The operator retrieves the job from the digital press.
The cards are printed on an 11 x 17 pag e.
The operator follows the printer’s marks and cuts
the business cards.
When you use Impose, your downloaded file must be a non-raster file. To remove raster
information from a file with Command WorkStation, right-click the file and select
Remove Raster Data.
Page 15

PPML WITH IMPOSITION 15
PPML WITH IMPOSITION
This chapter provides an overview of PPML and imposition, and an example workflow
of an imposed job using PPML.
What is PPML and how do you impose it?
Personal Print Markup Language (PPML) is an XML-based language for variable data
printing. PPML enables faster printing of variable data jobs by allowing a printer to store text
elements and graphic elements and reuse them as needed. PPML is a non-vendor-specific
language and is considered to be an open industry standard.
You can create the master and variable elements of a job as a PPML file in a variable data
printing application, such as Pageflex Persona, and then print the job to the EX Print Server.
Impose PPML as you would any other job (see page 11). Impose the PPML job on a sheet to
print the pieces in a particular order so that when the job is printed, it is cut and stacked in
the correct order.
For more information about PPML, see Variable Data Printing.
Example: PPML workflow with imposition
Dr. Jones is a veterinarian who has just moved his practice to a new neighborhood and wants
to inform his current customers, and possible new ones, of his new location, phone number,
and hospital hours. He decides to send out 30,000 5
has a picture of his dog, Max, with information about his practice, and the back of the card
has each customer’s name and address with a bar code.
Dr. Jones sends his order to a print shop along with the PDF of his mailer and the Microsoft
Excel file database, including address information about his customers and neighborhood
residents.
The print shop creates the merged master and variable document in Pageflex Persona to create
the JonesMailer.ppml file.
For more information about Pageflex Persona, see the documentation that accompanies the
application.
To save time and money, four cards are printed on both sides of a single 11
To expedite the mailings and reduce costly postage charges, the cards are imposed so that
after the pages are cut, the cards easily stack with the zip codes in the correct sort order.
x 8 mailer cards. The front of each card
x 17 page.
Page 16

PPML WITH IMPOSITION 16
The following diagram illustrates how the job is imposed and sorted.
Items required for this example
• Windows computer with Pageflex Persona
• JonesMailer.ppml
• EX Print Server
• Command WorkStation with Impose
Page 17

PPML WITH IMPOSITION 17
PPML workflow with imposition
1 2 3
456
EX Print Server
7
Step Task For more information
1
The operator at the print shop creates the merged master
and variable document in Pageflex Persona to create the
For more information about Pageflex Persona, see the
documentation that accompanies the application.
JonesMailer.ppml file.
2
The operator at the print shop downloads the file
Command WorkStation Help
to Command WorkStation.
Page 18

PPML WITH IMPOSITION 18
Step Task For more information
3
4
5
6
The operator selects the job in Command WorkStation
and chooses Impose from the Actions menu.
a) From the Sheet bar, the operator specifies 11 x 17,
landscape, and duplex.
b) From the Layout bar, the operator specifies two rows
and two columns, and turns on printer’s marks.
c) From the Scale bar, the operator specifies scale at 100%.
d) From the Finishing bar, the operator specifies to gang
up the job and cut and stack it, and enters 64 for record
set. The operator chose 64 because this is the number of
sheets that the paper cutter can easily cut at one time.
(This value must be a multiple of the number specified
for the layout. For this example, the operator specified
two rows and two columns. So the amount entered here
should be a multiple of 4, such as 64.) This is the record
per set.
The operator prints the job. Command WorkStation Help
The operator retrieves the job from the digital press.
The mailers are stacked and ready to cut.
Utilities
7
The operator checks the Impose Control Strip to match
the set information.
Command WorkStation Help.
Check the Impose Control Strip to match the set information. This is useful if certain
pages of your job do not print correctly and you must reprint specific pages.
Print one document to verify that the master and variable information matches.
Make sure that the scale size in Impose is set to 100%, otherwise the cards do not print
with the specified 5
x 8 size and are adjusted to print to the scale value entered.
Page 19

VARIABLE DATA PRINTING WITH FREEFORM 19
VARIABLE DATA PRINTING WITH FREEFORM
This chapter provides an overview of variable data printing, and an example workflow
that uses FreeForm to create a variable data job.
What is variable data printing?
Variable data printing links a digital press to databases that contain the content for printed
documents. Content consists of text and images (including graphics and photographs)
in electronic form. Variable data printing is used for direct-mail advertising or other targeted
mailings. It typically combines a set of master elements that are common across copies of
a document with a set of variable elements that change from copy to copy. An example is a
brochure that greets customers by name and may include other personal information about
the customer obtained from a marketing database. Background elements, illustrations, and
text blocks that do not change across copies of the brochure comprise the master elements.
The customer name and other customer-specific information comprise the variable elements.
For more information, see Variable Data Printing.
Variable data printing languages
The EX Print Server is compatible with the following variable data printing languages:
• FreeForm and FreeForm 2
• Personalized Print Markup Language (PPML)
• Creo Variable Print Specification (VPS)
• Xerox Variable Data Intelligent PostScript Printware (VIPP)
Sending variable data jobs to the EX Print Server
You can create the master and variable data in most software programs, and assign the
master and variable data from Command WorkStation, Hot Folders, or the printer driver.
If you create your master and variable data in PPML or Creo VPS format from a supported
third-party application, such as Pageflex Persona or Atlas PrintShop Mail, you can send your
variable job directly to the EX Print Server through these applications. You can also download
your file using Hot Folders.
For more information about how to send variable data printing to the EX Print Server, see
Variab l e D ata Pri n t i ng.
Page 20

VARIABLE DATA PRINTING WITH FREEFORM 20
What is FreeForm and how is it used with variable data print jobs?
FreeForm allows you to use print options to define and store master-element documents,
called FreeForm masters, on the EX Print Server. You can send a variable-element job to
the EX Print Server with instructions to combine the job with a particular FreeForm master.
For more information, see Variable Data Printing.
Example: Variable data workflow using FreeForm
Ocean Crest University wants to promote their three schools through a mailing to prospective
students. The students will be able to request information about the different campuses and
programs. Students can reply via a postage-paid business reply card integrated into the mailer.
The document is personalized with the prospective student’s name, address, and a personal
web link. The design is graphic-intensive to attract the attention of the reader. It is printed on
11
x 17 paper and folded three times, in order to qualify for the standard “letter” mail rate at
the post office.
To create this mail piece, the in-house production department decides to use the caching
capabilities of FreeForm. FreeForm allows them to store a rasterized version of the graphic
intensive layout in memory, since these elements are common to all pages (send and process
once). The variable text (address, name, and web link) is printed separately and merged with
the layout at the EX Print Server.
The production department creates the master document with all the common elements and
saves the file in PDF format (College_Master.pdf). Next, they create the variable document in
Microsoft Word (College_Variable.doc) and link the variable information to their database
file (College_data.xls).
NOTE: No specialized variable printing software is used to build this job. You can use any
page layout application to create the FreeForm master and any mail merge function, such
as Microsoft Word Mail Merge, to build and print the variable data.
For more information about how to use the Mail Merge feature in Microsoft Word, see the
documentation that accompanies Microsoft Word.
Page 21

VARIABLE DATA PRINTING WITH FREEFORM 21
The following diagram illustrates the components of the mailer.
Master file
Database file
Items required for this example
• College_Master.pdf
• College_Variable.doc
• College_data.xls
• EX Print Server
• EX Print Server printer driver with FreeForm
• Windows computer with Adobe Acrobat, Microsoft Word, and Microsoft Excel installed
Page 22

VARIABLE DATA PRINTING WITH FREEFORM 22
Variable data printing workflow using FreeForm
1
45
EX Print Server
2
EX Print Server
3
6
Step Task For more information
1
The operator in the production department opens
College_Master.pdf in Acrobat.
2
The operator prints the file to the EX Print Server,
Printing from Windows
specifying 11 x 17 and duplex, and choosing 1 for Create
Master in the printer driver.
Page 23

VARIABLE DATA PRINTING WITH FREEFORM 23
Step Task For more information
3
4
5
6
The operator opens the College_Variable. doc in
Microsoft Word.
The variable document also opens the College_data.xls file,
since the two documents are linked. If the documents are
not linked, Word prompts the operator for the location
of the Data Source File.
The operator selects Data Merge in Word.
The operator prints the file to the EX Print Server,
specifying 11
Use Master in the printer driver.
The master file and variable file are combined on the
EX Print Server.
The operator retrieves the job from the digital press.
The mailer includes the combined master and variable data.
x 17 and duplex, and choosing 1 for
Microsoft Word documentation
Printing from Windows
Certain elements of the master and variable information must match. For example,
the page size and orientation must match. For a complete list, see Variable Data Printing.
You cannot send FreeForm jobs to the Direct connection.
If Two-Way Communication is enabled in the printer driver, the printer driver detects what
masters already reside on the EX Print Server. Use stored FreeForm masters as often as needed
with multiple sets of variable elements. For more information about Two-Way
Communication, see Printing from Windows.
If the administrator clears the EX Print Server, all FreeForm masters are deleted. For more
information about administrator functions, see Configuration and Setup.
Page 24

VARIABLE DATA PRINTING WITH FREEFORM 2 AND MIXED MEDIA 24
VARIABLE DATA PRINTING WITH FREEFORM 2 AND MIXED MEDIA
This chapter provides an overview of how to use Mixed Media with variable data printing
jobs, and provides an example workflow that uses variable data printing and Mixed Media.
What is FreeForm 2 and how is it used with variable data print jobs?
FreeForm 2 extends the functionality of FreeForm (see “Variable Data Printing with
FreeForm” on page 19). FreeForm 2 requires a third-party variable data printing application
that supports FreeForm 2 technology, such as Atlas PrintShop Mail. Using the third-party
printing application and FreeForm 2, you can create multiple page masters, allowing more
customization to your documents. You can still use any master created in another application,
and then use a third-party application that supports FreeForm 2,
such as PrintShop Mail, to combine the design and database information.
Multiple masters allow you to define more than one master file for your job, while drawing
from the same database of variable information. For example, if you own a movie rental
company, you may maintain a database of customer names, addresses, and the last five movies
the customer rented, categorized by genre. As a promotion, you want to send a coupon
booklet with a new movie rental release pictured on the front cover. You want to customize
your mailer with a movie of a similar genre as the last movie the customer rented. The variable
information, such as the customer names and addresses, is always drawn from the database.
However, the different movie images are defined by the multiple masters.
For more information about FreeForm 2, see Variable Data Printing.
What is Mixed Media and how can it be used in variable data
jobs?
print
The Mixed Media feature allows you to print ranges of pages on different types of media.
For more information, see “What is Mixed Media?” on page 7.
Variable data printing links a digital press to databases that contain the content for printed
documents. For more information, see “Variable Data Printing with FreeForm” on page 19.
Use variable data print jobs with Mixed Media to create custom jobs, such as mailers. For
example, use the variable information to create booklet mailers that greet customers by name,
and print the booklet cover on a different medium than the body of the mailer.
The Mixed Media you specify for your job is applied for every record, relative to the record
start. For example, if Mixed Media is set to print Page 1 with cover stock, the first page of
every record is printed on cover stock.
Page 25

VARIABLE DATA PRINTING WITH FREEFORM 2 AND MIXED MEDIA 25
Example: Variable data workflow with FreeForm 2 and Mixed Media
To announce its new line of children’s styles, Banana Rama is creating a promotional mailer
that targets customers by ethnicity, gender, and age. The company has compiled a database of
customers by name and attributes, such as ethnicity, gender, and age. For the promotional
mailer, Banana Rama also draws from a content database consisting of images of children of
different ages, gender, and ethnicity wearing the new Banana Rama clothes; images of
typical gadgets enjoyed by these children; and background graphics. Using a variable data
application, such as PrintShop Mail and images that match the targeted individual, Banana
Rama creates, in one print run, a mailer targeting parents of girls aged 7 to 10 years and
customized mailers targeting parents of boys in different age groups. The mailers feature
images of children in the targeted age group wearing Banana Rama clothing and playing with
their favorite toys.
Each promotional mailer includes a cover sheet with the customer’s name and a discount
coupon. The Banana Rama girls’ clothing line is more extensive, so the mailer targeting girls
includes additional pages advertising the girls’ fashions.
Since the promotional mailer may vary in length, depending on whether it is targeted toward
a boy or a girl, a blank page is added between each mailer to indicate when a new mailer starts.
The print shop that received Banana Rama’s mailer request uses Atlas PrintShop Mail to create
the master and variable document as a .psm project file. For more information about
PrintShop Mail, see the documentation that accompanies the application.
Page 26

VARIABLE DATA PRINTING WITH FREEFORM 2 AND MIXED MEDIA 26
The following diagram illustrates the components of the mailer.
Girls template
Boys template
Letter/coupon template
Graphics
Database
Items required for this example
• Atlas PrintShop Mail
• FreeForm 2
• BananaRama.psm
• BananaRama_V.ps
• EX Print Server
• Command WorkStation with Mixed Media
•Cover stock
• Plain media
Page 27

VARIABLE DATA PRINTING WITH FREEFORM 2 AND MIXED MEDIA 27
Variable data workflow with FreeForm 2 and Mixed Media
1
2 3
EX Print Server
Step Task For more information
1
The print shop operator opens the Banarama.psm file in
PrintShop Mail, specifies FreeForm 2, and prints the file the
EX Print Server.
Variable Data Printing
For more information about PrintShop Mail, see the
documentation that accompanies the application.
In the Print dialog box, the operator sends both the master
and variable data. The EX Print Server receives a master and
variable PostScript document.
4
EX Print Server
5678
2
The operator selects the BanaRama_V.ps file from
Command WorkStation Help
Command WorkStation.
Page 28

VARIABLE DATA PRINTING WITH FREEFORM 2 AND MIXED MEDIA 28
Step Task For more information
3
The operator chooses Properties from the Actions menu, clicks
Utilities
the Media icon on the Job Properties toolbar, and scrolls down
to Mixed Media. The operator applies the following settings:
a) From Define Cover, the operator specifies a front cover
that prints on front only, cover stock, and the tray for
the media.
b) From New Insert, the operator specifies to insert a blank
page after the last page, indicates the tray for the media,
clicks Insert, and then clicks OK.
4
5
6
7
8
The operator processes and holds the job. Command WorkStation Help
The operator previews the job. Command WorkStation Help
The operator prints the job. Command WorkStation Help
The operator retrieves the job from the digital press.
The job prints with the merged variable and master
information with a blank sheet between records.
Certain elements of the master and variable information must match. For example, the
page size and orientation must match. For a complete list, see Variable Data Printing.
Page 29

HOT FOLDERS
What is a Hot Folder?
HOT FOLDERS 29
This chapter provides an overview of Hot Folders and an example workflow using
Hot Folders.
Hot Folders is a software application that streamlines network printing tasks. A Hot Folder
is a folder to which you can assign a group of print options, along with a EX Print Server
print queue.
To print a document, drag and drop the file onto the Hot Folder. You can create multiple
Hot Folders, each with different settings and different EX Print Server connections.
Depending on the configuration of the Hot Folder, jobs are routed to a EX Print Server with
settings that you have configured.
Hot Folder software runs as a background utility, continuously monitoring Hot Folders
for new jobs.
For more information about Hot Folders, see Utilities and Hot Folders Help.
Example: Workflow with Hot Folders
Greg works for Company ABC and wants to print 25 copies of his new business cards.
Company ABC has configured a network Hot Folder called “BusinessCards,” so that their
employees can drop their business card .pdf file directly onto the Hot Folder for printing.
Greg creates his business cards using the required company business card template, and saves
the file as GregCard.pdf. The business card template ensures that the cards are printed
optimally, using the imposition settings specified in the BusinessCards Hot Folder.
After the cards are printed, an operator in the company print shop cuts the cards and places
them in interoffice mail for the employee.
Company ABC business cards are 2
x 3.25 inches in size.
Page 30

HOT FOLDERS 30
{
The following graphic illustrates how the business cards are imposed.
5 columns
11 x 17 page
5 rows
2 x 3.25 business card
Items required for this example
• GregCard.pdf
• EX Print Server
• Hot Folder configured on the network
•8.5
x 11 heavy media, such as card stock
For information about supported media types, see Print Options.
• Paper cutter
NOTE: The EX Print Server supports PDF versions 1.2 through 1.7.
Page 31

HOT FOLDERS 31
Imposition workflow
1
2 3 4
EX Print Server
567
Page 32

HOT FOLDERS 32
Step Task For more information
1
2, 3
4
5
The operator at Company ABC creates a Hot Folder
on the network, names it “BusinessCards,” and applies
the following Hot Folder settings.
a) From Job Settings, the operator specifies 25 copies.
b) The operator specifies 8.5 x 11 for Sheet Size, and from the
Sheet tab he selects Landscape for Orientation, and Off for
Duplex.
c) From the Layout tab in Imposition Settings, the operator
specifies 5 Rows and 5 columns, and selects Printer’s
Marks.
d) From the Scale tab in Imposition Settings, the operator
specifies scale at 100%.
e) From the Finishing tab in Imposition Settings, the operator
selects Gang Up and chooses Repeat.
Greg drops the file GregCard.pdf on the BusinessCards
Hot Folder.
The job prints.
The operator retrieves the job from the digital press.
Utilities
Hot Folders Help
Hot Folders Help
6
7
The cards are printed on an 8.5 x 11 page.
The operator follows the printer’s marks and cuts
the business cards.
Page 33

COMPOSE WITH PAPER CATALOG 33
COMPOSE WITH PAPER CATALOG
This chapter provides an overview of Compose and Paper Catalog and provides an example
workflow using both applications to create a printed piece that incorporates colored covers,
tabs, and operator-specified chapter starts.
What is Compose?
Compose is a software application available that allows you to prepare a job (spooled or held
in Command WorkStation) for printing.
For a single job, use Compose to:
• Preview a job as thumbnails and full screen previews.
• Set chapter starts and identify and apply finishing options.
• Specify different media for front and back covers, body pages, and sections.
• Insert blank sheets, tabs, or other documents.
• Edit a document using Adobe Acrobat and Enfocus PitStop.
Compose is a dynamic application that displays and enables options based on the
EX Print Server selected for the job. For example, if a job contains mixed media settings that
were set in the printer driver or Command WorkStation, these settings appear when you view
the job in Compose.
For more information about Compose, see Utilities and Compose Help.
Page 34

COMPOSE WITH PAPER CATALOG 34
What is Paper Catalog and how is it used with Compose?
Paper Catalog is a system-based paper warehouse database. Paper Catalog stores the attributes
of any media stock available in a production print shop.
The Paper Catalog database resides on the EX Print Server and is not affected when you
restart or clear the EX Print Server.
Paper Catalog allows administrators to:
• Define multiple media attribute combinations and assign unique names to
each combination.
• Assign trays with loaded media stock.
• Select predefined media when a job is submitted.
• Specify which Paper Catalog columns are available for users.
• Centrally maintain a Paper Catalog database.
Paper Catalog allows operators to:
• Assign trays with loaded media stock.
• Select predefined media when a job is submitted.
After the administrator defines the Paper Catalog, the operator chooses the media for the job
from Compose. When the operator views the job with Compose thumbnails, the operator
clearly sees the settings applied for that paper catalog entry, such as the color of the media.
For more information about Paper Catalog and additional ways to access it, see Utilities and
Paper Catalog Help.
Example: Tab Workflow with Compose and Paper Catalog
The Company ABC Human Resources Manager has created a new benefits handbook. The
handbook is a single PDF document without blank pages between chapters. The manager
wants the front and back covers of the published piece printed on heavy gold media and she
wants each chapter to start on a right-hand page. Additionally, she wants blue tab stock
labeled “Tax Form” inserted as the fourth page of the handbook.
The Human Resources Manager sends her request, with the attached book file in PDF format
(Benefits.pdf), to the company’s in-house production department.
The production department uses Compose to reformat the book, adding front and back
covers and designating chapter starts.
Gold is Company ABC’s signature color. All published company documentation must have
gold covers. The production department administrator has already added gold covers and
blue tab stock to the Paper Catalog.
Page 35

COMPOSE WITH PAPER CATALOG 35
The following illustration shows the components of the handbook.
Back cover printed on
gold heavy media
Chapters printed on
plain media
Blue tab stock
Front cover printed
on gold heavy media
Completed handbook
Items required for this example
• Benefits.pdf
• EX Print Server
• Command WorkStation with Compose and Paper Catalog
• Company ABC Gold cover stock for the front and back covers
• Plain media for the chapter text
• Blue tab stock
The administrator first defines Company ABC Gold cover stock and blue tab stock in the
Paper Catalog database. The administrator also assigns the media to the appropriate tray in
Tray and Paper Association. For more information, see Paper Catalog Help.
For information about supported media types, see Print Options.
For information about the Paper Catalog database, see Paper Catalog Help.
Page 36

COMPOSE WITH PAPER CATALOG 36
Compose workflow using Paper Catalog
1 2
3
4
9
5
6
78
EX Print Server
Page 37

COMPOSE WITH PAPER CATALOG 37
Step Task For more information
1
The production department administrator defines Company
Paper Catalog Help
ABC gold cover stock and blue tab stock in the Paper Catalog.
She assigns the media to the appropriate digital press trays,
using Paper Tray Association.
2
The Human Resources Manager creates the PDF and sends the
file to the company’s in-house production department.
3
The operator in the production department downloads
Command WorkStation Help
the file to Command WorkStation.
4
The operator right-clicks the job, chooses Properties, specifies
Command WorkStation Help
that the job prints duplex, and indicates that the job is stapled.
5
The operator selects the job in Command WorkStation,
Compose Help
chooses Compose from the Actions menu, chooses Thumbnail
view, and then applies the following settings:
a) The operator selects all the pages of the job, clicks the
Paper tab, and selects letter-size media.
b) The operator right-clicks the first page of the job, scrolls to
Set Paper Catalog and chooses Co. ABC Cover. She repeats
this for the last page of the job.
c) The operator clicks the Document Front/Back tab, clicks
Side One for the Document Front, and then clicks Side
One for the Document Back.
d) The operator selects the first page of the first chapter and
clicks Chapter Start. She repeats this for each chapter in the
handbook.
e) The operator right-clicks the fourth page, chooses Add
Tab, selects Co. ABC Tab, and then selects Before to
include the tab before the fourth page.
f) The operator double-clicks the tab, types “Tax Form” for
the tab text, and clicks OK.
g) The operator clicks Reader view to display the thumbnails
as a user would see the pages when reading it as a book. She
checks the thumbnails to make sure the pagination is
correct.
h) The operator clicks Save.
6
The operator prints the job.
Command WorkStation Help
NOTE: The operator can print one set as a proof
before printing multiple copies.
Page 38

COMPOSE WITH PAPER CATALOG 38
Step Task For more information
7
8
The operator retrieves the job from the digital press.
The job is printed with gold front and back covers, as specified
from Paper Catalog, and the first page of each chapter prints
on a right-hand page.
If your job only uses one tab, but your tab media includes tabs in several other positions,
the EX Print Server only prints on the tab designated for your job and outputs the remaining
blank tabs.
Page 39

TERMS
TERMS 39
Atlas PrintShop Mail
A variable data printing application that supports FreeForm, FreeForm 2, and PostScript.
Authoring tool
A software application used to create text or images, or to define layouts for documents.
Component
In variable data printing, an element such as text, a graphic, or a photograph that is printed
on a page.
Creo VPS (Variable Print Specification)
A variable data printing language from Creo.
Encapsulated PostScript (EPS)
A PostScript file format designed to be embedded in another PostScript stream.
FreeForm
A variable data printing technology that works with variable-data printing solutions from EFI.
It allows data that is used many times in a variable-data printing job to be processed just once,
enabling a digital press to run at or near rated speed.
FreeForm 2
FreeForm 2 expands FreeForm technology by allowing you to determine page conditions and
rules for printing a job containing multiple master pages. Unlike FreeForm, FreeForm 2
requires a variable data printing application that specifically supports FreeForm 2.
Master elements
Used in variable data printing with variable elements. Reusable data that is common across
copies of a document.
Mixed Media
A feature that allows you to print ranges of pages on different types of media.
Pageflex Persona
A variable content design application that supports PPML and PostScript. It uses PPML to
store and re-use variable data elements.
PDF (Portable Document Format)
An open file format specification that describes text and graphics in documents.
Page 40

TERMS 40
PostScript
A device-independent page description language that is used to print and display pictures and
text. PostScript 3 includes many enhancements to older versions of PostScript, including
improved image quality and color.
Raster image
Electronic representation of a page or image using a grid of points called pixels.
Rasterization
The process of converting code that describes text and graphics into the format that is
understood by a printer’s “print engine” to print them on a page.
Variable Data Printing (VDP)
Digital technology that links print engines to databases that contain the content for printed
documents in order to print pages that vary in content.
Variable elements
Used in variable data printing with master elements. Data that changes across copies of a
document.
Xerox VIPP (Variable data Intelligent PostScript Printware)
A page-description language (PDL) designed especially for printing variable data documents.
Page 41

INDEX
INDEX 41
A
Atlas PrintShop Mail 24, 39
Authoring tool 39
C
component 39
Creo VPS 39
D
downloading files 9, 13, 17, 37
E
Encapsulated PostScript (EPS) 39
F
Finishing 14
FreeForm
defined 39
example workflow 20
FreeForm 2
defined 24, 39
example workflow 25
with mixed media 25
H
Hot Folder
example workflow 29
M
master elements 39
mixed media
accessing from Command WorkStation 37
defined 39
example workflow 7
example workflow with FreeForm 2 25
overview 7
with variable data printing 24
P
Pageflex Persona 15
PDF 39
PostScript 40
PPML 15
example workflow 15
with imposition 15
Preview job 28
from Command WorkStation 10
R
raster image 40
rasterization 40
S
Scale 14
Sheet 14
I
Impose
Finishing 14
Layout 14
Scale 14
Sheet 14
Impose Control Strip 18
imposition
example workflow 11
overview 11
with PPML 15
L
Layout 14
T
terminology 5
V
variable data printing
defined 40
example workflow 20
languages 19
with mixed media 25
variable elements 40
VIPP (Variable data Intelligent PostScript
Printware) 40
Page 42

 Loading...