


Xerox 700 Digital Color Press with Integrated
®
Fiery
Color Server
Print Options

© 2008 Electronics for Imaging, Inc. The information in this publication is covered
under Legal Notices for this product.
45072747
21 April 2008
CONTENTS
CONTENTS
CONTENTS 3
INTRODUCTION 5
Terminology and conventions 5
About this document 6
PRINT OPTIONS OVERVIEW 7
About printer drivers and printer description files 7
About Print options 7
Setting print options 8
Print option override hierarchy 8
PRINT OPTIONS 9
Print options and settings 9
Print options 10
Booklet Maker options 25
Gang-up print options 29
Additional information 31
Auto Trapping 31
Booklet Maker 31
Document size and Paper size 33
Duplex 34
Gang-up print 35
Hole Punching and Punch Position 36
Image Shift 37
Manual Duplex 38
Scale 41
Scale to Fit 41
Secure Print 42
INDEX 43

INTRODUCTION
Terminology and conventions
INTRODUCTION 5
This document provides a description of print options for the Xerox 700 Digital Color Press
with Integrated Fiery Color Server.
For information about supported operating systems and system requirements, see Wel co me .
This document uses the following terminology and conventions.
Term or convention Refers to
Aero Integrated Fiery Color Server (in illustrations and examples)
Digital press Xerox 700 Digital Color Press
Integrated Fiery Color Server Xerox 700 Digital Color Press with Integrated Fiery Color Server
Mac OS Apple Mac OS X
Titles in italics Other documents in this set
Windows Microsoft Windows 2000, Windows XP, Windows Server 2003,
Windows Vista
Topics for which additional information is available by starting
Help in the software
Tips and information
Important information
Important information about issues that can result in physical harm
to you or others

INTRODUCTION 6
About this document
This document covers the following topics:
• Information about printer drivers, printer description files, and setting Integrated Fiery
Color Server print options
• Brief explanations of each print option, default settings, and any constraints or
requirements
• Additional details about specific print options

PRINT OPTIONS OVERVIEW 7
PRINT OPTIONS OVERVIEW
This chapter describes printer drivers and printer description (PPD/PDD) files, Integrated
Fiery Color Server print options, and locations for setting print options.
About printer drivers and printer description files
The Integrated Fiery Color Server receives files from computers on the network, processes
(RIPs) the files, and then sends them to the digital press. Windows and Mac OS computers
communicate with the Integrated Fiery Color Server by means of a printer driver and PPD
(PostScript Printer Description) files. Windows computers can also communicate with the
Integrated Fiery Color Server by means of a Printer Control Language (PCL) printer driver
and PDD files (PCL’s equivalent of PPD files). Both drivers enable you to use special features
of the Integrated Fiery Color Server from the Print dialog box.
A printer driver manages printing communication between your application and the printer.
It interprets the instructions generated by the application, merges those instructions with
printer-specific options you set, and then translates all information into Adobe PostScript or
PCL, languages the printer understands. In other words, the printer driver writes a PostScript
or PCL file based on your original file and the options you set from the Print dialog box.
A printer driver also allows you to select print options for your digital press. To do this, the
printer driver must be matched with a PPD/PDD file for your Integrated Fiery Color Server.
A PPD/PDD file contains information about the features and capabilities of a particular
device (for example, what paper sizes and media types are supported). The printer driver reads
the information in the PPD/PDD file and presents the information to you in the form of
options you select in the Print dialog box. The PPD/PDD file for the Integrated Fiery Color
Server includes information about the features of both the digital press and the Integrated
Fiery Color Server. For information about the specific print options for the Integrated Fiery
Color Server, see the table that begins on page 10.
About Print options
Print options give you access to the special features of your digital press and Integrated Fiery
Color Server. Print options can be specified in several places—in Integrated Fiery Color
Server Setup, or from the printing application, ColorWise Pro Tools, Hot Folders, or
Command WorkStation.

PRINT OPTIONS OVERVIEW 8
Setting print options
• During Setup
Some settings are specified during Setup by the administrator. For information about the
current default server settings, contact the administrator or the operator.
• From applications
With the printer drivers, you can specify job settings when you print a job. For
information about specifying job settings from Windows applications, see Printing from
Windows. For information about specifying job settings from Mac OS applications, see
Printing from Mac OS.
• From ColorWise Pro Tools
You can set the default CMYK Simulation Profile, CMYK Simulation Method, RGB
Source Profile, RGB Separation, Output Profile, Rendering Style, Spot Color Matching,
Black Text/Graphics, and Black Overprint settings from ColorWise Pro Tools. For more
information about using ColorWise Pro Tools, see Color Printing.
• From Hot Folders
Assign a group of print options to a Hot Folder. When you specify print options for a
Hot Folder, the print options are assigned to all jobs sent through that Hot Folder.
These print options override any default options.
For more information, see Hot Folders Help.
• Overrides from Command WorkStation
To change job settings from Command WorkStation, double-click a job to display the
Properties dialog box.
For more information about using Command WorkStation, see Command WorkStation
Help.
Print option override hierarchy
The override hierarchy is as follows:
• A user’s printer driver settings override the Integrated Fiery Color Server Setup and
ColorWise Pro Tools settings.
• Settings made to Hot Folders override the user’s printer driver settings.
• Settings made from Command WorkStation Job Properties override the user’s printer
driver settings.

PRINT OPTIONS
Print options and settings
PRINT OPTIONS 9
This chapter explains each print option, default setting, location of the print option in the
printer driver, and any constraints or requirements. It also provides additional detail about
specific print options, beginning on page 31.
In the following table, underlined settings in the Option and settings column indicate default
printer driver settings (PPD/PDD defaults). If you do not use the printer driver interface to
configure a particular option, the Integrated Fiery Color Server prints the job with the
underlined default setting.
The Printer driver location column lists where to find the print option in the Integrated Fiery
Color Server printer driver.
For options that you configure in Command WorkStation, Configure WebTool, or
ColorWise Pro Tools, choosing Printer’s default results in the Integrated Fiery Color Server
printing the job with the setting you specified in Setup. For options that cannot be configured
in Setup, the Integrated Fiery Color Server prints the job with a preconfigured Printer’s
default setting. For more information, see the Requirements, constraints, and information
column in the table.
To determine the current Setup defaults, print the Configuration page from Command
WorkStation. For information about printing a Configuration page, see Configuration and
Setup.

PRINT OPTIONS 10
Print options
Option and settings
(default setting is underlined)
Auto Trapping
Printer’s default
Black Detection
/Off
On
Black Overprint
Printer’s default
/
Off
Text/
Text/Graphics
/On/Off
/
Printer driver
location
Color
Color
Color
Description Requirements, constraints,
and information
Use this option to ensure the proper fit
and registration of adjacent colors.
Specify On to automatically trap text and
graphics.
Printer’s default reflects the setting
specified in ColorWise Pro Tools Setup.
For more information, see page 31.
NOTE: This option is not available for
PCL printing.
Select Off if your job consists of black
only text pages combined with a
significant number of color pages.
Select On if the job is predominantly
black and white.
To use this setting, you must set Print
Mode (Windows) or Color Mode (Mac)
to CMYK, Standard Color, or Expert
Color.
For more information, see Color Printing.
NOTE: This setting is not available for
PCL printing.
Specify the type of black overprint
style, which determines whether black
text overprints colored backgrounds.
Select Text to overprint black text.
Select Text/Graphics to overprint black
text and graphics.
To access this option, click Expert
Settings.
NOTE: If Two-Way Communication is
not enabled, this option is set to Printer’s
default, which reflects the setting
specified in ColorWise Pro Tools.
If this option is set to Text or
Text/Graphics, you must set the
Combine Separations option to Off.
To select this setting, you must enable
Black Text/Graphics.
For more information, see Color Printing.
NOTE: This option is not available for
PCL printing.
Black Text/Graphics
Printer’s default
Rich Black On/Normal
/Pure Black On/
Color
Select Normal to print black text and
graphics as a four-color black using C, M,
Y, and K toner, and to use normal
PostScript rendering.
Select Pure Black On to print black text
and graphics as a one-color black, using
100% black toner only.
Select Rich Black On to print black text
and graphics as a one-color black, using
100% black toner, plus some amount of
cyan to make the black even darker.
To access this option, click Expert
Settings.
Printer’s default reflects the setting
specified in ColorWise Pro Tools Setup.
For more information, see Color Printing.
NOTE: This option is not available for
PCL printing.

PRINT OPTIONS 11
Option and settings
(default setting is underlined)
Booklet Layout
Brightness
85% Lightest/90% Lighter/95%
Light/100% Normal
110% Darker/115% Darkest
CMYK Simulation Method
/Full (Source GCR)/
Quick
Full (Output GCR)
/105% Dark/
Printer driver
location
Image
Color
Description Requirements, constraints,
and information
For a list of options and available settings,
see the table on page 25. For additional
information, see page 31.
Select 85% for a substantially lighter
image, 115% for a substantially darker
NOTE: This option is not available for
PCL printing.
image, or use one of the settings in
between.
Select Quick to use one-dimensional
transfer curves to adjust density output of
individual color channels.
Select Full (Source GCR) for a more
complete and accurate simulation.
Full (Source GCR) applies colorimetric
To access this option, click Expert
Settings.
For more information, see Color Printing.
NOTE: This option is not available for
PCL printing.
transformations that adjust hue as well as
output density. This option produces
output that maintains the same amount
of black as the source document.
Select Full (Output GCR) to apply the
same simulation method as Full (Source
GCR), except that the output produced
contains an amount of black determined
by the Output Profile.
CMYK Simulation Profile
DIC (EFI)/Euroscale (EFI)/
ISO Coated
JMPA ver.2 (EFI)/
Japan Color 2001 type 1 (EFI)/
SWOP-Coated (EFI)/
TOYO Offset Coated 2.0/
Simulation-1/Simulation-2/
Simulation-3/Simulation-4/
Simulation-5/Simulation-6/
Simulation-7/ Simulation-8/
Simulation-9/Simulation-10/
None/ColorWise OFF
Collate
On
/ISO Uncoated/
/Off
Color
Finishing
Specify the simulation goal to use for the
current print job.
Specify how to output multiple-page/
multiple-copy jobs.
To access this option, click Expert
Settings.
For more information, see Color Printing.
NOTE: If Two-Way Communication is
enabled, Simulation 1– Simulation 10 do
not appear in the list of profiles.
NOTE: If Two-Way Communication is
enabled, the profile names differ slightly.
NOTE: This option is not available for
PCL printing.
PRINT OPTIONS 12
Option and settings
(default setting is underlined)
Color Mode (Mac and PCL
drivers)
Printer’s default
Print Mode (PostScript printer
driver)
Standard Color
Grayscale
Combine Separations
On/Off
/CMYK/Grayscale
/Expert Color/
Printer driver
location
Color
Color
Description Requirements, constraints,
and information
Specify the color mode for the current
print job.
Select CMYK, Standard Color, or Expert
Color for a full-color document.
Select Grayscale for a grayscale or
black-and-white document.
NOTE: The color or black-and-white
settings specified in third-party
applications do not control whether a job
prints in color or black and white. If you
combine other options with those set in
the Integrated Fiery Color Server printer
driver, output may not print as desired.
You must choose Expert Settings to set
other color print options, including Black
Overprint, Black Text/Graphics and
Print gray using black only.
For more information, see Color Printing.
When printing separations from
supported desktop publishing
applications:
For more information, see Color Printing.
NOTE: This option is not available for
PCL printing.
Select On to combine separations on
a single page. The result is one page
of overprinted colors that simulates
printing on a press from film separations.
Select Off to view separations as four
individual black-and-white pages, each
representing one color plate.
Composite Overprint
On/Off
Copies
-9999
1
Color
Job Info
Specify how to print the colors of
overlapping images.
Select On to print a combination of
background and foreground colors where
objects overlap.
Select Off to hide the background object
where images overlap.
Specify the number of copies of a job you
want to print.
For more information, see Color Printing.
NOTE: This option is not available for
PCL printing.
PRINT OPTIONS 13
Option and settings
(default setting is underlined)
Document Size
List of available sizes
(8.5x11 (Letter) LEF=default)/
PostScript Custom Page Size/
Custom
Duplex
/Top-Top/Top-Bottom
Off
Face-Down Printing
Printer’s default/Face Up
Face Down
/
Printer driver
location
Media
Layout
Finishing
Description Requirements, constraints,
and information
Document size is defined in your original
application’s Page setup (or Print setup)
dialog box.
Use this option to specify or override the
page size defined in your document by
doing one of the following:
Select from the list of available sizes in the
Document size menu. (SEF stands for
Short Edge Feed; LEF stands for Long
NOTE: If the Document size is different
from the selected Paper size, the image is
scaled and printed at the specified Paper
size.
For information about Document size
and Paper size, see page 33.
For information about printing custom
page sizes, see Printing from Windows or
Printing from Mac OS.
Edge Feed.)
Select PostScript Custom Page Size to
define a non-standard size (for PostScript
printing).
Select Custom to define a non-standard
size (for PCL printing).
Specify whether a job is printed
For more information, see page 33.
single-sided or double-sided (duplex),
by specifying the orientation of printed
pages.
Select Face Up to print your document
on the top of the sheet of paper.
Select Face Down to print your
Printer’s default reflects the setting
specified in Integrated Fiery Color Server
Setup.
document on the bottom of the sheet of
paper (the document outputs from the
digital press with the text facing down).
Fasten Mode
/Fold & Staple/Folding Only
Off
FreeForm: Create Master
/1-100
None
Layout
VDP
Specify if you want your job stapled and
folded or just folded.
To create a FreeForm master from your
job, specify a number to assign to the
FreeForm master file.
NOTE: Command WorkStation allows
you to create up to 100 FreeForm
Masters.
A finisher must be installed to use this
option.
For information on installing finishers,
see Printing from Windows or Printing
from Mac OS.
For more information, see Variable Data
Printing.
For information on creating masters in
Command WorkStation, see Command
Work St a t i o n He l p .
NOTE: This option is not available for
PCL printing.
PRINT OPTIONS 14
Option and settings
(default setting is underlined)
FreeForm: Preview Master
Click to preview
FreeForm: Print Master
Printer’s default
FreeForm: Use Master
/1-100
None
/No/Yes
Printer driver
location
VDP
VDP
VDP
Description Requirements, constraints,
and information
Click to generate a low-resolution image
of the selected FreeForm Master.
This option is selectable only if you
enable Use Master.
For more information, see Variable Data
Printing.
NOTE: This option is not available for
PCL printing.
When you create a Master page using
FreeForm (or other variable data
applications), use this option to verify or
confirm your Master page.
Select Yes to print the Master page.
NOTE: Applicable click charges occur
when you print the Master.
Printer’s default reflects the setting
specified in Integrated Fiery Color Server
Setup.
This option is selectable only if Create
Master is enabled.
For more information, see Variable Data
Printing.
NOTE: This option is not available for
PCL printing.
For variable data print jobs, specify the
FreeForm master to use for the job.
NOTE: Command WorkStation allows
you to create and use up to 100 FreeForm
Masters.
For more information, see Variable Data
Printing.
For information about using FreeForm
masters in Command WorkSt a t i o n, see
Command WorkStation Help.
NOTE: This option is not available for
PCL printing.
Gang-up print Layout
Gloss Level
On/Off
Hole Punching
/2 Holes/3 Holes/4 Holes
Off
Image Quality
/Best
Normal
Image
Finishing
Image
Specify On if you want to gloss the image
to print like a photograph.
Specify if you want to punch two, three,
or four holes.
Use this option to optimize the image
resolution in jobs.
Select Normal for lower resolution with
faster printing time.
Select Best for higher resolution with
slower printing time.
For a list of options and available settings,
see the table on page 29. For additional
information, see page 35.
To specify the position of holes, use the
separate Punch Position option.
For more information, see page 38.
NOTE: This option is not available for
PCL printing.

PRINT OPTIONS 15
Option and settings
(default setting is underlined)
Image Shift
/On
Off
Image Shift: Align front and
back images
/On
Off
Image Shift: Units
inches/mm
Image Smoothing
On/Off
Instructions Job Info
Job Monitor Printer
/points
Printer driver
location
Finishing
Finishing
Finishing
Image
Description Requirements, constraints,
and information
Select On to adjust an image on the page
to allow for finishing options, such as
stapling or punching.
Select On to align the front cover image
to the back cover image when using the
Image Shift print option.
Specify the measurement value (inches,
millimeters, or points) when using the
Image Shift print option.
Select On to minimize grainy output
when printing low-resolution images.
For more information, see page 35.
NOTE: This option is not available for
PCL printing.
For more information, see page 35.
NOTE: This option is not available for
PCL printing.
For more information, see page 35.
NOTE: This option is not available for
PCL printing.
NOTE: This option is not available for
PCL printing.
When you select On, Image Smoothing is
applied to all images.
Type instructions for the operator about
the job.
This field has a 127-character
(alphanumeric and special characters)
limit.
Use Job Monitor to monitor the status of
the digital press and view information
about the print jobs sent to it.
For information about configuring job
monitor, see Printing from Windows.
NOTE: This option is not supported for
Mac OS.
Manual Duplex
On/Off
Media Type
Use Machine Settings
Uncoated/Uncoated Side 2/
Transparency/Tab/Label/
Recycled/Prepunched/
Coated/Coated Side 2/
Transfer/Post Card/Custom 1/
Custom 2/Custom 3/Custom 4/
Custom 5/Custom 6/Custom 7/
Custom 8/Custom 9/Custom 10
Media Weight
64-80gsm
91-105gsm/106-128gsm/
129-150gsm/151-176gsm/
177-220gsm/221-256gsm/
257-300gsm
/81-90 gsm/
/
Layout
Media
Media
Select On if you want to manually load
duplex pages in the bypass tray.
Select the media type on which to print
the document.
Select Use Machine Settings to use the
media that is set in the digital press.
NOTE: “Side 2” settings automatically
adjust the fuser temperature for the
second side when duplex printing.
Select the weight for media on which to
print the document.
For more information, see page 38.

PRINT OPTIONS 16
Option and settings
(default setting is underlined)
Mirror
/On
Off
Mixed Media
Click to define
Notes 1/Notes 2 Job Info
Offset Mode
Printer’s default
Orientation
/Landscape
Portrait
Output Profile
Printer’s default
Use Media Defined Profile/
Use Server’s Default/
Use Output Profile: Output-1/
Output-2/Output-3/Output-4/
Output-5/Output-6/Output-7/
Output-8/Output-9/Output-10
/On/Off
/
Printer driver
location
Layout
Media
Finishing
Layout
Color
Description Requirements, constraints,
and information
Select this option to print the mirror
image of your print job (from right to
NOTE: This option is not available for
Mac or PCL printing.
left).
Click Define to specify the media types
used for specific pages, or ranges of pages,
or for printing front and back covers on
special media.
NOTE: This option is not available for
PCL printing.
For information about Mixed Media, see
Utilities.
Enter information about the job. The Notes field has a 31-character limit.
Select On to offset (shift in output tray)
the job.
Printer’s default reflects the setting
specified in Integrated Fiery Color Server
Setup.
Specify Portrait or Landscape page
orientation of the document.
Specify the output profile to use for the
job.
Select Use Media Defined Profile to
automatically use the media type profile
assigned to a print job.
Select Use Server’s Default to use the
default Output Profile set in Color Setup.
Printer’s default reflects the setting
specified in ColorWise Pro Tools setup.
To access this option, click Expert
Settings.
For more information, see Color Printing.
NOTE: This option is not available for
PCL printing.
Select Use Output Profile to use custom
profiles available from the pull-down
menu.
Output Tray
AutoSelect
SCT/OCT/
Finisher Top Tray/
Finisher Stacker Tray/
Booklet Output Tray/
Tri-Fold Output Tray/
HCS Top Tray/
HCS Stacker Tray
Page Order
Forward
/
/Reverse
Finishing
Finishing
Specify the output bin for the job. For information about installing optional
finishers and trays, see Printing from
Windows or Printing from Mac OS.
Specify how the pages of your job are
ordered in the digital press output tray.
Select Forward to produce a stack that is
in sequential reading order (with the first
page on the top of the stack).
Select Reverse to produce a stack that is in
reverse order (with the first page on the
bottom of the stack).

PRINT OPTIONS 17
Option and settings
(default setting is underlined)
Page Order
Click to define
Pages per sheet
1-up
16-up
Paper Size
List of available sizes
Same as Document Size/
Define custom size
/2-up/4-up/6-up/9-up/
Printer driver
location
Layout
Layout
Media
Description Requirements, constraints,
and information
When printing multiple document pages
per sheet, click the Page Order icons to
specify the layout direction (left to right
NOTE: The Page Order icons are only
selectable when Pages per sheet is set to
2-up or greater.
horizontal, left to right vertical, right to
left horizontal, or right to left vertical) of
the document pages.
Specify a page layout for the job.
Paper size defines the dimensions of the
actual paper on which your document
will print.
Use this option to specify the paper size
by doing one of the following:
Select from the list of available sizes in the
Paper size menu. (SEF stands for Short
Edge Feed; LEF stands for Long Edge
Feed.)
NOTE: If the Document size is different
from the selected Paper size, the image is
scaled and printed at the specified Paper
size.
For information about Document size
and Paper size, see page 33.
For information about printing custom
page sizes, see Printing from Windows or
Printing from Mac OS.
Select Same as Document Size to use the
same document and paper size.
Select Define custom size to define a nonstandard size.
Paper Source
AutoSelect
Tray 5 (Bypass)/Tray 6/
Tray 6 (Oversized)/
Tray 7 (Oversized)/
Tray 8 (Inserter)
/Tray 1/Tray 2/Tray 3/
Media
Specify the paper tray to use for the job.
AutoSelect automatically selects the tray
containing the paper size specified for the
job.
Trays 1–3 and Tray 6 are used to print
using the media selected from the digital
press.
Tray 5 (Bypass) is used to print using the
media selected from the printer driver.
Tray 6 (Oversized) and Tray 7
(Oversized) are used for large size
print jobs.
Tray 8 (Inserter) is typically used for
printing covers and for post-fusing.
To use Tray 6, Tray 6 (Oversized), Tray
7 (Oversized) and Tray 8 (Inserter), these
options must first be installed.
For information on installing optional
trays and finishers, see Printing from
Windows or Printing from Mac OS.

PRINT OPTIONS 18
Option and settings
(default setting is underlined)
Print Border (PS)
Print Page Borders (PCL)
On/Off
Print gray using black only
(CMYK)
Printer’s default/
Off/
Text/Graphics/
Text/Graphics/Images
Print gray using black only
(RGB)
Printer’s default/
/
Off
Text/Graphics/
Text/Graphics/Images
Printer driver
location
Layout
Color
Color
Description Requirements, constraints,
and information
When printing multiple pages per sheet,
specify On to print a border around each
page in your document.
Select these settings to print a CMYK job
using black toner instead of processed
black.
Select Text/Graphics to render text and
graphic elements (vectors) in grayscale
using black only, when cyan=0,
magenta=0, and yellow=0 and the black
(K) value is between 1 and 100.
Select Text/Graphics/Images to render
text, graphic elements (vectors), and
images (rasters) in grayscale using black
only, when cyan=0, magenta=0, and
yellow=0 and the black (K) value is
This option is designed to use black
efficiently, by using only black toner
(rather than a processed black), and to
reduce click charges, ensuring that a
single black-and-white charge is incurred,
instead of multiple color when using a
processed black.
To access this option, click Expert
Settings.
Printer’s default reflects the setting
specified in ColorWise Pro Tools Setup.
For more information, see Color Printing.
between 1 and 100.
Select these settings to print an RGB job
using black toner instead of processed
black.
Select Text/Graphics to render text and
graphic elements (vectors) in grayscale
using black only, rather than processed
black, when the colors are defined with
equal values in all three channels, for
example red=128, green=128, and
blue=128.
Select Text/Graphics/Images to render
text, graphics (vectors), and images
(rasters) in grayscale using black only,
when the colors are defined with equal
values in all three channels, for example
red=128, green=128, and blue=128.
For both settings, RGB values can range
from R=0,G=0, B=0 to R=255,G=255,
This option is designed to use black
efficiently, by using only black toner
(rather than a processed black), and to
reduce click charges, ensuring that a
single black-and-white charge is incurred,
instead of multiple colors when using a
processed black.
The option is especially useful with
PowerPoint and other Microsoft
applications, which do not always
properly register RGB conversion to
grayscale.
To access this option, click Expert
Settings.
Printer’s default reflects the setting
specified in ColorWise Pro Tools Setup.
For more information, see Color Printing.
B=255.

PRINT OPTIONS 19
Option and settings
(default setting is underlined)
Print Queue Action
/Print and Hold/
Print
Process and Hold
Printer Screen Mode
Printer’s default
200 Cluster Dot/
200 Rotated Line/
Enhanced Text
Enhanced Text & Graphics
/
/
Printer driver
location
Job Info
Image
Description Requirements, constraints,
and information
Select Print to send the file directly to
printing.
Select Print and Hold to save the raster
file after printing.
Select Process and Hold if you want the
job to RIP (process) and not print.
These settings allow for quicker printing
and also for a “Wait and Proof” function
using Command WorkStation or the
digital press control panel:
When a multiple-set job is sent using
Print and Hold, a single set of the job is
printed and the raster data for the job is
held in the queue. You can then proof the
initial copy and select the job in the Hold
queue, specifying the number of copies
that you want to print (without
reprocessing data).
When you select Process and Hold, the
raster data is processed and the job is
added to the Hold queue. You can then
select the job using Command
WorkStation or at the copier (without
reprocessing data).
Select a predefined halftone screen to set
the dots- or lines-per-inch of the raster
used during printing.
Printer’s default reflects the setting
specified in Integrated Fiery Color Server
Setup.
Select 200 Cluster Dot for Text=200
Dot, Graphics=200 Dot, Image=200
Dot.
Select 200 Rotated Line for Text=200
Line, Graphics=200 Line, Image=200
Line.
Select Enhanced Text & Graphics for
Text=300 Line, Graphics=300 Line,
Image=200 Dot.
Select Enhanced Text=300 Line,
Graphics=200 Dot, Image=200 Dot.
Punch Position
/Left/Right/Top
None
Remove White PPT Background
On/Off
Finishing
VDP
Specify the hole punch position for the
job.
Select On when using PowerPoint to
create variable data in conjunction with
FreeForm.
To specify the number of holes, use the
separate Hole Punching option.
For more information, see page 38.
NOTE: This option is not available for
PCL printing.

PRINT OPTIONS 20
Option and settings
(default setting is underlined)
Rendering Style
Printer’s default/
Photographic
Relative Colorimetric/
Absolute Colorimetric
RGB Separation
Printer’s default/Simulation
Output
/Presentation/
/
Printer driver
location
Color
Color
Description Requirements, constraints,
and information
Specify a default color rendering
dictionary (CRD) to use when you print
images, objects, and text.
Select Photographic when printing
photographs, including scans and digital
camera images.
Printer’s default reflects the setting
specified in ColorWise Pro Tools Setup.
To access this option, click Expert
Settings.
For more information, see Color Printing.
Select Presentation when printing
artwork and graphs, or for mixed pages
containing graphics and photographs.
Select Relative Colorimetric when color
matching is important, but you prefer
white colors to print as paper white.
Select Absolute Colorimetric when exact
colors are needed and visible borders are
not distracting.
Select Simulation for RGB jobs to
simulate an output device other than the
device to which you are printing.
Select Output for RGB jobs you are
printing to the final output device.
Printer’s default reflects the setting
specified in ColorWise Pro Tools Setup.
To access this option, click Expert
Settings.
For more information, see Color Printing.
NOTE: This option is not available for
PCL printing.
RGB Source Profile
Printer’s default/
Apple Standard/sRGB (PC)/
Adobe RGB (1998)/
ECI-RGB/Fiery RGB v 5
Source-1/Source-2/Source-3/
Source-4/Source-5/Source-6/
Source-7/Source-8/Source-9/
Source-10/None
Rotate 180
Yes/N o
/EFIRGB/
Color
Layout
Specify a source color space definition for
printing RGB images, objects, and text.
Specify if you want to rotate the pages of
your job 180 degrees.
Printer’s default reflects the setting
specified in ColorWise Pro Tools Setup.
To access this option, click Expert
Settings.
NOTE: If Two-Way Communication is
enabled, Source 1– Source 10 do not
appear in the list of profiles.
NOTE: If Two-Way Communication is
enabled, the profile names differ slightly.
For information about setting up Two-
Way Communication, see Printing from
Windows or Printing from Mac OS.
For more information, see Color Printing.
NOTE: This option is not available for
PCL printing.

PRINT OPTIONS 21
Option and settings
(default setting is underlined)
Scale
/25-400%
100%
Scale to Fit
/Off
On
Secure Print Job Info
Single Page Folding
/Single Fold/C Fold/Z Fold/
Off
Z Fold Half Sheet
Slip Sheet
On/Off
Slip Sheet Page Size
List of available sizes
(8.5x11 (Letter) LEF=default)/
Printer driver
location
Layout
Layout
Finishing
Media
Media
Description Requirements, constraints,
and information
Specify a scaling override for the job. The supported range is 25 to 400
percent.
For more information, see page 41.
Specify whether to automatically scale
For more information, see page 41.
your print job to fit a particular page size.
This feature provides security for sensitive
or confidential print jobs. Enter an
arbitrary password and re-enter it at the
digital press control panel when you are
For more information, see page 42.
For more detail, see the documentation
that accompanies your digital press.
present at the digital press.
Specify how you want your job folded. A finisher must be installed to use the
folding option.
For information on installing finishers,
see Printing from Windows or Printing
from Mac OS.
Specify whether to insert a slip sheet
between copies or pages of multiple-copy
This option is effective only for
non-sorted or collated jobs.
jobs.
Specify the slip sheet page size by
selecting from the list of available sizes.
SEF stands for Short Edge Feed;
LEF stands for Long Edge Feed.
Slip Sheet Paper Source
Tray 1/Tray 2/Tray 3
Tray 5 (Bypass)
Tray 6 (Oversized)/
Tray 7 (Oversized)/
Tray 8 (Inserter)
Spot Color Matching
Printer’s default/Off/On
/Tray 6/
Media
Color
Specify the paper tray to use for the
slip sheet.
Select Off to print specified PANTONE
colors in your job using the current
CMYK Simulation and CMYK
Simulation Method.
Select On to activate the PANTONE
Lookup Table. The Integrated Fiery
Color Server prints specified PANTONE
colors in your job by matching the
CMYK print blend to the same color
from the PANTONE library.
To use Tray 6, Tray 6 (Oversized), Tray
7 (Oversized) and Tray 8 (Inserter), these
options must first be installed.
For information about installing optional
trays and finishers, see Printing from
Windows or Printing from Mac OS.
Printer’s default reflects the setting
specified in ColorWise Pro Tools Setup.
To access this option, click Expert
Settings
For more information, see Color Printing.
NOTE: This option is not available for
PCL printing.

PRINT OPTIONS 22
Option and settings
(default setting is underlined)
Stapler Mode
/Left Bottom Single/Right
Off
Bottom Single/Left Top Single/
Right Top Single/Left Double/
Bottom Double/Right Double/
Top Double/Bottom Center/Left
Center/Right Center/Top Center
Substitute Colors
On/Off
Text/Graphics Edge Enhancement
Printer’s default
Text/Graphics Quality
/Best
Normal
/On/Off
Printer driver
location
Finishing
Color
Image
Image
Description Requirements, constraints,
and information
Specify how to staple multiple-page/
multiple copy jobs.
Specify On to use the Substitute Color
For more information, see Color Printing.
Values defined in the ColorWise Pro
Tools Spot-On module.
Specify if you want to sharpen the edges
of text or vector graphics.
Text/Graphics Quality affects the
sharpness and fineness of text and
NOTE: This option is not available for
PCL printing.
NOTE: This option is not available for
PCL printing.
graphics in the job, with a trade-off in
processing speed.
Select Normal for a good quality and
faster processing speed.
Select Best for the sharpest possible text
and graphic edges with slower processing
speed.
Transparency Interleave Paper
Source
Tray1/Tray 2/Tray 3/
Tray 5 (Bypass)
Tray 6 (Oversized)/
Tray 7 (Oversized)/
Tray 8 (Inserter)
Transparency Interleaving
On/Off
Tray Alignment
On/Off
/Tray 6/
Media
Media
Media
Select a paper source tray for transparency
interleaving.
Select On to print multiple transparency
sheets separated by blank, plain paper
pages.
Specify if you want to enable
tray alignment, which allows you to
adjust the placement of text and images
on the page so they are correctly aligned
for duplex printing.
To use Tray 6, Tray 6 (Oversized), Tray
7 (Oversized) and Tray 8 (Inserter), these
options must first be installed.
For information about installing optional
trays, see Printing from Windows or
Printing from Mac OS.
NOTE: This option is not available for
PCL printing.
For information about enabling tray
alignment, see Utilities.

PRINT OPTIONS 23
Option and settings
(default setting is underlined)
Use PDF XObjects
On/Off
Use PDF/X Output Intent
On/Off
User Authentication: I’m a Guest
/Off
On
User Authentication: Password
Enter a password
Printer driver
location
VDP
Color
Job Info
Job Info
Description Requirements, constraints,
and information
Specify On to use PDF XObjects, a
feature that recognizes objects (text,
images, vectors) within a PostScript or
PDF file and caches the image, reducing
the need to reRIP (re-process) image data
For more information, see Variable Data
Printing.
NOTE: This option is only accessible
from Command WorkStation.
for faster printing.
Specify On to enable the PDF/X Output
Intent feature to use the embedded
output intent for PDF/X compliant print
jobs.
NOTE: To use PDF/X Output Intent,
you must set the RGB Source Profile to
None.
For information about the PDF/X
Output Intent feature, see Color Printing.
NOTE: This option is only accessible
from Command WorkStation.
If User Authentication is enabled, select
this option to allow guest printing
Guest printing must be set to On in the
Integrated Fiery Color Server.
privileges.
If User Authentication is enabled on the
Integrated Fiery Color Server, enter User
Name and Password to print the job.
If you are logged on to a Windows
system, you may automatically use your
Windows login, otherwise type the local
password or domain password.
User Authentication: Save User
Info
Off/On
User Authentication: Use
Windows Login
On/Off
Job Info
Job Info
Select On to save the user name and
password information for subsequent
sessions.
If User Authentication is enabled on the
Integrated Fiery Color Server, select this
option to use your Windows login name
and password.

PRINT OPTIONS 24
Option and settings
(default setting is underlined)
User Authentication: Username
Enter a username
Water mar ks
/Confidential/Copy/Draft/
None
Original/Top Secret
Edit/New/Delete
Printer driver
location
Job Info
Stamping
Description Requirements, constraints,
and information
If User Authentication is enabled on the
Integrated Fiery Color Server, specify
your User Name and Password to print
the job.
If you are logged on to a Windows
system, you may automatically use your
Windows login, or type the local
username or domain username.
Specify whether to print a standard
watermark for your print job.
To modify a watermark, select from the
list and click Edit.
To create your own watermark, click
New.
To remove a watermark, select from the
list and click Delete.
To print a watermark only on the first
page, select First Page Only.
To print watermarks as transparent text
(PCL only), select Transparent.

PRINT OPTIONS 25
Booklet Maker options
The following table provides a short description of Booklet Maker options and available
settings, with the default setting (where relevant) underlined. The Basic pane is indicated at
left in
grey text. Any differences between Basic and Advanced mode are noted in the Options
and available settings and Requirements, constraints and information columns.
For information about Booklet Maker options, see Booklet Maker Help.
NOTE: Booklet Maker options are not available for PCL printing.
s
Option and available settings Printer driver
location
Booklet Type: Booklet Type
Saddle (left)
Saddle (right)/
Nested Saddle (left)/
Nested Saddle (top)/
Nested Saddle (right)/
Perfect (left)/
Perfect (top)/
Perfect (right)
Booklet Type: Cover (Win)
Basic mode: Cover is prepared
for the booklet/Cover is not
prepared
Advanced mode: On/Off
Paper size: Paper size for 2-up
List of available sizes
(8.5x11 (Letter) LEF=default)/
Select From Paper Catalog/
Define custom size
/Saddle (top)/
Layout: Booklet
Layout: Booklet
Layout: Booklet
Description Requirements, constraints, and
information
Booklet Type is a combination of
binding method (Saddle, Nested Saddle,
or Perfect), which determines how the
signatures of your booklet are folded and
how the pages are imposed, and binding
edge (left, right, or top), which
determines the location of the spine of
your booklet.
NOTE: Binding method and Binding
edge (as separate options) are only
accessible in Advanced mode.
For information about Binding
methods, see page 31 and Booklet
Maker Help.
NOTE: This option is not available for
PCL printing.
Cover option (Saddle only) allows you to
specify an inline cover for your booklet.
NOTE: This option is not available for
PCL printing.
If you select Cover is prepared for the
booklet, you define the Cover content,
Cover media, and Booklet Cover Source
in the final steps of the booklet process.
If you select Cover is not prepared,
Booklet Maker skips remaining Cover
options.
Paper size for 2-up defines the size of the
sheet of paper (unfolded) on which your
booklet will print.
To select a paper size for your booklet, do
one of the following:
Select from the list of available sizes in
the Paper size menu.
Select from Paper Catalog to access a
For more information about Paper size
and booklet printing, see Booklet Maker
Help.
For information about printing custom
page sizes, see Printing from Windows or
Printing from Mac OS.
NOTE: This option is not available for
PCL printing.
dynamic database that stores the media
attributes of any paper available for
printing from the Integrated Fiery Color
Server.
Select Define Custom size to create a
non-standard paper size.

PRINT OPTIONS 26
Option and available settings Printer driver
location
Paper size: Document size
List of available sizes
(8.5x11 (Letter) LEF
Define custom size
Paper size and Subset size:
Number of Sheets in a subset
(saddle)
-20
2
Paper size: Orientation
Portrait/Landscape
=default)/
Layout: Booklet
Layout: Booklet
Layout: Booklet
Description Requirements, constraints, and
information
Document size is defined in your original
application’s Page setup (or Print setup)
dialog box.
Use this option to specify the page size
defined in your document by doing one
of the following:
Select from the list of available sizes in
the Document size menu. (SEF stands
for Short Edge Feed; LEF stands for
Long Edge Feed.)
For information about Document size,
see Booklet Maker Help.
NOTE: This option is only available
when you access Booklet Maker from
the Windows printer driver.
For information about printing custom
page sizes, see Printing from Windows or
Printing from Mac OS.
NOTE: This option is not available for
PCL printing.
Select Define custom size to define a
non-standard size.
When Nested Saddle selected, use this
option to specify the number of sheets
per subset.
For information about nested saddle
booklets, see Booklet Maker Help.
NOTE: This option is not available for
PCL printing.
Orientation displays the aspect ratio
(Portrait or Landscape) defined in your
original document. Use this option to
override the Orientation defined in your
original document.
For information about orientation, see
Booklet Maker Help.
NOTE: This option is only available
when you access Booklet Maker from
the Windows printer driver.
Paper size: Shrink to fit
/Off
On
Page alignment:
Align pages (Win)
Centering Adjustment (Mac)
At the center/At the spine
Layout: Booklet
Layout: Booklet
Shrink to Fit automatically scales down
page content to fit specified Paper size.
When Shrink to fit is turned Off, page
contents print at 100%.
The Align pages option shifts page
content in relation to the horizontal (leftand right- binding) or vertical (topbinding) axis.
Select At the center to position page
content in the center of one-half the
specified Paper size.
Select At the spine to align page content
with the spine.
NOTE: This option is not available for
PCL printing.
For information about Shrink to fit, see
Booklet Maker Help.
NOTE: Shrink to fit is only accessible in
Advanced mode.
NOTE: This option is not available for
PCL printing.
For information about page alignment,
see Booklet Maker Help.
NOTE: This option is not available for
PCL printing.

PRINT OPTIONS 27
Option and available settings Printer driver
location
Page alignment:
Increase gutter by
-50 mm (1 mm increments)
0
-1.97 in (.04 inch increments)
0
Page alignment:
Compensate creep for (Win)
Creep Adjustment (Mac)
/Plain/Thick
Off
Cover Content:
Content input
None (use insert)/
As Separate Page
s
Layout: Booklet
Layout: Booklet
Layout: Booklet
Description Requirements, constraints, and
information
The Increase gutter by option adds extra
white space between adjacent pages to
allow for binding.
For information about gutters, see
Booklet Maker Help.
NOTE: This option is not available for
PCL printing.
NOTE: The Compensate (for) creep
option adjusts the position of page
content to counteract the shift that
occurs when sheets are folded to create
Saddle and Nested Saddle booklets.
For information about creep
compensation, see Booklet Maker Help.
NOTE: This option is not available for
PCL printing.
Select Plain when printing Saddle or
Nested Saddle booklets with a large
number of pages.
Select Thick when printing Saddle or
Nested Saddle booklets on heavyweight
paper.
NOTE: Creep is not a factor in Perfect
booklets.
Content Input (Saddle only) defines
whether a pre-printed cover is inserted, or
separate pages from your original
document are printed as the cover
content your booklet job.
For information about cover options,
see Booklet Maker Help.
NOTE: This option is not available for
PCL printing.
Select None (use insert) to insert a preprinted cover that will be added to your
booklet print job.
Select As Separate Pages to print
individual pages from your document as
the cover content for your booklet.
(Using this setting, it is not possible to
print on the spine.)

PRINT OPTIONS 28
Option and available settings Printer driver
location
Cover Content: Front cover
Print on outside
Print on inside/
Print on both sides/
Do not print
Cover Content: Back cover
Print on outside
Print on inside/
Print on both sides/
Do not print
/
/
Layout: Booklet
Layout: Booklet
Description Requirements, constraints, and
information
Front Cover (Saddle only) defines how
the content of the front cover is printed.
Select Print on outside to print only on
the outside of the front cover (the inside
of the front cover will be blank).
Select Print on inside to print only on the
NOTE: When you add a cover, blank
pages may be added depending on the
allocation of pages to signatures in the
job.
NOTE: This option is not available for
PCL printing.
inside of the front cover (the outside of
the front cover will be blank).
Select Print on both sides to print on
both the inside and outside of the front
cover.
Select Do not print if you do not want
any content printed on the front cover.
Back Cover (Saddle only) defines how
the content of the back cover is printed.
Select Print on outside to print only on
the outside of the back cover (the inside
of the back cover will be blank).
Select Print on inside to print only on the
NOTE: When you add a cover, blank
pages may be added depending on the
allocation of pages to signatures in the
job.
NOTE: This option is not available for
PCL printing.
inside of the back cover (the outside of
the back cover will be blank).
Select Print on both sides to print on
both the inside and outside of the back
cover.
Select Do not print if you do not want
any content printed on the back cover.
Cover Media: Cover Media
Same as body
Cover Media: Booklet Cover
Source
Same as Job
Tray 3/Tray 5 (Bypass)/Tray 6/
Tray 6 (Oversized)/
Tray 7 (Oversized)/
Tray 8 (Inserter)
/Tray 1/Tray 2/
Layout: Booklet
Layout: Booklet
Cover Media (Saddle only) specifies the
media for your booklet print job.
Choose Same as body to use the same
media as the body pages of your job.
Booklet Cover Source (Saddle only)
specifies the tray that contains the Cover
media for your booklet.
NOTE: Cover Media is not an option
for Mac OS.
NOTE: This option is not available for
PCL printing.
NOTE: This option is not available for
PCL printing.

PRINT OPTIONS 29
Gang-up print options
Option and settings
(Default setting underlined)
Gang-up print
Step & repeat/Cut & stack
Paper size
List of available sizes
(8.5x11 (Letter) LEF=default)/
Select From Paper Catalog/
Define custom size
Printer driver
location
Layout:
Gang-up print
Layout:
Gang-up print
Description Requirements, constraints,
and information
Select Step & repeat to speed print a job
by printing two document pages on each
sheet. When the printed sheets are cut in
half, the result is two complete sets of the
same document.
For more information about Gang-up
printing, see page 35.
NOTE: This option is not available for
PCL printing.
Select Cut & stack to speed print a job
by printing two document pages side by
side. When the printed sheets are cut in
half and stacked, the result is one
complete set of the document (in faster
printing time).
Paper size defines the size of the sheet of
paper on which your gang-up job will
print.
To select a paper size, do one of the
following:
Select from the list of available sizes in
the Paper size menu.
Select from Paper Catalog to access a
For information about printing custom
page sizes, see Printing from Windows or
Printing from Mac OS.
For information about using Paper
Catalog, see Utilities and Paper Catalog
Help.
NOTE: This option is not available for
PCL printing.
dynamic database that stores the media
attributes of any paper available for
printing from the Integrated Fiery Color
Server.
Document size
List of available sizes
(8.5x11 (Letter) LEF
Define custom size
=default)/
Layout:
Gang-up print
Select Define custom size to create a
non-standard paper size.
Document size is defined in your
original application’s Page setup (or
Print setup) dialog box.
Use this option to specify the page size
defined in your document by doing one
of the following:
Select from the list of available sizes in
the Document size menu. (SEF stands
for Short Edge Feed; LEF stands for
Long Edge Feed.)
Select Define custom size to define a
non-standard size.
For information about printing custom
page sizes, see Printing from Windows or
Printing from Mac OS.
NOTE: This option is not available for
PCL printing.

PRINT OPTIONS 30
Option and settings
(Default setting underlined)
Orientation
Portrait/Landscape
Shrink to fit
/Off
On
Increase gutter by
0-50 mm (1 mm increments)
0-1.97 in (.04 inch increments)
Duplex
Off/Top-Top
Printer driver
location
Layout:
Gang-up print
Layout:
Gang-up print
Layout:
Gang-up print
Layout:
Gang-up print
Description Requirements, constraints,
and information
Orientation displays the aspect ratio
(portrait or landscape) defined in your
NOTE: This option is not available for
PCL printing.
original application’s Print setup (or
Page setup) dialog box. Use this option
to override, if necessary.
Shrink to fit scales down the document
page to fit the paper size you select.
NOTE: This option is not available for
PCL printing.
When Shrink to fit is set to Off, page
contents print at 100%.
NOTE: Shrink to fit only reduces or
scales down the document page size. It
does not scale up or enlarge.
Increase gutter by adds extra white space
between adjacent pages to allow room
NOTE: This option is not available for
PCL printing.
for trimming or other finishing options.
Select Off for single-sided printing.
Select Top-Top for duplex printing.
NOTE: This option is not available for
PCL printing.

PRINT OPTIONS 31
Additional information
The following sections provide additional information about print options. For more
information about the settings, requirements, and constraints in effect for these options, see
the table that begins on page 9.
Auto Trapping
Trapping is a technique to print some objects slightly larger or smaller than specified in an
application, in order to prevent white edges around the objects. These white edges, or “halos,”
can be caused by factors such as misregistration, the physical properties of the toners, and the
stiffness of the media. The Auto Trapping feature provides you with advanced trapping
settings and gives you full control over their values. For more information, see
Booklet Maker
Booklet Maker is the imposition tool that allows you to quickly print documents in booklet
format, without the need for more involved page imposition programs. Booklet Maker
provides advanced settings, while streamlining the booklet-making process by displaying only
the options and controls relevant to your selections. Booklet Maker is capable of imposing
jobs from nearly any application.
Color Printing.
Booklet Maker can be accessed in the printer driver when you print a job or in Command
WorkStation Job Properties, where you can modify a job’s properties.
NOTE: Booklet Maker options are not available for PCL printing.

PRINT OPTIONS 32
The following booklet layouts are available:
Saddle binding: In Saddle binding, signatures are folded together as a group, and then stapled
or stitched along the center fold, which forms the spine of the booklet.
Perfect binding: In Perfect binding, the signatures are folded individually, and then stacked
together along the common edge, which is flattened and glued to form the spine of the
booklet.
Nested Saddle: The Nested Saddle binding method combines saddle and perfect binding
methods by stacking two or more saddles (also called “groups” or “subsets”) together along
the common fold, then glued together at the fold to form the spine of the booklet.
For Booklet Maker options and available settings, see to the table on page 25.
For information about using Booklet Maker options, see Booklet Maker Help.

PRINT OPTIONS 33
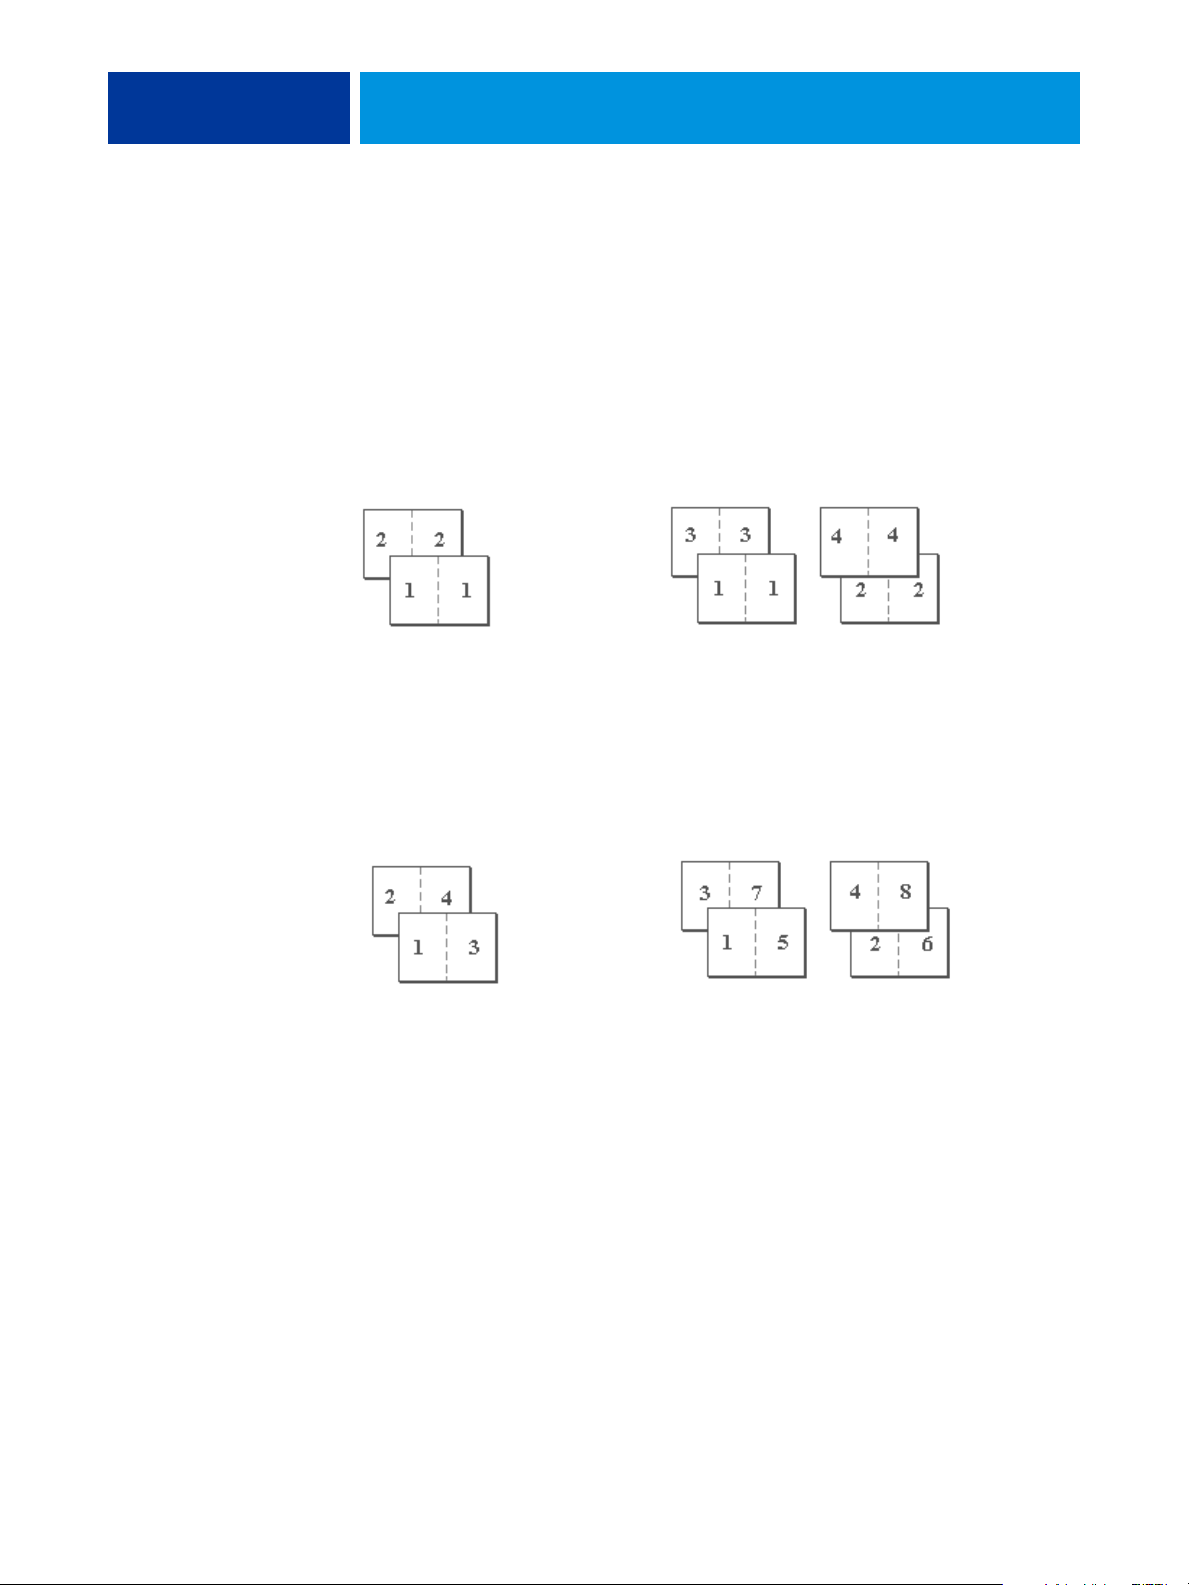
Document size and Paper size
Document size is the page size defined in your application’s Print setup (or Page setup) dialog
box. Paper size is the size of the actual sheet of paper on which your job will print. It may be
useful to think of document size as digital input (the page size defined in your original
document) and Paper size as the physical output (the actual size of the paper in the digital
press tray).
In cases when printing one document page per sheet of paper, Document size is usually the
same as the Paper size. However, Document size may differ from Paper size when printing
booklets or imposing multiple document pages on a single sheet.
The illustrations below show examples of possible relationships between Document size and
Paper size. Note that the orientation of all pages shown is Landscape.
Document size (input) Paper size (output)
Document size is the same
as the Paper size.
Scaling is 100%.
11x17 Document size scaled
to fit on Letter Paper size.
Scaling is 50%.
Letter Letter
A
11x17 Letter
A
A
A
A4 Document size scaled to
fit on A3 Paper size.
Scaling is 141%.
Document size may also differ from Paper size when using the Scale or Scale to Fit options.
The Scale option reduces or enlarges the document page at a specified percent. The Scale to
Fit option automatically reduces or enlarges the document image to fit the selected Paper size.
A4 A3
A
A
For information about Scale and Scale to Fit, see page 41.
For information about Document size and Paper size in booklet printing, see Booklet Maker
Help.

PRINT OPTIONS 34
Duplex
The Integrated Fiery Color Server digital press is equipped for automatic two-sided (duplex)
printing. When the Duplex print option is set to one of the duplex settings, the digital press
automatically turns the paper for printing on the opposite side.
TO PRINT DUPLEX PAGES AUTOMATICALLY
1 Choose Print in your application and locate the Duplex print option (Layout tab).
The location of Integrated Fiery Color Server print options varies, depending on the printer
driver that you use.
2 Choose a Duplex setting.
Top-Top:
image on Side 2.
Top-Bottom : Prints the top of the image on Side 1 on the opposite edge of the page from the
top of the image on Side 2.
The following table illustrates how Duplex settings correspond to printed output:
Portrait
Landscape
3Print the job.
Prints the top of the image on Side 1 on the same edge of the page as the top of the
Top-Top Top-Bottom
2
1 2
1
2
1
2
1
PRINT OPTIONS 35
Gang-up print
The following speed printing methods are available:
NOTE: Gang-up print options are not available for PCL printing.
Gang-Up - Step & repeat: Choose this setting to print a job so that the data on the first page is
duplicated on the first sheet. The next page duplicates the data on the second page, and
so forth. For example, when each of the printed copies is cut in half, the result is two
complete sets of the same document.
Single-sided Double-sided (Duplex)
Front only Front Back
Gang-Up - Cut & stack: Choose this setting to speed print a job so that when the sheets are
stacked and cut from the central position, the job is numbered in order and separated as two
stacks. The order of print is such that when they are cut in half, they can be combined to form
a single complete set of the document, in faster printing time.
Single-sided Double-sided (Duplex)
Front only
Front Back
For available options and settings, see the table on page 29.

PRINT OPTIONS 36
Hole Punching and Punch Position
The following table illustrates the number of holes and punch positions.
NOTE: Punch positions vary according to paper size, paper type, number of pages, and
feed direction.
Punch setting Portrait Landscape
Left Right Top Left Right Top
2 Holes
3 Holes
4 Holes
For information about installing punch finishers and other installable options, see Printing
from Windows and Printing from Mac OS.

PRINT OPTIONS 37
Image Shift
Image Shift allows you to specify how much the image on each page should be shifted, relative
to the X (horizontal) and Y (vertical) axes. Moving the job content in this manner enables you
to allow for various finishing options, such as stapling and binding. Image Shift prevents the
image from being clipped.
NOTE: This option is not available for PCL printing.
NOTE: This option is effective only for jobs in which Pages per sheet is set to 1-up.
TO DEFINE IMAGE SHIFT FOR A PRINT JOB
1 In the printer driver, enable the Image Shift option, and then click Image Shift Options.
2 Select the unit of measurement.
3 Type the Front and Back image shift settings in the X and Y axis fields. You can also use the
arrow buttons to shift the image settings.
NOTE: The maximum value for both X and Y axes is 999.99 points/13.89 inches/352.77 mm.
4 To align front and back images proportionately, select Align front and back images.
5 Click OK.

PRINT OPTIONS 38
Manual Duplex
Manual Duplex printing is supported using either Tray 5 (Bypass), Tray 6 (Oversized) or
Tray 7 (Oversized) as the paper source. When you print a manual duplex job, the Integrated
Fiery Color Server prompts you to perform the manual steps required, and also displays
messages to assist you if you run into errors.
TO PRINT A MANUAL DUPLEX JOB
1 Choose Print in your application.
2 Set the print options as follows:
• Manual Duplex = On
• Face-Down Printing = Face Up
• Paper Source = Tray 5 (Bypass), Tray 6 (Oversized) or Tray 7 (Oversized)
3Print the job.
The even-numbered pages are printed.
4 If you are printing from Tray 5 (Bypass), remove any unused paper from the tray.
5 Notice how the pages are oriented in the output tray before removing them.
6 Turn the pages over so that the printed side faces down and load them back in the same tray
used to print the first side.
Depending on how you load the pages, you can print Side 2 with the same orientation as
Side 1 (Top-Top) or rotated 180 degrees relative to Side 1 (Top-Bottom).
Top-Top Top-Bottom
Portrait
Landscape
1 2
1
1
2
1
2
2
Fo r Top -To p m a n u a l d up l e x i n g , k eep the pages oriented in the same direction as they arrive
in the output tray, except face down. For example, if the image is upside down and the pages
are face up, load them with the image upside down and the pages face down.
Do not rotate the pages. Load them in the same direction (long edge first or short edge first)
as when you printed Side 1.

Top-Top printing
PRINT OPTIONS 39
NOTE: The illustrations below show pages with Portrait orientation printed LEF (Long Edge
Feed).
Top-Bottom printing
Output Tray
Input Tray
For Top-Bottom printing, rotate the pages 180 degrees and turn them face down.
Output Tray
7 For Tray 6 (Oversized), press the Start button on the digital press control panel.
Input Tray
Tray 5 (Bypass) will detect that the pages have been loaded, so you do not need to press Start.
The odd-numbered pages are printed.
NOTE: For jobs imposed using Impose, always flip the pages along the long edge of the page.
Integrated Fiery Color Server messages for manual duplex printing
During the manual duplex process, the Integrated Fiery Color Server displays messages to
help you perform the tasks. These messages are described in the following table:
When this happens This message is displayed
Printing of Side 1 from Tray 6
(or Tray 7) is complete.
Printing of Side 1 is complete. To print Side 2 do the following:
1. Remove Side 1 prints from the Output Tray.
2. Flip the output over and place with the printed side down in
Tray 6 (or Tray 7).
NOTE: If you do not load the correct number of pages, the
Integrated Fiery Color Server prompts you to load the correct
Paper Size and Paper Type.

PRINT OPTIONS 40
When this happens This message is displayed
Printing of Side 1 from Tray 5
(Bypass) is complete.
A paper jam occurs during
printing of Side 2 from Tray 6
(or Tray 7).
A paper jam occurs during
printing of Side 2 from Tray 5
(Bypass).
Printing of Side 1 is complete. To print Side 2 do the following:
1. Remove Side 1 prints from the Output Tray.
2. Flip the output over and place with the printed side down in
Tray 5 (Bypass).
NOTE: If you do not load the correct number of pages, the
Integrated Fiery Color Server prompts you to load the correct
Paper Size and Paper Type.
1. Remove the output from the Output Tray and set it aside.
This output will be combined later with other output to make a
completed stack.
2. Open Tray 6 (or Tray 7).
3. Remove the printed sheets from Tray 6 (or Tray 7) and set aside.
You will be prompted to reload these sheets later.
4. Load blank sheets in Tray 6 (or Tray 7).
5. Close Tray 6 (or Tray 7).
1. Remove the output from the Output Tray and set it aside.
This output will be combined later with other output to make a
completed stack.
2. Remove the printed sheets from Tray 5 (Bypass) and set aside.
You will be prompted to reload these sheets later.
3. Load blank sheets in Tray 5 (Bypass).
The Side 2 pages that had to be
reprinted due to a paper jam have
successfully printed from Tray 6
(or Tray 7).
The Side 2 pages that had to be
reprinted due to a paper jam have
successfully printed from Tray 5
(Bypass).
1. Remove Side 1 prints from the Output Tray.
2. Flip the output over and place on top of the printed sheets
previously removed from Tray 6 (or Tray 7).
3. Open Tray 6 (or Tray 7).
4. Load the whole stack into Tray 6 with the printed side down.
5. Close Tray 6 (or Tray 7).
6. After printing has finished remove the prints from the Output
Tray and combine them with the stack previously set aside.
1. Remove Side 1 prints from the Output Tray.
2. Flip the output over and place on top of the printed sheets
previously removed from Tray 5 (Bypass).
3. Load the whole stack into Tray 5 (Bypass) with the printed side
down.
4. After printing has finished remove the prints from the Output
Tray and combine them with the stack previously set aside.
PRINT OPTIONS 41
Scale
The Scale option allows you to increase or decrease the scale (in the range of 25–400%) of
your print job. The operator can specify a scaling override, but the override is applied to any
scaling value already set in the active job. For example, if a user sends a print job with a scaling
value of 50% and the operator specifies a scale override of 300%, the job is printed at 150%
of the original document size, that is, 50% of 300%.
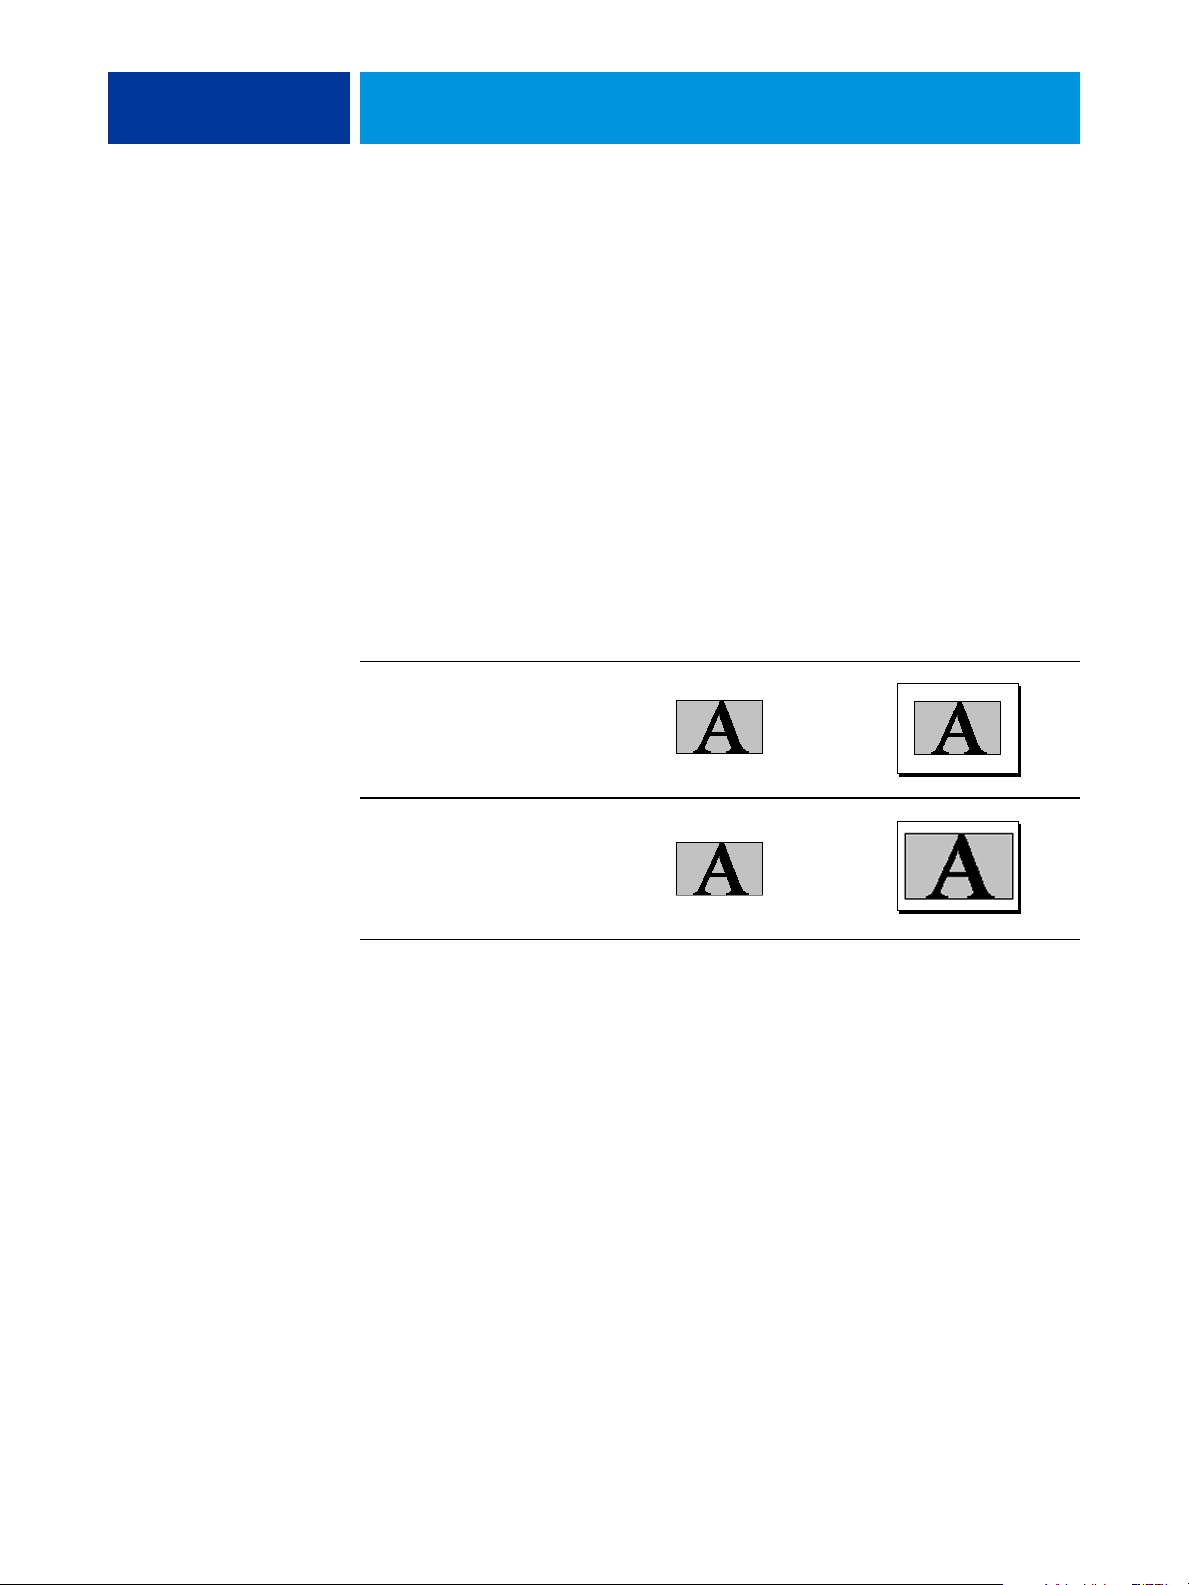
Scale to Fit
This option allows you to scale a job to a paper size different from the image size. When you
set this option to On, the image is increased or reduced in size to fit a paper size you select
from the Page Size option. When this option is set to Off, the original document size is
printed without any scaling, even if you print to a larger paper size.
Scale to Fit set to Off
Scale to Fit set to On
Original size
Letter
Print size
11 x 17

PRINT OPTIONS 42
Secure Print
The Secure Print feature offers a level of security for sensitive or confidential print jobs. This
feature allows you to print your job only when you are present at the copier. When using this
feature, enter a password into the Secure Print field in the printer driver (Job Info tab) before
sending your job to the Integrated Fiery Color Server. To print your Secure Print job, re-enter
the password at the Integrated Fiery Color Server digital press control panel as described in
the following procedure.
TO PRINT A SECURE PRINT JOB
1 Enter a password in the Job Info > Secure Print field in the printer driver.
NOTE: The password is limited to alphanumeric characters (do not use symbols).
For more information about entering the password, see
Printing from Windows or Printing
from Mac OS.
2 Make any other changes to job properties and send your job to the Integrated Fiery Color
Server.
3 At the Integrated Fiery Color Server digital press control panel, select Secure Print and enter
the same password you entered Job Info > Secure Print field of the printer driver.
The print jobs which match the password display in the login window.
4 Select your print job and choose either Print or Delete.
The screen returns to the main pages after 45 seconds without activity.

INDEX
INDEX 43
A
Align front and back images option 15, 37
Auto Trapping option 10, 31
B
binding methods 32
Black Detection option 10
Black Overprint option 10
Black/Text Graphics option 10
Booklet Maker 31
Back Cover option 28
binding methods 32
Booklet Cover Source option 28
booklet type 32
Cover Content option 27
Cover control 25
Cover Media option 28
Creep Adjustment (Mac) 27
Creep compensation (Win) 27
Front Cover option 28
Increase gutter by option 27
nested saddle binding 32
Orientation 26
Page Alignment 26
Page size 26
Paper size 29
Paper size for 2-up 25
perfect binding 32
saddle binding 32
Shrink to Fit 26
Brightness option 11
C
CMYK Simulation Method option 11
CMYK Simulation Profile option 11
Collate option 11
Color Mode option 12
ColorWise Pro Tools
job overrides 8
Combine Separations option 12
Compensate creep for option 27
Composite Overprint 12
Copies option 12
Cover Content Input option 27
Cover Media option 28
Create Master option 13
Creep Adjustment 27
Creep compensation 27
D
Document Size option 13
Duplex option 13, 34
F
Face-Down Printing option 13
Fasten Mode option 13
Folding option see Single Page Folding
folding see Fasten Mode
FreeForm
Create Master option 13
Preview Master option 14
Print Master 14
Use Master option 14
G
Gang-up print 35
Cut & stack 35
Document size 29
duplex option 30
Gutter option 30
Increase gutter by option 30
Orientation 30
Shrink to fit option 30
Step & repeat 35
type 29
Gloss Level option 14
gutters 30
H
Hole Punching option 14, 36
Hot Folders
job overrides 8
I
I’m a Guest option 23
Image Quality option 14

INDEX 44
Image Shift 15
Align front and back images 15, 37
defining 37
Image Smoothing 15
Increase gutter by option 27
Instructions field 15
J
job overrides
Auto Trapping option 10
Black Detection option 10
Black Overprint option 10
Black/Text Graphics option 10
Brightness option 11
CMYK Simulation Method option 11
CMYK Simulation Profile option 11
Collate option 11
Color Mode option 12
Combine Separations option 12
Copies option 12
Create Master option 13
Document Size option 13
Duplex option 13, 34
Image Quality option 14
Image Shift 15
Media Type option 15
Media Weight option 15
Mixed Media option 16
Orientation option 16
Paper Size option 17, 33
Preview Master option 14
Print Master option 14
Print Mode option 12
print settings 8
Rendering Style option 20
RGB Separation option 20
RGB Source option 20
Rotate 180° option 20
Scale option 21
Slip Sheet option 21
Spot Color Matching option 21
Stapler Mode option 22
Substitute Colors option 22
Text/Graphics Edge Enhancement
option 22
Text/Graphics Quality option 22
Tray Alignment option 22
Use Master option 14
Use PDF/X Output Intent 23
Use Windows Login option 23
M
Manual Duplex option 15, 38
Media Type option 15
Media Weight option 15
Mirror option 16
Mixed Media option 16
N
N-up layout see Pages per sheet
Nested Saddle binding 32
Notes field 16
O
Offset Mode option 16
Orientation option 16
Output Profile option 16
Output Tray 16
overrides, of job settings 8
P
Page Order option 17
Pages per sheet option 17
Paper Size option 17, 33
Paper Source option 17
Password (User Authentication) 23
PCL (Printer Control Language) 7
PCL printer description files, see PDDs
PDDs 7
Perfect bin ding 32
PostScript printer description files, see PPDs
PostScript printer drivers
explained 7
PPDs (PostScript printer description files)
options 8
Preview Master option 14
Print Border option 18
Print gray using black only (CMYK) 18
Print gray using black only (RGB) 18
Print Master option 14

INDEX 45
Print Mode option 12
Print Queue Action option 19
Printer Control Language, see PCL
printer default settings
where to set 8
Printer Screen Mode option 19
printing duplex pages 13, 34
Punch Position option 19, 36
Pure Black see Black Text/Graphics
R
Remove White PPT Background option 19
Rendering Style option 20
RGB Separation option 20
RGB Source option 20
Rich Black see Black Text/Graphics
RIPping 7
Rotate 180° option 20
S
Saddle binding 32
Save User Info option 23
Scale option 21, 41
Scale to Fit option 21, 41
Secure Print 21
Shrink to fit 30
Single Page Folding option 21
Slip Sheet option 21
speed printing
see Gang-up print
speed printing see Gang-up print
Spot Color Matching option 21
Stapler Mode option 22
stapling see Fasten Mode
Substitute Colors option 22
T
Text/Graphics Edge Enhancement option 22
Text/Graphics Quality option 22
Transparency Interleave Paper Source 22
Transparency Interleaving option 22
Tray Alignment option 22
U
Units option 15
Use Master option 14
Use PDF XObject option 23
Use PDF/X Output Intent 23
Use Windows Login option 23
User Authentication
guest printing 23
password 23
Save User Info option 23
Use Windows Login 23
Username 24
V
Variable Data Printing (VDP)
Use PDF XObjects 23
Variable Data Printing (VDP) see FreeForm
W
Watermarks option 24

 Loading...