

Page 1

User Guide
English
731 00216A-EN
Spire CXP8000 Color Server for
Xerox DocuColor 8000 Digital
Press
version 1.0
www.creo.com
Page 2

This page is intentionally left blank.
Page 3

Spire CXP8000 color server
version 1.0
User Guide
Page 4

This page is intentionally left blank.
Page 5

Copyright
Trademarks
Copyright © 2004 Creo Inc. All rights reserved.
No copying, distribution, publication, modification, or incorporation of this document, in whole or part, is
permitted without the express written permission of Creo. In the event of any permitted copying, distribution,
publication, modification, or incorporation of this document, no changes in or deletion of author attribution,
trademark legend, or copyright notice shall be made.
No part of this document may be reproduced, stored in a retrieval system, published, used for commercial
exploitation, or transmitted, in any form by any means, electronic, mechanical, photocopying, recording, or
otherwise, without the express written permission of Creo Inc.
This document is also distributed in Adobe Systems Incorporated's PDF (Portable Document Format). You may
reproduce the document from the PDF file for internal use. Copies produced from the PDF file must be
reproduced in whole.
. . . . . . . . . . . . . . . . . . . . . . . . . . . . . . . . . . . . . . . . . . . . . . . . . . . . . . . . . . . . . . . . . . . . . . . . . . . . . . . . . . . . . . . . . . . . . . . . . . . .
The Creo wordmark, Creo logo, and the names of the Creo products and services referred to in this document are
trademarks of Creo Inc.
Adobe, Acrobat, and the Acrobat logo are registered trademarks of Adobe Systems Incorporated, and are
registered in the U.S. Patents and Trademark Office and may be registered in other jurisdictions.
Apple, AppleTalk, AppleShare, EtherTalk, LocalTalk, Macintosh, and LaserWriter are trademarks of Apple
Computer, Inc.
Microsoft, Windows, Windows 2000, and Windows NT are trademarks or registered trademarks of Microsoft
Corp.
XEROX®, The Document Company ®, the digital X®, and DocuColor are trademarks of XEROX
CORPORATION.
Other brand or product names are the trademarks or registered trademarks of their respective owners.
. . . . . . . . . . . . . . . . . . . . . . . . . . . . . . . . . . . . . . . . . . . . . . . . . . . . . . . . . . . . . . . . . . . . . . . . . . . . . . . . . . . . . . . . . . . . . . . . . . . .
FCC Compliance
The Creo equipment referred to in this document complies with the requirements in Part 15 of FCC Rules for a
Class A computing device. Operation of the Creo equipment in a residential area may cause unacceptable
interference to radio and TV reception, requiring the operator to take whatever steps are necessary to correct the
interference.
. . . . . . . . . . . . . . . . . . . . . . . . . . . . . . . . . . . . . . . . . . . . . . . . . . . . . . . . . . . . . . . . . . . . . . . . . . . . . . . . . . . . . . . . . . . . . . . . . . . .
Limitation of Liability
The product, software or services are being provided on an "as is" and "as available" basis. Except as may be stated
specifically in your contract, Creo Inc. expressly disclaims all warranties of any kind, whether express or implied,
including, but not limited to, any implied warranties of merchantability, fitness for a particular purpose and noninfringement.
You understand and agree that Creo Inc. shall not be liable for any direct, indirect, incidental, special,
consequential or exemplary damages, including but not limited to, damages for loss of profits, goodwill, use, data
or other intangible losses (even if Creo has been advised of the possibility of such damages), resulting from: (i)
the use or the inability to use the product or software; (ii) the cost of procurement of substitute goods and
services resulting from any products, goods, data, software, information or services purchased; (iii) unauthorized
Page 6

Patents
access to or alteration of your products, software or data; (iv) statements or conduct of any third party; (v) any
other matter relating to the product, software, or services.
The text and drawings herein are for illustration and reference only. The specifications on which they are based
are subject to change. Creo Inc. may, at any time and without notice, make changes to this document. Creo Inc.,
for itself and on behalf of its subsidiaries, assumes no liability for technical or editorial errors or omissions made
herein, and shall not be liable for incidental, consequential, indirect, or special damages, including, without
limitation, loss of use, loss or alteration of data, delays, or lost profits or savings arising from the use of this
document.
.. . . . . . . . . . . . . . . . . . . . . . . . . . . . . . . . . . . . . . . . . . . . . . . . . . . . . . . . . . . . . . . . . . . . . . . . . . . . . . . . . . . . . . . . . . . . . . . . . . . .
This product is covered by one or more of the following U.S. patents:
RE37,376
4,558,302
4,743,091
4,992,864
5,049,901
5,079,721
5,103,407
5,111,308
5,113,249
5,122,871
5,124,547
5,132,723
5,150,225
5,153,769
5,155,782
5,157,516
5,208,818
5,208,888
5,247,174
5,249,067
5,283,140
5,291,273
5,323,248
.. . . . . . . . . . . . . . . . . . . . . . . . . . . . . . . . . . . . . . . . . . . . . . . . . . . . . . . . . . . . . . . . . . . . . . . . . . . . . . . . . . . . . . . . . . . . . . . . . . . .
Creo Inc.
3700 Gilmore Way
Burnaby, B.C., Canada
V5G 4M1
Tel: +1.604.451.2700
Fax: +1.604.437.9891
http://www.creo.com
.. . . . . . . . . . . . . . . . . . . . . . . . . . . . . . . . . . . . . . . . . . . . . . . . . . . . . . . . . . . . . . . . . . . . . . . . . . . . . . . . . . . . . . . . . . . . . . . . . . . .
Internal 731 00216A-EN
Revised August 2004
5,325,217
5,339,176
5,343,059
5,355,446
5,359,451
5,359,458
5,367,360
5,384,648
5,384,899
5,412,491
5,412,737
5,420,702
5,420,722
5,459,505
5,473,733
5,481,379
5,488,906
5,497,252
5,508,828
5,509,561
5,517,359
5,519,852
5,526,143
5,532,728
5,561,691
5,568,595
5,576,754
5,579,115
5,592,309
5,594,556
5,600,448
5,608,822
5,615,282
5,625,766
5,636,330
5,649,220
5,650,076
5,652,804
5,680,129
5,691,823
5,691,828
5,696,393
5,699,174
5,699,740
5,708,736
5,713,287
5,742,743
5,764,374
5,764,381
5,771,794
5,785,309
5,813,346
5,818,498
5,854,883
5,861,904
5,861,992
5,875,288
5,894,342
5,900,981
5,934,196
5,942,137
5,946,426
5,947,028
5,958,647
5,966,504
5,969,872
5,973,801
5,986,819
5,995,475
5,996,499
5,998,067
6,003,442
6,014,471
6,016,752
6,031,932
6,043,865
6,060,208
6,063,528
6,063,546
6,072,518
6,090,529
6,096,461
6,098,544
6,107,011
6,112,663
6,115,056
6,121,996
6,130,702
6,134,393
6,136,509
6,137,580
6,147,789
6,158,345
6,159,659
6,164,637
6,180,325
6,181,362
6,181,439
6,186,068
6,189,452
6,191,882
6,204,874
6,208,369
6,214,276
6,217,965
6,260,482
6,266,080
6,266,134
6,267,054
6,268,948
6,283,589
6,295,076
6,299,572
6,318,266
6,352,816
6,353,216
6,366,339
6,371,026
6,377,739
6,387,597
6,396,422
6,396,618
6,407,849
6,414,755
6,422,801
6,435,091
6,441,914
6,450,092
6,456,396
6,476,931
6,477,955
6,509,903
6,541,181
6,545,772
6,564,018
Page 7

Environment Management System (EMS)
EMS Overview
Creo is committed to the Environment Management System (EMS). According to this policy, we are
committed to keeping customers and service engineers informed about the principles of handling
company products with an emphasis on environmental conservation.
The Triple-R principles are
reduce, reuse, and recycle.
Any item that can be recycled should be recycled and any item that can be reused should be reused, to
reduce the quantities of trash that cities must handle.
Recycling
Used items such as paper, plastic, electronic parts, and glass – should be sent for recycling.
Packaging Materials
Packaging materials should be kept at the customer’s premises. For disposal, they should be sent to a
plant for paper, carton, and wood recycling.
Product Recycling and Disposal
Xerox operates a worldwide equipment take back and reuse/recycle program. Contact your Xerox sales
representative (1-800-ASK-XEROX) to determine whether this Xerox product is part of the program.
For more information about Xerox environmental programs, visit www.xerox.com/environment.
If you are managing the disposal of your Xerox product, please note that the product contains lead,
mercury and other materials whose disposal may be regulated due to environmental considerations.
The presence of lead and mercury is fully consistent with global regulations applicable at the time that
the product was placed on the market. For recycling and disposal information, contact your local
authorities. In the United States, you may also refer to the Electronic Industries Alliance web site:
www.eiae.org.
Page 8

This page is intentionally left blank.
Page 9

Contents
1 Welcome 1
Welcome to the Spire CXP8000 Color Server User Guide.......................................................................... 2
Overview of Guide.................................................................................................................................... 3
Overview of Spire CXP8000 Color Server .................................................................................................. 4
Hardware and Software Components ................................................................................................6
New Features..................................................................................................................................... 6
Features............................................................................................................................................. 8
Supported Formats .......................................................................................................................... 10
Workflow ........................................................................................................................................ 10
Data Flow ........................................................................................................................................ 12
Spire CXP8000 Color Server Network Printers .................................................................................. 13
2 Getting Started 15
Turning On the Spire CXP8000 Color Server ........................................................................................... 16
Opening the Workspace From the Start Menu ................................................................................. 17
Logging On ..................................................................................................................................... 18
The Workspace....................................................................................................................................... 19
Customizing the Workspace View.................................................................................................... 20
The Server and Printer Monitors....................................................................................................... 21
The Settings Window ............................................................................................................................. 25
The Resource Center .............................................................................................................................. 26
The Job Parameters Window .................................................................................................................. 27
Handling Conflicts .................................................................................................................................. 31
Basic Job Workflow ................................................................................................................................ 31
Submitting....................................................................................................................................... 32
Processing ....................................................................................................................................... 33
Storage............................................................................................................................................ 34
Resubmitting ................................................................................................................................... 35
Turning Off the Spire CXP8000 Color Server........................................................................................... 36
3 Working From a Client Workstation 37
Default Network Printers ........................................................................................................................ 38
Setting PPD File Parameters .................................................................................................................... 39
Working From Windows Client Workstations.......................................................................................... 48
Defining a Printer on Windows Client Workstations ......................................................................... 48
Printing From Windows ................................................................................................................... 64
Working From Macintosh Client Workstations ........................................................................................ 65
Defining a Printer on Macintosh Client Workstations ....................................................................... 66
Printing from a Macintosh ............................................................................................................... 75
Spire Web Center ................................................................................................................................... 76
The Web Viewer .............................................................................................................................. 78
Page 10

viii Spire CXP8000 Color Server User Guide
Downloads ...................................................................................................................................... 83
Links................................................................................................................................................ 84
Using Hot Folders ................................................................................................................................... 85
Hot Folder File Formats .................................................................................................................... 86
Hot Folders and Brisque or Prinergy jobs (GAP Formats) ................................................................... 86
Using Hot Folders from Client Workstations..................................................................................... 86
LPR Printing with the Spire CXP8000 Color Server .................................................................................. 91
Setting up an LPR Printer in Windows NT 4.0................................................................................... 91
Setting up an LPR Printer in Windows 2000 and Windows XP.......................................................... 97
Windows NT, Windows 2000, Windows XP Command Line .......................................................... 105
Setting up an LPR Printer in Macintosh OS X (10.2)........................................................................ 106
Using the Choose Spire Over IP Utility to set up an LPR Printer in Macintosh OS 9 .......................... 108
Printing from Linux ........................................................................................................................ 114
Defining a Printer on UNIX Client Workstations ............................................................................. 117
UNIX Connectivity ................................................................................................................................ 118
Installing the SFU 3.0 Software ...................................................................................................... 118
Increasing NFS Performance Using the Windows Registry............................................................... 121
Creating a File-name Translation File.............................................................................................. 121
Configuring NFS Server Settings with SFU...................................................................................... 123
Setting Up Windows SFU for Brisque ............................................................................................. 124
Brisque Workstation Installation and Configuration Procedures...................................................... 132
Configuring and Setting up NDS .......................................................................................................... 136
Defining NDS Printer Queues in the NDS Tree....................................................................................... 137
Using the Novell NetWare Administrator Application ..................................................................... 137
Using the NDS PConsole................................................................................................................ 149
Configuring IPX Printing ....................................................................................................................... 150
Installing the Printer Drivers on a Novell Client Using the Adobe PS Application .................................... 152
4 Basic Workflows 153
Importing and Printing Jobs.................................................................................................................. 154
Importing Files............................................................................................................................... 154
Reprinting Jobs..................................................................................................................................... 156
Basic Settings ....................................................................................................................................... 156
The Print Settings Tab.................................................................................................................... 157
The Paper Stock Tab ...................................................................................................................... 166
The Print Quality Tab ..................................................................................................................... 175
5 Managing Jobs 185
Overview.............................................................................................................................................. 186
Managing the Job Queues.................................................................................................................... 186
The Queues Window ..................................................................................................................... 188
Status Information......................................................................................................................... 190
Batching Jobs ................................................................................................................................ 191
Changing the Order of Jobs in the Queues .................................................................................... 192
Suspending and Resuming Queues ................................................................................................ 192
Page 11

Contents ix
Aborting a Running Job ................................................................................................................. 193
Moving a Waiting Job to the Storage Window............................................................................... 194
Viewing and Editing Job Parameters .............................................................................................. 195
Running a Rush Job ....................................................................................................................... 195
Deleting a Job................................................................................................................................ 196
Managing the Storage Window............................................................................................................ 196
Discarding RTP Information............................................................................................................ 199
Handling Jobs in the Storage Window ........................................................................................... 199
Job Editor ............................................................................................................................................. 203
Navigation Buttons ........................................................................................................................ 203
Previewing the Job......................................................................................................................... 203
Viewing Pages in the Job Editor ..................................................................................................... 204
Editing an RTP Job ......................................................................................................................... 209
Job Accounting .................................................................................................................................... 212
Viewing the Accounting Information ............................................................................................. 213
Setting the Accounting/Message Viewer ........................................................................................ 215
Printing and Exporting the Accounting Log .................................................................................... 216
Managing Virtual Printers ..................................................................................................................... 218
Job Flow............................................................................................................................................... 222
Job Ticket Report.................................................................................................................................. 223
6 Production Printing 225
Imposition Workflow ............................................................................................................................ 226
The Imposition Tab ........................................................................................................................ 227
Imposition Templates..................................................................................................................... 238
Editing Imposition Jobs .................................................................................................................. 247
High-Resolution Workflow.................................................................................................................... 248
Creo APR....................................................................................................................................... 249
OPI ................................................................................................................................................ 252
Creo APR and OPI File Formats....................................................................................................... 254
Preparing to Print Using Creo APR or OPI ....................................................................................... 254
Printing with Creo APR or OPI........................................................................................................ 255
Sample Job: Printing a Brochure Using the Creo APR Workflow ..................................................... 256
PDF Workflow ...................................................................................................................................... 257
Export as PDF2Go .......................................................................................................................... 260
Page Exceptions.................................................................................................................................... 263
The Exceptions Tab ........................................................................................................................ 263
Using Page Exception Workflows ................................................................................................... 267
Dynamic Page Exceptions ..................................................................................................................... 275
Setting the Spire CXP8000 Color Server for Dynamic Page Exceptions............................................ 275
Adding Dynamic Page Exceptions in PostScript and Variable Print Specification Formats ................. 276
Adding Dynamic Page Exceptions in PDF........................................................................................ 277
Adding Dynamic Page Exceptions in VIPP Format ........................................................................... 279
Printing Tabs Using the Dynamic Page Exceptions Workflow .......................................................... 281
Tips and Limitations ....................................................................................................................... 284
The Finishing Tab.................................................................................................................................. 285
Page 12

x Spire CXP8000 Color Server User Guide
Admin. Page.................................................................................................................................. 285
Slip Sheet ...................................................................................................................................... 286
Front Cover ................................................................................................................................... 288
Back Cover .................................................................................................................................... 289
Finisher.......................................................................................................................................... 291
Fonts.................................................................................................................................................... 294
Font List ........................................................................................................................................ 294
Managing Fonts on the Spire CXP8000 Color Server...................................................................... 297
Downloading Fonts ....................................................................................................................... 298
Substituting Fonts.......................................................................................................................... 302
7 Color Workflow 303
Calibration ........................................................................................................................................... 304
Guidelines for Successful Calibration ............................................................................................. 305
The Calibration Process.................................................................................................................. 305
Calibrating the DTP32HS Densitometer.......................................................................................... 306
Color Calibration Methods ............................................................................................................ 309
Calibrating the Spire CXP8000 Color Server................................................................................... 311
Reading Color Density Data ........................................................................................................... 325
Printing the Job with the Calibration Table .................................................................................... 327
Default Color Flow ............................................................................................................................... 328
Color Mode................................................................................................................................... 332
RGB Workflow .............................................................................................................................. 333
CMYK Workflow ........................................................................................................................... 334
Spot Workflow .............................................................................................................................. 337
Destination Profile ......................................................................................................................... 338
Screening ...................................................................................................................................... 339
Calibration .................................................................................................................................... 341
Ink Saving (GCR)............................................................................................................................ 342
Color Adjustments......................................................................................................................... 344
Color Tools........................................................................................................................................... 346
Profile Manager............................................................................................................................. 346
Spot Color Editor and Workflow.................................................................................................... 351
Gradation Tool .............................................................................................................................. 354
8 Graphic Arts Workflow 365
Printing PrePress Files - GAP Files .......................................................................................................... 366
Importing GAP Files ....................................................................................................................... 366
Supporting GAP Files ..................................................................................................................... 366
GAP File Structure ......................................................................................................................... 367
Preflight Check..................................................................................................................................... 368
Preflight Report ............................................................................................................................. 369
Export as Creo Synapse InSite Job......................................................................................................... 373
Page 13

Contents xi
9 VI Workflow 375
VI Overview .......................................................................................................................................... 376
VI Document Formats ........................................................................................................................... 377
Creo Variable Print Specification .................................................................................................... 378
VIPP............................................................................................................................................... 379
VIPP 2001 and PPML...................................................................................................................... 381
PostScript Files ............................................................................................................................... 381
Using Creo Variable Print Specification to Print a VI Job ........................................................................ 381
Useful VI Print Options................................................................................................................... 382
Managing VI Elements.......................................................................................................................... 385
Deleting VI Elements...................................................................................................................... 386
Archiving VI Elements .................................................................................................................... 387
Retrieving VI Elements ................................................................................................................... 387
Applying VI Structure to Large Files (Split to Booklets)........................................................................... 389
10 System Administration 391
Setting Up and Configuring the Spire CXP8000 Color Server ................................................................ 392
Server Setup .................................................................................................................................. 392
Network Setup .............................................................................................................................. 395
Remote Tools Setup....................................................................................................................... 399
Security ......................................................................................................................................... 402
System Disks.................................................................................................................................. 404
Backing up the Configuration ........................................................................................................ 405
Localization ................................................................................................................................... 409
Pre-RIP Preview .............................................................................................................................. 410
General Defaults............................................................................................................................ 411
Print Queue Manager .................................................................................................................... 411
Color ............................................................................................................................................. 413
Messages....................................................................................................................................... 416
View Configuration ....................................................................................................................... 418
System Messages.................................................................................................................................. 419
The Alerts Window ........................................................................................................................ 419
Job History..................................................................................................................................... 421
The Message Viewer...................................................................................................................... 422
Glossary 425
Index 437
Page 14

This page is intentionally left blank.
Page 15

Welcome
Welcome to the Spire CXP8000 Color Server User Guide ....................2
Overview of Guide ..............................................................................3
Overview of Spire CXP8000 Color Server.............................................4
Page 16

2 Chapter 1 – Welcome
Welcome to the Spire CXP8000 Color Server User Guide
Welcome to your Spire CXP8000 Color Server User Guide. This user guide
provides you with information about the Xerox DocuColor 8000 Digital
Press.
The Spire CXP8000 color server is a powerful, comprehensive color server
that provides high throughput and print predictability to digital
workflows. In combination with the Xerox DocuColor 8000 Digital Press,
the Spire CXP8000 color server effectively addresses the growth of ondemand printing needs and delivers the best output quality available.
Throughout this guide, we look forward to supporting you all the way
from prepress to print.
This user guide will help you operate the Spire CXP8000 color server. It
can also be used as a reference guide for questions or procedures. Study this
user guide to take full advantage of the many unique and advanced features
of the Spire CXP8000 color server.
This user guide is for Spire CXP8000 color server operators and system
administrators. This guide explains how you can quickly and easily print
from the Spire CXP8000 color server or from a client workstation. Step-bystep procedures are included for new and occasional Spire CXP8000 color
server users. Detailed information is provided for users who require indepth knowledge of the Spire CXP8000 color server.
Page 17

Overview of Guide 3
Overview of Guide
Table 1: Guide Overview
Chapter Contents Description
Chapter 1 Welcome This chapter introduces the guide and the Spire
CXP8000 color server features and workflows.
Chapter 2 Getting Started This chapter explains how to turn on the Spire
CXP8000 color server and provides explanations
about the Spire CXP8000 color server workspace and
main windows.
Chapter 3 Working from a Client
Wo r ks t a t io n
This chapter explains how set up Windows® and
Macintosh® client workstations and how to configure
LPR printing. It also explains how to setup and
configure Novell Directory Services.
Chapter 4 Basic Workflows This chapter explains how to perform basic
workflows in the Spire CXP8000 color server, such as
importing and printing jobs, and how to set basic
parameters in the Print Settings, Paper Stock and
Print Quality Tab.
Chapter 5
Managing Jobs This chapter explains how to manage jobs in the
Queue Manager and in the Storage window. It also
explains
how to export jobs to an InSite server and
how to use the Job Preview & Editor tool and the
Thumbnail window. A section about managing disk
space is also provided.
Chapter 6
Production Printing This chapter provides the workflows for imposition,
high resolution, PDF, and page exception (manual/
dynamic) print jobs. In addition it describes how to
select finishing options and work with fonts.
Chapter 7
Color Workflow This chapter explains how to work with color in the
Spire CXP8000 color server, and includes calibration
and RGB and CMYK workflows. It also explains how
to adjust colors, and to use color tools and post-RIP
controls.
Page 18

4 Chapter 1 – Welcome
Table 1: Guide Overview
Chapter Contents Description
Chapter 8
Graphic Arts Workflow This chapter contains the graphic arts workflow,
which includes importing and supporting Graphic
Art Port (GAP) files, performing a pre-flight check,
and the Creo® Network Graphic Production
workflow.
Chapter 9
Variable Information
Wo r kf l o w
This chapter contains the procedure for printing
variable information jobs, from managing the VI
data to converting PostScript® files to VI by splitting
the file into a booklet.
Chapter 10
System Administration This chapter explains how to administrate your
system using the Administration window utilities.
Overview of Spire CXP8000 Color Server
The Spire CXP8000 color server is an on-demand pre-press system that
uses Creo Spire advanced pre-press technologies, to drive a Xerox
DocuColor 8000 Digital Press.
As an optimal digital color solution for printers, the Spire CXP8000 color
server enables you to print from Windows, Macintosh, and UNIX® client
workstations. The Spire CXP8000 color server processes image files in
page-description language (PDL) formats—for example, PostScript, PDF,
and Variable Information—using RIP (Raster Image Processor)
technology. The system converts image files into a suitable RTP (Ready-ToPrint) format for direct, high-quality digital printing. The Spire CXP8000
color server also streamlines the printing process by allowing printing with
preset workflows.
In combination with the Xerox DocuColor 8000 Digital Press, the Spire
CXP8000 color server enables you to efficiently print flyers, brochures,
pamphlets, dummy catalogs, short-run trials, and print-on-demand
publications. When installed as a fast, network printer with the Spire
CXP8000 color server, the Xerox DocuColor 8000 Digital Press prints up
to 80 full-color A4 (210mm x 297mm) or Letter (8.5 inches x 11inches)
pages per minute.
Page 19
Overview of Spire CXP8000 Color Server 5
The Spire CXP8000 color server combines RIP functionalities,
automation, control tools and special hardware development capabilities
with PC architecture.
Spire CXP8000 color server for Xerox DocuColor 8000 Digital Press
WARNING: A shielded ethernet cable must be used from the Token Ring board
to the Token Ring Hub to maintain compliance with Council Directive 89/336/
EEC.
Page 20

6 Chapter 1 – Welcome
Hardware and Software Components
The Spire CXP8000 color server is a dedicated Creo platform running in a
Windows 2000 environment.
The Spire CXP8000 color server includes:
• Creo hardware, including the interface board
• Software, including:
Creo Application Software
Windows 2000 Professional Operating System
Adobe® Acrobat® version 5.0
New Features
The new version of the Spire CXP8000 color server includes the following
new features:
• New GUI Design
The Spire CXP8000 color server graphic user interface has been
updated to a new design with new icons and a new feel that is moreuser-friendly. New features of the GUI include new options, such as
user profiles and preference settings.
• Security Features
New and improved security features in the Spire CXP8000 color server,
include access control, removable disk and disk wipe options.
• Client Tools
The following have been added for client workstations:
Font downloader for Windows fonts - The Spire CXP8000 color
server provides a special hot folder for downloading fonts from a
Windows client workstation. The hot folder is published in the
Spire CXP8000 color server
D:\HotFolders\HF_FontDownLoader.
Page 21

Overview of Spire CXP8000 Color Server 7
You can use the HF_FontDownLoader hot folder to install new or
missing fonts to the Spire CXP8000 color server fonts dictionary.
The fonts are installed when you drag them to the hot folder.
XPIF support - The Spire CXP8000 color server can receive Xerox
Programming Information Format (XPIF), and automatically
convert this format to Spire CXP8000 color server job parameters.
UNIX connectivity – The NFS server enables the user to mount the
Spire shared/hot folder
• Color and Quality Enhancements
The following color and quality enhancements have been added:
Import RGB profiles – RGB source profiles can be imported via
Profile Manager
Destination profile – Mapping to destination profiles according to
paper sets
• Feature Enhancements
The following feature enhancements have been added:
Dynamic page exceptions - More dynamic page exception
commands within a job are supported, True Inserts within a job,
Plex SPD commands, and Support XRX commands in PDF files.
The
Preflight parameter enables you to check if your file includes
dynamic page exception commands.
Image position on a page level - The image position tool enables
you to shift an image on a specific page or range of pages.
Pre-separated files - The Spire CXP8000 color server now supports
pre-separated PostScript file and DCS file.These files are printed as
composite files.
APR enhancements - The HiRes Path dialog box now includes the
Search in the input folder check box. The Spire CXP8000 color
server first searches for high-resolution images in the same folder as
the PDL file, and then in the
D:\Shared\High Res folder.
Page 22

8 Chapter 1 – Welcome
Features
The Spire CXP8000 color server provides the following:
• Creating jobs in RTP format
Using the Spire CXP8000 color server, RTP files can be created and
stored on the Spire CXP8000 color server itself. This enables you to
print RTP data at any time without further processing.
• Powerful document printing capabilities
In combination with the Xerox DocuColor 8000 Digital Press, the
Spire CXP8000 color server enables complete printing and processing
of documents, including the production of covers and pages on
different paper stocks.
• Enhanced job editing
The Spire CXP8000 color server enables you to edit jobs, both pre- and
post-RIP. Pre-RIP editing includes full Adobe Acrobat functionality
including: deletion, extraction, rotating, adding, and cropping of
pages. Post-RIP editing includes deleting job pages and merging pages
from different jobs to a new job. This minimizes the need to re-RIP
jobs.
• RIP - Adobe Postscript Level III and Extreme Certified technologies
The Spire CXP8000 color server uses the industry-standard Adobe RIP,
with enhancements for Continuous Tone and Linework. Data are
processed separately as Continuous Tone and Vector Data layers for
increased efficiency and merged during printing.
• Ready-to-Print job preview and editing
The Spire CXP8000 color server enables you to preview RTP jobs up to
pixel levels to see all job details and to verify job quality and content
post-RIP. It is also possible to view a thumbnail list of job pages, or the
actual raster pages.
• Job management
The Spire CXP8000 color server enables you to monitor job progress
during all stages of printing. Among other functions, you can promote,
demote, delete, monitor the import process, and estimate when a job
will be fully imported. You can also abort jobs during RIPing or
printing, as well as archive and retrieve jobs.
• Enhanced text and line art quality
You can choose superior text quality with the Creo proprietary
algorithm. This function enhances the quality of diagonal lines,
Page 23

Overview of Spire CXP8000 Color Server 9
borders, blends, and small text. The Creo anti-aliasing causes blends to
appear smooth with no banding and diagonal lines to appear crisp
without jagged edges (do not use this option with VI jobs).
You can choose superior image quality with the Creo proprietary
smooth scale algorithm. This function improves the quality of images
containing various resolutions (such as images taken from the
Internet).
• Trapping - FAF (Full Auto Frame)
The Spire CXP8000 color server uses the well-known Creo algorithm
to trap job information easily. The FAF algorithm has been tailored for
digital printing.
• Imposition
The Spire CXP8000 color server offers a full suite of Imposition
functions, based on the well-known Ultimate Imposition engine. On
the Spire CXP8000 color server, imposition is robust with userfriendly operation. And only the Spire CXP8000 color server enables
imposition of Variable Information jobs.
• Color Management
The Spire CXP8000 color server has a number of color management
tools and utilities that will help you to improve the quality of your jobs.
The Spire CXP8000 color server enables you to modify color on-thefly, even for images that have already been RIPped. This functionality
includes application of brightness and contrast adjustments, as well as
changes to image gradation and calibration.
• Variable Information printing
The Spire CXP8000 color server enables processing of Creo Variable
Print Specification and Xerox VIPP file formats and PPML for efficient
VI (Variable Information) processing and printing. Repeated elements
are RIPped once and cached, so there is no need to continually re-RIP
them.
The Spire CXP8000 color server also provides easy management of VI
elements, including previewing, deleting and updating. The Spire
CXP8000 color server also offers imposition for VI jobs, the only
digital solution in the industry with this capability.
• Creo workflow extenders
This is a set of Adobe Photoshop and QuarkXPress software plug-ins
and extensions that facilitate printing with the Spire CXP8000 color
Page 24

10 Chapter 1 – Welcome
server. These extensions are located in the shared Utilities folder on the
Spire CXP8000 color server or on CD #3 supplied with the Spire
CXP8000 color server software kit.
Supported Formats
The Spire CXP8000 color server supports the following file formats:
• PostScript (composite or pre-separated files)
• PDF
• EPS
• Creo VPS (Variable Print Specification)
• VIPP (Variable Data Intelligent PostScript Params)
• PPML (Personalized Print Markup Language)
• GAP (Graphic Art Port) files (file formats from various prepress
systems, for example Brisque job and TIFF / IT)
• Creo CT & LW
Workflow
• JPG, TIFF
• Pre-separated formats
The Spire CXP8000 color server receives and processes files from the
following client workstations:
• Macintosh – running Mac OS 9.x or later and Mac OS X (10.1 and
later)
• Windows – running Windows 98, ME, Windows NT 4.0, 2000, and XP
• UNIX Workstations and Servers
Page 25
Overview of Spire CXP8000 Color Server 11
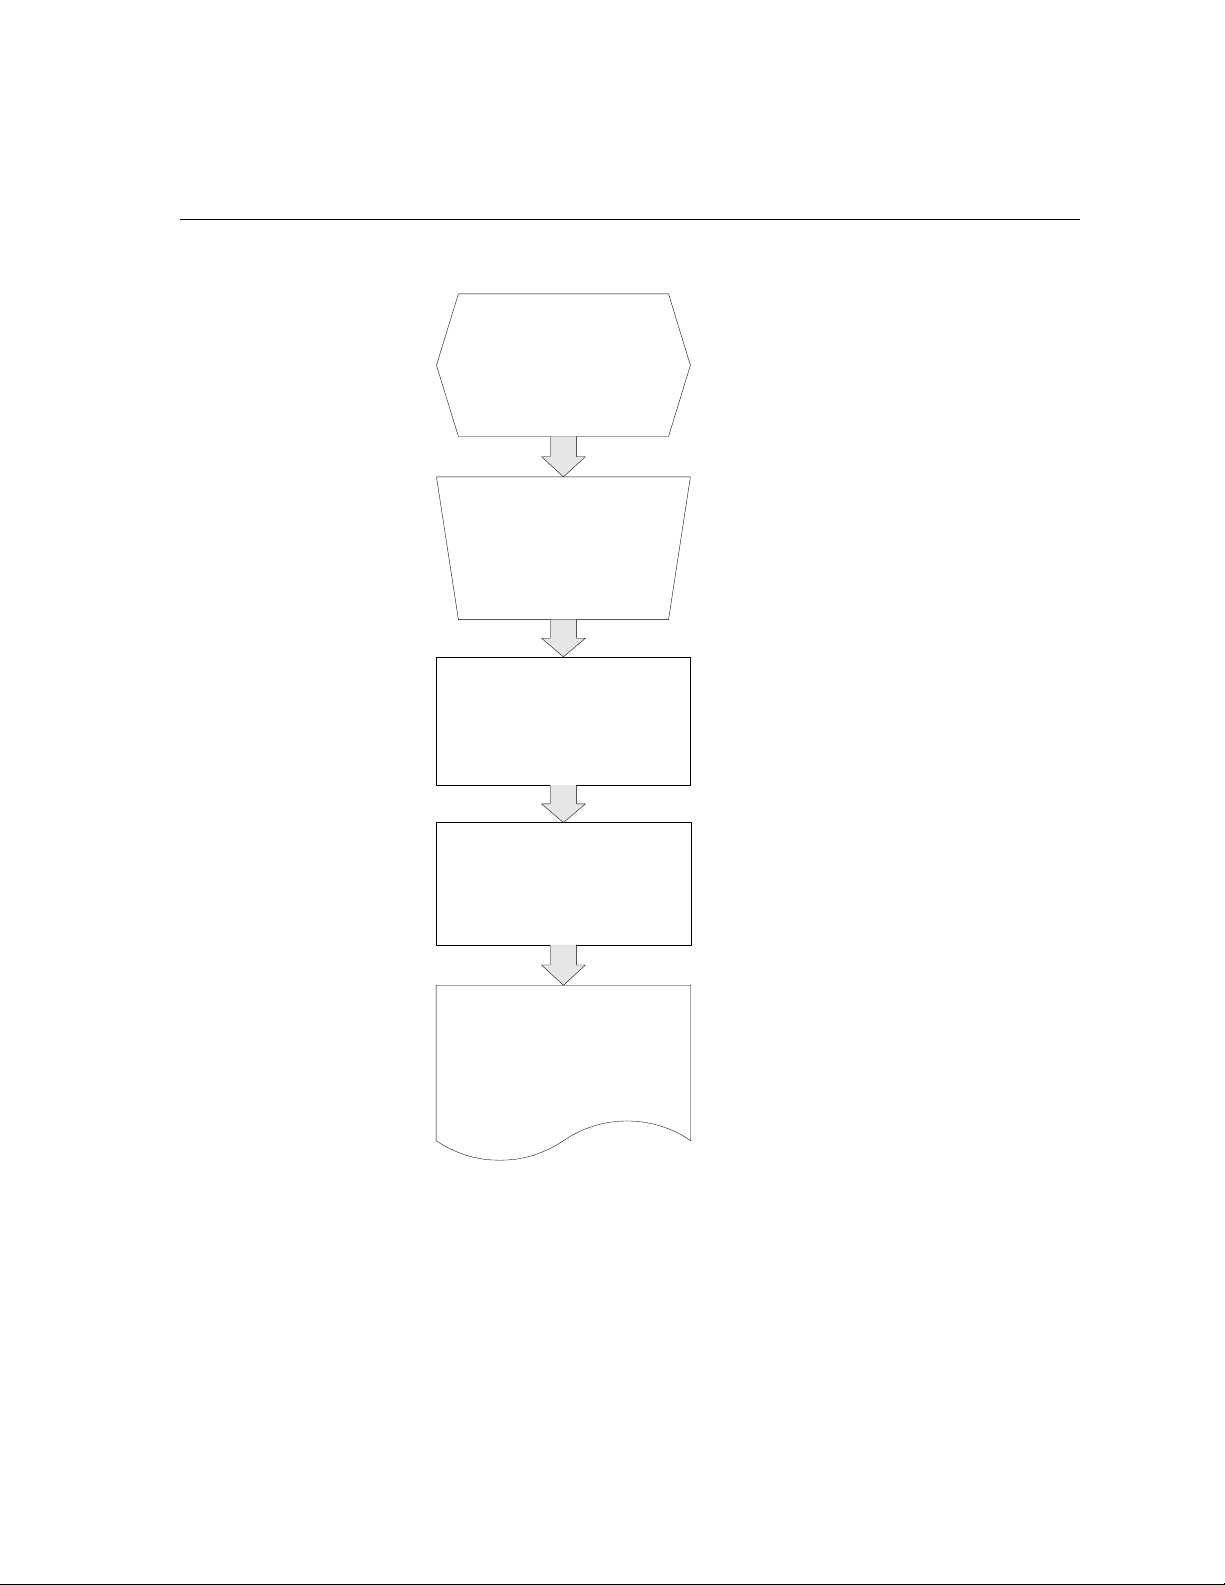
The Spire CXP8000 color server basic workflow is as follows:
User activates Print in the DTP
(for example, Microsoft PowerPoint).
User selects one of the default Spire
File is sp ooled to th e Spire c olor server.
application
color se rver virtual p rinters
(for example, ProcessPrint).
File begins processing according to settings
predefined in the file or for the selected
After the job has completed processing, the
file is prin ted to th e Docu Color p rinter, an d
an RTP (Ready-to-Print) format of the job is
stored in the storage folder on the Spire
virtual printe r.
color server.
Page 26
12 Chapter 1 – Welcome
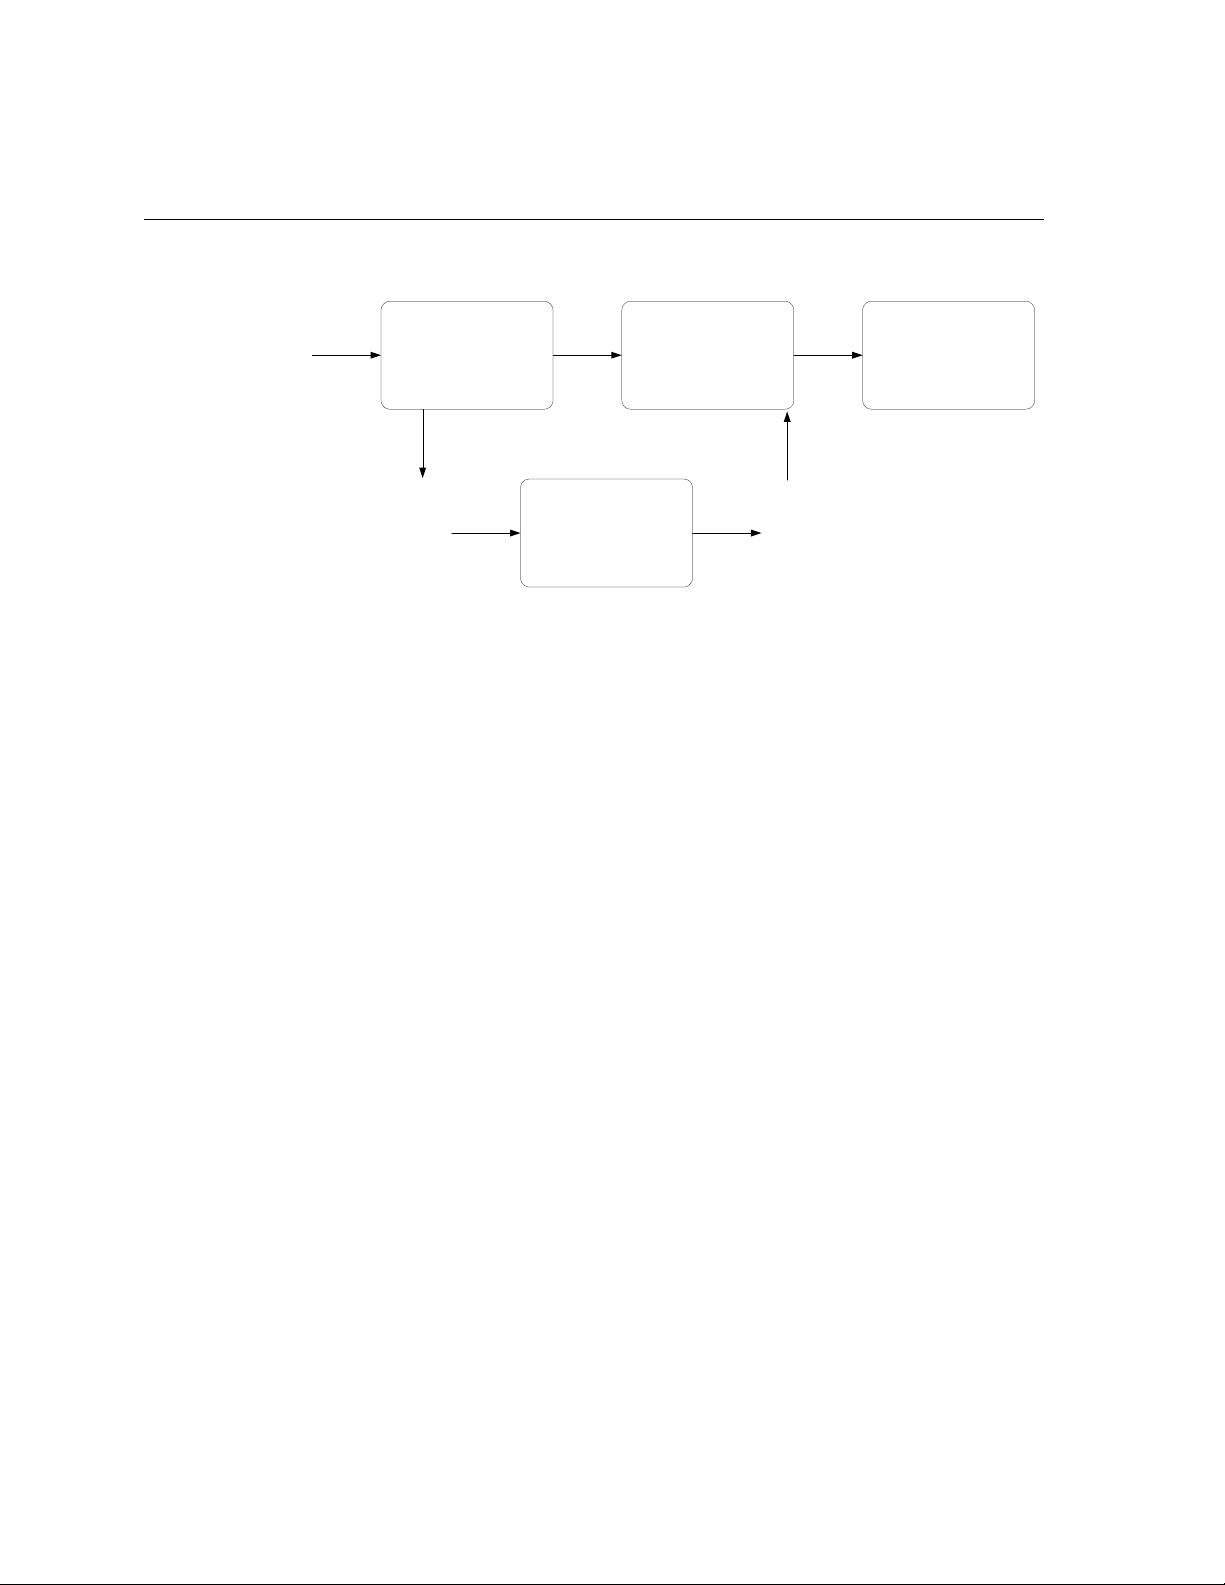
Data Flow
PDL
Processing
Software
RTP
Printer Disks RTP
Decompress and
Page Assembly
(Hardware)
Image Delivery
(Printed Page)
The Spire CXP8000 color server Data Flow is as follows:
1. The input file arrives at the Spire CXP8000 color server from either a
client workstation, local hard disk, or external media and is submitted
to the Process queue.
2. The processing sub-system produces a RTP job from the input file.
3. The RTP job is stored on an image disk.
4. When printing starts, the RTP job elements on the disk are
decompressed and merged to the correct location on the page. This is
done using Creo hardware.
5. The image delivery sub-system converts the RTP information into the
print engine format.
6. The image delivery sub-system transmits the page information to the
print engine.
7. The page data is delivered to the Print Engine and the job is printed.
Page 27

Overview of Spire CXP8000 Color Server 13
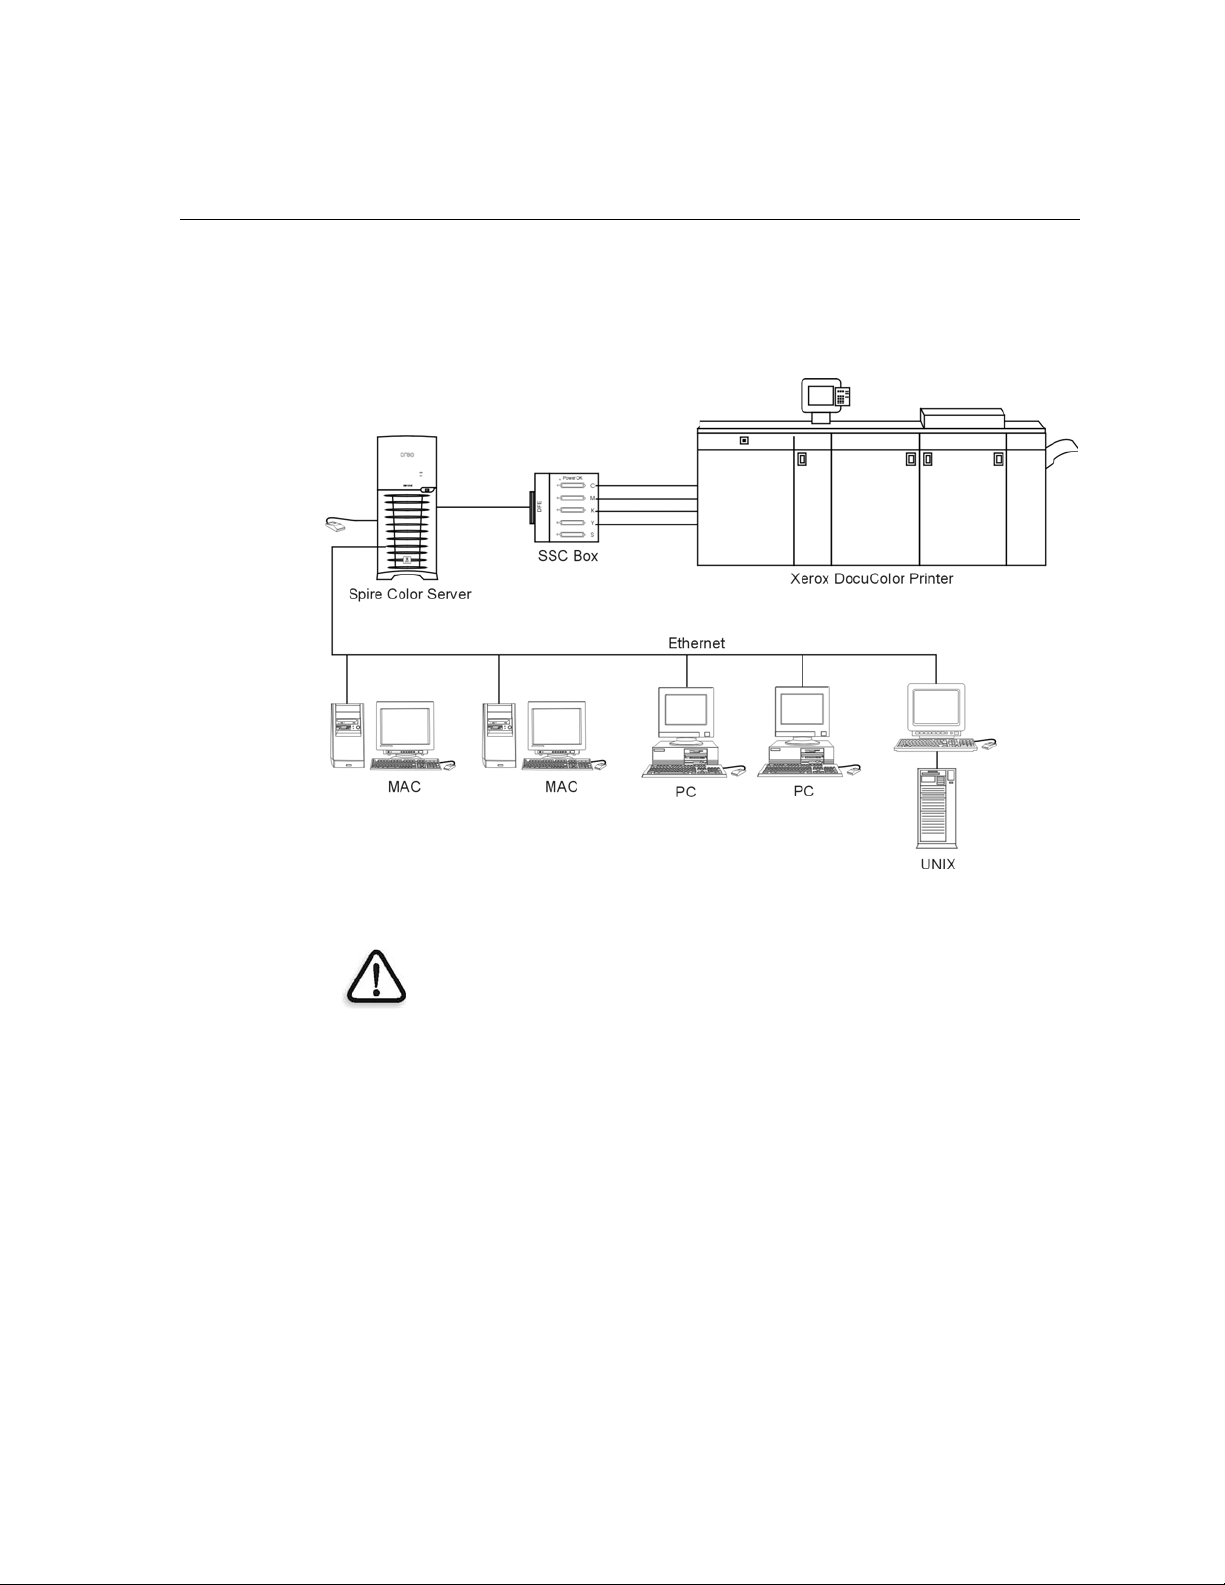
Spire CXP8000 Color Server Network Printers
For Macintosh and Windows networks, the Spire CXP8000 color server
provides three default network printers, known also as virtual printers.
Virtual printers are a function used for automating workflows, which then
define job streaming. They contain preset workflows that are automatically
applied to all print jobs processed with that virtual printer. There is no
need to reset job settings for each job, thus increasing printing efficiency.
Note: The job (print) parameters set in the job (from the client) override the
parameters set in the virtual printer.
The three default virtual printers are:
• SpoolStore
Files are spooled directly to the Storage window and await operator
processing. You can only import PDL files (such as: PS, PDF, VIPP,
VPS) to the spool store, not RIPped - RTP files.
• ProcessPrint
Files sent to this virtual printer are processed and printed directly to
the Xerox DocuColor 8000 Digital Press via the Spire CXP8000 color
server.
• ProcessStore
Files sent to this virtual printer are automatically processed and stored
in RTP format. After processing, the files are stored in the Storage
window of the Spire CXP8000 color server until the print operator resubmits them for printing.
With printing workflows tailored to your job requirements, the Spire
CXP8000 color server enables you to:
• Define new virtual printers
• Choose from which virtual printer to print
For information on defining and editing virtual printers, see Managing Virtual
Printers on page 218.
Page 28

This page is intentionally left blank.
Page 29

Getting Started
Turning On the Spire CXP8000 Color Server......................................16
The Workspace .................................................................................19
The Server and Printer Monitors ........................................................21
The Settings Window........................................................................25
The Resource Center.........................................................................26
The Job Parameters Window.............................................................27
Basic Job Workflow...........................................................................31
Turning Off the Spire CXP8000 Color Server .....................................36
Page 30
16 Chapter 2 – Getting Started
Turning On the Spire CXP8000 Color Server
1. Tu rn on th e m o ni tor.
2. Press the power button on the front panel of the Spire CXP8000 color
server.
The power indicator on the front panel lights up. The Windows
operating system starts, and the Spire CXP8000 color server splash
screen appears.
Page 31

Turning On the Spire CXP8000 Color Server 17
Opening the Workspace From the Start Menu
Notes:
• If the Spire CXP8000 color server workspace is already turned on,
open the workspace from the
Workspace From the Start Menu later in this chapter.
Start menu. See Opening the
• By default, the Auto Log On check box is selected in the Settings
window. This option enables you to open the workspace without
having to go through the logon process each time. If you want to
designate different access levels for each user, you need to set
security settings in the Settings window. For more information
about designating access levels, see Security on page 402.
The Spire CXP8000 color server program group appears in the Windows
Start menu.
¾ Select Start>CXP8000>CXP8000.
The Loading Drivers window appears and then the Spire CXP8000
color server workspace.
Note: The Spire CXP8000 color server includes a diagnostics utility that can
check the hardware components of the system. Only service engineers
should use this utility.
Page 32

18 Chapter 2 – Getting Started
Logging On
By default, the Auto Log On check box is selected in the Settings window.
This option enables you to open the workspace without having to go
through the logon process each time. If you want each user to have to log
on to the Spire CXP8000 color server, you need to clear the
check box, and then assign each user an access level and password.
For more information about designating access levels, see Security on page 402.
The Login dialog box enables you to log on to the Spire CXP8000 color
server with a designated access level and password. The system
administrator assigns each user an access level, as follows:
Auto Log On
• Operator (default): Enables the user to operate the Spire CXP8000
color server and configure the
Preferences area in the Settings window.
• Administrator: Enables the user to access all features and settings in the
Spire CXP8000 color server
• Guest: Enables the user to import a job through an existing virtual
printer and view the workspace
Logging On as a Different User
If you are already working in the Spire CXP8000 color server workspace,
you can change your access level—for example, if you are logged on as an
operator and you need administrator privileges.
1. From the Job menu, select Logon as a different user.
2. In the Access level list, select a different access level.
Page 33

The Workspace 19
3. If you want to log on as an administrator or operator, type your
password.
Note: If you want to log on as a guest, you do not need a password.
4. Click Logon.
You are logged on with the new access level.
The Workspace
After you turn on the Spire CXP8000 color server, the workspace
automatically appears.
1
2
3
8
4
7
5
6
Page 34

20 Chapter 2 – Getting Started
Table 2 describes the Spire CXP8000 color server workspace.
Table 2: Spire CXP8000 color server workspace
Item Name Description
1
Menu Bar
Consists of the Job, Selection, Tools, Control, View, and Help menus.
Click a menu name to open the corresponding menu
2
3
Status Panel
Toolbar
Contains the logo Pane, Processing status area, Printing status area,
server icon, and printer icon
Consists of shortcut buttons for the Import window, Resource Center,
Message Viewer, and Calibration window
4
Queues
Consists of the Process Queue, which lists the files to be processed. After
a file has been processed successfully, it moves either to the
Print Queue
(the upper area) or to the Storage window.
5
6
Alerts
Thumbnail
Lists all of the alert messages that are generated during the workflow
Displays a thumbnail view of a specific page in an RTP job that has
finished processing
7
Storage
The Storage window contains files that:
• were successfully printed
• were held, were aborted, or failed during processing or printing
• were sent directly from the client workstation to the Storage window
or were imported to the Storage
8
Paper Stocks
Displays information about the paper in each tray and also shows
whether the trays are ready for printing
window
Customizing the Workspace View
The View menu enables you to customize the workspace. From this menu,
you can open and close the Queues window. The menu also provides the
following view options:
Page 35

The Workspace 21
• Spire classic view: Displays the status panel, toolbar, Storage window,
Queues window, Thumbnail window, and Alerts window
• Spire classic plus view: Displays the status panel, toolbar, Paper Stocks
window, Storage window, Queues window, Thumbnail window, and
Alerts window
• Queues view: Displays only the Print Queue and Process Queue
• Refresh view: Reverts to the factory default view for the view that is
currently displayed
Note: The Spire CXP8000 color server always displays the workspace in the most
recently selected view.
Tip: By default, the windows in the workspace are all docked-that is, attached
to the workspace. You can detach, or undock, a window from the workspace by
right-clicking the window’s title bar and selecting UnDock Window.
The Server and Printer Monitors
The server and printer icons are on the right end of the status panel and
indicate (through animation) whether processing and printing are taking
place. If a finishing device is connected to the printer, the finishing device
also appears in the printer icon. You can click the
display status information. You also view messages regarding the printer
operation mode and status next to the
reminder
indicator reminds you to calibrate the printer. You can set the
printer icon. The calibration
reminder in the Settings window.
printer or server icon to
For more information about setting the calibration reminder, see Color on
page 413.
Server icon
Printer icon
Calibration reminder
indicator
Page 36

22 Chapter 2 – Getting Started
The DFE Monitor
Click the server icon to open the DFE Monitor window. This window
displays information about disk space, network details, and the virtual
printers you have defined.
The
Disk Usage tab shows how much space is available on the user disk and
printer disk.
Network tab provides information about the network.
The
Page 37

The Workspace 23
The Virtual Printers tab lists the virtual printers that you have defined.
The Printer Monitor
Click the printer icon to open the Printer Monitor window.
The Printer Monitor window displays information about the size and type
of paper in each tray, the connected devices, the available toner, and other
aspects of the consumables.
Paper Stock tab displays information about the paper in each tray and
The
also shows whether the trays are ready for printing.
Page 38

24 Chapter 2 – Getting Started
The Finisher tab displays information about finishing devices that are
connected to the Xerox DocuColor 8000 Digital Color Press.
Toner tab shows whether there is enough toner.
The
Page 39

The Settings Window 25
The Consumables tab displays the status of other refillables.
The Settings Window
You can set all system preferences in the Settings window.
To open the Settings window:
¾
From the To ol s menu, select Settings.
Page 40

26 Chapter 2 – Getting Started
The window is divided into two areas:
• Administration: All users can view these settings, but only an
administrator can configure the settings.
• Preferences: All users can view these settings, but only an
administrator or operator can configure the settings.
Note: If you log on to the Spire CXP8000 color server as a guest, the Settings
window is unavailable.
For more information about setting system preferences, see Setting Up and
Configuring the Spire CXP8000 Color Server on page 392.
The Resource Center
The Resource Center enables you to add, remove, and manage external
resources for the Spire CXP8000 color server.
To open the Resource Center:
¾
From the toolbar, click Resource Center.
Page 41

The Job Parameters Window 27
The Resource Center provides access to the following resources:
• Virtual Printers, see Managing Virtual Printers on page 218
• Fonts, see Managing Fonts on the Spire CXP8000 Color Server on
page 297
• Imposition Templates, see Imposition Templates on page 238
• Cached VI Elements, see Managing VI Elements on page 385
• Paper Sets, see Managing Paper Sets on page 167
• Profile Manager, see Profile Manager on page 346
The Job Parameters Window
The Spire CXP8000 color server enables you to edit imported PDL files and
change the job settings—for example, paper size, imposition, and color
settings—in the Job Parameters window.
To open the Job Parameters window:
¾
Double-click a job in the Storage window.
Or:
Right-click a job in the Storage
Parameters.
window, and from the menu select Job
Page 42

28 Chapter 2 – Getting Started
The Job Parameters window title bar displays the following information:
• The name of the job
• The time of submission
• The name of the virtual printer
Each tab has a set of related parameters and values that you can select.
Table 3: Description of tabs in the Jobs Parameters window
This tab Enables you to
Print Settings
Paper Stock
Print Quality
Set print related job parameters—for example,
Print range and Print method. See The Print
Settings Tab on page 157
Set job parameters related to paper stock—for
example,
Paper size and Paper set name. See The
Paper Stock Tab on page 166
Set job parameters related to print quality—for
example,
Trapping and Image quality—and
improve the quality of printed jobs. See The Print
Quality Tab on page 175
Page 43

The Job Parameters Window 29
Table 3: Description of tabs in the Jobs Parameters window
This tab Enables you to
Color
Imposition
Services
Finishing
Exceptions
Apply last minute color corrections, or set the
output job to match other output devices. See
Color Workflow on page 303
Set job parameters related to positioning, folding,
trimming, and binding of pages—for example,
Margins and Te mp l at e. See The Imposition Tab on
page 227
Set job parameters that will assist your job
workflow—for example,
APR path and Preflight.
See Creo APR on page 249, Preflight Check on
page 368, Substituting Fonts on page 302, Applying
VI Structure to Large Files (Split to Booklets) on
page 389, and Job Deletion on page 383
Select from various options to finalize your
printed document—for example, define settings
for the front and back cover. See The Finishing Tab
on page 285
Define paper sets to include special exceptions in
a job, and add inserts or interleaves. See The
Exceptions Tab on page 263
The Help Menu
The Help menu enables you to access the online help, which is based on
this user guide, and provides information about the current version of the
Spire CXP8000 color server installed on your computer.
Page 44

30 Chapter 2 – Getting Started
To open the About window:
From the Help menu, select About.
¾
The About window displays the following information:
• Spire CXP8000 color server version number
• Date the version was installed
• Any updates that were installed on top of the version
To open the online help:
From the Help menu, select To pi cs .
¾
Page 45
Handling Conflicts 31
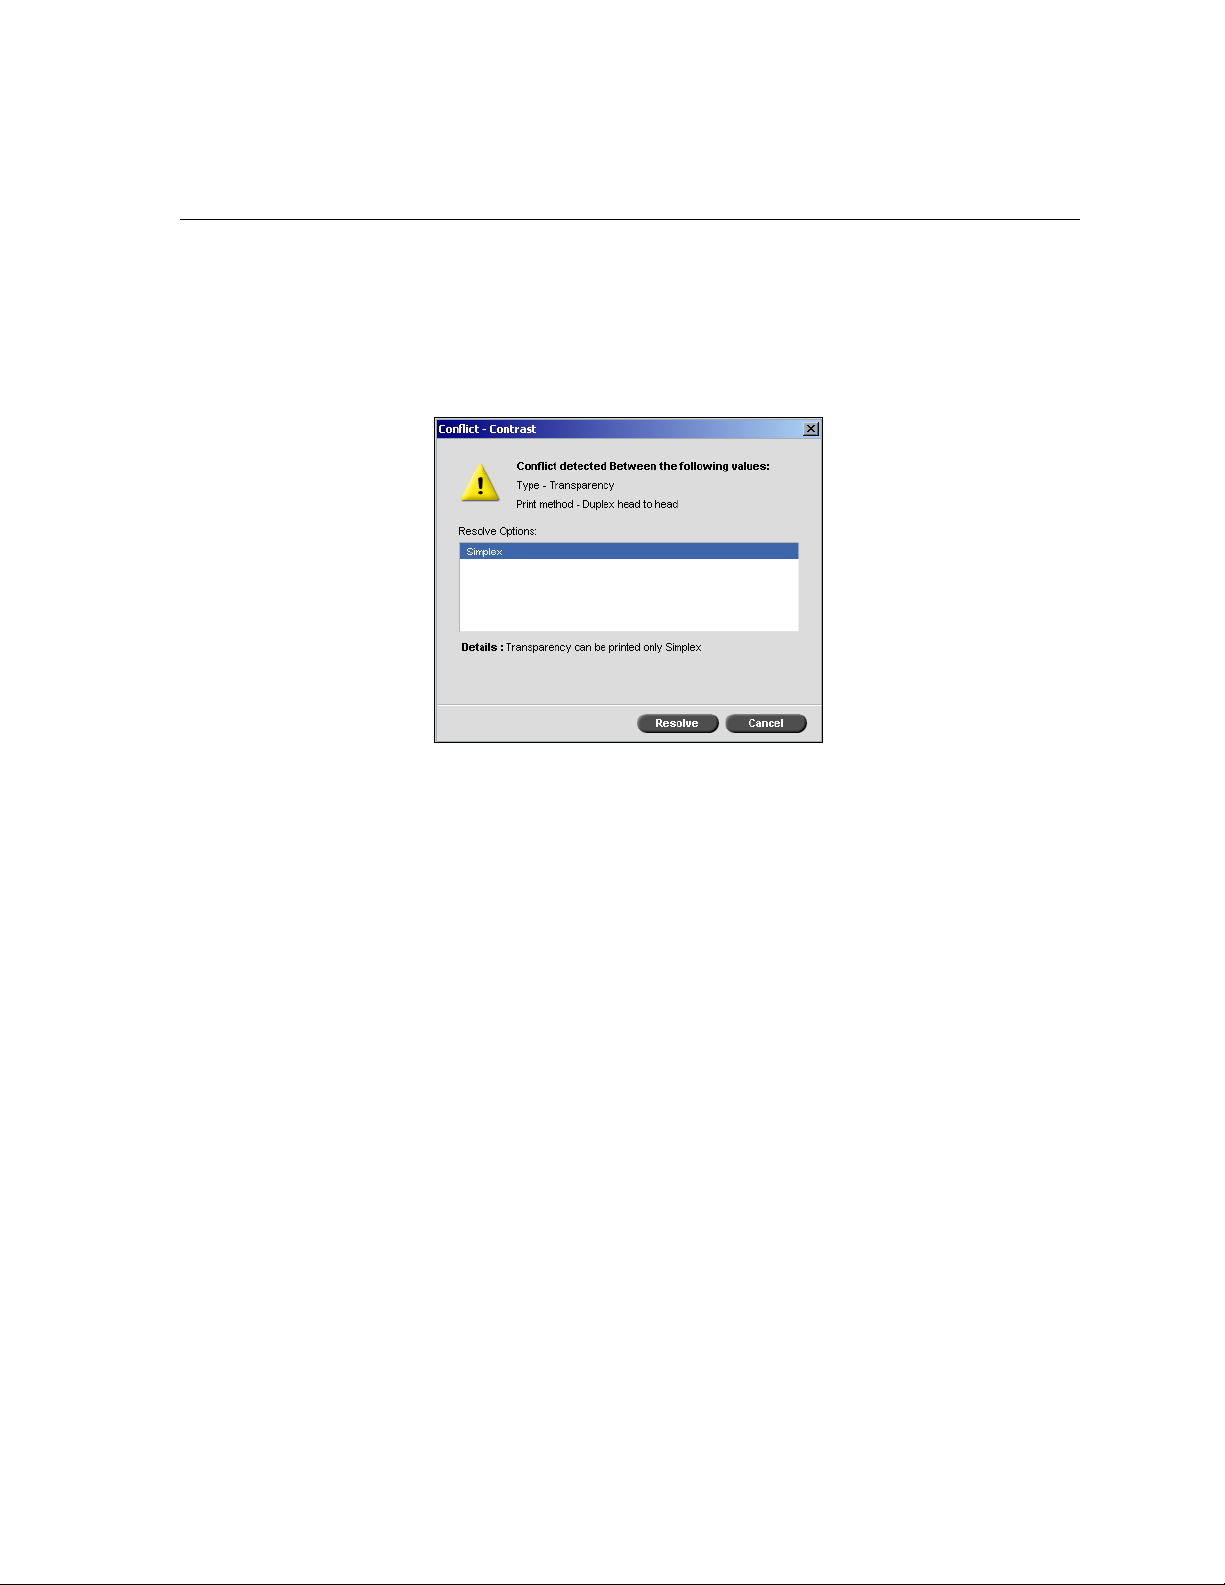
Handling Conflicts
If there are conflicts in the Job Parameters window, the Conflict window
displays the two parameters that conflict—for example, Transparency
conflicts with duplex printing. You can’t print your job until the conflict is
resolved.
To resolve the conflict, select one of the following options:
Basic Job Workflow
• In the Resolve Options area, select a resolve option, and then click
Resolve.
• Click Cancel to remove the value you selected for the last parameter.
The basic workflow in the Spire CXP8000 color server consists of three
main stages:
1. Submitting a file from a client workstation, or importing and printing
from the Spire CXP8000 color server, see Submitting on page 32
2. After a job is imported, the print engine starts to process the job, see
Processing on page 33
3. The job is printed and stored in the Storage window for future use, see
Storage on page 34
Page 46

32 Chapter 2 – Getting Started
Submitting
There are two methods for submitting a file for printing:
• Submit a file from an application on your client workstation—for
example, PDL formats that were created on client workstations that are
not connected to the Spire CXP8000 color server, or files that are
available only on external media.
• You can also import job files that reside locally on the Spire CXP8000
color server.
Printing From a Client Workstation
To print a job from a client workstation, select one of the following
methods:
• Print the job via one of the Spire CXP8000 color server network
(virtual) printers—for example,
The job is spooled and then processed or printed (according to the
selected job flow of the virtual printer). If you use this method, you can
print from any application —for example, Microsoft Word— and use
any file format from any client workstation (Windows, Macintosh, or
UNIX).
ProcessPrint.
• Drag the job to a hot folder.
The job is spooled and processed or printed (according to the selected
job flow of the corresponding virtual printer).
For more information about hot folders, see Using Hot Folders on page 85.
If you use the hot folder method, you can print most PDL files on the
Spire CXP8000 color server— for example, PostScript, PDF, EPS,
Variable Print Specification, and VIPP files.
Note: PDL jobs that are spooled to the Spire CXP8000 color server must have
the appropriate file name extensions—for example, *.ps or *.pdf.
Page 47

Basic Job Workflow 33
Importing and Printing From the Spire CXP8000 Color Server
You can import to the Spire CXP8000 color server any PDL file such as a
PostScript or PDF file, that is located on any local or network drive —for
example, a CD-ROM drive or a shared network drive.
Processing
After a job enters the Spire CXP8000 color server, it resides in the Queues
window or the Storage window, depending on the job flow. The Queues
window consists of two areas:
• The Process Queue lists the job currently being processed and all the
jobs that are waiting to be processed.
• The Print Queue lists the job that is currently printing and all the jobs
that were processed successfully and are waiting to be printed. The
Print Queue also lists frozen jobs (jobs for which the specified paper
stock is not available).
Each queue holds jobs in the order in which they enter the queue (unless a
rush job “interrupts” the submission order).
For more information about rush jobs, see Running a Rush Job on page 195.
The top job in the queue is the currently running job, while all the others
are waiting to run. The
number of jobs and their status. You can change the order of jobs, suspend
them, resume them, or view and edit the parameters.
Print Queue and Process Queue areas show you the
Page 48

34 Chapter 2 – Getting Started
Note: If there are very short jobs in the Print Queue, several jobs may be
running at the same time. The jobs marked as running are listed first and are
printed in the order of the list.
Storage
Page 49

Basic Job Workflow 35
The Storage window is the main repository for jobs. It can contain:
• Completed jobs
• Jobs that were manually moved to the Storage window
• Jobs that were aborted during processing or printing
• Jobs that failed to complete processing or printing
• Jobs that were imported or spooled directly from a client workstation
For more information about the Storage window, see Managing the
Storage Window on page 196.
Resubmitting
You can easily reprint RTP jobs that are stored in the Storage window.
Select the job you want to reprint and then submit it. The job is
automatically placed in the
The Spire CXP8000 color server enables you to change job parameters and
edit jobs prior to reprinting.
You can change job parameters in the Job Parameters window. Certain
changes to the job parameters require you to re-RIP the job. The Spire
CXP8000 color server automatically determines whether your file requires
re-RIPing and places it in the appropriate queue when you submit it for
reprinting.
Print Queue.
For more information about resubmitting a job, see Reprinting Jobs on
page 156.
You cannot re-RIP jobs that you edit in the Job Editor. When you save a job
in the Job Editor, a new RTP file is created. No PDL file is associated with
it. Therefore, parameters requiring re-RIPing can’t be applied.
For more information about editing RTP jobs, see Editing an RTP Job on
page 209.
Page 50

36 Chapter 2 – Getting Started
Turning Off the Spire CXP8000 Color Server
1. In the Spire CXP8000 color server workspace, from the Job menu,
select
Exit.
Or:
Click in the upper-right corner of the Spire CXP8000 color server
workspace.
The Spire CXP8000 color server workspace closes, and you return to
the Windows desktop.
Note: If there are jobs that are being processed or printed, a message is
displayed.
2. Verify that the Spire icon has disappeared from your taskbar.
Taskbar with Spire icon
3. From the Windows desktop, select Start>Shut Down.
4. In the shutdown dialog box, select Shut down.
5. When the Windows shutdown is complete, turn off the monitor.
6. On the Spire CXP8000 color server, click the power button behind the
Taskbar without Spire icon
front door.
The power LED on the front panel turns off.
Note: Some situations may require the power button to be depressed for
more than 4 seconds.
Page 51

Working From a Client
Workstation
Default Network Printers...................................................................38
Setting PPD File Parameters...............................................................39
Working From Windows Client Workstations ....................................48
Working From Macintosh Client Workstations...................................65
Spire Web Center..............................................................................76
Using Hot Folders..............................................................................85
LPR Printing with the Spire CXP8000 Color Server.............................91
UNIX Connectivity...........................................................................118
Configuring and Setting up NDS .....................................................136
Defining NDS Printer Queues in the NDS Tree..................................137
Configuring IPX Printing..................................................................150
Installing the Printer Drivers on a Novell Client Using the Adobe PS
Application .....................................................................................152
Page 52

38 Chapter 3 – Working From a Client Workstation
Default Network Printers
For Macintosh and Windows networks, the Spire CXP8000 color server
provides three default network printers known as virtual printers,
ProcessPrint, ProcessStore and SpoolStore.
Virtual printers contain preset workflows that are automatically applied to
all print jobs processed with that virtual printer. Using virtual printers
enables you to print jobs more efficiently.
Note: Unless you select the Override PPD parameters check box when you
add a virtual printer, the job (print) parameters that are set in the job will override
the parameters set in the virtual printer.
The Spire CXP8000 color server enables you to select from which virtual
printer to print. It also allows you to define new virtual printers, with
printing workflows tailored to your specific job requirements.
For more information about virtual printers, see Managing Virtual Printers on
page 218 and Spire CXP8000 Color Server Network Printers on page 13.
An additional default network printer is provided for Macintosh networks.
FontDownLoader
This is a special network printer that you use with Macintosh client
workstations to download fonts. The FontDownLoader enables you to
send fonts to the Spire CXP8000 color server and use these fonts later in
printed jobs. It is not possible to send files via the FontDownLoader, only
fonts.
For more information about the Fontdownloader, see Using the Fontdownloader
For
for Macintosh Networks on page 298.
Page 53

Setting PPD File Parameters 39
Setting PPD File Parameters
You can set job parameters from a client workstation using the Spire
CXP8000 color server PPD file or you can define a virtual printer with
predefined PPD file settings.
To print a file from Windows, you first need to set up a Spire CXP8000
color server network printer with the appropriate PPD file. The PPD file
contains all the parameters and paper stock definitions for the printer and
enables you to print your file properly.
To use the Spire CXP8000 color server PPD file:
¾
In the Print window of your application, select print settings specific to
printing to the Spire CXP8000 color server.
For more information about print settings, see Printing From Windows on
page 64 and Printing from a Macintosh on page 75.
To define a virtual printer:
Set job parameters when you create or edit a virtual printer.
¾
These settings become the printer's default options.
For more information about virtual printers, see Adding a new printer on
page 218 and Editing an Existing Printer on page 221.
The following table lists the PPD file parameters and the printing options
that can be selected from the Print window of an application.
Notes:
• In the PPD file, the Printer’s Default option is selected for all PPD file
parameters. The Printer’s Default option corresponds to the settings of the
currently selected virtual printer.
• The parameter settings that were last modified or applied are the settings
that are applied to the job. However, the print settings defined in the job file
override the settings of the virtual printer.
• Grayscale images created in RGB applications (such as PowerPoint) should be
specified as monochrome or you should select Gray RGB>Print grays using
black toner in the PPD file when you submit the job to the Spire CXP8000
color server. This selection ensures that grayscale images are counted as
black and white instead of color in both the Spire CXP8000 color server and
in the Xerox DocuColor 8000 Digital Color Press billing meters.
Page 54

40 Chapter 3 – Working From a Client Workstation
Table 4: PPD parameters
PPD Parameter Printing Options
Print Method
Image orientation
for imposition
Reverse Print
Order
Face Up
Collation
Image Scale
Simplex prints single-sided pages (default).
In
Duplex Head to Toe, the image on the reverse side of the sheet is
rotated 180 degrees. It is used for calendar-style hard copies and
presentation-style copies (usually used with landscape jobs).
In
Duplex Head to Head, the head of the image appears at the top of the
page on both sides of the sheet. It is used for normal book-style hard
copies (usually used with portrait jobs).
Landscape specifies a landscape orientation for imposition.
Portrait specifies a portrait orientation for imposition.
Yes starts printing from the last page.
No starts printing from the first page.
Face Up delivers the pages face up on the printer.
Face Down delivers the pages face down on the printer (when printing
confidential documents).
Yes prints a complete copy of the job before the first page of the next
copy is printed.
No prints all the copies of each page before all the copies of the next page
are printed.
Select Fit to paper for the image to fit the selected paper in the paper
stock
100% prints at 100% of the original size (default)
Select an image scale by which to proportionally increase or decrease the
image size,
50%, 150%, 200%, 250%, 300%, 350%, 400%
Rotate 180
Paper set
Type
Yes (only relevant for the Finisher Module > HCSS Staple Tray option),
modifies the stapling position by 180 degrees. For example, instead of
stapling on the upper left-hand corner, you can staple on the lower
right-hand corner.
No ignores this method.
Undefined uses the parameters from the Paper Stock tab
Paper sets 1-10 are the predefined paper sets available on the Spire
CXP8000 color server
Select Paper or Transparency as the media.
Page 55

Setting PPD File Parameters 41
Table 4: PPD parameters
PPD Parameter Printing Options
Weight
Coating
Text and Line
Quality
Image Quality
Trapping
Select the desired paper weight from the list. The following ranges are
listed:
60-80, 81-105, 106-135, 136-186, 187-220 and 221-300 For
example,
Coated prints on coated paper.
UnCoated prints on uncoated paper.
Normal provides standard text quality.
Anti Aliasing provides superior text quality. The Creo anti-aliasing
81-105 gsm prints on 81-105 gsm paper.
causes blends to appear smooth with no banding and diagonal lines to
appear crisp without jagged edges.
Sharpen edges provides superior text quality.
High provides superior image quality. This setting applies the Creo
proprietary smooth scale algorithm, which improves the quality of
images containing several resolutions (such as images taken from the
Internet).
Normal provides standard image quality and increased RIPing speed.
Yes applies the Creo FAF (Full Auto Frame) algorithm to the job.
Trapping solves misregistration between color separations in offset and
digital printing. This occurs regardless of the printer device accuracy.
This problem results in white lines around objects on top of a
background (in a knock-out procedure) and also between adjacent
colors. The FAF solution is to extract the element or background to
create an overlap between them. Do not use this option with VI jobs.
No does not begin image trapping while RIPing (this does not affect
trapping incorporated by the authoring application). If trapping was
applied in the authoring application, select
No.
Page 56

42 Chapter 3 – Working From a Client Workstation
Table 4: PPD parameters
PPD Parameter Printing Options
Black Overprint
PS Overprint
Yes provides better printing quality (as in FAF) and a richer, deeper
black with the underlying CMY values equal to those of the printed
background. As a result, misregistrations are not visible.
Black Overprint ensures that 100% black text prints cleanly within a tint
or picture area. Occasionally, white lines may appear around black text
and the text may appear less dense than desired as a result of
misregistration between color separations. With Black Overprint, the
Pure Black Text / Graphics option is automatically activated and there
are no knock-outs under the black text. However, a knock-out occurs
when you print only the topmost color. This results in less color density
and can cause misregistration if separations are not perfectly aligned.
No leaves the job as is.
PS Overprint offers the option to use the overprint, which exists in the
PostScript file. It also determines whether the DTP application PS
Overprint settings are honored in the RIP.
Spire CXP8000 color server settings override PS Overprint commands
from DTP applications. For example, if PS Overprint was set to
DTP application, selecting PS Overprint
No in the Spire CXP8000 color
Yes in a
server results in no overprinting. The Spire CXP8000 color server can
not create PS Overprint that is not predefined in the file. Selecting PS
Overprint
Yes for a file that has not had overprinting defined in a DTP
application does not result in overprinting.
Yes (default) instructs the RIP to use the overprint information that
exists in the input PostScript file. Also, if PS Overprint is applied in a
DTP applications, it is implemented by the Spire CXP8000 color server.
Background colors are not knocked out.
For example, in the case of a yellow triangle overlapping a cyan circle,
selecting
Yes results in the overlapping area turning green. This is not
seen on the screen, only in print.
No ignores the overprint information that exists in the input PostScript
file. Background colors are knocked out and only the top most color
parts are seen on the screen in your DTP application.
For example, in the case of a yellow triangle overlapping a cyan circle,
selecting
No results in the cyan background being knocked out, so only
the yellow is printed.
Page 57

Setting PPD File Parameters 43
Table 4: PPD parameters
PPD Parameter Printing Options
Image Noise
Color Mode
RGB Workflow
Gray RGB
Rendering Intent
for RGB
No (default) applies no image noise to your job.
Noise 2-10 apply image noise. The higher the level, the smoother the
vignettes appear.
Grayscale prints all pages using black (K) toner only.
Color prints all pages using all CMYK toners.
If you selected
Gray RGB list to print RGB gray images using black toner only. If you
Color, select the Print grays in black toner option in the
want grayscale CMYK elements to be printed using black toner only, you
need to select
Perceptual as the rendering intent.
This option changes gamma values, thus producing more color depth
for RGB images. To use the embedded CSA, select
replace use a Spire or Adobe CSA, select
RGB2.1
, Use Spire RGB 2.4, Use sRGB, or Use Adobe RGB.
Use Spire RGB 1.8, Use Spire
Use Source CSA. To
Select Print grays using CMYK to print grayscale CMYK elements using
black toner only.
Select
Print grays in black toner to print RGB gray images using black
toner only.
Rendering intent defines how colors are compressed from CIELAB
values to printer color space.
Relative Colorimetric provides an accurate general-purpose gamut
mapping for all applications. The lowest density is mapped to white.
Absolute Colorimetric preserves the substrate tint.
Saturated (presentation) produces saturated colors that are suitable for
office environment applications —for example, text documents and
presentations.
Perceptual (photographic) yields the most effective results on
continuous tone and images.
Saturated (presentation) and Perceptual (photographic) are the most
effective rendering intent methods for RGB images.
Page 58

44 Chapter 3 – Working From a Client Workstation
Table 4: PPD parameters
PPD Parameter Printing Options
CMYK Workflow
Emulate Source
Paper Tint
Emulate RGB
Elements
Preserve Pure
Colors
Rendering Intent
for CMYK
Select Use Original CMYK values, Use Source CSA, or select a CMYK
emulation,
Emulation
Match Print
Printer’s Default (None), applies Ink Saving (GCR) without emulation.
Printer’s Default (None), Fogra Gloss Emulation, Fogra Matt
, Fogra Uncoated, Euroscale, Gravure, Japan_Color, Offset,
, iGen3 or SWOP.
In all cases, emulation applied in the original DTP application overrides
the Spire CXP8000 color server settings.
Yes to emulate also the original paper tint.
No
This parameter is available only if you selected an emulation method.
No
Yes
to emulate RGB colors according to the selected CMYK emulation
method.
This parameter is available only if you selected an emulation method.
Yes to emulate pure CMYK colors.
No
This parameter is available only you selected an emulation method.
Rendering intent defines how colors are compressed from CIELAB
values to printer color space.
Relative Colorimetric provides an accurate general-purpose gamut
mapping for all applications. The lowest density is mapped to white.
Perceptual (photographic) yields the most effective results on
continuous tone and images.
Saturated (presentation) produces saturated colors that are suitable for
office environment applications (for example text documents and
presentations).
Absolute Colorimetric preserves the substrate tint.
Relative Colorimetric and Absolute Colorimetric are the most effective
rendering intent methods for CMYK images.
Use Spire Spot
color dictionary
Yes to use the Spire spot color dictionary.
No
Page 59

Setting PPD File Parameters 45
Table 4: PPD parameters
PPD Parameter Printing Options
Destination profile
Calibration
Screening Method
Ink Saving (GCR)
Linked uses the destination profile that was mapped to a paper color in
the Resource Center>
DC_8000_C.GA
Normal prints using the normal calibration table.
Saturated prints using the saturated calibration table.
None prints without calibration, therefore, there is no balance between
and DC_8000_U.COM are predefined destination profiles.
Profile Manager
colors and gives no color calibration data.
Automatic applies two types of screens:
• For CT, the system uses Dot type screen of 200 lpi.
• For LW (text / line-art elements), the system uses Line type screen of
200 lpi.
Dot 150 applies Dot type screen of 150 lpi.
Dot 200 applies Dot type screen of 200 lpi.
Line 200 applies line type screen of 200 lpi.
Line 300 applies line type screen of 300 lpi.
Line 600 applies line type screen of 600 lpi.
No does not use GCR and uses default maximum toner settings.
Low, Medium, or High to set the amount of CMY toners to be
Use
replaced by the black toner.
on toner (this prevents the occasional peeling of ink and the curling
effect that may occur when printing transparencies).
High provides low ink coverage while saving
Brightness
Contrast
Brightness settings can be applied to RTP jobs without reprocessing (re-
RIPing the file).
Normal keeps the current job setting and does not apply extra
brightness.
To apply brightness, select one of the range options:
(10%), Lightest (15%), Dark (5%), Darker (10%), Darkest (15%).
Light (5%), Lighter
Contrast settings can be applied to RTP jobs without reprocessing (re-
RIPing the file).
Normal keeps the current job setting and does not apply extra contrast.
To apply contrast, select
Less Contrast or More Contrast.
Page 60

46 Chapter 3 – Working From a Client Workstation
Table 4: PPD parameters
PPD Parameter Printing Options
Automatic
Deletion
APR
Job Flow
Always, Never, Successful Only, Failed Only
On large VI jobs, which take up a large amount of the Spire CXP8000
color server’s disk space, it is recommended (if you do not need to
reprint the job) that you use the this option. Completed and failed jobs
are automatically saved in the Storage window unless you select one of
the
Job Deletion options.
Always removes all jobs after they are printed.
Never does not delete any job after printing it.
Successful Only continuously deletes pages once they have been
successfully printed and thus sustains enough free disk space for the
duration of the print run. Each successfully printed page of the job is
immediately deleted while the rest of the job remains in the queue to
print.
Failed only removes failed jobs (while processing or printing) from the
Spire CXP8000 color server.
Print with High Res prints using high-resolution files.
Print with Low Res prints using low-resolution files.
Process Print RIPs the PDL files and prints them, and then moves the
files to the Storage window
or deletes them in accordance with the
deletion policy.
Process Store RIPs the PDL files, and then moves them to the Storage
window as RTP jobs.
Spool Store copies the PDL files directly to the Storage window.
Split to booklets
Admin Page
Select the desired number of pages (1-10) per booklet.
Printers Default (No) does not split the job to booklets.
Admin Page includes general information about the job, including paper
stock parameters (Admin Page can also apply to completed jobs that
weren’t successful).
Admin page is printed in the same order as the job, before each set for
face-down printing and after each set for face-up printing.
No (default) does not print an admin page with the job.
Yes prints an admin page.
Page 61

Setting PPD File Parameters 47
Table 4: PPD parameters
PPD Parameter Printing Options
Slip Sheet
Finisher Module
Finisher Offset
Yes inserts a sheet offset from the job stock between jobs or copies of a
job or at the end of uncollated stacks of pages.
No does not insert any slip-sheets.
To select the printed output’s destination, select a finisher module from
the list:
OCT (Offset Catch Tray) prints to the output cache tray.
If your printer is equipped with an HCS (High Capacity Stacker), select:
HCS Top Tray to print to the top tray.
HCS Stack Tray to print to the stack tray, which is the internal tray.
If your printer is equipped with an HCSS (High Capacity Stacker
Stapler), select:
HCSS Top Tray to print to the top tray.
HCSS Stack Tray to print to the stack tray (usually for many pages or
copies).
HCSS Staple Stack to print a document that is already stapled.
DFA Profile 1 / DFA Profile 2 / DFA Profile 3 / DFA Profile 4 /
DFA Profile 5
prints to the DFA (Document Finishing Architecture)
device. Select the desired profile according to the profile set in the Xerox
DocuColor 8000 Digital Color Press.
Yes shifts the sheets when a new page number is delivered. For example,
if you requested three copies of each page uncollated, the printing
output sequence is as follows, Page1, Page1, Page1, Offset, Page2, Page2,
Page2, Offset, and so on.
No does not use this printing method.
Staple Options
Landscape - Single TL a single staple in the top left corner.
Landscape - Single TR a single staple in the top right corner.
Landscape - Dual Right two staples along the right side.
Landscape - Dual Left two staples along the left side.
Landscape - Dual Top two staples along the top.
Portrait - Single TL a single staple in the top left corner.
Portrait - Single TR a single staple in the top right corner.
Portrait- Dual Right two staples along the right side.
Portrait - Dual Left two staples along the left side.
Portrait - Dual Top two staples along the top.
Page 62

48 Chapter 3 – Working From a Client Workstation
Working From Windows Client Workstations
The Spire CXP8000 color server can print from a Windows client
workstation that has one of the following operating systems:
• Windows 98, Windows ME
• Windows NT 4.0, Windows 2000, Windows XP
The following section describes how to define a Spire CXP8000 color
server network printer for each of the supported operating systems.
Defining a Printer on Windows Client Workstations
You use the Windows Add Printer wizard to define the Spire CXP8000
color server network printers.
Note: When you add a new Spire CXP8000 color server network printer to a
client workstation, there is no need to install the Spire CXP8000 color server PPD
file and Adobe PostScript printer driver separately. They are installed
automatically in the Windows Add Printer wizard.
Defining a Printer on Windows NT 4.0
To define a network printer using the Windows Add Printer wizard:
1. On your Windows desktop, click the Start button and select
Settings>Printers.
2. Double-click the Add Printer icon.
3. Select Network printer server, and then click Next.
Page 63

Working From Windows Client Workstations 49
4. In the network, locate the Spire CXP8000 color server and double-
click the server name.
A list of the network printers is displayed.
Note: The Spire CXP8000 color server is provided with three network
printers, ProcessPrint, ProcessStore and SpoolStore.
5. Select one of the network printers—for example, ProcessPrint—and
then click
6. Select Ye s if you want to set this printer as the default printer on your
computer. Otherwise, select
7. Click Next.
8. Click Finish to complete the setup.
OK.
No.
The Spire CXP8000 color server network printer is now successfully
installed.
To define a network printer using the network neighborhood:
1. Locate the desired network printer.
2. Double-click the network printer icon.
3. In the message that appears, click Yes to setup the printer.
The network printer is defined on your Windows client workstation.
Page 64

50 Chapter 3 – Working From a Client Workstation
4. From the Printers list, select the Spire CXP8000 color server, and then
click
Next.
Note: To install additional network printers, repeat the process.
Defining a Printer - Windows 98
Note: When you add a new Spire CXP8000 color server network printer to a
client workstation, there is no need to install the Spire CXP8000 color server PPD
file and Adobe PostScript printer driver separately. They are installed
automatically in the Windows Add Printer wizard.
To define a network printer using the Windows Add Printer wizard:
1. On your Windows desktop, click the Start button, and follow the path
Settings>Printers.
2. Double-click the Add Printer icon.
The Add Printer wizard appears.
3. Click Next.
4. Select Network printer, and then click Next.
Page 65

Working From Windows Client Workstations 51
5. Type the network path or the queue name of your printer
Or:
If you don’t know the exact name, click
Browse to view the available
network printers.
a. Select one of the network printers—for example, ProcessPrint.
b. Click OK.
6. Click Next.
7. Select Ye s if you want to set this printer as the default printer on your
computer. Otherwise, select
8. Click Next.
No.
Page 66

52 Chapter 3 – Working From a Client Workstation
9. Select Ye s to print a test page.
The Spire CXP8000 color server network printer is now successfully
installed.
10. Click Finish to complete the setup.
To define a network printer using the network neighborhood:
1. Browse to the desired network printer.
2. Double-click the network printer icon.
The Add Printer wizard appears and the network printer is defined on
your Windows client workstation.
Note: To install additional network printers, repeat the process.
Defining a Printer - Windows 2000 and Windows ME
Note: When you add a new Spire CXP8000 color server network printer to a
client workstation, there is no need to install the Spire CXP8000 color server PPD
file and Adobe PostScript printer driver separately. They are installed
automatically in the Windows Add Printer wizard.
To define a network printer using the Windows Add Printer wizard:
1. On your Windows desktop, click the Start button and follow the path
Settings>Printers.
2. Double-click the Add Printer icon.
The Add Printer wizard appears.
3. Click Next.
Page 67

Working From Windows Client Workstations 53
4. Select Network printer.
5. Click Next.
6. Select Type the printer name, or click Next to browse for a printer.
Page 68

54 Chapter 3 – Working From a Client Workstation
7. In the Name box, type the exact name of the printer.
Or:
Click
Next to browse for a printer.
8. Select one of the network printers—for example, ProcessPrint.
9. Click Next.
10. Select Yes if you want to set this printer as the default printer on your
computer. Otherwise, select
11. Click Next.
12. Click Finish to complete the setup.
No.
The Spire CXP8000 color server network printer is now successfully
installed.
To define a network printer using the network neighborhood:
1. Locate the desired network printer.
2. Double-click the network printer icon.
3. In the message that appears, click Yes to setup the printer.
The network printer is defined on your Windows client workstation.
Note: To install additional network printers, repeat the process.
Page 69

Working From Windows Client Workstations 55
Defining a Printer - Windows XP
Note: When you add a new Spire CXP8000 color server network printer to a
client workstation, there is no need to install the Spire CXP8000 color server PPD
file and Adobe PostScript printer driver separately. They are installed
automatically in the Windows Add Printer wizard.
To define a network printer using the Windows Add Printer wizard:
1. On your Windows desktop, click the Start button and select Printers
and Faxes
.
2. In the Printer Tasks area, select Add a printer.
The Add Printer wizard appears.
Page 70

56 Chapter 3 – Working From a Client Workstation
3. Click Next.
4. Select A network printer, or a printer attached to another computer
and click Next.
5. Select Browse for a printer, and click Next.
Page 71

Working From Windows Client Workstations 57
6. Locate the Spire CXP8000 color server and double-click it to display
the list of network printers.
7. Select the printer you wish to setup, and click Next.
8. Select Ye s if you want to set this printer as the default printer on your
computer. Otherwise, select
No.
9. Click Next.
10. Click Finish to close the wizard.
The Spire CXP8000 color server network printer is added to your
printer list.
To define a network printer in Windows XP using the network
neighborhood:
1. Locate the desired network printer.
2. Double-click on the network printer icon.
The network printer is defined on your Windows client workstation.
Note: To install additional network printers, repeat the process
Page 72

58 Chapter 3 – Working From a Client Workstation
Creating PostScript Files on Windows
The following procedures describe how to create PostScript files using the
Spire CXP8000 color server from the client workstation. This is useful
when you are not connected to the Spire CXP8000 color server and you
need to distribute jobs for printing on the Spire CXP8000 color server
remotely or on external media. These files can then be imported to the
Spire CXP8000 color server for printing.
To create a PostScript File:
1. Open a job in your DTP application —for example, Microsoft Word—
and from the
File menu, select Print.
2. Select the Print to File check box.
3. Click OK.
A PostScript file is created.
To define a print to file printer locally:
1. Start the Adobe PostScript Driver application (the application is
available on CD#3 in the
Utilities folder (AdobePSDriver.exe), or at
Adobe's Web site at http://www.adobe.com/support/downloads/
main.html).
The Welcome window appears.
Page 73

Working From Windows Client Workstations 59
2. Click Next.
The End User Agreement window appears.
3. Read the license agreement and click Accept.
4. Select It is directly connected to your computer (Local Printer) and
click
Next.
5. In the Available ports list, select File: Local Port and click Next.
Page 74

60 Chapter 3 – Working From a Client Workstation
The next step is to configure the printer with the Spire CXP8000 color
server PPD file. The Spire CXP8000 color server PPD file is located in
a shared folder on the Spire CXP8000 color server.The Spire CXP8000
color server PPD file name is
6. Click Browse.
CXP8K801.
Page 75

Working From Windows Client Workstations 61
7. Click the Network button and browse to your Spire CXP8000 color
server.
8. Locate the Spire CXP8000 color server and double-click on the server
icon. Then, double-click the
9. Click OK.
Utilities folder.
10. Double click the PPD folder and select the Spire CXP8000 color server
PPD file name,
11. Click OK.
Page 76

62 Chapter 3 – Working From a Client Workstation
12. In the Printers list, select the Spire CXP8000 color server printer, and
then click
13. In the Sharing dialog box, select Not Shared, and then click Next.
Next.
14. Type a name for the printer which you will be able to identify on the
client workstation—for example
15. Select Yes (Recommended) if you want to print a test page or select
No, and then click Next.
16. Click Install to install the print to file printer with the Spire CXP8000
CXP8000_ProcessStore.
color server PPD file. When prompted to configure the printer, click
Yes, and then click Next.
17. Select Yes .
Page 77

Working From Windows Client Workstations 63
18. Click Next.
19. Configure the printer according to your specifications, and then
OK.
click
20. Click Finish to complete the setup.
The printer appears in the Printers window.
You are now ready to print *.ps and *.prn files. Once printed, these files
can be imported and printed on the Spire CXP8000 color server.
Page 78

64 Chapter 3 – Working From a Client Workstation
Copying the PPD File from Windows
You need to use the Spire CXP8000 color server PPD file to create
PostScript files to send to the Spire CXP8000 color server. Therefore, you
should copy and distribute the Spire CXP8000 color server PPD file to your
customer.
To copy the PPD file from the Spire CXP8000 color server for
distribution on a disk or by e-mail:
1. On the Windows desktop, double-click the Network Neighborhood
icon.
2. Locate and select the Spire CXP8000 color server station—for
example,
3. Double-click the Utilities folder, and then double-click the PPD folder.
4. Double-click the folder for the desired language—for example,
English.
V4_CXP8000.
5. Copy the PPD file to a disk or send it by e-mail to the customer.
Printing From Windows
1. Open the file you would like to print in the corresponding
2. From the File menu, select Print.
3. From the Name list, select the desired Spire CXP8000 color server
application—for example, open a PDF file in Adobe Acrobat.
The Print window appears.
network printer—for example,
For more information about installing Spire CXP8000 color server network
printers on client workstations, see Working From Windows Client
Workstations on page 48.
Spire_ProcessPrint.
Page 79

Working From Macintosh Client Workstations 65
4. If desired, click the Properties button and modify the job parameters.
Notes:
• Unless the Override PPD Parameters option was selected in the
virtual printer, any changes to the printer parameters override the
parameters of the selected virtual printer.
• Printer's Default indicates that the value is taken from the settings of
the selected virtual printer on the Spire CXP8000 color server.
5. Click OK.
6.
Click OK in the Print window.
The file is sent to the Spire CXP8000 color server.
Working From Macintosh Client Workstations
This section describes how to define a Spire CXP8000 color server network
printer for Macintosh client workstations. The Spire CXP8000 color server
can print to Macintosh client workstations running Mac OS 9 and Mac OS
X (10.2).
You can also submit jobs using the Spire CXP8000 color server virtual
printers over a TCP/IP protocol. This connection enables a significantly
higher spooling speed.
For more information about TCP/IP protocol, see Spire Over TCP/IP on page 108.
Page 80

66 Chapter 3 – Working From a Client Workstation
Defining a Printer on Macintosh Client Workstations
Copying the Spire CXP8000 color server PPD File for Mac OS 9
Before setting up a Spire CXP8000 color server network printer, you need
to install the Spire CXP8000 color server PPD file on your Macintosh client
workstation.
1. From the Apple menu, select Chooser.
2. Select AppleShare, and then locate the Spire CXP8000 color server on
the network.
3. Click OK.
The Login window appears.
4. Select the Guest option, and then click Connect.
The corresponding Spire CXP8000 color server window appears.
Page 81

Working From Macintosh Client Workstations 67
5. Select Utilities, and then click OK.
Note: Do not select the Utilities check box. If you do, Utilities will mount
with every reboot.
6. On the desktop, double-click the Utilities volume.
The Utilities window appears.
Page 82

68 Chapter 3 – Working From a Client Workstation
7. Double-click the PPD folder, and then double-click the folder for the
desired language—for example,
8. Copy the PPD file to the System Folder>Extensions>Printer
Descriptions
folder.
English.
The Spire CXP8000 color server PPD file is now installed in the
Descriptions
folder. It is ready to be configured with one of the Spire
Printer
CXP8000 color server network printers.
Setting the Network Printer for Mac OS 9
1. Make sure that the Spire CXP8000 color server PPD file has been
copied to the
For more information about copying the PPD file, see Copying the Spire
CXP8000 color server PPD File for Mac OS 9 on page 66.
2. From the Apple menu, select Chooser.
Printer Descriptions folder on your client workstation.
Page 83

Working From Macintosh Client Workstations 69
3. Select LaserWriter and then locate the Spire CXP8000 color server on
the network.
4. Select one of the Spire CXP8000 color server's network printers—for
example,
CXP8000_ProcessStore—and click Create.
The system automatically locates the Spire CXP8000 color server PPD
file and configures the printer as a Spire CXP8000 color server network
printer.
If you have the Desktop Printer Spooler extension enabled, a printer
icon appears on the desktop.
Note: Use this icon when you want to download PostScript files to the Spire
CXP8000 color server.
Page 84

70 Chapter 3 – Working From a Client Workstation
Copying the Spire CXP8000 Color Server PPD File for Mac OS X (10.2)
Before you define a network printer you need to install the Spire CXP8000
color server PPD file on your Macintosh client workstation.
1. From the Go menu, select Connect to Server.
The Connect to Server window appears.
2. Locate the desired Spire CXP8000 color server, and then click
Connect.
3. Select Guest, and then click Connect.
Page 85

Working From Macintosh Client Workstations 71
4. Select the CXP8000_Utilities folder, and then click OK.
CXP8000_Utilities folder is mounted on your desktop.
The
5. Double-click the CXP8000_Utilities folder on your desktop.
6. Double-click the PPD folder, and then double-click the folder for the
desired language.
7. Copy the PPD file from the Spire CXP8000 color server to your
Macintosh hard disk.
Page 86

72 Chapter 3 – Working From a Client Workstation
Setting the Network Printer for Mac OS X (10.2)
1. Copy the Spire CXP8000 color server PPD file to the
Library>Printers>PPDs folder on your client workstation.
For more information about copying the PPD file, see Copying the Spire
CXP8000 Color Server PPD File for Mac OS X (10.2) on page 70.
2. From the Go menu, select Applications.
3. Open the Utilities folder and double-click the Print Center icon.
Page 87

Working From Macintosh Client Workstations 73
4. Click Add Printer.
5. Select AppleTalk as the connection type and then locate the Spire
CXP8000 color server.
Note: If you would like to use the LPR protocol instead, see the procedure
Setting up an LPR Printer in Macintosh OS X (10.2) on page 106.
6. In the Printer Model list, select Other.
7.
Locate the folder to which you have copied the PPD file, and then
select the file.
Page 88

74 Chapter 3 – Working From a Client Workstation
8. Click Choose to assign the PPD file to the selected Spire CXP8000
color server network printer.
9. Click Add to add the new printer to the printer list.
Page 89

Working From Macintosh Client Workstations 75
Printing from a Macintosh
1. Open the file you would like to print, in the corresponding
application—for example, open a Quark file.
2. From the File menu, select Print.
3. From the Printer list, select the desired printer—for example,
Color_ProcessPrint.
For more information about installing the Spire CXP8000 color server
network printers on client workstations, see Copying the Spire CXP8000
color server PPD File for Mac OS 9 on page 66 and Setting the Network
Printer for Mac OS X (10.2) on page 72.
4. To set job parameters, click General and from the pop-up menu, select
one of the
Printer Specific Options.
Page 90

76 Chapter 3 – Working From a Client Workstation
A window similar to the one shown below appears.
5. Adjust the printer options as desired.
Notes:
• The Printer's Default option indicates that the value is taken from the
virtual printer that is currently selected.
• The PPD parameters are divided into five Printer Specific Options in
the drop-down menu.
Spire Web Center
6. After modifying the job settings, click Print.
The file is sent to the Spire CXP8000 color server.
The Spire Web Center is an internet site that provides online Spire
information and can be accessed from client workstations.
The Spire web center enables you to:
• View the status of jobs in the Spire queues, the Alerts window in its
current state, and the printer system information
• Download remote client tools, utility applications, color profiles, and
print drivers
• View Spire related documentation, such as release notes, Spire guides,
frequently asked questions and answers, and other troubleshooting
information
• Find links to related vendors or products
Page 91

Spire Web Center 77
To connect to the web center from a client workstation:
Important: To connect to the Spire Web Center from a client workstation, you
must first enable the web connect service on the Spire CXP8000 color server. To
enable this service, select the Settings window>Administration>Remote
Tools Setup.
For more information about setting up the web connect service, see Remote
Tools Setup on page 399.
1. On your desktop, click the Internet Explorer icon.
2. When the Internet Explorer starts, in the address field type:
http://<spire name>—for example, if the Spire station name is
FALCON_E, type http://FALCON_E.
Note: You can also use the Spire color server IP address—for example,
http://192.168.92.0.
Important: If you would like to connect to the Spire CXP8000 color server
from a Macintosh client workstation, contact your system administrator to
add the Spire name to the DNS. This is required since Windows name
resolution protocols are not supported in Macintosh. The DNS addition is
required when clients go through a main server on the network.
Page 92

78 Chapter 3 – Working From a Client Workstation
The Spire CXP8000 color server Web Center appears.
The Web Viewer
The Web Viewer page enables you to view the printer configuration and
system information, the jobs that currently reside in the Spire CXP8000
color server Queues window and Storage window, and to view the alerts
that currently appear in the Alerts window. This information is important
when you print from a client workstation because it enables you to
monitor your jobs in the queues and then make any necessary changes.
In addition, if you have a system that uses XML protocol, you can retrieve
information about the job list and printer status.
Page 93

Spire Web Center 79
The Queues tab
In the Queues tab you can view the jobs that are currently running in the
Spire CXP8000 color server
Print Queue and Process Queue.
Page 94

80 Chapter 3 – Working From a Client Workstation
The Storage tab
In the Storage tab you can view the Spire CXP8000 color server Storage
window and the jobs that reside in this window.
Page 95

Spire Web Center 81
The Alerts tab
In the Alerts tab you can view the Spire CXP8000 color server Alerts
window messages. For example, if a job that you sent to print from your
client workstation has failed—you can view the message in the Alerts
window, edit the job parameters (PPD file), and then resend it for
processing and printing on the Spire CXP8000 color server.
Page 96

82 Chapter 3 – Working From a Client Workstation
The Printer tab
In the Printer tab you can view the Spire CXP8000 color server system
information.
Web Viewer API
The JobList.xml file and the Printer Status.xml file enable you to retrieve
information about the job list and the printer status.
The
JobList.xml file contains information about files in the Print Queue,
Process Queue, and the Storage window.
To see the Job List view, type the following path:
http://<ComputerName>/WebViewer/GetView.asp?View=JobList_xml.
The Printer Status.xml file contains information about the various printer
states. To see the Printer State view, type the following path:
http://<ComputerName>/WebViewer/GetView.asp?View=PrinterStatus_xml.
Page 97

Spire Web Center 83
Downloads
The Downloads page enables you to access the Spire CXP8000 color server
Utilities folder and download available tools and files for Windows and
Macintosh client workstations—for example, the Spire CXP8000 color
server PPD file.
Page 98

84 Chapter 3 – Working From a Client Workstation
Links
The Links page enables you to link to related vendors or products.
Page 99

Using Hot Folders 85
Using Hot Folders
For every published Spire CXP8000 color server network printer that you
define on a client workstation, a corresponding hot folder is automatically
created in the Spire CXP8000 color server
CXP8000 color server has three default hot folders,
HF_ProcessStore, and HF_SpoolStore. These hot folders correspond to the
three default printers.
Each hot folder carries the virtual printer's name (HF_printer’s name), see
the following graphic.
D:\Hot Folders folder. The Spire
HF_ProcessPrint,
When you connect from a client workstation to the Spire CXP8000 color
server over the network, you can use the hot folder to submit PDL jobs to
the Spire CXP8000 color server. When you establish a connection, drag
your jobs onto the desired hot folder (according to the selected workflow).
Tip: You can also drag the hot folder icon to your desktop to create a short cut
to the folder for future usage.
Jobs that reside in the hot folder will automatically be submitted to the
Spire CXP8000 color server through the corresponding virtual printer.
Consequently, all of the virtual printer job parameters, inclusive of the
workflow, will be applied to the job.
Page 100

86 Chapter 3 – Working From a Client Workstation
As soon as the job has been spooled to the Spire CXP8000 color server, it
disappears from the hot folder and enters the Spire CXP8000 color server
Process Queue or Storage window, according to the selected workflow.
Note: If you send files for printing through a hot folder while the Spire CXP8000
color server application is down, when the application restarts, the files that
reside in hot folders will immediately be imported to the system.
Hot Folder File Formats
Hot folders may contain all PDL formats that are supported by the Spire
CXP8000 color server, PS, PDF, EPS, PRN, VPS, VIPP, PPML, TIF, JPG
and GAP.
Files with unsupported formats that are moved to a hot folder, will not be
imported to the Spire CXP8000 color server and will remain in the hot
folder.
Hot Folders and Brisque or Prinergy jobs (GAP Formats)
When you use hot folders to print GAP jobs, the process is automated and
the job is converted to a PDF, which is displayed in the Spire CXP8000
color server queues. The PDF files can then be programmed and printed as
any other PDF file.
For more information about supported GAP formats, see Printing PrePress Files GAP Files on page 366.
Using Hot Folders from Client Workstations
You can use hot folders to process and print files from any client
workstation. The following procedures explain how to print using hot
folders from Windows, Mac OS 9, and Macintosh OS X.
To print a job using a hot folder from Windows:
1. On your Windows desktop, double-click the Network Neighborhood
icon.
2. Locate your Spire CXP8000 color server.
3. Double-click the Spire CXP8000 color server.
 Loading...