

Page 1
User Guide
6204 Wide Format Solution
701P44865
Wide Format
Scan Service
Page 2

Xerox Corporation
Global Knowledge & Language Services
800 Phillips Road Bldg. 845-17S
Webster, NY 14580
Copyright © 2006 Xerox Corporation. All rights reserved.
Printed in the United States of America.
Copyright protection claimed includes all forms and matters of
copyrighted material and information now allowed by statutory
or judicial law or hereinafter granted, including without
limitation, material generated from the software programs that
are displayed on the screen such as styles, templates, icons,
screen displays, looks, etc.
Adobe® and the Adobe logo, Acrobat®, and the Acrobat
logo are either registered trademarks or trademarks of
Adobe Systems Incorporated in the United States and/or other
countries.
Microsoft®, Microsoft® Windows, and Windows® Server 2003
are trademarks of Microsoft Corporation.
XEROX®, The Document Company®, the digital X®,
Xerox 6204 Wide Format are the trademarks of or licensed
to XEROX CORPORATION.
Page 3

Table of contents
Preface..........................................................................................................................................................iii
Using this Guide...........................................................................................................................................iv
Conventions ..................................................................................................................................................v
Operating Environment................................................................................................................................ vi
Hardware...........................................................................................................................................vi
Operating System.............................................................................................................................. vi
Network............................................................................................................................................. vi
Supported Device.............................................................................................................................. vi
1 Installing Wide Format Scan Service........................................................................................................1
2 Starting Wide Format Scan Service..........................................................................................................7
Starting the Application..............................................................................................................................8
Overview of the [Wide Format Scan Service] Window..............................................................................9
Tool Button Functions..............................................................................................................................11
Wide Format Scan Service Menus..........................................................................................................13
3 Setting Up the Program Defaults............................................................................................................17
Polling......................................................................................................................................................18
File Formats.............................................................................................................................................19
Media Size List........................................................................................................................................20
Display Units............................................................................................................................................21
Saving Custom Settings..........................................................................................................................22
Exporting Custom Settings...............................................................................................................22
Importing Custom Settings...............................................................................................................23
4 Setting Up a Wide Format Scan Service Mailbox...................................................................................25
Creating a Wide Format Scan Service Mailbox ......................................................................................26
Deleting a Wide Format Scan Service Mailbox.......................................................................................30
5 Setting Up a Windows Folder .................................................................................................................31
Creating a New Folder.............................................................................................................................31
Creating a Shortcut to the New Folder....................................................................................................33
Deleting a Windows Folder......................................................................................................................35
6 Importing Stored Documents from a Mailbox..........................................................................................37
Manual Import..........................................................................................................................................38
Auto Import..............................................................................................................................................41
7 Displaying the Contents of the Windows Folder.....................................................................................43
Creating the Title Block View Settings ....................................................................................................45
8 Editing a Retrieved Document................................................................................................................47
Despeckle................................................................................................................................................48
Image Rotation........................................................................................................................................49
Skew Correction......................................................................................................................................51
Creating Customized Edit Image Icons...................................................................................................52
Editing the Document..............................................................................................................................54
9 Using Wide Format Scan Service Viewer...............................................................................................57
Starting Wide Format Scan Service Viewer............................................................................................57
Overview of the [Wide Format Scan Service Viewer] Window................................................................59
Tool Button Functions..............................................................................................................................60
Wide Format Scan Service Viewer Menus..............................................................................................63
Opening a File.........................................................................................................................................65
Editing: Despeckle, Image Rotation, Skew Correction...........................................................................65
Editing: Reduce/Enlarge.........................................................................................................................66
Editing: Area Mode.................................................................................................................................68
Delete Selected Area .......................................................................................................................68
Save Selected Area..........................................................................................................................69
10 Uninstalling Wide Format Scan Service................................................................................................71
Index............................................................................................................................................................73
Wide Format Scan Service User Guide i
Page 4

ii Wide Format Scan Service User Guide
Page 5

Preface
Thank you for using the Xerox Wide Format Scan Service. This software is
designed expressly for the Xerox 6204 Wide Format Copier/Printer.
This User Guide describes the procedures and precautions involved in
installing and operating the Xerox Wide Format Scan Service. Refer to the
Xerox 6204 Wide Format Solution User Guide for details on how the
Copier/Printer and this software interact.
The explanations in this document assume that the user has a basic
knowledge of computer operation and network configuration. Refer to the
documentation supplied with the computer, Windows® documentation, and
the manuals supplied with the network system for details on computer and
network operations.
Wide Format Scan Service User Guide iii
Page 6

Using this Guide
This guide consists of the following chapters:
1 Installing Wide Format Scan Service
Provides instructions for installing the Wide Format Scan Service software
on a workstation.
2 Starting Wide Format Scan Service
Explains how to start Wide Format Scan Service and use the features of the
[Wide Format Scan Service] window.
3 Setting Up the Program Defaults
Explains how to set up the mailbox polling frequency, the default display
units (millimeters or inches), and the default media size settings which
display in document lists. Also explains the use of the [Export Setup File]
and [Import Setup File] features.
4 Setting Up a Wide Format Scan Service Mailbox
Provides instructions for setting up a Wide Format Scan Service mailbox.
When the user selects this mailbox, the software checks the contents of the
Copier/Printer’s mailbox and then displays the file names of the scanned
documents it contains.
5 Setting Up a Windows Folder
Explains how to create a folder to receive and store imported files.
6 Importing Stored Documents from a Mailbox
Provides instructions for importing scanned image files from a
Copier/Printer mailbox to a folder on a user’s workstation.
7 Displaying the Contents of the Windows Folder
Explains how to display the imported documents contained in the Windows
folder and their properties.
8 Editing a Retrieved Document
Illustrates how to use and customize the Despeckle, Skew Correction, and
Image Rotation features.
9 Using Wide Format Scan Service Viewer
Wide Format Scan Service Viewer allows users to edit and print documents
which have been imported from a mailbox on the Copier/Printer. The
chapter explains how to use the features of the [Wide Format Scan Service
Viewer] window.
10 Uninstalling Wide Format Scan Service
Provides instructions for uninstalling Wide Format Scan Service.
iv Wide Format Scan Service User Guide
Page 7

Conventions
This User Guide uses the following symbols and conventions:
< > Indicates the keys on the keyboard.
EXAMPLE Press the <Enter> key.
[ ] Indicates the menus and display items on the screens.
EXAMPLE Select either the [On] or [Off] button.
“ “ Indicates areas of reference within this User Guide.
EXAMPLE Refer to “1 Installing Wide Format Scan
Service.”
IMPORTANT Indicates important information which you should read.
NOTE Indicates additional information on operation or features.
REFER TO Indicates reference sources.
EXAMPLE Indicates an example.
The term “documents” is used generically throughout this guide to indicate
the image files (TIFF, PDF, and CALS formats) which are stored on the
Xerox 6204 Wide Format Copier/Printer and/or in a designated import folder
on a user’s workstation.
Wide Format Scan Service User Guide v
Page 8

Operating Environment
The following is the operating environment of the Wide Format
Scan Service.
Hardware
Minimum PC hardware requirements:
• PC/AT compatible machine (excluding NEC NX series)
• Processor: Pentium III 850MHz
• Memory (at 600 dpi, B/W binary data):
A/A4: 256MB or more
B/A3: 256MB or more
C/A2: 512MB or more
D/A1: 512MB or more
E/A0: 512MB or more
• Hard Disk with 20MB or more free space for program
installation
• CD ROM drive
Operating System
• Microsoft® Windows® XP Home Edition (SP2)
• Microsoft® Windows® XP Professional (SP2)
• Microsoft® Windows® 2000 Professional (SP4)
• Microsoft® Windows® Server 2003 (SP1)
Network
• Network Interface Card
• TCP/IP communication capability
Supported Device
• Xerox 6204 Wide Format Copier/Printer
vi Wide Format Scan Service User Guide
Page 9
1 Installing Wide Format Scan Service
Instructions for installing Wide Format Scan Service follow. Before
beginning the installation, log on to Print Services on Web as
Administrator, select the Properties tab, and perform the following:
1. Confirm that the settings for the IP Address and Subnet Mask
are correct.
2. Confirm that both FTP and SNMP are enabled.
NOTE The procedure below is written for Windows
systems. The installation procedures for Windows
®
Windows
1. Insert the CD ROM in the workstation’s CD ROM drive.
2. Select [Start] > [My Computer] and then select the CD ROM
3. When the contents of the CD ROM display, double click the zip
4. Extract the contents of the zip file to the workstation’s Desktop.
Server 2003 systems differ only in screen appearance.
drive in which you inserted the CD ROM.
file named WideFormatScanServiceVer.x.x.x.x_XC.zip (Fig. 1).
Figure 1
A folder entitled [WideFormatScanServiceVerx.x.x.x_XC] will
be created on the Desktop (Fig. 2).
Figure 2
®
XP Professional
®
2000 and
5. Double click the [WideFormatScanServiceVerx.x.x.x_XC] folder
that was created in step 4. A folder labeled [Disk1] will display
(Fig. 3).
Figure 3
Wide Format Scan Service User Guide 1
Page 10
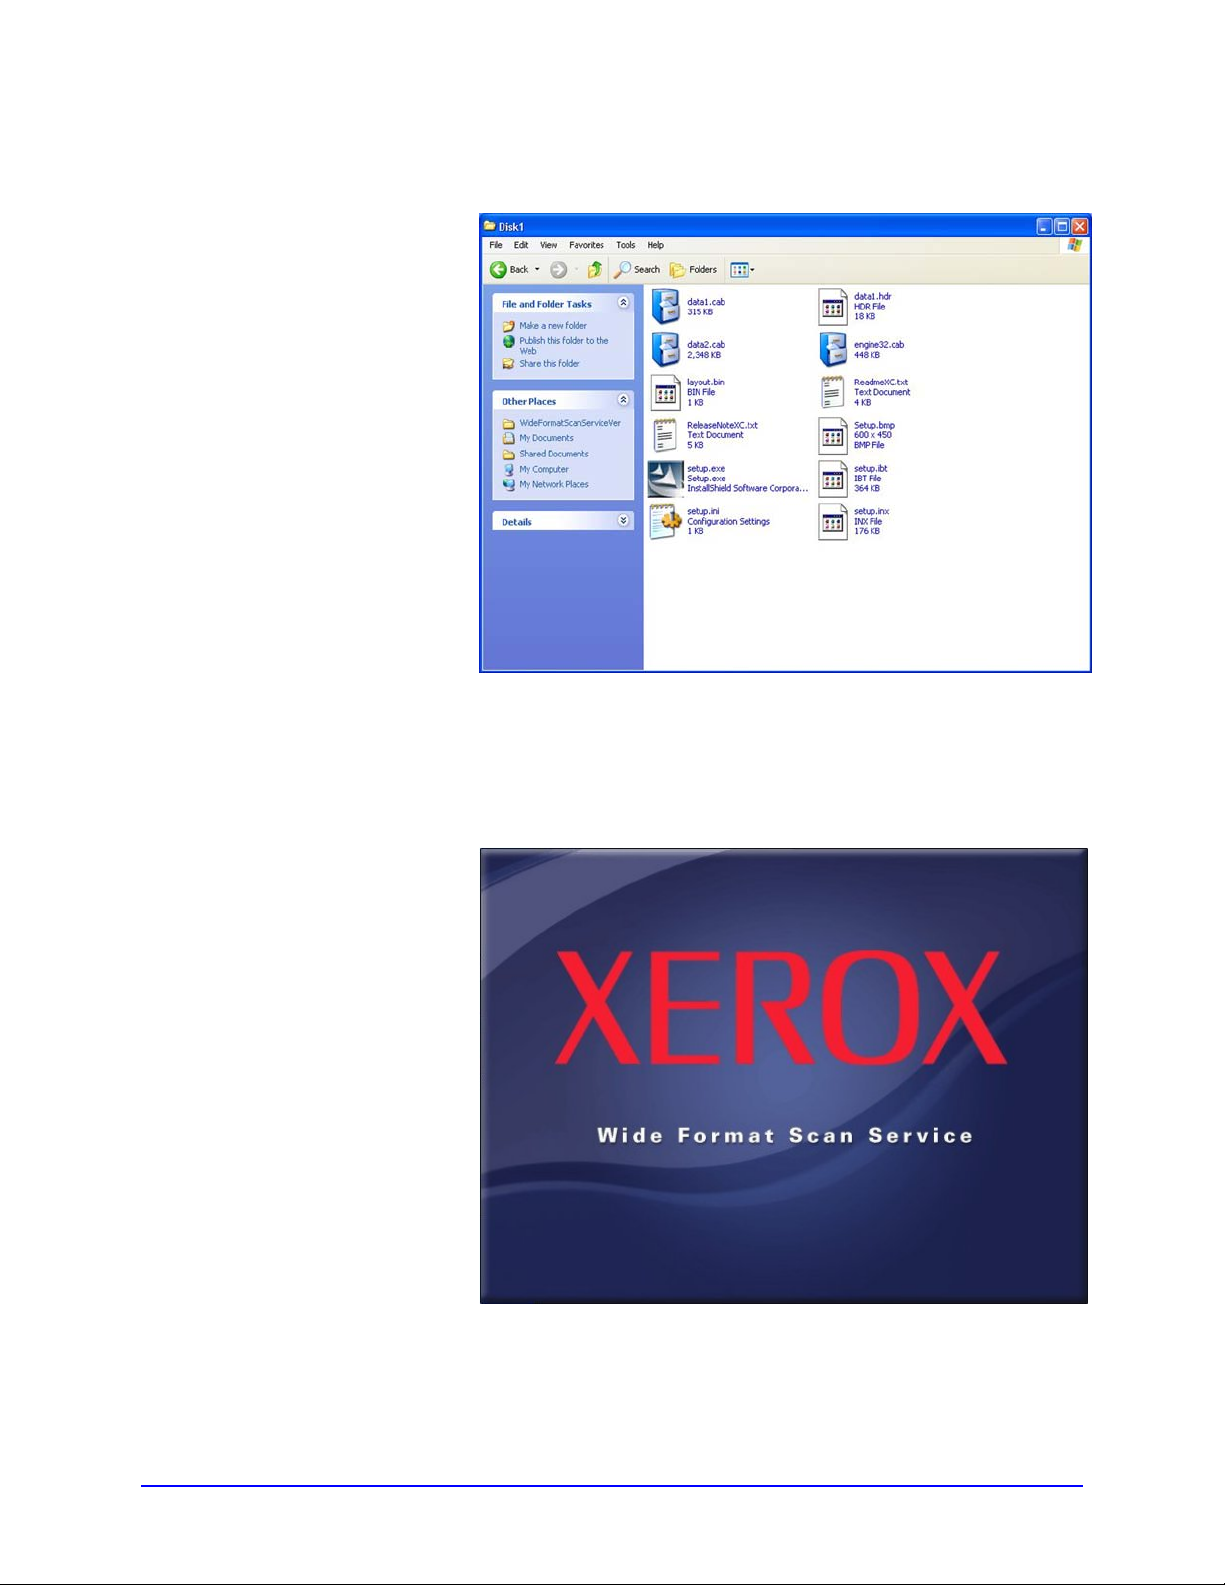
6. Double click the [Disk1] folder. The contents of the folder will
display (Fig. 4).
Figure 4
7. Double click the [setup.exe] icon to activate the installer
program. The [Xerox Wide Format Scan Service] screen
(Fig. 5) will display, followed by the [Wide Format Scan Service
- InstallShield Wizard] Welcome screen (Fig. 6).
Figure 5
2 Wide Format Scan Service User Guide
Page 11
Figure 6
8. Click the [Next] button on the [Wide Format Scan Service -
InstallShield Wizard] Welcome screen. The [Choose
Destination Location] dialog box will display (Fig. 7).
Figure 7
Wide Format Scan Service User Guide 3
Page 12

9. Either accept the default Destination Folder or bro w se to a
another location of your choice, and then click the [Next] button.
The [Ready to Install the Program] screen will display (Fig. 8).
Figure 8
10. Click the [Install] button. The [Setup Status] screen (Fig. 9) will
display, and the installer will begin the installation of the
program files.
Figure 9
4 Wide Format Scan Service User Guide
Page 13

When the installation is complete, the [InstallShield Wizard
Complete] screen will display (Fig. 10).
Figure 10
11. Click the [Finish] button and remove the CD ROM.
The installation process places two shortcuts on the Desktop,
one for Wide Format Scan Service Viewer and the other for the
Wide Format Scan Service (Fig. 11).
Figure 11
Wide Format Scan Service User Guide 5
Page 14

6 Wide Format Scan Service User Guide
Page 15

2 Starting Wide Format Scan Service
Wide Format Scan Service enables a user to retrieve to a
workstation the documents which were previously scanned and
stored on the Xerox 6204 Wide Format Copier/Printer. Once the
image information is retrieved, it can be edited and saved, then
printed on the Copier/Printer. Printing is performed using the Wide
Format Scan Service Viewer (see “9 Using Wide Format Scan
Service Viewer”). Edited image information cannot be returned to a
Copier/Printer mailbox for storage.
This section explains how to launch the Wide Format Scan Service
and describes the features of the [Wide Format Scan Service]
window.
NOTE Although the scanned document information is preserved in the
file that is retrieved to the workstation, the document in the
Copier/Printer mailbox may be deleted once retrieved. To prevent
this from occurring, set the [Delete/Save Documents] feature to [Off]
when you create or change a mailbox on the Xerox 6204 Wide
Format Copier/Printer’s control panel.
REFER TO Xerox 6204 Wide Format Solution User Guide, Chapter 4 Scan,
Creating/Deleting/Changing a Mailbox.
Wide Format Scan Service User Guide 7
Page 16
Starting the Application
NOTE You cannot use Wide Format Scan Service and Wide Format
Network TWAIN Source at the same time.
To start Wide Format Scan Service:
Either select the [Wide Format Scan Service] shortcut on the
Desktop or select [Start] > [All Programs] > [Xerox] > [Wide Format
Scan Service] > [Wide Format Scan Service].
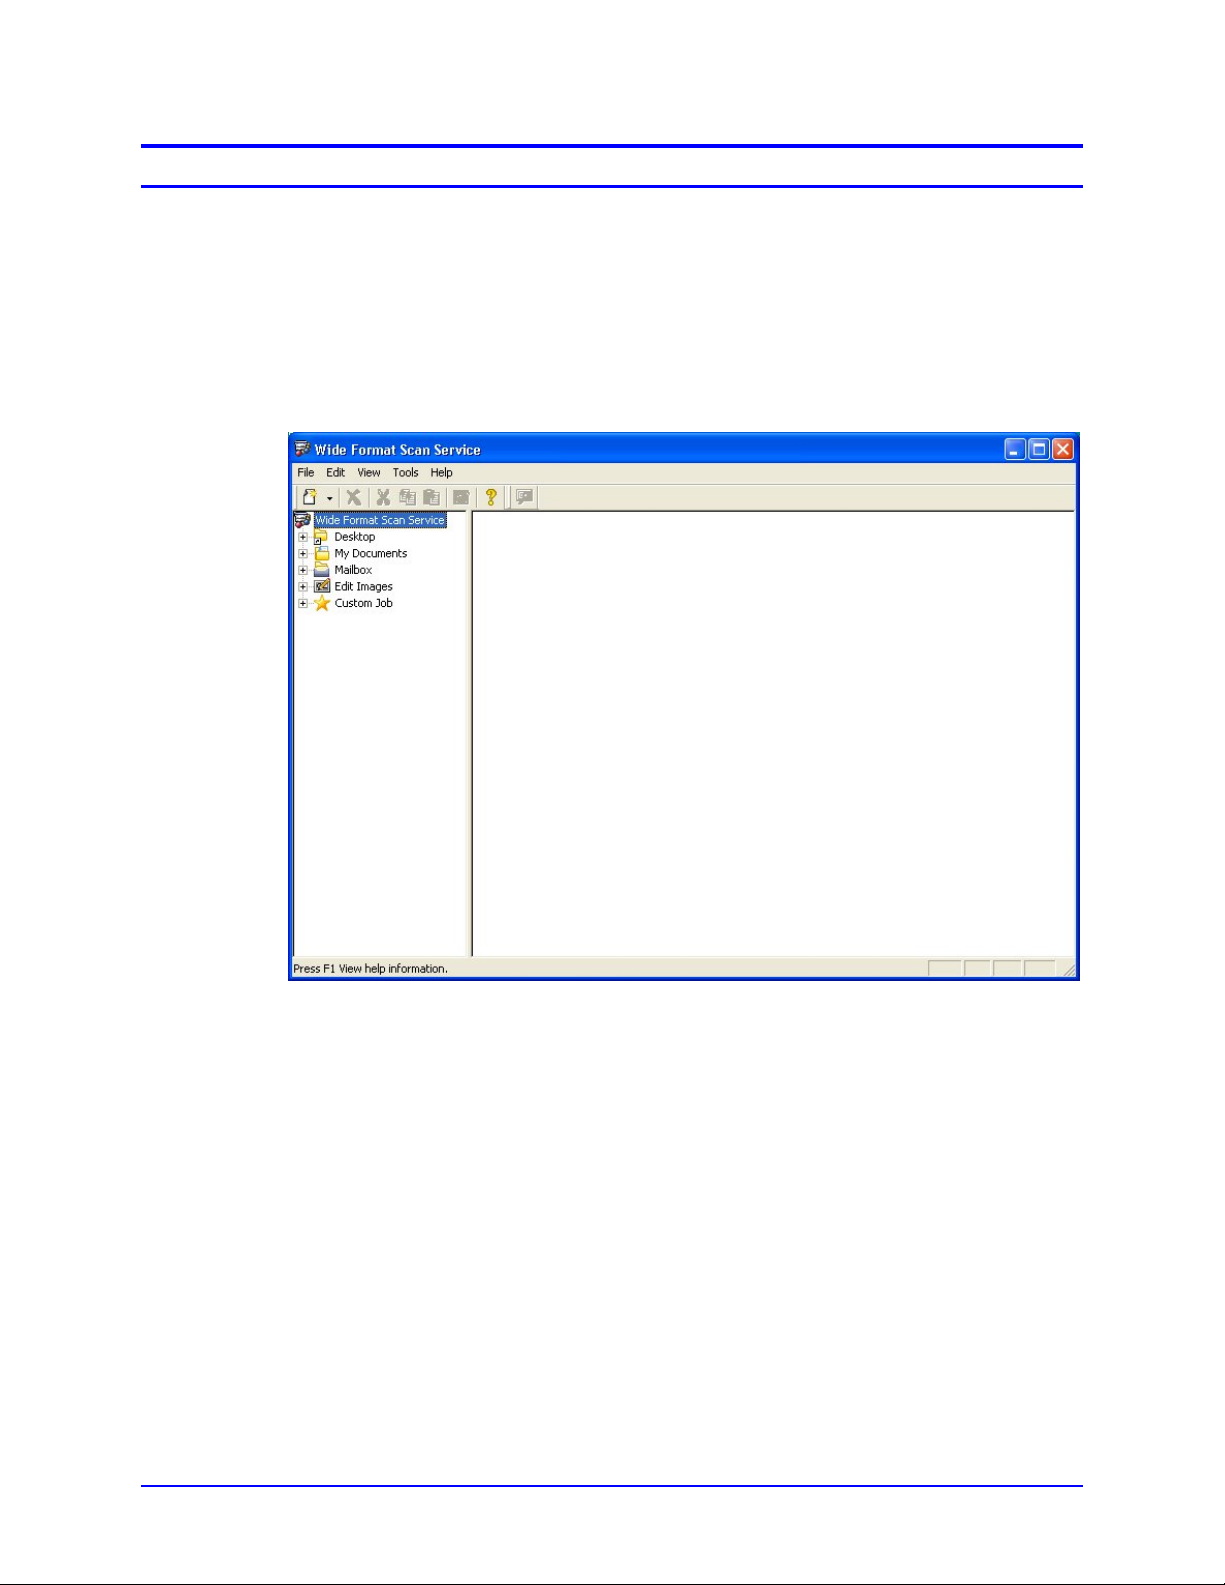
The [Wide Format Scan Service] window (Fig. 1) will display.
Figure 1
8 Wide Format Scan Service User Guide
Page 17
Overview of the [Wide Format Scan Service] Window
[
]
r
r
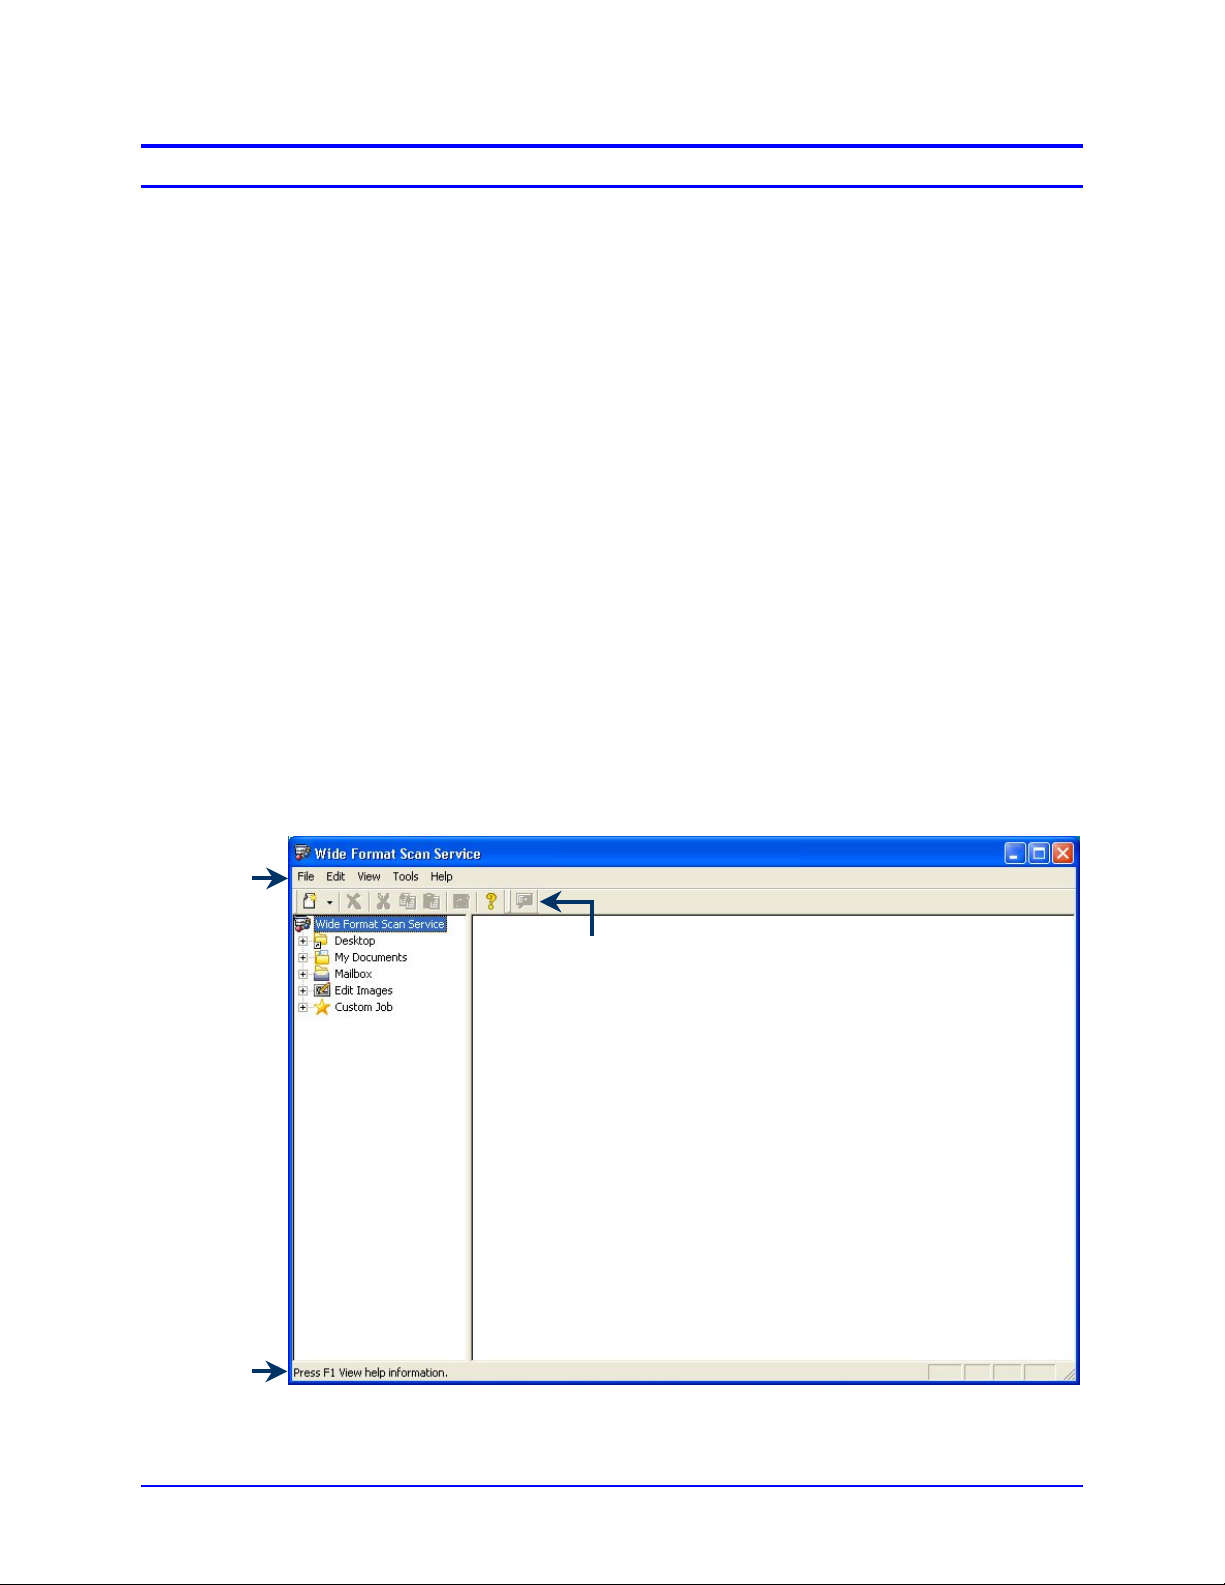
The [Wide Format Scan Service] window (Fig. 2) contains these
features:
Menu Bar
Tool
Buttons
Service
Area
File Area
The Menu Bar provides access to the File, Edit, View, Tools,
and Help menus and submenus.
Tool Buttons provide convenient shortcuts for frequently performed
tasks. There are four categories of tool buttons: Common,
Windows Folder, Mailbox Service, and Edit Images; all are
described in this chapter.
The [Service Area] tree view works much like any Windows
directory. It also displays mailbox and Windows folder shortcuts
which the user creates to access and manage scanned and edited
documents. The [Service Area] also will display customized Edit
Images icons which the user may create to streamline editing tasks.
When a user selects a Wide Format Scan Service mailbox, the [File
Area] will display a list of documents which are stored in the
associated Copier/Printer mailbox. Once the list displays, the user
may select documents to retrieve for editing.
When a user selects a folder that contains retrieved documents, the
files in the folder will display in List View, Thumbnail View, or Title
Block View. The user may drag and drop one or more files on an
Edit Images icon to be edited or select (double-click) a file to
display it in Wide Format Scan Service Viewer.
Menu Ba
Status Ba
Tool Buttons
[Service Area]
File Area
Figure 2
Wide Format Scan Service User Guide 9
Page 18
NOTE When you pause the cursor over a tool button, a tool tip will display
and a description of the button will appear in the [Status Bar] (see
Fig. 2).
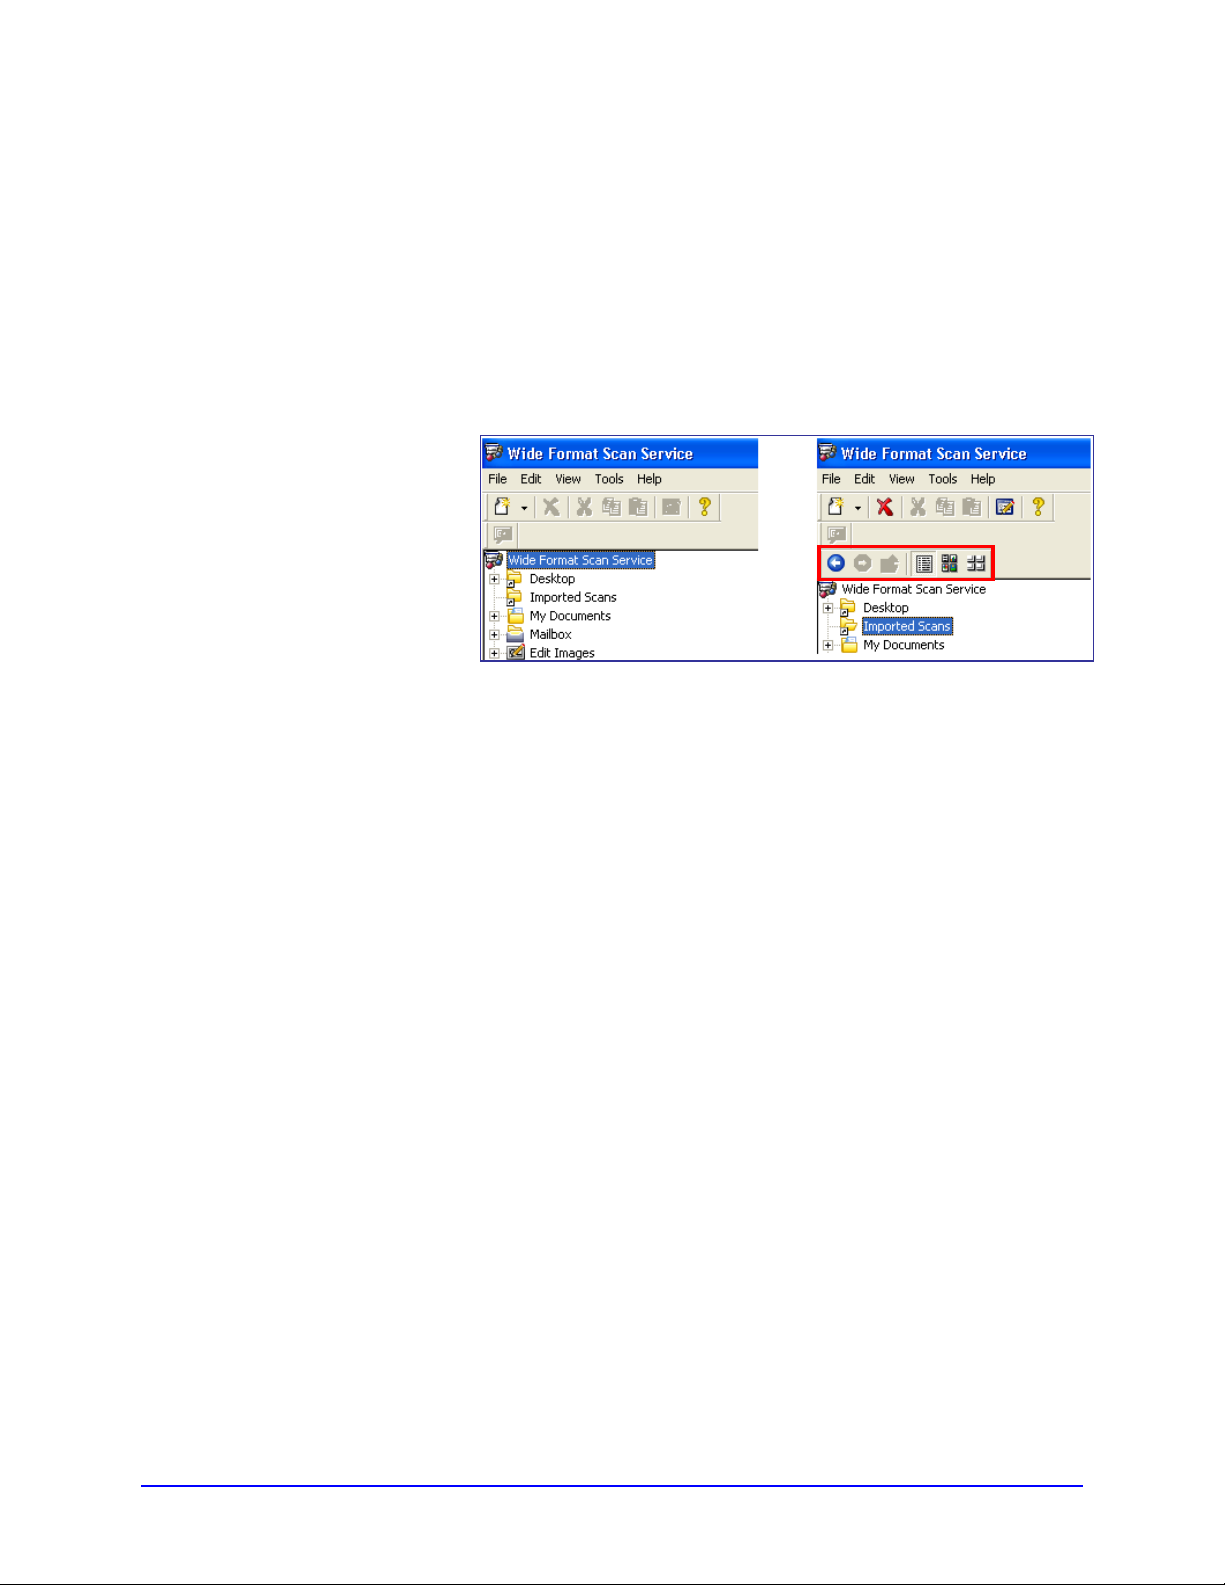
NOTE The tool buttons that display in the [Wide Format Scan Service]
window will change based on which item is selected in the [Service
Area].
EXAMPLE
Selecting the folder that contains imported documents will cause the
Windows folder Tool Buttons to display (Fig. 3).
Figure 3
10 Wide Format Scan Service User Guide
Page 19
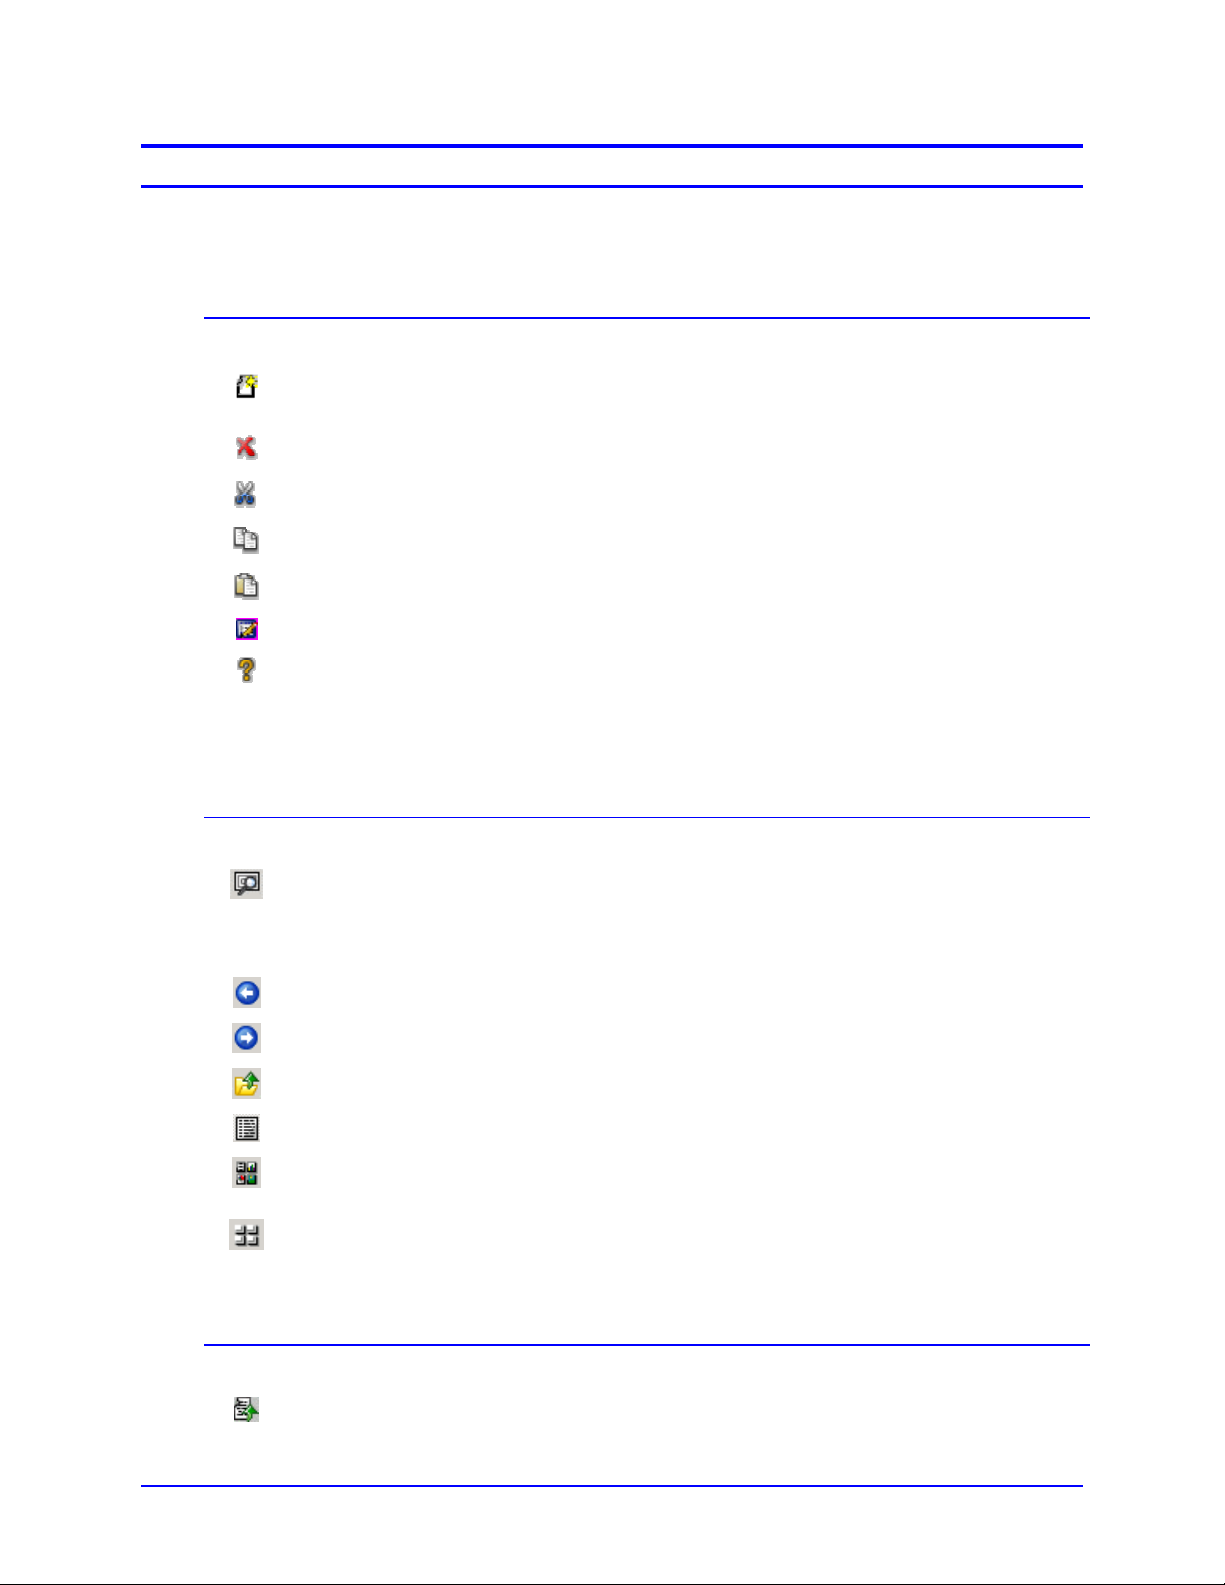
Tool Button Functions
Common Tool Buttons
Icon Function Description
The tables below define the functions of the tool buttons on the
[Wide Format Scan Service] window.
New
Delete Deletes the selected folder or file.
Cut Cuts the selected folder or file.
Copy Copies the selected folder or file.
Paste Pastes the folder or file that has been copied or cut.
Properties Displays the properties of the selected folder or file.
Help Displays the Help file.
NOTE Mailbox folders and Edit Images folders cannot be deleted, copied, cut, or pasted, and their properties cannot
be edited.
Adds a Windows folder, a Mailbox, or an Edit Images icon (for Skew
Correction, Despeckle, or Image Rotation) to the [Service area].
Windows Folder Tool Buttons
Icon Function Description
Start Wide
Format Scan
Service
Viewer
Starts Wide Format Scan Service Viewer .
Back Back to previous folder.
Next Next folder.
Up Up one level.
List View Displays a list that contains file name, size, save date, etc., information.
Thumbnail
View
Title Block
View
Displays the thumbnail image of files.
Displays title block images set by the Title Block View Settings.
Mailbox Service Tool Button
Icon Function Description
Retrieve Retrieves file(s) from a Copier/Printer mailbox to your computer.
Wide Format Scan Service User Guide 11
Page 20

Edit Images Tool Buttons
Icon Function Description
Store File Stores multiple files so they can be batch processed.
Execute
Stored File
Move Up Moves the selected file up.
Move Down Moves the selected file down.
Move to Top Moves the selected file to the top.
Move to Last Moves the selected file to the end.
Executes the editing of the stored files.
12 Wide Format Scan Service User Guide
Page 21

Wide Format Scan Service Menus
This section describes each of the items in the menus on the Wide
Format Scan Service Menu Bar.
File Menu
Item Description
New
Delete…
Rename
Properties
Import Setup File… Imports a previously exported setup file that describes the configuration
Export Setup File… Exports a setup file that describes the configuration of the [Service
Exit
Adds Windows folders, mailboxes, and Edit Images icons to the
[Service Area]. The submenu consists of the following:
• Windows Folder: Displays the [Windows Folder Properties] window
to enable adding Windows folders to Wide Format Scan Service.
• Mailbox: Displays the Mailbox Setup Wizard for creating a Wide
Format Scan Service mailbox.
• Edit Image: Allows the user to add customized Edit Images icons
(Skew Correction/Despeckle/Image Rotation) to the [Service Area].
Deletes the selected folder, Edit Images icon, or file.
Renames the folder, Edit Images icon, or file.
Displays the properties of the selected folder, Edit Images icon, or file.
of the [Service Area] Edit Images Icons and the Detailed Settings
(Polling Interval, File Formats, Media Size List Settings, and display
units (millimeters or inches).
Area] Edit Images Icons and the Detailed Settings.
Closes Wide Format Scan Service.
Edit Menu
Item Description
Cut
Copy
Paste
Select All
Wide Format Scan Service User Guide 13
Cuts the selected folder, Edit Images icon, or file.
Copies the selected folder, Edit Images icon, or file.
Pastes the selected folder, Edit Images icon, or file.
Selects all the files in the file area.
Page 22

View Menu
The selections displayed on the View Menu differ based on which folder or service is selected in
the [Service Area].
Item Description
Toolbar
Status Bar
Shows or hides the Toolbar.
Shows or hides the Status Bar. The status bar is displayed by default.
Refresh Refreshes the display. Rechec ks the Copier/Pri nter mailbox for
documents if the Wide Format Scan Service mailbox is highlighted
when Refresh is selected.
Arrange Icons by Arranges the files displayed in List View in the [File Area] in a specified
order, i.e., Name, Size, Type, Date Modified.
List View
Displays a file list that shows the file name, size, update date/time, etc.
Thumbnail View This viewing method may be selected if a Windows folder is highlighted
in the [Service Area]. It displays a reduced image of the each file in the
folder.
Title Block View This viewing method may be selected if a Windows folder is highlighted
in the [Service Area]. It displays a reduced image of each document’s
Title Block.
Move Folder This viewing method may be selected if a Windows folder is highlighted
in the [Service Area]. The submenu consists of the following:
• Back: Performs the same function as the Back button.
• Next: Performs the same function as the Next button.
• Up: Closes the current folder and opens its parent folder.
Move File Changes the order in which files are processed. The submenu consist s
of the following:
• Move Up: Moves the stored job up one level.
• Move Down: Moves the stored job down one level.
• Move to Top: Moves the stored job to the top.
• Move to Last: Moves the stored job to the last.
14 Wide Format Scan Service User Guide
Page 23

Tools Menu
The selections displayed on the Tools Menu differ based on which folder or service is selected in
the [Service Area].
Item Description
Retrieve Displays in the Tools Menu when a Wide Format Scan Service mailbox
is selected. Retrieves file(s) from a Copier/Printer mailbox to your
computer..
Create New Folder Displays in the Tools Menu when a Windows folder is selected.
Creates a new Windows folder.
Start Wide Format
Scan Service Viewer
Title Block View
Settings…
Detailed Settings… Specifies polling settings and file format settings. This is a common
Store File Displays in the Tool Menu when an Edit Images icon is selected.
Execute Stored File Displays in the Tool Menu when an Edit Images icon is selected.
Starts Wide Format Scan Service Viewer.
Specifies the title block view settings. This is a common menu item that
can be selected at any time.
menu item that can be selected at any time.
Stores multiple files so they can be batch processed. When Store File is
on, a check mark is displayed at the left side of the menu item.
Executes the editing of the stored files.
Help Menu
Item Description
Help
Website
About
Displays Help.
Starts the web browser and links to the xerox.com website.
Displays the version of the Wide Format Scan Service.
Wide Format Scan Service User Guide 15
Page 24

16 Wide Format Scan Service User Guide
Page 25
3 Setting Up the Program Defaults
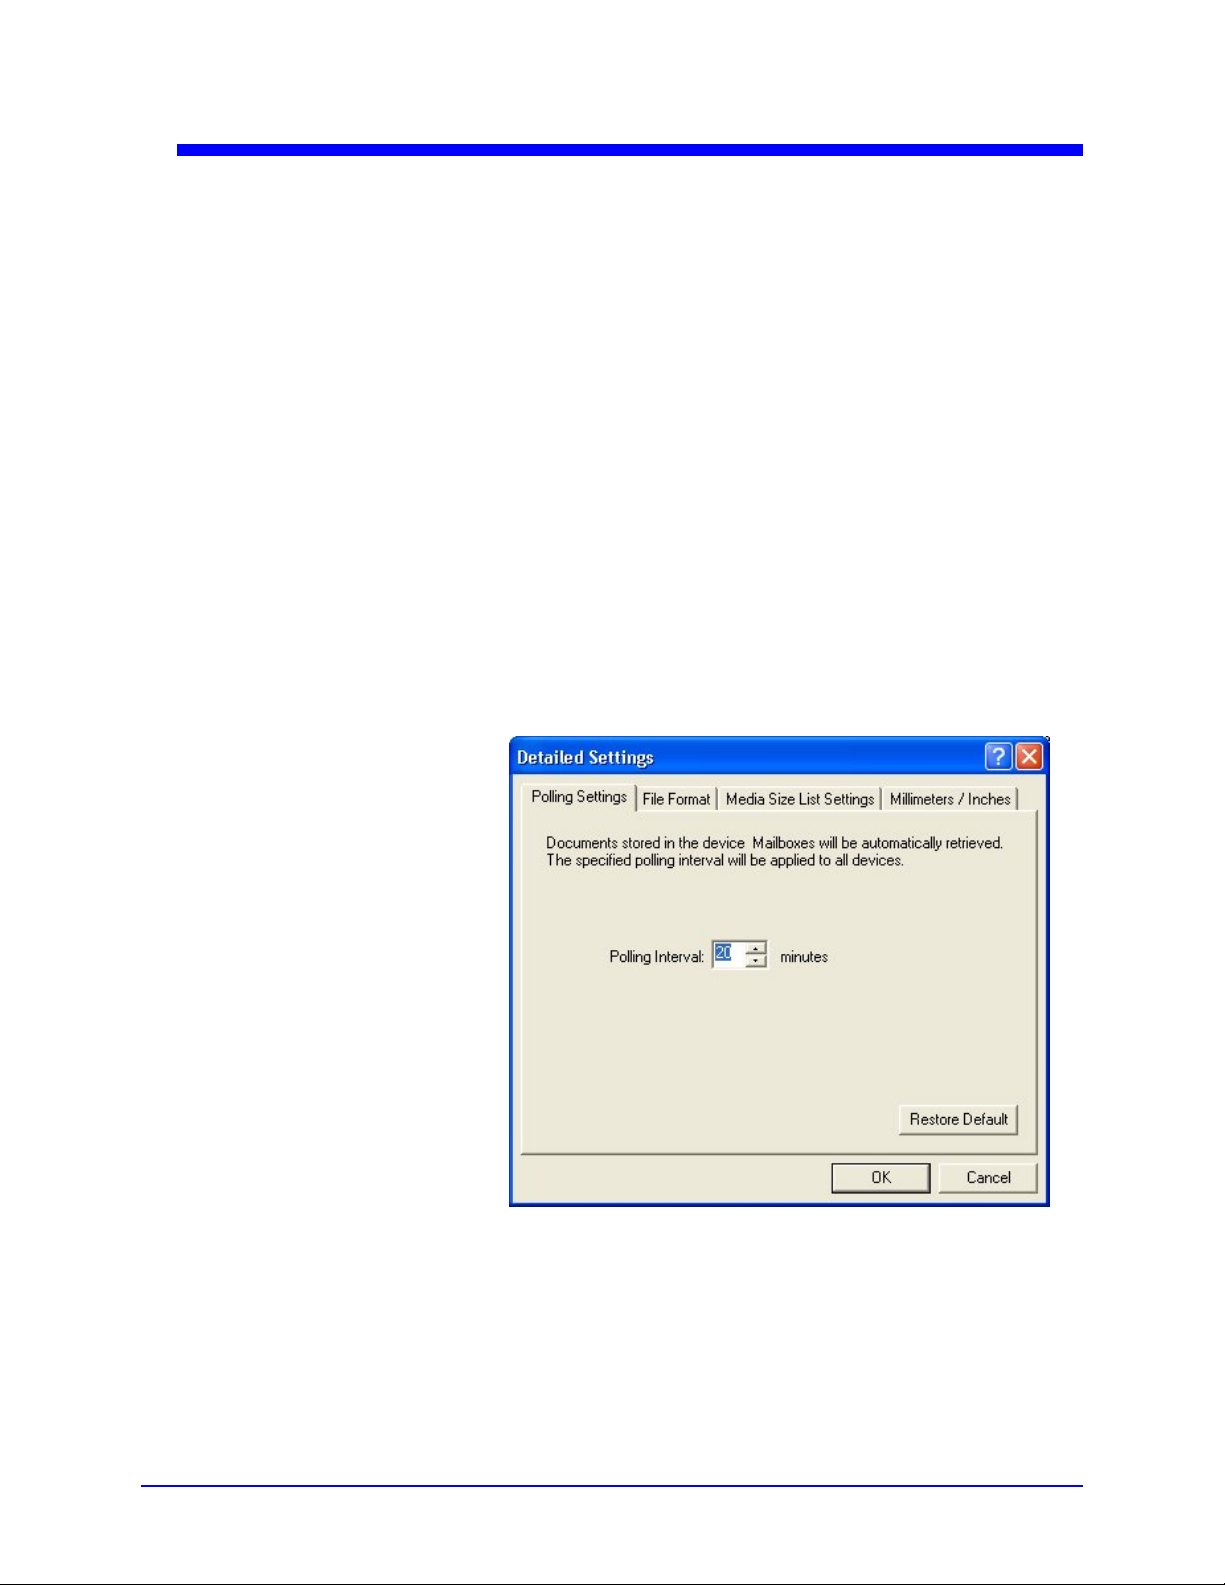
The Wide Format Scan Service [Detailed Settings] dialog box
(Fig. 1) allows you to specify default settings which govern some
aspects of program operation and the appearance of the displ ay,
including:
• the polling frequency for retrieving documents automatically
• the file formats which will be associated with Wide Format Scan
Service Viewer
• the media size settings which will be displayed
• the units of measurement (millimeters or inches) which will be
displayed
To access the [Detailed Settings] dialog box select [Tools] >
[Detailed Settings].
Figure 1
Wide Format Scan Service User Guide 17
Page 26
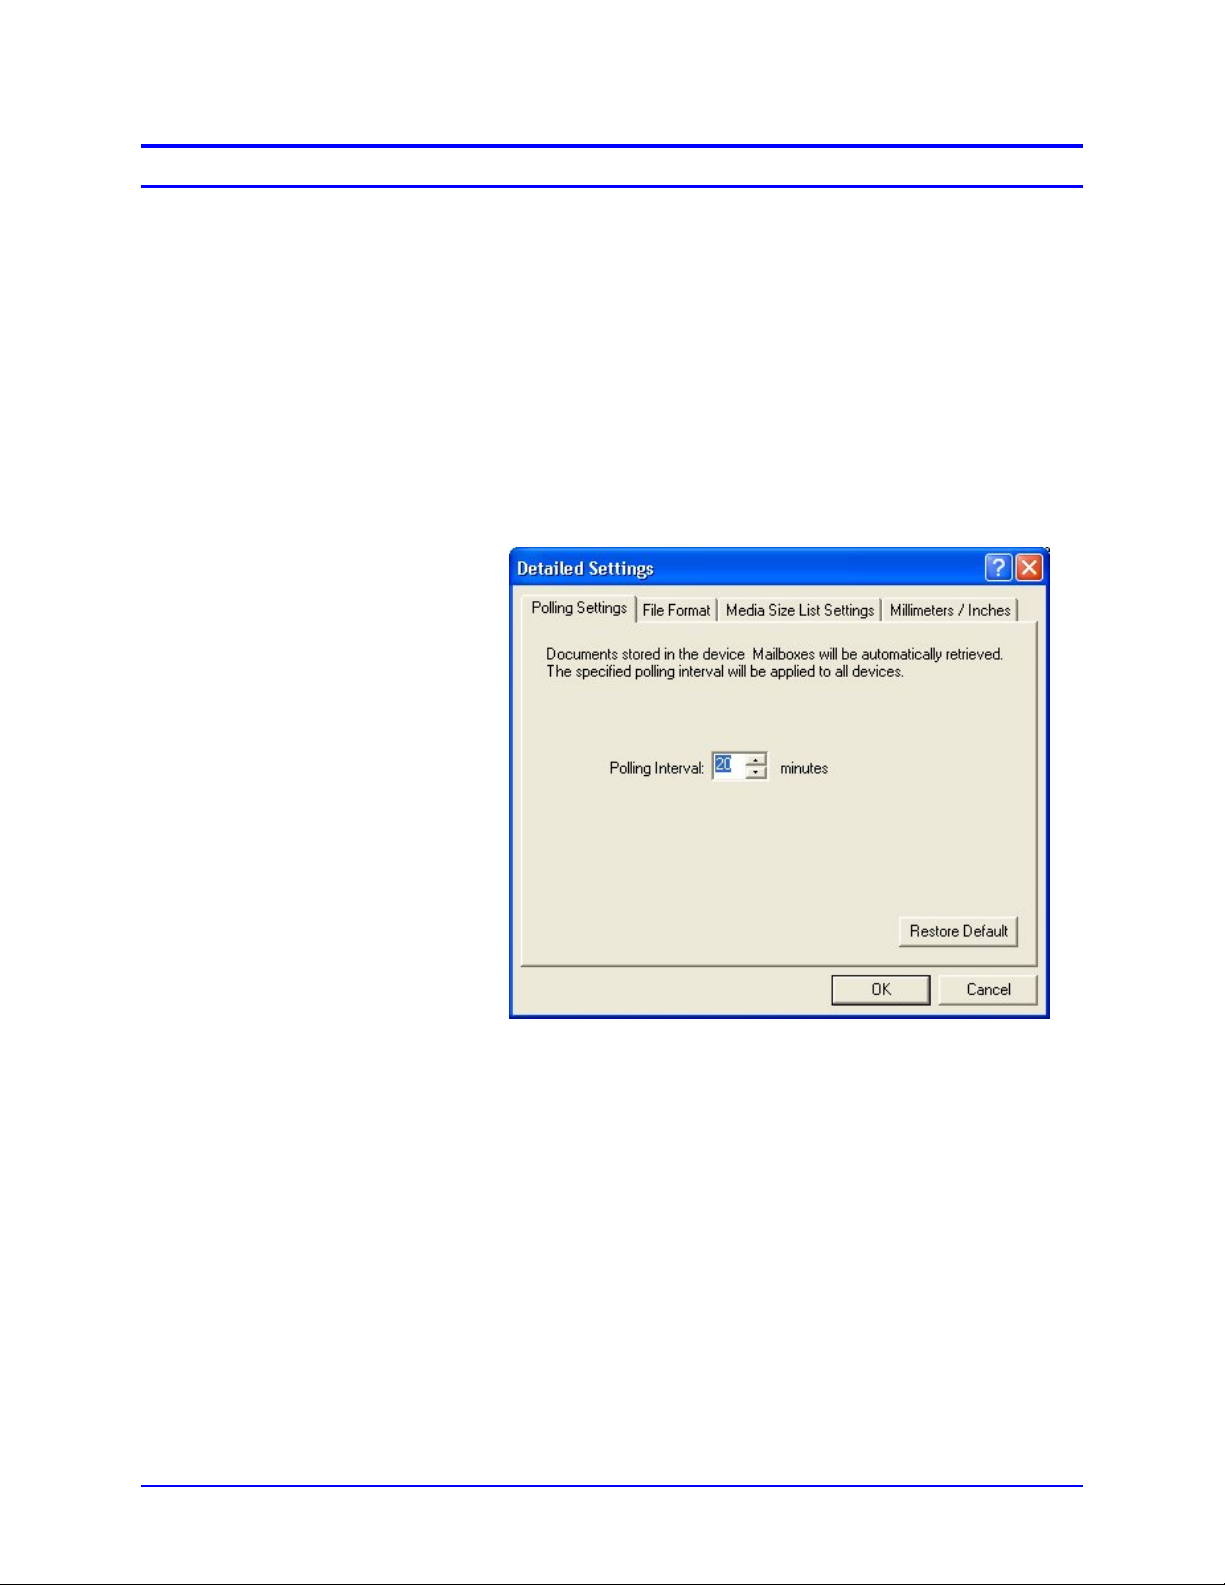
Polling
The Wide Format Scan Service allows you to either manually or
automatically retrieve documents from the mailbox on the Xerox
6204 Wide Format Copier/Printer. If you choose to retrieve
documents automatically, you may either accept the default setting
of 20 minutes or specify an interval of from one to 60 minutes.
NOTE If polling is enabled when you select a mailbox, the document list is
not displayed. You must disable polling to view the mailbox
document list.
To set up the Polling Interval:
1. Display the [Detailed Settings] dialog box by selecting [Tools] >
[Detailed Settings]. The [Polling Settings] tab (Fig. 2) will be on
top.
Figure 2
2. Either enter a number directly in the [Polling Interval:] field or
use the arrow buttons to scroll to the desired setting.
3. Select [OK] to save the setting and close the dialog box or
select another tab to make additional settings.
18 Wide Format Scan Service User Guide
Page 27

File Formats
The Wide Format Scan Service and the Wide Format Scan Service
Viewer are compatible with TIFF, PDF, and CALS file formats. To
associate one or more of these file formats with the Wide Format
Scan Service Viewer:
1. Select the [File Format] tab.
2. Select the appropriate che ckbox(es) at the left side of the file
extension(s) listed on the window (Fig. 3).
3. Select [OK] to save the settings and close the dialog box or
select another tab to make additional settings.
Figure 3
Wide Format Scan Service User Guide 19
Page 28

Media Size List
The [Media Size List Settings] tab (Fig. 4) enables you to specify
the media series and sizes which will be displayed in Wide Format
Scan Service and Wide Format Scan Service Viewer. By default,
all media sizes will display (setting = [Yes]) when you select a
feature that normally displays a list of media sizes, for example, the
[Title Block View Settings].
EXAMPLE If you only work with the ARCH series or with the ISO series, you
can use the [Media Size List Settings] tab to turn off all series and
sizes except the one you normally use.
To reduce the size of the list to the media series and sizes you
commonly use:
1. Select the [Media Size List Settings] tab.
2. Select a media size from the list.
3. Select [No] in the [Add to List:] pull down menu to prevent the
selected size media from being displayed.
4. Select [OK] to save the settings and close the dialog box or
select another tab to make additional settings.
Figure 4
20 Wide Format Scan Service User Guide
Page 29

Display Units
The [Millimeters/Inches] tab (Fig. 5) enables you to set up the units
of measurement which will display in Wide Format Scan Service
and Wide Format Scan Service Viewer.
To change the default units of measurement:
1. Select the [Millimeters/Inches] tab.
2. Select either the [Millimeters] or the [Inches] radio button.
3. Select [OK] to save the setting and close the dialog box or
select another tab to make additional settings.
Figure 5
Wide Format Scan Service User Guide 21
Page 30

Saving Custom Settings
Exporting Custom Settings
The [Export Setup File…] and [Import Setup File…] selections in
the [File] menu enable users to save their customized program
settings (Edit Image icons and Detailed Settings) and then reload
them as needed, for example, after upgrading workstations.
Perform the steps below to export your customized program
settings as a data file:
1. Select [File] > [Export Setup File]. A [Save As] popup will
appear (Fig. 6).
Figure 6
2. Select a location for the setup data file, enter a name in the
[File Name:] field, and then select [Save]. Wide Format Scan
Service will generate a setup data file (*.dat) that contains your
customized program settings.
22 Wide Format Scan Service User Guide
Page 31

Importing Custom Settings
Perform the steps below to reestablish your custom settings by
importing a setup data file that was saved earlier.
1. Select [File] > [Import Setup File]. An [Open] popup will display
(Fig. 7).
2. Select the previously saved setup data file, and then select
[Save]. Wide Format Scan Service will import the setup file and
incorporate your custom settings.
Figure 7
Wide Format Scan Service User Guide 23
Page 32

24 Wide Format Scan Service User Guide
Page 33

4 Setting Up a Wide Format Scan Service Mailbox
The purpose of a Wide Format Scan Service mailbox is to retrieve
and display information about the scanned images which are stored
in a mailbox on the Copier/Printer. Whenever you select the
mailbox that you create in Wide Format Scan Service, the program
connects to the Copier/Printer, checks the associated mailbox
located there, updates the list of documents, and displays them in
the [File Area] of the [Wide Format Scan Service] window.
This section of the guide describes the procedures for creating and
deleting a Wide Format Scan Service mailbox.
Wide Format Scan Service User Guide 25
Page 34

Creating a Wide Format Scan Service Mailbox
1. Launch Wide Format Scan Service.
2. A new mailbox may be set up from the [Wide Format Scan
Service] window in any one of the following ways:
a. Select [File] > [New] > [Mailbox], or
b. Select the [New] (
menu item, or
c. Right click anywhere in the [Service Area], and then select
[New] > [Mailbox].
The [Select a scanner] dialog box will open (Fig. 1).
) button and then select the [Mailbox]
Figure 1
26 Wide Format Scan Service User Guide
Page 35
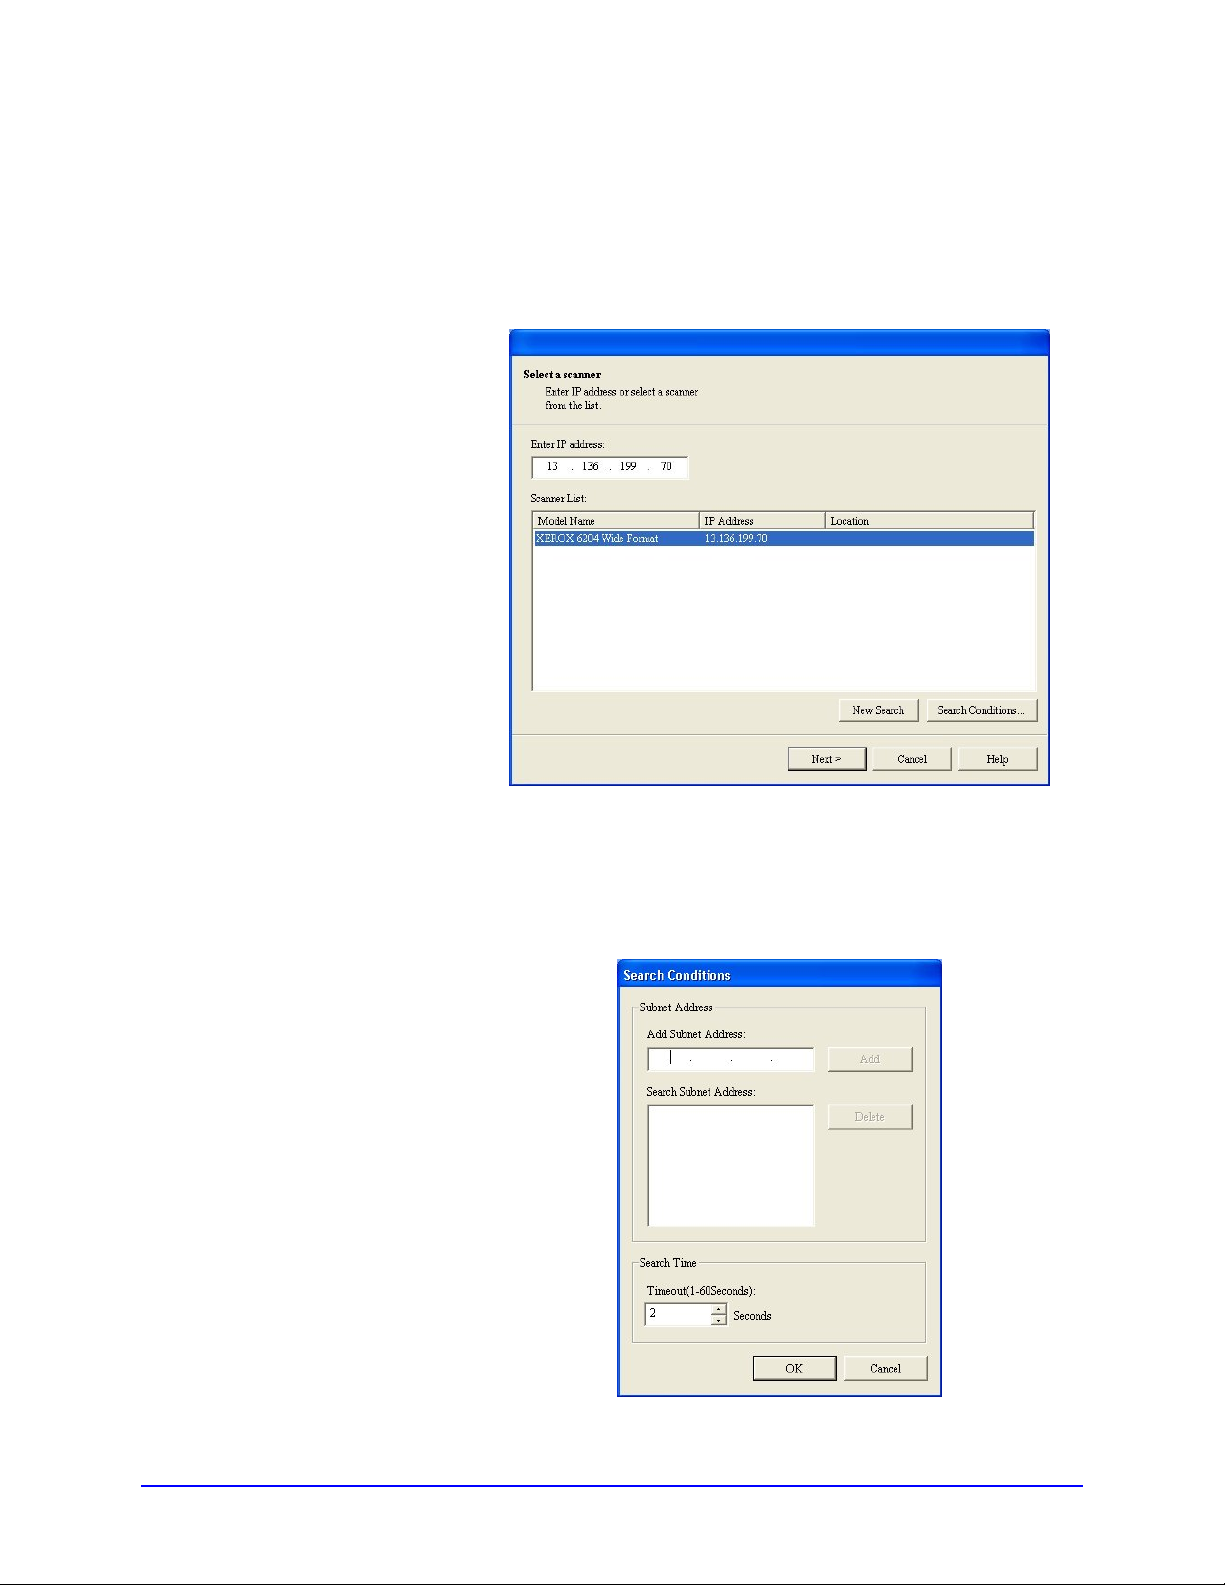
3. Enter the IP Address of the Copier/Printer in the [Enter IP
address:] field, and then click [Next]. The Wide Format Scan
Service will search the subnet for the specified Xerox 6204
Wide Format Copier/Printer and then display it in the [Scanner
List] (Fig. 2). Additional Xerox 6204 Wide Format
Copier/Printers will appear in the list if they are connected to
the subnet and are scan enabled.
Figure 2
NOTE You can use the [Search Conditions…] and [New Search] buttons
(Fig. 3) to search additional subnets for connected, scan enabled,
Xerox 6204 Wide Format Copier/Printers. See your System
Administrator for assistance.
Figure 3
Wide Format Scan Service User Guide 27
Page 36

4. (Refer to Fig. 2) Select the appropriate Xerox 6204 Wide
Format in the [Scanner List:] and click [Next], or double click
the scanner name to connect to the Copier/Printer.
The [Select a Mailbox] dialog box will display (Fig. 4) with the
Copier/Printer’s mailboxes shown in the [Mailbox List].
Figure 4
5. Either select a mailbox from the [Mailbox List:] or enter the
number of the mailbox in the [Mailbox Number:] field.
6. Enter the password you created when you set up the mailbox
on the Copier/Printer.
7. Click [Next]. A dialog box will display which indicates that the
Mailbox Settings have been completed (Fig. 5).
28 Wide Format Scan Service User Guide
Page 37

Figure 5
8. Click [Exit] to return to the [Wide Format Scan Service] window.
The newly created mailbox will appear in the Mailbox folder in
the [Service Area] (Fig. 6). Be sure to click the [+] sign at the
left side of [Mailbox] to expand the item and display the new
mailbox.
New Mailbox
Figure 6
Wide Format Scan Service User Guide 29
Page 38

Deleting a Wide Format Scan Service Mailbox
Deleting a mailbox from the [Service Area] removes the link
between the Wide Format Scan Service and the mailbox on the
Xerox 6204 Wide Format; it does not remove the mailbox from the
Copier/Printer.
Perform the steps below to delete a Wide Format Scan Service
mailbox.
1. Select the mailbox you wish to delete and then select [File] >
[Delete], or right-click the mailbox and select [Delete] from the
menu that displays (Fig. 7).
Figure 7
A confirmation popup (Fig. 8) will display.
Figure 8
2. Click [Yes]. The mailbox will be deleted.
30 Wide Format Scan Service User Guide
Page 39

Creating a New Folder
5 Setting Up a Windows Folder
When you retrieve scanned documents from the Copier/Printer you
will be prompted to select a folder in which to store them. This
folder may be located in [My Documents], on the [Desktop], or
elsewhere on the workstation’s hard drive(s). Wide Format Scan
Service refers to this destination folder as a Windows folder. This
section of the guide explains the process for creating and deleting a
Windows folder.
1. Right click either the [Desktop] or the [My Documents] folder in
the [Service Area].
A menu will appear with the selection [Create New Folder…] at
the bottom (Fig. 1). This selection enables you to create a new
folder within the Windows directory structure that can be used
as the destination for documents you import from the
Copier/Printer’s mailbox.
Figure 1
Wide Format Scan Service User Guide 31
Page 40
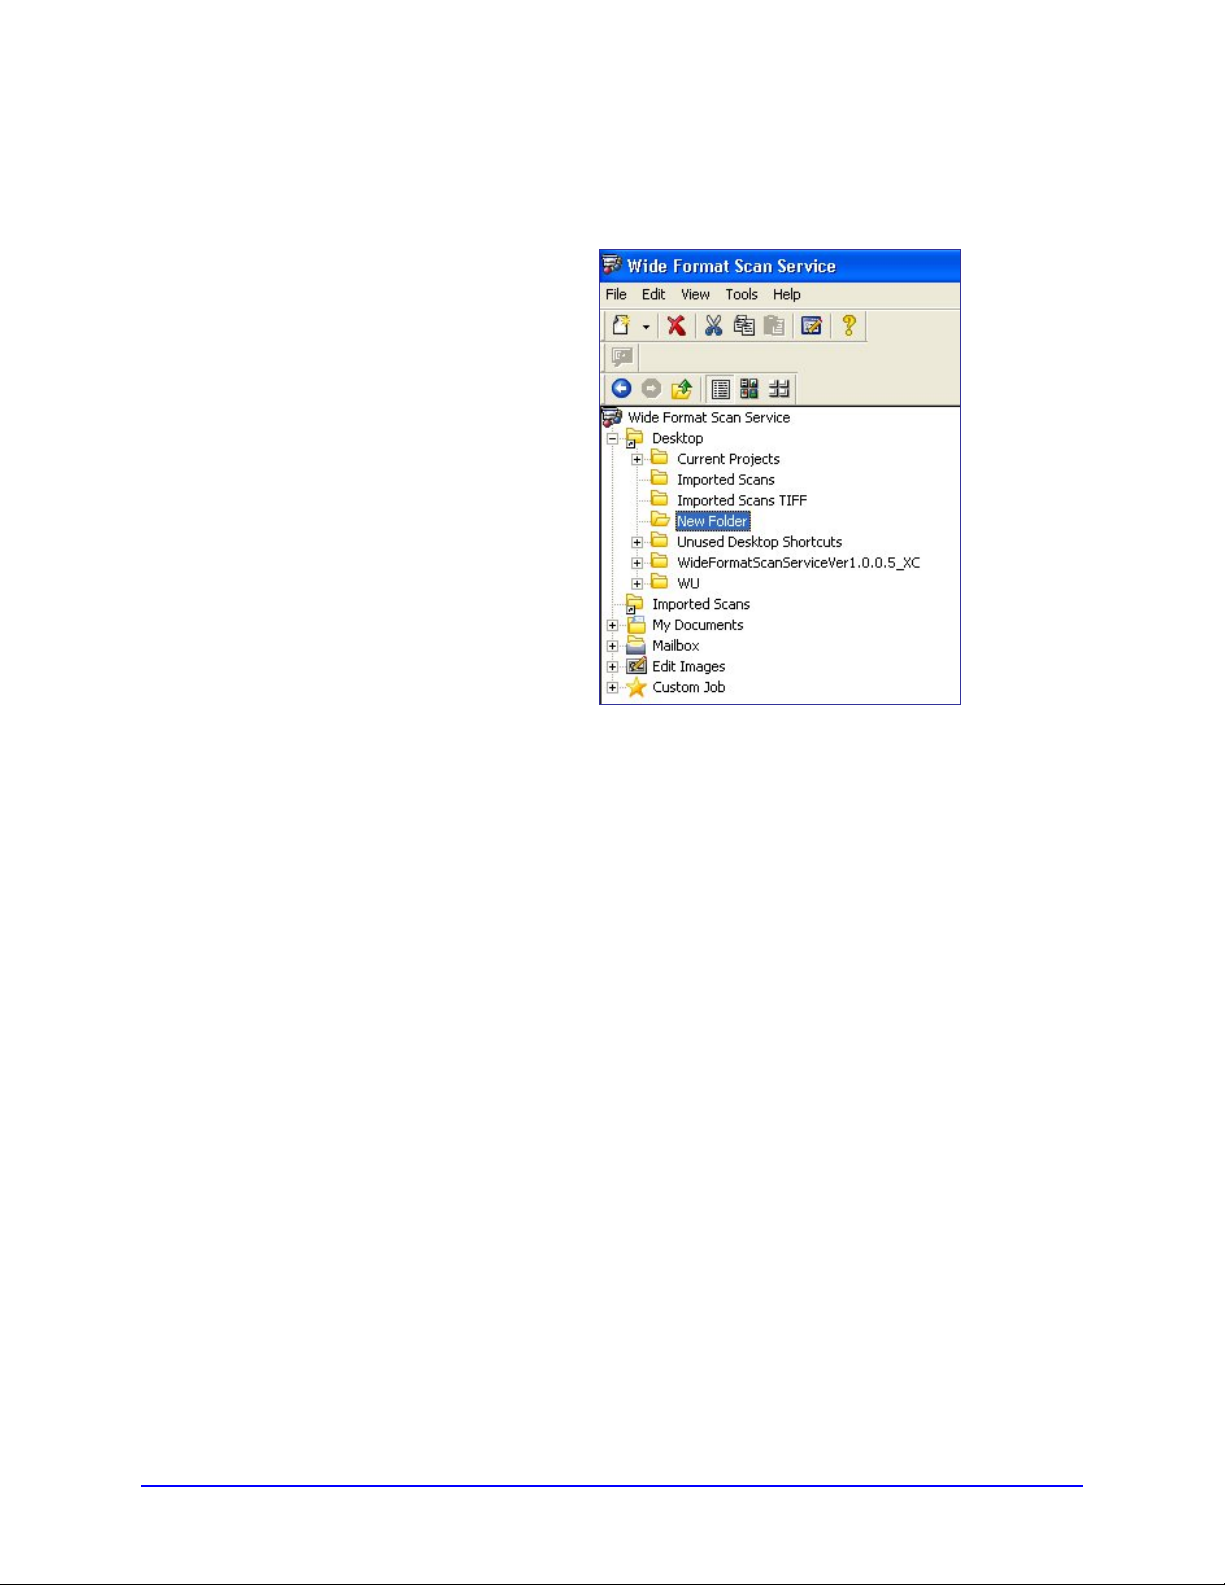
2. Select [Create New Folder…].
A [New Folder] icon will be added within the Windows directory
you selected in step 1 (Fig. 2).
Figure 2
3. Rename the [New Folder] in the same way you would rename
any Windows folder, that is, right click on the [New Folder],
select [Rename], and enter a name for the folder. It is a good
practice to use a name that clearly indicates the types of files in
the folder.
32 Wide Format Scan Service User Guide
Page 41

Creating a Shortcut to the New Folder
The process described below creates a shortcut to the folder that
you just created to receive imported documents. This shortcut looks
like a folder and will appear at the same level as the Desktop, My
Documents, etc., in the tree view in the [Service Area].
1. The following are three ways to create a new Windows folder
shortcut (see Fig. 3):
a. Right click anywhere in the [Service Area] and select
[New] > [Windows Folder] when the menu displays, or
a.
b.
c.
b. Select the [New] (
or
c. Select [File] > [New] > [Windows Folder].
) button and then [Windows Folder],
Figure 3
Wide Format Scan Service User Guide 33
Page 42
r
r
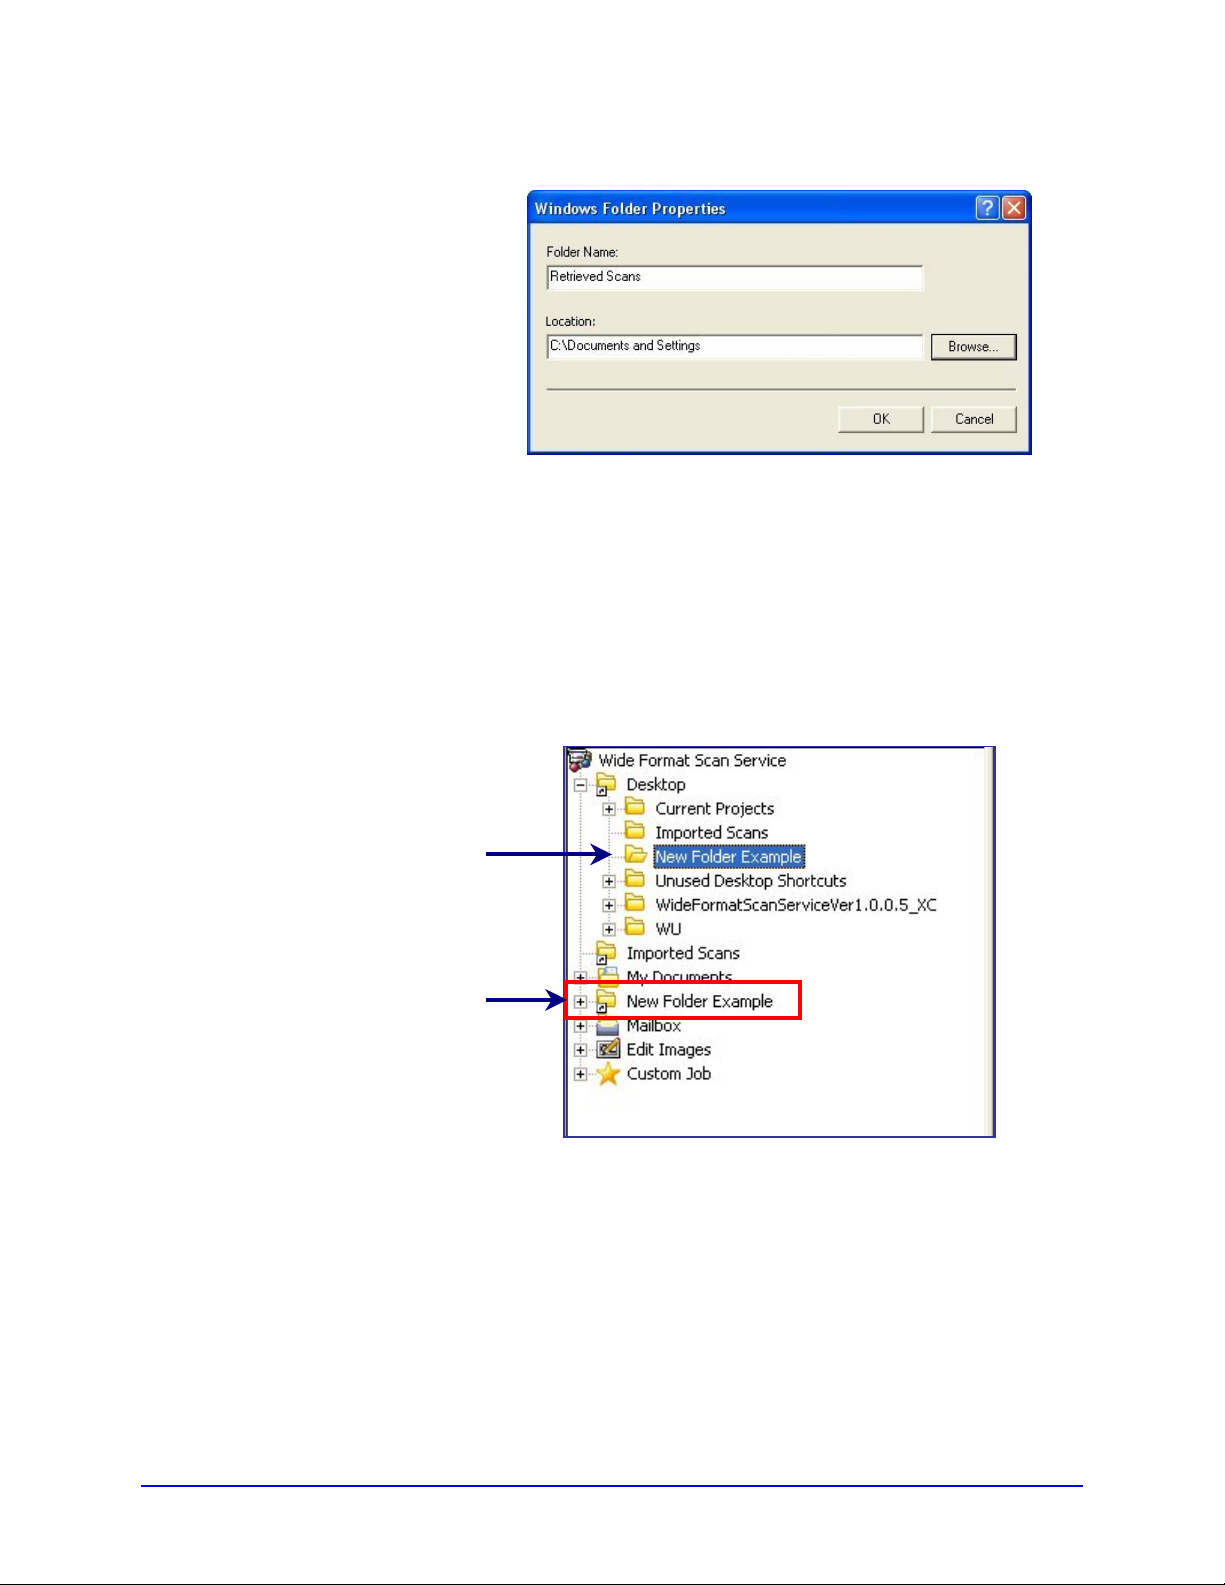
A [Windows Folder Properties] popup will display (Fig. 4).
Figure 4
2. Enter the name of the new Windows folder in the [Folder
Name:] field.
3. Either key-in the path to the folder in the [Location:] field or click
[Browse] and select it.
4. Click [OK]. The new folder shortcut will be added and will
appear in the Wide Format Scan Service window in the
[Service Area] (Fig. 5). Henceforth, use the folder shortcut to
display the imported documents.
Destination Folde
Shortcut to the
Destination Folde
Figure 5
34 Wide Format Scan Service User Guide
Page 43

Deleting a Windows Folder
1. To delete a Windows shortcut folder from the [Service Area]:
a. Right click on the shortcut folder you wish to delete and
then select [Delete] from the menu that appears (Fig. 6), or
b. Select the Windows folder shortcut that you wish to delete
and then select [File] > [Delete].
Figure 6
An informational popup will display, informing you that only the
shortcut folder will be deleted (Fig. 7). The import folder that you
created earlier in Windows will remain unchanged, as will its
contents.
Figure 7
2. Click [OK] to delete the Shortcut folder.
Wide Format Scan Service User Guide 35
Page 44

36 Wide Format Scan Service User Guide
Page 45

6 Importing Stored Documents from a Mailbox
Image files (in TIFF, PDF, and CALS formats) which are stored as
documents in a Copier/Printer mailbox must be retrieved (imported)
to a workstation to be edited using Wide Format Scan Service. This
section of the guide explains the procedure for retrieving these
documents.
Wide Format Scan Service User Guide 37
Page 46

Manual Import
1. Start the Wide Format Scan Service.
2. Click the [+] character at the left side of the Mailbox folder in the
[Service Area]. The item will expand and show all of the
mailboxes that have been set up (Fig. 1).
Figure 1
3. Select the appropriate mailbox from those displayed in the
[Service Area]. A [Please Wait] popup will display while the
Wide Format Scan Service accesses the mailbox (Fig. 2). You
may select [Cancel] to stop connecting to the mailbox or allow
the process to continue.
Figure 2
38 Wide Format Scan Service User Guide
Page 47

4. When the popup closes, a list of the documents stored on the
Copier/Printer will display in the [File Area] (Fig. 3). Notice that
multi-page scanned documents may be identified by the
number of pages indicated in the [Pages] column.
Multi-page
Figure 3
5. To retrieve one or more of the listed documents, either:
a. (Fig. 4) Left click the Document Number, and then click the
[Retrieve] (
)button, or
a.
b.
b. Right click the Document Number, and then select
[Retrieve] from the menu that appears, or
c. Select all of the Document Numbers and use either of the
above methods to begin the retrieval.
Retrieve Button
Figure 4
Wide Format Scan Service User Guide 39
Page 48

A [Browse for Folder] dialog will open (Fig. 5).
Figure 5
6. Select the destination folder for the selected document(s) and
click [OK]. The stored document(s) will be retrieved from the
Copier/Printer and saved in the selected folder.
40 Wide Format Scan Service User Guide
Page 49

Auto Import
Documents may be automatically retrieved from a mailbox on the
Copier/Printer at an interval of your choice. Auto Import is enabled
as follows:
1. Right click on the mailbox and then select [Properties]. The
[Mailbox Properties] dialog box (Fig. 6) will display.
Figure 6
2. Select the [Polling] checkbox to enable polling.
3. Click [OK]. The window will close and an informational popup
(Fig. 7) will appear.
NOTE When polling is enabled, the document list will not display in the
[File Area] when you select a mailbox.
Figure 7
4. Click [OK]. Wide Format Scan Service will poll the mailbox on
the 6204 Wide Format Copier/Printer for recently scanned
documents at the default interval of 20 minutes.
NOTE To display recently imported documents when polling is enabled,
repeat step 1 above, deselect the [Polling] checkbox, and then click
[OK]. The document list will repopulate when you select the mailbox.
You can set the polling interval from one to 60 minutes. The
procedure for changing the polling interval is located in “3 Setting
Up the Program Defaults” in this guide.
Wide Format Scan Service User Guide 41
Page 50

42 Wide Format Scan Service User Guide
Page 51

7 Displaying the Contents of the Windows Folder
You display the contents of a folder that contains retrieved
documents by selecting the folder shortcut in the [Service Area].
The documents stored within the folder will display in List View by
default but you can choose to display them in Thumbnail View or
Title Block View by selecting the appropriate Windows Folder
buttons (Fig. 1).
NOTE TIFF, PDF, and CALS file formats can be displayed in Thumbnail
view and Title Block view. Only the top page of multi-page TIFF and
multi-page PDF documents can be displayed
List View
Thumbnail View
Title Block View
Figure 1
Wide Format Scan Service User Guide 43
Page 52

Right-clicking a file in the [File Area] displays a menu that allows
you to display the file’s properties (Fig. 2).
Figure 2
44 Wide Format Scan Service User Guide
Page 53

Creating the Title Block View Settings
If you choose to display retrieved files in Title Block View (Fig. 3),
you must set up the correct orientation and dimensions in the Title
Block View Settings.
Figure 3
1. Select [Tools] > [Title Block View Settings…]. The [Title Block
View Settings] dialog box (Fig. 4) will open.
Figure 4
Wide Format Scan Service User Guide 45
Page 54

2. Specify the [Title Block Position:] for both the [Portrait Original]
and the [Landscape Original] selections by choosing the
appropriate locations from the pull-down menus.
3. Specify the [Width:] and the [Height:] for Portrait and
Landscape originals, or select the [Setup by Image Size]
checkbox and accept the default title box locations for the
media sizes you typically use.
4. Click [OK].
46 Wide Format Scan Service User Guide
Page 55

8 Editing a Retrieved Document
The Wide Format Scan Service provides three editing features:
• Despeckle
• Image Rotation
• Skew Correction
Each of these features and its use is explained in this chapter.
The Wide Format Scan Service also allows you to create
customized Edit Image icons which appear in the [Service Area].
These customized editing icons simplify and speed the editing
process.
Wide Format Scan Service User Guide 47
Page 56

Despeckle
NOTE Despeckle works with bitmap images only.
The Despeckle feature helps remove unwanted noise (small black
dots) from monochrome images and background from scanned
color images, enhancing the appearance of the print.
The feature can be changed to meet the editing requirements of
individual documents by right clicking the [Despeckle] item in the
[Service Area] and selecting [Properties]. This displays a
[Despeckle Properties] dialog box (Fig. 1) from which you can
specify the degree to which an image will be cleaned (Low,
Medium, High, or Specify by Dot Size). Be sure to click [OK] to save
your selection before editing the document.
EXAMPLE
Original image
Figure 1
Same image
with Despeckle applied
48 Wide Format Scan Service User Guide
Page 57

Image Rotation
The Image Rotation feature allows you to rotate a retrieved
document 90° Counterclockwise, 180°, or 90° Clockwise. The
direction of rotation is selected by right clicking the [Image Rotation]
item in the [Service Area], selecting [Properties], and then making
the desired selection in the [Image Rotation Properties] dialog box
(Fig. 2). Click [OK] to save your selection.
Figure 2
EXAMPLE
Original Document Rotated Document*
* The rotated image is reduced to fit the display widow only; no image information is lost.
Wide Format Scan Service User Guide 49
Page 58

When the [Add to Do Not Rotate List…] button is selected, the [Do
Not Rotate] dialog box opens (Fig. 3). You can select by size and
direction of rotation the media sizes which you do not wish to rotate.
Figure 3
50 Wide Format Scan Service User Guide
Page 59

Skew Correction
NOTE Skew correction is designed to be used with line drawings or other
documents which have clearly defined axes. Grayscale images may
not respond to Skew Correction. The skew in the retrieved image
°
should be 5
The Skew Correction feature allows you to correct skew which may
have occurred in scanning or which may be due to skewed printing
of the scanned original. Right clicking the [Skew Correction] item in
the [Service Area] and then selecting [Properties] will display the
[Skew Correction Properties] dialog box (Fig. 4). Here you may
choose between an Auto Correction mode or you may specify an
exact correction angle.
or less.
EXAMPLE
Skewed Document
Figure 4
Same Document
with Skew Correction
applied
Wide Format Scan Service User Guide 51
Page 60

Creating Customized Edit Image Icons
By creating customized Edit Image icons you increase your
productivity by reducing the need to change the Despeckle, Image
Rotation, and/or Skew Correction properties. For example, you may
find that a Skew Correction of one degree clockwise is almost
always sufficient or that a Despeckle setting of 5 x 5 dots will yield
the desired results for most of your documents.
When you create a customized Edit Image icon it will appear with
the others in the [Service Area] of the [Wide Format Scan Service]
window.
Perform the following steps to create a customized Edit Image icon:
1. Select [File] > [New] > [Edit Image], and then select the editing
feature you wish to customize, that is, Skew Correction…,
Despeckle…, or Image Rotation….
The Properties dialog box showing the default setting for the
editing feature will display, in this example, Despeckle (Fig. 5).
Figure 5
52 Wide Format Scan Service User Guide
Page 61

2. Enter a name for the new Edit Image icon in the [Name:] field.
The name may not exceed 64 characters (Fig. 6).
3. Select one of the available editing options from the pull down
menu or specify a custom value (Fig. 6).
Figure 6
4. Select [OK].
The newly created Edit Image icon will appear in the [Service
Area] of the [Wide Format Scan Service] window (Fig. 7).
Figure 7
Wide Format Scan Service User Guide 53
Page 62

Editing the Document
NOTE The thumbnail view is shown in Fig. 1. Editing a document in List
To edit a document, select it in the [File Area] and then drag and
drop it on the desired Edit Image icon in the [Service Area]. When a
document is edited in Wide Format Scan Service, the original file
remains unchanged but the edited image is saved with a new file
name, that is, with a number (-1, -2, etc.) appended to the original
file name.
1. Select the standard or customized editing feature you wish to
use and, if necessary, modify its settings.
2. Open the folder in the [Service Area] that contains the
document you wish to edit. The contents of the folder will
display in the [File Area].
3. Left click the document to select it and then drag and drop it on
the desired editing icon under [Edit Images] in the [Service
Area] (Fig. 1).
View and in Title Block View works the same way.
Edit Icons
Figure 1
You will be prompted to save the edited file (see Fig. 2).
Figure 2
54 Wide Format Scan Service User Guide
Page 63

4. Select the location where you want the file to be saved, e.g., in
the original folder or in a new one which contains only edited
documents, and then click [OK].
Wide Format Scan Service will edit the image, save it to the
specified location, and append a new version number to the file
name (Fig. 3).
Edited Original
Figure 3
Wide Format Scan Service User Guide 55
Page 64

56 Wide Format Scan Service User Guide
Page 65

9 Using Wide Format Scan Service Viewer
The [Wide Format Scan Service Vierwer] window displays images
one by one. You can use this window to edit and print images.
Starting Wide Format Scan Service Viewer
NOTE Although you cannot run Wide Format Scan Service and Wide
Format Network TWAIN Source at the same time, you can run Wide
Format Scan Service Viewer while Wide Format Network TWAIN
Source is active.
This section explains how to launch the Wide Format Scan Service
Viewer.
To start the Wide Format Scan Service Viewer:
Click the [Wide Format Scan Service Viewer] shortcut on the
Desktop or select [Start] > [All Programs] > [Xerox] > [Wide Format
Scan Service] > [Wide Format Scan Service Viewer].
The [Wide Format Scan Service Viewer] window (Fig. 1) will
display.
NOTE It is also possible to launch the [Wide Format Scan Service Viewer]
window from Wide Format Scan Service; just double click on the
filename or thumbnail of a retrieved document (displayed in the File
area of the [Wide Format Scan Service] window). Launching the
program in this manner will display the selected document in the
[Wide Format Scan Service Viewer] window when it opens.
Wide Format Scan Service User Guide 57
Page 66

Figure 1
58 Wide Format Scan Service User Guide
Page 67

Overview of the [Wide Format Scan Service Viewer] Window
r
r
The image below (Fig. 2) shows the [Wide Format Scan Service
Viewer] window as it appears when a multi-page document is open.
• The Page Tool buttons appear when a multi-page document is
open, enabling you to move among the pages.
• The File Tool buttons display when the folder containing the
documents contains more than one image file. These buttons
enable you to conveniently open the next file, the previous file,
a specified file, etc.
• The Zoom Tool buttons display whenever a file is open in
Wide Format Scan Service Viewer.
• A tool tip and a message in the Status Bar display when you
pause the cursor over a tool button.
• Among the Standard Tool Buttons which are unique to Wide
Format Scan Service Viewer are the Reduce/Enlarge and the
Area Mode buttons.
• Right-clicking anywhere in the image area displays the menu
pictured at the right side of the figure. The menu provides an
alternate way to access the image editing and display
functions.
Menu Ba
Tool Buttons
Status Ba
Standard
Zoom Tool Buttons
File Tool Buttons
Page Tool Buttons
Figure 2
Wide Format Scan Service User Guide 59
Page 68

Tool Button Functions
Standard Tool Buttons
Icon Function Description
Open Opens the folder which contains the imported documents.
Save Overwrites the edited file.
Print Prints the displayed image. The maximum printable length is
Undo Undoes the last action.
Point Mode Changes the cursor into the Point Mode.
The tables below define the functions of the Wide Format Scan
Service Viewer tool buttons.
3,276.7 mm, regardless of resolution.
The shape of the cursor becomes an arrow.
Scroll Mode Changes the cursor into the Scroll Mode.
The shape of the cursor becomes a hand. The displayed image can
be scrolled by locating the cursor on the image and then dragging it.
Area Mode Changes the cursor into the Area Mode.
The shape of the cursor becomes a
press and hold the left mouse button, then drag the cursor over a
portion of the image. A selected area can be despeckled but not
rotated or deskewed. A selected area also can be saved as a new
image in the import folder.
Delete Selected
Area
Save Selected
Area
Skew
Correction
Despeckle Removes noise in the same way as Wide Format Scan Service.
Image Rotation Rotates images in the same way as Wide Format Scan Service.
Reduce/Enlarge Reduces/enlarges images.
Help Displays Help.
Deletes the selected images.
Saves the selected images.
Corrects image skew in the same way as Wide Format Scan Service.
+. To select an area of an image,
60 Wide Format Scan Service User Guide
Page 69

Zoom Tool Buttons
Icon Function Description
Reduce Zooms out of a displayed image.
Fit Page Resizes a displayed image to fit completely within the display area.
Fit Width Resizes a displayed image, fitting the image width in the display area.
Fit Height Resizes a displayed image, fitting the image height in the display area.
Enlarge Zooms into the displayed image.
Upper Left Displays the upper left corner of an image.
Lower Left Displays the lower left corner of an image.
Upper Right Displays the upper right corner of an image.
Lower Right Displays the lower right corner of an image.
Page Tool Buttons
Icon Function Description
First Page Displays the first page of a multi-page imported document.
Previous
Page
Next Page Displays the next page of a multi-page imported document.
Last Page Displays the last page of a multi-page imported document.
Specify Page Displays the specified page of a multi-page imported document.
Displays the previous page of a multi-page imported document.
Wide Format Scan Service User Guide 61
Page 70

File Tool Buttons
Icon Function Description
Open Opens the folder which contains the imported documents, allowing you
First File Displays the first file in the folder.
Previous File Displays the previous file in the folder.
Next File Displays the next file in the folder.
Last File Displays the last file in the folder.
to select a file to open.
62 Wide Format Scan Service User Guide
Page 71

Wide Format Scan Service Viewer Menus
This section describes each of the items in the menus on the Wide
Format Scan Service Viewer Menu Bar.
File Menu
Item Description
Open
Save
Save As
Print
Exit
Opens the most recently opened Windows folder which contains the
retrieved documents
Overwrites the previously saved file with the newly edited file.
Saves the edited file as a specified name in a specified location.
Prints the file. The maximum printable length is 3,276.7mm (10.75 ft.)
regardless of resolution.
Closes Wide Format Scan Service Viewer.
Edit Menu
Item Description
Undo
Delete Selected Area
Save Selected Area…
Undoes the last action.
Deletes the image detail from a selected area.
Saves the image detail from a selected area.
Skew Correction
Despeckle
Image Rotation
Reduce / Enlarge
Title Block View
Settings
Wide Format Scan Service User Guide 63
Corrects image skew.
Removes noise (small black specks/dots) from an image.
Rotates images. Same as in Wide Format Scan Service.
Reduces/enlarges images.
Specifies the title block view settings.
Page 72

View Menu
Item Description
Mode
Zoom…
Position
Page
File
Switches the mode for the cursor. The items displayed on the submenu
are as follows:
• Point Mode: The shape of the cursor becomes an arrow.
• Scroll Mode: The shape of the cursor becomes a hand. The
displayed image can be scrolled by locating the cursor on the image
and then dragging it.
• Area Mode: The shape of the cursor becomes a crosshair. To select
an area of an image, press and hold the left mouse button, then drag
the cursor over a portion of the image. A selected area can be
despeckled but not rotated or deskewed. A selected area also can be
saved as a new image in the import- or another folder.
Displays the [Zoom] window, enabling the user to change the zoom
ratio.
Changes the portion of the document that is displayed. The items on
the submenu include Upper Left, Lower Left, Upper Right, Lower Right.
Enables the user to navigate through the pages of a multi-page
document, e.g., a multi-page TIFF or PDF file. The submenu entries
(First Page, Previous Page, Next Page, Last Page, Specify Page) work
in the same way as the Page Tool buttons.
Enables the user to navigate through the files in a folder. The submenu
entries (First File, Previous File, Next File, Last File) work in the same
way as the File Tool buttons.
Toolbars
Status Bar
Toggles to show or hide the Standard, View, Page, and File toolbars.
Toggles to show or hide the Status Bar.
Help Menu
Item Description
Help
About
Displays Help.
Displays the version of Wide Format Scan Service Viewer.
64 Wide Format Scan Service User Guide
Page 73

Opening a File
Perform the following steps to open a file immediately after starting
Wide Format Scan Service Viewer:
1. Select [File] > [Open] or click either one of the [Open] (
buttons.
The contents of the most recently opened folder will display.
2. Select the file you wish to open and then click [Open], or
navigate to another location and select the file.
The file will open in Wide Format Scan Service Viewer if it was
saved in a TIFF, PDF, or CALS format.
If the file consists of multiple pages, the top page will display.
Use the Page Tool buttons to display the other pages.
Editing: Despeckle, Image Rotation, Skew Correction
The Despeckle, Image Rotation, and Skew Correction features
work the same in Viewer as in Wide Format Scan Service, except
that customized Edit Image icons are unavailable.
To edit an image in Wide Format Scan Service Viewer:
1. Open the file you wish to edit following the steps in the section
“Opening a File.”
2. With the image displayed:
a. Select [Edit] > [Skew Correction or Despeckle or Image
Rotation] from the Menu Bar, or
)
b. Select the desired editing button from the Standard Tool
buttons, or
c. Right-click anywhere is the image area and select the
desired editing function from the menu that displays.
3. Specify the editing option, i.e., the direction of rotation,
despeckle level, or skew correction angle.
Wide Format Scan Service Viewer will edit the document and
display the result.
Click the [Undo] button (
4. To save the edited file:
a. Select [File] > [Save], or
b. Select the [Save] button (
c. Right-click anywhere in the image area and select [Save]
from the menu that appears.
Unlike the Wide Format Scan Service, Viewer will save the file
under the same file name; it will not add a suffix to the file
name.
) to undo an edit.
), or
Wide Format Scan Service User Guide 65
Page 74

Editing: Reduce/Enlarge
The Reduce/Enlarge functions are unique to Wide Format Scan
Service Viewer, i.e., they are not available in Wide Format
Scan Service. Using the R/E capabilities of Wide Format Scan
Service Viewer you can reduce or enlarge a document to fit
standard size media or you can specify a non-standard size.
To use the Reduce/Enlarge feature:
1. Select [Edit] > [Reduce / Enlarge…], or
Select the [Reduce / Enlarge…] button (
The [Reduce / Enlarge] dialog box (Fig. 3) will display.
Figure 3
).
2. Standard R/E: To reduce or enlarge the image to a standard
size media, select the [Reduce /Enlarge to Fit Media Size]
checkbox, and then select, as appropriate, either the [Portrait]
or the [Landscape] radio button. The dimensions displayed in
the [Size] fields will become those of the selected media size.
66 Wide Format Scan Service User Guide
Page 75

Non-Standard R/E: To reduce or enlarge the image to a nonstandard size media, deselect the [Reduce /Enlarge to Fit
Media Size] checkbox and then enter the desired width and
height in the lower, [Reduce / Enlarge] fields.
Be sure to select the [Lock Aspect Ratio] checkbox to ensure
that the edited image maintains the same width-to-height ratio
as the original.
3. Click [OK]. Wide Format Scan Service Viewer will resize the
original image according to the entries in the [Reduce / Enlarge]
dialog box.
4. Save the resized image.
Wide Format Scan Service User Guide 67
Page 76

Editing: Area Mode
Delete Selected Area
The Area Mode feature permits you to select an area of a
displayed image and then either delete the selected area or
save it as a new file. The delete function is a useful tool for
eliminating unwanted detail from an image.
To delete a portion of an image:
Selected
Area
1. Select the [Area Mode] (
2. Drag the cursor over the portion of the image that you wish to
delete. A dotted line will appear around the selected area
(Fig. 4).
3. Resize the selected area, if necessary, by selecting and
dragging one of the [Handles].
4. Select the [Delete Selected Area] (
Scan Service Viewer will delete the image detail.
Handles
) button.
) button. Wide Format
Figure 4
68 Wide Format Scan Service User Guide
Page 77

Save Selected Area
To save a portion of an displayed image as a new image:
1. Select the [Area Mode] (
2. Drag the cursor over the portion of the image that you wish to
save. A dotted line will appear around the selected area
(Fig. 5).
) button.
Figure 5
3. Resize the selected area, if necessary, by selecting and
dragging one of the [Handles].
4. Select the [Save Selected Area] (
will appear (Fig. 5).
5. Specify a location for the edited image and then click [Save].
Wide Format Scan Service Viewer will save the image detail to
the specified location.
Wide Format Scan Service User Guide 69
) button. A [Save As] popup
Page 78

70 Wide Format Scan Service User Guide
Page 79

10 Uninstalling Wide Format Scan Service
NOTE Log on as Administrator.
There are five steps involved in uninstalling Wide Format Scan
Service.
1. Click [Start] > [Control Panel] > [Add/Remove Programs].
The [Add/Remove Programs] window appears.
2. Select [Xerox Corporation Wide Format Scan Service] from the
list and click [Change/Remove].
The InstallShield Wizard [Preparing Setup] window and then a
confirmation popup will appear (Figure 1).
Figure 1
Wide Format Scan Service User Guide 71
Page 80

3. Select [Yes].
The [Setup Status ] screen appears and uninstallation begins.
Figure 2
The [InstallShield Wizard Complete] screen displays when the
uninstallation is complete (Figure 3).
Figure 3
4. Select [Finish].
Uninstallation is complete.
72 Wide Format Scan Service User Guide
Page 81

Index
A
Add to Do Not Rotate List… button, 50
Area Mode buttons, 59
Auto Correction mode, 51
Auto Import, 41
B
Background, 48
Button
Add to Do Not Rotate List…, 50
Mailbox Service Tool, 11
Search Conditions, 27
Reduce/Enlarge, 59
Buttons
Wide Format Scan Service Viewer window, 60
Wide Format Scan Service window, 11
C
CALS, 19
Choose Destination Location dialog box, 3
Common Tool Buttons, 11
Conventions, v
Correction angle, 51
Create New Folder…, 32
Create New Folder…menu selection, 31
Creating a New Folder, 31
Creating a Shortcut to the New Folder, 33
Creating a Wide Format Scan Service Mailbox,
26
Creating Customized Edit Image Icons, 52
Creating the Title Block View Settings, 45
D
Delete Selected Area, 68
Deleting a Wide Format Scan Service Mailbox,
30
Deleting a Windows Folder, 35
Despeckle, 48
Despeckle Properties dialog box, 48
Detailed Settings, 17
Detailed Settings dialog box, 17
Disk1 folder, 1, 2
Display Units, 21
Displaying the Contents of the Windows Folder,
43
Do Not Rotate dialog box, 50
E
Edit
Area Mode, 68
Delete Selected Area, 68
Despeckle, 48
Image Rotation, 49
Reduce/Enlarge, 66
Save Selected Area, 69
Skew correction, 51
Edit Images icons, 9, 52
Edit Images Tool Buttons, 12
Edit Menu, 9, 13
Editing a Retrieved Document, 47
Editing the Document, 54
Export Setup File, 22
Exporting Custom Settings, 22
Wide Format Scan Service User Guide 73
Page 82

F
File Formats, 19
File Menu, 9, 13
File properties, 44
File Tool buttons, 59
FTP, 1
H
Hard Disk, vi
Hardware requirements, vi
Help Menu, 15
I
Image Rotation, 49
Image Rotation Properties dialog box, 49
Import Setup File, 23
Importing Custom Settings, 23
Importing Stored Documents from a Mailbox, 37
Installing Wide Format Scan Service, 1
InstallShield Wizard Complete screen, 5
IP Address, 1, 27
L
Location field, 34
M
Mailbox folder, 38
Mailbox List, 28
Mailbox Number, 28
Mailbox Properties dialog box, 41
Mailbox Service Tool Button, 11
Manual Import, 38
Media Size List, 20
Media Size List Settings tab, 20
Memory, vi
Menus
Wide Format Scan Service Viewer, 63
Menus, Wide Format Scan Service, 13
Microsoft® Windows® 2000 Professional (SP4),
vi
Microsoft® Windows® Server 2003 (SP1), vi
Microsoft® Windows® XP Home Edition (SP2),
vi
Microsoft® Windows® XP Professional (SP2), vi
Millimeters/Inches tab, 21
Multi-page documents, 39
N
Network Interface Card, vi
Network requirements, vi
New Folder icon, 32
New Search button, 27
Noise, 48
O
Operating Environment, vi
Operating System, vi
Overview of the Wide Format Scan Service
Window, 9
P
Page Tool buttons, 59
PDF, 19
Polling, 18
Polling Interval, 18
field, 18
Polling interval, duration, 41
Polling Settings tab, 18, 19
Polling, and Document List, 41
Polling, enable, 41
Processor, vi
R
Ready to Install the Program screen, 4
Reduce/Enlarge button, 59
Rename New Folder, 32
S
Save Selected Area, 69
Saving an edited image, 54
Saving Custom Settings, 22
Scanner List, 27
Search Conditions button, 27
Select a Mailbox dialog box, 28
Select a scanner dialog box, 26
Setting Up a Wide Format Scan Service
Mailbox, 25
Setting Up a Windows Folder, 31
Setting Up the Program Defaults, 17
Setup by Image Size checkbox, 46
Setup Status screen, 4
Skew Correction, 51
Skew Correction Properties dialog box, 51
Skew Correction, and grayscale images, 51
Skew Correction, limitations, 51
SNMP, 1
Starting the Application, 8
74 Wide Format Scan Service User Guide
Page 83

Starting Wide Format Scan Service, 7
Starting Wide Format Scan Service Viewer, 57
Subnet Mask, 1
Supported Device, vi
T
TCP/IP, vi
TIFF, 19
Title Block Position, 46
Title Block View, 45
Title Block View Settings, 45
Title Block View Settings dialog box, 45
Tool Button Functions, 11
Tool Buttons
Common, 9
Edit Images, 9
Mailbox Service, 9
Windows Folder, 9
tool tip, 10
Tools Menu, 9, 15
tree view, 9
U
Uninstalling Wide Format Scan Service, 71
Units of measurement, 21
Using Wide Format Scan Service Viewer, 57
V
View Menu, 9, 14
Viewer window
Edit Menu, 63
File Menu, 63
Help Menu, 64
View Menu, 64
W
Wide Format Network TWAIN Source, 8, 57
Wide Format Scan Service - InstallShield Wizard
Welcome screen, 2
Wide Format Scan Service Viewer, 9
Area Mode editing, 68
Editing a file, 65
Opening a File, 65
Reduce/Enlarge, 66
Wide Format Scan Service Viewer shortcut, 57
Wide Format Scan Service Viewer window, 57
File Tool Buttons, 62
Page Tool Buttons, 61
Standard Tool Buttons, 60
Zoom Tool Buttons, 61
Wide Format Scan Service Viewer window,
Overview, 59
Wide Format Scan Service window, 8
File Area, 9
Menu Bar, 9
Service Area, 9
Tool Buttons, 9
Windows Folder Properties, 34
Windows Folder Tool Buttons, 11
Windows® 2000, 1
Windows® Server 2003, 1
X
Xerox 6204 Wide Format Solution User Guide, 7
Xerox Wide Format Scan Service screen, 2
xerox.com website, 15
Z
Zoom Tool buttons, 59
Wide Format Scan Service User Guide 75
Page 84

Prepared by:
Xerox Corporation
GKLS/K&DS, XGS
800 Philips Road
Webster, New York 14580-9791
USA
© 2006 by Xerox Corporation. All rights reserved.
XEROX, The Document Company, the stylized X, 6204, and any
identifying product names and numbers are trademarks of XEROX
Corporation.
All terms mentioned in this document which are known to be
trademarks or service marks are appropriately capitalized.
No part of this manual may be copied without prior written
permission of Xerox Corporation.
Printed in the U.S.A
701P44865 January 2006
 Loading...