

Page 1

User Guide
Guide d’utilisation
Guida dell'utente
Phaser® 6180MFP
multifunction printer
Benutzerhandbuch
Guía del usuario
Guia do Usuário
Gebruikershandleiding
Användarhandbok
Betjeningsvejledning
Ɋɭɤɨɜɨɞɫɬɜɨɩɨɥɶɡɨɜɚɬɟɥɹ
3U]HZRGQLNXĪ\WNRZQLND
)HOKDV]QiOyL~WPXWDWy
8åLYDWHOVNiSĜtUXþND
.XOODQÕP.ÕODYX]X
ǼȖȤİȚȡȓįȚȠȤȡȒıIJȘ
www.xerox.com/support
Page 2

Unpublished rights reserved under the copyright laws of the United States. Contents of this publication may not be reproduced in
any form without permission of Xerox Corporation.
Copyright protection claimed includes all forms of matters of copyrightable materials and information now allowed by statutory
or judicial law or hereinafter granted, including without limitation, material generated from the software programs which are
displayed on the screen such as styles, templates, icons, screen displays, looks, etc.
®
XEROX
, CentreWare®, Phaser®, PrintingScout®, and Walk-Up® are trademarks of Xerox Corporation in the United States and/
or other countries.
®
and PostScript® are trademarks of Adobe Systems Incorporated in the United States and/or other countries.
Adobe
®
Apple
, Bonjour®, ColorSync®, EtherTalk®, Macintosh®, and Mac OS® are trademarks of Apple Computer, Inc. in the United
States and/or other countries.
®
is a trademark of Hewlett-Packard Corporation in the United States and/or other countries.
PCL
®
Microsoft
, Vista™, Windows®, and Windows Server™ are trademarks of Microsoft Corporation in the United States and/or other
countries.
®
Novell
, NetWare®, and IPX/SPX™ are trademarks of Novell, Incorporated in the United States and/or other countries.
NERGY STAR
As an E
efficiency. The E
®
partner, Xerox Corporation has determined that this printer meets the ENERGY STAR guidelines for energy
NERGY STAR name and logo are registered U.S. marks.
Page 3

Contents
Contents
1 Printer Information
User Safety . . . . . . . . . . . . . . . . . . . . . . . . . . . . . . . . . . . . . . . . . . . . . . . . . . . . . . . . . . . . . . 1-2
Electrical Safety . . . . . . . . . . . . . . . . . . . . . . . . . . . . . . . . . . . . . . . . . . . . . . . . . . . . . 1-2
Laser Safety. . . . . . . . . . . . . . . . . . . . . . . . . . . . . . . . . . . . . . . . . . . . . . . . . . . . . . . . . 1-3
Maintenance Safety. . . . . . . . . . . . . . . . . . . . . . . . . . . . . . . . . . . . . . . . . . . . . . . . . . . 1-4
Operational Safety. . . . . . . . . . . . . . . . . . . . . . . . . . . . . . . . . . . . . . . . . . . . . . . . . . . . 1-4
Moving the Printer . . . . . . . . . . . . . . . . . . . . . . . . . . . . . . . . . . . . . . . . . . . . . . . . . . . 1-6
Safety Symbols Marked on Printer . . . . . . . . . . . . . . . . . . . . . . . . . . . . . . . . . . . . . . . 1-8
Printer Specifications. . . . . . . . . . . . . . . . . . . . . . . . . . . . . . . . . . . . . . . . . . . . . . . . . . . . . . . 1-9
Physical Specifications . . . . . . . . . . . . . . . . . . . . . . . . . . . . . . . . . . . . . . . . . . . . . . . . 1-9
Environmental Specifications . . . . . . . . . . . . . . . . . . . . . . . . . . . . . . . . . . . . . . . . . . . 1-9
Electrical Specifications . . . . . . . . . . . . . . . . . . . . . . . . . . . . . . . . . . . . . . . . . . . . . . . 1-9
Performance Specifications. . . . . . . . . . . . . . . . . . . . . . . . . . . . . . . . . . . . . . . . . . . . 1-10
Controller Specifications. . . . . . . . . . . . . . . . . . . . . . . . . . . . . . . . . . . . . . . . . . . . . . 1-11
Regulatory Information . . . . . . . . . . . . . . . . . . . . . . . . . . . . . . . . . . . . . . . . . . . . . . . . . . . . 1-12
United States (FCC Regulations) . . . . . . . . . . . . . . . . . . . . . . . . . . . . . . . . . . . . . . . 1-12
Canada (Regulations) . . . . . . . . . . . . . . . . . . . . . . . . . . . . . . . . . . . . . . . . . . . . . . . . 1-12
European Union . . . . . . . . . . . . . . . . . . . . . . . . . . . . . . . . . . . . . . . . . . . . . . . . . . . . 1-13
Copy Regulations . . . . . . . . . . . . . . . . . . . . . . . . . . . . . . . . . . . . . . . . . . . . . . . . . . . . . . . . 1-14
Fax Regulations . . . . . . . . . . . . . . . . . . . . . . . . . . . . . . . . . . . . . . . . . . . . . . . . . . . . . . . . . . 1-17
Material Safety Data Sheet . . . . . . . . . . . . . . . . . . . . . . . . . . . . . . . . . . . . . . . . . . . . . . . . . 1-21
Printer Recycling and Disposal . . . . . . . . . . . . . . . . . . . . . . . . . . . . . . . . . . . . . . . . . . . . . . 1-22
European Union . . . . . . . . . . . . . . . . . . . . . . . . . . . . . . . . . . . . . . . . . . . . . . . . . . . . 1-22
North America. . . . . . . . . . . . . . . . . . . . . . . . . . . . . . . . . . . . . . . . . . . . . . . . . . . . . . 1-23
Other Countries . . . . . . . . . . . . . . . . . . . . . . . . . . . . . . . . . . . . . . . . . . . . . . . . . . . . . 1-23
2 Printer Features
Main Components and Their Functions . . . . . . . . . . . . . . . . . . . . . . . . . . . . . . . . . . . . . . . . 2-2
Front View . . . . . . . . . . . . . . . . . . . . . . . . . . . . . . . . . . . . . . . . . . . . . . . . . . . . . . . . . 2-2
Rear View . . . . . . . . . . . . . . . . . . . . . . . . . . . . . . . . . . . . . . . . . . . . . . . . . . . . . . . . . . 2-3
Internal View. . . . . . . . . . . . . . . . . . . . . . . . . . . . . . . . . . . . . . . . . . . . . . . . . . . . . . . . 2-4
Scanner . . . . . . . . . . . . . . . . . . . . . . . . . . . . . . . . . . . . . . . . . . . . . . . . . . . . . . . . . . . . 2-4
Printer Configurations . . . . . . . . . . . . . . . . . . . . . . . . . . . . . . . . . . . . . . . . . . . . . . . . . . . . . . 2-5
Options . . . . . . . . . . . . . . . . . . . . . . . . . . . . . . . . . . . . . . . . . . . . . . . . . . . . . . . . . . . . 2-5
Phaser® 6180MFP Multifunction Printer
i
Page 4

Contents
Control Panel . . . . . . . . . . . . . . . . . . . . . . . . . . . . . . . . . . . . . . . . . . . . . . . . . . . . . . . . . . . . . 2-6
Control Panel Layout . . . . . . . . . . . . . . . . . . . . . . . . . . . . . . . . . . . . . . . . . . . . . . . . . 2-6
Information Pages . . . . . . . . . . . . . . . . . . . . . . . . . . . . . . . . . . . . . . . . . . . . . . . . . . . . 2-9
Power Saver Modes. . . . . . . . . . . . . . . . . . . . . . . . . . . . . . . . . . . . . . . . . . . . . . . . . . . . . . . 2-10
Power Saver Mode 1 (Printer) . . . . . . . . . . . . . . . . . . . . . . . . . . . . . . . . . . . . . . . . . 2-10
Power Saver Mode 2 (System) . . . . . . . . . . . . . . . . . . . . . . . . . . . . . . . . . . . . . . . . . 2-10
Checking Status of Print Data . . . . . . . . . . . . . . . . . . . . . . . . . . . . . . . . . . . . . . . . . . . . . . . 2-11
Checking Status in Windows . . . . . . . . . . . . . . . . . . . . . . . . . . . . . . . . . . . . . . . . . . 2-11
Checking Status in CentreWare Internet Services . . . . . . . . . . . . . . . . . . . . . . . . . . 2-11
Displaying Optional Accessory Configuration and Paper Tray Settings . . . . . . . . . . . . . . 2-12
More Information . . . . . . . . . . . . . . . . . . . . . . . . . . . . . . . . . . . . . . . . . . . . . . . . . . . . . . . . 2-13
Resources . . . . . . . . . . . . . . . . . . . . . . . . . . . . . . . . . . . . . . . . . . . . . . . . . . . . . . . . . 2-13
3 Printer Management Software
Print and Scan Drivers. . . . . . . . . . . . . . . . . . . . . . . . . . . . . . . . . . . . . . . . . . . . . . . . . . . . . . 3-2
CentreWare Internet Services . . . . . . . . . . . . . . . . . . . . . . . . . . . . . . . . . . . . . . . . . . . . . . . . 3-2
Creating an Administrative Password. . . . . . . . . . . . . . . . . . . . . . . . . . . . . . . . . . . . . 3-2
Address Book Editor . . . . . . . . . . . . . . . . . . . . . . . . . . . . . . . . . . . . . . . . . . . . . . . . . . . . . . . 3-3
Express Scan Manager. . . . . . . . . . . . . . . . . . . . . . . . . . . . . . . . . . . . . . . . . . . . . . . . . . . . . . 3-3
Launcher (Windows) . . . . . . . . . . . . . . . . . . . . . . . . . . . . . . . . . . . . . . . . . . . . . . . . . . . . . . . 3-3
PrintingScout Software . . . . . . . . . . . . . . . . . . . . . . . . . . . . . . . . . . . . . . . . . . . . . . . . . . . . . 3-4
4Network Basics
Overview of Network Setup and Configuration . . . . . . . . . . . . . . . . . . . . . . . . . . . . . . . . . . 4-2
Choosing a Connection Method . . . . . . . . . . . . . . . . . . . . . . . . . . . . . . . . . . . . . . . . . . . . . . 4-3
Connecting via Ethernet and USB . . . . . . . . . . . . . . . . . . . . . . . . . . . . . . . . . . . . . . . 4-3
Connecting via Ethernet . . . . . . . . . . . . . . . . . . . . . . . . . . . . . . . . . . . . . . . . . . . . . . . 4-3
Connecting via USB . . . . . . . . . . . . . . . . . . . . . . . . . . . . . . . . . . . . . . . . . . . . . . . . . . 4-4
Connecting via Parallel . . . . . . . . . . . . . . . . . . . . . . . . . . . . . . . . . . . . . . . . . . . . . . . . 4-5
Configuring the Network Address. . . . . . . . . . . . . . . . . . . . . . . . . . . . . . . . . . . . . . . . . . . . . 4-6
TCP/IP and IP Addresses . . . . . . . . . . . . . . . . . . . . . . . . . . . . . . . . . . . . . . . . . . . . . . 4-6
Automatically Setting the Printer’s IP Address . . . . . . . . . . . . . . . . . . . . . . . . . . . . . 4-6
Dynamic Methods of Setting the Printer’s IP Address . . . . . . . . . . . . . . . . . . . . . . . . 4-7
Manually Setting the Printer’s IP Address . . . . . . . . . . . . . . . . . . . . . . . . . . . . . . . . . 4-8
Phaser® 6180MFP Multifunction Printer
ii
Page 5

Contents
Installing the Printer Drivers . . . . . . . . . . . . . . . . . . . . . . . . . . . . . . . . . . . . . . . . . . . . . . . . 4-10
Available Drivers . . . . . . . . . . . . . . . . . . . . . . . . . . . . . . . . . . . . . . . . . . . . . . . . . . . 4-10
Windows 2000 or Later. . . . . . . . . . . . . . . . . . . . . . . . . . . . . . . . . . . . . . . . . . . . . . . 4-11
Macintosh OS X, Version 10.2 and Higher . . . . . . . . . . . . . . . . . . . . . . . . . . . . . . . 4-11
5 Printing Basics
Supported Paper and Media. . . . . . . . . . . . . . . . . . . . . . . . . . . . . . . . . . . . . . . . . . . . . . . . . . 5-2
Paper Usage Guidelines . . . . . . . . . . . . . . . . . . . . . . . . . . . . . . . . . . . . . . . . . . . . . . . 5-3
Automatic Document Feeder Guidelines . . . . . . . . . . . . . . . . . . . . . . . . . . . . . . . . . . 5-4
Paper That Can Damage Your Printer . . . . . . . . . . . . . . . . . . . . . . . . . . . . . . . . . . . . 5-5
Paper Storage Guidelines . . . . . . . . . . . . . . . . . . . . . . . . . . . . . . . . . . . . . . . . . . . . . . 5-5
About Paper . . . . . . . . . . . . . . . . . . . . . . . . . . . . . . . . . . . . . . . . . . . . . . . . . . . . . . . . . . . . . . 5-6
Setting Paper Types and Sizes. . . . . . . . . . . . . . . . . . . . . . . . . . . . . . . . . . . . . . . . . . . . . . . . 5-9
Setting Paper Trays . . . . . . . . . . . . . . . . . . . . . . . . . . . . . . . . . . . . . . . . . . . . . . . . . . . 5-9
Setting Paper Types . . . . . . . . . . . . . . . . . . . . . . . . . . . . . . . . . . . . . . . . . . . . . . . . . . 5-9
Setting Paper Sizes . . . . . . . . . . . . . . . . . . . . . . . . . . . . . . . . . . . . . . . . . . . . . . . . . . . 5-9
Loading Paper . . . . . . . . . . . . . . . . . . . . . . . . . . . . . . . . . . . . . . . . . . . . . . . . . . . . . . . . . . . 5-10
Loading Paper in Tray 1 (MPT) . . . . . . . . . . . . . . . . . . . . . . . . . . . . . . . . . . . . . . . . 5-10
Loading Paper in Trays 2 and 3 . . . . . . . . . . . . . . . . . . . . . . . . . . . . . . . . . . . . . . . . 5-13
Selecting Printing Options. . . . . . . . . . . . . . . . . . . . . . . . . . . . . . . . . . . . . . . . . . . . . . . . . . 5-17
Selecting Printing Preferences (Windows) . . . . . . . . . . . . . . . . . . . . . . . . . . . . . . . . 5-17
Selecting Options for an Individual Job (Windows). . . . . . . . . . . . . . . . . . . . . . . . . 5-18
Selecting Options for an Individual Job (Macintosh) . . . . . . . . . . . . . . . . . . . . . . . . 5-20
Printing on Both Sides of the Paper. . . . . . . . . . . . . . . . . . . . . . . . . . . . . . . . . . . . . . . . . . . 5-23
Automatic 2-Sided Printing Guidelines . . . . . . . . . . . . . . . . . . . . . . . . . . . . . . . . . . 5-23
Binding Edge Options. . . . . . . . . . . . . . . . . . . . . . . . . . . . . . . . . . . . . . . . . . . . . . . . 5-24
Selecting 2-Sided Printing . . . . . . . . . . . . . . . . . . . . . . . . . . . . . . . . . . . . . . . . . . . . 5-24
Printing on Specialty Media . . . . . . . . . . . . . . . . . . . . . . . . . . . . . . . . . . . . . . . . . . . . . . . . 5-25
Printing Transparencies. . . . . . . . . . . . . . . . . . . . . . . . . . . . . . . . . . . . . . . . . . . . . . . 5-25
Printing Envelopes . . . . . . . . . . . . . . . . . . . . . . . . . . . . . . . . . . . . . . . . . . . . . . . . . . 5-28
Printing Labels . . . . . . . . . . . . . . . . . . . . . . . . . . . . . . . . . . . . . . . . . . . . . . . . . . . . . 5-31
Printing Glossy Paper . . . . . . . . . . . . . . . . . . . . . . . . . . . . . . . . . . . . . . . . . . . . . . . . 5-36
Printing Custom Size or Long Paper . . . . . . . . . . . . . . . . . . . . . . . . . . . . . . . . . . . . . . . . . . 5-41
Defining Custom Paper Sizes . . . . . . . . . . . . . . . . . . . . . . . . . . . . . . . . . . . . . . . . . . 5-41
Printing on Custom Size Paper . . . . . . . . . . . . . . . . . . . . . . . . . . . . . . . . . . . . . . . . . 5-42
Phaser® 6180MFP Multifunction Printer
iii
Page 6

Contents
Printing Confidential Document - Secure Print. . . . . . . . . . . . . . . . . . . . . . . . . . . . . . . . . . 5-44
About Secure Print . . . . . . . . . . . . . . . . . . . . . . . . . . . . . . . . . . . . . . . . . . . . . . . . . . 5-44
Configuring Secure Print . . . . . . . . . . . . . . . . . . . . . . . . . . . . . . . . . . . . . . . . . . . . . 5-44
Print After Checking Printing Result - Proof Print . . . . . . . . . . . . . . . . . . . . . . . . . . . . . . . 5-46
About Proof Print . . . . . . . . . . . . . . . . . . . . . . . . . . . . . . . . . . . . . . . . . . . . . . . . . . . 5-46
Configuring Proof Print . . . . . . . . . . . . . . . . . . . . . . . . . . . . . . . . . . . . . . . . . . . . . . 5-46
6Copying
Basic Copying . . . . . . . . . . . . . . . . . . . . . . . . . . . . . . . . . . . . . . . . . . . . . . . . . . . . . . . . . . . . 6-2
Adjusting Copying Options. . . . . . . . . . . . . . . . . . . . . . . . . . . . . . . . . . . . . . . . . . . . . . . . . . 6-3
Basic Settings . . . . . . . . . . . . . . . . . . . . . . . . . . . . . . . . . . . . . . . . . . . . . . . . . . . . . . . 6-3
Image Adjustments . . . . . . . . . . . . . . . . . . . . . . . . . . . . . . . . . . . . . . . . . . . . . . . . . . . 6-6
Image Placement Adjustments . . . . . . . . . . . . . . . . . . . . . . . . . . . . . . . . . . . . . . . . . . 6-9
Output Adjustments . . . . . . . . . . . . . . . . . . . . . . . . . . . . . . . . . . . . . . . . . . . . . . . . . 6-12
7Scanning
Scanning Overview . . . . . . . . . . . . . . . . . . . . . . . . . . . . . . . . . . . . . . . . . . . . . . . . . . . . . . . . 7-2
Installing the Scan Driver . . . . . . . . . . . . . . . . . . . . . . . . . . . . . . . . . . . . . . . . . . . . . . . . . . . 7-3
Installing the Windows Scan Driver over USB . . . . . . . . . . . . . . . . . . . . . . . . . . . . . 7-3
Loading Documents for Scanning . . . . . . . . . . . . . . . . . . . . . . . . . . . . . . . . . . . . . . . . . . . . . 7-4
Scanning to a USB Connected Computer . . . . . . . . . . . . . . . . . . . . . . . . . . . . . . . . . . . . . . . 7-5
Scanning to a Computer on a Network . . . . . . . . . . . . . . . . . . . . . . . . . . . . . . . . . . . . . . . . . 7-6
Setting Up Scanning to a Computer . . . . . . . . . . . . . . . . . . . . . . . . . . . . . . . . . . . . . . 7-6
Scanning to a Computer on a Network . . . . . . . . . . . . . . . . . . . . . . . . . . . . . . . . . . . 7-10
Scanning to Email . . . . . . . . . . . . . . . . . . . . . . . . . . . . . . . . . . . . . . . . . . . . . . . . . . . . . . . . 7-11
Setting Up the SMTP Server. . . . . . . . . . . . . . . . . . . . . . . . . . . . . . . . . . . . . . . . . . . 7-11
Using CentreWare IS to Create an Address . . . . . . . . . . . . . . . . . . . . . . . . . . . . . . . 7-11
Scanning to Email . . . . . . . . . . . . . . . . . . . . . . . . . . . . . . . . . . . . . . . . . . . . . . . . . . . 7-12
Scanning to a FTP Server . . . . . . . . . . . . . . . . . . . . . . . . . . . . . . . . . . . . . . . . . . . . . . . . . . 7-13
Creating an Address for the Scanner. . . . . . . . . . . . . . . . . . . . . . . . . . . . . . . . . . . . . 7-13
Scanning to a FTP Server . . . . . . . . . . . . . . . . . . . . . . . . . . . . . . . . . . . . . . . . . . . . . 7-14
Phaser® 6180MFP Multifunction Printer
iv
Page 7

Contents
Scanning Images into an Application . . . . . . . . . . . . . . . . . . . . . . . . . . . . . . . . . . . . . . . . . 7-15
Scanning an Image into a Windows Application (TWAIN). . . . . . . . . . . . . . . . . . . 7-15
Using the WIA Image Manager in a Windows Application. . . . . . . . . . . . . . . . . . . 7-16
Scanning an Image into a Macintosh OS X Application . . . . . . . . . . . . . . . . . . . . . 7-17
Adjusting Scanning Options . . . . . . . . . . . . . . . . . . . . . . . . . . . . . . . . . . . . . . . . . . . . . . . . 7-18
Adjusting the Default Scan Settings . . . . . . . . . . . . . . . . . . . . . . . . . . . . . . . . . . . . . 7-18
Changing the Scan Settings for an Individual Job . . . . . . . . . . . . . . . . . . . . . . . . . . 7-21
8Faxing
Fax Setup . . . . . . . . . . . . . . . . . . . . . . . . . . . . . . . . . . . . . . . . . . . . . . . . . . . . . . . . . . . . . . . . 8-2
Basic Faxing . . . . . . . . . . . . . . . . . . . . . . . . . . . . . . . . . . . . . . . . . . . . . . . . . . . . . . . . . . . . . 8-4
Sending a Fax from the Printer . . . . . . . . . . . . . . . . . . . . . . . . . . . . . . . . . . . . . . . . . . 8-4
Sending a Fax from Your Computer. . . . . . . . . . . . . . . . . . . . . . . . . . . . . . . . . . . . . . 8-5
Using the Address Book When Faxing . . . . . . . . . . . . . . . . . . . . . . . . . . . . . . . . . . . . . . . . . 8-6
Faxing to an Individual . . . . . . . . . . . . . . . . . . . . . . . . . . . . . . . . . . . . . . . . . . . . . . . . 8-6
Faxing to a Group . . . . . . . . . . . . . . . . . . . . . . . . . . . . . . . . . . . . . . . . . . . . . . . . . . . . 8-8
Selecting Fax Options for Single Jobs. . . . . . . . . . . . . . . . . . . . . . . . . . . . . . . . . . . . . . . . . 8-11
Setting the Fax Resolution . . . . . . . . . . . . . . . . . . . . . . . . . . . . . . . . . . . . . . . . . . . . 8-11
Selecting the Original Type . . . . . . . . . . . . . . . . . . . . . . . . . . . . . . . . . . . . . . . . . . . 8-11
Making the Image Lighter or Darker . . . . . . . . . . . . . . . . . . . . . . . . . . . . . . . . . . . . 8-12
Delay Sending a Fax . . . . . . . . . . . . . . . . . . . . . . . . . . . . . . . . . . . . . . . . . . . . . . . . . 8-12
Enabling Color Fax . . . . . . . . . . . . . . . . . . . . . . . . . . . . . . . . . . . . . . . . . . . . . . . . . . 8-12
Changing the Default Fax Job Settings . . . . . . . . . . . . . . . . . . . . . . . . . . . . . . . . . . . . . . . . 8-13
Fax Configuration . . . . . . . . . . . . . . . . . . . . . . . . . . . . . . . . . . . . . . . . . . . . . . . . . . . . . . . . 8-13
Managing Fax Functions . . . . . . . . . . . . . . . . . . . . . . . . . . . . . . . . . . . . . . . . . . . . . . . . . . . 8-14
Printing Transmission Reports . . . . . . . . . . . . . . . . . . . . . . . . . . . . . . . . . . . . . . . . . 8-14
Enabling or Disabling Secure Faxes . . . . . . . . . . . . . . . . . . . . . . . . . . . . . . . . . . . . . 8-15
Limiting Access to Fax and Scan Operations . . . . . . . . . . . . . . . . . . . . . . . . . . . . . . 8-16
Limiting Who Can Send Faxes to the Printer . . . . . . . . . . . . . . . . . . . . . . . . . . . . . . 8-16
Printing Fax Reports . . . . . . . . . . . . . . . . . . . . . . . . . . . . . . . . . . . . . . . . . . . . . . . . . 8-17
Inserting Pauses in Fax Numbers . . . . . . . . . . . . . . . . . . . . . . . . . . . . . . . . . . . . . . . 8-17
Solving Fax Problems . . . . . . . . . . . . . . . . . . . . . . . . . . . . . . . . . . . . . . . . . . . . . . . . . . . . . 8-18
Problems Sending Faxes . . . . . . . . . . . . . . . . . . . . . . . . . . . . . . . . . . . . . . . . . . . . . . 8-19
Problems Receiving Faxes . . . . . . . . . . . . . . . . . . . . . . . . . . . . . . . . . . . . . . . . . . . . 8-20
Phaser® 6180MFP Multifunction Printer
v
Page 8

Contents
9 Using the Control Panel Menus and Keypad
Control Panel Menus . . . . . . . . . . . . . . . . . . . . . . . . . . . . . . . . . . . . . . . . . . . . . . . . . . . . . . . 9-2
Menu Configuration . . . . . . . . . . . . . . . . . . . . . . . . . . . . . . . . . . . . . . . . . . . . . . . . . . 9-2
Changing Menu Settings. . . . . . . . . . . . . . . . . . . . . . . . . . . . . . . . . . . . . . . . . . . . . . . 9-3
Description of Menu Items . . . . . . . . . . . . . . . . . . . . . . . . . . . . . . . . . . . . . . . . . . . . . . . . . . 9-4
Default Settings. . . . . . . . . . . . . . . . . . . . . . . . . . . . . . . . . . . . . . . . . . . . . . . . . . . . . . 9-4
Tray Settings . . . . . . . . . . . . . . . . . . . . . . . . . . . . . . . . . . . . . . . . . . . . . . . . . . . . . . . . 9-6
Information Pages . . . . . . . . . . . . . . . . . . . . . . . . . . . . . . . . . . . . . . . . . . . . . . . . . . . . 9-7
Billing Meters . . . . . . . . . . . . . . . . . . . . . . . . . . . . . . . . . . . . . . . . . . . . . . . . . . . . . . . 9-8
Admin Menu . . . . . . . . . . . . . . . . . . . . . . . . . . . . . . . . . . . . . . . . . . . . . . . . . . . . . . . . 9-8
Menu Map . . . . . . . . . . . . . . . . . . . . . . . . . . . . . . . . . . . . . . . . . . . . . . . . . . . . . . . . . . . . . . 9-20
Entering Text on the Control Panel . . . . . . . . . . . . . . . . . . . . . . . . . . . . . . . . . . . . . . . . . . . 9-21
Correcting Text . . . . . . . . . . . . . . . . . . . . . . . . . . . . . . . . . . . . . . . . . . . . . . . . . . . . . 9-21
10 Troubleshooting
Paper Jams . . . . . . . . . . . . . . . . . . . . . . . . . . . . . . . . . . . . . . . . . . . . . . . . . . . . . . . . . . . . . . 10-2
Preventing and Clearing Paper Jams. . . . . . . . . . . . . . . . . . . . . . . . . . . . . . . . . . . . . 10-2
Paper Jams in Tray 1 (MPT) . . . . . . . . . . . . . . . . . . . . . . . . . . . . . . . . . . . . . . . . . . . 10-3
Paper Jams in the Paper Tray . . . . . . . . . . . . . . . . . . . . . . . . . . . . . . . . . . . . . . . . . . 10-6
Paper Jams at the Automatic Document Feeder . . . . . . . . . . . . . . . . . . . . . . . . . . . . 10-9
Paper Jams at the Fuser. . . . . . . . . . . . . . . . . . . . . . . . . . . . . . . . . . . . . . . . . . . . . . 10-11
Paper Jams at the Duplex Unit . . . . . . . . . . . . . . . . . . . . . . . . . . . . . . . . . . . . . . . . 10-14
Paper Jams in the Optional Sheet Feeder . . . . . . . . . . . . . . . . . . . . . . . . . . . . . . . . 10-16
When Long Paper Jams. . . . . . . . . . . . . . . . . . . . . . . . . . . . . . . . . . . . . . . . . . . . . . 10-19
Print Quality . . . . . . . . . . . . . . . . . . . . . . . . . . . . . . . . . . . . . . . . . . . . . . . . . . . . . . . . . . . 10-20
Print-Quality Problems . . . . . . . . . . . . . . . . . . . . . . . . . . . . . . . . . . . . . . . . . . . . . . 10-20
Copy-Quality Problems. . . . . . . . . . . . . . . . . . . . . . . . . . . . . . . . . . . . . . . . . . . . . . 10-24
Color Registration . . . . . . . . . . . . . . . . . . . . . . . . . . . . . . . . . . . . . . . . . . . . . . . . . . 10-25
Problems With the Printer . . . . . . . . . . . . . . . . . . . . . . . . . . . . . . . . . . . . . . . . . . . . . . . . . 10-28
Enabling Options. . . . . . . . . . . . . . . . . . . . . . . . . . . . . . . . . . . . . . . . . . . . . . . . . . . 10-31
Control Panel Error Messages . . . . . . . . . . . . . . . . . . . . . . . . . . . . . . . . . . . . . . . . . . . . . . 10-32
Messages About Supplies . . . . . . . . . . . . . . . . . . . . . . . . . . . . . . . . . . . . . . . . . . . . 10-32
Messages About the Printer and Other Items . . . . . . . . . . . . . . . . . . . . . . . . . . . . . 10-34
Network Related Errors . . . . . . . . . . . . . . . . . . . . . . . . . . . . . . . . . . . . . . . . . . . . . 10-38
Getting Help . . . . . . . . . . . . . . . . . . . . . . . . . . . . . . . . . . . . . . . . . . . . . . . . . . . . . . . . . . . 10-40
Control Panel Messages . . . . . . . . . . . . . . . . . . . . . . . . . . . . . . . . . . . . . . . . . . . . . 10-40
PrintingScout Alerts . . . . . . . . . . . . . . . . . . . . . . . . . . . . . . . . . . . . . . . . . . . . . . . . 10-40
Online Support Assistant . . . . . . . . . . . . . . . . . . . . . . . . . . . . . . . . . . . . . . . . . . . . 10-40
Web Links . . . . . . . . . . . . . . . . . . . . . . . . . . . . . . . . . . . . . . . . . . . . . . . . . . . . . . . . 10-41
Phaser® 6180MFP Multifunction Printer
vi
Page 9

Contents
11 Maintenance
Cleaning the Printer. . . . . . . . . . . . . . . . . . . . . . . . . . . . . . . . . . . . . . . . . . . . . . . . . . . . . . . 11-2
Cleaning the Document Glass. . . . . . . . . . . . . . . . . . . . . . . . . . . . . . . . . . . . . . . . . . 11-2
Cleaning the Exterior . . . . . . . . . . . . . . . . . . . . . . . . . . . . . . . . . . . . . . . . . . . . . . . . 11-2
Cleaning the Interior . . . . . . . . . . . . . . . . . . . . . . . . . . . . . . . . . . . . . . . . . . . . . . . . . 11-3
Ordering Supplies . . . . . . . . . . . . . . . . . . . . . . . . . . . . . . . . . . . . . . . . . . . . . . . . . . . . . . . . 11-4
Consumables . . . . . . . . . . . . . . . . . . . . . . . . . . . . . . . . . . . . . . . . . . . . . . . . . . . . . . . 11-4
Routine Maintenance Items . . . . . . . . . . . . . . . . . . . . . . . . . . . . . . . . . . . . . . . . . . . 11-4
When to Order Supplies . . . . . . . . . . . . . . . . . . . . . . . . . . . . . . . . . . . . . . . . . . . . . . 11-5
Recycling Supplies . . . . . . . . . . . . . . . . . . . . . . . . . . . . . . . . . . . . . . . . . . . . . . . . . . 11-5
Managing the Printer . . . . . . . . . . . . . . . . . . . . . . . . . . . . . . . . . . . . . . . . . . . . . . . . . . . . . . 11-6
Checking or Managing the Printer with CentreWare IS . . . . . . . . . . . . . . . . . . . . . . 11-6
Checking Printer Status with PrintingScout (Windows). . . . . . . . . . . . . . . . . . . . . . 11-7
Checking Printer Status Through E-mail . . . . . . . . . . . . . . . . . . . . . . . . . . . . . . . . . 11-7
Checking Page Counts. . . . . . . . . . . . . . . . . . . . . . . . . . . . . . . . . . . . . . . . . . . . . . . . . . . . 11-10
Moving the Printer. . . . . . . . . . . . . . . . . . . . . . . . . . . . . . . . . . . . . . . . . . . . . . . . . . . . . . . 11-11
Index
Phaser® 6180MFP Multifunction Printer
vii
Page 10

Printer Information
This chapter includes:
■ User Safety on page 1-2
■ Printer Specifications on page 1-9
■ Regulatory Information on page 1-12
■ Copy Regulations on page 1-14
■ Fax Regulations on page 1-17
■ Material Safety Data Sheet on page 1-21
■ Printer Recycling and Disposal on page 1-22
Phaser® 6180MFP Multifunction Printer
1-1
Page 11

User Safety
User Safety
Your printer and the recommended supplies have been designed and tested to meet strict safety
requirements. Attention to the following information ensures the continued safe operation of
your printer.
Electrical Safety
■ Use the power cord supplied with your printer.
■ Plug the power cord directly into a properly grounded electrical outlet. Make sure each
end of the cord is securely connected. If you do not know if an outlet is grounded, ask an
electrician to check the outlet.
■ Do not use a ground adapter plug to connect the printer to an electrical outlet that does not
have a ground connection terminal.
■ Do not use an extension cord or power strip.
■ Verify that the printer is plugged into an outlet that is capable of providing the correct
voltage and power. Review the printer’s electrical specification with an electrician if
necessary.
Warning: Avoid the potential of electrical shock by ensuring that the printer is properly
grounded. Electrical products may be hazardous if misused.
■ Do not place the printer in an area where people might step on the power cord.
■ Do not place objects on the power cord.
■ Do not block the ventilation openings. These openings are provided to prevent overheating
of the printer.
■ Do not drop paper clips or staples into the printer.
Warning: Do not push objects into slots or openings on the printer. Making contact with a
voltage point or shorting out a part could result in fire or electrical shock.
Phaser® 6180MFP Multifunction Printer
1-2
Page 12

User Safety
If you notice unusual noises or odors:
1. Turn off the printer immediately.
2. Disconnect the power cord from the electrical outlet.
3. Call an authorized service representative to correct the problem.
The power cord is attached to the printer as a plug-in device at the back of the printer. If it is
necessary to disconnect all electrical power from the printer, disconnect the power cord from
the electrical outlet.
Warning: Do not remove the covers or guards that are fastened with screws unless you are
installing optional equipment and are specifically instructed to do so. Power should be OFF
when performing these installations. Except for user-installable options, there are no parts that
you can maintain or service behind these covers.
Note: Leave the printer on for optimum performance; it does not pose a safety hazard. If
however the printer will not be used over an extended period of time, it should be turned off
and unplugged.
The following are hazards to your safety:
■ The power cord is damaged or frayed.
■ Liquid is spilled into the printer.
■ The printer is exposed to water.
If any of these conditions occur, do the following:
1. Turn off the printer immediately.
2. Disconnect the power cord from the electrical outlet.
3. Call an authorized service representative.
Caution: To reduce the risk of fire, use only No. 26 American Wire Gauge or larger
telecommunication line cord.
Laser Safety
With specific regard to lasers, this printer complies with laser product performance standards
set by governmental, national, and international agencies and is certified as a Class 1 Laser
Product. The printer does not emit hazardous light because the beam is totally enclosed during
all modes of customer operation and maintenance.
Phaser® 6180MFP Multifunction Printer
1-3
Page 13

User Safety
Maintenance Safety
■ Do not attempt any maintenance procedure that is not specifically described in the
documentation supplied with your printer.
■ Do not use aerosol cleaners. The use of supplies that are not approved may cause poor
performance and could create a hazardous condition.
■ Do not attempt to open, reuse, or burn any consumables or routine maintenance items. For
information on Xerox supplies recycling programs, go to www.xerox.com/gwa
.
Operational Safety
Your printer and supplies were designed and tested to meet strict safety requirements. These
include safety agency examination, approval, and compliance with established environmental
standards.Your attention to the following safety guidelines helps to ensure the continued, safe
operation of your printer.
Printer Location
Place the printer in a dust-free area within a temperature range of 50° F to 95° F (10° C to
35° C) and a relative humidity range of 15 percent to 80 percent.
Note: Sudden temperature fluctuations can affect print quality. Rapid heating of a cold room
can cause condensation inside the machine, directly interfering with image transfer.
Printer Clearance
Place the printer in an area where there is adequate space for ventilation, operation, and
servicing. The recommended minimal spacing is:
Overhead Clearance:
■ 35 cm (13.8 in.) above the printer
Total Height Requirements:
■ 108 cm (42.5 in.)
Other Clearances:
■ 10 cm (3.9 in.) behind the printer
■ 60 cm (23.6 in.) in front of the printer
■ 10 cm (3.9 in.) on the left side of the printer
■ 10 cm (3.9 in.) on the right side of the printer
Phaser® 6180MFP Multifunction Printer
1-4
Page 14

User Safety
Operational Guidelines
■ Do not block or cover the slots and openings on the printer. The printer may overheat
without adequate ventilation.
■ For optimum performance, use the printer at elevations below 3,100 m (10,171 ft.).
■ Do not place the printer near a heat source.
■ Do not place the printer in direct sunlight to avoid exposing light-sensitive components
when the doors are open.
■ Do not place the printer in line with the cold air flow from an air conditioning system.
■ Place the printer on a level, solid non-vibrating surface with adequate strength for the
weight of the printer. It should be within 1° of horizontal with all four feet in solid contact
with the surface. The printer weight with the duplex unit and consumables is 40 kg
(88.2 lb.).
■ Do not place the printer in locations exposed to magnetic forces.
■ Do not place the printer in damp locations.
■ Do not place the printer in locations susceptible to vibrations.
Printing Safety Guidelines
■ Wait 10-15 seconds between turning the printer off and on.
■ Keep hands, hair, neckties, etc., away from the exit and feed rollers.
When the printer is printing:
■ Do not remove the paper source tray that you selected in either the printer driver or control
panel.
■ Do not open the doors.
■ Do not move the printer.
Printer Supplies
■ Use the supplies specifically designed for your printer. The use of unsuitable materials
may cause poor performance and a possible safety hazard.
■ Follow all warnings and instructions marked on, or supplied with, the printer, options, and
supplies.
Caution: Use of non-Xerox supplies is not recommended. The Xerox Warranty, Service
Agreements, and Total Satisfaction Guarantee do not cover damage, malfunction, or
degradation of performance caused by use of non-Xerox supplies, or the use of Xerox supplies
not specified for this printer. The Total Satisfaction Guarantee is available in the United States
and Canada. Coverage may vary outside these areas; please contact your local representative
for details.
Phaser® 6180MFP Multifunction Printer
1-5
Page 15
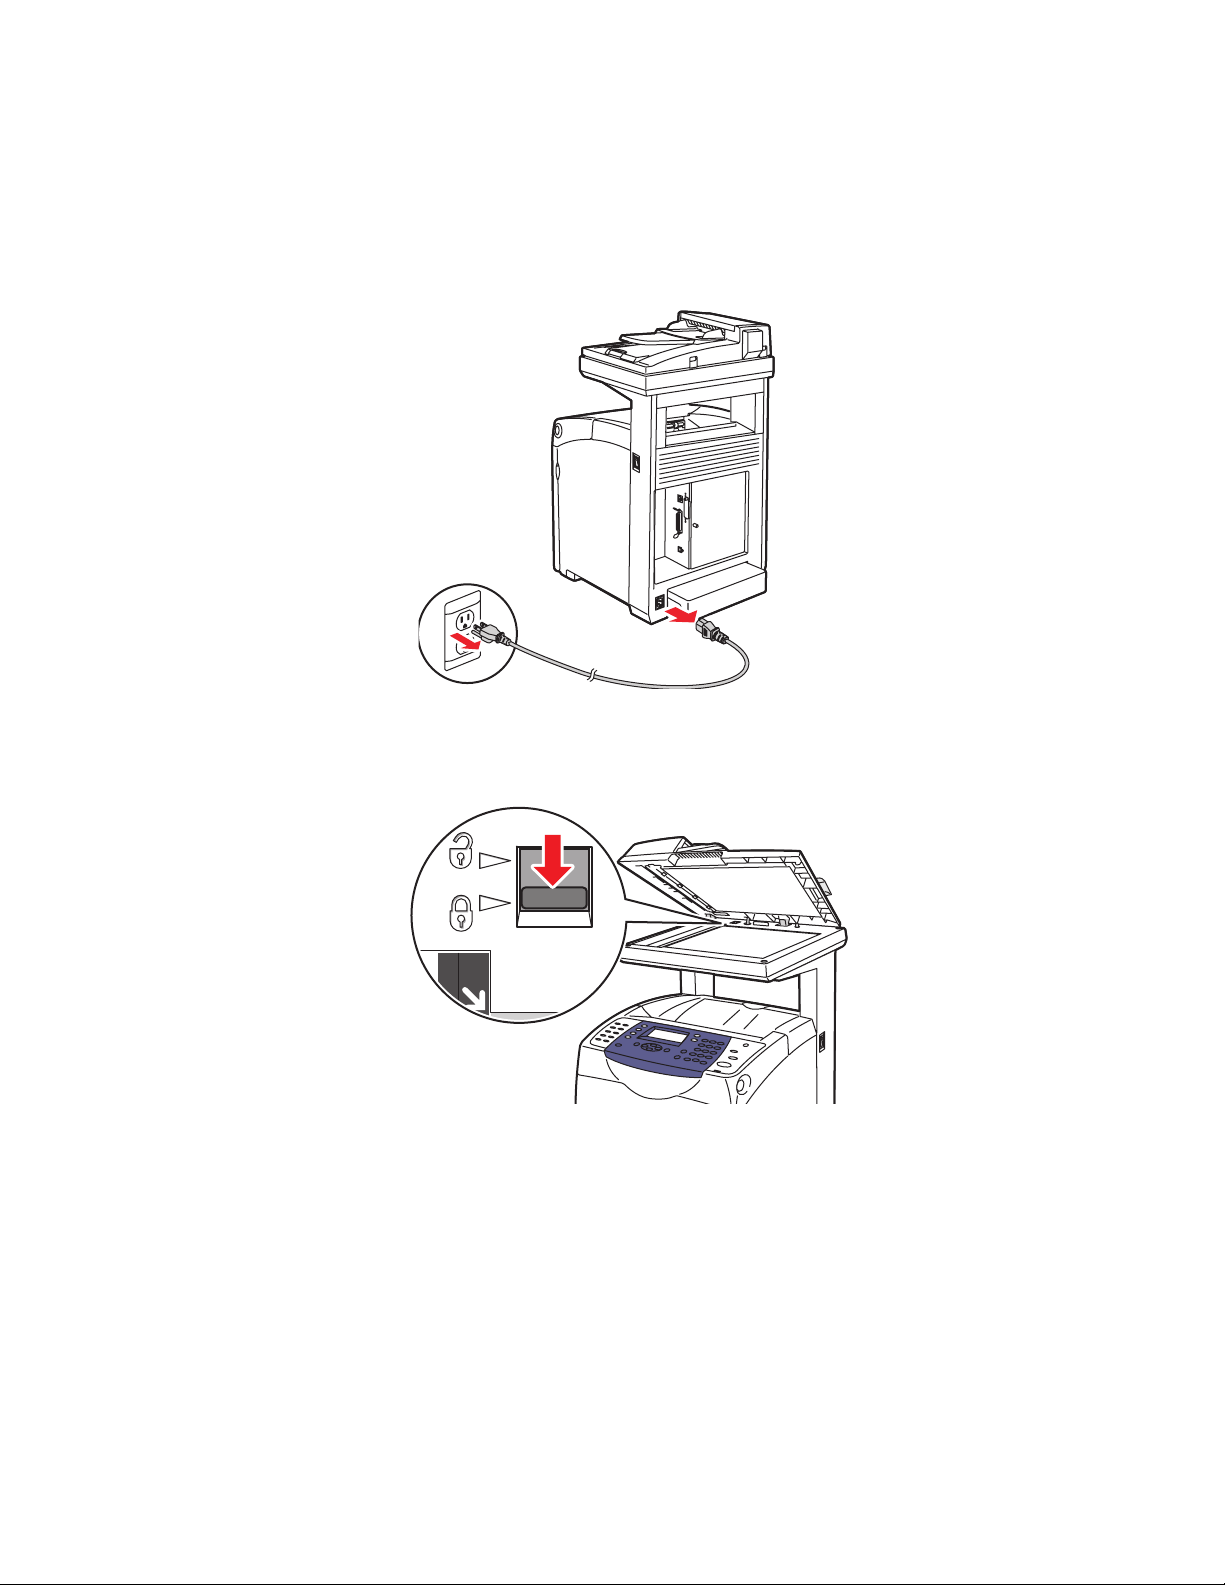
Moving the Printer
Follow these guidelines to avoid injuring yourself or damaging the printer:
■ Turn off the printer and unplug all power cables before moving the printer.
User Safety
■ Set the scan bar lock switch to the locked position.
6180mfp-001
6180mfp-064
Phaser® 6180MFP Multifunction Printer
1-6
Page 16

■ Always use three people to lift the printer.
■ Always lift the printer from the designated lift points.
User Safety
6180mfp-042
■ Carry the printer without tilting it.
Caution: Do not tilt the printer more than 10 degrees to the front/back or right/left.
Tilting more than 10 degrees may lead to consumables inside the printer spilling out.
Note: The rear side of this printer is heavier than the front. Be aware of this weight
difference when moving the printer.
■ Do not place any food or liquids on the printer.
Caution: Damage to the printer resulting from improper moving or failure to repackage the
printer properly for shipment, is not covered by the warranty, service agreement, or Total
Satisfaction Guarantee. The Total Satisfaction Guarantee is available in the United States and
Canada. Coverage may vary outside these areas; please contact your local representative for
details.
See also:
Moving the Printer on page 11-11
Phaser® 6180MFP Multifunction Printer
1-7
Page 17

Safety Symbols Marked on Printer
Use caution (or draws attention to a particular
component). See the manual(s) for information.
Hot surface on or in the printer. Use caution to
avoid personal injury.
It may take 30 minutes for the fuser to cool down.
Do not touch the item.
User Safety
Do not burn the item.
Do not expose the item to sunlight.
Do not expose the item to light.
Recycle the item.
Phaser® 6180MFP Multifunction Printer
1-8
Page 18

Printer Specifications
Printer Specifications
Physical Specifications
■ Width: 460 mm (18.1 in.)
■ Depth: 520 mm (20.5 in.)
■ Height (with scanner lid up): 1080 mm (42.5 in.)
■ Weight:
■ 6180MFP-N: 40 kg (88.2 lb.) including consumables
■ 6180MFP-D: 41 kg (90.4 lb.) including consumables
Environmental Specifications
50° F to 95° F (10° C to 32° C) and a relative humidity range of 15 percent to 80 percent
Electrical Specifications
Electrical Specifications
■ 110-127 V~, 50/60 Hz, 9 A
■ 220-240 V~, 50/60 Hz, 4.5 A
Power Consumption
■ AC 110 V:
■ Power Saver Mode 1 (Printer): 35 W or less
■ Power Saver Mode 2 (System): 17 W or less
■ Standby: 90 W or less (fuser on)
■ Continuous color or monochrome printing average: 500 W or less
■ AC 220 - 240 V:
■ Power Saver Mode 1 (Printer): 35 W or less
■ Power Saver Mode 2 (System): 17 W or less
■ Standby: 90 W or less (fuser on)
■ Continuous color or monochrome printing average: 500 W or less
This printer does not consume electric power when the power switch is turned off even if the
printer is connected to an AC outlet.
■ ENERGY STAR qualified printer:
Default time to Power Saver Mode 1 is 30 minutes.
Default time to Power Saver Mode 2 is 30 minutes after Power Saver Mode 1 begins.
Phaser® 6180MFP Multifunction Printer
1-9
Page 19

Printer Specifications
Warm-Up Time
■ 30 seconds or less (when power is switched on, temperature: 22° C)
The printer’s electrical system is ready 10 seconds after switching on the printer.
Performance Specifications
Resolution
Maximum Resolution: 600 × 600 dpi
Print Speed (Letter/ A4)
1-Sided Printing (ppm) 2-Sided Printing (ipm)
Print Mode
600 dpi standard 20 / 20 31 / 30 14 / 14 21 / 21
600 dpi enhanced 20 / 20 31 / 30 14 / 14 21 / 21
Color Black & White Color Black & White
Copy Speed
■ Color: 20 cpm
■ Black & White: 31 cpm
Phaser® 6180MFP Multifunction Printer
1-10
Page 20

Controller Specifications
Processor Speed
400 MHz processor
Memory
■ Printer: 256 MB
■ Copy/Scan/Fax: 128 MB
Expandable to combined memory of 1408 MB
Resident Fonts
■ PCL 5/PCL 6
■ PostScript 3
Interfaces
Printer Specifications
■ Ethernet 10/100 Base Tx
■ Universal Serial Bus (USB 2.0)
■ Parallel
Phaser® 6180MFP Multifunction Printer
1-11
Page 21

Regulatory Information
Regulatory Information
This printer has been tested to electromagnetic emission and immunity standards. These
standards are designed to mitigate interference caused or received by this printer in a typical
office environment.
United States (FCC Regulations)
This equipment has been tested and found to comply with the limits for a Class B digital
device, pursuant to Part 15 of the FCC Rules. These limits are designed to provide reasonable
protection against harmful interference in a residential installation. This equipment generates,
uses, and can radiate radio frequency energy. If it is not installed and used in accordance with
these instructions, it may cause harmful interference to radio communications. However, there
is no guarantee that interference will not occur in a particular installation. If this equipment
does cause harmful interference to radio or television reception, which can be determined by
turning the equipment off and on, the user is encouraged to try to correct the interference by
one or more of the following measures:
■ Reorient or relocate the receiver.
■ Increase the separation between the equipment and receiver.
■ Connect the equipment into an outlet on a circuit different from that to which the receiver
is connected.
■ Consult your reseller or an experienced radio/television technician for help.
Any changes or modifications not expressly approved by Xerox could void the user's authority
to operate the equipment. To ensure compliance with Part 15 of the FCC rules, use shielded
interface cables.
Canada (Regulations)
This Class B digital apparatus complies with Canadian ICES-003.
Cet appareil numérique de la classe B est conforme à la norme NMB-003 du Canada.
Phaser® 6180MFP Multifunction Printer
1-12
Page 22

Regulatory Information
European Union
The CE mark applied to this printer symbolizes Xerox’s declaration of
conformity with the following applicable Directives of the European Union
as of the dates indicated:
■ January 1, 1995: Low Voltage Directive 73/23/EEC as amended by 93/68/EEC
■ January 1, 1996: Electromagnetic Compatibility Directive 89/336/EEC
■ March 9, 1999: Radio & Telecommunications Terminal Equipment Directive 1999/5/EC
This printer, if used properly in accordance with the user's instructions, is neither dangerous
for the consumer nor for the environment.
To ensure compliance with European Union regulations, use shielded interface cables.
A signed copy of the Declaration of Conformity for this printer can be obtained from Xerox.
Phaser® 6180MFP Multifunction Printer
1-13
Page 23

Copy Regulations
Copy Regulations
United States
Congress, by statute, has forbidden the reproduction of the following subjects under certain
circumstances. Penalties of fine or imprisonment may be imposed on those guilty of making
such reproductions.
1. Obligations or Securities of the United States Government, such as:
Certificates of Indebtedness National Bank Currency
Coupons from Bonds Federal Reserve Bank Notes
Silver Certificates Gold Certificates
United States Bonds Treasury Notes
Federal Reserve Notes Fractional Notes
Certificates of Deposit Paper Money
Bonds and Obligations of certain agencies of the government, such as FHA, etc.
Bonds (U.S. Savings Bonds may be photographed only for publicity purposes in connection
with the campaign for the sale of such bonds.)
Internal Revenue Stamps. If it is necessary to reproduce a legal document on which there is
a canceled revenue stamp, this may be done provided the reproduction of the document is
performed for lawful purposes.
Postage Stamps, canceled or uncanceled. For philatelic purposes, Postage Stamps may be
photographed, provided the reproduction is in black and white and is less than 75% or more
than 150% of the linear dimensions of the original.
Postal Money Orders
Bills, Checks, or Draft of money drawn by or upon authorized officers of the United States.
Stamps and other representatives of value, of whatever denomination, which have been or
may be issued under any Act of Congress.
2. Adjusted Compensation Certificates for Veterans of the World Wars.
3. Obligations or Securities of any Foreign Government, Bank, or Corporation.
4. Copyrighted materials, unless permission of the copyright owner has been obtained or the
reproduction falls within the “fair use” or library reproduction rights provisions of the
copyright law. Further information of these provisions may be obtained from the
Copyright Office, Library of Congress, Washington, D.C. 20559. Ask for Circular R21.
5. Certificate of Citizenship or Naturalization. Foreign Naturalization Certificates may be
photographed.
6. Passports. Foreign Passports may be photographed.
7. Immigration papers.
8. Draft Registration Cards.
Phaser® 6180MFP Multifunction Printer
1-14
Page 24

Copy Regulations
9. Selective Service Induction papers that bear any of the following Registrant’s information:
■ Earnings or Income
■ Court Record
■ Physical or mental condition
■ Dependency Status
■ Previous military service
Exception: United States military discharge certificates may be photographed.
10. Badges, Identification Cards, Passes, or Insignia carried by military personnel, or by
members of the various Federal Departments, such as FBI, Treasure, etc. (Unless
photograph is ordered by the head of such department or bureau.)
Reproducing the following is also prohibited in certain states:
■ Automobile Licenses
■ Drivers’ Licenses
■ Automobile Certificates of Title
The above list is not all inclusive, and no liability is assumed for its completeness or accuracy.
In case of doubt, consult your attorney.
Canada
Parliament, by stature, has forbidden the reproduction of the following subjects under certain
circumstances. Penalties of fine or imprisonment may be imposed on those guilty of making
such reproductions.
1. Current bank notes or current paper money.
2. Obligations or securities of a government or bank.
3. Exchequer bill paper or revenue paper.
4. The public seal of Canada or of a province, or the seal of a public body or authority in
Canada, or of a court of law.
5. Proclamations, orders, regulations or appointments, or notices thereof (with intent to
falsely cause same to purport to have been printed by the Queens Printer for Canada, or the
equivalent printer for a province).
6. Marks, brands, seals, wrappers or designs used by or on behalf of the Government of
Canada or of a province, the government of a state other than Canada or a department,
board, Commission or agency established by the Government of Canada or of a province
or of a government of a state other than Canada.
7. Impressed or adhesive stamps used for the purpose of revenue by the Government of
Canada or of a province or by the government of a state other than Canada.
Phaser® 6180MFP Multifunction Printer
1-15
Page 25

Copy Regulations
8. Documents, registers or records kept by public officials charged with the duty of making
or issuing certified copies thereof, where the copy falsely purports to be a certified copy
thereof.
9. Copyrighted material or trademarks of any manner or kind without the consent of the
copyright or trademark owner.
The above list is provided for your convenience and assistance, but it is not all-inclusive, and
no liability is assumed for its completeness or accuracy. In case of doubt, consult your
solicitor.
Other Countries
Copying certain documents may be illegal in your country. Penalties of fine or imprisonment
may be imposed on those found guilty of making such reproductions.
■ Currency notes
■ Bank notes and cheques
■ Bank and government bonds and securities
■ Passports and identification cards
■ Copyright material or trademarks without the consent of the owner
■ Postage stamps and other negotiable instruments
This list is not inclusive and no liability is assumed for either its completeness or accuracy. In
case of doubt, contact your legal counsel.
Phaser® 6180MFP Multifunction Printer
1-16
Page 26

Fax Regulations
Fax Regulations
United States
Fax Send Header Requirements
The Telephone Consumer Protection Act of 1991 makes it unlawful for any person to use a
computer or other electronic device, including a fax machine, to send any message unless such
message clearly contains in a margin at the top or bottom of each transmitted page or on the
first page of the transmission, the date and time it is sent and an identification of the business
or other entity, or other individual sending the message and the telephone number of the
sending machine or such business, other entity or individual. The telephone number provided
may not be a 900 number or any other number for which charges exceed local or long distance
transmission charges.
In order to program this information into your machine, refer to customer documentation and
follow the steps provided.
Data Coupler Information
This equipment complies with Part 68 of the FCC rules and the requirements adopted by the
Administrative Council for Terminal Attachments (ACTA). On the cover of this equipment is a
label that contains, among other information, a product identifier in the format
US:AAAEQ##TXXXX. If requested, this number must be provided to the Telephone
Company.
A plug and jack used to connect this equipment to the premises wiring and telephone network
must comply with the applicable FCC Part 68 rules and requirements adopted by the ACTA. A
compliant telephone cord and modular plug is provided with this product. It is designed to be
connected to a compatible modular jack that is also compliant. See installation instructions for
details.
You may safely connect the machine to the following standard modular jack: USOC RJ-11C
using the compliant telephone line cord (with modular plugs) provided with the installation
kit. See installation instructions for details.
Phaser® 6180MFP Multifunction Printer
1-17
Page 27

Fax Regulations
The Ringer Equivalence Number (REN) is used to determine the number of devices that may
be connected to a telephone line. Excessive RENs on a telephone line may result in the devices
not ringing in response to an incoming call. In most but not all areas, the sum of RENs should
not exceed five (5.0). To be certain of the number of devices that may be connected to a line, as
determined by the total RENs, contact the local Telephone Company. For products approved
after July 23, 2001, the REN for this product is part of the product identifier that has the format
US:AAAEQ##TXXXX. The digits represented by ## are the REN without a decimal point
(e.g., 03 is a REN of 0.3). For earlier products, the REN is separately shown on the label.
To order the correct service from the local telephone company, please provide the Facility
Interface Code (FIC) and Service Order Code (SOC) listed below:
FIC: 02LS2
SOC: 9.0F
You may also have to provide the USOC Jack code and the Ringer Equivalence Number
(REN).
If this Xerox equipment causes harm to the telephone network, the Telephone Company will
notify you in advance that temporary discontinuance of service may be required. But if
advance notice is not practical, the Telephone Company will notify the customer as soon as
possible. Also, you will be advised of your right to file a complaint with the FCC if you
believe it is necessary.
The Telephone Company may make changes in its facilities, equipment, operations or
procedures that could affect the operation of the equipment. If this happens, the Telephone
Company will provide advance notice in order for you to make necessary modifications to
maintain uninterrupted service.
If trouble is experienced with this Xerox equipment, for repair or warranty information, please
contact the appropriate service center; details of which are displayed either on the machine or
contained within the User Guide. If the equipment is causing harm to the telephone network,
the Telephone Company may request that you disconnect the equipment until the problem is
resolved.
Repairs to the machine should be made only by a Xerox Service Representative or an
authorized Xerox Service provider. This applies at any time during or after the service
warranty period. If unauthorized repair is performed, the remainder of the warranty period is
null and void. This equipment must not be used on party lines. Connection to party line service
is subject to state tariffs. Contact the state public utility commission, public service
commission or corporation commission for information.
If your office has specially wired alarm equipment connected to the telephone line, make sure
that the installation of this Xerox equipment does not disable your alarm equipment.
If you have questions about what will disable alarm equipment, consult your Telephone
Company or a qualified installer.
Phaser® 6180MFP Multifunction Printer
1-18
Page 28

Fax Regulations
Canada
Note: The Industry Canada label identifies certified equipment. This certification means that
the equipment meets certain telecommunications network protective, operational and safety
requirements as prescribed in the appropriate Terminal Equipment Technical Requirements
document(s). The Department does not guarantee the equipment will operate to the user’s
satisfaction.
Before installing this equipment, users must make sure that it is permissible to be connected to
the facilities of the local telecommunications company. The equipment must also be installed
using an acceptable method of connection. The customer should be aware that compliance
with the above conditions may not prevent degradation of service in some situations.
Repairs to certified equipment should be coordinated by a representative designated by the
supplier. Any repairs or alterations made by the user to this equipment, or equipment
malfunctions, may give the telecommunications company cause to request the user to
disconnect the equipment.
Users should make sure for their own protection that the electrical ground connections of the
power utility, telephone lines and internal metallic water pipe systems, if present, are
connected together. This precaution may be particularly important in rural areas.
Caution: Users should not attempt to make such connections themselves, but should contact
the appropriate electric inspection authority, or electrician, as appropriate.
The Ringer Equivalence Number (REN) assigned to each terminal device provides an
indication of the maximum number of terminals allowed to be connected to a telephone
interface. The termination on an interface may consist of any combination of devices subject
only to the requirement that the sum of the Ringer Equivalent Numbers of all of the devices
does not exceed 5. For the Canadian REN value, please see the label on the equipment.
Phaser® 6180MFP Multifunction Printer
1-19
Page 29

Fax Regulations
Europe
Radio Equipment & Telecommunications Terminal Equipment Directive
The Facsimile has been approved in accordance with the Council Decision 1999/5/EC for panEuropean single terminal connection to the public switched telephone network (PSTN).
However, due to differences between the individual PSTNs provided in different countries, the
approval does not, of itself, give an unconditional assurance of successful operation on every
PSTN network terminal point.
In the event of a problem you should contact your authorized local dealer in the first instance.
This product has been tested to and is compliant with ES 203 021-1, -2, -3, a specification for
terminal equipment for use on analogue-switched telephone networks in the European
Economic Area. This product provides an user-adjustable setting of the country code. Refer to
the customer documentation for this procedure. Country codes should be set prior to
connecting this product to the network.
Note: Although this product can use either loop disconnect (pulse) or DTMF (tone) signaling,
it is recommended that it is set to use DTMF signaling. DTMF signaling provides reliable and
faster call setup. Modification of this product, connection to external control software or to
external control apparatus not authorized by Xerox, will invalidate its certification.
Phaser® 6180MFP Multifunction Printer
1-20
Page 30

Material Safety Data Sheet
Material Safety Data Sheet
For Material Safety Data information regarding your Phaser 6180MFP printer, go to:
■ United States and Canada: www.xerox.com/msds
■ European Union: www.xerox.com/environment_europe
For the Customer Support Center phone numbers, go to www.xerox.com/office/worldcontacts.
Phaser® 6180MFP Multifunction Printer
1-21
Page 31

Printer Recycling and Disposal
Printer Recycling and Disposal
European Union
Some equipment may be used in both a domestic/household and a professional/business
application.
Domestic/Household Environment
Application of this symbol on your equipment is confirmation that you
should not dispose of the equipment in the normal household waste stream.
In accordance with European legislation, end of life electrical and electronic equipment
subject to disposal must be segregated from household waste.
Private households within EU member states may return used electrical and electronic
equipment to designated collection facilities free of charge. Please contact your local disposal
authority for information.
In some member states, when you purchase new equipment, your local retailer may be
required to take back your old equipment free of charge. Please ask you retailer for
information.
Professional/Business Environment
Application of this symbol on your equipment is confirmation that you must
dispose of this equipment in compliance with agreed national procedures.
In accordance with European legislation, end of life electrical and electronic equipment
subject to disposal must be managed within agreed procedures.
Prior to disposal, please contact your local reseller or Xerox representative for end of life
takeback information.
Phaser® 6180MFP Multifunction Printer
1-22
Page 32

Printer Recycling and Disposal
North America
Xerox operates an equipment takeback and reuse/recycle program. Contact your Xerox sales
representative (1-800-ASK-XEROX) to determine whether this Xerox printer is part of the
program. For more information about Xerox environmental programs, visit
www.xerox.com/environment.html
local authorities.
If you are managing the disposal of your Xerox product, please note that the product contains
lamp(s) with mercury, and may contain lead, perchlorate, and other materials whose disposal
may be regulated due to environmental considerations. The presence of these materials is fully
consistent with global regulations applicable at the time that the product was placed on the
market. For recycling and disposal information, contact your local authorities. In the United
States, you may also refer to the Electronic Industries Alliance web site: www.eiae.org
Perchlorate Material - This product may contain one or more Perchlorate-containing devices,
such as batteries. Special handling may apply, please see
www.dtsc.ca.gov/hazardouswaste/perchlorate
or for recycling and disposal information, contact your
.
.
Other Countries
Please contact your local waste authorities and request disposal guidance.
Phaser® 6180MFP Multifunction Printer
1-23
Page 33

Printer Features
This chapter includes:
■ Main Components and Their Functions on page 2-2
■ Printer Configurations on page 2-5
■ Control Panel on page 2-6
■ Power Saver Modes on page 2-10
■ Checking Status of Print Data on page 2-11
■ Displaying Optional Accessory Configuration and Paper Tray Settings on page 2-12
■ More Information on page 2-13
Phaser® 6180MFP Multifunction Printer
2-1
Page 34

Main Components and Their Functions
Main Components and Their Functions
This section includes:
■ Front View on page 2-2
■ Rear View on page 2-3
■ Internal View on page 2-4
■ Scanner on page 2-4
Front View
3
2
1
8
1. Front door A
2. Control panel
3. Output tray
4. Power switch
5. Button A for opening the front door
6. Tray 1 (MPT)
7. Tra y 2
8. Optional Tray 3
4
5
7
6
6180mfp-002
Phaser® 6180MFP Multifunction Printer
2-2
Page 35

Rear View
Main Components and Their Functions
1. Power cord connector
2. USB port
3. Parallel port
4. Telephone line out
5
8
4
3
2
1
5. Fax line in
6. Optional memory slot
7. Multi-protocol network card
8. Network connector
6180mfp-003
7
6
Phaser® 6180MFP Multifunction Printer
2-3
Page 36

Internal View
1
2
Main Components and Their Functions
3
4
1. Fuser
2. Print cartridge
3. Transfer unit
4. Button A for opening the front door
Scanner
1
5
4
2
6180mfp-005
3
1
6180mfp-006
1. Duplex unit
1. Automatic document feed cover
2. Document guides
3. Document feed tray
4. Document glass
5. Scan bar lock switch
Phaser® 6180MFP Multifunction Printer
6180mfp-004
2-4
Page 37

Printer Configurations
Printer Configurations
Printer Configuration
Features
Memory Configuration* 384 MB 384 MB
Resolutions (dpi)
Standard
Enhanced
Ethernet Interface 10/100 Base-T 10/100 Base-T
Tray 1 (MPT) (150 Sheet) Standard Standard
Tray 2 (250 Sheet) Standard Standard
550-Sheet Feeder Optional Optional
Duplex Unit Optional Standard
* All configurations have one memory slot supporting 256 MB/512 MB/1024 MB DDR2
DIMMs, to a maximum of 1408 MB. Standard memories are soldered on the board.
6180MFP-N 6180MFP-D
600 x 600 x 1 bit
600 x 600 x 4 bit
600 x 600 x 1 bit
600 x 600 x 4 bit
Options
You can order additional memory, tray, multi-protocol network card, and a duplex unit if these
items are not standard on your printer.
Memory
The printer features one slot that accepts 256, 512, or 1024 MB of DDR2 DIMMs.
Duplex Unit
The duplex unit enables 2-sided printing.
Multi-Protocol Network Card
The multi-protocol network card provides additional protocols and security features including
IPP, SMB, WINS, DDNS, SSL/HTTPS, and IPv6.
Additional Trays
550-Sheet Feeder (Tray 3)
Phaser® 6180MFP Multifunction Printer
2-5
Page 38

Control Panel
This section includes:
■ Control Panel Layout on page 2-6
■ Menu Map on page 2-9
■ Information Pages on page 2-9
Control Panel
001 002
003 004
005 006
007 008
009 010
Copy
Fax
E-mail
Scan
Color Mode
B&W
Color
Control Panel Layout
Job in Memory
Job Status
ABC
@:./
System
OK
Manual Dial
DEF
123
GHI
JKL MNO
56
4
PQRS
TUV WXYZ
-_~
Redial/
Pause
7
9
8
#
0
Speed Dial
C
Wake Up
Clear All
Stop
Start
Error
6180mfp-007
001 002
003 004
1
005 006
007 008
009 010
6180mfp-045
1. One Touch buttons
Provides access to the first 10 entries in the Fax address book.
For example, you can press the Fax button, and then press the upper left button to access the first
entry in your address book.
Phaser® 6180MFP Multifunction Printer
2-6
Page 39

Control Panel
111213141516
Copy
1
2
Fax
E-mail
Scan
Color Mode
B&W
Color
Job in Memory
3
4567 8
1. Press to use the Copy, Fax, E-mail, and
Scan menus on the display screen.
2. Color Mode button
Press to switch between Color and Black and
White modes for your copy, fax, and scan job.
3. Job in Memory LED
When illuminated, it indicates that there is a
job in the printer’s memory.
4. Arrow LEDs
These LEDs indicate the flow of data either
into or out of the printer.
5. Up Arrow button
Scrolls upward through the menus.
Down Arrow button
Scrolls downward through the menus.
Back Arrow button
Scrolls backwards through the menus, or
displays the Walk-Up Features menu.
Forward Arrow button
Scrolls forward through the menus.
6. Manual Dial button
When faxing, you can press this button to
quickly enter a fax number with the
alphanumeric key pad.
7. Redial/Pause button
Press the button to recall the last fax number
used or to insert pauses in fax numbers.
8. Clear button
Deletes a single character each time the
button is pressed. For use when entering email
addresses and telephone numbers.
Job Status
@:./
ABC
System
OK
Manual Dial
DEF
123
JKL MNO
GHI
56
4
TUV WXYZ
PQRS
-_~
Redial/
Pause
7
9
8
#
0
Speed Dial
C
10
9
6180mfp-046
9. Speed Dial button
Press to access directories of group or
individual fax telephone numbers.
10. Alphanumeric keypad
Use to enter numbers and letters for names
and phone numbers.
11. Address Book button
Press to access the Fax and Email address
books.
12. Job Status button
Press to check active job status and Walk-Up
printing jobs.
13. System button
Switches the display to the Setup menu.
14. OK button
Press to accept the setting selected.
15. Graphic display indicates status messages,
menus, and toner levels.
16. Exit button
Press to go up one level in the menu.
Phaser® 6180MFP Multifunction Printer
2-7
Page 40

Control Panel
1
2
3
4
5
Wake Up
Clear All
Stop
Start
Error
6180mfp-047
1. Wake Up button
This light is on in power saver mode. Push the button to exit power saver mode.
2. Clear All button
Press once to return to the default main menu. All job settings are reset to default.
3. Stop button
Cancels the current print job.
4. Start button
Press to start a copy, scan, or fax job.
5. Error
The red light indicates an error condition.
Phaser® 6180MFP Multifunction Printer
2-8
Page 41

Control Panel
Information Pages
Your printer comes with a set of information pages to help you obtain the best results from
your printer. Access these pages from the control panel. Print the Menu Map to see where
these information pages are located in the control panel menu structure.
Menu Map
The Menu Map helps you navigate the control panel menus. To print the Menu Map:
1. On the control panel, press the System
button, select Information Pages, and then press
the OK button.
2. Select
Menu Map, and then press the OK button to print.
Note: Print the Menu Map to see other information pages available for printing.
Configuration Page
To print the Configuration page to view current information about your printer, do the
following:
1. On the control panel, press the System
button, select Information Pages, and then press
the OK button.
2. Select
Configuration, and then press the OK button to print.
Turning the Startup Page On or Off
When the printer is turned on, it prints a Startup page by default.
To turn the printing of the Startup page on or off:
1. On the control panel, press the System
2. Select
3. Select
4. Select
5. Select
Admin Menu, and then press the OK button.
System Settings, and then press the OK button.
Startup Page, and then press the OK button.
On or Off, and then press the OK button.
button.
Phaser® 6180MFP Multifunction Printer
2-9
Page 42

Power Saver Modes
Power Saver Modes
Power Saver Mode 1 (Printer)
The printer is equipped with Power Saver Mode 1 to reduce power consumption when it is left
idle.
When no print data is received for 30 minutes (default), the printer will enter Power Saver
Mode 1.
The time range that can be specified for the printer to enter Power Saver Mode 1 is
5 to 60 minutes. Consumption of power during Power Saver Mode 1 is 35 W or less and the
time required to exit from Power Saver Mode 1 to a print-ready status is about 20 seconds.
See also:
Changing the Power Saver Time on page 9-3
Exiting the Power Saver Mode
The printer automatically cancels Power Saver Mode 1 if the scanner lid is raised, any control
panel buttons are pressed, or if it receives data from the computer.
Power Saver Mode 2 (System)
Power Saver Mode 2 controls the scanner lamp. When the scanner is not being used, the lamp
turns off after the time specified for Power Saver Mode 2. The time range that can be specified
for the printer to enter Power Saver Mode 2 is 5 to 120 minutes. Consumption of power during
Power Saver Mode 2 is 17W. The default setting for Power Saver Mode 2 is 30 minutes after
Power Saver Mode 1 starts.
The printer automatically cancels Power Saver Mode 2 once it receives data from the
computer. To cancel the Power Saver Mode 2 manually, press the Wak e U p button.
See also:
Changing the Power Saver Time on page 9-3
Phaser® 6180MFP Multifunction Printer
2-10
Page 43

Checking Status of Print Data
Checking Status of Print Data
Checking Status in Windows
Printer information and status are displayed on the Status window. Double-click the
PrintingScout printer icon on the taskbar at the bottom right of the screen. From the displayed
window, check the column Status.
You can change the display contents with the button on the left of the Printer Status window.
Status Setting button: Displays the Status Setting screen and allows you to check the printer
name, printer connection port, and printer status.
For more information about PrintingScout, see the Help:
1. From the Start menu, select Programs.
2. Select Xerox Office Printing.
3. Select PrintingScout.
4. Select PrintingScout Help.
See also:
PrintingScout Software on page 3-4
Checking Status in CentreWare Internet Services
You can check the status of the print job sent to the printer at the Jobs tab of CentreWare
Internet Services.
See also:
Printer Management Software on page 3-1
Phaser® 6180MFP Multifunction Printer
2-11
Page 44

Displaying Optional Accessory Configuration and Paper Tray Settings
Displaying Optional Accessory Configuration and
Paper Tray Settings
Print the Configuration page to view the current information about your printer:
1. On the control panel, press the System
the OK button.
2. Select
Configuration, and then press the OK button to print.
button, select Information Pages, and then press
Phaser® 6180MFP Multifunction Printer
2-12
Page 45

More Information
More Information
Obtain information regarding your printer and its capabilities from the following sources.
Resources
Information Source
Installation Guide* Packaged with printer
Feature Setup Guide Packaged with printer
Quick Use Guide* Packaged with printer
User Guide (PDF)* Software and Documentation CD-ROM
Quick Start Tutorials (English only) www.xerox.com/office/6180MFPsupport
Video Tutorials www.xerox.com/office/6180MFPsupport
Recommended Media List Recommended Media List (United States)
Recommended Media List (Europe)
Printer Management Tools www.xerox.com/office/6180MFPdrivers
Online Support Assistant www.xerox.com/office/6180MFPsupport
Technical Support www.xerox.com/office/6180MFPsupport
Information pages Control panel menu
* Also available on the Support website.
Phaser® 6180MFP Multifunction Printer
2-13
Page 46

Printer Management Software
This chapter includes:
■ Print and Scan Drivers on page 3-2
■ CentreWare Internet Services on page 3-2
■ Address Book Editor on page 3-3
■ Express Scan Manager on page 3-3
■ PrintingScout Software on page 3-4
Phaser® 6180MFP Multifunction Printer
3-1
Page 47

Print and Scan Drivers
Print and Scan Drivers
To access all of your printer’s features, install the print and scan drivers from the Software and
Documentation CD-ROM or from the Xerox Drivers and Downloads website:
ww.xerox.com/office/6180MFPdrivers
w
■ Print drivers enable your computer and printer to communicate and provide access to your
printer features.
■ Scan drivers enable you to scan images directly to your personal computer and place
scanned images directly into an application.
See also:
Installing the Scan Driver on page 7-3
CentreWare Internet Services
This section provides information on CentreWare Internet Services, an HTTP (HyperText
Transfer Protocol)-based web page service that installs with your printer driver and is accessed
through your web browser.
These pages give you instant access to printer status, and printer configuration options.
Anyone on your network can access the printer using their web browser software. In
administrative mode you can change the configuration of the printer, set up your fax
directories, and manage your printer settings without leaving your computer.
Note: Users who are not given passwords by the administrator can still view the configuration
settings and options in user mode. They will not be able to save or apply any changes to the
current configuration.
Creating an Administrative Password
1. Launch your web browser.
2. Enter the printer’s IP address in the browser’s Address field.
3. Click the Properties button.
4. In the left navigation panel, scroll down to Security and select Administrator Security
Settings.
Note: If the Security folder is not open, click the plus sign (+) to expand the folder.
5. Click the Enable Administrator Mode check box.
6. In the User Name field, type a name for the administrator.
7. In the Password and Verify Password fields, type a password for the administrator.
8. Click Save Changes, your new password has been set and anyone with the administrator
name and password can log in and make changes to the printer configuration and settings.
Phaser® 6180MFP Multifunction Printer
3-2
Page 48

Address Book Editor
Address Book Editor
The Address Book Editor provides a convenient interface for modifying the printers address
book entries. With it you can create:
■ Fax entries
■ Email entries
■ Server entries
When you start the software, if the printer is connected via USB, the Address Book Editor
reads the printer’s address book. You can create, edit, and delete entries. After making
changes, you can then save the updated address book to the printer or to your computer.
The Address Book Editor can be installed from the Software and Documentation CD-ROM.
It is available for Windows and Macintosh.
Express Scan Manager
The Express Scan Manager handles scan jobs sent from the printer to your computer via USB.
When the scan is sent from the printer to the computer, Express Scan Manager automatically
manages the scan job.
Before scanning to your computer, you should start Express Scan Manager and configure the
scan settings. You can specify settings for image type, resolution, paper size, and output
destination.
The Express Scan Manager can be installed from the Software and Documentation CD-ROM.
It is available for Windows and Macintosh.
See also:
Scanning on page 7-1
Launcher (Windows)
The Launcher is installed with the Address Book Editor and Express Scan Manager, and
provides a method for starting those applications.
The Launcher icon can be found in the taskbar. To start either application, right-click the icon,
and then select Start > Address Book Editor or Express Scan Manager.
You can also start the Launcher from the Start > Xerox > Phaser 6180MFP menu.
Phaser® 6180MFP Multifunction Printer
3-3
Page 49

PrintingScout Software
PrintingScout Software
PrintingScout automatically checks the printer status when you send a print job. If the printer
is unable to print your job, PrintingScout automatically displays an alert on your computer
screen to let you know that the printer needs attention.
PrintingScout can be installed from the Software and Documentation CD-ROM. It is available
only for Windows.
Phaser® 6180MFP Multifunction Printer
3-4
Page 50

Network Basics
This chapter includes:
■ Overview of Network Setup and Configuration on page 4-2
■ Choosing a Connection Method on page 4-3
■ Configuring the Network Address on page 4-6
■ Installing the Printer Drivers on page 4-10
This chapter provides basic information about setting up and connecting to your printer.
See also: (English Only)
CentreWare Internet Services tutorial at www.xerox.com/office/6180MFPsupport
Printer driver tutorial at www.xerox.com/office/6180MFPsupport
Phaser® 6180MFP Multifunction Printer
4-1
Page 51

Overview of Network Setup and Configuration
Overview of Network Setup and Configuration
To set up and configure the network:
1. Connect the printer to the network using the recommended hardware and cables.
2. Turn on the printer and the computer.
3. Print the Configuration page and keep it for referencing network settings. For more
information see Displaying Optional Accessory Configuration and Paper Tray Settings on
page 2-12.
4. Install the driver software on the computer from the Software and Documentation
CD-ROM. For information on driver installation, see the section in this chapter for the
specific operating system you are using.
5. Configure the printer’s TCP/IP address, which is required to identify the printer on the
network.
■ Windows operating systems: Run the Installer on the Software and Documentation
CD-ROM to automatically set the printer’s IP address if the printer is connected to an
established TCP/IP network. You can also manually set the printer’s IP address on the
control panel.
■ Macintosh systems: Manually set the printer’s TCP/IP address on the control panel.
6. Print a Configuration page to verify the new settings.
Note: If the Software and Documentation CD-ROM is not available, you can download the
latest driver from
www.xerox.com/office/6180MFPdrivers.
Phaser® 6180MFP Multifunction Printer
4-2
Page 52

Choosing a Connection Method
Choosing a Connection Method
Connect the printer via Ethernet, USB, or parallel. A USB or a parallel connection is a direct
connection and is not used for networking. An Ethernet connection is used for networking.
Hardware and cabling requirements vary for the different connection methods. Cabling and
hardware are generally not included with your printer and must be purchased separately. This
section includes:
■ Connecting via Ethernet and USB on page 4-3
■ Connecting via Ethernet on page 4-3
■ Connecting via USB on page 4-4
■ Connecting via Parallel on page 4-5
Connecting via Ethernet and USB
You can connect your Phaser 6180MFP printer through Ethernet, USB, or both at the same
time. The available features for each connection type are shown in the following table.
Connection Type Available Features
USB When connected via USB you can:
■ Scan an image into an application.
■ Scan an image to a folder on the computer.
■ Use the Address Book Editor to manage address book entries.
Ethernet When connected via Ethernet you can:
■ Scan to a computer on the network.
■ Scan to an FTP server.
■ Scan to email.
■ Use CentreWare IS to manage address book entries.
For information on each connection type, see Connecting via Ethernet on page 4-3 and
Connecting via USB on page 4-4.
Connecting via Ethernet
Ethernet can be used for one or more computers. It supports many printers and systems on an
Ethernet network. An Ethernet connection is recommended because it is faster than a USB
connection. It also allows you direct access to CentreWare Internet Services (IS). The
CentreWare IS web interface enables you to manage, configure, and monitor networked
printers from your desktop.
Phaser® 6180MFP Multifunction Printer
4-3
Page 53

Choosing a Connection Method
Network Connection
Depending on your particular setup, the following hardware and cabling is required for
Ethernet.
■ If you are connecting to one computer, an Ethernet RJ-45 crossover cable is required.
■ If you are connecting to one or more computers with an Ethernet hub, or cable or DSL
router, two or more twisted-pair (category 5/RJ-45) cables are required. (One cable for
each device.)
If you are connecting to one or more computers with a hub, connect the computer to the hub
with one cable, and then connect the printer to the hub with the second cable. Connect to any
port on the hub except the uplink port.
See also:
Configuring the Network Address on page 4-6
Installing the Printer Drivers on page 4-10
Scanning to a Computer on a Network on page 7-10
Scanning to Email on page 7-12
Connecting via USB
If you are connecting to one computer, a USB connection offers fast data speeds. A USB
connection is not as fast as an Ethernet connection but is faster than using parallel. To use
USB, PC users must have Windows 2000, Windows XP, Windows Server 2003, or newer
operating system. Macintosh users must use Mac OS X, version 10.2 and higher.
USB Connection
A USB connection requires a standard A/B USB cable. This cable is not included with your
printer and must be purchased separately. Verify that you are using the correct USB cable for
your connection (2.0 for best results).
1. Connect one end of the USB cable to the printer and turn it on.
2. Connect the other end of the USB cable to the computer.
See also:
Address Book Editor on page 3-3
Express Scan Manager on page 3-3
Installing the Printer Drivers on page 4-10
Phaser® 6180MFP Multifunction Printer
4-4
Page 54

Choosing a Connection Method
Connecting via Parallel
A parallel cable connection can also be used for connecting to one computer. This type of
connection provides the slowest data speeds. Parallel connection requires a standard-to-high
density parallel printer cable, (36-pin high-density 1284-C [male] to 36-pin low density
1284-B [male] cable), with a maximum length of three meters (10 feet). Connect the parallel
cable to the printer and the computer while they are both Off, and then turn them On. Install
the printer driver from the Software and Documentation CD-ROM, and select the appropriate
LPT parallel port.
See also:
Installing the Printer Drivers on page 4-10
Phaser® 6180MFP Multifunction Printer
4-5
Page 55

Configuring the Network Address
Configuring the Network Address
This section includes:
■ TCP/IP and IP Addresses on page 4-6
■ Automatically Setting the Printer’s IP Address on page 4-6
■ Dynamic Methods of Setting the Printer’s IP Address on page 4-7
■ Manually Setting the Printer’s IP Address on page 4-8
TCP/IP and IP Addresses
If your computer is on a large network, contact your network administrator for the appropriate
TCP/IP addresses and additional configuration information.
If you are creating your own small Local Area Network or connecting the printer directly to
your computer using Ethernet, follow the procedure for automatically setting the printer’s
Internet Protocol (IP) address.
PCs and printers primarily use TCP/IP protocols to communicate over an Ethernet network.
With TCP/IP protocols, each printer and computer must have a unique IP address. It is
important that the addresses are similar, but not the same; only the last digit needs to be
different. For example, your printer can have the address 192.168.1.2 while your computer has
the address 192.168.1.3. Another device can have the address 192.168.1.4.
Generally, Macintosh computers use either TCP/IP or the Bonjour protocol to talk to a
networked printer. For Mac OS X systems, TCP/IP is preferred. Unlike TCP/IP, however,
Bonjour does not require printers or computers to have IP addresses.
Many networks have a Dynamic Host Configuration Protocol (DHCP) server. A DHCP server
automatically programs an IP address into every PC and printer on the network that is
configured to use DHCP. A DHCP server is built into most cable and DSL routers. If you use
a cable or DSL router, see your router’s documentation for information on IP addressing.
See also:
Online Support Assistant at www.xerox.com/office/6180MFPsupport
Automatically Setting the Printer’s IP Address
If the printer is connected to a small established TCP/IP network without a DHCP server, use
the installer on the Software and Documentation CD-ROM to detect or assign an IP address to
your printer. For further instructions, insert the Software and Documentation CD-ROM into
your computer’s CD-ROM drive. After the Xerox Installer launches, follow the prompts for
installation.
Note: For the automatic installer to function, the printer must be connected to an established
TCP/IP network.
Phaser® 6180MFP Multifunction Printer
4-6
Page 56

Configuring the Network Address
Dynamic Methods of Setting the Printer’s IP Address
There are two protocols available for dynamically setting the printer’s IP address:
■ DHCP (enabled by default on all Phaser printers)
■ AutoIP
You can turn on/off both protocols using the control panel, or use CentreWare IS to turn on/off
DHCP.
Note: You can print a report that includes the printer’s IP address. On the control panel, press
the System button, select
then press the OK
button. The IP address is listed on the Configuration report.
Using the Control Panel
To turn on/off either the DHCP or AutoIP protocol:
1. On the control panel, press the System button.
2. Select the
3. Select the
4. Select the
5. Select
Admin menu, and then press the OK button.
Network Settings menu, and then press the OK button.
TCP/IP menu, and then press the OK button.
Get IP Address, and then press the OK button.
Information Pages, press the OK button, select Configuration, and
Using CentreWare IS
To turn on/off the DHCP protocol:
1. Launch your web browser.
2. Enter the printer’s IP address in the browser’s Address field.
3. Select Properties.
4. Select the Protocols folder on the left navigation panel.
5. Select TCP/IP.
6. In the Get IP Address field, select the DHCP/Autonet option.
7. Click the Save Changes button.
Phaser® 6180MFP Multifunction Printer
4-7
Page 57

Configuring the Network Address
Manually Setting the Printer’s IP Address
Note: Verify that your computer has a properly configured IP address for your network.
Contact your network administrator for more information.
If you are on a network without a DHCP server, or in an environment where the network
administrator assigns printer IP addresses, you can use this method to manually set the IP
address. Manually setting the IP address overrides DHCP and AutoIP. Alternatively, if you are
in a small office with a single PC and use a dialup modem connection, you can manually set
the IP address.
Information Required for Manual IP Addressing
Information Comments
Internet Protocol (IP) address of the printer Format is xxx.xxx.xxx.xxx, where xxx represents
a decimal number from 0–255.
Network Mask If you are unsure, leave this blank; the printer
chooses an appropriate mask.
Default Router/Gateway address Router address is required to communicate with
the host device from anywhere other than the
local network segment.
Using the Control Panel
To manually set the IP address:
1. On the control panel, press the System button.
2. Select the
3. Select the
4. Select the
5. Select
6. Select
7. Select
and then press the OK button.
Admin menu, and then press the OK button.
Network Settings menu, and then press the OK button.
TCP/IP menu, and then press the OK button.
Get IP Address, and then press the OK button.
Panel, and then press the OK button.
IP Address under the TCP/IP menu and use the arrows to configure the IP values,
Phaser® 6180MFP Multifunction Printer
4-8
Page 58

Configuring the Network Address
Changing or Modifying the IP Address Using CentreWare IS
CentreWare IS provides a simple interface that enables you to manage, configure, and monitor
networked printers from your desktop using an embedded web server. For complete
information about CentreWare IS, click the Help button in CentreWare IS to go to the
CentreWare IS Online Help.
After setting the printer’s IP address, you can modify TCP/IP settings using CentreWare IS.
1. Launch your web browser.
2. Enter the printer’s IP address in the browser’s Address field.
3. Click Properties.
4. Select the Protocols folder on the left navigation panel.
5. Select TCP/IP.
6. Enter or modify the settings, and then click Save Changes at the bottom of the page.
Phaser® 6180MFP Multifunction Printer
4-9
Page 59

Installing the Printer Drivers
Installing the Printer Drivers
This section includes:
■ Available Drivers on page 4-10
■ Windows 2000 or Later on page 4-11
■ Macintosh OS X, Version 10.2 and Higher on page 4-11
Available Drivers
To access special printing options, use a Xerox printer driver.
Xerox provides drivers for a variety of page description languages and operating systems. The
following printer drivers are available:
Printer Driver Source* Description
Windows PostScript Driver
(also used for Windows Vista)
PCL 6 CD-ROM and
Mac OS X (version 10.2 and
higher) Driver
UNIX Web only This driver enables printing from a UNIX
Linux CD-ROM This driver enables printing from a Linux
* Go to www.xerox.com/office/6180MFPdrivers
CD-ROM and
Web
Web
CD-ROM and
Web
The PostScript driver is recommended to take
full advantage of your printer's custom
features and genuine Adobe® PostScript®.
(Default printer driver)
The Printer Command Language driver can
be used for applications requiring PCL.
Note: For Windows 2000/XP only.
This driver enables printing from a Mac OS X
(version 10.2 and higher) operating system.
operating system.
operating system.
for the latest printer drivers.
Phaser® 6180MFP Multifunction Printer
4-10
Page 60

Installing the Printer Drivers
Windows 2000 or Later
To install the printer driver from the Software and Documentation CD-ROM:
1. Insert the CD-ROM into the computer’s CD-ROM drive. If the installer does not launch,
do the following:
a. Click Start, and then click Run.
b. In the Run window, type: <CD drive>:\INSTALL.EXE.
2. Select your desired language from the list.
3. Select Install Printer Driver.
4. Select the installation method you want to use, and then follow the onscreen instructions.
Note: PrintingScout is a separate option from the printer driver. To install PrintingScout, use
the Software and Documentation CD-ROM.
See also:
Online Support Assistant at www.xerox.com/office/6180MFPsuppor
t
Macintosh OS X, Version 10.2 and Higher
Set up your printer using Bonjour (Rendezvous), create a desktop USB connection, or use an
LPD/LPR connection for Macintosh OS X, version 10.2 and higher.
Macintosh OS X, Version 10.2 and 10.3
To install the printer driver from the Software and Documentation CD-ROM:
1. Insert the CD-ROM into the CD-ROM drive and select the VISE installer to install the
printer software.
2. When installation is complete, select one of the following options:
■ Open the Print Center utility for Mac OS X, version 10.2.x.
■ Open the Printer Setup Utility for Mac OS X, version 10.3.x.
Note: To locate utilities on the Macintosh hard drive, open the Applications folder, and
then open the Utilities folder.
3. Confirm that the first drop-down menu is set to Bonjour (Rendezvous).
4. Select the printer in the window.
5. Select Xerox from the list of manufacturers in the lower drop-down menu.
6. Select the appropriate printer model from the list of available devices.
7. Click the Add button.
See also:
Online Support Assistant at www.xerox.com/office/6180MFPsupport
Phaser® 6180MFP Multifunction Printer
4-11
Page 61

Installing the Printer Drivers
USB Connection
To install the printer driver from the Software and Documentation CD-ROM:
1. Insert the CD-ROM into the CD-ROM drive.
■ Open the Print Center utility for Mac OS X, version 10.2.x.
■ Open the Printer Setup Utility for Mac OS X, version 10.3.x.
Note: To locate utilities on the Macintosh hard drive, open the Applications folder, and
then open the Utilities folder.
2. Click the Add button.
3. Select USB from the drop-down menu.
4. Select the printer in the window.
5. Select Xerox from the manufacturers in the drop-down menu.
6. Select the appropriate printer configuration from the list of available printers.
7. Click the Add button.
LPR Connection
To install the printer driver from the Software and Documentation CD-ROM:
1. Insert the CD-ROM into the CD-ROM drive and select the VISE installer to install the
printer software.
2. Once installation is complete, select one of the following options:
■ Open the Print Center utility for Mac OS X, version 10.2.x.
■ Open the Printer Setup Utility for Mac OS X, version 10.3.x.
Note: To locate utilities on the Macintosh hard drive, open the Applications folder, and
then open the Utilities folder.
3. Click the Add button.
4. Select one of the following options:
■ Mac OS X, Version 10.2: Select IP Printing from the pull-down menu. Enter the
printer’s IP address in the Printer Address field. Select Xerox from the Printer
Model pull-down menu, and then select the corresponding PPD file. Click the Add
button. The printer is added to the list.
■ Mac OS X, Version 10.3: Select IP Printing from the first pull-down menu. Select
LPD/LPR from the second pull-down menu. Enter the printer’s IP address in the
Printer Address field. Verify that the Queue Name field is blank. Select Xerox from
the Printer Model pull-down menu, and then select the corresponding PPD file. Click
the Add button. The printer is added to the list.
Phaser® 6180MFP Multifunction Printer
4-12
Page 62

Installing the Printer Drivers
Macintosh OS X, Version 10.4
Bonjour Connection
To install the printer driver from the Software and Documentation CD-ROM:
1. Insert the CD-ROM into the CD-ROM drive and select the VISE installer to install the
printer software.
2. When installation is complete, select the Printer Setup Utility.
Note: To locate utilities on the Macintosh hard drive, open the Applications folder, and
then open the Utilities folder.
3. Click the Add button.
4. Select the Default Browser in the Printer Browser.
5. Select the Bonjour printer in the list of available printers. If the Printer Browser:
■ Selects the appropriate printer from the Print Using drop-down list, go to Step 8.
■ Does not select the appropriate printer from the Print Using drop-down list, go to
Step 6.
6. Select Xerox from the list of manufacturers in the lower drop-down menu.
7. Select the appropriate printer from the list of available printers.
8. Click the Add button.
USB Connection
To install the printer driver from the Software and Documentation CD-ROM:
1. Insert the CD-ROM into the CD-ROM drive.
2. Open the Printer Setup Utility.
Note: To locate utilities on the Macintosh hard drive, open the Applications folder, and
then open the Utilities folder.
3. Click the Add button.
4. Select the Default Browser in the upper left corner of the Printer Browser.
5. Select the USB-connected printer in the printers window. The Printer Browser selects the
appropriate printer configuration in the Print Using drop-down list.
■ If the appropriate printer configuration is selected, proceed to Step 8.
■ If the appropriate printer configuration is not selected, proceed to Step 6.
6. Select Xerox from the manufacturers in the drop-down menu.
7. Select the appropriate printer configuration from the list of available printers.
8. Click the Add button. The printer is displayed as an available printer in the Printer Setup
Utility.
Phaser® 6180MFP Multifunction Printer
4-13
Page 63

Installing the Printer Drivers
LPD Connection
To install the printer driver from the Software and Documentation CD-ROM:
1. Insert the CD-ROM into the CD-ROM drive and select the VISE installer to install the
printer software.
2. Once installation is complete, open the Printer Setup Utility.
Note: To locate utilities on the Macintosh hard drive, open the Applications folder, and
then open the Utilities folder.
3. Click the Add button.
4. Select IP Printer from the upper left corner of the Printer Browser.
5. Select LPD from the pull-down menu.
6. Enter the printer’s IP address in the Address field.
7. Click the Add button. The printer is added to the list.
Phaser® 6180MFP Multifunction Printer
4-14
Page 64

Printing Basics
This chapter includes:
■ Supported Paper and Media on page 5-2
■ About Paper on page 5-6
■ Setting Paper Types and Sizes on page 5-9
■ Loading Paper on page 5-10
■ Selecting Printing Options on page 5-17
■ Printing on Both Sides of the Paper on page 5-23
■ Printing on Specialty Media on page 5-25
■ Printing Custom Size or Long Paper on page 5-41
■ Printing Confidential Document - Secure Print on page 5-44
■ Print After Checking Printing Result - Proof Print on page 5-46
Phaser® 6180MFP Multifunction Printer
5-1
Page 65

Supported Paper and Media
Supported Paper and Media
This section includes:
■ Paper Usage Guidelines on page 5-3
■ Automatic Document Feeder Guidelines on page 5-4
■ Paper That Can Damage Your Printer on page 5-5
■ Paper Storage Guidelines on page 5-5
Your printer is designed to be used with a variety of paper types. Follow the guidelines in this
section to ensure the best print quality and to avoid jams.
For best results, use Xerox printing media specified for your Phaser 6180MFP printer. They
are guaranteed to produce excellent results with your printer.
To order paper, transparencies, or other specialty media, contact your local reseller or go to
www.xerox.com/office/6180MFPsupplies
Caution: Damage caused by using unsupported paper, transparencies, and other specialty
media is not covered by the Xerox warranty, service agreement, or Total Satisfaction
Guarantee. The Total Satisfaction Guarantee is available in the United States and Canada.
Coverage may vary outside these areas; please contact your local representative for details.
.
See also:
R
ecommended Media List (United States)
Recommended Media List (Europe)
Phaser® 6180MFP Multifunction Printer
5-2
Page 66

Supported Paper and Media
Paper Usage Guidelines
The printer trays accommodate most sizes and types of paper, transparencies, or other
specialty media. Follow these guidelines when loading paper and media in the trays:
■ Envelopes and transparencies can be printed from Tray 1 (MPT) only.
■ Fan paper, transparencies, or other specialty media before loading in the paper tray.
■ Do not print on label stock once a label has been removed from a sheet.
■ Use only paper envelopes. Do not use envelopes with windows, metal clasps, or adhesives
with release strips.
■ All envelopes should be printed single-sided only.
■ Some wrinkling and embossing may occur when printing envelopes.
■ Do not overload the paper trays. Do not load paper above the fill line on the inside of the
paper guide.
■ Adjust the paper guides to fit the paper size. For Trays 2 and 3, the paper guides click into
place when they are adjusted correctly.
■ If excessive jams occur, use paper or other media from a new package.
See also:
Printing Transparencies on page 5-25
Printing Envelopes on page 5-28
Printing Labels on page 5-31
Printing Glossy Paper on page 5-36
Printing Custom Size or Long Paper on page 5-41
Phaser® 6180MFP Multifunction Printer
5-3
Page 67

Supported Paper and Media
Automatic Document Feeder Guidelines
The document feeder accommodates the following original sizes:
■ Width: 148 mm – 216 mm (4.1 in. – 8.5 in.)
■ Length: 210 mm – 355.6 mm (8.3 in. – 14 in.)
The weight range includes 65 – 120 g/m
Follow these guidelines when loading originals into the document feeder:
■ Load originals faceup so that the top of the document enters the printer first.
■ Place only loose sheets of paper in the document feeder.
■ Adjust the paper guides so that they fit against the originals.
■ Insert paper in the document feeder only when the ink on the paper is completely dry.
■ Do not load originals above the MAX fill line.
2
(17 – 32 lb. Bond).
6180mfp-063
Document Glass
Use the document glass rather than the document feeder to copy or scan the following types of
originals:
■ Paper with paper clips or staples attached
■ Paper with wrinkles, curls, folds, tears, or notches
■ Coated or carbonless paper, transparencies, or items other than paper such as cloth or
metal
■ Envelope
Phaser® 6180MFP Multifunction Printer
5-4
Page 68

Supported Paper and Media
Paper That Can Damage Your Printer
Your printer is designed to use a variety of media types for print jobs. However, some media
can cause poor output quality, increased paper jams, or damage to your printer.
Unacceptable media includes:
■ Rough or porous media
■ Plastic media other than supported transparencies
■ Paper that has been folded or wrinkled
■ Paper with staples
■ Envelopes with windows or metal clasps
■ Padded envelopes
■ Non-laser glossy or coated paper
■ Perforated media
Paper Storage Guidelines
Providing good storage conditions for your paper and other media contributes to optimum
print quality.
■ Store paper in dark, cool, relatively dry locations. Most paper items are susceptible to
damage from ultraviolet (UV) and visible light. UV radiation, which is emitted by the sun
and fluorescent bulbs, is particularly damaging to paper items. The intensity and length of
exposure to visible light on paper items should be reduced as much as possible.
■ Maintain constant temperatures and relative humidity.
■ Avoid attics, kitchens, garages, and basements for storing paper. Inside walls are drier than
outside walls where moisture can collect.
■ Store paper flat. Paper should be stored on pallets, cartons, shelves, or in cabinets.
■ Avoid having food or drinks in the area where paper is stored or handled.
■ Do not open sealed packages of paper until you are ready to load them into the printer.
Leave paper in the original packaging. For most commercial cut-size grades, the ream
wrapper contains an inner lining that protects the paper from moisture loss or gain.
■ Leave the media inside the bag until you are ready to use it; reinsert unused media in the
bag and reseal it for protection. Some specialty media is packaged inside resealable plastic
bags.
Phaser® 6180MFP Multifunction Printer
5-5
Page 69

About Paper
About Paper
Using unsuitable paper may lead to paper jams, poor print quality, breakdown and damage to
your printer. In order to use the features of this printer effectively, use the suggested paper that
is recommended here.
Usable Paper
The types of paper that can be used on this printer are as follows:
Tray 1 (MPT)
Paper Size Letter (8.5 x 11 in.)
Legal (8.5 x 14 in.)
Executive (7.25 x 10.5 in.)
Folio (8.5 x 13 in.)
#10 Commercial (4.1 x 9.5 in.)
Monarch (3.8 x 7.5 in.)
A4 (210 x 297 mm)
A5 (148 x 210 mm)
B5 JIS (182 x 257 mm)
DL (110 x 220 mm)
C5 (162 x 229 mm)
Custom:
76.2
– 127 mm (3 – 5 in.)
216 – 355.6 mm (8.5 – 14 in.)
Paper Type (Weight)
Loading Capacity 150 sheets
Plain (65
Thin Card Stock (100
Thick Card Stock (160 – 220 g/m2) (60 – 80 lb. Cover)
Glossy Paper (100
Thick Glossy Paper (160
Labels
Transparency
Paper Envelope
(Standard paper) or 15 mm or below
– 120 g/m
2
) (17 – 32 lb. Bond)
– 163 g/m
– 160 g/m
2
) (37 – 60 lb. Cover)
2
) (37 – 60 lb. Cover)
– 200 g/m
2
) (60 – 80 lb. Cover)
Phaser® 6180MFP Multifunction Printer
5-6
Page 70

Trays 2 and 3
Paper Size Letter (8.5 x 11 in.)
Legal (8.5 x 14 in.)
Executive (7.25 x 10.5 in.)
Folio (8.5 x 13 in.)
A4 (210 x 297 mm)
A5 (148 x 210 mm)
B5 JIS (182 x 257 mm)
Custom:
148
– 215.9 mm (5.83 – 8.5 in.)
210
– 355.6 mm (8.27 – 14 in.)
About Paper
Paper Type (Weight)
Loading Capacity Tray 2 holds 250 sheets.
Plain (65
Thin Card Stock (100
Thick Card Stock (160
Glossy Paper (100 – 160 g/m2) (37 – 60 lb. Cover)
Thick Glossy Paper (160
Labels
Tray 3 holds 550 sheets.
(Standard paper) or 27.6 mm or below
– 120 g/m
2
) (17 – 32 lb. Bond)
– 163 g/m
– 220 g/m
2
) (37 – 60 lb. Cover)
2
– 200 g/m
) (60 – 80 lb. Cover)
2
) (60 – 80 lb. Cover)
For details on how to load envelopes, see Printing Envelopes on page 5-28.
Printing on paper that has different settings from the paper size or paper type selected on the
print driver, or loading paper into an unsuitable paper tray for printing, may lead to paper jams.
To ensure that printing is correctly done, select the correct paper size, paper type, and paper
tray.
See also:
R
ecommended Media List (North America)
Recommended Media List (Europe)
Phaser® 6180MFP Multifunction Printer
5-7
Page 71

2-Sided Printing Paper Types and Sizes
The available paper types and sizes for 2-sided printing are as follows:
Paper Size Paper Type
A4 (210 x 297 mm) Plain, Thin Card Stock, Glossy
B5 JIS (182 x 257 mm)
A5 A5 (148 x 210 mm)
Letter (8.5 x 11 in.)
Folio (8.5 x 13 in.)
Legal (8.5 x 14 in.)
Executive (7.25 x 10.5 in.)
Custom
(65–163 g/m2, 17–43 lb. Bond)
Custom Sizes
Width: 148
Height: 210
–215.9 mm (5.83–8.5 in.)
–355.6 mm (8.27–14 in.)
About Paper
Phaser® 6180MFP Multifunction Printer
5-8
Page 72

Setting Paper Types and Sizes
Setting Paper Types and Sizes
Setting Paper Trays
When loading paper in Tray 2 or the 550-Sheet Feeder (optional), it is necessary to set the
paper type on the control panel.
When loading paper in Tray 1 (MPT), set the paper size and type on the control panel when
printing. When MPT Mode has been set to Panel Specified (default) on the control panel, you
can set the paper size and type on the control panel.
This section describes how to set the paper size and type on the control panel.
Note: When you set MPT Mode to Panel Specified, printing will be performed only when
the settings for the paper size and type configured on the print driver match the settings on the
control panel. When the settings on the print driver and control panel do not match, follow the
instructions displayed on the control panel.
You can also display the message to set the paper size and type on the control panel every time
you load paper into each tray.
See also:
Description of Menu Items on page 9-4
Setting Paper Types
Caution: Paper type settings must match those of the actual paper loaded in the trays.
Otherwise, print-quality problems can occur.
1. Press the System button to display the Setup screen.
2. Select
3. Select the tray, and then press the OK button.
4. Select
5. Select the correct paper type for the loaded paper, and then press the OK button.
Tray Settings, and then press the OK button.
Paper Type, and then press the OK button.
Setting Paper Sizes
1. Press the System button to display the Setup screen.
2. Select Tray Settings, and then press the OK button.
3. Select the tray, and then press the OK button.
4. Select Paper Size for Custom Size only, and then press the OK button.
Note: Select Driver Specified when you set a custom size paper from Tray 1 (MPT).
Phaser® 6180MFP Multifunction Printer
5-9
Page 73

Loading Paper
Loading Paper
This section includes:
■ Loading Paper in Tray 1 (MPT) on page 5-10
■ Loading Paper in Trays 2 and 3 on page 5-13
Loading Paper in Tray 1 (MPT)
Use Tray 1 (MPT) for a wide range of media including:
■ Plain paper
■ Card stock
■ Labels
■ Envelopes
■ Transparencies
■ Glossy paper
■ Specialty media including business cards, postcards, trifold brochures, and weatherproof
paper
■ Pre-printed paper (paper already printed on one side)
■ Custom size paper
See also:
About Paper on page 5-6
Tray 1 video tutorial at www.xerox.com/office/6180MFPsupport
Loading Paper in Tray 1 (MPT)
In addition to plain paper, Tray 1 (MPT) can use various other sizes and types of print media,
such as envelopes and transparencies.
Make sure of the following points when loading paper in Tray 1 (MPT).
You can load up to 150 sheets or a stack of paper (65
– 220 g/m
Cover) less than 15 mm high. Sizes can start from 3 x 5”.
■ Tray 1 (MPT) accepts print media within the following dimensions:
■ Width: 76.2 – 216.0 mm (3 – 8.5 in.)
■ Length: 127.0 – 355.6 mm (5 – 14 in.)
■ You can load media that is 65 – 163 g/m
2
(17 – 43 lb. Bond) for duplex printing.
2
, 17 – 40 lb. Bond, 40 – 80 lb.
Phaser® 6180MFP Multifunction Printer
5-10
Page 74

Loading Paper
Make sure of the following points to avoid any problems during printing:
■ Do not load different types of paper at the same time.
■ Use high quality paper for laser printers to print at high quality. See About Paper on
page 5-6.
■ Do not remove or add paper to Tray 1 (MPT) when printing, or if there is any paper still in
the tray. Doing so may cause a paper jam.
■ Do not put any objects other than paper on Tray 1 (MPT). Also, do not push or force down
Tray 1 (MPT).
■ Always load paper short-edge feed.
To load paper in Tray 1 (MPT):
1. Gently pull open the Tray 1 (MPT) cover.
6180mfp-016
2. Slide the width guides to the edge of the tray. The width guides should be fully extended.
6180mfp-017
Phaser® 6180MFP Multifunction Printer
5-11
Page 75

Loading Paper
3. Insert all media facedown and top edge first into Tray 1 (MPT).
6180mfp-018
Note: Do not force the paper.
4. Slide the width guides until they rest lightly against the edge of the paper stack.
6180mfp-019
Note: Be careful not to bend the paper.
If Tray 1 (MPT) is configured for DriverSpecified, configure the paper size and type in the
print driver.
When MPT Mode is set to Panel Specified, you need to set the paper type and size settings
for the tray on the control panel before printing.
See also:
Setting Paper Types and Sizes on page 5-9
Phaser® 6180MFP Multifunction Printer
5-12
Page 76

Loading Paper
Loading Paper in Trays 2 and 3
Use Trays 2 and 3 for a wide range of media including:
■ Plain paper
■ Thin card stock
■ Thick card stock
■ Glossy paper
■ Thick Glossy paper
■ Labels
See also:
Printing on Specialty Media on page 5-25
Loading Paper in Trays 2 and 3
This section describes how to load paper in the standard and optional paper trays. All trays are
loaded the same way.
Caution: Do not remove the tray during printing. It may cause a paper jam.
1. Pull the tray out of the printer until it stops. Hold the tray with both hands, lift the front
slightly, and remove it from the printer.
6180mfp-008
Phaser® 6180MFP Multifunction Printer
5-13
Page 77

Loading Paper
2. Slide the width guides to the edge of the tray. The width guides should be fully extended.
6180mfp-009
Note: When loading paper that is 216 mm (8.5 in.) wide, such as Letter-size or Legal-size
paper, set the tab on the side of the tray to the (8.5) position.
3. Squeeze the green tab on the length guide, and then slide the tray until the arrow lines up
with the appropriate paper size. The guide clicks into place. The length guide extends
beyond the edge of the tray for paper that is longer than 279 mm (11 in.).
6180mfp-010
Phaser® 6180MFP Multifunction Printer
5-14
Page 78

Loading Paper
4. Before loading the print media, flex the sheets back and forth, and then fan them.
Straighten the edges of the stack on a level surface.
6180mfp-011
5. Place the print media into the tray with the print side faceup.
Note: Do not exceed the maximum fill line in the tray. Overfilling the tray may cause
paper jams.
6. Slide the width guides and length guide until they rest lightly against the edge of the print
media stack.
6180mfp_012
Phaser® 6180MFP Multifunction Printer
5-15
Page 79

Loading Paper
7. Insert the tray into the printer, and push until it stops.
6180mfp-013
Caution: Do not use excessive force on the tray. Doing so could damage the tray or the inside
of the printer.
Phaser® 6180MFP Multifunction Printer
5-16
Page 80

Selecting Printing Options
Selecting Printing Options
This section includes:
■ Selecting Printing Preferences (Windows) on page 5-17
■ Selecting Options for an Individual Job (Windows) on page 5-18
■ Selecting Options for an Individual Job (Macintosh) on page 5-20
Selecting Printing Preferences (Windows)
Printer preferences control all of your print jobs, unless you override them specifically for a
job. For example, if you want to use automatic 2-sided printing for most jobs, set this option in
printer settings.
To select printer preferences:
1. Select one of the following options:
■ Windows 2000, Windows Server 2003, and Windows Vista: Click Start, select
Settings, and then click Printers.
■ Windows XP: Click Start, Settings, and then select Printers and Faxes.
2. In the Printers folder, right-click the icon for your printer.
3. From the pop-up menu, select Printing Preferences or Properties.
4. Select the Advanced tab, and then click the Printing Defaults button.
5. Make selections on the driver tabs, and then click the OK button to save your selections.
Note: For more information about Windows printer driver options, click the Help button on
the printer driver tab to view the online help.
Phaser® 6180MFP Multifunction Printer
5-17
Page 81

Selecting Printing Options
Selecting Options for an Individual Job (Windows)
If you want to use special printing options for a particular job, change the driver settings before
sending the job to the printer. For example, if you want to use Photo print-quality mode for a
particular graphic, select this setting in the driver before printing that job.
1. With the desired document or graphic open in your application, access the Print dialog
box.
2. Select the Phaser 6180MFP printer and click its Properties button to open the printer
driver.
3. Make selections from the driver tabs. See the following table for specific printing options.
Note: In Windows 2000, Windows XP, Windows Server 2003, and Windows Vista, you
can save current printing options with a distinctive name and apply them to other print
jobs. Select either the Advanced, Paper/Output, Image Options, or Layout tab, and
then select a Saved Setting. Click the Help button for more information.
4. Click the OK button to save your selections.
5. Print the job.
Phaser® 6180MFP Multifunction Printer
5-18
Page 82

See the following table for specific PCL printing options:
PCL Printing Options for Windows Operating Systems
Operating
System Driver Tab Printing Options
Selecting Printing Options
Windows Vista,
Windows 2000,
Windows XP, or
Windows Server
2003
Paper/Output tab
Image Options tab
Layout tab
■ Job Type
■ Document size, paper type, and tray selection
■ 2-sided printing
■ Feed orientation
■ Saved Settings
■ Covers/Separators
■ Transparency Separators
■ Address Book
■ Printer Status
■ Output Color
■ Image Quality
■ Image adjustment, image type, image correction
■ Image Settings
■ Color Balance
■ Profile Settings
■ Pages per sheet (N-up)
■ Image Orientation
■ Booklet/Poster/Mixed Document/Rotation layout
■ Output Size
■ Margin Shift
Watermarks/Overlays
tab
Advanced tab
■ Watermarks
■ Overlays
■ Header/Footer Options
■ Skip Blank Pages
■ Draft Mode
■ Banner Sheet
■ Tray Mapping
■ Graphics Settings
■ Font Settings
Note: If your driver does not display the options listed in the table above, see Enabling
Options on page 10-31 for more information.
Phaser® 6180MFP Multifunction Printer
5-19
Page 83

See the following table for specific PostScript printing options:
PostScript Printing Options for Windows Operating Systems
Operating
System Driver Tab Printing Options
Selecting Printing Options
Windows Vista,
Windows 2000,
Windows XP, or
Windows Server
2003
Paper/Output tab
Image Options tab
Layout tab
Advanced tab
■ Job Type
■ Document size, paper type, and tray selection
■ 2-sided printing
■ Orientation
■ Output Color
■ Printer Status
■ Image Settings
■ Color corrections
■ Brightness
■ Color Balance
■ Pages per sheet (N-up)
■ Fit to new paper size
■ Booklet layout
■ Transparency Separators
■ Image options: reduce/enlarge, image smoothing
■ Details: blank pages, tray mapping
Note: If your driver does not display the options listed in the table above, see Enabling
Options on page 10-31 for more information.
Selecting Options for an Individual Job (Macintosh)
To select print settings for a particular job, change the driver settings before sending the job to
the printer.
1. With the document open in your application, click File, and then click Print.
2. Select the desired printing options from the menus and drop-down lists that are displayed.
Note: In Macintosh OS X, click Save Preset on the Print menu screen to save the current
printer settings. You can create multiple presets and save each with its own distinctive
name and printer settings. To print jobs using specific printer settings, click the applicable
saved preset in the Presets list.
3. Click Print to print the job.
Phaser® 6180MFP Multifunction Printer
5-20
Page 84

See the following table for specific printing options:
Macintosh PostScript Driver Settings
Operating System Driver Drop-Down Title Printing Options
Selecting Printing Options
Mac OS X, Version
10.4
Copies & Pages
Layout
Paper Handling
ColorSync
Cover Page
Error Handling
Paper Feed
Job Type
■ Copies
■ Pages
■ Pages per sheet
■ Layout direction
■ Border
■ 2-sided printing
■ Page order
■ Print (all, odd, even)
■ Destination paper size
■ Color conversion
■ Quartz filter
■ Print cover page (none, before document,
after document)
■ Cover page type
■ Billing information
■ PostScript errors
■ Tray switching
■ Paper source
■ Secure prints, personal prints, personal
saved prints, proof prints, saved prints, print
with
Printer Features ■ Print quality/color
■ Color adjustment
■ Color balance (C, M, Y, K)
■ Media handling
■ Printer specific options
Supply Levels
■ Fuser
■ Belt unit
Phaser® 6180MFP Multifunction Printer
5-21
Page 85

Macintosh PostScript Driver Settings (Continued)
Operating System Driver Drop-Down Title Printing Options
Selecting Printing Options
Mac OS X, Version
10.2 and 10.3
Copies & Pages ■ Copies
■ Pages
Layout
Paper Handling
ColorSync
Cover Page
Paper Feed
Job Types
■ Pages per sheet
■ Layout direction
■ Border
■ Two-sided printing
■ Reverse page order
■ Print (all, odd, even)
■ Color matching
■ Cover pages
■ Paper source
■ Secure prints, personal prints, proof prints,
and saved prints
Image Quality
Printer Features
■ Print quality
■ RGB color corrections neutral grays
■ Image smoothing
■ Paper types
■ Separation pages
Phaser® 6180MFP Multifunction Printer
5-22
Page 86

Printing on Both Sides of the Paper
Printing on Both Sides of the Paper
This section includes:
■ Automatic 2-Sided Printing Guidelines on page 5-23
■ Binding Edge Options on page 5-24
■ Selecting 2-Sided Printing on page 5-24
Note: For information about manual two-sided printing, go to the Online Support Assistant at
www.xerox.com/office/6180MFPsupport.
Automatic 2-Sided Printing Guidelines
Automatic 2-sided printing is available from the Phaser 6180MFP-DN configuration. A
Duplex Unit is available as an option for the Phaser 6180MFP-N configuration. Before
printing a 2-sided document, verify that the paper is a supported size for the tray. For a list of
supported paper sizes, see Supported Paper and Media on page 5-2. The following paper and
media cannot be used for 2-sided printing:
■ Transparencies
■ Envelopes
■ Labels
■ Any die-cut specialty media, such as business cards
■ Thick card stock
■ Thick glossy card stock
See also:
2-Sided Printing Paper Types and Sizes on page 5-8
Supported Paper and Media on page 5-2
Phaser® 6180MFP Multifunction Printer
5-23
Page 87

Printing on Both Sides of the Paper
Binding Edge Options
When you use the printer driver to select 2-sided printing, also select the binding edge, which
determines how the pages turn. The actual outcome depends on the orientation (portrait or
landscape) of images on the page, as displayed in the following illustrations.
Portrait Landscape
Flip on Long Edge Flip on Short Edge Flip on Short Edge Flip on Long Edge
Selecting 2-Sided Printing
To select automatic 2-sided printing:
1. Insert paper in the tray. For more information, see Loading Paper on page 5-10.
2. In the printer driver, select 2-sided printing as shown in the following table, and then press
the OK button.
To select automatic 2-sided printing:
Operating System Steps
Windows Vista,
Windows 2000,
Windows XP, or
Windows Server 2003
Mac OS X, version
10.2 and higher
1. Select the Paper/Output tab.
2. On the 2-Sided Print drop-down list, select either Flip on short edge
or Flip on long edge.
1. In the Print dialog box, select Layout.
2. Select Print on Both Sides.
3. Click the Binding icon that matches the edge to bind.
Note: If your driver does not display the options listed in the table above, see Enabling
Options on page 10-31 for more information.
See also:
Loading Paper in Tray 1 (MPT) on page 5-10
Loading Paper in Trays 2 and 3 on page 5-13
Phaser® 6180MFP Multifunction Printer
5-24
Page 88

Printing on Specialty Media
Printing on Specialty Media
This section includes:
■ Printing Transparencies on page 5-25
■ Printing Envelopes on page 5-28
■ Printing Labels on page 5-31
■ Printing Glossy Paper on page 5-36
■ Printing Custom Size or Long Paper on page 5-41
Printing Transparencies
Transparencies can only be printed from Tray 1 (MPT). They should be printed on one side
only. For best results, use only recommended Xerox transparencies.
To order paper, transparencies, or other specialty media, contact your local reseller or go to
www.xerox.com/office/6180MFPsupplies
.
Caution: Damage caused by using unsupported paper, transparencies, and other specialty
media is not covered by the Xerox warranty, service agreement, or Total Satisfaction
Guarantee. The Total Satisfaction Guarantee is available in the United States and Canada.
Coverage may vary outside these areas; please contact your local representative for details.
See also:
R
ecommended Media List (North America)
Recommended Media List (Europe)
Guidelines
■ Remove all paper before loading transparencies in the tray.
■ Do not load more than 25 sheets in Tray 1 (MPT). Overloading the tray may cause the
printer to jam.
■ Handle transparencies by the edges using both hands to avoid fingerprints and creases,
which may cause poor print quality.
■ Fan transparencies before loading in the paper tray.
This section explains how to print on transparencies.
Phaser® 6180MFP Multifunction Printer
5-25
Page 89

Printing on Specialty Media
Loading Transparencies
Note: Transparencies with a white frame and full-color transparencies cannot be used.
1. After carefully fanning a small stack of transparencies, load them into Tray 1 (MPT) with
the side to be printed facing down. Load no more than 25 transparencies at a time.
6180mfp-018
2. Slide the paper guides to the size of the transparencies.
6180mfp-019
Printing on Transparencies
When MPT Mode is set to Panel Specified, you need to set the paper type and size settings
for the tray on the control panel in advance. See Setting Paper Types and Sizes on page 5-9.
The way to display the printer Properties dialog box differs according to the application
software. Refer to the manual of your respective application software.
Printing transparencies continuously may lead to the output transparencies sticking to each
other. Remove the transparencies from the output tray after about 20 sheets, and then fan them
to lower their temperatures.
Phaser® 6180MFP Multifunction Printer
5-26
Page 90

Printing on Specialty Media
Using the PostScript Driver
To print on transparencies using the PostScript print driver, display the Paper/Output tab.
1. From the File menu, select Print.
2. Select this printer as the printer to be used and click Preferences to display the Properties
dialog box.
3. Select the Paper/Output tab.
4. From Paper Type, select Transparency.
5. From Paper Tray, select Tray 1 (MPT).
6. From Paper Size, select the size of the original document.
7. Click OK.
Using the PCL Driver
To print on transparencies using the PCL print driver, display the Paper/Output tab.
1. From the File menu, select Print.
2. Select this printer as the printer to be used and click Preferences to display the Properties
dialog box.
3. Select the Paper/Output tab.
4. From Paper Tray, select Tray 1 (MPT).
5. Select Transparency from Tray 1 (MPT) Paper Type.
6. From Paper Size, select the size, and then click OK.
7. Click Print in the Print dialog box to start printing.
Phaser® 6180MFP Multifunction Printer
5-27
Page 91

Printing on Specialty Media
Printing Envelopes
Envelopes can be printed only from Tray 1 (MPT).
Guidelines
■ Use only paper envelopes specified in the Supported Paper Sizes and Weights table.
Successful envelope printing is highly dependent on the quality and construction of the
envelopes. Use envelopes made specifically for laser printers.
■ It is recommended that you maintain constant temperatures and relative humidity.
■ Store unused envelopes in their packaging to avoid the effects of moisture and dryness
which can affect print quality and cause wrinkling. Excessive moisture can cause the
envelopes to seal before or during printing.
■ Avoid padded envelopes; purchase envelopes that lie flat on a surface.
■ Remove air bubbles from the envelopes before loading by setting a heavy book on top of
the envelopes.
■ If wrinkling or embossing problems occur, use a different brand of envelopes made
specifically for laser printers.
Caution: Never use envelopes with windows or metal clasps; they can damage the printer.
Damage caused by using unsupported envelopes is not covered under the Xerox warranty,
service agreement, or Total Satisfaction Guarantee. The Total Satisfaction Guarantee is
available in the United States and Canada. Coverage may vary outside these areas, please
contact your local representative for details.
Phaser® 6180MFP Multifunction Printer
5-28
Page 92

Printing on Specialty Media
Loading Envelopes
To load envelopes, insert the envelopes with the flaps closed and at the right side. The print
side must be facing down. You can load envelopes up to the maximum fill line in the tray at
one time.
The following explains how to load envelopes in Tray 1 (MPT) using Monarch as an example.
Note: The reverse side of the envelope cannot be printed on. Envelopes can get wrinkled or
the print quality is reduced depending on the type used.
See also:
About Paper on page 5-6
To load envelopes in Tray 1 (MPT):
1. In the case of Monarch, insert the envelopes with the side to be printed facedown.
2. Slide the paper guides to the size of the envelope.
6180mfp-020
Phaser® 6180MFP Multifunction Printer
5-29
Page 93

Printing on Specialty Media
Printing on Envelopes
When MPT Mode is set to Panel Specified, you need to set the paper type and size settings
for the tray on the control panel in advance. See Setting Paper Types and Sizes on page 5-9.
The way to display the printer Properties dialog box differs according to the application
software. Refer to the manual of your respective application software.
Using the PostScript Driver
To print on envelopes using the PostScript print driver, display the Paper/Output tab.
1. From the File menu, select Print.
2. Select this printer as the printer to be used and click Preferences to display the Properties
dialog box.
3. Select the Paper/Output tab.
4. From Paper Tray, select Tray 1 (MPT).
5. From Paper Type, select Envelope.
6. From Paper Size, select the size of the original document.
7. Click OK, and then Print.
Using the PCL Driver
To print on envelopes using the PCL print driver, display the Paper/Output tab.
1. From the File menu, select Print.
2. Select this printer as the printer to be used and click Preferences to display the Properties
dialog box.
3. Select the Paper/Output tab.
4. From Paper Tray, select Tra y 1 (MPT).
5. Select the appropriate paper type from Tray 1 (MPT) Paper Type.
6. From Paper Size, select the size of the original document.
7. Click OK.
8. Click Print in the Print dialog box to start printing.
Phaser® 6180MFP Multifunction Printer
5-30
Page 94

Printing on Specialty Media
Printing Labels
Labels can be printed from all trays.
To order paper, transparencies, or other specialty media, contact your local reseller or go to
www.xerox.com/office/6180MFPsupplies
See also:
About Paper on page 5-6
Guidelines
■ Do not use vinyl labels.
■ Print only on one side of the sheet of labels.
■ Do not use any sheet where labels are missing; it may damage the printer.
■ Store unused labels flat in their original packaging. Leave the sheets of labels inside the
original packaging until ready to use. Return any unused sheets of labels to the original
packaging and reseal it.
■ Do not store labels in extremely dry or humid conditions or extremely hot or cold
conditions. Storing them in extreme conditions may cause print-quality problems or cause
them to jam in the printer.
■ Rotate stock frequently. Long periods of storage in extreme conditions can cause labels to
curl and jam the printer.
.
Printing Labels from Tray 1 (MPT)
1. Gently pull open the Tray 1 (MPT) cover.
6180mfp-016
Phaser® 6180MFP Multifunction Printer
5-31
Page 95

2. Open the paper guides.
3. Fan the labels to release sheets that are stuck together.
Printing on Specialty Media
6180mfp-017
6180mfp-011
4. Insert the labels into Tray 1 (MPT), and adjust the paper guides to fit the sheets.
■ Place the side to be printed facedown with the top of the sheets entering first.
■ Do not load more than 25 sheets.
6180mfp-018
Phaser® 6180MFP Multifunction Printer
5-32
Page 96

Printing on Specialty Media
5. In the printer driver, select either Labels as the paper type or Tra y 1 (MPT) as the paper
tray.
6. If the printer is set to Panel Specified, the control panel asks for media type and size.
Printing Labels from Trays 2 and 3
1. Pull the tray out of the printer.
6180mfp-008
2. If necessary, open the paper guides:
■ Squeeze the tab on the length guide, and then slide it back. The guide clicks into place.
■ Slide the side guides outward.
6180mfp-010
6180mfp-009
Phaser® 6180MFP Multifunction Printer
5-33
Page 97

Printing on Specialty Media
3. Fan the label sheets to release sheets that are stuck together.
6180mfp-011
4. Insert the label sheets into the tray. Place the side to be printed faceup with the top of the
page toward the front of the printer.
Note: Do not load the paper above the fill line indicated on the tray. Overloading the tray
may cause jams. The following illustration indicates the maximum fill line for
transparencies, labels, and glossy paper.
6180mfp-022
Phaser® 6180MFP Multifunction Printer
5-34
Page 98

Printing on Specialty Media
5. If necessary, press the paper guides inward to fit the sheets.
Note: When the paper guides are adjusted correctly, there may be a small space between
the labels and the guides.
6180mfp_012
6. Insert the tray into the tray slot, and push the tray completely into the printer.
6180mfp-013
7. On the control panel, select the paper type:
a. Press the System button.
b. Select
c. Select
d. Select
e. Select
Tray Settings, and then press the OK button.
Tray 2 or Tray 3 , and then press the OK button.
Paper Type, and then press the OK button.
Labels, and then press the OK button.
8. In the printer driver, select either Labels as the paper type or the appropriate tray as the
paper tray.
Phaser® 6180MFP Multifunction Printer
5-35
Page 99

Printing on Specialty Media
Printing Glossy Paper
Glossy paper can be printed from any tray. It can be printed on both sides.
To order paper, transparencies, or other specialty media, contact your local reseller or go to
www.xerox.com/office/6180MFPsupplies
Guidelines
■ Do not open sealed packages of glossy paper until you are ready to load them into the
printer.
■ Leave glossy paper in the original wrapper, and leave the packages in the shipping carton
until ready to use.
■ Remove all other paper from the tray before loading glossy paper.
■ Load only the amount of glossy paper you are planning to use. Do not leave glossy paper
in the tray when you are finished printing. Reinsert unused glossy paper in the original
wrapper and seal.
■ Rotate stock frequently. Long periods of storage in extreme conditions can cause glossy
paper to curl and jam the printer.
.
Printing Glossy Paper from Tray 1 (MPT)
1. Gently pull open the Tray 1 (MPT) cover and open the paper guides.
6180mfp-016
Phaser® 6180MFP Multifunction Printer
5-36
Page 100

Printing on Specialty Media
2. Fan the glossy paper to release sheets that are stuck together.
6180mfp-011
3. Insert the glossy paper into Tray 1 (MPT), and adjust the paper guides to fit the paper.
■ Place the side to be printed facedown.
■ Do not load more than 25 sheets.
6180mfp-018
4. In the printer driver, select either Glossy Paper as the paper type or Tray 1 (MPT) as the
paper tray.
5. If the printer is set to Panel Specified, the control panel asks for media type and size.
Phaser® 6180MFP Multifunction Printer
5-37
 Loading...