

Page 1

Xerox Document Centre
ColorSeries 50 LP/ST
Digital Copier/Printer
Printer Installation Guide
Page 2

JUNE 1999
©
1999 Xerox Corporation. All rights reserved.
Copyright protection claimed includes all forms and matters of
copyrightable material and information now allowed by statutory or
judicial law or hereinafter granted, including without limitation, material
generated from the software programs that are displayed on the screen
such as styles , templates, icons, screen displays, looks, etc.
Xerox®, The Docume nt C om pa ny®, the stylized X, an d all Xe rox p r odu ct
names and prod uct nu mbers ment ioned in th is pu blica tion a re regist ered
trademarks of Xerox Corporation. Xerox Canada is a licensee of all the
trademarks. Other company brands and product names may be
trademarks or registered trademarks of their respective companies and
are also acknowledged.
Kodak is a trademark of the Eastman Kodak Company.
TM
StuffIt Expander
PANTONE
is a trademark of Aladdin Systems, Inc.
®
Colors generated by the Xerox Document Centre
ColorSeries 50 are four and/or three-color process simulations and may
not match PANTONE- identified solid color standards. Use current
PANTONE Color Reference Manuals for accurate color.
®
PANTONE
Color simulations are only obtainable on this product when
driven by qualified Pantone-licensed software packages. Contact
Pantone, Inc. for a current list of qualified licensees.
PANTONE
Pantone, Inc.
®
and other Pantone, Inc. trademarks are the property of
©
Pantone, Inc., 1988.
Changes are periodically made to this document. Technical updates will
be included in subsequent editions .
Bustled Controller, Part Numbers 97N00893 and 97N00894 are for use
with Xerox Corp. Digital Color Product Model YFA-1.
Printed in the United States of America.
Page 3

Radio Frequency Emissions Notice
This equipment has been tested and found to com ply with the limits for a Class B digital
device, pursuant to Part 15 of the FCC Rules. These limits are designed to provide
reasonable protection against harmful interference in a residential installation. This
equipment generates, uses, and can radi ate radio frequency ener gy and, if not install ed and
used in accordance with the instructions, may cause harmful interference to radio
communications. However, there is no guarantee that interference will not occur in a
particular installation. If this equipment does cau se harmful interference to radio or
television reception, which can be determined by turning the equipment off and on, the
user is encouraged to try to correct the interference by one or more of the following
measures:
• Reorient or relocate the receiving antenna
• Increase the separation between the equipment and receiver
• Connect the equipment into an outlet on a circuit different from that to which the
receiver is connected.
• Consult the dealer or an experienced radio/TV technician for help.
Changes or modifications to this equipment n ot s pecifically approved by the Xerox
Corporation may void the authority granted by the FCC to operate this equipment.
Shielded cables must be used with this equipment to maintain compliance with FCC
regulations.
Page 4

In Canada
This digital apparatus does not exceed the Class B limits for radio noise emissions from
digital apparatus as defined in the Radio interference regulations of Industry Canada.
FCC
The following applies to the product when equipped with the Token Ring or Banyan
VINES connectivity options.
This equipment has been tested and found to com ply with the limits for a Class A digital
device, pursuant to Part 15 of the FCC Rules. These limits are designed to provide
reasonable protection against harmful interference when the equipment is operated in a
commercial environment. This equipment generates, uses, and can radiate radio fr equency
energy and, if not installed and used in accordance with th e instruction manu al, may cause
harmful interference to radio communications. Operation of this equipment in a residential
area is likely to cause harmful interference in which case the user will be required to
correct the interference at his/her own expense.
Changes or modifications to this equipment n ot s pecifically approved by the Xerox
Corporation may void the user’s authority to operate this equipment.
Shielded cables must be used with this equipment to maintain compliance with FCC
regulations.
In Canada
This digital apparatus does not exceed the Class A limits for radio noise emissions from
digital apparatus as defined in the Radio interference regulations of Industry Canada.
Page 5

Safety Extra Low Voltage Approval
The Xerox Document Centre ColorSeries 50 copier/printer is in compliance with various
governmental agencies and national safety regulations. All system ports meet the Safety
Extra Low Voltage (SELV) circuits for connection to customer-owned devices and
networks. Additions of customer-owned or third-party accessories that are attached to the
copier/printer must meet or exceed the requirements listed above. All modules that require
external connection must be installed per the Xerox Document Centre ColorSeries 50
installation procedure.
Page 6

Certifications . . . in Europe
The CE marking that is applied to this prod uct sy mbol izes Xerox Eu rope’s Declaration of
Conformity with the following applicable Directives of the European Union as of the
dates indicated:
January 1, 1995 - Council Directive 73/23/EEC amended by Council Directive 93/68/
EEC, approximation of the laws of the member states related to low voltage equipment.
January 1, 1996 - Council Directive 89/336/EEC, approximation of the laws of the
member states related to electromagnetic compatibility.
Changes or modifications to this equipment n ot s pecifically approved by Xerox Europe
may void the user’s authority to operate the equipment.
Shielded cables must be used with this equipment to maintain compliance with the EMC
Directive 89/336/EEC.
This equipment is not primarily intended for use in a domestic environment.
A full declaration, defining the relevant Directives and referenced standards, can be
obtained from your Xerox Europe representative.
WARNING:
In order to all ow this equipme nt to operate in proximity to
Industrial, Scientific and Medical (ISM) equipment, the external radiation from
ISM equipment may have to be limited or special mitigation measures taken.
Page 7

The following applies to the product when equipped with Token Ring or Banyan VINES
connectivity options.
WARNING:
This is a Class A product. In a domestic environment, this product
may cause radio interference, in which case the user may be required to take
adequate measures.
Changes or modifications to this equipment n ot s pecifically approved by Xerox Europe
may void the user’s authority to operate the equipment.
Shielded cables must be used with this equipment to maintain compliance with the EMC
Directive 89/336/EEC.
WARNING:
In order to all ow this equipme nt to operate in proximity to
Industrial, Scientific and Medical (ISM) equipment, the external radiation from
ISM equipment may have to be limited or special mitigation measures taken.
Page 8

It’s Illegal . . . in the USA
Congress, by statute, has fo rbidden the copying of the following subjects under certain
circumstances. Penalties of fine or imprisonment may be imposed on those guilty of
making such copies.
1. Obligations or Securities of the United States Government, such as:
Certificates of Indebtedness National Bank Currency
Coupons from Bonds Federal Reserve Bank Notes
Silver Certificates Gold Certificates
United States Bonds Treasury Notes
Federal Reserve Notes Fractional Notes
Certificates of Deposit Paper Money
Bonds and Obligations of certain agencies of the government, such as FHA, etc.
Bonds. (U.S. Savings Bonds may be photographed only for publicity purposes in
connection with the campaign for the sale of such bonds.)
Internal Revenue Stamps. (If necessary to copy a legal document on which there is a
canceled revenue stamp, this may b e done, pr ovided th e reprod uction of t he document
is performed for legal purposes.)
Postage Stamps, canceled or uncanceled. (For philatelic purposes, Postage Stamps
may be photographed, provided the reproduction is in black and white and is less than
75% or more than 150% of the linear dimensions of the original.)
Postal Money Orders.
Bills, Checks, or Drafts of money drawn by or upon authorized officers of the United
States.
Stamps and other representatives of value, of whatever de nomination, w hich have
been or may be issued under any Act of Congress.
Page 9

2. Adjusted Compensation Certificates for Veterans of the World Wars.
3. Obligations or Securities of any Foreign Government, Bank, or Corporation.
4. Copyri gh ted material, unless permission o f th e copy ri ght owner has been obtained or
the copying falls within the “fair use” or library reprod uction rights provisions of the
copyright law. Further information of these provisions may be obtained from the
Copyright Office, Library of Congress, Washington, D.C. 20559. Ask for Circular
R21.
5. Certificates of Citizenship or Naturalization. (Foreign Naturalization Cert ificates may
be photographed.)
6. Passports. (Foreign Passports may be photographed.)
7. Immigration Papers.
8. Draft Regis t rat ion Card s.
9. Selective Service Induction Papers that bear any of the following Registrant’s
information:
- Earnings or Income - Dependency Status
- Court Record - Previous military service
- Physical or mental condition
- U.S. Army and Navy discharge certificates may be photographed.
10. Badges, Identification Cards, Passes, or Insignia carried by Military or Naval
personnel, or by members of the v ari ous F ed e ral Departments, such as FBI, Treasury,
etc. (unless photograph is ordered by the head of such department or bureau).
Copying the following is also pr ohibited in certain states:
Automobile Licenses - Drivers’ Licenses - Automobile Certificates of Title.
The above list is not all inclusive, and no liability is as sumed for its completeness or
accuracy. In case of doubt, consult your attorney.
Page 10

It’s Illegal . . . in Canada
Parliament, by statute, has forbidden the copying of the following subjects under certain
circumstances. Penalties of fines or imprisonment may be imposed on those guilty of
making such copies.
1. Current bank notes or current pap er money.
2. Obligations or securities of a government or bank.
3. Exchequer bill pap er or revenue p aper.
4. The pu blic seal of Can ada or of a pr ovince, or th e seal of a publi c body or aut horit y in
Canada, or of a court of law.
5. Proclamations, orders, regulations or appointments , or notices thereof (with intent to
falsely cause same to pur port to have been printed b y t h e Queen ’s Printer for Canada,
or the equivalent printer for a province).
6. Marks, brands, seals, wrappers or designs used by or on behalf of the Government of
Canada or of a province, the go vernment of a state other t han Canada or a department,
board, Commission or agency established by the Government of Canada or of a
province or of a government of a state other than Canada.
7. Impressed or adhesive stamps used for the purpose of revenue by the Government of
Canada or of a province or by the government of a state other than Canada.
8. Documents, registers or records kept by public officials charged with the duty of
making or issuing certified copies thereof, where the copy falsely purports to be a
certified copy thereof.
9. Copyrigh ted material or trademarks of any mann er or k in d without the consent of the
copyright or trademark owner.
10. The above list is provided for your convenience and assistance, but it is not all
inclusive, and no liability is assumed for its completeness or accuracy. In case of
doubt, consult your solicitor.
Page 11

Environmental Notices . . . in the USA
As an ENER GY S TAR® partner , Xerox Corp oration has deter mined t hat thi s copier/ print er
model meets the ENERGY STAR
ENERGY STAR
The ENERGY STAR program is a team effort between the Environmental Protection
Agency and the office equipment industry to promote energy-efficient personal computers,
monitors, printers, fax machines and copiers. Reducing the energy consumption of this
equipment will help combat smog, acid rain and long-term changes to the climate by
decreasing the emissions that result from generating electricity.
®
is a US registered trademark.
®
guidelines for energy efficiency.
Page 12

Environmental Notices . . . in Canada
As a participant in the Enviro nmental C hoice program, Xerox Corpor ation has dete rmined
that this copier/printer model meets the Environmental Choice guidelines for energy
efficiency.
Environment Canada established the Environmental Choice program in 1988 to help
consumers identify environment ally respon sible products and serv ices. Cop ier , prin ter and
fax products must meet energy efficiency and emissions criteria, and exhibit compatibility
with recycled supplies. Currently, Environmental Choice has more than 1600 approved
products and 140 licensees. Xerox has been a leader in offering EcoLogo approved
products. In 1996, Xerox became the first company licensed to use the Environmental
Choice EcoLogo for its copiers printers, and fax machines.
Page 13

Table of Contents
Introduction . . . . . . . . . . . . . . . . . . . . . . . . . . . . . . . . . . . i
About this Guide . . . . . . . . . . . . . . . . . . . . . . . . . . . . . . . . . . . .ii
Requirements for Using this Guide . . . . . . . . . . . . . . . . . . . . . . ii
Contents of this Guide . . . . . . . . . . . . . . . . . . . . . . . . . . . . . . . . ii
How to Use this Guide . . . . . . . . . . . . . . . . . . . . . . . . . . . . . . . .iii
Conventions Used in This Guide . . . . . . . . . . . . . . . . . . . . . . . . iv
Terminology and Font Conventions . . . . . . . . . . . . . . . . .iv
Procedures . . . . . . . . . . . . . . . . . . . . . . . . . . . . . . . . . . . . .iv
Notes . . . . . . . . . . . . . . . . . . . . . . . . . . . . . . . . . . . . . . . . . v
Cautions . . . . . . . . . . . . . . . . . . . . . . . . . . . . . . . . . . . . . . . v
Where to Find Information . . . . . . . . . . . . . . . . . . . . . . . . . . . . vi
Where to get Support . . . . . . . . . . . . . . . . . . . . . . . . . . . . . . . viii
Internet Support . . . . . . . . . . . . . . . . . . . . . . . . . . . . . . . . . . . .viii
Telephone Technical Support . . . . . . . . . . . . . . . . . . . . . . . . .viii
Printer Installation Guide
Page 14

Network Printer Features . . . . . . . . . . . . . . . . . . . . . . 1-1
Printer Models and Features . . . . . . . . . . . . . . . . . . . . . . . . . . 1-2
Supported Network Environments . . . . . . . . . . . . . . . . . . . . . 1-3
Network Installation Overview . . . . . . . . . . . . . . . . . . . . . . . 1-4
Network Connectivity . . . . . . . . . . . . . . . . . . . . . . . . . . . . . . 1-5
RJ-45 Connection . . . . . . . . . . . . . . . . . . . . . . . . . . . . . .1-6
AUI Connection . . . . . . . . . . . . . . . . . . . . . . . . . . . . . . . .1-6
Token Ring Connection . . . . . . . . . . . . . . . . . . . . . . . . . .1-7
Parallel Port Connection . . . . . . . . . . . . . . . . . . . . . . . . .1-7
Printer Control Panel . . . . . . . . . . . . . . . . . . . . . . . . . . . . . . . 1-8
Printer Reports . . . . . . . . . . . . . . . . . . . . . . . . . . . . . . . . . . . . 1-9
Network Software . . . . . . . . . . . . . . . . . . . . . . . . . . . . 2-1
CentreWare Network Installation Software . . . . . . . . . . . . . . 2-2
Which Installation Software should you use? . . . . . . . . . . . . .2-2
CentreWare Printer Admin Services . . . . . . . . . . . . . . . . . . . .2-3
Installation Requirements . . . . . . . . . . . . . . . . . . . . . . . .2-3
Installing Printer Admin Services . . . . . . . . . . . . . . . . . .2-4
Using Printer Admin Services . . . . . . . . . . . . . . . . . . . . .2-5
Uninstalling Printer Admin Services . . . . . . . . . . . . . . .2-11
CentreWare Internet Services . . . . . . . . . . . . . . . . . . . . . . . .2-12
Requirements . . . . . . . . . . . . . . . . . . . . . . . . . . . . . . . . .2-12
Accessing Internet Services . . . . . . . . . . . . . . . . . . . . . .2-13
Using Internet Services . . . . . . . . . . . . . . . . . . . . . . . . .2-14
Network Printer Drivers . . . . . . . . . . . . . . . . . . . . . . . . . . . . 2-18
Color Calibration Utilities . . . . . . . . . . . . . . . . . . . . . . . . . .2-18
Table of Contents
Novell NetWare Network Installation . . . . . . . . . . . . . 3-1
Before You Start . . . . . . . . . . . . . . . . . . . . . . . . . . . . . . . . . . 3-2
Step 1. Set Up the Printer . . . . . . . . . . . . . . . . . . . . . . . . . . . . 3-3
Step 2. Customize Printer Connectivity Settings . . . . . . . . . . 3-5
Using CentreWare Printer Admin Services . . . . . . . . . . . . . . .3-5
Using CentreWare Internet Services . . . . . . . . . . . . . . . . . . .3-11
Step 3. Print a Test Page . . . . . . . . . . . . . . . . . . . . . . . . . . . 3-13
Page 15

Microsoft (SMB) Network Installation . . . . . . . . . . . . . 4-1
Before You Start . . . . . . . . . . . . . . . . . . . . . . . . . . . . . . . . . . 4-2
Step 1. Set Up The Printer . . . . . . . . . . . . . . . . . . . . . . . . . . . 4-3
Step 2. Customize Printer Connectivity Settings . . . . . . . . . . 4-5
Using CentreWare Printer Admin Services . . . . . . . . . . . . . . .4-5
Using CentreWare Internet Services . . . . . . . . . . . . . . . . . . .4-10
Step 3. Print a Test Page . . . . . . . . . . . . . . . . . . . . . . . . . . . 4-13
AppleTalk Network Installation . . . . . . . . . . . . . . . . . . 5-1
Before You Start . . . . . . . . . . . . . . . . . . . . . . . . . . . . . . . . . . 5-2
Step 1. Customize Printer Connectivity Settings . . . . . . . . . . 5-3
Using CentreWare Printer Admin Services . . . . . . . . . . . . . . .5-3
Using CentreWare Internet Services . . . . . . . . . . . . . . . . . . . .5-8
Step 2. Print a Test Page . . . . . . . . . . . . . . . . . . . . . . . . . . . 5-10
TCP/IP Network Installation . . . . . . . . . . . . . . . . . . . . 6-1
Before You Start . . . . . . . . . . . . . . . . . . . . . . . . . . . . . . . . . . 6-2
Step 1. Set Up The Printer . . . . . . . . . . . . . . . . . . . . . . . . . . . 6-3
Step 2. Customize Printer Connectivity Settings . . . . . . . . . . 6-5
Using CentreWare Printer Admin Services . . . . . . . . . . . . . . .6-5
Using CentreWare Internet Services . . . . . . . . . . . . . . . . . . . .6-9
Step 3. Print a Test Page . . . . . . . . . . . . . . . . . . . . . . . . . . . 6-12
Banyan VINES Network Installation . . . . . . . . . . . . . . 7-1
Before You Start . . . . . . . . . . . . . . . . . . . . . . . . . . . . . . . . . . 7-2
Step 1. Make the Physical Connection . . . . . . . . . . . . . . . . . . 7-3
Parallel Port Connection . . . . . . . . . . . . . . . . . . . . . . . . .7-3
Step 2. Set Up Banyan VINES . . . . . . . . . . . . . . . . . . . . . . . . 7-3
Step 3. Print a Test Page . . . . . . . . . . . . . . . . . . . . . . . . . . . . 7-4
Printer Installation Guide
Page 16

Printer Driver Installation . . . . . . . . . . . . . . . . . . . . . . 8-1
Microsoft Windows 3.X Printer Driver . . . . . . . . . . . . . . . . . 8-2
Installing the PostScript Printer Driver . . . . . . . . . . . . . . . . . .8-2
Microsoft Windows 95/98 Printer Driver . . . . . . . . . . . . . . . 8-4
Installing the PostScript Printer Driver . . . . . . . . . . . . . . . . . .8-4
Windows NT 4.0 . . . . . . . . . . . . . . . . . . . . . . . . . . . . . . . . . . 8-6
Installing the PostScript Printer Driver . . . . . . . . . . . . . . . . . .8-6
Macintosh Adobe PostScript Driver . . . . . . . . . . . . . . . . . . . . 8-7
Installing the PostScript Printer Driver . . . . . . . . . . . . . . . . . .8-7
Configuring the PPD File . . . . . . . . . . . . . . . . . . . . . . . . . . . . .8-8
Troubleshooting . . . . . . . . . . . . . . . . . . . . . . . . . . . . . 9-1
Novell NetWare Networks . . . . . . . . . . . . . . . . . . . . . . . . . . . 9-2
Microsoft (SMB) Networks . . . . . . . . . . . . . . . . . . . . . . . . . . 9 -4
Microsoft NetBEUI Troubleshooting Steps . . . . . . . . . . . . . . .9-4
Microsoft NetBIOS/IP Troubleshooting Steps . . . . . . . . . . . .9-6
IBM Networks . . . . . . . . . . . . . . . . . . . . . . . . . . . . . . . . . . . . 9-8
OS/2 Troubleshooting . . . . . . . . . . . . . . . . . . . . . . . . . . . . . . .9-8
AppleTalk Networks . . . . . . . . . . . . . . . . . . . . . . . . . . . . . . . 9-9
TCP/IP Networks . . . . . . . . . . . . . . . . . . . . . . . . . . . . . . . . .9-10
Glossary . . . . . . . . . . . . . . . . . . . . . . . . . . . . . . . . . . 10-1
Table of Contents
Index . . . . . . . . . . . . . . . . . . . . . . . . . . . . . . . . . . .Index-1
Page 17

Introduction
This guide contains information specifically for the network printer versions of
the Xerox Document Centre ColorSeries 50 LP/ST. This Introduction chapter
contains information about this guide and obtaining support for your network
copier/printer, including:
The contents of this guide and how to use it
Where to find product information
How to get technical support.
i
Page 18

About this Guide
This guide is written for an experienced Network Adminis trator. It contains
procedures for installing and setting up the Xerox Document Centre
ColorSeries 50 LP/ST in a network environment.
Requirements for Using this Guide
This guide assumes you have a network pri nter version of the Xerox Document
Centre ColorSeries 50 LP/ST with the network controller installed. In general,
the requirements for success fully connectin g and s etting up your co pier/prin ter
include:
A working knowledge of your network environment
Appropriate cabling to connect your copier/printer to your network
A network workstation with the appropriate operating system and
software installed. You may use either a Microsoft Windows (95, 98, or
NT 4.0) workstation or a workstation (such as Macintosh, UNIX, etc.)
with Microsoft Internet Explorer (version 4.0 or higher) or Netscape
Navigator (version 4.0 or higher) installed.
The Xerox Document Centre ColorSeries 50 Network Software CDROM.
Contents of this Guide
This guide contains printer feature information and network installation
procedures, including:
ii Introduction
An overview of network printer features and the network software
Printer installation procedures for all supported network environments
Installation procedures for network printer drivers
Troubleshooting information for network installations.
Page 19

How to Use this Guide
This guide is organized to minimize the number of procedures and the reading
required to install the Xerox Document Centre ColorSeries 50 LP/ST on a
network.
To use this guide:
1
Review the Table of Contents and familiarize yourself with the content
and organization of this guide.
2
Review Chapter 1 Network Printer Features and Chapter 2 Network
Printer Software. These chapters contain important introductory
information that will assist you in understanding printer and network
software features.
3
Locate the appropriate network installation chapter for your network
environment. Refer to that chapter and follow the proced ures to install the
printer on the network, install a printer driver, and print a test page.
4
If your test print job does not print or if you encounter any problems
during the network installation, refer to Chapter 8 Troubleshooting.
5
Check the test print for print quality. If print quality problems exist, refer
to the Problem Solving chapter in the Xerox Document Centre ColorSeries
50 LP/ST Digital Color Copier/Printer Printer User Guide to correct the
problem.
About this Guide iii
Page 20

Conventions Used in This Guide
Terminology and Font Conventions
References to other sections or documents are italicized.
Names of screen buttons and menu items are
The term Select is used when choosing or highlighting an entry, or when
choosing an option from a list. Selecting does not usually start an action.
For example: Select
The term Click is used to indicate an action carried out by depressing the
from the File menu.
Print
left mouse button once. You may also double-click and right-click. For
example: Click
When procedures include a series of menu selections, the series may be
Exit
.
represented by a string of selections separated by the > symbol. For
example: At the desktop select
File > Print > Options
For a series of directory tree selections, the + symbol is used. For example:
In the directory tree, select
Connectivity+Interface+Ethernet
Procedures
The start of a proce dure is marked by bold text and a right arro w icon in the left
margin. For example:
bold
.
.
.
iv Introduction
To install the CentreWare software:
Page 21

Notes
Notes provide information that will help you perfor m a certain task or provide
additional information related to a task. Notes may also provide reference
information. For example:
Note:
Calibration Utilities are installed using this procedure.
Both the Printer Admin Services program and Windows Color
Cautions
A Caution notifies you that performing a procedure incorrectly may res ul t in
the loss of important settings or data. For example:
CAUTION:
without resetting the copier/printer may result in the loss of data settings.
Do not proceed without resetting the copier/printer. Proceeding
About this Guide v
Page 22

Where to Find Information
There are several paper-based and online information resources for the Xerox
Document Centre ColorSeries 50 LP/ST.
Xerox Document Centre ColorSeries 50 LP/ST
Digital Color Copier/Printer System Administration
Guide
The System Administration Guide is used by the System Administrator to
perform tasks such as checking meters and consumables, using the Tools
mode, performing system maintenance and ordering supplies.
Xerox Document Centre ColorSeries 50 LP/ST
Digital Color Copier/Printer User Guide
The User Guide provides information and procedures that focus primarily on
the copier user. It contains information such as basic copying, image quality,
output formats, job assembly and problem solving information.
Xerox Document Centre ColorSeries 50 LP/ST
Digital Color Copier/Printer Printer Installation
Guide (this guide)
This guide is used by the Network Administrator to install the copier/printer on
a network. It includes network connection and setup procedures, as well as
procedures for installing and using the network software programs and printer
drivers.
Xerox Document Centre ColorSeries 50 LP/ST
Digital Color Copier/Printer Printer User Guide
The Printer User Guide is intended for the network printer user. It contains
step-by-step procedures for installing and using the printer drivers and
accessing and using CentreWare Internet Services to print and scan documents.
vi Introduction
Page 23

Xerox Document Centre ColorSeries 50 LP/ST
Digital Color Copier/Printer User Quick Start
The Printer User Quick Start provides an overview of the steps associated with
using the printer drivers to print documents and u sing CentreWare Internet
Services software to print and scan documents with the copier/printer.
Network Software Online Help
Online help information is available for CentreWare Printer Admin Services,
CentreWare Internet Services, printer drivers, and Color Calibration Utilities.
To invoke Help, simply click
are using.
on the software screen or dialog that you
Help
Other Sources of Information
Other sources of info rmati on in cl ude the Quick Reference Install Cards, Color
Materials Usage Guide, Recommended Papers List, and Customer Site
Planning Guide. These documents will assist you in determining a suitable
location for your copier/printer , selecting th e appropriate pr int and copy media,
and quickly locating user informat i on for digi t al copying .
Where to Find Information vii
Page 24

Where to get Support
Internet Support
For the latest product information and news, visit Xerox on the Internet at
www.xerox.com.
Telephone Technical Support
Contact the Xerox Welcome Center for telephone technical support. Loca te the
following information and have it available when contacting the Welcome
Center:
Product Model:
Color Copier/Printer
Product Serial Number:
Contact the Welcome Center for your country using the telephone numbers
listed below. If the telephone number for your country is not listed, it will be
provided to you when your copier/printer is delivered. For future reference,
please record the number in the space provided below.
United States:
Canada:
Your Country:
Note:
Centre ColorSeries 50 LP/ST Digital Color Copier/Printer System
Administration Guide
1-800-939-3769
Information on ordering supplies is provided in the
Xerox Document Centre ColorSeries 50 LP/ST Digital
1-800-821-2797
Xerox Document
.
viii Introduction
Page 25

Chapter 2
Network Software
This chapter contains information on the printer network software, including:
CentreWare Network Installation Software
Network Printer Drivers
Color Calibration Utilities.
2-1
Page 26

CentreWare Network Installation Software
Two software programs are provided to assist you in installing the Xerox
Document Centre ColorSeries 50 on th e network:
CentreWare Printer Admin Services
CentreWare Internet Services.
The network installation may be performed using either of these programs.
Which Installation Software should you use?
You should use the program that is best suited to yo ur network workstation
environment and your own preference.
Use CentreWare Printer Admin Services if you are using a Microsoft W indows
network workstation. Use CentreWa re Internet Services if you prefer an
Internet-based solution. The use of CentreWare Internet Services requires a
TCP/IP network and a network workstation with either Microsoft Internet
Explorer (version 4.0 or higher) or Netscape Navigator (version 4.0 or higher)
installed.
2-2 Network Software
Page 27

CentreWare Printer Admin Services
CentreWare Printer Admin Services is a 32-bit, Microsoft Windows-based
software program. It may be used by the Network Administrator to remotely
perform tasks such as:
modifying printer network connectivity settings
viewing the printer configuration
printing reports.
This section contains the installation procedures and the general procedures for
using the Printer Admin Services program . Detailed, step-by-step instructions
for using Printer Admin Services to install and set up a printer are provided in
the appropriate network installation chapter of this guide.
Installation Requirements
Printer Admin Services is installed from the Xerox Document Ce ntre
ColorSeries 50 Network Software CD-ROM. The installation program allo ws
you to install both the Printer Admin Services p rogram and the Microsoft
Windows Color Calibration Utilities at the same time.
The minimum recommended workstation configuration for installing and
running the program is:
80486 processor
2 MB of available disk space
16 MB of RAM
Microsoft Windows 95, 98, or NT 4.0
A network connection
VGA video display.
Note:
recommended workstation configuration requirements.
The Windows Color Calibration Utilities have the same minimum
CentreWare Network Insta llation Software 2-3
Page 28

Installing Printe r Adm in S er vices
Use the Windows Install/Remove Programs feature to install Printer Admin
Services.
Note:
Calibration Utilities are installed using this procedure.
To install Printer Admin Services:
1
2
3
4
5
6
7
8
9
10
Both the Printer Admin Services program and Microsoft Windows Color
Insert the Xerox Document Centre ColorSeries 50 Network Software CDROM in the workstation CD-ROM drive.
At the desktop, select
Double-click
Click
Install
Click
Next
location of the Xerox Document Centre ColorSeries 50 Network Software
CD-ROM. On the CD-ROM, double-click
Double-click
the Command Line field.
Click
Finish
On the Welcome dialog, click
Click
Yes
Enter your name and company information and click
accept the default destination folder.
Add/Remove Programs
to start the Install Program Wizard.
. Click
Setup
. The Printer Admin Services installation program will start.
to accept the license agreement.
Start > Settings > Control Panel
.
Browse
to open the Browse dialog. Browse to the
Client > Setup
and click
. The installation path is displayed in
Open
.
Next
.
Next
.
. Click
Next
to
11
Select the desired installation component(s) (Printer Admin Services and
Color Calibration Utility) and click
12
Click
will be installed.
13
Click
The installation is complete.
2-4 Network Software
.
Next
to accept the default Program folder. The selected components
Next
.
Finish
Page 29
Using Printer Admin Services
This section provides an overview of the Printer Admin Services features and
the tasks that may be performed using the software. Step-by-step procedures
for using the software are provided in each of the networ k installation chapters.
No passwords are required to make changes to the printer connectivity settings
with Printer Admin Services.
Starting Printer Admin Services
To start Printer Admin Services at the desktop, select
Xerox CentreWare Color > Printer Admin Services
displayed.
Start > Programs
. The main window is
>
CentreWare Network Insta llation Software 2-5
Page 30
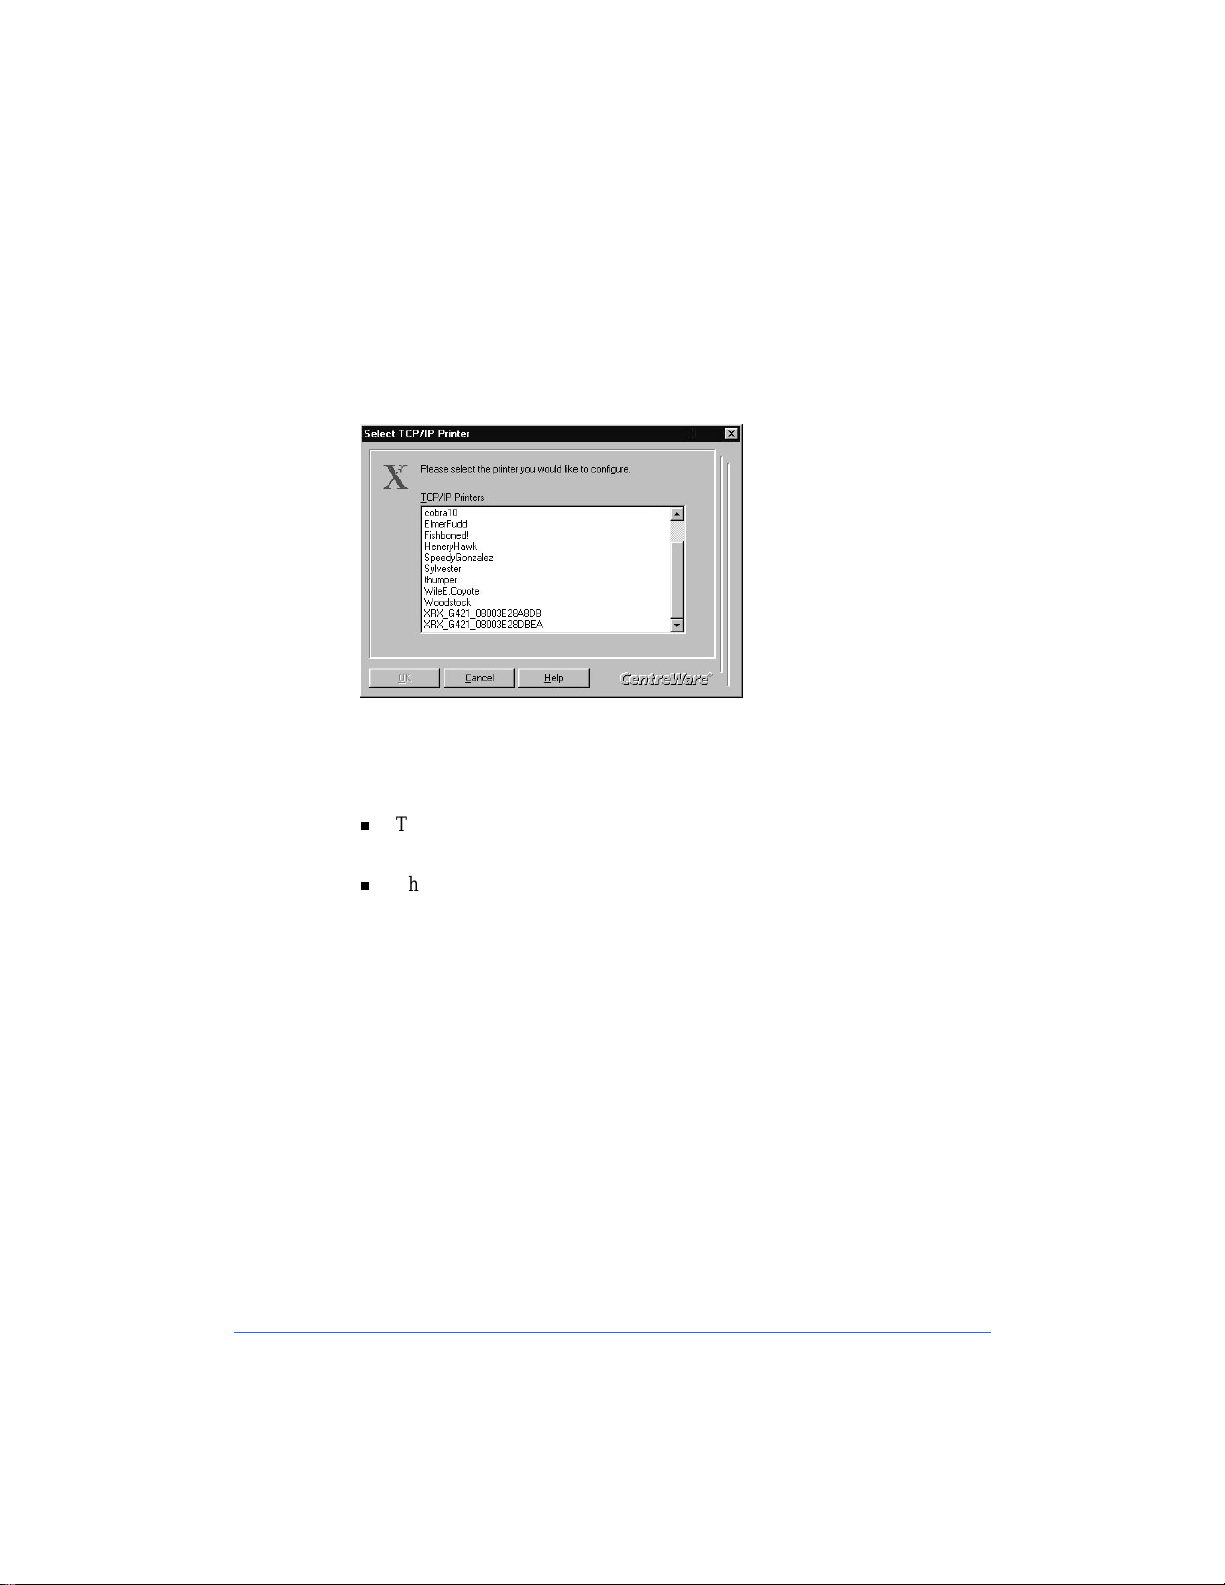
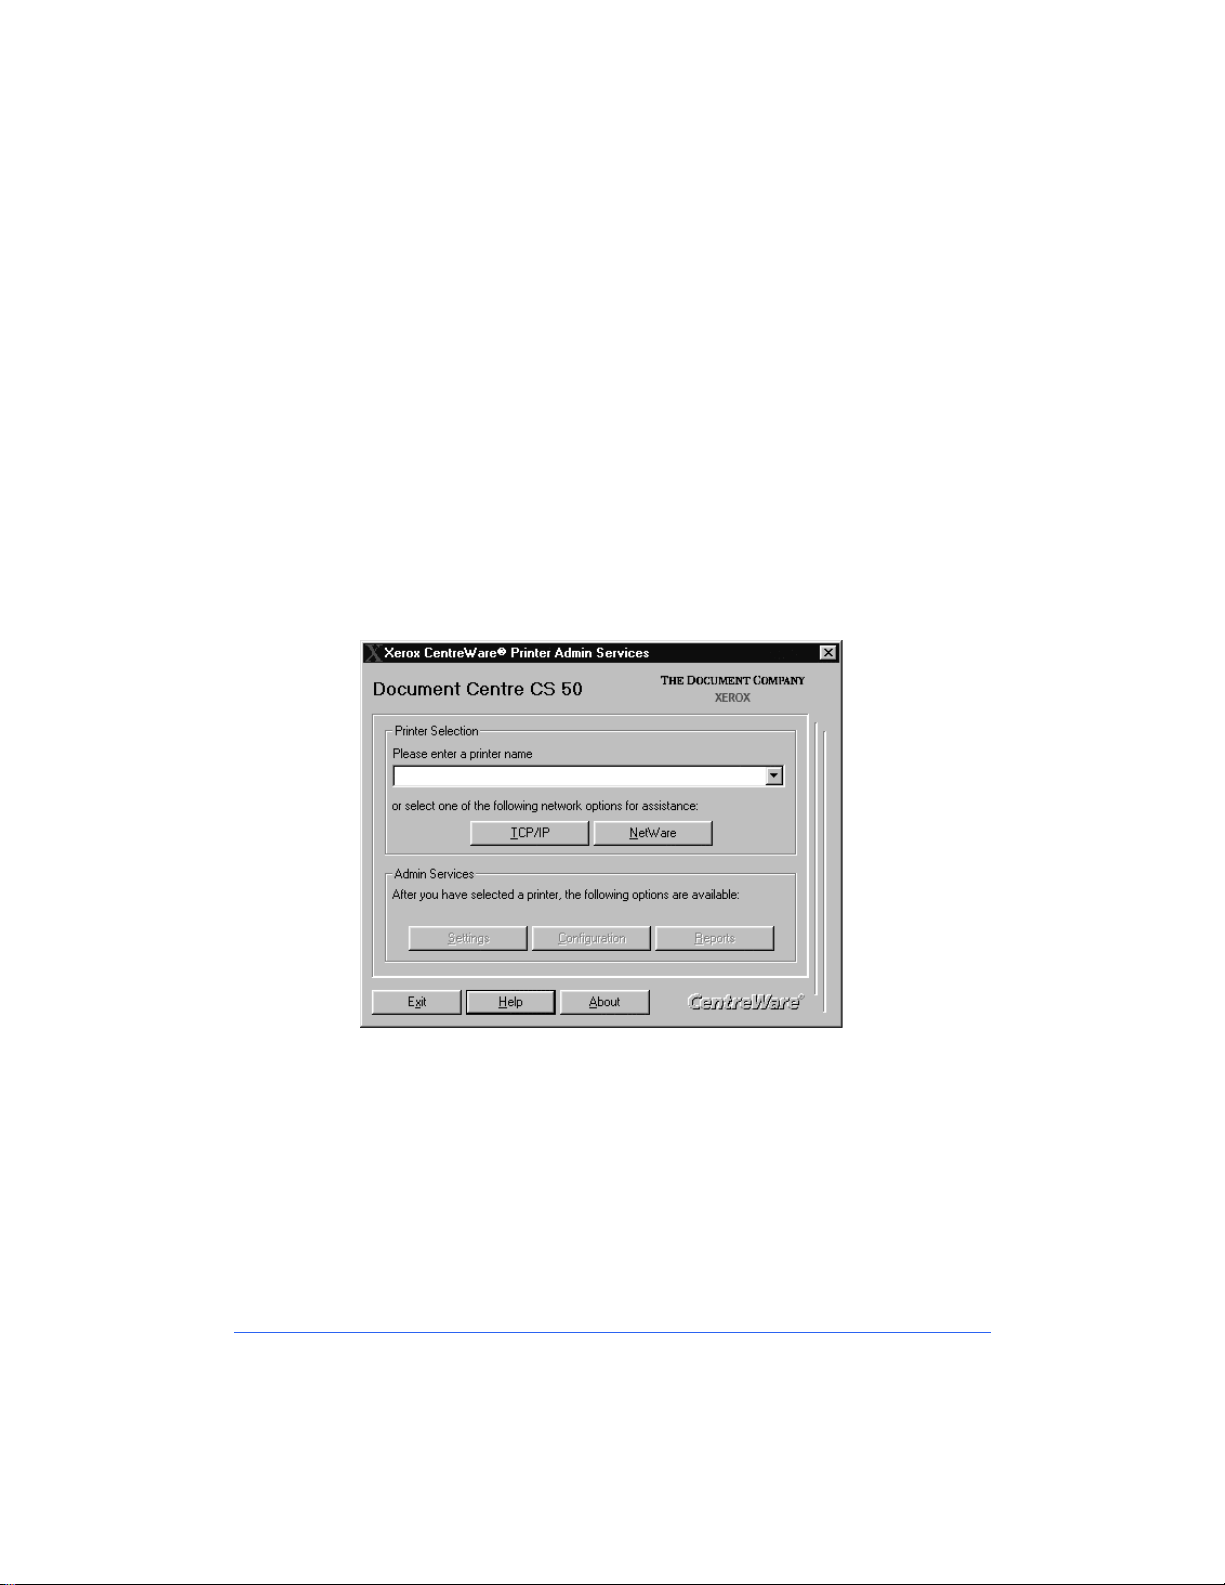
Selecting a Printer
The first step when using Printer Admin Services is to select a printer.
Depending upon your network type, click either
TCP/IP
or
NetWare
to
display a list of printers on the network.
If the printer has not yet been configured, the default printer name will appear
in the list.
The default TCP/IP printer name is XRX [IP Address] XRX. For example:
XRX13_128_145_138X RX.
The default NetWare printer name is XRX_[MAC Address]. For example:
XRX_08003E28A8AD.
Select the printer you are installing or reconfiguring from th e list and click
.
OK
2-6 Network Software
Page 31

The main screen is displayed. The printer name appears in the Printer Nam e
field and the
Settings, Configuration
, and
Reports
buttons are now active.
The program is ready to configure the printer connectivity settin gs, view the
printer configuration information, and print reports.
CentreWare Network Insta llation Software 2-7
Page 32

Configuring Printer Connectivity Settings
Click
Settings
on the main window to display the printer connectivity setti ngs
tabs.
The
Network
tab is used to modify printer network settings such as Network
Type, Frame Type, and Connection Type. The
Networks
, and
AppleTalk
tabs are used to modify printer settings that are
specific to those network environments.
TCP/IP, NetWare, Microsoft
Detailed, step-by-step instructions for using Printer Admi n Services to install
and set up a printer are provided in the appropriate network installation
chapters of this guide.
To remain in the Settings dialog after making changes to the connectivity
settings, click
the connectivity settings, click OK.
Note:
printer must be powered off and back on in order for the pending changes to
take effect.
2-8 Network Software
Whenever changes are made to the printer connectivity settings, the
. To return to the main window after making changes to
Apply
Page 33

Viewing the Printer Configuration
Click
Configuration
in the main window to display the Printer Configuration
window.
The displayed data shows the current values for the selected printer. Use the
scroll bar to view the entire list. Configuration values include:
Installation date/time
Software and system versions
Up time
Capacity data for RAM and Hard Disk.
Click
to return to the main window.
Close
CentreWare Network Insta llation Software 2-9
Page 34

Printing Reports
Click
Reports
To print a report simply select the desired report from the list and click
in the main window to display the Printer Reports window.
Print
Retrieve the printed report at the copier/printer.
Use the checkbox to select whether or not to print a Configuration Report each
time the copier/printer is powered on. Changing the checkbox selection
enables the OK button. If you wish to accept a checkbox change, click OK to
accept the change and return to the main window. Otherwise, click
Cancel
to
return to the main window.
.
2-10 Network Software
Page 35

Uninstalling Printer Admin Services
Use the following procedure to remove the CentreWare programs from the
workstation.
Note:
Calibration Utilities are uninstalled using this procedure.
To Uninstall Printer Admin Services:
1
2
3
4
5
The uninstall procedure is complete.
Both the Printer Admin Services program and Windows Color
At the desktop, select
Double-click
In the program list window, select Xerox CentreWare x.x for DocuColor.
Click
Add/Remove.
When the uninstall process is complete, click OK. Click OK to close the
Add/Remove Programs dialog.
Add/Remove Programs
Start > Settings > Control Panel
.
Click
. The program(s) are uninstalled.
Yes
.
CentreWare Network Insta llation Software 2-11
Page 36

CentreWare Internet Services
CentreWare Internet Services is the embedded HTTP server software that is
installed and running on the printer network con troller. Like Printer Admin
Services, Internet Services enables you to access and modify printer
connectivity settings and print reports.
Internet Services also enables you to manage printer jobs, view and change
printer properties, submit print-ready jobs to the printer, and scan hard-copy
documents to electronic files (ST model only).
This section contains the procedures for accessing Internet Services and the
general procedures for using the program. Detailed, step-by-step instructions
for using Internet Services to install and set up a printer are provi ded in the
appropriate network installation chapter of th is guide.
Requirements
The requirements for accessing and using Internet Services include:
A TCP/IP network
A network workstation that has Microsoft Internet Explorer (version 4.0
or higher) or Netscape Navigator (version 4.0 or higher) installed.
Since you are using the Internet browser to access information that is resident
on the network controller, it is not necessary to have a large amount of disk
space available to use Internet Services. If the network workstation meets the
configuration requirements for installing and running the Internet browser,
then it will be sufficient for accessing and using Internet Services.
2-12 Network Software
Page 37

Accessing Internet Services
Once the copier/printer is connected and communicating on a TCP/IP network,
you can access the Xerox Document Centre ColorSeries 50 Home Page using
the Internet browser.
To access Internet Services:
1
Obtain the IP Address for the printer.
2
At your workstation, start the browser. Enter the printer’s IP Address as
the URL (Universal Resource Locator) in the browser’s Address or
Location field and press
3
The Xerox Document Centre Colo rSeries 50 Home Page is displayed.
Enter
.
CentreWare Network Insta llation Software 2-13
Page 38

Using Internet Services
This section provides an overview of the Internet Services features and some
of the tasks that may be per formed usi ng the softwar e. Step-by -step procedur es
for using the software for network installations are provided in each of the
network installation chapters. Comprehensive Internet Services user
information is provided in the Xerox Document Centre ColorSeries 50 LP/ST
Digital Color Copier/Printer Printer User Guide.
Navigatin g Internet Services
The Xerox Document Centre ColorSeries 50 Home Page provides selections
for the available Internet Services features pages. They are:
Print
Jobs
Status
Properties
Maintenance
Scan.
Clicking the button or link displays the associated feature tab.
Internet Services tabs are divided into a left and right frame. The left frame
contains copier/printer status information. The width of the left and right
frames can be adjusted by sliding the divider between the two frames. On so me
pages, information in the left fr ame is sho wn in tree or directory/folder format.
Clicking the plus (+) sign will expand the tree, while clicking the minus sign
(-) collapses the tree.
2-14 Network Software
Page 39

Security
If you change any settings affecting the printer configuration, such as network
connectivity settings, you will be prompted to enter a User Name and
Password.
To continue, enter the User Name and Password and click OK. The default
User Name is
Use the following procedure to change the Internet Services Password.
To change a password:
1
At the Home Page, click
(with a capital "A") and the default Password is
Admin
Properties
. The Properties tab is displayed
11111
.
2
In the Properties directory tree, click
3
Enter a new password (minimum of 5, maximum of 15 characters) in the
Password
4
Enter the same password in the
5
Click
6
Enter the existing Password to complete the change.
field. Passwords are case-sensitive.
Apply New Settings
.
CentreWare Network Insta llation Software 2-15
Security
Verify Password
.
field.
Page 40

Configuring Printer Connectivity Settings
The Properties tab is used to configure or modify the printer network
connectivity settings. Connectivity properties pages are provided for
AppleTalk, NetWare, TCP/IP, and SMB. Each pag e allows the modif ication of
both the Physical Configuration and the Protocol Configuration for the
selected network environment.
To view and change printer connectivity settings:
1
At the Home Page, click
2
In the Properties directory tree, click
The TCP/IP settings page is displayed.
Properties
. The Properties tab is displayed.
Connectivity+Protocols+TCP/IP
.
3
Review and modify the TCP/IP network connectivity settings as
necessary.
4
Click
5
Enter the User Name and Password to complete the change.
2-16 Network Software
Apply New Settings
.
Page 41

Printing Reports
Printer reports can be printed using Internet Services. Options include a font
listing, Configuration Report, and a test page.
To print a report:
1
At the Home Page, click
Reports
radio dial to display the Reports page.
. The Print tab is displayed. Click on the
Print
2
Select a Report Type from the drop-down list.
3
Review the Defaults information. Use the Properties tab to modify the
default output selections if necessary.
4
Click
5
Retrieve the printed report from the copier/printer.
to print the report.
Print
CentreWare Network Insta llation Software 2-17
Page 42

Network Printer Drivers
Network printer drivers and PPDs for the printer are included on the Xerox
Document Centre ColorSeries 50 Network Software CD-ROM. The printer
drivers and PPDs are installed on the user workstations to enable printing from
the network. Printer drivers and PPDs are provided for the followin g
workstation environments:
Macintosh
Microsoft Windows 3.X
Microsoft Windows 95/9 8
Microsoft Windows NT 4.0.
Instructions on when to install printer drivers are provided in the network
installation chapters. Procedures for installing the printer drivers and printing a
test page are provided in Chapter 8 Printer Driver Installation.
Comprehensive printer driver installation and user information is provided in
the Xerox Document Centre ColorSeries 50 LP/ST Digital Color Copier/
Printer Printer User Guide.
Color Calibration Utilities
Color calibration software is also provided with the copier/printer. The
software is used to calibrate the printer for consistent, accurate color and to
adjust for variances that can occur over time due to changes in the
environment. Color Calibration is a powerful tool for th e professional color
image designer, but it is also useful for anyone who creates business graphics
or other color documents.
The Color Calibration Utilities are included on the Xerox Docume nt Centre
ColorSeries 50 Network Software CD-ROM and support both Microsoft
Windows and Macintosh workstation environments.
Detailed procedures for installing and using the Color Calibration Utilities are
provided in the Xerox Document Centre ColorSeries 50 LP/ST Digital Color
Copier/Printer Printer User Guid e.
Note:
Services. Procedures for calibrating the printer color with the Color Calibration
Utilities and with CentreWare Internet Services are provided in the
Document Centre ColorSeries 50 LP/ST Digital Color Copier/Printer Printer
User Guide
2-18 Network Software
Color calibration may also be performed using CentreWare Internet
Xerox
.
Page 43

Chapter 1
Network Printer Features
This chapter contains information on network printer features, including:
Printer Models and Features
Supported Network Environments
Network Installation Overview
Network Connectivity
Copier/printer Control Panel
Printer Reports.
1-1
Page 44

Printer Models and Features
The printer is available either as a digital copier/printer (ST) or as a standalone printer (LP). The different m odels are easily iden tifiable as the ST model
is equipped with a document scanner while the LP model is not.
Document Scanner
ST LP
Both models connect to the network in the same ma nner and have the same
printing capabilities. Printer features include:
Direct printing of PostScript files using Adobe PostScript 3 Raster Image
Processing (RIP)
PostScript printer drivers are provided for printing from Windows (3.x,
95, 98, NT 4.0) and Macintosh network workstations
Direct IPX printing to support printing over NetWare networks
TCP/IP direct printing to support UNIX-style LPD/LPR printing over
TCP/IP networks
Microsoft (SMB) network support for printing over NetBIOS/NETBEUI
and NetBIOS/IP networks
Color calibration software to maintain consistent, accurate color printing
over time and with changes in the printing environment.
1-2 Network Printer Features
Page 45

Supported Network Environments
The printer supports the following network environments and connections.
Network Environment Network Connections
NetWare 5.X
NDS
NetWare 3.X and 4.X
Bindery, NDS, and TCP/IP
TCP/IP
AppleTalk
EtherTalk
Banyan VINES/IP
Microsoft (SMB) Networking
NetBIOS/IP and NetBIOS/
NetBEUI
Ethernet, Token Ring
Ethernet, Token Ring
Ethernet, Token Ring
Ethernet
Parallel Port
(External print server)
Ethernet, Token Ring
Supported Network Enviro nments 1-3
Page 46

Network Installation Overview
The installation of the printer on a network is accomplished using a
combination of the Control Panel, n a tive network utilities, one of the Xerox
network software programs, and a Xerox printer driver.
The following procedure provides an overview of the major steps associated
with installing the printer on a network.
To install the printer on a network:
1
Physically connect the printer to the networ k
2
Set up the network using native ne twork utilities and procedures (if
necessary)
3
Enable connectivity at the printer Control Panel (if necessary)
4
Configure printer connectivity settings from the workstation using one of
the Xerox network software programs
5
Install a Xerox printer driver on your workstation
6
Print a test page.
These procedures may vary somewhat for the dif feren t network en viro nmen ts.
Detailed instructions for installing and setting up the printer are provided in the
network installation chapters of this guide.
1-4 Network Printer Features
Page 47

Network Connectivity
Network connection ports are located on the printer controller on the lower
rear of the printer. The printer is equipped with standard AUI and RJ-45
Ethernet connections and a parallel port to support external prin t server
connections. The printer may also be equipped with an optional Token Ring
port and adapter to support an RJ-45 Token Ring connection.
Network Controller
Network Connection Ports
To update the printer controller software:
1
It you need to upgrade or reinstall printer controller software, insert the
Xerox Document Centre ColorSeries 50 CD-ROM that you receive from
Xerox into the printer controller. The software installation process will
begin automatically.
2
Note that no messages will be displayed on the Touch Screen during the
software installation. The installation process will take approximately 10
minutes. Remove the CD-ROM when the process is completed.
Network Connectivity 1-5
Page 48

RJ-45 Connecti on
The printer has one RJ-45 Type 3 connector supporting an unshielded twisted
pair cable.
RJ-45 Connection
AUI Connec ti on
The printer has one AUI connection.
AUI Connection
1-6 Network Printer Features
Page 49

Token Ring Con nec ti on
The printer can be equipped with an optional Token Ring connection.
Token Ring Connection
Parallel Port Connection
The printer is equipped with one parallel port to support uni-directional
printing via an external print server. This connection supports Banyan VINES/
IP network printing.
Parallel Port Connection
(for external print server)
Network Connectivity 1-7
Page 50

Printer Control Panel
Some of the printer network connectivity settings may be accessed and
modified using the Control Panel buttons and the touch screen.
Touch Screen Buttons
Use the following procedure to access the printer network connectivity settings
at the Control Panel. Detailed instructions for installing and setting up the
printer are provided in the network installation ch apters of this guide.
To access printer connectivity settings:
1
2
Press the
Press
Tools
Administration
on the Touch Screen
button on the Contr ol Panel
3
Using the numbered buttons, enter your
11111) and press
4
Press
Machine Setup
their current settings is displayed.
1-8 Network Printer Features
Access Number
on the Touch Screen
Enter
on the Touch Screen. The list of available Items and
(default is
Page 51

5
T o change an Item, press the Item o n the Touch Screen list or use the scroll
buttons to select the Item.
6
Press
Change Settings
7
Enter the desired value using the buttons and press
Screen.
8
Press
Administration screens.
If you made any changes to the printer connectivity settings, the printer must
be powered off and back on in order for the pending changes to take effect.
on the Touch Screen repeatedly until you exit the
Close
on the Touch Screen.
on the Touch
Save
Printer Reports
There are several printer reports that are used to provide information ab out the
printer settings and to test the printer. Available reports include:
Configuration Report
PS Font List
Test Page.
The printer reports may be selected and printed using one of the Xerox
network software programs provided with the copier/printer. The procedures
for selecting and pr int i ng a repo rt are p rov ided in Chapter 2 Netw or k So f tware.
Printer Reports 1-9
Page 52

1-10 Network Printer Features
Page 53

Chapter 3
Novell NetWare Network Installation
This chapter describes the activities needed to install the Xerox Document
Centre ColorSeries 50 in a Novell NetWare 3.x, 4.x, or 5.x environment.
3-1
Page 54

Before You Start
1
Either the CentreWare Printer Admin Services or CentreWare Internet
Services network software provided with the copier/printer will be used
during this procedure to customize the printer network connectivity
settings.
Determine now which CentreWare network software you will use to
perform this task. Refer to Chapter 2 Network Softwar e for info rmation on
installing and using CentreWare Printer Admin Services and CentreWare
Internet Services. This information will assist you in deciding which
software to use.
2
For all NetWare environments, record the following information, making
sure to capture upper and lower cases:
NDS Tree
Frame Type
File Server Name
Print Server Name
assigned
3
When using Novell NetWare 4.x or 5.x for
and
NDS Conte x t Name
Print Server Password
(for NDS only)
.
a Bindery
installation, you
must create the Queue and Print Server as Bindery objects, and know the
context in which they are created. For a
Bindery
installation, you must
also record the File Server Name.
4
When using Novell NetWare 4.x or 5.x for an
installation, you must
NDS
create the Printer, Print Server and Queue, and know the Context and T ree
Name in which they are created.
5
When using Novell NetWare version 3.x, you must have a Queue and
Print Server created for the server, and know the Frame Type being used.
3-2 Novell NetWare Network Installation
Page 55

Step 1. Set Up the Printer
To set up the printer for network connectivity:
1
Run NWADMIN, NWAD MIN32 or PCONSOLE to set up a printer and
queue objects. Refer to the Novell documentation, if needed.
2
Make certain that your printer is properly connected to the network with
the appropriate cabling. See Chapter 1 Network Printer Features for
detailed information on making the physical connections needed to install
the printer on your network.
3
Press the
Panel.
4
Press
5
Using the keypad, enter your
Touch Screen. The default Access Number is 11111. It may have been
changed by a System Administrator.
6
Press
their current settings is displayed.
7
Press
Address
8
Press
Administration
on the Touch Screen.
Tools
Machine Setup
IP Address
field.
Change Settings
in the Items list, or use the scroll buttons to locate the
button, located on the copier/printer Control
Access Number
on the Touch Screen. The list of available Items and
on the Touch Screen.
and then press
Enter
on the
IP
9
The IP Address must be entered with leading zeroes. For example, an IP
Address of 13.145.200.4 must be entered as 01314520000 4. After entering
the IP Address using the keypad, press
10
Press
Frame Type
locate the
11
Press
12
After pressing the desired button for
13
If you are using Token Ring, also set the
Frame Type
Change Settings
, located in the Items list, or use the scroll buttons to
.
on the Touch Screen.
.
Save
Frame Type
Source Routing
Step 1. Set Up the Pri nter 3- 3
, press
Save
value.
.
Page 56

14
Press
15
Power off and power on the copier/printer. Allow at least 30 seconds
between powering off and powering on the printer. A Configuration
Report will print in approximately 5 minutes. The informat ion on the
Configuration Report can be very helpful in completing the network
installation and troubleshooti ng problems with your copier/printer.
16
Continue with Step 2 Customize Pr inter Connectivity Settings.
repeatedly until you exit the Administration screens.
Close
3-4 Novell NetWare Network Installation
Page 57

Step 2. Customize Printer Connectivity
Settings
In this step, you will use CentreWare Printer Admin Services or CentreWare
Internet Services to enable NetWare connectivity.
Follow the instructions for the CentreWare network software that you will use
to complete the network installation of your copier/pri nter. Continue with the
section titled Using CentreWare Printer Admin Services below or Using
CentreWare Internet Services, which begins on page 3-11.
Using CentreWare Printer Admin Services
To customize printer NetWare settings:
1
Install the Printer Admin Services software. Refer to the section titled
Installing Printer Admin Services, located in Chapter 2 Network Software
for installation details. Refer to the Using Printer Admin Services section
of Chapter 2 Ne twork Software for information on additional Printer
Admin Services functions.
2
Start the Printer Admin Services program. From a Windows workstation
with Printer Admin Services installed, click
CentreWare Color > Printer Admin Services
displayed.
Start > Programs > Xerox
. The main window is
Step 2. Customize Printer Connec tivity Setting s 3- 5
Page 58

3
From the main Printer Admin Services window:
a)
Click
NetWare
b)
Select the printer that you want to install from the list of printers. The
default format name for a new copier/printer is XRX_(Mac Address).
An example of how your printer name would be listed is
XRX_08043E28A8AD.
.
c)
Click OK.
3-6 Novell NetWare Network Installation
Page 59

d)
Click
Settings
connectivity settings tabs.
from the main window to display the printer
Step 2. Customize Printer Connec tivity Setting s 3- 7
Page 60

4
Click on the
5
Review the Network settings. Verify that the settings are correct for your
network environment. Make any necessary changes.
Network
tab.
3-8 Novell NetWare Network Installation
Page 61

6
Click on the
7
Review, and if necessary, edit the
Password, Poll Interval
NetWare
tab.
Print Server Name, Print Server
and
SAP Interval
settings.
a)
For a NetW are Bindery installation, you must also enter a n ame in the
File Server 1
b)
For a NetWare ND S installation, enter information in the
and
Context
8
If you are using IP, continue with Step 9. If you are not using IP, proceed
to Step 11.
field. Enter information in other fields as desired.
Tree Name
fields.
Step 2. Customize Printer Connec tivity Setting s 3- 9
Page 62

9
Click on the
10
Review and edit any fields, if necessary. If you enable DHCP, be sure to
save the new Configuration Rep ort that will print appr oximately 5 minutes
after you power off and power on the copier/printer (in Step 12 below),
since the IP Address may have changed. You will need the new address
the next time you access the settings.
TCP/IP
tab.
11
When you have finished entering the Settings data, click
then
12
Power off and power on the copier/printer. Allow at least 30 seconds
between powering off and powering on the printer. A Configuration
Report will print in approximately 5 minutes. The informat ion on the
Configuration Report can be very helpful in completing the network
installation and troubleshooti ng problems with your copier/printer.
13
Continue with Step 3 Print a Test Page.
3-10 Novell NetWare Network Installation
Exit
.
Apply, OK
and
Page 63

Using CentreWare Internet Services
To customize printer NetWare settings:
1
At your workstation, open the Internet Explorer or Netscape Navigator
browser.
2
In the browser, enter the IP Address for the printer, and press the
key. The Internet Services Home Page is displayed.
3
Click
Properties
to display the Properties tab menu and its directory tree.
Enter
Step 2. Customize Printer Connec tivity Setting s 3-11
Page 64

4
Click
Connectivity + Pro toco ls + NetWare
view current NetWare information. You may need to scroll to view all of
the available information.
5
Review, and if necessary, edit the NetWare settings.
in the Properties tab menu to
6
Click
Apply New Settings
7
Provide a
Name is
8
Power off and power on the copier/printer. Allow at least 30 seconds
between powering off and powering on the printer. A Configuration
Report will print in approximately 5 minutes. The informat ion on the
Configuration Report can be very helpful in completing the network
installation and troubleshooti ng problems with your copier/printer.
9
Continue with Step 3 Print a Test Page.
3-12 Novell NetWare Network Installation
User Name
Admin
and
with a capital "A" and the default Password is
if any changes were made.
Password
when prompted. (The default User
11111
.)
Page 65

Step 3. Print a Test Page
1
Install the network printer driver(s) for your workstation environment, and
print a test page. Detailed instructions for installing printer drivers and
printing a test page are provided in Chapter 8 Printer Driver Installation.
2
The network installation and setup of your copier/printer is complete. If
you have encountered any problems during the installation process, refer
to Chapter 9 T roubleshooting for assistance.
Step 3. Print a Test Page 3-13
Page 66

3-14 Novell NetWare Network Installation
Page 67

Chapter 4
Microsoft (SMB) Network Installation
This chapter describes the activities needed to install the copier/printer in one
of the following Microsoft (SMB) networking environments:
Microsoft Windows NT 4. 0 NetBIOS/NetBEUI
Microsoft Windows NT 4. 0 NetBIOS/IP
IBM LAN Server (OS/2 Warp) NetBIOS/NetBEUI
IBM LAN Server (OS/2 Warp) NetBIOS/IP.
4-1
Page 68

Before You Start
1
Either the CentreWare Printer Admin Services or CentreWare Internet
Services network software provided with the copier/printer will be used
during this procedure to customize the printer network connectivity
settings.
Determine now which CentreWare network software you will use to
perform this task. Refer to Chapter 2 Network Softwar e for info rmation on
installing and using CentreWare Printer Admin Services and CentreWare
Internet Services. This information will assist you in deciding which
software to use.
2
You must create a Host (or SMB) Name and Workgroup. These should
reside on an existing domain.
3
For a Windows NT installation, you must have Microsoft TCP/IP Printing
Services installed.
4
If you are running NetBIOS/NetBEUI, you must use TCP/IP or NetWare
for printer discovery.
4-2 Microsoft (SMB) Network Installation
Page 69

Step 1. Set Up The Printer
To set up the printer for network connectivity:
1
Make certain that your printer is properly connected to the network with
the appropriate cabling. See Chapter 1 Network Printer Features for
detailed information on making the physical connections needed to install
the printer on your network.
2
Press the
Panel.
3
Press
4
Using the keypad, enter your
Touch Screen. The default Access Number is 11111. It may have been
changed by a System Administrator.
5
Press
their current settings is displayed.
6
Press
Address
7
Press
8
The IP Address must be entered with leading zeroes. For example, an IP
Address of 13.145.200.4 must be entered as 01314520000 4. After entering
the IP Address using the keypad, press
Administration
on the Touch Screen.
Tools
Machine Setup
IP Address
field.
Change Settings
in the Items list, or use the scroll buttons to locate the
button, located on the copier/printer Control
Access Number
on the Touch Screen. The list of available Items and
on the Touch Screen.
and then press
.
Save
Enter
on the
IP
9
From the Items list, locate and set the
(Mask) Address
10
If you are using Token Ring, also set the
(as in Steps 6 through 8).
Gateway Address
Source Routing
Step 1. Set Up The Printer 4 -3
and
value.
Subnet
Page 70

11
Press
12
Power off and power on the copier/printer. Allow at least 30 seconds
between powering off and powering on the printer. A Configuration
Report will print in approximately 5 minutes. The informat ion on the
Configuration Report can be very helpful in completing the network
installation and troubleshooti ng problems with your copier/printer.
13
Continue with Step 2 Customize Pr inter Connectivity Settings.
repeatedly until you exit the Administration screens.
Close
4-4 Microsoft (SMB) Network Installation
Page 71

Step 2. Customize Printer Connectivity
Settings
In this step, you will use CentreWare Printer Admin Services or CentreWare
Internet Services to enable Microsoft SMB connectivity.
Follow the instructions for the CentreWare network software that you will use
to complete the network installation of your copier/pri nter. Continue with the
section titled Using CentreWare Printer Admin Services below or Using
CentreWare Internet Services, which begins on page 4-10.
Using CentreWare Printer Admin Services
To customize printer Microsoft SMB settings:
1
Install the Printer Admin Services software. Refer to the section titled
Installing Printer Admin Services, located in Chapter 2 Network Software
for installation details. Refer to the Using Printer Admin Services section
of Chapter 2 Ne twork Software for information on additional Printer
Admin Services functions.
2
Start the Printer Admin Services program. From a Windows workstation
with Printer Admin Services installed, click
CentreWare Color > Printer Admin Services
displayed.
Start > Programs > Xerox
. The main window is
Step 2. Customize Printer Connec tivity Setting s 4- 5
Page 72

3
From the main Printer Admin Services window:
a)
enter a printer name in the entry box if you know which printer to
access and set up
b)
click the down arrow to view and select a printer fro m the drop-down
list
c)
select the printer that you want to install from the list of printers.
4
Click OK.
5
Click
Settings
settings tabs.
from the main window to display the printer connectivity
4-6 Microsoft (SMB) Network Installation
Page 73

6
Click on the
7
Review the Network settings. Verify that the settings are correct for your
network environment. Make any necessary changes.
Network
tab.
Step 2. Customize Printer Connec tivity Setting s 4- 7
Page 74

8
Click on the
9
Review and edit any fields, if necessary.
Microsoft Networks
tab.
10
If you are using IP, continue with Step 11. If you are not using IP, proceed
to Step 13.
4-8 Microsoft (SMB) Network Installation
Page 75

11
Click on the
12
Review and edit any fields, if necessary. If you enable DHCP, be sure to
save the new Configuration Rep ort that will print appr oximately 5 minutes
after you power off and power on the copier/printer (in Step 12 below),
since the IP Address may have changed. You will need the new address
the next time you access the settings.
TCP/IP
tab.
13
When you have finished entering the Settings data, click
then
14
Power off and power on the copier/printer. Allow at least 30 seconds
between powering off and powering on the printer. A Configuration
Report will print in approximately 5 minutes. The informat ion on the
Configuration Report can be very helpful in completing the network
installation and troubleshooti ng problems with your copier/printer.
15
Continue with Step 3 Print a Test Page.
Exit
.
Step 2. Customize Printer Connec tivity Setting s 4- 9
Apply, OK
and
Page 76

Using CentreWare Internet Services
To customize printer Microsoft SMB settings:
1
At your workstation, open the Internet Explorer or Netscape Navigator
browser.
2
In the browser, enter the IP Address for the printer, and press the
key. The Internet Services Home Page is displayed.
3
Click
Properties
to display the Properties tab menu and its directory tree.
Enter
4-10 Microsoft (SMB) Network Installation
Page 77

4
Click
Connectivity + Protocols + SMB
view current SMB information. You may need to scroll to view all of the
available information.
5
Be sure to enter the
Review and edit any additional fields, as desired.
Workgroup/Domain
in the Properties tab menu to
name and the
SMB Name
.
6
If you are using IP, continue with Step 7. If you are not using IP, skip to
Step 9.
7
Click
Connectivity + Protocols + TCP/IP
view current TCP/IP information.
8
Make sure that the
Address
are set to the correct values.
IP Addr ess, Host Name, Subnet Mask
Step 2. Customize Printer Connec tivity Setting s 4-11
in the Properties tab menu to
, and
Gateway
Page 78

9
Click
Apply New Settings
10
Provide a
Name is
11
Power off and power on the copier/printer. Allow at least 30 seconds
between powering off and powering on the printer. A Configuration
Report will print in approximately 5 minutes. The informat ion on the
Configuration Report can be very helpful in completing the network
installation and troubleshooti ng problems with your copier/printer.
12
Continue with Step 3 Print a Test Page.
User Name
with a capital "A" and the default Password is
Admin
if any changes were made.
and
Password
when prompted. (The default User
11111
.)
4-12 Microsoft (SMB) Network Installation
Page 79

Step 3. Print a Test Page
1
Install the network printer driver(s) for your workstation environment, and
print a test page. Detailed instructions for installing printer drivers and
printing a test page are provided in Chapter 8 Printer Driver Installation.
2
If you have configured your copier/printer for printing with lpr/lpd, use a
native print tool to send a test page to the copier/prin ter.
3
The network installation and setup of your copier/printer is complete. If
you have encountered any problems during the installation process, refer
to Chapter 9 T roubleshooting for assistance.
Step 3. Print a Test Page 4-13
Page 80

4-14 Microsoft (SMB) Network Installation
Page 81

Chapter 5
AppleTalk Network Installation
This chapter describes the activities needed to install the copier/printer in an
AppleTalk environment.
5-1
Page 82

Before You Start
1
CentreWare Internet Services network software provided with the copier/
printer will be used during this procedure to customize the printer network
connectivity settings. The printer supports the AppleTalk Phase 2
protocol.
2
Make certain that your printer is properly connected to the network with
the appropriate cabling. See Chapter 1 Network Printer Features for
detailed information on making the physical connections needed to install
the printer on your network.
3
Obtain a Configuration Report (printed approximately 5 minutes after
every printer power off and on sequence, if this feature has not been
disabled) to verify that AppleTalk is enabled, and to view other current
settings on the copier/printer. If AppleTalk is not enabled, see Step 1
Customizing Printer Co nnectivity Settings for information on enabling
AppleTal k.
4
Ensure that you have a Macintosh inst alle r program. This is used to install
the printer driver software.
5
Ensure you have a browser (version 4.0 or higher) on your Macintosh in
order to use Internet Services. Internet Services can be used to review and
change connectivity settings.
5-2 AppleTalk Network Installation
Page 83

Step 1. Customize Printer Connectivity
Settings
In this step, you will use CentreWare Internet Services to enable AppleTalk
connectivity.
Using CentreWare Internet Services
To customize printer AppleTalk settings:
1
At your workstation, open the Internet Explorer or Netscape Navigator
browser.
2
In the browser, enter the IP Address for the printer, and press the
key. The Internet Services Home Page is displayed.
3
Click on the
directory tree.
Properties
button to display the Properties tab menu and its
Enter
Step 1. Customize Printer Connec tivity Setting s 5- 3
Page 84

4
Click
Connectivity + Protocols + AppleTalk
to view current AppleTalk information.
You may need to scroll to view all of the available information.
in the Properties tab menu
5
Review and edit fields, as desired.
6
Click
Apply New Settings
7
Provide a
Name is
8
Power off and power on the copier/printer. Allow at least 30 seconds
between powering off and powering on the printer. A Configuration
Report will print in approximately 5 minutes. The informat ion on the
Configuration Report can be very helpful in completing the network
installation and troubleshooti ng problems with your copier/printer.
9
Continue with Step 2 Print a Test Page.
5-4 AppleTalk Network Installation
User Name
with a capital "A" and the default Password is
Admin
if any changes were made.
and
Password
when prompted. (The default User
11111
.)
Page 85

Step 2. Print a Test Page
1
Install the network printer driver(s) for your workstation environment, and
print a test page. Detailed instructions for installing printer drivers and
printing a test page are provided in Chapter 8 Printer Driver Installation.
2
The network installation and setup of your copier/printer is complete. If
you have encountered any problems during the installation process, refer
to Chapter 9 T roubleshooting for assistance.
Step 2. Print a Test Page 5-5
Page 86

5-6 AppleTalk Network Installation
Page 87

Chapter 6
TCP/IP Network Installation
This chapter describes the activities needed to install the copier/printer in a
TCP/IP environment.
6-1
Page 88

Before You Start
1
Either the CentreWare Printer Admin Services or CentreWare Internet
Services network software provided with the copier/printer will be used
during this procedure to customize the printer network connectivity
settings.
Determine now which CentreWare network software you will use to
perform this task. Refer to Chapter 2 Network Softwar e for info rmation on
installing and using CentreWare Printer Admin Services and CentreWare
Internet Services. This information will assist you in deciding which
software to use.
2
There are several items that must be provided prior to starting the
installation procedure. These items serve as a checklist for each TCP/IP
installation environment.
Print Service - You must con f igure the LPR daemon that you will be
printing throu gh.
Printer Type - You must configure the print daemon on the server to
account for support of TEXT (ASCII) or RAW (PostScript) data.
Address Resolution - You must have STATIC or DHCP assigned.
Host Name - You must provide a DNS or local Host Name.
Subnet Mask - You must provide a Subnet Mask for the network to
which your printer is currently connected.
Default Gateway - You m us t provide the default Gateway Address
where your printer is located (through which packets are forwarded to
other networks or subnets).
Frame T ype
IP Address
6-2 TCP/IP Network Installation
Page 89

Step 1. Set Up The Printer
To set up the printer for network connectivity:
1
Make certain that your printer is properly connected to the network with
the appropriate cabling. See Chapter 1 Network Printer Features for
detailed information on making the physical connections needed to install
the printer on your network.
2
Press the
Panel.
3
Press
4
Using the keypad, enter your
Touch Screen. The default Access Number is 11111. It may have been
changed by a System Administrator.
5
Press
their current settings is displayed.
6
Press
Address
7
Press
8
The IP Address must be entered with leading zeroes. For example, an IP
Address of 13.145.200.4 must be entered as 01314520000 4. After entering
the IP Address using the keypad, press
Administration
on the Touch Screen.
Tools
Machine Setup
IP Address
field.
Change Settings
in the Items list, or use the scroll buttons to locate the
button, located on the copier/printer Control
Access Number
on the Touch Screen. The list of available Items and
on the Touch Screen.
and then press
.
Save
Enter
on the
IP
9
If the
IP Address
10
From the Items list, locate and set the
(Mask) Address
11
If you are using Token Ring, also set the
is 0.0.0.0, you must enable
(as in Steps 6 through 8).
.
DHCP
Gateway Address
Source Routing
Step 1. Set Up The Printer 6 -3
and
value.
Subnet
Page 90

12
Press
13
Power off and power on the copier/printer. Allow at least 30 seconds
between powering off and powering on the printer. A Configuration
Report will print in approximately 5 minutes. The informat ion on the
Configuration Report can be very helpful in completing the network
installation and troubleshooti ng problems with your copier/printer.
14
Continue with Step 2 Customize Pr inter Connectivity Settings.
repeatedly until you exit the Administration screens.
Close
6-4 TCP/IP Network Installation
Page 91

Step 2. Customize Printer Connectivity
Settings
In this step, you will use CentreWare Printer Admin Services or CentreWare
Internet Services to enable TCP/IP connectivity.
Follow the instructions for the CentreWare network software that you will use
to complete the network installation of your copier/pri nter. Continue with the
section titled Using CentreWare Printer Admin Services below or Using
CentreWare Internet Services, which begins on page 6-9.
Using CentreWare Printer Admin Services
To customize printer TCP/IP settings:
1
Install the Printer Admin Services software. Refer to the section titled
Installing Printer Admin Services, located in Chapter 2 Network Software
for installation details. Refer to the Using Printer Admin Services section
of Chapter 2 Ne twork Software for information on additional Printer
Admin Services functions.
2
Start the Printer Admin Services program. From a Windows workstation
with Printer Admin Services installed, click
CentreWare Color > Printer Admin Services
displayed.
Start > Programs > Xerox
. The main window is
Step 2. Customize Printer Connec tivity Setting s 6- 5
Page 92

3
From the main Printer Admin Services window:
a)
Select the printer that you want to install from the list of printers or
click
TCP/IP
When the list appears, click on the target printer.
b)
The default format name for a new copier/printer is XRX ( IP Address)
XRX. An example of how your printer name would be listed is
XRX13_138_128_145XRX. Note that the IP Address numbers of your
printer, as shown in this example, are separated by underscore
characters rather than dots.
c)
Click OK.
d)
Click
Settings
connectivity settings tabs.
for assistance in selecting an existing printer name.
from the main window to display the printer
6-6 TCP/IP Network Installation
Page 93

4
Click on the
5
Review the Network settings. Verify that the settings are correct for your
network environment. Make any necessary changes.
Network
tab.
Step 2. Customize Printer Connec tivity Setting s 6- 7
Page 94

6
Click on the
7
Review and edit any fields if necessary. If you enable DHCP, be sure to
save the new Configuration Report that will print after you power off and
power on the copier/printer, (in Step 9 below, if this feature has not been
disabled), since the IP Address may have changed. You will need the new
address the next time you access the settings.
TCP/IP
tab.
8
When you have finished entering the Settings data, click
then
9
Power off and power on the copier/printer. Allow at least 30 seconds
between powering off and powering on the printer. A Configuration
Report will print in approximately 5 minutes. The informat ion on the
Configuration Report can be very helpful in completing the network
installation and troubleshooti ng problems with your copier/printer.
10
Continue with Step 3 Print a Test Page.
6-8 TCP/IP Network Installation
Exit
.
Apply, OK
and
Page 95

Using CentreWare Internet Services
To customize printer TCP/IP settings:
1
At your workstation, open the Internet Explorer or Netscape Navigator
browser.
2
In the browser, enter the IP Address for the printer, and press the
key. The Internet Services Home Page is displayed.
3
Click
Properties
to display the Properties tab menu and its directory tree.
Enter
Step 2. Customize Printer Connec tivity Setting s 6- 9
Page 96

4
Click
Connectivity + Protocols + TCP/IP
view current TCP/IP information.
You may need to scroll to view all of the available information.
in the Properties tab menu to
6-10 TCP/IP Network Installation
Page 97

5
If the IP Address Resolution is
Host Name, Subnet Mask
values. If the IP Address Resolution is
only.
6
Click
Apply New Settings
7
Provide a
Name is
8
Power off and power on the copier/printer. Allow at least 30 seconds
between powering off and powering on the printer. A Configuration
Report will print in approximately 5 minutes. The informat ion on the
Configuration Report can be very helpful in completing the network
installation and troubleshooti ng problems with your copier/printer.
9
Continue with Step 3 Print a Test Page.
User Name
with a capital "A" and the default Password is
Admin
, and
if any changes were made.
and
Password
, make sure that the
Static
Gateway Address
, these fields will be read-
DHCP
when prompted. (The default User
IP Address
are set to the correct
11111
,
.)
Step 2. Customize Printer Connec tivity Setting s 6-11
Page 98

Step 3. Print a Test Page
1
Install the network printer driver(s) for your workstation environment, and
print a test page. Detailed instructions for installing printer drivers and
printing a test page are provided in Chapter 8 Printer Driver Installation.
2
If you have configured your copier/printer for printing with lpr/lpd, use a
native print tool to send a test page to the copier/prin ter.
3
The network installation and setup of your copier/printer is complete. If
you have encountered any problems during the installation process, refer
to Chapter 9 T roubleshooting for assistance.
6-12 TCP/IP Network Installation
Page 99

Chapter 7
Banyan VINES Network Installation
This chapter describes the activities needed to install the copier/printer in a
Banyan VINES environment.
7-1
Page 100

Before You Start
1
The following External Print Port server, manufactured by Osicom, is
recommended by Xerox for use with your copier/printer:
NETPrint 500 Elite with 10/100 Ethernet Auto-sensing.
7-2 Banyan VINES Network Installation
 Loading...