

Page 1

Xerox Document Centre
440/432/430/426/425/420
User Guide
604P00074
Xerox Document Centre 440/432/430/426/425/420 User Guide
Page 2

Prepared by:
The Document Company Xerox
GKLS European Operations
Bessemer Road
Welwyn Garden City
Hertfordshire
AL7 1HE
ENGLAND
©2003 by Xerox Corporation. All rights reserved.
Copyright protection claimed includes all forms and matter s of copyrighted material and information
now allowed by statutory or judicial law or hereinafter granted, including without limitations, materia l
generated from the software programs which are displayed on the screen, such as icons, screen
displays, looks etc.
®
Xerox
, The Document Company
publication are trademarks of Xerox Corporation. Product names and trademarks of other
companies are hereby acknowled
Changes are periodically made to this document. Changes, technical inaccuracies, and
typographical errors will be corrected in subsequent editions.
Printed in the United States of America
®
, the digital X® and all Xerox products mentioned in this
ged.
Xerox Document Centre 440/432/430/426/425/420 User Guide
Page 3

Content
1 About This Guide.......................................................................1-1
Conventions ........................................................................................................1- 3
Orientation .......................................................................................................1- 3
Bracket text typeface .......................................................................................1- 4
Italic typeface................................................................................................... 1-4
Quick Pathway................................................................................................. 1-4
Notes................................................................................................................ 1-5
Hints................................................................................................................. 1-5
Cautions........................................................................................................... 1-5
Warnings..........................................................................................................1- 5
Related Information Sources .............................................................................1- 6
Safety Notes ........................................................................................................1- 7
Safety Standards ............................................................................................. 1-9
Regulatory Information..................................................................................... 1-10
FCC Part 15................................................................................................... 1-10
ICES-003 ....................................................................................................... 1-10
FCC Part 68................................................................................................... 1-11
Canadian CSO3............................................................................................. 1-13
Laser Safety................................................................................................... 1-14
Environmental Compliance.............................................................................. 1-16
Energy Star® ................................................................................................. 1-16
Environmental ChoiceM................................................................................. 1-16
Illegal Copying................................................................................................... 1-17
Ground Fault Interrupter (GFI)......................................................................... 1-20
2 Product Overview ......................................................................2-1
Identifying the machine components................................................................ 2-2
Optional Components.........................................................................................2- 4
Power ON/OFF.....................................................................................................2- 7
Powering On .................................................................................................... 2-7
Powering Off........................................................................................................ 2-9
Xerox Document Centre 440/432/430/426/425/420 User Guide Page i
Page 4

Power Save Modes............................................................................................ 2-10
Changing the Default Time Settings .............................................................. 2-12
Modes.................................................................................................................2- 16
Features button.............................................................................................. 2-17
Job Status button ...........................................................................................2- 18
Machine Status button ...................................................................................2- 19
System controls ................................................................................................ 2-24
Job Interrupt ...................................................................................................... 2-25
Auditron Access Screen................................................................................... 2-26
Information Sources .........................................................................................2- 27
3 Copy ........................................................................................... 3-1
Copying procedure .............................................................................................3- 2
1. Load the documents..................................................................................... 3-2
2. Select the Features button...........................................................................3- 6
3. Select the features ....................................................................................... 3-7
4. Enter the quantity.........................................................................................3- 8
5. Select Start .................................................................................................. 3-9
6. Identify the copy job in the Print Queue ....................................................... 3-9
Standard Features - Copy................................................................................. 3-10
Output ............................................................................................................ 3-10
Sides Imaged ................................................................................................. 3-14
Reduce/Enlarge ............................................................................................. 3-16
Paper Supply.................................................................................................. 3-18
Image Quality................................................................................................. 3-20
Added Features - Copy..................................................................................... 3-21
Image Adjustment tab - Copy........................................................................... 3-22
Original Size (DC440/432/430/425)/Original Input (DC426/420) ................... 3-22
Bound Originals.............................................................................................. 3-25
Image Shift..................................................................................................... 3-27
Expert Image Quality...................................................................................... 3-28
Erase.............................................................................................................. 3-29
Edit (optional)................................................................................................. 3-30
Output Format - Copy ....................................................................................... 3-34
Transparencies .............................................................................................. 3-34
N Up (2 Up - DC426/420)............................................................................... 3-36
Annotation...................................................................................................... 3-38
Page ii Xerox Document Centre 440/432/430/426/425/420 User Guide
Page 5

Inserts ............................................................................................................ 3-42
Booklet Creation ............................................................................................ 3-44
Covers (DC440/432/430/425)........................................................................ 3-45
Job Assembly - Copy........................................................................................ 3-48
Build Job ........................................................................................................ 3-48
Stored Jobs.................................................................................................... 3-50
Managing Copy Jobs........................................................................................ 3-53
Print Queue.................................................................................................... 3-53
Completed Print Jobs Queue......................................................................... 3-56
4 Fax...............................................................................................4-1
Embedded Fax Procedure.................................................................................. 4-2
Sending a Fax using Embedded Fax............................................................... 4-2
Standard Features - Embedded Fax.................................................................. 4-7
Resolution........................................................................................................ 4-7
Original Type.................................................................................................... 4-8
Sides Scanned................................................................................................. 4-9
Dialing............................................................................................................ 4-10
More Features - Embedded Fax....................................................................... 4-18
Cover Letter (Cover Page)............................................................................. 4-19
Transmission Report...................................................................................... 4-20
Lighter/Darker ................................................................................................ 4-20
Communication Mode (DC440/432/430/425) ................................................ 4-21
Delayed Start ................................................................................................. 4-22
Send Priority (DC440/432/430/425)............................................................... 4-23
Advanced Features - Embedded Fax .............................................................. 4-24
Build Job ........................................................................................................ 4-25
Poll Remote Fax ............................................................................................ 4-26
Store for Polling ............................................................................................. 4-27
Fax Mailbox.................................................................................................... 4-30
Original Size (DC440/432/430/425)/Mixed Size Originals (DC426/420)........ 4-33
Reports & Setups - Embedded Fax ................................................................. 4-34
Fax Reports ................................................................................................... 4-35
Answer Mode................................................................................................. 4-36
Dial Directory Setup....................................................................................... 4-37
Comment Setup............................................................................................. 4-42
Transmit Header Print.................................................................................... 4-43
Server Fax Procedure 440/432/430/425........................................................... 4-44
Xerox Document Centre 440/432/430/426/425/420 User Guide Page iii
Page 6

Sending a Fax using Server Fax.................................................................... 4-45
Standard Features - Server Fax ....................................................................... 4-48
Resolution ...................................................................................................... 4-48
Original Type.................................................................................................. 4-49
Sides Scanned............................................................................................... 4-50
Dialing ............................................................................................................ 4-51
More Fax Features - Server Fax....................................................................... 4-55
Lighter/Darker ................................................................................................ 4-55
Original Input Size.......................................................................................... 4-56
Delayed Start ................................................................................................. 4-57
Authentication Mode - Server Fax ................................................................... 4-58
Login - Guest Access..................................................................................... 4-58
Login - Network Authenticated Access .......................................................... 4-59
Login - Guest Access and Network Authenticated Access ............................ 4-60
Changing the Authentication Service............................................................. 4-60
Logging Off..................................................................................................... 4-61
LAN Fax (Local Area Network Fax).................................................................. 4-62
LAN Fax Features.......................................................................................... 4-62
Managing Fax Jobs........................................................................................... 4-63
Fax Queue ..................................................................................................... 4-63
Completed Fax Jobs Queue .......................................................................... 4-65
Connecting Fax to the ISDN (Digital Line) - Embedded Fax (DC440/432/430/425)
4-67
5 Media Print................................................................................. 5-1
Using Media Print................................................................................................ 5-2
6 Network Scanning..................................................................... 6-1
Network Scanning............................................................................................... 6-2
Templates and template list ............................................................................. 6-4
Public and Private Templates .......................................................................... 6-5
Image Adjustment ............................................................................................... 6-7
Original Size..................................................................................................... 6-8
Basic Image Quality ......................................................................................... 6-9
Sides Imaged ................................................................................................. 6-10
Reduce/Enlarge ............................................................................................. 6-11
Stored Image Settings.................................................................................... 6-12
Page iv Xerox Document Centre 440/432/430/426/425/420 User Guide
Page 7

Erase.............................................................................................................. 6-13
Output Format (or Filing Setups)..................................................................... 6-14
Server IP Address /Server Name................................................................... 6-15
Document Path / Volume............................................................................... 6-16
Document Name (or Document Folder)......................................................... 6-16
Login Name/Password................................................................................... 6-17
If File Already Exists (or Filing Policy)............................................................ 6-17
Document Management Fields (DC440/432/430/425) .................................. 6-18
Authentication Mode - Network Scanning...................................................... 6-22
Login - Guest Access..................................................................................... 6-22
Login - Network Authenticated Access .......................................................... 6-23
Login - Guest Access and Network Authenticated Access ............................ 6-24
Changing the Authentication Service............................................................. 6-24
Logging Off .................................................................................................... 6-25
Managing Scan Jobs ........................................................................................ 6-26
Scan Queue................................................................................................... 6-26
Completed Scan Jobs Queue (DC440/432/430/425) .................................... 6-27
7 E-mail ..........................................................................................7-1
Standard Features............................................................................................... 7-2
Entering a manual E-mail address................................................................... 7-3
Using the Address Books................................................................................. 7-4
Image Adjustment............................................................................................... 7-7
Original Size..................................................................................................... 7-8
Basic Image Quality......................................................................................... 7-9
Sides Imaged................................................................................................. 7-10
Stored Image Settings ................................................................................... 7-11
Erase.............................................................................................................. 7-12
Output Format ................................................................................................... 7-13
Reply to.......................................................................................................... 7-13
Authentication Mode - E-mail........................................................................... 7-14
Login - Guest Access..................................................................................... 7-14
Login - Network Authenticated Access .......................................................... 7-15
Login - Guest Access and Network Authenticated Access ............................ 7-16
Changing the Authentication Service............................................................. 7-17
Logging Off .................................................................................................... 7-18
Managing Scan Jobs ........................................................................................ 7-19
Scan Queue................................................................................................... 7-19
Xerox Document Centre 440/432/430/426/425/420 User Guide Page v
Page 8

Completed Scan Jobs Queue ........................................................................ 7-20
8 Print............................................................................................ 8-1
Print Driver Features........................................................................................... 8-2
Tower Mailbox ..................................................................................................... 8-5
Managing Print Jobs........................................................................................... 8-6
Print Queue...................................................................................................... 8-6
Completed Print Jobs Queue........................................................................... 8-9
9 Internet Services ....................................................................... 9-1
Standard Features - Internet Services............................................................... 9-2
Interface Options.............................................................................................. 9-2
Services Tab ........................................................................................................ 9-4
Job Submission................................................................................................ 9-4
Stored Templates............................................................................................. 9-5
Queue Tab............................................................................................................9- 6
Status Tab............................................................................................................ 9-7
Properties Tab ..................................................................................................... 9-8
Properties Features.......................................................................................... 9-9
Maintenance Tab ............................................................................................... 9-13
Assistance Tab.................................................................................................. 9-14
Scanning with Internet Services...................................................................... 9-15
Public and Private Repositories ..................................................................... 9-15
Template Pools .............................................................................................. 9-16
Template Management .................................................................................. 9-16
Scan to File .................................................................................................... 9-24
Scan to Fax ................................................................................................... 9-27
Scan with Local Copy..................................................................................... 9-27
Problem Solving................................................................................................ 9-28
10Paper and other media ............................................................. 10-1
Loading paper...................................................................................................... 10-2
Preparing paper for loading.............................................................................. 10-2
Loading the paper trays ................................................................................... 10-2
The Bypass Tray.............................................................................................. 10-6
The Envelope Tray (optional)........................................................................... 10-8
Page vi Xerox Document Centre 440/432/430/426/425/420 User Guide
Page 9

The High Capacity Feeder (optional)............................................................. 10-10
Auto Tray Switching....................................................................................... 10-11
Storing and Handling Paper............................................................................. 10-12
Other media ....................................................................................................... 10-13
Media Uses and Special Considerations ....................................................... 10-13
11Setups.........................................................................................11-1
Setup Procedures ............................................................................................... 11-2
Key Operator Tools.......................................................................................... 11-2
System Administrator Tools............................................................................. 11-3
Auditron Administrator Tools............................................................................ 11-3
Owner Tools..................................................................................................... 11-4
Changing the Settings...................................................................................... 11-4
Machine Setups................................................................................................... 11-6
Access the Machine Setups............................................................................. 11-7
Paper Tray Setups........................................................................................... 11-8
Date/Time Setup.............................................................................................. 11-9
Walkup Screen............................................................................................... 11-11
Timers............................................................................................................ 11-11
Contention...................................................................................................... 11-13
Localization.................................................................................................... 11-14
Additional Setups.............................................................................................. 11-15
Report Languages ......................................................................................... 11-15
Touch Screen Contrast.................................................................................. 11-16
Customer Support Number............................................................................ 11-16
Paper Sizes.................................................................................................... 11-17
Machine Serial Number ................................................................................. 11-17
Xerox Supplies Number / Supplies Tel. Number ........................................... 11-18
Fault Override.................................................................................................... 11-19
Accessing Fault Override............................................................................... 11-19
Unavailable Features..................................................................................... 11-20
Copy Setups ...................................................................................................... 11-25
Access the Copy Setups................................................................................ 11-25
Reduce/Enlarge ............................................................................................. 11-26
Image Quality................................................................................................. 11-28
Output ............................................................................................................ 11-29
Sides Imaged................................................................................................. 11-29
Expert Image Quality ..................................................................................... 11-31
Xerox Document Centre 440/432/430/426/425/420 User Guide Page vii
Page 10

Margin Shift (DC440/432/430/425) ................................................................ 11-31
Erase (DC440/432/430/425) .......................................................................... 11-32
Fax Setups ......................................................................................................... 11-34
Access the Fax Setups .................................................................................. 11-34
Server Fax Setups (DC440/432/430/425) ......................................................... 11-36
Embedded Fax................................................................................................... 11-37
Fax Terminal Setups......................................................................................11- 37
Access Fax Terminal Setups ......................................................................... 11-38
Fax Printing Options....................................................................................... 11-44
Fax Report Options........................................................................................ 11-47
Fax Panel Defaults......................................................................................... 11-50
Fax Mailboxes................................................................................................ 11-53
Fax File Management .................................................................................... 11-55
Fax Communication Setups........................................................................... 11-57
Outgoing Fax Options. ................................................................................... 11-58
Incoming Fax Options .................................................................................... 11-63
Line Use Restriction (DC440/432/430/425) ................................................... 11-66
Auditron Setups ................................................................................................ 11-67
Access Auditron Setups................................................................................. 11-68
Internal Auditron (DC440/432/430/425) ......................................................... 11-69
Internal Auditron (DC426/420) ....................................................................... 11-76
Job Based Accounting (optional) (DC440/432/430/425)................................ 11-82
Foreign Interface Device................................................................................ 11-84
Access Rights.................................................................................................... 11-86
Assign Privileges............................................................................................ 11-89
Add Pin........................................................................................................... 11-90
Set User Privileges......................................................................................... 11-90
Delete PIN...................................................................................................... 11-91
Service Access Control - Authentication Mode
(DC440/432/430/425)..................................................................................... 11-92
Network Scanning Setups................................................................................ 11-94
Print Setups ....................................................................................................... 11-96
E-mail Setups (DC440/432/430/425).................................................................11- 99
12Maintenance .............................................................................. 12-1
Ordering Supplies ............................................................................................... 12-2
Cleaning the DC440/432/430/426/425/420.......................................................... 12-3
Page viii Xerox Document Centre 440/432/430/426/425/420 User Guide
Page 11

The Document Glass and Constant Velocity Transport Glass......................... 12-3
The Control Panel and Touch Screen.............................................................. 12-4
The Document Feeder and Output Trays ........................................................ 12-4
Replacing the Copy/Print Cartridge .................................................................. 12-5
Removing the old Copy/Print Cartridge ........................................................... 12-5
Recycling the Copy/Print Cartridge.................................................................. 12-9
Inserting the new Copy/Print Cartridge............................................................ 12-9
Loading Staples ................................................................................................ 12-12
Finisher (optional) .......................................................................................... 12-12
Convenience Stapler (optional)...................................................................... 12-15
13Problem Solving.........................................................................13-1
Fault Clearance Procedure................................................................................. 13-2
Clearing Jams...................................................................................................... 13-3
Problem Solving Tables ..................................................................................... 13-4
Fault Codes and Messages.............................................................................. 13-16
Table of Fault Codes...................................................................................... 13-16
Output Quality ................................................................................................... 13-19
Call for Service procedure ............................................................................... 13-20
Xerox Welcome Center Telephone Number .................................................. 13-20
14Specifications.............................................................................14-1
Machine Specifications ...................................................................................... 14-2
Electrical Specifications ................................................................................... 14-7
Specifications for the Embedded Fax Feature ................................................. 14-8
15Glossary......................................................................................15-1
Terms Defined ..................................................................................................... 15-2
Xerox Document Centre 440/432/430/426/425/420 User Guide Page ix
Page 12

Page x Xerox Document Centre 440/432/430/426/425/420 User Guide
Page 13

1 About This Guide
Welcome to the Xerox family of Document Centre products.
This User Guide provides detailed information, technical
specifications and procedural steps when using the integrated
features of the machine.
About This Guide
Xerox Document Centre 440/432/430/426/425/420 User Guide Page 1-1
Page 14
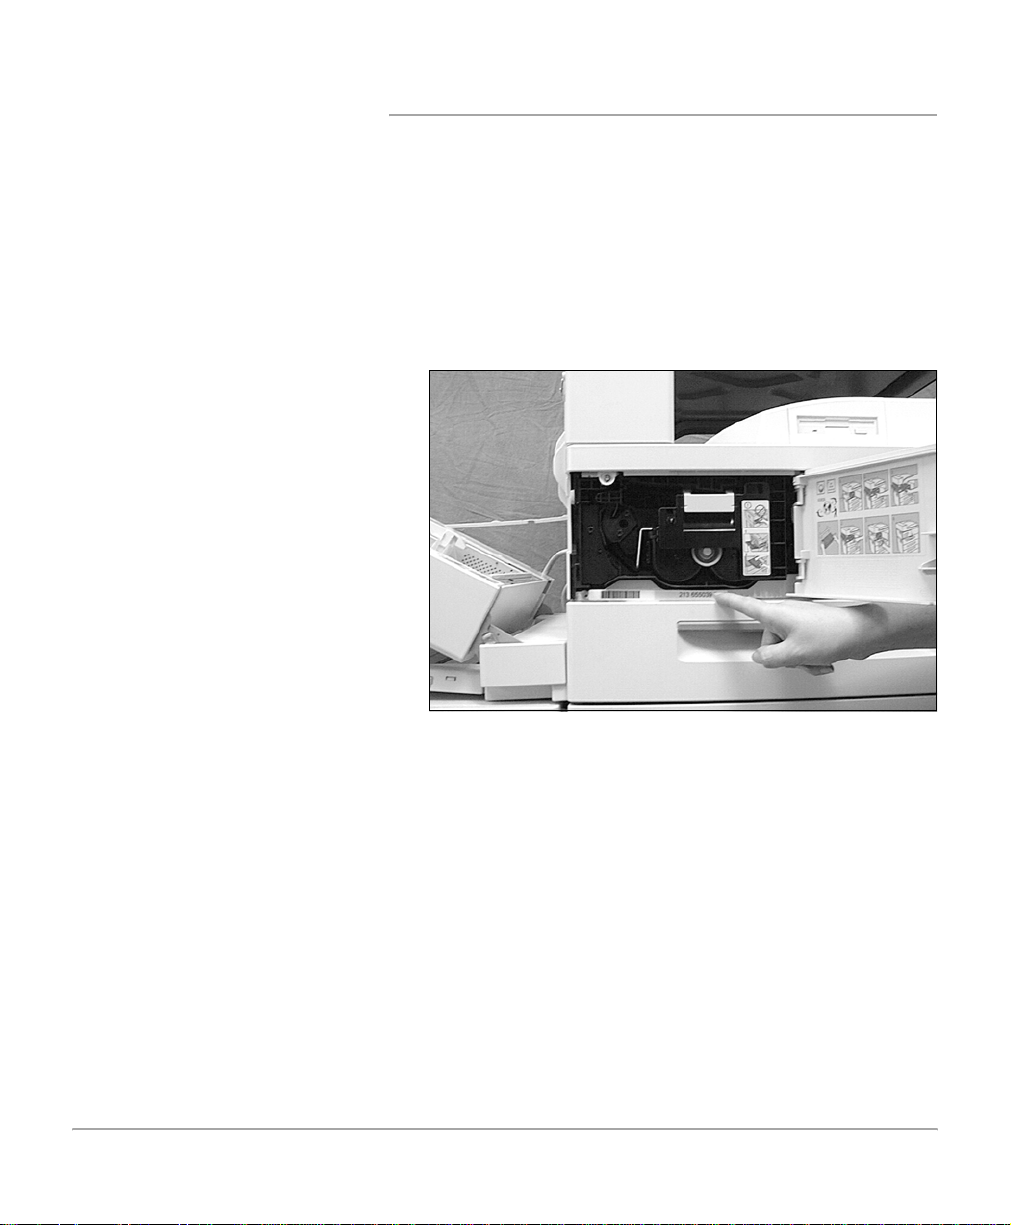
Xerox Welcome Center
If after product installation further assistance is required,
please call our experts using the Xerox Welcome Center
telephone number. When telephoning, please quote the
machine serial number, which may be written in the space
below. The serial number is located behind the left hand front
cover, as shown:
Serial number:
_______________________________________
The Xerox Welcome Center telephone number is provided at
the time of product installation. For convenience and future
reference, please record the telephone number in the space
below:
Welcome Center Telephone Number:
Canada (English, French, and local Toronto) 800-939-3769
United States 800-821-2797
_______________________________________
Also, keep a record of any error messages. This information
can help problems to be resolved quickly.
Page 1-2 Xerox Document Centre 440/432/430/426/425/420 User Guide
Page 15

Conventions
Throughout this User Guide, you will find that some terms are
used interchangeably:
¾ Paper is synonymous with media.
Orientation
Long Edge Feed (LEF) /
Short Edge Feed (SEF) /
Portrait
Landscape
¾ Document is synonymous with original.
¾ Page is synonymous with sheet.
¾ Document Centre (DC) 440/432/430/426/425/420 is
synonymous with the machine.
Orientation is used to mean the direction of images on the
page. When the image is upright, the paper (or other media)
can be one of two ways:
When observed from the front of the machine, paper or
originals with the long edges to the left and right of the paper
tray or document feeder.
When observed from the front of the machine, paper or
originals with the short edges to the left and right of the paper
tray or document feeder.
Use the diagram below for more information.
LEF Orientation
A
A
SEF Orientation
A
A
About This Guide
Paper feed direction
Xerox Document Centre 440/432/430/426/425/420 User Guide Page 1-3
Paper feed direction
Page 16
Bracket text typeface
Italic typeface
The [Bracket Text] typeface is used to emphasize the
selection of a feature mode or button. Fo r ex ample:
¾ Select [Image Quality].
¾ Apply the new settings.
¾ Select [Save].
The Italic typeface is used to emphasize a word or phrase. In
addition, references to other chapters and publications are
displayed in Italic typeface. For example:
- Always follow safety procedures whe n op er a ting the
equipment.
- Refer to “Maintenance” on page 12-1, for information
about cleaning the Document Glass.
- For more information about the network options available,
refer to the System Administrator Guide.
Quick Pathway
Quick Pathway
¾ Select [Access]
on the Control Panel
¾ Enter Key Operator
PIN
¾ Select [Machine
Setups]
Page 1-4 Xerox Document Centre 440/432/430/426/425/420 User Guide
In addition to the step by step instructions available throughout
this user guide, a summary of the steps is contained in the
Quick Pathway at the beginning of a chapter or section. After
becoming familiar with the procedures for a particular feature,
the Quick Pathway is a useful reminder of the steps required to
access a particular feature.
Page 17

Notes
Hints
Cautions
Notes are statements that provide additional information. For
example:
NOTE: If the DC440/432/430/426/425/420 does not include
the Finisher and/or High Capacity Feeder, ignore the first step.
About This Guide
Hints help users perform a task. For exampl e:
HINT: Select the X / Y display areas to display a pop up
keypad which can be used to enter and save the values.
Cautions are statements that suggest mechanical damage as
a result of an action. For example:
CAUTION:When cleaning the DC440/432/430/426/425/420,
do not use organic solvents or aerosol cleaners.
Warnings
Warnings are statements that alert users to the possibility of
personal damage. For example:
WARNING:This equipment must be connected to an
earthed mains socket outlet.
Xerox Document Centre 440/432/430/426/425/420 User Guide Page 1-5
Page 18

Related Information Sources
Information available for the Document Centre 440/432/430/
426/425/420 consists of:
-This User Guide
-The On-line Help system
-The Document Centre 440/432/430/426/425/420 ST
System Administration Guide
-The Xerox CentreWare Customer Documentation
NOTE: Please note that the screens shown in this user guide
apply to a fully configured DC440/432/430/426/425/420 and
therefore may not exactly represent the configuration being
used.
Page 1-6 Xerox Document Centre 440/432/430/426/425/420 User Guide
Page 19
Safety Notes
Your Xerox product and supplies have been designed and
tested to meet strict safety requirements. These include safety
agency approval, and compliance to established
environmental standards. Please read the following
instructions carefully before operating the product and refer to
them as needed to ensure the continued safe operation of your
product.
The safety testing and performance of this product have
been verified using Xerox materials only.
Follow all warnings and instructions marked on, or supplied
with the product.
This WARNING Mark alerts users to the possibility of
personal injury.
This WARNING Mark alerts users to heated surfaces.
WARNING: This product must be connected to a
protective earthing circuit.
About This Guide
This product is equipped with a 3-wire type plug, provided
with a protective earthing pin. This plug will fit only into an
earthed power outlet. This is a safety feature. To avoid risk of
electric shock, contact your electrician to replace the
receptacle if you are unable to insert the plug into the outlet.
Never use an earthed adapter plug to connect the p roduct to a
power source receptacle that lacks an earth connection
terminal.
This product should be operated from the type of power
source indicated on the marking label. If you are not sure of the
type of power available, consult your local power company.
Do not allow anything to rest on the power cord. Do not locate
the product where persons will step or trip on the cord.
Xerox Document Centre 440/432/430/426/425/420 User Guide Page 1-7
Page 20

Use of an extension cord with this product is not
recommended or authorised. Users should check building
codes and insurance requirements if a properly earthed
extension cord is to be used. Ensure that the total ampere
ratings of the products plugged into the extension cord do not
exceed the extension cord ampere rating. Also, make sure that
the total amperage of all products plugged into the wall outlets
does not exceed the outlet rating.
Disconnect Device for this product is the power cord. To
remove all electrical power to the product, disconnect the
power cord from the power receptacle.
Your equipment is equipped with an energy saving device to
conserve power when the machine is not in use. The machine
may be left on continuously.
Unplug this product from the wall outlet before cleaning.
Always use materials specifically designated for this pr od u ct.
Use of other materials may result in poor performance and
could create a hazardous situation.
Do not use aerosol cleaners. Follow the instructions in this
User Guide for proper cleaning methods.
Never use supplies or cleaning materials for purposes other
than those for which they were intended. Keep all supplies and
materials out of reach of children.
Do not use this product near water, wet locations, or o utdoors.
Do not place this product on an unstable cart, stand or table.
The product may fall, causing personal injury or serious
damage to the product
Slots and Openings in the cabinet and in the back a nd sides
of the product are provided for ventilation. To ensure reliable
operation of the product and to protect it from overheating,
these openings must not be blocked or covered. The product
should never be located near or over a radiator or heat register.
This product should not be placed in a built-in installation
unless proper ventilation is provided.
Never push objects of any kind into the slots of the product as
they may touch dangerous voltage points or short out parts
which could result in a fire or electric shock.
Never spill liquid of any kind on the product.
Page 1-8 Xerox Document Centre 440/432/430/426/425/420 User Guide
Page 21

Safety Standards
Never remove covers or guards that require a tool for remo val,
unless directed to do so in a Xerox approved maintenance kit.
Never defeat interlock switches. Machines are designed to
restrict operator access to unsa fe areas. Covers, guards and
interlock switches are provided to ensure that the machine will
not operate with covers opened.
Do not put your hands into the fuser area, located just inside
the exit tray area, as you may be burned.
Quality Standards: The product is manufactured under a
registered ISO9002 Quality system.
If you need additional safety information concerning the
product or Xerox supplied materials you may call the
following number:
+44(0) 1707 353434
This Xerox product is certified by the following Agency using
the Safety Standards listed.
Agency
UNDERWRITERS LABORATORIES
About This Guide
Standard
UL1950 3rd Edition
Certification is based on reciprocity agreements which include
requirements for Canada.
Xerox Document Centre 440/432/430/426/425/420 User Guide Page 1-9
Page 22

Regulatory Information
FCC Part 15
This equipment has been tested and found to comply with the
limits for a Class A digital device, pursuant to Part 15 of the
FCC Rules. These limits are designed to provide reasonable
protection against harmful interference when the equipment is
operated in a commercial environment. This equipment
generates, uses and can radiate radio frequency energy and,
if not installed and used in accordance with the instruction
manual, may cause harmful interference to radio
communications. Operation of this equipment in a residential
area is likely to cause harmful interference in which case the
user will be required to correct the interferences at their own
expense.
Changes or modifications to this equipment not specifically
approved by the Xerox Corporation may void the user’s
authority to operate this equipment.
WARNING:Shielded cables must be used with this
equipment to maintain compliance with FCC regulations.
ICES-003
This Class A digital apparatus complies with Canadian ICES-
003.
Cet appareil numérique de la classe A est conforme à la norme
NMB-003 du Canada.
Page 1-10 Xerox Document Centre 440/432/430/426/425/420 User Guide
Page 23

FCC Part 68
Send Header Requirements
Federal Communications Commission (FCC) regulations
require all persons within the United States who send any
message via a facsimile machine to include an identifying
message in the transmission. The message must clearly
contain an identifier and telephone number for the entity
(business or individual) sending the message.
This facsimile machine provides the local ID and name
features required for the FCC regulation. To satisfy the FCC
regulation, the telephone number and na me must be inclu ded
with the printed document. To comply with the FCC rules,
carefully read and follow the instructions listed in this document
to program the local ID and name.
Data Coupler Information
This Xerox Document Centre 440/432/430/426/425/420
machine contains an internal data coupler. Its use is restricted
by the FCC (Federal Communications Commission). To
comply with the FCC rules, you must carefully read and follow
the instructions listed below.
This equipment complies with Part 68 of the FCC rules. On the
rear of this equipment is a label that contains, among other
information, the FCC registration number and Ringer
Equivalence Number (REN). If requested, provide this
information to your telephone company.
The REN is useful to determine the quantity of device s you
may connect to your telephone line and still have all of those
devices ring when your number is called. In most, but not all
areas, the sum of the RENs of all devices should not exceed
five (5.0). To be certain of the number of devices you may
connect to your line, as determined by the REN, you should call
your local telephone company to determine the maximum REN
for your calling area.
About This Guide
Xerox Document Centre 440/432/430/426/425/420 User Guide Page 1-11
Page 24

WARNING:Ask your local telephone company for the
modular jack type installed on your line. Connecting this
machine to an unauthorized jack can severely damage
telephone company equipment. You, not Xerox, assume
all responsibility and/or liability for any damage caused
by the connection of this machine to an unauthorized
jack.
You may safely connect the machine to the following standard
modular jack: USOC RJ-11C. Use the standard line cord (with
modular plugs) provided with the installation kit to connect it.
An FCC compliant telephone cord and modular plug is
provided with this equipment. This equipment is designed to be
connected to the telephone network or premises wiring using a
compatible modular jack which is Part 68 compliant.
Do not connect this machine to a party or coin operated phone
line.
Repairs to the machine should be made only by a Xerox
representative or an authorized Xerox service agency. This
applies at any time during or after the service warranty period.
If unauthorized repair is performed, the remainder of the
warranty period is null and void.
If you find the telephone line is damaged or the telephone
company notifies you that your machine is causing damage,
disconnect the machine from the telephone line and call for
service. Do not reconnect the machine until necessary repairs
are made.
The telephone company will, where practical, notify you when
they need to temporarily disconnect service. However, if action
is reasonable and necessary, but prior notice is not practical,
they may still temporarily disconnect your service. In such
cases they must:
¾ Immediately notify you of their temporary action.
¾ Reconnect service when the source of damage is removed.
¾ Inform you of your rights to bring a complaint to the FCC
under FCC rules.
Page 1-12 Xerox Document Centre 440/432/430/426/425/420 User Guide
Page 25

The telephone company may make changes to its
communications facilities, equipment, operations, or
procedures. Such action must be reasonable, required in the
operation of their business, and consistent with FCC rules.
They must give you prior written notification if the changes can:
¾ Make your machine incompatible with their equipment.
Canadian CSO3
¾ Require modification or alteration of the machine.
¾ Otherwise physically affect performance of the machine.
WARNING:When programming emergency numbers and/
or making test calls to emergency numbers:-
- Remain on the line and briefly explain to the dispatcher
the reason for the call before hanging up.
- Perform such activities in the off-peak hours, such as
early morning hours or late evenings.
Notice: The Industry Canada Label on the machine identifies
certified equipment. This certification means that the
equipment meets certain telecommunications networks
protective, operational and safety requirements. Industry
Canada does not guarantee the equipment will operate to the
user’s satisfaction.
Before installing this equipment, users should ensure that it is
permissible to be connected to the facilities of the local
telecommunications company. The equipment must also be
installed using an acceptable method of connection. In some
cases, the company’s inside wiring associated with a single
line individual service may be extended by means of a certified
connector assembly (telephone extension cord).
The customer should be aware that complia nce with the above
conditions may not prevent degradation of service in some
situations.
Repairs to certified equipment should be made by an
authorized Canadian maintenance facility designated by the
supplier. Any repairs or alterations made by the user to this
About This Guide
Xerox Document Centre 440/432/430/426/425/420 User Guide Page 1-13
Page 26

Laser Safety
equipment, or equipment malfunctions, may give the
telecommunications company cause to request the user to
disconnect the equipment.
Users should ensure for their own protection the electrical
ground connections of the power utility, telephone lines and
internal metallic water pipe system, if present, are connected
together. This precaution may be particularly important in rural
areas.
CAUTION:Users should not attempt to make such
connections themselves, but should contact the
appropriate electric inspection authority or electric ian, as
appropriate.
Notice: The Ringer Equivalence Number (REN) assigned to
each terminal device provides an indication of the maximum
number of terminals allowed to be connected to a telephone
interface. The termination on an interface may consist of any
combination of devices subject only to the requirement that the
sum of the Ringer Equivalence Numbers of all the devices
does not exceed 5.
This product complies with safety standards and is certified a s
a Class 1 Laser product under the US Department of Health
and Human Services (DHSS) Radiation Performance
Standard according to the Radiation Control for Health and
Safety Act of 1968. This product does not emit hazardous laser
radiation.
CAUTION:Use of controls or adjustments or performance
of procedures other than those specified herein may
result in hazardous exposure of laser light.
Since radiation emitted inside this product is completely
confined within the protective housing and external covers, the
laser beam cannot escape from the machine during any phase
of the user operation.
Page 1-14 Xerox Document Centre 440/432/430/426/425/420 User Guide
Page 27

The Center for Devices and Radiological Health (CDRH) of the
US Food and Drug Administration implemented r egulations for
laser products on August 1 1976. These regulations apply to
laser products marketed in the United States.The label on the
machine indicates compliance with CDRH regulations and
must be attached to laser products marketed in the United
States.
This product contains laser warning labels. These labels are
intended for use by Xerox Service Representatives and are
placed on or near panels or shields that require special tool s for
removal. Do not remove any of the panels. There are no
operator serviceable areas inside these covers.
About This Guide
Xerox Document Centre 440/432/430/426/425/420 User Guide Page 1-15
Page 28
Environmental Compliance
Energy Star
®
Environmental Choice
Xerox Corporation designed this product to comply with the
guidelines of the ENERGY STAR
Environmental Protection Agency. As an ENERGY STAR
Partner, Xerox has determined that this product meets the
ENERGY STAR
Your Document Centre 440/432/430/426/425/420 will be
delivered with the timer for switching to Low Power Mode from
the last copy/print out, set at 15 minutes. The time to switch to
power save (auto off/sleep) mode is set at 60 minutes from the
last copy/print out. A more detailed description of these modes
together with instructions on changing the default times to suit
your work pattern can be found in the “Power Save Modes” on
page 2-10 of this User Guide.
®
guidelines for energy efficiency.
®
program of the
M
Terra Choice Environmental Services, Inc., of Canada has
verified that this Xerox product conforms to all applicable
Environmental Choice
impact to the environment.
M
EcoLogoM requirements for minimized
®
Page 1-16 Xerox Document Centre 440/432/430/426/425/420 User Guide
Page 29

Illegal Copying
Congress, by statute, has forbidden the copying of the
following subjects under certain circumstances. Penalties of
fine or imprisonment may be imposed on those guilty of making
such copies.
¾ Obligations or Securities of the United States Government,
such as:
Certificates of Indebtedness
Coupons from Bonds
Silver Certificates
United States Bonds
Federal Reserve Notes
Certificates of Deposit
National Bank currency
Federal Reserve Bank Notes
Gold Certificates
Treasure Notes
Fractional Notes
Paper money
Bonds and obligations of certain agencies of the
government, such as FHA
Bonds (US Savings Bonds may be photographed only
for publicity purposes in connection with the campaign
for the sale of such bonds.)
Internal Revenue Stamps (If it is necessary to copy a
legal document on which there is a cancelled revenue
stamp, this may be done provided the reproduction of
the document is performed for lawful purposes.)
Postage Stamps, cancelled or uncanceled (For
philatelic purposes, postage stamps may be
photographed provided the reproduction is black and
white and less than 3/4 or more than
1 1/2 times the linear dimensions of the original.)
Postal Money Orders
About This Guide
Xerox Document Centre 440/432/430/426/425/420 User Guide Page 1-17
Page 30

Bills, checks, or drafts for money drawn by or on
authorized officers of the United States
Stamps and other representatives of value, of
whatever denomination, which may be or have been
issued under any Act of Congress
¾ Adjusted compensation Certificates for veterans of the
World Wars
¾ Obligations or Securities of any foreign government, bank,
or corporation
¾ Copyrighted material (unless permission of the copyright
owner has been obtained or the copying falls within the “fair
use” or library reproduction provisions of the copyright law).
Further information of these provisions may be obtained
from the Copyright Office, Library of Congress, Washington,
DC 20559 (circular R21)
¾ Certificates of Citizenship or Naturalization. (Foreign
naturalization certificates may be photographed.)
¾ Passports (Foreign passports may be photographed.)
¾ Immigration papers
¾ Draft Registration cards
¾ Selective Service Induction papers which bear any of the
following information:
Registrant’s earnings or income
Registrant’s dependency status
Registrant’s court record
Registrant’s previous military service
Registrant’s physical or mental condition
NOTE: Exception: US Army and Navy discharge certificates
may be photographed.
Page 1-18 Xerox Document Centre 440/432/430/426/425/420 User Guide
Page 31

¾ Badges, identification cards, passes or insignias carried by
military or Naval personnel, or by members of the various
Federal Departments and Bur eaus, such as the FBI and
Treasury (unless the pho tograph is ordered by the head of
such Department or Bureau)
Copying of the following is also prohibited in certain states:
automobile licences, driver’s licenses, and automobile
Certificates of Title. This list is not all-inclusive. In case of
doubt, consult your attorney.
About This Guide
Xerox Document Centre 440/432/430/426/425/420 User Guide Page 1-19
Page 32

Ground Fault Interrupter (GFI)
If a fault is detected in the power supply to the Document
Centre 440/432/430/426/425/420, a Ground Fault Interrupter
(GFI) device on the machine automatically removes all
electrical power. If power is interrupted, locate the GFI on the
right side of the machine, towards the back.
If the GFI has been activated:
- on the DC426/420 the switch will be in the down position.
-on the DC440/432/430/425 the switch will be in the left
position.
Flip the switch to restore power to the machine.
DC426/420
If the GFI interrupts power to the machine again, or if power
has not been restored by this procedure, call your Xerox
service representative.
Page 1-20 Xerox Document Centre 440/432/430/426/425/420 User Guide
DC440/432/430/425
Page 33

2 Product Overview
The Document Centre 440/43 2/430/426/425/420 is not simply
a conventional copier. It is a digital device capable of being
used for copying, faxing, printing and scanning, dependent on
the configuration.
For more information on available options, contact the local
Xerox representative.
The graphic representations of the touch screen throughout
this User Guide are based on a fully configured Document
Centre 440/432/430/425 with the Copy mode as the default.
The appearance of the touch screens may differ slightly on
other models or configurations. However, feature descriptions
and functionality as described, remain the same.
NOTE: The available features are dependant on the model
and configuration purchased.
Product Overview
Xerox Document Centre 440/432/430/426/425/420 User Guide Page 2-1
Page 34

Identifying the machine components
The following pages provide information about the Document
Centre components and control panel buttons as well as a
description of the services and modes available. Contact the
local Xerox Representative for more information.
Left
Tray
Bypass
Tray
Touch
Screen
Duplex
Module
Document
Feeder
Left
Front
Cover
Document Glass
(under the document feeder)
Control
Panel
Center
Tray
On / Off Switch
(426/420)
Paper
Trays
On / Off Switch
(440/432/430/425)
Page 2-2 Xerox Document Centre 440/432/430/426/425/420 User Guide
Page 35

NOTE: The Document Centre 425 Digital Copier is also
available as a single-sided copier only. The Document Feeder
will be replaced by a Document Glass Cover and a maximum
of 2 paper trays will be available. Limited features will be
available on this configuration.
Product Overview
Xerox Document Centre 440/432/430/426/425/420 User Guide Page 2-3
Page 36

Optional Components
The graphic below shows some of the optional components
available. Depending on the Document Centre configuration
the following may be already be available.
Finisher
High Capacity
Feeder (HCF)
Duplex module (DC420/425) Makes two-sided copies from one-sided and/or two-sided
documents. Refer to page 3-14 for more information.
NOTE: The Duplex Module is not an optional component on
the DC425 single-sided configuration.
Paper Tray 2 (426/420)
Paper Trays 3 & 4 (DC432/430/
425)
Page 2-4 Xerox Document Centre 440/432/430/426/425/420 User Guide
Similar to Tray 1, these trays can hold a maximum of 500
sheets of 20lb (substance 20) paper. Refer to “Paper and other
media” on page 10-1 for more information.
Duplex
Module
Paper Trays 3
& 4
Page 37

Envelope Tray Enables the printing of addresses on envelopes as an
alternative to using labels. It can hold a maximum of 70
envelopes of 24lb (substance 24) paper at one time. The
envelope tray can only be used in place of tray 1. Refer to
“Paper and other media” on page 10-1 for more information.
High Capacity Feeder (HCF) This tray is located on the left side of the machine, under the
Bypass Tray and Finisher or Left Tray. The tray can hold a
maximum of 2000 sheets of 20lb (substance 20) paper, 8 1 /2”
x 11”, long edge feed. Refer to “Paper and other media” on
page 10-1 for more information.
Finisher The Finisher can stack a variety of paper sizes from 5 1/2” x 8
1/2” through 11 x 17” and can handle a maximum of 1000
sheets of 20lb (substance 20) paper at one time. It can staple
up to 50 pages of 20lb (substance 20) paper in one set. Refer
to “Output” on page 3-10 for more information.
NOTE: The Finisher Stand or the High Capacity Feeder must
also be fitted with the Finisher.
Tower Mailbox The Tower Mailbox is only available on the Copier/Printer,
Copier/Fax/Printer. On the DC440/432/430/425 each bin can
hold approximately 100 sheets of 5 1/2” x 8 1/2” through 11 x
17” paper. On the DC426/420 each bin can hold approximately
70 sheets of 5 1/2” x 8 1/2” through 11 x 17” paper. Refer to
“Tower Mailbox” on page 8-5 for more information.
Product Overview
Convenience Shelf This two-tiered shelf attaches to the right hand side of the
machine. The shelf is useful as a work area.
Convenience Stapler If the Convenience Shelf is fitted, the Convenience Stapler can
also be installed to manually staple documents, or to staple
output if the Finisher option is not fitted. The stapler can handle
a maximum of 50 sheets of 20lb (substance 20) paper. Refer
to page 3-13 for more information.
NOTE: The Convenience Shelf can be installed without the
Convenience Stapler.
Xerox Document Centre 440/432/430/426/425/420 User Guide Page 2-5
Page 38

Editing Kit Allows editing tasks to be carried out on part or all of a
document. For more information refer to “Edit (optional)” on
page 3-30.
Fax The Fax option includes a digital modem with automatic
fallback capability supporting baud rates of 2.4 kbps to 14.4
kbps on the DC426/420 and bit rates up to 33.6 kbps on the
DC440/432/430/425. For more information refer to “Fax” on
page 4-1.
Multiple Fax Line (DC440/432/
430/425)
Hard Disk (DC426/420) The Digital Copier uses DRAM (Dynamic Random Access
If the Fax option has been installed on the DC440/432/430/
425, the Multiple Fax Line kit can also be purchased. This kit
enables the use of two telephone lines for sending and
receiving faxes. For more information refer to “Fax” on page 4-
1.
Memory) for permanent and temporary storage. The optional
hard disk provides additional storage space for large or
complex jobs.
Page 2-6 Xerox Document Centre 440/432/430/426/425/420 User Guide
Page 39

Power ON/OFF
Powering On
The 440/432/430/425 power
switch is located on the top of
the printer on the right hand
side.
¾ Locate the ON / OFF switch.
¾ Switch to I to turn the
machine on.
Ensure that the DC440/432/430/426/425/420 is connected to a
suitable power supply and that the power cord is fully plugged
in to the electrical outlet. For detailed technical information,
refer to “Specifications” on page 14-1. The DC440/432/430/
426/425/420 takes approximately 3 1/2 minutes to power ON
and complete a self test.
DC440/432/430/425
Product Overview
The DC440/432/430/425 digital copier will take approximately
55 seconds to power ON.
Xerox Document Centre 440/432/430/426/425/420 User Guide Page 2-7
Page 40

On the DC426/420 the power
switch is located on the right
hand side of the printer.
¾ Locate the ON / OFF switch.
¾ Switch to I to turn the
machine on.
DC426/420
The DC426/420 digital copier will take approximately 59
seconds to power ON.
Page 2-8 Xerox Document Centre 440/432/430/426/425/420 User Guide
Page 41

Powering Off
When powering off the DC440/432/430/426/425/420, the
machine remains on for approximately 10 seconds before the
power is terminated. The machine is storing files and preparing
for the shutdown.
CAUTION:Failure to leave at least 20 seconds between
repeated power off /on can result in damage to the DC440/
432/430/426/425/420 hard drive.
NOTE: If the Printer option is inst alled and the power is turned
off, the DC440/432/430/426/425/420 will remain on for
approximately 15 seconds before the power is terminated.
Product Overview
Xerox Document Centre 440/432/430/426/425/420 User Guide Page 2-9
Page 42
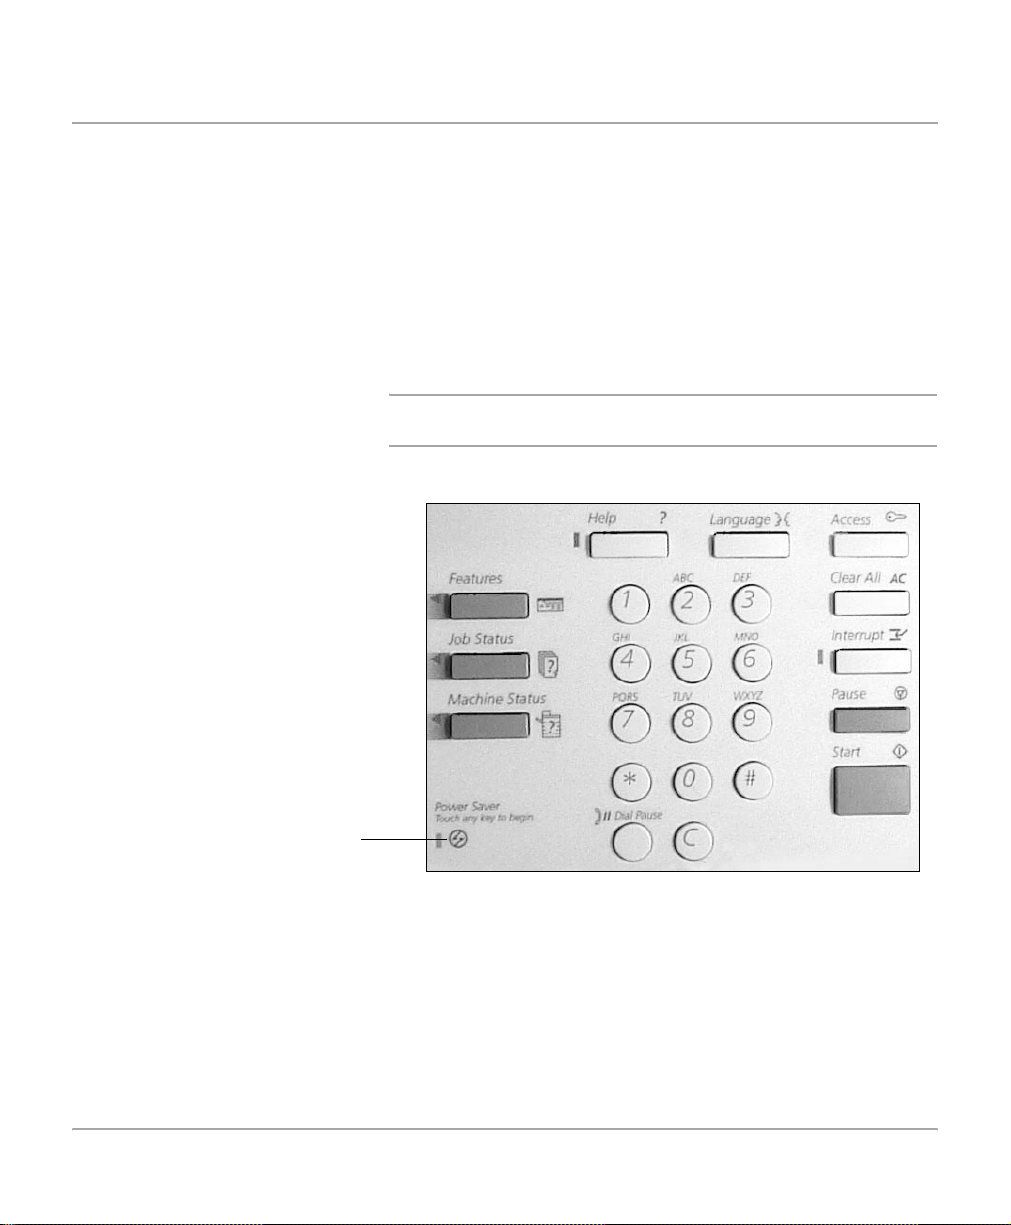
Power Save Modes
The DC440/432/430/426/425/420 has energy saver features
which significantly reduce the power consumption during
periods of inactivity. The Power Save Indicator is a light,
located on the lower-left portion of the control panel.
The Power Save feature operates in three modes:
- Stand-by
-Low Power
- Power Save (Auto Off/Sleep)
NOTE: The behavior of these modes will depend on the
configuration of the machine.
Power Save
Indicator light
Page 2-10 Xerox Document Centre 440/432/430/426/425/420 User Guide
Page 43

Stand-by Mode
Prior to entering Low Power or Power Save (Auto Off/Sleep),
the machine is in Stand-by Mode whenever it is not copying,
faxing, scanning or printing a job. The touch screen is visible
and ready to be programmed.
Low Power Mode
As delivered, the machine automatically switches into Low
Power Mode 15 minutes after the last copy/print out. In this
mode, the touch screen is blank and the Power Save Indicator
light is on.
The machine is re-activated if the touch screen or any button
on the control panel is touched, the document feeder is loaded,
a paper tray opened, a job is submitted to the print queu e (fax
receive or network print), or a fax or print job arrives in the print
queue. The machine responds within one second and all the
features are available within 30 seconds.
The factory default setting of 15 minutes is customer
changeable within the range of 5 to 240 minutes. For more
information refer to “Changing the Default Time Settings” on
page 2-12.
Power Save Mode (Auto Off/Sleep)
As delivered, the machine automatically switches into Power
Save (Auto Off/Sleep) Mode, 60 minutes after the last copy/
print out. In this mode the copier version of the DC 426/420
switches the Power ON/OFF switch to the off position. Any
stored jobs remain in the memory and the DC 426/420 returns
to an operational condition when powered ON.
In Power Save (Auto Off/Sleep) Mode on the copier/printer/fax
version of the DC 426/420 and all DC 440/432/430/425
configurations, the touch screen is blank and the Po wer Save
light is lit. The machine is re-activated if the touch screen or any
button on the control panel is touched, the do cument feeder is
loaded, a paper tray opened, a job is submitted to the pr int
Product Overview
Xerox Document Centre 440/432/430/426/425/420 User Guide Page 2-11
Page 44

queue (fax receive or network print), or a fax or print job arrives
in the print queue. The machine responds within one second
and all the features are available within 50 seconds.
NOTE: The machine will not exit Power Save (Auto Off/Sleep)
mode if a fax job arrives and the fax enabled trays are empty.
The job will be held in memory until either the control panel is
touched or paper is loaded.
The factory default setting of 60 minutes is customer
changeable within the range of 5 to 240 minutes, d epending on
work pattern.
Changing the Default Time Settings
¾ Select [Access] on
the control panel.
Page 2-12 Xerox Document Centre 440/432/430/426/425/420 User Guide
Page 45
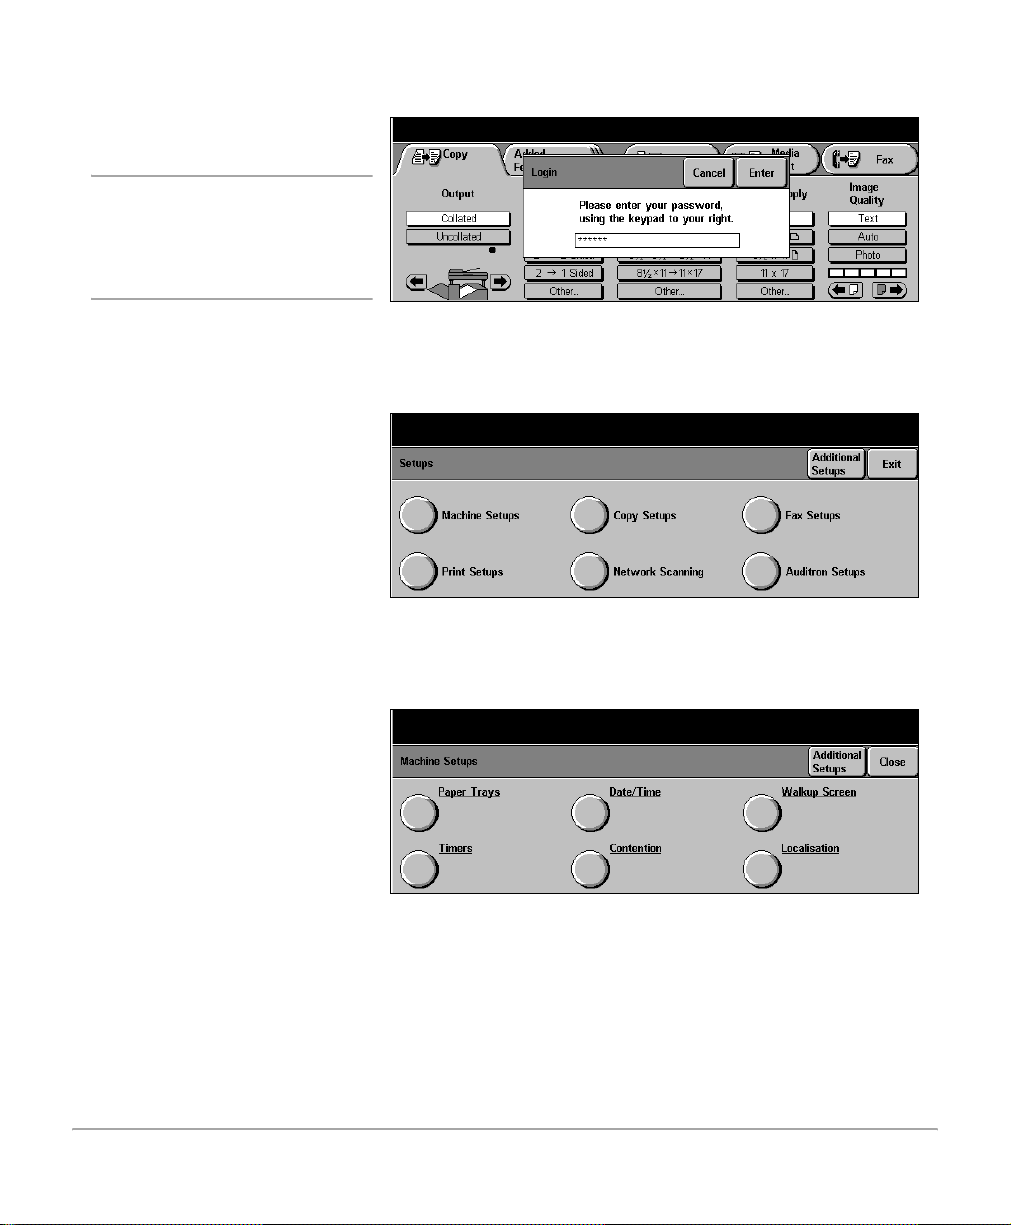
¾ Enter the password using the
keypad and select [Enter].
NOTE: User access to Setups
is password protected. Please
contact the Key Operator or
refer to “Setups” on page 11-1
for assistance.
¾ Select [Machine Setups].
Product Overview
¾ Select [Timers].
Xerox Document Centre 440/432/430/426/425/420 User Guide Page 2-13
Page 46
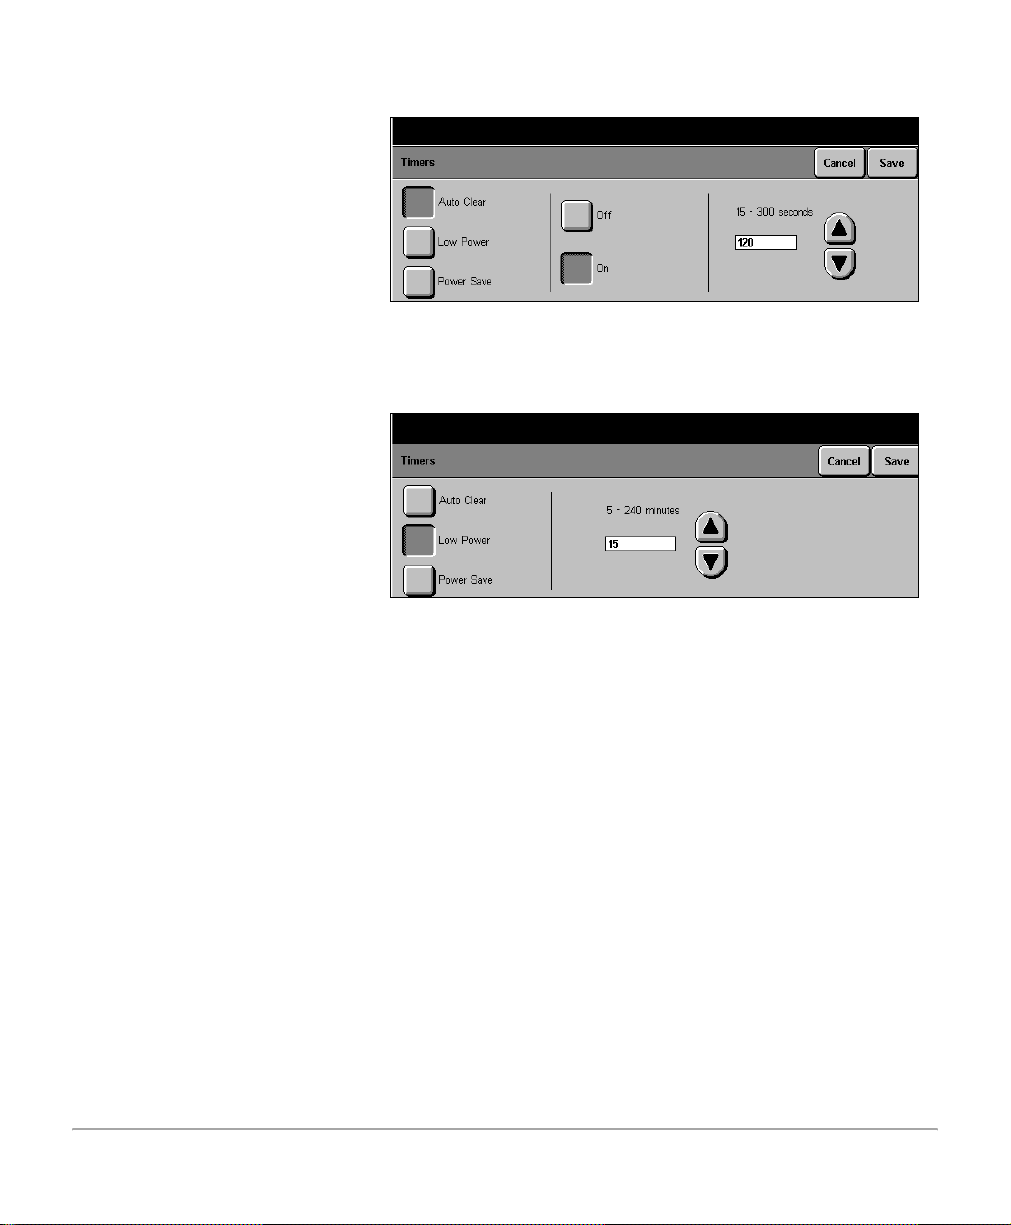
Select the option required.
¾
¾ The touch screen displays
the current timer value. Use
the scroll buttons to apply the
new setting and select
[Save].
¾ Select [Close].
¾ Select [Exit]. The touch
screen displays ‘Please
wait...exit routine in
progress’. After a few
seconds the screen reverts to
the standard display. The
timer settings have now been
changed.
Page 2-14 Xerox Document Centre 440/432/430/426/425/420 User Guide
Page 47

Recycled Paper
The DC 440/432/430/426/425/420 has established
performance with the use of recycled paper with its consequent
benefits to the environment.
Xerox recommends the following recycled paper that can be
obtained both through Xerox and many other office suppliers.
- 3R6296 8 1/2”x 11”, 20lb
consumer waste
- 3R6299 11” x 17”, 20lb 2500 sheets with 30% post
consumer waste
The above is a small sample from a range of recycled media
available from Xerox - including a variety of different sizes,
weights and colors.
5000 sheets with 30% post
Product Overview
Xerox Document Centre 440/432/430/426/425/420 User Guide Page 2-15
Page 48

Modes
Features button
Job Status button
There are three modes available on the machine:
-Features
- Job Status
- Machine Status.
The mode buttons access the screens which enable users to
program features, monitor the status of jobs on the machine
and obtain general information about the DC440/432/430/426/
425/420.
NOTE: The features available will depend on the machine
configuration.
Machine Status button
Page 2-16 Xerox Document Centre 440/432/430/426/425/420 User Guide
Page 49

Features button
¾ Select [Features] on the
control panel to display the
default screen.
NOTE: The first Copy screen is
normally the default setting.
This can be changed by the
Key Operator.
Select this button to access the feature screens. Each “screen”
is accessed by a tab. The first screen for each tabbed feature
contains all the basic settings required for each feature. For
example, the first Copy screen enables programming to make
a copy and the first Fax screen to send a fax. The additional
screens provide settings to allow further programming
selections.
Machines connected to the network are able to support two
types of walk up fax - Embedded Fax or Server Fax. Both fax
services can be installed on the machine BUT only one can be
enabled at any one time. Whichever service is enabled, the
Fax feature tab will be available for selection. Please refer to
“Fax” on page 4-1 for more information.
Product Overview
All Services
The All Services button will be available for selection when the
touch screen is not able to display the feature buttons for all the
installed services.
Xerox Document Centre 440/432/430/426/425/420 User Guide Page 2-17
Page 50

¾ Select [All Services].The
pop-up window will be
displayed.
¾ Select the Feature option
required or select [Close] to
cancel.
Job Status button
¾ Select [Job Status] on the
control panel.
The Print Queue is the default
setting and will be automatically
displayed.
¾ Select [Other Queues] to
display the queues available.
Use Job Status to check on the progress of a job and if
necessary to change its position in a queue.
NOTE: The queues available are dependent on the machine
configuration.
Print Queue Maintains pending and active jobs that are to be printed. These
include copy jobs, network print jobs, fax print jobs and report
jobs.
Completed Print Jobs Queue Maintains all print jobs that have been successfully completed,
canceled by a user or canceled due to a fault.
Fax Queue Maintains all pending Embedded Fax transmission jobs
including send, broadcast send, poll, multi-poll and any current
active Embedded Fax jobs. This queue will also include all Fax
Page 2-18 Xerox Document Centre 440/432/430/426/425/420 User Guide
Page 51

scan jobs for delayed Embedded Fax jobs including send,
Mailbox and polling reservation. Only outgoing Server Fax jobs
will be displayed in this queue.
Completed Fax Jobs Queue Maintains all Fax jobs that have been successfully completed,
canceled by a user or canceled due to a fault. Certain failed fax
jobs will be maintained in the machine memory and available
for re-submission. Inbound Server Fax jobs do not appear in
the queue.
Scan Queue Maintains all active and pending Network Scanning and E-mail
jobs.
Product Overview
Completed Scan Jobs Queue
(440/432/430/425)
Machine Status button
¾ Select [Machine Status] on
the control panel. The screen
shown will be automatically
displayed.
¾ To exit Machine Status,
select [Job Status] or
[Features] at any time.
Maintains all Network Scanning and E-mail jobs that have
been successfully completed, canceled by a user or canceled
due a fault.
Displays information about the DC 440/432/430/426/425/420.
Select this button to confirm the paper supply, review the status
of faults and find information required for service calls.
NOTE: Machine Status cannot be accessed during a system
fault, when the confirmation window is displayed, or when the
Key Operator Tools is ac cessed on the touch screen.
Xerox Document Centre 440/432/430/426/425/420 User Guide Page 2-19
Page 52

Machine Information
Displays the Customer Support Number, Machine Serial
Number, and Software levels.
Paper Supply Status
Displays the status of each paper tray, the bypass tray, and the
optional high capacity feeder. It also displays the size, type,
and color of the media in each tray and whether or not
embedded fax printing is enabled for each tray (if embedded
fax is installed). The Key Operator sets the defaults and
enables specific paper for printing fax documents.
Page 2-20 Xerox Document Centre 440/432/430/426/425/420 User Guide
Page 53

Faults
Displays a list of the six most recent faults, the date and time
of the code and the status (active or cleared). Select the Fau lt
Clearance Instructions button for assistance when clearing an
active fault.
Reports and Counters
Print Reports
Accesses the various reports available for printing.
Product Overview
- Options Report (DC 426/420) - lists the options currently
connected to the machine.
- Pending Jobs Report - lists the jobs that are still in
memory and the available memory.
Xerox Document Centre 440/432/430/426/425/420 User Guide Page 2-21
Page 54

- Printer Configuration - lists the status of the printer
options, installed options, PCL options, PostScript options
and connectivity options.
NOTE: If enabled, the Printer Configuration Report will
automatically print after the machine has been successfully
powered up.
- PostScript Font List - lists the available PostScript fonts
for the printer.
- PCL Font List - lists the available PCL fonts for the printer.
Account Information
When the Auditron is enabled use this screen to review the limit
and current count for your account number.
Counters
Displays the total number of prints made on the machin e.
Users can also review the counter for individual modes,
however if a mode is not installed on the machine the counters
button for that mode will not be displayed, for example if Fax is
not installed, the counters screen will not display a fax button.
On receipt of a Xerox meter card, check that the serial number
on the card matches that shown on the machine, if the
information is correct enter the Machine counter reading in the
relevant box and return the pre-paid card to Xerox.
Page 2-22 Xerox Document Centre 440/432/430/426/425/420 User Guide
Page 55

¾ Select [Machine Status].
¾ Select [Reports &
Counters].
¾ Select [Counters].
¾ The ‘Total Pages Printed’
billing counter for the
machine will be displayed.
Enter this number on the
meter reading card.
¾ To review the counter for an
individual mode, select the
required feature button.
NOTE: If available, select
[Additional Counters] to
access more mode buttons.
¾ Select [Exit].
Product Overview
¾ To exit [Machine Status],
select either [Job Status] or
[Features].
NOTE: The Services button displays the number of copies/
prints made by the Xerox Service Representative working in
the diagnostics mode.
Xerox Document Centre 440/432/430/426/425/420 User Guide Page 2-23
Page 56

System controls
Help (?) button -
accesses
additional
information about
a specific task.
Language button changes the text to
an alternative
language (when
available).
Access button
- displays a pop-up
login window to access
the Set-up Tools used
to adjust the defaults of
the machine.
Clear All (AC)
button - resets the
default settings and
displays the first
screen for the
current pathway.
*(asterisk)
button - used to
indicate the
dialling character.
Also used as a
wildcard speed
dial character.
Power Save
Indicator Light -
identifies when
the machine is in
Power Save (Auto
Off/Sleep) mode.
Dial Pause button used to enter a
pause in a
telephone number
when transmitting a
fax.
Clear button used to delete a
numeric value or
the last digit
entered. Also
replaces the current
value with a default
value.
Interrupt button temporarily
interrupts a job to
enable a priority job
to be programmed.
Pause (Stop)
button - used to
temporarily stop a
job.
Start button -starts
a job.
# (hash) button - used
to indicate the dialing
character, to designate
a group dial number,
also used when
entering a password.
Page 2-24 Xerox Document Centre 440/432/430/426/425/420 User Guide
Page 57
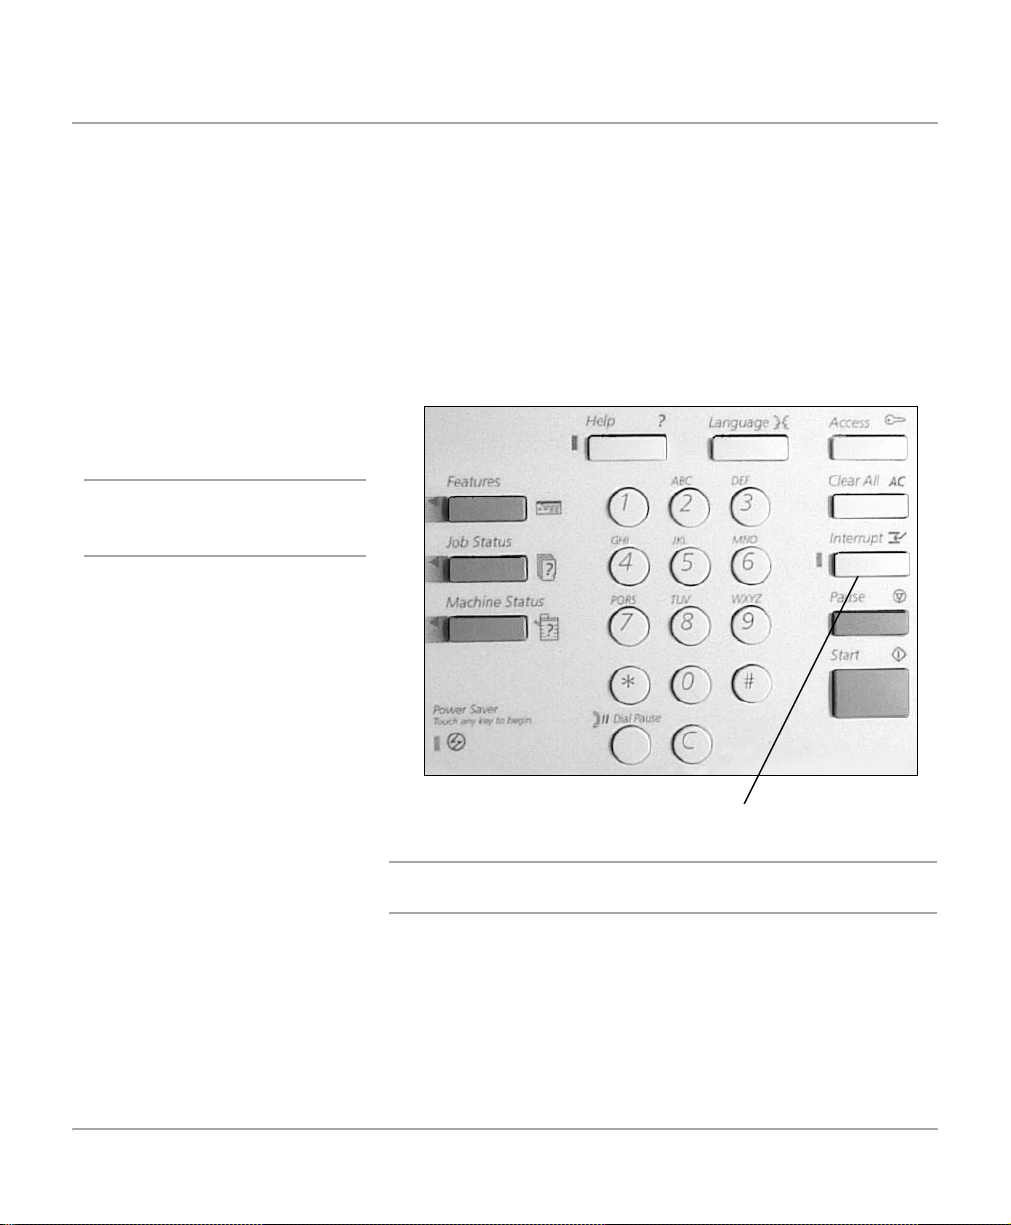
Job Interrupt
Job Interrupt is used to temporarily suspend the curren t
copying/printing to allow an urgent copy job to be completed.
When using job interrupt only a limited range of features will be
available for programming.
The System Administrator can set up Job Interrupt as follows:
Interrupt on Set Boundary the machine will finish printing the current set.
Interrupt on Page Boundary the machine will finish printing the current page.
¾ Select [Job Interrupt]. The
indicator light will be lit.
NOTE: The Document Centre
identifies a convenient point to
interrupt the current job.
¾ Program the job.
¾ Select [Start]. The interrupt
job will be completed.
Product Overview
¾ Select [Job Interrupt] and
follow the screen messages
to continue the interrupted
job.
Job Interrupt button
NOTE: Interrupt jobs cannot be pr omoted, released or deleted
in the Print Queue.
Xerox Document Centre 440/432/430/426/425/420 User Guide Page 2-25
Page 58
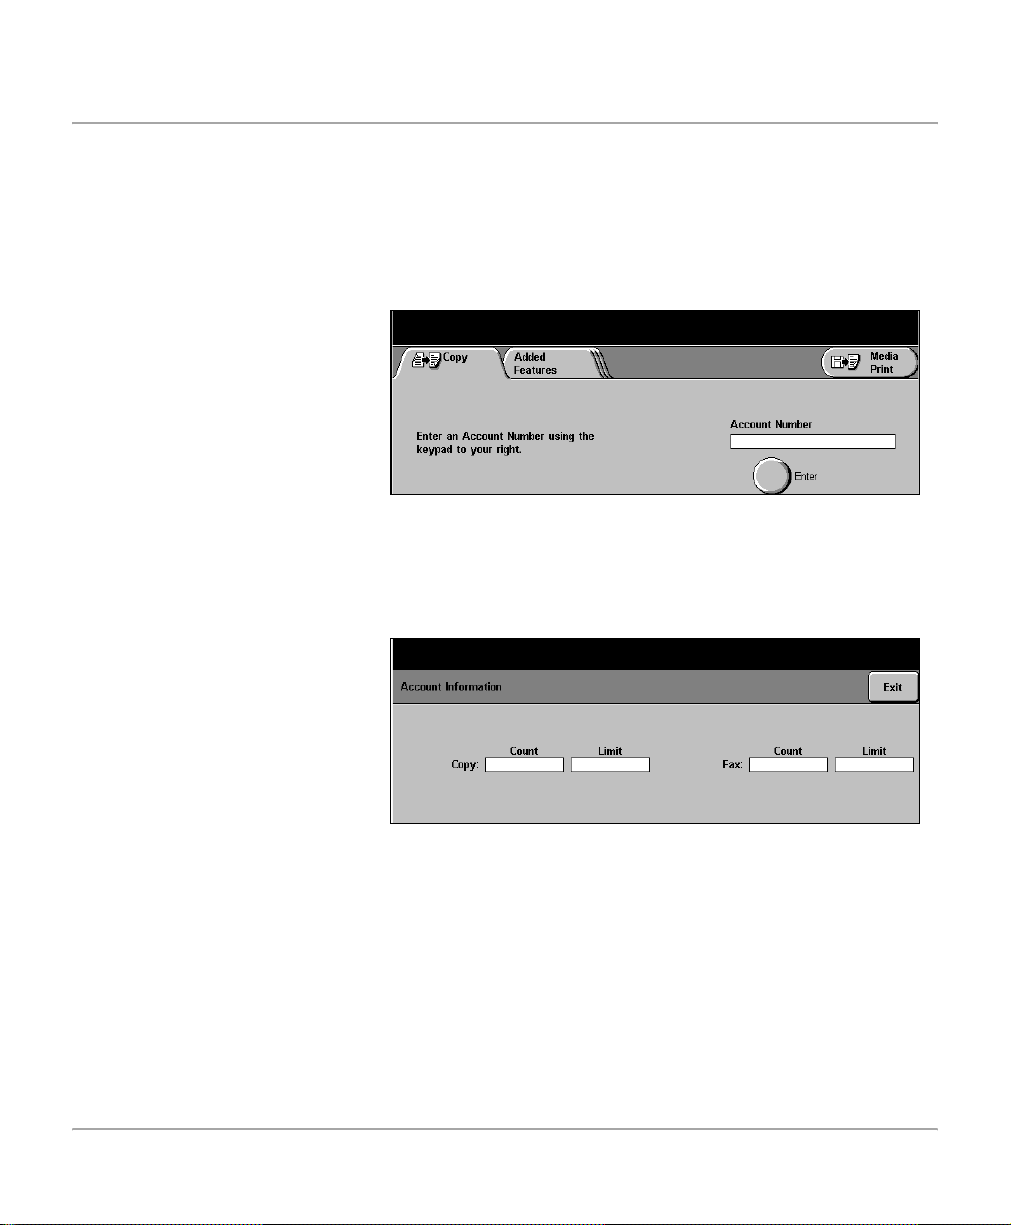
Auditron Access Screen
The Auditron is a feature of the machine which automatically
tracks usage. If Auditron is enabled, an account number must
be entered. For account number allocation, or further
information about the Auditron, please contact the Key
Operator.
¾ Use the numeric keypad to
enter the account number.
¾ Select [Enter].
¾ Make feature selections as
required to complete the job.
¾ To exit the account, select
[Clear All] twice.
Whilst still logged on, use the following steps to review the
status of the account.
¾ Select [Machine Status] on
the control panel to the right
of the touch screen.
¾ Select [Account
Information].
¾ The screen shown will be
displayed with the count for
Copy and/or Fax jobs
completed and the limit set
for the account.
¾ Select [Exit] to close the
screen.
Page 2-26 Xerox Document Centre 440/432/430/426/425/420 User Guide
Page 59

Information Sources
In addition to the graphic and message display, the following
information sources are designed to provide guidance and
information when making copies.
¾ Select [Help] at the top lef t of
the numeric keypad.
¾ Select the feature you want
more information about.
¾ If available select
- Page to scroll through the
options page by page,
- System to gain help about
the machine,
- Index for a list of features
available.
¾ Select [Close] to exit the
help screens.
Using the Help (?) button
The Help (?) button on the control panel, provides additional
information about a specific task. The Help system also
provides context-sensitive help - specific information to the
task being carried out. The help screens can be reviewed in
Features, Job Status and Machine Status modes.
Product Overview
NOTE: Jobs cannot be programmed when using the Help
screen.
Xerox Document Centre 440/432/430/426/425/420 User Guide Page 2-27
Page 60

Labels
Located on the machine at point-of-need throughout the
machine, labels provide guidance when, for example, clearing
paper jams or loading documents.
User Documentation
There are 2 books available which fully describe the operation
of the system.
- User Guide: All operational, maintenance and machine
setup procedures.
- DC440/432/430/426/425/420ST System Administration
Guide: Information on Network installation and setup
procedures.
Page 2-28 Xerox Document Centre 440/432/430/426/425/420 User Guide
Page 61

3Copy
Copy
This chapter contains information about th e Copy screen and
the features available.
Xerox Document Centre 440/432/430/426/425/420 User Guide Page 3-1
Page 62
Copying procedure
Quick Pathway
¾ Load documents.
¾ Press [Features].
¾ If necessary select
[Copy].
¾ Select the Copy
features required.
1. Load the documents
Before making copies on the DC440/432/430/426/425/420,
identify what is to be copied and the number of copies r equired.
Use the following steps to make a copy using the Document
Centre.
NOTE: If the Auditron has been enabled on the machine, an
account number may be required before programming can
commence. For account allocation, or further information
about the Auditron, please contact the Key Operator.
HINT: When programming a copy job on a network
connected machine, select Job Interrupt first. The Document
Centre will not complete any network jobs allowing the copy
job to be programmed and completed without interruption.
Refer to “Job Interrupt” on page 2-25 for more information.
A choice of document input areas is available. These are:
- A document feeder for single or multiple documents
- A document glass for single documents or bound
originals.
NOTE: A document glass cover will be fitted on the DC425
cabinet configuration.
Document Feeder
Up to 50 documents can be scanned at one time using the
document feeder. Ensure the documents are of the same size,
in good condition and all staples or paper clips removed.
Page 3-2 Xerox Document Centre 440/432/430/426/425/420 User Guide
Page 63

NOTE: To reduce the risk of document feeder jams, place
folded or creased documents on the Document Glass and
make a copy. Replace folded or creased documents with the
new copy.
Documents should be 16 - 32lb (substance 16 - 32) and 8 1/2”
x 5 1/2” through 8 1/2” x 11” long edge feed or 5 1/2” x 8 1/2”
through 11” x 17” short edge feed.
The Document Feeder senses only standard sizes. If the
documents include non-standard sizes, copy them from the
Document Glass. If the sensor cannot detect the size, it scans
the entire glass area and prints on 8 1/2” x 11” inch pa pe r.
Image loss might occur if the original is larger than 8 1/2” x11”
inch.
NOTE: If feeding Computer Fan Fold through the Document
Feeder always remove the perforated feed edge first.
NOTE: For information about copying mixed size originals
using the document feeder please refer to page 3-23. For
instructions on faxing mixed size originals using the document
feeder refer to page 4-33.
Copy
Xerox Document Centre 440/432/430/426/425/420 User Guide Page 3-3
Page 64

¾ Before placing the
documents into the document
feeder, remove all staples
and paper clips.
¾ Insert the documents neatly
into the document feeder,
face up. The first page should
be on top with the headings
towards the back or left of the
machine.
¾ Align the stack with the left
and rear edges of the
document feeder tray and
position the guide to just
touch the edge of the
documents.
¾ Check the green light on the
top rear of the document
feeder. When the documents
are positioned correctly , it will
light up.
Light
Document Feeder Guide
When Auto paper is selected, the docu ment feeder senses the
size and orientation of the documents, then checks the paper
trays to find one that corresponds. The size and or ientation are
displayed in the message area in the upper left hand corner of
the touch screen.
NOTE: This applies when paper supply is set to Auto and
used with standard document sizes. For non-standard sizes,
manually select the paper tray required.
Document Glass
The document glass should be used for single pages or bound
originals up to a maximum of 11” x 17” size.
Page 3-4 Xerox Document Centre 440/432/430/426/425/420 User Guide
Page 65

.
¾ Raise the document feeder or
the document glass cover, if
fitted.
¾ Place the document face
down onto the document
glass, aligned with the tip of
the registration arrow near
the top left of the document
glass.
Copy
Pic of document feeder being raised
¾ Lower the document feeder.
Xerox Document Centre 440/432/430/426/425/420 User Guide Page 3-5
Page 66

Constant Velocity Transport Glass
The Constant Velocity Transport (CVT) glass is the narrow
strip of glass located at the left hand side of the document
glass. When documents are fed from the document feeder, the
CVT glass automatically scans the images into memory, and
does not apply to documents placed on the glass.
Constant Velocity
Transport Glass
2. Select the Features button
¾ Select [Features] located on
the left of the numeric
keypad. Ensure that the first
Copy screen is displayed.
Page 3-6 Xerox Document Centre 440/432/430/426/425/420 User Guide
Page 67

¾ Select [Clear All] once to
cancel any previous screen
programming selections.
NOTE: Selecting Clear Al l twice
will clear all the programming
pathways and return the
machine to its default status.
Features Button
3. Select the features
Copy
Clear All Button
The features available on the first Copy screen are those used
most often. Many of the features contain a selection called
Other. Select this option to access additional programming
options.
NOTE: Only those features relevant to the machine
configuration will be available.
¾ Select the button for the
feature required. The button
changes to white. If Other is
selected, select [Save] to
confirm the selected feature
or [Cancel] to return to the
previous screen.
Xerox Document Centre 440/432/430/426/425/420 User Guide Page 3-7
Page 68

4. Enter the quantity
U
DC440/432/430/425 On the DC440/432/430/425 the maximum copy quantity is 999.
DC426/420 On the DC426/420 the maximum copy quantity is 250.
¾
se the numeric keypad to
enter the number of copies
required. The number
entered is displayed in the
top right hand corner of the
touch screen.
For a more detailed explanation of the standard features
available on the touch screen please refer to the following
pages:
- Output - page 3-10
- Sides Imaged - page 3-14
- Reduce / Enlarge - page 3-16
- Paper Supply - page 3-18
- Image Quality - page 3-20
To cancel an incorrect entry,
select [C] and enter the correct
quantity.
Page 3-8 Xerox Document Centre 440/432/430/426/425/420 User Guide
Page 69

5. Select Start
¾ Select [Start]. Each
document is scanned once
only . The size and orient ation
are displayed in the upper left
hand corner of the touch
screen.
If a resource problem or
programming conflict prevents
the job completing, a message
will be displayed. Follow the
message to resolve the
problem.
On completion, remove the
scanned documents from under
the document feeder or from the
document glass.
6. Identify the copy job in the Print Queue
Copy
Start button
¾ Select [Job Status] on the
control panel to display the
Print Queue.
¾ The job will be displayed in
the queue. If there are no
jobs in the queue, the job
may have already been
processed.
NOTE: Refer to “Managing
Copy Jobs” on page 3-53 for
more detailed information.
Xerox Document Centre 440/432/430/426/425/420 User Guide Page 3-9
Page 70

Standard Features - Copy
Quick Pathway
¾ Select [Features] on
the control panel.
¾ If necessary select
[Copy].
¾ Select the features
available on the first
[Copy] screen.
Use the first Copy screen to select the standard features for a
copy job. For more information about the features available
refer to the following:
Output - page 3-10
Sides Imaged - page 3-14
Reduce / Enlarge - page 3-16
Paper Supply - page 3-18
Image Quality - page 3-20
NOTE: Only those features relevant to the machine
configuration will be available.
Output
Depending on the machine configuration the Document Centre
can be installed with a Tray, a Left Tray and a Finisher.
NOTE: A6 size paper should not be fed to the Finisher.
The Center Tray is the default output tray. Output will be
delivered face down and offset to the Center Tray. Copy sets
delivered to the Left Tray will be face up and are not offset.
Page 3-10 Xerox Document Centre 440/432/430/426/425/420 User Guide
Page 71

NOTE: The Left Tray will not be available when custom size
paper has been programmed.
Output Icon
HINT: Use the Output Icon located on the lower left hand side
of the screen to quickly and easily switch from the Center Tr ay
to the Left Tray.
Copy
Collated
This option delivers the specified number of copy sets to the
1,2,3.
1,2,3.
Center Tray in the same order as the documents. If selecting
two copies of a three-page document, the order of the output
will be pages 1-2-3,1-2-3.
Uncollated
This option delivers the copies to the Center Tray in the order
3,3..
2,2..
1,1..
Xerox Document Centre 440/432/430/426/425/420 User Guide Page 3-11
based on the total number of copies for each document. The
order of the output for two copies of a three-page docu ment will
be 1-1, 2-2, 3-3.
Page 72

Stapled (optional)
If the Finisher has been fitted, the Stapled option will be
available.
1,2,3.
¾ Select and release the button
on the top of the Finisher.
The green light next to the
button is lit.
NOTE: The Finisher is not available on the DC425 singlesided configuration.
The Finisher can staple either 8 1/2” x 11” x 17” in sets of 2 to
50 sheets of 20lb (substance 20) paper either automatically or
manually. The staple cartridge holds 5000 staples.
NOTE: Uncollated is not available for stapled copies.
Automatic Stapling using the Finisher
Automatic stapling occurs when the stapled option has been
selected on the touch screen.
Manual Stapling using the Finisher
The Finisher stapler can also be used to staple documents
manually. Use the following steps to manually staple a set of
documents.
NOTE: If a job is currently in
process, the light will flash wait until the job finishes.
Page 3-12 Xerox Document Centre 440/432/430/426/425/420 User Guide
Page 73
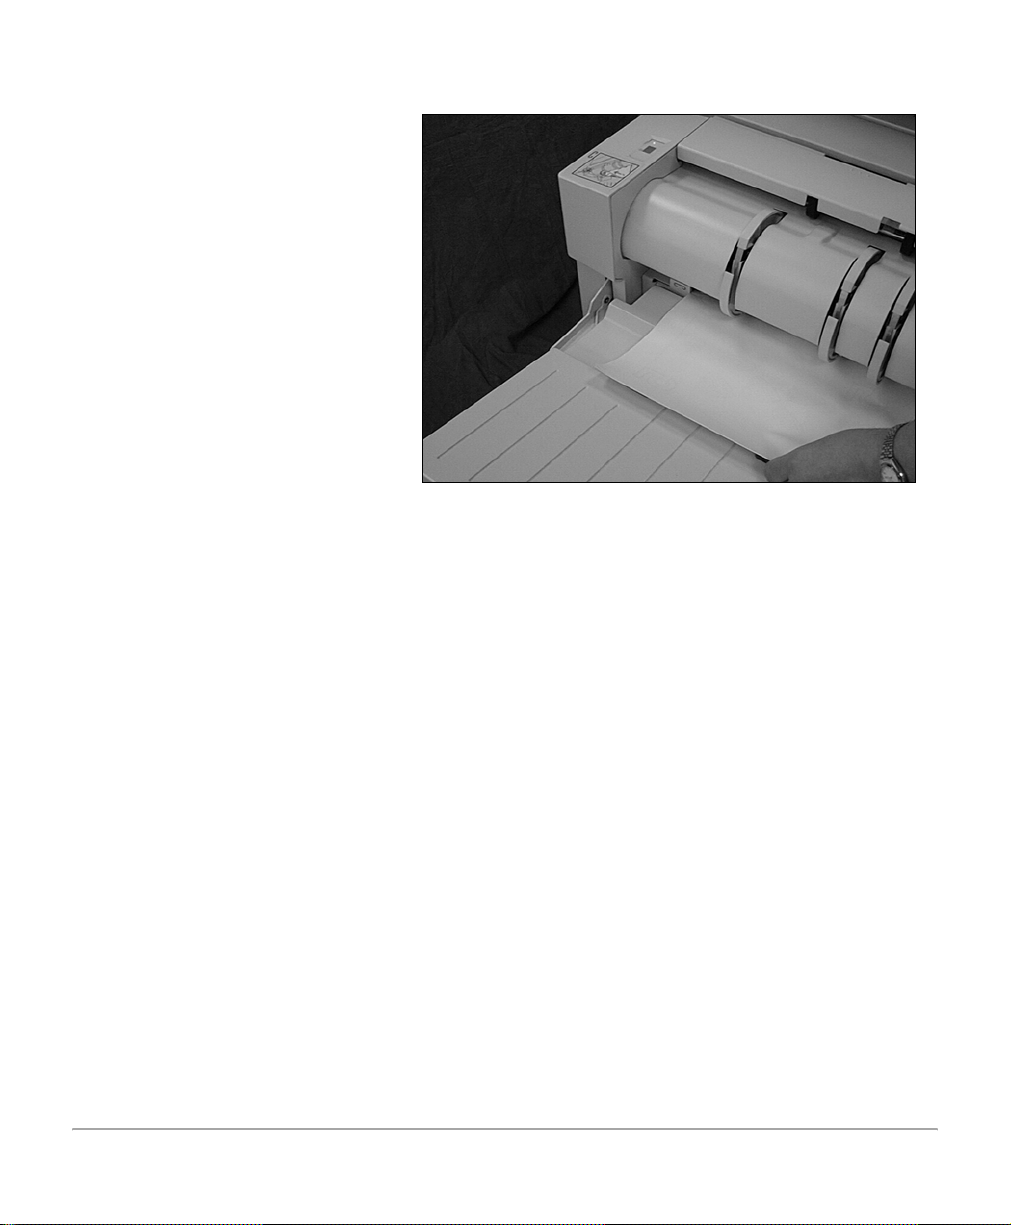
¾ Place the documents face
down and long edge feed
over the green rectangle with
the left edge of the
documents against the tab of
the Staple Cartridge Door.
¾ Slide the documents forward
until you hear the click of the
staple being inserted. The
staple is inserted in the upper
left corner of the documents.
¾ Remove the stapled set from
the Finisher.
Copy
Convenience Stapler (optional)
The Convenience Stapler is an optional extra and can be
installed if the Convenience Shelf is fitted. It attaches to the
right hand corner at the rear of the shelf and is positioned so
that documents can be stapled straight or at an angle.
The Convenience Stapler can staple sets of 2 to 50 sheets of
20lb (substance 20) paper. The staple cartridge holds 5000
staples.
Xerox Document Centre 440/432/430/426/425/420 User Guide Page 3-13
Page 74
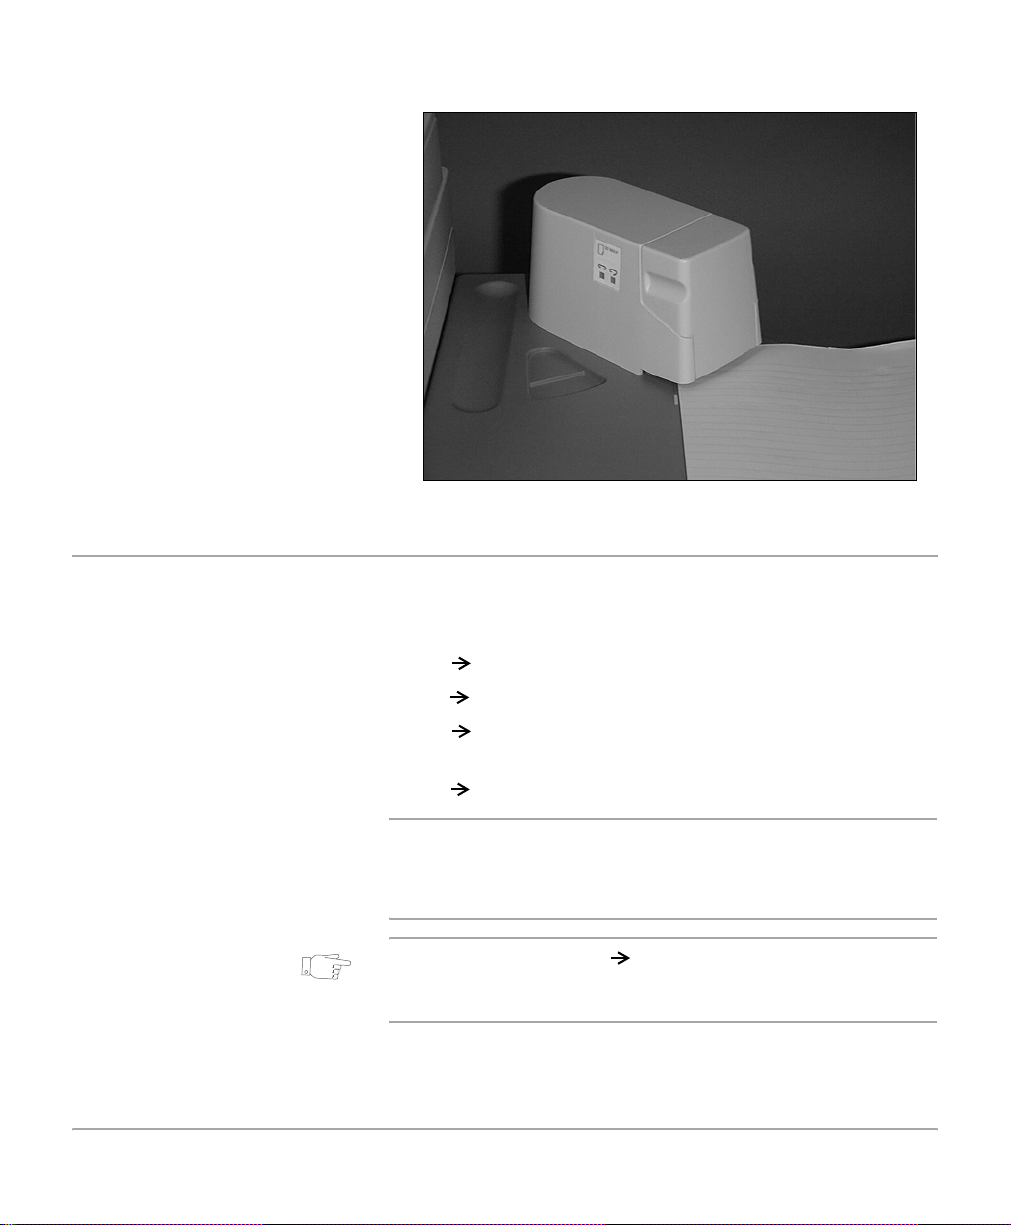
¾ With the documents face up,
slide the corner to be stapled
into the stapler.
¾ The stapler will automatically
staple the documents.
• During stapling the
indicator light on the left
hand side of the stapler will
be lit.
¾ Remove the stapled set from
the Convenience Stapler.
Sides Imaged
Up to 50 double-sided copies, ranging in size from 8 1/2” x 5 5
1/2” through 11 x 17” can be made automatically from one or
two-sided documents.
• 1 1: single-sided copies from single-sided documents.
• 1 2: double-sided copies from single-sided documents.
• 2 2: double-sided copies from double-sided
documents.
• 2 1: single-sided copies from double-sided documents.
NOTE: The machine copies the second side of a document
first. When making double-sided copies using drilled or preprinted paper, load the paper the opposite way round to the
single sided copying instruction label on the tray.
HINT: When using the 1 2 option and the document glass,
the machine will display a message when it is ready to scan
side 2.
Page 3-14 Xerox Document Centre 440/432/430/426/425/420 User Guide
Page 75

NOTE: The 2-sided options are not available on the DC425
single-sided configuration.
Orientation
Select the Other option to access the Orientation features.
DC440/432/430/425 Select the Other option and the n either 1 2, 2 1 and 2
‘ 2 to access the following orientation options available:
Head to Head—the output will be the same orientation as the
documents.
Head to Toe—the output will be rotated 180
side.
Portrait—the image appears in the portrait orientation.
Landscape—the image appears in the landscape orientation.
The following illustration depicts the results for Head to Head
or Head to Toe selections for Portrait and Landscape images.
o
on the second
Copy
Xerox Document Centre 440/432/430/426/425/420 User Guide Page 3-15
Page 76

Portrait ImagesLandscape Images.
Head to Head
for binding on the long edge
B
A
Head to Toe Head to Toe
for binding on the short edge
A
B
DC426/420 select the Other option and then 1 2 to access the following
orientation options available:
Head to Head—the output will be the same orientation as the
documents.
Head to Toe—the output will be rotated 180
NOTE: Inserts can not be programmed with 1 2. Bound
Originals and Build Job are not available with 1 2 selected
when using the document glass. Tabbed sto ck, envelopes and
transparencies will not feed through the Duplex Module.
Head to Head
for binding on the short edge
A
for binding on the long edge
B
A
B
o
.
Reduce/Enlarge
In addition to 100% size for size copies, reduced or enlarged
copies can be produced by selecting one of the Reduce /
Enlarge options. If the media loaded is the same size as the
documents, but does not match the orientation, the DC440/
432/430/426/425/420 can rotate the image so that it fits
correctly on to the paper. Rotation will only occur when Auto
Reduce/Enlarge or Auto Paper Supply, but not both, is
selected.
Page 3-16 Xerox Document Centre 440/432/430/426/425/420 User Guide
Page 77
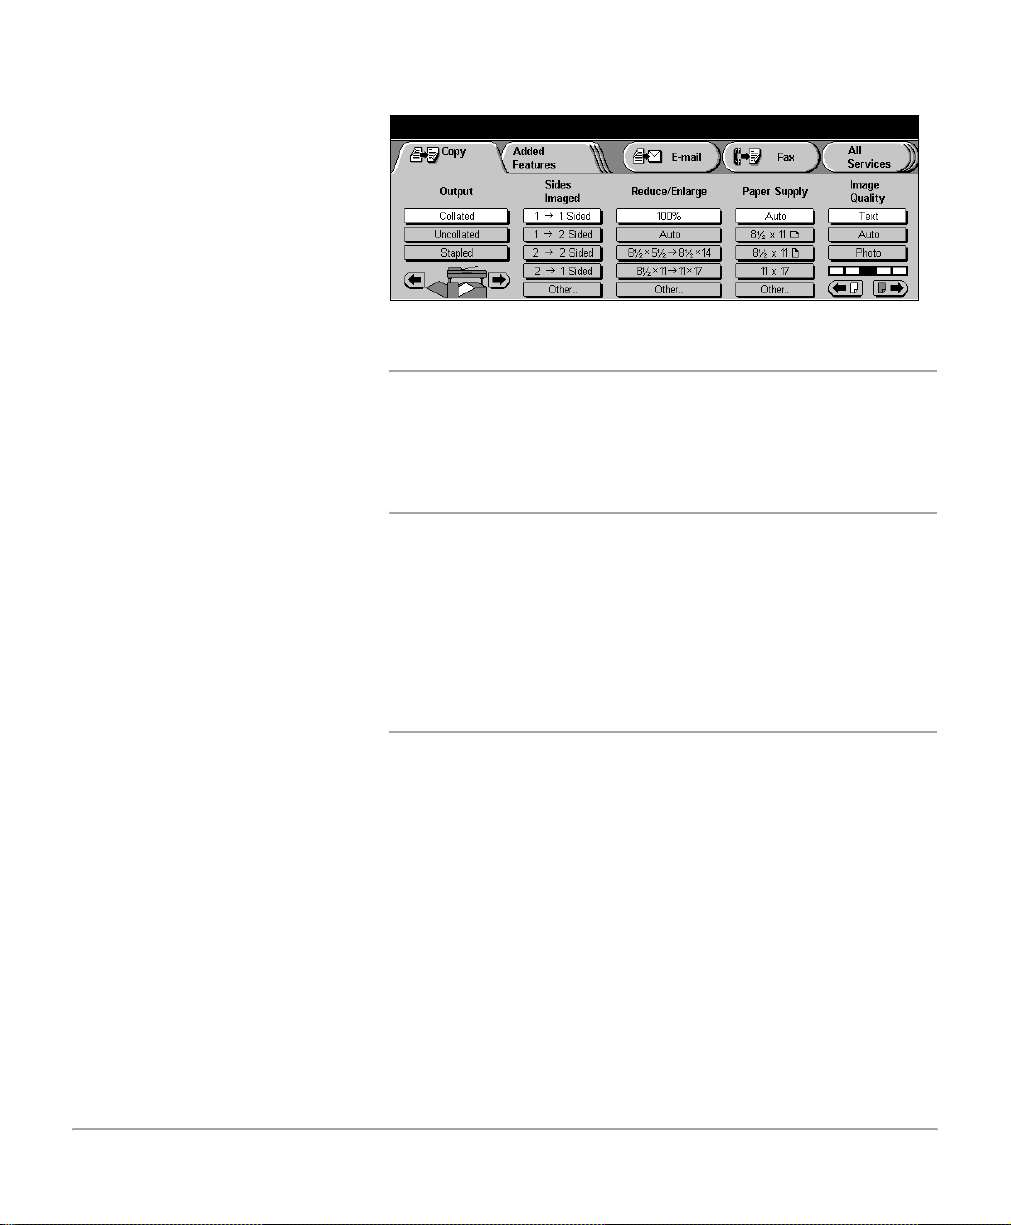
¾ Select [Auto] or one of the
presets options.
100% size for size copies.
Auto automatically reduces / enlarges a document to fit on the paper
Copy
Reduce / Enlarge options
size selected.
NOTE: When Auto Reduce/Enlarge is selected, the machine
automatically selects 8 1/2” x 11” long edge feed paper. If
selecting Auto Reduce/Enlarge and 8 1/2” x 11” long or short
edge paper supply, the machine automatically rotates the
image 90° to match the orientation of the 8 1/2” x 11”
documents and prints on to 8 1/2” x 11” long e dge feed paper.
However, when using the Bypass Tray ensure that the paper
is loaded short edge feed. Feeding paper long edge feed will
cause a mismatch with the reduction/enlargement selection.
Presets displays the two most frequently used preset reduce / enlarge
settings. The presets are set up by the Key Operator.
Other used to specify a magnification not listed, or to select normal or
custom settings.
- Normal — reduces or enlarges the length and width of a
document by a specific amount. 100%, Auto and the
presets are also available. For non-standard sizes, use
the scroll buttons to choose a specific enlargeme nt or
reduction in 1% increments.
Xerox Document Centre 440/432/430/426/425/420 User Guide Page 3-17
Page 78

Paper Supply
HINT: To save time use the pop-up keypad on the touch
screen instead of the scroll buttons to insert value s. Select the
display box for the size selections (the small rectangle to the
left of the scroll buttons) and a keypad will be displayed. Enter
the values and select Save.
- Custom — used to reduce or enlarge a document in nonequal proportions. Again, 100% and Auto ar e available to
reset the magnification after using a custom setting.
HINT: When Custom Reduce/Enlarge is selected, the
machine does not rotate the image to match the orientation of
the paper. If Auto Custom Reduce/Enlarge is selected, the
machine does rotate the image.
The media loaded in the paper trays determines the sizes
displayed in the Paper Supply selection on the touch screen.
For example, if transparencies are loaded, a picture of a
transparency is displayed.
When a tray is opened or paper is loaded in to the Bypass Tray,
a pop-up window ‘Tray Attributes’ will be displayed on the
touch screen. When changing the type or color of stock in the
tray, the tray must be programmed to match the media being
loaded. If the type or color of stock is not being changed, select
Confirm to close the window.
NOTE: For information about loading paper, refer to “Paper
and other media” on page 10-1.
Page 3-18 Xerox Document Centre 440/432/430/426/425/420 User Guide
Page 79

¾ Open the paper tray. The tray
attributes window is
displayed.
¾ Load the tray.
¾ If the paper type or colour
has been changed, select
[Change Type or Colour]
and programme the new
settings. Select [Save].
¾ Select [Confirm] to carry on
with the job.
Auto accepts the default setting (standard white paper) for the paper
Copy
NOTE: The size and orientation is determined for all trays
except the Bypass Tray.
Paper Supply options
supply. If a specific paper size is not selected, the DC440/432/
430/426/425/420 defaults to the size it senses from the
document and sends the output to the Center Tray.
Presets displays the most regularly used paper supply options. The
presets are set up by the Key Operator.
Other displays a list of all the trays and the paper type, color, size and
orientation loaded.
Xerox Document Centre 440/432/430/426/425/420 User Guide Page 3-19
Page 80

Image Quality
Use the image quality settings to adjust the quality of the
output.
Image Quality options
Text used for scanning text, solids, line art and halftones.
Auto automatically adjusts the image quality based on the attributes
of the document. Auto can also be used to make copies of
documents that contain halftones and different images.
Photo used for scanning continuous-tone photographs and high-
quality, high-frequency halftones.
HINT: For best results, copy a maximum of 5 photographs in
one job, unless the machine has additional memory.
Lighter/Darker scroll bar allows manual adjustment to be made to the lightness and
darkness of the output.
Scroll bar
Page 3-20 Xerox Document Centre 440/432/430/426/425/420 User Guide
Page 81

Added Features - Copy
y
The Added Features tab offers additional programming
Quick Pathway
¾ Select [Features] on
the control panel.
¾ If necessary select
[Copy].
¾ Select [Added
Features].
features for a copy job. When selected, a series of tabs is
displayed.
Image Adjustment - page 3-22
Output Format - page 3-34
Job Assembly - page 3-48
Copy
NOTE: Only those features relevant to the machine
configuration will be available.
Xerox Document Centre 440/432/430/426/425/420 User Guide Page 3-21
Page 82

Image Adjustment tab - Copy
For more information about the features available refer to the
following:
Original Size - page 3-22
Bound Originals -page 3-25
Image Shift -page 3-27
Expert Image Quality - page 3-28
Erase - page 3-29
Edit (optional) - page 3-30
¾ Select [Added Features].
The Image Adjustment
screen will be displayed.
Original Size (DC440/432/430/425)/Original Input (DC426/420)
Use this feature to copy and/or manipulate non-standard size
documents from the Document Feeder and Document Glass.
Use the following steps to program this feature on the DC440/
432/430/425.
NOTE: This feature is known as Original Input on the DC426/
420.
Page 3-22 Xerox Document Centre 440/432/430/426/425/420 User Guide
Page 83

¾ Place a document on the
document glass and select
the features required.
¾ Select [Original Size].
¾ Select the option required.
Auto automatically determines the size of the document being
Original Size indicates the document size, or the size you want the
Copy
Original Size (DC440/432/430/425)/Original Input (DC426/420) Options
copied and selects a paper supply source of the same size.
The machine cannot sense the size of non-standard
documents.
Document Centre to scan, if the document is a non-standard
size. Choose from the preset sizes listed, or using the scroll
arrows enter the X and Y values. This feature can be used with
the Document Feeder or the Document Glass.
NOTE: The paper tray sensors can detect only the size of the
paper loaded. They cannot detect paper attributes, such as
transparencies, color stock, or drilled stock. The attributes
must be selected.
Mixed Size use this option to feed documents of different sizes through the
document feeder. To produce size for size or reduced /
enlarged copies. To enable this feature documents must be
loaded in to the Document Feeder.
NOTE: The lead edges must have the same dimensions. For
example 1 1” x 1 7” short e dge feed can be loaded with 8 1/2” x
11” long edge feed, but 11” x 17” short edge feed cannot be
loaded with 8 1/2” x 11” short edge feed.
Xerox Document Centre 440/432/430/426/425/420 User Guide Page 3-23
Page 84

To produce size for size copies
¾ Load the documents.
¾ Select [Auto] paper supply.
¾ Select [Added Features].
¾ Select [Original Size].
¾ Select [Mixed Size] and select [Save].
¾ Enter the quantity and select [Start].
NOTE: Inserts, Booklet Creation and N Up (2 Up on the
DC426/420) cannot be used with Mixed Size Originals.
Page 3-24 Xerox Document Centre 440/432/430/426/425/420 User Guide
Page 85

To produce reduced / enlarged copies
Bound Originals
¾ Place the bound document
face down on to the
document glass. Close the
cover until it rests on the
bound document. Do not
force it shut.
¾ Load the documents.
¾ Select the paper size required.
¾ Select [Added Features].
¾ Select [Original Size].
¾ Select [Mixed Size] and select [Save].
¾ Enter the quantity and select [Start].
NOTE: Inserts, Booklet Creation and N Up cannot be used
with Mixed Size Originals.
Select Bound Originals to make copies of pages from bound
documents or magazines using the Document Glass.
Copy
Xerox Document Centre 440/432/430/426/425/420 User Guide Page 3-25
Page 86

¾ Select the features required.
¾ Select [Added Features].
¾ Select [Bound Originals]
and select the features
required.
¾ Select [Save].
¾ Select [Start].
Off the feature is not available.
Bound Originals options
Side 1 copies only the page on the left when looking at the open book,
face up.
Side 2 copies only the page on the right when looking at the open
book, face up.
1 and 2 copies both pages of an open book and places each page on
a separate sheet of paper.
Book size use this option if the open book size is anything other than 11”
x 17”.
Page 3-26 Xerox Document Centre 440/432/430/426/425/420 User Guide
Page 87

Gutter Erase erases up to 2 in from the gutter area down the center of a
Image Shift
¾ Select the features required.
¾ Load the document. Ensure
that the documents are in the
same orientation as the
media loaded in the paper
trays.
¾ Select [Added Features].
¾ Select [Image Shift] and the
option required.
¾ Select [Save] and [Save]
again.
¾ Enter the quantity and select
[Start].
bound document. When the 1 and 2 option is selected any
amount from 0 - 2 in can be entered.
Use this feature to change the position of the image on a pag e.
Copy
Image Shift options
Off the feature is not available.
Auto Center automatically shifts the image to the center of the paper.
Margin Shift copies the image to a specific area. Unless the new location is
specified, the output will be displayed on the page just as it is
on the document.
- Side 1: (the default setting) shifts the image to the left or
right, up or down for the first page of the document being
copied. The image can be shifted up to 2 in.
Xerox Document Centre 440/432/430/426/425/420 User Guide Page 3-27
Page 88

Expert Image Quality
¾ Select the features required.
¾ Load the document. Ensure
that the documents are in the
same orientation as the
media loaded in the paper
trays.
¾ Select [Added Features].
¾ Select [Expert Image
Quality] and the option
required.
- Side 2: shifts the image to the left or right, up or down for
the second page of the document being copied. The
image can be shifted up to 2 in.
Independent: Use this to set different image
placement options for side 2 of the documents.
Mirror Side 1: sets the image shift selections for side
2 the same as those entered for side 1.
Use this feature when documents require more than the ba sic
image quality adjustment.
¾ Select [Save] and [Save]
again.
¾ Enter the quantity and select
[Start].
Page 3-28 Xerox Document Centre 440/432/430/426/425/420 User Guide
Page 89

Expert Image Quality options
Sharpness adjusts the sharpness of the image. This feat ur e is use d to
increase the sharpness of fine lines and details, or to decrease
the sharpness for a smooth, uniform appearance. However, it
is advisable not to decrease the sharpness too much, the copy
might appear distorted. Normal is the default setting.
Copy
Gray Scale Copying (DC426/
Auto Exposure when copying text images from colored paper documents, this
Erase
¾ Load the documents in the
same orientation as the
selected Paper Tray.
¾ Select the features required.
¾ Select [Added Features].
420)
use when copying documents containing highlights and
shadows. This option provides better reproduction of
graylevels. Images tend to be sharper and have less contrast.
NOTE: 1 2, 2 2, Transparencies, 2 Up, Booklet Creation,
Build Job or Annotation cannot be used with Gray Scale
Copying.
feature enables users to obtain a copy with a clean, white
background.
Use this feature to erase unwanted marks such as hole punch
impressions from the edge of the copy.
¾ Select [Image Adjustment].
¾ Select [Erase].
Xerox Document Centre 440/432/430/426/425/420 User Guide Page 3-29
Page 90
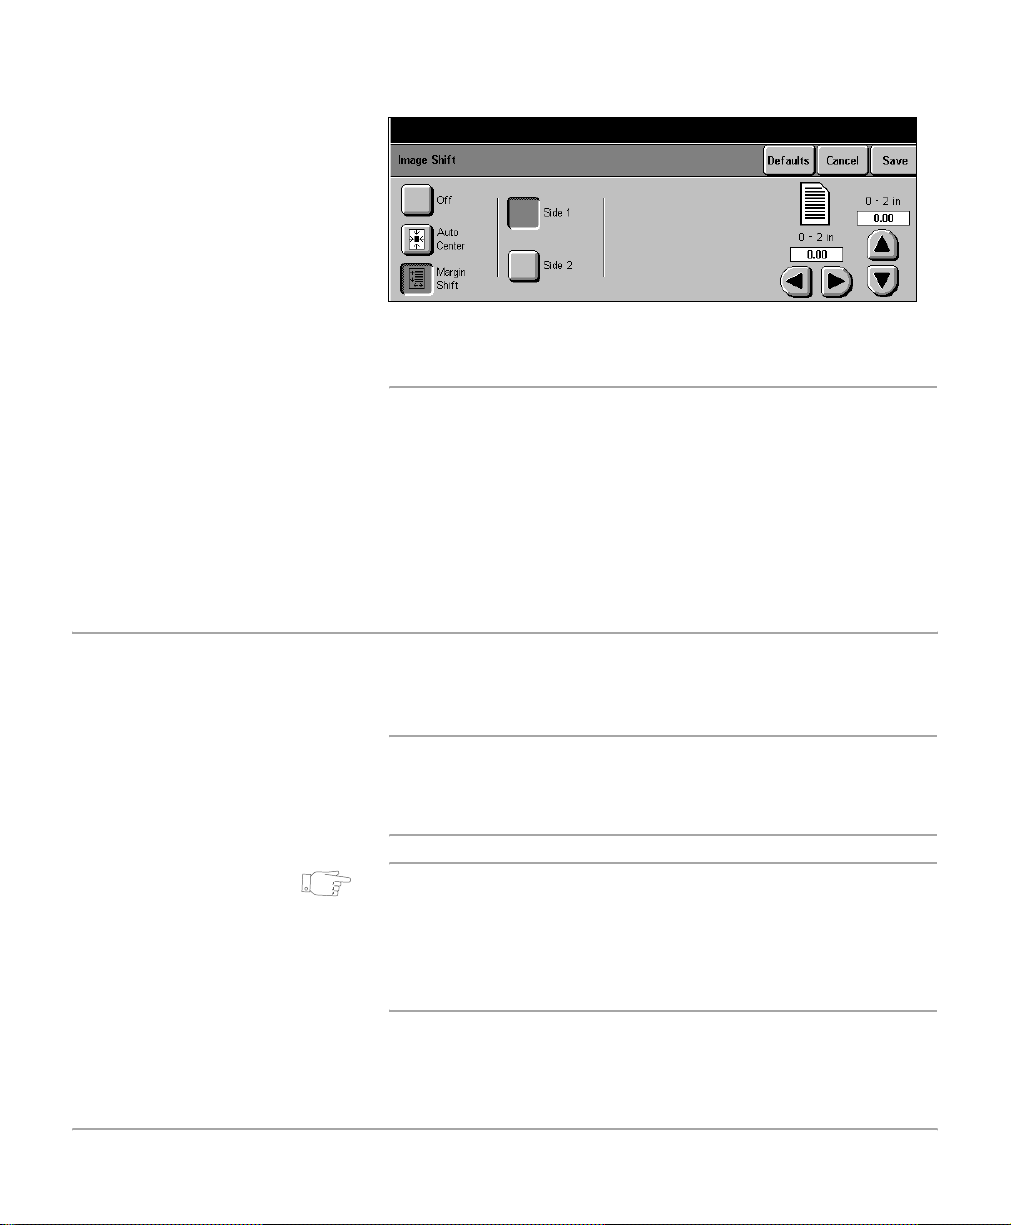
¾ Select [Border Erase] or
[Edge Erase].
¾ Use the scroll arrows to enter
the amount of erase required.
¾ Select [Save].
¾ Enter the quantity and select
[Start].
Border Erase to erase equal amounts from all edges, up to 2 in.
Edge Erase to erase a specific amount from each edge of the copy. Up to
Edit (optional)
Erase options
Off the feature is not available.
2 in can be applied to each edge.
Use the Editing Kit to change the appearance of a document
copy. The kit is supplied with an orange editing marker.
Markers other than the one supplied can be used.
NOTE: When editing, keep the Document Glass closed,
unless editing a bound document or using the Original Size
feature. Do not select Interrupt or Pause while scanning a
document.
HINT: The Editing feature will not function if the original is not
white, for example when using recycled paper or colored
originals. If the Editing feature is not working properly, o r if the
edit marks are not dark, replace the orange marker. Also,
avoid placing edit marks within approximately 1/4 of an inch of
the edge of the document.
Page 3-30 Xerox Document Centre 440/432/430/426/425/420 User Guide
Page 91

DC440/432/430/425 there is a choice of two edit options - Area Edit or Page Edit.
DC426/420 there is a only one choice available - Edit
¾ To protect the document
make a copy first.
¾ Use the orange editing
marker, draw around the
areas to be printed, or draw a
thick line through the areas.
Press firmly on the edit
marker. The line indicating
the area to be printed must
be dark, without any breaks.
NOTE: There is no limit to the
number of markings.
¾ Place the marked copy on to
the Document Glass.
¾ Select [Added Features]
and then [Image
Adjustment].
Copy
Area Edit (DC440/432/430/425)
¾ Select [Edit].
¾ Select [Area Edit].
¾ Select the option required
and select [Save].
¾ Select [Start].
Xerox Document Centre 440/432/430/426/425/420 User Guide Page 3-31
Page 92

Area Edit options
Off the feature is not available.
Delete Inside scans everything outside the orange lines and ignores
everything inside. The center area will be blank.
Delete Outside scans everything inside the orange lines and ignores
everything outside. The outside area will be blank.
Centring (DC440/432/430/425) centres the image from inside the marker ar ea onto the outp ut
paper. Areas outside the marker area are deleted.
Inversion (DC440/432/430/425) changes all the black images within the marker area to white
and all the white images to black.
Page Edit (DC440/432/430/425)
This feature does not require the use of a ma rker pen, hence
pre-scan is not required. The editing function selected will be
applied to the entire page. The Document Glass or the
Document Feeder can be used with Page Edit.
¾ Load the document in the
Document Feeder or place it
on the Document Glass.
¾ Select [Added Features]
and then [Image
Adjustment].
¾ Select [Edit].
¾ Select [Page Edit].
¾ Select the option you want to
use and select [Save].
¾ Select [Start].
Page 3-32 Xerox Document Centre 440/432/430/426/425/420 User Guide
Page 93

Page Edit options
Off the feature is not available.
Mirroring a mirror image of the document is created.
Inversion changes all the black images on the page to white and all the
white images to black.
Edit (DC426/420)
Edit is available on the DC426/420. For instructions on
programming the Edit option, refer to “Area Edit (DC440/432/
430/425)” on page 3-31.
Edit options
Off the feature is not available.
Delete Inside scans everything outside the orange lines and ignores
everything inside. The center area will be blank.
Delete Outside scans everything inside the orange lines and ignores
everything outside. The outside area will be blank.
Copy
Xerox Document Centre 440/432/430/426/425/420 User Guide Page 3-33
Page 94

Output Format - Copy
Quick Pathway
¾ Select [Features]
button on the control
panel.
¾ If necessary select
[Copy].
¾ Select [Added
Features].
¾ Select [Output
Format].
Select the features available on the Output Format screen to
enhance the appearance of a copy job. For more information
about the features available refer to the following:
Transparencies - page 3-34
N Up (2 Up - DC426/420) - page 3-36
Annotation - page 3-38
Inserts - page 3-42
Booklet Creation - page 3-44
Covers (DC440/432/430/425) - page 3-45
Transparencies
This feature enables copying on to transpar en cy stoc k ,
placement of dividers between the pages and making hard
copy sets for handouts.
NOTE: For information about loading transparency stock
please refer to “Paper and other media” on page 10-1.
Page 3-34 Xerox Document Centre 440/432/430/426/425/420 User Guide
Page 95
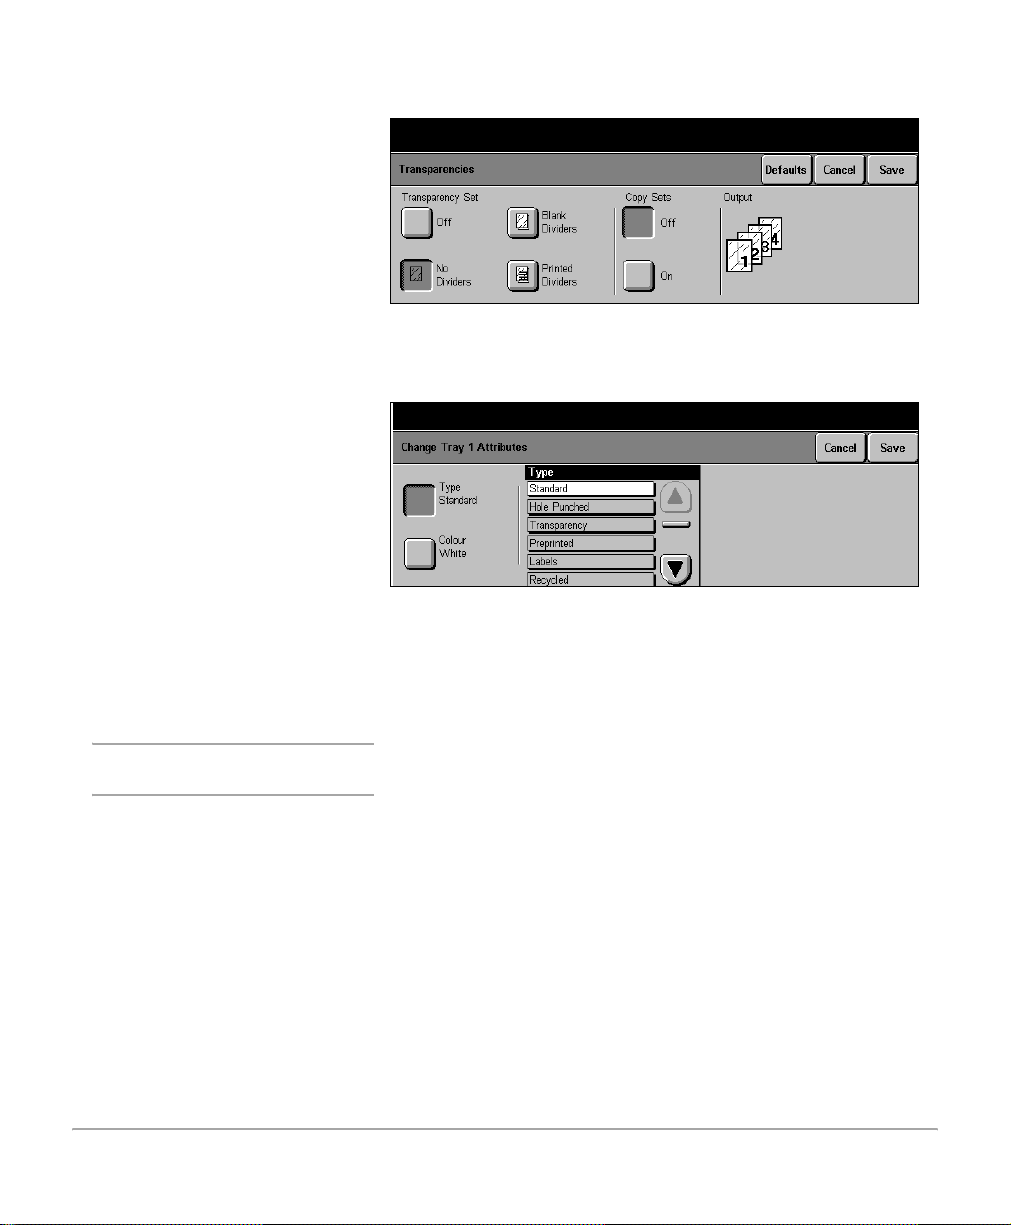
¾ Load the documents in the
document feeder.
¾ Make the required feature
selections.
¾ Select [Output Format].
¾ Select [Transparencies].
Following the instructions,
select the option required.
¾ Load the transparency stock.
¾ Programme [Change Tray
Attributes]:
•Select [Type]. Use the up /
down scroll arrows to
display the transparency
option. Select
[Transparency] and select
[Save].
•Select [Color] then [Clear]
and then [Save].
Copy
¾ Select [Start].
NOTE: A maximum quantity of
1 can be selected.
Xerox Document Centre 440/432/430/426/425/420 User Guide Page 3-35
Page 96

Transparency options
Off the feature is not available.
Blank Dividers places a blank sheet of paper between each transparency.
No Dividers prints transparencies with no dividers, Copy Sets can still be
selected.
Printed Dividers an additional paper copy is automatically inserted after each
transparency.
Copy Sets prints additional paper sets of the transparencies. Select Copy
Sets a nd use the number keypad to enter the quan tity required.
HINT: If a paper tray has been loaded and the tray attribute s
have been programmed it is not necessary to assign a tray for
transparencies. The DC440/432/430/426/425/420
automatically detects the tray that contains the
transparencies.
NOTE: To avoid overheated or distorted transparencies do not
copy onto transparencies without selecting Transparencies
first.
N Up (2 Up - DC426/420)
DC440/432/430/425 This feature prints two or four independent documents on to
one sheet of paper. The DC440/432/430/425 reduces/
enlarges the images as needed to print them either in
landscape or portrait orientation on one page based on the
paper supply selected.
DC426/420 this feature is available as 2 Up. It enables two independent
documents to be printed side by side on to one shee t of paper.
It reduces / enlarges the images as needed to display them in
landscape orientation on one page.
Page 3-36 Xerox Document Centre 440/432/430/426/425/420 User Guide
Page 97
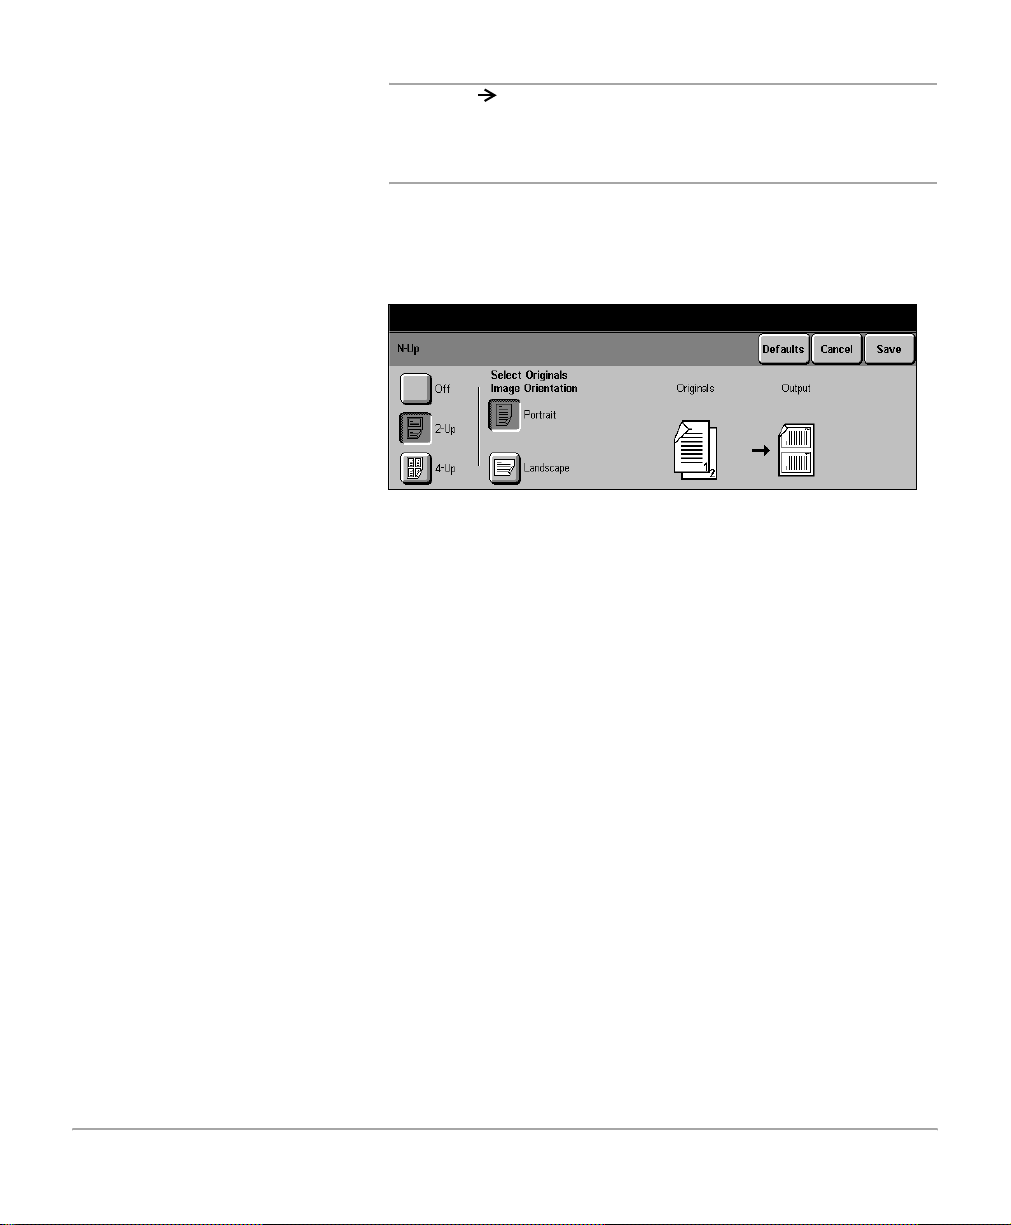
¾ Load the documents in the
document feeder . Documents
must be loaded long edge
feed.
¾ Make the required feature
selections for the job. Select
[Paper Supply] and the
paper size required.
¾ Select [Added Features]
and then [Output Format].
¾ Select [N Up].
¾ Select either [2 Up] or [4 Up].
¾ Select landscape or portrait
and then [Save].
NOTE: 2 1, Bound Originals, Image Shift, Transparencies,
Booklet Creation, Gray Scale Copying (DC426/420), Build
Job, Mixed Size Originals or Annotation cannot be used with
this feature.
Use the following steps to program N Up on the DC440/432/
430/425.
Copy
¾ Enter the quantity.
Select [Start].
On the DC426/420:
¾ Select [Added Features]
and then [Output Format].
¾ Select [2 Up].
¾ Select [On].
Xerox Document Centre 440/432/430/426/425/420 User Guide Page 3-37
Page 98

Annotation
¾ Load the documents.
¾ Make the required feature
selections.
¾ Select [Added Features].
Use this feature to add the date, page numbers and a comme nt
to the copy output.
NOTE: N Up (2 Up on the DC426/420), Booklet Creation,
Bound Document, Uncollated, custom size documents and
envelopes are not available with Annotation.
¾ Select [Output Format].
¾ Select [Annotation]. The
Annotation options will be
displayed.
¾ Select the option required
and follow the instructions
displayed on the screen.
¾ Select [Save].
Page 3-38 Xerox Document Centre 440/432/430/426/425/420 User Guide
Page 99

Annotation options
Date prints the current date, based on the machine settings.
On the DC440/432/430/425 the date is added to the top or
bottom of a page on the left, right or center . On the DC426/420
the date can be added to the left, right or ce nter of the top of a
page only.
Page Numbering prints page numbers.
On the DC440/432/430/425 the page number is added to the
top or bottom of a page on the left, right, or center . On the
DC426/420 page numbers can be added to the left, right, or
center of the top of a page only.
Comments prints a comment on the document. On the DC440/432/430/
425 the comment is added to the top or bottom of a page on
the left, right, or center . On the DC426/420 a comment can be
added to the left, right, or center of the top of a page only.
Choose a programmed comment or create one by selecting
Enter. Refer to the instructions on page 3-40 for creating a
comment.
Format (DC440/432/430/425) there are three options available. Each option is available with
any one of the annotations.
Copy
- orientation informs the machine of the orientation
(landscape or portrait) of the document. The machine
then uses this information to determine where to place the
annotation.
- font size offers a choice of two fonts. Small font size is set
at 72 dots and the large font size is set at 144 dots per
inch.
- write mode prints the annotation on to the page as either
transparent or opaque. Selecting Transparent means that
the image on the document is not deleted and the
annotation is placed on top of the document image.
Selecting Opaque means that the annotation replaces the
document image.
Xerox Document Centre 440/432/430/426/425/420 User Guide Page 3-39
Page 100

¾ If Off is selected, select
comment and the Document
Centre will display the list.
HINT: If the document image extends to the top edge of the
page, reduce the image to 90% of its document size to make
room for the annotation.
If the same position is inadvertently selected for the date, page
numbering and comment, they will be displayed in the default
order: comment (left), page number (center) and date (right).
When date is selected there is a choice of format - MM/DD/YY
or DD/MM/YY.
NOTE: When loading documents long edge feed, the
annotation can only be printed at the top of the page.
Annotation is not available on the landscape edge of any
document over 8.5x11inches in size.
Programming a new comment
The DC440/432/430/426/425/420 can store up to 8
programmed messages (up to 40 characters each on the
DC440/432/430/425 and up to 20 characters each on the
DC426/420).
¾ Select an empty slot in the
Comment List.
¾ Select [Enter].
Page 3-40 Xerox Document Centre 440/432/430/426/425/420 User Guide
 Loading...