

HMI Spec Ver. 2.2
Revision History
Rev Date Description By
1.0 Nov.04 06 The primarily draft Q.C
1.1 Nov.30 06 Added Music & Dual mode Q.C
2.0 Dec.12 06 Partially Revised Q.C
2.1 Dec.27 06 Added Remote control configuration Q.C
2.2 Mar.06 07 Change FMT UI Q.C
XDMB Inc.,
2
805 8F Ssangyoung IT-1 Sangdaewon-dong Jungwon-gu
Seongnam-si Gyenggi-do, Korea
Tel: +82-31-741-7007
Fax: +82-31-741-7006`

HMI Spec Ver. 2.2
TABLE OF CONTENTS
1. PURPOSE
2. FEATURES SUMMARY
3. Front view
4. Back view
5. Bottom view
6. Getting started
7. Modes of operation Display
8. NAVIGATION
9. XM Ready
10.MUSIC
11. BACK UP CAM
12. MEDIA
13. SETUP
14. REMOTE CONTROL CONFIGURATION
15. File Copy
16. Troubleshooting
17. Specifications
XDMB Inc.,
805 8F Ssangyoung IT-1 Sangdaewon-dong Jungwon-gu
Seongnam-si Gyenggi-do, Korea
Tel: +82-31-741-7007
Fax: +82-31-741-7006`
3

HMI Spec Ver. 2.2
1 PURPOSE
This document specifies the requirements for the human machine interface (HMI) for the
NAVIGATION with XM Ready model, hereinafter re ferred to as the “NVXM1000 “.
It is primarily used for the development and verification of embedded software within the
system controller of the NAVIGATION with XM Ready.
Specifically, the user control and visual and audible responses in the application layer
are described.
The objective of this document is to provide guidance as to how to quickly, reliably and
cost effectively design and develop the “NVXM1000“ to meet with current mass
production schedule. To achieve this, the “NVXM1000 “shall use existing reference
design and similar derivatives and the like from NAVIGATION with XM Ready, both
hardware and software, as a base. Software changes shall be as minimal as possible.
XDMB Inc.,
805 8F Ssangyoung IT-1 Sangdaewon-dong Jungwon-gu
Seongnam-si Gyenggi-do, Korea
Tel: +82-31-741-7007
Fax: +82-31-741-7006`
4
HMI Spec Ver. 2.2
2 FEATURES SUMMARY
The following is a list of features that “NVXM1000“ software shall implement.
Features Summary Comparison
Item Description Reference
1 Atlas II 300MHz CPU
2 Windows CE v5.0 Installed
3 1" HDD 8GB Located
4 4"TFT Touch Screen (16.7M Color) Display
6 High Speed USB Support
7 Li-Ion (3.7v2400mA) Internal Battery Located
8 Navteq (11M POI) Navigation Mapping
9 XM Ready
10 External Memory Extend (SD/MMC Slot)
11 Photo Album
12 Built-in Speaker
13 FM Transmitter
14 A/V Input Jack
15 Audio Output Jack
16 Audio Output Jack
XDMB Inc.,
805 8F Ssangyoung IT-1 Sangdaewon-dong Jungwon-gu
Seongnam-si Gyenggi-do, Korea
Tel: +82-31-741-7007
Fax: +82-31-741-7006`
5

HMI Spec Ver. 2.2
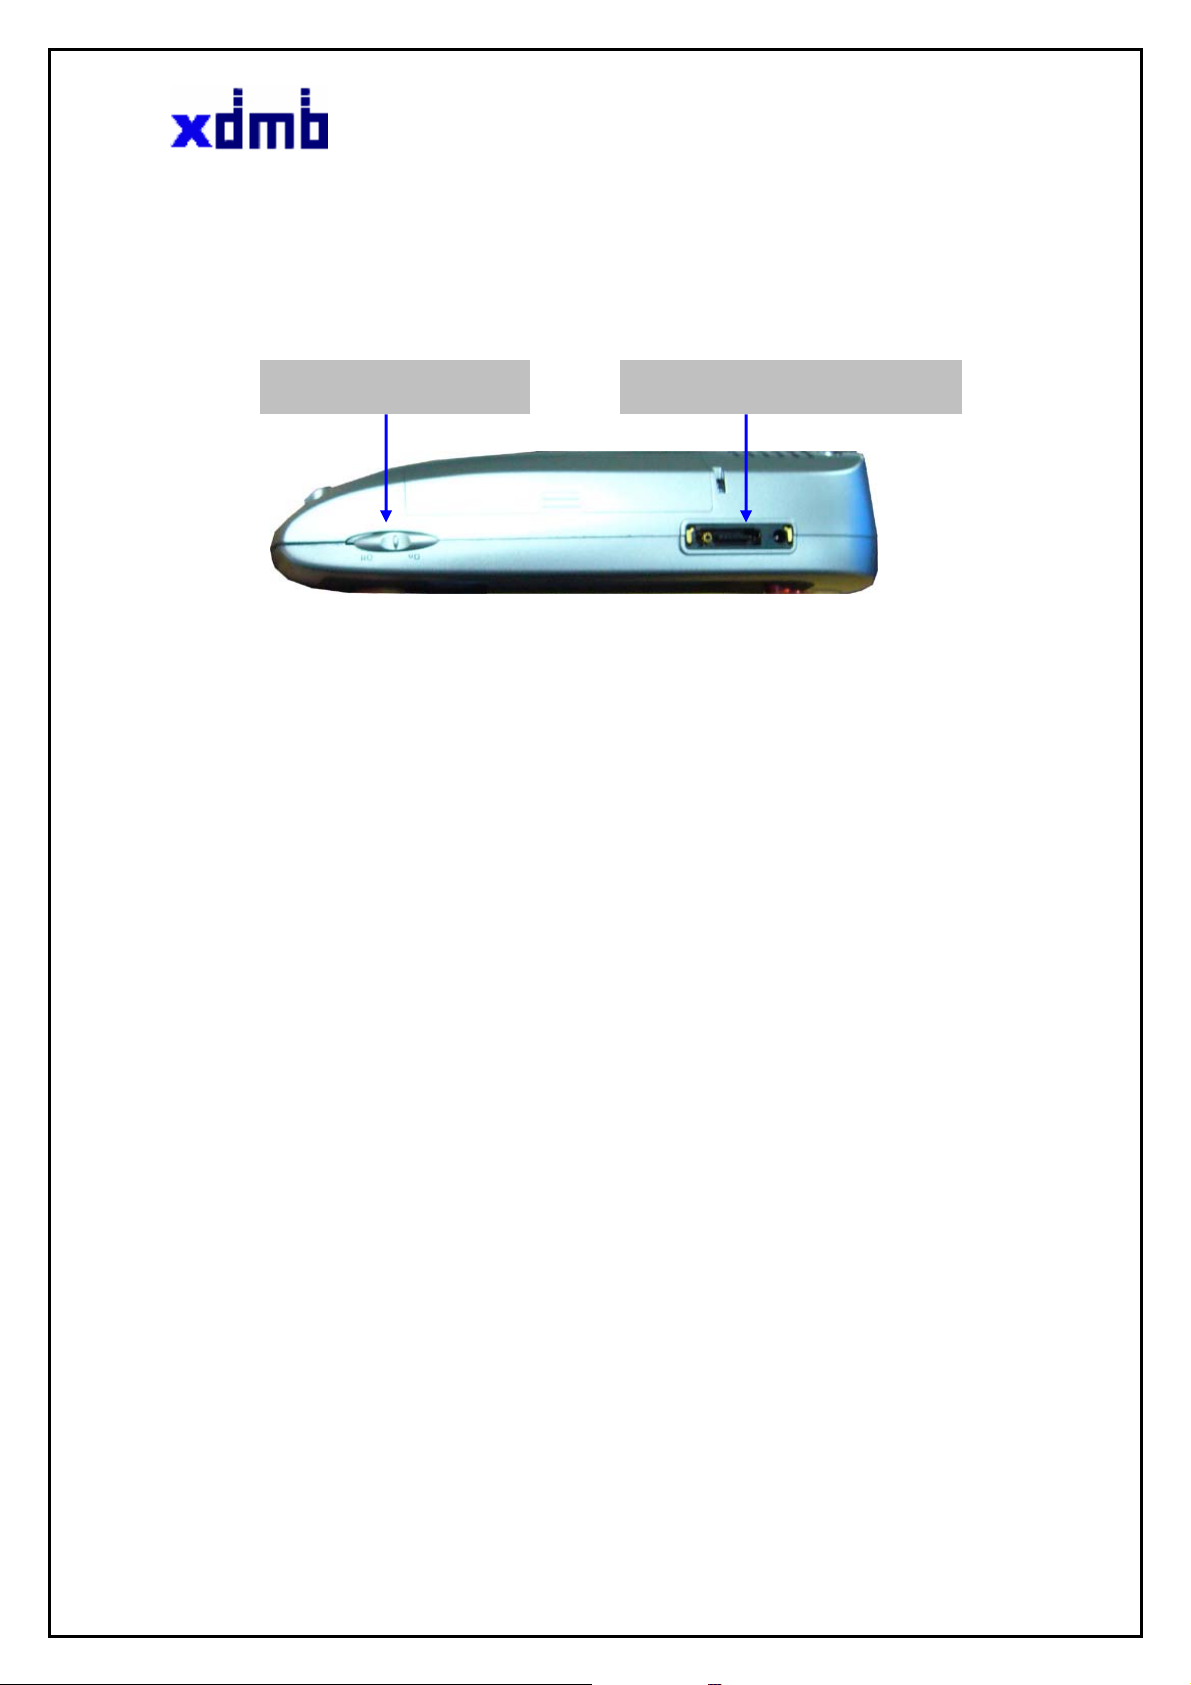
3. Front view
XM Mini Tuner Slot
SD card slot
HOME Button
4. Back view
Volume Up/Down Button
Liquid Crystal Display (LCD) &
Touch Screen
Stereo Speaker Output
AUDIO OUTPUT connector
USB 2.0 (DEVICE) connector
DC IN
Connects to power cable
SUCTION CUP locking slot
Connects to suction head
XDMB Inc.,
805 8F Ssangyoung IT-1 Sangdaewon-dong Jungwon-gu
Seongnam-si Gyenggi-do, Korea
Tel: +82-31-741-7007
Fax: +82-31-741-7006`
Extra GPS antenna connector
XM antenna connector
Protection against heat hole
6
HMI Spec Ver. 2.2
5. Bottom view
Power ON/OFF Switch
Note
To save internal battery, power off the power on/off switch when not use or portable transfer
I/O connector for Cradle
XDMB Inc.,
805 8F Ssangyoung IT-1 Sangdaewon-dong Jungwon-gu
Seongnam-si Gyenggi-do, Korea
Tel: +82-31-741-7007
Fax: +82-31-741-7006`
7
HMI Spec Ver. 2.2
6. Getting started
1. Press the Standby button.
The JENSEN Logo appears;
You’re ready to use the NVXM1000. as a Modes of operation Display
.
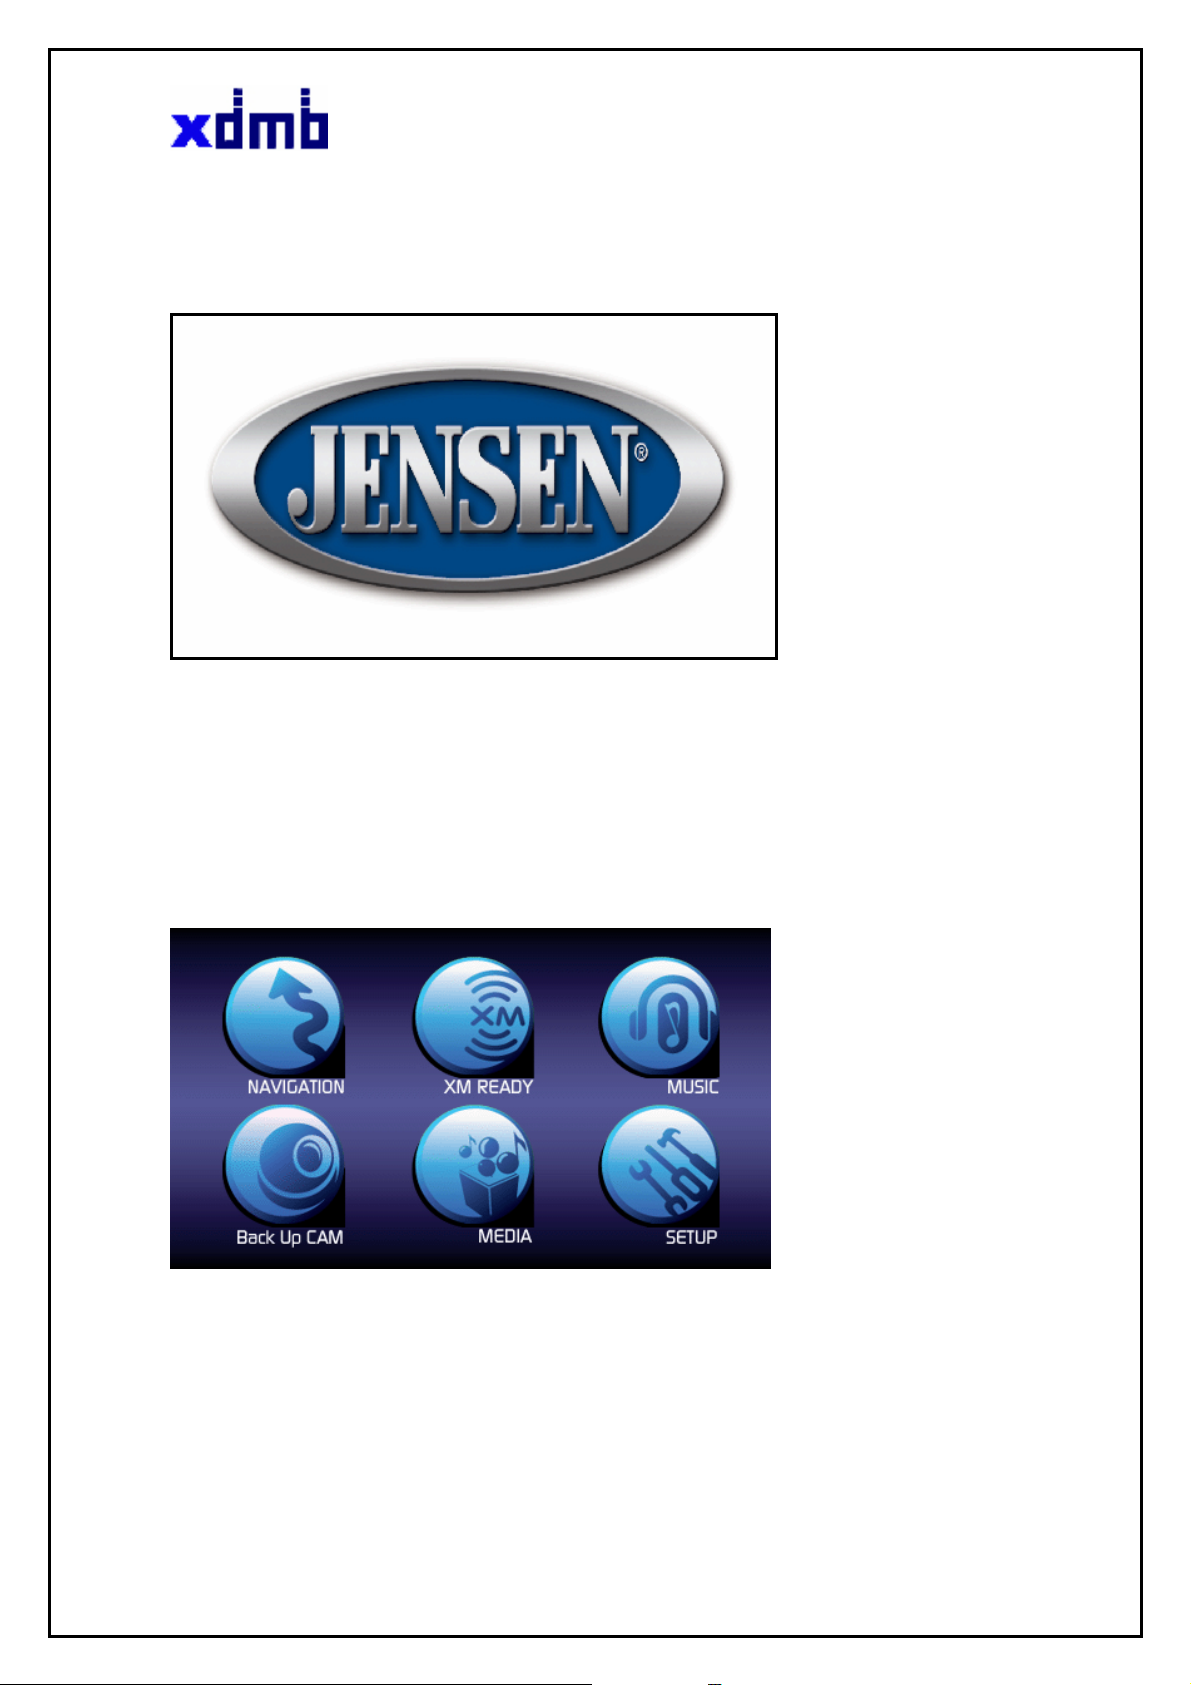
7. Modes of operation Display
The mode button looks like a toolbox.
Pressing this button displays a cycle of features from which you can select NAVIGATION, XM Ready
(radio), MUSIC, Back UP CAM. MEDIA. SETUP
Modes of operation default display
XDMB Inc.,
805 8F Ssangyoung IT-1 Sangdaewon-dong Jungwon-gu
Seongnam-si Gyenggi-do, Korea
Tel: +82-31-741-7007
Fax: +82-31-741-7006`
8
HMI Spec Ver. 2.2
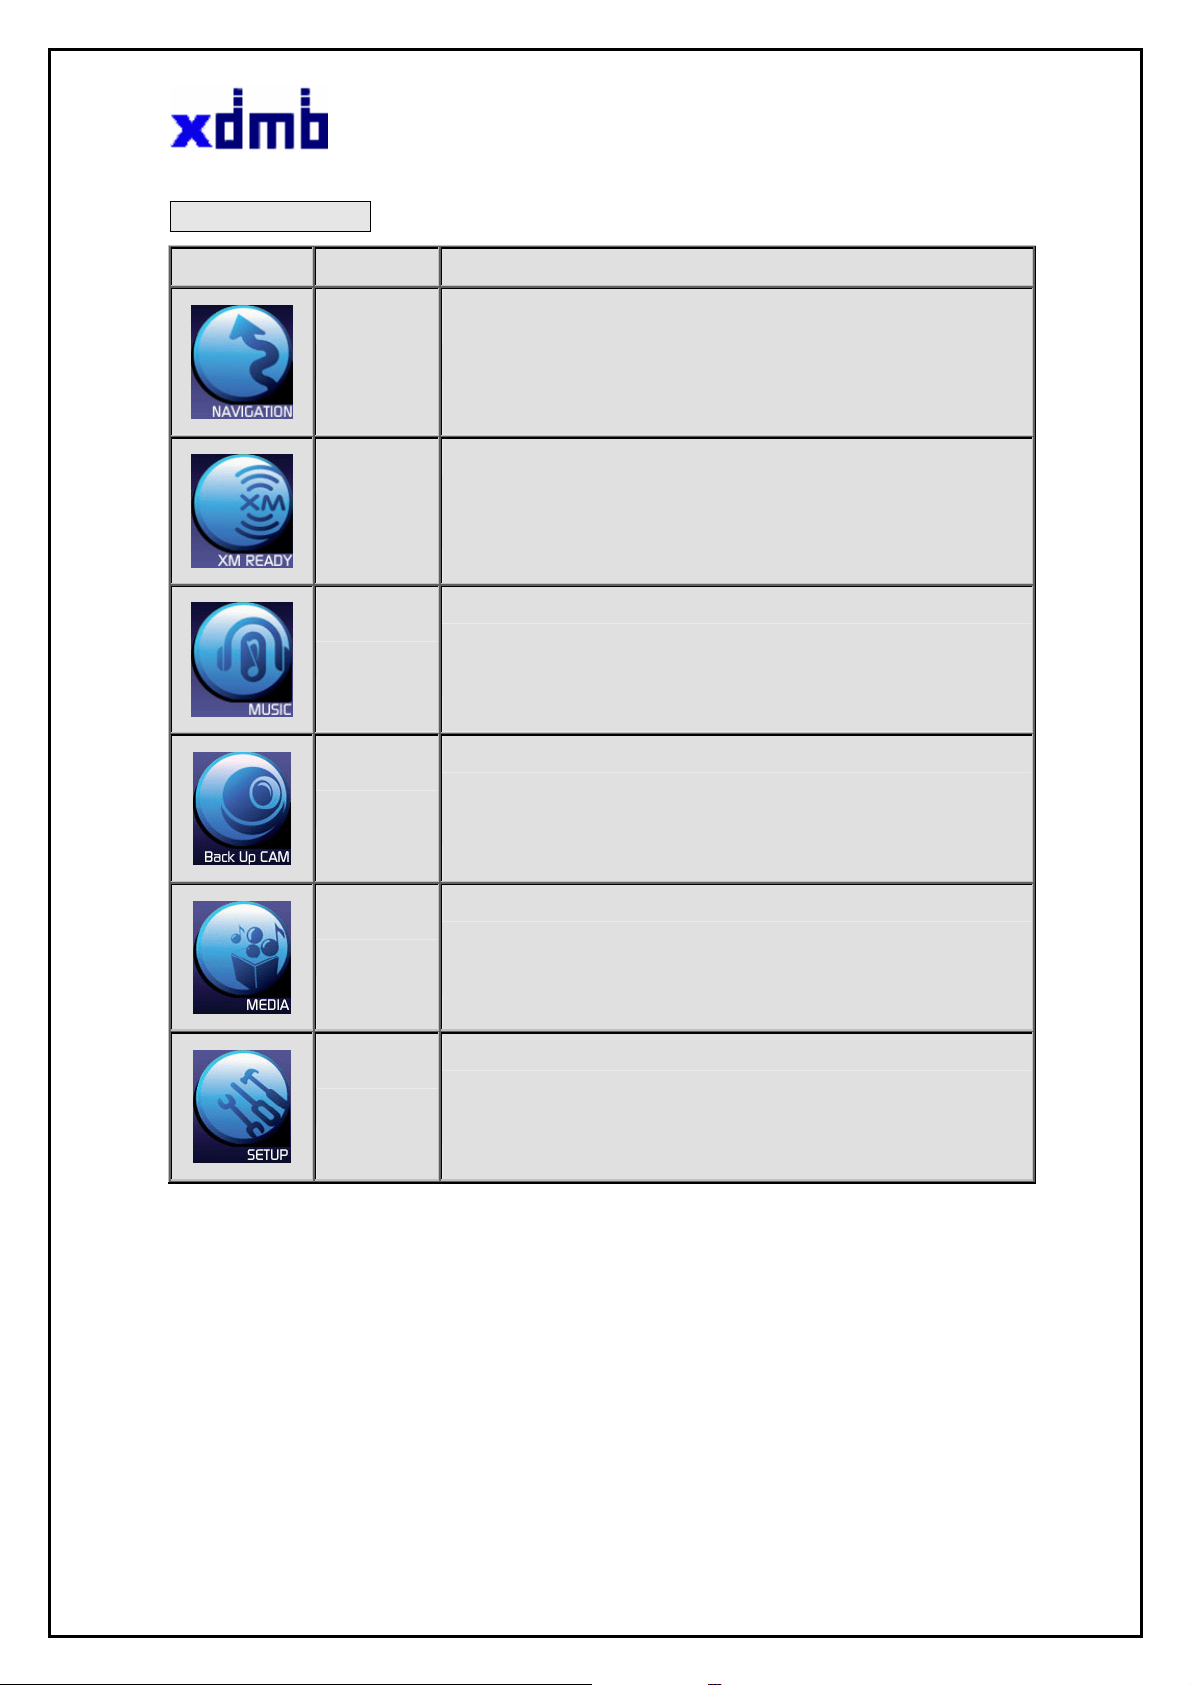
Function Buttons
Icon Button Press This Button to...
NAVIGATION
XM READY
Back Up CAM
Corresponds to the button of the same name. For details, see “Navigation”
Corresponds to button of the same name and launches satellite radio mode. For
details, see “XM Ready”
Corresponds to button of the same name and launches music mode. For details,
MUSIC
see “ Music”
Corresponds to button of the same name button and launches video mode. For
details, see “Back Up Cam”.
Provides access to five configuration options. For a complete summary of details,
MEDIA
see “Media ”
SETUP
Provides access to five configuration options. For a complete summary of details,
see “Setup ”
8. NAVIGATION
This chapter explains how to navigate using the NVXM1000 If this is the first time you’ve used the unit,
read this chapter from beginning to end. Later, use it to refer to specific procedures.
Refer to an appendix for Navigation software user manual
XDMB Inc.,
805 8F Ssangyoung IT-1 Sangdaewon-dong Jungwon-gu
Seongnam-si Gyenggi-do, Korea
Tel: +82-31-741-7007
Fax: +82-31-741-7006`
9
HMI Spec Ver. 2.2
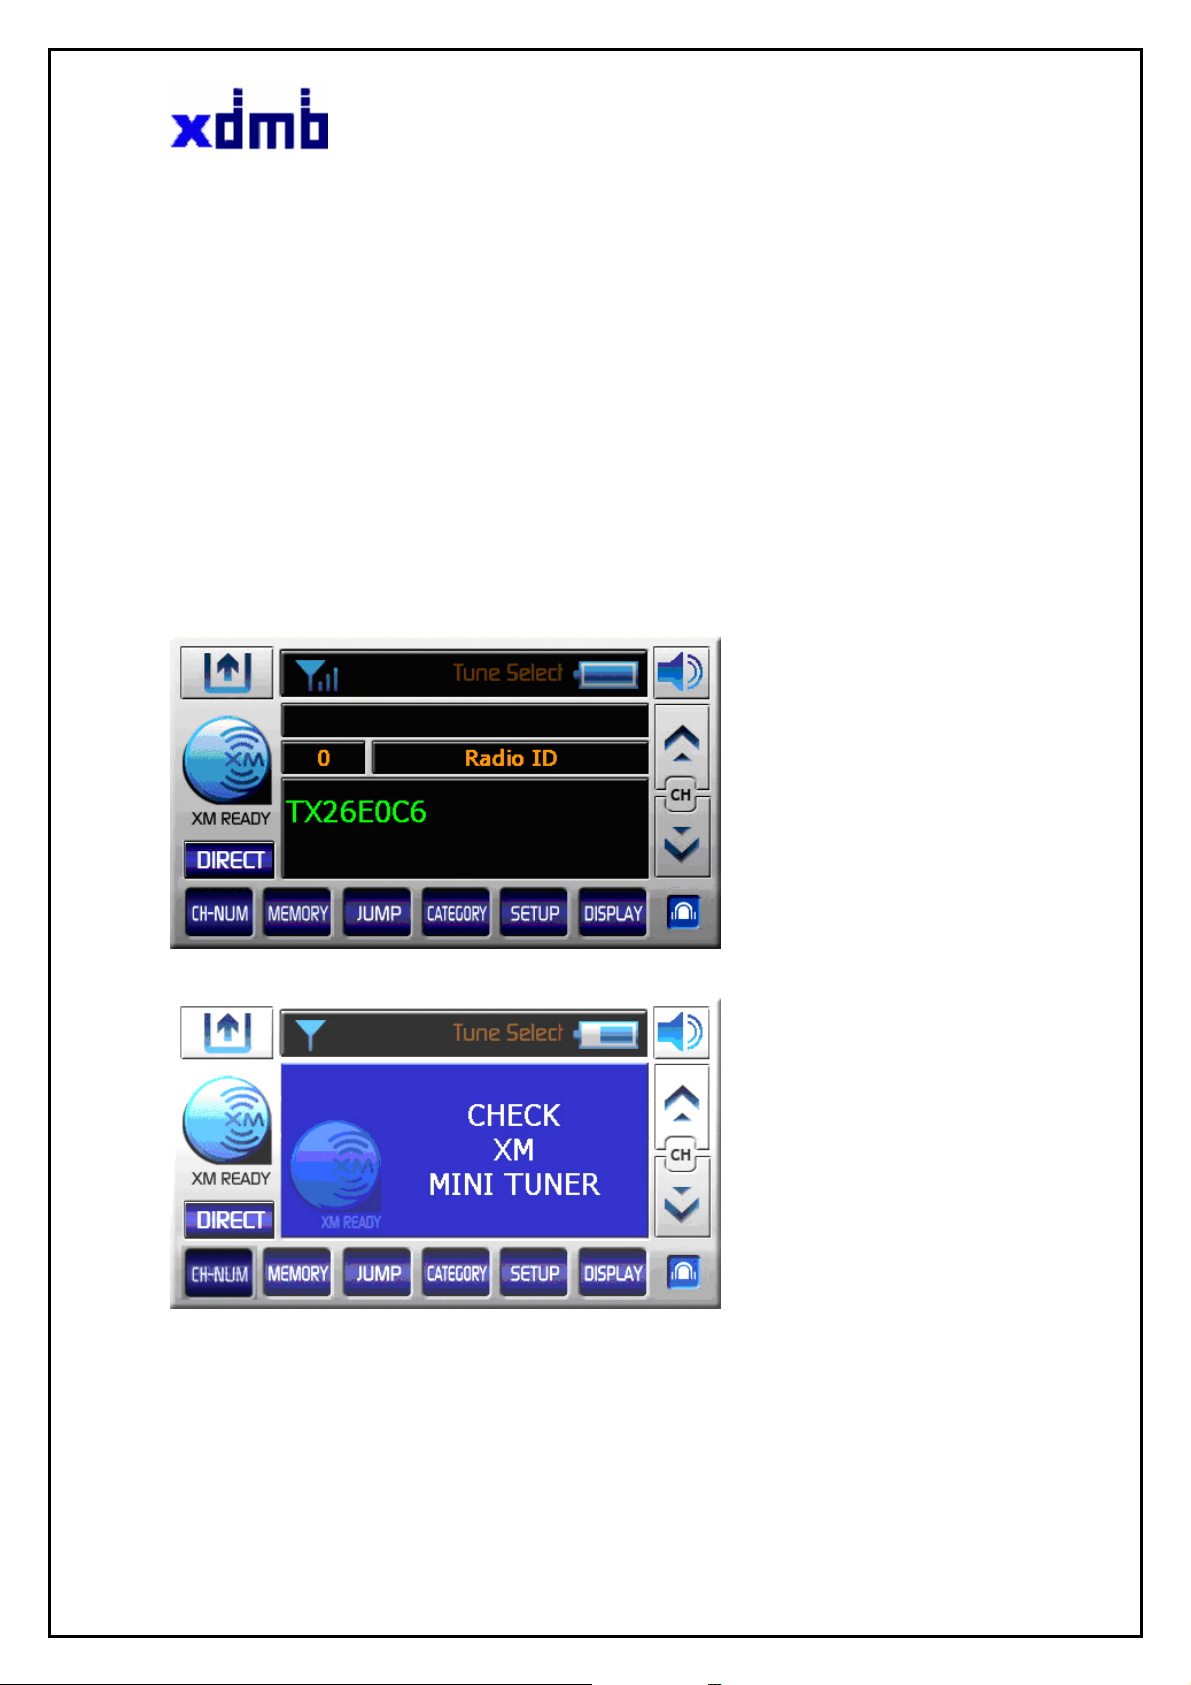
9. XM Ready
Getting started
To listen to XM satellite radio you need two things in addition to your NVXM1000.:
• Optional XM Mini tuner & XM antenna installed in your vehicle or Home..
• A subscription to XM satellite radio.
Note your ID number
1. Press the XM Ready button at the press the mode button (toolbox),
2. Select Channel 0. The XM Mini tuner’s eight –character XM Satellite Radio ID number will appear on the
display. Write the number here:
3. Activate your Satellite Radio service.
XM Satellite Radio ID number display
XM Mini tuner disconnected display
XDMB Inc.,
10
805 8F Ssangyoung IT-1 Sangdaewon-dong Jungwon-gu
Seongnam-si Gyenggi-do, Korea
Tel: +82-31-741-7007
Fax: +82-31-741-7006`
HMI Spec Ver. 2.2
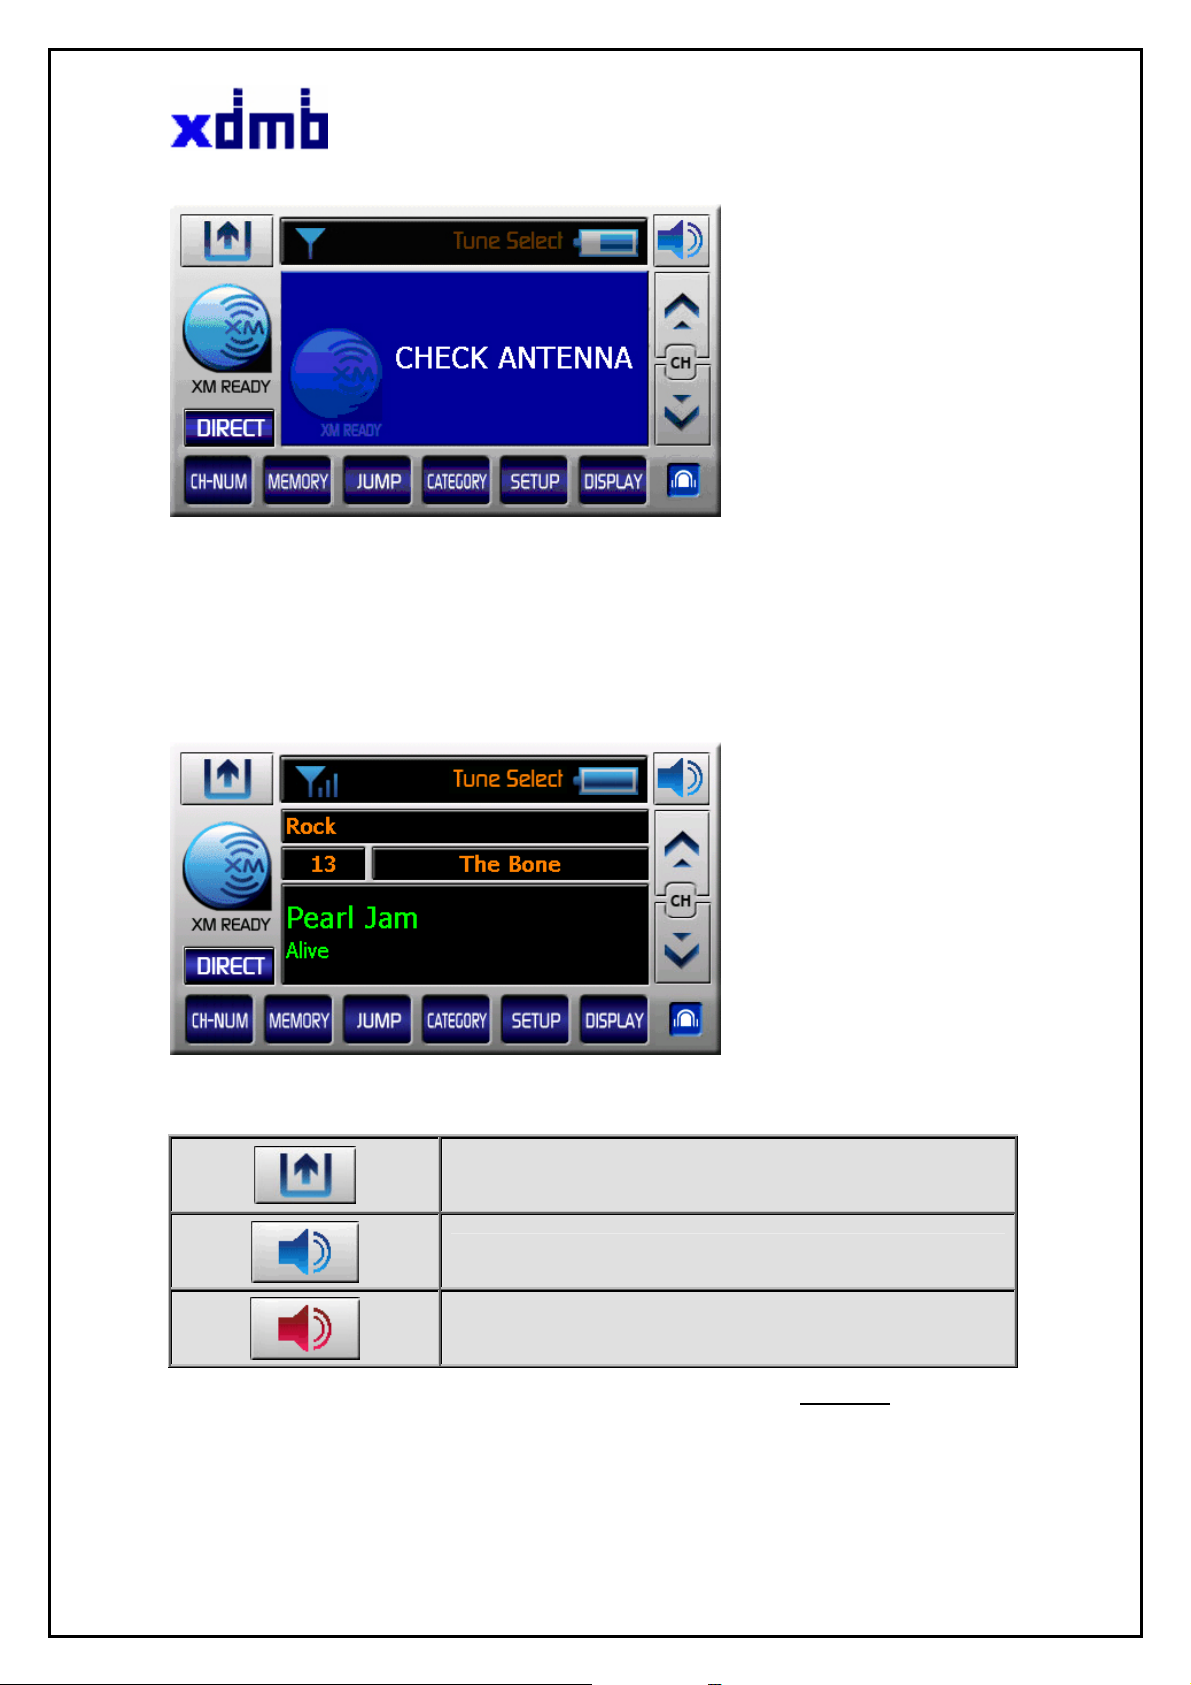
XM Antenna disconnected display
XM Ready main screen
While turned to an XM channel, the NVXM1000 XM default display contains information about that channel
Function Buttons
Return to “Modes of operation” mode .
XDMB Inc.,
805 8F Ssangyoung IT-1 Sangdaewon-dong Jungwon-gu
Seongnam-si Gyenggi-do, Korea
Tel: +82-31-741-7007
Fax: +82-31-741-7006`
11
XM Ready DEFAULT DISPLAY
Mute ON
Mute OFF
HMI Spec Ver. 2.2
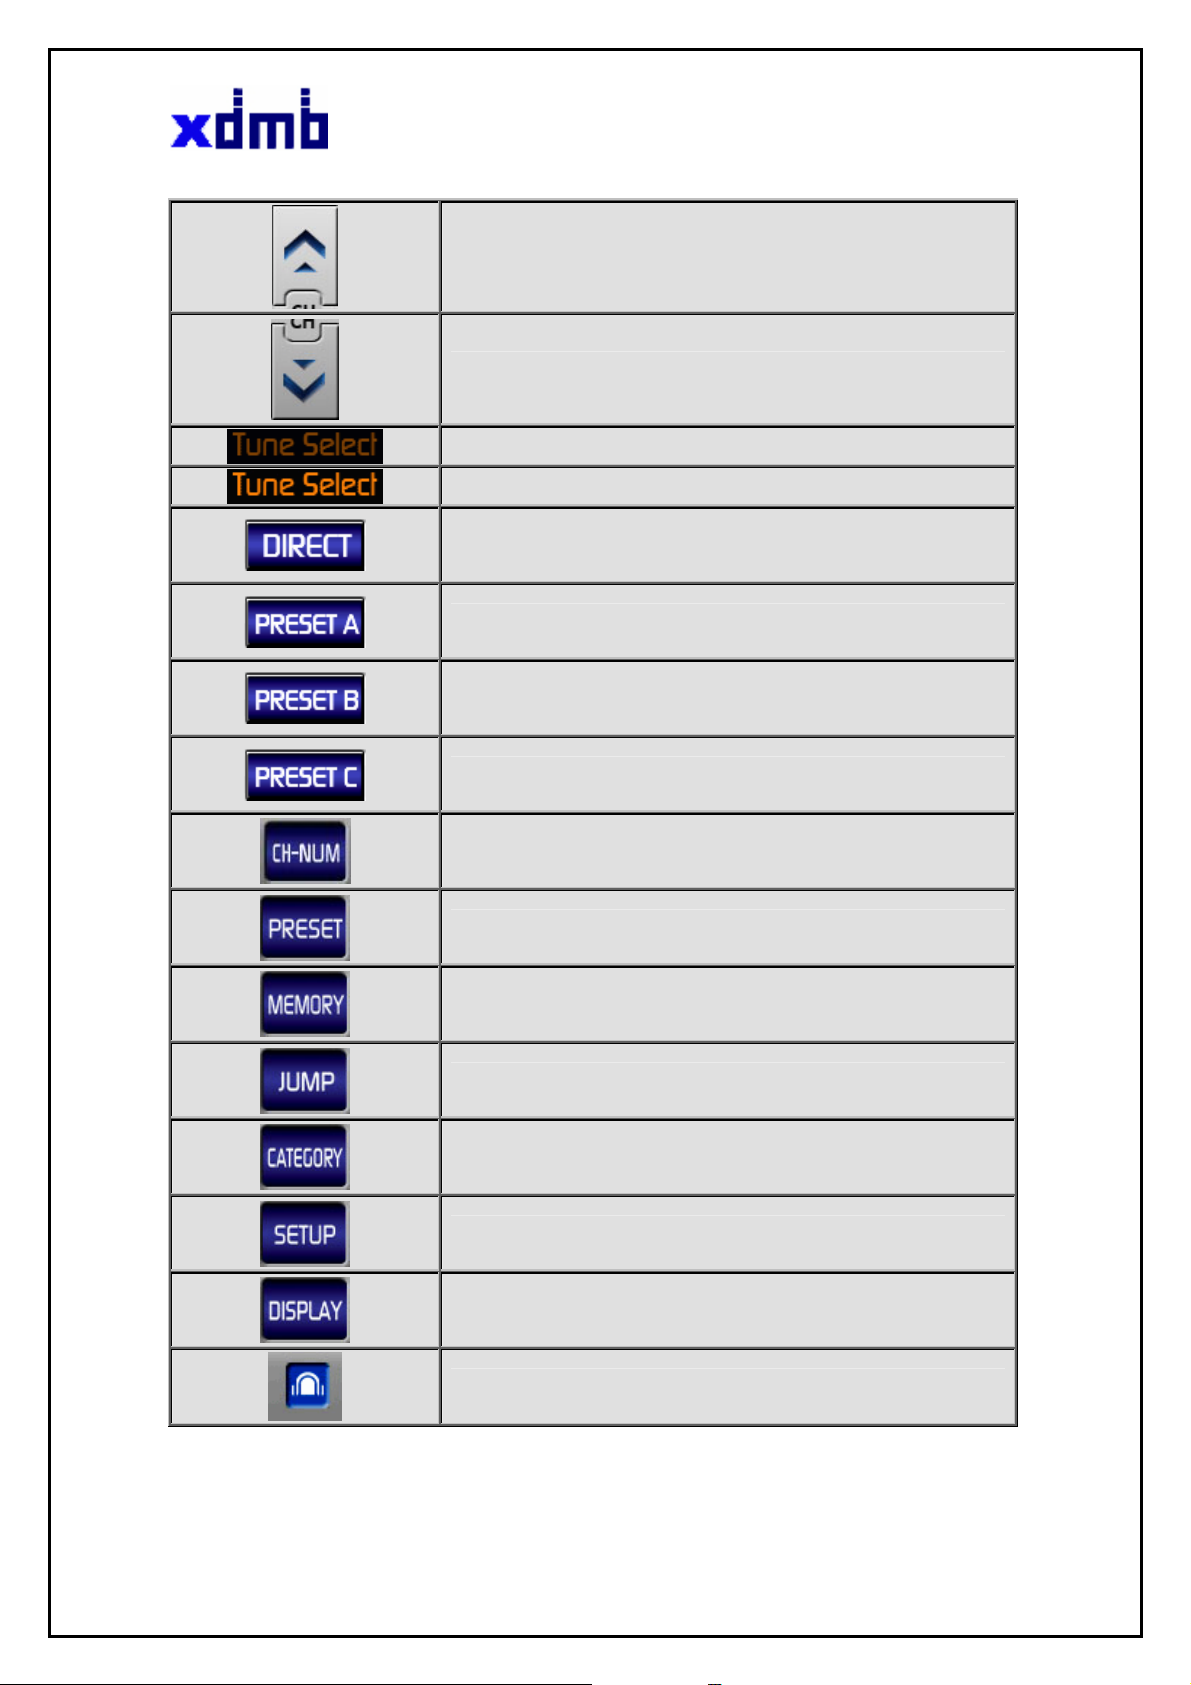
Next Channel & Preset A/B/C
Previous Channel & Preset A/B/C
Disable Tune Select
Enable Tune Select
Direct channel input
Select Preset A
Select Preset B
Select Preset C
Channel number direct entry
Preset setting
Memory present song
Move previous channel
Display category list window
Display user menu list window.
Display Mode change
Display main setup menu
XDMB Inc.,
12
805 8F Ssangyoung IT-1 Sangdaewon-dong Jungwon-gu
Seongnam-si Gyenggi-do, Korea
Tel: +82-31-741-7007
Fax: +82-31-741-7006`
HMI Spec Ver. 2.2
CHANNEL UP/DOWN BUTTONS
The CH ▲▼buttons are the primary controls for navigating through the various lists and option menus
available on the unit. In the default mode, these buttons provide sequential tuning through the available
program channels.
The Up (
tunes down one channel. When in the list
▲) button, when pressed, tunes up one channel, while the Down (▼) button, when pressed,
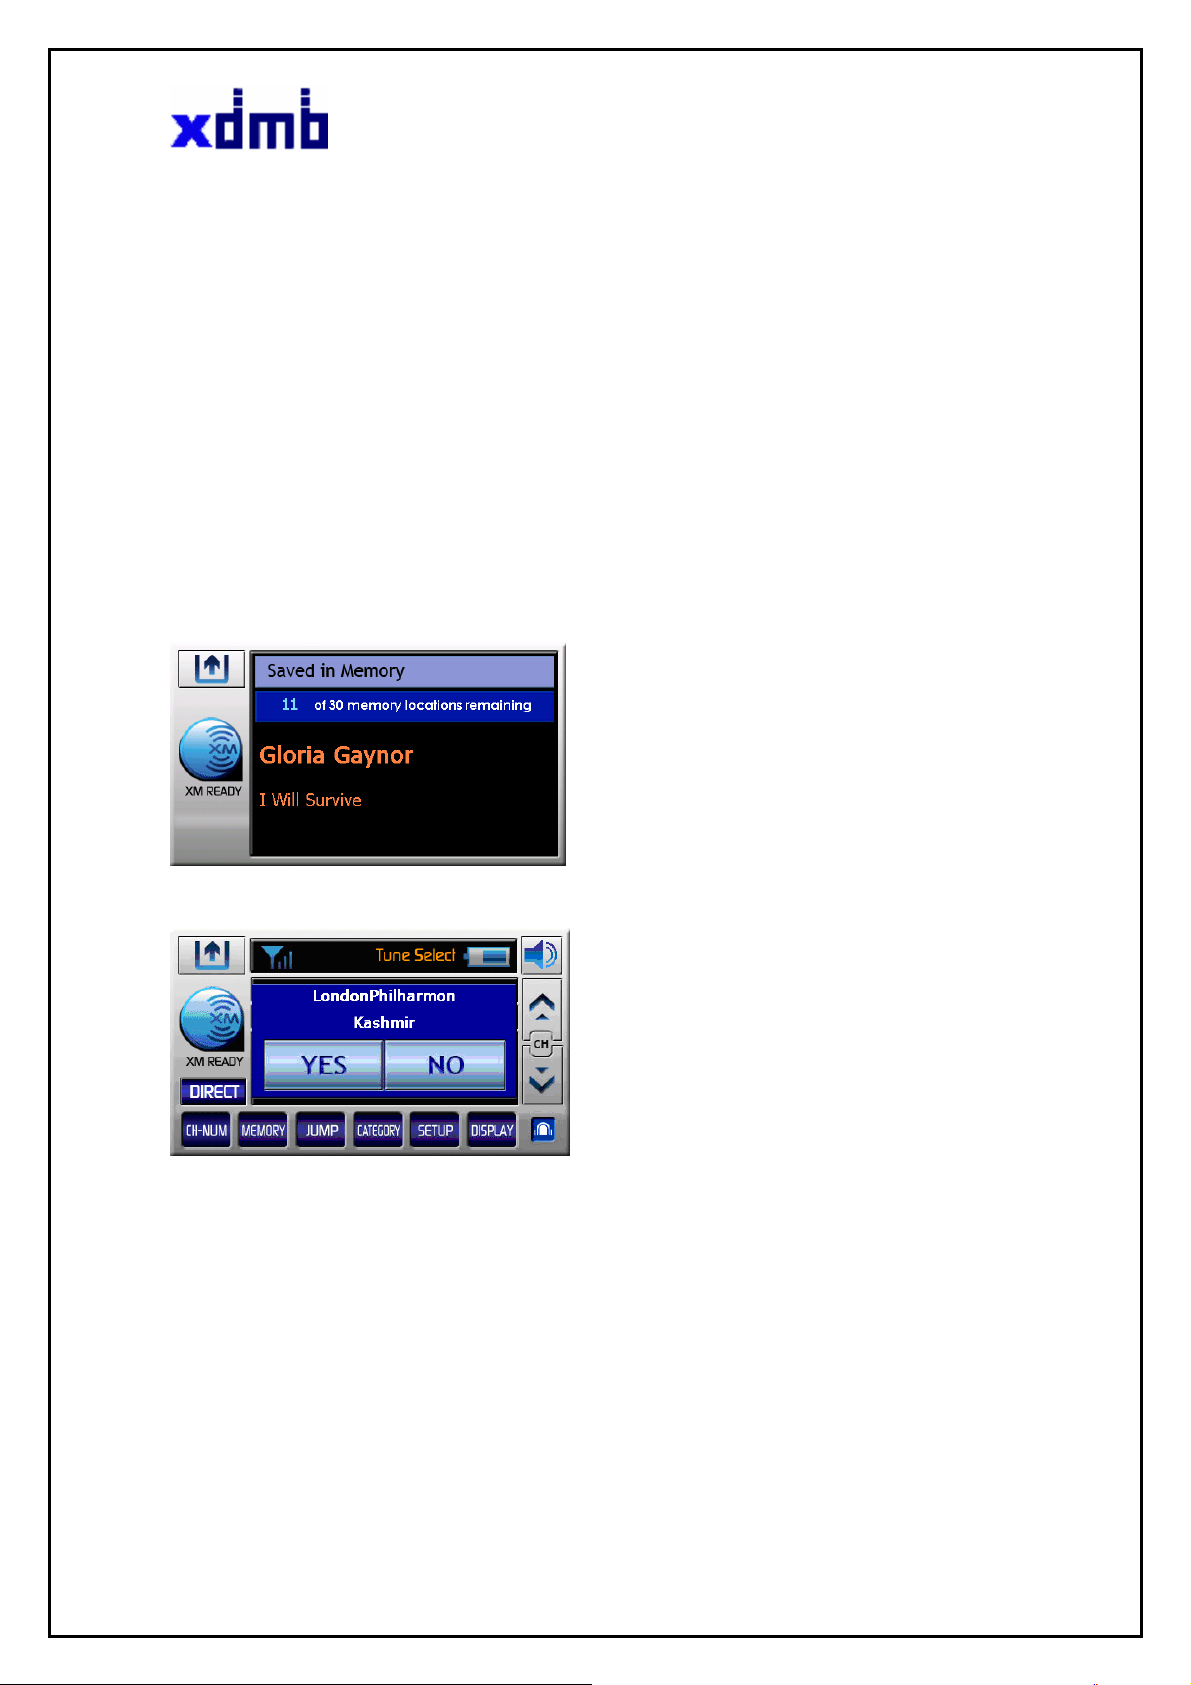
MEMORY BUTTON & TUNE SELECT FUNCTION
If user want hear like song again Press the Memory button.
Then, the user can enjoy the song whenever broadcast on the other channels by Tune select enable
Memory display
Tune Select pop up
This feature allows the user to capture and store the current program data information (Channel Name &
Number/ Artist & Song Title). You can store up to 30 Artist/Song Title combinations. The NVXM1000 also
has the capability to search the current incoming XM signal, and thereby alert you if it matches the
Artist/Song title stored in NVXM1000 memory.
XDMB Inc.,
805 8F Ssangyoung IT-1 Sangdaewon-dong Jungwon-gu
Seongnam-si Gyenggi-do, Korea
Tel: +82-31-741-7007
Fax: +82-31-741-7006`
13
HMI Spec Ver. 2.2
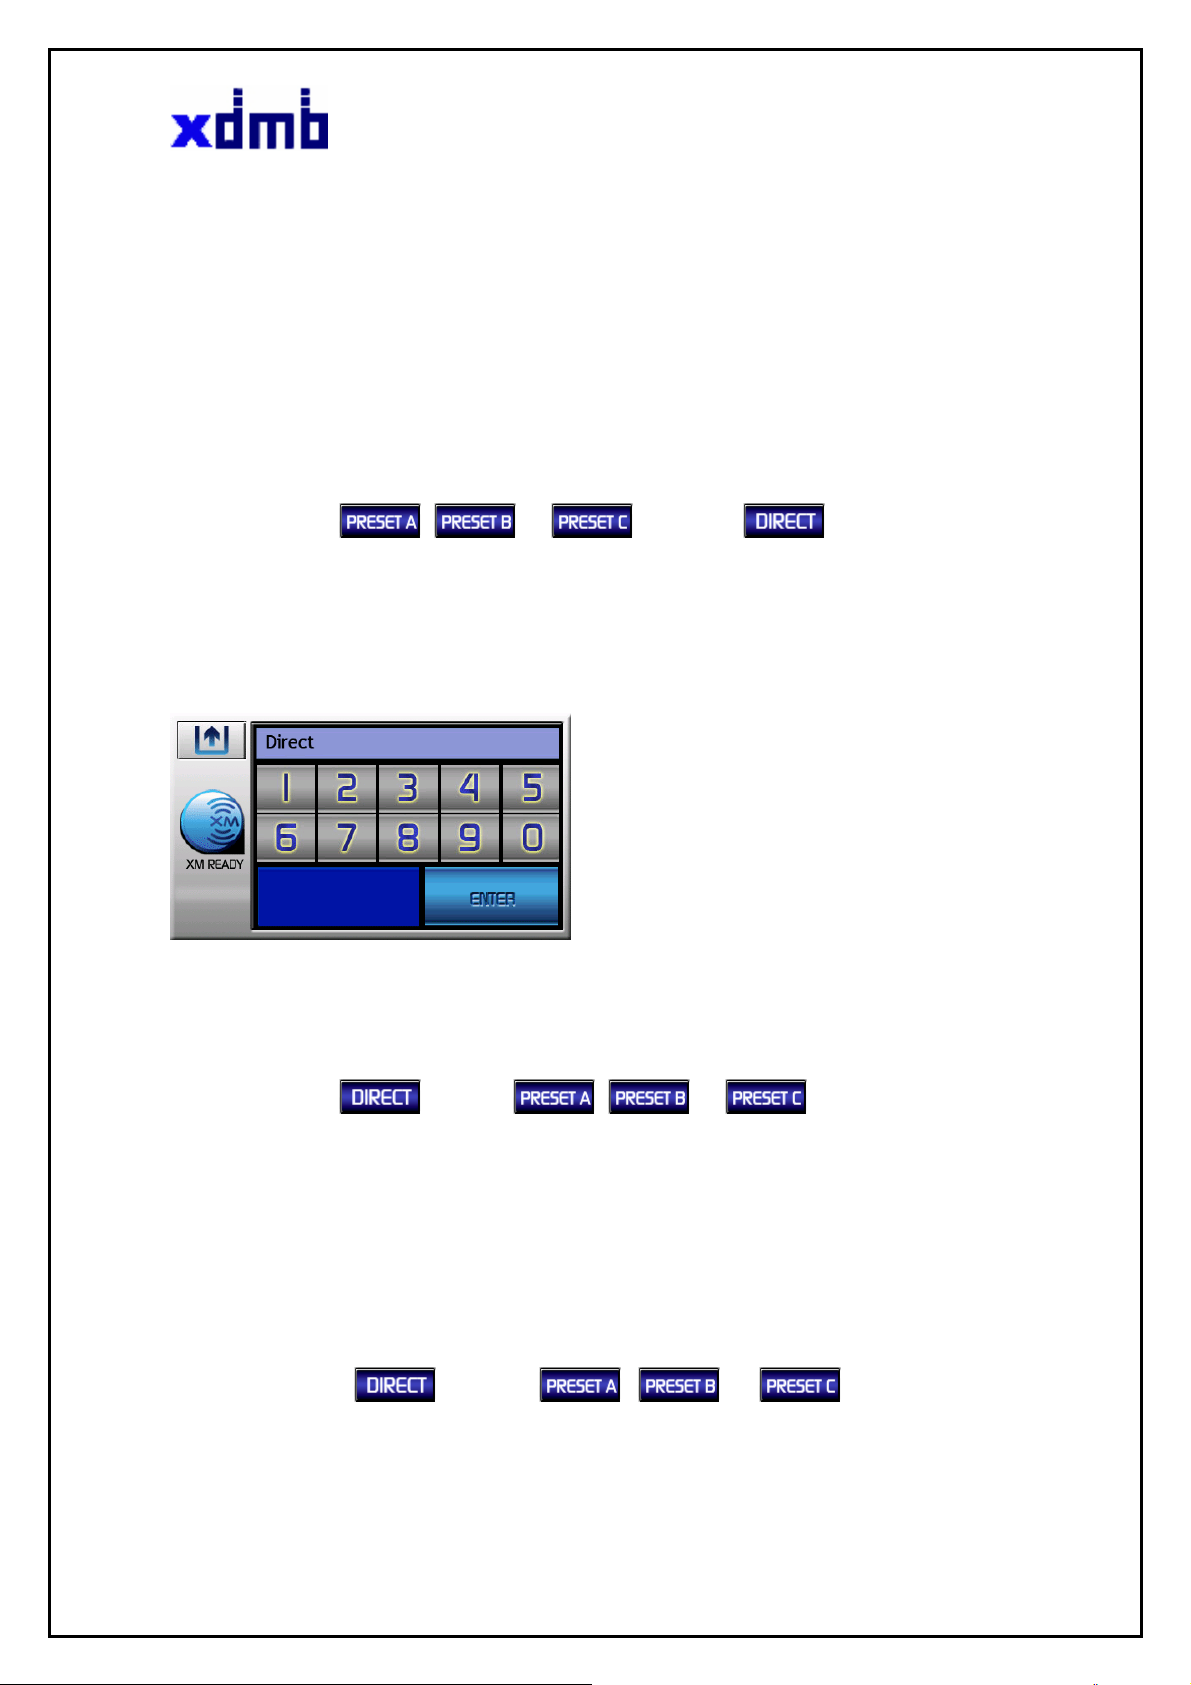
PRESET A/B/C & DIRECT BUTTON
To recall the like channels, user can use the preset functions
DIRECT CHANNEL NUMBER ENTRY
To entry direct a channel
Firstly, Change from
default display
The user can select then press the CH-NUM button
Once a select has been made, it can be tuning by pressing the ENTER button
PRESET STORE
To store preset channel,
Firstly, Change from
, or button. to on the XM Ready
Direct Channel number display
button. to , or on the XM Ready
default display
The user can select between 3 banks Then, press the PRESET button
User can store the channel in the 3banks by press the ‘SET’ button also user can store preset numbers
user want
PRESET RECALL
To recall preset channel,
Firstly, Change from button. to , or on the XM Ready
default display
XDMB Inc.,
14
805 8F Ssangyoung IT-1 Sangdaewon-dong Jungwon-gu
Seongnam-si Gyenggi-do, Korea
Tel: +82-31-741-7007
Fax: +82-31-741-7006`

HMI Spec Ver. 2.2
The user can select between 3 banks Then, press the PRESET button
User can recall the channel in the 3banks by input number in preset display by press the ‘SELECT’ button
Preset display
Function Buttons
Exit preset mode
~
Keypad buttons
Store preset channel numbers
Recalling preset channel numbers into memory
Each momentary press of the PRESET & DIRECT button allows the user to switch between 3 banks of
Channel presets (10 presets each Preset A, Preset B, and Preset C, plus Direct channel entry. When in
any of the three preset banks, momentarily pressing any of the number buttons will recall the stored
channel. In the Direct mode, use the number buttons to directly enter the desired channel number
JUMP BUTTON
Move previous channel
XDMB Inc.,
805 8F Ssangyoung IT-1 Sangdaewon-dong Jungwon-gu
Seongnam-si Gyenggi-do, Korea
Tel: +82-31-741-7007
Fax: +82-31-741-7006`
15

HMI Spec Ver. 2.2
CATEGORY
Category list display
The CATEGORY button allow the user to advance through the channel groups based on content category.
By pressing the CATEGORY button, the user can then page up or down through the channels within that
category. Once a choice has been made, it can be tuning by pressing the touch screen.
The Display button allow the user to change display channel name /Artist name/song title
SETUP
Upon entering this mode, there are four sub-buttons.
Setup display
Function Buttons
Exit Setup mode
Display Antenna Aiming
Display Channel Add/Skip
XDMB Inc.,
805 8F Ssangyoung IT-1 Sangdaewon-dong Jungwon-gu
Seongnam-si Gyenggi-do, Korea
Tel: +82-31-741-7007
Fax: +82-31-741-7006`
16

HMI Spec Ver. 2.2
Antenna Aiming
Display Tune Select
Display Data Service
A ntenna A iming display
Antenna Aiming display
Upon entering this mode, two vertical bar graphs are displayed representing terrestrial (tower) and satellite
transmitters. The signal strength is displayed by the respective graph segments. Position the antenna to
optimize either the satellite or terrestrial signal. The current setting is indicated by number of bars in the
graph. Moving the antenna location should maximize the number of bars in the respective graph, thus
ensuring optimum reception. To exit this function, press the exit Button.
NOTE: Terrestrial repeaters are typically used in large urban areas where structures may affect the line of
sight satellite signal. Terrestrial signals may not be available in your geographic location.
Tune Select
Turn Select display
XDMB Inc.,
17
805 8F Ssangyoung IT-1 Sangdaewon-dong Jungwon-gu
Seongnam-si Gyenggi-do, Korea
Tel: +82-31-741-7007
Fax: +82-31-741-7006`

HMI Spec Ver. 2.2
Upon entering this mode, the user all 30 Memory Locations can be cleared or some parts memory
Locations can be cleared.
The following adjustment options are possible:
1. Clear all Memory Locations. Press the Erase All button; a prompt display screen appears confirming
Please Confirm Your Selection? Select Yes or No and press the Yes or No button.
Confirm display
2. Clear some Memory Locations
.Press the Erase some button; a prompt display screen appears the already memorize list
Memory list display
Select the one item by touch screen. ; a prompt display screen appears confirming
Please Confirm Your Selection? Select Yes or No and press Yes or No button
Confirm display
Select by Artist, Song Title and Artist/Song Title
3.
T Select Search Options: - All, Artist Name, Song Title
Press the Select by Artist button, Then, the display would be replaced “Select by Song Title”
XDMB Inc.,
18
805 8F Ssangyoung IT-1 Sangdaewon-dong Jungwon-gu
Seongnam-si Gyenggi-do, Korea
Tel: +82-31-741-7007
Fax: +82-31-741-7006`

HMI Spec Ver. 2.2
And next replaced “Select by Artist/Song Title”
According to user choice, the XM display would be show each selected display
Channel Add/Skip
Channel A dd/Skip display
Upon entering this mode, a channel list is displayed with the current channel. Use the Page Up/Down
buttons to navigate the list. Once a channel has been select one item by touch screen, pressing the item
you can see the color change of the contents from white color to gray color on the display and prevents the
channel from being accessible during any of the tuning modes. Skipped channels can only be accessed
either through direct channel number entry or by returning to this menu and going through the same
process to return the skipped channel to the list. Upon adding a channel, the check mark is removed from
alongside the channel number/name.
DATA SERVICE
Function Buttons
XDMB Inc.,
805 8F Ssangyoung IT-1 Sangdaewon-dong Jungwon-gu
Seongnam-si Gyenggi-do, Korea
Tel: +82-31-741-7007
Fax: +82-31-741-7006`
19

HMI Spec Ver. 2.2
Exit Data Service mode
Stock
Function Buttons
Display Data Service control window
Display Data Service control window
Stock display
Exit Stock mode
Present stock erase all
Present stock erase some
Stock Erase All popup
XDMB Inc.,
805 8F Ssangyoung IT-1 Sangdaewon-dong Jungwon-gu
Seongnam-si Gyenggi-do, Korea
Tel: +82-31-741-7007
Fax: +82-31-741-7006`
20
Stock ON
Stock Off
Add stock list

Stock Add
HMI Spec Ver. 2.2
Stock Erase All display
Function Buttons
S tock Add display
Exit Stock Add mode
Spelling scroll up
Spelling scroll down
previous spelling select
Next spelling select
List page up
XDMB Inc.,
805 8F Ssangyoung IT-1 Sangdaewon-dong Jungwon-gu
Seongnam-si Gyenggi-do, Korea
Tel: +82-31-741-7007
Fax: +82-31-741-7006`
21

HMI Spec Ver. 2.2
List page down
Stock Add popup
XDMB Inc.,
805 8F Ssangyoung IT-1 Sangdaewon-dong Jungwon-gu
Seongnam-si Gyenggi-do, Korea
Tel: +82-31-741-7007
Fax: +82-31-741-7006`
22

HMI Spec Ver. 2.2
Stock Erase Some
Stock Erase Some popup
Stock Erase Some display
Info Extra
Function Buttons
Info Extra display
Exit Info Extra mode
Info Extra ON
Info Extra OFF
Select info Extra
XDMB Inc.,
805 8F Ssangyoung IT-1 Sangdaewon-dong Jungwon-gu
Seongnam-si Gyenggi-do, Korea
Tel: +82-31-741-7007
Fax: +82-31-741-7006`
23

HMI Spec Ver. 2.2
Info Extra Select
Display Stock
Info Extra Select display
Display Info Extra
DISPLAY BUTTON
The DISPLAY button allows the user to choose one of several ways of presenting the Artist, Song Title
and data service information on the LCD screen.
Main setup Button
XDMB Inc.,
805 8F Ssangyoung IT-1 Sangdaewon-dong Jungwon-gu
Seongnam-si Gyenggi-do, Korea
Tel: +82-31-741-7007
Fax: +82-31-741-7006`
24

HMI Spec Ver. 2.2
XM Ready & Navigation dual play
To operating XM Ready & Navigation dual mode, Please follow step.
1. firstly, operate Navigation Mode or Music Mode
2. Go back “Modes of operation” mode by press the “ ” button or “Home” button at the front
3. Press the XM Ready mode or Navigation on the Modes of operation default display
4. You can see the dual modes display
5. In this mode, you can use all functions of XM ready & Navigation
Function Buttons
Display Music default mode
Next Channel & Preset A/B/C
Previous Channel & Preset A/B/C
XM Ready mode done
Direct, Preset A/B/C setting
Display current folder list
XDMB Inc.,
25
805 8F Ssangyoung IT-1 Sangdaewon-dong Jungwon-gu
Seongnam-si Gyenggi-do, Korea
Tel: +82-31-741-7007
Fax: +82-31-741-7006`

HMI Spec Ver. 2.2
10. Music
This chapter provides guidelines for using the NVXM1000. in Music mode.
MUSIC default display
Playing music
You can play music stored on the unit’s hard disk with on a personal computer to the USB 2.0 port.
1. If the music is stored on a personal computer insert the USB2.0 connector directly into the USB2.0 port
on the right side of the unit.
To change the song, press the title of a different song in the list.
OR To play a song in a different folder, press the folder in the displayed pane and press the title
OR To play a song stored on SD Memory, press the SD button. You can see same type display list in the
SD Memory
Function Buttons
Play present loading song
Play previous song
Play next song
Pause current song
XDMB Inc.,
26
805 8F Ssangyoung IT-1 Sangdaewon-dong Jungwon-gu
Seongnam-si Gyenggi-do, Korea
Tel: +82-31-741-7007
Fax: +82-31-741-7006`

HMI Spec Ver. 2.2
Stop current song
Display main setup menu
Display current folder list
Random Play within HD/SD all songs
Play sequence
Repeat Play present a song
Repeat Play present Directory
Repeat Play within HD/SD all songs
Go back “Modes of operation” mode.
Display current all files of SD memory
Display current all files of HDD memory.
Display previous list within current folder
Play current check a file or Play first a file in current folder
Display next list within current folder
XDMB Inc.,
27
805 8F Ssangyoung IT-1 Sangdaewon-dong Jungwon-gu
Seongnam-si Gyenggi-do, Korea
Tel: +82-31-741-7007
Fax: +82-31-741-7006`

HMI Spec Ver. 2.2
HDD folder list
2. Press the song title on the touch screen. The song begins to play. When it’s finished, the unit plays the
next song based on the MUSIC mode
MUSIC & Navigation dual play
MUSIC & Navigation mode display
To operating MUSIC & Navigation dual mode, Please follow step.
1. firstly, operate Navigation Mode or Music Mode
2. Go back “Modes of operation” mode by press the “ ” button or “Home” button at the front
3. Press the MUSIC mode or NAVIGATION on the Modes of operation default display
4. You can see the dual modes display
5. In this mode, you can use all functions of MUSIC & Navigation
XDMB Inc.,
805 8F Ssangyoung IT-1 Sangdaewon-dong Jungwon-gu
Seongnam-si Gyenggi-do, Korea
Tel: +82-31-741-7007
Fax: +82-31-741-7006`
28

HMI Spec Ver. 2.2
Function Buttons
Display Music default mode
Play previous song
Pause current song
Music mode done
Play next song
Display current folder list
XDMB Inc.,
29
805 8F Ssangyoung IT-1 Sangdaewon-dong Jungwon-gu
Seongnam-si Gyenggi-do, Korea
Tel: +82-31-741-7007
Fax: +82-31-741-7006`

HMI Spec Ver. 2.2
11. Back up CAM
This chapter provides guidelines for using the NVXM1000 in Back up CAM mode.
Getting started
To see to Back up CAMER Screen you need two things in addition to your NVXM1000.:
• Optional NVXM1000 Cradle & Back up camera installed in your vehicle. ..
• Connect to Back up camera cable to the NVXM1000 Cradle
Back Up CAM displa y
Function Buttons
Quit and Exit Back up mode
Mute ON
Mute OFF
Display full screen
Backup view
To operating Backup camera, press the Back cam icon on the entertainment pack mode.
To use rear camera mode, Please follow step.
In case not shift into reverse gear
1. Connect the backup view camera cable on the NVXM1000 cradle
2. Start the rear view Mode
In case shift into reverse gear
XDMB Inc.,
805 8F Ssangyoung IT-1 Sangdaewon-dong Jungwon-gu
Seongnam-si Gyenggi-do, Korea
Tel: +82-31-741-7007
Fax: +82-31-741-7006`
30

HMI Spec Ver. 2.2
1. Connect the backup view camera cable on the NVXM1000 cradle
2. It will be display backup view. Whenever drivers shift into reverse gear automatically
12. Media
This chapter provides guidelines for using the NVXM1000 in Media mode.
Media display
Function Buttons
Quit Media and
Return to main menu
Operate Store demo mode
Operate Photo mode
PHOTO
Photo view
This chapter provides guidelines for using the NVXM1000 in PHOTO mode.
XDMB Inc.,
805 8F Ssangyoung IT-1 Sangdaewon-dong Jungwon-gu
Seongnam-si Gyenggi-do, Korea
Tel: +82-31-741-7007
Fax: +82-31-741-7006`
31

HMI Spec Ver. 2.2
Function Buttons
Photo view display
Quit Photo mode and
Return to Media default display
Mute ON
Mute OFF
Display full screen
Display full screen and slide mode
Display previous image
Display next image
Display image file list
Photo view
Press the previous and next buttons to view the images
Full screen
To expand the image to fill the screen, press the full-screen mode button.
XDMB Inc.,
805 8F Ssangyoung IT-1 Sangdaewon-dong Jungwon-gu
Seongnam-si Gyenggi-do, Korea
Tel: +82-31-741-7007
Fax: +82-31-741-7006`
32

HMI Spec Ver. 2.2
Slide Mode
Press the Slide mode button to start the slide show.
.
Supported formats
• JPEG
Full Screen & Slide Mode display
• BMP
13. SETUP
Setup - General mode
XDMB Inc.,
805 8F Ssangyoung IT-1 Sangdaewon-dong Jungwon-gu
Seongnam-si Gyenggi-do, Korea
Tel: +82-31-741-7007
Fax: +82-31-741-7006`
33

HMI Spec Ver. 2.2
Function Buttons
Setup - General display
Quit and Exit Setup mode
Battery charge status indicator
Speaker Volume status.
Execute calibration setting program.
Setting brightness level.
Setting duration level of main menu window.
Increase level (1- 2 - 3 - 4 - 5)
Decrease level 5 - 4 - 3 - 2 - 1)
FM Frequency and audio setting mode
Display System menu.
Calibrate
XDMB Inc.,
805 8F Ssangyoung IT-1 Sangdaewon-dong Jungwon-gu
Seongnam-si Gyenggi-do, Korea
Tel: +82-31-741-7007
Fax: +82-31-741-7006`
34

HMI Spec Ver. 2.2
To adjust stylus touch position for each user, Press the Calibrate button on the setup mode general display.
Carefully press and briefly hold stylus on the center of the target
Repeat as the target moves around the screen
TMC (Traffic Message Control) ON/OFF
This feature allows the user to control of Traffic status indicate on the Navigation mode
Brightness
To adjust LCD brightness, Press LCD + or - buttons on the setup mode main display
Duration of main
This feature allows the user to adjust of main display holding duration.
On the each mode operation for example NAVI, MUSIC, MUSIC … and etd.
When exit the main menu the previous menu will be return automatically according to setting duration
The setting duration are 2sec,4sec, 6sec, 8sec and ON
In case “ON” setting, the main menu did not return to previous menu without user select
Setup – Audio mode
XDMB Inc.,
35
805 8F Ssangyoung IT-1 Sangdaewon-dong Jungwon-gu
Seongnam-si Gyenggi-do, Korea
Tel: +82-31-741-7007
Fax: +82-31-741-7006`

HMI Spec Ver. 2.2
Function Buttons
Setup - Audio display
Quit and Exit Setup mode
Display General menu.
Display System menu.
Operate FM modulation (Speaker OFF)
Display direct FM channel setting mode.
Store current channel / Recall the stored channel
Store current channel / Recall the stored channel
Store current channel / Recall the stored channel
Operate Speaker ON
Speaker
This feature allows the user to control internal speaker ON or OFF
Green back ground : Speaker ON / FMT OFF
XDMB Inc.,
805 8F Ssangyoung IT-1 Sangdaewon-dong Jungwon-gu
Seongnam-si Gyenggi-do, Korea
Tel: +82-31-741-7007
Fax: +82-31-741-7006`
36

HMI Spec Ver. 2.2
Grey back ground : Speaker OFF / FMT ON
FMT
Upon entering this mode, any FM transmitter frequency can be chosen using select by touch screen FM
frequency buttons. The frequency step is 200Khz. The FM frequency range from 96.1 to 99.9MHz is
represented by a display
graph;
Preset1/2/3
If you want store user desire frequency channel, firstly adjust the favorite frequency Then, Press Preset
1or2or3 button during 2sec. the user can select user desire frequency by preset number choice
Direct button
Setup – Audio – Direct
Setup - Audio - Direct display
Function Buttons
Exit direct mode
~
Direct FM frequency Buttons
Previous page
Direct
User can set desire FM frequency directly.
Sequence is following:
- press the “Direct” button
XDMB Inc.,
805 8F Ssangyoung IT-1 Sangdaewon-dong Jungwon-gu
Seongnam-si Gyenggi-do, Korea
Tel: +82-31-741-7007
Fax: +82-31-741-7006`
37
Next page

HMI Spec Ver. 2.2
- Press the desire FM frequency button. And then screen will automatically return the FM
setting menu.
NOTE
FM Modulation button, redirects audio output from the speakers in the NVXM1000. to the speakers in your
car using a wireless connection.
FMT Mode: directs audio output to your vehicle’s stereo speakers.
Speaker Mode: directs audio output to the NVXM1000 own internal speakers.
Setup – System mode
Display system information (model name / OS version / software version / navigation version)
Setup – System display
Function Buttons
Exit current mode
FM Frequency and audio setting mode
Show the system information
14. REMOTE CONTROL CONFIGURATION
XM
XDMB Inc.,
805 8F Ssangyoung IT-1 Sangdaewon-dong Jungwon-gu
Seongnam-si Gyenggi-do, Korea
Tel: +82-31-741-7007
Fax: +82-31-741-7006`
38

HMI Spec Ver. 2.2
MEDEA,BACK UP CAM, PHOTO, MUSIC AND SETUP
XDMB Inc.,
805 8F Ssangyoung IT-1 Sangdaewon-dong Jungwon-gu
Seongnam-si Gyenggi-do, Korea
Tel: +82-31-741-7007
Fax: +82-31-741-7006`
39

HMI Spec Ver. 2.2
15. File Copy
XDMB Inc.,
805 8F Ssangyoung IT-1 Sangdaewon-dong Jungwon-gu
Seongnam-si Gyenggi-do, Korea
Tel: +82-31-741-7007
Fax: +82-31-741-7006`
40

HMI Spec Ver. 2.2
Connecting to your PC
You connect your NVXM1000. to a PC using a standard USB 2.0 cable. Most computers come with this
cable or you can purchase one at your computer store.
1. Make sure power to both the PC and the NVXM1000 is turned off.
2. Connect one end of a standard USB cable to the USB 2.0 port on the NVXM1000.
3. Connect the other end of the USB cable to the PC’s USB 2.0 port.
4. Turn on power to both the PC and the NVXM1000
USB Connecting Massage
Copy
On the PC, open My Computer or Windows Explorer. Consult your Windows manual if you need help.
Windows opens a screen showing all the drives on your computer. Windows assigns a drive letter to the
NVXM1000 based on the other drives in your system.
Therefore, the drive letter you see may be different from the one in the following example.
A Copying message may appear, depending on the PC’s operating system and processor speed.
When the copy is finished, the files appear in the selected Music, Movie or Photo folder on the NVXM1000.
16. Troubleshooting
XDMB Inc.,
805 8F Ssangyoung IT-1 Sangdaewon-dong Jungwon-gu
Seongnam-si Gyenggi-do, Korea
Tel: +82-31-741-7007
Fax: +82-31-741-7006`
41

HMI Spec Ver. 2.2
Description Probable Cause Remedy
NVXM1000 does not turn on. The power cable may not be
properly connected.
GPS signal strength is weak In some
applications/installations,
GPS signal may be difficult to
receive.
You hear no sound from the
unit’s internal speaker.
You hear no sound from your
car stereo speakers
When trying to update
firmware, the unit displays,
“OS Update File can’t be
The speaker may be turned off
or redirected to the stereo
speakers in your car or home.
You’ve selected an
unavailable FM frequency
To update, you need the
update software.
See “Upgrade the firmware”
Check power cable
Position the built-in GPS antenna
to a better angle for signal reception.
To locate the antenna, see “Back view”
1. Press Setup, Navigation Preferences.
2. Press the button to change the
setting from FMT Mode to Speaker Mode
Tune to the correct FM frequency
Double-check all connections
found”
17. Specifications
XDMB Inc.,
805 8F Ssangyoung IT-1 Sangdaewon-dong Jungwon-gu
Seongnam-si Gyenggi-do, Korea
Tel: +82-31-741-7007
Fax: +82-31-741-7006`
42

HMI Spec Ver. 2.2
Dimensions (W x H x D): 159 x 81.60 x 37.66 mm
Operating system Windows CE version 5.0
Embedded processor Atlas II 300MHz
Memory 64MB SDRAM
64MB Flash Memory
8GB Hard Disk Drive
Power source 12 ~ 24V DC (using cigar jack)
Map database Nav Tech Map Database
Liquid crystal display (LCD) 4" LCD Antiglare touch panel TFT Touch screen
LCD 480 horizontal x 272 vertical pixels
XDMB Inc.,
43
805 8F Ssangyoung IT-1 Sangdaewon-dong Jungwon-gu
Seongnam-si Gyenggi-do, Korea
Tel: +82-31-741-7007
Fax: +82-31-741-7006`

 Loading...