

Page 1

Table of Contents
Installation & User Guide
X-44
1
Page 2

Table of Contents
Notices and Compliance! 6
Notices! 6
Hearing Aid Compatibility! 6
UL/CSA Safety Compliance! 6
Documentation Disclosure! 6
FCC Statement! 6
Environment! 7
CE Declaration of Conformity! 7
WiFi Compatibility! 7
Long Distance! 7
Copyright and Trademark Notice! 7
Part Numbers! 7
Before you Begin! 9
Package Contents! 9
Tools Needed! 9
Order your telephone Lines! 10
Connecting Telephone Lines! 10
Product Overview! 11
Automated Attendant Answering! 14
Auto Attendant Greetings! 14
Setup! 15
Installation! 15
Ports on the Back! 16
Back View! 17
Sidecar! 18
Connecting the Sidecar! 18
Connecting the WiFi Wireless Adapter! 19
From your Personal Computer! 19
Getting to Know your WiFi Adapter! 20
Connecting the WiFi Wireless Adapter! 20
Default Programming! 21
Other Default Settings! 21
Setting up your WiFi Adapter! 22
Getting Started! 23
From your Personal Computer! 23
Reconfiguring your Computer’s Network Connection! 28
Getting to Know your new X-44! 30
2
Page 3

Table of Contents
Button LED Indication! 33
Using your Telephone! 35
Getting to know your way around! 35
Placing a call! 36
Review Call Records! 40
Using your Sidecar! 41
Telephone Feature Description Table! 43
Telephone Programming Sequences! 43
Automated Attendant Greetings! 45
Automatic Answer! 46
Automatic Busy Redial! 46
Automatic Day and Night Greetings (Operating Mode)! 47
Block Anonymous! 47
Call Forward! 48
Call Hold! 49
Call Log! 49
Call Waiting! 50
Conference - 3 Way! 50
Customizable Voice Mailbox Greetings! 51
Dial Timeout! 51
Distinctive Ringing! 52
Do Not Disturb (DND)! 52
Extension Feature Reset! 53
Feature (Flexible) Button Programming! 53
Hold Reminder! 54
Language! 54
LCD & Interactive Soft Buttons! 54
Message Box! 55
Multi-Line Appearance! 55
Mute! 56
Name in Display! 56
On-Hook Dialing! 56
Paging! 57
Paging Allow! 57
Paging Single! 57
Password Protection! 58
Phonebook! 58
Plug and Play! 59
Quick Setup! 60
Speed Bin! 60
Tone Type! 60
Transfer! 61
3
Page 4

Table of Contents
Voice Mail! 61
Volume Control! 62
Web Management! 62
Telephone Programming Menu! 63
Menu Programming! 63
Getting Started! 63
Menu! 64
Web Programming! 69
Programming with an Internet Browser! 69
Information Page! 70
Network Information! 70
Product Information! 70
SIP Trunk 1! 71
Extension Information! 71
DID Table! 71
Network Page! 72
Network! 72
QoS Settings! 72
Phone! 73
Language Setting! 74
Volume Control! 74
Tone/Ring Selection! 74
Voice Parameters! 74
Phone Features! 74
Paged Settings! 75
Speed Dialing Settings! 75
Voice Mail Settings! 75
Premise Text Message! 76
Subscriber Information! 76
Forwarding Settings! 76
Always Call Forwarding! 76
Busy Call Forward:! 76
No Answer Call Forward:! 76
No Answer Time (sec):! 76
Codec Settings:! 77
Call Blocking Settings:! 77
Prefix Entry Settings! 77
4
Page 5

Table of Contents
Dial Plan:! 78
Management! 79
HTTP Upgrade! 79
TFTP/FTP Upgrade! 80
Account Settings! 80
Reset to Default! 80
Admin Settings! 81
Diagnostics! 82
Syslog Settings! 82
Diagnostics! 82
System! 85
SIP Trunk (1 - 4) Settings! 86
Multiple Service Providers! 86
Subscriber Information! 86
Incoming Call Settings! 87
All Ring & Operator No Answer Setting! 87
Session Timer! 87
Auto Provision Settings! 88
All Paging Access Code! 88
Operator Setting! 88
Operating Mode! 88
NAT Settings! 88
Time Settings! 89
DID Settings! 89
Number Range Settings! 89
Transfer Recall Timeout! 90
Emergency Number List! 90
RTP Port Setting! 90
Phonebook! 91
Private! 91
Public! 92
Voicemail! 93
Getting to Know your Voice Mailbox! 93
Setting up your Voice Mailbox! 93
Using your Voice Mailbox! 94
Remote Message Pickup! 94
Troubleshooting! 95
5
Page 6

Date
Version
Supersedes
Description
April 2012
Version 1.0
Initial Release
Table of Contents
Notices and Compliance
© Copyright 2011 by XBLUE Networks, LLC. All rights reserved
Notices
Hearing Aid Compatibility
The X-44 telephone endpoints are hearing aid compatible, as defined in section 68.316 of Part 68 FCC
Rules and Regulations.
UL/CSA Safety Compliance
All X-44 telephones has met all safety requirements, and found to be in compliance with the Underwriters
Laboratories (UL) 60950-1.
Documentation Disclosure
The information contained in this document is subject to change without notice and should not be
construed as a commitment by XBLUE Networks, LLC. The information contained herein is supplied
without representation or warranty of any kind. XBLUE Networks, reserves the right, without notice, to
make changes to the equipment, equipment design, and documentation as advances in engineering and
manufacturing methods warrant, and assumes no responsibility and shall have no liability of any kind
arising from the supply or use of this document or the material contained herein.
Warning: This documented information is designed to assist in the installation of the new XBLUE
products. XBLUE networks has done its best to give adequate warnings and cautions to advise both
technical and non-technical individuals, but it is very important to use common sense when installing all
electrical equipment. The use of this system may result in local, long distance, Internet access or data
transfer charges, which are the sole responsibility of the user/owner of the equipment. Wireless access
has been added for convenience, however, XBLUE does not warrant or guarantee, written or implied, that
the wireless will work in every location. It is the responsibility of the owner to enable security to stop
unwanted access to the network.
FCC Statement
This equipment generates, uses and can radiate radio frequency energy, and if not installed and used
properly, that is, in strict accordance with the instruction manual, may cause interference to radio and
television reception. This equipment has been tested and found to comply with the limits for a Class B
computing device in Subject J of Part 15 of FCC rules, which are designed to provide reasonable
protection against such interference when operated. However, there is not guarantee or warranty, written
or implied, that interference will not occur in a particular installation. If this equipment causes or receives
interference or fails to operate correctly, due to radio frequency interference (RFI) or electromagnetic
interference (EMI), it will be fixed at the owners expense.
6
Page 7

Part Number
Description
47-9101
X-44 VoIP Telephone
47-9003
24 Button Sidecar, Electronic Dialing Module (EDM)
47-9004
8 Port 10/100 Ethernet Switch
47-9005
XBLUE Networks Universal Wireless Adapter
47-9006
6+ Foot Ethernet Cable
Table of Contents
Environment
All electronic equipment must be disposed of at an approved electronic recycling center.
CE Declaration of Conformity
This equipment complies with the requirements relating to electromagnetic compatibility, EN55022 class B
for ITE and EN 50082-1. This meets the essential protection requirements of the European Council
Directive 89/336/EEC on the approximation of the laws of the Member States relating to electromagnetic
compatibility.
WiFi Compatibility
The system has been tested and found to work adequately using XBLUE Networks‘ WiFi Bridge
(47-9005); in most cases, the device will function correctly. However, XBLUE Networks does not
guarantee that the device will function in all cases. In such cases, it will be up to the user, at their
expense, to provide a Category 5, 5E or 6 cable for the device to function correctly. In addition, XBLUE
will not; does not; guarantee or warranty that the device will work using a different WiFi Device.
Long Distance
XBLUE Networks is not responsible for any long distance, domestic or non-domestic toll charges
regardless of access or intent. All toll calling charges, above the calling plan, is the sole responsibility of
the user.
Copyright and Trademark Notice
All right reserved. No part of this publication may be reproduced, transmitted, transcribed, stored in
retrieval system, photographically or translated into any language or computer language, in any form or
by any means, electronic, mechanical, magnetic, optical, chemical, manual or otherwise, without the prior
written permission of XLBUE Networks, LLC.
Windows 98/NT/2000/XP/7™ and Internet Explorer™ are registered trademarks of Microsoft Corporation.
All other company, brand and product names, like Netscape Navigator™ are trademarks or registered
trademarks of their respective owners.
Part Numbers
Below is a list of compatible component part numbers:
7
Page 8

Table of Contents
Notes:
8
Page 9
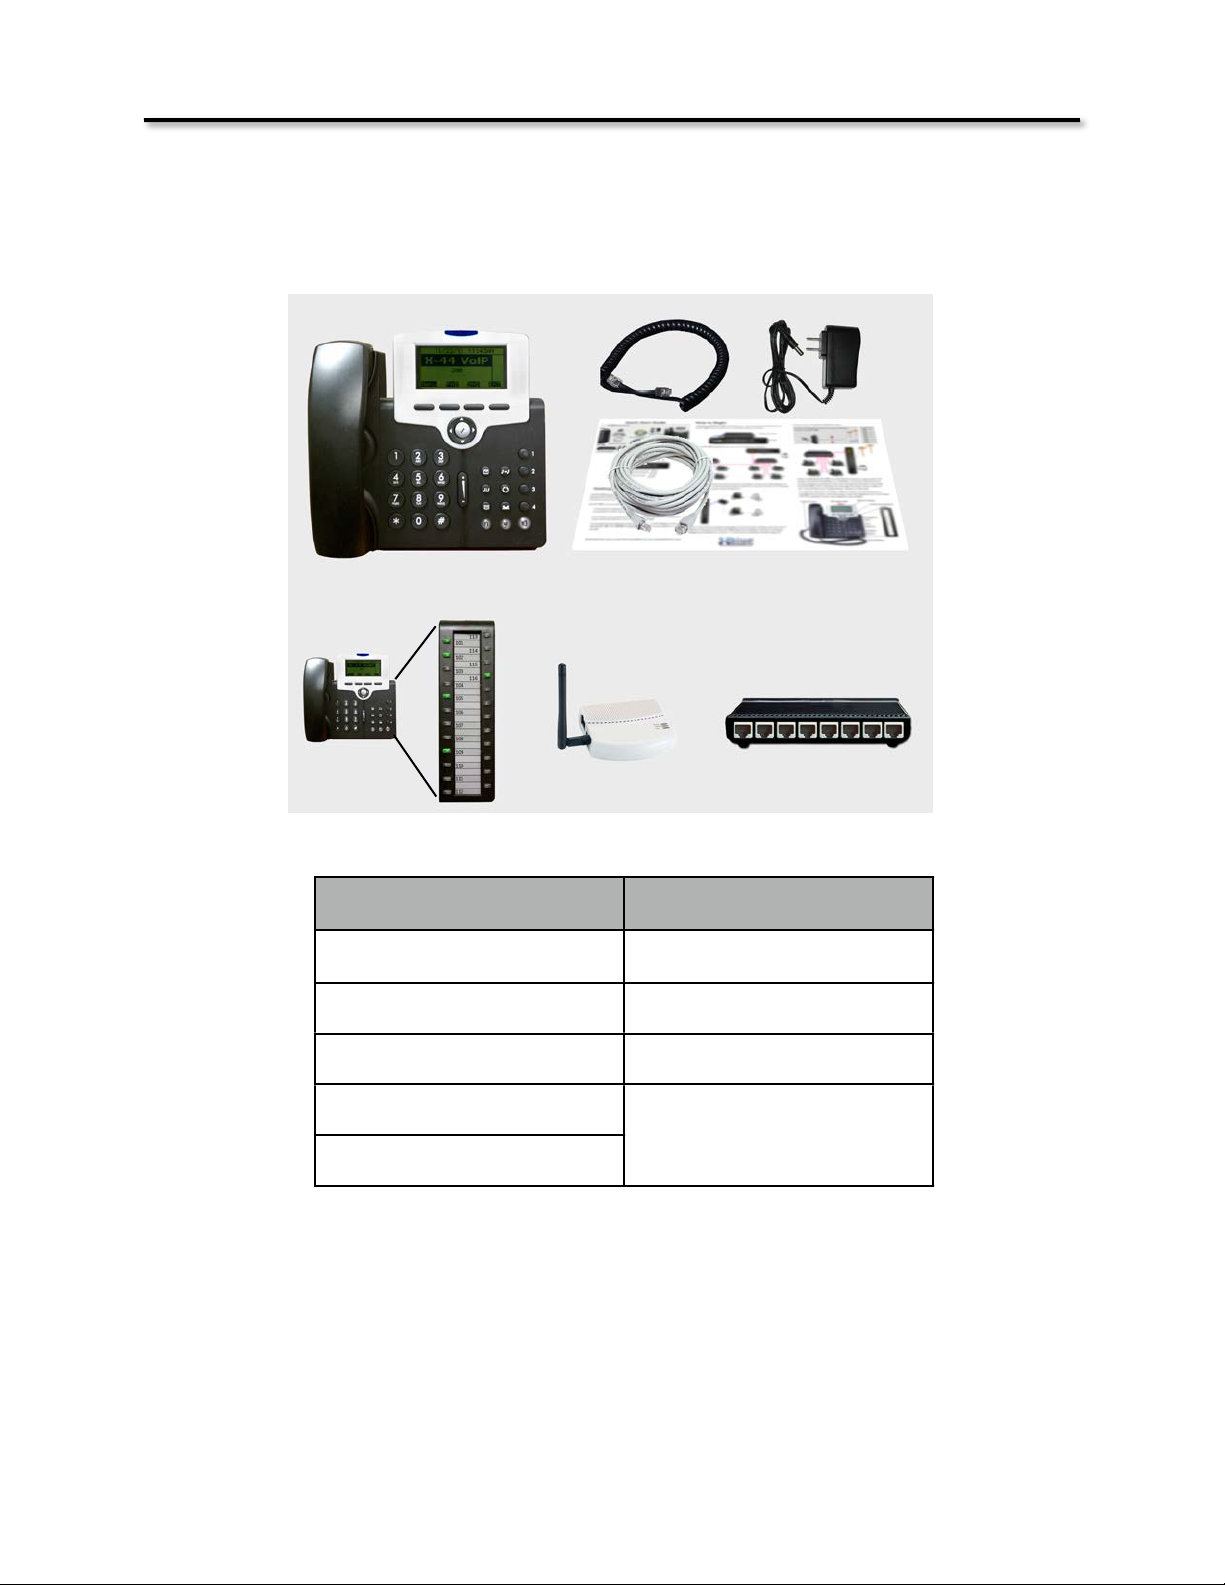
Standard Equipment
Optional Equipment
1 - X-44 SIP Telephone
6 - Sidecar
2 - 6 foot Ethernet Patch Cable
7 - WiFi Wireless Bridge
3 - Power Supply
8 - 8 Port Data Switch
4 - Coiled Handset Cord
5 - Quick Installation Guide
Before You Begin
Before you Begin
Package Contents
The X-44 comes with everything that you need to connect it to an existing Local Area Network (LAN).
1
3
4
5
2
Optional Equipment
6
8
7
Tools Needed
The X-44 requires an existing data network
•
Small Philips screwdriver is needed to connect the optional Sidecar
•
9
Page 10
Before you Begin
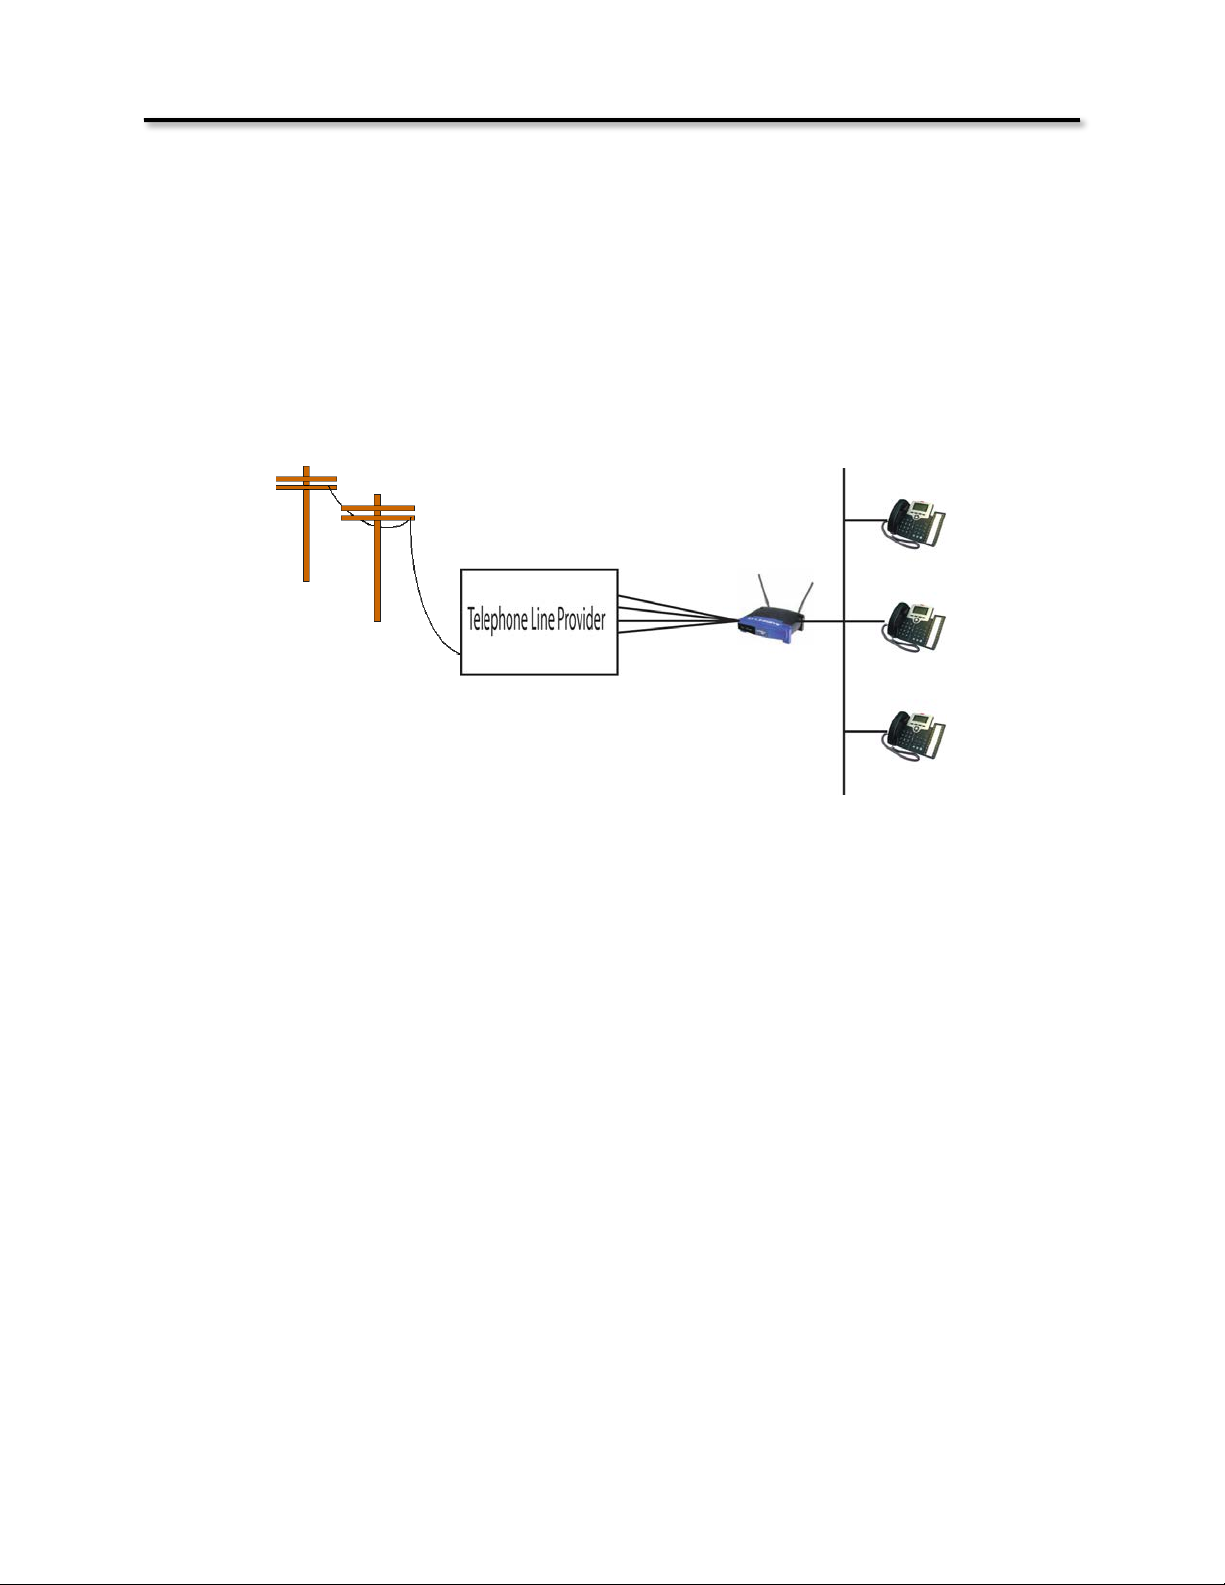
Order your telephone Lines
The X-44 uses low cost Voice Over Internet Protocol (VoIP) telephone lines. Because there is no physical
connection to your existing telephone line wiring, it the easiest telephone system to install.
Call 866-XBLUE12 (866-925-8312) to order your new telephone lines. Most area codes are available so
that you can get a local number and are usually issued the same day. In addition, in most cases you can
keep your existing telephone number.
Connecting Telephone Lines
Up to 4 telephone lines can be authenticated right over your existing data network. Simply enter the
information provided to you by your SIP Trunk (Telephone Line) provider and your telephone lines will
come on line and begin working.
Once authenticated, they are automatically shared with all other extensions on your network, and the
lines appear on the 4 line buttons on each telephone.
Your system is now fully operational and you are ready to make and take phone calls.
10
Page 11
Product Overview
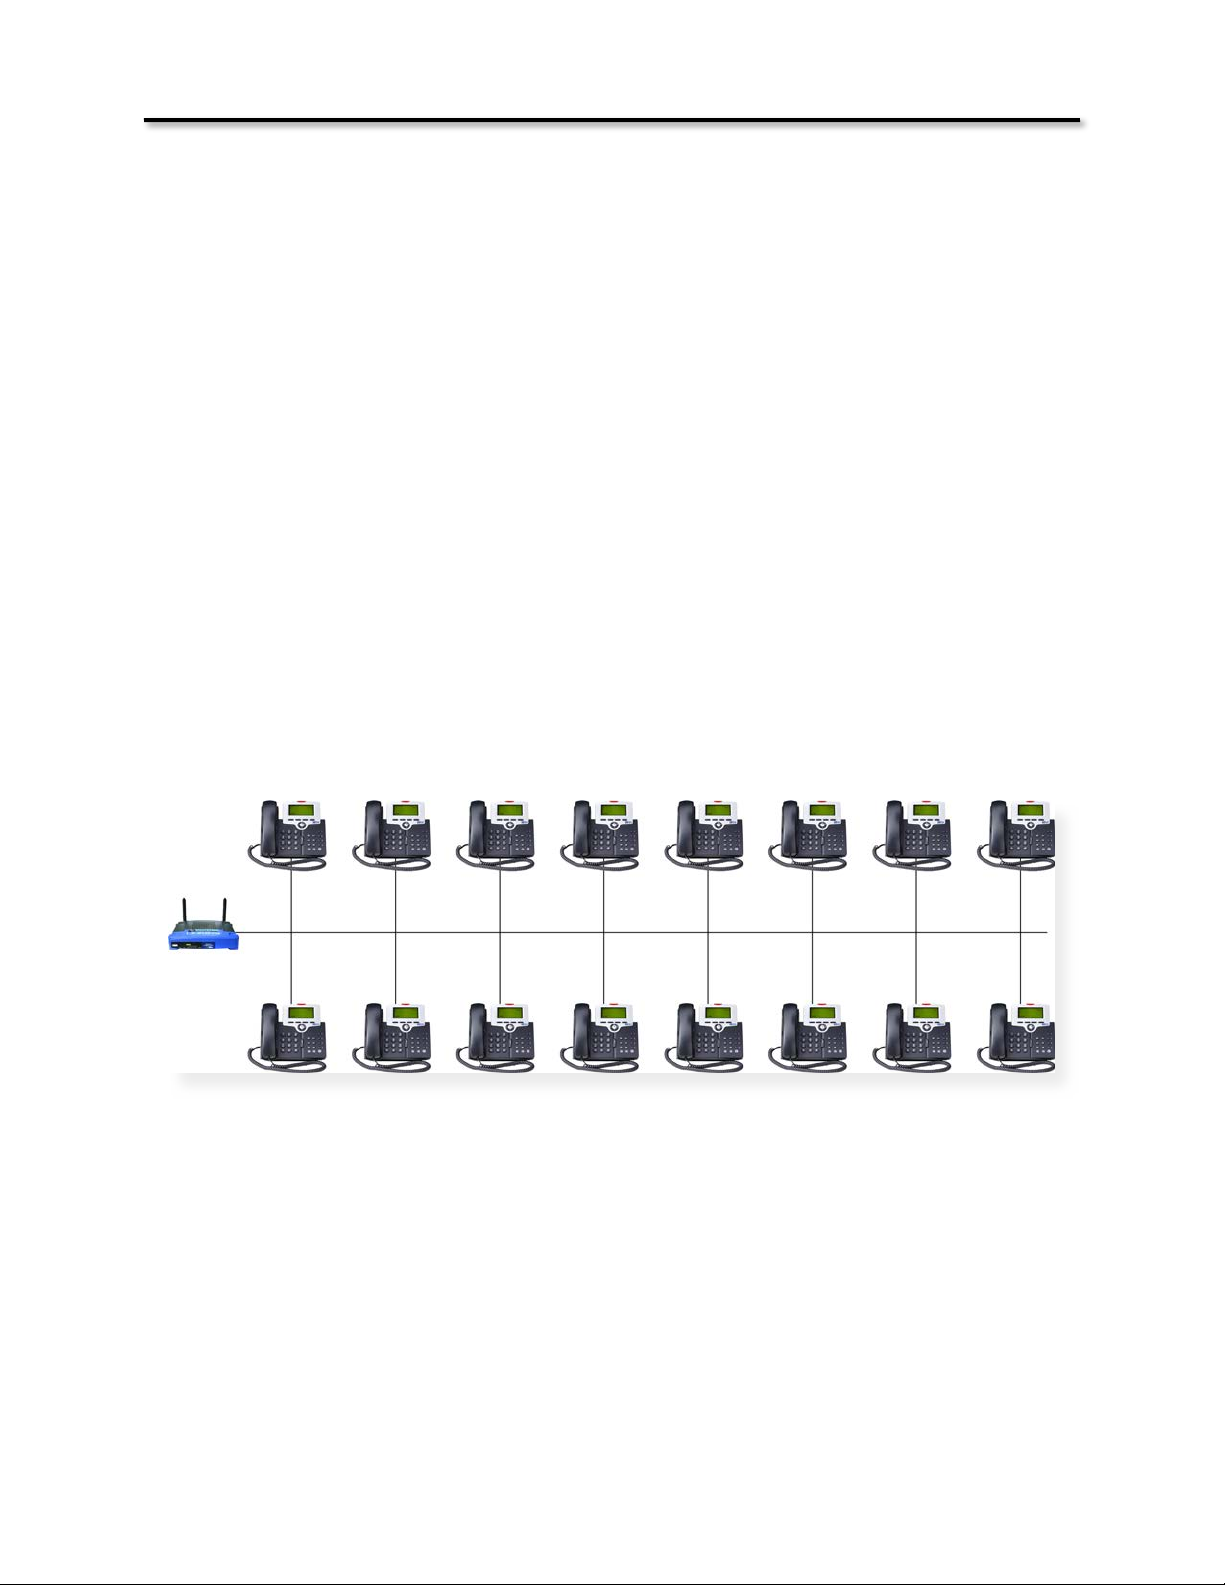
Product Overview
The$X&44$is$a$full$featured$Session$Initiated$Protocol$(SIP)$telephone$endpoint$that$connects$to$your$
existing$data$infrastructure$and$does$not$require$a$specialized$Router$or$Gateway.$$Each$X&44$will$
automatically$locate$and$connect$to$all$other$X&44$telephones$on$your$network.$The$X&44$connects$to$a$
Local$Area$Network$(LAN)$(10/100/1000$base&T)$and$uses$Internet$Protocol$(IP)$to$process$voice$calls,$
which$is$known$as$Voice$over$Internet$Protocol$(VoIP).$The$X&44$uses$Session$Initiated$Protocol$V2$(SIP$
V2),$which$was$specifically$designed$to$transport$VoIP$calls$over$a$data$network$and$gives$the$X&44$
Telephones$a$comprehensive$telephone$system$feature$offering,$such$as$Intercom$Calling,$Call$
Conference,$Call$Forward,$Automated$Attendant$and$Voice$Mail,$right$over$your$existing$LAN.
11
Page 12
Product Overview
The$X-44$telephone$is$a$2$port,$layer$2$network$switch$allowing$you$to$use$a$single$Category$5$or$6$
cable$to$transmit$both$voice$and$data.$Simply,$plug$the$X-44$Telephone$into$your$data$jack$and$a$
Personal$Computer$(Desktop$or$Laptop)$into$the$X-44$Telephone;$both$end$points$will$be$connected$to$
your$current$network.$
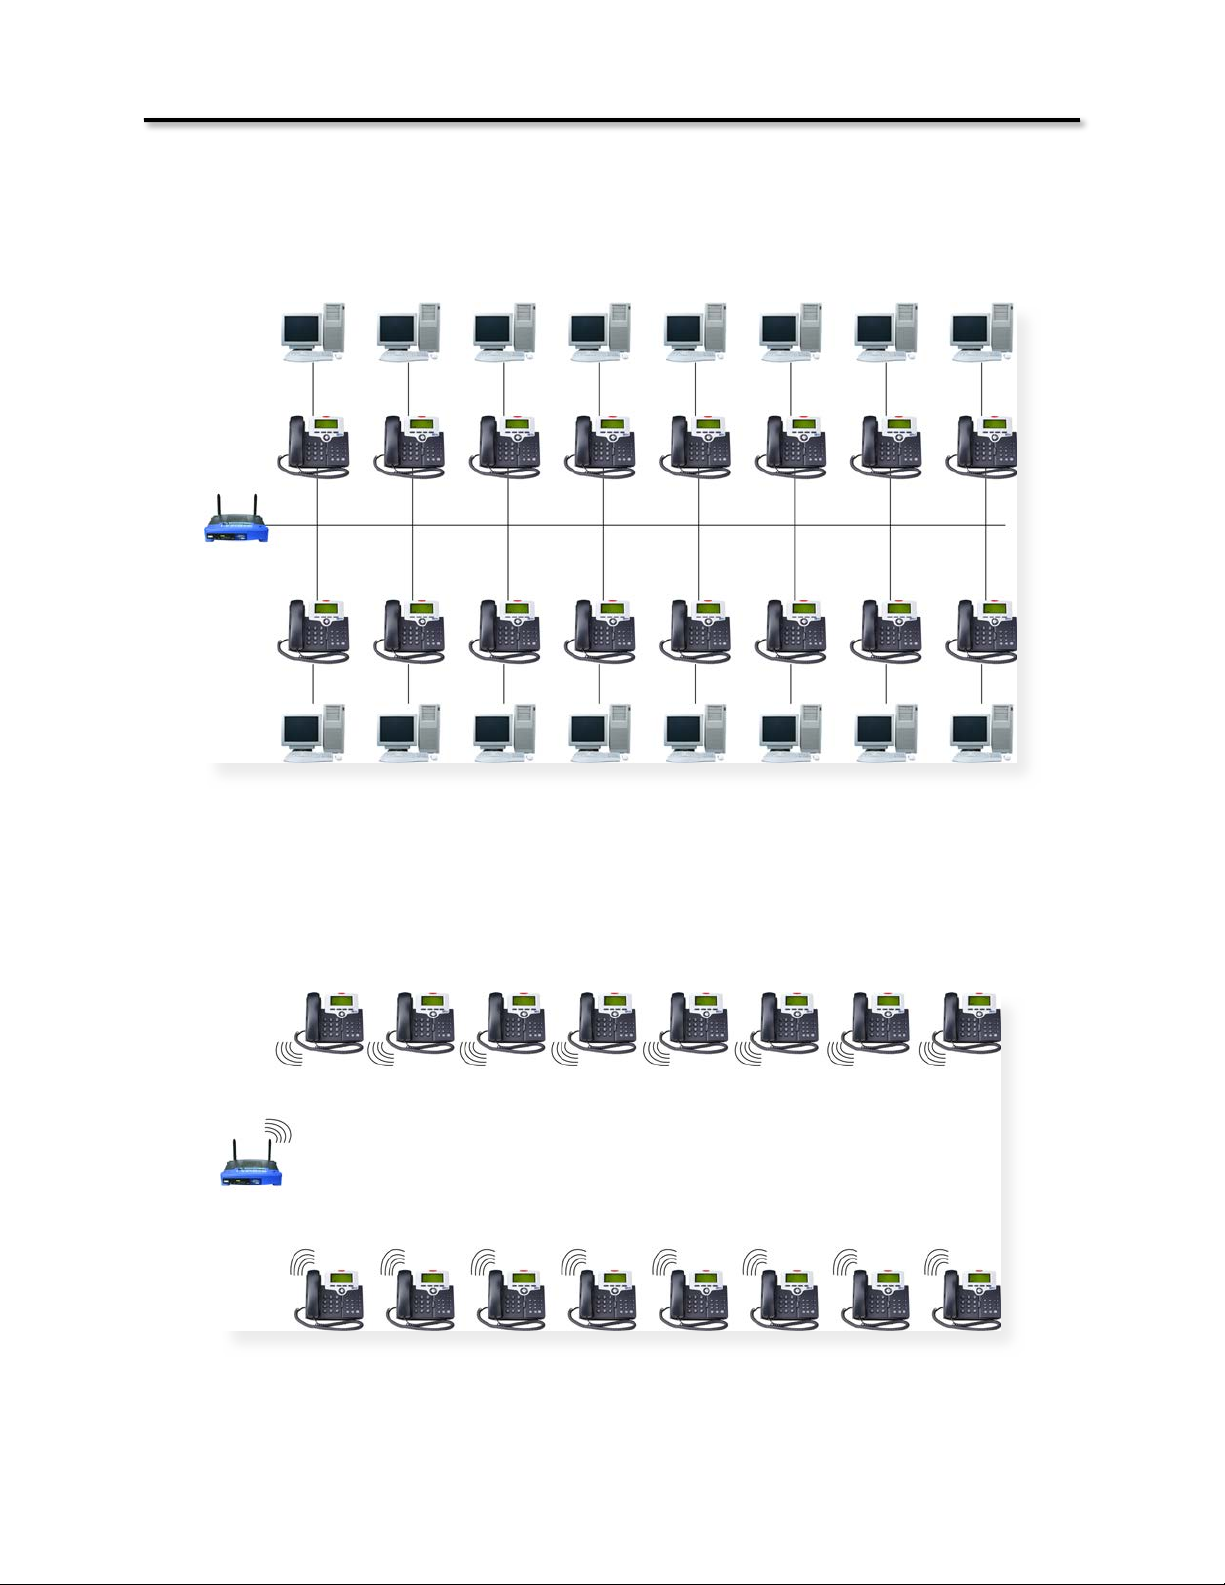
Best$of$all$if$you$have$a$location$that$does$not$have$access$to$a$network$cable,$just$use$the$XBLUE$
Networks$WiFi$Adapter$(sold$Separately)$to$connect$your$new$X-44$Telephone$system$to$your$existing$
wireless$802.11n$router.
12
Page 13
Product Overview
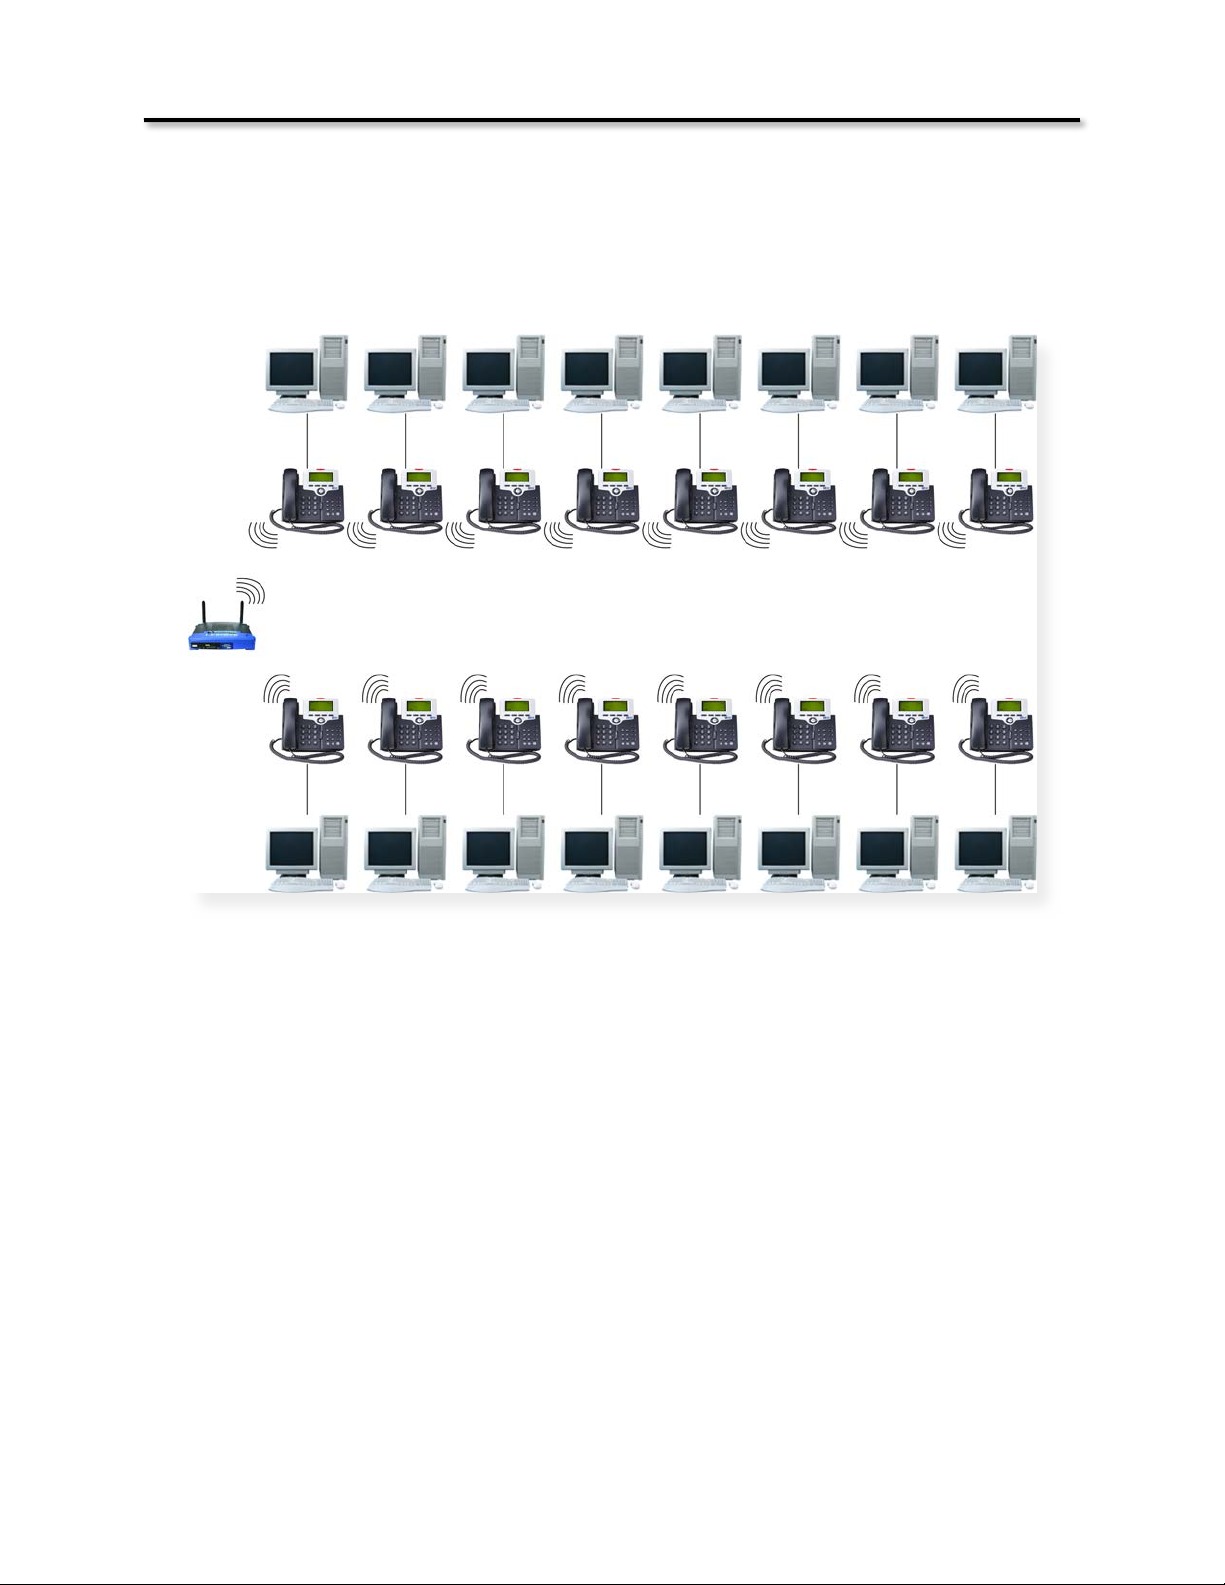
An$if$you$would$like$to$locate$a$Personal$Computer$at$the$same$location,$just$plug$it$into$the$X-44$
telephone$allowing$both$the$X-44$telephone$and$your$Personal$Computer$to$work$wirelessly.
13
Page 14

Product Overview
Automated Attendant Answering
The$X-44$telephone$can$work$as$a$standalone$telephone$and$as$you$add$telephones$to$your$existing$
network$it$becomes$a$full$featured$telephone$system$with$Auto$Attendant,$Call$Forwarding,$Call$Hold,$
Music$on$Hold,$Conference,$and$Voicemail.
Telephone$Line$calls$can$be$programmed$to$ring$one$or$more$X-44$telephones.$In$addition,$they$can$be$
programmed$as$Direct$Private$Lines$known$as$Direct$Inward$Dial$(DID).$$When$a$call$that$is$programmed$
to$ring$all$extensions$and$it$goes$unanswered$the$call$can$be$programmed$to$go$directly$to$a$single$
mailbox$or$to$the$system’s$Automated$Attendant.$
Auto Attendant Greetings
The Auto Attendant can answer with a day or night greeting.
The Day Greeting - “Thank you for calling XBLUE Networks, if you know your party’s extension
dial it now for Sales dial 101, for Accounts Payable dial 102, for Support dial 103, etc.
The Night Greeting - “Thank you for calling XBLUE Networks, you have reached us after our
regular business hours which are 8:30 am to 5:00 pm, central time. If you know your party’s
extension dial it now to leave a message in our general delivery mailbox dial zero and someone
will call you on the next business day.
Since all calls can be programmed to go directly to a mailbox you may want to leave a similar message
for all callers, such as:
Single Voice Mailbox - “Thank you for calling XBLUE Networks, You have reached this message;
if all agents are busy during our regular business hours, which are 8:00 am to 5:30 pm, central
time, or it is after hours. Please leave a message and someone will contact you as soon as
possible.
Calls on hold or being transferred will be played Music On Hold (MOH), which is provided by the X-44
system. It is also possible to change the MOH file.
14
Page 15
Setup
Installation
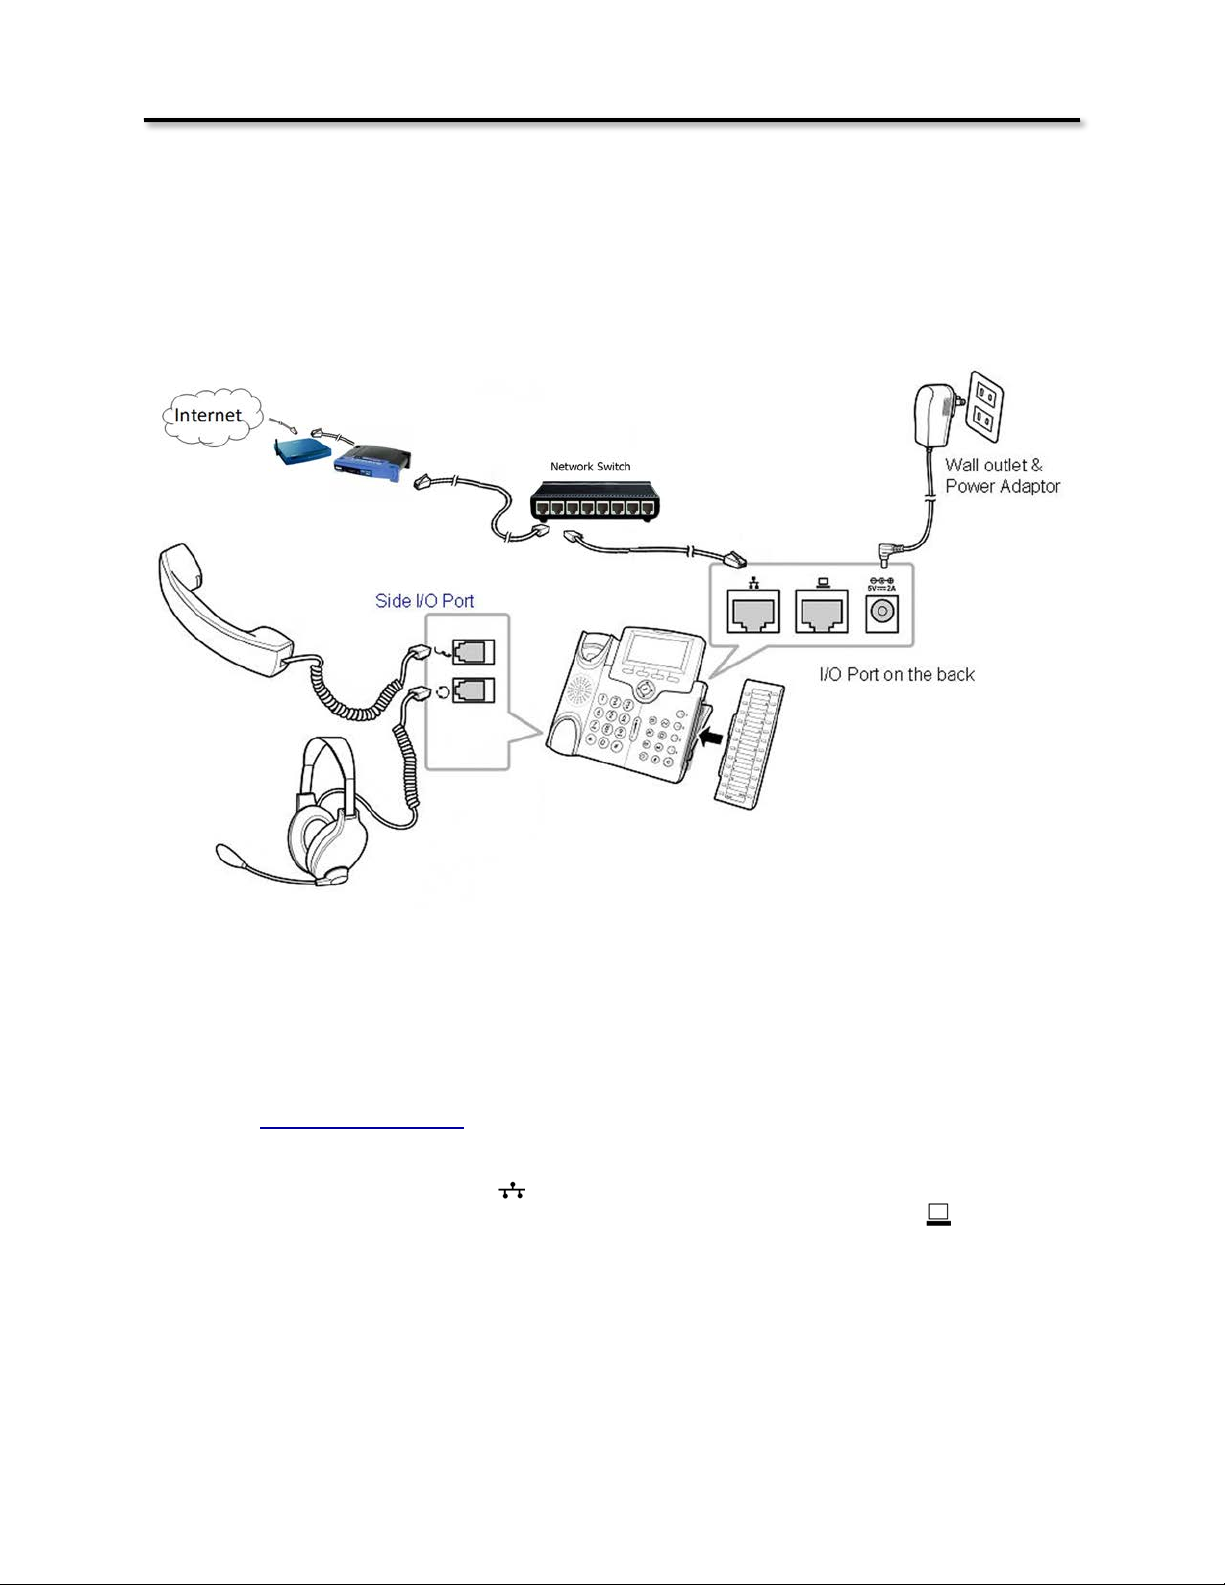
Connecting the X-44 Telephone to your existing network only takes a few steps.
Product Overview
It is a good idea to plug each X-44 into an Uninterrupted Power Supply (UPS), which will keep them
functioning during a power outage or use Power Over the Ethernet (PoE) switch, which will allow you to
use one centralized UPS.
1. Remove the contents from the box. For installation of the optional sidecar, refer to
“Connecting the Sidecar”
2. When connecting to an existing network, unplug the Ethernet cable from your computer and
plug it into the port labeled , then connected the supplied cable from where your original
cable was plugged into and the other end into the X-44‘s port labeled with symbol.
3. Connect the coiled handset cord to the top port on the left side of the X-44 telephone. If
you are using an ancillary headset connect it to the bottom port on the left side of the X-44.
4. Connect the supplied power supply from the X-44 to the electrical outlet or into the ancillary
UPS System or use a Power Over the Ethernet (PoE) switch (no power supply needed).
15
Page 16

No
Port
Description
1
Ethernet LAN Port
Connect to the Local Area Network
2
Ethernet Computer Port
Connect to your Personal Computer, the X-44 works
as a network switch.
3
Power Connection
Plug in the supplied power supply after plugging in the
LAN ethernet port or use a PoE switch. If using a PoE
switch, there is no need to use the power supply.
4
Network Activity LED’s and Reset Button
There are two Green LED’s, one that shows the
connection to the network and the other shows the
connection to any attached device, such as a Personal
Computer. In addition, there is a default button that
allows you to set the telephone back to factory default.
Product Overview
Ports on the Back
16
Page 17
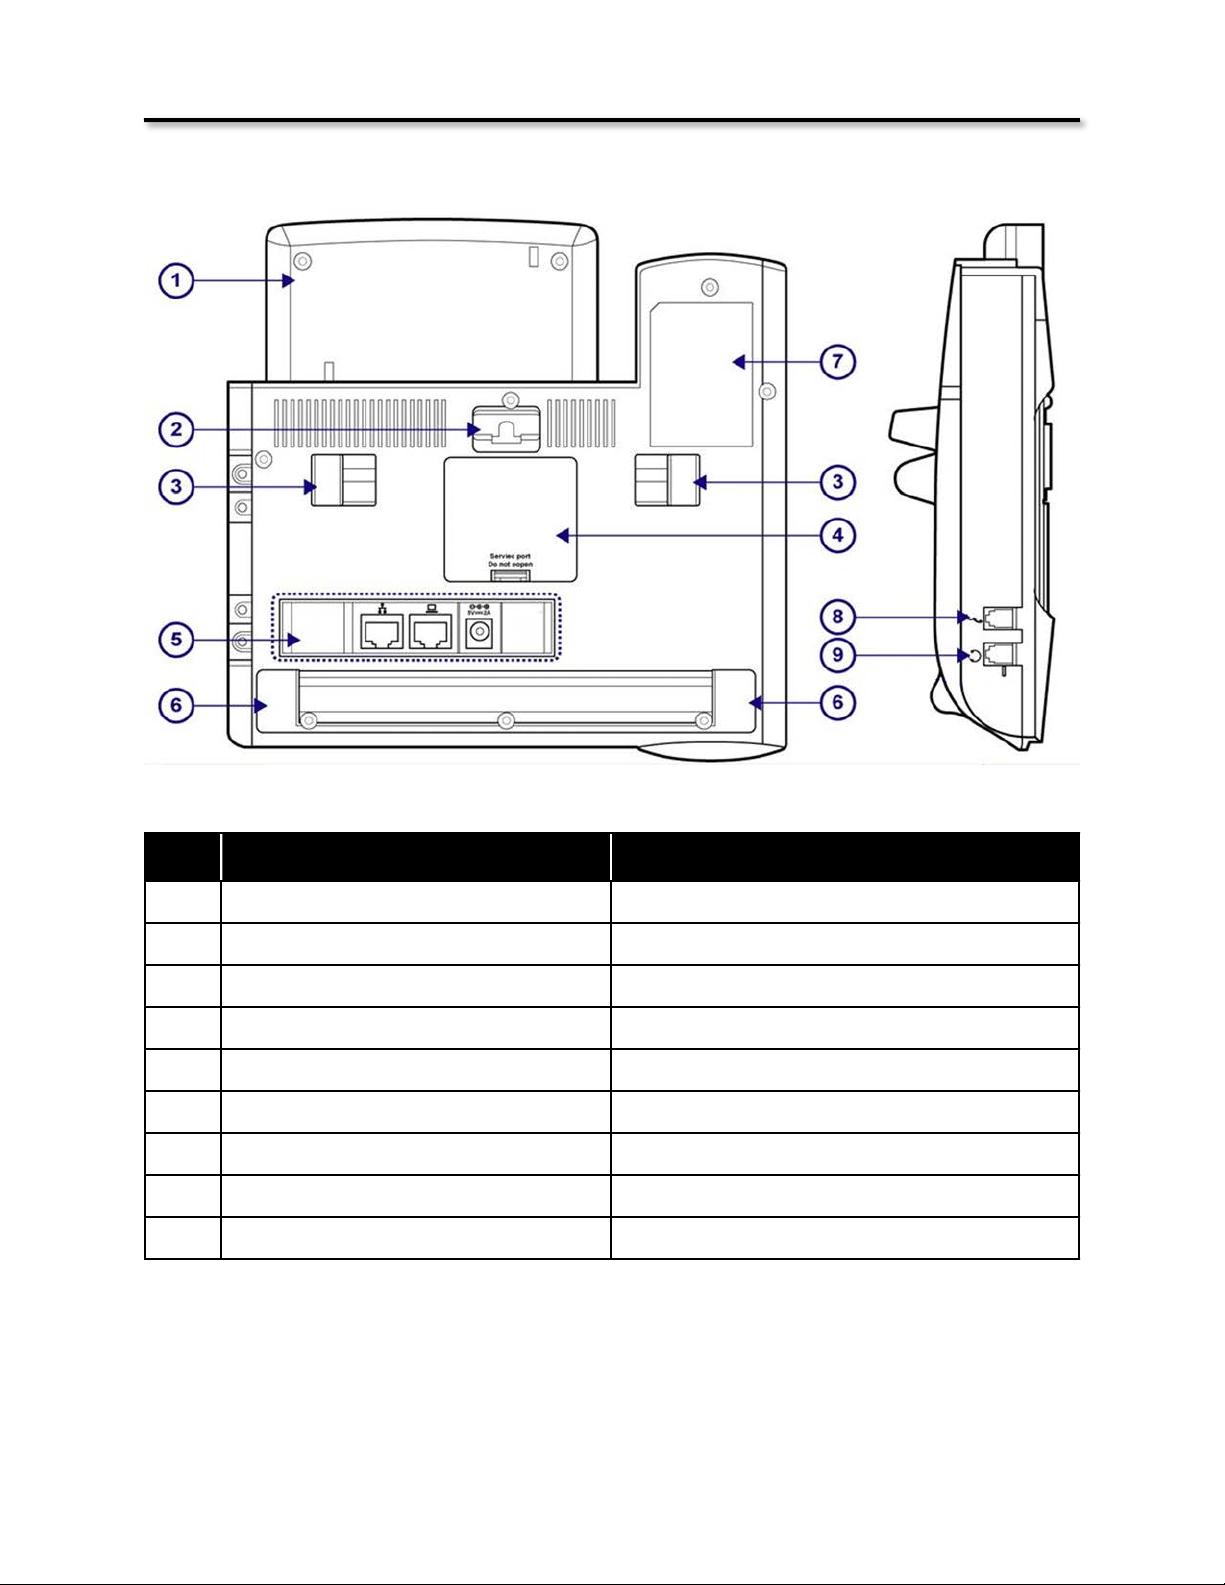
Back View
No.
Part Number
Description
1
LCD Back Cover
Secures the back of the LCD
2
Wall Mount Hole
Used with the optional wall mount kit
3
Hinge of Stand
Used to adjust the angle of the telephone
4
Secure Door
Used for service only
5
Input/Output Ports
Ethernet and Computer ports
6
Hinge of Chassis
Supports different angles
7
Product Label
Product information
8
Handset Cord Port
Plug the handset into the telephone
9
Headset Ports
Headset Port RJ9
Product Overview
17
Page 18

Feature
Description
None
When pressed the button does nothing
Extension Number
This will show when an extension is busy or idle
Park Number
This allows the user to place a call in a park location
Feature Code
This allows a feature to be used by pressing the button.
Do Not Disturb (DND)
This allows the user to press this button and place the telephone into
DND
Others
This allows you to program another task such as pushing a single button
to dial frequently used telephone numbers.
Product Overview
Sidecar
The Sidecar (Electronic Dialing Module - EDM) has 24 programmable buttons which allows you to
customize how your telephone will operate. Below is a list of features that can be programmed on any
one of the 24 buttons is found below.
Connecting the Sidecar
1. Remove the contents from the box
2. Remove the power from the telephone
3. Remove the rubber protector from the pins on the Sidecar
4. Securely connect the Sidecar to the telephone by inserting the pins and aligning the plastic
posts.
5. Secure the Sidecar to the phone using the supplied screws.
6. Plug the network connection into the telephone and then plug it into the AC outlet.
18
Page 19

Product Overview
Connecting the WiFi Wireless Adapter
XBLUE has developed a special WiFi Wireless Adapter that allows you to put your X-44 VoIP Telephone
in locations that may not have access to an Ethernet Cable. The WiFi Adapter requires an “802.11n”
wireless router.
From your Personal Computer
1. From$your$desktop$right$click$on$the$“Network”$ICON$and$locate$and$click$on$Properties$or$go$to$
Control$Panel,$locate$and$double$click$on$(Windows$7)$Network$and$Sharing$Center$(Windows$
XP)$Network$Connection$and$double$click.$Windows$7$requires$an$extra$step$&$$locate$and$double$
click$on$“Change$Adapter$Settings”$which$can$be$found$on$the$left$side$of$your$display.$
2. Locate$and$right$click$on$the$“Local$Area$Connection”$for$your$wired$(because$the$WiFi$Adapter$
is$connected$to$your$computer$using$a$cable)$Internet$connection$and$locate$and$click$on$
properties.$Generally,$a$wireless$adapter$will$say$“Wireless”$or$“WiFi”.$$$
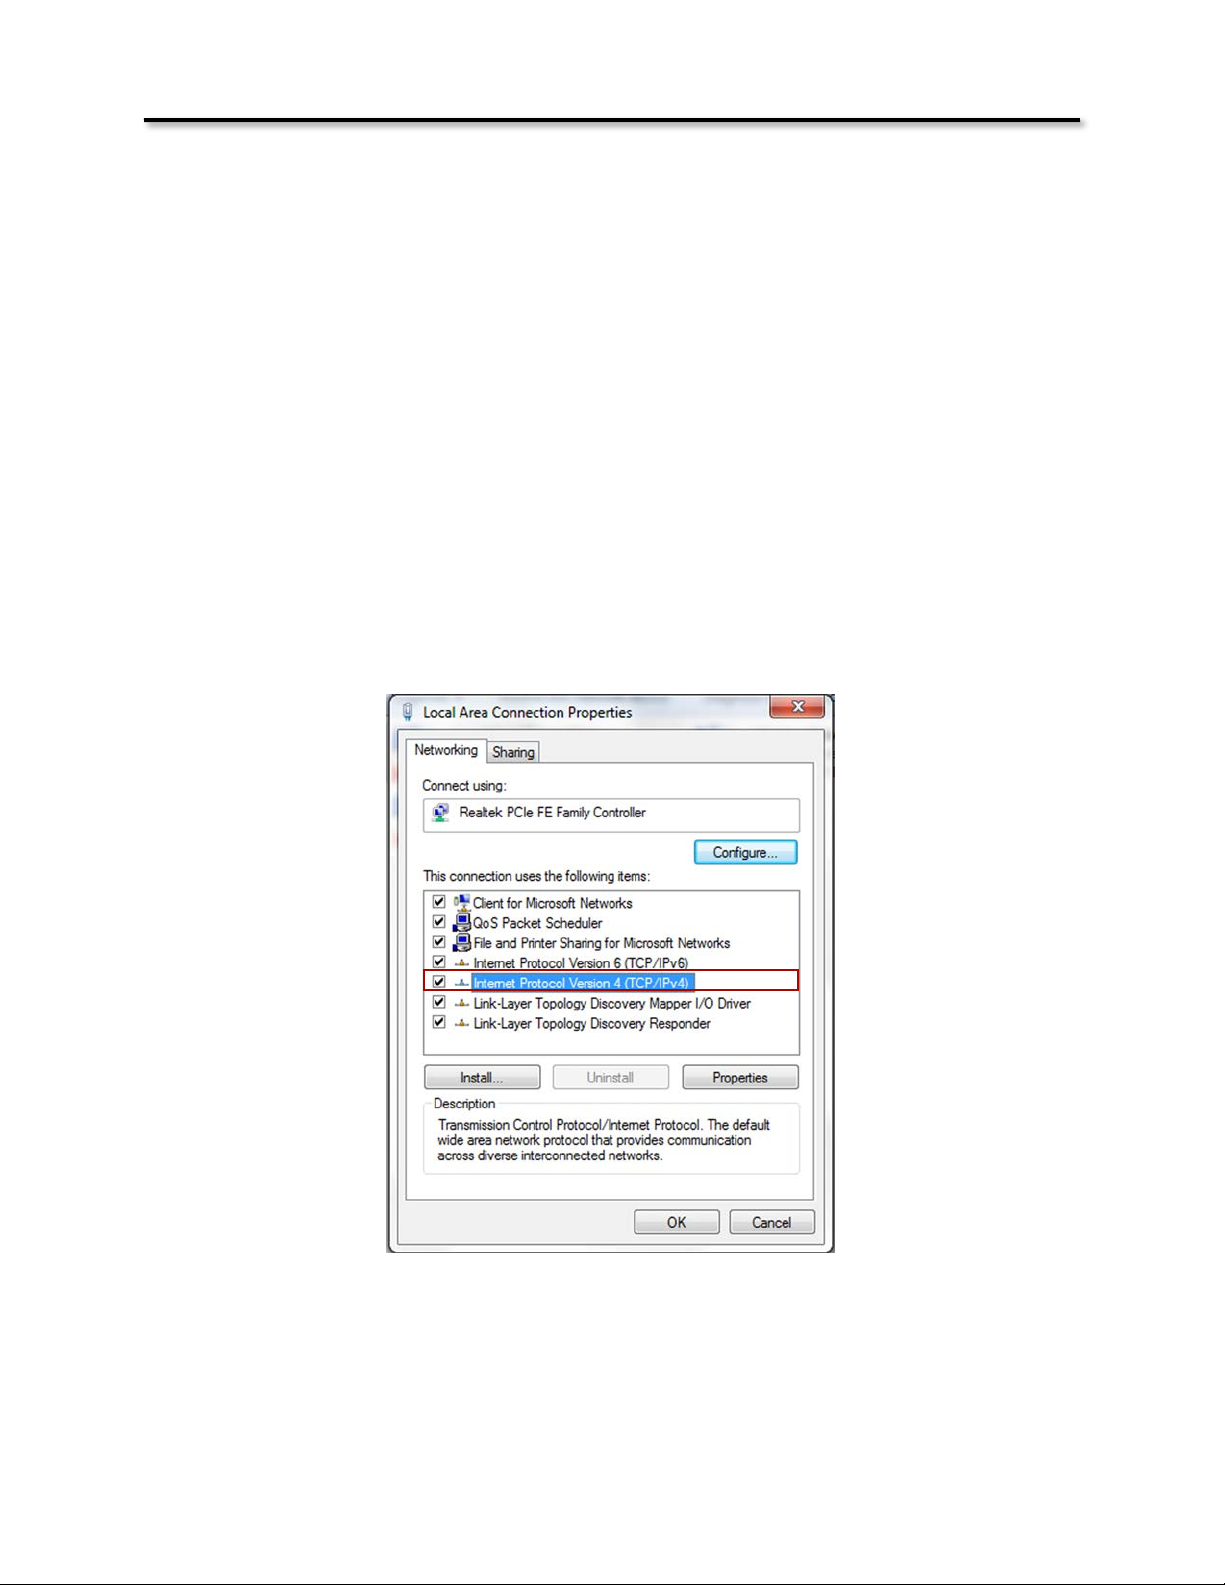
3. Locate$and$double$click$on$(Windows$7)$“Internet$Protocol$Version$4$(TCP/IPv4)”$(Windows$XP)$
Internet$Protocol$(TCP/IP).$
19
Page 20
Product Overview
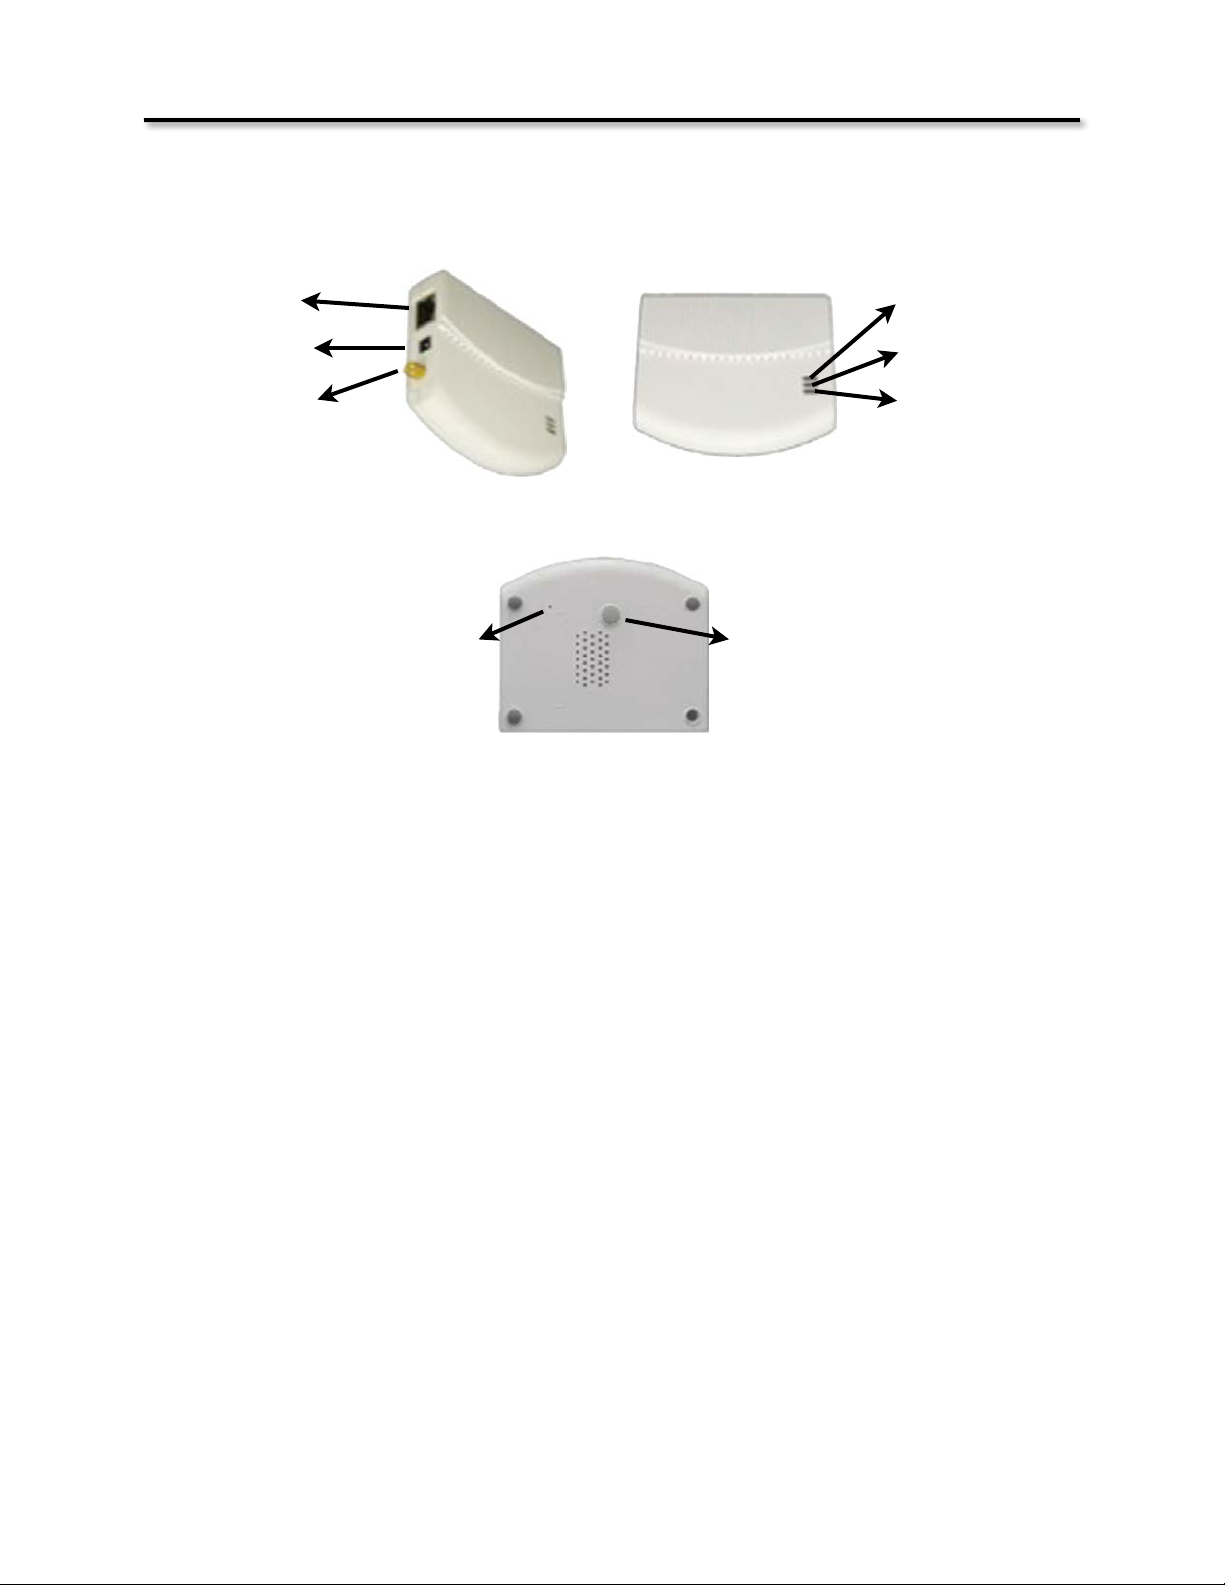
Getting to Know your WiFi Adapter
RJ45 Port
AC Power Jack
Antenna Interface
Reset Button
WPS Button
Power
Activity
Link
Reset (Pinhole) Button - Restore To Default
This is only used to restore the unit back to factory default. With the WiFi Adapter powered up,
use a device such as a paperclip to press and hold the recessed “Reset Button” until all of the
lights go out. This will take about 8 to 10 seconds. When the unit powers up, it will be at factory
default.
Connecting the WiFi Wireless Adapter
XBLUE Networks$has$developed$a$special$WiFi$Wireless$Adapter$that$allows$you$to$put$your$
X-2020$and$X-44$VoIP$Telephones$in$a$location$that$does$not$have$access$to$an$Ethernet$Cable.$The$
WiFi$Wireless$Adapter$requires$an$“802.11n”$wireless$router.$If$you$are$using$an$XBLUE X-50$system$
with$a$software$version$of$9.6$or$newer$the$WiFi$Adapter$will$automatically$connect,$there$is$no$
programming$required.$$$
20
Page 21

Operation Mode
AP Client
User
admin
Password
admin
IP Address
169.254.0.1
Router Mode IP Address
172.32.1.254
Subnet Mask
255.255.0.0
SSID
Voice
Channel
Auto
Mode
11b/g/n mixed mode
Encryption
WPA2-PSK, AES
Passphrase
eciovrofdiss
WPS Function
Disabled
DHCP Server
Disabled
Product Overview
Default Programming
At$default$the$WiFi$Adapter$will$automatically$connect$to$the$XBLUE X-50$system$using$the$following$
parameters:
Mode = AP Client
•
SSID = Voice - Hidden
•
Security = WPA2-PSK
•
Encryption = AES
•
WPA Shared Key - eciovrofdiss (ssid for voice - backwards)
•
Other Default Settings
$
21
Page 22

LED Name
LED Color
Light Status
Description
On
The device is on and ready.
Power
Amber
Off
The device is off.
On
The device is on and ready.
Activity
Blue
Off
The device is off.
Activity
Blue
Flashing
The device is transmitting or receiving data.
On
The device is connected to an Ethernet network.
Link
Red
Off
The device is off or there is no Ethernet connection.
Link
Red
Flashing
The Device is connected to an active network
Product Overview
Setting up your WiFi Adapter
1. Remove all of the contents from the box
2. Connect the Antenna to the WiFi Adapter
3. Plug the provided Ethernet cable into your computer and the WiFi Adapter.
4. Plug the power cord into into the WiFi Adapter and then plug it into your AC powered
wall outlet and allow it to boot up. It is normal for the Power LED on the WiFi adapter to
take up to 6 seconds to illuminate.
22
Page 23
Product Overview
Getting Started
With your PC powered up, make sure to disconnect any connections (wired or wireless) to your
Local Area Network (Internet). Be sure to power up the WiFi Adapter and connect it to your
Personal Computer.
From your Personal Computer
1. From$your$desktop$right$click$on$the$“Network”$ICON$and$locate$and$click$on$Properties$or$go$to$
Control$Panel,$locate$and$double$click$on$(Windows$7)$Network$and$Sharing$Center$(Windows$
XP)$Network$Connection$and$double$click.$Windows$7$requires$an$extra$step$&$$locate$and$double$
click$on$“Change$Adapter$Settings”$which$can$be$found$on$the$left$side$of$your$display.$
2. Locate$and$right$click$on$the$“Local$Area$Connection”$for$your$wired$(because$the$WiFi$Adapter$
is$connected$to$your$computer$using$a$cable)$Internet$connection$and$locate$and$click$on$
properties.$Generally,$a$wireless$adapter$will$say$“Wireless”$or$“WiFi”.$$$
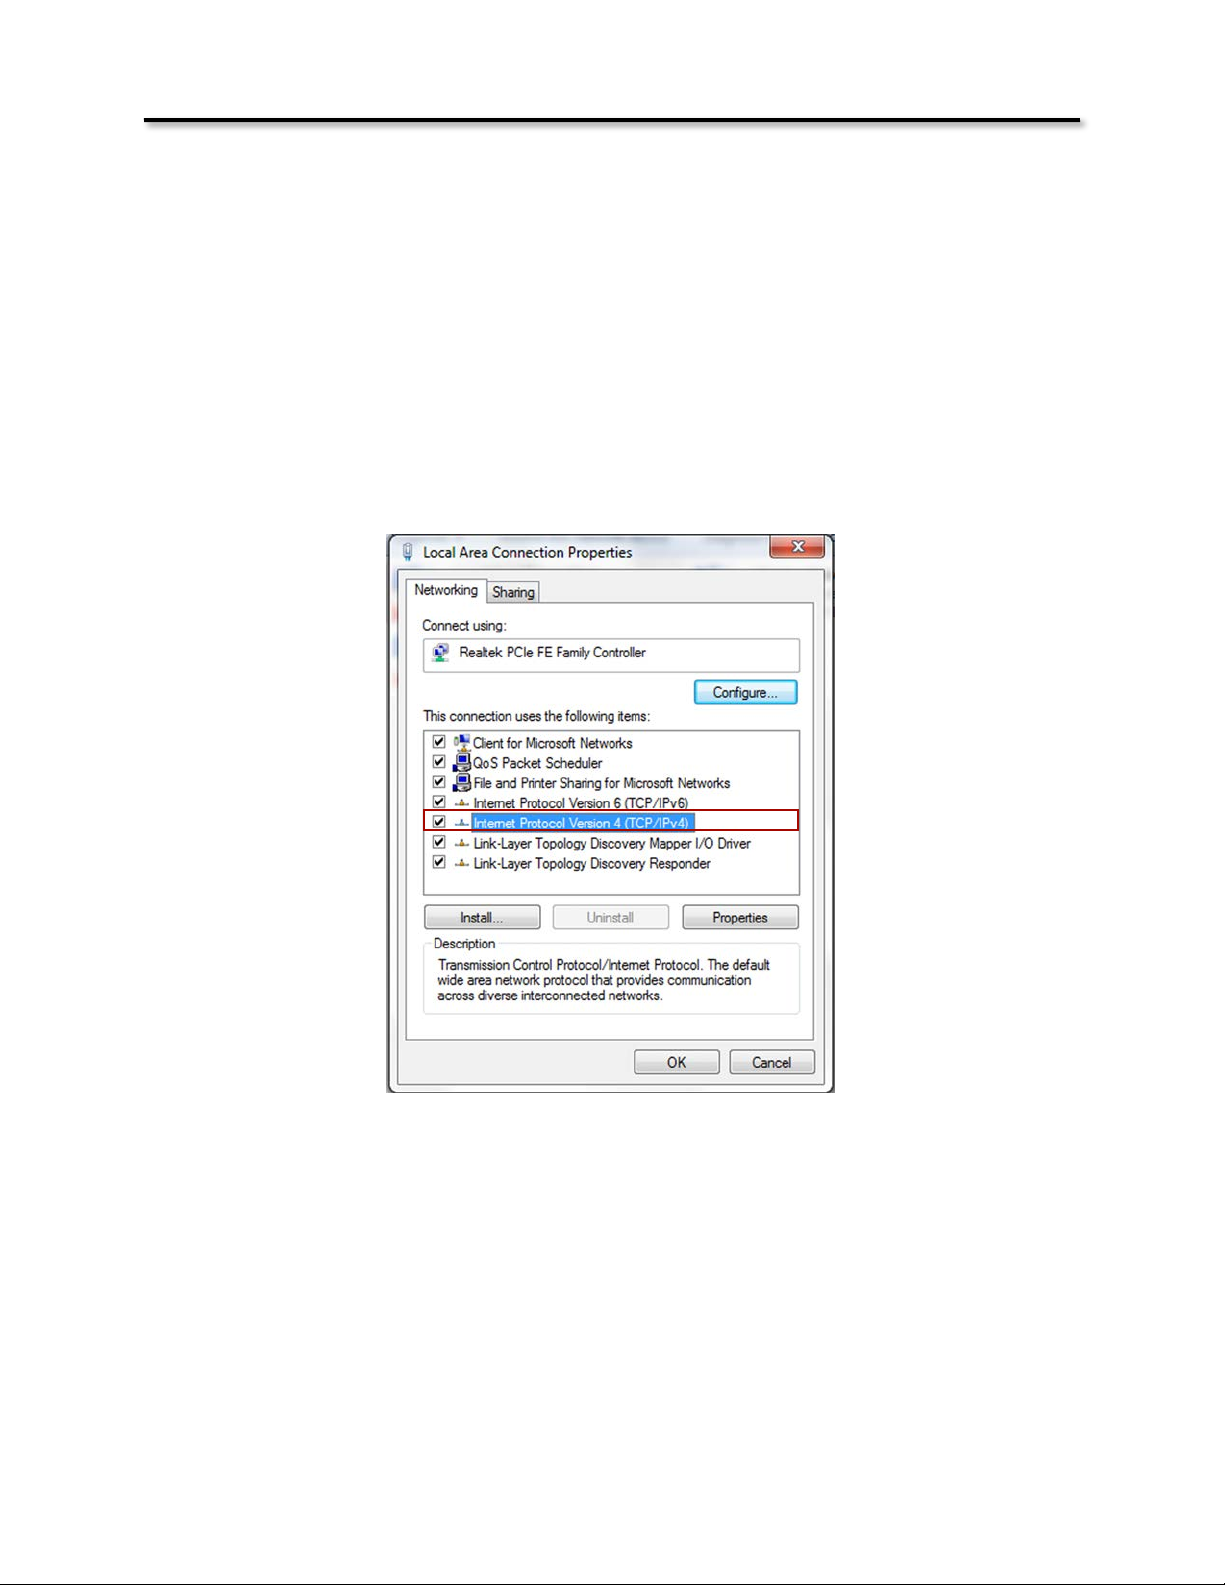
3. Locate$and$double$click$on$(Windows$7)$“Internet$Protocol$Version$4$(TCP/IPv4)”$(Windows$XP)$
Internet$Protocol$(TCP/IP).$
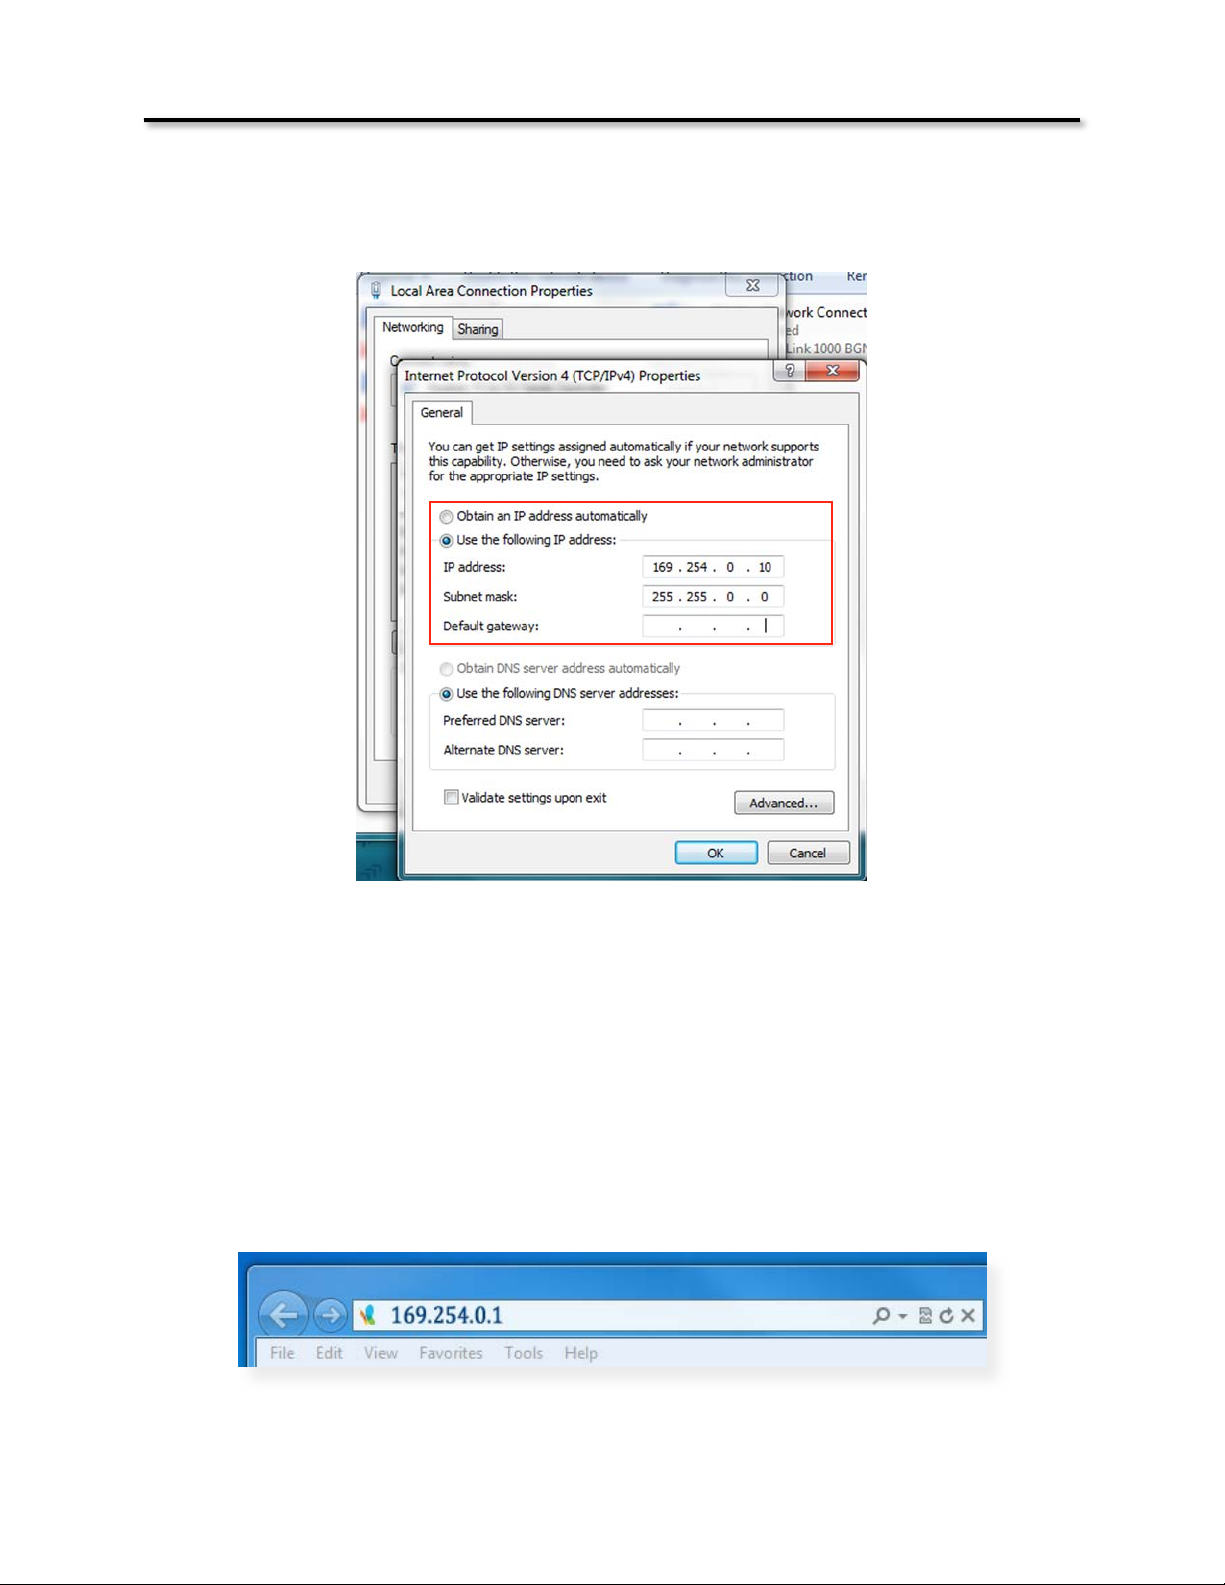
4. Select “Using the Following IP Address”
23
Page 24
Product Overview
5. Enter – 169.254.0.10 and then press “Tab” – this will automatically enter 255.255.0.0 into the
“Subnet Mask” field.
6. Click on “OK” to exit the Version 4 (TCP/IPv4) page
7. Click on “Close” to exit the Local Area Connection Properties page
Note: This procedure forces your PC to use the same network settings as the WiFi Wireless Adapter,
which is located at 169.254.0.1.
Open Windows Internet Explorer 7, or newer, and enter the IP Address of the WiFi Wireless Adapter,
which is 169.254.0.1 and then press enter
24
Page 25
Product Overview
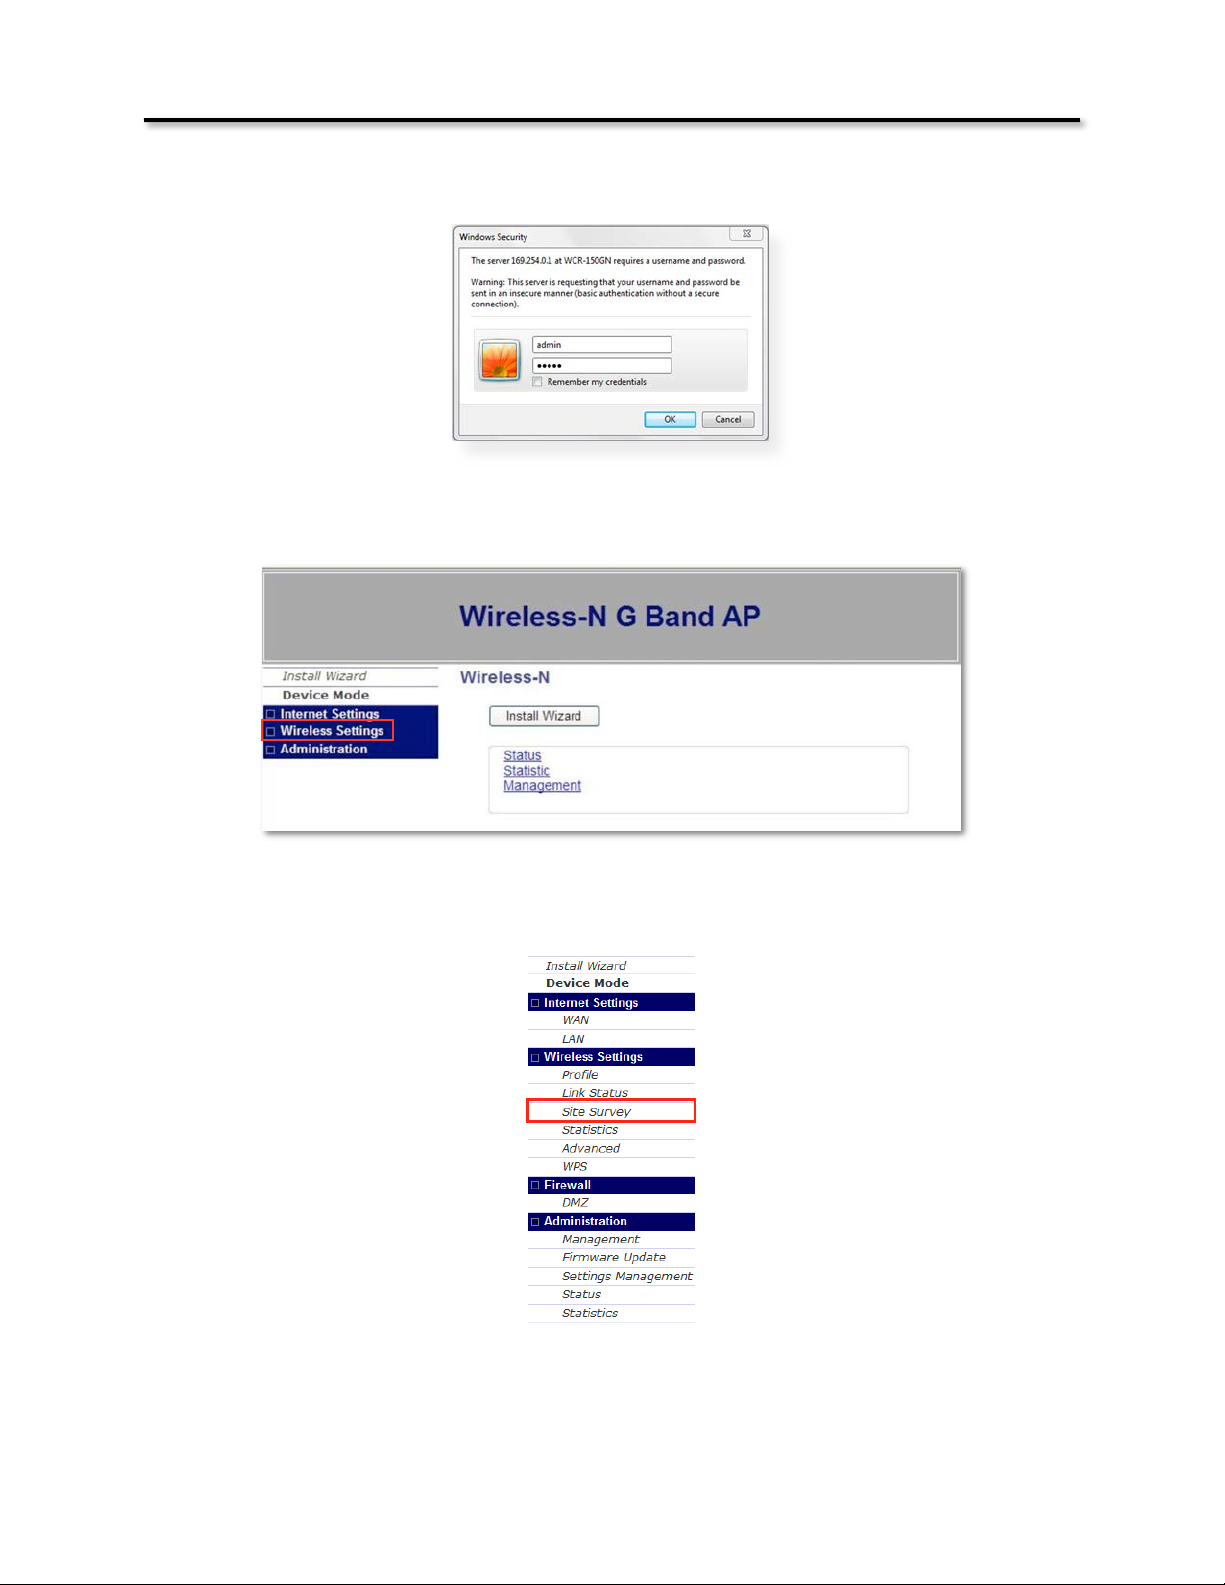
Log into the WiFi Adapter using “admin” as the user name and “admin” as the password and then click
OK
1. Click on Wireless Settings
2. Click on “Site Survey”
3. Locate your wireless router and click on it, filling in the radio button
25
Page 26
Product Overview
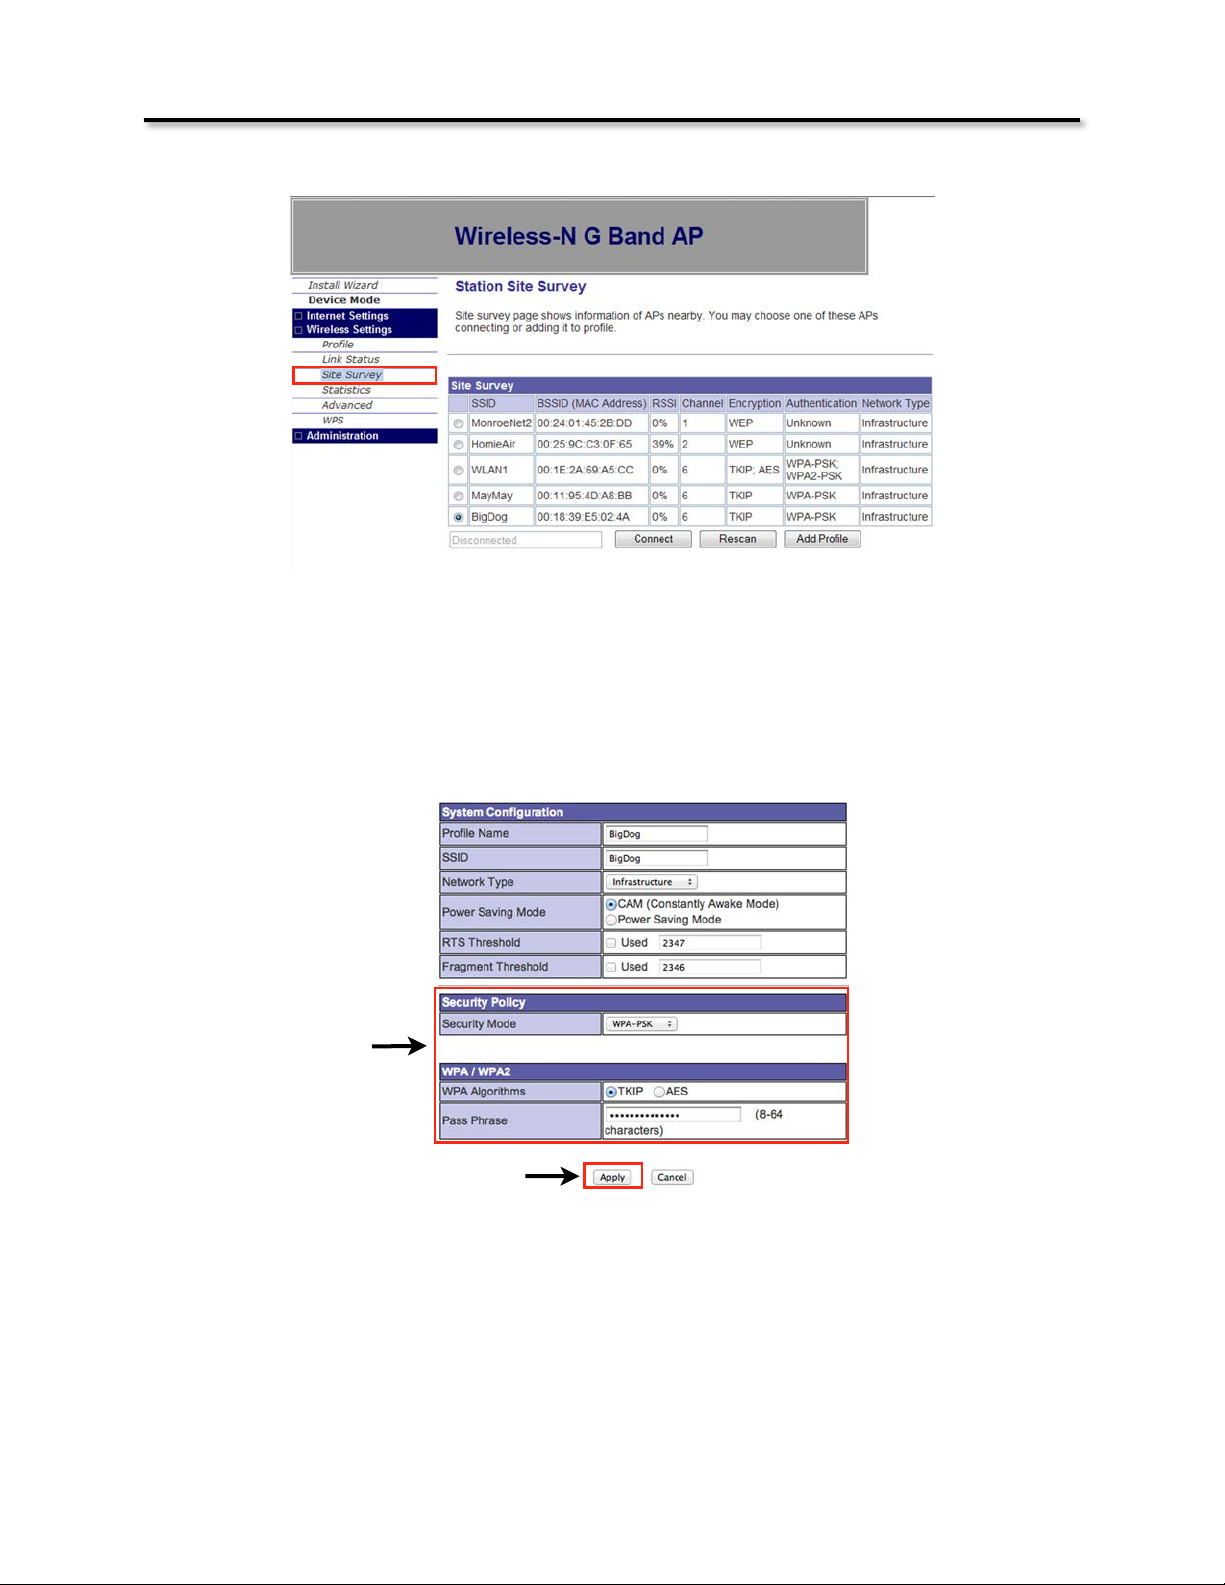
4. Then click on the Add Profile Button
5. Enter a name for the profile that you are creating, such as “BigDog” and then Confirm the
Security Policy, WPA/WPA2, WPA Algorithms, and enter the router password and then click on
Apply
26
Page 27
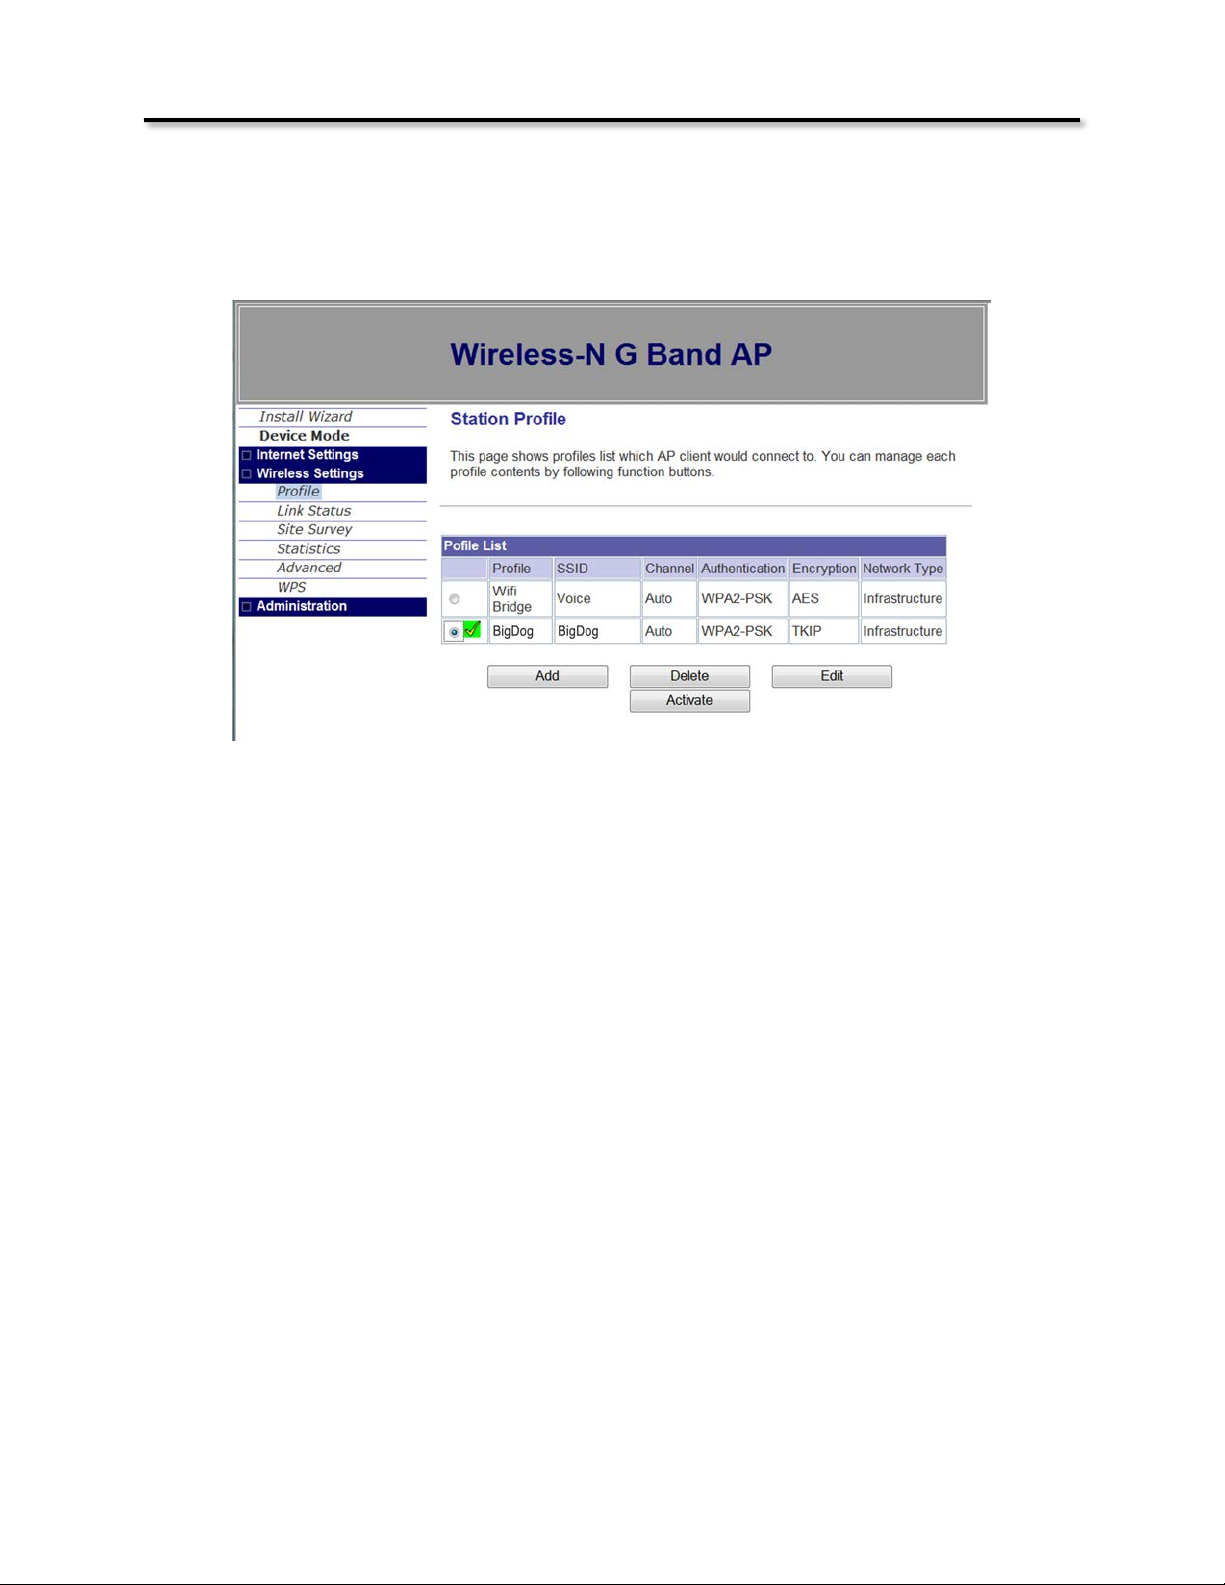
Product Overview
6. Click on the Profile Tab and then locate the profile that you just created and then click on
“Activate”. Activation will take between 20 and 60 seconds and a green check will appear once
the profile is active.
7. To verify that the WiFi Adapters is connected, click on Link Status and you will see the network
information being transferred back and forth.
8. The next step is to reset your computer to use DHCP so that it automatically connects to your
existing network
27
Page 28
Product Overview
Reconfiguring your Computer’s Network Connection
1. From$your$desktop$right$click$on$the$“Network”$ICON$and$locate$and$click$on$Properties$or$go$to$
Control$Panel,$locate$and$double$click$on$(Windows$7)$Network$and$Sharing$Center$(Windows$
XP)$Network$Connection$and$double$click.$Windows$7$requires$an$extra$step$&$$locate$and$double$
click$on$“Change$Adapter$Settings”$which$can$be$found$on$the$left$side$of$your$display.$
2. Locate$and$right$click$on$the$“Local$Area$Connection”$for$your$wired$(because$the$WiFi$Adapter$
is$connected$to$your$computer$using$a$cable)$Internet$connection$and$locate$and$click$on$
properties.$Generally,$a$wireless$adapter$will$say$“Wireless”$or$“WiFi”.$$$
3. Locate$and$double$click$on$(Windows$7)$“Internet$Protocol$Version$4$(TCP/IPv4)”$(Windows$XP)$
Internet$Protocol$(TCP/IP).$
4. Select Obtain an IP Address automatically (Windows XP) Using Network and sharing
28
Page 29
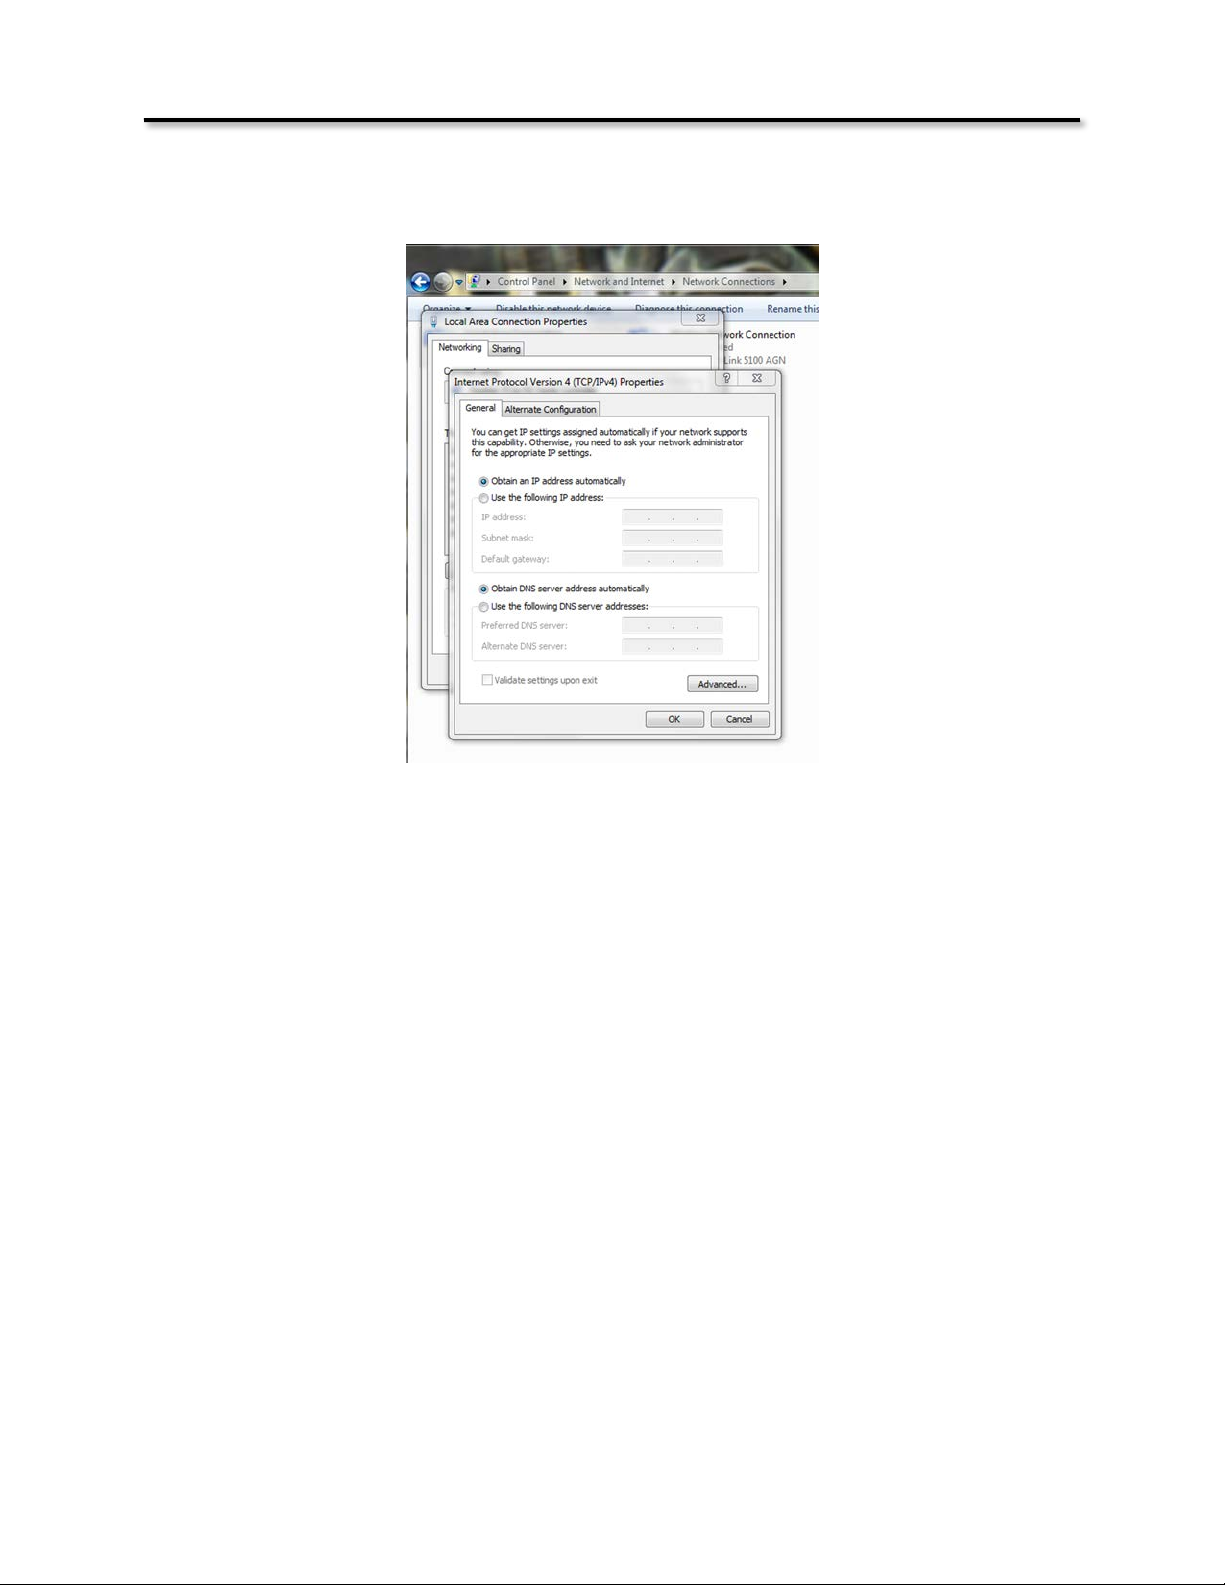
5. Select obtain DNS Server address automatically.
Product Overview
6. Click on “OK” to exit the Version 4 (TCP/IPv4) page
7. Click on “OK” to exit the Local Area Connection Properties page Select “Obtain an IP Address
Automatically’
8. Close the network and sharing page
9. To verify that the WiFi Adapter programming was successfully, you should be able to open your
Internet Browser and connect to the Internet.
a. If you cannot access the Internet, start by restoring the WiFi Adapter back to factory
default (Page3) and redo the programming steps (pages 6 - 12).
b. If you can access the Internet, unplug the WiFi adapter and connect it to your Device.
10. Remember, since the first step to this process was to disable your access to the Internet, don’t
forget to re-enable your access.
Note:
The quality of your wireless connection may affect the quality of the voice connection. There is no
guarantee, written or implied, that the XBLUE Wireless adapter will work 100 percent of the time.
29
Page 30
Product Overview
Getting to Know your new X-44
30
Page 31

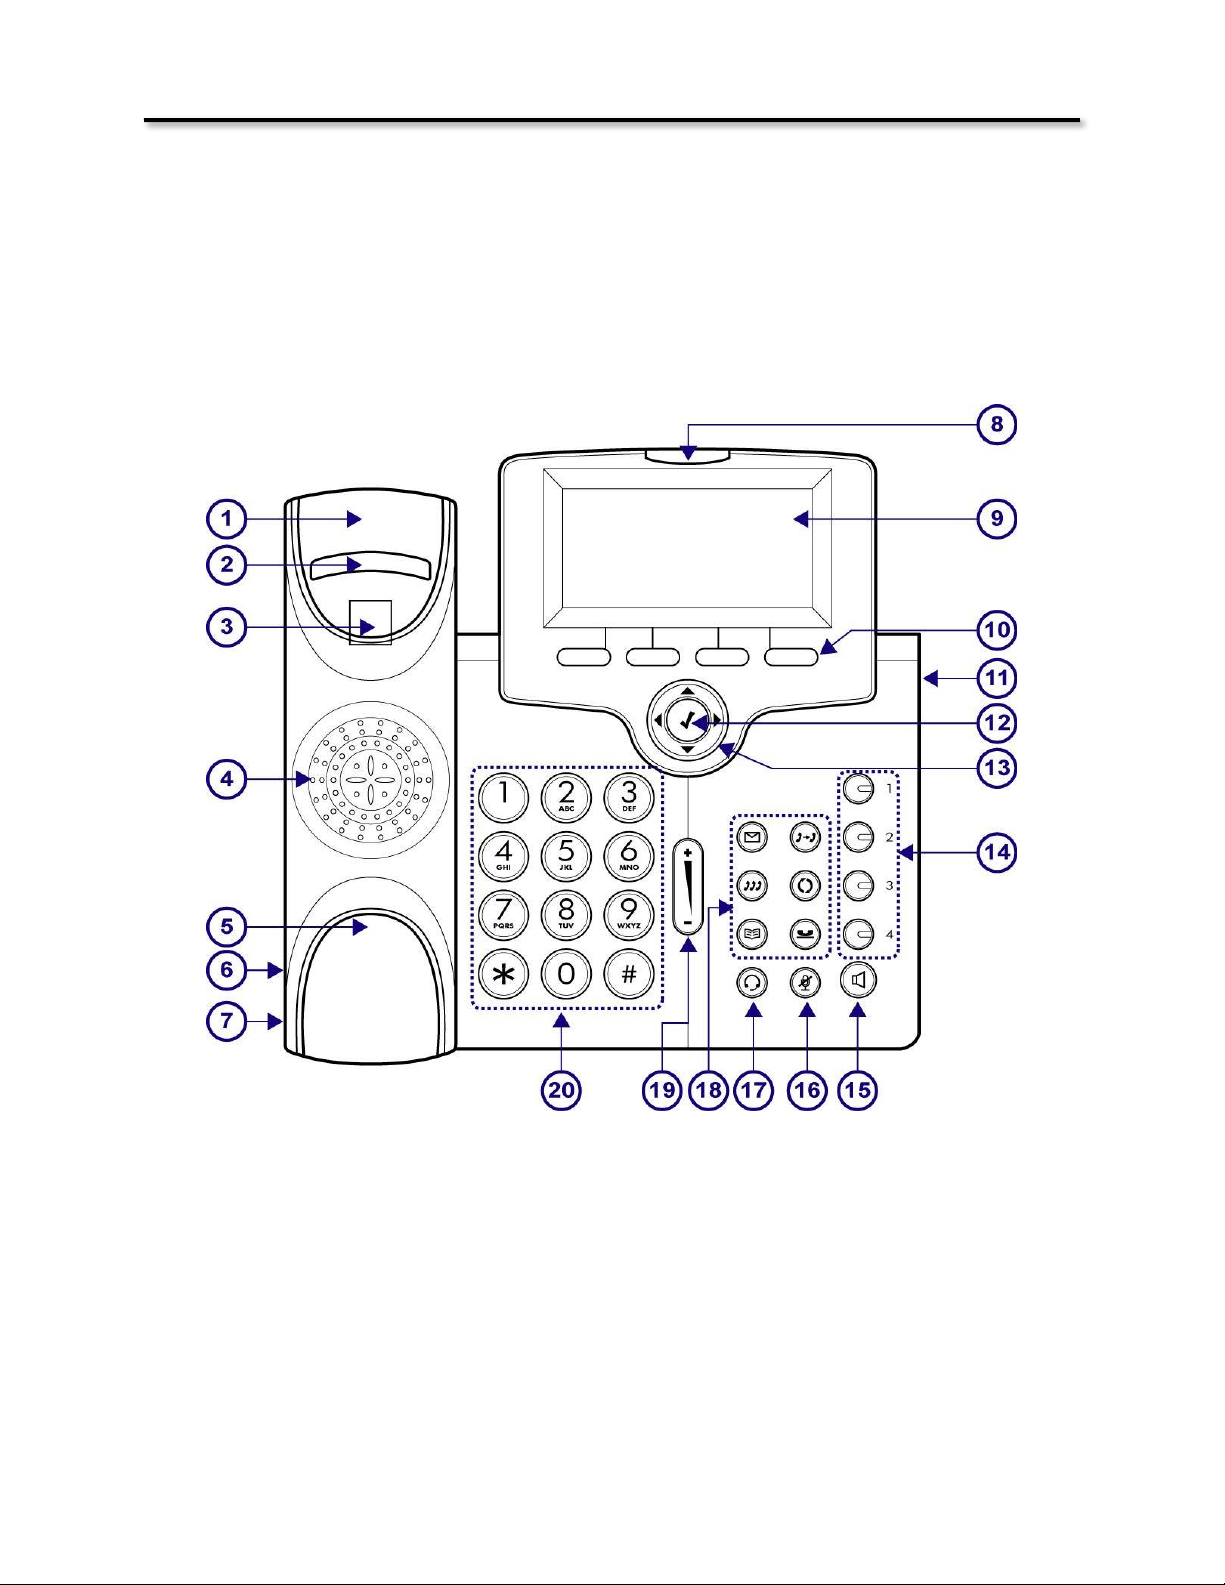
No.
Part Name
Description
1
Handset Top Cradle
For placement of the Handset
2
Hook Switch
For hanging up your handset
3
Cradle Latch
Used to Secure the handset to the base unit
4
Speaker
Speaker output for handsfree operation
5
Handset Bottom
Cradle for the bottom of the handset
6
Handset Cord Port
Used to connect the handset to the telephone base
7
Headset Wire Port
Used to connect an ancillary headset to the telephone base
8
Message LED Light Bar
Flashes for a new call and when there is a new Voice Mail Message
9
Graphic LCD
LCD display showing date, time, phone number, Caller ID, line status
etc.
10
Soft Keys
Soft keys change as the phone is being used, which will assist you
with the most used features
11
Sidecar - EDM Console
A special module that connects an additional 24 programmable
buttons
12
Navigation OK or Select Key
The center “Check” button of the “Cell-Phone-Like” navigation keys, is
used as the “enter”, “select” or “OK” button
13
Navigator Control Keys
Navigation, left, down, up and right ^ v < > are used to navigate
through menu programming and during the normal operation.
14
Telephone Line Buttons 1-4
The X-44 telephone has 4 telephone line buttons, labeled 1, 2, 3 and
4. Each line button has a green LED that indicates that it is being used
by an extension on your network.
15
Speaker Button
Press the speaker button to answer a ringing call. The button will turn
green when the speakerphone is active.
Product Overview
31
Page 32

16
Mute Button
Press the Mute button to suspend the transmission of your voice to
speak privately with someone in your office. When the Button is red it
is active and not transmitting, when the LED is out it will transmit your
voice. This mute button may not mute an ancillary headset.
17
Headset Button
Once an ancillary headset is connected to the phone, press the
Headset button to activate and place or answer a call. Some headsets
require that the handset be off hook to activate your headset.
Transfer Button
Press the transfer button to transfer an intercom or telephone line call
to a different extension.
Redial button
Press the redial button and use the down navigation key to scroll
down and the center navigation button to dial the desired telephone
number.
Hold button
Press the hold button to place a call on hold. The telephone line
button will flash slowly indicating that the line is on hold.
18
Message Button
Press the message button to access Voice Mail to send or retrieve a
voice mail message.
18
Conference Button
Use the Conference Button to create a 2 or 3 party conference.
18
Phonebook Button
Press the Phonebook Button to dial or add personal contacts to your
phonebook.
19
Volume Bar
Use the volume bar to increase or decrease the volume of the
handset, headset and speakerphone, whichever is active. Also, when
the phone is ringing you can increase or decrease the ring volume.
20
Dial Pad
Use the dial pad (Numeric Keypad) to dial digits.
Product Overview
32
Page 33

Button LED Indication
LED
Color
Status
Description
Light is Off
Idle or No New Messages
Light Bar
Blinking Slowly
New Voice Message Indication
Light Bar
Blue
Blinking Rapidly
There is an incoming Call
Light is Off
Speakerphone Idle
Speaker Button
Red
On Steady
Speakerphone engaged
Light is Off
Microphone is active
Mute Button
Red
On Steady
Microphone is inactive
Light is Off
Headset is disabled
Headset Button
Red
On Steady
Headset is active
Light is Off
Trunk is Idle
Line Buttons
Steady On
Trunk is Active (Busy)
Line Buttons
Green
Blinking Slowly
Line is on Hold
Line Buttons
Green
Blinking Rapidly
Line is ringing
Product Overview
33
Page 34

ICON
Description
The telephone Line is connected
The telephone Line is not connected
Indication of a new message as well as the new message count
Press the button under the word “Menu” to enter the programming mode.
Press the button under “FWD” to forward your telephone to a new destination
such as the default voicemail or to your cellular telephone.
Press the button under “DND” to stop calls from ringing at your extension.
Press the button under “EXT” to scroll through and select an extension to dial.
Product Overview
The Display will show the Date and Time, extension number and special ICONS showing the status of
your Telephone.
34
Page 35

ICON
Description
ICON
Description
ICON
Description
Off Hook
Redial Key
Hold Key
On Hook
Message Key
Headset Key
Speaking
Phonebook Key
Mute Key
Dial or Key Pad
Volume Bar
Telephone Line
Buttons labeled 1, 2,
3 and 4
Down, Up, Right
and Left
Navigation keys
Transf er Ke y
Speakerphone
Center
Navigation key Used for Select
or OK
Conference Key
Soft Key
Product Overview
Using your Telephone
Getting to know your way around
The X-44 telephone connects to your existing network without the need for a specialized Gateway or
Router and automatically identifies all other X-44 telephones on your network. The X-44 allows you to
make calls using the handset, speakerphone or using an ancillary headset. In addition, the X-44 has a
“Hot Keypad” which allows you to dial a number without lifting the handset or pressing the speaker
button. Just dial the number and the X-44 will do the rest.
The following ICONS will help you get to know your new X-44 telephone.
35
Page 36

Operation
ICON
Description
Dial the desired telephone number. The number will
appear in the display but not sent to the telephone line
provider, allowing you to delete (backsp) any incorrect
digits.
Wait 5 seconds or press the “Dial” soft key when you
are satisfied with the entered telephone number.
Place a Call
Lift the handset to speak privately or remain on
speakerphone.
Place a Call
If the headset is enabled the LED will light, and the
headset port on the telephone will be active. However,
some ancillary headsets require that the handset is
taken off hook.
Place a Call
Replace the handset, or press the speaker button to
end the call
Product Overview
Placing a call
There$are$two$types$of$calls,$internal,$known$as$Intercom$calls,$and$external$which$are$placed$over$a$
telephone$line.$In$either$case,$you$can$simply$dial$the$desired$telephone$number$and$the$X-44$will$
automatically$route$the$call.$If$the$dialed$number$is$part$of$the$internal$numbering$plan$such$as$another$
extension,$which$are$numbered$101$through$116,$at$default,$the$call$will$ring$the$appropriate$extension.$
If$the$number$is$not$within$the$numbering$plan,$the$X-44$will$automatically$connect$to$an$idle$
telephone$line.$In$addition,$you$can$select$a$specific$telephone$line$and$then$dial$the$digits$and$the$call$
will$be$placed$over$the$selected$line.$
36
Page 37

Operation
ICON
Description
Press the desired telephone line
Dial the desired telephone number. The number will
appear in the display but not sent to the telephone line
provider, allowing you to delete (backsp) any incorrect
digits.
Make a call using a
Wait 5 seconds or press the soft key when you are
satisfied with the entered telephone number
Make a call using a
specific telephone line
Lift the handset to speak privately or remain on
speakerphone.
Make a call using a
specific telephone line
If the headset is enabled the LED will light, and the
headset port on the telephone will be active. However,
some ancillary headsets require that the handset is
taken off hook.
Make a call using a
specific telephone line
Replace the handset, or press the speaker button to
end the call
Lift the handset to speak privately or press
speakerphone.
Answer a Call
Replace the handset, or press the speaker button to
end the call
Product Overview
37
Page 38

Operation
ICON
Description
Press the telephone line that you wish to answer.
Answer a specific
telephone line
Lift the handset to speak privately or remain on
speakerphone.
Answer a specific
telephone line
Replace the handset, or press the speaker button to
end the call
Placing a call on Hold
While on a call press the hold button. Press the hold
button again, or press the telephone line to pick up the
held call.
Using Mute
Press the mute button, which will light red when active
to stop transmitting, and speak privately. Press the
mute button again, unlit, to begin speaking to the
outside party again.
Transf er a Ca ll
Telephone line calls can be answered at one extension
and transferred to another extension. While on a call,
press the transfer button and dial the extension
number or press the preprogrammed extension button
on your Sidecar
Product Overview
38
Page 39

Operation
ICON
Description
Phonebook
Press the phonebook button to store or dial one of 200
personal phonebook (address book) entries.
Redial stores the last 30 numbers that you dialed.
Press the redial button and then use the down 6
navigation button to find the desired telephone
number.
Redial
Press the soft button under the “Dial” in the display
Message Button
Use the message button to pick up new messages. You
will know that you have a new message when the light
bar at the top of the display is flashing. When checking
voicemail messages, you will have to enter your
mailbox password.
Conference
X-44 users can create a conference with up to 2
telephone line callers or 1 telephone line and another
intercom caller or 2 additional intercom callers for a
total of 3 callers.
Use the following steps to create a conference
•
While on a call press the hold
button
• Press the down navigation key. This will open a
second communications path, allowing you to
place a second internal or external call.
• Dial the desired telephone number after the
second call is answered and you are ready to
establish the conference, press the conference
button, and you and the other two parties
will be joined in a single conversation.
Product Overview
39
Page 40

Operation
ICON
Description
Volume Button
Each X-44 telephone comes with a volume
adjust bar, which is used to “on the fly” increase
(press up) or decrease (press down) the volume.
For example, when the telephone is ringing, press
up to increase or down to decrease the volume of
ring.
When speaking on the handset, press up to
increase or down to decrease the volume of the
handset, etc.
Product Overview
Review Call Records
From an idle telephone press the up navigation key, allowing you to review three different call record
types; Dialed Calls, Missed Calls, and Received Calls.
Dialed Calls - These are calls that were dialed from the telephone.
Missed Calls - These are calls that rang at the telephone but was not answered.
Received Calls - These are calls that rang at the telephone and were answered.
Call Log
1. Dialed Calls
2.Received Calls
3.Missed Calls
4.Deleted Calls
40
Page 41

Feature
Description
None
(Blank) When pressed the button does nothing
Extension Number
This will show when an extension is busy or idle
Telephone Line (Trunk) Number
This will show when an extension is busy or idle
Park Number
This allows the user to place a call in a park location
Feature Code
This allows a feature to be used by pressing the button.
Do Not Disturb (DND)
This allows the user to press this button and place the telephone into
DND
Others
This allows you to program another task such as one button dialing to
frequently dialed telephone numbers
Product Overview
Using your Sidecar
If$you$have$an$optional$Sidecar,$also$known$as$an$Electrical$Dialing$Module$or$Direct$Station$Select$(DSS)$
console,$attached$to$your$telephone$you$have$access$to$twenty&four$(24)$programmable$buttons.$At$
default,$the$first$16$buttons$are$programmed$as$extensions$to$show$when$an$extension$is$buys$known$as$
Busy$Lamp$Field$(BLF).$However,$these$buttons$can$be$customized$allowing$you$to$program$features$that$
you$would$like$to$use$at$the$touch$of$a$button.$$$
Each$button$can$be$programmed$as$a$Blank$button,$which$does$nothing,$an$Extension$Number$to$show$
when$an$extension$is$busy$or$idle,$a$Call$Park$button,$a$Feature$button$&$requires$the$feature$code$to$be$
entered,$Do$Not$Disturb$(DND)$temporarily$stops$your$phone$from$ringing,$and$“Others”$button$which$
can$be$programmed$to$perform$tasks$such$as$one$button$dialing$of$frequently$dialed$numbers$or$a$
Cellular$telephone.
Log$into$an$Internet$browser$and$select$the$“EDM”$tab,$and$then$use$the$drop$box$to$select$the$feature$
that$you$would$like$to$appear$on$each$button.$
41
Page 42

Product Overview
Notes:
42
Page 43

Telephone Feature Description Table
Feature
Programming Sequence
Automated Attendant Greetings
Menu > VAA Settings > On/Off Duty Greeting
Automatic Answer
Menu > Feature Setting > Automatic Answer
Automatic Busy Redial
Web Programming Only - Web > Phone > Phone
Features > Auto Redial Attempts and Auto Redial
Interval
Automatic Day and Night Greeting -
Operating Mode
Menu > Admin > VAA Settings > AA Time Setting
Web: System > Operating Mode
Block Anonymous
Menu > Feature Setting > Block Anonymous
Call Forward - Always
FWD or Menu > User Settings > Call Forward
Call Forward - Busy
FWD or Menu > User Settings > Call Forward
Call Forward - No Answer
FWD or Menu > User Settings > Call Forward
Call Hold
Fixed Hold Button
Call Log
Press the up Navigation Button from an Idle Phone or
Menu > Feature Setting > Call Log (Dialed, Missed,
Answered, or Deleted Calls)
Call Waiting
Menu > Feature Setting > Call Waiting
Conference Call
No Programming Required
Customizable Voice Mailbox Greetings
Menu > VM Settings > Record Greeting
Dial Timeout
Menu > Phone Settings > Dial Timeout
Distinctive Ringing (Ring Type)
Menu > Phone Settings > Sounds > Ring Type
Do Not Disturb (DND)
Menu > Feature Setting > DND
Extension Feature Reset
Menu > Phone Settings > Admin > Reset Settings
Hold Reminder Tone
Web Programming Only - Phone > Phone Features >
Hold Reminder
Language
Menu > Phone Settings > Language (Currently English
only)
LCD interactive
No Programming Required
Message Box
Menu > User Settings > Message Box
Mute
Fixed Mute Button
Name in Display
MENU > Phone Settings > Name In Display
Telephone Programming Sequences
Feature Descriptions
43
Page 44

Feature
Programming Sequence
On-Hook Dialing
No Programming Required
Page Answer (Meet Me Page)
Menu > Feature Settings > Auto Answer
Caution - All Calls that ring at an extension with Auto
answer enabled will be answered, including outside
calls.
Paging All
Default - *99 - Web Programming - System > All
Paging Access Code
Paging Allow/Deny
Default - Enabled - Web Programming - Phone >
Paged Settings (All and Single Paging)
Paging Single
Web Programming Only - Phone > Single Paged Call
Password Protection (Admin and User)
Menu > Admin Settings > Account Type
Phone Lock/Unlock
Menu > Feature Setting > Phone Lock - Use the
Admin Password to unlock
Phonebook Private (Exclusive)
To use: Press the Preprogrammed Phonebook Button
(Private)
To Program: Menu > Phone Book
Web: Phonebook Tab > Private
Phonebook Public
Web: Phonebook Tab > Public
Web: Management Tab > Public Import CSV file
Quick Setup (Auto Provision)
Menu > [Admin Pswd] > Auto Provision
Speed Dial
Menu > Feature Settings > Speed Dialing
Tone Type
Menu > Phone Settings> Sounds > Tone Type (USA,
China, U.K., Canada, Japan, France, Korea, Germany,
Singapore, Hong Kong, and Taiwan
Tran sfe r R eca ll
Fixed Transfer Button
Voice Mailbox
Menu > User Settings > Message Box
Volume Control
Fixed Volume Bar or Menu > Phone Settings > Sounds
> Volume > (Ring, Handset, Handsfree
(Speakerphone), Headset Volume.
WEB: Phone > Volume Control
Web management
Enter the IP Address of your Telephone into a
standard Internet Browser
Feature Descriptions
Some features require two buttons, one to activate and one to cancel a feature.
44
Page 45

Notes:
All other extensions are locked, and cannot take phone calls, when you
are recording the Auto Attendant Greetings.
Feature Descriptions
Automated Attendant Greetings
Description:
The X-44 a complete telephone system, which includes a full automated attendant. The Automated
Attendant can have one day (On Duty) and one night (Off Duty) greeting, which can be programmed to
automatically switch between greetings.
Operation:
To customize your Automated Attendant Greeting:
From and Idle X-44 Telephone:
Menu > 4. VAA Settings (enter Admin Password) > 3. Customize AA Voice
Select between the On Duty and the Off Duty greeting.
Common Greetings
Day Greeting: Thank you for calling <my company>, if you know your party’s extension dial it now
•
or press zero (0) to speak to the attendant.
or
Thank you for calling <my company>, If you have reached this message during business hours,
•
which are 8:00 am to 5:00 pm, Eastern Time, then we are all helping other customers. If you know
your party’s extension number, please dial it now, or press zero (0) to speak to the attendant.
Night Greeting: Thank you for calling <my company>, you have reached us after our regular
•
business hours, which are 8:00 am to 5:00 pm, Eastern Time. If you know your party’s extension
number, dial it now, or press zero and leave a message and someone will contact you on the next
business day.
Notes:
1.
The X-44 Auto Attendant will automatically switch between day and night every day based
on the Automatic Day and Night Mode settings.
2. Calls can be programmed to be answered by the Auto Attendant or ring one or all phones
before the auto attendant answers the call.
45
Page 46

Warning:
Enabling this may cause unexpected results
Feature Descriptions
Automatic Answer
Description
The XBLUE X-44 telephone can be programmed to automatically answer all incoming calls. Once
enabled ALL Intercom and Telephone Line calls will be answered automatically.
Operation:
This feature can be programmed using the Telephone User Interface (TUI) or the Graphical User
Interface (GUI) through a standard Internet Browser.
Menu > 3. User Setting > 4. Automatic Answer
Notes:
Once Auto Answer is enabled, all calls to your extension will automatically answer.
Automatic Busy Redial
Description
If while placing a telephone line call you encounter a busy signal, the X-44 can automatic redial the
busy number up to 10 times; once every 15 to 60 seconds.
Operation:
This feature is programmed thought the Web Interface only.
Found in the Phone Tab, under Phone Features, you can set the Auto Redial Attempts from 1 - 10, and
the Auto Redial Interval from 15 to 60 seconds. When the timer expires, the number is automatically
redialed. The number is redialed unit it reaches the maximum attempts or the line starts ringing.
Notes:
Call Waiting may affect the operation of this feature
46
Page 47

PM
24 hour
PM
24 hour
1:00
1300
7:00
1900
2:00
1400
8:00
2000
3:00
1500
9:00
2100
4:00
1600
10:00
2200
5:00
1700
11:00
2300
6:00
1800
12:00
00:00
Feature Descriptions
Automatic Day and Night Greetings (Operating Mode)
Description
When “Operating Mode” is enabled, the XBLUE X-44 telephone system will automatically switch
between a Day (On Duty) and a Night (Off Duty) greeting.
Operation:
This feature can be programmed using the Telephone User Interface (TUI) or the Graphical User
Interface (GUI) through a standard Internet Browser. However, the greetings can only be recorded from
the telephone.
Once enabled, you will have to enter the time that you open, and the time that you close for each of the
7 days. Enter the time in 4 digit, 24 hour format.
Notes:
Block Anonymous
Description:
The X-44 has the ability to block up to 10 different telephone numbers.
Operation:
This feature can be programmed using the Telephone User Interface (TUI) or the Graphical User
Interface (GUI) through a standard Internet Browser.
Using$a$calls’$inbound$caller$ID$the$X-44$telephone$allows$you$to$block$up$to$10$different$telephone$
numbers,$each$can$contain$up$to$31$digits.$When$using$Caller$Blocking$Settings,$it$is$important$to$use$as$
many$digits$of$the$number$to$be$blocked$as$possible.$This$will$avoid$inadvertently$blocking$large$groups$
of$numbers.$For$example,$if$you$only$enter$“913”,$then$all$calls$with$the$area$code$913$(Kansas)$will$be$
blocked.$$$$$$$
47
Page 48

Feature Descriptions
Enable Call Block: - Click on the Check Box to enable all 10 of the call Blocking Entries.
Caller Blocking Entry x: (x = 0 - 9: - Enter the telephone numbers that you want to block).
Remember to use as much of the telephone number as you can.
Notes:
Call Forward
Description:
There are three different types of call forwarding; Always (Direct), Busy and No Answer. Each call can be
forwarded to an internal extension, voicemail or to an external telephone number such as a cellular
telephone. This allows you to customize how calls to your extension will forwarded.
Operation:
This feature can be programmed using the Telephone User Interface (TUI) or the Graphical User
Interface (GUI) through a standard Internet Browser.
The Telephone User Interface:
1. From an Idle Telephone Press the FWD Button to Program Call Forward.
2. Select “Always, Busy or No Answer Forwarding.
3. Press the Center Navigation Button
4. Select Status - Change to On
5. Press the lower left “Save” button
6. Select Destination Enter voicemail
7. Press the lower left “Save” button
If you are using No Answer - You will have to program the amount of time a call should ring at your
telephone before it is sent to the new destination.
The Graphical User Interface:
After connecting to the telephone using an Internet Browser, locate the “Phone” tab.
1. Check the type of forwarding that you would like to use
2. Enter the destination
3. Scroll to the bottom of the page and select Save
If you are using No Answer - You will have to program the amount of time a call should ring at your
telephone before it is sent to the new destination.
Notes:
48
Page 49

Feature Descriptions
Call Hold
Description:
Both intercom and telephone line calls can be placed on hold. Once on hold the held party will receive
Music on Hold (MOH).
Operation:
No Programming Required.
While on a call press the hold button to place the call on hold. Press the hold button again, or press the
held telephone line, to retrieve the held call. If multiple calls are placed on hold from the same
extension, the last call placed on hold, will be retrieved.
Notes:
After placing a call on hold, you may need to press the down navigation button to preform another
•
function.
Call Log
Description:
The X-44 stores a list of Dialed, Missed, Answered and Delete calls. The Dialed, Missed and Answered
can be used to make or return a call. The Delete list allows you to delete all of the entries stored in the
Dialed, Missed or Answered calls, or you can delete one category.
Operation:
This feature can only be accessed using the Telephone User Interface (TUI).
The Call Log List is accessed by pressing the up navigation key from an idle telephone. Then using the
navigation keys to scroll through the list to locate the number that you would like to dial or delete. To
dial a specific number, press the softkey under the word “Dial” in the display. Select Delete to delete a
category or a specific number. To delete a specific number select a category and then use the softkey
under the word delete the unwanted number.
1. From an Idle Telephone, press the up navigation key
2. Scroll down to select the Call Log list that you would like to access
3. Press the button under the word “Dial” to dial a number or “Delete” delete a number
Notes:
49
Page 50

Feature Descriptions
Call Waiting
Description:
Call Waiting allows you to be alerted, while you are on a call, that another person is calling you. If
disabled, the call will receive a busy signal or be sent to the busy forward destination without giving you
a chance to answer the call. If it is enabled, you will receive a special alert tone indicating that you have
a second call. The alert tone is called Call Waiting Tone, which you can disable if you do not want to hear
the alert tone.
Operation:
“Call Waiting” can be programmed using the Telephone User Interface (TUI) or the Graphical User
Interface (GUI) through a standard Internet Browser. However, the Call Waiting Tone can only be
programmed by the Graphical User Interface (GUI).
1. Select Menu - Scroll down to 3. User Settings > 2. Call Waiting
2. Press the Center Navigation to select “Call Waiting”
3. Press the up navigation key to toggle between on and off.
Notes:
Conference - 3 Way
Description:
The conference feature allows you to connect two additional callers in a single conversation. There are
two types of conference, supervised and unsupervised. A supervised conference is when the initiator (the
creator of the conference) remains in the conference. An unsupervised conference is when the initiator
(the creator of the conference) disconnects from the conference. All conferences in the X-44 are
supervised except when transferring a call to an extension that is forwarded to an external number such
as a cellular telephone.
Operation:
No programming is required for this feature.
Use the following steps to create a conference
1. While on a call press the hold button
2. Press the down navigation key, which will open a second communications path, allowing you
to place a second internal or external telephone line call.
3. Dial the desired telephone number
4. After the second call is answered and you are ready to establish the conference, press the
conference button, now you and the other two parties will be joined in a single conversation.
Notes:
50
Page 51

Feature Descriptions
Customizable Voice Mailbox Greetings
Description:
Your X-44 telephone has a password protected personal voice mailbox, which you can personalize by
recording a personal greeting.
Operation:
This feature can only be accessed using the Telephone User Interface (TUI).
To customize your voice mailbox greeting:
1. From your Idle Telephone
2. Menu > 4. VM Settings > 2. Record Greeting
Common Greeting
Hello you’ve recached <Your Name>, I am either on the phone or away from my desk. Please leave
•
me a detailed message and I will return your call as soon as I can. Thank you for calling.
Notes:
Your telephone must be forwarded to voicemail for callers to hear your greeting.
•
Dial Timeout
Description:
The dial timeout is the amount of time, after a digit is dialed, before the phone processes the call.
Operation:
This feature can be programmed using the Telephone User Interface (TUI) or the Graphical User
Interface (GUI) through a standard Internet Browser.
To customize the dial timeout:
1. From and Idle
2. Menu > 2. Phone Settings > 4. Dial Timeout
Notes:
Changing this setting form the default 5 seconds, may cause the phone to dial a call before you are
•
done dialing the number.
51
Page 52

Feature Descriptions
Distinctive Ringing
Description:
Each X-44 extension may select between thirteen (13) different ring tones making it easier to determine
which telephone is ringing. In addition, each telephone line can be programmed with a Distinctive Ring
tone making it easier to determine which line is ringing.
Operation:
This feature can be programmed using the Telephone User Interface (TUI) or the Graphical User
Interface (GUI) through a standard Internet Browser.
1. From and Idle
2. Menu > 2.Phone Settings > 3.Sounds
Notes:
In the event that both a telephone line and a telephone is set to have different distinctive ring
•
tones, the telephone line ring assignment takes precedence.
Priority of Distinctive ringing:
•
Caller ID Ring type is referenced first
•
Telephone line ringing is referenced second
•
Telephone extension is referenced third
•
Do Not Disturb (DND)
Description:
When Do Not Disturb (DND) is active on your phone, your telephone will will not receive any inbound
calls.
Operation:
From and Idle telephone press the button under “DND” to put your phone into and out of Do Not Disturb
mode.
Notes:
When you are in DND, the display will change and show *DND*
•
Other extensions will not receive an indication that you are in DND until they call your extension
•
52
Page 53

Feature Descriptions
Extension Feature Reset
Description:
This feature is a quick way to deactivate several features that have been changed from factory default.
Operation:
The following will be set back to factory default:
Call Waiting
Paging Accept
All programmed buttons are returned to default
Phone Lock is disabled
All programmed call forwarding is removed
DND is disabled
The extension (Agent) is logged into all programmed groups
Auto Answer is disabled
All programmed Distribution List are deleted
Notes:
This is good when troubleshooting extension anomalies
•
Feature (Flexible) Button Programming
Description:
The four buttons on the X-44 telephone have been preprogrammed as the four telephone lines 1 - 4 and
cannot be changed. However, all 24 buttons on the Sidecar can be reprogrammed allowing you to
customize your telephones buttons.
Operation:
The Sidecar can only be programmed using the Graphical User Interface (GUI) through a standard
Internet Browser.
The buttons on the Sidecar are preprogrammed as extensions 101 - 116, the remaining buttons are
preprogrammed as Speed Bins.
Notes:
Most features can be programmed on a button
•
Some features require one button to enable and another to disable the feature
•
If you program a button with the Phone Lock feature, pressing the button will automatically lock
•
the phone. Only your extension password will unlock your phone.
53
Page 54

Feature Descriptions
Hold Reminder
Description:
Each time the programmable “Hold Reminder” timer is exceeded, a reminder tone will be heard at the
extension that placed the call on hold.
Operation:
This feature can be programmed using the Telephone User Interface (TUI) or the Graphical User
Interface (GUI) through a standard Internet Browser.
Each extension can enable or disable the Hold Reminder as well as adjust the length of the timer.
Notes:
Language
Description:
The X-44 currently support English.
Operation:
X-44 telephone, at default, is set to English.
The
Notes:
LCD & Interactive Soft Buttons
Description:
The X-44 has four interactive “Soft Buttons” or “Soft Keys” that changes as you use your phone. These
soft buttons will assist you with the operation and programming of your telephone.
Operation:
Notes:
54
Page 55

Message Box
Telephone Line status
LED
Description
Dark
Idle
Fast Flash
Ringing
Slow Flash
Line is on hold
Wink Flash
Call is recalling
Lit Solid
Line is Busy
Description:
The Message Box allows you to interact with your voice mailbox.
Operation:
No programming needed for this feature.
Select Message Box to begin interacting with your voicemail messages.
Menu > 3.User Settings > 9.Message Box
Notes:
Multi-Line Appearance
Description:
Feature Descriptions
At default, all of the X-44 telephones are programmed with the four telephone lines. Once
authenticated, any of the X-44 Telephones can press one of the buttons 1 - 4 and pick one of the
telephone lines.
The LED on the telephone line button indicates the current state of the telephone line. For example,
when the line is busy, the light will be lit solid.
Operation:
When making an outside call, you may press one of the programmed telephone line buttons and then dial
the desired telephone number or just dial the telephone number and let the X-44 system automatically
route the call.
Notes:
55
Page 56

Feature Descriptions
Mute
Description:
Each X-44 has a mute button that that temporarily disable the telephone’s microphone.
Operation:
This feature requires no programming.
Press the Mute button to disable the telephone’s microphone, which when active, will light Red. Press the
Mute button again to resume your conversation. When Mute is disabled, the LED will not be lit.
Notes:
The Mute button may not mute an ancillary headset
•
Name in Display
Description:
Extensions can be programmed with the name of user allowing other extensions to see who is calling.
Operation:
This feature can be programmed using the Telephone User Interface (TUI) or the Graphical User
Interface (GUI) through a standard Internet Browser.
Notes:
Enter the name, with up to 12 characters. You cannot use a space or any character that does not
•
appear on a telephone keypad.
On-Hook Dialing
Description:
On hook dialing, also known as Hot Keypad allows you to dial a number without lifting the handset or
pressing the speaker button. It also allows you to delete unwanted digits by press the “Backsp” button
Operation:
No programming is needed for this feature.
Simply dial an extension or outside telephone number without lifting the handset or pressing the speaker
button. You may press the Dial Softkey, the check button or wait 5 seconds for the system to evaluate the
dialed number and then process.
Notes:
56
Page 57

Feature Descriptions
Paging
Description:
All Call Page allows an extension to make an announcement to all idle X-44 telephones in your system.
Once an extension initiates a page, any extension can “Answer” to answer the call and create a private
conversation.
Operation:
This feature can be programmed using the Telephone User Interface (TUI) or the Graphical User
Interface (GUI) through a standard Internet Browser.
Any extension can dial the page code and initiate a page. Any idle extension that receives the page will
have the ability to answer the page and create a private conversation between the initiator and the
extension that presses “Answer”.
Notes:
Paging allow/deny will affect how this feature works.
•
Paging Allow
Description:
This feature allows you to enter a code to allow or deny paging at your extension.
Operation:
This feature can only be programmed using the Graphical User Interface (GUI) through a standard
Internet Browser.
To enable paging deny (thus block paging) dial *99
Notes:
Paging Single
Description:
Enable single paging between extensions to make oneway pages to the called extension
Operation:
This feature can only be programmed using the Graphical User Interface (GUI) through a standard
Internet Browser.
Notes:
57
Page 58

Feature Descriptions
Password Protection
Description:
All extensions have two different password accounts; admin, user and voice mailbox passwords. The User
account The Admin account has total access to all programming parameters. The mailbox password is
used to access and retrieve your voicemail messages from on site or remotely.
Operation:
User Access Password is 1111
•
Admin Password is 1234
•
Voice Mailbox 0000
•
Notes:
Only the Admin account has the ability to access and change passwords
•
Phonebook
Description:
Each extension has a personal and public phonebook that contains the contact name, phone number,
ringing tone.
Operation:
This feature can only be programmed using the Graphical User Interface (GUI) through a standard
Internet Browser.
Your telephone has both a Private and a Public Phonebook. The Private Phonebook is for your personal
use, and the Public Phonebook is synchronized with a CSV file, which can be located in a centralized
location. Currently, the Phonebook feature does not support Microsoft Excel’s CSV files.
The easiest way to create a public phone book file, is to enter the information into your personal
phonebook and then create a back up file. This file can be centrally located on your network so that all of
the telephones can synchronize the information.
Private:
The Private Phonebook is for your personal use. You can enter each number individually or you can use a
CSV File to upload them all at once.
Enter the three parameters and then press the “Add” button, to add new entries.
User Name: - Enter the user name (up to 31 characters) that will be associated with this entry.
•
Phone Number: - Enter the phone number (up to 64) digits.
•
Ring Type: - There are eleven different ring tones that can be used to differentiate the entered
•
telephone number when it calls into the system.
58
Page 59

Feature Descriptions
Once you are done entering your personal Phonebook, click on the “Management” tab to create a
backup.
Click on the “Backup Button” and save it in a location that is easy to locate if needed.
Public:
The Public phonebook links to a CSV file in a centralized location this allows the administrator to
reference the list from any phone. There are several ways to create a CSV file. One way is to use the
backup created from the personal phonebook. Another way to create the file is using Windows Notepad.
Once created save it with a name such as “Publicphonebook.csv, and place it in a location that you can
easily find.
The format of this file is very important:
Name,Number,Ring Type
Anne Sweeney,1924020842,0
Alan Booker,769011,0
Bob Smith,12122641501,0
Donald Kilroy,18752250474,0
Once the file is ready to be uploaded, click on the “Management” tab.
Locate the “Public Phonebook File:” and click on the Browse... button
•
Locate the saved file
•
Click on the Update button
•
Click on “OK” to complete the upload or “Cancel” to stop the upload.
•
Click on the Phonebook tab, and then the Public Page tab. If the file format is correct, the
•
information will be visible. If the numbers are not visible recheck the file format.
Notes:
Plug and Play
Description:
All X-44 telephones connected to your existing Local Area Network (LAN) will automatically authenticate
with all other X-44 telephones. The first telephone plugged in will automatically be assigned extension
101, the next will be 102, etc., up to 16 extensions which will be extension 116. However, if you prefer
you can change the numbering plan to other 3 digit numbers.
Operation:
The X-44 telephones will automatically connect to all other extensions on the Local Area Network.
Notes:
59
Page 60

Feature Descriptions
Quick Setup
Description:
Quick Setup, Auto Provisioning, is used to automatically authenticate your new telephone lines.
Operation:
This feature will help setup your new telephone lines.
Notes:
Speed Bin
Description:
There are ten (0-9) different speed dial bins each that can be programmed with up to a 32 digit
telephone number.
Operation:
Enter the number as you would normally dial it to make a call. The X-44 will automatically route the
call.
Notes:
Tone Type
Description:
The X-44 telephones are preset to use standard United States telephone tones.
Operation:
Because different countries use different call processing tones X-44 has been preset with several
different countries, at default it is set to use the tones from the United States.
Notes:
Changing this setting may cause erratic call processing results.
•
60
Page 61

Feature Descriptions
Transfer
Description:
Calls may be transferred from your extension to another extension. The transferred call will follow the call
forwarding of the receiving extension. There are two ways to transfer a call. A Blind Transfer is when you
do not announce the call and supervised where you do announce the call.
Operation:
1. While on a telephone line call press the transfer button
2. Press the down navigation key to open a second talk path
3. Dial the desired destination or press the extension button on the Sidecar
4. Stay on the line to announce (Supervised) the call transfer or Hang up to release (Blind) transfer
the call
5. Hang up to complete the transfer
Notes:
If the receiving extension is forwarded, the transferred call will follow the forwarding
•
If the receiving extension is not forwarded, and the call goes unanswered, it will recall at the
•
extension that transferred the call.
Voice Mail
Description:
Each X-44 telephone comes with a private, password protected voice mailbox.
Operation:
From an idle telephone
1. Press your voice mailbox button, which has a picture of an envelope
2. Enter your password (Default is 0000)
a. Press 1 to listen to new messages
i. Press 1 to listen to new messages
ii. Press 2 to delete all messages
b. Press 2 change your password
c. Press 3 to record your personal greeting
Notes:
It is a good idea to record your personal greeting and change your password when setting up your
•
voice mailbox.
61
Page 62

Feature Descriptions
Volume Control
Description:
The X-44 system is equipped to adjust the volume levels of the following settings:
Ringing (extension and telephone line), Handset, Speaker, Headset
Operation:
Press the volume up to increase or down to decrease the volume of the currently used feature. For
example, while the telephone is ringing use the volume button to increase or decrease the ringing
volume.
Notes:
Web Management
Description:
The X-44 can be programmed using the LCD menu or using a standard Internet Web Browser, such as
Windows Internet Explorer.
Operation:
Enter the IP Address in the browser address bar to access the Web interface page for programming.
Notes:
62
Page 63

Programming Menu
Telephone Programming Menu
Menu Programming
Each telephone can be customized by the individual user using either the telephone menu or through a
standard Internet Browser such as Windows Internet Explorer. Press the Menu soft button to enter the
programming area.
From an Idle X-44 telephone select Menu to change programming parameters, FWD to change where a
call will forward to, DND to place the extension into Do Not Disturb mode, or EXT to scroll through to
locate and dial a specific extension number.
There are 8 different programming menus in the programming area, which are accessed by press the
down navigation button. The following menu options will be displayed.
1. Quick Setup - Used to auto provision telephone lines
2. Phone Settings - To customize Name, Language, and sounds for the telephone
3. User Settings - To customize DND and Call Forwarding parameters
4. VM Setting - Setup Voicemail for your extension
5. Phone Information - for reference only
6. VAA Settings - Voice Auto Attendant Settings - This procedure locks all other telephones.
7. Admin Settings - Network and Interface programming parameters
8. Reboot the telephone
Getting Started
At default, the X-44 is programmed as DHCP. Therefore, when the telephone is plugged into your
existing network it will automatically be assigned an IP Address, extension number and locate any other
X-44 telephones on your network.
At default the extensions are numbered from 101 - 116, but can be changed to accommodate different
three digit numbering plans. When changing the extension numbering remember not to create any
conflicts such as 311, 411, 611, and 911.
Programming can be done using one of the telephones or using an Internet Browser such as Internet
Explorer (Internet Explorer 9 may need to be run in compatibility mode).
63
Page 64

Menu Parameters
Description
1. Quick Setup
1. Admin (1234)
1. Auto Provision
Quick Setup - is used to auto provision your
new SIP telephone lines
2. Phone Settings
1. Display Name
2. Languages
3. Sounds
1. Ring Type
2. Tone Type
3. Volume
1. Ringing Volume
2. Handset Speaker
3. Handsfree Speaker
4. Headset Speaker
4. Dial Timeout
Display name - Enter the name that will appear when you
are calling another extension or searching for someone
using the “EXT” button.
Languages - English is the only Language supported at this
time.
Sounds -
Ring Type - Select from 13 different ringing tones that will
be heard when your telephone rings.
Tone Type - Select which country’s ring tones should be
used.
Volume - The volume can be adjusted here or while in
operation using the volume up and down bar.
Dial Timeout - This timer is used to determine how much
time can elapse between entering each digit, and after you
have completed dialing. Changing this time may result in
erratic operation.
Programming Menu
Menu
64
Page 65

3. User Settings
1. DND
2. Call Waiting
3. Call Forwarding
1. Always Forward
2. Busy Forward
3. No Answer Forward
4. Auto Answer
5. Phone Lock
6. Call Log
1. Dialed Calls
2. Missing Calls
3. Answered Calls
4. Deleted Calls
7. Phonebook
8. Speed Dialing
9. Message Box
1. Inbox
2. Outbox
3. Delete
All
Inbox
Outbox
DND - Do not Disturb - Stops all intercom calls from Ringing
at your extension.
Call Waiting - This allows you to receive a second call while
you are busy on a call.
Call Forwarding - This allows you to forward your calls to a
different destination. Select between Always - Never rings
your phone, Busy - only when you are on the phone or No
Answer - when you do not answer the call. The forward
destination can be another extension, your voice mailbox, or
even an external telephone number.
Auto Answer - Although not recommended, this allows all
calls, intercom and telephone line to automatically answer at
your telephone.
Phone Lock - This allows you to lock your extension to
prevent unauthorized calls while you are not at your
telephone.
Call Log - There are four different locations that the X-44
saves call information; Dialed Calls, which are calls that you
have dialed, Missed Calls, which are calls that were not
answered, Answered Calls, which are calls that you have
answered. Delete allows you to delete a category or a
specific call from the list. These Call can be used to dial
back any of the stored telephone numbers.
Phonebook - Enter up to 10 of the most dialed telephone
numbers, and names, for easy dialing access.
Speed Dialing - Enter up to 10 of the most dialed telephone
numbers.
Message Box - Allows you to see how many messages you
have in your voice mailbox.
4. VM Settings
1. Visual Voice Mail
2. Record Greeting
3. Change Password
5. Phone Information
Model Name:
Software Version:
MAC Address
DHCP
IP Address
Subnet Mask
Default Gateway
DNS Server
Trunk Info
Phone Information - This is a summary of your telephone’s
settings and is for reference only. This is frequently used for
troubleshooting.
Programming Menu
65
Page 66

6. VAA Settings
1. Operating Mode
1. Time Mode
2. Day Mode
3. Night Mode
2. AA Time Setting
1. Sunday (00:00 00:00)
2. Monday (09:00 17:00)
3. Tuesday (09:00 17:00)
4. Wednesday (09:00 17:00)
5. Thursday (09:00 17:00)
6. Friday (09:00 17:00)
7. Saturday (00:00 00:00)
3. Customize AA Voice
1. On Duty Greeting
2. Off Duty Greeting
3. Other AA Voice
1. AA Voice 10101
2. AA Voice 10102
3. AA Voice 10102
4. AA Voice 10103
5. AA Voice 10104
6. AA Voice 10105
7. AA Voice 10106
8. AA Voice 10107
9. AA Voice 10201
Entering this feature will lock all other extensions
Operating Mode - Your new phone system can have a day
greeting, night greeting and it automatically switch between
the two. Set the Operating Mode to Day Mode and use only
the day greeting, or set it to Night Mode, to run only the
night greeting. Set it to Time Mode to automatically switch
between day and night modes.
AA Time Setting - This is your open and close schedule
when the Operating Mode is set to “Time Mode”. The first
entry is the time that you open and the second is when you
are closed.
Customize AA Voice - This allows you to record a
companywide greeting that will be heard by anyone that is
answered by the auto attendant. There is a day greeting
(On Duty) and a night (Off Duty) greeting, which
corresponds with the open and closed schedule set in the
AA Time Setting.
It is also possible to rerecord 9 additional greetings, but
once they are rerecorded they cannot be restored without
completely reloading the voice files.
10101 - “Please hold while your call is being transferred”
10102 - “The extension that you dialed is unavailable, press
the “*” key to try again.
10103 - “The extension you dialed is currently busy, press
“*” key to try again.
10104 - “Dial another extension, or press Zero to reach the
operator.”
10105 - “Invalid Entry”
10106 - “The number you dialed is invalid, please try again.”
10107 - “The number you dialed is invalid, please hold while
your call is transferred to the operator.”
10201 - “Thank you for calling, Goodbye.”
Programming Menu
66
Page 67

7. Ad mi n Se tt in gs
1. Phone Number
2. Account Type
1. Admin
2. User
3. Network Settings
1. Network Type
Static
1. Static IP Address
2. Subnet Mask
3. Default Gateway
4. DNS
DHCP
4. System Setting
1. Multi-Service
2. Trunk Line 1 ~ 4
1. SIP Server
1. SIP Proxy
2. Outbound Proxy
3. Registrar Server
4. Registrar Outbound
5. Port
2. Authentication
1. Authorized IP
2. Authorized Password
3. Phone Number
4. Display Name
5. Answering Position
1. Operator
2. Auto Attendant
3. All Ring
4. EXT (Extension)
Phone Number - Each X-44 is assigned a unique number,
which is also their extension number. The default is 101 ~
116, but can be anything from 200 ~ 800. Be careful not to
create any conflicts such as 311, 411, 611, or 911.
Account Type - There are two types of account; Admin,
which has access to all programming parameters and User,
which only has basic access to the parameters.
Network Settings - At default your new telephone is set to
“DHCP” allowing it to automatically connect to your existing
network. However, you can also set it to “Static IP” which
requires you to enter the IP Address, Subnet Mask, Default
Gateway, and the DNS server. If you are not comfortable
with these settings, simply leave it at DHCP.
System Settings - This is where you will set up the
telephone lines, Authentication, Display Name, Answer
Position, etc.
Multi-Service - There are four telephone lines that can be
authenticated. It may be necessary to program each line
individually, or all at one. Programming lines individually is
called “One to One”, and all at once is called “One to Many”.
Trunk Line - The programming entry parameters will be
provided to you and should be entered into the correct
fields. SIP and Outbound Proxy as well as the Registrar
Server and Registrar Outbound, and the port number will be
provided to you in a table that resembles the entry screen.
Authentication - Enter the Authorized IP and Password,
which will be provided to you when you order your new
telephone lines.
Phone Number - Enter the Provided telephone number. If
you are “Porting” your existing telephone number, enter that
number here. Allow 15 to 20 working days to get an
existing telephone number ported over to your new
telephone lines.
Display Name - Enter the provided Display Name.
Depending on your provider this will be what the called
party will see when you call them.
Answering Position - Select where each telephone line
should ring.
The Operator - Only the Operator (Attendant will ring)
Auto Attendant - The Automated Receptionist will answer
incoming calls and allow callers to enter the extension
number of the person that they are trying to reach.
All Ring - Ring some or all authenticated telephones.
Ext (Extension) - Ring a specific Extension.
Programming Menu
67
Page 68

6. Ring Type
3. Trunk Line 2
4. Trunk Line 3
5. Trunk Line 4
6. Operating Settings
7. Numbering Range
On/Off Control
Range Settings (101 - 199)
Reset Phone Number
8. Time Zone
9. DID Settings
Status
On/Off
DID List
1 - 16
10. Reset Settings
5. SIP
1. DTMF
2. Codec
3. Packet Time
6. Block Anonymous
7. Call Blocking
8. Ping IP Address
9. Reset Phonebook
10. Reset to Default
Reset Configuration
Reset Phonebook
Reset All
Ring Type - Select the distinctive ringing tone for each
telephone line.
DID Settings - Direct Inward Dial - This allows users to have
their own “Private” telephone number, which can be
programmed to ring directly at their extension.
Reset Setting - Use this parameter to reset the telephone
lines back to factory default.
SIP - The SIP settings are preset to work in the United
States on a standard data network.
Block Anonymous - If enabled all anonymous calls will be
automatically blocked.
Ping IP Address - This troubleshooting parameter is used to
locate other devices on the network.
Reset Phonebook - Reset your phonebook, deleting all
entries.
Reset to Default - Select one or more parameter to reset
back to factory default.
8. Reboot
Reboot allows you to reboot your X-44 telephone without
affecting any of the other telephones on your network.
Programming Menu
68
Page 69

User Name
Password
Admin
1234
User
1111
Web Programming
Web Programming
Programming with an Internet Browser
The X-44 telephone can be programmed using the telephone or using an Internet Browser such as
Windows Internet Explorer. Once connected to a Local Area Network (LAN) a computer can access the
telephone’s Web page by entering its IP Address.
To find the telephone’s current IP Address go to Menu > 5.Phone Information > Press the down
navigation key to location “IP Address:”
Enter the IP address of the telephone, which may be different from the example, into the address bar of
the Internet browser and press the Enter Key.
The Password page will appear.
Once you log into your telephone, you will have seven programming tabs, unless you have the optional
Sidecar, then you will have eight programming tabs, one that shows “EDM”, which is how you customize
the buttons on your Sidecar.
When you first log in, you will see the “Information” page, which is for reference only.
69
Page 70

Web Programming
Information Page
Network Information
Network Type - Default is set to DHCP
•
Current IP - Shows the current IP address of the telephone
•
Subnet Mask - Shows the current subnet mask of the telephone
•
Default Gateway - Shows the IP address of the Default Gateway
•
Primary DNS - Shows the Primary DNS address to be used for address resolution
•
Secondary DNS - Shows the Secondary DNS address to be used for address resolution
•
Product Information
Software Version - Shows the software version of the telephone
•
MAC Address - Shows the MAC address of the telephone
•
70
Page 71

Web Programming
SIP Trunk 1
If all SIP Trunks are authenticated with the same provider, this will only show SIP Trunk 1, if there are
multiple providers, it will show each individual trunks status.
Phone Number - The extension number of the telephone
•
Registration State - This will show “Registered” when the phone is connected to the X-50 system,
•
and “Unregistered” when it is not connected successfully.
SIP Proxy Server - Shows the registered SIP proxy address number (The LAN or WAN port of the
•
X-50 system.)
Answer Position - This shows where the trunks will be answered.
•
Extension Information
Shows the current extensions seen on the network. The Arrow points to the phone that you are
currently administrating and the (*) shows the last telephone that saved a change from the “System”
page.
DID Table
The DID table shows the numbers that are currently routed through your system.
71
Page 72

Web Programming
Network Page
The network page is used to automatically or manually enter the telephone’s network addresses. When
set to DHCP the telephone will automatically join your existing network and be assigned an IP Address. If
you prefer to use static IP Address, just select “Static” and enter the desired IP Address.
Network
DHCP - When set to DHCP, the X-44 is automatically assign a valid IP Address
•
Static - When set to Static, you will have to enter a valid IP Address manually
•
QoS Settings
Use this parameter to match the QoS protocol that is set on the network. If QoS is not set, both
parameters should remain as “Best Effort”.
DSCP for RTP - For best results leave this at “Best Effort”
•
DSCP for SIP - For best results leave this at “Best Effort”
•
72
Page 73

Phone
Web Programming
73
Page 74

Web Programming
Language Setting
System Language - English is the only language that is supported currently.
•
Volume Control
There are 7 different volume levels that can be customized, on the fly, by the user. Each parameter has
10 different volume levels to choose from.
Handset Mic: - Select the proper volume, between 1 and 10. One (1) being the lowest and ten (10)
•
being the highest volume. The Handset Mic is set to 5 at default.
Handset Speaker: - Select the proper volume, between 0 and 9. Zero (0) being the lowest and nine
•
(9) being the highest volume. The Handset Speaker is set to 4 at default.
Ring Volume: - Select the proper volume, between 0 and 9. Zero (0) being the lowest and nine (9)
•
being the highest volume. The Ring Volume is set to 4 at default.
Handsfree Mic: - Select the proper volume, between 1 and 10. One (1) being the lowest and ten
•
(10) being the highest volume. The Handsfree Mic is set to 5 at default.
Handsfree Speaker: - Select the proper volume, between 0 and 0. Zero (0) being the lowest and
•
nine (9) being the highest volume. The Handsfree Speaker is set to 4 at default.
Headset Mic: - Select the proper volume, between 1 and 10. One (1) being the lowest and ten (10)
•
being the highest volume. The Headset Mic is set to 5 at default.
Headset Speaker: - Select the proper volume, between 0 and 9. Zero (0) being the lowest and nine
•
(9) being the highest volume. The Headset Speaker is set to 4 at default.
Tone/Ring Selection
Tone Type - Select the Country where the telephone will be installed. The default settings is “United
•
States”.
Ring Type - Personalize the ring tone by selecting one of eleven (11) different ring tones. Select
•
between zero (0), the default, and ten (10).
Voice Parameters
Echo Canceller: - Check to enable “Echo Cancellation” which will eliminate unwanted echo.
•
VAD+CNG: - Check to enable “Voice Activity Detection (VAD)” and “Comfort Noise Generation
•
(CNG)”.
Phone Features
Auto Answer: - Check to enable “Auto Answer”, which will automatically answer any (Intercom or
•
Telephone Line) calls that are programmed to ring at your extension.
DND: - Check this parameter to place the telephone into Do Not Disturb. If the “DND Forwarding”
•
is enabled, calls to your telephone will be sent directly to voice mail. If not, the call will not transfer.
CLIP: - Check this parameter to enable “Calling Line Identity Presence (CLIP)”. When enabled the
•
Caller ID of incoming calls will show on your telephones LCD Display.
CLIR: -
•
Call Waiting: - Check to enable “Call Waiting”, which allows your telephone to receive a second
•
telephone call, when you are busy on a call.
Call Waiting Tone: - Check this parameter to enable the “Call Waiting Tone”, which is heard when
•
call waiting is enabled and a second call is programmed to ring on your extension.
Hold Reminder: - Check this parameter to enable “Hold Reminder” which will remind you, with a
•
single tone burst, each time the Hold Reminder Time Expires.
Hold Reminder Time (sec): - Select how often, in seconds from zero (0) never to sixty (60)
•
seconds, which is how often the hold reminder tone should play.
74
Page 75

Web Programming
Block Anonymous: - Check this parameter to block calls that have a Caller ID that shows
•
“Anonymous.”
Phone Lock: -
•
Dial Timeout (sec): - This timer, in seconds, is the amount of time that passes after you dial a digit
•
and the call is placed. It is also the amount of time that the telephone will wait between digits. If
you pause for longer than this timer, the call will dial, even if you have not finished entering the
number.
Ringback Time (Sec): -
•
Auto Redial Attempts: - Auto Redial is the number of times that the telephone will automatically
•
attempt to redial a number after the Auto Redial feature is enabled.
Auto Redial Interval (sec): - Is the number of seconds between attempts.
•
LCD Backlit Time: - Select the amount of time, in seconds, that a backlit display will be active.
•
Select between 10, 20, 30, 40, 50, 60, and to leave it on “Enable”
End Dial on #: - This allows you to press the # key to place the call.
•
Paged Settings
All Paged Call: - Allows the extension to receive a page, when it is idle.
•
Auto Mute on Single Paged Call: - When placing an intercom call, dialing between extensions, the
•
Third Soft button will change to show “Paging” which will allow the caller to activate a one way
paging announcement. If unchecked, the third button on the calling party’s telephone will not
change to show “Paging”.
Single Paged Call: - When placing an intercom call, dialing between extensions, the third soft
•
button will change to show “Paging” which will allow the caller to activate a two way paging
conversation. If unchecked, the third button on the calling party’s telephone will not change to
show “Paging”.
Notification on Single Paged Call: - Once enabled, a beep tone will be heard when someone calls
•
your extension and activates the Single Paged Call Feature.
Speed Dialing Settings
Your telephone has ten (10) personal speed bins, for commonly dialed numbers, each one can hold
•
up to 31 digits. To access the numbers, go off hook, or press the speaker button and then press
the soft button under the word “SPD” from an idle telephone press the down navigation button.
Select the Speed Dialing Entry 0 - 9.
•
Voice Mail Settings
Voice Mail Password: - Enter the four digit password that you will use when logging into your voice
•
mailbox. The default password is set to 4 zeros - 0 0 0 0
Max Length per voice message (Sec): - Enter the length, in seconds, of time that each caller will
•
have to leave a voicemail message. The default is set to 180 seconds.
75
Page 76

Web Programming
Premise Text Message
Premise Message Type: - There are 4 types of Preprogrammed messages; Idle, the default, Call Me
•
Later, Call My Mobile, Do Not Disturb, and Other (which allows you to enter your own message).
Once enabled all intercom calls to your extension will receive this message in their display.
Premises Message: - Enter up to 16 Characters or Numbers such as “Out of office”, “At the Doctor”,
•
“Off-Site Meeting”.
Subscriber Information
Phone Number: - Each telephone will automatically be assigned an extension number between 101
•
and 116. To ensure that each extension is in the right place, you may change the extension number
to any three digit number within the numbering plan. (See - System - Numbering Range Settings Range Settings. The default is 101 - 199.)
Display Name: - Enter the name, up to 12 characters, that will be seen in the display.
•
DTMF Type: - Select the DTMF type to be used. In the United States this should be set to RFC2833.
•
DTMF Payload - In the United States, using RFC2833, the payload should be set to 101.
•
Forwarding Settings
There are three different types of call forwarding; Always, Busy and No Answer Forward. Click on the
check box to enable the type of call forwarding that you would like to use. Then enter [vm] for voicemail
or enter the number where the call should be forwarded to, when a call is transferred to your extension.
Always Call Forwarding
This feature forwards all calls, without ringing your telephone or giving you a chance to answer the call.
In addition, there is no indication that a call is “ringing” your extension.
Always Forward Destination: - Enter the forward destination. This can be another extension,
•
voicemail, or an external telephone number such as a cellular telephone.
Busy Call Forward:
This feature will forward calls when your phone is busy and overrides the “Call Waiting” feature.
Busy Forward Destination: - Enter the forward destination. This can be another extension,
•
voicemail, or an external telephone number such as a cell phone.
No Answer Call Forward:
This feature will only forward calls that go unanswered at your extension. At default, the extension is
forwarded to “vm” Voicemail.
No Answer Call Forward Destination: - Enter the forward destination. This can be another
•
extension, voicemail, or an external telephone number such as a cell phone.
No Answer Time (sec):
This is the amount of time that a call will ring at your extension before it is considered a “No
•
Answer” call. At the expiration of this timer, the call will be forwarded to the entered destination.
76
Page 77

Web Programming
Codec Settings:
A Codec is a coding and decoding protocol that allows two devices to transmit information between them
using an agreed upon protocol. A commonly used codec is G.711, which has no compression and delivers
the best sound reproduction, therefore, it uses the most bandwidth. The X-44 telephone uses three
different Codecs, µ-law (pronounced MU-Law) used in the United States, a-law used in most European
countries, and G.729a, which is used universally throughout the world.
Once the codec is determined, it is important set the Packet Time (how often, in milliseconds, the
payload, amount of information, should be sent between devices.
Codec G.711 µ-law
Pronounced “Mu-Law” (like “new” with an M) and generally written µ-law is the algorithm used by
telephone communications products in the United States. This algorithm allows us to send
communications signals down long expanses of wires with very little distortion.
Codec G7.11 a-law
The a-law algorithm is used in many European telecommunications products. This algorithm also
allows communication signals to be send down long expanses wires with very little distortion but
a-law does not have as many different frequency ranges that µ-law, so the signal decreases faster
over a shorter distance.
Codec G.729a
G.729a is a compression protocol, which can be used in any country. It is used to minimize the size
(amount) of the data which is passed between devices.
Packet Time - G.711u, G.711a, G.729a
The packet time is the amount of time that elapses between data packets being sent. These timers
should remain at default, which is 20 (ms).
Call Blocking Settings:
Using a calls’ inbound Caller ID the X-44 telephone allows you to block up to 10 different telephone
numbers, each can contain up to 31 digits. When using Call Blocking Settings, it is important to use as
many digits of the number to be blocked as possible. This will avoid inadvertently blocking large groups
of numbers. For example, if you only enter “913”, then all calls with the area code 913 (Kansas) will be
blocked.
Enable Call Block: - Click on the Check Box to enable all 10 of the call Blocking Entries.
•
Caller Blocking Entry x: (x = 0 - 9: - Enter the telephone numbers that you want to block.
•
Remember to use as much of the telephone number as you can.
Prefix Entry Settings
This allows each telephone the ability to evaluate any digits dialed before the X-44 processes the digits
dialed. When a dialed number matches an “Entry Pattern” in the X-44, the telephone can be
programmed to add digits to the number dialed or replace the dialed digits with a new set of digits.
Prefix Entry x Type: (x = 0 - 9) - Enter the dialed digit or digits that will be evaluated by the X-44.
•
If a match is found the X-44 can “Insert” one or more numbers such as a “1” for a long distance
call or the X-44 can actually replace the dialed number with a different number.
Prefix Entry x Pattern: Enter the number or numbers to be evaluated before sending the call to the
•
X-44 system for processing.
77
Page 78

Dial Plan Entry Examples
Entry
Result
2xx|3xx
All three digit numbers between 200 and 399
10x|11x
All three digit numbers between 100 and 119
30[6-9]
The specific numbers 306, 307, 308 and 309
10[45]
The specific numbers 104 and 105
10x|11x|20[0-5|22[0123]|35x
This entry will dial 100~109 | 110~119 | 200, 201, 202, 203, 204,
205 | 220, 221, 222, 223 | 350~359
Web Programming
Prefix Entry x Replace: Enter the number or numbers that will replace the dialed digits when a
•
pattern match is found. For example, if the “Type” is set to “Replace”, and the pattern is set to
“411” and “Modification” is set to 1-913-555-1212. When a user dials 411, the number sent out will
be 1-913-555-1212 and not 411.
Dial Plan:
The Dial Plan is used to make an intercom call faster by comparing the dialed numbers with an entry in
the Dial Plan. When a dialed number matches one of the entries, the call is placed immediately. If no
match is found then the call will wait until the “Dial Timeout” timer expires. Care should be given when
entering any number or numbers into the dial plan because it could cause a conflict with some area
codes.
If you do not want to wait for the Dial Timeout (default 5 seconds) you can always press the button
under the word “Dial”.
Dial Plan: - Use the following rules to establish a dial plan.
An entry of “X” represents all digits from 0~9. For example, and entry of 2xx represents all three
•
digit numbers that begin with the number 2 - 200~299.
From [Digit to Digit] - represents all digits from within the entered range. This is used to define a
•
specific range within a entry. For example, an entry of 20[0-9] represents three digits numbers
from 200 through 209.
An [Entered Digit] - represents the specific digit in the location that it is entered. For example, an
•
entry of 20[1234] represents specific numbers 201, 202, 203 and 204.
The use of the “|” - separates each rule in the dial plan.
•
78
Page 79

Management
Click here to upgrade your telephone
Click Here to
Create a Backup
Click here to restore the configuration
Web Programming
HTTP Upgrade
Occasionally it is a good idea to check for software updates for your telephone. However, before doing
any upgrade it is a good idea to create a backup.
To download a new software upgrade file, go to http://www.xbluenetworks.com/x-44_voip.html
•
and download the file in a location that you can easily find.
Before you do the upgrade, remember to create a backup. This will ensure that you do not lose
•
your configuration, Private and Public Phonebook entries. To Create a backup, Locate “Select
Configuration Profile to Update” and click on the Backup Button.
Select Hold Music Tar File to Update (Max File side: 200K)
It is possible to create and upload a custom Music On Hold (MOH) file.
•
Select Private Phonebook CSV File to Update
After entering your private phonebook entries, you may create a backup to keep your phonebook
•
entries safe.
79
Page 80

Web Programming
Select Public Phonebook CSV File to Update
After entering your private phonebook entries, you may create a backup to keep your phonebook
•
entries safe.
Select Voice Tar File to Update
Since all of the voice prompts are in a single “indexed” file, this upgrade may not be common.
•
Select Logo File to Update (113x20 pixels)
This is the logo that appears in the X-44 LCD Display. The file must be 113 pixels wide and 20
•
pixels tall. Then it must be converted, by using a special application (tcbmp.exe) to a special type
“bmp” file that can be uploaded to the X-44 telephone.
TFTP/FTP Upgrade
A different way to upgrade a phone is to create a temporary “TFTP” server.
Download and install the “TFTP” application on your PC
•
Set the TFTP Server to 192.168.10.11 and set it up to be the DHCP Server
•
Power up the X-44 telephone while holding down the first “Soft Button” (left button directly under
•
the LCD)
Press the center check button on the telephone to begin the download, which will take about 3
•
minutes. This method does not allow for a configuration backup.
Account Settings
Each telephone has two different accounts - Admin, which gives you access to all of the
•
programming parameters and the User, which limits access to specific pages. For example, a “User”
has no access to the software upgrade page, specific parts of the SIP page, and cannot reassign
the Admin or User passwords.
Reset to Default
It may require that the X-44 telephone be isolated in order to fully default the system back to factory
default. The best way to accomplish this is to unplug the network cable, and then restore it back to
factory default. Once that is complete reconnected the X-44 to your existing network.
Reset Configuration - Select Reset Configuration to default the configuration of the X-44
•
telephone.
Reset Phonebook - Select Reset Phonebook to default the private and public phonebook back to
•
factory default.
Reset All - Select Reset All to completely default the X-44 back to factory default.
•
80
Page 81

Account User Passwords
admin
1234
user
1111
Web Programming
Admin Settings
Each telephone has two different accounts - Admin, which gives you access to all of the programming
parameters and User, which limits access to specific pages. For example, a “User” has no access to the
software upgrade page, specific parts of the SIP page, and cannot reassign the Admin or User passwords.
81
Page 82

Web Programming
Diagnostics
The diagnostics page is used to diagnose your X-44 telephone and telephone system.
Syslog Settings
Gives you the ability to download a system log to a central computer or server.
Enable “Log Server” by checking the checkbox
•
Select the log level between Emergency (lowest level) and Debug (highest level - most amount of
•
trace information)
System Log Address - Enter the IP Address of the Client or Server computer where the trace
•
information will be saved.
System Log Port - Although you can change the log port, leaving it at 514 may be the best solution.
•
Diagnostics
VM (Voicemail) status - shows the amount, in a percentage, of time that is used by the voicemail
•
system.
System Status - Shows the status of each of the telephones on the network. The Arrow points to
•
the phone that you are currently logged into, and the * shows the operator extension.
82
Page 83

Web Programming
Network Status - Shows the status of the telephone on the network.
•
SIP Message - Shows the specific SIP messages between the telephones and across the network.
•
Download System Log - This will download the system logs to your local computer and may be
•
needed to troubleshoot your network.
Download Troubleshooting - The X-44 has a special built in troubleshooting trace, which may be
•
needed to assist with troubled installation.
83
Page 84

Web Programming
Notes:
84
Page 85

Programming Menu
System
The parameters in the system programming area affects all of the X-44 telephones on your network.
Once a telephone enters the system programming parameters all other telephones are locked out of the
system programming area.
85
Page 86

Programming Menu
SIP Trunk (1 - 4) Settings
The X-44 can be equipped with up to four VoIP Telephone lines from one or multiple telephone line
providers.
Multiple Service Providers
Generally, when using a single telephone line provider, this will be set to “Off”. The number of registered
telephone lines is equal to the total number of concurrent calls.
Subscriber Information
Enter the information provided by the telephone line provider.
•
Phone Number - Enter the phone number, which may not resemble a standard telephone number it
•
may be a series of numbers, letters, or other characters, i.e. 04123*120. Using a nonstandard
number sequence will minimize malicious attach.
Auth ID - The Authorization ID may be the same as the telephone number, or it may be something
•
totally different. In addition, this parameter may not be used with some telephone line providers.
Auth Password - Enter the password that was provided by the telephone line provider.
•
The SIP Proxy, Outbound Proxy, SIP Secondary Proxy, SIP Surviving Proxy, Register Server,
•
Outbound Registrar, and SIP Domain - Some or all of these entries will be used, and may be an IP
Address, or a URL such as SIP.TrunkProvider.com.
Register Expires (sec) - Is the amount of time, in seconds, that the X-44 and the remote device
•
will “Speak to Each other”, known as a “Keep Alive”. Unless the telephone line provider specifies a
different time, this parameter should not be changed.
Port - Unless the telephone line provider specifies a different port, this parameter should not be
•
changed.
86
Page 87

Programming Menu
Notes:
Some routers may require you to disable the SIP ALG feature, which, when enabled may cause you
•
not to hear the calling party. Most Routers allow you to change this in the Advanced Setup, but
some require you to do it in the Command Line. Please reference your routers Admin Manual.
Incoming Call Settings
Ring Type - The X-44 comes with 13 different ring tones to choose from. This setting will override
•
any “Distinctive” ring tone set at a specific X-44 Telephone.
Answer Position - There are four different “Answer Positions”, Operator, Auto Attendant, All Ring, or
•
a specific Extension. This parameter overrides the settings for Direct Inward Dial (DID) (see below)
private line number settings, and will most likely be used to set telephone line ringing for the
“Whole” system.
Operator - Only the extension identified as the Attendant/Operator will ring for all incoming
•
calls. Dial zero from any X-44 telephone on your network to identify the attendant/operator.
Auto Attendant - All Calls will ring directly to the systems Auto Attendant’s main greeting, which
•
should say something such as “Thank you for calling our company, if you know your party’s
extension, dial it now, or press zero to speak to the attendant.
All Ring - Ring all “Checked” extensions that are connected to your network will ring.
•
Ext - Ring a specific extension number and only that extension number.
•
Block Anonymous - When this parameter is enabled, any inbound call that does not have a valid
•
Caller ID string, the call is blocked.
All Ring & Operator No Answer Setting
No Answer Time (sec) - This is the amount of time that a call will ring before it is sent to the
•
entered mailbox ID.
Mailbox ID - Once entered, unanswered calls will not go to the main Auto Attendant, it will go
•
directly to the entered mailbox.
Session Timer
Enable Session Timer - All of the X-44 telephones are preprogrammed with a timer that makes
•
sure that they are always in communication with each other. Occasionally, it is necessary to set a
specific timer to ensure that all phones are synchronized. However, this parameter is rarely used
for the X-44 systems.
87
Page 88

Programming Menu
Session Expires (sec) - This is the maximum amount of time, in seconds, that an X-44 telephone
•
can go without synchronizing with all other telephones. If this time elapses and the phone does not
communicate, the phone is considered off line.
Min-SE (sec) - This is the minimum amount of time, in seconds, that an X-44 telephone can go
•
before it synchronizes with all other X-44 telephones on your network.
Auto Provision Settings
When enabled, the X-44 will go to a specific SIP Trunk provider and automatically download all of
•
the information needed to setup and start using your SIP Trunks. Only enable this parameter once
you have decided which SIP Trunk provider you will be using.
All Paging Access Code
The default All Paging Access Code is set to *99, which will open a one way page to any idle
•
telephone on your network, allowing the user to make an announcement.
Operator Setting
Operator - Is the extension that will ring when someone dials zero.
•
Operating Mode
The X-44 can be set to Day only, Night only or to automatically switch between day and night. When
set to Day - only the day greeting will play; when set to night only the night greeting will play; when set
to time mode, the day greeting will play between the hours entered into the working hours schedule, and
after that, the night greeting will play. The hours are set in 24 hour format. An entry of 08:30 to 17:00,
means means that you open at 8:30 am and close at 5:00 pm.
Operating Mode - Using the drop down menu select between Day - Night and Time Modes
•
Working Hours - Enter the start and end time for each day of the week. An entry of all zeros,
•
means that the message will not change for the currently playing message.
NAT Settings
Enable STUN - Session Traversal Utilities for NAT - This parameter is used to make a specific device
•
on an internal Local Area Network, to appear as a device on the Internet. Consequently, this
parameter is not commonly used. not be
STUN Server - Enter the IP Address of the STUN Server
•
STUN Server Port - Enter the port that the STUN Server will use to communicate.
•
88
Page 89

Programming Menu
Time Settings
Time Server - This is the IP Address (192.43.244.18 or time.nist.gov) of the server that is
•
synchronizing the time on your X-44 telephones.
Date Format - Select the date format to be used on your X-44 system. MM=Month, DD=Day and
•
YY=Year.
MM/DD/YY
•
DD/MM/YY
•
YY/MM/YY
•
MMM/DD/YY
•
Time Format - select how the time should be displayed on your X-44 system; 12 or 24 hour
•
format.
Time Zone - Select the GMT (Greenwich Mean Time) offset. For example, For Eastern Time would
•
select “GMT-05:00 (Eastern time (US & Canada)”, For Central “GMT-06:00 (Central time (US &
Canada)”
Auto DST - Enable this to allow the X-44 to automatically compensate for Daylight Savings time
•
changes.
DID Settings
Direct Inward Dial - often called “Private or Direct Line” is a number that rings directly on your telephone
bypassing the attendant and auto attendant.
DID Enable - click on the checkbox to enable the DID feature. This information will be provided to
•
you by your telephone line provider.
DID Number - Enter the DID Number exactly as it was provided to you from your telephone line
•
provider. This number can be as few as three digits or as many as 11.
Extension Number - Enter the Extension number that this direct number should ring.
•
Notes:
•
Any entry in this parameter overrides the “Answer Position” programmed in the “Incoming
•
Call Settings” area.
No other extensions will be able to retrieve the call, unless the the call is forwarded to their
•
destination.
Number Range Settings
The X-44 comes preprogrammed for extensions 101 - 116 but can be customized to different three digit
numbering plans. However, it is important to remember that some numbers should not be used such as
411, 611, 911 because it may cause confusing with some of the users.
Number Range - this parameter is enabled so that all telephones connected to the system will
•
automatically be assigned an extension number when it is connected to your network.
Notes:
•
Disabling this feature may cause erratic results.
Range Setting - Enter the number range to be used.
•
Reset Phone Number - When this button is pressed, all of the telephones on the network will
•
automatically renumber based on your new numbering plan.
Notes:
•
All Telephones will be considered Off Line, while the system is renumbering,
therefore, calls will go unanswered until the renumbering process is complete.
89
Page 90

Programming Menu
Transfer Recall Timeout
Transfer Recall Timeout - is the amount of time a transferred call will ring at an extension before it
•
recalls back to the transferring location such as the auto attendant or an extension.
Notes:
•
If this timer is set shorter than an extension’s no answer forward time, the call will recall
•
before the forward takes place.
Emergency Number List
When an extension is locked, only the numbers in the emergency number list can be dialed. All other
calls are blocked.
RTP Port Setting
Real-time Transport Protocol (RTP) Port - is the lowest or starting port, which is usually an “Even” port
number, used to receive media packets. Replay information is then transferred using RTCP which will use
the next odd port number. As a general rule, this port number should not be changed.
90
Page 91

Web Programming
Phonebook
Your telephone has both a Private and a Public Phonebook. The Private Phonebook is for your personal
use, and the Public Phonebook uses a CSV file to synchronize with all X-44 extensions, which can be
located in a centralized location. Currently, the Phonebook feature does not support Microsoft Excel’s CSV
files.
The easiest way to create a public phone book file, is to enter the information into your personal
phonebook and then create a back up file. This file can be centrally located on your network so that all of
the telephones can synchronize the information.
Private
The Private Phonebook is for your personal use. You can enter each number individually or you can use a
CSV File to upload them all at once.
Enter the three parameters and then press the “Add” button, to add new entries.
User Name: - Enter the user name (up to 31 characters) that will be associated with this entry.
•
Phone Number: - Enter the phone number (up to 64) digits.
•
Ring Type: - There are 13 different ring tones that can be used to differentiate the entered
•
telephone number when it calls into the system.
Once you are done entering your personal Phonebook, click on the “Management” tab to create a
backup.
Click on the “Backup Button” and save it in a location that is easy to locate when needed.
91
Page 92

Web Programming
Public
The Public phonebook gets linked to a CSV file in a centralized location, allowing an administrator to
reference the list from any phone. There are several ways to create a CSV file. The easiest way is to use
the backup created from the personal phonebook. Another way to create the file is using Windows
Notepad. Once created save it with a name such as “Publicphonebook.csv, and place it in a location that
you can easily find.
The format of this file is very important:
Name,Number,Ring Type
Anne Sweeney,1924020842,0
Alan Booker,769011,0,
Bob Smith,12122641501,0
Donald Kilroy,18752250474,0
Once the file is ready to be uploaded, click on the “Management” tab.
Locate the “Public Phonebook File:” and click on the Browse... button
Locate the saved file
Click on the Update button
Click on “OK” to complete the upload or “Cancel” to stop the upload.
Click on the Phonebook tab, and then the Public Page tab. If the file format is correct, the information will
be visible. If the numbers are not visible recheck the file format.
92
Page 93

Web Programming
Voicemail
The X-44 comes standard with both Auto Attendant and Voicemail. The Auto Attendant’s job is to
answer an incoming calls, play prerecorded greetings, allow the caller to dial an extension number and be
transfer to the dialed extension number. The voicemail’s job is to play the personal greeting of the dialed
extension number and then take a message.
Getting to Know your Voice Mailbox
When you have a new message the light above the display will begin flashing and the display will show
an envelope with the new message count.
New Voice Mail Message
Setting up your Voice Mailbox
It is a good idea to customize your voice mailbox. To do this you will press your message button ,
then you will be prompted to enter your password. The default password is four zeros (0000).
Use the following steps to personalize your greeting and name.
1. After the voice mail answers dial 3 to record your personal greeting
2. Press 2 - to record your new greeting
3. Record your personalize greeting and then press the # key. A common greeting may be
“Hi, this is Jonathan I am either on my phone or away from my desk. Please leave a detailed
•
message and I will return your call as soon as I can.”
It is also a good idea to change the mailbox password. At default, the password is four zeros (0000) and
can be changed to any 4 digit sequence from 0000 - 9999
1. After logging into your voice mailbox select 2 to change your mailbox password or if you just
recorded your greeting, press # and then press 2.
2. Enter your new 4 digit password, one that is easy for you to remember, and then press #. The
voicemail will announce your new password. Then press 1 to confirm.
93
Page 94

Web Programming
Using your Voice Mailbox
From an idle telephone
1. Press your voice mailbox button, which has a picture of an envelope.
2. Enter your password (Default is 0000)
a. Press 1 to listen to new messages
i. Press 1 to listen to new messages
ii. Press 2 to delete all messages
b. Press 2 change your password
c. Press 3 to record your personal greeting
Remote Message Pickup
You can also access your voice mailbox remotely allowing you pick up your new and saved messages as
well as record your personal greeting.
To access your voice mailbox remotely:
1. Call into the voice mailbox
2. When you hear your personal greeting
3. Press *
4. Enter your password (default is 0000)
94
Page 95

Troubleshooting
Symptom
Solution
The Display does not light
The device is not receiving power
Make sure that the power supply is plugged into
the back of the device and securely plugged into
the electrical power outlet that has the correct
power for your power adapter.
If using Power over the Ethernet, be sure that the
PoE switch is plugged in and operational and
check to see if all devices support PoE.
The light at the top of the display is flashing
rapidly - 3 impulses per second
This means that the telephone is not connected
to your Local Area Network.
Be sure that the network cable is plugged into the
correct port on the back of the telephone.
If using the WiFi adapter, make sure that it is
connected to your Local Area Network and
operational. Follow the setup procedure
Connecting your WiFi Adapter
Check programming to make sure that the
networking parameter is set to “DHCP” or
programmed with your Local Area Network’s IP
address. Menu --> 7.Admin (enter the password)
--> 3.Network --> 1.Network Type or 2.Static IP
My Computer is connected to the back of the
device but I cannot access the Internet
This means that the computer is not connected to
your Local Area Network.
Be sure that the telephone is connected to your
Local Area Network.
Be sure that the network cable is plugged into the
correct port on the back of the telephone.
Troubleshooting
95
Page 96

Symptom
Solution
How do I hang the telephone on the wall?
The telephone requires a special Wall Mount Kit
to allow it to be wall mounted.
I cannot hear anything through my handset.
Be sure that the handset is plugged into the port
labeled
How do I find the telephone’s IP Address?
Once your telephone is connected to your Local
Area Network, Select Menu --> 5. Phone
Information - Scroll down to locate IP Address.
The time and date are not correct in the display,
how can I set to to the correct time and date?
There is no need to set the time and date
because it will automatically synchronize with an
Internet based time server, plus or minus GMT. If
the time is not correct, it usually means that you
have lost your connection to the Internet.
My X-44 devices do not see each other.
The most common reason for this is when you
have two different networks or two different
subnets on the same Local Area Network.
Go to each device and locate the IP Address of
each to ensure that they are on the same
network. Select Menu --> 5. Phone Information Scroll down to locate IP Address.
The Day and Night greetings don’t play at the
correct times.
The most common reason for this is when the
telephone is not correctly connected to your Local
Area Network, so it cannot synchronize with the
Internet based time server.
First try rebooting the device. If that does not try
rebooting your Internet Service Provider (ISP)
Router. If that does not work, power down all
network devices and power them up, starting at
the ISP Router, then any routers, then any
switches and then all of the network devices,
including computers, printers, telephones, etc.
Can I change my extension number?
Yes. Using the Internet browser, log into your
device, and click on the Phone page, locate the
Subscriber Information, and enter the extension
number that you would like your device to use.
Troubleshooting
96
Page 97

Symptom
Solution
Calls are not going to my voice mailbox
There are several programming parameters that
could cause this, but the most common is that
your telephone is no longer programmed to
forward to voicemail. To verify that your
telephone is programmed to voicemail, log into
your device using a windows browser and click on
the Phone page, and locate the Call Forwarding
Settings and verify that the “No Answer Forward”
is set to “vm”.
When I dial my telephone number I get a busy
This is most commonly caused because either the
Enable Direct Inward Dial (DID) is set to off, or
the DID number is not entered or entered
correctly.
There is an “X” in the little on the right side of the
display.
This means that the telephone lines are not
authenticated correctly. Double check the SIP
trunk parameters provided to you are entered to
correctly, especially the password.
Cannot hear the calling party but they can hear us
This is commonly caused by a programming
parameter (SIP ALG) in your ISP’s Router.
Check your router’s administration manual to
determine how to disable this parameter. Some
routers provide a GUI interface, others requires a
Command Line Entry to disable this parameter.
Troubleshooting
97
Page 98

98
XBLUE Networks
12205 West 88 Street
Lenexa, KS 66215
Toll Free: 866-925-8312
FAX: 913-599-3877
X-44 Installation and User Guide
© Copyright XBLUE Networks 2012
 Loading...