

Page 1

Page 2

2
Safety Instructions
Please read the following instructions carefully before starting to use the
SP2014.
• Always read the safety instructions carefully.
• Keep this User Manual for future reference.
• Keep the unit away from humidity.
• Place the unit on a reliable flat surface before setting it up
• If any of the following situation arises, have the unit checked by a
service technician:
- The unit has been exposed to moisture.
- The unit has been dropped and damaged.
- The unit has obvious sign of breakage.
• Do not place the basic unit in a damp room at a distance of less
than 1.5 m from a water source. Keep water away from the
telephone.
• Do not use the telephone in environments where there is a risk of
explosions.
• Maintain the telephone in an environment-friendly manner.
Note: Skype™ does not allow emergency calls. Such calls should be
made with a traditional telephone or a mobile phone.
Page 3

3
Table of Contents
TABLE OF CONTENTS...................................................................3
1. INTRODUCTION..................................................................6
1.1 Package Contents..........................................................6
1.2 Front & Rear Views ..........................................................7
2. ALPHANUMERIC KEYPAD ..................................................9
3. HARDWARE INSTALLATION..............................................10
4. SETTING UP THE PHONE....................................................12
4.1 Select Language...........................................................12
4.2 Accept Agreement ......................................................12
4.3 Sign in to Skype..............................................................13
4.3.1 Login with an Existing Account.......................13
4.4 Create New Account...................................................15
5. MAIN SCREEN ..................................................................16
6. MENU SCREEN..................................................................17
7. CONTACTS .......................................................................18
7.1 Call a Skype Contact ...................................................18
7.2 Send Voicemail .............................................................19
7.3 View Profile.....................................................................20
7.4 Advanced Options .......................................................21
7.4.1 Rename a Contact .........................................22
7.4.2 Remove a Contact..........................................22
7.4.3 Block/ Unblock a Contact ..............................23
7.4.4 Request Contact Details ..................................23
7.4.5 Add a Contact..................................................23
8. HISTORY............................................................................25
Page 4

4
9. STATUS ..............................................................................26
9.1 Change Status...............................................................27
9.2 Mood Message .............................................................28
9.3 Select My Profile ............................................................29
9.3.1 Select Details to be Shown ..............................29
9.3.2 Private Details....................................................30
9.4 Switch User .....................................................................31
9.5 Sign out ...........................................................................32
10. SEARCH ............................................................................33
11. SERVICES..........................................................................35
12. SETTINGS...........................................................................36
12.1 General Settings..........................................................37
12.1.1 Change Password...........................................37
12.1.2 Auto Sign in......................................................38
12.1.3 Language ........................................................39
12.1.4 Software Updates ...........................................40
12.1.5 Reset.................................................................41
12.2 Call Divert .....................................................................42
12.2.1 Call Forwarding ...............................................42
12.2.2 Forward to Voice Mail ....................................43
12.2.3 Set Welcome Message...................................44
12.3 Privacy ..........................................................................45
12.3.1 Set Allowed Calls.............................................45
12.3.2 SkypeIn Calls....................................................46
12.3.3 Blocked Users...................................................46
12.4 Tones Setting................................................................47
12.4.1 Incoming Call Alert .........................................47
12.4.2 Ring Tone .........................................................48
12.4.3 Ring Volume ....................................................49
12.4.4 Notification Tones............................................49
12.4.5 Set Keypad Tones ...........................................50
Page 5

5
12.5 Time and Date.............................................................51
12.6 Manage Blocked Users ..............................................51
12.7 Network ........................................................................52
12.7.1 Set Network Type ............................................52
12.8 Phone Settings .............................................................53
12.8.1 Brightness .........................................................53
12.8.2 Timeout.............................................................54
12.9 Information...................................................................55
12.10 Advanced..................................................................57
12.10.1 Software Updates .........................................57
12.10.2 Network Proxy................................................58
12.10.3 Skype Ports.....................................................59
Appendix A: Specification..................................................60
Page 6

6
1. INTRODUCTION
Thank you for purchasing this Desktop phone SP2014. This phone is
designed for making calls over the Internet, using the Skype™ software.
Note: Please make sure you have a working Internet connection.
Please connecting the SP2014 to an available port from a router.
Package Contents
- SP2014 x 1
- Handset with curl cord x 1
- Ethernet cable x 1
- Power adapter x 1
- User Manual ( CD Version )
- Installation guide
Page 7

7
Front & Rear Views
Page 8

8
No. Description
1 LCD screen
2 Left soft button
3
Navigation button
4 Right soft button
5 OK/Enter button
6 End button
7 Call button
8 Mute button
9 Mute LED
10 Speaker button
11 Speaker LED
12 Pause LED
13 Pause button
14 Return button
15 Volume down button
16 Volume up button
17 Alphanumeric keypad
18 Hook switch
19 Hands free speaker
20 Handset (RJ9) jack
21 Compartment
22 Ethernet (RJ45) jack
23 Power Jack
Page 9

9
2. ALPHANUMERIC KEYPAD
Refer to the table below when using the alphanumeric keypad. When
entering usernames or passwords, you can press the key to toggle
between numbers (123), lower case (abc) and upper case (ABC)
characters.
Key Lower Case (abc) Upper case (ABC)
1 1 . , ? ! - _ 1 . , ? ! - _
2 a b c 2 A B C 2
3 d e f 3 D E F 3
4 g h i 4 G H I 4
5 j k l 5 J K L 5
6 m n o 6 M N O 6
7 p q r s 7 P Q R S 7
8 t u v 8 T U V 8
9 w x y z 9 W X Y Z 9
0 [SPACE] + 0
* Toggle between: Numerical/ Lower Case/ Upper Case
# Special character selection
Page 10
10
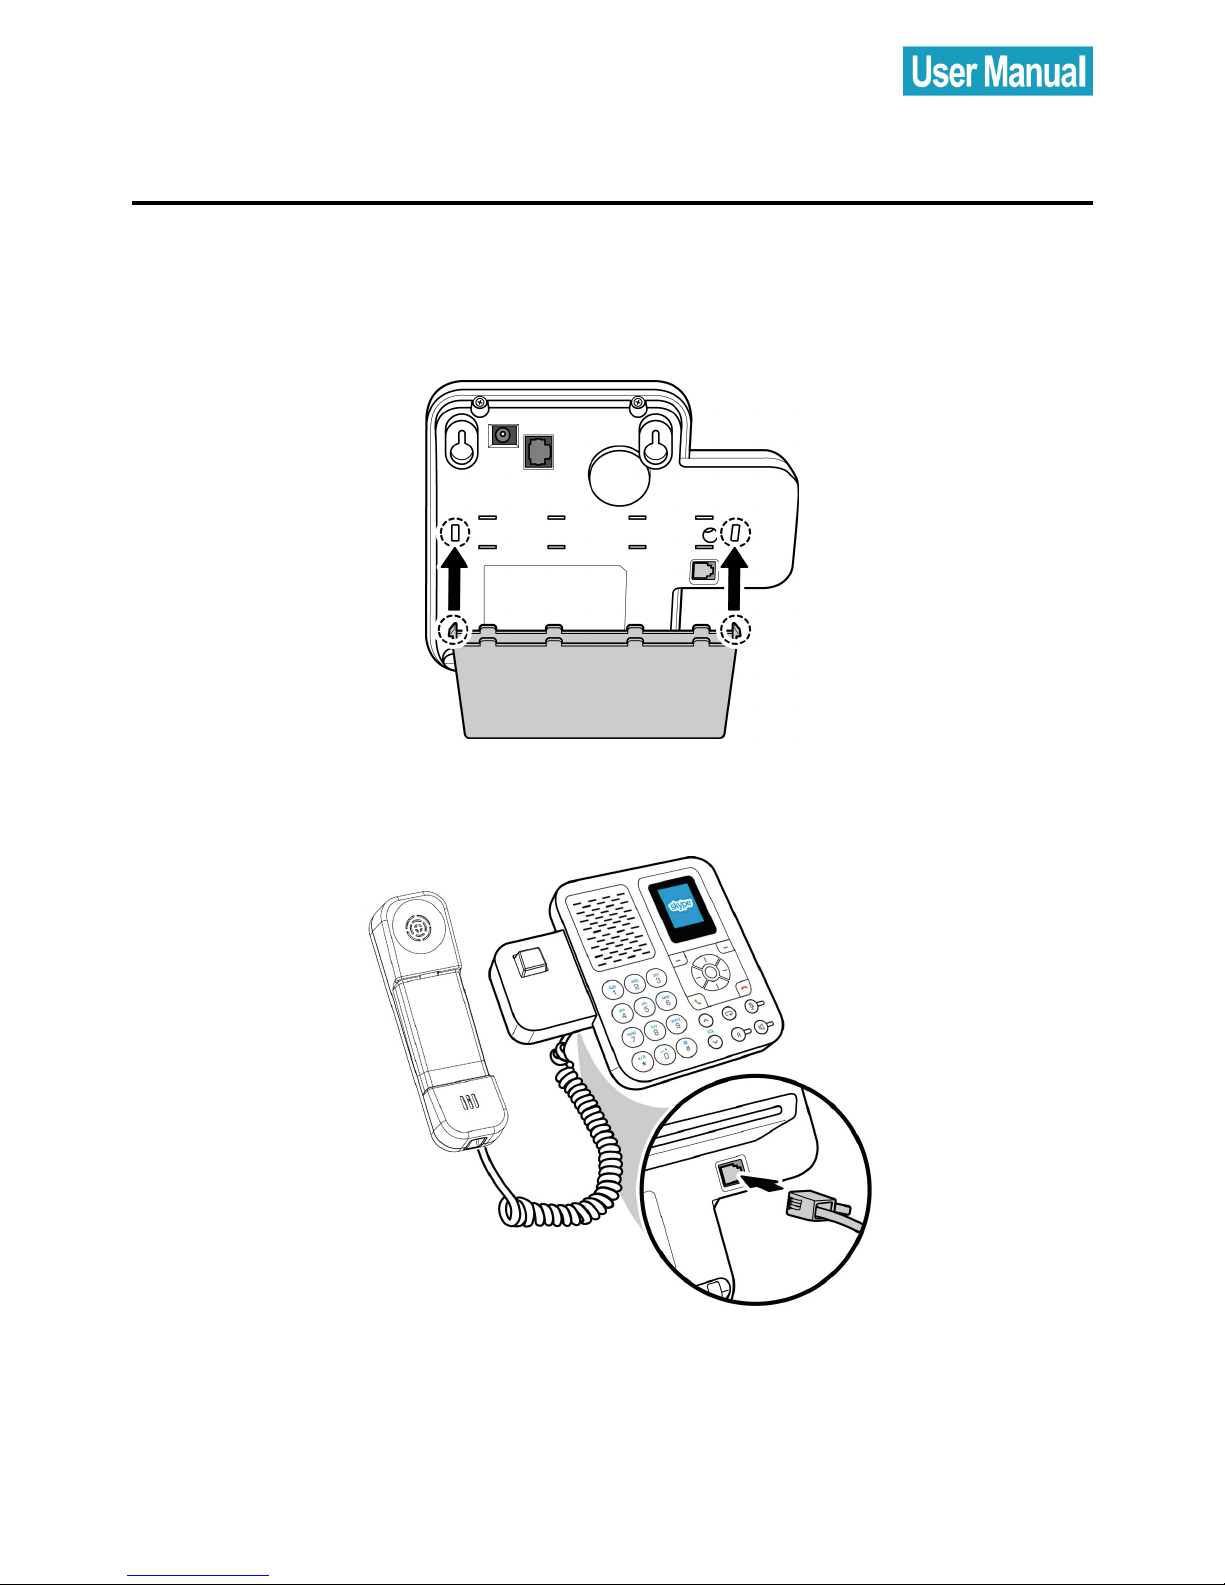
3. HARDWARE INSTALLATION
Follow the steps below to install the SP2014 Skype phone.
1. Mount the stand to the rear of the phone as shown.
2. Connect the handset to the handset (RJ9) jack as shown.
Page 11
11
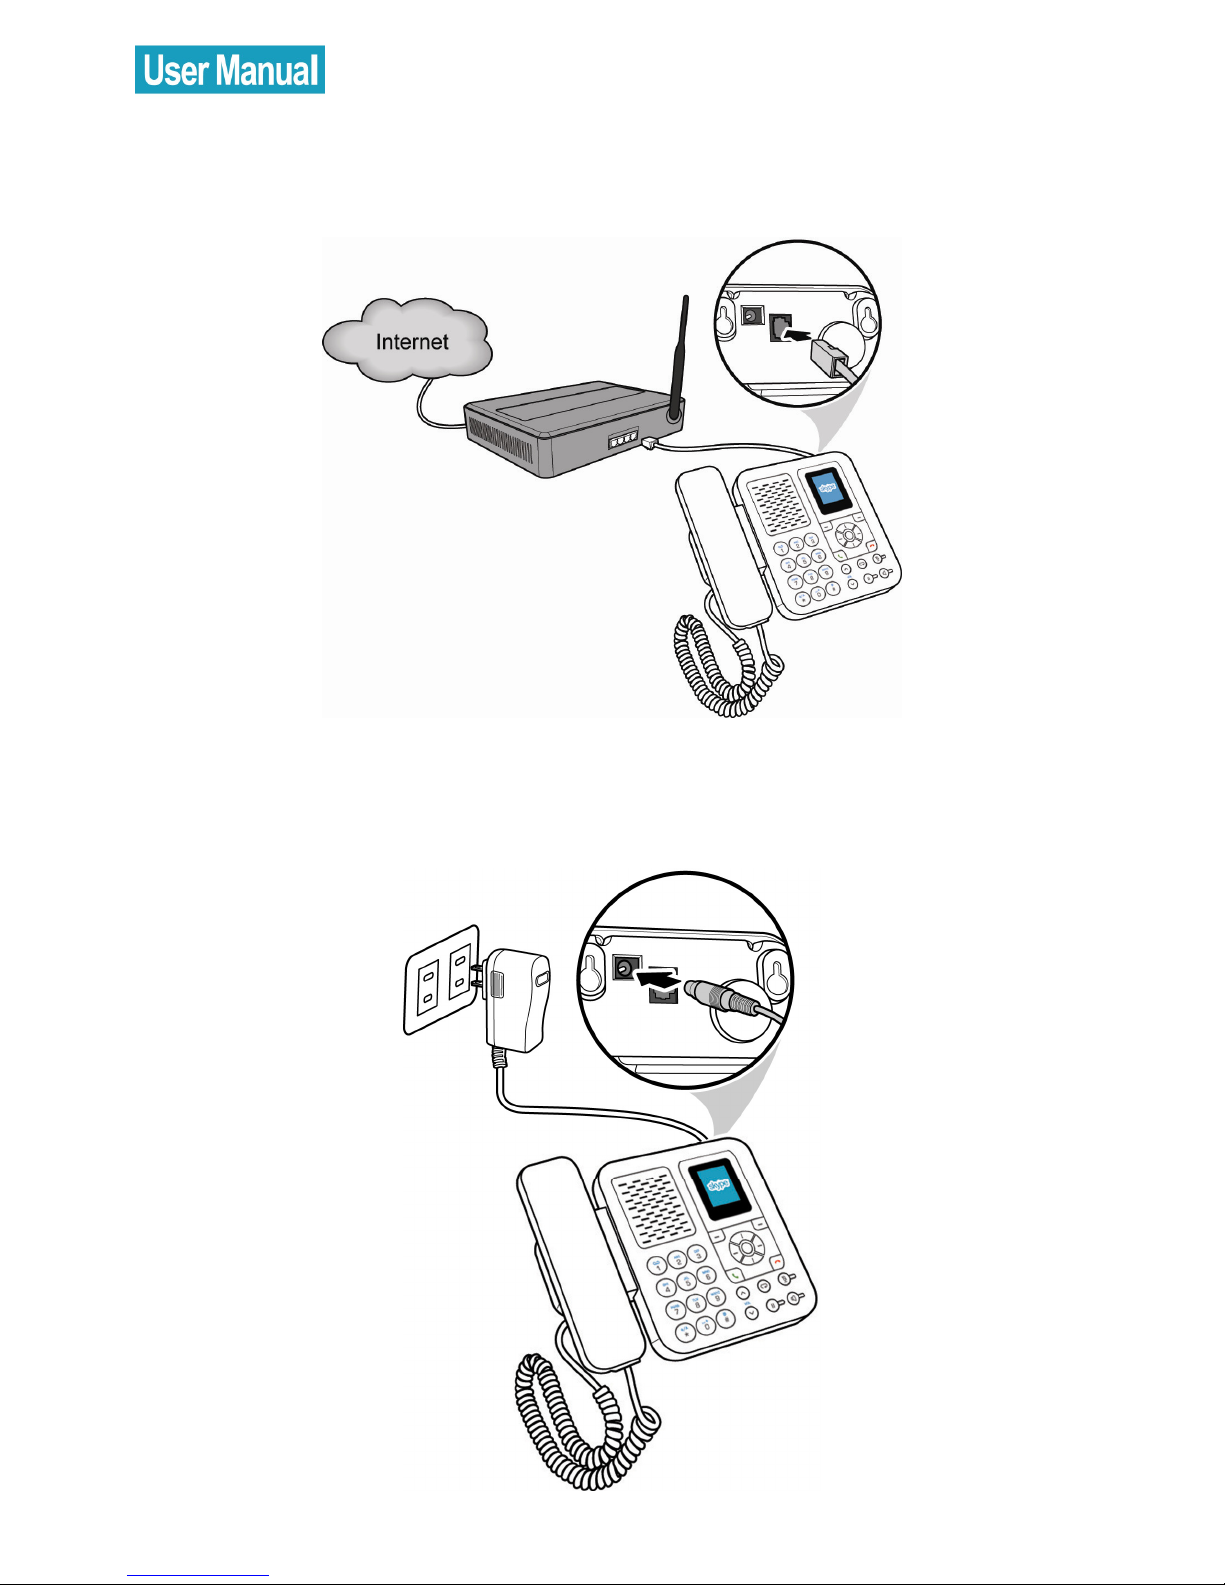
3. Connect one end of the supplied ethernet cable to the Ethernet
(RJ45) jack on the phone. Connect the other end to the network
router.
4. Connect one end of the power adapter to the phone’s power jack.
Plug the power adapter into a mains outlet.
Page 12

12
4. SETTING UP THE PHONE
When the phone is powered up for the first time, you need to select the
language, accept the agreement, sign in to Skype, or create a new
Skype account.
Select Language
Press the navigation button up or down to
select the language of the user interface.
Press the left soft button to select.
Accept Agreement
Press the navigation button down to read
the agreement.
Press the left soft button to accept.
Page 13
13
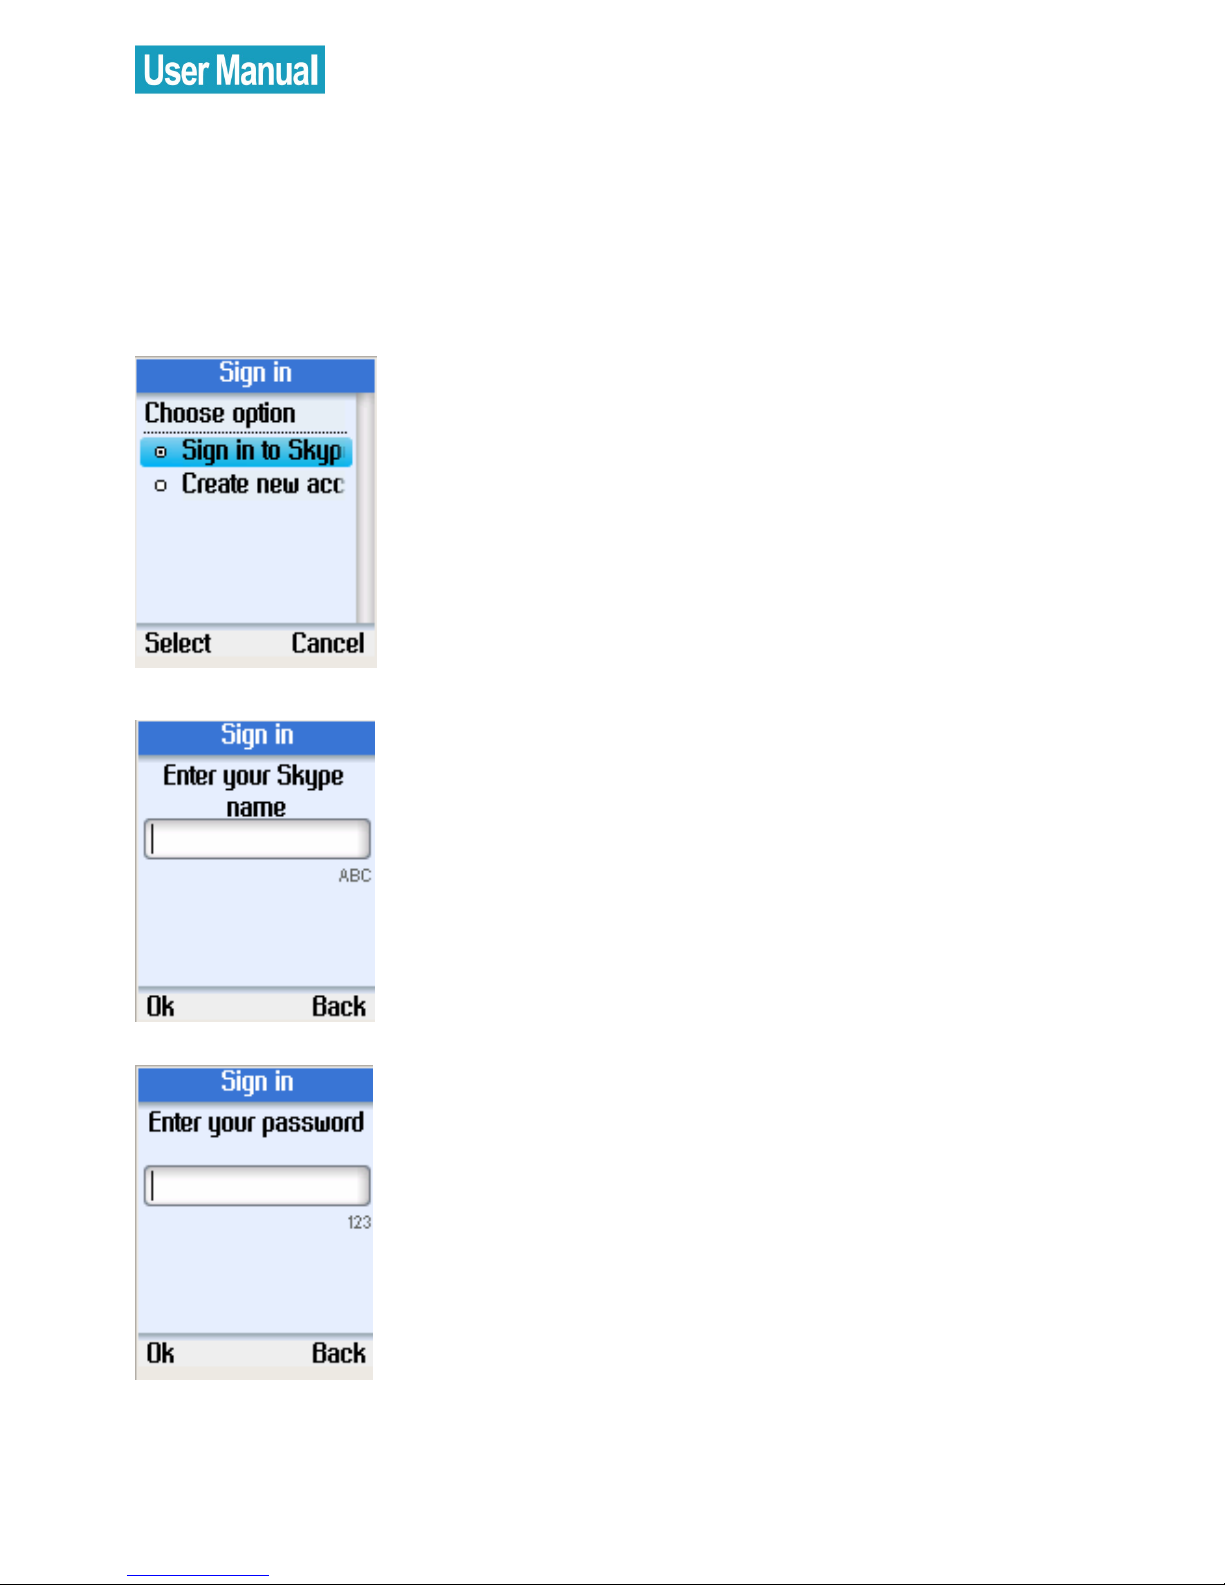
Sign in to Skype
You can configure your phone with an existing Skype account, or you
can register a new account (refer to Create New Account).
Login with an Existing Account
Use the navigation button to select Sign in
to Skype.
Press the left soft button to select.
Enter your Skype account name using the
alphanumeric keypad.
Press the left soft button to continue.
Enter your Skype password using the
alphanumeric keypad.
Press the left soft button to continue.
Page 14
14
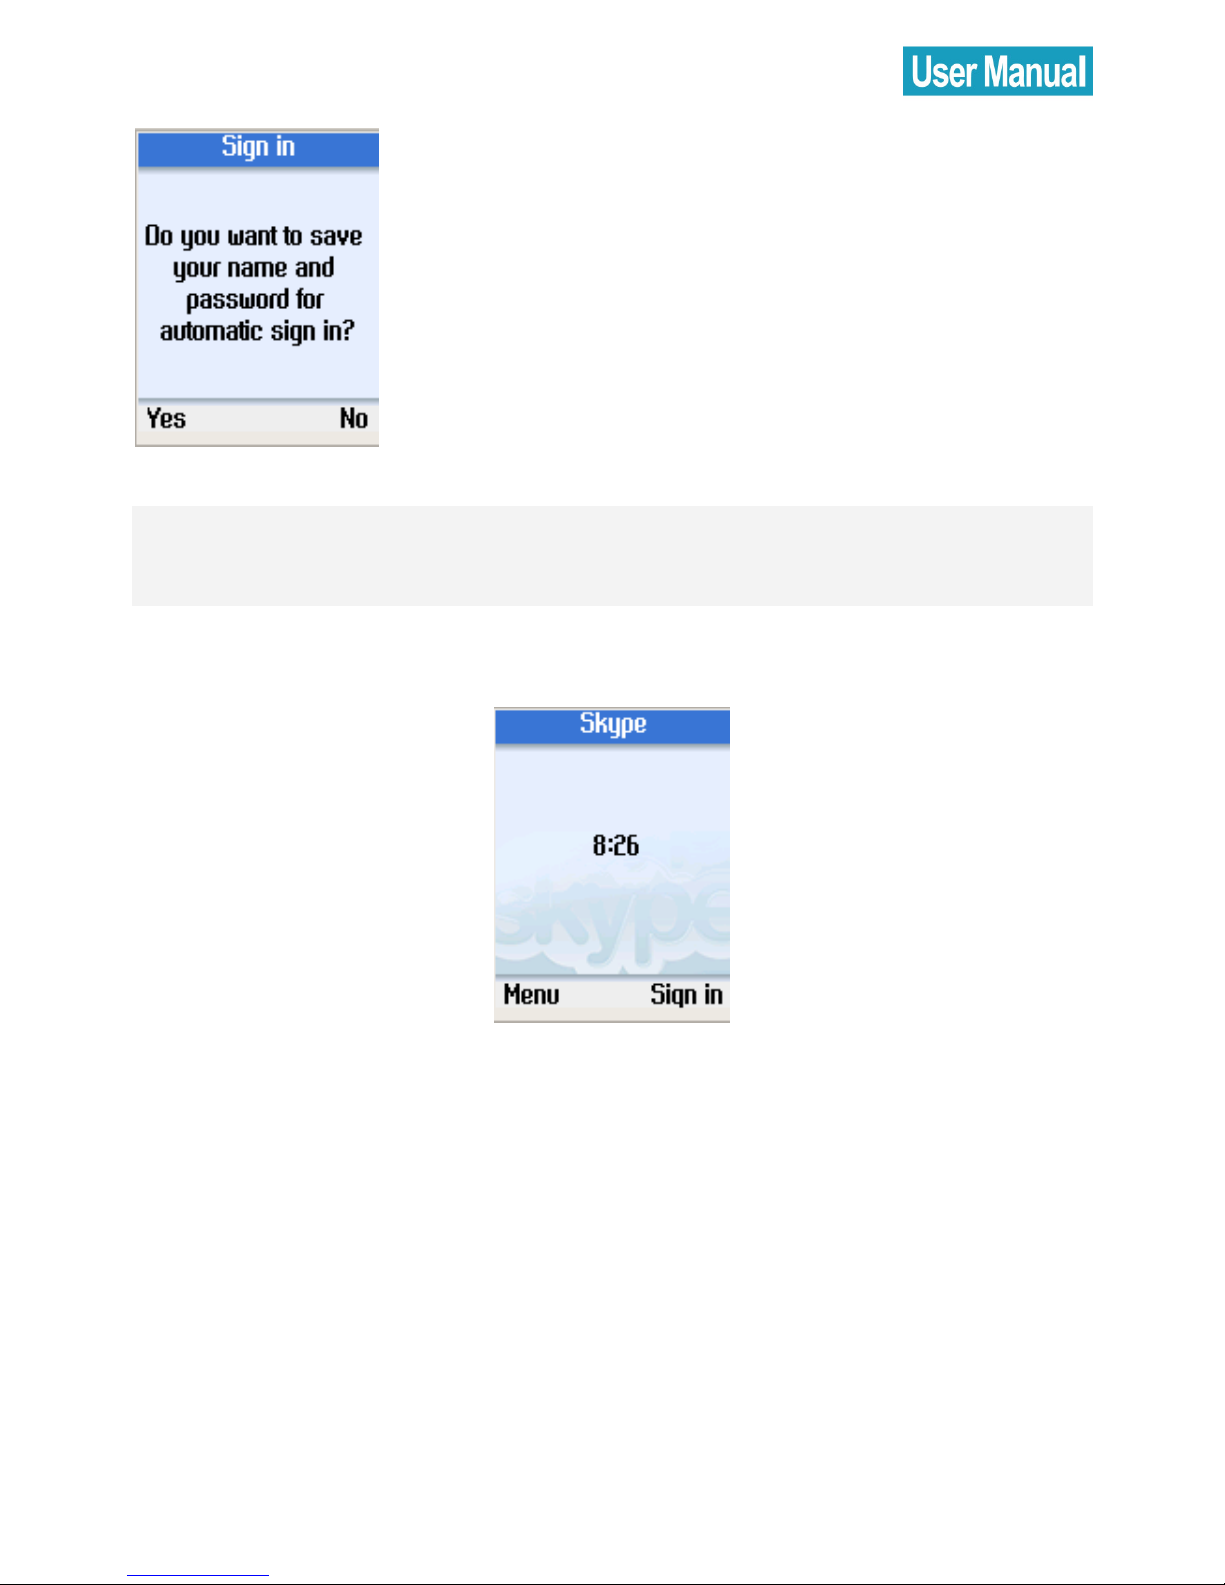
Press the left soft button to save the user
name and the password in the phone.
Press the right soft button if you don’t
want to save the password.
Note: When you select to save the user name and the password for
automatic sign in, the phone automatically signs in to the account you
entered every time it powers up.
1. After you select to save the account information for automatic sign
in, you return to the main screen.
2. If you select not to save the account information, you will go to the
Menu (refer to Section 6).
Page 15

15
Create New Account
Use the navigation button to select
Create new account.
Press the left soft button to select.
Enter a unique Skype user name of 6 to 32
characters using the alphanumeric
keypad.
Press the left soft button to continue.
Enter a password of 4 to 20 characters.
Press the left soft button to continue.
Page 16

16
Enter the password again.
Press the left soft button to continue.
Note: Please keep your Skype user name and
password safe.
5. MAIN SCREEN
The following screen is displayed after you log in to Skype successfully.
Press the left soft button to enter the Menu, or press the right soft button
to enter Contacts.
Page 17

17
6. MENU SCREEN
On the main display, press the left soft button to enter the Menu. Use
the navigation button to select options, and press the left soft button to
select.
Contacts: Browse your Skype contacts.
Refer to Section 7.
History: View your missed calls, incoming
and outgoing calls, voicemail, and
contact requests. Refer to Section 8.
Status: Change your Skype status (Offline,
Online, Skype Me, Away, Not Available,
Do Not Disturb, or Invisible). Refer to
Section 9.
Add contact: Add Skype users or
SkypeOut numbers to your contact list.
Refer to Add contact.
Search: Search for Skype users. Refer to
Section 10.
Services: Displays information about your
Skype credit balance, your SkypeIn
account, and your Skype Voicemail.
Refer to Section 11.
Settings: Change Time and Date, Tones,
Network settings, Call divert, Display
properties, etc. Refer to Section 12.
Page 18

18
7. CONTACTS
Your Skype contacts are stored in your Skype account. When you log in
with an existing Skype account, all your contacts will be automatically
downloaded to the contact list on the phone.
Call a Skype Contact
Use this option to call the selected contact.
From the main display, press the right soft
button to open the contacts list or press
the left soft button to enter the Menu and
select Contacts.
A list of your Skype contacts appears.
Press the left soft button to select Options.
Use the navigation button to select Call.
Press the left soft button to select.
Lift the handset and press
.
The call will be made.
To end the call, hang up the handset and
press .
Page 19

19
Notes:
If you do not lift the handset, the phone will automatically go to
handsfree mode.
You can also make calls without entering the Options menu.
Select a contact from your contact list and press to call.
Send Voicemail
Use this option to send a voicemail message to the selected contact.
From the main display, press the right soft
button to open the contacts list or enter
the Menu and select Contacts.
A list of your Skype contacts appears.
Press the left soft button to select Options.
Use the navigation button to select Send
Voicemail.
Press the left soft button to select.
Page 20

20
View Profile
Go to Contacts, use the navigation
button to select the contact whose profile
you want to view.
Press the left soft button to select Options.
Use the navigation button to select User
Profile.
Press the left soft button to select.
Use the navigation button to browse the
user information of the contact.
Page 21

21
Advanced Options
The advanced options menu enables you to rename, remove,
block/unblock, or add a contact.
Go to Contacts, use the navigation
button to select a contact to view.
Press the left soft button to select Options.
Use the navigation button to select
Advanced.
Press the left soft button to continue.
Use the navigation button to select
Advanced.
Press the left soft button to continue.
Page 22

22
Rename a Contact
Use the navigation button to select
Rename in Advanced options.
Press the left soft button to continue.
Enter a new name for the contact using
the alphanumeric keypad.
Press the left soft button to confirm.
Remove a Contact
Use the navigation button to select
Remove in Advanced options.
Press the left soft button to continue.
You can select to remove and block the
contact, or remove the contact only.
Page 23

23
Block/ Unblock a Contact
Use the navigation button to select
Block/ unblock in Advanced options.
Press the left soft button to continue.
You can select to block or unblock the
selected contact.
Request Contact Details
Use the navigation button to select
Request details in Advanced options.
Press the left soft button to continue.
You can select a contact and send a
text message as a request to the user to
view his/her status or profile.
Add a Contact
Use the navigation button to select Add
a contact in Advanced options
Press the left soft button to continue.
Page 24

24
Use the navigation button to select to
add a contact by Skype name or
SkypeOut number.
Press the left soft button to select.
To add a contact by Skype name, enter
the user name using the alphanumeric
keypad.
Press the left soft button to continue.
To add a contact by SkypeOut number,
enter the number using the
alphanumeric keypad.
Press the left soft button to continue.
Page 25

25
8. HISTORY
Press the left soft button to enter the
Menu.
Use the navigation button to select
History.
Press the left soft button to enter the
History menu.
Use the navigation button to select an
option, and then press the left soft button
to select.
The following options are available in the History menu.
Option Description
All calls View all calls
Missed calls View missed calls
Incoming calls View incoming calls
Outgoing calls View outgoing calls
Voicemails View voicemails
Contacts request View contacts request
Page 26

26
9. STATUS
Press the left soft button to enter the
Menu.
Use the navigation button to select Status.
Press the left soft button to enter the
Status menu.
You can change your Skype status, define
mood message, select the profile details
to be shown to other users, switch user, or
sign out Skype.
Page 27

27
Change Status
Use the navigation button to select
Change status.
Press the left soft button to continue.
Use the navigation button to select
Offline, Online, Skype me, Away, Not
available, Do not disturb, or Invisible.
Press the left soft button to select.
Page 28

28
Mood Message
You can enter a message about yourself to be displayed to all your
contacts.
Use the navigation button to select
Mood message.
Press the left soft button to continue.
Enter your mood message using the
alphanumeric keys.
Press the left soft button to confirm.
Page 29

29
Select My Profile
Select the details to be displayed to all your contacts and private
details that are not shown to others.
Select Details to be Shown
Use the navigation button to select
Details shown to all.
Press the left soft button to continue.
Use the navigation button to select an
item and press the left soft button to
continue.
You can select to shown Skype name, full
name, gender, birth date, country/
region, state/ province, city, language,
etc. to other contacts.
Page 30

30
Private Details
Use the navigation button to select
Private details.
Press the left soft button to continue.
Select the private details to be displayed
to your contacts.
Page 31

31
Switch User
Use the navigation button to select
Switch user.
Press the left soft button to continue.
Press the left soft button to save your
password on the device or the right soft
button not to save.
After signing out, enter a new Skype
user name or use the navigation button
to select an existing user on the list.
Press the left soft button to sign in.
Page 32

32
Sign out
Use the navigation button to select Sign
out.
Press the left soft button to continue.
Press the left soft button to confirm sign
out.
Page 33

33
10. SEARCH
You can search for a Skype contact by entering the name or e-mail
address of the Skype user.
Press the left soft button to enter the
Menu.
Use the navigation button to select
Search.
Press the left soft button to continue.
Enter the name or e-mail address using
the alphanumeric keypad.
All the matched results will be shown. If
more than one match is found, use the
navigation button to select the correct
contact.
Press the left soft button to continue.
Page 34

34
Use the navigation button to select Add
to contacts (add user to contact list),
View profile (view the user’s profile), Call
(call the user), or Search again (search
one more time).
Page 35

35
11. SERVICES
You can view your Skype credit balance, your SkypeIn account, and
Skype Voicemail. If the services are not active, or you need to buy extra
credit, go to www.skype.com for details.
Press the left soft button to enter the
Menu.
Use the navigation button to select
Services.
Press the left soft button to continue.
Use the navigation button to select
Skype Credit, SkypeIn, or Skype
Voicemail.
Page 36

36
12. SETTINGS
Press the left soft button to enter the
Menu.
Use the navigation button to select
Settings.
Press the left soft button to continue.
You can configure the general settings,
set call divert, change the date and time,
etc.
Page 37

37
General Settings
In the General settings menu, you can change the Skype password, set
automatic sign in, change language of user interface, update software,
or reset the phone.
Change Password
Use the navigation button to select
Change password.
Press the left soft button to continue.
Enter the old password using the
alphanumeric keypad.
Press the left soft button to continue.
Page 38

38
Enter a new password of 4 to 20
characters.
Press the left soft button to continue.
Enter the password again.
Press the left soft button to confirm.
Auto Sign in
You can select to sign in Skype automatically or let the phone prompt
for your username and password every time turn it on.
Use the navigation button to select Auto
sign in.
Press the left soft button to continue.
Page 39

39
Select automatic sign in or prompt for
password.
Press the left soft button to confirm.
Language
Use the navigation button to select
Language.
Press the left soft button to continue.
Use the navigation button to select the
language you require.
Press the left soft button to confirm.
Page 40

40
Software Updates
Use the navigation button to select
Software updates.
Press the left soft button to continue.
Use this option to update the software
automatically. To use this option, make
sure that you have checked for the
automatic software updates via
Settings> Advanced> Software updates.
Page 41

41
Reset
Use the navigation button to select Reset.
Press the left soft button to continue.
Select Reset all to reset all phone settings,
or select to reserve the network
configurations and reset other settings.
Page 42

42
Call Divert
In the Call Divert menu, you can choose if to divert all your calls to your
voicemail.
Call Forwarding
Use the navigation button to select Call
Forwarding.
Press the left soft button to continue.
Select Yes to forward unanswered calls to
a Skype name.
Press the left soft button to continue.
Page 43

43
Enter the Skype name using the
alphanumeric keypad.
Press the left soft button to confirm.
Forward to Voice Mail
Use the navigation button to select
Voicemail.
Press the left soft button to continue.
Select Yes to forward unanswered calls to
Skype voicemail.
Press the left soft button to continue.
Page 44

44
Set Welcome Message
In Call divert menu, use the navigation
button to select Welcome message.
Press the left soft button to continue.
Record your voice message.
Page 45

45
Privacy
In the Privacy menu, you can configure privacy settings for calls,
SkypeIn calls, and blocked users.
Set Allowed Calls
Use the navigation button to select Calls.
Press the left soft button to continue.
Select allow calls from anyone, only
contacts on your list, or specified
contacts.
Press the left soft button to confirm.
Page 46

46
SkypeIn Calls
Use the navigation button to select
SkypeIn Calls.
Press the left soft button to continue and
set the allowed SkypeIn calls.
Blocked Users
Use the navigation button to select
Blocked Users.
Press the left soft button to continue and
browse the information of the blocked
users.
Page 47

47
Tones Setting
In the Tones Setting menu, you can set the incoming call alert, ring tone,
ring volume, notification tones, and keypad tones.
Incoming Call Alert
Select Tones in Settings.
Press the left soft button to continue.
Use the navigation button to select
Incoming call alert.
Press the left soft button to continue.
Page 48

48
Select ringing (continuously), ring once,
beep one, or turn off the ringing tone.
Ring Tone
Use the navigation button to select Ring
tone.
Press the left soft button to continue.
There are three preset ring tones. Use the
navigation button to select your desired
ring tone.
Page 49

49
Ring Volume
Use the navigation button to select Ring
volume.
Press the left soft button to continue.
Use the navigation button to adjust the
volume level.
Press the left soft button to confirm.
Notification Tones
Use the navigation button to select
Notifications tones.
Press the left soft button to continue.
Page 50

50
Use the navigation button to select on or
off.
Set Keypad Tones
Use the navigation button to select
Keypad tones.
Press the left soft button to continue.
Use the navigation button to select on or
off.
Page 51

51
Time and Date
In the Time and Date menu, you can configure time, date, and time
zone.
Select Time and Date in the Settings menu.
Use the navigation button to select time, time zone,
daylight savings, time format, time separator, date, date
format, and date separator.
Press the left soft button to configure each setting.
Manage Blocked Users
Select Manage blocked users in the
Settings menu.
Press the left soft button to continue. You
can browse the information of the
blocked Skype contacts.
Page 52

52
Network
In the Network menu, you can configure the network connection type,
IP address, subnet mask, default gateway, and DNS information of the
phone.
Set Network Type
Select Network in Settings.
Press the left soft button to continue.
Select DHCP, Static IP, PPPoE, or PPPoE
Static IP for the network connection
method used by the phone.
Page 53

53
Unless you are using DHCP, you must
enter your IP address, subnet mask,
gateway, primary and secondary DNS
addresses.
Phone Settings
In the Phone settings menu, you can configure the brightness of the
phone display screen, and screen timeout settings.
Brightness
Use the navigation button to select
Brightness.
Press the left soft button to continue.
Page 54

54
Use the navigation button to adjust the
brightness level.
Timeout
Use the navigation button to select
Timeout.
Press the left soft button to continue.
Use the navigation button to select 1, 2,
3, or 5 min for screen timeout.
Page 55

55
Information
Select Information in Settings.
Press the left soft button to continue.
Page 56

56
Press the navigation button up and
down to view the information including
serial number of the phone, product ID,
software version, hardware version,
MAC address, and copyright.
Page 57

57
Advanced
In the Advanced settings menu, you can update software, and
configure network proxy and Skype ports.
Software Updates
Use the navigation button to select
Software updates.
Press the left soft button to continue.
Use this option to check for software
updates.
Page 58

58
Network Proxy
Use the navigation button to select
Network Proxy.
Press the left soft button to continue.
Configure the proxy type for your
phone. You can select No proxy, HTTPS,
or SOCKS5. When HTTPS or SOCKS5 is
selected, you can enter the host name
and port number, and select to enable
or disable the proxy authentication.
Page 59

59
Skype Ports
Use the navigation button to select
Skype ports.
Press the left soft button to continue.
Configure the port number for incoming
connections and the alternative port
numbers.
Page 60

60
Appendix A: Specification
I. VOICE PERFORMANCE
Handset Receiver
1. Impedance:150 Ohm +- 20%
2. Input Power: 0.01W / 0.02W (Min./ Max.)
Handsfree Speaker
1. Voice Coil Impedance: 25 Ohm +- 15%
2. Input Power 0.25W
Microphone
1. Sensitivity: -42 +- 2 dB
2. Output Impedance: 2.2 K Ohm
II. Recommended Distance of Handfree mode : 0.5~1.5M
III. Hardware Specification
10/100 Base-T Ethernet with auto MDIX (Full-Duplex)
1.8” LCD 160x128
Sample Rate: 8K
Acoustic Echo Canceller Enabled
Audio Frequency Range: 100Hz - 3400Hz
Network protocol:
DHCP, Static IP, PPPoE, PPPoE Static IP, DNS , TCP/UDP/IPV4
System Requirement:
Broadband Internet (xDSL/Cable), IP sharing Router/Gateway (internet
access device).
Page 61

61
NOTE:
This device complies with Part 15 of the FCC Rules. Operation is subject
to the following two conditions:
(1) This device may not cause harmful interference, and (2) this device
must accept any interference received, including interference that
may cause undesired operation.
 Loading...