

Page 1

Page 2

2 Copyright
Copyright
This documentation is protected by law. All rights, especially the right of
duplication, circulation, and translation, are reserved.
No part of this publication may be reproduced in the form of copies, microfilms
or other processes, or transmitted into a language used for machines,
especially data processing machines, without the express written consent of
the publisher.
All copyrights reserved.
All other product names are trademarks of the corresponding manufacturers.
Errors in and changes to the contents as well as program modifications
reserved.
Copyright © MAGIX AG, 1994 - 2011. All rights reserved.
MAGIX and MAGIX Website Maker are registered trademarks of MAGIX AG.
Other named product names may be registered trademarks of their respective
owners.
www.magix.com
Page 3

Preface 3
Preface
Those wishing to have a website of their own are confronted with a dizzying
array of offers from various providers, as well as complicated technical
requirements. Terms, such as HTML, PHP, MySQL, ASP, FTP etc. are a
source of anxiety for beginners and advanced users alike.
Moreover, most software solutions designed for creating homepages can only
be used offline, they create relatively static websites, and don't offer any
webspace or top-level domains for publication. And all this is before the
complicated process of creating websites has even begun.
This is where MAGIX Website Maker 5 comes into the picture. MAGIX Website
Maker 5 is an all-around package which provides you with everything you need
to know to create and maintain your personal website: Complete web hosting
including webspace and a real domain (www.desiredname.co.uk). No more
need to search for an appropriate webhosting provider or deal with
complicated data transfers via FTP. You don't have to take care of a thing:
Simply create your website and publish it with just one click. This makes
MAGIX Website Maker 5 an all-around carefree package for every webmaster.
This package impresses with ease-of-use and impressively animated flash
websites, which add an entertainment touch.
This manual explains how everything works. First, you will receive a short
introduction to MAGIX Website Maker 5 and its powerful features. After the
quick start, a thorough course follows to help you build great websites with
MAGIX Website Maker 5.
Have fun with MAGIX Website Maker 5,
The MAGIX team
www.magix.com
Page 4

4 Table of Contents
Table of Contents
Copyright 2
Preface 3
Customer Service 6
Before you start 8
Package contents 8
System requirements 8
Installation 9
Product activation 10
Introduction 11
What is MAGIX Website Maker 5? 11
Definition of concepts: Webpage or website? 11
Features 12
What's new in MAGIX Website Maker 5 13
Quick start 17
Start: Website Maker and Online World Control Center 17
3 steps to a professional website 19
Web hosting 23
Interface – The layout of MAGIX Website Maker 5 24
Website Maker and Control Center 24
Website Maker 25
Website Maker functions 35
Editing pages with the Page Manager 35
Filling your pages with the Object Manager 39
Scale, position, and mirror 47
Adjusting page contents with the Properties Manager 48
Link hidden page 50
Start website 51
Specify keywords for search engines 52
Export 52
Control Center functions 54
Control Center - Overview 54
Online Album 58
Website Maker 59
www.magix.com
Page 5

Table of Contents 5
Domain & Email 61
MAGIX services in detail 67
MAGIX Online Album 67
magix.info 68
MAGIX Magazine 69
MAGIX Online Print Service 69
Catooh – the Online Content Library 71
MAGIX Fotobuch 71
MAGIX Blog Service 72
Glossary 73
Index 77
www.magix.com
Page 6

6 Customer Service
Customer Service
If you experience any problems with your MAGIX software, please get in touch
with our support team:
http://support.magix.net
Here's how to contact the MAGIX Customer Service team and access the
following free offers:
FAQs (frequently asked questions) and general Tips & Tricks: You'll find the
solution to most problems you may encounter when using the program here.
Just in case you don't, there's also an email support form for your queries.
Email support form: You can use the special form to supply our support staff
with information about your system. This information is used to quickly and
competently solve whatever problem you may be experiencing. Simply fill it out
and send it off!
Support forum: You are not alone. Other users may have experienced similar
problems and might be able to help you.
Note: You will find the activation code on the cover of the installation disc of
MAGIX Website Maker 5.
Europe
Here you can find a summary of our technical support telephone numbers:
http://support.magix.net/phone/uk
Mail:
MAGIX Development Support
P.O. Box 20 09 14
01194 Dresden
Germany
North America
Here you can find a
http://support.magix.net/phone/us
summary of our technical support telephone numbers:
www.magix.com
Page 7

Mail:
MAGIX Customer Service
1105 Terminal Way #302
Reno, NV 89502
Please have the following information at hand:
Which MAGIX program are you using (version)?
Which operating system do you use?
What make is your graphics card and what screen resolution do you use?
How large is your RAM?
Customer Service 7
www.magix.com
Page 8

8 Before you start
Before you start
Package contents
Program disc: This disc contains the MAGIX Website Maker 5 installation
manager.
Printed manual: The printed manual contains all necessary information for a
quick start into the program.
Note: The complete documentation can be found in the Start Center of the
installed version of MAGIX Website Maker 5.
You can read it on your screen or print it. This requires the display program
"Foxit Reader", which is located in the program folder of
MAGIX Website Maker 5.
System requirements
Operating system:
Mac OS X requires Mac OS X v. 10.0 or later
Microsoft
®
Windows® XP | Vista® | Windows 7
Processor:
Mac: . PowerPC
recommended)
PC: Min. Intel
®
G3 500 MHz (Intel CoreTM Duo 1.33 GHz or quicker)
®
Pentium® II or AMD® Athlon® 450 MHz or higher
Computer general
Min. 512 MB (1 GB or higher)
CD installation only: CD-ROM drive, 50 MB free hard drive space
Monitor: Min. resolution 1024x600, 16 bit high color
Optional: 16 bit sound card
Internet access: Minimum DSL
®
Internet browser: Microsoft
Internet Explorer, version 6.0 or higher or Safari 4
or higher.
Further tested Internet browsers: Firefox 3.0, Opera 9
www.magix.com
Page 9

More: Adobe
®
FlashTM Player version 8.0 or higher (latest version is
Before you start 9
recommended), Java 2 Runtime environment version 1.4.2 or higher (both
available free of charge) and activated Javascript and Cookies (default settings)
Installation
Installation on your PC
Step 1
Insert the program disc into the CD/DVD drive of your PC. The installation
manager starts up automatically in Windows. If this doesn't happen:
Open the Windows Explorer and click the letter of the CD-ROM drive.
Now double-click on "Start.exe" to start the installation manager.
Step 2
To begin installing MAGIX Website Maker 5, click on INSTALL. The MAGIX
Website Maker 5 installation program will appear.
Hint:During installation you will be asked (in case there are multiple users on
your computer) if you would like to set up an administrator. The "Administrator
only" option restricts use of the program to the administrator only. The "All
users" option allows all users of the computer to use the program.
Simply follow the instructions on screen and then click on "Continue". All files
are now copied onto the hard drive.
Step 3
Once the installation is complete, confirm the message by pressing "Finish".
Now you can start the program at any time from the Windows "Start" menu.
Installation on netbooks
Due to their pared-down hardware outfit, netbooks don't have an optical drive.
Therefore the program should not be installed from a CD. Simply open product
activation (More Informationen can be found in the section "Product activation"
on page 10) to start using MAGIX Website Maker 5.
www.magix.com
Page 10

10 Before you start
Installation on MACs
Step 1
Insert the program disc into the CD/DVD drive of your computer. Macintosh
automatically displays the drive "Website Maker 4" on your desktop. Open it.
If the drive does not display "Website Maker 4" automatically, open the finder
and click on the CD/DVD drive.
Step 2
Move the Website Maker application into your program folder or to the link
with the same name located next to the Website Maker logo.
Double-click on the Website Maker application icon in your program folder to
start MAGIX Website Maker 5.
Tip: Start MAGIX Website Maker 5 faster by moving the Website Maker
application icon from your program folder into your doc.
Product activation
One-time activation of the product is required before you can use MAGIX
Website Maker 5. Please proceed as follows:
PC/MAC
Windows users start MAGIX Website Maker 5 from the Windows Start menu.
Macintosh-users open MAGIX Website Maker 5 from the program folder.
The clear Start Center of MAGIX Website Maker 5 opens. Click on the "Start
Website Maker" button in the Start Center to start the program. If your product
has not been activated yet, you can do that now.
Use the activation code on the package for activation. After successful
activation, you will receive the access data for starting MAGIX Website Maker
5.
Note: You will find the activation code on the cover of the installation disc of
MAGIX Website Maker 5.
www.magix.com
Page 11

Netbooks
Use the activation code on the package for activation. After successful
activation, you will receive the access data for starting MAGIX Website Maker
5.
Note: You will find the activation code on the leaflet in the MAGIX Website
Maker 5 packaging.
Open the web address specified in the product activation for netbooks and
follow the instructions.
Introduction 11
Introduction
What is MAGIX Website Maker 5?
MAGIX Website Maker 5 - the all-around package for dynamic Flash®
websites
The name says it all: MAGIX Website Maker 5 creates and publishes your
websites in professional quality. Quick, intuitive, and in high-quality design –
includes videos, photos, music, and animations, directly online.
In the Website Control Center, your online administration tool, you always have
an overview of your domains, emails, web space and user data. Whether from
home or on the move, you can access and edit MAGIX Website Maker 5 via
the Website Control Center from anywhere in the world (from an Internet café,
for instance).
Definition of concepts: Webpage or website?
A website is composed of many web pages. A website is characterized by a
uniform navigation and graphic design.
A web page (or an Internet page) is a document that can be called up by a
program (e.g. a web browser) from a web server and presented on a computer
screen. As a minimum, web pages consist of structured text and multimedia
elements like images or animations. Every page can be addressed at least
through one URL.
www.magix.com
Page 12

12 Introduction
Features
Flash® technology
Modern Flash
with short loading times.
Online software – no installation required
MAGIX Website Maker 5 doesn't need to be installed locally, since it functions
completely via the Internet. MAGIX Website Maker 5 is your control center for
creating your own site and managing its content online, anywhere in the world,
any time. With any up-to-date browser you can make changes from anywhere,
and thanks to automatic updates, you'll always be using the latest program
version.
Complete multimedia center
You can quickly upload, insert and present photos, videos, music or complete
slideshows. That means that you can upload your newest photos while you're
on holidays to show them to your friends.
Includes three web addresses (WSM4)
®
technology lets you create unique and animated web pages
Besides a real domain (www.yourdomain.com), you will also receive two
subdomains (http://your-name.magix.net) including 5,000 MB of storage
space. You can easily change to domains with the following endings: .COM,
.NET, .ORG, .BIZ, .INFO, .AT, .CH, .NL, .CO.UK, .ES, .IT and .FR.
Synchronize with your MAGIX Online Album
On the MAGIX Online Album you can compile your personal media as
interactive albums and present them online as slideshows, music, or video.
The MAGIX Online Album is available free of charge and can also be reached
via the Website Control Center.
If you have already added an Online Album, then you don't need to need to
upload media you want to use again for your website. Instead, you can directly
connect via "Magix -> Objects -> Online Album". You'll find all of your photos,
videos, and music files here (from your Online Album).
All you need for perfect Flash® websites!
Design templates: Numerous high-quality website templates in the latest
professional Flash
®
design with pre-finished, customizable subpages, start
pages, profile pages, photo pages, video pages, and much more.
www.magix.com
Page 13

Introduction 13
Text & text effects: Freely positionable text fields with fantastic fonts and
animated text effects can be added and individually formatted with ease.
Multimedia content: Select your favorite photos, spectacular slideshows,
videos and an online video player with your own background music, or
integrate it all as an online music player with playlists.
Decorative elements: Attractive design objects, plenty of vector shapes,
background images, buttons, and much more offer more possibilities for
designing unique websites than ever.
Animation objects: Large selection of dynamic, impressive animation objects
for breathtaking, moving websites.
Links: Easily add links to your own or external websites.
Top extras: Enhance your website with a visitor counter, guest book, contact
form, and many other useful extras.
Export function: Conveniently add individual components of your website
(e.g. video player, slideshow, online music player) or even the entire website to
external sites as an embedded website.
What's new in MAGIX Website Maker 5
Your domain name of choice
MAGIX Website Maker 5, the all-around package, includes three domains: One
personal top-level domain (www.desiredname.com), two subdomains, five
email addresses and 5,000 MB of web space. Get your own real domain
today!
Add Google Static Map
Now you can add a static image from Google Maps to your website (view page
45). This allows you to quickly enter destina
tions in a map, making it easier to
inform your website's visitors about a certain location.
Link to Facebook & Twitter
After publishing your website, you can make it more known by leaving
messages on Twitter and Facebook.
Create animated Flash® widgets
Create animated Flash widgets for external HTML websites such as Ebay and
MySpace with the Flash Widget Maker (view page 56). You'll find it in your
Control Center under "Overview".
www.magix.com
Page 14
14 Introduction
Information: Widgets are small applications for displaying or playing back
different files. Widgets are no independent applications, but are embedded into
websites, for example.
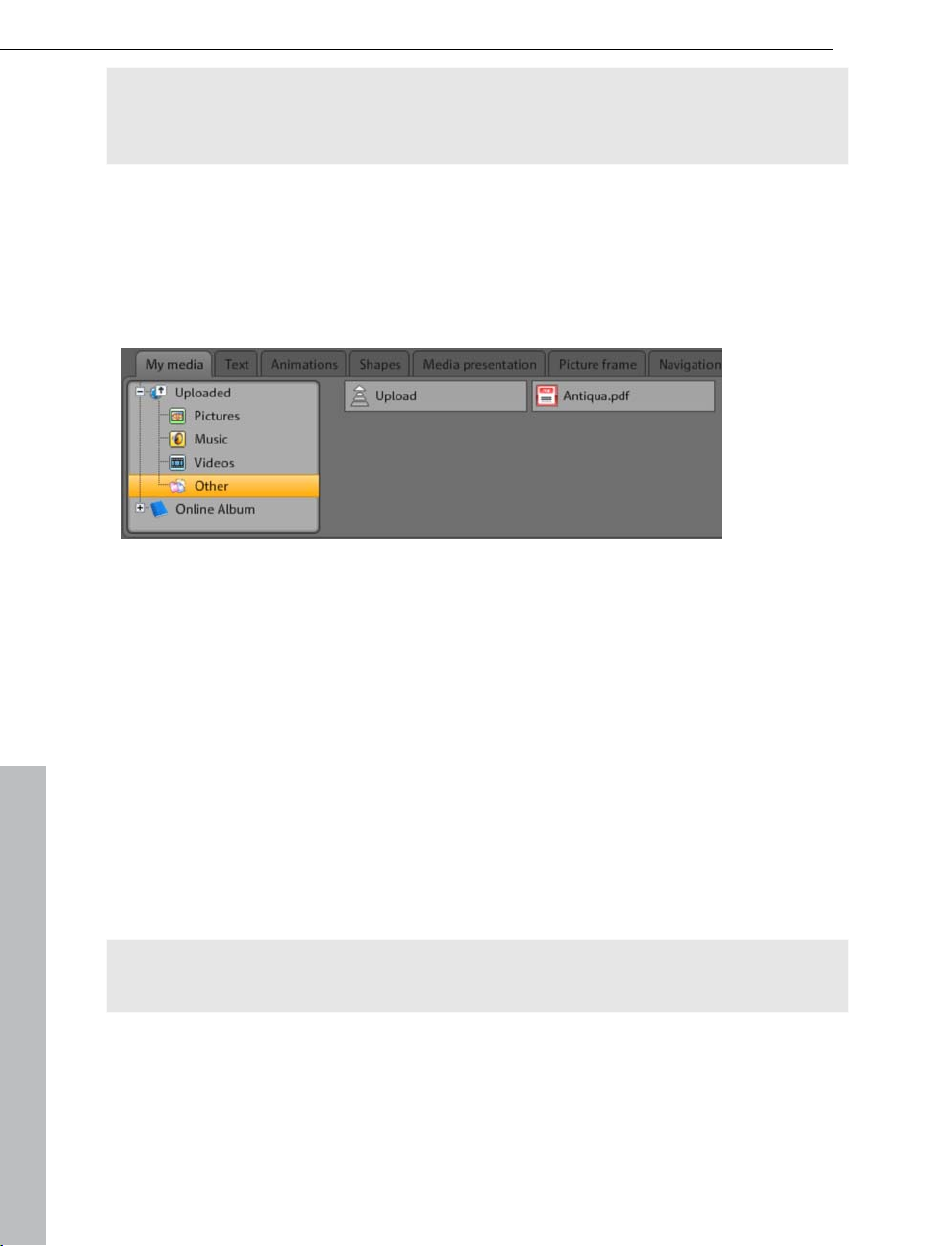
Upload and play animated GIFs
MAGIX Website Maker 5 now enables you to load and display animated GIFs
on your website. You'll find all Gifs that are available as templates in the Object
Manager under "My media > Uploaded > Other". Other Gifs can be made
available via "Uploaded".
Interactive photo & video gallery with impressive effects
Enrich your website now with the new interactive photo & video gallery! Finally,
you can present your photos & videos as clearly laid-out galleries with
enlarging effects (lightbox) or conventionally in a new browser window. Your
visitors will love it!
This is how it works:
Add an empty gallery obje
ct into the workspace of Website Maker via drag &
drop. Gallery objects can be found in the Object Manager under "Media
presentation". Fill the gallery object with your photos, videos, or even complete
online albums. You can specify features like order, alignment, and size of the
media as well as enlargement effects (lightbox or popup) via "Settings" in the
Properties Manager.
Tip: You can also drag an online album onto your website and then select
whether it should be displayed as a media player or gallery.
www.magix.com
Page 15
Introduction 15
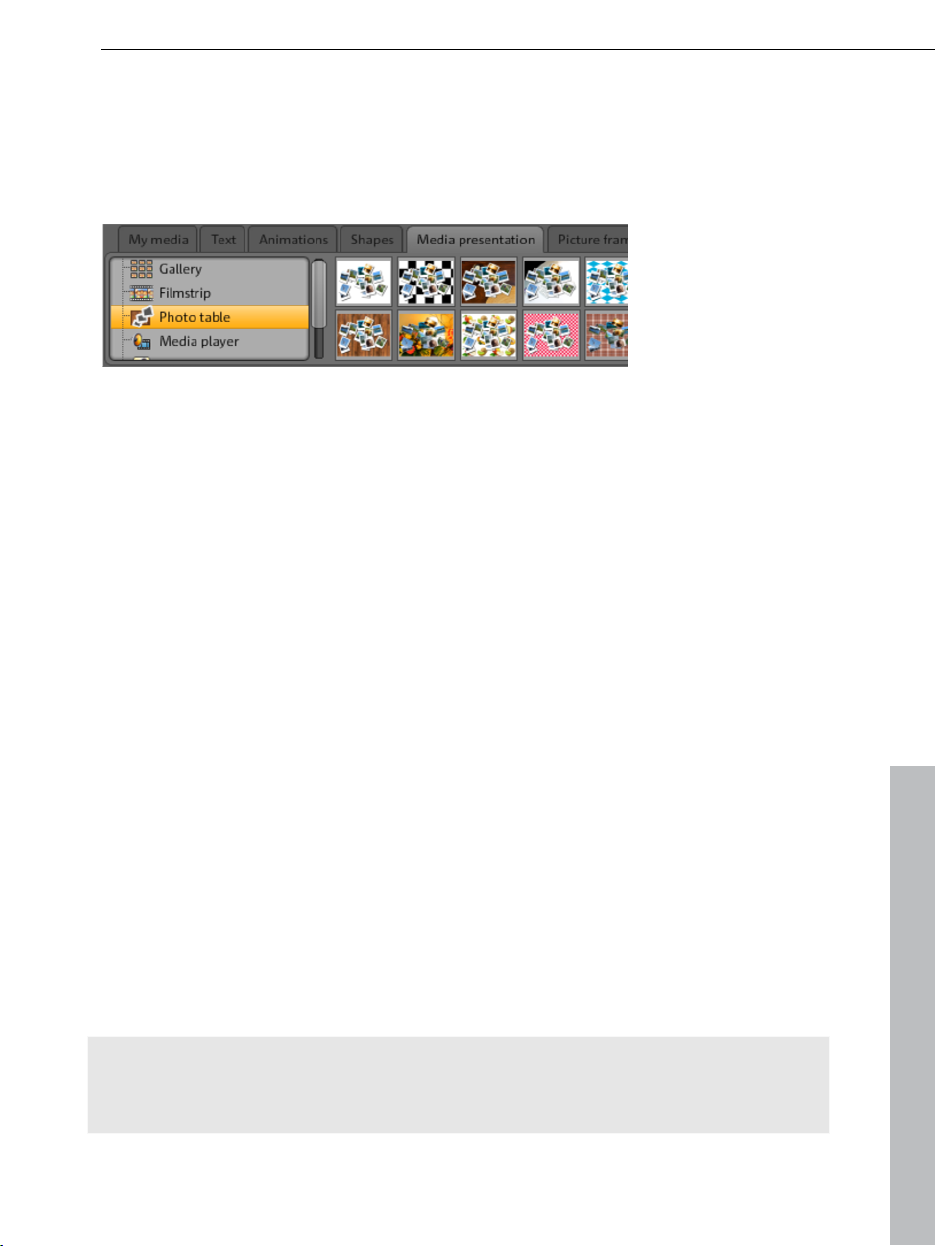
Photos presented as filmstrips or photo tables
To add some spice to your photo presentations, you can add your photos to
filmstrip templates or photo tables and present them in a creative way. You'll
find the templates in the Object Manager under "Media presentation". If you
hold the mouse over a template, a preview and the button "Insert" will appear.
Create your own buttons
Buttons that can be embedded into your website are available in the Object
Manager under "Extras". Click on "Insert" to add the button template to the
current page. Now you can edit and move it freely. Click on the button's text to
access the text level where you can customize it.
Table templates for precise text management
Designing tables is no longer a problem thanks to the template included in
MAGIX Website Maker 5 that you can adjust freely to meet your needs. The
number of rows and columns, the table's total width, alignment of the
individual text boxes, etc. can be customized in the Properties Manager. The
template can be found in the Object Manager under "Text".
The new, extra-fast multi-file upload function
Now MAGIX
Website Maker 5 has a new, easier-to-use, and quicker file upload
function. Starting now, individual files, multiple files, and even different file
formats may be uploaded in a single process to your Online World's web
storage. It couldn't be any quicker, safer, or more practical.
It's this easy:
Start MAGIX Website Maker 5 and open the Object Manager. Now click on
"Upload". Use the "Select files" option to select media from your hard drive
and load them into your webspace.
Tip: To add only selected files to the upload list, hold the Ctrl key down while
you are selecting files. To upload all files of a folder, select the first file while
holding the Shift key and click on the last file.
www.magix.com
Page 16

16 Introduction
After the upload has been completed, the corresponding web storage folder in
the Object Manager will open. Simply insert files into your website by selecting
the corresponding file and using drag & drop to add it to the workspace.
Alternatively, select the file and click the "Add“ button.
36 great visitor counters for your website
We have increased the number of available website visitor counters. Thanks to
36 new visitor counters you can share the number of visitors on your website.
Of course, you can change the counter's design any time.
Tip: Now you can also adjust the number displayed in the counter manually.
Select the visitor counter on your website and open the properties manager.
Use "Settings" to enter the desired number of visitors.
FTP access to your webspace
Your MAGIX Website Maker 5 website is safely located on the MAGIX server. If
you wish to place additional pages or files online, use the additional FTP
access. Log in on www.magix-online.com and use the link "Web hosting via
FTP" provided via "Online storage".
www.magix.com
Page 17

Quick start 17
Quick start
Start: Website Maker and Online World Control Center
After successfully activating the product, you will receive your login data
(access link, user name and password) via email, and then you're ready to get
started. With this data and an Internet connection, you can work from home or
from anywhere in the world using MAGIX Website Maker 5, making it easy to
upload new material (holiday photos, etc. from an Internet café).
To start MAGIX Website Maker 5 there are three options:
Click on the link in the email containing your login details.
Type (or copy) the link into your browser's address bar and press the "Enter"
key.
Select the MAGIX Website Maker 5 entry from the "Start" menu of your
computer.
This should launch the login window for you to log in using your email address
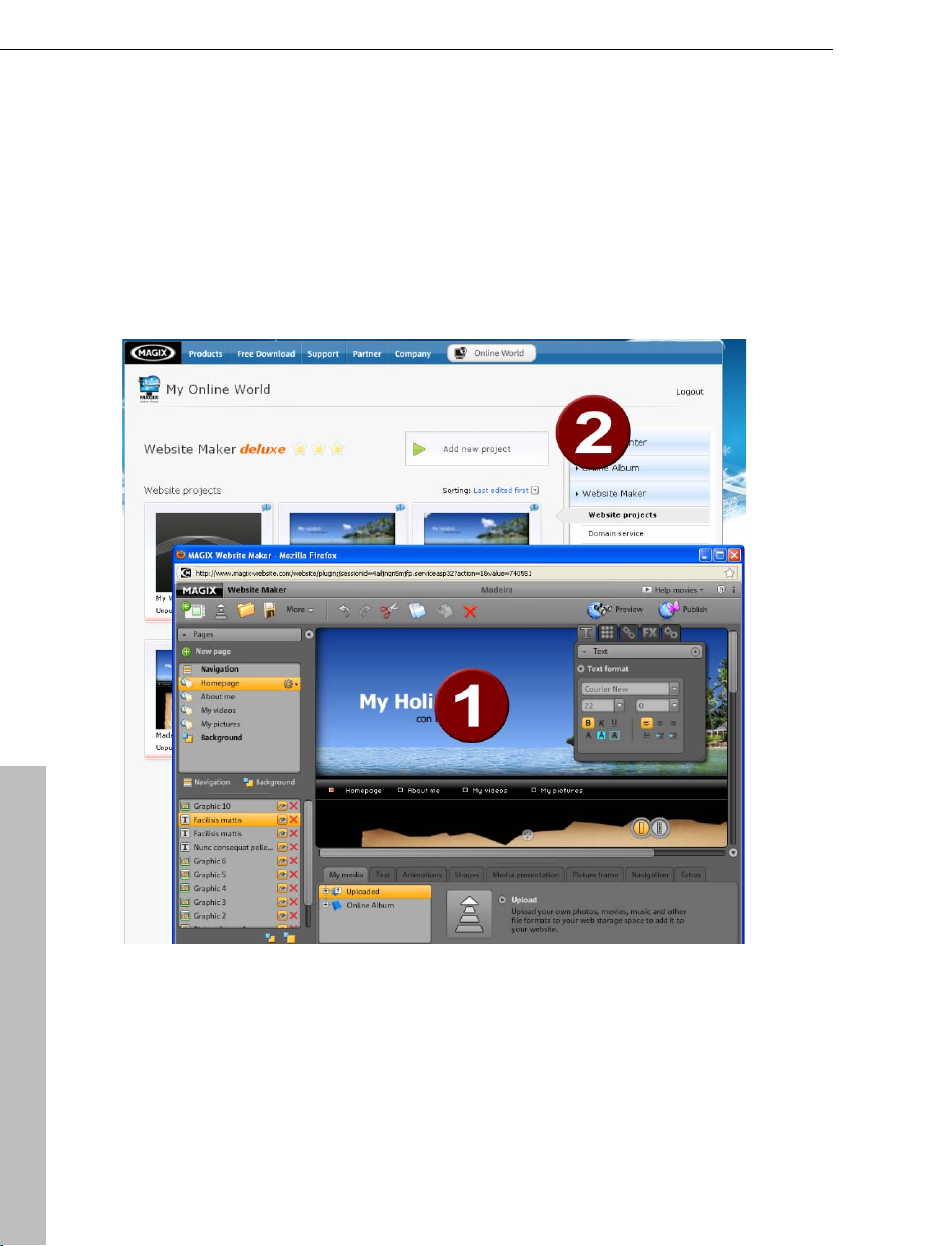
and user name. Following this, two webpages will be opened:
In the background of your browser, you can see the Online World Control
Center
Website Maker is in the foreground
www.magix.com
Page 18

18 Quick start
It
might look like this in your browser:
1
2
Note: If you start MAGIX Website Maker 5 via the "Start" menu on your
computer, then you will load both websites individually.
Website Maker is your tool for creating and editing your own online presence.
The Control Center is the command center of your website. Expand storage
The browser window for Website Maker
The browser window for the Online World Control Center
Build start and subpages, create a clear overview, develop the design, text,
images and multimedia objects, upload your own photos, music, or videos,
optimize it all for search engines, and much more.
for your website, send emails, and manage your Internet addresses (domains).
You will also find the address of your first website that is automatically created
as http://your-name.magix.net/website.
www.magix.com
Page 19
Quick start 19
3 steps to a professional website
When you launch MAGIX Website Maker 5 for the first time, you can
immediately create a website in three quick steps.
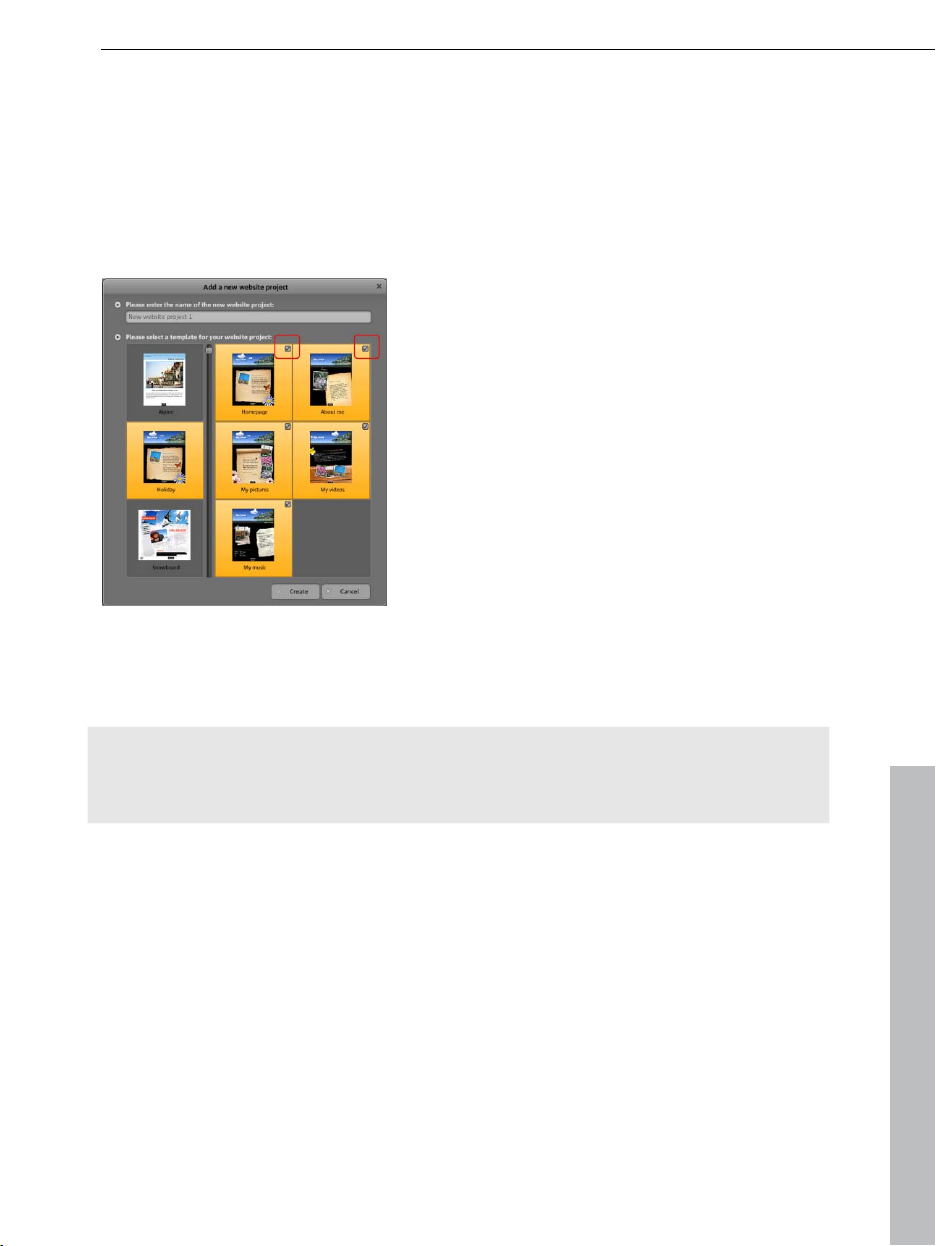
Step 1: Select layout
The first step is to select the layout for your
website from several professional designs.
For each layout you also get a series of
suitable subpages. These are listed to the
right.
If there are some individual pages which you
don't need, then you can remove them with
a click on the check boxes.
Give your website a logical name. Every website you add can be accessed
again via "Open" in the main menu and edited as desire. You can save several
website templates with different subpages and publish them as required.
Note: The website
name has nothing to do with the title of your website as it is
displayed when you access it online. This title is entered by you via "Settings
-> Text in the title bar of the web browser".
Step 2: Edit pages
Step 2 lets you customize your webpages to meet your exact requirements
and enrich everything with your own content (e.g. photos, videos, music, text,
effects, animations, etc.), since the templates are filled with example content to
begin with.
www.magix.com
Page 20

20 Quick start
To do this, go to the Functions (view page
30) section located to the left and select
"Pages"
to access the website that you
would like to edit.
Tip: You can rename each page by
double-clicking the page name.
These names also appear in the main
navigation.
In the page list you will see a list of all of
the individual elements of the page, which
you can hide or completely delete.
To the right, you can see the website with
all of the objects in the workspace, and
they can all be activated and edited by
clicking on them.
Beneath the workspace you'll see an overview of all of the objects that can be
integrated into you website. These include text elements, animations, and
shapes etc.
Editing existing objects
The individual template sites are already provided with a number of elements
like images and text. The Latin "filler" text has no meaning. It only illustrates
where text can be placed and how it would look in this design.
Every object you select in the object list is automatically selected in the work
space. In the workspace, you can customize the selected object or select a
different object.
There are a number of ways that you can adjust the objects on the page:
Change text by clicking the text field, deleting the Latin text, and then entering
whatever you want.
www.magix.com
Page 21
De
lete objects by selecting the corresponding object and pressing "Del" on
Quick start 21
the keyboard. Delete objects by selecting them from the object list below and
clicking the red "X" (delete).
Every object can be moved simply by clicking it and dragging it into position.
Use the handles (arrows) on the corners of objects to change the size of each
object.
Tip: By pressing the "Shift" key while changing the object's size, the page ratio
can be locked, i.e. the object's width/length ratio will remain intact.
Loading new objects
Of course, you won't want to publish your website with the objects we have
provided as examples – your own images, photos, videos, music, and also
your own visitor counter and other extras can be integrated easily.
Loading your own objects (photos, videos, music) to your website:
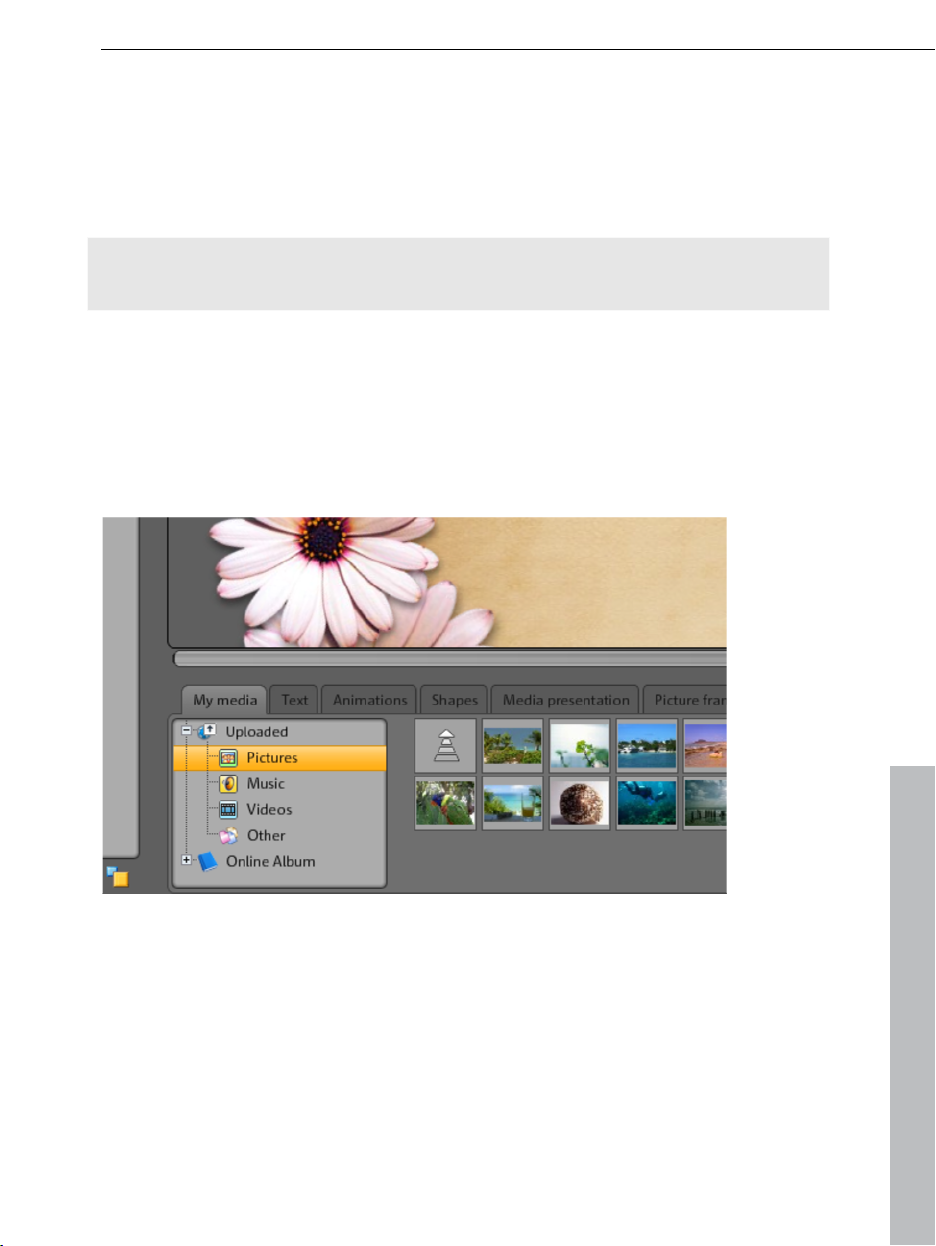
1. Click on "My media" located beneath the workspace and select the
category "Uploaded".
2. Open the respective category (e.g. "Images").
3. Click the arrow button to upload, and then select the method which you
would like to use to upload.
4. Select the file(s) to be uploaded in the file selection dialog.
5. Drag the respective file with the mouse button pressed from the overview to
your website on the right, and place it over the image you would like to
replace.
www.magix.com
Page 22
22 Quick start
New
text objects can be added in the following way:
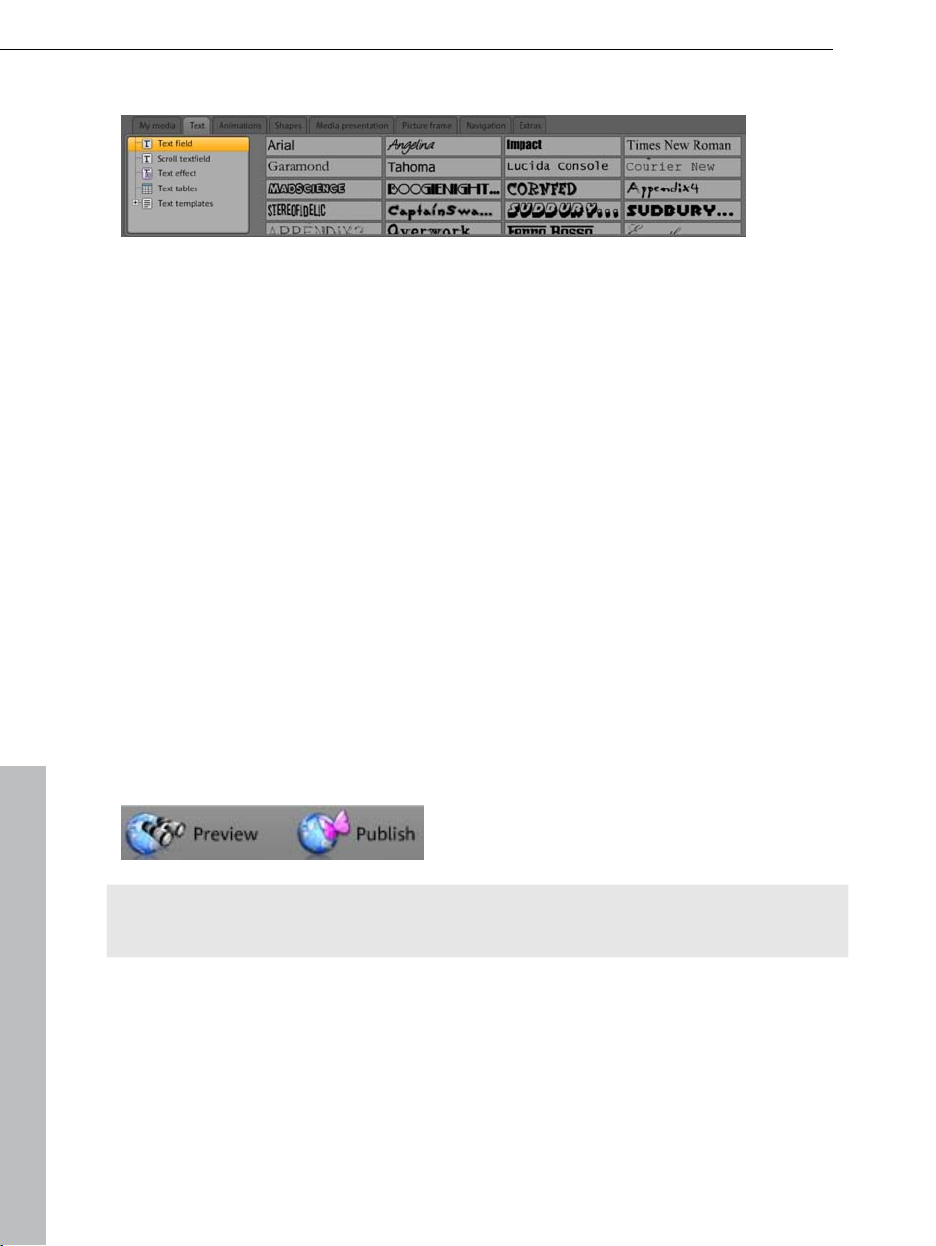
1. Click on "Text" located beneath the workspace and open the category "Text
box". A preview list appears in the overview with possible fonts.
2. Select a font of your choice by clicking it.
3. Drag this text box onto the workspace by pressing the mouse button.
4. Click on the text box and enter your text.
In the same way, you can load all of the other elements and objects in the
object manager.
Open the respective category (My Media, text, animations, shapes,
decoration, picture frames, navigation, extras).
Click on a category to open its preview list.
Select using the preview list, and then drag the object of your choice to the
workspace with the mouse button pressed.
It's best to open the categories in the object manager and have a look at
everything which is available to you there.
Preview
Once all of your adjustments have been made, you can preview your website.
Some objects like animations, text effects, slideshows, or videos are not
shown in the workspace, but rather only in the preview.
Tip: Click on the preview often while working on your project to be able to get
a better idea of how well your work matches what you have planned.
www.magix.com
Page 23

Quick start 23
Step 3: Publish website
If you are satisfied with the results you see in the preview and would like to
continue by putting your website online, then simply click "Publish" to finish!
Now you and anyone else online can view your homepage from anywhere, any
time at http://your-name.magix.net/website/.
Web hosting
To transfer the files of your website to MAGIX, you need an FTP software
(available for free online). Most website creation programs have an integrated
FTP function. Use their program help (F1) to find out more.
To use FTP, you require the address of the FTP server and your Online World
login details:
The address of the MAGIX FTP server is: ftp.magix-online.com
Your login details are the email address registered with MAGIX (often called
user name) and the password you selected.
As
soon as your website has been transferred to MAGIX successfully via FTP,
you can open it via your Online World web address
http://yourname.magix.net/public. Alternatively, you may register (view page
62) real domains (for example, www.desiredname.com) in
the Online World at
any time.
More information
http://www.magix-online.com/de/hilfe__support/webhosting
.1836.html can be
found in the online FAQ's at magix-online.com.
www.magix.com
Page 24
24 Interface – The layout of MAGIX Website Maker 5
Interface – The layout of MAGIX Website Maker 5
This chapter will provide you with an overview of the areas and key functions
available in MAGIX Website Maker 5 and where to find them.
Website Maker and Control Center
1
The browser
content here.
2
The browser window for the Website Control Center; manage your website
here.
Website Maker is your tool for creating and editing your own online presence.
Build the start and subpages, create a clear overview, develop the design, text,
window for Website Maker; fill up your website with your own
www.magix.com
Page 25

Interface – The layout of MAGIX Website Maker 5 25
images and
multimedia objects, upload your own images, music, or videos,
optimize it all for search engines, and much more...
The Website Control Center is the command center of your website. Expand
storage space for your website, send emails (the Website Maker deluxe
package includes a domain + 5 inboxes), and manage your Internet addresses
(domains). You will also find the address of your first website that is
automatically created as http://your-name.magix.net.
Website Maker
Website Maker helps you edit the contents of your future website.
Click "More" to open the Menu (view page 27).
Toolbar (view page 25) with all major functions for quick editing.
The "Functions" area with all pages (view page 30) and integrated
objects.
The workspace (view page 30) displays the web page you are currently
working on.
Object Manager (view page 32) to fill your website with content.
www.magix.com
Page 26

26 Interface – The layout of MAGIX Website Maker 5
Toolbar
Add a new website project: MAGIX Website Maker 5 lets you create up to 99
website projects.
Upload media from the hard disk: Opens a dialog where you can load files
into the Media Manager to embed in your website. The uploaded files are
organized into different categories in the Media Manager under "Uploaded".
Open a saved website project: MAGIX Website Maker 5 enables you to
manage multiple website projects. Use this function to load one of your
existing website projects.
Save the current website project: You can create and save multiple website
projects. Select this menu item to give the current website a name and to save
it.
More: (view page 27) Opens the menu for Website
Maker's main function.
Undo: Click here to undo the last change you made in Website Maker.
Redo: If you want to restore the last action you undid, then click here.
Cut: The selected object is cut out. If desired, you can add it to a different
page.
Copy: If you selected an object, you can now copy it.
Insert: Inserts
the object from the clipboard. (You need to have used the
"Copy" function beforehand.)
Delete: Deletes a selected object.
Preview & publish
The "Preview" button to the top right shows you a view of your website the
way it would look online.
www.magix.com
Page 27

Interface – The layout of MAGIX Website Maker 5 27
"P
ish" puts your website online the way you have currently designed it.
ubl
Now you and anyone else online can view your homepage from anywher
time at http://your-name.magix.net/website/.
Menu
You can open Website Maker's menu via the "More" button.
e, any
New website project: MAGIX Website Maker 5 lets you create up to 99
website projects.
Upload: Opens a dialog where you can load files into the Media Manager to
embed them in your website. The uploaded files are organized into differe nt
categories in the Media Manager under "Uploaded".
Open...: MAGIX Website Maker 5 enables you to manage multiple website
projects. Use this function to load one o
f your existing website projects.
Save as: You can add multiple website projects and save them according to
how you would
like to use them online. Select this menu item to give the
current website a name and to save it.
Delete: Deletes the current website project. Deleting is final and data cannot
be recovered.
www.magix.com
Page 28

28 Interface – The layout of MAGIX Website Maker 5
Note: Your online domain continues to exist even after you delete the website
in Website Maker. It will be overwritten once you upload a new website.
Export website...: This function (view page 52) makes it possible to embed th
website project you created in any HTML files, for example, if you already ow
e
n
a domain and would like to display the website from that location, too.
Note! In case you are using a pop-up blocker, or if your browser is blocking
pop-ups, then you will need to deactivate this function for the page which
displays MAGIX Website Maker 5. The correct address is
"http://magix-website.com".
Preview: Launch a preview of the currently loaded website project with a click.
You can now see all of the pages as they would look like online.
Publish: Use
this option to publish the current website online.
All pages can
then be opened via your web address.
Settings: You can set your website's title, page size, positionin
g, background
color, and much more in the website settings (view page 28).
Invite friends:
to view your website in order to make it more known. Thi
s
function is available only after you've published your website.
Website settin
gs
"More" opens the menu which contains the advanced functions. Click
"Settings"
to access the "Website settings" dialog.
Website title
Enter the title
for your page as you would like to see it displayed in your
browser. Add keywords appropriate for your site to help search engines list it.
And if you want to, you can enter a short description of your site, too.
Web display
If you have a specific idea of how how large and whe
re on the screen you
would like your website to appear, then you can set these values here.
You can also specify the background color of your website. In case the
gaps
between the objects make the background visible, then you can always be
sure that it will have t
he color that you enter here.
www.magix.com
Page 29
Interface – The layout of MAGIX Website Maker 5 29
he color of the browser, i.e. the part of the website which isn't filled with your
T
website, can also be individually set. Nothing is left up to chance here.
MAGIX Web Catalog
Which category does your website fall under? Personal? Travel? Association?
Select a category from the many options so that other MAGIX website own
ers
can find yours easier.
Online Album
If you own a
music, then you can activate a link within your website's navigation to y
MAGIX Online Album for presenting your photos, videos, and
our
media.
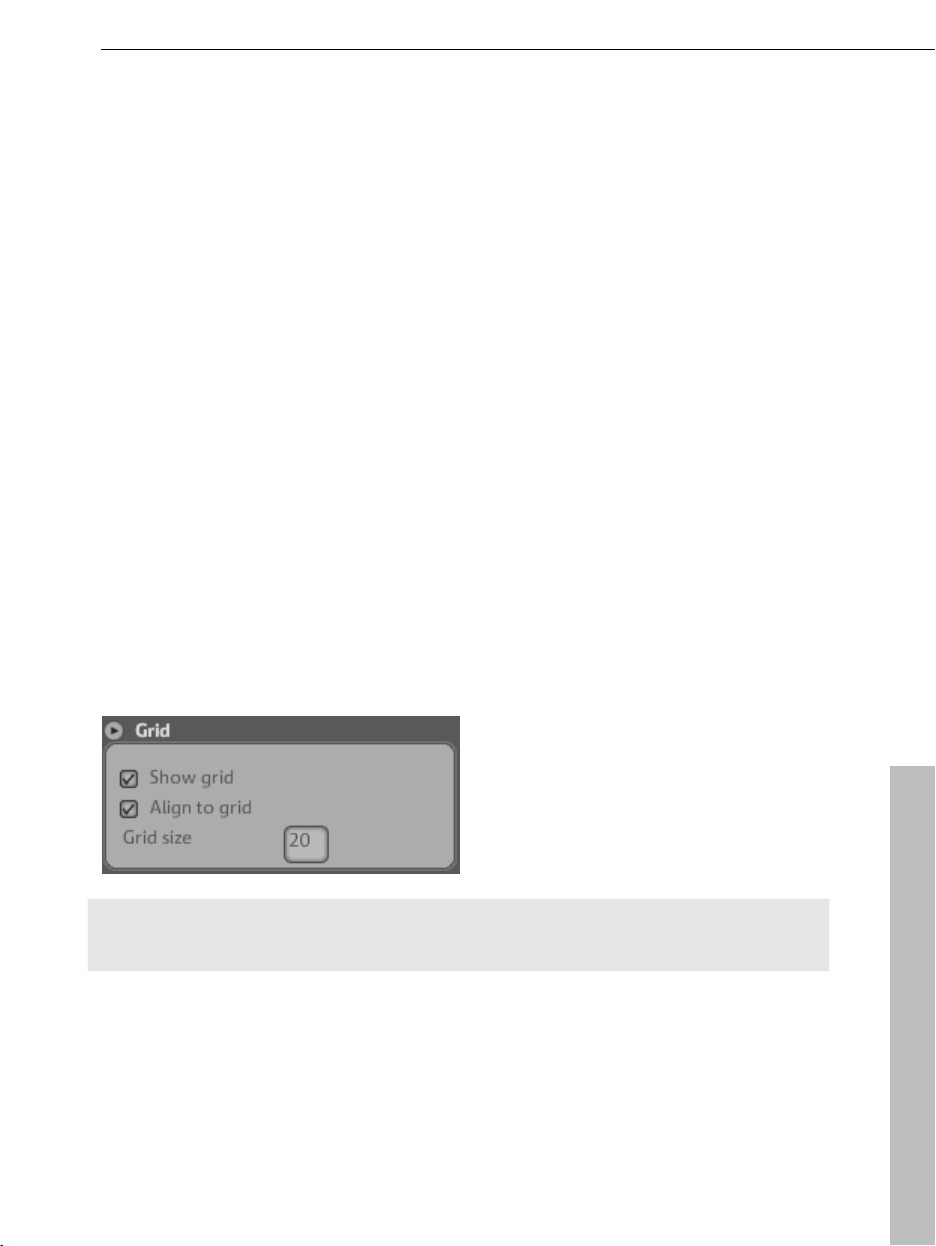
Object grid
MAGIX Webs
ite Maker 5 offers you the option to show a grid to better
orientate your objects on your pages. You can also specify that every object's
position should relate to this grid. This means that objects will always move in
relation to the grid
as you move them, making it easy to line up objects exactly
in a row, etc. You can always change the size of the grid points depending on
your needs.
This function can be found in the Settings menu. You will find "Grid" in the
opened dialog.
Note: The published site will not display the grid. The grid is only present to
help you organize objects in Website Maker.
www.magix.com
Page 30

30 Interface – The layout of MAGIX Website Maker 5
Workspace
Here the pages of your current website are displayed. This design view lets
you design your pages just the way you want them.
In the workspace, WYSIWYG (what you see is what you get) is applied, i.e.
what you see on the screen is exactly what you will see on the Internet with the
exception of animations, text effects, videos, and slideshows, which can only
be previewed in the preview window of the workspace.
Some animations, text effe
cts, slideshows, or videos can only be displayed
fully functionally in the preview.
Important: Only after publishing the websites via the main menu will the
contents from the workspace be updated online.
Functions window
The functions window to the left displays all of the editing options in a clear
manner.
Pages
The Page Manager (to the left in Website Maker) lets you easily manage and
edit (view page 35) your individual pages and objects.
www.magix.com
Page 31

Interface – The layout of MAGIX Website Maker 5 31
Pages: In the page selection you can
easily access your pages. The cogwheel
icon provides access to important page
functions (view page 32) like "Duplicate" or
"Delete".
"New page" allows
you to create new
pages for your website.
Clicking on "Navigation" allows you to edit
your website's navigation in order to
re-position it, etc.
Clicking on "Background" opens the
background layer of your website. (This
graphic is visible in the background of
every page of your website).
Tip: You can rename pages by
double-clicking on a page.
The cogwheel button opens the Page menu (view page 32) with additional
functions.
Object list: Below the pages, there is a
list of all of the objects on the currently
selected page. Move the objects up and down in the list via drag & drop to
change the layers of the objects. The red "x" is used for deleting objects from
the object list.
Tip: If you wish to temporarily hide individual objects to have a better overview,
you can do this by clicking the "Eye" symbol.
www.magix.com
Page 32

32 Interface – The layout of MAGIX Website Maker 5
Page menu
Duplicate page: If you would like to create a page that is intended to be very
similar to another existing page, then you can duplicate a page and make
some changes to the copy. This will save you some time.
Rename page: If you want to rename a page, then use this function. Choose a
page name carefully, since this will also appear in the the browser's navigation
bar; make sure that the name is descriptive so that visitors know what to
expect on the site.
Create password pro
tection: You can add password protection to individual
pages to ensure that only authorized users have access to them. You can
distribute access rights to certain pages among a group of users.
Don't publish: If you don't want to load a certain page onto the Internet yet
(maybe it's still under construction), then activate this function. All other pages
will be published and made accessible, but this particular site will remain
offline.
Delete page: If you don't need a page any longer, then you can delete it
completely from your project.
www.magix.com
Page 33

Interface – The layout of MAGIX Website Maker 5 33
Objec
ts
The Object Manager, which can be found below the workspace, contains the
objects library, which is sorted according to categories.
Here you will find many different objects that you can integrate into your
website (view page 39).
Click
on a category and place the mouse over an object. A preview and
"Insert" button will appear.
Click on "Insert" to add the object to the currently activated page. Now you
can edit and move it to the desired position.
Properties
In the freely movable Properties tab you can customize the settings of each
object (view page 47).
www.magix.com
Page 34

34 Interface – The layout of MAGIX Website Maker 5
To do
so, select the object in the workspace and click on "Properties". Now
you can adjust all object-specific parameters.
Tip: You can automatically open the properties of each and every object in the
workspace by double-clicking the object.
www.magix.com
Page 35

Website Maker functions 35
Website Maker functions
Editing pages with the Page Manager
Use the Page Manager to the left to organize the individual web pages.
In the upper section of the Page Manager, all pages of the currently loaded
website are listed.
www.magix.com
Page 36

36 Website Maker functions
Move - adju
st sequence of web pages: Moving pages via drag & drop is quick
and easy with the Page Manager. To do so, click on a page and keep the left
mouse button held while moving it to the position in the page list to where you
want it.
The position will be noticeable by a thin line. Once you have reached the
desired position, let go of the left mouse button. Now you've moved the
position of the page. You can check the result immediately in the navigation on
the workspace.
Change title - adjust page names: You can change the name of your pages
whenever you want after having already set them.
To do so, double-click on the page title in the Page Manager and enter the
new title.
Note: Changing the page's title also changes the title in the navigation bar of
your website. You can check the result of every change immediately in the
navigation on the workspace.
www.magix.com
Page 37

Website Maker functions 37
Website layers
Background (-1) contains all of the objects that should always be visible on
your website (independent of the selected page), e.g. background picture,
background music, etc.
Page view (0) lets you design individual content for each page. All objects are
automatically positioned in front of background objects and behind foreground
objects.
round (1) shows your navigation; this is on every page and always visible
Foreg
in the foreground. Your navigation can be selected in the object manager from
the object list in the "Navigation" category.
Page objects
The object list can be found under the page list.
Clicking the eye symbol allows you to hide/show individual objects. Hidden
objects will not be visible on the published site, but they can quickly be built
back in, since they aren't deleted.
Clicking the cross symbol allows you to delete individual objects completely.
www.magix.com
Page 38

38 Website Maker functions
Page password protection
The password protection feature helps you implement protected pages on
your website to make sure that only authorized users have access to their
contents.
1. Select the page that you would like to protect with a password under
Pages.
2. Click the cogwheel (see figure above) to open the menu, and then select
"Set password protection". The corresponding dialog opens.
3. Select the contacts you want to give password access to for that page.
4. Enter the corresponding password for the page and then close the dialog.
5. Publish your website again to update the changes. The page will now be
blocked for the public. Only selected persons that know the password can log
in to view the page. (All contacts that have been entered will receive the
password via email).
www.magix.com
Page 39

Website Maker functions 39
Filling your pages with the Object Manager
Each element within a page is known as an object and can be inserted into the
page via the Object Manager. In the Object Manager all object types are sorted
and displayed according to categories.
The corresponding object selection is displayed below the categories. You will
find previews of all objects. Take your time to view everything and add objects
to the page via "Insert".
My Media
Media that you have uploaded via MAGIX Website Maker or via your MAGIX
Online Album are listed here.
Insert pictures from the hard disk
You can add your own pictures to your website using the Object Manager.
1. Select the "My Media" category in the Object Manager.
You can eith
er insert photos from your Online Album into the workspace, or
upload photos from your hard drive via "Uploaded". (Uploaded photos can be
found here later).
2. Open "Uploaded" and select "Pictures"; then click on the arrow symbol to
the right (see figure).
3. Select a method for uploading:
www.magix.com
Page 40

40 Website Maker functions
"Normal" is intended for only one or two images,
"Express" for multiple images or entire folders. A dialog appears for you to
select images or folders to be uploaded in one go.
4. In the dialog that follows, select the image (or entire folders of images,
depending on the method) from your hard drive.
Once all images have been uploaded, you will be able to find them again in the
Object Manager under "My Media" > "Uploaded" > "Pictures".
5. Now select the image and insert it into the workspace via drag & drop or the
"Insert" button.
Integrate music
Would you like your website to play music to add a certain atmosphere? It's
easy with MAGIX Website Maker 5.
Upload new songs in the Object Manager via "My Media" -> "Music" or use
tracks which you have already saved in your Online Album.
Use drag & drop to position the track at an open position in the workspace.
MAGIX Website Maker 5 automatically creates a player to play the track.
You can design the player yourself, of course. Double-click on the player to
open "Properties" and then "Player Skin". You can select a template here and
apply it by double-clicking, i.e. the player will be adjusted automatically.
"Playback" lets you specify
whether or not the music is played automatically when the website is
accessed, and whether
it should be played back in a loop or just one time.
Use the slider to adjust the volume.
Text
Insert text:
To insert text into your website, select the "Text" category from the Object
Manager.
Use the "Text field" option to preview various text types (fonts) in the object
selection.
www.magix.com
Page 41

Yo
u can add text boxes to the current page via "Insert".
Website Maker functions 41
Click in the text box and write your text.
Format text: You can format text boxes as well as all other objects via the
object properties.
Here the usual text formatting options can be specified.
www.magix.com
Page 42

42 Website Maker functions
Tables
The table
template makes creating and editing tables child's play.
Templates for tables are available under "Text > Text tables". Drag the desired
table to its final position on your website and adjust the number of columns
and rows via the Properties Manager.
Activa
te the table's "Manual editing" feature to customize the text.
www.magix.com
Page 43

Link text
Website Maker functions 43
You can link
text boxes via the "Link" tab.
If you want to link to a page on your own
website, choose the "Internal link" option
and select the page from the selection list.
If you wish to link to an external page, you
can also specify whether the page should
open in a new or the same window.
Activate Download link (view page 49) if
you want
visitors to be able to download a
file when they click on a text.
Animation
The "Animations" category provides a large selection of animations. These
funny and playful elements really add life to your page. Be careful not to add
too many animations though, as less is sometimes more.
Note: Animations are only displayed in the workspace as placeholders. To get
an original view of the effect, click "Preview" to open the website's preview.
Shapes
Shapes and
objects can be selected in the Object Manager by clicking on the
Decoration option. Here you'll find a large selection of stylistic elements like
arrows, geometric figures, headers, backgrounds, and much more for your
website. These can be edited and customized just like all other objects via
"Properties".
www.magix.com
Page 44

44 Website Maker functions
Media presentation
Select a template for presenting your photos, videos, or music tracks. Gallery,
filmstrip and photo table offer everything you could ever want for presenting
your photos. Just test what you like the most.
The "YouTube video" option allows you to show videos from
www.youtube.com on your website. Click "Insert" and enter the link or code of
the corresponding video in the dialog that appears. Click on "OK" to link the
video to the video monitor on your page. (You will obtain the code for the
YouTube video by clicking on "Embed".)
Picture frames
In MAGIX Website Maker 5 you'll find useful magnetic picture frames to
enhance the appearance of your photos. Picture frames can be selected in the
Object Manager from the "Picture frames" category in portrait or landscape
format.
1. Move the matching picture frames onto the workspace using drag & drop or
via the "Insert" button.
2. Now go to your picture folder, e.g. My pictures > Uploaded > Pictures.
3. Select the photo you want to add to the picture frame and then drag it onto
the picture frame using drag & drop.
The picture snaps into the frame automatically.
Size and position can be
customized using the arrows (object handles).
Your photo is displayed in the best way possible!
www.magix.com
Page 45

Website Maker functions 45
Note: If you've already inserted an image into a page and want to add a
picture frame later, then the picture frame will be added a layer above the
image and it will be covered. Simply change the layers of the objects by
moving the affected objects in the Page Manager under "Page objects". The
picture frame must be a layer lower than the picture.
Extras
Of course, MAGIX Website Maker 5 also gives you the option of integrating
visitor counters, guestbooks, contact forms, and other accessories into your
website. Simply select one of the different designs, add it to the desired page
and individually customize it.
Delete entries in guestbooks
If you want to delete an entry in your guestbook, then proceed as follows:
1. Start Website Maker.
2. Go to the particular page that contains the guestbook via "Pages".
3. Se
lect the guestbook among the objects on this page. A small button with a
cross appears behind every guestbook entry.
4. Click the cross behind the entry you would like to delete. The entry will be
deleted if you confirm the action in the dialog that appears.
Google Static Maps
To embed a Google Map on your website, proceed as follows:
1. Select a destination on the Google Maps homepage
http://maps.google.com/ and zoom into the map according to your
preferences.
www.magix.com
Page 46

46 Website Maker functions
2. Open the
or instant messaging (IM) to the clipboard: Right-click on the link and select
"Copy" from the menu.
links located above the map to the right and copy the link for email
3.
Switch to the Website Maker window and select "Extras > Google Static
Maps" in the Object Manager.
4. If you click on "Insert", a dialog pops up where you can insert the link text
from the clipboard: Right-click in the dialog and select "Paste" from the menu.
www.magix.com
Page 47

Website Maker functions 47
Confirm by clicking on "O
K".
The map now appears as an object on the current page and can be moved
and customized freely.
Scale, position, and mirror
Each object's size and position can be adjusted.
Select your picture object in the work
space. The typical handle arrows will then
appear at the sides of the object.
Drag the arrows while holding down the
left-mouse button to distort the picture.
If you drag the corners while holding down
the "Shift" key you can scale your photo.
Click on the cross to start repositioning the object.
You can rotate the photo by clicking on the cross and, while holding down the
left-mouse button, draw a circle with the mouse. The photo will now follow the
movement of the mouse.
If you wish to mirror your photo, simply drag the arrows with the mouse
across the middle axis and your photo will be mirrored.
www.magix.com
Page 48

48 Website Maker functions
Adjusting page contents with the Properties Manager
Here you can edit the properties of all of the objects on your website. Select an
object and open one of the properties areas to change it.
Note: Not every property can be applied to every object. The properties areas
are adjusted automatically according to the selected object.
Click on one
of the tabs at the top to change the properties areas.
"Reset" allows you to change the properties back to their default settings at
any time. The two small buttons to the right enable you to change the layer
position of objects that overlap each other, i.e. which object is on top and
which is underneath.
Text format
Once you have selected a text box, you can find and adjust the text properties
in the "Properties" tab under "T". You can change the font type, size,
alignment, etc. and adjust the scroll bar of longer text boxes.
www.magix.com
Page 49

Style
Website Maker functions 49
Select a
text box and then move the slider located below "Opacity". The further
you move the slider to the left, the less opacity the text will have. It appears
brighter as the background shines through.
Would you like to change the color of the images on your website? Just color
them in:
1. Uncheck the "Selectively" box.
2. Reduce the opacity with the help of the slider (move the slider to the left).
3. Select the desired color in the "Colors" area.
Changes are immediately visible in the image.
Effects
Select one of your homepage's objects and choose from among the numerous
effects available in "Animation", "Filters", and "Blend".
For some effects you can also specify space, angle, color, etc.
Linking/links
MAGIX Website Maker 5 make it easy to create links to other pages. It doesn't
matter whether the link is to a page within your website (internal) or to a page
of another website on the Internet (external).
1. Select an object or section of text in the workspace which you would like to
link to another page.
2. Go to "Properties > Links" and select the link's target. Is it internal or
external or do you want to create a download link?
If the link is internal, use the drop-down menu to select the corresponding
page of your website.
www.magix.com
Page 50

50 Website Maker functions
For
external links simply enter the full website address (URL).
If you want to provide a link on your website that allows visitors to download a
file onto their PC, please select "Download link". Select the desired file from
among the uploaded files and the download link will be created. Whenever
visitors click on this link on your website, a dialog will open where the storage
location for the file can be specified.
3. After you have published your website, you can test the links online.
Settings
You can adjust position, size, scaling, and the rotation angle of the object here.
Link hidden page
If you have individual pages on your site that don't appear in the navigation,
but rather only by being accessed from other sites (internal linking), then
proceed as follows:
Step 1
Hide a page by
1. activating the "Navigation" under "Pages" and then
2. opening "Properties -> Navigation", then selecting the page which should
not be shown in the navigation and deactivating it (click the eye icon behind
www.magix.com
Page 51

th
e page in question so that it is no longer highlighted in orange). The
Website Maker functions 51
navigation bar will be adjusted accordingly.
Step 2
Create an internal link to this page
1. by selecting the website under "Pages" which should contain the link to the
hidden page.
2. Select the text that should be linked.
3. Switch to "Links" under "Properties".
4. Activate "Internal link" and select the hidden page.
After the changes have been saved, you will need to publish your site again to
update it online.
Start website
You can launch a preview of your current website project at any time via the
Preview button.
After you've uploaded your website to the Internet via Menu > Publish, you
can access your website at any time via your Internet address. To do so, open
your browser, enter your address into the address bar of the browser, and
press "Enter" on your keyboard.
www.magix.com
Page 52

52 Website Maker functions
Specify keywords for search engines
MAGIX Website Maker 5 lets you specify keywords in the menu under
"Settings...". Enter these words via "Website title -> Keywords for web
search". Separate the concepts with commas.
Note: There is no guarantee about where your website will be placed in a
search engine's index. There are as many different search algorithms as there
are search engines, and these all read different information about your
homepage for display in the search results.
Tip: Create a good website with interesting content. Don't try optimizing
everything for every search engine. SEO (search engine optimization) is a kind
of science that comapnies work with to be found in the flood of information.
This process cannot be compared with simply entering key search terms.
Export
The complete website can be displayed in another website by using the export
function. A link will be created to the original website which still exists on the
MAGIX server.
So, if you already have another website on another server, then you can have
your MAGIX website displayed there, too. For this some HTML code will be
produced which you will need to add to your other website. This code ensures
that the website generated using MAGIX Website Maker 5 will be displayed
correctly (objects, etc.) when the other website is opened.
Note: The export function doesn't allow a complete download of the file, since
synchronization of the guest book, the counter, and the Online Album requires
that the page be located on the MAGIX server. Uploading the website via FTP
to a third-party server is therefore not possible at this time for technical
reasons.
www.magix.com
Page 53

Export the entire website
Website Maker functions 53
The complete website
including menus, all
sub-pages, and media should
be re-used.
Select "Export website" from
the main menu.
A window will open in which
you can find the code for your
website or its links and can
copy it here for use elsewhere.
The text you
are copying from the text box here is the address of your website
for displaying it in the new website. This code also contains additional
information that is required for displaying your website correctly. Just like usual
text this code can be copied from the text box into the clipboard and then
reinserted.
"Right-click > Insert" inserts the content of the clipboard at the desired
position.
Shortcuts:
Select all: Ctrl + A
Copy: Ctrl + C
Paste: Ctrl + V
www.magix.com
Page 54

54 Control Center functions
Control Center functions
Control Center - Overview
Log in to MAGIX Online World and access the "My Online World -> Overview"
area.
At a glance, you can see which Online Album you
are using (free, classic, or premium) if it is active.
The same applies to Website Maker, which is
available as a free, easy, and deluxe version.
All functions connected with these services can be
accessed by clicking them.
You can also see the storage capacity display on the start page in the Control
Center. This doesn't just show you the maximum memory available to you for
your projects, it also shows you how much is also being used.
If both services are active, i.e. Online Album and Website Maker, then you will
see 2 links under "My pages": One accesses your Album Website, and the
other takes you to the website that you have created with Website Maker.
"News &
regarding MAGIX Online World.
Settings
You may adjust the personal data that you entered when you registered for
MAGIX Online World here:
Name & Address: if your address or telephone number has changed, then
you can change this information here.
Email & Password: Your email address serves as your login name and as a
way for us to contact you. For this reason, you should always enter your
Announcements" keeps you informed about developments at MAGIX
www.magix.com
Page 55

Control Center functions 55
current email address. If you would like to enter a new password for security
reasons, then go ahead and do so here.
Subdomain: The name of your Album Website is normally generated from
your name and last name. To change your subdomain, enter the new name
here. If it has not been assigned already, then your Album Website will appear
with this name after you save it.
Payment data: keep your payment data up-to-date to avoid extra costs due
to charge-backs, etc.
"Activate services / deactivate" allows you to activate online services so that
your website can be accessed online or deactivated so that it is hidden.
Note: This function may only be used for free services and not for
subscriptions.
Access: If you have any fee-based subscriptions running and would like to
stop using MAGIX Online World, then you may delete your access. You may
not delete Online World access as long as you have fee-based subscriptions
running.
Note: Please note the cancellation period specified in our General terms of
Service of eight weeks prior to expiry of services. Canceled subscriptions run
until the end of the specified period in spite of cancellation. At this point,
automatic switching to the corresponding free version will take place.
Rename subdomains
Upon registering with MAGIX Website Maker 5, you will automatically receive a
subdomain (web address) for your website – irrespective of the package you
select. This is usually http://your-name.magix.net. If you already have a
MAGIX Online Album with the same name, then the extension /website will be
added to the subdomain to indicate the website.
Note: If you change the subdomain, the new name applies globally, i.e. your
Online Album can also be found under the new domain.
If you want to change your subdomain's address, ...
1. .... then log in at http://www.magix-website.com by entering your email
address and password.
2. In the Control Center, select "Settings > Web address." The current
subdomain will be displayed.
www.magix.com
Page 56

56 Control Center functions
3. Enter the new address in the input field and confirm by clicking "Save".
Note: Only the middle part of the address can be changed;
"magix.net/website" remains unchanged.
Note! Domains cannot be renamed. This is only possible for subdomains.
Help & Support
Frequently asked questions (FAQs) and answers are available here to help you
with any problems you may have. You'll also find:
step-by-step instructions for moving a domain,
manuals for MAGIX services,
a list of system requirements for using services properly,
a glossary featuring Internet concepts, and
an offer & price list for fee-based service packages.
Contact
If you have technical questions or questions about contracts, then you may
use this online form to get in touch with MAGIX customer service or with
technical support.
1. Select a subject and enter your inquiry into the text field.
2. Before you send this form, a security question must be answered (correctly
recognize and enter the sequence of characters in the graphic). Note that
your entries are case-sensitive.
Start Flash Widget Maker
You'll find the Flash Widget Maker on the overview page of your Control Center
under your Website Maker service.
Starting the Flash Widget Maker with a click will close Website Maker in case it
is open.
1. Select a widget:
Select an adequate widget, depending on the type of media you want to
present: a photo table for presenting photos or videos, for example, or an
audio player for music files. The templates change according to which
template is selected. Select a template and click on "Continue" to go to the
next step.
www.magix.com
Page 57

Control Center functions 57
2. Customize
:
First, you have to upload files for the widget. If you've already uploaded files for
a Website Maker project, you will find them organized into the following areas:
pictures, videos, music, and other. If you haven't uploaded data for a Website
Maker project yet, please proceed as follows:
Click on this button and a small dialog will appear. By clicking on
"Select files", you can navigate to the files in question. Select them
and confirm by clicking "Open". Once all files are included in the list,
click on "Upload now".
Then click on "Insert" to add all files that you want to have presented by the
widget to the playlist to the left. Now you can customize the widget's size or
playback properties, etc. Once you have made all changes, click on
"Continue".
3. Insert:
In the third step, the code for the widget is displayed. This code needs to be
copied in order to be able to embed the widget into external HTML websites.
If you want to reuse or customize the widget at a later stage, you can save it
with a unique name and open and customize it later in the first step.
www.magix.com
Page 58
58 Control Center functions
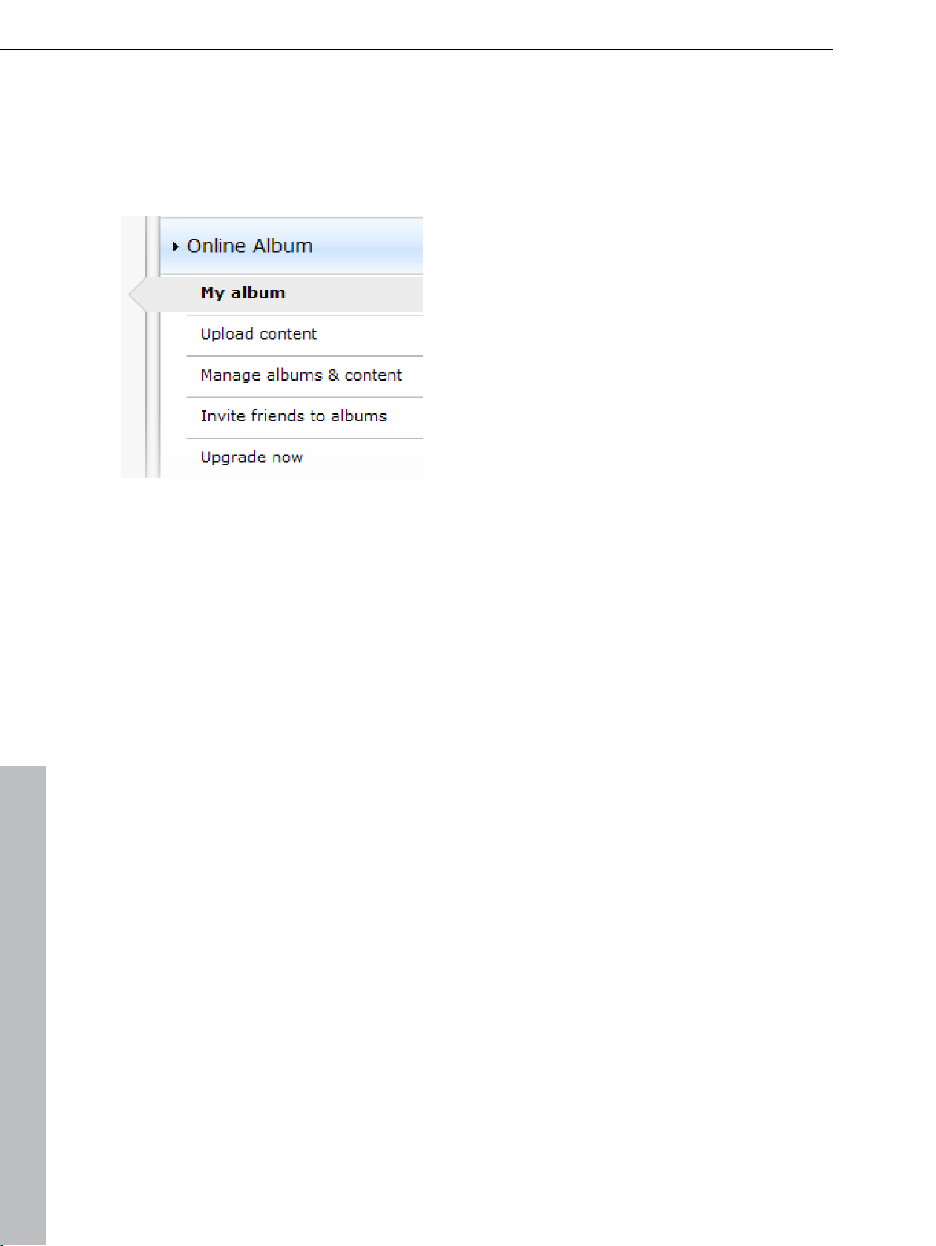
Online Album
Switch in the Control Center to "Online Album" and access the "My Album"
area.
You can see which Online Album package you are using, and you can display
your album website in an Internet browser by clicking the link or project.
The following functions are available in the menu:
Open album website : Opens your album website for viewing.
Change design template: Opens MAGIX Website Maker 5 and also the dialog
for you to adjust the album design automatically.
Upload contents: Opens MAGIX Website Maker 5 and the dialog "upload
media".
Manage album & contents: Opens MAGIX Website Maker 5 in the main
screen so that you can move, delete, and add content into the folders.
Invite friends: O
pens MAGIX Website Maker 5 and the dialog "Invite friends".
If you would like to change the web address, click "Change" beside the link to
access the Control Center and the "Settings -> Web address (view page 54)"
area.
www.magix.com
Page 59

Control Center functions 59
Website Maker
Switch in the Control Center to "Website Maker" and access the "Website
projects" area.
You can see which Website Maker package you are using, plus an overview of
the next higher packages.
All website projects are listed, and their menus offer the following functions:
Edit: Opens the corresponding project in Website Maker for editing.
Open: If you have published this website project, then you can use this
function to open the website in an Internet browser for viewing.
Publish: If your website has not been published, then you can use this
function to exchange the current website project with this project.
Delete: Deletes this project.
Clicking "Create new project" allows
another project to be created for
publishing.
Domain Service
Click here to list your current domains. Click the corresponding web address
to load this website in an Internet browser for viewing. You may also add a
new domain via "Register domain".
If you have subscribed to Website Maker deluxe, then you will have 5 email
accounts (1 GB each)available to you which you may access from here.
www.magix.com
Page 60

60 Control Center functions
Google AdSense
Google AdSe
nse provides advertising that is automatically adjusted according
to the contents of your website. You can choose between text and image
advertisements. Just a few clicks, and these can be embedded in your website
– you'll receive payment whenever a user clicks a targeted ad.
1. Click here
https://www.google.com/adsense/support/bin/answer.py?answer=21592&to
c=134 to access the introduction to Google AdSense and get sta
rted.
pi
2. After registering with Google AdSense and the creation of your advertising,
log into Website Maker's Control Center.
3. Select "Embed Google AdSense" under "What would you like to do?" on the
"Start page".
4. If you have multiple domains, then select the domain under the first point
where you would like to embed the advertising.
5. Under the third point, enter the HTML code created by Google AdSense as
required (see "Help" beside the 4th entry box).
6. Save the entries by clicking "Save" – finished!
You will have to repeat the process for each advertisement you want to
embed.
Upgrade now
Click here to subscribe to Website Maker deluxe.
10,000 MB web space
over 100 web designs
over 1,000 design objects
Effects, media player, animations, and much more
1 domain included²
5 email accounts (1 GB each)
Multi-project mode
Google AdSense™
Page password protection
Program updates
No advertising
only 4.99 per month
www.magix.com
Page 61

Control Center functions 61
Domain & Email
Here you can assign your existing domains to websites, register additional
domains, and manage and buy new email accounts.
My domains
Flexibly assign the domains you registered with MAGIX as well as the MAGIX
web addresses (subdomains) to your websites that are published in the MAGIX
Online World.
This applies to:
Your Online Album website
Your Website Maker projects
Your websites that you uploaded via FTP (for example, from MAGIX Web
Designer)
Not
e: Your MAGIX web address "http://yourname.magix.net" and registered
domains can be assigned freely.
This does not apply to specific addresses that have been assigned to a service
(on the basis of your MAGIX web address http://yourname.magix.net):
/album (only for the Online Album website)
/website (only for your Website Maker projects)
/public (only for websites uploaded via FTP)
Assigning domains to my websites
Step 1: Log in to your MAGIX Online World and select "Domain & Email". All of
your domains and subdomains (MAGIX web addresses) registered with MAGIX
are displayed here.
Step 2: Freely assign domain(s) to a website:
Assign a domain to a website that was uploaded via FTP:
www.magix.com
Page 62

62 Control Center functions
To do so, select the assignment option "FTP" for the corresponding domain.
The dialog that pops up displays the folder structure of your FTP area. Select
the folder to which the corresponding website (with the start file index.htm(l))
was uploaded. This is usually the root directory, but you can also assign
subfolders freely.
Please note that the start file "index.htm(l)" always has to be available in the
corresponding FTP folder in order to be able to open your website via your
domain. It doesn't matter whether it is in the root directory or in subfolders.
This enables you to publish multiple websites at the same time and to flexibly
assign them to your domains.
Assign a domain to a Website Maker project:
Select the assignment option "Website Maker project" for the corresponding
domain. The dialog that pops up displays an overview of your saved Website
Maker projects. Click on "Select" to freely assign a project to your domain.
Assign a domain to your Online Album website:
Select the assignment option "Album website" for the corresponding domain.
In the dialog that appears, confirm that the selected domain should open your
album website.
Assign a domain to no website:
Select the assignment option "No assignment" for the corresponding domain.
In the dialog that appears, confirm that the selected domain should not have
any assignment. Whenever someone now opens the domain, the MAGIX
Online World "website under construction" page will appear.
Register domain
If you would like a web address that doesn't include magix.net, you can
purchase a domain with the following endings via "Register domain": .de, .ch,
.at, .com, .net, .org, .biz, .info, .co.uk, .nl.
1. To do so, click on "Single domain". An input window for your desired
domain appears.
2. Enter your domain name of choice and click on "Check".
3. If the domain is not available, enter a different name and check it again. If
the name is available, select it and click on the "Register now" button that
appears. Follow the instructions and enter your information to conclude the
contract.
www.magix.com
Page 63

Control Center functions 63
When will your domain be available?
As soon as you have decided on a domain and completed your registration,
MAGIX will send your domain application to the relevant NIC (Network
Information Center). For newly registered users, it can take up to three days for
the registration to be processed. Normally, registration should be completed
within 1-4 hours. Your domain status can be requested at any time via the
Website Control Center at www.magix-website.com.
Note: Even with successful registrations it can take up to 24 hours until your
domain is accessible on the Internet.
If you have any problems registering your domain, please contact
shop@magix-online.com
Fees:
Registration of a domain requires a one-time set-up fee of 9.99 and entrance
into a fee-based contract. Any trial periods are canceled automatically.
Duration amounts to 12 months and must be canceled in writing at least 8
weeks before expiry (see General Terms of Service), otherwise an automatic
extension follows, including debiting for a further 12 months.
Email accounts:
Email packages can only be purchased if a domain is available via Website
Maker. The account size of all email accounts offered via MAGIX Website
Maker amounts to 1 Gbyte per account.
Single-project mode:
In the Website Maker easy package, all registered domains can refer to only
one published website project.
Multi-project mode:
The Website Maker deluxe and Website Maker easy Plus packages (acquired
as a result of purchasing a Website Maker package in a retail store) allow
different website projects to be published on any registered domains.
www.magix.com
Page 64

64 Control Center functions
Transferring a domain to MAGIX
you already have a domain with another provider (Strato, 1&1, alfahosting,
If
profihost, etc.), you can easily switch domains to MAGIX using the domain
switch form (KK form – provider switch form). After you have transferred your
domain, your MAGIX website will be accessed via your old domain.
Note: Currently only Website Maker easy, Website Maker deluxe and Website
Maker easyplus customers can transfer their domains.
Currently, domains with the following endings can be transferred to MAGIX:
.de, .com, .net, .org, .biz, .info, .ch, .at, .nl, .co.uk.
Requirements for domain switching: You must be the domain owner (AdminC)
or have a contractual agreement with the domain owner about the switch of
the domain.
This is how it works in detail:
1. Register with MAGIX Online World for free.
2. Upgrade to Website Maker easy or Website Maker deluxe in your Control
Center.
3. Download the KK form from our website and print it out.
4. Fill out the KK form in full and sign it. Please make sure that it is legible.
5. Terminate the contract with your previous provider.
6. Please fill out the form for the domain transfer / provider switch for your
domain from your old provider and sign it.
7. The form and instructions can be found on the website of your old provider.
8. The fax number of the MAGIX Service Team is: +49 (0) 5741-310 768
Please make sure to fax us the following documents:
1. Filled-out and signed KK form (domain transfer/provider switch)
2. The confirmation of cancelation from your previous provider
3. The authorization code (for the domain endings. .de, .com, .net, .org,
.biz, .info, .ch, .at, .nl, .co.uk
Please contact your current provider for the authorization code.
Once you have faxed us all documents, our service team will take care of the
domain transfer. You will receive an email from us in due time with all the most
important information. This may take a few days.
Time periods: Approx. 1-2 weeks as the current domain owner and the current
provider must both agree to the domain switch.
www.magix.com
Page 65

Control Center functions 65
.com, .net, .org, .info and .biz domains can be transferred to another registrar
60 days, at the earliest, after the transfer or after registering for the first time.
Tip! Avoid additional costs: Please make sure to terminate previously existing
web hosting contracts with your old provider so that you do not have to
continue paying these fees.
Prices: Please note that when registering a domain (when switching as well) a
one-time setup fee to the amount of 9.99 will be charged. Monthly fees for
the domain will also be charged. See price list
http://www.magix-online.com/de/angebote__preise.1602.html.
My email accounts
Your email accounts with MAGIX are listed here.
Set up email account
The Website Maker deluxe package includes 5 email accounts per domain.
They can be created by clicking on "Add". You can freely choose the address.
You can also assign a password to every account, which has to be entered in
order to open MAGIX Webmail and manage your emails.
You can delete a personal account in order to, for example, set up a new one
with a different address.
Webmail
You can start MAGIX Webmail for every email address. MAGIX Webmail works
like most well-known webmail services (Hotmail, Gmail, etc.).
Click on the account (email address) and enter the password in the window
that appears.
Note: MAGIX Webmail is only available once a domain has been registered
successfully and you have set up an account.
Tip in case your webmail doesn't open: Seeing as MAGIX Webmail opens as a
pop-up, your browser's pop-up blocker might prevent it from starting.
Deactivate it or enter MAGIX as an exception.
www.magix.com
Page 66

66 Control Center functions
Use email programs for accessing your emails
In case you want to access your email account with an email program, use the
following data. Repeat this for all accounts.
When accessing via IMAP
IMAP server: mail.magix-website.com
SMTP server: mail.magix-website.com
User name: Email address of the account
Password: The account's password
When accessing via POP3
POP3 server: mail.magix-website.com
SMTP server: mail.magix-website.com
User name: Email address of the account
Password: The account's password
www.magix.com
Page 67

MAGIX services in detail 67
MAGIX services in detail
MAGIX Online Album
In the MAGIX Online Album you can post your favorite photos online and then
send the link to your friends. All photos are immediately available from
anywhere in the world on a professionally-designed photo website, in
well-organized photo galleries, as full-screen slideshows, or in the form of a
personal photo e-card.
Personalized photo website in many designs.
Unique Internet address (URL).
Upload your pictures directly from a camera phone, send the link, and share
the picture with other camera phone users.
Full-screen online slideshows with fade effects and music.
Send custom designed e-cards with your own photos.
Share your photos with friends, including Internet management and password
access to private albums.
Your photos online
MAGIX Online Album is available in three versions, of which the smallest (the
FREE album with 500 MB webspace for your photos) is entirely free.
The larger versions (CLASSIC or PREMIUM) are available for a monthly charge,
but also come with many handy features, such as a faster website, 5,000 MB
or 10,000 MB storage space, more website designs or access by mobile
phone/PDA.
More information about prices and services is available at the MAGIX
WEBSITE.
Using your MAGIX Online Media Manager, you can quickly manage your
photo website, upload photos and music, create new albums, add designs
and text, and much more. All online without even having to download any
extra software! Worldwide, easy and quick in just a few clicks. At
http://www.magix-photos.com
The following options are also available:
Send e-cards and photo emails
www.magix.com
Page 68

68 MAGIX services in detail
Send your ph
otos as unique ecards with great designs or as a photo email to
your friends and family.
Order photo prints and gifts
Order paper prints or great photo gifts from your MAGIX Online Album and
have them delivered directly to your home, or pick them up from a photo lab in
your area. Delivery time is usually just 2 - 3 days.
magix.info
Share your knowledge & get answers This MAGIX service offers you and the
MAGIX Community at large a central platform for exchanging knowledge,
photos, videos, and music, for discussing and evaluating, for communicating
with one another, for presenting yourself, and networking with other members.
You will find the sections "Questions & Answers", "Show & Discuss", "Online
Training", and "Chat" where you can play an active or passive role in the
MAGIX Community. For this there's not only the www.magix.info
http://www.magix.info/uk portal, but magix.info directly in your product.
Ask questio
ns online
If you have questions or problems with your MAGIX program or you're looking
for tips & tricks concerning multimedia, then you're at the right place.
Display all questions & answers...
Use the questions which other community members have asked and the
collective knowledge of the answers to improve your own working methods, to
solve problems, and to get to know the details of MAGIX Website Maker 5.
Launch the online training center
www.magix.com
Page 69

MAGIX services in detail 69
Learn not only theoretically, but also practically what the program is capable
of: "learning by doing", quickly and uncomplicated.
Let your friends view the contents of your MAGIX.info screen over the
Internet on their PCs.
Ideal for viewing photos and videos together or for receiving support for
questions arising during your creative workflow while using the program (a
licensed client will be installed for this purpose).
MAGIX Magazine
The MAGIX Magazine – well-informed & up-to-date:
Digital trends
Interesting websites
Useful information about MAGIX products
You can find the MAGIX Magazine at www.magixmagazine.com.
MAGIX Online Print Service
MAGIX Online Print Service gives you the opportunity to order photo prints and
gifts, for example, t-shirts or mugs. With just a few clicks, your photos are
uploaded into the Web and the finished photos or gift items are delivered to
your home within a few days.
High-quality prints in all standard formats or poster size
Fun photo products like t-shirts, calendars, mugs, mouse pads, etc.
Convenient round-the-clock order service from your home
Fast delivery within just a few days directly to your doorstep
Easy to reorder online with just one click of the mouse
Quality prints and great photo gifts from your digital pictures – it's that easy
1. Select photos
Click on "Order" on the MAGIX Website http://www.magix-prints.de and on
"Upload pho
without MAGIX Photo Manager.
www.magix.com
tos now" if you would like to select, edit and order your photos
Page 70

70 MAGIX services in detail
Click the arrow button to upload, and then select the images which you would
like to print and click on "Upload images".
2. Format and select
Select the desired texture, amount and the print format (10 x 15...) or photo
gift (cup, t-shirt...).
One great option is the crop function for your prints. To do so, click on the
"Image format" while preview of your photo. In the preview window you can
see how your photo print will come out.
3. Send order
After you have made your settings selections, click on the button "OK". Now
simply enter your address and the delivery method.
You receive an order confirmation by email which contains a link providing you
with the status of your order.
Home delivery
Have your prints and photo gifts delivered to your house, or pick up them up
directly at a local photo lab, and save on delivery costs. Delivery time is usually
2 - 3 days.
You can also read the FAQ (frequently asked questions) on the Internet.
www.magix.com
Page 71

MAGIX services in detail 71
Catooh – the Online Content Library
Catooh provides you with high-quality photos, videos, and music for every
theme, expanded by intelligent iContent with professional Soundpools, DVD
menu templates, and brilliant MAGIX ShowMaker styles to help you make your
photo, video, and music projects reality. All of this is available directly from
your MAGIX software.
Just choose "Online" from the menu "Catooh" to set up an Internet connection.
Browse through the thematically sorted categories or view the results directly
by entering a keyword. After downloading, you can drag the objects from the
Media Pool directly into your arrangement.
Tip: Read the introduction online http://rdir.magix.net/?page=JRF6LASAR2Z3!
MAGIX Fotobuch
Experience your finest photos as a high-quality album!
Create albums easily yourself
Large selection of book formats
Super-fast delivery directly to your house
It's easy:
1. Download the software for free: To design your personal album, first you
will need to save the free MAGIX Fotobuch software on your computer.
Just click on "Free download" and save the software on your drive.
After you have downloaded it, double click the installation file on your desktop
and the program will install itself. Deinstallation is possible at any time, of
course.
2. Albums made easy: As soon you have opened the MAGIX Fotobuch
interface, you can start making your unique album with only a few clicks. Just
select the images which you would like to have printed in your album and drag
them into the software. A number of functions make it possible for you to edit
and design everything just the way you want it to be. You can always save
your album file and continue editing it later on.
www.magix.com
Page 72

72 MAGIX services in detail
3. Burn a CD or send online: Once you have finished your album, start the
ordering process by clicking the "Order" button. You can choose whether you
would like to burn the file onto a CD and send it in the mail or whether you
would like to send the file comfortably online. A wizard will help you with every
step. You can see the albums you've created on the site, manage them, and
order them.
Now you can look forward to receiving an album created by you of your own
beautiful photos!
MAGIX Blog Service
YOU make the news – Create you own online journal with MAGIX Blog Service!
Easy to use and lightning fast – Design your own online journal (blog) however
you want: Categories, keyword for quick searching, calendar, archiving, and
much more. No HTML knowledge required!
Create an account and add up to 5 individual blogs; you decide what your
subdomain should be (http://your-name.magix.net/blog) – all without any
banners.
Spam guard: Captchas make the commenting function even more secure
against spam and comments which come from IP addresses or contain links
that are listed in different blacklists.
Manage it: MAGIX Blog Service lets you invite authors for your blogs to work
together on their growth. Up to 10 authors can work together on a single blog.
Every editor can be assigned specific rights: Editor and chief editor - entries by
an editor must be authorized by the chief editor before going live. The chief
editor does not require any authorization!
Webspace: All media that you use in MAGIX Blog Service is managed in the
storage space for MAGIX Online Album. If you still don't have MAGIX Online
Album, then you will receive a free album with 500MB worth of space when
you register for the blog service. Upgrade to classic subscription with 2,000
MB, or you can switch to the premium service with 5,000 MB of memory at
any time for a small fee.
www.magix.com
Page 73

Glossary 73
Glossary
B
Browser
A browser (also known as web browser, or Internet browser) is a computer
program that displays websites. The best-known browsers are Internet
Explorer, Firefox, Safari, and Opera.
C
CC
CC stands for "Connectivity Co-ordination" and describes how the change of a
domain name from one provider to another occurs (domain transfer).
D
DNS
The abbreviation DNS stands for Domain Name Service and refers to a
provider of Internet services that registers domain names for customers.
Domain
A domain is the website's Internet address. It consists of the name of the
Internet protocol (usually http://), the computer or network name (such as
www), the second-level domain (such as magix), and the top level domain
(such as .com, .net).
Altogether we have:
protocol://networkname.second-level-domain.top-level-domain (such as
"http://www.magix.com").
Domains are allocated by a country's so-called NIC (Network Information
Center). In Germany the DENIC is responsible for the release of domains.
MAGIX takes care of this registration and technical maintenance of your
domain as well as the webhosting of your site (created with MAGIX Website
Maker).
Domain transfer
See CC. If you already have a domain, you can move it from your previous
provider to another provider.
www.magix.com
Page 74

74 Glossary
H
HTTP
Stands for Hyper Text Transfer Protocol and is used for transferring websites
onto the Internet (from web server to the browser). For this reason, the
abbreviation http:// always comes before the Internet address. This is
automatically inserted and does not have to be entered when entering the
Internet address.
Hyperlink
Hyperlinks (or in short "links") are references to other websites/online
documents (or other computer networks). They build the base of the World
Wide Web (WWW) as it is only via these hyperlinks that networking or
interlinking between the billions of website out there is actually possible.
I
IMAP
Stands for Internet Mail Access Protocol and is an advanced procedure used
for receiving emails.
P
POP3
Stands for Post Office Protocol (version 3) and is used in standard email
programs for receiving email (for example, Outlook Express). POP3 enables
email to be collected by the provider's email server and loaded into your email
program.
Provider
A provider or ISP (Internet Service Provider) offers Internet services like
webhosting or domains (DNS). In relation to the MAGIX Website Service,
MAGIX is the provider.
S
SMTP
Stands for Simple Mail Transfer Protocol and enables the exchange of emails
across computer networks.
www.magix.com
Page 75

Glossary 75
Subdomain
The independent area of a domain is called the subdomain. The name of the
respective subdomain is written before the domain name. The MAGIX domain
looks like this: http://www.magix.net. A possible subdomain could therefore be
"http://your-name.magix.net". You can create as many of these as you like.
T
Top-level domain
Top-level domains (TLD) are always those separated by a dot at the end of an
Internet address (for example, "http://www.magix.com" < here, .com is the
top-level domain). Among these are also country top-level domains, such as
.co.uk, .us, .de as well as so-called generic top-level domains like .net, .org,
.biz, and so on.
Traffic
Traffic (data transmission) occurs within your MAGIX Website Service as soon
as data is transferred across the Internet: for example, when uploading or
downloading files to your website or when someone else opens your website.
U
URL
URL stands for Uniform Resource Locator and describes where a source can
be found online (for example, a website). The address or the path to the
storage location of a file on your computer is known as a URL. Often the term
URL is used as a term for the domain. The URL for the MAGIX website is:
http://www.magix.co.uk
W
Webhosting
This means that an Internet Service Provider makes domains and webspace
available to its customers. With the MAGIX Website Service, MAGIX provides
webhosting to its customers.
Webmail
Webmail enables the customer to view and receive the contents of their email
inbox without having to install email software on their computer. Customers of
the MAGIX Website Service can use MAGIX Webmail for this.
www.magix.com
Page 76

76 Glossary
Webmaster
A webmaster is responsible for the administration and maintenance of a
website. Often, the webmaster is also the owner of the website as well as the
domain that belongs to it. Once you have registered a domain in the MAGIX
Website Service, an email account will automatically be set up, for example:
"mailto:webmaster@domainname.co.uk".
Webserver
Webserver refers to the computer on which your host saves your website's
pages and which makes your pages accessible on the Internet 24-hours a day.
Website / web page – what is the difference?
A website is composed of many web pages. A website is characterized by a
uniform navigation and graphic design.
A web page (or an Internet page) is a document that can be called up by a
program (e.g. a web browser) from a web server and presented on a computer
screen. As a minimum, web pages consist of structured text and multimedia
elements like images or animations. Every page can be addressed at least
through one URL.
Widgets
Widgets are small applications for displaying and playing back different data
such as images, music files, and videos. Widgets are not independent
applications, but are embedded into websites, for example.
World Wide Web (WWW)
WWW stands for "World Wide Web" and is the most used service of the
Internet. On the WWW, web browsers (for example, Internet Explorer) are used
to display information via websites. The process is colloquially called "Surfing
the Internet".
www.magix.com
Page 77

Index 77
Index
3
3 steps to a professional website 19
36 great visitor counters for your website 16
A
Add Google Static Map 13
Adjusting page contents with the Properties Manager 33, 48
All you need for perfect Flash® websites! 12
Animation 43
Assigning domains to my websites 61
B
Before you start 8
Browser 73
C
Catooh – the Online Content Library 71
CC 73
Complete multimedia center 12
Contact 56
Control Center - Overview 54
Control Center functions 54
Copyright 2
Create animated Flash® widgets 13
Create your own buttons 15
Customer Service 6
D
Definition of concepts Webpage or website? 11
Delete entries in guestbooks 45
DNS 73
Domain 73
Domain & Email 61
Domain Service 59
Domain transfer 73
www.magix.com
Page 78

78 Index
E
Editing existing objects 20
Editing pages with the Page Manager 30, 35
Effects 49
Email 59
Export 28, 52
Export the entire website 53
Extras 45
F
Features 12
Filling your pages with the Object Manager 33, 39
Flash® technology 12
FTP access to your webspace 16
Functions window 20, 30
G
Google AdSense 60
Google Static Maps 13, 45
H
Help & Support 56
HTTP 74
Hyperlink 74
I
IMAP 74
Includes three web addresses (WSM4) 12
Insert pictures from the hard disk 39
Installation 9
Integrate music 40
Interactive photo & video gallery with impressive effects 14
Interface – The layout of MAGIX Website Maker 5 24
Introduction 11
L
Link hidden page 50
Link text 43
www.magix.com
Page 79

Link to Facebook & Twitter 13
Linking/links 43, 49
Loading new objects 21
M
MAGIX Blog Service 72
MAGIX Fotobuch 71
MAGIX Magazine 69
MAGIX Online Album 67
MAGIX Online Print Service 69
MAGIX services in detail 67
magix.info 68
Media presentation 44
Menu 25, 26, 27
My domains 61
My email accounts 65
My Media 39
O
Object grid 29
Objects 25, 33
Online Album 58
Online software – no installation required 12
Index 79
P
Package contents 8
Page menu 31, 32
Page objects 37
Page password protection 38
Pages 25, 30
Photos presented as filmstrips or photo tables 15
Picture frames 44
POP3 74
Preface 3
Preview 22
Preview & publish 26
Product activation 9, 10
Properties 33
Provider 74
www.magix.com
Page 80

80 Index
Q
Quick start 17
R
Register domain 23, 62
Rename subdomains 55
S
Scale, position, and mirror 47
Settings 50, 54, 58
Shapes 43
SMTP 74
Specify keywords for search engines 52
Start - Website Maker and Online World Control Center 17
Start Flash Widget Maker 13, 56
Start website 51
Step 1 - Select layout 19
Step 2 - Edit pages 19
Step 3 - Publish website 23
Style 49
Subdomain 75
Synchronize with your MAGIX Online Album 12
System requirements 8
T
Table templates for precise text management 15
Tables 42
Text 40
Text format 48
The new, extra-fast multi-file upload function 15
Toolbar 25, 26
Top-level domain 75
Traffic 75
Transferring a domain to MAGIX 64
U
Upgrade now 60
Upload and play animated GIFs 14
URL 75
www.magix.com
Page 81

W
Web hosting 23
Webhosting 75
Webmail 75
Webmaster 76
Webserver 76
Website / web page – what is the difference? 76
Website layers 37
Website Maker 25, 59
Website Maker and Control Center 24
Website Maker functions 35
Website settings 28
What is MAGIX Website Maker 5? 11
What's new in MAGIX Website Maker 5 13
Widgets 76
Workspace 25, 30
World Wide Web (WWW) 76
Y
Your domain name of choice 13
Index 81
www.magix.com
 Loading...