

Page 1
Page 2

2 Copyright
Copyright
This documentation is protected by law. All rights, especially the right
of duplication, circulation, and translation, are reserved.
No part of this publication may be reproduced in the form of copies,
microfilms or other processes, or transmitted into a language used
for machines, especially data processing machines, without the
express written consent of the publisher.
All copyrights reserved.
All other product names are trademarks of the corresponding
manufacturers. Errors in and changes to the contents as well as
program modifications reserved.
MAGIX and Cleaning Lab are registered trademarks of MAGIX AG.
VST is a registered trademark of Steinberg Media Technologies
GmbH.
MAGIX Audio Cleaning Lab uses patent-pending technology.
Other mentioned product names may be registered trademarks of the
respective manufacturer.
MAGIX licensing conditions are included in the installation and also at
www.magix.com under EULA
Copyright © MAGIX AG, 2000-2010. All rights reserved.
Legal notice: Copyrights and laws against exploitation of
accomplishments of artists and publishers shall be observed.
www.magix.com
Page 3

Preface 3
Preface
Congratulations on purchasing MAGIX Video Sound Cleaning Lab!
You are now the proud owner of an efficient tool that was developed
specifically for improving the quality of your video's audio tracks.
Camera hiss, wind noise and incomprehensible voices can make a
video appear cheap and amateurish. Up until now, you had no other
choice but to rely on the limited options offered by your video editing
software. With MAGIX Video Sound Cleaning Lab you've purchased a
program that tackles these typical audio track problems with the help
of professional tools.
Problems are solved on the basis of the highly efficient MAGIX Audio
Cleaning Lab algorithms which have been revised specifically for
editing the audio tracks of videos. Elements of the award-winning
MAGIX Movie Edit Pro video engine have also been included in the
program.
As a video filmmaker, there's no need for you to familiarize yourself
with the complex field of audio editing. The program's task-oriented
workflow guarantees direct and quick results. Simply select your
problem and, if required, fine tune your settings.
This manual provides you with a short introduction to MAGIX Video
Sound Cleaning Lab. A detailed description of the program is
available in the program's Help file ("Help" Menu > Help) or in the
PDF manual.
Have fun using MAGIX Video Sound Cleaning Lab and removing
irritating noise!
Your MAGIX team.
www.magix.com
Page 4

4 Table of Contents
Table of Contents
Copyright 2
Preface 3
Support 9
Serial number 10
More about MAGIX 12
MAGIX Online World 12
magix.info 12
Introduction 13
What is MAGIX Video Sound Cleaning Lab? 13
Features 13
Quick Start 14
Overview of the program screen 29
Track window and constant control elements 30
Upper buttons 30
MAGIX News Center 31
The master track 31
Transport control 35
Monitor 37
Zoom 39
Zoom settings 40
Mouse mode 41
Volume controller/auto button 43
Status Line 44
Import 45
Audio files 45
Video files 46
Recording dialog 47
Cut sound – Working with objects 50
Project 50
Split objects 50
Change object volume 51
Reducing and increasing the length of objects 51
Fading objects in and out 52
Fading objects 52
www.magix.com
Page 5

Table of Contents 5
Object FX page 53
Quick zoom 54
Draw volume curve 55
Voice over 56
Remove 58
Using the effect modules 58
Parametric Equalizer 59
Graphic Equalizer 60
Sound Cloner 61
DeNoiser 64
Dehisser 67
Artefacts 68
Remove DC offset 69
Spectral Cleaning 69
Enhance 74
Using the effect modules 74
Declipper 74
Dynamics 75
Stereo FX 76
Plug-ins 78
Multimax 80
Reverb/Echo (object FX only) 81
Export 85
Audio files 85
Video files 87
Save and Exit 91
File Menu 92
New Project 92
Load project 92
Save Project 92
Save project as 92
Load audio file 92
Load video file 93
Record 93
Export audio 93
Export video 93
Delete old projects 93
Exit 94
Edit Menu 94
Undo 94
Redo 95
www.magix.com
Page 6

6 Table of Contents
Undo Lists 95
Set marker 95
Delete marker 95
Remove all markers 95
Split 95
Remove object beginning 96
Remove object end 96
Cut 96
Copy 96
Paste 96
Delete 97
Voice-Over 97
Remove pauses 97
Object FX Editor 98
Apply all realtime effects 98
Effects Menu 98
Normalize object volume 99
Isolate Stereo Channels 100
Acoustics simulator 101
Switch channels 102
Plug-ins 102
Options menu 103
Standard mouse mode 103
Cut mouse mode 103
Zoom mode 104
"Delete objects" mode 104
Draw volume curve mouse mode 104
2 tracks 104
Stereo display 105
Comparisonics waveform display 105
Activate Volume Curves 105
Overview track 106
Lock all objects 106
Play parameter 106
Units of measurement 108
Mouse Grid Active 108
Auto crossfade mode active 108
Display values scale 108
Path settings 108
Tasks menu 109
Online menu 109
Catooh – the Online Content Library 109
www.magix.com
Page 7

Table of Contents 7
MAGIX Online Album 109
magix.info 110
More online services 111
Screen transfer - MAGIX Screenshare 113
Online login details 114
Help menu 115
Help 115
Display tips 115
Show tutorial videos 115
System information 115
About MAGIX Video Sound Cleaning Lab 115
Register online 115
Update check 116
Restore original program settings 116
Keyboard layout and mouse-wheel support 117
Keyboard layout 117
Mouse-wheel support 118
Activate additional functions 119
Free activation (MPEG-2, MPEG-4, Dolby Digital 2.0 & 5.1) 119
Activation problems 120
Appendix: MPEG Encoder Settings 122
General settings 122
Video settings 123
Advanced video settings 124
Audio settings 125
MPEG glossary 128
Motion estimation 128
Bit rate 128
Block 129
Chroma format 129
Field 129
Frame 130
GOP 130
I frames 131
Interlace 131
P frames and B frames 132
Prediction 133
Quantization scaling 134
MPEG-4 encoder settings 136
MPEG-4 136
www.magix.com
Page 8

8 Table of Contents
AVC / H.264 142
AMR 148
AAC 148
Multiplexer 149
Index 151
www.magix.com
Page 9

Support 9
Support
If you experience any problems with your software, then please get in
touch with our support team:
Support website: http://support.magix.net
This website will lead you to the MAGIX user service page which,
among other things, contains the following free offers:
• FAQs (frequently asked questions) and general tricks and tips. In
most cases you’ll find the solution to your problem here. If not, then
please use the email support form.
• Email support form: You can tell our support staff about your
system via the email support form. This information is used to solve
your problems quickly and competently. Simply fill it out and send it
with a mouse click!
• Support forum: You are not alone. Perhaps other users had a similar
problem and can help you solve yours. Our support staff are also
regular contributors.
• Download section: Updates, improvements, and patches are
likewise offered free of charge via download. Many problems you
may experience are well known to us and can be solved by
downloading the latest patch. Besides patches, there are also
wizards for checking and optimizing your system.
• Links: In the links list, you will find the contact addresses of the most
popular hardware manufacturers.
Please note: To be able to use the support, you have to register your
product using the serial number provided. This number can be found
on the CD case of your installation CD or on the inside of the DVD
box.
You can also reach our support team by telephone:
UK:
Denmark:
www.magix.com
0905 118 0888 (25p/min)
(open Monday to Friday 9:00 - 16:00 GMT)
077345695
(open Monday to Friday 10:00 - 17:00 CET)
Page 10

10 Support
Finland:
Norway:
Sweden:
Please have the following information at hand:
• Program version
• Configuration details (operating system, processor, memory, hard
drive, etc.)
• Sound card configuration (type, driver)
• Information regarding other audio software installed
0942597819
(open Monday to Friday 11:00 - 18:00 EET)
021543223
(open Monday to Friday 10:00 - 17:00 CET)
0852507027
(open Monday to Friday 10:00 - 17:00 CET)
Serial number
A serial number is included with each product, and although it is not
required for the installation of the software, it does enable access to
additional bonus services. Please store this number in a safe place.
What can a serial number do?
A serial number ensures that your copy of MAGIX Video Sound
Cleaning Lab is clearly assigned to you and only you, and it makes
improved and more targeted customer service possible. Abuse of the
software can be prevented with a serial number, since it ensures that
the optimum price/performance ratio continues to be offered by
MAGIX.
Where can the serial number be found?
The serial number can be found on the reverse side of your CD/DVD
case. If your product, for example, is packed in a DVD box, then
you'll find the serial number on the inside.
For versions that have been especially optimized for the Internet
(download versions), you'll receive your serial number for activating
the software directly after purchasing the product via email.
When will you need the serial number?
www.magix.com
Page 11

The serial number is required when you start or register MAGIX Video
Sound Cleaning Lab for the first time.
Note: We explicitly recommend registering your product, since only
then are you entitled to get program updates and contact MAGIX
Support. Entering the serial number is also required for activating
codecs (view page 118).
Support 11
www.magix.com
Page 12
12 More about MAGIX
More about MAGIX
MAGIX Online World
Well-connected: Products and services online from MAGIX
Discover the possibilities offered by the MAGIX Online World. Every
MAGIX product offers a direct and easy-to-use gateway to the world
of online multimedia:
• Present your photos, videos, and music directly
in your Online Album or in worldwide Internet
communities.
• Find professional templates & content for
enhancing your personal projects.
• Design your own personalized website using professional Flash
design with photos, videos, music & impressive animations.
• Order brilliant photo prints to be sent directly to your doorstep. It's
quick, easy, and well-priced.
®
Experience these and many more online services on
www.magix.com
magix.info
Help and get help - Directly from within the program, you'll be able to
access magix.info, the new MAGIX Multimedia Knowledge
Community (view page 110). In the Multimedia Knowledge
Community, you'll find answers to all of the most frequently asked
questions about MAGIX products and multimedia in general. Couldn't
find an answer to your particular question? No problem, just ask the
question yourself.
You can go to magix.info in the "Online" menu, or via this
button.
www.magix.com
Page 13

Introduction 13
Introduction
What is MAGIX Video Sound Cleaning Lab?
MAGIX Video Sound Cleaning Lab is a specialized audio program
that was designed specifically to improve the quality of audio tracks
of videos. The program's audio editing options go far beyond the
functions offered by conventional video editing programs. For this
reason, MAGIX Video Sound Cleaning Lab is especially suitable as a
companion to MAGIX Movie Edit Pro, but also any other video
software.
The workflow is based on three steps: You import your file, remove all
bothersome noise and export it, either to do further editing in another
video program or to watch the video on your computer.
MAGIX Video Sound Cleaning Lab features many preset tasks such
as the removal of wind noise, sibilants or camera hiss. Simply select a
preset and the program solves the problem!
Features
Import
You can load video as well as audio files in the "Import" section.
Remove & Enhance
The "Cleaning" section is the key function of MAGIX Video Sound
Cleaning Lab. It is divided into two areas: "Remove" and "Enhance".
The workflow is task-based and requires no previous knowledge at
all. Simply select the task that applies to you. If desired, you can also
make individual settings.
For example:
• Remove wind noise: With the parametric EQ located in the
"Remove" section.
• Remove camera noise or power humming: Use the presets in the
DeNoiser and FFT filter located in the "Remove" section.
• Optimize the stereo picture: Use the stereo panorama editing
feature "Stereo FX" located in the "Enhance" section.
• Create a more balanced or powerful sound pattern with the
www.magix.com
Page 14

14 Introduction
dynamics module or the Multimax located in the "Enhance" section.
• Remove hissing S sounds with the DeEsser plug-in located in the
"Enhance" section.
• Remove popping sounds with the integrated 10-band EQ located in
the "Remove" section.
• Remove single coughs, clapping or noises: Use the very powerful
"Spectral Cleaning" tool in the "Remove" section.
• In addition: Simulate rooms (e.g. the sound of a cathedral), add
echo, automatic noise reduction and much more
Export
The "Export" section is where you export your project as a video file
in different formats. Alternatively, you can create an audio file or save
and exit the project.
Supported formats
• Video: (DV-)AVI, MPEG-2
MOV, WMV, MXV
• Audio: WAV, MP3
1
MPEG-4 and MPEG-2 must first be activated online for free.
1
, MPEG-4 (incl. AVCHD)1, QuickTimeTM
2
, WMA, AIF, OGG, FLAC
2
MP3 export requires Windows Media installation version 10 or
higher.
Quick Start
In this chapter, we will guide you through all of the important
functions in MAGIX Video Sound Cleaning Lab step-by-step. You
don't need to have any previous experience; just some space on your
hard drive.
• Open MAGIX Video Sound Cleaning Lab from the Windows Start
menu.
Load a video file into MAGIX Video Sound Cleaning Lab and play
it.
After starting the program, MAGIX Video Sound Cleaning Lab
displays an empty project window.
You are in the "Import" section, which is recognizable by the lit button
below the project window.
www.magix.com
Page 15
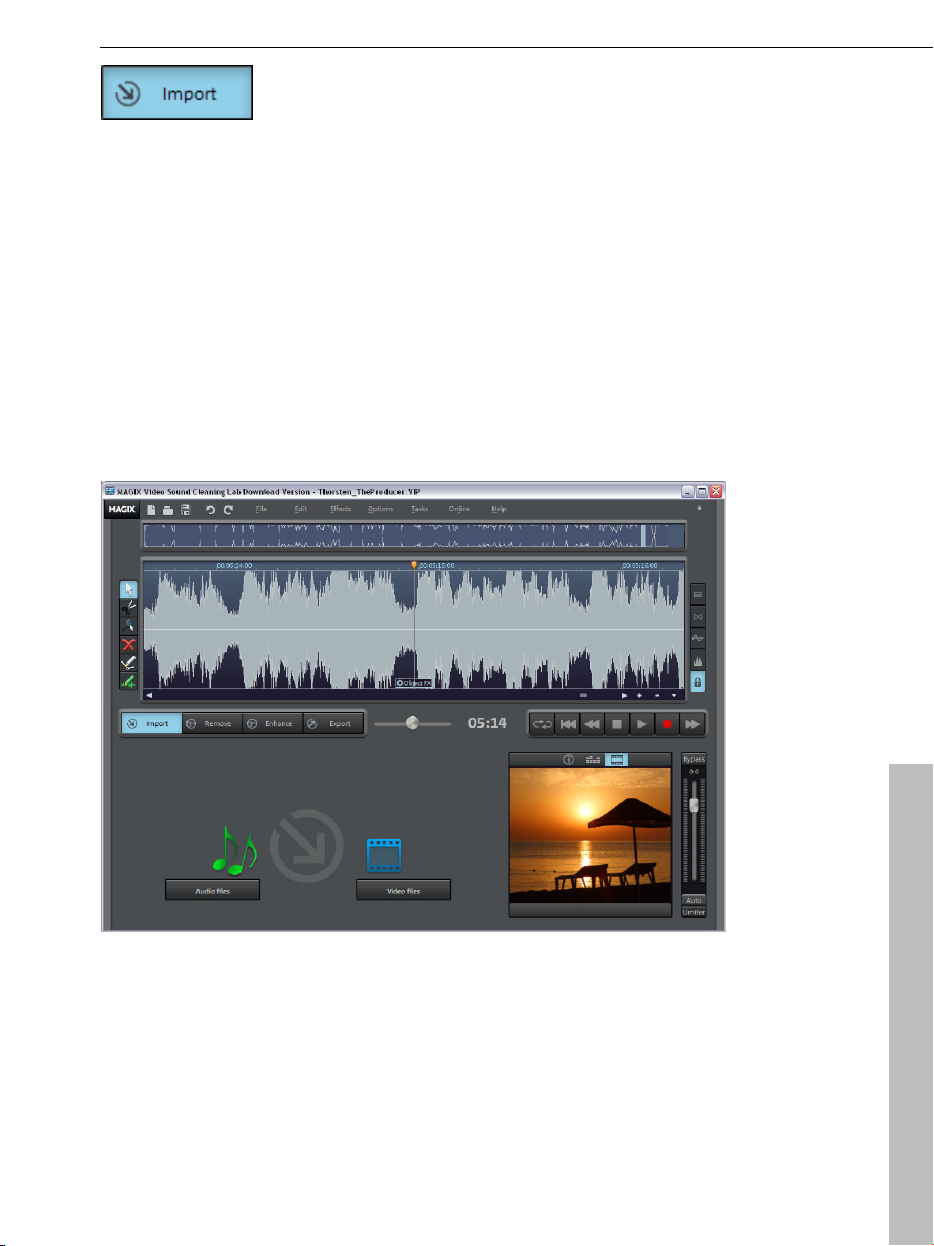
The workflow in this section is very easy: Use the "Audio files" button
to load audio files and the "Video files" button to load video files.
In most cases you will load a video file with an audio track that needs
to be edited. Of course, you can also import video sound only
(without video). To do so, simply deactivate the "Show video image"
option in the Import dialog. Alternatively, you can load an audio file
directly or enter comments via the recording function.
After import, a waveform display of the audio track appears in the
main window. If you imported video as well, the video monitor located
in the lower right hand corner of the screen will display the first frame
of the image track.
Introduction 15
The waveform display gives you an idea of the audio track's
progression. It displays where in the video sound is audible. It's also
possible to estimate the type of sound. Crackling, for example,
creates a clearly identifiable peak in the waveform.
www.magix.com
Page 16

16 Introduction
Below to the right, you'll find the transport controls for playback, stop
and winding. You'll be familiar with these functions from other
playback devices.
Use the mouse for quicker navigation: If you click into the waveform
display with the mouse, the playback marker will be moved exactly to
this position. Use the space bar on your keyboard to start and stop.
The preview monitor helps you orient yourself within the material. You
can see where in the video you are currently working.
It also serves to detect audio disturbances, because not every
rumbling or crackling noise is superfluous. Rule of thumb: If
something in the picture falls on the ground, the corresponding
sound should be audible. If, on the other hand, nothing happens in
the picture and everything is quiet, but you can hear something falling
on the ground, it's likely to be an audio disturbance. Unless, of
course, it's a dramaturgical trick and the image that matches the
sound will appear in the next scene.
Remove constant noise such as power humming or hissing
There are many types of noise. Let's start with the easiest ones:
constant humming or irritating hissing. This kind of noise is usually
caused by cameras, microphones or other electronic devices and are
present on the entire audio track. Find out how to get rid of these
irritating distortions:
www.magix.com
Page 17
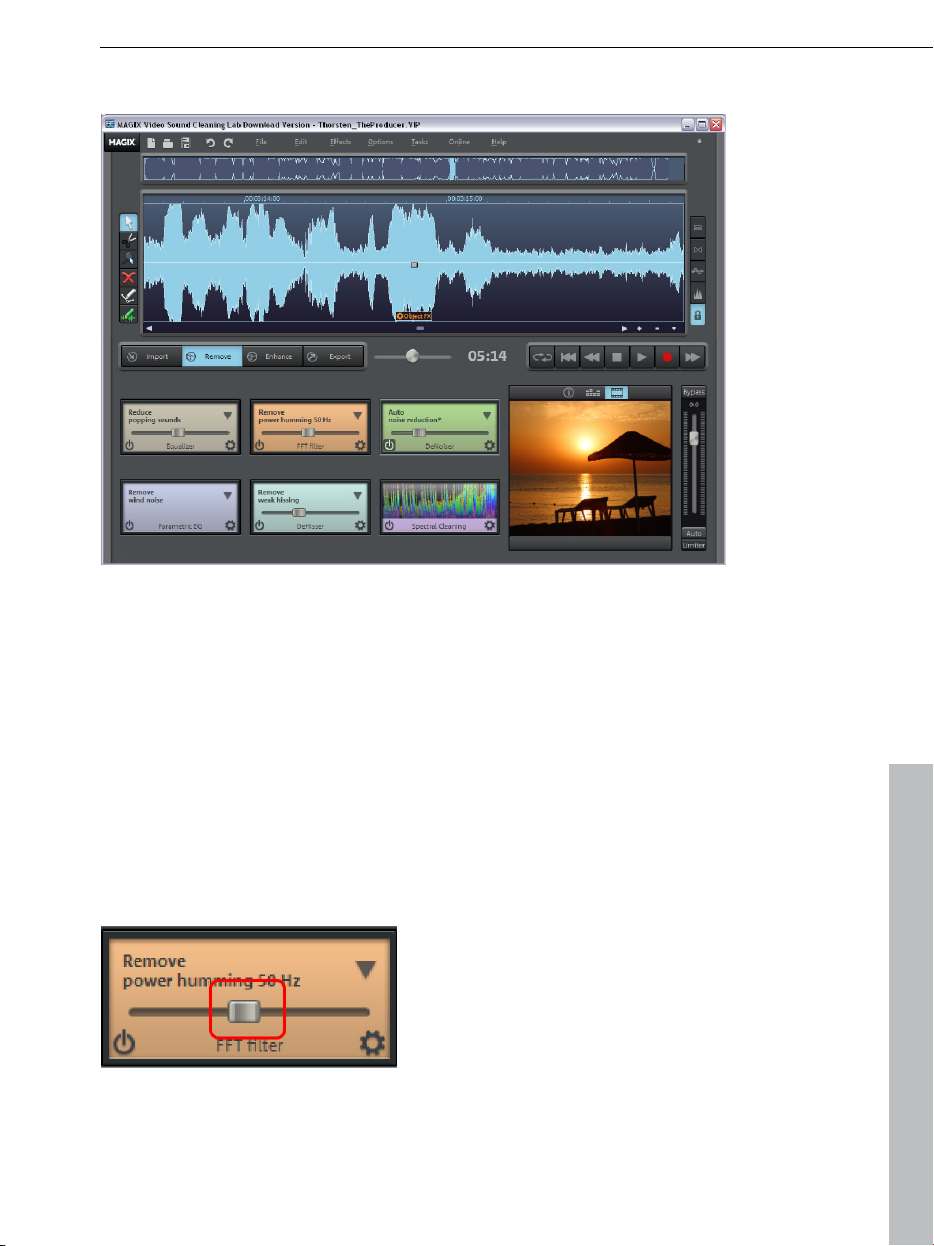
• Switch to the "Remove" section.
Most of the elements that are displayed here are identical to the ones
in the "Import" section, but the function area in the lower left hand
corner has changed decisively. Six different functions for removing
audio disturbances are available here: "Reduce popping sounds",
"Remove power humming", "Auto noise reduction", "Remove wind
noise", "Remove weak hissing" and "Spectral Cleaning".
Introduction 17
Thanks to their names, you know right away which noise is removed
by the different functions.
• The slider lets you regulate the strength of all of the "cleaning"
effects (except for the parametric EQ, DeEsser and Spectral
Cleaning, which we will deal with later):
• The triangle opens a selection menu, which provides access to more
presets of the effect:
www.magix.com
Page 18
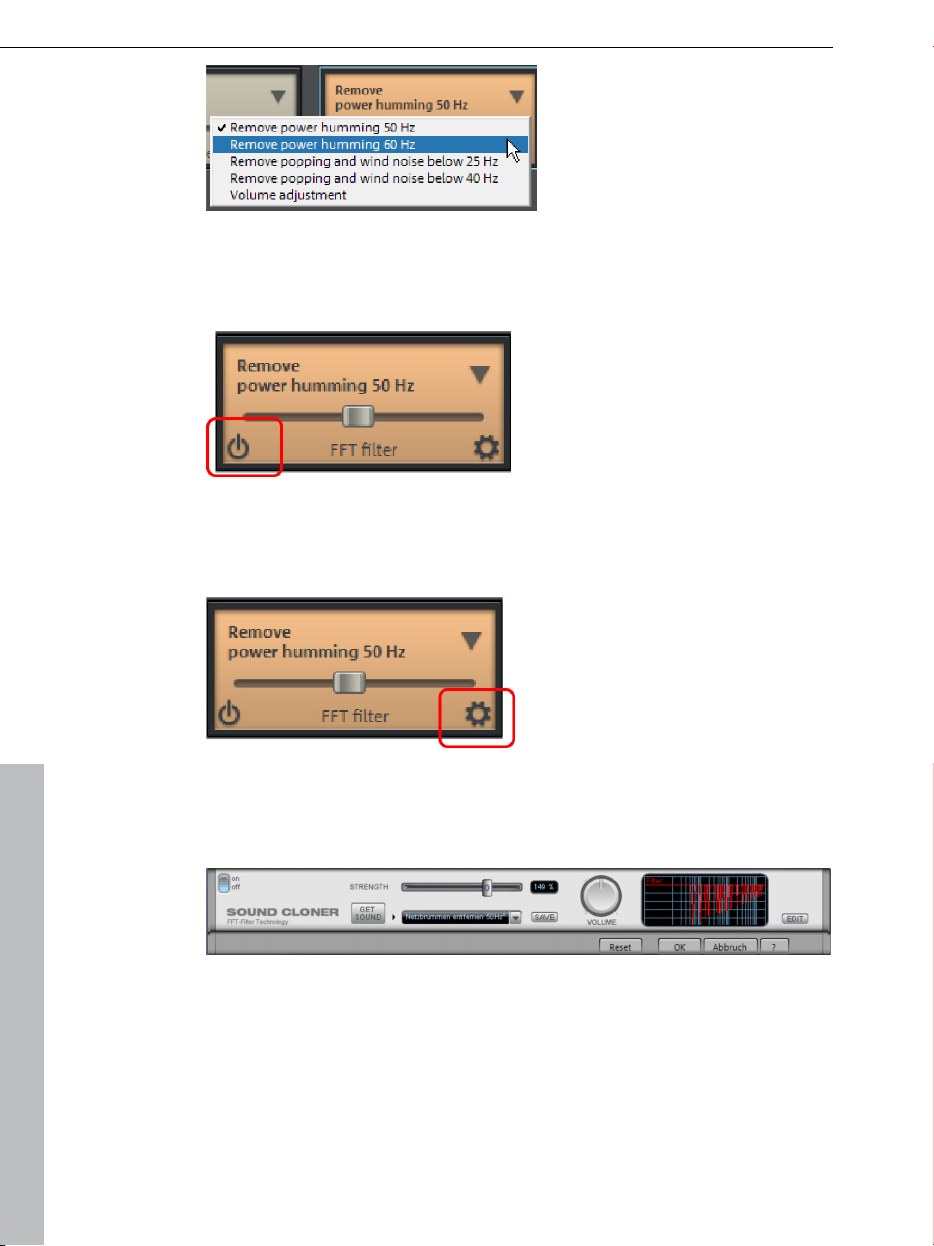
18 Introduction
• To get an idea of the how the selected effect affects your audio
material, you can turn it on and off by clicking on the symbol in the
left hand corner:
• Click on the symbol in the bottom right hand corner to open a user
interface where you can set all of the available parameters for the
effect.
In a way, this symbol represents the effect's engine hood. The
interface located behind it was designed to simulate professional
audio editing devices.
Depending on the effect device, you can specify very effective audio
editing settings here. To do so, it's necessary to know a bit about
audio editing though. Usually, however, you will not need these
special functions, but they can be useful in complex cases. If you
need them or if you're interested, please read the complete
documentation (either the PDF manual or the program's Help file).
www.magix.com
Page 19
Optimize volume and speech comprehensibility
The second effects area "Enhance" aims at optimizing the audio
material.
• Click on the "Enhance" button.
Introduction 19
You'll find the following effects modules here: "Remove
overmodulation", "Level automation", "Optimize the stereo picture for
speech", "Remove hissing S sounds (DeEsser)", "Stronger volume
boost" and "Simulate room".
The functionality of the optimization effects is the same in principle:
Adjust the strength of the effect via the slider, switch the effect on
and off to compare the original with the edited audio material and
access the actual operation console by clicking on the symbol in the
bottom right hand corner.
Remove individual distortions such as crackling
Up until now, the workflow was extremely easy: Load your video,
select a suitable cleaning effect, make changes, if necessary –
finished. Now, let's take a look at some applications that require a bit
more preparation, but are able to solve complicated problems. Above
all, this includes filtering out specific audio disturbances.
www.magix.com
Page 20
20 Introduction
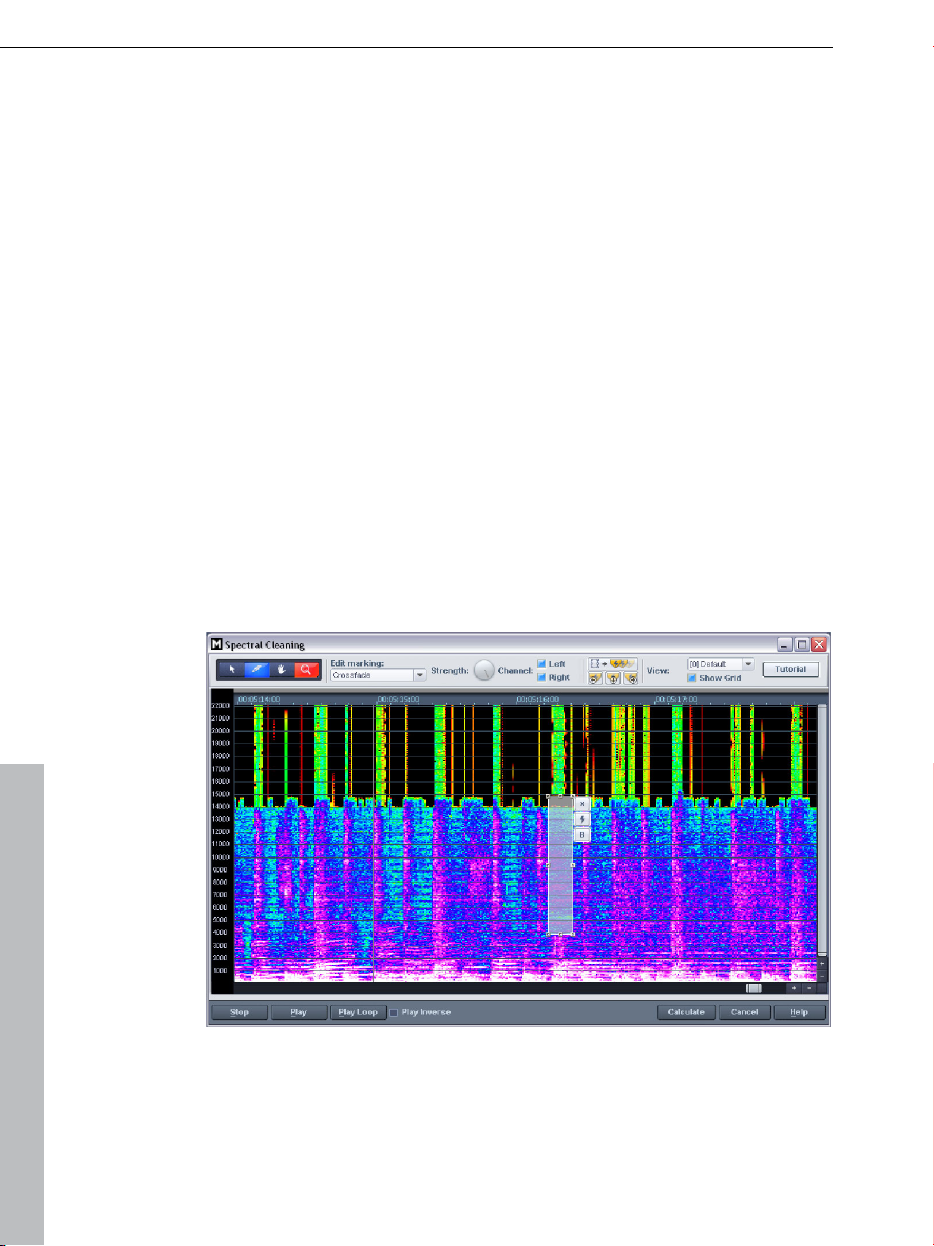
Spectral Cleaning
Spectral Cleaning in the "Remove" section can be useful for editing
video recordings of concerts or theater plays, for example, where a
single cough in the audience threatens to ruin an otherwise beautiful
effect. Spectral Cleaning can be used to remove short distortions
such as coughing, passing cars, a whistle, crackling or short drop
outs.
Here's how it works: The clearly audible noise has a different acoustic
signature than the rest of the material, otherwise it wouldn't be clearly
audible. Based on this signature, the noise can be identified and
filtered. After it has been identified, the audio material's frequency
spectrum is analyzed before and after the disturbance. Based on this
"acoustic environment", frequencies are calculated that can be used
to fill the gap that was created after filtering out the disruptive
signature. Ideally, a simulation of the "normal" background acoustics
replaces the cough, almost as if it were removed magically.
Let's start:
• First, set the play cursor roughly to the position of the distortion.
• Open the Spectral Cleaning Editor.
• Try to select the distortion using the marking tool in the Editor.
• Once you've marked the distortion, click on "Play". The algorithm
becomes active immediately: The selected area is filtered out and
replaced with frequency material from the surrounding "acoustic
environment".
www.magix.com
Page 21

• Can you hear an improvement? If not, change the selection. The
selection should be as small as possible. Localize the audio
disturbance by trial and error.
• Once you are satisfied with the result, click on "Calculate". Up until
now, you merely experimented, but now the settings will be applied.
Tips: For information on the individual buttons in the editor, please
read the entire documentation (available as PDF manual or program
Help file). By the way, you can also access a tutorial video that
explains the workflow directly from within the Spectral Cleaning
Editor.
The Spectral Cleaning Editor might seem a bit complicated, but it is a
very effective tool that previously was reserved for pros. Therefore,
it's worth investing some time to familiarize yourself with this tool.
For Spectral Cleaning to work, the audio disturbance has to differ
clearly from the background. If this isn't the case or only partially
applies, you can try the DeNoiser.
DeNoiser
Introduction 21
What to do, if the single cough turns into a coughing fit that drowns
out the actor's voice partially or entirely? You can't eliminate it using
Spectral Cleaning without also deleting parts of the speaker's voice.
In these more complicated cases, it can be useful to use the
DeNoiser. It's actually designed to remove consistent noise such as
hissing, but can also be used to filter out certain distortions.
Whereas Spectral Cleaning entirely replaces the distortion with
surrounding sounds, the DeNoiser filters out a specific sound
signature, a so-called "Noise sample", from the frequencies and does
not affect the rest of the material. This way, it can filter out a specific
distortion without affecting the background.
The DeNoiser can be accessed via the expert button located in the
"Auto noise reduction" module.
www.magix.com
Page 22
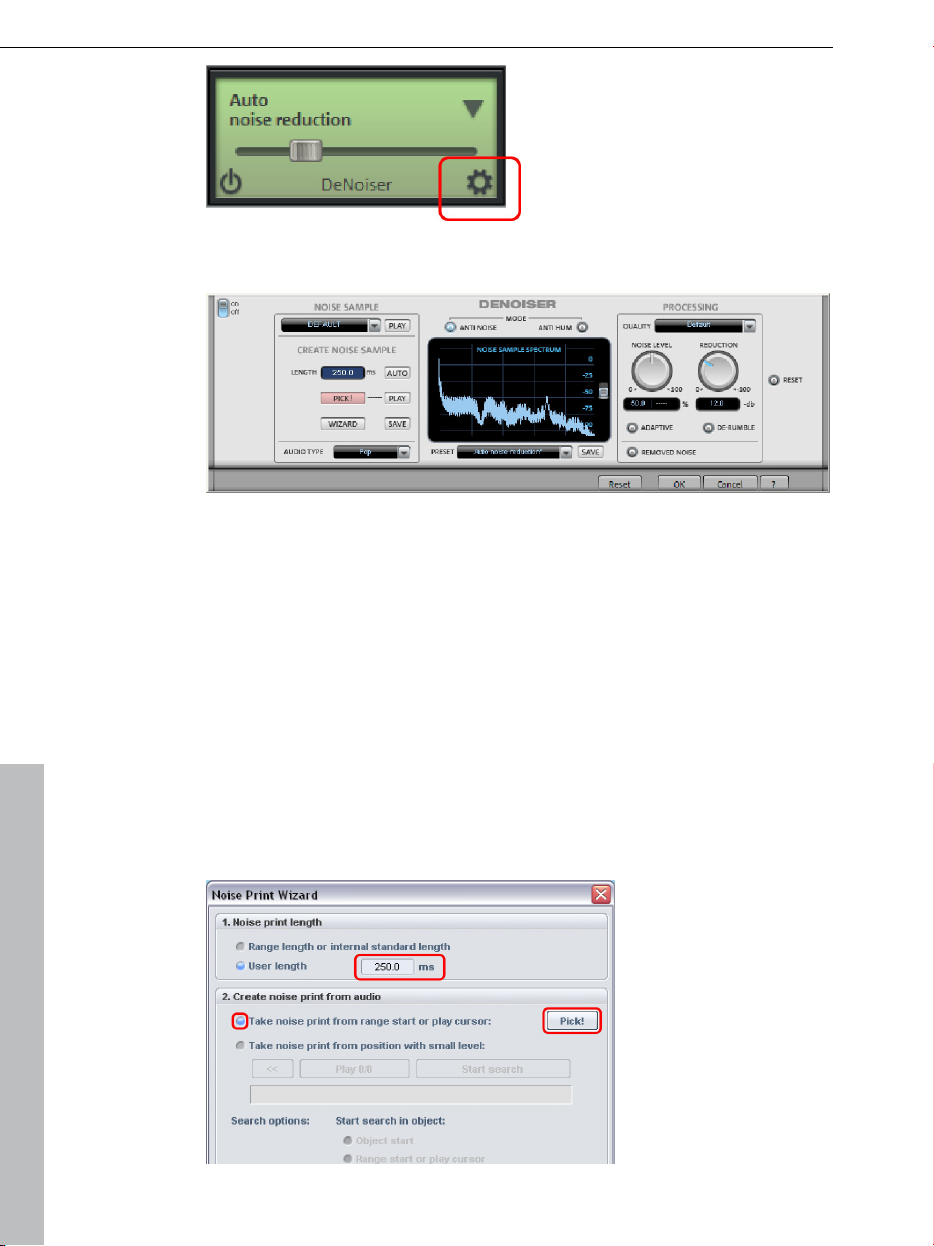
22 Introduction
The associated effect device will be opened:
You can create a sample of the pure audio disturbance in the "Create
Noise Sample" section.
• Position the playback marker directly in front of the audio
disturbance.
• Click on "Wizard" to open the fine settings for the noise sample
generation.
Three settings have to be specified in the Wizard dialog:
• Activate "Take noise print from range start or play cursor".
• Under "User length", enter the length of the distortion that you want
to filter.
• Get the distortion by clicking on the "Pick!" button.
www.magix.com
Page 23
• Click on "Play" in the DeNoiser to check whether the noise sample
really contains only the audio disturbance.
• Turn the "Reduction" knob to the far right and play the section that
needs to be filtered for test purposes using the transport controls in
the main window.
• If you're satisfied, close the DeNoiser by clicking "OK".
Sometimes chirping artefacts occur in the DeNoiser. If this is the
case, please adjust the settings. More information on this can be
found in the PDF manual or the program's Help file.
Cut out undesired passages
Now let's take a look at some special kinds of audio disturbances.
For example, if the microphone was knocked against something by
mistake or crackling, crashing, rustling, which can't be removed
satisfactorily with the DeNoiser, because the background noise is too
irregular, for example.
These kinds of noises as well as longer undesired passages can be
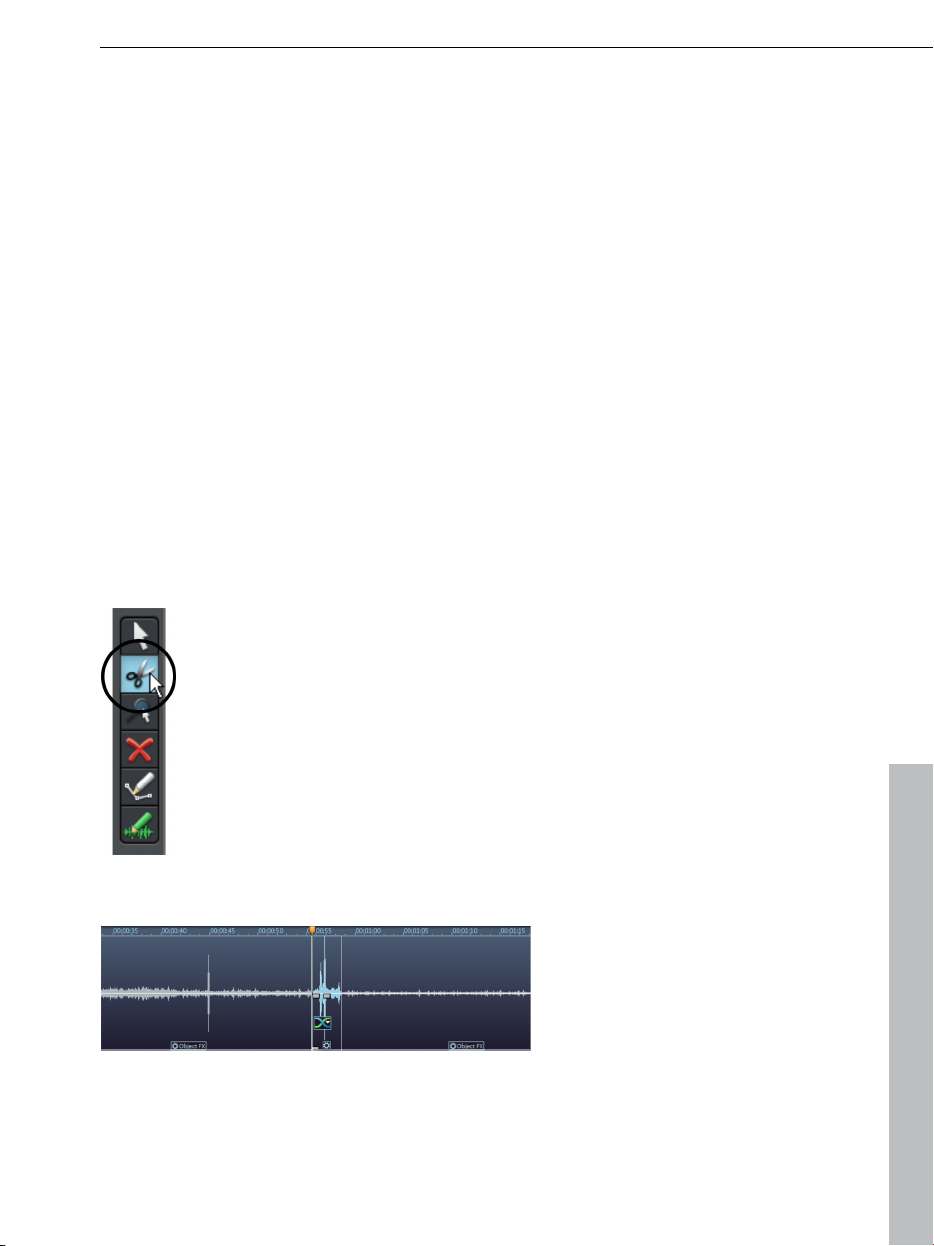
cut out using the scissors tool in the left hand corner of the track
window.
Introduction 23
• Select the scissor mouse mode.
The mouse pointer turns into a pair of scissors. If you
move it across the track, the playback marker is moved
with it.
• Play the audio track and search for the section that you
want to cut out.
• Click before and after the section to cut at these points.
This way, three separate objects are created on the track.
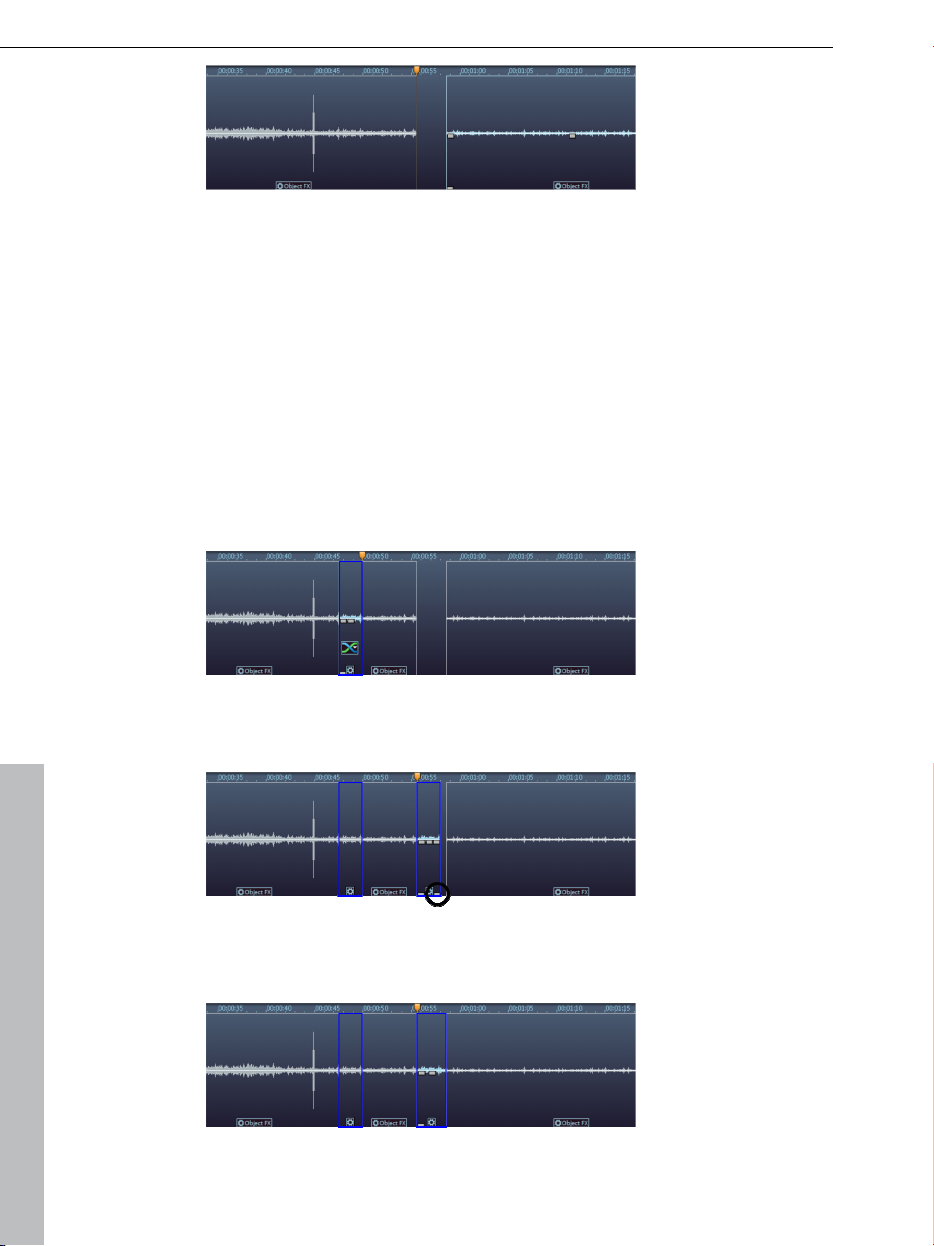
• Switch back to standard mode, select the object in the middle and
delete it by pressing the Del key.
www.magix.com
Page 24
24 Introduction
A gap is created in the audio track. The problem is that where the
disturbance used to be there is now absolute silence, which is
irritating too. It's not enough to simply cut out the audio disturbance,
you have to add another sound into the gap, even if it's only very
quiet hissing that is audible throughout the rest of the material, i.e.
the room sound. Therefore, fill the gap with quiet material that
features only hissing, for example.
• Search for a suitable passage in a different section of the audio track
that is roughly as long as the gap. Cut the audio track before and
after the passage.
• Switch back to standard mode and select the passage. Copy it to
the clipboard (Ctrl + C or "Edit > Copy").
• Set the position line to the beginning of the gap and insert the
passage (Ctrl + V or "Edit > Insert").
• Move the bottom right handle on the inserted object to adjust its
length to the gap. (It will latch into the cut edges).
This way, the distortion is "patched". All of the cuts can be fine tuned
www.magix.com
Page 25
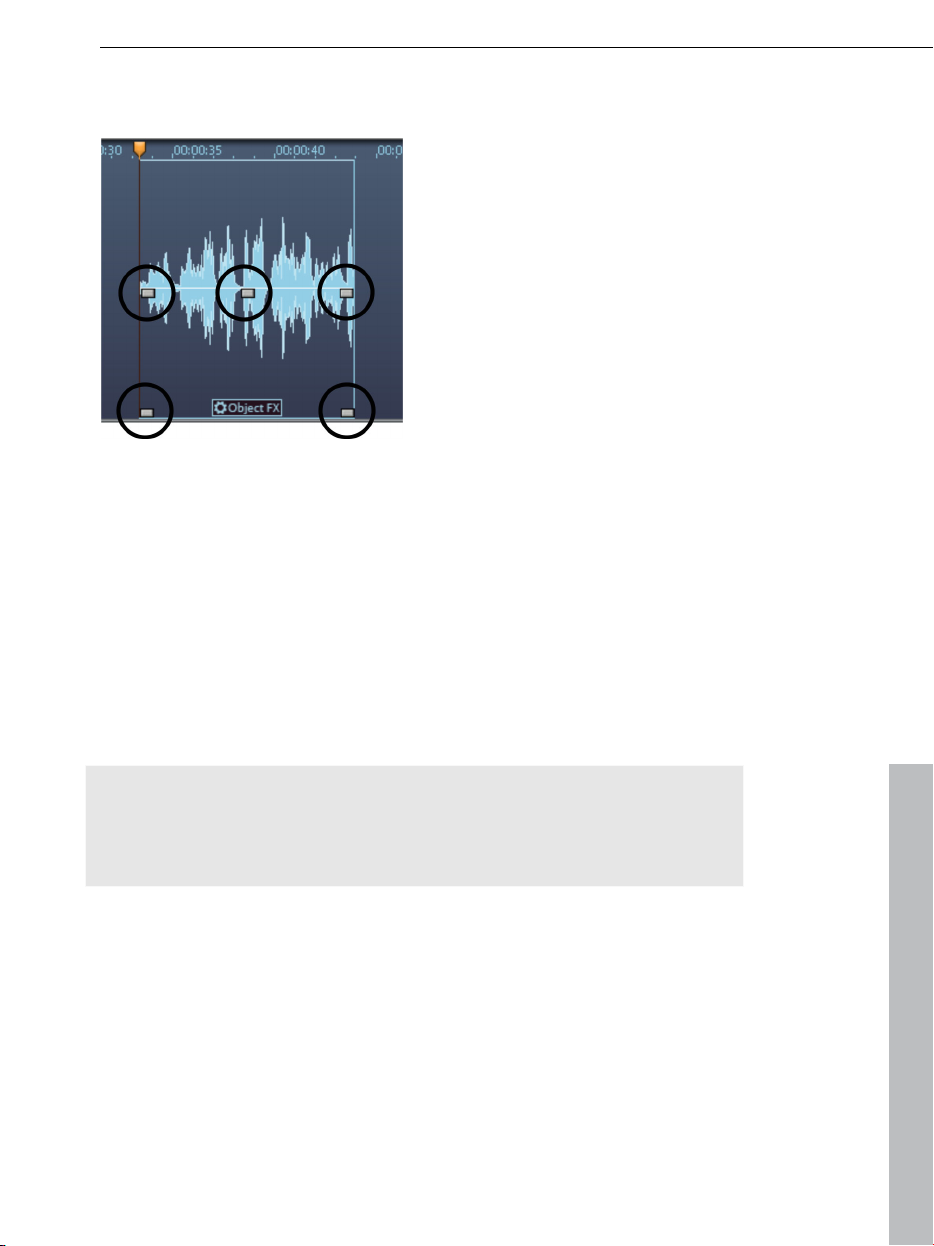
retroactively using the object handles to avoid crackling at the
transitions.
• There are handles at the top left and right hand corners, which allow
you to create fade ins and outs.
• The handle at the top center is for adjusting the volume. If you pull it
downwards, the volume of the object is reduced.
• The handles at the bottom left and right corners adjust the object's
borders. You can fine tune your cuts by extending or contracting the
object.
Introduction 25
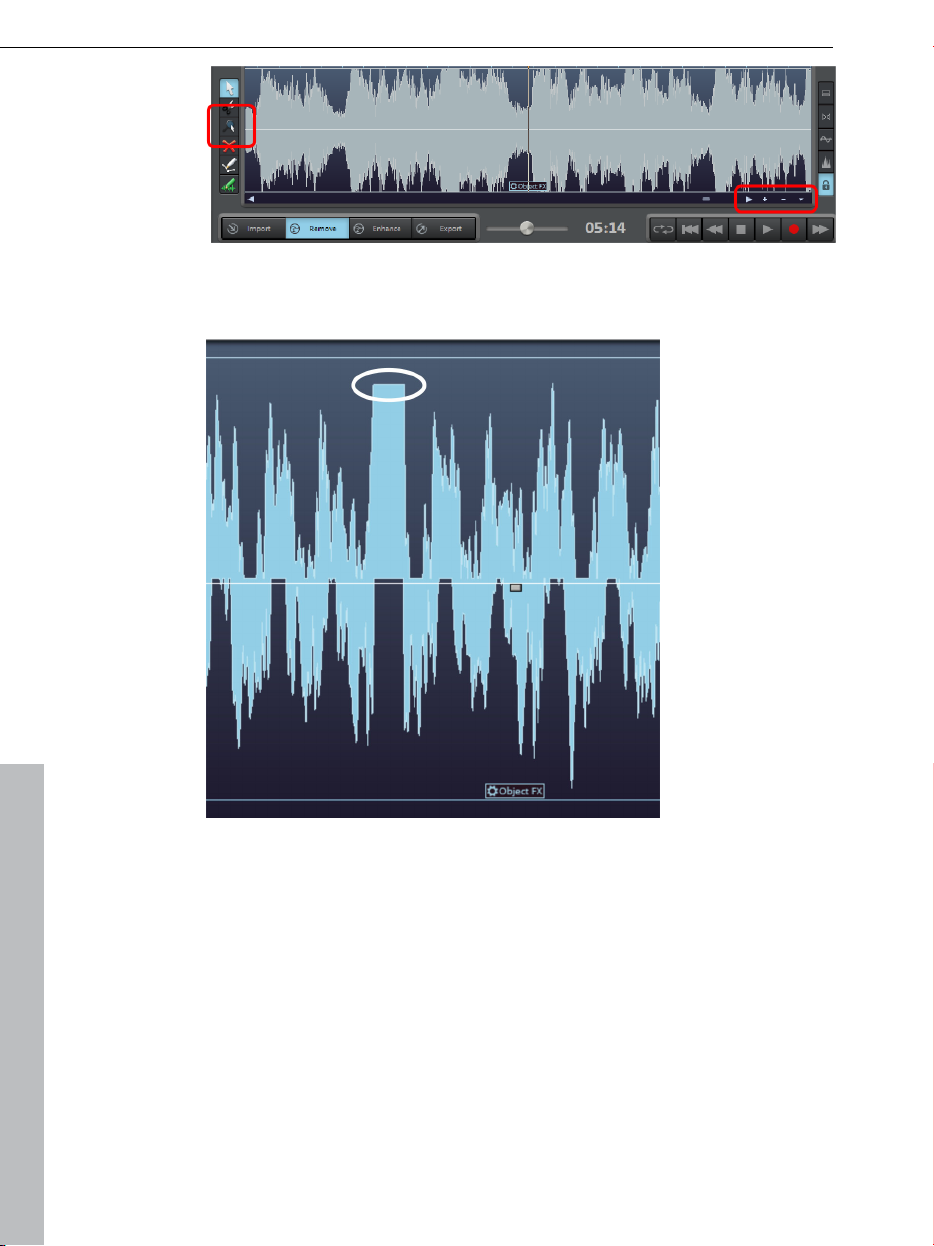
Retouch short distortions such as cracks
Let's take a look at a quick and elegant way of retouching short
distortions such as cracks and clicks using a pen tool.
Note: You can't undo editing that you did with the waveform drawing
tool (no "Undo" function). After selecting the pen tool, you can decide
whether, for safety purposes, you want to edit in a copy of the file or
directly in the original material.
• Search for a section in the material where you hear crackling and set
the play cursor to that position.
• Zoom into that section so that you can see the details of the
waveform display. You can either use the zoom button in the bottom
right corner of the track window or the zoom mouse mode.
www.magix.com
Page 26
26 Introduction
• Take a close look. Can you see the crack? Look for a "mountain"
that is flat on top or exceeds its surroundings.
www.magix.com
Page 27
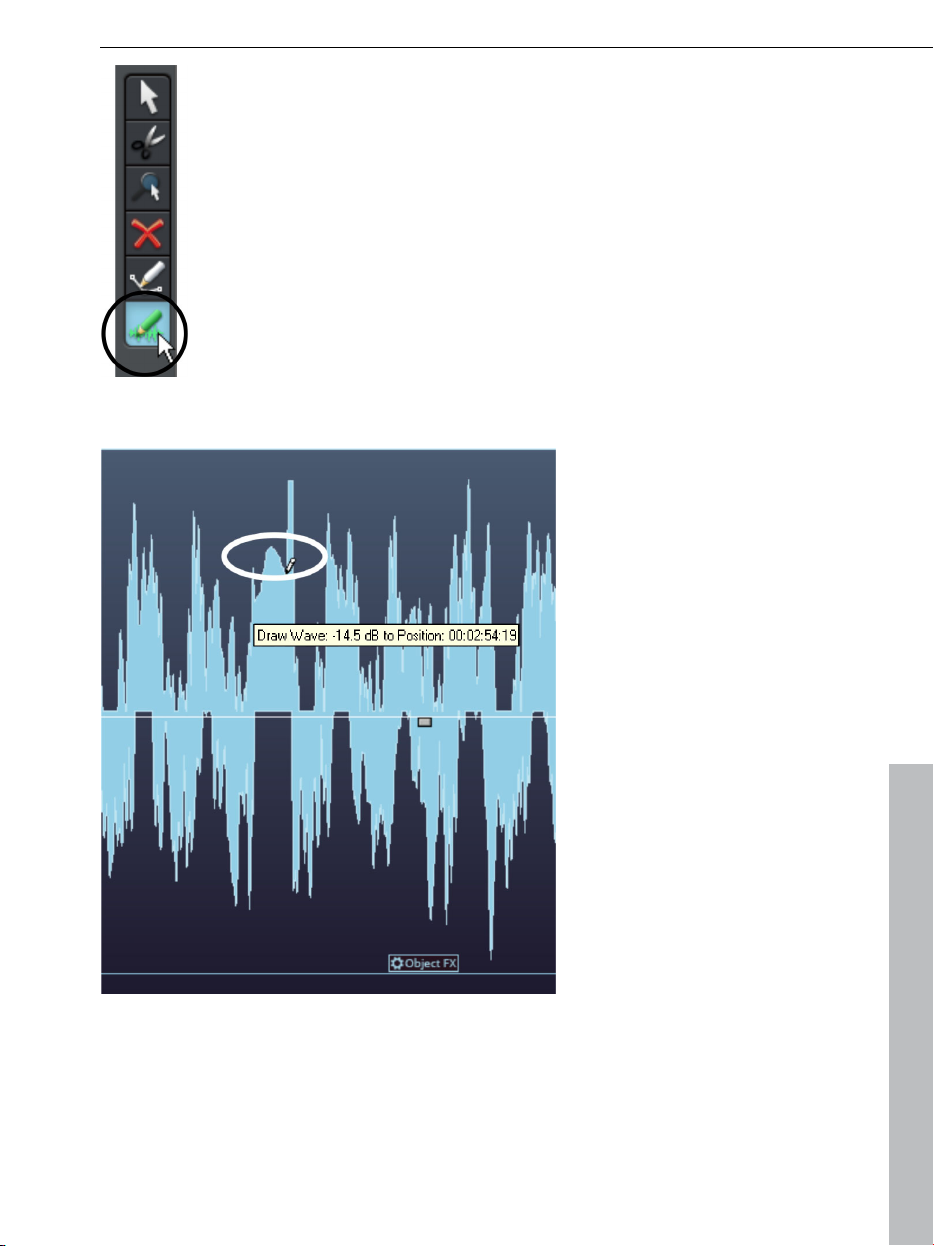
• Select the Draw Wave shape mode.
The mouse pointer turns into a pen which you can use
to draw directly into the waveform. If you click, the
zoom level increases automatically and you can draw.
It's about trying to turn the flat form a bit more into a
peak and moving it slightly towards the bottom.
This way, for example:
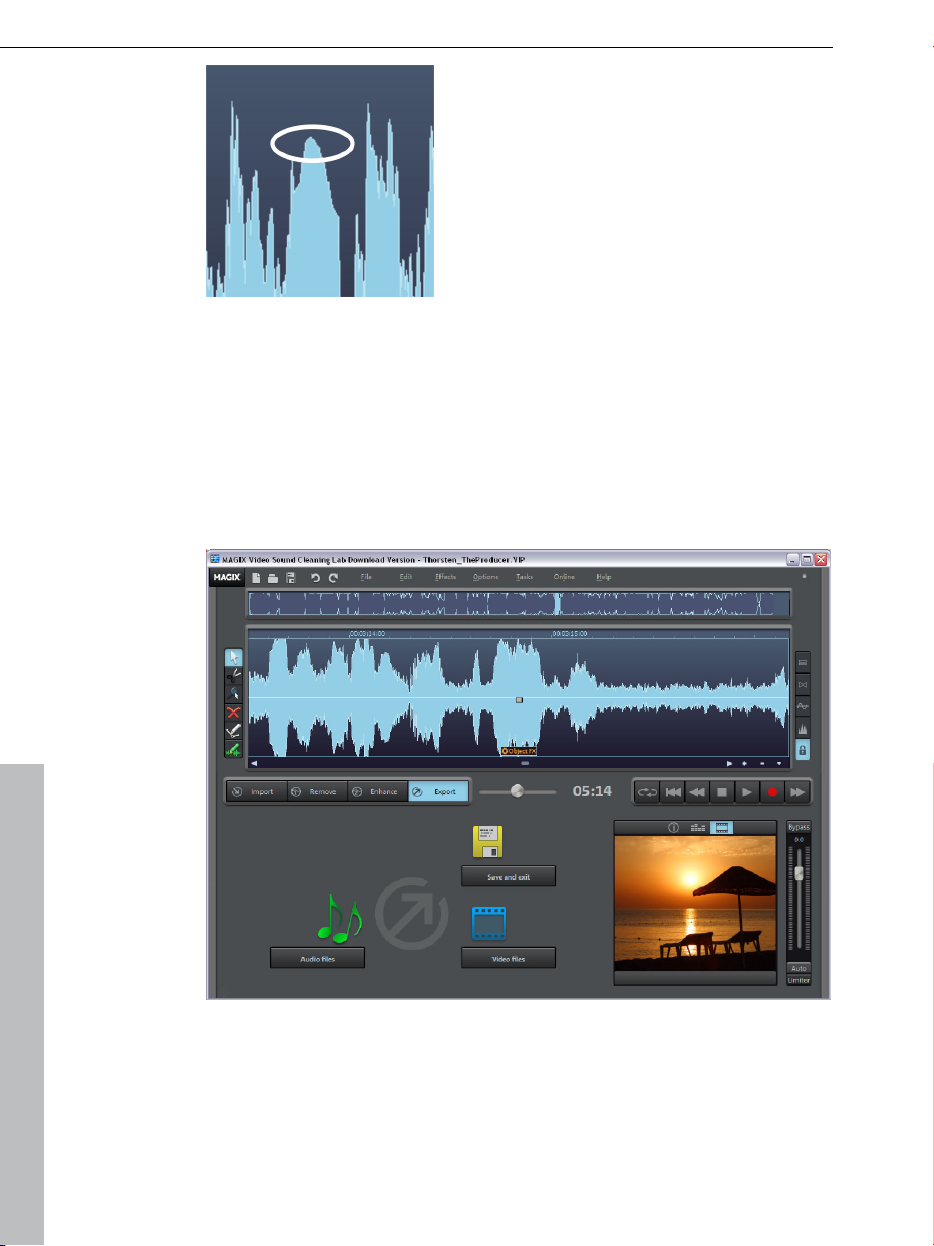
Introduction 27
As a result, the critical section looks like this:
www.magix.com
Page 28
28 Introduction
If you play back the material now, the cracks have disappeared.
Export video files
After you have "cleaned up" the material, you can export your video,
either to do further editing in your video editor of choice or to use it in
other ways.
• Switch to the "Export" workspace:
This workspace is very similar to the "Import" section. You have two
options here as well: You can either export the audio file only or the
entire video.
You can also save the project, which is recommended if you wish or
have to edit the files later on.
www.magix.com
Page 29
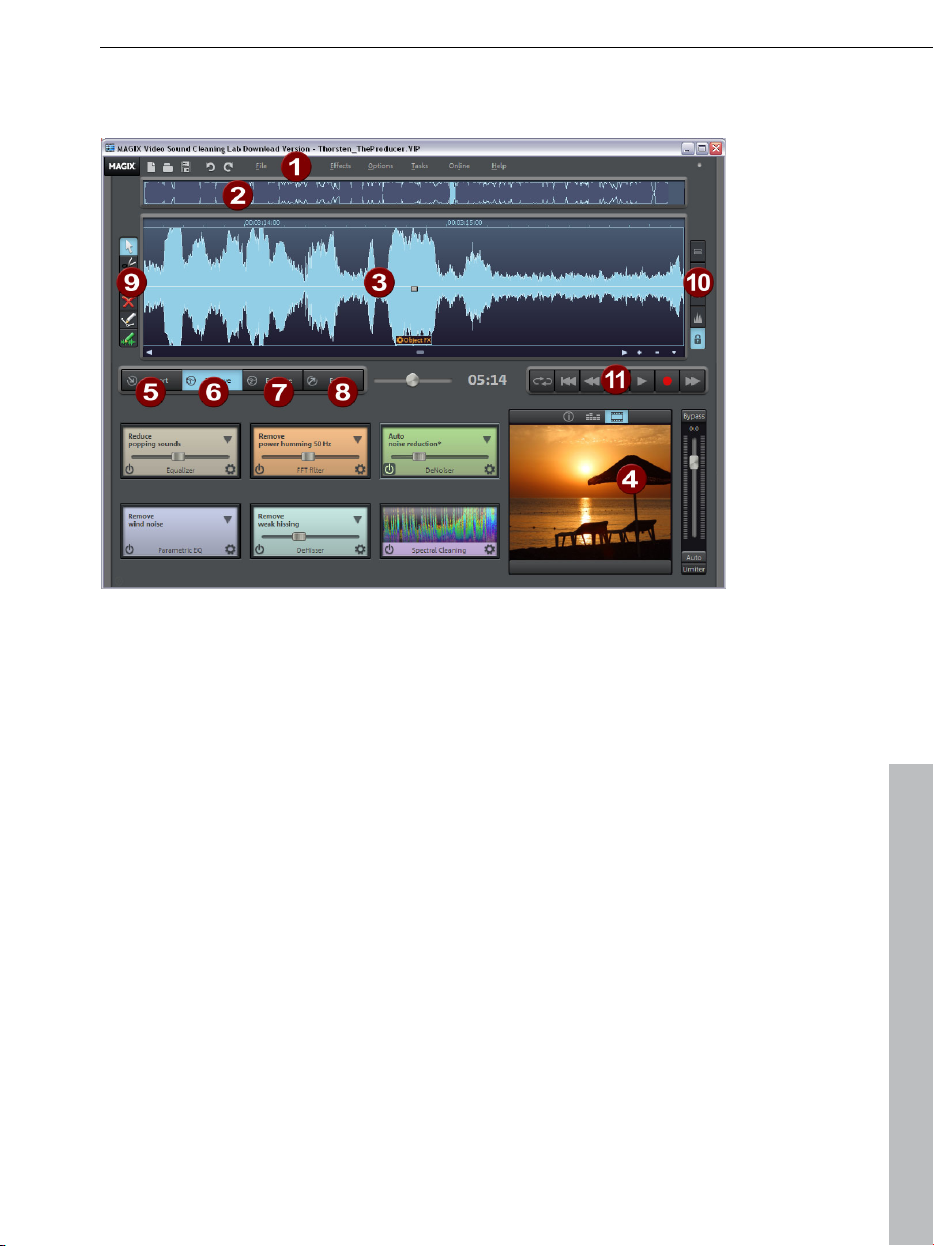
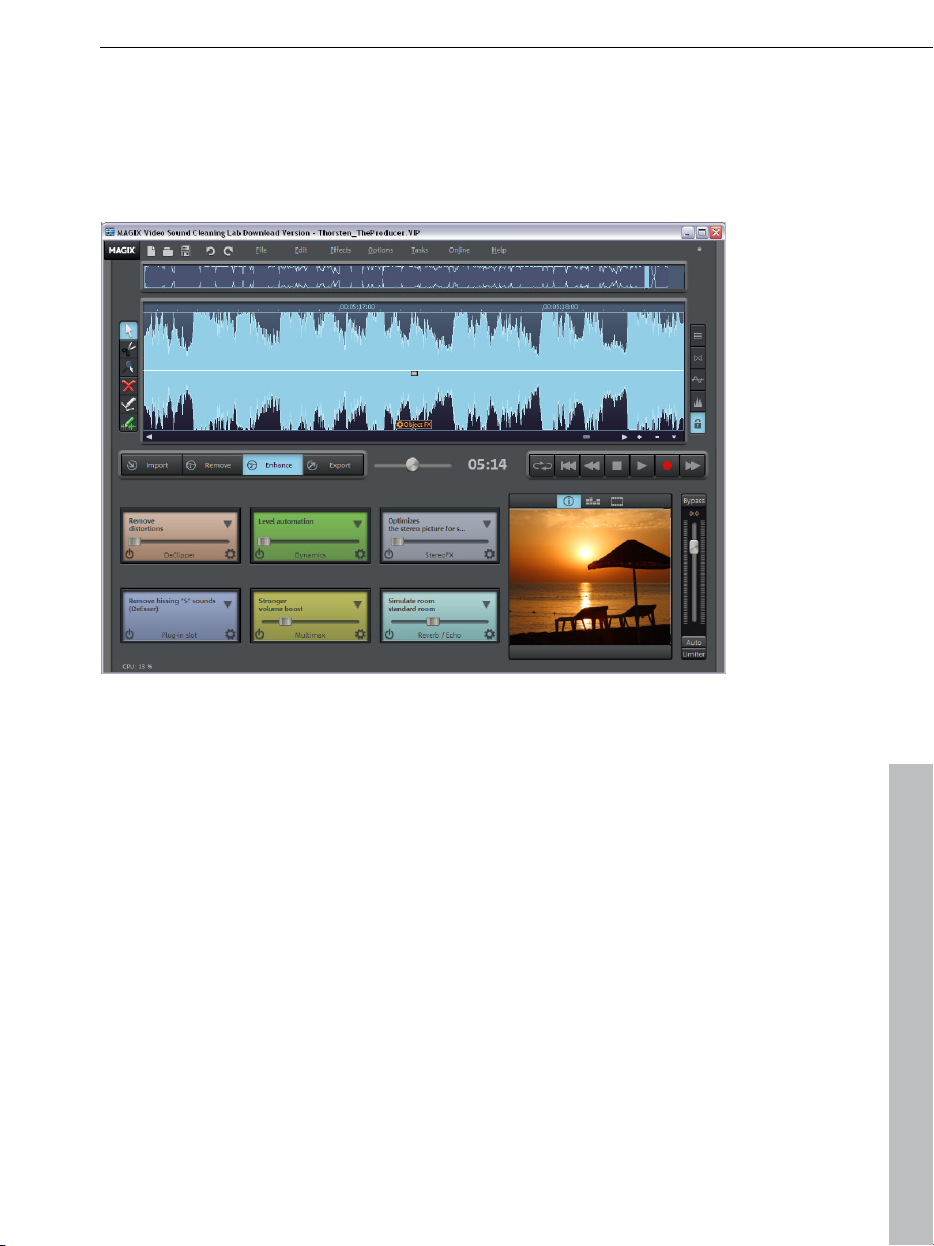
Overview of the program screen 29
Overview of the program screen
1. Menu Bar: Here you'll find all functions of MAGIX Video Sound
Cleaning Lab as menu options.
2. Overview track: The entire audio track is displayed here. The
area that you are editing is selected.
3. Workscreen: A section of the audio track is displayed in
enlarged view allowing you to edit the audio material in detail.
4. Preview monitor: The video is displayed at the position of the
playback marker.
5. Import: This is where you can load video or audio files into
MAGIX Video Sound Cleaning Lab.
6. Remove: In "Remove" view, you can delete audio disturbances
from your audio material in the track.
7. Enhance: Use the "Enhance" view to optimize the audio
material in the track.
8. Export: Here you can export your video material as a file in
order to use it somewhere else.
9. Mouse modes: Select a suitable tool here: Arrow (Standard
mode), Scissors (Cut mode), Magnifying glass (Zoom mode),
"X" (Delete mode), Pen 1 (Draw volume curve mode) or Pen 2
(Draw Wave shape mode).
10. Display: You can choose between different display modes and
add a second track.
11. Transport control: Controls playback
www.magix.com
Page 30

30 Track window and constant control elements
Track window and constant control elements
This chapter describes the display and control elements which are
available to you independently from the selected section in MAGIX
Video Sound Cleaning Lab
Upper buttons
The buttons located above the track display provide quick access to
important program functions.
Using this option you can set up a new MAGIX Video Sound
Cleaning Lab project (view page 50).
Keyboard shortcut: E
Using this option you can load previously saved projects (view
page 50).
Keyboard shortcut: O
The current project (view page 50) is stored under its given
name. If there is no name chosen, the program opens a file
requester, where the path and name can be determined.
Keyboard shortcut: S
In the project you can undo the last changes you made. This
way, it's no problem if you want to try out critical operations. If
you don't like the result, you can always revert to the previous
state using "Undo".
Keyboard shortcut: Ctrl+Z
Redo "undoes" a previous Undo command.
Keyboard shortcut: Ctrl+Y
www.magix.com
Page 31

Track window and constant control elements 31
MAGIX News Center
MAGIX can supply you with all of the latest information about
your software. In the MAGIX News Center, you will find all of
the links to current online tutorials as well as tips & tricks on
individual topics or software application examples.
You will also be informed of the availability of brand new updates and
patches for your program as well as special offers, contests, and
surveys.
The news is split into three color-coded sections:
• Green for practical tips & tricks for your software
• Yellow reports the availability of new patches and updates for your
product
• Red for special offers, contests, and surveys
• And if there are no new messages, then the button will be grey
All available information is shown as soon as you click on MAGIX
News Center. If you click on one of the news items you will be
forwarded to the corresponding website.
The master track
Audio material display
All of a project's audio material is displayed in the master track of the
track window as a waveform. The waveform corresponds with the
acoustic properties of the material. This means that there isn't
anything to listen to at places where there isn't anything visually;
higher waves mean high volumes. The tracks waveform display forms
the most important basis for locating specific passages.
The display is compressed, meaning that the waveform is displayed
as a ratio of loud passages to quiet passages. This ensures correct
display for quieter sections at the beginning or end of a song.
Position line
During playback a thin line will move horizontally from the left to the
right over the master track. This is the position line, which indicate,
which part of the wave form is currently reproduced.
www.magix.com
Page 32

32 Track window and constant control elements
The last starting point of the playback is indicated by a small triangle
in the master track. The position line will jump back to that position,
once playback has finished.
Timeline
The timeline is located above the track. It shows the time position in
the project. The measurement units can be selected from the
"Options" menu. You can choose from: samples, milliseconds,
hours/minutes/seconds, and CD frames.
The markers are also displayed in the timeline. They can be
accessed, moved or deleted with the mouse.
Navigation
The task of the transport controls is to help you navigate through the
audio material in the master track. Here you can find functions that
you will already now from your old tape recorder. You can get more
information in the chapter Transport controls (view page 35).
The simplest solution, however, is to navigate directly in the track: a
mouse click on the time ruler will set the starting point for the
playback (even if playback is already running!) The space bar starts
and stops playback.
Overview track
The overview track lets you select the project section which is
displayed in the track display (displayed in blue).
The tracks window now includes an additional overview track with a
reduced display of the complete project. Now you can work at a
certain position or on a certain song and keep an overview of the
complete project and quickly navigate to areas that need work. In the
overview track, you can also select the song or position in the
material to be depicted in the track window.
www.magix.com
Page 33

Move the section to the part of the project simply by clicking in the
overview track; the zoom level remains the same. Define a new range
in the overview track by clicking and dragging. Vertical yellow lines
indicate the markers in the overview track.
Use the "Overview mode" entry in the "Options" menu to show/hide
the overview track.
2 Tracks (Zwei Spuren)
Die zusätzliche Spur kann notwendig werden, wenn Sie zusätzliches
Audiomaterial zum Video hinzufügen wollen, zum Beispiel Musik oder
Audiokommentare.
Audioaufnahmen erfolgen immer auf der zweiten Spur, wenn sich auf
der ersten Spur bereits Audiomaterial befindet. Wenn Sie über Import
Audio (view page 45) zusätzliches Audiomaterial laden, wird es in der
ersten Spur ganz hinten angehangen. Sie können es dann auf die
zweite Spur verschieben.
Track window and constant control elements 33
Mit der Schaltfläche „2 Tracks“ kann eine zweite Tonspur
angezeigt werden.
Note: To move objects, the "Lock all objects" option must be
deactivated. Under certain circumstances, sound and video
might become out of sync if you move certain audio objects.
Untereinander liegendes Material wird gleichzeitig abgespielt. Wenn
dies erwünscht ist, sollte auf den Lautstärkepegel an dieser Stelle
geachtet werden, denn gleichzeitig gespielte Objekte addieren sich in
der Lautstärke. Mit der Voice-Over-Funktion können Sie den Videoton
automatisch an diesen Stellen absenken. Mehr dazu siehe
Voice-Over (view page 55).
Auf der unteren Spur können die Objekte verschoben werden, ohne
die nachfolgenden mitzuverschieben.
Stereo
Use the "Stereo" button to split the stereo characteristics of the
audio material into two channels in the waveform display.
This view is useful to optically monitor processing of the material in
the stereo panorama, or to locate precise crossover points during
editing operations.
www.magix.com
Page 34

34 Track window and constant control elements
Volume curve
You can activate a volume curve (view page 55) with the
"Volume curve" button.
Spectral display
In addition to the waveform display, this button allows a
spectral display of the audio material to be shown as well.
Spectral display equates the X axis (horizontal) to the time dimension.
In contrast to the waveform display, whereby the height of the
waveform only indicates the total level of the signal, the spectral
display shows the level of each of the audio signal's individual
frequencies. The actual level of each frequency is indicated by the
color of the points in the spectrogram image.
Different color palettes can be selected in the menu "Options ->
Spectral waveform display". "Display values scale" in the same menu
("#" key) shows an object's frequency scale.
Spectral cleaning is significantly more processor-heavy than the
normal waveform display, so redrawing after a section changes is
always slightly delayed. This delay is increased the further the zoom
is extended, since MAGIX Video Sound Cleaning Lab needs to
include more and more data for calculation of the display. For this
reason, spectral display is only available from a certain zoom level.
Spectral display of the audio enables specific disturbances in the
audio to be detected. Clicking can be recognized by vertical lines
across the entire frequency spectrum; continuous disturbing sounds
www.magix.com
Page 35

can be detected by horizontal lines.
More detailed explanations can be referenced in the section "Spectral
cleaning (view page 69)".
This display also makes it easier to find sections in a song quickly,
since instrumental changes can be clearly seen in the spectrum. On
the other hand, the waveform display will not indicate changes if the
volume level does not fluctuate.
Lock all objects
If this button is activated, the objects on the master track can't
be moved.
This option is activated by default to prevent that you move the audio
track of a video inadvertently and image and sound become out of
sync (the sound starts too early or late in the video). This option
usually doesn't require changing; there are very few cases where it is
useful to remove this lock. More on this in the section Cut sound.
Enlarge track window
Track window and constant control elements 35
The entire track window can be enlarged to include the entire
screen. Click on the corresponding button on the right-hand
side.
Transport control
Use the transport control to control the playback position in the
project. The position line, which indicates the current playback
position, is a thin vertical line located in the track window.
Quickly move the position line within the project by using the position
slider.
The time display indicates the current playback
position (using the measurement unit selected via
Options > Measurement units (view page 108))
www.magix.com
Page 36

36 Track window and constant control elements
Use the transport control to start and stop playback, move forward
and backward within the project and set the position line back to the
very beginning.
Loop: Clicking on the loop button starts playback an endless
loop.
This function is useful if you wish to monitor transitions or
effect settings in critical sections and therefore want to listen
to certain ranges or objects repeatedly. You can extend or
shorten the loop range in the Timeline by using the mouse or
by entering changes numerically in the "Playback parameters"
window (options menu).
Return to start: Resets the position line to the start of the
project (also works during playback).
Rewind/Fast-forward: Rewind/fast-forward first starts slowly,
then quickly speeds up if you continue to hold the rewind or
FF button. This corresponds to the functionality of a tape
recorder which also takes some time to gain speed.
Alt + Click on this button lets you jump to the next or
previous marker.
Stop: Stops playback, the position line jumps back to the
starting position.
Play: Starts playback, clicking again stops playback at the
current position.
Recording: Opens the record dialog where you can set the
recording format, level etc. The actual recording is started in
the record dialog.
Control functions of the keyboard and mouse:
• The space bar starts or stops playback.
• A simple mouse-click in the timeline above the track moves the
position line to the corresponding position (also works during
playback).
• The Pos 1 key moves the position bar back to the start of the
project.
• Use the position slider to quickly move the playback cursor within
the project.
• Other special keyboard commands are available to jump between
www.magix.com
Page 37

Track window and constant control elements 37
markers and object borders quickly, see Zoom commands (view
page 40).
Monitor
The monitor has three different views:
Info box
Info box. The info box provides
information on how to use the selected
effect.
Analyzer. The analyzer displays the audio
material graphically.
Video monitor. The video monitor
displays a preview of the loaded video.
The Info box offers fast and immediate
help when working with MAGIX Video
Sound Cleaning Lab.
Please click on an effect to receive
information on purpose of use,
functionality, correct handling and
possible sources of error.
Clicking on an object displays the applied Object effects (view page
53), if available. The info box also offers useful tips for other program
areas.
www.magix.com
Page 38

38 Track window and constant control elements
Analyzer
Audio material being played is graphically illustrated in the visualizer.
You can choose between the following display options: Peak Meter,
Oscilloscope, Phase Correlation, Spectroscope and Spectrogram.
The visualizer can be modified to your taste. Click "setup" and in the
context menu, choose from a number of options, including the
update speed, color, etc.
Setup
Value range/display: You can adjust the minimum and maximum
values for the display of the visualization in all modes. The numeric
peakmeter display is activated and deactivated via the Peakmeter
value menu item. The option "Non-linear dB scale stretches the range
of interest slightly below 0dB. An additional RMS value display (visible
as a small white bar in the peakmeter) can be activated and
deactivated via the RMS menu item.
Speed: Here you can define the speeds of all visualization modes.
However, you can also customize the speeds. The measurement
units for a drop are specified in 10 dB (ms/dB).
Peak hold: Here you can enter a time value for holding and dropping
of the peak levels. You can also enter these time values manually in
"ms".
Frequency bands: Here you can enter the number of frequency
bands displayed in the spectroscope. Warning: Higher band numbers
means a higher CPU load and thus reduced PC performance or
portable visualization display.
www.magix.com
Page 39

Video Monitor
Track window and constant control elements 39
The video monitor displays a preview of
the loaded video. The playback position
in the project corresponds to the position
in the video. The video monitor,
therefore, serves as a kind of orientation
help so you can see where in the video
you are currently working.
Zoom
The wave shape display allows you to recognize certain parts of the
material from the shape. For many tasks it is quite useful to enlarge
the wave shape display. For detailed work, e.g. editing with the
scissor tool, there are several zoom options:
Quick zoom: For quickly zooming it is sufficient to click in the
timeline, keep the mouse button pressed and move it up or down.
This way you can quickly zoom the cursor in and out at any position
without releasing the mouse.
This enlarges the central area of the track window. Clicking on the
adjacent triangle opens the zoom window. Here you can open zoom
and navigation commands (view page 40).
Zoom mouse mode enables more precise zooming.
With it you can click on the range of the display you want to enlarge
or reduce. Left-clicking enlarges the view (zoom in), the right mouse
key zooms out. The "A" key quickly restores fullscreen view of the
project.
You can use the slider to move within the project. Moving the scroll
bar forward and backward quickly scrolls within the project. Dragging
the scroll bar ends adjusts the size, which also zooms in and out of
the project.
www.magix.com
The +/- zoom buttons at the bottom right corner of
the track window zoom the display.
Page 40

40 Track window and constant control elements
Zoom settings
Command Keyboard shortcut Description
Play/Position marker
Commands for quickly
editing the playback
position
Marker left Alt + right
Marker right Alt + left
The play marker can be
moved quickly between
the markers.
Object border left Shift + Alt + right
The play marker can be
quickly moved from
object edge (object
Object edge right Shift + Alt + left
Zoom ranges
start and end) to object
edge.
Show all A The entire project is
visible.
Zoom 1s 1
Zoom 10 s 0
Zoom 60 s 6
Zoom 4 min 4
The visible section of
the project is quickly
set to the selected
value.
Zoom 10 min Shift + 0
Vertical zoom
Vertically zooms in and
out of the wave shape.
Zoom into waveform Ctrl + Cursor down
This is useful for
locating the crossover
Zoom out of waveform Ctrl + Cursor up
point (for precise
sample editing).
www.magix.com
Page 41

Track window and constant control elements 41
Mouse mode
"Mouse modes" are your tools for working in the track
window of MAGIX Video Sound Cleaning Lab. Depending on
which mode you choose, the mouse pointer and its function
will change if moved to the track window.
For more information on mouse modes, please read the
section Cut sound – Working with objects
Standard mouse mode
The standard mouse mode is set as default. You can take
care of all important object editing with this mode.
Right-clicking on an object opens the so-called context menu from
which you can select important editing options for the object.
Keyboard shortcut: V
Cut mouse mode
In "Cut" mode, the mouse pointer turns into a pair of scissors.
In this mode, you can cut any object at the mouse position.
This creates two separate objects that can be edited independently
of one another.
If you move the mouse across the waveform display of the audio
material, the position line will be moved together with the mouse
pointer. This allows you to carefully monitor the position where you
want to cut. To perform precise cuts, we recommend zooming into
the waveform display with the magnifying glass before using the cut
mode.
Keyboard shortcut: H
Zoom mode
Right mouse button: Zooms out of the project.
Left mouse button: Zooms into the project.
www.magix.com
Page 42

42 Track window and constant control elements
"Delete objects" mode
If the "Delete objects" mode is activated, the mouse pointer
turns into an eraser. In this mode, objects can be deleted from
the project.
In Standard mode you can also select an object and press the Del
key on your keyboard to delete it.
Keyboard shortcut: Ö
Draw volume curve mouse mode
With the Draw volume curve mode you can "draw" any
volume curve using the mouse.
This allows you to "draw" any volume curve using the mouse. This
way, you can create irregular volume progressions quickly.
To delete volume curve points, double-click on the corresponding
point or simply click on the point in "Eraser" mode (view page 42).
You can delete several points by holding the Shift key and clicking
the first and last points so that all points in between are selected.
Selected volume points have a blue frame. You can now delete the
points with the Del key.
Wave drawing mode
Repair short distortions such as crackling directly in the
wave form of the audio file by using the Wave drawing
mode. Such distortions usually only last a few sample
values, so you can use the mouse and try to draw along the
original waveform without the distortion.
There is an automatic zoom function in the wave form display when
you switch into the Wave drawing mode, so sample values become
visible.
Warning: Unlike other editing of the master track which only affects
the project, this mode lets you work directly with the Wave audio file,
i.e. on the recorded raw material, which is changed directly and
permanently. Create a backup copy to undo changes. Back up
copies are created automatically when working with MP3 and other
compressed formats, since such files have to be converted into the
Wave format for this function.
www.magix.com
Page 43

Track window and constant control elements 43
Volume controller/auto button
This controller sets the playback level of the track. Before exporting,
the project should be set as loud as possible in order to receive an
optimally calibrated recording level. The "Auto" button below the
volume control is for automatically optimizing the volume
(normalizing).
In order to set the volume of the project as high as possible, place
the position line just before the loudest part of the project and start
playback (the loudest position can be found by locating the highest
peak of the wave shape display).
After you have played the loudest part, click on the "Auto" button
below the master volume control. MAGIX Video Sound Cleaning Lab
automatically adjusts the volume so that the loudest part of the range
that was just played is exactly 0 dB, i.e. the maximum volume.
Note: The volume controller adjusts the volume of the project, i.e. the
volume that is finally used for exporting. If you want to set the level
lower here (e.g. because you are talking to someone), the project will
also be exported quieter. It is better to adjust the monitor volume with
the sound card mixer or directly on your stereo system (e.g. monitor
speakers) and to leave the volume control at the position
recommended by the "Auto" button.
To adjust the monitor volume in the sound card mixer, you can click
on the loudspeaker symbol in the tray (at the right bottom corner of
the screen). However, you can also adjust it directly in the "Playback
parameters" (view page 106) dialog.
LED Display
The LED display is a peakmeter and shows you the maximum peaks
during the playback of the audio material on the track. In the stereo
tracks, the left LED-chain will indicate the level of the left channel and
the right LED-chain the level of the right channel. Both chains will
show the same values while working with mono tracks.
Bypass FX
Switch all effects on or off with this button to directly compare the
original with the processed audio.
www.magix.com
Page 44

44 Track window and constant control elements
Limiter
The limiter can be switched on to reduce clipping. This
device works sound-neutrally and provides a final guard
against extreme levels.
Status Line
On the lower edge, you will see a display of the current system load.
If video playback is "jerky", check whether system load is at 100% or
more. If this is the case, you should reduce the number of real-time
effects, use the "Apply all Realtime Effects" (view page 98) function or
Load an optimized video (view page 46).
www.magix.com
Page 45

Import 45
Import
Audio files
MAGIX Video Sound Cleaning Lab can
load audio files in the following
formats: WAVE, Quicktime (*.aif), Ogg
Vorbis (*.ogg), MP3, WMA and FLAC.
To do so, click the respective button
in the import section, "Audio files",
and the "Load audio file" dialog will
open.
Use this function to add an audio track to a video that doesn't have
one or to add additional audio material to the video. You can access
any folder containing audio files here. Every file listed can be
previewed and loaded into a MAGIX Video Sound Cleaning Lab
project. If the project already contains a video with an audio track,
the loaded file will be inserted behind it. In this case you will have to
move it to the second track (view page 104).
Note: To move objects, the "Lock all objects" option must be
deactivated. Under certain circumstances, sound and video
might become out of sync if you move certain audio objects.
You can also load several files simultaneously. Just like with Windows
Explorer, you can extend your selection with "Ctrl" + click and select
a series of files with "Shift + click".
Keyboard shortcut: W
www.magix.com
Page 46

46 Import
Video files
* a corresponding codec must be installed on your system (e.g.
®
)
DivX
The video's audio track is displayed as an audio object in the master
track and can now be edited. The video is displayed in the video
monitor (view page 39) during playback.
MAGIX Video Sound Cleaning Lab can
load video files in the following
formats: DV-AVI, AVI
*
(*.avi),
Quicktime (*.mov), MPEG 1/2/4
(*.mp4;*.mv4, *.3gp), AVCHD (*.mt2)
and Windows Media (*.wmv).
To do so, click the respective button
in the import section, "Video files"
and the "Load video files" dialog will
open.
Note: The video track of a video file is loaded for display in the
monitor, but can't be edited (cut, for example) with MAGIX Video
Sound Cleaning Lab.
There are two other specific video import options:
• Show video image. If you deactivate this option, the video track is
not loaded and displayed in MAGIX Video Sound Cleaning Lab. At
the end, you can export (view page 85) only the audio.
• Optimize video for smooth playback in video monitor. Some video
formats can be displayed directly in MAGIX Video Sound Cleaning
Lab, whereas others are need to be converted into the internal
MAGIX MXV format upon being opened. Opening them directly is
faster, but places a larger demand on the system. If playback in the
video monitor is jerky, you can use this option to convert the video
into the resource-saving MXV format.
www.magix.com
Page 47

Import 47
Recording dialog
The "Record" button in the transport controls of MAGIX Video Sound
Cleaning Lab opens the recording dialog. You can use the recording
function to add additional comments to the video.
Please read more on this in the section Voice over (view page 55)!
Audio input: Opens the input and level automation (view page 48) for
automatic selection of the correct input signal and level.
Recording level: Displays whether the level of the recorded signal is
correct. Level settings that are too low will have adverse effects on
sound quality, distortions will lead to unpleasant "clippings".
Record: This button starts the actual recording. At the end of the
recording ,you will be asked if you want to use the recording. The
recorded material will be inserted into the second track (view page
104) at the position of the playback marker as an object.
Record pause: Pauses the recording. Click the "Pause" button again
to resume.
Stop: This button ends recording. Advanced...: Opens the advanced
view of the recording dialog (view page 48) for additional settings
options.
Help: Opens the program's help file for the recording dialog.
Close: Closes the recording dialog.
Keyboard shortcut: R
www.magix.com
Page 48

48 Import
Advanced settings in the recording dialog
Capture format: Set the sample rate and bit resolution of the
recorded audio file, and also whether recording should take place in
stereo or mono.
You can also record directly in compressed file formats such as MP3
or OGG VORBIS. Select the format you want to use from the list box,
and use "Format options" to specify details such as the bit rate and
compression method.
Audio input: The button "Sound card settings" opens a dialog with
special settings (view page 49) for whatever sound card is present.
The name of the selected sound card is also displayed. If you are
using several sound cards (or ones with several inputs), you can
select one from the menu.
Timer: Enter a specific time to start the recording, plus the recording
length. The recording won't begin immediately after pressing the
"Record" button, but rather at the specified time. This way,
time-delayed recordings (for example, at night or when you're out)
are now possible. Of course, the system clock has to be set
correctly. If "Record length" is also activated, then the recording will
end automatically after the indicated period.
File name/File path: The name of the audio file that is to be created
and the preset directory path are displayed at the bottom of the
record window. Both can be changed by clicking the folder button.
Simplified...: Simplified version of the recording dialog.
Input and level automation
Every sound card has a least two inputs (microphone and line), as
well as various "internal" inputs for the CD drive or the signal from
another program, for example, Internet radio. With input and level
automation you can automatically select the correct input for your
recording without having to search and adjust the input level in order
to avoid distortions.
To do so, click on "Audio input" in the record dialog. If you had
already connected your source and begun playback, the correct input
will be determined immediately. Otherwise do this now and click on
"Search channel again".
If this didn't work, use the "Windows mixer" button to open the
Windows Mixer and select the channel manually.
www.magix.com
Page 49

Adjusting the recording level is essential when recording digitally via
sound cards in order to achieve optimum sound quality. If the
adjustment is set too high, distortion occurs and the incoming signal
must be reduced. If you reduce input sensitivity, the resolution at
which the analog signal is digitized is also reduced. The level
controllers of your sound card should generally be set as high as
possible in order to achieve optimum results. Yardstick for an optimal
level is the loudest part of the material. The loudest part should be
adjusted to the maximum. You can now adjust the recording level
with the help of the LED display in the record dialog.
You can adjust the level of the source manually using the "Volume"
controller. If you activated "Automatic level adjustment", the level
controller will automatically be set to the correct value.
Record properties
This dialog provides you with information regarding the currently
selected sound card. Supported audio formats of the sound card and
the sound card driver's information is also displayed.
Driver system: Here you can switch between driver types (MME and
WDM).
Import 49
Note: Adjust this setting only if you have problems with audio
playback or recording.
Special: Some sound cards or audio devices (for example, USB
turntables) do not offer mixer support. With the "Monitor input signal"
option you can listen to the sound during recording (monitoring).
"Filter DC offset" allows you to remove the DC offset section (view
page 69) of the input signal, even during recording.
www.magix.com
Page 50

50 Cut sound – Working with objects
Cut sound – Working with objects
This chapter deals with advanced editing of audio tracks of videos.
Audio material in the master track of MAGIX Video Sound Cleaning
Lab is displayed in the form of "objects". The starting point of an
object is assigned to a certain point in the audio or video file. The
length of the object determines the length of the section that is
played. Each of these "boxes" displays the waveform of the
corresponding audio material.
Thanks to the objects, you can cut and edit the material without really
changing the media file that was loaded. This is due to the fact that
objects are really only "Playback instructions" for the file.
By splitting the large object of the loaded video file into multiple
smaller ones, you can edit parts of the audio track separately.
Project
The project (*.vip file) contains all data MAGIX Video Sound Cleaning
Lab uses. It does not contain audio or video data, but only the names
of the imported and recorded files and their storage locations on the
hard drive, all cuts, reductions and most effect edits. For the sake of
brevity, the object display on the tracks is subsequently referred to as
a project.
Split objects
You can split up an object into several parts to edit certain sections
of the audio track in detail. To do so, set the position line to where
you want to split the object (use the transport control or click into the
timeline). Go to the "Edit" menu and select "Split" or press the t key.
If you prefer working with the mouse, use the cut mouse
mode (view page 41).
If you split an object, a short transition (view page 52) ("Cross fade")
is created automatically at the position of the cut to avoid crackling
being caused by the cut.
To find the best parts for object cuts, we recommend working with a
www.magix.com
Page 51

zoomed wave shape display. The magnifying glass is an ideal tool for
such purposes. Left-click into the wave shape display with the
magnifying glass tool to enlarge it, right-click to reduce the size
again.
Cut sound – Working with objects 51
Change object volume
The handle at the top center can be used to adjust the volume of the
objects. You can increase or reduce the volume for individual
passages in the video.
Reducing and increasing the length of objects
All objects can be shortened by dragging the bottom handles
inwards. This way, objects can be shortened without having to be
cut.
To extend the object again, drag the handle outwards. If you can't
move the object borders any further, it means that no more audio
material is available.
www.magix.com
Page 52

52 Cut sound – Working with objects
Fading objects in and out
At the top corners of every object there are two fade handles that can
be adjusted to fade an object in or out. It is particularly useful to use
the fade handles when you have cut passages out of a recording to
avoid hard transitions or crackling.
Fading objects
With every cut the two objects that are created are slightly
crossfaded in order to avoid crackling. This is called Auto crossfade.
A crossfade is also added if two objects in a track are moved into
each other or overlap each other.
A crossfade symbol is added to each crossfade. By clicking
on the symbol, you can change the curve of the transition.
The top handle of the right object allows you to regulate the fading in
and out of both objects.
The bottom handle controls the length of the two objects. If you move
them, one of them is extended whereas the other is shortened. The
length of both objects together remains the same.
www.magix.com
Page 53

Object FX page
Open the Object FX page using the "Object
FX" button located directly on the objects in
the track window. While the effects of the
program interface are applied to all objects in
the master track, the settings of the Object FX
page are only applied to the individual object.
Cut sound – Working with objects 53
You can switch between "Remove" and "Enhance" effects just
like on the main interface.
All effects, except for the main interface, are also available as
object effects.
Object name with Forwards/Backwards buttons: Use them to
"jump" from object to object in the master track. The settings of
the Object FX page are automatically adjusted to the settings of
the selected objects. When moving from one object to the next,
the Object FX button of the corresponding object in the master
track flickers for a short while to indicate that the Object FX
page now applies to a different object.
www.magix.com
Page 54

54 Cut sound – Working with objects
Object play state indicates that the activated object is being
played. If you start playback by clicking on this button, the
playback marker will automatically be set to the beginning of the
activated object. This guarantees that you can hear your Object
FX as well (since they only affect the selected object).
Control the level of the object here (the object handle in the
middle). The auto button located at the level controller of the
object performs a normalization (view page 99) to 0dB.
In general the following applies: If in doubt, the blinking
Object FX button in the master track always indicates
which object the current settings apply to!
If the Object FX page is not opened, a red Object FX
button indicates the active object effects.
If you click on the
object, the info box
(view page 37)
displays which object
effects are active.
Quick zoom
For many tasks it is quite useful to enlarge the wave shape display.
For quickly zooming it is sufficient to click in the timeline, keep the
mouse button pressed and move it up or down. This way you can
quickly zoom the cursor in and out at any position without releasing
the mouse.
www.magix.com
Page 55

Cut sound – Working with objects 55
Draw volume curve
Use the "Volume curve" button to activate a volume curve.
You can use it to add volume curves to your audio material, for
instance, for compensating volume fluctuations or increasing the
volume of quiet passages.
Volume changes are immediately visible in the waveform display so
that is very easy to visually align the volume of different passages.
There are 2 methods of editing these volume curves:
A "handle" is created by clicking on the curve (in standard mode).
You can then move it with the mouse and create volume
progressions. This method should preferably be used if gradual
volume changes over longer passages are needed.
Additionally, you can use the Draw volume curve mode (view
page 42). This allows you to "draw" any volume curve using
the mouse. This way, you can create irregular volume
progressions quickly.
Tip: The voice over effect (view page 55) creates volume curves for
automatic fading in/out based on the audio material in the second
track.
www.magix.com
Page 56

56 Cut sound – Working with objects
Voice over
The voice over effect creates volume curves for automatically fading
the video's audio track in and out for speech recordings or imported
audio material located on the second track (view page 104).To do so,
proceed as follows:
• Record speech with the recording function (view page 46). Before
that, you can move to the right position in the video; the recordings
will be added to the second track (view page 104) at the current
position. The video will not be played back during recording.
• Now open the voice over dialog (via the "Edit" menu) and activate
the voice over effect.
• A volume curve (view page 42) is created on the first track which
automatically fades the video sound in and out at the correct
positions. With the sliders Automatic track damping and Fade
in/out speed, you can set by how much the volume of the original
sound should be reduced during speech passages and how quickly
this should happen.
www.magix.com
Page 57

• You can also move, cut and edit your speech recordings
retroactively via the object handles to remove undesired noise or
mishaps. The voice over dialog can remain open while doing so, but
you have to click "Update" after making changes to objects in the
second track in order to adjust the volume curve.
Note: To move objects, the "Lock all objects" option must be
deactivated. Under certain circumstances, sound and video
might become out of sync if you move certain audio objects.
What's important is that you cut out longer speech pauses during
which the video sound should not be lowered because the voice over
function does not check how loud an audio object is, but only if one
exists on the second track. Alternatively, you can record each speech
passage separately and only shorten the beginnings and ends of the
recording.
Cut sound – Working with objects 57
The opposite way is possible too! You can load audio material,
background music or sounds, etc. into the second track and fade it
out whenever there is original sound in the video. To do so, select
"Background music/original audio is on track 2". You must cut out
all passage from the video sound that are not required her too. In the
original situation, i.e. the original sound as a single complete audio
object, the music would be faded out during the entire length. In this
context, the Remove pauses (view page 97) function in the "Edit"
menu is useful.
Since the video sound must not be moved, make sure that the
"Lock all objects" option is activated.
www.magix.com
Page 58

58 Remove
Remove
Most of the functions for removing audio disturbances ("Cleaning")
are activated via the "Remove" section – either as master effects on
the entire audio track or as object-related effects on a separate
"Object FX" page.
All effects in the "Remove" section function in realtime, meaning that
you can switch them on and off and change their parameters during
playback and listen to the result of the changes immediately
Additional cleaning functions can be found in the "Edit" menu.
Using the effect modules
On/Off: Individual effects modules can be turned off and on via the
buttons to the left.
Slider: Each function has a slider that controls the intensity of the
cleaning effects.
The effects of the "Cleaning" section include a selection of useful
presets which can be chosen from a flip menu. Click on the arrow...
In most cases it is sufficient to select a preset here in order to
achieve good results.
Info field: Instead of the analyzer, you can use a help field to
explain how the selected effect should be used.
Edit button: The meticulous can add special settings to the cleaning
effects. For this the "Effect device" is opened via the button on the
right of the module. Now the cleaning effects can be edited.
All effects devices can be activated and deactivated via the "On/Off"
button. With "OK" you can apply the settings, "Cancel" closes the
effects device without applying the settings. "Reset" returns the
settings to their defaults.
www.magix.com
Page 59

Remove 59
Parametric Equalizer
The parametric equalizer consists of four filter bands for adjusting the
overall sound of the music track. Each band is a filter with a typical
"bell shape". Within a certain frequency range and around an
adjustable middle frequency, you can increase or reduce the signal
level gain. The width of this frequency range is called bandwidth. The
bandwidth is defined by the Q value. The higher the Q value, the
narrower and steeper the filter curve.
You can influence the basic sound of the mix by increasing and
decreasing the broadband to give it more "depth" (lower center =
200-600 Hz) or more "air" (highs = 10Khz). You can also decrease
the narrow bandwidth (high Q value) in the frequency response, e.g.
to remove disruptive frequencies.
Graphic: The resulting frequency path of
the equalizer is displayed in the graphic.
The frequency is spread out horizontally,
the increase or decrease of the respective
frequency, vertically.
The blue bullets 1-4 symbolize the four wave bands. You can move
them around with the mouse until you find your desired frequency
response.
Peak meter: The peak meter gives you control over the output level
of the equalizer. The adjacent master gain controller can be used to
balance the level with the EQ.
www.magix.com
Page 60

60 Remove
Edit: The "Edit" button opens the fine tuning for the four
bands:
Parameter selection: With the buttons on the right you can select the
parameter that can be adjusted with four faders of each band.
Furthermore, there are number keys to enter every parameter of the
bands.
Gain dB: These controllers allow you to raise or lower the filter.
Setting the controller to 0 deactivates the filter and doesn’t use CPU
power.
Freq. Hz: The center frequency of the individual filters can be set
between 10 Hz and 24 kHz with the frequency controllers. Freely
choosing the frequency enables multiple filters to be set to the same
frequency in order to have a greater effect.
Q (bandwidth): Set the bandwidth of the individual filters between 10
Hz and 10 kHz.
There is still a peculiarity among bands 1 and 4; The filter curve for
these bands can be changed from a normal "peaking" EQ filter (
to "shelving" (
high-cut (band 4)
or decrease in all frequencies happens above or below the filter
frequency, and the Q parameter does not have a function here. With
a low-cut or high-cut filter, all frequencies below (low-cut) or above
(high-cut) the set frequency are filtered out.
) (this is the basic setting) and high (band 1) or
. When using the "shelving" filter, a soft increase
)
Graphic Equalizer
The 10-track equalizer divides the frequency spectrum into 10 areas
(tracks) and supplies them with separated volume controls, which
allows you to achieve many impressive effects, from the simple rising
of the bass, to total sound transformation. If you raise the low
www.magix.com
Page 61

frequencies too much throughout the whole level, it can cause
distortions. In this case, lower the master volume using the master
volume control on the main screen.
Thumb Controls: All of the 10 frequency areas can be raised or
decreased separately by the 10 volume controls.
Link Bands: Using this switch you can match the frequency areas in
a flexible way to avoid the overemphasizing of single frequency areas
that sound artificial.
A/B: If you have selected a preset for the effect and later you change
it manually, you can compare the original-preset-sound with the new
adjustments using the A/B-switch.
Reset: Reset inserts the sound effect into the neutral starting position
where no processing power is used and where no effect is calculated
in the sound.
Remove 61
Touch-screen (right EQ-Section): This is the "sensor-field" of the EQ:
Use your mouse to draw a curve that will be transferred immediately
into the corresponding EQ control adjustment.
Sound Cloner
The FFT filter (Sound Cloner) in MAGIX Video Sound Cleaning Lab
has two areas of application.
It's first function is the removal of complex noise such as power
humming. Since this is a precisely defined audio disturbance, the
filter can work cleaner and more precise than the DeNoiser that has
to extract the noise from the audio signal first. You'll find the presets
in the "Presets" menu.
www.magix.com
Page 62

62 Remove
"Sound Cloning" is the second area of application, which encourages
experimentation. You can determine the sound characteristics of a
video and transfer them to other videos. The Sound Cloner is a kind
of automatic 1024-band equalizer. Its filter curve (compare the touch
screen in the "normal" EQ) is a result of the mean of the cloned and
the original sound.
This allows you to add the sound of an old light-sound movie to a
current movie, for example. Load a movie whose sound you like a lot,
set the playback position to a characteristic position and press the
"Get Sound" button in the Sound Cloner. The sound characteristics
will be identified. After that, the sound is available as SOUND CLONE
preset and can be stored permanently via "Save" for later use.
Create a new project into which you can load the movie that you
want to enhance with the sound characteristics of the other movie.
Open the FFT filter again and load SOUND CLONE from the preset
menu. With the slide control, you can regulate the intensity of the
sound transmission.
Sound cloner - FFT filter
Use Edit to open the dialog which contains the fine-tuning settings
for the sound cloner's FFT filter.
A red line can be drawn in the graphic field using the mouse. The left
side of the graphic is for the lower frequencies of the sound, the right
for the higher. A "mountain" in the left part of the graphic creates a
large increase in bass, and a similar figure in the right increases the
highs.
www.magix.com
Page 63

Freehand: With the pencil you can draw "freehand". Draw or rotate a
straight line by pressing and holding the "Shift" key.
Draw quantization: This activates a quantization function to draw
straight lines and angled figures. The farther away from the curve you
are, the wider the bulge in the range. This effect can be increased
with the "Ctrl" key.
Reshape tool: This drawing tool lets you bend existing curves.
Deformed curves can be achieved by pressing the mouse button
repeatedly.
Navigation tool: Drag the display area.
Zoom tool: With the left mouse button you can zoom into the
selection; zoom back out with the right. Keep the left mouse button
depressed to feed along the zoom area.
Reset: The "Reset" button quickly allows you to replace the filter
curve with that present in the output state.
Preset: Access the presets for definite applications here.
Remove 63
Strength: The "Strength" slider allows you to enhance or diminish the
intensity of curvatures. The result is a stronger or weaker modulation.
Vol:The "Volume" controller controls the volume of the material.
Sound cloner: With the sound cloner you can determine the sound
characteristic of a song and transfer it to your other recordings. This
way you can, for example, create a Pat Metheny song in the style of
Madonna. Load a track you really like, set the song's playback
position and press the "Learn" button´.
Scale options: Accesses a settings dialog with the following options
available:
Freq: This switch lets you choose between a logarithmic ("log") or a
linear ("lin") frequency scale. The logarithmic display corresponds to
the human perception of volume. Like on a keyboard of a key
instrument, the (graphic) spacing of the intervals, i.e. halftones, is
uniform across the entire range.
Freq.log: The upper labeling of the graphic can be switched between
output in "Hz" or "Notes". Note output is only possible via logarithmic
frequency display ("log").
www.magix.com
Page 64

64 Remove
Value display: Here you can set a logarithmic or linear display as well
as an enlargement of the filter curve.
Value range: Here you can set the displayed value range in dB.
Curve display: Here you can switch between a bar and a curved
display.
DeNoiser
The DeNoiser removes persistent background noise like computer
humming, hissing, noises from sound cards, disturbance from ground
wires, interference from audio-equipment with high-impedance
outputs (e.g. turntables), or other device noises. Subsonic noise or
rumbling can be removed effectively from LPs with the rumble filter.
The DeNoiser requires a short section from your music which
contains a sample of the audio distortion, usually from the start or
end of the recording.
When the DeNoiser is activated in the project for the first time, a
sample of the distortion will be searched for immediately after the
playback marker. The automatically detected noise sample enables
good results to be achieved even without opening the DeNoiser
dialog.
For more specific results, open the dialog with the "Edit" button.
Noise sample
Noise sample: If the automatic noise sample settings were not
suitable for finding noisy material, then a noise sample can be
selected from the list. There are several typical distortions available,
e.g. camera noises or power mains humming.
www.magix.com
Page 65

An even more specific option is to create a noise sample yourself.
Create noise sample
Length: The length can be set in ms if the "auto" button is switched
off, otherwise the length of the noise sample will be determined
automatically.
Pick! Generates a noise sample. A short noise sample is taken from
the selected play range. The playback marker can be moved with the
transport control when the dialog is open to search for a suitable
position. If the playback position is between two objects, it's not
possible to generate a noise sample. Play allows the noise sample to
be previewed for testing purposes.
Wizard: This opens a wizard that helps to create the noise sample.
The wizard mainly consists of a search function which helps you find
the suitable noise sample in the audio material. Various distortion
types can be selected.
Save: The noise sample created can be saved in the noise sample
folder. It is then available as a new noise sample in the noise sample
preset list for any other project.
Remove 65
Audio type: Set the type of edited audio material here, and the
algorithm will be customized accordingly.
Spectral view
"Spectral view" shows the spectrum of the noise sample by default. It
can be switched to spectrogram view by pressing the corresponding
button on the right-hand side. In this case, the played audio material
is shown as a spectrogram. The spectral sections removed with by
the DeNoiser are displayed in red.
Mode
Anti-noise: In this mode, the DeNoiser works in an optimized mode
to remove particularly "noisy" distortions.
Anti-hum: In this mode, the DeNoiser works in an optimized mode to
remove tonal disturbances. This includes feedback from power
cables, power humming, PC fans, video cameras, or ventilation
noises.
If the option "Max. damp tonal noise" is active, then this type of
www.magix.com
Page 66

66 Remove
distortion will be completely removed. The "Reduction" controller
affects all possible existing disturbances. This is a sensible step,
since tonal disturbances are much more annoying than other noise –
a small amount of "extra" noise in the recording may be allowed in
order to avoid a greater loss of highs throughout the desired signal.
This option can be found in "Hum" mode under the "Noise level"
controller in place of the "Adaptive" parameter (not available in "Hum"
mode).
Processing section
Quality: The quality of the calculation can be set in two stages. You
can set the values in the standard quality setting precisely without
influencing the playback in any way and select high quality for burning
once the material is ready.
Noise level: The threshold of the noise reduction function should be
set as precisely as possible. Values that are too low will exhibit too
low a distortion dampening level and result in artifacts like noise or
"twittering" (see below). High settings produce dull results – useful
signals that sound similar to hissing noises are also filtered away.
Take your time to find the best setting for the individual case. If the
"Adaptive" option is activated, the setting is relative, i.e. in addition to
automation.
Reduction: This sets the balance between the original signal and the
signal with the applied noise reduction. It's often better to reduce
interference signals by 3 to 6 dB rather than as much as is possible
to keep the sound "natural". For buzzing, it’s best to apply complete
removal.
Adaptive: The value for the "Noise level" parameter is set
automatically by setting the level of the hiss present in the signal. The
advantage of this is that if a distortion is not constant, the noise level
always adapts to the current distortion. If the noise sample is not
calculated from the signal that is to be edited, but rather uses a
preset to do so, the difference between the strength of the distortion
in the audio material and in the noise sample will be equalized
automatically. If the noise sample has been calculated from the signal
being edited and the distortion is constant, then the "Adaptive"
setting should not be used.
Removed noise: The part of music that was filtered out by the
DeNoiser can be previewed for testing purposes.
www.magix.com
Page 67

DeRumble: Here you can activate a special filter for deep-frequency
rumbling noises. Examples of such distortions are mechanical noises
from old record players, wind, and subsonic noises in microphone
recordings.
Preset: All the DeNoiser's settings, i.e. the noise sample applied and
the settings of the processing section can be saved as a preset for
later use.
Remove 67
Dehisser
The Dehisser was especially designed to eliminate the band noise,
which is all so typical for analogue tape recordings, micro-preamps or
AD-transducers.
Noise Level: Here you will have to determine as exactly as possible
the noise level at which the Dehisser starts to work. If you choose a
level that is not high enough, the band noise will not be completely
eliminated. In such a case you will notice tweeting sounds (the so
called "melodic band noise"). An excessive value will result in a dull
sound as part of the band noise and part of the original audio signal
recording will be eliminated by the Dehisser as well (for example: air
intake sounds of brass instruments) (see Artifacts (view page 68))
If the noise level on your recording is low, you should experience no
problems while adjusting it.
Adaptive: The value for the noise level parameter is set automatically
by determining the hiss contained in the signal. If the noise level value
is changed, its effect is then relative, i.e. the resulting value is
determined from the automation as well as the noise level fader
settings.
One advantage is that you no longer have to set the noise level value
manually and that this value can also be adjusted later if the noise
share fluctuates, for example, if you use music tracks with differing
hiss levels within one project.
www.magix.com
Page 68

68 Remove
If the noise level is constant, a better result may be obtained manually
(Adaptive off). However, the noise level value must then be set
precisely.
Audio type: Lets you set the audio material that is to be edited; the
algorithm is adjusted accordingly.
Noise Reduction: this option allows you to adjust the damping of the
band noise in decibel units. In many occasions it is the best solution,
not to eliminate the noise completely, but to damp it only -3 - -6 dB,
hence maintaining the natural sound of the original material.
Quality: The processing quality can be set in two stages. You can
use this to precisely adjust the values in the dialog for standard
quality adjustment without skipping playback, and can then select a
higher quality for final burning.
Removed: This option allows you to listen to the music that would be
filtered away by the Dehisser.
Artefacts
With incorrect settings, the DeNoiser and the DeHisser may leave
behind a metallic chirping or twittering sound, the so-called artefact
noise. The cause of this is the incomplete removal of the distortion.
The ear is quite sensitive to this sound because of its synthetic
character. This problem, in practice, only occurs in especially difficult
cases.
To achieve the best possible results you should pay attention to the
following hints:
• First, select a preset from the selection menu. In most cases the
result is satisfactory.
• Be careful when "denoising" the effect: Less is more! The distortion
sound should no longer be audible, otherwise artefacts may be
brought about.
We recommend removing any DC offset that may exist from the
material before using it ("Effects" menu > Cleaning > "Remove DC
offset" (view page 69)).
www.magix.com
Page 69

Remove 69
Remove DC offset
This function can only be opened via the "effects" menu and can thus
only be applied to selected objects. This can be useful if your sound
card overlays your sample with a constant DC offset during
recording, which leads to crackling during playback or editing. (This is
basically always the case with recordings that use the integrated
sound card of your PC).
Options: Here you can enter a minimum DC offset threshold, which
indicates where DC offset removal will kick in. You can also edit
stereo channels together to reduce computing time.
Spectral Cleaning
MAGIX Spectral Cleaning removes background noise (such as
coughing, whistling or clapping) from a recording without audibly
influencing the signal.
The music is displayed in the Spectral Cleaning Editor by means of a
spectrogram (sometimes also referred to as a sonogram). This
displays the frequency elements with regard to time (see illustration).
The frequency level is then visualized by a color code or by its
brightness, respectively.
www.magix.com
Page 70

70 Remove
Audible background noises are usually louder than the signal and are
generally restricted to a certain frequency spectrum. They are
therefore highlighted in the spectrogram in color and can be easily
encircled and removed with the mouse.
Tone Tone with noise
For example, you can
recognize the held tone from a
pattern consisting of
horizontal lines that
correspond with the
harmonics of the sound (see
illustration on the left). A
pulsed noise is characterized
by a vertical line. The right
illustration displays a tone
overlapping a short noise.
In MAGIX Spectral Cleaning Editor you can now simply mark and
"remove" all noises with the mouse. Lost elements of the original
frequency spectrum are then added from the signal surrounding the
noise in order to avoid audible gaps.
MAGIX Spectral Cleaning is ideal for all short but clear sounds in the
music, such as clicking, coughing and even short drop-outs, but NOT
for permanent disturbances such as hiss or noise. In such a case
please use the DeHisser or DeNoiser.
Operation
Select the object and position the play cursor at the approximate
location of the noise. Then open the Spectral Cleaning Editor with the
toolbar button or via the "Edit" menu -> "Spectral Cleaning".
www.magix.com
Page 71

Remove 71
Noise must be marked as such for it to be removed. This is
done by using the marking tool.
You can mark as many noises in the editor window as you like, and
remove these "in a single step".
Three buttons are visible on the marker.
Delete: Deletes the marker.
Show noise: The result of the noise removal is usually
displayed within the marked range. If this button is depressed,
however, the original signal containing the noise is displayed.
Bypass: Under normal circumstances the result of the noise
removal is played back when playing in the Spectral Cleaning
Editor. The original sound is played when clicking this button.
In order to perfect the result you can now position the play cursor in
front of the marked noise and listen to it very carefully (see "Playback"
section). If necessary, change the noise marker. This should always
be selected as small as possible.
However, it will sometimes also be necessary to modify the
parameters (see Operator Controls, Edit marked range). If you are
satisfied with the result, click on the "Calculate" button.
The result of the Spectral Cleaning is now saved in the original file
and the editor is closed.
Controls
Toolbar
You can assign a different tool to the left and right mouse buttons by
clicking on the corresponding button in the toolbar. The selected
tools are marked in blue for the left mouse button, in red for the right
mouse button.
Selection tool: Use this tool to modify selections.
Drawing tool: Use this tool to select distortions or to modify
the selection.
Double-clicking on the selection applies it to the entire frequency range.
Navigation tool: You can move the displayed range by
holding down the mouse button and moving the mouse.
www.magix.com
Page 72

72 Remove
Zoom tool:
Left mouse button (click): Zoom in
Left mouse button (click and drag): Creates a zoom field
Right mouse button: Zoom out
Edit selection
With this setting you can specify how you wish to remove the
distortion. All selected distortions can be edited in the same way. If
you wish to use various editing methods in an audio file, you will have
to do it in various procedures.
The following methods are available to you:
1. Transitions: This method attempts to replace the distortion with
the help of the bordering parts of the music selection.
2. Transitions (Hard): Behaves like transitions, but has a more
powerful effect. This way, stronger distortions can be better
suppressed. The distortion, however, must be highlighted more
precisely.
3. Gap: This mode should be used for very short drop-outs.
4. Damping: This only makes the selected distortion quieter,
surrounding audio material is not faded in. This does not introduce
any artifacts, but can lead to an irritating silence, or even a
drop-out. Use this mode if a distortion is present in a very narrow
frequency range or if the surrounding noises are very quiet.
5. Fading in: Corresponds to dampening, only that here the music is
faded back in towards the end of the selection, i.e. it becomes
louder. This can be quite practical if an impulse-like distortion is
located at the beginning of a music track.
6. Fading out: Like fade ins, but in reverse, i.e. this mode is useful
for distortions at the end of a track.
Strength: Use this setting to meter your changes. A fully turned up
fader corresponds to a 100% change.
Left / right channel: Shows and calculates each channel. If the
distortion is only audible on one side, simply switch off the other
channel.
View
In the "View" menu you can select from various view schemes. The
schemes contain various color scales, but also varying time and
frequency resolutions.
www.magix.com
Page 73

Show grid: Displays a time and frequency grid.
Playback
Stop: Stops playback.
Play: Starts playback from the play position.
Play Loop: Repeats playback within a short range.
Play Inverse: Plays the signal difference, i.e. the removed sound
elements.
Calculate: Performs the calculation and closes the dialog.
Abort: Aborts the editing.
Help: Opens the help window.
Tutorial Video: The tutorial video briefly explains the possibilities of
Spectral Cleaning.
Remove 73
www.magix.com
Page 74

74 Enhance
Enhance
The functions for improving the sound ("Mastering") are activated via
the "Enhance" section – either as mastering effects on the main
screen, or as object-related effects via a separate "Object FX" page
(not available in MAGIX Music Editor).
All mastering effects function in real time, meaning that you can
switch them on and off and change their parameters during playback
and listen to the result of the changes immediately.
Using the effect modules
Please read the section "Using the effect modules" (view page 58) in
the "Remove" chapter.
Declipper
Should the input level of an audio recording be too high,
overmodulation may result at the louder parts (the signal peaks). This
digital distortion can also be called "clipping": At the overmodulated
area, the values that are too high are simply cut off and the typical,
quite unpleasant sounding crackling and distortions are heard.
MAGIX Video Sound Cleaning Lab includes a special function for the
elimination of these digital clippings and analogue distortion.
The clippings are detected and eliminated, based on the material of
the selected object. Lastly, the entire volume of the material can be
reduced so that the interpolated parts can be played back without
overmodulation.
www.magix.com
Page 75

The declipping-algorithm is especially useful in material, where the
excessive recording level has caused distorted piano or chorus
voices. Affected drumbeats however will normally not improve after
the use of this function.
CLIP LEVEL: Here you can tell the algorithm from which level on the
algorithm has to consider the sample as blasted and therefore
corrects it. This is an important point, as the different sound cards
have different clipping characteristics.
Choosing -6dB, for example, will cause that all samples that exceed
half of the maximum value will be considered blasted and therefore
will be calculated again.
With GET CLIP LEVEL the CLIP LEVEL can be gaged automatically.
The interpolated signal peaks adjust the whole level, which must be
balanced out with the GAIN fader so as to avoid new overmodulation.
When doing so, you should observe the peak meter to the right of the
dialog.
Enhance 75
The option "LIMITER" switches on a limiter which reliably avoids
overmodulation.
With the INVERSE button you can control whether or not undistorted
parts of the wanted signal are interpreted as clippings and are filtered
out unnecessarily.
Dynamics
The compressor is basically an automatic, dynamic volume controller.
The volume dynamics of a track will be limited by the settings; loud
passages will stay loud, and the volume of silent passages will be
raised. Compression is normally useful if you want to make your
material sound more powerful and penetrating. The grade of
compression can be adjusted using the ratio controller. The threshold
is controlled by the threshold button and attack and release can also
be controlled by the corresponding buttons.
www.magix.com
Page 76

76 Enhance
The processing of the track is as "prospective" as with high-end
professional studio equipment. This means that there are no peak
overrides (blasting, clipping) or other disturbances, since the
algorithm cannot be "surprised" by sudden peaks.
Sensor field: The sensor field of the compressors can be
manipulated intuitively by mouse movement, and this will change the
colour of the graphic and the effect settings for your reference.
Ratio: This parameter controls the compression ratio.
Threshold: Adjusts the threshold above or below the active
compression.
Attack: Adjusts the algorithm's response delay to increasing levels.
Short attack times can result in a ”pumping” sound, since the volume
will be raised or lowered very quickly.
Release: This value controls the algorithm's reaction delay to falling
levels.
A/B: If you chose a preset value for the effect and then changed it
manually, you can compare the original sound settings with the new
ones pressing the A/B buttons.
Reset: Resets the compressor to the default values. In this state no
system resources are used and no effects are added to the original
sound.
Load/Save: This option allows you to save the actual settings as an
effects file to use them for other projects.
Stereo FX
With the Stereo FX Enhancer you can determine the positioning of the
audio material in the stereo balance. If the stereo recordings sound
unfocused and undifferentiated, an extension of the stereo
base-width can often provide better transparency.
www.magix.com
Page 77

Use the maximize function to move the echo, for example, into the
foreground, thereby improving the stereo picture.
Volume control: Adjusts the volume of every single channel, thereby
adjusting the entire balance. The reduction of left and right levels is
displayed under the control buttons. This way you can balance out
and thus improve an imbalanced recording in which, for example, one
channel was recorded at a lower level than the other.
Pan-Direction: With this controller you can move the sound source
that comes from the middle into stereo panorama. The signals at the
outer edges of the sound picture remain unchanged.
Bandwidth control: Adjusts the bandwidth between mono (on the
extreme left), unchanged bandwidth ("normal stereo"), and maximum
bandwidth ("wide", on the extreme right). The individual sound
sources of a recording are squeezed together or pulled apart in the
stereo picture.
Enhance 77
Raising the bandwidth (values over 100) diminishes the mono
compatibility. This means that recordings edited this way sound
hollow when listened to in mono.
Maximize: Use this controller to strengthen the room sound which
also increases the stereo transparency without influencing mono
compatibility.
Multiband: This can be used to switch Stereo FX to Multiband mode.
Stereo editing only applies to the middle frequency, the bass and
highs remain unchanged.
Stereo meter: This provides a graphical display of the phase relation
of the audio signal. You can use it to review the orientation of the
signal in the stereo balance and the effect of the stereo enhancer. To
keep mono-compatibility the "cloud" shown should always be higher
than broad. Otherwise some frequency ranges may cancel each
other out if the stereo signal is played on a mono device.
www.magix.com
Page 78

78 Enhance
Plug-ins
Microsoft's DirectX and VST-compatible plug-ins may be used for
effects calculation in MAGIX Video Sound Cleaning Lab. This allows
you to use almost any effect algorithm of third parties vendors in
addition to the effects integrated in MAGIX Video Sound Cleaning
Lab.
The DeEsser, which is an effect included in the program, is loaded as
a plug-in.
Selection menu: Select the plug-in via the selection menu on
the right hand side of the module. For this, you will need to
have plug-ins installed on your computer. The path to search
for installed VST plug-ins can be set in the "Options" menu via
-> "Path settings". All recognized plug-ins will be added to the
menu list.
Edit: The selected plug-in is opened to define specific effect
settings.
VST Plug-in Editor
The VST Plug-in Editor can be opened by right-clicking on the
instrument's name in the MIDI Editor, via the corresponding plug-in
slot in the Mixer, or via the "VST Instruments Editor" entry in the
instrument list.
The Instrument Editor has two views, the so-called "GUI" of the
plug-in (Graphical User Interface) and the parameter view. This is
either automatically activated when the VST plug-in does not have its
own GUI or can be used if the GUI of the plug-in is too unclear or
takes up too much space on the screen. The parameter view displays
the eight parameters of the plug-in as sliders. In the File menu you
can change between these views (plug-in dialog/plug-in parameter).
Load/save patch/bank: The instrument settings can be saved and
loaded in the patch formats typical for VST plug-ins (*.fxp) and bank
formats (*.fxb).
www.magix.com
Page 79

Random parameters: This function can be an important source of
inspiration. However, before using it please save the current preset
you've just created as this feature does not ask before it is applied.
Menu program: Here you can select the presets integrated into the
plug-in or loaded via the File menu.
De-Esser (Plug-in)
If you have ever edited or restored your own spoken or sung
recordings, you've most certainly come across the occasional
unpleasant loud "S" or "SSHH" sound. This hissing can ruin an
otherwise perfectly good recording.
The De-Esser works according to the "dynamic filter" principle,
meaning that it contains a filter switch (band pass and high cut),
whose frequency and implementation depends on the input signal
and the recognized "problem area".
Enhance 79
So-called detector circuiting reacts to the input peak levels in the mid
and high areas. This level recognition occurs automatically in a
comprehensive modulation area. For this reason the De-Esser can
manage without having to set a threshold.
Using the De-Esser is quite simple:
You have to notify the detector circuiting which areas contain the "S"
or other sibilant sounding distortions. A switch for male and female
voices has been designed for this. Depending on the switch setting,
it will select the internal parameters for the most exact recognition
possible.
After you have set the switch, the Reduction fader has to be adjusted
enough that the "S" parts of the signal are reduced to a normal level.
An overly strong reduction of "S" sounds in speech or song
recordings can, however, result in a "lisping" sound. Often, a small
reduction can be enough to balance the ratio levels.
www.magix.com
Page 80

80 Enhance
The Removed Noise button can be used to control the recognition
and adjustment of the De-Esser. With it you can pick up the detector
circuitry and evaluate whether the switch is in the correct position.
You can also try to edit other sound sources, partially complete mixes
and drum recordings with the De-Esser. For the latter, the adjustment
control can bring about an improvement in the sound of cymbals and
high hats that were too loud. For humming signals/complete mixes,
the De-Esser (discreet setting) can be used to design the sound
characteristics more softly.
For such 'forced adjustment' the correct setting for the switch can be
found out quite simply by testing ot out.
Multimax
MultiMax is a compressor with three independent frequency bands.
The dynamics are edited separately for each band.
The advantage of a multi-band compressor in comparison to a
"normal" compressor is that the "pumping" tendency and other
disturbing side effects are dramatically reduced while editing
dynamics. For instance, it can prevent a bass top peak from
"dragging down" the entire signal.
Multi-band technology also lets you specifically edit individual
frequency ranges.
Link bands: When this button is activated and one fader is adjusted,
all faders are changed in the same ratio. However, the way the
dynamics are edited is not affected.
Limiter: MultiMax includes a limiter that prevents clipping by
automatically lowering the level if it is set too high. Quiet parts remain
unaffected.
www.magix.com
Page 81

High quality: When the "High quality" setting is activated, an even
more precise algorithm is used which, however, requires more
processing power. We recommend that you switch on this setting
before you export the project.
Setting the frequency bands: The settings of the frequency bands
are changed directly in the graphic. Simply click on the separator
lines and move them.
Bass/Mid/High: These knobs control the level of compression for
each frequency band.
Enhance 81
Reverb/Echo (object FX only)
The reverb effect device offers newly developed and very realistic
reverb algorithms to add more room depth to your recording.
Reverb is probably the most important, but also the most difficult
effect to generate.
Fundamentals
Our everyday experience shows that not every room matches every
instrument. Thus we have designed "virtual" rooms. However, it still
remains important to find the correct parameters. Here are some
examples of parameters that are decisive for the sound impression in
real and virtual rooms:
• Size of room: The larger the room, the longer the sound travels
between walls or objects. Our brain "calculates" the size from the
time difference. The size impression is mainly determined from
so-called first reflections and the discreet echo. We don’t notice a
(diffused) reverb.
• The reverberation time is mainly influenced by the composition of the
walls, ceilings, and floors. This reverb time is highly
frequency-dependent. For instance, the highs and mids are
dampened more in rooms with curtains, carpets, furniture, and some
corners than in an empty, tiled room.
• The density of the reflection. The sequence of the first reflection is
particularly important. A room with many individually recognizable
echoes feels alive, especially if they are quite far apart.
www.magix.com
Page 82

82 Enhance
• The diffusion. Simple reverb machines do not take into account that
reflections become more and more complex as they develop. They
blur the first echoes at the beginning, which sounds artificial and
"two-dimensional" for many signals. Our reverb effect works like a
real room instead where individual echoes can still be heard at the
beginning of the reverb but then reflect amongst each other more
and more until they disappear in the signal sustain as a so-called
"diffused hiss".
The presets include many rooms that were designed for certain
instruments and applications and whose internal parameters have
been optimized for these applications. However, you can influence
most of the characteristics of the room using the provided sliders.
In addition to the rooms we have modeled two device types in the
reverb effect that allow you to create an artificial reverb for a longer
time: Plate Reverb and Spring Reverb.
Plate reverb
A plate reverb consists of a large metal plate (often 0.5 to 1m² thick,
or more) that is put into motion by a magnet and coil system (similar
to a loudspeaker). On the reverb plate, so-called "taps" are
positioned at different locations. These are pick-ups comparable to
those on a guitar. Reverb plates have a very dense sound (high
diffusion); no direct echo can be heard. They are therefore ideal for
percussive metal. A plate reverb generates a smooth "pleasant effect"
with vocals.
Spring reverb
You probably remember spring reverb from guitar and keyboard
amps, particularly the older ones. At the bottom of these amps, a unit
consisting of two to four spirals is mounted on a vibration-free
carriage. As with the reverb plate, it uses systems for transforming
the electric signal into a mechanical one. There are different designs
and sizes of spring reverb; however, they all have the same quite
peculiar sound: the typical "bloing" sound when the springs are
moved, similar to splashing. When the reverb dies away the basic
pitch of the spring(s) can usually be heard quite clearly. Furthermore,
the frequency range is considerably limited due to the losses in the
spirals and in the used pick-up/transmitter. Despite this, the sound is
special and some of the latest music styles (e.g. dub & reggae) would
hardly be possible without spring reverb.
www.magix.com
Page 83

Parameters
The reverb effect has the following parameters:
Size: Defines the size of the room (or the system for the plate and
spring). With some low "size" settings, you can also reduce the
distance between the individual reflections. This allows resonance to
develop (accentuated frequency ranges), which can sound
oppressive if the reverb sustain is too long. The proper size for each
instrument can be gauged by taking into account the interplay
between the room and the resonance.
Time: Reverberation time. This controller lets you define how far the
echo will be absorbed, i.e. the time for the reverb to die away.
Turning this knob to the left minimizes the time. You will then only
hear the first reflection. Turning the knob to the right minimizes the
absorption, and therefore results in a long sustained reverberation.
Color: Within certain limits, you can influence the sound characteristic
of the effect. The effect of this controller depends on the used preset.
In rooms, "color" controls the dampening of the highs in the reverb
(from dark to bright) as well as pre-filtering of the signal. The
controllers for plate and spring presets also determine the dampening
of the basses.
Enhance 83
Mix: This controller sets the mix ratio between the original and the
edited signal. For rooms, you can quite easily move a signal further
into the room by increasing the amount of effect. The last four
presets are intended for use in an AUX channel of the mixer and are
set to 100%.
Presets
The presets are primarily sorted by instruments, but you can (and
should) choose which preset you want to use for which instrument.
Delay
This effect is like an echo which delays the signal and repeats it.
Delay: This sets the period of time between the individual echoes.
The more the control is turned to the left, the faster the echoes will
follow each other.
Feedback: This adjusts the number of echoes. Turn the dial
completely to the left, there is no echo at all; turn it completely to the
right and there are seemingly endless repetitions.
www.magix.com
Page 84

84 Enhance
Mix: This fader determines how much of the unprocessed original
sound (dry signal) is subjected to the echo (wet signal). Application of
this effect in an AUX bus requires the controller to be set to 100% (all
the way to the right).
www.magix.com
Page 85

Export 85
Export
In the export section, you can save the project either as an audio or
video file.
Audio files
Via "Audio files" you can save the
audio track from the current project as
an audio file in different formats.
Use this function, if you wish to save
only the edited audio track.
The "Export project" dialog will open. You can define the file name
and path here. "Recent dir. lists recently used file paths. Via "File
type", you can select the file format you want to use to create the file.
Format settings: This button opens another dialog where you can set
export formats and adjust their settings. With compression formats
like MP3 or OGG you can select codec compression rates.
Wave: The audio material is exported as a standard Wave file. This is
the conventional format for further use on Windows PCs. These files
are not compressed and retain their full sound quality.
MP3: MP3 (actually, MPEG -1 layer 3) is currently the most important
standard for compressing audio files. Normal audio files in WAV
format are usually very large; in MP3 format they are greatly
diminished in size and reduced to their essentials. Different quality
settings (view page 86) are possible.
AIFF: The audio material is exported as an AIFF file. This is the most
commonly used audio format for Apple™ computers.
Windows Media: Exports the arrangement in WMA format (Windows
Media Audio).
www.magix.com
Page 86

86 Export
FLAC:FLAC is the abbreviation for "Free Lossless Audio Codec". This
is a freely savable format that can be used to compress your audio
data to 50% of their original size. Unlike lossy compression methods
like MP3 or OGG, the full sound quality is kept intact with FLAC.
OGG:OGG Vorbis files have all of the important characteristics of
MP3 files, except that they do not require any kind of licensing for
their codecs. – They can be freely decoded and encoded. Not all
portable devices support this format.
Keyboard shortcut: K
Format settings
Output format: Set the output bit rate and the stereo or mono format
here.Bit rate is the data stream during playback of audio or video
data. It is given in kilobyte per second (kbit/s or kbps) and also
determined the file size. An MP3 file that is 3 minutes long and has a
constant bit rate of 128 kbit/s is ca. 2.8 MB in size.
Bit rates for music are usually 192 kbit for good quality, 256 kbit and
more for excellent quality. 128 kbit are sufficient for Internet
streaming and speech (in mono).
Encoder quality: The included MP3 encoder can operate in three
"gears": "Fast" mode is especially fast, "highest" mode is very
powerful to achieve the best sound possible and takes a little more
time, and the third "gear" is a compromise between the two.
Padding options: Leave this setting on ISO padding, unless you
detect undesired pauses at the beginning of tracks during playback
on certain players.
Encoder settings: These are optimizations that will only be used for
low bit rates (smaller than 128 kbit) to reduce the file size. "Permit
intensity stereo coding" or "mid/size stereo coding" will save certain
parts of the audio material in mono to save bandwidth. The extend to
which sound quality is improved depends on the material. "Permit
mixdown in mono" allows the encoder to save in mono if it detects
that the content of both stereo channels is identical, even if stereo
was set as output format (e.g. introduction within a radio program).
Content options: The "Use CRC check" option adds an internal
checksum to the MP3 file which checks whether the MP3 file is
complete. The other options (private, copyright, original) are merely
for your own labeling system, as they won't be evaluated in any form.
www.magix.com
Page 87

VBR: VBR (variable bit rate) adjusts the bit rate to the audio material,
so a lower bit rate will be used for quiet parts. Therefore, VBR files
are smaller than files of comparable quality without VBR. Thus, a
constant bit rate setting doesn't exist, but rather a quality setting. Not
all playback programs and devices can use VBR properly; problems
may occur when displaying the track length and during winding
(seeking).
Export 87
Video files
Click on "Video files" to save the video
and the new audio track in a new
video file.
A dialog will open where you can
select the video format.
The format of the original video is set as default. Whenever it's
possible, other properties of the original video are used as well.
Click on "Next" to start the video export. If you check the Show video
format advanced settings in the next step option a settings dialog
for the selected video format will open where you have full control
over the properties of the exported video.
www.magix.com
Page 88

88 Export
Advanced settings for video formats
The dialog will look different, depending on which video format is
selected.
Here you can adjust the settings for the exported video precisely. The
options available vary according to the selected format.
Presets: Under "Presets", you'll find typical settings for the selected
format for the most important applications.
Click "Save" to save your own settings and "Delete" to
remove them from the list.
Export settings: You can specify general export parameters like
resolution, aspect ratio and frame rate. Select the most frequently
used values from the list fields; to set your own values click on the
"..." buttons. The "Advanced" button opens the specific settings for
the selected video format (see below).
In "File" you can enter the file name for your exported file.
www.magix.com
Page 89

Use the folder symbol to select the folder into which you want
to export. The dialog will remember the export path for future
exports.
The "Overwrite file without a warning" option allows you to execute
multiple exports in the same file.
Shut down PC after successful export: Use this option to have the
computer switch off automatically after lengthy export processes.
Video as MPEG video
MPEG stands for "Motion Picture Experts Group" and is a
high-performance compression format for audio and video files.
Details on the settings of the MPEG encoder can be found in the
program's Help file in the "MPEG Encoder Settings" (view page
121) appendix.
Video as DV-AVI
This option exports the video as a DV encoded AVI. The arrangement
can be easily transferred to the digicam using a Firewire interface.
Export 89
The dialog will provide further information on all available options. You
can access it via "Advanced" in the export dialog. You will also be
asked for which video standard you want to export the DV data - PAL
(Europe) or NTSC (USA).
Video as QuickTime movie
Exports the project in Quicktime Movie format. This format ensures
the best possible compatibility on Apple computers.
You can define settings for video size, frame rate, and codec settings
here. However, you cannot add comments, etc. to videos in the
export dialog.
Hint: The Quicktime Library has to be installed for Quicktime files
(*.mov).
Video as MAGIX video
Exports the project in MAGIX video format.
This format is used for video recording by MAGIX video software and
www.magix.com
Page 90

90 Export
is optimized for digitally editing high-quality video material.
Video as MPEG-4 video
MPEG-4 is the most advanced video format available at the moment.
In comparison to others, it can provide pictures with the highest
quality at the same file size.
Details on the settings of the MPEG-4 encoder can be found in the
program's Help file in the "MPEG-4 Encoder Settings" (view page
135) appendix.
Windows Media Export
This is a universal audio/video format from Microsoft. Accordingly, the
settings options in the "Advanced" dialog are very complex.
Manual configuration
Audio/Video codec: Various codecs corresponding to the various
Windows Media versions (7, 8, 9) are possible. Should compatibility
problems arise on playback, try an older codec with a lower version
number.
Bit rate mode: Constant and variable bit rates are possible, most
devices and streaming applications require constant bit rates. For
VBR two pass modes the movie is compressed in two passes in
order to optimally use the bandwidth for highly-compressed movies
for the Internet.
Bit rate/quality/audio format: The bit rate is decisive in defining the
display/audio quality. The higher this is, the better your videos will
look and the larger the files and the required encoding time will be.
For variable bit rates the bit rate is adapted dynamically to the
requirements of the corresponding picture or sound material. Either
the quality value can be set between 1-100 or, for two-pass
encoding, an average or maximum bit rate. For audio, the bit rate is
set additionally by the audio format.
Import from system profile (export type): For the most common
methods (other than playback on mobile devices, with which you
should use the supplied presets), like, for example, Internet
streaming, Microsoft provides diverse system profiles to choose from.
If you have the Windows Media Encoder 9 installed, which is available
from Microsoft as a free download, you can edit the profiles or create
your own. These can be loaded by pressing the "Import from profile
www.magix.com
Page 91

file" button.
In Clip info, title and artist names, copyright details, and descriptions
can be entered.
Export 91
Save and Exit
If you click this button, you can save
the audio or video file and close the
program. For audio files, the program
does not ask for the name or format of
the file; the opened original file will be
overwritten. This button is particularly
useful if you launched MAGIX Video
Sound Cleaning Lab from a different
program like MAGIX Movie Edit Pro,
for example.
www.magix.com
Page 92

92 File Menu
File Menu
New Project
Using this option you can set up a new MAGIX Video Sound Cleaning
Lab project (view page 50).
Keyboard shortcut: E
Load project
Using this option you can load previously saved projects (view page
50).
Keyboard shortcut: O
Save Project
The current project (view page 50) is stored under its given name. If
there is no name chosen, the program opens a file requester, where
the path and name can be determined.
Keyboard shortcut: S
Save project as
It opens a file requester where you can determine the path and the
name of the project (view page 50), under which it will be stored.
Keyboard shortcut: Shift + S
Load audio file
Please read more on this in the "Import" chapter in the section "Audio
files" (view page 85)!
Keyboard shortcut: W
www.magix.com
Page 93

File Menu 93
Load video file
Please read more on this in the "Import" chapter in the section "Video
files" (view page 46)!
Keyboard shortcut: J
Record
With this command you can open the MAGIX Video Sound Cleaning
Lab record dialog. More information on this topic can be found in the
chapter Record audio (view page 46).
Keyboard shortcut: R
Export audio
Read the section "Exporting audio" in the "Export section" chapter.
Export video
Please read more on this in the section "Video files" (view page 87) in
the "Export" chapter!
Delete old projects
The command "Delete old projects" is a convenient method for
deleting old projects with all affiliated audio files.
Project: All of your most recently saved projects as well as all
projects contained in the Project folder (view page 108) are listed
here. You can choose one that should be deleted. Use "Search for
project" to add other project files from any folder to the list.
Select the project file (.vip) that should be deleted by clicking on it. Of
www.magix.com
Page 94

94 Edit Menu
course, a project can not be opened if it is to be deleted.
The "Open in Windows Explorer" option opens an explorer window
with the folder of the selected project. Here you can...no longer
required files manually.
Used files: Lists the files used in the project that you want to delete.
Use the small boxes to select the files you wish to delete.
With "Delete" you can delete the project (.vip) and the files selected
for deleting in the file list.
When you select a project you wish to delete, some files in the list,
i.e. files located in the project folder are selected already. They are
recording files, files that are automatically produced when importing
specific formats, and back up copies. In other words, data which is
used only within one project of MAGIX Video Sound Cleaning Lab.
Files which are not located in the project folder, MP3 files from music
collections or videos, for instance, are not selected, as you will
probably use them in other projects or with other programs. You can
select them if you're sure you don't need them anymore. In general,
it's quite sensible to have the preset apply to the project folder
because it allows you to simply choose a project at the top and to
click "Delete" at the bottom to delete files which are no longer
needed in a project.
Exit
Closes MAGIX Video Sound Cleaning Lab.
Edit Menu
Undo
In the project you can undo the last changes you made. This way, it's
no problem if you want to try out critical operations. If you don't like
the result, you can always revert to the previous state using "Undo".
Keyboard shortcut: Ctrl+Z
www.magix.com
Page 95

Edit Menu 95
Redo
Redo "undoes" a previous Undo command.
Keyboard shortcut: Ctrl+Y
Undo Lists
The last 20 editing steps are listed. You can return to a precise
editing step without complication.
Set marker
With this command you set a marker into the track to mark a certain
time position in the project. You can jump between the markers with
the keyboard commands Alt+Arrow left/right.
Keyboard shortcut Alt+M
Delete marker
This function deletes a track or pause marker. To select a marker,
you have to place the position line to the marker position by clicking
on it.
Keyboard shortcut: Del
Remove all markers
This option deletes all previously set markers.
Keyboard shortcut: Ctrl + Del
Split
A selected object is split into two objects at the position line. This
also works during playback.
Keyboard shortcut: T
www.magix.com
Page 96

96 Edit Menu
Remove object beginning
This command removes the part of an object beneath the position
line, chronologically located before the position line. The audio
material following it is moved forward to the initial position.
Keyboard shortcut: D
Remove object end
This command removes the part of an object beneath the position
line, chronologically located after the position line. The audio material
following it is moved closer.
Keyboard shortcut: U
Cut
The selected object is cut out from the project and placed on the
clipboard. It can then be reinserted elsewhere.
Keyboard shortcut: Shift + Del
Copy
The selected object is copied from the project into the clipboard. It
can then be re-inserted elsewhere.
Keyboard shortcut: C
Paste
The content of the clipboard is inserted into the project at the
position line.
Keyboard shortcut: Ctrl + V
www.magix.com
Page 97

Edit Menu 97
Delete
The currently selected object will then be deleted from current
project. The subsequent objects are moved forward so that there is
no gap in the track.
Keyboard shortcut: Del
Voice-Over
More on this you can read in section "Voice-Over” (view page 55) in
chapter “Sound FX“!
Remove pauses
This function automatically removes sections without or with low
audio level in the selected object. In the dialog, you can set a
minimum time and threshold for recognition.
Threshold (dB): Here you can specify the threshold. The value is
specified in decibels, 0db corresponds to the maximum level.
Typically, you will enter negative values, the higher the numerical
value, the lower the level and the less audio material is removed.
Min. Time (ms): Here you can specify the minimum time for
recognition. If the function removes intended (musical) pauses in the
music, increase the value.
www.magix.com
Page 98

98 Effects Menu
Apply to all objects: If this option is activated, the function will be
applied to all audio objects in the project.
Object FX Editor
This opens the Object FX page for the selected object.
More on this you can read in chapter “Cleaning FX (view page 69)!“!
Apply all realtime effects
If the effects settings become too full to manage or you just want to
"summarize" your production, use this function to convert the entire
audio arrangement into a single audio file. It will appear as a long
object in a new project.
Once the effects have been added they will no longer require CPU
power. Therefore, of the system monitor reaches the red area but you
still require CPU-intensive plug-ins, you can use this function to
release CPU power.
Effects Menu
All of the effects included in the "Remove" and "Enhance" tabs as
well as other effects organized in submenus according to different
topics are available here.
There is one decisive difference between the effects of the master
track and the Object FX page and the ones accessed via the
"Effects" menu: In the latter case, a copy of the audio track is
produced in WAV format, and the ending _fx is added to its name.
The effect is added to it directly.
The advantage is that the effect does not have to be calculated
during playback, which saves computing power. The disadvantage is
that the effect's settings can't be changed later. However, since you
are working with a copy, the Undo (view page 94) function is available
in case you made a mistake.
Just as was the case with the effects of the Object FX page, the
effects don't affect the entire audio material of the master track, but
only the selected object.
www.magix.com
Page 99

A description of the effects which are not explained in what follows
can be found in the sections Remove (view page 58) and Enhance
(view page 74).
Effects Menu 99
Normalize object volume
This function raises the volume of an object to the maximum level
without the material being clipped. This utilizes the dynamic range the
best way possible. First the highest levels are detected, and then the
object level is adjusted so that the max. level amounts to 0 dB, i.e.
the maximum volume (or another value between 1% and 400%).
Note: If you experience very slight clipping during recording and then
proceed to normalize the material, then you won't achieve the same
quality as if you produce a correctly clipped recording! For example, if
you only modulate half of the material, then your recording will have a
quality of 15-bit samples – normalizing to 100% doesn't change
anything.
Normalize to: Here you can set the value to which the audio material
should be normalized by entering it into the input field, moving the
fader, or selecting one of the presets (50, 95, 100 or 200%). The
value will be shown in % and dB (100% = 0 dB = max.). Values
above 0 dB bring about digital clipping.
Maximum level: Displays the highest detected peak in the selected
range/object.
Level change: Displays the level change in dB, in accordance with
www.magix.com
Page 100

100 Effects Menu
the selected normalize level and the detected maximum level.
Different methods can be specified under "Selection":
Normalize the selected object only: Normalization is only applied to
the selected object. This function can also be executed in "Object FX"
mode by clicking the "Auto" button below the volume controller
(always normalizes to 100%).
Normalize all objects separately: Each object in the project is
normalized according to its own maximum (peak) level. The level
ratios between the individual objects changes for this reason.
Normalize all objects as a single unit: The maximum level is detected
for all objects in the project, and each object is normalized according
to that value. The level ratios between the individual objects is
preserved, but only the object that contains the maximum level is
optimally clipped.
Start loudness adjustment (RMS normalization): Starts normalization
including the average loudness (RMS) of objects, see Loudness.
Shortcut: N
Isolate Stereo Channels
Displays a stereo file from two mono objects. The two mono objects
are totally independent, are located one above the other on two
tracks and can be worked on separately. This option is particularly
suitable for removing undesirable audio interference that can only be
heard on one channel.
www.magix.com
 Loading...