

Page 1
Page 2

2
Copyright
This documentation is protected by law. All rights, especially the right to duplicate,
circulate, and translate, are reserved.
No part of this publication may be reproduced in the form of copies, microfilms or
other processes, or transmitted into a language used for machines, especially data
processing machines, without the express written consent of the publisher.
All copyrights reserved.
All other product names are trademarks of the corresponding manufacturers. Errors in
and changes to the contents as well as program modifications reserved.
Copyright © MAGIX Software GmbH, 2008 - 2013. All rights reserved.
MAGIX is a registered trademark of MAGIX AG.
Created under license from Dolby Laboratories
Dolby and the double D symbol are trademarks of the Dolby Laboratories.
© 1992 - 2013 Dolby Laboratories. All rights reserved.
Other mentioned product names may be registered trademarks of the respective
manufacturer.
This product uses MAGIX patent pending technology.
Page 3

Preface 3
Preface
Thank you for choosing MAGIX Video Pro X5! Your new software offers video editing
and postproduction on a professional level, comprehensive format support, powerful
performance, high-end audio editing and all options for DVD authoring and export.
The fully developed MAGIX Video Pro X5 operating concept helps you get top results
after only a short familiarization period. This documentation offers you an overview
and a quick start at the beginning. The sections at the end provide a detailed and
systematic description of the numerous functions.
Have fun with your projects and MAGIX Video Pro X5 from
Your MAGIX Team
Page 4

4
Table of Contents
Copyright 2
Preface 3
Support 11
Before You Start 13
Package Contents 13
Installation 13
Serial number 14
System requirements 15
Introduction 16
What is MAGIX Video Pro X5? 16
Features 16
Notes for MAGIX Movie Edit Pro users 18
Projects, movies and scenes 20
Quick start 22
Program start 22
Select, load, and play back videos 23
Import video material from memory card 26
Video editing 28
Publish videos 34
Edit mode 36
Standard mode 36
Basic mode 37
Switching between standard and basic modes 40
Work screens 41
Activate main screen 41
"Edit" screen 42
The "Burn" screen 67
Video recording 68
Select the recording method 68
AVCHD/DVCPRO/AVC-Intra 69
HDV camera 72
Page 5

DV camera 72
Video 79
Audio 82
Single frame 85
Screen 88
Edit after recording 89
Objects 91
Insert object into the project 92
Select and group objects 94
Duplicate objects 94
Move Objects 95
Extract sound from videos 95
Object handles 96
Object borders 97
Trim Objects 97
Transitions (fades) 100
Search for gaps 102
Simple cut 103
Two-point cut 103
Three-point editing 105
Four-point editing 107
Move the contents of trimmed objects 107
Zoom preview 107
Table of Contents 5
Markers 108
Playback marker 108
Project markers 108
Ranges (in and out points) 109
Chapter markers 110
Scene markers 112
Multicam editing 113
Preparation 113
Source tracks and preview images 114
Multicam edit functions 115
Synchronize video objects using the audio track 116
Title 117
Title editor 117
Page 6

6
3D Text 118
Advanced settings 119
Creating titles using a template 120
Create titles without a template 120
Edit titles retroactively 121
Position titles 121
Fade in date as title 121
Timecode 122
Effects 123
Apply effects to objects 123
Preview rendering 125
Video effects in the Media Pool 128
Movement effects in the Media Pool 137
Stereo3D in the Media Pool 142
Audio effects in the Media Pool 143
Design elements in the Media Pool 144
My Presets in the Media Pool 144
Additional Effects 144
Animate objects, effect curves 147
Create effects masks 152
Attach to picture position in the video 158
Create overlay graphic/animation 158
Image stabilization 159
Image improvements for the entire movie 161
Image improvements for individual objects 163
Stereo3D 164
3D basics 164
Record 3D 165
Prepare 3D editing 166
Set playback mode for 3D 167
Align videos and pictures for 3D 168
Turn camera movements into 3D videos 169
Export and burn 3D videos 170
Audio editing 172
Load and edit audio files 172
Audio effects 173
Page 7

Mixer 190
5.1 Surround 193
Set multiple sound tracks 198
Scrubbing 201
Edit disc menu 202
Preview and editing 202
Menu 203
Templates 204
Edit disc menu 205
Edit DVD menus with Xara Xtreme Pro or Photoshop 212
Burn disc 220
Burning wizard 220
The burn dialog 221
Memory 222
Encoder settings 224
Use Quick Sync Video, Open CL or CUDA for rendering 226
Export movie 227
Video as AVI 227
Video as DV-AVI 228
Video as MPEG video 228
Video as MAGIX video 228
Video as QuickTime movie 228
Uncompressed movie 229
Video as MotionJPEG AVI 229
Movie as a series of individual frames 229
Windows Media Export 229
Video as MPEG-4 video 230
Export as media player 231
Audio as MP3 232
Audio as wave 232
Export as transition... 232
Single frame as BMP file 233
Single frame as JPG 233
Animated GIF 233
Export movie information as EDL 233
Upload to Internet 234
Table of Contents 7
Page 8

8
Upload to Internet (MAGIX Online Album) 235
Export to device 236
Output as media player 236
Output as video file 237
Settings for and management of video projectors 238
Movie and project settings 238
Program settings 246
Proxy and Preview Rendering 253
Backup copy 255
Load backup project... 256
Importing & exporting EDL files 256
Clean-up wizard 257
Special functions and wizards 258
Proxy editing 258
Automatic scene detection 259
Musical cut adjustment 260
MAGIX Soundtrack Maker 264
Slideshow Maker 266
Produce panorama pictures 270
Batch conversion 271
Blackmagic Design video cards 274
Use movie templates 275
Menus 277
File Menu 277
Edit Menu 284
Effects Menu 292
Windows Menu 298
Help Menu 301
Context menu (right click) 303
Video objects 303
Image objects 307
Transitions 310
Audio objects 310
Text objects 313
MAGIX 3D Maker objects 315
Project folder 318
Page 9

Track 318
Problems and solutions 320
File will not load 320
Choppy or uneven playback 320
Problems and Remedies regarding the Auto Remix Assistant 320
Activation problems 321
Online functions 322
Integrated browser 322
MAGIX News Center 324
Embed Flash videos into your own web page 324
Keyboard shortcuts 326
Playback functions 326
Scroll and zoom 327
Monitors 327
Arranger view 327
Move view 328
Mouse Modes 328
Context Menu 329
File menu 329
Edit menu 330
Effects menu 331
Windows menu 332
Help menu 333
Edit keyboard shortcut 333
Table of Contents 9
Activate codecs 335
Free activation of codecs 335
Fee-based DVCPRO and AVC-Intra activation 336
Annex: Digital Video and Data Storage 337
MPEG Compression 337
General notes on AVI videos 337
Overview of the different disc types 338
MPEG-4 encoder 341
Video codec 342
Audio codec 349
Multiplexer 351
Page 10

10
Appendix: MPEG Encoder Settings 352
General settings 352
Video settings 353
Advanced video settings 354
Audio settings 355
MPEG glossary 357
Motion estimation 357
Bit rate 357
Block 358
Chroma format 358
Field 358
Frame 358
GOP 359
I frames 359
Interlace 359
P frames and B frames 361
Prediction 361
Quantization scaling 362
Glossary 364
If you still have questions 379
Tips for program help 379
Index 380
Page 11

Support 11
Support
Dear MAGIX customer,
Our aim is to provide fast, convenient, solution-focused support at all times. To this
end, we offer a wide range of services:
• Unlimited web support:
As a registered MAGIX customer, you have unlimited access to web support
offered via the convenient MAGIX service portal on http://support.magix.net,
including an intelligent help assistant, high-quality FAQs, patches and user
reports that are constantly updated.
The only requirement for use is product registration at http://pro.magix.com
• The online community, on-the-spot support and a platform for exchange:
MAGIX customers have free and unlimited access to the online community at
www.magix.info, which includes approx. 150,000 members and offers the
opportunity to ask members questions concerning MAGIX products as well as
use the search function to search for specific topics or answers. In addition to
questions & answers, the knowledge pool includes a glossary, video tutorials and
a discussion forum. The multiple experts, found round-the-clock at
www.magix.info guarantee quick answers, which sometimes come within
minutes of a question being posted.
• Email support for MAGIX products:
For every new MAGIX product you will receive, as of date purchase, 12 months of
email based customer service.
Premium email support:
For priority support, or if you want the MAGIX support team to help with nonMAGIX related hardware problems you can purchase a Premium email support
ticket. Log in at http://support.magix.net and click on "Purchase access code",
the ticket is for a specific problem, and is valid until it is solved, it is not restricted
to an email.
Please note: To be able to use the Premium email support and free product email
support via the Internet, you have to register your MAGIX product using the serial
number provided. This can be found on the CD case of your installation CD or on the
inside of the DVD box.
• Additional telephone service:
Besides the large number of free customer service offers, we also offer a feebased telephone customer service.
Page 12

12
Here you can find a summary of our technical support telephone numbers:
http://support.magix.net/
Mail (Europe): MAGIX Development Support, P.O. Box 20 09 14, 01194 Dresden,
Germany
Mail (North America): MAGIX Customer Service, 1105 Terminal Way #302, Reno,
NV 89502, USA
Please make sure you have the following information at hand:
• Program version
• Configuration details (operating system, processor, memory, hard drive, etc.),
sound card configuration (type, driver)
• Information regarding other audio software installed
MAGIX Sales Department
You can reach the MAGIX Sales Department workdays for help with the following
questions and problems:
• Orders
• Product consulting (pre-purchase)
• Upgrade requests
• Returns
Europe
Monday - Friday, 09:00-16:00 GMT
U.K.: 0203 3189218
Denmark: 45 699 18763
Sweden: 46 852 500713
Finland: 35 89 42419023
Norway: 47 210 35843
North America
9 am to 4 pm EST Mon-Fri
Phone: 1-305-722-5810
Page 13

Before You Start 13
Before You Start
Package Contents
Installation & multimedia content DVD
The MAGIX Video Pro X5 installation manager is included on the installation DVD.
Printed and PDF manuals
The printed manual contains an overview of the most important functions of MAGIX
Video Pro X5.
If you have further questions, please read the complete documentation and a shortcut
pdf located in the program folder of MAGIX Video Pro X5. To read it, you will require
the free Foxit Reader program.
Installation
Step 1: Insert the program disc into the drive. The installation program starts up
automatically in Windows. If the disc doesn't run automatically,
• open the Windows Explorer and click the letter of the CD/DVD drive.
• Now double-click on "Start.exe" to start the installer.
Step 2: To begin the installation of MAGIX Video Pro X5, click on "MAGIX Video Pro
X5". The MAGIX Video Pro X5 installation program will appear.
Simply follow the instructions on screen to complete the installation process, and
then click "Continue". All files are copied onto the hard drive.
Step 3: Once the installation is complete, confirm by pressing "Finish". You can start
the program at any time using the Windows "Start" menu
Page 14

14
Serial number
A serial number is included in each product. This serial number is required for the
installation of the software and enables usage of additional bonus services. Please
store this number in a safe place.
What can a serial number do?
With a serial number your MAGIX Video Pro X5 is clearly assigned to you and only
you. This way improved and more targeted customer service is made possible. Abuse
of the software can be prevented with a serial number, which ensures that optimum
the price/performance ratio continues is guaranteed.
Where can the serial number be found?
The serial number can be found on the reverse side of your CD/DVD case. If your
product is packed in a DVD box, then you'll find the serial number on the inside.
For the versions that have been especially optimized for the Internet (download
versions), you'll get your serial number for activating the software directly after
purchasing the product via email.
When will you need the serial number?
The serial number is required when you start or register MAGIX Video Pro X5 for the
first time.
Note: We explicitly recommend registering your product (free), since only then are
you entitled to download updates and use MAGIX support (view page 10) services.
Unlocking MAGIX Video Pro X5
After MAGIX Video Pro X5 has been installed and the serial number has been
entered, the software can be used for 30 days. After these 30 days have expired,
MAGIX Video Pro X5 must be activated.
Page 15

Before You Start 15
System requirements
For Microsoft Windows XP | Vista | 7 | 8
Minimum configuration:
• Processor: Intel Core Duo with 1.83 GHz, AMD Dual-Core with 2.0 GHz
• RAM: 1GB
• Graphics card: Onboard graphics card with a screen resolution of at least 1024 x
768
• Sound card: Internal sound card
• Hard drive space: 1 GB (for minimum installation)
• Optical drive: DVD drive
Minimum requirements for HD/3D editing:
• Processor: Intel Core 2 Quad-core processor with 2.83 GHz (Intel Core i7
recommended), AMD Quad-core processor with 2.8 GHz
• RAM: 4 GB
• Graphics card: Dedicated graphics card with 512 MB VRAM or more
• Sound card: Multi-channel sound card recommended for Surround sound editing
• Hard drive space: 4 GB
• Optical drive: Blu-ray burner to create Blu-ray Discs
Page 16

16
Introduction
What is MAGIX Video Pro X5?
MAGIX Video Pro X5 is a professional video editing program for Windows PC. All
common video formats can be imported directly without any conversion into a
proprietary format in an open timeline. The Hybrid Video Engine supports GPU
processing with OpenCL, CUDA and QuickSync. Editing options include realtime
effect editing, efficient three- and four-point cuts, intelligent mouse modes for fast
editing and a Multicam mode with auto synchronization on up to nine tracks. Based
on the high end audio engine from Samplitude, perfect synchronization of audio and
image is realized in realtime. Finished projects can be exported using efficient batch
rendering into broadcast formats to DVDs, AVCHD- and Blu-ray discs or uploaded
directly to common video portals and mobile devices.
Features
Recording
MAGIX Video Pro X5 features the following recording options:
• AVCHD/DVCPRO/AVC-Intra/Video-DSLRs/XDCAM/NXCAM (and other
drives)*
• HDV camera: HDV camcorder
• DV camera: Mini DV camcorder or DV video recorder
• Video: Analog TV, video input, VCR, webcam
• Audio: Microphone, cassette recorder, MiniDisc player, record player
• Screen: PC monitor.
• Single frame: Single and series images from webcams, video recorders, video
cameras, or TV cards
*Import of AVC-Intra and DVCPRO possible after fee-based activation (view page
336)
Analog capture requires capt
be performed through an OHCI-compatible IEEE 1394 host adapter (FireWire or
iLink). A TV card can be used to record programs from TV or from your video
recorder.
ure cards compatible with DirectShow. DV capture can
Page 17

Introduction 17
Import and export formats
Supported import formats:
Video: AVI, DV-AVI, MPEG-1, MPEG-2, MPEG-4, M2TS, MJPEG, MKV, MTS, MXF,
MXV, QuickTime, WMV(HD), VOB
Audio: AAC, Dolby®Digital Stereo/5.1 (downmix to stereo), MIDI, MP3, OGG, WAV,
WMA
Photo: BMP, GIF, JPEG, PNG, TIF, TGA
Supported export formats:
Video: AVI, DV-AVI, MPEG-1, MPEG-2, MPEG-4, MXV, MJPEG, Quicktime,
WMV(HD)
Audio: DolbyDigital Stereo, DolbyDigital 5.1 (with video), MP3, WAV
Photo: BMP, JPEG
Note: For copy protection reasons, MPEG-4, MPEG-2, and Dolby Digital Stereo
must first be activated. Initial activation is free of charge. MP3 export requires
installation of Windows Media Player version 10 or higher.
Multicam editing
MAGIX Video Pro X5 enables multicam editing (view page 113) for up to 9 tracks. The
different camera recordings can be played back in sync and edited together as a single
version.
Editing
• Program and source monitors: To provide an optimal overview, these two
separate preview monitors are integrated for the source material and movie
arrangement respectively.
• The project folder is used for storing your material. It's useful for selecting the
necessary media for your current project. Use it to store video, audio, titling files,
and even edited versions or sections of films for use later in your projects.
• Picture optimization: This includes color improvement (RGB, saturation),
sharpness (focus, feathering), brightness regulator (brightness, contrast), and the
anti-flicker filter.
• Sound optimization: The equalizer allows you to manipulate the frequency
spectrum, which is useful for reducing peaks, for example. The compressor limits
the signal's dynamics. The StereoFX processor controls the position of the sound
within the stereo panorama. The De-noiser and De-hisser are professional noise
reduction tools for removing noise and hisses.
Page 18

18
• Video effects: Such as creative filters, distortion, video mix (chroma key),
movement effects (e.g. camera/zoom or rotation), cropping, picture-in-picture
collages, video effect plug-in support, etc.
• Automatic scene recognition
• Slideshow Maker turns photo collages into spectacular multimedia shows
automatically.
• MAGIX Soundtrack Maker creates background music automatically.
Burnable disc formats
You will find the following burning options in the "Burn" area:
• DVD
• Blu-Ray disc
• AVCHD disc (on DVD and Blu-ray Discs)
In the "File" menu you can make and burn backup copies.
Multimedia editable disc menus
Included are many disc menu templates which offer selection options for movies and
chapters on the screen. Many of these are also available in 16:9 format. They can be
included during burning and give the disc a professional appearance.
Every menu template may be customized with personal photos, thematic animations,
3D captions, sound, intro videos, etc.
Notes for MAGIX Movie Edit Pro users
If you are used to working with MAGIX Movie Edit Pro, you can change the window
appearance to MAGIX Video deluxe "classic" view by going to "Window"> "Window
appearance" > "Minimal".
For all those who haven't used MAGIX Movie Edit Pro before, we recommend the
"Standard" window appearance. You have the most options available in this mode.
Below you will find a rough overview of the differences between MAGIX Video Pro X5
and MAGIX Movie Edit Pro.
Video monitors
• In the "Minimal" mode you will see only one preview monitor like in MAGIX
Movie Edit Pro, which is used as both a program and a source monitor. When the
project is stopped, you can select files in the Media Pool and play them back
using the transport controls. To play the arrangement again, you first must click
on the arranger.
Page 19

Introduction 19
• The "Standard" appearance offers two preview monitors: a program monitor for
project preview in the arranger and a source monitor for preview of Media Pool
files. Both preview monitors have separate transport controls, so that Media Pool
preview and project playback can be controlled separately. For additional
information about the preview monitors, please read the corresponding section of
the "Interface" (view page 64) chapter.
Keyboard layout
The preset keyboard shortcuts are different and can be displayed in both modes via
"File -> Settings -> Keyboard shortcuts". MAGIX Video Pro X5 also allows familiar
shortcuts from Movie Edit Pro to be loaded if they are easier to work with. More
information about keyboard shortcuts can be found in the chapter "Keyboard
shortcut" (view page 325) and in the shortcut pdf located in the program folder of
MAGIX Vide
o Pro X5.
Load files
• In MAGIX Video Pro X5, files are dragged (drag&drop) to the desired position in
the arranger or loaded via the commands from the insert menu. To learn more
about the paste menus, please read the "Paste Modes" section in the "Interface"
chapter.
• In Movie Edit Pro, files can also be loaded form the Media Pool by double clicking
them. Videos and images are placed in the first track at the position of the
playback marker. If another object is already located there, the new object will be
placed after the last object in the first track. Titles will appear on tracks 3 and 4,
additional audio material on track 5.
You may also change this behavior under "File -> Settings -> Program" via the tab
"System" and under "Behavior on double click".
Space bar behavior
In either program, use the space bar on your keyboard to start and stop. Pressing the
space bar again produces different effects according to the respective program:
• In Movie Edit Pro, the playback marker is placed at the last stop position.
• In MAGIX Video Pro X5, the playback marker is kept at the current position. This
corresponds with the functionality of a tape recorder when stopped.
Playback behavior may be switched via "File -> Settings -> Program" and then the
"Playback" tab.
Project folder
• In Movie Edit Pro, the project folder function is not available.
• MAGIX Video Pro X5 features the project folder as a separate folder on the right
side, which serves as an intermediate store or catch-all for all kinds of project
Page 20

20
material. More information about this is available in the section "Project folder
(view page 62)" in the chapter "Workspaces".
Projects, movies and scenes
MAGIX Video Pro X5 works with "Projects", "Movies", and "Scenes". In order to work
quickly and intuitively, is it important to know the differences between these three
hierarchically-ordered terms.
Project A "Project" includes everything that you want to include on a disc.
Normally this means one or more movies and a menu structure for
selecting movies for playback. Projects can be saved as "MVP" files on
your hard drive and can be loaded later to do further editing to the
movies.
Movie A "Movie" can be one single video clip or a combination of clips and
photos. It can also include music, titles, transitions and much more.
Each movie can be exported individually as a video. The "project" can be
considered a type of drawer into which you can put multiple movies that
will be edited together and burned to the same disc.
Scene Scenes are the main components of a movie. They may contain
integrated photos that are displayed as still shots or animated images.
Along with photos and videos, a movie has many other elements such as
titles, transitions, decorative elements, music, voiceover commentary
etc.
Summary: „Projects“ contain „Movies“ and „Movies“ contain „Scenes“. When you
burn a disc, the movies of a project appear as menu items and the scenes are the
menu items for each movie.
Page 21
Introduction 21
Project management
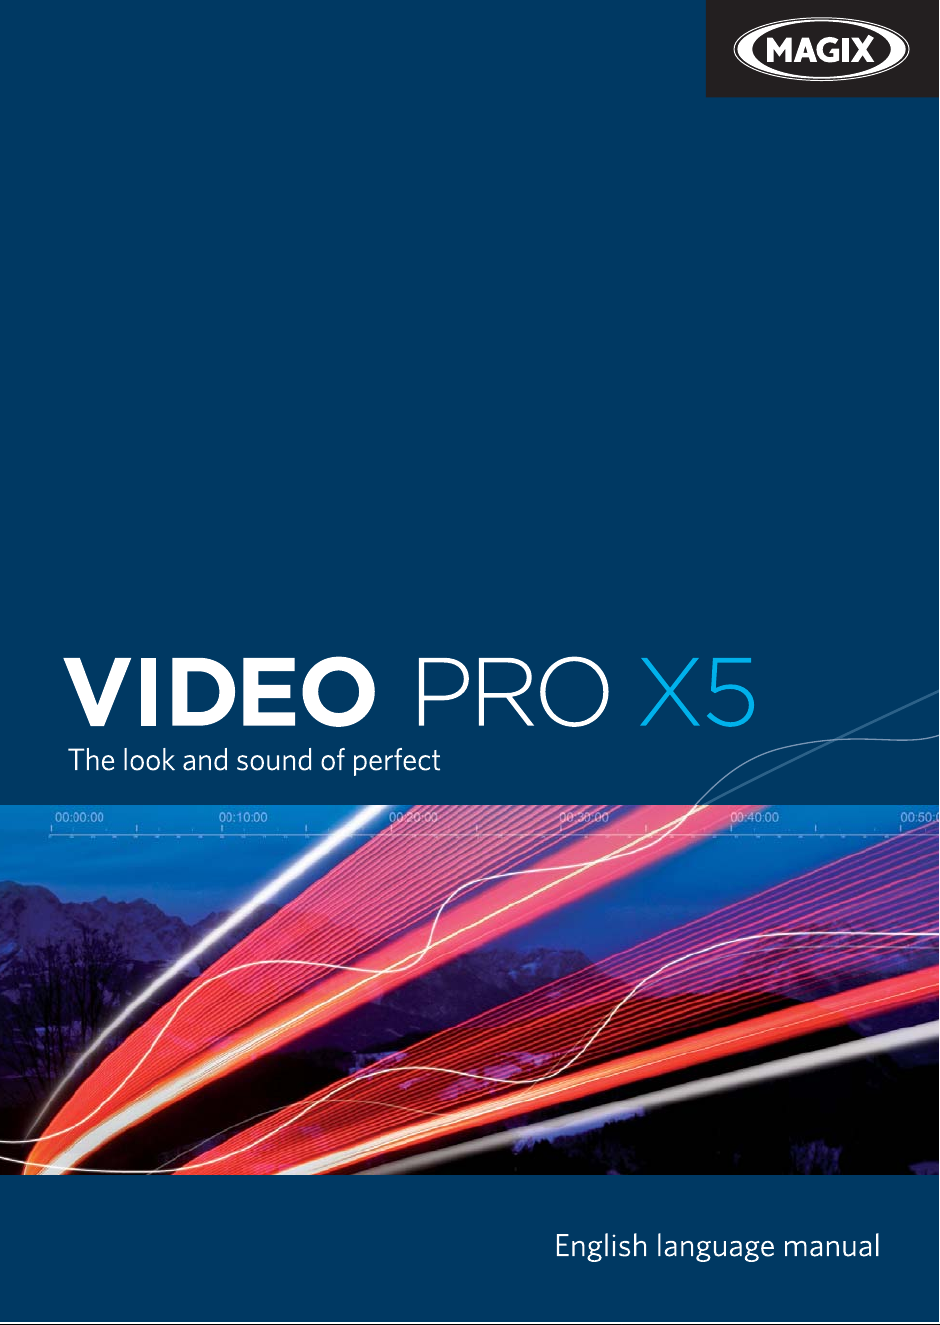
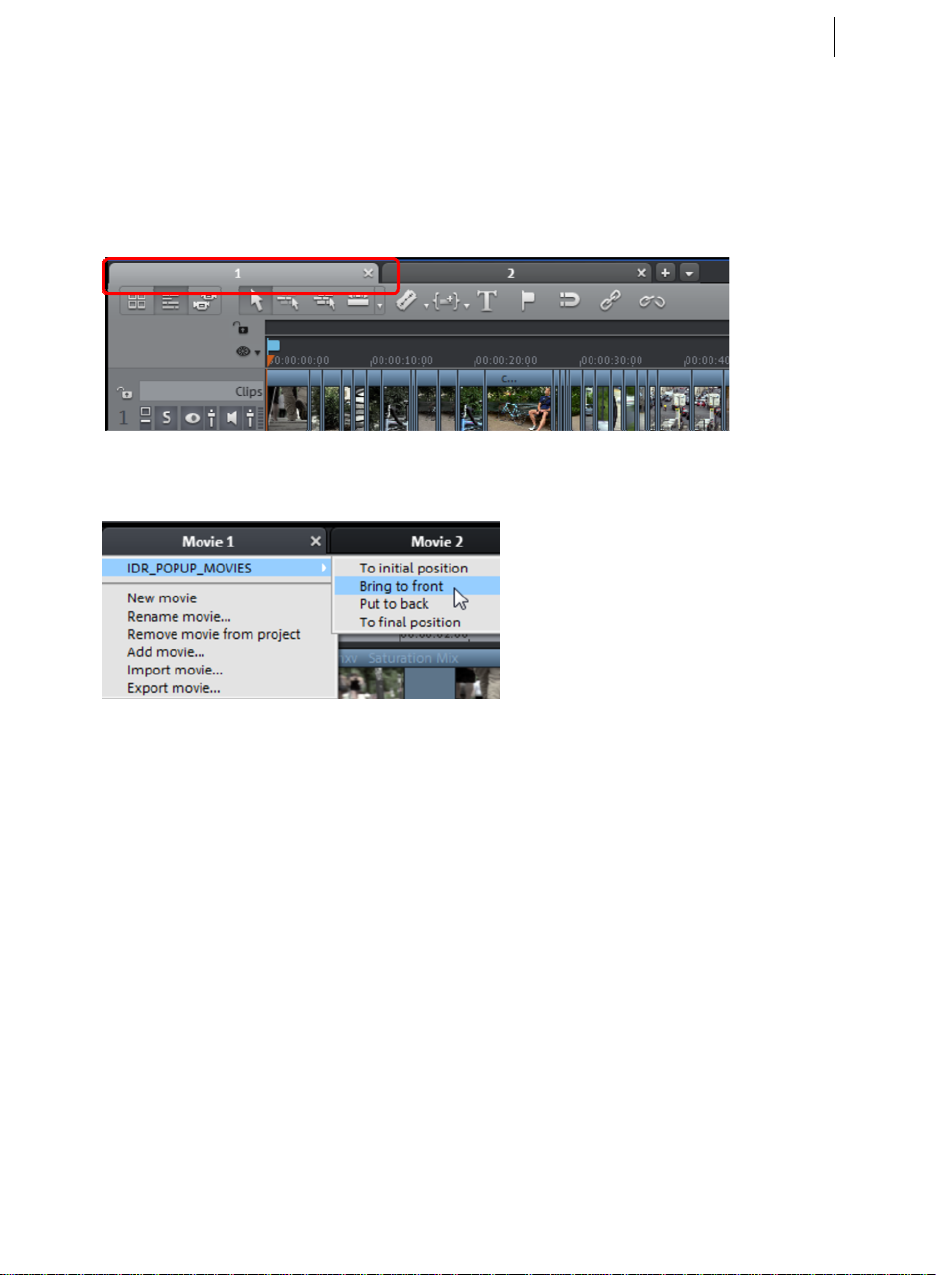
The "Edit" area can be used for editing films and also for managing your projects, i. e.
here you can sort the order of the movies, add new movies, remove existing movies
from the project or rename the movies.
Each film in a current project can be controlled through its own tab above the tracks.
To rename, sort, load or delete movies, the easiest way is to right-click on one of the
tabs. You can then select the action you want from the context menu that appears.
Page 22
22
Quick start
This chapter explains the basic functions of MAGIX Video Pro X5 with a step-by-step
introduction. A systematic description of all program functions can be found in the
following chapters.
Tip: Use the online tutorial videos that can be accessed in the "Help" menu. This
feature requires an Internet connection.
The program keyboard shortcuts (view page 325) for commonly used processes and
functions are also very helpful.
Program start
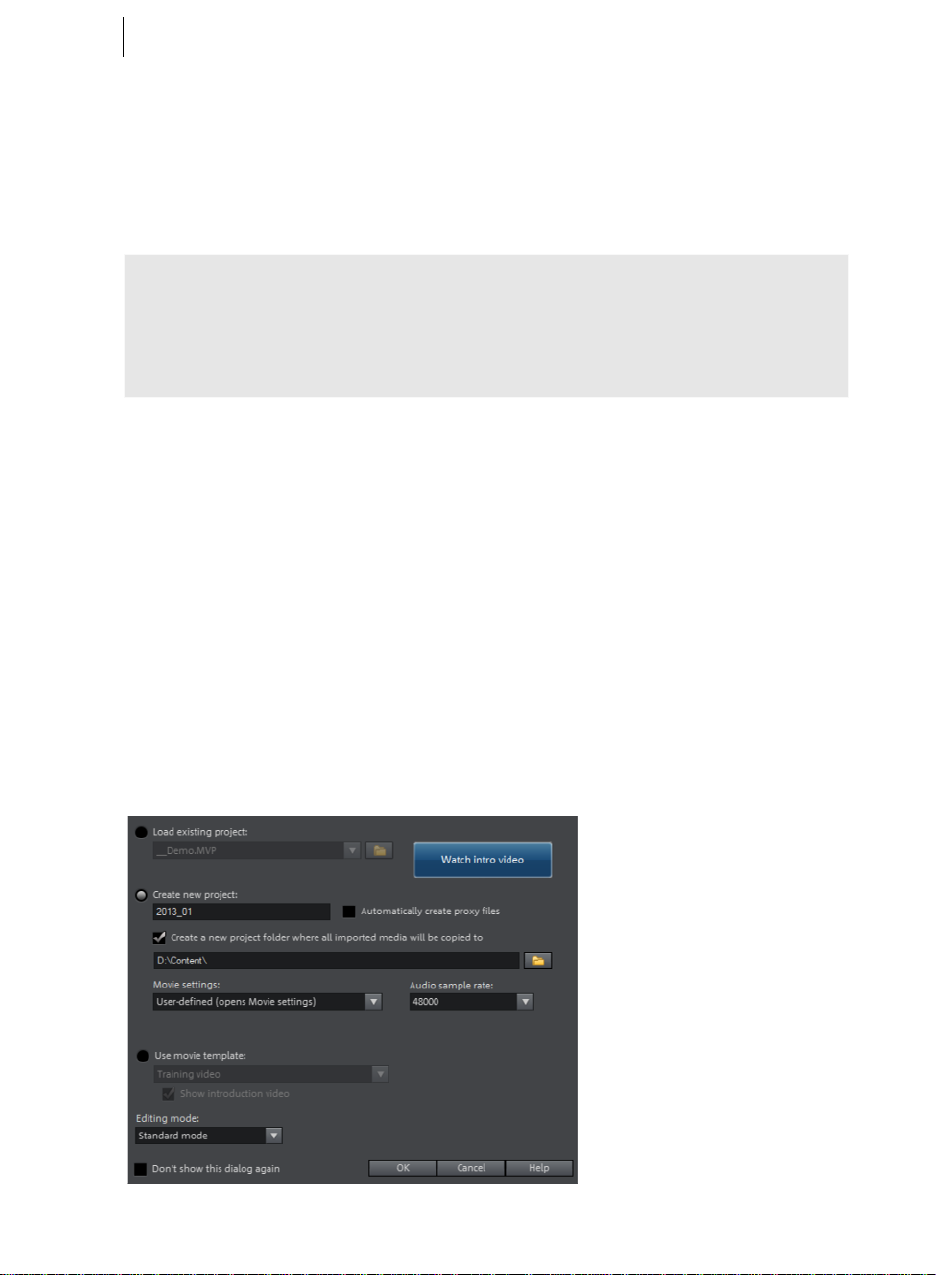
When you start MAGIX Video Pro X5 for the first time, the start dialog will appear.
This dialog allows you to either "Load an existing project" or "Create a new project".
You can also "Create a new project folder". All files belonging to this movie will be
saved there.
Additionally, you can also use movie templates (view page 274). Movie templates
offer a structur
included placeholders.
If you are looking for a quick start into the basic functions of MAGIX Video Pro X5, we
recommend switching into the "Basic mode" (view page 37), which can be found
under "Edit
e for quickly developing certain standard projects with the help of
ing mode".
Page 23
Quick start 23
We're still at the very beginning, so let's stick with keeping an overview of everything.
Click "OK" to end the dialog and continue.
Select, load, and play back videos
In the beginning, it's probably best to load a video file for test purposes and to get to
know the program functions.
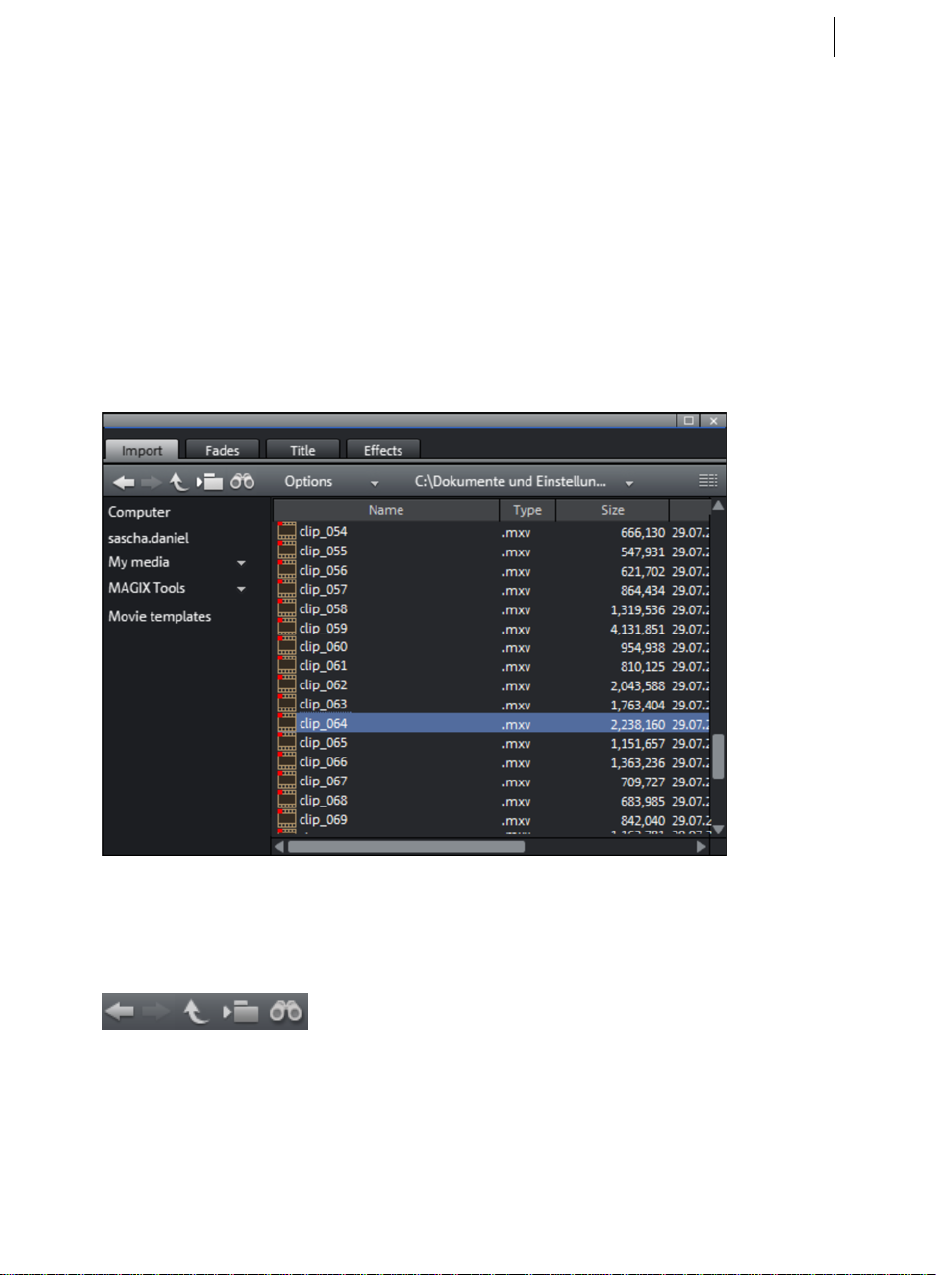
• The Media Pool appears at the top right; four tabs provide access to all important
elements that are required for video projects. The first tab displays all usable files
(besides movies, also photos, images, audio files, and even RTF text files for
captions) in the current folder.
• Navigation works just like in other file managers: folders can be opened with a
double-click. Arrow buttons allow you to go one level up or down. You can also
display a folder tree featuring the folder hierarchy and then use the search
function (view page 57) to locate files according to different criteria.
• All files opened in the file list can be loaded and used. Find a video file, e.g. in the
format *.mpg, *mxv, or *.avi.
Page 24
24
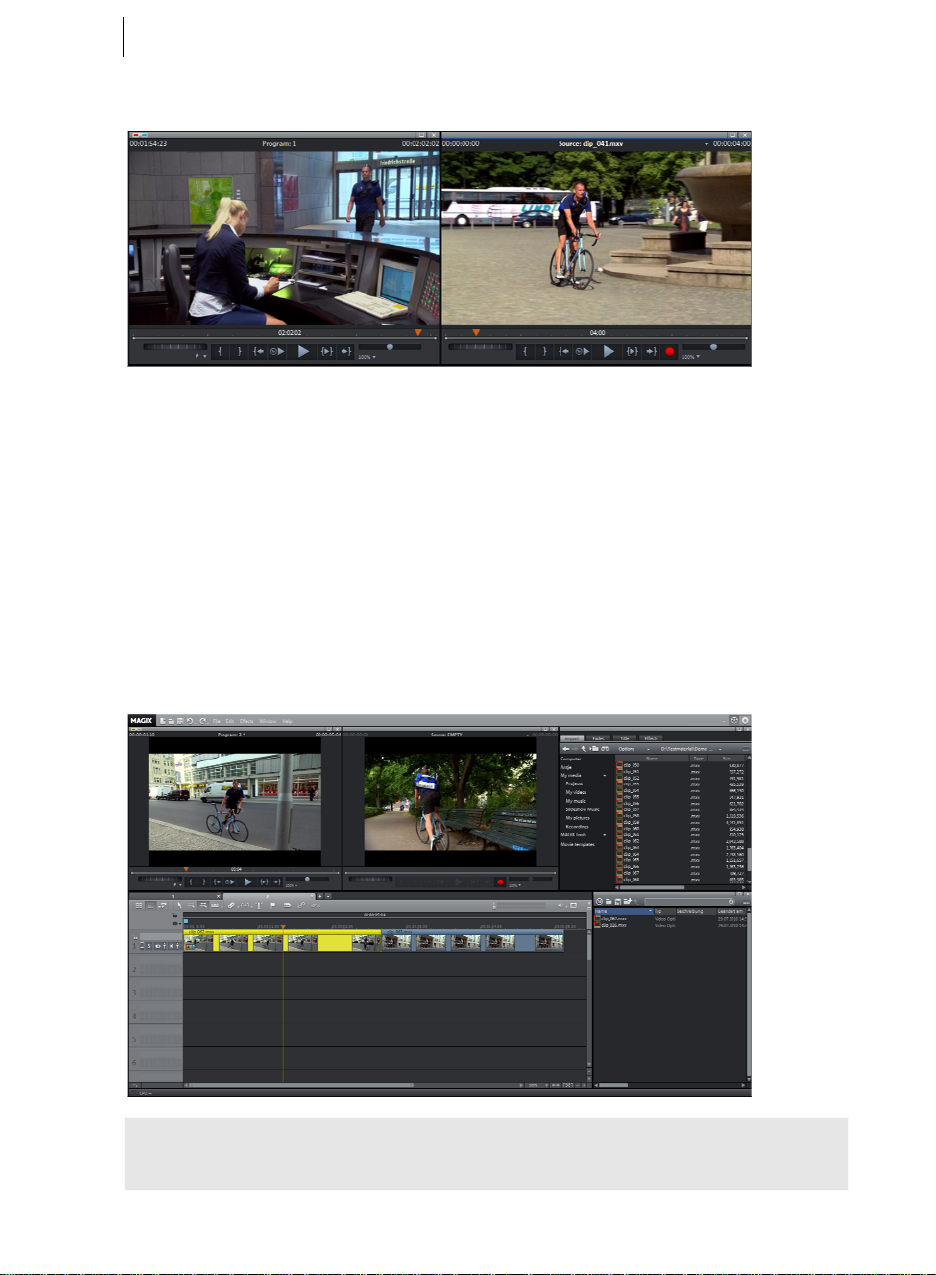
• In the upper-left area, you will see two preview monitors.
• The left program monitor is responsible for playback of objects in the arranger.
The right source monitor displays a preview of files in the Media Pool.
• To enable playback of movie files from the Media Pool in the right source
monitor, double-click the file in the file list first. Double-clicking loads the file in
the monitor first.
• This method lets you select and play back different video files. Drag the selected
file (hold down the mouse button) from the Media Pool down into the arranger.
An object appears at the location on the track where you release the mouse
button to represent this video file.
• Each object can be moved in any way in the arranger with the mouse, horizontally
on a track as well as vertically between tracks. Drag the video object on the first
track all the way to the left to the beginning of the track.
Note: If the video also has an audio track, it will be displayed in the same track. You
can learn how to separate image and sound in the "Objects" (view page 95) chapter.
Page 25
Quick start 25
• Now the first file is in the Arranger, where it can be cut, edited and exported.
Now you can load additional files and videos and combine audio files on the
tracks.
• To play back the arranger, click the play button on the transport console under
the program monitor to the left.
Tip: An even easier way to control playback is by pressing the space bar on your
keyboard.
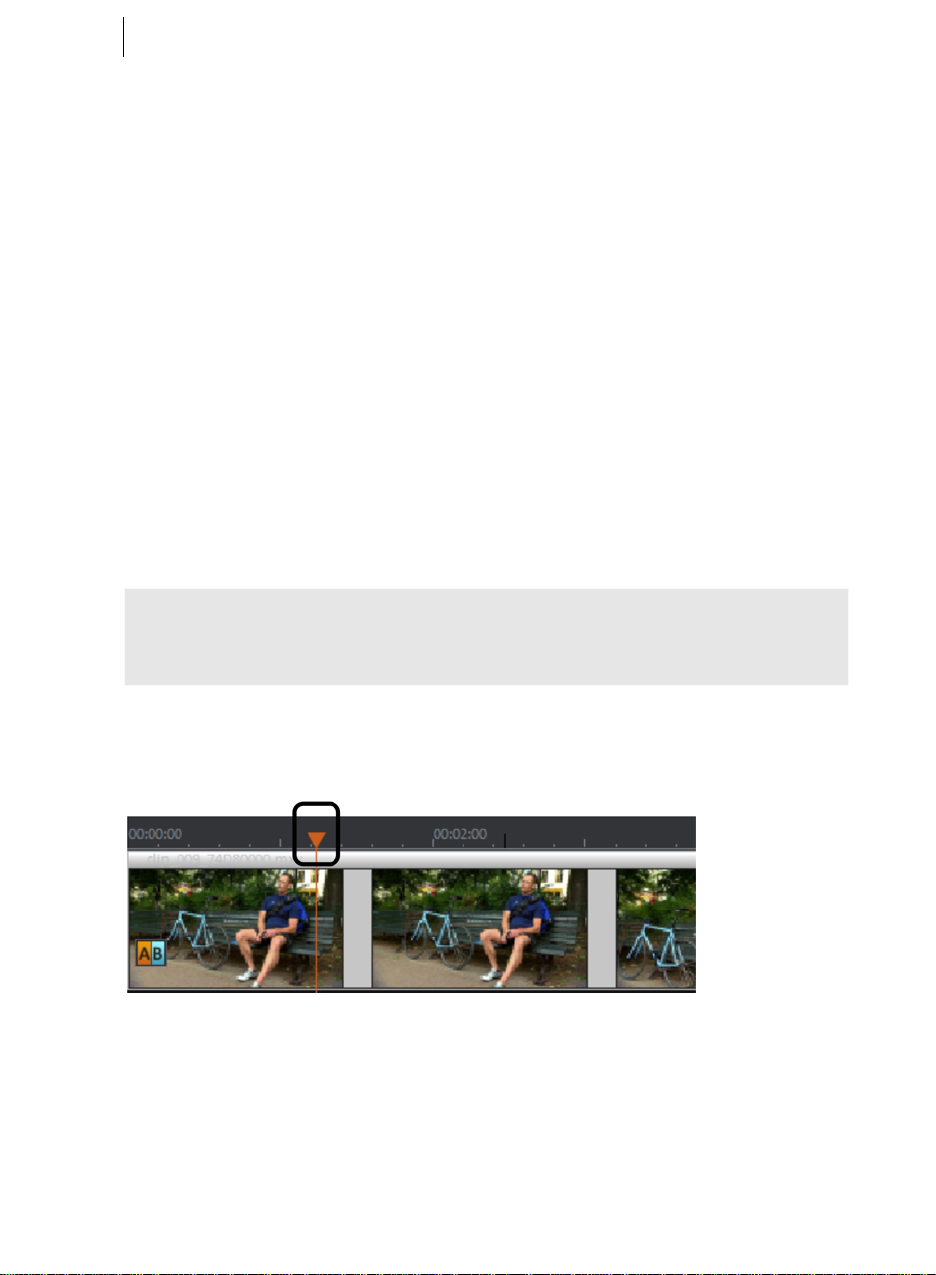
• During playback, a vertical line will move across the Arranger: this is the playback
marker that displays the current position. It can be set directly with a mouse click
in order to jump to certain positions.
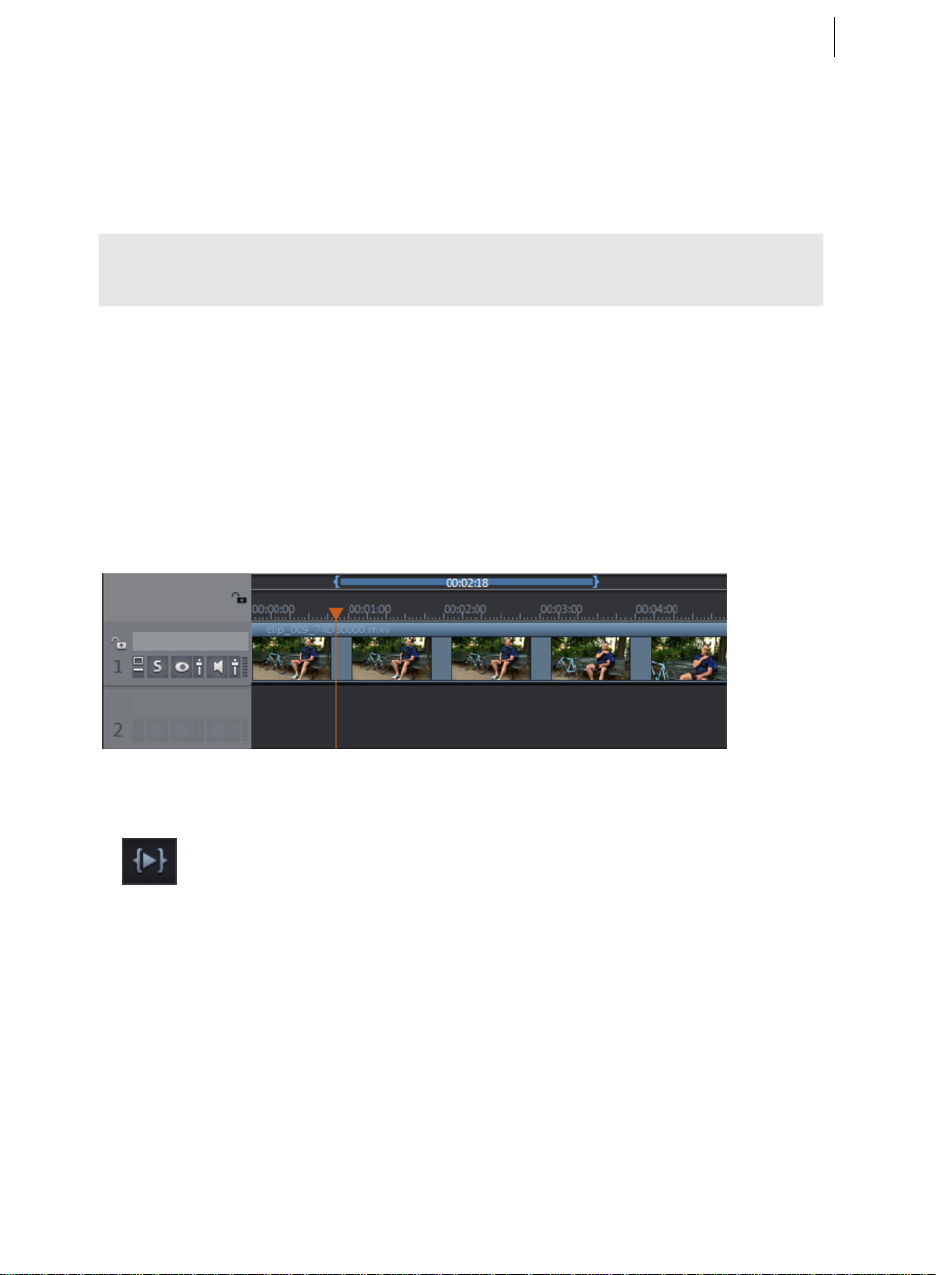
• You can also define playback ranges, e.g. to freeze a certain position independent
of the playback marker. Clicking in the range bar above the first track lets you
define an in-point, i.e. the starting point of the playback range. If you right-click
further on, the end marker will appear to indicate the end point of the playback
range. The length of the playback area is shown in the center of the section
display.
• The in and out points can be moved with the mouse: Left-clicking positions the
in-point, and the right mouse button sets the out-point.
• To play back the range, click the "Play back range" button on the transport
control under the program monitor.
Now you know how to load and play back media files in different ways. Would you
like to try to make your own movie now?
• If you want to continue with your own video footage, select the "New movie"
option from the "File" menu and read the following chapters about video import.
• If you want to continue working with the test file, simply skip the following import
tutorial and begin reading the "Video editing (view page 28)" section.
Page 26
26
Import video material from memory card
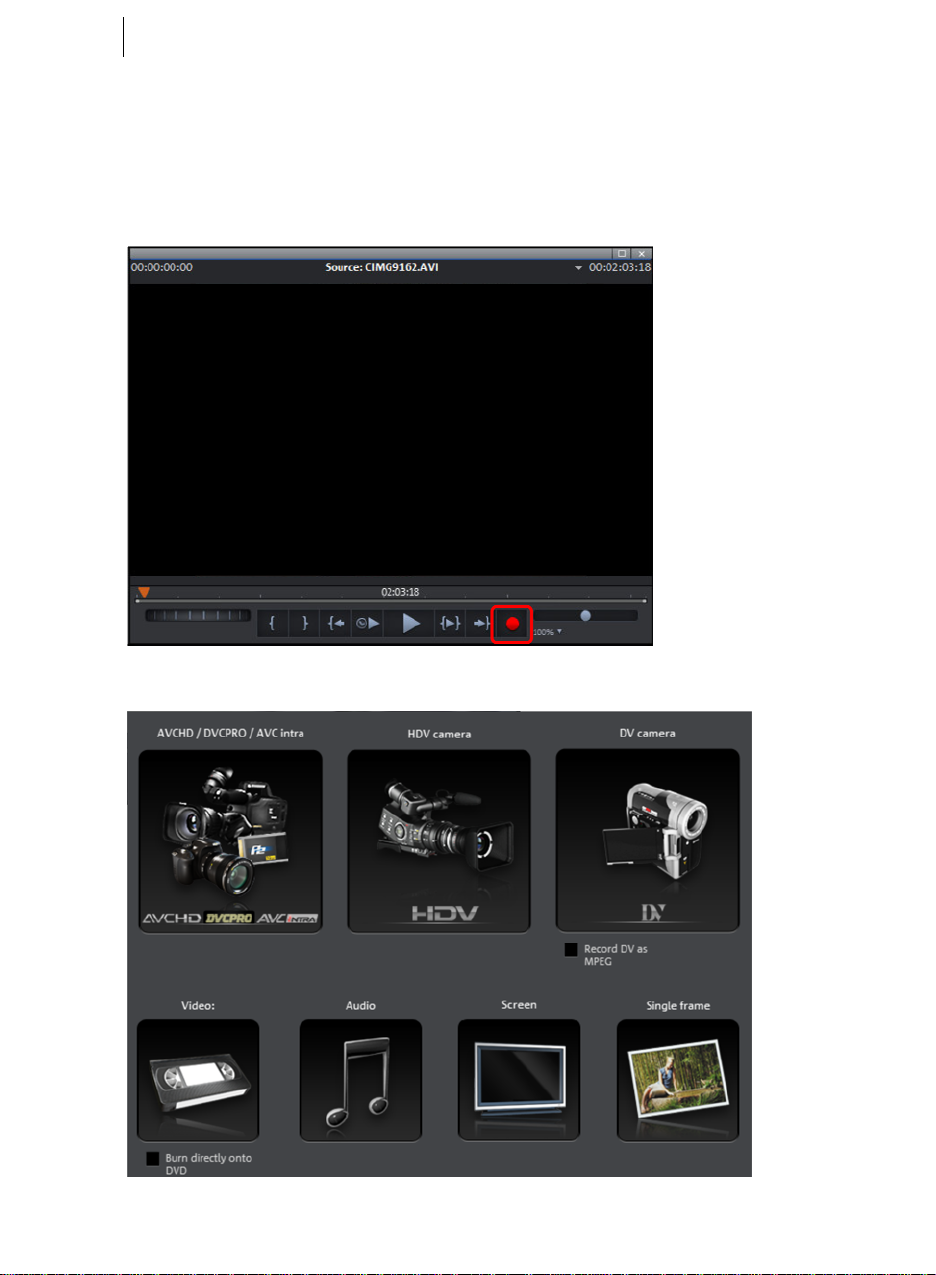
• Connect your memory medium (camera, USB stick, SD card or other) to the PC.
You may have to first turn your camera on.
• Click on the red button below the source monitor to open the record dialog.
• In the record dialog, click on "AVCHD/DVCPRO/AVC-Intra".
Page 27

Quick start 27
• The AVCHD import assistant will then open. Select your connected storage
devices as "video source". A file list will appear.
• In the file list, select all the recordings that you've imported from the device.
• You can preview all your recordings using the preview monitor in the middle of
the dialog in order to decide if they are suitable for your movie.
• After selecting all videos, in "Import options" you can select whether the
recordings should be directly placed into your movie project or simply copied to
your computer's hard drive (you can select the location in the next dialog). You
can also automatically delete your recordings after import.
Page 28
28
Video editing
Timeline mode
All editing takes place in the arranger. All movies and scenes are represented in
accordance to their duration in the "Timeline mode": The longer the symbol is, the
longer is the scene represented by it.
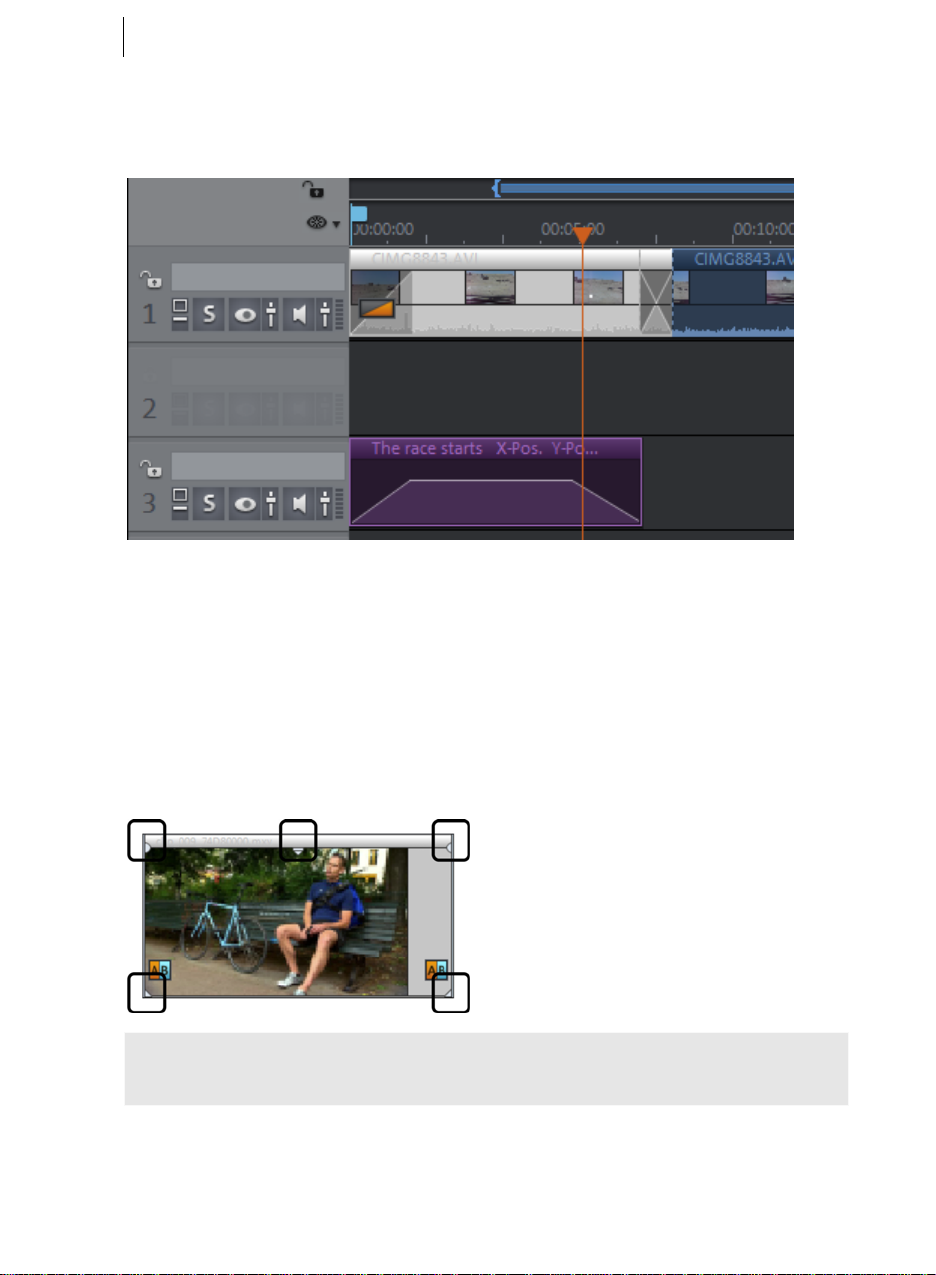
Handles: All objects may be shortened by placing the mouse on one of the lower
object corners until the mouse cursor turns into a stretch symbol. You can now
squash the object as much as you like. At the top corners of every object you’ll find
two fade handles that can be adjusted to fade an object in or out. The handle at the
top center can be used to adjust the volume of audio objects and the transparency of
video objects.
Note: Video objects with a sound track will automatically be displayed on one track.
These have six, not five handles. For more information, read the "Objects" chapter.
Object selection: For advanced effects editing, the objects must be selected first.
Individual objects can be selected with the mouse. Objects will change color to show
Page 29

Quick start 29
that they have been selected. Multiple objects can be selected by holding down the
"Shift" key. If you click next to an object, you can draw a rectangle with a held-down
mouse key. All objects contained therein will be selected.
Effect editing: Selected objects may be edited with the help of effects sound in the
Media Pool.
Settings for each effect may be found directly in the Media Pool. Most effects can be
controlled using keyframe animation or effect curves. Effect intensity is controlled
dynamically using single points (keyframes) or a drawable curve (effect curve). All
buttons for keyframe and effect curve animation can be found in the lower part of the
Media Pool after selecting the effect.
Note: To activate the effect curve, the first keyframe must be set first.
Context menu: The context menu also offers a number of object editing options. It is
opened by right-clicking on an object. Different trim editors can be opened which
enable an exact cut with different transition parameters. For video objects, there is
another context menu than for audio and title objects.
Page 30
30
Remove unusable scenes
One of the most important work steps during import of your footage is cutting out
unusable scenes from the material. There are two options for this:
• Variant 1: The complete material is loaded into your project first and the unusable
scenes are cut out.
• Variant 2: Cut the material prior to importing it, and then proceed to import only
the scenes you need. This process is recommended for long movies with a lot of
editing; it functions either via the Media Pool or the project folder.
Cut videos in the project
Let's assume that you have already imported your film material into a project and
would now like to edit it.
• Play back your video by clicking "Play" on the program monitor's transport
control (or simply press the space bar on the keyboard).
• If during playback you have reached a scene which you would like to cut out, click
on the playback button again. The playback marker stays near the start of the
scene to be removed.
Tip: For long movies or for quick browsing, you can let the movie play fast forward
and follow the action on the program monitor. To do so, drag the playback marker
while holding down the mouse key across the timeline (but not too fast!).
• Set the playback marker at the start of the unused material. To get a better view,
we recommend using the zoom function (the +/- buttons at the bottom right of
the arranger).
• Press "T" on the keyboard. This will have the effect of cutting the current scene
into two sections at the position of the payback marker.
Page 31

Quick start 31
• Repeat these steps for the end of the unusable scene. Find the end of the scene,
place the play marker as close as possible to the end point, and then press the "T"
key on the keyboard again.
• Now you have "isolated" the unusable scene and can simply delete it from the
movie using the "Del" key. Before this, the scene must be selected by clicking it
with the mouse.
• If you didn't work accurately during cutting, then don't worry; you can use the
object handles to stretch or shorten the remaining objects to recover or exclude
material from the deleted section.
Page 32

32
• After deleting, a gap remains in your movie where the removed scene once was.
How do you remove gaps out of the film? Easy: You can drag the following
scenes back until the end of the first scene "docks" to the later material.
Remember to "take" all objects that are further behind, otherwise the gap will just
be "passed" to the end. To pull up later objects, use "All tracks" mouse mode,
since this automatically takes the objects on all tracks found later on the timeline
along with the object being moved.
Note: If your project has both a video and an audio track, it is usually necessary to
cut both tracks synchronously. After camera import, image and sound tracks are
combined into one object, so all cut and move actions effect both in the same
manner. However, if you have created a separate sound track, which isn't connected
to the image material, it is recommended that you create a group before your editing
operations. To do so, select the video object and the audio object via "Ctrl" + click,
and in the "Edit" menu select the "Group" option (or click the group tool).
All cutting functions (as well as all other editing processes in MAGIX Video Pro X5)
are non-destructive. This means that the original material on your hard drive will not
be altered.
Importing individual scenes from longer movies
If you have saved a longer video as a file on your hard disk and only want to use a
section of it for your project, then proceed as follows:
• Double click the desired file in the Media Pool. Double-click the file to load it in
the source monitor and play it back using the transport controls.
• Find the range which you would like to import. Position the playback marker
above the transport control at the start position of the range and click the "Set in
point" button.
Page 33

Quick start 33
• Next, position the playback marker at the end of the section and click the "Set out
point" button.
• The currently selected range appears highlighted in blue in the range display. You
can playback this range separately with the "Playback range" button.
• All range limits can be moved by holding down the mouse button and dragging.
Once the range matches the section that you want to import, click on the preview
monitor and drag the section onto the track. An object will appear featuring the
material you wanted to import. If you're not sure where you would like to use the
section in the project, you can drag it into the project folder instead of onto the
track.
Tip: You can also edit files that are located in the project folder in the same way. A
shortened file also contains information in the project folder about in and out points
so that you don't always need to reset these in case the video needs to be reimported at a later time. You can also drag each file directly from the Media Pool
into the project folder.
Regroup scenes
You will often want to move specific scenes or even groups of scenes to a different
place within a film. This happens completely intuitively: Single scenes can be selected
in any view by clicking them and moving them to the desired position (drag & drop).
You can also create scene groups which can be moved together: "Ctrl" + mouse click
lets you select more than one scene, "Shift" + mouse click lets you select all of the
scenes that lie in between.
Finally, here are three tips for more extensive arranger work:
• With the mouse modes "All tracks" or for "One track" (view page 45) doesn't just
the selected scene, but all objects that are located behind the object (one
move
track) or all tracks (all tracks).
• The commands "Group" (view page 287) and "Ungroup" (view page 287) let you
bine any scenes into groups which can then be moved together as a block.
com
Page 34

34
• If cutting and moving around parts of your project has left it a little unorganized,
try using the project folder. The project folder is better suited for intermediate
storage of all of the objects you want to use in your movie. You can either move
all of the objects directly from the arranger into the project folder by dragging
them there (they will be removed from the corresponding track), or you can copy
the objects and paste them into the project folder. Hold down "Shift" while you
click to select multiple files. You can also drag sections of files or files from the
Media Pool and drag them directly into the project folder.
Note: Please ensure that the project folder is reserved for the respective project at
hand. The contents will be saved together with the project and made available the
next time the same project is opened, but not when another project is opened.
Publish videos
Burn DVDs and Blu-ray discs with interactive menus
You can burn your projects onto DVD or Blu-ray discs with an interactive menu.
Note: Authoring for DVDs and Blu-ray discs is the same for both formats.
For multiple films that are subdivided into individual chapters, the disc selection menu
becomes even more important, allowing you to jump to each movie or chapter using
your remote control. To make sensible chapter divisions in your movie, it should be
split into sensible sections. Place the play marker where you'd like to have it and
choose the option "Chapter marker" from the "Edit" menu (keyboard shortcut: Shift +
Enter). If you select the option "Automatic chapter markers", a chapter marker is
automatically placed at the beginning of every scene.
Page 35

Quick start 35
You can switch to the "Burn" screen by pressing the corresponding button at the top
right.
The "Burn" screen has two views: "Preview" and "Edit". The "Preview" screen provides
fast loading for a menu template followed by burning. More detailed editing such as
activation/deactivation of menu entries, creation of new menu pages, or
individualization of templates takes place via the "Edit" screen.
Once the menu is finished, you may burn a disc to watch via your player.
Export video as file
Besides burning the project, it may also be exported as a video file. During export, the
entire arrangement will be recalculated into a single file, which will be saved in the
indicated folder on the hard drive. The available export formats are listed in the menu
"File -> Export film".
To place a video on the Internet, you fill find a direct connection to MAGIX Online
Album and platforms such as YouTube, Vimeo, Facebook and Videocloud under "File"
> "Online".
Page 36
36
Edit mode
In the standard mode, MAGIX Video Pro X5 offers plenty of menus, toolbars and
controls, which can confuse beginners.
For simple video editing tasks, such as a rough cut or format conversion, the full range
of function in MAGIX Video Pro X5 isn't necessary. For this reason, the MAGIX Video
Pro X5 interface can be switched to a simplified, or basic mode. In this mode control
elements, menus and toolbars are reduced to the basic necessities.
Standard mode
The standard mode offers all MAGIX Video Pro X5 functions for advanced project
editing.
• Program and source monitor
• Complete Media Pool with "Fades", "Titles" and "Effects" tabs.
• The arranger which can be activated as scene overview, timeline mode and
multicam mode.
• Complete menus and toolbars
• Project folder
Page 37

Edit mode 37
Basic mode
In basic mode all elements, menus and toolbars are reduced to a minimum.
• The window layout corresponds to the arrangement in Movie Edit Pro with
program monitor, Media Pool and project.
• The Arranger is replaced by a one-track Storyboard (view page 37). Here,
mported video material can be cut and arranged. Controls and menu commands
i
for effects and audio editing are hidden.
• Only standard fades and simple titles in preset fonts are possible.
• The Media Pool can be used solely for file import. The fades, titles and effects
tabs are hidden.
• Next to the buttons used for switching between the main screens Edit and Burn
(view page 220), there is an additional button Export (v
the export dialog, the finished movie can be saved in various formats and
uploaded to Internet platforms.
• In the Burn screen, the control elements for menu template editing are missing.
iew page 39). Along with
Page 38

38
Storyboard in basic mode
In the "Edit" screen in basic mode, the Arranger has been replaced with a Storyboard.
Pictures and video footage (including the audio track) are displayed as scenes in the
Storyboard. The scenes are all displayed the same way, irrespective of how long they
really are in the movie.
Note: With this kind of display, the playback marker moves in the movie at different
speeds during playback. Correspondingly, it moves slower in longer scenes.
You can load a video or image file by dragging it into the Storyboard from the Media
Pool using the mouse. To generate a preview of the video, drag the file into the
program monitor. The transport console no longer applies to the Storyboard, but plays
the video from the Media Pool.
A loaded file is made up of a single long "scene", which can be split into several
smaller scenes. You can do this manually using the Cut button (view page 46) in the
lower tool
hortcut Shift + Z).
(S
bar or using the function Automatic scene detection (view page 259)
You can then re-arrange the scenes using drag & drop and delete unwanted scenes.
The following buttons are found on every scene:
Add titles and text: Click on the "T" button to add a title. Enter your
text straight into the program monitor. You can also change the size
of the title. The title is added at the beginning of the scene and is
displayed for 5 seconds.
Set volume: The volume in the soundtrack of each scene can be set
with the loudspeaker button.
Page 39

Edit mode 39
Export
Effects menu: This button provides access to a menu with
copy/paste functions, some special functions ("Scene recognition",
Audio/video offset for videos, "Cut automatically to fit screen" and
"Change photo length" for pictures) and Object properties.
Transitions/Fades: Click on the large button between the scenes and
select a scene transition (or "Fade"). You can choose between a
"Crossfade" and a "Thru black" that each last one second. Selecting
"Cut (no fade)" removes the fade.
Rotate image (only with image files): If an image or photo is on its
side or upside down, click on this button. The photo will rotate 90
degrees.
Display duration: The display duration for each scene is shown here
in [Minutes]:[Seconds]:[Frames]. With image files, you can click the
time display and adjust the display duration in the dialog that appears.
This duration can be applied to all photos in the movie.
The "Export" button opens a dialog containing the most
important export functions. With it, the finished movie can be
saved in various formats, exported to various devices and
uploaded to Internet platforms.
Save on computer (view page 226)
Place on MAGIX Online Album (view page 235)
Export to device
Upload to Internet (view page 234)
Export as Media Player (view page 236)
Page 40

40
Switching between standard and basic modes
To switch MAGIX Video Pro X5 into basic mode, select "Window" > "Editing mode" >
"Basic mode".
Note: If you switched into basic mode by accident and your MAGIX Video Pro X5
project contains cut and edited audio and video material on multiple tracks, this
arrangement will not be changed. However, it is not recommended to work in basic
mode because the effects on other tracks during editing in Storyboard aren't
predictable. For this reason, in this case you should switch back into standard mode.
Tip: If you switch from basic mode back into standard mode, by going to "Window"
> "Window arrangement" > "Resent window arrangement" you can restore the
previous arrangement of MAGIX Video Pro X5.
Page 41
Work screens 41
Work screens
This chapter will provide an overview of the the screens that available in MAGIX
Video Pro X5.
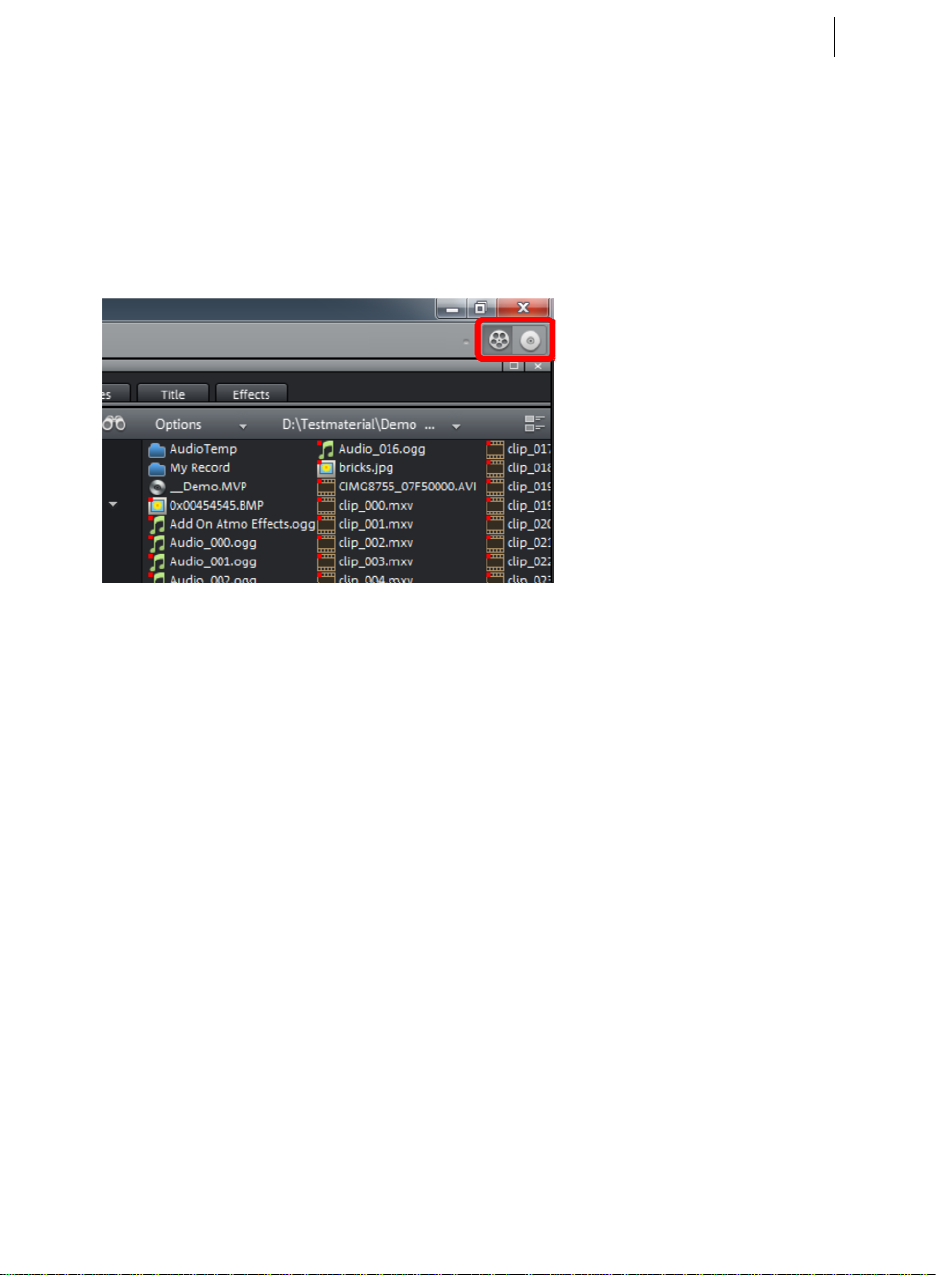
Activate main screen
MAGIX Video Pro X5 contains two views where all work is executed:
• The "Edit" screen is the main view. Load the videos here and edit them in a
project window.
• The "Burn" screen is a special view for burning discs. This especially involves
design on a selection menu, for example as used by DVDs and other storage
devices.
The above right allows you to switch between these screens.
Page 42

42
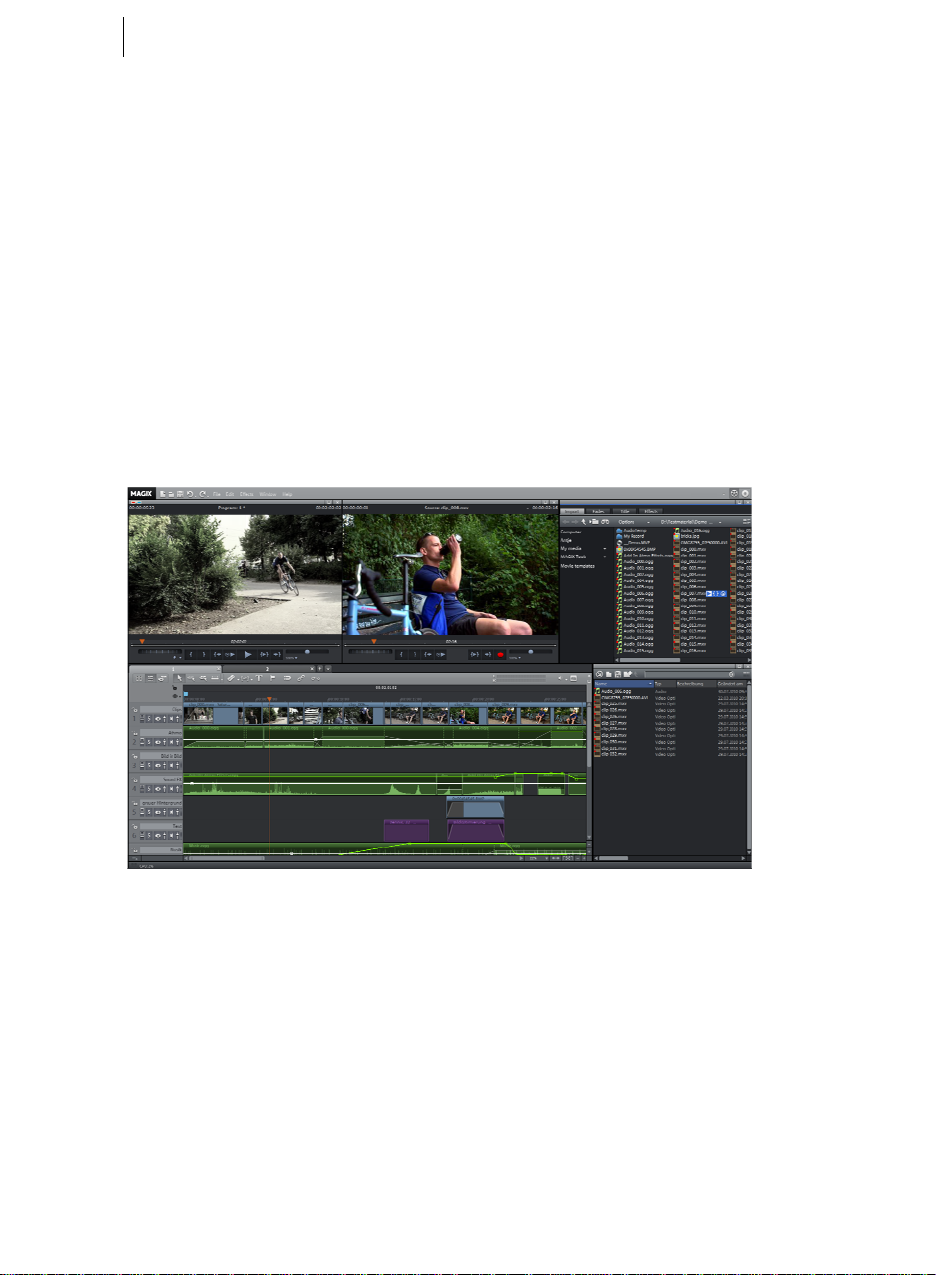
"Edit" screen
1 Top toolbar (view page 43): Here you will find buttons for quick access to
important commands.
2 Menu bar: This contains important MAGIX Video Pro X5 functions.
3 Program and source monitor (view page 64): Video and image objects are
displayed here
4 Media Pool: Using the four tabs, you can reach your PC's folders, various
transitions, titles and effects.
5 Switch for overview mode and Multicam mode: Here you can switch into
overview mode. In it, all objects on the first track are displayed, allowing quick
scene re-sorting. The right button activates the Multicam mode (view page 113).
6 Lower to
modes for various edits, among others.
7 Timeline: Here you can define the playback range. It is equipped with a time
scale.
8 Peakmeter: The peakmeter shows the sum soundtrack volume at the moment.
9 Project clipboard (view page 62): Here you can collect all files nee
project.
10 Arranger (view page 50): All files can be dr
clipboard via Drag & Drop onto the tracks.
11 Scroll bars: The lower scroll bar can be stretched and contracted for zooming
with the mouse. The right scroll bar zooms into the tracks vertically. Click on the
edge of the scroll bars while holding the mouse button to change the visible part
in the arrangement window.
.
olbar: In Timeline mode, here you can select between various mouse
agged from the Media Pool or project
ded for the
Page 43
Work screens 43
Note: Various interface elements are only available in the default, "Standard" display
mode ("Window" > "Window arrangement").
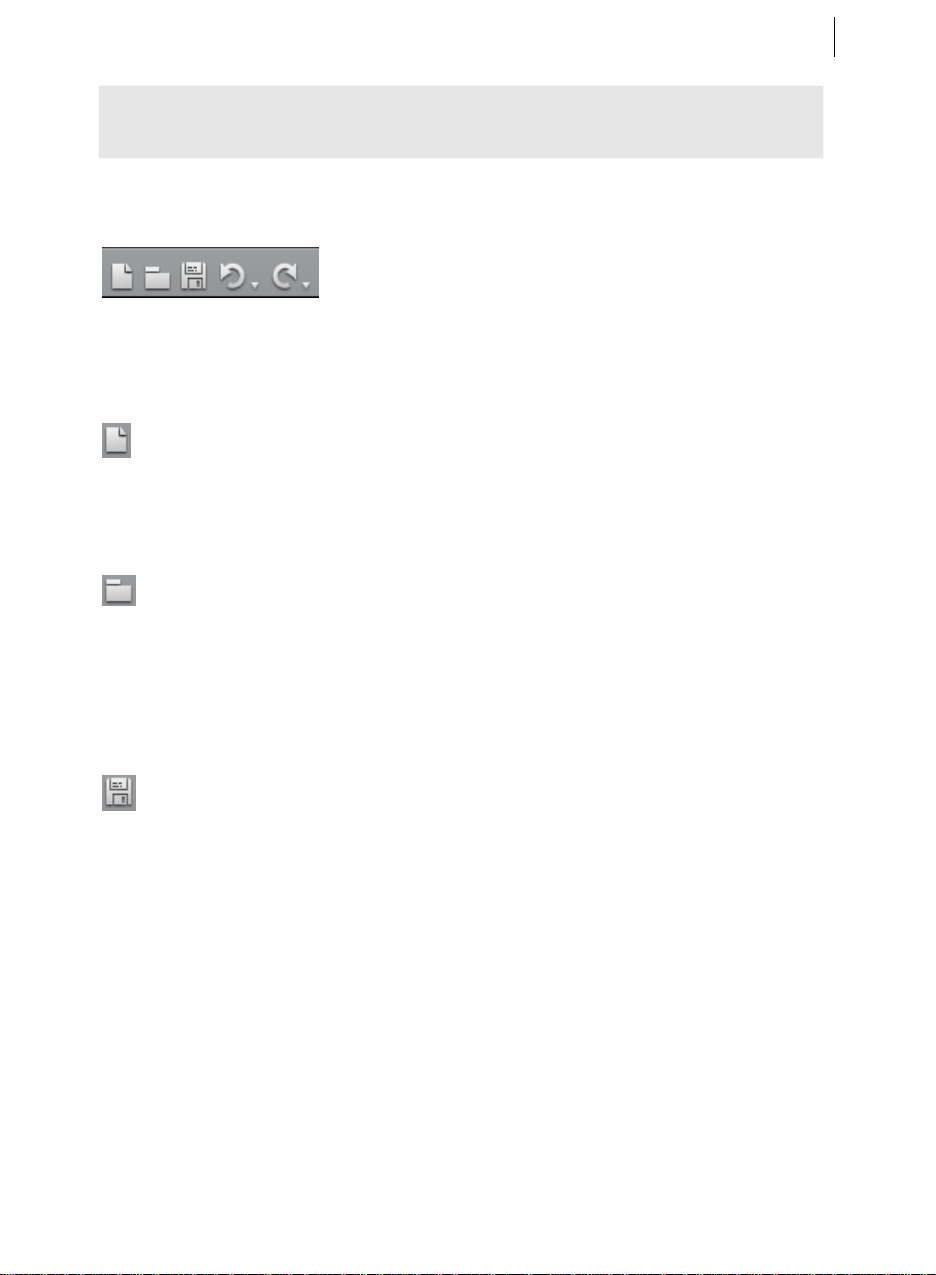
Toolbars
Upper button bar
The upper button bar can be found in the monitor to the top left. It has the following
functions:
New project
Creates a new MAGIX Video Pro X5 project. A dialog with settings for a new
disc project or a new film (view page 245) opens to get started.
board shortcut: Ctrl + N
Key
Load project
With this option you can load a project or a media file. Please note that all
media files associated with it must be loaded along with a project. MAGIX
Video Pro X5 will search for all used sounds and video files in the folders in
which they were located when the move was saved.
Keyboard shortcut: Ctrl + O
Save project
The current movie is saved with the name displayed in the project window. If
you have not yet specified a name for your project, a dialog will open wherein
MAGIX Video Pro X5 asks you to do so.
Please note: In the project file (*.MVP), all information about the used media files,
cuts, effects, and titles are saved, but not the picture and sound material itself. This is
found in the recorded or imported media files that remain unchanged during the entire
MAGIX Video Pro X5 editing process. To save the full movie into a dedicated
directory, for instance to continue editing on a different PC, please use the command
"Copy movie and media into directory".
Keyboard shortcut: Ctrl + S
Page 44
44
Undo
With this command you can undo the last changes you made. This way, it's no
problem if you want to try out critical operations. If you don't like the result,
then you can always revert to the previous state by using "Undo".
Clicking on the arrow next to the button opens a list of changes made until now,
allowing you to undo several changes made in sequence.
Note: You can adjust the length of the list to your needs in program settings. In
general: The longer the list, the more RAM is used.
Keyboard shortcut: Ctrl + Z
Redo
This function undoes the previous "Undo" function.
Clicking on the arrow next to the button opens a list of changes made until now,
allowing you to undo several changes made in sequence.
Note: You can adjust the length of the list to your needs in program settings. In
general: The longer the list, the more RAM is used.
Keyboard shortcut: Shift + Y
MAGIX News Center
The MAGIX News Center features links to current online tutorials and tips & tricks on
the software application examples. The "News" is indicated by color according to
content:
• Green indicates practical tips & tricks for the software
• Yellow reports the availability of new patches and updates
• Red for special offers, contests and questionnaires
If no new messages are present, the button will appear gray. When the MAGIX News
Center is clicked, all of the available information will be displayed. Click the messages
to reach the corresponding website.
Page 45

Work screens 45
Lower toolbar
The lower toolbar is located just above the first track. It has the following functions:
Object
This is the preset mouse mode for individual objects that is used the most
often.
Left clicking selects an object. Holding down the mouse button moves the selected
object. Right clicking opens the context menu.
Shortcut: 6
One track
This mouse mode behaves similar to the mouse mode "All tracks". When
moving objects, only those objects will be moved that are located on the same
track after the selected object.
Keyboard shortcut: 8
All tracks
This mouse mode behaves similar to "Object" mouse mode. However, when
objects are moved, all of the objects behind the selected object are also
moved.
The complete background component of the arrangement, i.e. all objects and gaps on
all tracks, will therefore be maintained during any movement.
This is useful for moving a complete arrangement, e. g. to insert new opening credits
or to close gaps.
Keyboard shortcut: 7
Mouse modes
MAGIX Video Pro X5 offers special mouse modes for different kinds of editing.
These may be selected using the small arrow next to the button.
Page 46

46
Stretching
This special mode enables the length of objects to be adjusted. The object is
played back completely and the playback speed is adjusted to the stretched
object length.
Video objects are therefore accelerated or decelerated accordingly. Audio objects are
stretched or pinched via timestretching, but without creating any changes to the pitch
itself.
Attention: If the object is to be animated with effects curves, then the option
"Connect curve length with object length (view page 150)" should also be set.
Shortcut: 0
Curve
This mouse mode is used especially for drawing effects curves.
Effects curves control the level of the effect: The higher the curve point is, the more
intense the respective effect parameter will be at this position. These may be used for
the video and image objects of the image tracks as well as for the audio objects of the
sound tracks.
More information about this can be found in the chapter "Animate objects", section
"Editing object effects curves".
Shortcut: 9
Preview audio
This mode allows you to preview audio objects (as long as the mouse button is
held down).
In this mode, objects cannot be moved or changed.
Keyboard shortcut: Alt + 6
Cut button
MAGIX Video Pro X5 offers various modes for video editing. They can be
opened using the small arrow next to the button.
Page 47

Work screens 47
Split
This command cuts a scene at the point where the playback marker is
positioned. This way, two free-standing objects are created.
Shortcut: T
Remove start
This command cuts a scene at the point where the playback marker is positioned and
removes the material before the playback marker.
Keyboard shortcut: Z
Remove end
This command cuts a selected object at the playback marker position and
removes the material behind the playback marker.
Shortcut: U
Hint: If the commands "Split" and "Remove beginning/end" are applied without a
selection, all objects at the position of the playback marker are cut.
Remove scene
This command allows you to completely remove selected objects. The parts
that follow will be automatically moved to the end of the object in front of the
object to be removed.
Shortcut: Ctrl + Del
Split movie
Splits movie at the playback marker position into two sections within one
project. These can be individually controlled using the "Window" menu or the
button "Select movie for editing" (see above).
Shortcut: Alt + Y
Special functions to insert new objects
MAGIX Video Pro X5 has various modes for inserting new objects from the
Media Pool. They can be opened using the small arrow next to the button.
Before inserting new files, the insertion mode should be checked or set. There are two
options for using the modes:
Page 48
48
• You can either first select one or several files in the Media Pool and then click on
the insert button in the lower toolbar
• Or you can hover the mouse over the file to be inserted and click on one of the
import buttons in the window that appears.
Apply automatically
Pastes the file selected in the Media Pool into the arranger. Video and image
objects will always be placed behind the last object into the first track; audio
and text objects are separated into different tracks.
Single-track ripple
Inserts an object from the Media Pool at the position of the playback marker
and simultaneously moves the objects on the track following it.
• In contrast to automatic placement, with track ripple, all objects will be placed at
the position of the playback marker. Objects on the target track are automatically
moved behind the inserted object. Bordering tracks are unchanged.
• Videos and images will be loaded to the first track, as usual. If another object is
found at the playback marker position, then it will be cut continued at the end of
the inserted object (so that the inserted object can start exactly at the point of
insertion).
Multitrack ripple
The object selected in the Media Pool will be inserted on the target track at the
position of the playback marker. All objects found at the playback marker
position will be split and moved down the length of the inserted object. All
objects on the track located further on will also be moved.
• In contrast to automatic insertion, all objects will be inserted at the position of the
playback marker.
• Videos and images will be loaded to the first track, as usual. If another object is
found at the playback marker position, then it will be cut continued at the end of
the inserted object (so that the inserted object can start exactly at the point of
insertion).
• If other objects are located at the playback marker position, these will also be
separated and moved further along the track.
• Objects lying further along on all tracks will be moved further down.
Replace
Replaces the selected object with an object selected in the Media
Pool.
Page 49
Work screens 49
Overwrite
Overwrites the object in the target track at the position of the start marker
with the object selected in the Media Pool.
Hint: In contrast to "Replace", no length adjustment takes place. With "Replace", any
downstream objects are moved, while "Overwrite" overwrites downstream objects
as well (sometimes only partially), depending on the length of the object being
inserted in comparison to the object being overwritten.
Title editor
Opens the Title editor for the selected photo, video, or title object.
Keyboard shortcut: Ctrl + T
Set chapter marker
Places a chapter marker at the position of the playback marker. This creates a
chapter entry in the disc menu in case the movie is being burned to disc.
You can rename the chapter markers by right clicking and selecting "Rename". The
new name will appear in the chapter menu (view page 203).
Keyboard shortcut:
Shift + Enter
Object grid
Use this button to switch the object grid on and off. When the object grid is
switched on, the objects snap into place beside one another so that everything
fits in seamlessly.
Form group
All selected objects are assigned to a group which may then be selected and
edited jointly by clicking the mouse.
Shortcut: G
Ungroup objects
This command splits an object group into separate objects.
Shortcut: Shift + G
Page 50

50
Mute button
This button mutes the sound output. Clicking the triangle provides access to
settings for scrubbing (view page 201) and selection of the audio track for
multi-au
dio tracks (view page 198).
Mixer
With this option you can open and close the real-time mixer. Further information can
be found in the Mixer (view page 190) chapter.
ortcut: M
Sh
Arranger
The arranger offers a professional editing screen for post-production.
Overview mode
The “Scene overview” mode is a special view that improves manageability and
categorization of scenes. All scenes are listed one after the other (in multiple lines,
like in a text program) and can be copied, cut, moved, deleted and inserted.
Page 51

Work screens 51
"Overview" mode does not indicate start, playback, or end markers. The scene which
is currently being played has a frame around it.
The zoom slider enables the view
to be enlarged or reduced.
This controller also specifies how many scenes are displayed. The smaller the preview
pictures, the more will fit onto the overview.
Maximize: Use this button to maximize the scene overview to fullscreen mode.
Timeline mode
In the Timeline mode, your movies and scenes are shown in proportion to their length:
The longer the object in the track, the longer the corresponding movie.
You also have direct access to all media files such as titles, effects, etc. currently
being used in the movie.
Multicam mode
The Multicam mode is an expanded timeline mode, where you can edit together
scenes shot with different camera perspectives, a process called Multicam editing
(view page 113). The top two tracks serve as target tracks for copyi
ng sound and video
from two different source tracks.
Tracks
The arranger offers tracks for multimedia material positioning and editing. The
number of displayed tracks can be defined in "File" > "Settings" > "Movie".
In principle, any object type may be placed on any of the tracks. Video and image
objects may also be combined with MIDI and audio objects on any of these tracks.
The maximum length of a movie is restricted to 6 hours.
At the start of every track there is a track header.
Page 52

52
Lock symbol: With this symbol you can lock the complete track and all objects
located on it.
Track number: For quick orientation, all tracks are numbered.
Maximize track: Enlarges the track. This way, you can easier edit details, such
as edit transitions.
Solo: Switches the track into "solo". Only this track will be played during
arrangement playback.
Hide video, image and title objects: All visible objects become transparent.
Audio objects remain audible.
Transparency slider: Here you can set the transparency for the entire track.
Mute: Switches all audio objects on the track to mute. Video, image and title
objects will continue to be played back.
Volume control: Sets the volume for all audio objects on the track.
Track name: The name of the track. You can freely select the name by clicking
on the name field and typing the name. To apply, press the enter key.
A right-click on the track header opens the context menu, where you will find the
following options:
• MultiCam > Source track: Here you can activate/deactivate a track as a source
track.
• Multicam > Master audio track: Here you can define the master audio track for
Multicam editing (view page 115).
D audio track: If you are planning to burn several audio tracks (for example,
• DV
for multiple languages) to a DVD or Blu-ray, for tracks containing only audio, you
can determine the position on which the current track should be found. As soon
as you select an option from a submenu, a dialog opens, where you must give
your audio track a name (such as "English"). For more information, read the
"Audio editing" (view page 198).
k height: Set whether the selected track or all tracks should be displayed as
• Trac
small, large or in standard size.
You can also adjust the size using your mouse. To do so, drag the lower border of
a track box downward using a mouse.
Page 53

Work screens 53
Zoom
The vertical zoom function sets the number of
visible tracks. On many tracks zooming is useful
for selectively editing a track or an object in full
view.
Use the horizontal zoom functions to set up the visible section of the arrangement on
the timeline.
Clicking and dragging on the bottom border of a track allows you to adjust the height
of the display.
Object zoom: Vertical and horizontal zoom stages are enlarged so that all of
the selected objects are displayed at maximum size.
Optimize view: Displays the complete arrangement in full width. Zoom will
be set to 100%.
When the function is turned off, the old zoom level will be reactivated.
Scroll
The scroll bars serve to navigate in the arrangement. This enables the visible section
of the arranger to be moved.
The zoom level may be changed via the horizontal scroll bar by clicking the bar's edge
and dragging.
Tip: To zoom and scroll, it is recommended to use keyboard shortcuts (view page
326).
Page 54

54
Grid
The arranger surface features a frame-exact snap grid. This ensures that video and
image objects snap exactly to the borders of a frame.
The snap stages depend on the frame rate specified in the movie settings ("File ->
Settings -> Movie"). Choose between Europe's conventional frame rate for PAL (25
frames per second) and America's and Japan's conventional frame rate NTSC (29.97
frames per second) or any other manually set frame rate.
When moving an object, the position display indicates at which frame the first image
of the object is shown.
The position is displayed in the form of a
tooltip when moving the object.
It indicates
"Hours:Minutes:Seconds:Frames".
Note: Audio objects may be moved sample-precise. That means that they do not
move along a frame grid if they are not grouped with a video object.
In addition to the constantly active frame grid, an object grid may also be activated.
This ensures that two consecutive objects will seamlessly snap together even if they
are on different tracks. This avoids undesired gaps or overlaps.
The object grid may be activated/deactivated via the magnet symbol in the
lower toolbar.
Preview rendering
You can access the preview rendering options by pressing this button.
Page 55

Work screens 55
Media Pool
The structure and functioning of the Media Pool is similar to Windows Explorer with
the only difference being that the Media Pool only displays usable files. This is used to
access and load multimedia files of all kinds: photos and other image files, video files,
audio files, transitions, titles, effects, and also complete projects.
Note: The Media Pool displays the files on your hard drive. If you delete files here,
you won't be able to find them again using Windows Explorer.
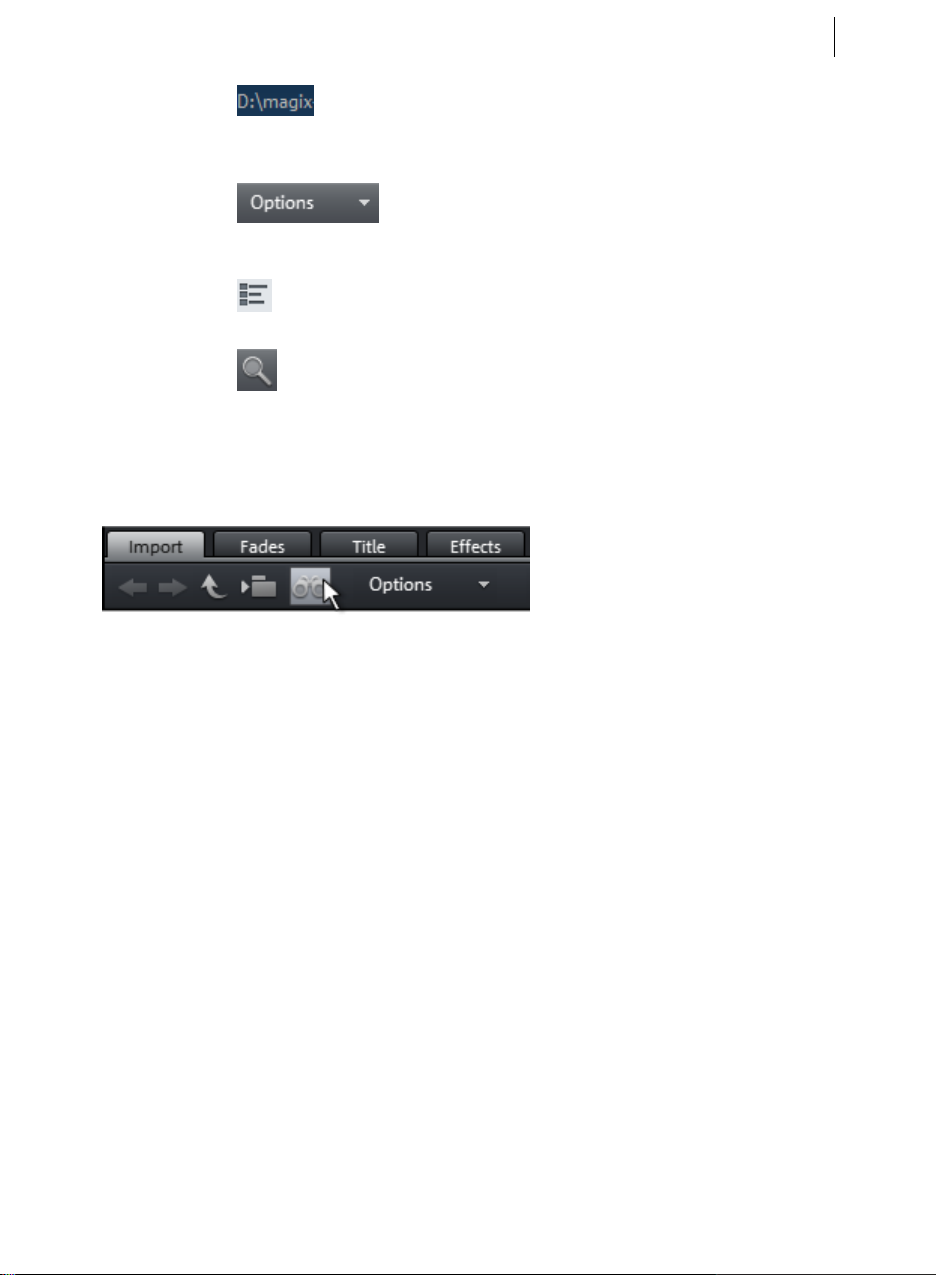
If you hover the mouse pointer over a media file, three icons for the options will
appear: preview, range import and complete import.
• Preview: All available media can be previewed using the preview function. If you
click on the playback icon, the file will be played back in the preview monitor.
Video and image files are displayed and audio files are played back through the
sound card. There are previews for the templates and effects included to make it
clear how they will function.
• Range import: You can define an import range using buttons for setting an in- and
out-point in the source monitor.
• Complete import: This button will import the complete file into the Arranger.
Page 56

56
When importing using the import buttons, you can set (view page 47) various
insertion modes.
You can also load files from the Media Pool by dragging & dropping them. You can
even drag & drop entire folders into the Arranger. If you want to load several files
simultaneously, you first have to select them in the Media Pool.
• Click on the selected entries one after the other while holding down "Ctrl".
• If you want to load a sequence of files, hold the "Shift" key and click on the first
entry and then on the last. All entries in between will be selected.
• By holding down the left mouse button you can drag out a selection box over
multiple image files to select them. "CTRL + A" selects every entry contained in a
Media Pool folder.
Tip: Improve access to your media folder by creating a link in the "Import" area of
the Media Pool. You can do this by right-clicking on one of the entries and selecting
"Create link". Select the media folder and click "OK" to confirm.
Note: All links are automatically deleted if the function "Reset standard program
settings" ("Edit" menu > "Settings") is used.
Preview function
A preview function for all of the files in the Media Pool can be started by double
clicking or by pressing the playback button on the source monitor.
The transport control function in the source monitor allows you to select sections
from a longer video file in the Media Pool and load them. Read the "Add objects into
the project" (view page 64) section.
Importing
Navigation buttons
The navigation buttons let you navigate through your computer’s drives and folders.
Forward/
back
Higher
directory
Folder tree
Search
These buttons access the previously viewed folders.
This button accesses the next highest folder level.
Here you can activate a folder tree to navigate through
your computer system.
The search function allows you to find specific files
quickly. You may specify your search according to file
type, date, or certain folders.
Page 57
Work screens 57
Browse
history list
and path
details
The path information for the current folder is displayed in
the center above. Use the arrow button to open the
menu to find the folders you previously visited.
Options All functions of the context menu (switch views,
rename, or delete files, etc.) can also be accessed
via the options button.
Display
options
Zoom
Settings for how detailed the entries should be listed
may be specified here.
A zoom slider can be used to set the number and size of
visible symbols in the "Large symbols" view.
Search
The Media Pool has an easy search function for finding files on the computer. It may
be activated and turned off again with the shown button.
File name: Enter any part of the name of the file you are looking for in the "File name"
field. The X symbol deletes the entry. A "?" may be used as a placeholder for a single
character, and "*" for any number of characters.
File type: Here you can enter a file name extension. Multiple entries are separated
using a semicolon. Below the entry field, various presets may be selected for oftenused file name extensions.
Date: Here, you can set time period limits on your search. Choose an entry from the
list.
Folder: If you don't want to search the entire computer, but only look on certain drives
or in a single folder, you can define a certain search path.
Search depth: Here you have various options that determine whether additional
locations should be searched.
• Search indexed locations and the selected folder
• Search indexed locations, the selected folder and personal files.
• Search indexed locations, the selected folder, personal files and the project file.
Page 58

58
"Indexed locations" are folders, which are searched and cataloged in Windows via the
index list. If the index list is activated, the files in the indicated folders will be indexed
while the computer is idling, so that the user's search query may be completed faster.
Note: In Microsoft Windows XP, the indexing service is usually deactivated by
default. The search functions in Windows Vista® may be installed with the current
version of "Windows Search". They make it possible to easily add to the indexing
service. Please refer to the installation instructions from Microsoft.
Computer
The link button "Computer" displays the drives in the Media Pool. All drives will be
listed along with their drive letters and can be opened with a double click.
User directory
The second button featuring the user's name opens their personal folder in the Media
Pool.
My media
The "My media" button lets you select "Projects", "My videos", "My music", "My
images", and "Recordings".
Projects: Here you can switch to the folder where your projects and films are usually
stored.
You will find the "Show project contents" function in the context menu of a project.
Using this function, you can display all objects of a project and copy them into the
current project, retaining the editing and effect state of the object. This means that
you don't have to edit the objects again to keep the status of the "old" project. But you
can certainly continue editing the transferred object. These changes will be then
saved in the current project.
My videos: Displays all usable files found in "My documents\My videos."
My music: Displays the contents of the "My Documents\My Music" folder. MAGIX
Music Manager also suggests this folder for importing your music collection into the
database.
Slideshow music: This features the music that is included for dubbing.
My pictures: Switches to the "My documents\My pictures" folder. This folder is often
used by digital cameras and scanners to store transferred images by default. The
included MAGIX Photo Manager program also uses this folder (e.g. during image
import).
Page 59

Work screens 59
Recordings: MAGIX Video Pro X5 specifies standards for all recordings.
MAGIX tools
The "MAGIX tools" link selects links to "Downloads", "Database", "Online Album",
and "Internet Media".
XAR animations: Here you will find various elements, which you can design with the
help of Xara Designer Pro and use in your projects. As soon as you drag one of the
elements into the Timeline, Xara Designer Pro will automatically open with the
corresponding element. You can find additional information about Xara Designer Pro
at http://pro.magix.com.
Downloads: This buttons gives you access to media files downloaded with Catooh.
Data base: This button opens the program-spanning database view. Right clicking
opens the database search. The database first has to be created using the supplied
additional program, MAGIX Photo Manager.
Online Album: With this button you can access MAGIX Online Album directly. This
provides a shortcut to uploading and deleting data. To do this, you must first register
on MAGIX Online Album.
There are many ways to upload data:
• While holding "Ctrl" down, select the data to be uploaded in the Media Pool, and
select "Copy" in the context menu (opened by right clicking). Switch to the
MAGIX Online Album screen, open the desired folder, and select "Paste" in the
context menu.
• In the Media Pool, click on "Online Album", and go to the desired directory. Open
the Windows Explorer, select the desired data with "Ctrl" held down, and drag it
into the Media Pool.
Both options will result in your desired data being uploaded to your MAGIX Online
Album.
Note: This function requires Internet access. To gain access, make sure you have
your log in information (email address and password) ready.
Internet media: Opens the integrated browser (view page 322) from MAGIX Video
Pro X5. It offers you the option of collecting media directly from the Internet, for
example for use in your current project.
Page 60

60
Fades
Here you can find all fades from MAGIX Video Pro X5, sorted into various categories.
One click on a category displays all of the fades that are contained.
To load a fade, drag it with a held-down mouse key onto the object, into which you
would like to fade.
You can find additional information in the "Fades" section of the "Objects (view page
100)" chapter.
Title
This displays the title settings and the title editor. These presets are sorted into
different categories and may be loaded by double-clicking or drag & drop. The 3D title
templates are also located here.
The text featured by title objects may be changed directly in the program monitor by
double-clicking.
Effects
This provides access to the effects that are sorted into the various categories. Read
more about this in the chapter "Effects" (view page 123).
Video effect templates
Here you can find pre-configured effect templates that can be dragged-and-dropped
onto a video or image object. These effect templates consist of a combination of
various effect settings which you can adjust in the appropriate effect dialogs.
In the "Video mix effects" subfolder you will find templates for mixing two video or
image objects. To do so, two video or image objects have to lie on two tracks directly
above or below the other. To use a mix effect template, drag on the lower object.
Video effects
Here you can find adjustable effects for video and photo objects. The effects can be
set only after selecting an object in the respective effects dialog. For more
information, go to the "Video effects in the Media Pool" (view page 128) section in the
Effects" chapter.
"
Movement effects
These are movement effects you can use to animate the frame by using zoom or
camera movements. For more information go to the "Effects" chapter, section
"Movement effects in Media Pool" (view page 137).
Page 61

Work screens 61
Stereo3D
This accesses the program's Stereo 3D functionality. Please read the corresponding
chapter "Stereo 3D". (view page 163)
Audio effects
Here you will find many audio effect templates such as echo, reverb, equalizer,
compressor, etc. Read the "Audio editing" (view page 171) for more information.
Design elements
Collages: work similarly to picture-in-picture effects, but employ multiple objects.
Depending on the collage, arrange the selected objects one after the other and drag
the collage onto the first object.
Test images: Professional test images are available to calibrate your system.
Backgrounds: The color fields are a collection of various backgrounds that can be
used to create your own color fades or as backgrounds for text. The special "User"
template opens a color selection dialg where you can choose the desired color.
Image objects: Here you will find various image objects such as black bars, arrows
and symbols for illustrations.
You can find additional information in "Effects" chapter, in the section "Design
element in Media Pool".
My Presets
Here you will find the folder for your own effect templates. For more details, please
read the "My Presets in Media Pool" section in the "Effects" chapter (view page 144).
Additional Effects
Here you will find all available effect plug-ins. Please read the "Additional effects in
the Media Pool" section in the "Effects" chapter.
Various file list view modes
All supported multimedia files and subfolders of the currently selected folder are
displayed in the file list. Three different views (list, detail, large symbols) can be set by
right-clicking on the Media Pool context menu.
Page 62
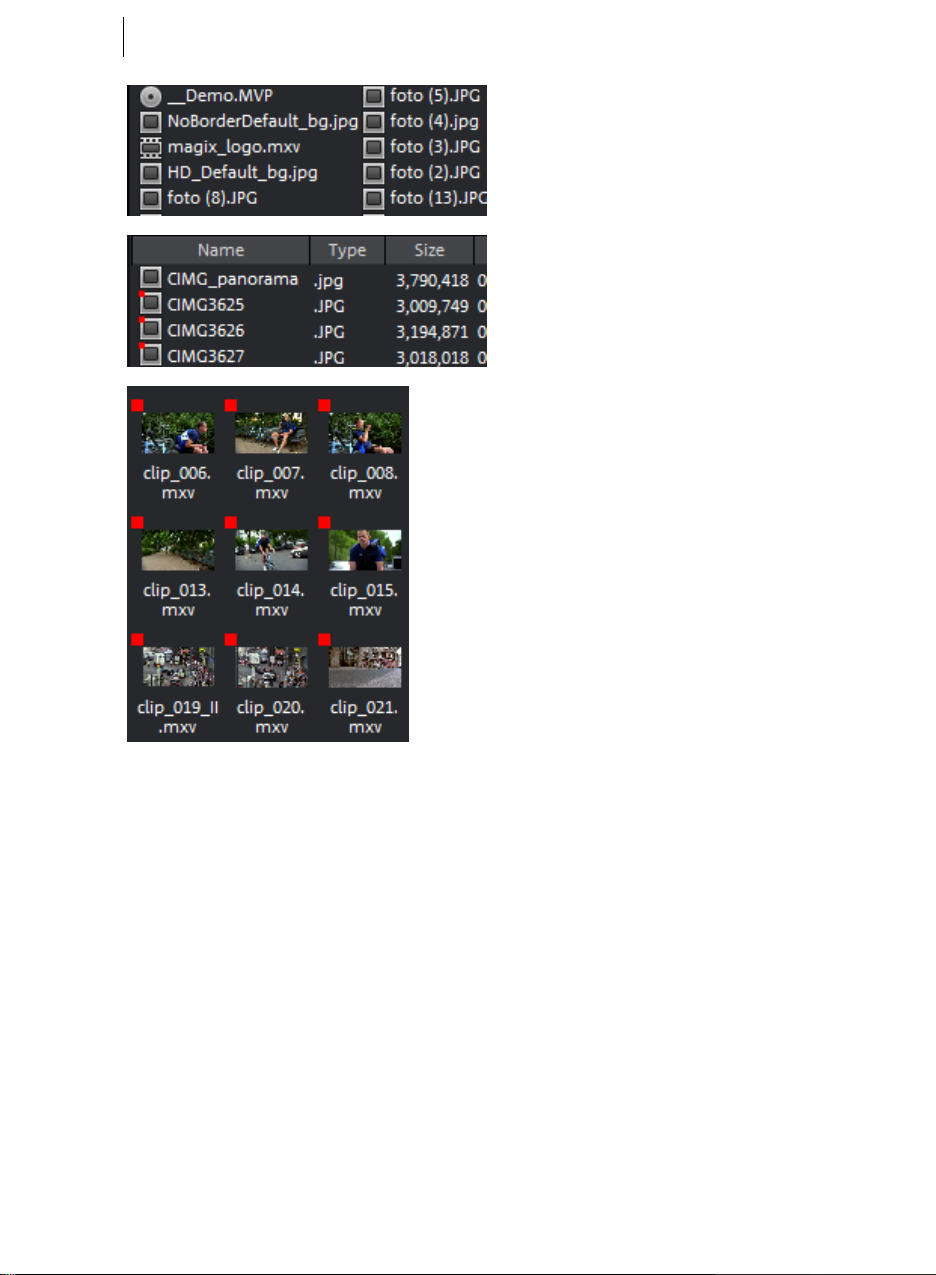
62
List: Only file names are listed. This
view mode displays the most files
simultaneously.
Details: For each media file, its type,
size and date of last change will be
displayed next to its name.
Large symbols can be quite useful
because they show a preview frame for
each movie and picture file. This allows
you to sort through the material
quicker.
As soon as you activate this display,
the zoom function will appear. With it,
you can additionally magnify
thumbnail images.
Page 63

Work screens 63
Project folder
The project folder is a type of clipboard for files or objects. The possible applications
in this case are diverse:
• Material storage: Interesting files
from the Media Pool can be
combined in the project folder
before loading them from there
into the project.
• Cutting: You can cut different
sections from longer videos in
the project folder in order to use
them as separate objects in the
arrangement.
• Exchange: You can move finished
objects from the arranger into the
project folder in order to use
them in other projects.
The project folder supports drag & drop in either direction which allows you to move
elements from the project folder into the arrangement or move objects or object
groups from the arrangement into the project folder.
The context menu (view page 318) for project folder elements enables these to be
saved indiv
idually as takes (*.tk2) in order to use them in other projects again; the
entries may also be renamed.
Opens the import dialog. As an alternative to dragging & dropping from
the Media Pool, this dialog enables a file to be loaded into the project
folder.
This adds a virtual folder to the project folder. No additional subfolders
can be created inside a folder.
Save or load the contents of the entire project here in order to use it in
other projects.
This button accesses the next highest folder level.
Search field: MAGIX Video Pro X5
searches through all file names in
the project folder for the text entered
and then lists the results.
Page 64
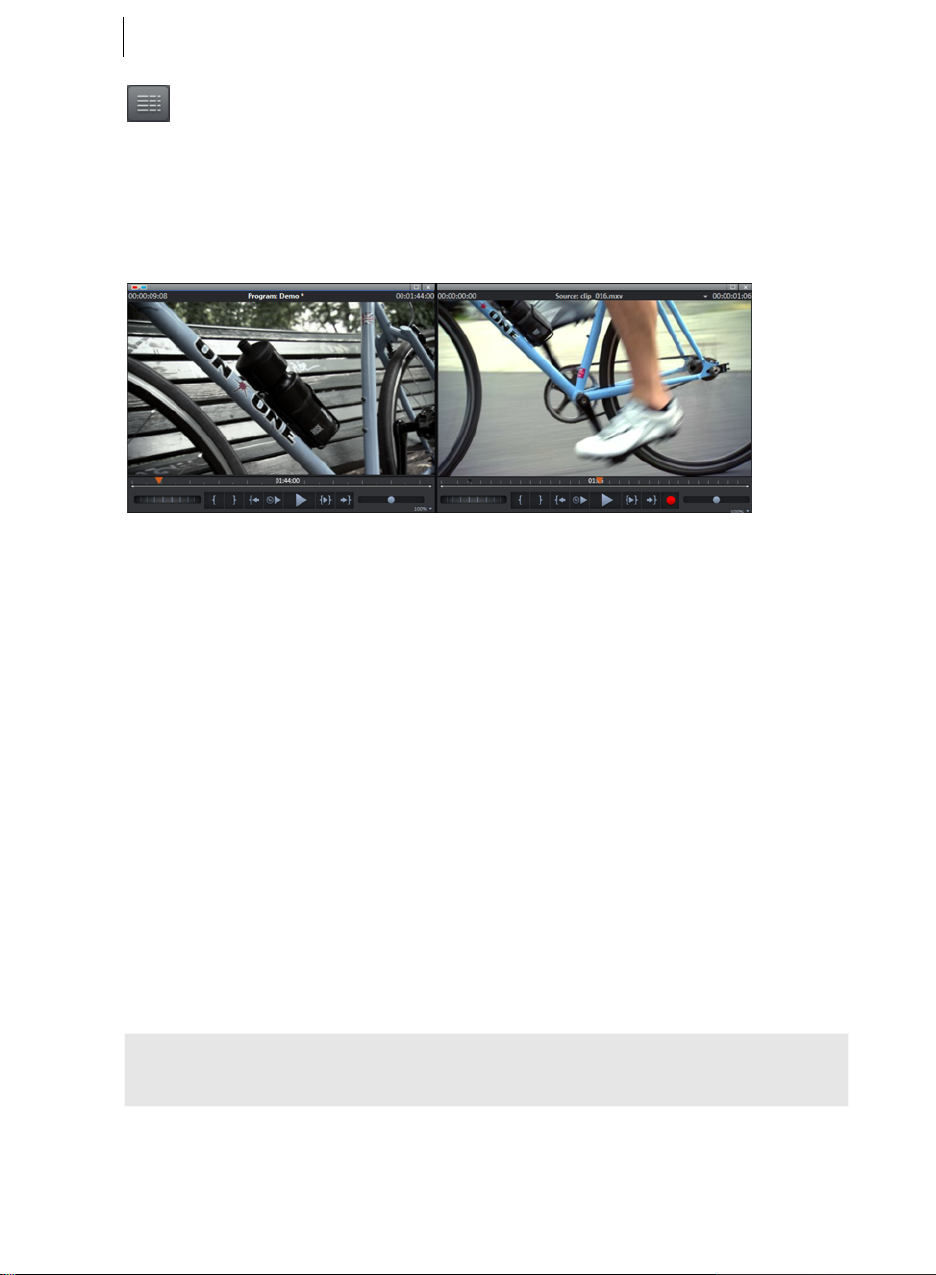
64
Settings for how detailed the entries in the project folder should be listed
can be made here.
Program and source monitor
MAGIX Video Pro X5 features two video monitors: a program monitor for object
image output in the arranger and a source monitor for previewing files in the Media
Pool or project folder.
Setting up the preview monitor
Program and source monitors can be set up in various ways:
• The size of each monitor can be adjusted. This can be done by clicking the screen
with the right mouse button and selecting the desired size from the context
menu, either from the presets submenu or user-defined ("Other resolution").
• Every monitor can be positioned freely. To do this, click on the top bar of the
monitor window and drag it with the mouse button held down to the position you
want. This may be a separate monitor, for example, where you can maximize the
window.
Fullscreen view
The option "Video monitor fullscreen" in the context menu maximizes the monitors.
Alternatively, you can simply double-click on one of the monitors or select the desired
monitor with a mouse click and press Alt + Enter.
You can also shift the monitors in full screen mode and access the context menu
(right mouse button). There, you can also hide and display the transport control, apart
from the regular entries.
Tip: Using the "Edit video effects" option in the context menu you can display Media
Pools effect settings and edit effects directly inside the fullscreen display.
"Esc" returns you to the normal view (or click on "smaller" button to the right in the
fullscreen mode).
Page 65

Work screens 65
Movie Overview
The option "Movie Overview" in the "Window" menu enables an overview of the
entire Arranger. All objects in the Arranger will be displayed in the program monitor.
The overview display is especially recommended for work with long movies because
the reduced overview in the program monitor and the zoomed detailed view in the
Arranger present a good combination.
The movie overview can be used for moving around in the movie and for editing
certain parts:
• When you click on a certain object in the program monitor, the Arranger will
zoom into that object.
• You can use the mouse to draw a frame in the preview monitor – the
corresponding section will be zoomed in the Arranger.
• When you move the playback marker in the program monitor, the Arranger
playback marker will also move correspondingly.
Tip: If you use this option very often, then try using the corresponding keyboard
shortcut ("Shift + A").
Monitor zoom
The preview images of both monitors may be zoomed in and out to examine specific
details in the image more closely (zoom in) or to reduce the image so that black
edges result for use of animations (view page 151).
ick on the preview monitor and zoom out of the video image by holding down
• Cl
"Ctrl" and using mouse wheel.
Transport control
Both transport controls enable the video material to be played back.
Range: Change the range between the in and out points
by clicking above the playback functions.
Playback marker: This marker indicates the location of the image
currently displayed on-screen.
Page 66
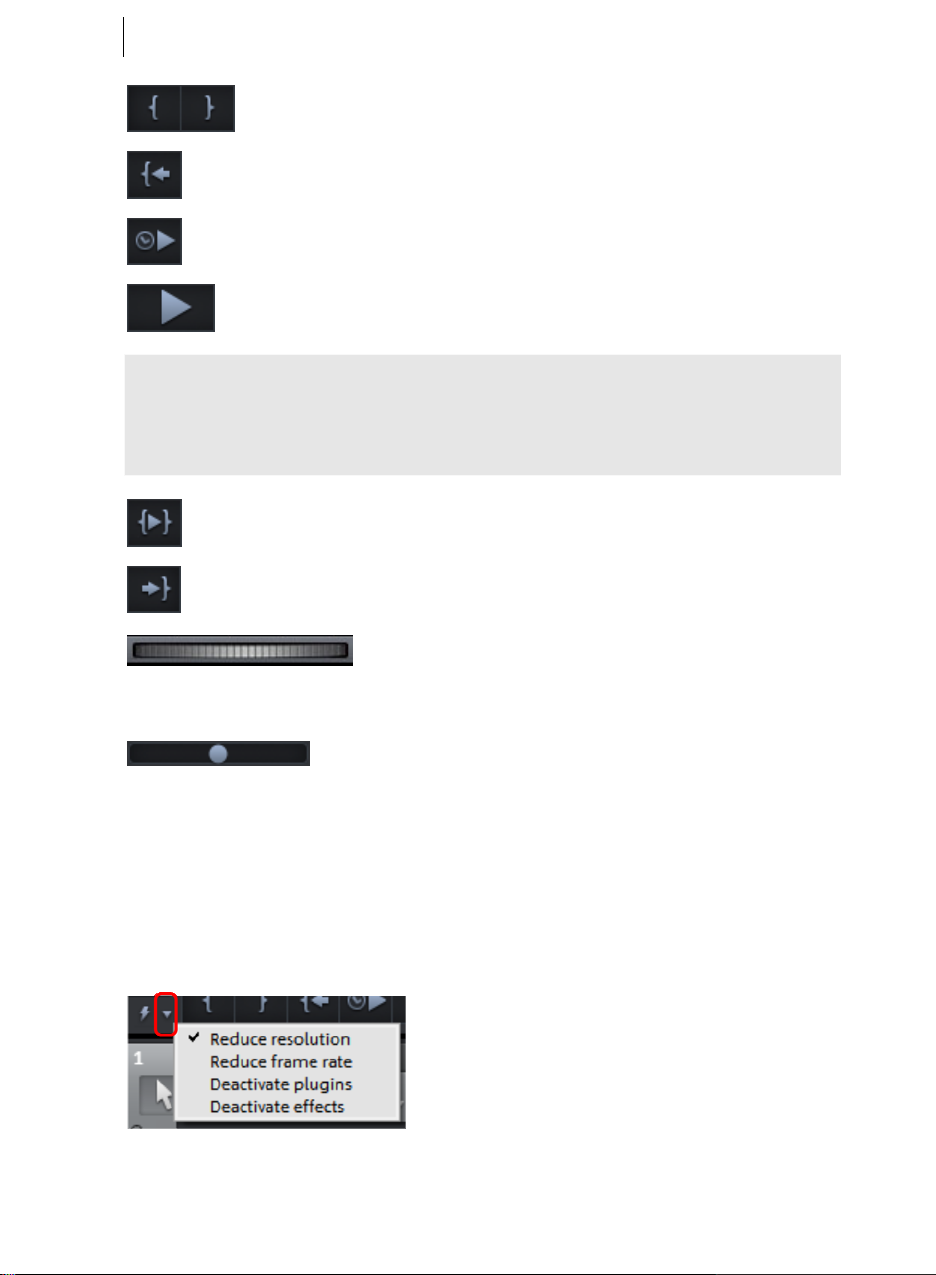
66
Tip: In the menu "File -> Settings -> Program -> Playback", you can set whether the
playback marker will go back to the start position (stop) after the second click or
following the appropriate shortcut (space bar), or if it should stay at the current
position (pause function).
Set in/out points: Defines the start and end of the playback range.
To the start: This button sets the playback marker to the start of the
current area.
Playback by a frame: This button sets the playback marker just behind
the current frame and plays it back.
Play/stop (pause): The playback button in the middle starts playback.
A second click ends playback.
Range playback: This button plays back the current range.
To the end: This button sets the playback marker to the end of the current
range.
Jog wheel: Using this wheel, you can move by single
frames within the video and position the playback
marker exactly at high zoom levels.
Shuttle control: The further the slider control is moved
to the side, the quicker the arrangement is played in the
corresponding direction. This way a certain position can
be reached quickly.
Smoother playback with a click
If performance deteriorates due to hardware limitations, high-res source material or
project complexity, you can "activate" a smoother preview during editing using this
function.
In the selection menu, you can set which
functions you want to use for the optimized
preview when this button is activated: reducing
resolution, reducing frame rate, deactivating
plug-ins and/or effects.
"Reduce resolution" and "Reduce frame rate" are preset.
Page 67

Work screens 67
If you have activated the proxy file function in the start dialog or inMovie settings
(view page 239), you will additionally see "Use proxy objects".
Adjusting the workspace
The source and program monitors, the project folder, the arranger, and the Media
Pool can be shut off completely or freely repositioned. Some "Edit" screen
configurations can be saved and recalled at any time via "Window" > "Window
arrangement" > "Save".
The first three user-defined window arrangements will automatically be assigned to
F10, F11 and F12 keys, and by going to "File" > "Settings" > "Key shortcuts..." you can
assign Keyboard shortcuts (view page 333) to any additional ones.
Tip: You can switch between the last used window, even if it's unsaved, and the
current view using the Ctrl + F9 shortcut.
The "Burn" screen
1 Menu preview: Here you can see a selection menu preview. For more
information, read the "Edit disc menu" (view page 276) chapter.
2 Sw
itch views: Here you can switch between preview and edit views.
3 Remote control: Here you can check how your future disc will react when you
press the buttons of your player's remote control.
4 Output:Before burning the project, select the desired format.
5 Play preview: Play the preview menu and test how it works with the remote
control.
Page 68

68
6 Template category: Select the desired section from various categories with
different menus.
7 Menu templates: Switch between different templates for designing your menus.
8 Use templates: Here you can select whether a template should be assigned to a
page, the menu or all menus on a disc.
You will find more information in the "Burning" (view page 220) section.
Video recording
Select the recording method
To start recording, click on the red "Record" button below the preview monitor.
The following selections are possible:
• AVCHD/DVCPRO/AVC-Intra for AVCHD/DVCPRO/AVC-Intra cameras, as
well as for digital cameras or video DSLR with memory cards or hard drives as
well as P2 memory cards for XDCAM. This option may also be used to import
media from removable storage devices, USB devices, or hard drives as a clearly
laid-out alternative to the Media Pool.
Page 69

Video recording 69
• HDV camera: For HDV cameras
• DV cameras: For mini DV cameras and DV video recorders
• Video for analog video cameras, analog TV, VCR, webcams and others.
• Audio for microphones, cassette recorders, MiniDisc players, record players
and others.
• Screenshot: Records directly from the computer monitor.
• Frame for snapshots or image series from analog video cameras, analog TV,
VCRs, webcams and others.
AVCHD/DVCPRO/AVC-Intra
This option accesses a universal import dialog that is not only suitable for AVCHD,
DVCPRO, or AVC-Intra cameras, but also for external hard drives, P2 memory cards,
photo, and movie cameras that contain usable files equally. MAGIX Video Pro X5
automatically recognizes the file structures and shows only individual takes, making
import convenient and easy.
Alternatively, these drives may also be controlled directly via the Media Pool. The
import dialog also features its own display filters and additional options for
convenience.
Note: DVCPRO and AVC-Intra import is optional and must be activated (view page
334) for a fee.
Connect camera
Suitable cameras are essentially available in three varieties:
• Cameras featuring removable data storage: These cameras have a slot for a
memory card. Your computer should have a card reader for the corresponding
memory card, which you can then remove from the camera and insert into the
card reader. Different camera models can also be connected via USB.
• Cameras which burn DVDs directly (usually 80 mm diameter instead of the
regular 120 mm): The DVD can simply be taken out of the camera and inserted
into the computer. For so-called "Slot in DVD" drives, look beforehand in the
operational manual whether or not 80 mm DVDs (also called 3" DVDs or
MiniDVDs) are acceptable.
• Cameras with built-in hard drives: The camera will respond as a drive as soon as
it is connected via a USB cable to the PC. This additional drive will appear in
Media Pool.
Page 70
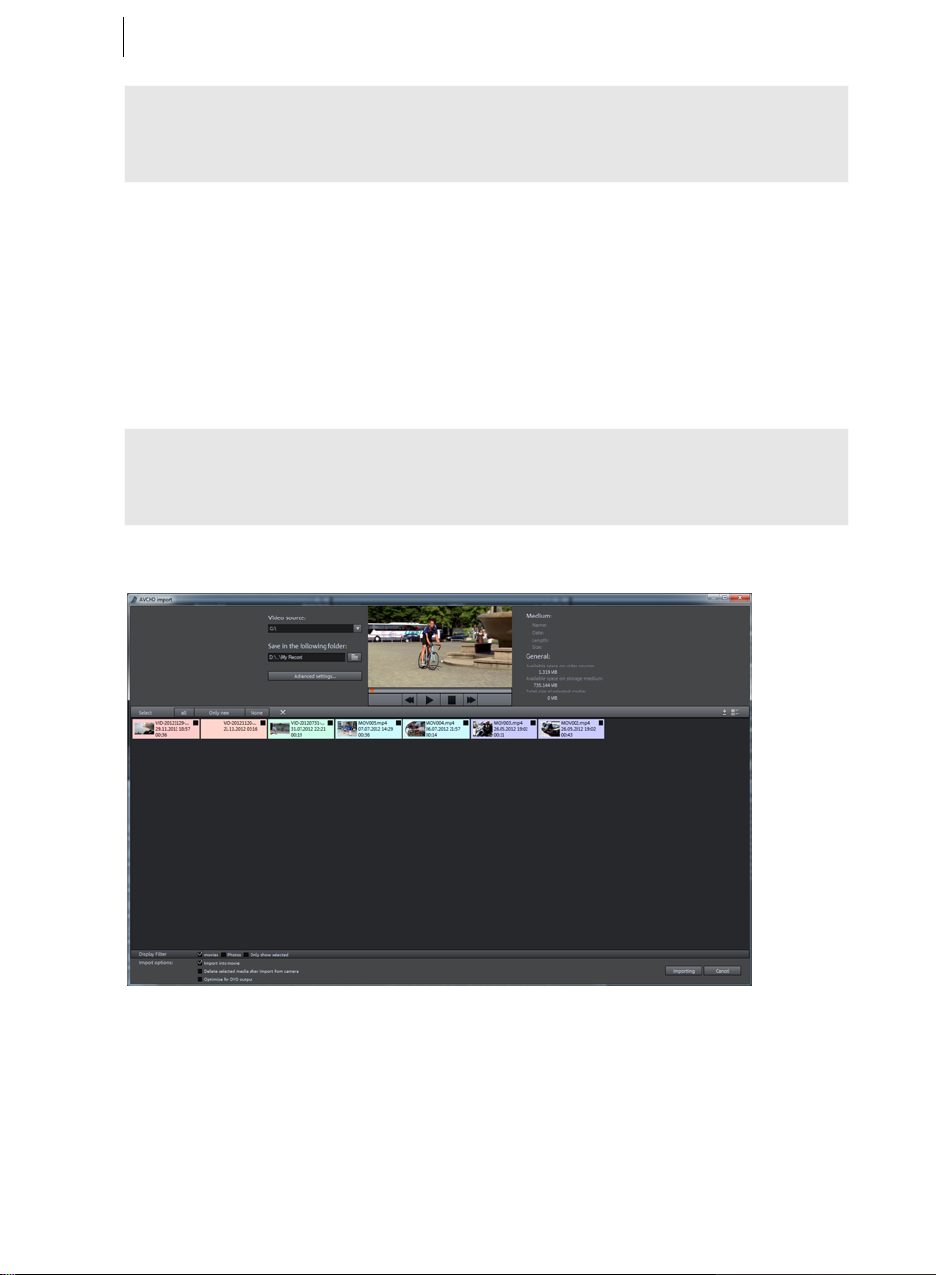
70
Hint: The listed options and procedures reflect our experience with what works. Still,
we recommend you read the camera's manual for the exact sequence of actions and
contact the manufacturer in case of problems.
Import
The option "AVCHD/DVCPRO/AVC-Intra" does not produce a recording as such,
but rather "only" the transfer of the already created video file and its integration into
the existing project.
On older systems, it may be helpful to transfer AVCHD files into MPEG-2 format
during import. A corresponding query appears automatically as these files are
imported.
Note: Before AVCHD import it is necessary to activate (view page 334) the MPEG4 codec and Dolby®Digital Stereo codec for copyright reasons. MAGIX Video Pro
X5 offers this option as soon as the codec is required.
After you have selected a recording option, the following dialog opens.
Video source: Here you can select the drive that corresponds to your connected
camera.
Save in folder: Here you can select the folder where the imported files are to be
stored.
Advanced settings: Adjust various settings affecting the name and date of the files to
be created.
Page 71

Video recording 71
Preview monitor and transport control: Play and rewind the clips in the file list here.
Medium/general: An info area for the files is provided to the right next to the preview
monitor.
File list: The contents of the selected drive are shown here. Use the display filters to
reduce the types of files shown. You can select every file separately using the little
check boxes in order to import them later. At the top right of the list you can find
options for displaying the files.
Note: The files are color-coded. The colors indicate recording times, so that you can
quickly recognize which recordings were made at the same time.
Select: This offers self-explanatory options for file display ("all", "only new", or
"none").
Display filter: Here you can select whether you want to view "Movies" or "Photos".
With the option "Show only selected", all non-selected elements will be hidden. You
should only use this option if you've already selected elements.
Insert into movie: With this option active, media will be inserted directly into the
MAGIX Video Pro X5 Arranger as objects. When inactive, they will be simply copied
into the target folder and may be selected from the Media Pool at any time.
Delete all media after camera import: This option deletes the selected media after
importing from the camera.
Import: Starts the import process of the selected files into the target directory.
Cancel: closes the dialog without import.
Tip: In theory, the AVCHD import dialog is a universal import dialog, which can be
used for external drives, photo and movie cameras, containing usable files. If you
find the display filters useful for your camera a s well, nothing stands in the way of
connecting the camera to the computer and then activating AVCHD recording in
MAGIX Video Pro X5.
Page 72
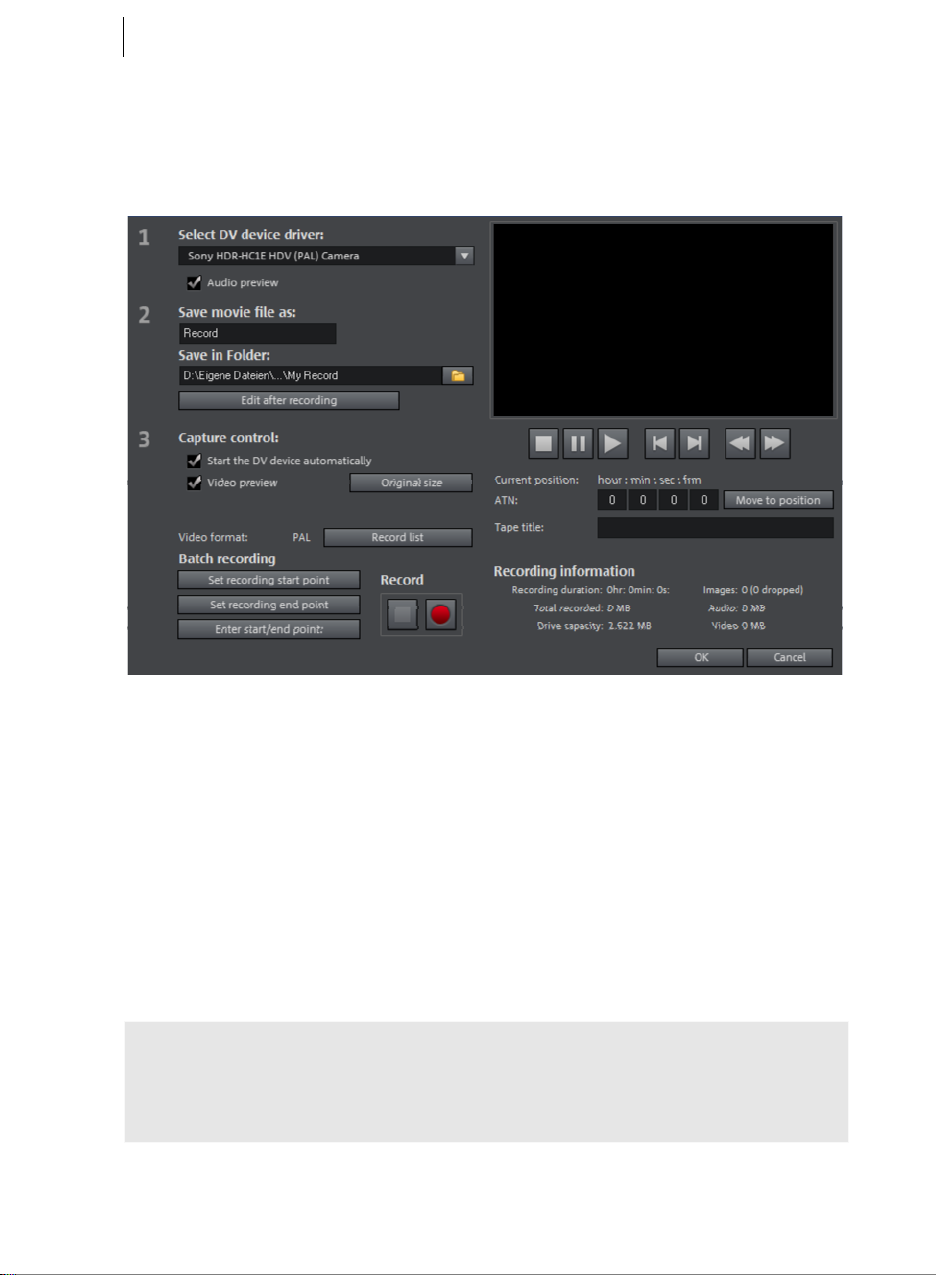
72
HDV camera
Use this option to open the HDV camcorder record dialog. To do this, you have to
connect an HDV camcorder.
The options in this dialog can also be found above in DV recording.
DV camera
Connect a DV or HDV camera
• Connect the digital output of the switched-off camera with the computer's DV
interface (also called FireWire or iLink).
• Insert a DV cassette or the storage device into the camera.
• Switch your camera’s operating mode to "Video recorder" or "Playback".
The camera is now ready to transfer video to the computer.
Note: You may also use a HDV camera in DV mode to, for example, transfer
recordings in the old DV format. We have noted problems with this mode in many
cameras, and therefore recommend that the Record mode of the camera is also
switched to DV, switching the camera off and then on again.
Page 73

Video recording 73
Capturing DV recorders or cameras
To start recording, click the "Record" button below the source
monitor.
• Select "DV camera" from the recording dialog. Uncompressed DV capture
requires approx. 220 MB per minute of video. If you would instead like to record
using the more space-saving MPEG format, then you should first activate the
"Record DV as MPEG" option.
• This opens the actual recording dialog. Check to see if a DV camera driver has
been selected.
• Name your recording. It's worth choosing a logical name which will allow you to
find it easily again on the hard drive.
• You can access the appropriate place on the camcorder tape by using the remote
control buttons: shuttle forwards, backwards, and start/stop playback. To start
recording, click on the "Record" button. Keep an eye on the remaining hard drive
space.
• Cease capturing with the "Stop" button and exit the record dialog. You can see
the recording in the film-strip in the lower third of the screen.
Tip: In the DV recording dialog, you can set clips from the DV video which then will
be recorded one after the other (batch capturing). Read more on this in the chapter
"Batch processing" (view page 75).
Page 74

74
"DV capturing" dialog
Note: Keep an eye on the available hard drive space before each recording. DV
capture requires approx. 220 MB per minute of video!
Select DV device driver: The device driver for your DV device should be listed here. If
"Record audio" is deactivated, then video without sound is recorded only. "Audio
preview" activates the audio output of the recording.
Note: The audio preview is deactivated at first, since DV cameras usually include
built-in speakers.
Save movie file as/save in folder: Enter the name of the movie to be recorded. You
can also select the folder where you wish to store your video file. The default
recording directory is set by default, but you can change the Path settings under menu
item "File -> Program settings -> Path settings".
Edit after recording: This provides access to the automatic editing options.
Start the DV device automatically: Starts the DV recorder or DV camera
automatically when the "Record" button is pressed. This does not function with all
digital cards/video devices.
Page 75

Video recording 75
Video preview: On the preview monitor you can see a preview of your movie.
Original size: This option allows you to preview the video in the original size. To
return to the dialog use the "Esc" key.
Recording list
Set the start and end points for the capture here. This allows you to search the entire
video for all captures to be used and list them for planned batch capture. This is then
processed in sequence when the recording starts (via the red button). That way, you
don't need to record each scene individually. Simply specify the recording time points
and the computer takes care of the rest. To set precise start and end points, click
"Enter start/end point (view page 76)
Record list: Press this button to view the available list
of already recorded videos and scheduled recordings.
All entries from the list may be selected and deleted.
Every batch recording is automatically logged.
Conversely, every "manual" DV and HDV recording is
transferred into the recording list in order to restore lost
recordings without much effort.
Batch recording: Here the start and end points can be set for the capturing. This
allows you to search the entire video for all captures to be used and list them for
planned batch capture. This is then processed in sequence when the recording starts
(via the red button). That way you don't need to record each scene individually. You
simply determine recording time points, and the computer takes care of the rest. To
set the start and end points precisely, click "Enter start/end point (view page 76)"
Record: Starts the recording process. Also contains the list of scheduled recordings.
These are processed step-by-step (batch capturing).
Stop: Stops the recording process.
Page 76

76
Snapshot! With the Snapshot! button, you can create a frozen image directly from the
preview monitor. Start the camcorder and watch the preview window. When the
image you want appears, click "Snapshot". Or you can navigate using the remote
control to the position you want, and stop there in Pause mode. Stopped playback on
the DV camera will not deliver an image! The images are saved in the record directory
as graphics files in the set resolution.
Remote control
MAGIX Video Pro X5 also supports remote controls for most digital camcorders. This
does not function with all digital cards/video devices. If your hardware does not
support the remote control function, the buttons will not be usable.
The transport controls required for this are featured in the DV or HDV recording
dialog.
Tape title: Enter a name for your tape here. MAGIX Video Pro X5 requires this name
for the DV logging feature.
Recording information: Displays various information about your recordings.
Set recording start/end point: Enter the exact start and end point or the recording
length for a scene.
Page 77

Video recording 77
Both values can be entered as ATN (absolute
track number) or as a timecode in
hours:minutes:seconds:frames.
DV as MPEG
This recording selection dialog option allows you to transfer DV recordings directly
into the space-saving MPEG format on the harddisk.
From the "DV as MPEG" dialog window you can find
MPEG encoder settings options under "Advanced".
You can also burn your DV material direct to disc
without any intermediate steps.
Recording list
Set the start and end points for the capture here. This allows you to search the entire
video for all captures to be used and list them for planned batch capture. This is then
processed in sequence when the recording starts (via the red button). That way, you
don't need to record each scene individually. Simply specify the recording time points
and the computer takes care of the rest. To set precise start and end points, click
"Enter start/end point (view page 76)
Page 78

78
Record list: Press this button to view the available list
of already recorded videos and scheduled recordings.
All entries from the list may be selected and deleted.
Every batch recording is automatically logged.
Conversely, every "manual" DV and HDV recording is
transferred into the recording list in order to restore lost
recordings without much effort.
Logging
Logging means that MAGIX Video Pro X5 also saves the original save location,
position and additional information (metadata, e.g. scene, take, rating, comments,
etc.) about DV video and audio files.
Everything copied using DV recording, DV to MPEG recording and HDV recording
appears in the recording lists of the corresponding recording dialog. Recordings for
which the corresponding video material is no longer on the hard disk will appear as
"planned recordings".
If MAGIX Video Pro X5 does not find the corresponding DV and WAV files during the
loading of a video, it will ask that the corresponding DV tape is inserted into the
connected camcorder again for automatic scene import.
You no longer have to save DV AVI and audio files (which can be very large). If at a
later time you would like to work on a film again, but do not have the space to keep
the material for it on your hard disk, then you can simply delete the bulky DV AVI and
audio files.
Page 79

Video recording 79
Video
This option allows a video recording to be made from analog sources.
Connect analog video source
Connect the video out of your video camera, DVD player or VCR to the video in (TV,
video, or video-in graphics card) of your computer, and the audio out to the line in of
your sound card.
Due to the variety of device configurations, it is difficult to say which cable will
function best with your setup. If you’re not sure, check the manual of your VCR or
your TV-, video- or graphics cards.
Example: Many VCRs have a SCART output and most DVD players have three RCA
outputs (two for the stereo track, one for the image). In such cases, you will need a
SCART to RCA adapter, a cable with 3 RCA plugs at each end.
SCART/RCA adapter Scart/RCA adapter with 3
RCA jacks
Stereo RCA/mini phone jack
adapter
Most sound card inputs are mini stereo jacks. To connect the audio out of your VHS
recorder to the sound card audio in, you will need a stereo RCA/ mini phone plug
adapter.
You will have to purchase a cable with three RCA plugs and a stereo RCA/mini phone
plug adapter.
Page 80
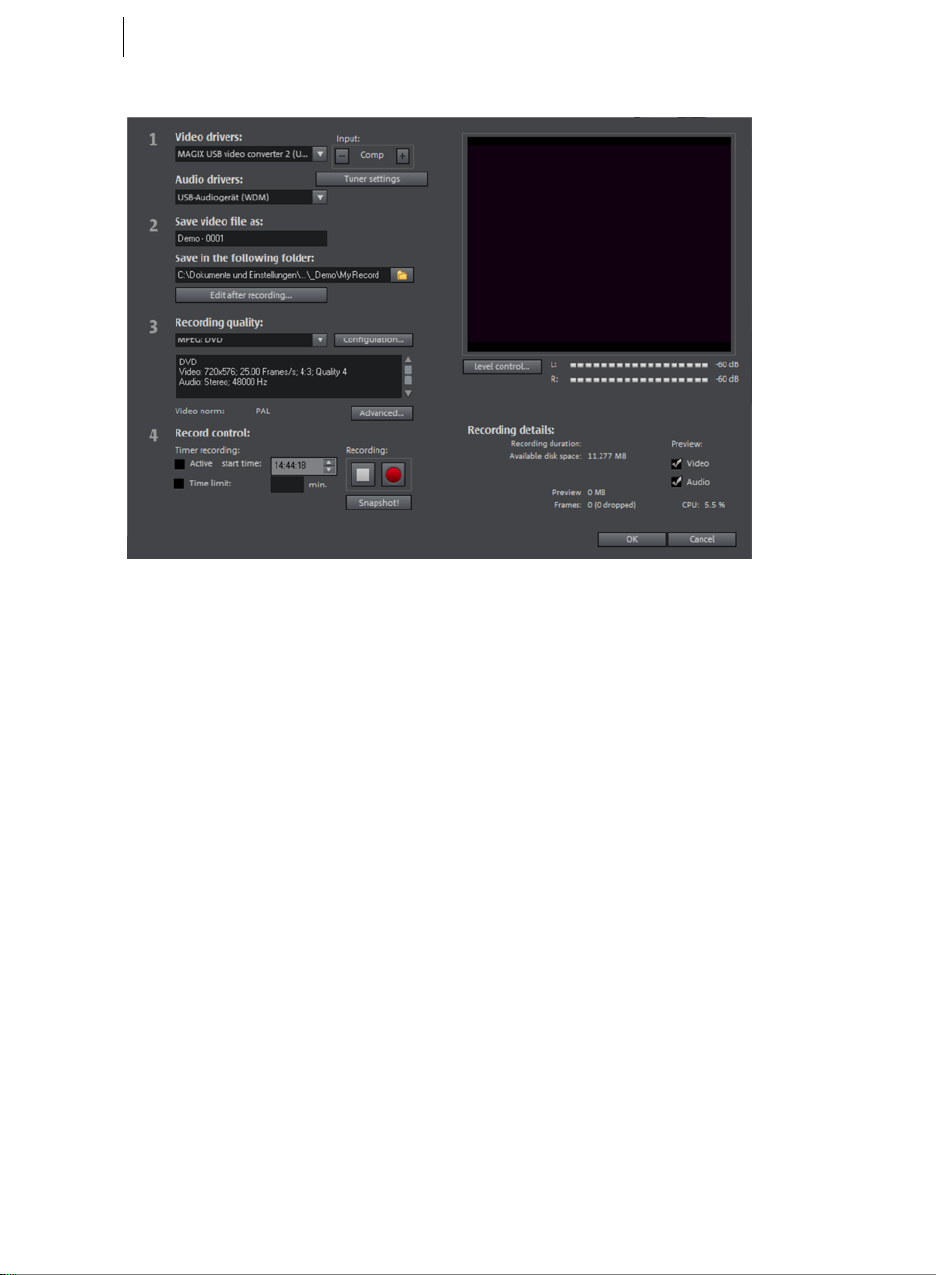
80
Record dialog
Video/audio driver: Here you can make settings to you video or sound card before
recording. In practically every case the driver software supplied with the hardware
must be installed.
Input/tuner settings: Supports your video recording card with multiple sources; in
cases when a TV tuner or multiple inputs (SVHS, composite...) are available, you can
select the source to be recorded and the correct TV channel.
Save video file as/save in following folder: Enter the name of the movie to be
recorded. You can also select the folder where your video file should be saved. The
standard recording folder is set as default. The location of this folder may be changed
via "Path settings" under "File -> Program settings -> Folders".
Edit after recording: This provides access to the automatic editing options.
Recording quality: You can select among various recording qualities depending on
intended use of the material and computer performance. These are sorted according
to picture quality. Use Configuration to fine-tune the quality for the preset. Presets
you have created yourself appear in this list as long as you use the default folder
provided as the save location.
• Presets displayed with MPEG record directly in MPEG format.
• The preset "AVI: user-defined" enables AVI videos to be recorded via the codecs
included with MAGIX Video Pro X5. There are several codecs for various
applications, e.g. "MSU Screencapture Lossless Codec", which is used for screen
Page 81

Video recording 81
capturing. Please pay attention to the general advice for AVI videos (view page
337).
Tip: Use MPEG presets if you want to burn your recordings immediately after
recording, because thanks to the so-called "Smart Encoding" additional lengthy
encoding after recording won't be necessary.
Advanced...: Opens the video driver settings dialog.
Recording control: Here you will find the red record button and the stop button. Using
them, you can start and stop recording.
Timer recordings active/time limit: Specify the recording start time and length to
turn your PC into a fully functioning VCR.
Snapshot!: With Snapshot! you can create a still frame directly from the preview
monitor. The images are saved in the recordings folder as graphics files in the
resolution you have set.
Recording information: Here you will find statistics about recording time, available
disk space, recorded frames and "dropped frames". Dropped frames are frames that
have been left out because the computer is too slow for the selected image format
and recording quality and cannot accept all incoming frames.
Preview: With some graphics cards, system strain can be reduced by switching video
preview off. If you hear an "echo", deactivate the audio preview.
Advanced configurations in the video capturing dialog
Here you can adjust certain settings for the video recording driver.
These dialog boxes, so-called “property sheets,” come with the video card drivers.
These driver-specific performance properties may deviate depending on the cards.
We also have a very limited influence on the behavior of these drivers. If you
encounter any difficulties, please contact the video card manufacturer for the latest
driver updates.
Source: Sets the crossbar of the video card.
The crossbar determines which video and audio input signal will be recorded. The
crossbars are connected in series to the video recording chip itself. In the output field,
the video output (for the crossbars) is the input for the recording chip (video or audio
decoder-in) of the video card. In the “Input” field, select the signal source that will be
used by the video card to capture for this input. Many video cards have separate
crossbars for audio and video. If you have a problem, try out the different
configurations until the right sound matches the right image.
Page 82

82
Composite-in = the normal video input (typically a cinch jack)
S-video = S-video input (mini-din jack)
SVHS-in = SVHS input (special cable)
Tuner-in = TV signal of the integrated tuner
Display
Video decoder: If the picture only appears in black & white or it flickers, the video
standard may be set incorrectly. In mainland Europe, PAL_B is used.
VideoProcAmp: Fine-adjustment of colors, brightness, contrast etc. We recommend
against changing any of the manufacturer’s settings.
Format: Please do not change anything here. The capturing format is set in the
"Recording quality" option in the video recording dialog.
Station selection
This option is only available if a TV tuner is integrated into your video card.
Audio
Songs, noises, or instruments can be easily recorded in MAGIX Video Pro X5 using
the audio recording function. A hooked-up microphone or various audio devices
(especially a stereo system) can be used as recording sources.
Connecting the source for recording
First of all, the source of the audio material must be connected to the sound card
input. Again, there are several possibilities which primarily depend on the type of
equipment you have.
If you are recording from a microphone, then please connect the microphone to the
microphone jack on your sound card (usually red).
If you want to record material from a stereo system, then you can use the line-out or
AUX out jacks on the back of your amplifier or tape deck. This involves connecting
them to the sound card input (usually red).
If your amplifier has no separate output (other than for the speakers), then you can
use the connection intended for headphones for your recordings. In most cases, you
will need a cable with two mini-stereo jacks. This type of connection has the
advantage of being able to set the headphone input signal level with a separate
volume. As headphone connections generally are not the best, it is advised that you
use the line outputs if possible.
Page 83

Video recording 83
When recording cassettes from a tape deck, you can connect the tape deck's line out
directly to the sound card input.
When recording from vinyl records, you should not connect the record player's output
directly with the sound card because the phono signal needs to be pre-amplified. A
more suitable method would be to use the headphone connection or an external preamp.
Adjusting the Signal Level
Adjusting the signal level to the sound card is also recommended to get the best
sound quality during digital recording.
Once a recording source is connected to the sound card, the "Record" button opens
the recording dialog and starts the recording source.
You can now adjust the recording level with the help of the LED display in the
recording dialog. For this, you must first check off "Show Levels".
If the adjustment is set too high, distortion occurs and the incoming signal must be
reduced. If you have connected the source through either an amplifier or tape deck
output to the sound card, you can only reduce the signal level in your sound card’s
software mixer interface. You can access the mixer directly from within the recording
dialog via the “Recording Level” button.
If you reduce input sensitivity by using the input fader, the resolution at which the
analog signal is digitized is also reduced. Try to set these automatic controllers to the
loudest sound level possible.
The maximum setting for an optimal level is the loudest part of the material. The
loudest part should be adjusted to be the maximum. The actual recording begins
when you press the "Record" button. At the end of the the recording you will be
asked if you want to use the recording. Upon confirmation, the newly-recorded
material will be placed at the next free position of the start maker in the arrangement.
Page 84
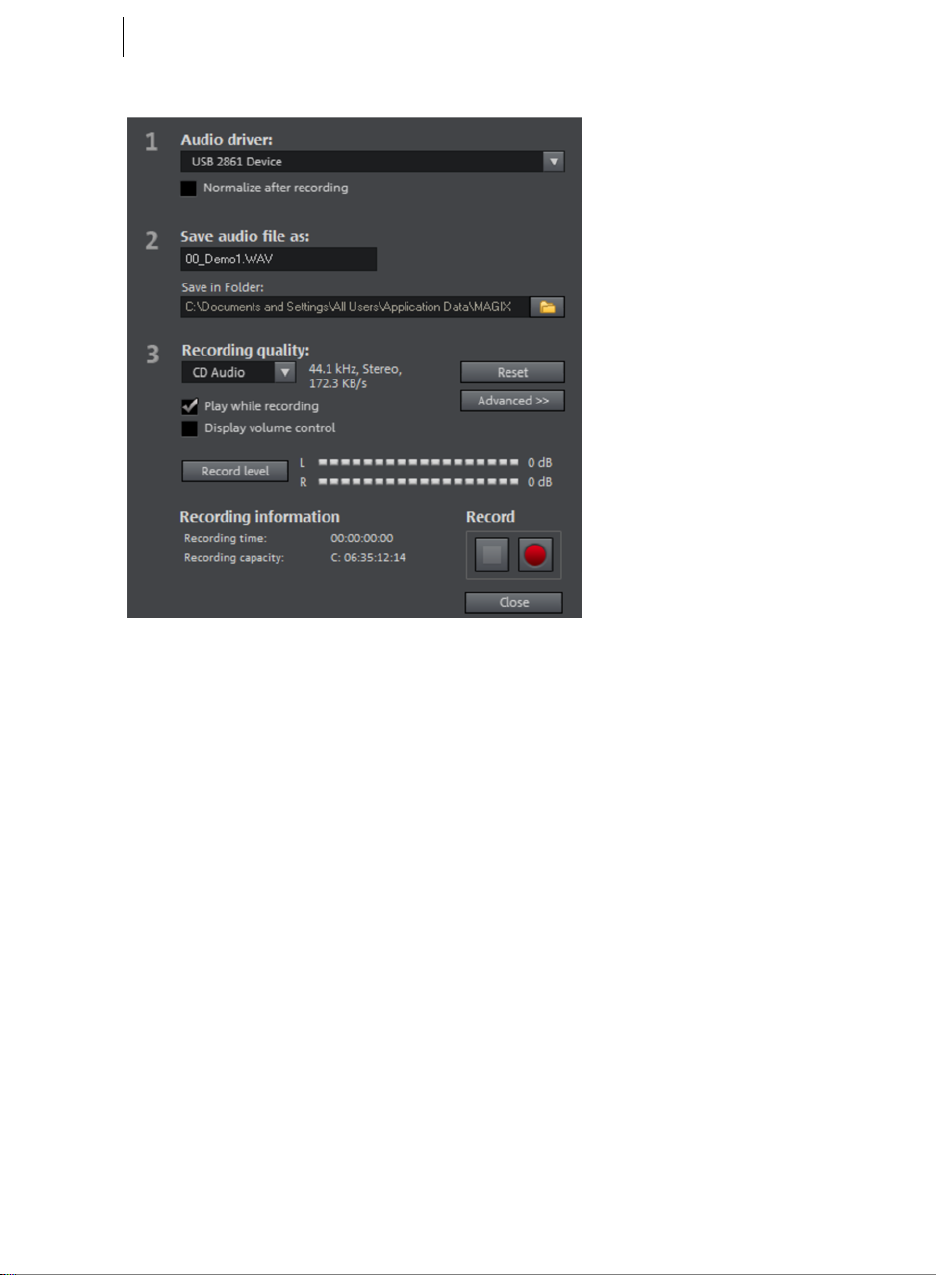
84
Audio record dialog
Audio driver: Selects the sound card for the recording.
Save audio file as/ Save in folder: Here you can select the title of the audio file you
wish to record. You can also select the folder where you wish to store the file.
Recording quality: Sets the sound quality of the recording. In the preset menu you can
choose between medium wave radio ("AM tuner"), UKW ("FM Radio"), DAT (Digital
Audio Tape) and CD quality.
Display Volume control: Using the peakmeter, you can monitor the level of the
incoming signal. Please read more on this in the chapter "Adjusting levels" (view page
83)
Record: This button starts the actual recording.
Stop: Click this
Normalize after recording: With this option activated, your material's volume is
raised to a proper level after recording is completed. In order to achieve good results,
you should try to record the source as loud as possible without overmodulating it. To
do so, refer to the peak meter reader in the recording dialog.
button to stop recording
Page 85

Video recording 85
Play while recording: This option is particularly important for spoken commentary,
etc. If activated, the selected movie (or selected scene if recorded in the "Edit" screen)
is played while recording. This acts as orientation for the movie.
Advanced: Use this button to open a window where you can select from special
features:
Advanced settings for audio recordings
• Mono recording: Activate to record in mono. This reduces the required memory
space in half. Mono recordings are recommended for voice recordings made
using only one standard mono microphone.
• Real-time resample to project's current sample rate: Automatically matches the
sample rate of a new file to be recorded with the sample rate of the current
movie's sound track (set in the video recording).
• Automatic volume reduction of other audio tracks ("ducking"): To add narration
or other sound material to a video that already has sound volume levels set,
activate the option ”Automatic reduction of sound volume of remaining audio
tracks”. This automatically reduces the volume of audio objects in the
arrangement during the recording session (”ducking”). This is achieved using an
automatically configured volume curve: Before and after the recording, other
tracks will be faded in or out, resulting in a homogeneous total volume level.
(Lowering of volume level during spoken comments is also called "Ducking".)
Single frame
Single frame recording may be used to record snapshots from the connected video
source. This requires a DirectShow compatible video recording or TV card or a
corresponding USB device (e.g. a webcam).
The time control function allows you to automatically take snapshots. This is useful
for the following applications:
• to create slideshows using videos
• for animation films (stop-motion recording)
• for video surveillance
• or in time-lapse photography
The recorded images are added to the current arrangement.
Page 86

86
Recording dialog
Video source: You may set the video card used to take pictures here.
Save picture as: Enter the title of the snapshot to be recorded here. Snapshots are
saved under this name and numbered consecutively. You may also select the file path
for storage.
Recording quality: Set the solution for the recording here. This corresponds with the
resolution options offered on the camera. Use the slider to set the image quality.
Using higher resolutions results in larger file sizes for each recording. "Reset" resets
the image quality to the preset value.
Advanced...: Opens the video driver settings dialog.
Camera sound during recording: This causes the program to play a clicking sound
each time a snapshot is taken.
Record controls: The red record button triggers a snapshot or alternatively a series of
recordings when using the time control function.
Timer-controlled recording
Recording interval: When active, starting recording produces a sequence of images.
Snapshots are saved according to the selected time interval and numbered
sequentially. For example, if snapshots are taken every two seconds and then inserted
every five frames into the slideshow, then a ten times accelerated time lapse
recording will result.
Photo length in frames: Specifies how long the photos appear in the slideshow.
Page 87

Video recording 87
Enhanced single-frame recording dialog settings
You can adjust certain settings for the video recording driver.
These dialog boxes, so-called "property sheets", come with the video card drivers. The
driver-specific features may slightly vary from driver to driver. The MAGIX team has
little direct influence on the performance of the various drivers. If you encounter any
difficulties, then please contact the video card manufacturer for the latest driver
updates.
Input: Sets the crossbar switch of the video card. This lets you define what video and
audio signal is used in the recording. The crossbars are connected in series to the
video recording chip itself.
Output: In the "Output" field, the video output (for the crossbars) is the input for the
recording chip (video or audio decoder in) of the video card. In the "Input" field, you
select the signal source to be used for this input by the video card during recording.
Composite in = the normal video input (typically a cinch jack)
S-VHS in = S-VHS input (special cable)
Tuner in = the TV signal of the built-in tuner
Video decoder: If the picture only appears in black & white or it flickers, then the
video standard may be set incorrectly. PAL_B is used in Germany and most European
countries (France: SECAM; US/CAN: NTSC).
VideoProcAmp: For fine tuning of colors, brightness, contrast, etc. We recommend
against changing any of the manufacturer's settings.
Format: Do not change anything here! The capture format settings can be changed
under "Resolution" in the "Recording" dialog box.
Page 88

88
Screen
Use screen capturing to record everything that moves on your monitor. This process
is called "screen capturing".
Use this feature to record your screen content. This process is called "screen
capturing".
• Under Recording quality, you will find
various presets for different
applications. You can either record the
entire monitor ("fullscreen"), a frame of
variable size (e.g. to film the Windows
Media Player display), or a different
video player. Click "Configuration" to
make custom size adjustments.
Hint: Because many video players work
with overlay, it is recommended to open
each player before starting the capture!
This way switching into "Overlay" mode
can be prevented.
Tip: Use the fullscreen preset under "Recording quality". MXV, a video codec
especially well suited for screen capturing, will be used.
• Click on the record button in the record dialog. An additional dialog with a red
record button, a black stop button as well as a frame with dashed bordering
appears.
• Activate the option "Record mouse pointer" to record the movements of the
mouse pointer.
• If you like, you can deactivate "Animate mouse click", if you don't want to visually
record it.
Page 89

Video recording 89
• Now select the screen area you wish to record, i.e. the screen of the video player
in which the video is playing. Drag the frame over the area you wish to record and
adjust its size as required by dragging the edges and corners.
Note: If you previously selected "Fullscreen", the window will be hidden.
• To start recording, press the red record button. The recording starts; the record
symbol appears in the task bar (tray).
• If you are finished with everything, click on the record button or the stop button
to stop recording. Recording ends and the recording dialog is visible once again.
Edit after recording
The "Edit after recording" dialog can be
opened from the "HDV Camera", "DV
Camera" and "Video" recording dialogs.
This dialog offers the these options:
Page 90

90
• Automatic scene recognition: This divides the footage into scenes. Please also
read the section "Automatic scene recognition" (view page 259).
• Automatically
set chapter markers: Please also read the section "Set chapter
marker automatically (view page 111)" in the chapter "Edit" in the PDF manual
(press "F1").
project immediately after recording: You can use this option to record and burn
Burn
to a disc in a single step. Simply select the format you would like to burn, insert a
suitable blank disc into the drive, and press record.
Note: Make sure that the selected recording quality corresponds with the disc type
(for DVDs the preset "MPEG DVD").
If you use your own settings for MPEG encoding (e.g. half image resolution for longplay DVDs) make sure that settings for recording and later for burning are the same
so that no new encoding is necessary (Smart encoding).
After recording, the program automatically switches to the "Burn" screen, the burn
window opens and the disc is burned. The last set layout is used for the menu layout
for the DVD.
Tip: This function is particularly suitable for handling lengthy projects in one go. You
can start recording in the evening and have the finished DVD by morning.
Export for mobile device: The recorded movie is immediately converted into the
format of the selected mobile device and transferred. The preset in the list field is the
device which has been selected in the Export video/audio dialog.
Settings: Opens the Export settings (view page 226) for the selected target device.
Page 91

Objects 91
Objects
In the MAGIX Video Pro X5 "Timeline" mode you are dealing with objects. The
general term "object" includes all media types that are present on the arranger tracks.
The following object types are found in MAGIX Video Pro X5.
Combination objects: Combination objects
are video objects with an image track and an
audio track. In the context menu, you can add
the waveform representation of the audio
track or add the sound as an independent
audio object.
Video objects: Video objects include a file
extension typical for videos (e. g. *.mpg, *.avi,
*.mxv). Depending on the length of the video
object, you will see several frames
representing various positions in your video.
Image objects: Image objects are photos or
other static images. They have a file extension
typical for an image (e. g. *.jpg, *.png, *.bmp).
In contrast to video objects, you'll always see
only one frame.
Audio objects: All objects that contain sound
are considered audio objects. They have an
extension typical for audio (e. g. *.ogg, *.mp3,
*.wav). With a right-click you can add a
waveform display to any audio object.
Title objects: Title objects are created using
the title editor and contain the text that
appears in your projects. They have no file
extensions.
In the following chapter you can read about what you can do with these objects. The
workflow for all object types is the same.
Page 92

92
Insert object into the project
Load Files
Media files can be loaded into the arranger from the Media Pool in several different
ways:
• The fastest way: Click on the "Paste" option that appears when you move the
mouse pointer over the file in the Media Pool. Or you can simply drag and drop
the file from the Media Pool onto a track. If an object is already present at this
position, the file is inserted at the same time position on the next empty track
below.
• Load several files: If you want to load several files, hold down the "Ctrl" key while
clicking on the entries you want to use. If you want to load a sequence of files,
hold the "Shift" key and click the first entry and then the last. All entries in
between will be selected. Then you can drag all of the selected files into the
arranger by holding down the mouse button.
• Use insert modes: You can also use the menu commands that are accessible
through the "Insert Mode" button. For more about this, read the section "Insert
modes (view page 47)" in the chapter "Workspaces".
sert through a two, three or four-point edit: These professional insert
• In
techniques will be dealt with separately later on (view page 103).
• Project temp
collect your material separately. It can be used as a sort of clipboard that stores
files that might be used in the project. This creates a better overview and saves
repetitive, annoying navigation through folders in the Media Pool.
Files with multiple audio tracks
MAGIX Video Pro X5 also loads VOB files that contain multiple audio tracks. After
the VOB file has been loaded, simply click the audio object created and select the
desired audio track.
folder: Using a project temp folder is recommended if you want to
Note: To view and select audio objects in the arrangement, Timeline mode must be
active.
Page 93
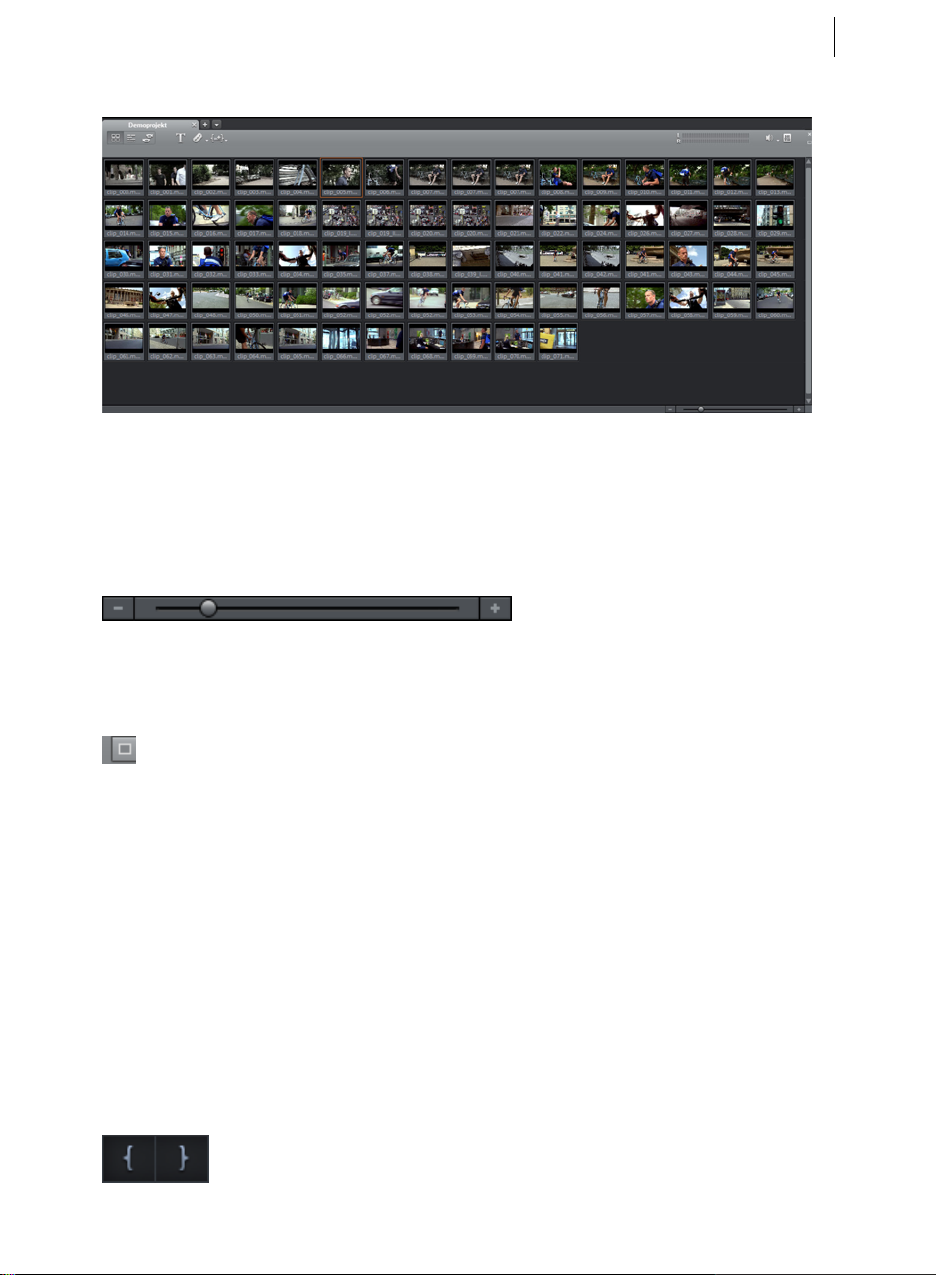
Objects 93
Scene overview
The “Scene overview” mode is a special view that improves manageability and
categorization of scenes. All scenes are listed one after the other (in multiple lines,
like in a text program) and can be copied, cut, moved, deleted and inserted.
"Overview" mode does not indicate start, playback, or end markers. The scene which
is currently being played has a frame around it.
The zoom slider enables the view
to be enlarged or reduced.
This controller also specifies how many scenes are displayed. The smaller the preview
pictures, the more will fit onto the overview.
Maximize: Use this button to maximize the scene overview to fullscreen mode.
Loading parts of longer movie files
For longer videos, it is recommended to define the areas which should be loaded into
the project before importing. An in and out point is set to define the area for this
purpose. This can be done in the following way:
• Select a file from the Media Pool by double-clicking it. Play it back using the play
buttons on the source monitor to indicate the section which you want to use in
the project.
• You can move the range borders directly by holding down the left mouse button
or you can set them using the buttons (or the keyboard shortcuts I and O).
Keyboard shortcuts are particularly useful when setting precise positions with the
shuttle or jog wheel.
Page 94

94
• Click on the monitor image and drag & drop it into the arranger. An object
corresponding to the selected area will appear on the track.
• You can also drag your selection into the project folder and use it in your project
later by dragging it from the project folder onto the arranger. The file in the
project temp folder in this case has the same name as the original file, extended
by a running number (001, 002...).
• You can also drag a file from the Media Pool into the project folder first and then
cut it from there with the help of the source monitor. The in- and out-points
created this way will be saved directly when the segment is removed.
• You can also do the reverse by dragging objects from the Arranger into the
project temp folder. If the object should appear both in the Arranger and in the
project temp folder, just hold down the Ctrl key. All object-related settings (fades,
effects, animations) are transferred as well. You can put together different edits
of one and the same object and store them in the project temp folder for later
use.
Select and group objects
To edit or delete objects using menus, you must first select them. To do so, simply
click on the object you wish to select. Objects will change color to show that they
have been selected.
When the Shift key is pressed, multiple objects are selected. You can open up a
rectangle positioning the mouse over the object, then holding down the mouse button
and marking all objects within the rectangle (”elastic band selection”) by left-clickdragging.
Any object can be combined with others to make up a group, to avoid the objects
being unintentionally moved out of relation to each other. Once they are combined,
clicking on one object of a group will select the entire group. To group or ungroup
objects, use the buttons in the tool bar or the corresponding commands in the "Edit"
menu.
Duplicate objects
Objects may be duplicated very easily. Click on the object to be copied with the
mouse while holding down the "Ctrl" key. This generates a copy, which you can
immediately drag to the desired position or cut separately.
Page 95

Objects 95
Move Objects
Hold down the mouse button to move selected objects to any tracks and positions via
drag and drop. It is recommended to place objects that belong together on
neighboring tracks and to create separate tracks for audio and video objects. For this
reason, videos that should overlay each other should usually be placed on the same
track.
If the Shift key is pressed, objects can be moved from one track to another, without
the time position being changed.
Extract sound from videos
Video with audio material appears in the arranger as a combination object (audio and
video in one object).
In order to edit audio and image material separately, right-click the object and select
"Audio functions" > "Video/audio on separate tracks" from the context menu. Audio
and video objects will then be grouped and appear on two tracks. With the "Ungroup"
(view page 287) function in the "Edit" menu or using the corresponding key, the
object group can b
e dissolved.
Now you can replace the audio or the video track, or process each file separately. Rejoin/regroup the tracks with the "Group" function.
Page 96
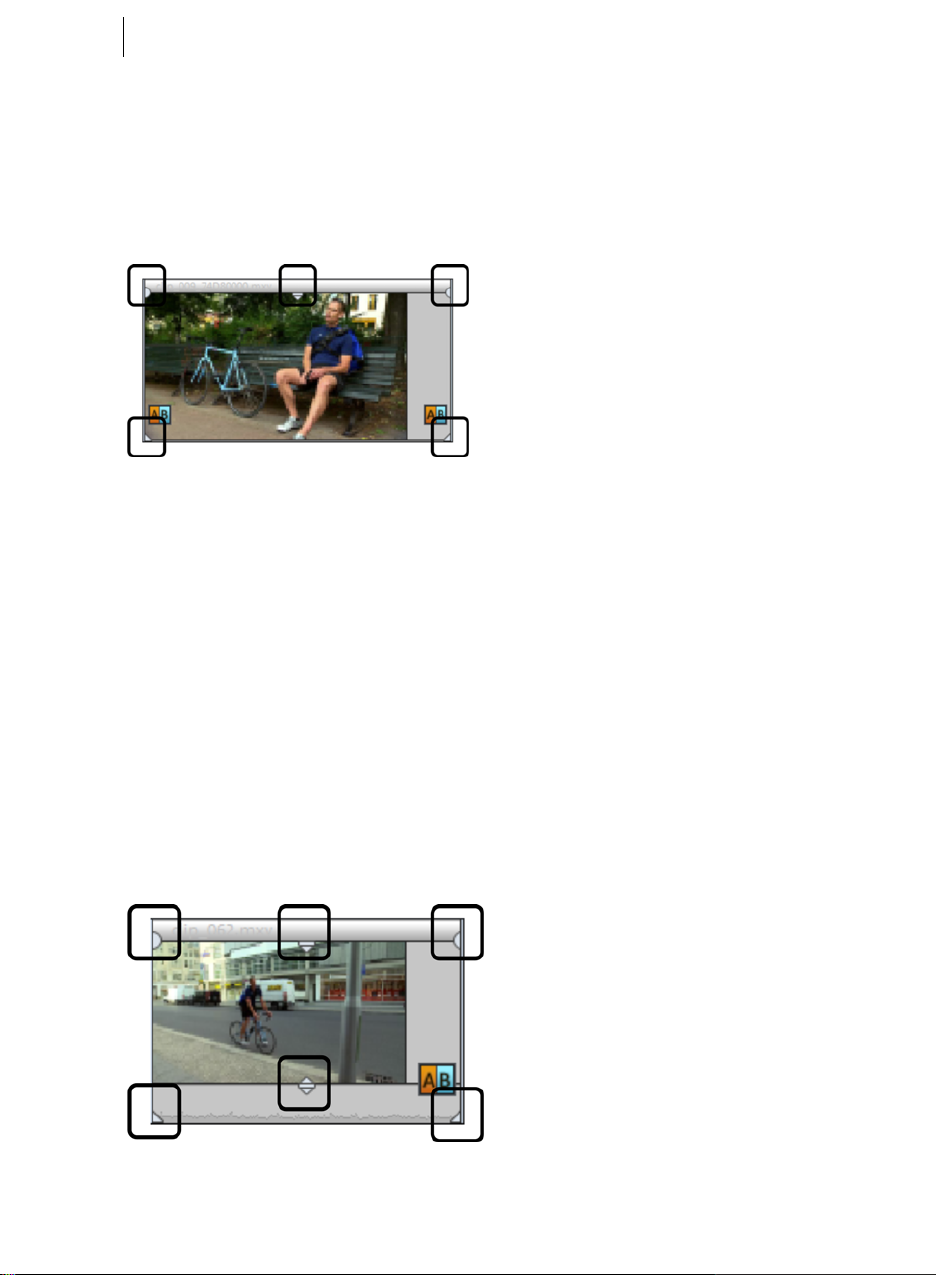
96
Object handles
All objects can be re-sized with their lower edge “object handles”. Move the mouse
over one of the lower corners of the object until the mouse pointer becomes a double
arrow. Move the mouse over one of the lower corners of the object until the mouse
pointer becomes a stretch symbol.
5 "handles": Length, fade, transparency (volume)
An object can be faded in or out with the handles to the left and right upper corners of
the object. Cross-fades between different objects can be created by overlapped
positioning of objects that are fading in and out. The length of the cross-fade can be
adjusted with the handles.
Using the transparency/volume handle located centrally at the top of the object,
adjusts the transparency of video and Bitmap objects, or the volume of audio and
image objects.
If you adjust the middle handle of a video object all the way down, the object will
become transparent. If a second object is located on a track above it, a black color will
appear from below it, so that brightness will be reduced.
Object handles for combi objects
Combi objects have an additional, sixth handle.
• The four outer handles have the same function as with regular objects.
Page 97
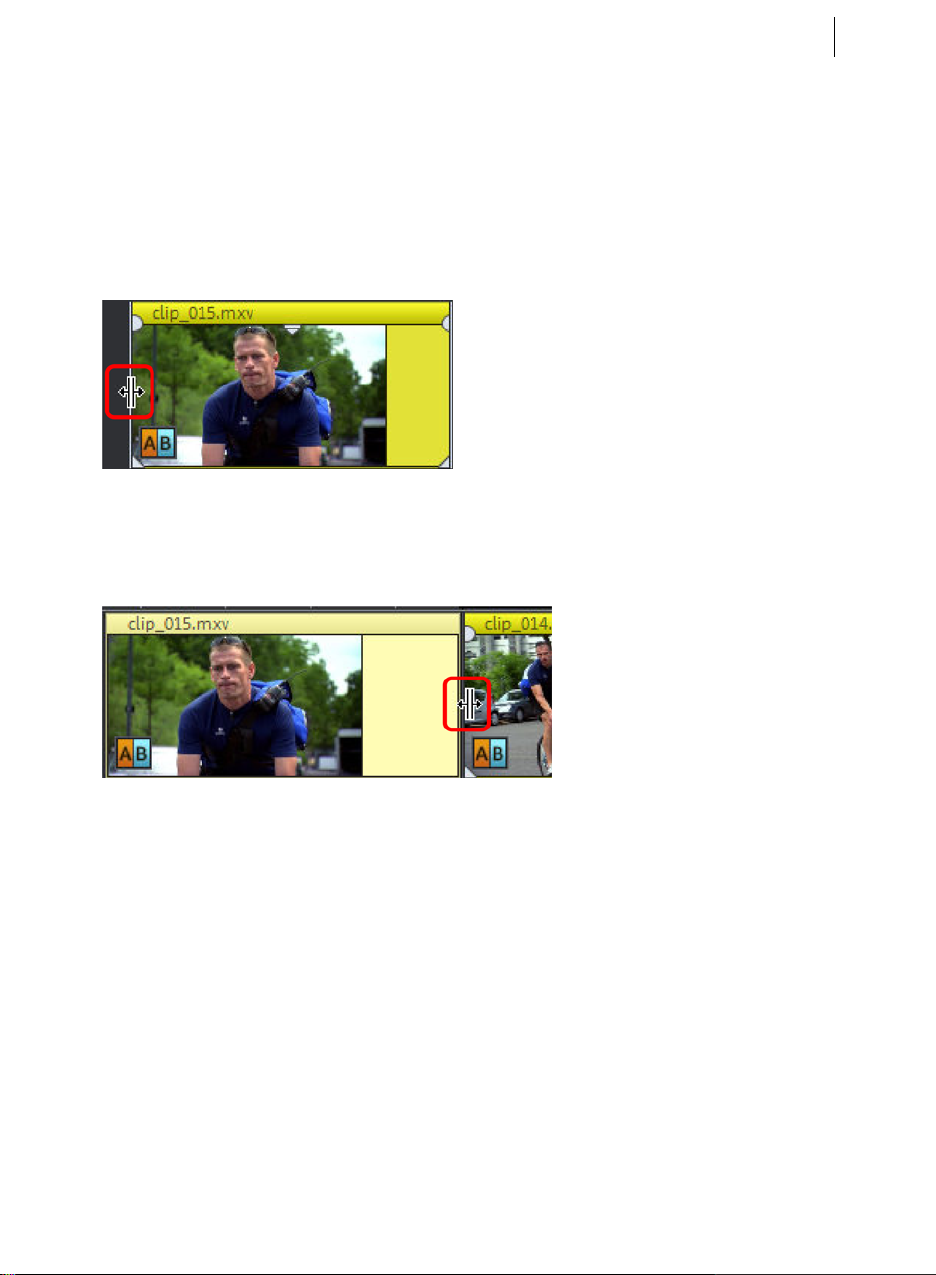
Objects 97
• The lower middle handle regulates the object's track volume.
• The top middle handle controls the transparency of the object's image track.
Object borders
When you place the mouse pointer on a vertical object border, it will turn into a
double line.
If the object doesn't border any other objects, the functionality doesn't differ from
bottom handles, which means that you can stretch or compress the object. With a
hard cut or a crossfade, the object transition will be moved, meaning that the object
start and end of both neighboring objects will remain coupled to each other.
Trim Objects
Trimming provides exact placement of object borders or transitions. MAGIX Video
Pro X5 has two different trimmers, and these can be opened using the context menu
for a video or image object.
General advice for operating both trim editors
Play functions: The trim window contains its own play functions that allow the object
to be played individually or in relation to the arrangement.
The right play button plays the arrangement normally. Replays can sometimes appear
shaky because the processor may be over-worked. Those frames that the processor
cannot calculate quickly enough are left out.
Page 98

98
The middle play button plays the arrangement “frame by frame”, which means no
frames are left out. Depending on the processor load, playback may thus be slower,
but still smooth.
The left play button renders material before playing, i.e. the current settings are
calculated first and then exported. This method ensures a smoother playback.
With the fast forward and rewind functions you can change the range start in the
timeline. This allows for complete control of transitions between two videos.
Increments: A click on the arrow buttons in both trim editors moves the handle or the
material within an object exactly by one frame. With the Ctrl key you can increase the
frame rate gradually to 5 frames per mouse-click.
Object trimmer
A schematic display of the selected object and its handles can be found in the center
of the trimming window.
Fade in/out (4, 5): These buttons adjust the upper fade handles of an object.
Object content (3): Here you can move the video material to be played without
changing the object length.
Position (2): Moves the object on the track.
First frame/End fade-in (7): Toggles the left monitor between the first frame of the
object and the end of the transition.
Start fade-out/Last Frame (8): Toggles the right monitor between the start of the
transition and the last frame of the object.
Left/right arrow buttons (1, 6): Here you can adjust the lower object handles.
Page 99

Objects 99
Next object/cut (9, 10): The buttons below and to the right skip to the next/previous
object and/or cut in the arranger. These buttons make it easy to move and trim
objects in the arrangement without having to leave the trimmer.
Keyboard Shortcut: Shift + N
Cut trimmer
A schematic display of the selected transition and its handles can be found at the
center of the trimming window.
Left arrow buttons (1): These buttons move the last frame of the first object while
adjusting the second. The length of the transition remains. The display indicates the
relative change in comparison with the starting situation when the trimmer was
opened.
Position (2): Moves the second object. The length of the transition is changed. This
corresponds with shifting an object in the arranger.
Object content (3): Moves the movie under the second object. The length of the
object and the object itself are not changed.
Crossfade (4): Changes the transition’s length between both objects. The objects
remain of equal length. The length can be numerically entered.
Middle arrow buttons (5): Shifts the existing transition. Both objects remain in their
positions, but the transition’s center point moves.
Transition (6): Displays the type of transition. A mouse click opens a popup window
from which you can select a transition.
Right arrow buttons (7): Move the first frame of the second object. The first object
and the transition remains. Only the length of the second object changes.
Page 100
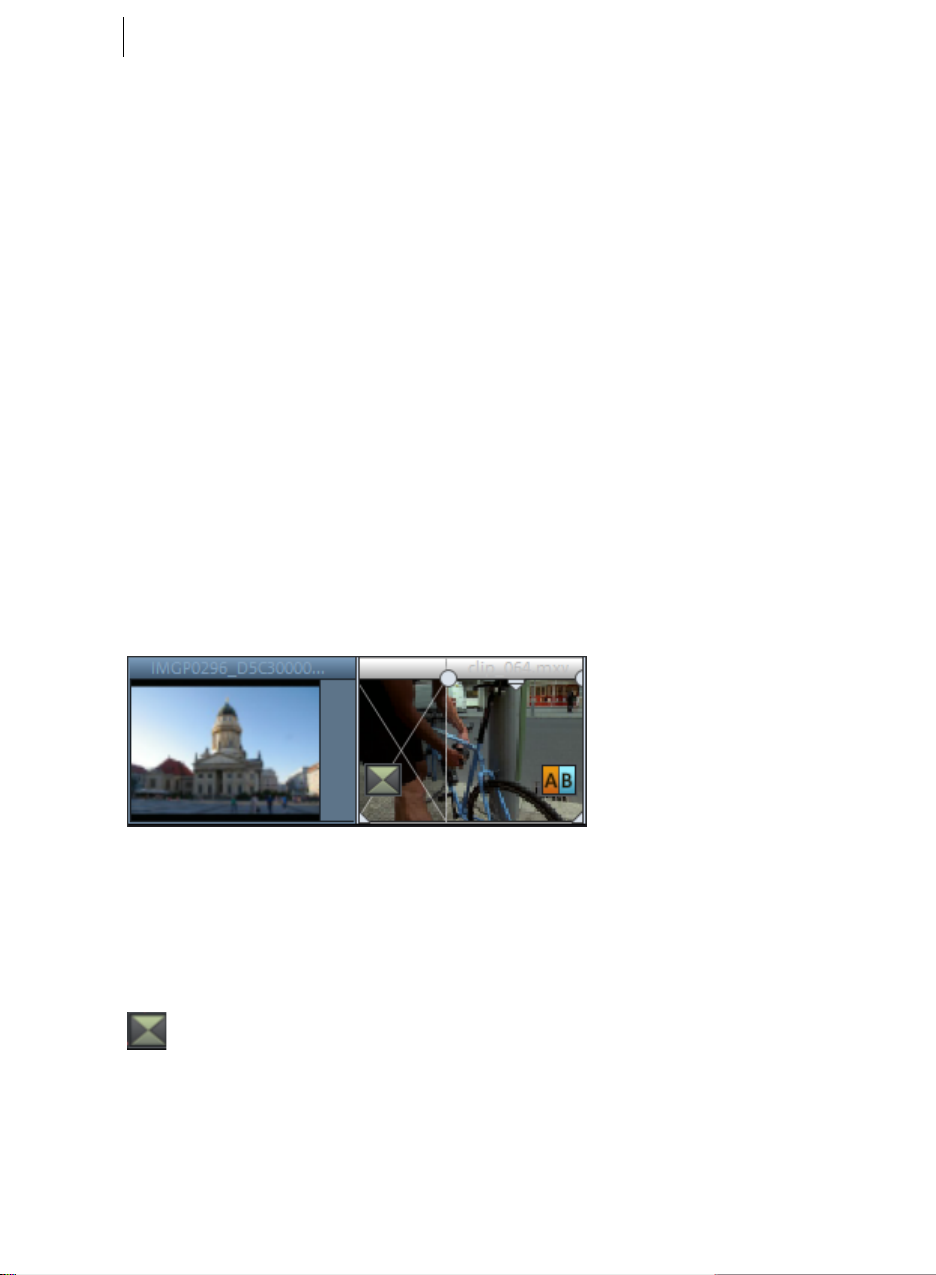
100
Start fade-out/Last frame (8): Switches the left monitor between the start of the
transition and the last frame of the object.
First frame/End fade-in (9): Switches the right monitor between the first frame of the
following object and the end of the transition.
Next cut (10)/Next object (11): The buttons below and to the right skip to the
next/previous object and/or cut in the arranger. These buttons make it easy to move
and trim cuts in the arrangement without having to leave the trimmer.
Keyboard shortcut: N
Transitions (fades)
When importing video files into the arranger, individual objects usually follow directly
after one another. This is called a "hard cut". However, you can make scenes blend or
“transition” into each other.
This means that for the duration of a transition, two objects are shown at once and
can be mixed "faded" together in different ways. You will find numerous blends in the
Media Pool’s transition directory.
Simple crossfade
A simple transition can be created in the arranger by dragging one object over
another. A crossfade will be automatically created. During this standard transition,
the brightness of both objects is increased, i.e. the first clip fades out while the second
clip fades in. The duration of the crossfade is displayed in the arranger by white
crossing lines. You can adjust the length of the crossfade by dragging the upper
handle of the second object to the left or to the right.
To select a different fade click on the transition symbol displayed when
an object is selected.
The fade menu opens. The transition icon will change, depending on your selection.
 Loading...