

Page 1

Support
UK:
0905 118 0888 (25p/min)
(open Monday to Friday 9:00 - 16:00 GMT)
Denmark:
77345695
(open Monday to Friday 10:00 - 17:00 CET)
Finland:
0942597819
(open Monday to Friday 11:00 - 18:00 EET)
Norway:
21543223
(open Monday to Friday 10:00 - 17:00 CET)
Sweden:
0852507027
(open Monday to Friday 10:00 - 17:00 CET)
If you experience any problems with your software, then please get in touch with our support team:
Support website: http://support.magix.net
This website will lead you to the MAGIX user service page which, among other things, contains the
following free offers:
FAQs (frequently asked questions) and general tricks and tips. In most cases you'll find the
solution to your problem here. If not, then please use the email support form.
Email support form: You can tell our support staff about your system via the email support
form. This information is used to solve your problems quickly and competently. Simply fill it out
and send it with a mouse click!
Support forum: You are not alone. Perhaps other users had a similar problem and can help you
solve yours. Our support staff are also regular contributors.
Download section: Updates, improvements, and patches are likewise offered free of charge via
download. Many problems you may experience are well known to us and can be solved by
downloading the latest patch. Besides patches, there are also wizards for checking and optimizing
your system.
Links: In the links list, you will find the contact addresses of the most popular hardware
manufacturers.
Please note:
To be able to use the support, you have to register your product using the serial number provided. This
number can be found on the CD case of your installation CD or on the inside of the DVD box.
You can also reach our support team by telephone:
Please have the following information at hand:
Program version
Configuration details (operating system, processor, memory, hard drive, etc.)
Sound card configuration (type, driver)
Information regarding other audio software installed
Page 1
Page 2

Program help file
"Help" contains hints on how to use the program, plus a lot of additional information. It's available to you
at all times in the program. You can search the help file using keywords and cross references.
Homepage:
The main help page can be accessed via the "Help -> Contents" menu point.
Context Help:
Press the "F1" key on your keyboard at any point in the opened program and "Help" will open with the
matching help topic (context help).
Page 2
Page 3

Introduction
In this chapter
What is MAGIX Speed burnR?
Features
Page 3
Page 4

What is MAGIX Speed burnR?
MAGIX Speed burnR is the fast total solution for backing up valuable data, either on disc or as a
backup. You can:
Comfortably burn files of any kind onto CDs and DVDs
Create 1:1 copies of existing storage media
Create backup copies of any kind locally on your computer or on a network or burn them to disc
The part: You select the job in the start dialog that you want to do and then get results with just a few
clicks. Every important application is offered during the process.
MAGIX Speed burnR offers many special applications for media files like "Edit & burn photos", "Create
slideshow for TV" or "Record video(s)". The integrated extra programs deliver tailor-made solutions for
multimedia tasks like this.
Page 4
Page 5

Features
Backup
MAGIX Speed burnR makes backing up your data especially comfortable with:
Full, incremental & differential backups, i.e. everything/only new/only changed files are backed
up
Live backup: Continue working while the backup is being created.
MAGIX Disc Image Maker: Back up 1:1 copies of CDs & DVDs as image files on the hard
drive.
Copy
MAGIX Speed burnR reliably copies DVDs and CDs:
all conventional formats, even the new Blu-ray DiscTM is supported
with individual copy methods: Disc-to-disc, on-the-fly, or with intermediate storage
any number of copies
Burn
MAGIX Speed burnR burns photos, videos, music, and all other file types to CD, DVD, or Blu-ray
TM
Disc
:
in all variations and formats, e.g. as CD(RW), DVD(RW), double/dual-layer DVD, or Blu-ray
TM
Disc
Images can be easily mounted as a virtual drive and burned
with many special functions: multi-session discs, overburn function, erase disc, etc.
Page 5
Page 6

Backup
MAGIX Speed burnR makes backing up your data especially comfortable with:
Full, incremental & differential backups, i.e. everything/only new/only changed files are backed
up
Live backup: Continue working while the backup is being created.
MAGIX Disc Image Maker: Back up 1:1 copies of CDs & DVDs as image files on the hard
drive.
Copy
MAGIX Speed burnR reliably copies DVDs and CDs:
all conventional formats, even the new Blu-ray DiscTM is supported
with individual copy methods: Disc-to-disc, on-the-fly, or with intermediate storage
any number of copies
Burn
MAGIX Speed burnR burns photos, videos, music, and all other file types to CD, DVD, or Blu-ray
TM
Disc
:
in all variations and formats, e.g. as CD(RW), DVD(RW), double/dual-layer DVD, or Blu-ray
TM
Disc
Images can be easily mounted as a virtual drive and burned
with many special functions: multi-session discs, overburn function, erase disc, etc.
Page 6
Page 7

Copy
MAGIX Speed burnR reliably copies DVDs and CDs:
all conventional formats, even the new Blu-ray DiscTM is supported
with individual copy methods: Disc-to-disc, on-the-fly, or with intermediate storage
any number of copies
Burn
MAGIX Speed burnR burns photos, videos, music, and all other file types to CD, DVD, or Blu-ray
TM
Disc
:
in all variations and formats, e.g. as CD(RW), DVD(RW), double/dual-layer DVD, or Blu-ray
TM
Disc
Images can be easily mounted as a virtual drive and burned
with many special functions: multi-session discs, overburn function, erase disc, etc.
Page 7
Page 8

Burn
MAGIX Speed burnR burns photos, videos, music, and all other file types to CD, DVD, or Blu-ray
TM
Disc
:
in all variations and formats, e.g. as CD(RW), DVD(RW), double/dual-layer DVD, or Blu-ray
TM
Disc
Images can be easily mounted as a virtual drive and burned
with many special functions: multi-session discs, overburn function, erase disc, etc.
Page 8
Page 9

Quick start
In this chapter
Burn files to disc
Copying discs
Save media on your PC
Burning audio CDs
In this chapter, we introduce all the most important features of MAGIX Speed burnR step-by-step. No
previous experience is necessary.
Page 9
Page 10

Burn files to disc
You can burn all kinds of data onto disc. From text documents to multimedia content like photos and
audio, saving everything onto a storage medium is easy with MAGIX Speed burnR.
Compile files
In the file browser (left window), you can select any file or folder and add it to the burn
compilation (right window) by clicking on "Add". Click on "Delete" to remove the files from your
compilation again.
Use the arrow buttons in the upper area to undo or restore your selection in the Explorer.
At the upper-right section, you can enter or change the name of the disc you are about to burn.
Click on the folder symbol to add new folders to your burn compilation which you can fill with
files.
In "Media", select the type of medium you want to write. If a burnable disc is already inserted,
the selection of the storage medium format will be automatic. At the bottom part of the menu, the
fill gauge displays how much space is still available on your disc for more files. When you have
compiled the contents of your future disc, click on "Next".
Burn files to disc
Select your disc burner and enter the number of copies and the write speed.
If you want to, you can simulate the burn session first. To do this, please activate the option
"Simulate burning".
You can also check the disc for write errors after burning. Simply check the "Verify disc after
burning" box and select "Quick" or "Complete".
If you want to add files to your discs later, you can activate the "Burn multi-session disc" option.
Most blanks support the "Overburn disc" function, which writes discs to a certain degree beyond
their stated capacity.
If you won't be using your PC after burning, select "Shut down PC after burning". Your PC will
then be shut down automatically once the disc is complete.
In case you would like to create a video CD/DVD that you can play later on in a DVD player,
use the "Create video disc" function.
Click the large "Start burning" button to begin the burn session. The selected files will now be burned to
the destination disc inserted in the drive.
Page 10
Page 11

Compile files
In the file browser (left window), you can select any file or folder and add it to the burn
compilation (right window) by clicking on "Add". Click on "Delete" to remove the files from your
compilation again.
Use the arrow buttons in the upper area to undo or restore your selection in the Explorer.
At the upper-right section, you can enter or change the name of the disc you are about to burn.
Click on the folder symbol to add new folders to your burn compilation which you can fill with
files.
In "Media", select the type of medium you want to write. If a burnable disc is already inserted,
the selection of the storage medium format will be automatic. At the bottom part of the menu, the
fill gauge displays how much space is still available on your disc for more files. When you have
compiled the contents of your future disc, click on "Next".
Burn files to disc
Select your disc burner and enter the number of copies and the write speed.
If you want to, you can simulate the burn session first. To do this, please activate the option
"Simulate burning".
You can also check the disc for write errors after burning. Simply check the "Verify disc after
burning" box and select "Quick" or "Complete".
If you want to add files to your discs later, you can activate the "Burn multi-session disc" option.
Most blanks support the "Overburn disc" function, which writes discs to a certain degree beyond
their stated capacity.
If you won't be using your PC after burning, select "Shut down PC after burning". Your PC will
then be shut down automatically once the disc is complete.
In case you would like to create a video CD/DVD that you can play later on in a DVD player,
use the "Create video disc" function.
Click the large "Start burning" button to begin the burn session. The selected files will now be burned to
the destination disc inserted in the drive.
Page 11
Page 12

Burn files to disc
Select your disc burner and enter the number of copies and the write speed.
If you want to, you can simulate the burn session first. To do this, please activate the option
"Simulate burning".
You can also check the disc for write errors after burning. Simply check the "Verify disc after
burning" box and select "Quick" or "Complete".
If you want to add files to your discs later, you can activate the "Burn multi-session disc" option.
Most blanks support the "Overburn disc" function, which writes discs to a certain degree beyond
their stated capacity.
If you won't be using your PC after burning, select "Shut down PC after burning". Your PC will
then be shut down automatically once the disc is complete.
In case you would like to create a video CD/DVD that you can play later on in a DVD player,
use the "Create video disc" function.
Click the large "Start burning" button to begin the burn session. The selected files will now be burned to
the destination disc inserted in the drive.
Page 12
Page 13

Copying discs
With MAGIX Speed burnR you can copy any type of disc. In the following section we will explain how
to copy a disc using audio CDs and DVDs as examples.
Adjust copy settings
Select the source drive that contains the disc that you would like to make a 1:1 copy of. Next select the
target drive (burner). If you have a combination drive that can read and burn, you can set the device as a
source and target drive. The disc that you are copying is then imported first. You will then be asked to
insert the disc you want to write to. The imported content wil then be burned onto the now inserted disc.
Select "Direct copy" if you want to copy the disc without caching on the hard drive (on-the-fly). If you
want to temporarily copy the data onto your hard drive first, you should uncheck this button. In the box
below, select a directory where you want to save the temporary files.
Note
: If you you are using the same drive as source and target (combination drive), "direct" copying
(on-the-fly) is not possible.
Then select the desired copy method. You can choose between "Sector copy" and "File copy". Sector
copy is the default for copying 1:1 discs. File copy also copies 1:1, but also allows additional files to be
added (depending on size of the memory). Next, click on "Continue" to proceed to the burn window.
Burn files to disc
Select your disc burner and enter the number of copies and the write speed.
If you want to, you can simulate the burn session first. To do this, please activate the option
"Simulate burning".
You can also check the disc for write errors after burning. Simply check the "Verify disc after
burning" box and select "Quick" or "Complete".
If you want to add files to your discs later, you can activate the "Burn multi-session disc" option.
Most blanks support the "Overburn disc" function, which writes discs to a certain degree beyond
their stated capacity.
If you won't be using your PC after burning, select "Shut down PC after burning". Your PC will
then be shut down automatically once the disc is complete.
In case you would like to create a video CD/DVD that you can play later on in a DVD player,
use the "Create video disc" function.
Click the large "Start burning" button to begin the burn session. The selected files will now be burned to
the destination disc inserted in the drive.
Page 13
Page 14

Adjust copy settings
Select the source drive that contains the disc that you would like to make a 1:1 copy of. Next select the
target drive (burner). If you have a combination drive that can read and burn, you can set the device as a
source and target drive. The disc that you are copying is then imported first. You will then be asked to
insert the disc you want to write to. The imported content wil then be burned onto the now inserted disc.
Select "Direct copy" if you want to copy the disc without caching on the hard drive (on-the-fly). If you
want to temporarily copy the data onto your hard drive first, you should uncheck this button. In the box
below, select a directory where you want to save the temporary files.
Note
: If you you are using the same drive as source and target (combination drive), "direct" copying
(on-the-fly) is not possible.
Then select the desired copy method. You can choose between "Sector copy" and "File copy". Sector
copy is the default for copying 1:1 discs. File copy also copies 1:1, but also allows additional files to be
added (depending on size of the memory). Next, click on "Continue" to proceed to the burn window.
Burn files to disc
Select your disc burner and enter the number of copies and the write speed.
If you want to, you can simulate the burn session first. To do this, please activate the option
"Simulate burning".
You can also check the disc for write errors after burning. Simply check the "Verify disc after
burning" box and select "Quick" or "Complete".
If you want to add files to your discs later, you can activate the "Burn multi-session disc" option.
Most blanks support the "Overburn disc" function, which writes discs to a certain degree beyond
their stated capacity.
If you won't be using your PC after burning, select "Shut down PC after burning". Your PC will
then be shut down automatically once the disc is complete.
In case you would like to create a video CD/DVD that you can play later on in a DVD player,
use the "Create video disc" function.
Click the large "Start burning" button to begin the burn session. The selected files will now be burned to
the destination disc inserted in the drive.
Page 14
Page 15

Burn files to disc
Select your disc burner and enter the number of copies and the write speed.
If you want to, you can simulate the burn session first. To do this, please activate the option
"Simulate burning".
You can also check the disc for write errors after burning. Simply check the "Verify disc after
burning" box and select "Quick" or "Complete".
If you want to add files to your discs later, you can activate the "Burn multi-session disc" option.
Most blanks support the "Overburn disc" function, which writes discs to a certain degree beyond
their stated capacity.
If you won't be using your PC after burning, select "Shut down PC after burning". Your PC will
then be shut down automatically once the disc is complete.
In case you would like to create a video CD/DVD that you can play later on in a DVD player,
use the "Create video disc" function.
Click the large "Start burning" button to begin the burn session. The selected files will now be burned to
the destination disc inserted in the drive.
Page 15
Page 16
Save media on your PC
With MAGIX Goya you can conveniently save your data offline. You can create any type of file backup
at the touch of a button.
Create offline backup
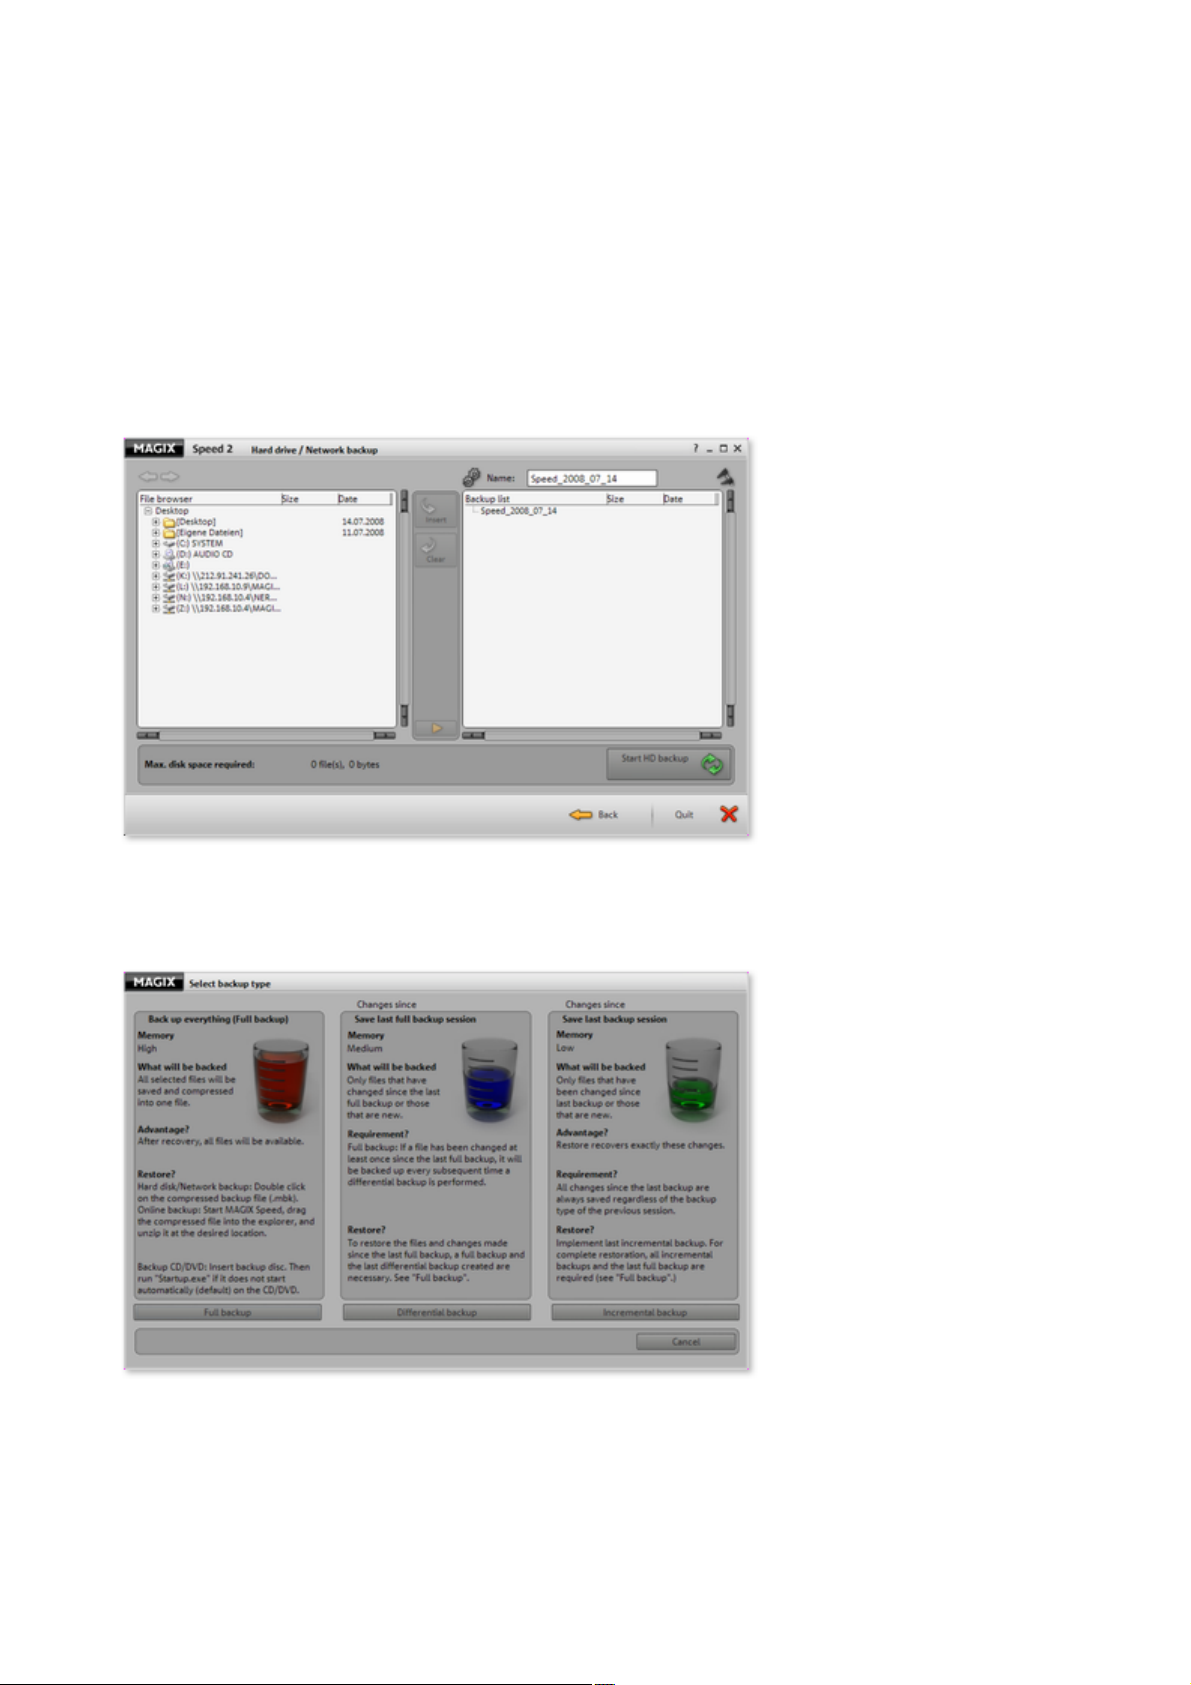
In the file browser (left window), you can select any file or folder and add it to the backup list (right
window) by clicking on "Add". Click on "Delete" to remove the files from your backup list again. Use the
arrow buttons in the upper-left area to undo or restore your selection in the file browser. Once your
backup compilation is complete, click on "Start HD backup".
Select backup type
Now specify which backup type you want to create. For your MAGIX Speed burnR backup, you
should select "Full backup".
Full backup: All marked files will be compressed and saved in one file.
Differential backup: Only files that have changed or have been added since the last full backup
will be compressed and saved.
Incremental backup: Only files that have changed since the last backup will be compressed and
saved.
Page 16
Page 17

Save files
Select a target folder into which you wish to copy your backup. Here you can enter a name for your
backup file or change it. Then click on "Save" to save your content onto hard disk.
Page 17
Page 18

Create offline backup
In the file browser (left window), you can select any file or folder and add it to the backup list (right
window) by clicking on "Add". Click on "Delete" to remove the files from your backup list again. Use the
arrow buttons in the upper-left area to undo or restore your selection in the file browser. Once your
backup compilation is complete, click on "Start HD backup".
Select backup type
Now specify which backup type you want to create. For your MAGIX Speed burnR backup, you
should select "Full backup".
Full backup: All marked files will be compressed and saved in one file.
Differential backup: Only files that have changed or have been added since the last full backup
will be compressed and saved.
Incremental backup: Only files that have changed since the last backup will be compressed and
saved.
Save files
Select a target folder into which you wish to copy your backup. Here you can enter a name for your
backup file or change it. Then click on "Save" to save your content onto hard disk.
Page 18
Page 19

Select backup type
Now specify which backup type you want to create. For your MAGIX Speed burnR backup, you
should select "Full backup".
Full backup: All marked files will be compressed and saved in one file.
Differential backup: Only files that have changed or have been added since the last full backup
will be compressed and saved.
Incremental backup: Only files that have changed since the last backup will be compressed and
saved.
Save files
Select a target folder into which you wish to copy your backup. Here you can enter a name for your
backup file or change it. Then click on "Save" to save your content onto hard disk.
Page 19
Page 20

Save files
Select a target folder into which you wish to copy your backup. Here you can enter a name for your
backup file or change it. Then click on "Save" to save your content onto hard disk.
Page 20
Page 21

Restore files
To access files in your backup copy, you will have to restore your data. To do so open the backup file
that was created with the backup. You can then specify where you wish to store the restored files in a
menu. Click on "Start" to begin restoring the files.
Page 21
Page 22

Burning audio CDs
MAGIX Speed burnR lets you comfortably compile and burn an audio CD which can be played by all
cobentional CD players.
Compile track list
In the file browser (left window), select any audio files (WAV, MP3, WMA
, OGG) for the audio CD you want to burn. The burn compilation is displayed in the right window. Click
on "Delete" to remove the files from your compilation again.
An audio track is created for each audio file on the CD, and these can be selected later in the CD player
for playback. The upper text window ("CD/DVD title") is provided for giving the CD a name, which is
often displayed by most CD players. At the bottom part of the menu, the fill gauge displays how much
space is still available on the disc for more music files.
Once the contents of the future disc have been compiled, click on "Next".
Tip
: To listen to a song, simply select the desired file and then click on the play button.
Prepare and start the burning process
If there is more than one burner set up on the computer, select the burner to be used to burn the
disc via the "Select CD/DVD burner" menu.
You can specify the number of CDs that should be burned under "Number of copies".
The write speed during the burning process can be specified under "Write speed".
Tip
: On older CD players, problems may occur when reading audio CDs burned at high speeds. For this
reason, we recommend selecting (8x) burn speed for audio CDs.
"Burn options" allows other settings to be specified for the burning process. For music CDs,
there are special burn settings which can be individually specified.
Once you've made all your settings, click the "Start burning" button. Your music CD will now be
burned.
Page 22
Page 23

Compile track list
In the file browser (left window), select any audio files (WAV, MP3, WMA
, OGG) for the audio CD you want to burn. The burn compilation is displayed in the right window. Click
on "Delete" to remove the files from your compilation again.
An audio track is created for each audio file on the CD, and these can be selected later in the CD player
for playback. The upper text window ("CD/DVD title") is provided for giving the CD a name, which is
often displayed by most CD players. At the bottom part of the menu, the fill gauge displays how much
space is still available on the disc for more music files.
Once the contents of the future disc have been compiled, click on "Next".
Tip
: To listen to a song, simply select the desired file and then click on the play button.
Prepare and start the burning process
If there is more than one burner set up on the computer, select the burner to be used to burn the
disc via the "Select CD/DVD burner" menu.
You can specify the number of CDs that should be burned under "Number of copies".
The write speed during the burning process can be specified under "Write speed".
Tip
: On older CD players, problems may occur when reading audio CDs burned at high speeds. For this
reason, we recommend selecting (8x) burn speed for audio CDs.
"Burn options" allows other settings to be specified for the burning process. For music CDs,
there are special burn settings which can be individually specified.
Once you've made all your settings, click the "Start burning" button. Your music CD will now be
burned.
Page 23
Page 24

Prepare and start the burning process
If there is more than one burner set up on the computer, select the burner to be used to burn the
disc via the "Select CD/DVD burner" menu.
You can specify the number of CDs that should be burned under "Number of copies".
The write speed during the burning process can be specified under "Write speed".
Tip
: On older CD players, problems may occur when reading audio CDs burned at high speeds. For this
reason, we recommend selecting (8x) burn speed for audio CDs.
"Burn options" allows other settings to be specified for the burning process. For music CDs,
there are special burn settings which can be individually specified.
Once you've made all your settings, click the "Start burning" button. Your music CD will now be
burned.
Page 24
Page 25

The various interfaces
In this chapter
Copy CD/DVD
Compile media
Hard drive and network backup
Create a copy of a CD/DVD as an image
MAGIX Shrinker
Learn more about the individual screens that open after specific burning functions are selected. Once a
function which is connected to an extra program is selected, it will open directly for you.
Page 25
Page 26
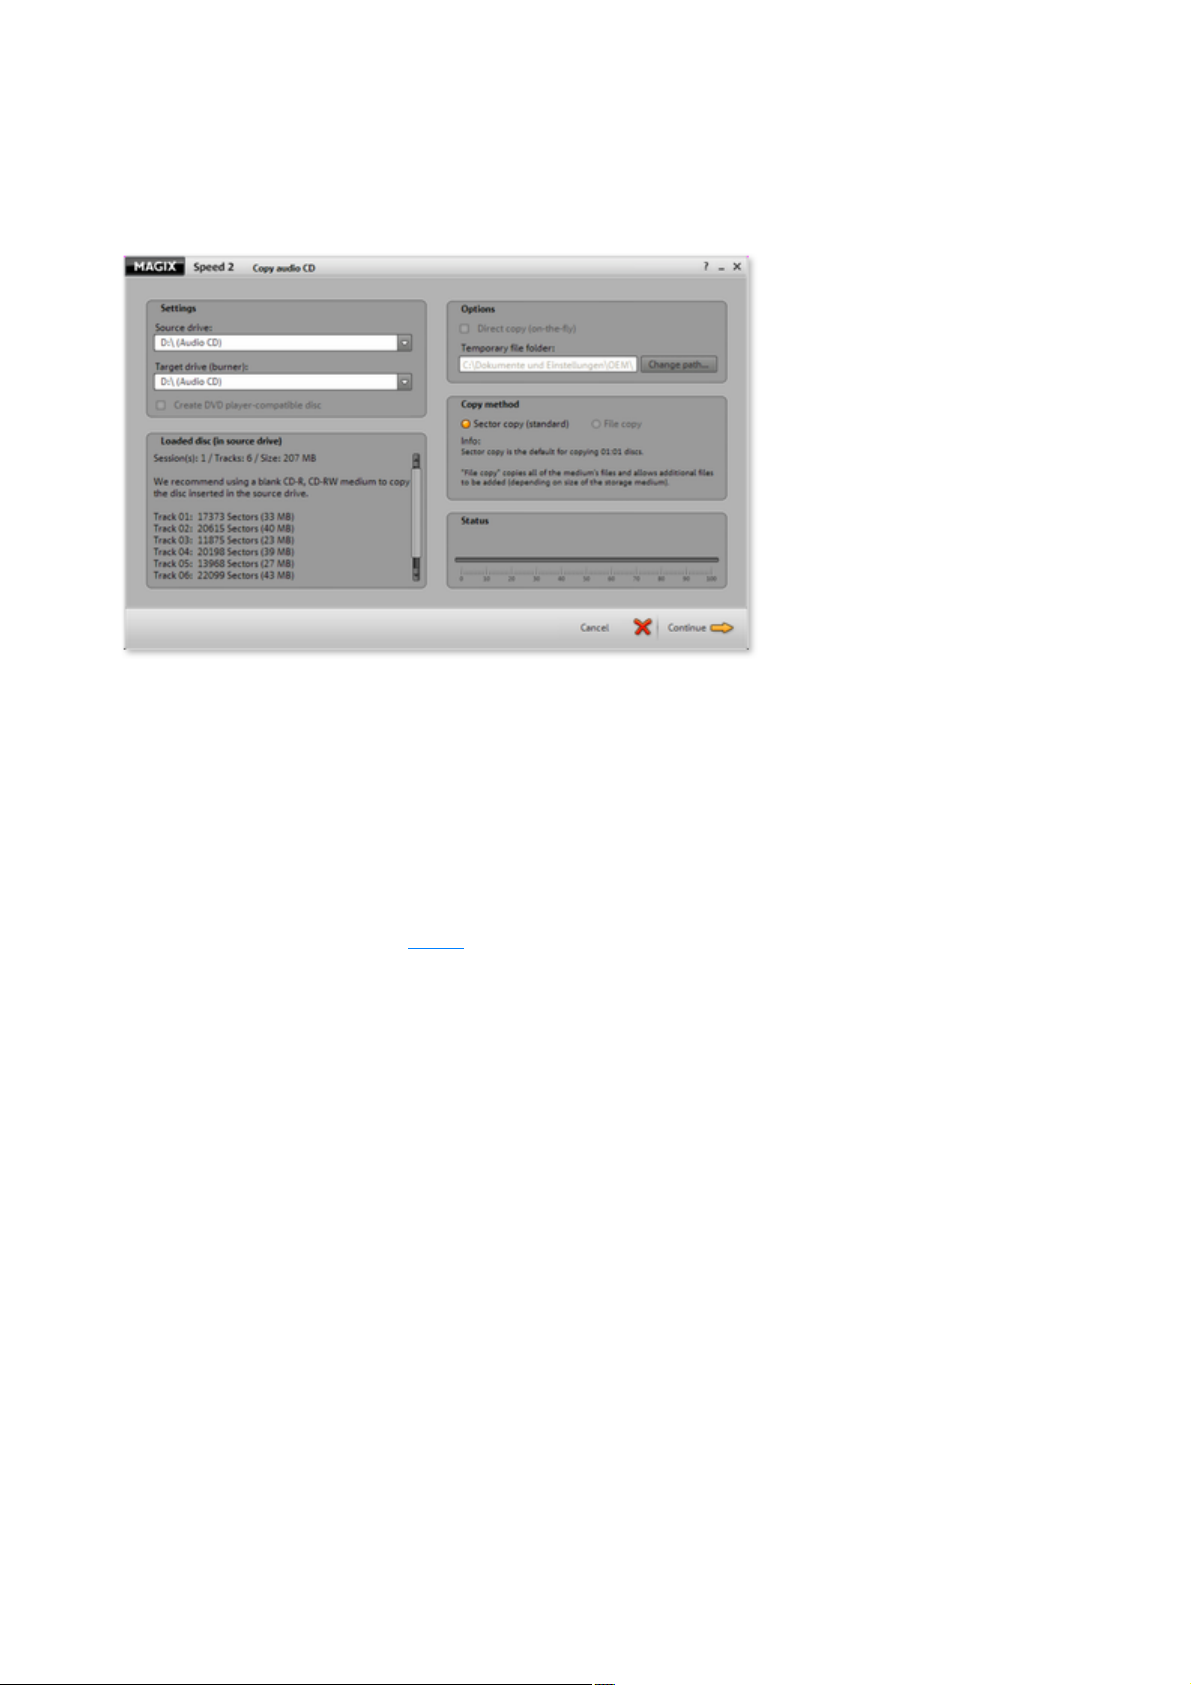
Copy CD/DVD
In this mode you can create identical copies of data CDs and DVDs. The following view will open when
copying CDs/DVDs:
Settings
Source drive
: Enter the name of the drive which contains the original CD or DVD.
Destination drive
: Enter the name of the burner here.
Note
: If you only have one drive, enter the name of this drive in both of these boxes. A temporary file is
created on the hard disk and then burned.
Create disc for DVD player: Image
files on video CDs, super video CDs, and DVDs are converted into video files that are compatible with
every suitable player.
Options
Direct copy
: If you select to burn "on-the-fly", the source disc is read and the copy is burned simultaneously. If you
work with only one drive for reading and burning media, the source disc is saved to the hard disk as a
temporary file and then burned.
Note
: Make sure when burning "on-the-fly" that the write speed is not higher than the effective read speed,
otherwise the burning process may not end successfully. Many burners provide a protection mechanism:
"Burn proof". Activate this function if possible.
Temporary file folder
: Here you can enter the path for temporary files by clicking "Search". This can be important if you want
to save complex and large projects where MAGIX Speed burnR has to create a temporary image.
Note!
The path should always lead to a drive with enough free memory.
Copy method
Sector copy
Page 26
Page 27

: This is the standard for 1:1 disc copying.
File copy
: Copies 1:1, but also allows additional files to be added (depending on size of the memory).
Loaded disc
When you have inserted a disc, you will see:
how many sessions have been burned to it, how many tracks it contains, how much space they
take up;
which medium types can be used as blank CDs, and
how many sectors can be accepted from the tracks.
Status
If you only have one drive at your disposal for reading and burning media, a temporary file of the original
is created on your hard disk. You can see from the display how far the process has advanced. If you
choose to burn without intermediate saving, the status display remains empty.
Page 27
Page 28

Compile media
Click here to start burning.
Click on this button if you wish to return to the
pre-selection.
In this section:
Compile data for the burning process
The following interface for compiling media opens:
1
: Use these two arrow buttons to navigate through the file browser.
2:
The file browser resembles the tree structure of Windows Explorer. This way you'll be able to find all
your folders and their respective files the way you normally do.
3:
Click the "Add" button to assign the selected file to the burning list. If you wish to remove a file from the
list, click on "Delete".
4:
Your compilation for burning. Here you can select all the files you wish to burn.
5:
The new title of the disc.
6:
Depending on the type of burning process you selected previously, all media types appear here that you
can use for this particular burn. The format description of the medium you inserted appears once it is
detected in the burner.
7:
This display lets you check how much free space is left on the inserted medium. You can also see how
many files are currently in the burning list and how long the playing time is.
Tip
: Not only can you add files and folders to the list by pressing "Add", you can also do it via drag & drop:
Select the desired files, hold down the left mouse button and drag the selected files into the window on
the right-hand side. Now let go of the mouse button to add the files.
Continue to the burning process
Back to selection
Page 28
Page 29

Compile data for the burning process
Click this button to specify "advanced burning options
".
There are other burn options
available to you for creating a music CD.
Depending on the process you have selected, this icon will
appear in the top half of the burning list. Click on the
folder, and MAGIX Speed burnR creates a folder in the
burning list.
Note
: Folders cannot be created for music CDs.
Click this button to play back and listen to music files.
Select the file(s) you want to burn.
1.
Click "Add" to add the selected file to the burn list. The file appears on the right side in the
2.
burning list (4) and is transferred to the medium during the burning process.
Once your list is complete, click "Continue".
3.
Tip
: Several individual files or folders can be highlighted with "Ctrl + Click", a group which belongs together
can be highlighted with "Shift + Click".
Depending on the process you have selected, these icons will appear in the top half of the burning list:
Page 29
Page 30

Hard drive and network backup
Specify settings for the File filter
.
In case you would like to back up and the backup won't be
too large, then you can increase the compression rate. The
backup created will be smaller, but the amount of time
required to create it will increase. If the compression rate is
decreased, then the size of the backup will increase.
Create backup
: Click on this button once all data has
been compiled for which you wish to
create a backup. This starts the backup
process.
Back to selection
: Click on "Back" if you want to go back
to the previous selection.
Cancel
: This button will cancel the backup
process. This may be necessary if you
wish to add something to be backed up.
In this section:
Compile data for the backup process
1
: Use these two arrow buttons to navigate through the file browser.
2
: The file browser resembles the tree structure of Windows Explorer. This way you'll be able to find all
your folders and their respective files the way you normally do.
3
: Click "Add" to insert a selected file to the burning list.
4
: The list of files compiled for the backup.
5
: The new name of your backup.
Page 30
Page 31

Compile data for the backup process
4.
Select the backup type that corresponds to your
requirements by clicking on the relevant button below the
explanations.
5.
In the next dialog window, enter a logical name for your
backup and click on "Save".
Select the file(s) and/or folder(s) that you want to back up.
1.
Click on the "Add" button to add your selection to the backup list.
2.
Once your compilation is complete, click on the "Start HD backup" button.
3.
A dialog opens that explains which type of backup you can choose:
Three backup types
Page 31
Page 32

Create a copy of a CD/DVD as an image
The disc image maker lets you create CD/DVD images and 1:1 copies which you can burn later or
mount as a drive. This lets you preserve the original CD, for example.
Enter the source drive (no. 1 in the figure) containing the non copy-protected CD/DVD which
1.
you would like to copy as an image.
Under "Save destination" (2), enter where the image should be saved.
2.
Click "Continue" (3) to start creating the image.
3.
Page 32
Page 33

MAGIX Shrinker
Use this option to reduce the amount of data on a DVD (shrink it) to be able to burn it onto a standard
4.7 GB (120 min) blank DVD. On the one hand, this function removes unimportant elements like
subtitles, alternative audio tracks and extras; on the other hand, it reduces the size of the actual video file
of the main film.
The files must be available in a non-copy-protected form, i.e. either on a non-copy-protected DVD or in
a folder on your hard drive.
Step 1:
Select the source folder (on your hard disk or on the DVD) containing the video data. Every
video DVD contains a folder with the name "Video TS". It contains the movie files, the so-called
VOBs. The folder will be analyzed automatically.
The chosen target folder target should be selected on a hard drive with enough free space.
Step 2:
Step 3:
You can choose between "Keep all structures" and "Remove all except main movie". Selecting
the complete structure makes sense only if the original size is no larger than 4.7 GB.
If you only wish to burn the main film, you can also reduce the size of the actual video material so
that it fits onto the DVD.
For DVDs with multiple language and sound versions, you can selected which sound tracks you
want under "Audio". For example, "de" stands for German, "en" stands for English.
"Start shrink" starts the shrinking and burning process. The current level of progress is visible on
the progress bar.
If you want to cancel this process – even during the shrinking process – click on "Cancel".
"Close" closes MAGIX Shrinker once the shrink process is finished.
Page 33
Page 34

Burn media
Once you have finished compiling data for burning and wish to start, the following window opens:
Settings
Select CD/DVD burner
: If you have more than one burner set up on your computer, select the one that you want to use to burn
your disc.
Number of copies
: Specify the amount of discs you wish to create. Should you, for example, wish to burn your compilation
three times onto disc, enter "3" here. The finished disc is ejected automatically and MAGIX Speed burnR
asks you to insert a new blank disc.
Write speed
: Select at which speed you wish to write. The maximum speed possible will be displayed by the
corresponding burner.
Recorder
According to the type of media you can use for burning and which one you choose from the options, the
respective properties will appear here.
Eject
: "Eject" automatically opens the respective drive for you to remove the medium.
Load disc
: Updates the capacity display.
Finalize disc
: Click on this button if you wish your medium to be finalized after burning. This way, no additional files
can be burned to this medium.
Delete disc
: If you are using an RW disc (rewritable), i.e. a disc which can be overwritten, then you can click on
"Delete disc" here to reformat it for burning.
Status
Here you can see how advanced the current burning process is.
Page 34
Page 35

Click on this button if you wish to cancel
the process. This brings you back to the
start view and you can reselect an
application process.
Click this button to save your burn
compilation to use again later on.
Create an image using your compilation
(not available when creating music CDs).
Once you have set all your burn settings to
meet your requirements, click this button.
The burn session will now start.
In this chapter
Burning options
Advanced burning options
Advanced burn options for audio CDs.
Page 35
Page 36

Burning options
Simulate burn:
If you want to make sure that the burn will be successful, you can simulate burning. Simulation means that
the burner behaves exactly as if it was burning without actually writing to your blank disc. This way you
can test if the burn process will destroy your CD should it not be successful.
Verify disc after burning:
With this setting you can check that your medium has been burned correctly or if there are problems
reading. This way you won't experience any unpleasant surprises the next time you need your CD or
DVD and their files.
Quick: Use this setting to verify that the disc is readable and that all files are available.
Complete: Here, each file on the disc is compared individually with its respective source file.
Multi-session CD/DVD:
If there's still a lot of space left on your disc and you may wish to use it later, select this setting.
Overburn disc:
With this setting you can exceed the actual capacity of your disc by a few kilobytes.
Shutdown PC after burning:
In case you've started burning and you don't want to have to wait around until it has finished, activate this
setting and the computer will automatically shut down after the process has been completed, along with
all other applications.
Page 36
Page 37

Advanced burning options
There are some advanced settings which depend on the disc type chosen. Not all chosen objects are
suitable or available for all disc modes.
File filter:
The file list can also be filtered, e.g. to exclude unwanted temporary files from the burning process.
"Apply" switches on the filter. The applicable filter options are now displayed.
"Configure..." lets you edit the filter options.
Note
: The ";" symbol allows multiple file types to be selected. Use the form "*.(file extension)".
The filter can be positively edited, i.e. only the file types entered will be burned, or it can be used
negatively. i.e. file types entered will be ignored. You can also include/exclude from the burn session by
specifying a minimum/maximum allowable file size.
File name settings:
Joliet file system: Uses long file names. This can lead to incompatibilities when using the disc, meaning
that some MP3
or CD/DVD players won't play them.
ISO file system:
Short file names are used (8 + 3 characters). This makes the disc compatible with all MP3 CD and
DVD players.
UDF file system
: UDF is a platform-independent file system. With this setting, the file names can be up to 255 characters
in length, and there are no limitations to the path depth.
Allow more than 8 directory levels
: If your files are saved in folders more than 8 levels deep, then you can use this function to burn them
without changing the structure.
Folder options:
Here you can choose how the paths (folders) of your data should behave while burning. This option
controls the creation of subfolders on the disc should you wish to compile data manually and burn it to
Page 37
Page 38

disc.
To make sure that the burning options
are set properly, you should switch on
this feature before each burn session.
Burn files like in burning list (standard)
: All files and folders will be burned onto CD/DVD as they are selected in the file browser. Subfolders
remain unchanged. Folders at higher levels will not be burned.
Burn files with complete folders
: The files/folders are burned with their full path, i.e. all folders of higher levels are also created on the
disc. Please note that differing source drives will not be treated differently. If the list contains files with the
same name and path (with the exception of drive letters), an error message will be displayed!
Group common folders (relative)
: If parts of the paths of the source files match, only the parts of the folder structure whose paths differ
will be generated on the CD. The source drive is not considered!
Burn files without subdirectories
: The files are saved without original paths and only with their file names in the root folder of the CD.
Burn method:
Discs-at-once
: During this process, the laser does not "pause" to readjust during burning. The disadvantage of this
process is that the medium cannot be used again during another burning session.
Track-at-once
: This burning process allows another burning session to be added to a previously burned medium (if
enough space is available).
Burn proof
: This setting guarantees continual writing of the medium and ensures successful burning.
Switch on compatibility mode
: Activate this function to be sure that the CD/DVD will be able to be played by older drives and players,
too. An older file system will be burned. However, many limitations must be considered: No files larger
than 4 GB can be burned, files may not be present in more than 8 folder levels, and the file names may
not be longer than 64 characters/no special characters permitted.
Page 38
Page 39

Advanced burn options for audio CDs.
If you wish to burn an audio CD, you can specify individual settings in the following areas:
File filter:
The file list can also be filtered, e.g. to exclude unwanted temporary files from the burning process.
"Apply" switches on the filter. The applicable filter options are now displayed.
"Configure..." lets you edit the filter options.
Note
: The ";" symbol allows multiple file types to be selected. Use the form "*.(file extension)".
The filter can be positively edited, i.e. only the file types entered will be burned, or it can be used
negatively. i.e. file types entered will be ignored. You can also include/exclude from the burn session by
specifying a minimum/maximum allowable file size.
Pause between audio tracks:
No pause
: Select this option if you simply want to play the audio tracks (songs) one after the other without any
audible pauses.
1 second
: Activate this function if you want a pause of one second between each track.
If you want a pause longer than a second, select the option beneath it and enter the corresponding pause
length.
Burn method:
Discs-at-once
: During this process, the laser does not "pause" to readjust during burning. The disadvantage of this
process is that the medium cannot be used again during another burning session.
Track-at-once
: This burning process allows another burning session to be added to a previously burned medium (if
enough space is available).
Burn proof
: This setting guarantees continual writing of the medium and ensures successful burning.
Switch on compatibility mode
: Activate this function to be sure that the CD/DVD will be able to be played by older drives and players,
Page 39
Page 40

too. An older file system will be burned. However, many limitations must be considered: No files larger
To make sure that the burning options
are set properly, you should switch on
this feature before each burn session.
than 4 GB can be burned, files may not be present in more than 8 folder levels, and the file names may
not be longer than 64 characters/no special characters permitted.
Page 40
Page 41

Restoring system/partition
In this chapter
Operating the restore program
Source (CD/DVD drive and storage media)
Backup information
Target
backups from a boot CD/DVD
Boot-capable drives are scanned by default when the computer is restarted. If a backup is found on a
medium in the drive, then this medium and all backups contained on it will be displayed.
Note
: After the backup is finished, the medium with the backup file must be removed form the drive so that the
backup is not detected again when the computer is restarted!
To enable a restore from a backup on CD/DVD, a small Linux-based operating system is included with
the backup on the medium. This operating system starts the restore program.
Page 41
Page 42

Operating the restore program
Q
The "Q" key on your keyboard ends the restore program.
H
"H" opens a small help file for the program.
R
To search the entire PC and all connected hard
drives/USB sticks for backups, press "R".
S
If you have a backup selected via the arrow keys, then
you can begin the restore process by pressing "S" (the
"Enter" key also works).
Note
: The mouse will not function in this program!
To switch between source and destination, you can use the arrow keys on the keyboard; the
"Tab" key can also be used.
The up and down arrow keys can be used to move up and down in the source or destination.
Under Source, select the respective backup which you would like to restore. Select the
Destination, i.e. the respective hard drive and partition, where the backup should be restored.
Keyboard shortcuts
Page 42
Page 43

Source (CD/DVD drive and storage media)
All optical drives (CD and DVD drives/burners) that are installed will be displayed. The manufacturer,
type of drive, and the product description will also be indicated.
As soon as a drive recognizes a medium with a backup, this will display a star ("*") behind the drive
letter. The brackets before the manufacturer's name contain the name of the medium that you entered
during the burning session.
[Search for backup on hard disk...]
If you activate this function with the "Enter" key, then all partitions on the hard drive will be searched for
backups. If one or more backups are located, then these will be listed below and selectable via the arrow
keys on the keyboard.
Note
: Searching for backups can require a lot of time, since every file on the PC must be checked to find out if
it is a backup.
If you connect a hard drive or USB stick later on and want to search these for backups, activate the
function again. Backups which have already been located will remain in the list; the hard drive will not be
searched again and you will save time.
R key: Refreshes view
Click "R" to search the computer again with all connected and contained drives and USB sticks for
backups.
Note
: The described functions for searching for backups also allows backups to be restored which do not
include a restore function.
Backup information
All available information about the selected backup is displayed here. This allows you to certify which
backup you are currently working with.
Target
Page 43
Page 44

All drives which are currently connected to the computer are displayed under "Destination", plus all
partitions that have been created on the hard drives. Drives are underlined, and the partitions associated
with them are inserted directly under them in the list. The name of the partition is displayed in brackets
(provided that a name has been assigned).
Note
: In case a sensible pre-selection can be made, a partition for restoring the backup will be suggested to
you for the selected backup. This will be displayed under "Destination" with a white background.
Confirm the pre-selection by pressing "Enter" on the keyboard (also possible via "S").
If you want to restore the backup on another hard drive or partition, then select this via the arrow
keys. Confirm with "Enter" or "S".
Restoring the backup will now be started and located in the destination after it is completed.
Note
: After the backup is finished, the medium with the backup file must be removed form the drive so that the
backup is not detected again when the computer is restarted!
Page 44
Page 45

Backup information
All available information about the selected backup is displayed here. This allows you to certify which
backup you are currently working with.
Target
All drives which are currently connected to the computer are displayed under "Destination", plus all
partitions that have been created on the hard drives. Drives are underlined, and the partitions associated
with them are inserted directly under them in the list. The name of the partition is displayed in brackets
(provided that a name has been assigned).
Note
: In case a sensible pre-selection can be made, a partition for restoring the backup will be suggested to
you for the selected backup. This will be displayed under "Destination" with a white background.
Confirm the pre-selection by pressing "Enter" on the keyboard (also possible via "S").
If you want to restore the backup on another hard drive or partition, then select this via the arrow
keys. Confirm with "Enter" or "S".
Restoring the backup will now be started and located in the destination after it is completed.
Note
: After the backup is finished, the medium with the backup file must be removed form the drive so that the
backup is not detected again when the computer is restarted!
Page 45
Page 46

Target
All drives which are currently connected to the computer are displayed under "Destination", plus all
partitions that have been created on the hard drives. Drives are underlined, and the partitions associated
with them are inserted directly under them in the list. The name of the partition is displayed in brackets
(provided that a name has been assigned).
Note
: In case a sensible pre-selection can be made, a partition for restoring the backup will be suggested to
you for the selected backup. This will be displayed under "Destination" with a white background.
Confirm the pre-selection by pressing "Enter" on the keyboard (also possible via "S").
If you want to restore the backup on another hard drive or partition, then select this via the arrow
keys. Confirm with "Enter" or "S".
Restoring the backup will now be started and located in the destination after it is completed.
Note
: After the backup is finished, the medium with the backup file must be removed form the drive so that the
backup is not detected again when the computer is restarted!
Page 46
Page 47

Additional features and
In this chapter
File filter
Right click dialog
MAGIX News Center
settings
Page 47
Page 48

File filter
With the help of the file filter you can search for only selected file types or exclude them, and you can
also limit the search according to file size. Just click a check box in the desired filter and then enter the
criteria (file type, exact size(s)).
You can also include files according to their archiving information: Place a check if only those files should
be included which were changed since the last backup.
Page 48
Page 49

Right click dialog
If you have MAGIX Speed burnR installed, then you will find different MAGIX Speed burnR functions
available to you when you open a file's context menu.
If the case regards a folder or a file
such as an image, song, or video, then you can...
insert it directly into the list on the burning screen. Select "Burn with MAGIX Speed burnR".
create a backup. Select "MAGIX Speed burnR... > Create backup with MAGIX Speed
burnR...".
On the other hand, if the case involves a backup, then you can click "Restore
backup with MAGIX Speed burnR" to restore the files it contains.
If an image
is present, then it is possible to mount it as a drive via "Mount image as drive" to access the files it
contains.
Page 49
Page 50

MAGIX News Center
MAGIX supplies you with all the latest information on your
software. In the MAGIX News Center you can find out about
all the links to current online tutorials as well as tips & tricks on
individual topics or software application examples.
You will also be informed of the availability of brand new updates and patches for your program as well
as special offers, contests, and surveys.
The news is split into three color-coded sections:
Green for practical tips & tricks for your software
Yellow reports the availability of new patches and updates for your product
Red for special offers, contests, and surveys
And if there are no new messages, then the button will be gray
All available information is shown as soon as you click on MAGIX News Center. If you click on one of
the news items you will be forwarded to the corresponding website.
Page 50
Page 51

Background information
In this chapter
What is a partition?
What is a backup?
What is an image?
Media type
Page 51
Page 52

What is a partition?
A hard drive's storage space can be divided up into several areas which can be used as separate,
independent hard drives. These areas are called partitions. Every partition in Windows receives its own
drive letter.
Hard drives can only be partitioned retroactively if the respective hard drive (hardware) is reformatted,
i.e. all of the data is removed (there are also special programs which can partition unformatted drives, but
there is no guarantee that this will happen without loss of data!).
What is a backup?
Copying of files to a different file storage medium to secure these files is called backing up, or creating a
backup.
There are three different variants of data backups:
Full backup: All marked files will be compressed and saved in one file.
Incremental backup: Only files that have changed since the last backup will be compressed
and saved.
Differential backup: Only files that have changed or have been added since the last full
backup will be compressed and saved.
What is an image?
An image is a direct representation of a CD, DVD, hard drive or another storage medium. The
difference from a copy or backup is that an image contains information about the structure of the original
storage medium, and not just individual files. This enables 1:1 copies of complete storage media to be
created.
Some file extensions of images are: iso, img, nrg.
Images can also be mounted as a virtual drive. All of the data on the medium can be made accessible
without having to copy all of the data to the PC or having to insert the disc into the drive.
ISO image
is the name of an image on a CD/DVD in the ISO 9660 format. This norm indicates that the file system
was copied without any changes, so that the files can be exchanged between different operating systems
like Microsoft and Apple.
Page 52
Page 53

What is a backup?
Copying of files to a different file storage medium to secure these files is called backing up, or creating a
backup.
There are three different variants of data backups:
Full backup: All marked files will be compressed and saved in one file.
Incremental backup: Only files that have changed since the last backup will be compressed
and saved.
Differential backup: Only files that have changed or have been added since the last full
backup will be compressed and saved.
What is an image?
An image is a direct representation of a CD, DVD, hard drive or another storage medium. The
difference from a copy or backup is that an image contains information about the structure of the original
storage medium, and not just individual files. This enables 1:1 copies of complete storage media to be
created.
Some file extensions of images are: iso, img, nrg.
Images can also be mounted as a virtual drive. All of the data on the medium can be made accessible
without having to copy all of the data to the PC or having to insert the disc into the drive.
ISO image
is the name of an image on a CD/DVD in the ISO 9660 format. This norm indicates that the file system
was copied without any changes, so that the files can be exchanged between different operating systems
like Microsoft and Apple.
Page 53
Page 54

What is an image?
An image is a direct representation of a CD, DVD, hard drive or another storage medium. The
difference from a copy or backup is that an image contains information about the structure of the original
storage medium, and not just individual files. This enables 1:1 copies of complete storage media to be
created.
Some file extensions of images are: iso, img, nrg.
Images can also be mounted as a virtual drive. All of the data on the medium can be made accessible
without having to copy all of the data to the PC or having to insert the disc into the drive.
ISO image
is the name of an image on a CD/DVD in the ISO 9660 format. This norm indicates that the file system
was copied without any changes, so that the files can be exchanged between different operating systems
like Microsoft and Apple.
Page 54
Page 55

Media type
In this chapter
Digital Versatile Disc (DVD)
Blu-Ray disc
HD-DVD
The common characteristic of all optical storage media is the storage layer which reflects light in different
amounts. Changes to this ability to reflect are used to store information.
This will give you a short overview of the DVD and its successors.
Page 55
Page 56

Digital Versatile Disc (DVD)
Quality
The exceptional color quality, image definition, and contrast of the DVD format are all well known.
A resolution of 720 x 576 (PAL) and coded using MPEG-2, 25 pictures per second produces very
good results. The quantity of data is approx. 5 times as much as a VCD.
DVD size
DVDs look similar to CDs. The only visible difference is that double-sided DVDs have no label.
Otherwise, both formats have the same dimensions.
Diameter: 12 cm, like a normal CD (there are also DVDs with a diameter of only 8 cm)
Thickness: 1.2 mm, just like a normal CD
DVD media (overview)
The DVD does not differ outwardly from a conventional CD-ROM. Higher memory density (up to 17
GB as opposed to 650-780 megabytes) results from the fact that information is stored more densely
(double-capacity) and that up to four layers can be used. In order to be able to read the information, a
special laser with modified wavelength is required. Therefore, DVDs cannot be read using conventional
CD-ROM drives.
Writable disc formats
The recordable DVD market is split for the time being into three types: DVD-RAM, DVD+RW and
DVD-RW.
DVD-R:
Once-only writable medium. The DVD-R can be specified with the file structures of DVD Video, DVD
Audio, or DVD-ROM.
DVD+RW
: Re-recordable DVDs can be created using +RW drives and can be read by almost any commercial
DVD-ROM or DVD player. The companies involved are mainly Philips, Sony, HEWLETT PACKARD
(as well as Ricoh, Yamaha, and Mitsubishi).
DVD-RW:
Writable and erasable DVD technology is promoted by Pioneer and Sharp. This format was developed
by the Pioneer company and should be compatible with existing DVD players.
DVD-RAM:
This standard is not recommended due to small storage capacity and incompatibility with DVD players.
Note: MAGIX Speed burnR supports DVD -R, DVD+R, DVD +RW, DVD -RW, but not
DVD-RAM!
Blank discs:
Single-sided recordable blanks with a capacity of 4.7 GB and a run-time of approx. 2 hours serve as
storage media for all DVD burning formats at present.
Double-layer
DVDs can consist of one or two storage layers, and both of these can be written to. Video DVDs
increase the capacity up to 4.5 or 8.5 GB.
During the write and read process, each layer can be accessed without damaging data on the other layer.
One of the biggest challenges of development of this medium was making normal DVD players able to
playback these discs.
Page 56
Page 57

Blu-Ray disc
Alongside HD-DVD, the Blu-ray disc is viewed as the successor to DVDs and offers especially high
storage capacity of up to 27 GB as a single-layer disc (double-layer up to 54 GB) with very few write
errors.
The term Blu-ray disc comes from the blue color of the laser. Because a color cannot be registered as a
trademark, the letter "e" was removed from the word "blue".
The high storage capacity of the Blu-ray disc suits high definition videos and slideshows in high quality
perfectly, since these are characterized by large file sizes (depending on material approximately 40
MB/sec) and very high memory use.
Hint:
A corresponding device is required for viewing Blu-ray discs. To fully enjoy the benefits of high
definition video, you should also use an HD-enabled TV.
Companies that were involved in developing Blu-ray technology have united themselves into the Blu-ray
Disc Association (BDA).
Blu-ray discs come in three varieties:
Only readable BD ROM (comparable to DVD video),
rewritable BD-RE (comparable to DVD±RW or DVD RAM),
and as a disc that can be written to only once BD-R (comparable to DVD±R).
Page 57
Page 58

HD-DVD
The HD-DVD is intended for playback on HD-DVD players and cannot be played on normal DVD
players. By default it is created in "1080i" (1920 x 1080 pixels) format. The amount of data is four-times
that of normal DVD formats
.
Despite the HD-DVD format, blank DVDs, which have now been on the market for quite a while (and
are therefore a much better value for money), can also be used. Like with a mini DVD, whereas the
DVD data format is burned to CD, the HD-DVD format can be burned onto a normal DVD.
The quality of the mini HD-DVD matches the highest demands by using higher bit rates (standard: over
20,000 kBit/s) and HD resolution. The high quality has to deal with a much shorter playback time when
using normal blank DVDs, but this should not impede usage at home in any way.
In order to burn longer films in the HD-DVD format, HD-DVD media can also obviously be used. The
requirement is of course an HD-DVD burner.
Advice
: Toshiba declared at the beginning of 2008 that the manufacture and further development of the
technology (including devices) would be stopped. This makes Blu-ray the official successor to the DVD.
Page 58
 Loading...