

Page 1
Page 2

2 Copyright
Copyright
This documentation is protected by law. All rights, especially the right of
duplication, circulation, and translation, are reserved.
No part of this publication may be reproduced in the form of copies, microfilms
or other processes, or transmitted into a language used for machines,
especially data processing machines, without the express written consent of
the publisher.
All copyrights reserved.
All other product names are trademarks of the corresponding manufacturers.
Errors in and changes to the contents as well as program modifications
reserved.
MAGIX is a registered trademark of MAGIX AG.
Other mentioned product names may be registered trademarks of the
respective manufacturer.
This product uses MAGIX patent pending technology.
Copyright © MAGIX AG, 2002-2010. All rights reserved.
www.magix.com
Page 3

Table of Contents 3
Table of Contents
Copyright 2
Support 4
What is Slideshow Maker 2? 6
System requirements 6
More about MAGIX 7
MAGIX News Center 7
MAGIX Website Maker 7
MAGIX Online Print Service 7
MAGIX Online Album 7
MAGIX Community 8
Preface 8
What's new in Slideshow Maker 2 8
Quick start 10
Specify basic settings 10
Load photos 10
Effects and background music 11
Finish 11
Load photos – overview 12
Effects & background music – overview 13
Fades 14
Effects 15
Properties & titles 16
Background music 17
Save/Delete Style Template 18
Finish – overview 19
Output as video file 19
Share in your online album 20
Publish online 21
If You Still Have Questions 22
Tips for program help 22
Index 23
www.magix.com
Page 4

4 Table of Contents
Support
Dear MAGIX customer,
Our aim is to provide convenient, fast and solution-focused support at all
times. To this end, we offer a wide range of services:
Unlimited web support:
As a registered MAGIX customer, you have unlimited access to web support
offered via the convenient MAGIX service portal on http://support.magix.net,
including an intelligent help assistant, high-quality FAQs, patches and user
reports that are constantly updated.
The only requirement for use is product registration on www.magix.com
The online community - on-the-spot support and a platform for exchange:
MAGIX customers have free and unlimited access to the online community at
www.magix.info, which includes approx. 100,000 members and offers the
opportunity to ask members questions concerning MAGIX products as well as
use the search function to search for specific topics or answers. In addition to
questions & answers, the knowledge pool includes a glossary, video tutorials
and a discussion forum. The multiple experts, found round-the-clock on
www.magix.info guarantee quick answers, which sometimes come within
minutes of a question being posted.
Email support for MAGIX products:
8 (eight) weeks of free email customer service (starting from the purchase
date) is automatically included with the purchase of any new MAGIX product.
MAGIX guarantees fast processing of your request and an immediate reply.
Premium email support:
If you experience problems after the 8 weeks of free email support have
expired, you can purchase a Premium email support ticket in the MAGIX Shop
for USD 12.99 | CAD 13.99 | GBP 9.99 | AUD 18.99 | ZAR 120.00 | EUR
12.99 | SEK 119.00 | NOK 99.00 | DKK 99.00. This ticket applies to a specific
problem and is valid until it is solved; it is therefore not restricted to one email.
Reporting evident program errors is exempt from this regulation.
Please note: To be able to use the Premium email support and free product
email support via the Internet, you have to register your MAGIX product using
the serial number provided. This can be found on the CD case of your
installation CD or on the inside of the DVD box.
www.magix.com
Page 5

Additional telephone service:
Besides the large number of free customer service offers, we also offer a feebased telephone customer service.
Here you can find a summary of our technical support telephone numbers:
http://support.magix.net/
Mail (Europe): MAGIX Development Support, P.O. Box 20 09 14, 01194
Dresden, Germany
Mail (North America): MAGIX Customer Service, 1105 Terminal Way #302,
Reno, NV 89502, USA
Please have the following information at hand:
Program version
Configuration details (operating system, processor, memory, hard drive, etc.),
sound card configuration (type, driver)
Information regarding other audio software installed
MAGIX Sales Department
You can reach the MAGIX Sales Department workdays for help with the
following questions and problems:
Support 5
Orders
Product consulting (pre-purchase)
Upgrade requests
Returns
Europe
Monday -
U.K.: 0203 3189218
Denmark: 699 18149
Sweden: 0852500858
Finland: 09 31581630
Norway: 0210 30665
North America
9 am
Phone: 1-305-722-5810
www.magix.com
Friday, 09:00-16:00 GMT
to 4 pm EST Mon-Fri
Page 6

6 What is Slideshow Maker 2?
What is Slideshow Maker 2?
The name says it all: Slideshow Maker 2 compiles your photos into a slideshow
that can be viewed on your PC – just like a movie!
A typical case: Your hard drive is full of digital photos. What to do with all those
pictures? Slideshow Maker 2 organizes and compiles your photos, enhances
them by adding fades, music or effects and turns them into an exciting
slideshow.
The unique thing about Slideshow Maker 2 is that only very little information is
needed to create exciting slideshows. The best part: you don't even have to be
a computer expert. Slideshow Maker 2 guides you through all of the steps
required for creating a slideshow: it takes the photos that are scattered all over
your hard drive and turns them into a slideshow that you will want to watch
over and over again.
System requirements
For Microsoft® Windows® XP | Vista® | 7
Minimum configuration:
Intel® or AMD® Athlon® processor 1 GHz or higher
512 MB RAM, 100 MB hard drive space for program files, min. 1 GB for video
files
SVGA graphics card with min. 32 MB RAM, (min. resolution 1024 x 600, 16-
bit high-color)
Microsoft® compatible mouse
www.magix.com
Page 7

More about MAGIX 7
More about MAGIX
MAGIX News Center
The MAGIX News Center features links to current online tutorials and tips &
tricks on the software application examples. The "News" is indicated by color
according to content:
Green indicates practical tips & tricks for the software
Yellow reports the availability of new patches and updates
Red for special offers, contests and questionnaires
If no new messages are present, the button will appear gray. When the MAGIX
News Center is clicked, all of the available information will be displayed. Click
the messages to reach the corresponding website.
MAGIX Website Maker
MAGIX Website Maker helps you create a personal Internet showcase with a
professional design in just a few mouse clicks – without prior knowledge,
including your own chosen domain and email address. Publish slideshows and
videos and accessorize your site with music and various effects – anything
from a simple business card to a fireworks display of effects, professional or
private – show your best side!
More about this topic can be found under MAGIX Website Maker.
MAGIX Online Print Service
MAGIX Online Print Service is perfect for getting your pictures processed
online or printed as photo gifts on mugs, t-shirts, or calendars.
MAGIX Online Album
MAGIX Online Album is your personal multimedia album on the Internet. If you
want to present slideshows or videos online, then MAGIX Online Album is the
perfect service.
www.magix.com
Page 8

8 Preface
MAGIX Community
MAGIX Community is the place to exchange photos, videos, and music with
friends and the world. As soon as you have registered for free, you can use all
of its great features.
You can also read the FAQ (frequently asked questions) online
http://rdir.magix.net/?page=EBCVJGJAFZHV.
Preface
It has never been so easy to create slideshows! Slideshow Maker 2 is a quick
and uncomplicated tool that enables you to turn your photos into exciting
multimedia slideshows in no time at all. The best part: you are in the director's
chair!
It doesn't matter whether you are a PC beginner or a multimedia pro. With
Slideshow Maker 2 anyone can turn their snapshots into great presentations –
all in one go and with just 3 clicks. After you've created your slideshow, you
can watch it on the PC together with friends and family or present your works
of art on Youtube
®
or Flickr®!
Have fun with Slideshow Maker 2!
What's new in Slideshow Maker 2
New user interface
The user interface of Slideshow Maker 2 has been completely revised and is
sure to impress you! As a result, the program is even easier to use than before.
Properties & titles
Now it's even
add opening and closing credits in no time at all. You can also adjust the
slideshow to the length of the background music in order to avoid irritating
silences. This also works the other way around.
Upload to Flick
Share your slideshows with the largest possible audience – the whole world!
By uploading your slideshows to social media platforms such as Flickr
Facebook
Slideshow Maker 2.
easier to customize your slideshows: with the title editor you can
r and Facebook
®
®
you will reach millions of users worldwide – all it takes is a click in
www.magix.com
and
Page 9

Adjust the intensity of fades and effects
Preface 9
How would you like it?
frequently? Do you want the transitions to be more subtle? The frequency of
fades and effects can be adjusted easily using the sliders.
Save your own style templates
Once you are sa
allows you to use your favorite creation for your next slideshow, instead of
having to set fades and effects from scratch.
Intelligent presets
your slideshow includes regular photos as well panoramas and pictures in
If
portrait format, you can apply special presets included in the program. This
ensure that certain effects such as rotation or zooms will only be applied to
standard photos and not to photos with special formats.
tisfied with your stylistic settings, you can save them. This
Do you want the effects in your slideshow to appear
www.magix.com
Page 10

10 Quick start
Quick start
Specify basic settings
Specify the aspecte ratio for
the project. You can also
determine how Slideshow
Maker 2 should behave with
photos that do not match the
project's formatting.
Project name:Give your disc project a name. This name will be used as a
preset title for the disc you are going to burn. The slideshows will also be given
this name.
Cut to fit screen automatically: Images that do not correspond to the project's
ratio are adjusted automatically. The zoom factor is set in such a way that
there are no black bars to the left or right or top and bottom.
Load photos
Click on "Load files..." to select
photos and videos that you
want to add to the project.
"Delete" removes the selected
files from the list. "Rotate
images by 90°" brings your
photos into the right position.
The sequence of objects can be
specified via drag & drop.
y time for each photo (seconds): By default, photos are displayed for
Displa
the time entered here. Of course, you can later change the time each photo is
displayed.
Total length of slideshow: The approximate total length of the slideshow
created is shown here. It adjusts if the display time per photo is changed.
www.magix.com
Page 11
Quick start 11
Use the slider
in the bottom right-hand corner to enlarge or reduce the display
(only in "Large icons" mode).
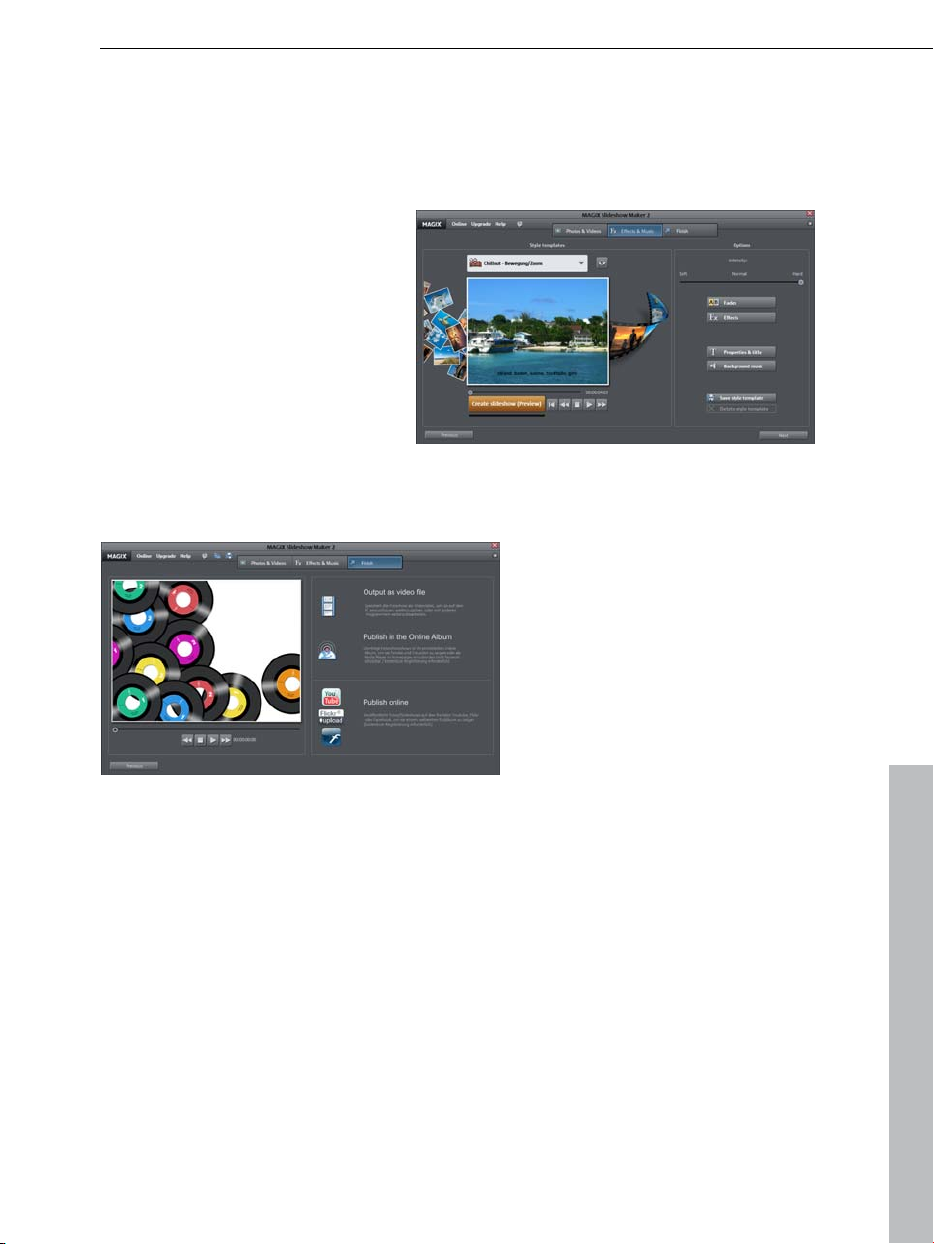
Effects and background music
Simply select one of the styles
that best suits the theme of your
slideshow. Click on the "Play"
button to listen to a preview of
the styles. You can set the
frequency of the effects using the
slider.
Finish
This is where you specify where
and how you want to show your
slideshow. "Output as video file"
saves your slideshow on your
PC as a WMV file. "Publish in
the Online Album" presents your
slideshow in the MAGIX Online
Album. "Publish online"
automatically uploads your
slideshow to Youtube
or Facebook
®
.
®
, Flickr®,
www.magix.com
Page 12

12 Load photos – overview
Load photos – overview
Quick access toolbar: contains buttons for quickly accessing the three
major components of Slideshow Maker 2.
Toolbar: this is where you access the dialog for adding new pictures,
deleting existing photos and rotating photos 90 degrees clockwise.
Program monitor: video and picture objects are displayed here.
Display duration: specify here how long each picture is to be displayed
in the finished slideshow before the next picture follows.
Zoom controller: enlarge or reduce the display to adjust the visible area
in the program monitor. You can switch between "Detailed view", "List
view", and "Large icons view" by clicking on the button.
www.magix.com
Page 13

Effects & background music – overview 13
Effects & background music – overview
Style templates: you can select ready-to-use style templates for your
slideshow or create your own.
Intensity: determines how often selected fades and effects appear in
your slideshow.
Options: this button provides access to fades, effects, titles, and
background music that you can use to enhance your slideshows.
Preview: click on the "Create slideshow (preview)" button to play a
preview of your slideshow complete with fades and effects in the
preview window. As the name indicates, this is not the final version.
www.magix.com
Page 14

14 Effects & background music – overview
Fades
Note: The sliders do not set the intensity of the fades, but their frequency. If
you select "Frequently", fades will appear after every third picture.
Fade duration: determines the length of a fade effect in the finished slideshow.
Random fad
fades and determines their frequency and duration.
es: if you click this button, the program automatically selects
www.magix.com
Page 15
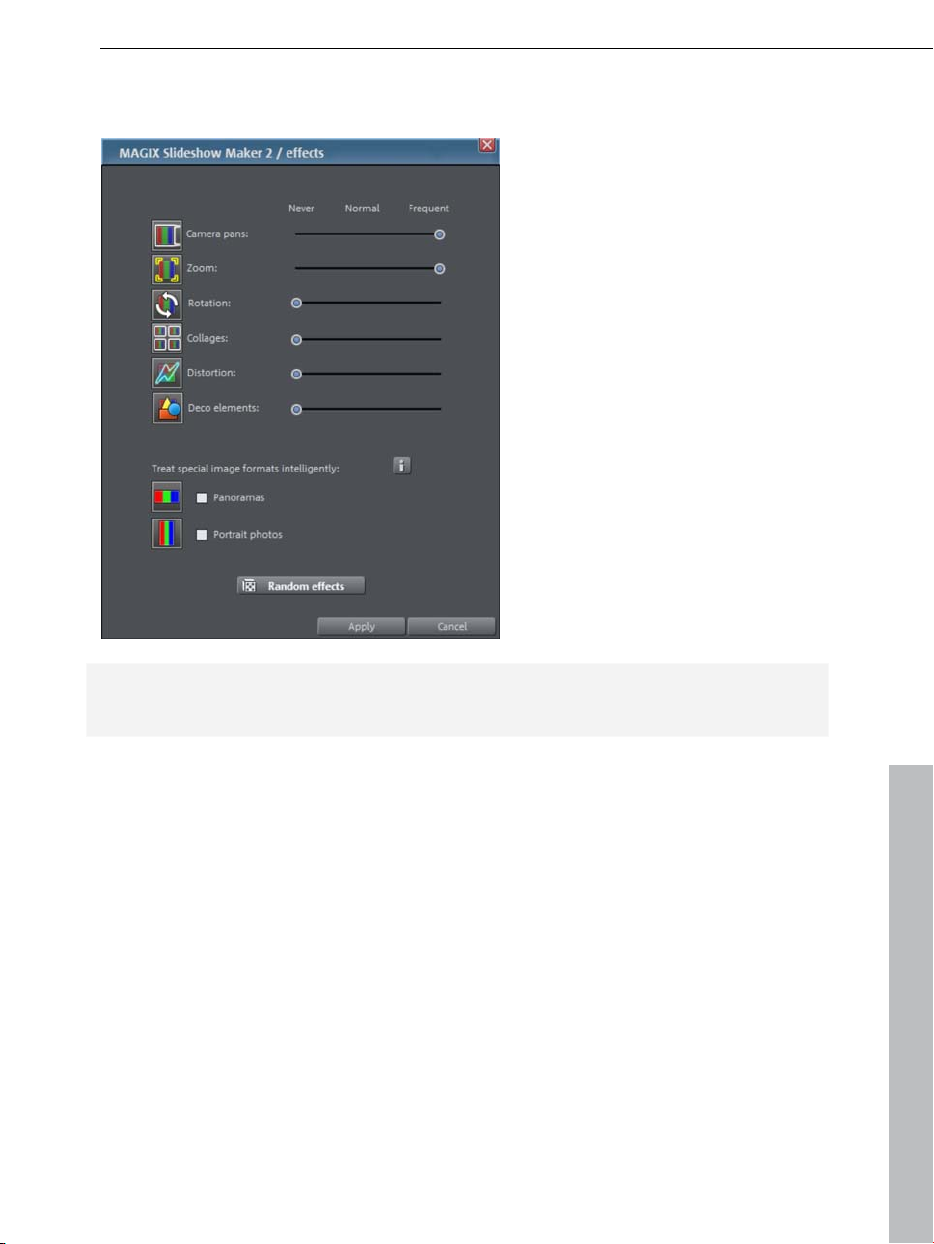
Effects
Effects & background music – overview 15
Note: The sliders do not set the intensity of the effects, but their frequency. If
you select "Frequently", effects will appear after every third picture.
Treat special image formats intelligently: If
and photos in portrait format are handled separately. The program
automatically recognizes these special formats and excludes them from effects
that would have a negative impact. Panoramas, for example, are not rotated.
Random effects: if you click this button, the program automatically selects
effects and determines their frequency and duration.
www.magix.com
you select this option, panoramas
Page 16
16 Effects & background music – overview
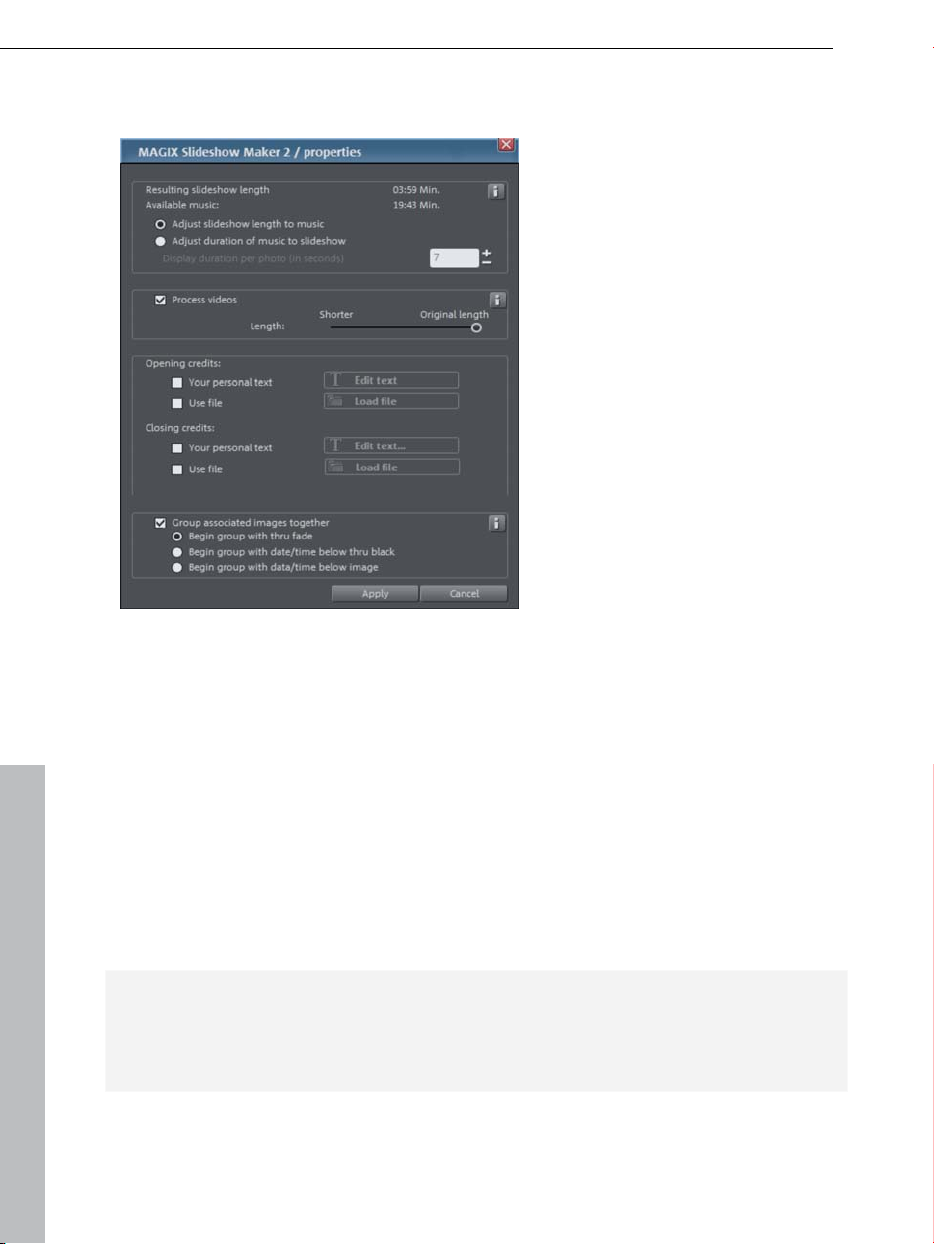
Properties & titles
Resulting slideshow length: this is an estimation of how long the slideshow will
be after applying Slideshow Maker 2.
Available music: shows the length of all available titles that could be used as
background music.
Adjust slid
of the photo objects to the background music. If the slideshow is too short, the
music will be cut off. If the slideshow is too long, the music will be repeated.
Adjust music length to the slideshow: photo objects have a set length, and
the resulting slideshow is filled with music. The music at the end of the
slideshow is simply faded out.
Note: You should try to adjust the length of the slideshow and the music. If the
slideshow has finished, but there is still music "left", the song will finish with a
hard cut. The opposite case is just as undesirable: if the slideshow is longer
than the background music, part of the slideshow will have no music.
Process videos: if your slideshow includes videos, you can set how long they
will be displayed here.
eshow length to the music: it will be attempted to adjust the length
www.magix.com
Page 17
Effects & background music – overview 17
Openin
Your own text: Enter the text that is to appear as opening and closing credits.
Use file: Besides text, you can also use images and videos for your opening
Group associated images together: If your slideshow contains pictures from a
clearly defined period of time (day, time of day, etc.), this option will
automatically compile these photos into a group. You can then decide how you
want the grouped images to be displayed: starting with a black fade only, with
date and time below the black fade, or with the date and time faded in below
the picture
g/closing credits:
and closing credits. Select the file by clicking on "Load file".
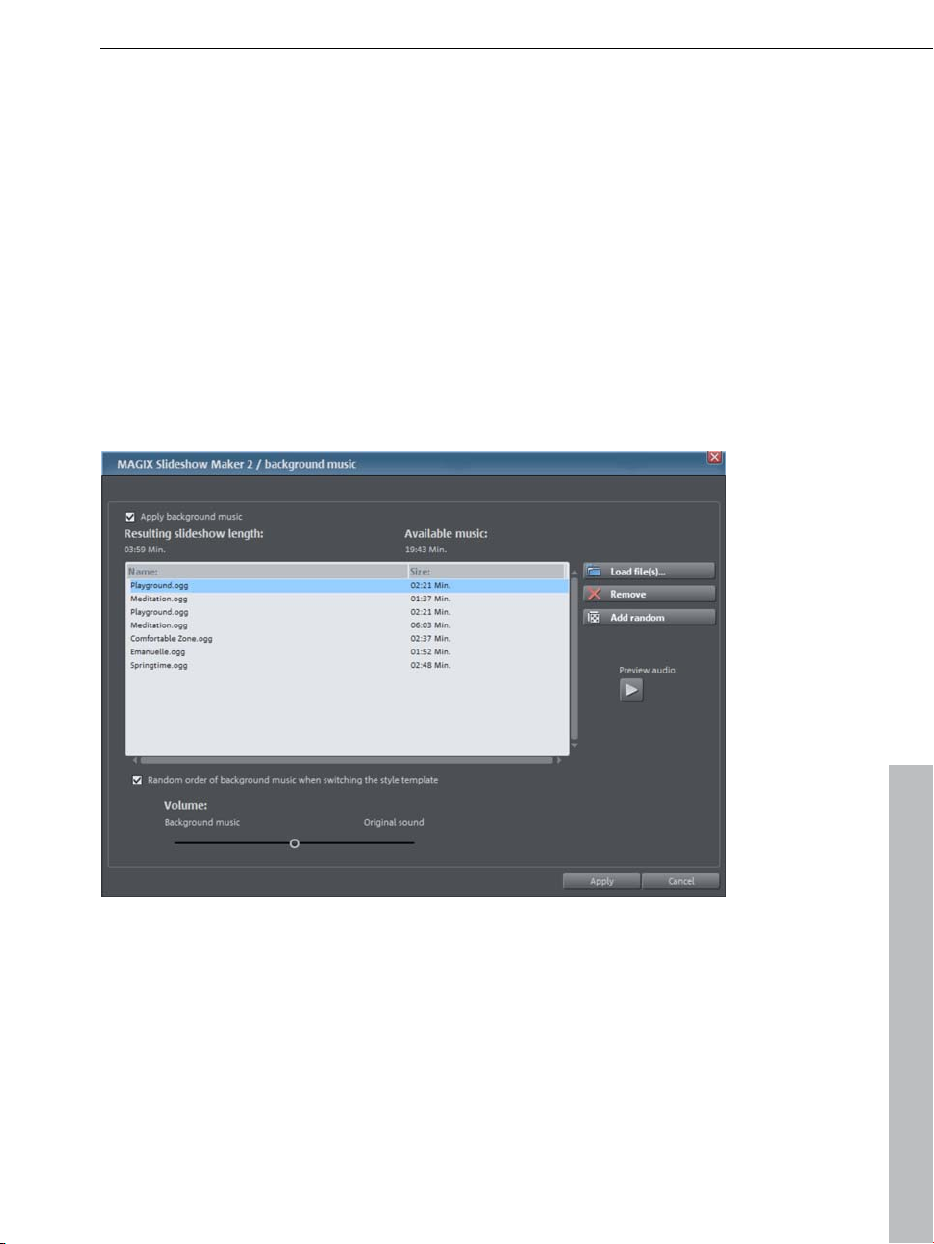
Background music
Use background music: select whether you want to add music to your
slideshow.
Resulting slideshow length: displays the duration of the finished slideshow.
Available music: shows the length of all available titles that could be used as
background music.
Load file(s): here you can load music tracks into the project. You can also use
MP3 files.
www.magix.com
Page 18

18 Effects & background music – overview
Remove: deletes the selected music track located to the left of the project
window from the project.
Please note: The song is removed from the project, not from your hard drive!
Add random: randomly loads music tracks from the "Slideshow music" folder
into the slideshow.
Preview: by clicking on this button, you can listen to the music track selected
in the project window.
Random order of background music when switching the style template: if
you change your mind before you have finished the slideshow and decide you
want to use a different style template, the music tracks are ordered randomly.
Tip: you can manually change the order of the music in the project window via
drag&drop!
Volume ratio: if your slideshow includes videos, you can adjust their volume in
relation to the background music using the sliders. If you want to hear more of
the music, move the slider to the left. If, on the other hand, you want the
video's audio to be more prominent, simply move the slider to the right.
Save/Delete Style Template
Save your own Style Templates that contain all your personalizations made to
the slidewhow options by pressing "Save Style Template". You can name the
template in the following window. Now you can choose this template from the
list of style templates .in the upper right. To delete a style template select it first
and then press "Delete Style Template".
www.magix.com
Page 19

Finish – overview 19
Finish – overview
On the left side you have a video monitor with the usual transport controls
where you can watch you just created slideshow. On the right side there are
three options to save your slide show.
Output as video file: saves your slideshow on your PC as a WMV file.
Present in the Online Album: you can share your slideshow with family
and friends by presenting it in the MAGIX Online Album for free.
Publish online: imagine your slideshow on "Youtube", "Flickr", or
"Facebook".
Output as video file
Quality: select the output quality for the Windows Media file on your computer.
www.magix.com
Page 20

20 Finish – overview
Share in your online album
You can select whether you want to present your entire slideshow on MAGIX
Online Album or only parts of it.
Video: loads the entire slideshow to MAGIX Online Album.
Individual media: select this option if you want to upload individual images,
videos, or music tracks to your album without linking these elements.
www.magix.com
Page 21

Publish online
Community: you can choose between Flickr
Finish – overview 21
®
, Facebook® and Youtube®.
Note: using these portals requires a free registration with the corresponding
provider.
Title: please
Description: add a description to your slideshow.
Keywords: add keywords to your slideshow that will enable finding your video
on the portals later.
Category (only for Youtube): decide to which category you want to assign
your slideshow.
Send: determines who on the community portal is authorized to watch your
slideshow.
Export settings: you can determine the quality of the finished slideshow here.
Please note that high settings (HD) generate a very good image quality, but
might produce very large files of several hundreds of MB. The Medium (SD)
setting is a good compromise between quality and file size.
www.magix.com
enter the desired title for your slideshow here.
Page 22

22 If You Still Have Questions
If You Still Have Questions
Tips for program help
The program Help contains hints on how to use the program and lots of
additional information.
Context Help: press the "F1" key on your keyboard at any point in the opened
program and Help will open with the matching Help topic (context help).
Search function: to find out more information about specific words, use the
search function. Enter either the individual word or use logical operators (OR,
AND, NEAR) to refine your search if you have several search words.
OR (between two words): all topics which contain both words or one of the
words will be listed.
AND (between two words): only those topics will be listed which contain both
words.
NEAR (between two words): only those topics will be listed which contain both
words. A maximum of 6 additional words are allowed to stand between two
search words.
NOT (before a word): topics which contain this word will not be listed.
Print: use the help program's print function to make a printout of individual
topics or entire sections. The print button is located at the very top of the
toolbar in the help window.
Have fun with Slideshow Maker 2, and enjoy designing your slideshows!
www.magix.com
Page 23

Index 23
Index
A
Adjust the intensity of fades and effects 9
B
Background music 17
C
Copyright 2
E
Effects 15
Effects & background music – overview 13
Effects and background music 11
F
Fades 14
Finish 11
Finish – overview 19
I
If You Still Have Questions 22
Intelligent presets 9
L
Load photos 10
Load photos – overview 12
M
MAGIX Community 8
MAGIX News Center 7
MAGIX Online Album 7
MAGIX Online Print Service 7
MAGIX Website Maker 7
www.magix.com
Page 24

24 Index
More about MAGIX 7
N
New user interface 8
O
Output as video file 19
P
Preface 8
Properties & titles 8, 16
Publish online 21
Q
Quick start 10
S
Save your own style templates 9
Save/Delete Style Template 18
Share in your online album 20
Specify basic settings 10
Support 4
System requirements 6
T
Tips for program help 22
U
Upload to Flickr and Facebook 8
W
What is Slideshow Maker 2? 6
What's new in Slideshow Maker 2 8
www.magix.com
 Loading...