


2 COPYRIGHT
Copyright
This documentation is protected by copyright law.
All rights, especially rights concerning duplication, distribution, and translation, are
reserved.
No part of this publication may be reproduced in form of copies, microfilms or other
processes, or transmitted into a language used for machines, especially data processing
machines, without the express written consent of the publisher.
®
MAGIX
ASIO & VST are registered trademarks of Steinberg Media Technologies GmbH
EUCON
All other product names are trademarks of their respective owners.
Errors and changes to the contents as well as program modifications reserved.
This product uses MAGIX patented technology (USP 6518492) and MAGIX patent pending
technology.
and Samplitude® are registered trademarks of MAGIX AG.
TM
is a registered trademark of Avid Technology.
Copyright © MAGIX AG, 1990 - 2011. All rights reserved.

WELCOME 3
Welcome
Thank you for choosing Samplitude!
You now possess one of the most successful complete solutions for professional audio
editing. This PC-based Digital Audio Workstation (DAW) features extensive application
options for recording, editing, mixing, media authoring, and mastering. The program stands
for unique functionality & sound neutrality, outstanding cutting & editing options, perfect
CD/DVD mastering, and the flexible customization of individual workflows. Also this version
was developed in close collaboration with musicians, sound engineers, producers, and
users, it boasts numerous innovative functions as well as incorporating the advanced
development of tried and tested performance features.
Samplitude Pro X and Samplitude Pro X Suite are now available as either a 64-bit version
or 32-bit version. You can continue to rely on the superior sound and absolute phase
stability of Samplitude.
In addition to this manual, we also recommend reviewing the "Help" file, which may be
accessed via the "Help" menu; this includes more information about the individual functions
in more detail. Please also use the included PDF documents (manual.pdf, Effects_Plug-
ins_and_Instruments.pdf, Hardware_Controller.pdf, Tutorials.pdf) for further
information.
You can also visit our support area and the user forum online at
http://www.samplitude.com to find out more.
The Samplitude team

4 TABLE OF CONTENTS
Table of Contents
Copyright 2
Welcome 3
System Requirements 16
64-Bit Version. Should I switch? 16
Samplitude on Windows x64 (64-Bit) 16
Samplitude on Windows x86 (32-Bit) 16
General system requirements 16
Hard disk 16
Contact 17
Product activation: 17
Support 17
Sales 17
Installation 18
Activating Samplitude 20
Use Samplitude with CodeMeter dongle 22
Introduction to Samplitude network installation 23
CodeMeter Control Center 24
System settings 25
Audio setup 25
Monitoring settings 27
Audio devices 31
MIDI setup 31
General 33
What's new in Samplitude Pro X/Pro X Suite? 36
64 Bit Version 36
Tempo-Map and Tempo track 36
Revised visualizations 36
SE-cleaning effects 37
Advanced Docking-/Manager concept 37
Revised Object Editor 38
Advanced essentialFX Suite 38
Soundpool manager 39
Independence 39
Content Packs 39
True Resynthesis Timestretching (TRTS) (offline) 40
Spectral view 40

TABLE OF CONTENTS 5
Spectral mode 40
Multifunction input field with help-function 40
Controller Artist Series support 41
New MIDI functions 41
New functions 42
What's new in 11.2? 42
Options administration/Remote/User administration 42
New functions 43
What’s New in Version 11.1? 43
Multi-track selection 43
Multi-language version – one EXE for all languages 44
Options management 44
Metronome 44
Vandal 45
MIDI 45
System options > Design > View options > VIP 45
System options -> Performance 46
New functions 46
Screen Elements 47
What is a VIP? 47
Program interface – Overview 47
Toolbars – Overview 64
Samplitude Quick Start 80
Initial navigation in the virtual project (VIP) 80
Workshop: Recording 80
Multi-track recording 87
MIDI recording 88
Objects in the virtual project (VIP) 91
Mixer 92
Effects 92
CD mastering 95
General Functions in the Project Window 97
Section 97
Select multiple tracks – group track controls 98
Zooming 99
Scrolling 101
Ranges 102
Working with ranges 102
Markers 105
Advanced ruler/time display 106
Scrubbing 107

6 TABLE OF CONTENTS
Samplitude as a wave editor 108
Working with Samplitude – tips & tricks 110
Object-oriented audio editing 113
What is an object? 113
Object Editor 114
Basic functions: Object editor 114
Object effects 116
Position/Fades 119
Timestretching/Pitchshifting 121
Methods for Working with Objects 123
Integrating wave files as objects in the VIP 123
Integrating sections from wave projects as objects 123
The difference between loading and importing audio files 123
Integrating CD tracks as objects into VIP 124
Selecting objects and clearing selection 124
Object handles 125
Select multiple objects; clear selection of multiple objects; reverse selection125
Moving objects 126
Changing the length and start time of an object 127
Duplicating, copying, and inserting objects 127
Mute objects 128
Change waveform view 128
Edit fades in the object editor or by using the handles 128
Reverb in the object 129
Locking objects 131
Editing an object destructively 131
Moving to a defined position 133
Group/ungroup objects 133
Linking objects 134
Overlapping objects 134
Gluing objects 136
Looping objects 136
Trimming objects 136
Replacing an audio file below the object 137
Moving audio material below the object 137
Manager 138
File browser 139
Object manager 144
Track manager 146
Marker manager 147
Range manager 149
Take manager 150

TABLE OF CONTENTS 7
Take Composer 152
Comping 154
VSTi manager 156
Routing manager 156
Soundpool manager 157
Mixer 158
Mixer overview 158
Using the mixer 158
Channels 161
Master section 165
Global buttons 167
Buses and routing 172
Effect routing/plug-ins dialog 174
Effects – organization and workflow 178
Save effects parameters (preset mechanism) 179
Saving new effects parameters 180
Track effect settings 180
Effect routing 181
External hardware effect integration 181
Setting latencies for external effects 184
Integrating external synthesizers 184
Effects and Plug-ins in an Overview 185
Real-time effects at track, object, and master level 185
Cleaning/Restoration Suite (optional) 186
DirectX and VST effects 186
VST Instruments 186
MAGIX Plug-ins 187
Object synths 188
MAGIX synths 205
Plug-ins at track, object, and master level 217
Remix Agent 220
Stereo Editor 221
Stereo dialog options 221
MS-Processing 223
Surround Sound 224
Adding a new project with a Surround mixer 224
Converting an existing stereo VIP into a VIP with mixer in surround format 225
Project Surround setup 225
Surround panning 227
Surround panorama module 228

8 TABLE OF CONTENTS
Panorama modes in the Surround panorama module 230
2-channel Surround mode 235
Stereo and mono signal processing in surround projects 237
Alternating between stereo and Surround formats 238
Automating the Surround panorama module 238
Effects in Surround projects 239
Editing Surround sound automation 240
Surround bouncing 240
MIDI in Samplitude 242
MIDI setup 242
Import, record, edit 242
MIDI object editor 244
MIDI Editors 247
Open MIDI Editor 247
Working with the MIDI Editor 248
MIDI editor: mouse mode/toolbar 250
MIDI editor: Editing fields 253
MIDI functions 253
Quantize 258
Step recording via keyboard or controller keyboard 264
Cell Edit Mode 265
Velocity Mode 265
Matrix Editor (Piano Roll Editor) 266
Drum Editor 269
Controller Editor 273
Event list 278
Multi object editing (MO-Editing) 280
Score Editor 282
MIDI editor shortcut keys 298
Tempo Editing 301
Tempo and Time signature changes in the tempo map... 301
Tempo markers 302
Tempo Map Modes: BPM Mode / Grid Fit Mode 303
Tempo Change: BPM Marker 304
Time Signature Marker 305
Grid Position Marker 305
Grid Tapping 305
Tempo Track 306
Edit in the Tempo Track (only BPM Mode) 307
Tempo Scaling / Change Global Tempo... 307
Tempo Map Dialog 308
Tempo and Time Signature Dialog 310
Manipulating the Tempo Marker in Timestretch Mouse Mode 310

TABLE OF CONTENTS 9
Software-Instrumente/VST-Plug-Ins/ReWire 312
Installing VST plug-ins 312
Load software instruments 313
Apply plug-ins at wave level 314
Load plug-ins at object level 314
Load plug-ins at track level 314
Load plug-ins at master level 314
Loading routing settings with software instruments 314
VST MIDI out + Audio out recording 317
Routing VST instruments using the VSTi manager 318
Instruments with multi-channel outputs 319
Plug-in panel - graphical interface 319
Plug-in parameter dialog 320
Plug-in menu functions 321
Play and monitor instruments live 323
VST instrument preset selection 324
Sidechain Input 324
Freezing VST instruments 325
"Inactive" state for VST instruments and VST effects 325
ReWire Client Application 326
Automation 327
Track automation - Basic procedures 328
Automation modes 330
Object automation 334
Master automation 335
Automation – context menu 335
MIDI controller automation 339
VST plug-in/VST parameters dialog 341
Recording automation in "Read" mode 341
"Draw" mode 341
Edit automation curves 342
Move automation curve with audio/MIDI data 343
Automation/MIDI controller settings 343
Synchronization 345
Synchronization formats 345
Synchronization setup dialog 348
Synchronization - Samplitude as master 351
MIDI Machine Control (MMC) 352
Synchronization applications 354
Media link/video setup 358
Hardware Controller 360
Hardware controller - Introduction 360
Hardware controller settings 360

10 TABLE OF CONTENTS
Hardware controller – "Internal" mode 362
Customizing controllers 365
Controller elements 368
Hardware controller options 369
Hardware controller - fader scaling 371
Learn controller for plug-in/mixer elements 372
Hardware controller presets 374
Preset keyboard shortcuts 412
File menu 412
Edit menu 413
Track menu 415
Object menu 415
Play 418
Real time effects 419
CD/DVD menu 419
View menu 419
Help menu 420
Mouse 421
Signal Flow 422
Record 422
Playback 422
Signal flow with monitoring 423
Glossary 426
Menu reference 438
File Menu 439
New Virtual Project (VIP) 439
Open Project 440
Load/Import 444
Save Project 448
Save Project as... 448
Save Project Copy... 449
Save Project as Template... 449
Save project as EDL... 449
Save Object... 449
Save Session... 449
Export Audio 449
Trackbouncing 456
Range Bouncing (Internal Mixdown) 460
MIDI bouncing 461
Export project as AAF/OMF 462
Rename Project... 463

TABLE OF CONTENTS 11
Clean up 464
Close Project 466
Project Properties 467
Program Preferences 474
More 504
Exit 504
Recent File 504
Edit Menu 505
Mouse mode 505
Object Mode 513
Undo 513
Restore 513
Undo History 513
Delete Undo History 513
Copy 513
Cut 514
Split 514
Insert 515
Delete 516
Silence 517
Tempo 518
Range 519
Crossfade 523
Batch Processing... 526
More 530
Track Menu 531
Insert New Tracks 531
Copy tracks 532
Paste Track(s) 533
Deletes Track(s) 533
Track type 533
Input 533
Group track controls 533
Ungroup track control group 534
Hide Track 534
Unhide All Tracks 534
Track size 534
Freeze Track 534
Track Effect Settings 536
Mono Effect Processing 538
VST MIDI out recording: 538
Track Options... 538
Revolver Tracks 541
More 541

12 TABLE OF CONTENTS
Object Menu 545
Object Editor... 545
MIDI Editor... 545
Edit audio file 545
New MIDI Object 545
New MIDI object in the range 546
New Synth Object 546
Edit 546
Quantization 550
Object effects 557
Selecting Objects 558
Groups 559
Moving objects 560
Hotspot 562
Takes 563
Object Color/Name 563
Freeze Objects 563
Remix Agent – Tempo and Beat Recognition 564
audioid 571
Comparisonics Audio Search… 571
Time Stretch/Pitch Shift Patcher... 571
More 573
Object Manager... 573
Playback Menu 574
Play Once 574
Play Loop 574
Play in Range/Loop 574
Play with Preload 574
Play Only Selected Objects 574
Play Cut 574
Restart Play 575
Stop 575
Stop and Go to Current Position 576
Playback Mode 576
Playback parameters 578
Record 580
Record Mode/Punch In 580
Record Options 582
Further recording Options 583
Monitoring 585
Move Play Cursor 585
Markers 587
Auto JamSession 592
Retrospective Recording (MIDI Pre-Recording) 596
MIDI Record Mode 596

TABLE OF CONTENTS 13
MIDI Panic – All Notes Off 597
Automation Menu 598
No effect (Track) 598
Edit selected curve 598
(Track) Automation Mode 598
MIDI Controller Automation 599
Hide Automation 599
Show Track Automation 599
Show Object Automation 599
Show Only Selected Curve 599
Show all curves (not selectable) 599
Show all curves (selectable) 599
Select previous curve 599
Select next curve 599
Effects Menu 600
Notes concerning offline effects editing 600
Advanced options for offline effect calculation 601
Amplitude 603
Dynamics Effects 606
Frequency/Filters 621
Delay/Reverb 639
Time/Pitch 647
Distortion 662
Restoration 666
Stereo/Phase 673
Modulation/Special 678
MIDI velocity dynamics 682
Sample manipulation 682
Plug-Ins... 684
essentialFX 685
MAGIX Plug-Ins 698
Further Console Elements: 698
Analog Modelling Suite: AM-Track 699
Analogue Modelling Suite: AM-Pulse 707
Analog Modelling Suite: AM-Phibia 711
Analog Modelling Suite: AM-Munition 719
CORVEX – chorus/flanger 729
ECOX – Echo/Delay 733
FILTOX – Multimode Filter 735
VariVerb Pro 737
Vandal 746
Waveform Generator 775
SMPTE Generator 775
Process Only Left/Right Stereo Channel 776

14 TABLE OF CONTENTS
Process Effects Offline 776
CD/DVD Menu 777
Import Audio CD Track(s)… 777
Import Audio DVD… 780
Make CD... 781
Create DVD-Audio... 785
Indices (Track markers) 787
CD-Title-/ Index-Manager 790
CD disc options 791
CD-Text/MP3-ID-Editor 792
Set Pause Time 792
Set Start Pause Time 792
CD Arrange Mode 792
Get freeDB Title Info 793
freeDB Options 793
Search CD Online and Set Track Indices 794
Show CDR Drive Information… 794
Show CDR Disc Information… 794
audioid 795
View Menu 796
Mixer 796
Transport Console 796
Time Display 796
Visualization 798
Video Window 809
Track Editor 809
Manager/Docker 809
Manager 809
New Manager... 809
Control bars 809
Autoscroll 811
Autoscroll Soft 811
Rebuild Graphic Data 811
Clips 811
Hide Submix/AUX Busses 812
Grid view 812
VIP Display Mode 814
Overview Mode 814
Fix vertically 814
Store Position and Zoom Level 815
Get Position And Zoom Level 815
Store Zoom Level 815
Get Zoom Level 816
Horizontal 816

TABLE OF CONTENTS 15
Vertical 817
Cascade 818
Tile 818
Untile 818
Window 818
System information 819
FTP Download... 819
1, 2, ... 819
Help Menu 820
Help Menu 820
Help Index… 820
Context Help… 820
Open Manual… 820
About Samplitude... 820
Start Wizard / Tip of the Day 820
Dongle Activation... 820
Index 821

16 SYSTEM REQUIREMENTS
System Requirements
64-Bit Version. Should I switch?
By switching to the 64-bit version you increase the available amount of RAM On a 32-bit
system the upper limit of addressable memory is 3.5 GB, for many programs it's only 2
GB. In contrast on a 64-bit system the theoretical upper limit is a lot higher, namely 264 =
16 Exabytes. Practical values are 16 GB for Windows 7 Home/Premium and 192 GB for
Windows 7 Professional/Ultimate. If you work with very large projects or memory-intensive
VST instruments such as samples, it is recommendable to change to a 64-bit system.
Before changing to a 64-bit system make sure that your computer has at least 4 GB of
virtual memory and that 64-bit drivers are available for connected devices (soundcards,
controllers etc).
Samplitude on Windows x64 (64-Bit)
If you have installed the 64-bit version of Windows on your system you can use Samplitude
as a 64-bit or 32-bit version. The internal VST bridge makes it possible to use both 32- and
64-bit plug-ins.
Be aware that certain functions and technology will only be available when using Windows
x64. Find more info on our website.
Samplitude on Windows x86 (32-Bit)
If you have installed the 32-bit version of Windows on your system you can only use 32-bit
version of Samplitude.
General system requirements
1 GB RAM for Windows XP; 1GB RAM for Windows Vista/Windows 7 32-Bit; 4GB RAM
for Windows Vista/Windows 7 64-Bit
Recommended: Windows 7
500 MB disk space on hard disk for minimal installation
Graphics card with a minimum resolution: 1024 x 768
ASIO and/or WDM-compatible sound card
DVD-ROM drive
Optional: CD-/DVD burner, MIDI interface
Samplitude is compatible with Windows 7.
Hard disk
The maximum number of audio tracks depends on the rotation speed, access time, and
data transfer rate of the hard disk. Nowadays, modern UltraDMA hard disks are very fast
and enable the simultaneous use of many audio tracks. Ideally, your hard disk should have
a rotation speed of 7200 RPM (or faster) as well as an access time of under 9 milliseconds.
The audio data should be saved on a hard disk separate from the operating system.

CONTACT 17
Contact
Product activation:
For questions about product activation, please contact the Samplitude service team:
Telephone: +49 (0) 5741 3455 30 (Mon - Fri 9:00 to 5:00)
Fax: +49 (0)5741 310 768
Or send an email to servicesfr@magix.net
Support
Registered users have access to technical support:
The current terms and conditions for support services apply.
You can find the terms and conditions and more information at:
http://rdir.magix.net/?page=DNIZMJ03VM2M
Sales
If you have questions regarding licensing and upgrades/crossgrades, please contact our
sales department:
Telephone: +49 (0) 5741 3455 25
Fax: +49 (0) 5741 3107 68
Email: samplitude@magix.net
Addresses:
MAGIX AG
Friedrichstr. 200
10117 Berlin
MAGIX AG
Borsigstrasse 24
32312 Lübbecke

18 INSTALLATION
Installation
1. Place the installation CD into the CD-ROM drive.
2. The installation program will launch automatically. If it does not, open Explorer and click
the letter of the DVD drive. Open start.exe by double clicking it. The contents of the
installation CD are displayed, you may visit our website, or install additional programs such
as CodeMeter Runtime (view page 23).
3. To begin the installation of Samplitude click on "Install program > Samplitude Pro X /
Samplitude Pro X Suite".
4. The Samplitude installation wizard will now start. Just follow the appearing dialogs. If you
choose the "User defined" installation style, you can also specify the target folder for the
program and choose whether you want to install additional components such as impulses
responses too. In the selection screen you will see the necessary memory requirements for
the installation.

INSTALLATION 19
After installation you can add or remove components by starting this installation program
again and selecting/deselecting the respective components.
Click "Continue" to proceed with the installation.
Once all the files have been copied to the hard disk, a program group will be created. The
installation is now complete. Complete the installation by clicking "Finish".
Next choose the language in which you want to install Samplitude. In the corresponding
dialog you can choose between English, German, French, Italian and Spanish.
You are able to change language at any time after the first installation by accessing the
program folder "Samplitude" and then double clicking the file "Install.cfg"; in the code line
titled "language=", enter the abbreviation for the desired program language:
E or US for English
D for German
F for French
I for Italian
ES for Spanish
If another language code is entered, Samplitude will reinstall in the language featured by
your Windows system settings.
After you have saved "Install.cfg", the program will display the desired language version
the next time it is started.
After the initial installation, you may start the program at any time via the Windows "Start"
menu. Under "Programs > MAGIX > Samplitude" you can find start menu entries such as:
Samplitude
Samplitude Help
README
License terms
20 INSTALLATION
Activating Samplitude
After the program has started, the "Program activation" dialog appears. Select "Register".
Step 1: Enter the serial number in the next dialog. You will be able to find this on the case
of the software DVD.
Step 2: Samplitude calculates a user code once the serial number has been entered.
The actual activation code is generated from this code later. An online connection to our
authorization server is necessary for this to work. If your computer has an Internet
connection, press "Activate online" now.
Alternatively, you can of course transfer the data onto a separate PC if your studio PC does
not have an Internet connection. Simply click on the button to create a text file. You can
then save it on a USB stick or any other portable medium and then copy the content (the
entire URL) into the address box of a web browser.
Activation may even be completed by fax, by email or by filling out the form provided via
the corresponding button, printing it, and sending it to the address indicated.
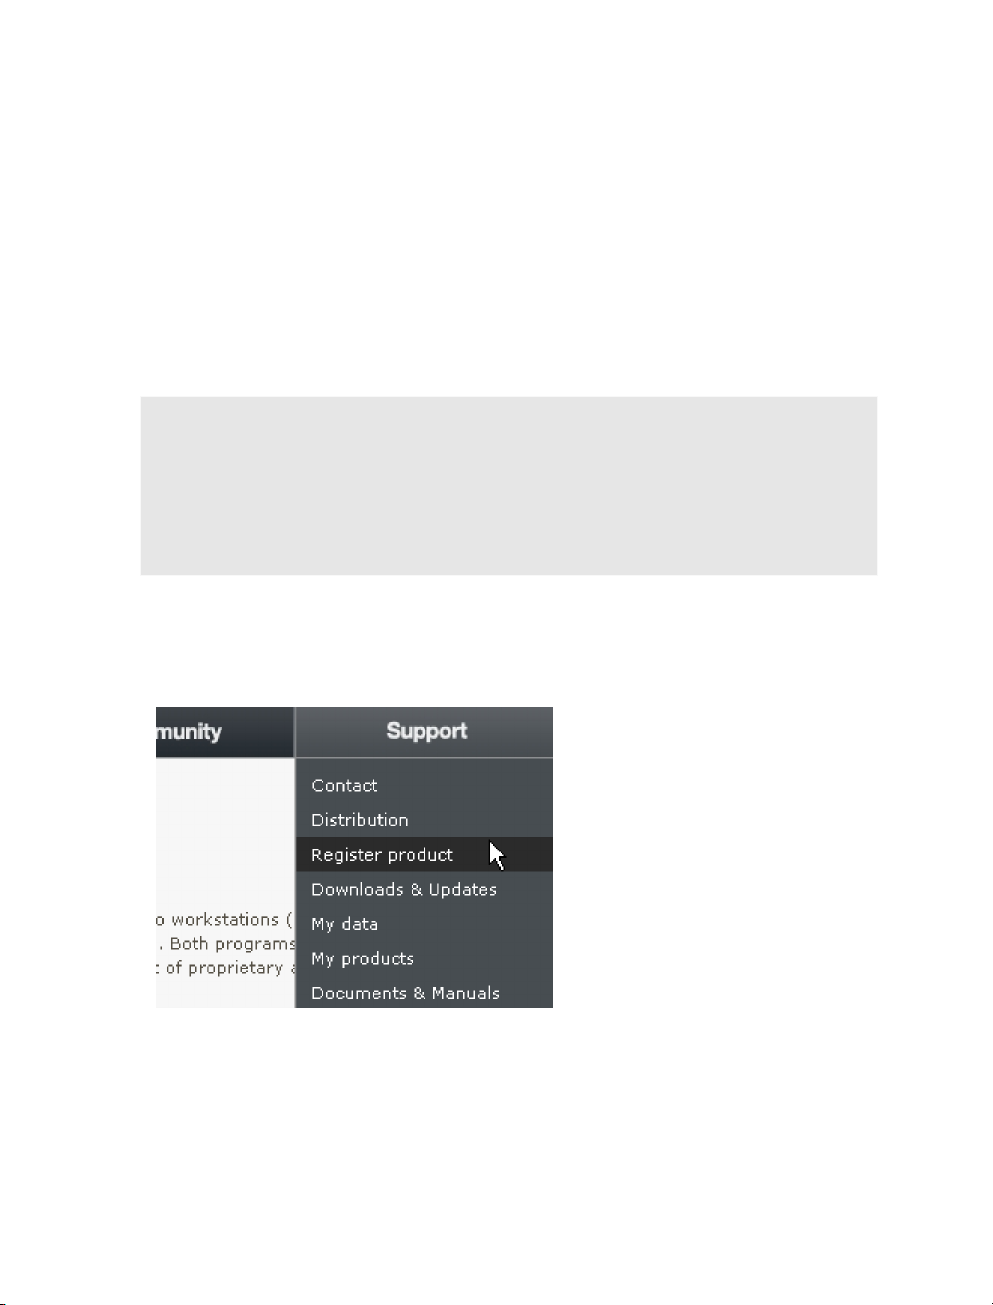
You will now be directed to the support area of the Samplitude website. If problems
occur with the automatic connection, then open your web browser, type
http://www.samplitude.com into the address bar, and select "Register product" in the
support area.
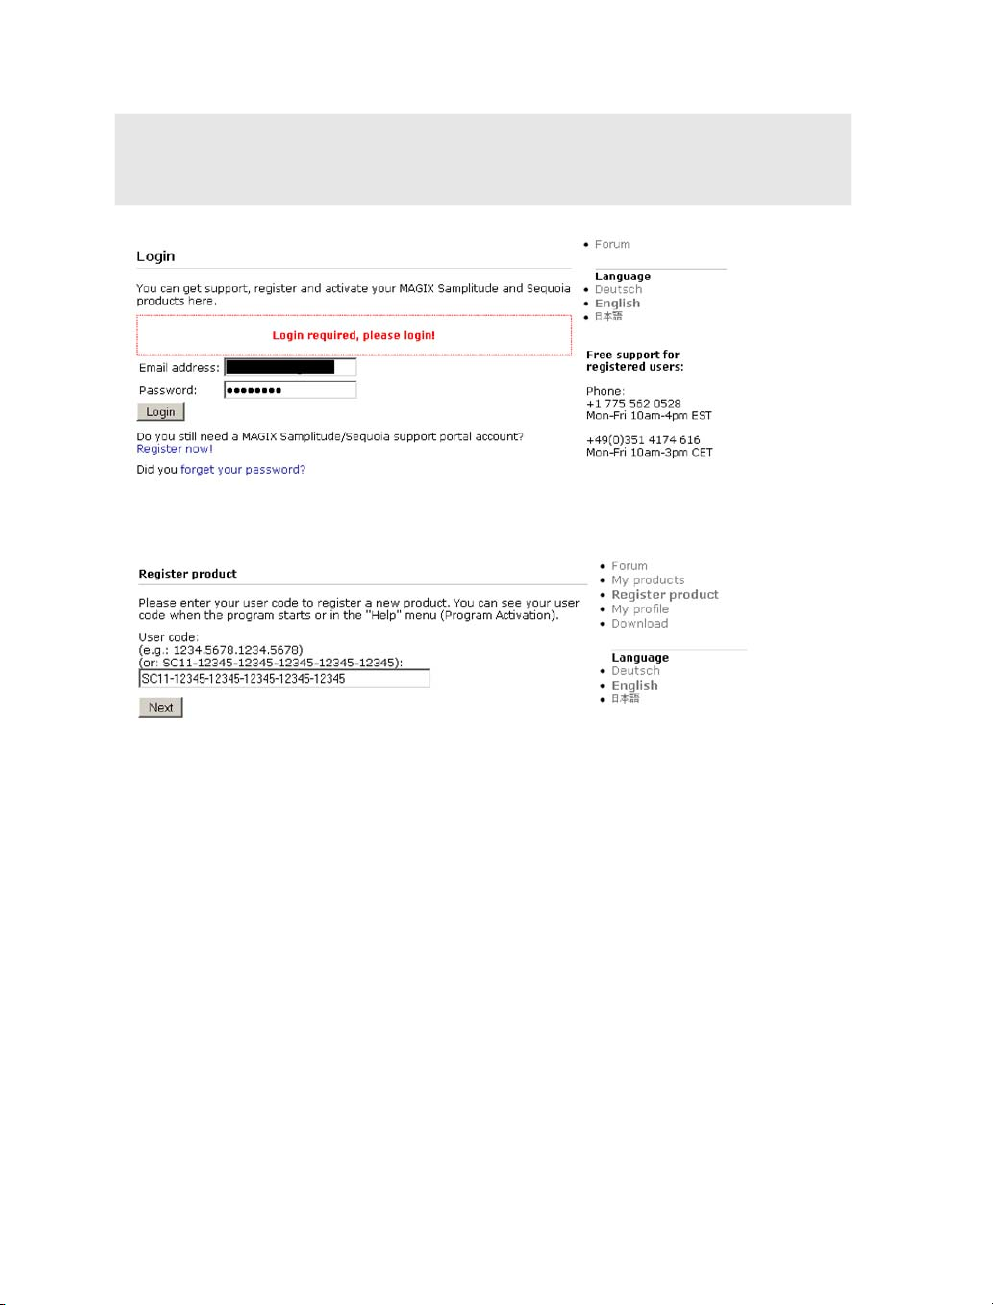
You will now proceed to online product registration. Please use your email address and
password to log in. If you do not have access to the support portal, register first by filling in
the required fields.
INSTALLATION 21
Note: Ensure sure when entering your data that your email address is correct so that we
will be able to send you the activation code once the registration process has been
completed.
Enter the user code to register a new product.
Click on "Continue". In the next window, continue with activation by clicking the
corresponding button.
The activation code will now be displayed. This will also be sent to your email address
automatically. Use the activation code to complete the final step:
Step 3: Now copy the activation code into the corresponding box in the dialog and then
click on the button beside this to activate.
Samplitude is now fully authenticated and ready for unrestricted use.
22 INSTALLATION
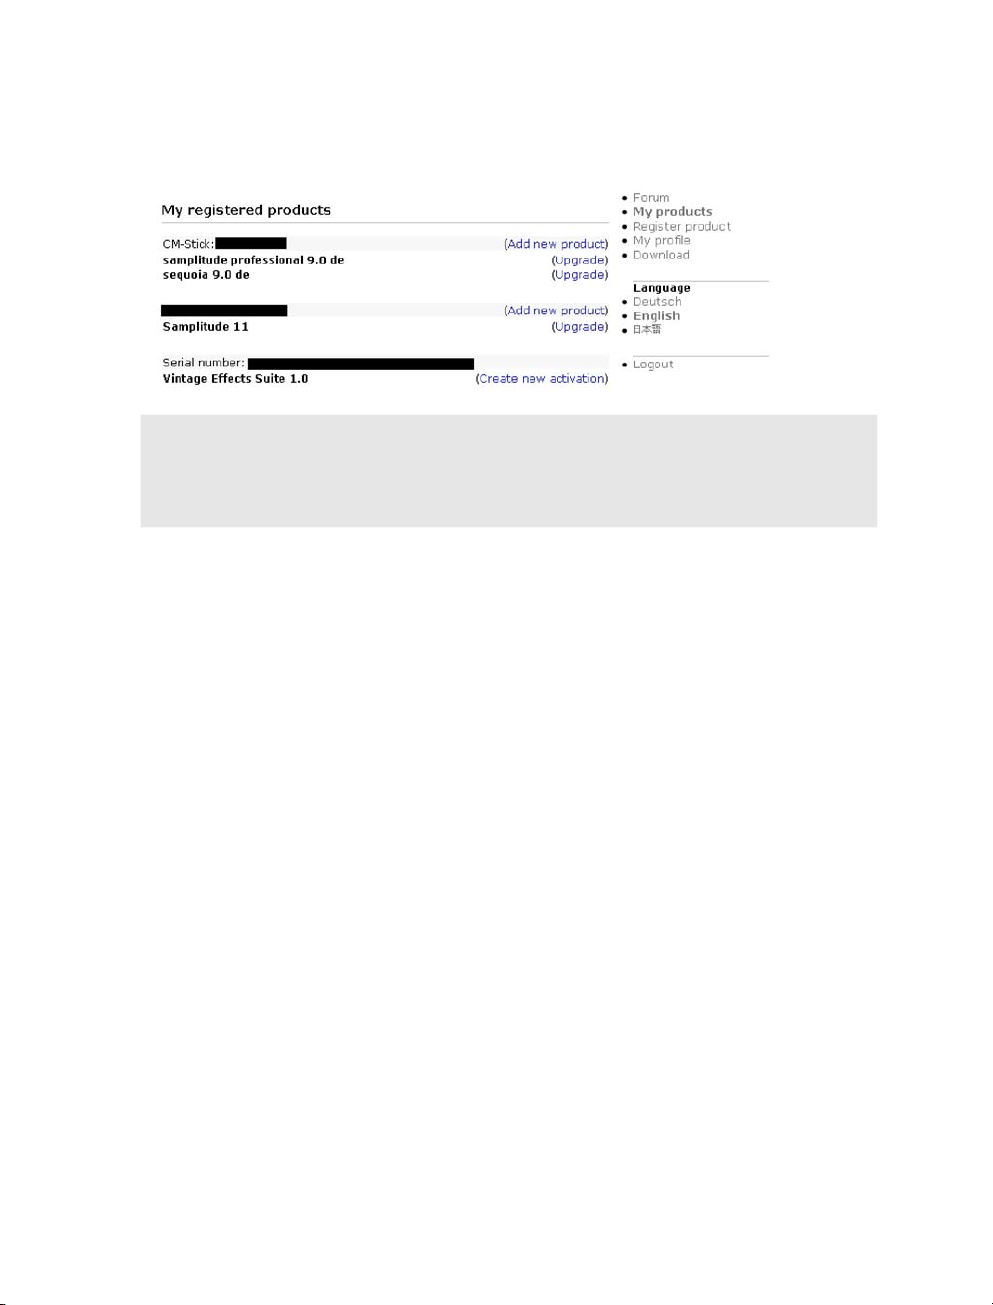
On the support page under "My Products", you will now see the most recently activated
product in the list of registered products:
Note: Please keep your serial number and activation code in a safe place. If you lose it,
you will not be able to activate the product again. Substantial changes to the hardware
configuration of your system may require reactivation as it may change the user code. You
can activate the product three times in total. After that you will have to contact our support.
Use Samplitude with CodeMeter dongle
If you already own a dongle of a previous version or purchased a dongle through a
distributor you can use it with the current version of Samplitude:
1. In the "Program activation" dialog select the "Use dongle" button or in the Menu
click "Help" then "Dongle Activation".
2. An information window will inform you of the CodeMeter lease's activation. Shut the
program down first.
3. Insert the dongle into a free USB port on the computer.
4. Restart the program.
Now Samplitude searches for CodeMeter Runtime and the license entries on startup. If
your dongle is already registered, Samplitude will start and you may continue with program
activation. If a license is not found, the "CodeMeter License Update" or "CodeMeter Start
Wizard" will open.
If you do not own a CodeMeter dongle, you can purchase one from our distributors.

INSTALLATION 23
Introduction to Samplitude network installation
Network installation – configuring the CodeMeter stick
1. Install a current CodeMeter Runtime on a network server or on a network PC
(Windows, Linux, Mac OS X). You can find the newest Runtime at www.codemeter.de
2. Insert the CodeMeter dongle into an available USB port on the server.
3. Start the CodeMeter Control Center via "Start/Programs/CodeMeter/CodeMeter
Control Center".
4. Now open "WebAdmin" in the CodeMeter Control Center on the bottom left. Your
internet browser will open.
5. In WebAdmin, go to "Settings", check the option "Start as server", and press "Apply".
Note: The tab "Contents -> Licenses" features a list of available license numbers.
6. Return to the CodeMeter Control Center and exit the runtime in the menu via "Exit
file/CodeMeter". Restart CodeMeter again by clicking "File/Start CodeMeter".
The server is now ready.
Network installation - Program installation
The program DVD may now be installed on a Windows client PC.
You should also install the current CodeMeter Runtime on the Client PCs in order to
guarantee optimum network performance.
Please make sure your firewall is set up properly. If you have any problems, please
deactivate your firewall as a test.
Register the dongle by first inserting it locally into a client PC or install Samplitude on the
server and register straight away after starting the program. This is necessary to gain
access to the latest updates on our homepage www.samplitude.com.
Please contact our MAGIX support (view page 17) if you have any questions about
installation or if
you require technical support.

24 INSTALLATION
CodeMeter Control Center
You can find the newest Runtime in the download section at www.codemeter.de.
Insert the CodeMeter into an available USB port on the server.
Start the CodeMeter Control Center via Start/Programs/CodeMeter/CodeMeter
Control Center.
Now open "WebAdmin" in the CodeMeter Control Center on the bottom. Your internet
browser will open.
In WebAdmin go to the register Content > CmStick. In the CmStick line you will see
your dongle's serial number.
If you want to add, change and delete further licenses, click on "Update License" and
then "Create license request". You can also create license questions or install license
updates.
Now go back to the CodeMeter Control Center and exit the runtime in the menu via
"Exit file/CodeMeter".

SYSTEM SETTINGS 25
System settings
Before you start working with Samplitude, you should configure your sound card after
starting the system for the first time.
Press the "Y" key on your keyboard or open the global system settings via "File > Program
preferences > System/Audio".
This allows you to access information about any connected playback and recording
devices as well as MIDI, metronome, or program settings, and change them if necessary.
You may also select the target folders for projects and VST plug-ins and the view options
and coloring of screen elements. The most important dialogs are explained briefly in the
following.
Audio setup
Enter all essential settings for the driver system, buffers, driver communications, and
monitoring here.
Driver system: A so-called "driver system" is used for the necessary communication
between Samplitude and your sound card. In order to take full advantage of the program,
we recommend that you use ASIO.
MME is the standard Windows multimedia driver system with the best compatibility. It also
supports 16-bit playback. If you are recording 24/32-bit audio material, then you can use
MME/WDM. This driver system is suitable for multi-track recordings of up to 64 tracks that
don't place severe requirements on the monitoring processes. For performance critical
recordings, this provides greater security compared to ASIO drivers; in any case, for many
sound cards, multi-track recordings will not be synchronous.
ASIO: Use a sound card model fitted with ASIO drivers if possible. This offers a number of
decisive advantages over the MME/WDM driver system:

26 SYSTEM SETTINGS
Lower latency (input/output delay) in terms of the driver system. Resulting response
times during real-time editing are clearly reduced. This provides the possibility to use the
software monitoring for inputs and VST instruments.
ASIO is intended for editing multi-track recordings featuring several sound cards that are
all using the same ASIO drivers. The sound cards are synchronized by the ASIO driver.
Advanced hardware monitoring options are also available by using ASIO direct
monitoring.
ASIO settings
ASIO device: Choose the sound card driver that you would like to work with. The drivers
for all ASIO devices installed on the system will be listed here. Clicking the "Control panel"
button opens the settings dialog for the sound card driver. In the display field beside "ASIO
buffer", you'll see the buffer size and bit rate set for the driver. Samplitude also displays the
relevant output and input latencies.
Buffer settings: The VIP object buffer indicates the buffer size for internal processing of
object effects and economy tracks in hybrid mode. In every other monitoring mode, the
buffer size also determines the editing of track effects. With a smaller VIP object buffer size,
the amount of playback delay also sinks (latency). In these cases, the processor may
become overloaded, which will result in dropouts during playback. Large buffer sizes
actually increase stability, but they also increase the latency of the system. The field below
displays the resulting latency in relation to the buffer settings.
Tip: The VIP object buffer size should normally be bigger than the ASIO buffer size and be
set between 1024 and 8096 samples.
Device Resolution/Driver Communication: This option enables you to select the bit
resolution for communication with audio devices. The preset value correlates with that of
the sound card installed on your system.
The ASIO driver system specifies the bit resolution of the ASIO drivers. Samplitude always
assumes the bit resolution set for the ASIO drivers. The settings options displayed for
device resolution/driver communication only specifies the bit depth applied by dithering
(view page 498). For 32-bit data transfer, dithering is 24-bit or 16-bit. The settings for 32bit are recommended especi
ally for Samplitude
in case no dithering is intended.
in case the input is not fed by the sound card's converter unit, but rather directly by a
DSP card.
If MME driver system is selected, Samplitude opens the drivers with the it depth set under
Device resolution/driver communication. If the output device cannot process the set bit
resolution, then the corresponding lower resolution will be produced and this will be
transmitted to the MME driver.
To specify the plug-in buffer and the path to your VST plug-ins, switch to the dialog
"System options (Y) > Effects > VST/DirectX/ReWire (view page 176)".
SYSTEM SETTINGS 27
Monitoring settings
Monitoring is defined as listening to the input signals, for example with the intention of
returning these to the incoming music. The routing of monitor signals is an important and
complex process that is subject to various requirements.
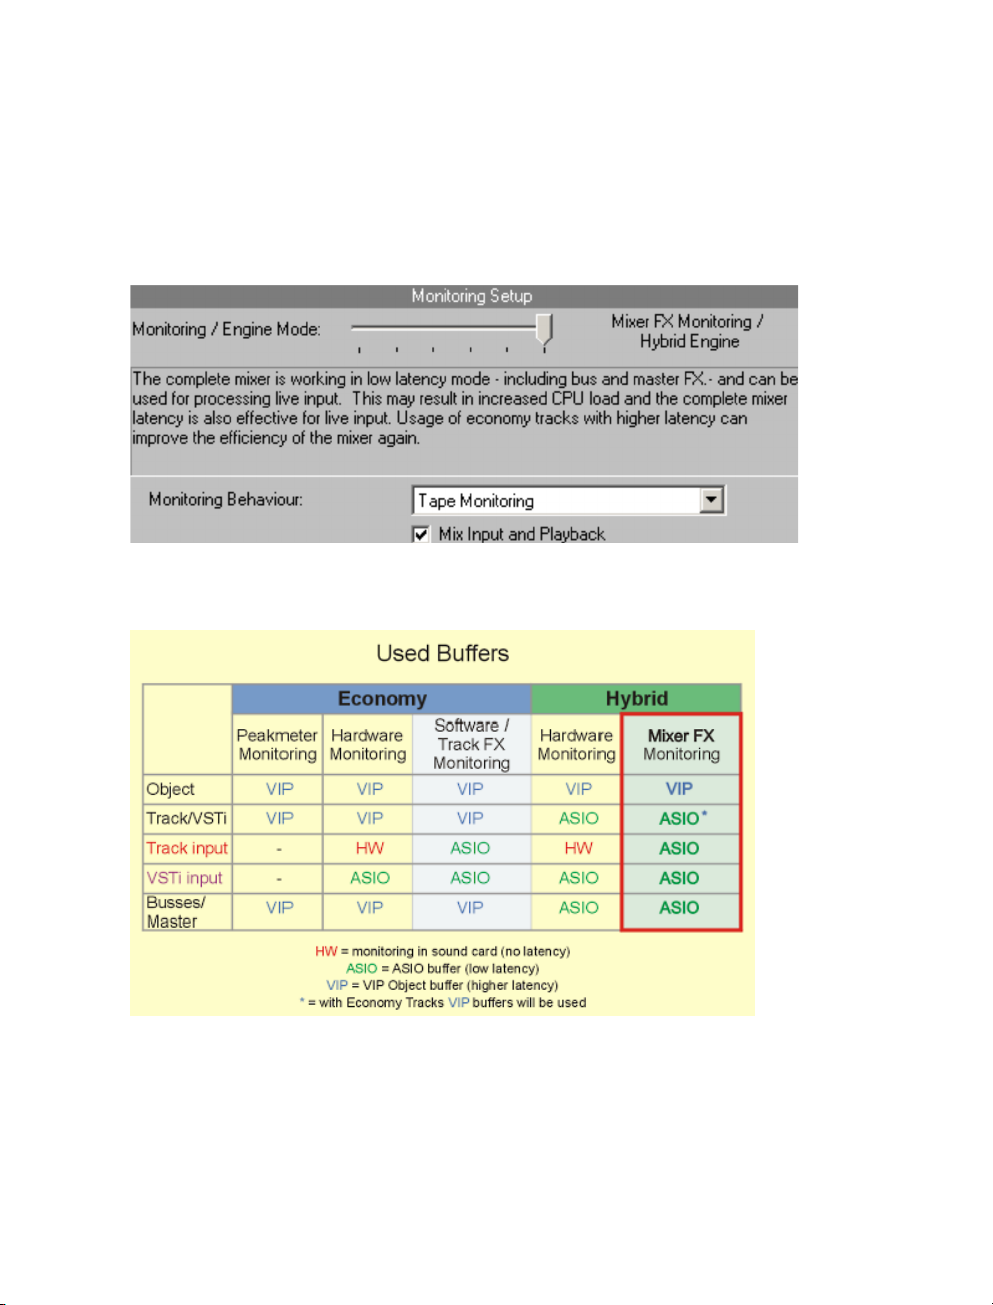
In most cases, we recommend using the "Mixer FX Monitoring/Hybrid Engine".
For each selected monitoring setting, a matrix display also opens to indicate which buffer
sizes are used and what effect the currently selected engine mode has on the latencies.

28 SYSTEM SETTINGS
Hybrid Audio Engine
In general, "Hybrid" refers to a system in which two separate technologies are combined
with one another. Samplitude's Hybrid Audio Engine is a special combination of a Low
Latency Engine and the classic Samplitude Playback engine with higher latency. The Low
Latency Engine calculates live input signals and the output of the playback engine. This
provides short reaction times for calculating track effects and also provides monitoring with
low latency. The classic playback engine saves resources and enables integration of highperformance effects.
The Hybrid Engine provides a combination of Low Latency Engine and a classic engine for
calculating the track and effects. For example, processor-intensive VST instruments may
be played via the so-called "Economy" tracks (see below), while only the VST instrument
that is being recorded is calculated by the Low Latency Engine.
Go to system settings (shortcut "Y") ->"Audio Setup" -> "Driver System" and select
"ASIO". "Monitoring settings" features the mode "Mixer FX monitoring/Hybrid Engine".
Mixer FX monitoring provides audio monitoring including all insert and AUX effects and also
calculates the playback tracks with the least mount of latency. The entire mixer may
therefore operate in "Low latency" mode, including the bus and master effects, and it may
also be used for editing input signals.
SYSTEM SETTINGS 29
Economy track
If you have selected the ASIO Hybrid Engine as the driver system, you may take individual
tracks from the Low Latency Engine and calculate the track effects with a larger VIP buffer
size for VIP objects during playback. This saves the system's processor from being
overloaded.
To switch a track to "Economy", select the menu item "Track -> Track properties ->
Economy track".
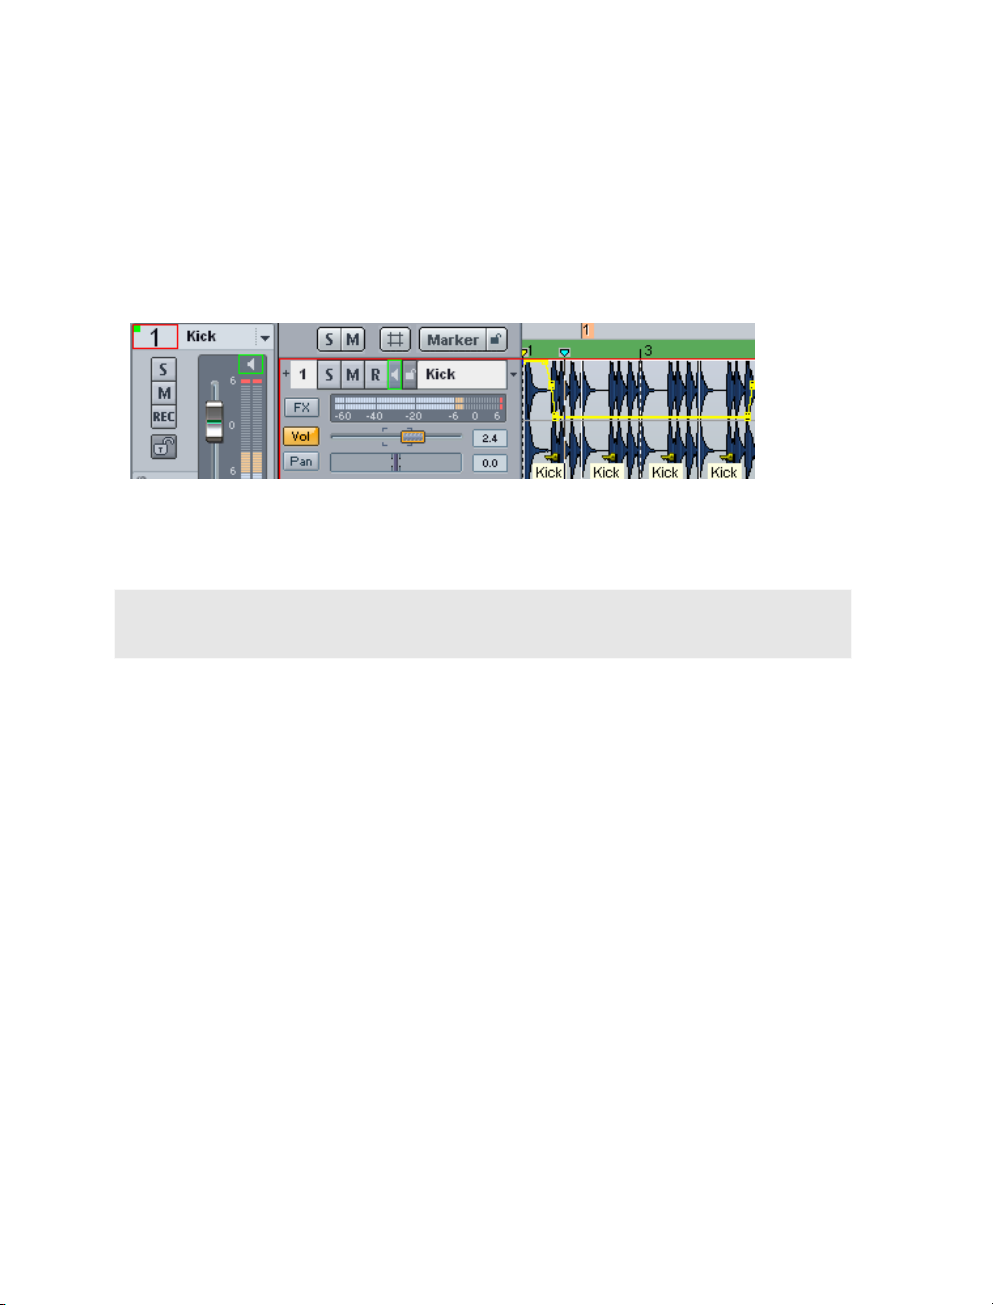
Economy tracks are indicated by a green dot in the volume display of the mixer's
corresponding channel and in the track editor. The "Volume" button for the track is framed
in green.
Note: The Hybrid Engine compensates for latency of track effects in economy tracks so
that the total latency of the mixer does not increase for other tracks.
Overview of monitoring/engine modes
No audio monitoring (peak meter only): Displays the input level, but muted.
Hardware monitoring: Audio monitoring via sound card or external mixer hardware. This is
the only monitoring type for MME drivers; for ASIO, many sound cards are able to process
functions directly such as mute/solo, volume, and pan. For large ASIO or VIP buffers,
minimal latency is able to be achieved with just a few samples. Effects may not be applied
to the input signal.
Software monitoring/economy engine: Audio monitoring includes the recording track
levels and software instruments. This monitoring option is only available with ASIO drivers.
No effects are applied to the input signals, and latency and CPU load remains the same,
even for complex projects.
Track FX monitoring: Audio monitoring including the track effects of the recording track.
This monitoring option is only available when using ASIO drivers. Connected effects may
therefore be monitored in recording tracks. Bus or master effects will not be included.
Hardware monitoring/Hybrid Engine: In this case, the complete mixer operates in "Low
latency" mode. This produces low playback latency. Monitoring of the input signals
depends on the sound card being used.
Mixer FX monitoring/Hybrid Engine: The Hybrid Audio Engine enables audio monitoring
throughout the entire mixer and also calculates playback tracks in the mixer with short

30 SYSTEM SETTINGS
latency. You may therefore also mix data from the hard drive with the lowest possible
playback delay. We recommend this mode for input signals as well as for live mixing with
hardware controllers, since this guarantees access to all bus and master effects.
Applies to all monitoring modes: Track effects in the recording track will not be included
when recording. However, the recorded track may be saved along with all track effects
afterwards via the "Trackbouncing (view page 456)" function.
Note: If you use "TotalMix" from RME in combination with a hardware monitoring mode,
then set the panning law in "TotalMix" to -6dB. This helps ensure that the recording level in
Samplitude matches the monitoring levels in "TotalMix".
Mode switching
Tape monitoring (preset): In STOP and RECORD states, the input signal is played; in
PLAY state, the track content is played.
Manual monitoring: With the help of the loudspeaker button in the track head or the track
editor, you can manually switch on the input signal for monitoring. This mode is only
effective when the ASIO driver system is used.
Mix input and playback: If you put a check mark here, then you will be able to hear the
input signal during running playback too, if track monitoring is active.
Other than the system options in the audio setup, the monitoring settings and switching
processes are available to you by right clicking "Mon" directly. This displays two more MIDI
recording options:
Automatic MIDI record switch on current track: This option ensures that MIDI tracks are
always ready for recording as soon as they are selected. You can recognize this by the litup pink record buttons.
Automatic MIDI monitoring (thru): If this option is selected, then every MIDI track which
you activate for recording will be switched on, i .e. you will always immediately hear the
input signal for this track.

SYSTEM SETTINGS 31
Audio devices
Select the inputs and outputs (devices) for the installed sound cards used by the program
in this dialog.
By clicking the box to the left of each respective device, you can activate and deactivate
them as desired. Set the sequence with the arrow keys. The "Reset" button activates all of
the devices displayed. For ASIO, only the first 4 stereo channels will be activated
(standard). If you hold the "Shift" key, then all devices will be activated. Clicking the button
"Device info" opens the control panel for your sound card. Press "Rename" to customize
each device name individually.
MIDI setup
Samplitude offers comprehensive MIDI functions. MIDI files may be imported, inserted,
edited with an external editor, and played back. In addition to MIDI timecode
synchronization, the other main use is for accessing external and internal sound sources
such as synthesizers and VST instruments. External hardware controllers may be accessed
remotely via MIDI access signals.
Note: For seamless work with MIDI, please always use the monitoring settings "Track FX
monitoring", "Hardware monitoring/Hybrid Engine", or "Mixer FX monitoring/Hybrid
Engine".

32 SYSTEM SETTINGS
Global MIDI devices
Open the System options – MIDI via "File > Program preferences > MIDI options" and
then set the global playback and global record device. The set devices are used to play
back MIDI files directly, and they are also used for the standard settings for new tracks.
You can rename the devices at any time.
Record offset
Enter a recording offset value in milliseconds to determine the time difference which passes
between a MIDI command and placement in the arrangement.
Samplitude places played notes in the MIDI object on the right according to the set time,
i. e. MIDI notes are delayed and displayed later in the timeline.
Retrospective MIDI recording
Activate the "Retrospective recording" option here for the same function available under
"Play/Rec -> Retrospective MIDI recording (view page 596)". Samplitude creates a MIDI
object to the selected, recording-ready MIDI track that may b
e adjusted in terms of buffer
length.
Audio/MIDI synchronization
Force sync specifies how precisely Samplitude synchronizes MIDI tracks with audio
tracks. On faster systems, this setting should be at 100% in order to achieve the closest
sync between the MIDI and the audio. . If your system experiences difficulties synchronizing
the MIDI tracks with the audio tracks, select a lower sync reciprocation value. Normally,
you will also want to use sample-exact reference times from your audio device (e.g.
sound card) for audio/MIDI synchronization.

SYSTEM SETTINGS 33
Automatic volume fader mode for MIDI tracks
The behavior of the MIDI track's volume fader is preset to controller 7 (MIDI volume).
Alternatively, you can also select that "Volume fader" mode should not change for MIDI
tracks or that the volume fader for MIDI tracks should match the MIDI velocity scaling. New
MIDI tracks will assume the currently set Volume fader mode (view page 161).
Activate SysEx input
Selecting this option causes Samplitude to receive SysEx data from external devices.
Use system time for MIDI timestamps
If this option is activated, the MIDI device driver's timestamp will be ignored. This is helpful
if drivers provide a timestamp that is not synchronized with the audio or is completely
incorrect.
This function detects invalid driver timestamps and then falls back to the system time
automatically. This helps fix MIDI recording problems with MIDI devices.
Link VIP Q and MIDI editor Q
This option links the grid or quantization settings between the VIP and MIDI editor, i.e.
changing the grid/quantization settings in the VIP will automatically be assumed for the
grid/quantization settings in the MIDI editor and vice versa.
Deactivate all MIDI functions
You can switch off all MIDI functions in the MIDI projects or VIP projects. In this case, the
MIDI menu is removed from the menu list and the MIDI functions in the arranger, track
editor, and track settings dialog are no longer available.
Note On Chasing
"Note On Chasing" has the effect that held MIDI notes are also played back when they
receive their "Note On" command in the arrangement before playback starts . The MIDI
level activity display also for chased notes.
Send "All Notes Off" to VST instruments
As an alternative to the "All Notes Off" mechanism, an individual "Note Off" mechanism is
available for VST instruments, since "All Notes Off" is ignored by some VST instruments.
You can completely shut off "All Notes Off" for VSTis in the MIDI systems settings.
General
Shortcut: I, Ctrl + Shift + ´

34 SYSTEM SETTINGS
Here you can see the most important information about the current project at a glance.
This includes beat/BPM, recording, editing, and snap/grid settings.
Project options– Project
Sample rate (Hz): This indicates the project's sample rate. You can also change the
sample rate for the project and adjust Audio and MIDI objects to the modified sample rate.
Damping: Set level decreases in 6 dB stages. Volume reduction can be necessary when
working on multitrack virtual projects if you are working with 16-bit internal precision.
0 dB editing is definitely possible when working with 32-bit float internal accuracy, since
this prevents internal overmodulation. Simply set the sum levels to 0 dB via the master
mixer faders.
Note: Bear in mind that Samplitude reduces the volume of wave projects by the value set
in the virtual project. This way you can quickly toggle between virtual projects and wave
projects without the volume level changing. If, on the other hand, a wave project is the only
project opened (that is, without the virtual project it uses), it will always be played at
maximum volume.
Project start time: Specify the project's starting time here.
Project length: The project length is displayed here in bars and beats.
System options - Recording/Editing
Here you'll find various presets for recording and editing:
Lock recorded Objects: Protects against unintentional moving of recorded objects.

SYSTEM SETTINGS 35
Group object according to Multirecord: Objects that belong together will be grouped in a
multitrack recording.
Offline audio editing (only for Wave projects): Detailed information about destructive
editing is available in the chapter"Working in the project window -> Samplitude as a
wave editor (view page 108)".
to Crossfade Mode: Use this function to activate a mode which adds a crossfade to
Au
all newly recorded objects created from cuts or from wave projects which were dragged
into your project. Every object may be assigned a standard fade-in, and this can be
edited via the "Object editor fade" menu via "Get/set global crossfade". If two objects
overlap in this mode, a realtime crossfade will occur at the intersection.
CD arrange mode: If this is activated, Samplitude arranges newly added objects to insert
a Red Book Standard-compatible pause between the objects.
Project options - Bar/BPM
Bar/BPM/PPQ: Enter the bar type (counter/signature), the tempo in beats per minute
(BPM), and the timer resolution in peaks per quarter (PPQ/clicks per quarter note) here.
Get BPM from selected range: If you enter the number of beats into the field beside
"Selected range has beats:", then Samplitude will calculate the BPM based on the
selected range when the button is pressed.
Project options – Snap/Grid
Snap to: Switches the global snap on/off.
Objects: This option activates the object grid. This lets objects snap exactly to the edges
of other objects.
Range: Activates the range grid and enables the current range to be used as the basis
for snapping.
Beats/bars: Activates a grid with bars as the basis for snapping.
Bar grid (relative): Activates a grid with bars as the basis for snapping. The selected
object will maintain a relative distance to the snap markings when moved.
Grid/frames: Activates the frame-based grid.
Snap offset to project start: Sets the snap offset relative to the beginning of the project.
"Use current position for offset" specifies the current position as the grid's zero position.
Show grid: If a check is placed here, then the grid will be displayed for the project
according to the unit set in the selection box beside it.
Use snap offset also for grid: The snap offset is used as a reference size for the grid.
Project options - Standard pitch for tuner (Hz)
This field indicates a standard pitch of A at 440 Hz. You can change this value anytime you
like.

36 WHAT'S NEW IN SAMPLITUDE PRO X/PRO X SUITE?
What's new in Samplitude Pro X/Pro X Suite?
64 Bit Version
Sequoia_x64.exe or. Sam_x64.exe with 64 Bit memory addressing for 64 Bit-operating
systems (view page 16), i. e. no 2 GB limit.
VST plug-in handling: Automatic "bridge" handling i. e. you can load 32-bit plug-ins in
the 64-bit system and vice versa.
You can change projects from 32-bit to 64-bit.
In the 32.bit version, by pressing the shift key, the 32-bit plug-in will run with the bridge -
meaning that there is more memory available in the 32-bit version.
Restrictions:
-Restricted video functions (only MXV and WMV)
-No Rewire
-VST Bridge: no VST MIDI Out Support
Tempo-Map and Tempo track
Changes in tempo can be made using the marker or graphically using aTempo track (view
page 305). A tempo track contains the project's tempo map as an automation curve.
The tempo map displays all the tempo markers and determines the musical positioning
for each time position.
In the Tempo-Map dialog (view page 308) you can specify which objects or markers in
r position should be adjusted when tempo changes are made.
you
Revised visualizations
The visualizations (view page 798)have been completely reworked. They have a new
design.
The new interface allows you to design multi-visualizations individually. You can integrate
the visualization interface into the Docking Bay (view page 51) or open it in its own window.
A surround visualization (view page 806) is now also built in.

WHAT'S NEW IN SAMPLITUDE PRO X/PRO X SUITE? 37
SE-cleaning effects
DeClipper SE, DeClicker/Decrackler SE, DeHisser SE, DeNoiser SE are called the new
SE-Cleaning-effects. These restoration tools (view page 666)offer a range of functions that
are straightforward to use, practical on a day to day basis. With as few faders and little
space on the screen you get an overview of multiple instances in the project. The SE
restoration tools in Samplitude don't use many resources. With the optional "Cleaning /
Restoration Suite" you have access to the full versions with an enhanced range of
functions.
Advanced Docking-/Manager concept
Advanced Docking-/Manager concept
In addition to the Manager windows now Visualization, Time display, Transport
console, Sound pool, Object Editor and MIDI Editor are grouped by default in a
"Docker" (view page 50). This allows you to individually choos
need for your workflow.
e the display windows you
Advanced Docking concept (view page 51)
Moreover you can dock certain dialogs and windows to areas in the VIP interface or to the
docking bay.
Undocked windows may be docked to the areas provided in the VIP by double clicking the
title bar or by clicking the title bar and moving with the "Ctrl" key pressed.
Vice versa, an individual window may be undocked by clicking the title bar or by double
clicking the handle area.

38 WHAT'S NEW IN SAMPLITUDE PRO X/PRO X SUITE?
Revised Object Editor
Object Editor (view page 114) and MIDI Object Editor (view page 244) have been revised
and have new graphic interface designs.
Integration in the new docker
"To all" is now a status button:
- Changes (Volume, Fades, EQ....) are immediately transferred
- Changes in effect dialogs after closing the editor
- edited plug-ins are transferred individually
- volume changes are transferred relatively
- EQ is always completely transferred
Configure using right click
Mute/Inverse button for individual channels available in the Context menu
Volume fader up to +12 dB
Comments field
4 slots for copy & paste purposes (global)
Solo button
Object Automation for EQ, Pan (not for 2-channel volume / pan), Object-surround
(Drawing of a range is supported)
FX presets (*.obj)
Offline FX menu
Advanced essentialFX Suite
The essentialFX Suite (view page 685) has been endowed with 10 first-class effect plug-ins
and is suited for all every day studio applications. In addition to high-quality algorithms,
great importance was placed on practical icons for the individual parameters and the
effectiveness of the function. The uniform operation concept, combined with low resources
demands for top quality production, makes the essentialFX suite a collection of high-quality
audio tools for all-around tasks.
The essentialFX Suite consists of the following plug-ins:
efx_Compressor
Classic compressor with soft clip function and advanced sidechain filter feature.
eFX_Gate
Flexible gate with optional soft knee characteristics and sidechain filter function for ducking
effects.
eFX_DeEsser
Dynamic plug-in for reducing unwanted sibilants in recordings containing speech and
vocals.

WHAT'S NEW IN SAMPLITUDE PRO X/PRO X SUITE? 39
eFX_VocalStrip
Optimized channel strip with compressor, DeEsser, gate, Highpass filter and one shaping
for recordings containing vocals or speech.
eFX_Tubestage
Authentic analog tube amplifier with oversampling mode simulation.
eFX_Reverb
Reverb plug-in for creating versatile reverb effects - from short to long reverberations.
eFX_StereoDelay
Stereo delay with individually adjustable delays for both channels, as well as tempo sync
function.
eFX_ChorusFlanger
Traditional chorus/flanger effect with adjustable rate, depth, feedback and mix settings.
eFX_Phaser
Classic phaser effect with adjustable rate, depth, feedback and mix settings.
eFX_TremoloPan
Tremolo effect with optional tempo sync function and parameters for rate, shape, tremolo
and panorama.
Soundpool manager
In the Docker's Soundpool Manager (view page 157) you can integrate, listen to and
arrange loops effortlessly.
Independence
Included in the package is the "Independence" sampler with 12 GB of content for
Samplitude Pro X and 70 GB Content for Samplitude Pro X suite or Sequoia.
This gives you access to hundreds of customized, music based software functions. The
intuitive user interface and file management system, the ultra fast streaming integration,
multi-core processor support and the Auto-RAM-Cleaner will enable you to store and use
an huge number of instruments in seconds.
Note: Detailed information about "Independence" can be found in the PDF document.
Content Packs
The Content Pack 1 puts 3 GB of current drum-, percussion-, guitars- , bass-, brass-,
vocals-, woodwinds-, piano-, harp- and effect-loops at your disposal for use with
Samplitude Pro X. The loops are divided into numerous music styles and varying
tempos (BPM).
The Content Pack 2 makes 4 GB of content categorized by music styles, instruments
and BPM available for Samplitude Pro X Suite and Sequoia 12.

40 WHAT'S NEW IN SAMPLITUDE PRO X/PRO X SUITE?
True Resynthesis Timestretching (TRTS) (offline)
In "True Resynthesis Time Stretching (TRTS)" the signal is broken down into individual
components, with the amplitude and frequency modulated oscillators - simple synthesizers
-are reproduced faithfully. If these synths play longer or shorter a Timestretching effect will
be created.
You can do Timeline stretching (view page 651) using TRTS. The typical compression
artifacts and as
sociated non-uniformities will not occur. The algorithm is universally
applicable. Due to linear work practices TRTS is particularly suitable for very small and very
large Timestretch factors.
Spectral view
The Spectral view (view page 496) is split for the left and right stereo channels (stereo
representation)
Activate Spectral view by going to "File > Program Preferences > System/Audio >
Design > View options".
Spectral display and Comparisonics view are now available for individual VIP objects:
"Object > Object color/name"
Various colour palettes are available
Graphical data is saved as *hs files.
Spectral mode
Menu "Edit > Mouse mode > Spectral mode"
With the new "Spectral mode (view page 72)" you can remove noise from a track object,
without the wanted signal being audibly influenced. Editing can be done directly in the
Arranger window by dragging a range.
Multifunction input field with help-function
Command search bar for Finding menu commands and help topics (view page 78)
A maximum of five results from the main menu are displayed, which can be directly
selected.
Moreover up to four results will be displayed in the help index.

WHAT'S NEW IN SAMPLITUDE PRO X/PRO X SUITE? 41
Controller Artist Series support
Samplitude supports the Controller Artist Series (view page 374). Artist Mix, Artist Control
and Artist Transport are all part of this. These controllers are controlled using the EUCON
protocol, which can be activated in the Hardware Controller Settings (view page 360).
Note: Windows 7 is a requirement if you want to use the Artist series.
New MIDI functions
The MIDI Editor is now integrated into the Docker (view page 50) in the new version.
Transposition: (view page 253) Here you can transpose the pitch of selected events into
half steps.
MIDI Timestret
ching: With this function you can make various changes to selected
events, e.g
double the tempo
halve the tempo
scale to range length.
manual stretch. This allows you to enter individual values in the Stretch Factor field.
Reverse: With this function you can reverse the playback sequence. The events move by a
further quantization step each time they are reversed again.
Mirror melody: This function mirrors the selected events in terms of the pitch of the reselected event.
Further new MIDI features:
New Snap setting bars (view page 66) for bar snap and quantization.
ly one button for the mouse mode "Pen". Now there is a graphic selection menu for
On
pen mode.
Score anti-aliasing (binds, beams).

42 WHAT'S NEW IN 11.2?
New functions
Access to automation directly in the effect dialog: In many effect dialogs you now have
direct access to the automation button and therefore to the automation menu. This is
made possible by a newly created header (view page 179) in the respective dialogs,
which also provide presets and, where needed, A / B comparison functions.
The new command Menu Edit > Tempo > Create click track creates an audio track,
which contains all metronome click as objects.
BitMachine (view page 663) for creating „Lo-Fi“-Sound.
AAF/OMF Import and Export. Export: File > E
461) Import: File > Open > Import AAF/OMF (view page 441)
xport project as AAF/OMF (view page
EUCON
Surround functions (view page 224) for Samplitude Pro X.
TM
Interface for Euphonix Controller Artist Series (view page 360).
What's new in 11.2?
Options administration/Remote/User administration
Note: If you work with "Remote Logins", please extract the contents from
"RemoteSetupTools.zip" in your remote directory, because changes were made to
"AdminCreator.exe" as well as "remote_setup_copy_from_server.bat".
User-specific templates are now stored in "fx-preset/user_name/templates".
If user-specific templates are available, they will only be shown to the user when creating
a new project. If these templates don't exist then the templates of the local admin will be
displayed.
The auto jam session continues working with the templates in the template directory of
the local admin, not with the user-specific path.
Templates are now also saved in the INZ container. If there are no user specific
templates available, the templates of the local admin will be saved.
When importing INZ containers, previously available user-specific templates are deleted.

WHAT’S NEW IN VERSION 11.1? 43
"Recent Files list" and work paths for remote users are saved separately for each remote
user in the "audio.ini" of the admin (in other sections)
Current "Recent files list" is kept if you import INZ containers. You will only encounter
troubles if the "audio.ini" e. g. is overwritten by an admin when loading INZ containers.
Query when deleting a user profile in user administration.
New functions
Cue mode: Objects that are split by crossfades of hard cuts are seen as a group.
Clipstore: When transferring clips that contain multiple objects into the VIP, all clips will
be renamed with the clip name
Marker manager: double clicking on the marker opens the Name Editor
Object manager: Dragging & dropping objects in the Arranger is possible
Object manager: Context menu entry "Duplicate object"
Root VIP editing now also for surround objects
Hardware Controller: updated HUI templates (HUI, Mackie HUI, DM2000, O2R)
What’s New in Version 11.1?
Multi-track selection
To execute the multi-track selection (view page 98) option, select multiple tracks by
clicking the respective track numbers/track ranges while holding down the "Ctrl" key
or the "Shift" key.
Track box context menu: "Track properties > Group track controls"
In order to remove a track from an existing multi-track selection, hold down the "Ctrl"
key and click the track name.
In order to clear the selection, click a track below the selection or use the
Track box context menu: "Track > Ungroup track controls"
Note: Multi-channel selection in the mixer functions exactly like multi-track selection in the
arranger, i.e. by clicking the track number/name while holding down the "Ctrl" key or
"Shift". In order to clear a group of channels, click a channel before than the selection.

44 WHAT’S NEW IN VERSION 11.1?
Multi-language version – one EXE for all languages
The program will be installed in the language corresponding with your Windows system
settings. After installation, you may select freely between English, German, French,
Spanish, and Italian by accessing the program folder "Samplitude" and then double
clicking the file "Install.cfg"; in the code line titled "language=", enter the abbreviation for
the desired program language:
E or US for English
D for German
F for French
I for Italian
ES for Spanish
If another language code is entered, Samplitude will reinstall in the language featured by
your Windows system settings.
After you have saved "Install.cfg", the program will display the desired language version
the next time it is started.
Options management
During loading, the current state will be saved as a "Backup" (view page 483).
During saving, check boxes and the file name may be preset.
Check boxes may be changed during loading.
Loading via the "Load and restart" button.
INI patches for easily setting INI options
INI patches: (view page 483) Collection of diverse INI entries in the "Customize" folder.
I patches: Load via the "Load" button in "Option administration".
IN
INI patches: Displays a short info text.
INI patch: Option to apply or reset.
Metronome
New option for metronome pre-counting with or without VIP playback: "Play VIP during
pre-count (view page 84)"

WHAT’S NEW IN VERSION 11.1? 45
Vandal
(Vandal in Samplitude Pro X Suite/Vandal SE in Samplitude Pro X)
New presets and floor effects (view page 750)
Visit http://www.vandalamps.com for more information.
Version limits of Vandal SE versus Vandal:
1. The SE version of Vandal only includes the following stomp boxes (floor effects):
La Crema Overdrive
Hellfire Distortion
Chorus
PhaseShifter/tremolo
2.MIDI scenes & MIDI control are not included.
3.Guitar and bass amp, detailed microphone settings, and pre and power amps cannot be
selected manually, rather only via "Presets & templates".
4. The SE version does not feature "Scene memory"; in this case, a preset only includes
one individual scene. If a preset was created using the full version, then only the first scene
will be used.
MIDI
Updated presets for "Create MIDI object": MIDI drums and MIDI phrases (filter sweep, 6
octave sequence, etc.)
New MIDI tracks now assume the set volume fader mode (view page 161)
ve template selection is now in the drum editor and drum map editor as well
Groo
<ALL> may now be selected as the MIDI input device (view page 88) for a track
Improved SMF MIDI file import (view page 242)/export (view page 456)
System options > Design > View options > VIP
The system options also allow you to set the following parameters via "Design > View
options > VIP (view page 491)":
CPU peak meter: If this option is activated, the peak meter in the track header
displays the CPU load per track. The upper peak meter displays the load on the
Economy Engine for the left channel, while the peak meter below this displays the load
on the Low Latency Engine for the right channel. In this case, a display value of 0dB
equals a load of 100%.
Compressed wave display: This display option causes the waveform to be distorted
according to the zoom level. The transition from silence (less than –90 dB) to signals with
lower levels (e.g. noise) is also shown more clearly.

46 WHAT’S NEW IN VERSION 11.1?
System options -> Performance
The maximum CPU number for audio processing may now be set via !System options >
Performance (view page 477)" (new standard: 3)
New functions
New menu command "Tempo > Hard quantize object position"
New menu command "Tempo > Soft quantize object position"
The "Insert" buttons on the mixer (view page 158) now activate all effects (effects
inserts + plug-ins) for the individual tracks as
indicator (*) is displayed for plug-ins that were previously active and are active the next
time "Insert" button is pressed. For old projects with a deactivated "FX" button, this is
activated as the individual plug-ins are deactivated.
The upper "AUX" button in the mixer now switches all AUX paths between active and
inactive, effectively making it an AUX bypass switch.
Object mode "Lock objects (view page 77)": Holding down the "Alt" key at the same
time temporarily removes th
e mode for the selected objects.
CD-Text character count in the CD-Text editor
File manager (view page 138): Folders may now be deleted in the directory tree
Improved recording performance
Impro
Addition
ved synchronization (view page 347) with SMPTE and APP
al improvements to details and bug fixes
well as in the master module. A visual

SCREEN ELEMENTS 47
Screen Elements
What is a VIP?
VIP (virtual project) refers to the basic project window for a Samplitude project. This
provides a graphical framework for you to edit the project and navigate throughout the
arrangement. The VIP covers all toolbars and buttons, the arranger, track header, track
editor, transport console, and status display.
Furthermore, .vip is the file extension for virtual projects in Samplitude.
Program interface – Overview
VIP window:
1. Title bar: The title bar is located at the top of the window. This contains the name of the
application and the project. To move the entire window, simply click the title bar and move
it as desired. You may also move dialog windows by dragging them by their title bar.
2. Menu bar: Menus are located directly beneath Samplitude's title bar. Every menu entry
may be assigned to a keyboard shortcut. Click the icon in the above left of the mixer's title
bar or in the arranger to select different skins for the program.

48 SCREEN ELEMENTS
Detailed information about how to use menu items and keyboard shortcuts is provided in
the menu reference, help file, or in the "manual.pdf" documentation under "Menu File ->
Program Preferences -> Edit keyboard shortcuts and menus (view page 488)".
3. Toolbars: Toolbars consist of buttons that execute specific commands or specify
states. They are ordered above and below the arranger in groups. You can move a toolbar
group by clicking on the left separator and dragging with the mouse.
Right clicking an icon opens a context menu. Hide the selected bar or show large
symbols in it. "Edit Toolbar" opens a dialog to individually remove current buttons or add
other available buttons for the selected bar.
The command "Edit Workspace" may also be used to activate and edit the individual
toolbars and to show or hide menu items.
More information about the toolbars is available in "Toolbars - Overview".
The context menu entries "Camo", "Canis", "Star Gray", "Samplitude 10", "Samplitude
9" and "Samplitude 8" provide options concerning how the buttons are displayed (view
page 481).
4. Grid/marker bar: The grid/marker bars are positioned above the first track in the VIP. In
the upper half (if two grid bars are displayed between both grid bars), you'll find the marker
bar, where the markers and playback cursors can be positioned. The grid bars display the
project time in relation to the selected measurement unit. You can also open various
ranges. You can use two grid bars, for example one for beats and one for SMPTE time. To
show both grids, move the play cursor by dragging with it the mouse across the upper
grid. If only one grid is displayed, then the play cursor can be moved by dragging the
mouse in the marker bar.

SCREEN ELEMENTS 49
Display second grid bar: Use the grid bar's context menu to activate a second grid bar
in the arranger and set your own measurement unit (2. Show grid bar).
Both grid bar positions can be exchanged (Swap grid). If you select "Independent time
format" in the transport window, the upper grid will adapt to a chosen BPM grid, unlike the
lower grid.
This way it's possible to select an SMPTE format independent of the project frame rate,
which provides an overview of two different SMPTE displays. The option "Activate
docking for transport window" switches on docking options for the transport window.
5. Arranger: Displays the VIP project tracks together with the audio and MIDI objects.
There are many commands for moving (scrolling (view page 101)) the visible portion of the
arranger and customizing its size (zooming (view page 99)). These can be opened via the
"View" men
u, the grid/marker bar, and the shortcut keys.
6. Track header: The track header is at the left in front of a VIP track. Besides the track
name, it contains various control elements, like mixer functions and automation. More
information about the individual controls of the track header can be found in the track
header (view page 60) overview.
7. Track editor
8. Setup / Zoom / Position buttons: This part of the work area helps manage each of the
four different setup and zoom settings (range and zoom settings of the VIP window shown
in the project clip). Similarly, the "Pos", "Len", "End", "Mouse", and "Mixer" fields can be
configured by right clicking them.

50 SCREEN ELEMENTS
9. Status bar: The status bar appears at the bottom border of the VIP window. Here, you
will find about CPU overload, latency, buffer, and current operations like loading, saving,
effect calculation, etc. You can open the status bar also via menu "View > Toolbars >
Status bar".
10. Transport console (view page 52)
11. Manager / Docker (view page 50)
12. Visualization (view page 798)
Managers / Docker
Menu "View > Managers / Docker"
In addition to the manager windows (view page 138) now visualization, time display,
transport console, sound pool, object editor and MIDI editor are grouped as a tab window
by default in a "Docker". This allows you to individually choose the display windows you
need for your workflow.
Every docker can be minimized by minimizing an opened tab window. If you click a tab
again, the docker will be maximized again.
Using the "+" key, you can open a new tab in the docker.
To remove a listed tab window again, just drag this out of the Docker lead or double-click
on the appropriate tab window. The corresponding dialog window will now appear in its
own window.
You can return the window to the docker through repeated double clicks or by dragging
the window onto the tab bar.

SCREEN ELEMENTS 51
Docking
In Samplitude you can dock certain dialogs and windows to areas in the VIP interface or to
the docking bay. The docking handle ranges for docking and undocking are found at the
top of the respective window and, in a docked state are distinguished from the selected
skin by a bar or double line.
In a undocked state the corresponding dialog appears with a conventional title bar.
Undocked windows may be docked to the areas provided in the VIP by double clicking the
title bar or by clicking the title bar and moving with the "Ctrl" key pressed. When moving
windows an arrow symbol appears on the interface. Move an undocked window with the
mouse pointer onto one of the arrow symbols this results in the area which docks when
you release being displayed as a transparent rectangle.

52 SCREEN ELEMENTS
Vice versa, an individual window may be uncoupled by clicking the title bar or by double
clicking the handle area.
Also inside the docking bay you can place and arrange new windows. Move the respective
window using the mouse pointer onto one of the arrow symbols in the docking bay.
The docking function is available for the following windows:
Manager
Visualization
Time display
Soundpool
Object Editor
MIDI-Editor
Transport console

SCREEN ELEMENTS 53
Transport console
Shortcut: Ctrl + Shift + T
Transport console with "Camo" skin
The transport console contains the most important commands for playback, recording,
and positioning.
Transport console with "Star Gray" skin
Play / Stop / Fast forward / Rewind buttons: Use these buttons to control the
positioning like a cassette player.
Right mouse click on play button: Opens the playback parameter window for stereo
master operation. This allows you to specify the sample rate, playback device, and
scrubbing/varipitch options, etc.
Right mouse click on record button: This opens a dialog for setting recording options.
You may also start stereo or mono recording from here directly.
Record button: This button begins recording for all active tracks, i. e. tracks featuring a
red "R" button in the track box.
Time display: Displays the current playback position. The unit of measurement can be
selected by clicking on the small triangle.
Range buttons: You can save ranges with buttons "1" and "2". Using the arrow symbol
you can open previously used ranges.
L/E time display: Displays the length and end position of an area and can be edited by
double clicking.
"Marker" button: This button opens the marker manager for further marker editing.
More information can be found in the chapter "Manager -> Marker manager" (view page
147).

54 SCREEN ELEMENTS
Marker buttons 1...12: The current play position may be saved to one of the 12 marker
buttons by clicking. If one position has been saved, the marker will appear bright. Another
click on the same marker moves the play position to the corresponding marker. Rightclicking deletes the saved marker again, making it available again to be allocated.
Recording modes: Here you can set up the appropriate recording mode.
Standard mode (playback while recording): This is the typical recording mode for multi-
track productions. Here, the currently active tracks are recorded. The other tracks are also
played back.
Record without playback: If this option is selected, playback of existing objects is
deactivated during recording, and the play cursor remains at the beginning of the
recording. Playback may be started manually, for example in case "read after write" is
required. Set the play cursor at a different position and start playback by pressing the
"Play" button. The recording will not be interrupted by doing so. This way, changes to
previously recorded material can be made without affecting the recording process.
Only Sequoia: In record mode Record without playback/read after write You can use
the export function even during recording.
Punch marker mode: In this mode, only the range between the punch start marker and
punch end marker is recorded. This setting corresponds to the "Punch" button (see below).
Auto Jam Session: Opens the "Auto Jam Session“ window.
Detailed information about "Auto JamSession" is available in the reference manual, the help
file, and in the "manual.pdf" documentation under "Playback -> Auto JamSession (view
page 591)"
"Mon" button: This button activates the Samplitude's record monitoring feature; all tracks
with an active "R" button display the relevant input signals in the peak meters. Right
clicking the "REC M" button lets you select from the various monitoring modes.
Please also read the chapter "System options > Global audio options > Monitoring settings
(view page 27)" for more details.
"Sync" button: This button opens the dialog with the synchronization setup.
More information is available in the chapter "Synchronization (view page 345)".
"Punch" button: This button switches Samplitude into Punch Marker mode. In this mode,
only the range between the punch starter marker and the punch end marker is recorded.
If you have not previously created a punch marker, one will be set automatically when you
press the record button. If the recording is started when punch markers already exist, the

SCREEN ELEMENTS 55
recording button will flash until the start marker has been reached as well as once the end
marker has been passed. It will light continuously during the actual recording between the
markers. End the punch recording by pressing the record button again; playback will not
be interrupted. Playback will stop if you press the "Stop" button.
"In" button: This button sets the starting point for a Punch recording.
"Out" button: This button sets the end point for a Punch recording.
Additional Punch In/Out markers can be set by holding down the Alt key.
"Loop" button: Use this to switch into Loop mode, that is, a specific range is played
repeatedly.
MIDI record modes: The following MIDI record modes are available: normal, overdub,
multi-overdub, and replace. The different modes determine how the newly recorded MIDI
files will be added to the VIP.
More information can be found in the chapter "Samplitudequick start -> Workshop:
recording (view page 80)".
Tempo section: The tempo section displays the tempo at the current position. You may
change the playback speed and the tempo of the complete arrangement. All objects in the
VIP are adjusted to the most recent speed value by moving them or stretching them.
The "Beat grid/snap (view page 66)" button enables you to activate and display
the beat grid.
Use the "CLICK" button to switch on the metronome click. Right clicking the
"CLICK" button opens the metronome options window (view page 84) to
configure the pr
e-counter and click volume.
Scrub control: The scrub control wheel can be used to adjust playback speed. This can
be used to find audio passages.
The buttons beneath it can be used to start playback forwards and backwards at a slower
speed. This too can be used to improve control over audio passages, like editing out
crackles or other errors later.

56 SCREEN ELEMENTS
Track Editor
Located at the left border of the arrangement window, the track editor enables quick
access to all of the most important track parameters of the selected track. Record and
monitoring status, volume, panorama, MIDI/audio in and outputs, plug-ins, AUX
sends, and EQ settings are displayed in well-arranged sections and can also be edited
via this view. All relevant settings of the corresponding track may be viewed without
opening the mixer or the track view in the arranger window.
Open the track editor via the corresponding track button at the bottom-left of the arranger
window beside the "Workspace" selection field or via the menu item "View -> Track editor".
1. Track number and track name: Double clicking on the track names allows them to be
edited. Right clicking the track name opens the "Track Options" dialog.
2. "S" button: Mutes all tracks except the selected one (track solo function).
Detailed information on the global solo modes can be found in "Global buttons -> Global
solo modes (view page 171)".

SCREEN ELEMENTS 57
3. "M" button: This button mutes the active track (track mute function).
4. The "REC" button: This activates the track for recording.
5. The "Lock" button: Protects objects in the track and prevents them from being
unintentionally moved or deleted.
6. The "Panorama" dial: This controls the position within the mix. Right click one of these
two control elements and the stereo panorama dialog (view page 220) will open to adjust
addition
al settings like panning laws or the stereo width.
7. The "Phase reverse" button reverses the signal phase 180 degrees. Right click on one
of these two control elements and the stereo panorama dialog (view page 220) will open
g you to adjust additional settings like panning laws or the stereo width.
allowin
Detailed information about the stereo editor can be found in the chapter "Stereo panorama
dialog (view page 220)".
8. The "Mono" button: This switch
es the track to mono processing from the input to the
pan controller. In particular, all track effects preceding the pan controller operate in mono,
which saves considerable CPU resources. The submix and AUX return buses always
remain stereo, however. If stereo objects are located in mono tracks, the mono share (L+R)
is generally played.
Right click one of these two control elements and the stereo panorama dialog (view page
220) will open to adjust additional settings lik
e panning laws or the stereo width.
For standard routing, only the post DX/VST plug-ins and post AUX sends are arranged
after the panorama controller, and are therefore calculated as a stereo signal. The routing
position of the pan controller, however, may be freely adjusted in the "FX routing" dialog.
If AUX sends are used, the AUX send panorama controller can be used for panning the
mono signals.
9. The "FX" button: Opens the dialog for specifying the effect sequences (view page 174)
and adding VST/DirectX plug-ins; right clicking this button also provides access to the
track effects se
ttings for the active track. These may be copied, inserted, reset, saved, or
loaded. Save your personal track effect settings in the program directory in "FX presets ->
Track FX". Of course, new subfolders may also be created. We've already included a
selection of useful presets, e. g. "Mid-side processing". The track effects settings of a VST
instrument may also be saved (including parameters and all subsequent track effects), and
transferred to other tracks.
10. The "MIDI" button This switches the track to MIDI recording and opens the MIDI
section (view page 58) of the track editor.
11. Volume input box
and volume controller.
12. The loudspeaker symbol switches on monitoring/playback of the incoming signals
when the "REC" button is active and if "Manual monitoring" is selected in the system
options. "MIDI thru" will be active here for MIDI tracks.
13. Control display: Shows both of the track's LED chains for the input and output signal.
14. The "Automation" button: This activates automation (view page 327) for the track.
15. Automatio
ns parameter selection field and automations control: Select automation
parameters and adjust the values with the corresponding controllers.

58 SCREEN ELEMENTS
MIDI
1. Arrow: Opens and closes the dialog box.
2. In: Opens the MIDI Input device menu.
3. Out: Opens the MIDI Output device menu.
4. Channel in: Set the MIDI Input channel.
5. Channel out: Set the MIDI Output channel.
6. Program: This button is used in MIDI mode for program selection of the MIDI
instrument. The first click activates this field, and the second mouse click opens the
program selection. When the menu is open, use the arrow and page up/down keys to
make your selection.
7. Bank MSB: Set the MSB byte for the "Bank select" MIDI message for controlling your
external instruments here.
8. Bank LSB: Set the LSB byte for the "Bank select" MIDI message for controlling your
external instruments here. The bank number is MSB value* 128 + LSB value.
9. Drum map: Here you can select a drum map (view page 270) for allocating MIDI notes
to the device-specific sou
available because the pitch is firmly assigned by the drum map.
10. Transpose: You can transpose the notes of the respective MIDI input or output up or
down here. This function works in real time, meaning that the MIDI files in the MIDI objects
will not be changed.
11. Velocity dyn: This button activates velocity dynamics as a real-time track effect.
nd. If a drum map is selected, the transpose function will not be
Detailed information about this MIDI effect, which processes the MIDI velocity dynamics,
can be found in "MIDI editors -> MIDI functions -> Velocity dynamics (view page 255)".
12. Input Q: In this case, the MIDI quantize settings (view page 259) are used to quantize
every recording offline. The original position may be restored via the menu item "Object ->
Quantize -> Reset Quantization".

Audio
SCREEN ELEMENTS 59
1. The "In" slot determines the audio input device,
e.g. your sound card inputs.
2. The "Out" slot determines the audio output
device. For example, this might be a sound card
output.
3. Delay: This sets the delay value for the track
4. Gain: This regulates the amplification level of the
input signal.
5. Plug-ins: You can use FX inserts, MAGIX plugins, DirectX, and VST effects for this track. Click the
button to the right of the field beside "Plug-ins" to
activate and open the "DirectX/VST plug-ins (view
page 174)" dialog to specify a plug-in setup for this
.
track
6. AUX: Specify the input for the aux sends (view
page 172) here
7. EQ: Contains the par
ametric EQ for this track.
Right clicking opens a convenient input window.
8. Comments: Track info section for quickly adding
notes on tracks.

60 SCREEN ELEMENTS
Track header
1. Control display: Shows both LED chains for the input and output signal for the track.
2. The "S" button (view page 171): Mutes all tracks except the selected one (track solo
nction).
fu
3. "M" button: This button mutes the active track.
4. The "R" button (view page 82): This activates the track for recording.
5. The loudspeak
6. The "Lock" button: This protects objects in the track and prevents them from being
unintentionally moved or deleted.
er symbol switches on monitoring (view page 27).
7. Clicking the track name or the track number selects the track. Repeated clicking the
track number causes the track's display height to switch between flat and high. Double
clicking on the track names enables them to be edited. If you want to add or remove a
track from the multi-track selection (view page 98), then hold down "Ctrl" while clicking the
ame. Right click the track name to open the track settings dialog; click the arrow to
track n
select additional track-relevant functions from the context menu.
8. Revolver tracks: Revolver tracks (view page 62) may be used to compile objects
differently for e
ach individual track. The combinations created for the corresponding track
may be accessed at any time in the revolver tracks menu.
9. Vol: This button switches on the level automation curve (view page 327). This allows
level adjustme
nts in the track to be controlled via an automation curve and drawn by
moving the channel fader.
10. Pan: Switch on panorama automation with this button.
11. Volume controller
12. Panorama controller (view page 220)
13. PL: Th
plug-ins to a tr
e plug-in selector (view page 92) assigns various insert effects, VST, or DirectX
ack.
14. Color selection (view page 74): If the right edge of a track header is clicked, a
selection menu will appear for you to specify the color of the track and its objects.

SCREEN ELEMENTS 61
Folder tracks
The command "Track > Insert new tracks > New folder track" adds a folder track in
front of the selected track. If a range across several tracks is selected before creating the
folder track, each of these tracks will be added to the new folder track.
The tracks in the folder track are displayed within a frame, and the folder track number is
appended with an "F" in the track manager.
If you want to delete a folder track, a dialog will ask to confirm if you really want to delete all
of the tracks contained in the folder as well.
Tracks can be moved into the folder via drag & drop by clicking on a free area in the
corresponding track box. The mouse pointer turns into a hand. Now drag the track into the
track header of the folder track.
Individual tracks can be removed from the expanded folder track again in the same way.
You can also copy folder tracks.

62 SCREEN ELEMENTS
The following functions work for all tracks found in the folder track:
Hide them via the track minimization button (-/+ symbols in the track header of the track
folder). All tracks included in the track folder are displayed in reduced size.
Mute, lock, and solo
Volume regulation All individual volume fader tracks are scaled relative to each other.
Focus for recording
All tracks in the folder track are displayed when the folder track is open. Each track
receives a border with the track color of the folder track. When minimized, the tracks found
in the folder will be hidden in the arranger. They will still be visible in the Mixer. Tracks of a
folder track are marked with the border color of the folder track in the mixer. Normally, all
tracks can be seen in the folder track along with their objects in a minimized state.
Section marking in the folder track is carried out across all tracks. You can use this function
for section-based cut operations across all tracks of the folder track.
Right clicking the track header of the folder track allows you to select a contained track as
a reference track. The objects of this track are displayed in the folder and may be used for
simultaneous object-based cutting operations.
Working with folder tracks and reference tracks:
1. Initiate a multi-track recording. This creates several grouped objects, one below the
other.
2. Select an area over all the objects that you wish to edit together. You can now create
a folder track.
3. Minimize the folder track and choose one of the contained tracks as a reference
track.
4. The object of the reference track can be seen now in the folder track instead of the
emblematic display of all contained tracks. All object editings, cuts, fades, and object
editor effects for this object are now applied to all objects of the track folder.
Revolver tracks
In Samplitude Revolver tracks are at your disposal. Revolver tracks can be used to compile
objects differently for each individual track. The combinations created for the
corresponding track may be accessed at any time in the revolver tracks menu.
Open the Revolver Tracks menu by holding down "Ctrl" and right clicking the track name in
the track header. If the new "Camo" or "Canis" skin is being used, then a button
specifically for this function is present beside the lock symbol.

SCREEN ELEMENTS 63
Before track objects are rearranged, select the option "New Revolver Track (copy)". The
track objects are copied as a new revolver track and a asterisk will appear before the track
name. The original objects may now be edited or repositioned to produce a different
version of the track.
Of course, the context menu may also be used to create a new, empty revolver track, to
delete the current one, or to display the the previous or next revolver track (shortcut: "Alt +
Page up" or "Alt + page down"). The command "delete revolver track" deletes the current
revolver track and displays the previous revolver track.
In the lower section of the dialog you can select which revolver track you would like to hear
next from the list of existing revolver tracks. The individual revolver tracks are numbered
and are listed by creation date and time.
Revolver Tracks are stored in the "TrackData" project subfolder.
To edit or view existing revolver tracks in the overview, open the take composer (view
page 152) for a particular track. This editor enables Revolver Tracks an
d object takes to be
edited, and the created Revolver Tracks are displayed under the individual takes.
Workspaces
The purpose of workspaces is to sort menu entries and toolbars in such a manner that you
have a good overview of the functions of Samplitude. Workspaces bundle commands for
certain tasks like mastering, editing, or recording.
As well as the Hide menu entries option (File > Program Preferences > Edit keyboard
shortcuts and menu... > Hide menu) and redesigning toolbars (right mouse click on the
toolbar), you can also save your settings as a presets.
You will see the selection box for the workspace at the bottom left corner of the Arranger
window. Some workspaces are already predefined. "Power User" shows collectively both
toolbar lists and commands.
Creating a new workspace: To create a new workspace, open the context menu by right
clicking on the workspace bar and then selecting "New workspace". You will now be
asked to enter a name for your workspace. The new workspace contains all settings of the
previously activated workspace as well as your current changes. All further adjustments
are automatically saved in the workspace. Manual saving is not required
Adjust the workspace: Open the context menu and click "Edit Workspace". Here you
can select which toolbar you want to have displayed in your new workspace. You can
activate or deactivate each bar individually, or add/remove individual symbols. You
may also hide menu items with the "Edit menu" command. Simply select the
corresponding menu item from the keyboard shortcuts and then press the button "Show
menu item" or "Hide menu item".

64 SCREEN ELEMENTS
Toolbars – Overview
All toolbars may be moved freely on the screen. To do so, click on the separator at the left
edge of the group of icons and drag the toolbar to the desired location. These will snap in
at different positions in the window. For example, you can also easily swap the position bar
with the toolbar.
Right clicking on an icon enables the skin for the buttons to be swapped, the size of the
buttons to be increased, shows or hides tools, or otherwise customizes the different
toolbars. You can also access the dialog "Edit Keyboard Shortcuts, Menu, and Mouse" via
"File > Program Preferences > "Edit Keyboard Shortcuts and Menu". The menus may be
individually edited via the corresponding buttons by either showing or hiding the different
items.
Detailed information about how to use menu items and keyboard shortcuts is provided in
the menu reference, help file, or in the "manual.pdf" documentation under "Menu File ->
Program Preferences -> Edit Keyboard Shortcuts and Menu (view page 488)".

To quickly sort a toolbar's individual buttons, click on the corresponding icon and drag it
to the desired position while holding down the "Alt" key. You can use the same method
to remove icons from the toolbar by holding the "Alt" key, dragging the icon outside the
boundaries of the toolbar, and then releasing it.
The following overview shows the presets:
SCREEN ELEMENTS 65
Toolbar: (left section)
New Virtual Project
Load virtual project
Load audio file
saving
Cut
Copy
Insert clip
Split Object
Glue objects
Undo the last action
Undo the last action
Auto crossfade mode
Crossfade Editor
grouping
Cancel grouping
Mixer

66 SCREEN ELEMENTS
Toolbar: (right section)
Set Marker
Set CD track index
Set CD sub index
Set CD pause index
Set CD end index
Automatically set CD track Markers
Create CD
Create DVD Audio
Grid toolbar/snap buttons
The grid toolbar is available in the toolbar. This enables important changes to be made to
the snap settings, without always needing to access the project options dialog (view page
33). Click the magnet button to activate the snap grid. Activating the button to the right
opens a contex
Objects: his option activates the object grid. This lets objects snap exactly to the edges of
other objects.
Snap to range: Activates the range grid and enables the current range to be used as the
basis for snapping.
Beats/bars: Activates a grid with bars as the basis for snapping.
Bar grid (relative): Activates a grid with bars as the basis for snapping. The selected
object will maintain a relative distance to the snap markings when moved.
t menu with the following snap settings options available:

SCREEN ELEMENTS 67
Grid/frames: Activates the frame-based grid.
Specify the snap length (for beat snapping only). Values range from every 4 beats, every 2
beats, every beat, musical measure and same as quantization.
The setting Musical measure means that, signatures based on quarter notes serve as a
quarter snap unit, and time signatures based on eighth notes serve as a eighth snap unit.
The snap therefore follows the time signature and observes any time signature changes.
Note: When snap is activated the play cursor jumps in the transport console according to
the snap values, even when using the fast forward and rewind buttons. If you would like to
temporarily shut off the transport controls, press the "Alt" key simultaneously.
Snap active: Switches the global snap on/off.
Shortcut: Ctrl + #
Snap and grid setup: This option jumps to the Project options - general (view page 33)
dialog to specify settings for th
e snap and grid.
The area indicated by a Q to the side you can specify the quantization value used for MIDI
(view page 259) and audio quantization (view page 550), "same as quantiz
ation" sets the
snap setting accordingly. This causes audio and MIDI quantization to be linked (view page
33). Right clicking the field opens th
e MIDI quantize settings.
Note about "Input Q": In the interface skins (e .g. "Camo"), you will see the button
"Input Q" in the MIDI area of the track editor (beside the button for velocity dynamics). If
this function is active, then recorded MIDI notes will be quantized according to the current
settings immediately. The original position may be restored at any time via the menu item
"Object -> Quantize -> Reset Quantization".
Details about audio quantization are provided in the menu reference "Object > Quantize >
Audio quantization wizard (view page 550)".

68 SCREEN ELEMENTS
Punch / Playback bar
Play to cut start
Play from cut start
Play to cut end
Play from cut end
Play beyond cut
Punch In mode
Punch recording
Set punch in marker
Set punch out marker
Delete punch marker
Cue mode: Playback stops after each object

Mouse mode bar
SCREEN ELEMENTS 69
Universal Mode
This is the preset mouse mode in Samplitude. All necessary functions are available by left
clicking. Depending on the relative position within the track, various functions will be
executed. Right clicking always opens a context menu.
The vertical position of the mouse distinguishes between object handling and range
manipulation within every VIP track: In the upper half, you can select ranges and set the
play cursor position. In the lower half, objects may be selected and moved.
Range Mode
In this mode, only ranges and the play cursor (position line) may be manipulated.
Additional functions are also available via the following keys:
Period key "." - Press this button to switch Samplitude to "Object" mode temporarily.
Objects may now be selected and moved.
Hyphen key "-" - Press this button to switch Samplitude to "Curve" mode temporarily. The
volume and panorama curves may now be edited.

70 SCREEN ELEMENTS
These special functions enable all important functions to be reached quickly, and
accidental movement of an object cannot occur.
Curve Mode
This mode is strictly for editing automation curves (view page 327). This mode may be
opened temporarily via "Universal/range" mode by pressing and holding down the hyphen
"-" key.
Place the cursor over a curve and click with the left mouse button to set a new curve point.
Curve points that have already been set can be moved easily using drag & drop.
In case you want to select several curve points for editing, simply span a range in the
desired length. This is similar to using the object lasso, but for curve points. You can also
select curve points vertically over multiple tracks.
Object Mode
This mode allows you to move objects and edit their start & end positions, the fade in &
fade out phases, and the object volume.
Object mode is especially useful together with range mode, which may be accessed
temporarily from within it. Press and hold the period key "." while using range mode. Once
you let it go, Samplitude switches back to range mode.
Detailed information about how to assign keyboard shortcuts for temporary function is
provided in the menu reference, help file, or in the "manual.pdf" documentation under
"Menu File -> Program Preferences -> Edit Keyboard Shortcuts and Menu (view page
488)".
Object/Curve Mode
In this mode, objects may be moved and curves may be edited with the left mouse button.
Mouse Mode Samplitude 4.0
Use this function to switch to the Samplitude 4.0 mouse mode. The right mouse button
then controls object functions, and the left one controls range manipulations.
Detailed information about how the functions of the individual mouse modes is provided in
the menu reference, help file, or in the "manual.pdf" documentation under "Menu > File
options -> Program settings -> VIP mouse mode" (view page 505).

SCREEN ELEMENTS 71
Cut Mode
Click on the object to separate it at the corresponding position. If the grid is switched on,
then the scissors tool which appears will move according to the grid settings.
Under "System options -> Keyboard/menu -> Special keys -> Temporary key for cut mode
(view page 488)", you can specify a keyboard shortcu
t to keep "Object cut" mode active
(provided the shortcut is held down).
Pitchshift/timestretch mode
The object handles below to the right and those in the object centre can be used for
directly setting the playback speed and pitch. Advanced functions are available for Tempo
marker manipulation in the timeline (view page 511).
Detailed information about how to use "Timestretch/pitchshift" mouse mode can be found
in the menu reference, help file, or documentation "manual.pdf" under "Edit > Tempo >
Tempo Map Dialog (view page 308)"
Volume Draw Mode
This mode allows volume automation curves (view page 327) to be drawn with the left
mouse button.
Automation Draw Mode
In order to draw an automation curve or a MIDI controller curve, select "Automation Draw
Mode". Selected curve points can be deleted using the "Del" key. If you move individual
points using the "Alt" key, the bordering can be lifted using the neighboring points to the
right. Holding down the "Shift" key while drawing fader movements produces a soft curve.
Object automation
Select "Object automation" in the track editor and place a check mark for the desired
parameters. The object curves for the object automation (view page 333) will be added.
Now draw the
corresponding automation curve by dragging with the mouse.
Track automation
This mode allows automation curves to be drawn for the selected track (view page 328) by
sing the left mouse button. Activate the automated parameters of the embedded plug-in
u
beforehand with the shortcut "Ctrl + Alt" move the corresponding plug-in's handle as
desired. Next, click the "Track automation" field in the track editor and place a check mark
for the desired parameters in the context menu. Now you can draw the curve of the
selected parameter onto the track ("Automation Draw Mode").
The selected parameter's curve can be seen in the track in the foreground; all other curves
may be displayed as thin lines by selecting this option in the context menu.
This mode also enables panorama curves, etc. to be drawn with the left mouse button. The
panorama curve on the respective track can be deactivated and activated again anytime
with the "Pan" button to the left in the track head.

72 SCREEN ELEMENTS
Tip: You may also move any plug-in parameter at any time via the small horizontal faders in
the track editor's automation box while in an automation drawing mode mode (e.g. touch,
latch, overwrite, or trim).
Draw waveform in the wave window
In "Wave editing" mode, use the left mouse button to draw the waveform of a file.
Waveform display shows the suitable zoom level, and the mouse pointer becomes a pencil.
Changing the waveform in the wave window is useful if you want to remove very short
impulse disturbances manually.
Spectral mode
Menu "Edit > Mouse mode > Spectral mode"
With the new "Spectral mode" you can remove noise from an object. You can also edit the
signal of the left and right channels individually too. Editing can be done directly in the
Arranger window.
To be able to work with "Spectral mode" particularly effectively set the Spectral display
(view page 496) in display options.
e graphical interpretation of the music is displayed in the Spectral display using a
Th
spectrogram. This displays the frequency proportions in a time curve. The volume of
frequencies is visualized via a color code or via its brightness.
Audible distortion noises louder than the wanted signal are usually limited to a certain
frequency spectrum. They are highlighted with colors in the Spectrogram. So you can
easily select the interference with the mouse and remove it.
A continuous sound is displayed by a pattern consisting of horizontal lines, which
correspond to the sound components or overtones of the sound. A distortion with an
impulse quality is seen as a vertical line.

SCREEN ELEMENTS 73
After calling up "Spectral mode" highlight the unwanted noise by drawing a rectangle
around it using the mouse. With help from the handle you can adjust the selected area.
So that there is no audible gap, removed components of the original frequency spectrum
from the wanted signal that surrounds the distortion are recalculated into the recording.
After making the correction, you can see the results in the Wave/Spectral display in the
Arranger window.
Scrub Mouse Mode
This mouse mode enables you to monitor and control the playback speed (view page 107).
In this case
, the project may be played back in the forwards or reverse scrubbing direction.
Zoom Mode
use the right mouse button to zoom out of the project, and click with the left button to
zoom into it (view page 99).

74 SCREEN ELEMENTS
Color mode Color mode enables you to color objects or entire tracks. Click on the arrow next to the brush symbol first. Next, select the desired color. Now move the mouse over the objects
and tracks in the arranger: the pointer turns to a paint bucket symbol. Click on the object
or track box you would like to color.
You may also apply color to multiple objects across different tracks by dragging the lasso
over the desired objects (the lasso appears when you drag the paint bucket). Release to
color all selected objects.
If you hold down the "Shift" key while doing this, you will not color the object, but rather
the wave form instead.
If you hold down the "Ctrl" key while doing this, then you will not color the object itself, but
rather the object's background instead.
If the preset color selection is not sufficient, then you may also select your own color or
even create your own personal color palette.
The option is also available to access the color palette for each track by clicking the color
selector on the right edge of the track header; this also enables a new color to be assigned
to a track. If multiple tracks are selected (view page 98) beforehand, the color selection will
apply to all of these.

Left mouse button: Changes the background color of the object
Right mouse button: Changes the object's wave form color
Position bar 1
Section to start
One section left
Half section left
Half section right
One section right
Section to end
SCREEN ELEMENTS 75
Play cursor to previous object edge
Play cursor to next object edge
Play cursor to previous marker
Play cursor to next marker
Increase clip size (zoom in)
Reduce clip size (zoom out)
Show all
Zoom to range
1 pixel = 1 sample
Predefined zoom range:
1 second, 10 seconds, 60 seconds, 1 minute

76 SCREEN ELEMENTS
Position bar 2
Freely defined zoom areas 1-4
Increase section vertically (zoom in)
Reduce section vertically (zoom out)
Show all vertically
Show range vertically
Zoom into waveform
Zoom out of waveform
Overview mode
Range bar
Play cursor back to range start
Play cursor to range end
Fold range to left
Flip Range right
Range start to previous zero crossover
Range start to next zero crossover
Range end to previous zero stage
Range end to next zero stage

Range Editor
Move object start left
Move object start right
Move object(s) left
Move object(s) right
Move object end left
Move object end right
Step size for moving objects
Object modes:
SCREEN ELEMENTS 77
Normal Object Mode
This mode moves objects and edits the end and start positions, fade in and out phases,
and object volume.
"Lock all audio in time"
This mode locks all objects to stop them from being moved accidentally. Object mode
"Lock all audio in time": Holding down the "Alt" key at the same time temporarily removes
the mode for the selected objects.
Link curves with objects
In this mode you can shift track automation curves when moving objects together with the
objects.
Link objects until pause
The means that the chosen object is selected and moved together with all subsequent
objects on this track. This way partial ranges of a project, if separated by pauses, remain
unaffected from moves.

78 SCREEN ELEMENTS
This function also applies to multiple selected objects arranged along various tracks.
Link objects on active track
In this mode, all objects on the current track are selected and moved together.
Link objects on all tracks
In this mode, all objects appearing in the arrangement are selected and moved together
from the mouse position.
Note: By using the object modes "Connect objects until pause" and "Connect objects on a
track" together, the markers in the top arranger track may also be moved when objects are
moved. Moving objects in object mode "Group objects", simultaneously moves the marker,
independent of the selected track.
More information about using the object modes is available in the chapter "Working with
object modes (view page 123)".
Multifunction input field with help-function
Samplitude provides a command search bar for finding menu commands and help topics.
Enter a character combination into the search field which is relevant to a search term.
Immediately up to five commands from the main menu will be displayed that contain the
desired character combination.

Moreover, in the section below you will see up to four help topics that contain your search
terms.
SCREEN ELEMENTS 79
All results that are listed can be directly selected. The commands in the upper section are
listed straight away.
By clicking on the appropriate help topic the program help will open up displaying
explanations from selected topic areas. You can see a list of recent commands by clicking
on the little arrow of the magnifying glass.
You can actually execute a command by clicking on the commands that are listed.

80 SAMPLITUDE QUICK START
Samplitude Quick Start
Initial navigation in the virtual project (VIP)
To start playback, press the space bar.
To end playback, press the space bar, the pause button, or the "0" on the keyboard.
To set the play cursor, click on the desired position in the timeline.
To move the playback cursor, use the left and right arrow keys.
In order to jump to the most recent position, press the back space key
To move the VIP under the play cursor, use the keyboard shortcut Alt + Arrow left / Alt +
Arrow right.
To create a range, use the mouse to draw in the grid list.
To move a range, move it with the mouse while holding down the Shift key.
To increase the size of a range, drag the end of the range using the mouse.
To reactivate a deactivated range, use the shortcut keys "Shift + back space".
To move an object, click on the lower half and drag it into its new position.
To jump to the object edges with the playback cursor, select the shortcut keys Ctrl + Q /
Ctrl + W.
To create markers at the play cursor position, select "Shift + 1...0" in the letter keys
block on your keyboard. 0“ im Buchstabenblock Ihrer Tastatur
To jump to a marker position with the play cursor, select the corresponding number 1...0
in the letter key block of your keyboard. 0“ im Buchstabenblock Ihrer Tastatur
Detailed explanations of numerous additional navigation functions can be found in the
chapters: "Working in the project window", "Object-oriented audio editing (view page 123)"
and in the menu reference, help file, or complete documentation "manual.pdf" under "Edit
> Range (view page 519)". A complete overview of all keyboard shortcuts can be found in
the chapter "Preset keyboard shortcuts".
Workshop: Recording
This chapter features information about recording audio material in Samplitude. This
explains the basic functions involved.

SAMPLITUDE QUICK START 81
Creating a VIP
First of all, create a new project by clicking the "New multi-track project (VIP)" button in the
start wizard on program launch. If you already have Samplitude open, select "New Virtual
Project (VIP)..." in the "File" menu.
Name your new project and select the file path where you would like to save the VIP. You
may also create a new folder where all files relating to this project may be saved. Select "[0]
Stereo Master" as the mixer setup.
In the "Track number" field, enter how many tracks you wish to use. This doesn't mean
that the project is limited to this number; new tracks may be added at any time. Adapt the
"Sample rate" to the sample rate supported by your sound card and confirm it with "OK".
Note: If the preset project length is exceeded, the VIP adapts itself to the actual project
length.

82 SAMPLITUDE QUICK START
Preparing to record
To record from your internal CD/DVD drive or from an external sound source using a
cable/microphone connection, it's important that your sound card is connected to the
sound source. You can check this by switching on the track which you wish to record.
Click the record button in the track header to do this; the button will glow red. The
source's input level peak meter now appears in the bar.
If you can't to see the input level peak meter, check in the track editor (menu "View ->
Track editor" to ensure the sound device is connected to the same port listed under
"Audio -> In". If this is not the case, set the track's input device to the port of the sound
card input of the sound source by clicking "Audio -> In".
If the level is in fact visible as a bar but sound is not yet audible, then make sure that the
output device of the track correlates to the output of your sound card.
If you have selected "Manual Monitoring" as your monitoring mode (Shortcut "Y -> Audio
Setup"), please click on the loudspeaker symbol next to the level display on the track
in order to view and hear the input signal.
Now right click the record button in the transport window.

SAMPLITUDE QUICK START 83
This will open up Record Options:
Select the format for the recording first. Detailed settings for the desired audio format
available via "Format options".
If record mode is set to 16-bit at a sample rate of 44.1 kHz, then this is equivalent to CD
quality. A bit resolution of 24-bit or even 32-bit (float) makes sure that hissing during
subsequent editing of the sound material remains at a minimum. On the other hand, the
higher the bit resolution, the more space that is required.
Now specify if the track should be recorded in mono or stereo. While a stereo recording
mode is usually selected for CD/DVD recordings, consider whether it would be better for
single instruments, like bass or guitar, to be recorded as mono tracks, since this could
improve future sound editing and addition of the instrument into the mix.
In "Mono (mix)" mode, the track input is switched to mono, the signal is recorded like a
stereo recording (dual channels), and then mixed into a single channel.
Detailed information about the recording options is available in "Play/rec -> Record options
(view page 582)"

84 SAMPLITUDE QUICK START
Metronome settings
The dialog "Options > Program settings > Metronome settings" allows you to activate the
metronome function. The metronome may also be set as an audio metronome or as a MIDI
metronome.
Active while playback: This option activates the metronome click during playback.
Active while record: This activates the metronome click during recording.
Pre-count for recording (measures): Specify the number of beats that the metronome
will pre-count prior to recording. If you activate "Pre-count clicks only", the metronome
will stop before recording.
The "Punch recording" button in the toolbar (view page 67)" blinks during pre-counting and
e "Record" button blinks in the transport console (view page 52). When recording begins,
th
both buttons remain active until the end of the respective recording period.
Detailed information about different punch functions is provided in the "manual.pdf"
documentation, in the help file, and under "Play/rec -> Record mode/punch in -> Punch
marker mode (view page 581)".
Audio metronome
First beat/beats: This setting allows you to specify individual samples for the metronome
("volume") for the first beat of each measure ("beats") or the remaining beats of the
measure ("beat").

SAMPLITUDE QUICK START 85
Both metronome sounds "Metronom1.wav" and "Metronom2.wav" are preset; these are
located in the folder "fx-preset" in the program directory.
Volume: This controller regulates the volume of the audio metronome's sounds.
Device: Set the audio device for the metronome here. Stereo master is preset, but this
may be changed to another audio device output as the source of the metronome.
MIDI metronome
MIDI output device: Set the device that should produce the metronome click here. This is
normally the sound card.
MIDI channel: Set the MIDI channel via which the MIDI commands are sent here.
First beat/beats/note value/velocity: Set various note values and the velocity for the first
beat of each bar or the other beats of the bar here.
Volume Adjustment
Click the "Visualizer" button under the recording information display. Various functions are
presented to aid visual orientation. Select "Setup > Peak Meter". If there is no visual
display of levels is shown, then press the "Monitor" button under "Options" in the recording
dialog. You should now be able to see a signal.
Detailed information about "Visualization" is available in the reference manual, the help file,
and in the "manual.pdf" documentation under "View > Visualization (view page 798)"
Note: Connect your input signal to your external amplifier/your sound card's input in such a
way that the peak meter is as close as possible to 0db, but doesn't quite reach this value.
The recording starts from the current position of the play cursor. If you wish to record
from the fifth bar (for example), place the play cursor at the beginning of the fifth bar. To do
so, open the project options under "View > Grid > Snap and grid setup" (shortcut: "I")
and check the "Snap to", "Grid/Bars" and "Show grid" boxes. In the "Show grid" "selection
menu, select "Bars/beats" as the grid unit, and confirm by clicking "OK".
Now you can see the grid lines in the VIP. These divide the project window, and the grid
toolbar now indicates the bars. Switch the display in the transport window (view page 52)
to "Beats". Since "Bars/Beats" is selected as the grid unit, you can easily use the left/right

86 SAMPLITUDE QUICK START
arrows on the keyboard to jump to the beginning of the fifth bar. Simultaneously, you can
read the bar and beat position in the play cursor of the transport window.
If you click on the "Record" button now; recording will start. As soon as you have
recorded enough, press the stop button. You will be asked if you wish to save your
recording. If you are happy with this, press the "Yes" button.
Your recording appears in the project window as a virtual object. Now activate the next
track by clicking on the "R" button in the second track. As you can see from the level
bars, the input signal is now selected for this track, which is ready for recording.
Note: You can bypass the dialog window in case settings have already been specified and
record straight into the VIP. Simply press the "R" key on the keyboard. If a track is
activated, recording will begin immediately.
Loop recordings
If you would like to record in a loop, select the section in the arranger that you want to
record first. Activate the "Loop" button in the transport control and start the recording. The
range will repeat until recording is ended. A new take will be created for every run. If you
hold down "Ctrl" and click with the right mouse button on the last take created for the
recorded track, you will be able to see all of the takes produced using loop recording. To
listen to a specific take, select it from the menu that is displayed.
The Take manager (view page 150) is useful for organizing and editing recording runs. Use
it together with the Take composer (view page 152) to produce the perfect take.
Punch recording with markers
If you know the exact range in which a punch recording prior to recording, then use punch
recording with markers. To do this, select the area with the mouse where you want to
use punch recording, and then activate the "In" and "Out" buttons in the transport
control above the red "Record" button. Position the play cursor next.
If "Punch" is activated, start the process with the "Record" button on the transport
console. The actual recording will occur within the punch range. While this is happening,
the "Record" button will flash when the play cursor is in front of the "In" marker. The
button remains red during the punch recording.

SAMPLITUDE QUICK START 87
Example: An error between beats 23 and 25 needs to be corrected. Playback starts
before the punch in position so that the introduction to the recording is made as easy as
possible. During the punch process the "Record" button flashes; the recording will start
automatically from the "In" marker (bar 23). Since the section following the object is already
satisfactory, the recording is ended automatically at the "Out" marker (bar 25).
Detailed information about different punch functions is provided in the "manual.pdf"
documentation, in the help file, and under "Play/rec -> Record mode/punch in -> Punch
marker mode (view page 581)".
Multi-track recording
The "Project options - mixer setup" dialog can be very useful for configuring multiple
tracks in multi-track recordings in a single step.
1. Open "Project options - mixer setup" via the key combination "Ctrl + Shift + M". You
can also access it via "Options -> Project properties -> Mixer setup...".
2. Click the "Routing" box and select the option "Route all tracks to existing stereo
devices" if you want to record in stereo. For mono recordings, select the option
"Route all tracks directly to existing mono devices".
3. If the recording doesn't start at the current track, enter the corresponding track
number into the "Start with track" field.
4. In the "Device setup (track in/output assignment, routing)" area, click the "I/O
devices" box and select "Record" from the dropdown list.
5. For example, if you have four recording devices, enter "4" into the "Track number"
field. The devices will then be set up across the next four tracks.
6. Click "OK" to confirm.

88 SAMPLITUDE QUICK START
Preparing to record
For each track you want to record on, press the "R" button to activate the track, i.e. to
prepare it for recording.
Click on the button with the loudspeaker to activate monitoring.
You can set the maximum gain of your signal from your recording sources. To monitor
the peak levels, open the peak meter via each track's context menu (track header ->
"Track visualization").
Starting recording
Once you have everything set up and the signal has been adjusted, start recording by
pressing "R". End recording by pressing the space bar (only in "Playback while
recording" mode) – or by pressing the "R" key again. Accept the recording by pressing
the "OK" button in the dialog window that opens.
Now you will see one object for each recorded track.
MIDI recording
In Samplitude, there is basically no separation between audio and MIDI tracks. Each
track may contain audio and MIDI objects. You may therefore work on audio and MIDI
material in a single project without having to split tracks. This enables you to manage VST
instruments entirely from within a single track. When freezing the track, the MIDI data is
converted into audio data. However, a track may only record from a certain device,
which means that audio and MIDI files cannot be recorded simultaneously onto one track.
In a Samplitude VIP track, MIDI data is recorded in the same way as audio data. An object
is created for each recording, which overlaps existing objects.
Note: Samplitude offers special MIDI recording modes (view page 90), in which already
existing MIDI objects are inserted either via mixing (overdub) or via local replacement
(replace).
Preparing a MIDI recording
If the "MIDI" button is activated in the track editor, the MIDI section opens to prepare the
track for MIDI recording.
Indicate to Samplitude which MIDI input device the program should use. Select the input
device via the MIDI in slot (e.g. MIDI keyboard or fingerboard) to do this.
If you have integrated multiple MIDI input devices with your system, you may also select
<ALL> as the MIDI input device for a track.

As the playback device (MIDI output device), select the MIDI port you use via the MIDI out
slot (e.g. MIDI out of your sound card or a VST instrument).
SAMPLITUDE QUICK START 89
If sound cannot be heard when the keys on your device are played, then monitoring likely
needs to be activated. Activate this via the loudspeaker button (MIDI thru) for the respective
MIDI track.
By right clicking the "Mon" button in the transport control provides access to the behavior
of the "Record" and "Monitoring" button. If you activate the options "Automatic MIDI
record switch on current track" and "Automatic MIDI monitoring (Thru)", then the
respectively selected MIDI tracks will be immediately activated for the recording and
monitoring will be switched on for the input signal. If you want to record multiple MIDI
tracks simultaneously, then deactivate the option "Automatic MIDI record switch on
current track".
If you still don't hear anything when you play the keys, make sure that the MIDI out
channel of the MIDI keyboard matches the "channel in" slot in the track editor for the
selected MIDI track.
Ensure that your MIDI synthesizer is sending to the same MIDI channel that you have
selected in the "channel out" slot in the track editor.

90 SAMPLITUDE QUICK START
Note: Many drum computers send to MIDI channel 10, since this is preferably used as the
percussion channel and is even specified as such according to the General MIDI (GM1)
specifications.
MIDI recording modes
The following MIDI record modes are available: normal, overdub, and replace. The
different modes determine how the newly recorded MIDI files will be added to the VIP.
You can specify the settings for MIDI Record Modes in the transport control. Click on the
arrow on the left beside the "Close" button in the transport control to display this section.
Alternatively, you can select the MIDI recording modes from "MIDI record" mode via "Play /
Rec > MIDI record mode".
Normal: Recording mode matches that of the audio recording. This means that a new
MIDI object is created over the existing object for each recording. The old object remains,
but it may be covered partially or completely by the most recently recorded one (both
visually and acoustically). This way, you can record multiple takes of a passage and then
compare them in the take manager (view page 150) later on.
Overdub: The
data is recorded into an already existing object, available and newly
recorded MIDI data is mixed together.
Replace: The data is recorded to an existing object, and any existing MIDI data is
overwritten.
After selecting the mode, make sure that the recording is activated for the track. The
record button, which is set to standby, changes to violet to signal that this MIDI track
should record MIDI data.
Now you can now start the MIDI recording using the shortcut key "R". After ending
recording with the "Stop" button, you will be asked whether you want to keep or delete the
recording. After confirming this with "OK", your newly recorded material will appear as a
"MIDI take" in the VIP. In case you have recorded several takes in normal mode for the
same selected range, you can select and play back the individual MIDI takes in the Take
manager (view page 150).
Note: You can switch between the individual recording passes even quicker by holding the
"Ctrl" button down and then right clicking the MIDI object. Now a menu will appear in
which you can select the desired take and play it right away.
If you record within a previously created MIDI object (Object -> New MIDI object), then you
can follow the recording via the arranger track. The created events are displayed as blue
bars. If individual MIDI events are muted after recording in the MIDI editor, these will appear
in the MIDI object as gray bars.

SAMPLITUDE QUICK START 91
Objects in the virtual project (VIP)
Audio and MIDI
Audio objects in a VIP always reference one wave file or one partial section of a wave file.
MIDI objects also reference a single corresponding MIDI file. In contrast to audio, in which
case wave files are saved visibly on the hard disk, MIDI files are saved together with their
objects, which links them directly to these objects.
Cutting and editing
Audio and MIDI objects are cut in the same way.
Place the play cursor at the cut position. Now click the object to be cut and press the "T"
key on the keyboard. If "Auto crossfade" mode is activated, then Samplitude will create a
fade for audio objects between the two newly created objects.
Detailed information on this can be found in the chapters: "Object-oriented audio editing
(view page 113)", "Object editor (view page 114)","Working with objects (view page 123)"
and "MIDI in Samplitude (view page 242)".

92 SAMPLITUDE QUICK START
Mixer
Use the mixer (keyboard shortcut "M") to adjust the volume and panorama of the recorded
tracks as well as automate fader and panorama movements. There are also multiple plugins, submix and AUX buses, a four-band parametric equalizer, inserts for the integration of
effects and VST instruments as well as many configuration and bouncing options available,
not only for each individual channel, but also for the complete stereo track.
Detailed information is available in the chapter "Mixer (view page 158)".
Effects
Note:You can find more detailed information on effects in the accompanying PDF
("Manual" and "Effects, plug-ins and instruments").
In Samplitude, effects can be used at various "levels", offline or virtual effects, for objects,
tracks in the mixer channel or as master effects.
Offline effects
The effects can be used in Wave projects and on objects. A Wave project represents an
audio file. Objects in a virtual project refer to this audio file. Offline effects change the audio
data in the wave project and may be set via "Effects -> Process Effects Offline".
Real time effects
Unlike offline effects, real-time effects are not calculated into the wave files that the objects
refer to. These effects are recalculated every time they are played and can be modified,
varied, without changing your original audio material.

SAMPLITUDE QUICK START 93
What effects are there?
In general, the following effect categories are available in objects, tracks, and in the master
area:
Dynamics
Frequency / Filter
Delay / Reverb
Distortion
Restoration
Stereo / Phase
Modulation / Special
MAGIX Plug-ins
essentialFX
DirectX (only available if DirectX effects are installed)
VST FX (only available should the VST effects be installed)
ReWire (only available for tracks and if ReWire clients are installed)
Analog Modeling Suite: am-track, am-pulse, am-phibia (Samplitude Pro X Suite and
Sequoia only)
am-munition (Samplitude Pro X Suite and Sequoia only)
Vintage Effects Suite: CORVEX (Chorus, Flanger), ECOX (Echo, Delay), FILTOX
(Modulation, Filter). These are special internal plug-in effects for dynamics, sound editing,
and simulation of analog switching.
Effects - Signal flow
Offline effects are applied before all real-time effects, as they are immediately calculated
into the audio material. Real-time effects on the other hand, do not change the original
audio material. They are calculated during playback in "real-time".
The signal passes through the real-time effects in the following order:
1. Object effects
2. Track effects
3. Master effects
Effects in audio objects
Object-based virtual effects are set in the object editor. These may be opened by double
clicking on an audio object. The effect view is opened here by default. To display the fullsize object editor, place a check next to "Max".
Object effects are applied only to the selected object. All other objects in the VIP are not
affected by these settings.
Effects in tracks
Track-related effects may be set either in the VIP window or in the mixer. These may be
internal effects or VST FX or DirectX effects.

94 SAMPLITUDE QUICK START
Now click on the arrow symbol for the corresponding field. A menu with the various effect
categories will open.
Mixer effects
To set track effects in the mixer, open the mixer by pressing the "M" key. In the "Ins"
section, click the arrow symbol of an effect slot in the corresponding channel. Selecting
effects is done the same way as described above. Use the "FX" button directly below the
track's channel fader to open a dialog to change the series of effects within the track.
Master effects
Master effects are applied to the entire material in a multi-track project. The signal is routed
through the effect, i.e. your audio card, before reaching the master output.
Master effects may only be set in the mixer, which may be opened by pressing "M". The
sum range of the mixer is wider than normal tracks and can be identified via the differently
colored faders.
The effect slots for MAGIX plug-ins as well as VST and DirectX effects are located at the
very top. All of Samplitude's internal master effects are located under this. The equalizer
may be used directly from the mixer or the equalizer dialog, which may also be opened by
right clicking one of the EQ controls.

SAMPLITUDE QUICK START 95
The sequence of the master effects may be set in the FX routing dialog, which opens
via the FX button beneath the master faders.
CD mastering
CDs may be burned directly from within the project, without having to export the
project as a wave file beforehand. Burning requires that a blank disc be inserted into the
drive and a valid TOC (Table of Contents) exists. Place at least one CD track marker and
a CD end marker to do this.
Set CD tracks
Position the play cursor where you wish to set the CD track marker. The marker menu is
located above the track head boxes in the VIP. Open this and select "Set CD track index".
Repeat this process until all markers that you want to set are in place.
Now position the play cursor where you want the CD to end. Open the marker menu again
and select "Set CD end marker".
Note: The burning process only starts from the first CD track marker.
Burn CD
Now play the project again and at Samplitude's status bar to see how much CPU is
required to play the project. This is important in order to estimate the speed that the project
may be burned to audio CD.
Now click the button with the CD symbol. Alternately, select the "Make CD..." option in the
"CD/DVD" menu. The CD burning dialog now opens.
Make CD

96 SAMPLITUDE QUICK START
Mode: Select whether you want to burn your project directly "on-the-fly" (without prior
rendering) or whether Samplitude should create a new file beforehand (bouncing).
Click "Burn CD".
CDR write settings: Enter the desired burn speed here.
If to wish to use CD text, open the "CD-Text/MP3 ID editor" by clicking "CD-Text
settings" and entering the desired CD text for your tracks.
Click on the "Write" button to begin burning. During burning, the play cursor runs through
the project to provide a progress display.
After burning, a message appears indicating that the process is complete. Confirm this by
clicking "OK".
Detailed information about CD mastering is available in the menu reference under
"CD/DVD". (view page 777)

GENERAL FUNCTIONS IN THE PROJECT WINDOW 97
General Functions in the Project Window
Section
"Section" refers to the visible part of a project in the project window.
There are many commands for moving (scrolling) the visible section and for customizing its
size (zooming). The corresponding commands can be opened via the "View" menu, via the
position bar, and via the shortcut keys.
Up to three different sections may be displayed at a time in a project (shortcut: "B"). This
allows you to display the entire project in the upper section while special passages of your
arrangement are displayed in the other sections, e.g. at loop start and loop end.
The simplified view may be restored via the keyboard shortcut "Shift + B".
Active section
If you display your project in several parts only one can be shown at a time. Activate a part
by clicking on it or clicking on its control. By clicking on both double arrow buttons at the
left, lower border of every section a corresponding context menu will appear that offers you
different possibilities for moving the corresponding section horizontally or vertically.
The red arrows in the lower toolbar are additional buttons for moving sections horizontally.
Detailed information about sections is available in "View -> Sections (view page 811)" and
"Edit > Range > Split range (view page 522)".

98 GENERAL FUNCTIONS IN THE PROJECT WINDOW
Select multiple tracks – group track controls
To select multiple tracks, choose the tracks by clicking the respective track
numbers/track ranges while holding down the "Ctrl" key or the "Shift" key. The
selected tracks are highlighted in the arranger, which indicates that they are grouped.
Alternatively, the select the desired tracks and then open the track context menu and
select "Track properties > Group track controls".
If the status of a button or controller is changed now, then it will become apparent that the
corresponding control elements of the other tracks in the group will also change. This
applies to faders, panorama, EQ, AUX, mono, phase, solo, mute, record, MIDI/audio
swapping, track color, track locking, Revolver track settings, bouncing settings, and for the
selection of types of automation (track/object), plus the audio inputs/audio outputs. For
the audio in and outputs, incremental functionality may also be selected, which
distributes the in and outputs available in your system according to the selected tracks.
On the other hand, specific settings such as integrated plug-ins, the selected automation
mode, or the comments field remain as individual settings for the respective track and are
not transferred to the group.
This group functionality also applies to the mixer. The multi-track selection function is also
available in the mixer for previously added control groups (view page 167) if the same
control element
s are integrated.
In order to clear the group, click any track above or below the selection. If you click
and move a control element related to one of the tracks removed from the group, it
becomes apparent that the complete group has been cleared.
In order to remove a track from an existing multi-track selection, hold down the "Ctrl"
key and click the track name. If you change a control element of another grouped
track, it becomes apparent that the tracks are still grouped, even without the track that
has been removed.
Alternatively, you may open the context menu in the track box and select "Track
properties > Ungroup track controls to clear a group.

GENERAL FUNCTIONS IN THE PROJECT WINDOW 99
The context menu featuring commands to group or ungroup track controls may also
be accessed by right clicking in the track header area below the last track in the arranger.
Note: Multi-channel selection in the mixer functions exactly like multi-track selection in the
arranger, i.e. by clicking the track number/name while holding down the "Ctrl" key or
"Shift". In order to clear a group of channels, click a channel before than the selection.
Zooming
Use the zoom functions to adjust the sections of a virtual project. The higher the zoom
stage, the more precise display will be.
Samplitude features the following zoom functions:
Zoom with the position bar
Click the magnifying glass to open the zoom feature. The glowing red buttons zoom
vertically along the timeline while the blue magnifying glasses zoom vertically. In addition,
there are 4 freely definable magnifying glasses; pressing a number and holding down
"Shift" while clicking enables the zoom stage to be set individually.
Use the wave symbols on the right to set the zoom stage for display of the waveform in the
active section.
Zoom with keyboard
The key combination "Ctrl + Arrow right" zooms out of the project; "Ctrl + Arrow left"
zooms in. Press "Ctrl + Arrow up" to zoom into the waveform display, while "Ctrl + Arrow
down" zooms out of the waveform display.

100 GENERAL FUNCTIONS IN THE PROJECT WINDOW
Zoom with the scroll bar buttons
In the lower right-hand corner of the VIP window, the "+" and "–" buttons may be used for
more precise adjustment of the horizontal and vertical zoom levels.
A common feature of the preset zoom functions is that they center the play cursor in the
visible section, provided it's visible when the zoom command in the section is executed.
Zooming with the mouse wheel
The key combination "Ctrl" and the mouse wheel provides simultaneous horizontal and
vertical zooming - even during playback.
The key combination "Ctrl + Alt" and the mouse wheel provides simultaneous horizontal
and vertical zooming.
You can zoom in by rolling the mouse wheel upwards.
You can zoom out by rolling the mouse wheel downwards.
Zooming with the mouse - vertical zoom
An elegant method of zooming is to left click on the time line, hold down the button,
and drag the mouse vertically.
By dragging the mouse up, you can zoom out of the project, and you can zoom in with
the reverse action. Simultaneously, you can change the range borders or the play cursor
position with horizontal mouse movements, depending on whether you position the mouse
at the beginning of the action on the grid toolbar or on the marker bar.
This way you can position the play cursor precisely in one go: set the desired playback
position roughly by clicking somewhere in the marker bar. . Next, move the mouse
downwards while holding down the mouse button to zoom into the project. Correct the
mouse position by moving it horizontally, and finally zoom out of the project by moving the
mouse upwards.
Deactivate this function at any time via the system settings ("Y -> keyboard, menu & mouse
-> Mouse -> Special key performs vertical zoom without shift key").
 Loading...