

Xantrex XPower Powerpack 200 Plus Owner's Manual

by
XPower Powerpack
200 Plus
Owner’s Guide

About Xantrex
Xantrex Technology Inc. is a world-leading supplier of advanced power
electronics and controls with products from 50 watt mobile units to one MW
utility-scale systems for wind, solar , batteries , fuel cells, microt urbines, and
backup power applications in both grid-connected and stand- alone systems.
Xantrex products include invert ers , battery charge rs, programmable power
supplies, and variable speed drives that convert, supply, control, clean, and
distr ib u t e el ec tr i cal power.
Trademarks
XPower Powerpac k 200 Plus is a t rademark of Xantre x Interna ti onal. Xantrex is a
registered trademark of Xantrex International.
Other trademarks , registered trademarks, and product names are the propert y of
their respe ctive owners and are used herein for identification purposes only.
Notice of Copyright
XPower Powerpack 200 Plus Owner’s Guide © October 2005 Xantrex
Internationa l. All rights reserved.
Disclaimer
UNLESS SPECIFICALLY AGREED TO IN WRITING, XANTREX TECHNOLOGY INC.
(“XANTREX”)
(a) MAKES NO WARRANTY AS TO THE ACCURACY, SUFFICIENCY OR SUITABILITY OF
ANY TECHNICAL OR OTHER INFORMATION PROVIDED IN ITS MANUALS OR OTHER
DOCUMENTATION.
(b) AS SUMES NO RESPONSIBILITY OR LIABILITY FOR LOSS OR DAMAGE, WHETHER
DIRECT, INDIRECT, CONSEQUENTIAL OR INCIDENTAL, WHICH MIGHT ARISE OUT OF
THE USE OF SUCH INFORMATION. THE USE OF ANY SUCH INFORMATION WILL BE
ENTIRELY AT THE USER ’S RISK.
Date and Revi sion
October 2005 Revision B
Part Number
975-0189-01-01
Contact Information
Phone: 1 360-925-5059
Fax: 1 360-925-5143
Website: www.xantrex.com/support

About This Guide
Purpose
The purpose o f this Owne r’s Guide is to pr ovi de explanations
and procedures for installing, operating, maintaining, and
troubleshooting the XPower Powerpack 200 Plus.
Organization
This guide is organized into five chapters and an appendix:
Chapter 1, “Introduction”, provides an overview of the main
features of the XPower Power pack 200 Plus.
Chapter 2, “Features”, provides a detailed description of the
feature s of th e XPower Powerpack.
Chapter 3, “Operation”, gives instructions for the main
operational procedures of the XPower Powerpack, including
operating AC and DC appliances, using the air compressor,
and boosting an engine.
Chapter 4, “Maintenance”, gives instructions for recharging
the XPower Powerpack and changing the built-in light bulb.
Chapter 5, “Troubleshootin g”, prov ides a troubleshooting
guide to the XPower Powerpack.
Appendix A, “Specifications”, provides the electrical and
physical specifications of the XPower Powerpack.
“Warranty and Return” at the end of this guide provides
detailed warra nty information and instructions for getting
warrant y serv ice.
i
About This Guide
Conventio n s Used
The following conventions are used in this guide.
WARNING
Warnings identify conditions that could result in personal injury or
loss of life.
CAUTION
Cautions identify conditions or practices that could resul t in
damage to the unit or to other equipment.
Important: These notes describe an important action item or an
item that you must pay attention to.
Abbrevi ations and Acr onyms
AAmpere(s)
AC Alternating Current
AG M Absorb e d Glass M a t
Ah Amp-hours
ASC Authorized Servi ce Centre
DC Direct Current
Hz Hertz
mA Milli-ampere
MHI Metal hali de arc
RMS Root Mean Square
UPS Uninterruptible Power Supply
VVolt(s)
WWatt(s)
ii

Important Safety Instructions
The XPower Powerpack 200 Plus generate s a type of AC
power similar to a normal household wall outlet. Operatin g
the XPower Powerpack 200 Plus incorrectly or misusing it
may damage the equipment or creat e hazar dous conditions
for the user.
Important: Before using your XPower Powerpack 200 Plus, be
sure to read and save these safety instructions.
Warnings and Cautions
WARNING: Shock hazard. Keep away from
children.
The XPower Powerpack 200 Plus generates the same pot entially
lethal AC power as a normal household wall outlet. Do not insert
foreign objects into the AC Power Outlet, the DC Power Outlet, or
the ventilation holes. Do not expose this product to water, rain,
snow, or spray.
Do not open the XPower Powerpack 200 Plus . Th ere are no userserviceable parts inside the unit.
CAUTION
Do not connect any AC appl iance with the neutral conductor
connected to ground to the XPower Powerpack 200 Plus.
CAUTION
Do not expose the XPower Powe rpac k 200 P lus to temperatures
over 40°C (104°F) .
iii

Important Safety Information
-
WARNING: Explosion hazard
Do not use this product where there are flammable fumes or gases,
such as in the bilge of a gasoline-powered boat, or near propane
tanks. Do not us e this product in an enclosu r e co ntaining
automotive-typ e lead-acid batteries. These batteries, unlike the
sealed AGM battery in the XPower Powerpack 200 Plus, vent
explosive hydrogen gas which can be ignited by sparks from
electrical connections.
When w o rki n g o n el ec t rical equipment, al w ay s en su r e so m e on e is
nearby to hel p you in an emergency.
WARNING: Heated surface
Ensure at least 2" (5 cm) air space is maintained on all sides of the
XPower Powerpack 200 Plus. During operation, ke ep awa y from
materials that may be affected by high temperatures such as
blanket s, pillows and sleeping bag s.
WARNING: Fire ha zard
Never allow boost ing cables’ red and black clamps to touch each
other or another common metal conductor. Thi s could cause
damage to the unit and/or create a sparking/explosion hazard.
Always store boos ting clamps in the appropri ate holder on each
side of the XPower Powerpack after use.
WARNING: Fire ha zard
Boosting cable clamps must be connected positive to positive (red
clamp to b at te r y “ +”) and negative to negative (black clamp to
battery “-”). A reverse polarity connection (positive to negative)
may cause damage to the unit and/or create a sparking/explosion
hazard.
iv
Important Safety Informa tio n
WARNING: Fire ha zard
The boosting feature is designed for short term operation only—
less th an 4 seconds. Opera ting the boosting feature for m ore than 4
seconds may caus e da ma ge to the unit. Allow the XPower
Powerpack 200 Plus to cool down for at least 3 minutes after each
boost.
WARNING: Fire ha zard
Do not leave the compressor unattended while operating. The
compressor is designed for short term ope ration only. Operation of
the compress or over an extended period of time will cause the
compressor unit to overheat and may cause damage. Allow the
compressor to cool down for 10 minutes after each 10 minutes of
continuous operation.
v
Important Safety Information
Pr ec aution s When Workin g With Your
Vehicle Battery
WARNING: Risk of Explosion, Fire or Burns
1. Follow all instructions publishe d by the battery
manufacturer an d the manufacturer of the equipment in
which the battery is installed.
2. Make sure the are a aroun d the battery is well-ventilated.
3. Never smoke or all ow a spark or flame in vicinity of the
engine or batterie s.
4. Be careful not to drop a metal object on the battery or
allow a metal tool to simultaneously touch the positive
and negative cable ends or battery terminals. It might
spark or short-cir cuit the battery or other electrical parts
and cause an explosion.
5. Remove persona l metal items such as rings, bracelet s,
necklac es , and wa tc hes when wo rk ing w ith a lea d -acid
battery. A lead-acid battery produces a short-circuit
current high enough to weld a ring or other similar
objects to metal, causing a severe burn.
6. If you need to remove a battery, always remove the
positive terminal from the battery first. Make sure all
accessories are off so you don’t cause an arc.
7. Someone should be within range of your voice, or close
enough to come to your aid when you work near a
lead-acid battery.
8. Have plent y of fresh water and soap nearby in case
battery acid contacts skin, clothing, and/or eyes.
9. Wear complete eye protection and clothing protection.
Avoid touching your eyes while working near batteries.
vi

Important Safety Informa tio n
10. If battery acid conta cts skin or clothing, wash
immediately with soap and water. If acid enters your
eyes, immediate ly flood them with runni ng cold water for
at least twenty minutes a nd get medical attention
immediately.
11. Keep a supply of baking soda on hand in the area of the
batteries. Baking soda neutralizes lead-acid battery
electrolyte.
vii

Important Safety Information
Precautions for Using Rechargeable
Appliances
CAUTION
The output of the XPower Powerpack 200 Plus inverte r is nonsinusoidal.
Most rechargeable battery-operated equipment use a separate
charger or transformer that is plugged into an AC receptacle
and produces a low voltage charging output.
Some chargers for rechargeable bat teries can be damaged if
connected t o the XP ow er Po werpack 200 Plu s .
Do not use the following with the XPower Powerpa ck 200
Plus:
• Small battery- operated applianc es like flashl ights, razors,
and night lights that can be plugged directly into an AC
receptacl e to rec h arge.
• Some chargers for battery packs used in hand power
tools. These affected chargers display a warning label
stating that dangerous voltages are present at the battery
terminals.
Note
: If you are unsure about using your rechargeable
appliance wit h the XPower Powe rpack 200 Plus, conta ct the
equipment manufacturer to determine the rechargeable
appliance’s compatibility with the modified sinewave (nonsinusoidal) AC waveform.
viii

Contents
1
Introduction
About the XPower Powerpack - - - - - - - - - - - - - - - - - - - - - - - - 1
Comprehensive Protection - - - - - - - - - - - - - - - - - - - - - - - - - - - 1
Automatic Overload - - - - - - - - - - - - - - - - - - - - - - - - - - - - 1
Overheating - - - - - - - - - - - - - - - - - - - - - - - - - - - - - - - - - - 1
Low Battery Protection - - - - - - - - - - - - - - - - - - - - - - - - - - 2
2
Features
Materials List - - - - - - - - - - - - - - - - - - - - - - - - - - - - - - - - - - - 3
XPower Powerpack Features - - - - - - - - - - - - - - - - - - - - - - - - - 4
Front Panel Detail- - - - - - - - - - - - - - - - - - - - - - - - - - - - - - 4
Left Side View - - - - - - - - - - - - - - - - - - - - - - - - - - - - - - - - 6
Accessories - - - - - - - - - - - - - - - - - - - - - - - - - - - - - - - - - - 7
3
Operation
Operating Conditions and Guidelines - - - - - - - - - - - - - - - - - - - 9
Choosing a Location- - - - - - - - - - - - - - - - - - - - - - - - - - - - - - 10
Using XPower Powerpa ck for the First Time - - - - - - - - - - - - - 11
Recharging with the AC Charger - - - - - - - - - - - - - - - - - - - - - 11
Using the Built-in Light- - - - - - - - - - - - - - - - - - - - - - - - - - - - 12
Operating AC Appliances - - - - - - - - - - - - - - - - - - - - - - - - - - 12
Understanding AC Appliances - - - - - - - - - - - - - - - - - - - - 12
Run Time on Typical AC Appliances- - - - - - - - - - - - - 12
High Surge Appliances - - - - - - - - - - - - - - - - - - - - - - 13
Trouble Appliances - - - - - - - - - - - - - - - - - - - - - - - - - 13
Operating Several Appliances at Once - - - - - - - - - - - - 14
Operating an AC Appliance - - - - - - - - - - - - - - - - - - - - - - 14
Operating 12 V DC Appliances - - - - - - - - - - - - - - - - - - - - - - 16
Boosting a Vehicle’s Engine - - - - - - - - - - - - - - - - - - - - - - - - 17
ix

Using the Air Compressor - - - - - - - - - - - - - - - - - - - - - - - - - - 20
Over-temperature Safety Protection - - - - - - - - - - - - - - - - - 20
Inflating Tires - - - - - - - - - - - - - - - - - - - - - - - - - - - - - - - 21
Inflatin g Smal l Spor ts E quip m en t - - - - - - - - - - - - - - - - - - 22
Connecting to an Externa l Battery- - - - - - - - - - - - - - - - - - - - - 23
4
Maintenance
Battery Maintenance- - - - - - - - - - - - - - - - - - - - - - - - - - - - - - 25
Recharging the XPower Powerpa ck Battery - - - - - - - - - - - - - - 26
Recharging with the AC Charger- - - - - - - - - - - - - - - - - - - 26
Recharging with the DC Charging Cable - - - - - - - - - - - - - 27
Recharging with a Generator ’s Regulated 12 V DC Outlet - 29
Recharging from a Solar Panel - - - - - - - - - - - - - - - - - - - - 30
Recycling - - - - - - - - - - - - - - - - - - - - - - - - - - - - - - - - - - - - - 31
Replacing the Built-in Light- - - - - - - - - - - - - - - - - - - - - - - - - 31
5
Troubleshooting
Common Problems- - - - - - - - - - - - - - - - - - - - - - - - - - - - - - - 33
Buzz in Audio Equipment - - - - - - - - - - - - - - - - - - - - - - - 33
Television Interference - - - - - - - - - - - - - - - - - - - - - - - - - 33
Troubleshooting Reference - - - - - - - - - - - - - - - - - - - - - - - - - 34
A
Specifications
Electrical Specifications - - - - - - - - - - - - - - - - - - - - - - - - - - - 39
Physical Specifications - - - - - - - - - - - - - - - - - - - - - - - - - - - - 41
Warr ant y and Re tu rn
- - - - - - - - - - - - - - - - - - - - - - - - - - - 43
x

1
Introduction
About the XP ower Powerpack
Easy-to-use and designed for years of reliable service, the
XPower Powerpack can run many AC appliances and
12 V DC appliances whenever you need power for work or
play, at home or on the road.
XPower Powerpack:
• Powers 115 V AC appliances
• Powers 12 V DC appliances
• Boosts vehicle engines
• Provides lighting for emergency use
• Inflates vehi cle tires and small sports equipment
Comprehensive Protection
Automatic Overload
The XPower Powerpack has built -in protecti on against out put
overload. If you connect an appliance that draws more than
200 W to the AC Power Outlet on t he XPowe r Powerpack, or
one which draws excessive surge power , the power to the AC
Power Outlet automati cally shuts off.
Overheating
The XPower Powerpack is protected from overheating. If the
inverter ex cee d s a safe temp e rat u re, power to the AC Power
Outlet automatically shuts off.
1

Comprehensive Protection
Low Battery Protection
Low battery protection protects the internal battery from
excessive discharge and possible damage. When the AC
Power On/ O ff Switch is turned ON, an audibl e alarm alerts
you when the internal battery is nearly discharged
(11.0 V DC) and the unit turns OFF at 10.5 V DC.
2

2
Features
Chapter 2 describes the main features of the XPower
Powerpack. We recommend that you familiarize yourself
with these feature s before operating the unit.
Materials List
Your XPower Powerpack package includes these it ems:
p XPower Powerpack
p Owner’s Guide
p AC Charger
p DC Charging Cable
p Nozzle and need l e adap tor s for the compresso r
3
XPower Powerpack Features
XPower P owerpack Features
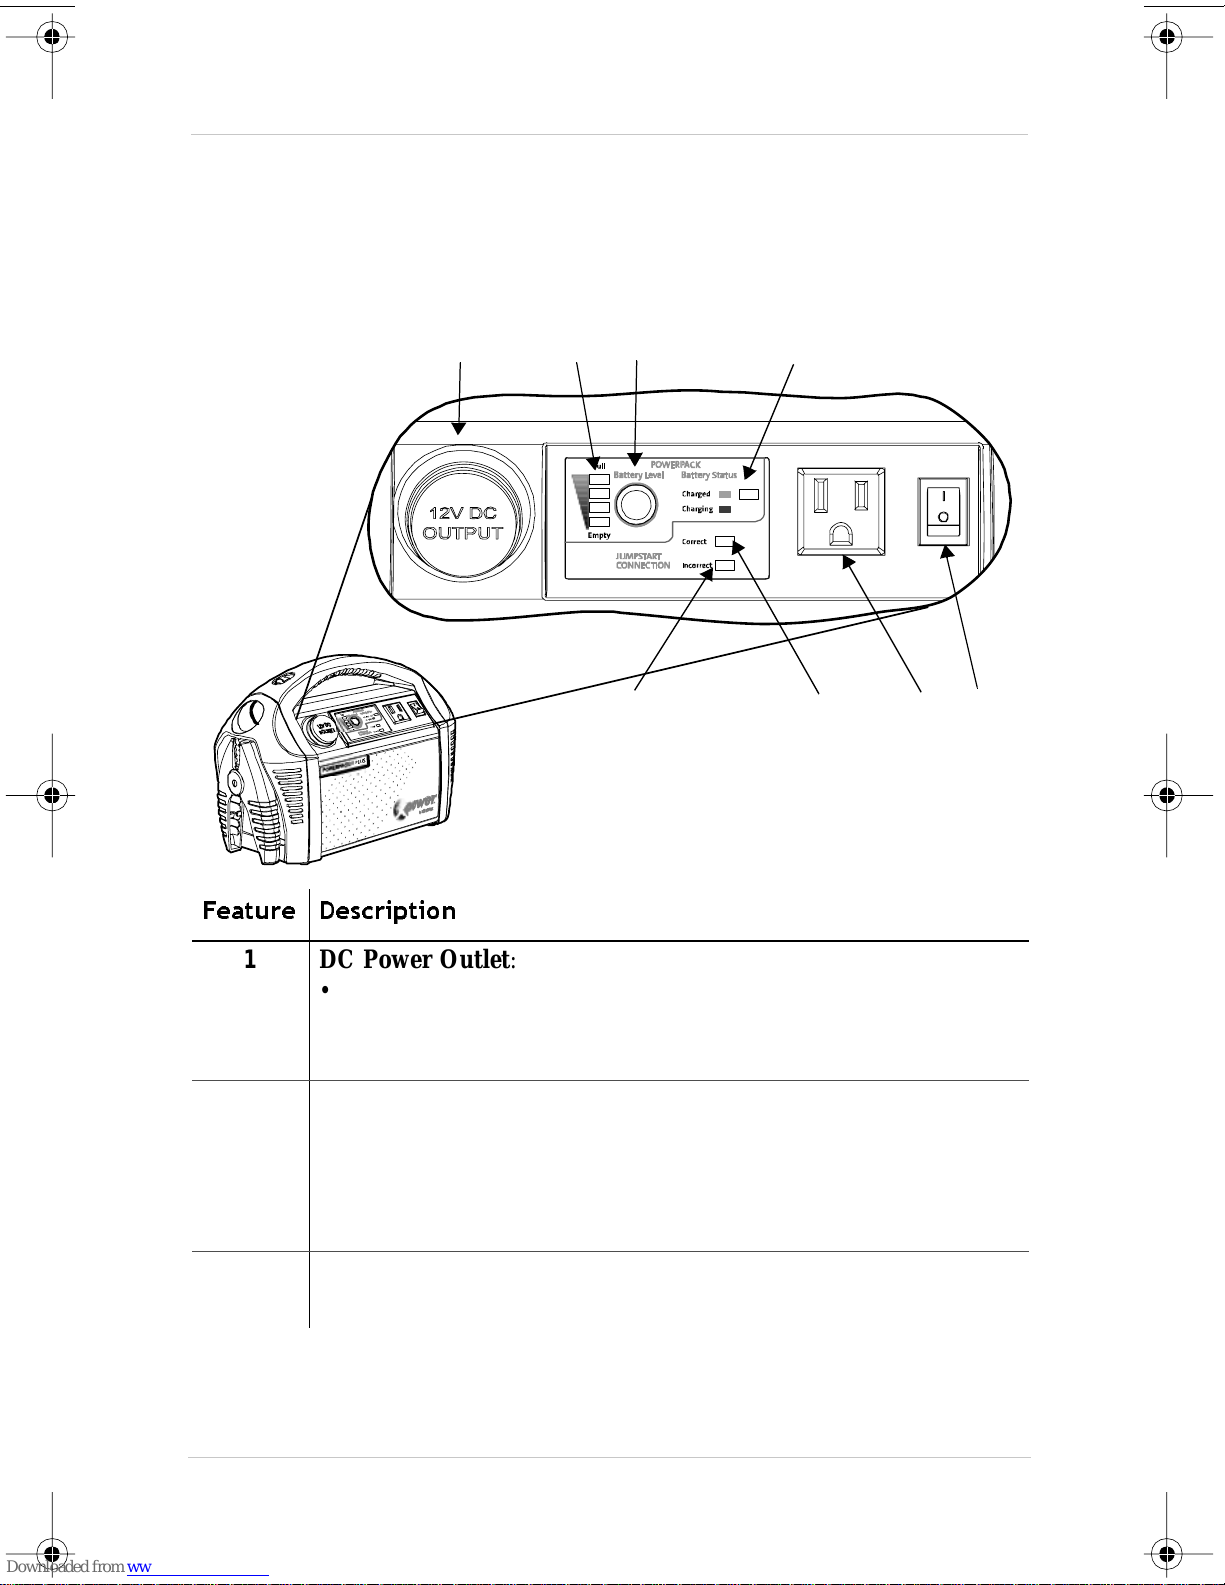
Front Panel Detail
Feature Description
1
2 34
5
7
86
1 DC Power Outlet:
• Powers 12 V DC auto, RV or marine appliances
• Recharges XPower Powerpack from a 12 V outle t in a vehicle
using the DC Charging Cable.
2 Battery Level LEDs illuminate to indicate the XPower Power pack
battery charge level. All LE Ds (t wo green, one yellow and on e re d)
are illumina ted wh en the bat tery is fully cha r ged (Fu ll) , only the red
LED is illuminate d when the bat tery is comple te ly disch arg ed
(Empty).
3 Battery Level button triggers the Battery Level Full/ Empty LED
indicato rs. Press to view the batte ry cha rge status.
4

XPower Powerp ac k Features
Feature Description
4 Battery Status LED illuminates when the XPower Powerpa ck is in
Charging Mode (i.e., an AC Charger is connected to the XPower
Powerpack’s AC Charger Input Socket and plugged into the
household 120 V AC outlet).
5 Red Boosting Connection LED illuminates and an alarm sounds
when the boosting cl am ps are improperly connec ted to the vehicle
battery.
6 Green Boosting Connection LED illuminates when the Boosting
clamps are properly connected to the vehicle battery.
7 AC Power Outlet is a standard 3-prong outlet supplying 120 V AC
power for running an AC appliance.
8 AC Power On/Off Switch illuminates when the switch is turned
ON.
Not
shown
Audible Alarm (insi de the unit) sounds in the ev ent of overheating
or low XPower Powerpack battery condition.
5

XPower Powerpack Features
Left Side View
1
2
3
4
5
6
7
8
Feature Description
1 Light On/Off Switch
2 Incandescent Light illumi nates for about 15 hours when the
battery is fully charged.
3
Pressure Gauge shows the PSI (lb/in
2
).
4 Boosting Clamp
5 Boosting Power Switch
6 AC Charger Input Socket
7 On/Off Sw it c h turns compressor unit on and off.
8 Valve connector with connector hose
6
 Loading...