

Page 1
Xantrex Battery Monitor Communication Interface Kit
Kit contents
1. Isolated XBM to RS232 interface box, including interface cable
2. 1.8m SD09M-SD09F serial cable
3. CD-Rom containing Xantrex Battery Monitor software for Windows 95/98/Me/2000/XP
4. This sheet
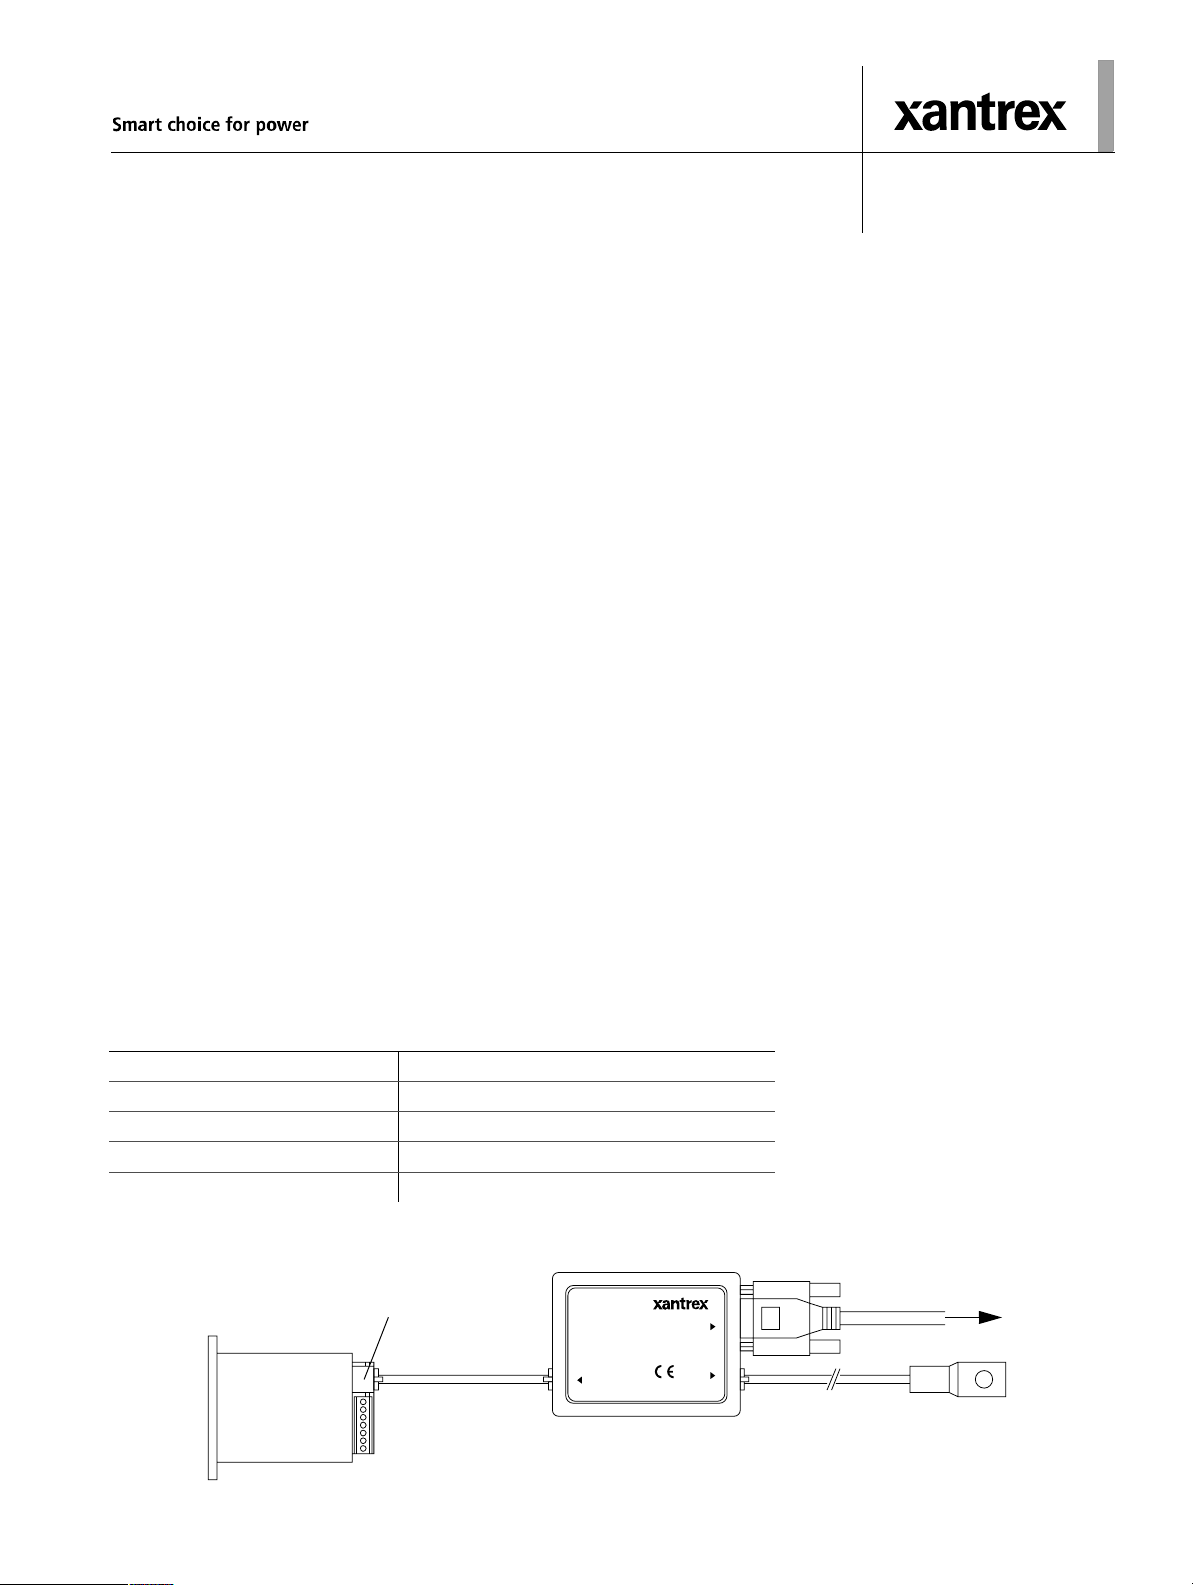
Using the kit
The interface box must be connected to the Xantrex Battery Monitor RJ12 expansion port as displayed below. If your battery monitoring
system contains an optional temperature sensor too, then this sensor must be connected to the TEMP. SENSOR input of the interface box.
The enclosed serial cable connec ts the RS232 input/output of the int erface box to your PC’s communication port.
To reduce the total power consumption of your battery monitoring system, it is advisable to disconnect the interface box from your Xantrex
Battery Monitor when no communication is neccesary. This is accomplished by removing the Xantrex Battery Monitor interface cable from
the Xantrex Battery Monitor expansion port.
Installing the software
Please follow the steps below to ensure proper installation of the Xantrex Battery Monitor software on your computer system:
1. Exit all running Windows programs.
2. Insert the Xantrex Battery Monitor CD-Rom into your driv e. The Autoru n capab ili ty of Windows will start the setup process
automatically. If it does not, select [START] [RUN] and type : D:\setup.exe where D: is your CD-Rom drive.
3. Follow the step-by-step instructions on your screen to complete the software installation.
Getting started with the Xantrex Ba tte ry Mo nito r software
T o start the Xantrex Battery Monitor software after installing, proceed with the following steps:
1. Click on the Windows [START] button.
2. Select [PROGRAMS] followed by [Xantrex Battery Monitor].
3. Choose the Xantrex Battery Monit or icon to launch the software.
If you need any further help with the Xantrex Battery Monitor software, please consult the online Help.
Technical specifications interface box
7HFKQLFDO6SHFLILFDWLRQVIXOOGXSOH[LVRODWHGLQWHUIDFHER[
Input voltage range +9...35 VDC
Input current range 16...25 mA
Isolation value 1500 Vrms for 1 sec.
Operating ambient temperature 0...50 °C
Dimensions (L×W×H) 3 3/8 × 2 9/16 × 1 1/16 in. / 86 × 66 × 27 mm
Xantrex Battery Monitor
expansion port
RS232 I/O
TEMP.˜
SENSOR
Xantrex
Battery Monitor
Battery Monitor
Isolated XBM to RS232˜
interfa ce box
I/O
Interface cable
E501˜
Complete Xantrex Battery Monitor communication setup
including temperature sensor
To PC serial port
Optional temperature sensor
Page 2

Kit de interfaz de comunicaciones del monitor de baterías Xantrex
Contenido del kit
1. Caja de interfaz aislada XBM a RS232, incluye cable de interfaz
2. Cable serie SD09M-SD09F de 1, 8 m
3. CD-Rom con software Xantr ex Battery Monitor par a Windows 95/9 8/Me/2000/XP
4. Esta hoja
Uso del kit
La caja de interfaz se debe conectar al puerto de expansión RJ12 del monitor de bat e rías Xantrex como se muestra a continuación. Si su
sistema de monitorización de baterías contiene además un sensor de temperatura opcional, este sen sor se debe conectar a la entrada TEMP.
SENSOR de la caja de interfaz. El cable serie incluido se utiliza para conectar la entrada/salida RS232 de la caja de interfaz al puerto de
comunicaciones de su PC.
Para reducir el consumo de corrient e total de su sistema de monitorización de baterías, se recomienda desconectar la caja de interfaz de su
monitor de baterías Xantrex cuando no se necesite establecer ninguna comunicación. Para ello se debe retirar el cable de la interfaz del
monitor de baterías Xantrex del puerto de expansión del mismo.
Instalación del software
Para asegurar una instalación correcta del software Xantrex Batt er y Monitor en su ordenador, realice los siguientes pasos:
1. Salga de todos los programas de Windows que se estén ejecutando.
2. Introduzca el CD-Ro m del software Xantrex Ba ttery Monitor en la uni dad. La función de ejecución automática (Autorun) de Windows
iniciará automáticamente el proceso de instalación. Si no se inicia, seleccione [INICIO] [EJECUTAR] y escriba: D:\setup.exe donde D:
es su unidad de CD-Rom.
3. Para completar la instalación, siga l as instrucciones paso a paso que aparecerán en la pantalla.
Iniciar el software Xantrex Battery Monitor
Para iniciar el software Xantrex Battery Monitor tras la instalación, realice los pasos siguientes:
1. Haga clic en el botón [INICIO] de Windows.
2. Seleccione [PROGRAMAS] y, a continuación, [Xantrex Battery Monitor].
3. Elija el icono Xantrex Battery Monitor para iniciar el software.
Si necesita ayuda adicional con el software Xantrex Battery Mon itor, consulte la función de ayuda en línea.
Especificaciones técnicas de la caja de interfaz
(VSHFLILFDFLRQHVWpFQLFDVGHODFDMDGHLQWHUID]DLVODGDIXOOGXSOH[
Rango de voltaje de entrada +9...35 VCC
Rango de corriente de entrada 16...25 mA
Valor del aislamiento 1500 Vrms para 1 seg.
Temperatura ambiente de funcionamiento 0...50 °C
Dimensiones (Largo x Ancho x Alto) 3 3/8 × 2 9/1 6 × 1 1/16 pul gadas / 86 × 66 × 27 mm
Monitor de
baterías
Xantrex
Puerto de expansión del
monitor de baterías Xantrex
Cable de interfaz
Instalación completa de las comunicaciones del monitor de
baterías Xantrex, incluyendo el sensor de temperatura
Sensor de temperatura opcional
Al puerto serie del PC
Page 3

Xantrex Akku-Monitor- Kommunikationsschnittstellenkit
Inhalt des Kits
1. XBM für die RS232-Anschlussbox, einschließlich Anschlusskabel
2. Serielles Ka bel SD09M-SD09F (1,80 m)
3. CD-ROM mit Software Xantrex Battery Monitor für Windows 95/98/Me/2000/XP
4. Dieses Datenblatt
Verwenden des Kits
Die Anschlussbox muss am RJ12-Erweiterungsans chluss des Xantrex Akku-Moni tors angeschlossen werden (siehe Abbildung). Wenn Ihre
Akku-Überwachungssystem über einen optionalen Temperaturfühler verfügt, muss dieser mit dem Anschluss TEMP. SENSOR der
Anschlussbox verbun den werden. Über das beiliegende serielle Kabel wird der RS232-Eingang/Ausgang der Anschlussbox mit dem
Kommunikationsanschl uss des PC verbunden.
Um den Stromverbrauch des Akku überwachungssystems zu verringern, wird empfohlen, die Anschlussbox vom Xantrex Akku-M onitor zu
trennen, wenn keine Kommunikation erforderlich ist. Ziehen Sie hierzu das Xantrex Akku-Monitor-Anschlusskabel vom
Erweiterungsanschluss des Xantrex Akku-Monitors ab.
Installieren der Software
Für eine ordnungsgemäße Installation der Software Xantrex Battery Monitor auf dem Computersystem Führen Sie bitte die folgenden
Schritte durch:
1. Beenden Sie alle ausgeführten Windows-Programme.
2. Legen Sie die Xantrex Battery Monitor CD- ROM in das Laufwerk ein. Der Installationsvorgang wir d von Windows automatisch
gestartet. Sollte dies nicht der Fall sein, wählen Sie [START] [AUSFÜHREN] aus, und geben Sie Folgende s ein : „D:\setup.exe“, sofern
das CD-ROM-Laufwerk den Buchstaben D: trägt.
3. Folgen Sie den Anwei s ungen auf dem Bildschirm, um die Installation der Software abzuschließen.
Erste Schritte mit der Software Xantrex Battery Mo nito r
Führen Sie folgende Schritte durch, um Software Xantrex Battery Monitor nach der Installation zu starten:
1. Klicken Sie auf die Windows-Schaltfläche [START].
2. Wählen Sie [PROGRAMME] und anschließend [Xantrex Battery Monitor] aus.
3. Wählen Sie das Symbol für Xantrex Battery Monitor aus, um die Software zu starten.
Wenn Sie weitere Hilfe zur Software Xantrex Battery Monitor benötigen, verwenden Sie die Onlinehilfe.
Technische Daten der Anschlussbox
7HFKQLVFKH'DWHQGHULVROLHUWHQ9ROOGXSOH[$QVFKOXVVER[
Eingangsspannungsbereich +9...35 V Gleichstrom
Eingangsstrombereich 16...25 mA
Isolationswert 1500 Vrms über 1 Sekunde
Betriebsumgebungstemperatur 0...50 °C
Abmessungen (T × B × H) 3 3/8 × 2 9/16 × 1 1/16 Zoll / 86 × 66 × 27 mm
Zum seriellen
Anschluss des PC
Xantrex
Akku-Monitor
Xantrex Akku-MonitorErweiterungsanschluss
RS232 I/O
TEMP.˜
SENSOR
Optionaler Temperaturfühler
Anschlusskabel
Battery Monitor
Isolated XBM to RS232 ˜
interfa ce box
I/O
E501˜
Vollständige Xantrex Akku-MonitorKommunikationsinstallation einschließlich Temperaturfühler
Page 4

Kit d’interface de communication du moniteur de batterie Xantrex
Contenu du kit
1. Boîte d'interface XBM vers RS232 isolée, y compris le câble d'interface
2. Câble série 1,8 m SD09M-SD09F
3. CD-Rom contenant le logiciel Xantrex Batte ry Monitor pour Windows 95/98/Me/2000/XP
4. Cette fiche
Utilisation du kit
La boîte d'interface doit être connectée au port d'expansion du moniteur de batterie Xantrex RJ12 tel qu'illustré ci-dessous. Si votre moniteur
de batterie contient également un capteur de température en option, ce capteur doit être connecté à l'entrée TEMP. SENSOR de la boîte
d'interface. Le câble série join t se branc he à la prise ent rée/so rtie RS232 de la boîte d'interface du port de communication de votre ordinateur.
Pour réduire la consommation électrique totale de votre moniteur de batterie Xantrex, il est conseillé de déconnecter la boîte d'interface du
moniteur lorsqu'aucune communication n'est nécessaire. Cela se réalise en retirant le câble d'interface du moniteur de batterie Xantrex du
port d'expansion du syst ème.
Installation du logiciel
Veuillez suivre les étapes ci-dessous pour vous assurer d'une installation correcte du logiciel Xantrex Battery Monitor sur votre ordinateur :
1. Quittez tous les programmes Windows ouverts.
2. Insérez le CD-Rom Xantrex Battery Monitor dans votre lecteur. La fonctionnalité d'exécution automatique de Windows démarre le
processus d'installation automatiqueme nt. Dans le cas contraire, sélectionnez [Démarrer] [Exécuter] puis tapez : D:\setup.exe où D:
représente votre lecteur de CD-Rom.
3. Suivez les instructions pas à pas sur votre écran afin de terminer l'installation du logiciel.
Mise en route du logiciel Xantrex Battery Monitor
Pour démarrer le logiciel Xantrex Battery Monitor après l'installation, suivez la procédure ci-dessous :
1. Cliquez sur le bou ton [Démarrer] de Windows.
2. Sélectionnez [PROGRAMS] puis [Xantrex Battery Monitor].
3. Choisissez l'icône Xantrex Battery Mon itor pour lancer le logiciel.
Si vous avez besoin d'aide supplémentaire avec le logiciel Xantrex Battery Monitor, veuillez consulter l'aide en ligne.
Spécifications techniques - Boîte d'interface
6SpFLILFDWLRQVWHFKQLTXHV%RvWHGLQWHUIDFHLVROpHHQGXSOH[LQWpJUDO
Gamme des t ensions d'entrée+9…35 V c.c.
Gamme de courant d'entrée 16...25 mA
Valeur d'isolation 1500 Vrms pour 1 s
Température ambiante de fonctionnement 0...50 °C
Dimensions (L × L × H) 3 3/8 × 2 9/16 × 1 1/16 po / 86 × 66 × 27 mm
Port d’expansion du moniteur de
batterie Xantrex
RS232 I/O
TEMP.˜
SENSOR
Capteur de température
(en option)
Moniteur de
batterie Xantrex
Battery Monitor
Isolated XBM to RS232 ˜
interfa ce box
I/O
Câble d'interface
E501˜
Configuration complète des communications du moniteur de
batterie Xantrex, y compris le capteur de température
Vers le port série
de l'ordinateur
Page 5

Kit interfaccia di comunicazione per sistema di monitoraggio batterie Xantrex
Contenuto del kit
1. Scatola di interfaccia XBM - RS232, incluso cavo di interfaccia
2. Cavo seriale SD09M- SD09F da 1,8 metri
3. CD-ROM contenente il sof tware Xantrex Battery Monitor per Windows 95/98/Me/2000 /XP
4. Il presente documento
Utilizzo del kit
La scatola di interfaccia deve essere collegata alla porta di espansione RJ12 del sistema di monitoraggio batterie Xantrex, come illustrato di
seguito. Se il sistema di monitoraggio batterie contiene un sensore di temperatura opzionale, è necessario collegarlo all'ingresso TEMP.
SENSOR sulla scatola di interfaccia . Il cavo seriale incluso nel kit consent e di collegare l'ingresso/uscita RS232 della scatola di interfaccia
alla porta di comunicazione del PC.
Per ridurre il consumo energet ico total e del sistema di mon itoragg io batteri e, è consigliabile scollegare la scatola di interfaccia dal sistema di
monitoraggio batterie Xantrex quando il collegamento non è necessario. A tale scopo, disinserire il cavo di interfaccia del sistema di
monitoraggio batterie Xantrex dalla relativa porta di espansione.
Installazione del software
Effettuare le seguenti operazioni per installare correttamente il software Xantrex Battery Monitor sul computer:
1. Chiudere tutte le applicazioni Windows in esecuzione.
2. Inserire il CD-ROM del software Xantrex Battery Monitor nell'apposita unità. Il processo di installazione viene automaticamente
avviato mediante la funzionalità Autorun di Windows. Se l'avvio automatico non riesce, selezionare [START] [ESEGUI] e digitare:
D:\setup.exe do ve D: è la lettera dell'unità CD-ROM.
3. Seguire le istruzioni dettagliate visualizzate sullo schermo per completare l'installazione del software.
Cenni preliminari sul software Xantrex Battery Monitor
Per avviare del software Xantrex Battery Monitor dopo l'installazione, effettuare l e seguenti operazioni:
1. Scegliere il pulsa nte [START] di Windows.
2. Scegliere [PROGRAMMI], quindi [Xantrex Battery Monitor].
3. Fare clic sull'icona Xantrex Battery Monitor per avviare il software.
Per ulteriori informazioni sul software Xantrex Battery Monitor, ve dere la Guida in linea.
Specifiche tecniche Sc at ola di interfaccia
6SHFLILFKHWHFQLFKH6FDWRODGLLQWHUIDFFLDLVRODWDIXOOGXSOH[
Intervallo di tensione in entrata +9...35 VDC
Intervallo di corrente in entrata 16...25 mA
Valore di isolamento 1500 Vrms per 1 sec.
Temperatura ambiente operativa 0...50 °C
Dimensioni (L × W × H) 3 3/8 × 2 9/16 × 1 1/16 pollici / 86 × 66 × 27 mm
Porta di espansione sistema di
monitoraggio batterie Xantrex
RS232 I/O
TEMP.˜
SENSOR
Sensore di temperatura
opzionale
Sistema di
monitoraggio
Xantrex
Battery Monitor
Isolated XBM to RS232˜
Cavo di interfaccia
I/O
E501˜
interfa ce box
Installazione completa di comunicazione del sistema di
monitoraggio batteri e Xantrex incluso il sensore di temp eratura
Porta seriale al PC
Page 6

 Loading...