

Page 1
1
A. CAUTIONS
1. Never attempt your own maintenance. If something appears strange,
please turn the TV off and consult your TV dealer. The TV is composed
of many delicate electronic components that can be damaged or broken if
you open the TV or attempt to modify it.
2. Do not exposing the TV to high humidity, dust, steam, oil, smoke, direct
sunlight etc.
3. Do not use thinners or other chemical reagent. Wipe the TV off with a
soft cloth if it gets dirty.
4. Do not leave the TV in excessively hot or cold places.
Permissible storage temperatures are within the range of -25 to +60 .
Permissible operation temperatures are within the range of 0 to +40 .
5. Only use specified adaptors and power sources.
6. Turn power OFF when not in use and unplug the adaptor.
7. Avoid dropping and strong impact.
For your safety, the driver should not watch TV or operate the controls
while driving. Please note that watching and operating the TV while
driving are prohibited by law in some countries.
It doesn t mean the TV is broken with some light or dark colour dots on
the LCD, it s an insurmountable condition with the TFT-LCD technology.
,
,
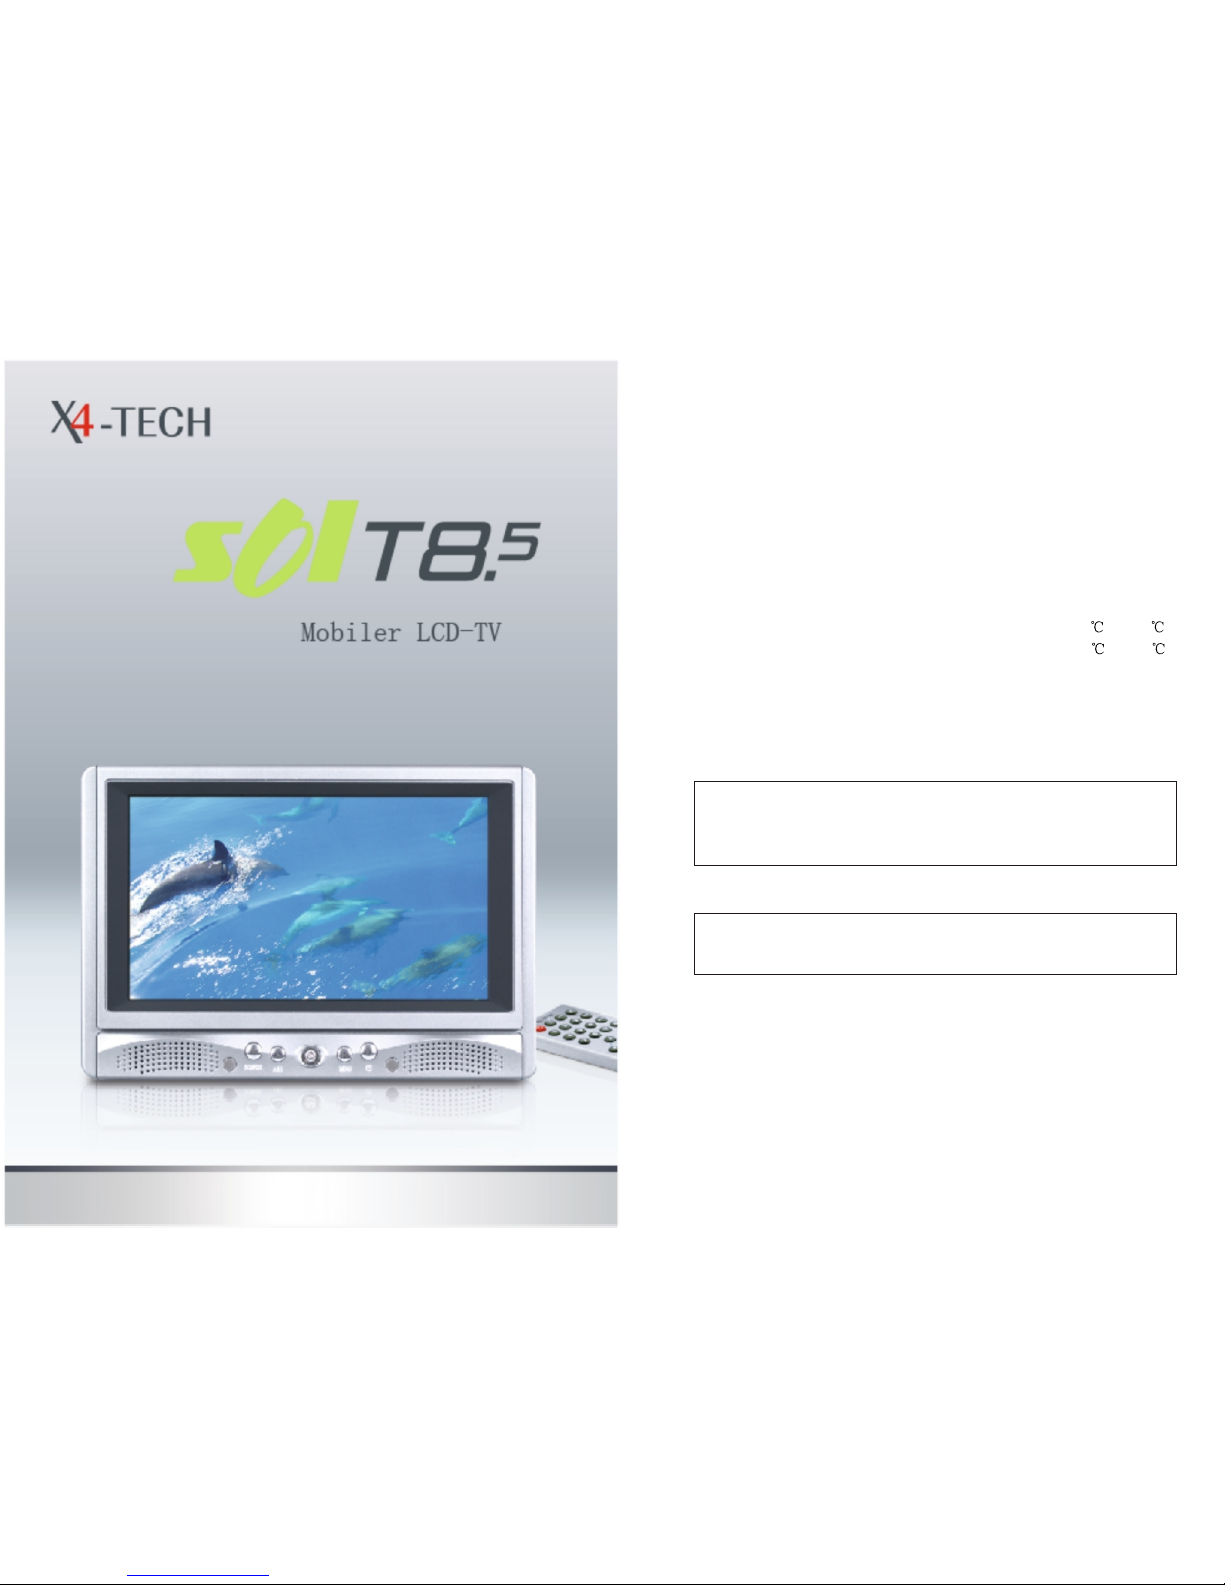
Instruction manual
Page 2

B. ASPECT
1. Main Part
(1) Remote sensor
(2) Selecting DTV/ATV/AV source button
(3)ANS button
(to select Volume, Brightness, Contrast Colour, Tint )
(4) TV complex button
(up, down, right, left ,ok buttons)
(5) TV menu button
(6) Power (standby ) ON/OFF button
(7) Power indication
(8) Speakers
(9) LCD screen
(10) Antenna
(11) Set stand
(12) Video input socket
(13) Left/Right Audio input socket
(14) Earphone socket
(15) DTV audio video output socket
(16) DC power input socket(10~15V)
(17) Main power switch
(18) Screw hole
DTV:DVB-T digital TV
ATV: Analogue TV
DTV:DVB-T digital TV
ATV: Analogue TV
2
3
9
8
10
12
14
15
16
17
18
13
11
1 2 3 4 5 6 7
Page 3

4
5
14
15
ANSANS
SOURCESOURCE
2. Remote Control
1. STANDBY to switch the TV on from standby or off to st andby.
2. NUMERIC KEYS Used to select channels or enter progr amming parameters.
3. LEFT/RIGHT( / ) Move the DTV left or right highlight marke d curs or.
Adjust volume.
4. UP/DOWN( / ) Move up or down highlight marked cursor. And turn to the
next or previous channel.
5. MENU Displays the Menu on th e screen .
6. TV/RADIO Receiver switches between DTV mode and Radio mode.
7. RED/GREEN/YELLOW DTV Function keys in menu.
8. EXIT Use in DTV menu go back to previous menu
9. OK To select DTV menu option , or to display channel list
10. LCD ON/OFF switch the LCD panel ON/OFF
11. AUDIO To select DTV audio mode: Left, Right, Stereo, language. To select
ATV sound system
12. GUIDE Displays the DTV/Radio Program Guide.
13. MUTE Used to enable or disable the audio.
14. INFO To display the TV channel status or various program information of current service.
15. RECALL Return to the previous menu or switch to the last view Channel.
16. SLEEP TIME To enter sleep time setup.
17. SOURCE To select DTV, ATV, AV, VGA source (Some TV sets without VGA)
18. ANS To select Volume , Brightness, Contrast, Colour, Tint adjusting mode.
19. MIRROR only AV mode use to mirror the picture
MIRRORMIRROR
LCD
ON/OFF
LCD
ON/OFF
19
Page 4

AC Household Current:
The optional AC adaptor allows the TV to be powered by standard household
current (please look over the symbol of the AC adaptor.)
Car Battery (DC 12V):
The optional car adaptor (apply to the car with - polarity connected to the
ground) allows the TV to be powered by a car battery through the vehicle s
cigarette lighter.
D. POWER SUPPLY
E. BASIC OPERATION
Turning on power
Slide the MAIN POWER Located on
the back side of the main unit .
Selecting DTV/AV/ATV source
1)Turn on the power of the connected
video equipment.
2)Press the SOURCE button to select the
applicable input source .the screen
displays DTV/ AV/ATV mode at the
upper left corner each time SOURCE
is pressed.
ON-screen display
AV mode
DTV
DTV mode
AV
NOTE:NOTE:
6
7
ATV mode
ATV
If there is not signal, the screen will display :"NO SIGNAL"
1.Rod Antenna
(1)Install the rod antenna clockwise rotation (figure 1)
(2)Uninstall the rod antenna anticlockwise movement (figure 2)
2.Use the Antenna adapter (IEC to F-type connect) to
connect outdoor Antenna
(1)Install the antenna adapter clockwise rotation (figure 1)
(2)Uninstall the antenna adapter anticlockwise movement (figure 2)
(1)
(2)
(1)
(2)
C. RF input(ANT input)
Page 5

8
9
5).Press to adjust the tint (tint only NTSC
system using )
4).Press LEFT/RIGHT( / ) button to adjust the colour
LEFT/RIGHT ( / ) button
............
50
............
50
1)Changing channels using the numeric buttons ,You can select
a
Changing the channelsChanging the channels
2)Changing channels with the UP/DOWN( / ) button to one by
one to select channels.
one-digit channel or two-digit channel .
ATV allow you to select up to 100 Positions(channel 0 to 99)
1)At ATV/AV mode press menu button to select FUNCTION
menu, Press the UP/DOWN( / ) button to select the function,
Press the LEFT/RIGHT( / ) button to transfer the function items,
The screen displays
LANGUAGE: Press the UP / DOWN
( / )button to select the language .Press the
LEFT / RIGHT( / ) button to change the language
Picture up and down: Press the UP / DOWN( / ) button to select .
Press the LEFT / RIGHT( / ) button to turn the picture up and down.
ASPECT MODE: Press the UP / DOWN( / ) button to select ASPECT.
Press the LEFT / RIGHT( / ) button to turn the 16:9 or 4:3 picture.
Function selection Function selection
LANGUAGE ENGLISHLANGUAGE ENGLISH
ASPECT 16:9ASPECT 16:9
FUCTIONFUCTION
NORMALNORMAL
1).Press LEFT/RIGHT( / )button to adjust the brightness.
2).Press LEFT/RIGHT( / )button to adjust the contrast
Adjusting the picture setting
1).Press the ANS button to select brightness
contrast, colour, tint (tint only NTSC system using)
2).Press LEFT/RIGHT( / )button to adjust the brightness,
contrast, colour, tint.
To mute sound
1).Press the MUTE button to temporarily turn off the sound .
Screen display the mute mark .
2).Press the MUTE or LEFT/RIGHT( / )button to turn the
sound back to the previous level.
Sound volume
1).PressANS to select volume .
2).press the RIGHT ( ) button to increase sound volume adjusting.
The segment of indicator increases.
3).Press the LEFT ( )button decrease sound volume.
The segment of indicator decreases.
............
50
............
50
............
50
............
50
Press one or two
Digit
buttons.
Page 6

11
10
1. Press the MENU button, the PRESET menu screen appears.
2. Press the UP/DOWN( / ) button to select the desired function
mode.
3. Each time you press the LEFT/RIGHT( / ) button ,the setting
for individual item is change as follows:
The mode changes in the following order
Channels Skip
The mode changes in the following order
Fine tune
The frequency changes to allow fine tuning.
BAND: changes Band VHFL VHFH UHF
Channel Setting
The mode changes in the following order
AUTO
PAL
NTSC SECAM
Colour System
Sound System
BG DK I
YES NO
M L
Press the remote control AUDIO to change the ATV sound system
SKIP THIS
1. Press the MENU button, the PRESET menu screen appears.
2. Press the UP/DOWN( / ) button to select AUTO SEARCH item.
3. Press the LEFT/RIGHT( / ) button ,all the TV stations in your
area that can be received by the LCD TV set are automatically preset
between channels 0 to 99.
4. The screen shows whatever is on channel 1 when full auto channel
preset is finished.
1. Press the MENU button, the PRESET menu screen appears.
2. Press the UP/DOWN( / ) button to select item.
3. Press the LEFT/RIGHT( / ) button to locate the channel you
want to preset to the position.
4. Press the UP/DOWN( / ) button to select MANUAL SEARCH
item.
CHANNEL
F. PRESET ATV
Presetting the channels(AUTO search)
Notes:
1.When starting the Auto searching after setting, The colour system and
sound system for all channel are stored into memory.
2.Unused channels are automatically skipped.
Presetting the channels(Manual Search)
CHANNELCHANNEL
COLOUR SYSTEMCOLOUR SYSTEM
SOUND SYSTEMSOUND SYSTEM
AUTOAUTO
BGBG
MANUAL SEARCHMANUAL SEARCH
FINE TUNEFINE TUNE
SKIP THIS SKIP THIS
11
NONO
5. Press the LEFT/RIGHT( / ) button search is initiated and when
a ATV signal is received during the search .the search stops.
6. Repeat step 2.3.4.5 above to preset the channel position for other
broadcasts etc.
PRESETPRESET
AUTO SEARCHAUTO SEARCH
200.25MHZ200.25MHZ
BANDBAND
VHFHVHFH
Page 7

12
13
G . PRESET DTV MENU:
(A). Antenna Active
Antenna ActiveAntenna Active
Press , , or button to select Antenna Active ,Then press OK button.
If you select "enable ",the tuner can provide 5V power supply.
Press or button to select Enable or Disable.
Antenna Antenna EnableEnable
5V On
Press OK Key to select Exit: Back
Press the [MENU] button when the TV is DTV mode, then the Preset
program setting menu will be shown on the screen.
Channel SearchChannel Search
Channel EditChannel Edit
InstallationInstallation
22
33
11
Main MenuMain Menu
Press OK Key to selectPress OK Key to select
Press , , or to select your desired recommend function.
Press [EXIT] button to return the upon interface.
Press [MENU] button to exit the menu interface.
1. Installation
InstallationInstallation
Press , , or button to select Installation ,Then press OK button.
Antenna ActiveAntenna Active
System SetupSystem Setup
1
2
System SetupSystem Setup
(B). System Setup
Press , , or button to select System Setup ,Then press OK button.
Local TimeLocal Time
User InterfaceUser Interface
Video Video
System InformationSystem Information
Factory ResetFactory Reset
11
22
33
44
55
When power on, [First Installation] will be shown on the screen if unit
without any channel stored
First InstallationFirst Installation
AreaArea UKUK
OSD LanguageOSD Language
OKOK
Time zoneTime zone
AntennaAntenna
Auto ScanAuto Scan
EnglishEnglish
GMT +1GMT +1
5V off5V off
Press , to select first Installation, then press OK button.
Area : Press , to select the appropriate area.
OSD Language : Press , to select to your preference language.
Time zone : Press , to select time zone.
Antenna : Press , to selet 5V on or 5V off so that the tuner will
or won t provide 5V power supply.
Auto Scan : Press OK and begin to auto san.
If you don t want to do the first installations, please press the EXIT
button to exit.
,
,
Page 8

15
14
TV System TV System PALPAL
16:916:9
Pan&ScanPan&Scan
Screen RatioScreen Ratio
4:3 Handing4:3 Handing
Press key to select PAL/SECAM/NTSC
Video
Press , , or button to select Video ,Then press OK button.
Press or button to select TV System , Screen Ratio or 4:3 Handing ,
Then press or button to set it .
VideoVideo
2. Channel Search
Channel Search
Press , , or button to select Channel Search ,Then press OK button.
AreaArea
FrequenyFrequeny
Band WidthBand Width
ModeMode
Scan ModeScan Mode
AustraliaAustralia
Pross LEFT/BIGHT key to Soloct Froquency. Pross LEFT/BIGHT key to Soloct Froquency.
CCHH[[44] ]5 57 7..55MMHHZZ
AutoAuto
Manual ScanManual Scan
LevelLevel 15%15%
0%0%
QualityQuality
OSD Language: Control the language as to you preference.
OSD Transparency: Customise the OSD transparency.
Local TimeLocal Time
Time zoneTime zone
Summer timeSummer time
DateDate
MonthMonth
YearYear
TimeTime
GMT+1GMT+1
OnOn
2323
9 9
20062006
11:0611:06
Press OK Key to select Exit:BackPress OK Key to select Exit:Back
User Interface
Press , , or button to select User Interface ,Then press OK button.
Press or button to select Language or Transparency item, Then press
or button to change the language .
Press OK Key to select Exit:BackPress OK Key to select Exit:Back
OSD LanguageOSD Language
OSD TransparencyOSD Transparency
EnglishEnglish
35%35%
User InterfaceUser Interface
Local Time
Press , , or button to select Local Time ,Then press OK button.
Press or button to select Time zone or Summer time item ,Then press
or button to set it .
System Information
Press , , or button to select System Information ,Then press OK
button. You can see the receiver Hardware and Software update details.
System SetupSystem Setup
Local TimeLocal Time
User InterfaceUser Interface
Video Video
System InformationSystem Information
Factory ResetFactory Reset
11
22
33
44
55
System InformationSystem Information
NEC uPD61110NEC uPD61110
S/W Version: uPD61110 V3.02S/W Version: uPD61110 V3.02
h/W Version: 3.0h/W Version: 3.0
Last Update: 2006.11.06Last Update: 2006.11.06
Factory Reset
Press , , or button to select Factory Reset ,Then press OK button.
Press or button to select Yes or No, then press OK button.
Note: this action will erase all the date you have store in the receiver ,Be
sure that you want to perform this function before you proceed .
System SetupSystem Setup
Local TimeLocal Time
UserInterfaceUserInterface
Video Video
System InformationSystem Information
Factory ResetFactory Reset
11
22
33
44
55
All Date are Erasing
Are you sure?
All Date are Erasing
Are you sure?
YesYes NoNo
7MH7MH
ZZ
Scan ModeScan Mode
Auto ScanAuto Scan
Page 9

17
16
TV Channel TV Channel
RADIO Channel RADIO Channel
11
22
This menu enable you to setup the channel of DVB-T. Such as move channels,
make your own favorite channels list ,skip channels and delete channels from
the list.
3. CHANNEL EDIT
(A). Preset TV Channel
Please select Channel Edit, then press OK button.
Channel 1Channel 1
Channel 2Channel 2
Channel 3Channel 3
Channel 4Channel 4
Channel 5Channel 5
0: Skip Edit
1: Delete Edit
2: Move Edit
0: Skip Edit
1: Delete Edit
2: Move Edit
3: Name Edit
4: Sort Edit
5 Fav Edit
3: Name Edit
4: Sort Edit
5 Fav Edit
474MHz
BW[8MHz]
CH 21
474MHz
BW[8MHz]
CH 21
00010001
00020002
00030003
00040004
00050005
helphelp
Channel EditChannel Edit
Add To Fav-1Add To Fav-1
Press [ 0 ] button to select Skip Edit item. then press or button to select
channel, press [OK ]button, will display beside the program, press [OK]
button again to remove this logo, when you press or button in no-menu
state,the program will skip.
Press or button to select Frequency ,Then press OK button.
Press or button to select desired recommend Frequency.
Press or button to select the Auto scan, then press OK button to search
program with auto search format. It would search all the currently TV
program and store them automatically.
If you want to stop the AUTO SEARCH mode, please press the [EXIT]
button.
Note: You may be wait for a moment when the TV finished
AUTO SEARCH.
You may be wait for a moment when the TV be stopped AUTO
SEARCH.
Channel SearchChannel Search
FrequencyFrequency
Band WidthBand Width
ModeMode
Scan ModeScan Mode
Scan ModeScan Mode
CH[45]666MHzCH[45]666MHz
Select Frequency ,OK: CH table Select Frequency ,OK: CH table
8MHz8MHz
AutoAuto
Manual ScanManual Scan
Auto ScanAuto Scan
LevelLevel 15%
0%
QualityQuality
TP ListTP List
CH[4]57.5MHz
CH[5]64.5MHzCH[5]64.5MHz
CH[6]177.5MHzCH[6]177.5MHz
CH[7]184.5MHzCH[7]184.5MHz
CH[8]191.5MHzCH[8]191.5MHz
CH[9]198.5MHzCH[9]198.5MHz
CH[10]205.5MHzCH[10]205.5MHz
CH[11]212.5MHzCH[11]212.5MHz
Press the , to select Area, then Press left/right to select the
appropriate area.
Channel 1Channel 1
Channel 2Channel 2
Channel 3Channel 3
Channel 4Channel 4
Channel 5Channel 5
0: Skip Edit
1: Delete Edit
2: Move Edit
0: Skip Edit
1: Delete Edit
2: Move Edit
3: Name Edit
4: Sort Edit
5 Fav Edit
3: Name Edit
4: Sort Edit
5 Fav Edit
474MHz
BW[8MHz]
CH 21
474MHz
BW[8MHz]
CH 21
00010001
00020002
00030003
00040004
00050005
helphelp
Skip ChannelSkip Channel
Press [ 1 ] button to select Delete Edit item. then press or button to
select channel, press [OK] button you can delete the channels.
Page 10

18
19
Press [ 3 ] button to select Name Edit. then press or button to select
channel, press [OK] button ,a keyboard is shown, press , , or to
select a letter, and the [OK] button to overwrite the current by anther letter,
press [OK] button to confirm the change name when your have finished.
Press [ 4 ] button to select Sort Edit. then press or button to
select channel, Press 1,2,3,4,or 5 button you can sort the channels.
(B). Preset RADIO Channel
Press , , or button to select RADIO Channel ,Then press OK button.
It's the same as "Preset TV Channel".
BBC PARLMNTBBC PARLMNT
474MHz
BW[8MHz]
CH 21
00010001
Channel 1Channel 1
Channel 1Channel 1
Channel 2Channel 2
Channel 2Channel 2
Channel 4Channel 4
Channel 4Channel 4
Channel 5Channel 5
Channel 5Channel 5
0: Skip Edit
1: Delete Edit
2: Move Edit
0: Skip Edit
1: Delete Edit
2: Move Edit
0: Skip Edit
1: Delete Edit
2: Move Edit
0: Skip Edit
1: Delete Edit
2: Move Edit
0: Skip Edit
1: Delete Edit
2: Move Edit
0: Skip Edit
1: Delete Edit
2: Move Edit
3: Name Edit
4: Sort Edit
5 Fav Edit
3: Name Edit
4: Sort Edit
5 Fav Edit
3: Name Edit
4: Sort Edit
5 Fav Edit
3: Name Edit
4: Sort Edit
5 Fav Edit
3: Name Edit
4: Sort Edit
5 Fav Edit
3: Name Edit
4: Sort Edit
5 Fav Edit
474MHz
BW[8MHz]
CH 21
474MHz
BW[8MHz]
CH 21
474MHz
BW[8MHz]
CH 21
474MHz
BW[8MHz]
CH 21
00010001
00010001
00020002
00020002
00030003
00030003
00040004
00040004
helphelp
helphelp
helphelp
Name editName edit
Sort EditSort Edit
A
H
O
V
Other
Space Save
G
N
U
DEL
F
M
T
E
L
S
Z
D
K
R
Y
C
J
Q
X
B
I
P
W
Channel 5
1--Sort by Channel name
2--Sort by Internal list
3--Sort by Lock
4--Sort by Scramble
5--Sort by Factory default
Add To Fav-1Add To Fav-1
Channel 1Channel 1
Channel 1Channel 1
Channel 2Channel 2
Channel 2Channel 2
Channel 4Channel 4
Channel 4Channel 4
Channel 5Channel 5
Channel 5Channel 5
0: Skip Edit
1: Delete Edit
2: Move Edit
0: Skip Edit
1: Delete Edit
2: Move Edit
0: Skip Edit
1: Delete Edit
2: Move Edit
0: Skip Edit
1: Delete Edit
2: Move Edit
3: Name Edit
4: Sort Edit
5 Fav Edit
3: Name Edit
4: Sort Edit
5 Fav Edit
3: Name Edit
4: Sort Edit
5 Fav Edit
3: Name Edit
4: Sort Edit
5 Fav Edit
474MHz
BW[8MHz]
CH 21
474MHz
BW[8MHz]
CH 21
474MHz
BW[8MHz]
CH 21
474MHz
BW[8MHz]
CH 21
00010001
00010001
00020002
00020002
00030003
00040004
00040004
helphelp
helphelp
Delete ChannelDelete Channel
Move IndexMove Index
Press [ 2 ] button to select Move Edit item. then press or button to
select channel, press [OK] button, press or button to the place you
want and press [OK] button ,the program move to the currently place.
Press , , or button to select TV Channel ,Then press OK button.
Channel 1Channel 1
Channel 2Channel 2
Channel 3Channel 3
Channel 4Channel 4
Channel 5Channel 5
0: Skip Edit
1: Delete Edit
2: Move Edit
0: Skip Edit
1: Delete Edit
2: Move Edit
3: Name Edit
4: Sort Edit
5 Fav Edit
3: Name Edit
4: Sort Edit
5 Fav Edit
474MHz
BW[8MHz]
CH 21
474MHz
BW[8MHz]
CH 21
00010001
00020002
00030003
00040004
00050005
helphelp
Add To Fav-1Add To Fav-1
Press [5] button to select Fav list, then press or button to select
channel. Press OK button you can set the channels to favor list.
Page 11

press [AUDIO] button to show the list of available audio language for the
channel you are watching, you can change the audio language you want to
hear by press the or button, and press [OK] button to confirm.
Audio
eng 2/2eng 2/2
StereoStereo
GUIDE (EPG)
Your DTV has an Electronic Program Guide(EPG)
to help you navigate programs through all the possible viewing
options. This receiver is equipped with a unique dual EPG system
which gives you easy way to view the program information. The
DTV Guide supplies information such as program listings and
starting and ending times for all available programs. Press the
GUIDE key while you are viewing a program and the Program
Guide screen will be displayed.
Navigate event: Press the Left Right key,
you can navigate the event information in four days.
Change channel: Press the Up Down key,you
can change the viewing channel.
Change fav list: Press the red key,you can select which
favorite type channel should be listed.
Reserve: Press the Yellow key,you can reserve the event you
want.
NOTICE:
This service is not offered by all channels. Program
information will be available only when it is included in the
transmission.
Depending on the receiving quality the page searching can last up
to half a minute until the start side 100 is displayed.
At the bottom of the text page links to other pages are displayed
with the colours red, green, yellow and blue. The red, green,yellow
button can be used for these links. The "TV/RADIO" button
complies with the blue button.
You can also navigate with the up
And the down button and
with the 0 9 buttons.
Teletext and subtitle
You can start the teletext and subtitle with the yellow button of
the remote control and confirm the appearing window with the
''OK'' button .You exit the teletext and subtitle by using ''EXIT''
button.
20
21
While viewing TV or Radio channel various function can be applied using
your remote control.
press [INFO] button to show you the information of the current channel.
press [OK] button to display the channel list of TV, Radio channel directly.
It's convenient for your selecting.
H . Basic function
Info
OK
LevelLevel 0%0%
0%0%
QualityQuality
Channel 1Channel 1 [CH21] 1013[CH21] 1013
PP
19:2519:25 2/22/2
FF TT EE
ProgProg
Channel 1Channel 1
Channel 2Channel 2
Channel 3Channel 3
Channel 4Channel 4
Channel 5Channel 5
00010001
00020002
00030003
00040004
00050005
Page 12

22
23
button to go back to TV.
You can see the actual page number on the left side and t
he
requested page number on the right side at the top of the teletext
page. The page searching is displayed on the left side.
Teletext is only available when receiving DVBT channels.
OTHER
Sound track
In digital broadcasts, multiple audio languages can be simultaneously
transmitted by the program provider. The Audio control menu appears
when the Audio key is pressed on the channel having different types
of sounds. You can change the desired audio language and audio mode
of current service.
This service is not offered by all channels. Teletext and subtitle information
will be available only when it is included in the transmission.
NOTICE:
Plug the earphone mini-plug into the earphone jack located on the rear side
of the set .
J. LISTENING WITH A EARPHONE
Earphone
No sound will be heard from the main unit speakers when
connecting the earphone set.
Notes:
K. TROUBLESHOOTING
Before calling for repair service,cheak the following items for possible
remedies to the encoutered symptoms.
TV set
There is no
picture or
sound.
There is no
picture or
sound,just
noise.
picture is
not clear.
The picture is
too dark.
Remote control
does not work.
picture is light
or improperly
tinted.
There is no
picture.
There is no
sound.
Problem
Check item
Make sure the AC adapter is properly
inserted in the power outlet.
Reception other than those of broadcasting
stations can be considered.
Make sure the input mode is set to TV.
Make sure the main power switch of the
main unit is on.
Make sure the colour system is right
Fluorescent lamp may have reached the end
of service life.
Make sure the sound system is right
Make sure the volume is not set to minimum.
Make sure the sound is not set to mute.
Make sure the headphone is not connected.
Make sure the antenna cable is properly
connected.
Bad reception can be considered.
Make sure the antenna cable is properly
connected.
Bad reception can be considered.
Check Contrast and Brightness adjustment.
Fluorescent lamp may have reached the end
of service life.
Check to see if batteries in the remote control
have sufficient power.
Make sure the remote sensor window is not
under strong fluorescent lighting.
Check colour adjustment.(NTSC mode)
1. Press the SLEEP key to display the sleep time screen.
2. Press the LEFT/RIGHT( / ) to set the sleep time (in minutes).
I. ADJUSTING THE SLEEP TIMER SETTINGS
The setting can be set in 10 . 20 . 30 . 40 . 50 . 60 ....... 200 .
210 . 220 . 230 . 240 minutes
Page 13

24
TROUBLESHOOTING(Continued)
Antenna
The picture
is doubled or
tripled
The picture
is spotted
There are stripes
on the screen or
colours fade
The reception may be weak.
The state of the broadcast may also be bad.
Make sure the antenna is facing the right direction.
Make sure the outside antenna is not disconnected.
Make sure the antenna is facing the right direction.
There may be reflected electric waves from mountains
or buildings.
There may be interference from automobiles,trains,high
voltage lines,neon lights,etc.
There may be interference between the antenna cable
and power cable.Try positioning them further apart.
Is the unit receiving interference from other devices?
Thansmission antennas of radio broadcasting stations
and transmission antennas of amateur radios and cellular
phones may also cause interference.
Use the unit as far apart as possible from devices that
may cause possible interference.
The picture
is not sharp
The picture
moves
Problem
Check item
L. SPECIFICATIONS
LCD COLOUR TV COMPARISON
Video colour systems
TV sound systems
TV Turning System
AUTO PRESET
CATV
PAL/NTSC/SECAM
I/DK/BG/M/L
Auto preset 99ch.
Yes
ATV
FUNCTION
~Hyper Band
25
LCD panel
Number of pixels
Luminance
Lamp life
Viewing angles
Audio amplifier
Speakers
Terminals
Video input
Left Right Audio input
Earphone output
DTV AV output
Power supply
Weight
Accessories
8.5(9) TFT LCD
480 x RGB x 234
ITEMS
MODEL
Slo T8.5
Standard
DVB-T
DTV
FUNCTION
Transport stream
Profile&level
Input frequency
COFDM spectrum
Demodulation method
Audio type
Audio sampling rate
MPEG-2 MP@ML
2k and 8k mode
QPSK,16QAM,64QAM
Single channel,Dual channel, joint stereo,Sereo
AV output
2
250 cd/m
10,000 Hours
00
H:120 V:100
0.25W x 2
2 x 4 cm, 2
RCA
RCAx2
Remote control, Antenna, AC adapter, AV cable,
IEC to F-type connector.
CS
P
F-type female
3.5 mm jack(Rear)
DC 10-15 V,AC 110 - 240 V
0.8 Kg w/o accessories
1/32,1/16,1/8,and1/4
Guard interval
ANT input
3.5 mm jack(Rear)
Audio.Video.Output
32,44.1and 48KHz
VHF ,UHF
ISO/IEC 13818
Car adapter, Earphone, Batteries Box
Page 14

Notice: This manual is only for you reference, any change to the
design and specifications will not be advised.
 Loading...