

Page 1

Bedienungsanleitung › Deutsch › Seite 2 – 18
Instruction manual › English › Page 19 – 35
Page 2

INHALTSVERZEICHNIS SEITE
Bestimmungsgemäßer Gebrauch 38
Technische Daten 38
Sicherheitshinweise 38
Bedienelemente 40
Inbetriebnahme 41
Anschließen 42
Bedienung 43
Uhr einstellen 44
Radiobetrieb 46
CD-Betrieb 46
MP3-Betrieb 48
USB- und Speicherkarten-Funktionen 50
Reinigung 50
Entsorgen 50
Garantie und Service 51
Service
Importeur 51
Hersteller
3
3
3
5
8
9
10
11
13
13
15
17
17
17
18
18
Lesen Sie die Bedienungsanleitung vor der ersten Verwendung aufmerksam durch und heben Sie diese für
den späteren Gebrauch auf. Händigen Sie bei Weitergabe des Gerätes an Dritte auch die Anleitung aus.
2
Page 3

MP3-DESIGNANLAGE KH2302
Bestimmungsgemäßer
Gebrauch
Dieses Gerät ist zum Empfang von FM/AM-Radiosendern, sowie zur Wiedergabe von Audio CDs
und MP3-Dateien von CDs, USB-Datenträgern und
SD/MMC Speicherkarten vorgesehen. Dieses Gerät ist nur zur Verwendung im häuslichen Gebrauch
vorgesehen. Es ist nicht für die Verwendung in gewerblichen oder in industriellen Bereichen geeignet.
Frequenzbereiche Radio:
Radio: MW (AM): 522 – 1620 KHz
UKW (FM): 87,5 – 108 MHz
USB-Steckplatz
Lesbare
USB-Speichersticks: USB1.1 und 2.0 bis zu einer
Kapazität von 2 GB
Speicherkartenfach
Lesbare Speicherkarten:
SD (2 GB), MMC (2 GB)
Technische Änderungen vorbehalten!
Technische Daten
Dieses Gerät entspricht hinsichtlich Übereinstimmung mit den grundlegenden Anforderungen und den anderen relevanten Vorschriften
der EMV-Richtlinie 2004/108/EC und der
Richtlinie für Niederspannungsgeräte
2006/95/EC.
Netzanschluss: AC 220 V - 240 V ~50 Hz
Leistungsaufnahme: 28 Watt
Nennleistung: 4,5 Watt RMS
an 8 Ohm pro Kanal
Standby-Betrieb: ca. 6 W
Betriebstemperaturbereich: +5°— +40°C
Feuchtigkeit: 5 — 90%
(keine Kondensation)
Abmessungen Mikroanlage
(ohne montierte Konsolen)
(L x B x H): 320 x 192 x 75 mm
Abmessungen Lautsprecher
(L x B x H): 130 x 160 x 205 mm
Gewicht Mikroanlage: ca. 2,1 kg
Gewicht der
Lautsprecher: ca. 2,2 kg
Schutzklasse: II /
Max. Ausgangsspannung
(Kopfhörer-Anschluss): 70-80 mV
CD-Spieler
abspielbare Formate: CD, CD-R, CD-RW
Sicherheitshinweise
• Dieses Gerät ist nicht dafür bestimmt, durch
Personen (einschließlich Kinder) mit eingeschränkten physischen, sensorischen oder
geistigen Fähigkeiten oder mangels Erfahrung
und/oder mangels Wissen benutzt zu werden,
es sei denn, sie werden durch eine für ihre
Sicherheit zuständige Person beaufsichtigt oder
erhielten von ihr Anweisungen, wie das Gerät zu
benutzen ist.
• Kinder sollten beaufsichtigt werden, um sicherzustellen, dass sie nicht mit dem Gerät spielen.
• Batterien dürfen nicht in die Hände von Kindern
gelangen. Kinder könnten Batterien in den Mund
nehmen und verschlucken. Wurde eine Batterie
verschluckt, muss sofort medizinische Hilfe in Anspruch genommen werden.
Um Lebensgefahr durch elektrischen
Schlag zu vermeiden:
• Schließen Sie das Gerät nur an eine vorschriftsmäßig installierte und geerdete Netzsteckdose
an. Die Netzspannung muss mit den Angaben auf
dem Typenschild des Gerätes übereinstimmen.
• Achten Sie darauf, dass im Betrieb das Netzkabel niemals nass oder feucht wird. Führen Sie es
so, dass es nicht eingeklemmt oder anderweitig
beschädigt werden kann.
3
Page 4

• Lassen Sie beschädigte Netzstecker oder Netzkabel sofort von autorisiertem Fachpersonal
oder dem Kundenservice austauschen, um Gefährdungen zu vermeiden.
• Lassen Sie Anschlussleitungen bzw. Geräte, die
nicht einwandfrei funktionieren oder beschädigt
wurden, sofort vom Kundendienst reparieren
oder austauschen.
• Verwenden Sie das Gerät nur in trockenen Räumen.
Tauchen Sie das Gerät niemals in Wasser
ein. Wischen Sie es nur mit einem leicht
feuchten Tuch ab.
• Stellen Sie sicher, dass niemals Flüssigkeiten oder
Gegenstände in das Gerät gelangen können.
• Stellen Sie keine mit Wasser gefüllten Behälter
(wie z. B. Blumenvasen) auf das Gerät.
• Platzieren Sie das Gerät in der Nähe der Netzsteckdose. Achten Sie darauf, dass die Netzsteckdose leicht zugänglich ist.
• Um Stolperfallen zu vermeiden, verwenden Sie
keine Verlängerungskabel. Bei Gefahr muss der
Netzstecker schnell erreichbar sein.
• Sie dürfen das Gerätegehäuse nicht öffnen oder
reparieren. In diesem Falle ist die Sicherheit nicht
gegeben und die Gewährleistung erlischt.
Reparaturen sind ausschließlich durch einen
Fachbetrieb bzw. Service-Center auszuführen.
Hinweis zur Netztrennung
Der Schalter POWER dieses Gerätes trennt das
Gerät nicht vollständig vom Stromnetz. Außerdem nimmt das Gerät im Standby-Betrieb Strom
auf. Um das Gerät vollständig vom Netz zu trennen, muss der Netzstecker aus der Netzsteckdose gezogen werden.
Hinweise zum Umgang mit Batterien
Die Fernbedienung verwendet Batterien. Für den
Umgang mit Batterien beachten Sie bitte Folgendes:
Explosionsgefahr!
Werfen Sie keine Batterien ins Feuer. Laden Sie
Batterien nicht wieder auf.
• Öffnen Sie die Batterien niemals, löten oder
schweißen Sie nie an Batterien.
Es besteht Explosions- und Verletzungsgefahr!
• Überprüfen Sie regelmäßig die Batterien. Auslaufende Batterien können Beschädigungen
am Gerät verursachen.
• Wenn Sie das Gerät längere Zeit nicht benutzen, entnehmen Sie die Batterien.
• Bei ausgelaufenen Batterien, ziehen Sie
Schutzhandschuhe an.
• Reinigen Sie das Batteriefach und die Batteriekontakte mit einem trockenen Tuch.
Um Brand- und Verletzungsgefahr zu vermeiden:
• Stellen Sie keine Kerzen oder andere offenen
Brandquellen auf das Gerät.
• Benutzen Sie das Gerät nicht in der Nähe von
heißen Oberflächen.
• Stellen Sie das Gerät nicht an Orten auf, die direkter
Sonnenstrahlung ausgesetzt sind. Andernfalls kann
es überhitzen und irreparabel beschädigt werden.
• Stellen Sie das Gerät so auf, dass kein Hitzestau
entstehen kann, also frei und gut belüftet.
• Decken Sie nie die Belüftungsöffnungen zu!
• Vermeiden Sie zusätzliche Wärmezufuhr, z. B.
durch direkte Sonneneinstrahlung, Heizungen,
andere Geräte usw.!
• Halten Sie Kinder von Anschlussleitung und Gerät
fern. Kinder unterschätzen häufig die Gefahren
von Elektrogeräten.
• Sorgen Sie für einen sicheren Stand des Gerätes.
• Falls das Gerät heruntergefallen oder beschädigt
ist, dürfen Sie es nicht mehr in Betrieb nehmen.
Lassen Sie das Gerät von qualifiziertem Fachpersonal überprüfen und gegebenenfalls reparieren.
4
Page 5

• Batterien dürfen nicht in die Hände von Kindern
gelangen. Kinder könnten Batterien in den Mund
nehmen und verschlucken.
Sollte eine Batterie verschluckt worden sein,
suchen Sie sofort einen Arzt auf.
Gewitterwarnung!
Vor einem Sturm und/oder Gewitter mit Blitzschlaggefahr trennen Sie das Gerät bitte vom Stromnetz!
Hinweis zu Stoßspannungen
(EFT / elektrischer schneller Übergangsvorgang) und elektrostatischen
Entladungen:
Im Falle einer Fehlfunktion aufgrund elektrischer schneller Übergangsvorgänge (Stoßspannung) bzw. elektrostatischer Entladungen
muss das Produkt zurückgesetzt werden, um
den normalen Betrieb wieder herzustellen.
Möglicherweise muss die Stromversorgung getrennt und wieder neu angeschlossen werden.
Hinweis:
Dieses Gerät ist mit rutschfesten Gummifüßen
ausgestattet. Da Möbeloberflächen aus den verschiedenen Materialien bestehen und mit unterschiedlichsten Pflegemitteln behandelt werden,
kann es nicht völlig ausgeschlossen werden, dass
manche dieser Stoffe Bestandteile enthalten, die
die Gummifüße angreifen und aufweichen. Legen Sie gegebenenfalls eine rutschfeste Unterlage unter die Füße des Gerätes.
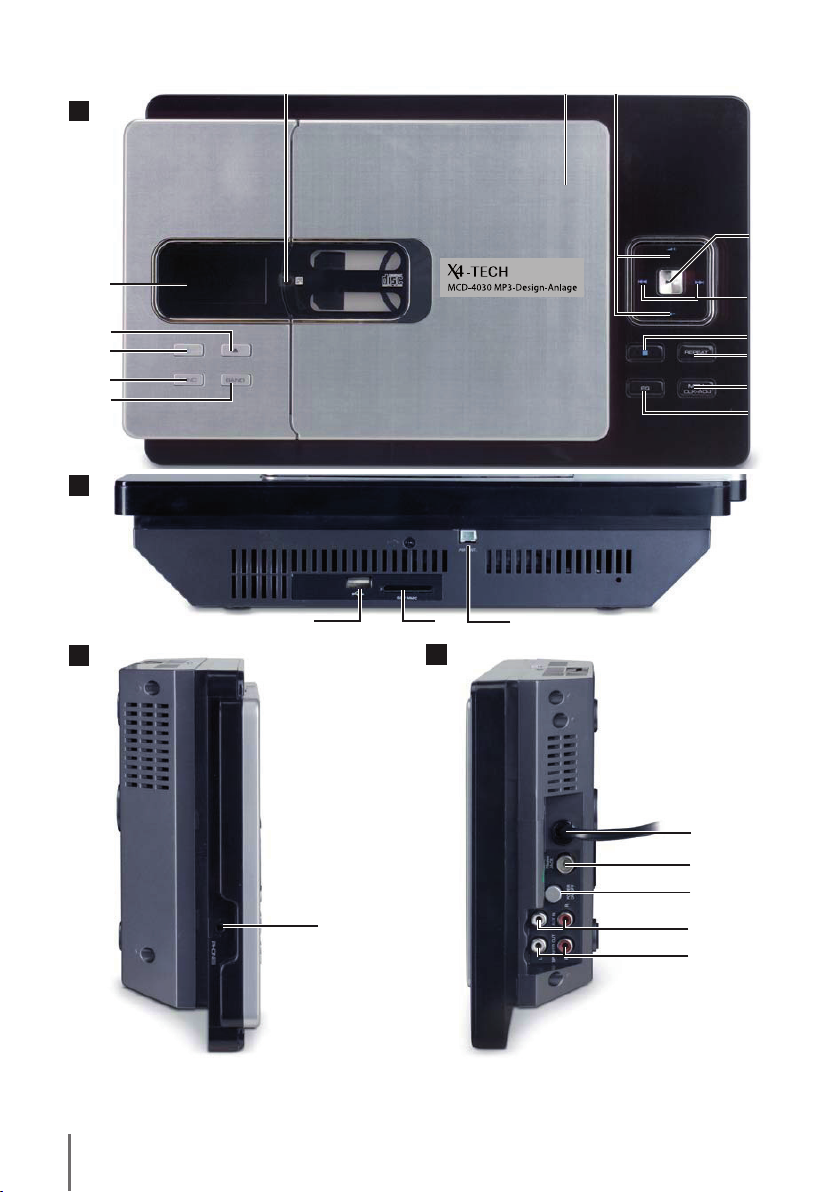
Bedienelemente
A. Vorderseite
Sensor für die Fernbedienung
q
CD-Fach
w
VOLUME +/-: Lautstärke erhöhen/verringern
e
PLAY/PAUSE : Wiedergabe starten/unterbrechen
r
Tasten SKIP und SKIP
t
Überspringtaste und Schnellsuchlauf innerhalb
eines Titels, Uhrzeiteinstellung (Minuten und
Stunden)
STOP: Wiedergabe anhalten
y
REPEAT: Wiederholfunktion einstellen
u
MEM: Programmierfunktion einstellen
i
EQ: Klang einstellen
o
BAND: Frequenzband wählen
a
FUNCTION: Betriebsart wählen
s
STANDBY: Gerät einschalten/
d
in den Standby-Betrieb schalten
OPEN/CLOSE: CD-Fach öffnen/schließen
f
Display
g
B. Oberseite
USB-Anschluss
h
Anschluss für SD/MMC Speicherkarten
j
Anschluss für Mittelwellenantenne
k
C. Linke Seite
Kopfhörer-Anschluss
l
Gefahr Laserstrahlung!
Das Gerät verfügt über einen „Klasse 1 Laser“.
• Öffnen Sie niemals das Gerät.
• Versuchen Sie nicht das Gerät zu reparieren. Im
Inneren des Gerätes liegt unsichtbare Laserstrahlung vor.
• Setzen Sie sich nicht dem Laserstrahl aus,
dies kann zu Augenverletzungen führen.
D. Rechte Seite
Netzkabel
;
Antennen-Anschluss 75 Ohm
2)
POWER: Ein- und Ausschalter
2!
AUX IN L/R: Linker und rechter Eingang Audiogerät
2@
SPEAKER OUT L/R: Linker und rechter Lautsprecher-
2#
anschluss
5
Page 6
q
w
e
A
r
g
f
d
s
a
t
y
u
i
o
B
h
C
l
j
k
D
;
2)
2!
2@
2#
6
Page 7
E
F
k
j
h
g
f
d
s
a
q
w
e
r
t
y
u
i
o
G
H
I
7
Page 8

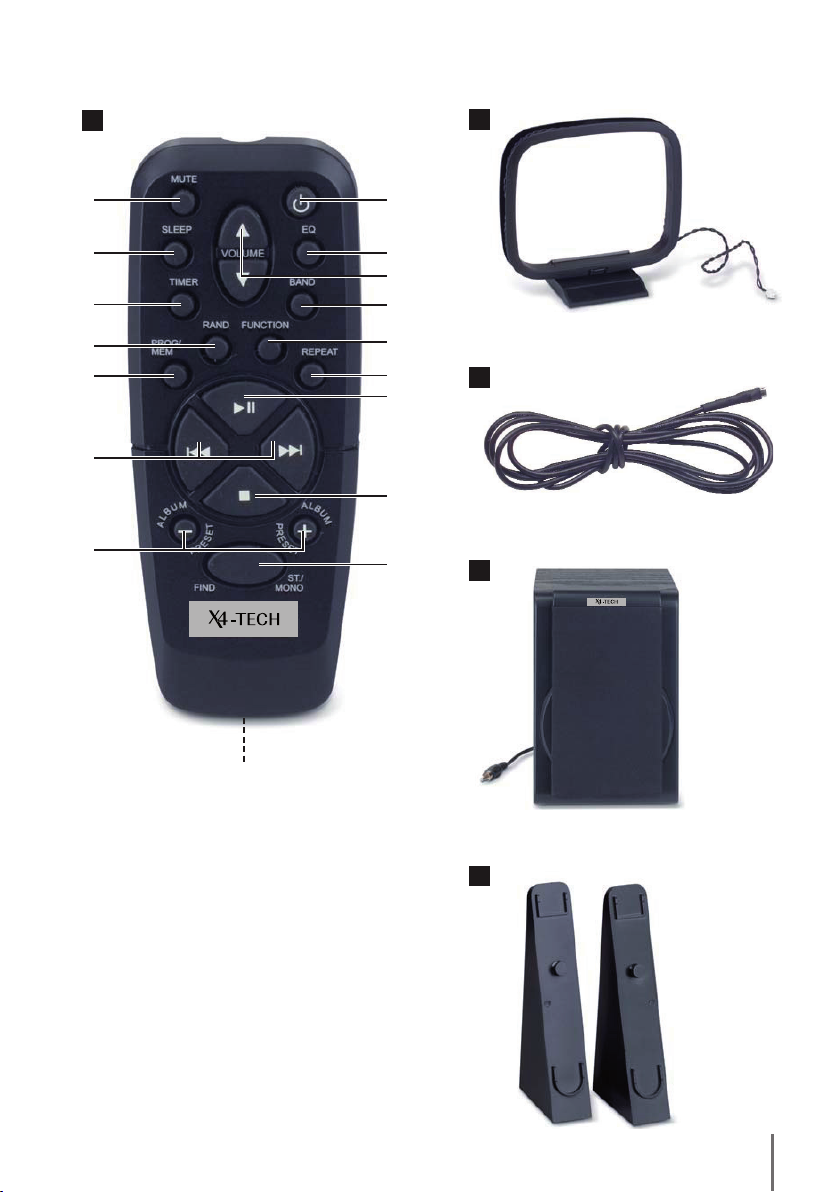
E. Fernbedienung
STANDBY: Gerät einschalten/
q
in den Standby-Betrieb schalten
EQ: Klang einstellen
w
VOLUME +/-: Lautstärke erhöhen/verringern
e
BAND : Frequenzband wählen
r
FUNCTION: Betriebsart wählen
t
REPEAT: Wiederholfunktion einstellen
y
PLAY/PAUSE: Wiedergabe starten/unterbrechen
u
STOP: Wiedergabe anhalten
i
Stereo/Mono-Umschaltung (ST./MONO),
o
Such-Taste (
Batteriefach (a. d. Rückseite)
a
Programmwahl-Taste +/- (ALBUM PRESET +/-)
s
Tasten SKIP und SKIP
d
Überspringtaste und Schnellsuchlauf innerhalb
eines Titels, Uhrzeiteinstellung (Minuten und
Stunden)
PROG/MEM: Programmierfunktion
f
RAND: zufällige Wiedergabe
g
TIMER: Einschalt- und Ausschaltzeit einstellen
h
SLEEP: Einschlaf-Funktion einstellen
j
MUTE: Ton ausschalten
k
FIND)
Inbetriebnahme
Gerät auspacken
Entfernen Sie sämtliches Verpackungsmaterial. Entfernen Sie auch die Transportsicherung aus dem
CD-Fach.
Achtung!
Lassen Sie kleine Kinder nicht mit Folie spielen.
Es besteht Erstickungsgefahr!
Lieferumfang prüfen
Vergewissern Sie sich beim Auspacken, dass folgende Teile mitgeliefert wurden:
- Mikroanlage
- Fernbedienung
- 2 Batterien 1,5 V Typ Micro AAA/R03
- 2 Lautsprecher
- 2 Konsolen
- Wurfantenne (UKW)
- Mittelwellenantenne (MW)
- Montagezubehör
F. Mittelwellenantenne (MW)
G. Wurfantenne (UKW)
H. Lautsprecher
I. Konsolen
8
Mikroanlage aufstellen oder aufhängen
Sie können die Mikroanlage waagerecht oder senkrecht aufstellen bzw. die Mikroanlage und die Lautsprecher an einer Wand montieren.
Hinweis:
Achten Sie bei jeder Art des Aufstellens darauf, dass sich die Klappe des CD-Fachs noch
vollständig öffnen kann.
Waagerechtes Aufstellen
1. Stellen Sie die Mikroanlage auf eine ebene,
waagerechte Fläche auf.
2. Stellen Sie die Lautsprecher den Anschlüssen
entsprechend zur rechten und linken Seite der
Mikroanlage auf.
Page 9
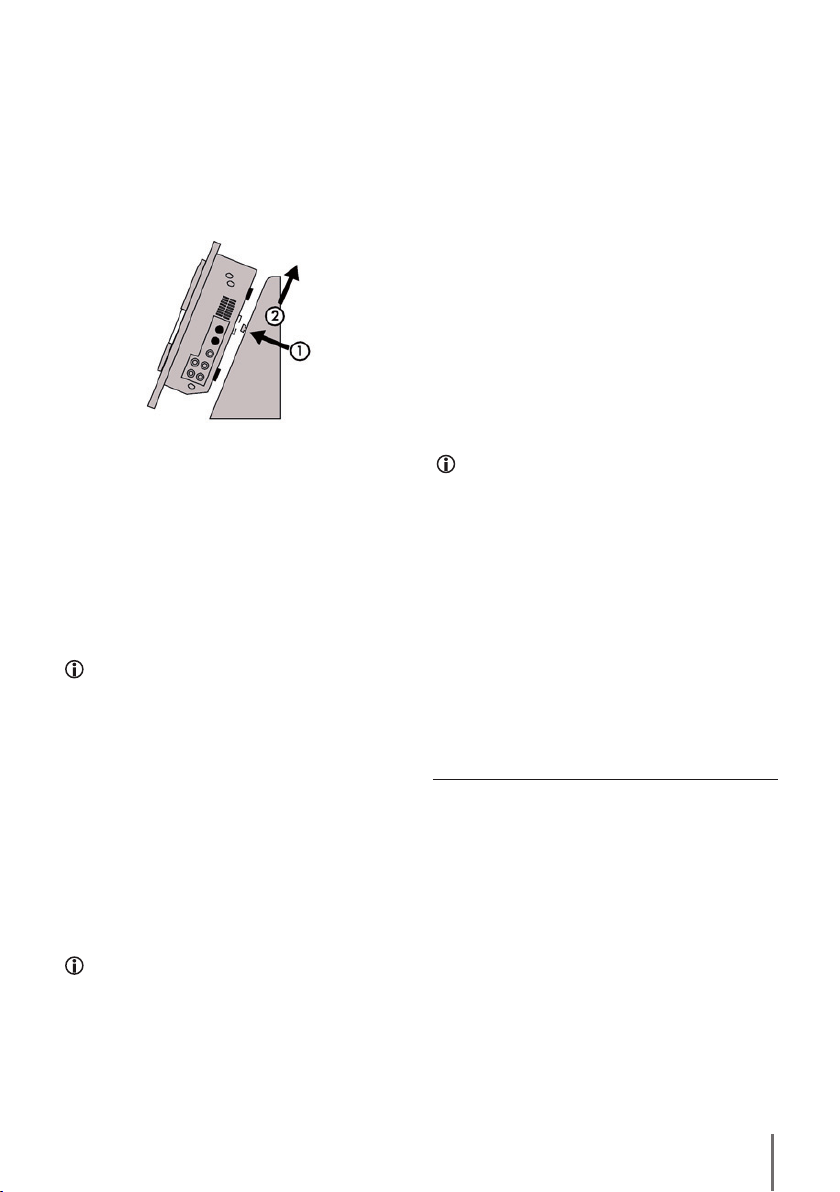
Senkrechtes Aufstellen
Wenn Sie die Mikroanlage senkrecht aufstel-
1.
len wollen, stecken Sie je eine der mitgelieferten Konsolen in eines der Schlüssellöcher auf
der Rückseite der Mikroanlage und schieben
Sie die Konsole bis zum Anschlag auf die
Mikroanlage.
Die Mikroanlage kann nun senkrecht aufgestellt
werden.
2. Stellen Sie die Lautsprecher den Anschlüssen
entsprechend zur rechten und linken Seite der
Mikroanlage auf.
Wandmontage
Sie können die Mikroanlage und die Lautsprecher
an einer Wand montieren.
Hinweis:
Bringen Sie das Gerät und die Lautsprecher
nur an einer stabilen Wand an.
3. Befestigen Sie die Schrauben, je nach Wand-
beschaffenheit, mit Hilfe von Dübeln in der
Wand.
4. Hängen Sie die Mikroanlage/Lautsprecher mit
den Schlüssellöchern an den Schrauben auf.
Batterien in die Fernbedienung einlegen
Für die Fernbedienung benötigen Sie zwei Batterien
1,5 V Typ Micro AAA/R03 (im Lieferumfang enthalten).
1. Öffnen Sie das Batteriefach auf der Rückseite
der Fernbedienung.
2. Legen Sie die Batterien unter Beachtung der im
Batteriefach abgebildeten Polarität in das Batteriefach ein.
3. Schließen Sie den Batteriefachdeckel wieder
sorgfältig, bis der Deckel einrastet.
Umgang mit Batterien
Auslaufende Batterien können Beschädigungen
am Gerät verursachen.
• Wenn Sie das Gerät längere Zeit nicht benutzen, entnehmen Sie die Batterien.
• Tauschen Sie immer alle Batterien gleichzeitig aus und verwenden Sie Batterien des
gleichen Typs.
• Bei ausgelaufenen Batterien ziehen Sie
Schutzhandschuhe an und reinigen Sie das
Batteriefach mit einem trockenen Tuch.
1. Bohren Sie die Schraublöcher für die Mikroan-
lage in einem Abstand von 19 cm nebeneinander waagerecht in die Wand.
2. Bohren Sie die Schraublöcher für die Lautspre-
cher 35 mm höher als die der Mikroanlage
und im Abstand von mindestens 7 cm von der
rechten und der linken Seite der Mikroanlage
in die Wand.
Hinweis:
Damit die Schrauben richtig in den Halterungen auf der Rückseite der Mikroanlage/Lautsprecher greifen können, müssen die Schraubenköpfe ca. 3 mm aus der Wand ragen.
Anschließen
Lautsprecher
Beide Lautsprecherkabel verfügen an ihren Enden
über jeweils einen Cinch-Stecker.
1. Verbinden Sie den Cinch-Stecker des rechten
Lautsprechers mit dem Lautsprecheranschluss
SPEAKER OUT R.
2. Verbinden Sie den Cinch-Stecker des linken
Lautsprechers mit dem Lautsprecheranschluss
SPEAKER OUT L.
9
Page 10
Zusätzliches Audiogerät
Sie können zusätzliche Audiogeräte, wie z. B. MiniDisc-Player oder ein TV-Gerät, an der Mikroanlage
anschließen, um den Ton über die Mikroanlage
wiedergeben zu können.
1. Verbinden Sie den Cinch-Stecker (rechter Ka-
nal) des Audiogeräts mit dem Anschluss
R.
2. Verbinden Sie den Cinch-Stecker (linker Kanal)
des Audiogeräts mit dem Anschluss
AUX IN
AUX IN L.
Kopfhörer anschließen
Sie können an der Mikroanlage einen Stereo-Kopfhörer mit 3,5 mm-Klinkenstecker anschließen. Die
Kopfhörerbuchse befindet sich an der linken Seite
der Mikroanlage. Wenn Sie den Kopfhörer angeschlossen haben, werden die Lautsprecher abgeschaltet und Sie hören den Ton nur noch über den
Kopfhörer.
• Stecken Sie den Klinkenstecker des Kopfhörers in
die Kopfhörerbuchse.
Mittelwellen-/Wurfantenne
anschließen und ausrichten
Für den Mittelwellen-Empfang (MW) müssen Sie die
Mittelwellenantenne an die Mikroanlage anschließen.
1. Wickeln Sie das Anschlusskabel von der Anten-
ne ab.
2. Richten Sie den Ring soweit auf, bis er hörbar
in den Antennenfuß einrastet.
3. Stecken Sie den Antennen-Stecker in den An-
schluss der Mittelwellenantenne.
Für den Ultrakurzwellen-Empfang (UKW) müssen Sie
die Wurfantenne an die Mikroanlage anschließen.
4. Damit Sie mit der Mikroanlage einen guten
Empfang haben, rollen Sie die Wurfantenne
ganz aus.
5. Stecken Sie den Antennen-Stecker der Wurfan-
tenne in die Anschlussbuchse
der Mikroanlage.
75 OHM JACK an
Hinweis:
Wenn der Empfang unzureichend ist, ändern
Sie die Position der Wurfantenne.
Zusätzliche Antenne über 75 Ohm-Anschluss
Bei unzureichendem Empfang über die mitgelieferte
Wurfantenne können Sie die Mikroanlage mit einer
Hausantenne verbinden.
• Stecken Sie den Antennen-Stecker der Hausan-
tenne in die Anschlussbuchse
Mikroanlage.
75 OHM JACK an der
Achtung:
Das Musikhören mit Kopfhörern über einen längeren Zeitraum und mit voller Lautstärke kann zu Gehörschäden führen!
Netzanschluss
• Wenn Sie alle Anschlüsse vorgenommen haben,
verbinden Sie den Netzstecker des Netzkabels
mit einer Netzsteckdose.
Bedienung
Gerät in den Standby-Modus
schalten/ausschalten
1. Drücken Sie den Schalter POWER ein.
Wenn die Uhrzeit noch nicht eingestellt wurde, wird
im Display 00:00 angezeigt. Die Mikroanlage befindet sich nun im Standby-Modus.
2. Um die Mikroanlage einzuschalten, drücken
Sie die Taste
Im Display erscheint die Anzeige HELLO und da-
nach die zuletzt eingestellte Funktion.
3. Um das Gerät wieder in den Standby-Modus
zu schalten, drücken Sie die Taste
Im Display erscheint die Anzeige GOOD BYE und
danach die Uhrzeit.
4. Um das Gerät vollständig auszuschalten, drü-
cken Sie erneut den Schalter
STANDBY.
STANDBY.
POWER.
10
Page 11

Hinweis:
Die Einstellung der Uhrzeit bleibt nicht erhalten,
wenn das Gerät vom Stromnetz getrennt wird.
Betriebsart wählen
• Drücken Sie so oft die Taste FUNCTION, bis im Display die gewünschte Betriebsart angezeigt wird.
Sie können zwischen folgenden Betriebsarten wählen:
CD (CD-Betrieb)
USB (Wiedergabe von MP3-Dateien
von einem USB-Datenträger)
CARD (Wiedergabe von MP3-Dateien
von einer Speicherkarte)
AUX (Wiedergabe eines an die An-
schlüsse
AUX IN angeschlossenen
Audiogerätes)
TUNER (Radiobetrieb)
Lautstärke regeln
• Um die Lautstärke zu erhöhen, drücken Sie die
Taste
VOLUME+ auf der Fernbedienung oder an
der Vorderseite des Gerätes.
• Um die Lautstärke zu verringern, drücken Sie die
Taste
VOLUME- auf der Fernbedienung oder an der
Vorderseite des Gerätes.
Im Display wird kurz die eingestellte Lautstärkestufe
angezeigt.
Ton ausschalten
• Um den Ton auszuschalten, drücken Sie die Taste
MUTE auf der Fernbedienung.
Im Display blinkt die Anzeige MUTE.
• Um den Ton wieder einzuschalten, drücken Sie
die Taste
Tasten
MUTE erneut oder drücken Sie eine der
VOLUME.
Klang einstellen
Mit der Klangeinstellung können Sie die Klangqualität der jeweiligen Musikrichtung anpassen. Sie
können aus folgenden Einstellungen wählen:
POP - JAZZ - FLAT - CLASSIC - ROCK
• Drücken Sie so oft die Taste
gewünschte Klangeinstellung angezeigt wird.
Wenn Sie während der Wiedergabe die Klangeinstellung anpassen, wird der Klang sofort verändert.
In der Einstellung FLAT wird der Klang unverändert
ausgegeben.
EQ, bis im Display die
Uhr einstellen
Sie können die Uhrzeit nur im Standby-Betrieb einstellen.
1. Drücken Sie die Taste MEM CLK-ADJ oder
PROG/MEM. Im Display blinkt die Stundenanzeige.
2. Um die Stunden einzustellen, drücken Sie die
Taste
SKIP oder SKIP .
3. Um die Einstellung zu speichern, drücken Sie
die Taste
play blinkt die Minutenanzeige.
4. Um die Minuten einzustellen, drücken Sie die
Taste
5. Drücken Sie die Taste MEM CLK-ADJ oder
PROG/MEM. Die Uhrzeit ist nun eingestellt und
aktiviert.
Hinweis:
Die Einstellung der Uhrzeit bleibt nicht erhalten,
wenn das Gerät vom Stromnetz getrennt wird
oder mit dem Netzschalter ausgeschaltet wird.
Weck-Funktion einstellen (Timer)
Sie können sich von Ihrer Mikroanlage wecken lassen.
Dazu können Sie die gewünschte Weckzeit, die
Tonquelle und die Lautstärke einstellen. Die Mikroanlage schaltet sich dann zur eingestellten Uhrzeit
ein und aus. Sie können sich vom Radio, vom Klang
einer CD, Speicherkarte oder eines USB-Datenträgers wecken lassen.
MEM CLK-ADJ oder PROG/MEM. Im Dis-
SKIP oder SKIP .
11
Page 12

Hinweis:
Wenn Sie vom Klang einer CD, Speicherkarte
oder eines USB-Datenträgers geweckt werden
möchten, legen Sie vorher das entsprechende
Medium ein.
Wenn Sie vom Radio geweckt werden möchten, stellen Sie einen Sender ein, wie unter "Radiobetrieb" beschrieben.
Um die folgenden Einstellungen vornehmen zu
können, muss sich das Gerät im Standby-Modus befinden.
Betriebsart einstellen
1. Drücken Sie die Taste TIMER.
Auf dem Display blinkt die Anzeige für die Betriebsart.
2. Wählen Sie mit der Taste FUNCTION die Betriebs-
art CD, USB, CARD oder TUNER aus.
Lautstärke einstellen
3. Drücken Sie die Taste TIMER.
Auf dem Display blinkt die Anzeige für die Lautstärke.
4. Stellen Sie mit den Tasten VOLUME+ und VOLUME-
die gewünschte Lautstärke ein.
Einschaltzeit einstellen
5. Drücken Sie die Taste TIMER. Auf dem Display
erscheint ON und es blinkt die Stundenanzeige für die Einschaltzeit.
6. Um die Stunden für die Einschaltzeit einzustel-
len, drücken Sie die Taste
7. Um die Einstellung zu speichern, drücken Sie
erneut die Taste
die Minutenanzeige für die Einschaltzeit.
TIMER. Auf dem Display blinkt
8. Um die Minuten einzustellen, drücken Sie die
Taste
SKIP oder SKIP .
Ausschaltzeit einstellen
9. Um die Stunden für die Ausschaltzeit einzuge-
ben, drücken Sie die Taste
play erscheint OFF und es blinkt die Stundenanzeige.
10. Um die Stunden einzustellen, drücken Sie die
Taste
SKIP oder SKIP .
SKIP oder SKIP .
TIMER. Auf dem Dis-
11. Um die Einstellung zu speichern, drücken Sie
erneut die Taste
die Minutenanzeige für die Ausschaltzeit.
TIMER. Auf dem Display blinkt
12. Um die Minuten einzustellen, drücken Sie die
Taste
SKIP oder SKIP .
Hinweis:
Wenn die Ausschaltzeit gleich der Einschaltzeit
ist, erscheint im nächsten Schritt die Anzeige
ERROR.
Einstellungen speichern
13. Drücken Sie die Taste TIMER.
Auf dem Display erscheint wieder die Uhrzeit.
Außerdem zeigt ein Uhrensymbol an, das die
Weckfunktion eingeschaltet ist.
• Wenn Sie die Weckfunktion ausschalten möchten, drücken Sie kurz die Taste
• Um die Weckfunktion wieder einzuschalten, drücken Sie die Taste
die oben beschriebenen Schritte zur Einstellung
der Weckfunktion aus.
TIMER erneut und führen Sie
TIMER.
Einschlaf-Funktion aktivieren (SLEEP)
Sie können eine Zeit festlegen, nachdem sich die
Mikroanlage abschalten soll. Sie können eine Abschaltzeit zwischen 10 und 90 Minuten auswählen.
1. Schalten Sie die Mikroanlage ein.
2. Drücken Sie so oft die Taste SLEEP, bis Sie die
Abschaltzeit eingestellt haben.
Auf dem Display wird die Abschaltzeit und SLEEP
angezeigt.
3. Mit jedem Tastendruck wird die Abschaltzeit
um zehn Minuten reduziert.
Um die Einschlaf-Funktion auszuschalten, drücken
Sie so oft die Taste
zeigt wird.
SLEEP, bis OFF im Display ange-
12
Page 13

Radiobetrieb
• Drücken Sie mehrmals die Taste FUNCTION, bis die
Anzeige TUNER im Display erscheint.
Frequenzband wählen
Mit der Mikroanlage können Sie UKW (FM) und
MW (AM) Sender empfangen.
• Um das Frequenzband zu wählen, drücken Sie
die Taste
AM bzw. die Anzeige FM.
Automatischer Suchlauf
• Halten Sie die Taste SKIP oder SKIP kurz gedrückt.
Der Suchlauf startet und hält automatisch an, wenn
eine Frequenz mit ausreichender Empfangsstärke
gefunden wurde.
• Um den Suchlauf erneut zu starten, halten Sie
noch einmal die Taste
gedrückt.
• Um den Suchlauf anzuhalten, drücken Sie die
Taste
Manuelle Suche
Mit der manuellen Suche können Sie eine Feinabstimmung der Sender z. B. bei schwierigen Empfangsverhältnissen durchführen.
• Um die Empfangsfrequenz zu erhöhen, drücken
Sie kurz die Taste
• Um die Empfangsfrequenz zu verringern, drücken Sie kurz die Taste
BAND. Im Display erscheint die Anzeige
Stereo/Monoempfang
Wenn der UKW-Empfang gestört ist, schalten
Sie mit der Taste
fang um.
Während des Umschaltens erscheint im Display kurz die Anzeige STEREO bzw. MONO.
In der Einstellung STEREO wird beim Stereoempfang eines UKW-Senders STEREO im Dis-
play angezeigt.
SKIP oder SKIP .
FIND ST./MONO auf Monoemp-
SKIP oder SKIP . kurz
SKIP .
SKIP .
Sender speichern (Memory)
Sie können Sender auf bis zu 45 Programmplätzen
(30 x UKW und 15 x MW) speichern.
• Wählen Sie ein Frequenzband aus und stellen
Sie den gewünschten Sender ein, wie zuvor beschrieben.
1. Um den Sender zu speichern, drücken Sie die
Taste
MEM CLK-ADJ oder PROG/MEM.
Im Display blinkt die Anzeige 1 für den Programmplatz 1.
2. Wählen Sie den gewünschten Programmplatz
mit den Tasten
ALBUM PRESET +/- aus.
3. Um den Programmplatz zu bestätigen, drücken
Sie die Taste
Der Sender ist jetzt auf dem Programmplatz gespeichert.
MEM CLK-ADJ oder PROG/MEM.
Gespeicherte Sender auswählen
Sie können während des Radiobetriebs die gespeicherten Sender auswählen.
1. Wählen Sie mit der Taste BAND das Frequenz-
band aus, in dem Sie den Sender gespeichtert
haben.
2. Wählen Sie mit den Tasten ALBUM PRESET +/- den
Programmplatz aus.
CD-Betrieb
• Drücken Sie mehrmals die Taste FUNCTION, bis die
Betriebsart CD im Display erscheint.
CD einlegen
1. Um das CD-Fach zu öffnen, drücken Sie die
Taste
OPEN/CLOSE .
Die Klappe des CD-Fachs öffnet sich.
Hinweis:
Entfernen Sie vor der ersten Verwendung den
Transportschutz aus dem CD-Fach!
2. Legen Sie die CD mit der bedruckten Seite
nach oben in das CD-Fach.
3. Drücken Sie die CD leicht nach unten, bis sie
fest auf der Achse sitzt.
13
Page 14

4. Um das CD-Fach zu schließen, drücken Sie
erneut die Taste
Im Display werden die Daten (Anzahl der Titel und
Gesamtspielzeit) der CD angezeigt.
OPEN/CLOSE .
CD herausnehmen
• Drücken Sie die Taste OPEN/CLOSE, um das CD-
Fach zu öffnen.
Entnehmen Sie die CD.
Wiedergabe starten
• Drücken Sie die Taste PLAY/PAUSE.
Wiedergabe stoppen
• Drücken Sie die Taste STOP.
Wiedergabe unterbrechen/fortsetzen
• Um die Wiedergabe zu unterbrechen, drücken
Sie während der Wiedergabe die Taste
PLAY/PAUSE. Die Anzeige im Display blinkt.
• Um die Wiedergabe fortzusetzen, drücken Sie
die Taste
PLAY/PAUSE erneut.
Titel vor und zurück
• Um den nächsten Titel einer CD wiederzugeben,
drücken Sie die Taste
• Um zum Anfang des aktuellen Titels zurückzu-
kehren, drücken Sie die Taste
• Um den vorherigen Titel einer CD wiederzuge-
ben, drücken Sie zweimal kurz nacheinander die
Taste
SKIP .
SKIP .
SKIP .
Titel Vor- und Rücklauf
• Halten Sie während der Wiedergabe die Taste
SKIP oder SKIP gedrückt.
• Halten Sie diese solange gedrückt, bis die ge-
wünschte Stelle im Titel erreicht wurde.
Wiederhol-Funktion (REPEAT)
Mit der Wiederholfunktion können Sie einzelne Titel
einer CD oder die gesamten Titel einer CD wiederholt abspielen.
• Um einzelne Titel zu wiederholen, drücken Sie
die Taste
Auf dem Display wird REPEAT1 angezeigt.
REPEAT.
• Um alle Titel einer CD zu wiederholen, drücken
Sie die Taste
Auf dem Display wird REPEAT ALL angezeigt.
• Um das Wiederholen zu beenden, drücken Sie
die Taste
AT1/REPEAT ALL erlischt.
REPEAT zweimal.
REPEAT so oft, bis die Anzeige REPE-
Titel in zufälliger Reihenfolge
abspielen (RAND)
• Drücken Sie auf der Fernbedienung die Taste
RAND. Im Display erscheint die Anzeige
RANDOM.
Die Wiedergabe in zufälliger Reihenfolge startet sofort.
Titelfolge programmieren
Sie können die Reihenfolge programmieren, in der
die Titel einer CD wiedergegeben werden. Dafür
stehen Ihnen 64 Programmplätze zur Verfügung.
Dies ist nur möglich, wenn die Wiedergabe gestoppt ist.
1. Drücken Sie die Taste MEM CLK-ADJ oder
PROG/MEM.
Auf dem Display wird der Programmplatz P--01 des
Titels angezeigt, der bei der Wiedergabe als erster
Titel abgespielt werden soll.
2. Wählen Sie mit der Taste SKIP oder SKIP .
den gewünschten Titel für den Programmplatz.
3. Um die Einstellung zu speichern, drücken Sie
die Taste
Um weitere Titel zu programmieren, wiederholen
Sie die vorhergehenden Handlungsschritte.
Nachdem alle Programmplätze belegt sind, erscheint die Anzeige FULL im Display.
Die Programmierung bleibt solange gespeichert, bis
Sie die CD aus dem CD-Fach entfernen, die Taste
STOP drücken oder die Mikroanlage ausschalten.
Programmierte Titelfolge starten
1. Starten Sie die Wiedergabe durch Drücken
der Taste
MEM CLK-ADJ oder PROG/MEM.
PLAY/PAUSE.
14
Page 15

MP3-Betrieb
• Um den vorherigen MP3-Titel auf der CD
wiederzugeben, drücken Sie zweimal nacheinander die Taste
SKIP .
MP3
MP3 bezeichnet ein vom Fraunhofer Institut
entwickeltes Verfahren bzw. Format zur Kompression von Audiodaten.
Im MP3-Format komprimierte Musikstücke haben nur noch einen Bruchteil ihrer ursprünglichen
Größe, wodurch sich z. B. auf CD-Rs/CD-RWs
weitaus mehr Musik speichern lässt als auf handelsüblichen Audio-CDs, auf denen Audiodaten
im CDA-Format gespeichert werden.
MP3-Titel wiedergeben
1. Legen Sie eine CD, die MP3-Dateien enthält, in
das CD-Fach ein.
2. Drücken Sie mehrmals die Taste FUNCTION, bis
die Betriebsart CD im Display erscheint.
Im Display wird die Anzahl der enthaltenen Alben
und die Titelanzahl angezeigt.
3. Um die Wiedergabe der MP3-CD zu starten,
drücken Sie die Taste
PLAY/PAUSE.
Alben anzeigen
Wenn die CD mehrere MP3-Alben enthält, gehen
Sie wie folgt vor:
1. Um ein Album auszuwählen, drücken Sie die
Tasten
ALBUM PRESET +/-.
2. Starten Sie die Wiedergabe des gesamten Al-
bums mit der Taste
PLAY/PAUSE .
3. Mit der Taste SKIP oder SKIP wählen Sie
einen Titel aus.
4. Starten die Wiedergabe mit der Taste
PLAY/PAUSE.
Wiedergabe stoppen
• Drücken Sie die Taste STOP.
Titel vor und zurück
• Um den nächsten MP3-Titel auf der CD wieder-
zugeben, drücken Sie die Taste
• Um zum Anfang des aktuellen MP3-Titels zurück-
zukehren, drücken Sie die Taste
SKIP .
SKIP .
Titel Vorlauf und Rücklauf
Sie können bestimmte Stellen innerhalb eines MP3
Titels wiedergeben.
• Halten Sie während der Wiedergabe die die
Taste
SKIP oder SKIP gedrückt, bis die ge-
wünschte Stelle im Titel erreicht wurde.
Suchfunktionen
Im Suchmodus können Sie Titel oder Alben auf Ihrer
MP3-CD nach Dateinamen suchen.
Sie können nach Anfangsbuchstaben (A–Z) oder
nach Ziffern (0–9) suchen. Wenn kein Dateiname
mit “A” vorliegt, wird A 000 angezeigt.
1. Um den Suchmodus zu starten, drücken Sie auf
der Fernbedienung einmal die Taste
ST./MONO.
Im Display erscheint der Buchstabe “A” und die
Anzahl der vorhandenen Titel, welche mit “A”
beginnen.
Wenn kein Dateiname mit “A” vorliegt, wird A 000
angezeigt.
2. Drücken Sie die Taste SKIP oder SKIP so
oft, bis im Display der gewünschte Anfangsbuchstabe oder die Ziffer angezeigt wird.
3. Um den Titel wiederzugeben, drücken Sie die
Taste
PLAY/PAUSE.
4. Wenn mehrere Dateinamen mit dem Buchsta-
ben "A" beginnen, drücken Sie die Taste
Im Display erscheint der Name des ersten Titels mit
dem Anfangsbuchstaben “A”.
5. Drücken Sie die Taste SKIP .
Im Display werden die weiteren Dateinamen mit
dem Anfangsbuchstaben "A" angezeigt.
6. Um den Titel wiederzugeben, drücken Sie die
Taste
PLAY/PAUSE.
7. Um die Albumsuche zu starten, drücken Sie
zweimal die Taste
Im Display erscheint der Name des ersten Albums.
Wenn keine Alben, sondern einzelne MP3-Dateien,
auf der CD gespeichert sind, erscheint im Display
“ROOT”.
FIND ST./MONO.
FIND
STOP.
15
Page 16

8. Drücken Sie die Taste SKIP oder SKIP so
oft, bis im Display das gewünschte Album oder
die Ziffer angezeigt wird.
9. Um das Album wiederzugeben, drücken Sie
die Taste
PLAY/PAUSE.
Datei-Informationen anzeigen
Sie können sich im Display den Dateinamen, den
Namen des Interpreten und den zum Titel gehörenden Albumtitel anzeigen lassen.
1. Starten Sie einen MP3 Titel.
2. Halten Sie während der Wiedergabe die Taste
FIND ST./MONO zwei Sekunden lang gedrückt.
Nacheinander werden im Display der Dateiname
(FILE), der Titel (TITLE), der Interpret (ARTIST) und
das Album (ALBUM) angezeigt.
3. Um die Gesamttitel-Anzeige wieder aufzuru-
fen, drücken Sie erneut die Taste
für zwei Sekunden.
FIND ST./MONO
MP3-Titelfolge programmieren
Sie können die Reihenfolge, in der die Titel einer
MP3-CD wiedergegeben werden, programmieren.
Dafür stehen Ihnen 64 Programmplätze zur Verfügung.
Dies ist nur möglich, wenn die Wiedergabe gestoppt ist.
1. Drücken Sie die Taste MEM CLK-ADJ oder
PROG/MEM.
Auf dem Display blinkt der Programmplatz 1 des
Titels, der bei der Wiedergabe als erstes abgespielt
werden soll.
2. Wählen Sie mit der Taste ALBUM PRESET- oder
ALBUM PRESET+ das gewünschte Album für den
Programmplatz.
Im Display blinkt die Titelanzeige für den Programmplatz 1.
3. Wählen Sie mit der Taste SKIP oder SKIP
den gewünschten Titel für den Programmplatz.
4. Um die Einstellung zu speichern, drücken Sie
die Taste
MEM CLK-ADJ oder PROG/MEM erneut.
Hinweis:
Um weitere Titel zu programmieren, wiederholen Sie die vorhergehenden Handlungsschritte.
Die Programmierung bleibt solange gespeichert, bis Sie die MP3-CD aus dem CD-Fach
entfernen, die Taste
Mikroanlage ausschalten.
Nachdem alle Programmplätze belegt sind, erscheint die Anzeige FULL im Display.
STOP drücken oder die
Programmierte Titelfolge starten
1. Starten Sie die Wiedergabe durch Drücken
der Taste
PLAY/PAUSE.
Programmierte MP3-Titelfolge überprüfen
1. Stoppen Sie die Wiedergabe mit der Taste
STOP.
2. Drücken Sie die Taste MEM CLK-ADJ oder
PROG/MEM.
Mit jedem Drücken wird ein gespeicherter Titel in
aufsteigender Reihenfolge der Programmplätze im
Display angezeigt.
MP3-Wiederhol-Funktion (Repeat)
Mit der Wiederholfunktion können Sie einzelne Titel
einer MP3-CD oder alle Titel einer MP3-CD wiederholt abspielen.
• Um einen Titel zu wiederholen, drücken Sie die
Taste
REPEAT.
Auf dem Display wird REPEAT1 angezeigt.
• Um alle Titel einer MP3-CD zu wiederholen, drücken Sie zweimal die Taste
Auf dem Display wird REPEAT ALL angezeigt.
• Um alle Titel eines Albums einer MP3-CD zu
wiederholen, drücken Sie dreimal die Taste
Auf dem Display wird REPEAT ALBUM angezeigt.
• Um die Repeat-Funktion abzubrechen, drücken Sie
so oft die Taste
REPEAT/ALL/ALBUM erlischt.
REPEAT, bis die Anzeige
REPEAT.
REPEAT.
16
Page 17

USB- und SpeicherkartenFunktionen
Hinweis:
Sie können Speichermedien mit bis zu 2 GB
Speicherkapazität an den USB-Anschluss bzw.
den Anschluss für Speicherkarten anschließen.
MMC
(Multimedia Card): Speichermedium für Ton- und
Bilddaten (rechteckig ca. 24 x 1,4 x 32 mm)
SD
(Secure Digital Card): Speichermedium für Ton- und
Bilddaten. (rechteckig ca. 24 x 2,1 x 32 mm)
USB
(Universal Serial Bus): Universelle Schnittstelle für
Datenübertragung.
Reinigung
• Reinigen Sie das Gehäuse ausschließlich mit ei-
nem leicht feuchten Tuch und einem milden
Spülmittel. Achten Sie darauf, dass bei der Reinigung keine Feuchtigkeit in das Gerät gelangt!
• Säubern Sie das Innere des Disk-Fachs – falls
nötig – ausschließlich mit einem sauberen trockenen Pinsel (z. B. Objektiv-Pinsel, erhältlich
im Foto-Fachhandel). Säubern Sie das Innere
des Disk-Fachs niemals feucht!
Warnung!
Dringt Feuchtigkeit in das Gerät ein, besteht
die Gefahr eines elektrischen Schlages! Außerdem kann das Gerät dabei irreparabel beschädigt werden!
Entsorgen
Hinweis:
Aufgrund der Vielzahl der erhältlichen Speichermedien kann keine Kompatibilität mit allen
aktuellen und zukünftigen Speichermedien gewährleistet werden.
MP3 von USB-Stick oder Speicherkarte
wiedergeben
Sie können MP3-Titel von USB-Sticks, SD- oder
MMC-Speicherkarten abspielen.
1. Stecken Sie einen USB-Stick in den USB-An-
schluss der Mikroanlage,
2. Stecken Sie eine SD- bzw. MMC-Speicherkarte
in den Anschluss für Speicherkarten.
3. Wählen Sie mit der Taste FUNCTION die Funktion
CARD-USB.
Im Display wird die Anzahl der enthaltenen Alben,
die Titelanzahl und MP3, angezeigt.
4. Um die Wiedergabe zu starten, drücken Sie
die Taste
Führen Sie die übrige Bedienung durch, wie im Kapitel „MP3-Betrieb” beschrieben.
PLAY/PAUSE.
Werfen Sie das Gerät keinesfalls in den
normalen Hausmüll. Dieses Produkt
unterliegt der europäischen Richtlinie
2002/96/EC.
Entsorgen Sie das Gerät über einen zugelassenen
Entsorgungsbetrieb oder über Ihre kommunale Entsorgungseinrichtung.
Beachten Sie die aktuell geltenden Vorschriften. Setzen Sie sich im Zweifelsfall mit Ihrer Entsorgungseinrichtung in Verbindung.
Batterien/Akkus entsorgen
Batterien/Akkus dürfen nicht im Hausmüll entsorgt
werden. Jeder Verbraucher ist gesetzlich verpflichtet,
Batterien/Akkus bei einer Sammelstelle seiner Gemeinde/seines Stadtteils oder im Handel abzugeben.
Diese Verpflichtung dient dazu, dass Batterien/Akkus einer umweltschonenden Entsorgung zugeführt
werden können. Geben Sie Batterien/Akkus nur im
entladenen Zustand zurück.
Führen Sie alle Verpackungsmaterialien
einer umweltgerechten Entsorgung zu.
17
Page 18

Service
Bei Fragen wenden Sie sich bitte an Ihren Fachhändler oder an unseren Service:
Hotline: (0 53 02) 8 06-450
Adresse: x-services.eu gmbh
Serviceabteilung X4-TECH
Brackestraße 3 · 38159 Vechelde/Germany
Informationen und Updates unter: http://www.x4-tech.de
› Der Inhalt dieser Bedienungsanleitung kann ohne vorhergehende Ankündigung ge-
ändert werden.
› Alle genannten Marken sind Eigentum von X4-TECH oder der jeweiligen Rechtsinhaber.
› X4-TECH übernimmt keine Gewähr für die Richtigkeit der Inhalte dieser Bedienungs-
anleitung.
© 2009 X4-TECH Alle Rechte vorbehalten.
Hersteller
x-peer.de GmbH · Brackestraße 3 · D-38159 Vechelde
Internet: www.x-peer.de · E-Mail: info@x-peer.de
18
Page 19

CONTENT PAGE
Intended Use 20
Technical data 20
Safety instructions 20
Operating Elements 22
Commissioning 23
Assembly 24
Operation 25
Setting the Clock 26
Radio operation 28
CD Playback 28
MP3 Operation 30
USB and memory card functions 32
Cleaning 32
Disposal 32
Warranty and Service 33
Service
Importer 33
Manufacturer
20
20
20
22
25
26
27
28
30
30
32
34
34
34
35
35
Read the operating instructions carefully before using the appliance for the first time and preserve this
booklet for later reference. Pass the manual on to whomsoever might acquire the appliance at a later date.
19
Page 20

MP3-SYSTEM KH2302
Intended Use
This device is intended for the reception of FM/AM
radio stations, as well as for the playback of Audio
CDs and MP3 files from CDs, USB data carriers and
SD/MMC memory cards. This device is intended
for use only in domestic settings. It is not suitable
for use in commercial or industrial applications.
Technical data
Radio frequency ranges:
Radio: MW (AM): 522 – 1620 KHz
VHF (FM): 87.5 - 108 MHZ
USB slot
Readable USB
memory sticks: USB 1.1 and 2.0 up to a
capacity of 2 GB
Memory card slot
Readable memory cards:
SD (2 GB), MMC (2 GB)
Subject to technical changes.
This consumer electronics device, being in con-
formity with their fundamental requirements
and directions, complies with the relevant
regulations of both the EMC Guidelines
2004/108/EC and the Guidelines for Low
Voltage devices 2006/95/EC.
Power supply: AC 220 V - 240 V ~ 50 Hz
Power consumption : 28 Watts
Nominal power: 4.5 watts RMS at 8 ohm
per channel
Standby: approx. 6 W
Operating temperature range: +5° - +40°C
Humidity: 5 — 90%
(no condensation)
Micro System Dimensions
(without consoles mounted)
(L x B x H): 320 x 192 x 75 mm
Loudspeaker Dimensions
(L x B x H): 130 x 160 x 205 mm
Micro System Weight: approx. 2.1 kg
Loudspeaker Weight: approx. 2.2 kg
Protection class: II/
Max. Output Voltage
(Headphone Connection): 70-80 mV
CD player
Playback formats: CD, CD-R, CD-RW
Safety instructions
• This device is not intended for use by individuals
(including children) with restricted physical, physiological or intellectual abilities or deficiences in
experience and/or knowledge unless they are
supervised by a person responsible for their safety
or receive from this person instruction in how the
device is to be used.
• Children should be supervised to ensure that
they do not play with the device.
• Keep batteries away from children. Children can
put batteries into their mouths and swallow them.
If a battery is swallowed medical assistance must
be sought IMMEDIATELY.
To avoid potentially fatal electric shocks:
• Connect the device only to correctly installed
and earthed mains sockets. Ensure that the rating
of the local power supply tallies completely with
the details given on the rating plate of the device.
• Ensure that the power cable never becomes wet
or damp during operation. Lay the cable so that
it cannot be trapped or otherwise damaged.
20
Page 21

• Arrange for defective power plugs and/or cables
to be replaced at once by qualified technicians
or our Customer Service Department.
• Get customer service to repair or replace connecting cables and/or devices that are not
functioning properly or have been damaged.
• Only use the device in dry rooms.
NEVER submerse the device in water.
Wipe it only with a slightly damp cloth.
• Make sure that liquids or objects are never able
to enter into the device.
• Do not place water-filled receptacles (e.g. flower
vases) on the device.
• Position the device close to an electrical wallsocket.
Make sure that the wall socket is easily accessible
• To avoid the risks of tripping, do not use an extension cable. In the event of danger, the plug
must be quickly and easily accessible.
• Do not open the housing or attempt to repair the
device yourself. Should you do so, device safety
can no longer be assured and the warranty will
become void.
Repairs are to be carried out exclusively by a
specialist firm or the service centre.
Notice regarding separation from
mains-power
The POWER switch does not completely disconnect
the device from the power network. Additionally,
the device consumes power when in standbymode. To completely separate the device from
mains-power, the power plug MUST be removed
from the wall socket.
Information regarding the handling
of batteries
The remote control requires batteries. For the handling
of batteries please observe the following:
Risk of explosion!
Do not throw batteries into a fire. Do not
recharge batteries.
• NEVER open batteries, NEVER solder or weld
batteries.
The risk of explosions and injuries exists!
• Regularly check the condition of the batteries.
Leaking batteries can cause damage to the
device.
• If you do not intend to use the device for an
extended period, remove the batteries.
• In the event of the batteries leaking acids, wear
protective gloves.
• Clean the battery compartment and the battery
contacts with a dry cloth.
To avoid the risks of fire or injury:
• Do not place candles or other open fire sources
on the device.
• Do not use the device near hot surfaces.
• Do not place the device in locations exposed to
direct sunlight. If you do, it may overheat and become irreparably damaged.
• To prevent heat build up, place the device at
a location with adequate ventilation .
• Never cover the ventilation openings!
• Avoid any additional heat build up, e.g. direct
sunlight, heaters, other devices, etc.
• Keep children away from the connecting cable
and the device. Children frequently underestimate
the danger from electrical devices.
• Provide for a safe location for the device.
• Do not operate the device if it has sustained a
fall or is damaged. Arrange for the device to be
checked and/or repaired by qualified technicians.
21
Page 22

• Keep batteries away from children. Children can
put batteries into their mouths and swallow them.
Should a battery be swallowed, seek medical
assistance IMMEDIATELY.
Thunderstorm warning!
Before a storm and/or a thunderstorm with a risk
of lightning, please separate the device from the
electrical power source!
Notice regarding electrical power
surges (EFT / electrical fast transient)
and electrostatic discharges:
In a case of malfunction due to an electrical
fast transient (power surge) and/or electrostatic
discharge, the device must be returned to
default settings in order to re-establish normal
operation. Possibly, the power supply must be
separated and then reconnected.
Note:
This device is equipped with non-slip rubber feet.
As furniture surfaces may be made of a variety
of materials and are treated with many different
types of cleaning agents, it cannot be completely
ruled out that some substances contain ingredients
which may corrode the rubber rests and soften
them. If possible place an anti-slip material under
the feet of the device.
Operating Elements
A. Front
Sensor for the remote control
q
CD compartment
w
VOLUME +/-: Raise/lower the sound level
e
PLAY/PAUSE : Start/Suspend playback
r
Button SKIP and SKIP
t
Skip button and fast search within a title,
Time adjustments (Minutes and Hours)
STOP: Stop playback
y
REPEAT: Set the repeat function
u
MEM: Adjust programming functions
i
EQ: Sound adjustment
o
BAND: Select frequency range
a
FUNCTION: Select operational mode
s
STANDBY: Switch the device on / into standby
d
OPEN/CLOSE: Open/close CD tray
f
Display
g
B. Top
USB connection
h
Connection for SD/MMC memory cards
j
Connection for medium wave aerial
k
C. Left side
Headphone Connection
l
Danger - Laser Beams!
This device is fitted with a "Class 1 Laser".
• Never open the device.
• Never attempt to repair the device. There is
invisible laser radiation inside the device.
• Avoid all direct optical contact with the laser
beam, it could lead to serious eye injuries.
22
D. Right side
Power cable
;
Aerial connection 75 Ohm
2)
POWER: On and off switch
2!
AUX IN L/R: Left and right input, audio device
2@
SPEAKER OUT L/R: Left and right loudspeaker
2#
connection
Page 23

q
w
e
A
r
g
f
d
s
a
t
y
u
i
o
B
h
C
l
j
k
D
;
2)
2!
2@
2#
23
Page 24

E
F
k
j
h
g
f
d
s
a
q
w
e
r
t
y
u
i
o
G
H
24
I
Page 25

E. Remote control
STANDBY: Switch the device on / into standby
q
EQ: Sound adjustment
w
VOLUME +/-: Raise/lower the sound level
e
BAND : Select frequency range
r
FUNCTION: Select operational mode
t
REPEAT: Set the repeat function
y
PLAY/PAUSE: Start/Suspend playback
u
STOP: Stop playback
i
Stereo/Mono switching (ST./MONO),
o
Search button (
Battery compartment (on the rear side)
a
Programme select button +/- (ALBUM PRESET +/-)
s
Button SKIP and SKIP
d
Skip button and fast search within a title,
Time adjustments (Minutes and Hours)
PROG/MEM: Programming functions
f
RAND: Random playback
g
TIMER: Programme switch-on and switch-off times
h
SLEEP: Programme sleep time
j
MUTE: Switch off sound
k
FIND)
F. Medium wave aerial (MW)
G. Wire antenna (UKW)
H. Loudspeaker
I. Consoles
Commissioning
Unpacking the device
Remove all packing material. Remove also the
transport restraint from the CD tray.
Important!
Do not permit small children to play with the
plastic packaging. There is a risk of suffocation!
Check the items supplied
Whilst unpacking, check that all of the following
items are available to you:
- Micro System
- Remote Control
- 2 x 1.5 V Batteries Type AAA/RO3 Micro
- 2 Loudspeakers
- 2 Consoles
- Wire antenna (UKW)
- Medium wave aerial (MW)
- Assembly accessories
Setting up or suspending the micro
system
You can set the micro system up either horizontally
or vertically, or you can suspend the micro system
and the loudspeakers against a wall.
Note:
Take note that, whichever set-up method you
select, you need to be able to completely open
the flap of the CD compartment at all times.
Horizontal set-up
1. Place the micro system on an even, level surface.
2. Place the loudspeakers to the left and right of
the micro system, appropriate to the loudspeaker
connections.
25
Page 26
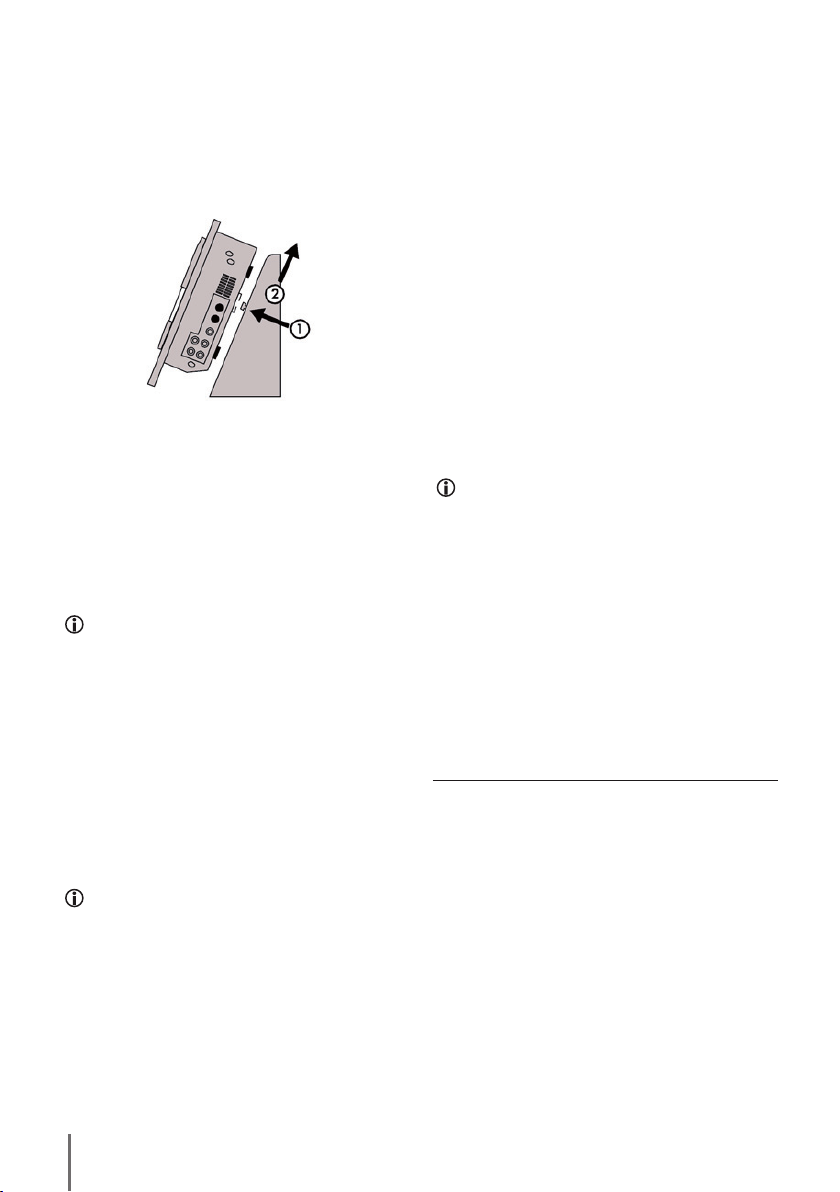
Vertical set-up
1. If you wish to set the micro system up vertically,
insert the supplied consoles into the key slots
on the rear of the micro system and then slide
the console as far as they will go onto the micro
system.
The micro system can now be set-up vertically.
2. Place the loudspeakers to the left and right of
the micro system, appropriate to the loudspeaker
connections.
Wall mounting
You can mount the micro system and the loudspeakers
against a wall.
Note:
Mount the device and the loudspeakers only to
a solid wall.
1. Drill the screwholes, with a horizontal spacing
of 19 cm from each other, into the wall for the
micro-system.
2. Drill the screwholes for the loudspeakers into
the wall, 35 mm above those for the micro
system and at a distance of at least 7 cm from
the right and left sides of the micro system.
Note:
To ensure that the screws can tightly hold the
mountings on the back of the micro-system/
loudspeakers, the screw heads must protrude
out of the wall by approx 3 mm.
3. Subject to the composition of the wall, secure
the screws into the wall with the help of wall
plugs.
4. Mount the micro system/loudspeakers onto the
screws with the key slots.
Inserting batteries into the remote
control
For the remote control you require two batteries, 1.5 V
Type Micro AAA/R03 (batteries supplied).
1. Open the battery compartment on the rear of
the remote control.
2. Insert the batteries, ensuring their positionings
comply with the polarity markings given in the
battery compartment.
3. Carefully close the battery compartment lid
until it clicks into place.
Interaction with batteries
Leaking batteries can cause damage to the
device.
• If you do not intend to use the device for an
extended period, remove the batteries.
• Always change all batteries at the same time
and always use batteries of the same type.
• Should the batteries leak, wear protective
gloves and clean the battery compartment
with a dry cloth.
Assembly
Loudspeakers
Both loudspeaker leads have a cinch plug at each
end.
1. Connect the cinch plug of the right loudspeaker
with the loudspeaker connection
2. Connect the cinch plug of the left loudspeaker
with the loudspeaker connection
SPEAKER OUT R.
SPEAKER OUT L.
26
Page 27

Additional audio device
You can connect additional audio devices, for
example a mini disc player or a television, to the
micro system for playback over the micro system.
1. Connect the cinch plug (right channel) of the
audio device to the connection
AUX IN R.
2. Connect the cinch plug (left channel) of the
audio device to the connection
AUX IN L.
Connecting and aligning the medium
wave/wire aerial/antenna
For medium wave reception (MW) you must connect
the medium wave aerial to the micro system.
1. Unwind the connecting cable from the aerial.
2. Erect the ring until you hear it click into place in
the aerial base.
3. Push the aerial plug into the connection for the
medium wave aerial.
For VHF reception (FM) you must connect the wire
antenna to the micro system.
4. Carefully roll the wire antenna fully out, so that
the micro-system can provide good reception.
5. Insert the antenna plug of the wire antenna
into the connection socket
micro system.
75 OHM JACK on the
Note:
Should FM radio reception be inadequate,
change the position of the wire antenna.
Additional antenna via 75 ohm connection
Should FM radio reception via the supplied wire
antenna be fully inadequate, you can connect a
house antenna to the micro system.
• Insert the antenna plug of the house antenna
into the connection socket
micro system.
75 OHM JACK on the
Connecting Headphones
You can connect stereo headphones to the micro-system
with a 3.5 mm jack plug. The headphone socket is
situated on the left side of the micro system. When
headphones are connected, the loudspeakers are
switched off and you will only hear sound via the
headphones.
• Insert the jack plug on the headphones into the
headphone socket.
Warning:
Listening to music with headphones for
long periods and at high volume levels
can lead to hearing damage!
Power supply
• When all of the required connections have been
made, insert the plug on the power cable into a
wall power socket.
Operation
Switching the device on and off in
standby mode
1. Press the button POWER.
If the time has not yet been programmed in, 00:00
is shown in the display. The micro system is now in
standby mode.
2. To switch the micro system on, press the button
STANDBY.
In the display the indicator HELLO appears and,
afterwards, the last programmed function.
3. To switch the device back into the standby
mode, press the button
In the display the indicator GOOD BYE appears
and then the time.
4. To switch the device completely off, press the
button
POWER once again.
STANDBY.
27
Page 28

Note:
The programming for the time is NOT retained
if the device is separated from the power network.
Select operational mode
• Press the button FUNCTION repeatedly until the
required mode is shown in the display.
You can select from the following modes:
CD (CD playback)
USB (Playback of MP3 files from a
USB memory stick)
CARD (Playback of MP3 files from a
memory card)
AUX (Playback of an audio device
connected to the connection
AUX IN)
TUNER (Radio mode)
To control the Volume
• To raise the sound volume, press the button VOLUME+
on the remote control or on the front of the device.
• To lower the sound volume, press the button
VOLUME- on the remote control or on the front of
the device.
The selected volume level is briefly shown in the display.
Switch off sound
• To switch the sound off, press the button MUTE
on the remote control.
The indicator MUTE flashes on the display.
• To switch the sound back on, press the
once again or press one of the VOLUME buttons.
MUTE
Sound adjustment
You can adapt the sound quality to the respective
type of music by means of the sound setting. You
can choose between the following settings:
POP - JAZZ - FLAT - CLASSIC - ROCK
• Press the button
sound adjustment is indicated in the display.
If you adjust the sound setting while playing, the
sound will change immediately.
In the setting FLAT the sound is played back unchanged.
EQ repeatedly until the required
Setting the Clock
You can only adjust the clock in standby mode.
1. Press the button MEM CLK-ADJ or PROG/MEM. The
hour indicator blinks in the display.
2. To set the hours, press the buttons SKIP or
SKIP .
3. To save the setting, press the buttons MEM CLK-ADJ
or PROG/MEM. The minute indicator blinks in the
display.
4. To set the minutes, press the buttons SKIP
or
SKIP .
5. Press the buttons MEM CLK-ADJ or PROG/MEM.
The time is now programmed and activated.
Note:
The programming for the time is NOT retained
if the device is separated from the power network or switched off with the power switch.
Setting the alarm function (timer)
You can program your micro-system to wake you up.
For this purpose you can set the desired waking time,
the sound source and the volume. The micro-system
will then switch itself on and off according to the set
time. You can choose to be woken by the radio or by
sounds from a CD, memory card or a USB memory
stick.
28
Page 29

Note:
If you wish to be woken by sounds from a CD,
memory card or a USB memory stick, you must
insert the appropriate medium beforehand.
If you wish to be woken by the radio, tune in
to a radio station as described under "Radio
mode".
To be able to carry out the following programmings, the device must be in the standby mode.
Programming the mode
1. Press the button TIMER.
The indicator for the mode flashes in the display.
2. With the button FUNCTION select the mode CD,
USB, CARD or TUNER.
Adjusting the volume.
3. Press the button TIMER.
The volume indicator flashes on the display.
4. With the buttons VOLUME+ and VOLUME- select
the desired sound volume.
Setting the switch-on time
5. Press the button TIMER. In the display appears
ON and the hour indicator for the switch-on
time blinks.
6. To set the hour for the switch-on time, press the
buttons
SKIP or SKIP .
7. To save the setting, press the button TIMER once
again. The minute indicator for the switch-on
time now blinks in the display
8. To set the minutes, press the buttons SKIP or
SKIP .
11. To save the setting, press the button TIMER once
again. The minute indicator for the switch-off
time blinks in the display.
12. To set the minute, press the buttons SKIP or
SKIP .
Note:
If the switch-off time is the same as the switch-on
time, the indicator ERROR appears in the next
step.
Saving the settings
13. Press the button TIMER.
The time appears in the display again. Additionally,
a clock symbol indicates that the alarm function is
active.
• Should you wish to deactivate the alarm function,
briefly press the button
• To reactivate the alarm function, press the button
TIMER.
TIMER once again and carry out the steps descri-
bed above to programme in the alarm function.
Activating the sleep function (Sleep)
You can detemine a time after which the micro-system
will switch itself off. You can select a switch-off time
between 10 and 90 minutes.
1. Switch the micro-system on.
2. Press the button SLEEP repeatedly until you have
entered in the desired switch-off time.
In the display the switch-off time and SLEEP is indicated.
3. Each time the button is pressed the switch-off
time is reduced by ten minutes.
To switch the sleep function off, press the button
repeatedly until OFF is indicated in the display.
SLEEP
Setting the switch-off time
9. To programme in the hour for the switch-off
time, press the button
appears OFF and the hour indicator blinks.
TIMER. In the display
10. To set the hour, press the buttons SKIP or
SKIP .
29
Page 30

Radio operation
• Press the button FUNCTION repeatedly until the
indicator TUNER appears in the display.
Select frequency range
You can receive VHF (FM) and MW (AM) transmissions with the micro system.
• To select the frequency range, press the button
BAND. In the display appears the indicator AM
or the indicator FM.
Stereo/Mono reception
If VHF reception is disturbed, switch over to
Mono reception with the button
During the switch-over, the indicators STEREO
resp. MONO appear briefly in the display.
With the setting STEREO, the stereo reception
of a VHF transmitter is shown in the display as
STEREO.
Automatic search function
• Briefly hold the button SKIP or SKIP pressed
down.
The search function begins and stops automatically
when a frequency with sufficient reception strength
has been found.
• To restart the search, once again briefly hold
the button
• To stop the search, press the button
SKIP or SKIP . pressed down.
SKIP .
Manual search
With the manual search function you can carry out
a fine adjustment function of the stations, for example,
if reception is disturbed.
• To raise the reception frequency, briefly press the
button
SKIP .
• To lower the reception frequency, briefly press
the button
SKIP .
FIND ST./MONO.
SKIP or
Storing the stations (memory)
You can save stations in up to 45 programme
locations (30 x UKW and 15 x MW).
• Select the frequency range and tune in to the
desired radio station as previously described.
1. To save the radio station, press the button MEM
CLK-ADJ or PROG/MEM.
In the display blinks indicator 1 for the programme
location 1.
2. Select the desired programme location with the
button
ALBUM PRESET +/-.
3. To confirm the programme location, press the
button
MEM CLK-ADJ or PROG/MEM.
The station is now saved in the selected program
location.
Selecting saved stations
You can select the saved stations during radio
operation.
1. With the button BAND, select the frequency range
in which the radio station has been saved.
2. With the button ALBUM PRESET +/- select programme
location.
CD Playback
• Press the button FUNCTION repeatedly until the
indicator CD appears in the display.
Inserting a CD
1. To open the CD compartment, press the button
OPEN/CLOSE .
The flap of the CD compartment opens itself.
Note:
Ensure that the transport restraint has been
removed from the CD compartment before
the first use!
2. Insert the CD into the CD compartment with
the printed side facing up.
3. Press the CD down slightly, until it is firmly posi-
tioned on the axle.
30
Page 31

4. To close the CD compartment, press the button
OPEN/CLOSE once again.
In the display, the data (number of titles and
total playing time) on the CD is indicated.
Removing the CD
• Press the button OPEN/CLOSE to open the CD
compartment.
Remove the CD.
Starting playback
• Press the button PLAY/PAUSE.
• To repeat all the titles on a CD press the button
REPEAT twice.
In the display REPEAT ALL will appear.
• To end the repeats, press the button
nuously until the indicator REPEAT1/REPEAT ALL
extinguishes.
REPEAT conti-
Playing titles in random order (RAND)
• On the remote control press the button RAND. In
the display the indicator RANDOM appears.
Playback of the titles in random order starts immediately.
Stopping the play function
• Press the button STOP.
Interrupting/continuing playback
• To interrupt playback, during playback press the
button
PLAY/PAUSE. The indicator in the display
blinks.
• To continue playback, press the button
once again.
PLAY/PAUSE
Next/previous title
• To jump to the next title of a CD during playback,
press the button
• To return to the start of the title currently being
played, press the button
• To playback a previous title on the CD again,
briefly double-press the button
SKIP .
SKIP .
SKIP .
Title fast forward/reverse
• During playback, hold the button SKIP or SKIP
pressed down.
• Keep this button pressed until the desired point in
the title has been reached.
Repeat function (REPEAT)
With the repeat function you can repeatedly playback indivdual titles of a CD or all of them.
• To repeat individual titles, press the button
In the display REPEAT1 is shown.
REPEAT.
Programme playing order
You can programme in the playing order in
which the titles of a CD are played back. For this,
64 programme locations are available.
This is only possible when the play function has
been stopped
1. Press the button MEM CLK-ADJ or PROG/MEM.
In the display the programme location P--01 is
indicated, for the title that is to be played first.
2. Select with the button SKIP or SKIP . the
desired title for the programme location.
3. To save the programming, press the button
MEM CLK-ADJ or PROG/MEM.
To programme further titles, repeat the previously
described steps.
When all programme positions are occupied, the
indicator FULL appears in the display.
The programming is saved until you either remove
the CD from the CD compartment, press the button
STOP or switch the micro system off.
Starting the programmed title list.
1. Start playback by pressing the button
PLAY/PAUSE.
31
Page 32

MP3 Operation
MP3
MP3 denotes a process and/or format developed
by the Fraunhofer Institute for the compression
of audio data.
In the MP3 format, recordings of music are compressed to a fraction of their original size, which,
on CD-Rs/CD-RWs for example, allows for
storage of a considerably greater volume of
music than on commercially available audio
CDs, on which audio data is stored in the CDA
format.
Playing MP3 titles
1. Place a CD containing MP3 files into the CD
compartment.
2. Press the button FUNCTION repeatedly until the
indicator CD appears in the display.
The number of albums and the number of titles
contained on the CD appears in the display.
3. To start playback of the MP3-CD, press the
button
PLAY/PAUSE.
Indicate albums
If the CD contains several MP3 albums,
proceed as follows:
1. To select an album, press the button ALBUM
PRESET +/-.
2. To start playback of the whole album, press
the button
3. With the button SKIP or SKIP select an
individual title.
4. Start playback with the button PLAY/PAUSE.
Stopping the play function
• Press the button STOP.
Next/previous title
• To playback the next MP3 title on the CD, press
the button
• To return to the start of the MP3 title currently
being played, press the button
PLAY/PAUSE.
SKIP .
SKIP .
• To playback a previous MP3 title on the CD
again, double-press the button
SKIP .
Title forward/reverse
You can playback specific segments within
an MP3 title.
• During playback, hold the button
pressed down until the specific segment in the
recording has been reached.
SKIP or SKIP
Search functions
In search mode, you can search for specific titles or
albums
on your MP3-CD by their filenames.
You can conduct the search using the first letter
(A–Z) or with the numbers (0–9). If there is not a
file name beginning with "A", the display will indicate A 000.
1. To start the search mode, on the remote control
press the button
In the display appears the letter “A” and the number
of titles on the disc beginning with the letter “A”.
If there is not a file name beginning with "A", the
display will indicate A 000.
2. Press the button SKIP or SKIP repeatedly
until the desired letter or number is indicated in
the display.
3. To play the title, press the button PLAY/PAUSE.
4. If several file names start with the letter "A",
press the button
In the display, the name of the first title beginning
with the letter “A” is indicated.
5. Press the button SKIP .
The names of the other files beginning with the letter
"A" will be indicated in the display.
6. To play the title, press the button PLAY/PAUSE.
7. To start album search, double-press the button
FIND ST./MONO.
The name of the first album is indicated in the display.
If no albums are saved on the CD, only individual
MP3 files, “ROOT” is indicated in the display.
FIND ST./MONO once.
STOP.
32
Page 33

8. Press the button SKIP or SKIP repeatedly
until the desired album or number is indicated
in the display.
9. To play the album, press the button PLAY/PAUSE.
Displaying file information
You can have the file name, name of the artist and
the album title belonging to the title shown on the
display.
1. Start an MP3 title.
2. During playback, hold the button FIND ST./MONO
pressed down for two seconds.
One after the other, the file name (FILE), the title
(TITLE), the artiste (ARTIST) and the album
(ALBUM) are indicated in the display.
3. To recall the total title display, press the button
FIND ST./MONO once again for two seconds.
Programming the MP3 title order
You can programme the order, in which the titles
on an MP3 CD are played back.
64 programme locations are available for this
purpose.
This is only possible when the play function has
been stopped
1. Press the button MEM CLK-ADJ or PROG/MEM.
On the display blinks program location 1, for the
title that is to be played first.
2. With the button ALBUM PRESET- or ALBUM PRESET+
select the album for this programme location.
The title display for program location 1 flashes on
the display.
3. With the button SKIP or SKIP , select the
preferred title for the programme location.
4. To save the programming, press the button MEM
CLK-ADJ or PROG/MEM once again.
Note:
To programme further titles repeat the previously
described steps.
The programming is saved until you either remove the MP3-CD from the CD compartment,
press the button
off.
When all programme positions are occupied, the
indicator FULL appears in the display.
STOP or switch the micro system
Starting the programmed title list.
1. Start playback by pressing the button PLAY/PAUSE.
Checking programmed MP3 title order
1.
Stop playback with the button STOP.
2. Press the button MEM CLK-ADJ or PROG/MEM.
With each press of the button a saved title is indicated
in the display, in ascending order of the program
locations.
MP3 repeat function (Repeat)
With the repeat function you can reprise individual
titles or all of the titles on an MP3-CD.
• To repeat individual titles, press the button
In the display REPEAT1 is shown.
• To repeat all of the the titles on an MP3-CD,
press the button
In the display REPEAT ALL will appear.
• To repeat all titles of an album on an MP3 CD,
press the button
In the display REPEAT ALBUM is indicated.
• To finish the repetitions, keep pressing the button
REPEAT twice.
REPEAT three times.
REPEAT until the indicator REPEAT/ALL/ALBUM
extinguishes.
REPEAT.
33
Page 34

USB and memory card functions
Note:
You can connect storage media with a memory
capacity of up to 2 GB on the USB connection
resp. the connection for memory cards.
MMC
(Multimedia Card): Storage media for sound and
image files (rectangular, approx. 24 x 1.4 x 32
mm)
SD
(Secure Digital Card): Storage media for sound and
image files. (rectangular, approx. 24 x 2.1 x 32 mm)
Cleaning
• Clean the housing only with a slightly moist
cloth and a mild detergent. Ensure that moisture
cannot permeate into the device during cleaning!
• If necessary, clean the inside of the disc tray
exclusively with a clean dry brush (e.g. a lens
brush, obtainable from a photographic dealer).
NEVER use moisture to clean the inside of the
CD compartment!
Warning!
Moisture penetrating into the device creates
the risk of electric shock! Additionally, the device
could become irreparably damaged!
USB
(Universal Serial Bus): Universal interface for data
transfer.
Note:
Due to the vast number of available storage
mediums there can be no guarantee of compatibility with all current and future storage
mediums.
Playing MP3 from a USB stick or
memory card
You can play MP3 titles from USB sticks, SD or
MMC memory cards.
1. Insert the USB stick into the USB connection
of the micro-system,
2. Insert an SD resp. MMC memory card in the
connection for memory cards.
3. With the button FUNCTION select the mode
CARD-USB.
The number of contained albums, number of titles
and MP3 appears on the display.
4. To start playback press the button PLAY/PAUSE.
Then operate the device as described in the chapter
"MP3 functions".
Disposal
Do not dispose of the device in your
normal domestic waste. This product is
subject to the provisions of European
Directive 2002/96/EC.
Dispose of the device through an approved disposal centre or at your community waste facility.
Observe the currently applicable regulations. In
case of doubt, please contact your waste disposal
centre.
Disposal of batteries/cells
Used batteries/rechargeable batteries may not be
disposed of in household waste. Every consumer is
legally obliged to dispose of batteries at a collection
site of his community / city district or at a retail store.
The purpose of this obligation is to ensure that batteries
are disposed of in a non-polluting manner. Only dispose of batteries when they are fully discharged.
Dispose of all packaging materials in an
environmentally friendly manner.
34
Page 35

Service
Should questions arise then please contact a specialist or our service hotline:
Hotline: +49 (0) 53 02/8 06-450
Address: x-services.eu gmbh
Service department X4-TECH
Brackestraße 3 · 38159 Vechelde/Germany
Information and updates: http://www.x4-tech.de
› We reserve the right to alter speci cations and information contained in this manual
without notice.
› All brands mentioned are property of X4-TECH or of their respective owners.
› X4-TECH assumes no responsibility or liability for any errors or inaccuracies that may
appear in this instruction manual.
© 2009 X4-TECH All Rights Reserved.
Manufacturer
x-peer.de GmbH · Brackestraße 3 · D-38159 Vechelde
Internet: www.x-peer.de · E-Mail: info@x-peer.de
35
Page 36

Version 1.0 – 7/2009
36
www.x4-tech.de
 Loading...