

Page 1
mobile Multiformatplayer
with DVB-T television
instruction manual
Page 2

Inhalt
5 Chapter 1 Intended Use
5 Before you start
5 Icon Description
6 Copyright Protection
7 Chapter 2 Safety Instructions
11 Chapter 3 Main features
11 Technical Data
13 Package Contents
14 Chapter 4 The Device
14 Front
15 Top
16 Left
18 Back
19 Remote Control
26 Changing batteries
27 Rechargeable battery
28 Tips on the Use of Batteries
30 Chapter 5 Getting Started
31 Chapter 6 DVB-T
34 Chapter 7 DVDs, Audio CDs, Data Discs, USB Sticks & Memory Cards
35 Tips on CDs und DVDs
41 Chapter 9 Maintenance and Handling
44 Chapter 10 Trouble Shooting
46 Chapter 11 Service
37 Chapter 8 The Menu
37 DVB-T-Mode
39 DVD-Mode
2
3
Page 3
Intended Use
1
Dear customer,
You have acquired one of our high-class products. This instruction manual will
tell you how to operate this device, as well as provide you with information on
cleaning and safety procedures. Please take a few minutes to read and follow all
safety and operating instructions found in this manual carefully, in order to maintain this products condition and ensure safe operation. Retain this manual for
future reference and pass on to third parties where applicable. Should you have
any additional questions regarding this device or should any suggestions arise,
please contract a specialized dealer or our service team for further information.
We look forward to you recommending us to others and hope you enjoy using
this device.
Your X4-TECH Team
Note:
All mentioned company and product names are registered trademarks under the rights of their
owners. All rights reserved.
No liabilities will be taken for damages or claims resulting out of not reading and/or not following
the user guide. Under these circumstances, no warranty services will be given. Liability cannot be
taken for consequential damages.
The contents of this owner manual may be changed at any time without notice.The contents may
dier slightly from those shown in print. All specications and designs are subject to change without prior notice.
This product is EMV-certied and fulls all European and National guideline requirements.
A declaration of CE conformity has been established for this product. Certication has been documented and entrusted to the manufacturer.
Please read the safety instructions of this user guide carefully and follow them.
The X4-TECH LUNA DT7 is a mobile DVD/TV device for the use with DVB-T television. The integrated DVD player will read Film Discs, Audio CD’s and Data Discs.
The USB Connector and the card slot oer additional possibilities of playing lm
and music data.
Before you start
Before installing and using the device, please read this user guide carefully. For
possible questions or future use, keep this user guide in a safe place. This user
guide contains information about the installation, use, service and maintenance
of your device. If you should pass the device to other people, do not forget to
include this user guide. Should you need service or any repairs, contact an authorized dealer or our service center.
Icon Description
The symbol with the exclamation mark should be read and followed with
great attention and care, as these are important points for the function of
the unit and the attached devices.
The ash symbol warns of unprotected, high voltage components or areas inside the housing or areas and components that should be handled
with great care. Touching these components and/or connection points
can be extremely dangerous. Only the expert may connect wires to such
points or only pre-manufactured connectors may be used. This unit does
not contain components may be maintained or handled by the user.
Therefore the unit may never be opened by anyone other than an authorized dealer or a trained expert.
4
Chapter 1 Intended Use
5
Page 4
DVB
Describes a function in the DVB-T operating mode.
TTX
Describes a function for the TTX.
DVD
Describes a function in the DVD operating mode. This includes the
functions for DVD playback.
CD
Describes a function for CDs.
VCD
Describes a function for VCDs.
Mp3
Describes a function for MP3s.
WMA
Describes a function for WMA-Data.
JPEG
Describes a function for JPEG-Data.
Safety Instructions
› The following safety instructions are not only for the safety and protection of the device, but also for the protection of your own safety and
health. Please read and follow them carefully.
› In no event will liabilities be taken for consequential, incidental, direct
or indirect damages resulting from improper use of the device according to the user guide. The warranty expires, if the instructions in the
user guide are not followed.
› This device has been built according to CE regulations. All unauthorized changes and/or modications on or in this device are not allowed.
The warranty and the CE expire, if this device is modied without authorization.
› All persons using, handling, installing, servicing and maintaining this
device must be trained and qualied for handling and repairing this device and follow this user guide.
› Pay attention to a correct installation and use of the device. Follow the
User Manual.
2
Copyright Protection
According to the current law it is illegal to copy copyright protected products, to
distribute them, to make them publicly accessible as well as to rent them without
the prior permission of the copyright holder or entitled bodies appointed by the
copyright holder.
6
Chapter 1 Intended Use Chapter 2 Safety Instructions
› Take care that the mains cable is not squeezed, broken, damaged by
sharp edges or subjected to mechanical strain. Avoid exposing the
cable to excessive thermal temperature. Do not exchange the mains
cable. A damaged mains cable can cause an extremely dangerous electric shock.
7
Page 5
› Should the device, power supply or any connecting lines show damage, do not touch them, while they is still connected to the mains. Switch
o the main switch rst and then pull the mains plug carefully out of
the socket. Do not use the defect device anymore and bring it in an
authorized dealer. Do not use this device if it is damaged in any form.
Liabilities will not be taken for secondary damages resulting from misuse or damages of attached devices.
› Always grasp the plug rmly and pull straight from the outlet. Never unplug the appliance by pulling on the cord.
› Lay out your cables in such a way, that they cannot become a hazard.
› This product is not a toy and not suitable for infants and children. Infants and children cannot assess the risks involved, when
dealing with electrical devices.
› This product contains small parts, which should be kept out of
reach of young children and babies.
› Do not leave the packaging material lying around. Children
might play with the plastic bags and risk suocation.
› Keep this product away from vessels containing liquids, e.g., buckets,
vases or plants. Liquids can enter the case/housing or the plug connectors. This may not only destroy the unit itself, but also lead to damages
of the connected devices.
› Do not use this device in a tropical humid climate. If the product is
brought in from the cold to a warm area (e.g., during transport), condensation can occur within the unit. Let the device reach room temperature, before you use it.
› Do not use this device in the bathroom.
› Never pull the mains plug with damp or wet hands. There is a risk of
electric shock!
› To avoid heat congestion, do not cover the device with objects such as
magazines, table covers or curtains.
› Do not use this device in a congested area or near sources of great
heat.
› Always put the device on an even stable surface to avoid damages.
› Keep this product away from water, dampness and high humidity to
avoid the danger of short circuit or/and re or/and electric shock or/
› Do not place this device or the power supply near an open ame such
as candles.
and damage to the product or/and connected devices.
› Follow all safety instructions in this user’s guide and the user guides of the
connected devices.
8
Chapter 2 Safety Instructions Chapter 2 Safety Instructions
9
Page 6

Main features
3
› If you have any doubt about the approach, the security, the handling or
the correct connection of the device, or questions should arise which are
not claried in the course of this user guide, please turn to an authorized
dealer or contact our technical information.
› 17,5 cm (7") LCD display with 480 x 234 resolution
› mobile DVB-T reception
› Supports MP3 and WMA music les
› Supports JPG les
› Supports MPEG 1, MPEG2, AVI les
› Supports DVD, DVD-R, DVD-RW, SVCD, VCD, CD, CD-R, CD-RW and Picture-CD
› Supports SD, MMC and MS memory cards up to 4 GB in FAT-32 format
› Supports USB-Stick up to 4 GB in FAT-32 format
› Supports EPG and TTX
› Integrated speakers
Technical Features
Device
› Operating voltage: Adapter: 100–240 V ~ 50 / 60 Hz
Car adapter: 10–15 V DC
Device: 9–12 V DC
› Power consumption: < 10 W
› Display: 17,5 cm (7")
› Aspect ratio: 16:9, 4:3 PS und 4:3 LB
› Resolution: 480 x 234
› Signal system: PAL and NTSC
› Dimensions (W x H x D): 200 x 140 x 36,5 mm
10
Chapter 2 Safety Instructions Chapter 3 Main features
11
Page 7

› Weight: approx. 546 g
› DVB-T mode: Standard: DVB-T
› Output Video: 1 Vp-p (75 Ω)
Audio: 1,4 Vrms (1 kHz, 0 dB)
DVD
› Laser: Semiconductor laser, wavelength 650 nm
› Video system: PAL and NTSC
› Frequency response: 20 Hz to 20 kHz (1 dB)
› Signal-to-noise ratio: > 80 dB (ANALOG OUT, connectors only)
› Dynamic range: > 85 dB (DVD/CD)
Rechargeable Lithium battery
Output: 7,4 V
Capacity: 1200 mAh
Charging time: approx. 4 hrs (OFF mode) / up to 20 hrs (On mode)
Operational time:
Operational time: Up to 2 hours (depending on activity)
Storage circumstances: Temperature: 0 – 40 °C
Humidity: 65 % ± 20 %
Up to 2 hours (depending on activity)
3.2 Package Contents
Connections
Antenna, AV-out (3,5 mm), earphones (3,5 mm), USB 2.0, card reader, 12 V DC-IN
› X4-TECH LUNA DT7 with integrated rechargeable battery
› Remote control
› 12V car adapter
Supports
Video: MPEG1, MPEG2, AVI
Audio: MP3, WMA
Pictures: JPG
Memory cards: SD, MMC and MS bis zu 4 GB capacity and formatted
to FAT-32
USB ash drives: up to 4 GB capacity and formatted to FAT-32
› User guide
› Service card
› AV-cable
› Power supply: Input: 100–240 V~50 / 60 Hz 0,3 A
Output: +9V 1A
› DVB-T antenna
Discs: DVD, DVD-R, DVD-RW, SVCD, VCD, CD, CD-R,
CD-RW and Picture CD
12
Chapter 3 Main features Chapter 3 Main features
13
Page 8

The Device
4
Front
4
1 1 2 3
1 Sensor (for the remote control)
2 Control-LED (On/O)
This LED is red when the device is switched on.
3 Control-LED (battery status)
This LED is green when the rechargeable battery is fully loaded. It becomes
red, when the device is being loaded.
4 LCD-Display
Top
5 6 7 8 9 10
5 Card Reader
The card reader supports SD, MMC and MS type memory cards up to 4 GB.
The cards need to be formatted in FAT-32 format.
6 MEDIA
This button opens the source selection menu. Select your source
DVD
(disc drive, memory card or USB stick) and exit the menu by pressing the
button again.
7 DVD/DVB-T
Press this button to switch between DVD and DVB-T mode.
8 SETUP
Press this button to enter/leave the setup menu. Please note that there is
a dierence between the setup menu of the DVD and the DVB-T mode.
9 ENTER
Press this button to conrm your selection.
14
Chapter 4 The DeviceChapter 4 The Device
15
Page 9

10 Navigation Buttons
/ VOL –, / VOL+, / and /
Press to navigate within menus.
JPEG
Press to rotate/mirror pictures.
/ VOL –, / VOL+ Hold to increase/decrease the volume.
Press to change to the next/previous
DVB
favourite group.
Press to arrive at the next/prior data overview.
/ , / Press, to display the next/previous program
DVD
DVB
during DVB-T mode.
Hold to change to the next/previous title/le.
DVD
Left Side
11
12
13
14
15
16
11 USB 2.0 Connector
› USB sticks up to a capacity of 4 GB can be used. They need to be formatted
in FAT-32.
› Do not use an extension cable longer than 25 cm.
› Hard discs cannot be used with this device.
The use of USB cables is limited to the length of 3m. A cable exceeding
the length of 3m might lead to a bad performance and can inuence
other devices due to electromagnetic disturbances (EMC).
The USB connector is not designed as a power supply for external devices e.g.
hard disc. Please read the user guide of the attached device.
12 Earphones
You can connect a set of earphones to this jack. Speakers are muted, once
earphones are plugged into the device.
Listening to earphones at higher volumes over a longer period of time
can damage your hearing or even cause permanent hearing loss.
13 AV OUT
Video output connector you can use this output to connect to external
devices (e.g. a monitor). Please read the user guide of the attached device.
14 DC IN 9-12V (Connection for the power supply)
› Switch o the device. Plug in the supplied power supply into the socket with
DC IN 9 –12V. Connect the power supply to the mains socket.
› To use the device with the cigarette lighter in the car, use the car adapter.
Connect the adapter to the socket with DC IN 9 –12V and then connect to the
cigarette lighter socket.
Please bear in mind that the device consumes a minimal amount of
power, even in a standby mode. Please take this into consideration
when operating the device with your vehicle’s electrical system. Remove the
adapter from the power supply source in order to completely cut o the
power supply to the device.
16
Chapter 4 The DeviceChapter 4 The Device
17
Page 10

15 ON OFF
› Push the switch to ON to use the device and to OFF to switch it o.
› The device will automatically use battery power if it is not connected to the
power supply.
16 ANT (Antenna)
› Connect the supplied DVB-T antenna to this input.
Back
19 1717 18
20
17 Loudspeakers
18 OPEN
Press this button to open the disc drive.
19 Disc Drive
You can play DVDs, DVD-Rs, DVD-RWs, SVCDs, VCDs, CDs, Audio-CDs and
Picture-CDs with this device.
20 Stand
Remote control
Please note that this device is designed to be used with a remote control.
To get best results, point the remote control directly at the device. The distance
should not exceed 5 meters or an angle of 60 degrees.
18
Chapter 4 The DeviceChapter 4 The Device
19
Page 11

1 A-B (Programming of repetitive sequence)
DVD CD VCD Mp3 WMA
Press the button at the starting point and then at the end point oft the
sequence you want repeated. Press the button again to exit the repetition
mode.
2 MUTE
Press this button to mute the volume. Press again to resume hearing.
3 Number Pad
› You can access titles directly by inputting the title number.
DVD
„10+“ counts in steps of 10. The last digit is input by the numbers on
the number pad.
DVD
Please note that all les are counted progressively. This means that the
rst le is le number one. A repetitive pressing of 10+ lets you select the les
in steps of 10.
TTX
A specic page can be accessed directly by entering the page number.
4 SUBTITLE
Press this button repeatedly to view the available subtitles.
5 ANGLE/EPG
DVD
Press the button repeatedly to view the available dierent viewing
angle of the DVD.
DVB
Press the button to enter or leave the Electronic Program Guide (EPG).
If this function is supported by the broadcasting station/the signal is
received, information on the running program can be viewed. With the
navigation buttons you can browse through the programs and their oers.
6 TITLE / TV / RADIO
DVB
Press the button to jump between the list of DVB-T programs oered
and possible radio stations.
DVD
7 Navigation Buttons
Back to the main menu of a DVD out of playback.
, and Press to navigate within menus.
,
JPEG
Pictures may be rotated or mirrored during viewing.
DVB
DVB
and wechseln Sie zu dem nächsten/vorherigen Sender.
With
andyou can choose your next/previous favourite group
With
during DVB-T mode. Favourites are selected and dened in the Setup Menu
under “Channel Guide“ -> “Channels Class“. If this is done, then only these
favourites can be selected whilst using this function.
DVD
Next/prior le page.
20
Chapter 4 The DeviceChapter 4 The Device
21
Page 12

8 ENTER
Press ENTER to conrm your selection.
9 SETUP
Opens/leaves the SETUP function.
(play/pause)
10
Press to pause/play/continue playback.
(stop)
11
Press
(stop) to stop playback. The device bookmarks the position in the
playback. Pressing ENTER will continue playback from this point onward.
Double pressing of
(stop) or another action will delete the bookmark.
12 PROGRAM/TTX (make playlist/videotext)
DVD
With “PROGRAM/TTX“ you can create a playlist. First you need to
choose a save space with the navigation buttons. You can then enter the
le (title and chapter number for DVDs) with the number buttons. After
you have selected your playlist press “PLAY“ to start playing. Press
”PROGRAM/TTX“ to exit the menu without saving. To delete the playlist
press “PROGRAM/TTX“ during replay and then “CLEAR“.
JPEG
Press the button repeatedly to select the available eects between the
pictures during a slide show.
TTX
By pressing “PROGRAM/TTX“ you can enter/leave the videotext (TTX)
mode. If this feature is supported by the broadcasting station the start menu
will open. You can browse through the pages with the number pad.
and substitute the colours green, red, blue and yellow function buttons.
, ,
13 REPEAT
DVD
Press this button repeatedly to access the available repeat modes.
14 DVD/DVB
Switch between DVB-T and DVD mode.
15 SOURCE
DVD
This will open the source menu. Here you can choose the input
medium that you want to view (disc drive, memory card or USB stick).
Pressing the button again will exit the menu.
16 DISPLAY
Press this button repeatedly to display available information (e.g. reception
quality or remaining playback time).
17 AUDIO
DVB DVD
Press this button repeatedly to select the available
soundtracks.
CD VCD
Press this button repeatedly to select the available audio
channels (STEREO, MONO L or MONO R).
18 MENU
DVD
Press this button to enter the chapter selection during playback of
DVDs. Pressing this button again will continue playback.
DVD
Press this button to select between le types (sound, picture, lm).
Pressing this button while viewing a le will bring you back to le selection.
19 RETURN
DVD
Press this button to return to the chapter selection during playback
of DVDs.
DVD
Press this button to return to the le type selection (sound, picture,
lm). Pressing this button while viewing a le will bring you back to le
selection.
DVB
Press this button to return to the previously seen program.
DVB
Press this button to navigate upwards/backwards within the
22
Chapter 4 The DeviceChapter 4 The Device
23
Page 13

DVB-T SETUP menu.
20 SEARCH
DVB
Starts the automatic program search function. First select the country,
if local position numbers should be used and start the program search. The
program search can take some time. During the search a progress bar is
shown. As soon as the search is nished program number one will be shown.
Alternatively you can search programs in the DVB-T setup menu.
DVD
Press the button once to enter the search menu. Press “Search“.
A search menu will open at the top of the display. Use the number pad to
directly input the channel number. Use “ENTER“ to navigate. Pressing this
button again exits the menu.
21 SLOW
DVD
functions.
Press this button repeatedly to select the available slow motion
(play/pause) resumes normal playback.
normalen Wiedergabe zurück.
22 VOL –/+
Volume control (decrease/increse the volume). Other sound control can be
selected in the setup menu.
/ red
23
DVD
Press this button to access previous chapter/title/le.
TTX
Is the red function button when using TTX. The use is dependent on
the TTX page.
/ green
23
DVD
Press this button to access next chapter/title/le.
TTX
Is the green function button when using TTX. The use is dependent on
the TTX page.
/ yellow
24
DVD
speed.
Starts a fast backward of the playback. Repeated pressing varies the
resumes normal playback.
TTX
Is the yellow function button when using TTX. The use is dependent
on the TTX page.
/ blue
25
DVD
speed.
Starts a fast forward of the playback. Repeated pressing varies the
resumes normal playback.
TTX
Is the blue function button when using TTX. The use is dependent on
the TTX page.
24
Chapter 4 The DeviceChapter 4 The Device
25
Page 14
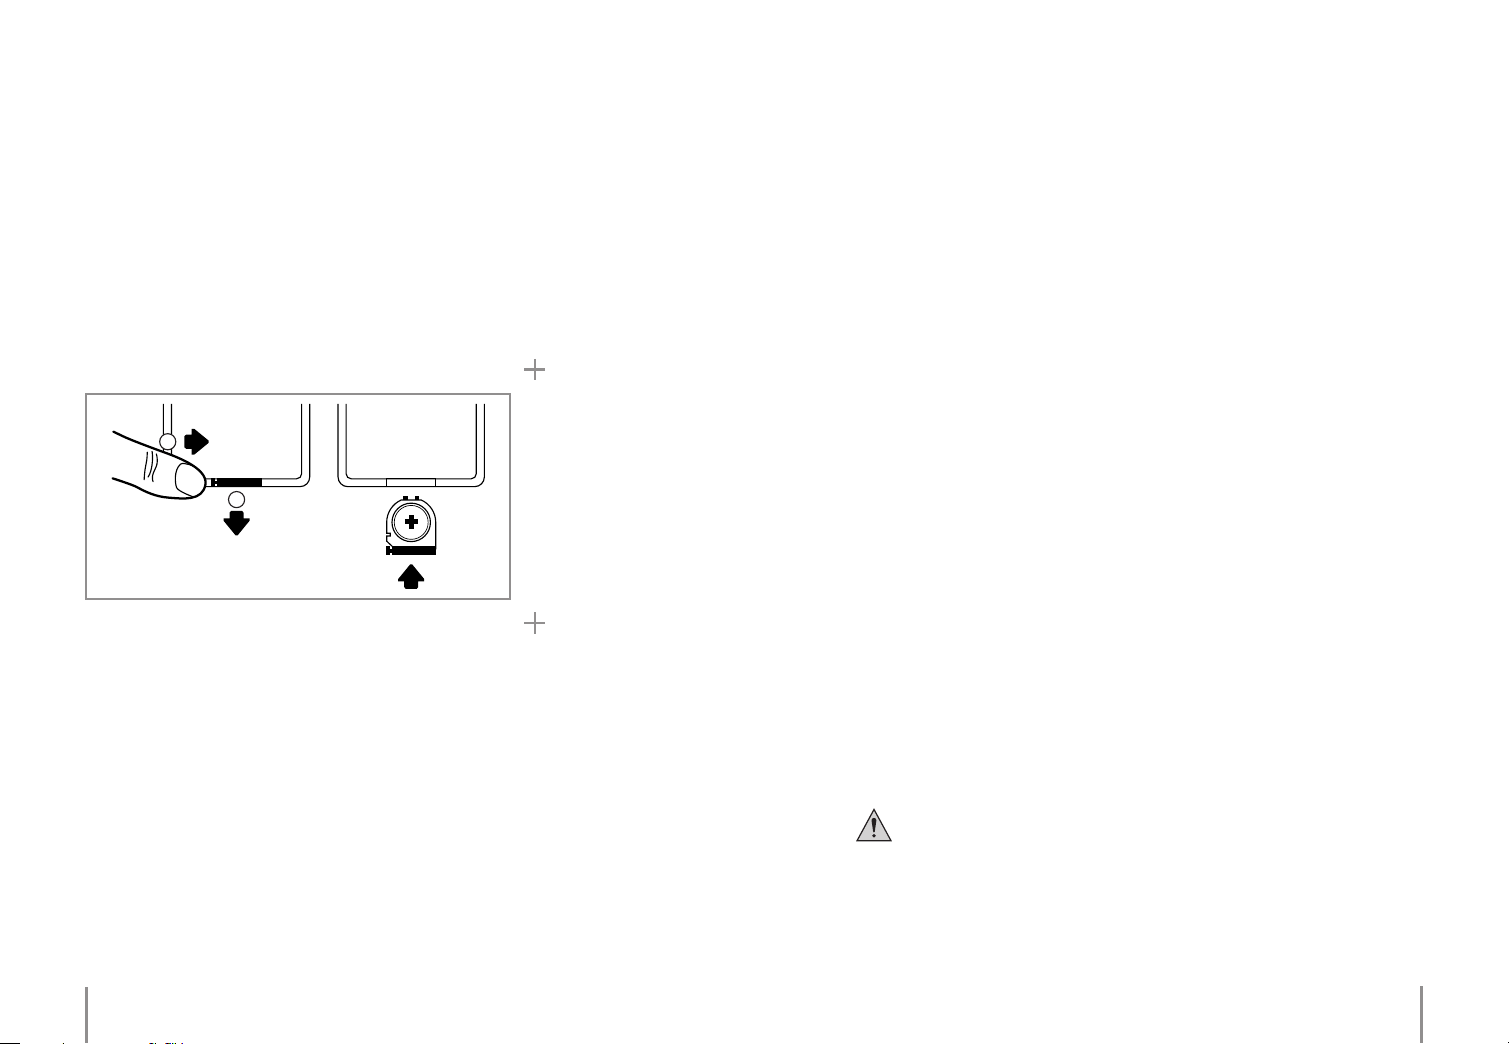
Changing Batteries
Rechargeable battery
The remote control uses one battery of the type CR2025 3V.
If the range of the remote control is reduced or if the remote control is not working correctly anymore, change the batteries.
1
battery
compar tment
2
› Press the small clip of the battery compartment in direction of the arrow (1). Pull
out the battery compartment (2).
› Take out the battery and dispose of it, as laws and regulations of your country
require.
› Place the new battery into the battery holder. Mind that you have the correct
polarity.
› Push the battery holder back into the battery slot.
The rechargeable battery has a capacity of 1200 mAh. This oers operational time
for about two hours, depending on the type of active use
The device will use the battery power if it is not connected to an external power
supply.
This device utilizes a Lithium rechargeable battery. Rechargeable batteries have a
limited number of charge cycles. Each charging cycle, even a short one, shortens
the battery lifespan. To increase battery lifespan, always recharge batteries completely and without disruption. The rechargeable battery can be charged up to
800 times, after which the capacity will then gradually begin to decrease.
This device has a permanent built-in rechargeable battery that should be kept
away from heat sources. Never try to remove the rechargeable battery. Please
contact your local dealer if a malfunction occurs during operation or battery replacement is required.
Note
Please note that the battery charging process can take up to approximately 20
hours, if the device is turned on at the same time. However, charging the battery
with the device turned o will only take up to approximately 4 hours. It is therefore recommended to turn the device o during charging.
Rechargeable batteries should always be completely charged rst, before
using them for the rst time. This could otherwise impair battery capacity.
› Remove the battery, if the remote control is not being used for a longer period
of time or stored away.
26
Chapter 4 The Device
Chapter 4 The Device
27
Page 15

Tips on the Use of Batteries
› Avoid the total discharge of rechargeable batteries.
Please note the following points when using batteries.
› Batteries are not toys and should be kept away from children.
› Remove batteries from devices when they are not being used for a longer time
period.
› Do not leave batteries lying around. There is a danger, that they may be swallowed by children or pets. In such a case, immediately contact your doctor
› Batteries may not be exposed to extreme heat such as sunshine, re or ovens.
There is the danger of explosion.
› Make sure that batteries are never short circuited. Batteries may not be recharged. There is the danger of explosion.
› Please follow the manufacturer’s instruction manual, in case you are using rechargeable batteries.
› Leaking and damaged batteries can cause burns on the skin. If the batteries are
damaged, use gloves.
› Make sure that the device is switched o when it is not being used.
› Change all batteries at the same time
› Take care of correct polarity when using batteries.
› Batteries are hazardous waste and do not belong in the normal waste bin.
› If necessary, clean the battery contacts and their contacts in the device.
28
Chapter 4 The DeviceChapter 4 The Device
29
Page 16

First time installation
5
DVB-T
6
The installation assistant dialogue box will appear on screen after turning
the device on for the rst time.
› You will be asked if this option is to be carried out. Select “YES“.
› Select the country and language.
› Select “NEXT“.
› Adjust now the desired volume.
› Now you will be asked if you would like to start an automatic channel scan. Select “YES“.
› Scanning starts. As soon as scanning is nished, the device will switch to the
program.
› Further settings are available for selection in the menu. You can open the menu
with “SETUP“.
Try to maintain a safe volume level and avoid excessive noise. Over a certain
amount of time your hearing will become accustomed to the adjusted
volume level. Please note that excessive sound pressure levels created when listening to loud volume levels with earphones or headphones can lead to permanent hearing damage or loss.
Your full concentration and attention is required while driving in trac (as
well as in many other surroundings). Operating the device, listening to music with earphones/headphones or watching a movie can divert one’s attention
and be just as distracting, as using your cell phone while driving. In case of an
accident, insurance coverage might be denied and you could be partially blamed
for the accident respectively!
What is DVB-T?
DVB-T is the abbreviation for Digital Video Broadcasting – Terrestrial. DVB-T is
broadcasted by earth based transmitters into the atmosphere. DVB-T is a variation of DVB and has been agreed upon as European standard for the broadcast
of television and radio programs for reception with a standard aerial. The used
frequencies are identical to the standard UHF- and VHF- of analogue channels.
These frequencies can be used far more eectively in the digital mode than in the
analogue mode as more than one program can be broadcasted on one channel.
Program Search
› The button „SEARCH“ starts the automatic program search.
› Alternatively programs can be directly selected in the DVB-T menu.
Changing channels
You have several options to select your program:
› With
› Channels can be selected directly by inputting the program channel number
with the number pad.
› Channels can be selected in the EPG mode. To open EPG mode press „ANGLE/
EPG".
› Pressing „RETURN" will change to the previously seen channel.
› With
/ you can change to next/previous channel.
/
you can choose a group of favourites to be active.
30
Chapter 5 First time installation
Chapter 6 DVB-T
31
Page 17

› „SETUP" opens the DVB-T menu. You can choose the channel in the “Channel
Guide” under „TV Channels".
› With the navigation buttons you can browse through the programs and their
oers.
Program settings
› Open the DVB-T menu by pressing „SETUP“. Choose “Channel Guide” to edit the
channels.
› TV/Radio Channels: Oers an overview over the channels and the possibility to
sort them.
› Channels Class: Here you can add or delete channels from the various groups.
› Channels Edit: Here channels can be renamed, moved or deleted.
Videotext (TTX)
› By pressing „PROGRAM/TTX“ you can enter/leave the videotext (TTX) mode. If
this feature is supported by the broadcasting station/the signal is received the
start menu will open. You can browse through the pages with the number pad.
, , and on the remote control serve as green, red, blue and yellow func-
tion buttons for this service.
Electronic Program Guide (EPG)
› The button „ANGLE/EPG“ opens/closes the Electronic Program Guide (EPG). If
this function is supported by the broadcasting station/the signal is received, information on the running program can be viewed.
Automatic Channel Change
› Choose a channel in the EPG overview by pressing „ENTER“ to switch the automatic channel change ON or OFF. Currently running programs or parallel running
programs cannot be selected. A channel, that has been selected for automatic
channel change is identied by having a dierent colour in the overview.
› Up to 15 programs can be selected for the automatic channel change.
› Exit EPG.
› As soon as a saved program starts you will be asked if you want to change to
the channel. Conrm by pressing „ENTER“. The window automatically closes after
15 seconds.
32
Chapter 6 DVB-TChapter 6 DVB-T
33
Page 18

DVDs, Audio CDs, Data Discs,
USB Sticks & Memory Cards
Please follow these steps in the described sequence.
1 Putting in the medium
› Press „OPEN“ to open the disc drive, insert the disc and close the drive.
› Put the USB stick into the USB socket.
› Put the memory card into the card reader slot.
2 Switch with "DVD/DVB" to DVD mode.
3 Open the source selection menu by pressing „SOURCE“ or „MEDIA“.
Movie DVDs will start their playback automatically.
4 Select the desired le type.
5 Before removing your current device, change to an alternative input device.
Never remove your media whilst it is being use. This may lead to damage
of the device, medium or loss of data.
7
Tips on Handling CDs und DVDs
Handling CDs and DVDs
Do not touch the silver side of the disc. Handle the disc by holding
the edges only or putting a nger through the center hole, so that
no ngerprints are left on the silver side. Do not stick tapes, labels
or papers onto either sides of the disc. The glue can destroy the
disc.
Storing CDs and DVDs
Store the DVD/CD in a safe place and in the supplied case. It will save it from scratches. Do not put the disc into direct sunlight. Do not put the DVD/CD near or on
heaters or other heat sources. Do not leave the disc in the car on warm days. Heat
may deform the disc. Do not put heavy things onto the disc.
Cleaning CDs und DVDs
Fingerprints, scratches and dust can be a reason that a disc is not
read or that a program does not install itself correctly. Before you
use the disc, clean it with a dry, antistatic cloth. Wipe the disc diagonally. Do not use any solvents such as alcohol, petrol, thinner or
any other cleaners or anti static sprays, as these might react with
the disc material and destroy the disc.
34
Chapter 7 Audio CDs, Data Discs, USB Sticks & Memory CardsChapter 7 Audio CDs, Data Discs, USB Sticks & Memory Cards
35
Page 19

Menu Overview
8
Note
Depending on your Disc-drive and/or the used CD-R/RW (DVD-R, DVD+R, DVDRW, DVD+RW) it may come to come to malfunction based in compatibility and
features of the disc-drive.
Some DVD’s and CD’s may not be able to be used at all, due to restrictions on the
disc. It may therefore come to inability to use certain discs.
Manufacturers may have already intentionally programmed playback functions
on some DVD and Video CDs. Therefore, it is possible that some playback functions may not be available or additional functions may be available for use.
Do not use irregularly shaped discs (e.g. heart shaped). This may cause a malfunction.
› Open/close the menu with „SETUP“.
DVB-T Mode
Channel Guide
› TV-/Radio Channels
- Allows an overview of all channels and oers the possibility to sort these.
› Channels Class
Allows the addition or deletion of channels to various groups.
› Channels Edit
Allows the change of channel names, the reorganisation of channels or the deletion.
System Cong
› TV Setting
TV SYSTEM (PAL or NTSC).
TV TYPE (4:3PS, 4:3LB or 16:9).
Note: PAL is the standard TV norm for Germany.
› Video Setting
Adjust Brightness, Contrast, Hue and Saturation.
› Audio Setting
Denes audio-output (SPDIF AUS, RAW or PCM) of the SPDIF-Signal.
36
Chapter 8 Menu OverviewChapter 7 Audio CDs, Data Discs, USB Sticks & Memory Cards
37
Page 20

› Language
Denes the OSD language.
› Parent Control
Change PIN (standard PIN is 0000).
Denes parental channel control (lock and unlock channels).
› Time Setting
Denes time zone (Germany is GMT+1).
› Systeminfo
Displays various information of the device.
Installation
› Auto Scan
Starts Automatic Channel Search for a specied country
› Manual Scan
Only certain bands are searched.
› Default Setup
Reset to factory settings.
8.2 DVD-Mode
System Setup
› TV System
Set the TV system (PAL or NTSC).
Note: PAL is the standard TV norm for Germany.
› Screen Saver
Activate screen saver On/O.
› TV-Type
Set the aspect ratio (4:3PS, 4:3LB or 16:9).
› Password
Change pin for parental control (standard PIN is 0000).
› Rating
Specication for parental control for DVD if this feature is supported by the DVD:
1: KID SAFE (for Kids)
2: G (for all age groups)
3: PG (for children with parental guidance)
4: PG 13 (for children above 13 years)
5: PG-R (for youngsters with parenting guidance)
6: R (not for youngsters)
7: NC-17 (for viewers over 17)
8: ADULT (for adults only)
38
Chapter 8 Menu OverviewChapter 8 Menu Overview
39
Page 21

Maintenance and
› Default
Reset to factory settings.
Language Setup
› OSD Language
Denes the menu language.
› Audio / Subtitel / Menu Language
Sets the Language of the Soundtrack, Subtitles and Menus of the DVDs.
› Font Setup
Adjusts the font size and style of some DVD menus.
Audio Setup
› Audio Output
Denes audio-output (SPDIF/OFF, SPDIF/RAW or SPDIF/PCM) of the SPDIF-Signal.
Video Setup
Adjust Brightness, Contrast, Hue and Saturation.
Speaker Setup
Handling
Maintenance
Carry out a technical safety inspection on a regular basis, e.g. check if the power
cable or housing may have become damaged.
If there is reason to believe that the device can no longer be operated safely, then
disconnect it immediately from the power supply and secure it against any unintentional operation. It can be assumed that safe operation is no longer possible,
if:
› neither the device, the USB cable, the power supply nor any other attached
cables or devices show any obvious signs of damage.
› the device no longer works.
› the device has been stored for a longer period of time under unfavorable conditions.
› the device has been exposed to rigorous transport conditions.
Always adhere to the following safety instructions before cleaning
and maintenance:
By opening the housing, components with high voltage are accessible.
Make sure that the device is detached from the mains and/or the power
supply. Capacitors within the device may still carry voltage even though
they have been disconnected.
9
› Downmix
- LT/RT: when using a DVD with 5.1 the LS, RS and centre channels can be processed to the left and right channels of the stereo speakers evenly.
- Stereo: when using a DVD with 5.1 the rear left channel will be processed to
the stereo left and the rear right channel to the stereo right channel. The centre
channel is processed to left and right channel.
40
This device does not contain any components that need to be
maintained by the user. Therefore this unit may not be opened by an
unauthorised person!
This unit may only be opened or repaired by a person authorized to do so
or who has knowledge of electrical safety regulations.
Chapter 9 Maintenance and HandlingChapter 8 Menu Overview
41
Page 22

Cleaning the device
Unplug all power supplies before cleaning. Always use a soft, dry and lint-free
cloth to clean the unit’s exterior. If the device is extremely dirty you can use a soft
cloth, dampened with water or a mild cleaning solution to clean. Never use any
abrasive or harsh cleaning agents (e.g. alcohol, petrol or thinners) as these could
damage the controls, casing or any markings and labels found on the device.
Keeping the external case clean
Never use volatile uids near the device, as for example insect spray. Avoid letting
the device come in contact with rubber or plastic products for longer periods of
time. These could otherwise leave marks behind.
Transportation
Please retain the original box and the packaging material in case you need to
transport or send the device out for maintenance at a later date. Please note that
the device should be repacked in the original packaging. The box and packaging
have been especially developed for this device in order to protect it during transport and against damage.
Retain this instruction manual for future reference and where required pass it
along with the device if handed over to a third party. It contains important information on initial operation and handling.
Note
Contribute to a better environment by using a designated disposal system (e.g.
Dual System in Germany) or recycling site for the disposal of packaging material.
Dispose of the device is such a way as is mentioned by the law or rules of your
community.
42
Chapter 9 Maintenance and HandlingChapter 9 Maintenance and Handling
43
Page 23

Trouble Shooting
10
This product has been produced according to current standards of production
and engineering. During the development it has proven to be reliable and working. Under some circumstances it may come to a malfunction. The reasons for
this malfunction can be numerous.
Before calling our service center you should read the following tips and check the
points mentioned.
General Problems
› Restart the device.
No Sound / distortion
› Check that all devices are on, correctly connected correctly adjusted and in
good working order.
› Check your volume control on all devices.
The IR-control does not work correctly
› Are you using the remote control at a larger distance than 5 meters?
› Check the remote control by holding it directly in front of the IR-eye of the device.
› Remove all objects between the remote control and the device.
› Check the correct polarity of the batteries in the remote control.
› Change batteries
Buttons do not work (device or RC)
› Switch the device o and on again. As an alternative, switch the device o, detach the power supply and switch it on again (The device may also not be functioning due to a stroke of lightning, static electricity or other external factors.).
No picture / distortion
› Check the connection.
› Check if the antenna has been moved or is covered by an item.
› Strong rain, thick clouds or snow can disturb the connection.
› Start channel search.
The CD/DVD is not detected
Check if the disc
› is deformed, damaged or scratched.
› is dirty.
Any repairs other than those mentioned above are to be carried out solely
by an authorized technician.
44
Chapter 10 Trouble ShootingChapter 10 Trouble Shooting
45
Page 24

Service
11
If you should have questions or need assistance please contact your local dealer
or our service center.
Hotline: (0 53 02) 8 06-450
Adress: x-services.eu gmbh
Serviceabteilung X4-TECH
Brackestraße 3
38159 Vechelde / Germany
Informational and updates
http://www.x4-tech.de
You will nd original X4-TECH spare parts and accessories on the home pages of
X4-TECH or under
www.x-spares.de
X4-TECH assumes no responsibility or liability for any errors or inaccuracies that
may appear in this instruction manual.
We reserve the right to alter specications and information contained in this manual without notice.
All brands mentioned are property of X4-TECH or of their respective owners.
© 2010 X4-TECH All Rights Reserved.
Hersteller
x-peer.de GmbH
Brackestraße 3
38159 Vechelde / Germany
Internet:
www.x-peer.de · E-Mail: info@x-peer.de
www.x4-tech.de
46
Chapter 11 ServiceChapter 11 Service
47
Page 25

Version 1.0 – 12 /2010
www.x4-tech.de
 Loading...