

Page 1
Hi-Fi stereo CD player
with encoding function
Instruction manual
Page 2

Table of contents
5 Chapter 1 Intended use
5 Explanation of symbols
6 Chapter 2 Safety information
8 Before use
9 Chapter 3 Features
10 Chapter 4 The device
12 The remote control
15 Installing/Replacing batteries
17 Chapter 5 Setup
18 Chapter 6 Connections
18 RCA connectors
23 Encoding function
2 3 Information on CDs and DVDs
2 4 Information on MP3 and WMA music formats
26 Chapter 9 Troubleshooting
27 Chapter 10 Maintenance, handling and cleaning
29 Chapter 11 Specications
29 Technical data
29 Delivery contents
18 Connecting to a power supply
19 Chapter 7 General operation
19 Volume regulation
20 Chapter 8 CD and MP3 playback
20 Turning ON/OFF
20 Inserting a CD
21 Connecting an USB medium
21 Playback
21 Forward
22 Reverse
21 Programming a playlist
22 Intro
23 Repeat
23 Random
2
3
Page 3

Intended use
1
Dear customer,
thank you for deciding on purchasing this quality product from X4-TECH. This instruction manual will give you a general idea of how this device operates, as well as provide you with information on cleaning and safety procedures. Please take a few minutes to read and follow all safety
and operating instructions found in this manual carefully, in order to maintain this products
condition and ensure safe operation. Should you have any additional questions regarding the
operation or installation of this device or should any suggestions arise, please contract a specialized dealer or our service team for further information.
We look forward to your recommending us to others and hope you enjoy using this Hi-Fi stereo
CD player from X4-TECH.
Your X4-TECH team
All company and product names mentioned in this document are registered trademarks of
their respective owners. All rights reserved.
The X4-TECH CD player CD-2000ME player is intended for playing audio CDs and CDs containing
MP3 and WMA les. It is also suitable for playing MP3 and WMA les stored on external storage
media and for storing songs from audio CDs in an MP3 le format on USB storage media via
encoding function.
› Audio output signals need to be transmitted to an external amplier in order to strengthen
them. This device is not intended for direct connection to loudspeakers.
› This product is only authorized for connection to a 230 V/~50 Hz alternating voltage supply and
is intended for indoor use only.
Please adhere to all of the safety information/instructions found in this instruction
manual!
Explanation of symbols
We assume no liability for damage occurred as a result of improper use or damage resulting
from the failure to comply with the safety instructions found in this manual, improper operation
or handling! Under such circumstances, all claims under warranty will become void. We assume
no liability for consequential damage!
This product is EMV-certied and fulls all European and National guideline requirements. A
declaration of CE conformity has been established for this product. Certication has been documented and entrusted to the manufacturer.
An exclamation mark is intended to inform the user of important information, operation or maintenance instructions or that special attention is required.
This symbol is intended to alert you to the presence of unprotected, live parts or components found within the product’s enclosure or of dangerous connections that upon
contact may be of sucient magnitude to constitute a risk of electric shock. Cables
intended for such connections should only be connected by qualied personnel or you
should only use ready to connect cables. There are no user-serviceable parts found inside the device, therefore the device is never to be opened.
4
Chapter 1 Intended use
5
Page 4
Safety information
2
Dear customer,
the following safety and hazard warnings are not only for the protection of your device, but also
serve as a protection against potential health hazards. Please take time to read the following
instructions carefully.
We assume no liability for personal or property damage resulting from the failure
to comply with the safety instructions, improper operation and handling. Under
such circumstances, all claims under warranty will become void.
› For safety and licensing (CE) reasons any unauthorized modication and/or change
on the device is prohibited and will void the warranty and all warranty claims.
› Any persons operating, installing, setting up, or servicing this device must be trained
and qualied accordingly and observe these operating instructions.
› Ensure that the device has been set up accordingly by following all instructions
found in the instruction manual.
› Power supply cords should be routed so that they are not likely to be walked on or
pinched by items placed upon or against them, paying particular attention to cords
at plugs, convenience receptacles, and the point at which they exit from the device.
Avoid exposing the cable to extreme heat or cold. Never modify/change the cable.
This could otherwise damage the cable and result in the dangerous risk of electric
shock.
› Should any evident damage be seen on the device or on the connection cables, do
not come in contact with or touch these. Switch o the corresponding circuit breaker in the power distribution panel rst, before carefully unplugging the power plug
from the wall outlet. Do not operate this device further! Please contact or take it to a
qualied service technician/specialty workshop.
› In order to completely cut o the power supply to the device, unplug the power
plug from the wall outlet. Merely turning the device o with the ON/OFF button is not
sucient enough. Make sure that receptacles are easily accessible.
› Always pull on the plug’s grips and never on the cable to remove from a wall outlet.
› For safety reasons, always unplug the device from the power outlet during thunderstorms.
› Eliminate potential tripping hazards by routing cables in such a way that no one can
trip or stumble over them.
› Never use the device if the power cable or device is damaged.
› This device is not suitable for children under 3 years of age.
Small children are unaware of the serious and immediate dangers involved
when exposing themselves to or handling electronic devices. Furthermore,
this product contains small parts that could be swallowed.
› Never leave packaging material lying around unsupervised. For children it could become a hazardous toy and lead to serious injury. Keep packaging and protective foil
away from children at all times to a void the danger of suocation.
› The device should never come in contact with water or moisture.
› To prevent the risk of re or electric shock make sure that liquids, such as dripping or
splashing water, rain or moisture, do not come in contact with the device and power
supply plug.
› Operate this device in a moderate climate and never expose to extreme temperatures, such as high humidity.
› Condensation can build up suddenly, when this device is brought from a colder into
a warmer area (e.g. when transporting). Should this happen, allow the device to warm
up to room temperature rst before using.
› Care should be taken that liquids do not come in contact with the interior; this is why
containers containing liquids, e.g. bucket, vase or plants should never be placed anywhere near or on this device. This can not only damage the device, but also become
a re hazard.
› It is imperative to avoid contact with moisture, e.g. in the bathroom.
› Never touch the power plug with damp or wet hands. There is the risk of electric
shock!
› Unplug the device from the power outlet, if it is not in use for a longer period of time.
6
› Make sure the device is properly ventilated during operation and never operate it
Chapter 2 Safety informationChapter 2 Safety information
7
Page 5

Features
3
in constricted areas, such as for example in a bookcase or shelf. Make sure the device
is placed on a rm and stable surface. Never block ventilation openings with papers,
magazines, blankets, curtains or similar.
› Never place any sources of re on top of or near the device (e.g. lighted candle).
› Please note that excessive sound pressure levels created when listening to loud volume levels with earphones or headphones can lead to permanent hearing damage
or loss.
› Please adhere to the additional safety information found in the individual chapters
of this instruction manual.
› When connecting other devices, please refer to the safety and operating instructions
found in these respective manuals.
› Please contact our technical hotline or a service technician for further information,
should you be in doubt about device operation, safety or when making connections
or if any questions arise that are not explained within this manual.
› Supports audio and MP3/WMA CDs
› Plays MP3/WMA les directly from a USB storage medium
› Supports audio, CD-R and CD-RW CDs
› Infrared system remote control
Before use
Please read this instruction manual thoroughly before operating this device and retain it for further reference, questions and use. Following and heeding all information found in this instruction manual shall maintain this products condition and ensure safe operation.
This instruction manual contains information on how to operate and maintain this device.
Should a component require maintenance, servicing or repairs, then please consult a qualied
dealer or service technician.
8
Chapter 2 Safety information
Chapter 3 Features
9
Page 6
The device
4
This device is equipped with a class 1 laser. Never open the device! A laser warning label can be
found on the device to caution the user. Do not remove this warning label from the device. Do not
open the device or attempt and try to gain access to the interior. Never look directly into the laser
beam. Exposure to laser radiation can seriously damage your eyes!
Class 1 Laser
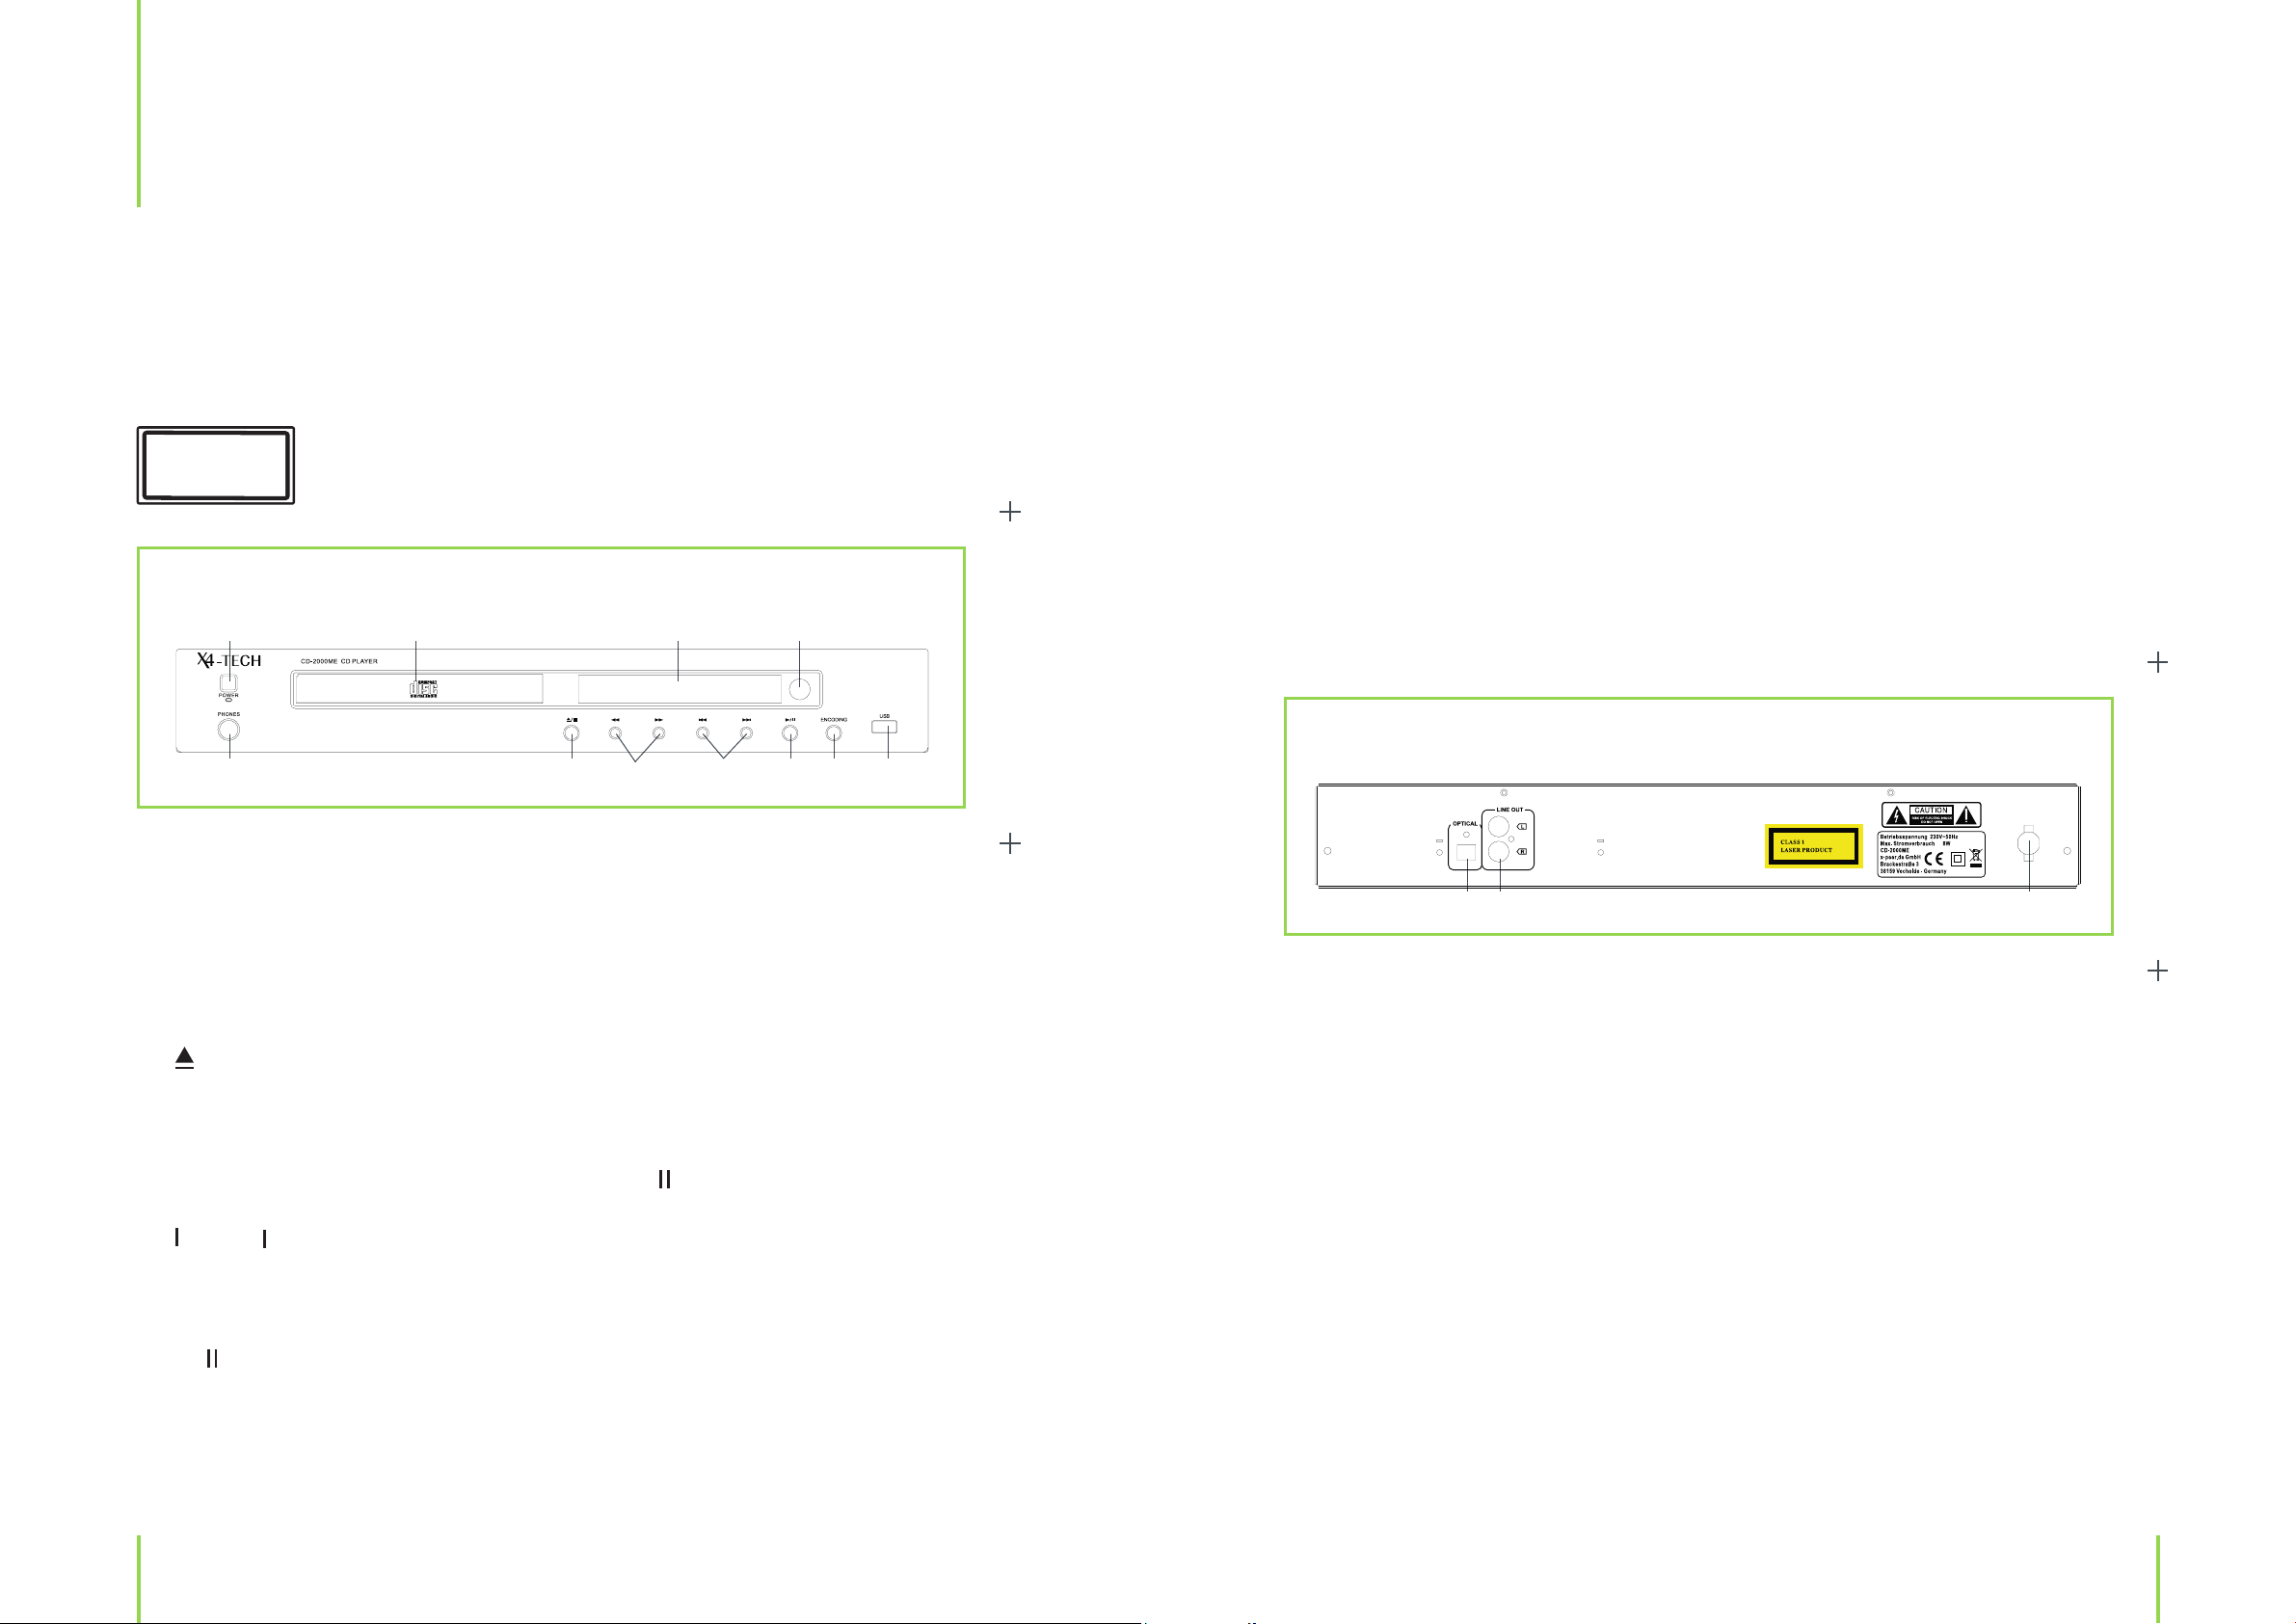
Front panel
1
2 3 4 5 6
91011
7 8
(8) USB
USB 2.0 connection
(9) Infrared sensor
(10) Display
Multifunctional display
(11) CD compartment
Compartment for inserting CDs
Rear panel
(1) POWER
Press this button to turn the device ON (button depressed) and OFF (button elevated)
(2) Phones
Earphone jack (speakers are not muted when earphones are connected)
(3)
Opens/Closes the CD compartment/Stops playback/encoding
(4) tt/ uuFast reverse/Fast forward
Press this button to fast forward/reverse and the u/
(5)
Press this button to return to the beginning of the current/previous song or
to skip to the next song
(6) u/
Starts/Pauses playback
/ n OPEN/CLOSE/STOP
tt/uu
Reverse/Forward
Play/Pause
button to stop this function.
1 2 3
(1) Optical
Connection for an optical cable
(2) Jack connections
Jacks for connection to an amplier
(3) Power cable
Power cable for connection to a public power supply system
(7) ENCODING
Press to start the encoding function
10
Chapter 4 The deviceChapter 4 The device
11
Page 7

The remote control
The included system remote control can be used to operate the
main functions of the X4-TECH CD2000ME (CD player). Please refer to
the numbers in the round ( ) brackets for these available functions.
If you have only purchased the CD2000ME, then please note that some
of the buttons on the remote control
will not function.
[1] AMPLIFIER STANDBY
Turns the amplier on/o
[2] SURR. SOUND
Turns the surround sound on/o
[3] EQUALIZER
Switches between the internal
and an external equalizer
[9] AUTO/MANUAL
Switches between an automatic and manual station search
[10] / STATION
Browses through preset programs
(11) MEM
Press to create a playlist
(12) MEM CLEAR
Press to delete a playlist
[13] TUNING +/–
Adjusts the reception frequency
(14) n Stop
Stops playback
(15) CD STANDBY
Turns the CD player on/o
[16] Source selection
Press to select a signal source
[4] ST/MONO
Switches between a stereo
and mono mode during FM
radio operatio
[5] MUTE
Activates/Deactivates the sound
[6] AMPLIFIER DISPLAY
Displays the current equalizer setting followed by the selected sound setting
Use during FM radio operation to browse through RDS data
[7] PTY SEARCH
Use to search for stations with a specic RDS signal
(8) CD DISPLAY/USB
Switches between the CD compartment and USB connection
[17] BAND
Switches between FM/AM radio reception
[18] Sound selection
Selection of various sounds
(19) REPEAT
Switches through various repeat mode options
(20) RANDOM
Press to activate/deactivate a random playback mode
[21] MEMORY
Stores a radio station
12
Chapter 4 The deviceChapter 4 The device
13
Page 8

(22) tt /tt / uu/ uu Reverse/Forward
Press to return to the beginning of the current/previous or skip to the next song
Keep depressed to fast reverse/forward
Installing/Replacing batteries
Keep batteries out of children’s reach.
(23) u/
Starts/Pauses playback
[24] BALANCE
Adjusts the speaker balance
[25] VOLUME +/–
Adjusts the volume
(26)
Opens/Closes the CD compartmen
(27) INTRO
Samples various songs on audio CDs
(28) Numeric buttons
For direct song selection
Play/Pause
Open/Close
› Batteries are hazardous waste and do not belong in household waste.
› Ensure that batteries are always inserted according to the correct polarity.
› Always remove batteries when not in use for longer periods of time.
› Never leave batteries lying around unsupervised. These could pose a choking hazard to children and pets if swallowed. Seek emergency medical care immediately, should this happen.
› Please follow manufacturer instructions, when charging rechargeable batteries.
› Never expose batteries to extreme temperatures, such as for example resulting from sunlight,
re or ovens. There is the risk of explosion!
› Make sure that batteries are not dismantled, short-circuited or are thrown into re. Never recharge non-rechargeable batteries. There is a risk of explosion!
› Touching leaking or damaged batteries could cause skin burns. Use suitable protective gloves
when handling such batteries.
14
› Only use alkaline batteries to ensure a longer battery life cycle.
› Always use batteries from the same manufacturer and never mix batteries, whether old with
new, of dierent capacities or with rechargeable batteries.
› If the operating distance between remote control and device weakens or the remote control is
not functioning properly any more, change the batteries as explained below:
Open the battery compartment on the back of the remote control by pressing the compartment
lid carefully in the direction of the arrow and by pulling upwards.
› Remove used batteries. Insert two new AAA batteries into the battery compartment. Ensure
correct polarity as indicated at the bottom of the battery compartment. Replace the compartment lid by rst inserting the lug on the lid into the small opening of the battery compartment
and then by carefully pushing the lid into place until a click can be heard.
Chapter 4 The deviceChapter 4 The device
15
Page 9

Setup
5
Selecting a proper location should be taken into consideration before setting up your
device, for example the distance to the next power outlet, avoiding areas where the
device may be exposed to direct sunlight, vibration, dust, heat, cold and moisture, as
well as keeping it away from transformers or motors.
› Choose a stable, at and even surface.
› Make sure ventilation openings are not blocked on the device and that proper ventilation is
provided during operation.
› Never drill or screw any additional screws into the housing to mount.
› Always ensure a safe and stable installation and keep away from objects that might fall onto
it. Improper setup could lead to device instability, resulting in signicant danger and accidents.
› Given the variety of paints and polishes used on furniture today does not excluded the fact
that a chemical reaction may be caused, leaving visible residue on furniture, when the mounting
feet of the device have been placed on furniture. Therefore, never place the device on furniture
surfaces without using proper protection.
16
Chapter 5 SetupChapter 4 The device
17
Page 10

Connections General operation
6 7
› Always ensure that the power cable has been disconnected from the power outlet before making any connections.
› Make sure that connections correspond to respective jacks, i.e. always left with left and right
with right.
RCA connectors
› Only use standard, shielded audio cables when making connections to RCA connectors. Other
cables may cause interference. Only connect devices equipped with the appropriate jacks to
avoid distortion and mismatching, which in turn could cause damage to the device.
› Make sure the correct terminal has been selected before connecting jacks. Audio cables/plugs,
as well as the terminals on most devices, are normally red and white to help distinguish what
plug is to be connected to what jack, i.e. red plug to red jack and white plug to white jack.
› Connect the jacks marked „CD” or „AUX” (depending on your amplier) found on the back of
your amplier to the respective jacks on your CD-2000ME. These are marked as „LINE OUT” on
the back of the device. Use the audio cable included in delivery to connect devices.
Connecting to a power supply
Merely turning the device o with the POWER button will not completely cut of the
power supply to the device. Pull the plug out of the power outlet in order to disconnect
completely.
Check that all connections are secure and have been made properly, before turning the
device on for the rst time.
› Turn the audio source on, for example a CD player.
› Select the desired audio source on your amplier (e.g. CD player).
› Adjust the volume to a comfortable listening level after starting playback.
› Reduce the volume level to a minimum before turning the device o.
Note
Failing to comply with the above sequence could cause damage to the loudspeakers or the
amplier.
Volume regulation
Please note that listening to high volume levels on a continual basis could lead to or
cause permanent hearing damage. Try to maintain a safe volume level and avoid excessive noise. Over a certain amount of time your hearing will become accustomed to
higher volume levels and sensitivity will decrease making what sounds normal to you
actually quite loud and harmful to your hearing. People then tend to regularly increase
the volume when this happens. This procedure will undoubtedly lead to hearing loss.
Protect yourself against this from the beginning on by setting your equipment to a safe
level before your hearing adapts. This also applies to when using headphones. Please
also pay special attention to children using headphones.
› Always pull on the plug’s grips and never on the cable to remove from a wall outlet.
› Ensure that the POWER button is turned o (button elevated) before connecting the CD2000ME to a power supply.
› Only plug your CD player’s power plug into a standard 230 V/~50 Hz power outlet that has been
correctly installed according to your public power system.
18
Chapter 7 General operationChapter 6 Connections
19
Page 11

CD and MP3 playback
8
› Turn your CD-2000ME on and select this as your signal source. The device will start searching for
a CD in the CD compartment. If no CD can be found, then the device will switch over and search
the USB connection for a data medium. If nothing can be found there as well, then the words „NO
DISC” will appear on display.
› Should a CD and storage medium be inserted into the disc compartment and USB connection
at the same time, then the inserted CD will be chosen as the active medium. Press and hold the
CD DISPLAY/USB button for approximately two seconds to switch between a CD and USB mode.
Turning ON/OFF
› Press the POWER button on the device to turn your CD-2000ME on and o.
› Press the CD STANDBY button on the remote control to exit a standby mode and enter an active
mode.
Connecting an USB medium
Insert a USB ash drive carefully into the CD player’s USB connection. Change to a USB mode by
pressing the CD DISPLAY/USB button. The device will start reading the connected storage medium. The total number of songs (up to 999) will appear on display. All MP3 and WMA les found
on the storage medium will be summarized.
Note
The storage medium must be formatted to FAT32. USB ash drives with capacities of up to 32 GB
will be recognized. Hard disks up to 1 TB will be recognized. The root folder will be used on both
storage mediums. Please note that USB cables connected must be less than 3 m in length in order to maintain EMC compliance. Using cables longer than 3 m could inuence electromagnetic
compatibility, which could lead to disturbance or failure.
Playback
› A blue control LED lights up when the device is in a standby mode.
› Press this button once again to return to a standby mode.
Inserting a CD
› Press the
label facing upwards. Press the
vice will start reading the inserted disc. The number of songs (up to 999) and the total playing
time on a music CD (mm:ss) will appear on display. All MP3 and WMA les found on the disc will
be summarized. 120 mm and 80 mm discs can be used for playback.
› Ensure that 80 mm discs are centered exactly. Press the CD DISPLAY/USB button when playing
a music CD to display the current song’s playing time, remaining playing time and the CDs current total playing time and the total remaining time left.
/ n or
button to open the CD compartment. Insert a CD into the tray with the
/ n or
button again to close the CD compartment. The de-
u/
Press the u/
to resume playback. Press the
You can also input a song number directly by using the numerical buttons on the remote control. Select the number of your song as follows:
1. Select a number for the rst eld
2. Press the 10+ button and then the corresponding number. Repeat this step where necessary.
3. Wait a moment. The device will skip to the selected song and begin playback.
For example:
Pressing “5” › “10+” › “3” switches over to song number 53.
Please note that the order in which songs are sorted may not necessarily have the same sort
order as you are accustomed to from other devices.
button to start playback. Press the
/ n or n button to stop playback.
button again to pause and a third time
Forward
20
Press the uu
the next song. To start a fast forward scan, press either the
button on the device or the uu/ uu
button on the remote control to skip to
uu on the device or the uu/uu
Chapter 8 CD and MP3 playbackChapter 8 CD and MP3 playback
21
Page 12

button on the remote control down shortly and release again.
Press the u/
button to stop fast forwarding and resume playback.
Reverse
Press the tt button on the device or the tt / tt button on the remote control to return to
the beginning of the current song being played. Press this button twice to return to the previous
song. To fast reverse through a song, press either the tt button on the device or the
tt button on the remote control down shortly and release again. Press the u/
stop fast reversing and resume playback.
tt /
button to
Repeat
This device supports two dierent repeat option modes. Press the REPEAT button once to continually repeat the current song being played (
CD continuously (
). Press the REPEAT button a third time to cancel this function.
). Press the REPEAT button again to repeat the entire
Random
This function lets you play songs in a random playback order. Press the „RANDOM“ button (RAN
ON) to activate. Press this button a second time (RAN OFF) to deactivate this function.
Programming a playlist
Create your own personal music playlist with your CD-2000ME. 20 memory presets are available
to you. Please note that this option will not function during playback.
1. Press the MEM button on the remote control.
and
2. Select the desired song with the uu/uu
3. Press the MEM button to store this song. Now you can select the next song to be stored.
4. Once all of your favourite songs have been stored, press the u/
The letter “M” can be seen on display when a stored playlist is being played.
5. To delete a stored playlist, press the MEM CLEAR button.
tt /tt buttons.
button to start playback.
Intro
This mode plays the rst few seconds of a song before skipping to the next.
Press the „INTRO“ button (ITR ON) to activate this function. The player will play the rst ten seconds of each song in a normal playback order before skipping to the next song. Press the „INTRO“ button again to cancel (ITR OFF) this function.
Encoding function
You can use the encoding function on your CD-2000ME to convert songs on CDs into an MP3
format and to transfer to and store these on connected USB media.
Insert a CD. Once the disc has been read, press the “ENCODING” button on the device. “REC” will
light up on display. After this information stops blinking on display, all of the songs found on
the CD will be played and stored as a MP3 le on the connected USB medium. Press
button once to stop encoding and a second time to stop playback. To convert certain songs on
a CD, press the „MEM” button on the remote control and then enter the respective song number
by using the numerical buttons. Press the „MEM” button once again to conrm your selection.
Repeat this process each time a new song has been selected. Once you’ve nished creating a
playlist you will be able to use the encoding function, as explained above, to start converting
the selected songs on your playlist. Converted songs will be stored in a folder named „RECORD”
in the ROOT FOLDER.
/ n the
Information on CDs and DVDs
22
Handling CDs
Do not touch the playback side of discs. Hold by the edges without
touching the recording surface, so that nger prints do not come in
contact with discs. Never stick paper or use tape on discs.
Chapter 8 CD and MP3 playbackChapter 8 CD and MP3 playback
23
Page 13

Storing CDs
After you are nished playing a CD, please replace and store it in its respective cover. Never
expose discs to direct sunlight, sources of heat or high temperatures. Never leave discs in a car
exposed to direct sunlight.
Cleaning CDs
Finger prints and dust found on a CD may be
the reason for poor picture or sound quality. Before playing a CD, carefully wipe o nger prints
and dust with a clean cloth. Please clean in an inwards to outwards motion. Never use any sovents or chemicals, such as alcohol, benzine, thinners, any commercially available cleaners or
antistatic sprays for records to clean discs.
Information on MP3/WMA music formats
tions could arise when converting into a compressed music data le. Hi- CD players will normally
not be aected by copy protected CDs; a lot of computer drives will although refuse playback. The
industry is tending to gradually change back to CDs that are not copy protected, due to the many
problems that DVD players, car radios and other portable playback units are having with this copy
protection method. This copy protection system was developed to prevent CD cloning and circulation, which is why many record companies are trying to protect their CDs. Such trends threaten
the existence of artists, musicians and the music industry. The development of the copy protection
system has also led to an illegal circulation of music in the form of MP3 les via internet and online
exchange. What it comes down to, is that there are now quite a number of various internet providers on the market oering compressed music les that can be legally purchased and downloaded. Being able to listen to dierent samples of music and having the ability to download directly,
one is only minutes away (granted you have DSL) from desired songs in either MP3 or WMA format.
Copyright information: The reproduction, duplication and copying of copyright protected material, as well as the distribution, circulation, public access to or even the rental of these, without
explicit authorization of the copyright holder, is strictly prohibited.
Music, that we listen to either from a stereo system, kitchen or car radio, is just actually an analog signal. In the past one could buy records, music cassettes and tapes with a recorded analog
signal. While records were usually damaged from dust and frequent use, tapes demagnetized
themselves leading to a dull and mued sound. Later on, the Compact Disc was developed
for storing music in digital form. An analog signal is measured at specic intervals, transferred
in numerical value and stored in a specic form on the CD. A CD player evaluates the computed value once again into an analog signal. An audio CD can hold approximately 70-80 minutes
of music. Its format is similar to that of a normal computer CD-ROM, which has an equivalent
data volume of approx. 650 – 700 MB. The early stages of computer technology development,
where 1 MB user memory, 100 MB hard drives and a 28 kBit modem, a standard thing were, usually also brought a lot of problems along with it. That’s why researchers started experimenting
with new ways of compressing an audio CDs amount of data. By various compression programs
on computers, such as for instance WINZIP, all initial information will be irretrievably lost when
audio compressing. Normally the dierence between MP3 and audio CD playback can not be
heard; provided that a „better” compression level is used. In this case, the playback quality offered in mobile devices or in cars is satisfactory. The most common known compressed le
format is „MP3”, which oers a variety of quality levels (The principle is: the better the format,
the greater the amount of data). Later on, other dierent compressed audio le formats were
developed; the second most important after „MP3” is the „WMA” format. Meanwhile, there are both
free of charge and/or very expensive programs for almost all operating systems available on the
market that can be used with any available audio CD, to help you create compressed music les.
Please note: A lot of audio CDs are copy protected to prevent cloning. In some cases, complica-
24
Chapter 8 CD and MP3 playbackChapter 8 CD and MP3 playback
25
Page 14

Maintenance,
Troubleshooting
9
The device you have just purchased is equipped with state-of-the-art technology and is safe to
operate. Nevertheless, problems or malfunctions may occur.
Before contacting a service technician, refer to the following possible solutions:
Distorted sound or no sound is audible
› Check if everything has been connected properly.
› Check if all devices in the playback chain have been turned on and/or are connected.
› Check if the right input has been selected.
› Check the volume control’s position.
The remote control is not working
› Check if the batteries have been inserted correctly.
› If batteries are empty, replace them with new ones.
› Point the remote control to the remote sensor and press to operate.
› Remove any objects found between the remote control and the remote sensor.
› Make sure the distance between the remote control and the device does not exceed 8 m.
Buttons do not function (on the device and/or remote control)
› Turn the device o and then on again. As an alternative, turn the device o, unplug it from the
power outlet and plug in again. (The device may also not be functioning due to a stroke of lightning, static electricity or other external factors.).
A connected USB medium is not working
› The USB-port does not provide the power needed for using the external media, for example a
hard drive. Look up the instruction manual of the connected medium.
handling and cleaning
10
Maintenance
› Carry out a technical safety inspection on a regular basis, e.g. check if the power cable or
housing may have become damaged.
› If there is reason to believe that the device can no longer be operated safely, then disconnect it
immediately from the power supply and secure it against any unintentional operation. Carefully
remove the power cable plug from the wall outlet and where applicable switch o the corresponding circuit breaker rst.
› It can be assumed that safe operation is no longer possible, if:
› there is visible damage to the device or power cable,
› the device no longer works,
› it has been stored for a longer period of time under unfavorable conditions
› or exposed to rigorous transport conditions.
› Always adhere to the following safety instructions before cleaning or servicing the device:
Live parts may be exposed, if the covering is opened or parts are removed.
The device must be disconnected from the power supply source prior to service, maintenance or repairs.
› Capacitors within the device may still carry voltage even though they have been disconnected
from all power supply sources.
› Repairs are only to be carried out by qualied personnel, who are familiar with the hazards involved and the relevant regulations.
26
Any repairs other than those mentioned above are to be carried out solely by an authorized technician.
Transporting or sending the device
› Please retain the original box and the packaging material in case you need to transport or send
the device out for maintenance at a later date. Please note that the device should be repacked
in the original packaging. The box and packaging have been especially developed for this device
in order to protect it during transport and against damage. Retain this instruction manual for
future reference and where required pass it along with the device if handed over to a third party.
Keeping the external case clean
› Never use volatile uids near the device, as for example insect spray. Avoid letting the device
come in contact with rubber or plastic products for longer periods of time. These could otherwise leave marks behind.
Chapter 10 Maintenance, handling and cleaningChapter 9 Troubleshooting
27
Page 15

Specications
11
Cleaning the device
› Unplug the power cable before cleaning. Always use a soft, dry, clean and fuzz-free cloth to
clean the unit’s exterior. If the device is extremely dirty you can use a soft cloth, dampened with
water or a mild cleaning solution to clean. Never use any abrasive or harsh cleaning agents (e.g.
alcohol, benzine or thinners) as these could damage the controls, casing or any markings and
labels found on the device.
› Contribute to a better environment by using a designated disposal system (e.g. Dual System
in Germany) or recycling site for the disposal of packaging material.
Technical data
› Operating voltage: 220 – 240 V/~50 Hz
› Output voltage: 2 V RMS (0 dB)
› Frequency response: 20 to 20 kHz, + 3 dB to – 3 dB
› Signal-to-noise ratio: (FLAT) 75 dB (1 KHz), (IHF-A) 90 dB (1 KHz)
› Channel separation: 58 dB (1 kHz)
› Channel balance: 0.5 dB (1dB)
› THD: (– 10 dB) 0.08 % (1 KHz)
› Optical connection
› Stereo OUT jack
› Dimensions (W x H x D): 430 x 70 x 230 mm
› Weight: 3.5 kg
Delivery contents
› X4-TECH CD-2000ME
› Audio cable
› Remote control
› Batteries
› User manual
› Service data sheet
28
Chapter 10 Maintenance, handling and cleaning Chapter 11 Specications
29
Page 16

Service
Should questions arise then please contact a specialist or our service hotline:
Hotline: +49 (0) 53 02/8 06-450
Address: x-services.eu gmbh
Service department X4-TECH
Brackestraße 3 · 38159 Vechelde/Germany
Information and updates: http://www.x4-tech.de
We reserve the right to alter specications and information contained in this manual without
notice.
All brands mentioned are property of X4-TECH or of their respective owners.
X4-TECH assumes no responsibility or liability for any errors or inaccuracies that may appear in
this instruction manual.
© 2009 X4-TECH All Rights Reserved.
Manufacturer
x-peer.de GmbH
Brackestraße 3 · D-38159 Vechelde
Internet: www.x-peer.de · E-Mail: info@x-peer.de
30
Chapter 11 Specications
31
Page 17

Version 1.1 – 11/2009
www.x4-tech.de
 Loading...