

Page 1
Model WM100
Product Manual
Page 2

Contents 2 Model WM100
Table of Contents
Section Page
1. Hardware .................................................................................................................................... 3
2. Software ..................................................................................................................................... 4
3. Features...................................................................................................................................... 5
4. Installation .................................................................................................................................. 6
5. App – Devices ............................................................................................................................. 9
6. App – Rooms............................................................................................................................. 12
7. App – Scenes............................................................................................................................. 14
8. App – Setup .............................................................................................................................. 18
Page 3
Hardware 3 Model WM100
Hardware
The hardware is simple and flexible. Normally, HUBs require the user to hardwire them
directly into the WiFi router, forcing the user to put the HUB in a location they may not
want it. This unit uses WiFi to connect and communicate with your router, allowing you
to place the X10 HUB anywhere within range of your router.
The hardware does currently have a memory limitation of 32 different addresses.
However, unlike traditional transceivers, this unit can control all of the 256 different
possible codes. In addition, this WiFi Module can also be used to detect what X10
signals are being seen on the electrical line by the WM100. This history can be found in
Setup > X10 WiFi history and settings.
Page 4
Software 4 Model WM100
Software
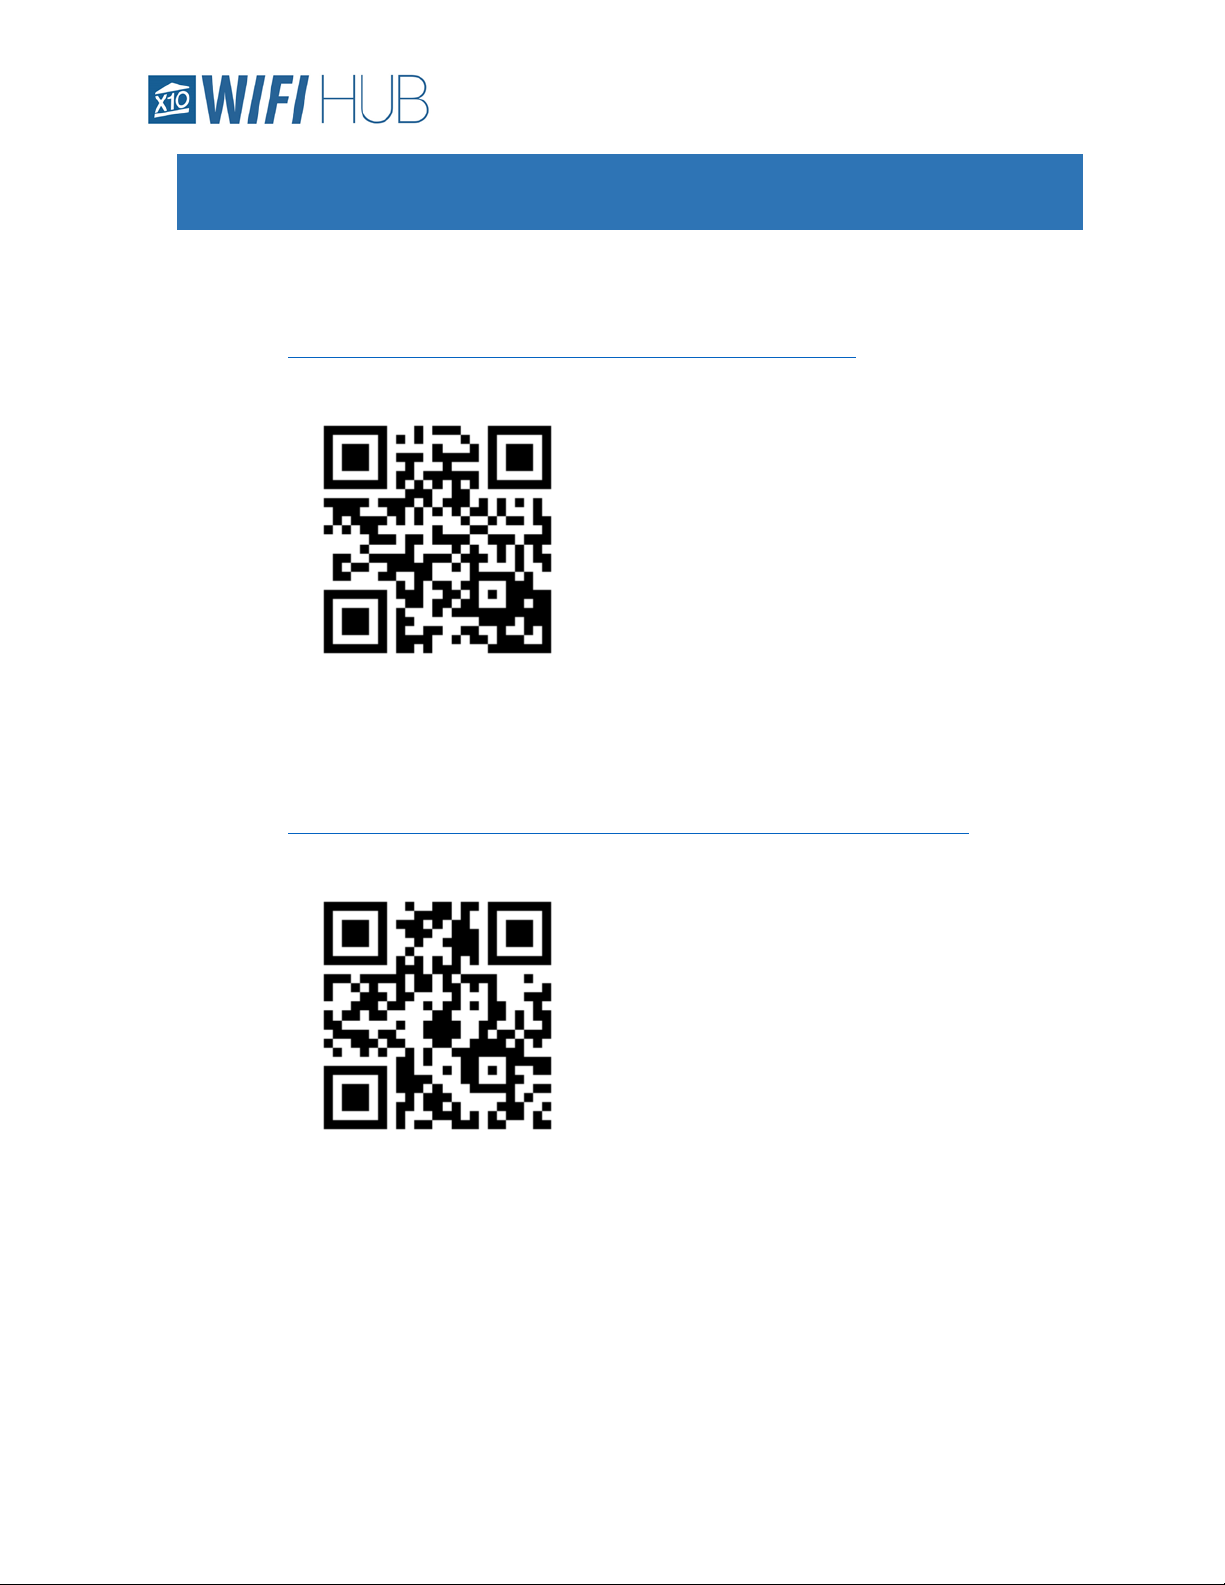
o The Apple App can be found here:
https://itunes.apple.com/us/app/x10-wifi/id1330310265?mt=8
o Android App can be found here:
https://play.google.com/store/apps/details?id=com.leconiot.wm100&hl=en
Page 5

Features 5 Model WM100
Features
• Control up to 32 of all the different possible 256 X10 codes
• Organize all your devices by giving them Names instead of relying on the codes (A1, F3, etc)
• Control all your devices with All ON and ALL OFF functionalities
• Easily create multiple timers per device
• Simple to edit and delete timers as necessary
• Organize your devices into “Rooms” for clearer and easier access
• Control the entire “Room” with the “All Room ON/OFF” buttons
• Create more complex commands with the “Scenes” tab
• Access to On/Off, Dim/Brighten and delays to create scenes tailored for you
• Over the Air firmware updates as necessary
• X10 Command History gives the advanced user the ability to look at the past 50 commands
heard by the WM100, doubling as a great troubleshooting tool
• Simple setup of secondary devices. After the first device is setup, other device setup is a breeze
• Multiple users can control the WM100 simultaneously
• The WM100 has an active ‘sense’ technology that will adjust the status of the devices in the app
regardless of if the signal was sent from the WM100 or any other source (like a hand remote)
Page 6
Installation 6 Model WM100
Installation
o Installation – Initial Install
▪ Install the app on your android or apple phone or tablet. The app may need
certain permissions in order to operate correctly (location for timing purposes
as well as camera to allow the app to scan the QR code for installation)
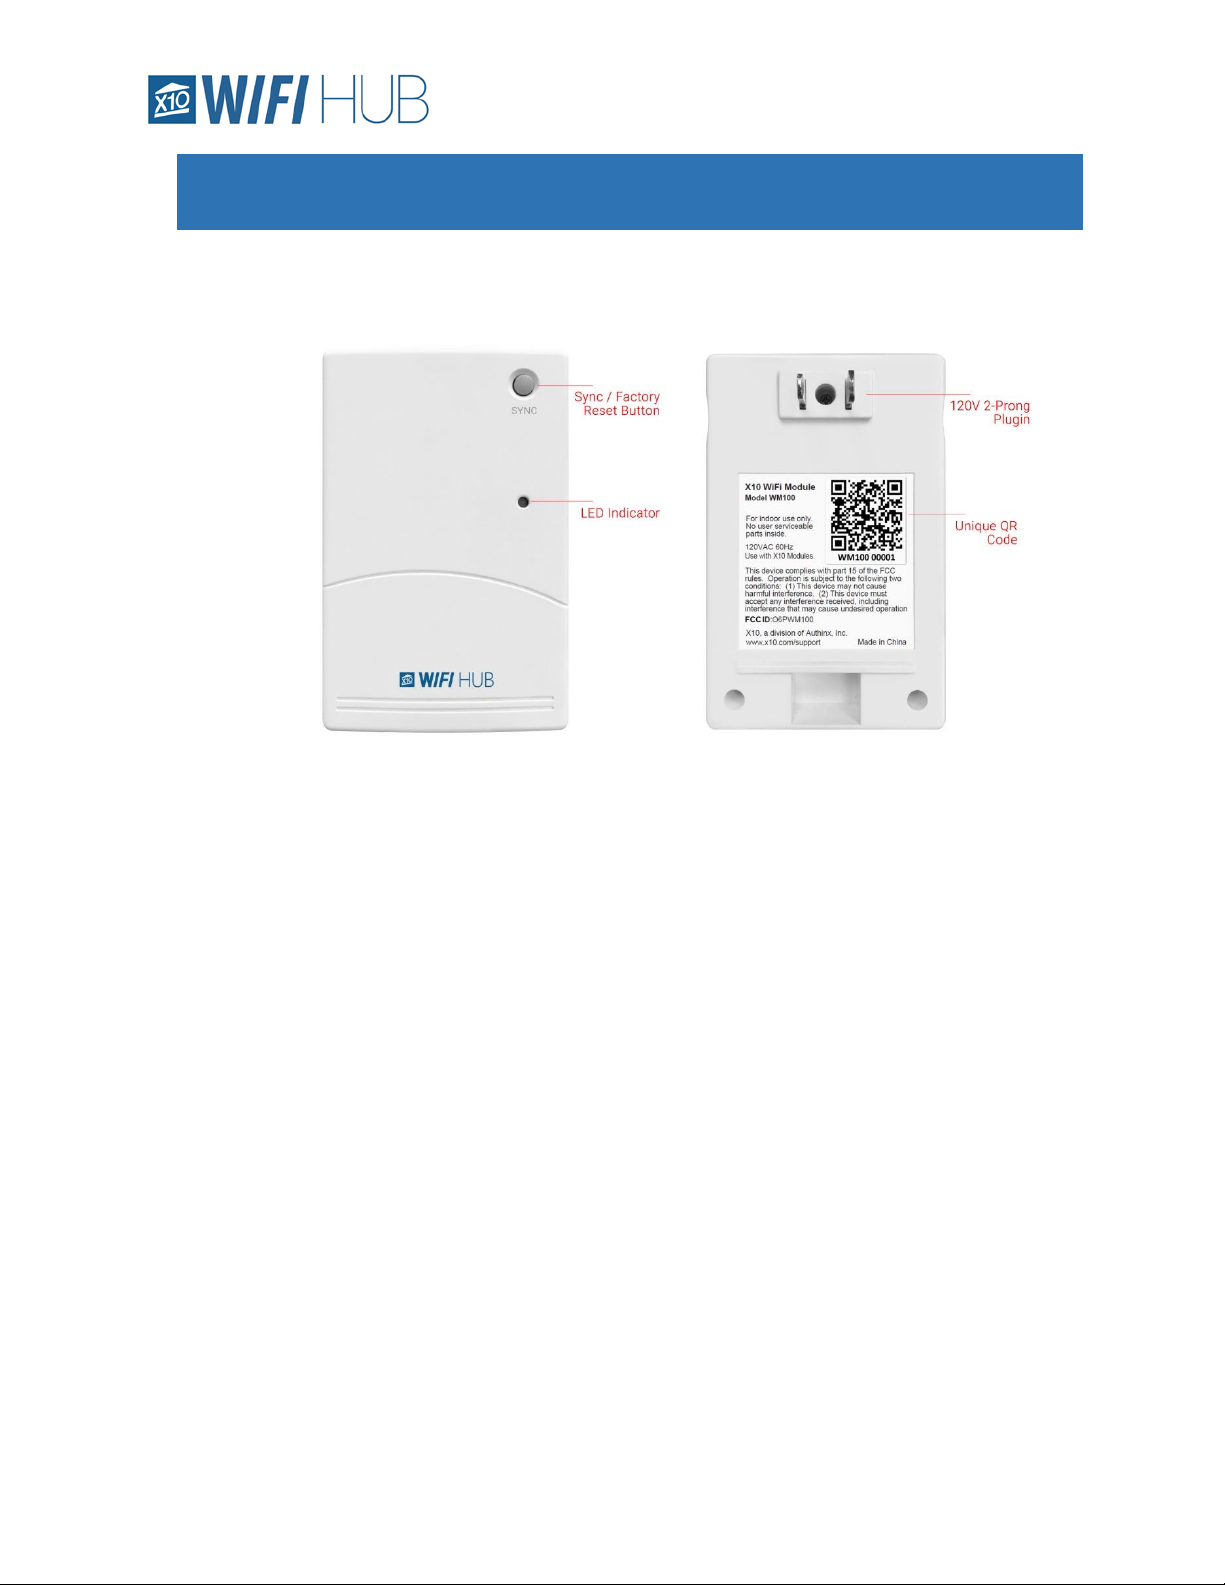
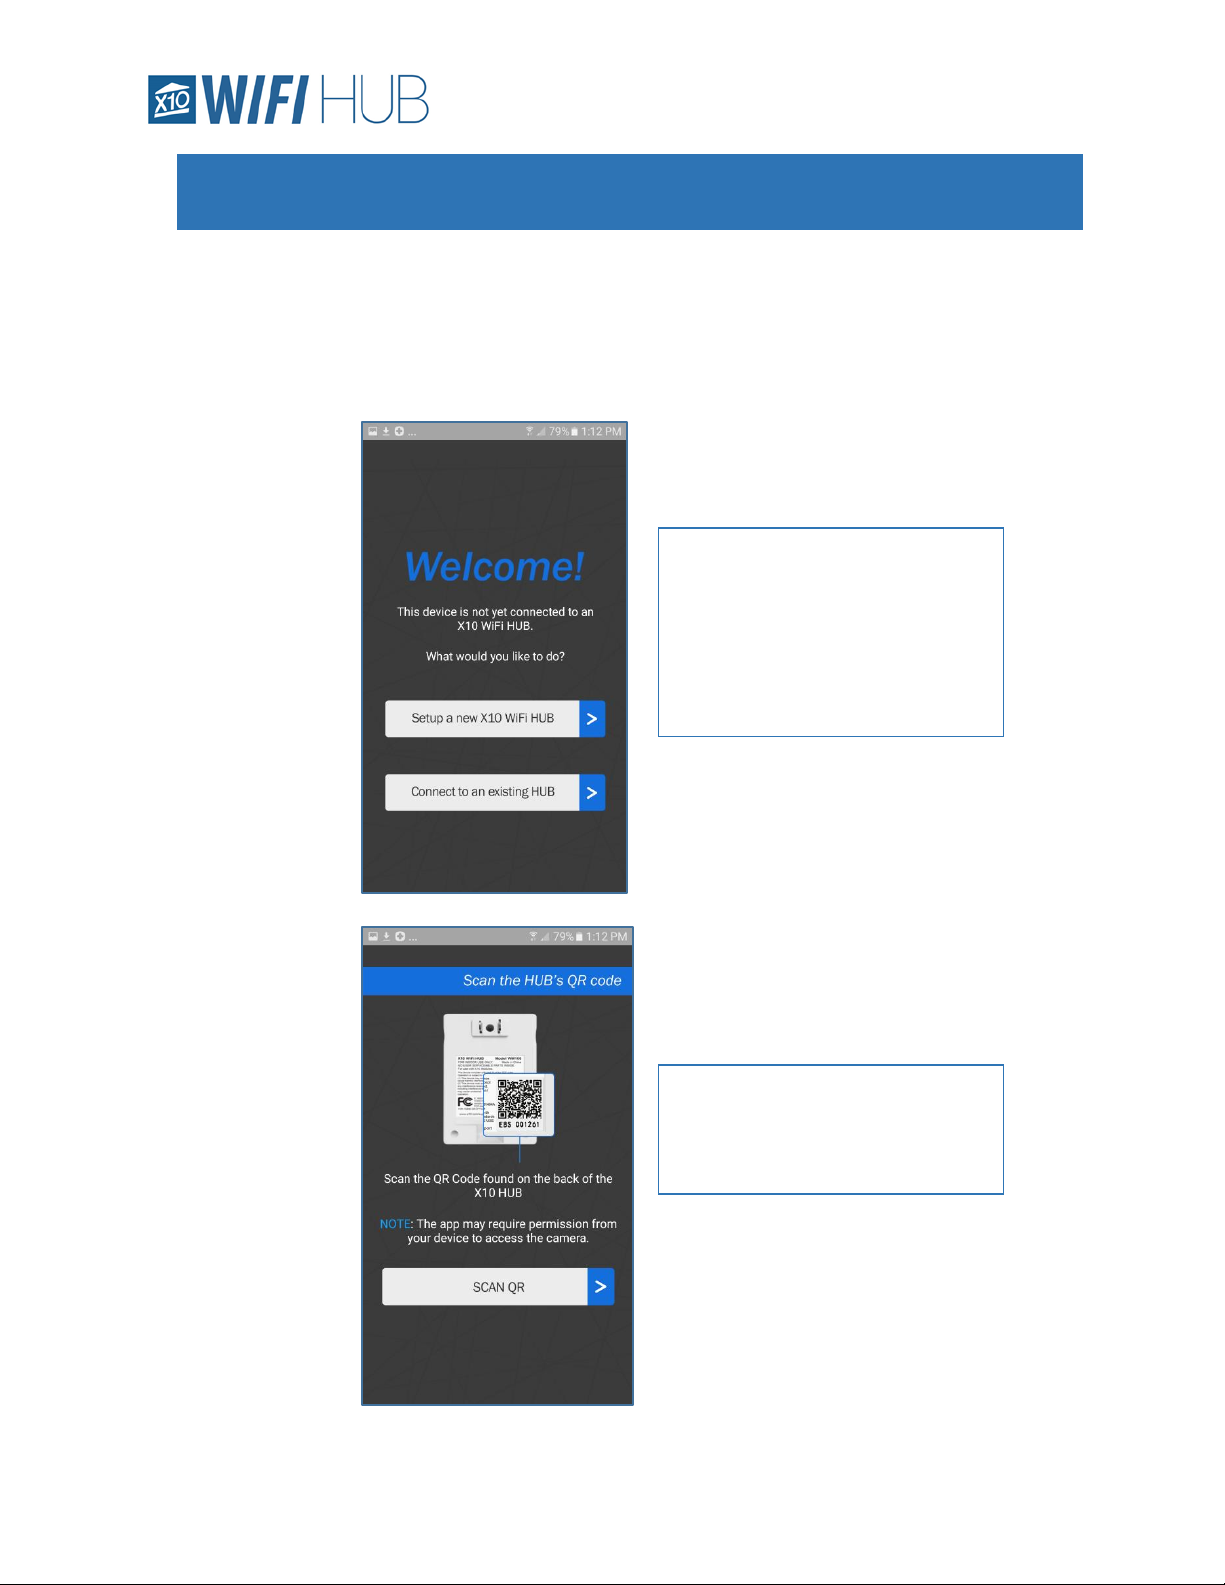
On the back of the WM100 HUB
there is a unique QR code. Locate
the QR code and hit the “SCAN
QR” button in the app to scan it.
To setup the unit for the first time,
open the app on a phone or tablet
that is connected to your home
network.
Select the “setup a new X10 WiFi
HUB”
Page 7

Installation 7 Model WM100
Simply place
the camera
over the QR
code to read it.
The app will automatically populate the
network with the network your phone or
tablet is connected to. If you discover at this
point you are not connected to your
network, close the app, connect to your
network and restart installation.
Enter your WiFi password and then hit
“NEXT” to enable your X10 HUB to
communicate on your home network.
SPECIAL NOTE ABOUT CONNECTING TO THE WIFI:
A 2.4Ghz connection is required. The WM100 cannot connect to a 5Ghz
network. Many Routers today come with both 2.4Ghz and 5Ghz networks.
The WM100 pulls the network information from your phone or tablet you
have the app installed from during initial installation.
Make sure your device is connected to your router on the 2.4Ghz connection
(and not the 5Ghz network) so the WM100 can pull the correct 2.4Ghz
information.
Usually, the 5Ghz connections have the network name followed by a ‘-5Ghz’
or ‘-5’. If you are having issues connecting, please make sure your device is
connected to the 2.4Ghz connection in your devices settings.
Page 8

Installation 8 Model WM100
o Installation – On other devices after initial install
▪ Once the HUB is installed on one device successfully, it is easy to add additional
phones and tablets. Load the app on the new device and select “Connect to an
existing Hub”. Scan the QR Code when prompted and quickly plug the WM100
into the outlet. The App will connect and download the settings and
preinstalled devices from the WM100.
You can now plug in your HUB. The HUB
should be within range of your home’s
router. In general, it should be within 100 ft.
Once plugged in, you are now ready to
connect the HUB to your home’s network.
To get the HUB into install mode, simply
press and HOLD the “SYNC” button in the
upper right of the HUB for about 5 seconds
(until the LED begins to blink steadily), then,
let go of the SYNC button.
While the LED is blinking on the WM100, go
back to the App and press the “CONNECT”
button.
After your X10 HUB has
connected to your home’s
network, you will end up on
the “Success” screen. If
unsuccessful, a message will
pop-up and prompt you to
try again.
At this point, you can start
adding X10 Devices or simply
exit the setup.
Page 9

App - Devices 9 Model WM100
App – Devices
o Add Device
▪ To add a device, go to the Devices tab and select the “Add
Device” button in the lower left.
On the Add Device page, you can
give the device a name, set the
house and unit code (it should
match the X10 device you are
trying to control) and indicate if it
is a dimmable module or not (like
the LM465 or WS467).
It is important to indicate if it is a
plugin module or wall switch as
they have different dimming
parameters.
Press Save when done (upper right)
Page 10

App - Devices 10 Model WM100
o Device Configuration
▪ Once the Device is created, you can now edit it as necessary by pressing
the gear icon to the right of the device.
▪ Adding a Timer
• To add a timer, hit the “Add Timer” button in the lower left of the Edit
Device Screen (as seen above)
You will now see a few new options that
were not there when you were creating
the device.
Trash Device – this will simply delete this
device.
Add Timer – This will allow you to add a
timer and indicate which days of the
week you would like it to control the
device ON, OFF or DIM.
Dawn | Dusk – This allows you to create
ON or OFF commands according to your
local dawn or dusk times (this does
require giving the app permission to
know your location.
Page 11

App - Devices 11 Model WM100
o Controlling Device
▪ In the upper right, you will also notice
these buttons. You can turn on or off all the devices listed with these buttons.
After you have saved the new
device, you will now see it in
the “Devices” tab. You can
now toggle between ON or
OFF and enter the devices
settings by hitting the gear
icon on the far right.
If it is a dimmable module,
you can also dim it by either
sliding the slider or hitting
the + or – buttons.
Select the ON or OFF button on the left.
Adjust the timer to desired time.
You can also set the dim level (if it is a
dimmable unit) with the minus and plus
icons under the time.
Select if you want it to repeat weekly
You can then individually select the days
you would like the timer to operate.
The Security button is a feature found on
other X10 units (like the MT14A minitimer) that allow the user to make the
home look ‘lived in’ and is usually used
when the user is out of town.
Page 12
App - Rooms 12 Model WM100
App – Rooms
o Rooms – Rooms allows you to organize your devices by room. This also enables you to
use the “ALL ON” or “ALL OFF” command for a certain room instead of across all your
devices.
o Add Room
▪ To add a new Room, select the “Add Room” button in the
lower left of the Rooms tab.
▪ Give the new Room a name (up to 16 characters) and hit the “Save” button in
the upper right. This will create the room and take you back to the Rooms page.
▪ Now select the Room you just created to go into its configuration page.
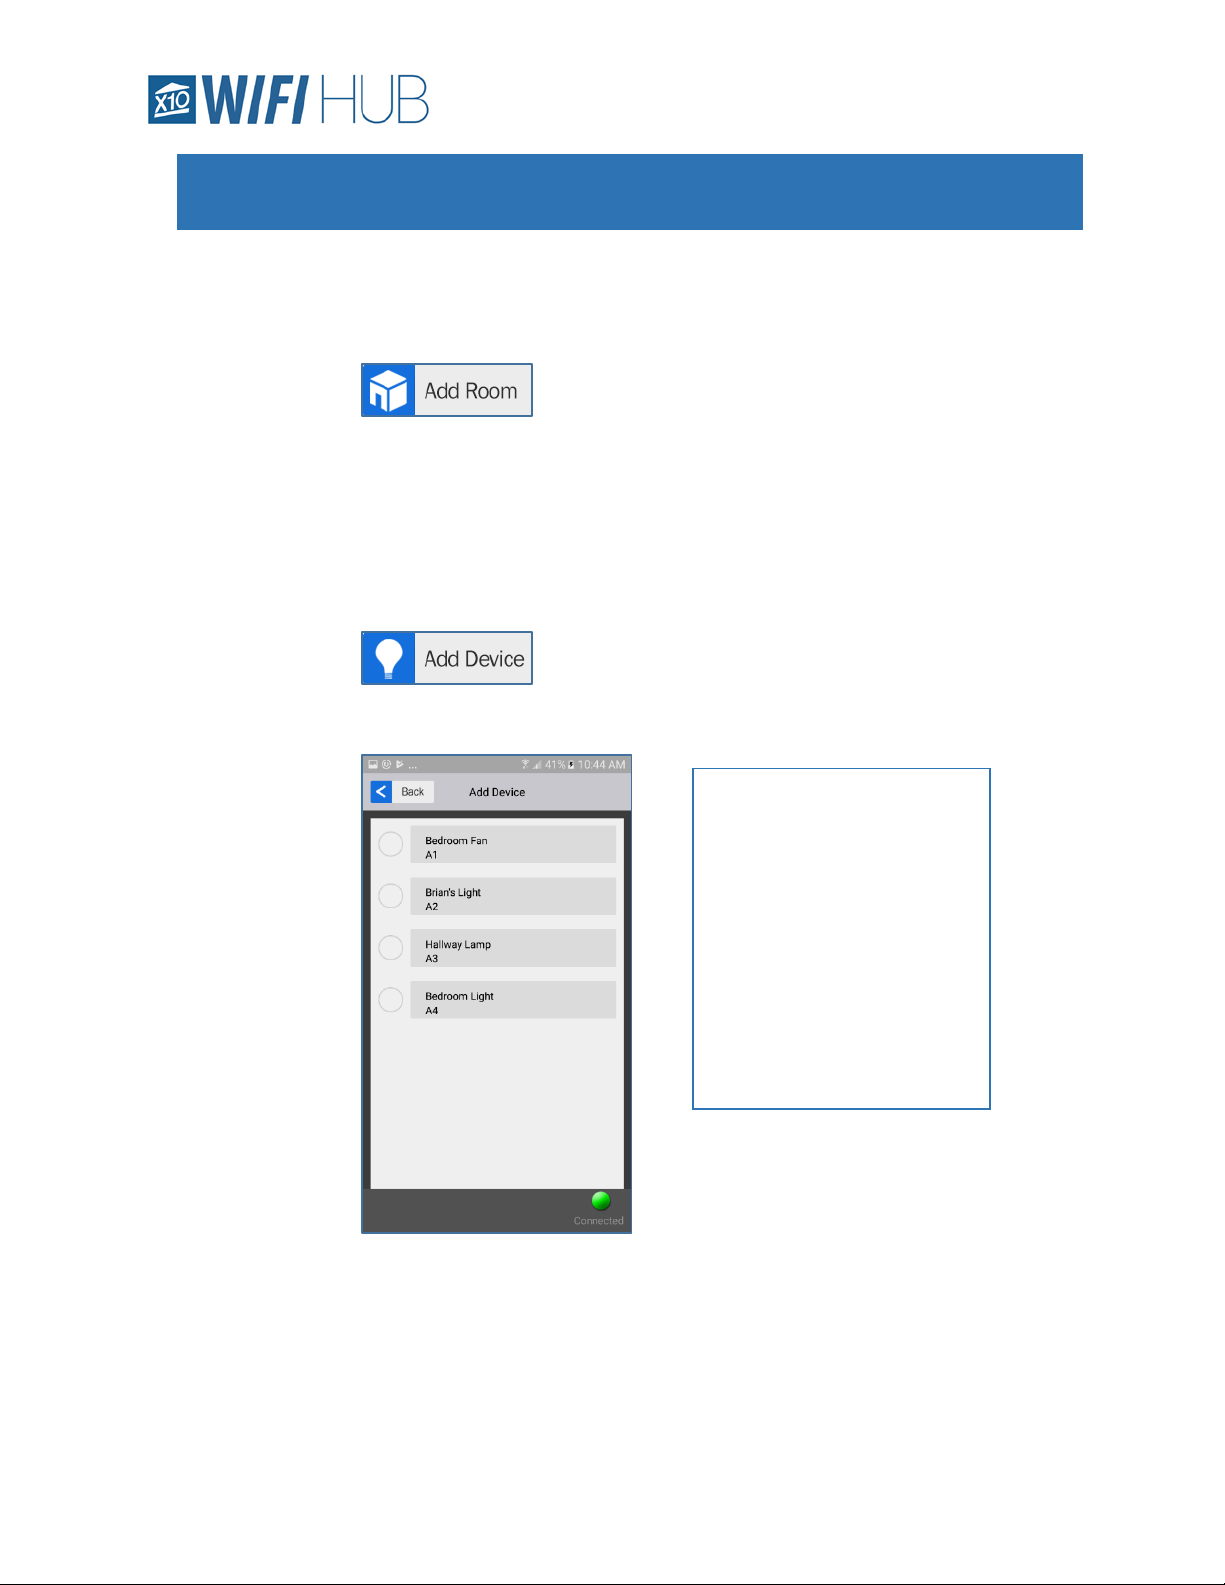
▪ In the lower left is a new button “Add Device”. Select this to
add devices to this room.
A list of all your devices will
show up.
Once you hit the circle to add
a device, it will add it to the
room and disappear from the
list.
Do this to as many devices as
you would like in the room.
When finished, hit the “Back”
button in the upper left.
Page 13
App - Rooms 13 Model WM100
o Controlling Rooms
o Configure Rooms
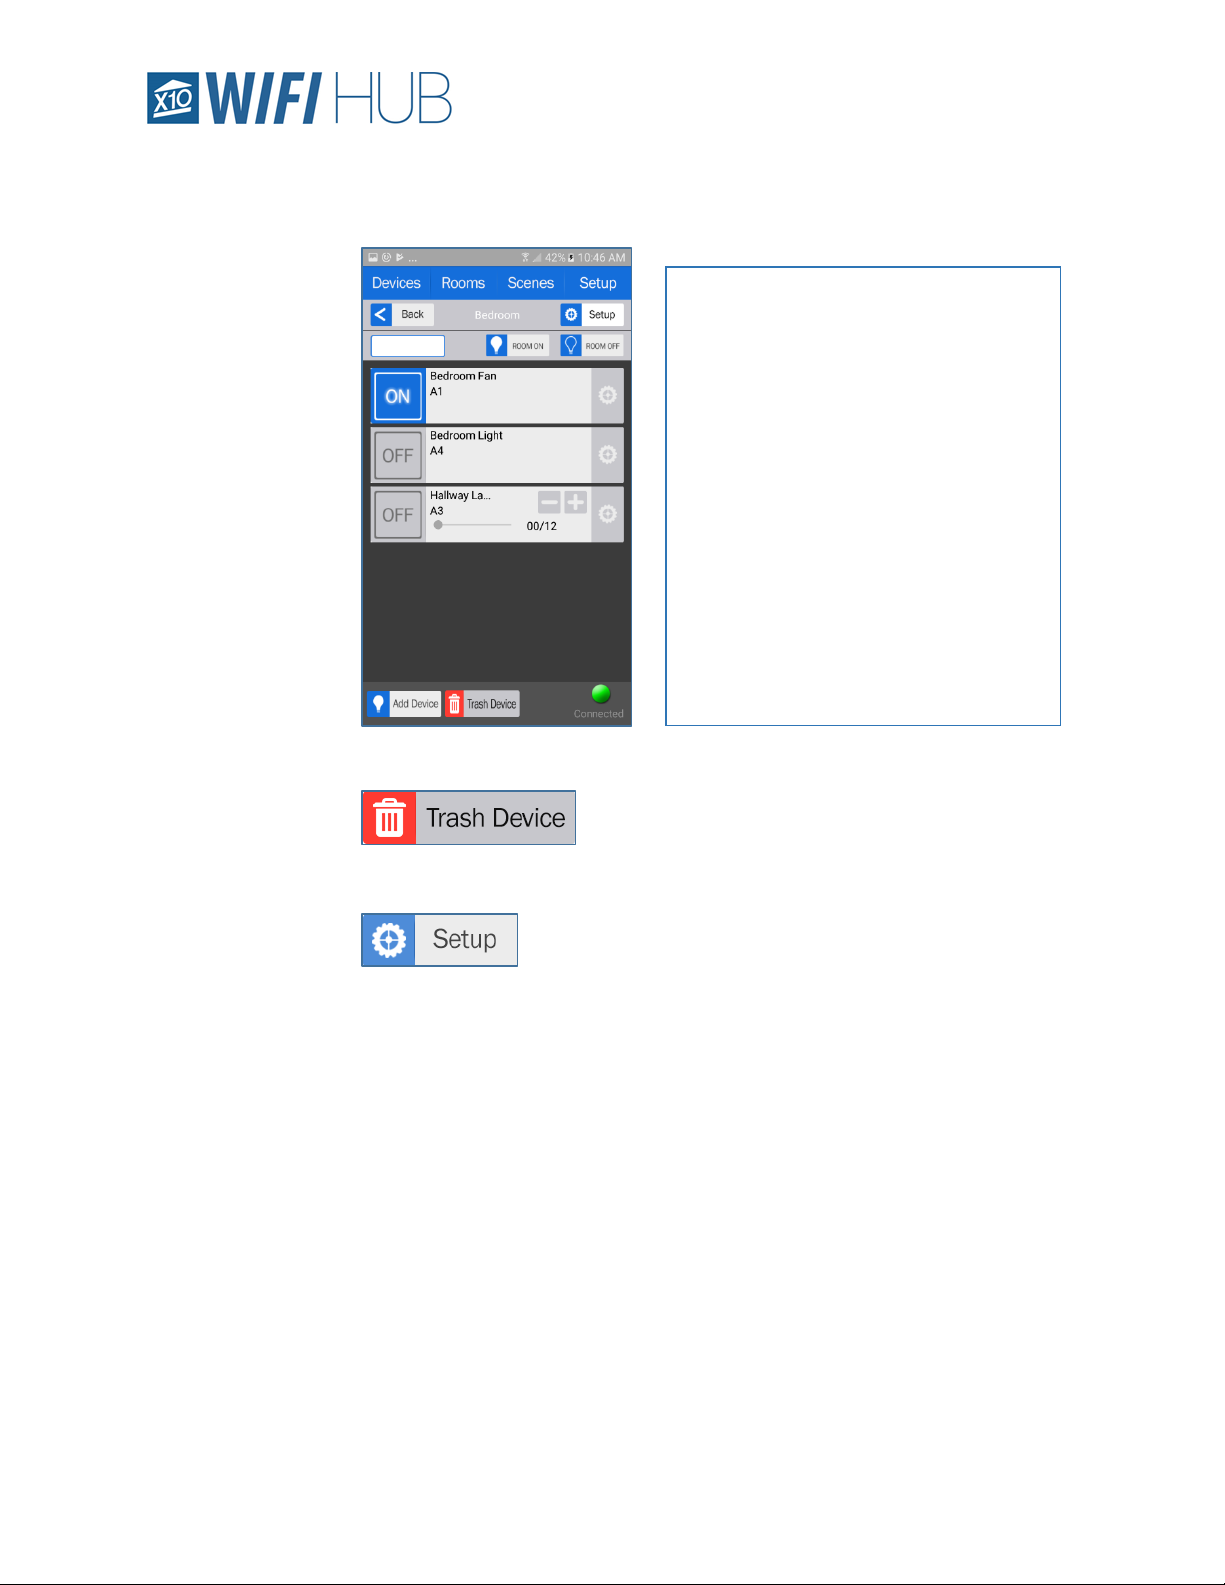
▪ If you accidentally add a device to a Room or would
like to remove it from the Room, select the “Trash Device” icon in the lower left
when in the Room and select the device you would like to remove.
▪ If you would like to rename your room or delete the room
altogether, hit the “Setup” button in the upper right.
Your Room will now be populated with
all the devices you selected. You can
now individually control these devices
or use the “ROOM ON” “ROOM OFF”
buttons to control the whole room.
NOTE: The “ROOM ON/OFF” buttons
will alter the status of every X10 device
added to that Room (lamp modules,
appliance modules, switches,
receptacles, etc.). Please be aware of
this when setting up your Room. If there
is a unit you do not want responding to
“ROOM ON/OFF” it may be wise not to
include that particular device in this
Room.
Page 14

App - Scenes 14 Model WM100
App – Scenes
o Scenes – Scenes allows the user to do a string of more complex commands with the
touch of one button. A scene is something like a “wake up” command, or a “leave
house” command that may turn on or off specific X10 devices across your whole home.
o Add Scene
▪ To start adding a Scene, go to the “Scenes Tabs” and select
“Add Scene”.
▪ Give the Scene a name, then select the “Save” button in the
upper right.
▪ You can now enter configuration for the scene to add devices and
delays. Hit the configuration button to the far right of the device name.
▪ You will now see an “Add Device” button in the lower left.
Select it to begin adding devices.
Much like adding devices to a Room, a list of
all your devices will show up.
Hit the circle to add a device. The device will
not disappear from the list. You can select it
as many times as you might want it in the
scene (for example, you may want it to turn
on then turn off 20 mins later. You would
need the device in the scene twice to do this).
The easiest way to setup a complex scene
may be to add one device at a time.
Do this to as many devices as you would like
in the scene. When finished, hit the “back”
button in the upper left.
Page 15

App - Scenes 15 Model WM100
You should now see your scene
with the devices you selected listed.
This page shows what the devices
will be doing in the scene (you
cannot actively select them ON or
OFF, etc.).
To change them from OFF and add
delays, etc. select the configuration
icon (gear icon) to the right of the
device to edit.
This is where you will be indicating
what the device will be doing in
your scene. You can select the
ON/OFF state, the DIM level (if the
device is dimmable) and set a delay
if you would like one.
You can delete this device by
pressing the red trash can icon on
the right.
When finished, hit “Save”.
Page 16

App - Scenes 16 Model WM100
▪ To run this scene, select “Save”, “Back”, or hit the “Scenes” tab at the top.
As another example: in
this configuration, we
are telling the Bedroom
Light device to turn ON
5 minutes after we
press the RUN button
on the Scenes page.
After the changes above, this is
what this particular Scene would
look like.
Again, you can’t actually change the
live status of these devices from
this page, this is just an indication
of what they will do in this scene.
Page 17
App - Scenes 17 Model WM100
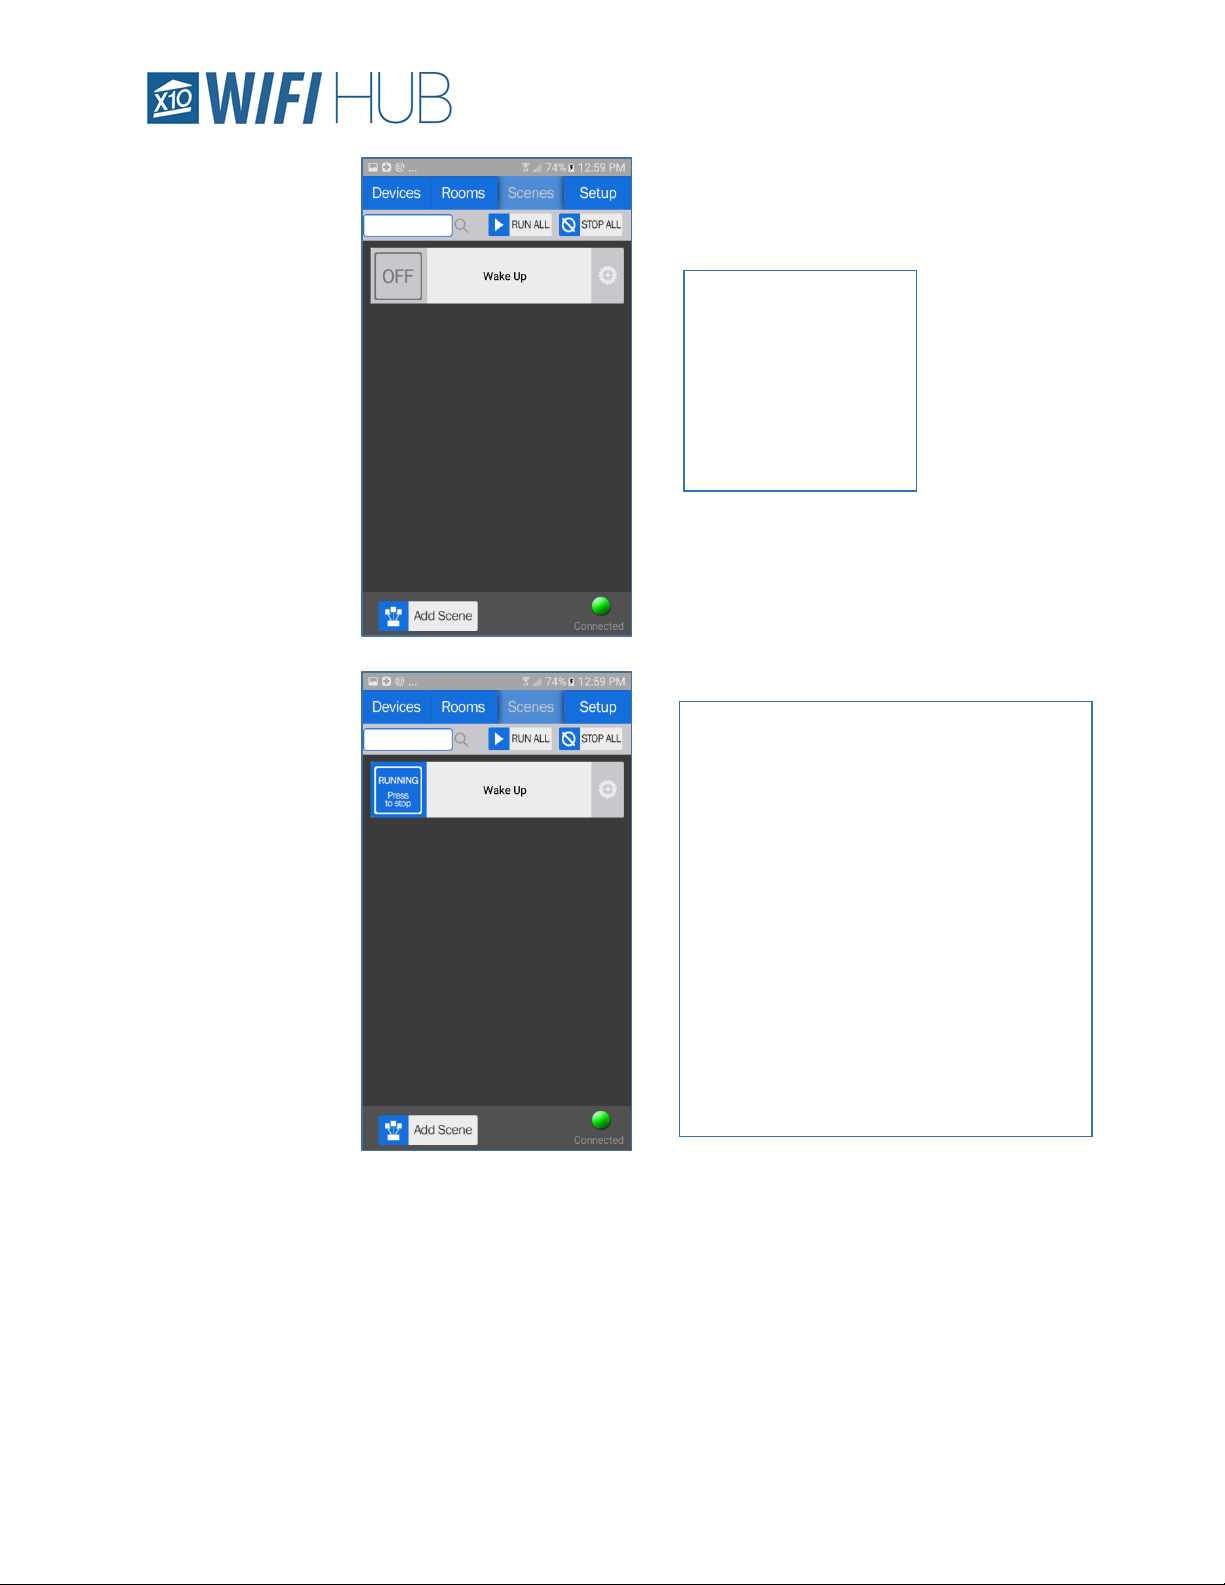
You will now see the
Scene you created on
the Scenes page.
Select the OFF button
to change the status
and to begin running
the scene.
The scene will say “RUNNING Press to
stop” as long as the scene is running.
The length of this time depends on how
many actions your scene has and delays.
For instance, if you have a device that has
a 5 minute delay, this scene will say
RUNNING for at least 5 minutes and until
the last action is executed.
You can press the button again to stop the
scene early.
You can also run or stop all the scenes
listed by hitting the “RUN ALL” or “STOP
ALL” buttons in the upper right.
Page 18

App - Setup 18 Model WM100
App – Setup
o General Settings
▪ Adjust Time of HUB
• If you find that the timing of your HUB is off, or is not turning devices on
and off at the right times, you may want to adjust the time of the HUB.
• Select the Setup tab > General settings > Adjust time of the WiFi HUB >
Sync HUB time with this device.
• This will sync the HUB with the device you are currently using.
▪ Check for Firmware Update
• The APP will normally let you know if there is a new firmware available,
but you can also manually check.
• Select the Setup tab > General settings > Check for firmware update.
• If an update is available, it will ask you if wish to update and it will take a
few minutes to do so. Try to keep the device awake to avoid the device
potentially going into sleep mode, disturbing the update process.
o X10 WiFi History and Settings
▪ X10 Communication History
• This screen shows the last 50 Commands the WM100 has heard over
your power line. These are not just signals sent and received from the
WM100, but are any X10 signal that is found on the line.
• You can also see the Firmware Version, Assigned IP Address and the
Port used by your router for the WM100.
• Clear History
o If you would like to clear the history, simply hit this button to do
so.
o Sync Data from HUB
▪ Hitting this button will sync your Apps data with the WM100. This is useful if,
for instance, you have made changes from another device and they have not yet
showed up on your current device.
o Enter WiFi setup Wizard
▪ This will enter the WiFi setup and allow you to change the network the WM100
is connected to or the routers password if necessary.
o Reset to Factory Settings
▪ This option will reset all the data on your APP ONLY. This does not affect the
WM100. This will simply clear out the data on your phone. If the WM100 does
not receive a hardware reset, once you reconnect with the WM100 it will resync
the App and download the information and settings from your WM100.
▪ To completely remove all data from both the hardware (WM100) and the App,
do a hard reset on the WM100 itself.
• To do this, HOLD down the SYNC button for about 10-15 seconds. You
will see a slow blink after about 4 -5 seconds then around 10-15 seconds
Page 19

App - Setup 19 Model WM100
© 2018 Authinx Inc. All Rights Reserved
you will see a fast blink followed by a solid LED. This indicates the unit
has been reset.
• The app will notice the reset and also ask if you wish to reset to factory
settings. Once confirmed, your WM100 and App will be completely
reset to factory settings.
For additional troubleshooting and X10 community support, you can visit the X10 Forums below:
http://forums.x10.com/index.php?board=148.0
Page 20

 Loading...