

Page 1
™
V CR COMMANDER
AND
VCR COMMANDER II
OWNER’S MANUAL
™
VCR COMMANDER, AND VCR COMMANDER II
M
ODELS UX21A AND UX23A
Page 2
CONTENTS
BASIC SETUP
Basic Setup ..........................................................................................3
Motion Sensor .................................................................................4
VCR Commands ............................................................................. 5
Basic Operation....................................................................................8
Testing the System ...........................................................................8
Using the VCR Commander.............................................................8
Checking the VCR Commander Status.............................................8
Additional Options................................................................................9
Clearing VCR Commands................................................................9
Clearing Motion Sensor Codes ........................................................9
Installing Batteries ............................................................................9
VCR Commander II Options .........................................................10
Troubleshooting .................................................................................. 11
INTRODUCTION
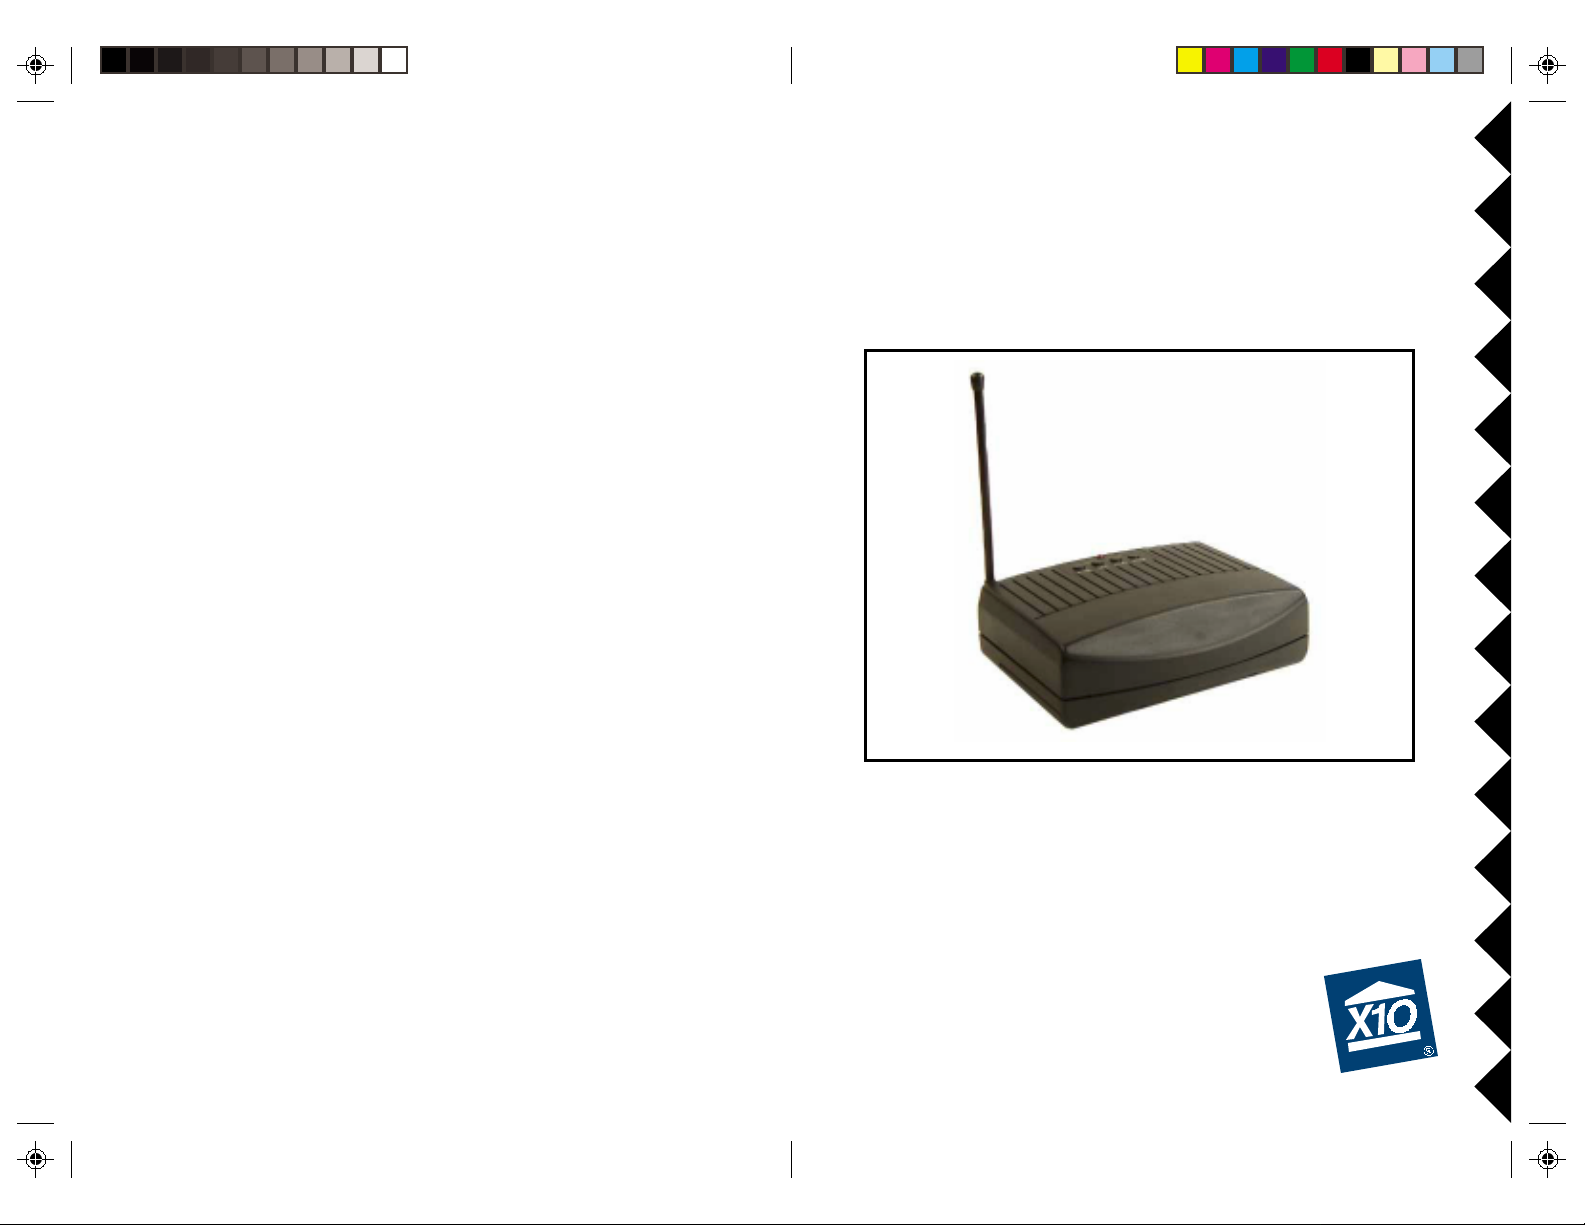
The VCR Commander works with your X10 cameras and wireless motion
sensors to record video on your VCR. When your motion sensor is
activated and turns on a camera, the VCR Commander automatically starts
your VCR and records the action. Your VCR will stop recording after five
minutes of inactivity from the motion sensor. The VCR Commander turns
your X10 cameras into a comprehensive video surveillance system.
This owner’s manual covers two models: VCR Commander , model
UX21A; and VCR Commander II, model UX23A.
When you are setting up your VCR Commander, it’s important that you
have all of the parts you need ready. During the set up process, you’ll need
to follow the steps exactly as described, without waiting too long in
between steps.
Make sure you have your VCR Commander, its power supply, its
infrared emitter cable, a motion sensor, and your VCR’s remote
control handy.
Important: the VCR Commander will not learn commands if the
IR emitter cable is plugged in.
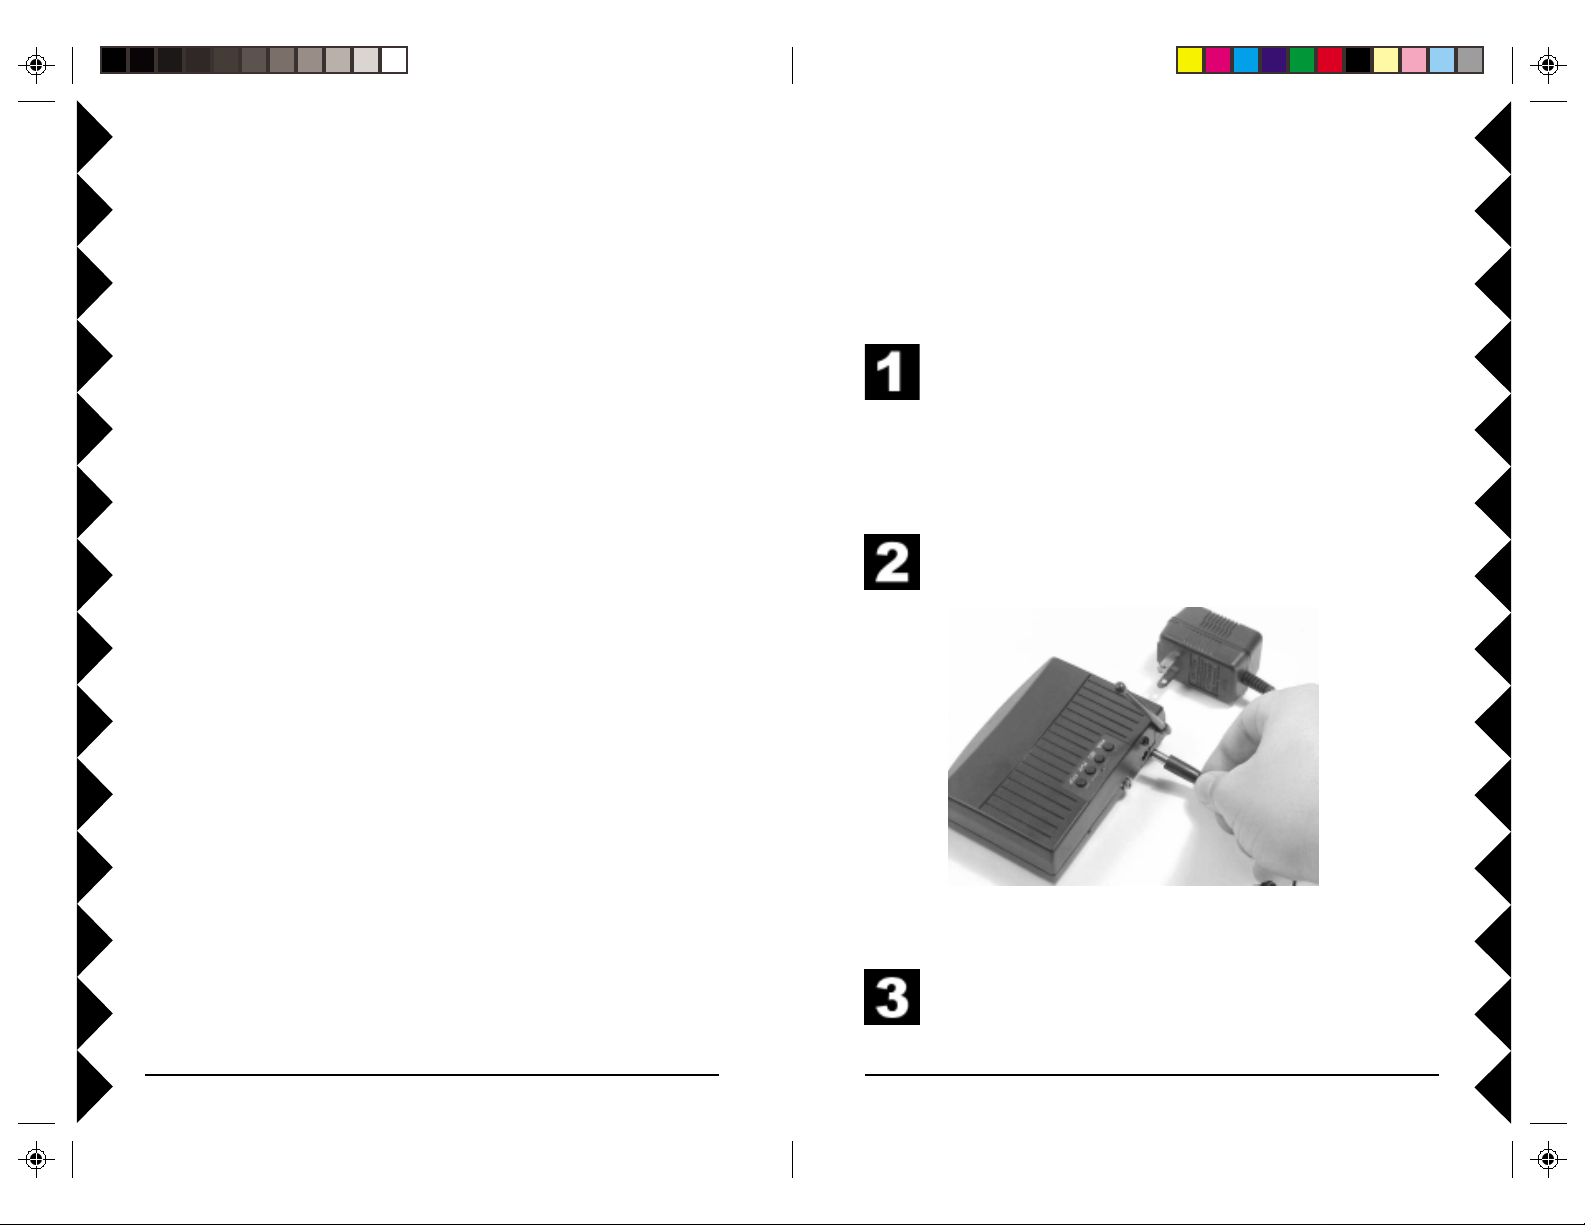
Connect the power supply (model D9100) to the VCR Commander
and plug it into a wall outlet.
Before you start
Before you set up the VCR Commander make sure that your camera is set
up and that you can record its picture on your VCR. If you have a wireless
camera, the wireless video receiver’s video output should be connected into
a Video In jack on your VCR. If you have a wired camera, it will be
connected directly into the Video In jack on your VCR. Check your VCR’s
manual for assistance.
22
2
22
Remove the battery cover from your Motion Sensor. Put two
AAA batteries in the motion sensor.
33
3
33
Page 3

Basic Setup
Basic Setup
Press and hold PLAY until the red light stays on.
Press the HOUSE button on the motion sensor. The red light on
the VCR Commander will go out. This motion sensor will now
start your VCR Commander. Point the motion sensor away from
where you are working and away from motion so that you can set
up the rest of the system.
Position your VCR remote control about one inch away from the
back of your VCR Commander, pointing at the infrared (IR)
receptor.
Infrared (IR)
Receptor
Press and hold REC until the red light stays on. The VCR
Commander is now in Learn Mode.
44
4
44
55
5
55
Page 4

Basic Setup
Press REC on the VCR Commander and release it. The red light
blinks quickly and then stays on. Press the Record button on your
remote and keep pressing until the red light on the VCR
Commander briefly goes out and comes back on solid. This means
that Record has been learned.
Basic Setup
Plug the IR emitter cable into the back of the VCR Commander.
Remove the plastic from the adhesive backing from one of the
infrared emitters and press it onto the VCR you are going to
control. Attach the emitter cable near the spot on the VCR where
you usually point your VCR remote control. See page 11 for more
help with this.
Press STOP on the VCR Commander and release it. The red light
will blink quickly and then stay on. Press the Stop button on your
remote and hold it down until the red light on the VCR Commander
briefly goes out and comes back on. This means that Stop has
been learned.
66
6
66
77
7
77
Page 5

BASIC OPERATION
ADDITIONAL OPTIONS
Testing the System
Now that you have set up your VCR Commander, you are ready to test the
system. Your VCR should be on and have the camera selected as its video
source.
Place the motion sensor in a location where you want it to detect motion.
Leave that area and wait one minute for the motion sensor to settle. Walk
past the motion sensor. The red light on the motion sensor will blink and
activate the VCR Commander. The VCR Commander will tell your VCR
to record. Leave the motion sensor’s area. Your VCR will stop recording
after five minutes.
Using the VCR Commander
Once you’ve programmed and tested everything, using the VCR
Commander is easy. When you want to use the VCR Commander, make
sure that you turn your VCR on and change the video input so that it can
record your camera. After that it’s all automatic!
Checking the VCR Commander Status
The red light on the top of the VCR Commander lets you know what the
VCR Commander is doing:
! While the VCR Commander is waiting for motion, the red light blinks
slowly, about every one and a half seconds.
! When motion is detected, the red light blinks quickly, about every half-
second.
! While VCR Commander is recording, the red light blinks about every
second.
Clearing VCR Commands
Here’s how to clear VCR commands from VCR Commander:
1. Press and hold the PWR button on the VCR Commander until the light
flashes (if you have a VCR Commander 2 it will also beep).
2. Release the PWR button. The red light will flash for about 8 seconds
and then the light will turn off. All VCR commands are now cleared
from memory.
Clearing the Motion Sensor Code
You can clear the motion sensor you programmed into the VCR
Commander:
1. Press and hold the PLAY button on the VCR Commander until the red
light stays on.
2. Release the PLAY button. The light will stay on.
3. Press PLAY again. The light will turn off and the motion sensor code
will now be cleared from memory.
Installing Batteries
After you have set up your VCR Commander, you can install four C cell
alkaline batteries (not included) in the battery compartment on the bottom of
the VCR Commander. Leave the VCR Commander connected to power
when inserting the batteries, or your learned commands will be lost.
88
8
88
99
9
99
Page 6

TROUBLESHOOTINGVCR COMMANDER II (UX23A) OPTIONS
VCR Commander II has three features that aren’t available in the standard
VCR Commander (UX21A).
Programming Multiple Motion Sensors
The VCR Commander II works with up to four X10 wireless motion
sensors. To setup additional sensors, put batteries in them. Start by
programming the first motion sensor:
1. Press and hold the UNIT button on the front of the sensor (inside the
battery compartment) until the light on the motion sensor comes on solid.
2. Release the UNIT button. Then press it once and release it quickly.
3. Press UNIT again and hold it down. The light will go out after a second,
and then flash twice after 2 seconds.
This motion sensor is now set up as Unit 2. Repeat these steps for each
additional motion sensor you have, adding an additional press and release of
the UNIT button each time, in step 2. You are now ready to program these
motion sensors into the VCR Commander II:
1. Press and hold PLAY on the VCR Commander II until the red light
stays on.
2. Press the HOUSE button on the motion sensor. The red light on the
VCR Commander will go out. This motion sensor will now start your
VCR Commander. Point the motion sensor away so it can’t see motion.
Repeat this process for all the motion sensors you are going to use.
Using Home and Away Modes
The default mode for the VCR Commander II is the Away Mode. In Away
Mode, your VCR Commander II performs normally — recording on your
VCR automatically when motion is detected and stopping after five minutes
of inactivity.
The Home Mode of your VCR Commander II is designed so that the
activity in your home or business won’t be recorded. In Home Mode, the
VCR Commander II does not tell your VCR to record when there’s
motion.
To put your VCR Commander II in Home Mode, press and hold the STOP
button. When you press the button initially , the VCR Commander II will
beep briefly. After you’ve held the button for about three seconds, the
VCR Commander II will make a long beep. It is now in Home Mode. To
restore the VCR Commander II to Away Mode, repeat the same steps.
VCR Commander Won’t Learn VCR Commands
If you have trouble getting your VCR Commander to learn VCR commands,
first make sure that the IR emitter is not connected while you are trying to
learn. Put new batteries in your VCR remote control. You can also try changing
the position of the VCR remote when learning. Y ou may need to change the
angle that you are pointing the remote, move it closer to the VCR Commander ,
or move it farther away.
After you’ve made some adjustments, follow the setup steps again. Timing is
important, so don’t wait too long between steps. If you wait too long between
steps when programming, the VCR Commander will “time out” and you will
need to start over.
If an error occurs while programming, the VCR Commander’s light will flash
(VCR Commander II will also beep). Repeat the setup procedure.
VCR Commander Won’t Operate Your VCR
If your VCR Commander still won’t start recording, you may need to change
the IR Emitter’s position on your VCR.
First, try to figure out where your VCR’s IR receptor is. Usually it’s under a
translucent piece of plastic on the front of your VCR, so you might be able to
see it through the front of the case. You can also block different parts of the
front of the VCR with a book to see if the VCR remote works when that part
is blocked. If the remote doesn’t work when you block a particular part of the
VCR, then it’s likely that the IR receptor is there. Move the VCR
Commander’s IR emitter and attach it in that area.
My VCR Turns Off When Motion Is Detected
Do not program the VCR Commander to send the VCR’s On/Off (Power)
command. Most VCRs turn on or off every time they receive this command. If
you teach the VCR Commander the Power command, you can end up turning
your VCR off instead of recording. Instead, make sure you leave your VCR
turned on when you want to use the VCR Commander.
VCR Commander Won't Learn Record
Some VCR remotes use a combination of buttons to send the Record
command. For example, you may need to press Record twice to record. When
learning, press the button(s) on your remote that you normally use to record.
1010
10
1010
1111
11
1111
Page 7

FCC Caution
THIS DEVICE COMPLIES WITH P ART 15 OF THE FCC RULES.
OPERA TION IS SUBJECT TO THE FOLLOWING TWO CONDITIONS:
(1) THIS DEVICE MA Y NOT CAUSE HARMFUL INTERFERENCE, AND
(2) THIS DEVICE MUST ACCEPT ANY INTERFERENCE RECEIVED, INCLUDING
INTERFERENCE THA T MA Y CAUSE UNDESIRED OPERATION.
This equipment generates and uses radio frequency energy, and if not installed and
used properly, that is, in strict accordance with the manufacturers instructions, it may
cause interference to radio and television reception. It has been type tested and
found to comply with the limits for remote control devices in accordance with the
specifications in Sub-Parts B and C of Part 15 of FCC Rules, which are designed to
provide reasonable protection against such interference in a residential installation.
However, there is no guarantee that interference will not occur in a particular
installation. If this equipment does cause interference to radio or television reception,
which can be determined by unplugging the equipment, try to correct the interference
by one or more of the following measures.
• Reorient the antenna of the radio/TV experiencing the interference.
• Relocate the equipment with respect to the radio/TV.
• Move the equipment away from the radio/TV .
• Plug the equipment into an outlet on a different electrical circuit from the radio/TV
experiencing the interference.
• If necessary, consult your local dealer for additional suggestions.
NOTE: Modifications to this product will void the user’s authority to operate this
equipment.
X10 Wireless Technology, Inc. Limited One Year Warranty
X10.com, a division of X10 Wireless Technology, Inc. (X10) warrants X10 products to
be free from defective material and workmanship for a period of one (1) year from the
original date of purchase at retail. X10 agrees to repair or replace, at its sole discretion,
a defective X10 product if returned to X10 within the warranty period and with proof
of purchase.
If service is required under this warranty:
Call 1-800-442-5065, visit www.x10.com, or e-mail support@x10.com.
For help or more information on setup, please visit:
www.x10.com/support
X10.com, a division of X10 Wireless Technology, Inc.
3824 North 5th St., Suite C,
North Las Vegas, NV 89032
VCRcom-09/02
 Loading...