

Page 1

PUR08
8 IN 1
L
EARNING REMOTE
O
WNER’S
M
ANUAL
Page 2

R
EAD THIS FIRST
S
AFETY CONSIDERATIONS
Remember to exercise good commonRemember to exercise good common
sense when using your X-10 PROsense when using your X-10 PRO
home automation remote -home automation remote especially when schedulingespecially when scheduling
unattended devices. There can beunattended devices. There can be
some unexpected consequences ifsome unexpected consequences if
not used with care. For example,not used with care. For example,
an empty coffee pot can bean empty coffee pot can be
remotely turned on. If that shouldremotely turned on. If that should
happen, your coffee pot could behappen, your coffee pot could be
damaged from overheating. If andamaged from overheating. If an
electric heater is turned on byelectric heater is turned on by
remote control while clothing isremote control while clothing is
draped over it, a fire could result.draped over it, a fire could result.
DO NOT USE the system for theDO NOT USE the system for the
control of high power heatingcontrol of high power heating
appliances such as portableappliances such as portable
heaters.heaters.
Caution:Caution: To reduce the risk of electric
shock, do not disassemble any part of the
Home Automation System. No userserviceable parts are inside. If you spill
liquid on any accessory unit, (modules, etc.)
disconnect the unit from the AC outlet to
prevent possible fire or shock hazard and
consult authorized service personnel.
Powerline operated equipment or
accessories connected to any of these units
should bear the UL listing or CSA
certification mark and should not have
been modified in any way that might defeat
their safety features.
Warning:Warning: To prevent electric shock
hazard, do not expose any part of the
Home Automation System to rain or
moisture.
!
FCC C
THIS DEVICE COMPLIES WITH PART 15 OF
THE FCC RULES.
OPERATION IS SUBJECT TO THE
FOLLOWING TWO CONDITIONS:
(1) THIS DEVICE MAY NOT CAUSE
(2) THIS DEVICE MUST ACCEPT ANY
This equipment generates and uses radio
frequency energy, and if not installed and
used properly, that is, in strict accordance
with the manufacturers instructions, it may
cause interference to radio and television
reception. It has been type tested and
found to comply with the limits for remote
control devices in accordance with the
specifications in Sub-Parts B and C of Part
15 of FCC Rules, which are designed to
provide reasonable protection against such
interference in a residential installation.
However, there is no guarantee that
interference will not occur in a particular
installation. If this equipment does cause
interference to radio or television
reception, which can be determined by
unplugging the equipment, try to correct
the interference by one or more of the
following measures.
• Reorient the antenna of the radio/TV
• Relocate the interface with respect to
• Move the interface away from the
• Plug the interface into an outlet on a
• If necessary, consult your local Dealer
NOTE:NOTE: Modifications to any of the
components in this kit will void the user’s
authority to operate this equipment.
AUTION
HARMFUL INTERFERENCE, AND
INTERFERENCE RECEIVED,
INCLUDING INTERFERENCE THAT
MAY CAUSE UNDESIRED
OPERATION.
experiencing the interference.
the radio/TV.
radio/TV.
different electrical circuit from the
radio/TV
experiencing the interference.
for additional suggestions.
32
Page 3

C
ONTENTS
I
NTRODUCTION
G
ETTING STARTED
CONTROLLERS AND MODULES.............. 6
HOUSE CODES AND UNIT CODES ......... 7
I
NSTALLING THE COMPONENTS
TRANSCEIVER MODULE ...................... 8
LAMP MODULE ................................. 8
8-IN-1 REMOTE ................................ 9
S
ETTING UP YOUR REMOTE
BUTTON DESCRIPTIONS .....................10
CLEARING THE MEMORY....................12
SETTING UP FOR TV, VCR,
CABLE BOX AND SATELLITE RECEIVER ..14
USING AUX TO CONTROL
A SECOND TV, VCR, CABLE BOX OR
SATELLITE RECEIVER ........................24
SEARCHING FOR CODES ...................26
IDENTIFYING CODES FOUND USING
THE SEARCH PROCEDURE .................27
SETTING THE SLEEP TIMER ................28
LEARNING ......................................29
C
ONTROLLING
TO SET THE X-10 PRO SLEEP TIMER....31
CHANGING THE X-10 PRO HOUSECODE:32
CONTROLLING AN
IR MINI CONTROLLER .......................33
E
XPANDING YOUR SYSTEM
T
ROUBLESHOOTING
W
ARRANTY
............................................ 5
........................................ 6
X-10 PRO M
................................... 37
................................................ 39
...................... 8
......................... 10
ODULES
............ 31
.......................... 35
I
NTRODUCTION
Congratulations on your purchase of the
X-10 PRO Learning Remote.
Make your lights and appliances goMake your lights and appliances go
to work for you....to work for you....
The X-10 PRO Remote will control most or
all of your video and audio equipment. But
what really sets it apart from other
remotes is that you can also control almost
any light or appliance in your home - even
in another room! And it’s easy to install.
Within minutes, you can be using your
X-10 PRO Remote to dim the lights, start
brewing a fresh pot of coffee and play your
favorite movie!*
Here are just some of the thingsHere are just some of the things
you can do with your X-10 PROyou can do with your X-10 PRO
Remote...Remote...
• Control your entire audio/video and
lighting setup for the ultimate Home
Theater experience.
• Turn on lights at night to scare away
intruders if you hear a noise.
• Start the coffee from your bedroom
when you wake up.
• Turn on your electric blanket before
the movie ends, so it’s nice and warm
when you go to bed.
Use this manual to become familiarUse this manual to become familiar
with your X-10 PRO Remote....with your X-10 PRO Remote....
This manual will explain how to set up your
Remote to use it with your existing Audio/
Video equipment.
Next it will show you how you can use it to
set up and use an X-10 PRO Transceiver
Module and Lamp Module (sold
separately) to operate electrical devices in
your home.
Finally, the manual will show how you can
expand your system with some of the many
additional X-10 PRO products you can
purchase.
* Requires X-10 PRO modules, sold
separately.
54
Page 4
G
ETTING STARTED
Because we know that you are eager to
get started, we’ve kept this introduction as
short as possible, but it contains very
valuable information, so you should read
through it very carefully.
C
ONTROLLERS AND MODULES
The first thing you need to understand is
that there are two different devices you
need to control your house;
Controllers and Modules. Any
light or appliance that you
want to control is plugged
into a Module and that
Module is then plugged into a
standard AC outlet.
Modules receive commands
from Controllers. Examples
include the Lamp Module
(sold separately). The
Transceiver Module (also
sold separately) is another
example (although it also
doubles as a controller as
described later).
Controllers are plugged into
standard wall outlets and
send commands to
Modules over your existing
electrical wiring in your house
without affecting your electricity
in any way.
The Transceiver Module works
as a controller when it is used
with a remote control such as
the Learning Remote. When
the Transceiver Module
receives a command from a
remote it sends digital
signals over your existing
house wiring to a Module
which receives the signals
and executes the command.
The remote uses radio frequency (RF)
signals to send commands to the
Transceiver module. RF signals can go right
through walls, so you can use the remotes
to control lights or appliances from
anywhere in your home.
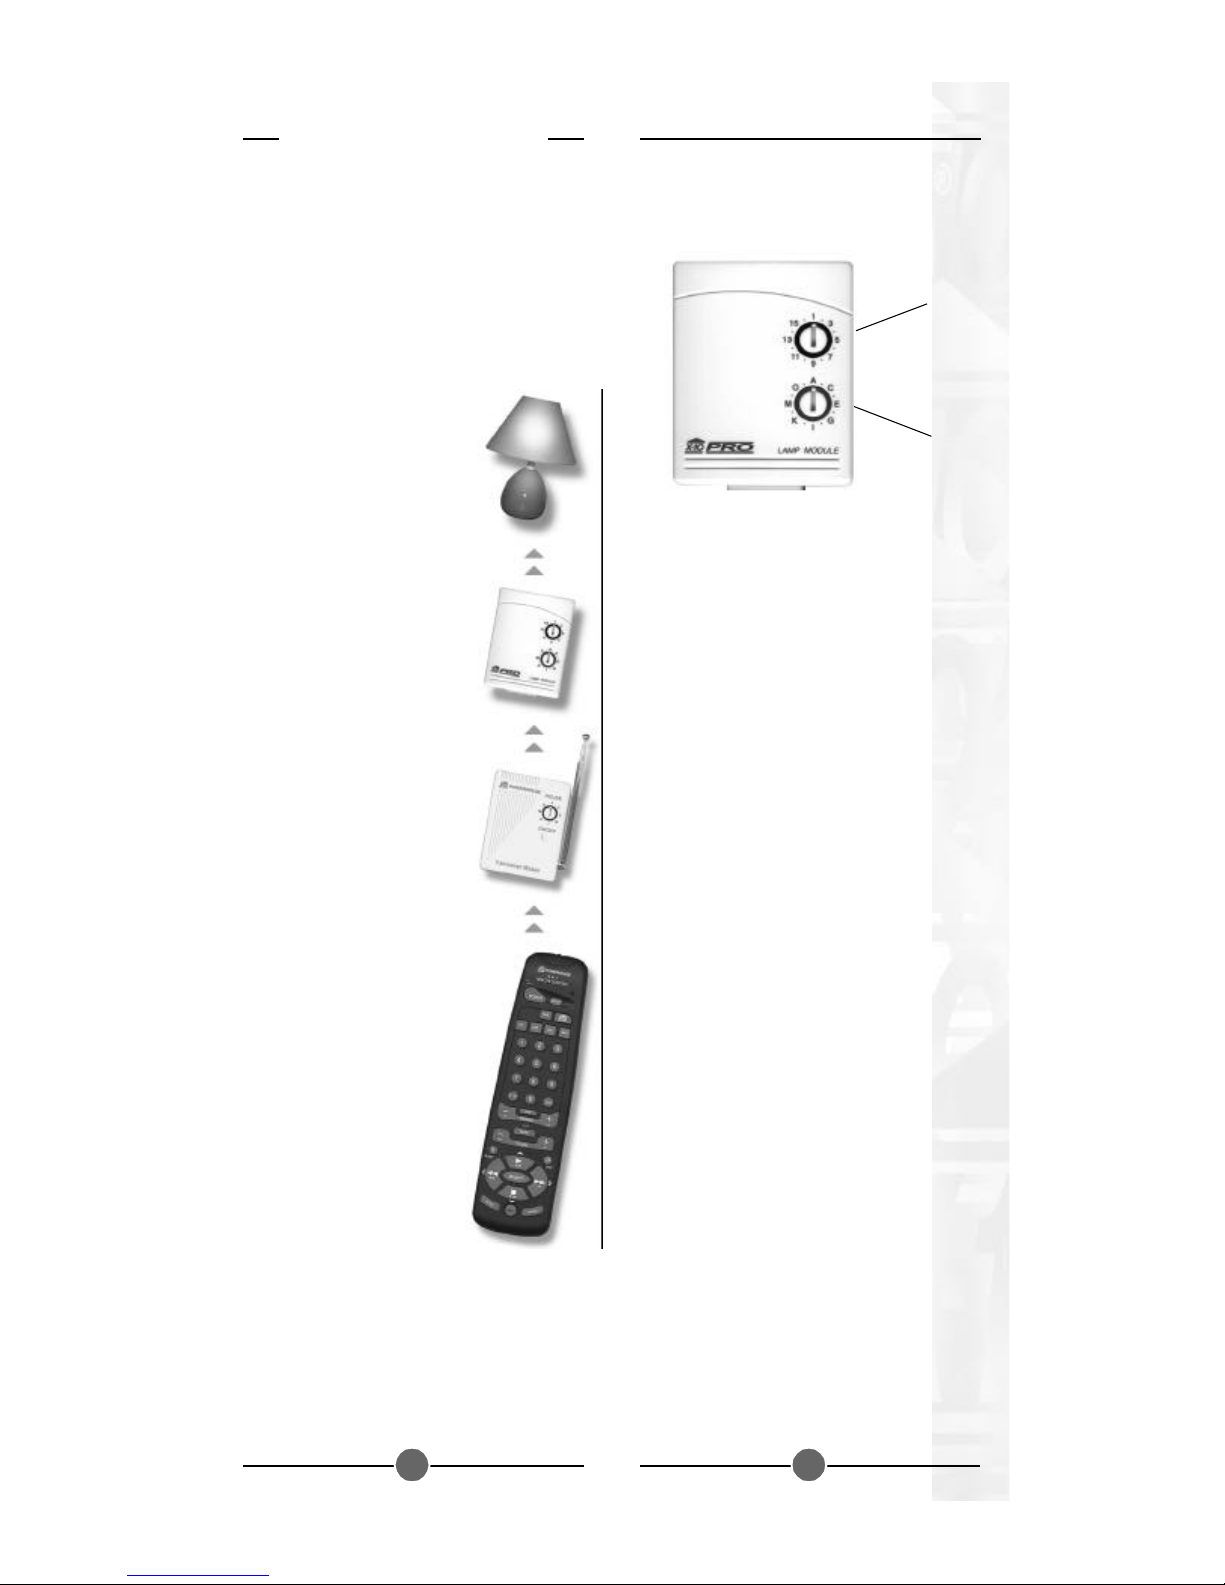
H
OUSE CODES AND UNIT CODES
UNIT CODE
DIAL
HOUSE CODE
DIAL
Each Module has a specific address made
up of a House Code (red dial on the face of
the Module) and a Unit Code (black dial on
the face of the Module).
The Controller first sends an address and
then a command on the AC power lines.
Only the Module with a matching address
will execute the command. If more than
one Module has the same address, both
Modules will execute the command.
Addresses are set on the Module by turning
the two dials on the front of the Module to
the desired letter and number (using a
small screwdriver or a coin). The House
Code is selected from the letters A through
P, and the Unit Code is selected from the
numbers 1 through 16.
76
Page 5
I
NSTALLING THE
C
OMPONENTS
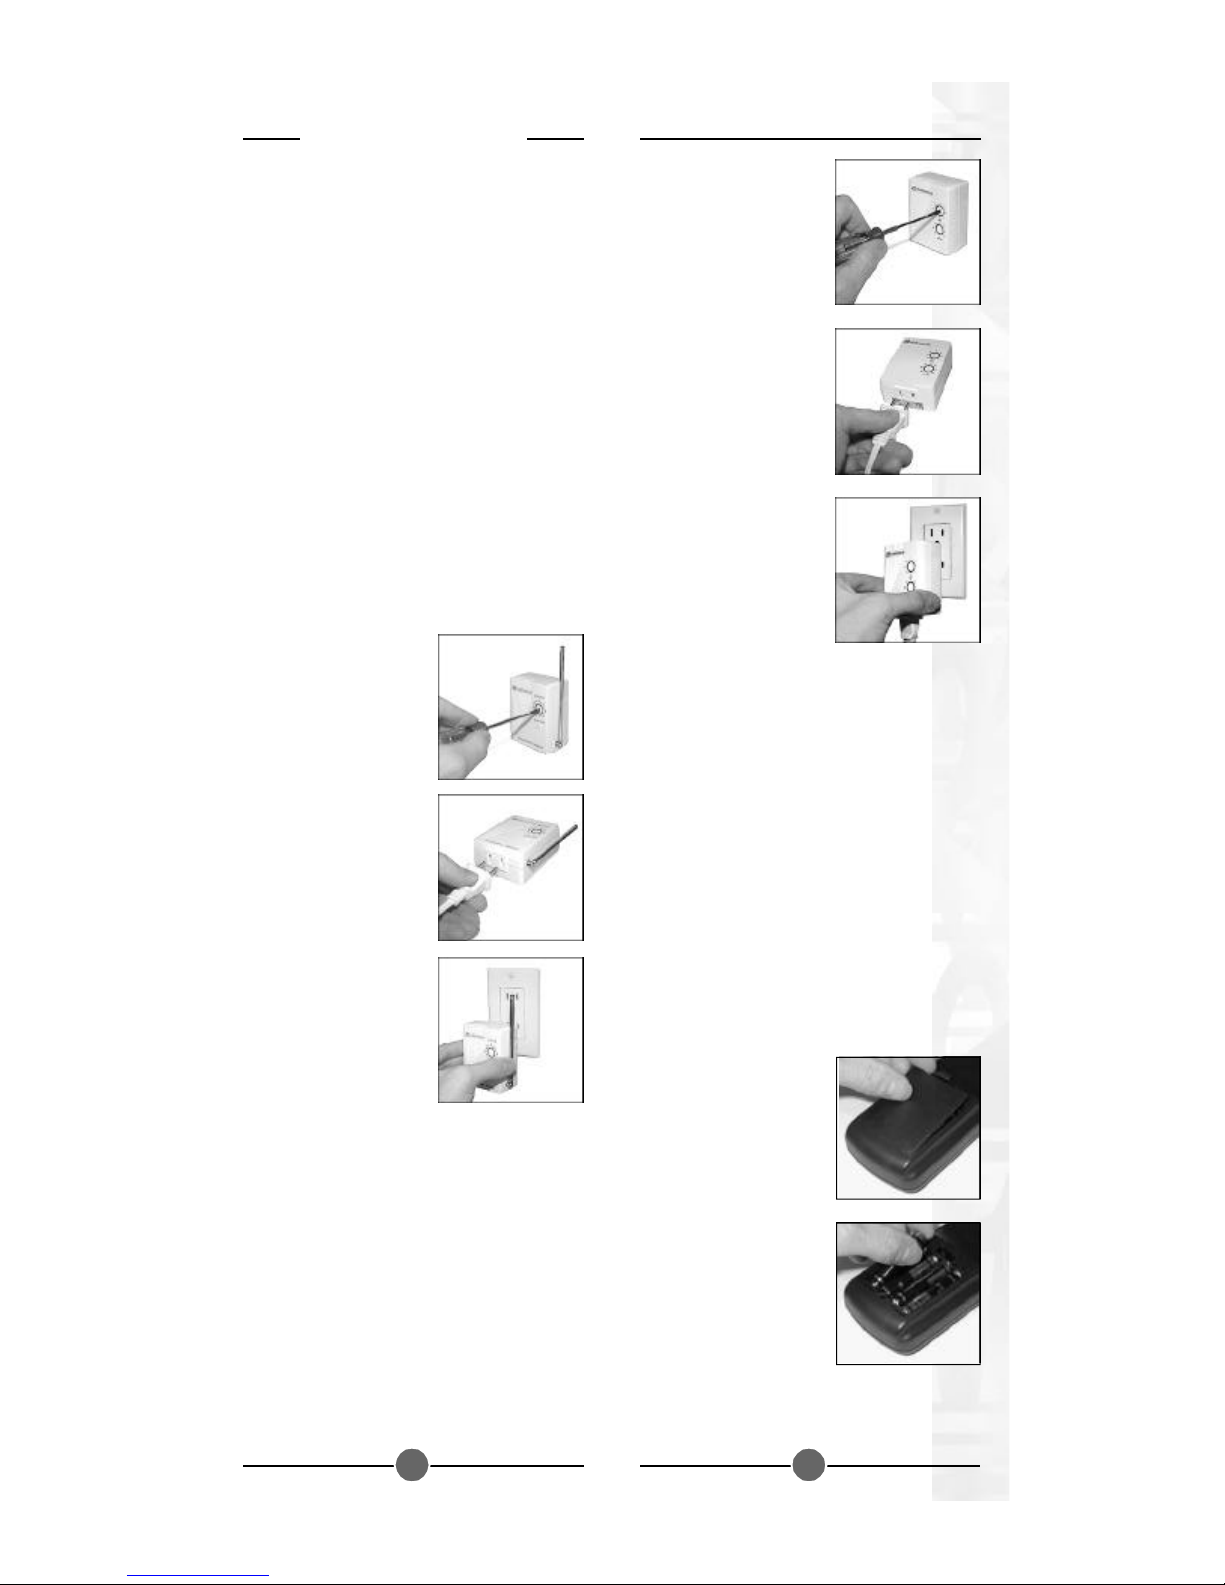
T
RANSCEIVER MODULE
The Transceiver Module receives radio
frequency (RF) commands from remotes to
operate a lamp or appliance plugged into
it. The Transceiver Module also passes on
commands over your house wiring to
control other X-10 modules. Note that
unlike the Lamp Module you cannot dim
and brighten a lamp connected to the
Transceiver Module.
You should locate the Transceiver Module
centrally in the home for maximum range
when controlled by the Learning Remote.
1. Set the House
Code to ‘A’ and the
Unit Code to ‘2.’
2. Plug a lamp into
the Lamp Module.
3. Plug the Lamp
Module into a
convenient AC
outlet.
1. Set the House
Code to ‘A’ .
2. Plug a lamp or
appliance into the
Transceiver
Module.
3. Plug the
Transceiver
Module into a
convenient AC
outlet. Fully extend
the antenna.
L
AMP MODULE
The Lamp Module may be used to control
any incandescent lamp rated up to 300W. It
is not suitable for other types of lamps such
as fluorescent or energy saving lamps, or
lamps which include a dimmer control.
Caution:Caution: Do not connect an appliance
such as a coffee pot or heater to the Lamp
Module. It may damage the module and the
appliance and could cause a fire hazard.
8-IN-1 L
The 8-in-1 Learning Remote allows you to
control practically everything electrical in
your home. It combines IR technology that
lets you control all your TV, VCR, Cable
and Satellite equipment with X-10 RF
technology that lets you control lamps and
appliances anywhere in your home.
To find out more about configuring the
Learning Remote to work with your audio/
video equipment, see the section titled
“Setting Up Your Remote.”
1. Push the tab and
2. Fit four AAA
EARNING REMOTE
lift off the battery
cover.
batteries, taking
care to match the +
and - marks in the
battery
compartment.
98
Page 6

S
ETTING UP
Y
OUR REMOTE
B
UTTON DESCRIPTIONS
INDICATOR LIGHT
The indicator light flashes when the
remote is operating.
POWER
Works in the same way as your original
remote. Also turns All Lights On, when in
X-10 mode.
SET UP
Used for programming the remote.
BACKLIGHT
Lights up the keys for a few seconds when
pressed.
LEARN
Lets you learn codes from an existing
remote, that might not be in the Learning
Remote’s library.
X-10
Lets you control X-10 PRO modules to
operate lamps and appliances around the
home.
CHANNEL
Works like your original remote. Also used
to turn X-10 Pro modules on and off.
MUTE
Works the same as your original remote.
Also turns All Modules Off, when in X-10
mode.
VOLUME
Works like your original remote. Also used
to brighten and dim lamps connected to
X-10 PRO Modules.
TIMER
Used to set the Sleep Timer to
automatically switch off the TV or
X-10 PRO Modules after a preset time.
L1, L2
Lets you learn additional keys from your
original remote.
DISP
Used to access on-screen information.
PLAY, REW, FF, STOP
Work the same as on your original VCR
remote.
TV, VCR, CBL, CD, AUX1, AUX2, SAT
Used to select the device to control. SAT
includes DSS receivers.
SHIFT
Lets you learn another function under the
same key.
0-9
Used as your original remote and to enter
device codes.
LAST
Selects the last channel viewed on your TV,
VCR, Cable Box or Satellite Receiver.
SELECT
Used for menu selections on DSS satellite
receivers.
GUIDE
Displays the main menu on DSS satellite
receivers.
REC
Record button. Works the same as your
original VCR remote. You must press the
REC button twice to begin recording.
PAUSE
Works the same as your original VCR
remote.
1110
Page 7

CLEARING THE MEMORY
It is recommended that you clear the
memory in the Learning Remote before you
start programming it:
1. Press and hold
SETUP until the
LED indicator
lights steadily.
Release the
SETUP button.
2. Press and
release the
LEARN key
twice.
3. Press and release
the SETUP key.
The LED turns off
after a few
seconds.
You can also clear the memory for just a
particular mode (TV, VCR, etc.).
1. Press and hold
SETUP until the
LED indicator
lights steadily.
Release the
SETUP button.
2. Press and release
the desired mode
button (TV, VCR,
etc.). The LED
blinks once.
3. Press the LEARN
key. The LED
blinks once.
4. Press SETUP. The
LED turns off.
1312
Page 8

S
ETTING UP FOR
C
ABLE
, CD,
R
ECEIVER
TV, VCR,
AND SATELLITE
1. Turn on the device
you want to control
(TV, VCR, cable
box, satellite
receiver etc.).
2. Press and hold
SETUP until the
LED indicator
lights steadily.
Release the
SETUP button.
3. Press and release
the mode button
that matches the
device you want to
control. The LED
blinks once.
4. Enter the 3 digit
Code from the
Library Code
Tables. The LED
turns off after the
last digit
entered.
5. Point the remote at
the device and
press the POWER
button. Your device
should turn off.
6. Turn your device
on and press CH
+. If the device
responds, setup is
complete.
Notes:Notes:
If your TV/VCR/Cable Box/SatelliteIf your TV/VCR/Cable Box/Satellite
Receiver does not respondReceiver does not respond, try the other
codes for your brand. If it still doesn’t
respond, try the Code Search method on
page 26.
If the LED blinks rapidly when youIf the LED blinks rapidly when you
enter the codeenter the code, you may have entered an
invalid code. Recheck the code in the code
list and try again.
If some buttons do not operate yourIf some buttons do not operate your
equipmentequipment, try one of the other codes for
your brand.
TV CODES
ABEX ...................................................................................185
ACME .................................................................................. 003
ADA ....................................................................................016
ADC ............................................................................ 012,096
ADMIRAL .................................................................... 014,186
ADVENTURA.....................................................................187
AIKO ....................................................................................029
ALLERON ........................................................................... 059
AMTRON ............................................................................051
AKAI ....................................................................................015
AMSTRAD...........................................................................202
ANAM NATIONAL ......................016,051,055,205,206,207
AOC ...................................... 017,018,020,022,188,189,208
AUDIOVOX ........................................................................051
...................................................................................................
BELCOR ..............................................................................017
BELL & HOWELL ............................................... 014,062,096
BRADFORD ........................................................................051
BROKWOOD ...................................................................... 017
...................................................................................................
CANDLE......................................................017,021,022,187
CAPEHART ........................................................................188
CELEBRITY .........................................................................015
CENTURION......................................................................022
CETRONIC .........................................................................055
CITIZEN............................................... 017,021,022,029,051
.......................................................055,084,118,184,187,190
CLAIRTONE .......................................................................189
CLASSIC .............................................................................. 055
COLORTYME ..............................................017,022,023,213
CONCERTO ............................................................... 017,022
CONTEC/CONY .................. 024,025,026,027,051,055,189
CRAIG .......................................................................... 051,055
CROWN .............................................................. 051,055,184
CURTIS MATHES ........................................013,017,022,028
...................................................................... 062,084,118,184
CXC ............................................................................. 051,055
...................................................................................................
DAEWOO ............................................ 017,018,022,029,030
.......................................................031,055,098,139,140,184
DAYTRON.......................................................... 017,022,184
DIMENSIA ...........................................................................013
DUMONT................................................................... 017,164
DYNASTY ...........................................................................055
DYNATECH .......................................................................191
...................................................................................................
ELECTROBAND ........................................................ 015,189
ELECTROHOME ................................. 016,017,022,034,035
EMERSON ..................... 017,022,025,027,036,037,038,039
................................ 040,043,044,045,046,047,048,049,050
................................ 051,052,053,054,055,056,057,058,059
........................ 060,062,136,137,176,184,189,190,192,210
ENVISION ................................................................... 017,022
...................................................................................................
FISHER ......................................................... 062,063,064,193
FUJITSO ..............................................................................059
FUNAI ................................................................. 051,055,059
FUTURETEC.............................................................. 051,055
...................................................................................................
1514
Page 9

GE .................................. 013,016,017,022,035,065,067,068
....................................... 100,176,177,178,179,180,181,194
GIBRALTER................................................................. 017,164
GOLDSTAR.......................................... 017,018,022,025,069
.......................................................070,071,168,169,184,185
GRUNDY ............................................................ 051,059,184
...................................................................................................
HALLMARK ................................................................ 017,022
HARVARD...........................................................................051
HITACHI ............................... 017,022,024,025,026,072,073
....................................... 074,100,150,151,152,153,154,155
........................ 156,157,158,159,160,161,163,192,211,212
...................................................................................................
IMA ...................................................................................... 051
INFINITY.............................................................................075
...................................................................................................
JANEIL .................................................................................187
JBL ....................................................................................... 075
JCB .......................................................................................015
JC PENNY ............................. 013,017,018,021,022,035,065
............................................... 067,071,076,077,084,100,118
.............................................................. 141,184,185,194,214
JENSEN ....................................................................... 017,022
JVC .................................................024,025,026,067,073,078
.......................................................079,080,102,171,172,195
...................................................................................................
KAWASHO .......................................................... 015,017,022
KAYPANI.............................................................................188
KEC......................................................................................055
KENWOOD ................................................................ 017,022
KLOSS NOVABEAM .................................... 081,082,187,196
KTV................................................051,055,083,184,189,190
...................................................................................................
LODGENET .......................................................................096
LOEWE ............................................................................... 075
LOGIK ..................................................................................096
LUXMAN .................................................................... 017,022
LXI.................................................013,022,062,075,084,194
MEGATRON ............................................................... 022,072
MAGNAVOX .................................017,021,022,075,081,082
.......................................................087,088,089,090,101,102
............................................... 143,144,145,146,147,196,197
MAJESTIC ............................................................................ 096
MARANTS...........................................................................075
MARANTZ................................................... 017,022,075,091
MATSUI ...............................................................................075
MEI.......................................................................................189
MEMOREX ........................................... 014,022,062,095,096
MGA ..................................................... 017,018,022,034,035
.............................................................. 059,064,092,093,095
MIDLAND............................................ 067,164,184,185,194
MINUTZ .............................................................................065
MITSUBISHI .................................. 017,018,022,034,035,059
............................................... 064,092,093,094,095,102,138
MONTGOMERY WARD .....................................................096
MOTOROLA............................................................... 016,186
MTC ...................................... 017,018,022,084,118,189,191
MULTITECH .............................................................. 051,191
MULTIVISION .....................................................................097
...................................................................................................
NAD.................................................................... 022,084,198
NEC ............................... 016,017,018,022,098,102,108,213
NIKEI ................................................................................... 055
NIKKO ......................................................................... 022,029
NTC .................................................................................... 029
ONKING ..............................................................................055
ONWA ........................................................................ 051,055
OPTIMUS ............................................................................198
OPTONICA ................................................................ 108,186
ORION ................................................................................ 048
...................................................................................................
PANASONIC ................................................ 016,067,075,183
PHILCO......................................... 016,017,018,021,022,025
....................................... 075,081,082,087,088,090,196,197
PHILIPS ......................... 016,017,019,021,022,025,075,081
....................................... 082,087,088,089,099,100,101,102
PILOT.......................................................................... 017,184
PIONEER............................... 017,022,103,104,105,192,198
PORTLAND ........................................ 017,018,022,029,184
PRICE CLUB .......................................................................118
PRISM ...................................................................................067
PROSCAN ................................................................... 013,194
PROTON ......................................017,022,025,106,188,199
PULSAR...............................................................................164
PULSER ...............................................................................017
...................................................................................................
QUASAR ...................................................... 016,067,083,107
...................................................................................................
RADIO SHACK/REALISTIC ................. 013,017,022,024,025
............................................... 051,054,055,062,108,184,185
RCA ........................ 013,016,017,018,020,022,109,111,112
................................ 113,114,115,116,142,192,194,200,201
RHAPSODY ........................................................................ 189
RUNCO............................................................................... 164
...................................................................................................
SAMPO ................................................. 017,022,184,185,188
SAMSUNG .....................................017,018,022,024,025,028
....................................... 084,117,118,119,184,185,214,217
SAMSUX ..............................................................................184
SANYO.......................... 017,062,063,093,120,121,182,193
SCOTCH.............................................................................022
SCOTT.......................... 017,022,025,037,048,051,055,059
SEARS ............................ 013,017,022,026,059,062,063,064
................................ 079,084,118,122,123,193,194,202,210
SHARP ...........................................017,022,025,108,124,125
.............................................................. 126,127,135,184,186
SHOGUN ............................................................................017
SIGNATURE ........................................................ 014,096,128
SIMPSON .............................................................................021
SONIC ................................................................................. 189
SONY ........................................................................... 015,019
SOUNDESIGN ..............................017,021,022,051,055,059
SQUAREVIEW.....................................................................202
SSS........................................................................ 017,051,055
STARLITE ............................................................................051
SUPRE-MACY .....................................................................187
SUPREME ............................................................................015
SYLVANIA ............................................ 017,021,022,075,081
.............................................................. 082,087,088,089,090
.............................................................. 101,129,174,196,197
SYMPHONIC ....................................................... 046,051,202
...................................................................................................
TANDY ............................................................................... 186
TATUNG..................................................................... 016,191
TECHNICS ..........................................................................067
TECHWOOD ..................................................... 017,022,067
TEKNIKA.......................................017,018,021,022,025,026
.......................................................029,051,055,059,084,089
.......................................................095,096,118,183,184,187
TELECAPTION .................................................................. 130
TELERENT ......................................................................... 096
TERA ...................................................................................199
TMK ............................................................................. 017,022
TOSHIBA ..................................................... 062,084,102,118
.............................................................. 122,130,131,173,214
TOTEVISION ......................................................................184
...................................................................................................
UNIVERSAL ................................................................ 065,100
...................................................................................................
VICTOR ....................................................................... 079,195
1716
Page 10

VIDTECH .............................................................. 017,018,022
VIKING .................................................................................187
...................................................................................................
WARDS ................................. 013,014,017,018,022,037,046
............................................... 059,065,075,081,082,087,088
....................................... 089,096,100,101,108,132,133,197
...................................................................................................
YAMAHA ............................................................ 017,018,022
YUPITERU ..........................................................................055
...................................................................................................
ZENITH ........................................096,134,164,165,166,167
VCR CODES
ADMIRAL ........................................................................... 014
ADVENTURA.................................................................... 039
AIKO ................................................................................... 040
AIWA ...........................................................................015,039
AKAI ..................................................... 016,017,018,019,020
...................................................................... 021,124,125,126
AMERICAN HIGH ............................................................. 034
ASHA.................................................................................. 026
AUDIO DYNAMICS ...................................................022,023
AUDIOVOX ....................................................................... 027
...................................................................................................
BELL & HOWELL .............................................................. 024
BEAUMARK ....................................................................... 026
BROKSONIC ............................................................... 025,038
...................................................................................................
CALIX ................................................................................. 027
CANDLE............................... 026,027,028,029,030,031,032
CANON .............................................................. 034,035,127
CAPEHART ................................................................ 033,123
CARVER.............................................................................. 075
CCE ............................................................................. 040,074
CITIZEN.......................................................026,027,028,029
...................................................................... 030,031,032,040
COLORTYME .................................................................... 022
COLT ................................................................................. 074
CRAIG ........................................................... 026,027,036,074
CURTIS-MATHES ........................................013,015,022,026
...................................................................... 029,031,034,035
CYBERNEX ........................................................................ 026
...................................................................................................
DAEWOO ............................................ 028,030,032,038,039
...................................................................... 040,041,123,143
DAYTRON......................................................................... 123
DBX ............................................................................. 022,023
DIMENSIA .......................................................................... 013
DYNATECH ............................................................... 015,039
ELECTROHOME ........................................................027,042
ELECTROPHONIC ........................................................... 027
EMERSON ............................. 015,019,025,027,028,034,037
............................................... 038,039,042,043,044,045,046
............................................... 047,048,049,050,051,052,053
............................................... 054,055,056,057,058,059,060
.............................................................. 078,118,126,129,130
FISHER .......................... 024,036,061,062,063,064,065,131
FUJI .............................................................................. 034,132
FUNAI ......................................................................... 015,039
GARRARD .......................................................................... 039
GE .......................................... 013,026,034,035,066,128,133
GOLDSTAR.......................................... 022,027,031,067,134
GRADIENTE ...................................................................... 039
...................................................................................................
HARLEY DAVIDSON ........................................................ 039
HARMAN KARDON ..................................................022,081
HARWOOD ....................................................................... 074
HEADQUARTER .............................................................. 024
HITACHI ....................... 015,068,069,070,120,124,133,135
HI-Q .................................................................................... 036
...................................................................................................
INSTANT REPLAY............................................................. 034
...................................................................................................
JCL ...................................................................................... 034
JC PENNEY ...........................022,023,024,026,027,034,035
............................................... 068,069,071,072,073,120,131
JENSEN .............................................................................. 124
JVC ......................................... 022,023,024,031,071,124,136
KENWOOD .................. 022,023,024,029,031,071,124,136
KLH ............................................................................. 074,144
KODAK ....................................................................... 027,034
LLOYD........................................................................015,039
LOGIK ................................................................................. 074
LXI...................................................................................... 027
...................................................................................................
MAGNAVOX ......................... 034,035,075,076,117,121,137
MAGNIN ............................................................................ 026
MARANTZ.............022,023,024,029,031,034,071,075,077
MARTA ............................................................................... 027
MASUSHITA ...................................................................... 034
MEI...................................................................................... 034
MEMOREX ........................................... 014,015,024,026,027
.............................................................. 034,036,039,056,117
MGA .................................................................... 042,078,126
MGN TECHNOLOGY ....................................................... 026
MIDLAND.......................................................................... 066
MINOLTA ........................................................... 068,069,120
MITSUBISHI ......................................... 042,068,069,078,079
.............................................................. 080,081,082,083,084
...................................................... 085,086,087,119,126,136
MONTGOMERY WARD ............................................. 014,088
MOTOROLA............................................................... 014,034
MTC .................................................................... 015,026,039
MULTITECH ....................................... 015,026,039,066,074
NEC ....................................... 022,023,024,029,031,071,077
...................................................... 089,090,091,092,124,136
NIKKO ................................................................................ 027
NOBLEX ............................................................................ 026
...................................................................................................
OLYMPUS .......................................................................... 034
OPTIMUS .................................................................... 014,027
OPTONICA ................................................................ 109,147
PANASONIC ................................ 034,035,122,138,139,140
PENTAX....................................... 029,068,069,029,120,133
PENTEX RESEARCH......................................................... 031
PHILCO........................................................ 034,035,075,076
PHILIPS ........................................................ 034,075,109,137
PILOT................................................................................. 027
PIONEER.............................................. 023,068,093,094,136
PORTLAND ................................................ 029,030,032,123
PROSCAN .......................................................................... 013
PROTEC............................................................................. 074
PULSAR.............................................................................. 117
...................................................................................................
QUARTER.......................................................................... 024
QUARTZ ........................................................................... 024
QUASAR ............................................................. 034,035,138
RCA ....................................... 013,016,026,034,068,069,095
............................................... 096,097,098,099,100,101,102
...................................................... 103,104,120,128,133,138
RADIOSHACK/REALISTIC .................. 014,015,024,026,027
.............................................................. 034,035,036,039,042
............................................................................. 062,063,109
RADIX ................................................................................ 027
RANDEX............................................................................ 027
RICOH ................................................................................ 141
RUNCO.............................................................................. 117
...................................................................................................
SAMSUNG .................................... 018,026,028,046,066,125
1918
Page 11

SANKY ........................................................................... 014,117
SANSUI ........................................................ 023,105,124,136
SANYO................................................................ 024,026,036
SCOTT.........................................................025,028,038,045
...................................................................... 051,078,106,129
SEARS ................................................... 024,027,034,036,061
.............................................................. 062,063,064,068,069
..................................................................................... 120,131
SHARP ...................................014,015,030,042,107,108,109
SHINTOM ............................................ 017,069,074,111,145
SHOGUN ........................................................................... 026
SIGNATURE ....................................................................... 015
SINGER ........................................................................ 034,074
SONY .................................................... 017,111,112,132,141
STS...............................................................................034,120
SYLVANIA ....................................................015,034,035,039
...................................................................... 075,076,078,137
SYMPHONIC ............................................................... 015,039
TANDY ....................................................................... 015,024
TASHIKO............................................................................ 027
TATUNG.....................................................................071,124
TEAC.................................................... 015,039,071,098,124
TECHNICS .................................................................. 034,122
TEKNIKA...................................... 015,027,034,113,142,039
TOSHIBA .............................. 028,062,064,068,078,106,129
TOTEVSION ............................................................... 026,027
TMK ..................................................................... 026,037,060
UNITECH .......................................................................... 026
...................................................................................................
VECTOR RESEARCH...................................022,023,028,029
VICTOR .............................................................................. 023
VIDEO CONCEPTS ............................. 022,023,028,029,126
VIDEOSONIC ..................................................................... 026
...................................................................................................
WARDS ........................................ 014,015,026,027,028,034
...................................................... 036,039,042,068,069,074
...................................................... 109,114,115,116,120,129
XR-1000 .............................................................. 034,039,074
YAMAHA ..................................... 022,023,024,031,071,124
ZENITH ............................................... 017,111,117,132,141
CABLE CODES
ABC ....................................... 014,015,016,017,018,019,020
ANTRONIX ................................................................ 021,022
ARCHER.......................................................021,022,023,024
...................................................................................................
CABLETENNA .................................................................. 021
CABLEVIEW ....................................................................... 021
CENTURY.......................................................................... 024
CITIZEN............................................................................. 024
COLOUR VOICE ........................................................025,026
COMTRONICS ........................................................... 027,028
CONTEC ........................................................................... 029
...................................................................................................
EASTERN ........................................................................... 030
...................................................................................................
GARRARD .......................................................................... 024
GC ELECTRONICS ............................................................ 022
GEMINI ........................................................................ 031,032
GENERAL INSTRUMENT ................................................. 016
...................................................................................................
HAMLIN ....................................................... 033,034,035,048
HITACHI ............................................................................ 016
HYTEX............................................................................... 015
JASCO ................................................................................. 024
JERROLD .............................................. 014,016,018,020,031
...................................................................... 036,037,062,063
MAGNAVOX ...................................................................... 038
MEMOREX .......................................................................... 039
MOVIE TIME ....................................................... 015,040,041
...................................................................................................
NSC ............................................................................. 015,040
...................................................................................................
OAK ..................................................................... 015,029,042
...................................................................................................
PANASONIC ....................................................... 013,061,064
PARAGON ......................................................................... 039
PHILIPS ........................................................ 024,025,026,032
...................................................................... 038,043,044,045
PIONEER..................................................................... 046,047
PULSAR.............................................................................. 039
...................................................................................................
RADIO SHACK .................................................................. 058
RCA ............................................................................. 013,060
REALISTIC.......................................................................... 022
REGAL ......................................................................... 035,048
REGENCY .......................................................................... 030
REMBRANDT .................................................................... 016
RUNCO.............................................................................. 039
...................................................................................................
SAMSUNG ...................................................................027,047
SCIENTIFIC ATLANTA ...............................019,049,050,051
............................................................................. 065,066,067
SIGNAL ....................................................................... 027,031
SIGNATURE ....................................................................... 016
SL MARX ............................................................................ 027
SPRUCER ........................................................................... 013
STANDARD COMPONENTS ........................................... 052
STARCOM ........................................................... 014,020,031
STARGATE .................................................................. 027,031
STARQUEST ...................................................................... 031
...................................................................................................
TANDY .............................................................................. 053
TELEVIEW.......................................................................... 027
TEXSCAN .......................................................................... 052
TOCOM .............................................................. 017,036,054
TOSHIBA ........................................................................... 039
TUSA.................................................................................. 031
TV86 .................................................................................. 040
...................................................................................................
UNIKA ................................................................. 021,022,024
UNITED ARTISTS ............................................................. 015
UNITED CABLE ................................................................ 014
UNIVERSAL ......................................... 021,022,023,024,055
...................................................................................................
VIDEOWAY ........................................................................ 057
VIEWSTAR ............................................ 028,038,040,053,056
...................................................................................................
ZENITH ............................................................................. 039
...................................................................................................
SATELLITE CODES
AMPLICA ........................................................................... 028
...................................................................................................
BIRDVIEW .......................................................................... 029
...................................................................................................
CHANNEL MASTER .......................................... 030,031,032
CHAPPARAL ...............................................013,014,033,034
CHEYENNE ....................................................................... 014
...................................................................................................
DRAKE ......................................... 015,016,037,038,039,040
DX ANTENNA........................................................... 035,036
...................................................................................................
ECHOSTAR ......................................................... 041,042,043
...................................................................................................
FUJITSU ...................................................................... 044,045
...................................................................................................
2120
Page 12

GENERAL INSTRUMENTS .............. 017,018,019,046,047,048
...................................................................................................
JANEIL ................................................................................ 049
JEROLD .............................................................................. 050
...................................................................................................
KENWOOD ....................................................................... 051
...................................................................................................
LUXOR .............................................................................. 052
...................................................................................................
MACOM STATE ................................................................. 053
...................................................................................................
NORSTAT .......................................................................... 054
...................................................................................................
REALISTIC........................................................... 020,056,057
...................................................................................................
SCIENTIFIC ATLANTA ..................................................... 060
SIERRA I, II, III ...................................................................... 014
STAR TRAK ........................................................................ 061
STS................................................ 021,022,023,024,058,059
SUPER GUIDE ................................................................... 062
...................................................................................................
TOSHIBA .................................................................... 025,063
...................................................................................................
UNIDEN .....................................................................026,064
...................................................................................................
VIDEO CIPHER II ............................................................... 027
DSS CODES
ECHOSPHERE ................................................................... 071
ECHOSTAR ........................................................................ 071
...................................................................................................
DISH NETWORK ............................................................... 071
...................................................................................................
HUGHES SATELLITE ........................................................ 075
...................................................................................................
PANASONIC ............................................................... 069,072
PRIMESTAR ........................................................................ 070
...................................................................................................
RCA .................................................................................... 065
...................................................................................................
SONY .................................................................................. 066
STAR SIGHT CABLE SERVICES ......................................... 073
...................................................................................................
TOSHIBA ............................................................ 067,068,074
LASER DISC CODES
PIONEER............................................................................ 093
PROSCAN .......................................................................... 146
...................................................................................................
RCA .................................................................................... 146
CD CODES
ADC ................................................................................... 013
ADCOM ...................................................................... 014,067
AIWA ...........................................................................015,016
AKAI ............................................................................ 068,090
AUDIO ALCHEMY ............................................................ 017
AUDIO TECHNICA .......................................................... 018
...................................................................................................
BSR...................................................................................... 017
...................................................................................................
CALIFORNIA AUDIO LABS ............................................. 069
CAPETRONIC ................................................................... 022
CARRERA ........................................................................... 017
CARVER............................................................... 019,020,021
CASIO ................................................................................. 070
CURTIS MATHES .............................................................. 070
...................................................................................................
DENON ...................................................................... 023,024
...................................................................................................
EMERSON ........................................................... 014,025,026
...................................................................................................
FISHER ......................................... 020,027,028,029,030,071
...................................................................................................
GE ....................................................................................... 078
GENEXXA....................................................025,026,031,072
GOLDSTAR................................................................. 032,073
...................................................................................................
HARMON KARDON ......................................................... 033
HITACHI ............................................................................ 031
...................................................................................................
INKEL ................................................................................. 034
...................................................................................................
JC PENNEY .................................................................043,070
JVC ...................................................................................... 035
...................................................................................................
KENWOOD ................................. 027,036,037,038,080,081
KRELL................................................................................. 019
KYOCERA .......................................................................... 013
...................................................................................................
LUXMAN ............................................. 039,040,082,083,091
LXI............................................................................... 025,070
...................................................................................................
MAGNAVOX ............................................................... 019,084
MARANTZ...................................................019,041,042,085
MCS ............................................................................. 043,070
MGA ................................................................................... 044
MISSION ............................................................................. 019
MITSUBISHI ................................................................ 044,045
...................................................................................................
NAD............................................................................ 074,092
NAKAMICHI ............................................................... 046,047
NEC .................................................................................... 043
NIKKO ................................................................. 018,026,029
NSM .................................................................................... 019
...................................................................................................
ONKYO ............................................................... 048,049,075
OPTIMUS ............................................. 017,020,021,025,031
.............................................................. 037,050,051,052,053
...................................................................................................
PANASONIC ....................................................... 069,086,093
PHILIPS ....................................................................... 019,084
PIONEER......................................................031,054,055,072
PROTON ........................................................................... 019
...................................................................................................
QUASAR ............................................................................ 069
...................................................................................................
RCA ...................................................... 014,020,025,056,076
RCA Digital Video Disc ...................................................... 096
REALISTIC....................................................014,020,022,025
.............................................................. 026,031,042,050,052
ROTEL ............................................................................... 019
...................................................................................................
SAE ..................................................................................... 019
SAMSUNG .......................................................................... 094
SANSUI ................................................ 019,025,057,076,087
SANYO................................................. 020,058,071,088,095
SCOTT................................................................ 014,025,026
SEARS ........................................................... 025,037,042,070
SHARP .........................................................................037,042
SHERWOOD................................................034,042,051,059
SHURE ............................................................................... 043
SONY ........................................................................... 060,061
STS...................................................................................... 013
SYLVANIA .......................................................................... 019
SYMPHONIC ...................................................................... 062
2322
Page 13

...................................................................................................
TEAC............................................ 029,042,052,062,063,064
TECHNICS .......................................................... 069,086,089
THETA DIGITAL ............................................................... 084
TOSHIBA ........................................................................... 074
...................................................................................................
VECTOR RESEARCH..................................................017,032
VICTOR .............................................................................. 035
...................................................................................................
YAMAHA .....................................................018,065,066,077
4. Press and release
the mode button
that matches the
A/V equipment you
want to control.
The LED blinks
once.
HOME AUTOMATION CODES
...................................................................................................
X-10 HOME AUTOMATION (RF) ................................... 013
X-10 HOME AUTOMATION (IR543) .............................. 014
GE HOMEMINDER ............................................................ 015
...................................................................................................
U
SING
AUX TO
TV, VCR, C
R
ECEIVER
CONTROL A SECOND
ABLE BOX OR SATELLITE
The AUX button is normally used to
control an audio component, but it can also
be configured to control a second TV, VCR,
cable box or satellite receiver.
1. Turn on the
equipment you
want to control.
2. Press and hold
SETUP until the
LED indicator
lights steadily.
Release Setup
button.
5. Enter the 3 digit
Code from the
Library Code
Tables. The LED
turns off after the
last digit entered.
6. Point the remote at
your A/V
component and
press the POWER
button. Your A/V
component should
turn off.
7. Turn your A/V
component on and
press CHANNEL
+. If it responds,
setup is complete.
Notes:Notes:
If your audio/video componentIf your audio/video component
does not responddoes not respond, try the other codes
for your brand. If it still doesn’t respond, try
the Code Search method on page 26.
If the LED blinks rapidly when youIf the LED blinks rapidly when you
enter the codeenter the code, you may have entered an
invalid code. Recheck the code in the code
list and try again.
3. Press either AUX
button.
2524
Page 14

S
EARCHING FOR CODES
I
DENTIFYING CODES FOUND USING THE
S
EARCH PROCEDURE
1. Turn on the device
you want to
control.
2. Press and hold
SETUP until the
LED indicator
lights steadily.
Release Setup
button.
3. Press the mode
button that
matches the
equipment you
want to control.
The LED blinks
once. For Aux,
press Aux, then the
mode button.
4. Press CH +
repeatedly* until
the device to be
controlled
changes channel.
1. Press and hold
SETUP until the
LED indicator
lights steadily.
Release Setup
button.
2. Press the mode
button that
matches the
equipment you
want to identify The
LED blinks once.
For Aux, press Aux,
then the mode
button.
3. Press and release
SETUP. The LED
blinks once.
4. To find the first
digit, press each
number button
from 0 to 9 until the
LED blinks. The
number you
pressed is the first
digit of the code.
If you go past the
code accidentally,
just press LAST
repeatedly until the
channel changes
again.
5. Press and release
the ENTER button
to complete the
setup.
*Note:*Note: You may have to press CH +
many times (50+). If the device does not
have a Channel Up function, use the PLAY
button (VCR only) or the POWER button.
5. Press each
number button
from 0 to 9 again
as above to find
the second digit.
6. Press each
number button in
turn to find the
third digit. When
the third digit has
been found, the
LED will go out.
2726
Page 15

S
ETTING THE SLEEP TIMER
The Sleep Timer automatically turns off the
TV after the time you set. Press the TV
button, then follow the instructions below
to set the Sleep Timer:
1. Press and hold
TIMER until the
LED indicator
lights steadily.
Release TIMER
button.
2. Use the number
buttons to enter
the sleep time
required
(1 to 99 minutes).
3. Press ENTER to
confirm the setting.
L
EARNING
Your PUR08 Learning Remote has the
codes for most TVs, VCRs, etc. in its code
library. However, if the code for your
particular device is not found in the library,
you can learn these codes from your
existing remote. Or if you find a code from
the tables in this manual that “almost”
matches your device, but a few buttons are
missing, you can learn just those buttons.
1. Point your existing
remote at the
Learning Remote
with a distance of
about 2 inches
between the
remotes.
2. Press and hold
SETUP until the
LED indicator
lights steadily.
Release the Setup
button.
Note:Note: Make sure you leave the remote
pointing at the TV to ensure it turns off the
TV at the time you set.
3. Press the mode
button that
matches the
equipment you
want to learn. The
LED blinks once.
4. Press and release
the LEARN button.
The LED blinks
once.
5. Press and release
the button on the
Learning Remote
that you want to
teach. The LED
blinks once.
(Press shift first to
learn a shifted
function). See notes on pages 30 and
31.
2928
Page 16

6. Press the button
on your existing
remote that you
want to learn. Hold
the button until the
LED on the
Learning Remote
blinks off.
7. Repeat steps 5 and 6 for each button
you want to learn.
You cannot store any functions under the
following keys:
Learn
Setup
TV
VCR
Cable
SAT
CD
AUX1
AUX2
X10
Timer
Enter
Shift
Shift Learn
Shift Setup
Shift TV
Shift VCR
Shift Cable
Shift SAT
Shift CD
Shift AUX1
Shift AUX2
Shift X10
Shift Timer
8. When you’ve
finished learning
all the keys, press
ENTER.
Notes:Notes:
Make sure you have fresh batteries in both
remotes before learning.
Take care not to move either remote while
pressing the buttons.
Experiment with the distance between the
remotes if you have a problem learning.
Some remotes do not have their LED in
the center so you might need to
experiment with the side-to-side position
of the remotes relative to each other.
Do not sit directly under an incandescent
lamp while teaching the Learning Remote.
In most cases you will hold the button on
the remote you are learning from until the
LED goes out on the Learning Remote. In
some cases however, you might find that
the LED on the Learning Remote doesn’t
go out until you release the key on the
remote you are learning from.
Use buttons L1 and L2 to learn codes for
which the Learning Remote does not have
a corresponding button.
If you have problems learning keys, try a
Master Reset (Page 12) and then try
learning them again.
You cannot store store two products under the
same key using shift, i.e. you can’t enter the
3 digit code for a VCR and then press shift
and enter another 3 digit code for another
VCR. But you can learn learn a second product
using SHIFT as follows.
e.g. For two VCRs:
Press SETUP, VCR, then enter the 3 digit
code for your first VCR (see page 14 for
more details).
For VCR2:
Press SETUP, VCR, LEARN.
Then press SHIFT, then Play (on the
PUR08) then Play (on the original VCR
remote).
Then SHIFT, then Stop (on the PUR08)
then Stop (on the original VCR remote),
etc.
Then Enter.
Then to access each VCR:
Press VCR on the PUR08 and the appropriate key on the PUR08 to access the first
VCR.
Press VCR and then Shift, and then the
appropriate key to access the second VCR.
You can keep pressing keys and you will
stay in the “shifted mode” for about 10
seconds. You will time out of the shifted
mode about 10 seconds after the last key is
pressed.
3130
Page 17

C
ONTROLLING
M
X-10 P
ODULES
RO
If you have already installed a PAT01
Transceiver Module, (sold separately) you
can control it and other X-10 Pro modules
as follows:
1. Press and release
the X-10 button.
2. Use the number
buttons to enter the
Unit Code number
of the chosen
module. (You do
not need to enter
‘0’ first for a single
digit number.)
3. Press the appropriate button for
the function you
require (see
below).
2. Press and hold
TIMER until the
LED indicator
lights steadily.
Release TIMER
button.
3. Use the number
buttons to enter the
module Unit Code
for the module to
be turned off.
4. Press the desired
function button
(e.g. CH - to turn
the module off
after the preset
time).
5. Using the number
buttons enter the
sleep time
required (1 to 99
mins).
6. Press ENTER to
confirm the setting.
XX-10 PRO FUNCTIONS:-10 PRO FUNCTIONS:
On: CHANNEL +
Off: CHANNEL –
Bright: VOLUME +
Dim: VOLUME –
All Lights On: POWER
All Modules Off: MUTE
Note:Note: You cannot dim or brighten an
Appliance Module. If the module was off
and you press Bright or Dim (VOLUME+
or VOLUME-) this will simply turn the
module on.
TO
SET THE
X-10 S
LEEP TIMER
The X-10 Sleep Timer switches off the
chosen modules after the preset time.
1. Press and release
the X-10 button.
C
HANGING THE
C
ODE
:
X-10 PRO H
OUSE
The Learning Remote defaults to House
Code A, and in most cases you will not
need to change this unless you are
experiencing interference from a
neighboring X-10 system.
1. Press and release
the X-10 button.
3332
Page 18

2. Press and hold
SETUP until the
LED indicator
lights steadily.
Release the Setup
button.
3. Use the number
buttons to enter
the number
equivalent to the
chosen House
Code (1=A, 2=B
..16=P).
4. Press the ENTER
button to confirm
the House Code.
The LED turns off.
Note: Note: The Housecode you choose must
match the Housecode on the Transceiver
Module you are using it with.
3. Enter 014 to
control an IR Mini
Controller, 013 for
standard
X-10 PRO control.
The LED turns off
after the last digit
entered.
Note:Note: In most cases, you will not need to
use the IR Mini Controller to receive
commands from the Learning Remote - the
Transceiver Module does this for you and
has the added advantage of working
through walls. You can’t control the IR Mini
Controller and the Transceiver Module at
the same time.
C
ONTROLLING AN
IR M
INI CONTROLLER
(IR543)
If you already own an IR Mini Controller,
you will need to change the X-10 PRO
Home Automation code in the remote to
use it. The code for standard X-10 PRO
Home Automation is 013. The code to
control the IR mini controller is 014. To
change the code:
1. Press and hold
SETUP until the
LED indicator
lights steadily.
Release the
SETUP button.
2. Press and release
the X-10 button.
3534
Page 19

T
ROUBLESHOOTING
The Transceiver Module doesn’tThe Transceiver Module doesn’t
respond to the remote:respond to the remote:
• Check the House Code of the
Transceiver Module is set to A. If you
have changed the Housecode on the
remote (see p. 32), check that it
matches the Housecode on the
module.
• Press the ON/OFF button on the front
of the module to confirm it operates
the equipment connected to it.
The Transceiver Module works, butThe Transceiver Module works, but
other modules don’t respond:other modules don’t respond:
• Check that the module has the same
Housecode as the Transceiver Module.
• Try plugging the module into a different
outlet.
The Remote won’t control your A/VThe Remote won’t control your A/V
equipment, or doesn’t work at all:equipment, or doesn’t work at all:
• Use manual controls or the original
remote control to confirm the
equipment is working properly.
• Be sure you pressed the device key for
the device you want to control.
• Re-enter the code for your A/V
product from the code listings on
pages 15 through 24.
• Try searching for the code as
described on page 26.
• Replace the Remote’s batteries.
W
ARRANTY
24 MONTH LIMITED WARRANTY
X-10 PRO (X-10) WARRANTS ITS PRODUCTS TO BE
FREE FROM DEFECTIVE MATERIAL AND
WORKMANSHIP FOR A PERIOD OF TWO (2)
YEARS FROM THE ORIGINAL DATE OF
PURCHASE AT RETAIL. X-10 AGREES TO REPAIR
OR REPLACE, AT ITS SOLE DISCRETION, A
DEFECTIVE X-10 PRODUCT IF RETURNED TO X-10
WITHIN THE WARRANTY PERIOD AND WITH
PROOF OF PURCHASE.
IF SERVICE IS REQUIRED UNDER THIS
WARRANTY:
1. RETURN THE DEFECTIVE UNIT POSTAGE
PREPAID TO YOUR DEALER.
2. ENCLOSE A DATED PROOF OF PURCHASE.
3. X-10 IS NOT RESPONSIBLE FOR SHIPPING
DAMAGE. UNITS TO BE RETURNED SHOULD
BE PACKED CAREFULLY.
THIS WARRANTY DOES NOT EXTEND TO ANY X10 PRODUCTS WHICH HAVE BEEN SUBJECT TO
MISUSE, NEGLECT, ACCIDENT, INCORRECT
WIRING OR TO USE IN VIOLATION OF OPERATING
INSTRUCTIONS FURNISHED BY US, NOR
EXTEND TO ANY UNITS ALTERED OR REPAIRED
FOR WARRANTY DEFECT BY ANYONE OTHER
THAN X-10. THIS WARRANTY DOES NOT COVER
ANY INCIDENTAL OR CONSEQUENTIAL DAMAGES
AND IS IN LIEU OF ALL OTHER WARRANTIES
EXPRESSED OR IMPLIED AND NO
REPRESENTATIVE OR PERSON IS AUTHORIZED
TO ASSUME FOR US ANY OTHER LIABILITY IN
CONNECTION WITH THE SALE OF OUR
PRODUCTS.
SOME STATES DO NOT ALLOW LIMITATIONS ON
HOW LONG AN IMPLIED WARRANTY LASTS, AND/
OR THE EXCLUSION OR LIMITATION OF
INCIDENTAL OR CONSEQUENTIAL DAMAGES SO
THE ABOVE LIMITATIONS AND EXCLUSIONS MAY
NOT APPLY TO THE ORIGINAL CUSTOMER. THIS
WARRANTY GIVES YOU SPECIFIC RIGHTS AND
YOU MAY ALSO HAVE OTHER RIGHTS WHICH
VARY FROM STATE TO STATE.
3938
 Loading...