

Page 1
Personal Assistance
1
9
513
15
3
711
•
•
•
•
•
•
•
UNIT
A
I
EM
O
C
GK
•
•
•
•
•
•
•
•
HOUSE
AC Power
Battery Low
RECORD
RECORD
1
4
7
PROG
0
8
5
2
MEM
9
6
3
Install
Run
System
Owner’s Manual
Personal Assistance System PA5800
Page 2

READ THIS FIRST
This equipment generates and uses
radio frequency energy, and if not
installed and used properly, that is, in
strict accordance with the manufacturers
instructions, may cause interference to
radio and television reception. It has
been type tested and found to comply
with the limits for remote control security
devices in accordance with the
specifications in Sub-Parts B and C of
Part 15 of FCC Rules, which are
designed to provide reasonable
protection against such interference in a
residential installation. However, there is
no guarantee that interference will not
occur in a particular installation. If this
equipment does cause interference to
radio or television reception, which can
be determined by unplugging the
equipment, try to correct the interference
by one or more of the following
measures.
• Reorient the antenna of the radio/TV
experiencing the interference.
• Relocate the console with respect to
the radio/TV.
• Move the console away from the radio/
TV.
• Plug the console into an outlet on a
different electrical circuit from the
radio/TV experiencing the interference.
If necessary, consult X10 Technical
Support for additional suggestions.
The Personal Assistance Console’s
telephone dialer is designed to conform
to federal regulations, and it can be
connected to most telephone lines.
However, each telephone or telephone
device that is connected to the telephone
line draws power from the telephone line.
This is referred to as the device’s ringer
equivalence number, or REN.
If more than one telephone or other
device is connected to the same line,
add up all the RENs. If the total is more
than five, the telephones might not ring.
In rural areas, a total REN of three might
impair ringer operation. If ringer
operation is impaired, remove one of the
devices from the line.
Note: The console must not be
connected to:
• Coin-operated systems
• Party-line systems
• Most electronic key telephone systems
The console’s telephone dialer complies
with Part 68 of FCC Rules. You must,
upon request, provide the FCC
registration number and the REN to the
local telephone company. Both numbers
are shown on the bottom of the console.
The telephone portion of the Personal
Assistance Console has been tested and
found to comply with all applicable UL
and FCC standards.
In the unlikely event that the console
causes problems on the telephone line,
the telephone company can disconnect
service. The telephone company
attempts to notify you in advance. If
advance notice is not practical, the
telephone company notifies you as soon
as possible and advises you of your right
to file a complaint with the FCC.
Also, the telephone company can make
changes to its lines, equipment,
operations, or procedures that could
affect the operation of this console. The
telephone company notifies the owner of
these changes in advance, so the
necessary steps can be taken to prevent
interruption of telephone service.
Note: The security functions of this
system have not been tested by
Underwriters Laboratories.
Contents
Introduction.................................................................................................... 4
Installation ..................................................................................................... 5
Locating The Console ................................................................................ 5
Console....................................................................................................... 6
Pendant Remote ......................................................................................... 7
Lamp Module .............................................................................................. 8
Home Automation Remote......................................................................... 9
Other X10 Products ................................................................................. 1 0
Setting Up the Dialer .................................................................................. 11
Programming Phone Numbers ................................................................ 12
Recording a Voice Message .................................................................... 13
Battery Information ..................................................................................... 12
General..................................................................................................... 12
Console..................................................................................................... 12
Pendant Remote ....................................................................................... 1 2
Clearing Remotes from the Console ....................................................... 1 3
Troubleshooting .......................................................................................... 14
32
Page 3

Introduction
Living Room
Dining Room
Kitchen
Hallway
Study
Installation
The X10 Personal Assistance System includes a Personal Assistance Console with an
automatic dialer that calls neighbors or friends when the CALL button is pressed on the
Pendant Remote.
The system may be configured with any combination of the following items:
• Up to 16 Pendant Remotes
• Additional X10 automation modules such as plug-in lamp and appliance modules and
wired-in replacement wall switches.
This manual describes the installation process for the Console and Pendant Remotes. It
does not cover the additional X10 automation modules which are supplied with their own
installation instructions.
Locating the Console
Choose a location for the Personal Assistance Console which is as central as possible in
the house, while providing access to a modular telephone jack and an AC outlet. The
console may be placed on a shelf or table, or may be fixed to a wall using the optional
mounting bracket and screws.
54
Page 4

Installation
Installation
Console
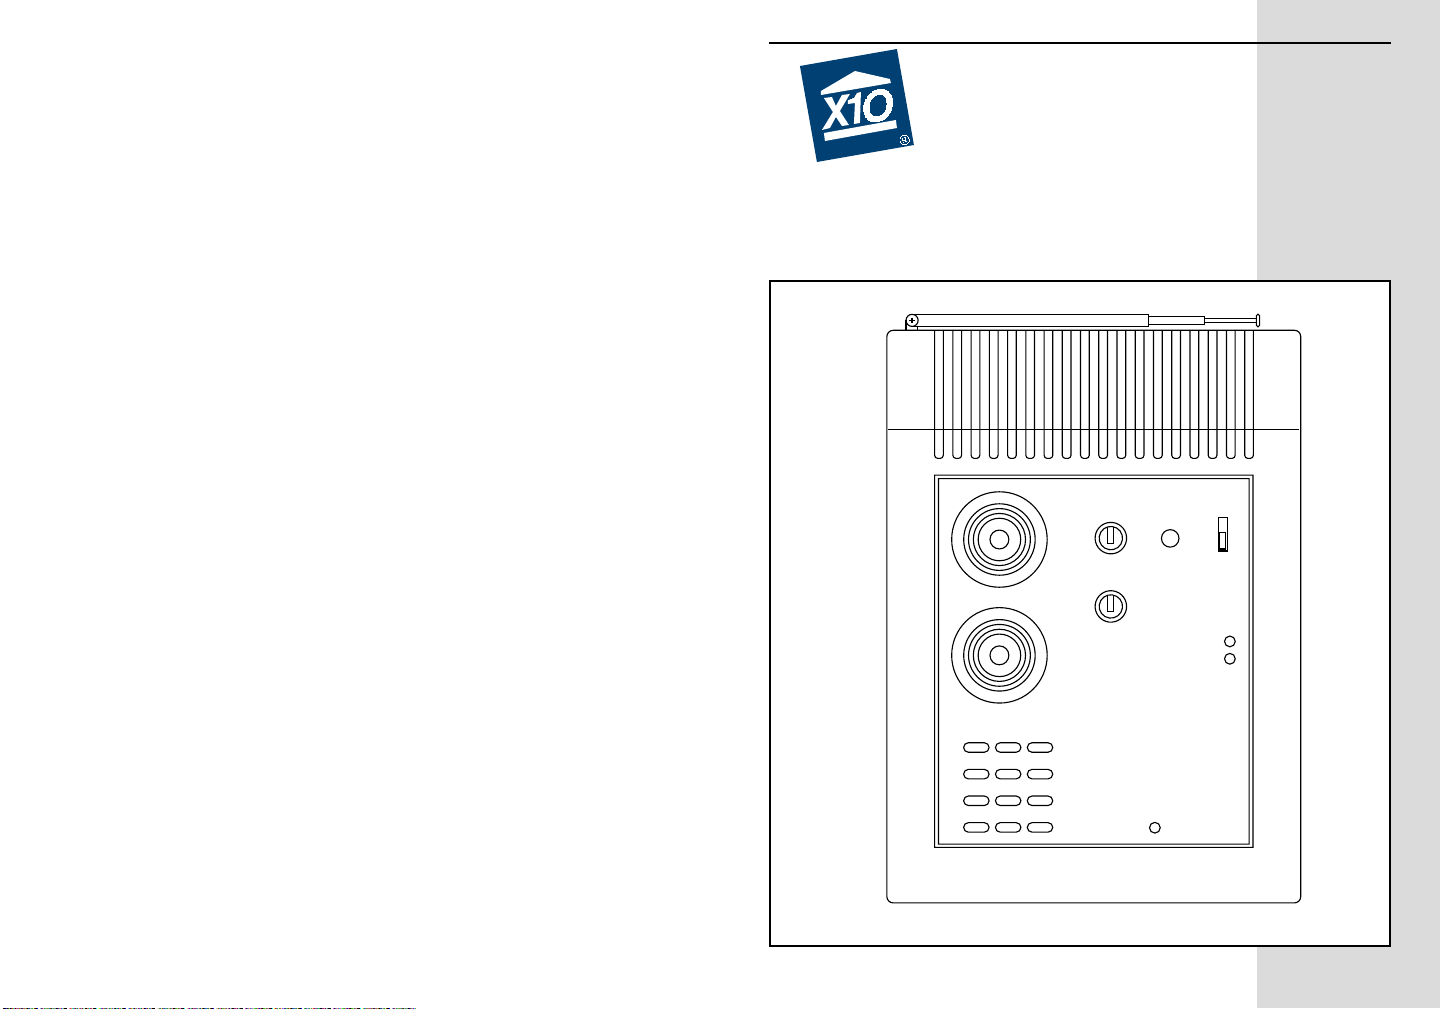
Mounting the console
The Personal Assistance Console is designed to be installed free-standing on a table
top or shelf. A wall mounting bracket is also available.
Fitting the backup battery
Slide off the battery compartment cover and clip a 9V battery onto the battery contacts.
Slide the battery into the battery compartment and replace the cover. When AC power is
applied the battery LED on the front panel will go out. It is not necessary to disconnect
power to the console when fitting or replacing batteries.
Attaching cables
A telephone cord terminated at each end in an RJ11 connector is provided for telephone
connection. If possible, the console should be connected to its own telephone line to
ensure that the line cannot be busy when the console attempts to dial out. For
applications where this is not practical, the console may also share a line with an
existing telephone using a “T” adapter.
Note: The X10 Personal Assistance Console is not designed to operate with an
RJ31X type telephone connection.
Pendant Remote
STOP
CALL
Registering the Pendant Remote with the Console
• Set the slide switch on the Console to INSTALL.
• Press CALL. The console beeps once to confirm that the pendant has been
registered.
• Return the console slide switch to the RUN position.
Testing the Pendant Remote
• Set the slide switch on the Console to RUN.
• Press CALL on the remote. The console is triggered and the alarm sounds.
• Press STOP to cancel the alarm.
Note: If the console has already started dialing out, it will finish dialing the current
number before canceling the alarm.
76
Page 5

InstallationInstallation
Lamp Module
1
15
3
513
711
9
UNIT
A
O
C
EM
GK
I
HOUSE
Lamp Module
Installing the Lamp Module
When the console’s alarm trips, lamps connected to Lamp Modules set to the same
House Code as the console flash on and off. The lamps stop flashing and remain on
after about 4 minutes or when STOP is pressed on the Pendant Remote.
• Set the House Code dial to match the House Code set on the Personal Assistance
Console.
• Set the Unit Code dial to an unused code which can be controlled from a remote or
plug-in controller as required.
• Plug a lamp into the Lamp Module and plug the Lamp Module into a convenient AC
outlet, preferably an unswitched one to ensure that the lamp will always operate when
the alarm is triggered.
Local control
The Lamp Module includes circuitry to sense the lamp’s own on/off switch to turn the
lamp on locally. To switch a lamp on, turn the lamp’s own switch off then on again.
Home Automation Remote
ON
1
2
3
4
5
6
7
8
A
.
.
C
O
.
.
E
M
.
.
G
K
..
I
Installing the Home Automation Remote
The X10 Home Automation Remote works with your Personal Assistance Console to let
you control lamps and appliances anywhere in the home.
Just set the House Code dial to the same House Code as the Personal Assistance
Console and you're ready to go.
Using the Home Automation Remote
To switch on a lamp or appliance, press the left side of the numbered key that matches
the Unit Code on the X10 module being controlled. Press the Bright and Dim keys to
adjust the brightness of lamps connected to Lamp Modules or Wall Switch Modules.
Move the slide switch to “9-16” to control modules with unit codes 9-16.
OFF
9-161-8
98
Page 6

Installation
Setting up the Dialer
Other X10 products
ON OFF
1
2
3
4
5
6
7
8
A
.
.
C
O
.
.
E
M
.
.
9-161-8
G
K
..
I
1
A
513
EM
9
I
Remote Switch
Modules
A wide range of switch and control modules are available from X10, all of which work
together with the Personal Assistance System. Modules available include replacement
wall switches, X10 controlled AC outlets, screw-in lamp modules, plug-in appliance
modules and many others.
Remotes
As well as being able to add up to 16 Pendant Remotes to the system, it is also possible
to add any number of Home Automation wireless remotes such as wireless stick-on wall
switches, keychain remotes, or the PalmPad™ Home Automation remote which controls
up to 16 modules around the house.
Controllers
A range of plug-in controls are available including the Mini Timer which can control up to
four modules with two on/off times each day, the Telephone Responder which allows the
owner to use any touch tone telephone to call home and control X10 modules, and
products which allow any PC to control X10 modules.
Please visit www.x10.com for more information.
Programming Phone Numbers
Note: you should program the console to call a friend, relative or neighbor who can then
listen-in to your home to determine if there is a real problem. The person can then call
the appropriate emergency services if necessary, or call you back to see if everything is
fine. You should NOT program the console to dial the police or other emergency services
directly.
1. Set the console to INSTALL.
2. Press PROG button.
3. Enter the first phone number that you want the console to call in the event of a
problem.
4. Press the MEM button.
5. Press 1 to store the phone number in memory location 1.
Press PROG, enter second phone number, press MEM, 2.
Press PROG, enter third phone number, press MEM, 3.
Press PROG, enter fourth phone number, press MEM, 4.
Repeat the above process to change a phone number.
Note: if you only want to program one phone number, you should store this number in
all four memory locations.
Storing a Voice Message
1. Set the console to INSTALL.
2. Press the RECORD button.
The BUSY light turns on.
3. Speak clearly into the microphone on the front of the console. You can record up to
15 seconds of speech. For example: “There is a burglary in progress at (address).
Press 0 to listen-in.”
After 15 seconds the BUSY light turns off.
4. Plug the earphone into the jack on the side of the console.
5. Set console to RUN. The console plays back your message through the earphone so
you can hear what it sounds like (it sounds better when played back over the phone
line).
6. If you want to hear the message again, set console to INSTALL then back to RUN.
Repeat above steps to change the message.
1110
Page 7

Battery InformationBattery Information
General
X10 Pendant Remotes are designed to operate for approximately two years when fitted
with a 3V lithium cell. Since operating conditions vary from installation to installation
however, it is recommended that all batteries are replaced once a year.
Console
Battery backup
The battery in the console is used as a backup when there has been a power failure.
The battery provides approx. 20 hours of backup time provided the alarm has not been
triggered.
While on battery backup, the console will continue to operate, and will sound the siren (if
enabled) and dial out if the alarm is triggered. It will not, of course, flash the house lights
or trigger Power Horn sirens. If both the AC supply and the battery fails, the console will
no longer dial out or sound the siren, and will lose its telephone numbers and recorded
message.
Battery Replacement
Batteries can be replaced at any time, even while the unit is powered up. There is no
special procedure for battery replacement.
Pendant Remote
Battery Replacement
Providing the battery has not already failed, it may be replaced with fresh batteries
without the need to reinstall the remote provided the fresh battery is fitted within 30
seconds of removing the old one. Confirm that the remote is still logged in by pressing
STOP and listening for the confirmation tone from the console. If there is no sound, the
code has been lost and you will need to install the remote again.
Clearing Remotes from the Console
If you suspect that a neighboring system is causing false alarms, or if you need to
reinstall remotes for any other reason, you can clear all sensors and remotes from the
console's memory by unplugging it and removing the battery.
Note: You will need to reprogram telephone numbers and recorded message after doing
this.
To replace the battery, remove the two screws and gently separate the two halves of the
cabinet. Slide out the old battery and replace with a fresh 3V Lithium Cell (CR2025).
1312
Page 8

Troubleshooting
Troubleshooting
The console’s alarm does not trip when
you press CALL on the pendant.
If the battery indicator on the Console is
on.
If you lose your Pendant Remote.
If the system trips by itself
If the console does not dial out when you
press CALL on the Pendant Remote.
SOLUTIONPROBLEM
• Check that the console’s slide switch
is set to RUN.
• Check that the battery indicator on the
Pendant Remote turns on when you
press CALL. Replace the battery and
reinstall the Remote if necessary.
Replace the console’s battery. A 9V
alkaline battery provides approximately
20 hours of backup. Replace battery at
least once a year.
Reinstall your complete system to
prevent someone else from using the lost
remote control.
A neighbor may have a compatible
system. Reinstall the complete system
so that it chooses different RF codes.
• Check that you have programmed in
emergency phone numbers. See
“Setting Up the Console.”
• Make sure the console is connected to
the phone line.
• Make sure the Pendant Remote’s
battery is good.
• Make sure the console has power and
the backup battery is good.
PROBLEM SOLUTION
If the console appears to be “locked up.” • If the RECORD light is on, you may
have just switched the console from
INSTALL to RUN. The console then
plays back the message. Wait 15
seconds and the RECORD light goes
out..
• If the RECORD light is not on, but the
console appears to be locked up, you
might have just triggered the system.
When the console dials out and
someone answers the phone and
presses any key, the console is put
into the listen mode for 75 seconds. If
you immediately call back the person,
or they call you, your phone will be
busy. Wait for 75 seconds: the console
will be operational again and the
phone line will be free.
Intercom Systems
Intercom systems which send voice signals over existing electrical wiring may interfere
with the ability to control modules from your X10 Personal Assistance system with the
intercom in use. If the intercom system has its own separate wiring it will not cause a
problem.
For help or more information on setup, please visit:
http://www.x10.com/support
1514
Page 9

ONE YEAR LIMITED WARRANTY
X10 WARRANTS ITS PRODUCTS TO BE FREE FROM DEFECTIVE MATERIAL AND
WORKMANSHIP FOR A PERIOD OF ONE (1) YEAR FROM THE ORIGINAL DATE OF
PURCHASE AT RETAIL. X10 AGREES TO REPAIR OR REPLACE, AT ITS SOLE
DISCRETION, A DEFECTIVE X10 PRODUCT IF RETURNED TO X10 WITHIN THE
WARRANTY PERIOD AND WITH PROOF OF PURCHASE.
THIS WARRANTY DOES NOT EXTEND TO ANY X10 PRODUCTS WHICH HAVE BEEN
SUBJECT TO MISUSE, NEGLECT, ACCIDENT, INCORRECT WIRING OR TO USE IN
VIOLATION OF OPERATING INSTRUCTIONS FURNISHED BY US, NOR EXTEND TO
ANY UNITS ALTERED OR REPAIRED FOR WARRANTY DEFECT BY ANYONE OTHER
THAN X10. THIS WARRANTY DOES NOT COVER ANY INCIDENTAL OR
CONSEQUENTIAL DAMAGES AND IS IN LIEU OF ALL OTHER WARRANTIES
EXPRESSED OR IMPLIED AND NO REPRESENTATIVE OR PERSON IS
AUTHORIZED TO ASSUME FOR US ANY OTHER LIABILITY IN CONNECTION WITH
THE SALE OF OUR PRODUCTS.
SOME STATES DO NOT ALLOW LIMITATIONS ON HOW LONG AN IMPLIED
WARRANTY LASTS, AND/OR THE EXCLUSION OR LIMITATION OF INCIDENTAL OR
CONSEQUENTIAL DAMAGES SO THE ABOVE LIMITATIONS AND EXCLUSIONS MAY
NOT APPLY TO THE ORIGINAL CUSTOMER. THIS WARRANTY GIVES YOU SPECIFIC
RIGHTS AND YOU MAY ALSO HAVE OTHER RIGHTS WHICH VARY FROM STATE TO
STATE.
IF SERVICE IS REQUIRED UNDER THIS WARRANTY:
Call 1-800-442-5065, visit www.x10.com, or e-mail support@x10.com
3824 North 5th St., Suite C,
North Las Vegas, NV 89032
Web Site: http://www.x10.com
PA5800-01/03
 Loading...