

Wunder Bar STAINLESS ONE Installation Manual
The Stainless One Stout Faucet
N
)
Congratulations on your purchase of the finest beer faucet available!
Please take a moment to review this manual to familiarize your self
with the care and maintenance of this faucet.
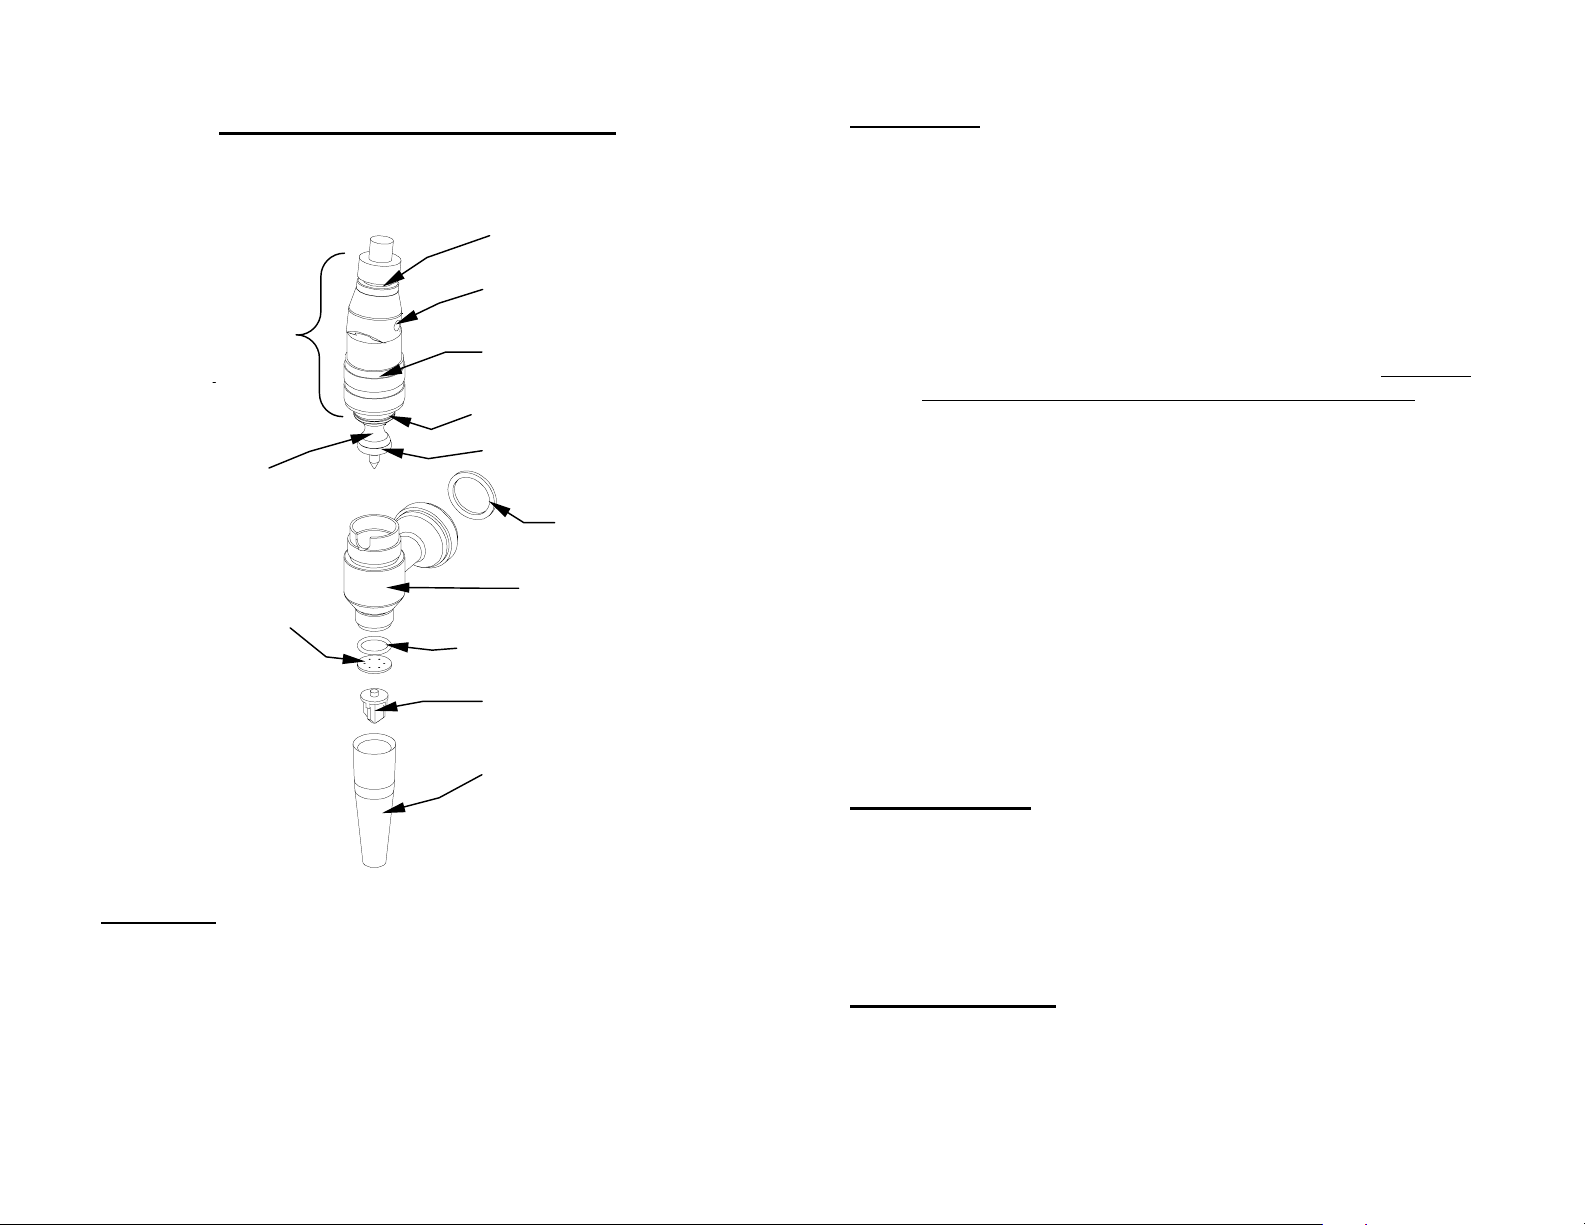
Lever (10-0011-00)
Gold Plated Lever (10-0011-01)
PLUNGER ASSEMBLY
(10-0010-01)
Gold Plated Plunger
Assembly
(10-0010-01)
Plunger (10-0009-01)
Exploder Plate (10-0053-00)
Installation
Before putting this faucet into service, first clean the faucet as you would for
regular cleaning (see cleaning instructions below). This will ensure that the
faucet has been cleaned of any materials that may be present from
manufacturing. Next, make sure that the faucet is cooled to the temperature of
the beer before dispensing beer. This will avoid
The faucet is mountable to any industry standard shank in the same manner as
all other faucets.
Shoulder Screw (20-0007-01
Cap (10-0006-00)
Gold Plated Cap (10-0006-01)
Dynamic O-ring (20-0002-90)
Static D-ring (CD-DOV-014V)
Shank Gasket (10-0015-00)
Faucet Body (10-0003-00)
Gold Plated Body (30-0002-01)
ozzle O-ring (20-0001-00)
Flow Straightener (10-0054-00)
Stout Nozzle (10-0052-00)
Patent # 5,794,823
possible foaming of the beer.
Maintenance
To maintain the Stainless One beer faucet, wipe the outer surfaces with a damp
cloth. As the surface will not oxidize, no polishing is required. To reduce wear
on the lever, apply WD-40 to the cap with a cloth when the faucet is in the
open position.
If you see beer dripping from the nozzle.
1) Dripping for a few moments after shutting the faucet:
• Check the nozzle attachment to the faucet body to ensure it is
properly compressing the nozzle o-ring to the faucet body. To
properly tighten the nozzle, turn the Nozzle clockwise until the o-ring
touches, then turn another 1/8 turn. The nozzle should be finger tight
with no gap between the top of the nozzle and the faucet body.
Overtightening the Nozzle forces the O-ring into the flow of beer
causing turbulence and foaming.
• If dripping continues, remove the nozzle and confirm the presence of
the nozzle o-ring properly positioned at the bottom of the threaded
section of the nozzle. If it is missing replace it with the spare from the
o-ring kit.
• If the drip persists, check the fluid flow when pouring off a glass of
beer. If gas bubbles are visible in the fluid stream when pouring, then
there is no leak. This dripping is caused by gas expanding in the
nozzle after shutting the valve.
2) Constant Dripping:
• If the drip appears constant shut the beer line off and remove the
plunger assembly. Inspe ct the static o-ri ng for cracks. If the o-ring
has failed, cut of the old o-ring with a razor knife. Replace the new oring by rolling into position
.
Cleaning Solution
Mix the appropriate amount of beer line cleaning solution, in a bucket or
sanitizing tank, with warm water per the manufacturer’s instructions. Liquid
and powder beer line cleaning concentrates are available from most restaurant
supply companies.
Liquid Beer Line Cleaner: Penetrate Beer Line Cleaner, manufactured by National Chemicals,
Inc., Winona, MN 55987
Powder beer line cleaner: Super No Rinse Line Cleaner, manufactured by National Chemicals,
Inc., Winona, MN 55987
Faucet Dis-assembly
Turn the Shoulder Screw (#20-0007-01) counterclockwise to remove the Lever
(10-0011-00) for cleaning. Lubricate the screw and Lever bottom with WD40, insert screw through lever and Plunger. And then tighten with slot
screwdriver in clockwise direction until snug.
3/03
Faucet Cleaning and Sanitizing Instructions
Forward Flush from Kegs- The faucet should be left on the tower.
1. Attach the keg connector to the sanitizer tank filled with Beer Line Cleaner (see
Cleaning Solution on page 3 of this manual).
2. Engage the keg connector to pressurize the sanitizer tank. Open the faucet until pure
cleaning solution is observed flowin g from the faucet. Close the faucet. Open and
close the faucet 3 to 4 times to insure that the cleaning solution contacts all faucet
surfaces contacted by beer. Allow the cleaning solution to remain in the connector,
line, and faucet for a minimum of two minutes.
3. Disconnect, empty, rinse, and then fill the sanitizing tank with cold water. Repeat step
2 until all rinse water is dispensed and air ONLY emerges from the faucet nozzle.
4. Disconnect the keg connector from the sanitizing tank . Attach the keg connector to
the keg and actuate the connector. Open the beer faucet until beer with no rinse water
is observed flowing from the faucet nozzle.
Backward Flush - (Requires a cleaning connector p/n 40-0005-00 from Stainless One.)
1. Remove the nozzle from th e faucet and atta ch the cleaning connector. Fill the sani tiser
tank or line cleaning pump with cleaning solution (see page 3 of this manual).
2. Attach the sanitizer tank or pump to the cleaning connector. Disconnect the keg
connector from the keg, open or actuate the connector, and then place it in a bucket.
Open the faucet, fully. Pressurize the tank or turn t he pump on. Allow th e cleaning
solution to flow through the faucet, lines, and then keg connector into the bucket until
pure cleaning solution is observed flowing from the keg connector. Open and close the
faucet 3 to 4 times to insure that all internal facuet surfaces and parts are cleaned.
Allow the cleaning solution to remain in the faucet and lines for, at least, two minutes.
3. Disconnect, empty, rinse, and then fill the sanitizing tank with cold water. Repeat step
2 until all rinse water is dispensed and air ONLY emerges from the faucet nozzle.
4. Disconnect the keg connector from the sanitizing tank . Attach the keg connector to
the keg and actuate the connector. Open the beer faucet until beer with no rinse water
is observed flowing from the faucet nozzle.
Periodic inspection – (Monthly Inspection) Remove the plunger assembly from the faucet body
by turning the knurled cap counter clockwise. (NOTE: the beer marker will stay straight during
plunger assembly removal.) The plunger assembly can be cleaned in cleaning solution, or washed
in a low temp dishwasher. (NOTE: do not leave the plunger assemblies in a high temperature
drying cycle. The drying cycle will breakdown the rubber o-rings, and cause premature failure.)
Support
If you should have any questions about or problems with your Stainless
One beer faucet, please contact Stainless One directly. We can be
reached by:
Toll free: (800) 722-6738
Tel: (707) 448-5151
Fax: (707) 448-1521
E-mail: jim@wunderbar.com
We hope you enjoy the use of our beer dispensing products! If you
have any comments, let us know!
“Pour beer better. Pour better beer.”
1997-2003 Automatic Bar Controls, Inc. / Wunder-Bar All rights reserved.
STOUT FAUCET
OWNER’S MANUAL
790 Eubanks Drive Vacaville, California 95688
(707) 448-5151 Facsimile (707) 448-1521
3/03
 Loading...