

Page 1
WORKSHOP MANUAL
KiSC issued 03, 2007 A
TRACTOR
ME8200,ME9000
Page 2

TO THE READER
KiSC issued 03, 2007 A
This Workshop Manual has been prepared to provide servicing personnel with
information on the mechanism, service and maintenanc e of KUBOTA tracto r ME8200
and ME9000. It is divided into two parts, "Mechanism" and "Servicing" for each section.
■ Mechanism
Information on the construction and function are included. This part should be
understood before proceeding with troubleshooting, disassembling and servicing.
Refer to Diesel engine / Tractor Mechanism Workshop Manual (Code No. 9Y02101872 / 9Y021-18200) for the one which has not been described to this workshop
manual.
■ Servicing
The heading "General" section comes general precautions, check and maintenance
and special tools. Other section, there are troubleshooting, servicing specification lists,
checking and adjusting, disassembling and assembling, and servicing which cover
procedures, precautions, factory specifications and allowable limits.
All information illustrations and specifications contained in this manual are based on
the latest product information available at the time of publication.
The right is reserved to make changes in all information at any time without notice.
© KUBOTA Corporation 2003
June 2003
Page 3
ME8200, ME9000, WSM
SAFETY FIRST
KiSC issued 03, 2007 A
SAFETY INSTRUCTIONS
SAFETY INSTRUCTIONS
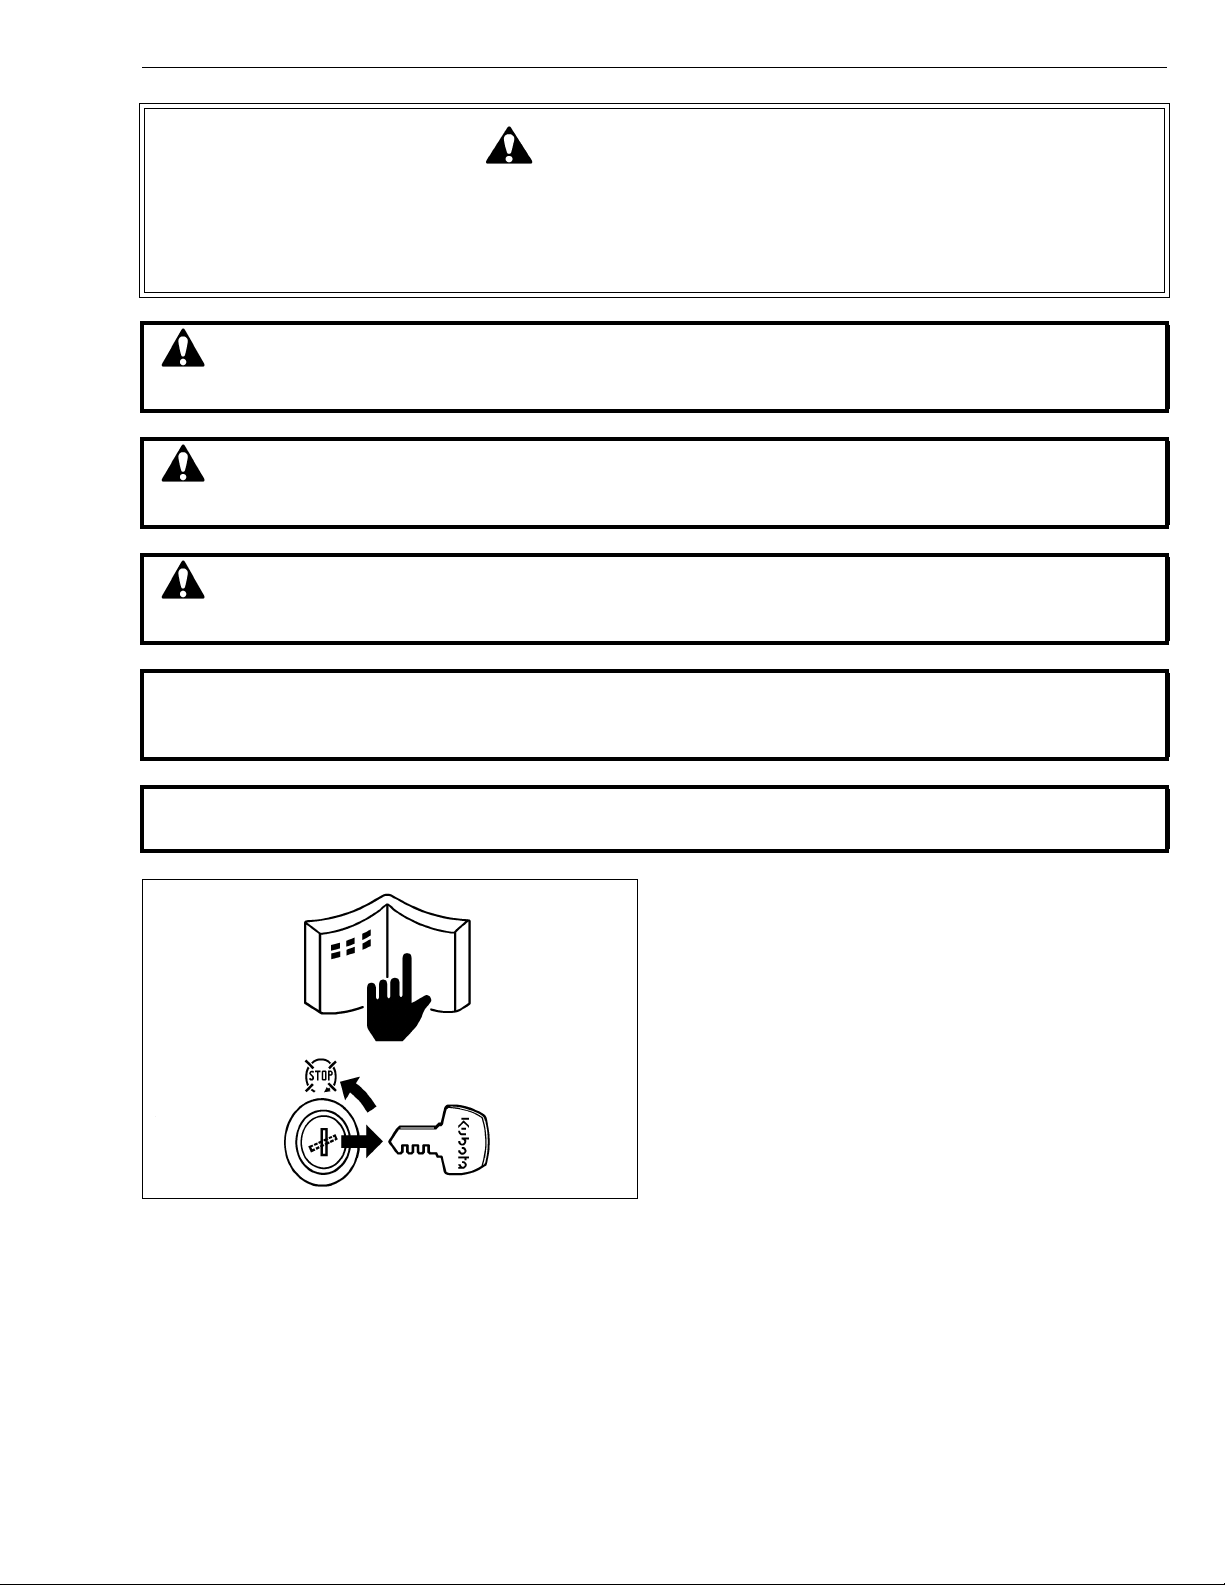
This symbol, the industry’s “Safety Alert Symbol”, is used throughout this manual and on labels on
the machine itself to warn of the possibility of personal injury. Read these instructions carefully.
It is essential that you read the instructions and safety regulations before you attempt to repair or use
this unit.
DANGER : Indicates an imminently hazardous situation which, if not avoided, will result in
death or serious injury.
WARNING : Indicates a potentially hazardous situation which, if not avoided, could result in
death or serious injury.
CAUTION : Indicates a potentially hazardous situation which, if not avoided, may result in
minor or moderate injury.
■ IMPORTANT : Indicates that equipment or property damage could result if instructions are not
followed.
■ NOTE : Gives helpful information.
BEFORE SERVICING AND REPAIRING
• Read all instructions and safety instructions in this
manual and on your machine safety decals.
• Clean the work area and machine.
• Park the machine on a firm and level ground, and set
the parking brake.
• Lower the implement to the ground.
• Stop the engine, and remove the key.
• Disconnect the battery negative cable.
• Hang a “DO NOT OPERATE” tag in operator
station.
1
Page 4
ME8200, ME9000, WSM
KiSC issued 03, 2007 A
SAFETY INSTRUCTIONS
SAFETY STARTING
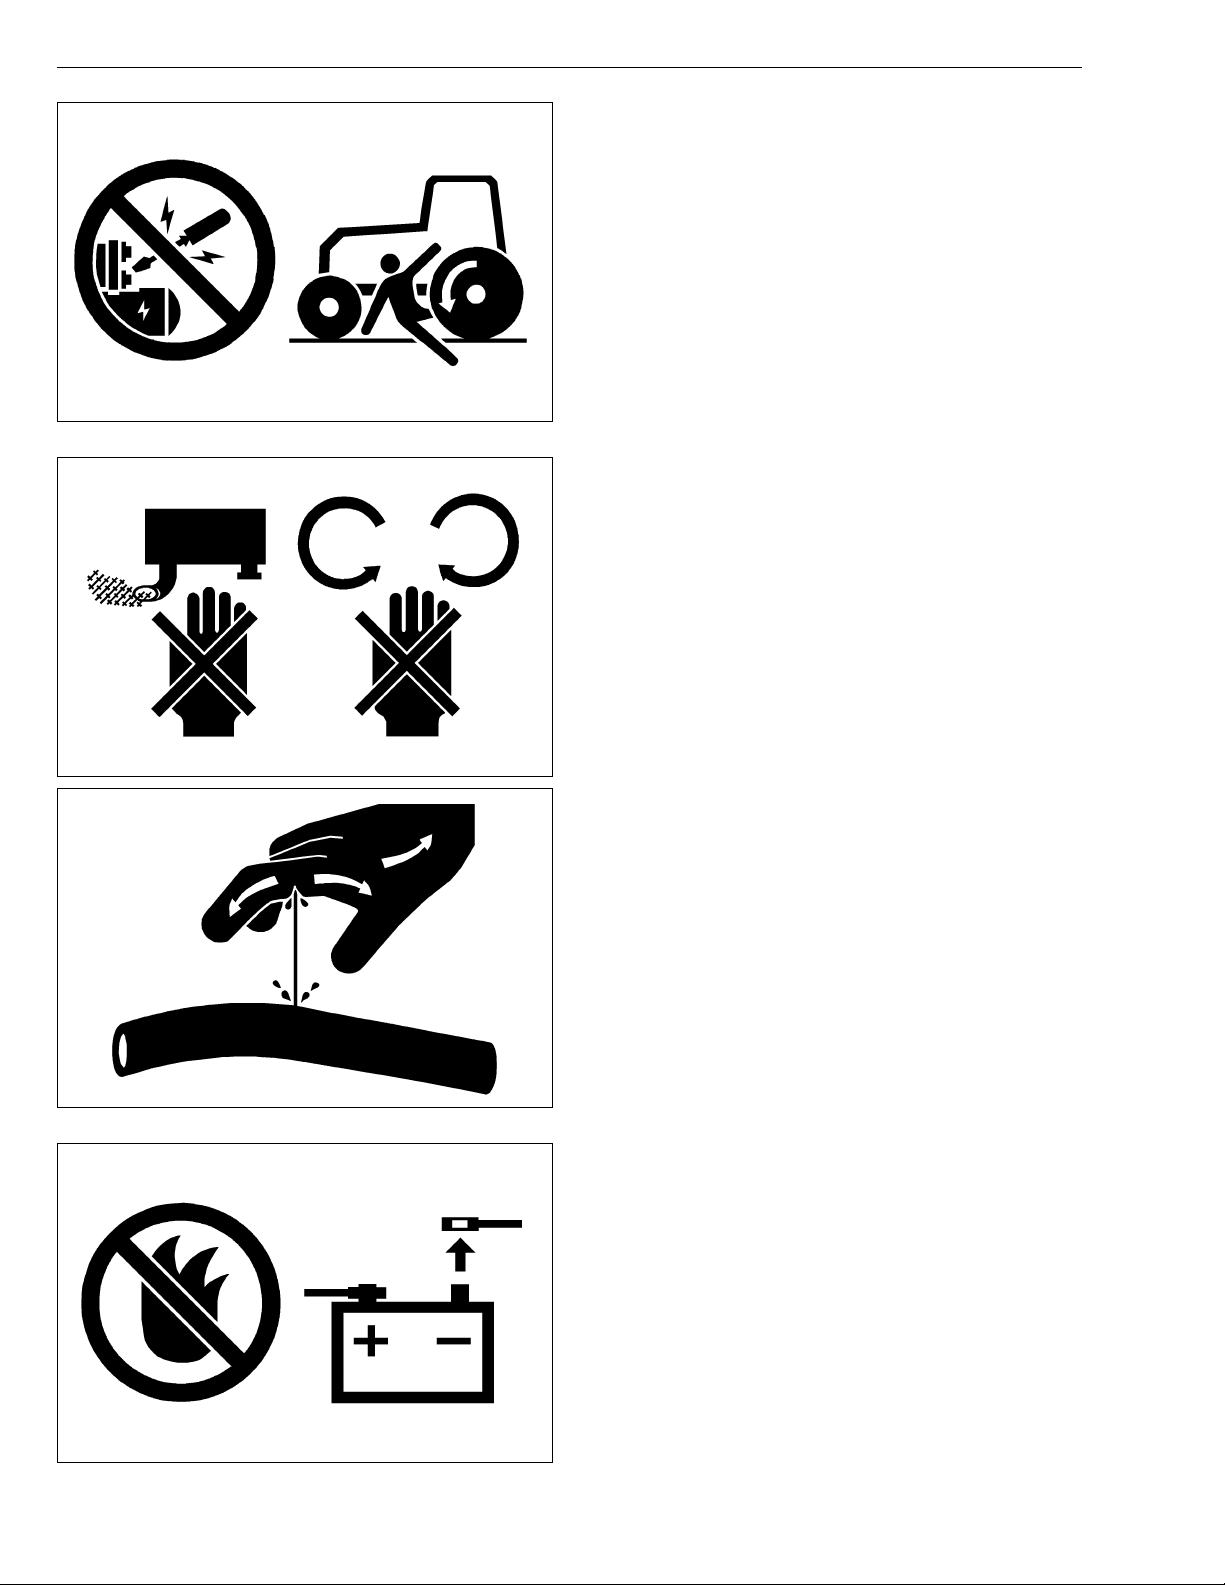
• Do not start the engine by shorting across starter
terminals or bypassing the safety start switch.
• Do not alter or remove any part of machine safety
system.
• Before starting the engine, make sure that all shift
levers are in neutral positions or in disengaged
positions.
• Never start the engine while standing on ground.
Start the engine only from operator’s seat.
SAFETY WORKING
• Do not work on the machine while under the influence
of alcohol, medication , or other substances or while
fatigued.
• Wear close fitting clothing and safety equipment
appropriate to the job.
• Use tools appropriate to the work. Makeshift tools,
parts, and procedures are not recommended.
• When servicing is performed together by two or more
persons, take care to perform all work safely.
• Do not work under the machine that is supported
solely by a jack. Always support the machine by
safety stands.
• Do not touch the rotating or hot parts while the engine
is running.
• Never remove the radiator cap while the engine is
running, or immediately after stopping. Otherwise, hot
water will spout out from radiator. Only remove
radiator cap when cool enough to touch with bare
hands. Slowly loosen the cap to first stop to relieve
pressure before removing completely.
• Escaping fluid (fuel or hydraulic oil) un der pressure
can penetrate the skin causing serious injury. Relieve
pressure before disconnecting hydraulic or fuel lines.
Tighten all connections before applying pressure.
AVOID FIRES
• Fuel is extremely flammable and explosive under
certain conditions. Do not smoke or allow flames or
sparks in your working area.
• To avoid sparks from an accidental short circuit,
always disconnect the battery negative cable first and
connect it last.
• Battery gas can explode. Keep sparks and open
flame away from the top of b attery, especially when
charging the battery.
• Make sure that no fuel has been spilled on the engine.
2
Page 5
ME8200, ME9000, WSM
KiSC issued 03, 2007 A
SAFETY INSTRUCTIONS
VENTILATE WORK AREA
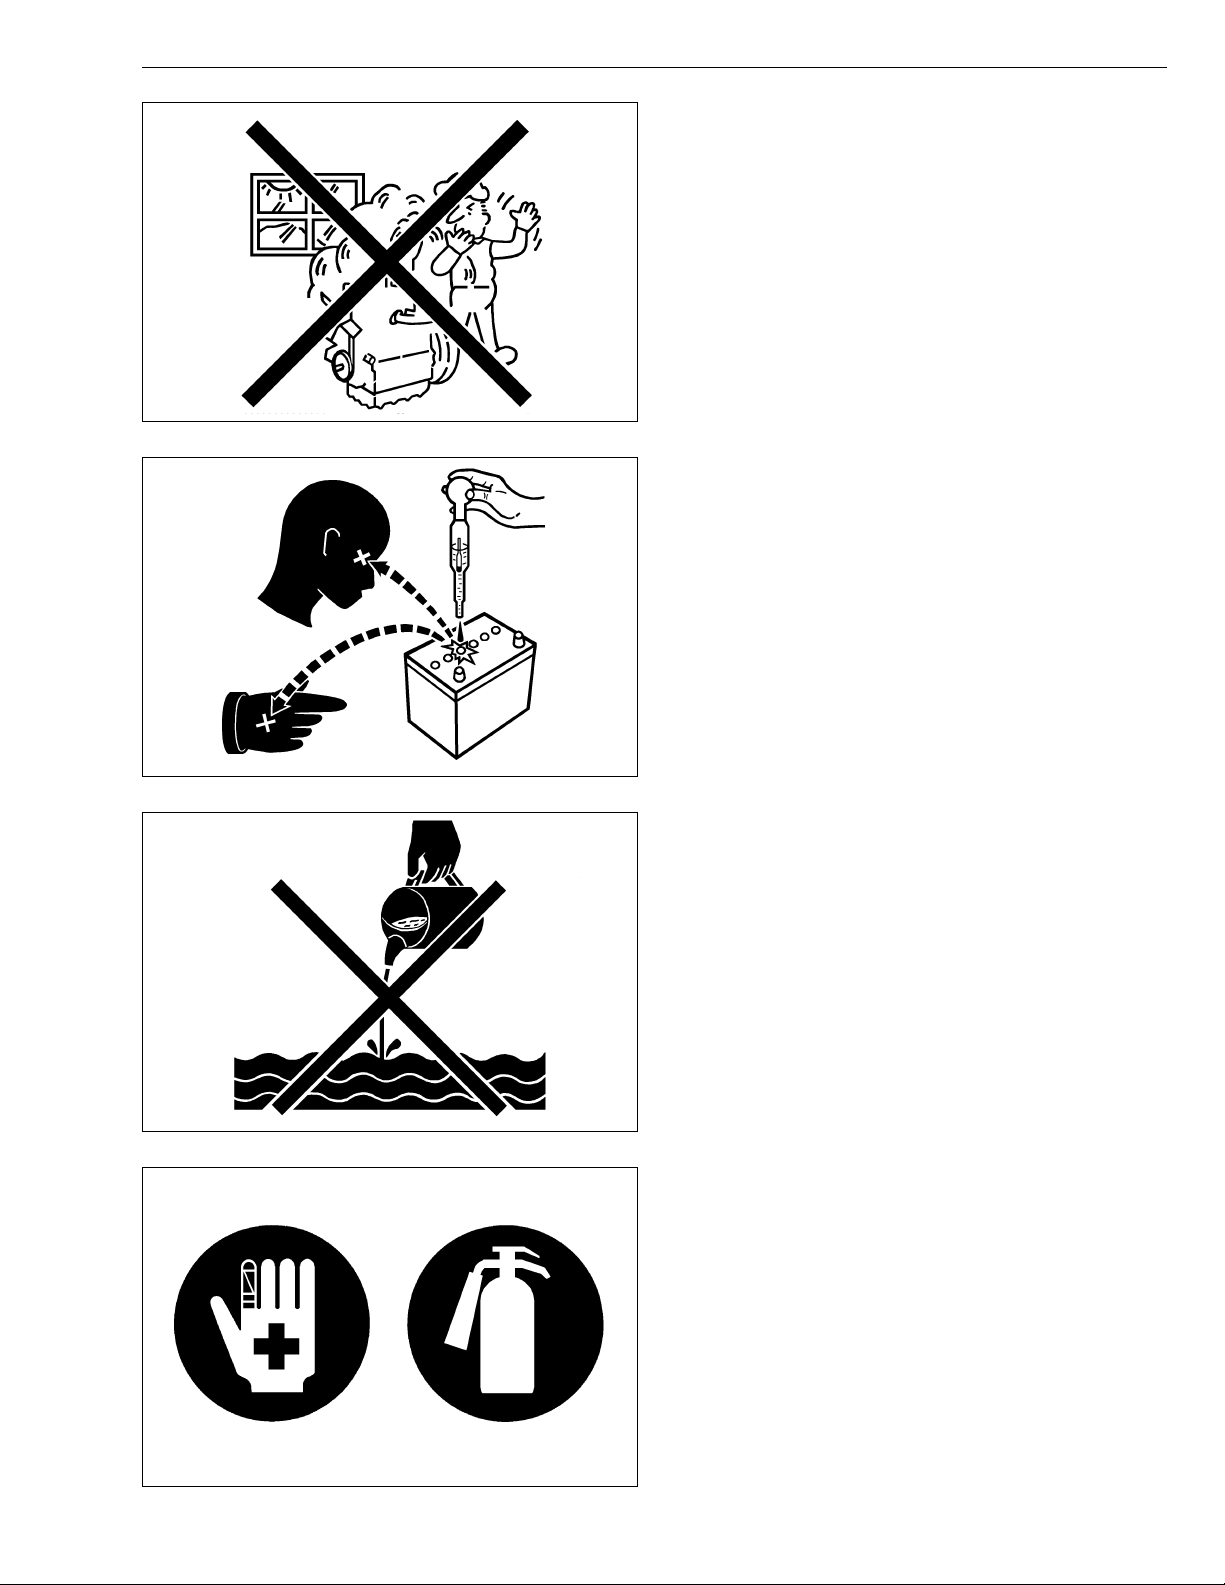
• If the engine must be running to do some work, make
sure the area is well ventilated . Neve r run the eng ine
in a closed area. The exhaust gas contains poisonous
carbon monoxide.
PREVENT ACID BURNS
• Sulfuric acid in batte ry electrolyte is poisonou s. It is
strong enough to burn skin, clothing and cause
blindness if splashed into eyes. Keep electrolyte
away from eyes, hands and clothing. If you spill
electrolyte on yourself, flush with water, and get
medical attention immediately.
DISPOSE OF FLUIDS PROPERLY
• Do not pour fluids into the ground, down a drain, or
into a stream, pond, or lake. Observe relevant
environmental prot ectio n regulati ons whe n disp osing
of oil, fuel, coolant, electrolyte and other harmful
waste.
PREPARE FOR EMERGENCIES
• Keep a first aid kit and fire extingui sher handy at all
times.
• Keep emergency numbers for doctors, ambulance
service, hospital and fire department near your
telephone.
3
Page 6
ME8200, ME9000, WSM
KiSC issued 03, 2007 A
SAFETY INSTRUCTIONS
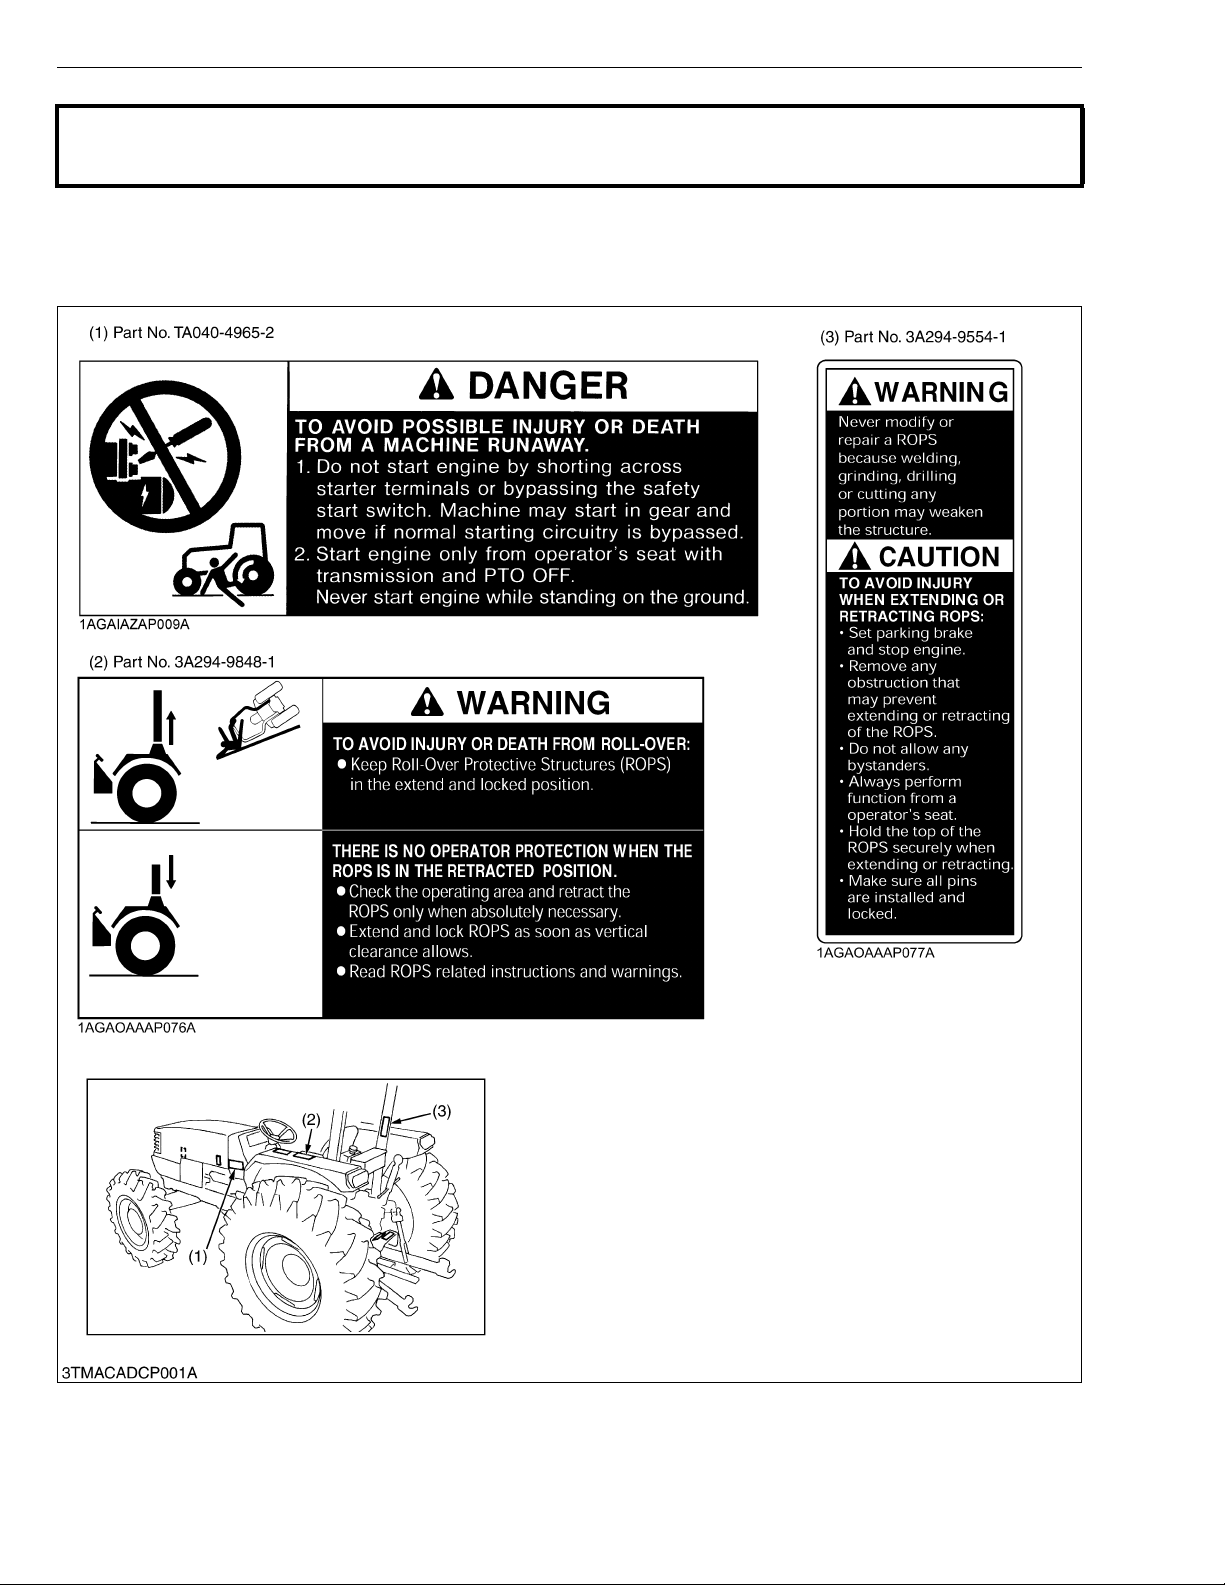
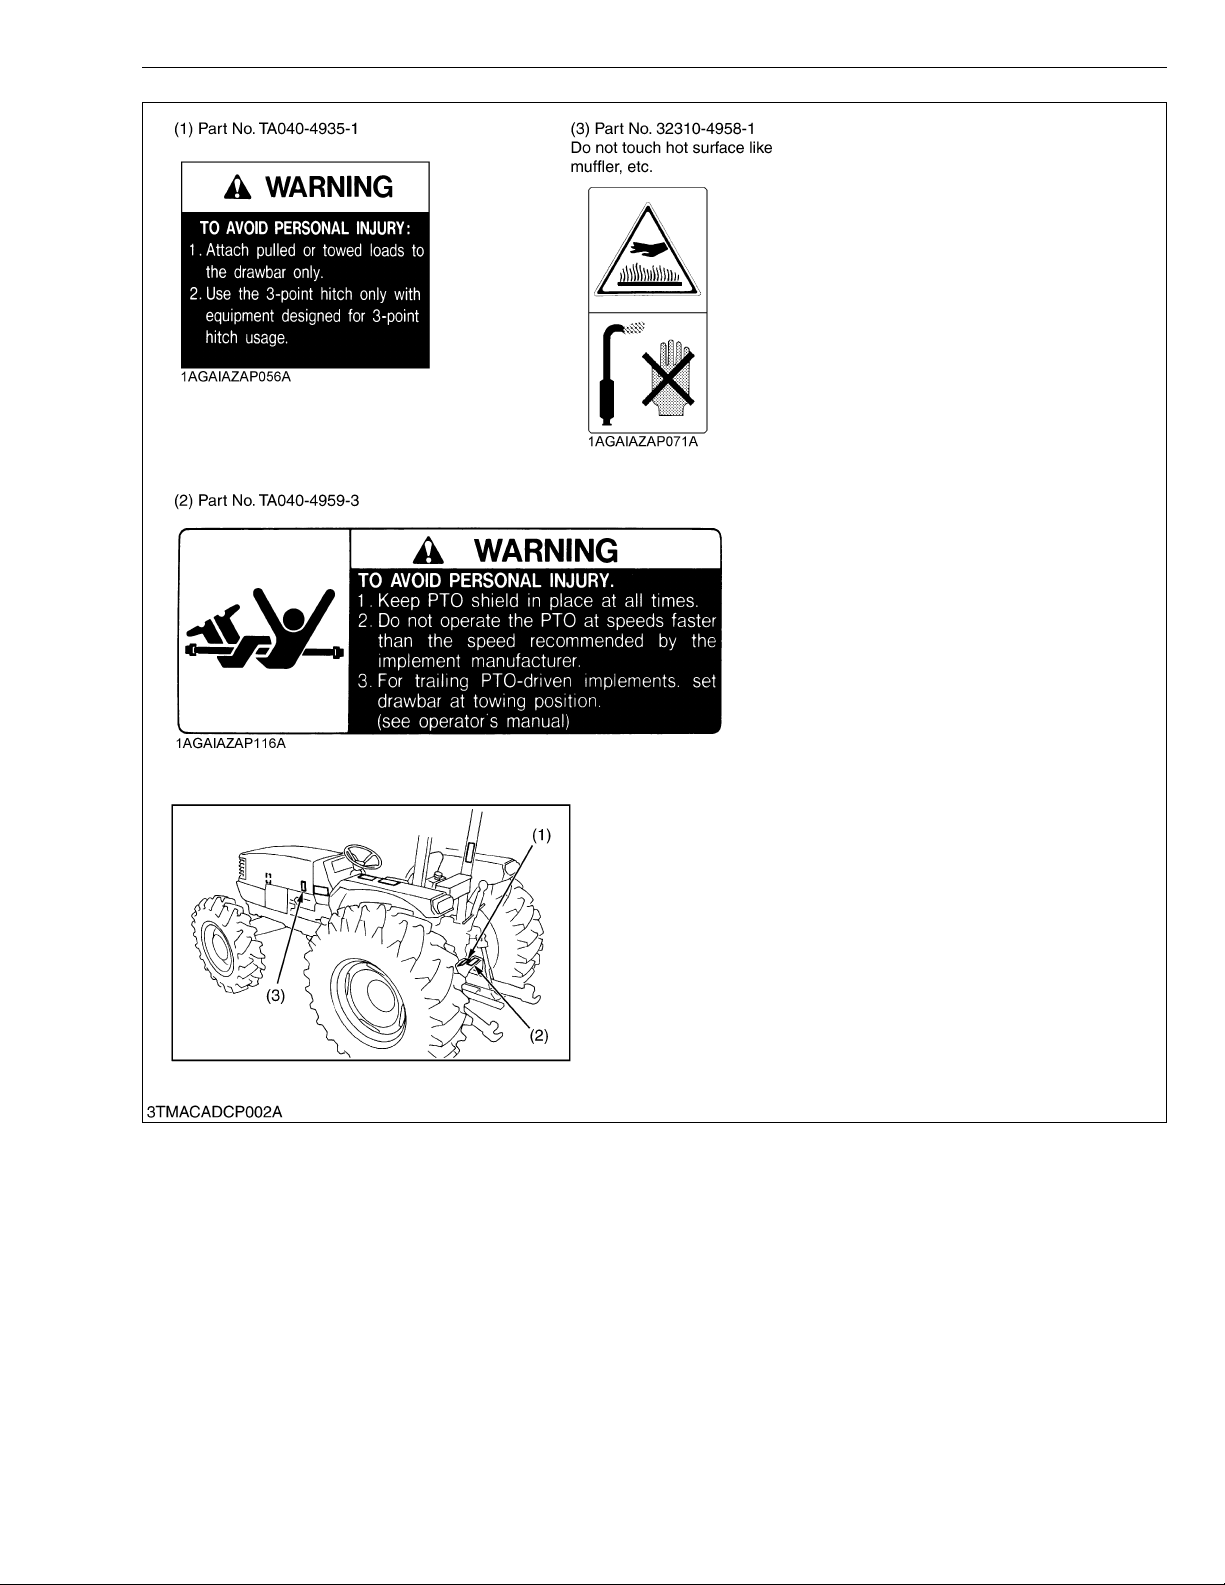
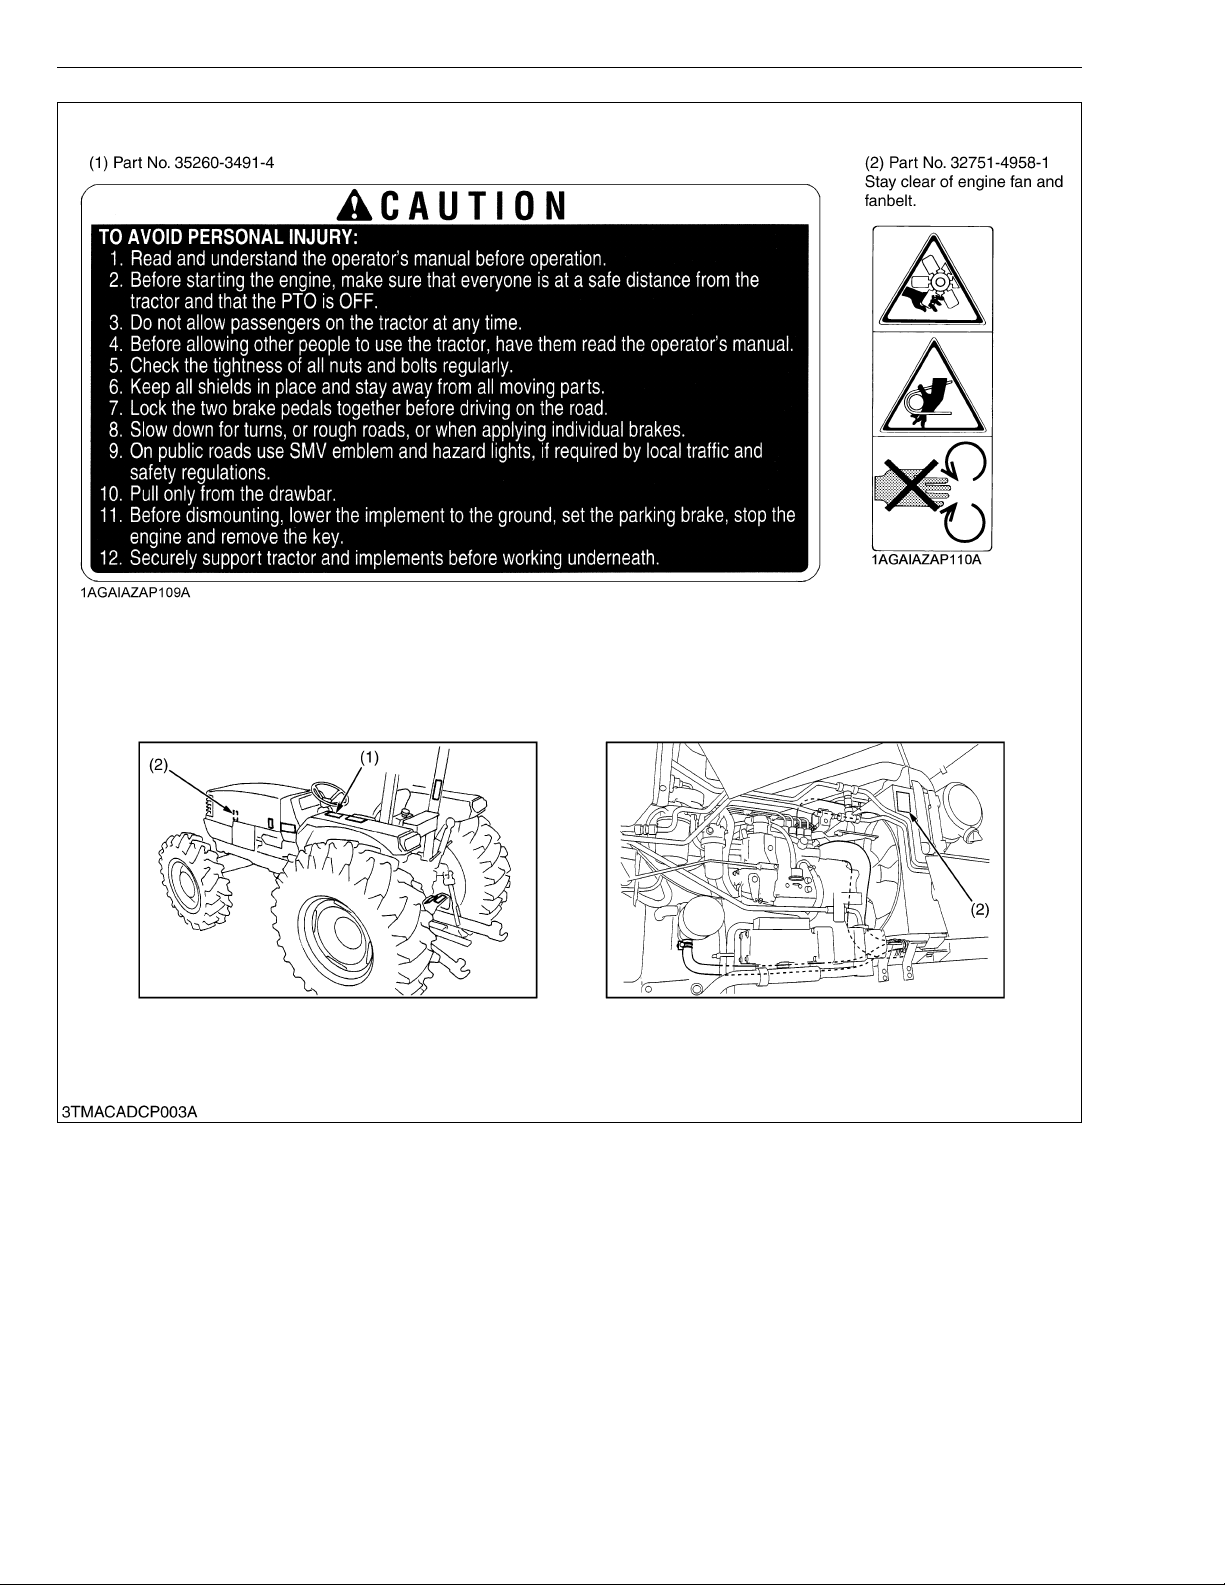
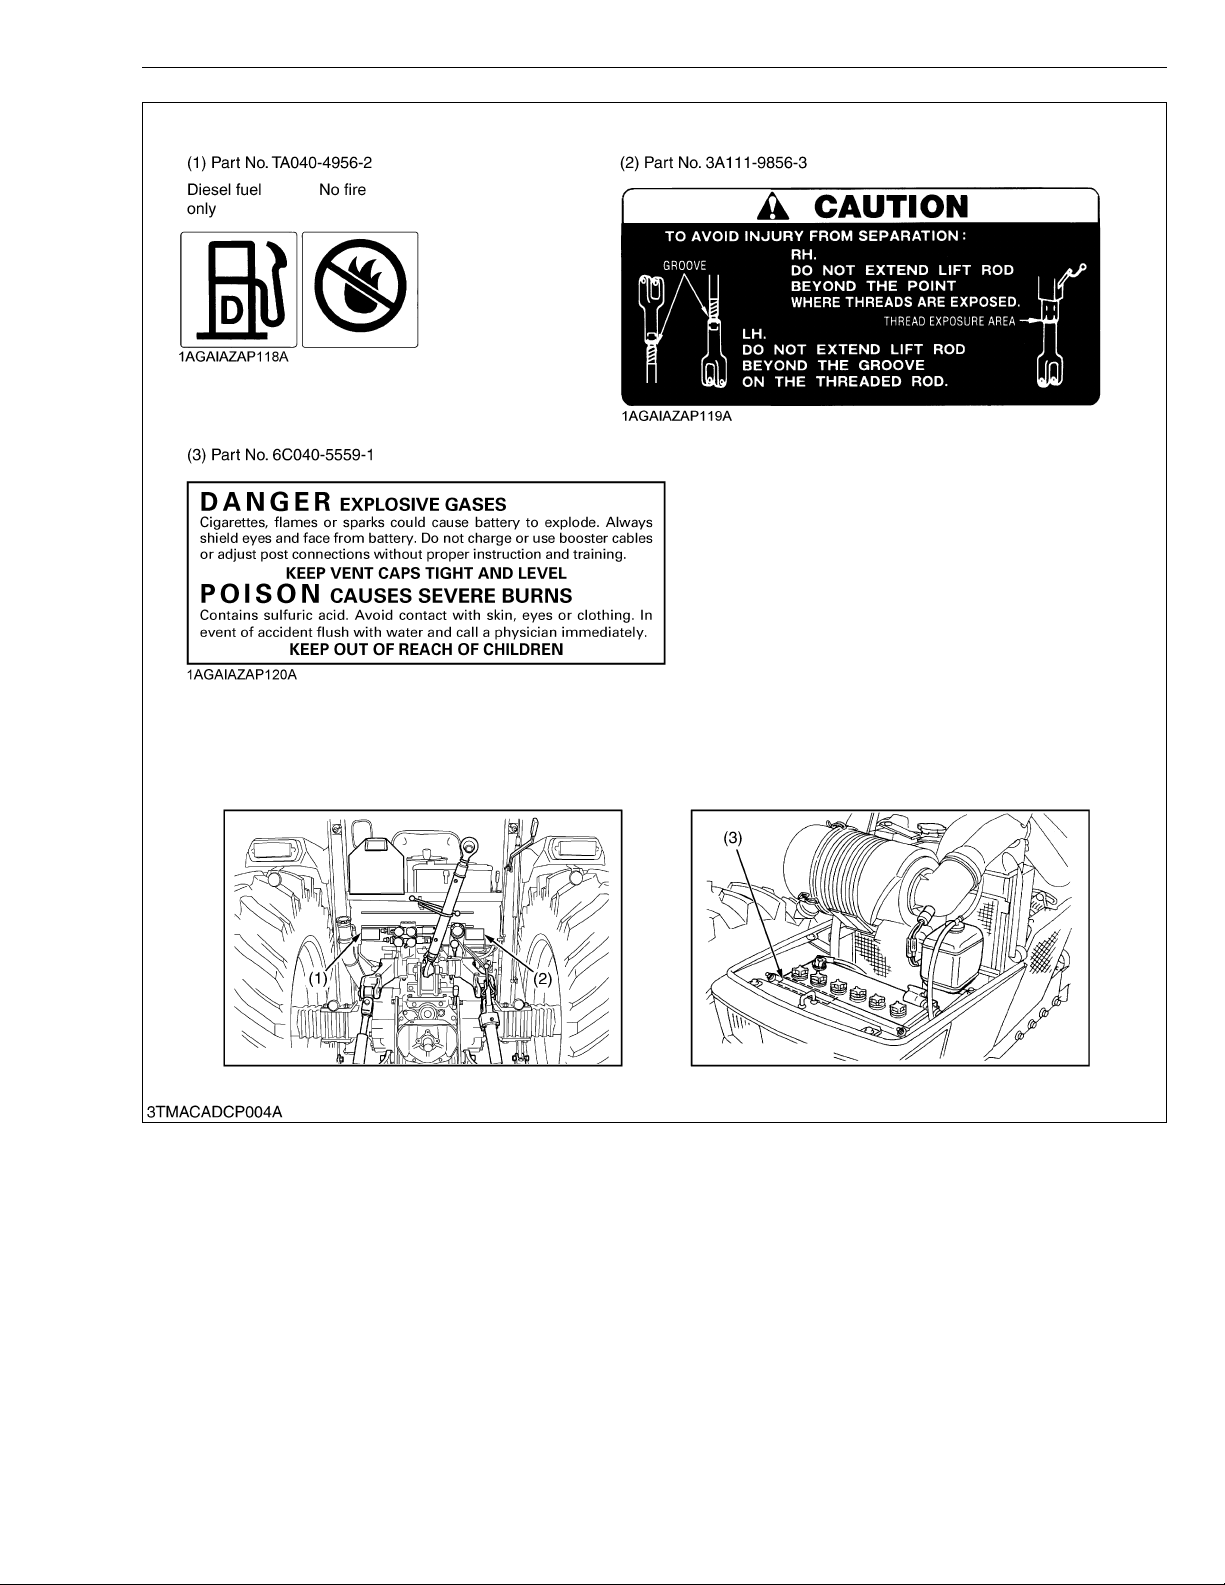
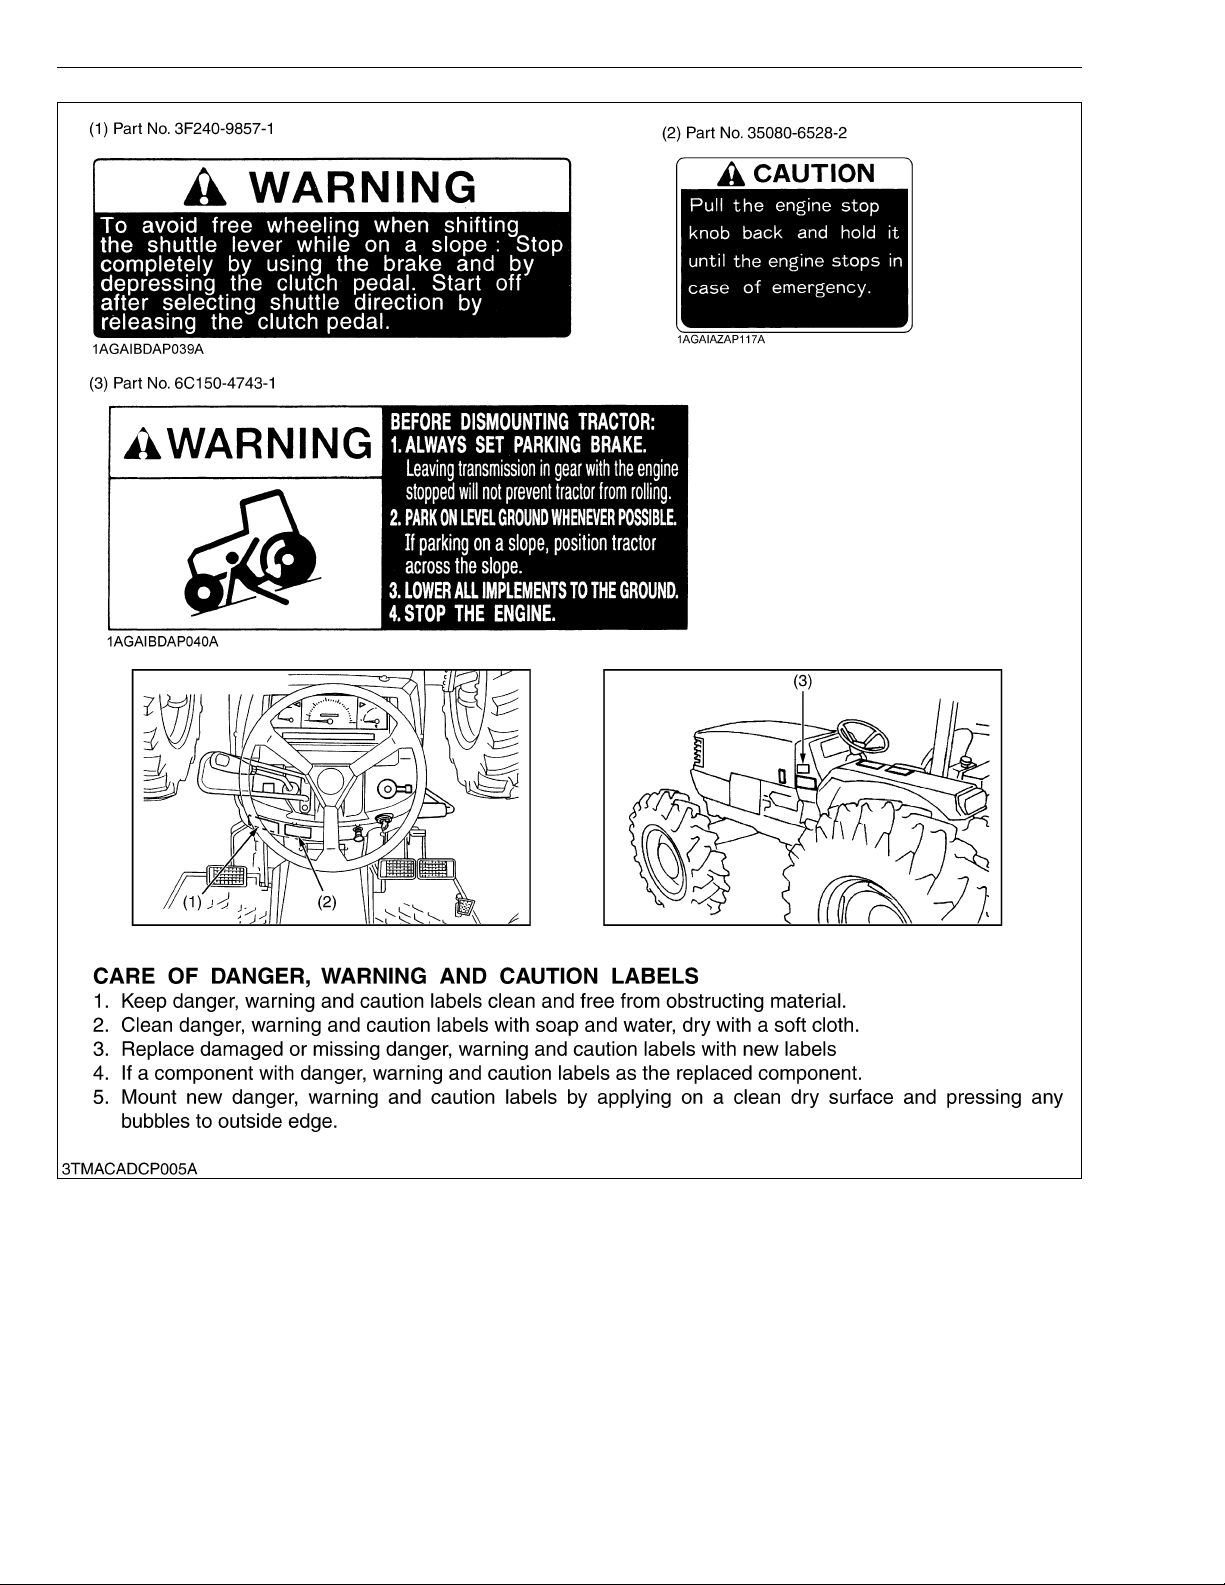
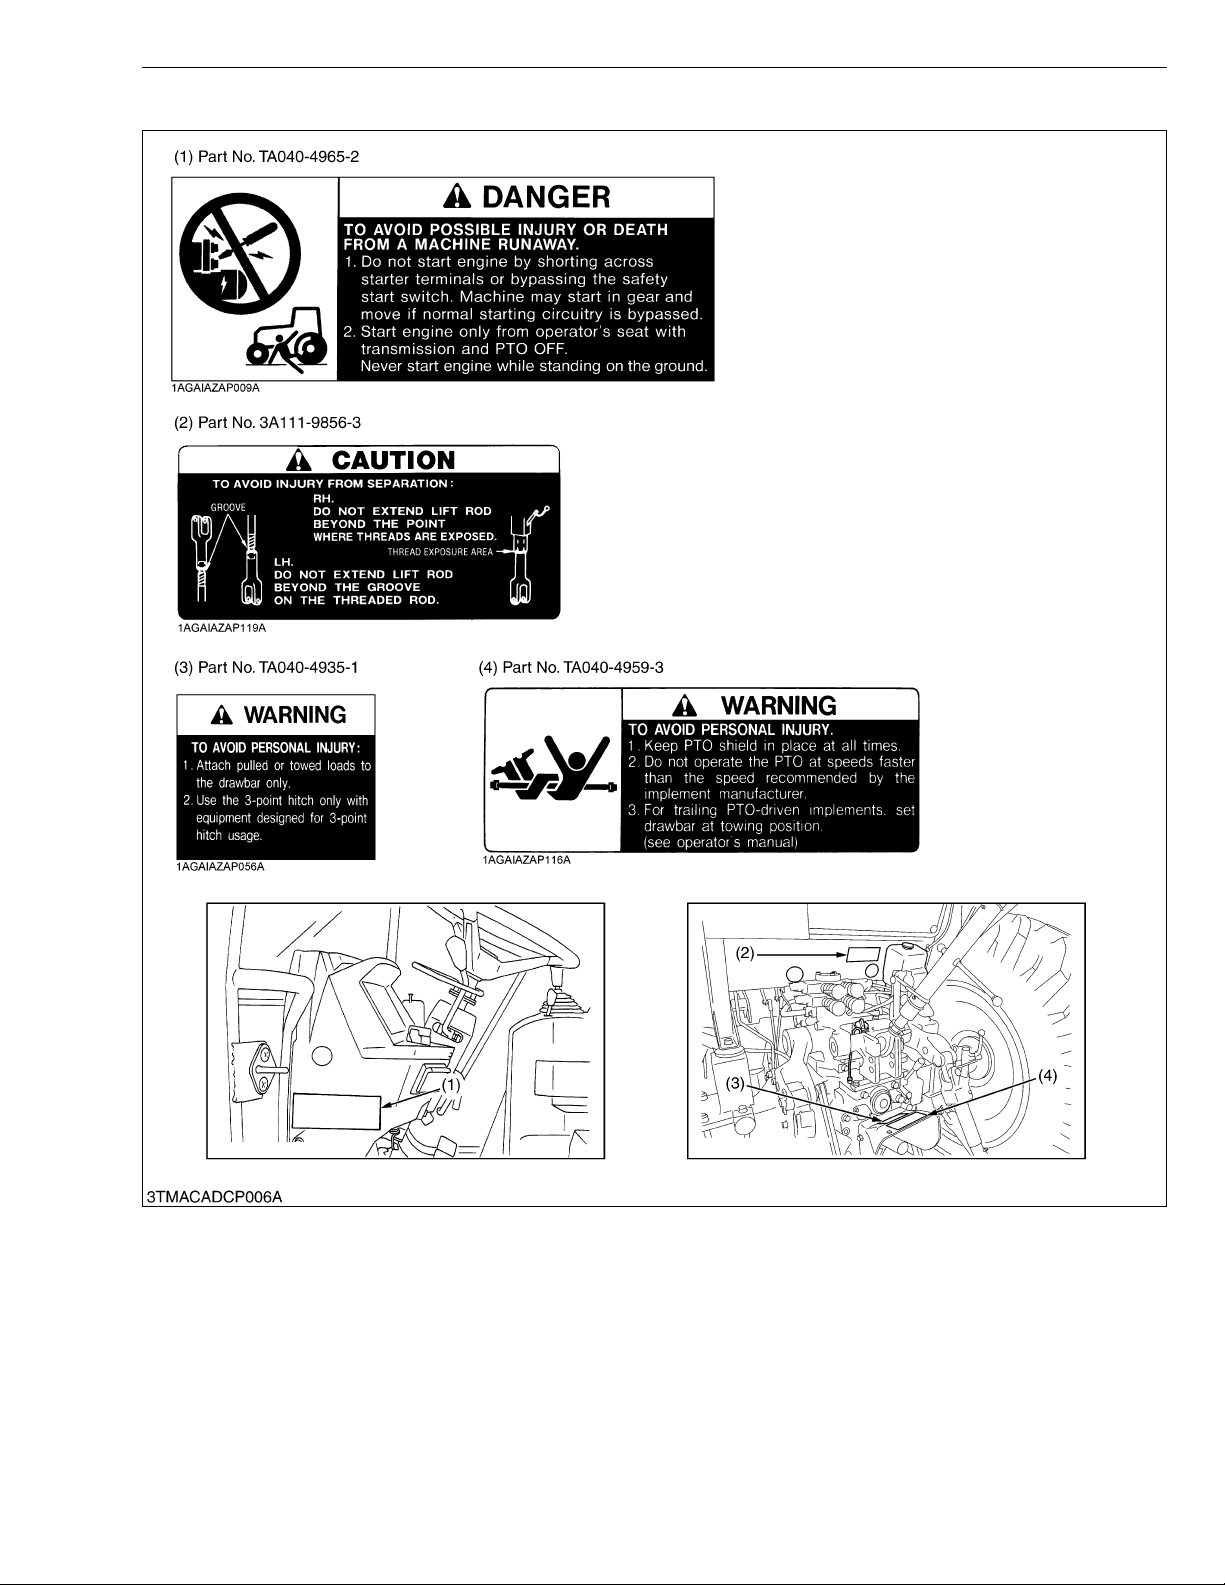
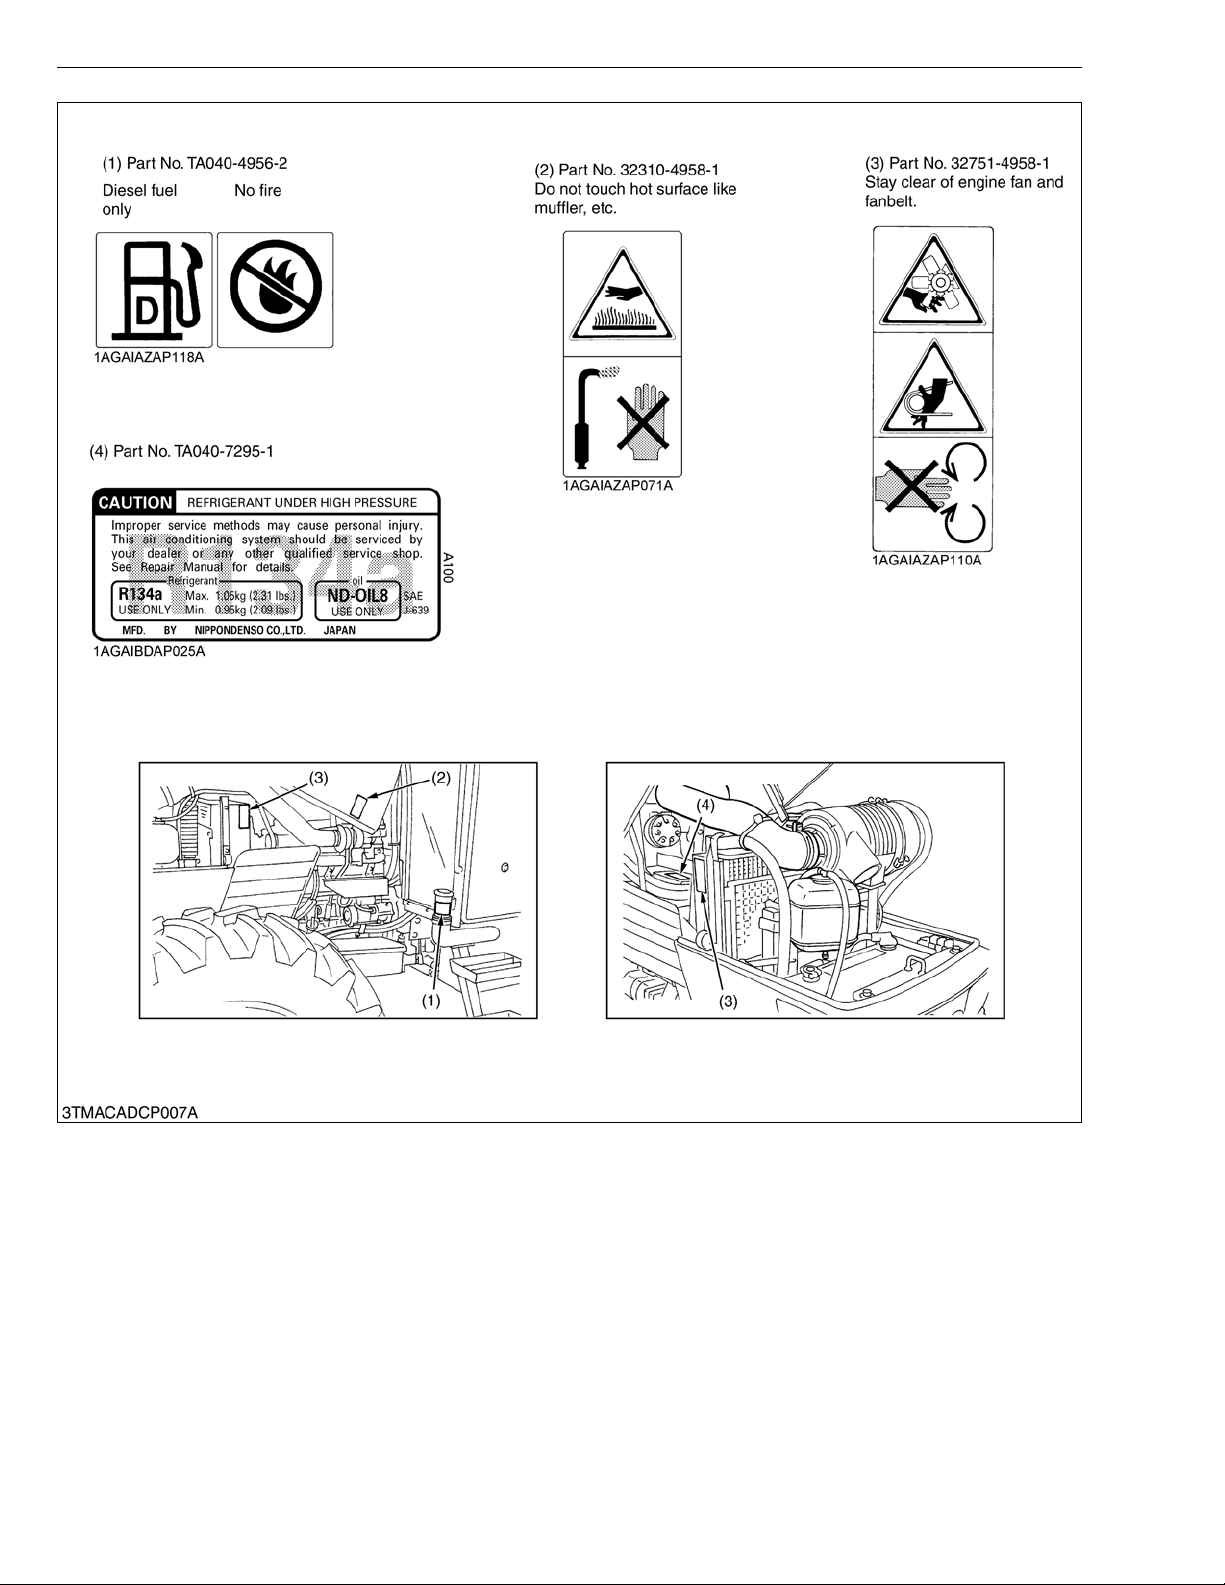
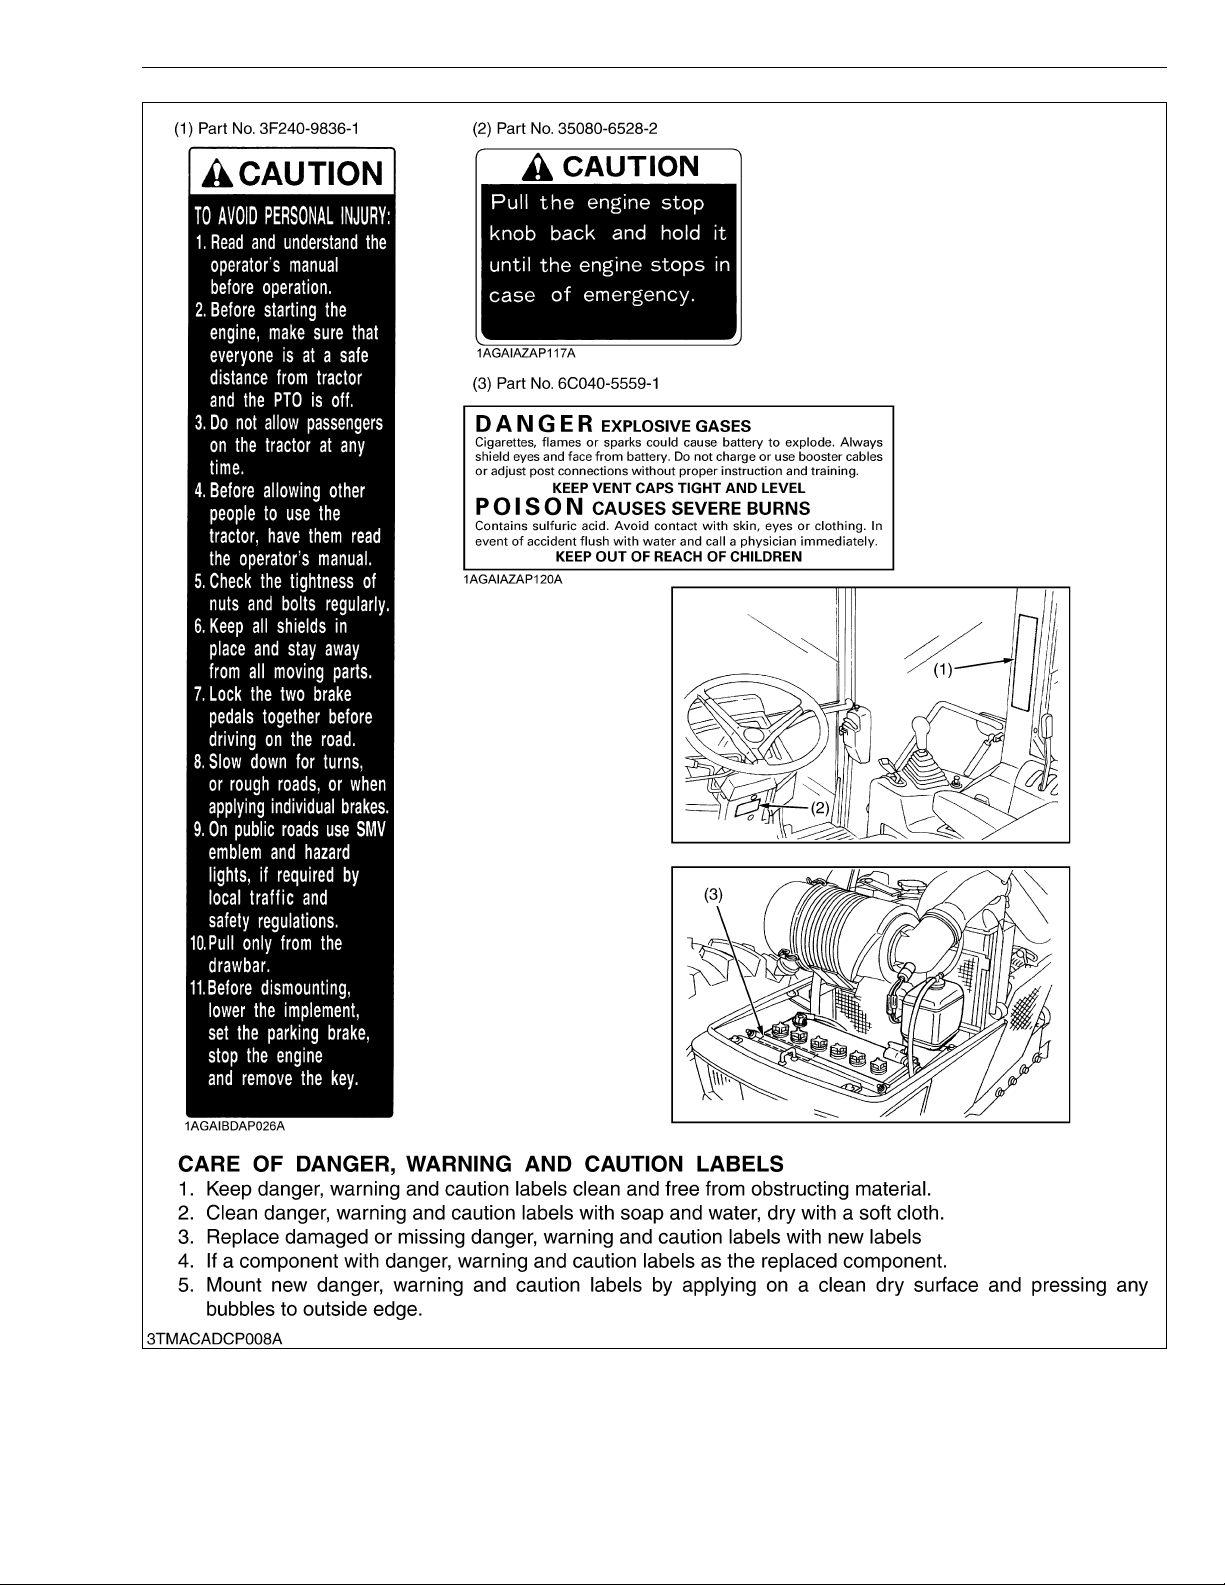
SAFETY DECALS
The following safety decals are installed on the machine.
If a decal becomes damaged, illegible or is not on the machine, replace it. The decal part number is listed in
the parts list.
[ROPS TYPE]
4
Page 7
ME8200, ME9000, WSM
KiSC issued 03, 2007 A
SAFETY INSTRUCTIONS
5
Page 8
ME8200, ME9000, WSM
KiSC issued 03, 2007 A
SAFETY INSTRUCTIONS
6
Page 9
ME8200, ME9000, WSM
KiSC issued 03, 2007 A
SAFETY INSTRUCTIONS
7
Page 10
ME8200, ME9000, WSM
KiSC issued 03, 2007 A
SAFETY INSTRUCTIONS
8
Page 11
ME8200, ME9000, WSM
KiSC issued 03, 2007 A
[CABIN TYPE]
SAFETY INSTRUCTIONS
9
Page 12
ME8200, ME9000, WSM
KiSC issued 03, 2007 A
SAFETY INSTRUCTIONS
10
Page 13
ME8200, ME9000, WSM
KiSC issued 03, 2007 A
SAFETY INSTRUCTIONS
11
Page 14
ME8200, ME9000, WSM
KiSC issued 03, 2007 A
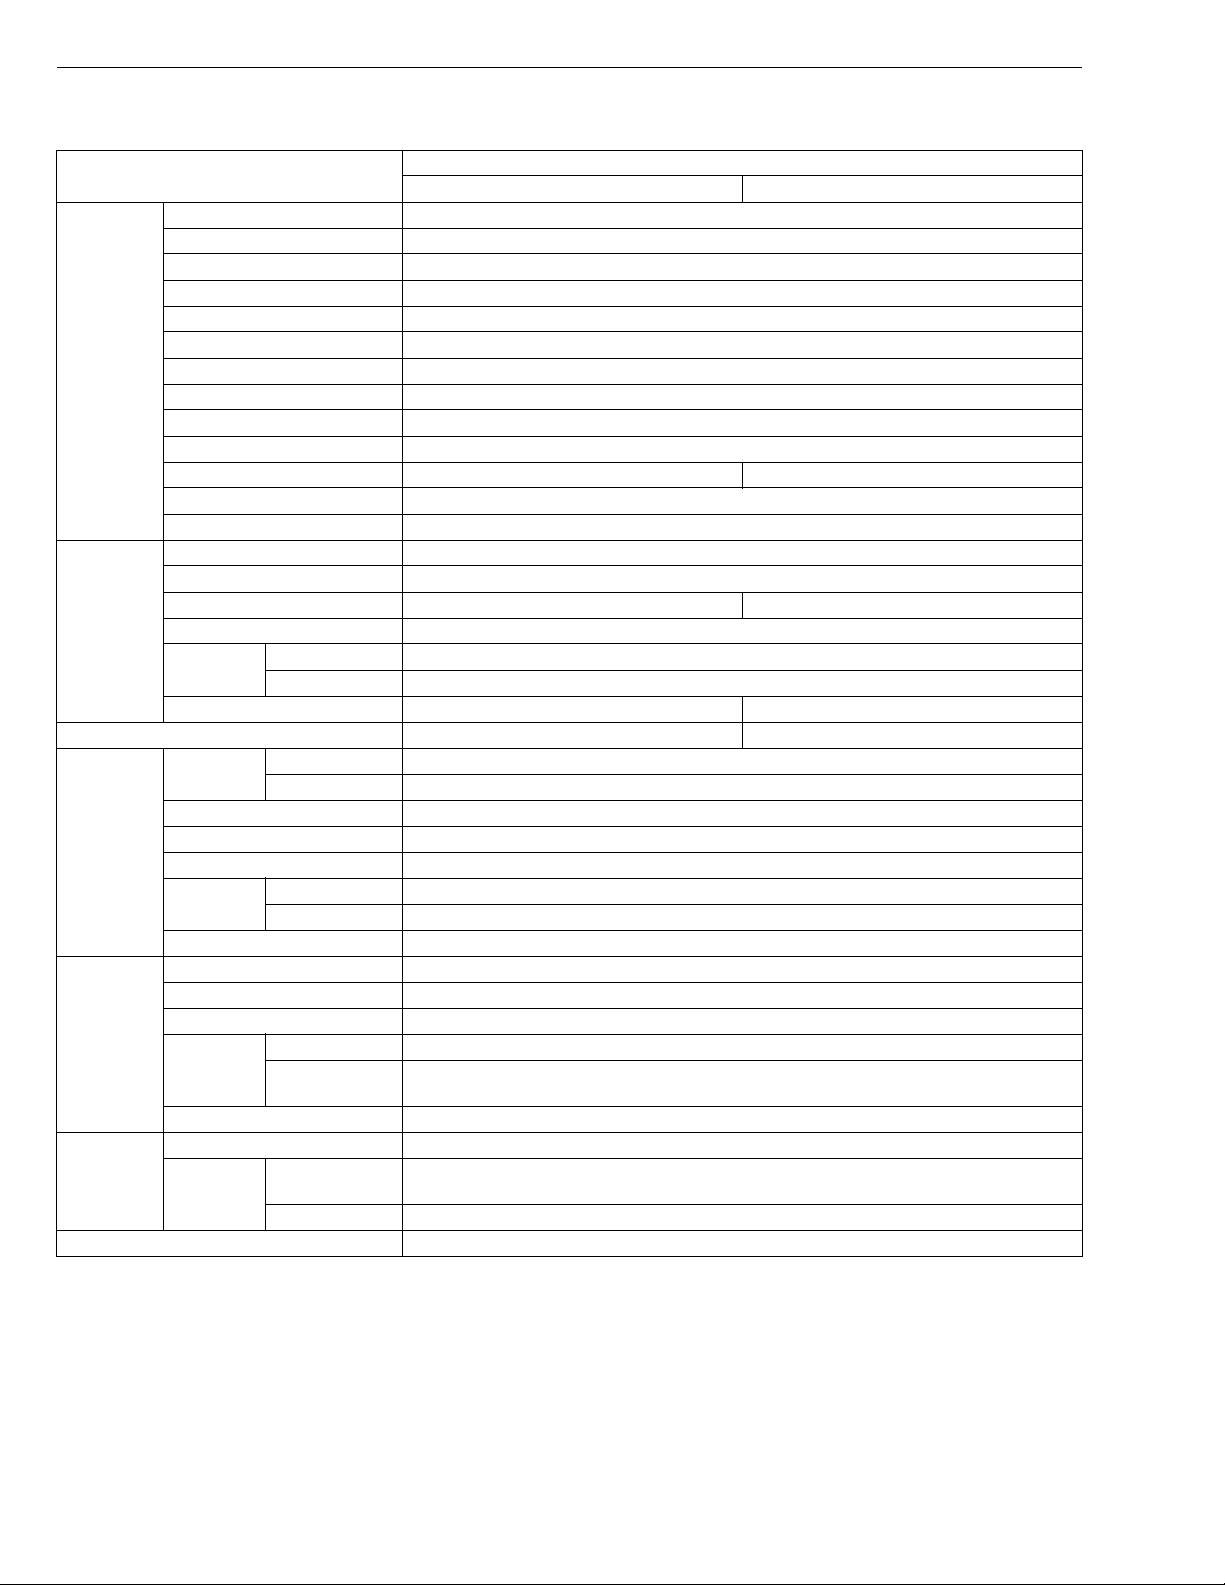
SPECIFICATIONS
SPECIFICATIONS
Model
Model V3300-EA
Type Vertical, water-cooled, 4-cycle diesel engine
No. of cylinder 4
Total displacement 3318 cm
Bore and stroke 98 × 110 mm (3.9 x 4 .3 in.)
Net power 61.2 kW (82 HP)*
Engine
Dimensions
Weight 2865 kg (6317 lbs) 3115 kg (6869 lbs)
Traveling
system
Hydraulic
system
PTO system
Traction system Swing drawbar, adjustable in direction
NOTE : * Manufacture's estimate.
The company reserves the right to change the specifications without notice.
PTO power (factory observed) 54.5 kW (73 HP)* / 2600 min
Maximum torque 285 N·m (29.1 kgf·m, 210.2 lbf·ft) / 1300 to 1500 min
Battery 12 V, CCA : 799 A
Fuel Diesel fuel No.1 [below −10 °C (14 °F), Diesel fuel No.2-D [above −10 °C (14 °F)]
Fuel tank 90 L (23.8 U.S.gals, 19.8 Imp.gals) 110 L (29.1 U.S.gals, 24.2 Imp.gals)
Engine crankcase 10.7 L (11.3 U.S.qts, 9.4 Imp.qts)
Engine coolant 9.0 L (9.5 U.S.qts, 7.9 Imp.qts)
Overall length 3890 mm (153.1 in.)
Overall width (Minimum tread) 1950 mm (78.0 in.)
Overall height 2510 mm (98.8 in.) (with ROPS) 2540 mm (100.0 in.) (with CABIN)
Wheel base 2250 mm (88.6 in.)
Tread
Minimum ground clearance 445 mm (17.5 in.) (BRACKET DRAWBAR) 445 mm (17.5 in.) (COVER TANK)
Standard
tire size
Clutch Multiple wet disc hydraulic
Steering Full hydraulic power steering
Transmission Hydraulic shuttle shift, fully synchronized main shift, 18F/18R
Brake
Differential Bevel gears with differential lock (Front, Rear)
Hydraulic control system Position, draft and mix control
Pump capacity 41.6 L/min. (44.0 U.S.gals/min., 36.6 Imp.gals/min.)
Three point hitch Category II
Max. lifting
force
System pressure 19.6 MPa (200 kgf/cm
Independent clutch Wet type, multiple discs
Live PTO
Front 1455 mm, 1565 mm (57.3 in., 61.6 in.)
Rear 1575 to 1870 mm (62.0 to 73.6 in.)
Front 11.2R24
Rear 18.4R30
Travelling Wet type multiple discs (hydraulic)
Parking Wet type multiple discs (mechanical)
At lifting point 2500 kg (5560 lbs) at lower link end with link horizontal
24 in. behind
lifting point
Direction of
turning
PTO speed 540 min
ROPS TYPE CABIN TYPE
2100 kg (4630 lbs) at 610 mm (24 in.) behind lifting point
Clockwise, viewed from tractor rear
-1
(rpm) at 2035 engine min-1(rpm), 540E min-1 (rpm) at 1519 engine min-1(rpm)
ME8200
3
(202.5 cu.in.)
−1
(rpm)
2
, 2847 psi)
−1
(rpm)
W10281170
12
Page 15
ME8200, ME9000, WSM
KiSC issued 03, 2007 A
SPECIFICATIONS
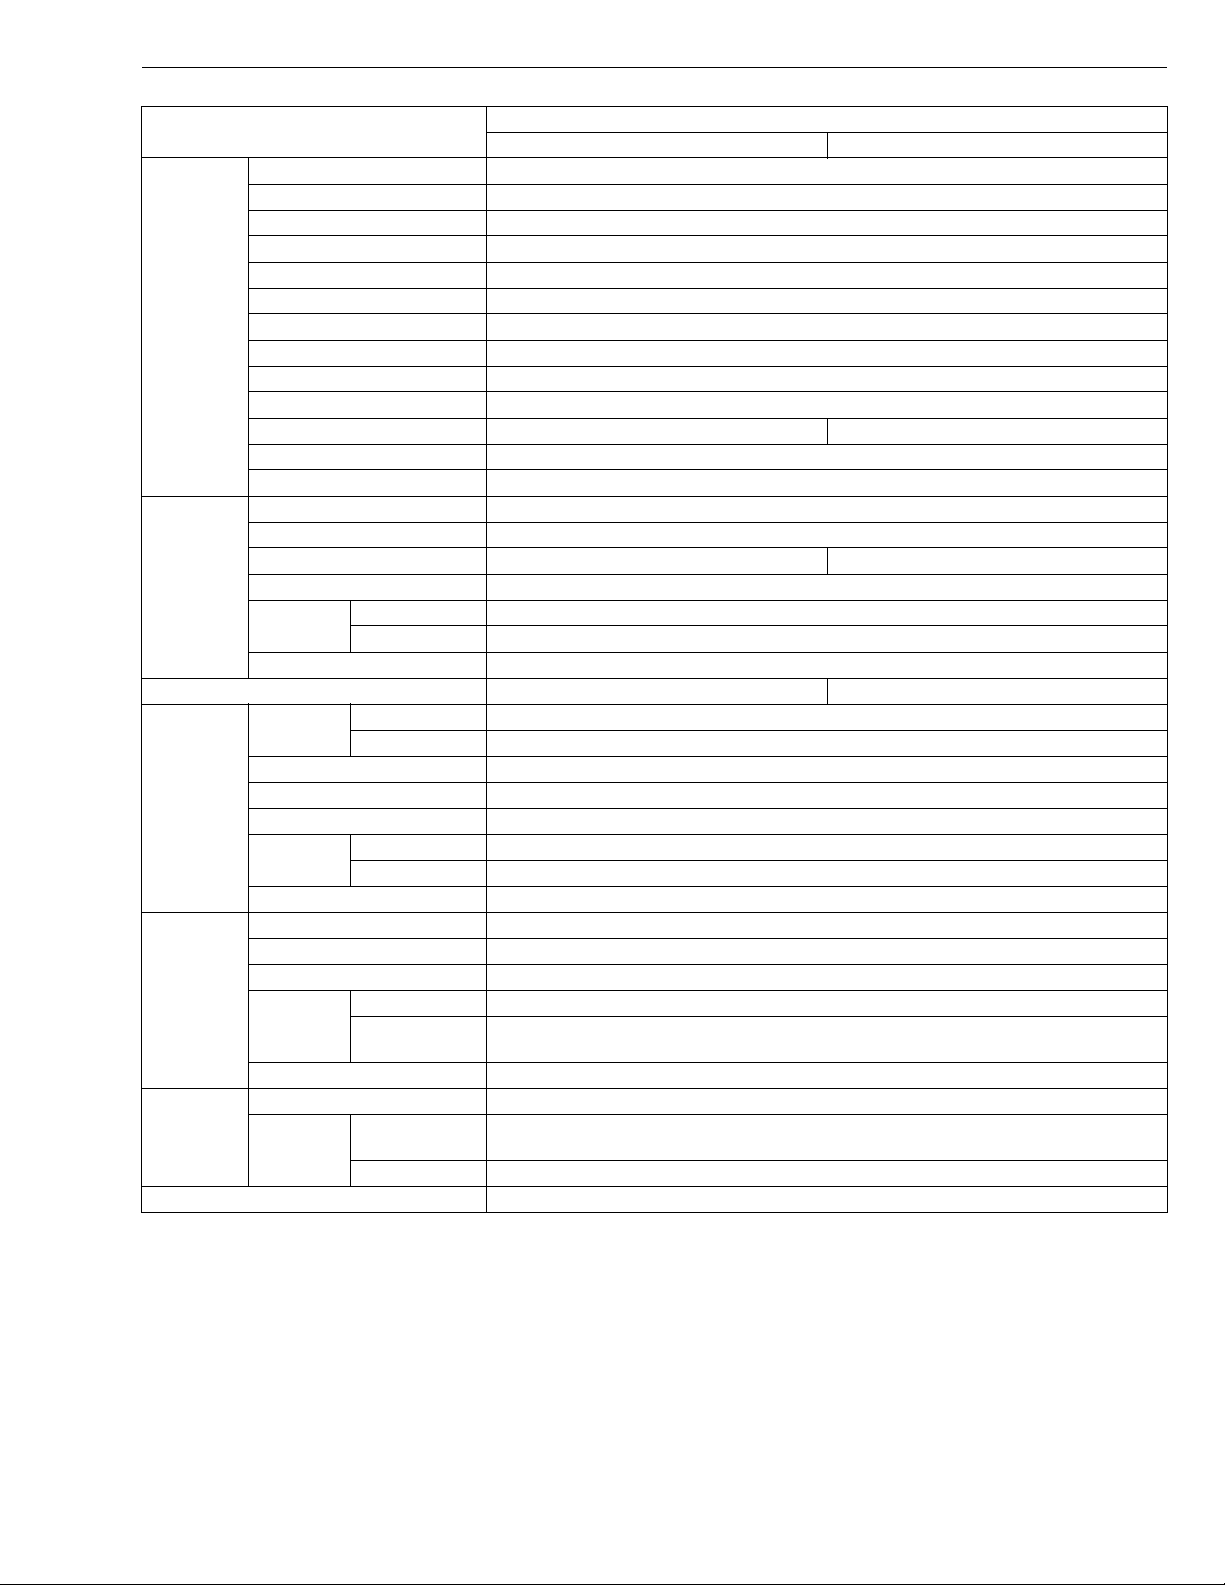
Model
ROPS TYPE CABIN TYPE
ME9000
Model V3300-TIE
Type Vertical, water-cooled, 4-cycle diesel engine
No. of cylinder 4
Total displacement 3318 cm
3
(202.5 cu.in.)
Bore and stroke 98 × 110 mm (3.9 x 4.3 in.)
Net power 67.2 kW (90 HP)*
Engine
PTO power (factory observed) 59.7 kW (80 HP)* / 2600 min
Maximum torque 311 N·m (31.7 kgf·m, 229.4 lbf·ft) / 1400 to 1600 min
−1
(rpm)
−1
(rpm)
Battery 12 V, CCA : 799 A
Fuel Diesel fuel No.1 [below −10 °C (14 °F), Diesel fuel No.2-D [above −10 °C (14 °F)]
Fuel tank 90 L (23.8 U.S.gals, 19.8 Imp.gals) 110 L (29.1 U.S.gals, 24.2 Imp.gals)
Engine crankcase 10.7 L (11.3 U.S.qts, 9.4 Imp.qts)
Engine coolant 9.0 L (9.5 U.S.qts, 7.9 Imp.qts)
Overall length 3890 mm (153.1 in.)
Overall width (Minimum tread) 1950 mm (78.0 in.)
Overall height 2530 mm (99.6 in.) (with ROPS) 2560 mm (100.8 in.) (with CABIN)
Dimensions
Wheel base 2250 mm (88.6 in.)
Tread
Front 1505 mm, 1615 mm (59.3 in., 63.6 in.)
Rear 1580 to 1870 mm (62.2 to 73.6 in.)
Minimum ground clearance 146 mm (18.3 in.) (BRACKET DRAWBAR)
Weight 2915 kg (6428 lbs) 3180 kg (7012 lbs)
Standard
tire size
Front 12.4R24
Rear 16.9R34
Clutch Multiple wet disc hydraulic
Traveling
system
Steering Full hydraulic power steering
Transmission Hydraulic shuttle shift, fully synchronized main shift, 18F/18R
Brake
Travelling Wet type multiple discs (hydraulic)
Parking Wet type multiple discs (mechanical)
Differential Bevel gears with differential lock (Front, Rear)
Hydraulic control system Position, draft and mix control
Pump capacity 64.3 L/min. (67.9 U.S.gals/min., 56.6 Imp.gals/min.)
Hydraulic
system
Three point hitch Category II
Max. lifting
force
At lifting point 2500 kg (5560 lbs) at lower link end with link horizontal
24 in. behind
lifting point
2100 kg (4630 lbs) at 610 mm (24 in.) behind lifting point
System pressure 19.6 MPa (200 kgf/cm
2
, 2847 psi)
Independent clutch Wet type, multiple discs
PTO system
Live PTO
Direction of
turning
PTO speed 540 min
Clockwise, viewed from tractor rear
-1
(rpm) at 2035 engine min-1(rpm), 540E min-1 (rpm) at 1519 engine min-1(rpm)
Traction system Swing drawbar, adjustable in direction
NOTE : * Manufacture's estimate.
The company reserves the right to change the specifications without notice.
W10295170
13
Page 16
ME8200, ME9000, WSM
KiSC issued 03, 2007 A
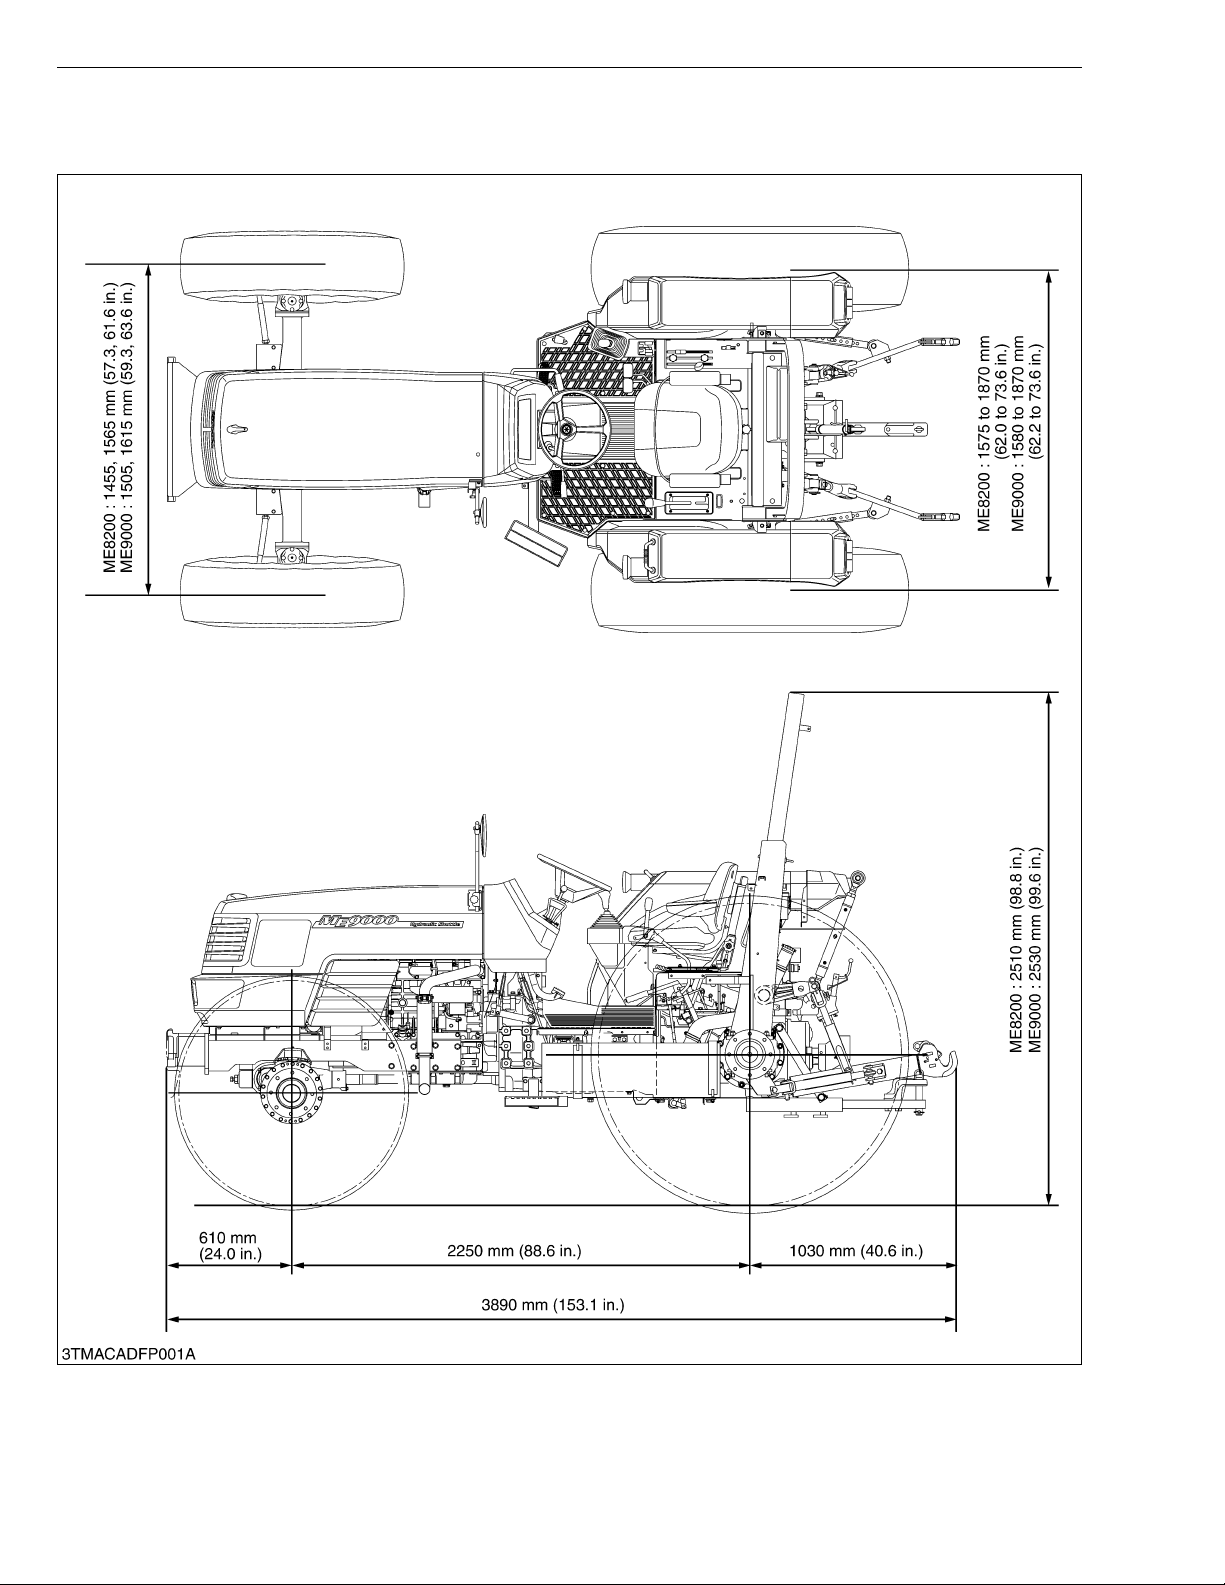
DIMENSIONS
[ROPS TYPE]
DIMENSIONS
14
Page 17
ME8200, ME9000, WSM
KiSC issued 03, 2007 A
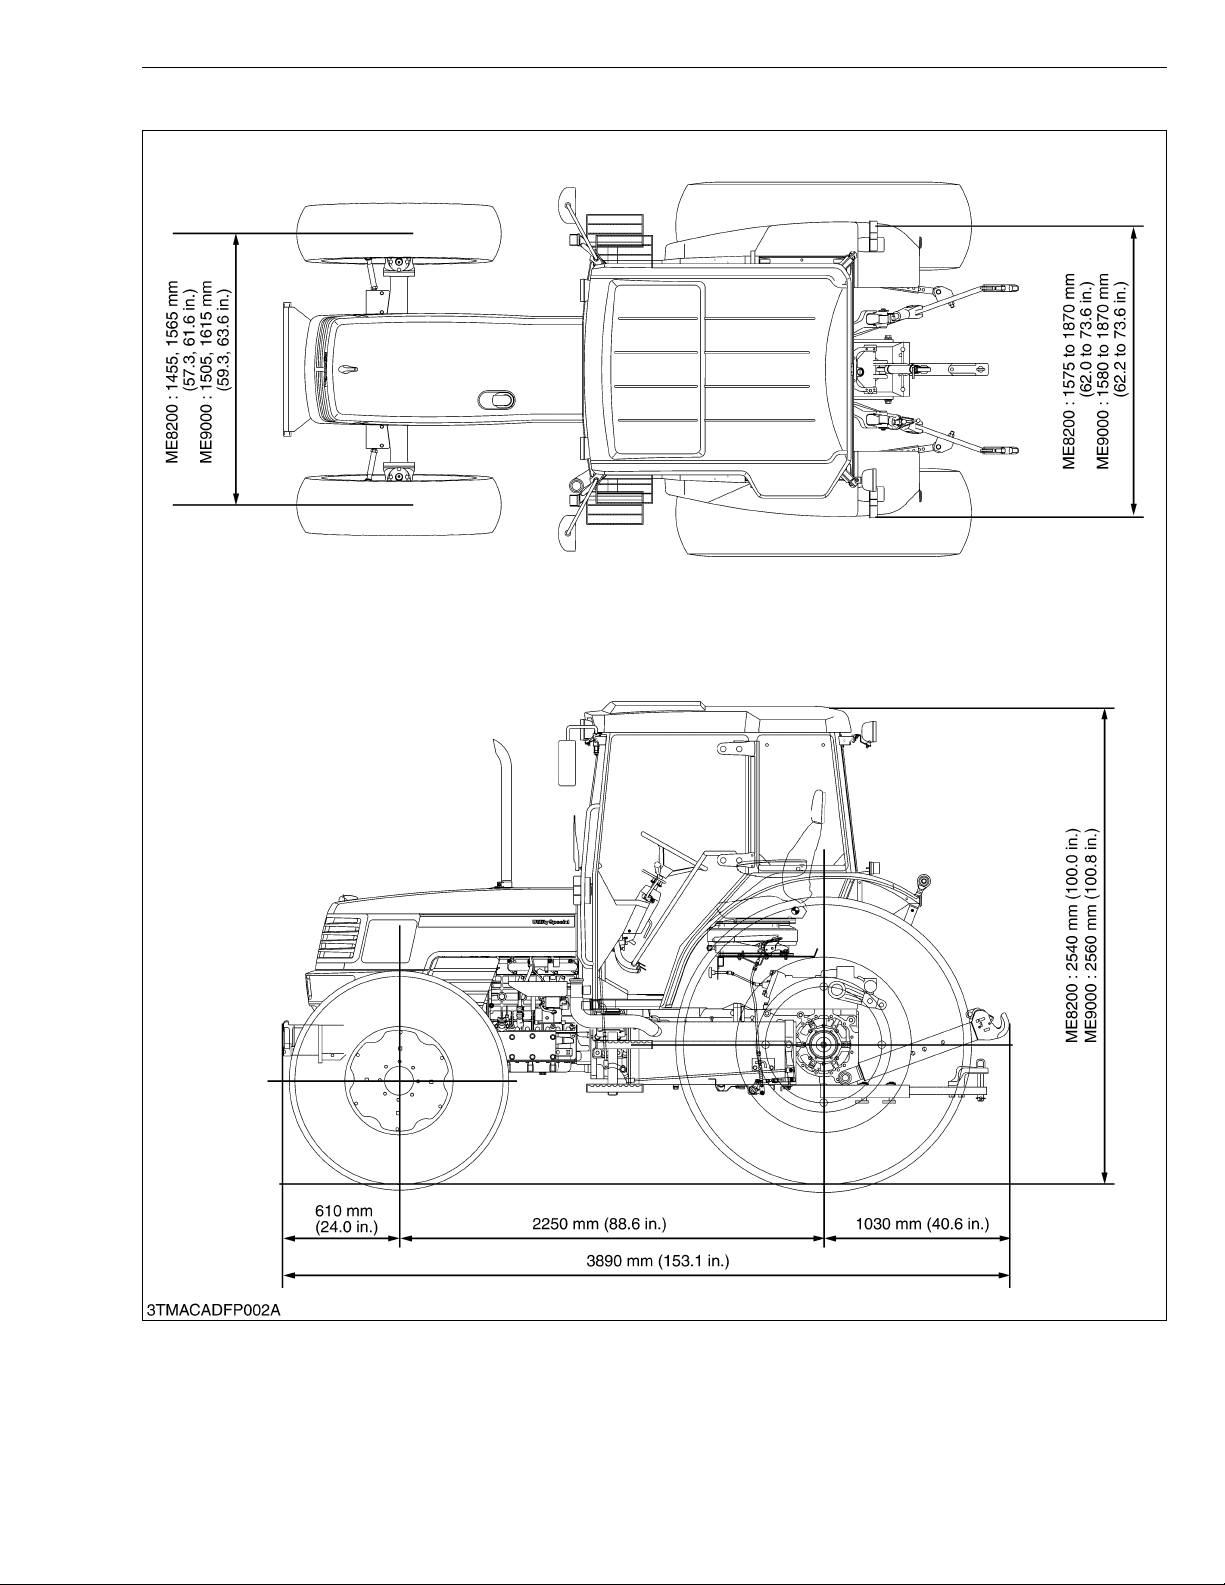
[CABIN TYPE]
DIMENSIONS
15
Page 18

G GENERAL
KiSC issued 03, 2007 A
Page 19

GENERAL
KiSC issued 03, 2007 A
CONTENTS
1. TRACTOR IDENTIFICATION ......................................................................... G-1
2. GENERAL PRECAUTIONS ............................................................................ G-2
3. HANDLING PRECAUTIONS FOR ELECTRICAL PARTS AND WIRING..G-3
[1] WIRING...................................................................................................... G-3
[2] BATTERY................................................................................................... G-5
[3] FUSE.......................................................................................................... G-5
[4] CONNECTOR............................................................................................ G-6
[5] HANDLING OF CIRCUIT TESTER......................................................... G-7
4. LUBRICANTS, FUEL AND COOLANT ......................................................... G-8
5. TIGHTENING TORQUES ............................. ....... ...... ....... ...... ....... ...... ....... .. G-10
[1] GENERAL USE SCREWS, BOLT AND NUTS................................... G-10
[2] STUD BOLTS.......................................................................................... G-10
6. MAINTENANCE............................................................................................. G-11
7. CHECK AND MAINTENANCE......... ...... ...... ....... ...... ....... ...... ....... ............... G-14
[1] DAILY CHECK........................................................................................ G-14
[2] CHECK POINTS OF INITIAL 50 HOURS........................................... G-15
[3] CHECK POINTS OF EVERY 50 HOURS........................................... G-18
[4] CHECK POINTS OF EVERY 100 HOURS......................................... G-19
[5] CHECK POINTS OF EVERY 200 HOURS......................................... G-24
[6] CHECK POINT OF EVERY 300 HOURS ........................................... G-27
[7] CHECK POINTS OF EVERY 400 HOURS......................................... G-27
[8] CHECK POINTS OF EVERY 600 HOURS......................................... G-27
[9] CHECK POINT OF EVERY 800 HOURS ........................................... G-29
[10]CHECK POINTS OF EVERY 1 YEAR................................................ G-29
[11]CHECK POINTS OF EVERY 2 YEARS.............................................. G-30
[12]OTHERS .................................................................................................. G-33
8. SPECIAL TOOLS.......................................................................................... G-39
[1] SPECIAL TOOLS FOR ENGINE .......................................................... G-39
[2] SPECIAL TOOLS FOR TRACTOR....................................................... G-53
9. TIRES............................................................................................................. G-65
[1] TYPE OF TIRES.................................................................................... G-65
[2] TREAD ADJUSTMENT........................................................................... G-66
(1) Front Wheels...................................................................................... G-66
(2) Rear Wheels ...................................................................................... G-67
[3] WHEEL HUB............................................................................................ G-67
[4] TIRE PRESSURE................................................................................... G-68
[5] TIRE LIQUID INJECTION...................................................................... G-68
10. IMPLEMENT LIMITATIONS.......................................................................... G-72
Page 20
ME8200, ME9000, WSM
KiSC issued 03, 2007 A
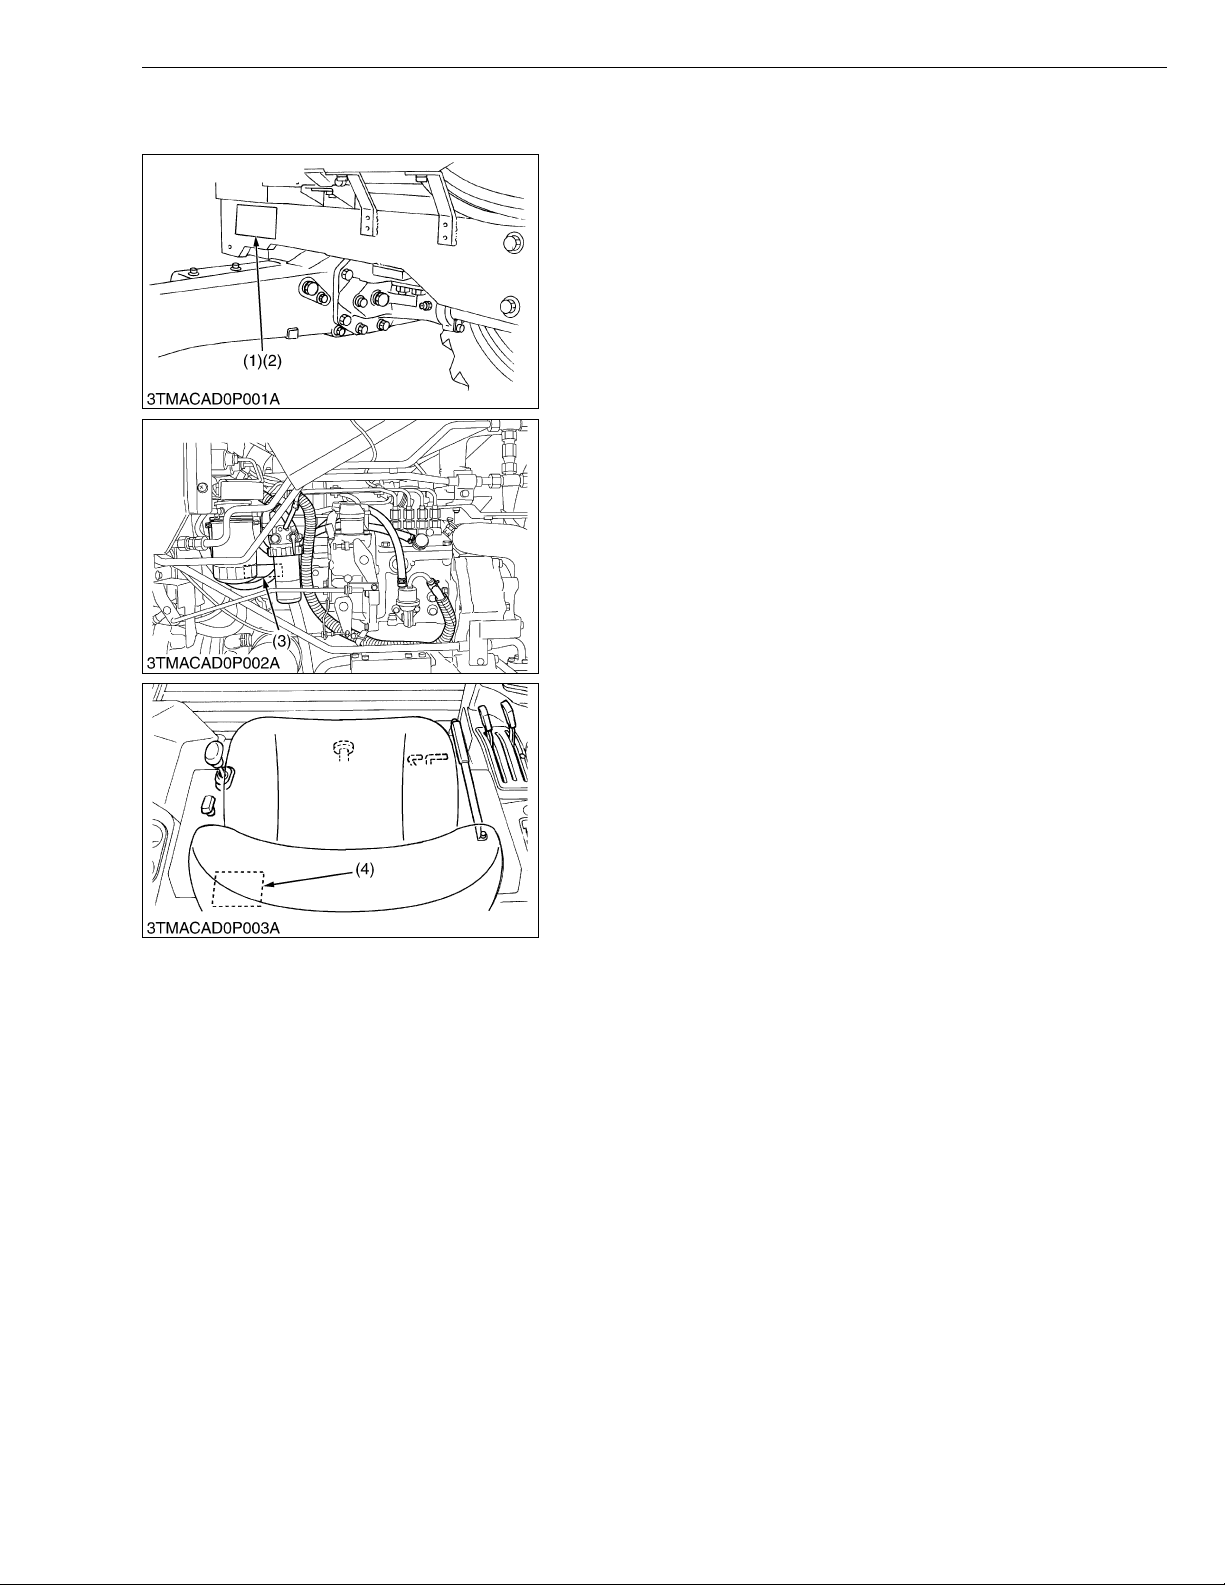
1. TRACTOR IDENTIFICATION
When contacting your loca l KUBOTA distr ibutor, alway s specify
engine serial number, tr actor serial number, CABIN seri al number
and hour meter reading.
(1) T ractor Identification Plate
(2) T ractor Serial Number
(3) Engine Serial Number
G GENERAL
(4) CABIN Identification Plate
(CABIN Serial Number)
W1010593
G-1
Page 21
ME8200, ME9000, WSM
KiSC issued 03, 2007 A
2. GENERAL PRECAUTIONS
• During disa ssembly, ca refully ar range removed parts in a cle an
area to prevent confusion later. Screws, bolts and nuts should be
installed in their original position to prevent reassembly errors.
• When special tools are requi red, use KUBOT A genuine speci al
tools. Special tools which are not frequently used should be
made according to the drawings provided.
• Before disassembling or servicing electrical wires, always
disconnect the ground cable from the battery first.
• Remove oil and dirt from parts before measuring.
• Use only KUBOTA genuine parts for parts replacement to
maintain machine performance and to assure safety.
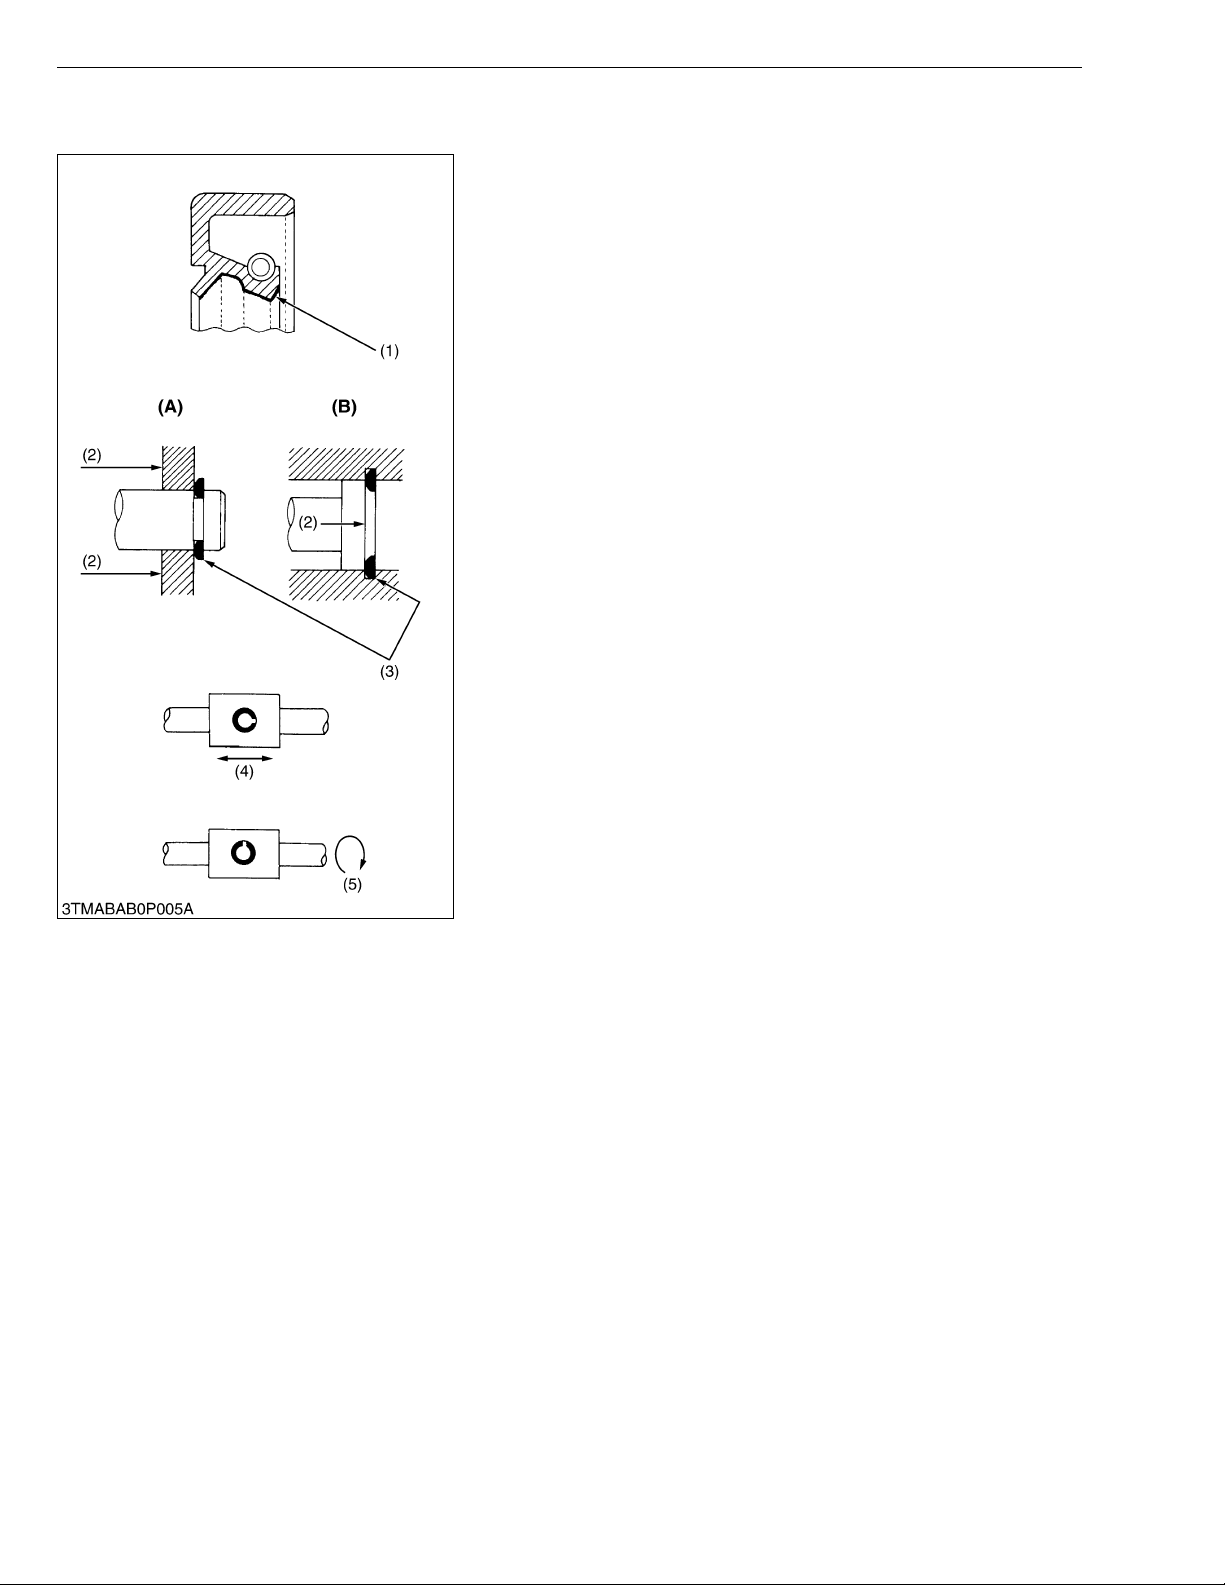
• Gaskets and O-rings must be replaced during reassembly. Apply
grease to new O -rings or oil seals bef ore assembling. See the
figure left side.
• When reassem bling external snap rings or inte rnal snap rings,
they must be positioned so that sharp edge faces against the
direction from which a force is applied. See the figure left side.
• When insert ing spring pins, their splits must face the direction
from which a force is applied. See the figure left side.
• To prevent dam age to the hydraulic s ystem, use only sp ecified
fluid or equivalent
(1) Grease
(2) Force
(3) Sharp Edge
(4) Axial Force
(5) Rotating Movement
G GENERAL
(A) External Snap Ring
(B) Internal Snap Ring
W1010780
G-2
Page 22
ME8200, ME9000, WSM
IMPORTANT■
KiSC issued 03, 2007 A
G GENERAL
3. HANDLING PRECAUTIONS FOR ELECTRICAL PARTS
AND WIRING
To ensure safety and prevent damage to the machine and
surrounding equipm ent, heed the following pr ecautions in handling
electrical parts and wiring.
• Check electrical wiring for damage and loosened
connection every year. To this end, educate the customer to
do his or her own check and at the s ame time recommend
the dealer to perform periodic check for a fee.
• Do not attempt to modify or remodel any electrical parts and
wiring.
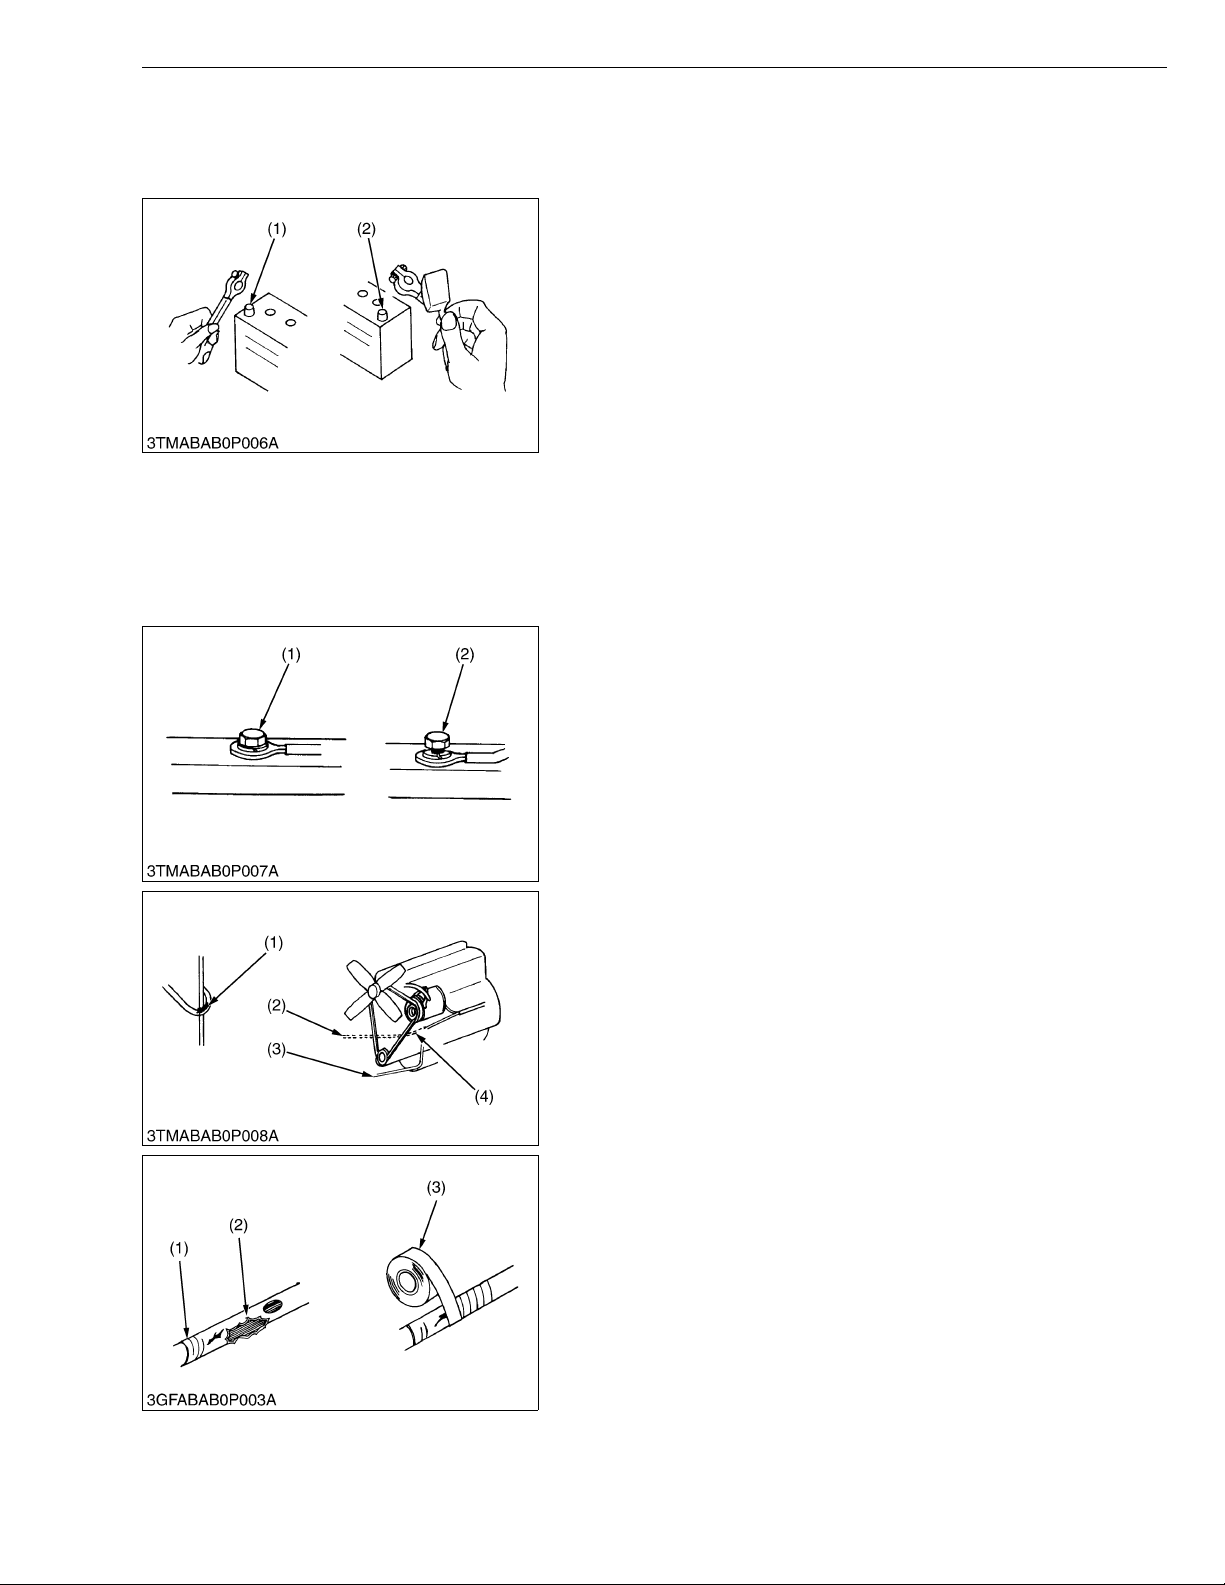
• When removing th e ba tter y cab le s, dis co nn ect t he n egat ive
cable first. When in stalling the b attery cables, c onnect the
positive cable first.
(1) Negative Terminal (2) Positive Ter minal
W1011139
[1] WIRING
• Securely t ighten wiring terminals.
(1) Correct (Securely Tighten) (2) Incorrect (Loosening Leads to Faulty
Contact)
W1011293
• Do not let wiring contact dangerous part.
(1) Dangerous Part
(2) Wiring (Incorrect)
(3) Wiring (Correct)
(4) Dangerous Part
• Repair or change torn or aged wiring immediately.
(1) Aged
(2) Torn
(3) Insulating Vinyl Tape
W1011390
W1011487
G-3
Page 23
ME8200, ME9000, WSM
KiSC issued 03, 2007 A
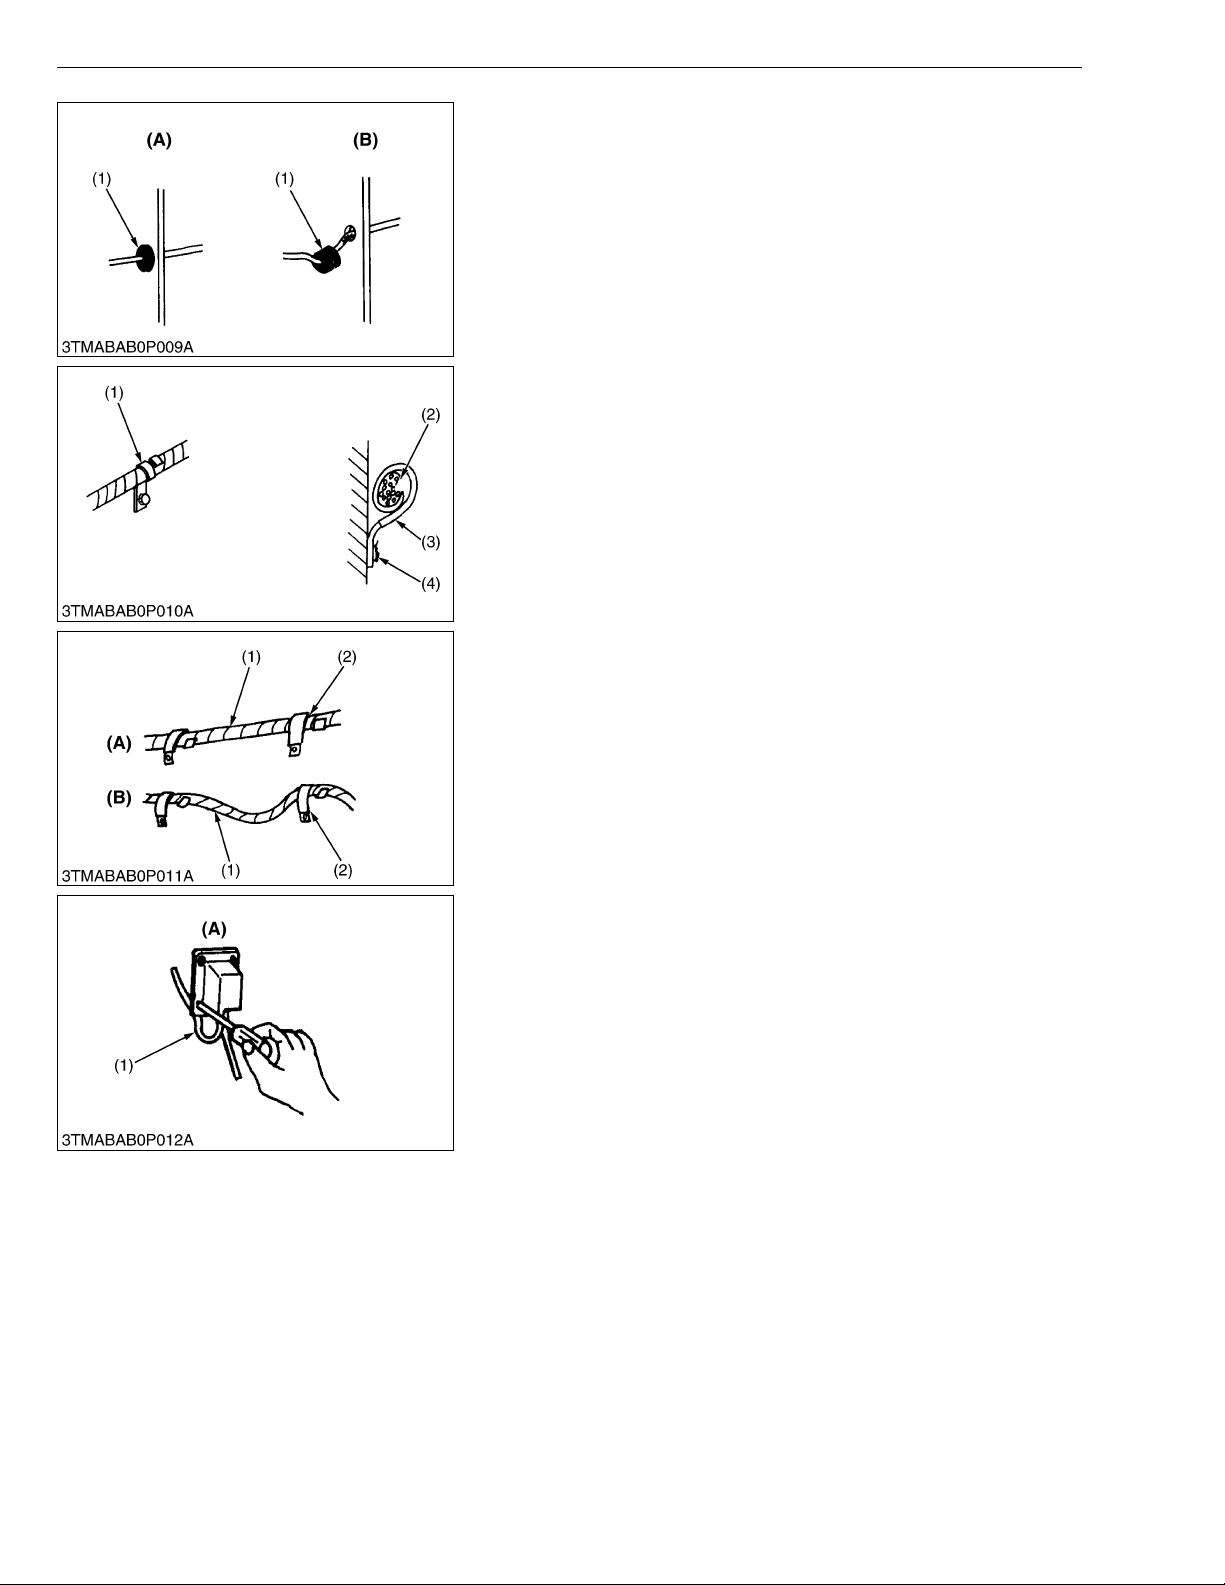
• Securely insert gro mm et.
(1) Grommet (A) Correct
(B) Incorrect
• Securely clamp, being careful not to damage wiring.
(1) Clamp
• Wind Clamp Spirally
(2) Wire Harness
(3) Clamp
(4) Welding Dent
G GENERAL
W1011388
W1011458
• Clamp wiring so that there is no twist, unnecessary sag, or
excessive tension, except for movable part, where sag be
required.
(1) Wiring
(2) Clamp
(A) Correct
(B) Incorrect
W1011587
• In installing a part, take care not to get wiring caught by it.
(1) Wiring (A) Incorrect
W1011670
G-4
Page 24
ME8200, ME9000, WSM
KiSC issued 03, 2007 A
[2] BATTERY
G GENERAL
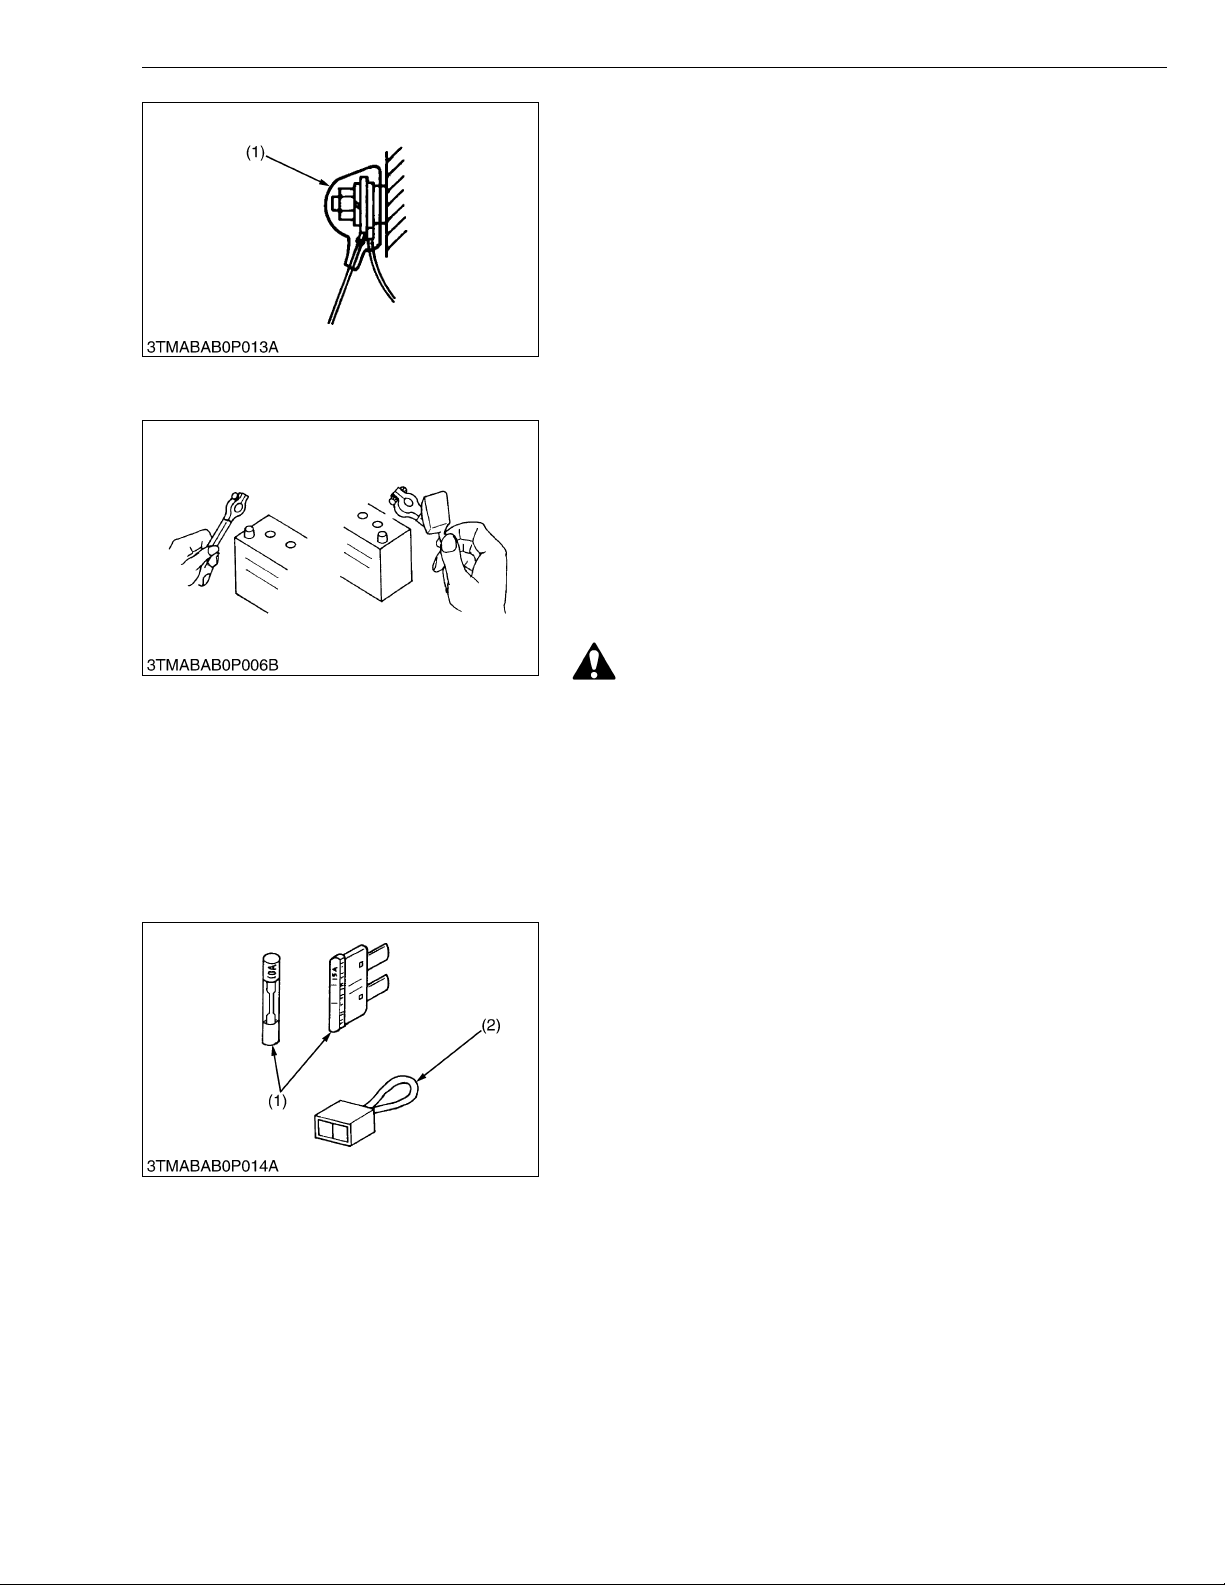
• After installing wiring, check protection of terminals and clamped
condition of wiring, only connect battery.
(1) Cover
• Securely Install Cover
W1011735
• Take care not to confuse positive and negative terminals.
• When removing battery cord, disconnect negative wire first.
When installing battery cord, check for polarity and connect
positive wire first.
• Do not install a ny battery with capacity other than is specified
(Ah).
• After connecting co rd to batte ry te rminals , apply g rease to them
and securely install terminal covers on them.
• Do not allow dirt and dust to collect on battery.
[3] FUSE
CAUTION
• Take care not to let battery liquid spill on your skin and
clothes. If contaminated, wash it off with water immediately.
• Before recharging the battery, remove it from the machine.
• Before recharging, remove cell caps.
• Do recharging in a well- ventilated place where there is no
open flame nearby, as hydrogen gas and oxygen are formed.
W1011816
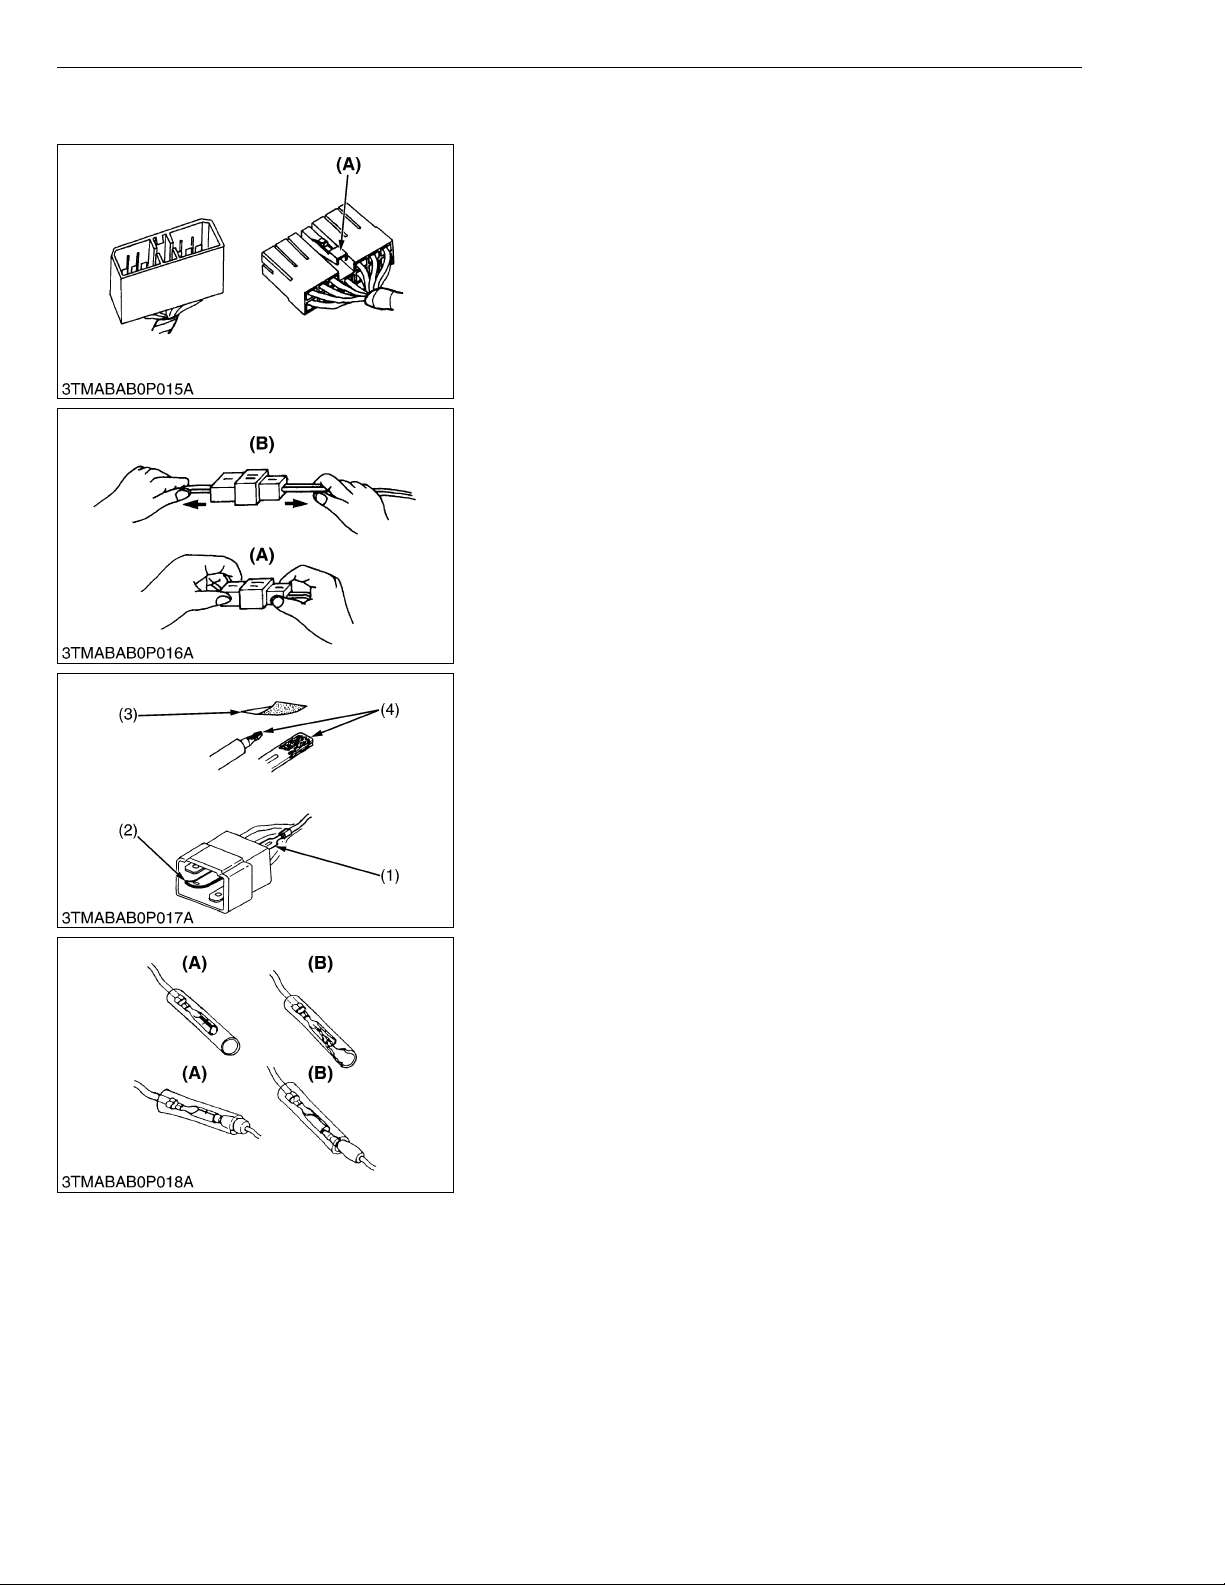
• Use fuses with specified capacity.
Neither too large or small capacity fuse is acceptable.
• Never use steel or copper wire in place of fuse.
• Do not install working light, radio set, etc. on machine which is not
provided with reserve power supply.
• Do not install accessories if fuse capacity of reserve power
supply is exceeded.
(1) Fuse (2) Slow Blow Fuse
W1012092
G-5
Page 25
ME8200, ME9000, WSM
KiSC issued 03, 2007 A
[4] CONNECTOR
G GENERAL
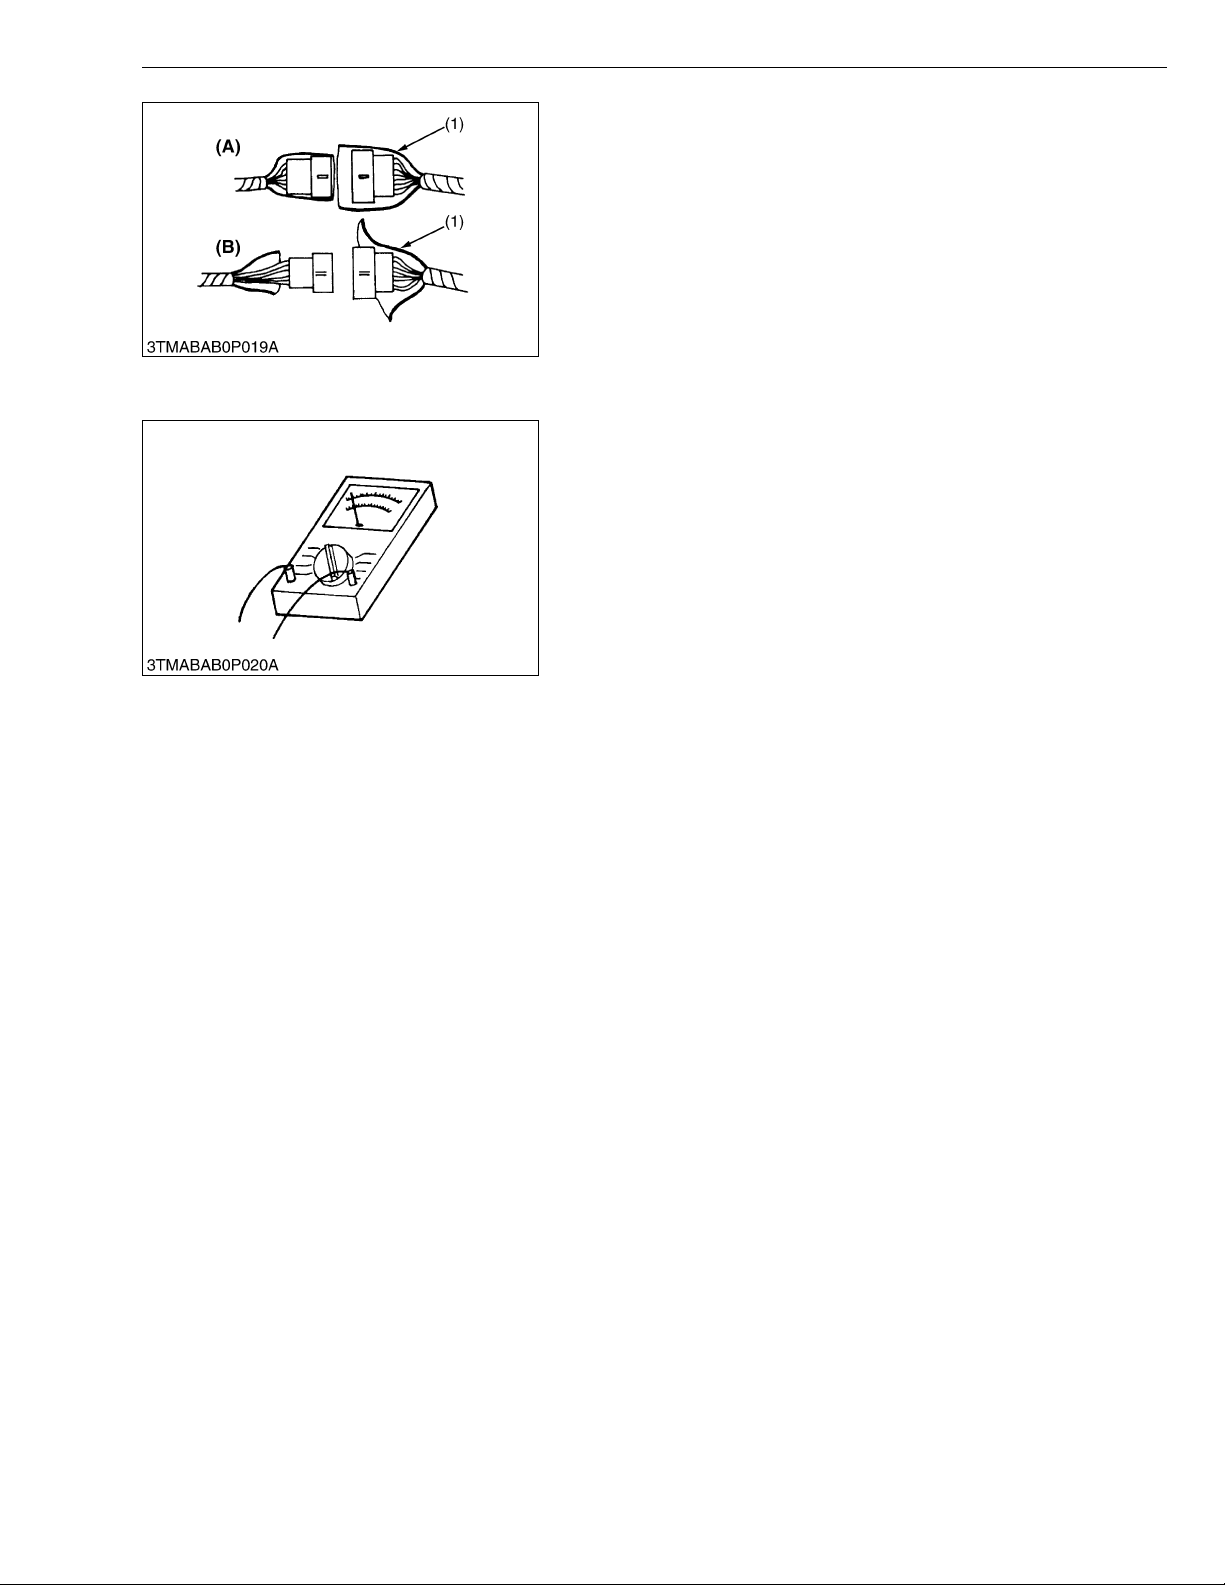
• For connector with lock, push lock to separate.
(A) Push
W1012211
• In separating connectors, do not pull wire harnesses.
• Hold connector bodies to separate.
(A) Correct (B) I n c orrect
W1012272
• Use sandpaper to remove rust from terminals.
• Repair deformed terminal. Make certain there is no terminal
being exposed or displaced.
(1) Exposed Terminal
(2) Deformed Terminal
(3) Sandpaper
(4) Rust
W1012346
• Make certain that there is no female connector being too open.
(A) Correct (B) Incorrect
W1012430
G-6
Page 26
ME8200, ME9000, WSM
KiSC issued 03, 2007 A
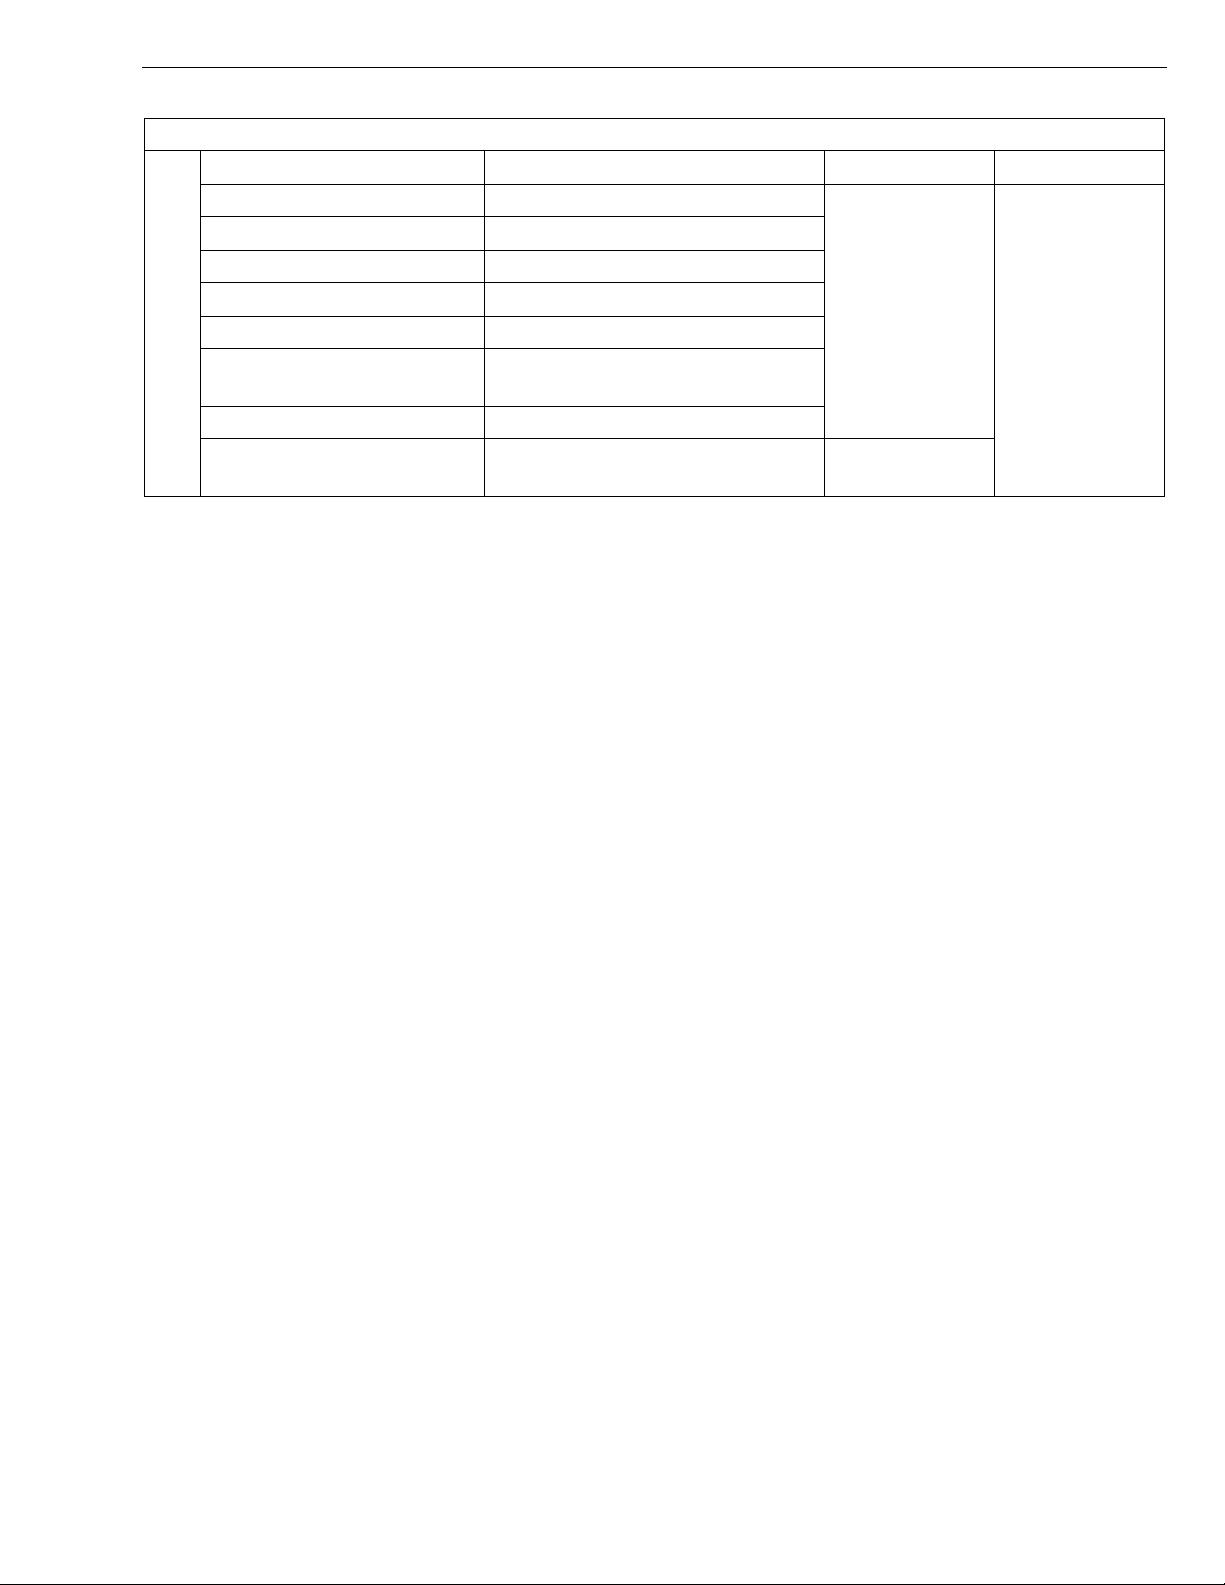
• Make certain plastic cover is large enough to cover whole
connector.
(1) Cover (A) Correct
[5] HANDLING OF CIRCUIT TESTER
• Use tester correctly following manual provided with tester.
• Check for polarity and range.
G GENERAL
(B) Incorrect
W1012519
W1012684
G-7
Page 27

ME8200, ME9000, WSM
KiSC issued 03, 2007 A
4. LUBRICANTS, FUEL AND COOLANT
G GENERAL
Place
ROPS Type
1 Fuel tank
CABIN Type
Engine block
radiator
2Coolant
Reserve tank
3 Engine crankcase
4 Transmission case
5 Front differential case oil
6 Front axle gear case oil
Brake oil (Reservoir and
7
lines)
* KUBOTA original transmission hydraulic fluid.
ME8200 ME9000
Serial No. :
up to 54529
5.3 U.S.qts
4.4 Imp.qts
Serial No. :
54530 and
6.3 U.S.qts
5.3 Imp.qts
23.8 U.S.gals
19.8 Imp.gals
29.1 U.S.gals
24.2 Imp.gals
5.0 L
above
6.0 L
Capacity
90 L
110 L
9.0 L
9.5 U.S.qts
7.9 Imp.qts
1.0 L
1.1 U.S.qts
0.9 Imp.qts
10.7 L
11.3 U.S.qts
9.4 Imp.qts
55 L
58.1 U.S.qts
48.4 Imp.qts
6.3 U.S.qts
5.3 Imp.qts
3.5 L
3.7 U.S.qts
3.1 Imp.qts
0.3 L
0.32 U.S.qts
0.26 Imp.qts
Lubricants, fuel and coolant
No. 2-D diesel fuel
No. 1-D diesel fuel if temperature is
below −10 °C (14 °F)
Fresh clean water with anti-freeze
Engine oil: API service
classification CD, CE or CF
Below 0 °C (32 °F) :
SAE10W, 10W-30 or 10W-40
0 to 25 °C (32 to 77 °F) :
SAE20, 10W-30 or 10W-40
Above 25 °C (77 °F) :
SAE30, 10W-30 or 10W-40
KUBOTA SUPER UDT fluid*
6.0 L
KUBOTA SUPER UDT fluid or
SAE80, 90 gear oil
KUBOTA UDT or SUPER UDT
fluid* or Turbine oil 32 (see below)
[regular type, multipurpose str ai ght
mineral oil
Mobile DTE Oil #32
TEXACO Regal Oil #32
CHEVRON-GST Oil #32
TERESSO Oil #32]
Never use automotive brake oil
G-8
Page 28
ME8200, ME9000, WSM
NOTE■
KiSC issued 03, 2007 A
G GENERAL
Greasing
Place No. of greasing point Capacity Type of grease
Front wheel case support 2
Front axle support 2
Top link 2
Top link bracket 2
8
Lift rod 3
Steering joint shaft
(CABIN Type)
1
Until grease
overflows
Multipurpose
type grease
Parking brake lever shaft 1
Battery terminal 2
Moderate
amount
• Engine Oil : Oil used in the engine should have an American Petroleum Institute (API) service classification
and Proper SAE Engine Oil according to the ambient temperature as shown above.
Do not mix different brands together.
• Transmission Oil : The oil used to lubricate the transmission is also used as hydraulic fluid. To insure
proper operation of the hydraulic system and complete lubrication of the t ransmission, it is important that
a multi-grade transmission fluid be used in this system. We recommend the use of KUBOTA SUPER UDT
fluid for optimum protection and performance.
Do not mix different brands together.
• Indicated capacity of water and oil are manufacture’s estimate.
G-9
Page 29
ME8200, ME9000, WSM
KiSC issued 03, 2007 A
G GENERAL
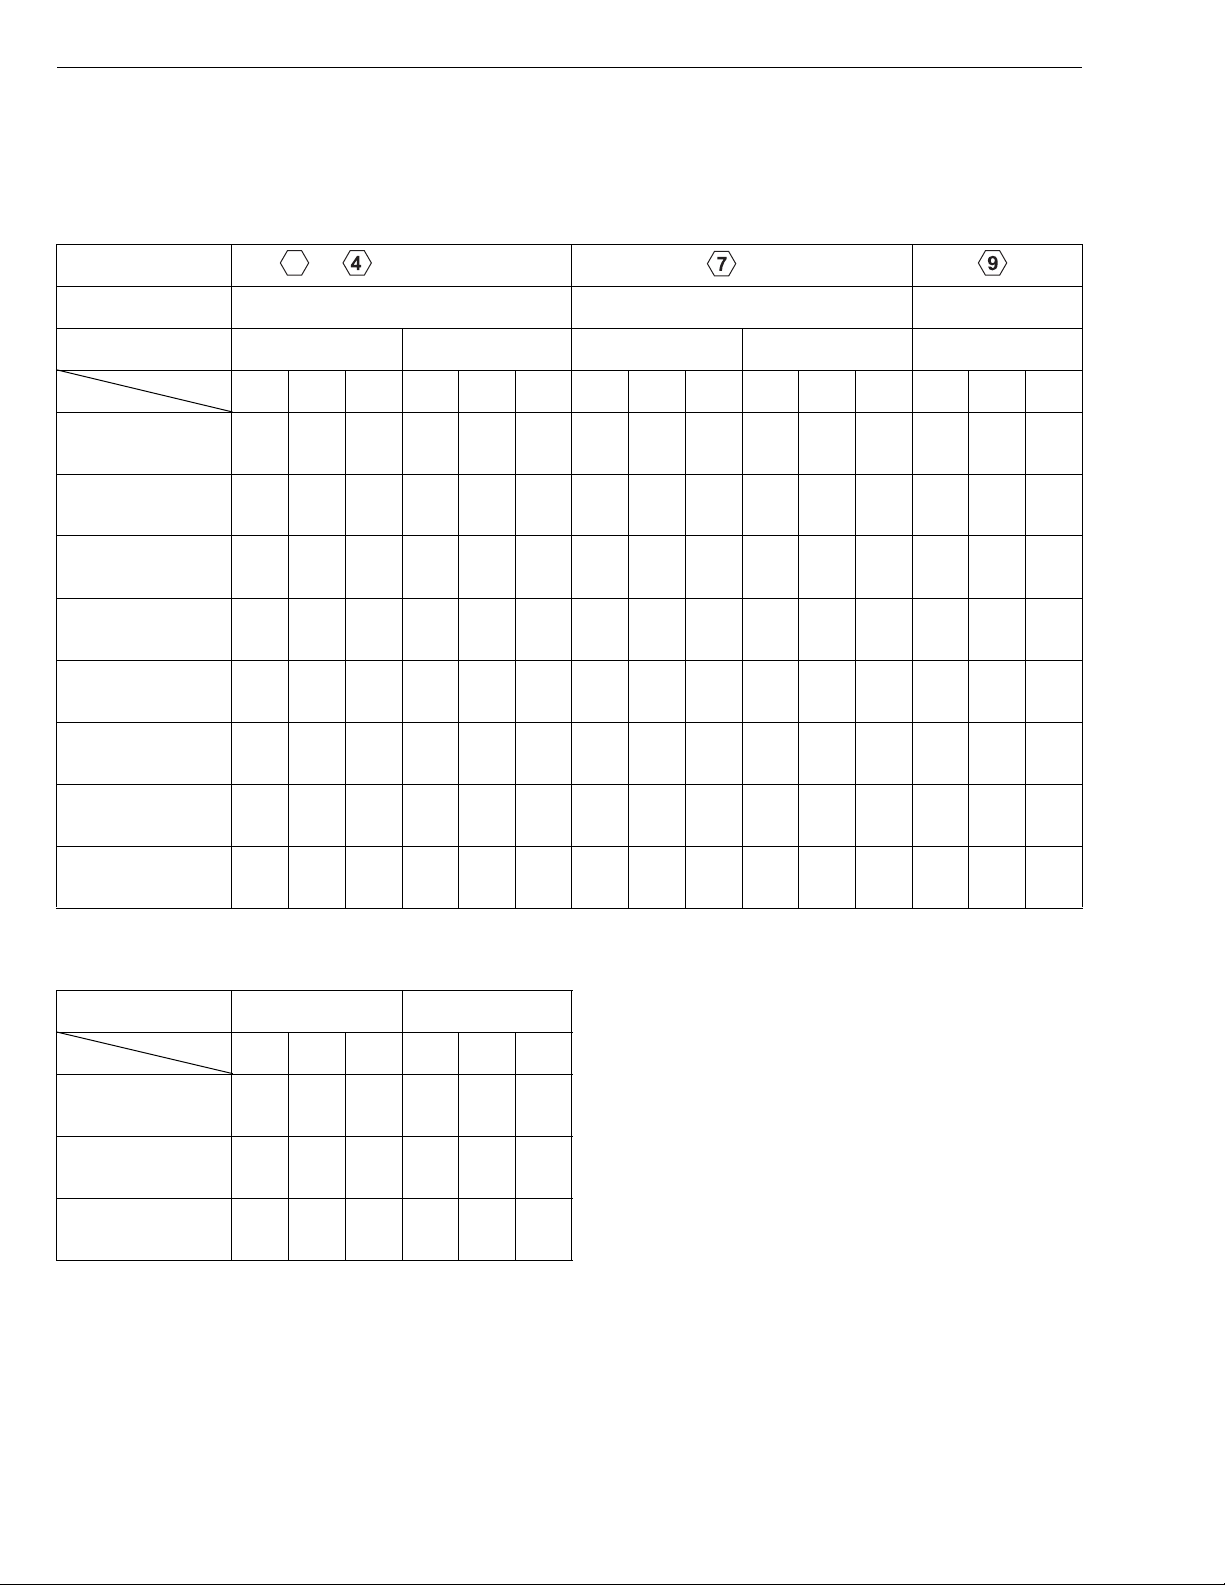
5. TIGHTENING TORQUES
[1] GENERAL USE SCREWS, BOLT AND NUTS
Screws, bolts and nuts whos e tightening torques are not spec ified i n this W orkshop Ma nual sho uld be tig htened
according to the table below.
Indication on top of
bolt
Material of bolt SS400, S20C S43C, S48C
Material of opponent
part
Unit
Diameter
M6
(6 mm, 0.24 in.)
M8
(8 mm, 0.31 in.)
M10
(10 mm, 0.39 in.)
M12
(12 mm, 0.47 in.)
M14
(14 mm, 0.55 in.)
M16
(16 mm, 0.63 in.)
M18
(18 mm, 0.71 in.)
M20
(20 mm, 0.79 in.)
No-grade or 4T 7T 9T
SCr435,
SCM435
Ordinariness Aluminum Ordinariness A lu minum Ordinariness
N·m kgf·m lbf·ft N·m kgf·m lbf·ft N·m kgf·m lbf·ft N·m kgf·m lbf·ft N·m kgf·m lbf·ft
7.85
0.80
5.79
7.85
0.80
5.79
9.81
1.00
7.24
7.85
0.80
5.79
12.3
to
9.31
17.7
to
20.5
39.3
to
45.0
62.8
to
72.5
108
to
125
167
to
191
246
to
284
334
to
392
to
0.95
1.8
to
2.1
4.0
to
4.6
6.4
to
7.4
11.0
to
12.8
17.0
to
19.5
25.0
to
29.0
34.0
to
40.0
to
6.87
13.1
to
15.1
29.0
to
33.2
46.3
to
53.5
79.6
to
92.5
123
to
141
181
to
209
246
to
289
to
to
to
8.82
0.90
6.50
16.7
19.6
31.4
34.3
1.7
12.3
to
to
2.0
3.2
to
3.5
–––
–––
–––
–––
–––
to
14.4
23.2
to
to
25.3
to
11.2
23.6
to
27.4
48.1
to
55.8
77.5
to
90.2
124
to
147
197
to
225
275
to
318
368
to
431
to
1.15
2.4
to
2.8
4.9
to
5.7
7.9
to
9.2
12.6
to
15.0
20.0
to
23.0
28.0
to
32.5
37.5
to
44.0
to
8.31
17.4
to
20.2
35.5
to
41.2
57.2
to
66.5
91.2
to
108
145
to
166
203
to
235
272
to
318
to
to
to
8.82
0.90
6.50
17.7
20.5
39.3
44.1
62.8
72.5
1.8
13.1
to
to
2.1
4.0
to
4.5
6.4
to
7.4
–––
–––
–––
–––
to
15.1
29.0
to
to
32.5
46.3
to
to
53.5
to
14.2
29.5
to
34.3
60.9
to
70.6
103
to
117
167
to
196
260
to
304
344
to
402
491
to
568
1.25
to
1.45
3.0
to
3.5
6.2
to
7.2
10.5
to
12.0
17.0
to
20.0
26.5
to
31.0
35.0
to
41.0
50.0
to
58.0
W1034542
9.05
to
10.4
21.7
to
25.3
44.9
to
52.0
76.0
to
86.7
123
to
144
192
to
224
254
to
296
362
to
419
[2] STUD BOLTS
Material of oppone n t
part
Unit
Diameter
M8
(8 mm, 0.31 in.)
M10
(10 mm, 0.39 in.)
M12
(12 mm, 0.47 in.)
Ordinariness Aluminum
N·m kgf·m lbf·ft N·m kgf·m lbf·ft
11.8
to
15.6
24.6
to
31.3
29.5
to
49.0
1.2
to
1.6
2.5
to
3.2
3.0
to
5.0
8.68
8.82
to
11.5
18.1
23.1
21.7
36.1
to
11.8
19.7
to
to
25.4
to
31.4 3.2 23.1
0.90
to
1.2
2.0
to
2.6
6.51
to
8.67
14.5
to
18.8
W1048139
G-10
Page 30
ME8200, ME9000, WSM
KiSC issued 03, 2007 A
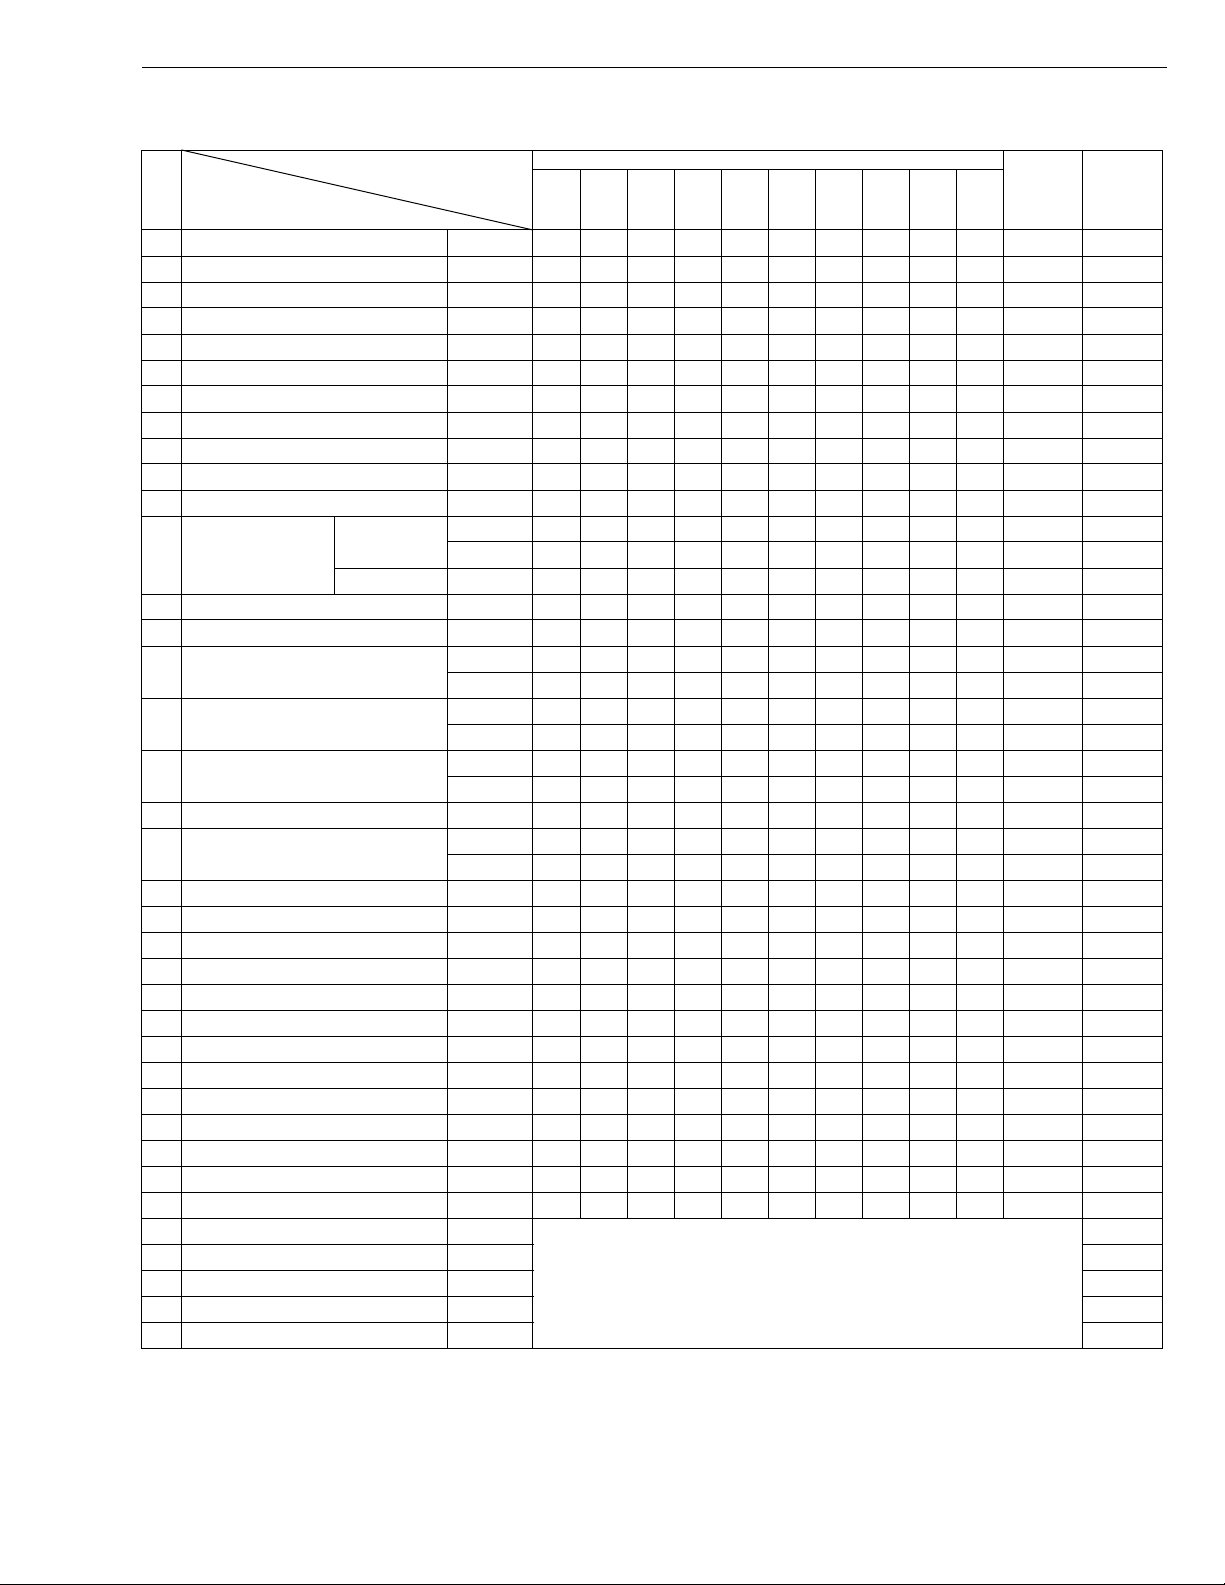
6. MAINTENANCE
G GENERAL
Period
No.
Item
1 Engine oil Change ★✩ ✩ G-15
2 Engine oil filter Replace ★✩G-16
3 Transmission fluid Change ★ G-16
4 Front differential case oil Change ★ G-17
5 Hydraulic oil filter Replace ★✩ G-16
6 Front axle gear case oil Change ★ G-17
7 Water separator Clean ★✩G-18
8 Engine start system Check ✩✩✩✩✩✩✩✩✩✩ G-18
9 Wheel nut torque Check ✩✩✩✩✩✩✩✩✩✩ G-19
10 Greasing – ✩✩✩✩✩ G-23
11 Battery condition Check ✩✩✩✩✩ G-19
Air cleaner element
12
[Double type]
13 Fan belt Adjust ✩✩✩✩✩ G-21
14 Brake Adjust ✩✩✩✩✩ G-21
15 Fuel line
16 Power steering oil line
17 Radiator hose and clamp
18 Toe-in Adjust ✩✩ G-25
19 Intake air line
20 Fuel tank Drain ✩✩ G-25
21 Fuel filter Replace ✩ G-27
22 Brake oil Change G-28
23 Front axle pivot Adjust G-28
24 Engine valve clearance Adjust 1-S23
25 Fuel injection nozzle Check 1-S71
26 Injection pump Check 1-S70
27 Brake hose Replace G-32
28 Master cylinder kit Replace G-33
29 Equalizer kit Replace G-33
30 Brake seal 1 and 2 Replace G-33
31 Cooling system Flush G-31
32 Coolant Change G-30
33 Fuel system Bleed
34 Clutch housing water Drain G-34
35 Fuse Replace G-35
36 Light bulb Replace G-37
37 Brake system Bleed G-34
Primary
element
Secondary Replace *2 G-29
Clean ✩✩✩✩✩*1 G-20
Replace *2 G-29
Check ✩✩✩✩✩ G-21
Replace G-32
Check ✩✩ G-24
Replace G-32
Check ✩✩ G-24
Replace G-32
Check ✩✩ –
Replace *3 –
Indication on hour meter
Service as required
Important
Reference
page50 100 150 200 250 300 350 400 450 500
G-33
W1035769
G-11
Page 31
ME8200, ME9000, WSM
KiSC issued 03, 2007 A
G GENERAL
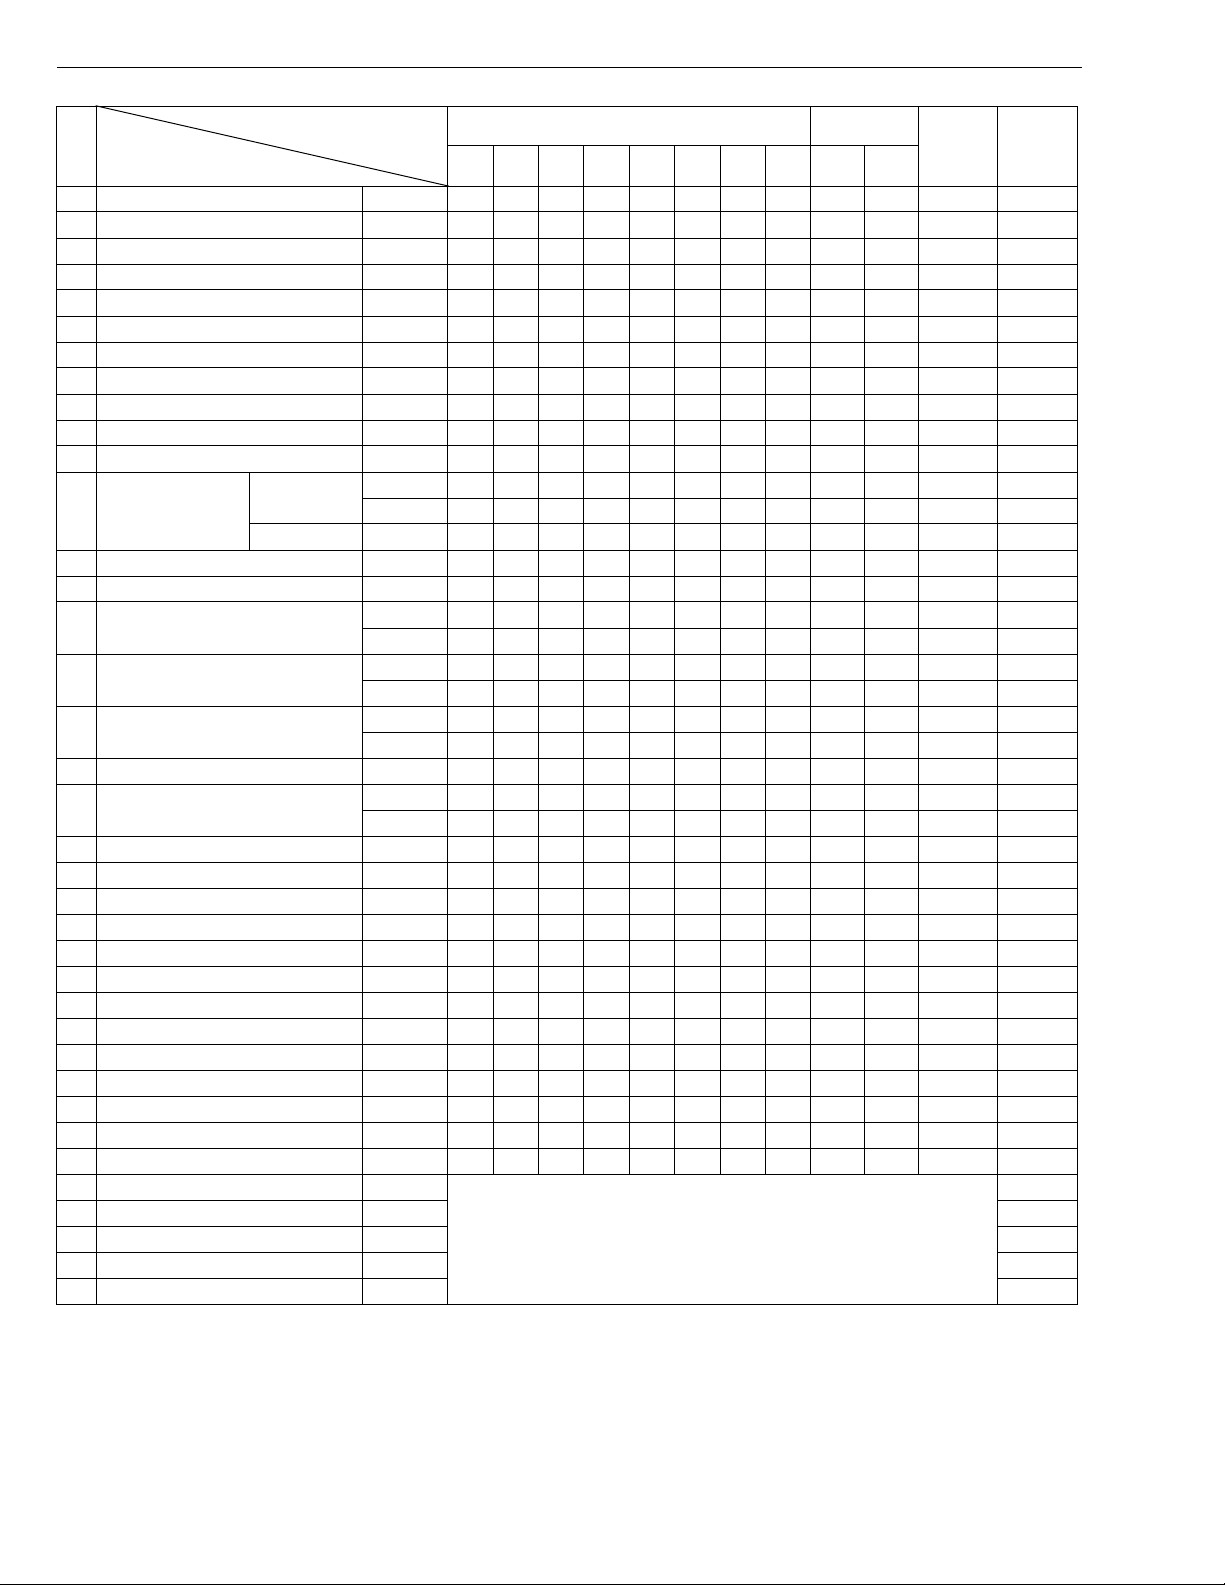
Period
No.
Item
1 Engine oil Change ✩✩ G-15
2 Engine oil filter Replace ✩ G-16
3 Transmission fluid Change ✩ G-16
4 Front differential case oil Change ✩ G-17
5 Hydraulic oil filter Replace ✩ G-16
6 Front axle gear case oil Change G-17
7 Water separator Clean ✩ G-18
8 Engine start system Check ✩✩✩✩✩✩ G-18
9 Wheel nut torque Check ✩✩✩✩✩✩ G-19
10 Greasing – ✩✩✩ G-23
11 Battery condition Check ✩✩✩ G-19
Air cleaner element
12
[Double type]
13 Fan belt Adjust ✩✩✩ G-21
14 Brake Adjust ✩✩✩ G-21
15 Fuel line
16 Power steering oil line
17 Radiator hose and clamp
18 Toe-in Adjust ✩✩ G-25
19 Intake air lin e
20 Fuel tank Drain ✩✩ G-25
21 Fuel filter Replace ✩
22 Brake oil Change ✩ G-28
23 Front axle pivot Adjust ✩ G-28
24 Engine valve clearance Adjust ✩ 1-S23
25 Fuel injection nozzle Check ✩ 1-S71
26 Injection pump Check ✩ 1-S70
27 Brake hose Replace ✩ G-32
28 Master cylinder kit Replace ✩ G-33
29 Equalizer kit Replace ✩ G-33
30 Brake seal 1 and 2 Replace ✩ G-33
31 Cooling system Flush ✩ G-31
32 Coolant Change ✩ G-30
33 Fuel system Bleed
34 Clutch housing water Drain G-34
35 Fuse Replace G-35
36 Light bulb Replace G-37
37 Brake system Bleed G-34
Primary
element
Secondary Replace ✩ G-29
Clean ✩✩✩ *1 G-20
Replace ✩ *2 G-29
Check ✩✩✩ G-21
Replace ✩ G-32
Check ✩✩ G-24
Replace ✩ G-32
Check ✩✩ G-24
Replace ✩ G-32
Check ✩✩ –
Replace ✩ *3 –
550 600 650 700 750 800 1500 3000 1 year
Indication on hour meter
Service as required
After
purchase
years
2
Important
Reference
page
G-27
G-33
W1026171
G-12
Page 32
ME8200, ME9000, WSM
IMPORTANT■
KiSC issued 03, 2007 A
G GENERAL
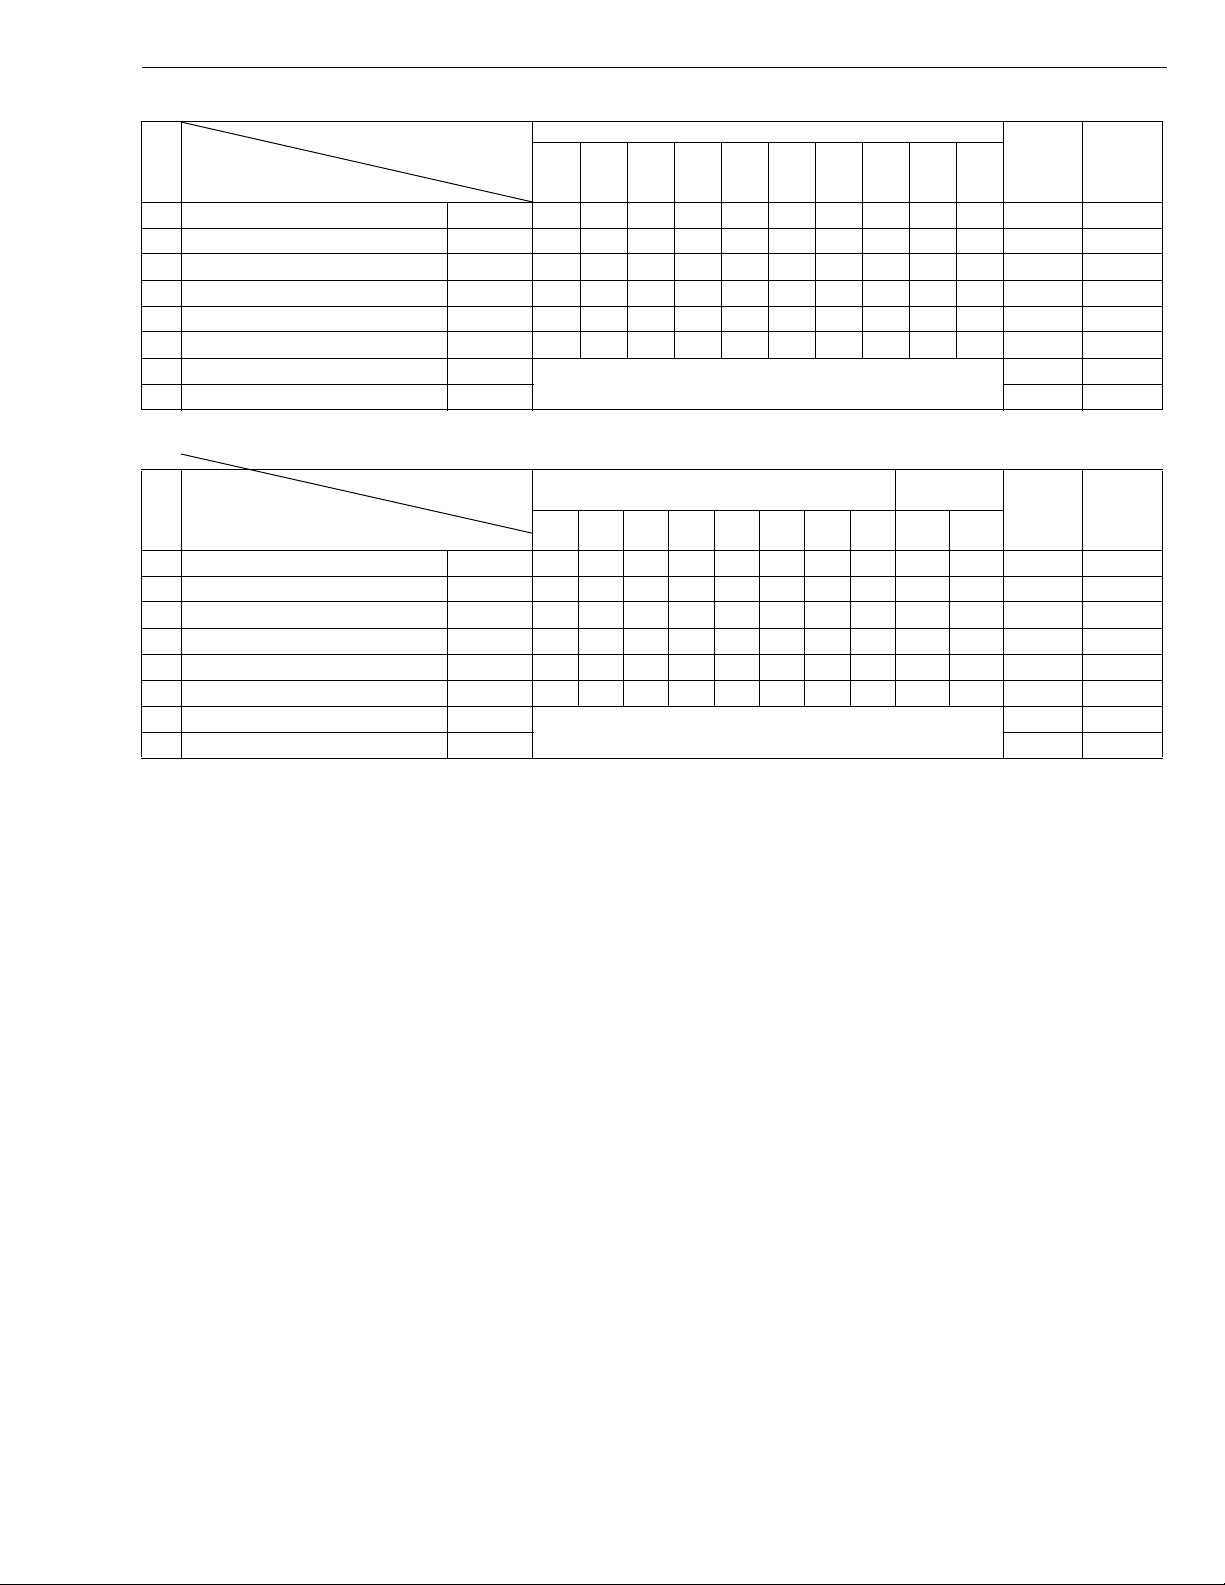
(Additional items for CABIN Type)
Period
No.
Item
1 Air conditioner drive belt Adjust ✩✩ G-27
2 Inner air filter Clean ✩✩ G-26
3 Fresh air filter Clean ✩✩ G-26
4 Air conditioner Clean ✩✩ G-26
5 Air conditioner pipes and hoses Check G-29
6 CABIN isolation Check G-29
7 Washer liquid Add
8 Amount of refrigerant (gas) Check G-38
Indication on hour meter
Service as required
Important
Reference
W1030852
(Additional items for CABIN Type)
Period
No.
Item
1 Air conditioner drive belt Adjust ✩✩ G-27
2 Inner air filter Clean ✩✩ G-26
3 Fresh air filter Clean ✩✩ G-26
4 Air conditioner Clean ✩✩ G-26
5 Air conditioner pipes and hoses Check ✩ G-29
6 CABIN isolation Check ✩ G-29
7 Washer liquid Add
8 Amount of refrigerant (gas) Check G-38
550 600 650 700 750 800 1500 3000 1 year
Indication on hour meter
Service as required
After
purchase
years
2
Important
Reference
W1033325
page50 100 150 200 250 300 350 400 450 500
G-38
page
G-38
• The jobs indicated by ★ must be done after the first 50 hours of operation.
• *1 : Air cleaner should be cleaned more often in dusty conditions than in normal conditions.
• *2 : Every year or every 6 times of cleaning.
• *3 : Replace only if necessary.
G-13
Page 33

ME8200, ME9000, WSM
KiSC issued 03, 2007 A
G GENERAL
7. CHECK AND MAINTENANCE
CAUTION
• Be sure to check and service the tractor on a flat place with engine shut off, the parking brake on and chock
the wheels.
[1] DAILY CHECK
To prevent trouble fro m occurring, it i s important to k now the condition o f the tractor. Chec k the following i tems
before starting.
Checking
• Check areas where previous trouble was experienced.
• Walk around the tractor.
1. Check the tire pressure, and check for wear and damage.
2. Check for oil and water leak.
3. Check the engine oil level.
4. Check the transmission fluid level.
5. Check the coolant level.
6. Check the brake oil level.
7. Check the washer liquid level.
8. Check the water separator.
9. Check air cleaner evacuator valve (when used in a dusty place).
10.Check the condition of seat belt and ROPS attaching hardware.
11.Check and clean the radiator screen and grill.
12.Check and clean the air conditioner condenser screen, and intercooler screen.
13.Check the nuts of tires are tight.
14.Check the number plate or SMV emblem for damage and replace as necessary if equipped.
15.Care of danger, warning and caution labels.
16.Clean around the exhaust manifold and the muffler of the engine.
• While sitting in the operator's seat.
1. Check the throttle pedal, brake pedal and clutch pedal.
2. Check the throttle lever and shuttle lever.
3. Check the parking brake.
4. Check the steering wheel.
• Turning the key switch.
1. Check the performance of the easy checker lights.
2. Check the head lights, turn signal lights, hazard lights and other light equipment. Clean if necessary.
3. Check the performance of the meters and gauges.
• Starting the engine.
1. Check to see that the lights on the easy checker go off.
2. Check the color of the exhaust gas.
3. Check the brakes for proper operation.
G-14
Page 34
ME8200, ME9000, WSM
IMPORTANT■
KiSC issued 03, 2007 A
[2] CHECK POINTS OF INITIAL 50 HOURS
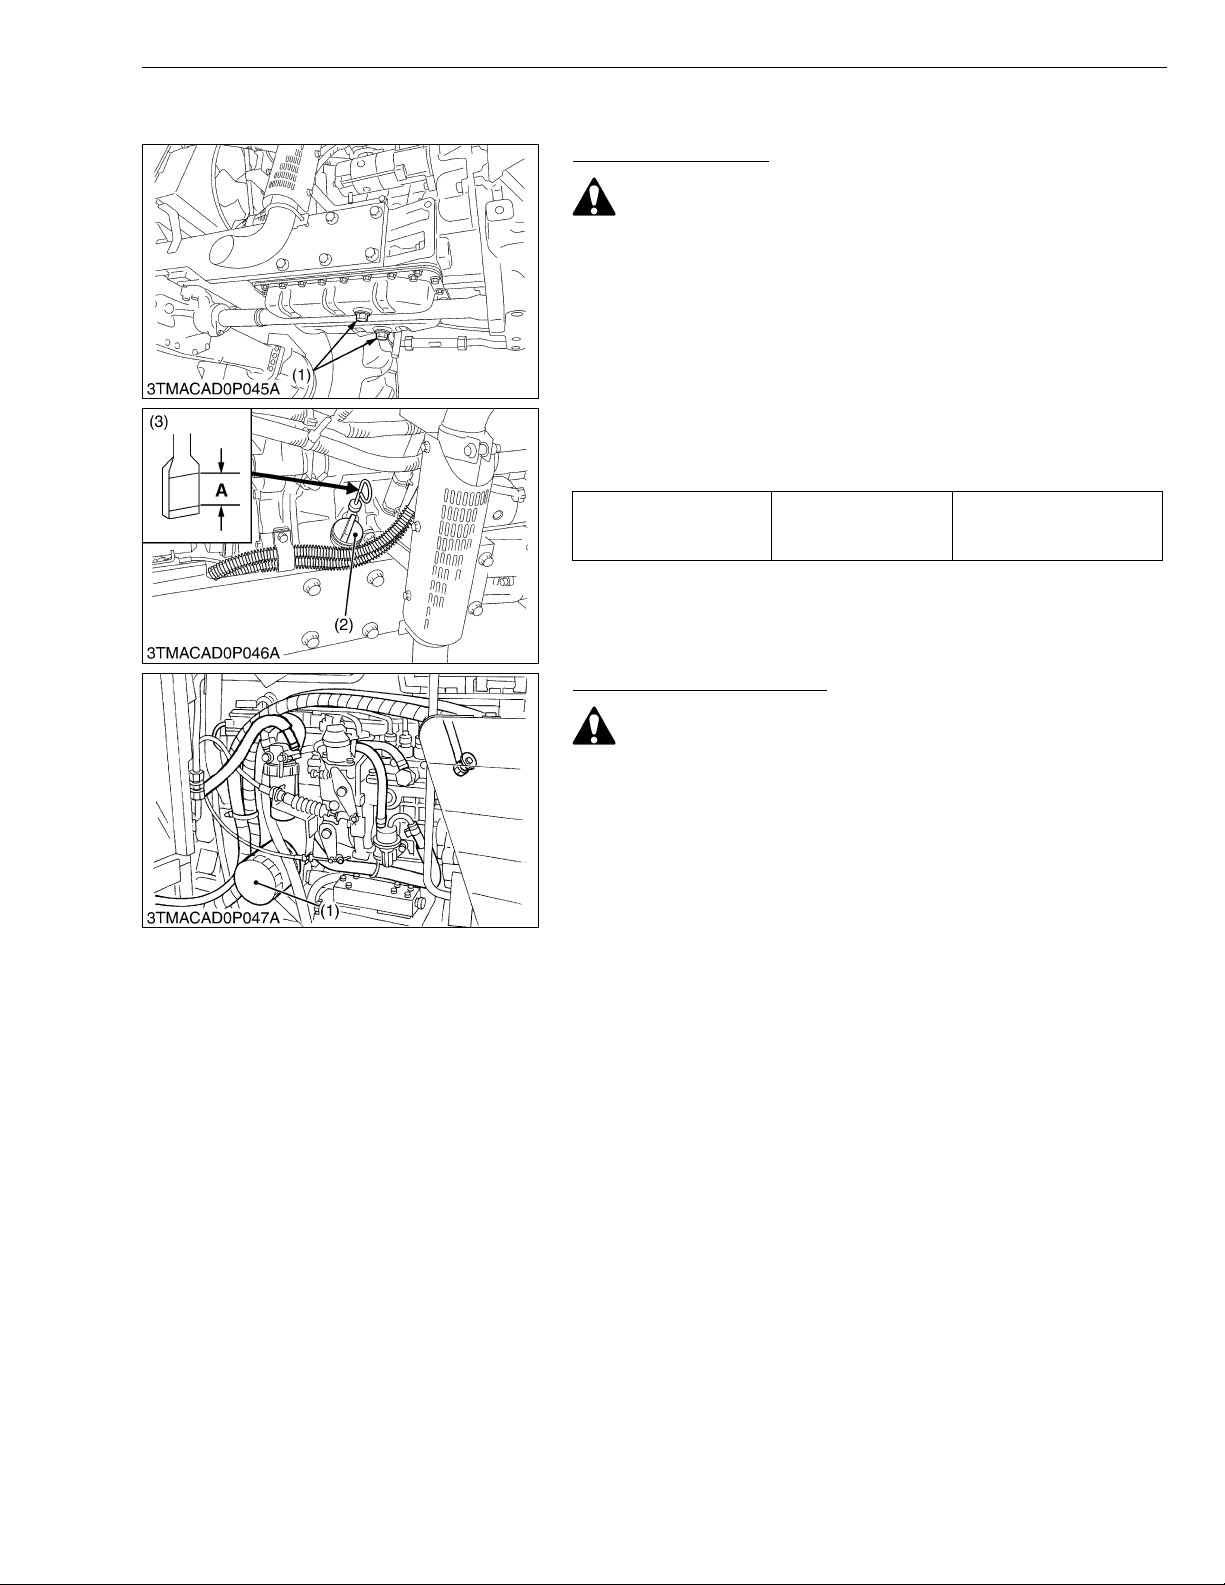
Changing Engine Oil
CAUTION
• Before changing oil, be sure to stop the engine.
• Allow engine to cool down sufficiently, oil can be hot and
can burn.
1. To drain the used oil, remove the drain plugs (1) at the bottom of
the engine and drain the oil completely into the oil pan.
All the used oil can be dr ain ed ou t eas ily when th e eng ine is still
warm.
2. After draining reinstall the drain plugs (1).
3. Fill with the new oil up to the upper notch on the dipstick.
Refer to “LUBRICANTS, FUEL AND COOLANT”. (See page
G-8.)
Engine Oil Capacity
G GENERAL
10.7 L
11.3 U.S .qts
9.4 Imp.qts
(1) Drain Plug
(2) Oil Inlet Plug
(3) Dipstick
(A) Oil level is acceptable within this
range.
W1036664
Replacing Engine Oil Filter
CAUTION
• Be sure to stop the engine before changing oil filter
cartridge.
• Allow engine to cool down sufficiently, oil can be hot and
can burn.
1. Remove the oil filter (1).
2. Put a film of clean engine oil on rubber seal of new filter.
3. Tighten the filter quickly until it contacts the mounting surface.
Tighten filter by hand an additional 1/2 turn only.
4. After the new filter h as been replaced, the engine oil no rmally
decreases a little. Make sure that the engine oil does not leak
through the seal and be sure to check the oil level on the dipstick.
Then, replenish the engine oil up to the prescribed level.
• To prevent serious damage to the engine, use only a
KUBOTA genuine filter.
(1) Engine Oil Filter
W1037391
G-15
Page 35
ME8200, ME9000, WSM
■
KiSC issued 03, 2007 A
G GENERAL
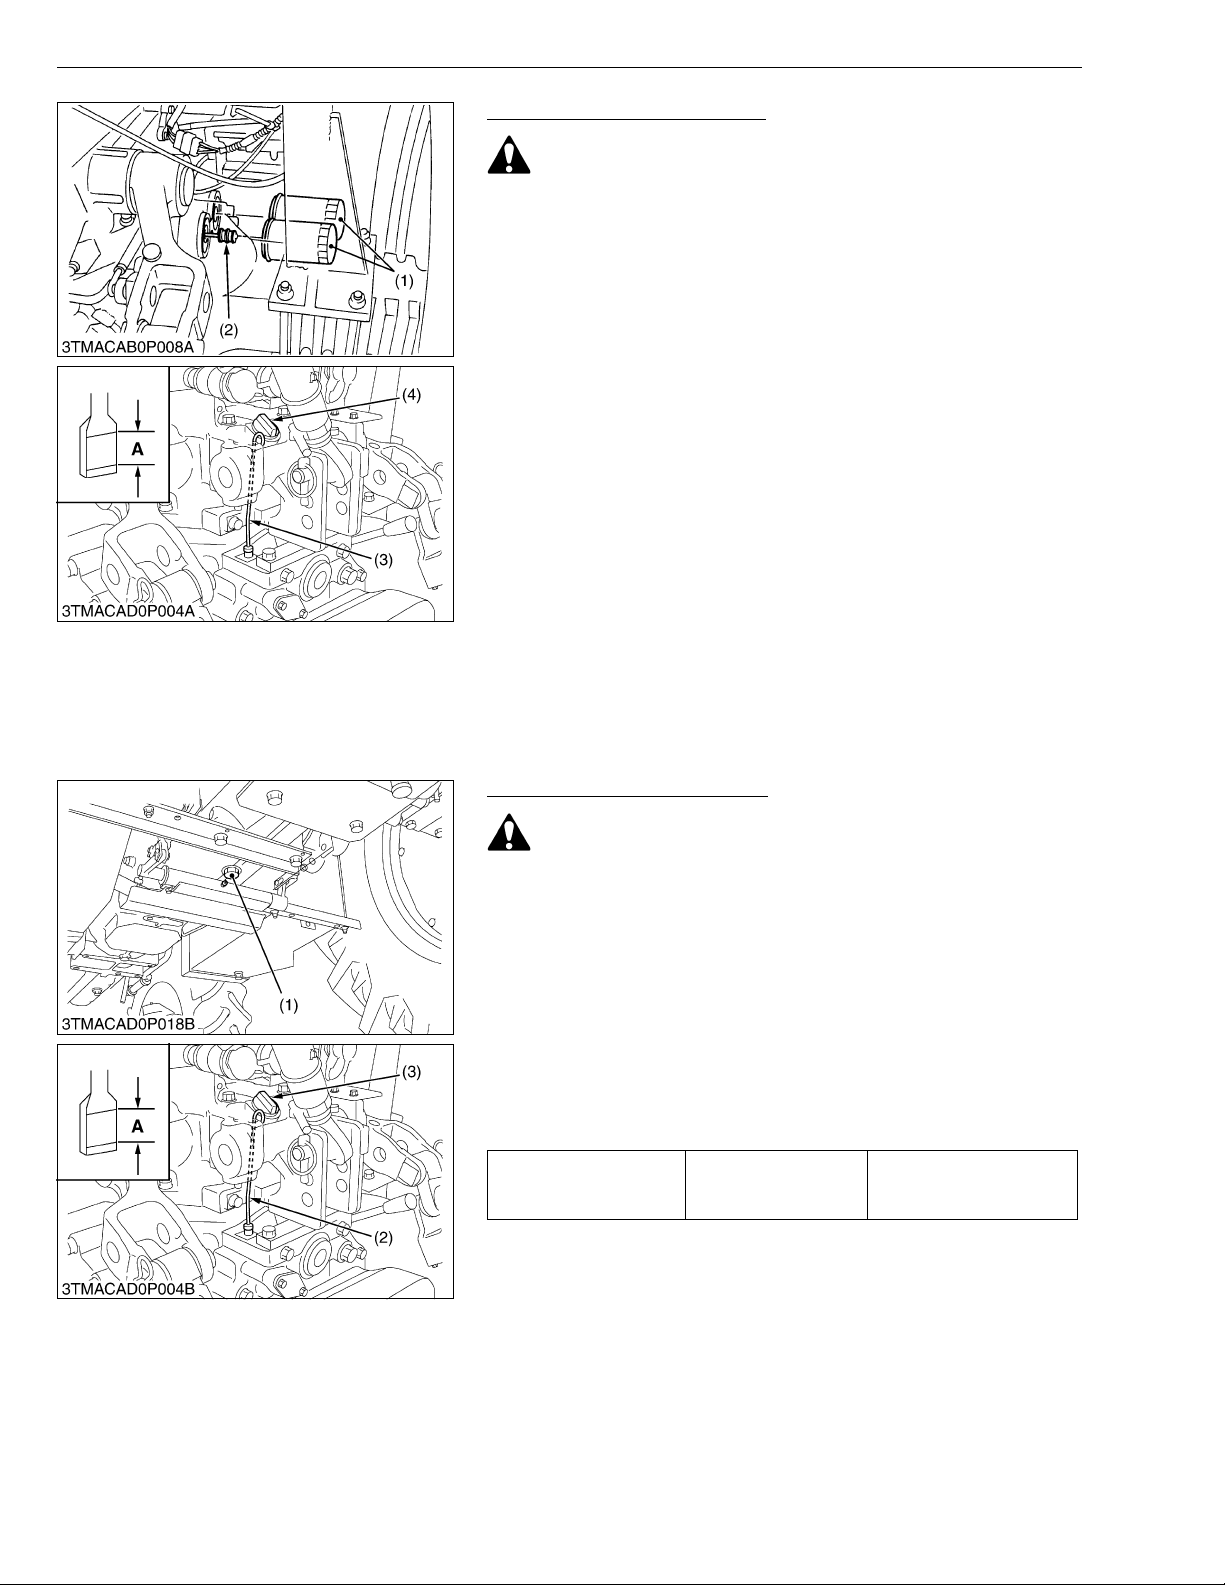
Replacing Hydraulic Oil Filter
CAUTION
• Allow engine to cool down sufficiently, oil can be hot and
can burn.
1. Remove the dr ain plug at the bottom of the tr ansmission case
and drain the oil completely into the oil pan.
2. After draining reinstall the drain plug.
3. Remove the two oil filters (1).
4. Clean off metal fillings with clean rags at the magnetic filters (2).
5. Put a film of clean transmission fluid on rubber seal of new filters.
6. Tighten the filter quickly until it contacts the mounting surface.
Tighten filter by hand and additional 1/2 turn only.
7. After the new fil ter has been replaced, fil l with the oil up to the
upper notch on the dipstick (3).
8. After running the engine for a few minutes, stop it and check the
oil level again, add oil to the prescribed level.
9. Make sure that the transmission flui d doesn't leak through the
seal.
IMPORTANT
• To prevent serious damage to the hydraulic system, use
only a KUBOTA genuine filter.
(1) Hydraulic Oil Filter
(2) Magnetic Filter (Clean off Metal
Fillings)
(3) Dipstick
(4) Oil Filling Plug
A : Oil level is acceptable within this
range.
W1037606
Changing Transmission Fluid
CAUTION
• Allow engine to cool down sufficiently, oil can be hot and
can burn.
1. To drain the used oil, remove the dr ain pl ug (1) a t the bo ttom of
the transmission case and drain the oil completely into the oil
pan.
2. After draining reinstall the drain plug.
3. Fill with the new KUBOTA SUPER UDT fluid up to the upper
notch on the dipstick (2).
Refer to “LUBRICANTS, FUEL AND COOLANT”. (See page
G-8.)
4. After running the engine for a few minutes, stop it and check the
oil level again; add oil to prescribed level.
55.0 L
Transmission fluid Capacity
(1) Drain Plug
(2) Dipstick
(3) Oil Inlet
A : Oil level is acceptable within the
range.
58.1 U.S.qts
48.4 Imp.qts
W1037968
G-16
Page 36
ME8200, ME9000, WSM
KiSC issued 03, 2007 A
G GENERAL
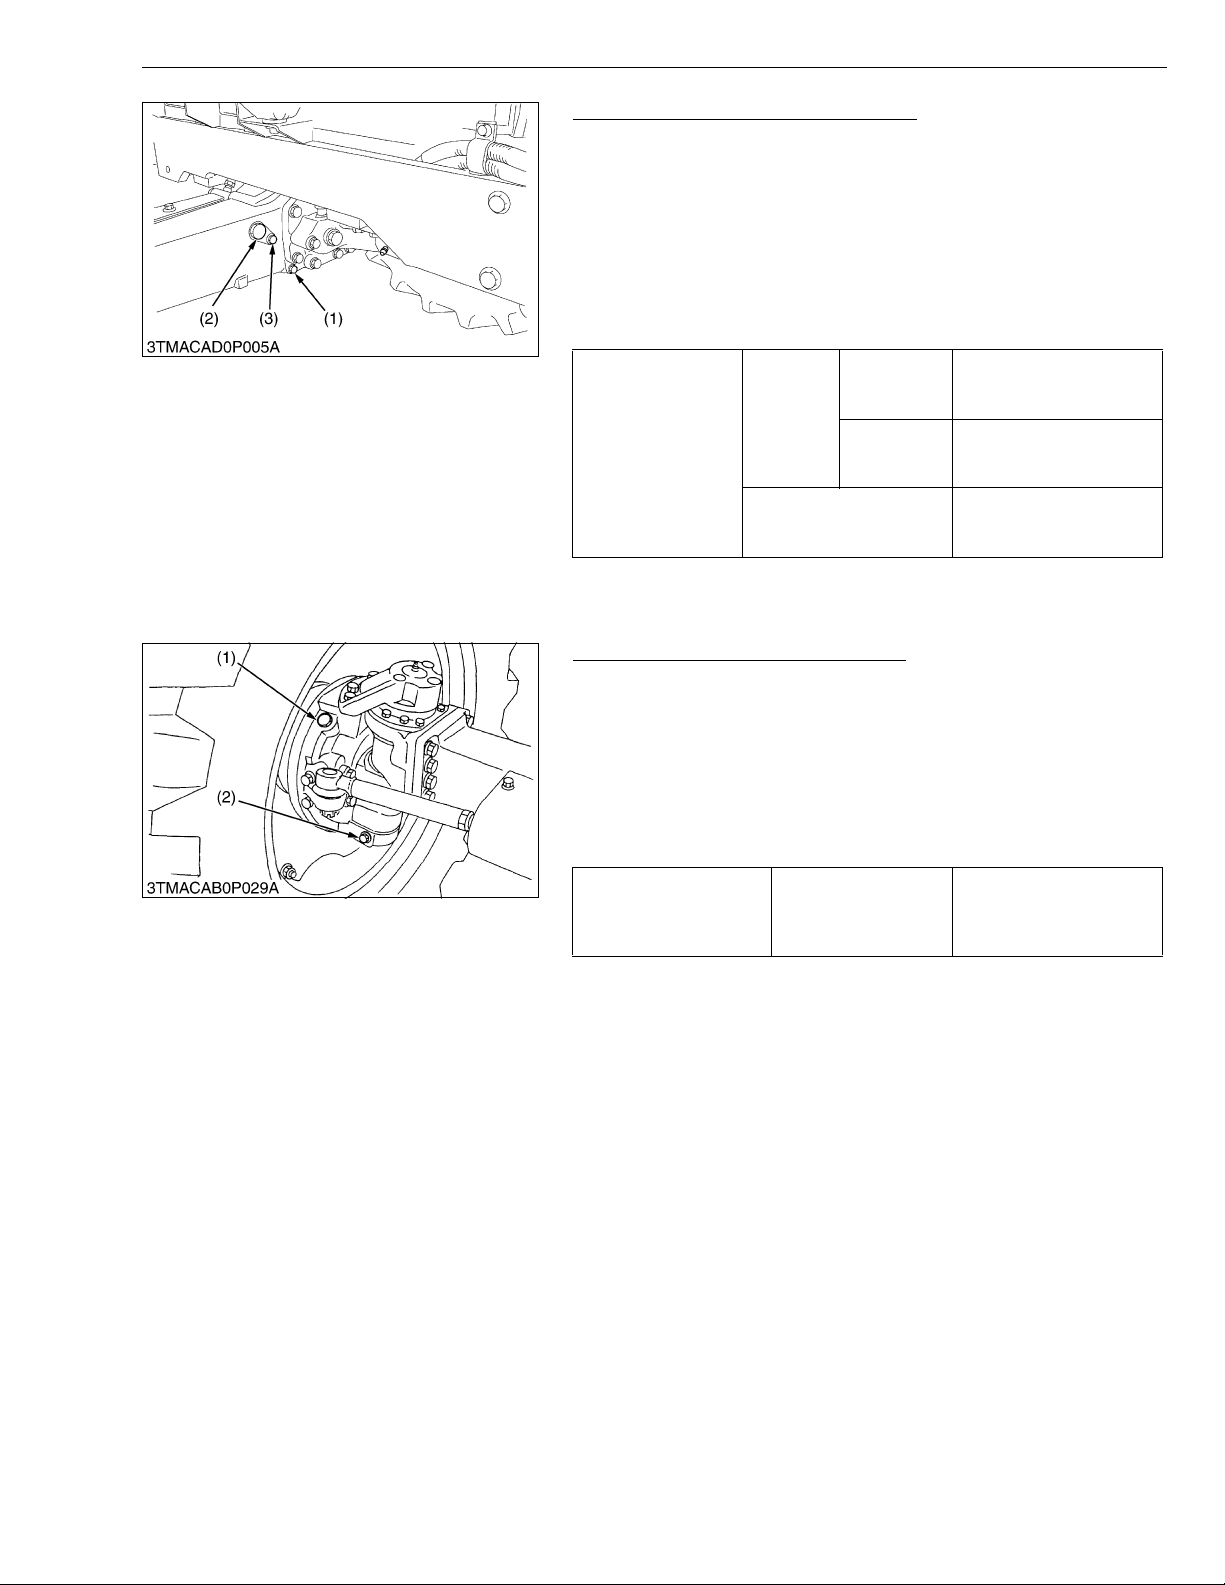
Changing Front Differential Case Oil
1. To drain the used oil, re mov e the d rain and fil li ng plu g (1) , ( 2) a t
the front differential case and drain the oil completely into the oil
pan.
2. After draining reinstall the drain plug (1).
3. Remove the oil level check plug (3).
4. Fill with the new oil up to the lower rim of check plug port.
Refer to “LUBRICANTS, FUEL AND COOLANT”. (See page
G-8.)
5. After filling reinstall the filling plug (2) and check plugs (3).
5.0 L
5.3 U.S.qts
4.4 Imp.qts
6.0 L
6.3 U.S.qts
5.3 Imp.qts
6.0 L
6.3 U.S.qts
5.3 Imp.qts
Oil capacity
ME8200
ME9000
Serial No. :
up to 54529
Serial No. :
54530 and
above
(1) Drain Plug
(2) Filling Plug
(3) Check Plug
W1038376
Changing Front Axle Gear Case Oil
1. To drain the used oil, remove the right and left drain plugs (2) and
filling plugs (1) at the front axle gear case and drain the oil
completely into the oil pan.
2. After draining reinstall the drain plugs (2).
3. Fill with the new oil up to the filling plug port.
Refer to “LUBRICANTS, FUEL AND COOLANT”. (See page
G-8.)
4. After filling reinstall the filling plugs (1).
3.5 L
Front Axle Gear Case
Oil
(1) Filling Plug (2) Drain Plug
Capacity
3.7 U.S.qts
3.1 Imp.qts
for each side
W1038644
G-17
Page 37
ME8200, ME9000, WSM
KiSC issued 03, 2007 A
G GENERAL
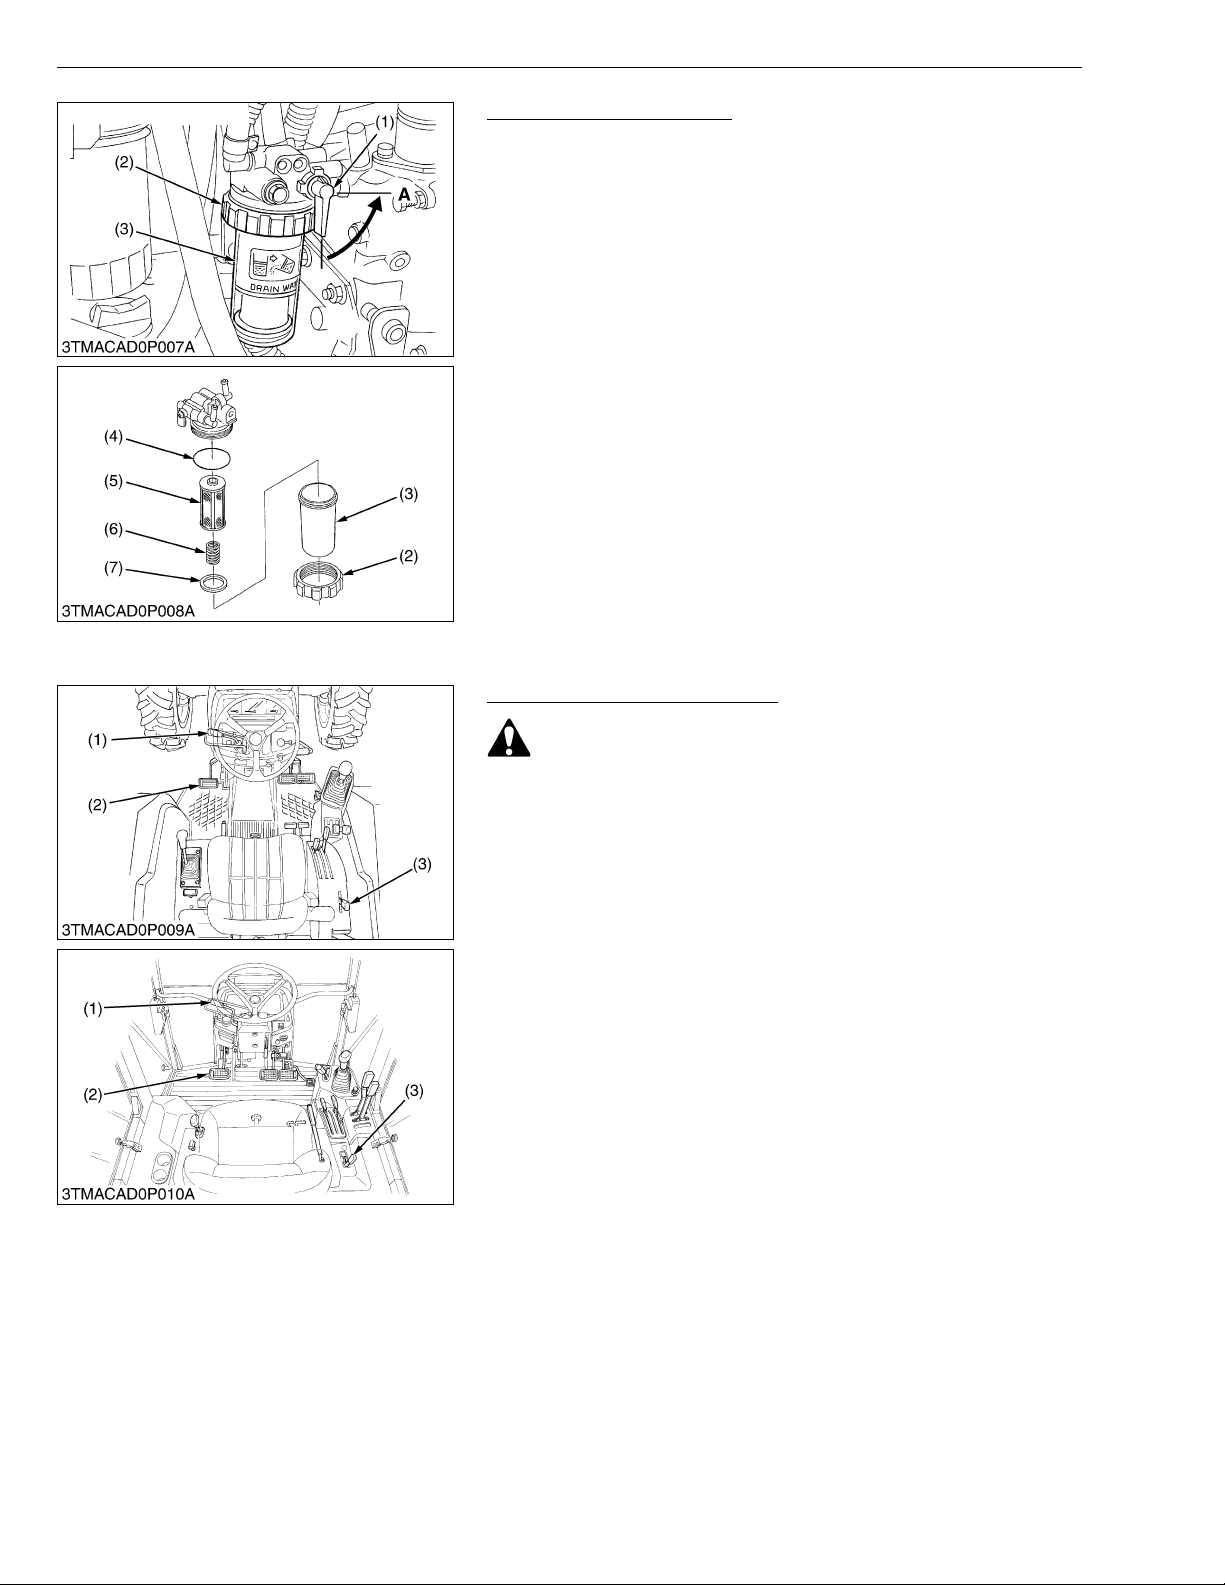
Cleaning Water Separator
1. Close the fuel cock (1).
2. Unscrew the reta iner ring (2) a nd remov e the cup (3) , and rinse
the inside with kerosene.
3. Take out the element and dip it in the kerosene to rinse.
4. After cleaning, reassemble the water separator, keeping out dust
and dirt.
5. Bleed the fuel system. (See page G-33).
(1) Fuel Cock
(2) Retainer Ring
(3) Cup
(4) O-ring
(5) Element
(6) Spring
(7) Red Float
A : Close
W1038840
[3] CHECK POINTS OF EVERY 50 HOURS
Checking Engine Start System
CAUTION
• Do not allow anyone near the tractor whil e testing.
• If the tractor does not pass the test, do not operate the
tractor.
■ Preparation before testing.
1. Place all shift lever and hydraulic levers in the “NEUTRAL”.
2. Set the parking brake and stop the engine.
■ Test 1 : Switch for the shuttle shift lever.
1. Sit on operator's seat.
2. Shift the shuttle shift lever to the forward or reverse position.
3. Depress the clutch pedal fully.
4. Disengage the PTO clutch control lever.
5. Pull out the engine emergency stop knob and turn the key to
“START” position.
6. The engine must not crank.
7. If it cranks, inspect the safety switch.
■ Test 2 : Switch for the PTO clutch control lever.
1. Sit on operator's seat.
2. Engage the PTO clutch control lever.
3. Depress the clutch pedal fully.
4. Shift the shuttle shift lever to the neutral position.
5. Pull out the engine emergency stop knob and turn the key to
“START” position.
6. The engine must not crank.
7. If it cranks, inspect the safety switch.
(1) Hydraulic Shuttle Shift Lever
(2) Clutch Pedal
(3) PTO Clutch Lever
W1039180
G-18
Page 38
ME8200, ME9000, WSM
KiSC issued 03, 2007 A
G GENERAL
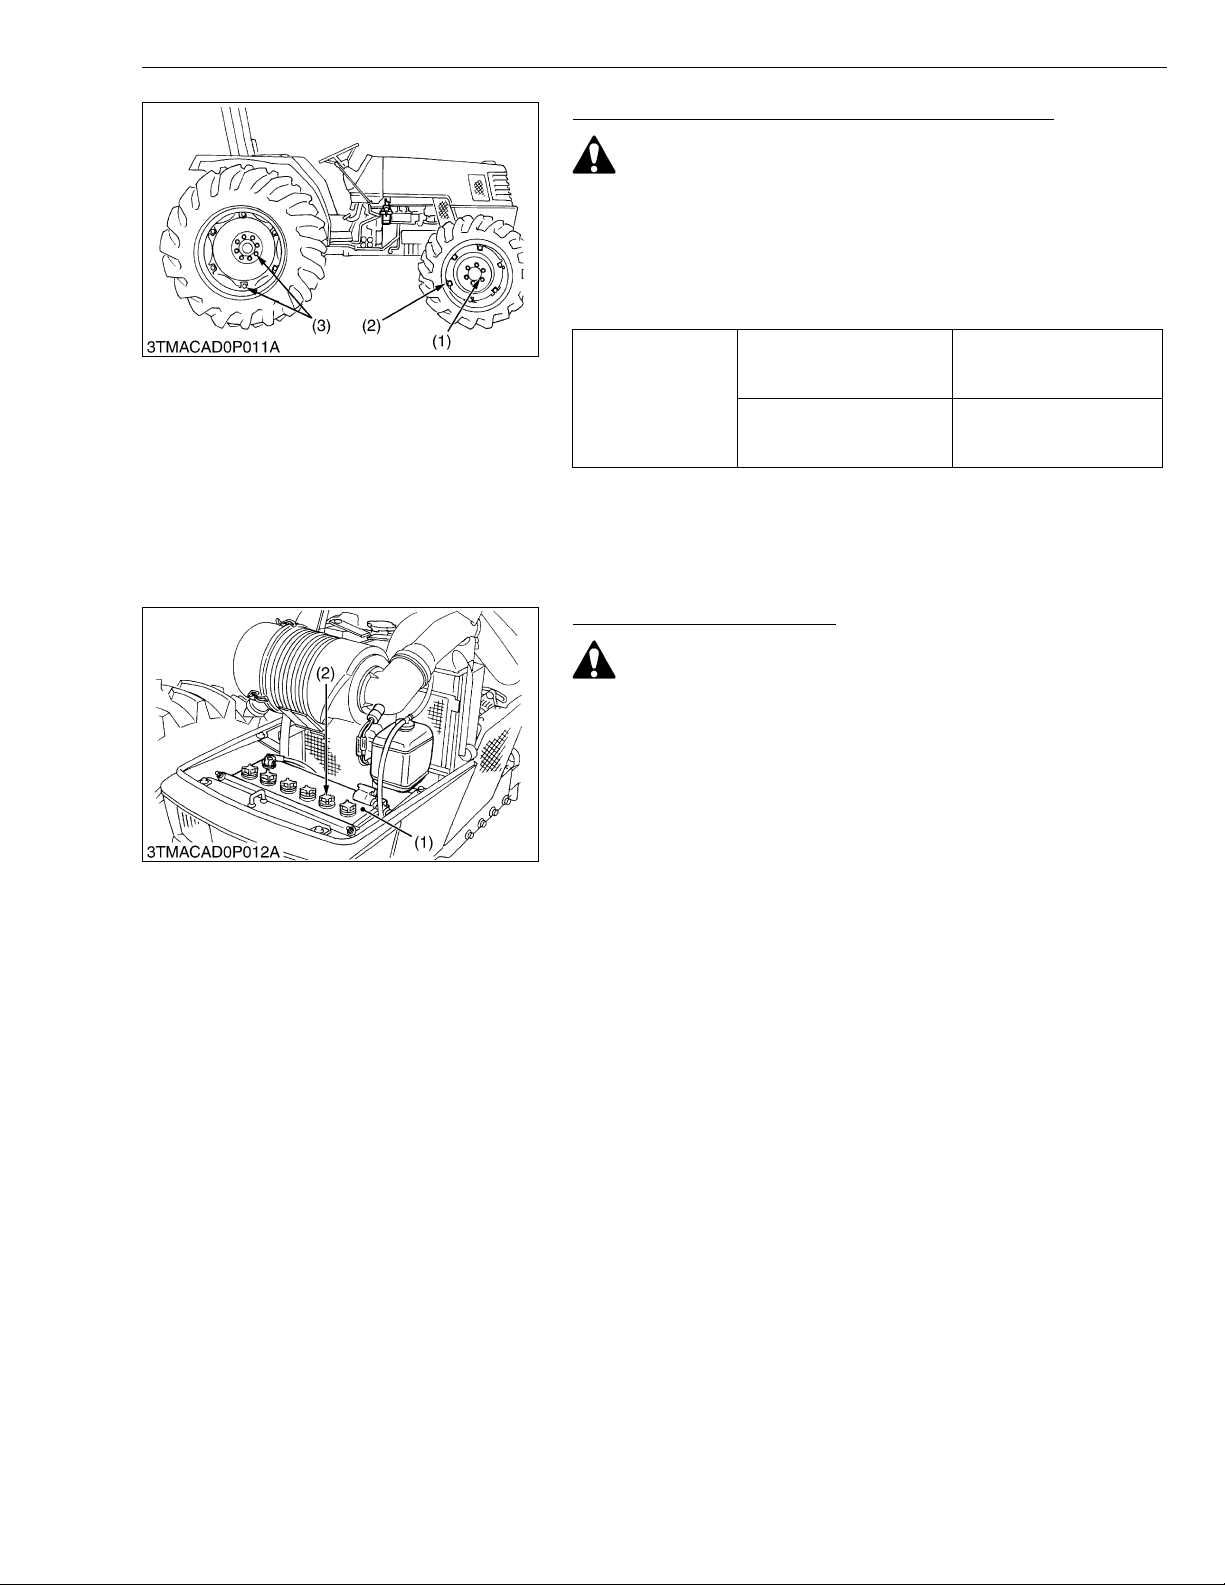
Checking Wheel Mounting Nuts Tightening Torque
CAUTION
• Never operate tractor with a loose rim, wheel, or axle.
• Any time bolts and nuts are loosened, retighten to specified
torque.
• Check all bolts and nuts frequently and keep them tight.
1. Check the wheel mounting nu ts regularly especially when new.
If there are loosened, tighten as follows.
Front wheel mounting nut
and front disc mounting nut
Tightening torque
Rear wheel mounting nut
and rear disc mounting nut
260 to 304 N·m
26.5 to 31.0 kgf·m
192 to 224 lbf·ft
260 to 304 N·m
26.5 to 31.0 kgf·m
192 to 224 lbf·ft
(1) Front Wheel Mounting Nut
(2) Front Disc Mounting Nut
[4] CHECK POINTS OF EVERY 100 HOURS
Checking Battery Condition
CAUTION
• Never remove the vent plugs while the engine is running.
• Keep electrolyte away fr om eyes, h and s and clothe s. If you
are spattered with it, wash it away completely with water
immediately and get medical attention.
• Keep open sparks and flames away from the battery at all
times. Hydrogen gas mixed with oxygen becomes very
explosive.
• Wear eye protection and rubber gloves when working
around battery.
1. The original battery is maintenance free type battery.
When the performance becomes low, inspect the battery.
2. Clean the battery surface with a clean cloth.
Keep the terminals clean and coated with petroleum jelly.
(1) Battery (2) Vent Cap
(3) Rear Wheel Mounting Nut and Rear
Disc Mounting Nut
W1039576
W1039905
G-19
Page 39
ME8200, ME9000, WSM
IMPORTANT■
KiSC issued 03, 2007 A
G GENERAL
Directions for Storage
CAUTION
• When connecting the battery, do not reverse the polarities.
Connection with reverse polarities will cause spark and
troubles to the battery and electrical system in the tractor.
• When disconnecting the cable from the battery, start with
the negative terminal first.
• When connecting the cable to the battery, start with the
positive terminal first.
• Reversing the steps may cause shortcircuiting, should a
metallic tool touch the terminals.
• When storing the tractor for long periods of time, remove the
battery from the tractor and store in a cool, dry place.
W1040112
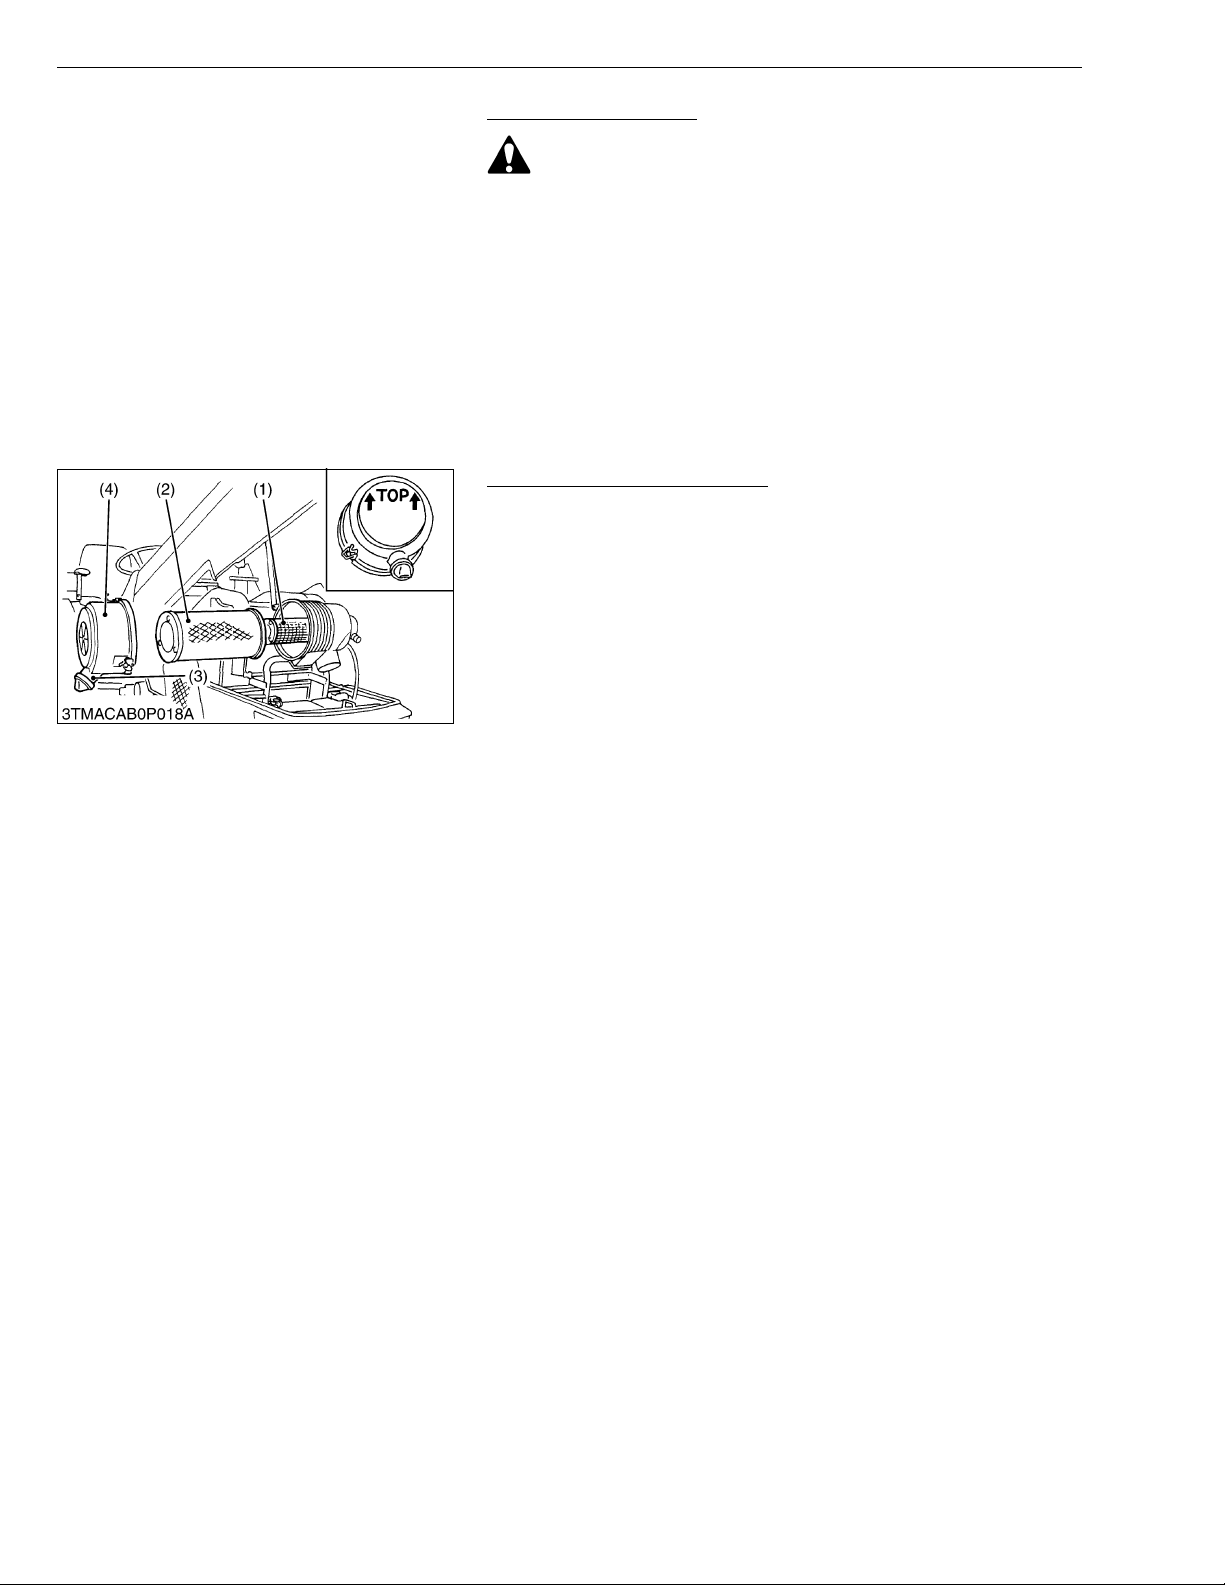
Cleaning Air Cleaner Element
1. Remove the air cleaner cover (4) and primary element (2).
2. Clean the primary element if:
- When dry dus t adheres to the element, blow compressed ai r
from the inside turning the element. Pressure of compressed
air must be under 205 kPa (2.1 kgf/cm
2
, 30 psi).
- When car bon or o il adhere s to the element, soak the element
in detergent for 15 minutes then wash it several times in water,
rinse with clean water and dry it naturally. After element is fully
dried, inspect inside of the element with a light and check if it is
damaged or not.
3. When replacin g the air cl eaner pri mary eleme nt (2), repla ce the
secondary element (1) as well :
Once a year or after every six times of cleaning, whichever
comes first.
• The air cleaner uses a dry element, never apply oil.
• Do not run the engine with filter element removed.
• Be sure to refi t the d ust cu p with t he arr o w ↑ (on the rear of
cup) upright. If the dust cup is improperly fitted, evacuator
valve will not function and dust will adhere to the element.
• Do not touch the secondary element except in cases where
replacing is required.
■ Evacuator Valve
Open evacuator valve on ce a week under ord inar y co nditi ons or
daily when used in a dusty pl ace to ge t rid of lar ge par ticles of dust
and dirt.
(1) Secondary (Safety) Element
(2) Primary Element
(3) Evacuator Valve
(4) Cover
W1040252
G-20
Page 40
ME8200, ME9000, WSM
NOTE■
■
KiSC issued 03, 2007 A
G GENERAL
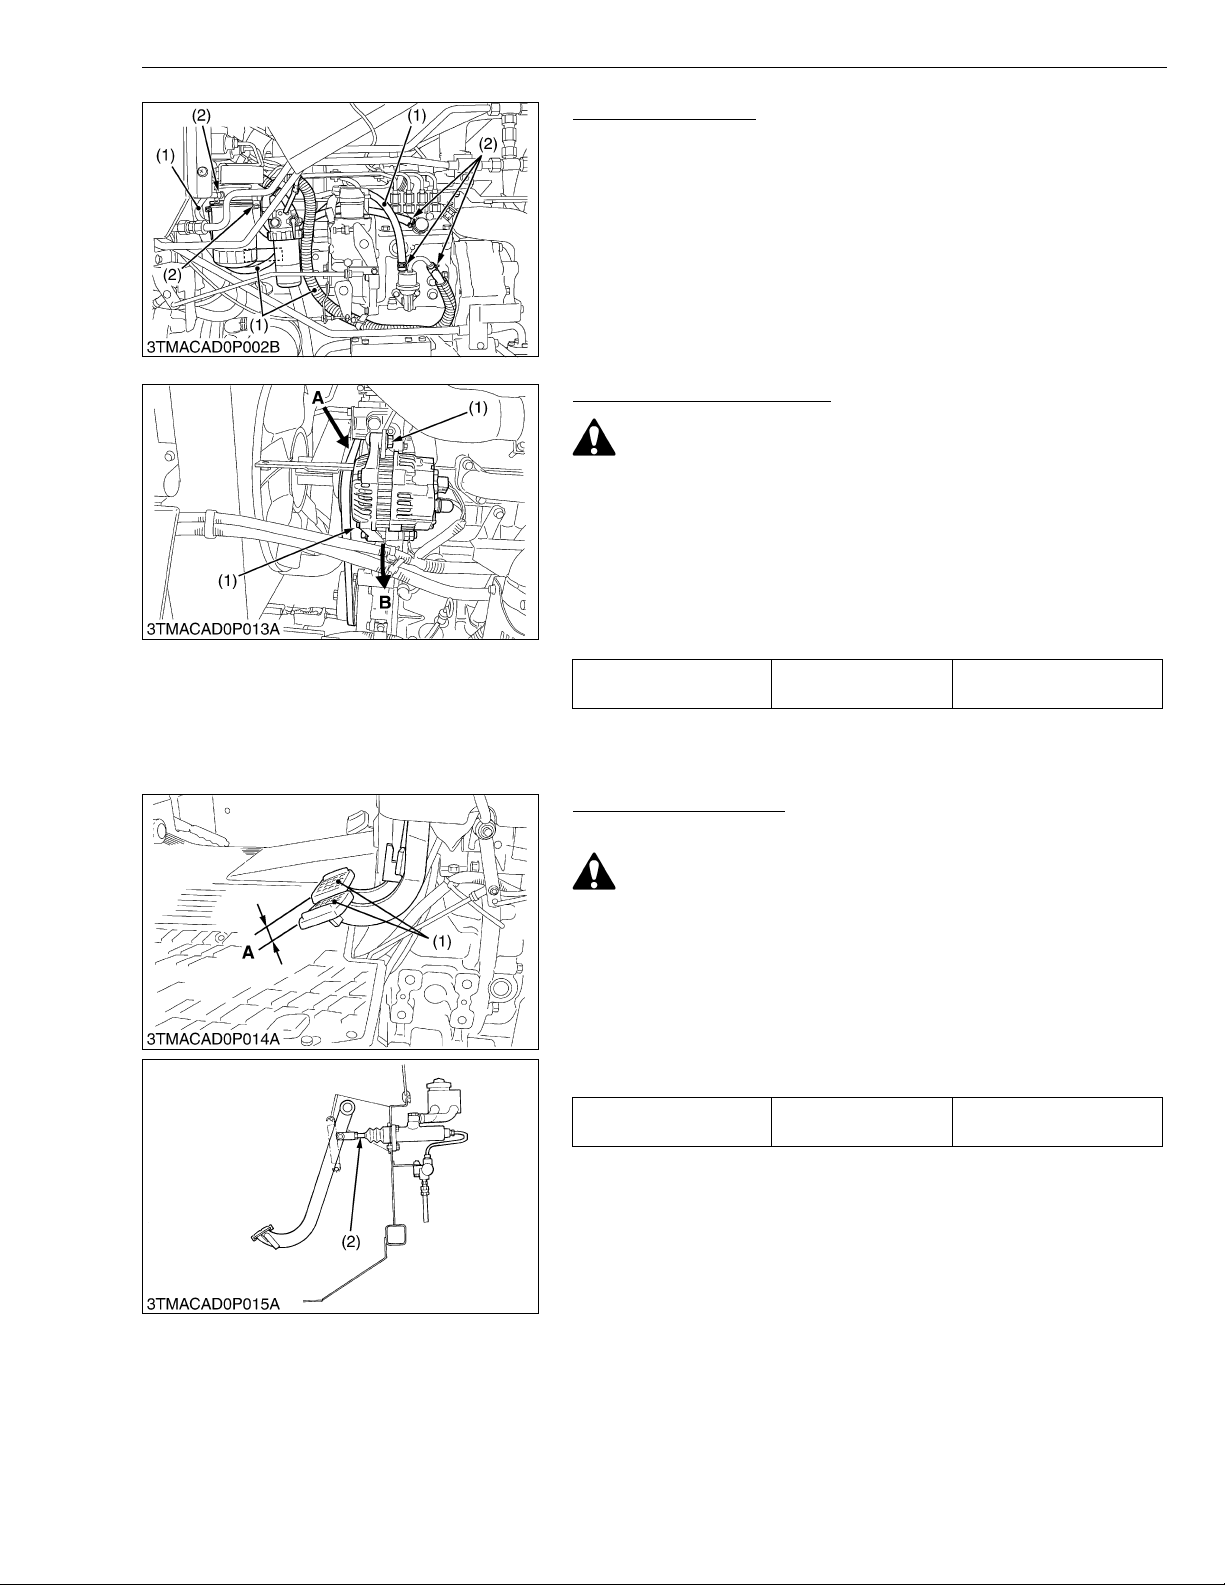
Checking Fuel Line
1. Check to see that all lines and hose clamps are tight and not
damaged.
2. If hoses and clamps are found worn or damaged, replace or
repair them at once.
• If the fuel line is removed, be sure to properly bleed the fuel
system.
Refer to “Bleeding Fuel System”. (See page G-33.)
(1) Fuel Line (2) Clamp Band
W1040573
Adjusting Fan Belt Tension
CAUTION
• Be sure to stop the engine before checking belt tension.
1. Stop the engine and remove the key.
2. Apply moderate thumb pressure to belt between pulleys.
3. If tension is incorrect, lo osen the alternator mounti ng bolts and,
using a lever placed between the alternator and the engine block,
pull the alternator ou t until the deflection of the bel t falls within
acceptable limits.
4. Replace fan belt if it is damaged.
Belt tension Fac tory spec.
10 to 12 mm
0.39 to 0.47 in.
(1) Belt A : Check the belt tension
B : To tighten
W1040751
Adjusting Brake Pedal
1) Brake Pedal Free Travel
CAUTION
• When checking, parking the tractor on flat ground, and stop
the engine.
1. Measure the free travel by depressing the brake pedals.
2. If the measurement is not within the factory specifications, adjust
the free travel by the push rod (2).
3. After adjustment, tighten the lock nut firmly.
IMPORTANT
• Keep the free travel in the right and left brake pedals equal.
Brake pedal free travel Factory spec.
(1) Brake Pedal
(2) Push Rod
A : Free Travel
7 to 14 mm
0.28 to 0.55 in.
W1041022
G-21
Page 41
ME8200, ME9000, WSM
KiSC issued 03, 2007 A
G GENERAL
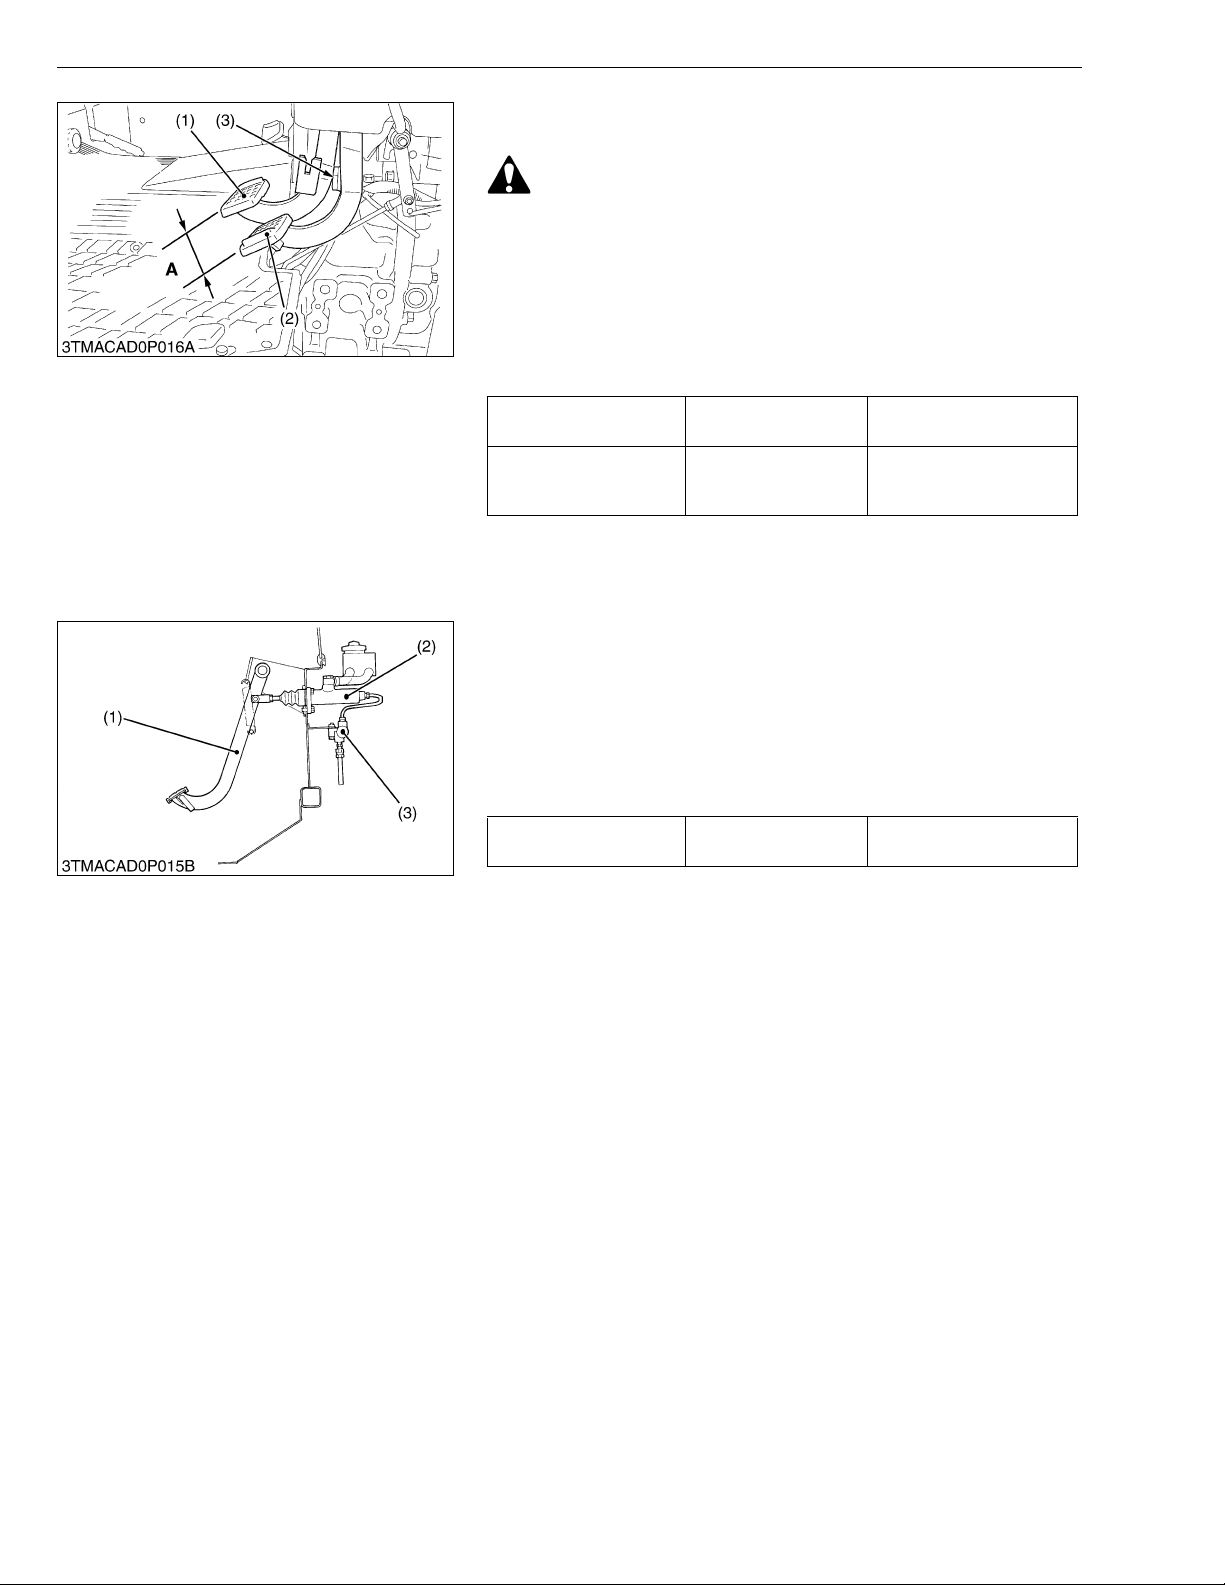
2) B rake Pedal Stroke and Difference between Right and Left
Pedal Strokes
CAUTION
• When checking, park the tractor on flat ground, and stop the
engine.
1. Disengage the brake pedal lock.
2. Step on either side brake pedal and measure the level difference
(pedal stroke) between right and left pedals.
3. Do the same for the other side.
4. If the pedal stroke exceeds the factory specification, check the air
bleeding, master cylinder, equa li ze r or brake case.
Brake pedal stroke Factory spec.
Difference between left
and right brake pedal
stroke
Factory spec.
Less than 100 mm
3.9 in.
0 to 5 mm
0 to 0.20 in.
(1) Brake Pedal LH
(2) Brake Pedal RH
(3) Brake Pedal Lock
A : Pedal Stroke
W1041265
3) Equalizer Working Level
1. Gently step on both the right and left pedals at o nce with your
both feet. Step on the right pedal all the way (the left pedal rises).
Measure the level difference between the two pedals.
2. Next step on t he left pedal all the way and measure th e level
difference.
3. If the measurement is not within the factory specification, check
the equalizer (3).
Level difference
between two pedals
(1) Brake Pedal
(2) Master Cylinder
Factory spec.
(3) Equalizer
Less than 10 mm
0.4 in.
W1041567
G-22
Page 42
ME8200, ME9000, WSM
KiSC issued 03, 2007 A
G GENERAL
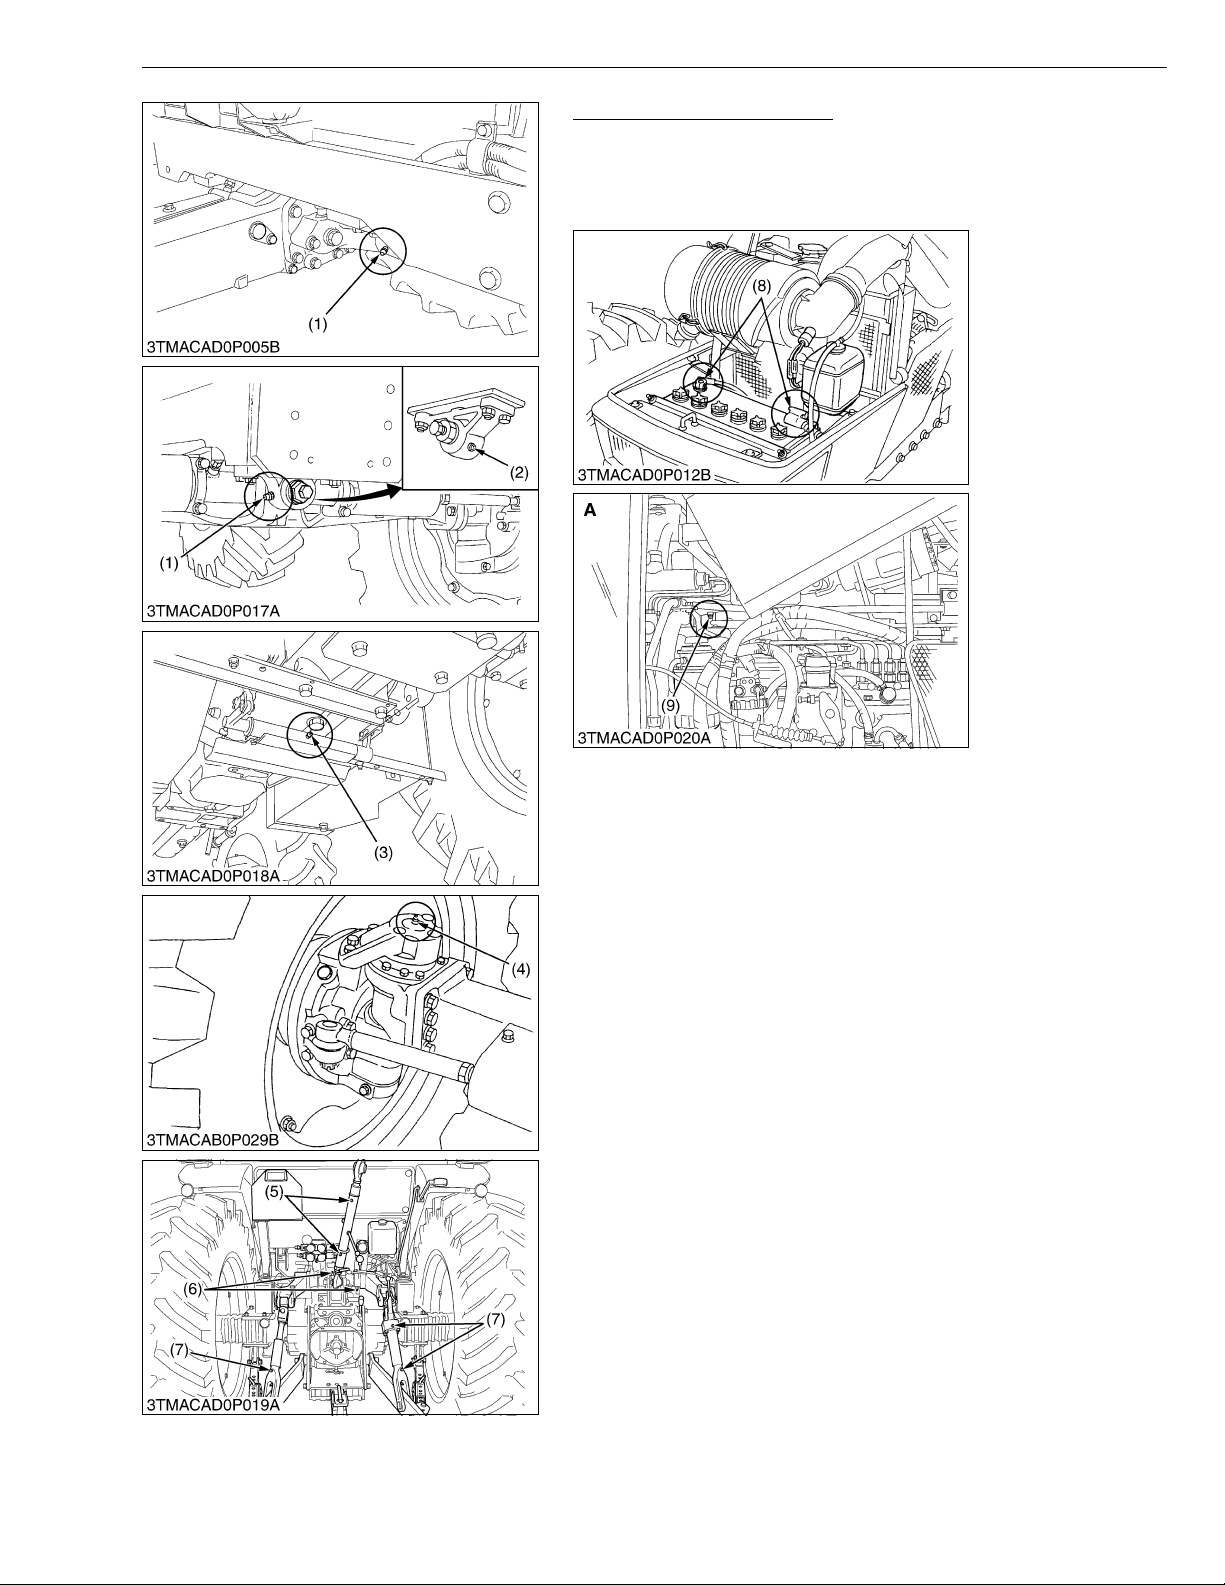
Lubricating Grease Fittings
1. Apply a small am oun t of m ul tipu r pos e gre ase to following points
every 100 hours :
2. If you operated the machine in extremely wet and muddy
condition, lubricate grease fittings more often.
(1) Greasing Fitting (Front Axle Support)
(2) Breather Plug
(3) Greasing Fitting
(Parking Brake Lever Shaft)
(4) Greasing Fitting (Front Wheel Case
Support) (RH, LH)
(5) Greasing Fitting (Top Link)
(6) Greasing Fitting (Top Link Bracket)
(7) Greasing Fitting (Lifting Rod)
(8) Battery Terminal
(9) Greasing Fitting
(Steering Joint Shaft)
A : CABIN Type
W1041759
G-23
Page 43
ME8200, ME9000, WSM
KiSC issued 03, 2007 A
[5] CHECK POINTS OF EVERY 200 HOURS
Changing Engine Oil
1. See page G-15.
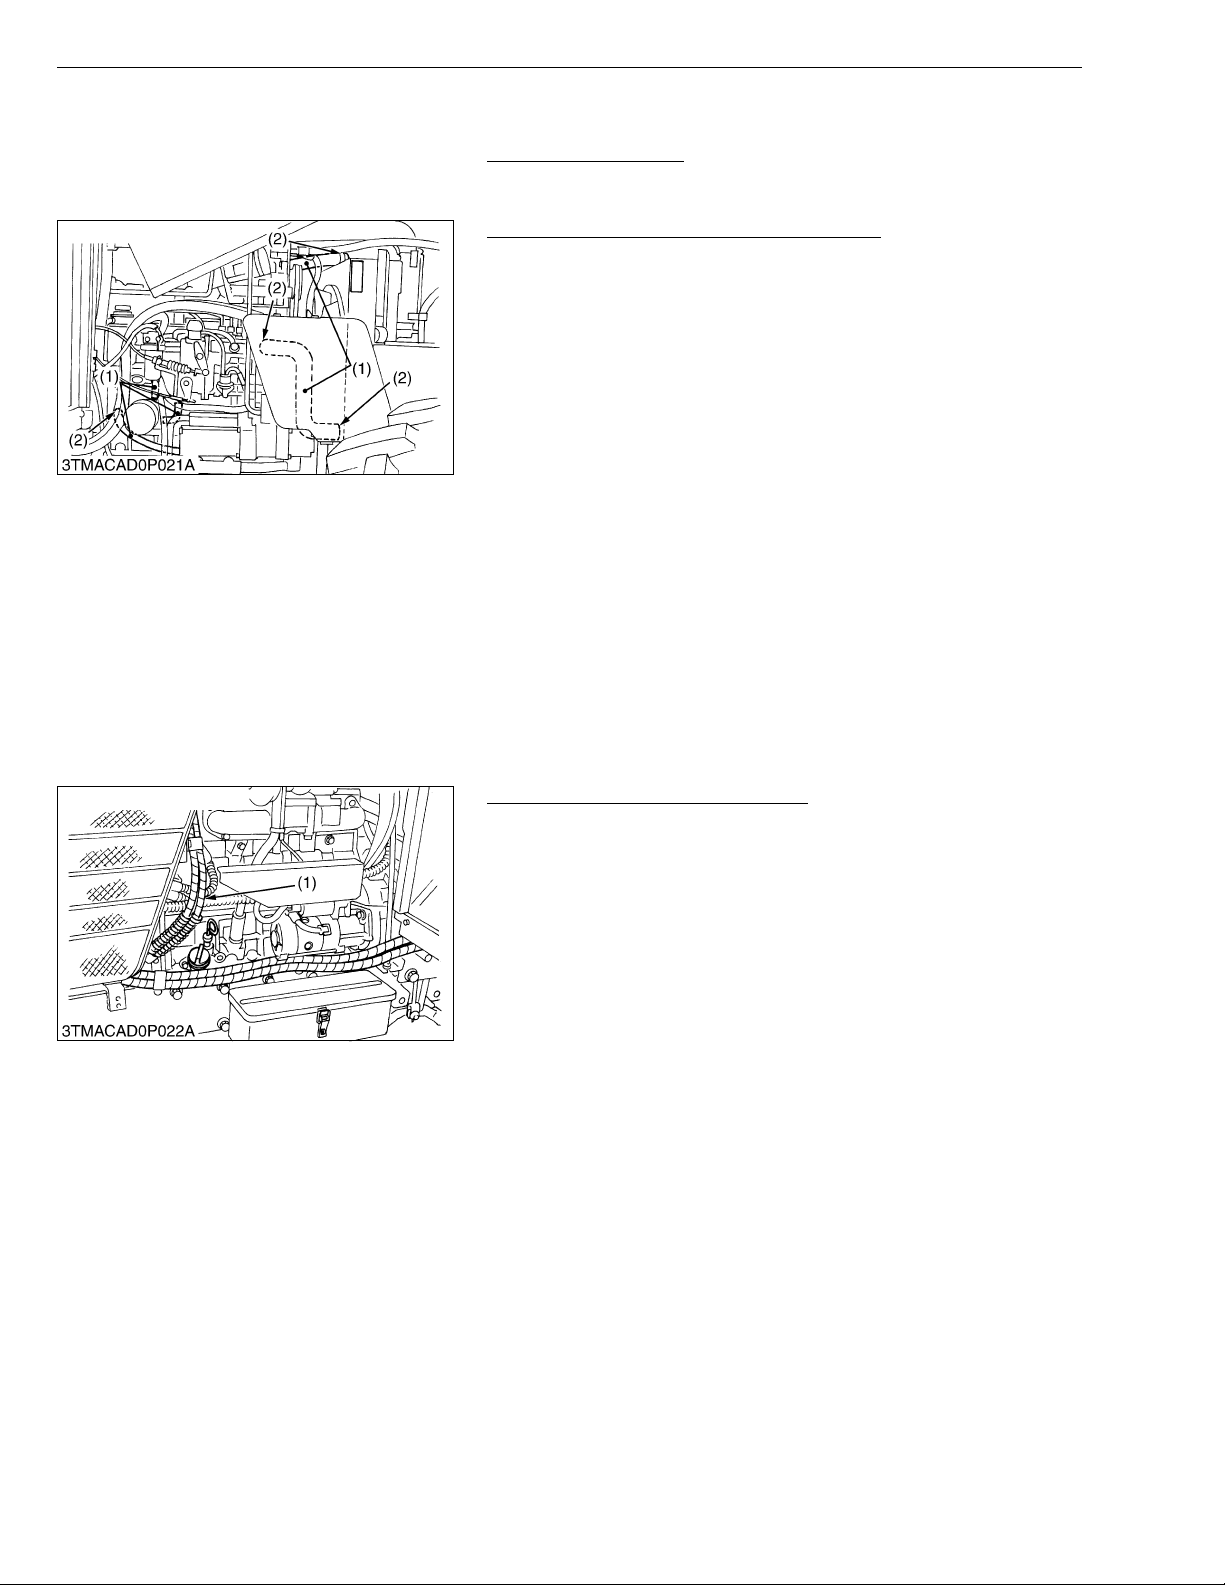
Checking Radiator Hose and Hose Clamp
Check to see if radiator hoses are properly fixed every 200 hours
of operation or six months, whichever comes first.
1. If hose clamps are loose or water leaks, tighten bands securely.
2. Replace hoses and tighten hose clamps securely, if radiator
hoses are swollen, hardened or cracked. Replace hoses and
hose clamps ever y 2 years or earlie r if checked and found t hat
hoses are swollen, hardened or cracked.
■ Precaution at Overheating
Take the following actions in the event the coola nt temperature
be nearly or more than the boiling point, what is called
“Overheating”.
1. Stop the machine operation in a safe place and keep the engine
unloaded idling.
2. Don't stop the engine suddenl y , but st op it after abo ut 5 mi nute s
of unloaded idling.
3. Keep yours el f w e ll a way f ro m t he m ach in e f or f ur t he r 10 m in u tes
or while the steam blown out.
4. Checking tha t there gets no danger such as burn, get r id of the
causes of overheating according to the manual, see
“Troubleshooting” section, and then, start again the engine.
(1) Radiator Hose (2) Clamp
Checking Power Steering Oil Line
1. Check to see that all line and hose clamps are tight and not
damaged.
2. If hoses and clamps are found worn or damaged, replace or
repair them at once.
(1) Power Steering Hose
G GENERAL
W1042349
W1042430
W1042765
G-24
Page 44
ME8200, ME9000, WSM
IMPORTANT■
KiSC issued 03, 2007 A
G GENERAL
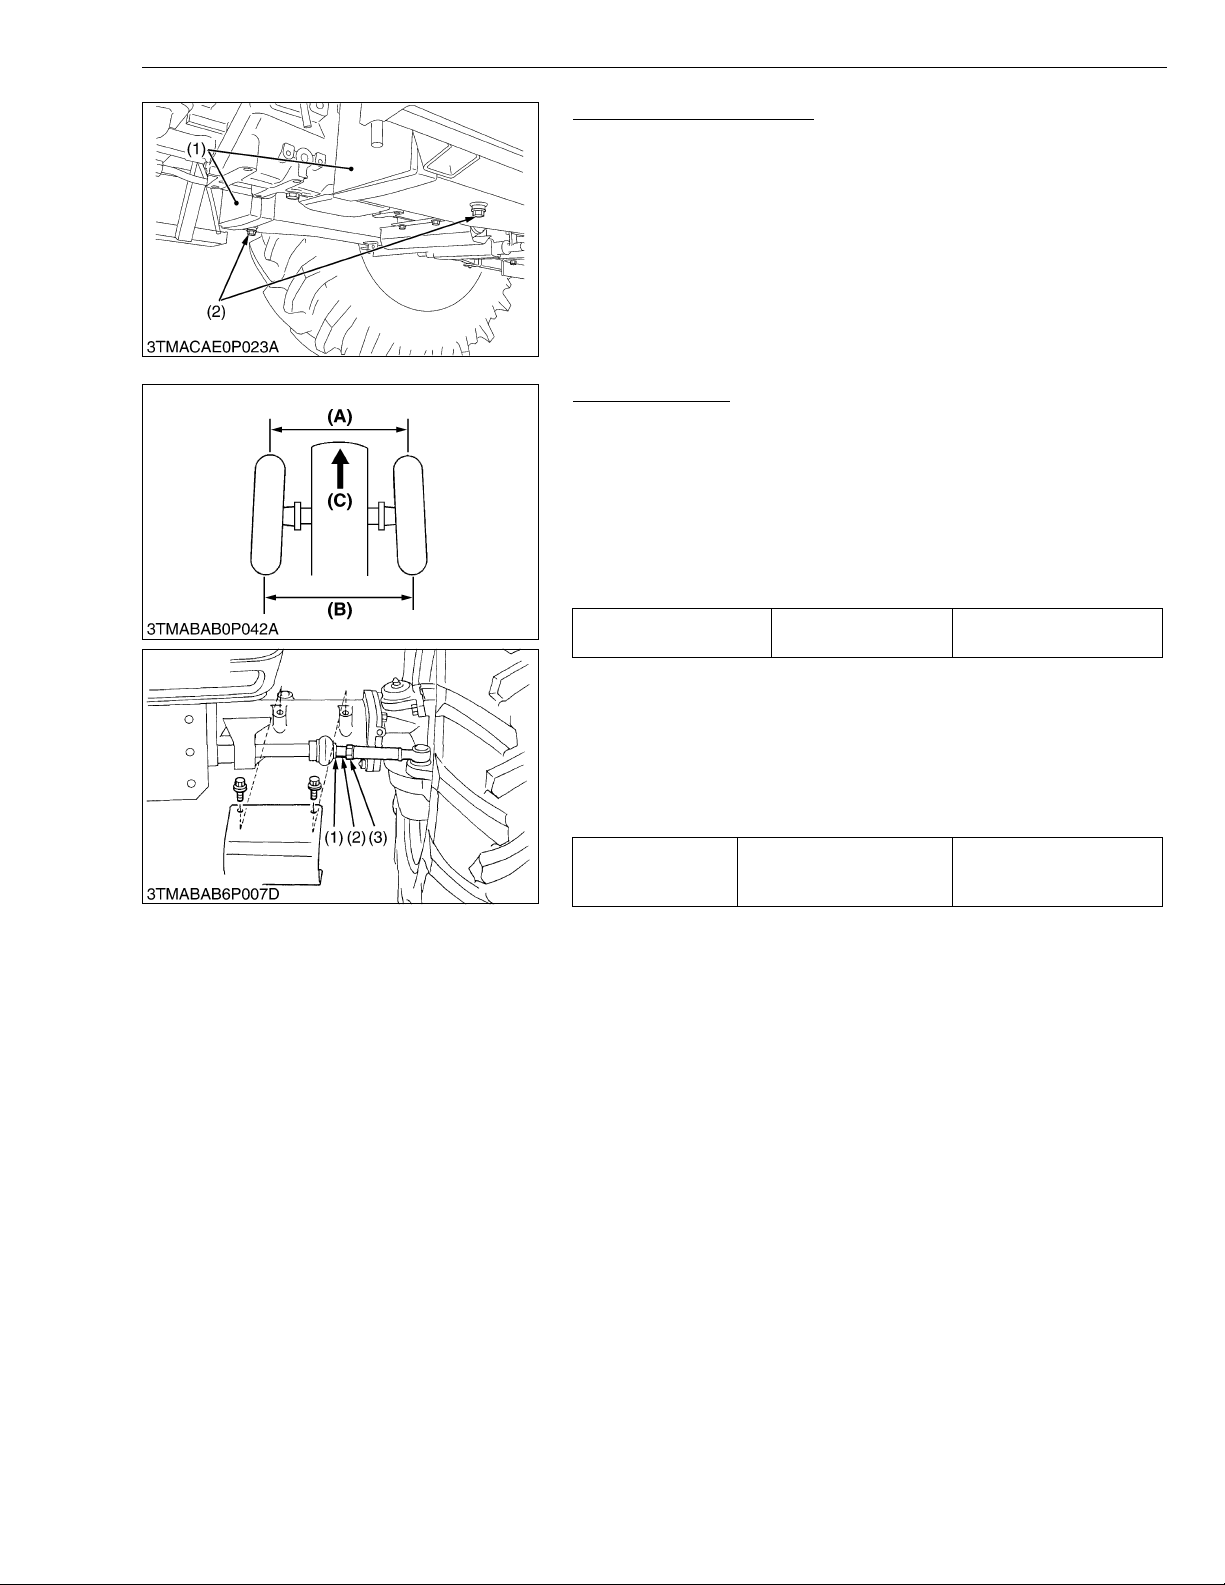
Draining Fuel Tank Water
1. Loosen the drain pl ugs (2) at th e bottom of th e fuel tanks ( 1) to
let sediments, impurities and water out of the tanks (1).
2. Finally tighten up the plugs (2).
• If the fuel contains poor qualities with much water in it, drain
the fuel tank at shorter intervals.
• Drain the fuel before operating the tractor after a long period
of storage.
(1) Fuel Tank (2) Drain Plug
W1042886
Adjusting Toe-in
1. Park tractor on a flat place.
2. Turn steering wheel so front wheels are in the straight ahead
position.
3. Lower the implement, lock the park brake and stop the engine.
4. Measure distance between tire beads at front of tire, hub height.
5. Measure distance between tire beads at rear of tire, hub height.
6. Front distance should be shorter than rear distance.
7. If not, adjust ti e-rod length.
Toe-in (B-A) Factory spec.
2 to 8 mm
0.08 to 0.31 in.
■ Toe-in Adjustment
1. Detach the snap ring (1).
2. Loosen the tie-rod joint lock nut (3).
3. Turn the tie-rod joint (2) to adjust the rod length until the prop er
toe-in measurement is obtained.
4. Retighten the tie-rod joint lock nut (3).
5. Attach the snap ring (1) of the tie-rod joint.
Tightening torque Tie-rod joint lock nut
166.7 to 196.1 N·m
17.0 to 20.0 kgf·m
123.0 to 144.7 lbf·ft
(1) Snap Ring
(2) Tie-rod Joint
(3) Tie-rod Joint Lock Nut
A : Wheel-to-wheel distance at front
B : Wheel-to-wheel distance at rear
C : Front
W1043085
G-25
Page 45
ME8200, ME9000, WSM
NOTE■
KiSC issued 03, 2007 A
G GENERAL
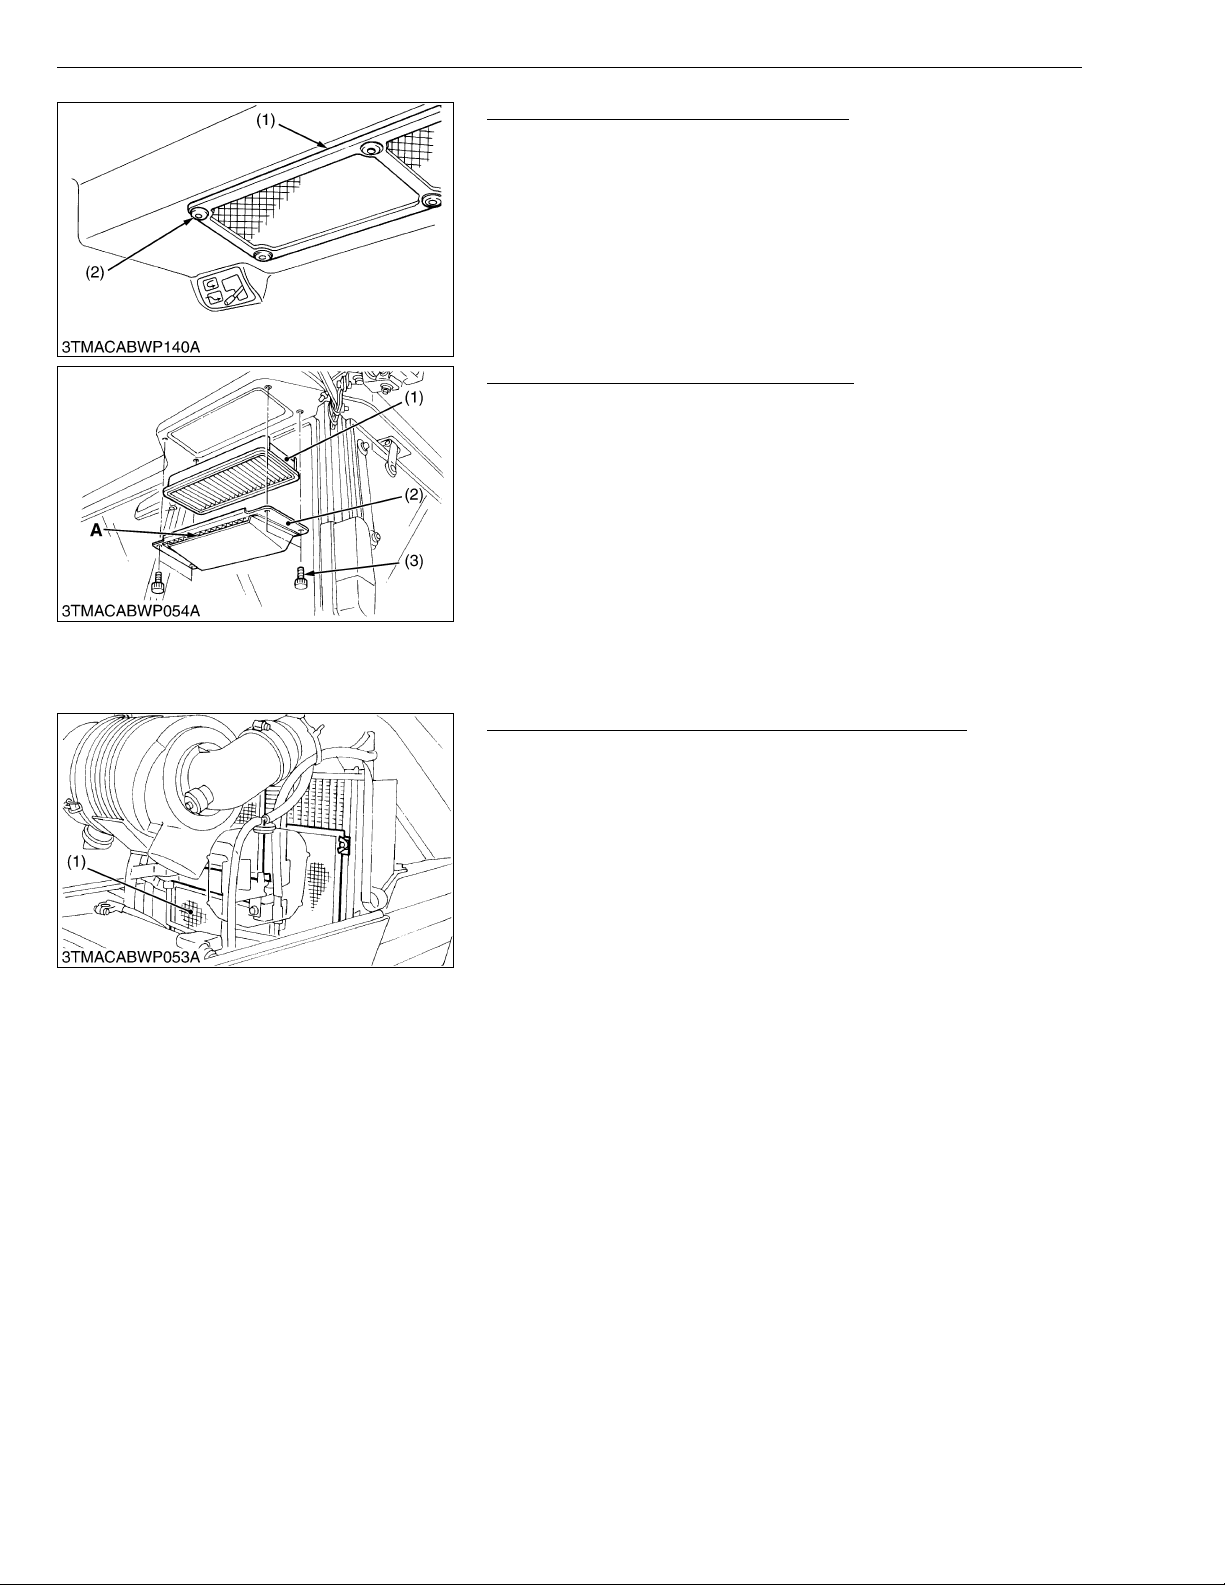
Cleaning Inner Air Filter (CABIN Type)
1. Remove the inne r air filter (1), and blow air from the direction
opposite to the filter's normal flow.
(1) Inner Air Filter (2) Push-rivet
W1043495
Cleaning Fresh Air Filter (CABIN Type)
1. Remove the knob bolts (3) and pull out filter (1).
• Do not hit the filter. If the filter becomes deformed, dust may
enter into the air-conditioner, which may cause damage and
malfunction.
• Do not use gasolin e, thinner or similar chemicals to clean
the filter as damage to the filter may occur.
• It may also cause an unpleasant odor in the CABIN when the
system is used next.
(1) Fresh Air Filter
(2) Cover
(3) Knob Bolt
A : Air Inner Port
W1043627
Cleaning Air Conditioner Condenser (CABIN Type)
1. Check the air conditioner condenser (1).
2. If dust and dirt, wash off all d irt and dus t from th e condens er (1)
with a soft brush, use care not to damage or bend the fins.
(1) Air Conditioner Condenser
W1043834
G-26
Page 46
ME8200, ME9000, WSM
KiSC issued 03, 2007 A
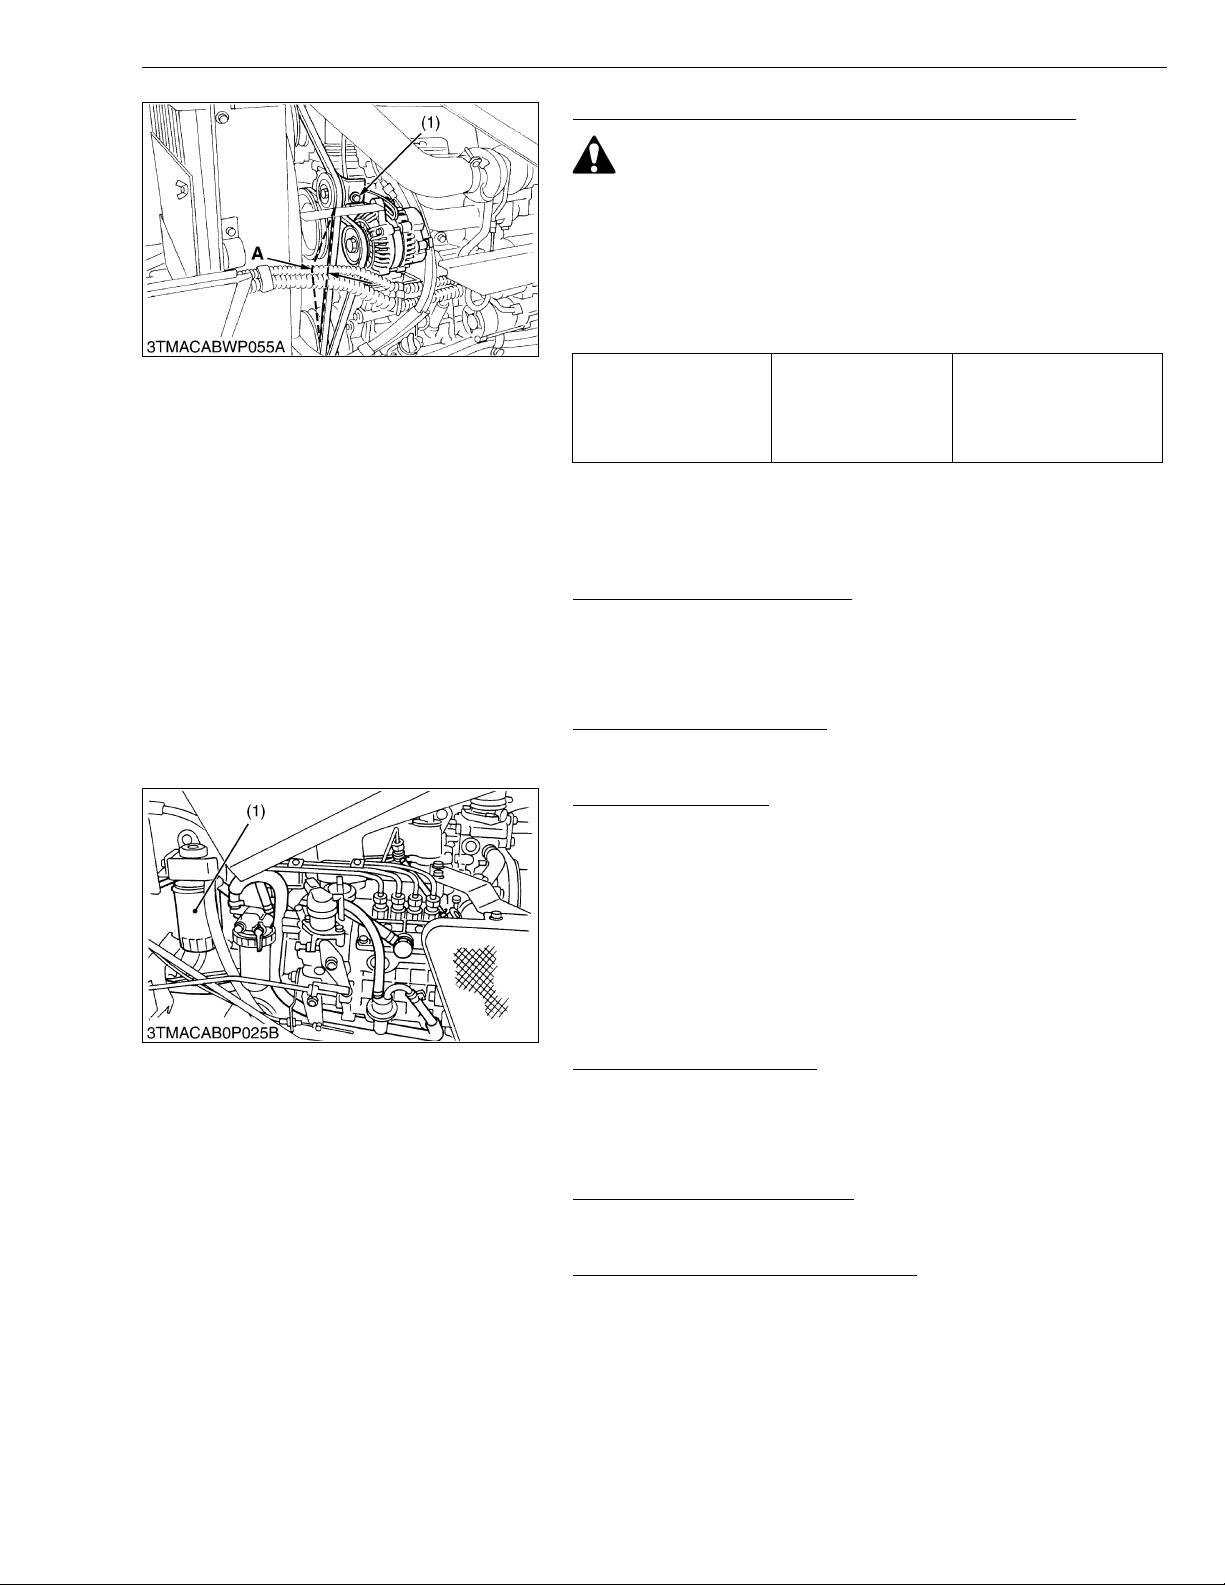
Adjusting Air Conditioner Belt Tension (CABIN Type)
CAUTION
• Be sure to stop the engine before checking air conditioner
belt tension.
1. Stop the engine and remove the key.
2. Apply 98 N (10 kgf, 22 lbf) pressure to the belt between the
pulleys.
3. If tension is incorrect, adjust the belt tension.
4. If belt is damaged, replace it.
Air conditioner belt
tension
(1) Adjusting Bolt A : Deflection
[6] CHECK POINT OF EVERY 300 HOURS
Replacing Hydraulic Oil Filter
1. See page G-16.
Factory spec.
G GENERAL
A deflection of between
10 to 12 mm (0.39 to 0.47
in.) when the belt is
pressed in the middle of
the span
W1043977
W1044335
[7] CHECK POINTS OF EVERY 400 HOURS
Replacing Engine Oil Filter
1. See page G-15.
Replacing Fuel Filter
1. Remove the fuel filter (1).
2. Put a film of clean fuel on rubber seal of new filter.
3. Tighten the filter u ntil it contact s the mountin g surface. Tig hten
filter by hand an additional 1/2 turn only.
4. Bleed the fuel system.
Refer to “Bleeding Fuel System”. (See page G-33.)
(1) Fuel Filter
Cleaning Water Separator
1. See page G-18.
[8] CHECK POINTS OF EVERY 600 HOURS
Changing Transmission Fluid
1. See page G-16.
Changing Front Differential Case Oil
1. See page G-17.
W1044400
W1044512
W1044455
W1044667
W1044724
G-27
Page 47
ME8200, ME9000, WSM
IMPORTANT■
KiSC issued 03, 2007 A
G GENERAL
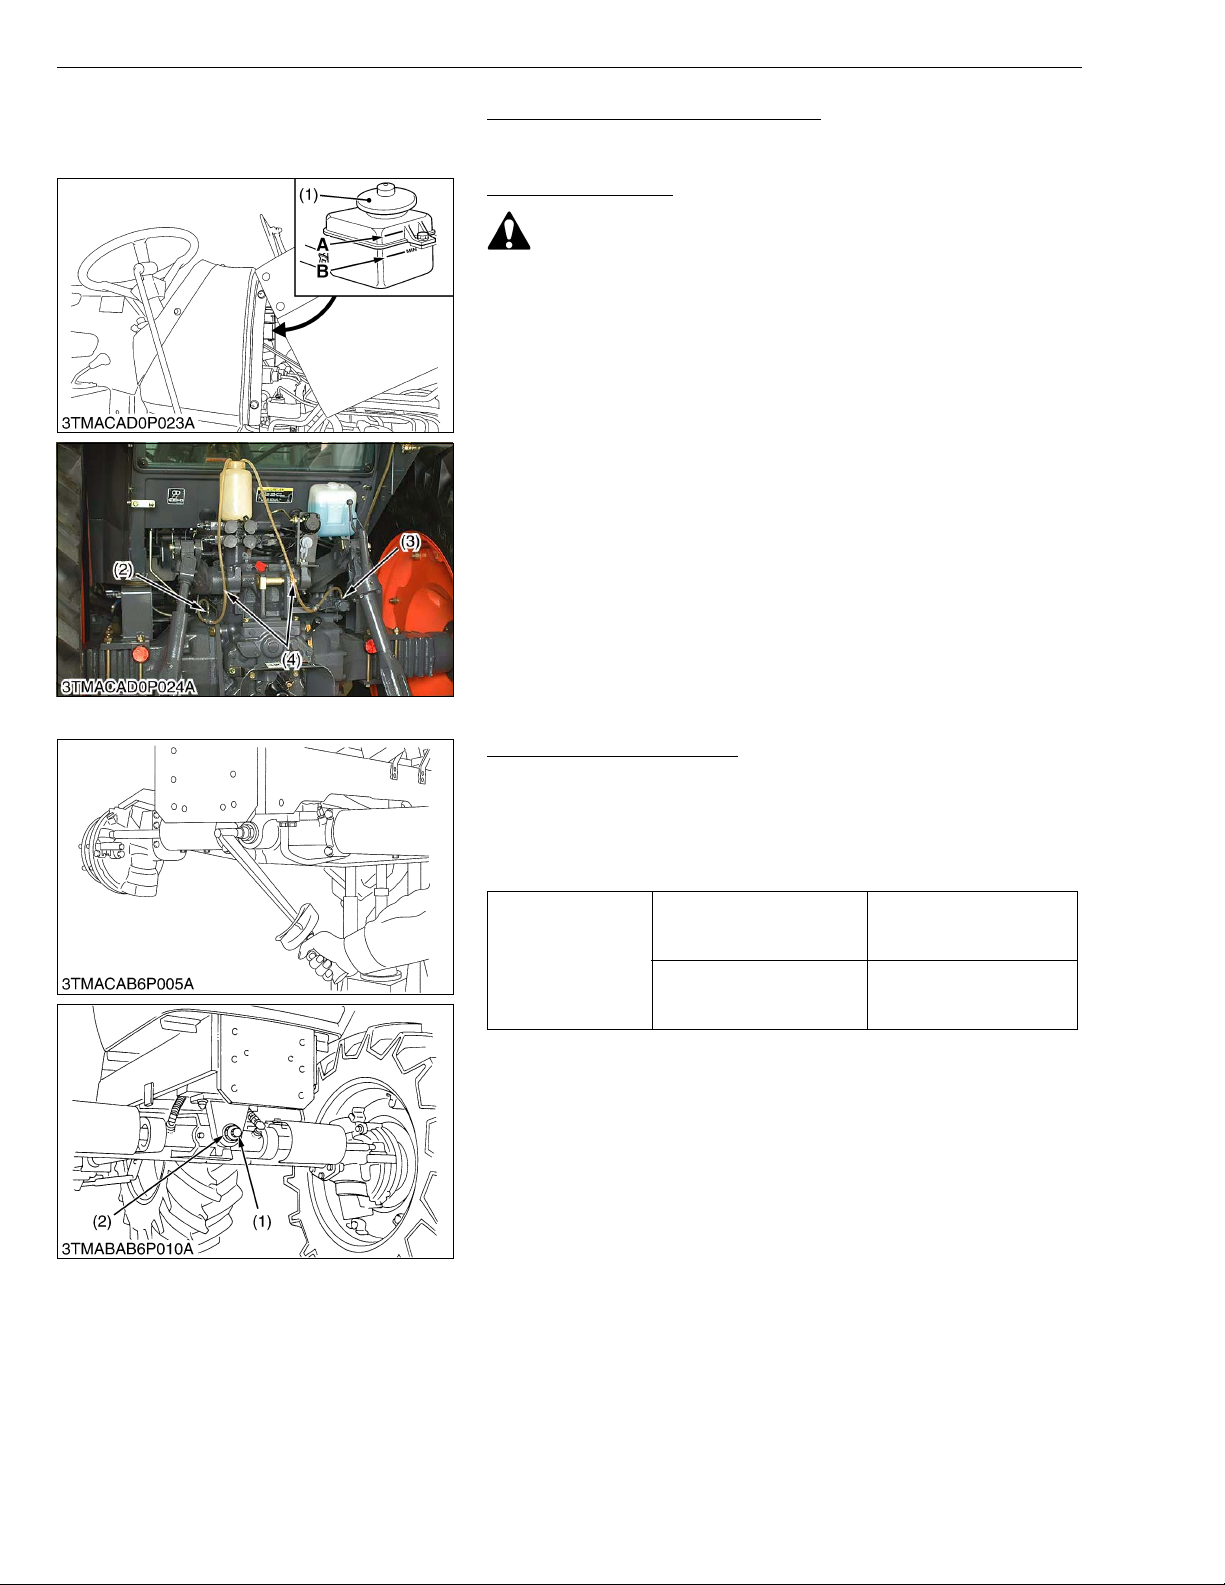
Changi ng Fr o nt Axle Gear C a se Oil
1. See page G-17.
W1044778
Changi ng B ra ke Oil
CAUTION
• Be sure to check and se rvic e th e tract or on a flat pl ac e with
engine shut off and applying the parking brake on.
• Be sure to use the recommended brake oil. (See page G-8.)
• When refilling brake oil, use the same quality of oil as the
one already in the reservoir. Adding an oil of different make
or type can cause trouble, and thus must be avoided.
• While changing brake oil, make sure to keep enough brake
oil in the reservoir.
1. Remove the brake reservoir cap (1), and fill with oil up to the
MAX. level.
2. After installing th e vinyl pipes (4) to the bleeder (2), (3), loosen
the bleeder a half turn.
3. Move the brake pe dal up and down. Repeat this motion until
fresh oil overflows.
(1) Brake Reservoir Cap
(2) Air Bleeder (on Brake Case)
(3) Air Bleeder (on Trailer Brake Valve)
(4) Vinyl Pipe
A : MAX Level
B : MIN Level
W1044840
Adjusting Front Axle Pivot
1. Jack up the tractor body, then loosen the lock nut (2).
2. Measure the adjusting screw tig hten ing torqu e.
3. If tightening tor q ue i s not wi thi n th e fac to ry s pecifications, adjust
the adjusting screw (1).
4. After adjustment, tighten the lock nut firmly.
Front axle adjusting screw
Tightening torque
Lock nut
19.6 to 29.4 N·m
2.0 to 3.0 kgf·m
14.5 to 21.7 lbf·ft
98.1 to 147.1 N·m
10.0 to 15.0 kgf·m
72.3 to 108.5 lbf·ft
(1) Adjusting Screw (2) Lock Nut
W1045128
G-28
Page 48
ME8200, ME9000, WSM
KiSC issued 03, 2007 A
[9] CHECK POINT OF EVERY 800 HOURS
Adjusting Engine Valve Clearance
1. See page 1-S23.
[10] CHECK POINTS OF EVERY 1 YEAR
Replacing Air Cleaner Primary Element and Secondary Element
1. Refer to “Cleaning Air Cleaner Primary Element”.
(See page G-20.)
Checking Air Conditioner Pipes and Hoses (CABIN Type)
1. Check to see that all lines and hose clamps are tight and not
damaged.
2. If hoses and clamps are found worn or damaged, replace or
repair them at once.
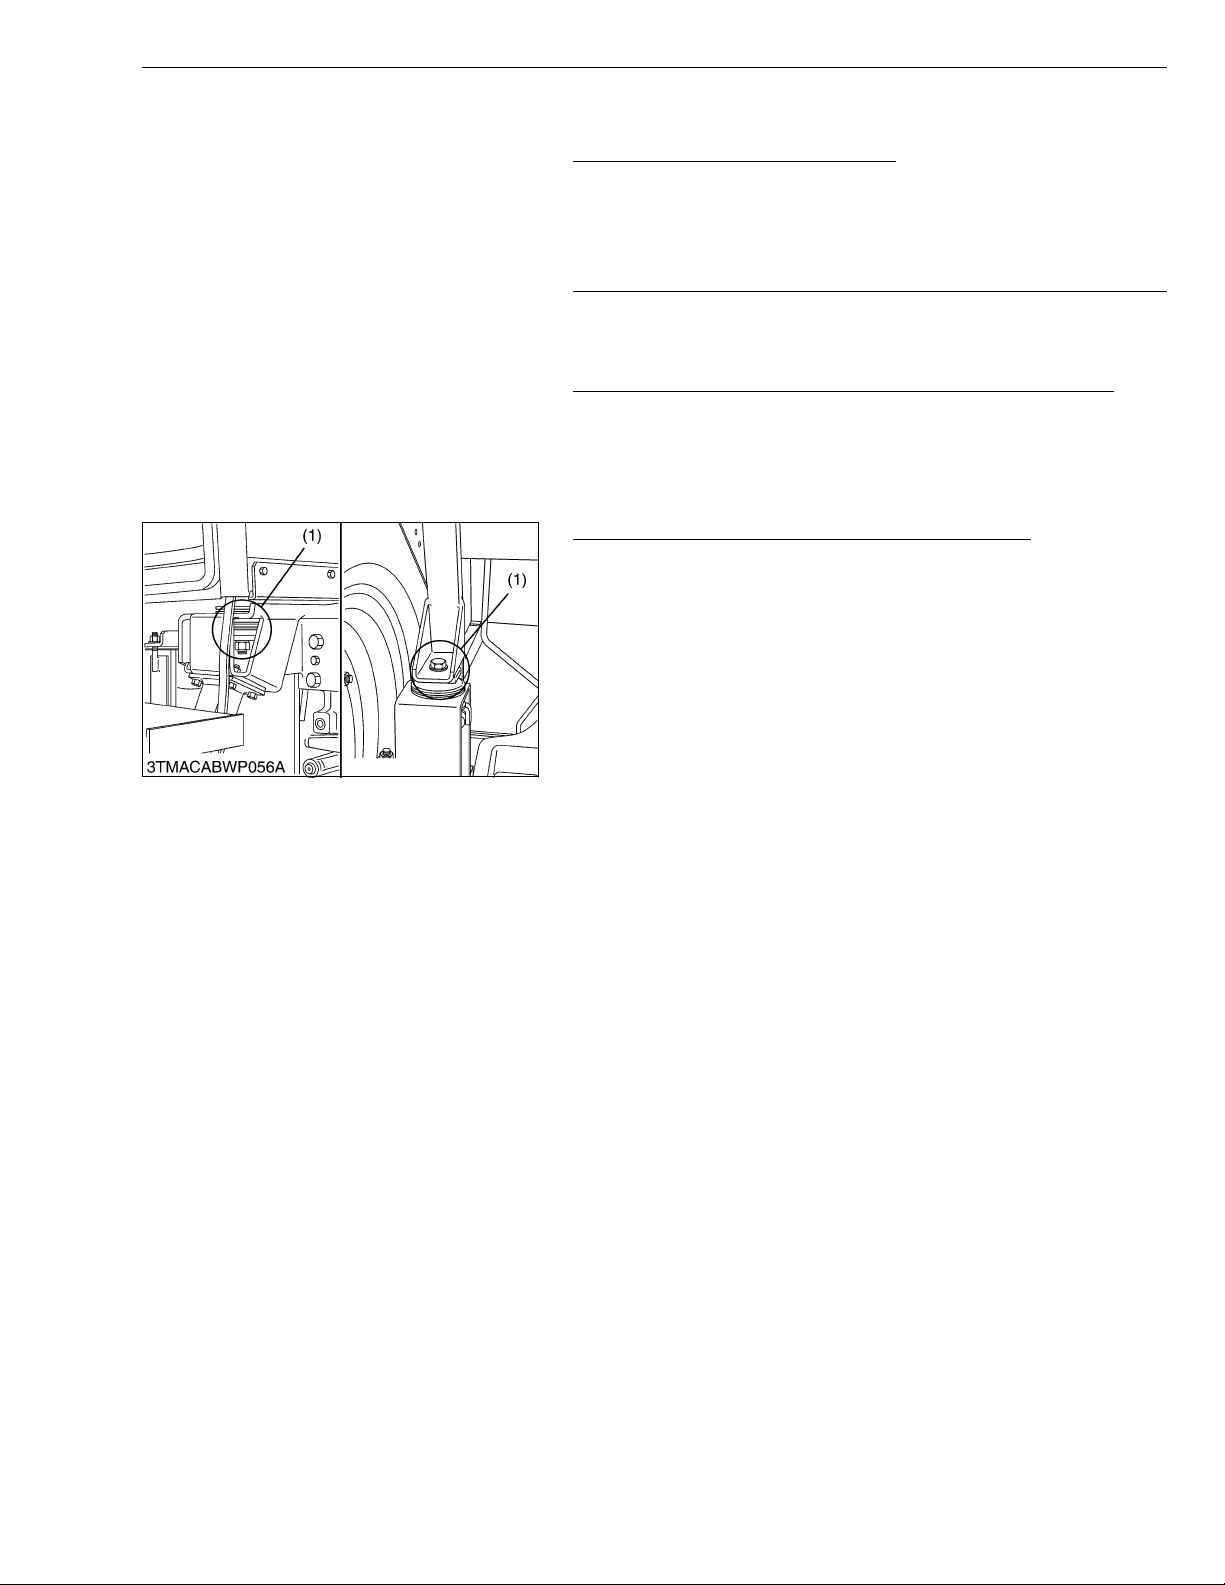
Checking Cabin Isolation Cushion (CABIN Type)
1. Check the cushions (1) for any breakage or fatigue.
2. Replace them if they have deteriorated.
(1) Cushion
G GENERAL
W1045406
W1045532
W1045466
W1045745
G-29
Page 49
ME8200, ME9000, WSM
IMPORTANT■
NOTE■
KiSC issued 03, 2007 A
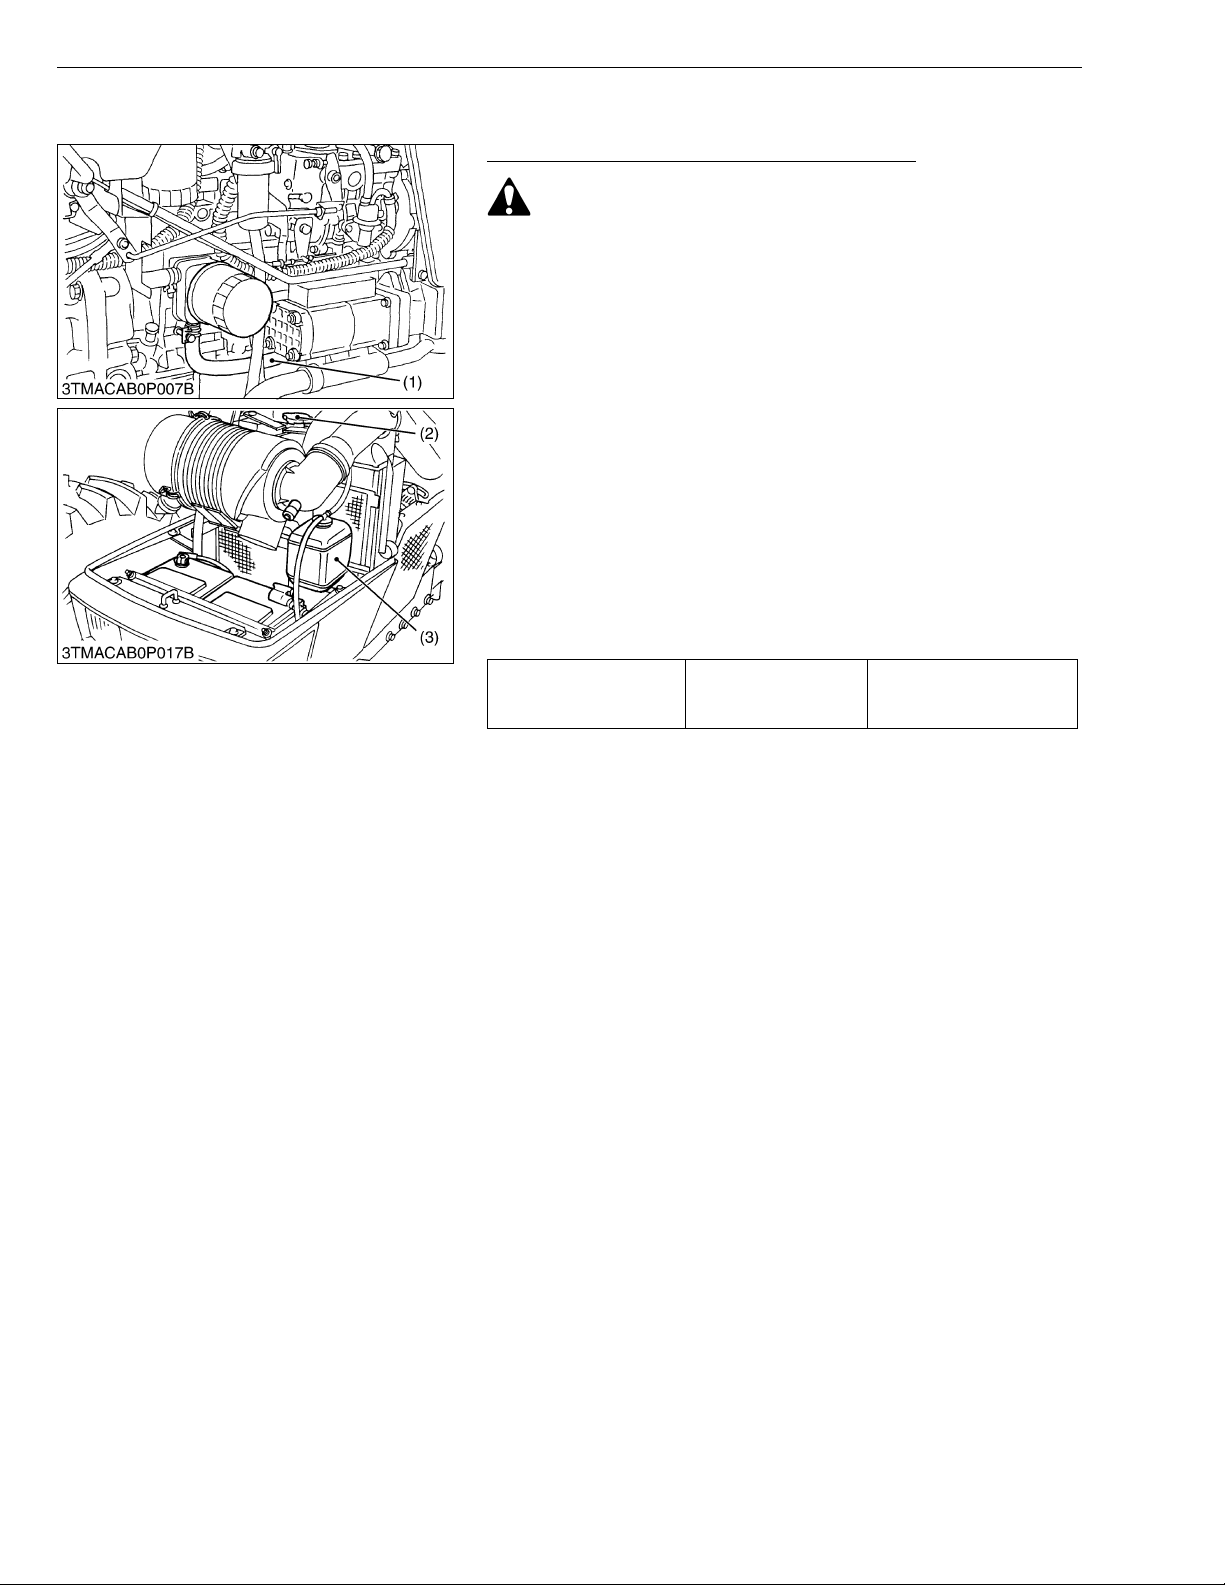
[11] CHECK POINTS OF EVERY 2 YEARS
Flush Cooling System and Changing Coolant
CAUTION
• Do not remove the radiator cap when the engine is hot. Then
loosen cap slightly to the stop to relieve any excess
pressure before removing cap completely.
1. Stop the engine and let cool down.
2. To drain the co olant, remove the radiato r hose (1) and radiator
cap. The radi ator cap ( 2) must b e remov ed to co mpletely d rain
the coolant.
3. After all coolant is drained, install the hose (1) securely.
4. Fill with clean water and cooling system cleaner.
5. Follow directions of the cleaner instruction.
6. After flushing, fill with clean water and anti-freeze until the coolant
level is just below the port.
7. Fill with clean water and anti-freeze up to the upper line of
recovery tank (3).
8. Install the radiator cap (2) securely.
9. Start and operate the engine for few minutes.
10.Stop the engine. Check coolant level and add coolant if
necessary.
Coolant Capacity
G GENERAL
9.0 L
9.5 U.S.qts
7.9 Imp.qts
• Do not start engine without coolant.
• Use clean, fresh water and anti-freeze to fill the radiator.
• When the anti-freeze is mixed with water, the anti-freeze
mixing ratio must be less than 50 %.
• Securely tighten radiator cap (2). If the cap is loose or
improperly fitted, water may lead out and the engine could
overheat.
• On cabin type machines, fresh water circulates through the
heater. This means th at one more l iter or so o f fresh wat er
is required.
In changing fresh water, pour fresh wate r up to the filter port
of the recovery tank. Turn ON the heater (shift the
temperature control lever toward WARM), and run the
engine for a while in order to warm fresh water. Then stop
the engine.
When fresh water has cooled down, some of the fresh water
in the recovery tan k is sucked. Now the recovery tank is
appropriately filled with fresh water.
(1) Radiator Hose
(2) Radiator Cap
(3) Recovery Tank
W1045880
G-30
Page 50
ME8200, ME9000, WSM
■
KiSC issued 03, 2007 A
G GENERAL
Flush Cooling System and Changing Coolant (Continued)
■ Anti-Freeze
CAUTION
• When using antifreeze, put on some protection such as
rubber gloves (Antifreeze contains position.).
• If should drink antifreeze, throw up at once and take medic al
attention.
• When antifreeze comes in contact with the skin or clothing,
wash it off immediately.
• Do not mix different types of Antifreeze.
The mixture can produce chemical reaction c ausing harmful
substances.
• Antifreeze is extremely flammable and explosive under
certain conditions. Keep fire and children away from
antifreeze.
• When draining fluids from the engine, place some container
underneath the engine body.
• Do not pour waste onto the grounds, down a drain, or into
any water source.
• Also, observe the relevant environmental protection
regulations when disposing of antifreeze.
If it freezes, coolant can damage the cylinders and radiator. If the
ambient temperature falls below 0 °C or before a long-term storage,
let out cooling water completely, or mix fresh water with long-life
coolant and fill the radiator and reserve tank with the mixture.
1. Long-life coolant (he reafter LLC) comes in sever al types. Use
ethylene glycol (EG) type for this engine.
2. Before employing LL C-mixed cooli ng water, fill th e radiator with
fresh water and empty it again.
Repeat this procedure 2 or 3 times to clean up the inside.
3. Mixing the LLC
Put the LLC in coolin g water in the percentage (%) for a target
temperature. Wh en mixing, stir it up well, and then fill i nto the
radiator.
4. The procedure for the mixing of water and antifreeze differs
according to the make of the antifreeze and the ambient
temperature. Refer to SAE J1034 standard, more specifically
also to SAE J814c.
IMPORTANT
• When the antifreeze is mixed with water, the antifreeze
mixing ratio must be less than 50 %.
Vol % Anti-freeze
40 −24 106
50 −37 108
Freeze Point Boiling Point*
°C °C
*At 1.013 x 1000000 Pa (760 mmHg) pressure (atmospheric).
A higher boiling point is obtained by using a ra diator pressure cap
which permits the development of pressure within the cooling
system.
W1046281
G-31
Page 51
ME8200, ME9000, WSM
NOTE■
KiSC issued 03, 2007 A
G GENERAL
5. Adding the LLC
(1) Add only water if the mixture reduces in amount by
evaporation.
(2) If there is a mixture leak, add the LLC of the same
manufacture and type in the same mixture percentage.
*Never add any long-life coolant of different manufacture.
(Different brands may hav e different additive components, and
the engine may fail to perform as specified.)
6. When the LLC is mixed, do not employ any radiator cleaning
agent. The LLC contain s antico rrosive agen t. If mixed with the
cleaning agent, sludge may build up, adversely affecting the
engine parts.
7. Kubota's genuine l ong-life coolant has a servi ce life of 2 years.
Be sure to change the coolant every 2 years.
• The above data represents industry standards that
necessitate a minimum g lycol content in the concentrated
anti-freeze.
• When the coolant level drops due to evaporation, add water
only to keep the antifreeze mix ing ratio less than 50 %. In
case of leakage, add an tifreeze and water in the specified
mixing ratio before filling in to the radiator.
W1046850
Replacing Radiator Hose (Water Pipes )
1. Replace the hoses and clamps.
Refer to “Checking Radiator Hose and Hose Clamp” .
(See page G-24.)
W1047085
Replacing Power Steering Hose
1. Replace the hoses and clamps, if necessary.
Refer to “Checking Power Steering Oil Line”.
(See page G-24.)
W1047139
Replacing Fuel Hose
1. Replace the fuel hose and clamps, if necessary.
Refer to “Checking Fuel Line”.
(See page G-21.)
W1047021
Replacing Brake Hose (CABIN Type)
1. Replace the brake hoses (1).
2. After replacing the hos es , blee d an air fr om brak e sy st em. (See
page G-34.)
(1) Brake Hose
W1047193
G-32
Page 52
ME8200, ME9000, WSM
IMPORTANT■
KiSC issued 03, 2007 A
[12] OTHERS
G GENERAL
Replacing Master Cylinder Kit and Equalizer Kit
1. Refer to “Removing Master Cylinder and Equalizer”.
(See page 5-S9.)
W1047316
Replacing Brake Seal 1 and 2
1. Refer to “Brake Case and Brake Disc”.
(See page 5-S10.)
W1047385
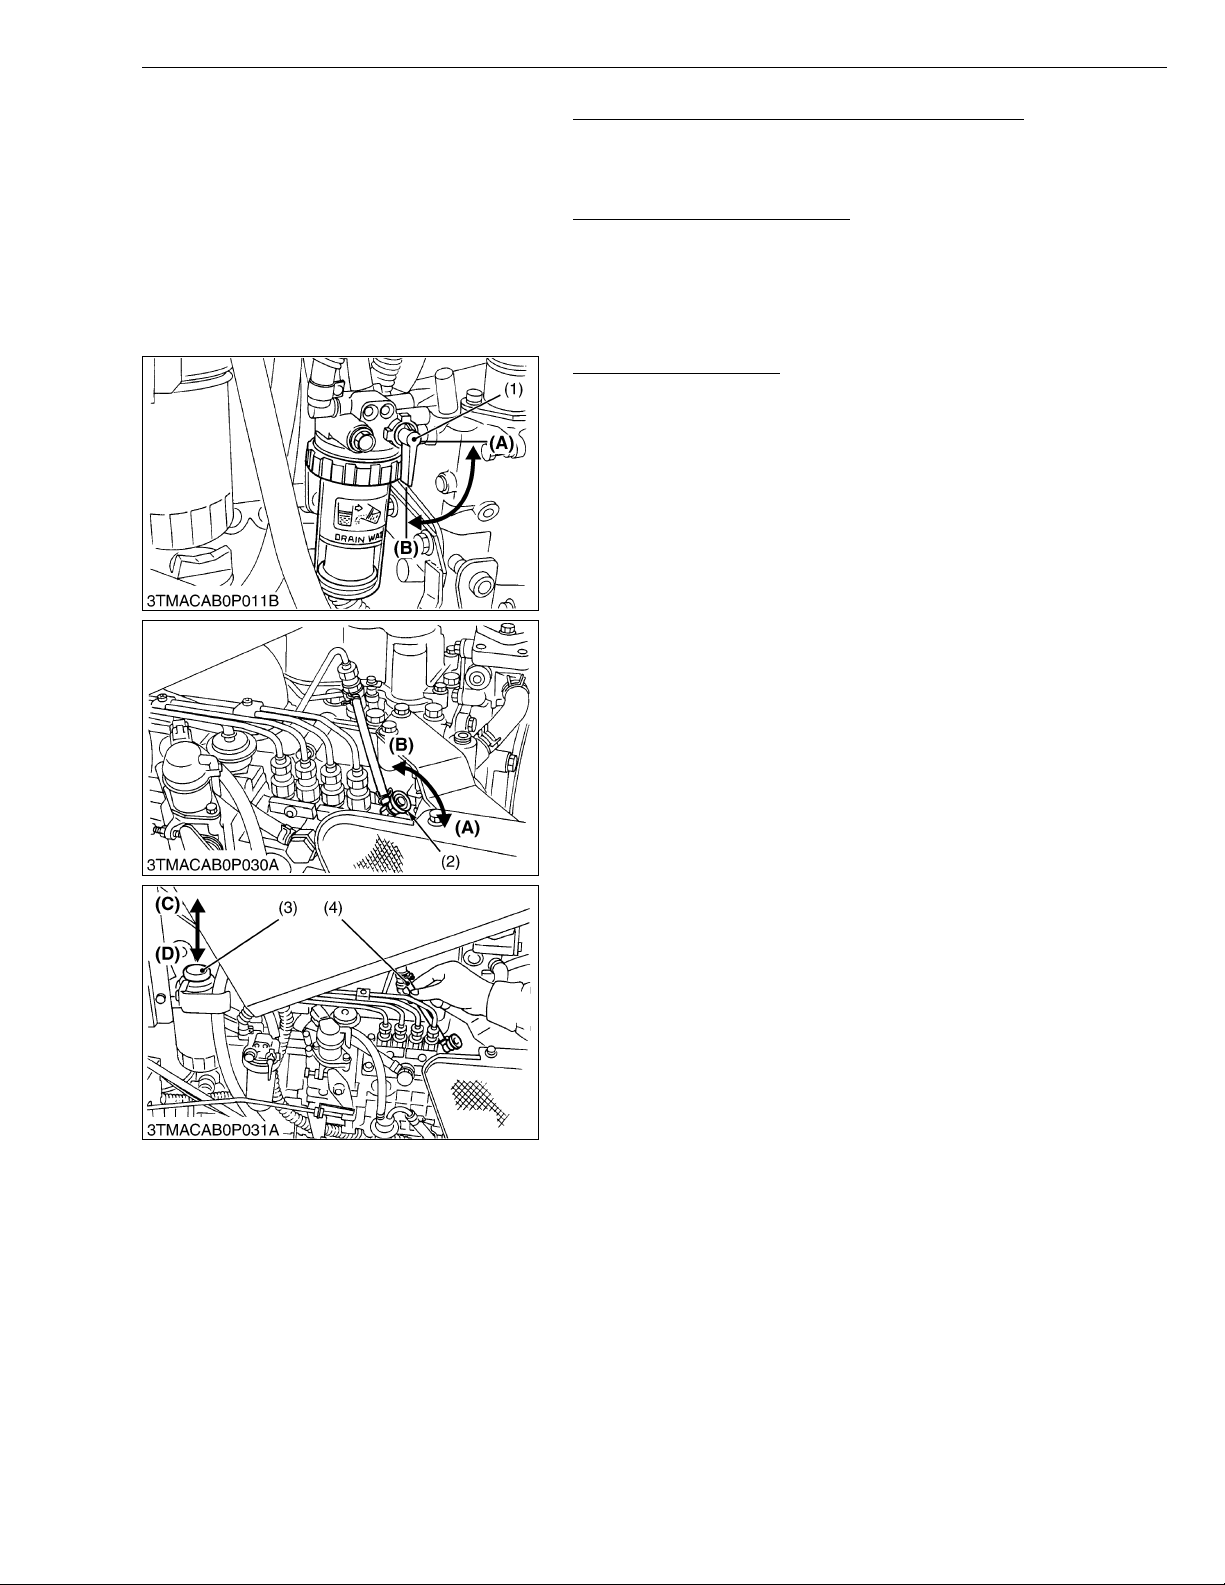
Bleeding Fuel System
Air must be removed:
1. When the fuel filter or lines are removed.
2. When water is drained from water separator.
3. When tank is completely empty.
4. After the tractor has not been used for a long period of time.
■ Bleeding Procedure is as Follows:
1. Make sure the fuel cock is in the “OPEN” position.
2. Open the air vent cock (2) on the fuel injection pump.
3. Pump the fuel pump knob (3) located on the top of the fuel filt er.
The fuel pump knob (3) will pump ea sily at first and with ad ded
resistance as air is purged from the system. To make sure air is
completely purged, p in ch the f uel ov erflow hose (4) with fingers,
if a pulsation is felt when the knob is pumped, then, no air
remains.
4. Set the hand throttle l ever at the max imum speed position, turn
on the key switch to s tart the e ngine, and then reset th e throttle
lever at the mid speed (around 1500 min
−1
(rpm)) position.
If engine doesn't start, try it several times with 30 seconds
intervals.
5. Accelerate the engine to remove the small portion of air left in the
fuel system.
6. If air still remains and the engine stops, repeat the above steps.
7. Close the air vent cock (2).
• Do not hold key switch at engine start position for more tha n
10 seconds continuously. If more engine cranking is
needed, try again after 30 seconds.
• Always close the air vent cock except for bleeding fuel lines.
Otherwise, engine runs irregularly or stalls frequently.
(1) Fuel Cock
(2) Air Vent Cock
(3) Fuel Pump Knob
(4) Fuel Overflow Hose
(A) Close
(B) Open
(C) Up
(D) Down
W1047469
G-33
Page 53
ME8200, ME9000, WSM
NOTE■
KiSC issued 03, 2007 A
G GENERAL
Draining Clutch Housing Water
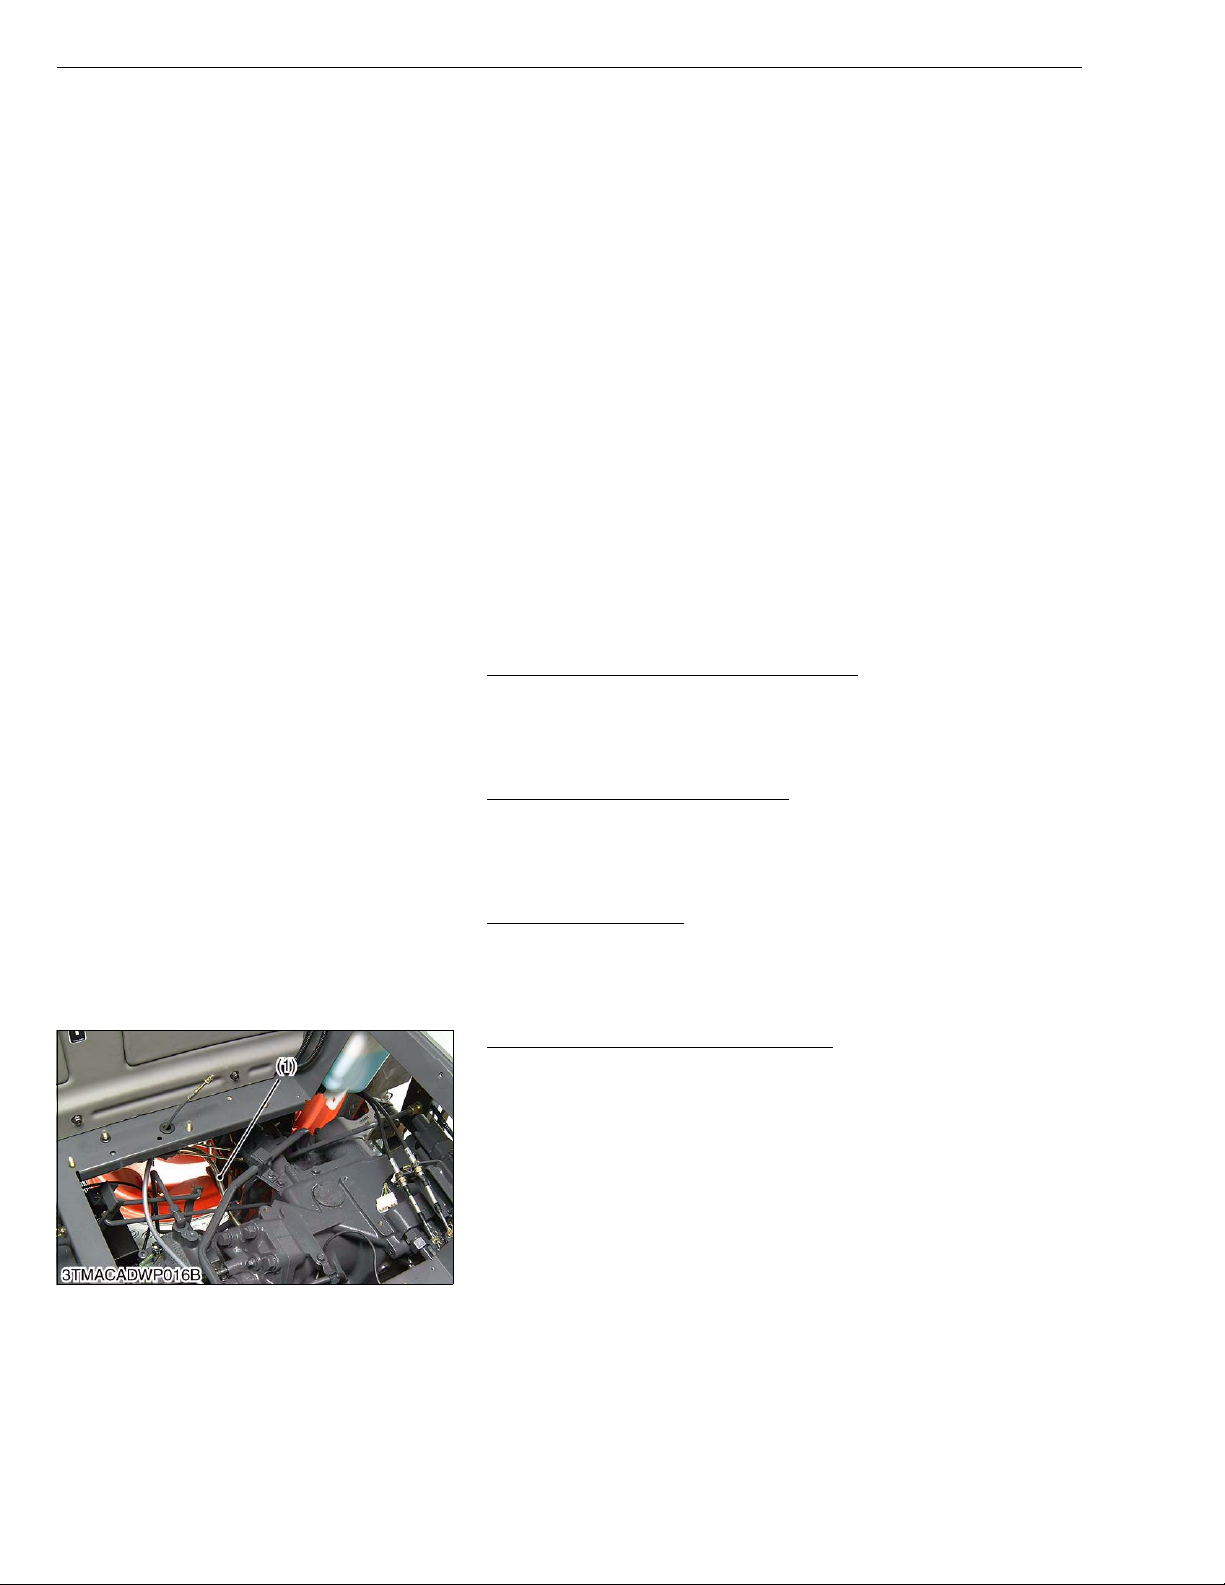
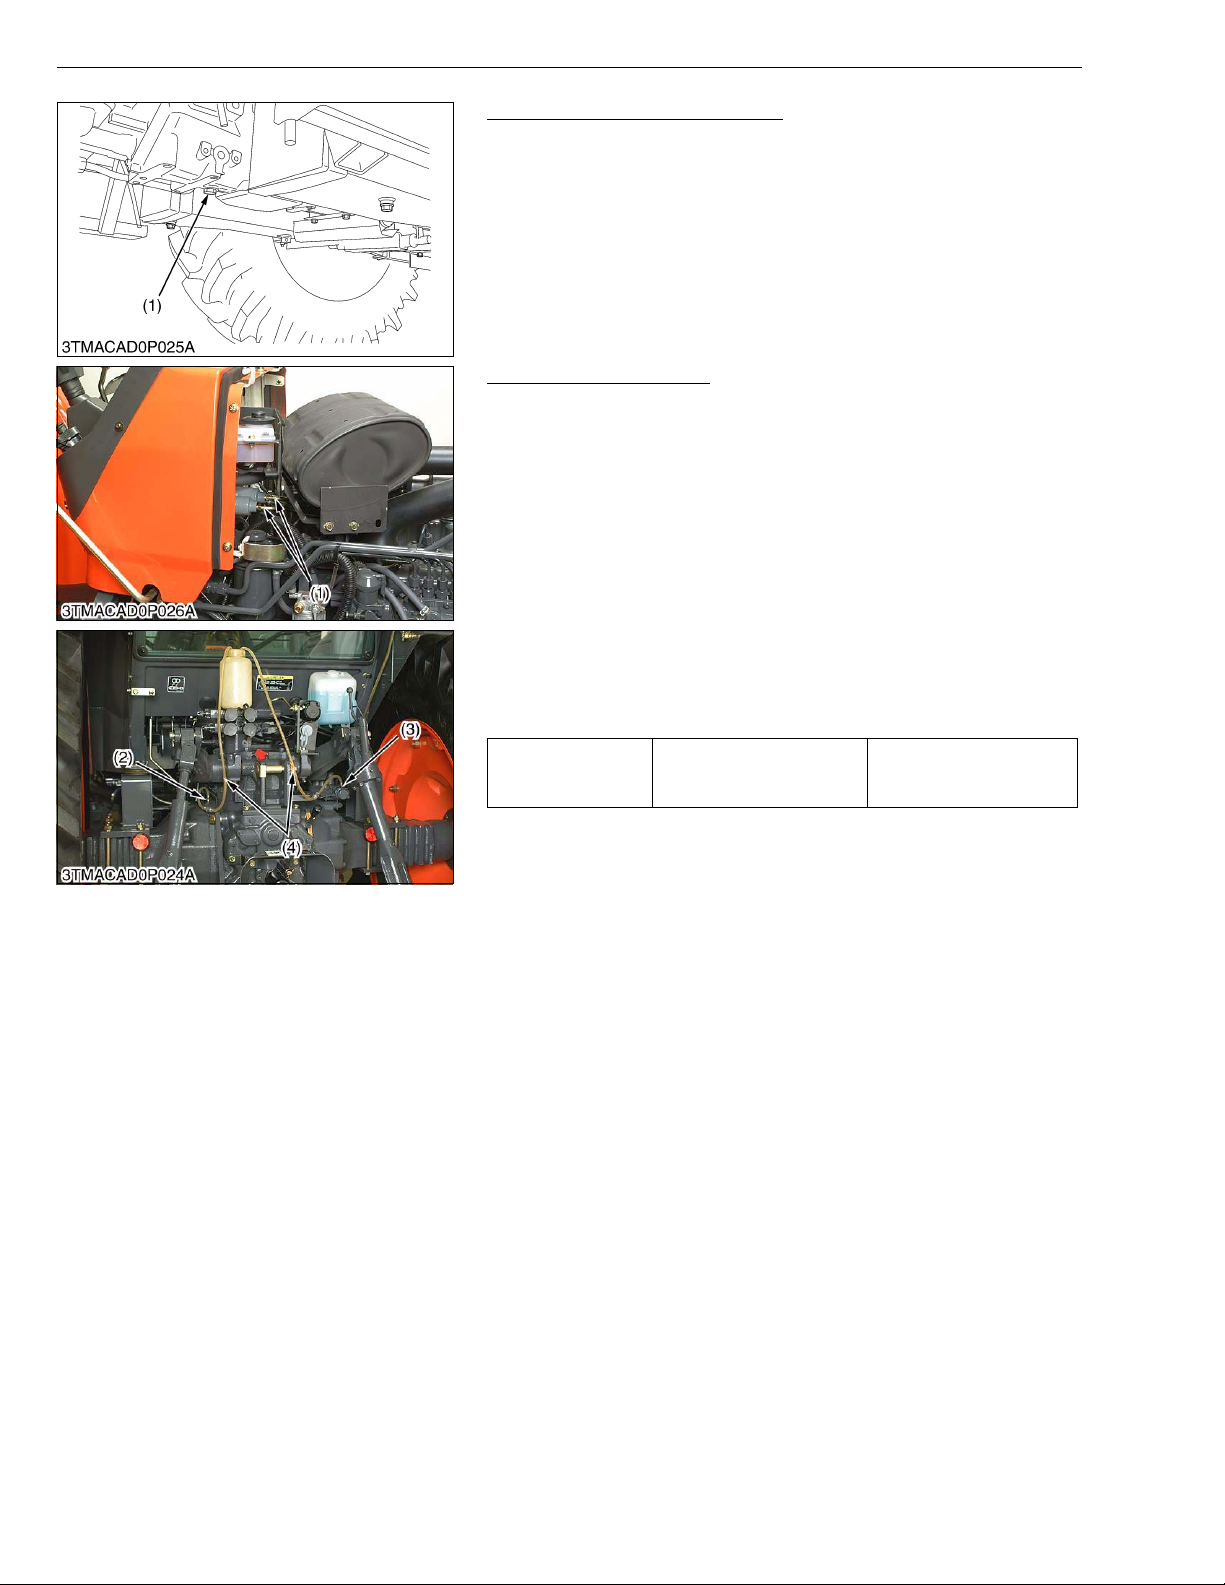
1. The tractor is equipped with drain plug (1) under the clutch
housing.
2. After operatin g in rain, snow or tractor has been washed, water
may get into the clutch housing.
3. Remove the dr ain plug (1) and drain the wa ter, then install the
plug (1) again.
(1) Drain Plug (Water)
W1047882
Bleeding Brake System
• While bleeding, make sure to keep enough brake oil in the
brake oil reservoir.
1. Disconnect the brake pipes (1) from the master cylinder.
2. Move the brake peda l u p an d d own b y h and . A t thi s tim e, when
raising the pedal, close the master cylinder outlet by a finger, and
when lowering, release the finger.
Repeat this operation several times. (Prepare and oil can.)
3. After bleeding the master cylinder, install the front brake pipes.
4. After installing the vinyl pipe (4) to the bleeder (2), (3), loosen the
bleeder two turns.
5. Move the brake pedal up and down.
Repeat this motion until air bubble in brake oil disappears.
After bleeding, tighten the bleeders firmly.
16 to 24 N·m
Tightening torque Brake pipe nut
1.63 to 2.45 kgf·m
11 .8 to 1 7. 7 l bf·ft
(Reference : Importance of Bleeding)
• If the air mixes in the brake hydraulic circuit, poor or no braking
force is obtain ed due to compr ess the air even when the brake
pedal is pressed.
Accordingly whenever the hydraulic brake system is
disassembled, be sure to bleed after reassembling
(1) Brake Pipe
(2) Bleeder (on Brake Case)
(3) Bleeder (on Trailer Brake Valve)
(4) Vinyl Pipe
W1048045
G-34
Page 54
ME8200, ME9000, WSM
IMPORTANT■
KiSC issued 03, 2007 A
G GENERAL
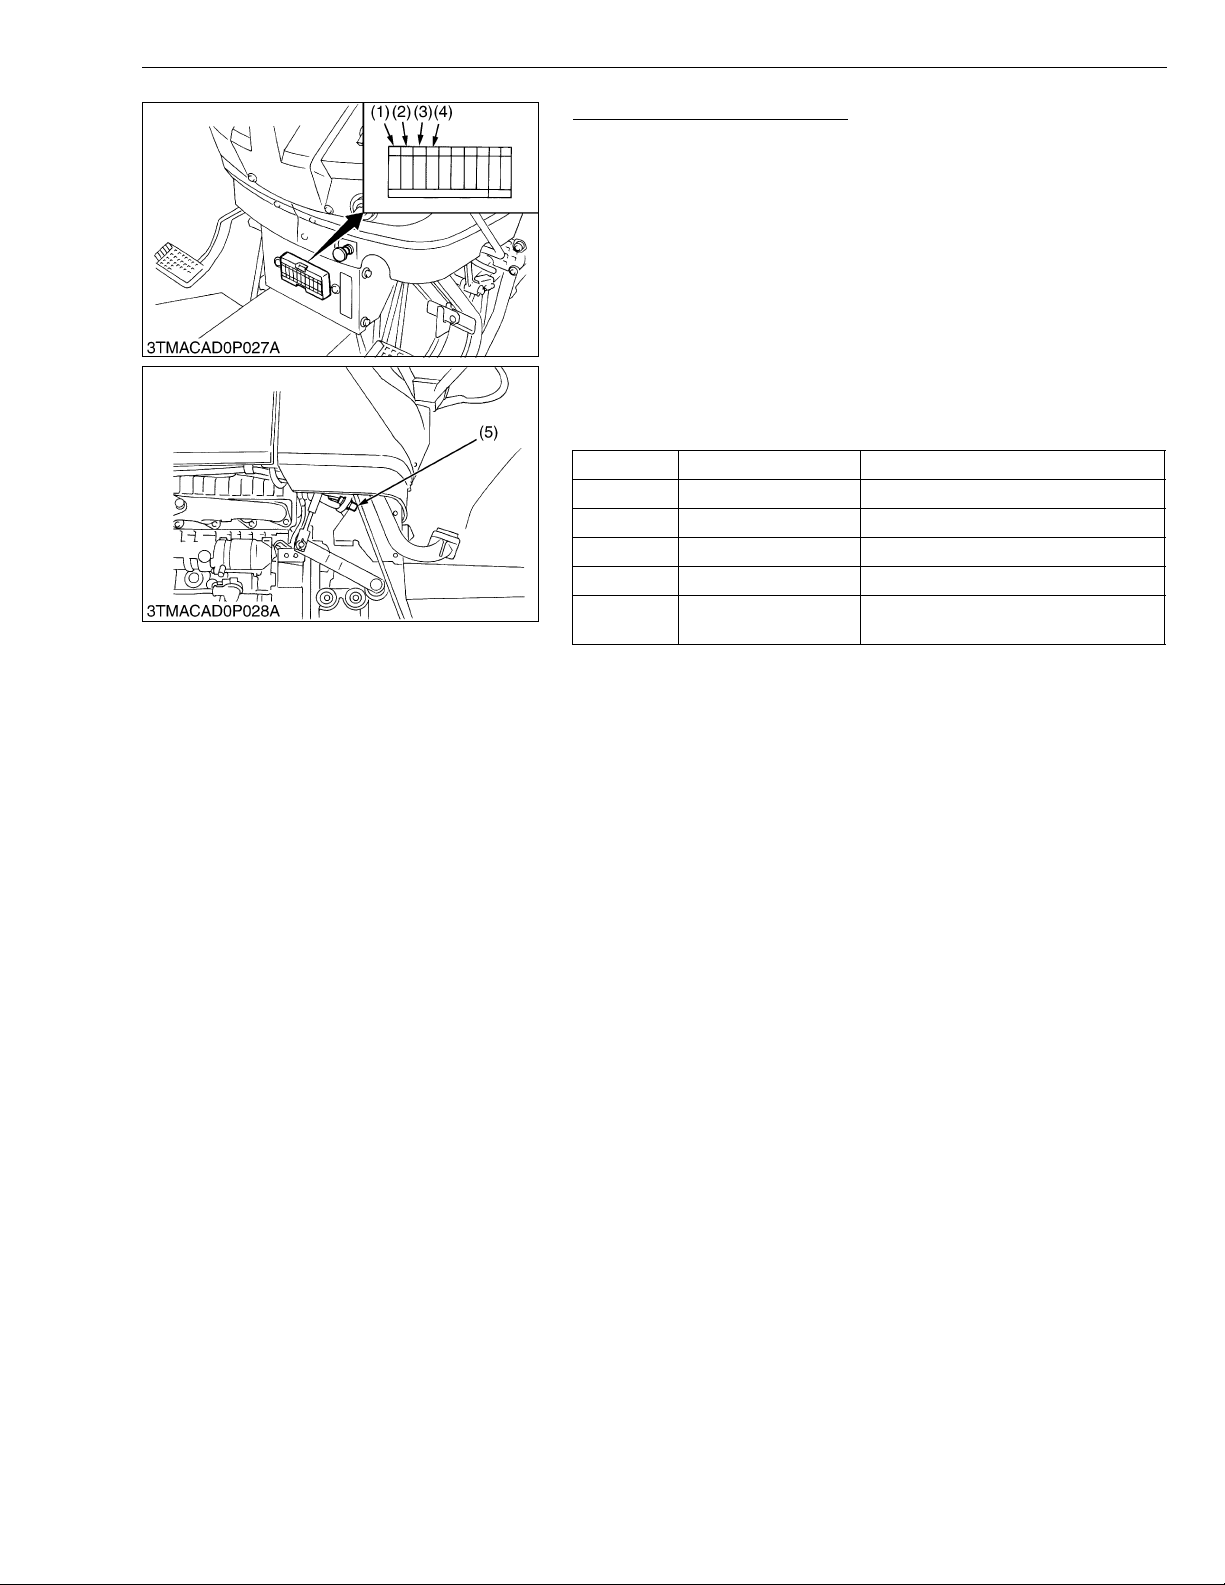
Replacing Fuse (ROPS Type)
1. The tractor electrical system is pr otected fr om poten tial dam age
by fuses.
A blown fuse indicates that there is an overload or short
somewhere in the electrical system.
2. If any of the fuses should blow, repl ace with a new one of the
same capacity.
• Before replacing a blown fuse, determine why the fuse blew
and make any necessary repairs. Failure to follow this
procedure may result in serious damage to the tractor
electrical system. Refer to troubleshooting section of this
manual for specific information dealing with electrical
problems.
Fuse No. Capacity (A) Protected circuit
1 20 Main key
2 15 Head light
3 15 Parking, Flasher (Hazard)
4 15 Work light
5
50
Slow blow fuse
Check circuit against wrong battery
connection
W1047515
G-35
Page 55
ME8200, ME9000, WSM
IMPORTANT■
KiSC issued 03, 2007 A
G GENERAL
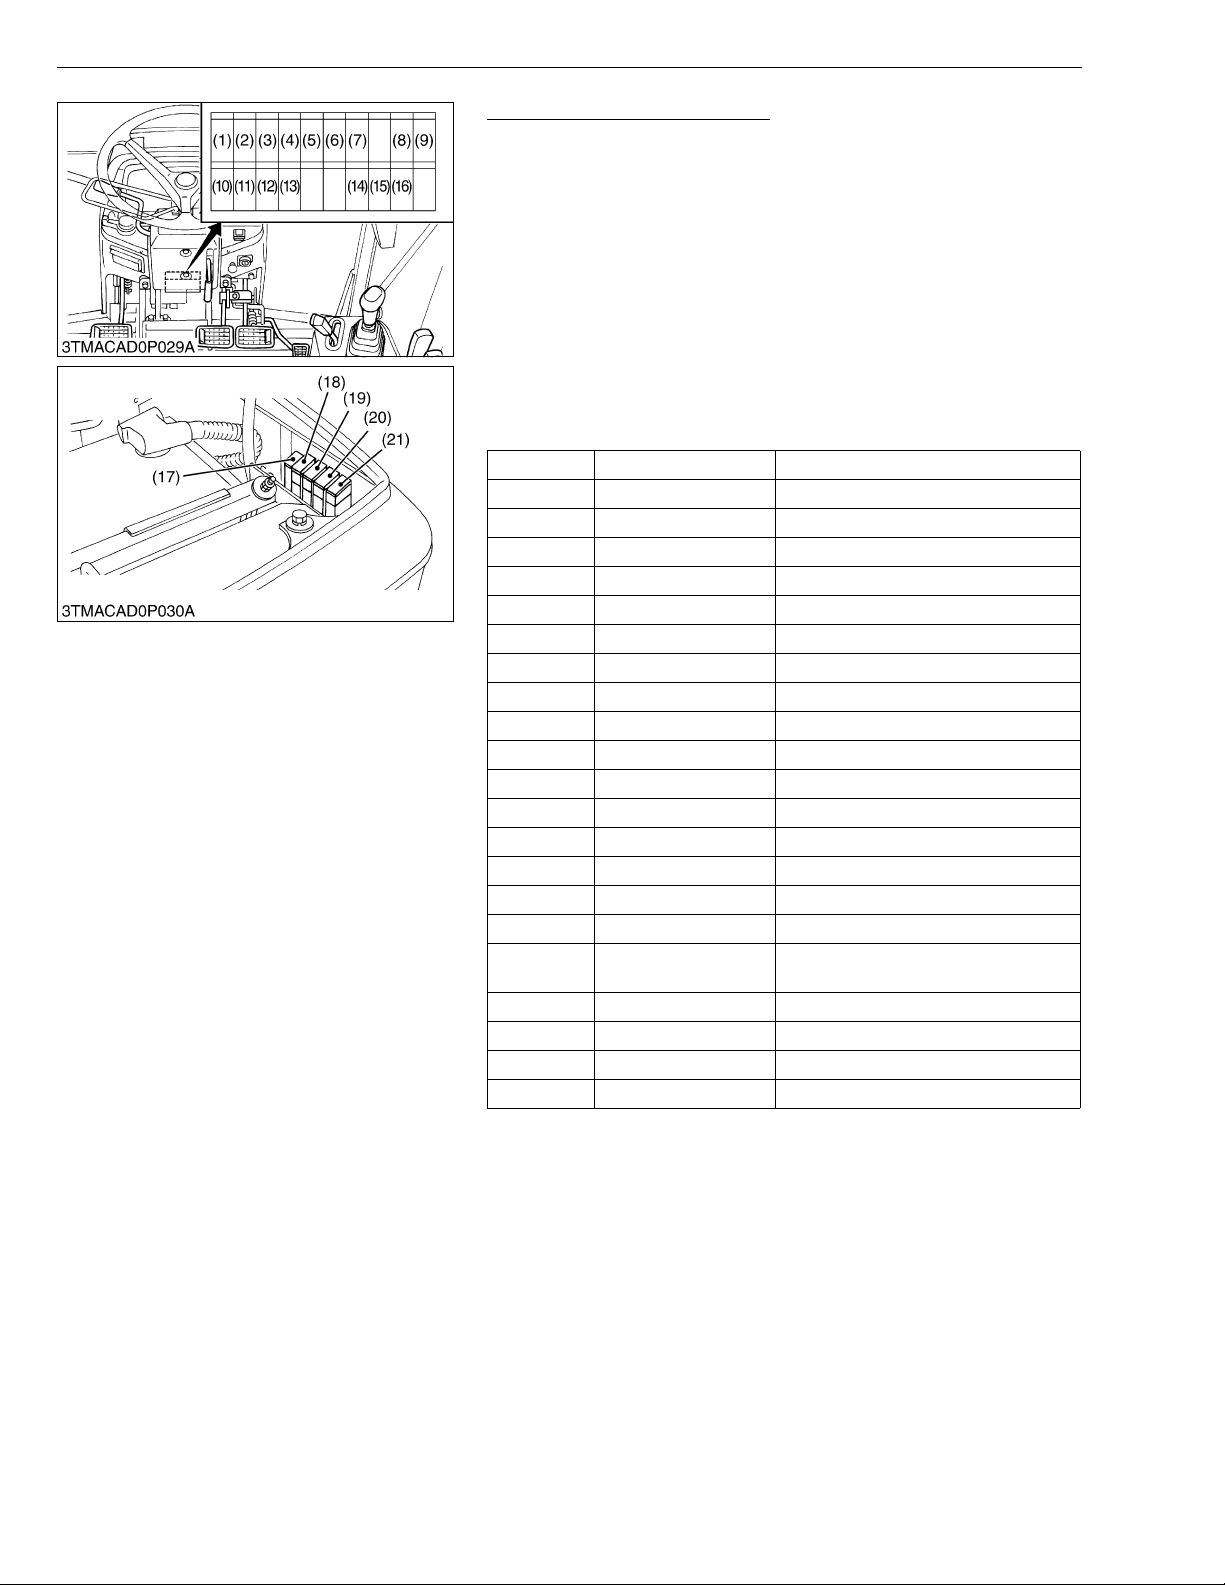
Replacing Fuse (CABIN Type)
1. The tractor electri cal system is pro tected from potenti al dama ge
by fuses.
A blown fuse indicates that there is an overload or short
somewhere in the electrical system.
2. If any of the fuses should blow, replace with a new one of the
same capacity.
• Before replacing a blown fuse, determine why the fuse blew
and make any necessary repairs. Failure to follow this
procedure may result in serious damage to the tractor
electrical system. Refer to troubleshooting section of this
manual for specific information dealing with electrical
problems.
Fuse No. Capacity (A) Protected circuit
1 15 Flasher (Hazard)
2 10 Dome light
3 10 Air conditioner (Compressor)
4 25 Air conditioner (Fan motor)
5 5 Air conditioner (Control)
615Wiper
7 5 Radio
815Spare
925Spare
10 10 Engine panel
11 15 Turn signal - Stop lamp
12 15 Auxiliary power
13 15 Head light - Tail lamp - Horn
14 15 Work light (Front)
15 15 Work light (Rear)
16 15 Cigarette lighter
17
18 30 Battery
19 30 Accessory
20 30 Main key
21 30 Air conditioner (Fan motor)
65
Slow blow fuse
Check circuit against wrong battery
connection.
W1047748
G-36
Page 56

ME8200, ME9000, WSM
KiSC issued 03, 2007 A
G GENERAL
Replacing Light Bulb (ROPS Type)
1. Head lights :
Take the bulb out of the light body and replace with a new one.
2. Other lights :
Detach the lens and replace the bulb.
Light Capacity
Head lights 45 W
Tail light 10 W
Turn signal / hazard light (front) 21 W
Turn signal / hazard light (rear) 21 W
Sidemarker light 5 W
Brake stop light 21 W
Number plate light 5 W
Instrument panel light 3.4 W
Work light 35 W
W1039659
Replacing Light Bulb (CABIN Type)
1. Head lights :
Take the bulb out of the light body and replace with a new one.
2. Other lights :
Detach the lens and replace the bulb.
Light Capacity
Head lights 45/45 W
Tail light 10 W
Turn signal / hazard light (front) 21 W
Turn signal / hazard light (rear) 21 W
Brake stop light 21 W
Instrument panel light 3.4 W
Easy checker 1.4 W, 3 W
Work light 55 W
Dome light (room light) 10 W
Sidemarker light 5 W
Number plate light 5 W
W1049044
G-37
Page 57
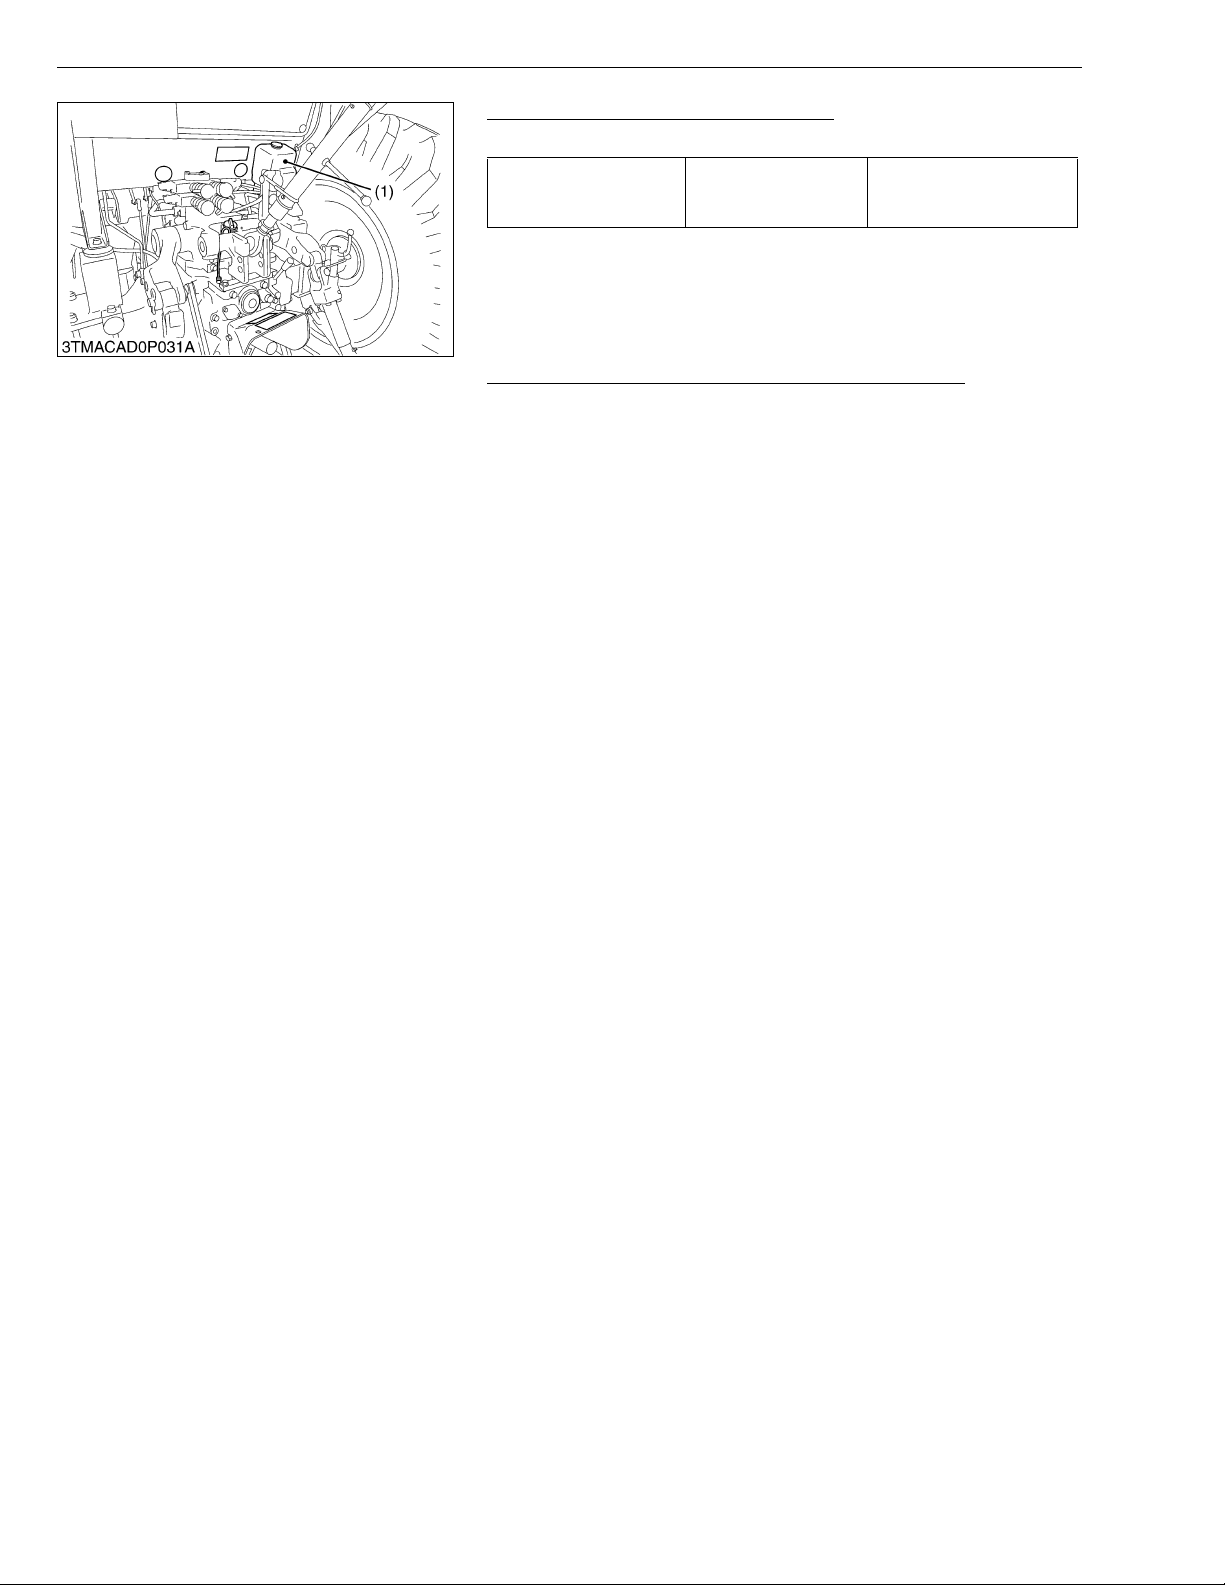
ME8200, ME9000, WSM
KiSC issued 03, 2007 A
Adding Washer Liquid (CABIN Type)
1. Add a proper amount of automobile washer liquid.
1.3 L
Washer liquid tank Capacity
(1) Washer Liquid Tank
1.4 U.S.qts
1.1 Imp.qts
Checking the Amount of Refrigerant (CABIN Type)
1. See page 10-S23.
G GENERAL
W1049482
W1049609
G-38
Page 58
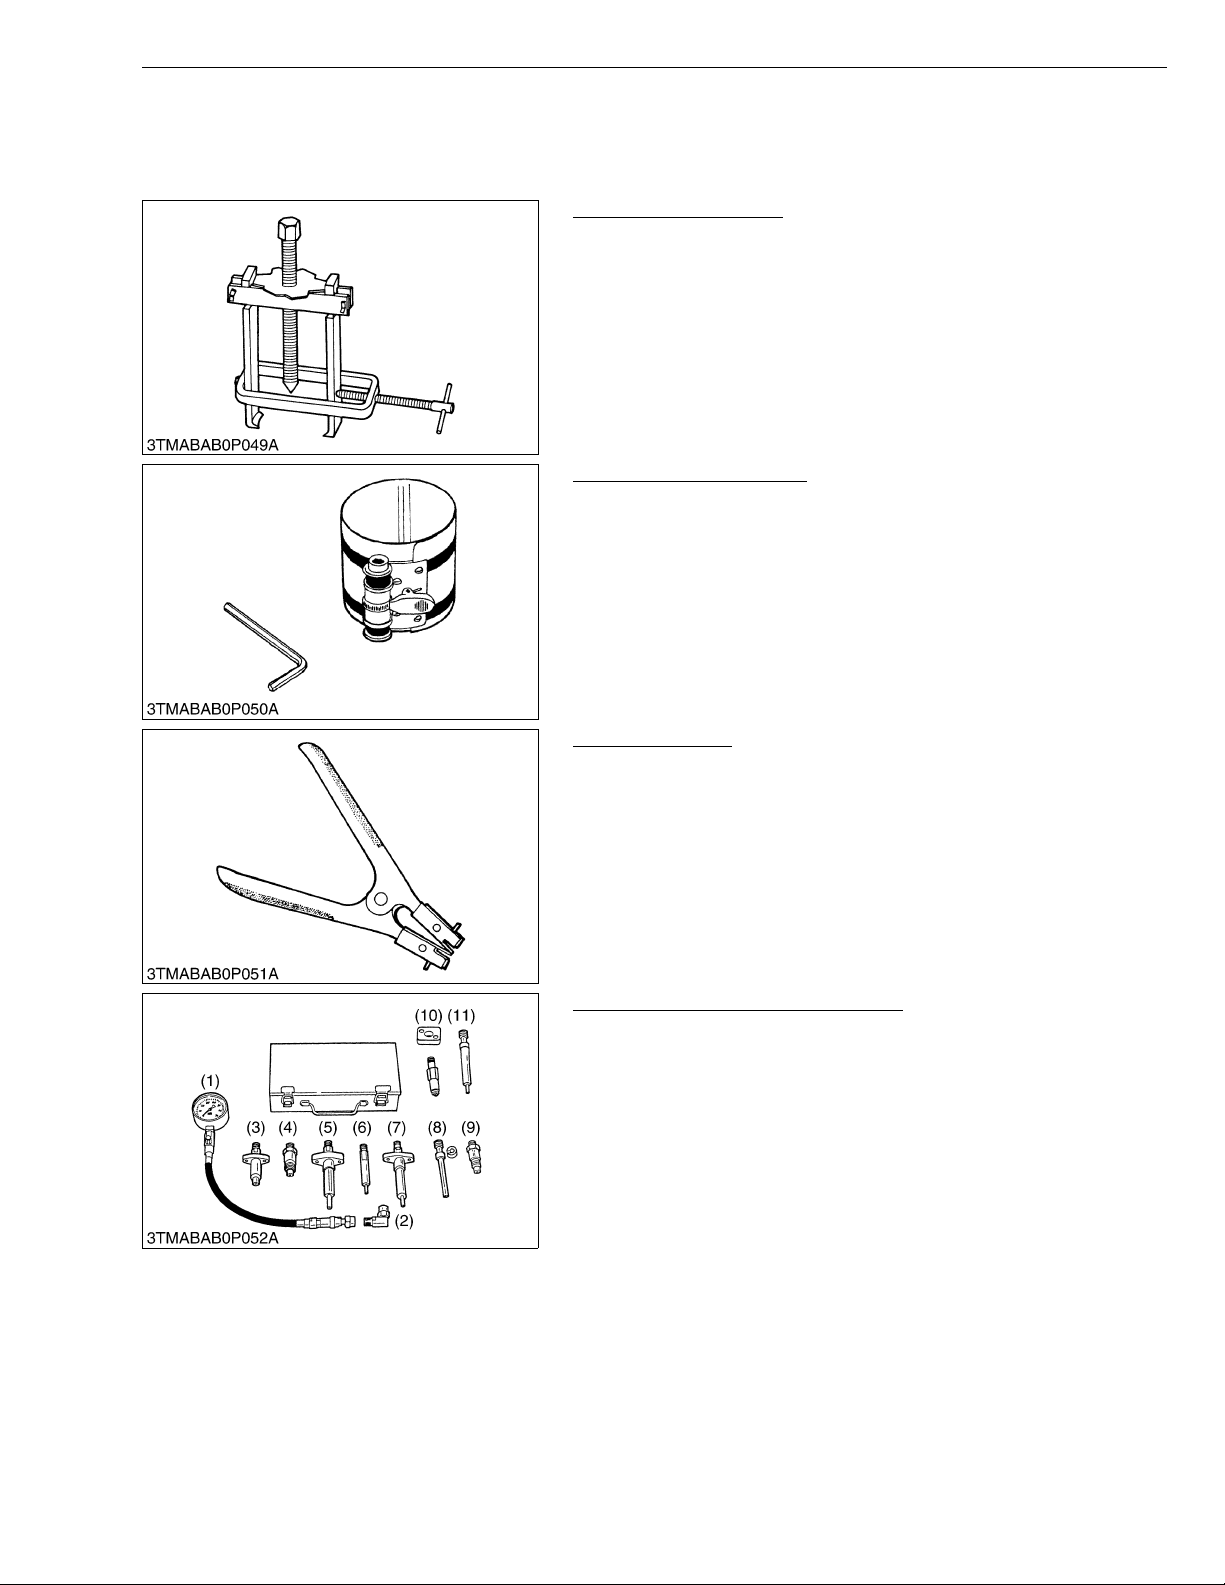
ME8200, ME9000, WSM
KiSC issued 03, 2007 A
8. SPECIAL TOOLS
[1] SPECIAL TOOLS FOR ENG INE
Special Use Puller Set
Code No.: 07916-09032
Application: Use exclusively for pulling out bearing, gears and other
Piston Ring Compressor
Code No.: 07909-32111
Application: Use exclusively for pushing in the piston with piston
G GENERAL
parts with ease.
W10240500
rings into the cylinder.
W10241000
Piston Ring Tool
Code No.: 07909-32121
Application: Use exclusively for removing or installing the piston ring
with ease.
W10241500
Diesel Engine Compression Tester
Code No.: 07909-30208 (Assembly) 07909-31251 (G)
07909-30934 (A to F) 07909-31271 (I)
07909-31211 (E and F) 07909-31281 (J)
07909-31231 (H)
Application: Use to measure diesel engine compression and
diagnostics of need for major overhaul.
(1) Gauge
(2) L Joint
(3) Adaptor A
(4) Adaptor B
(5) Adaptor C
(6) Adaptor E
(7) Adap tor F
(8) Adap tor G
(9) Adap tor H
(10) Adaptor I
(11) Adaptor J
W10242000
G-39
Page 59
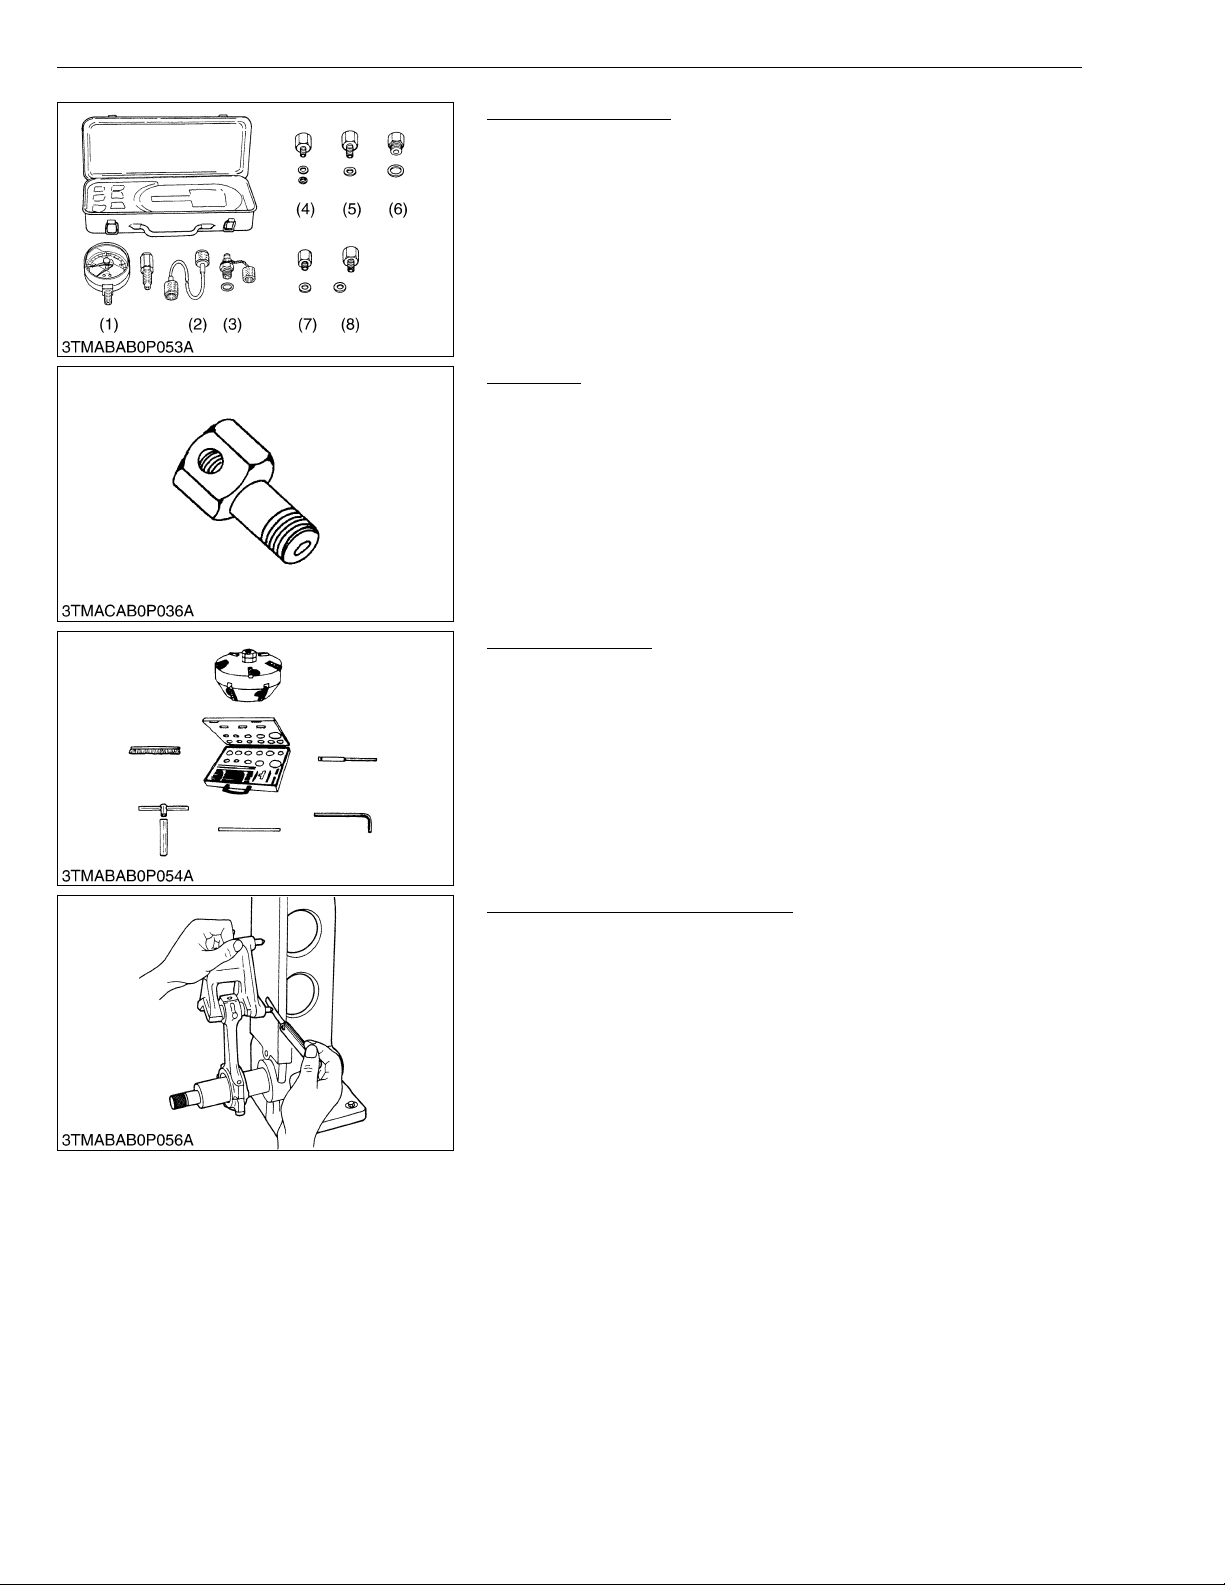
ME8200, ME9000, WSM
KiSC issued 03, 2007 A
Oil Pressure Tester
Code No.: 079 16- 32 032
Application: Use to measure lubricating oil pressure.
(1) Gauge
(2) Cable
(3) Threaded Joint
(4) Adaptor 1
(5) Adaptor 2
(6) Adaptor 3
(7) Adaptor 4
(8) Adaptor 5
Adaptor 7
Code No.: 079 16- 32 591
Application: Use to measure lubricating oil pressure.
G GENERAL
W10243180
W1030102
Valve Seat Cutter
Code No.: 079 09- 33 102
Application: Use to reseat valves.
Angle: 0.785 rad (45°)
0.262 rad (15°)
Diameter: 28.6 mm (1.126 in.) 38.0 mm (1.496 in.)
31.6 mm (1.244 in.) 41.3 mm (1.626 in.)
35.0 mm (1.378 in.) 50.8 mm (2.000 in.)
Connecting Rod Alignment Tool
Code No.: 079 09- 31 661
Application: Use to check the connecting rod alignment.
Applicable: Connecting rod big end I.D.
range 30 to 75 mm (1.18 to 2.95 in.) dia.
Connecting rod length
65 to 300 mm (2.56 to 11.81 in.)
W10244580
W10245830
G-40
Page 60
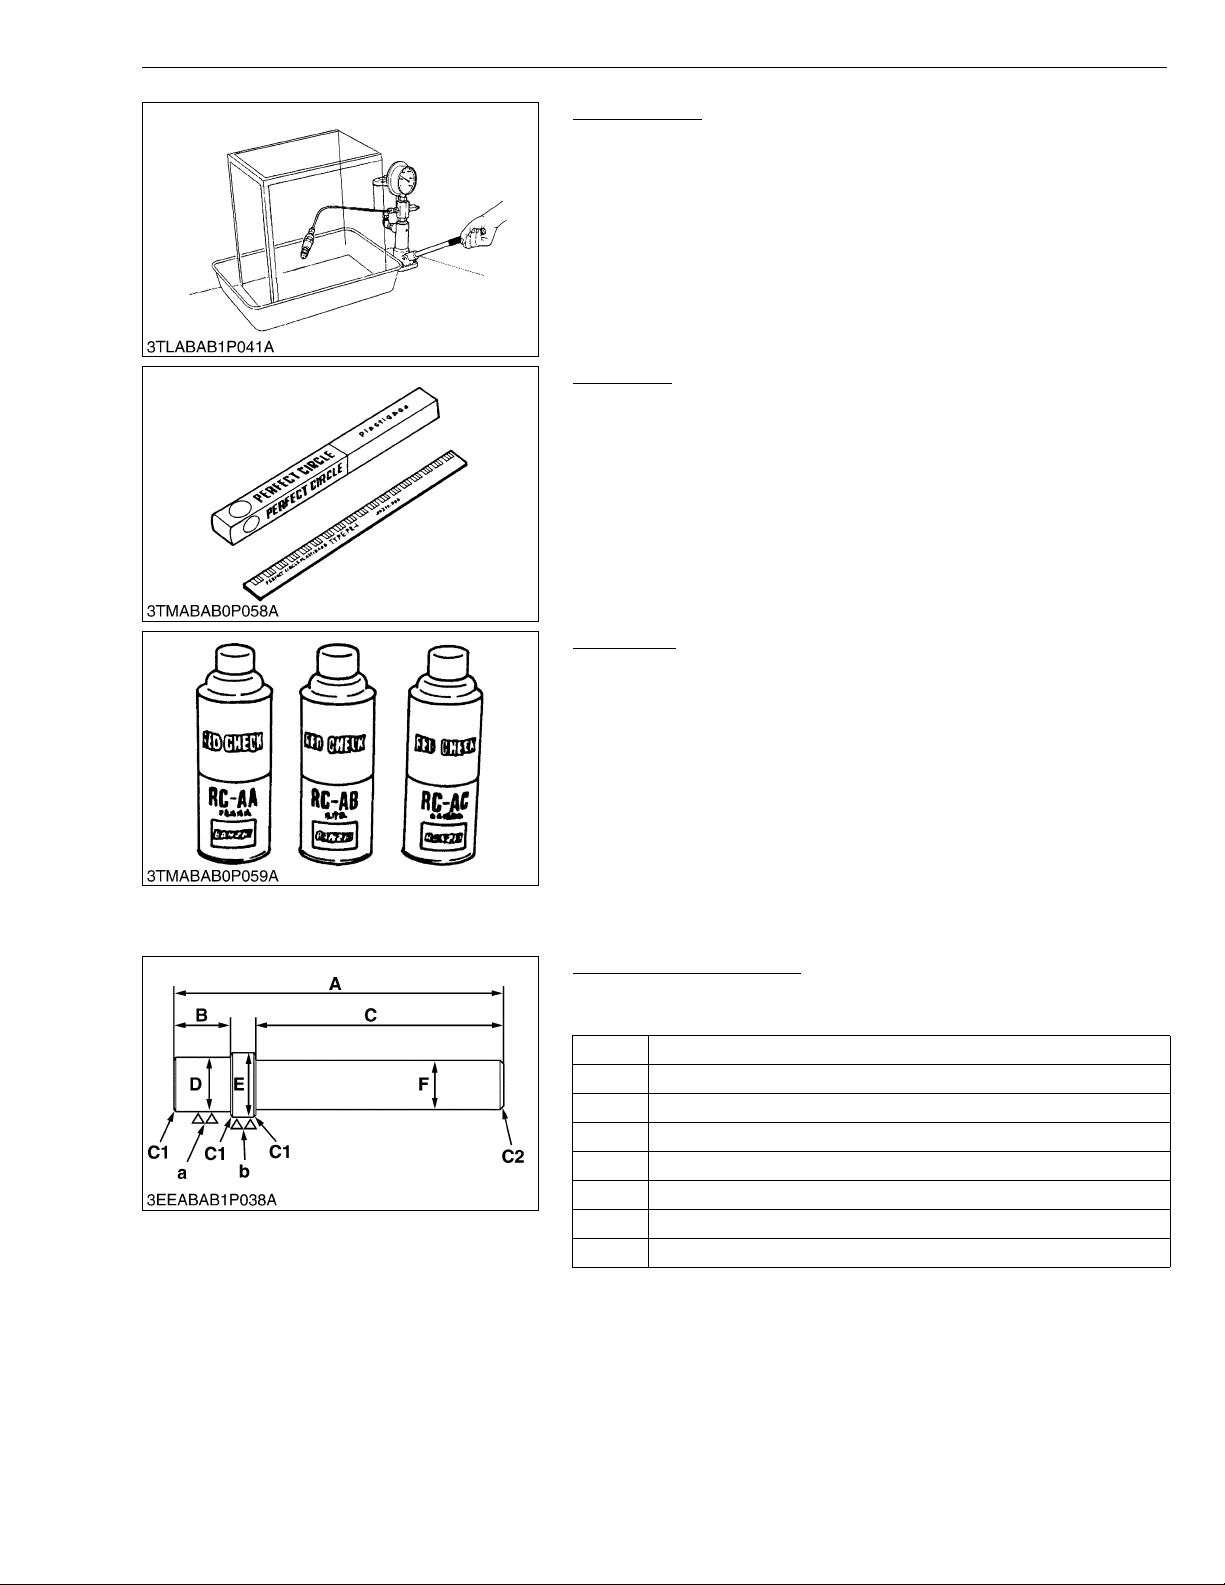
ME8200, ME9000, WSM
NOTE■
KiSC issued 03, 2007 A
G GENERAL
Nozzle Tester
Code No.: 07909-31361
Application: Use to check the fuel injection pressure and spray
pattern of nozzle.
Measuring: 0 to 50 MPa
2
range (0 to 500 kgf/cm
, 0 to 7000 psi)
W10246530
Plastigage
Code No.: 07909-30241
Application: Use to check the oil clearance between crankshaft and
bearing, etc.
Measuring: Green.... 0.025 to 0.076 mm (0.001 to 0.003 in.)
range Red ....... 0.051 to 0.152 mm (0.002 to 0.006 in.)
Blue....... 0.102 to 0.229 mm (0.004 to 0.009 in.)
W10247190
Red Check
Code No.: 07909-31371
Application: Use to check cracks on cylinder head, cyli nder block,
etc.
• The following special tools are not provided, so make them referring to the figure.
Bushing Replacing Tool
Application: Use to press out and to press fit the bushing.
1. For small end bushing
A 196 mm (7.7165 in.)
B 37.5 mm (1.476 in.)
C 150 mm (5.9055 in.)
D 45.95 mm dia. (1.7697 in. dia.)
E 48.100 to 48.075 mm dia. (1.8937 to 1.8927 in. dia.)
F 20 mm (0.7874 in.)
a 6.3 μm (250 μin.)
b 6.3 μm (250 μin.)
W10249090
W1025500
G-41
Page 61
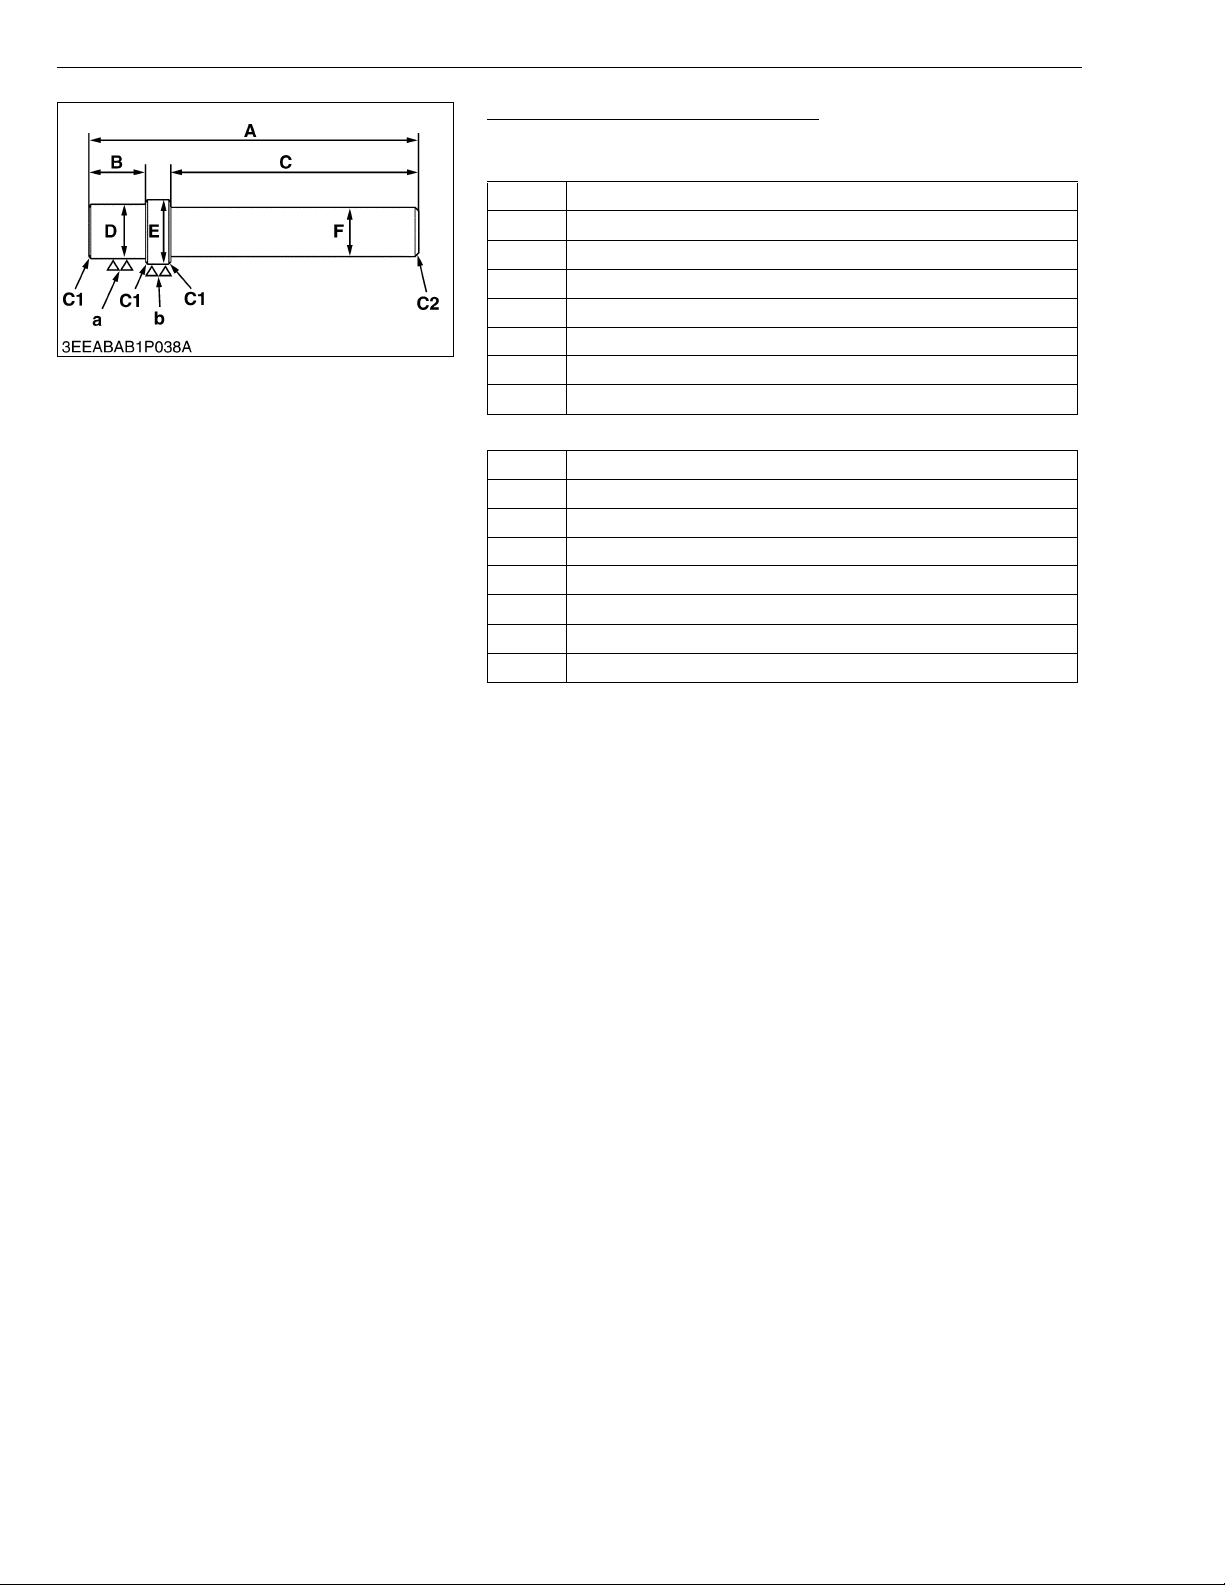
ME8200, ME9000, WSM
KiSC issued 03, 2007 A
G GENERAL
Small End Bushing Replacing Tool
Application: Use to press out and to press fit the small end bushing.
[Press out]
A 157 mm (6.1811 in.)
B 14.5 mm (0.571 in.)
C 120 mm (4.7244 in.)
D 30.0 mm dia. (1.1811 in. dia.)
E 32.95 mm dia. (1.2972 in. dia.)
F 20 mm dia. (0.7874 in. dia.)
a 6.3 μm (0.00025 in.)
b 6.3 μm (0.00025 in.)
[Press fit]
A 157 mm (6.1811 in.)
B 14.5 mm (0.571 in.)
C 120 mm (4.7244 in.)
D 30.0 mm dia. (1.1811 in. dia.)
E 42.000 mm dia. (1.6535 in. dia.)
F 20 mm dia. (0.7874 in. dia.)
a 6.3 μm (0.00025 in.)
b 6.3 μm (0.00025 in.)
W1031485
G-42
Page 62
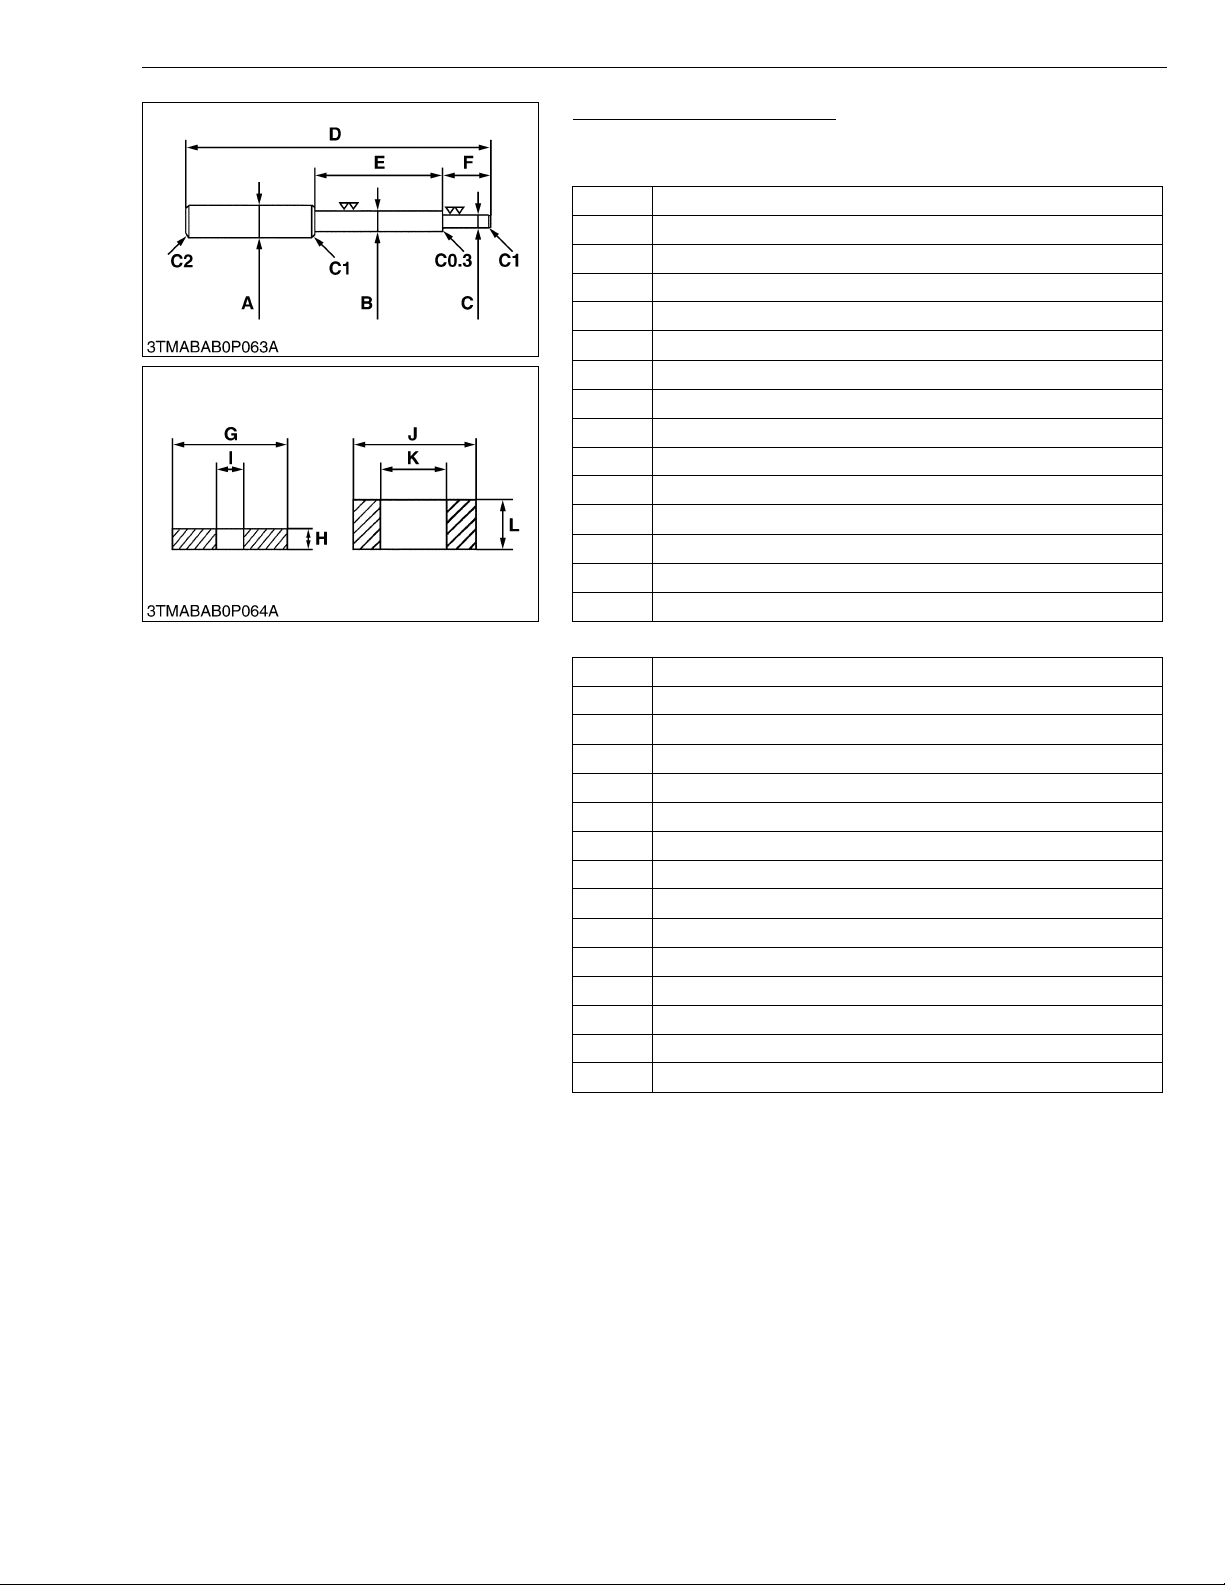
ME8200, ME9000, WSM
KiSC issued 03, 2007 A
G GENERAL
Valve Guide Replacing Tool
Application: Use to press out and press fit the valve guide.
[Intake valve guide]
A 20 mm dia. (0.79 in. dia.)
B 11.7 to 11.9 m m dia. (0.460 to 0.468 in. dia.)
C 6.5 to 6.6 mm dia. (0.256 to 0.259 in. dia.)
D 225 mm (8.86 in.)
E 70 mm (2.76 in.)
F 45 mm (1.77 in.)
G 25 mm dia. (0.98 in. dia.)
H 5 mm (0.197 in.)
I 6.7 to 7.0 mm dia. (0.263 to 0.275 in. dia.)
J 20 m m dia. (0.787 in. dia.)
K 12.5 to 12.8 mm dia. (0.492 to 0.504 in. dia.)
L 8.9 to 9.1 mm (0.350 to 0.358 in.)
C1 Chamfer 1.0 mm (0.039 in.)
C2 Chamfer 2.0 mm (0.079 in.)
C0.3 Chamfer 0.3 mm (0.012 in.)
[Intake valve guide]
A 20 mm dia. (0.79 in. dia.)
B 12.96 to 12.98 mm dia. (0.510 to 0.511 in. dia.)
C 7.50 to 7.70 mm dia. (0.295 to 0.303 in. dia.)
D 225 mm (8.86 in.)
E 80 mm (3.15 in.)
F 40 mm (1.57 in.)
G 14.5 to 15.5 mm dia. (0.57 to 0.61 in. dia.)
H 5 mm (0.197 in.)
I 8.0 to 8.1 mm dia. (0.31 to 0.32 in. dia.)
J 17.5 to 18.5 mm dia. (0.689 to 0.728 in. dia.)
K 13.1 to 13.2 mm dia. (0.516 to 0.520 in. dia.)
L 9.9 to 20.1 mm (0.390 to 0.398 in.)
C1 Chamfer 1.0 mm (0.039 in.)
C2 Chamfer 2.0 mm (0.079 in.)
C0.3 Chamfer 0.3 mm (0.012 in.)
W1045889
G-43
Page 63

ME8200, ME9000, WSM
KiSC issued 03, 2007 A
G GENERAL
Auxiliary Socket for Fixing Crankshaft Sleeve
Application: Use to fix the crankshaft sleeve of the diesel engine.
A Rm ax = 12.5 S
B 94. 5 to 95.0 mm dia. (3.7205 to 3.7402 in. dia.)
C 40 mm dia. (1.5748 in. dia.)
D 30 mm dia. (1.1811 in. dia.)
E 12 mm (0.4724 in.)
F 7.9 to 8.1 mm (0.3110 to 0.3189 in.)
G 20 mm (0.0787 in.)
H 130 mm dia. (5.1181 in. dia.)
I 99.4 to 99.6 mm dia. (3.9134 to 3.9213 in. dia.)
J 95.05 to 95.20 mm dia. (3.7421 to 3.7480 in. dia.)
K 3 mm dia. (0.1181 in.dia.)
L 15 mm (0.5905 in.)
M 10 mm (0.3937 in.)
N 90 mm (3.5433 in.)
O 115 mm (4.5275 in.)
P 16.9 to 17.1 mm (0.6654 to 0.6732 in.)
C1 Chamfer 1.0 mm (0.039 in.)
C3 Chamfer 3.0 mm (0.1181 in.)
C5 Chamfer 5.0 mm (0.1969 in.)
C0.2 Chamfer 0.2 mm (0.0079 in.)
C0.3 Chamfer 0.3 mm (0.0118 in.)
W1041815
Balancer Bushing Replacing Tool 1 Assembly
Application: Use to press fit the bushing.
No. Name of Part Q’ty Remarks
1 Shaft 1 See page G-45
2 Piece 1 1 See page G-45
3 Piece 2 1 See page G-46
4Bolt 2M6 × P1.0
W1035596
G-44
Page 64
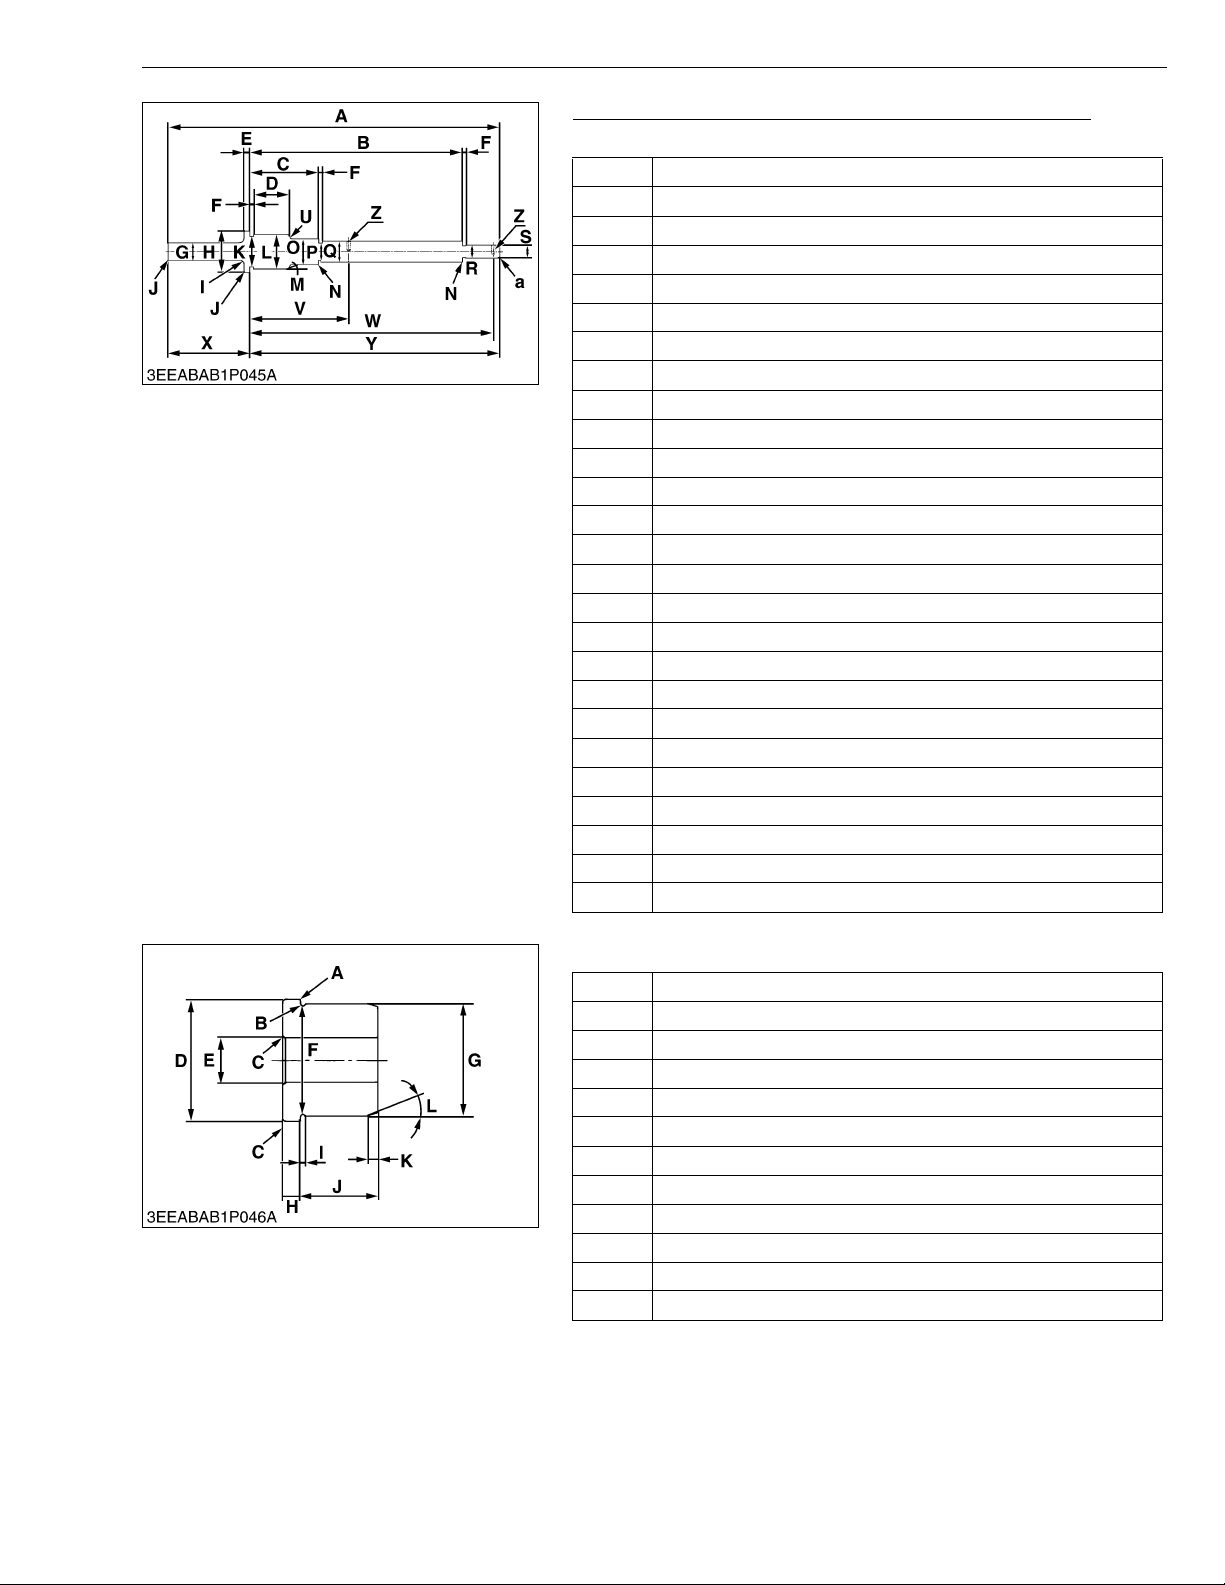
ME8200, ME9000, WSM
KiSC issued 03, 2007 A
G GENERAL
Balancer Bushing Replacing Tool 1 Components Parts
1) Shaft
A 498 mm (19.61 in.)
B 318.8 to 319.2 mm (12.5726 to 12.5669 in.)
C 102.8 to 103.2 mm (4.0472 to 4.0630 in.)
D 60 mm (2.36 in.)
E 8 mm (0.31 in.)
F 5 mm (0.20 in.)
G 30 mm dia. (1.18 in. dia.)
H 65 mm dia. (2.56 in. dia.)
I 6 mm (0.24 in.)
J Chamfer 1 mm (0.04 in.)
K 53 mm dia. (2.09 in. dia.)
L 54.7 to 54.9 mm dia. (2.1535 to 2.1614 in. dia.)
M 0.26 rad (15 °)
N Chamfer 0.5 mm (0.02 in.)
O 41 mm dia. (1.61 in. dia.)
P 32 mm dia. (1.26 in. dia.)
Q 33.961 to 34.0 mm dia. (1.3370 to 1.3386 in. dia.)
R 18 mm dia. (0.71 in. dia.)
S 19.967 to 20.0 mm dia. (0.7861 to 0.7874 in. dia.)
U 3 mm (0.12 in.)
V 149.1 to 149.4 mm (5.8701 to 5.8819 in.)
W 365.1 to 365.4 mm (14.3740 to 14.3858 in.)
X 123 mm (4.84 in.)
Y 375 mm (14.76 in.)
Z M6 × P1.0 depth 7 mm (0.28 in.)
a Chamfer 2 mm (0.08 in.)
W1036035
2) Piece 1
A Chamfer 0.1 mm (0.004 in.)
B 1 mm (0.04 in.)
C Chamfer 1 mm (0.04 in.)
D 53.8 to 53.9 mm dia. (2.1181 to 2.1220 in. dia.)
E 20.02 to 20.041 mm dia. (0.7882 to 0.7890 in. dia.)
F 48 mm dia. (1.89 in. dia.)
G 49.934 to 49.94 mm dia. (1.9659 to 1.9661 in. dia.)
H 8 mm (0.31 in.)
I 2 mm (0.08 in.)
J 35 m m (1.38 in.)
K 5 mm (0.20 in.)
L 0.26 rad (15 °)
W1036402
G-45
Page 65
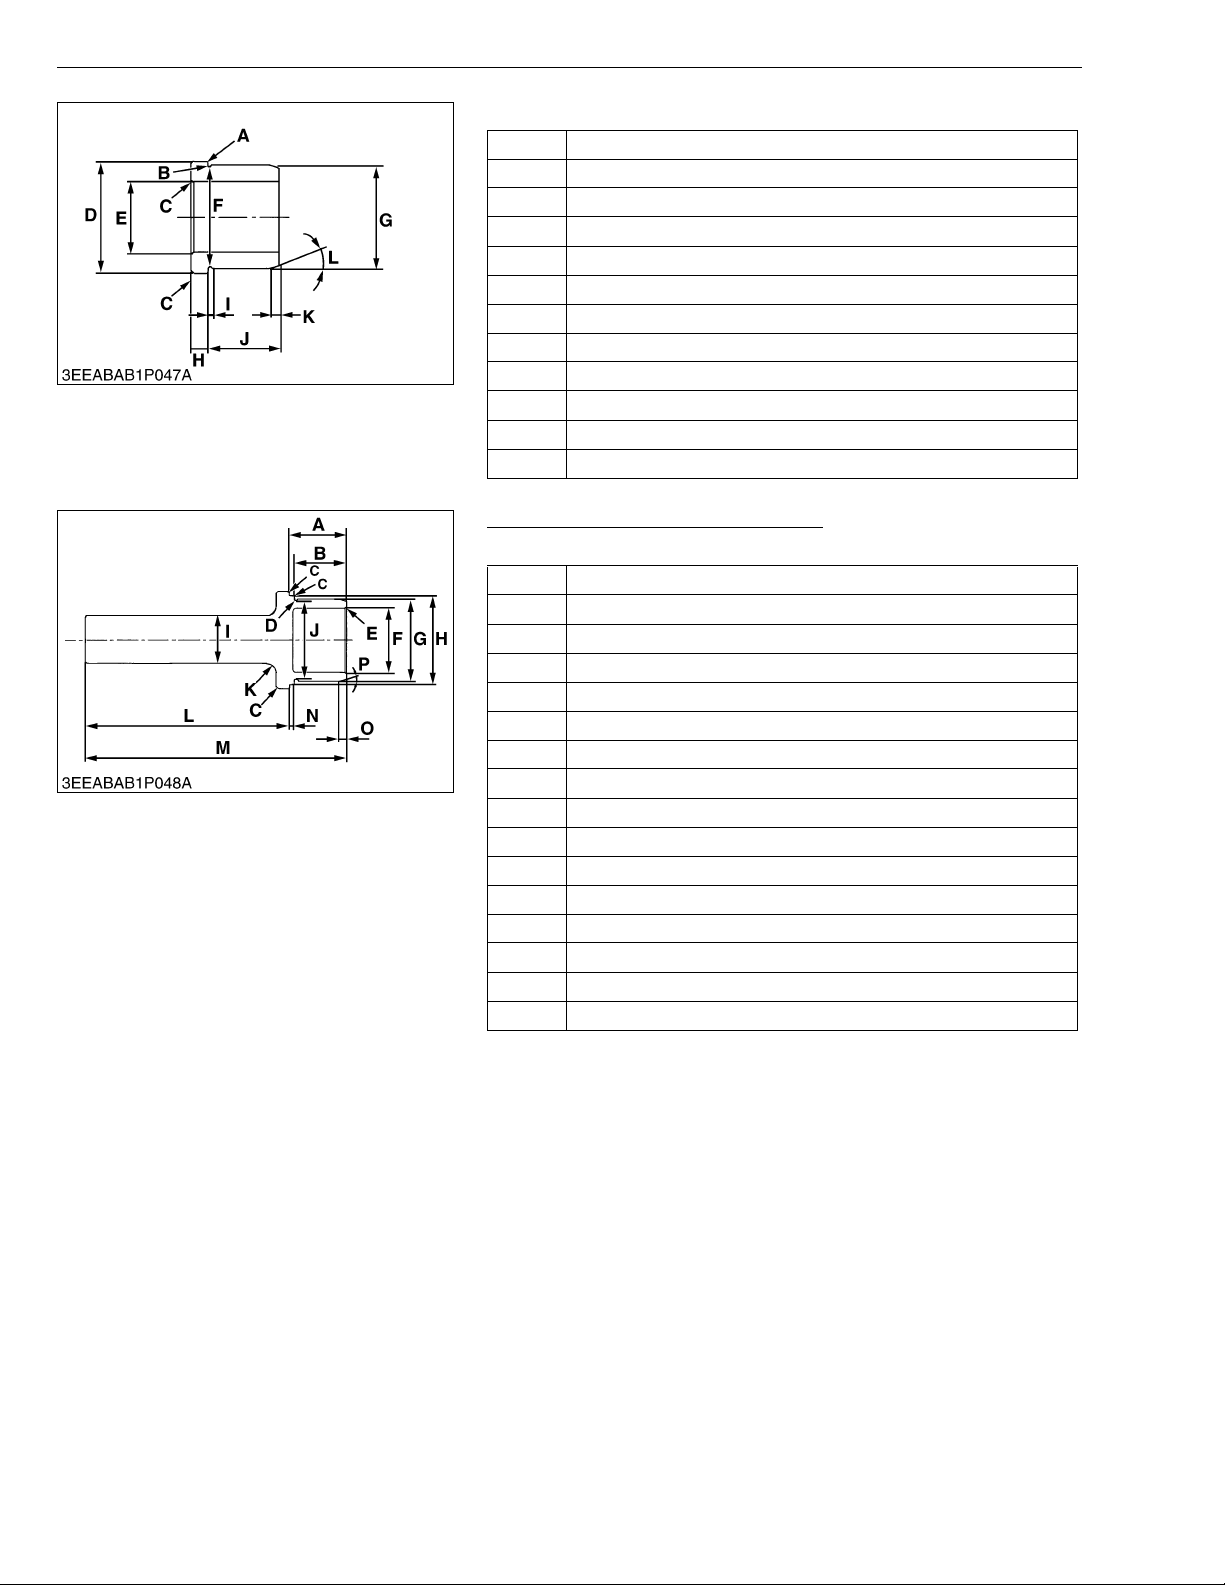
ME8200, ME9000, WSM
KiSC issued 03, 2007 A
G GENERAL
3) Piece 2
A Chamfer 0.1 mm (0.004 in.)
B 1 mm (0.04 in.)
C Chamfer 1 mm (0.04 in.)
D 54. 3 to 54.4 mm dia. (2.1378 to 2.1417 in. dia.)
E 34.025 to 34.05 mm dia. (1.3396 to 1.3406 in. dia.)
F 48.5 mm dia. (1.9094 in. dia.)
G 50.421 to 50.44 mm dia. (1.9851 to 1.9858 in. dia.)
H 8 mm (0.31 in.)
I 2 mm (0.08 in.)
J 35 mm (1.38 in.)
K 5 mm (0.20 in.)
L 0.26 rad (15 °)
W1036583
Balancer Bushing Replacing Tool 2
Application: Use to press fit the bushing.
A 35 mm (1.38 in.)
B 33 mm (1.30 in.)
C Chamfer 0.5 mm (0.02 in.)
D 1 mm (0.04 in.)
E Chamfer 1 mm (0.04 in.)
F 40 mm dia. (1.57 in. dia.)
G 50.921 to 50.94 mm dia. (2.0048 to 2.0055 in. dia.)
H 54. 8 to 54.9 mm dia. (2.1575 to 2.1614 in. dia.)
I 30 mm dia. (1.18 in. dia.)
J 49 mm dia. (1.93 in. dia.)
K 6 mm (0.24 in.)
L 125 mm (4.92 in.)
M 160 mm (6.30 in.)
N 3 mm (0.12 in.)
O 5 mm (0.20 in.)
P 0.26 rad (15 °)
W1036805
G-46
Page 66
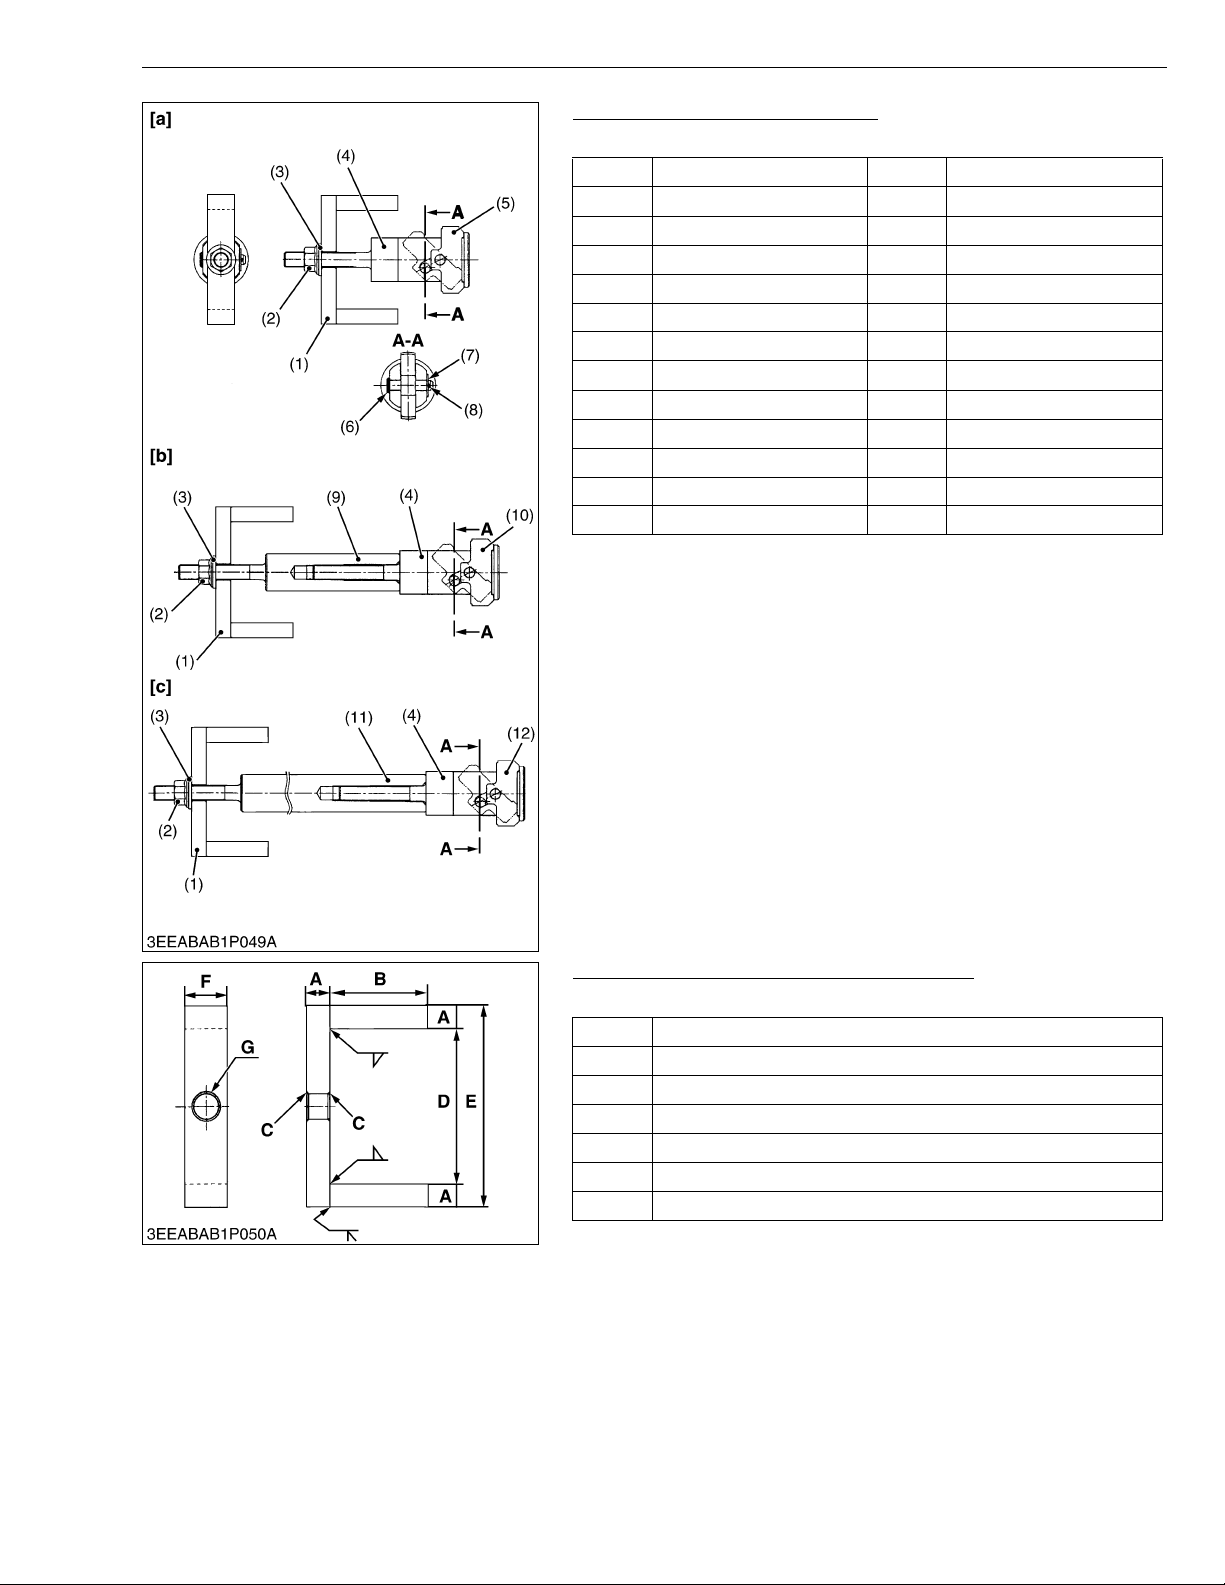
ME8200, ME9000, WSM
KiSC issued 03, 2007 A
G GENERAL
Balancer Replacing Tools 3, 4, 5
Application: Use to press fit the bushing.
No. Name of Part Q’ty Remarks
1 Brack et 1 See page G-47
2 Flange Nut 1
3 Washer 1
4 Shaft 1 See page G-48
5 Piece 1 1 See page G-48
6Clevis 1
7 Washer 1
8Cotter Pin 1
9 Joint 1 1 See page G-49
10 Piece 2 1 See page G-49
11 Joint 2 1 See page G-50
12 Piece 3 1 See page G-50
[a] Tool 3
[b] Tool 4
[c] Tool 5
Balancer Bushing Tool Components Parts
1) Bracket
A 12 mm (0.47 in.)
B 50 mm (1.97 in.)
C Chamfer 1 mm (0.04 in.)
D 80 mm (3.15 in.)
E 104 mm (4.09 in.)
F 22 mm (0.87 in.)
G 13 mm dia. (0.51 in. dia.)
W1037123
W1037894
G-47
Page 67
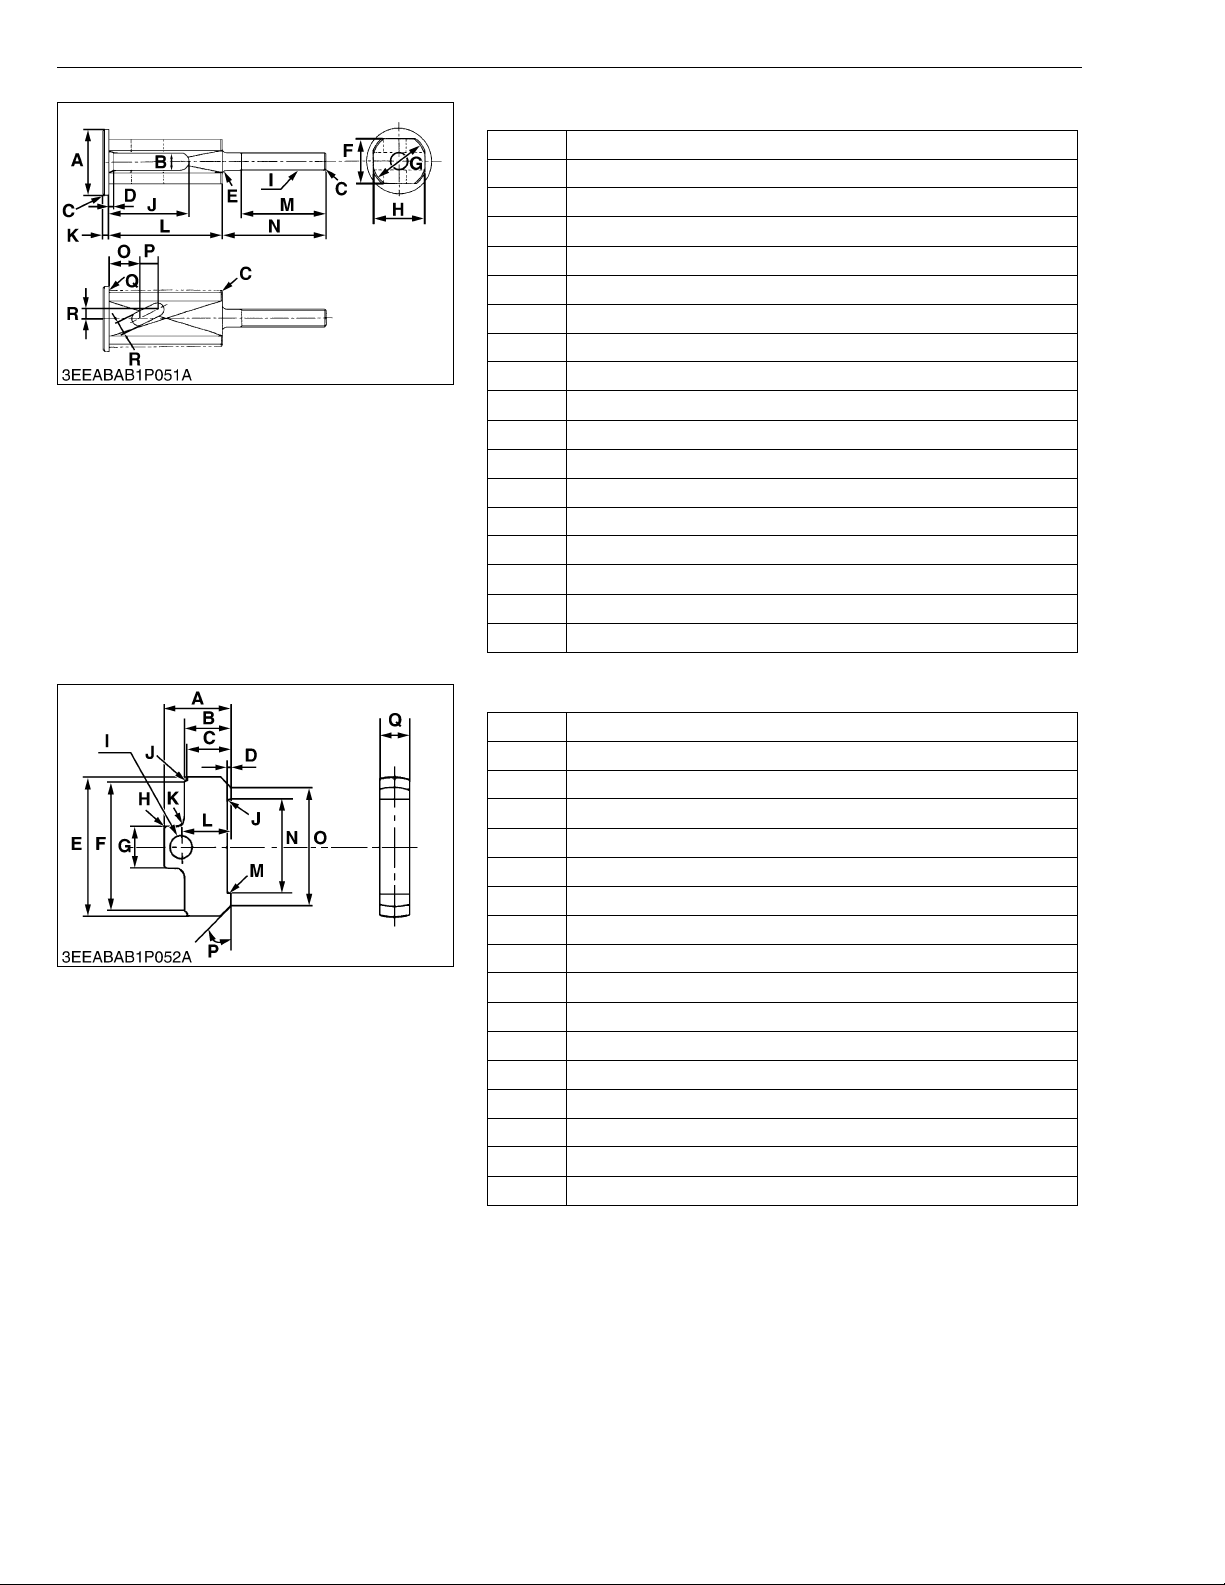
ME8200, ME9000, WSM
KiSC issued 03, 2007 A
G GENERAL
2) Shaft
A 44 mm dia. (1.73 in. dia.)
B 12 mm (0.47 in.)
C Chamfer 1 mm (0.04 in.)
D 3 mm (0.12 in.)
E 3 mm (0.12 in.)
F 30 mm (1.18 in.)
G 38 mm (1.38 in.)
H 35 mm (1.38 in.)
I M12 × P1.25
J 53 mm (2.09 in.)
K 4 mm (0.16 in.)
L 75 mm (2.95 in.)
M 57 mm (2.24 in.)
N 70 mm (2.76 in.)
O 19.5 mm (0.77 in.)
P 12 mm (0.47 in.)
Q 0.8 mm (0.03 in.)
R 6 mm (0.24 in.)
W1037691
3) Piece 1
A 26 mm (1.02 in.)
B 18 mm (0.71 in.)
C 16. 5 to 17.0 mm (0.6496 to 0.6693 in.)
D 1.5 mm (0.06 in.)
E 54.0 to 54.2 mm dia. (2.1260 to 2.1339 in. dia.)
F 50.55 to 50.75 mm dia. (1.9902 to 1.9980 in. dia.)
G 16 mm (0.63 in.)
H Chamfer 1 mm (0.04 in.)
I 8.5 mm dia. (0.33 in. dia.)
J 0.4 mm (0.0157 in.)
K 3 mm (0.12 in.)
L 19 mm (0.75 in.)
M Chamfer 0.5 mm (0.02 in.)
N 36 mm (1.42 in.)
O 45 mm dia. (1.77 in. dia.)
P 0.78 rad (45 °)
Q 11.5 mm (0.45 in.)
W1038038
G-48
Page 68
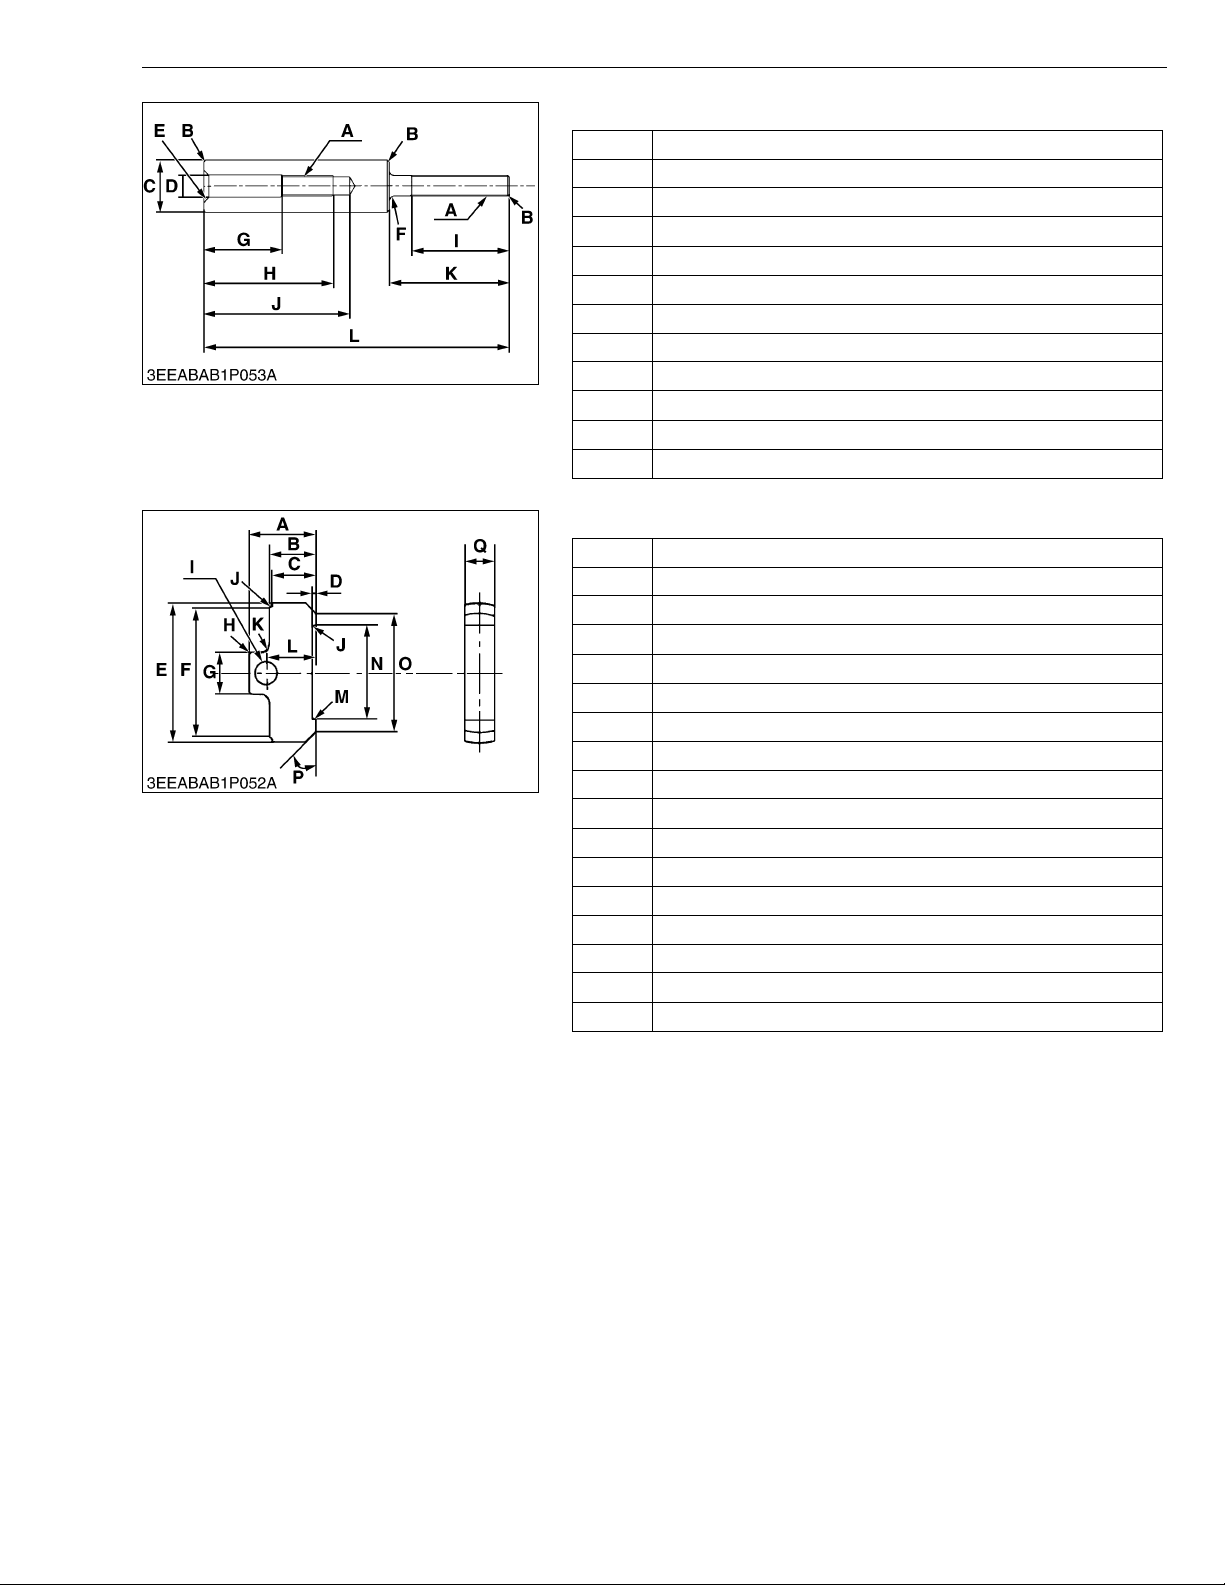
ME8200, ME9000, WSM
KiSC issued 03, 2007 A
G GENERAL
4) Joint 1
A M12 × P1.25
B Chamfer 1 mm (0.04 in.)
C 30 mm dia. (1.18 in. dia.)
D 13 mm dia. (0.51 in. dia.)
E Chamfer 3 mm (0.12 in.)
F R3 mm (0.12 in. radius)
G 45 mm (1.77 in.)
H 75 mm (2.95 in.)
I 57 mm (2.24 in.)
J 85 m m (3.35 in.)
K 70 mm (2.76 in.)
L 178 mm (7.01 in.)
W1038382
5) Piece 2
A 26 mm (1.02 in.)
B 18 mm (0.71 in.)
C 16.5 to 17.0 mm (0.6496 to 0.6693 in.)
D 1.5 mm (0.06 in.)
E 53.5 to 53.7 mm dia. (2.1063 to 2.1142 in. dia.)
F 50.05 to 50.25 mm dia. (1.9705 to 1.9783 in. dia.)
G 16 mm (0.63 in.)
H Chamfer 1 mm (0.04 in.)
I 8.5 mm dia. (0.33 in. dia.)
J 0.4 mm (0.0157 in.)
K 3 mm (0.12 in.)
L 19 mm (0.75 in.)
M Chamfer 0.5 mm (0.02 in.)
N 36 mm (1.42 in.)
O 45 mm dia. (1.77 in. dia.)
P 0.78 rad (45 °)
Q 11.5 mm (0.45 in.)
W1038568
G-49
Page 69
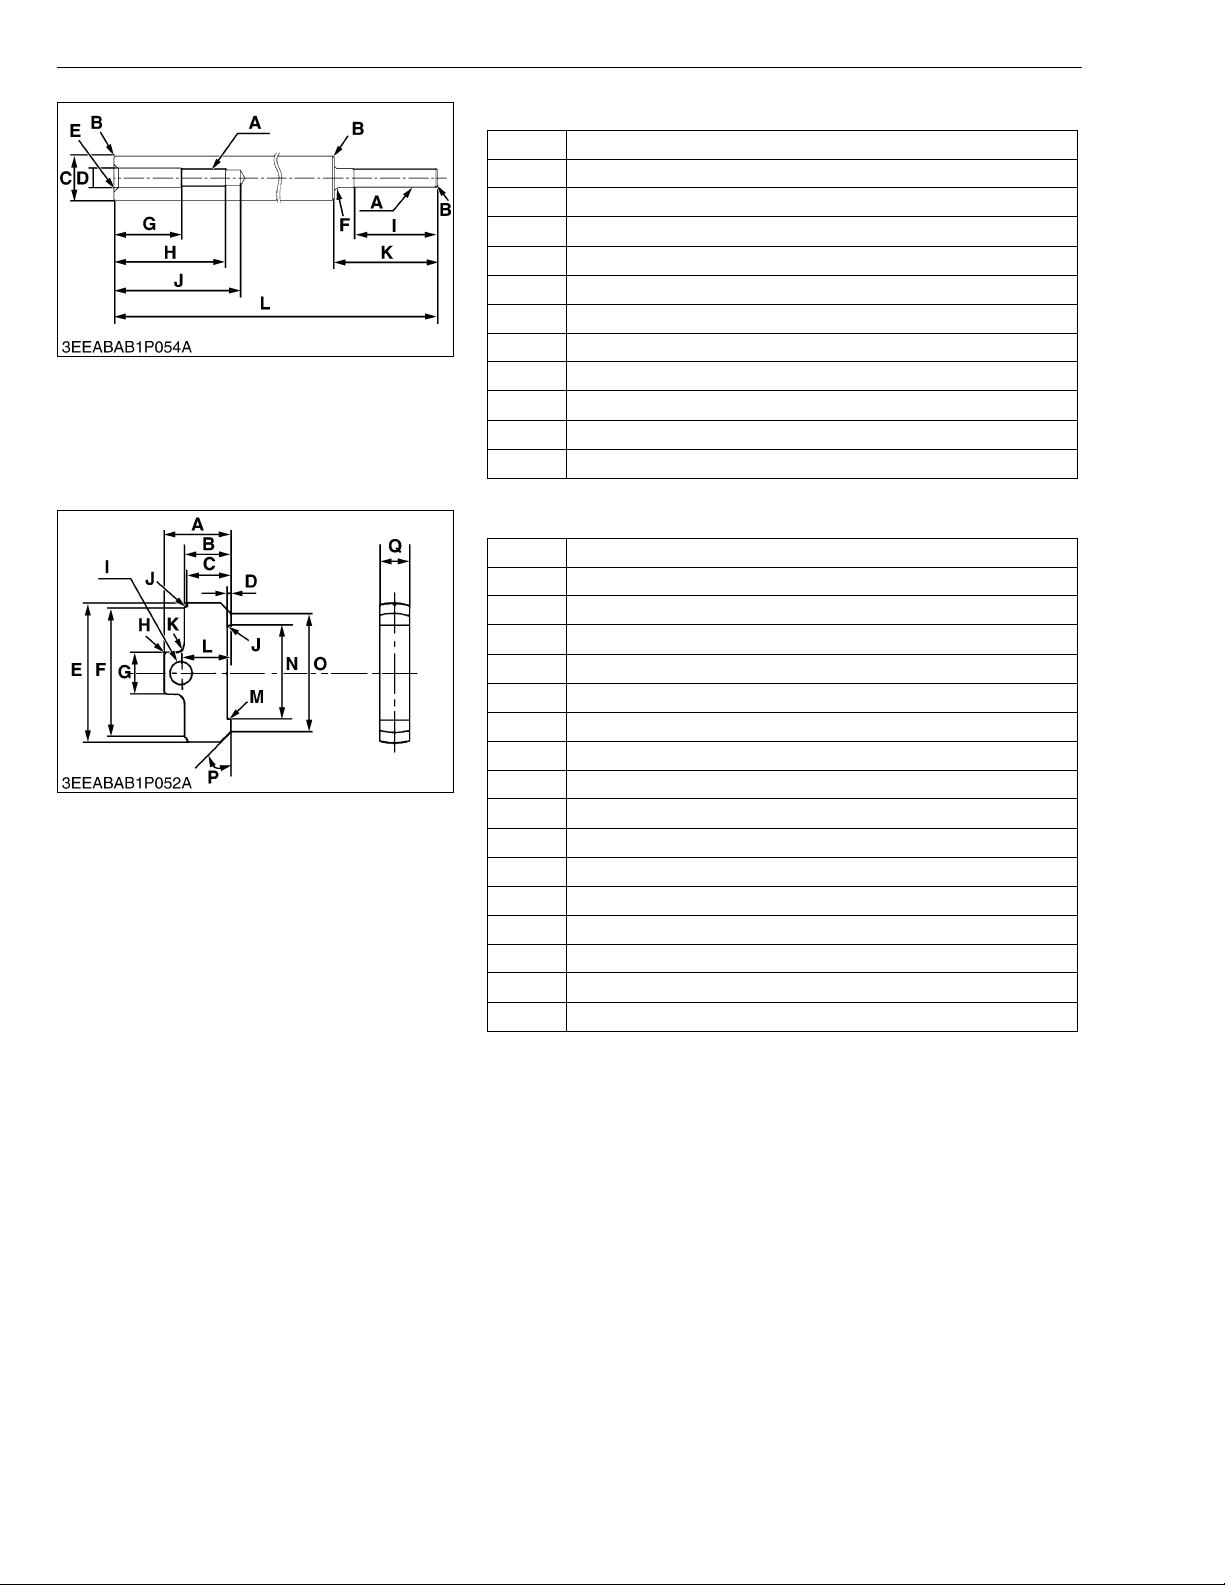
ME8200, ME9000, WSM
KiSC issued 03, 2007 A
G GENERAL
6) Joint 2
A M12 × P1.25
B Chamfer 1 mm (0.04 in.)
C 30 mm dia. (1.18 in. dia.)
D 13 mm dia. (0.51 in. dia.)
E Chamfer 3 mm (0.12 in.)
F R3 mm (0.12 in. radius)
G 45 mm (1.77 in.)
H 75 mm (2.95 in.)
I 57 mm (2.24 in.)
J 85 mm (3.35 in.)
K 70 mm (2.76 in.)
L 394 mm (15.51 in.)
W1038747
7) Piece 3
A 26 mm (1.02 in.)
B 18 mm (0.71 in.)
C 16. 5 to 17.0 mm (0.6496 to 0.6693 in.)
D 1.5 mm (0.06 in.)
E 53.0 to 53.2 mm dia. (2.0866 to 2.0945 in. dia.)
F 49.55 to 49.75 mm dia. (1.9508 to 1.9587 in. dia.)
G 16 mm (0.63 in.)
H Chamfer 1 mm (0.04 in.)
I 8.5 mm dia. (0.33 in. dia.)
J 0.4 mm (0.0157 in.)
K 3 mm (0.12 in.)
L 19 mm (0.75 in.)
M Chamfer 0.5 mm (0.02 in.)
N 36 mm (1.42 in.)
O 45 mm dia. (1.77 in. dia.)
P 0.78 rad (45 °)
Q 11.5 mm (0.45 in.)
W1038887
G-50
Page 70
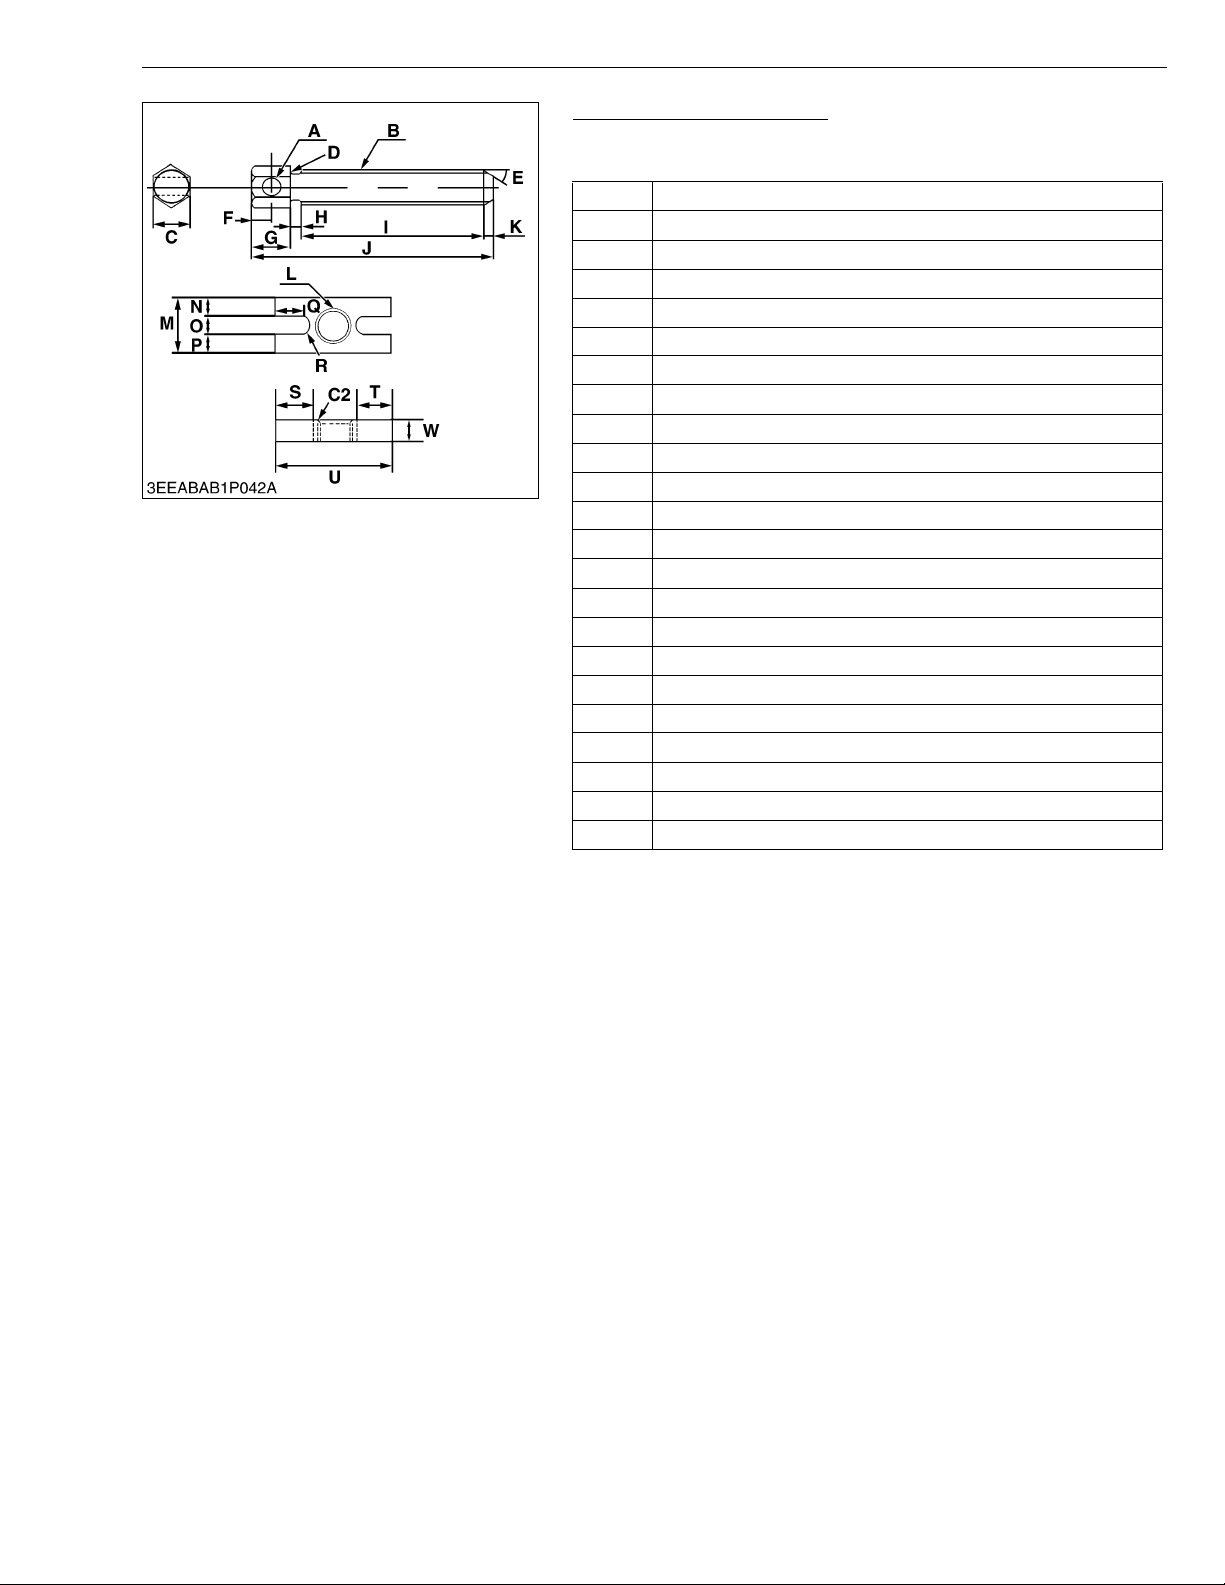
ME8200, ME9000, WSM
KiSC issued 03, 2007 A
G GENERAL
Injection Pump Gear Puller
Application: Use for remove the injection pump ge ar from governor
shaft.
A 10 mm dia. (0.39 in.dia.)
B M16 × Pitch 1.5
C 19 mm (0.75 in.)
D 0.5 mm radius (0.02 in. radius)
E 0.89 rad (50 °)
F 10 mm (0.39 in.)
G 20 mm (0.79 in.)
H 5 mm (0.20 in.)
I 95 mm (3.74 in.)
J 125 mm (4.93 in.)
K 5 mm (0.20 in.)
L M16 × Pitch 1.5
M 30 mm (1.18 in.)
N 9.5 mm (0.3740 in.)
O 11 mm (0.4331 in.)
P 9.5 mm (0.3740 in.)
Q 15.5 mm (0.6102 in.)
R 4.5 mm radius (0.18 in. radius)
S 20 mm (0.79 in.)
T 20 mm (0.79 in.)
U 80 mm (3.1496 in.)
W 12 mm (0.47 in.)
C2 Chamfer 2.0 mm (0.079 in.)
W1050545
G-51
Page 71
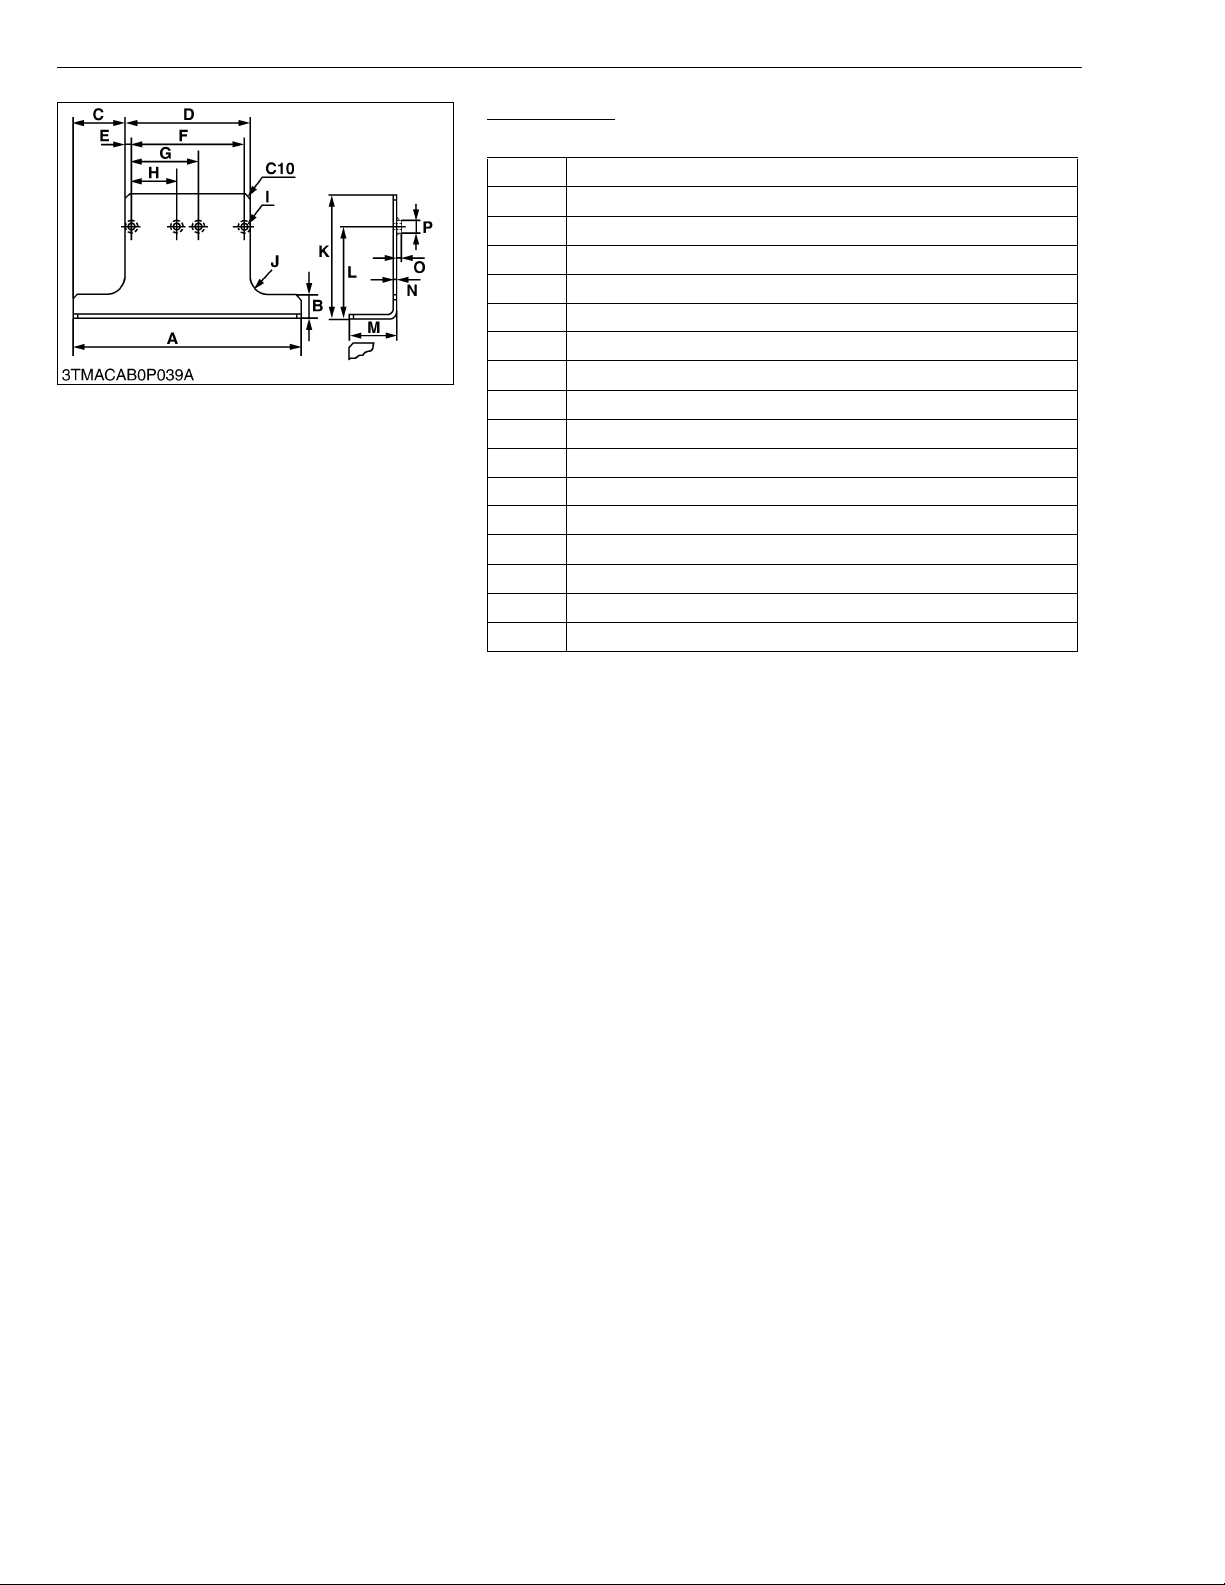
ME8200, ME9000, WSM
KiSC issued 03, 2007 A
G GENERAL
Engine Stand
Application: Use to support engine.
A 480 mm (18.90 in.)
B 50 mm (1.97 in.)
C 108.5 mm (4.272 in.)
D 263 mm (10.35 in.)
E 12.5 mm (0.492 in.)
F 237.5 mm (9.350 in.)
G 142.5 mm (5.610 in.)
H 95 mm (3.74 in.)
I 4.14 mm dia. (0.55 in. dia.)
J 40 mm (1.57 in.)
K 210 mm (8.27 in.)
L 190 mm (7.48 in.)
M 100 mm (3.94 in.)
N 6 mm (0.24 in.)
O 6 mm (0.24 in.)
P 25 mm dia. (0.98 in. dia.)
C10 Chamfer 10 mm (0.394 in.)
W1033645
G-52
Page 72
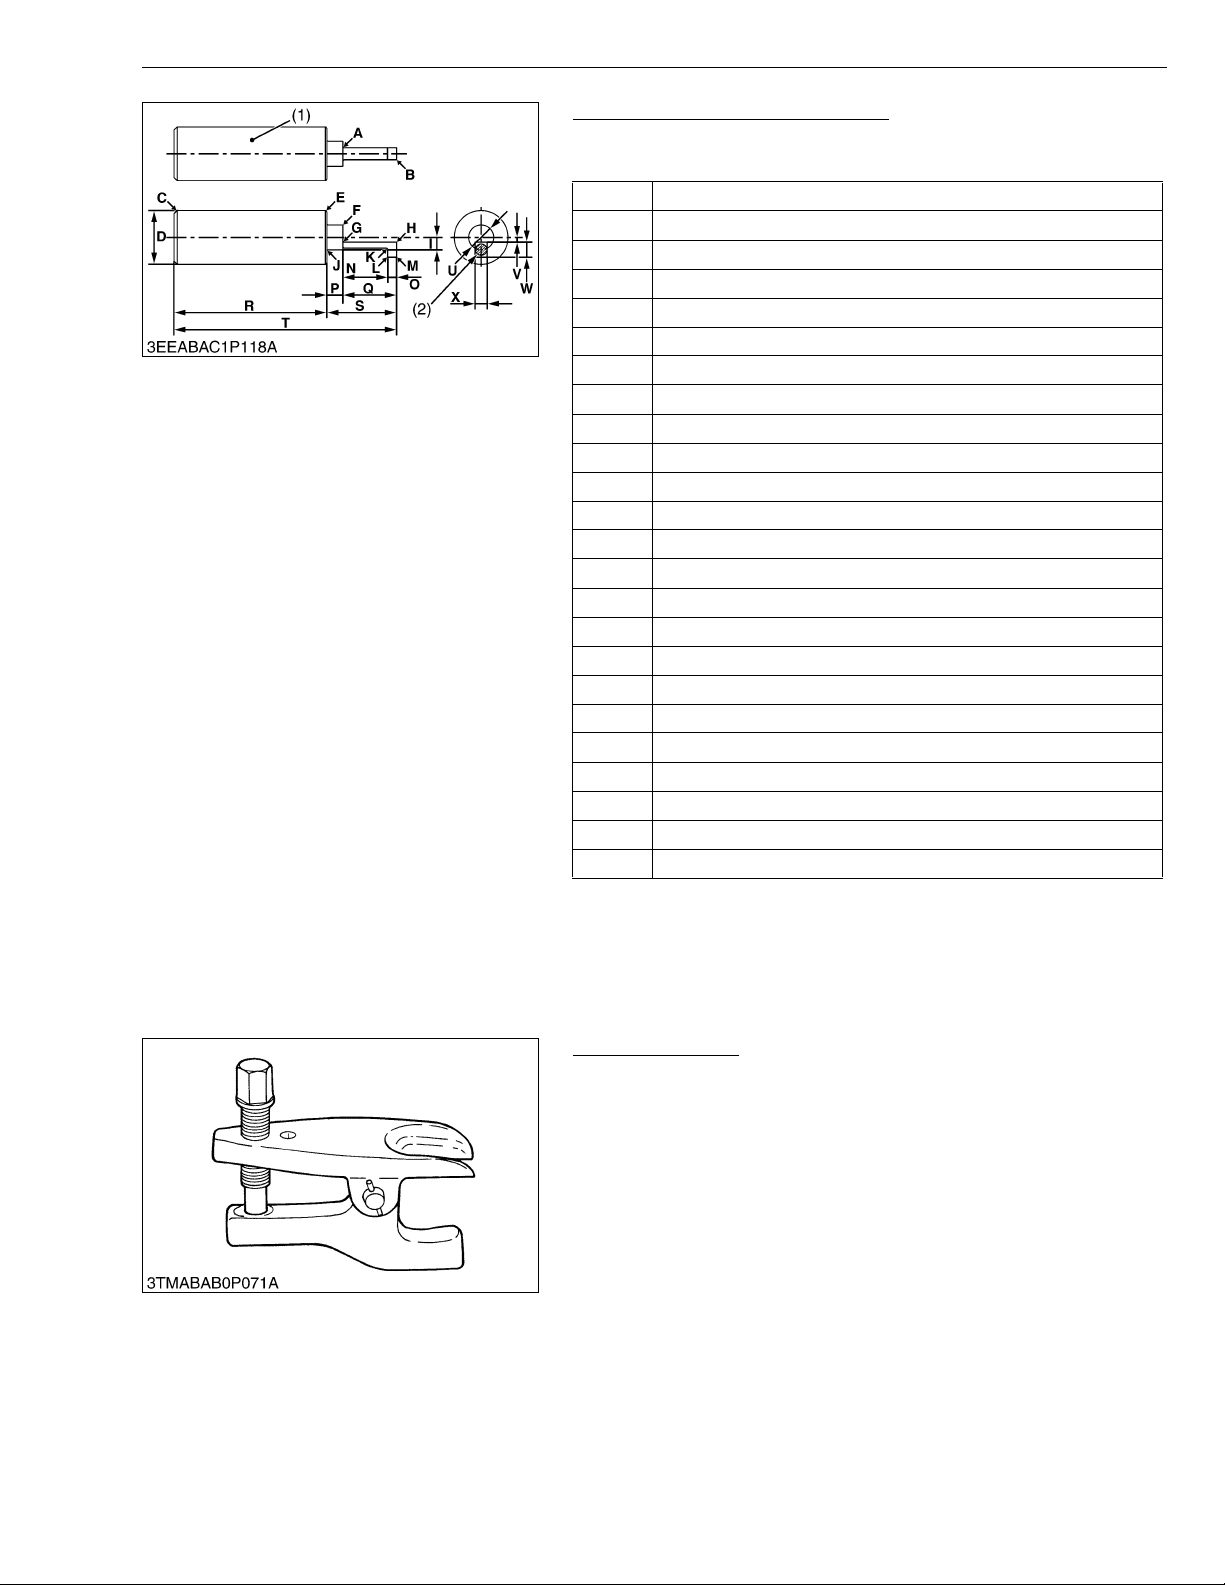
ME8200, ME9000, WSM
KiSC issued 03, 2007 A
G GENERAL
Jig for Governor Connecting Rod
Application: Use for connecting the governor connecting r od to the
rack pin of the fuel injection pump assembly.
A 1 mm (0.0394 in.)
B Chamfer 0.2 mm (0.0079 in.)
C Chamfer 2 mm (0.0787 in.)
D 35 mm dia. (1.3780 in. dia.)
E Chamfer 1 mm (0.0394 in.)
F Chamfer 0.1 mm (0.0039 in.)
G 1 mm (0.0394 in.)
H Chamfer 0.2 mm (0.0079 in.)
I R8 mm (0.3150 in. rad)
J 1 mm (0.0394 in.)
K 1 mm (0.0394 in.)
L Chamfer 0.2 mm (0.0079 in.)
M Chamfer 0.2 mm (0.0079 in.)
N 29 mm (1.1417 in.)
O 6 mm (0.2362 in.)
P 10.7 mm (0.4213 in.)
Q 35 mm (1.3780 in.)
R 99.3 mm (3.9095 in.)
S 45.65 to 45.75 mm (1.7972 to 1.8012 in.)
T 145 mm (5.7087 in.)
U 16.15 to 16.35 mm (0.6358 to 0.6437 in.)
V 3 mm (0.1181 in.)
W 10 mm (0.3937 in.)
X 8 mm (0.3150 in.)
(1) Material: S45C-D (2) Permanent Magnet: 8 mm dia.
[2] SPECIAL TOOLS FOR TRACTOR
Tie-rod End Lifter
Code No.: 07909-39051
Application: Use for removing the tie-rod end with ease.
(0.3150 in. dia.)
Thickness: 3 mm (0.1181 in.)
W1115114
W10264720
G-53
Page 73
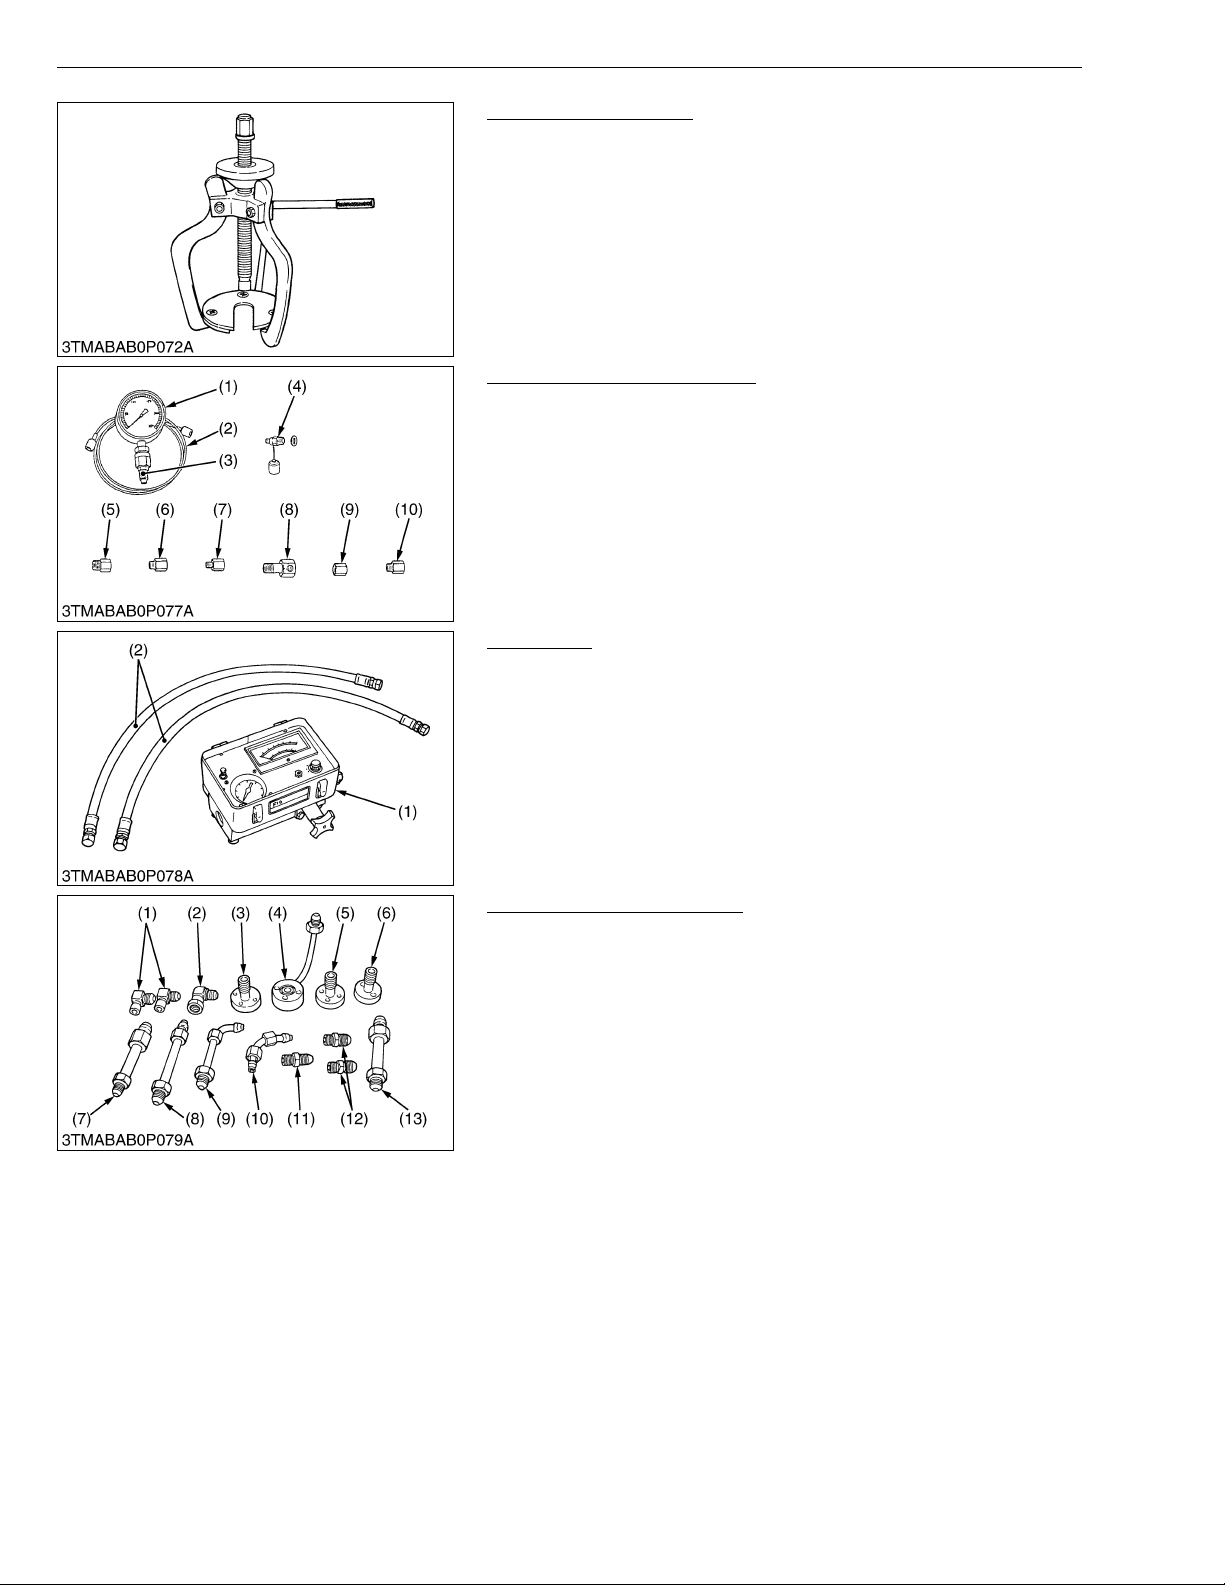
ME8200, ME9000, WSM
KiSC issued 03, 2007 A
G GENERAL
Steering Wheel Puller
Code No.: 079 16- 51 090
Application: Use for removing the steering wheel without damaging
the steering shaft.
W10265330
Relief Valve Pressure Tester
Code No.: 079 16- 50 045
Application: This allows easy measurement of relief set pressure.
(1) Gauge (07916-50322)
(2) Cable (07916-50331)
(3) Threaded Joint (07916-50401)
(4) Threaded Joint (07916-50341)
(5) Adaptor B (M18 × P1.5)
(07916-50361)
(6) Adaptor C (PS3/8) (07916-50371)
(7) Adaptor D (PT1/8) (07916-50381)
(8) Adaptor E (PS3/8) (07916-50392)
(9) Adaptor F (PF1/ 2) (07916-62601)
(10) Adaptor 58 (PT1/4) (07916-52391)
W10267410
Flow Meter
Code No.: 07916-52791 (Flow Meter)
07916-52651 (Hydraulic Test Hose)
Application: This allows easy testing of hydraulic system.
(1) Flow Meter (2) Hydraulic Test Hose
Adaptor Set for Flow Meter
Code No.: 079 16- 54 031
Application: Use for testing the hydraulic system.
(1) Adaptor 52
(2) Adaptor 53
(3) Adaptor 54
(4) Adaptor 61
(5) Adaptor 62
(6) Adaptor 63
(7) Adaptor 64
(8) Adaptor 65
(9) Adaptor 66
(10) Adaptor 67
(11) Adaptor 68
(12) Adaptor 69
(13) Hydraulic Adaptor 1
W10313180
W10313960
G-54
Page 74
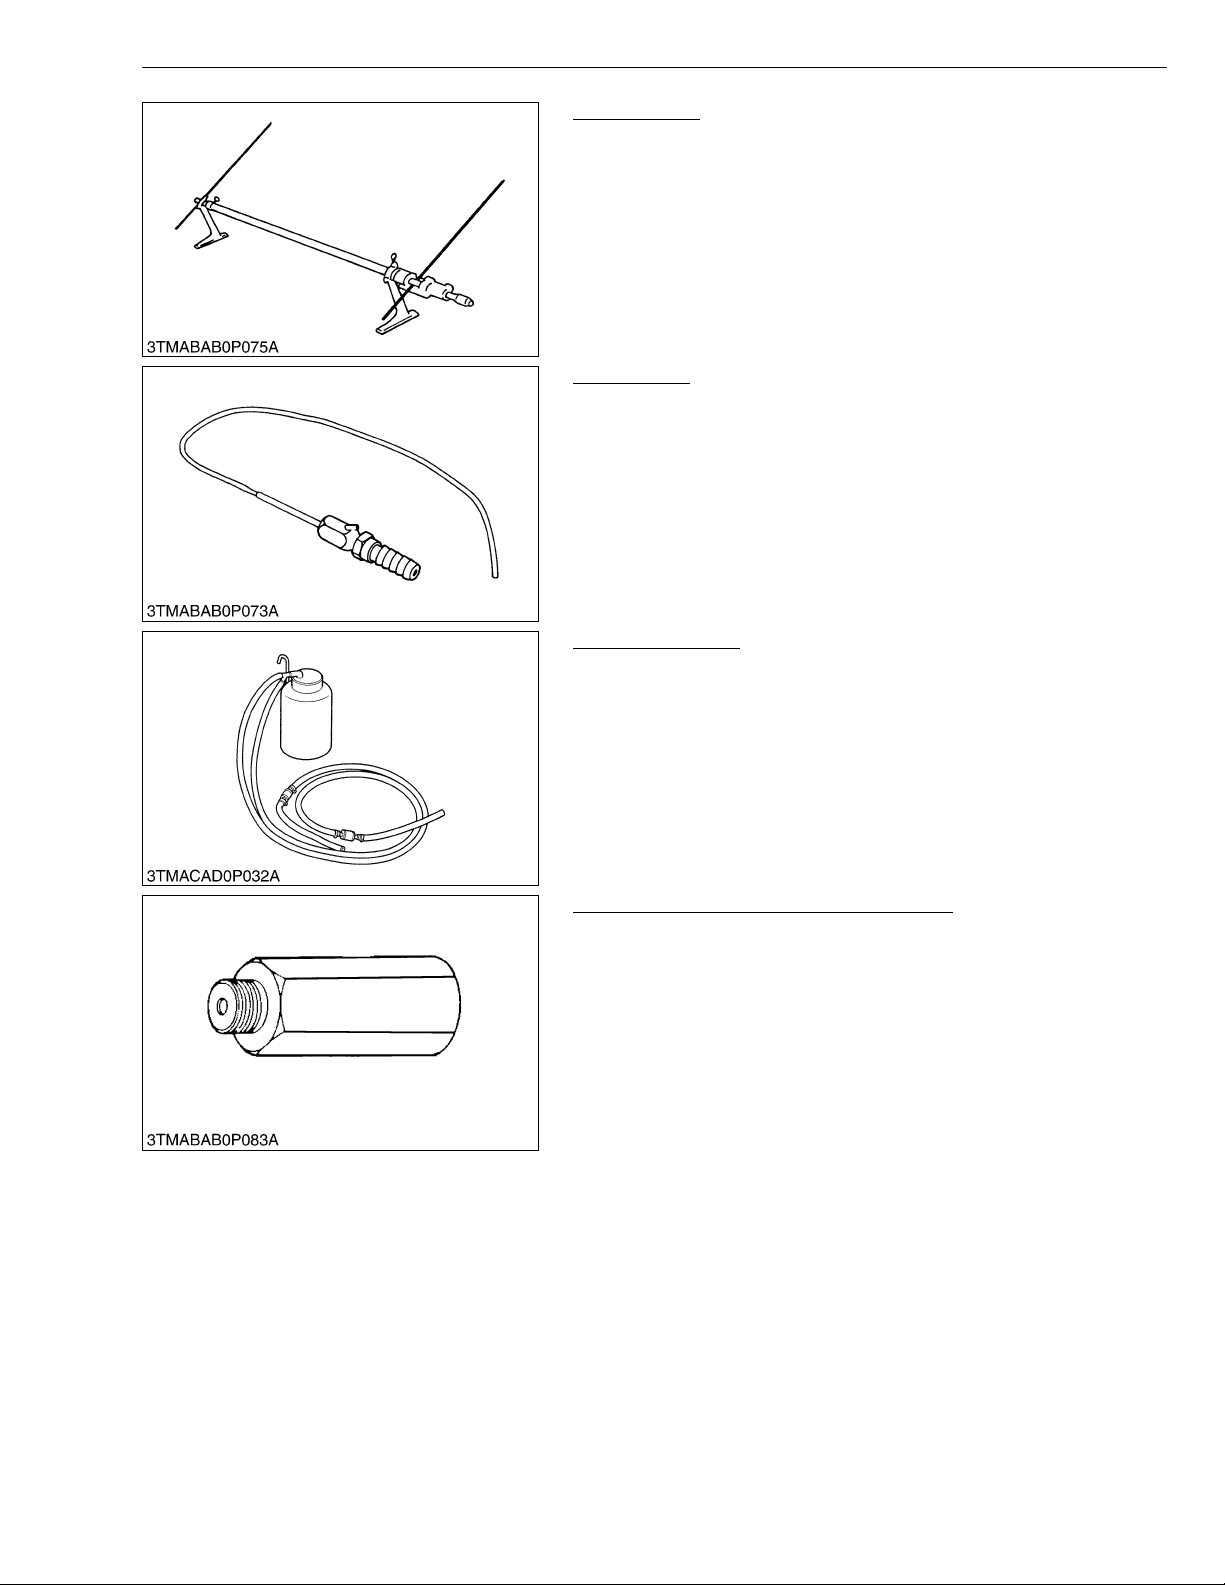
ME8200, ME9000, WSM
KiSC issued 03, 2007 A
G GENERAL
Toe-in Gauge
Code No.: 07909-31681
Application: This allows easy measurement of toe-in for all machine
models.
W10266890
Injector CH3
Code No.: 07916-52501
Application: Use for injecting calcium chloride solution into, and
removing it from, rear wheel.
W10265850
Brake Air Bleeder
Code No.: 07916-54001
Application: This allows easy air bleed of the hydraulic brake.
W10516480
Relief Valve Setting Pressure Adaptor G
Code No.: 07916-52751
Application: This offers easy measurement of relief valve setting
pressure from the h ydraulic coupl er. This is availa ble
with the relief valve setting pressure tester.
W10623960
G-55
Page 75
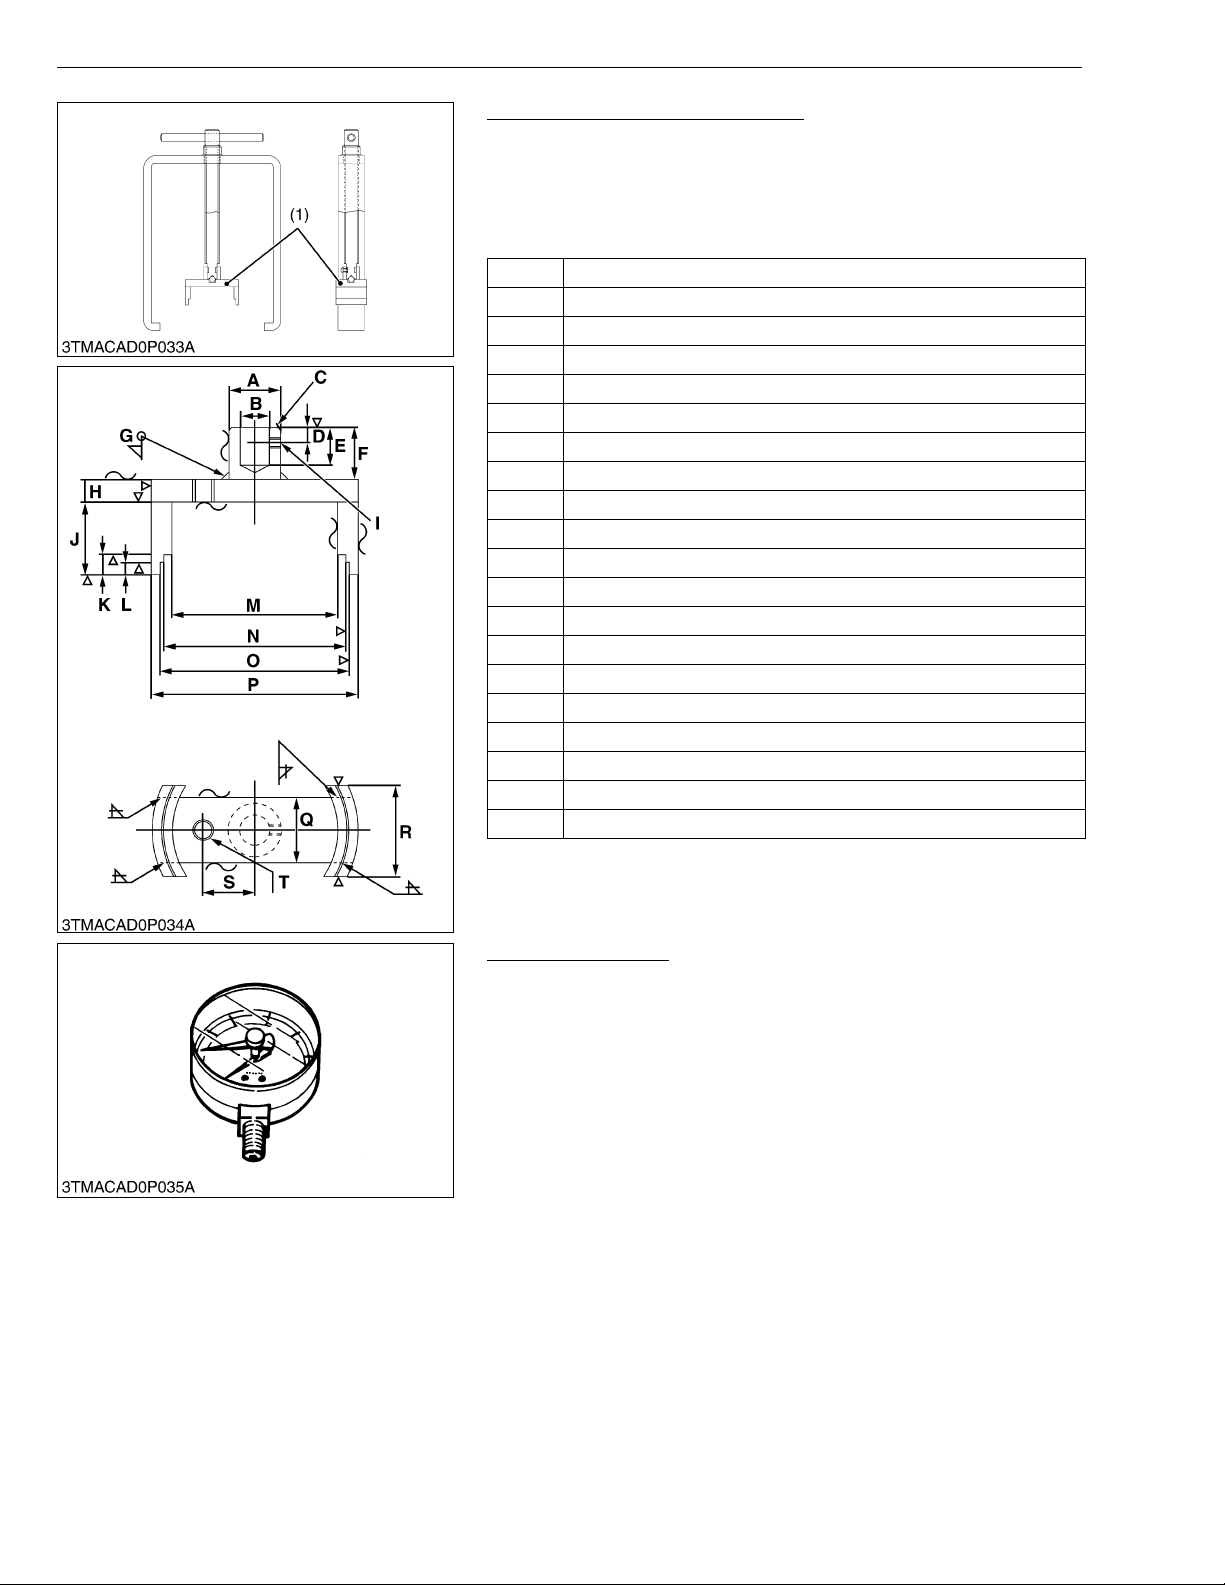
ME8200, ME9000, WSM
NOTE■
KiSC issued 03, 2007 A
G GENERAL
Shuttle Clutch Compression Tool
Code No.: 079 16- 55 031
Application: Use exclusively for pushing the thrust collar, remove
the external snap ring.
• Replace the center guide (1) for shown in figure.
A 20 mm dia. (0.79 in. dia.)
B 11.5 mm dia. (0.45 in. dia.)
C Chamfer 1 mm (0.04 in.)
D 6 mm (0.24 in.)
E 15 mm (0.59 in.)
F 20 mm (0.79 in.)
G Weld all around
H 6 mm (0.24 in.)
I M4 x 0.7
J 28 mm ( 1 .1 i n .)
K 8 mm (0.31 in.)
L 5 mm (0.2 in .)
M 67 mm dia. (2.64 in. dia.)
N 73.5 mm dia. (2.89 in. dia.)
O 76 mm dia. (2.99 in. dia.)
P 83 mm dia. (3.27 in. dia.)
Q 25 mm (0.98 in.)
R 35 mm (1.38 in.)
S 20 mm (0.79 i.)
T M8 x 1.25
(1) Center Guide
W1053661
Pressure Gauge 50
Code No.: 079 16- 52 961
Application: This pressure gauge is used to measure the low oil
pressure.
W10518650
G-56
Page 76
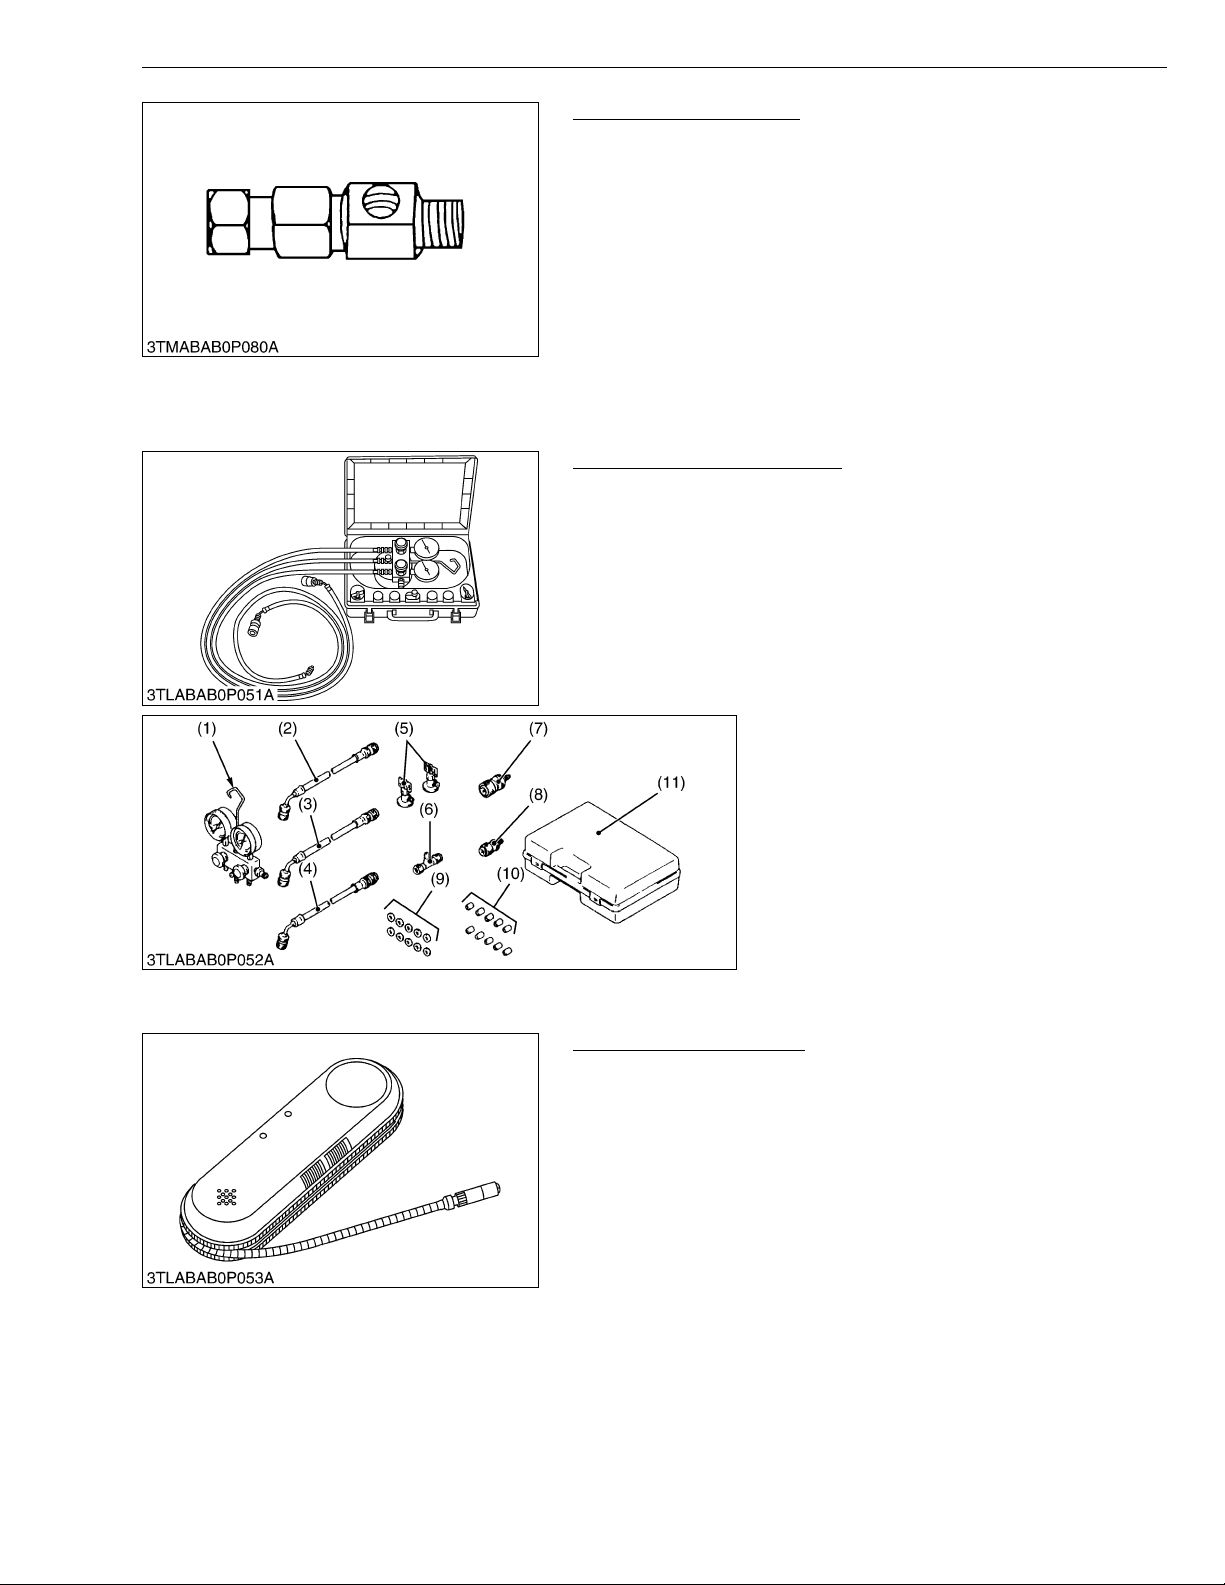
ME8200, ME9000, WSM
NOTE■
KiSC issued 03, 2007 A
G GENERAL
Power Steering Adaptor
Code No.: 07916-54021
Application: Use for measuring the relief valve se tting pressu re for
power steering.
W10442870
• Special tools for R134a refrigerant air conditioning system introduced below are available from DENSO
CO. LTD.
Air Conditioner Service Tool
Code No.: DENSO.CO. 95048-00061
Application: Use for charging, testing or discharging the air
conditioning system.
W1013507
(1) Manifold Gauge
Assembly
(2) Charging Hose
(Red : HI)
(3) Charging Hose
(Blue : LO)
(4) Charging Hose (Green)
(5) Can Tap Valve
(6) T Joint
(7) Quick Coupler (HI)
(8) Quick Coupler (LO )
(9) Se rvice Valve Packing
(10) Charging Hose Packing
(11) Tool Case
95048-10090
95948-10270
95948-10280
95948-10260
95048-10150
95048-10160
95048-10130
95048-10140
95906-10310
95906-10300
95949-10610
W1014733
Electric Gas Leak Tester
Code No.: DENSO.CO. 95146-00060
Application: Use for gas leak testing the air conditioning system.
W1013817
G-57
Page 77
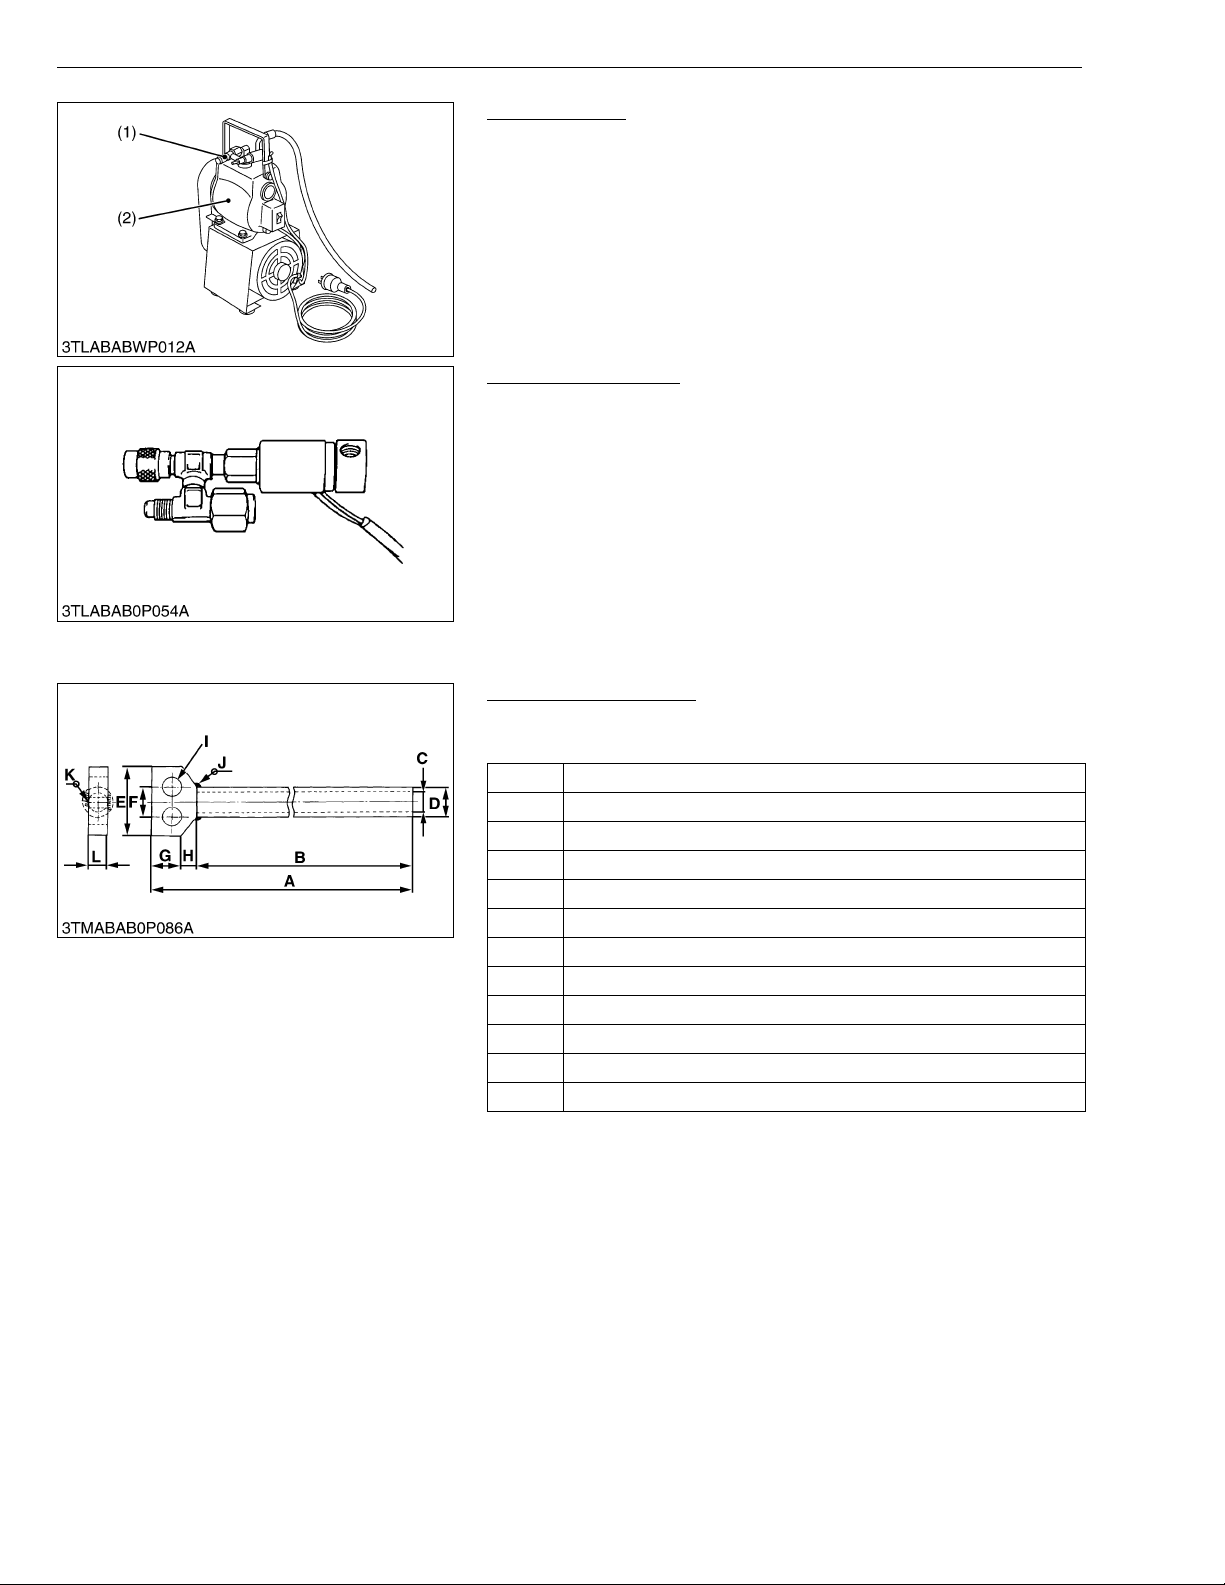
ME8200, ME9000, WSM
NOTE■
KiSC issued 03, 2007 A
G GENERAL
Vacuum Pump
Code No.: DENSO.CO. 95046-00040 (AC220V)
95046-00050 (AC240V)
Application: Use for evacuating the air conditioning system.
(1) Adaptor (For 134a) (2) Vacuum Pump
W1013764
Adaptor (For R134a)
Code No.: DENSO.CO. 95048-10190 (AC220V)
95048-10200 (AC240V)
Application: Use for evacuating the air conditioning system.
W1013888
• The following special tools are not provided, so make them referring to the figure.
Draft Control Test Bar
Application: Use for checking the lift range and floating range of
hydraulic draft control.
A 1045 mm (41.14 in.)
B 1000 mm (29.37 in.)
C 20 mm dia. (0.79 in. dia.)
D 30 mm dia. (1.18 in. dia.)
E 90 mm (3.54 in.)
F 30.5 mm (1.20 in.)
G 30 mm (1.18 in.)
H 15 mm (0.59 in.)
I 21 mm dia. (0.83 in. dia.)
J Weld all around
K Weld all around
L 20 mm (0.79 in.)
W1062519
G-58
Page 78
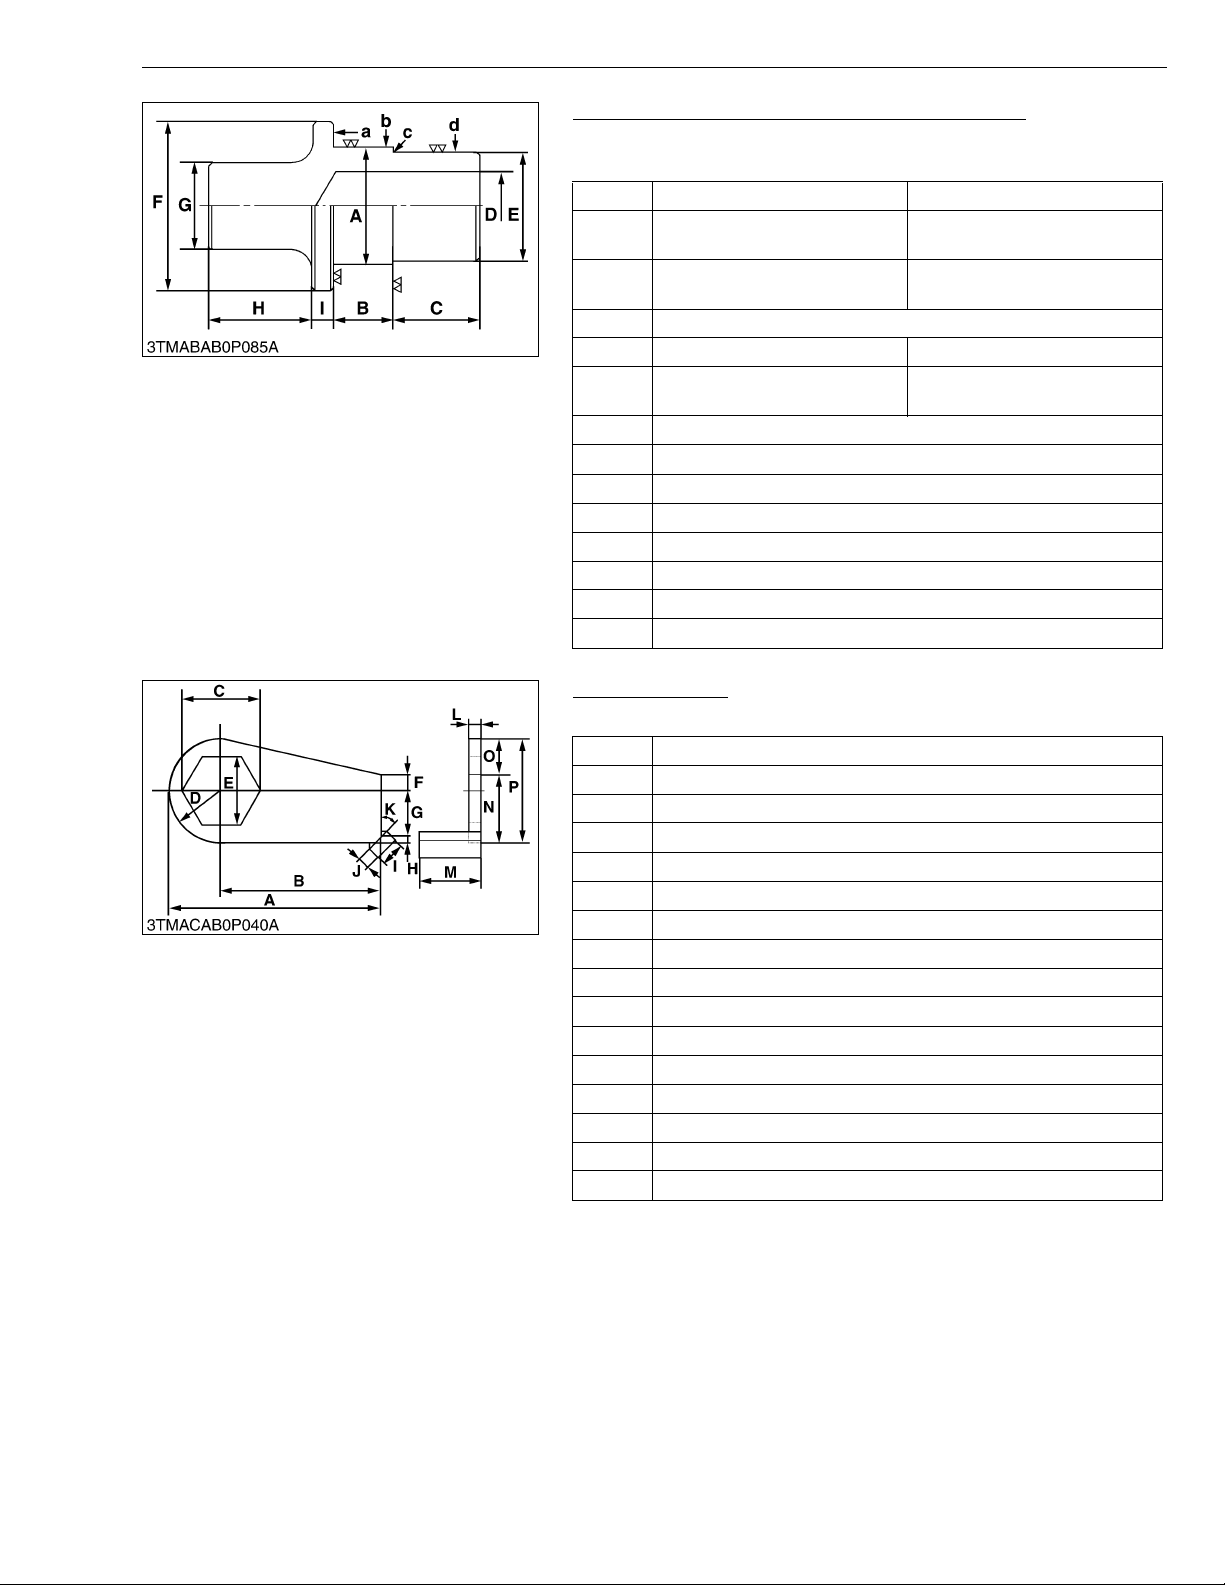
ME8200, ME9000, WSM
KiSC issued 03, 2007 A
G GENERAL
Hydraulic Arm Shaft Bushing Press-Fitting Tool
Application: Use for replacing the hydr aulic arm shaft bushin gs in
the hydraulic cylinder body.
Right Left
64.75 to 64.95 mm
A
(2.5492 to 2.5571 in.)
17.5 to 18.5 mm
B
(0.6890 to 0.7283 in.)
C 60 mm (2.3622 in.)
D 32 mm (1.26 in.) 40 mm (1.5748 in.)
59.97 to 59.999 mm
E
(2.3610 to 2.3618 in.)
F 70 mm dia. (2.76 in. dia.)
G 40 mm dia. (1.57 in. dia.)
H 50 mm (1.97 in.)
I 10 mm (0.39 in.)
a 6.3 μm (250 μin.)
b 6.3 μm (250 μin.)
c 6.3 μm (250 μin.)
d 6.3 μm (250 μin.)
69.75 to 69.95 mm
(2.7461 to 2.7539 in.)
13.5 to 14.5 mm
(0.5315 to 0.5709 in.)
64.97 to 64.99 mm
(2.5579 to 2.5587 in.)
W1031655
Locking Wrench
Application : Use for locking pinion nut.
A 170 mm (6.69 in.)
B 130 mm (5.12 in.)
C 63.5 mm (2.5 in.)
D 40 mm radius (1.57 in. radius)
E 55 mm (2.17 in.)
F 15 mm (0.59 in.)
G 35 mm (1.38 in.)
H 5 mm (0.2 in.)
I 20 mm (0.55 in.)
J 10 m m (0.39 in.)
K 0.78 rad (45 °)
L 10 mm (0.39 in.)
M 50 mm (1.97 in.)
N 55 mm (2.17 in.)
O 25 mm (0.97 in.)
P 80 mm (3.15 in.)
W1034911
G-59
Page 79
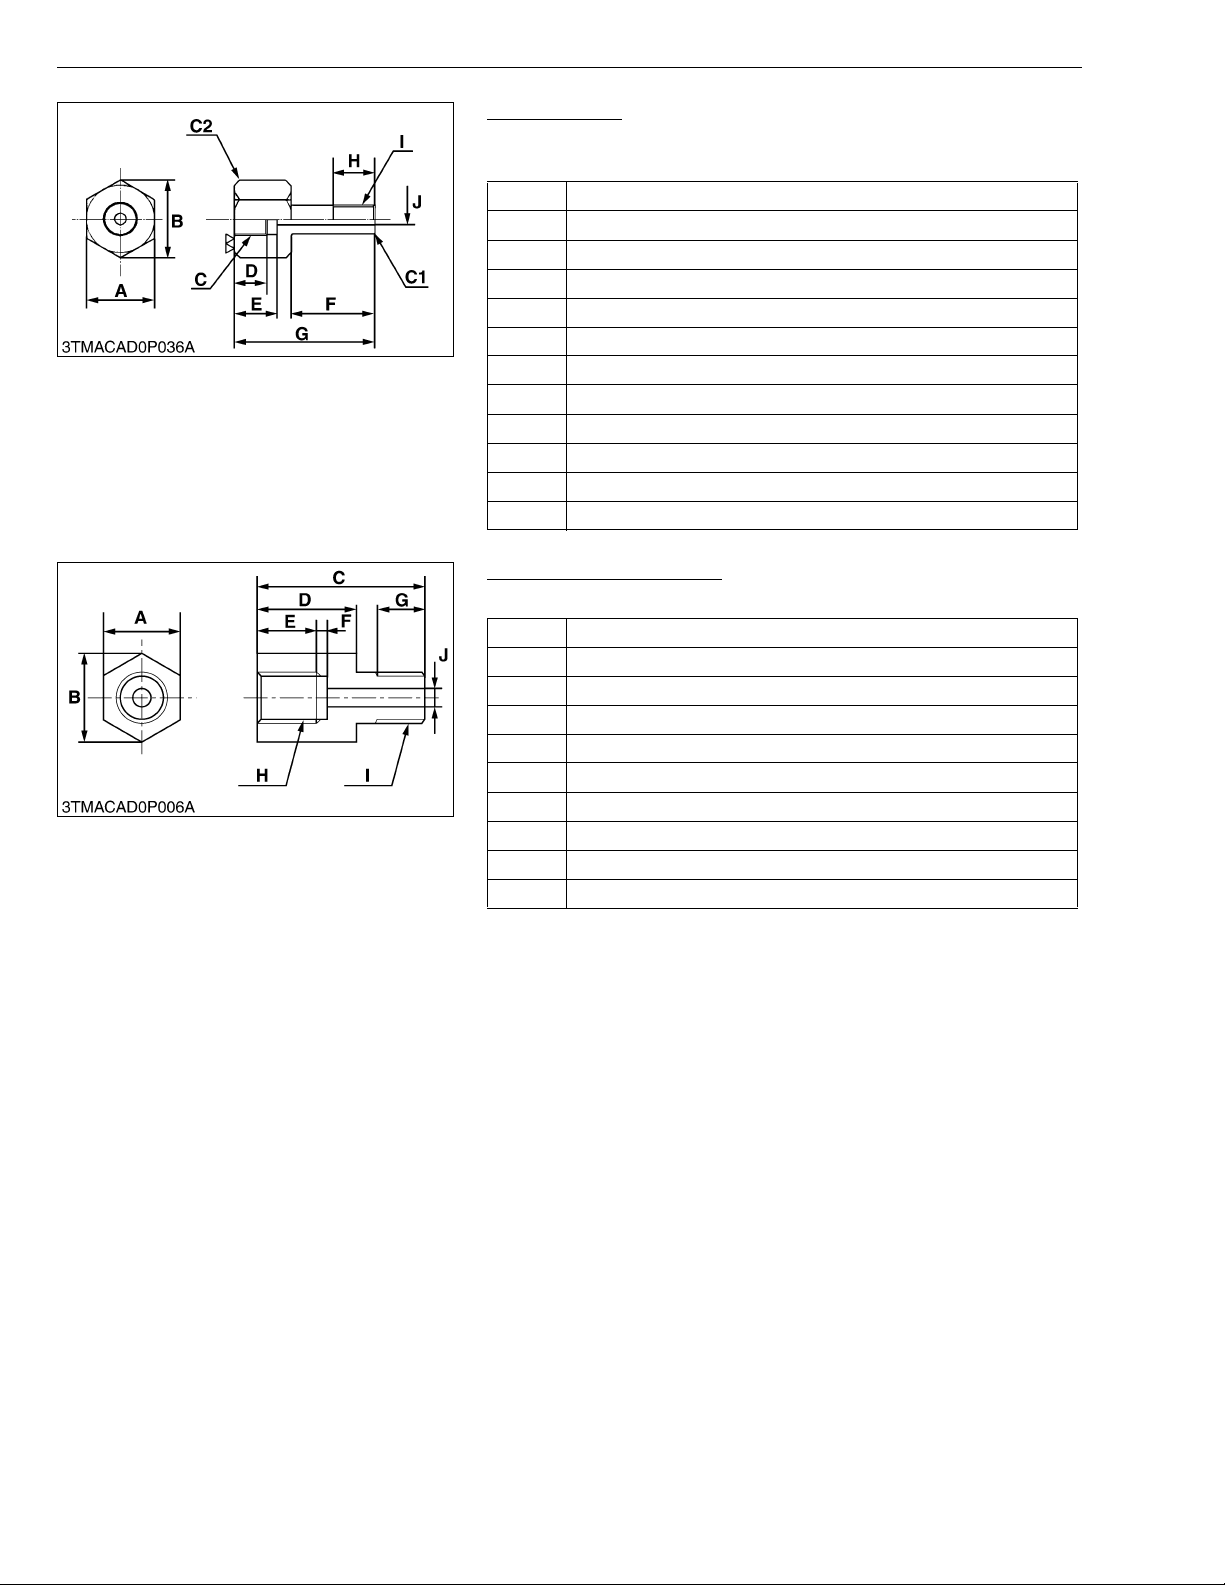
ME8200, ME9000, WSM
KiSC issued 03, 2007 A
G GENERAL
Valve Adaptor
Application: Use for measuring the system pressure of shuttle
valve.
A 24 mm (0.94 in.)
B 27.7 mm (1.09 in.)
C PS1/4
D 11 mm (0.43 in.)
E 15 mm (0.59 in.)
F 40 mm (1.57 in.)
G 60 mm (2.36 in.)
H 15 mm (0.59 in.)
I PT1/8
J 4 mm dia. (0.15 in. dia.)
C1 Chamfer 1 mm (0.039 in.)
C2 Chamfer 2 mm (0.079 in.)
W1039227
Hydraulic Brake Adaptor
Application: Use for measuring the braking pressure in brake case.
A 19 mm (0.74 in.)
B 21.4 mm (0.84 in.)
C 42 mm (1.65 in.)
D 25 mm (0.98 in.)
E 15 mm (0.59 in.)
F 3 mm (0.125 in.)
G 12.5 mm (0.49 in.)
H PS 1/4
I M12 x P1.0
J 5 mm dia. (0.20 in. dia.)
W1059490
G-60
Page 80
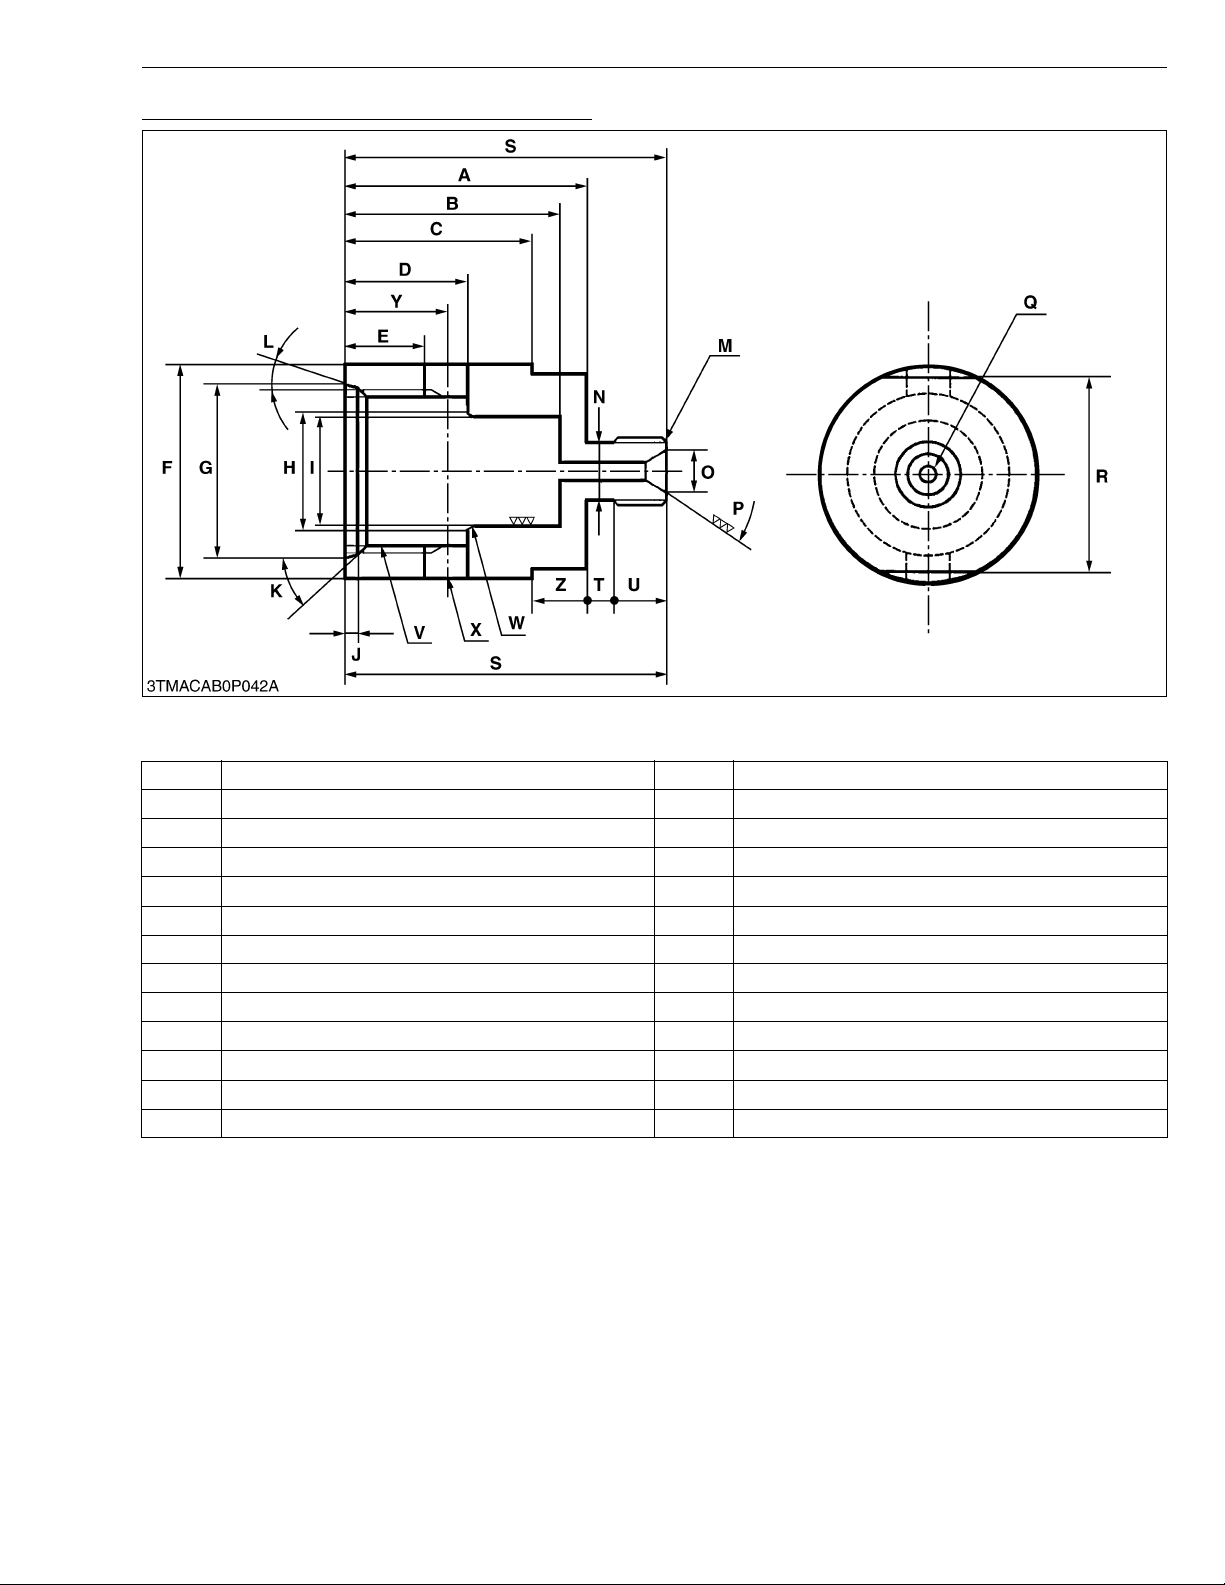
ME8200, ME9000, WSM
KiSC issued 03, 2007 A
Cylinder Safety Valve Setting Pressure Adaptor
G GENERAL
Application : Use to setting the safety valve to the nozzle tester to measure cracking pressure and check oil tightness
of the safety valves.
A 45 mm (1.77 in.) N 10 mm dia. (0.39 in. dia.)
B 40 mm (1.58 in.) O 7.5 mm dia. (0.3 in. dia.)
C 35 mm (13.8 in.) P 1.05 rad (60 °)
D 23 to 23.3 mm (0.9055 to 0.9713 in.) Q 3 mm dia. (1.18 in. dia.)
E 16 mm (0.63 in.) R 36 mm (1.18 in.)
F 40 mm dia. (1.58 in. dia.) S 60 mm (2.36 in.)
G 32.4 to 32.7 mm dia. (1.2756 to 1.2874 in. dia.) T 5 mm (0.20 in.)
H 21 mm dia. (0.83 in. dia.) U 10 mm (0.39 in.)
I 20 to 20.05 mm dia. (0.7874 to 0.7894 in. dia.) V M30 × P1.5
J 2.5 to 2.59 mm (0.0984 to 0.1097 in.) W 0.52 rad (30 °)
K 0.79 rad (45 °) X 8 mm dia. (0.32 in. dia.)
L 0.26 rad (15 °) Y 19 mm (0.75 in.)
M M12 × P1.5 Z 10 mm (0.39 in.)
G-61
Page 81
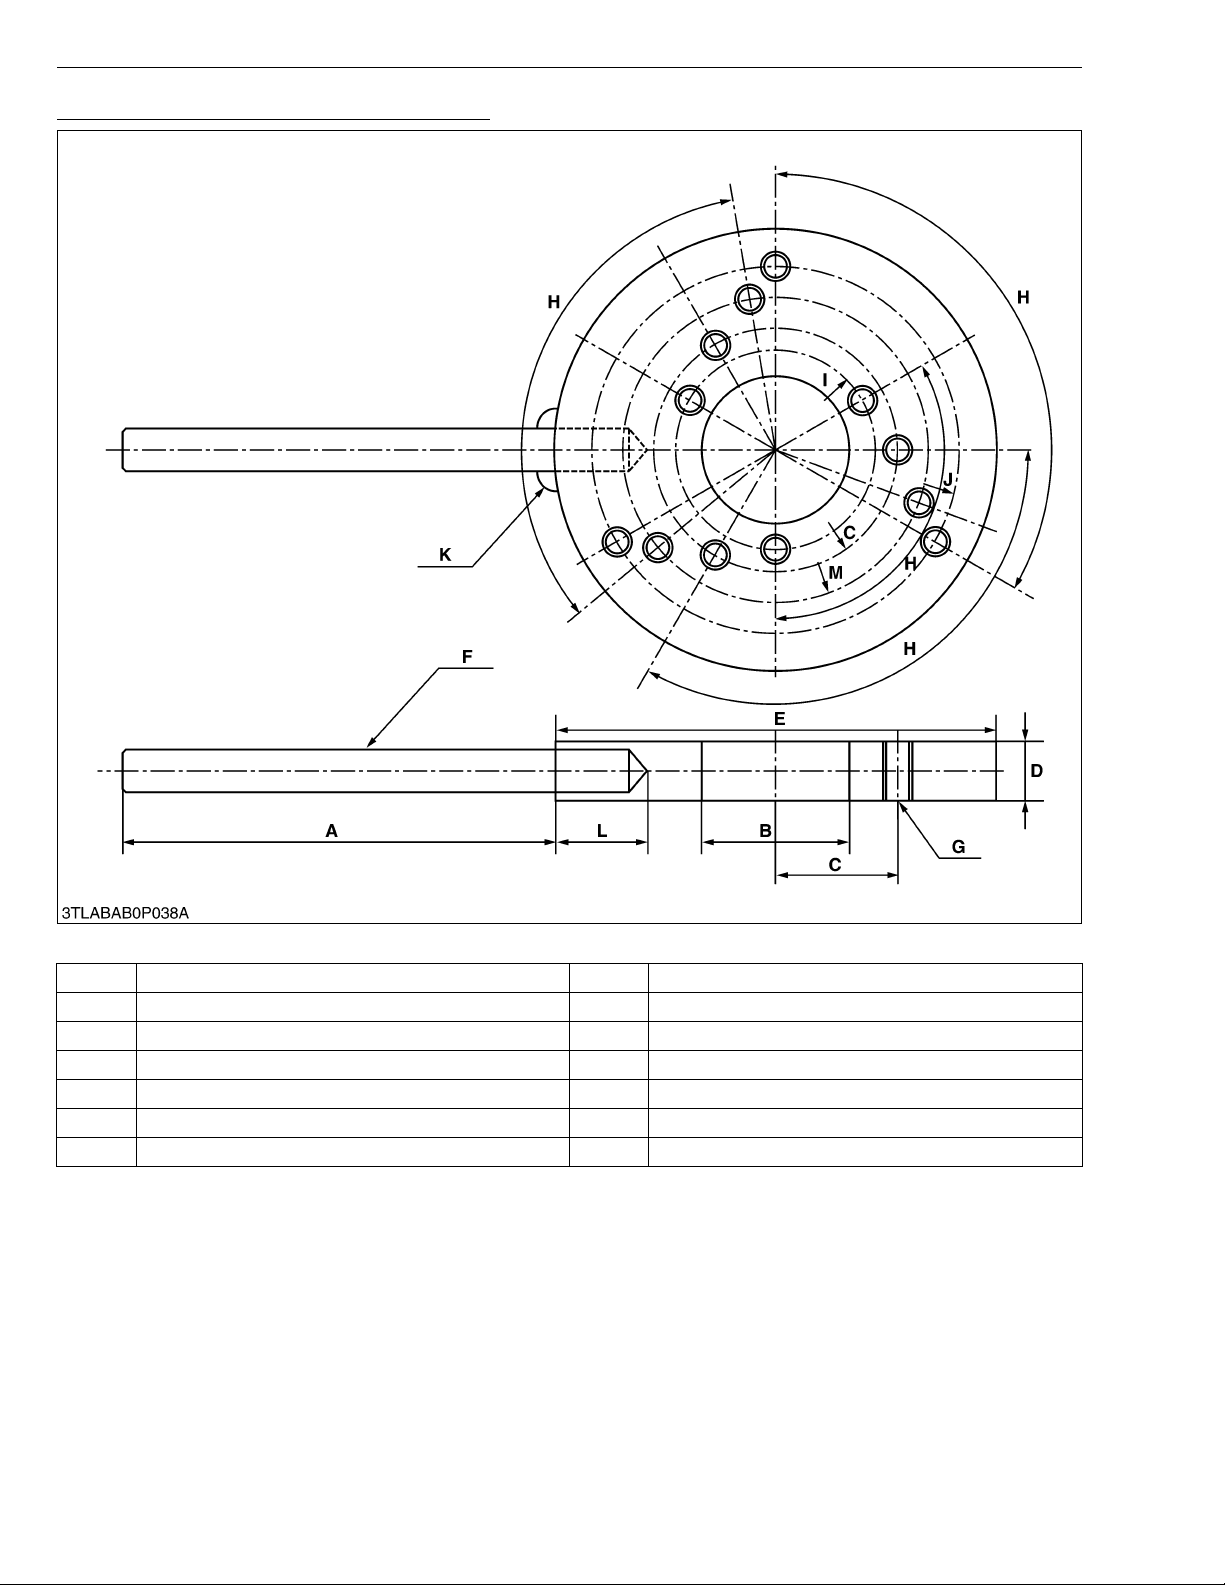
ME8200, ME9000, WSM
KiSC issued 03, 2007 A
Stopper Magnet Clutch (For A/C Compressor)
G GENERAL
Application: Use to loosen and tighten the magnet clutch mounting nut. (Use radius M)
A 125 mm (4.92 in.) H 4.52 rad (120 °)
B 40 mm dia. (1.57 in. dia.) I Radius 27 mm (Radius 1.06 in.)
C Radius 33 mm (Radius 1.30 in.) J Radius 50 mm (Radius 1.97 in.)
D 16 mm (0.63 in.) K Weld all around
E 120 mm dia. (4.72 in. dia.) L 20 mm (0.78 in.)
F 12 mm dia. (0.47 in. dia.) M Radius 41 mm (Radius 1.61 in.)
G 3 × M8 × 1.25 All screws
G-62
Page 82
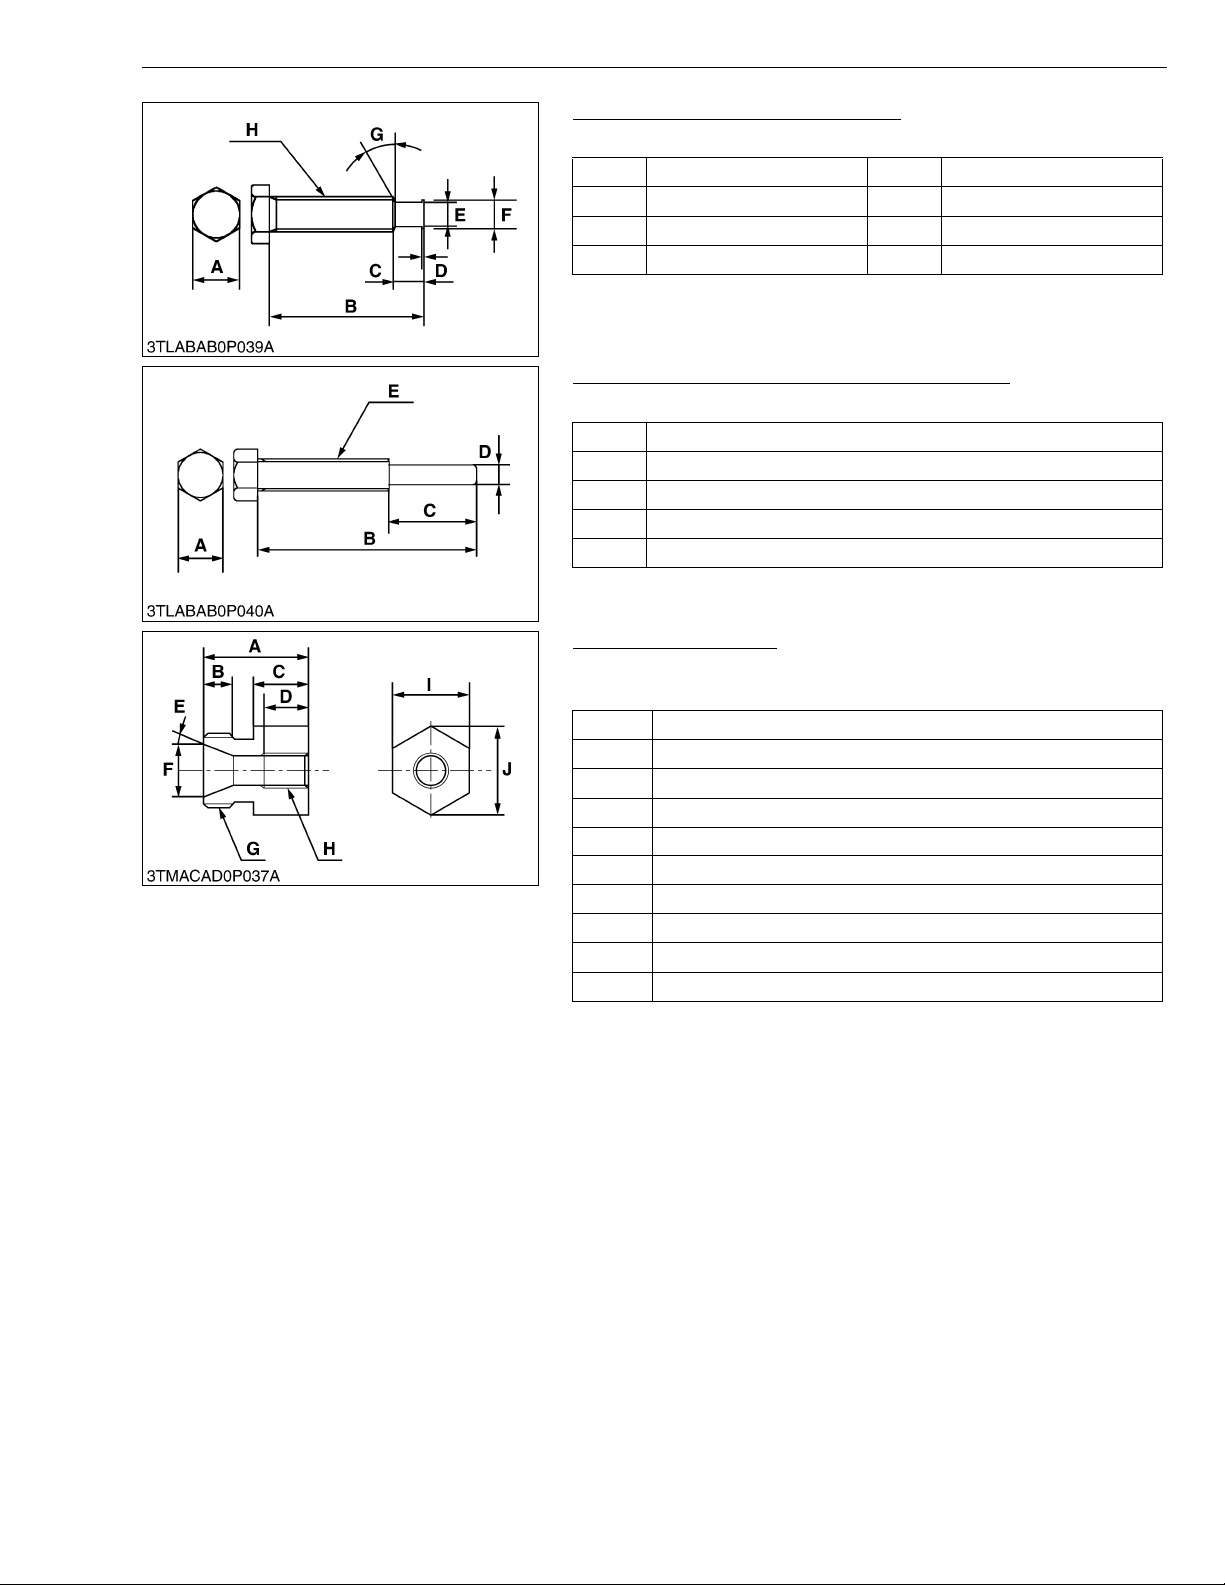
ME8200, ME9000, WSM
KiSC issued 03, 2007 A
G GENERAL
Stopper Bolt (for A/C Compressor)
Application : Use with the stopper magnet clutch.
A 12 mm (0.47 in.) E 5.5 mm dia. (0.22 in. dia.)
B 35 mm (1.38 in.) F 6.5 mm dia. (0.26 in. dia.)
C 7 mm (0.28 in.) G 0.52 rad (30 °)
D 0.4 mm (0.016 in.) H M8 × P1.25
W1065437
Remover Magnet Clutch (for A/C Compressor)
Application : Use to remove the hub plate or center piece.
A 12 mm (0.47 in.)
B 55 mm (2.16 in.)
C 20 mm (0.79 in.)
D 5 mm dia. (0.20 in. dia.)
E M8 × P1.25
W1066199
Trailer Brake Adaptor
Application: Use for measuring the braking pressure of trailer brake
valve.
A 40 mm (1.57 in.)
B 9 mm (0.35 in.)
C 25 mm (0.98 in.)
D 15 mm (0.59 in.)
E 0.21 rad (12 °)
F 14.3 mm dia. (0.56 in. dia.)
G M18 x P1.5
H PS 1/4
I 19 mm (0.74 in.)
J 21.4 mm (0.84 in.)
W1060263
G-63
Page 83
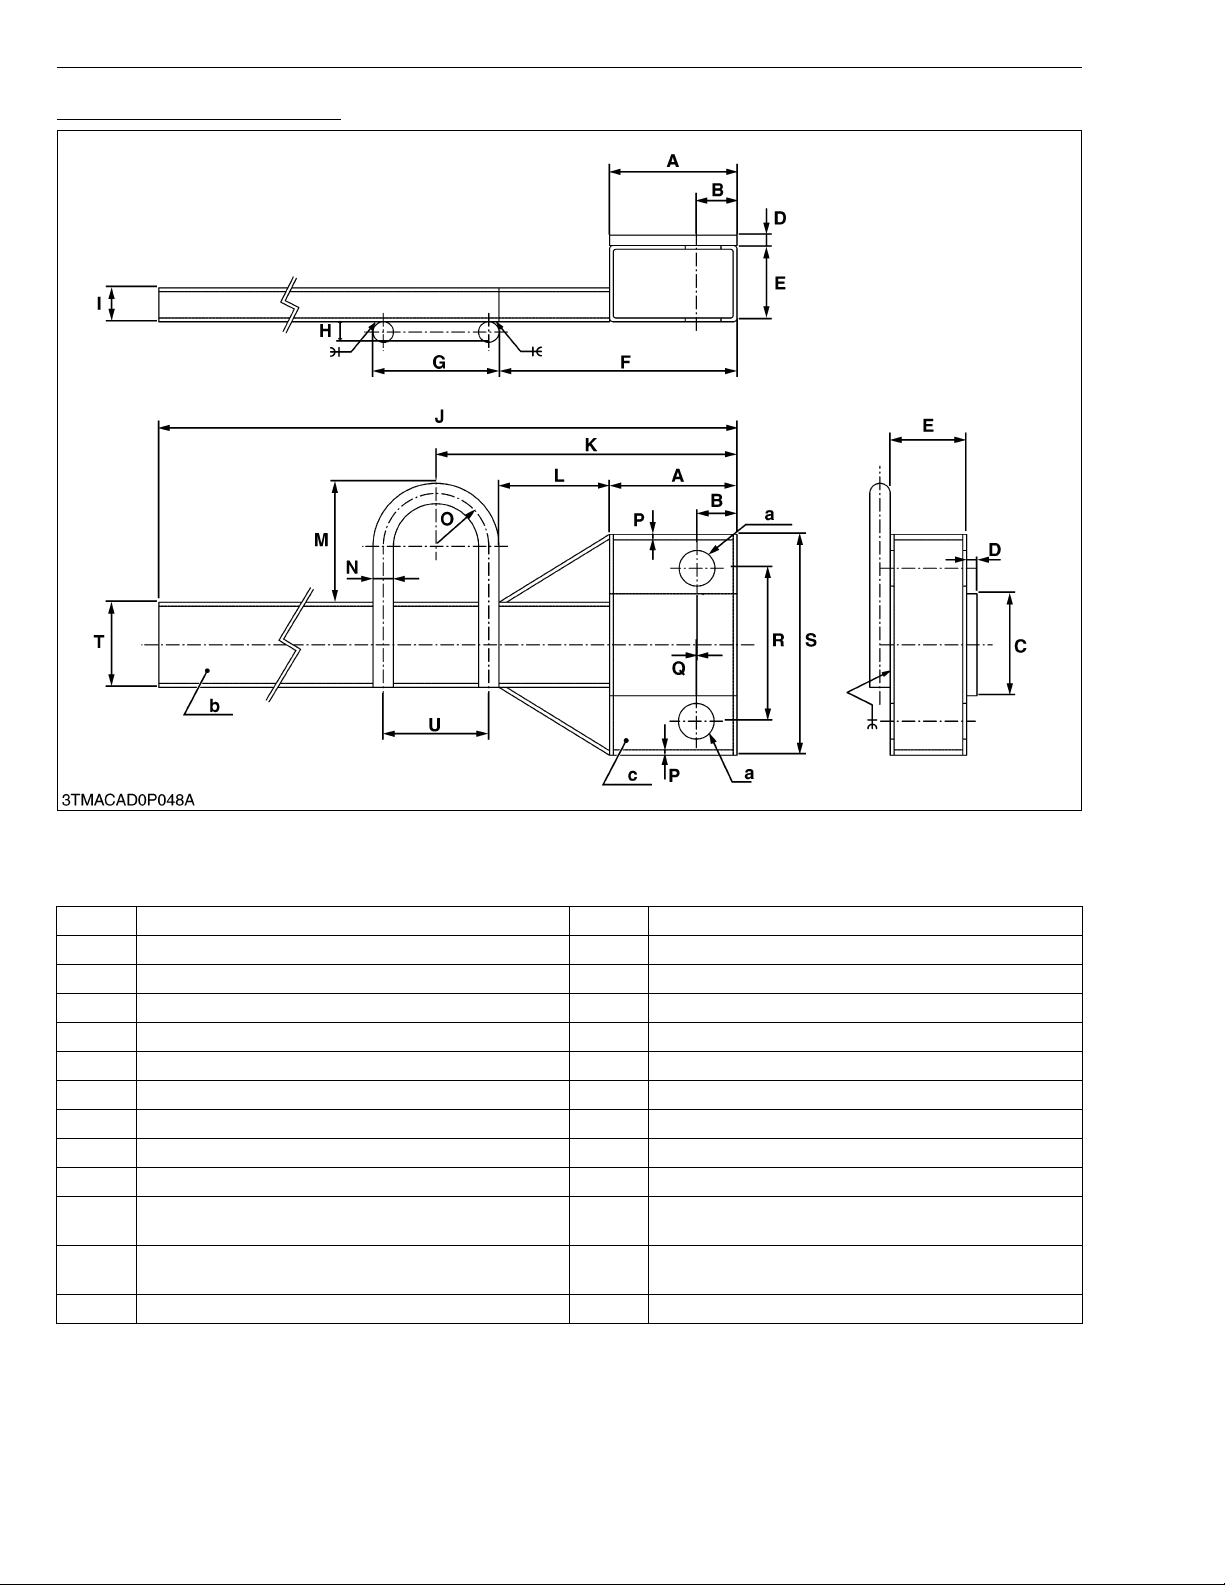
ME8200, ME9000, WSM
NOTE■
KiSC issued 03, 2007 A
Hydraulic Cylinder Block Tool
G GENERAL
Application : Use for separating a hydraulic cylinder block.
• The sealing surface of the connecting parts must be welded.
A 75 mm (2.95 in.) N 12 mm dia. (0.47 in. dia.)
B 24 mm (0.94 in.) O 31 mm radius (1.22 in. radius)
C 60 mm (2.36 in.) P t3.2 mm (t0.126 in.)
D 6 mm (0.24 in.) Q 4 mm (0.16 in.)
E 45 mm (1.77 in.) R 72.4 mm (2.85 in.)
F 140 mm (5.51 in.) S 130 mm (5.12 in.)
G 74 mm (2.91 in.) T 50 mm (1.97 in.)
H 12 mm (0.47 in.) U 62 mm (2.44 in.)
I 20 mm (0.79 in.)
J 1580 mm (62.2 in.) a 21 mm dia. (0.83 in. dia.)
K 177 mm (6.97 in.) b
L 65 mm (2.56 in.) c
M 70 mm (2.76 in.)
Square steel tube 50 mm x 20 mm x t2.3 mm
(Square steel tube 1.97 in. x 0.79 in. x t0.09 in.)
Square steel tube 75 mm x 45 mm x t2.3 mm
(Square steel tube 2.95 in. x 1.77 in. x t0.09 in.)
G-64
Page 84
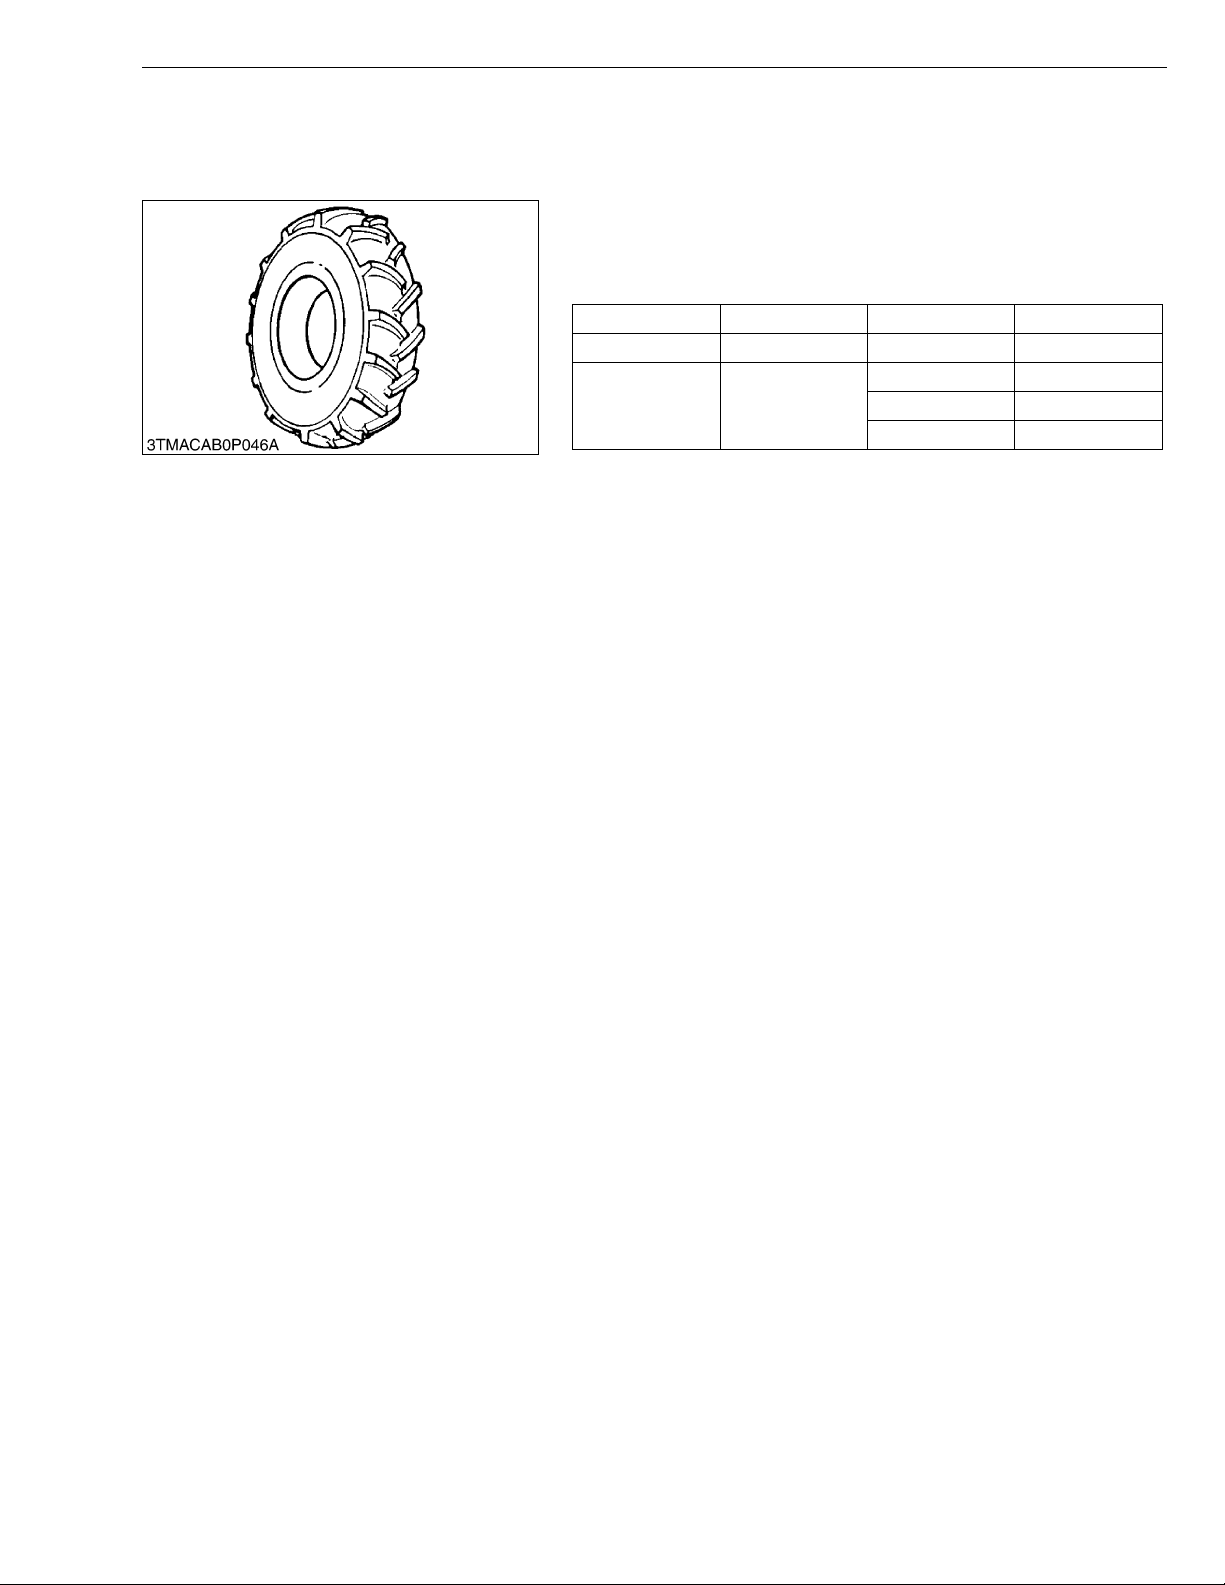
ME8200, ME9000, WSM
■
KiSC issued 03, 2007 A
9. TIRES
[1] TYPE OF TIRES
G GENERAL
The following tires can be mounted on model ME8200 and
ME9000.
IMPORTANT
• Do not use tires larger than specified.
Model Type of Tire Front Rear
ME8200 Farm Tire 11.2 R24 18.4 R30
11.2 R24 18.4 R30
ME9000 Farm Tire
12.4 R24 16.9 R34
320 / 70R24TL 18.4 R30
W1019656
G-65
Page 85
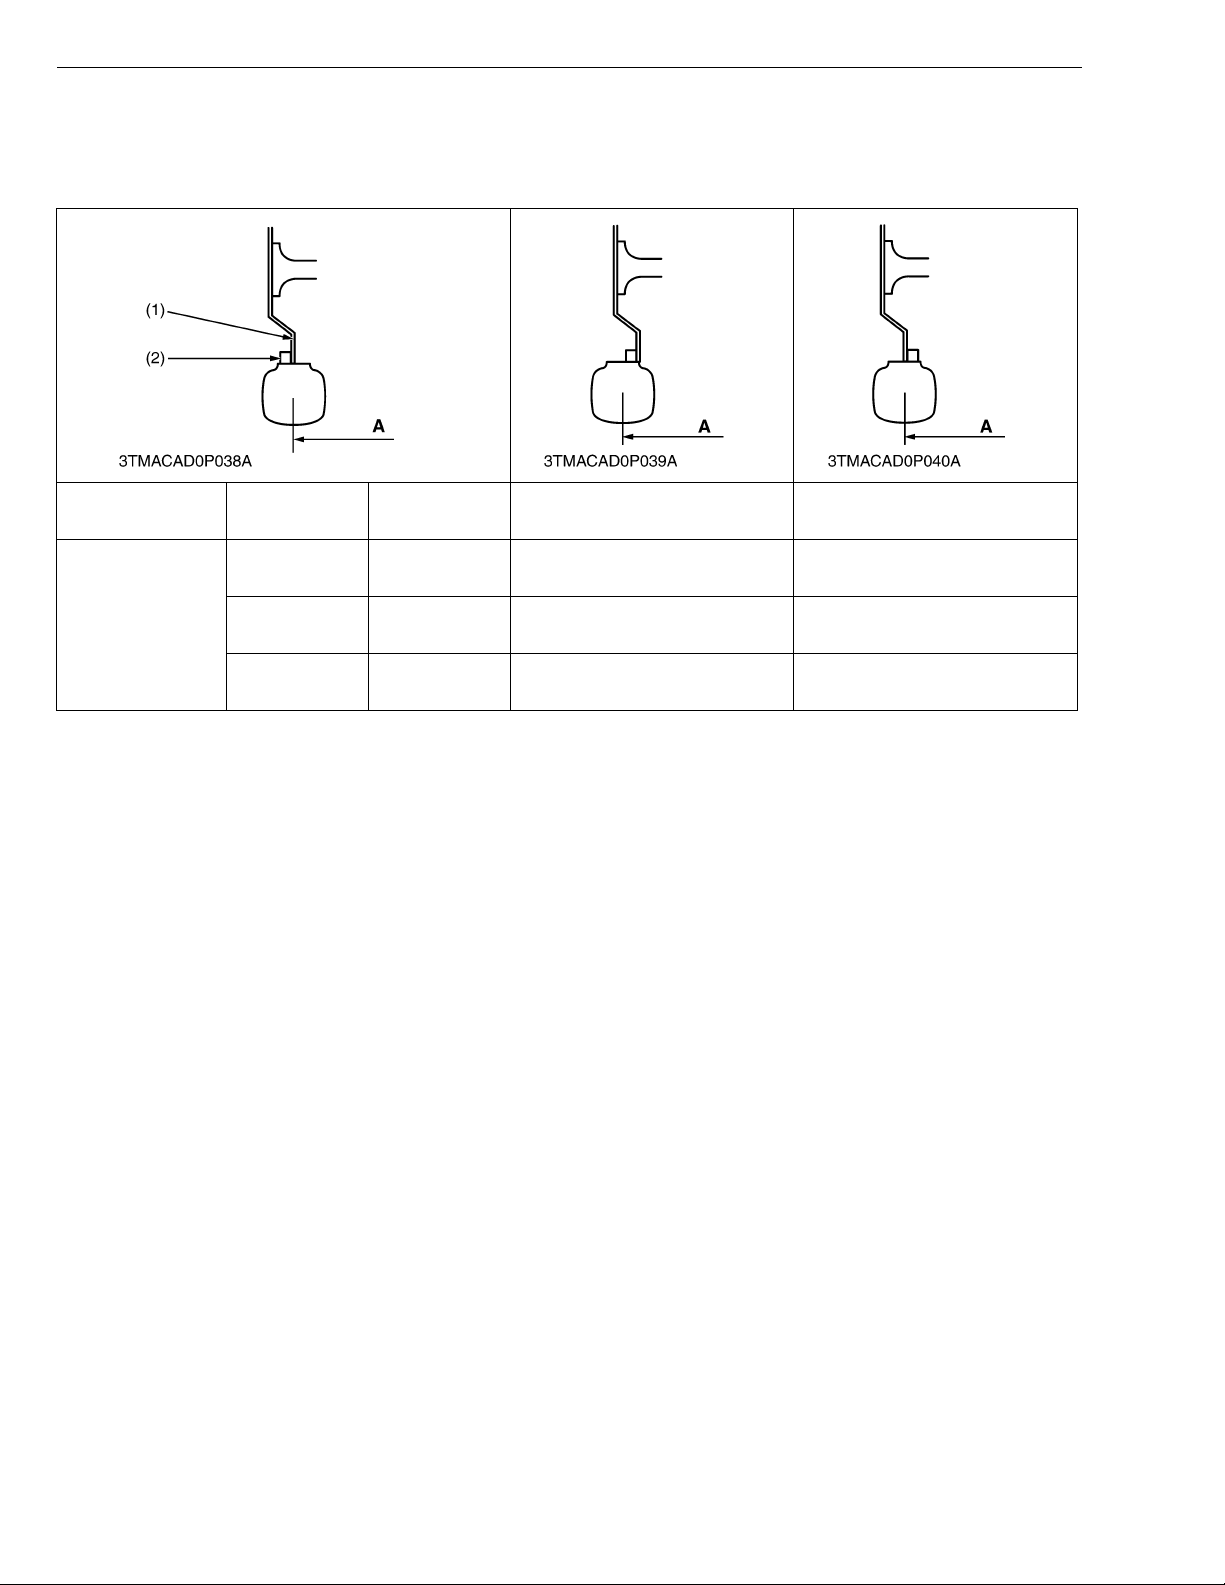
ME8200, ME9000, WSM
KiSC issued 03, 2007 A
[2] TREAD ADJUSTMENT
(1) Front Wheels
Front tread width can be adjusted as shown with the standard equipped tires.
G GENERAL
ME8200 11.2R24 –
11.2R24
ME9000
320 / 70R24
12.4R24
(1) Front Wheel Disc (2) Front Wheel Rim (A) Tread
1505 mm
(59.25 in.)
1505 mm
(59.25 in.)
1505 mm
(59.25 in.)
1455 mm
(57.28 in.)
1580 mm
(62.20 in.)
1565 mm
(61.61 in.)
1560 mm
(61.42 in.)
1565 mm
(61.61 in.)
–
–
1615 mm
(63.58 in.)
W10522820
G-66
Page 86
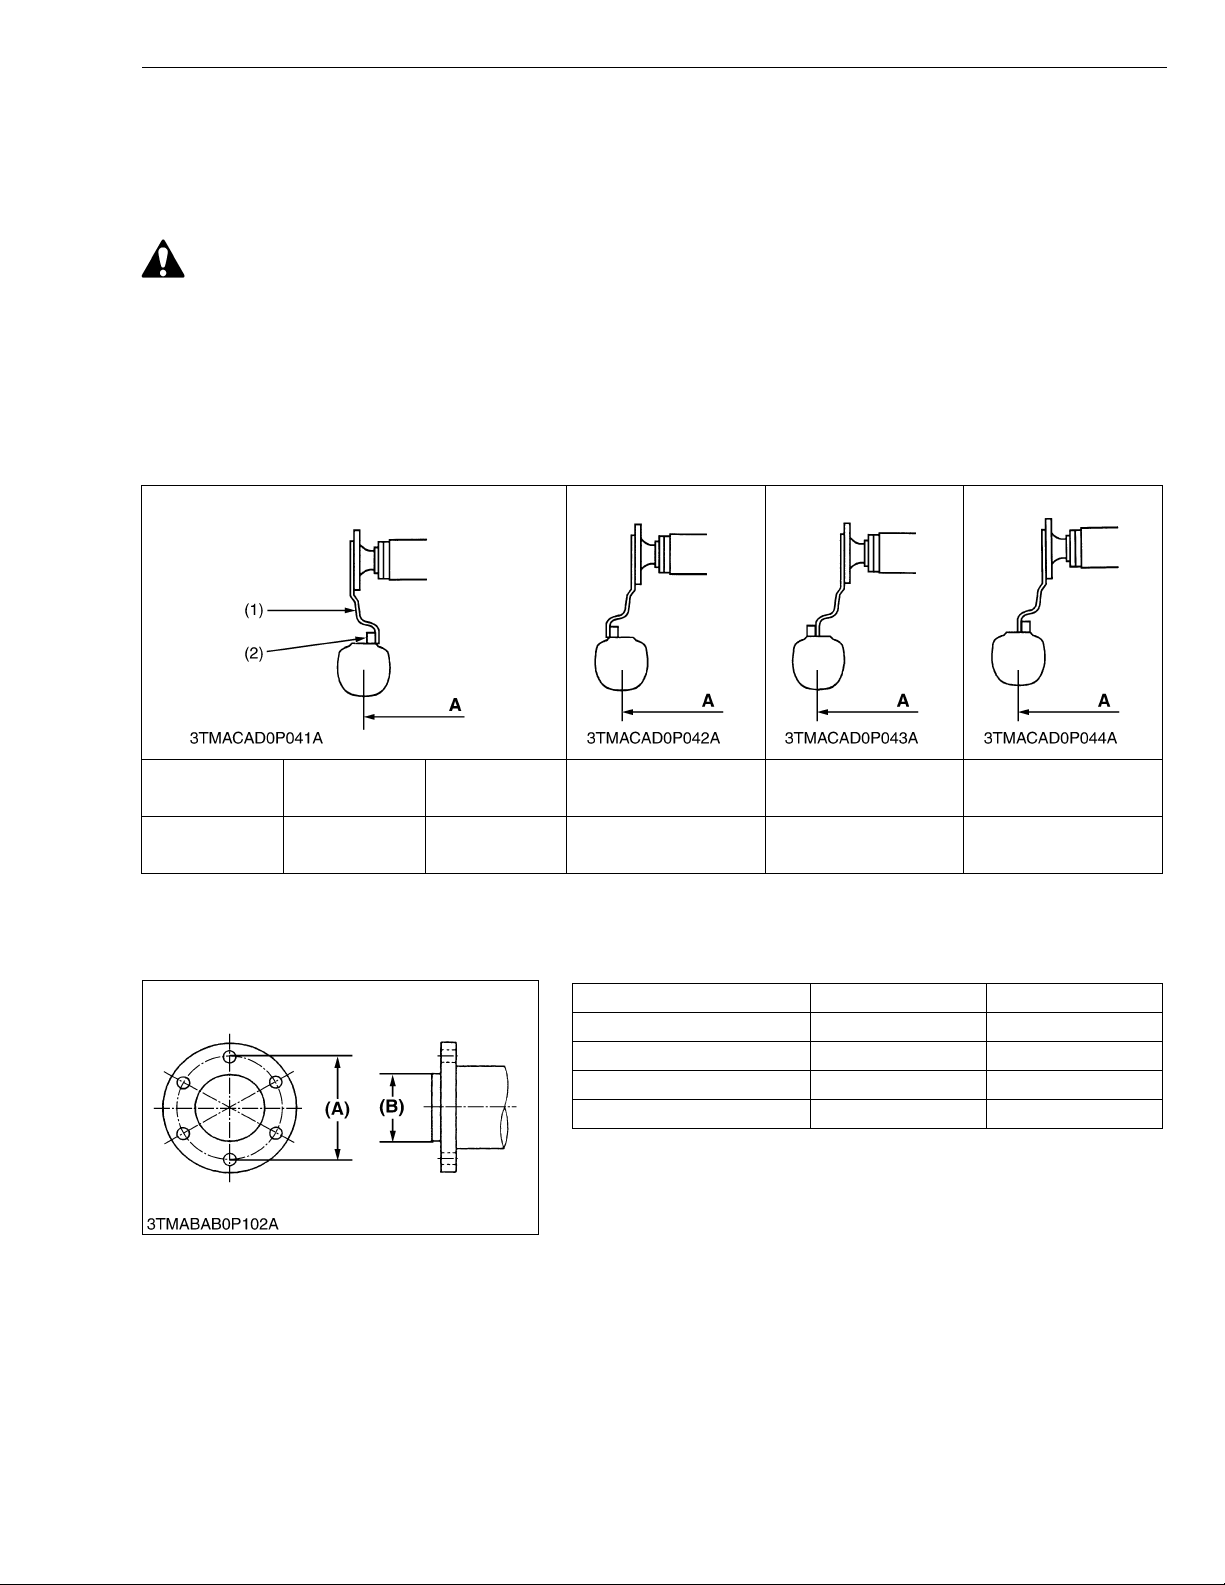
ME8200, ME9000, WSM
IMPORTANT■
KiSC issued 03, 2007 A
G GENERAL
(2) Rear Wheels
Rear tread width can be adjusted as shown with the standard equipped tires.
To change the tread width.
1. Remove the wheel rim and / or disk mounting bolts.
2. Change the position of the rim and / or disk (right and left) to the desired position, and tighten the bolts.
CAUTION
• When working on slopes or working with trailer, set the wheel tread as wide as practical for the job for
maximum stability.
• Always attach tires as shown in the drawings above.
• If not attached as illustrated, transmission parts may be damaged.
• Do not use tires larger than specified.
• When re-fitting o r adjusting a wheel, tighten t he nuts to the f ollowing torqu es then recheck a fter driving
the tractor 200 m (200 yards) and thereafter daily check service.
ME8200
ME9000
18.4R30
ME9000 16.9R34
(1) Rear Wheel Disc (2) Rear Wheel Rim (A) Tread
1575 mm
(62.00 in.)
1580 mm
(62.20 in.)
1665 mm
(61.61 in.)
1665 mm
(61.61 in.)
[3] WHEEL HUB
Screw circle diameter (A) 203.2 mm (8 in.) 203.2 mm (8 in.)
Number of screws 6 8
Screws M16 x 1.5 M16 x 1.5
Hub pilot diameter (B) 152.4 mm (6 in.) 152.4 mm (6 in.)
1780 mm
(70.08 in.)
1785 mm
(70.28 in.)
Front wheel hub Rear wheel hub
1870 mm
(73.62 in.)
1870 mm
(73.62 in.)
W10580340
W1043392
G-67
Page 87
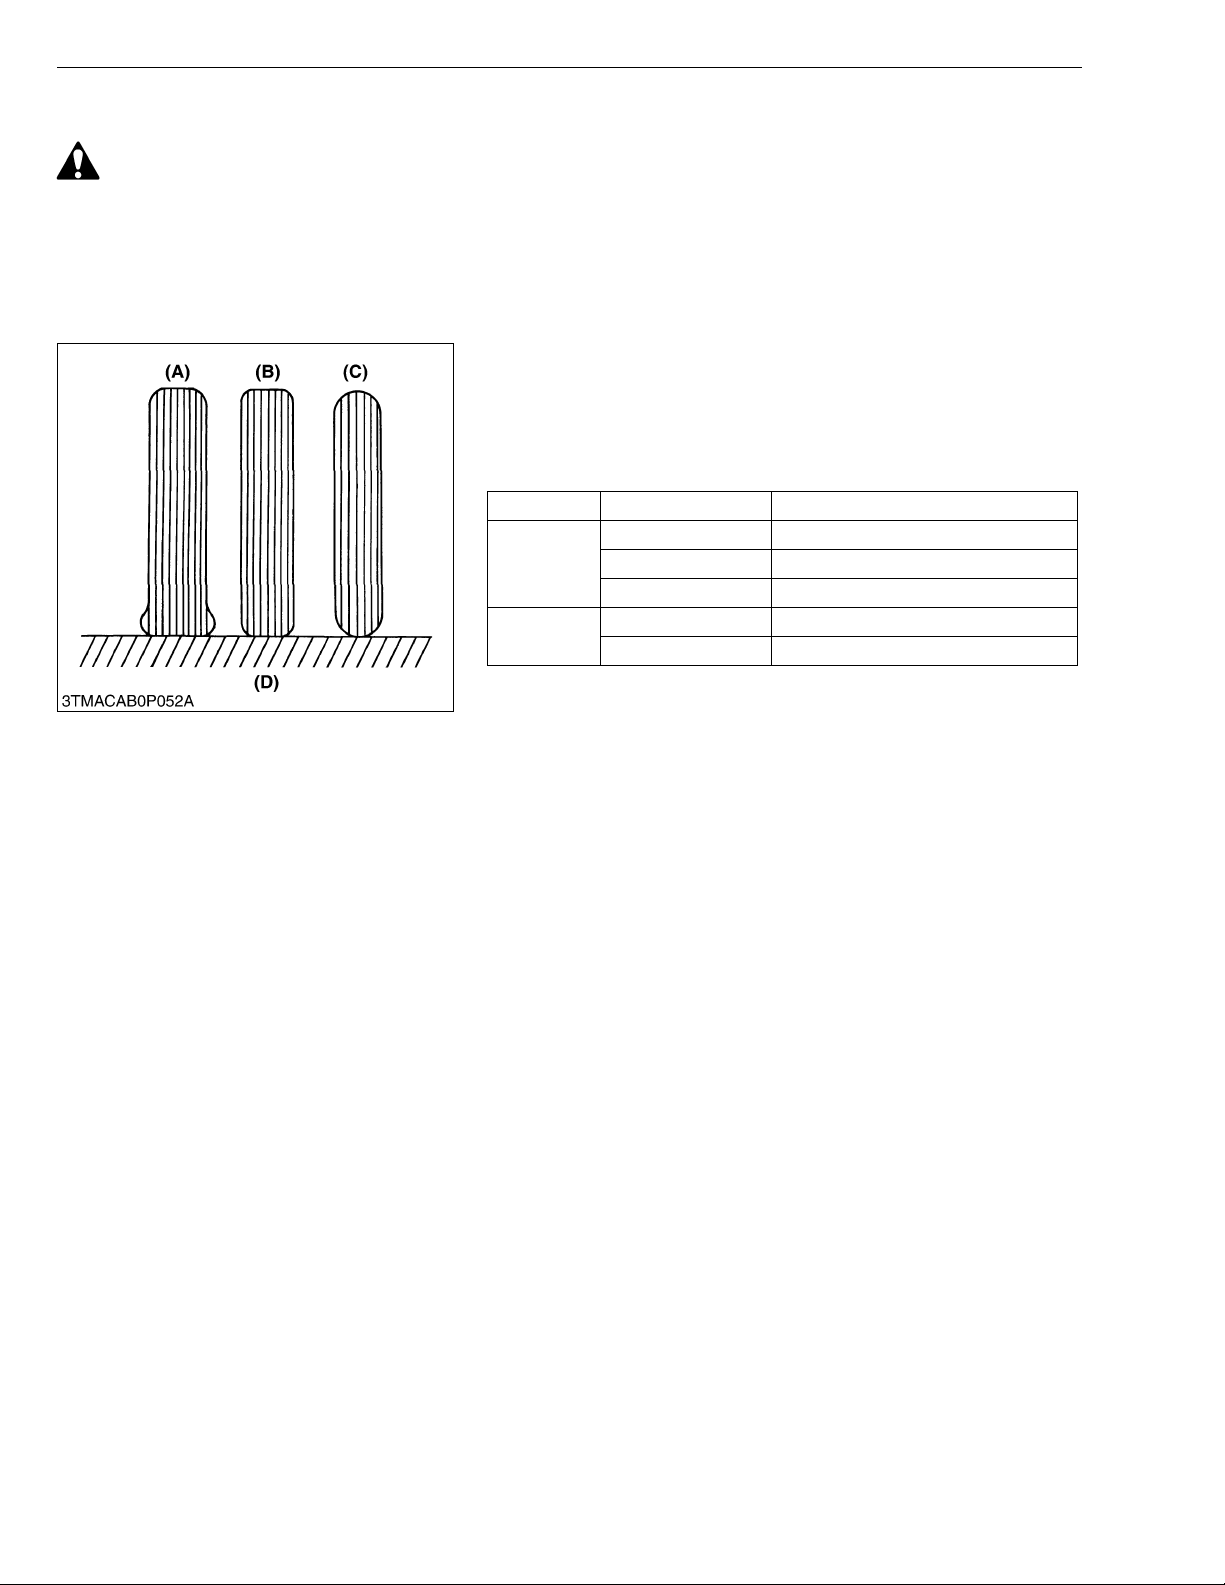
ME8200, ME9000, WSM
■
NOTE■
■
KiSC issued 03, 2007 A
G GENERAL
[4] TIRE PRESSURE
CAUTION
• Do not attempt mount a tire. This should be done by a qualified person with the proper equipment.
IMPORTANT
• Do not use tires larger than specified.
• When you intend to mount different size of tires from equipped ones, consult your distributor about front
drive gear ratio for detail.
• Excessive wear of tires may occur due to improper gear ratio.
Through the tire pressure is factory-set to the prescribed level, it
naturally drops slowly in the course of time. Thus, check it every day
and inflate as necessary.
To inflate the wheel tires, use an air compressor or hand pump.
■ Recommended Inflation Pressure
• Maintain the pressure shown below for normal use.
Tire sizes Inflation pressure
2
, 23 psi)
2
, 23 psi)
2
, 23 psi)
2
, 18 psi)
2
, 18 psi)
Front
Rear
11.2R24 160 kPa (1.6 kgf/cm
12.4R24 160 kPa (1.6 kgf/cm
320 / 70R24TL 160 kPa (1.6 kgf/cm
18.4R30 120 kPa (1.2 kgf/cm
16.9R34 120 kPa (1.2 kgf/cm
• Maintain the maximum pressure in front tires, if using a front
loader of when equipped with lots of front weights.
(A) Insufficient
(B) Standard
(C) Excessive
(D) Ground
W1030823
[5] TIRE LIQUID INJECTION
Auxiliary weights can be used to increase traction force for plowing in fields or clayey grounds.
Another way is to inject water or another liquid, such as a calcium chloride solution in the tires. Water must not be
used in winter si nce it freezes at 0 °C (32 °F). The calcium chloride so lution will not fr eeze and mor eover, affords
higher effect than water since its specific gravity is higher than that of water by about 20 %. Below is an explanation
of calcium chloride solution injection.
IMPORTANT
• Do not fill the front tires with liquid.
G-68
Page 88
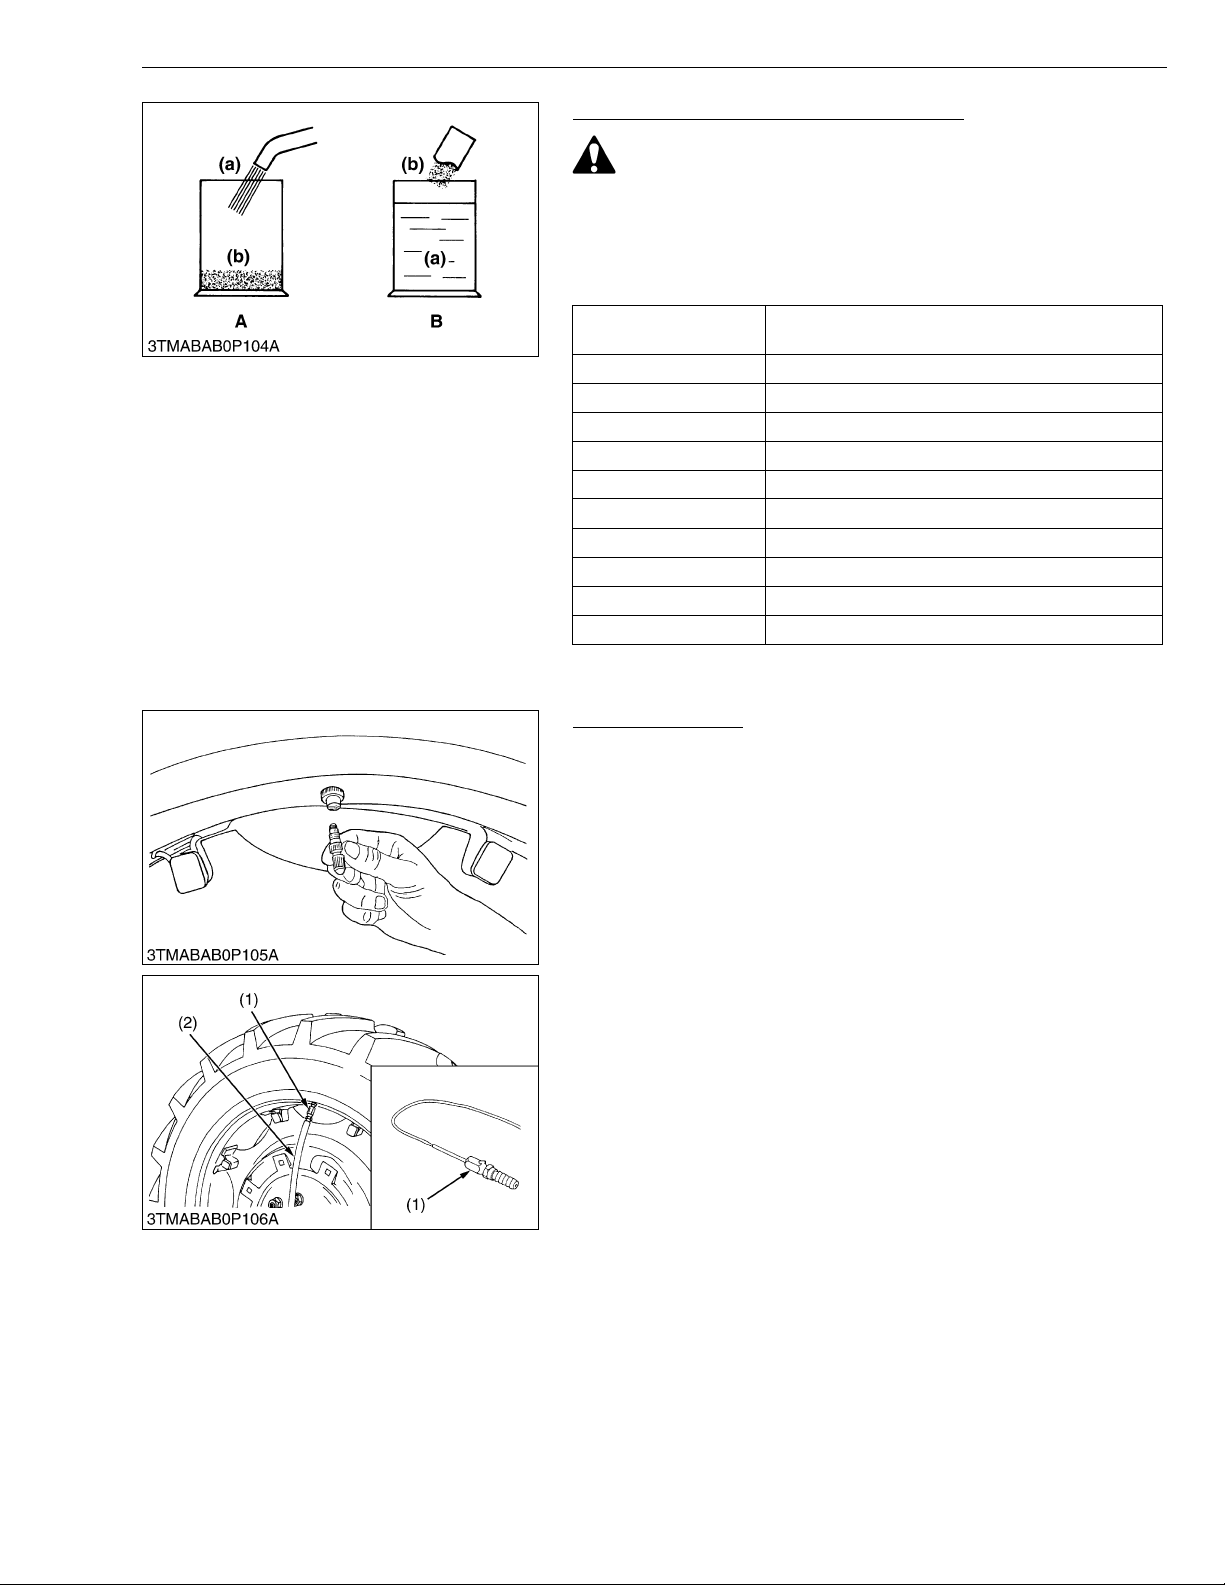
ME8200, ME9000, WSM
KiSC issued 03, 2007 A
G GENERAL
Preparation of Calcium Chloride Solution
CAUTION
• When making a calcium chloride solution, do not pour water
over calcium chloride since this results in chemical reaction
which will cause high temperature. Instead add a small
amount of calcium chloride to the water at a time until the
desired solution is achieved.
Freezing temp.
−5 °C (23 °F) 12 kg (26.4 lbs)
−10 °C (14 °F) 21 kg (46.3 lbs)
−15 °C (5 °F) 28 kg (61.7 lbs)
−20 °C (−4 °F) 34 kg (75.0 lbs)
−25 °C (−13 °F) 40 kg (88.2 lbs)
−33 °C (−22 °F) 44 kg (97.0 lbs)
−35 °C (−31 °F) 49 kg (108 lbs)
−40 °C (−40 °F) 52 kg (114.6 lbs)
−45 °C (−49 °F) 56 kg (123.5 lbs)
−50 °C (−58 °F) 61 kg (134.5 lbs)
Weight of CaCl
(26.5 U.S.gals, 22.0 Imp.gals) of water
2 to be dissolved in 100 L
(a) Water (b) CaCl
2 (Calcium Chloride)
W1033083
Attaching Injector
1. Lift the rear tires off the ground.
2. Turn the tire so that the air valve is at the top.
3. Remove the air valve, and attach the injector. (Code No. 07916-
52501)
(1) Injector (2) Hose
W1033331
G-69
Page 89
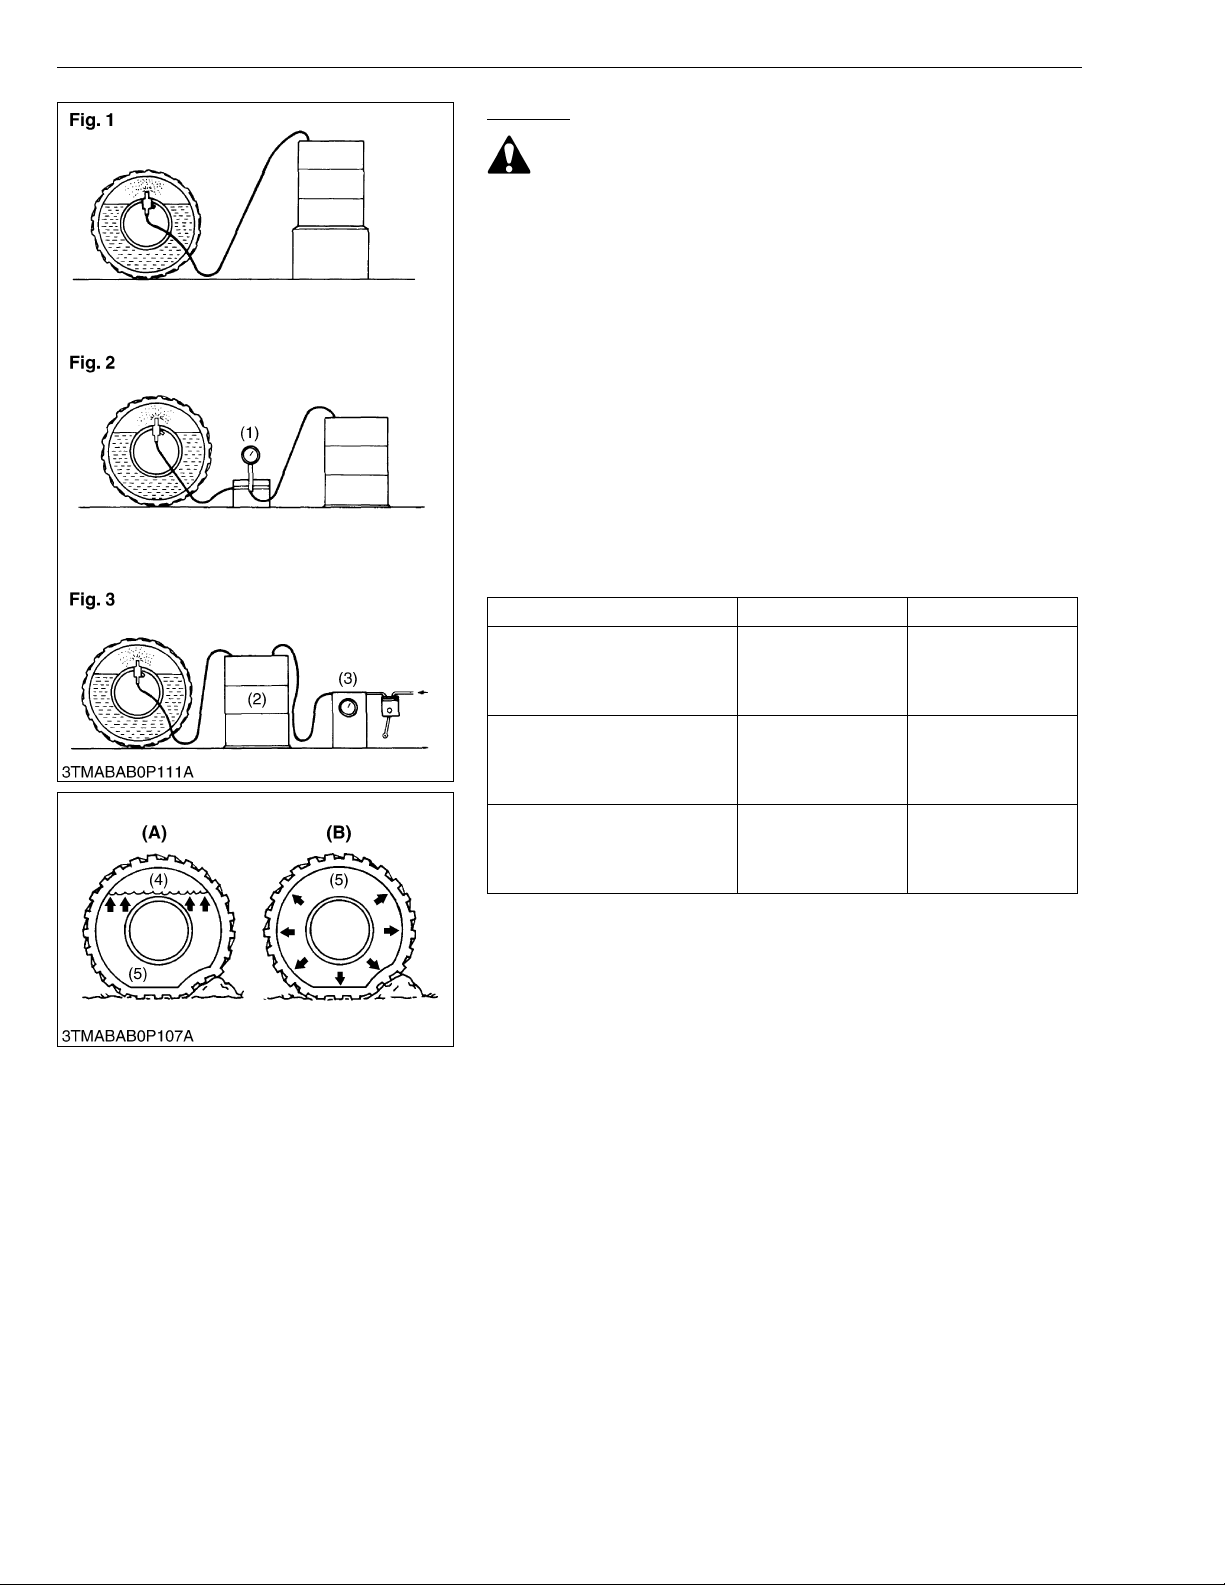
ME8200, ME9000, WSM
■
KiSC issued 03, 2007 A
G GENERAL
Injection
CAUTION
• When a calcium chloride solution is used, cool it before
pouring it into the tire.
• Do not fill tires with water or solution more than 75 % of full
capacity (to the valve stem level).
• To avoid damage of transmission, do not use rear wheel
weights and liquid ballast at the same time.
The following four ways can be used to in jec t wate r or a calci um
chloride solution into tires.
1. Gravity injection (Fig. 1)
2. Pump injection (Fig. 2)
3. Pressure tank injection (Fig. 3)
4. Injection directly from tap (only when water is being used).
NOTE
• Once injection is complete d, reset the air valve, and pump
air into the tire to the specified pressure.
Weight of Calcium Chloride Solution Filling 75 % of Full Capacity
of a Tire
Tire sizes 16.9-34 18.4-30
Slush free at −10 °C (14 °F)
Solid at −30 °C (−22 °F)
[Approx. 1 kg (2 lbs) CaCl
4 L (1 gal.) of water]
Slush free at −24 °C (−11 °F)
Solid at −47 °C (−53 °F)
[Approx. 1.5 kg (3.5 lbs) CaCl
per 4 L (1 gal.) of water]
Slush free at −47 °C (−53 °F)
Solid at −52 °C (−62 °F)
[Approx. 2.25 kg (5 lbs) CaCl
per 4 L (1 gal.) of water]
2 per
2
2
346 kg
(463 lbs)
376 kg
(829 lbs)
399 kg
(880 lbs)
385 kg
(848 lbs)
414 kg
(912 lbs)
436 kg
(960 lbs)
(1) Pump
(2) Pressure Tank
(3) Compressor
(4) Air
(5) Water
(A) Correct : 75 %
Air Compresses Like A Cushion
(B) Incorrect : 100 % Full
Water Can Not Be Compressed
W1033435
G-70
Page 90
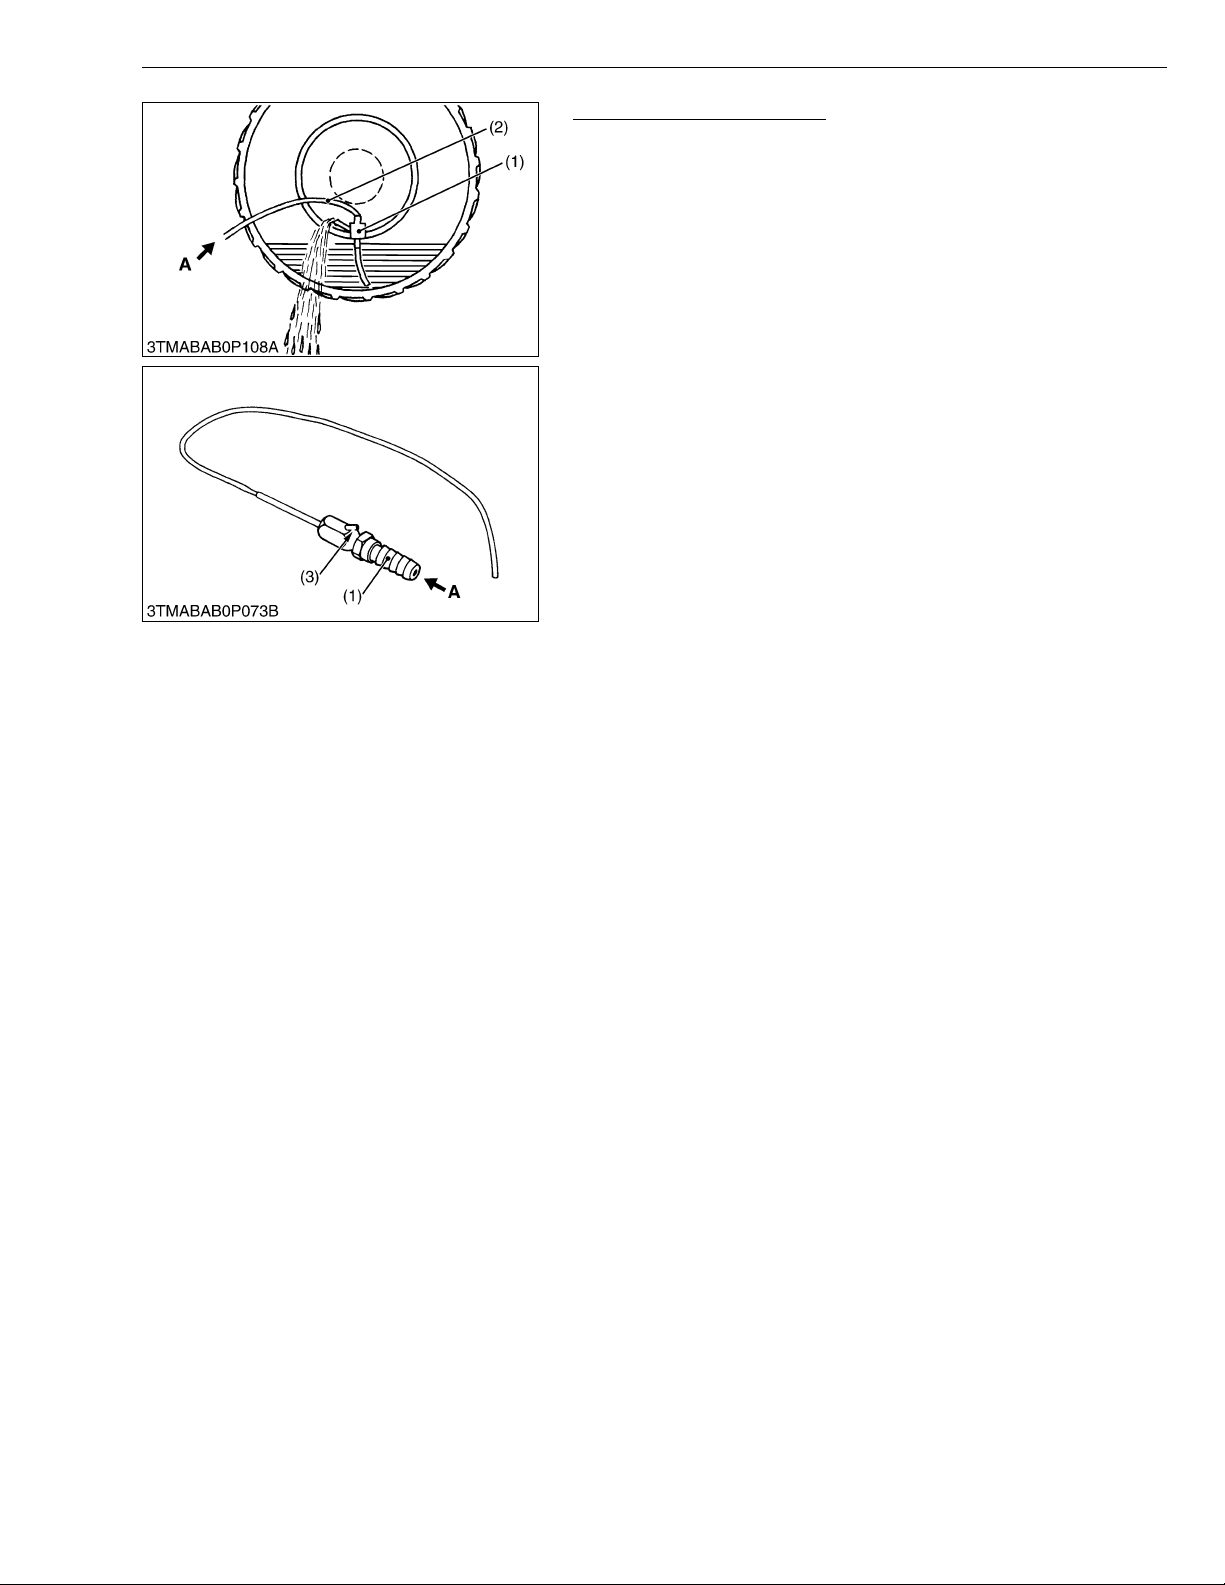
ME8200, ME9000, WSM
KiSC issued 03, 2007 A
G GENERAL
Draining Water or Solution
1. Lift the rear tires off the ground.
2. Turn the tire so that the air valve is at the bottom.
3. Remove the air valve, and drain liquid (liquid can only be drained
to the level of the valve and liquid under that level remains
inside).
4. To drain liquid completely, use the injector (1), and direct
compressed air into the tire to force out the liquid through the
injector’s vent (3).
(1) Injector
(2) Hose
(3) Vent
A: Compressed Air
W1045167
G-71
Page 91
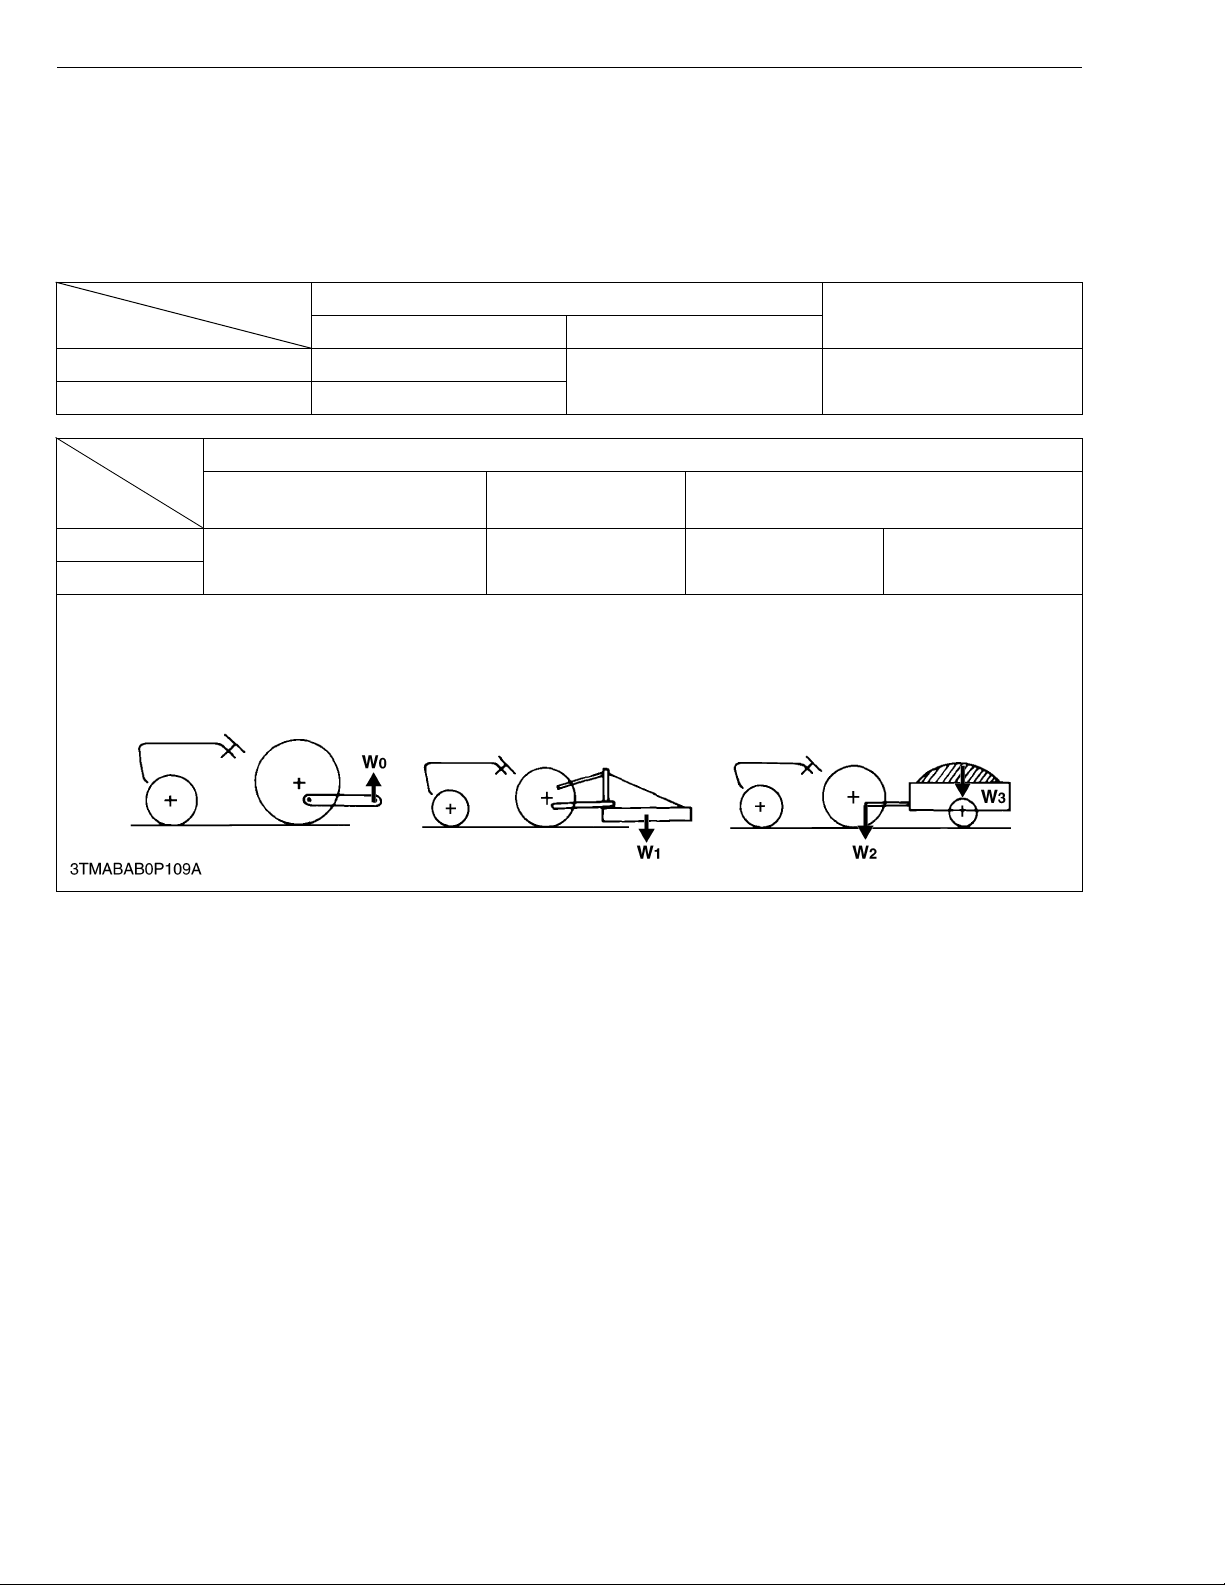
ME8200, ME9000, WSM
NOTE■
KiSC issued 03, 2007 A
G GENERAL
10.IMPLEMENT LIMITATIONS
The KUBOTA Tractor has been thoroughly tested for prop er performance with implem ents sold or approved by
KUBOTA. Use with implements which exceed the maximum specifications listed below, or which are otherwise unfit
for use with the KUBOTA Trac tor may result in ma lfunctio ns or failures of the tractor, dama ge to other property and
injury to the operator or others. [Any malfunctions or failures of the tractor resulting from use with improper implements
are not covered by the warranty.]
Tread (max. width) with farm tires
Front Rear
ME8200 1520 mm (59.8 in.)
ME9000 1620 mm (63.8 in.)
Implement Weight W1
and / or size
ME8200
ME9000
Lower link end max. hydraulic lifting capacity .....W0
Implement weight...............................................The implement’s weight which can be put on the lower link : W1
Max. drawbar load .............................................W2
Trailer loading weight .........................................The max. loading weight for trailer (without trailer’s weight ) : W3
As in the following list
(shown on the next page)
Max. Drawbar Load
800 kg (1764 lbs)
1920 mm (75.6 in.) 2500 kg (5513 lbs)
Actual figures
W2
Trailer loading weight W3 Max. capacity
3000 kg (6615 lbs)
without trailer brake
Lower link end max.
loading weight W
8000 kg (17646 lbs)
with trailer brake
0
• Implement size may vary depending on soil operating conditions.
G-72
Page 92
ME8200, ME9000, WSM
KiSC issued 03, 2007 A
No. Implement Remarks ME8200 ME9000
Max. Tank Capacity 4000 L (1060 U.S.gals, 880 Imp.gals)
1 Slurry Tank
Max. Load Capacity 5000 mm (11000 in.)
Max. Load Capacity 6000 kg (13200 lbs)
2Trailer
Max. Drawbar Load 800 kg (1764 lbs)
Max. Cutting Width 2300 mm (90 in.)
Max. Weight 600 kg (1320 lbs)
Max. Cutting Width 3660 mm (144 in.)
Max. Weight
Max. Cutting Width
1000 kg (2200 lbs)
2743 mm (108 in.)
800 L
Mid
(200 U.S.gals
170 Imp.gals)
Max.
Tankcapacity
Rear 3P
800 L
(200 U.S.gals
170 Imp.gals)
4500 L
Drawbar
(1200 U.S.gals
990 Imp.gals)
(1320 U.S.gals
1100 Imp.gals)
1000 L
(260 U.S.gals
220 Imp.gals)
1000 L
(260 U.S.gals
220 Imp.gals)
5000 L
3Mower
4 Sprayer
Rotarycutter
Flail
Mower
(Heavy)
Sickle
Bar
Max. Tilling Width 2400 mm (96 in.)
5 Rotary Tiller
Max. Weight 1000 kg (2200 lbs)
14 in. x 5
16 in. x 4
20 in. x 3
24 in. x 1
6 Bottom Plow
Max. Size
16 in. x 4
18 in. x 3
24 in. x 1
Max. Weight 750 kg (1650 lbs) 900 kg (2000 lbs)
Max. Size 24 in. x 24 24 in. x 28
Disc-
7
harrow
Drawbar
Type
3P Type
Max. Harrowing Width 2850 mm (112 in.) 3300 mm (130 in.)
Max. Weight 750 kg (1650 lbs) 900 kg (2000 lbs)
Max. Harrowing Width
3660 mm (144 in.) 4300 mm (168 in.)
Max. Size 26 in. x 4, 28 in. x 4
8 Disc Plow
Max. Weight 750 kg (1650 lbs) 900 kg (2000 lbs)
9Sub Soiler
Numbers of Cultivating
Tines
2
Cultivating Depth 500 mm (20 in.) 550 mm (22 in.)
Max. Width 4880 mm (192 in.) 5490 mm (216 in.)
10 Cultivator
Number of Rows 6
Max. Weight 750 kg (1650 lbs) 900 kg (2000 lbs)
Max. Cutting Width 2430 mm (96 in.) 2600 mm (102 in.)
11 Front Blade *
Max. Oil Pressure 19.6 MPa (200 kgf/cm
2
, 2844 psi)
G GENERAL
W1012736
G-73
Page 93
ME8200, ME9000, WSM
NOTE■
KiSC issued 03, 2007 A
No. Implement Remarks ME8200 ME9000
Max. Cutting Width 2430 mm (96 in.) 2600 mm (102 in.)
12 Rear Blade
Max. Oil Pressure 19.6 MPa (200 kgf/cm
2
, 2844 psi)
Max. Lifting Capacity 1250 kg (2750 lbs)
13 Front Loader *
Max. Oil Pressure 20.6 MPa (210 kgf/cm
2
, 3000 psi)
Max. Cutting Width 2430 mm (96 in.)
14 Box Blade
Max. Weight 750 kg (1650 lbs) 800 kg (1760 lbs)
Max. Digging Depth 3050 mm (120 in.)
15 Back Hoe
Max. Weight 1200 kg (2650 lbs)
Max. Width 2430 mm (96 in.) 2600 mm (102 in.)
16 Snow Blade
Max. Weight 750 kg (1650 lbs) 800 kg (1760 lbs)
• Implement size may very depending on soil operating conditions.
* Must remove front weight with this implement.
G GENERAL
W1060618
G-74
Page 94

1 ENGINE
KiSC issued 03, 2007 A
Page 95

MECHANISM
KiSC issued 03, 2007 A
CONTENTS
1. ENGINE BODY ............................................................................................. 1-M1
[1] CYLINDER BLOCK.................................................................................1-M1
[2] CRANKSHAFT......................................................................................... 1-M1
2. FUEL SYSTEM ............................................................................................. 1-M2
[1] FUEL FILTER....................... ....... ...... ....................................... ...... ....... .. 1-M3
3. LUBRICATING SYSTEM .............................................................................. 1-M4
4. COOLING SYSTEM......................................................................................1-M5
5. TURBOCHARGER SYSTEM........................................................................1-M6
Page 96
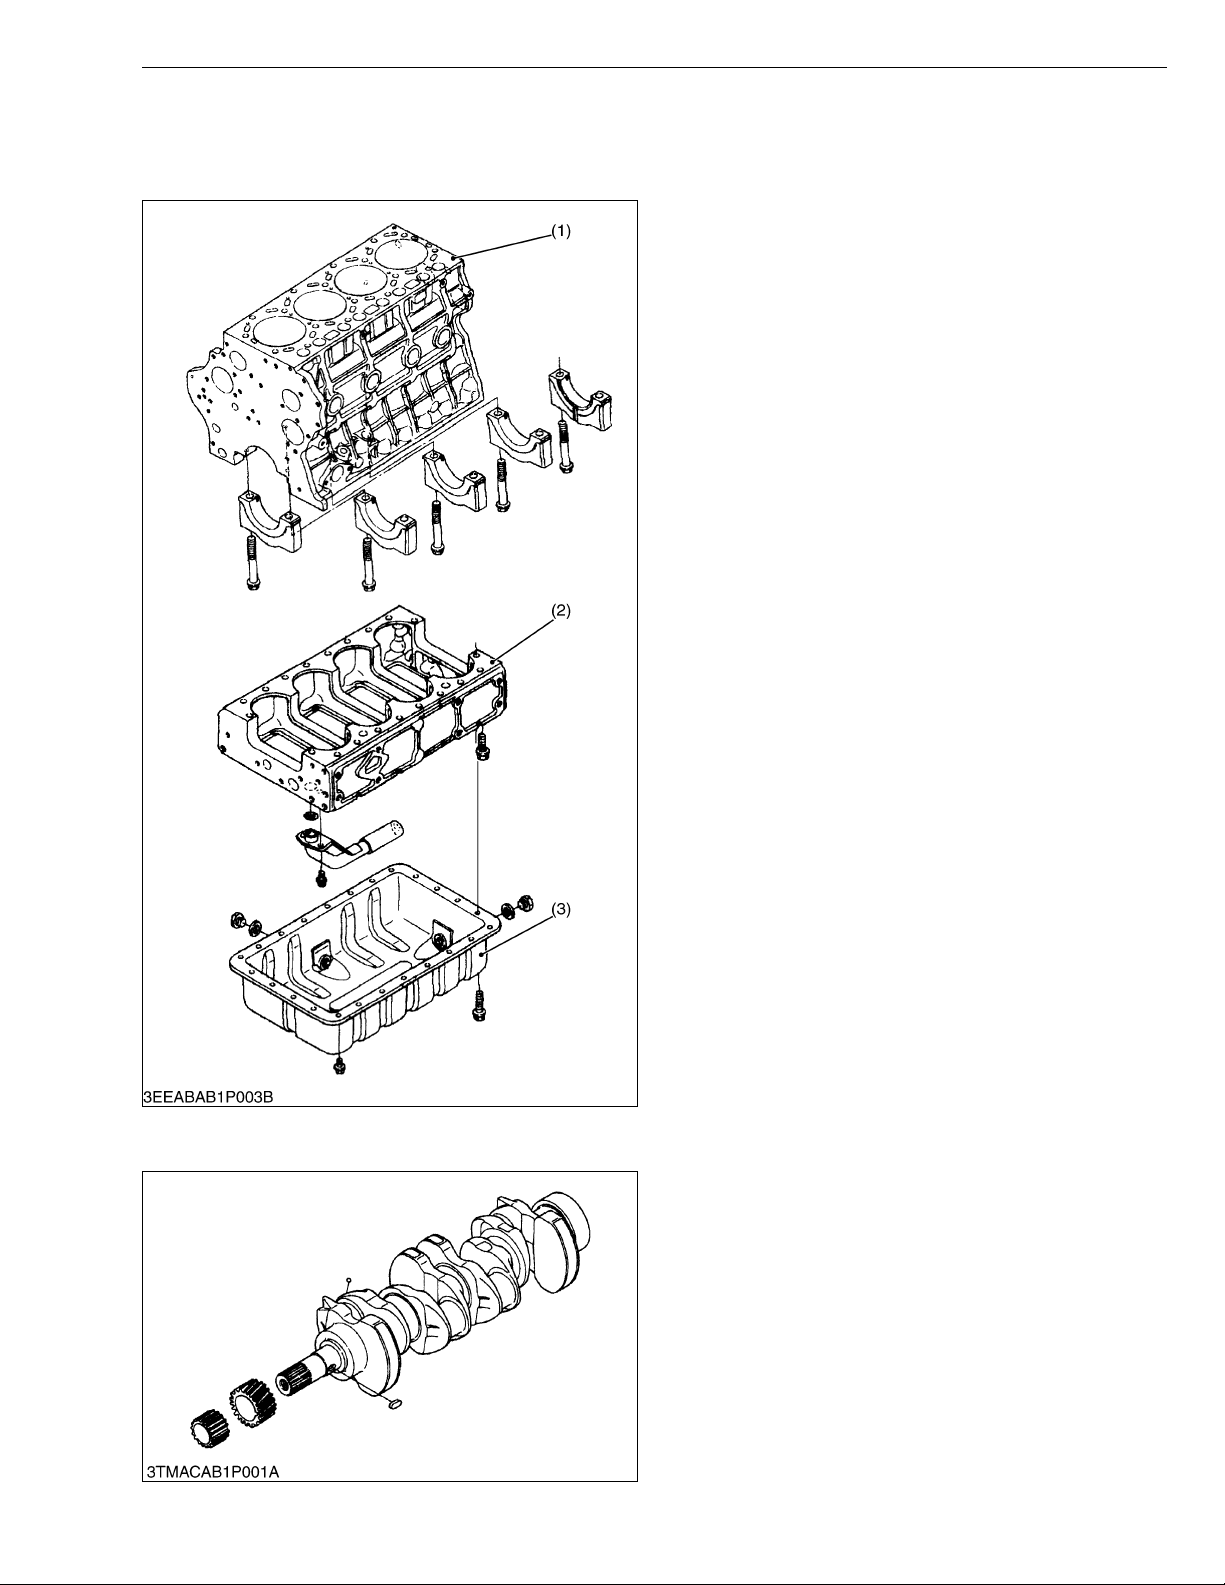
ME8200, ME9000, WSM
KiSC issued 03, 2007 A
1. ENGINE BODY
[1] CYLINDER BLOCK
ENGINE
This engine emplo ys separa te type cran kcases - the
crankcase 1 with com bustion part and the crankc ase 2
which supports the crankcase 1 and reduces noise.
Since it is a hanger type, you can easily ass emble /
disassemble it. The cylinder is a linerless type which
enables good cooling operation, less strain and good
abrasion resist ance.
(1) Crankcase 1
(2) Crankcase 2
(3) Oil Pan
W1012660
[2] CRANKSHAFT
This engine adopts the half counter system and
lightweight moving elements, and optimizes the oil
clearance of bearings to reduce noise and vibration.
It also adopts a large diameter journal to improve
rigidity and reliabili ty, and enable large capacity P.T.O.
(Power take-off).
W1012784
1-M1
Page 97
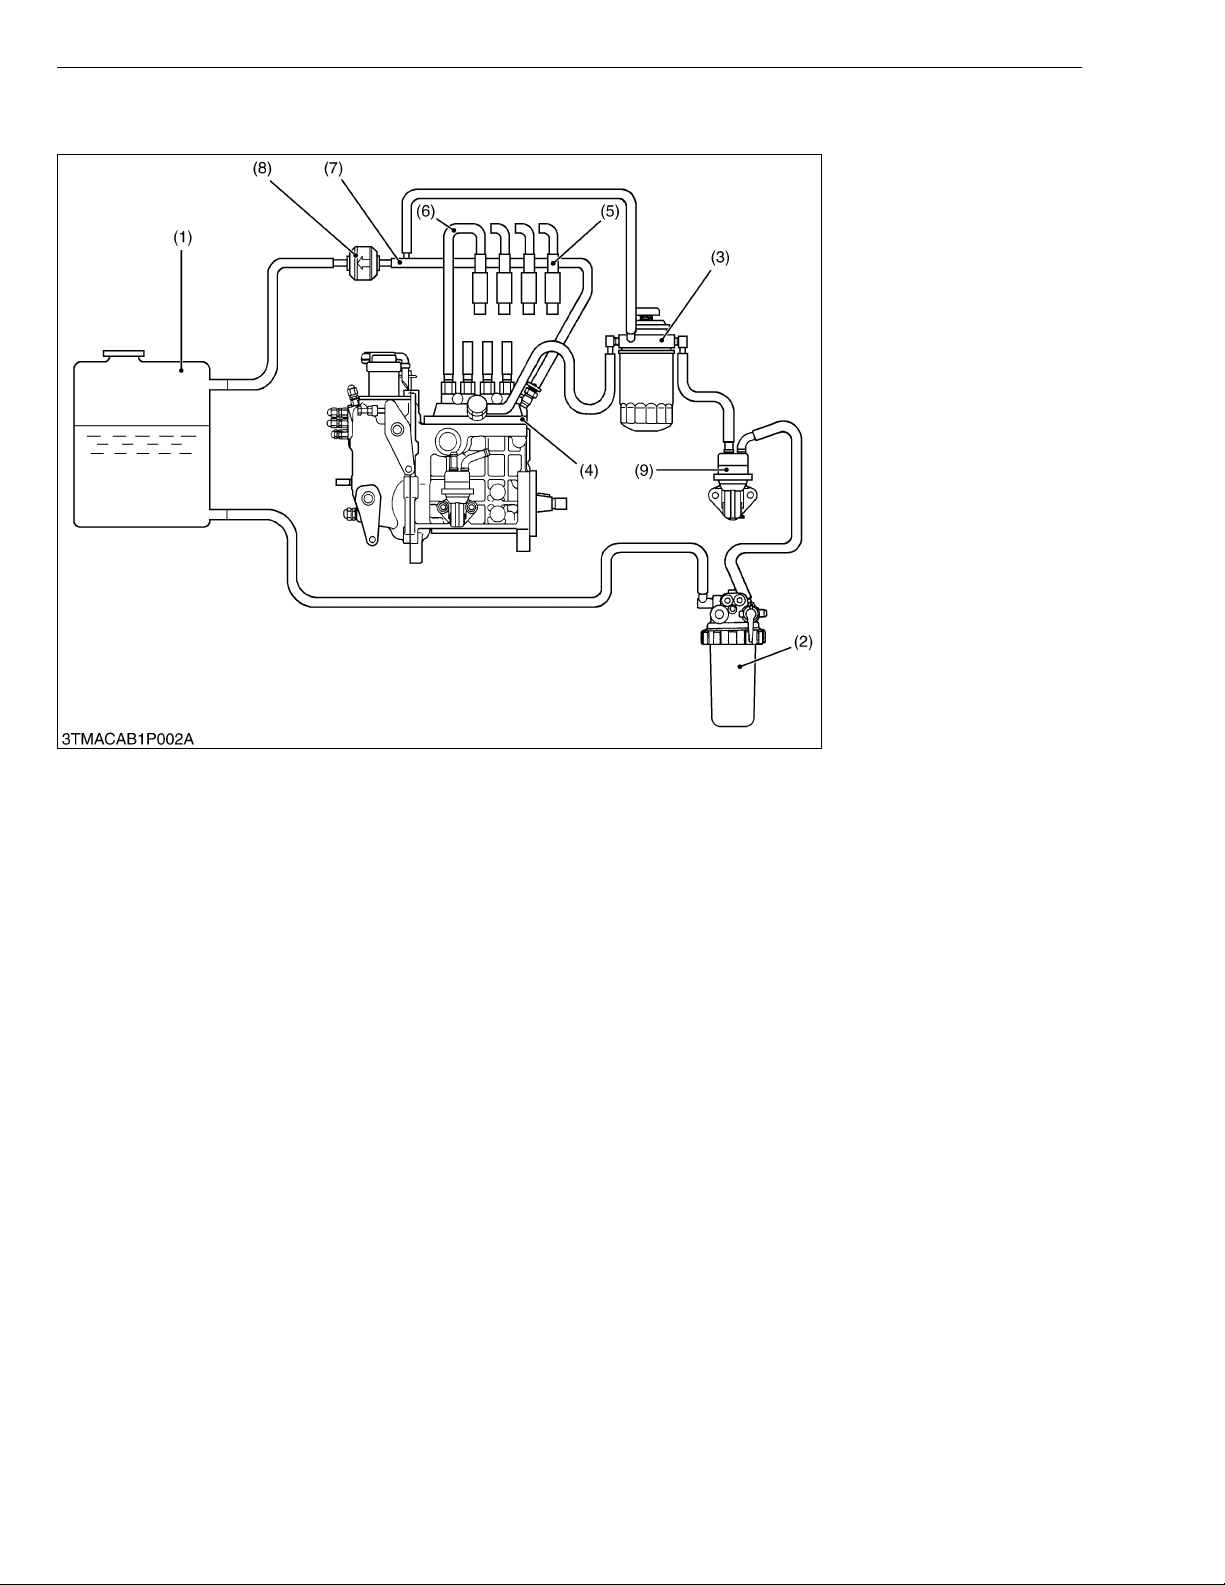
ME8200, ME9000, WSM
KiSC issued 03, 2007 A
2. FUEL SYSTEM
ENGINE
(1) Fuel Tank
(2) Separator
(3) Fuel Filter
(4) Injection Pump
(5) Injection Nozzle
(6) Injection Pipe
(7) Fuel Overflow Pipe
(8) Check Valve
(9) Fuel Feed Pump
W1012846
Fuel from the fuel tank (1) suck up by feed pump (9) through the separator (2) and then enter the fuel filter (3).
After impurities such as dirt, water etc. are removed, the fuel enter the injection pump (4) and is pressurized.
2
The fuel pressurized by the injection pump to the opening pressure (13.7 to 14.71 MPa, 140 to 150 kgf/cm
, 1991
to 2062 psi) of the injection nozzle (5) is injected into the combustion chamber.
Part of the fuel fed to the injection n ozzle (5) lubricates th e moving parts of th e plunger inside th e nozzle, then
returns to the fuel tank (1) through the overflow pipe (7) and check valve (8) another end of overflow pipe is connected
to pump body by joint.
Thus, this system is designed to prevent mixing of air into fuel which causes hard starting.
1-M2
Page 98
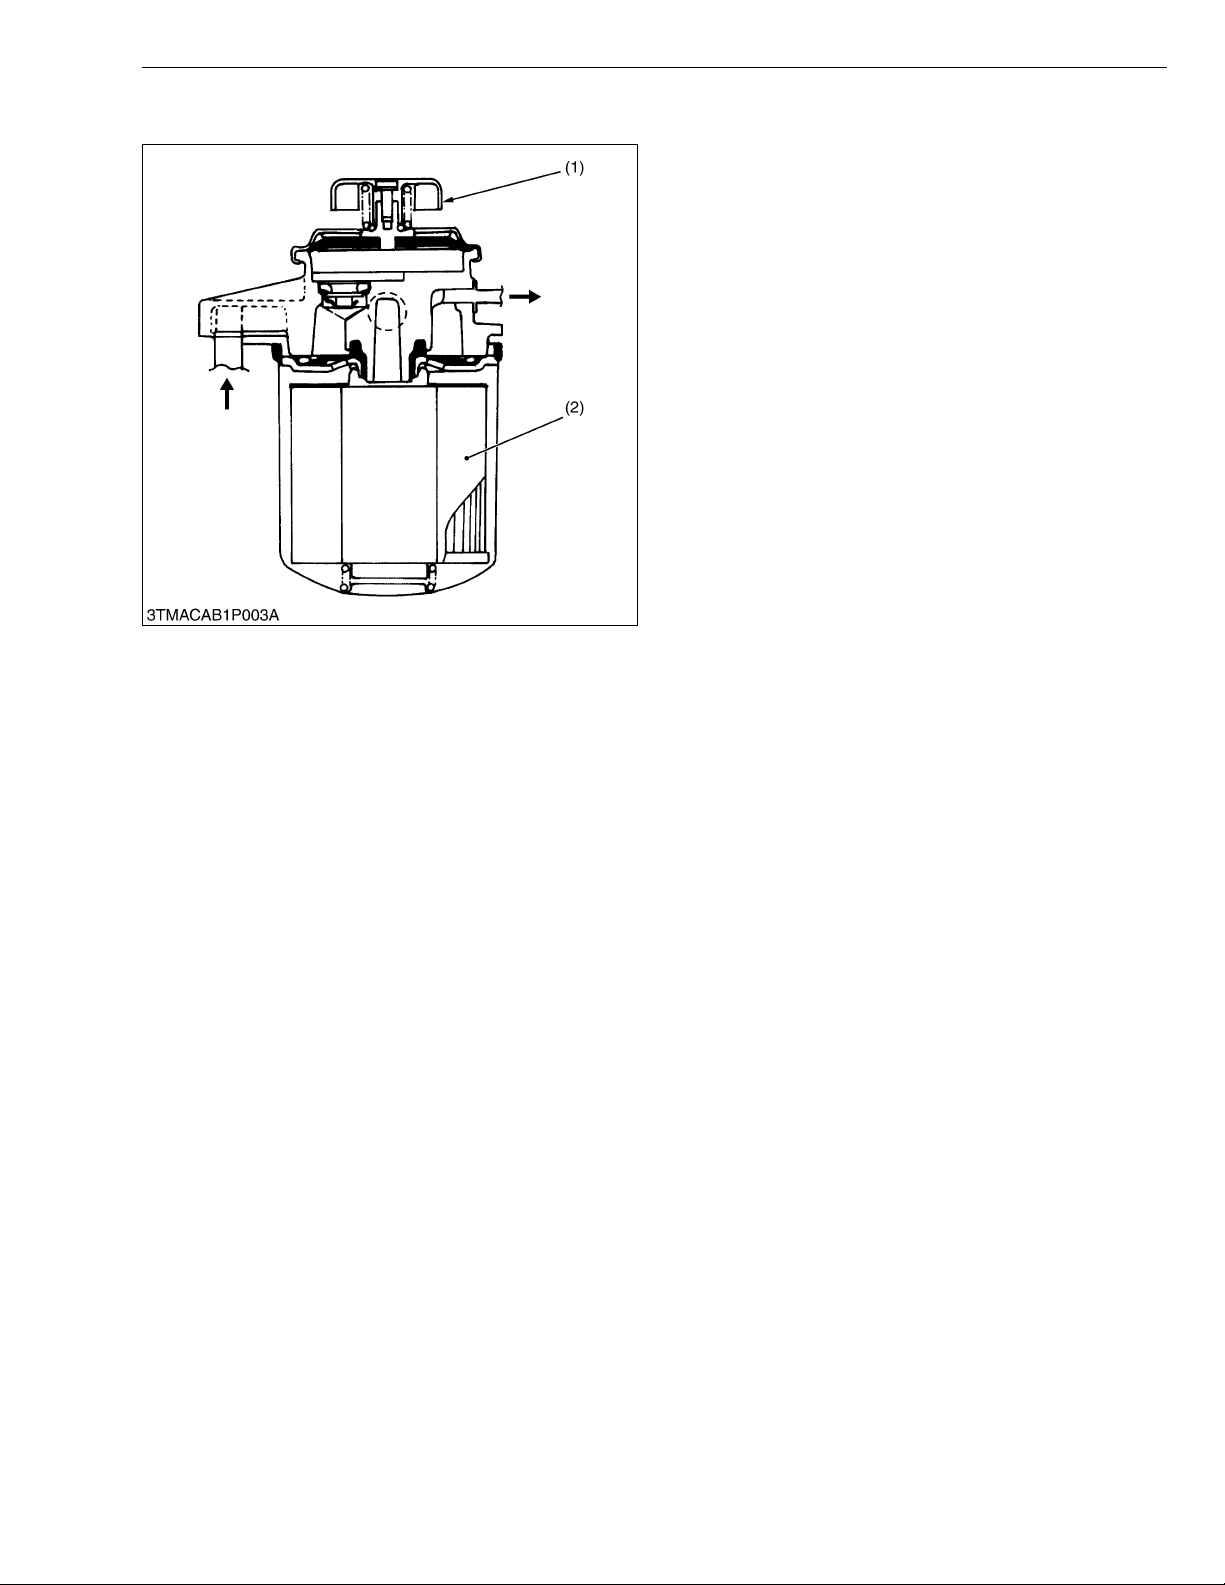
ME8200, ME9000, WSM
KiSC issued 03, 2007 A
[1] FUEL FILTER
ENGINE
The fuel filter is install ed between the fuel tank and
fuel lift pump, a nd serves to remove dir t and impurities
from the fuel.
Fuel from the fuel tank enter s the outside of t he filter
element (2) and passes through the filter elemen t under
its own pressure. As it passes through, the dirt and
impurities in the fuel are filtered out, all owing only cl ean
fuel to enter the interior of the filter element.
The feed pump (1) sends fuel from the fuel tank to the
injection pump by applying pressure to fuel.
(1) Feed Pump (2) Element
W1013080
1-M3
Page 99
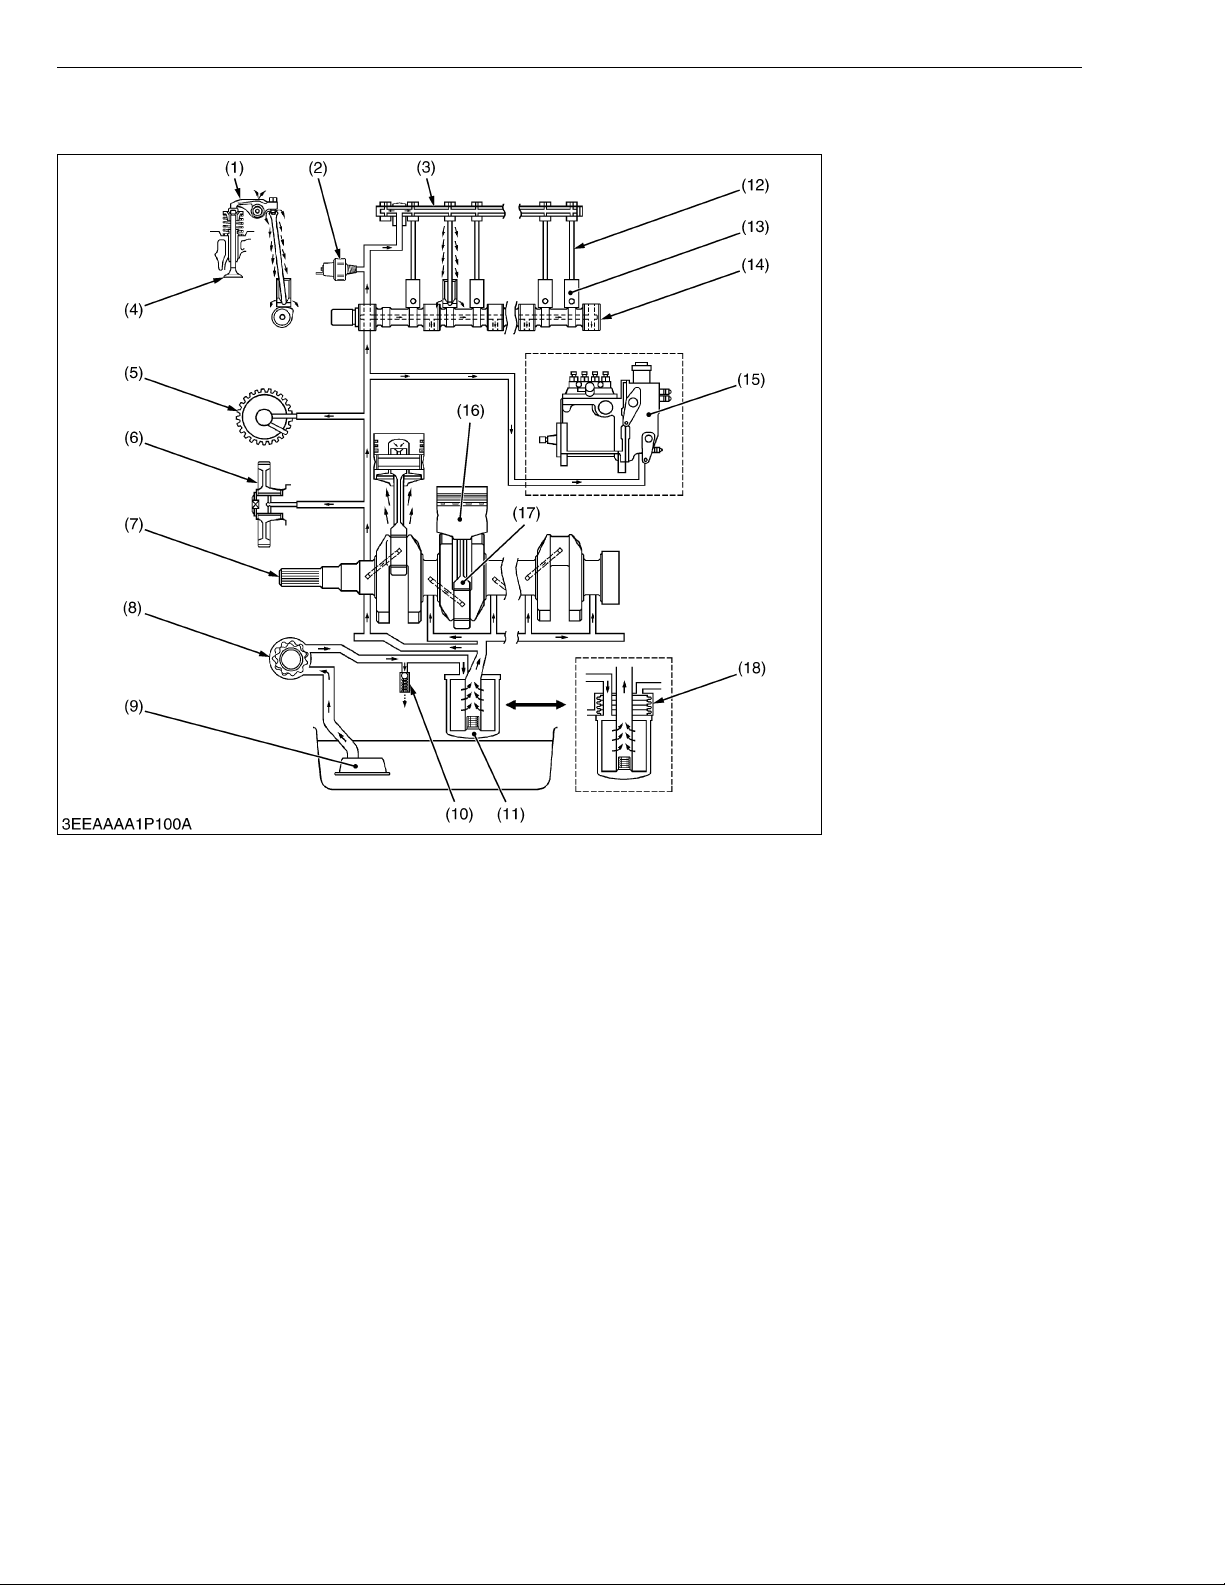
ME8200, ME9000, WSM
KiSC issued 03, 2007 A
3. LUBRICATING SYSTEM
ENGINE
(1) Roc ker Arm
(2) Oil Pressure Switch
(3) Roc ker Arm Shaft
(4) Valve
(5) Governor Shaft
(6) Idle Gear
(7) Crank shaft
(8) Oil Pump
(9) Oil Strainer
(10) Relief Valve
(11) Oil Filter Cartridge
(12) Push Rod
(13) Tappet
(14) Camshaft
(15) Fuel Injection Pump Unit
(16) Piston
(17) Connecting Rod
(18) Oil Cooler
W1013231
Engine lubricating system may be classified as:
• Full pressure feed type
• Pressure feed and splash type
Kubota engines have lubricating system of full pressure feed type.
This system consists of an oil strainer (9), oil pump (8), relief valve (10), oil filter cartridge (11), oil cooler (18) (some
models) and oil pressure switch (2).
The oil pump su cks lubricat ing oil fr om the oil pan through t he oil strai ner and th e oil flows d own to the oil filter,
cartridge where it is further filtered. Then the oil is forced to crankshaft (7), connecting rods (17), idle gear (6),
governor shaft (5) , camshaft (14 ), rocker arm s haft (3) and fuel inject ion pump unit ( 15) (some m odels) to lub ricate
each part through the oil gallery.
Some part of oil, spl ashed by the cra nksha ft or l eaking a nd dro pping fro m gaps of each pa rt, lu bricate s foll owing
parts.
•Pistons
• Cylinder walls
• Small ends of connecting rods
• Tappets
• Push rods
• Intake and exhaust valves
• Timing gears
1-M4
Page 100
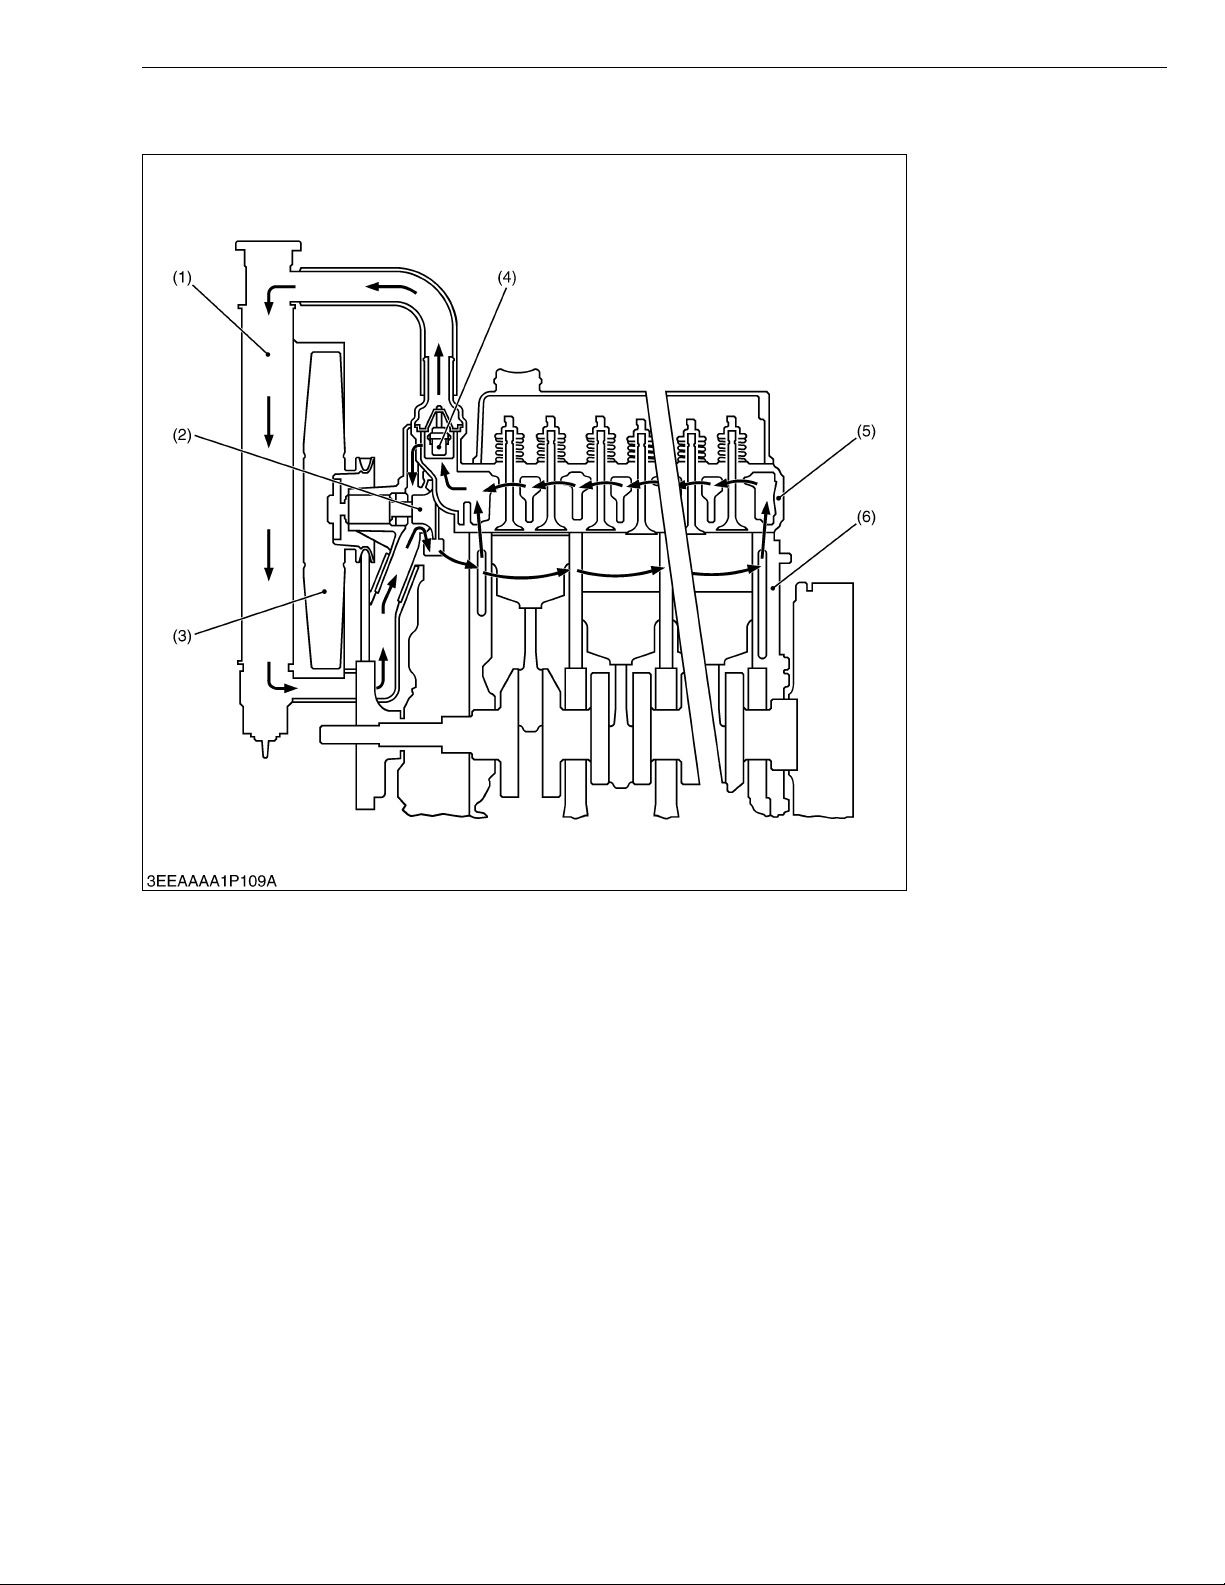
ME8200, ME9000, WSM
KiSC issued 03, 2007 A
4. COOLING SYSTEM
ENGINE
(1) Radiator
(2) Water Pump
(3) Cooling Fan
(4) Thermostat
(5) Cylinder Head
(6) Cylinder Block
W1013737
The cooling system cools the engine while it is running to preven t overheating and maintain a proper oper ating
temperature.
Kubota engines are used pressurized forced-circulation type.
This system con sists of a radiator (1) , water pump (2), coo ling fan (3), thermosta t (4) and coolant tem perature
sensor (some models).
The coolant is cool ed through th e radiator core , and the fan s et behind the ra diator pulls cooling air through the
core to improve cooling.
When the coolant in the engi ne is at a low temperature, the thermostat valve is closed so that the coolant is
circulated in the engine through the bypass pipe.When the temperature of the coolant becomes the valve opening
temperature of thermostat (4), the thermostat (4) opens the valve to return the heated coolant to the radiator (1).
The water pump (2) sucks the cooled water, forces it into the cylinder block (6) and draws out the hot water.
Some engines employ the bottom bypass system to improve the cooling performance of radiator and the three step
valve opening type thermostat to reduce thermal shock radically.
1-M5
 Loading...