

Page 1

WORKSHOP MANUAL
KiSC issued 07, 2012 A
TRACTOR
M6040,M7040
Page 2

TO THE READER
KiSC issued 07, 2012 A
This Workshop Manual tells the servicing personnel about the mechanism, servicing and
maintenance of the M6040 and M7040. It contains 4 parts: "Information", "General", "Mechanism"
and "Servicing".
Information
This section primarily contains information below.
• Safety First
• Safety Decal
• Specification
• Traveling Speeds
• Dimension
General
This section primarily contains information below.
• Engine Identification
• Model Identification
• General Precautions
• Maintenance Check List
• Check and Maintenance
• Special Tools
Mechanism
This section contains information on the structure and the function of the unit. Before you continue
with the subsequent sections, make sure that you read this section.
Refer to the latest version of Workshop Manual (Code No. 9Y021-01870 / 9Y021-18200) for the
diesel engine / tractor mechanism that this workshop manual does not include.
Servicing
This section primarily contains information below.
• Troubleshooting
• Servicing Specifications
• Tightening Torques
• Checking, Disassembling and Servicing
All illustrations, photographs and specifications contained in this manual are of the newest
information available at the time of publication.
KUBOTA reserves the right to change all information at any time without notice.
Since this manual includes many models, information or illustrations and photographs can show
more than one model.
September, 2008
© KUBOTA Corporation 2008
Page 3

I INFORMATION
KiSC issued 07, 2012 A
Page 4

INFORMATION
KiSC issued 07, 2012 A
CONTENTS
1. SAFETY FIRST .............................................................................................................................. I-1
2. SAFETY DECALS .......................................................................................................................... I-4
3. SPECIFICATIONS........................................................................................................................ I-10
4. TRAVELING SPEEDS.................................................................................................................. I-12
5. DIMENSIONS ............................................................................................................................... I-13
Page 5
M6040, M7040, WSM
SAFETY FIRST
DANGER
WARNING
CAUTION
IMPORTANT
NOTE
KiSC issued 07, 2012 A
INFORMATION
1. SAFETY FIRST
• This symbol, the industry's "Safety Alert Symbol", is used throughout this manual and on labels on the
machine itself to warn of the possibility of personal injury. Read these instructions carefully.
• It is essential that you read the instructions and safety regulations before you attempt to repair or use
this unit.
• Indicates an imminently hazardous situation which, if not avoided, will result in death or serious injury.
• Indicates a potentially hazardous situation which, if not avoided, could result in death or serious injury.
• Indicates a potentially hazardous situation which, if not avoided, may result in minor or moderate
injury.
• Indicates that equipment or property damage could result if instructions are not followed.
• Gives helpful information.
WSM000001INI0001US1
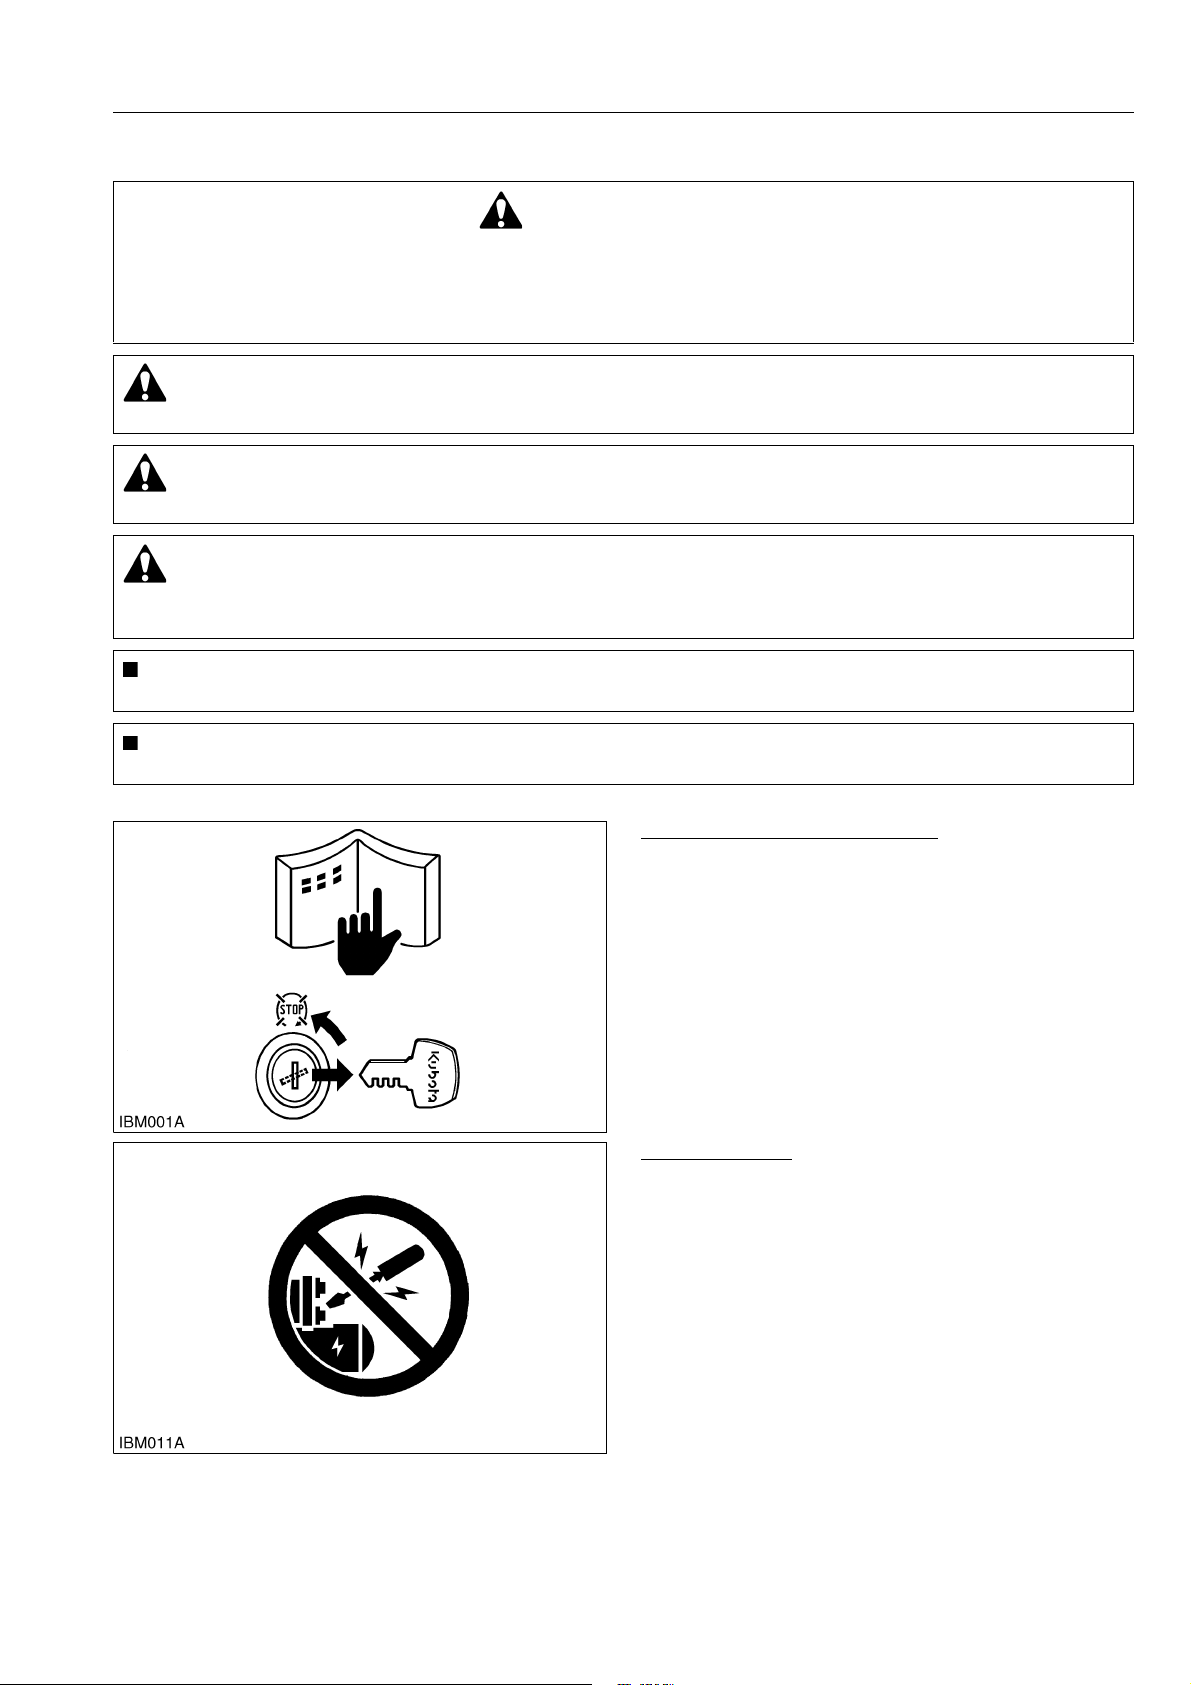
BEFORE YOU START SERVICE
• Read all instructions and safety instructions in this
manual and on your engine safety decals.
• Clean the work area and engine.
• Park the machine on a stable and level ground.
• Let the temperature of the engine decrease before
you start a job.
• Stop the engine, then remove the key.
• Disconnect the battery negative cable.
• Hang a "DO NOT OPERATE" tag in the operator
station.
WSM000001INI0002US0
START SAFELY
• Do not do the procedures below when you start the
engine.
– short across starter terminals
– bypass the safety start switch
• Do not make unauthorized modifications to the
engine. This can cause damage and decrease the
engine life.
WSM000001INI0003US0
I-1
Page 6
M6040, M7040, WSM
KiSC issued 07, 2012 A
INFORMATION
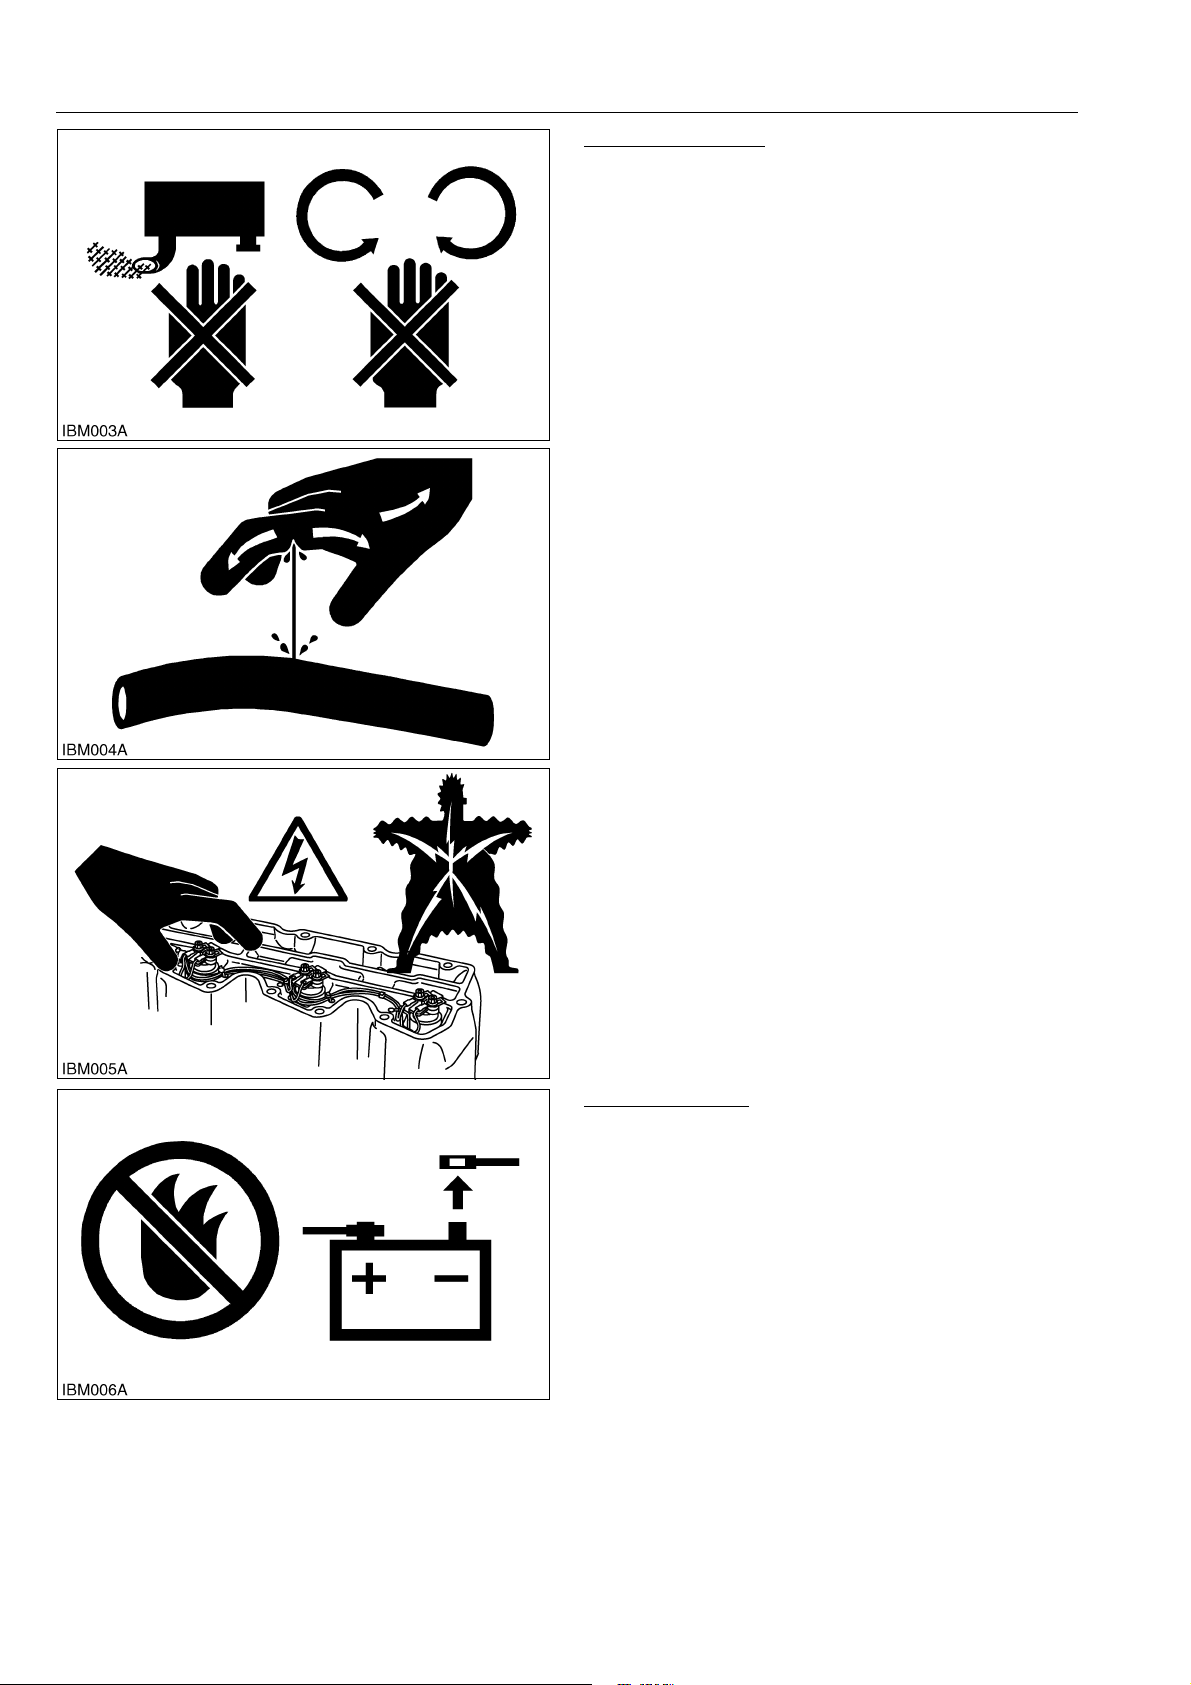
OPERATE SAFELY
• Do not use the machine after you consume alcohol
or medication or when you are tired.
• Put on applicable clothing and safety equipment.
• Use applicable tools only. Do not use alternative
tools or parts.
• When 2 or more persons do servicing, make sure
that you do it safely.
• Do not touch the hot parts or parts that turn when the
engine operates.
• Do not remove the radiator cap when the engine
operates, or immediately after it stops. If not, hot
water can spout out from the radiator. Only remove
the radiator cap when it is at a sufficiently low
temperature to touch with bare hands. Slowly loosen
the cap to release the pressure before you remove it
fully.
• Released fluid (fuel or hydraulic oil) under pressure
can cause damage to the skin and cause serious
injury. Release the pressure before you disconnect
hydraulic or fuel lines. Tighten all connections before
you apply the pressure.
• Do not open a fuel system under high pressure.
The fluid under high pressure that stays in fuel lines
can cause serious injury. Do not disconnect or repair
the fuel lines, sensors, or any other components
between the fuel pump and injectors on engines with
a common rail fuel system under high pressure.
• Put on an applicable ear protective device (earmuffs
or earplugs) to prevent injury against loud noises.
• Be careful about electric shock. The engine
generates a high voltage of more than DC100 V in
the ECU and is applied to the injector.
WSM000001INI0004US0
PREVENT A FIRE
• Fuel is very flammable and explosive under some
conditions. Do not smoke or let flames or sparks in
your work area.
• To prevent sparks from an accidental short circuit,
always disconnect the battery negative cable first
and connect it last.
• The battery gas can cause an explosion. Keep the
sparks and open flame away from the top of battery,
especially when you charge the battery.
• Make sure that you do not spill fuel on the engine.
WSM000001INI0005US1
I-2
Page 7
M6040, M7040, WSM
KiSC issued 07, 2012 A
INFORMATION
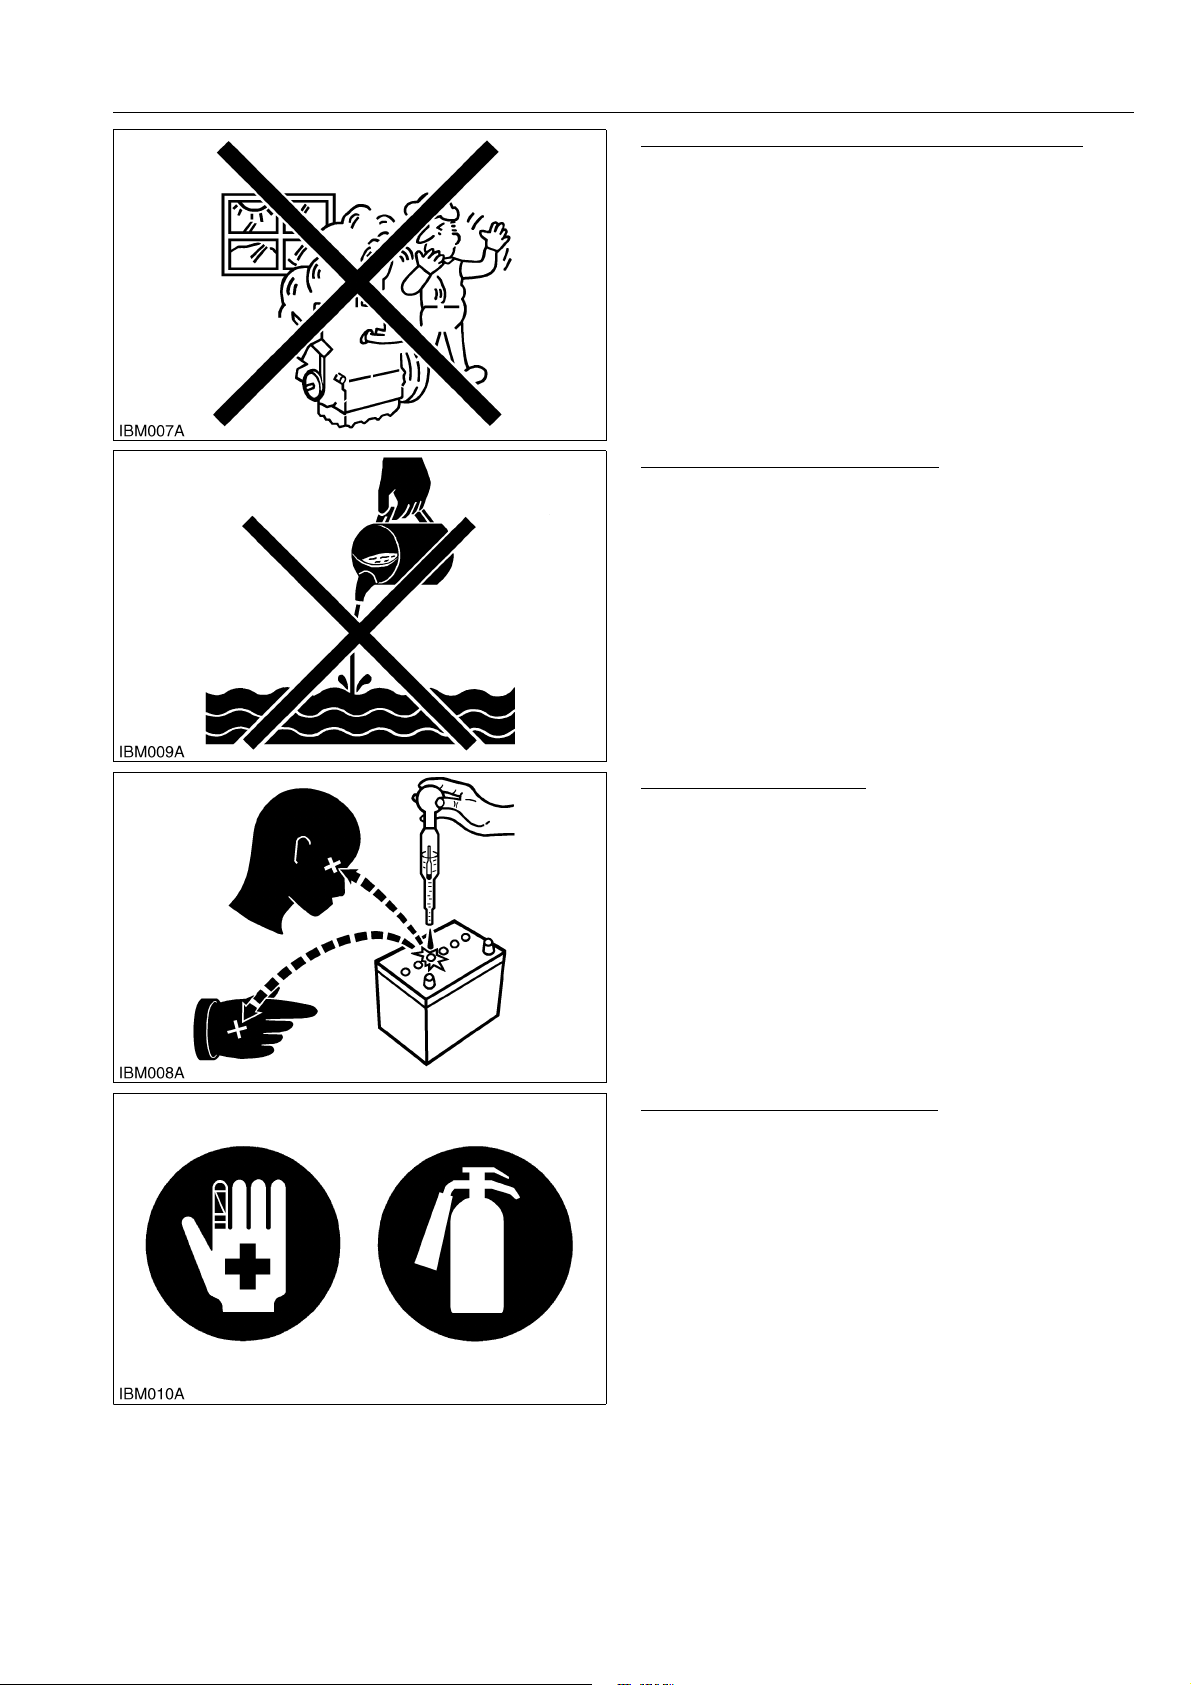
KEEP A GOOD AIRFLOW IN THE WORK AREA
• If the engine is in operation, make sure that the area
has good airflow. Do not operate the engine in a
closed area. The exhaust gas contains poisonous
carbon monoxide.
WSM000001INI0006US1
DISCARD FLUIDS CORRECTLY
• Do not discard fluids on the ground, down the drain,
into a stream, pond, or lake. Obey related
environmental protection regulations when you
discard oil, fuel, coolant, electrolyte and other
dangerous waste.
WSM000001INI0007US1
PREVENT ACID BURNS
• Keep electrolyte away from your eyes, hands and
clothing. Sulfuric acid in battery electrolyte is
poisonous and it can burn your skin and clothing and
cause blindness. If you spill electrolyte on yourself,
clean yourself with water, and get medical aid
immediately.
WSM000001INI0008US1
PREPARE FOR EMERGENCIES
• Keep a first aid kit and fire extinguisher ready at all
times.
• Keep the emergency contact telephone numbers
near your telephone at all times.
WSM000001INI0009US1
I-3
Page 8
M6040, M7040, WSM
KiSC issued 07, 2012 A
INFORMATION
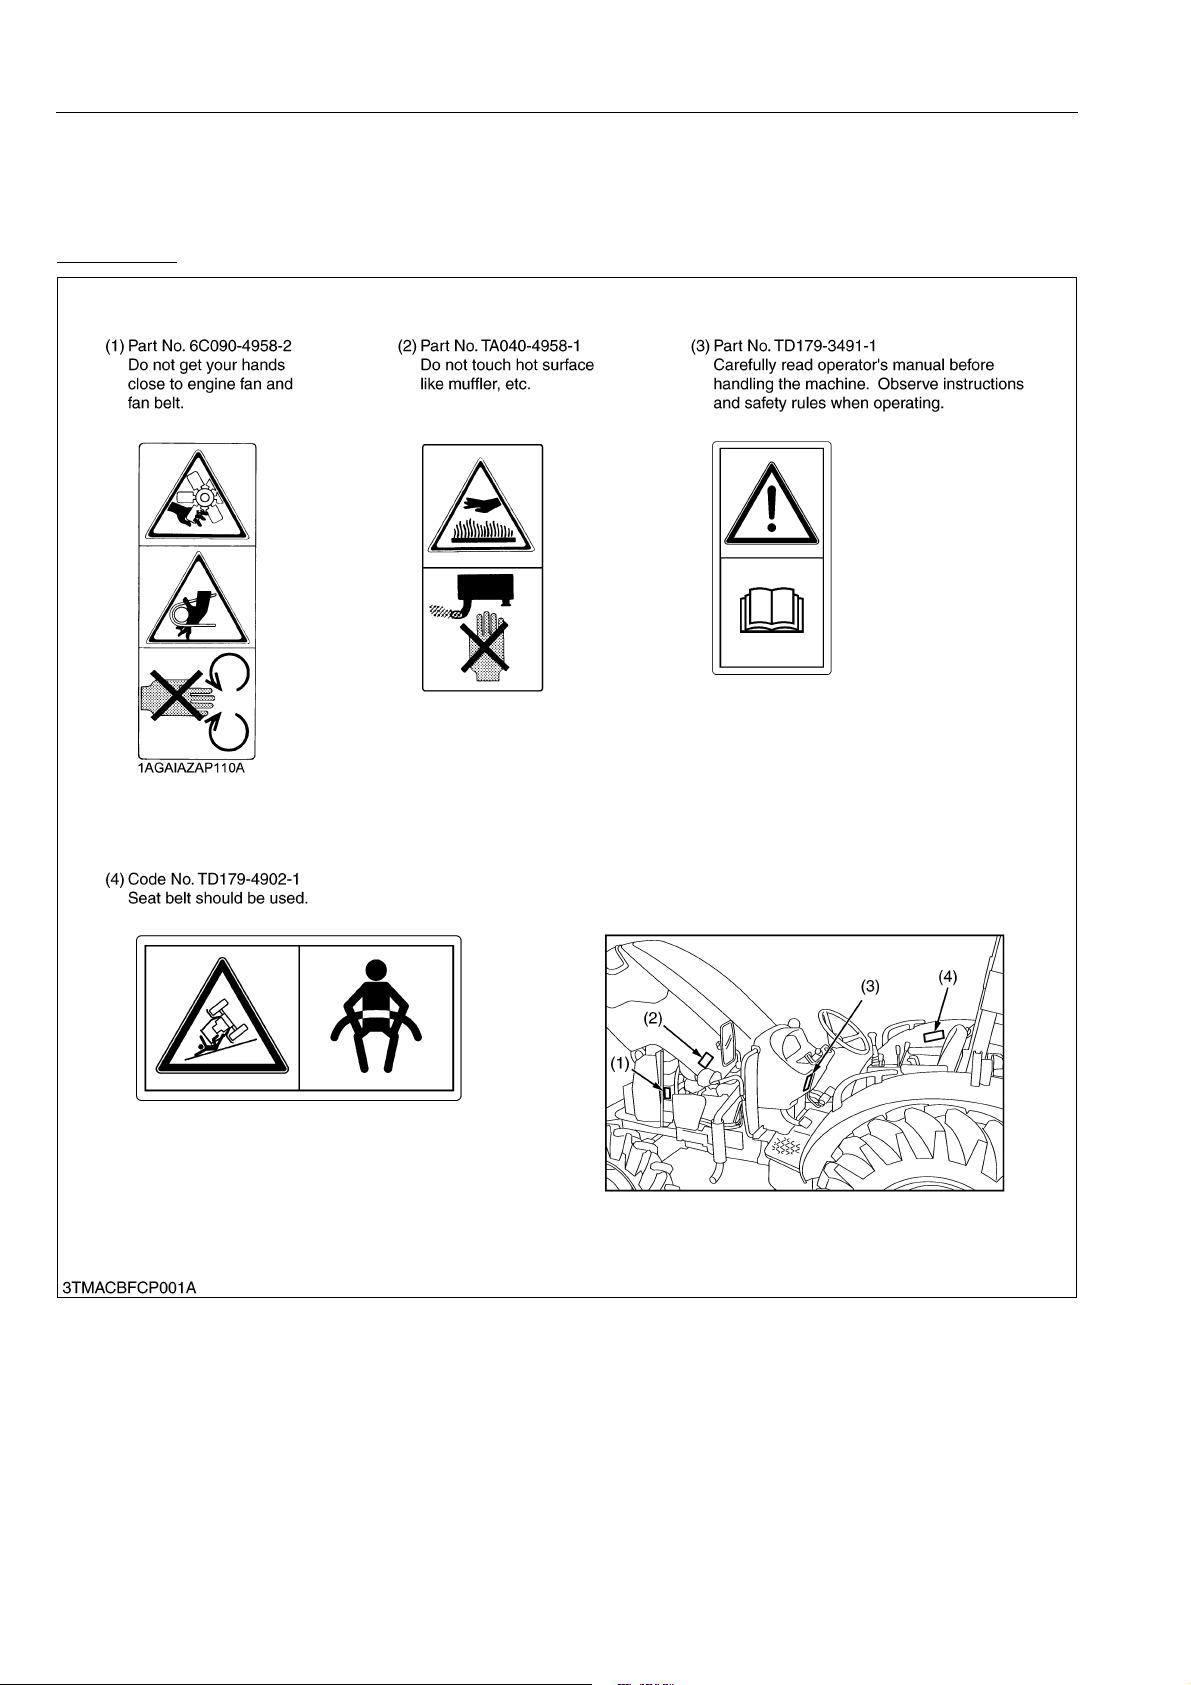
2. SAFETY DECALS
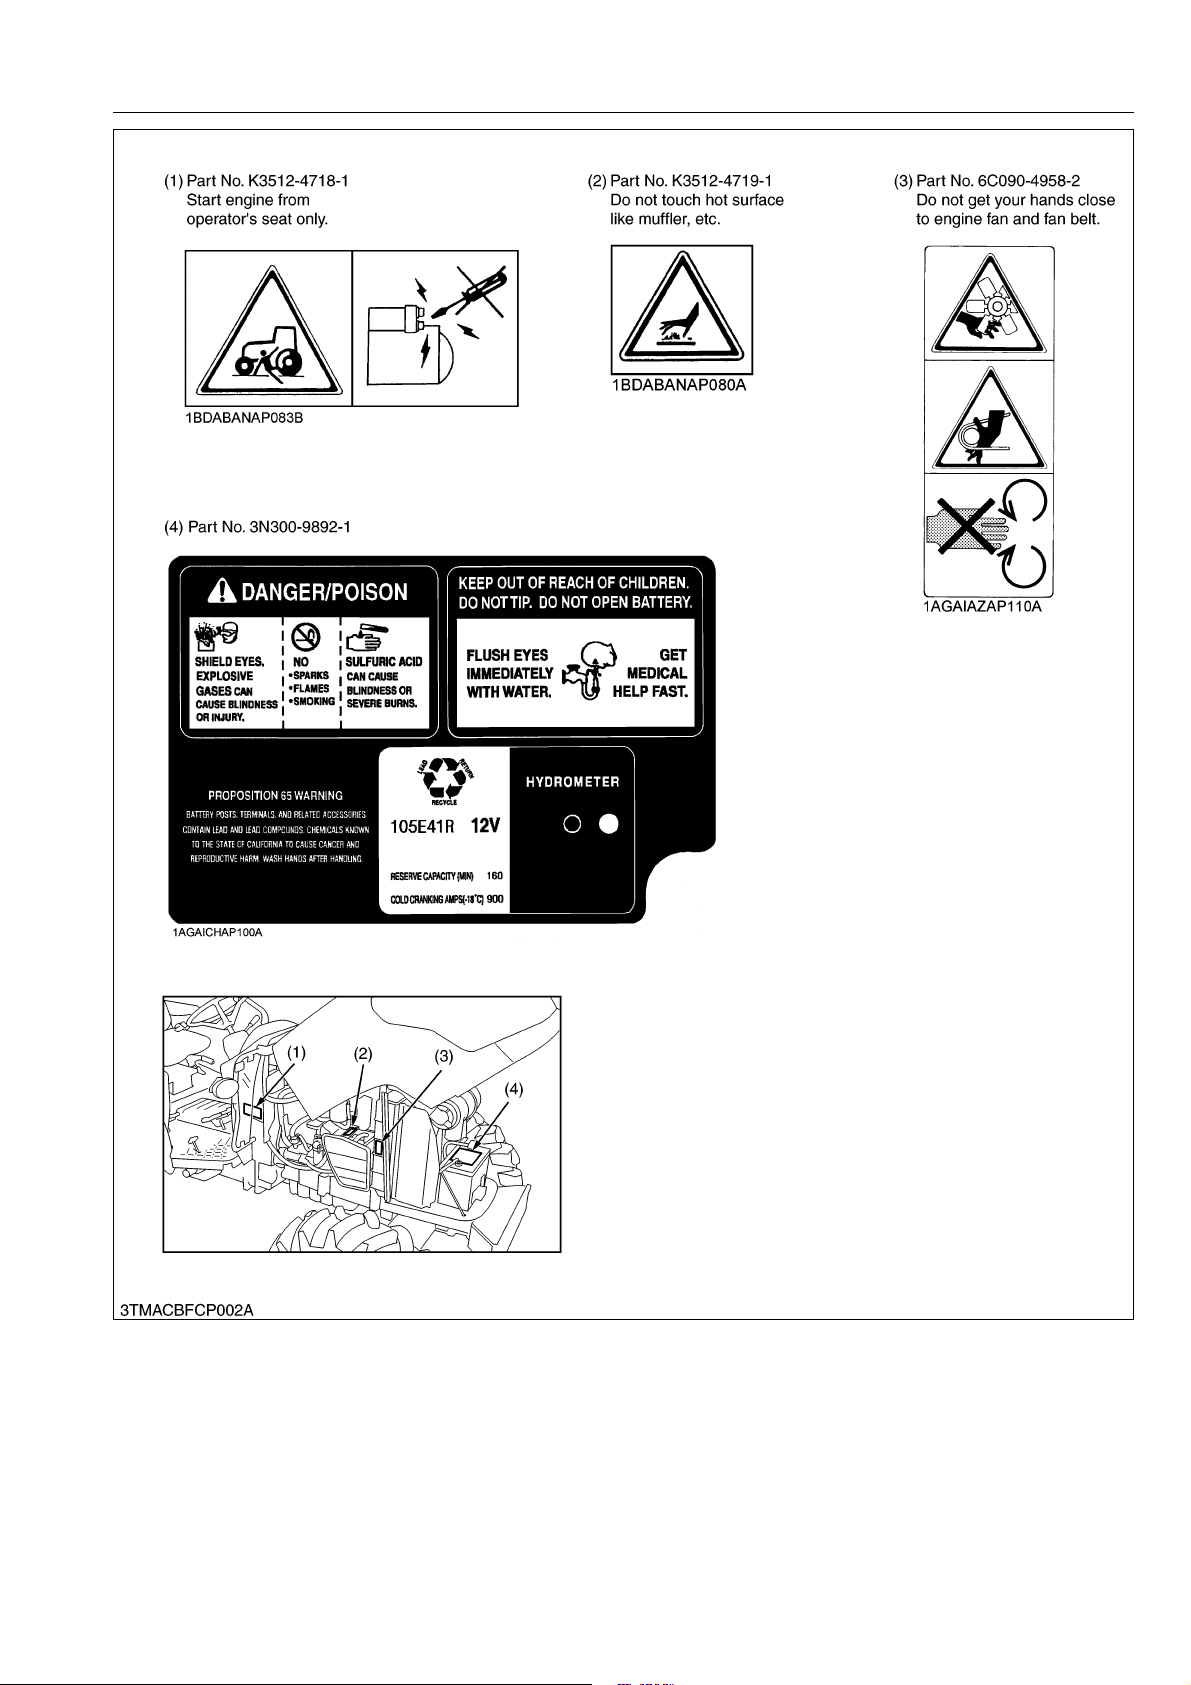
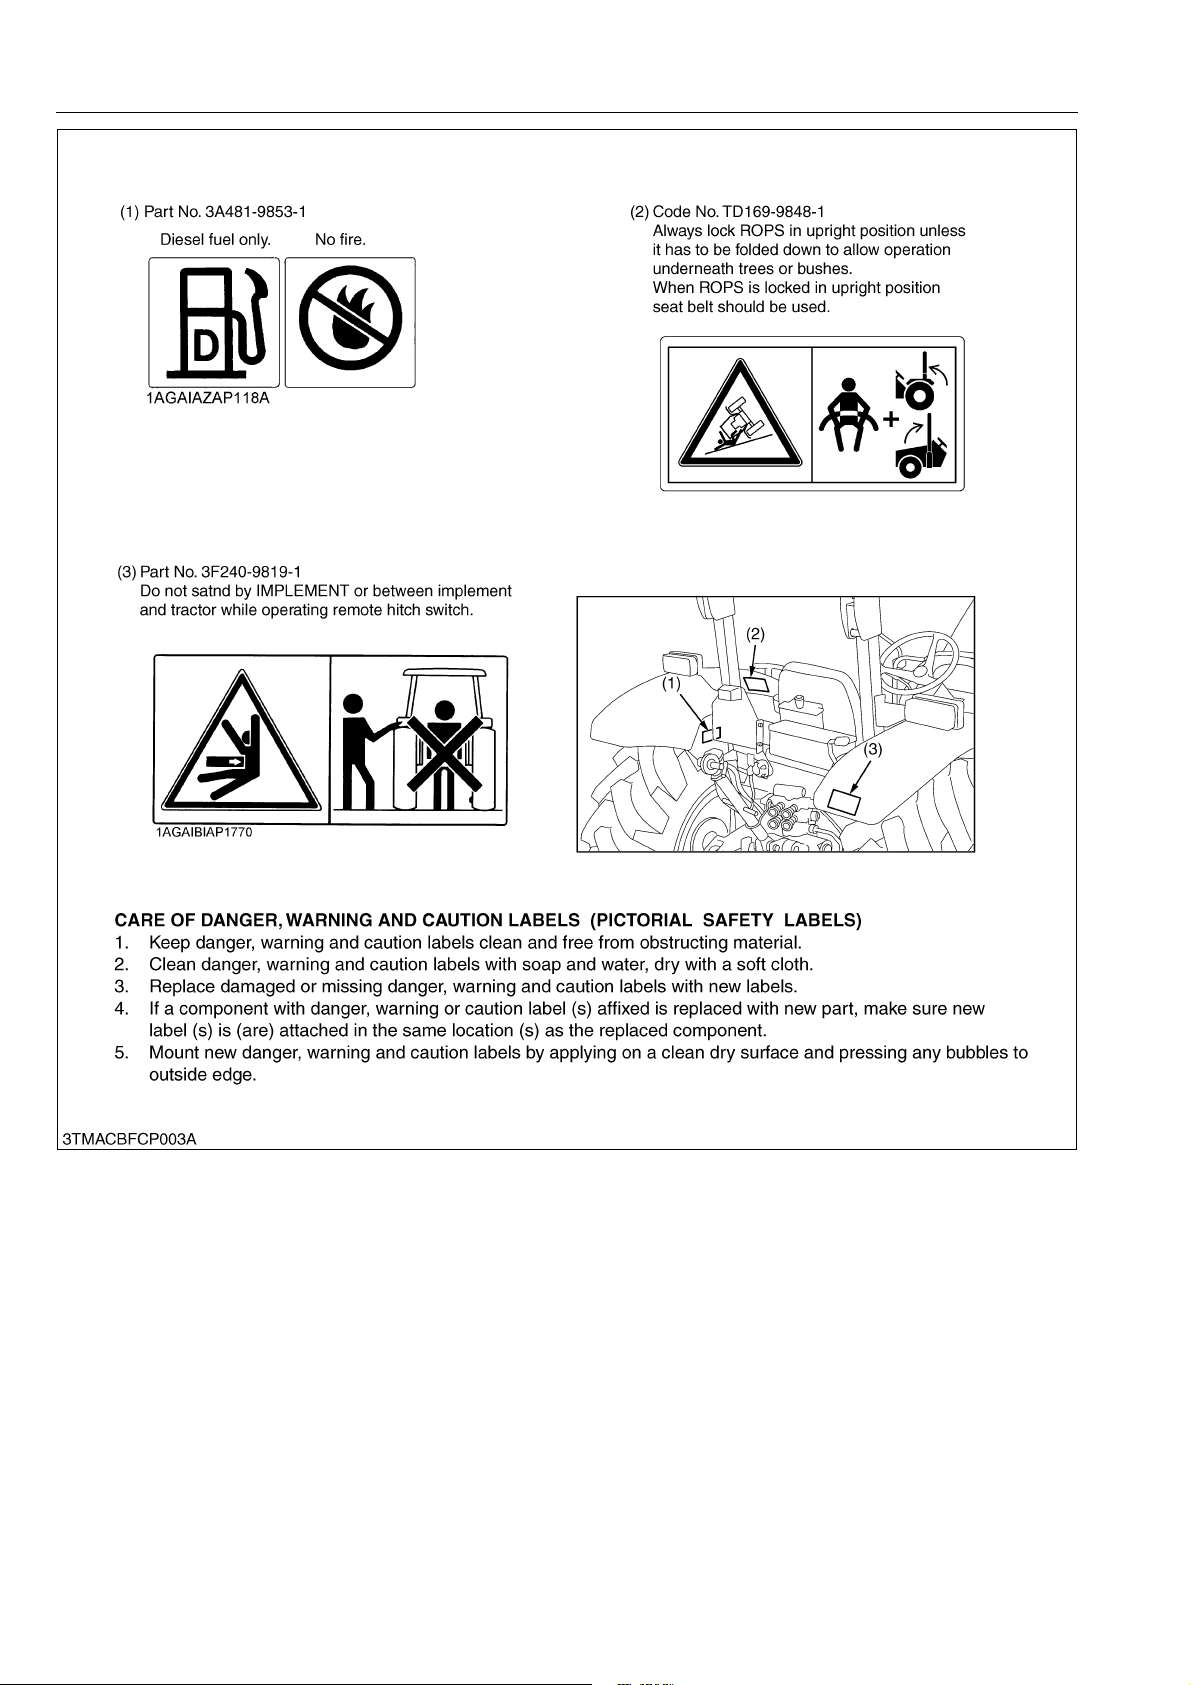
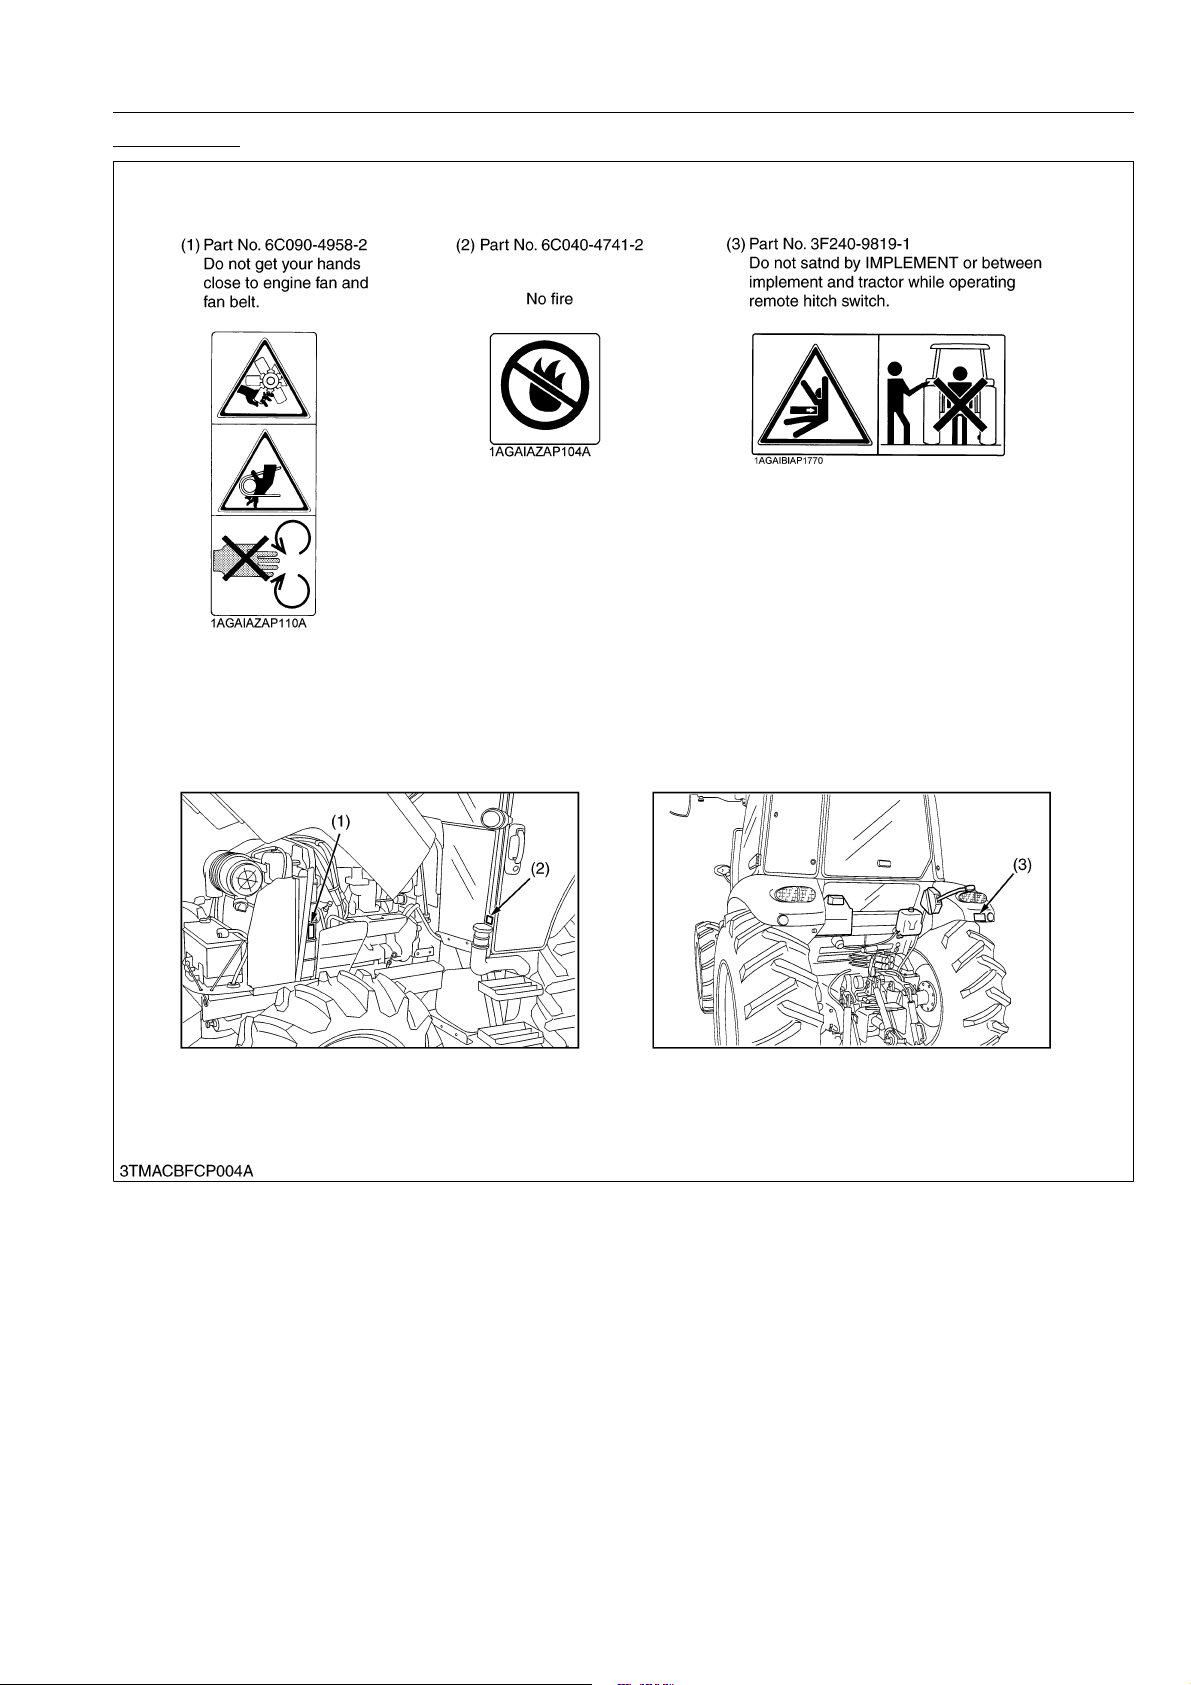
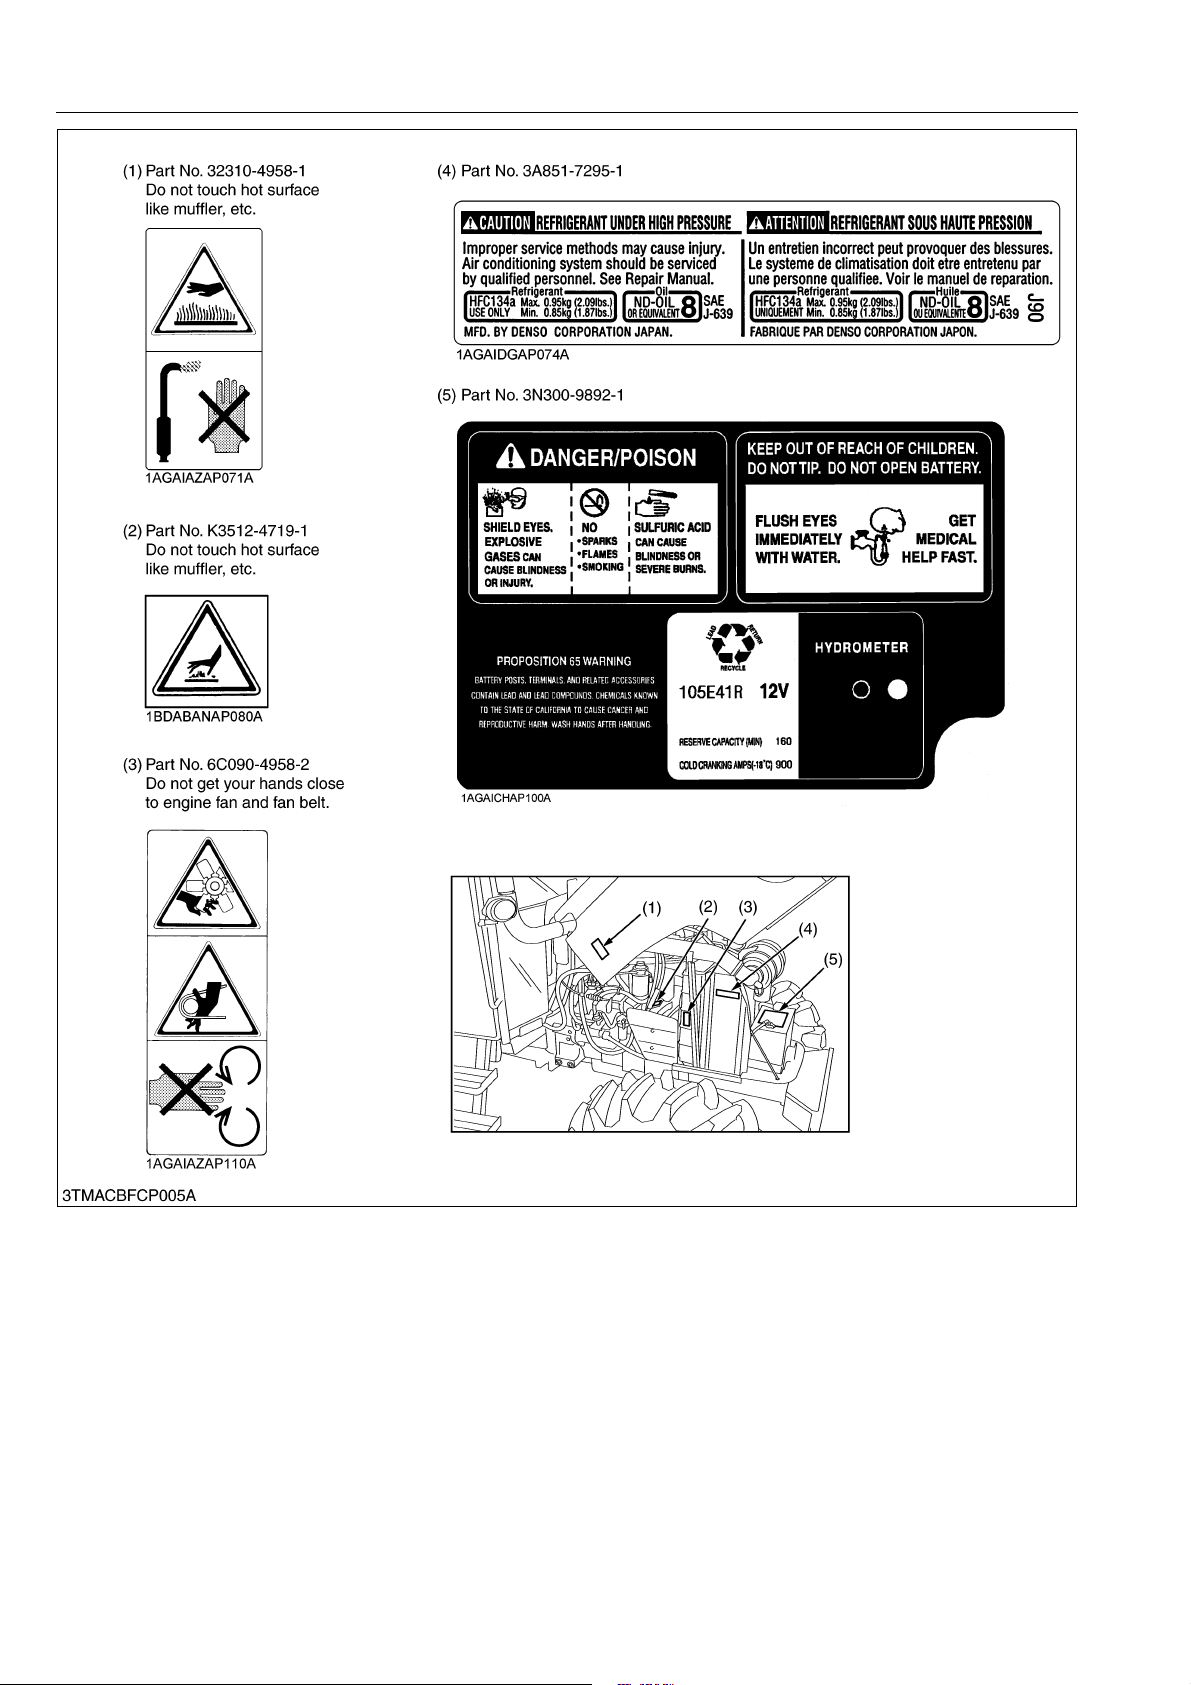
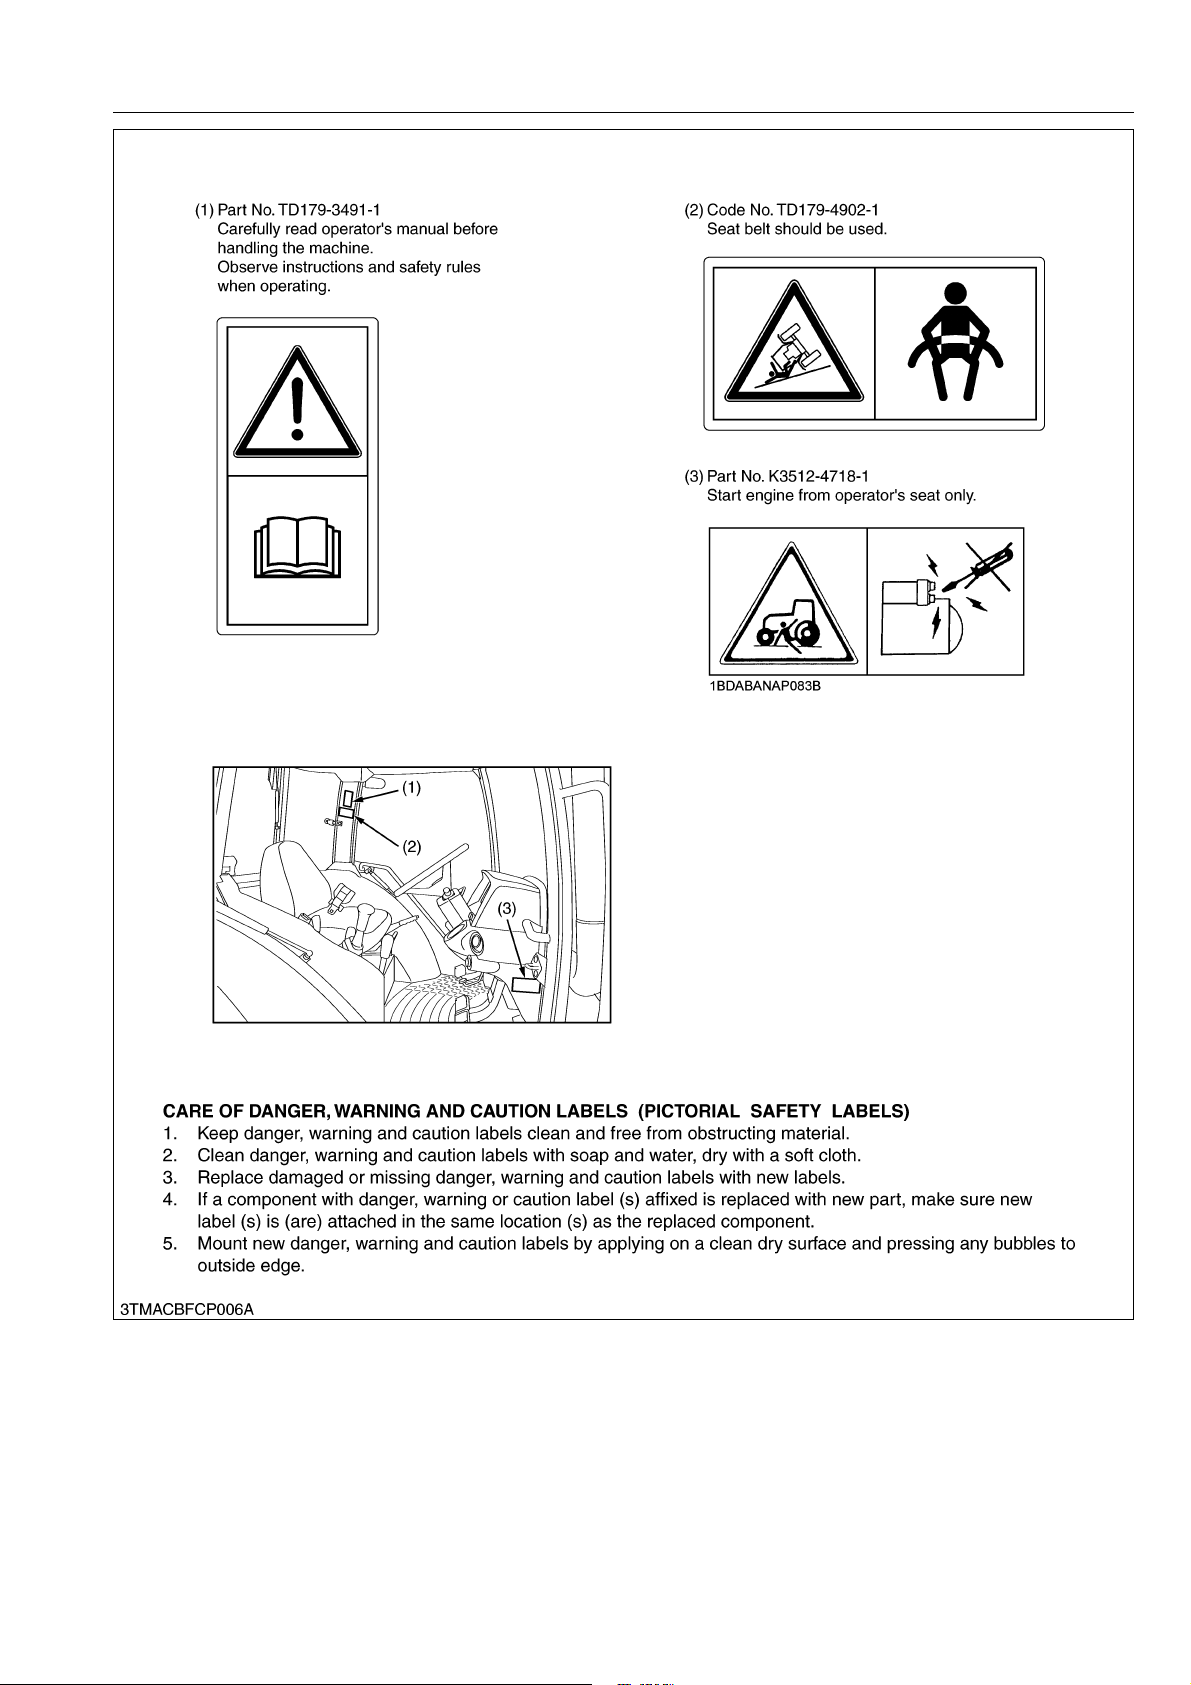
The following safety decals (pictorial safety labels) are installed on the machine. If a decal becomes
damaged, illegible or is not on the machine, replace it. The decal part number is listed in the parts list.
WSM000001INI0014US0
ROPS Model
9Y1210143INI0001US0
I-4
Page 9
M6040, M7040, WSM
KiSC issued 07, 2012 A
INFORMATION
9Y1210143INI0002US0
I-5
Page 10
M6040, M7040, WSM
KiSC issued 07, 2012 A
INFORMATION
9Y1210143INI0003US0
I-6
Page 11
M6040, M7040, WSM
KiSC issued 07, 2012 A
CABIN Model
INFORMATION
9Y1210143INI0004US0
I-7
Page 12
M6040, M7040, WSM
KiSC issued 07, 2012 A
INFORMATION
9Y1210143INI0005US0
I-8
Page 13
M6040, M7040, WSM
KiSC issued 07, 2012 A
INFORMATION
9Y1210143INI0006US0
I-9
Page 14
M6040, M7040, WSM
NOTE
KiSC issued 07, 2012 A
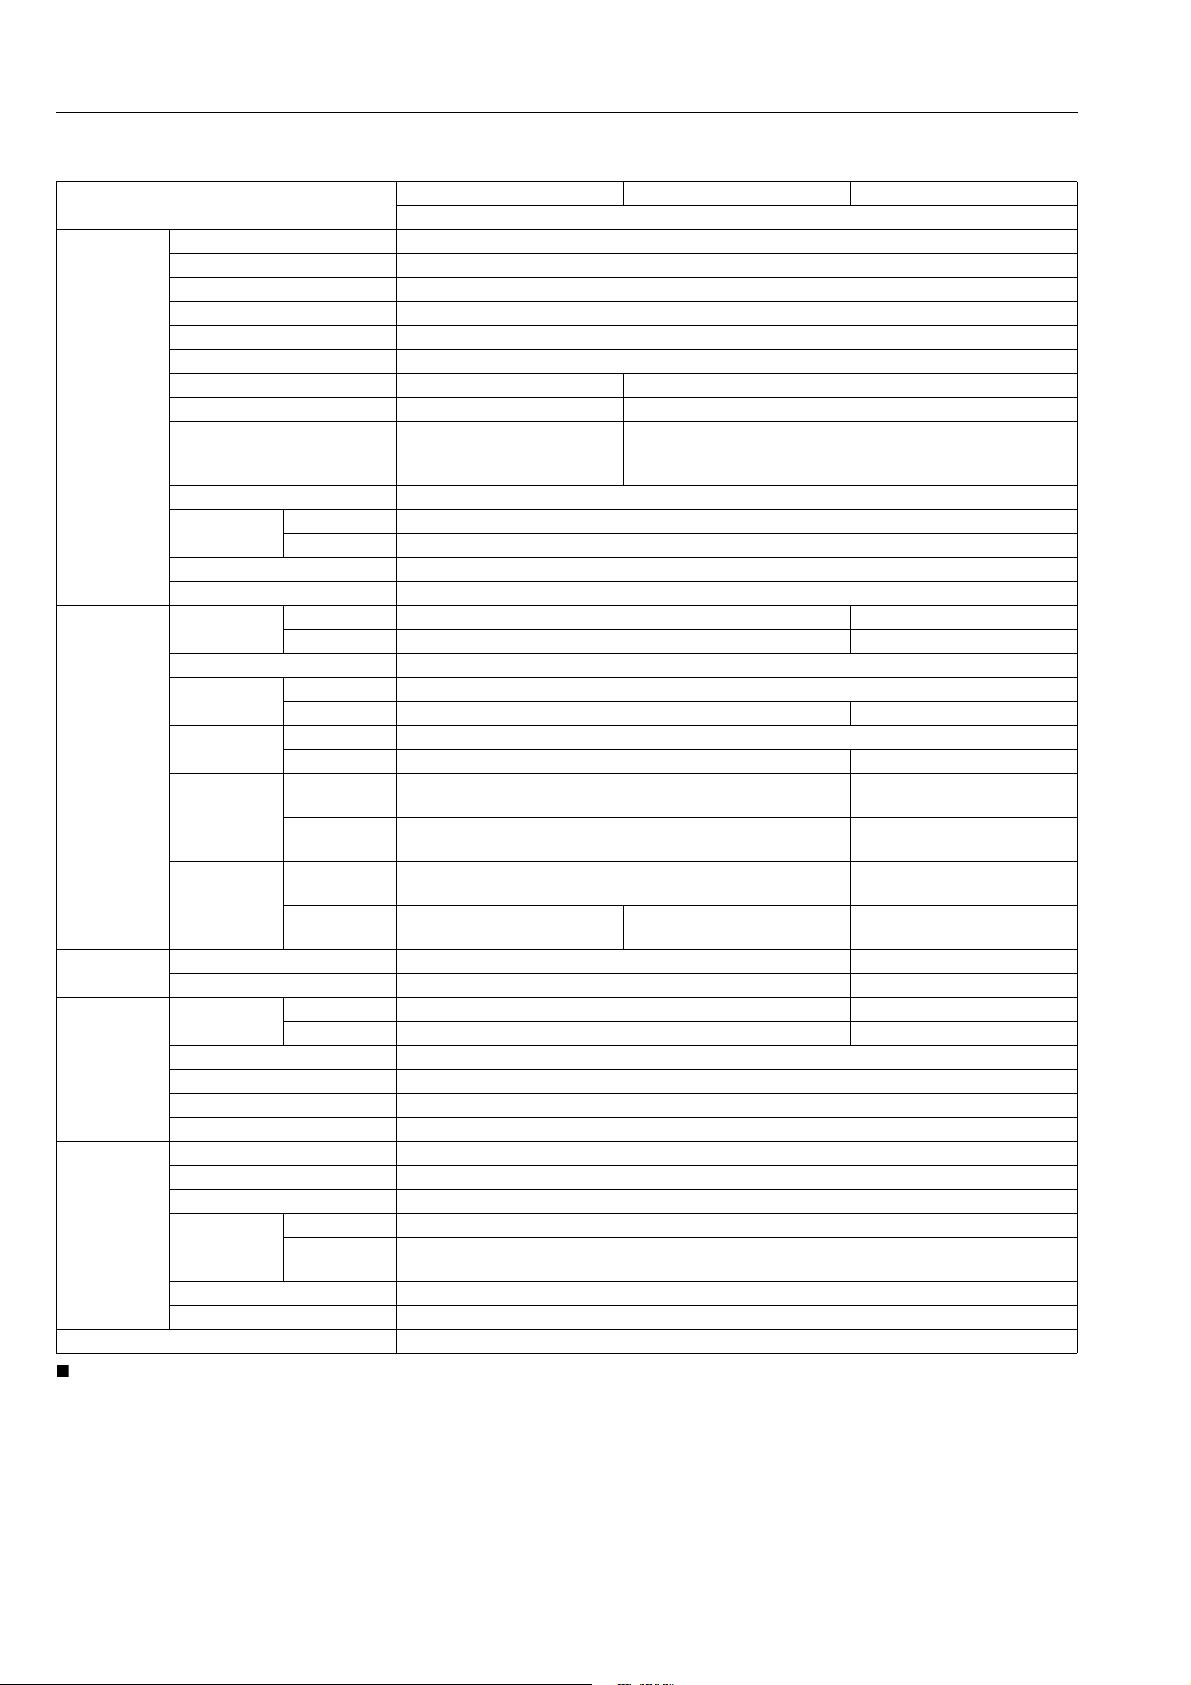
3. SPECIFICATIONS
INFORMATION
Model
M6040 M7040 M7040DTH-SPA
4WD
Model V3307-DI-TE3
Type Vertical, water-cooled, 4-cycle direct injection diesel engine
Number of cylinders 4
3
Total displacement 3331 cm
(203 cu.in.)
Bore and stroke 94 × 120 mm (3.7 × 4.7 in.)
-1
(rpm)
252 N·m (25.7 kgf·m, 186 lbf·ft) /
1500 to 1700 min
Engine
Rated speed 2600 min
Net power*
1
Gross power*
1
47.3 kW (63.5 HP) 52.9 kW (71.0 HP)
49.2 kW (66 HP) 54.9 kW (73.6 HP)
220 N·m (22.4 kgf·m,
Maximum torque
162 lbf·ft) /
1500 to 1700 min
-1
(rpm)
Battery capacity 12 V, RC: 160 min, CCA: 900 A
Fuel tank
capacity
ROPS Model 70 L (18.5 U.S.gals, 15.4 Imp.gals)
CABIN Model 90 L (23.8 U.S.gals, 19.8 Imp.gals)
Engine oil capacity 11 L (11.6 U.S.qts, 9.7 Imp.qts)
Coolant capacity 8 L (8.5 U.S.qts, 7.0 Imp.qts)
Overall length
ROPS Model 3615 mm (142.3 in.) 2435 mm (95.87 in.)
CABIN Model 3675 mm (144.7 in.) –
Overall width (min. tread) 1855 mm (73.03 in.)
Overall height
Wheel base
ROPS Model 2495 mm (98.23 in.)
CABIN Model 2545 mm (100.2 in.) –
ROPS Model 2050 mm (81 in.)
CABIN Model 2110 mm (83.1 in.) –
Dimensions
Front 1420, 1537 mm (55.9, 60.51 in.)
Tread
Rear 1416 to 1733 mm (55.75 to 68.22 in.)
ROPS Model 420 mm (16.5 in.) (Fuel tank stay)
CABIN Model
430 mm (16.9 in.)
(Fuel tank stay)
415 mm (16.3 in.)
(Fuel tank stay)
Front 320/85R24 (12.4R20) 320/70R20
Rear 420/85R30 (16.9R30) 420/70R28
Weight
Traveling
system
Minimum
ground
clearance
ROPS Model 2450 kg (5401 lbs) 2245 kg (5390 lbs)
CABIN Model 2730 kg (6019 lbs) –
Standard tire
size
Clutch Multiple wet discs
Steering Hydraulic power steering
Braking system Hydraulic wet discs
Differential Bevel gears with differential lock (rear)
Hydraulic control system Position, draft (top link sensing) and mix control
Pump capacity 61 L (16 U.S.gals, 13 Imp.gals) /min
3-point hitch SAE Category 1 and 2
Hydraulic
system
Max. lifting
force
At lift points*
24 in. behind
lift points*
2
2
2300 kg (5071 lbs)
1800 kg (3968 lbs)
Remote hydraulic control Two remote valves (3rd valve option) Max. Three
2
System pressure 19.1 MPa (195 kgf/cm
, 2270.3 psi)
Traction system Drawbar with clevis
-1
(rpm)
1365, 1385, 1415 mm
(53.74, 54.53, 55.71 in.)
1545 to 1737 mm
(60.83 to 68.38 in.)
360 mm (14.2 in.)
(Fuel tank stay)
–
• *1: Manufacture's estimate
*2: At lower link end with links horizontal.
The company reserves the right to change the specifications without notice.
I-10
Page 15

M6040, M7040, WSM
NOTE
KiSC issued 07, 2012 A
INFORMATION
Model
M6040 M7040 M7040DTH-SPA
Direction of
turning
PTO speed
PTO speed
540 min
540E min
1000 min
6 spline: 540 min
6 spline: 540E min
Shift type ground-live PTO
-1
(rpm): 8.94 min-1 (rpm) / one rotate of rear tire
-1
(rpm): 10.56 min-1 (rpm) / one rotate of rear tire
-1
(rpm): 14.47 min-1 (rpm) / one rotate of rear tire
PTO
Live PTO
(Independent)
Ground PTO
(For
M7040-ITA
Model)
• *1: Manufacture's estimate
*2: At lower link end with links horizontal.
The company reserves the right to change the specifications without notice.
4WD
Clockwise, viewed from tractor rear
-1
(rpm) / 2160 min-1 (rpm) engine speed
-1
(rpm) / 1825 min-1 (rpm) engine speed
–
9Y1210143INI0007US0
I-11
Page 16
M6040, M7040, WSM
KiSC issued 07, 2012 A
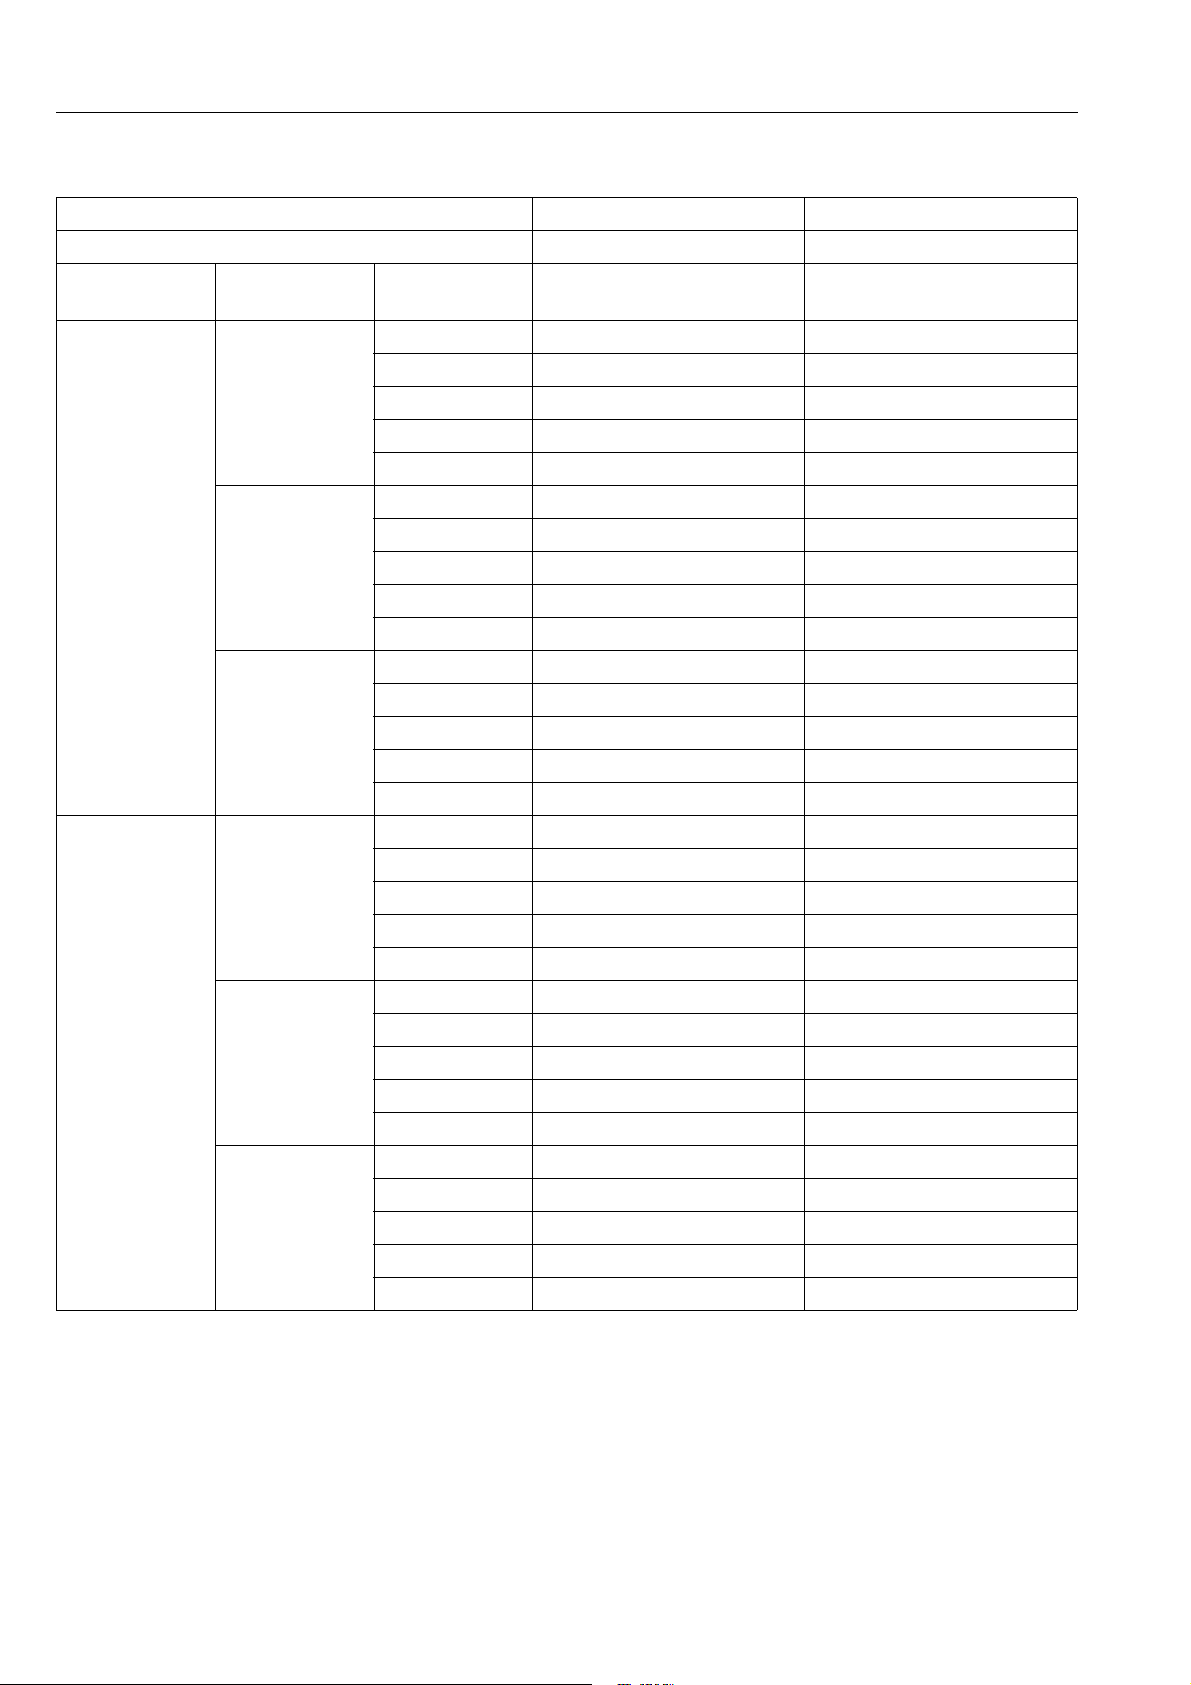
4. TRAVELING SPEEDS
Model M6040 / M7040 M7040DTH-SPA
Tire size (Rear) 420/85R30 (16.9R30) 420/70R28
Shuttle shift
lever
Forward
Reverse
Range gear
shift lever
CREEP
L
H
CREEP
L
H
Main gear shift
lever
1 0.43 (0.27) 0.40 (0.25)
2 0.61 (0.38) 0.56 (0.35)
3 0.79 (0.49) 0.73 (0.45)
4 1.0 (0.62) 0.9 (0.6)
5 1.3 (0.81) 1.2 (0.75)
1 3.0 (1.9) 2.8 (1.7)
2 4.3 (2.7) 4.0 (2.5)
3 5.6 (3.5) 5.2 (3.2)
4 7.1 (4.4) 6.5 (4.0)
5 9.4 (5.8) 8.7 (5.4)
1 12.1 (7.52) 11.2 (6.96)
2 17.2 (10.7) 15.9 (9.88)
3 22.2 (13.8) 20.5 (12.7)
4 28.5 (17.7) 26.3 (16.3)
5 37.5 (23.3) 34.6 (21.5)
1 0.44 (0.27) 0.41 (0.35)
2 0.62 (0.39) 0.57 (0.39)
3 0.80 (0.50) 0.74 (0.46)
4 1.03 (0.640) 0.95 (0.59)
5 1.35 (0.839) 1.25 (0.777)
1 3.1 (1.9) 2.9 (1.8)
2 4.4 (2.7) 4.1 (2.5)
3 5.6 (3.5) 5.2 (3.2)
4 7.2 (4.5) 6.6 (4.1)
5 9.5 (5.9) 8.8 (5.5)
1 12.3 (7.64) 11.3 (7.02)
2 17.4 (10.8) 16.1 (10.0)
3 22.5 (14.0) 20.8 (12.9)
4 28.9 (18.0) 26.7 (16.6)
5 38.0 (24) 35.1 (21.8)
INFORMATION
(At rated engine rpm)
km/h (mph) km/h (mph)
The company reserves the right to change the specifications without notice.
I-12
9Y1210143INI0008US0
Page 17
M6040, M7040, WSM
KiSC issued 07, 2012 A
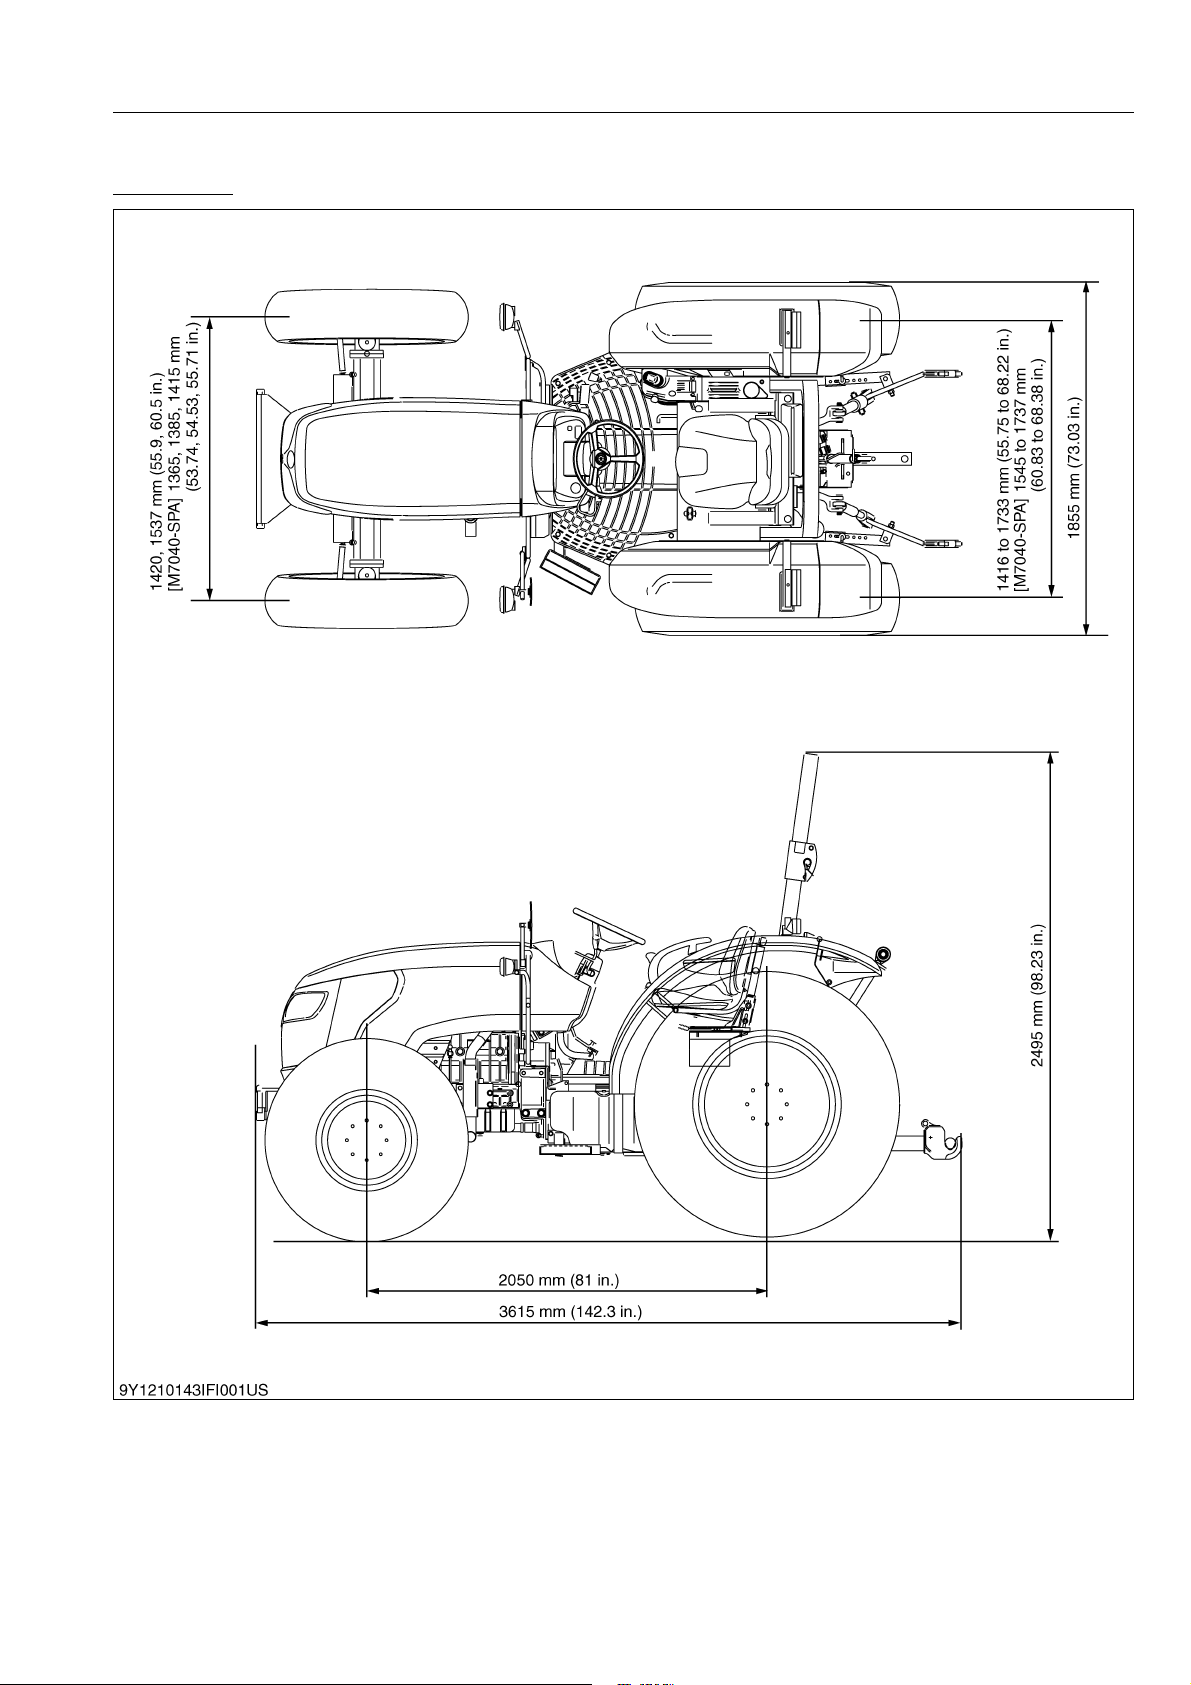
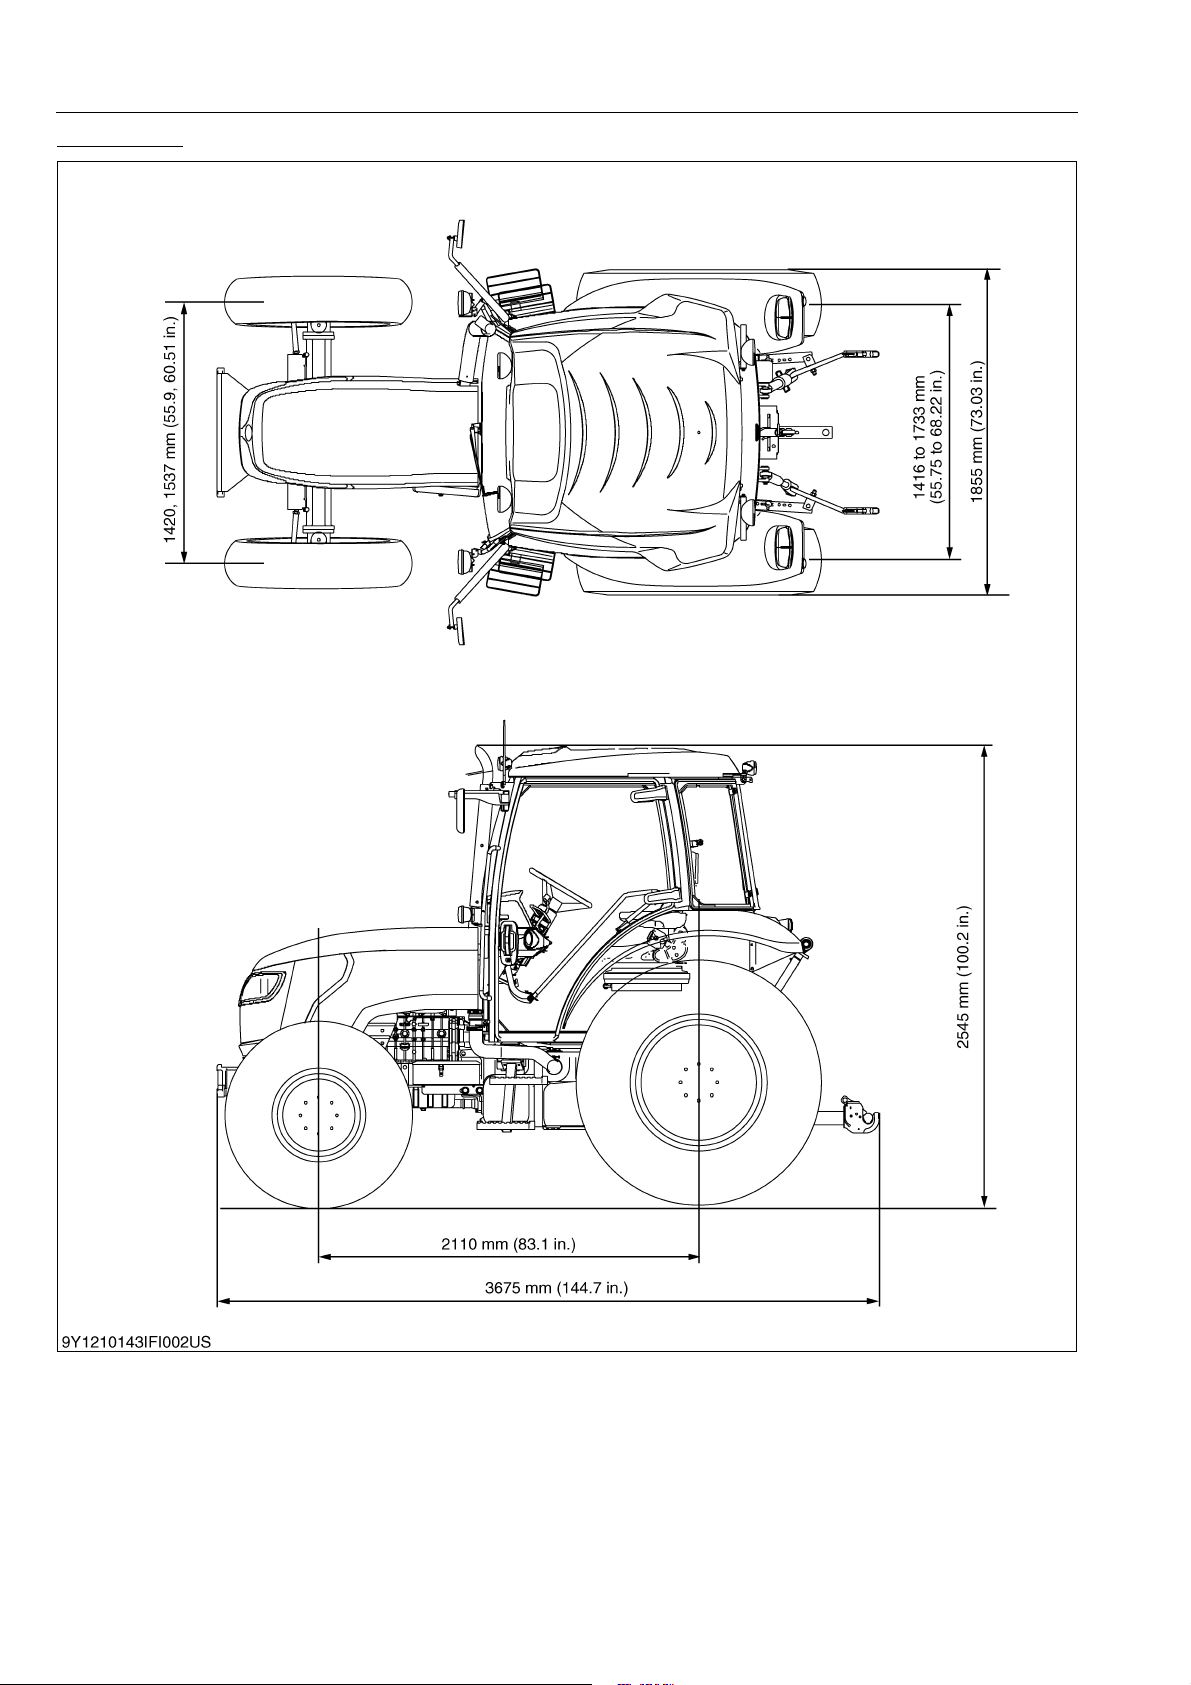
5. DIMENSIONS
ROPS Model
INFORMATION
9Y1210143INI0009US0
I-13
Page 18
M6040, M7040, WSM
KiSC issued 07, 2012 A
CABIN Model
INFORMATION
9Y1210143INI0010US0
I-14
Page 19

G GENERAL
KiSC issued 07, 2012 A
Page 20

GENERAL
KiSC issued 07, 2012 A
CONTENTS
1. TRACTOR IDENTIFICATION ....................................................................................................... G-1
[1] MODEL NAME AND SERIAL NUMBERS .............................................................................. G-1
[2] ENGINE NUMBER ................................................................................................................. G-2
[3] E3B ENGINE .......................................................................................................................... G-3
[4] CYLINDER NUMBER ............................................................................................................. G-3
2. GENERAL PRECAUTIONS.......................................................................................................... G-4
3. HANDLING PRECAUTIONS FOR ELECTRICAL PARTS AND WIRING .................................... G-5
[1] WIRING .................................................................................................................................. G-5
[2] BATTERY ............................................................................................................................... G-7
[3] FUSE ...................................................................................................................................... G-7
[4] CONNECTOR ........................................................................................................................ G-7
[5] HANDLING OF CIRCUIT TESTER ........................................................................................ G-8
[6] COLOR OF WIRING ..............................................................................................................G-9
4. LUBRICANTS, FUEL AND COOLANT....................................................................................... G-10
5. TIGHTENING TORQUES ........................................................................................................... G-13
[1] GENERAL USE SCREWS, BOLTS AND NUTS .................................................................. G-13
[2] STUD BOLTS ....................................................................................................................... G-13
[3] HYDRAULIC FITTINGS ....................................................................................................... G-14
(1) Hydraulic Hose Fittings................................................................................................... G-14
(2) Hydraulic Pipe Cap Nuts ................................................................................................ G-14
(3) Adaptors, Elbows and Others......................................................................................... G-14
[4] METRIC SCREWS, BOLTS AND NUTS .............................................................................. G-15
[5] AMERICAN STANDARD SCREWS, BOLTS AND NUTS WITH UNC OR UNF
THREADS ............................................................................................................................ G-15
[6] PLUGS ................................................................................................................................. G-15
6. MAINTENANCE CHECK LIST ................................................................................................... G-16
7. CHECK AND MAINTENANCE ................................................................................................... G-18
[1] DAILY CHECK...................................................................................................................... G-18
[2] CHECK POINTS OF INITIAL 50 HOURS ............................................................................ G-19
[3] CHECK POINTS OF EVERY 50 HOURS ............................................................................ G-22
[4] CHECK POINTS OF EVERY 100 HOURS .......................................................................... G-23
[5] CHECK POINTS OF EVERY 200 HOURS .......................................................................... G-28
[6] CHECK POINTS OF EVERY 300 HOURS .......................................................................... G-31
[7] CHECK POINTS OF EVERY 400 HOURS .......................................................................... G-32
[8] CHECK POINTS OF EVERY 600 HOURS .......................................................................... G-33
[9] CHECK POINT OF EVERY 800 HOURS ............................................................................. G-33
[10]CHECK POINT OF EVERY 1500 HOURS ........................................................................... G-33
[11]CHECK POINTS OF EVERY 3000 HOURS ........................................................................ G-33
G
[12]CHECK POINT OF EVERY 1 YEAR ....................................................................................
[13]CHECK POINTS OF EVERY 2 YEARS ............................................................................... G-35
[14]OTHERS............................................................................................................................... G-39
8. SPECIAL TOOLS ....................................................................................................................... G-42
[1] SPECIAL TOOLS FOR ENGINE .......................................................................................... G-42
[2] SPECIAL TOOLS FOR TRACTOR ...................................................................................... G-62
[3] SPECIAL TOOLS FOR AIR CONDITIONER UNIT .............................................................. G-76
9. TIRES ......................................................................................................................................... G-79
[1] TIRE SIZE AND INFLATION PRESSURE ........................................................................... G-79
[2] TREAD ADJUSTMENT ........................................................................................................ G-80
(1) Front Wheels .................................................................................................................. G-80
-34
Page 21

(2) Rear Wheels ................................................................................................................... G-82
KiSC issued 07, 2012 A
[3] WHEEL HUB ........................................................................................................................ G-83
[4] TIRE LIQUID INJECTION..................................................................................................... G-84
10. IMPLEMENT LIMITATIONS ....................................................................................................... G-87
[1] IMPLEMENT CAPACITY ...................................................................................................... G-88
[2] TRAILER LOAD CAPACITY................................................................................................. G-90
Page 22
M6040, M7040, WSM
KiSC issued 07, 2012 A
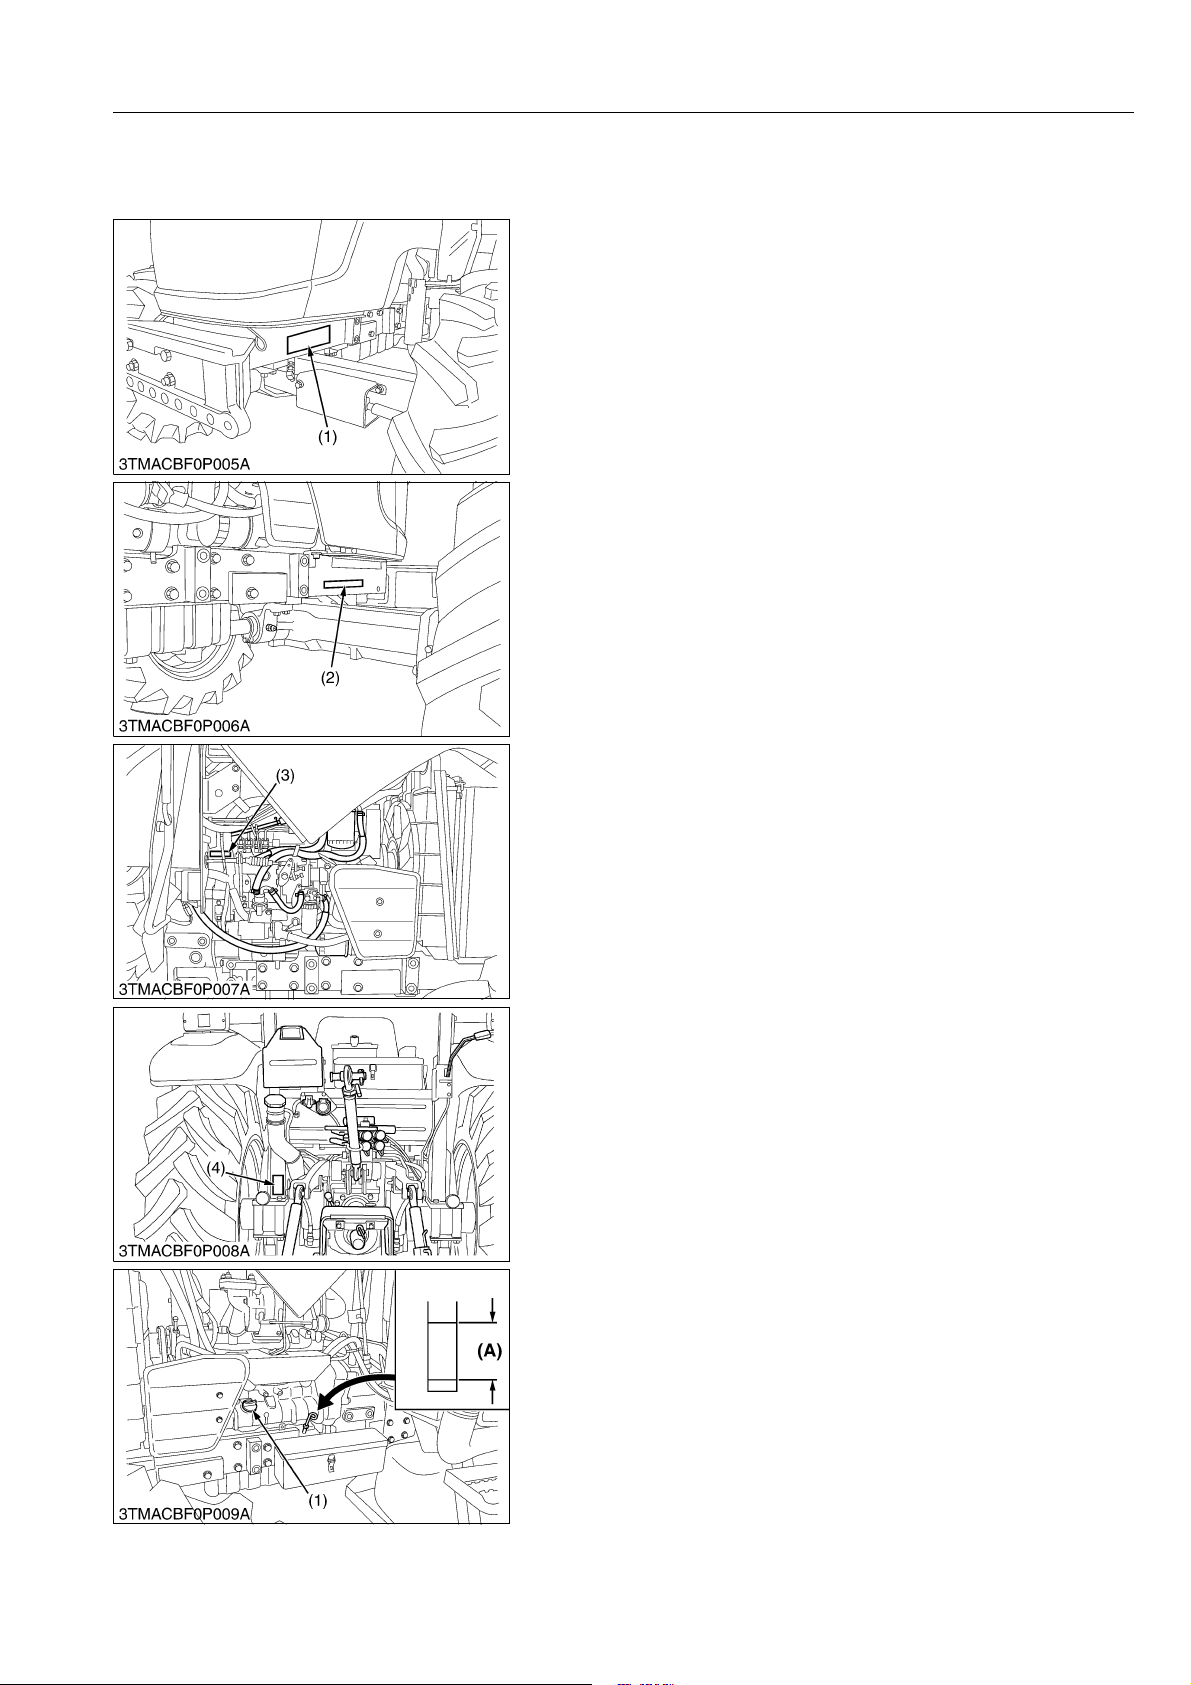
1. TRACTOR IDENTIFICATION
[1] MODEL NAME AND SERIAL NUMBERS
When contacting your local KUBOTA distributor, always specify
engine serial number, tractor serial number and hourmeter reading.
(1) Tractor Identification Plate
(2) Tractor Serial Number
(3) Engine Serial Number
GENERAL
(4) ROPS Identification Plate
(ROPS Serial Number)
(5) CABIN Identification Plate
(CABIN Serial Number)
9Y1210143GEG0001US0
G-1
Page 23
M6040, M7040, WSM
KiSC issued 07, 2012 A
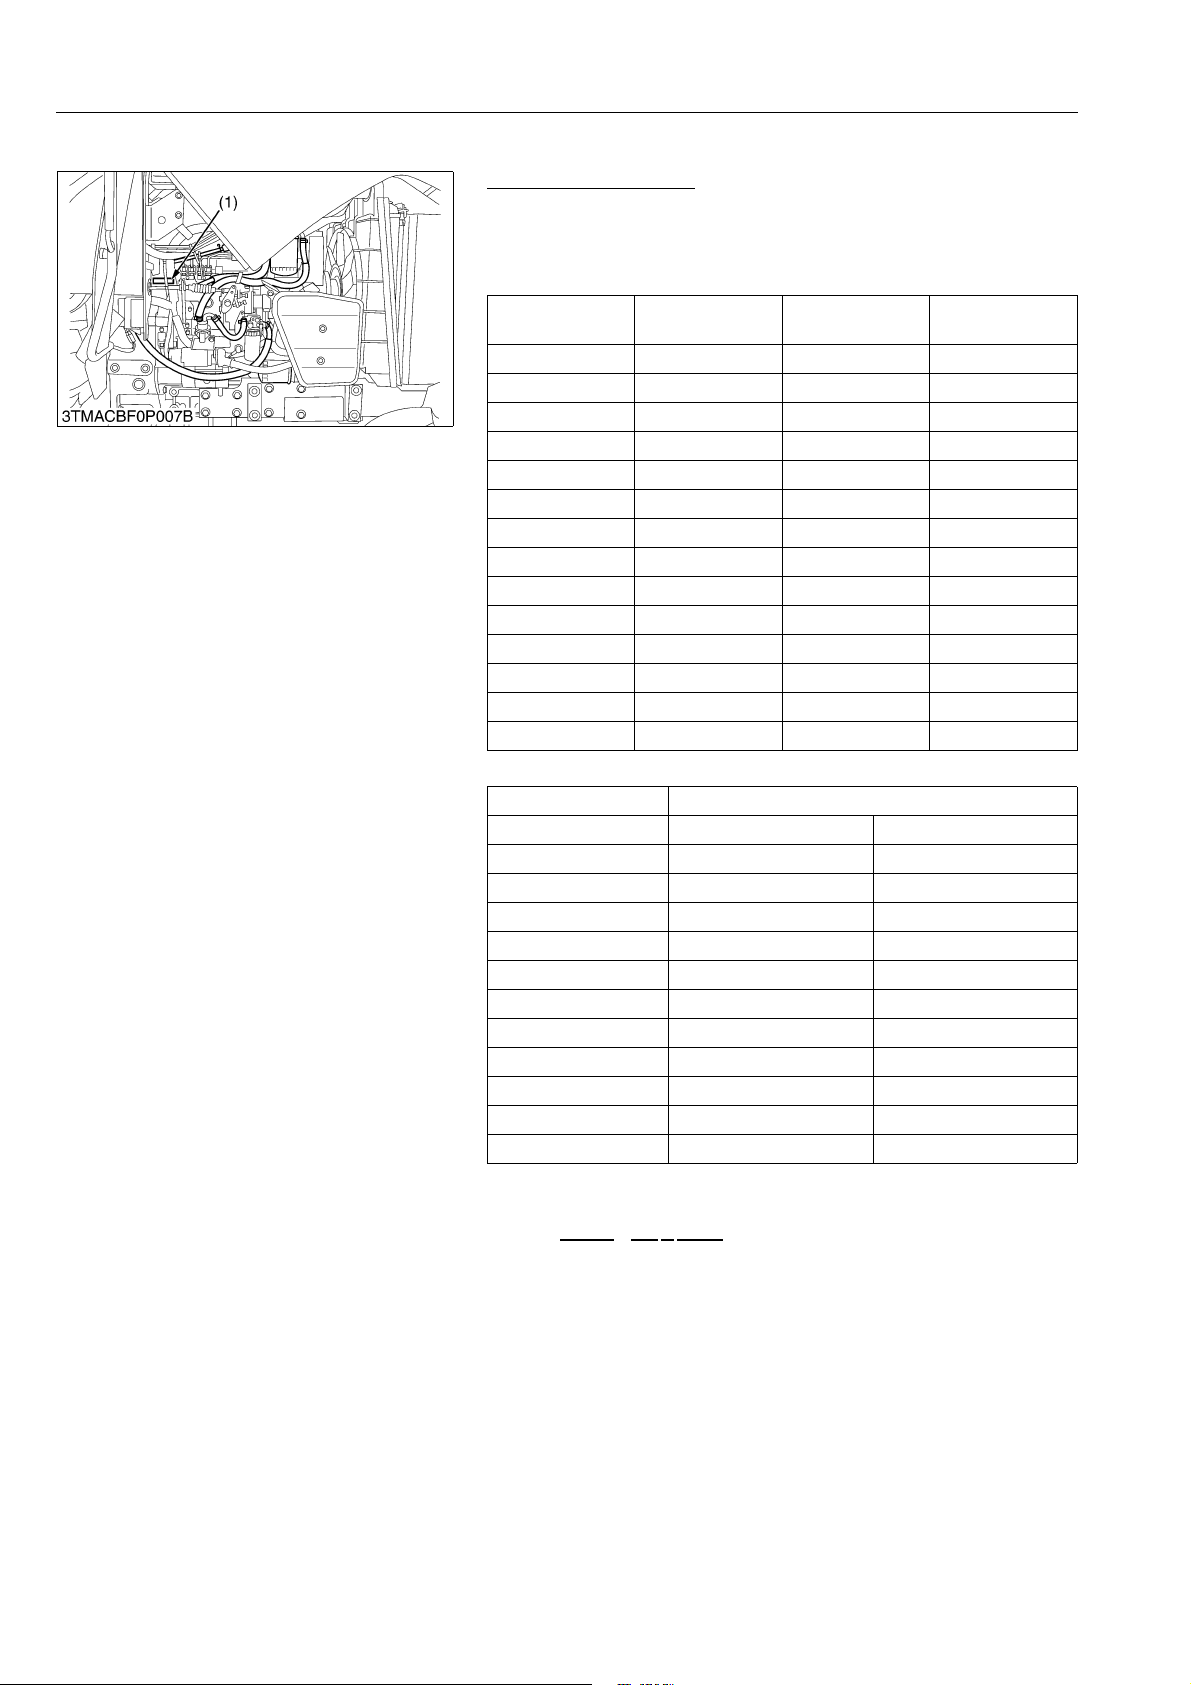
[2] ENGINE NUMBER
GENERAL
Engine Serial Number
The engine serial number is an identified number for the engine.
It is marked after the engine model number.
It indicates month and year of manufacture as follows.
Year of manufacture
Alphabet or
Number
1 2001 F 2015
2 2002 G 2016
3 2003 H 2017
4 2004 J 2018
5 2005 K 2019
6 2006 L 2020
7 2007 M 2021
8 2008 N 2022
9 2009 P 2023
A 2010 R 2024
B 2011 S 2025
C 2012 T 2026
D 2013 V 2027
E2014
Year
Alphabet or
Number
Year
Month of manufacture
Month Engine Lot Number
January A0001 ~ A9999 B0001 ~ BZ999
February C0001 ~ C9999 D0001 ~ DZ999
March E0001 ~ E9999 F0001 ~ FZ999
April G0001 ~ G9999 H0001 ~ HZ999
May J0001 ~ J9999 K0001 ~ KZ999
June L0001 ~ L9999 M0001 ~ MZ999
July N0001 ~ N9999 P0001 ~ PZ999
August Q0001 ~ Q9999 R0001 ~ RZ999
September S0001 ~ S9999 T0001 ~ TZ999
October U0001 ~ U9999 V0001 ~ VZ999
November W0001 ~ W9999 X0001 ~ XZ999
December Y0001 ~ Y9999 Z0001 ~ ZZ999
* Alphabetical letters "I" and "O" are not used.
(a)
(b)B(c)
(d)
e.g. XXXX
(a) Engine Model Name: XXXX
(b) Year: XX indicates 20XX
(c) Month: A or B indicates January
(d) Lot Number: (0001 ~ 9999 or A001 ~ Z999)
- XX
A001
(1) Engine Model Name and Serial
Number
9Y1210143GEG0002US0
G-2
Page 24
M6040, M7040, WSM
KiSC issued 07, 2012 A
GENERAL
[3] E3B ENGINE
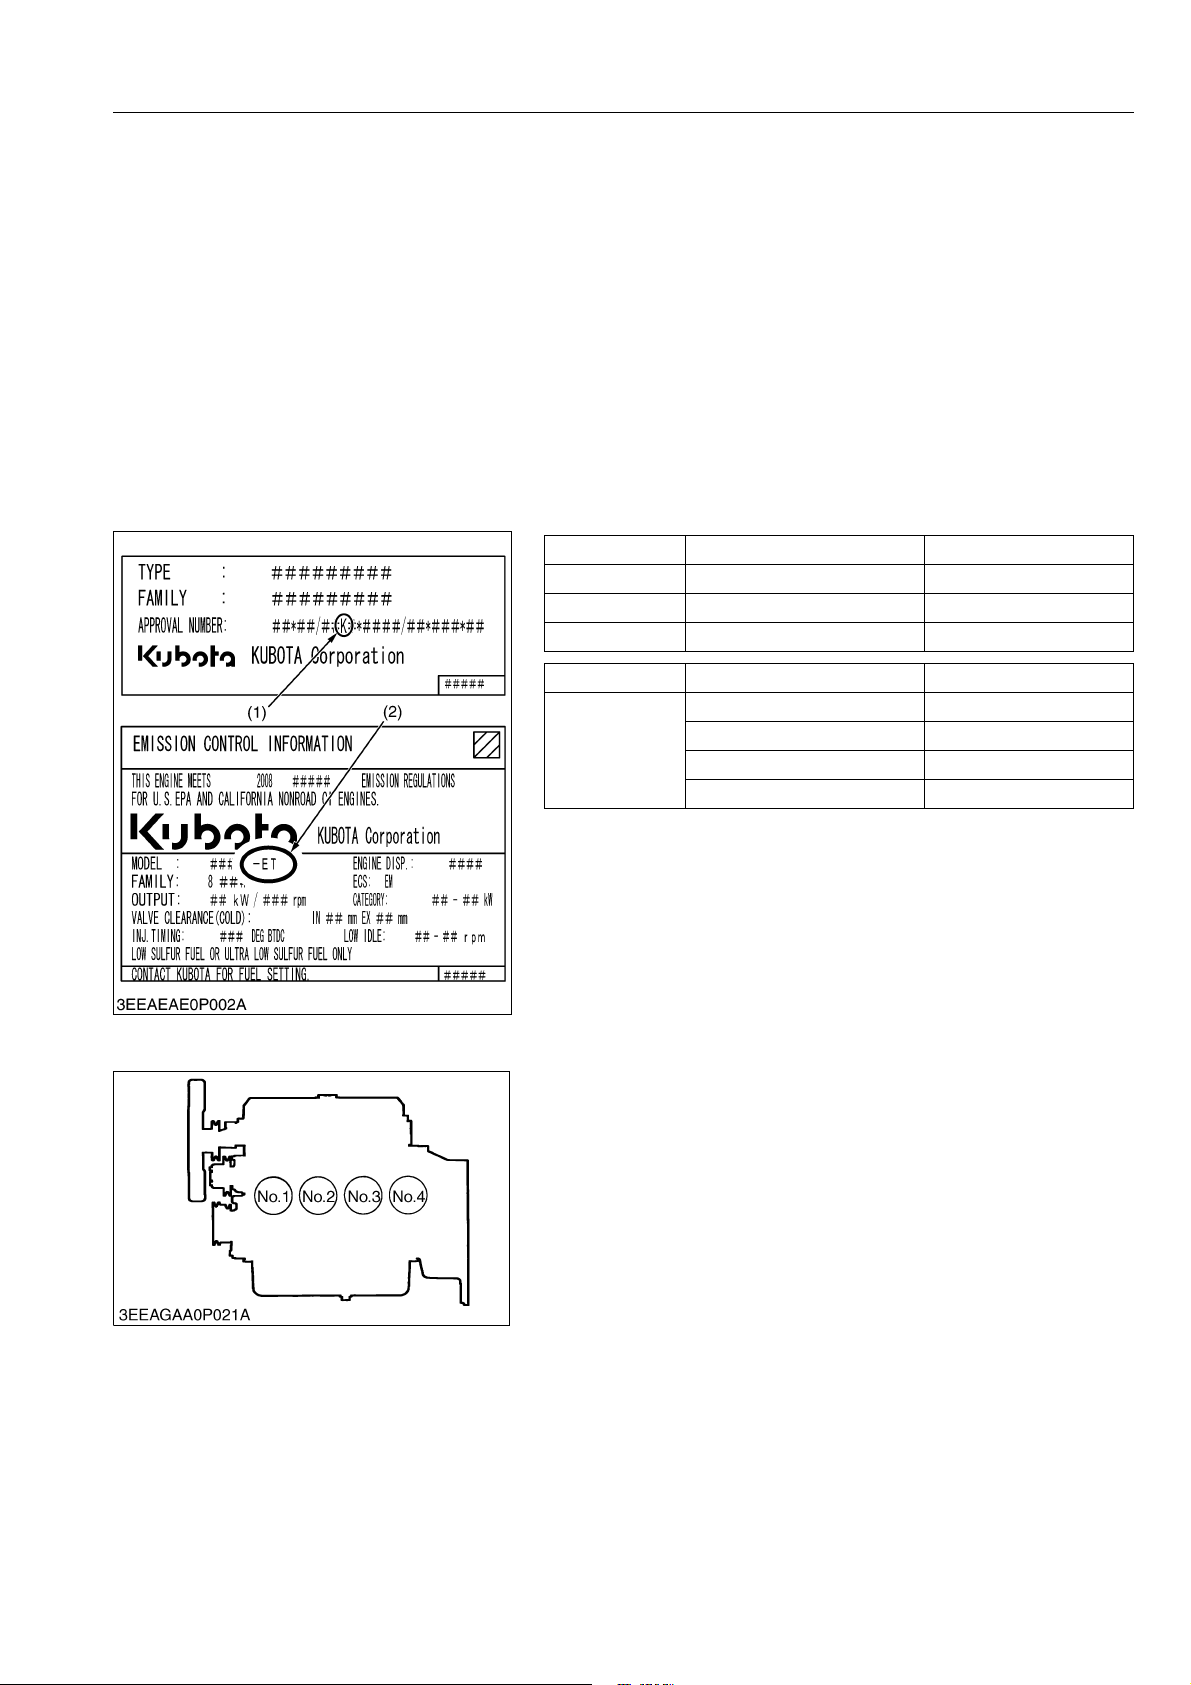
[Example: Engine Model Name V3307-DI-T-]
The emission controls previously implemented in various countries to prevent air pollution will be stepped up as
Non-Road Emission Standards continue to change. The timing or applicable date of the specific Non-Road Emission
regulations depends on the engine output classification.
Over the past several years, Kubota has been supplying diesel engines that comply with regulations in the
respective countries affected by Non-Road Emission regulations. For Kubota Engines, E3 will be the designation that
identifies engine models affected by the next emission phase (See the table below).
When servicing or repairing ###-E3 series engines, use only replacement parts for that specific E3 engine,
designated by the appropriate E3 Kubota Parts List and perform all maintenance services listed in the appropriate
Kubota Operator's Manual or in the appropriate E3 Kubota Workshop Manual. Use of incorrect replacement parts or
replacement parts from other emission level engines (for example: E2 engines), may result in emission levels out of
compliance with the original E3 design and EPA or other applicable regulations. Please refer to the emission label
located on the engine head cover to identify Output classification and Emission Control Information. E3 engines are
identified with "ET" at the end of the Model designation, on the US EPA label. Please note: E3 is not marked on the
engine.
Category (1) Engine output classification EU regulation
K From 19 to less than 37 kW STAGE IIIA
J From 37 to less than 75 kW STAGE IIIA
I From 75 to less than 130 kW STAGE IIIA
[4] CYLINDER NUMBER
Category (2) Engine output classification EPA regulation
Less than 19kW Tier 4
ET
(1) EU regulation engine output classification category
(2) "E3" engines are identified with "ET" at the end of the Model designation, on
the US EPA label.
"E3" designates Tier 3 and some Interim Tier 4 / Tier 4 models, depending on
engine output classification.
From 19 to less than 56 kW Interim Tier 4
From 56 to less than 75 kW Tier 3
From 75 to less than 130 kW Tier 3
9Y1210143GEG0003US0
You can see the cylinder numbers of KUBOTA diesel engine in
the figure. The sequence of cylinder numbers is No.1, No.2, No.3
and No.4 and it starts from the front cover side.
WSM000001GEG0059US0
G-3
Page 25
M6040, M7040, WSM
KiSC issued 07, 2012 A
2. GENERAL PRECAUTIONS
• When you disassemble, carefully put the parts in a clean area
to make it easy to find the parts. You must install the screws,
bolts and nuts in their initial position to prevent the reassembly
errors.
• When it is necessary to use special tools, use KUBOTA special
tools. Refer to the drawings when you make special tools that
you do not use frequently.
• Before you disassemble or repair machine, make sure that you
always disconnect the ground cable from the battery first.
• Remove oil and dirt from parts before you measure.
• Use only KUBOTA genuine parts for replacement to keep the
machine performance and to make sure of safety.
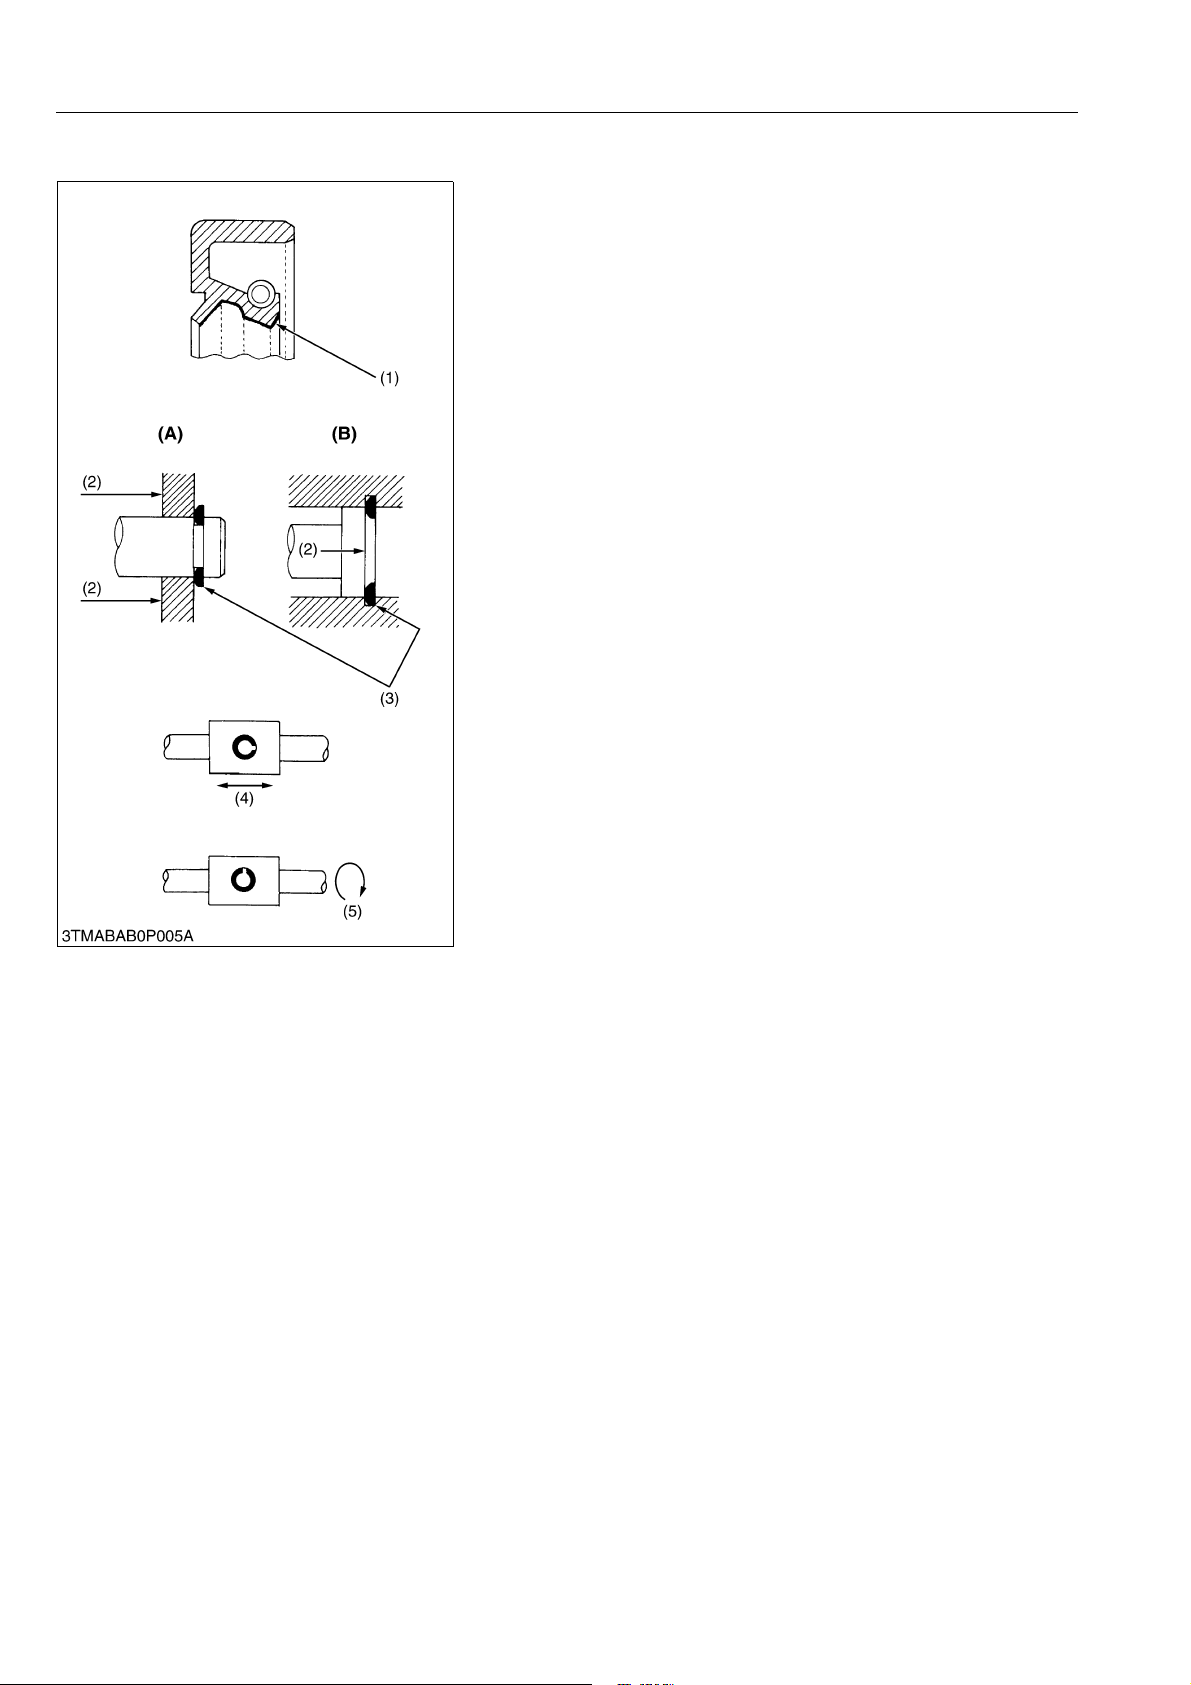
• You must replace the gaskets and O-rings when you assemble
again. Apply grease (1) to new O-rings or oil seals before you
assemble.
• When you assemble the external or internal snap rings, make
sure that the sharp edge (3) faces against the direction from
which force (2) is applied.
• When inserting spring pins, their splits must face the direction
from which a force is applied. See the figure left side.
• To prevent damage to the hydraulic system, use only specified
fluid or equivalent.
• Clean the parts before you measure them.
• Tighten the nipples to the specified torque. Too much torque
can cause damage to the hydraulic units or the nipples. Not
sufficient torque can cause oil leakage.
• When you use a new hose or pipe, tighten the nuts to the
specified torque. Then loosen (approx. by 45 °) and let them be
stable before you tighten to the specified torque (This is not
applied to the parts with seal tape).
• When you remove the two ends of a pipe, remove the lower end
first.
• Use two pliers in removal and installation. One to hold the stable
side, and the other to turn the side you remove to prevent twists.
• Make sure that the sleeves of flared connectors and taper s of
hoses are free of dust and scratches.
• After you tighten the nipples, clean the joint and apply the
maximum operation pressure 2 to 3 times to examine oil
leakage.
(1) Grease
(2) Force
(3) Sharp Edge
(4) Axial Force
(5) Rotating Movement
GENERAL
(A) External Snap Ring
(B) Internal Snap Ring
WSM000001GEG0106US1
G-4
Page 26
M6040, M7040, WSM
IMPORTANT
KiSC issued 07, 2012 A
GENERAL
3. HANDLING PRECAUTIONS FOR ELECTRICAL PARTS AND WIRING
To ensure safety and prevent damage to the machine and
surrounding equipment, heed the following precautions in handling
electrical parts and wiring.
• Check electrical wiring for damage and loosened
connection every year. To this end, educate the customer
to do his or her own check and at the same time
recommend the dealer to perform periodic check for a fee.
• Do not attempt to modify or remodel any electrical parts
and wiring.
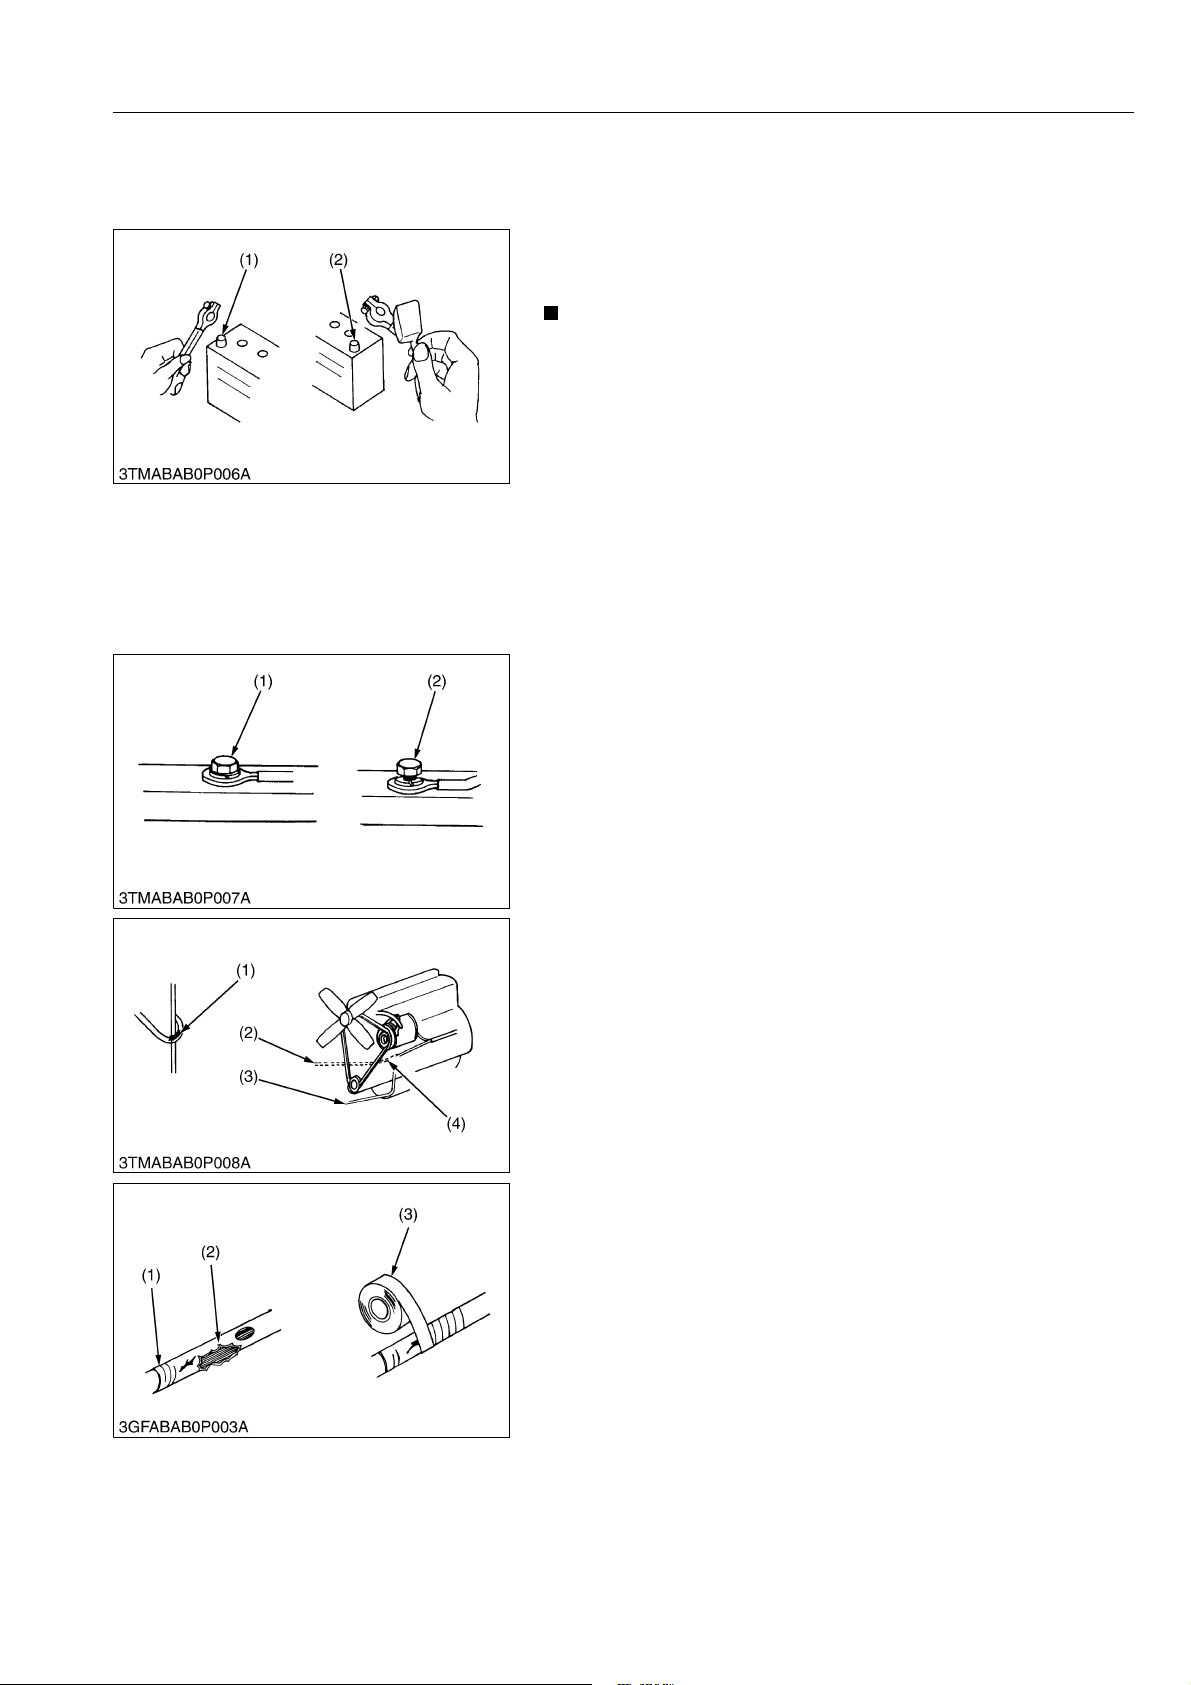
• When removing the battery cables, disconnect the negative
cable first. When installing the battery cables, connect the
positive cable first.
(1) Negative Terminal (2) Positive Terminal
WSM000001GEG0062US1
[1] WIRING
• Securely tighten wiring terminals.
(1) Correct
(Securely Tighten)
(2) Incorrect
(Loosening Leads to Faulty Contact)
WSM000001GEG0063US1
• Do not let wiring contact dangerous part.
(1) Dangerous Part (Sharp Edge)
(2) Wiring (Incorrect)
(3) Wiring (Correct)
(4) Dangerous Part
WSM000001GEG0064US1
• Repair or change torn or aged wiring immediately.
(1) Aged
(2) Torn
(3) Insulating Vinyl Tape
WSM000001GEG0065US1
G-5
Page 27
M6040, M7040, WSM
KiSC issued 07, 2012 A
GENERAL
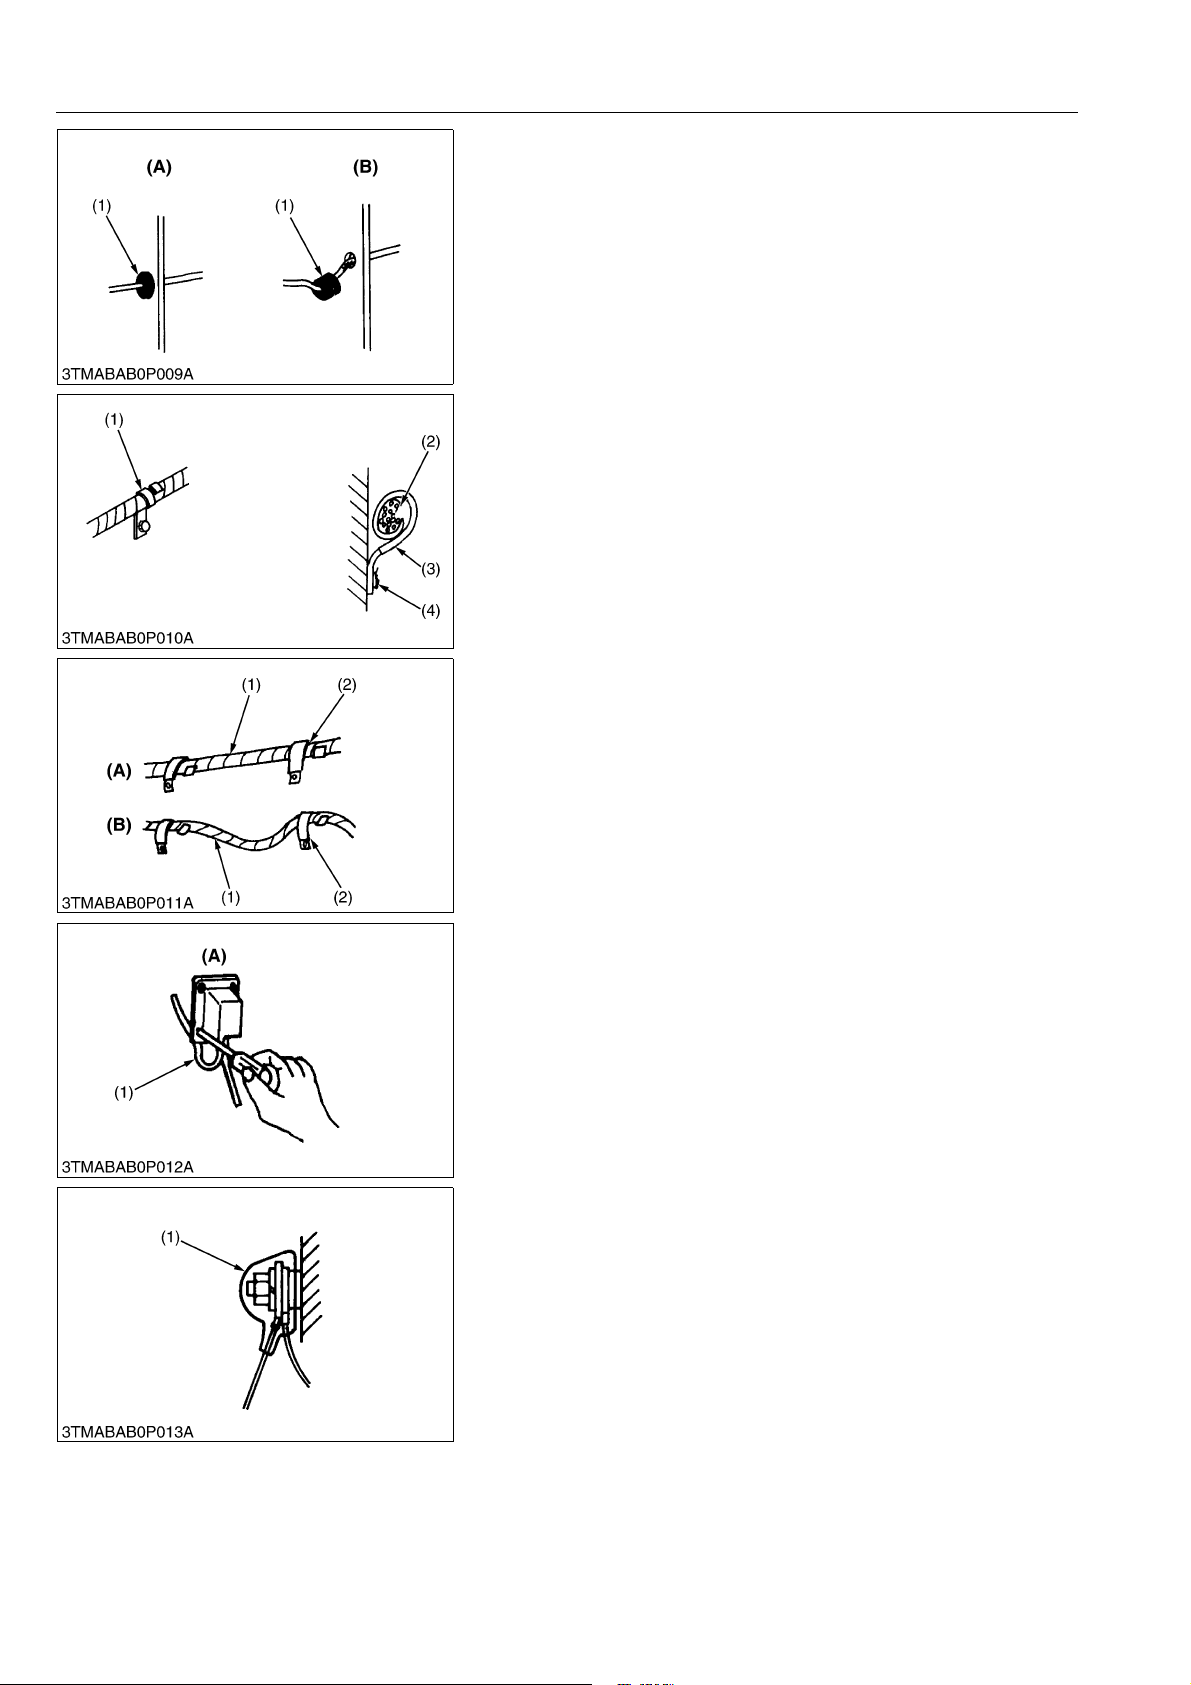
• Securely insert grommet.
(1) Grommet (A) Correct
(B) Incorrect
WSM000001GEG0066US1
• Securely clamp, being careful not to damage wiring.
(1) Clamp
(Wind Clamp Spirally)
(2) Wire Harness
(3) Clamp
(4) Welding Dent
WSM000001GEG0067US1
• Clamp wiring so that there is no twist, unnecessary sag, or
excessive tension, except for movable part, where sag be
required.
(1) Wiring
(2) Clamp
(A) Correct
(B) Incorrect
WSM000001GEG0068US1
• In installing a part, take care not to get wiring caught by it.
(1) Wiring (A) Incorrect
WSM000001GEG0069US1
• After installing wiring, check protection of terminals and
clamped condition of wiring, only connect battery.
(1) Cover
(Securely Install Cover)
WSM000001GEG0070US1
G-6
Page 28
M6040, M7040, WSM
CAUTION
KiSC issued 07, 2012 A
[2] BATTERY
GENERAL
• Take care not to confuse positive and negative terminal posts.
• When removing battery cables, disconnect negative cable first.
When installing battery cables, check for polarity and connect
positive cable first.
• Do not install any battery with capacity other than is specified
(Ah).
• After connecting cables to battery terminal posts, apply high
temperature grease to them and securely install terminal covers
on them.
• Do not allow dirt and dust to collect on battery.
• Take care not to let battery liquid spill on your skin and
clothes. If contaminated, wash it off with water
immediately.
• Before recharging the battery, remove it from the machine.
• Before recharging, remove cell caps.
• Do recharging in a well-ventilated place where there is no
open flame nearby, as hydrogen gas and oxygen are
formed.
WSM000001GEG0071US1
[3] FUSE
[4] CONNECTOR
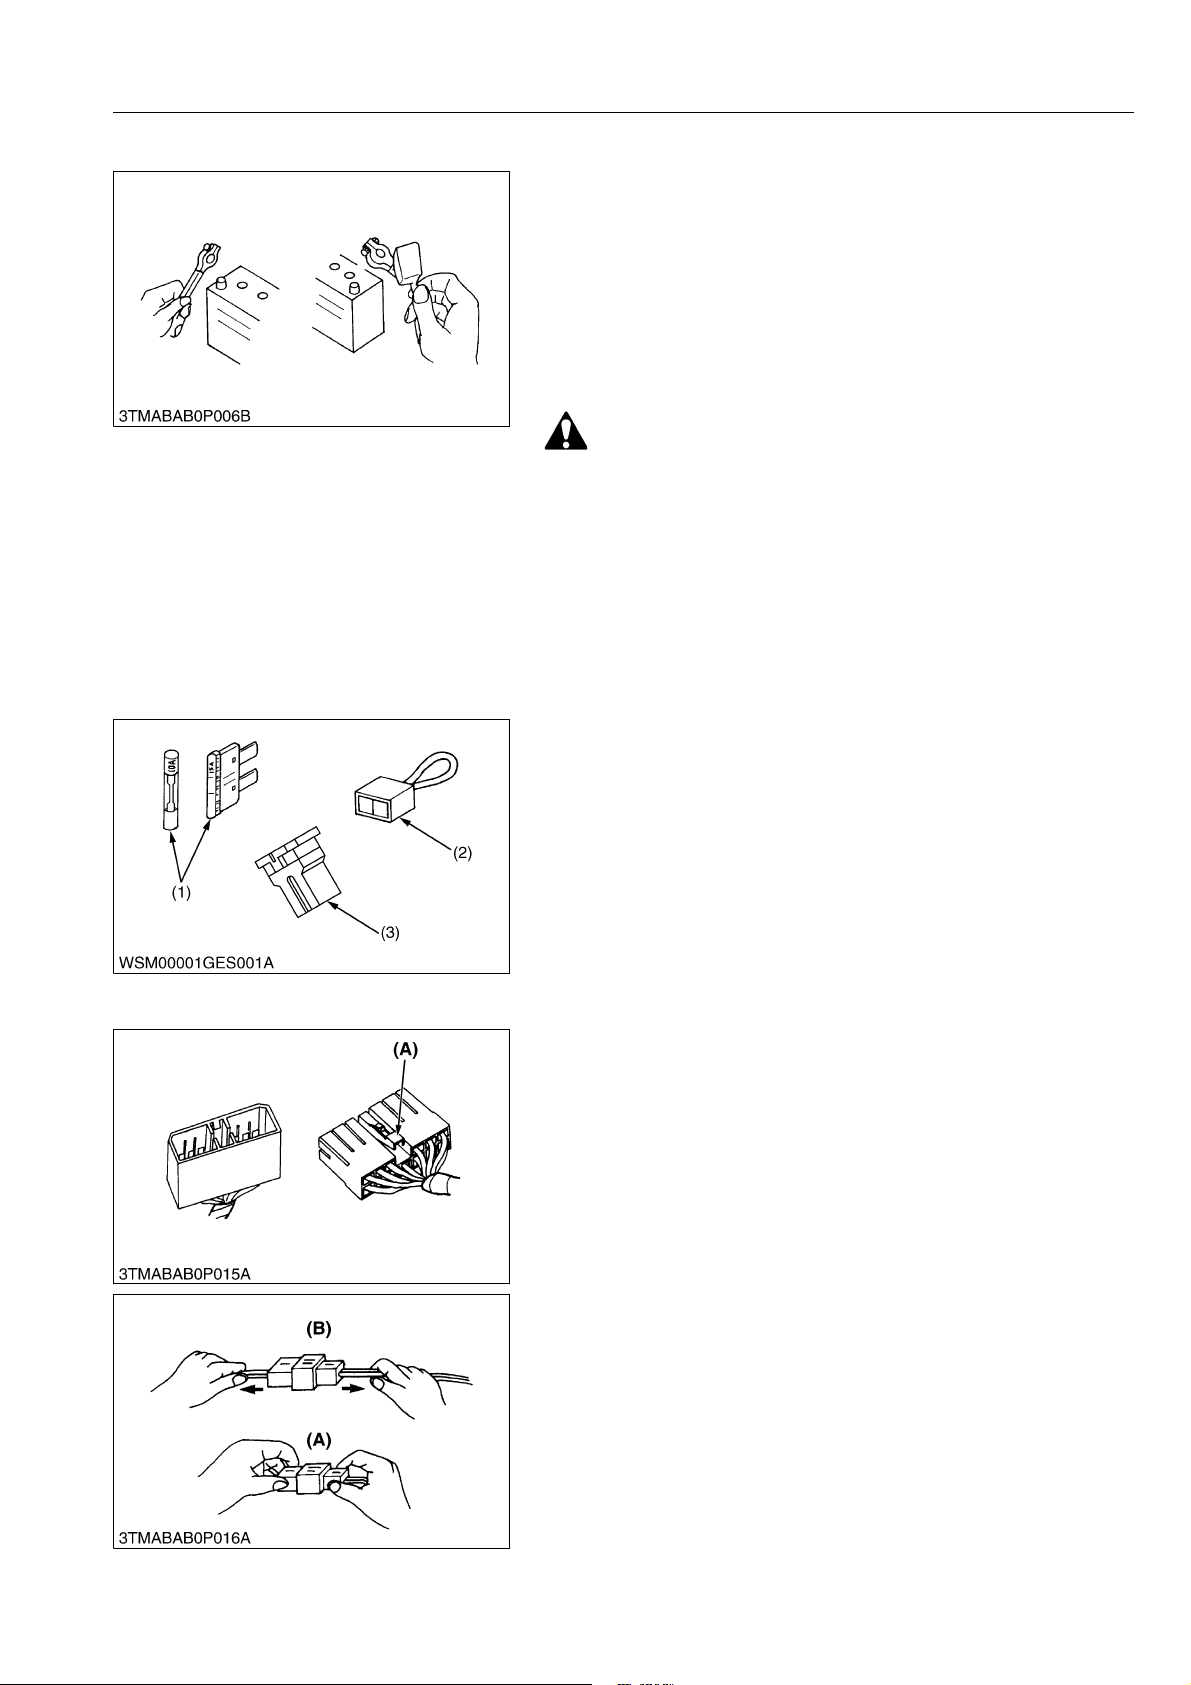
• Use fuses with specified capacity.
Neither too large or small capacity fuse is acceptable.
• Never use steel or copper wire in place of fuse.
• Do not install working light, radio set, etc. on machine which is
not provided with reserve power supply.
• Do not install accessories if fuse capacity of reserve power
supply is exceeded.
(1) Fuse
(2) Fusible Link
(3) Slow Blow Fuse
WSM000001GEG0072US1
• For connector with lock, push lock to separate.
(A) Push
WSM000001GEG0073US1
• In separating connectors, do not pull wire harnesses.
• Hold connector bodies to separate.
(A) Correct (B) Incorrect
WSM000001GEG0074US1
G-7
Page 29
M6040, M7040, WSM
KiSC issued 07, 2012 A
GENERAL
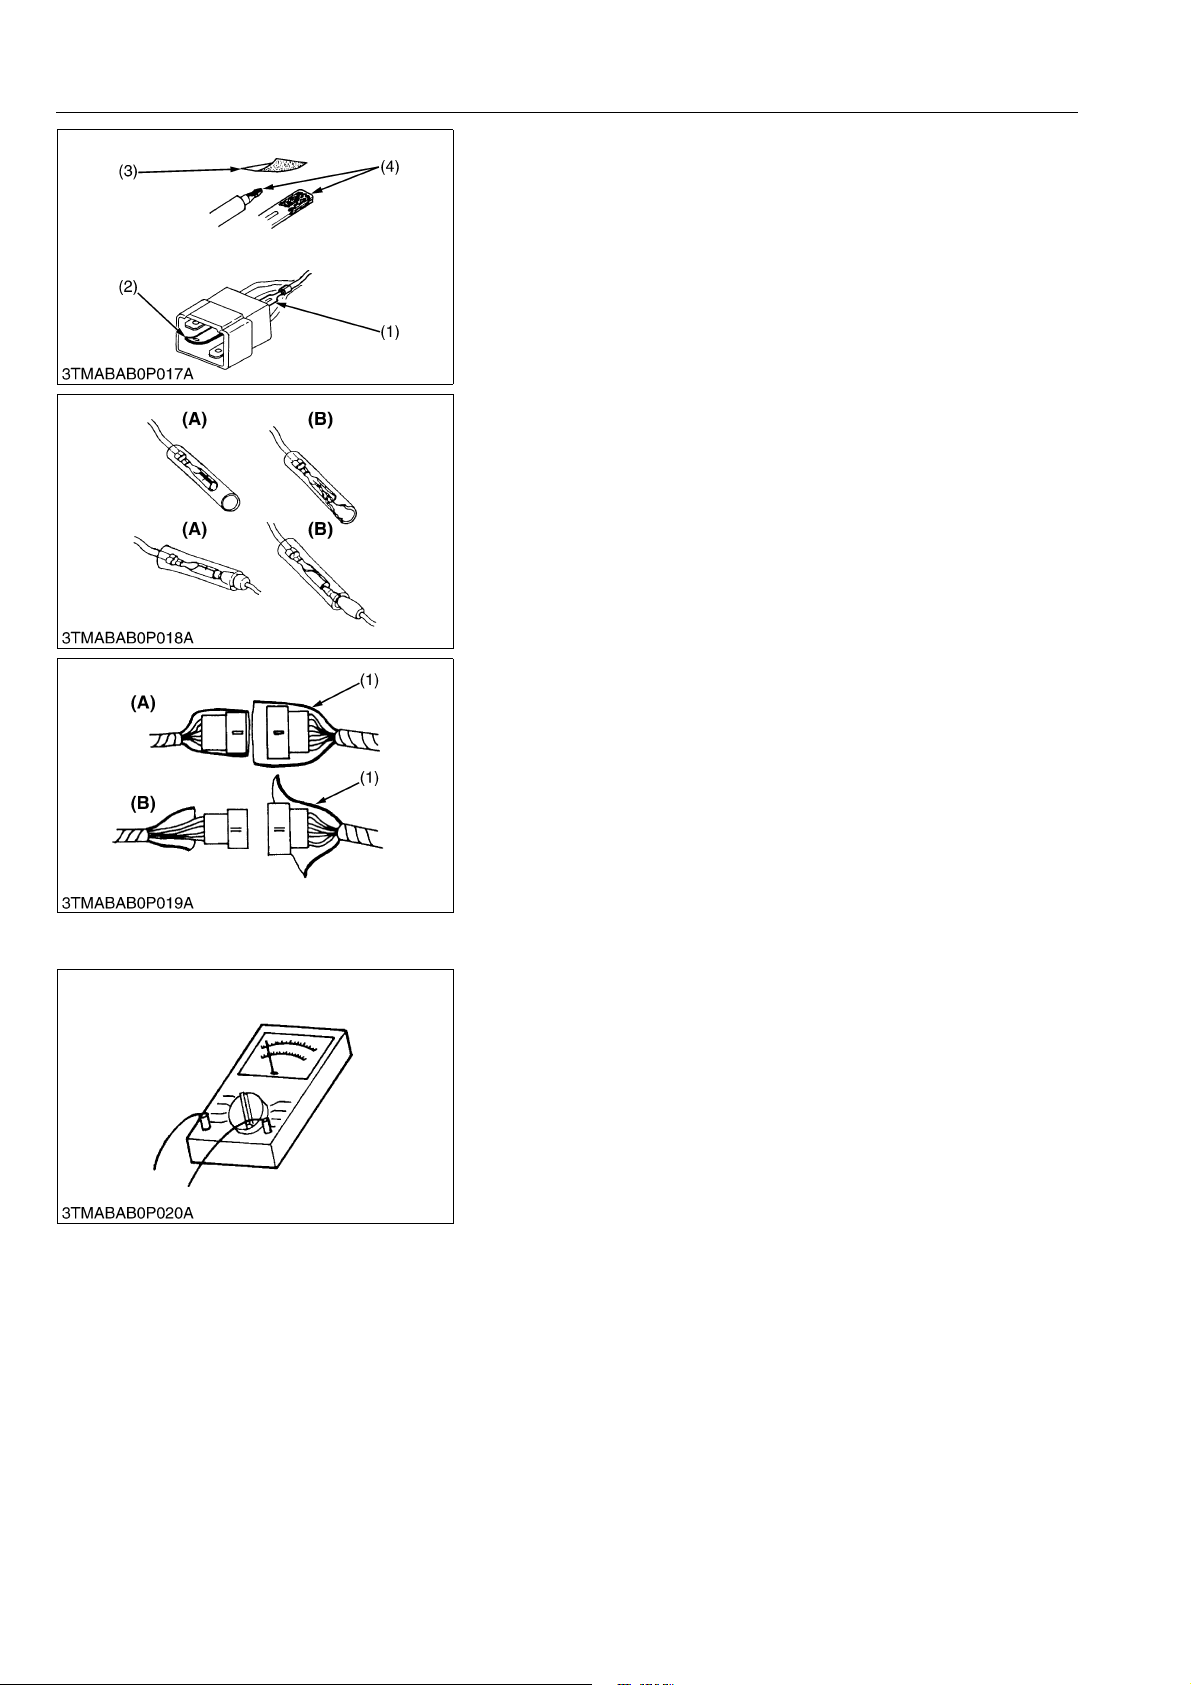
• Use sandpaper to remove rust from terminals.
• Repair deformed terminal. Make certain there is no terminal
being exposed or displaced.
(1) Exposed Terminal
(2) Deformed Terminal
(3) Sandpaper
(4) Rust
WSM000001GEG0075US1
• Make certain that there is no female connector being too open.
(A) Correct (B) Incorrect
WSM000001GEG0076US1
• Make certain plastic cover is large enough to cover whole
connector.
(1) Cover (A) Correct
(B) Incorrect
WSM000001GEG0077US1
[5] HANDLING OF CIRCUIT TESTER
• Use tester correctly following manual provided with tester.
• Check for polarity and range.
WSM000001GEG0078US1
G-8
Page 30
M6040, M7040, WSM
KiSC issued 07, 2012 A
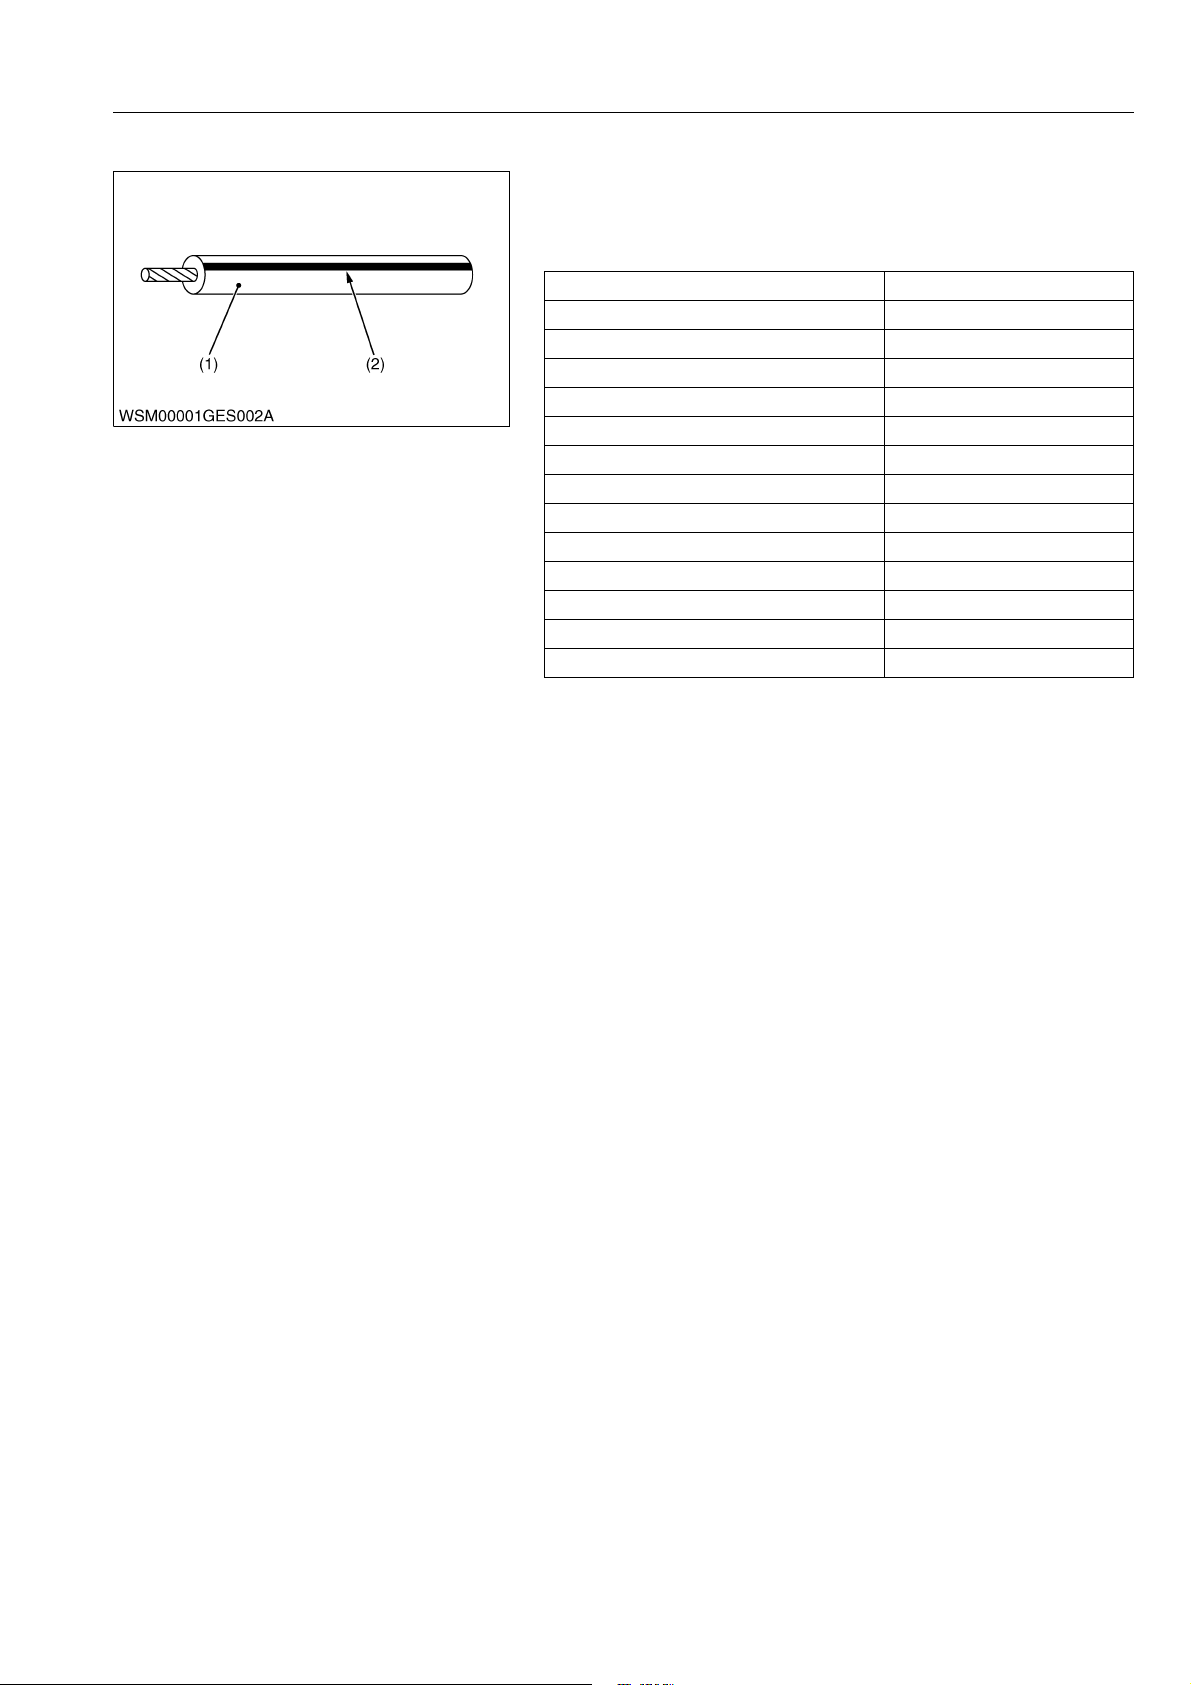
[6] COLOR OF WIRING
GENERAL
• Colors of wire are specified to the color codes.
• This symbol of "/" shows color with stripe(s).
(An example)
Red stripe on white color: W/R
Color of wiring Color code
Black B
Brown Br
Green G
Gray Gy or Gr
Blue L
Light Green Lg
Orange Or
Pink P
Purple Pu or V
Red R
Sky Blue Sb
White W
Yell ow Y
(1) Wire Color (2) Stripe
WSM000001GEG0079US0
G-9
Page 31
M6040, M7040, WSM
NOTE
KiSC issued 07, 2012 A
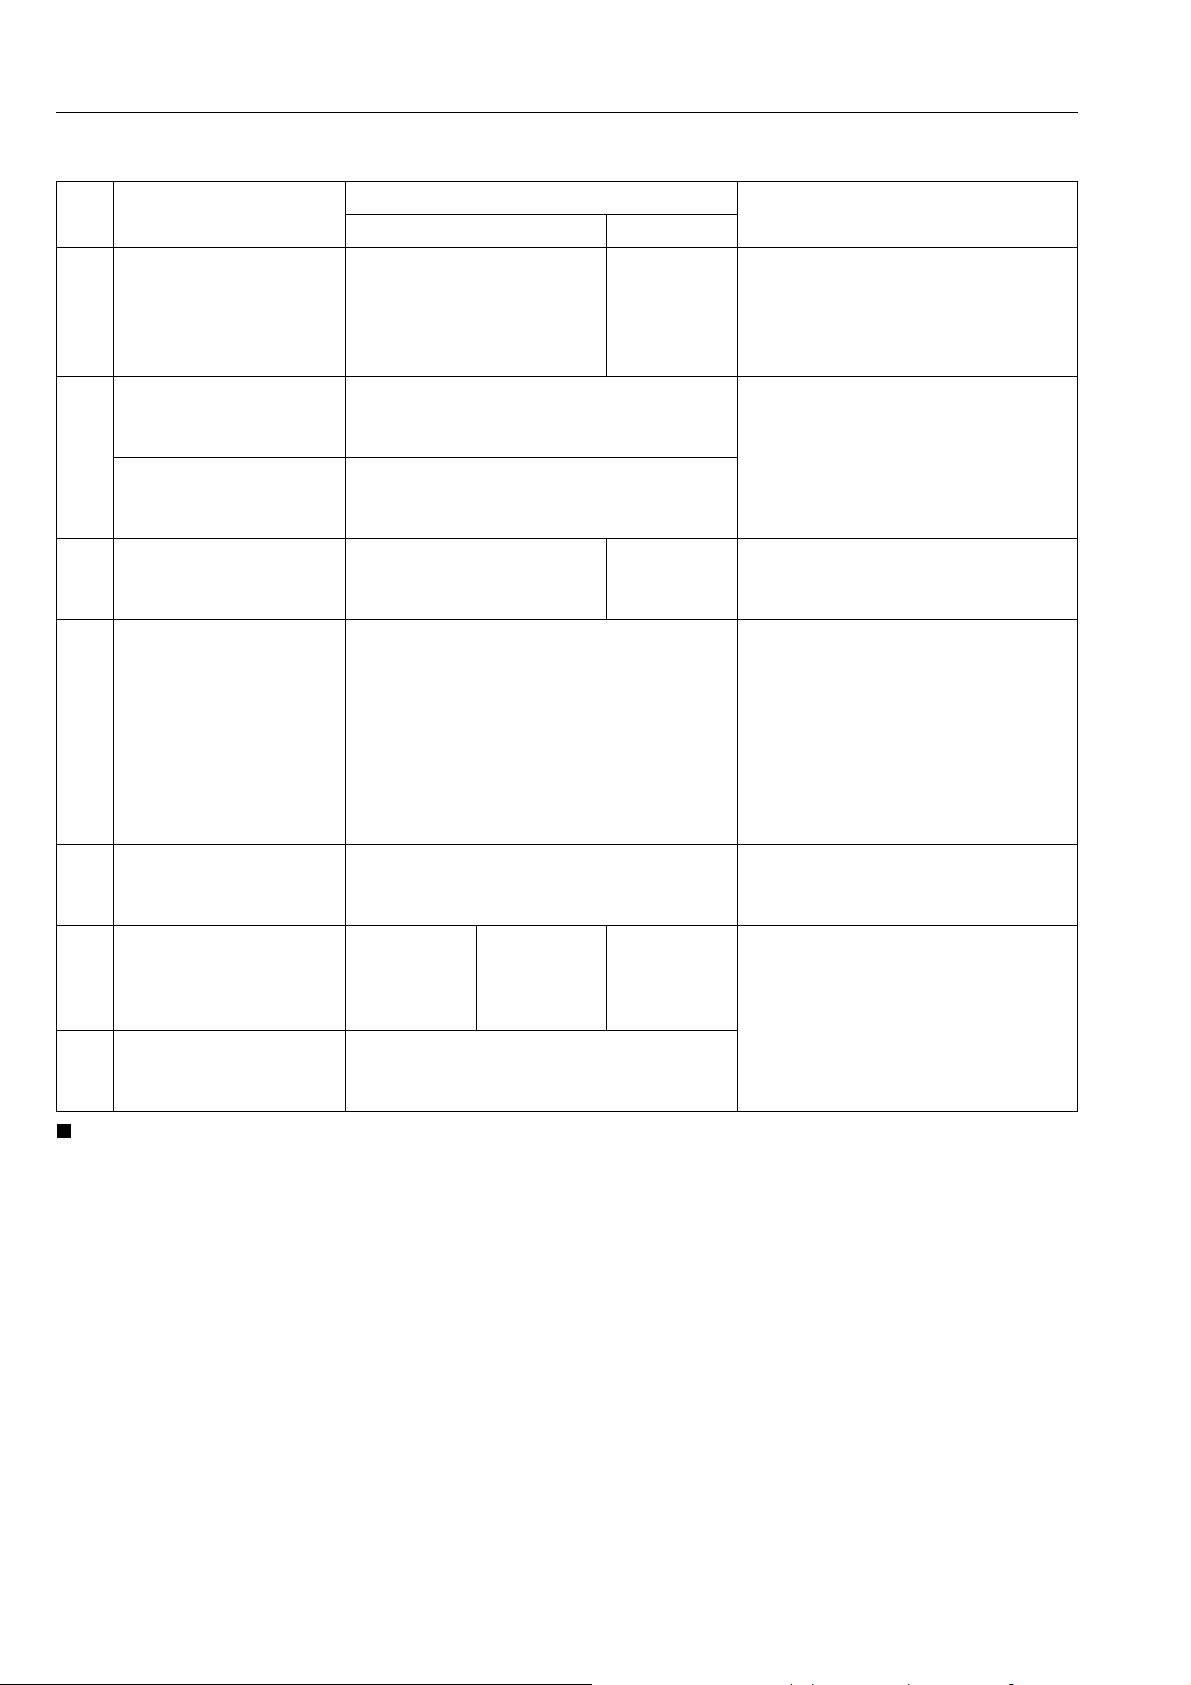
4. LUBRICANTS, FUEL AND COOLANT
GENERAL
No. Place
1 Fuel tank
Coolant
2
Recovery tank
3 Washer liquid –
Engine crankcase
4
(with filter)
5 Transmission case
Front differential case
6
oil
Front axle gear case oil
7
(one side)
18.5 U.S.gals
15.4 Imp.gals
5.5 L
5.8 U.S.qts
4.8 Imp.qts
Capacity
ROPS CABIN
90 L
70 L
8.0 L
8.5 U.S.qts
7.0 Imp.qts
1.0 L
1.1 U.S.qts
0.9 Imp.qts
11 L
11.6 U.S.qts
9.7 Imp.qts
56 L
59.2 U.S.qts
49.3 Imp.qts
M7040-SPA
5.0 L
5.3 U.S.qts
4.4 Imp.qts
3.5 L
3.7 U.S.qts
3.1 Imp.qts
23.8
U.S.gals
19.8
Imp.gals
1.3 L
1.4 U.S.qts
1.1 Imp.qts
5.5 L
5.8 U.S.qts
4.8 Imp.qts
Lubricants, fuel and coolant
• No. 2-D diesel fuel
• No. 1-D diesel fuel if temperature
is below −10 °C (14 °F)
Fresh clean water with anti-freeze
Automobil washer liquid
Engine oil
API Service Classification CF or
CI-4 (External EGR type engine)
• Below 0 °C (32 °F)
SAE10W, 10W-30 or 15W-40
• 0 to 25 °C (32 to 77 °F)
SAE20, 10W-30 or 15W-40
• Above 25 °C (77 °F)
SAE30, 10W-30 or 15W-40
KUBOTA UDT or SUPER UDT
fluid*
KUBOTA UDT or SUPER UDT
fluid* or SAE 80, SAE 90 gear oil
• * KUBOTA original transmission hydraulic fluid.
G-10
Page 32
M6040, M7040, WSM
KiSC issued 07, 2012 A
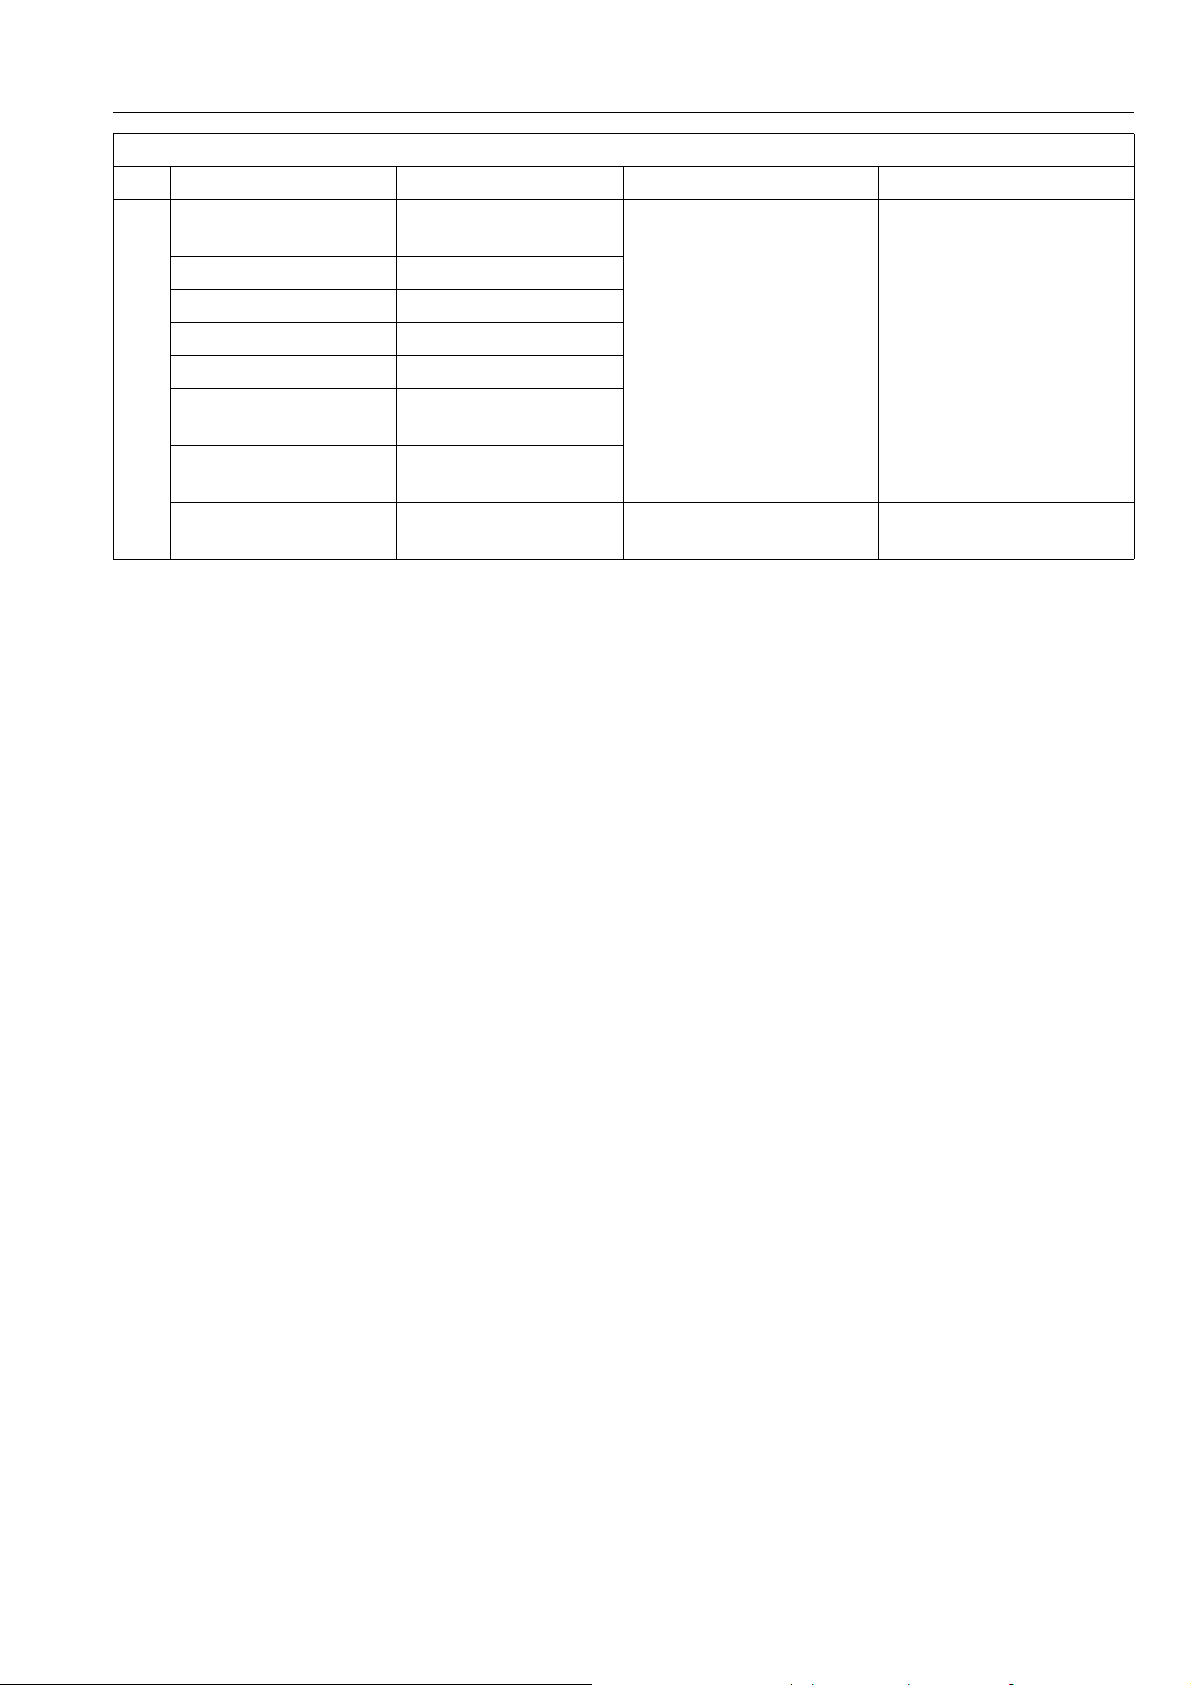
Greasing
No. Place No. of greasing point Capacity Type of grease
Front axle gear case
support
2
Front axle support 2
Top link 2
Top link bracket 2
Lift rod 2
8
Hydraulic lift cylinder
pin
Steering joint shaft
[CABIN model]
4
1
Until grease overflows
Battery terminal 2 Moderate amount
Multipurpose NLGI-2 or
NLGI-1 (GC-LB) grease
Multipurpose type grease
or petroleum jelly
9Y1210143GEG0004US0
GENERAL
G-11
Page 33
M6040, M7040, WSM
NOTE
KiSC issued 07, 2012 A
GENERAL
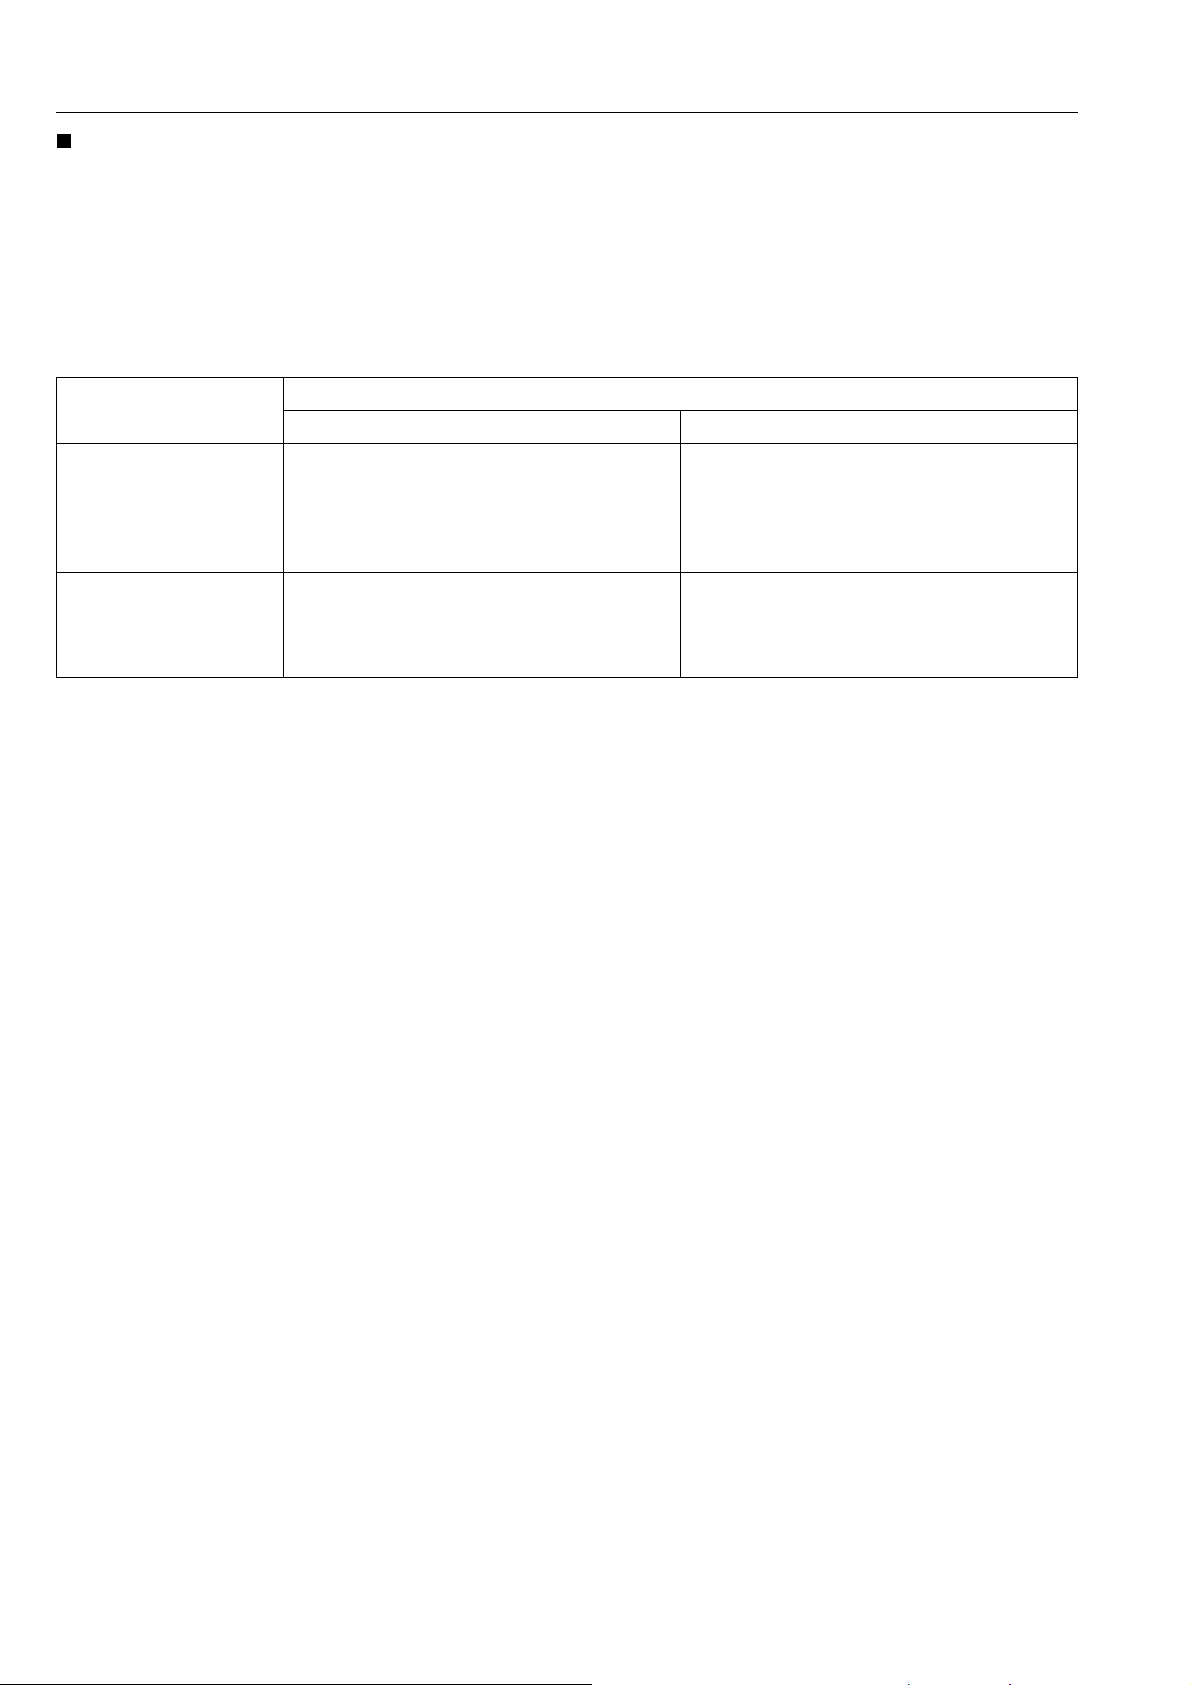
Engine Oil
• Oil used in the engine should have an American Petroleum Institute (API) service classification and
Proper SAE Engine Oil according to the ambient temperatures as shown above.
• With the emission control now in effect, the CF-4 and CG-4 lubricating oils have been developed for use
of a low-sulfur fuel on on-road vehicle engines. When an off-road vehicle engine runs on a high-sulfur
fuel, it is advisable to employ the "CF or better" lubricating oil with a high Total Base Number (TBN of 10
minimum).
• Refer to the following table for the suitable API classification engine oil according to the engine type (with
internal EGR, external EGR or non-EGR) and the fuel (low-sulfur or high-sulfur fuel).
Fuel used
Engine oil classification (API classification)
Oil class of engines except external EGR Oil class of engines with external EGR
CF
High Sulfur Fuel
(≥ 500 ppm)
(If the "CF-4, CG-4, CH-4, or CI-4"
lubricating oil is used with a high-sulfur
fuel, change the lubricating oil at shorter
—
intervals. (approximately half))
Low Sulfur Fuel
(< 500 ppm) or
Ultra Low Sulfur Fuel
(< 15 ppm)
CF, CF-4, CG-4, CH-4 or CI-4
CF or CI-4
(Class CF-4, CG-4 and CH-4 engine oils
cannot be used on EGR type engines)
EGR: Exhaust Gas Re-circulation
• The CJ-4 engine oil is intended for DPF (Diesel Particulate Filter) type engines, and cannot be used on
this tractor.
Fuel
• Cetane number of 45 minimum. Cetane number greater then 50 is preferred, especially for temperatures
below −20 °C (−4 °F) or elevations above 1500 m (5000 ft).
• If diesel fuel with sulfur content greater than 0.5 % sulfur content is used, reduce the service interval for
engine oil and filter by 50 %.
• DO NOT use diesel fuel with sulfur content greater than 1.0 %.
• Diesel fuels specified to EN 590 or ASTM D975 are recommended.
• No.2-D is a distillate fuel of lower volatility for engines in industrial and heavy mobile service. (SAE J313
JUN87).
Transmission oil
• The oil used to lubricate the transmission is also used as hydraulic fluid. To insure proper operation of
the hydraulic system and to complete lubrication of the transmission, it is important that a multi-grade
transmission fluid is used in this system. We recommend the use of KUBOTA UDT or SUPER UDT fluid
for optimum protection and performance.
Do not mix different brands together.
Indicated capacities of water and oil are manufacturer's estimate.
9Y1210143GEG0005US0
G-12
Page 34
M6040, M7040, WSM
KiSC issued 07, 2012 A
GENERAL
5. TIGHTENING TORQUES
[1] GENERAL USE SCREWS, BOLTS AND NUTS
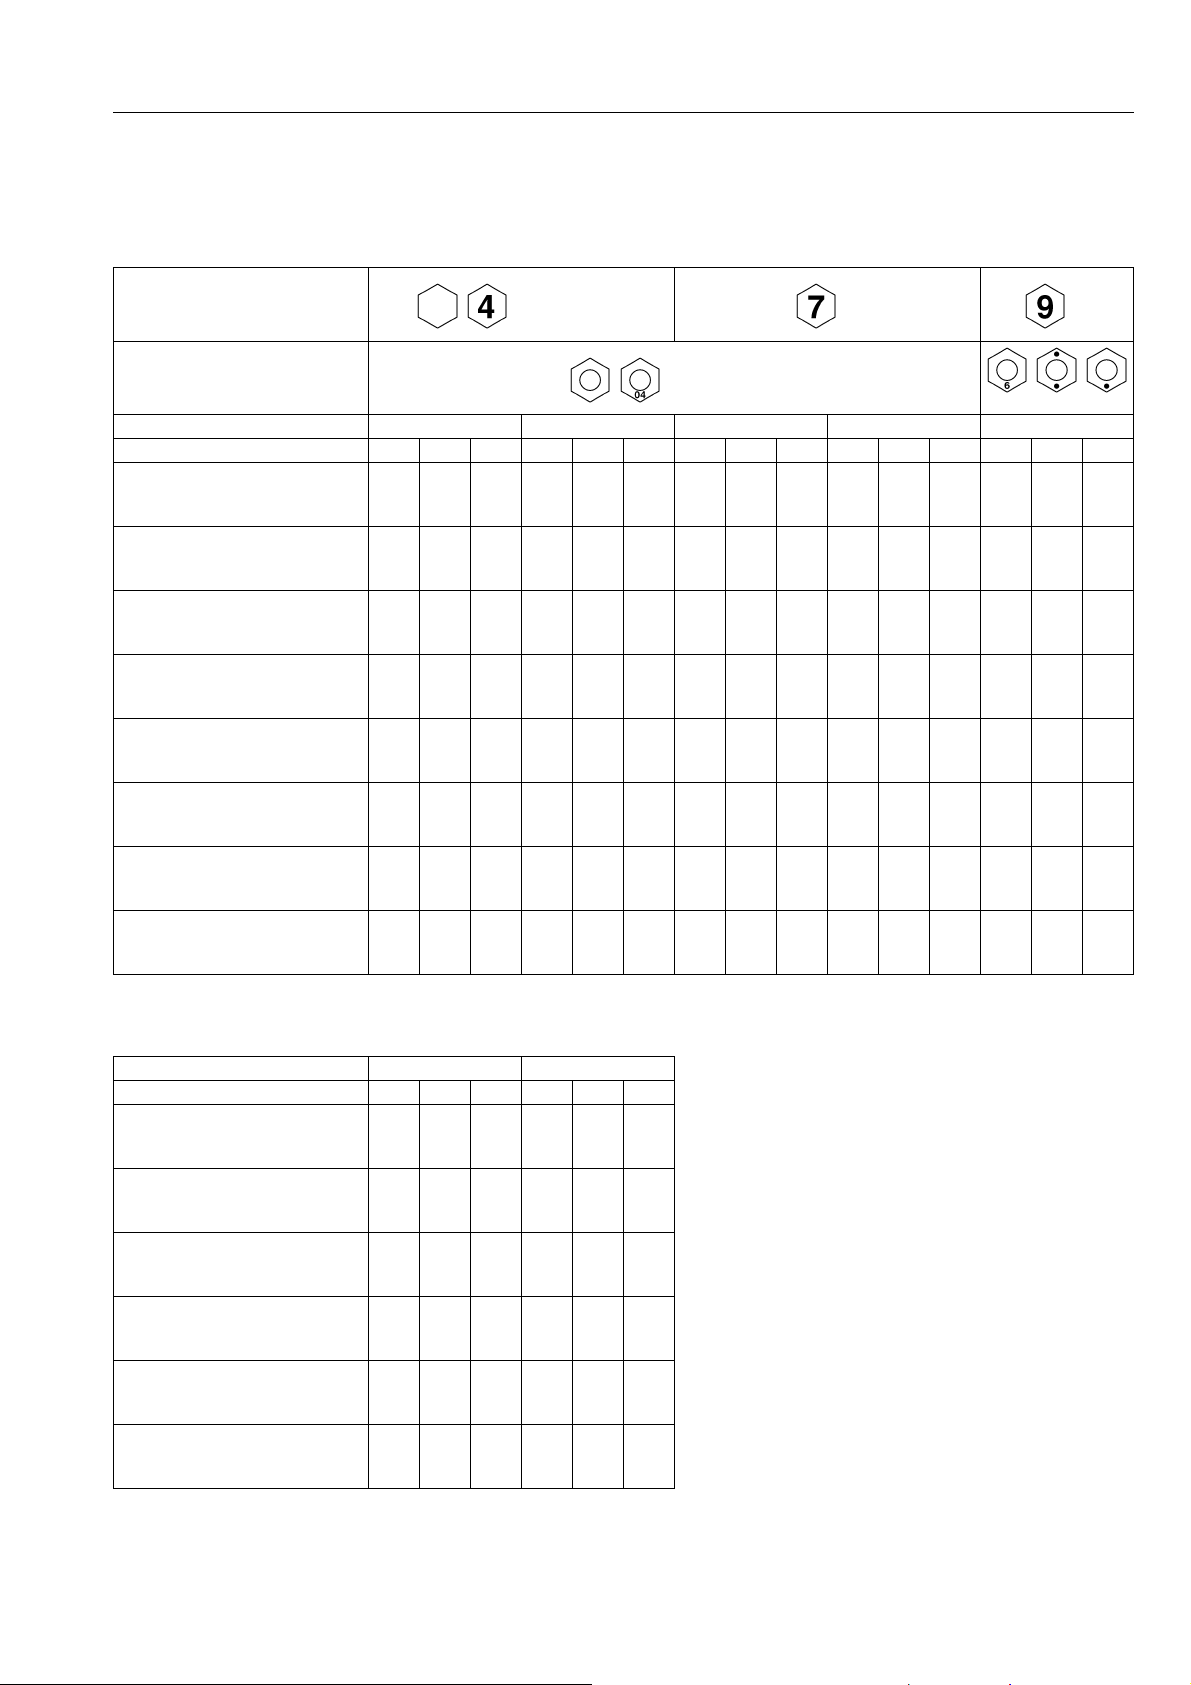
Screws, bolts and nuts whose tightening torques are not specified in this Workshop Manual should be
tightened according to the table below.
Indication on top of bolt
Indication on top of nut
Material of opponent part Ordinariness Aluminum Ordinariness Aluminum Ordinariness
Unit N·m kgf·m lbf·ft N·m kgf·m lbf·ft N·m kgf·m lbf·ft N·m kgf·m lbf·ft N·m kgf·m lbf·ft
7.9
0.80
M6
M8
M10
M12
M14
M16
M18
M20
to
9.3
18
to
20
40
to
45
63
to
72
108
to
125
167
to
191
246
to
284
334
to
392
to
0.95
1.8
to
2.1
4.0
to
4.6
6.4
to
7.4
11. 0
to
12.8
17.0
to
19.5
25.0
to
29.0
34.0
to
40.0
No-grade or 4T 7T 9T
No-grade or 4T
5.8
7.9
0.80
5.8
9.81
1.00
7.24
7.9
0.80
5.8
to
to
to
6.8
8.8
13
17
to
to
15
19
32
29
to
to
33
34
47
to 53–––
79.6
to
92.5
–––
123
to
–––
141
181
to
–––
209
246
to
–––
289
0.90
1.7
to
2.0
3.2
to
3.5
to
6.5
13
to
14
24
to
25
to
11. 2
24
to
27
48
to
55
78
to
90
124
to
147
197
to
225
275
to
318
368
to
431
to
1.15
2.4
to
2.8
4.9
to
5.7
7.9
to
9.2
12.6
to
15.0
20.0
to
23.0
28.0
to
32.5
37.5
to
44.0
to
8.31
18
to
20
36
to
41
58
to
66
91.2
to
108
145
to
166
203
to
235
272
to
318
to
to
8.8
0.90
18
1.8
to
to
20
2.1
40
4.0
to
to
44
4.5
63
6.4
to
to
72
7.4
–––
–––
–––
–––
12.3
to
to
6.5
14.2
13
30
to
to
15
34
29
61
to
to
32
70
47
103
to
to
53
117
67
1
to
19
260
to
304
344
to
402
491
to
568
WSM000001GEG0001US1
6T
1.25
to
1.45
3.0
to
3.5
6.2
to
7.2
10.5
to
12.0
17.0
to
6
20.0
26.5
to
31.0
35.0
to
41.0
50.0
to
58.0
9.05
to
10.4
22
to
25
45
to
52
76.0
to
86.7
123
to
144
192
to
224
254
to
296
362
to
419
[2] STUD BOLTS
Material of opponent part Ordinariness Aluminum
Unit N·m kgf·m lbf·ft N·m kgf·m lbf·ft
12
1.2
8.7
M8
M10
M12
M14
M16
M18
to
15
25
to
31
30
to
49
62
to
73
98.1
to
112
172
to
201
to
1.6
2.5
to
3.2
3.0
to
5.0
6.3
to
7.5
10.0
to
11. 5
17.5
to
20.5
8.9
to
to
11
11
18
20
to
to
23
25
22
to 3631 3.2 23
46
to 54–––
72.4
to
83.1
–––
127
to
–––
148
0.90
to
1.2
2.0
to
2.6
G-13
6.5
to
8.6
15
to
18
WSM000001GEG0002US1
Page 35
M6040, M7040, WSM
KiSC issued 07, 2012 A
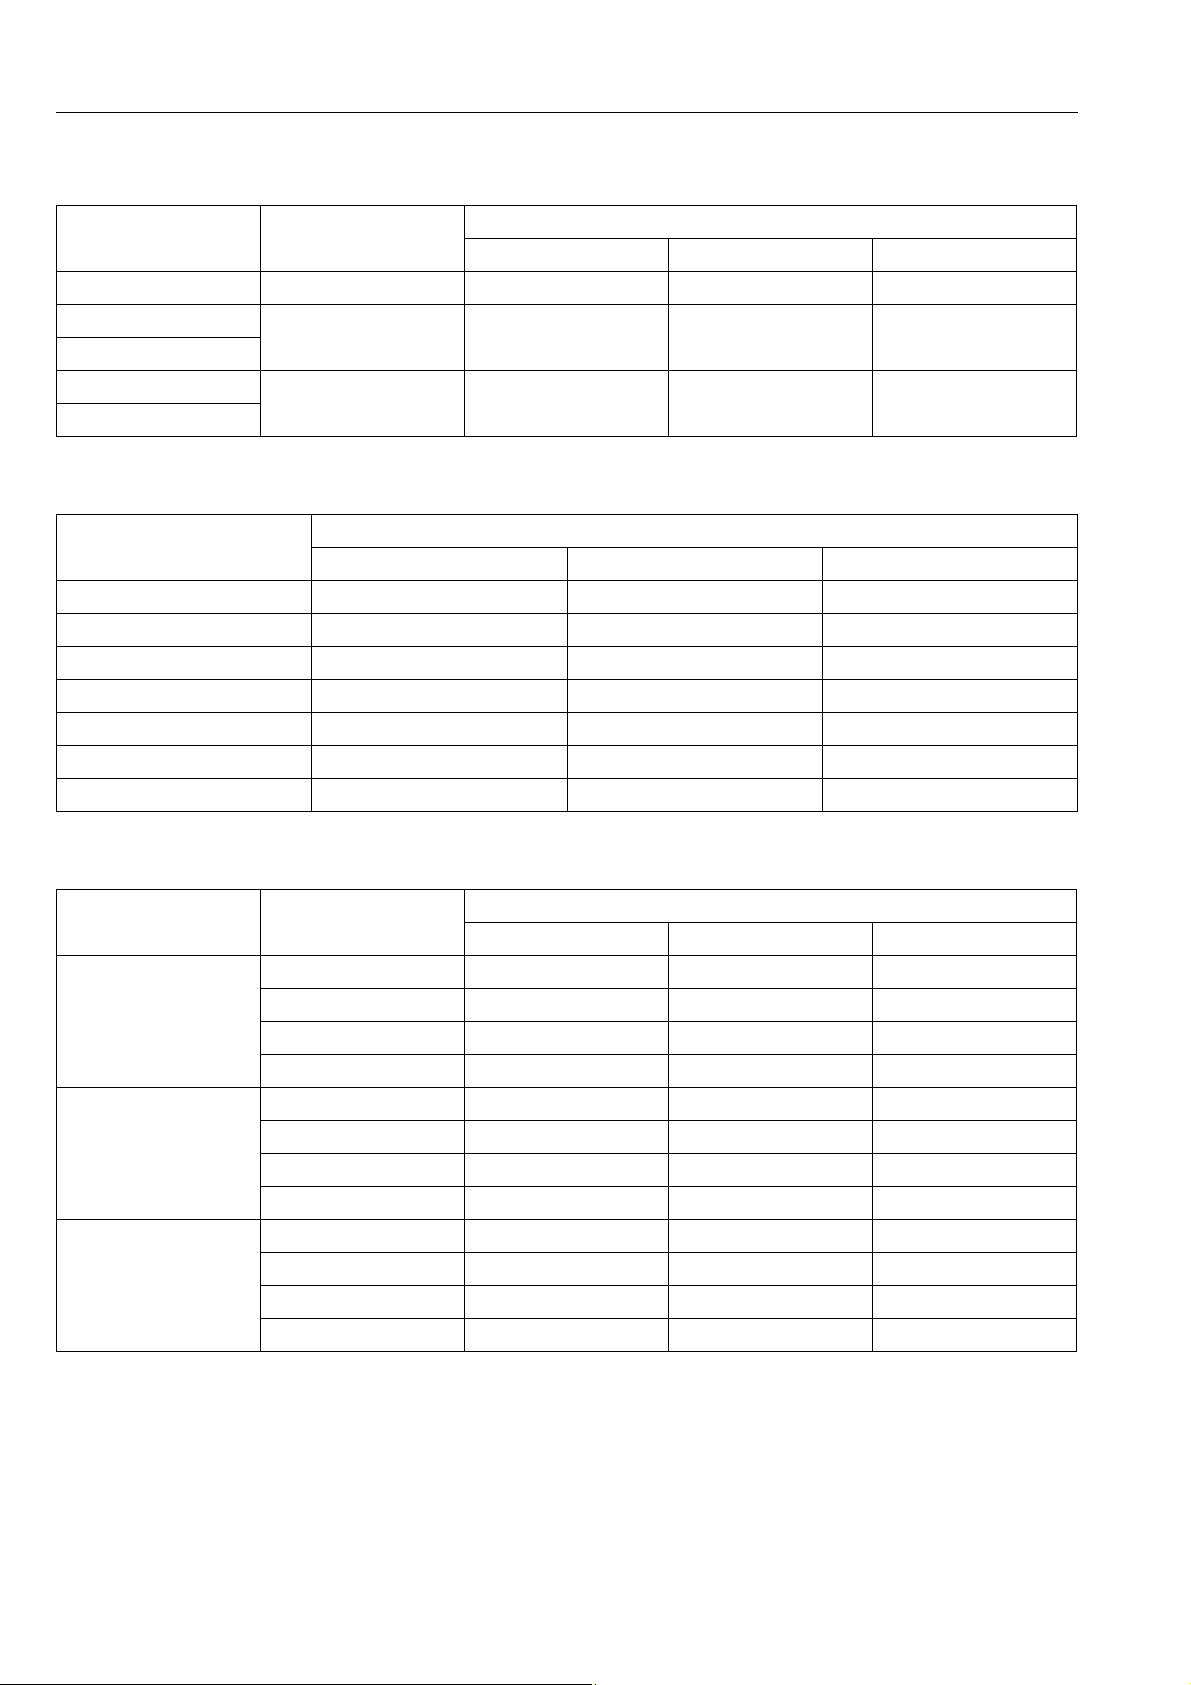
[3] HYDRAULIC FITTINGS
(1) Hydraulic Hose Fittings
GENERAL
Hose size Thread side
02 1/8 13.8 to 15.6 1.40 to 1.60 10.2 to 11.5
03
1/4 22.6 to 27.4 2.30 to 2.80 16.7 to 20.2
04
05
3/8 45.2 to 52.9 4.60 to 5.40 33.3 to 39.0
06
(2) Hydraulic Pipe Cap Nuts
Pipe size
N·m kgf·m lbf·ft
ϕ4 × t1.0 19.7 to 29.4 2.00 to 3.00 14.5 to 21.6
ϕ6 × t1.0 24.6 to 34.3 2.50 to 3.50 18.1 to 25.3
ϕ8 × t1.0 29.5 to 39.2 3.00 to 4.00 21.7 to 28.9
ϕ10 × t1.0 39.3 to 49.0 4.00 to 5.00 29.0 to 36.1
ϕ12 × t1.5 49.1 to 68.6 5.00 to 7.00 36.2 to 50.6
ϕ15 × t1.6 108 to 117 11.0 to 12.0 79.6 to 86.7
ϕ18 × t1.6 108 to 117 11.0 to 12.0 79.6 to 86.7
Tightening torque
N·m kgf·m lbf·ft
WSM000001GEG0097US0
Tightening torque
(3) Adaptors, Elbows and Others
Item Thread side
PF 1/8 45 to 53 4.5 to 5.5 33 to 39
POA-PF
(Nipple with O-ring)
POB-PF
(Elbow with O-ring
and no nut)
Adaptor
(NPT)
PF 1/4 74 to 83 7.5 to 8.5 55 to 61
PF 3/8 93.2 to 102 9.50 to 10.5 68.8 to 75.9
PF 1/2 113 to 122 11.5 to 12.5 83.2 to 90.4
PF 1/8 23 to 26 2.3 to 2.7 17 to 19
PF 1/4 36 to 43 3.6 to 4.4 26 to 31
PF 3/8 54 to 63 5.5 to 6.5 40 to 47
PF 1/2 73 to 83 7.4 to 8.5 54 to 61
PF 1/8 9.8 to 14 1.0 to 1.5 7.3 to 10
PF 1/4 30 to 34 3.0 to 3.5 22 to 25
PF 3/8 49 to 68 5.0 to 7.0 37 to 50
PF 1/2 69 to 88 7.0 to 9.0 51 to 65
WSM000001GEG0098US0
Tightening torque
N·m kgf·m lbf·ft
WSM000001GEG0099US0
G-14
Page 36
M6040, M7040, WSM
KiSC issued 07, 2012 A
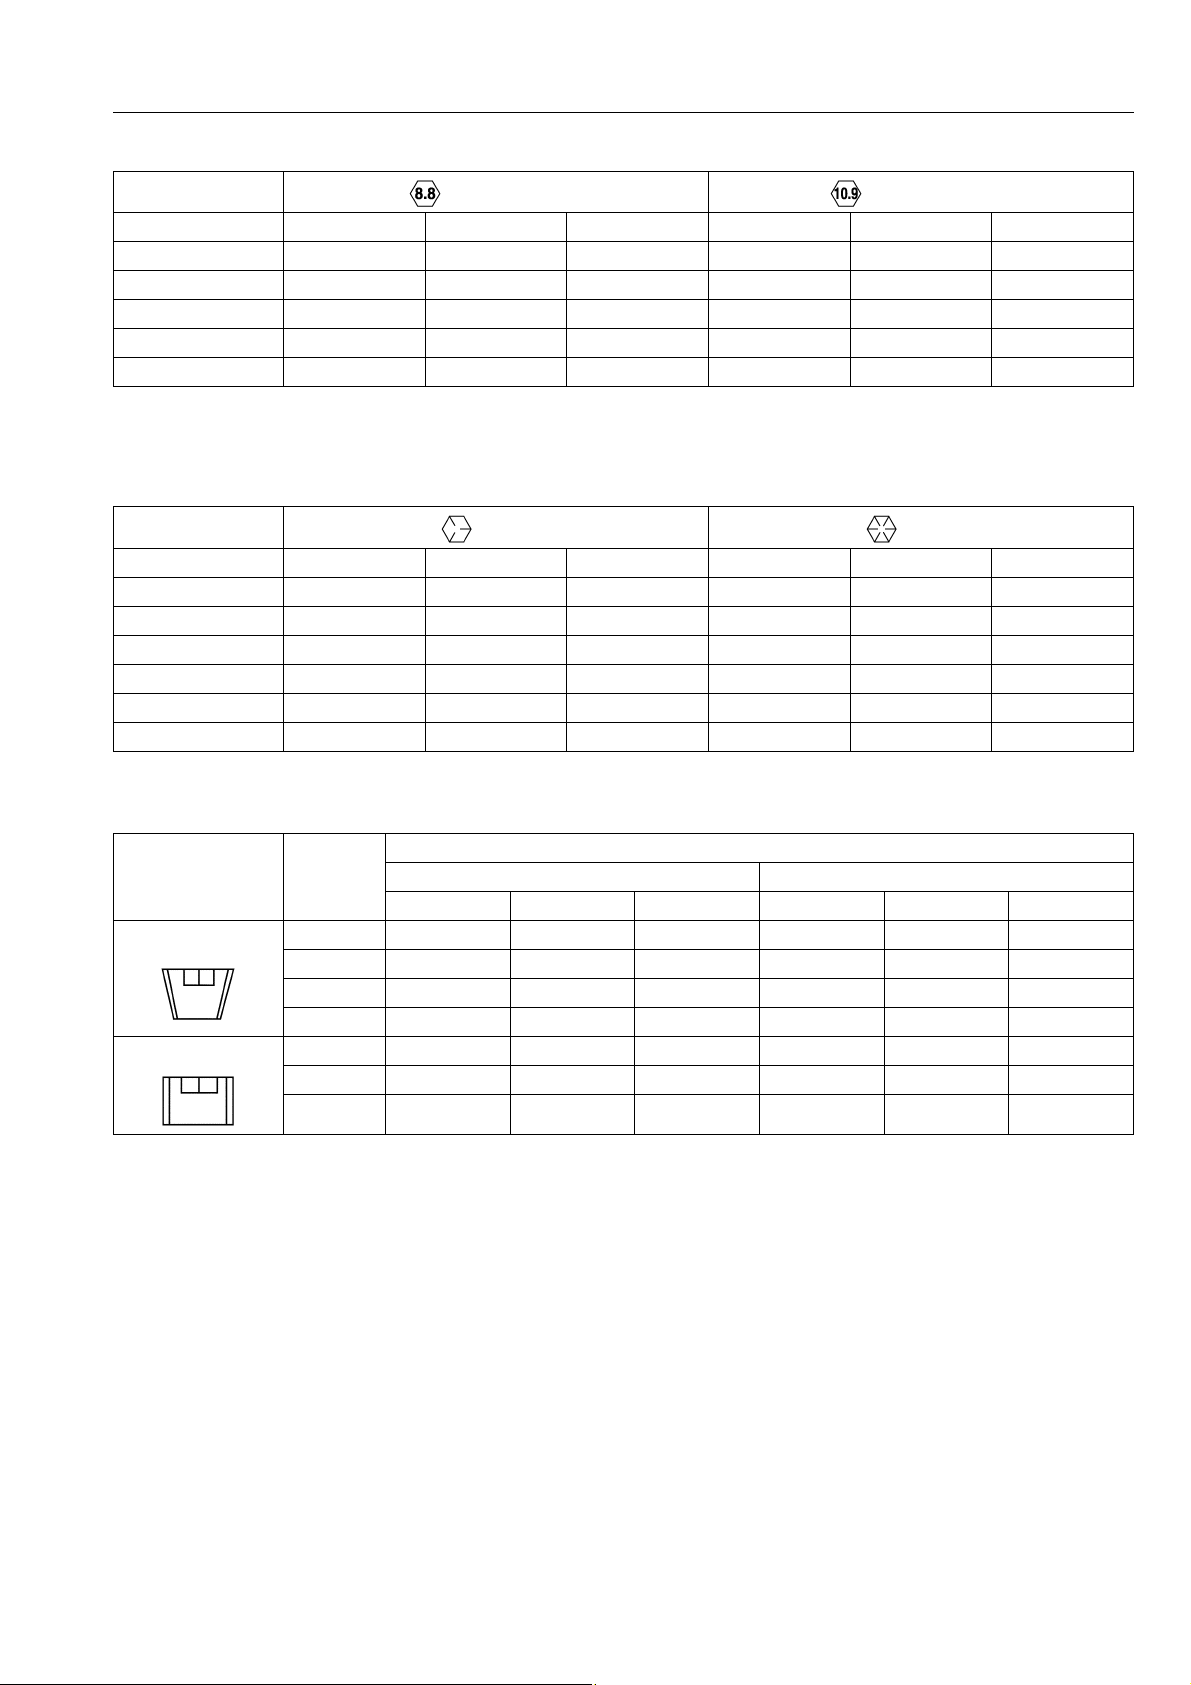
[4] METRIC SCREWS, BOLTS AND NUTS
GENERAL
Grade
Unit N·m kgf·m lbf·ft N·m kgf·m lbf·ft
M8 24 to 27 2.4 to 2.8 18 to 20 30 to 34 3.0 to 3.5 22 to 25
M10 48 to 55 4.9 to 5.7 36 to 41 61 to 70 6.2 to 7.2 45 to 52
M12 78 to 90 7.9 to 9.2 58 to 66 103 to 117 10.5 to 12.0 76.0 to 86.7
M14 124 to 147 12.6 to 15.0 91.2 to 108 167 to 196 17.0 to 20.0 123 to 144
M16 197 to 225 20.0 to 23.0 145 to 166 260 to 304 26.5 to 31.0 192 to 224
Property class 8.8 Property class 10.9
WSM000001GEG0003US1
[5] AMERICAN STANDARD SCREWS, BOLTS AND NUTS WITH
UNC OR UNF THREADS
Grade
Unit N·m kgf·m lbf·ft N·m kgf·m lbf·ft
1/4 11.7 to 15.7 1.20 to 1.60 8.63 to 11.5 16.3 to 19.7 1.67 to 2.00 12.0 to 14.6
5/16 23.1 to 27.7 2.36 to 2.82 17.0 to 20.5 33 to 39 3.4 to 3.9 25 to 28
3/8 48 to 56 4.9 to 5.7 36 to 41 61 to 73 6.3 to 7.4 45 to 53
1/2 110 to 130 11.3 to 13.2 81.2 to 95.8 150 to 178 15.3 to 18.1 111 to 131
9/16 150 to 178 15.3 to 18.1 111 to 131 217 to 260 22.2 to 26.5 160 to 191
5/8 204 to 244 20.8 to 24.8 151 to 179 299 to 357 30.5 to 36.4 221 to 263
SAE GR.5 SAE GR.8
WSM000001GEG0008US1
[6] PLUGS
Material of opponent part
Shape Size
N·m kgf·m lbf·ft N·m kgf·m lbf·ft
Tapered screw
Straight screw G1/4 25 to 34 2.5 to 3.5 18 to 25 – – –
R1/8 13 to 21 1.3 to 2.2 9.4 to 15 13 to 19 1.3 to 2.0 9.4 to 14
R1/4 25 to 44 2.5 to 4.5 18 to 32 25 to 34 2.5 to 3.5 18 to 25
R3/8 49 to 88 5.0 to 9.0 37 to 65 49 to 58 5.0 to 6.0 37 to 43
R1/2 58.9 to 107 6.00 to 11.0 43.4 to 79.5 59 to 78 6.0 to 8.0 44 to 57
G3/8 62 to 82 6.3 to 8.4 46 to 60 – – –
G1/2 49 to 88 5.0 to 9.0 37 to 65 – – –
Ordinariness Aluminum
WSM000001GEG0005US1
G-15
Page 37
M6040, M7040, WSM
KiSC issued 07, 2012 A
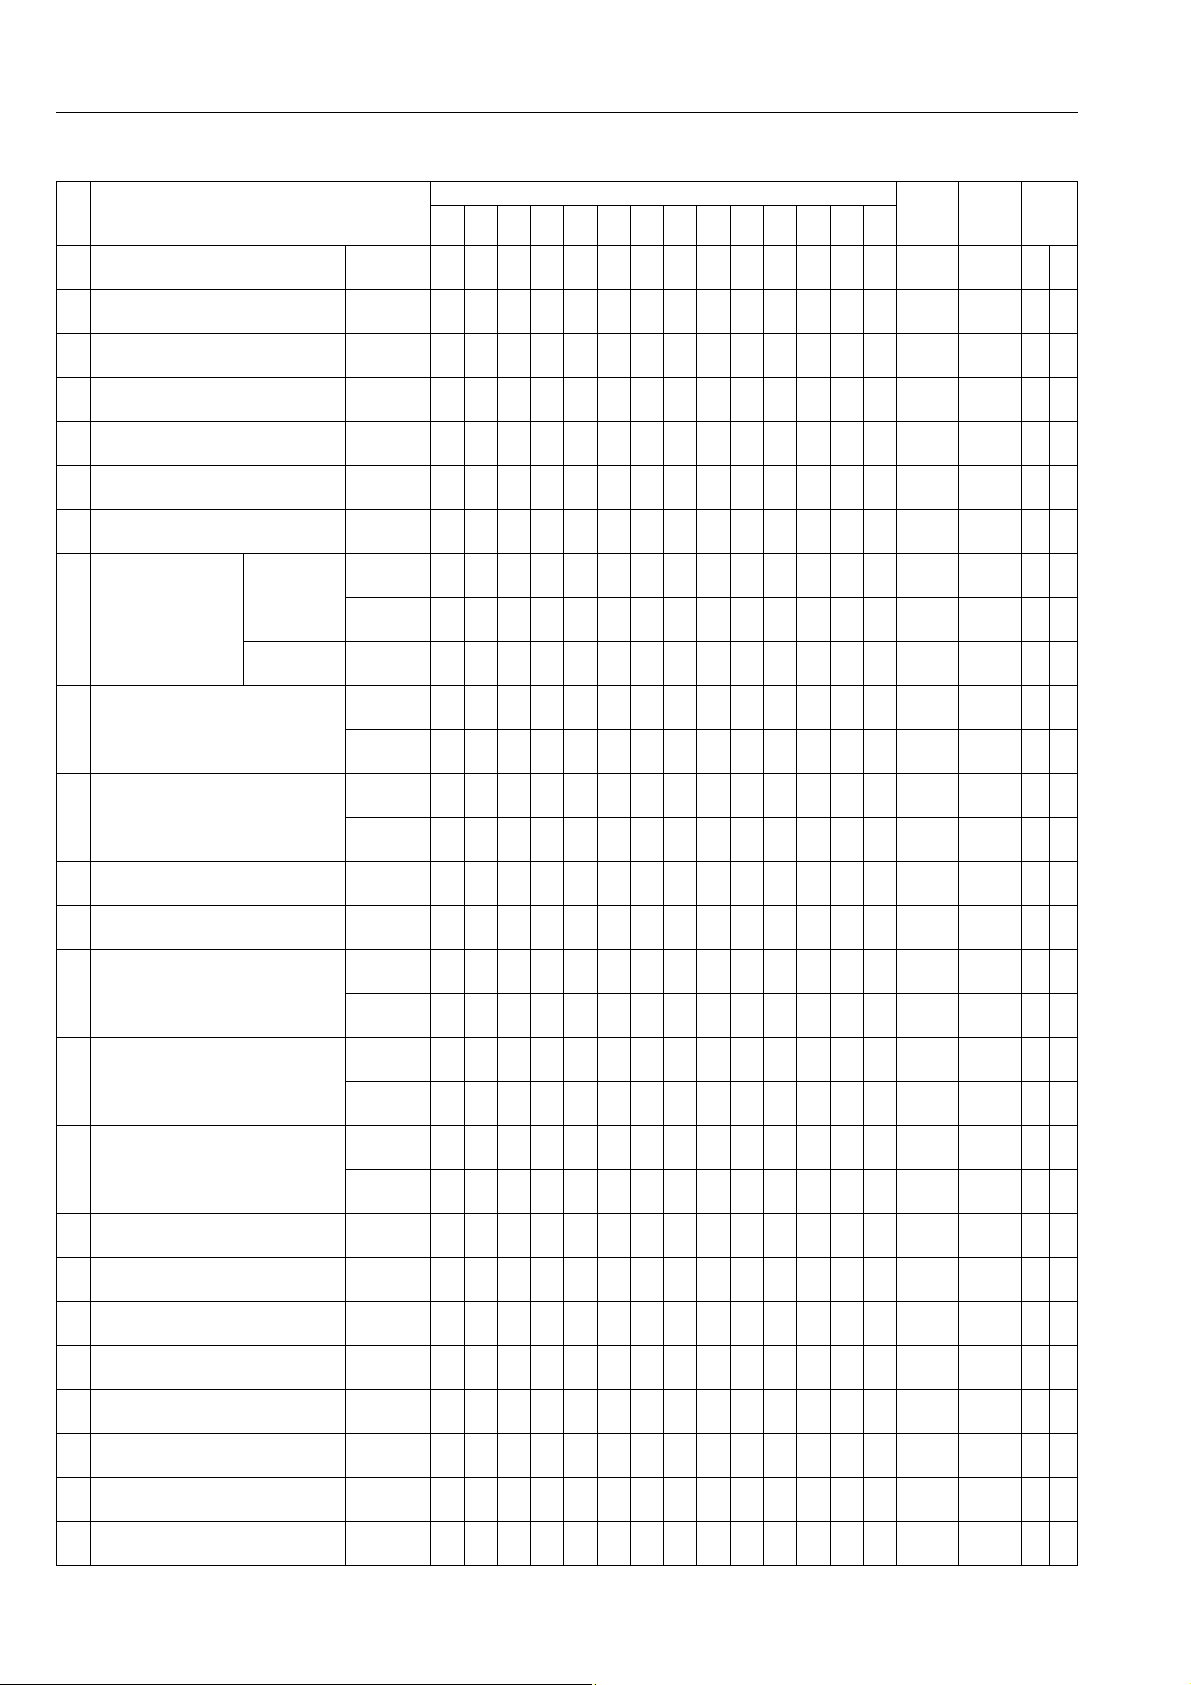
6. MAINTENANCE CHECK LIST
GENERAL
Indication on hour meter
No. Item
1 Engine start system Check
2 Wheel bolt torque Check
3 Battery condition Check
4 Greasing –
5 Fan/Air-conditioner belt Adjust
6 Alternator belt Adjust
7 Brake pedal Adjust
Primary
Air cleaner element
8
[Double type]
9 Fuel line
10 Parking Brake (Cable)
11 Toe-in Adjust
12 Fuel tank water Drain
13 Power steering oil line
14
Radiator hose and clamp
15 Intake air line
16 Engine oil Change
17 Hydraulic oil filter Replace
18 Water separator Clean
19 Fuel filter Replace
20 Engine oil filter Replace
21 Transmission fluid Change
22 Front differential case oil Change
23 Front axle case oil Change
element
Secondary
element
Clean
Replace
Replace
Check
Replace
Adjust
Replace
Check
Replace
Check
Replace
Check
Replace
50 100 150 200 250 300 350 400 450 500 550 600 650 700
Interval
100 Hr
100 Hr
100 Hr
100 Hr
100 Hr
100 Hr
every 1
every 1
100 Hr
every 2
100 Hr
every 2
200 Hr
200 Hr
200 Hr
every 2
200 Hr
every 2
200 Hr
every 2
300 Hr
300 Hr
400 Hr
400 Hr
600 Hr
600 Hr
600 Hr
600 Hr
every
50 Hr
every
50 Hr
every
every
every
every
every
every
year
year
every
years
every
years
every
every
every
years
every
years
every
years
every
every
every
every
every
every
every
every
Refer-
Impor-
ence
page
G-22
G-22
G-26 *4
G-23
G-25
G-25
G-26
G-24 *1
G-34 *2
G-34
G-26
G-38
G-26
G-38
G-29
G-30
G-29
G-
G-28
G-37
G-28
G-38 *3
G-31
G-31
G-32
G-32 @
G-33
G-33
G-33
G-33
tant
38
G-16
Page 38
M6040, M7040, WSM
IMPORTANT
KiSC issued 07, 2012 A
GENERAL
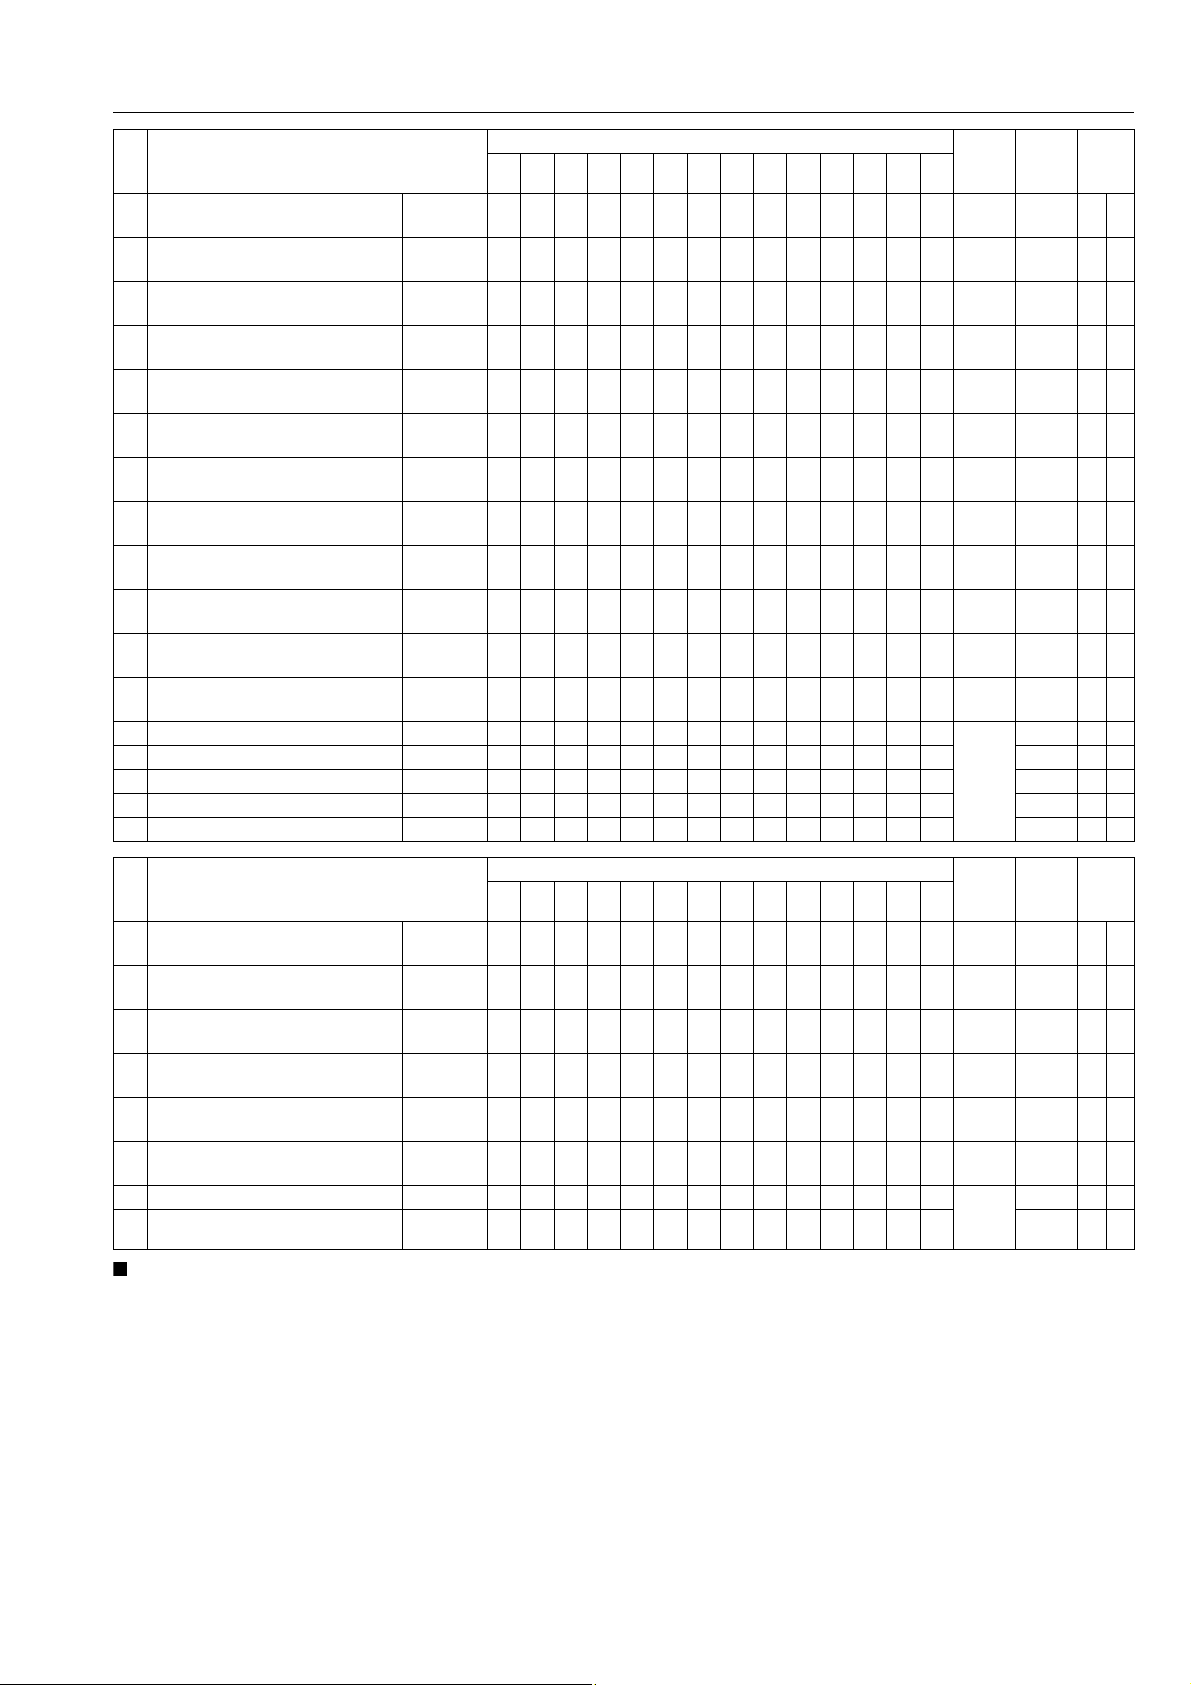
No. Item
24 Front axle pivot Adjust
25 Engine valve clearance Adjust
Fuel injection nozzle injection
26
pressure
27 Turbo charger Check
28 Injection pump Check
29 Cooling system Flush
30 Coolant Change
31 Master cylinder filter Clean
32 Lift cylinder hose Replace
33 Master cylinder kit Replace
34 Equalizer kit Replace
35 Brake seal 1 and 2 Replace
36 Fuel system Bleed
37 Brake system Bleed G-39
38 Clutch housing water Drain G-39
39 Fuse Replace G-39
40 Light bulb Replace G-40
Check
50 100 150 200 250 300 350 400 450 500 550 600 650 700
Indication on hour meter
Interval
600 Hr
800 Hr
1500 Hr
3000 Hr
3000 Hr
every 2
every 2
every 2
every 2
every 2
every 2
every 2
Service
quired
every
every
every
every
every
years
years
years
years
years
years
years
as re-
Refer-
ence
page
G-33 @
G-33
G-33 @
G-33 @
G-33 @
G-35
G-35
G-37
G-38
G-38
G-38
G-38
G-39
Impor-
tant
Indication on hour meter
No. Item
1 Fan/Air conditioner drive belt Adjust
2 Inner air filter Clean
3 Fresh air filter Clean
4 Air conditioner condenser Clean
5 Air conditioner pipes and hoses Check
6 Cabin isolation cushion Check
Washer liquid Add Service
7
8 Refrigerant (gas) Check G-41
50 100 150 200 250 300 350 400 450 500 550 600 650 700
Interval
100 Hr
200 Hr
200 Hr
200 Hr
every 1
every 1
quired
every
every
every
every
year
year
as re-
Refer-
ence
page
G-25
G-30
G-31
G-31
G-34
G-
34
G-41
Impor-
tant
• The jobs indicated by must be done after the first 50 hours of operation.
• *1: Air cleaner should be cleaned more often in dusty conditions than in normal conditions.
• *2: Every year or every 6 times of cleaning.
• *3: Replace only if necessary.
• *4: When the battery is used for less than 100 hours per year, check the battery condition by reading the
indicator annually.
9Y1210143GEG0006US0
G-17
Page 39

M6040, M7040, WSM
CAUTION
KiSC issued 07, 2012 A
GENERAL
7. CHECK AND MAINTENANCE
• Be sure to check and service the tractor on a flat place with engine shut off, the parking brake on and
chock the wheels.
9Y1210143GEG0007US0
[1] DAILY CHECK
To prevent trouble from occurring, it is important to know the condition of the tractor. Check the following items
before starting.
9Y1210143GEG0008US0
Checking
• Check areas where previous trouble was experienced.
• Walk around the tractor.
1. Check the tire pressure, and check for wear and damage.
2. Check and refueling.
3. Check for oil and water leak.
4. Check the engine oil level.
5. Check the transmission fluid level.
6. Check the coolant level.
7. Check the condition of ROPS attaching hardware. (ROPS model)
8. Check the washer liquid level. (CABIN model)
9. Check the water separator.
10. Clean the air cleaner evacuator valve.
11. Check and clean the radiator screen, oil cooler and battery mount.
12. Check and clean the air conditioner condenser screen. (CABIN model)
13. Check the nuts of tires are tight.
14. Check the number plate for damage and replace as necessary if equipped.
15. Care of danger, warning and caution labels (pictorial safety labels).
16. Clean around the exhaust manifold and the muffler of the engine.
• While sitting in the operator's seat.
1. Check the throttle pedal, brake pedal and clutch pedal.
2. Check the throttle lever and shuttle lever.
3. Check the parking brake.
4. Check the steering wheel.
5. Check the seat belt.
• Turning the key switch.
1. Check the performance of the Easy Checker™ lights.
2. Check the head lights, turn signal lights, hazard lights and other light equipment. Clean if necessary.
3. Check the performance of the meters and gauges.
• Starting the engine.
1. Check to see that the lights on the Easy Checker™ go off.
2. Check the color of the exhaust gas.
3. Check the brakes for proper operation.
9Y1210143GEG0009US0
G-18
Page 40
M6040, M7040, WSM
CAUTION
CAUTION
IMPORTANT
KiSC issued 07, 2012 A
[2] CHECK POINTS OF INITIAL 50 HOURS
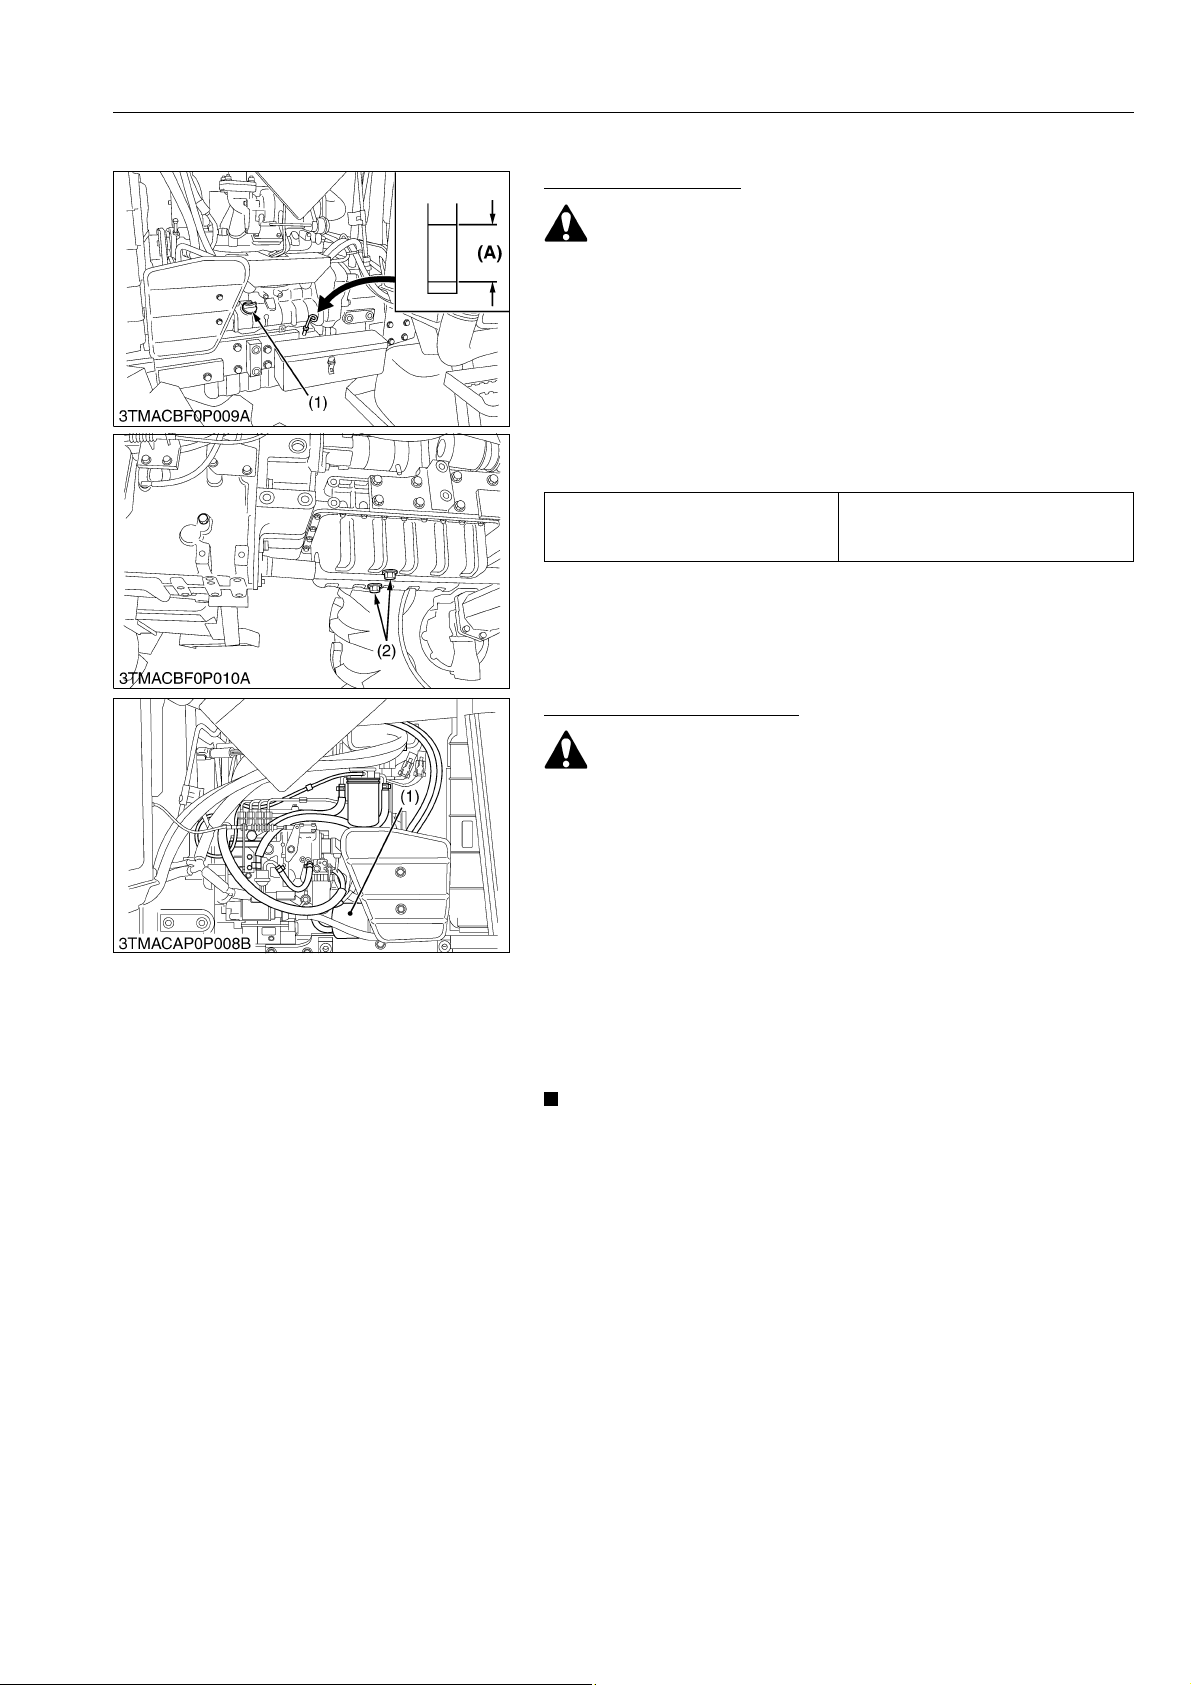
Changing Engine Oil
• Before changing oil, be sure to stop the engine.
• Allow engine to cool down sufficiently, oil can be hot and
can burn.
1. To drain the used oil, remove the drain plugs (2) at the bottom
of the engine and drain the oil completely into the oil pan.
All the used oil can be drained out easily when the engine is still
warm.
2. After draining reinstall the drain plugs (2).
3. Fill with the new oil up to the upper notch on the dipstick.
(See page G-10.)
Oil capacity with filter
GENERAL
11 L
11.6 U.S.qts
9.7 lmp.qts
(1) Oil Inlet
(2) Drain Plugs
(A) Oil level is acceptable within this
range.
9Y1210143GEG0010US0
Replacing Engine Oil Filter
• Be sure to stop the engine before changing oil filter
cartridge.
• Allow engine to cool down sufficiently, oil can be hot and
can burn.
1. Remove the oil filter (1).
2. Put a film of clean engine oil on rubber seal of new filter.
3. Tighten the filter quickly until it contacts the mounting surface.
Tighten filter by hand an additional 1/2 turn only.
4. After the new filter has been replaced, the engine oil normally
decreases a little. Make sure that the engine oil does not leak
through the seal and be sure to check the oil level on the
dipstick. Then, replenish the engine oil up to the prescribed
level.
• To prevent serious damage to the engine, use only a
KUBOTA genuine filter.
(1) Engine Oil Filter
9Y1210143GEG0011US0
G-19
Page 41
M6040, M7040, WSM
CAUTION
IMPORTANT
KiSC issued 07, 2012 A
GENERAL
Replacing Hydraulic Oil FIlter
• Allow engine to cool down sufficiently, oil can be hot and
can burn.
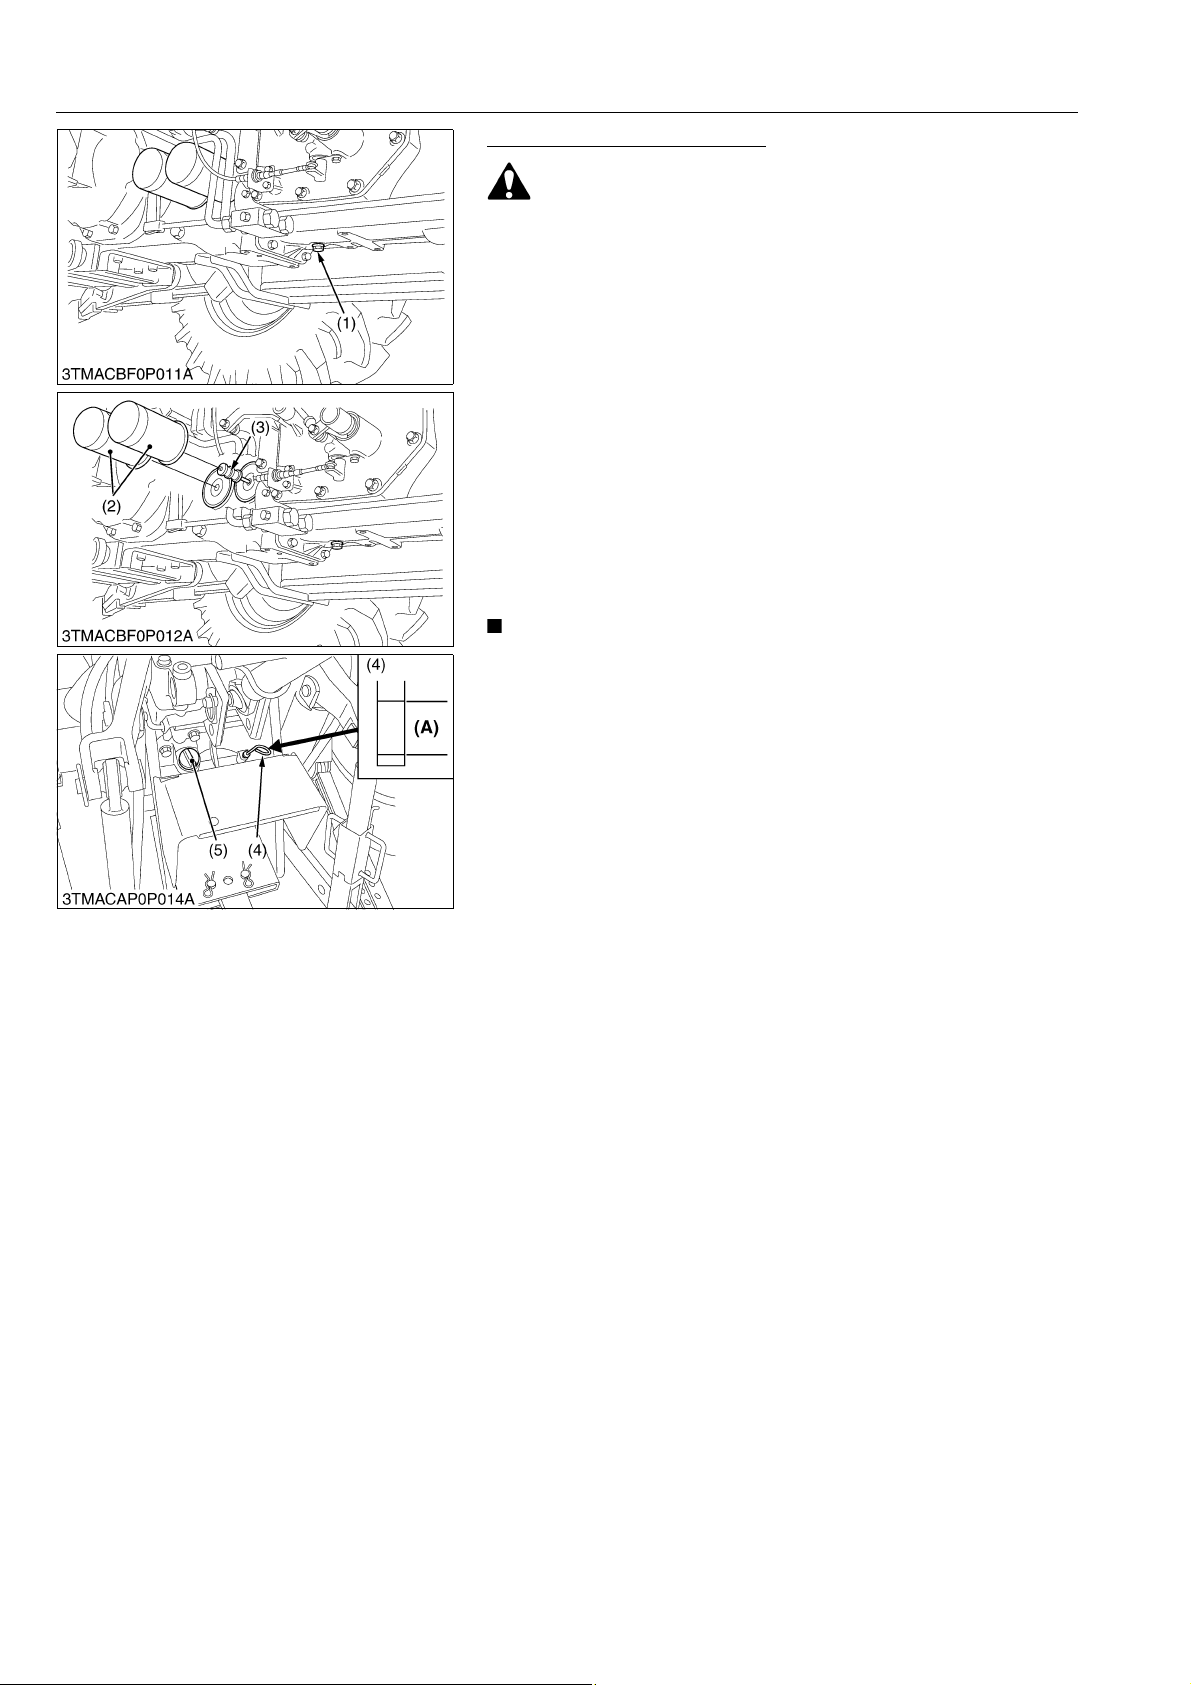
1. Remove the drain plug (1) at the bottom of the transmission
case and drain the oil completely into the oil pan.
2. After draining reinstall the drain plug (1).
3. Remove the two oil filters (2).
4. Wipe off metal fillings with clean rags at the magnetic filters (3).
5. Put a film of clean transmission fluid on rubber seal of new
filters.
6. Tighten the filter quickly until it contacts the mounting surface.
Tighten filter by hand and additional 1/2 turn only.
7. After the new filter has been replaced, fill with the oil up to the
upper notch on the dipstick (4).
8. After running the engine for a few minutes, stop it and check the
oil level again, add oil to the prescribed level.
9. Make sure that the transmission fluid doesn't leak through the
seal.
• To prevent serious damage to the hydraulic system, use
only a KUBOTA genuine filter.
(1) Drain Plug
(2) Hydraulic Oil Filter
(3) Magnetic Filter (Clean off Metal
Fillings)
(4) Dipstick
(5) Oil Filling Plug
(A) Oil level is acceptable within this
range.
9Y1210143GEG0012US0
G-20
Page 42
M6040, M7040, WSM
CAUTION
IMPORTANT
KiSC issued 07, 2012 A
GENERAL
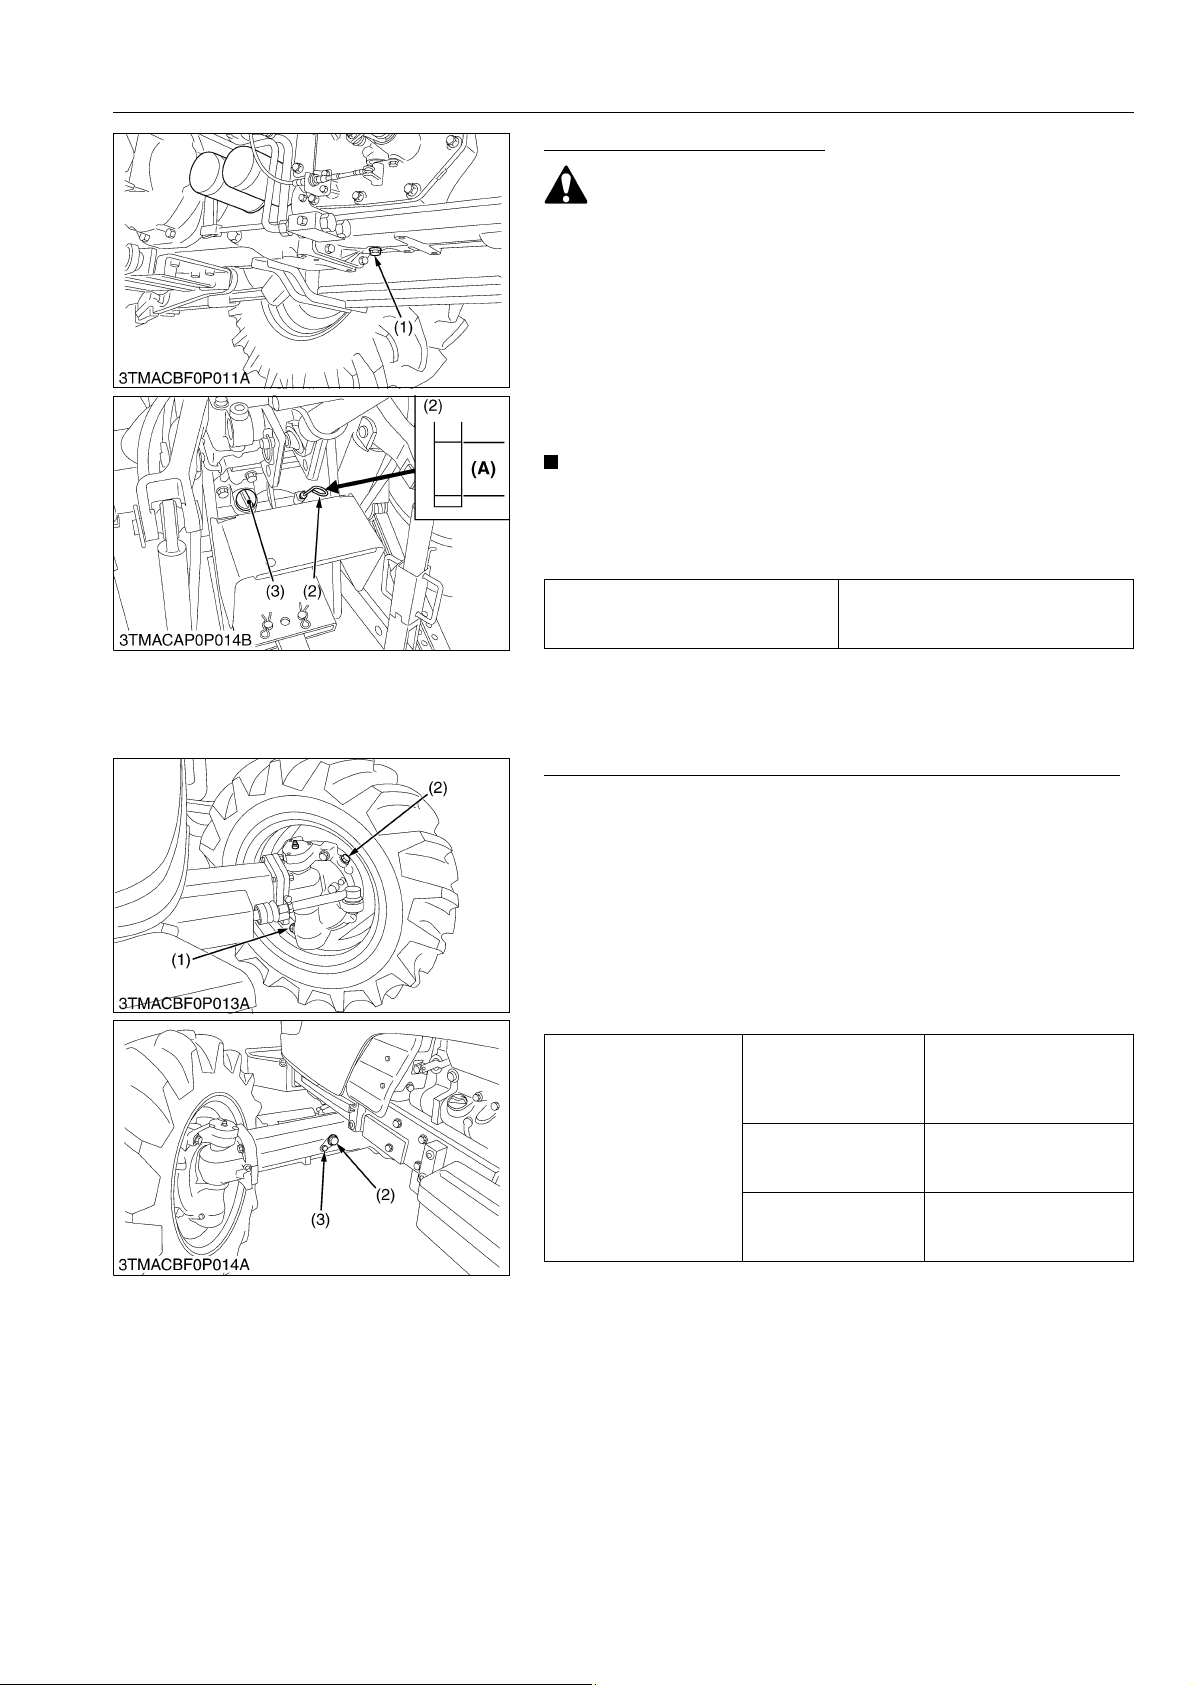
Changing Transmission Fluid
• Allow engine to cool down sufficiently, oil can be hot and
can burn.
1. To drain the used oil, remove the drain plug (1) at the bottom of
the transmission case and drain the oil completely into the oil
pan.
2. After draining reinstall the drain plug.
3. Fill with the new KUBOTA SUPER UDT fluid up to the upper
notch on the dipstick (2). (See page G-10.)
4. After running the engine for a few minutes, stop it and check the
oil level again; add oil to prescribed level.
• Do not operate the tractor immediately after changing the
transmission fluid.
Run the engine at medium speed for a few minutes to
prevent damage to the transmission.
56 L
Oil capacity
59.2 U.S.qts
49.3 lmp.qts
(1) Drain Plug
(2) Dipstick
(3) Oil Inlet
(A) Oil level is acceptable within the
range.
9Y1210143GEG0013US0
Changing Front Differential Case Oil and Front Axle Case Oil
1. To drain the used oil, remove the drain plugs at the both front
axle gear cases and filling plugs, and drain the oil completely
into the oil pan.
2. After draining reinstall the drain plugs (1).
3. Remove the oil level check plugs (3).
4. Fill the new oil for the both front axle gear cases.
5. Fill the new oil up to the check plug port on the front differential
case. (See page G-10.)
6. After checking oil is visible through the opening of the check
plug, reinstall filling plugs and check plugs.
3.5 L
3.7 U.S.qts
3.1 lmp.qts
for each side
5.5 L
5.8 U.S.qts
4.8 lmp.qts
5.0 L
5.3 U.S.qts
4.4 lmp.qts
Oil capacity
Front axle gear case
Front differential case
[M6040, M7040]
Front differential case
[M7040-SPA]
(1) Drain Plug
(2) Filling Port
G-21
(3) Check Plug
9Y1210143GEG0014US0
Page 43
M6040, M7040, WSM
CAUTION
WARNING
CAUTION
KiSC issued 07, 2012 A
[3] CHECK POINTS OF EVERY 50 HOURS
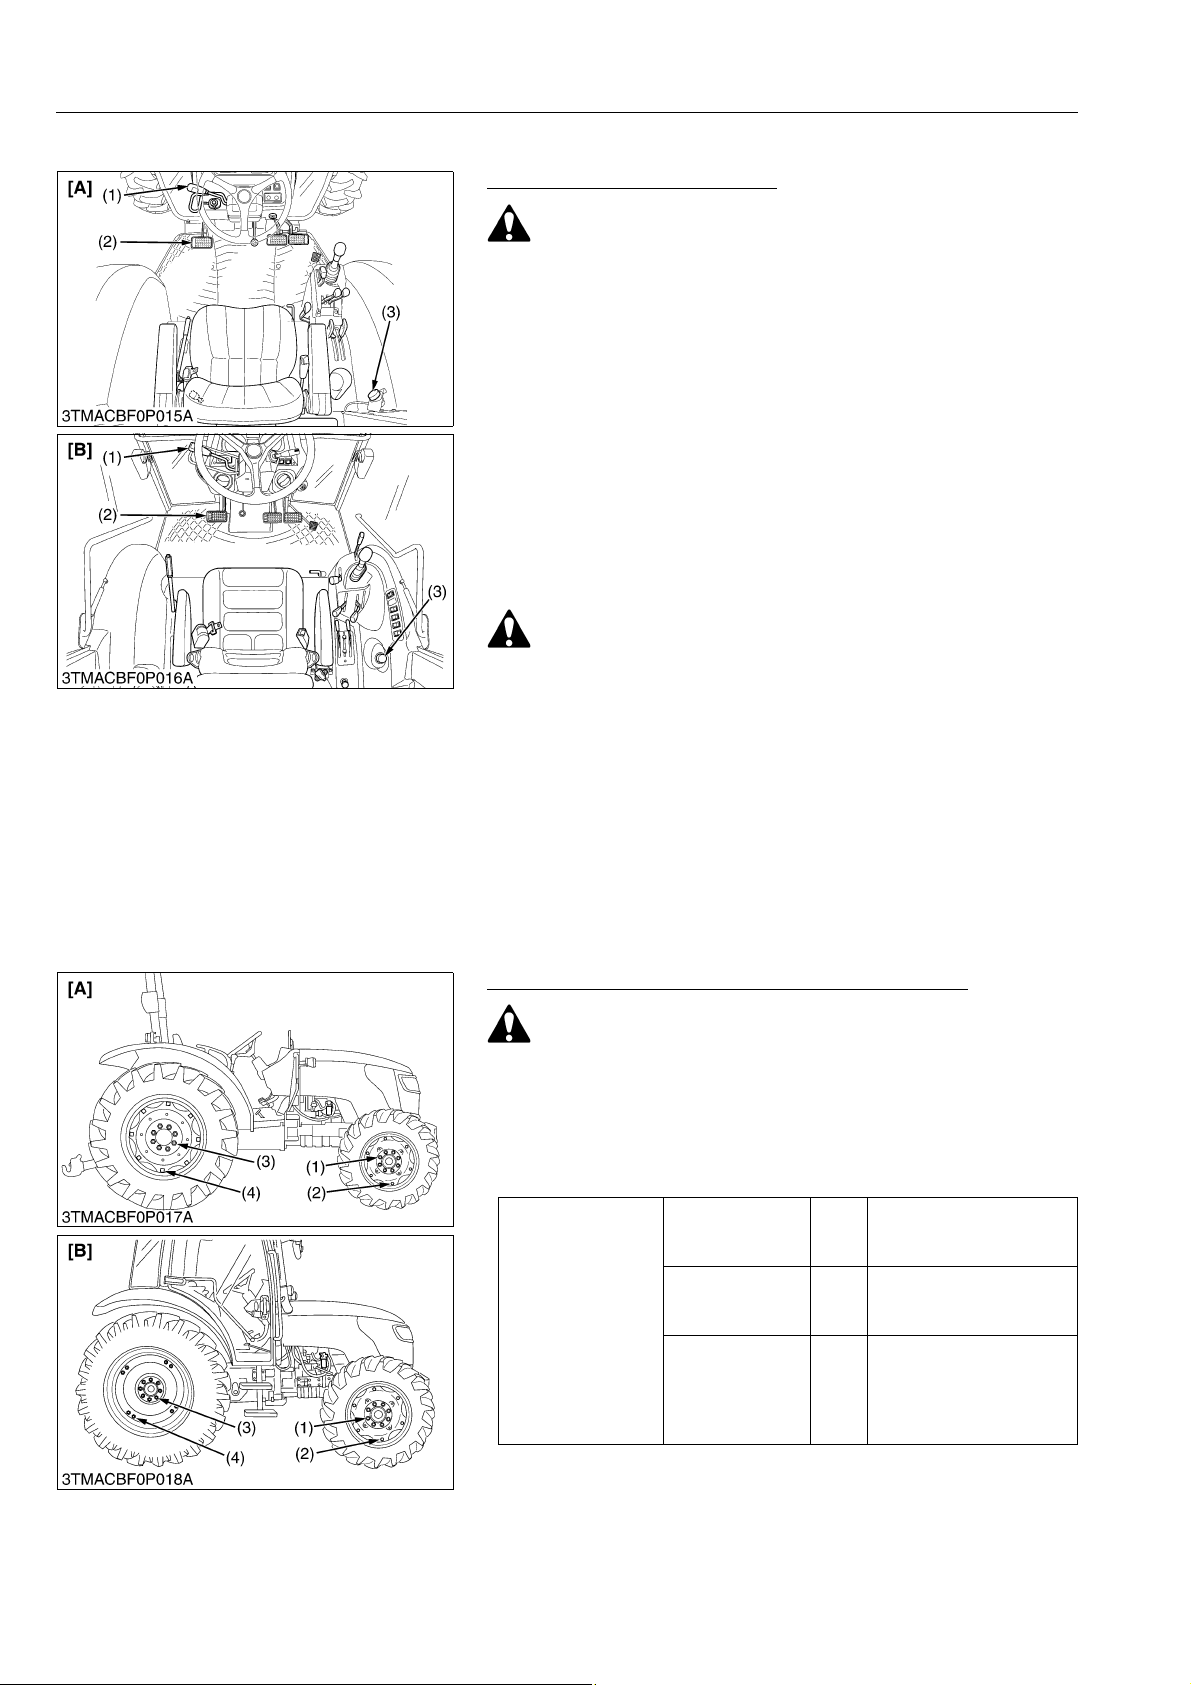
Checking Engine Start System
• Do not allow anyone near the tractor while testing.
• If the tractor does not pass the test, do not operate the
tractor.
Preparation before testing
1. Place all control levers in the "NEUTRAL" position.
2. Set the parking brake and stop the engine.
Test 1: Switch for the shuttle shift lever.
1. Sit on operator's seat.
2. Shift the shuttle shift lever (1) to the desired position.
3. Depress the clutch pedal (2) fully.
4. Set the PTO clutch control switch (3) to "OFF" position.
5. Turn the key to "START" position.
6. The engine must not crank.
7. If it cranks, inspect the safety switch.
Test 2: Switch for the PTO clutch control switch.
• Disconnect the implement drive universal joint from the
PTO shaft, if the implement has mounted.
1. Sit on operator's seat.
2. Set the PTO clutch control switch (3) to "ON" position.
3. Depress the clutch pedal (2) fully.
4. Shift the shuttle shift lever (1) to the neutral position.
5. Turn the key to "START" position.
6. The engine must not crank.
7. If it cranks, inspect the safety switch.
(1) Shuttle Shift Lever
(2) Clutch Pedal
(3) PTO Clutch Control Switch
Checking Wheel Mounting Nuts Tightening Torque
GENERAL
[A] ROPS Model
[B] CABIN Model
9Y1210143GEG0015US0
• Never operate tractor with a loose rim, wheel, or axle.
• Any time bolts and nuts are loosened, retighten to
specified torque.
• Check all bolts and nuts frequently and keep them tight.
1. Check the wheel mounting nuts regularly especially when new.
If there are loosened, tighten as follows.
Front wheel
mounting nut
Rear wheel
Tightening torque
(1) Front Wheel Mounting Nut
(2) Front Disc Mounting Nut
(3) Rear Wheel Mounting Nut
(4) Rear Disc Mounting Nut
mounting nut
Front and rear
disc mounting nut
(Both steel disc
and cast iron
disc)
[A] ROPS Model
[B] CABIN Model
259.9 to 304.0 N·m
M16
26.5 to 31.0 kgf·m
191.7 to 224.2 lbf·ft
259.9 to 304.0 N·m
M16
26.5 to 31.0 kgf·m
191.7 to 224.2 lbf·ft
259.9 to 304.0 N·m
M16
26.5 to 31.0 kgf·m
191.7 to 224.2 lbf·ft
9Y1210143GEG0016US0
G-22
Page 44
M6040, M7040, WSM
KiSC issued 07, 2012 A
[4] CHECK POINTS OF EVERY 100 HOURS
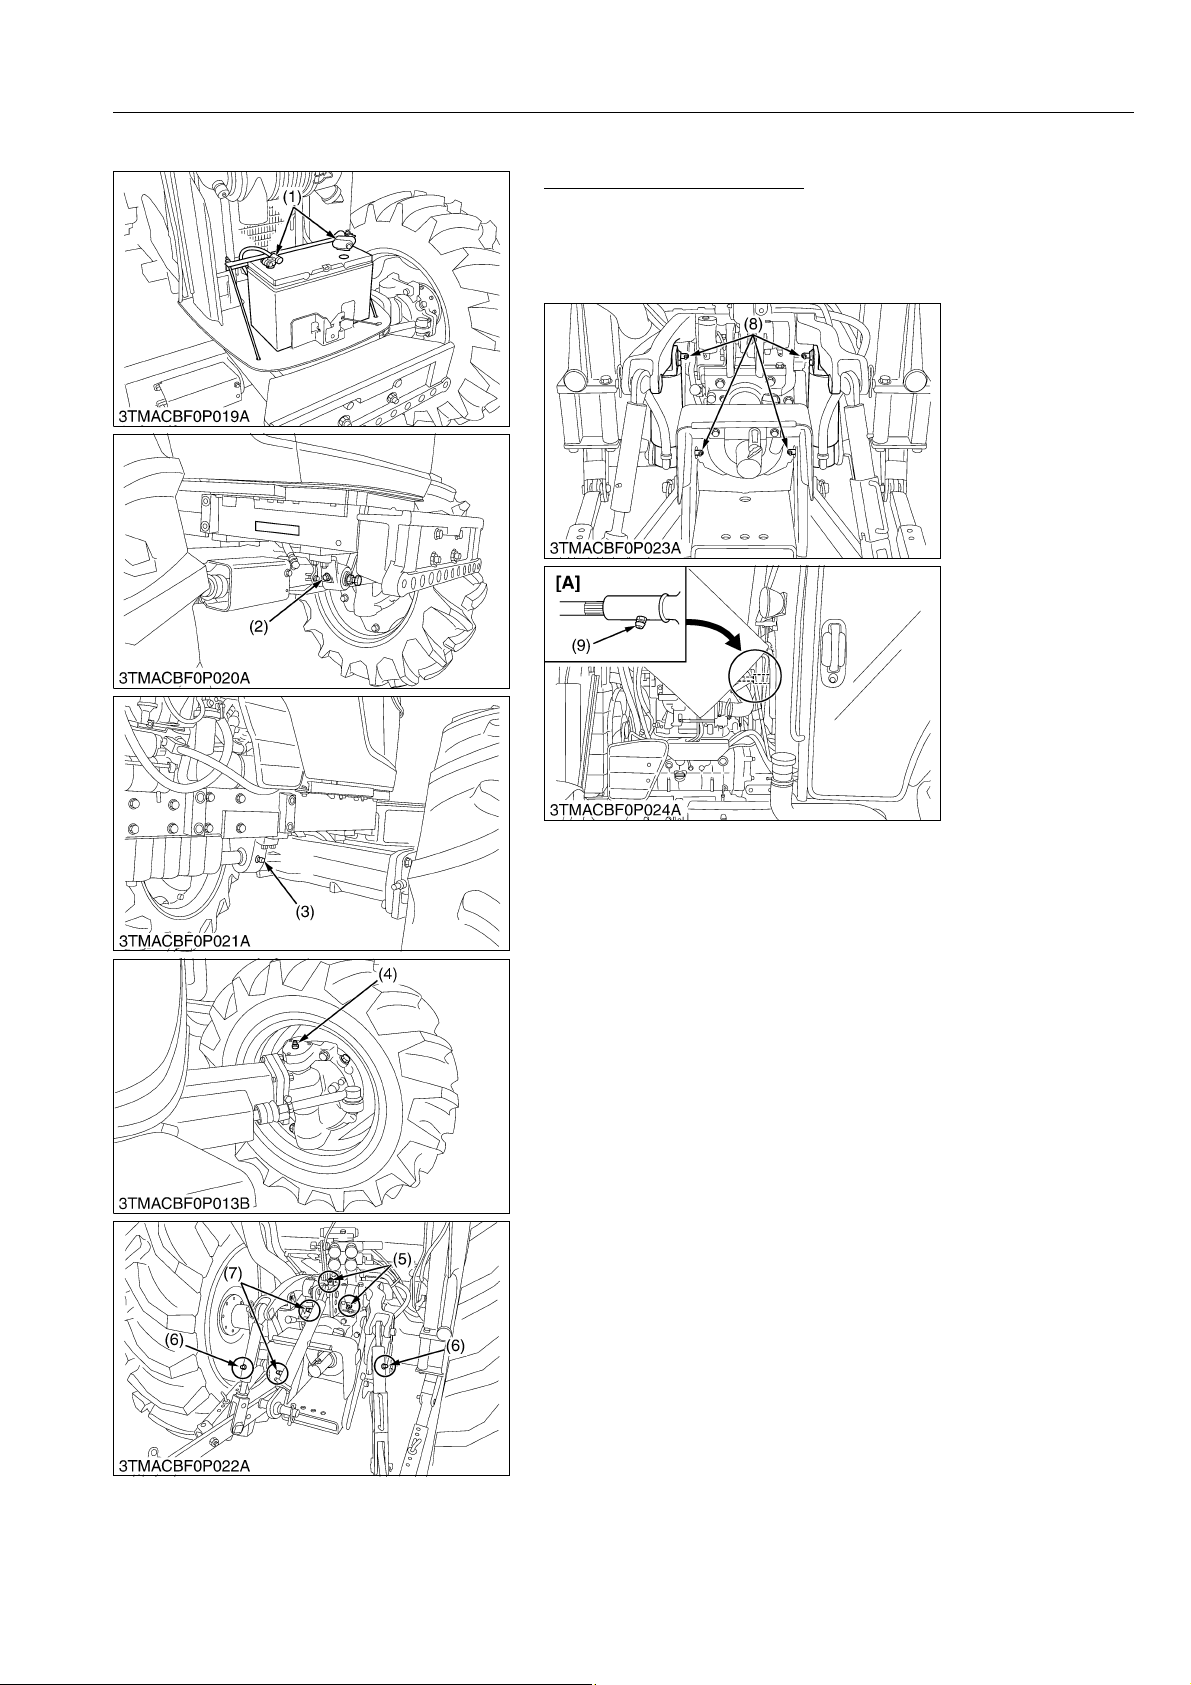
Lubricating Grease Fittings
1. Apply a small amount of multipurpose grease to following points
every 100 hours.
2. If you operated the machine in extremely wet and muddy
condition, lubricate grease fittings more often.
GENERAL
(1) Battery Terminals
(2) Grease Fitting (Front Axle Support)
(3) Grease Fitting (Front Axle Support)
(4) Grease Fitting (Front Axle Gear
Case Support) [R.H., L.H.]
(5) Grease Fitting (Top Link Bracket)
(6) Grease Fitting (Lifting Rod)
(7) Grease Fitting (Top Link)
(8) Grease Fitting (Hydraulic Lift
Cylinders Pin)
(9) Steering Joint Shaft
[A] ROPS Model
9Y1210143GEG0017US0
G-23
Page 45
M6040, M7040, WSM
NOTE
KiSC issued 07, 2012 A
GENERAL
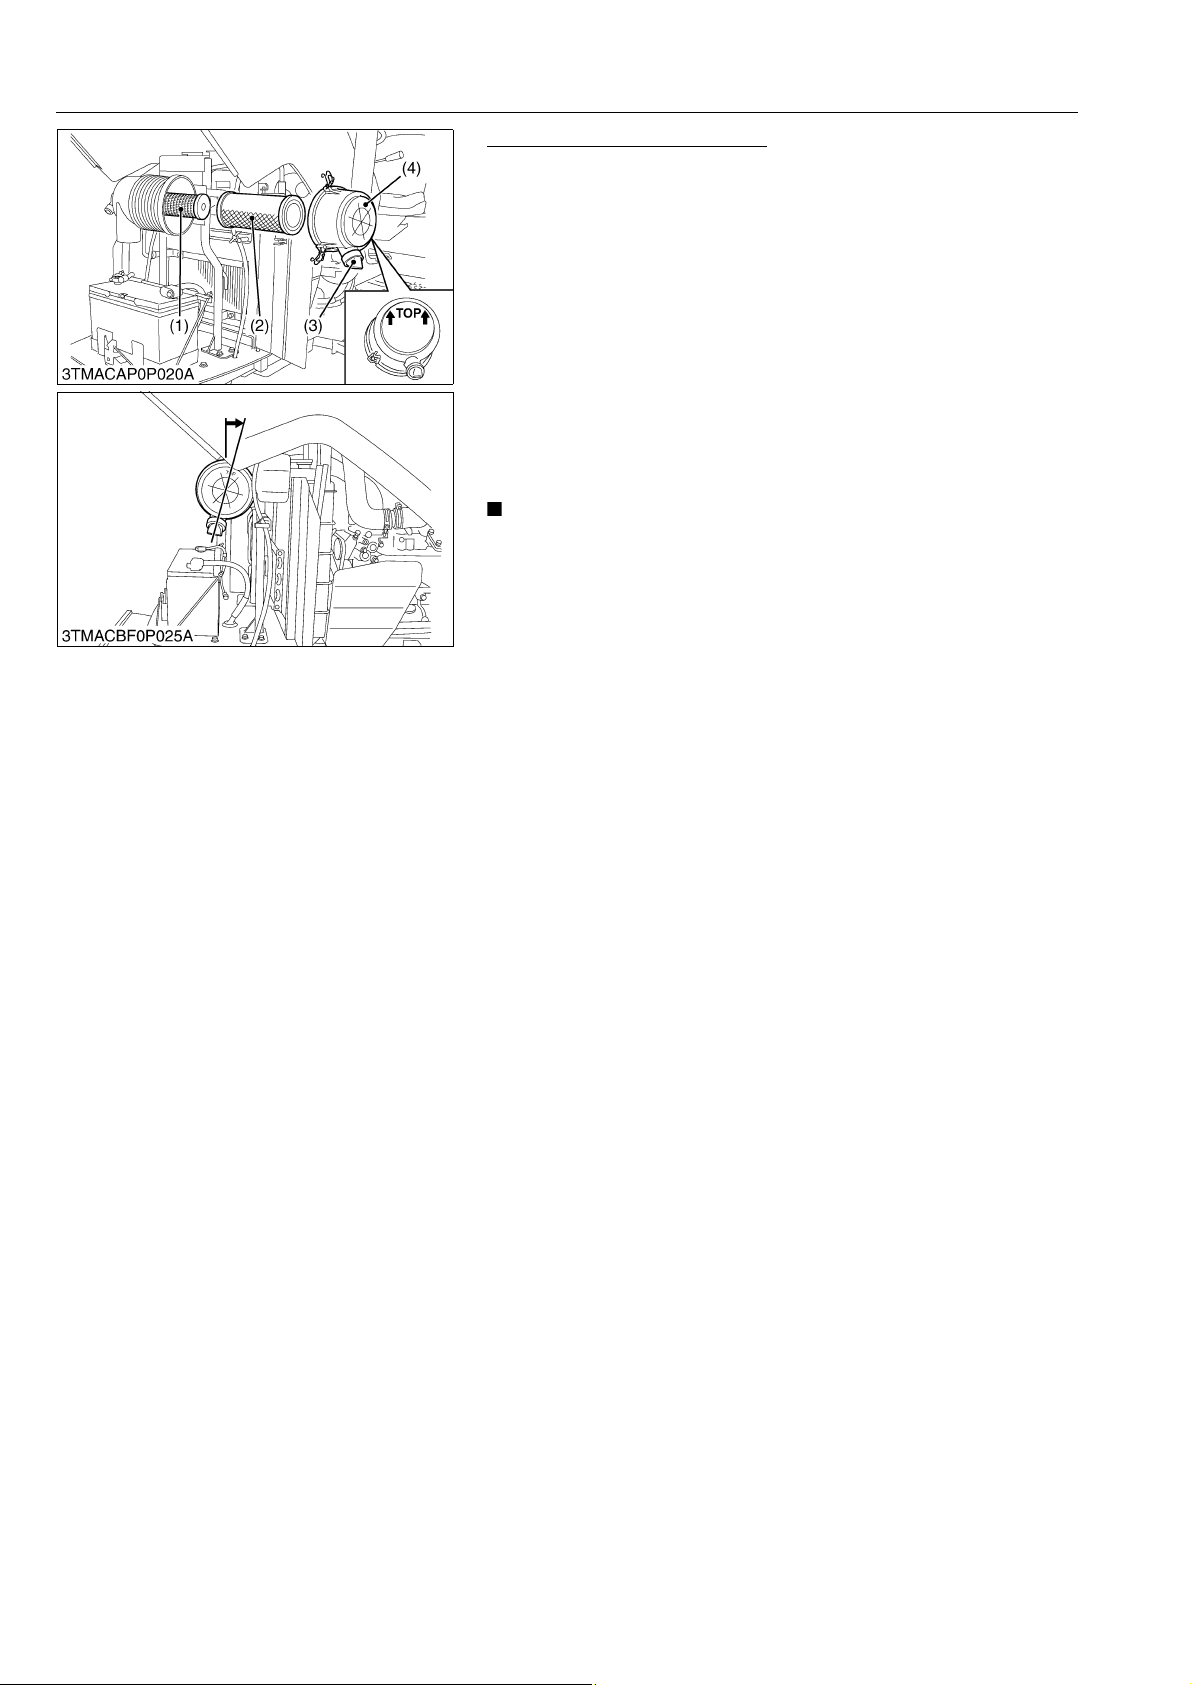
Cleaning Air Cleaner Element
1. Remove the air cleaner cover (4) and primary element (2).
2. Clean the primary element if:
• When dry dust adheres to the element, blow compressed air
from the inside turning the element. Pressure of
compressed air must be under 205 kPa (2.1 kgf/cm
30 psi).
• When carbon or oil adheres to the element, soak the
element in detergent for 15 minutes then wash it several
times in water, rinse with clean water and dry it naturally.
After element is fully dried, inspect inside of the element
with a light and check if it is damaged or not.
3. Replace the primary element (2):
Once a year or after every six times of cleaning, whichever
comes first.
• The air cleaner uses a dry element, never apply oil.
• Do not run the engine with filter element removed.
• Be sure to refit the dust cup with the arrow ↑ (on the rear of
cup) upright. If the dust cup is improperly fitted, evacuator
valve will not function and dust will adhere to the element.
• Do not touch the secondary element except in cases where
replacing is required.
Evacuator Valve
Open the evacuator valve once a week under ordinary
conditions or daily when used in a dusty place to get rid of large
particles of dust and dirt.
(1) Secondary (Safety) Element
(2) Primary Element
(3) Evacuator Valve
(4) Cover
9Y1210143GEG0018US0
2
,
G-24
Page 46
M6040, M7040, WSM
CAUTION
NOTE
CAUTION
KiSC issued 07, 2012 A
GENERAL
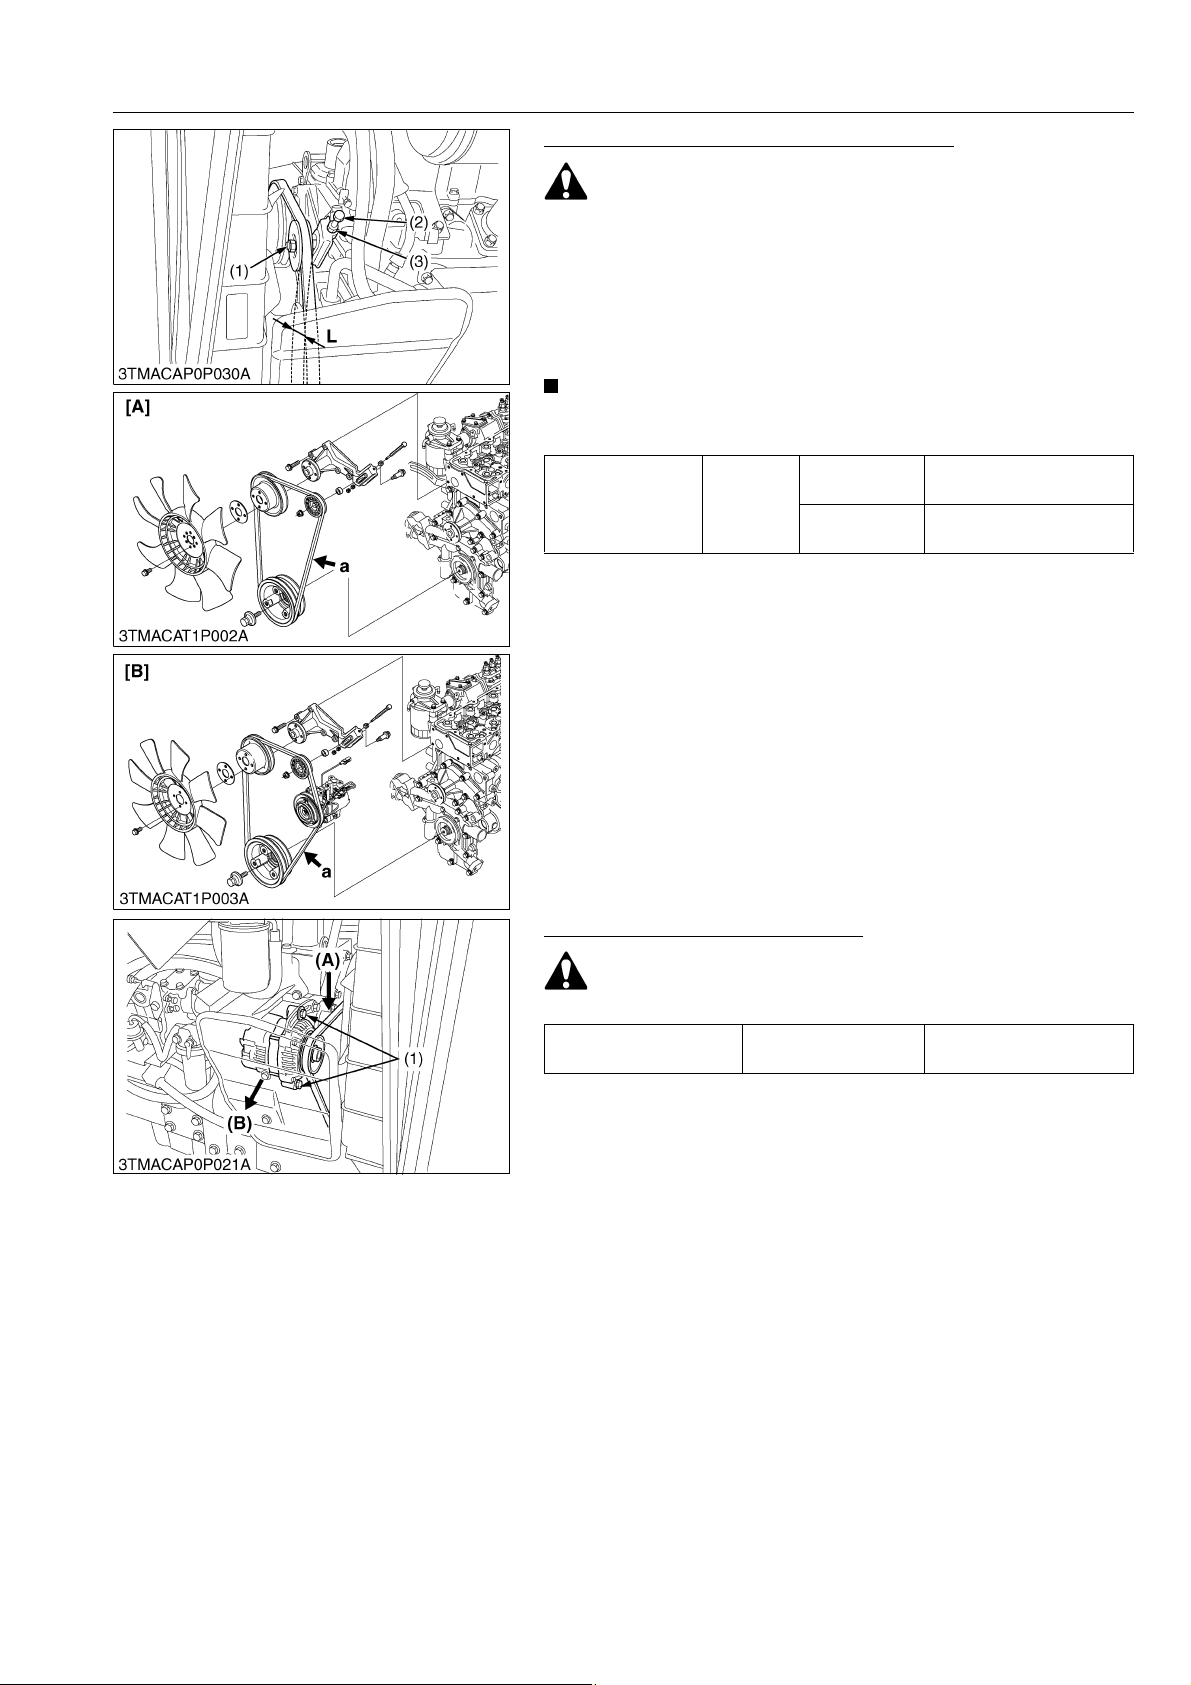
Adjusting Fan/Air Conditioner Belt Tension
• Be sure to stop the engine before checking belt tension.
1. Stop the engine and remove the key.
2. Apply moderate thumb pressure to belt between pulleys.
3. If tension is incorrect, loosen the tension pulley nut (1) and lock
nut (3). And turn the tension adjusting screw (2) until the
deflection of the belt falls within acceptable limits.
4. Replace fan belt if it is damaged.
• Turn counterclockwise the tension adjusting screw (2) to
increase belt tension.
16 to 17 mm
0.63 to 0.66 in.
11 to 12 mm
0.44 to 0.47 in.
Deflection "L"
Factory
specification
ROPS Model
CABIN Model
(1) Tension Pulley Nut
(2) Tension Adjusting Screw
(3) Lock Nut
[A] ROPS Model
[B] CABIN Model
L: Deflection
a: Measurement Point
9Y1210143GEG0019US0
Adjusting Alternator Belt Tension
• Be sure to stop the engine before checking belt tension.
Belt tension Factory specification
10 to 12 mm
0.39 to 0.47 in.
1. Stop the engine and remove the key.
2. Apply moderate thumb pressure to belt between pulleys.
3. If tension is incorrect, loosen the alternator mounting bolts and,
using a lever placed between the alternator and the engine
block, pull the alternator out until the deflection of the belt falls
within acceptable limits.
4. Replace fan belt if it is damaged.
(1) Bolt (A) Check the belt tension
(B) To tighten
9Y1210143GEG0020US0
G-25
Page 47
M6040, M7040, WSM
NOTE
CAUTION
KiSC issued 07, 2012 A
GENERAL
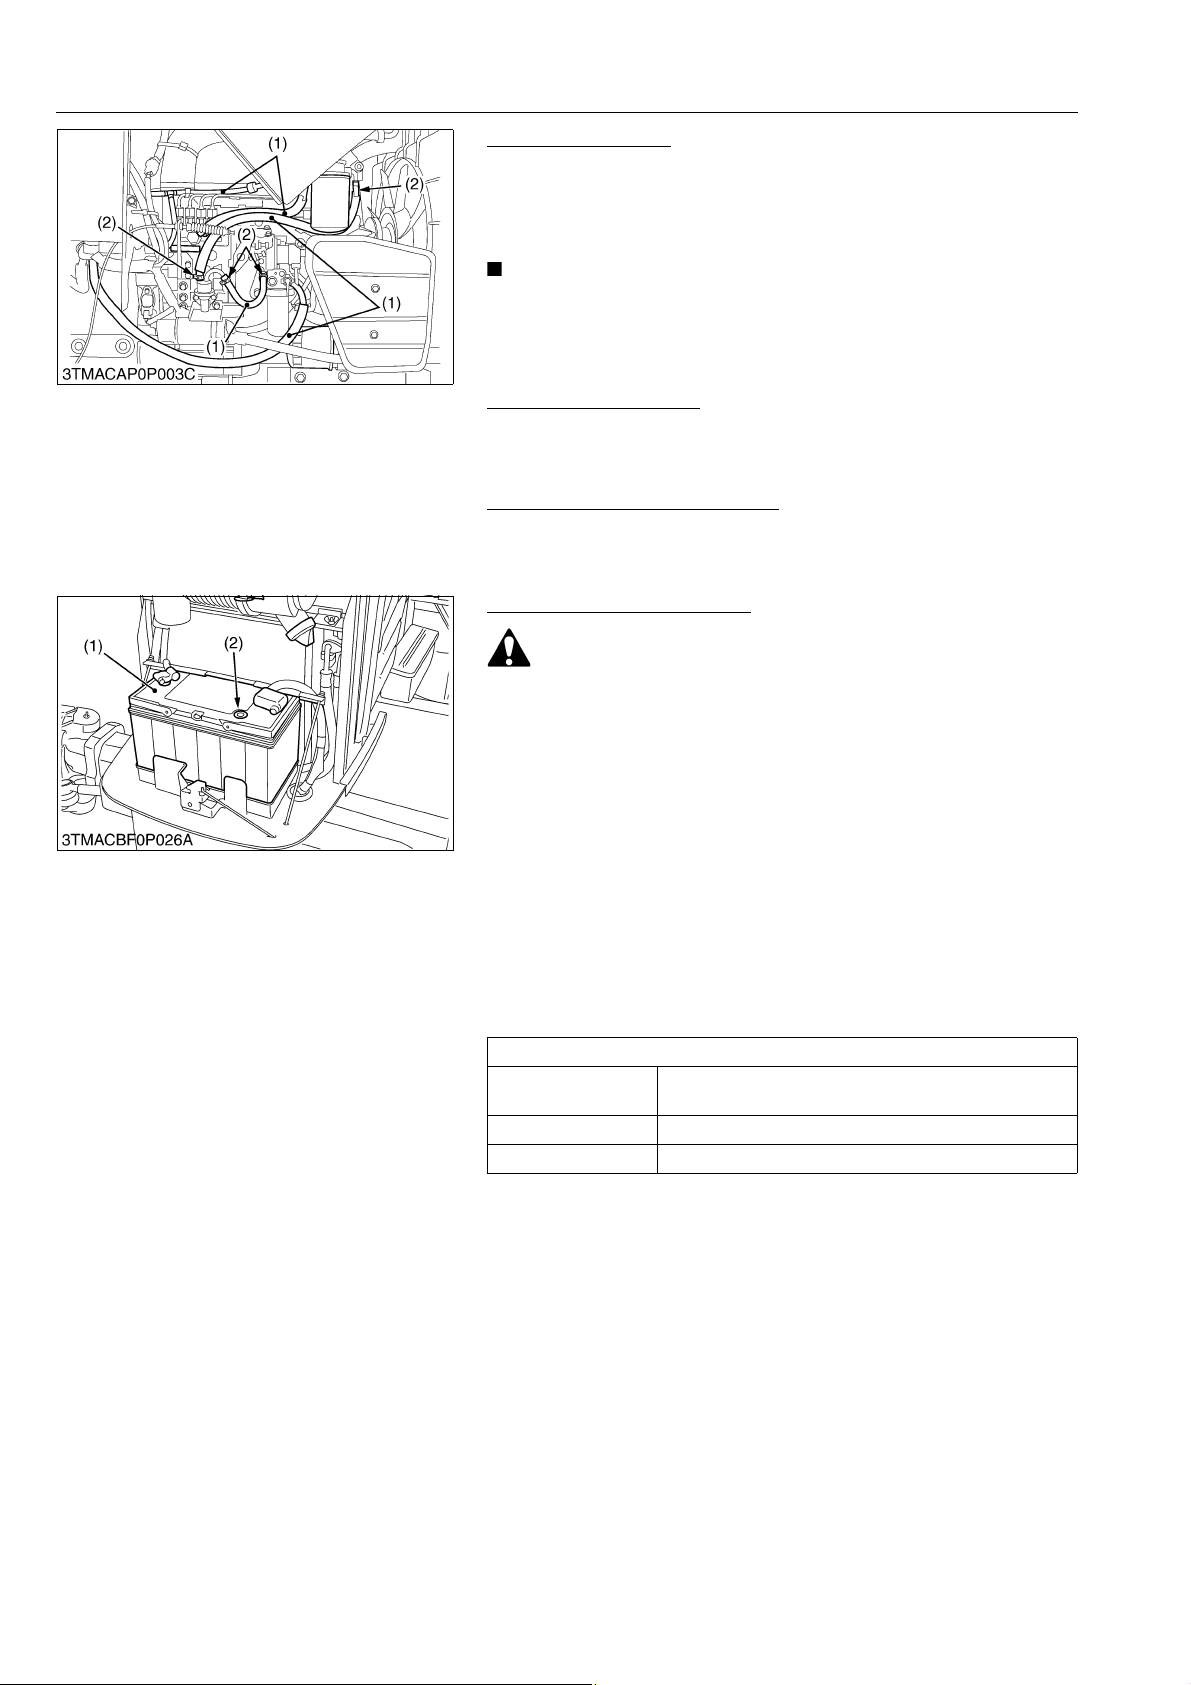
Checking Fuel Line
1. Check to see that all lines and hose clamps are tight and not
damaged.
2. If hoses and clamps are found worn or damaged, replace or
repair them at once.
• If the fuel line is removed, be sure to properly bleed the fuel
system. (See page G-39.)
(1) Fuel Line (2) Clamp Band
9Y1210143GEG0021US0
Adjusting Brake Pedal
1. To check and adjusting for brake pedal.
(See page 5-S4.)
9Y1210143GEG0022US0
Adjusting Parking Brake Lever
1. To check and adjusting for parking brake lever.
(See page 5-S7).
9Y1210143GEG0023US0
Checking Battery Condition
• Never remove the vent plugs while the engine is running.
• Keep electrolyte away from eyes, hands and clothes. If you
are spattered with it, wash it away completely with water
immediately and get medical attention.
• Keep open sparks and flames away from the battery at all
times. Hydrogen gas mixed with oxygen becomes very
explosive.
• Wear eye protection and rubber gloves when working
around battery.
1. The original battery is maintenance free type battery
(Non-refillable type).
When the performance becomes low, inspect the battery.
2. Clean the battery surface with a clean cloth.
Keep the terminals clean and coated with petroleum jelly.
3. Check the battery condition by reading the indicator.
State of indicator display
Green
Black Needs charging battery.
White Needs changing battery.
(1) Battery (2) Indicator
Specific gravity of electrolyte and quality of electrolyte
are both in good condition.
9Y1210143GEG0024US0
G-26
Page 48

M6040, M7040, WSM
CAUTION
KiSC issued 07, 2012 A
GENERAL
Directions for Storage
• When connecting the battery, do not reverse the polarities.
Connection with reverse polarities will cause spark and
troubles to the battery and electrical system in the tractor.
• When disconnecting the cable from the battery, start with
the negative terminal first.
• When connecting the cable to the battery, start with the
positive terminal first.
• Reversing the steps may cause shortcircuiting, should a
metallic tool touch the terminals.
• When storing the tractor for long periods of time, remove
the battery from the tractor and store in a cool, dry place.
9Y1210143GEG0025US0
G-27
Page 49
M6040, M7040, WSM
KiSC issued 07, 2012 A
[5] CHECK POINTS OF EVERY 200 HOURS
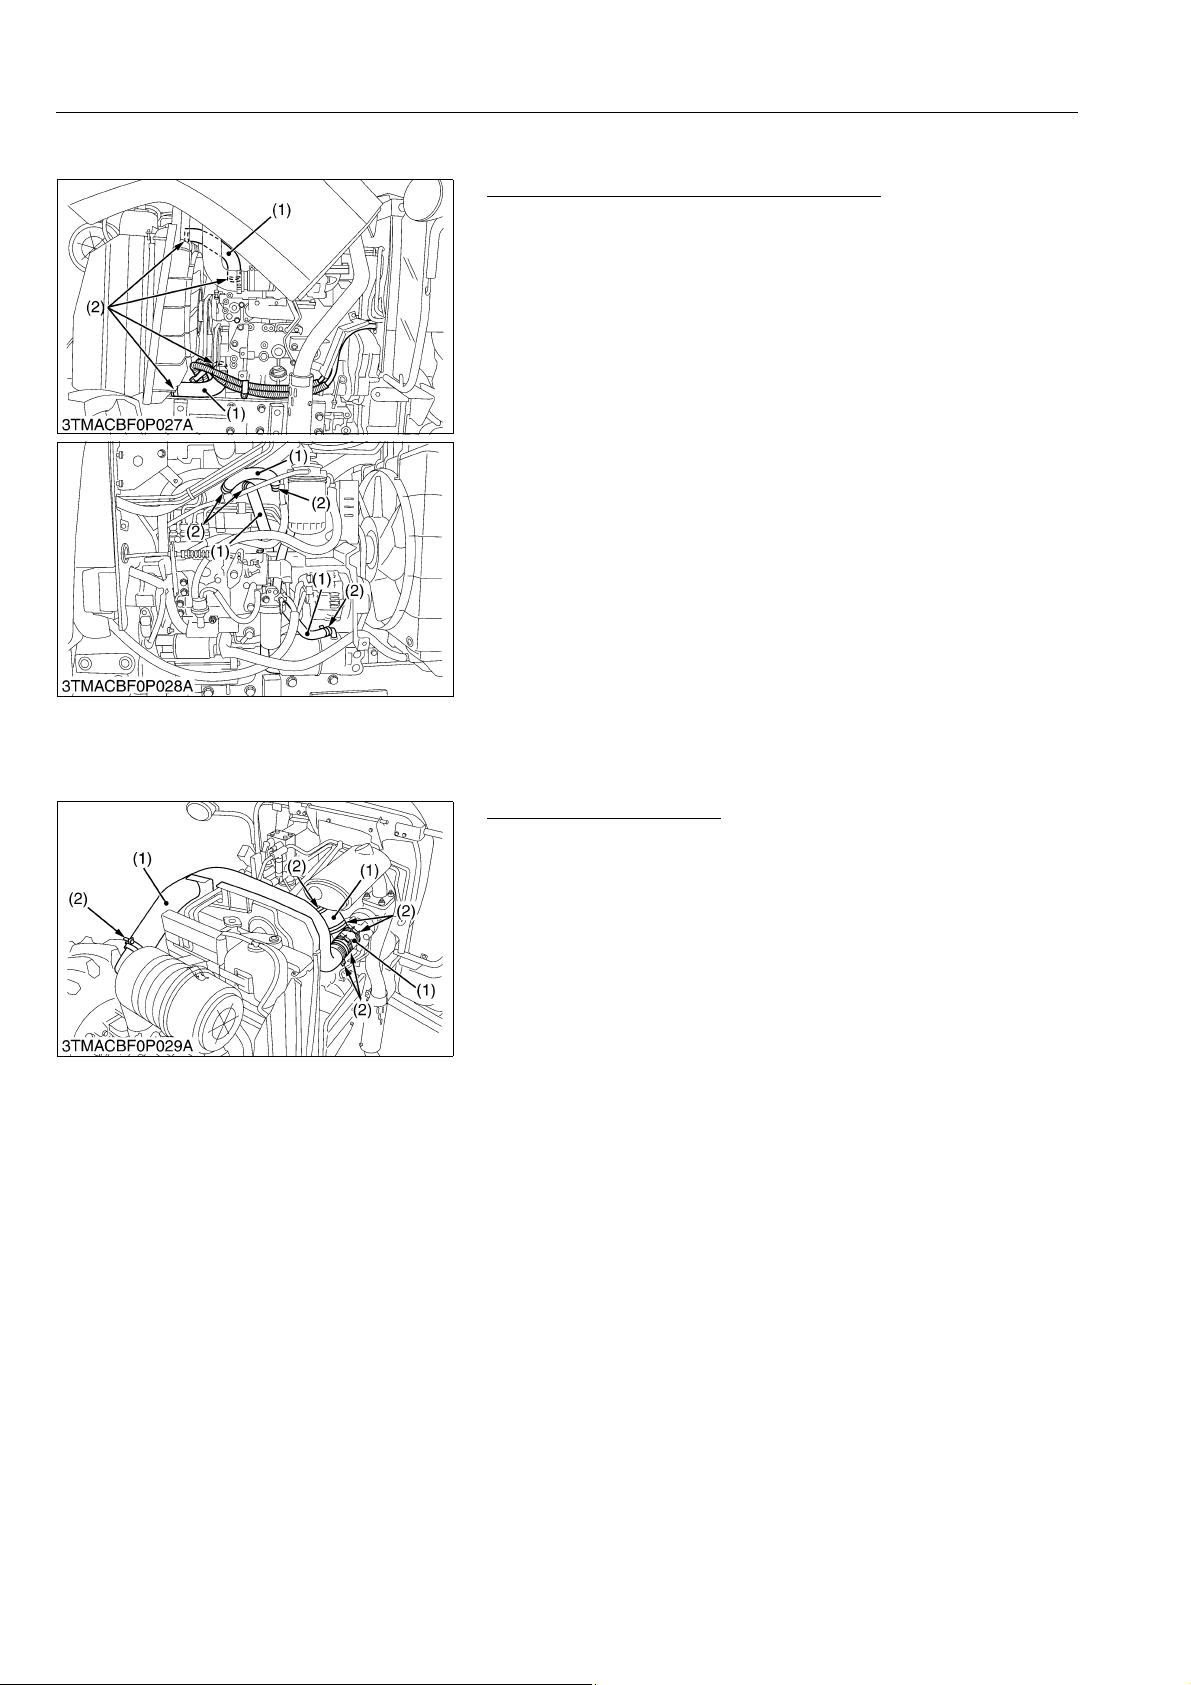
Checking Radiator Hose and Hose Clamp
Check to see if radiator hoses are properly fixed every
200 hours of operation or six months, whichever comes first.
1. If hose clamps (2) are loose or water leaks, tighten bands (2)
securely.
2. Replace hoses (1) and tighten hose clamps (2) securely, if
radiator hoses (1) are swollen, hardened or cracked.
Replace hoses and hose clamps every 2 years or earlier if
checked and found that hoses are swollen, hardened or
cracked.
Precaution at Overheating
Take the following actions in the event the coolant temperature
be nearly or more than the boiling point, what is called
"Overheating".
1. Stop the machine operation in a safe place and keep the engine
unloaded idling.
2. Do not stop the engine suddenly, but stop it after about
5 minutes of unloaded idling.
3. Keep yourself well away from the machine for further
10 minutes or while the steam blown out.
4. Checking that there gets no danger such as burn. Get rid of the
causes of overheating (refer to "1. TROUBLESHOOTING" on
page 1-S1) and then start again the engine.
(1) Radiator Hose (2) Clamp
Checking Intake Air Line
1. Check to see that hoses and hose clamps are tight and not
damaged.
2. If hoses and clamps are found worn or damaged, replace or
repair them at once.
(1) Hose (2) Clamp
GENERAL
9Y1210143GEG0026US0
9Y1210143GEG0027US0
G-28
Page 50
M6040, M7040, WSM
KiSC issued 07, 2012 A
GENERAL
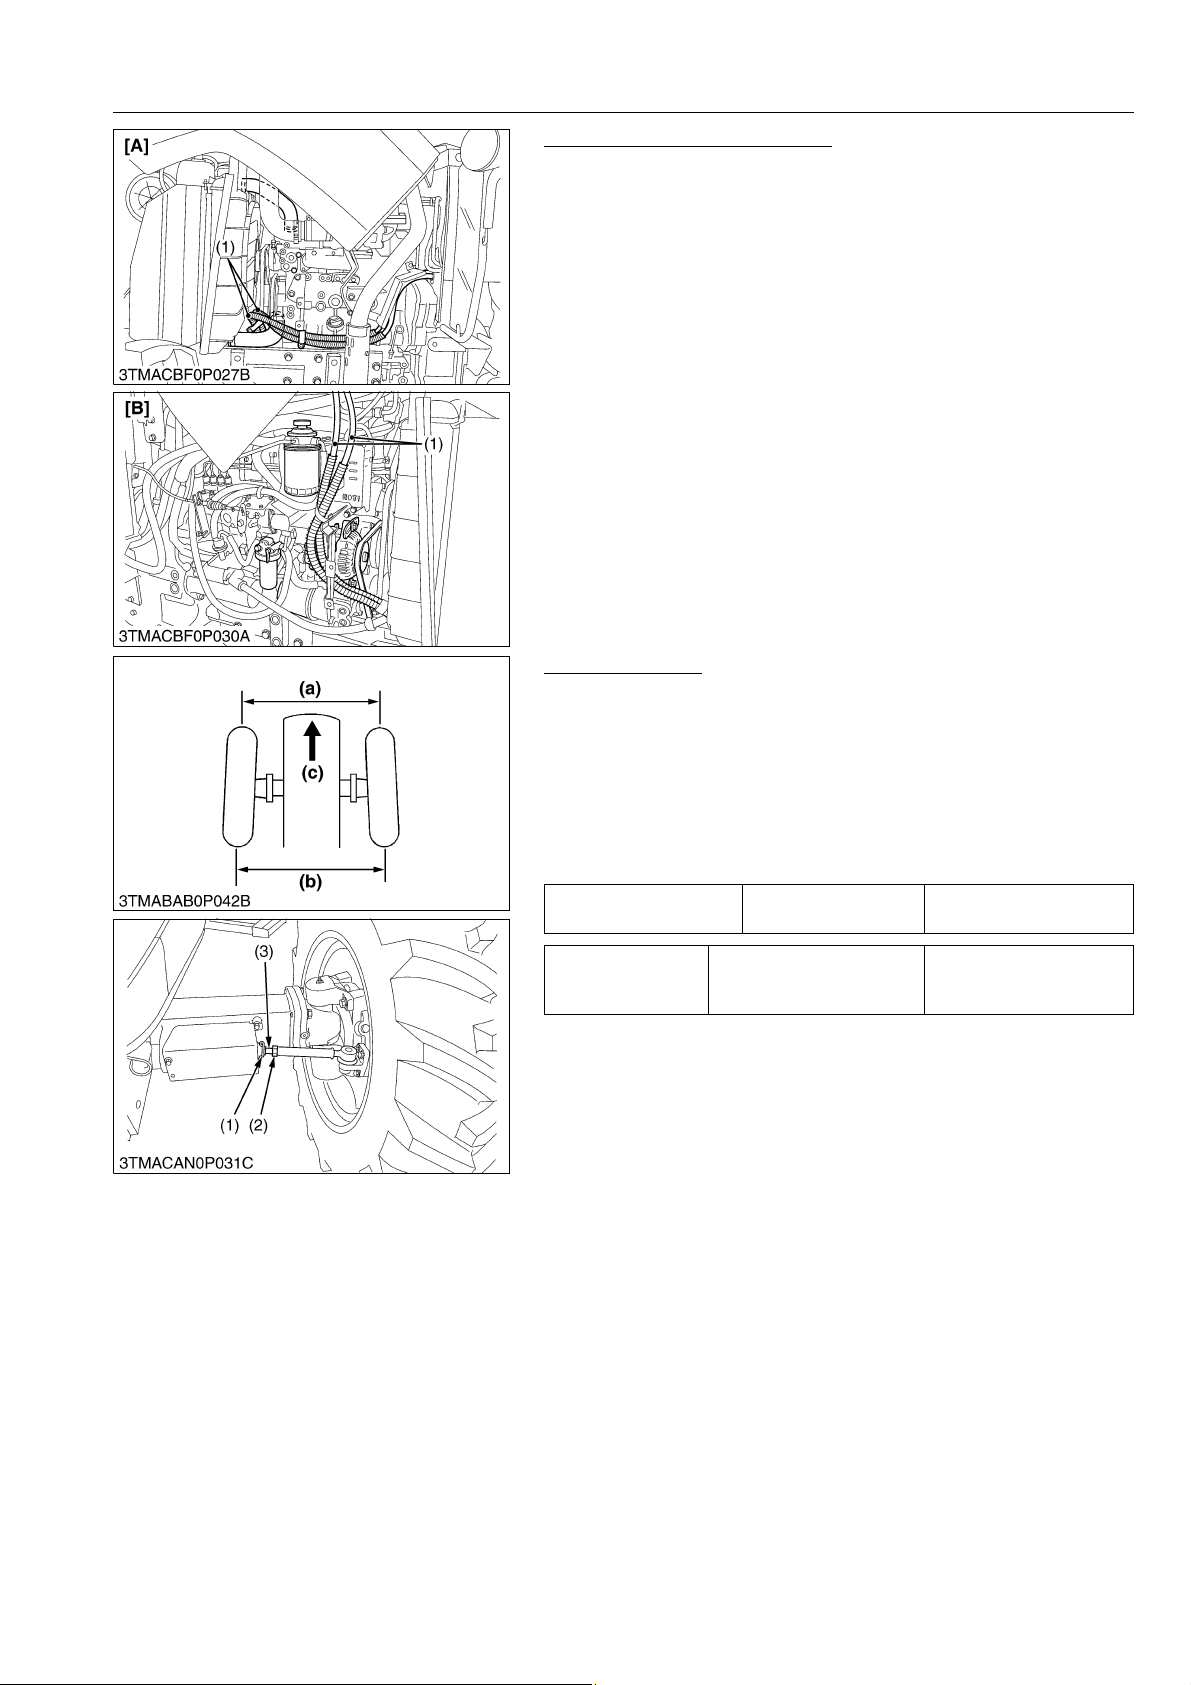
Checking Power Steering Line
1. Check to see that all line and hose clamps are tight and not
damaged.
2. If hoses and clamps are found worn or damaged, replace or
repair them at once.
(1) Power Steering Hose [A] ROPS Model
[B] CABIN Model
9Y1210143GEG0028US0
Adjusting Toe-in
1. Park tractor on a flat place.
2. Turn steering wheel so front wheels are in the straight ahead
position.
3. Lower the implement, lock the park brake and stop the engine.
4. Measure distance between tire beads at front of tire, hub height.
5. Measure distance between tire beads at rear of tire, hub height.
6. Front distance should be shorter than rear distance.
7. If not, adjust tie-rod length.
Toe-in (b–a) Factory specification
2.0 to 8.0 mm
0.08 to 0.31 in.
Tightening torque Tie-rod nut
167 to 196 N·m
17 to 20 kgf·m
123.2 to 144.6 lbf·ft
Toe-in Adjustment
1. Detach the snap ring (1).
2. Loosen the tie-rod nut (2).
3. Turn the rod joint (3) to adjust until the proper toe-in
measurement is obtained.
4. Retighten the tie-rod nut (2).
5. Attach the snap ring (1) of the tie-rod joint.
(1) Snap Ring
(2) Tie-rod Nut
(3) Tie-rod Joint
(a) Wheel-to-wheel distance at front
(b) Wheel-to-wheel distance at rear
(c) "FRONT"
9Y1210143GEG0029US0
G-29
Page 51
M6040, M7040, WSM
IMPORTANT
NOTE
KiSC issued 07, 2012 A
GENERAL
Draining Fuel Tank Water
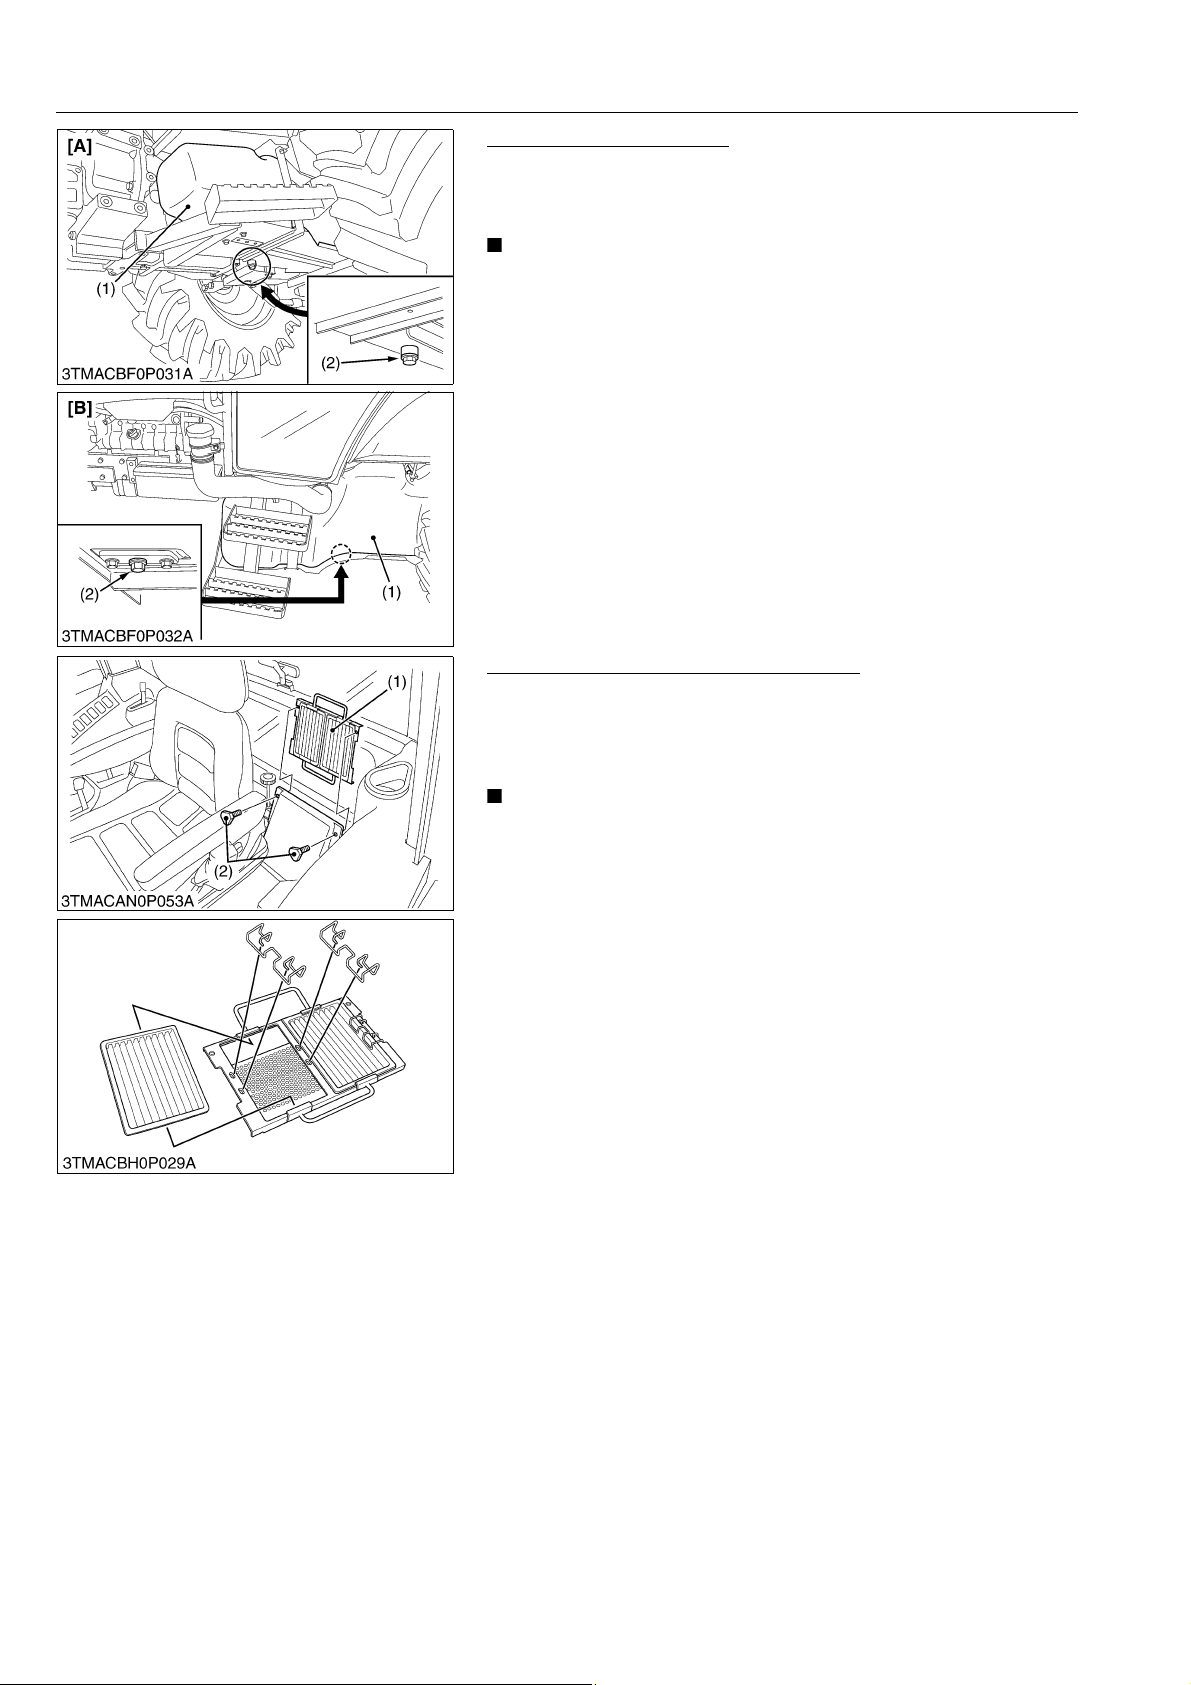
1. Loosen the drain plug (2) at the bottom of the fuel tank (1) to let
sediments, impurities and water out of the tank. Finally tighten
up the plug.
• If the fuel contains poor qualities with much water in it,
drain the fuel tank at shorter intervals.
• Drain the fuel tank before operating the tractor after a long
period of storage.
• The fuel tank is made of plastic. Be careful not to
overtighten the bolts.
(1) Fuel Tank
(2) Drain Plug
[A] ROPS Model
[B] CABIN Model
9Y1210143GEG0030US0
Cleaning Inner Air Filter (CABIN Model)
1. Remove the knob bolt (2) and pull out the filter (1).
2. Blow air from the direction opposite to the filter's normal air flow.
Pressure of compressed air must be under 205 kPa
(2.1 kgf/cm
2
, 30 psi).
• Attach the filter as the illustration.
(1) Inner Air Filter (2) Knob Bolt
9Y1210143GEG0031US0
G-30
Page 52
M6040, M7040, WSM
NOTE
IMPORTANT
CAUTION
IMPORTANT
KiSC issued 07, 2012 A
GENERAL
Cleaning Air Filter (CABIN Model)
Fresh Air Filter
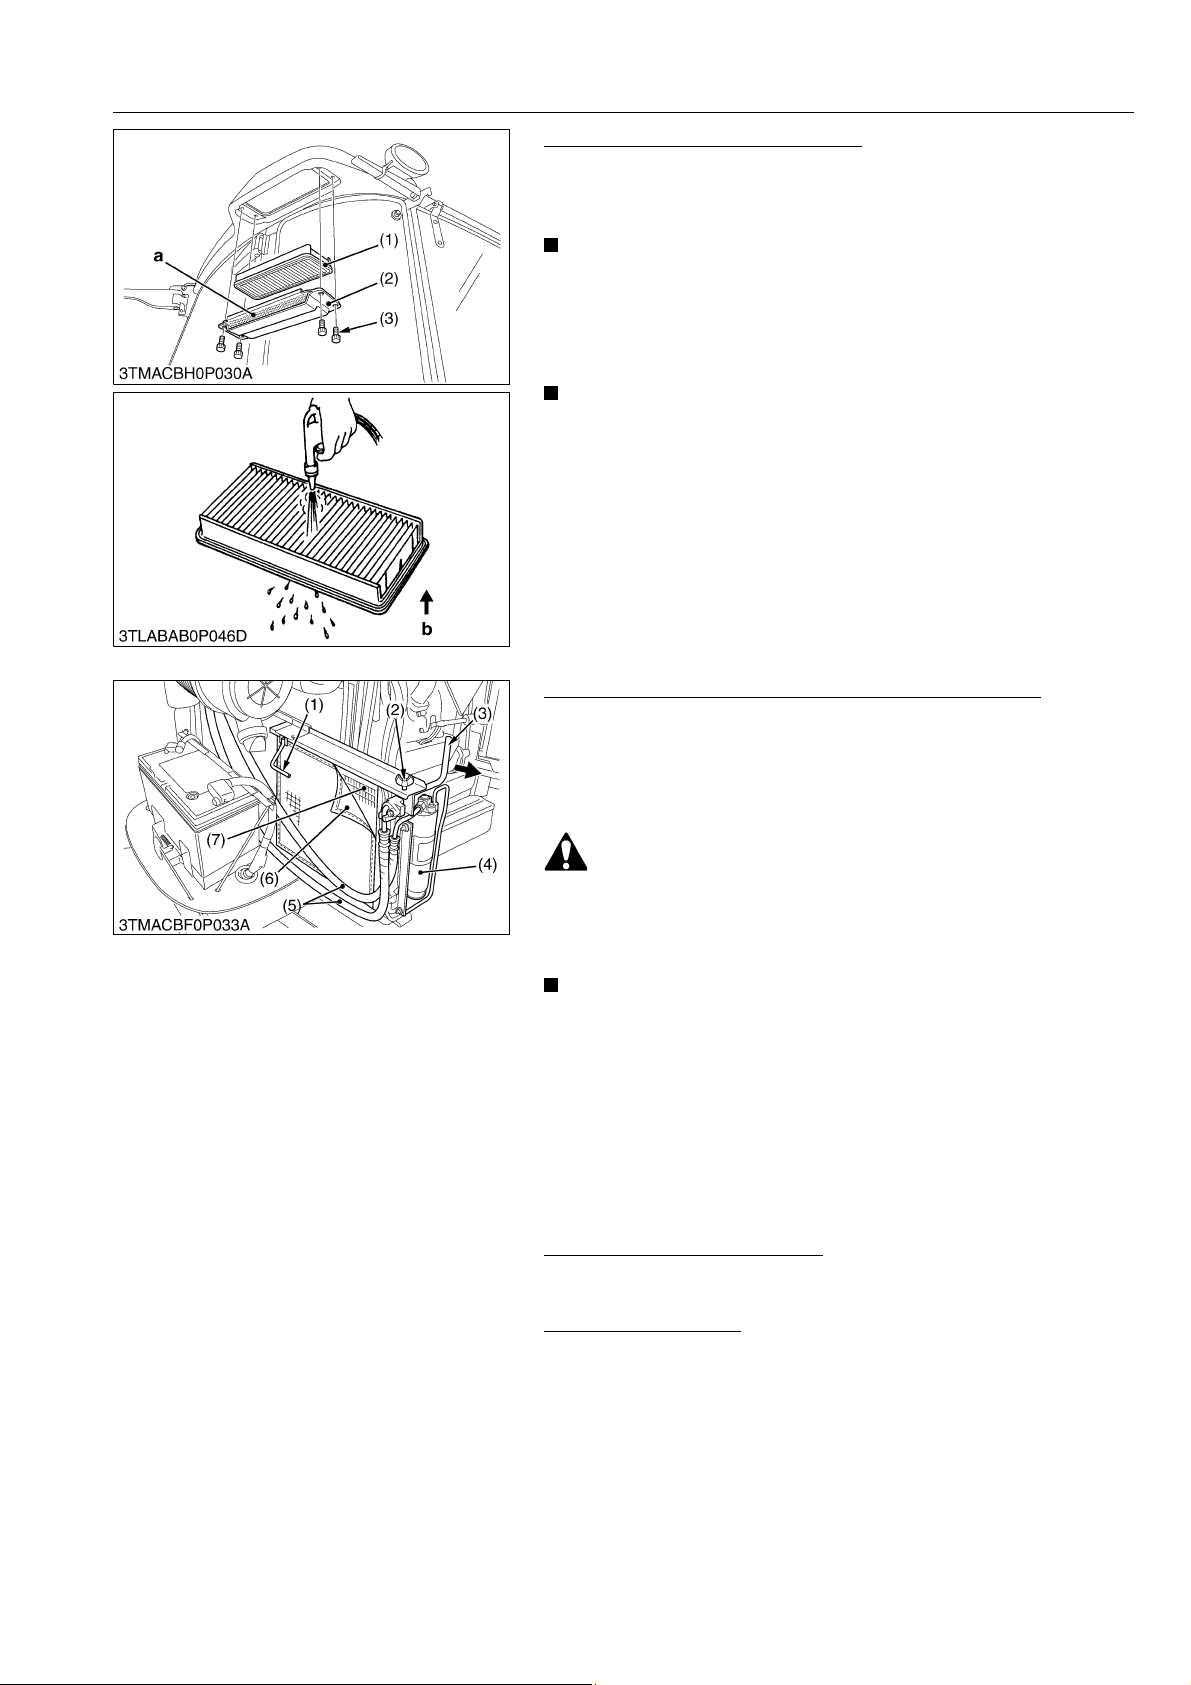
1. Remove the knob bolts (3) and pull out the fresh air filter (1).
2. Blow air from the opposite direction to the filter's normal air flow.
• If the filter is very dirty:
Dip the filter in lukewarm water with mild dish washing
detergent.
Move it up and down as well as left and right to loosen dirt.
Rinse the filter with clean water and let it air-dry.
• Do not use gasoline, thinner or similar chemicals to clean
the filter as damage to the filter may occur.
• If may also cause an unpleasant odor in the cabin when the
system is used next.
• Do not hit the filter. If the filter becomes deformed, dust
may enter into the air-conditioner, which may cause
damage and malfunction.
(1) Fresh Air Filter
(2) Cover
(3) Knob Bolt
a: Air Inlet Port
b: Air Conditioner Air Flow
9Y1210143GEG0032US0
Checking Air Conditioner Condenser (CABIN Model)
1. Release the air conditioner hoses off the hook (1).
2. Loosen the wing nut (2).
3. Hold the handle (3), slide out the air conditioner condenser (7).
4. Check air conditioner condenser (7) and air conditioner
condenser screen (6) to be sure it is clean of debris.
• Be sure to stop the engine before removing the screen.
• The condenser and receiver become hot while the air
conditioner is running. Before checking or cleaning them,
wait long enough until they cool down.
• Do not hold the air conditioner receiver or the air
conditioner pipes when sliding out the condenser for
cleaning.
(1) Hook
(2) Wing Nut
(3) Handle
(4) Receiver
[6] CHECK POINTS OF EVERY 300 HOURS
Replacing Hydraulic Oil Filter
1. See page G-20.
Changing Engine Oil
1. See page G-19.
(5) Air Condenser Hose
(6) Air Conditioner Condenser Screen
(7) Air Conditioner Condenser
9Y1210143GEG0033US0
9Y1210143GEG0034US0
9Y1210143GEG0035US0
G-31
Page 53
M6040, M7040, WSM
KiSC issued 07, 2012 A
[7] CHECK POINTS OF EVERY 400 HOURS
Replacing Fuel Filter
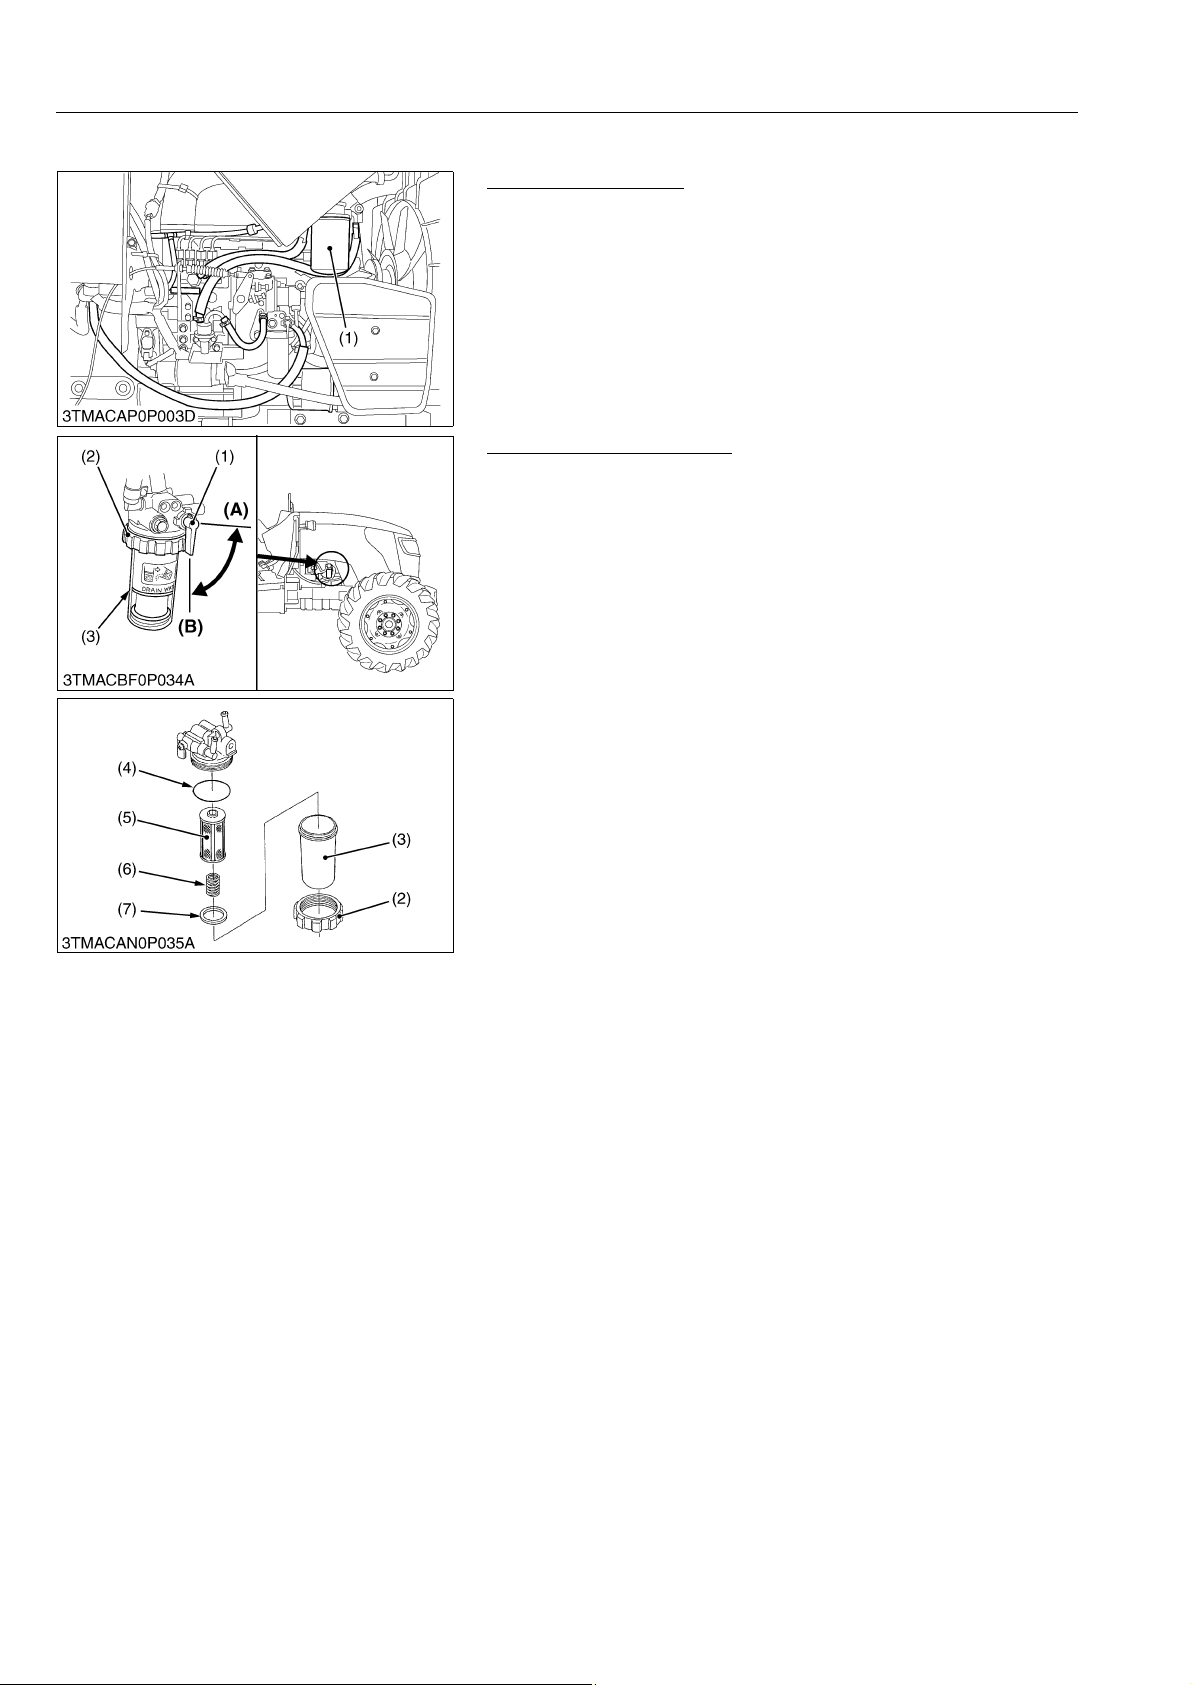
1. Remove the fuel filter (1).
2. Put a film of clean fuel on rubber seal of new filter.
3. Tighten the filter until it contacts the mounting surface. Tighten
filter by hand an additional 1/2 turn only.
4. Bleed the fuel system. (See page G-39.)
(1) Fuel Filter
Cleaning Water Separator
This job should not be done in the field, but in a clean place.
1. Close the fuel cock (1).
2. Unscrew the retainer ring (2) and remove the cup (3), and rinse
the inside with kerosene.
3. Take out the element (5) and dip it in the kerosene to rinse.
4. After cleaning, reassemble the water separator, keeping out
dust and dirt.
5. Bleed the fuel system. (See page G-39.)
(1) Fuel Cock
(2) Retaining Ring
(3) Cup
(4) O-ring
(5) Element
GENERAL
9Y1210143GEG0036US0
(6) Spring
(7) Red Float
(A) Close
(B) Open
9Y1210143GEG0037US0
G-32
Page 54
M6040, M7040, WSM
KiSC issued 07, 2012 A
[8] CHECK POINTS OF EVERY 600 HOURS
Replacing Engine Oil Filter
1. See page G-19.
Changing Transmission Fluid
1. See page G-21.
Changing Front Differential Case Oil
1. See page G-21.
Changing Front Axle Gear Case Oil
1. See page G-21.
Adjusting Front Axle Pivot
1. If the front axle pivot pin adjustment is not correct, front wheel
vibration can occur causing vibration in the steering wheel.
Adjusting Procedure
1. Loosen the lock nut (1), screw-in the adjusting screw (2) until
seated, then tighten the screw (2) with an additional 1/6 turn.
Re-tighten the lock nut (1).
Tightening torque Lock nut
GENERAL
9Y1210143GEG0038US0
9Y1210143GEG0039US0
9Y1210143GEG0040US0
9Y1210143GEG0041US0
98.1 to 147.1 N·m
10.0 to 15.0 kgf·m
72.3 to 108.5 lbf·ft
(1) Lock Nut (2) Adjusting Screw
[9] CHECK POINT OF EVERY 800 HOURS
Adjusting Engine Valve Clearance
1. See page 1-S14.
[10] CHECK POINT OF EVERY 1500 HOURS
Checking Fuel Injection Nozzle (Injection Pressure)
1. See page 1-S21.
[11] CHECK POINTS OF EVERY 3000 HOURS
Checking Injection Pump
1. See page 1-S20.
Checking Turbocharger
1. See page 1-S22.
9Y1210143GEG0042US0
9Y1210143GEG0043US0
9Y1210143GEG0044US0
9Y1210143GEG0045US0
9Y1210143GEG0046US0
G-33
Page 55
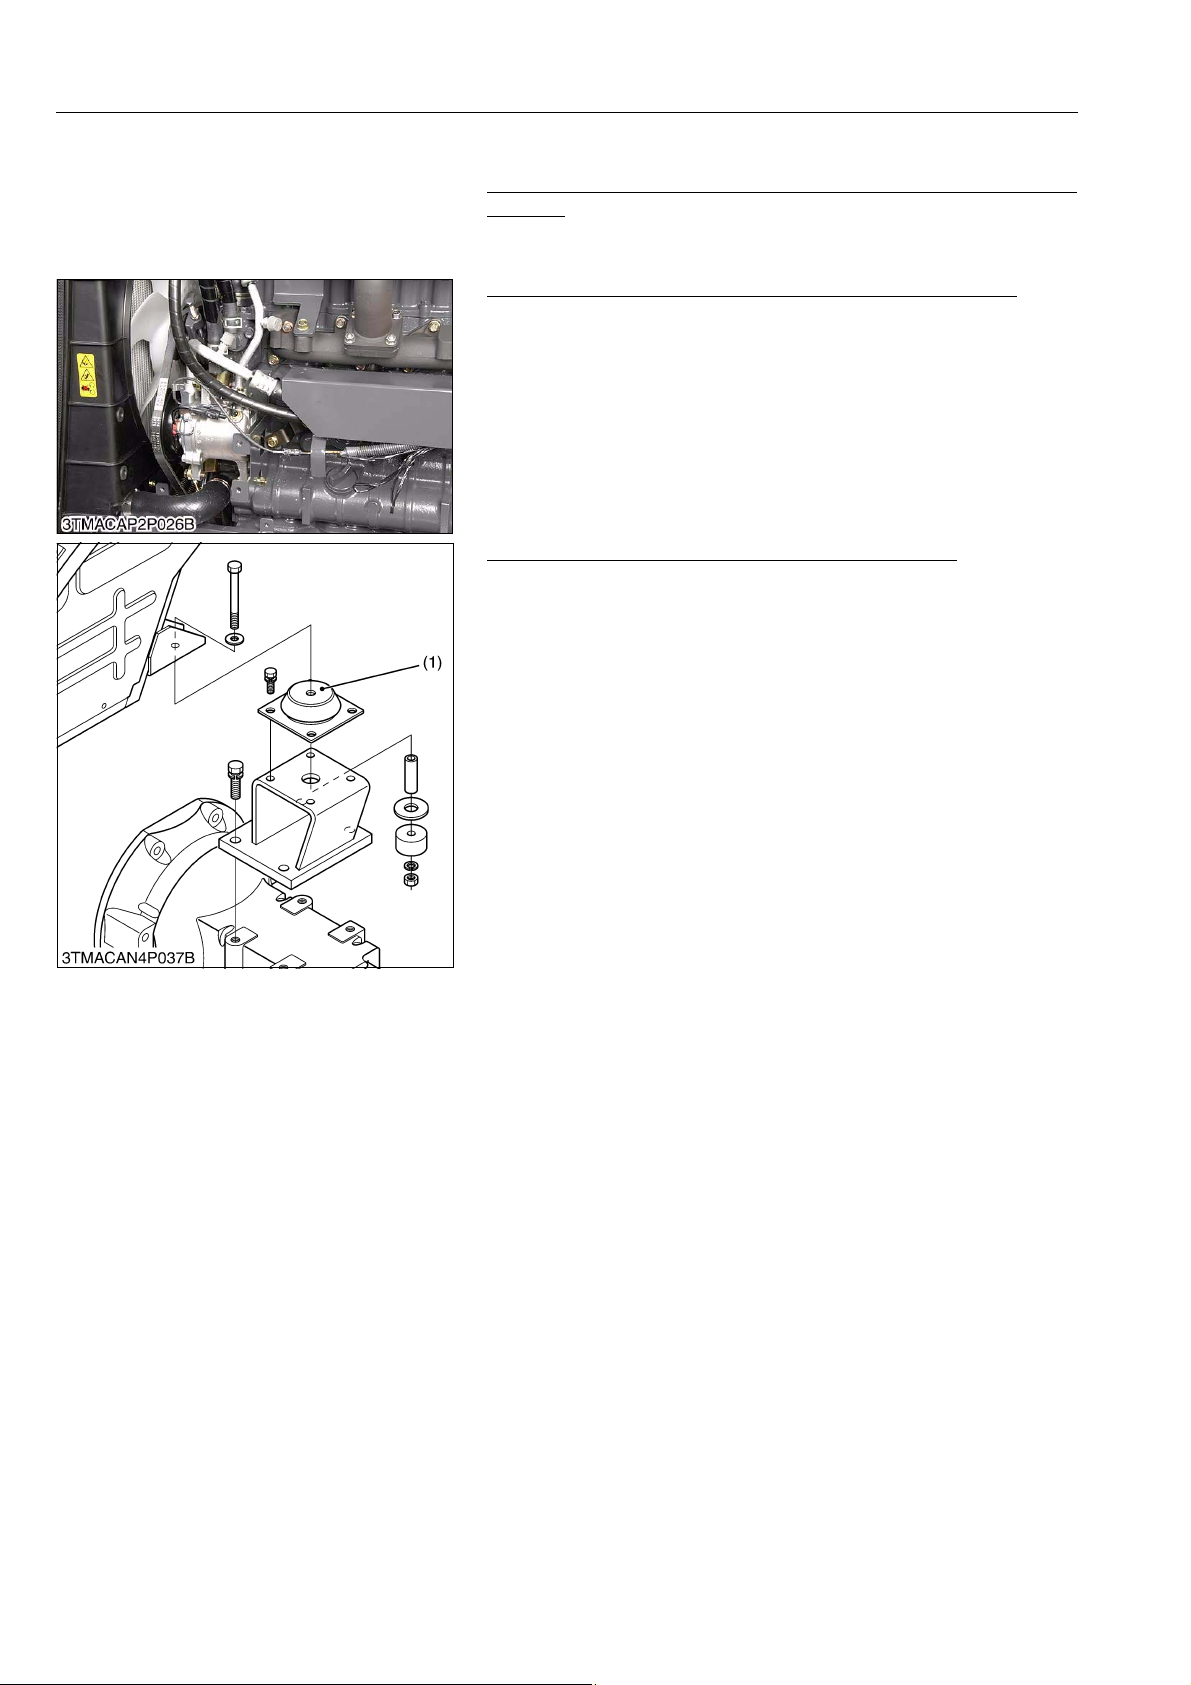
M6040, M7040, WSM
KiSC issued 07, 2012 A
[12] CHECK POINT OF EVERY 1 YEAR
Replacing Air Cleaner Primary Element and Secondary
Element
1. See page G-24.
Checking Air Conditioner Pipe and Hose (CABIN Model)
1. Check to see that all lines and hose clamps are tight and not
damaged.
2. If hoses and clamps are found worn or damaged, replace or
repair them at once.
Checking Cabin Isolation Cushion (CABIN Model)
1. Check the cushion (1) for any breakage or fatigue. Replace
them if they are deteriorated.
(1) Isolation Cushion
GENERAL
9Y1210143GEG0047US0
9Y1210143GEG0048US0
9Y1210143GEG0049US0
G-34
Page 56
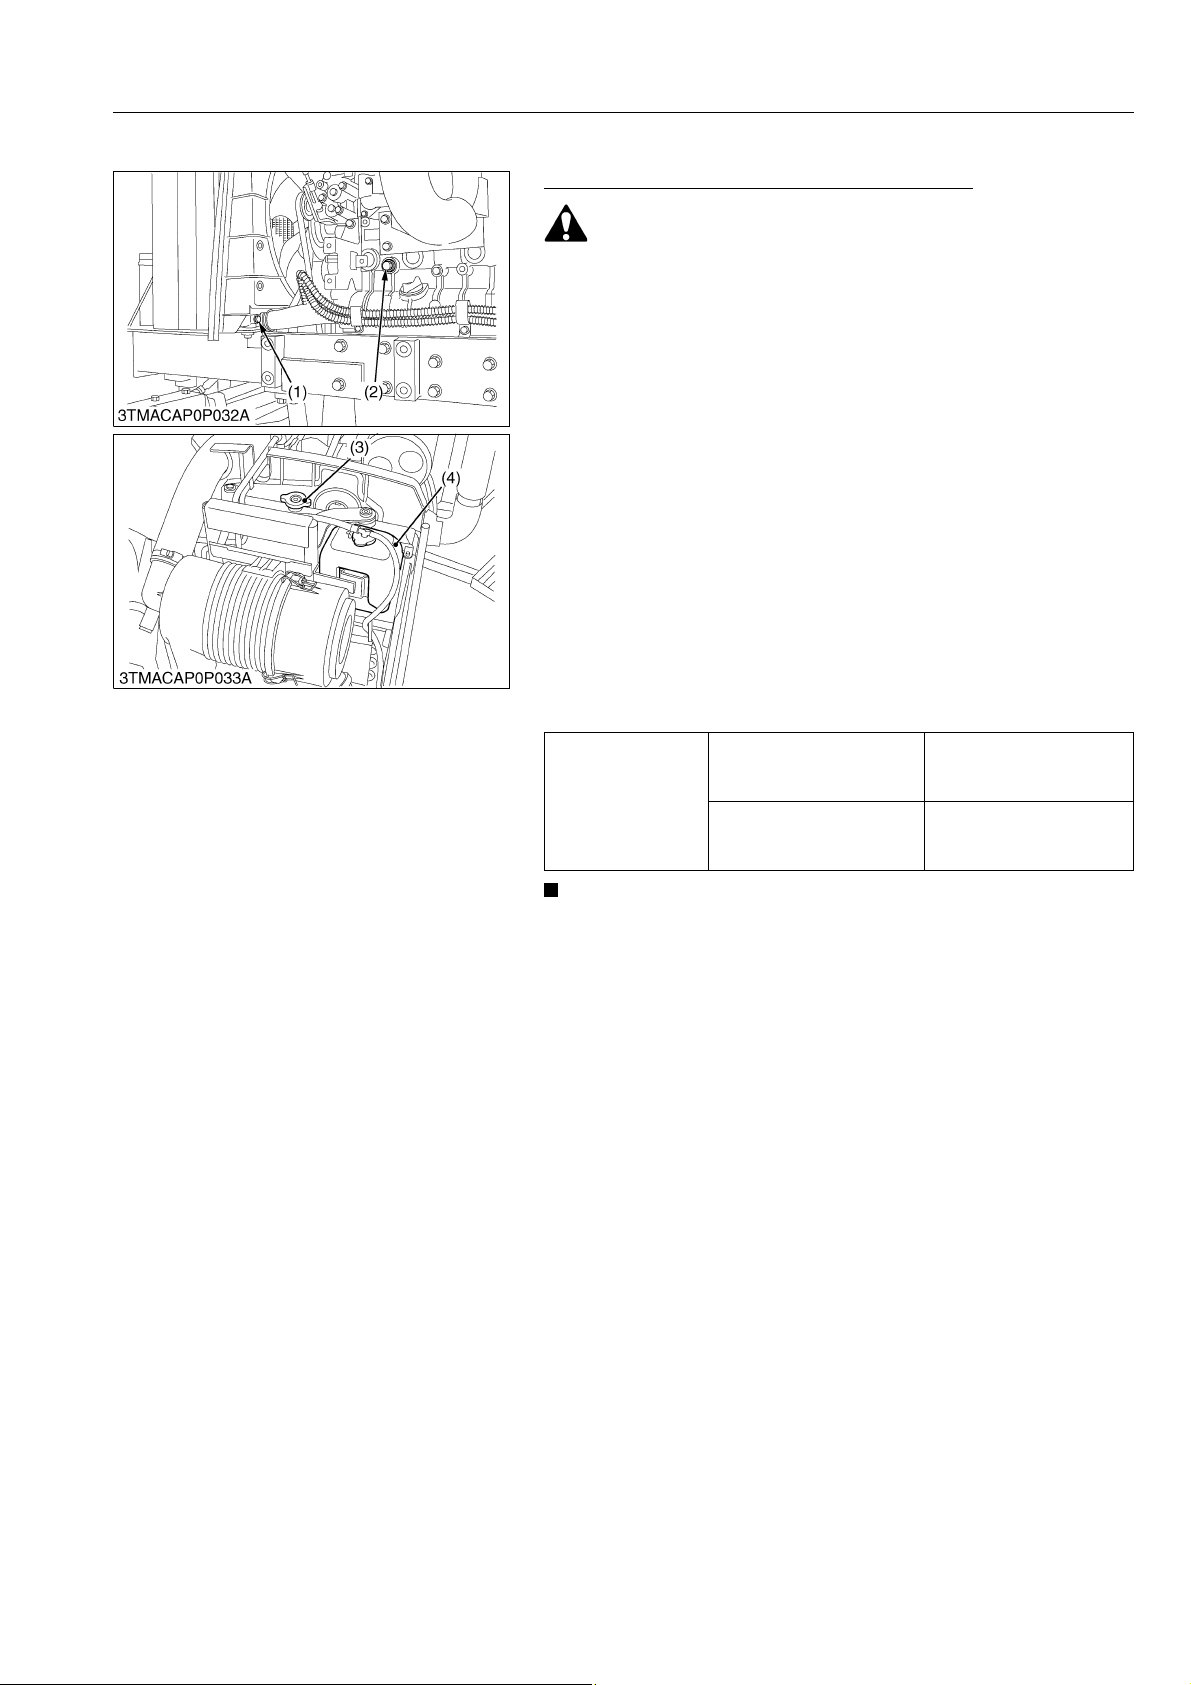
M6040, M7040, WSM
CAUTION
IMPORTANT
KiSC issued 07, 2012 A
[13] CHECK POINTS OF EVERY 2 YEARS
Flush Cooling System and Changing Coolant
• Do not remove the radiator cap when the engine is hot.
Then loosen cap slightly to the stop to relieve any excess
pressure before removing cap completely.
1. Stop the engine and let cool down.
2. To drain the coolant, open the radiator drain plug (1) and
remove the drain plug (2) and radiator cap (3). The radiator cap
(3) must be removed to completely drain the coolant.
3. After all coolant is drained, install the drain plug (1) and (2)
securely.
4. Fill with clean water and cooling system cleaner.
5. Follow directions of the cleaner instruction.
6. After flushing, fill with clean water and anti-freeze until the
coolant level is just below the radiator cap. Install the radiator
cap (3) securely.
7. Fill with clean water and anti-freeze up to the upper line of
recovery tank (4).
8. Start and operate the engine for few minutes.
9. Stop the engine. Check coolant level and add coolant if
necessary.
10. Properly dispose of used coolant.
Engine block and radiator
Coolant capacity
Recovery tank
GENERAL
8.0 L
8.5 U.S.qts
7.0 Imp.qts
1.0 L
1.1 U.S.qts
0.9 Imp.qts
• Do not start engine without coolant.
• Use clean, fresh water and anti-freeze to fill the radiator.
• When the anti-freeze is mixed with water, the anti-freeze
mixing ratio must be less than 50 %.
• Securely tighten radiator cap (3). If the cap is loose or
improperly fitted, water may lead out and the engine could
overheat.
(1) Drain Plug (Radiator)
(2) Drain Plug (Crankcase)
(3) Radiator Cap
(4) Recovery Tank
9Y1210143GEG0050US0
G-35
Page 57
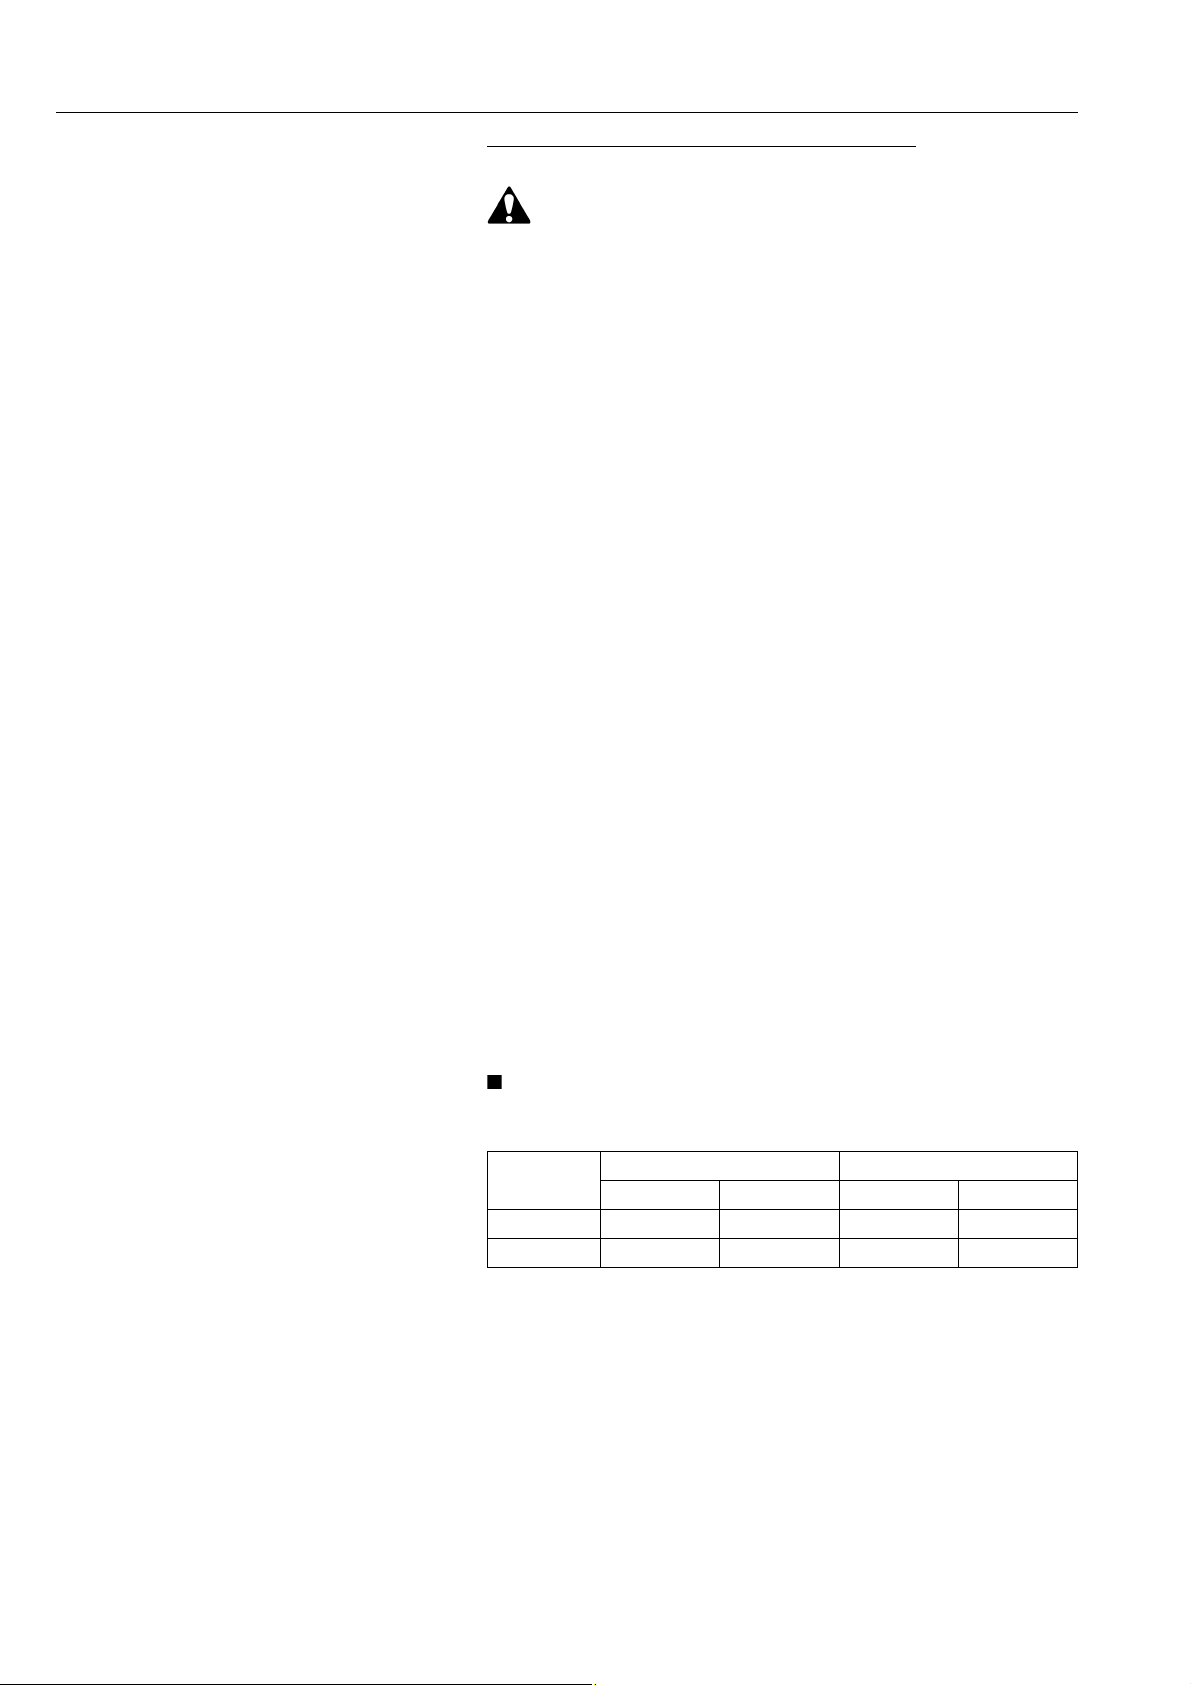
M6040, M7040, WSM
CAUTION
IMPORTANT
KiSC issued 07, 2012 A
GENERAL
Flush Cooling System and Changing Coolant
Anti-Freeze
• When using antifreeze, put on some protection such as
rubber gloves (Antifreeze contains position).
• If should drink antifreeze, throw up at once and take
medical attention.
• When antifreeze comes in contact with the skin or clothing,
wash it off immediately.
• Do not mix different types of Antifreeze.
The mixture can produce chemical reaction causing
harmful substances.
• Antifreeze is extremely flammable and explosive under
certain conditions. Keep fire and children away from
antifreeze.
• When draining fluids from the engine, place some
container underneath the engine body.
• Do not pour waste onto the grounds, down a drain, or into
any water source.
• Also, observe the relevant environmental protection
regulations when disposing of antifreeze.
If it freezes, coolant can damage the cylinders and radiator. If
the ambient temperature falls below 0 °C or before a long-term
storage, let out coolant completely, or mix fresh water with long-life
coolant and fill the radiator and reserve tank with the mixture.
1. Long-life coolant (hereafter LLC) comes in several types. Use
ethylene glycol (EG) type for this engine.
2. Before employing LLC-mixed coolant, fill the radiator with fresh
water and empty it again.
Repeat this procedure 2 or 3 times to clean up the inside.
3. Mixing the LLC
Put the LLC in coolant in the percentage (%) for a target
temperature. When mixing, stir it up well, and then fill into the
radiator.
4. The procedure for the mixing of water and antifreeze differs
according to the make of the antifreeze and the ambient
temperature. Refer to SAE J1034 standard, more specifically
also to SAE J814c.
• When the antifreeze is mixed with water, the antifreeze
mixing ratio must be less than 50 %.
Vol %
Anti-freeze
40 – 24 – 12 106 222
50 – 37 – 34 108 226
Freeze Point Boiling Point*
°C °F °C °F
*At 1.013 x 1000000 Pa (760 mmHg) pressure (atmospheric).
A higher boiling point is obtained by using a radiator pressure cap
which permits the development of pressure within the cooling
system.
(To be continued)
G-36
Page 58
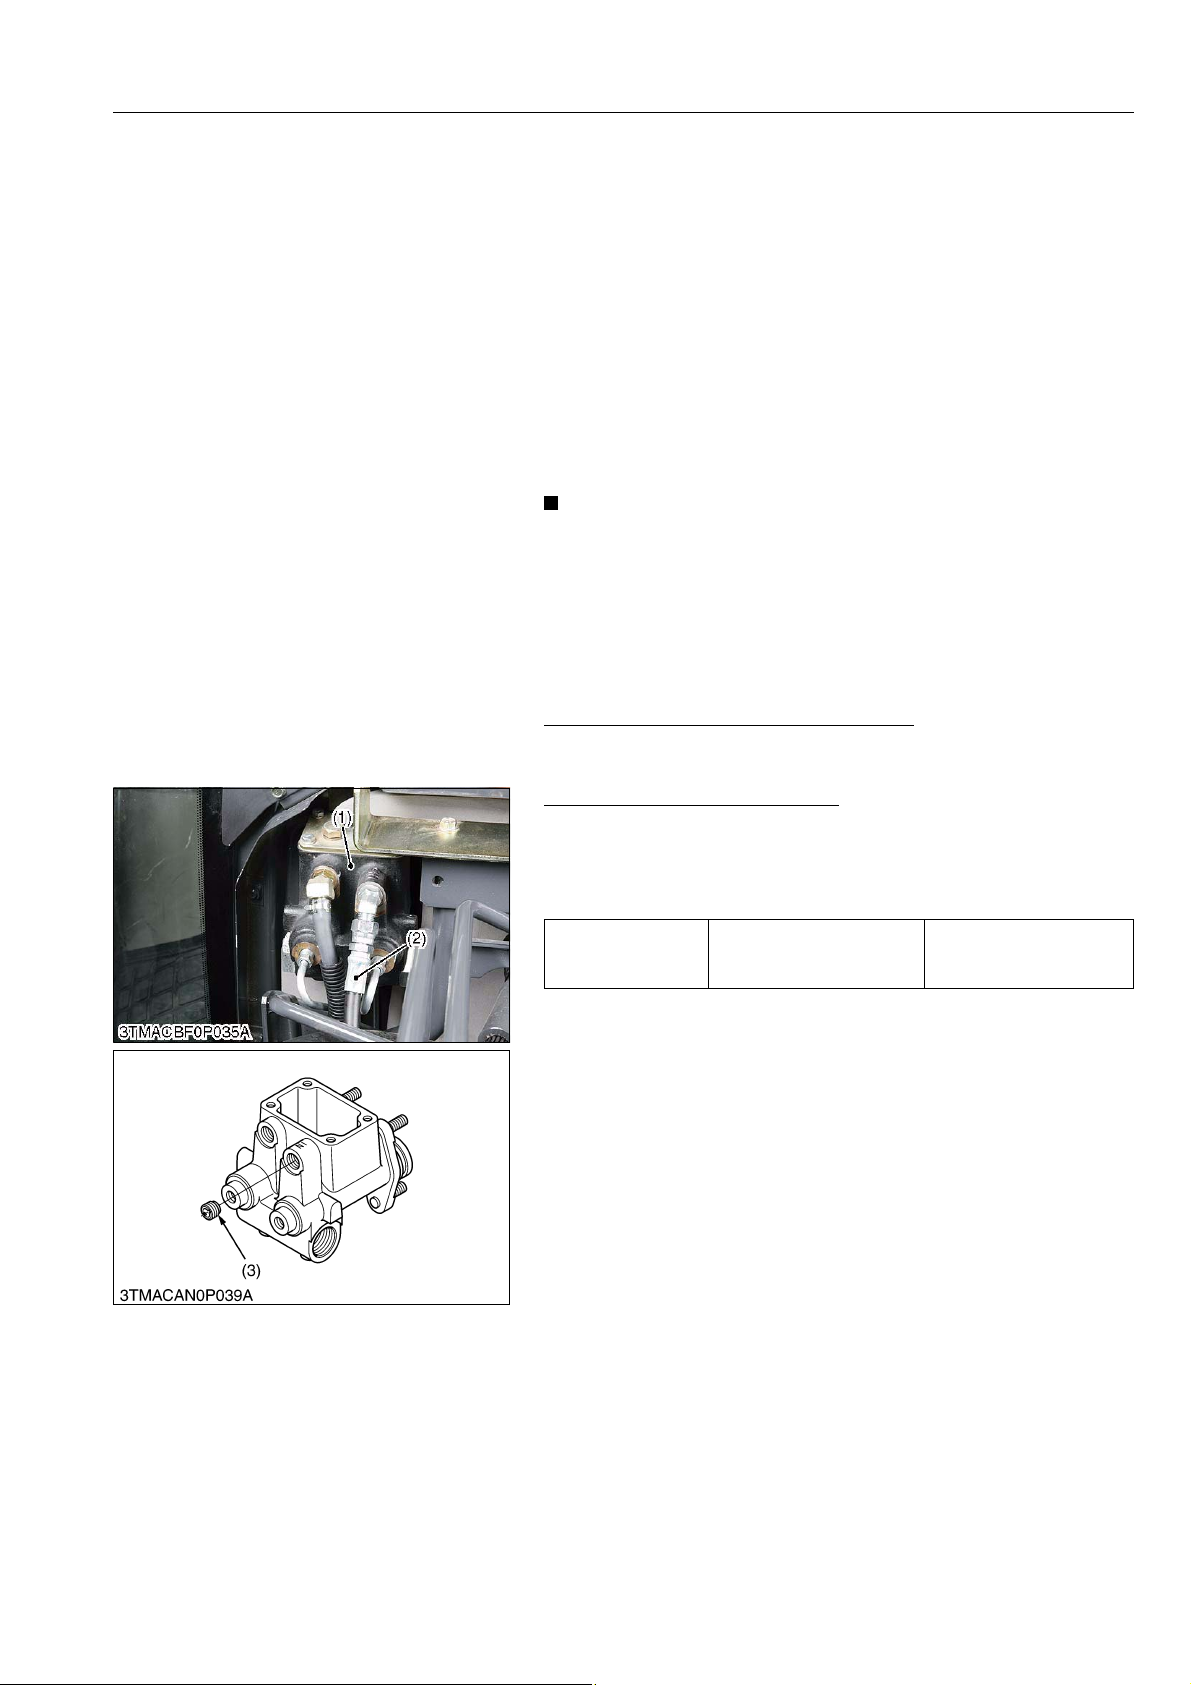
M6040, M7040, WSM
NOTE
KiSC issued 07, 2012 A
(Continued)
GENERAL
5. Adding the LLC
a) Add only water if the mixture reduces in amount by
evaporation.
b) If there is a mixture leak, add the LLC of the same
manufacture and type in the same mixture percentage.
*Never add any long-life coolant of different manufacture.
(Different brands may have different additive components, and
the engine may fail to perform as specified.)
6. When the LLC is mixed, do not employ any radiator cleaning
agent. The LLC contains anticorrosive agent. If mixed with the
cleaning agent, sludge may build up, adversely affecting the
engine parts.
7. Kubota's genuine long-life coolant has a service life of 2 years.
Be sure to change the coolant every 2 years.
• The above data represents industry standards that
necessitate a minimum glycol content in the concentrated
anti-freeze.
• When the coolant level drops due to evaporation, add water
only to keep the antifreeze mixing ratio less than 50 %. In
case of leakage, add antifreeze and water in the specified
mixing ratio before filling in to the radiator.
9Y1210143GEG0051US0
Replacing Radiator Hose (Water Pipes)
1. Replace the hoses and clamps. (See page G-28.)
9Y1210143GEG0052US0
Cleaning Master Cylinder Filter
1. Remove the master cylinder pipe (2) from the master cylinder
assembly (1).
2. Remove the filter (3) using the screwdriver.
3. Clean the filter (3) with kerosene and blow with air.
Tightening torque
Master cylinder pipe and
return pipe retaining nut
49.0 to 68.6 N·m
5.0 to 7.0 kgf·m
36.2 to 50.6 lbf·ft
(1) Master Cylinder Assembly
(2) Master Cylinder Pipe
(3) Filter
9Y1210143GEG0053US0
G-37
Page 59

M6040, M7040, WSM
KiSC issued 07, 2012 A
GENERAL
Replacing Power Steering Hose
1. Replace the hoses and clamps. (See page G-29.)
9Y1210143GEG0054US0
Replacing Fuel Hose
1. Replace the fuel hose and clamps. (See page G-26.)
9Y1210143GEG0055US0
Replacing Intake Air Line
1. Replace the hoses and clamps. (See page G-28.)
9Y1210143GEG0056US0
Replacing Parking Brake Cable
1. To check and adjusting for brake pedal. (Refer to "(2) Parking
Brake" on page 5-S7.)
9Y1210143GEG0057US0
Replacing Master Cylinder Kit
1. To check and adjusting for brake pedal. (Refer to "(1) Traveling
Brake" on page 5-S4, "(3) Master Cylinder" on page 5-S12.)
9Y1210143GEG0058US0
Replacing Equalizer Kit
1. To check and adjusting for brake pedal. (Refer to "(1) Traveling
Brake" on page 5-S4.)
9Y1210143GEG0059US0
Replacing Brake Seal 1 and 2
1. To check and adjusting for brake pedal. (Refer to "(4) Brake
Piston" on page 5-S12.)
9Y1210143GEG0060US0
Replacing Lift Cylinder Hose
1. Replace the lift cylinder hoses.
9Y1210143GEG0061US0
Replacing Air Conditioner Hose
1. Check the air conditioner hoses, when the hose has damaged
replace them.
9Y1210143GEG0062US0
G-38
Page 60
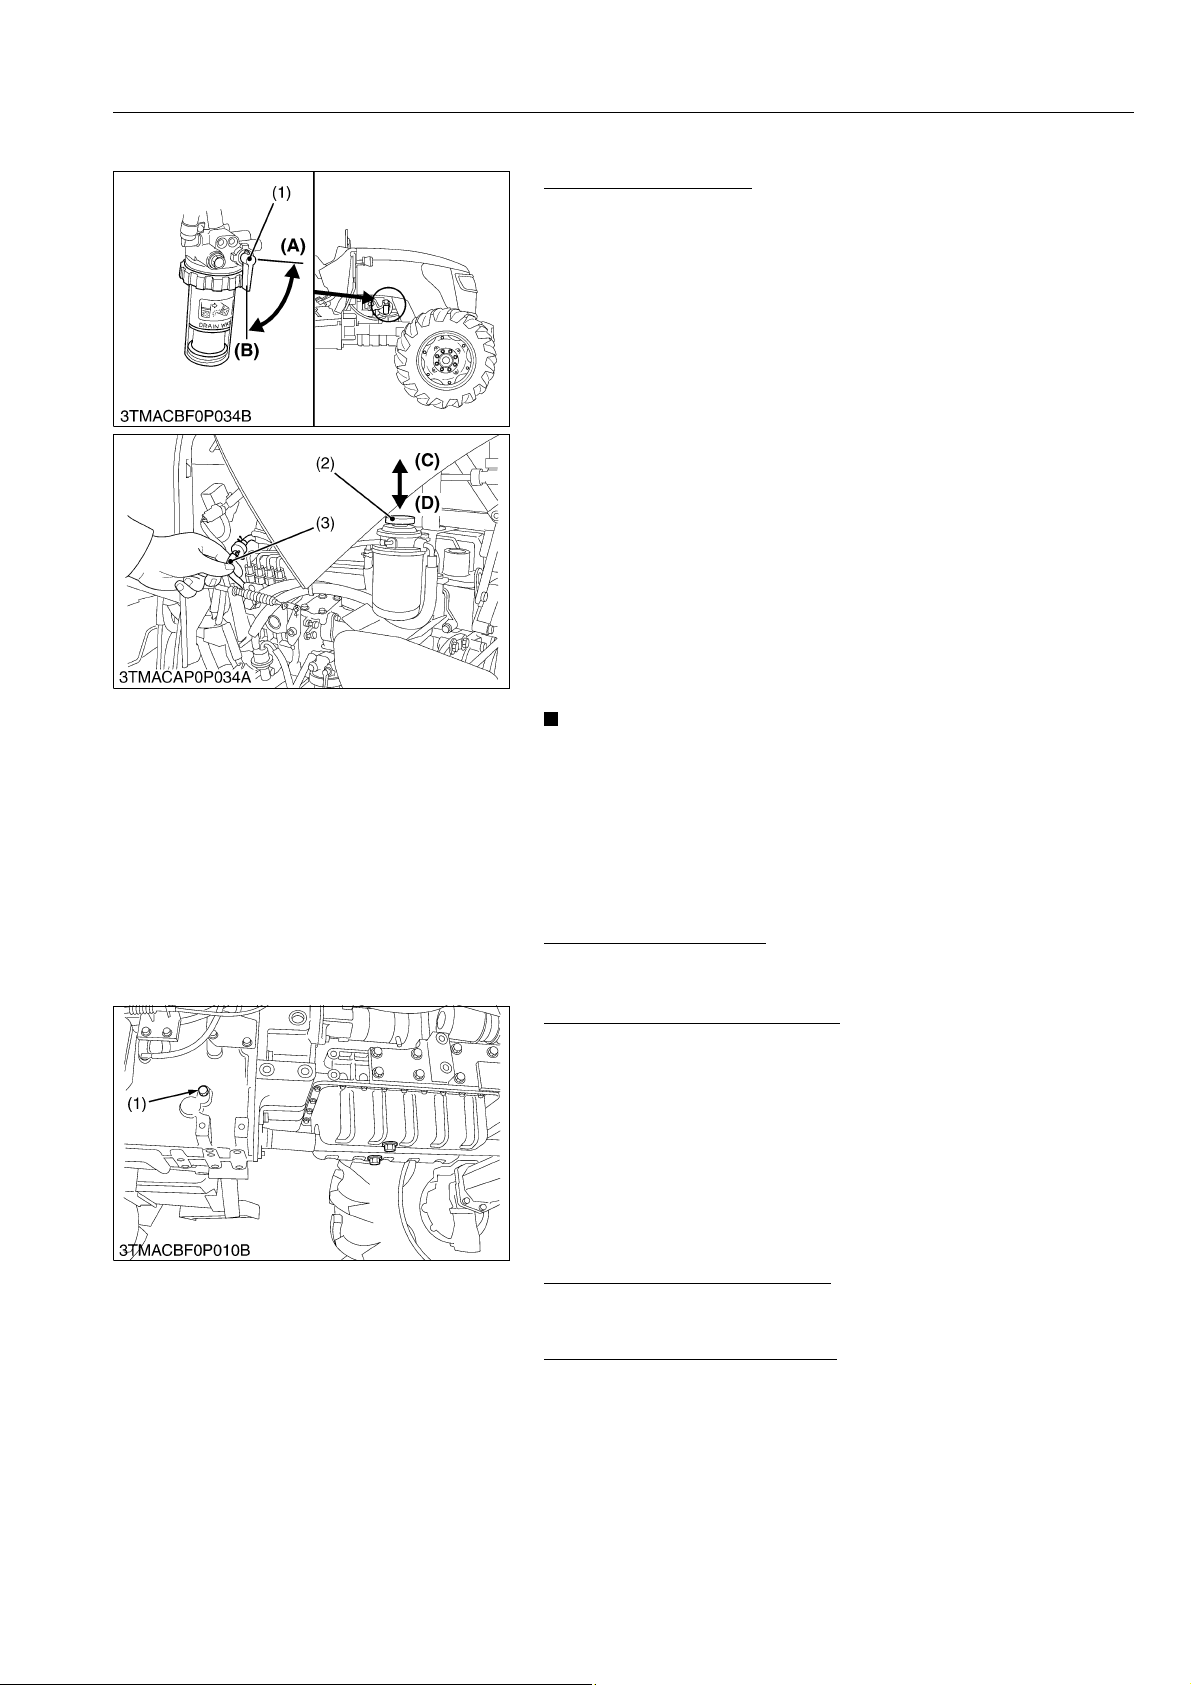
M6040, M7040, WSM
IMPORTANT
KiSC issued 07, 2012 A
[14] OTHERS
GENERAL
Bleeding Fuel System
Air must be removed:
1. When the fuel filter or lines are removed.
2. When water is drained from water separator.
3. When tank is completely empty.
4. After the tractor has not been used for a long period of time.
Bleeding procedure is as follows:
1. Fill the fuel tank with fuel, and open the fuel cock (1).
2. Pump the fuel pump knob (2) located on the top of the fuel filter.
The fuel pump knob will pump easily at first and with added
resistance as air is purged from the system. To make sure air is
completely purged, pinch the fuel overflow hose (3) with fingers,
if a pulsation is felt when the knob is pumped, then, no air
remains.
3. Set the hand throttle lever at the maximum speed position, turn
the key switch to start the engine, and then reset the throttle
lever at the mid speed (around 1500 min
-1
(rpm)) position.
If engine does not start, try it several times at 30 second
intervals.
4. Accelerate the engine to remove the small portion of air left in
the fuel system.
5. If air still remains and the engine stops, repeat the above steps.
• Do not hold key switch at engine start position for more
than 10 seconds continuously. If more engine cranking is
needed, try again after 30 seconds.
(1) Fuel Cock
(2) Fuel Pump Knob
(3) Fuel Overflow Hose
(A) Close
(B) Open
(C) Up
(D) Down
9Y1210143GEG0063US0
Bleeding Brake System
1. See page 5-S6.
9Y1210143GEG0064US0
Draining Clutch Housing Water
1. The tractor is equipped with drain plug (1) under the clutch
housing.
2. After operating in rain, snow or tractor has been washed, water
may get into the clutch housing.
3. Remove the drain plug (1) and drain the water, then install the
plug (1) again.
(1) Drain Plug (Water)
9Y1210143GEG0065US0
Replacing Fuse (ROPS Model)
1. See page 9-S11.
9Y1210143GEG0066US0
Replacing Fuse (CABIN Model)
1. See page 9-S12.
9Y1210143GEG0067US0
G-39
Page 61
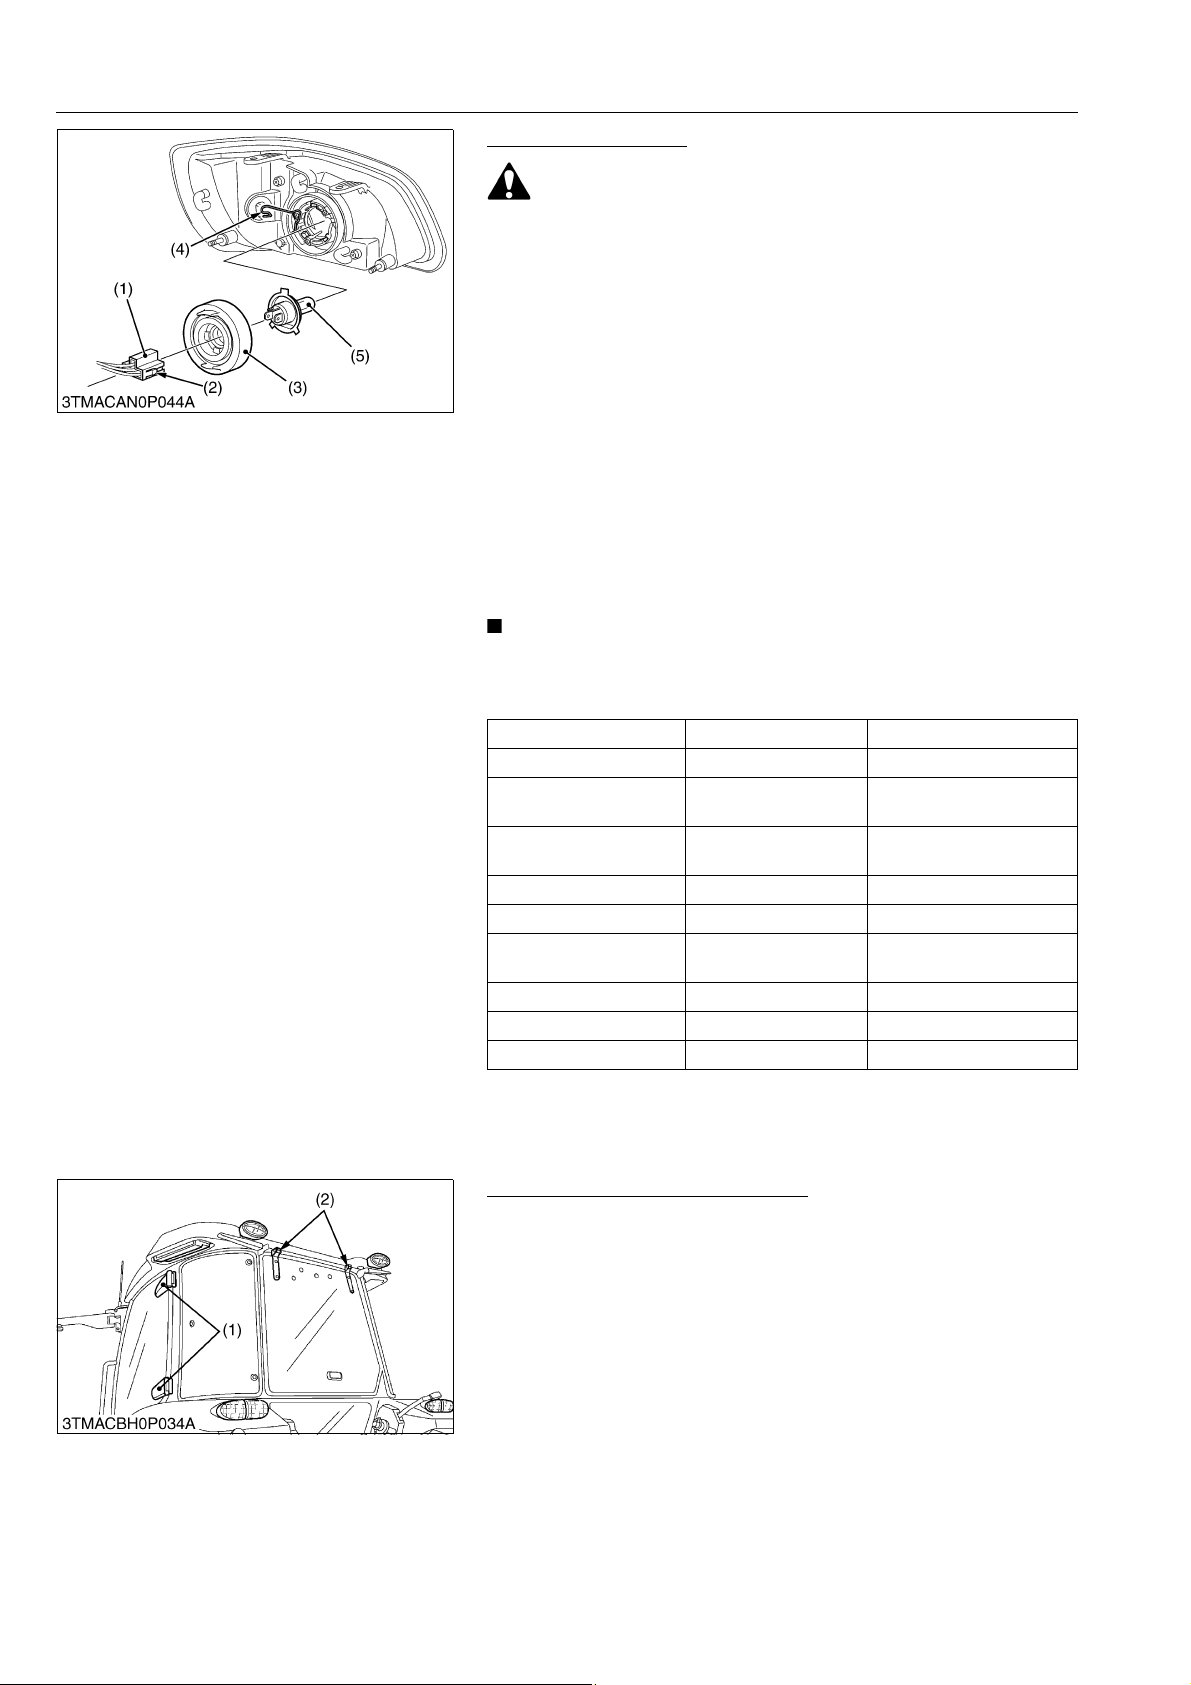
M6040, M7040, WSM
CAUTION
IMPORTANT
KiSC issued 07, 2012 A
GENERAL
Replacing Light Bulb
• Be careful not to drop the bulb, hit anything against the
lamp, apply excess force, and get the lamp scratched. If
broken, glass may cause injury. Pay more attention to
halogen lamps in particular, which have high pressure
inside.
• Before replacing the lamp, be sure to turn off the light and
wait until the bulb cools down, otherwise, you may get
burned.
Head lights
1. While pushing the right and left lock buttons (2), pull and remove
the electrical connector (1).
2. Remove the rubber boot (3).
3. Remove the clamping fixture (4) and take out the bulb (5).
4. Replace with a new bulb and reinstall the head lamp assembly
in the reverse order.
Other lights
1. Detach the lens and replace the bulb.
• Be sure to use a new bulb of the specified wattage.
• Never touch the bulb surface (glass) with bare hands.
Fingerprints, for example, may break the bulb.
Light Capacity Remark
Head lights 12 V, 55 / 60 W (H4)
Turn signal / Hazard light
(Front)
Turn signal / Hazard light
(Rear)
Tail / stop light 12 V, 5 W / 21 W
Front work light 12 V, 21 W
Work light
(for outer roof)
Dome light (Room lamp) 12 V, 5 W CABIN Model
Front position light 12 V, 10 W
Number plate light 12 V, 10 W
12 V, 21 W
12 V, 21 W
12 V, 55 W CABIN Model
(1) Electrical Connector
(2) Lock Button
(3) Rubber Boot
(4) Clamping Fixture
(5) Bulb
9Y1210143GEG0068US0
Lubricating Points (CABIN Model)
(1) Door Hinge (2) Rear Window Hinge
9Y1210143GEG0069US0
G-40
Page 62
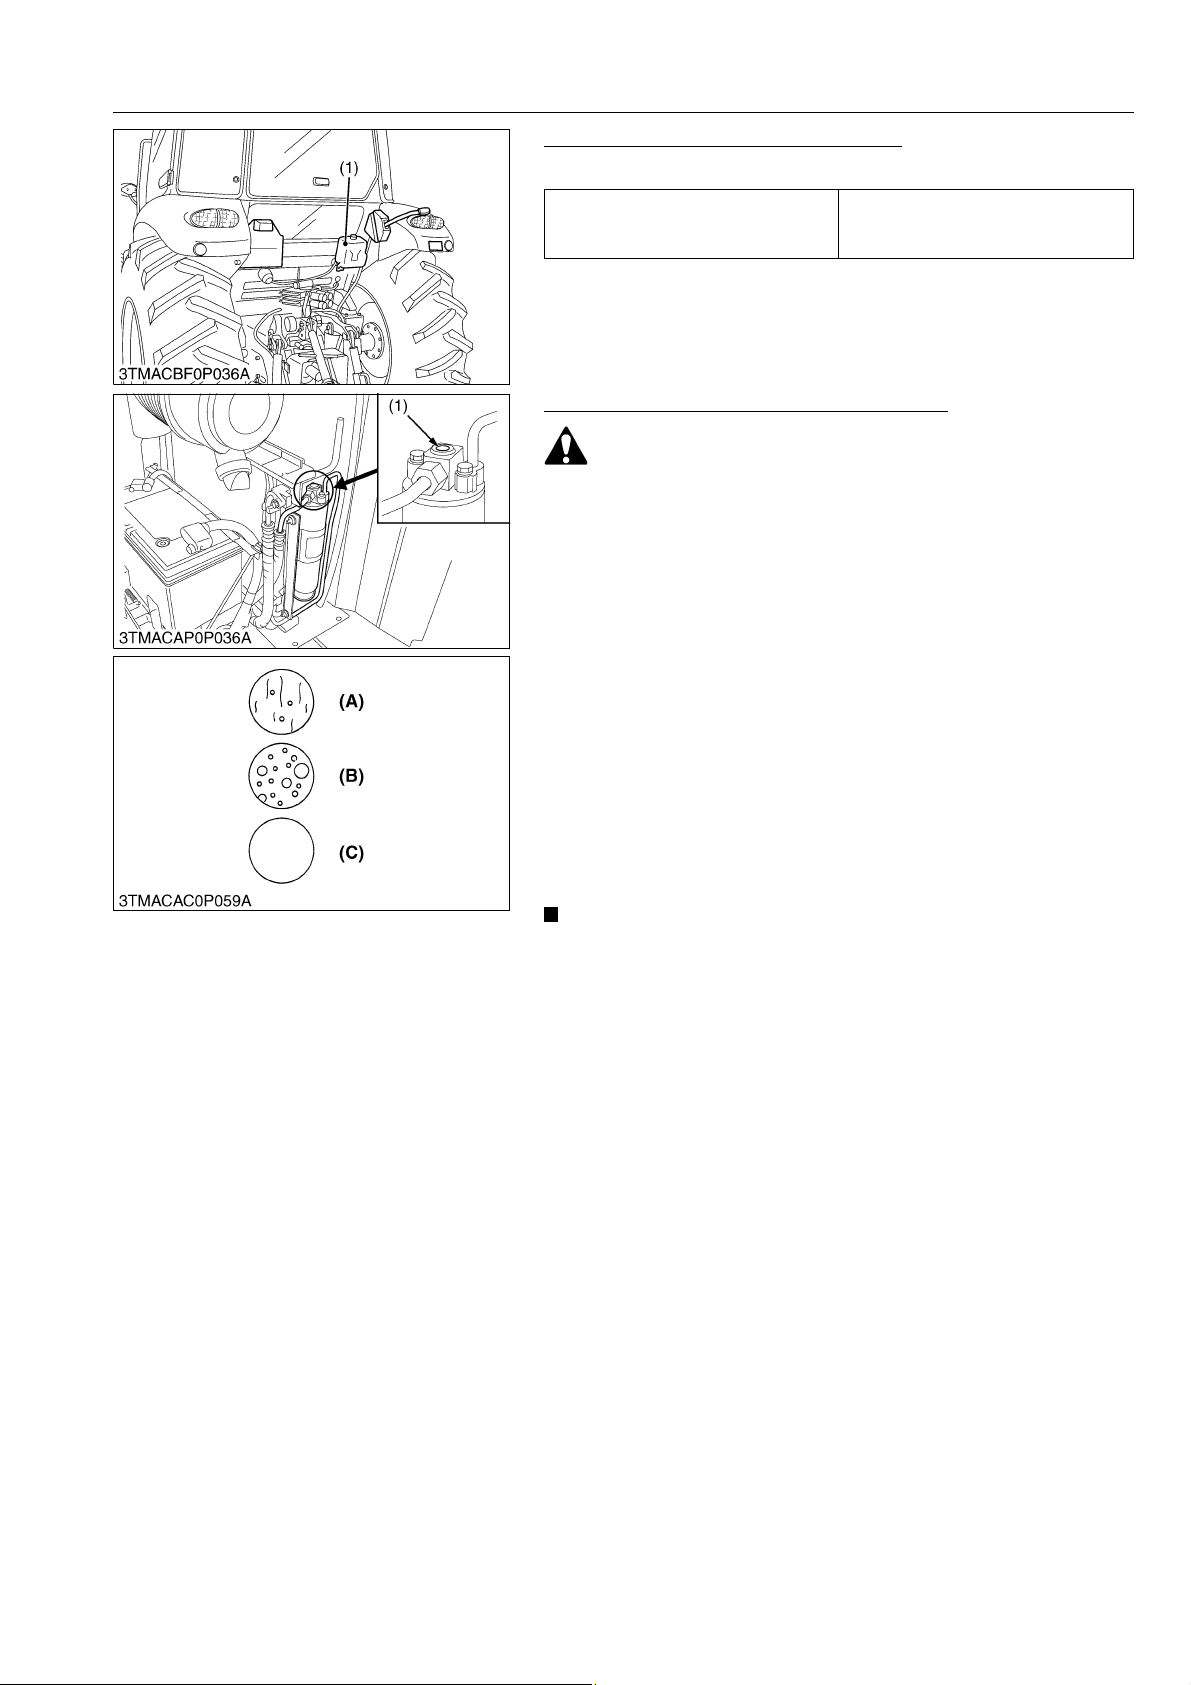
M6040, M7040, WSM
CAUTION
IMPORTANT
KiSC issued 07, 2012 A
GENERAL
Adding Washer Liquid (CABIN Model)
1. Add a proper amount of automobile washer liquid.
1.3 L
Tank capacity
(1) Washer Liquid Tank
1.4 U.S.gals
1.1 Imp.gals
9Y1210143GEG0070US0
Checking Refrigerant (Gas) (CABIN Model)
• Liquid contact with eyes or skin may cause frostbite.
• In the event of a leakage, wear safety goggles. Escaping
refrigerant can cause severe injuries to eyes.
• In contact with a flame, R134a refrigerant gives a toxic gas.
• Do not disconnect any part of the refrigeration circuit of the
air conditioning system.
A shortage of refrigerant impairs the air-conditioner
performance. Check the following points. If it is indicated that the
amount of refrigerant is extremely low, inspect and charge. (See
page 10-S21.)
Checking Procedure
1. Run the air-conditioner in the following conditions.
-1
• Engine speed: About 1500 min
(rpm)
• Temperature control lever: Maximum cooling position
• Fan switch: Highest blow (HI)
• Air-conditioner switch: ON
2. Look into the sight glass (1) to see if the refrigerant is flowing
through its circuit.
• Charge only with R134a not R12 refrigerant (gas).
(1) Sight Glass (A) Proper: Little or no air bubbles in
the refrigerant flow.
(B) Low: Lots of air bubbles in the
refrigerant flow (air bubbles or
foam passing continuously).
(C) Overfull or no refrigerant:
Colorless and transparent.
9Y1210143GEG0071US0
G-41
Page 63
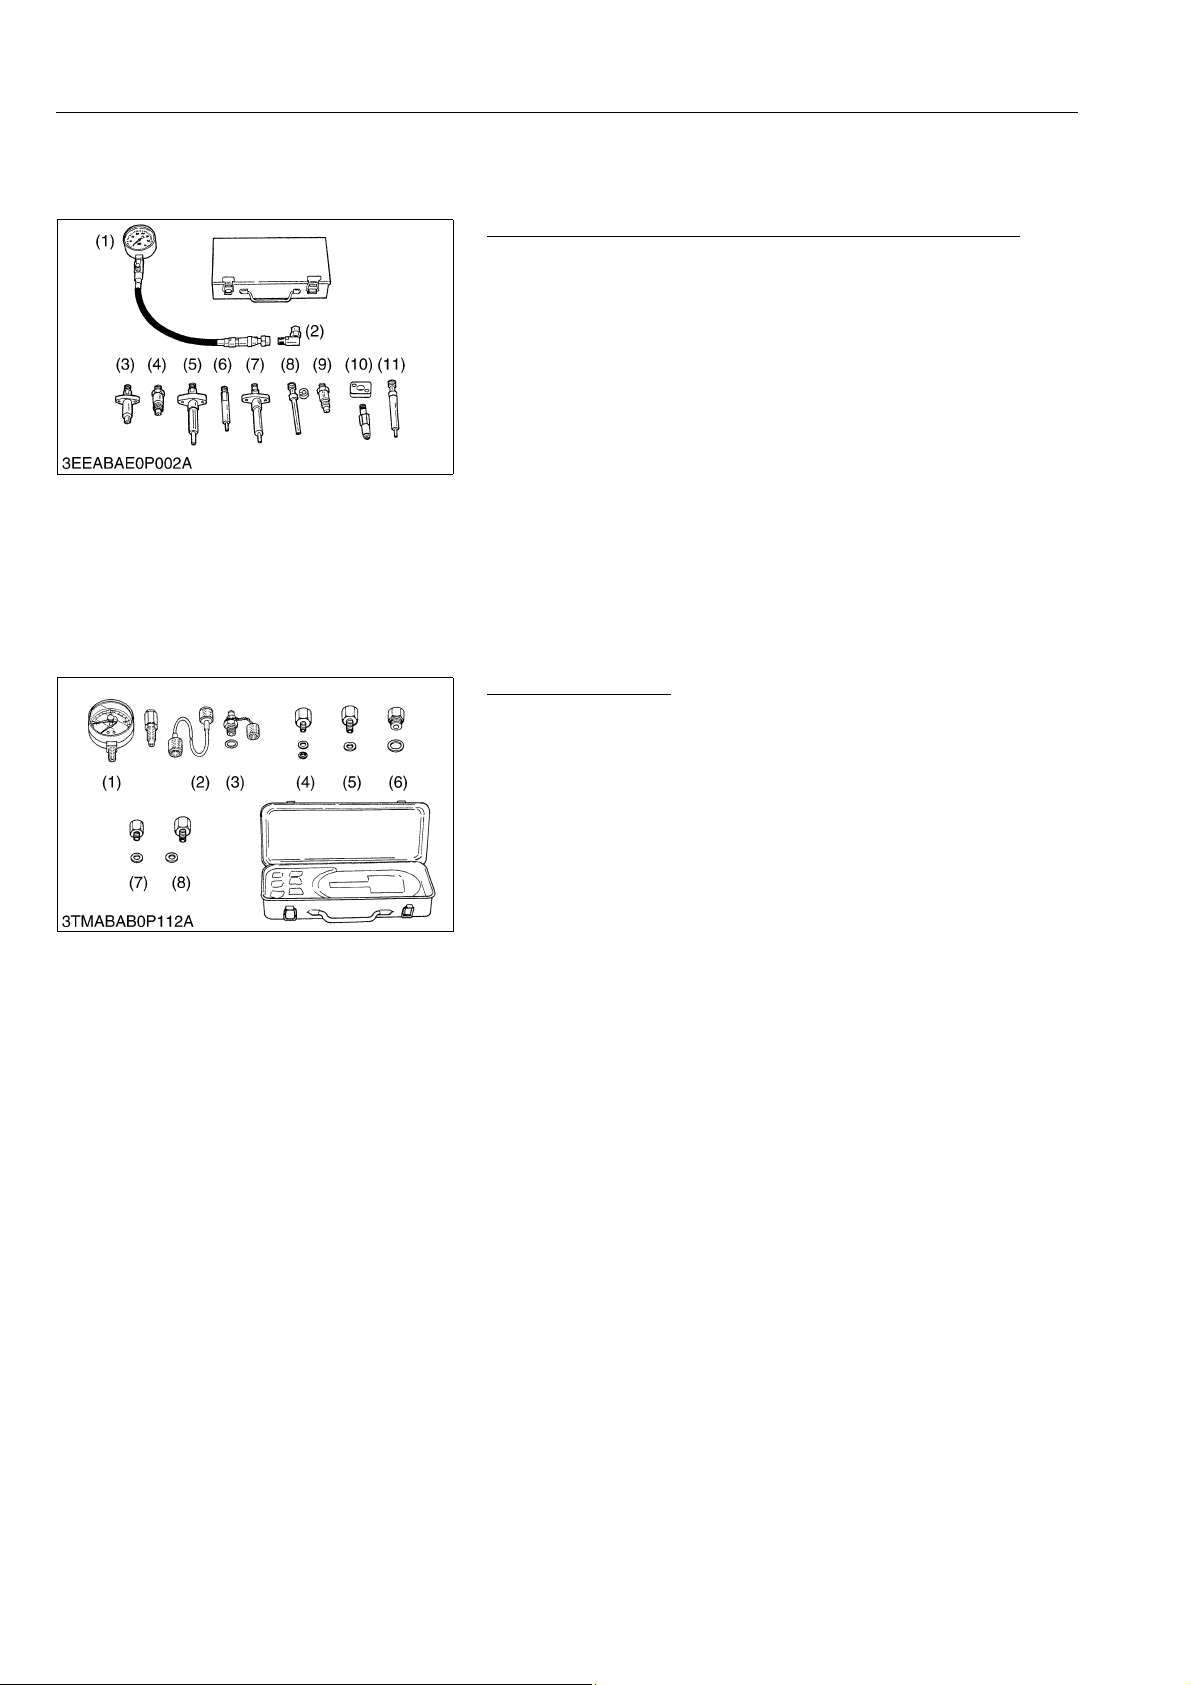
M6040, M7040, WSM
KiSC issued 07, 2012 A
8. SPECIAL TOOLS
[1] SPECIAL TOOLS FOR ENGINE
Diesel Engine Compression Tester (for Injection Nozzle)
Code No.
• 07909-30208 (Assembly)
• 07909-30934 (A to F)
• 07909-31211 (E and F)
• 07909-31231 (H)
• 07909-31251 (G)
• 07909-31271 (I)
• 07909-31281 (J)
Application
• Use to measure diesel engine compression and diagnostics of
need for major overhaul.
(1) Gauge
(2) L Joint
(3) Adaptor A
(4) Adaptor B
(5) Adaptor C
(6) Adaptor E
Oil Pressure Tester
Code No.
• 07916-32032
Application
• Use to measure lubricating oil pressure.
(1) Gauge
(2) Cable
(3) Threaded Joint
(4) Adaptor 1
GENERAL
(7) Adaptor F
(8) Adaptor G
(9) Adaptor H
(10) Adaptor I
(11) Adaptor J
WSM000001GEG0014US0
(5) Adaptor 2
(6) Adaptor 3
(7) Adaptor 4
(8) Adaptor 5
WSM000001GEG0015US0
G-42
Page 64
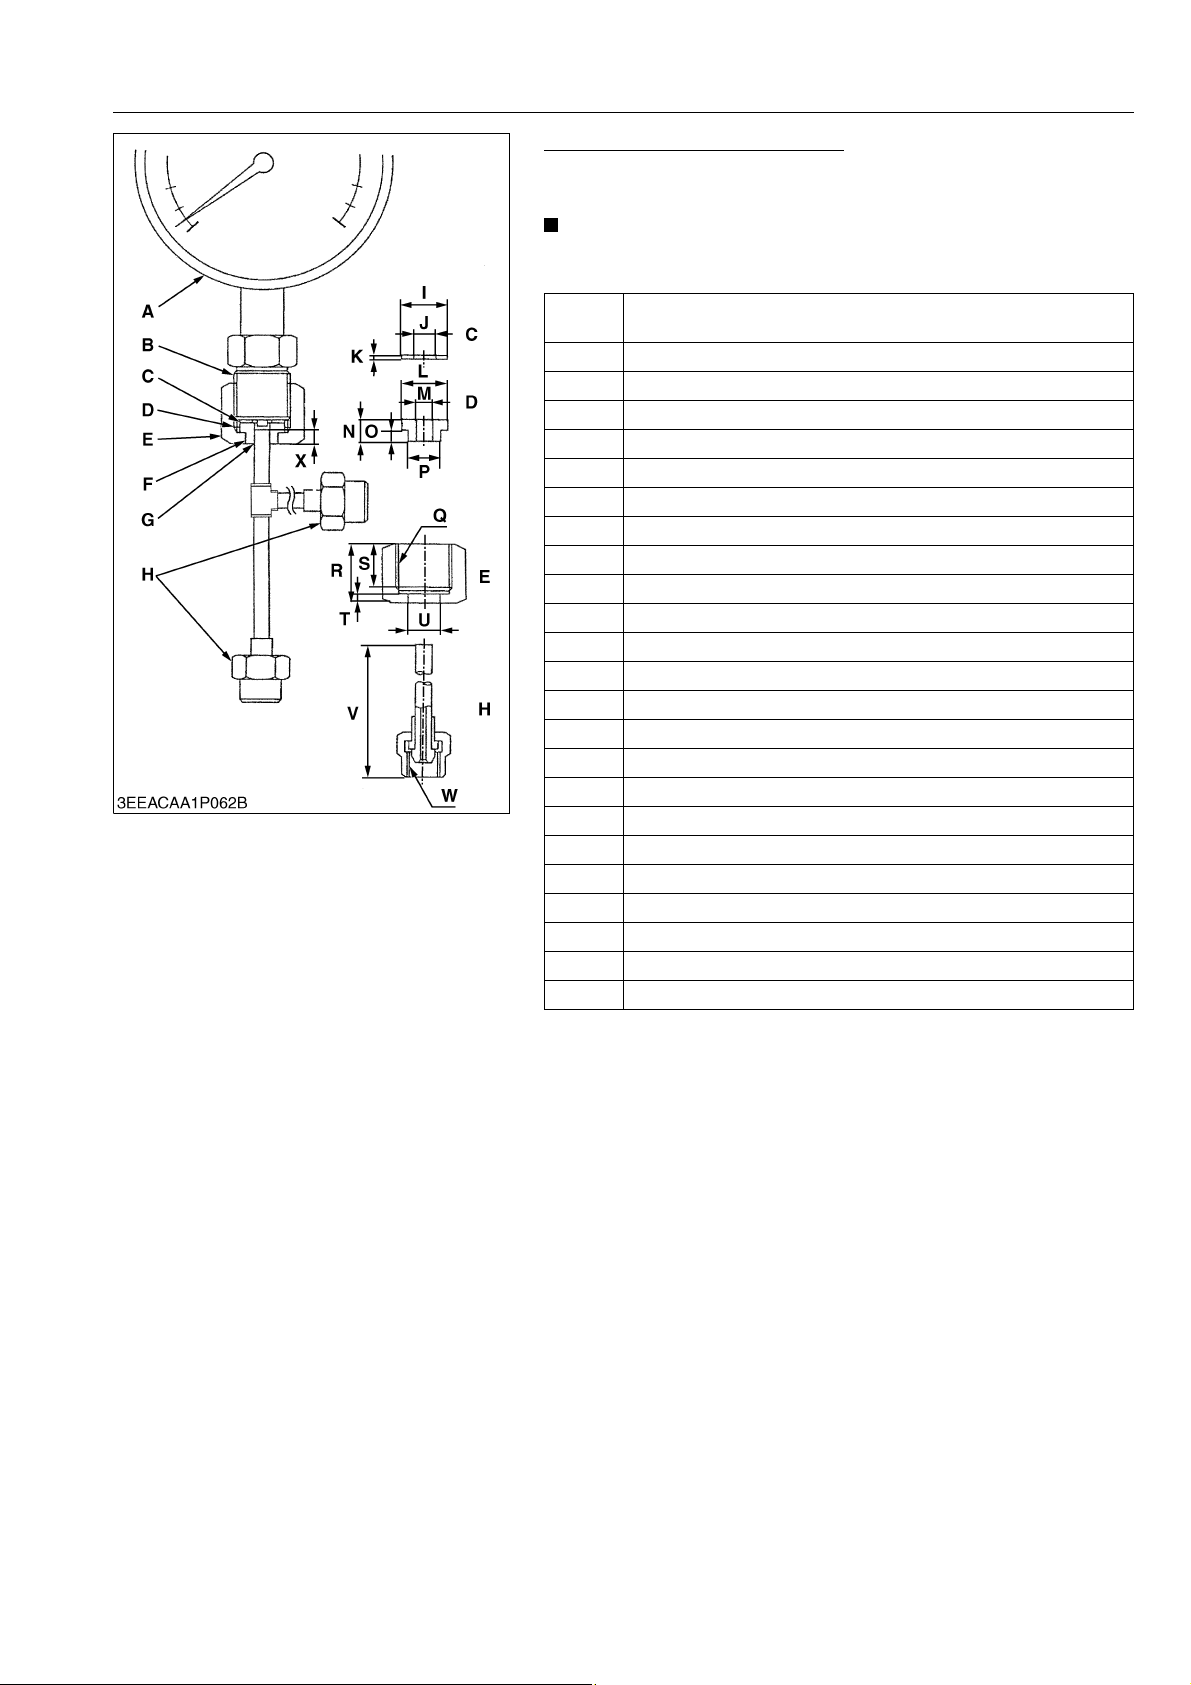
M6040, M7040, WSM
NOTE
KiSC issued 07, 2012 A
GENERAL
Injection Pump Pressure Tester
Application
• Use to check fuel tightness of injection pumps.
• The following special tools are not provided, so make them
referring to the figure.
Pressure gauge full scale:
A
More than 29.4 MPa (300 kgf/cm
B PF 1/2
C Copper gasket
D Flange (Material: Steel)
E Hex. nut 27 mm (1.06 in.) across the plat
F Adhesive application
G Fillet welding on the enter circumference
H Retaining nut
I 17 mm dia. (0.67 in. dia.)
J 8.0 mm dia. (0.31 in. dia.)
K 1.0 mm (0.039 in.)
L 17 mm dia. (0.67 in. dia.)
M 6.10 to 6.20 mm dia. (0.2402 to 0.2441 in. dia.)
N 8 mm (0.31 in.)
O 4 mm (0.16 in.)
P 11.97 to 11.99 mm dia. (0.4713 to 0.4720 in. dia.)
Q PF 1/2
R 23 mm (0.91 in.)
S 17 mm (0.67 in.)
T 4 mm (0.16 in.)
U 12.00 to 12.02 mm dia. (0.4724 to 0.4732 in. dia.)
V 100 mm (3.94 in.)
W M12 × P1.5
X 5 mm (0.20 in.)
2
, 4267 psi)
9Y1210143GEG0072US0
G-43
Page 65
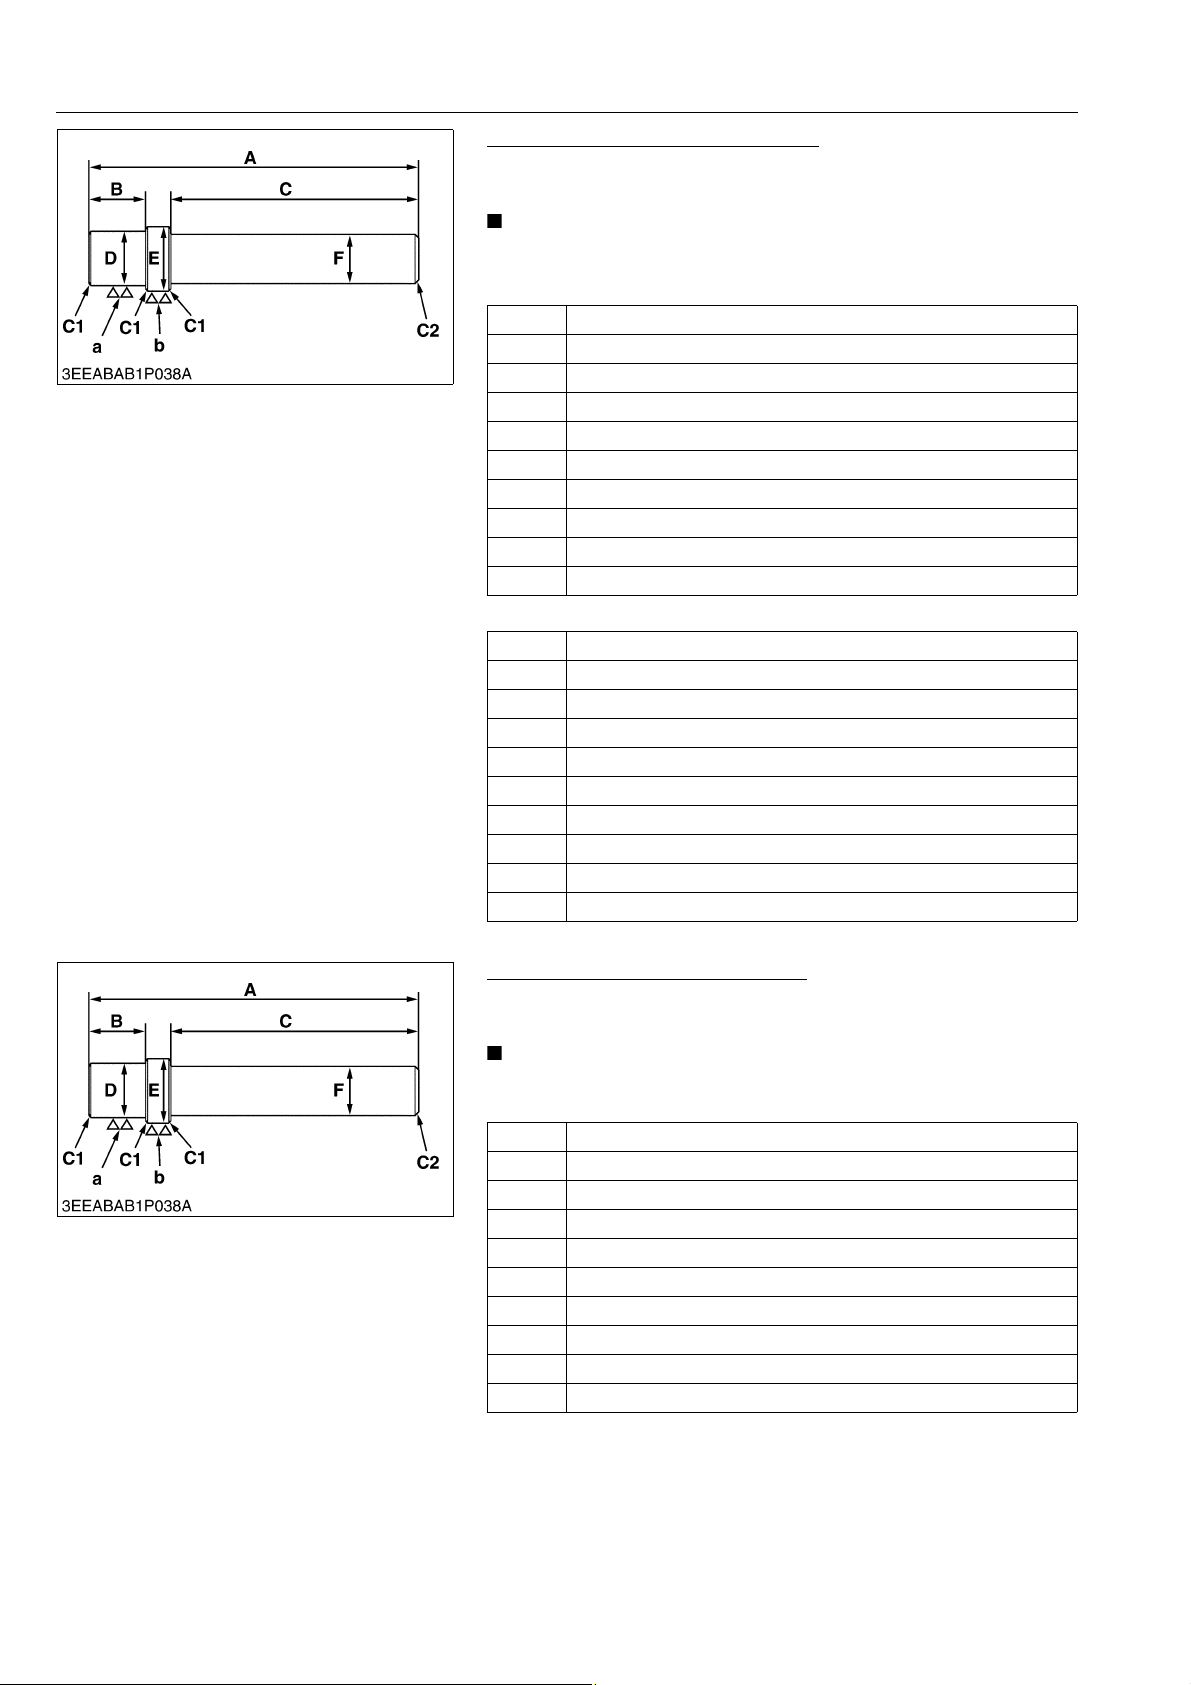
M6040, M7040, WSM
NOTE
NOTE
KiSC issued 07, 2012 A
GENERAL
Small End Bushing Replacing Tool
Application
• Use to press out and to press fit the small end bushing.
• The following special tools are not provided, so make them
referring to the figure.
[Press out]
A 157 mm (6.181 in.)
B 14.0 mm (0.5512 in.)
C 120 mm (4.7244 in.)
D 27.4 mm dia. (1.0787 in. dia.)
E 30.95 mm dia. (1.2185 in. dia.)
F 20 mm dia. (0.7874 in. dia.)
a 6.3 µm (250 µin.)
b 6.3 µm (250 µin.)
C1 Chamfer 1.0 mm (0.039 in.)
C2 Chamfer 2.0 mm (0.079 in.)
[Press fit]
A 157 mm (6.181 in.)
B 14.0 mm (0.5512 in.)
C 120 mm (4.7244 in.)
D 27.4 mm dia. (1.0787 in. dia.)
E 42.000 mm dia. (1.6535 in. dia.)
F 20 mm dia. (0.7874 in. dia.)
a 6.3 µm (250 µin.)
b 6.3 µm (250 µin.)
C1 Chamfer 1.0 mm (0.039 in.)
C2 Chamfer 2.0 mm (0.079 in.)
9Y1210143GEG0073US0
Idle Gear Bushing Replacing Tool
Application
• Use to press out and to press fit the bushing.
• The following special tools are not provided, so make them
referring to the figure.
A 196 mm (7.7165 in.)
B 25.0 mm (0.9843 in.)
C 150 mm (5.9055 in.)
D 34.5 mm dia. (1.3583 in. dia.)
E 38.075 to 38.100 mm dia. (1.4990 to 1.5000 in. dia.)
F 20 mm dia. (0.7874 in. dia.)
a 6.3 µm (250 µin.)
b 6.3 µm (250 µin.)
C1 Chamfer 1.0 mm (0.039 in.)
C2 Chamfer 2.0 mm (0.079 in.)
9Y1210143GEG0074US0
G-44
Page 66
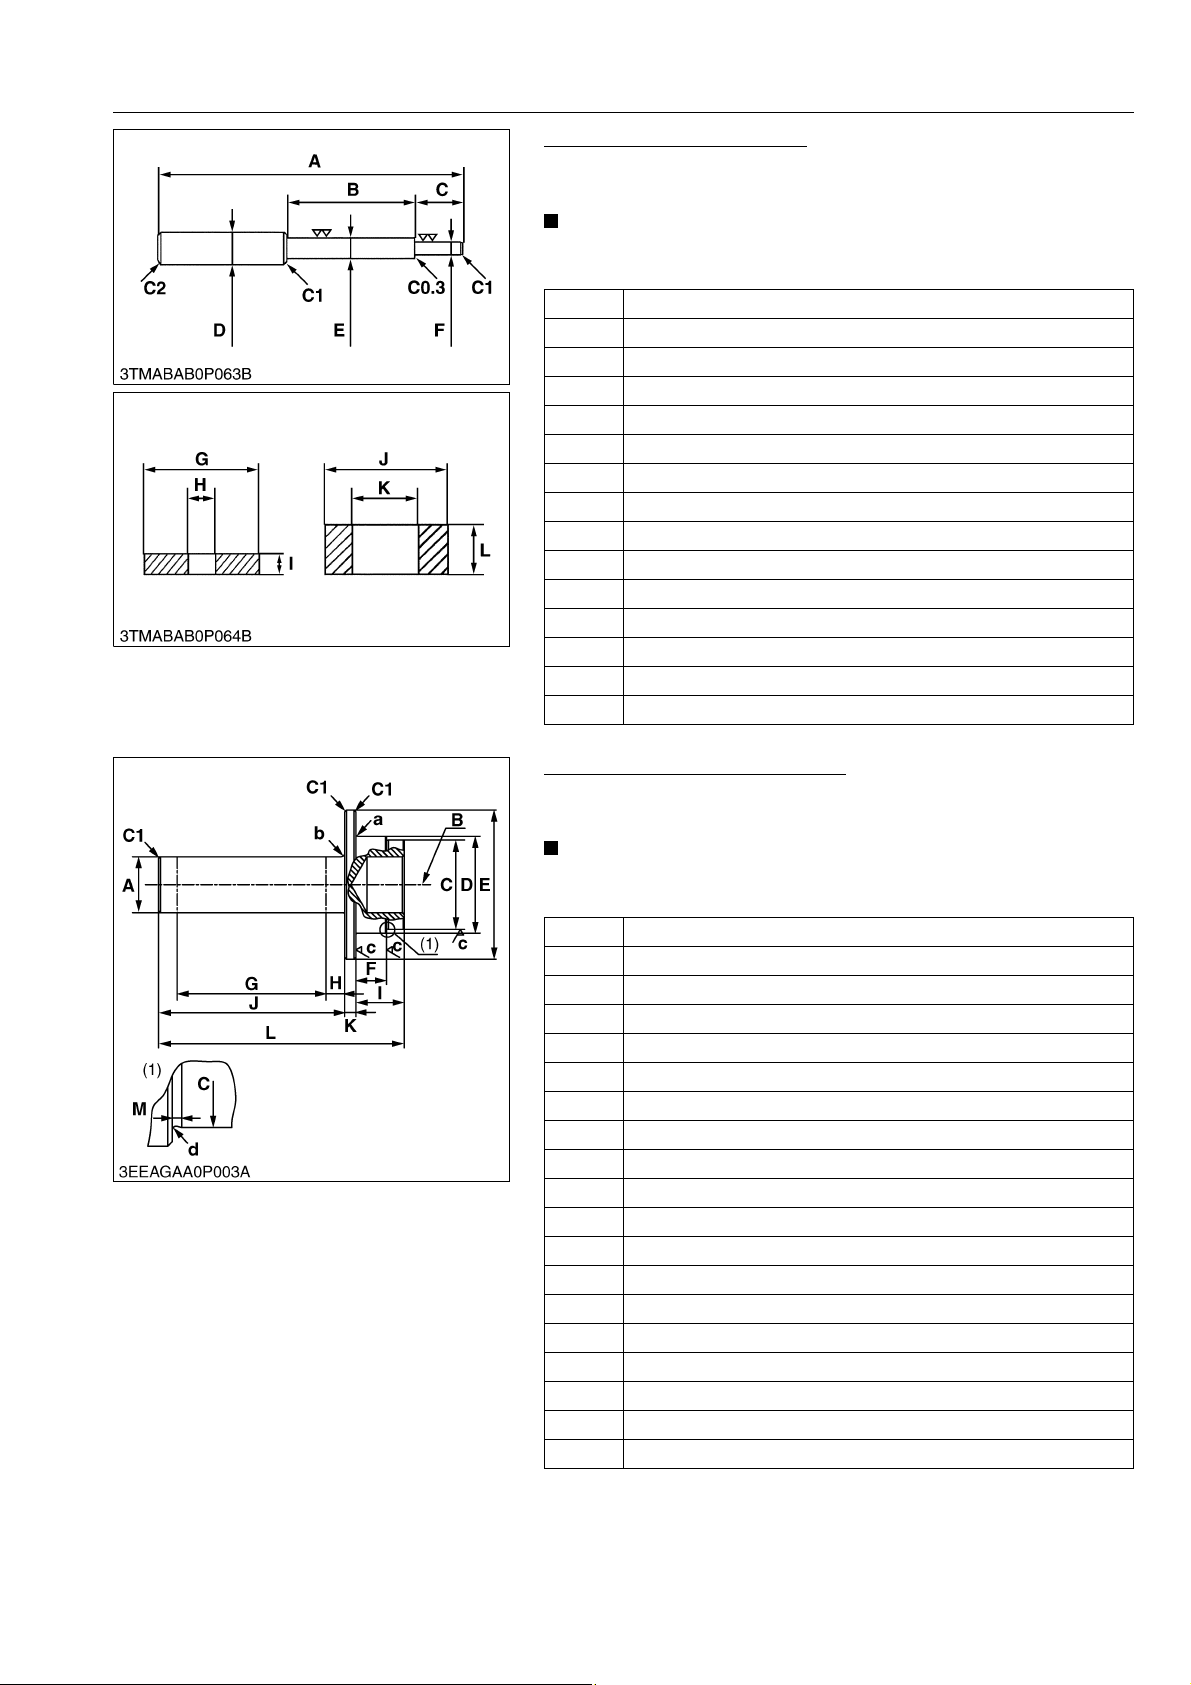
M6040, M7040, WSM
NOTE
NOTE
KiSC issued 07, 2012 A
GENERAL
Valve Guide Replacing Tool
Application
• Use to press out and press fit the valve guide.
• The following special tools are not provided, so make them
referring to the figure.
A 225 mm (8.86 in.)
B 70 mm (2.76 in.)
C 45 mm (1.77 in.)
D 20 mm dia. (0.79 in. dia.)
E 11.7 to 11.9 mm dia. (0.460 to 0.468 in. dia.)
F 6.5 to 6.6 mm dia. (0.256 to 0.259 in. dia.)
G 25 mm dia. (0.98 in. dia.)
H 6.7 to 7.0 mm dia. (0.263 to 0.275 in. dia.)
I 5 mm (0.197 in.)
J 20 mm dia. (0.787 in. dia.)
K 12.5 to 12.8 mm dia. (0.492 to 0.504 in. dia.)
L 8.5 to 8.9 mm (0.3346 to 0.3504 in.)
C1 Chamfer 1.0 mm (0.039 in.)
C2 Chamfer 2.0 mm (0.079 in.)
C0.3 Chamfer 0.3 mm (0.012 in.)
9Y1210143GEG0075US0
Camshaft Cover Replacing Tool
Application
• Use to press fit the camshaft cover.
• The following special tools are not provided, so make them
referring to the figure.
A 30 mm (1.1811 in.)
B 30 mm dia., 20 mm depth (1.1811 in. dia., 0.7874 in. depth)
C 47.975 to 48.000 mm (1.8888 to 1.8898 in.)
D 52 mm (2.0472 in.)
E 80 mm (3.1496 in.)
F 16.5 to 16.6 mm (0.6496 to 0.6535 in.)
G 80 mm (3.1496 in.)
H 10 mm (0.3937 in.)
I 26 mm (1.0236 in.)
J 100 mm (3.9370 in.)
K 6 mm (0.2362 in.)
L 132 mm (5.1969 in.)
M 1 mm (0.0394 in.)
a 1 mm radius (0.0394 in. radius)
b 2 mm radius (0.0787 in. radius)
c Ra = 3.2a
d 0.4 mm radius (0.0157 in. radius)
C0.5 Chamfer 0.5 mm (0.0197 in.)
C1 Chamfer 1.0 mm (0.039 in.)
9Y1210143GEG0076US0
G-45
Page 67
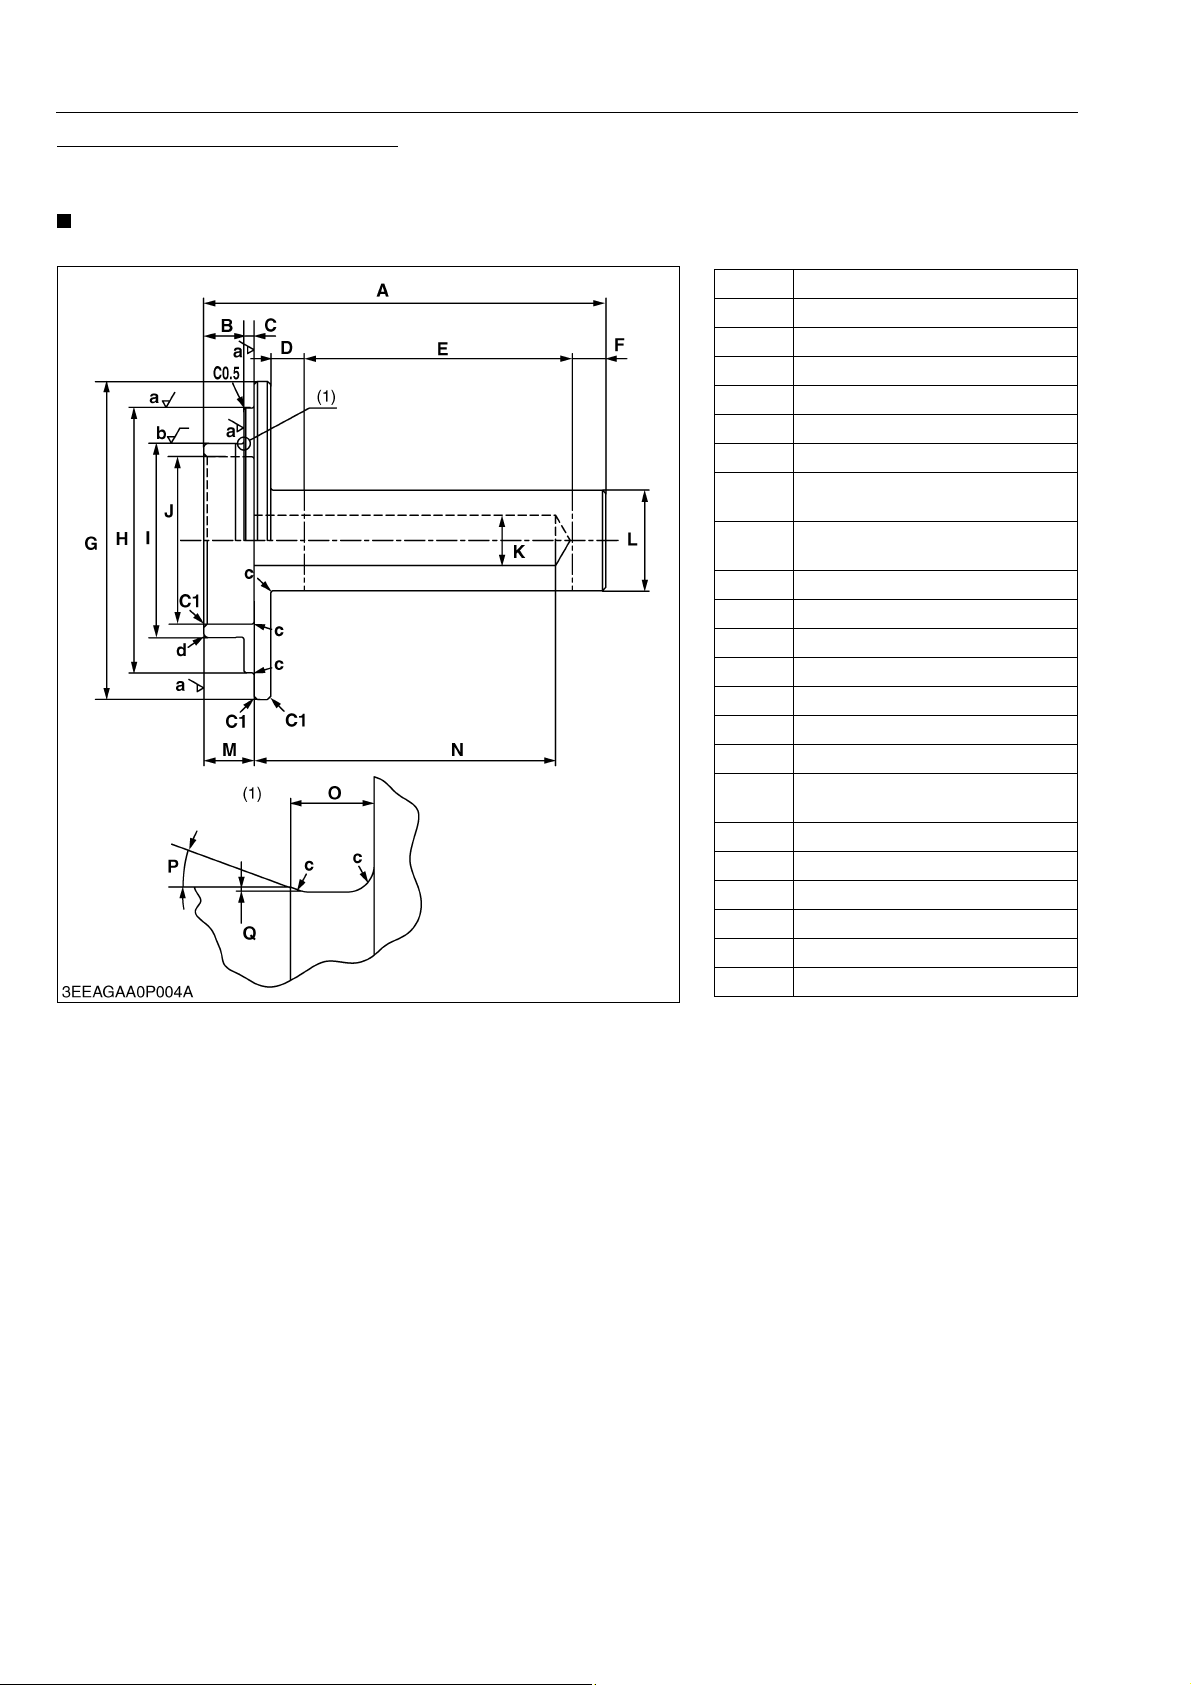
M6040, M7040, WSM
NOTE
KiSC issued 07, 2012 A
Front Cover Oil Seal Replacing Tool
Application
• Use to press fit the front cover oil seal.
• The following special tools are not provided, so make them referring to the figure.
A 120 mm (4.7244 in.)
B 12 mm (0.4724 in.)
C 2.9 to 3.0 mm (0.1142 to 0.1181 in.)
D 10 mm (0.3937 in.)
E 80 mm (3.1496 in.)
F 10 mm (0.3937 in.)
G 95 mm dia. (3.7402 in. dia.)
78.9 to 79.1 mm dia.
H
(3.1063 to 3.1142 in. dia.)
57.971 to 57.990 mm dia.
I
(2.2823 to 2.2831 in. dia.)
J 50 mm dia. (1.9685 in. dia.)
K 15 mm dia. (0.5906 in. dia.)
L 30 mm dia. (1.1811 in. dia.)
M 15 mm (0.5906 in.)
N 90 mm (3.5433 in.)
O 2.5 mm (0.0984 in.)
P 0.349 rad (20 °)
0.15 to 0.25 mm
Q
(0.0059 to 0.0098 in.)
a Ra = 3.2 a
b Ra = 1.6 a
c 0.8 mm radius (0.0315 in. radius)
d 1.5 mm radius (0.0591 in. radius)
C0.5 Chamfer 0.5 mm (0.0197 in.)
C1 Chamfer 1.0 mm (0.0394 in.)
GENERAL
9Y1210143GEG0077US0
G-46
Page 68
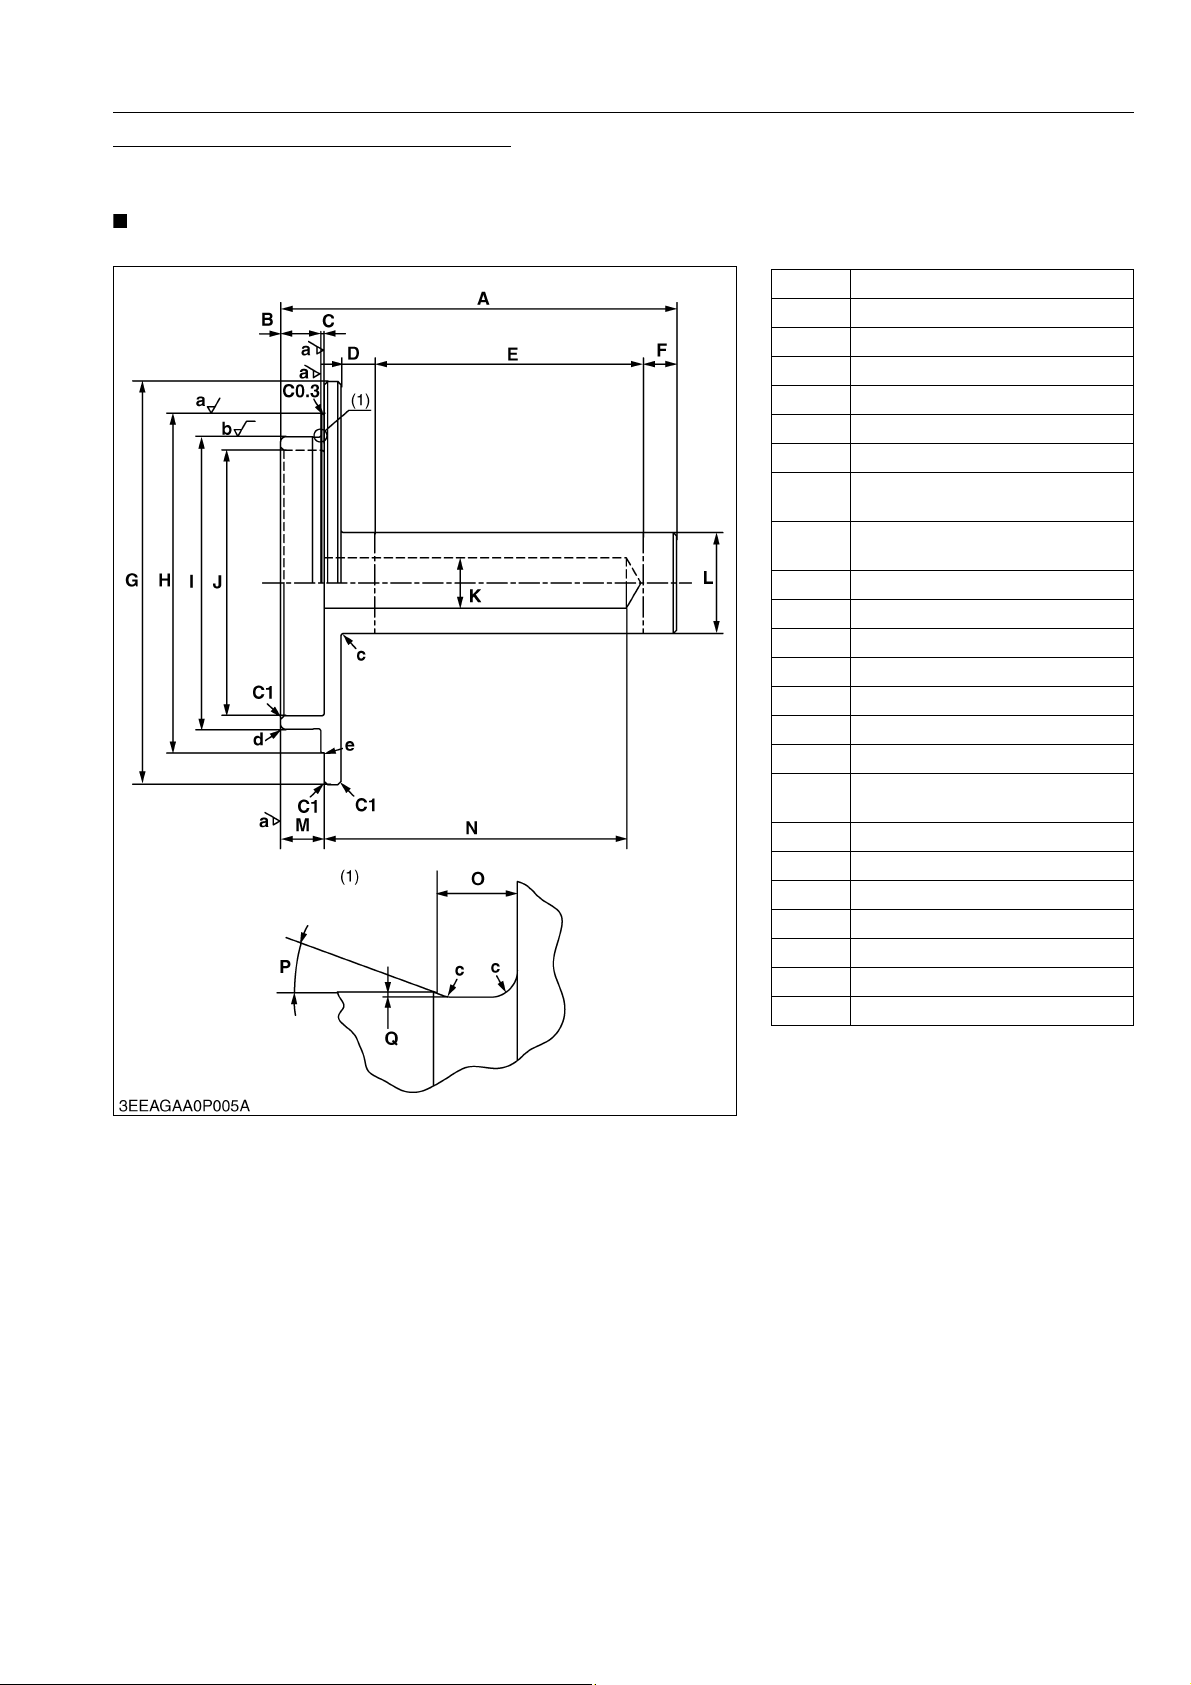
M6040, M7040, WSM
NOTE
KiSC issued 07, 2012 A
Flywheel Housing Oil Seal Replacing Tool
Application
• Use to press fit the flywheel housing oil seal.
• The following special tools are not provided, so make them referring to the figure.
A 118 mm (4.6457 in.)
B 12 mm (0.4724 in.)
C 0.9 to 1.0 mm (0.0354 to 0.0394 in.)
D 10 mm (0.3937 in.)
E 80 mm (3.1496 in.)
F 10 mm (0.3937 in.)
G 120 mm dia. (4.7244 in. dia.)
100.9 to 101.1 mm dia.
H
(3.9724 to 3.9803 in. dia.)
86.966 to 86.988 mm dia.
I
(3.4239 to 3.4247 in. dia.)
J 79 mm dia. (3.1102 in. dia.)
K 15 mm dia. (0.5906 in. dia.)
L 30 mm dia. (1.1811 in. dia.)
M 13 mm (0.5118 in.)
N 90 mm (3.5433 in.)
O 2.5 mm (0.0984 in.)
P 0.349 rad (20 °)
0.15 to 0.25 mm
Q
(0.0059 to 0.0098 in.)
a Ra = 3.2 a
b Ra = 1.6 a
c 0.8 mm radius (0.0315 in. radius)
d 1.5 mm radius (0.0591 in. radius)
e 0.2 mm radius (0.0079 in. radius)
C0.3 Chamfer 0.3 mm (0.0118 in.)
C1 Chamfer 1.0 mm (0.0394 in.)
GENERAL
9Y1210143GEG0078US0
G-47
Page 69
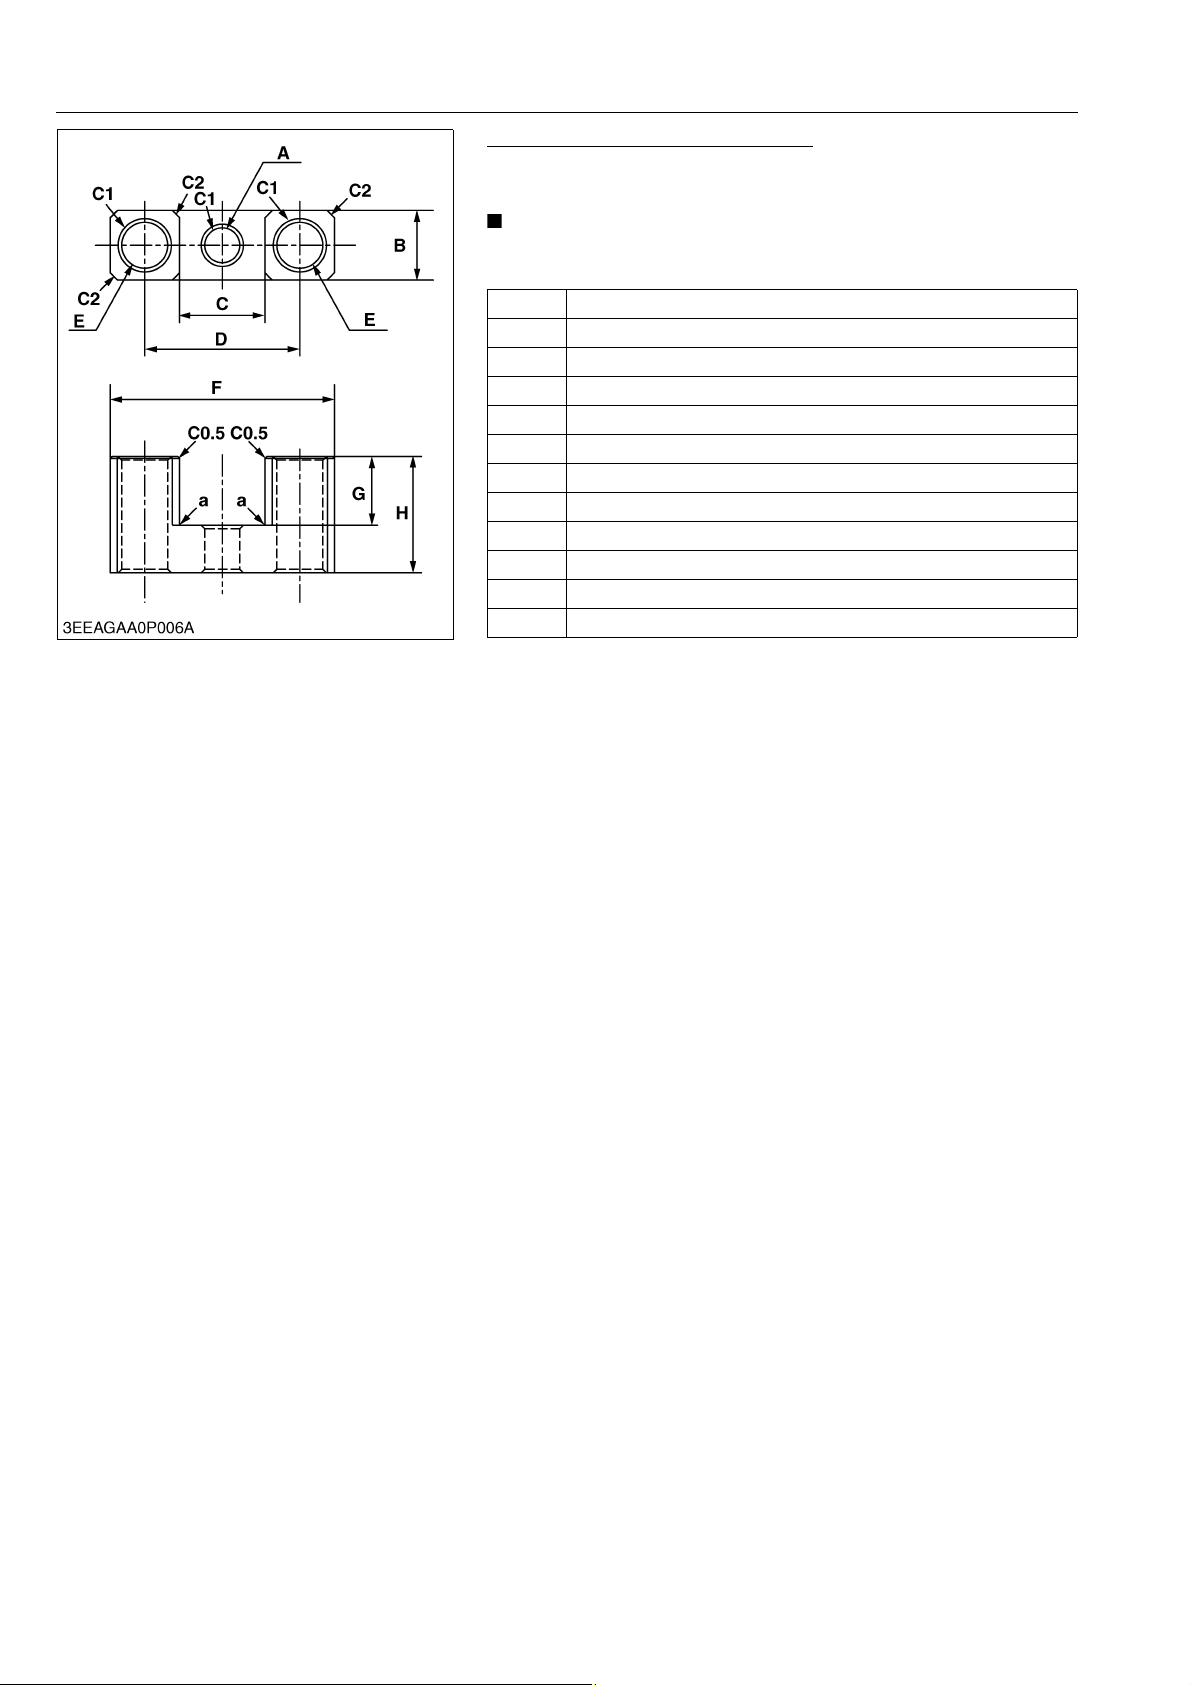
M6040, M7040, WSM
NOTE
KiSC issued 07, 2012 A
GENERAL
Valve Bridge Shaft Replacing Tool
Application
• Use to press fit the valve bridge shaft.
• The following special tools are not provided, so make them
referring to the figure.
A 9.5 mm dia. (0.3740 in. dia.) through hole
B 19 mm (0.7480 in.)
C 23.2 mm (0.9134 in.)
D 42.0 to 42.4 mm (1.6535 to 1.6693 in.)
E 12.5 mm dia. (0.4921 in. dia.) through hole
F 61 mm (2.4016 in.)
G 18.7 mm (0.7362 in.)
H 30.9 to 31.7 mm (1.2165 to 1.2480 in.)
a 0.3 mm radius (0.0118 in. radius)
C0.5 Chamfer 0.5 mm (0.0197 in.)
C1 Chamfer 1.0 mm (0.0394 in.)
C2 Chamfer 2.0 mm (0.0787 in.)
9Y1210143GEG0079US0
G-48
Page 70
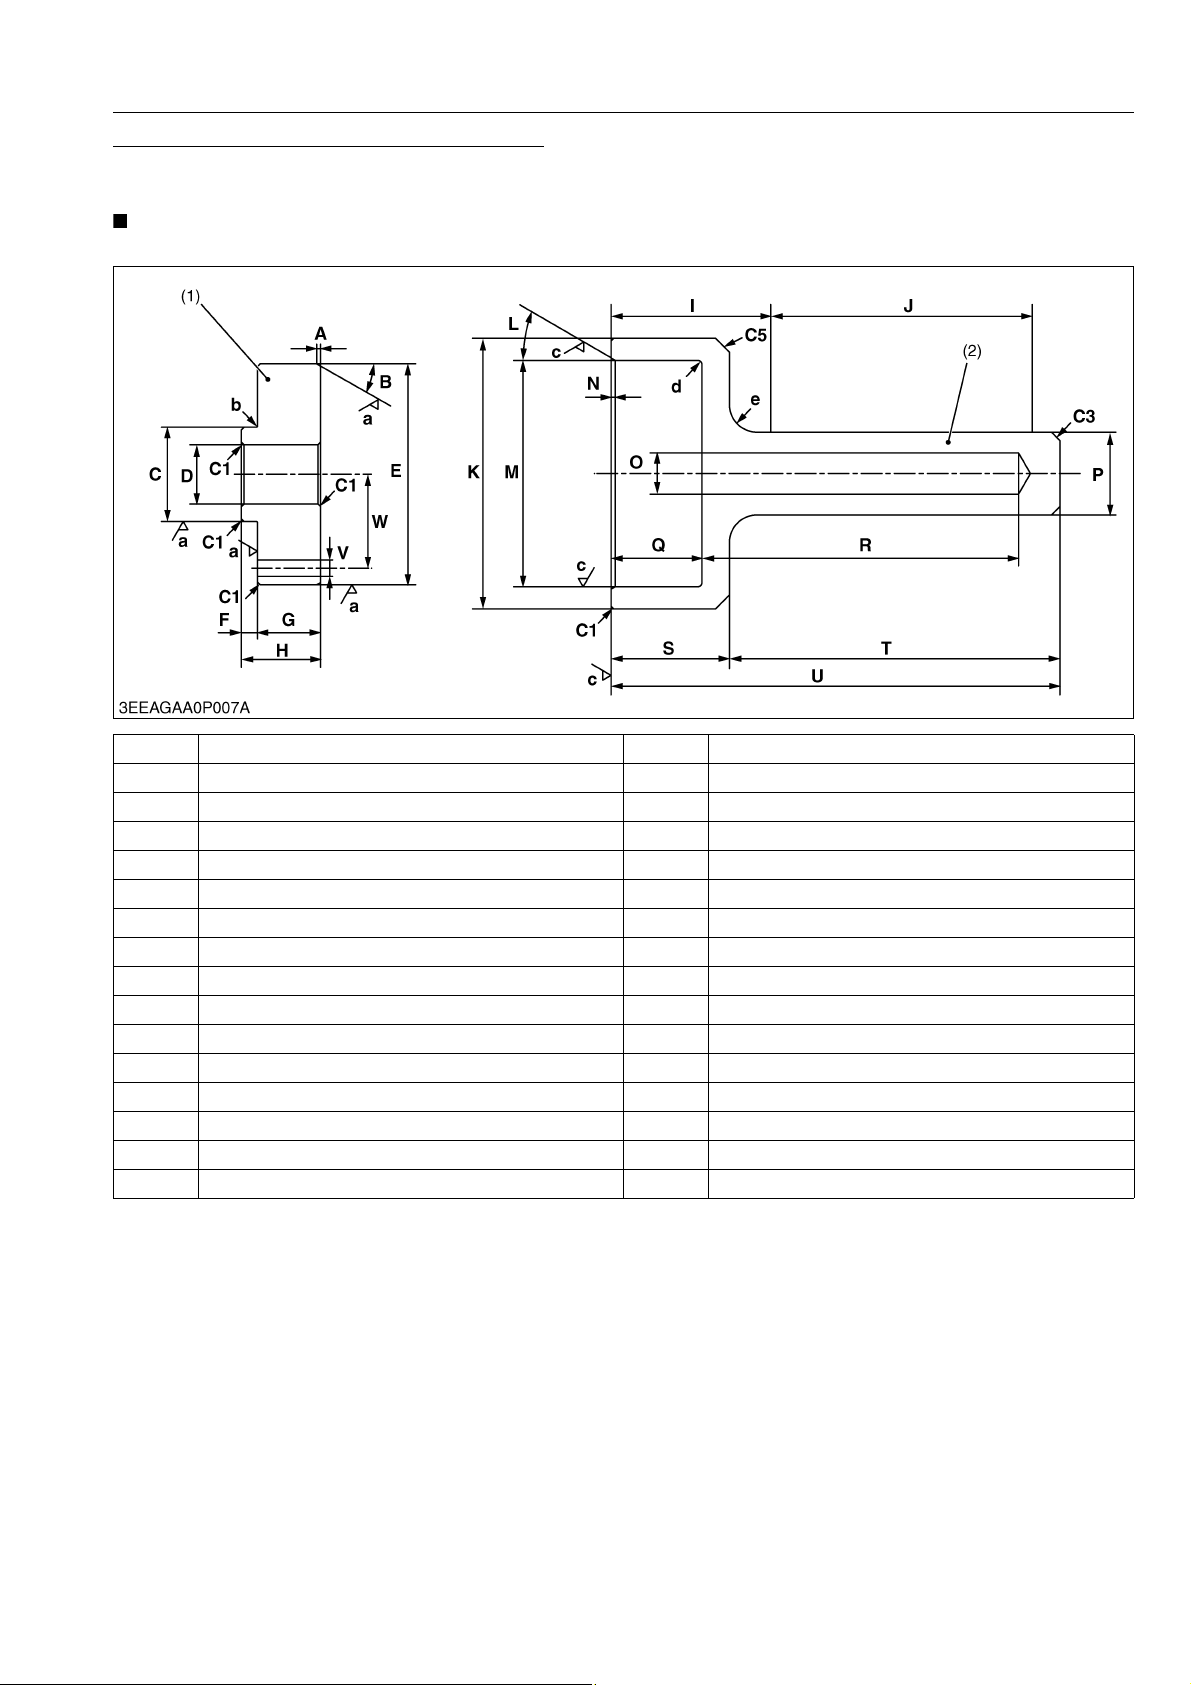
M6040, M7040, WSM
NOTE
KiSC issued 07, 2012 A
Auxiliary Socket for Fixing Crankshaft Sleeve
Application
• Use to fix the crankshaft sleeve of the diesel engine.
• The following special tools are not provided, so make them referring to the figure.
GENERAL
A 1.5 mm (0.0591 in.) Q 33 mm (1.2992 in.)
B 0.523 rad (30 °) R 115 mm (4.5276 in.)
C 34.925 to 34.950 mm dia. (1.3750 to 1.3760 in. dia.) S 43 mm (1.6929 in.)
D 22 mm dia. (0.8661 in. dia.) T 120 mm (4.7244 in.)
E 81.980 to 81.985 mm dia. (3.2276 to 3.2278 in. dia.) U 163 mm (6.4173 in.)
F 6 mm (0.2362 in.) V 8 mm dia. (0.315 in. dia.)
G 23.5 mm (0.9252 in.) W 33.475 to 33.525 mm (1.3180 to 1.3198 in.)
H 29.5 mm (1.1614 in.) a Ra = 1.6 a
I 58 mm (2.2835 in.) b 0.5 mm radius (0.0197 in. radius)
J 95 mm (3.7402 in.) c Ra = 3.2 a
K 98 mm dia. (3.8583 in. dia.) d 1.5 mm radius (0.0591 in. radius)
L 0.523 rad (30 °) e 10 mm radius (0.3937 in. radius)
M 82.1 to 82.2 mm dia. (3.2323 to 3.2362 in. dia.) C1 Chamfer 1.0 mm (0.0394 in.)
N 1.5 mm (0.0591 in.) C3 Chamfer 3.0 mm (0.1181 in.)
O 15 mm dia. (0.5906 in. dia.) C5 Chamfer 5.0 mm (0.1969 in.)
P 30 mm dia. (1.1811 in. dia.)
(1) Sleeve Guide (2) Auxiliary Socket for Pushing
9Y1210143GEG0080US0
G-49
Page 71
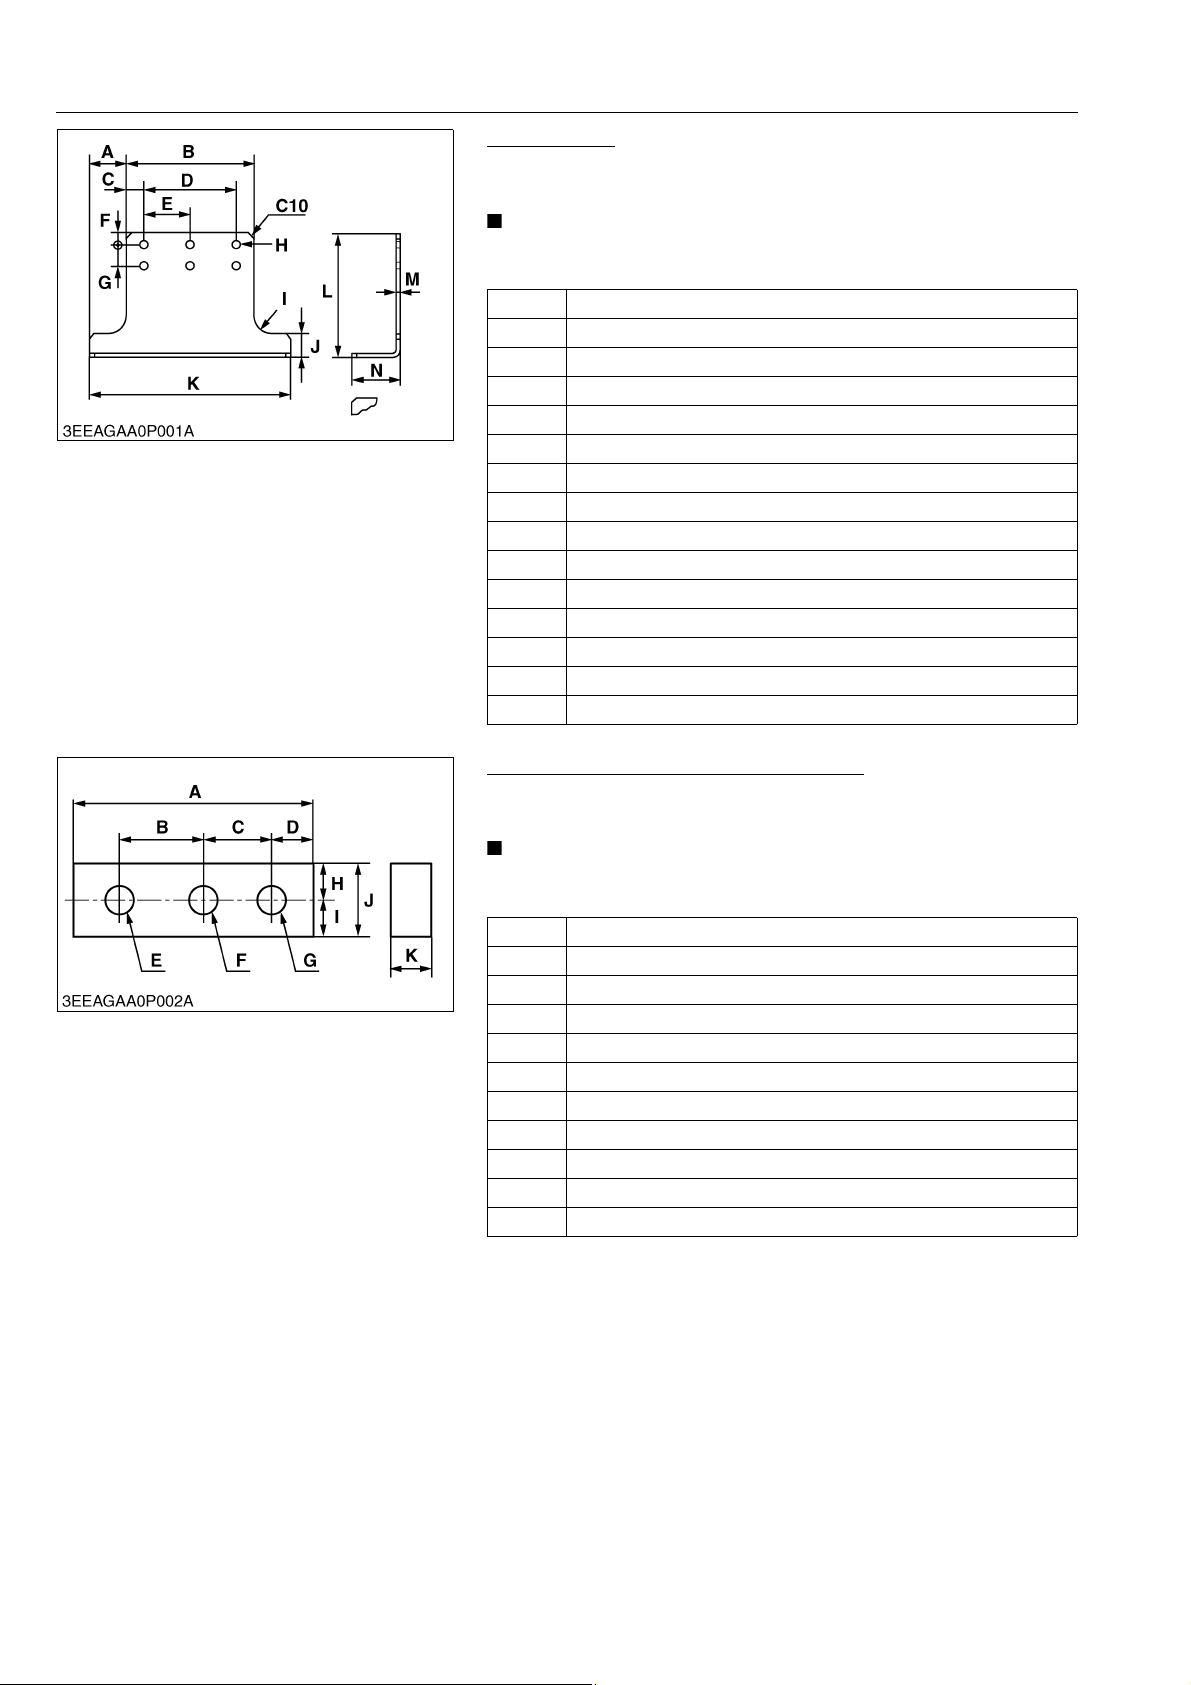
M6040, M7040, WSM
NOTE
NOTE
KiSC issued 07, 2012 A
GENERAL
Engine Stand
Application
• Use to support engine.
• The following special tools are not provided, so make them
referring to the figure.
A 107 mm (4.213 in.)
B 246 mm (9.685 in.)
C 21 mm (0.827 in.)
D 204 mm (8.032 in.)
E 102 mm (4.016 in.)
F 15 mm (0.591 in.)
G 59 mm (2.323 in.)
H 14 mm dia. (0.551 in. dia.)
I 80 mm radius (3.150 in. radius)
J 70 mm (2.756 in.)
K 460 mm (18.110 in.)
L 270 mm (10.630 in.)
M 6 mm (0.236 in.)
N 70 mm (2.756 in.)
C10 Chamfer 10 mm (0.394 in.)
9Y1210143GEG0081US0
Tool for Aligning the Crankcase 1 and 2
Application
• Use for aligning the crankcase 1 and 2.
• The following special tools are not provided, so make them
referring to the figure.
A 126.6 mm (4.9843 in.)
B 49.1 mm (1.9331 in.)
C 37.5 mm (1.4764 in.)
D 20 mm (0.7874 in.)
E 14 mm dia. (0.5512 in. dia.)
F 14 mm dia. (0.5512 in. dia.)
G 14 mm dia. (0.5512 in. dia.)
H 17.5 mm (0.6890 in.)
I 17.5 mm (0.6890 in.)
J 35 mm (1.3780 in.)
K 19 mm (0.7480 in.)
9Y1210143GEG0082US0
G-50
Page 72
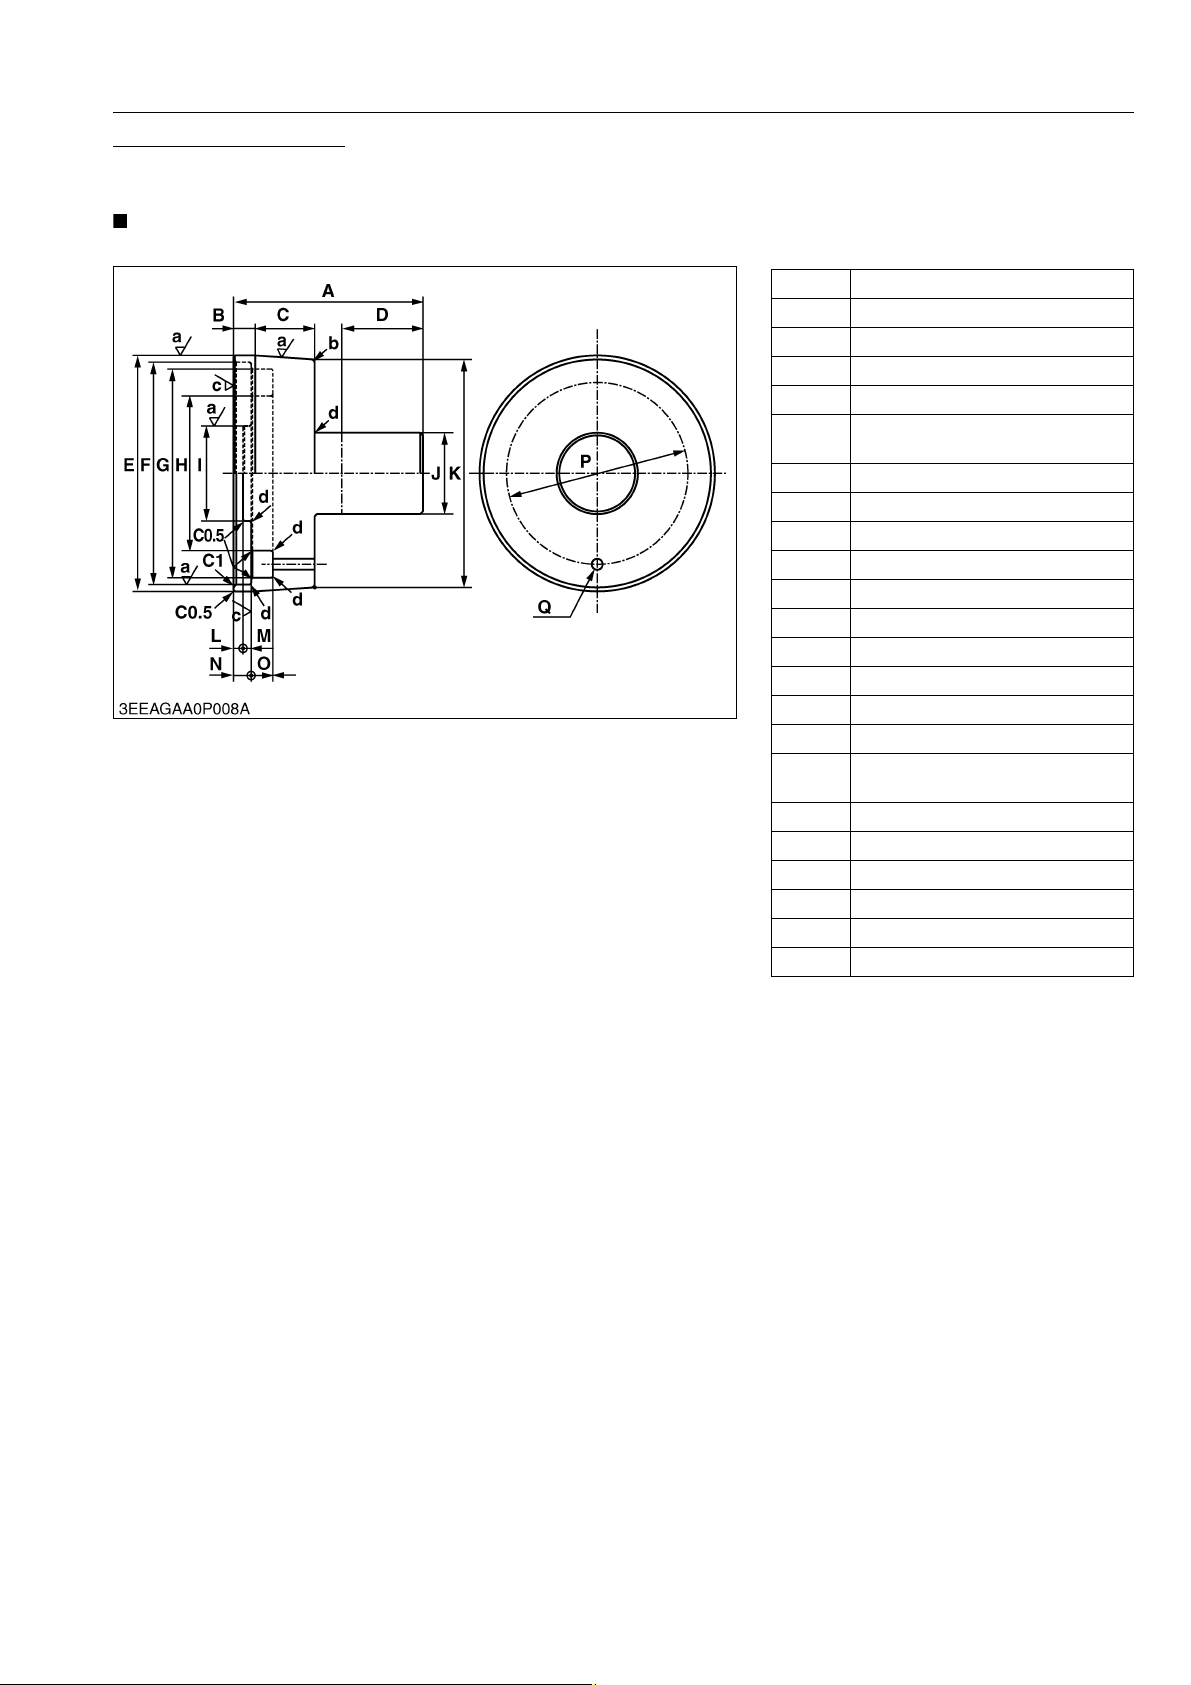
M6040, M7040, WSM
NOTE
KiSC issued 07, 2012 A
Flywheel Housing Guide
Application
• Use to install the flywheel housing to the crankcase.
• The following special tools are not provided, so make them referring to the figure.
A 70 mm (2.7559 in.)
B 8 mm (0.3150 in.)
C 22 mm (0.8661 in.)
D 30 mm (1.1811 in.)
E 87 mm dia. (3.4252 in. dia.)
82.036 to 82.071 mm dia.
F
(3.2298 to 3.2311 in. dia.)
G 77 mm dia. (3.0315 in. dia.)
H 57 mm dia. (2.2441 in. dia.)
I 35 mm dia. (1.3780 in. dia.)
J 30 mm dia. (1.1811 in. dia.)
K 84 mm dia. (3.3071 in. dia.)
L 3.5 mm (0.1378 in.)
M 3 mm (0.1181 in.)
N 6.6 to 6.8 mm (0.2598 to 0.2677 in.)
O 8 mm (0.3150 in.)
P 67 mm dia. (2.6378 in. dia.)
4 mm dia. (0.1575 in. dia.)
Q
through hole
a Ra = 1.6 a
b 1.5 mm radius (0.0591 in. radius)
c Ra = 3.2 a
d 0.8 mm radius (0.0315 in. radius)
C0.3 Chamfer 0.5 mm (0.0197 in.)
C1 Chamfer 1.0 mm (0.0394 in.)
GENERAL
9Y1210143GEG0083US0
G-51
Page 73
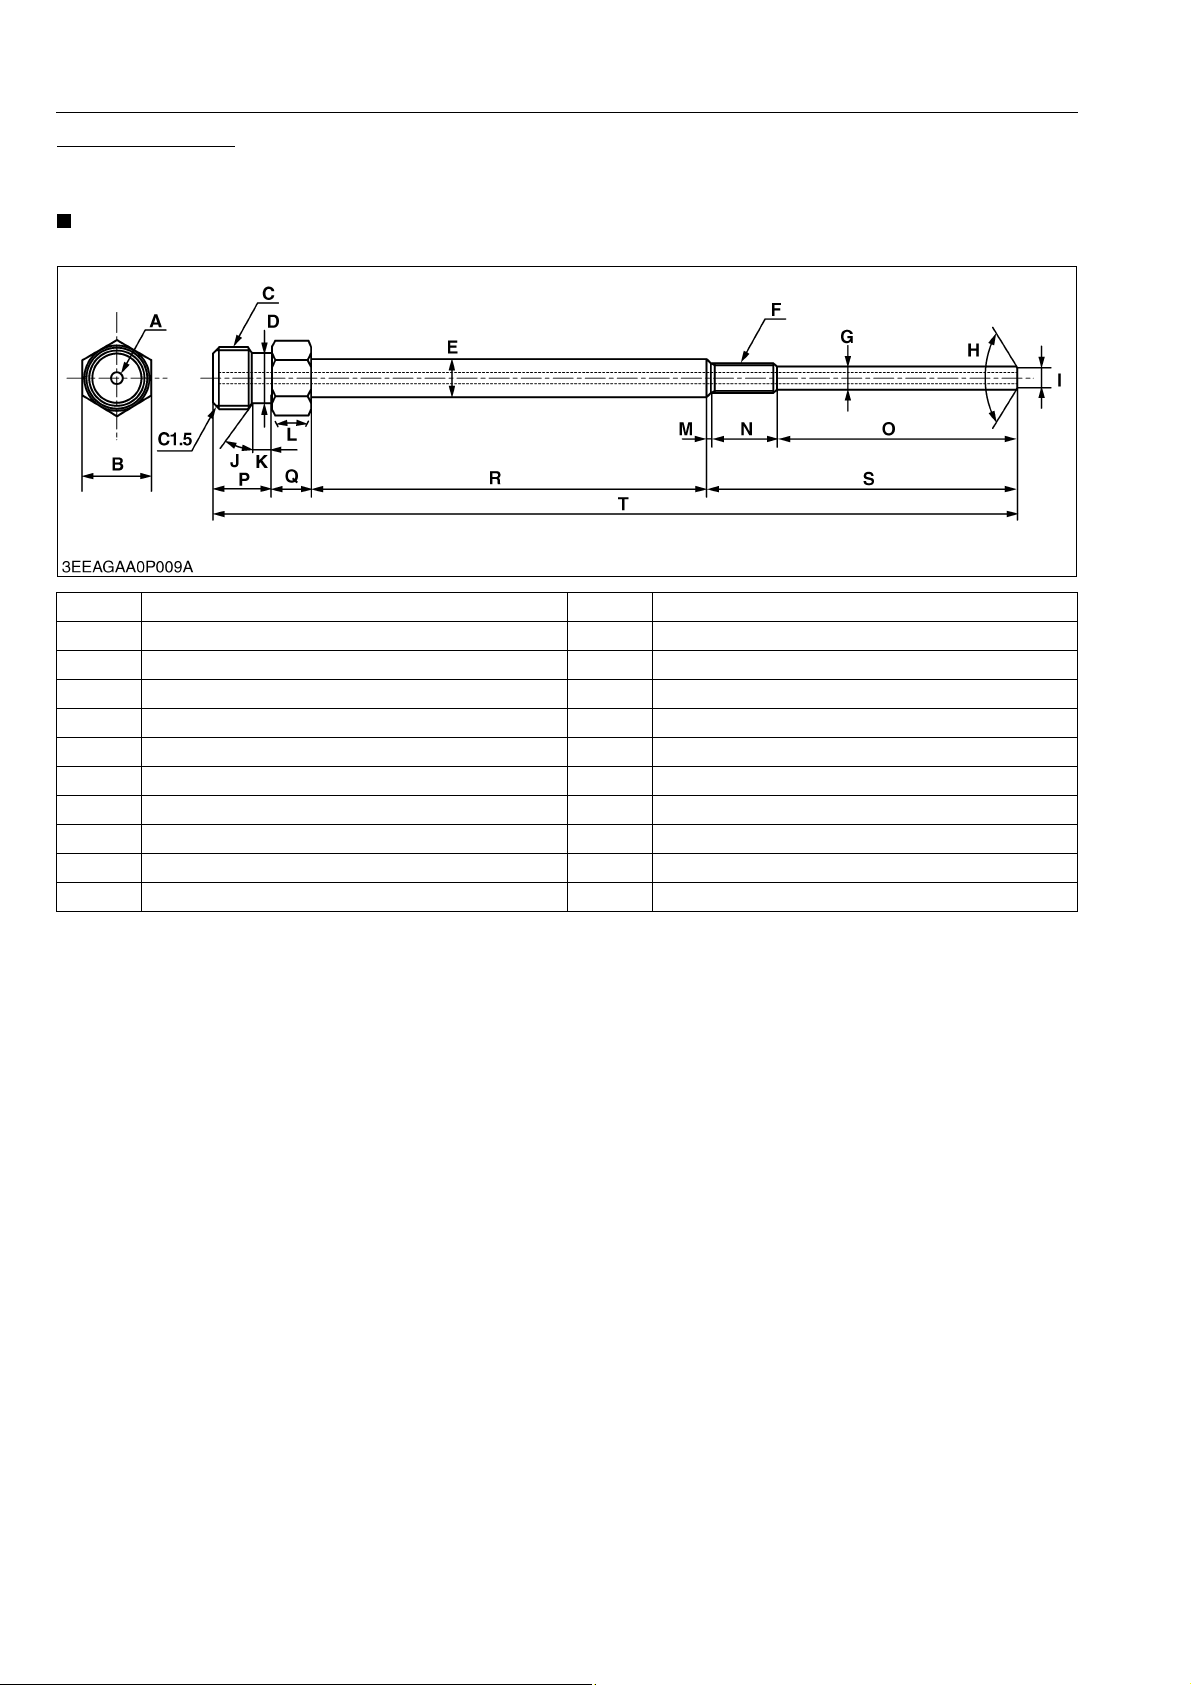
M6040, M7040, WSM
NOTE
KiSC issued 07, 2012 A
Glow Plug Adapter
Application
• Use to check compression pressure through glow plug hole.
• The following special tools are not provided, so make them referring to the figure.
A 3 mm dia. (0.118 in. dia.) through hole L 1.047 rad (60 °)
B 17 mm (0.669 in.) M 1 mm (0.039 in.)
C 16 mm dia. (0.630 in. dia.) P0.5 N 17 mm (0.669 in.)
D 13 mm dia. (0.512 in. dia.) O 61.5 mm (2.421 in.)
E 9.5 mm dia. (0.374 in. dia.) P 15 mm (0.591 in.)
F M8 × 1.0 Q 10 mm (0.394 in.)
G 6.5 to 6.7 mm dia. (0.256 to 0.264 in. dia.) R 100 mm (3.937 in.)
H 2.144 to 2.147 rad (122.9 to 123.1 °) S 79.5 mm (3.130 in.)
I 4.9 to 5.5 mm dia. (0.193 to 0.217 in. dia.) T 204.5 mm (8.051 in.)
J 0.523 rad (30 °) C1.5 Chamfer 1.5 mm (0.059 in.)
K 5 mm (0.197 in.)
GENERAL
9Y1210143GEG0084US0
G-52
Page 74
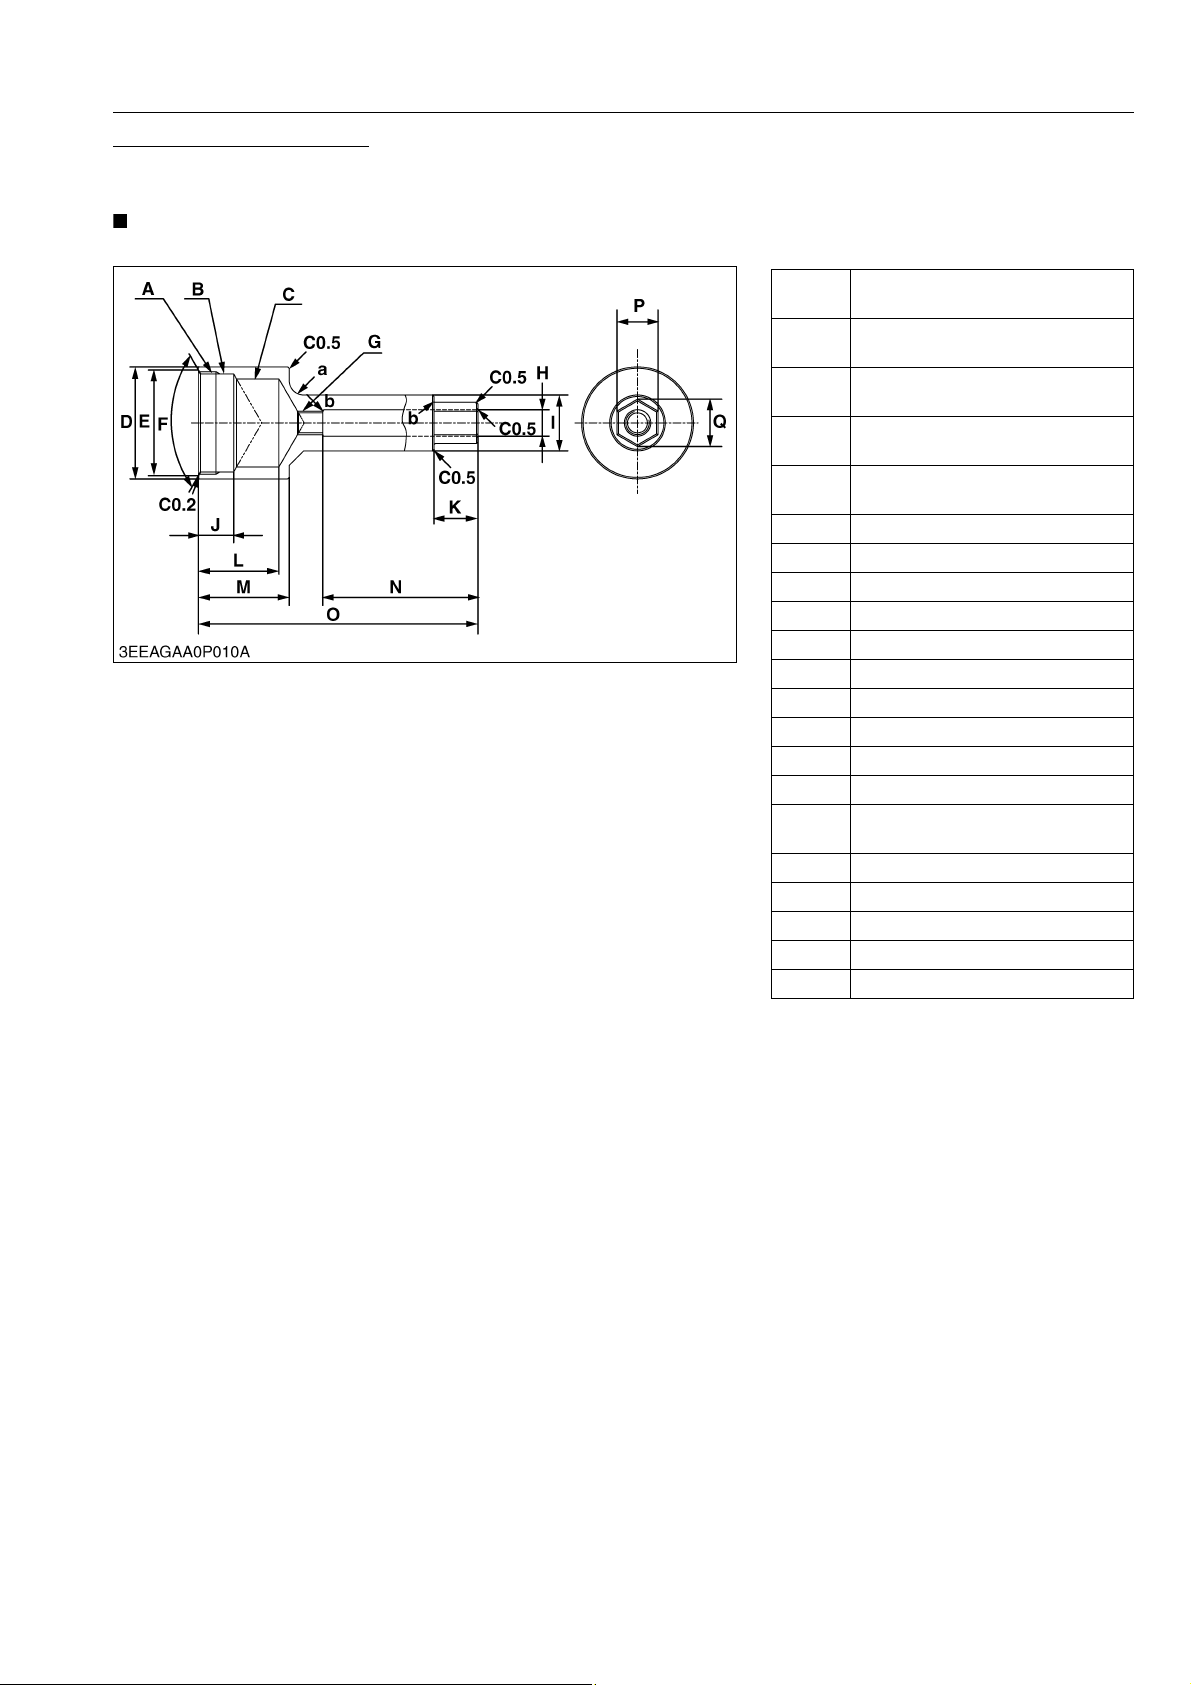
M6040, M7040, WSM
NOTE
KiSC issued 07, 2012 A
Injection Pump Gear Puller
Application
• Use for remove the injection pump gear from governor shaft.
• The following special tools are not provided, so make them referring to the figure.
M35 × P1.5, 6 mm depth
A
(0.2362 in. depth)
35 mm dia., 12 mm depth
B
(1.3780 in. dia., 0.4724 in. depth)
30 mm dia., 27.5 mm depth
C
(1.1811 in. dia., 1.0827 in. depth)
40.0 to 40.2 mm dia.
D
(1.5748 to 1.5827 in. dia.)
35.9 to 36.1 mm dia.
E
(1.4134 to 1.4213 in. dia.)
F 2.256 rad (120 °)
G M8
H 9 mm dia. (0.3543 in. dia.)
I 19 mm dia. (0.7480 in. dia.)
J 12 mm (0.4724 in.)
K 15 mm (0.5906 in.)
L 27.5 mm (1.0827 in.)
M 31 mm (1.2205 in.)
N 57.5 mm (2.2638 in.)
O 100 mm (3.9370 in.)
3.75 to 4.00 mm
P
(0.1476 to 0.1575 in.)
Q 16.17 mm (0.6366 in.)
a 5 mm radius (0.1969 in. radius)
b 0.4 mm radius (0.0157 in. radius)
C0.2 Chamfer 0.2 mm (0.0079 in.)
C0.5 Chamfer 0.5 mm (0.0197 in.)
GENERAL
9Y1210143GEG0085US0
G-53
Page 75
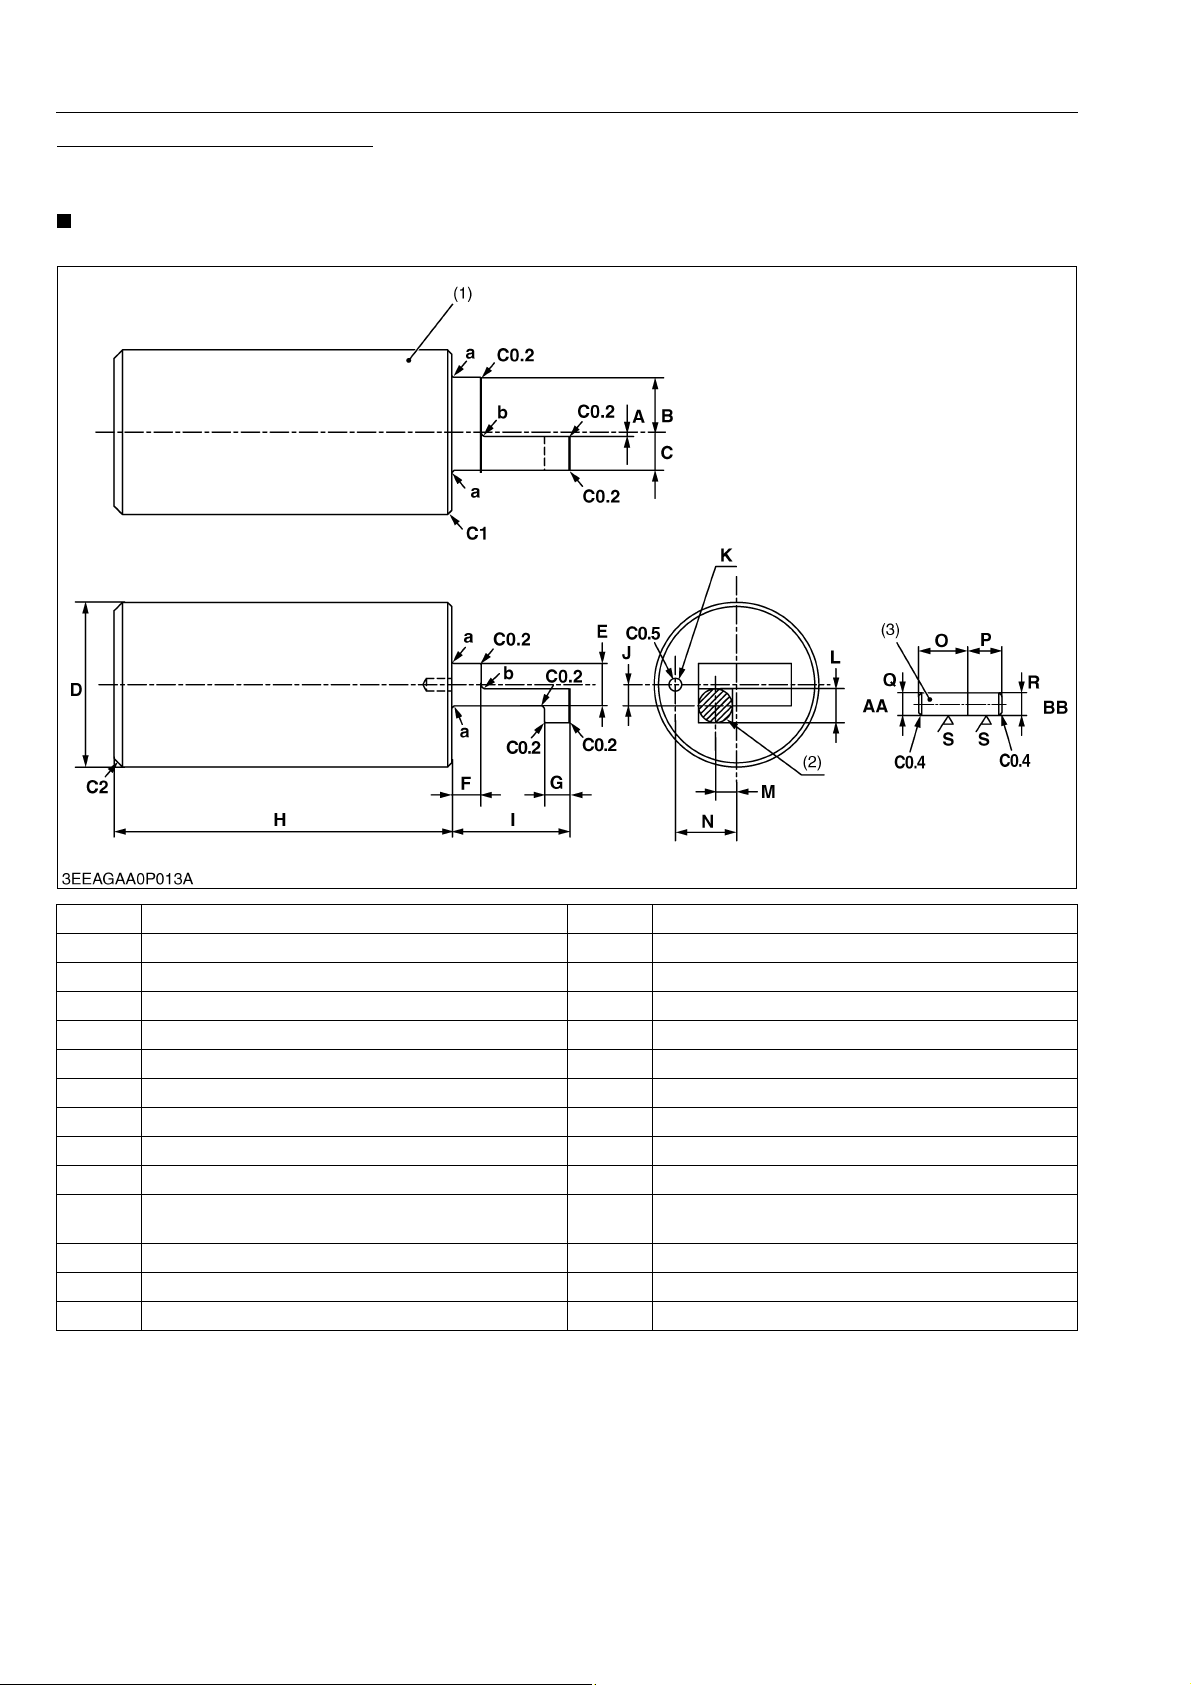
M6040, M7040, WSM
NOTE
KiSC issued 07, 2012 A
Jig for Governor Connecting Rod
Application
• Use for connecting the governor connecting rod to the rack pin of the fuel injection pump assembly.
• The following special tools are not provided, so make them referring to the figure.
GENERAL
A 0.5 mm (0.0197 in.) O 5 mm (0.1969 in.)
B 12.7 to 13.0 mm (0.5000 to 0.5118 in.) P 4 mm (0.1575 in.)
C 8.7 to 9.0 mm (0.3425 to 0.3543 in.) Q 2.955 to 2.965 mm dia. (0.1163 to 0.1167 in. dia.)
D 39 mm (1.5354 in.) R 3.020 to 3.030 mm dia. (0.1189 to 0.1193 in. dia.)
E 10 mm (0.3937 in.) S Ra = 1.6 a
F 7 mm (0.2756 in.) AA Governor housing side
G 6 mm (0.2362 in.) BB Press in side
H 80 mm (3.1496 in.) a 0.6 mm radius (0.0236 in. radius)
I 27.95 to 28.05 mm (1.1004 to 1.1043 in.) b 1 mm radius (0.0394 in. radius)
J 5 mm (0.1969 in.) C0.2 Chamfer 0.2 mm (0.0079 in.)
3.00 to 3.01 mm dia., 6 mm depth
K
(0.1181 to 0.1185 in.dia., 0.2362 in. depth)
L 9 mm (0.3543 in.) C0.5 Chamfer 0.5 mm (0.0197 in.)
M 5 mm (0.1969 in.) C1 Chamfer 1.0 mm (0.0394 in.)
N 14.45 to 14.55 mm (0.5689 to 0.5728 in.) C2 Chamfer 2.0 mm (0.0787 in.)
(1) Material: S43C-D (2) Permanent Magnet:
8 mm dia. (0.3150 in. dia.)
Thickness: 3 mm (0.1181 in.)
C0.4 Chamfer 0.4 mm (0.0157 in.)
(3) Pin
9Y1210143GEG0086US0
G-54
Page 76
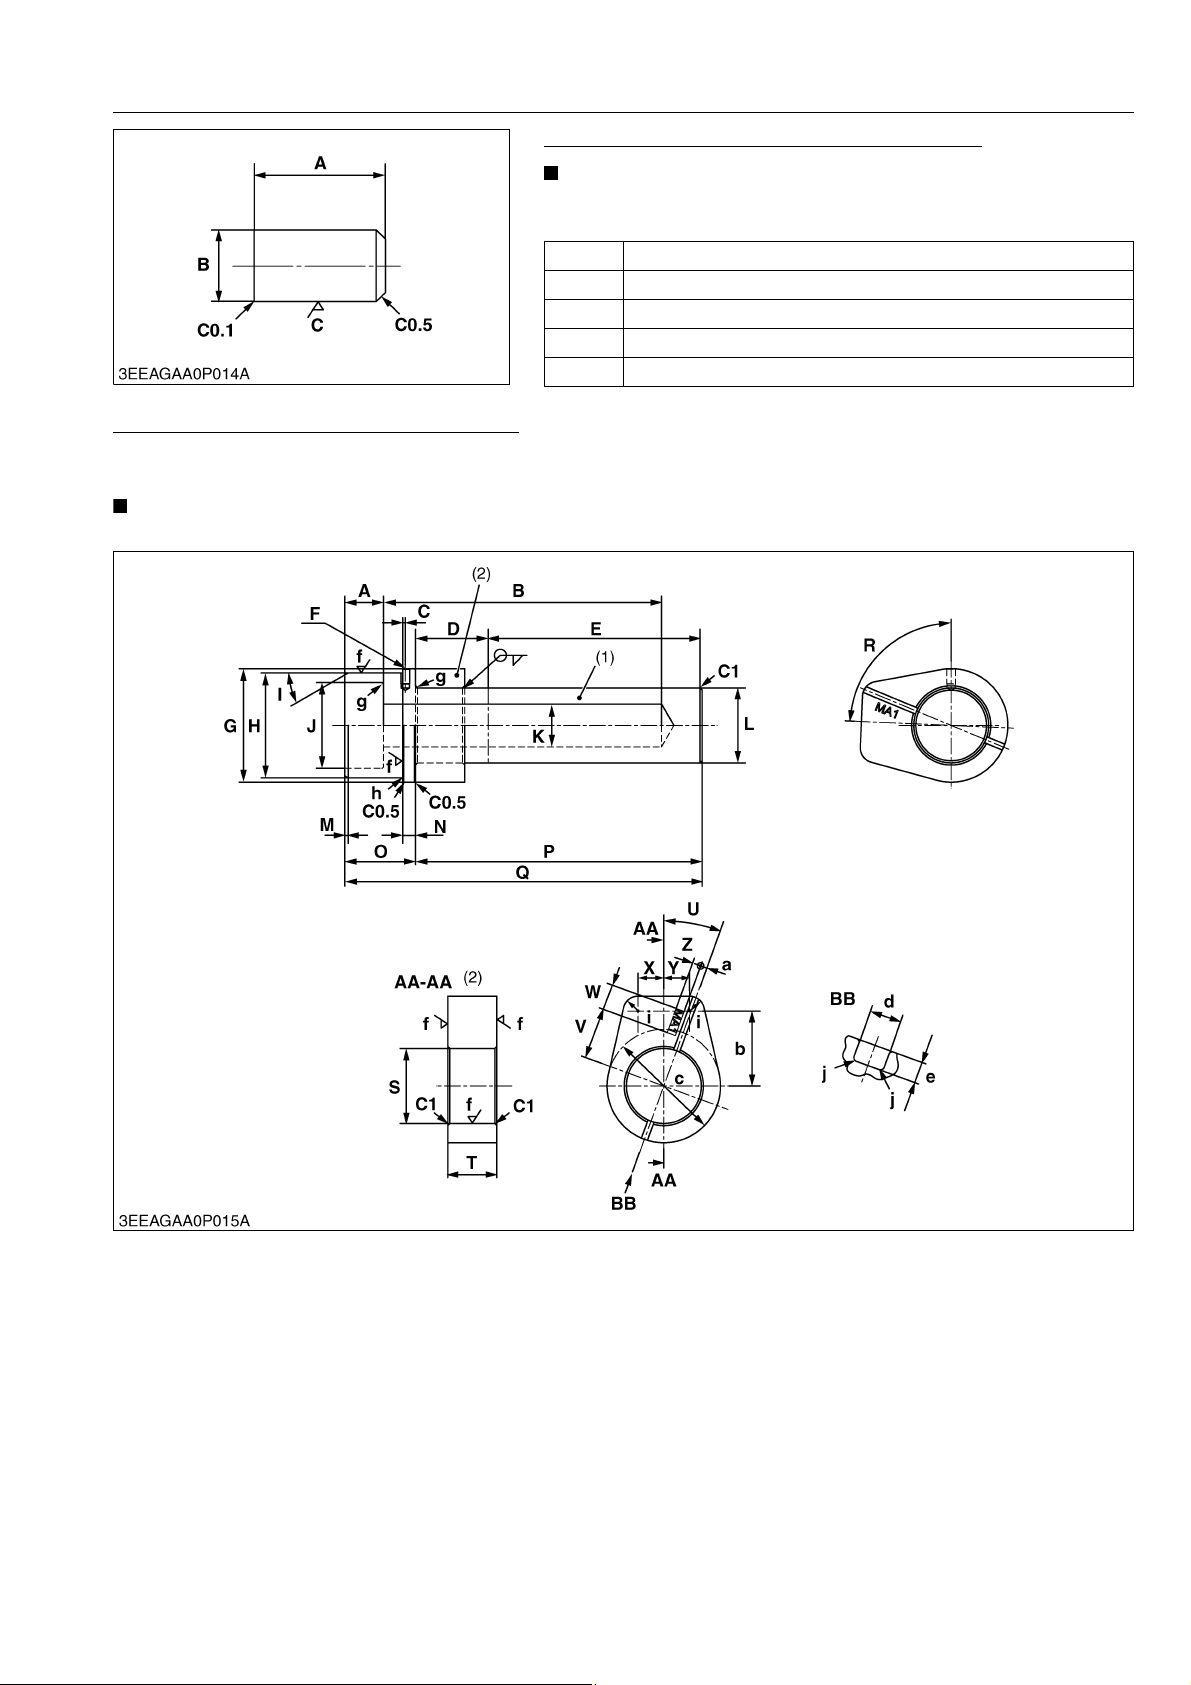
M6040, M7040, WSM
NOTE
NOTE
KiSC issued 07, 2012 A
Pin for Balancer Shaft Bearing Replacing Tool
• The following special tools are not provided, so make them
referring to the figure.
A 7.2 to 7.4 mm (0.283 to 0.291 in.)
B 4.0 mm dia. (0.158 in. dia.)
C Ra = 0.8 a
C0.1 Chamfer 0.1 mm (0.0039 in.)
C0.5 Chamfer 0.5 mm (0.0197 in.)
Balancer Shaft 1 Bearing A Replacing Tool
Application
• Use to press fit the bearing.
• The following special tools are not provided, so make them referring to the figure.
GENERAL
9Y1210143GEG0087US0
(1) Shaft (2) Stopper
(To be continued)
G-55
Page 77
M6040, M7040, WSM
KiSC issued 07, 2012 A
(Continued)
A 18 mm (0.7087 in.) T 23 mm (0.9055 in.)
B 130 mm (5.1181 in.) U 0.349 rad (20 °)
C 1.2 mm (0.0472 in.) V 24 mm (0.9449 in.)
D 34 mm (1.3386 in.) W 12 mm (0.4724 in.)
E 99 mm (3.8976 in.) X 12 mm (0.4724 in.)
4.000 to 4.018 mm dia., 7 mm depth
F
(0.1575 to 0.1582 in. dia., 0.2756 in. depth)
G 53 mm dia. (2.0866 in. dia.) Z 4 mm (0.1575 in.)
H 48.8 to 48.9 mm dia. (1.9213 to 1.9252 in. dia.) a 3 mm (0.1181 in.)
I 0.523 rad (30 °) b 35 mm (1.3780 in.)
J 40 mm dia. (1.5748 in. dia.) c 53 mm (2.0866 in.)
K 20 mm dia. (0.7874 in. dia.) d 3 mm (0.1181 in.)
L 34.9 to 35.0 mm dia. (1.3740 to 1.3780 in. dia.) e 2 mm (0.0787 in.)
M 1.5 mm (0.0591 in.) f Ra = 3.2 a
N 5.5 to 6.5 mm (0.2165 to 0.2559 in.) g 0.8 mm radius (0.0315 in. radius)
O 33 mm (1.2992 in.) h 0.3 mm radius (0.0118 in. radius)
P 134 mm (5.2756 in.) i 7.0 mm radius (0.2756 in. radius)
Q 167 mm (6.5748 in.) j 0.4 mm radius (0.0157 in. radius)
R 1.526 rad (87.5 °) C0.5 Chamfer 0.5 mm (0.0197 in.)
S 35 mm dia. (1.3780 in. dia.) C1 Chamfer 1.0 mm (0.0394 in.)
Y 12 mm (0.4724 in.)
GENERAL
9Y1210143GEG0088US0
G-56
Page 78
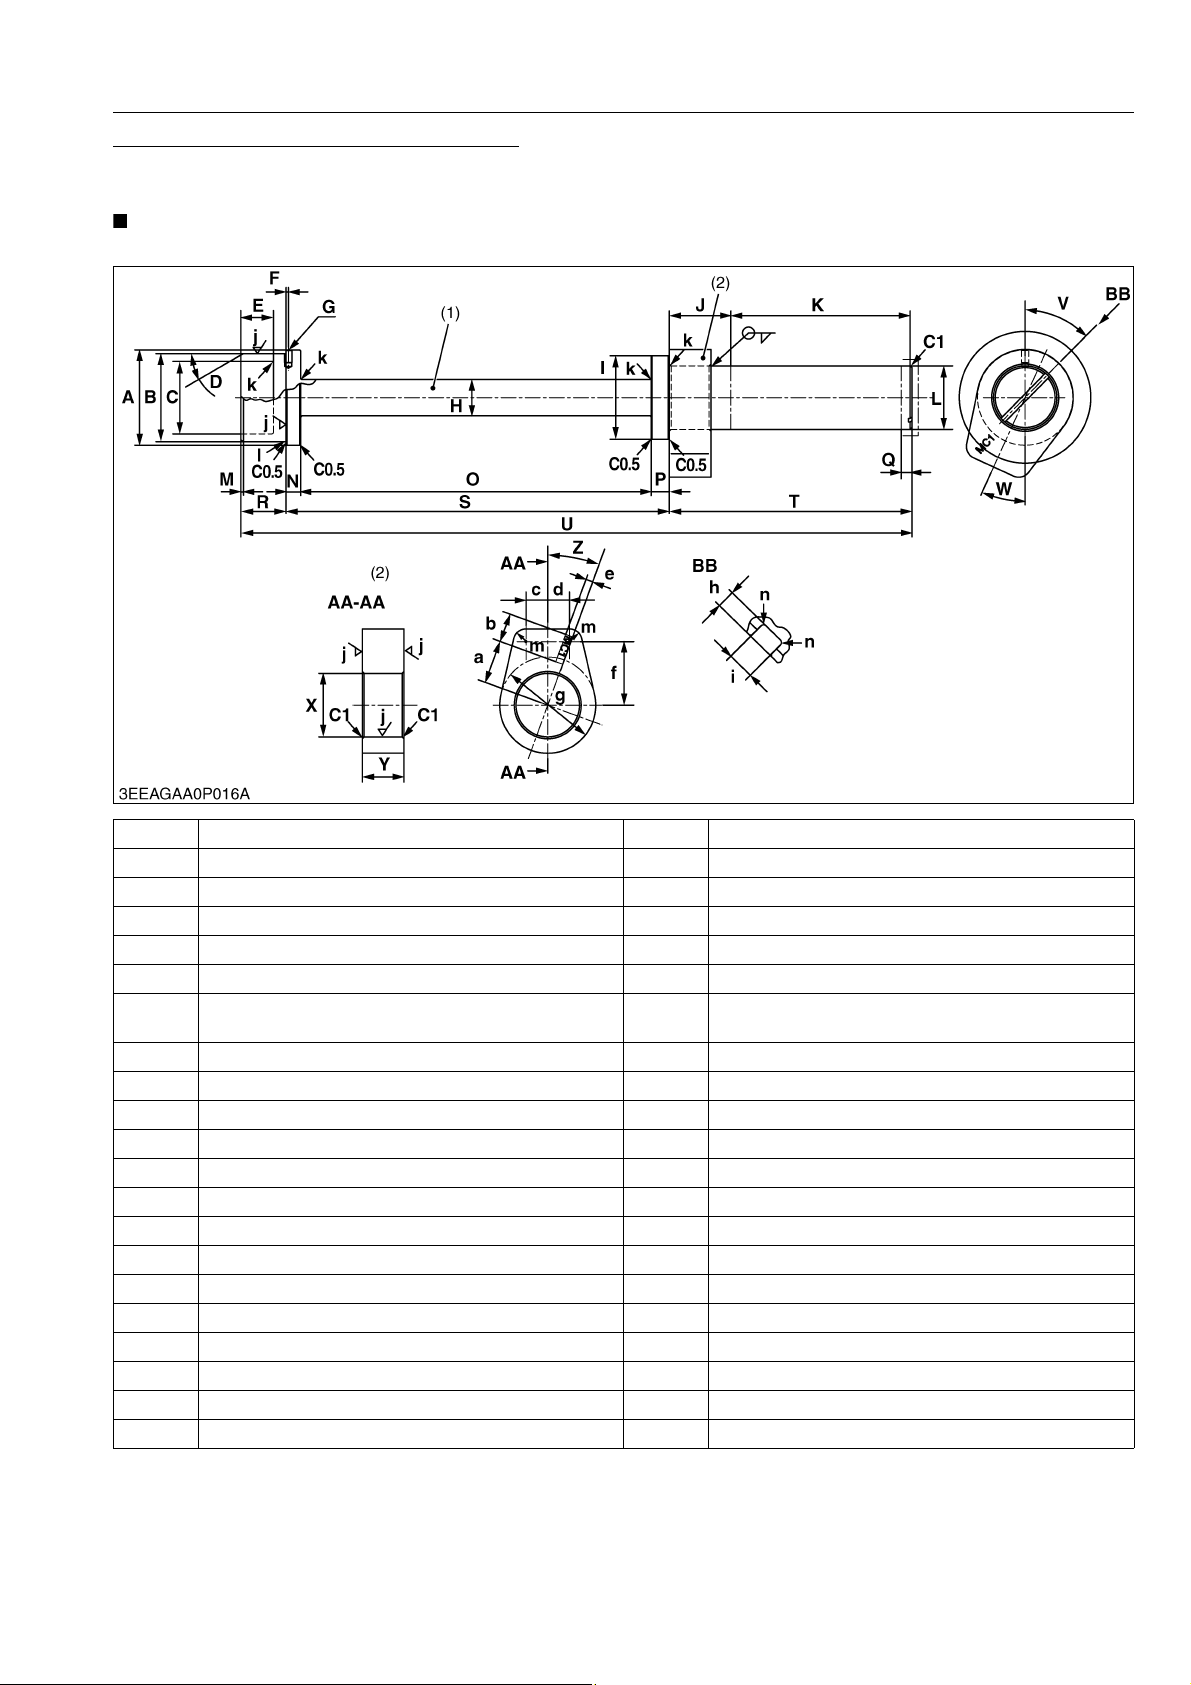
M6040, M7040, WSM
NOTE
KiSC issued 07, 2012 A
Balancer Shaft 1 Bearing C Replacing Tool
Application
• Use to press fit the bearing.
• The following special tools are not provided, so make them referring to the figure.
GENERAL
A 52.5 mm dia. (2.0669 in. dia.) V 0.855 rad (49 °)
B 48.4 to 48.5 mm dia. (1.9055 to 1.9095 in.) W 0.427 rad (24.5 °)
C 40 mm dia. (1.5748 in. dia.) X 35 mm dia. (1.3780 in. dia.)
D 0.523 rad (30 °) Y 23 mm (0.9055 in.)
E 18 mm (0.7087 in.) Z 0.349 rad (20 °)
F 1.2 mm (0.0472 in.) a 24 mm (0.9449 in.)
4.000 to 4.018 mm dia., 7 mm depth
G
(0.1575 to 0.1582 in. dia., 0.2756 in. depth)
H 20 mm dia. (0.7874 in. dia.) c 12 mm (0.4724 in.)
I 46 mm dia. (1.8110 in. dia.) d 12 mm (0.4724 in.)
J 34 mm (1.3386 in.) e 4 mm (0.1575 in.)
K 99 mm (3.8976 in.) f 35 mm (1.3780 in.)
L 34.9 to 35.0 mm (1.3740 to 1.3780 in.) g 53 mm (2.0866 in.)
M 1.5 mm (0.0591 in.) h 2 mm (0.0787 in.)
N 8 mm (0.3150 in.) i 3 mm (0.1181 in.)
O 193.5 mm (7.6181 in.) j Ra = 3.2 a
P 10 mm (0.3937 in.) k 0.8 mm radius (0.0315 in. radius)
Q 6 mm (0.2362 in.) l 0.3 mm radius (0.0118 in. radius)
R 25 mm (0.9843 in.) m 7.0 mm radius (0.2756 in. radius)
S 211.0 to 212.0 mm (8.3071 to 8.3465 in.) n 0.4 mm radius (0.0157 in. radius)
T 134 mm (5.2756 in.) C0.5 Chamfer 0.5 mm (0.0197 in.)
U 370.5 mm (14.5866 in.) C1 Chamfer 1.0 mm (0.0394 in.)
b 16 mm (0.6299 in.)
(1) Shaft (2) Stopper
9Y1210143GEG0089US0
G-57
Page 79
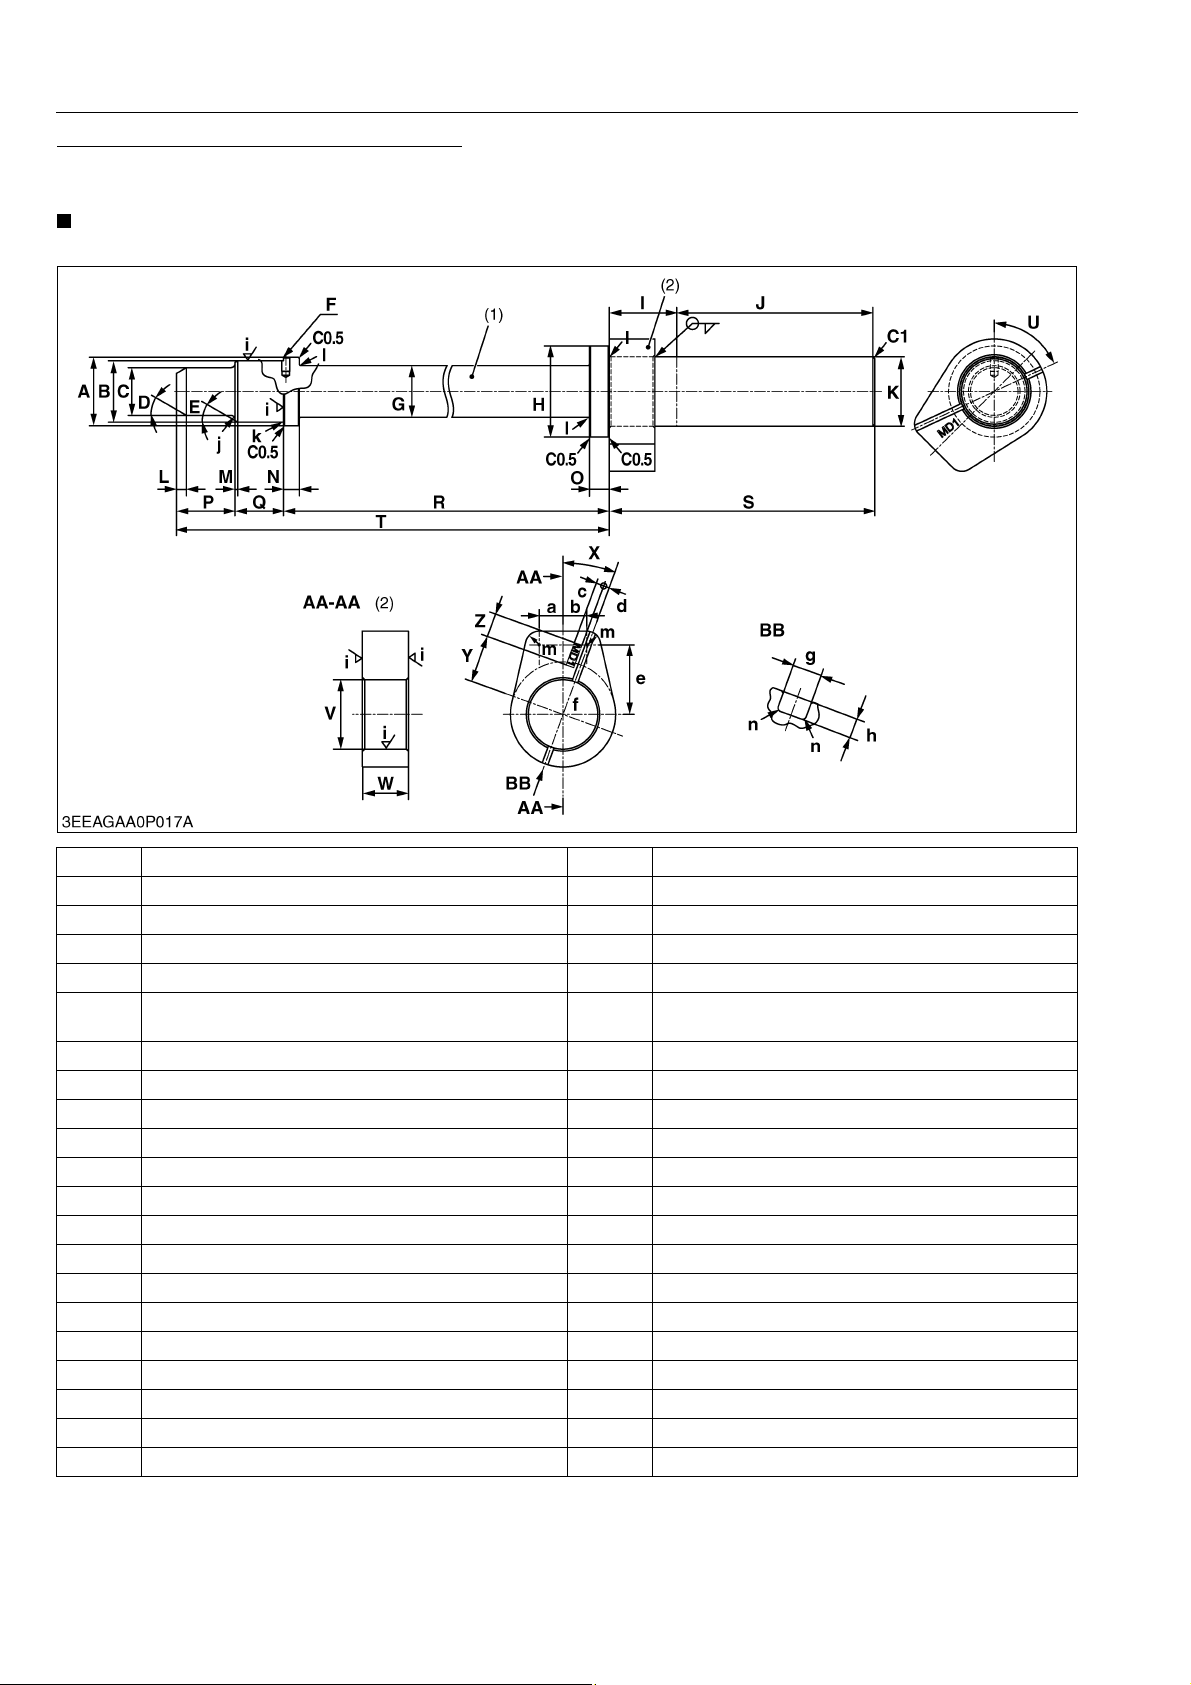
M6040, M7040, WSM
NOTE
KiSC issued 07, 2012 A
Balancer Shaft 1 Bearing D Replacing Tool
Application
• Use to press fit the bearing.
• The following special tools are not provided, so make them referring to the figure.
GENERAL
A 34.5 mm dia. (1.3583 in. dia.) V 35 mm dia. (1.3780 in. dia.)
B 30.8 to 30.9 mm dia. (1.2126 to 1.2165 in. dia.) W 23 mm (0.9055 in.)
C 24 mm dia. (0.9449 in. dia.) X 0.349 rad (20 °)
D 0.523 rad (30 °) Y 24 mm (0.9449 in.)
E 0.523 rad (30 °) Z 12 mm (0.4724 in.)
4.000 to 4.018 mm dia., 7 mm depth
F
(0.1575 to 0.1582 in. dia., 0.2756 in. depth)
G 26 mm dia. (1.0236 in. dia.) b 12 mm (0.4724 in.)
H 46 mm dia. (1.8110 in. dia.) c 4 mm (0.1575 in.)
I 34 mm (1.3386 in.) d 3 mm (0.1181 in.)
J 99 mm (3.8976 in.) e 35 mm (1.3780 in.)
K 34.9 to 35.0 mm (1.3740 to 1.3780 in.) f 53 mm (2.0866 in.)
L 5 mm (0.1969 in.) g 3 mm (0.1181 in.)
M 1.5 mm (0.0591 in.) h 2 mm (0.0787 in.)
N 8 mm (0.3150 in.) i Ra = 3.2 a
O 10 mm (0.3937 in.) j 2.0 mm radius (0.0787 in. radius)
P 29.5 mm (1.1614 in.) k 0.3 mm radius (0.0118 in. radius)
Q 24.5 mm (0.9646 in.) l 0.8 mm radius (0.0315 in. radius)
R 413.5 to 414.5 mm (16.2795 to 16.3189 in.) m 7.0 mm radius (0.2756 in. radius)
S 134 mm (5.2756 in.) n 0.4 mm radius (0.0157 in. radius)
T 468 mm (18.4252 in.) C0.5 Chamfer 0.5 mm (0.0197 in.)
U 1.134 rad (65 °) C1 Chamfer 1.0 mm (0.0394 in.)
a 12 mm (0.4724 in.)
(1) Shaft (2) Stopper
9Y1210143GEG0090US0
G-58
Page 80
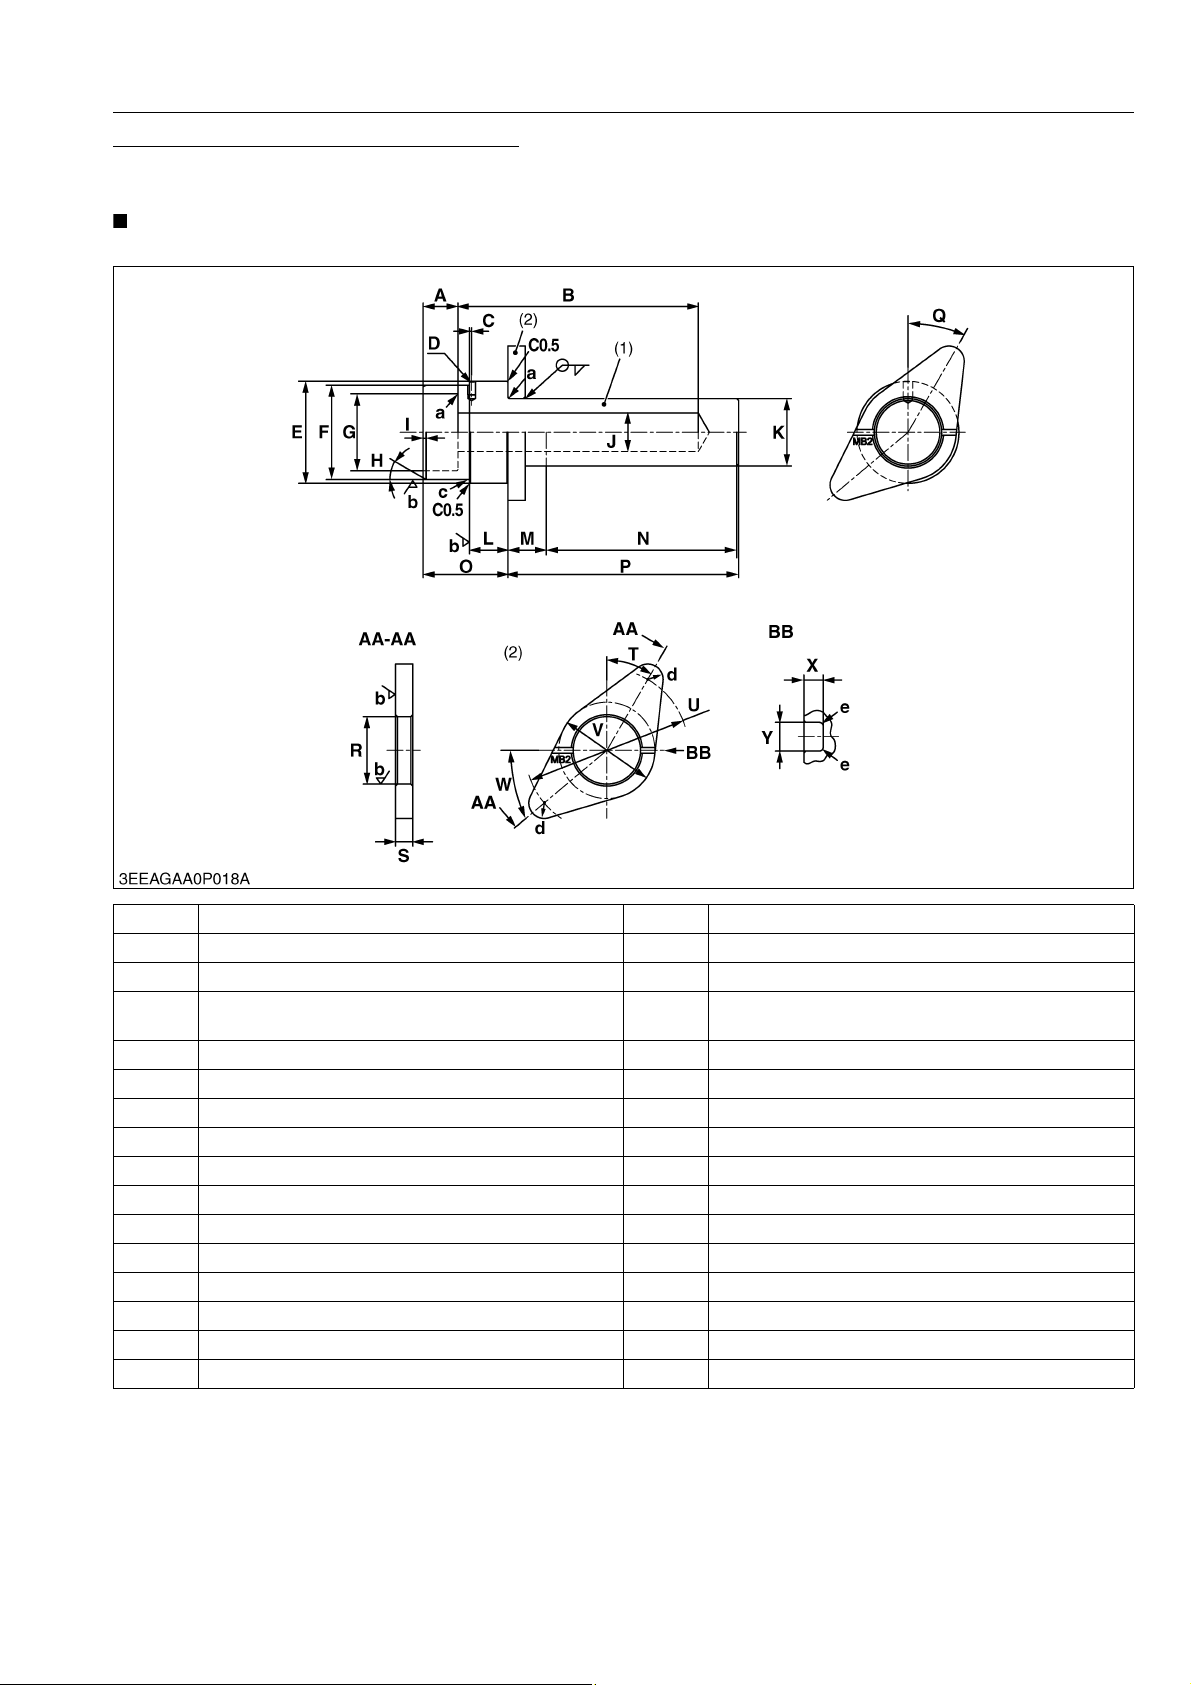
M6040, M7040, WSM
NOTE
KiSC issued 07, 2012 A
Balancer Shaft 2 Bearing B Replacing Tool
Application
• Use to press fit the bearing.
• The following special tools are not provided, so make them referring to the figure.
GENERAL
A 18 mm (0.7087 in.) Q 0.523 rad (30 °)
B 125 mm (4.9213 in.) R 35 mm dia. (1.3780 in. dia.)
C 1.2 mm (0.0472 in.) S 9 mm (0.3543 in.)
4.000 to 4.018 mm dia., 7 mm depth
D
(0.1575 to 0.1582 in. dia., 0.2756 in. depth)
E 53 mm dia. (2.0866 in.) U 84.5 to 85.5 mm (3.3268 to 3.3661 in.)
F 48.8 to 48.9 mm dia. (1.9213 to 1.9252 in. dia.) V 50 mm (1.9685 in.)
G 40 mm dia. (1.5748 in. dia.) W 0.698 rad (40 °)
H 0.523 rad (30 °) X 2 mm (0.0787 in.)
I 1.5 mm (0.0591 in.) Y 3 mm (0.1181 in.)
J 20 mm dia. (0.7874 in. dia.) a 0.8 mm radius (0.0315 in. radius)
K 34.9 to 35.0 mm dia. (1.3740 to 1.3780 in. dia.) b Ra = 3.2 a
L 19.5 to 20.5 mm dia. (0.7677 to 0.8071 in. dia.) c 0.2 mm radius (0.0079 in. radius)
M 20 mm (0.7874 in.) d 8.0 mm radius (0.3150 in. radius)
N 99 mm (3.8976 in.) e 0.4 mm radius (0.0157 in. radius)
O 44 mm (1.7323 in.) C0.5 Chamfer 0.5 mm (0.0197 in.)
P 120 mm (4.7244 in.) C1 Chamfer 1.0 mm (0.0394 in.)
(1) Shaft (2) Stopper
T 0.523 rad (30 °)
9Y1210143GEG0091US0
G-59
Page 81
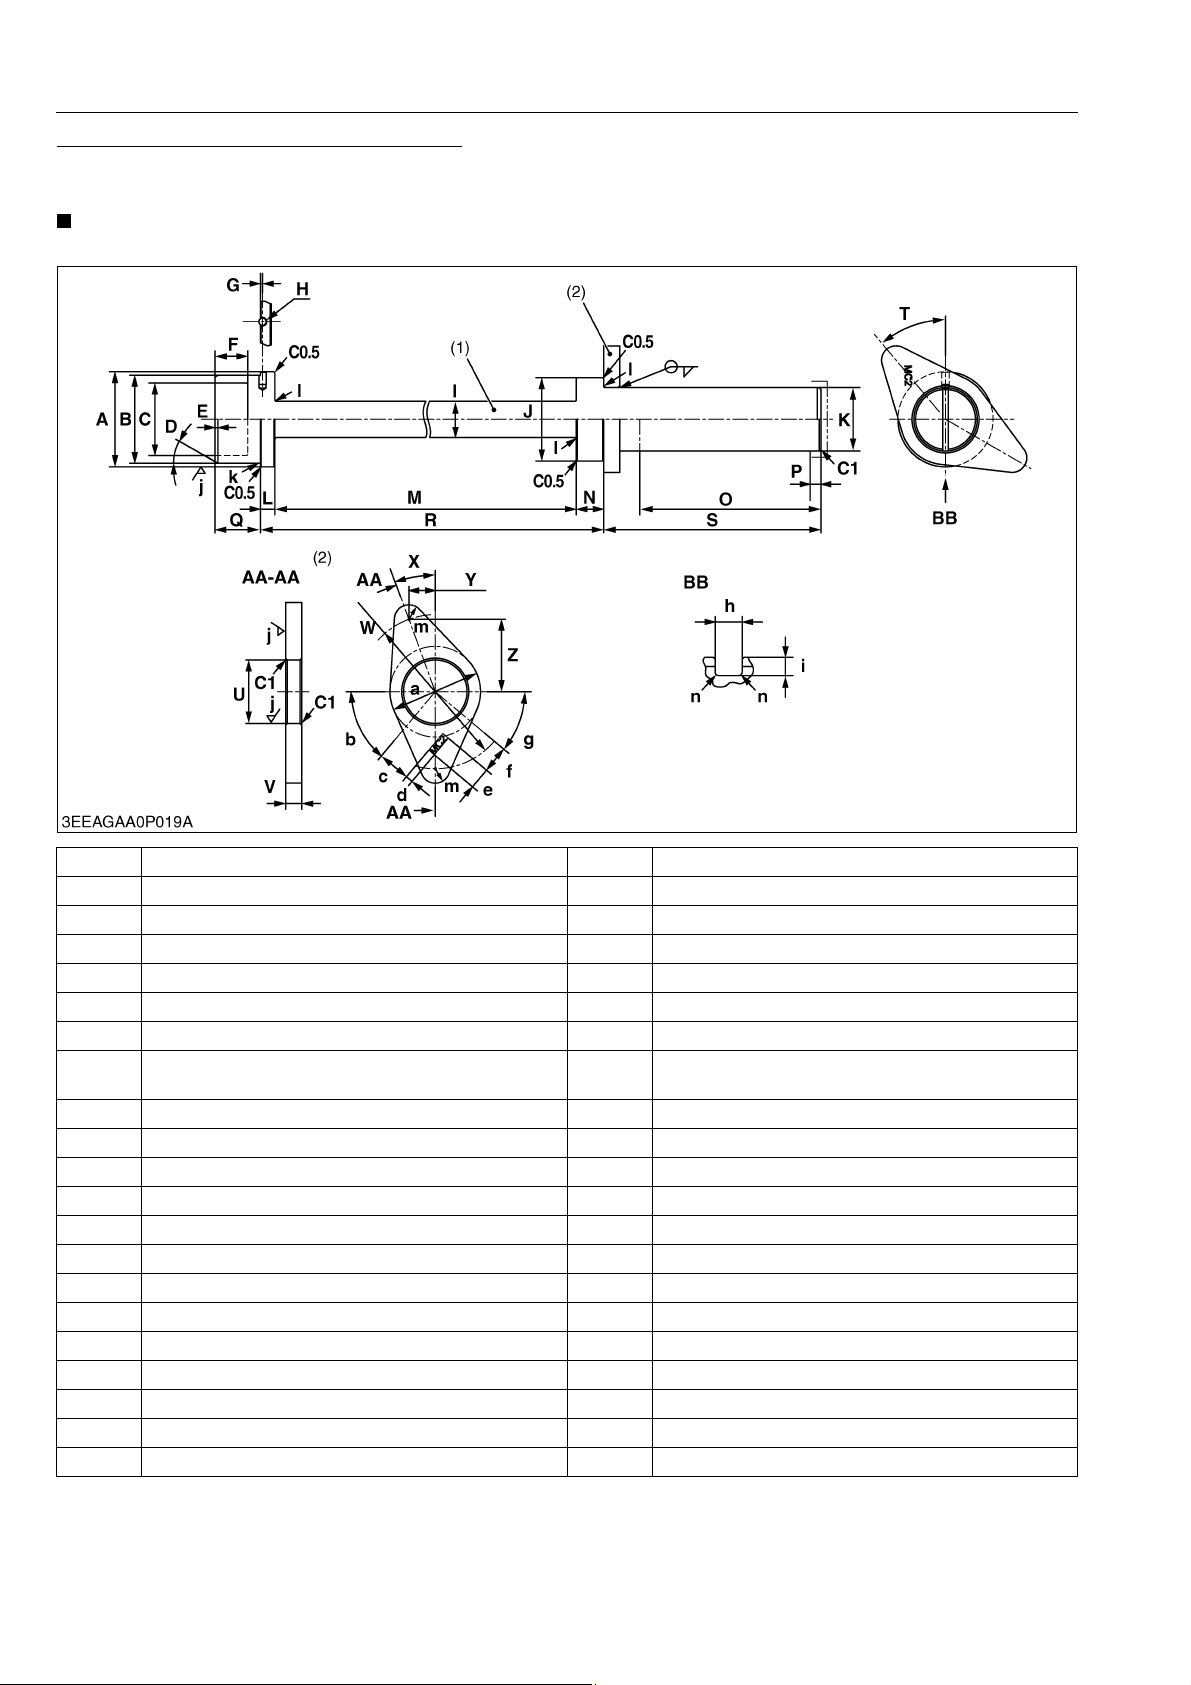
M6040, M7040, WSM
NOTE
KiSC issued 07, 2012 A
Balancer Shaft 2 Bearing C Replacing Tool
Application
• Use to press fit the bearing.
• The following special tools are not provided, so make them referring to the figure.
GENERAL
A 52.5 mm dia. (2.0669 in. dia.) V 9 mm (0.3543 in.)
B 48.3 to 48.4 mm dia. (1.9016 to 1.9055 in.) W 84.5 to 85.5 mm (3.3268 to 3.3661 in.)
C 40 mm dia. (1.5748 in. dia.) X 0.349 rad (20 °)
D 0.523 rad (30 °) Y 14.54 mm (0.5724 in.)
E 1.5 mm (0.0591 in.) Z 39.94 mm (1.5724 in.)
F 18 mm (0.7087 in.) a 50 mm (1.9685 in.)
G 1.2 mm (0.0472 in.) b 0.872 rad (50 °)
4.000 to 4.018 mm dia., 7 mm depth
H
(0.1575 to 0.1582 in. dia., 0.2756 in. depth)
I 20 mm dia. (0.7874 in. dia.) d 4 mm (0.1575 in.)
J 46 mm dia. (1.8110 in. dia.) e 12 mm (0.4724 in.)
K 34.9 to 35.0 mm dia. (1.3740 to 1.3780 in. dia.) f 15 mm (0.5906 in.)
L 8 mm (0.3150 in.) g 0.698 rad (40 °)
M 199.5 mm (7.8543 in.) h 3 mm (0.1181 in.)
N 15 mm (0.5906 in.) i 2 mm (0.0787 in.)
O 100 mm (3.9370 in.) j Ra = 3.2 a
P 6 mm (0.2362 in.) k 0.2 mm radius (0.0079 in. radius)
Q 25 mm (0.9843 in.) l 0.8 mm radius (0.0315 in. radius)
R 222.0 to 223.0 mm (8.7402 to 8.7795 in.) m 8.0 mm radius (0.3150 in. radius)
S 120 mm (4.7244 in.) n 0.4 mm radius (0.0157 in. radius)
T 0.698 rad (40 °) C0.5 Chamfer 0.5 mm (0.0197 in.)
U 35 mm dia. (1.3780 in.) C1 Chamfer 1.0 mm (0.0394 in.)
c 18 mm (0.7087 in.)
(1) Shaft (2) Stopper
9Y1210143GEG0092US0
G-60
Page 82
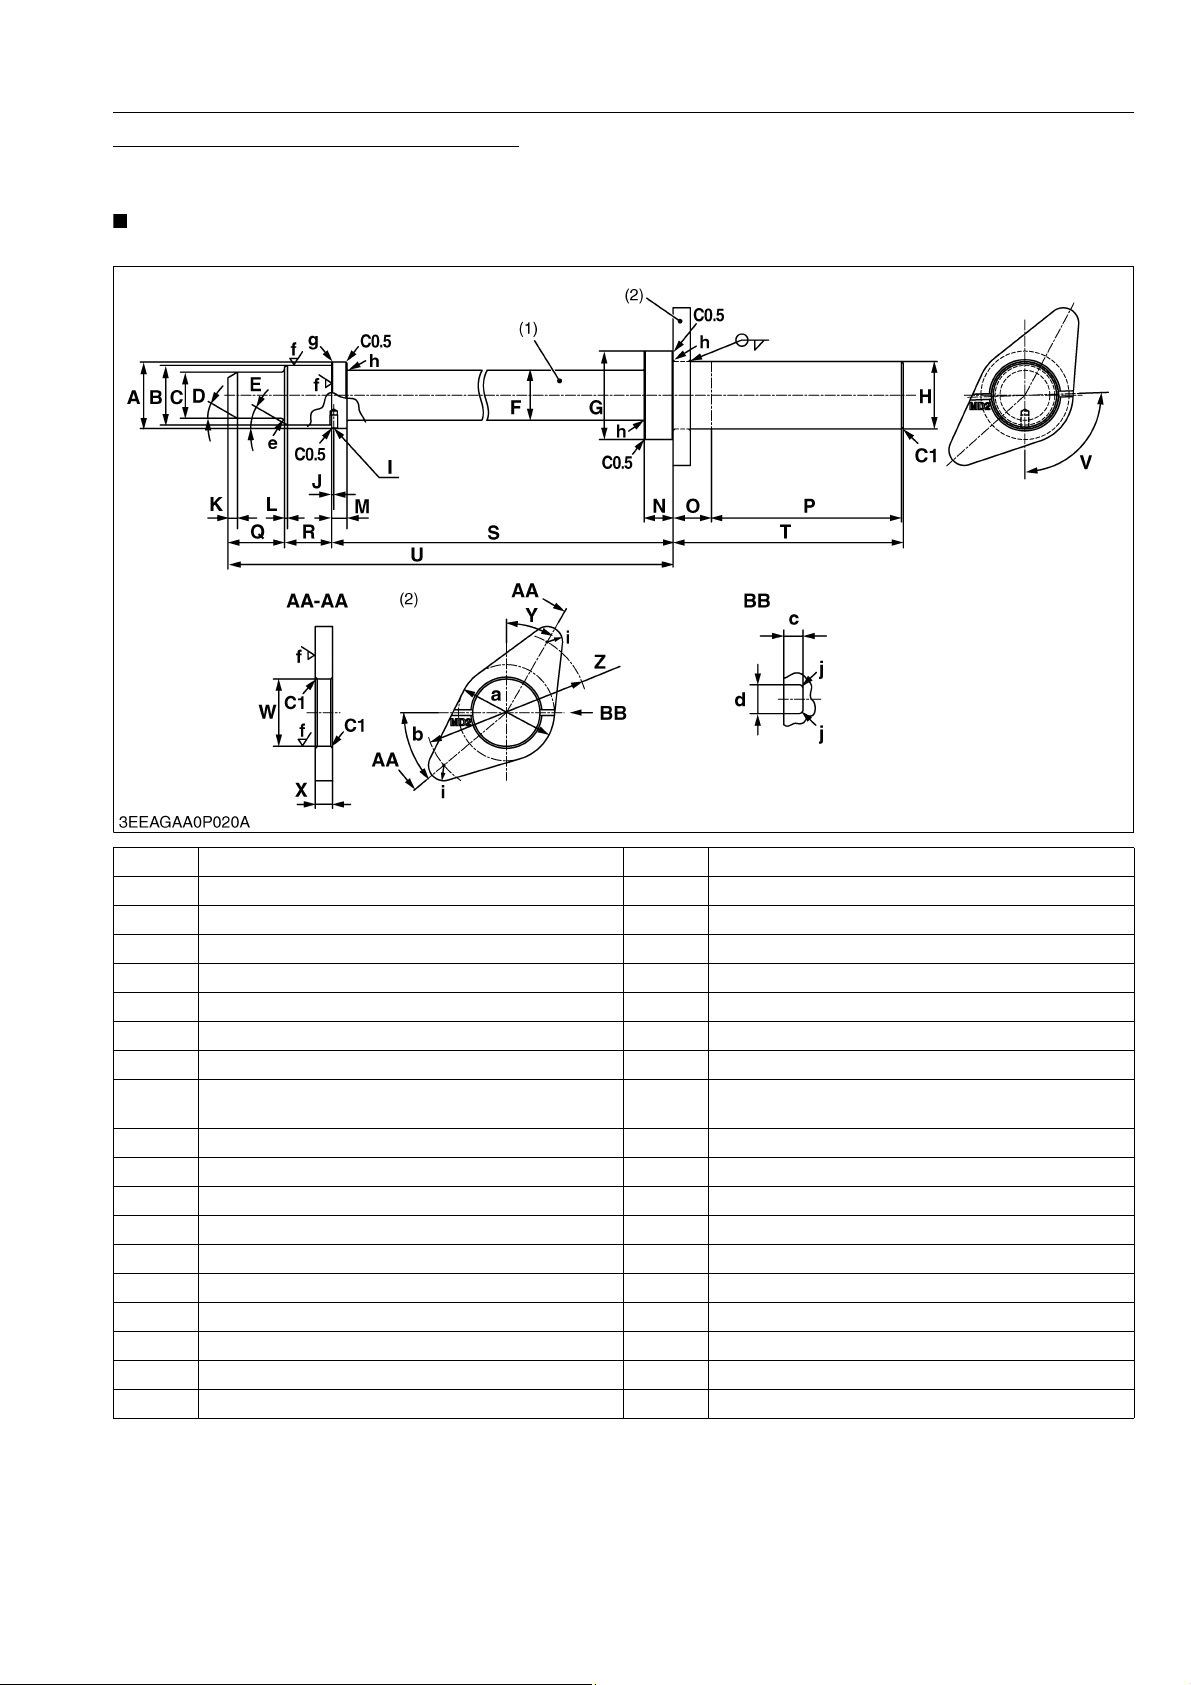
M6040, M7040, WSM
NOTE
KiSC issued 07, 2012 A
Balancer Shaft 2 Bearing D Replacing Tool
Application
• Use to press fit the bearing.
• The following special tools are not provided, so make them referring to the figure.
GENERAL
A 34.5 mm dia. (1.3583 in. dia.) T 120 mm (4.7244 in.)
B 30.8 to 30.9 mm dia. (1.2126 to 1.2165 in.) U 479 mm (18.8583 in.)
C 24 mm dia. (0.9449 in. dia.) V 1.605 rad (92 °)
D 0.523 rad (30 °) W 35 mm dia. (1.3780 in. dia.)
E 0.523 rad (30 °) X 9 mm (0.3543 in.)
F 26 mm dia. (1.0236 in. dia.) Y 0.523 rad (30 °)
G 46 mm dia. (1.8110 in. dia.) Z 84.5 to 85.5 mm (3.3268 to 3.3661 in.)
H 34.9 to 35.0 mm dia. (1.3740 to 1.3780 in. dia.) a 50 mm (1.9685 in.)
4.000 to 4.018 mm dia., 7 mm depth
I
(0.1575 to 0.1582 in. dia., 0.2756 in. depth)
J 1.2 mm (0.0472 in.) c 2 mm (0.0787 in.)
K 5 mm (0.1969 in.) d 3 mm (0.1181 in.)
L 1.5 mm (0.0591 in.) e 2 mm radius (0.0787 in. radius)
M 8 mm (0.3150 in.) f Ra = 3.2 a
N 15 mm (0.5906 in.) g 0.3 mm radius (0.0118 in. radius)
O 20 mm (0.7874 in.) h 0.8 mm radius (0.0315 in. radius)
P 99 mm (3.8976 in.) i 8.0 mm radius (0.3150 in. radius)
Q 29.5 mm (1.1614 in.) j 0.4 mm radius (0.0157 in. radius)
R 24.5 mm (0.9646 in.) C0.5 Chamfer 0.5 mm (0.0197 in.)
S 424.5 to 425.5 mm (16.7126 to 16.7520 in.) C1 Chamfer 1.0 mm (0.0394 in.)
b 0.698 rad (40 °)
(1) Shaft (2) Stopper
9Y1210143GEG0093US0
G-61
Page 83
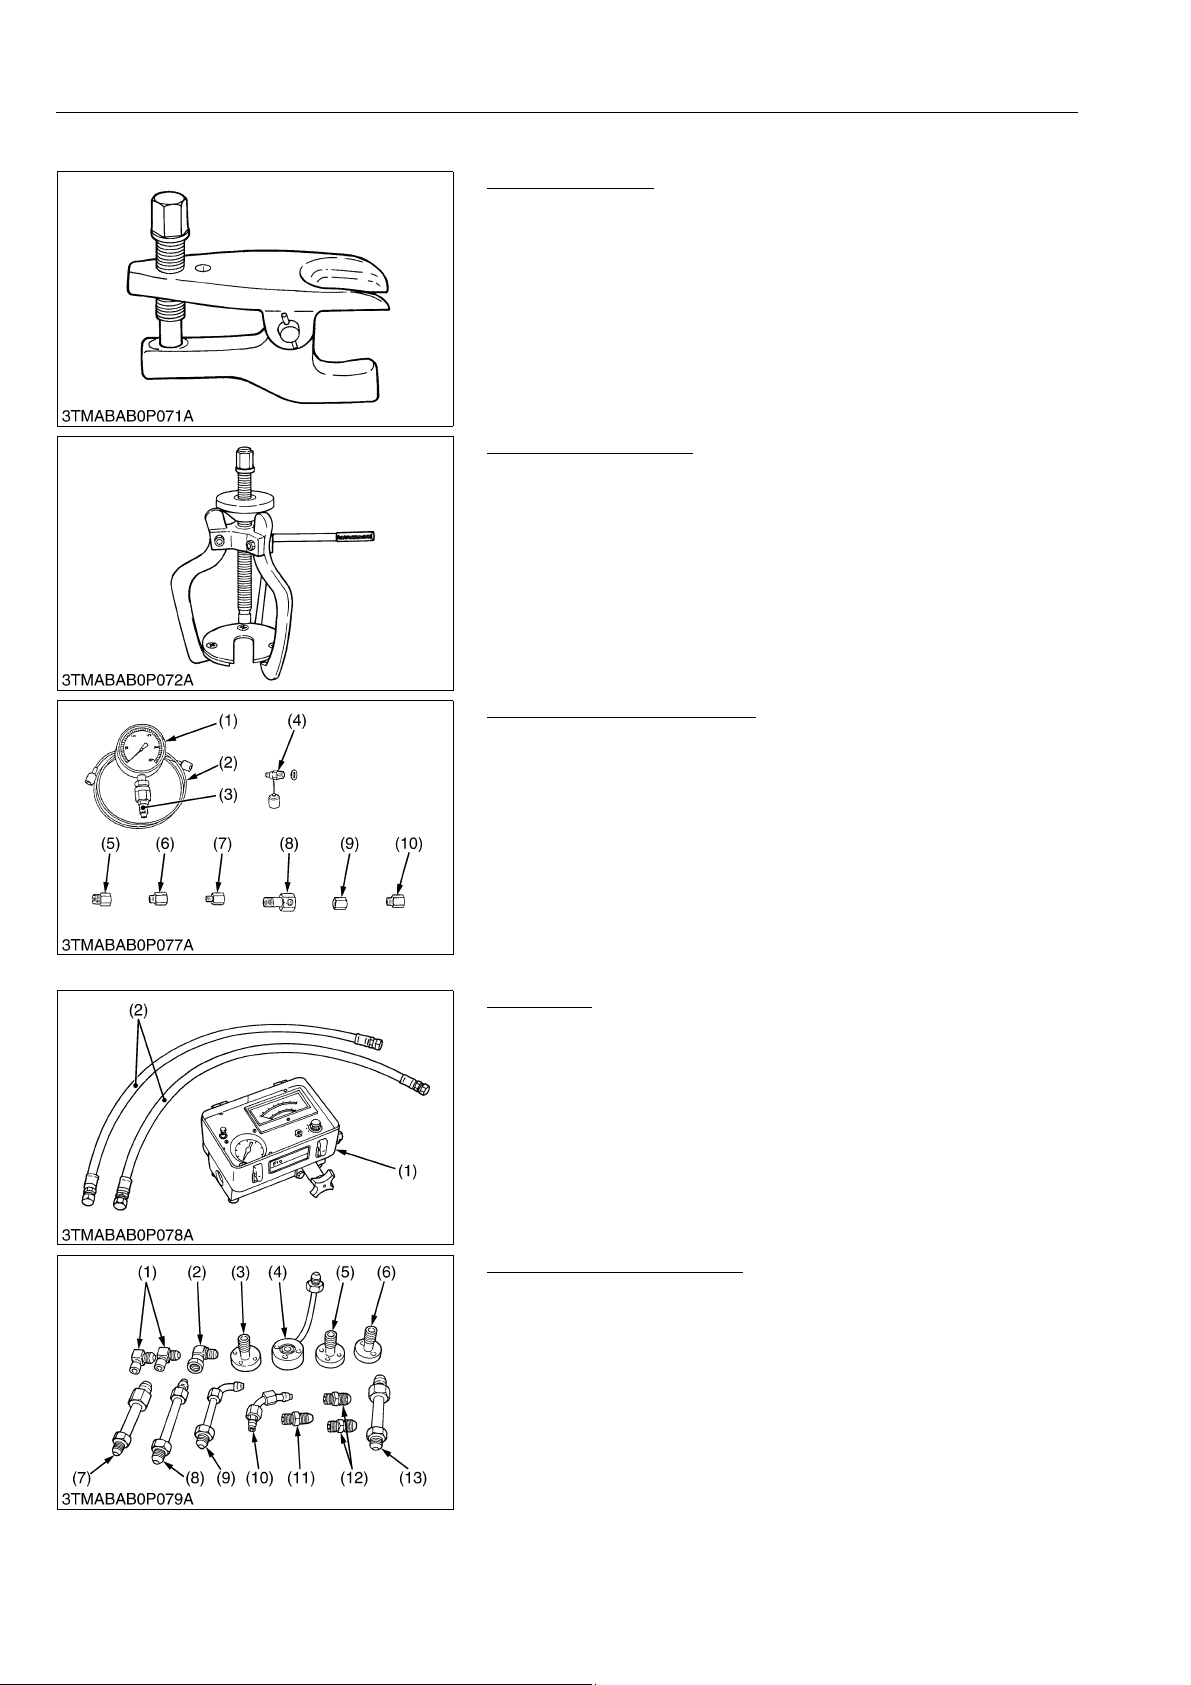
M6040, M7040, WSM
KiSC issued 07, 2012 A
[2] SPECIAL TOOLS FOR TRACTOR
Tie-rod End Lifter
Code No.
• 07909-39051
Application
• Use for removing the tie-rod end with ease.
Steering Wheel Puller
Code No.
• 07916-51090
Application
• Use for removing the steering wheel without damaging the
steering shaft.
GENERAL
WSM000001GEG0029US0
WSM000001GEG0030US0
Relief Valve Pressure Tester
Code No.
• 07916-50045
Application
• This allows easy measurement of relief set pressure.
(1) Gauge (07916-50322)
(2) Cable (07916-50331)
(3) Threaded Joint (07916-50401)
(4) Threaded Joint (07916-50341)
(5) Adaptor B (M18 × P1.5)
(07916-50361)
(6) Adaptor C (PS3/8) (07916-50371)
(7) Adaptor D (PT1/8) (07916-50381)
(8) Adaptor E (PS3/8) (07916-50392)
(9) Adaptor F (PF1/2) (07916-62601)
(10) Adaptor 58 (PT1/4) (07916-52391)
WSM000001GEG0027US0
Flow Meter
Code No.
• 07916-52791 (Flow Meter)
• 07916-52651 (Hydraulic Test Hose)
Application
• This allows easy testing of hydraulic system.
(1) Flow Meter (2) Hydraulic Test Hose
WSM000001GEG0036US0
Adaptor Set for Flow Meter
Code No.
• 07916-54031
Application
• Use for testing the hydraulic system.
(1) Adaptor 52
(2) Adaptor 53
(3) Adaptor 54
(4) Adaptor 61
(5) Adaptor 62
(6) Adaptor 63
(7) Adaptor 64
(8) Adaptor 65
(9) Adaptor 66
(10) Adaptor 67
(11) Adaptor 68
(12) Adaptor 69
(13) Hydraulic Adaptor 1
WSM000001GEG0037US0
G-62
Page 84
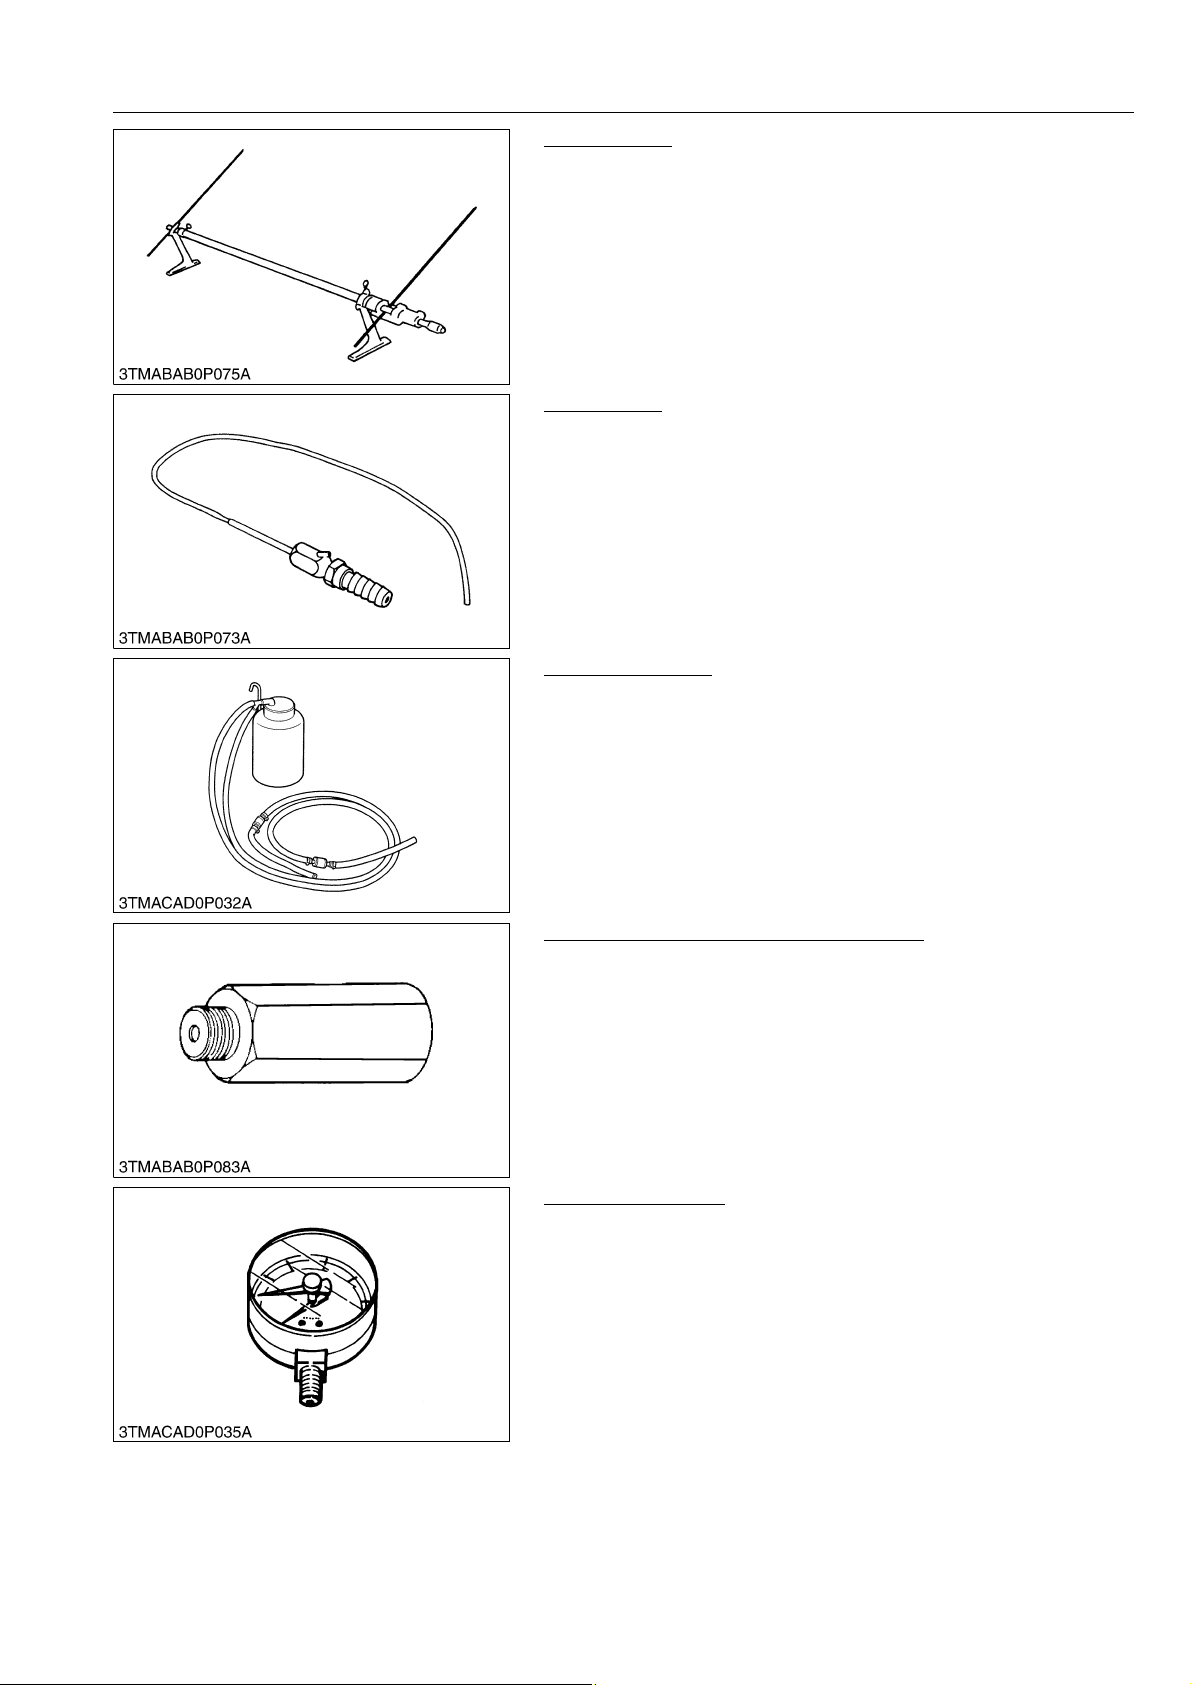
M6040, M7040, WSM
KiSC issued 07, 2012 A
GENERAL
Toe-in Gauge
Code No.
• 07909-31681
Application
• This allows easy measurement of toe-in for all machine models.
WSM000001GEG0034US0
Injector CH3
Code No.
• 07916-52501
Application
• Use to put calcium chloride solution into a rear wheel and to
remove it.
WSM000001GEG0031US0
Brake Air Bleeder
Code No.
• 07916-54001
Application
• This allows easy air bleed of the hydraulic brake.
WSM000001GEG0046US0
Relief Valve Setting Pressure Adaptor G
Code No.
• 07916-52751
Application
• This offers easy measurement of relief valve setting pressure
from the hydraulic coupler. This is available with the relief valve
setting pressure tester.
WSM000001GEG0041US0
Pressure Gauge 50
Code No.
• 07916-52961
Application
• This pressure gauge is used to measure the low oil pressure.
WSM000001GEG0047US0
G-63
Page 85
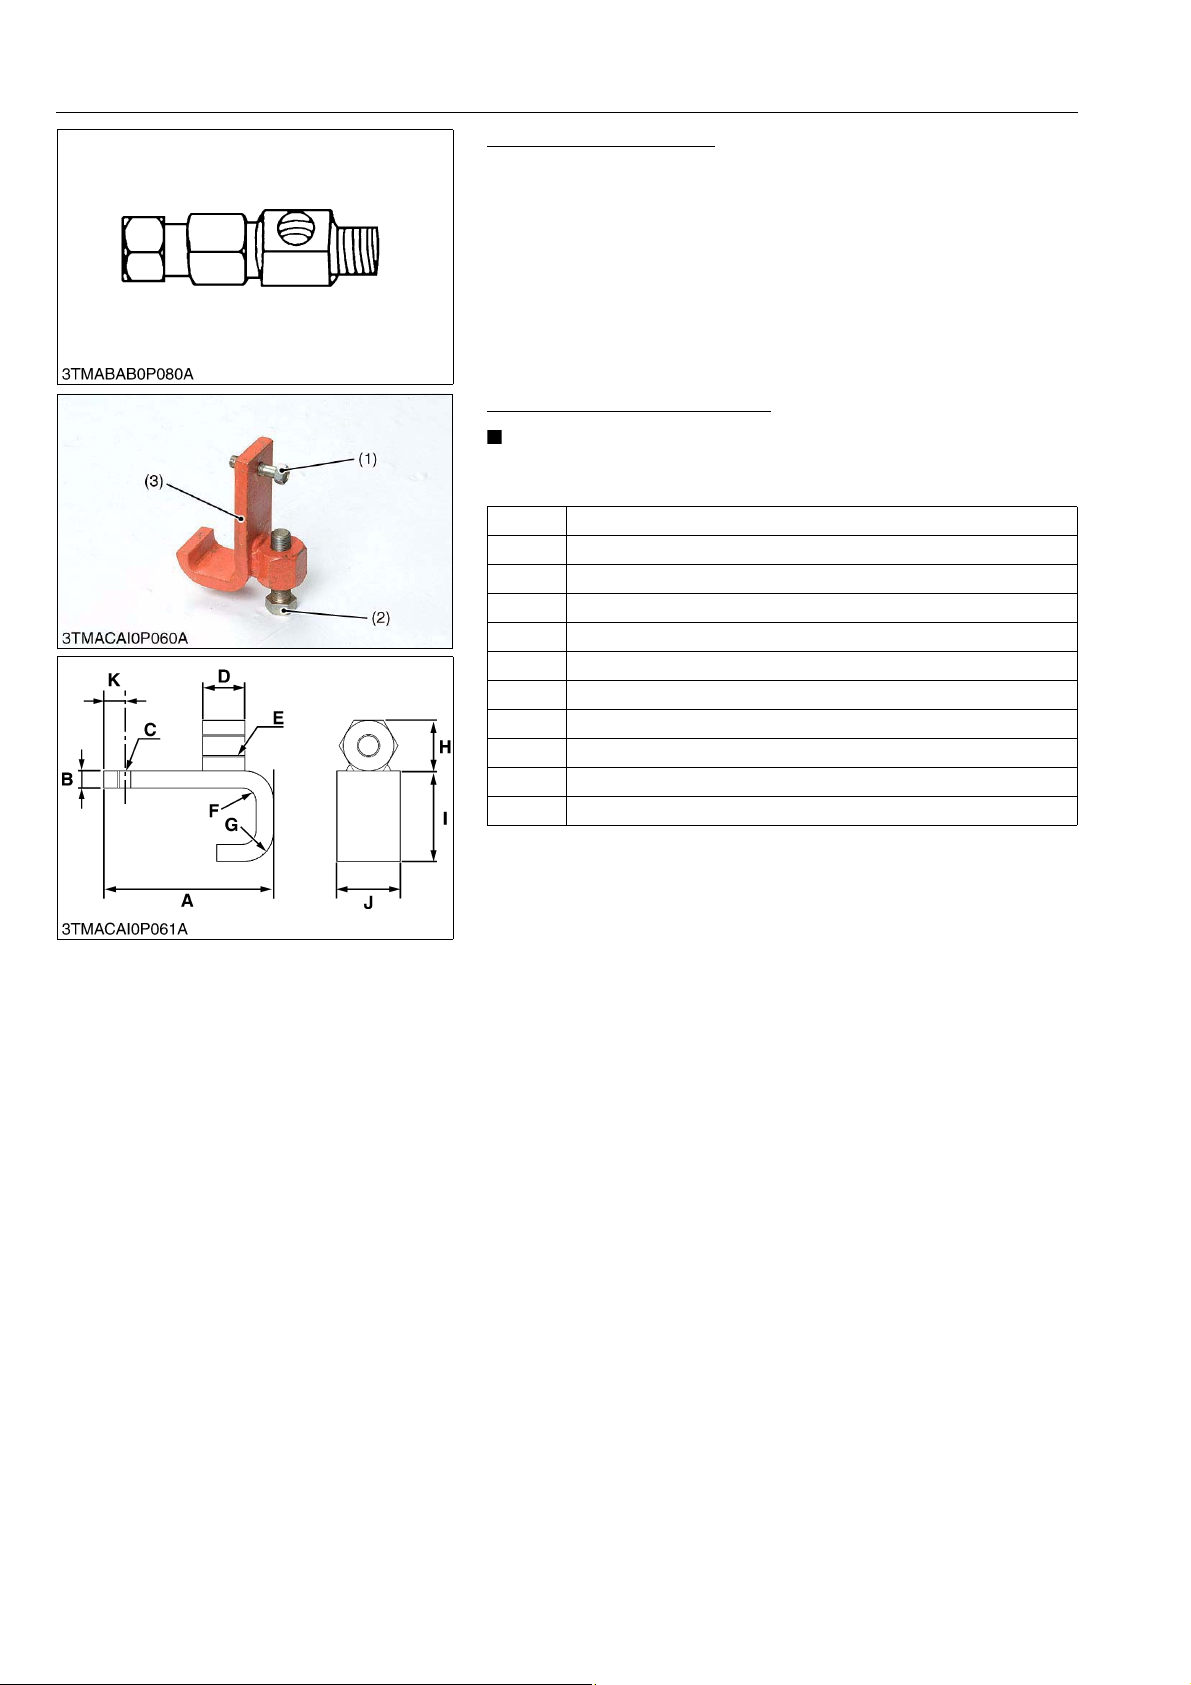
M6040, M7040, WSM
NOTE
KiSC issued 07, 2012 A
GENERAL
Power Steering Adaptor
Code No.
• 07916-54021
Application
• Use for measuring the relief valve setting pressure for power
steering.
WSM000001GEG0038US0
Front Axle Rocking Restrictor
• The following special tools are not provided, so make them
referring to the figure.
A 120 mm (4.72 in.)
B 12 mm (0.72 in.)
C M10 × P1.25
D 30 mm (1.18 in.)
E M16 × P1.5
F 10 mm (0.39 in.)
G 20 mm (0.79 in.)
H 36 mm (1.42 in.)
I 64 mm (2.52 in.)
J 45 mm (1.77 in.)
K 20 mm (0.79 in.)
(1) Screw
M10 × P1.25 × L50 mm (2 in.)
(2) Screw
M16 × P1.5 × L50 mm (2 in.)
(3) Rocking Restrictor
9Y1210143GEG0094US0
G-64
Page 86
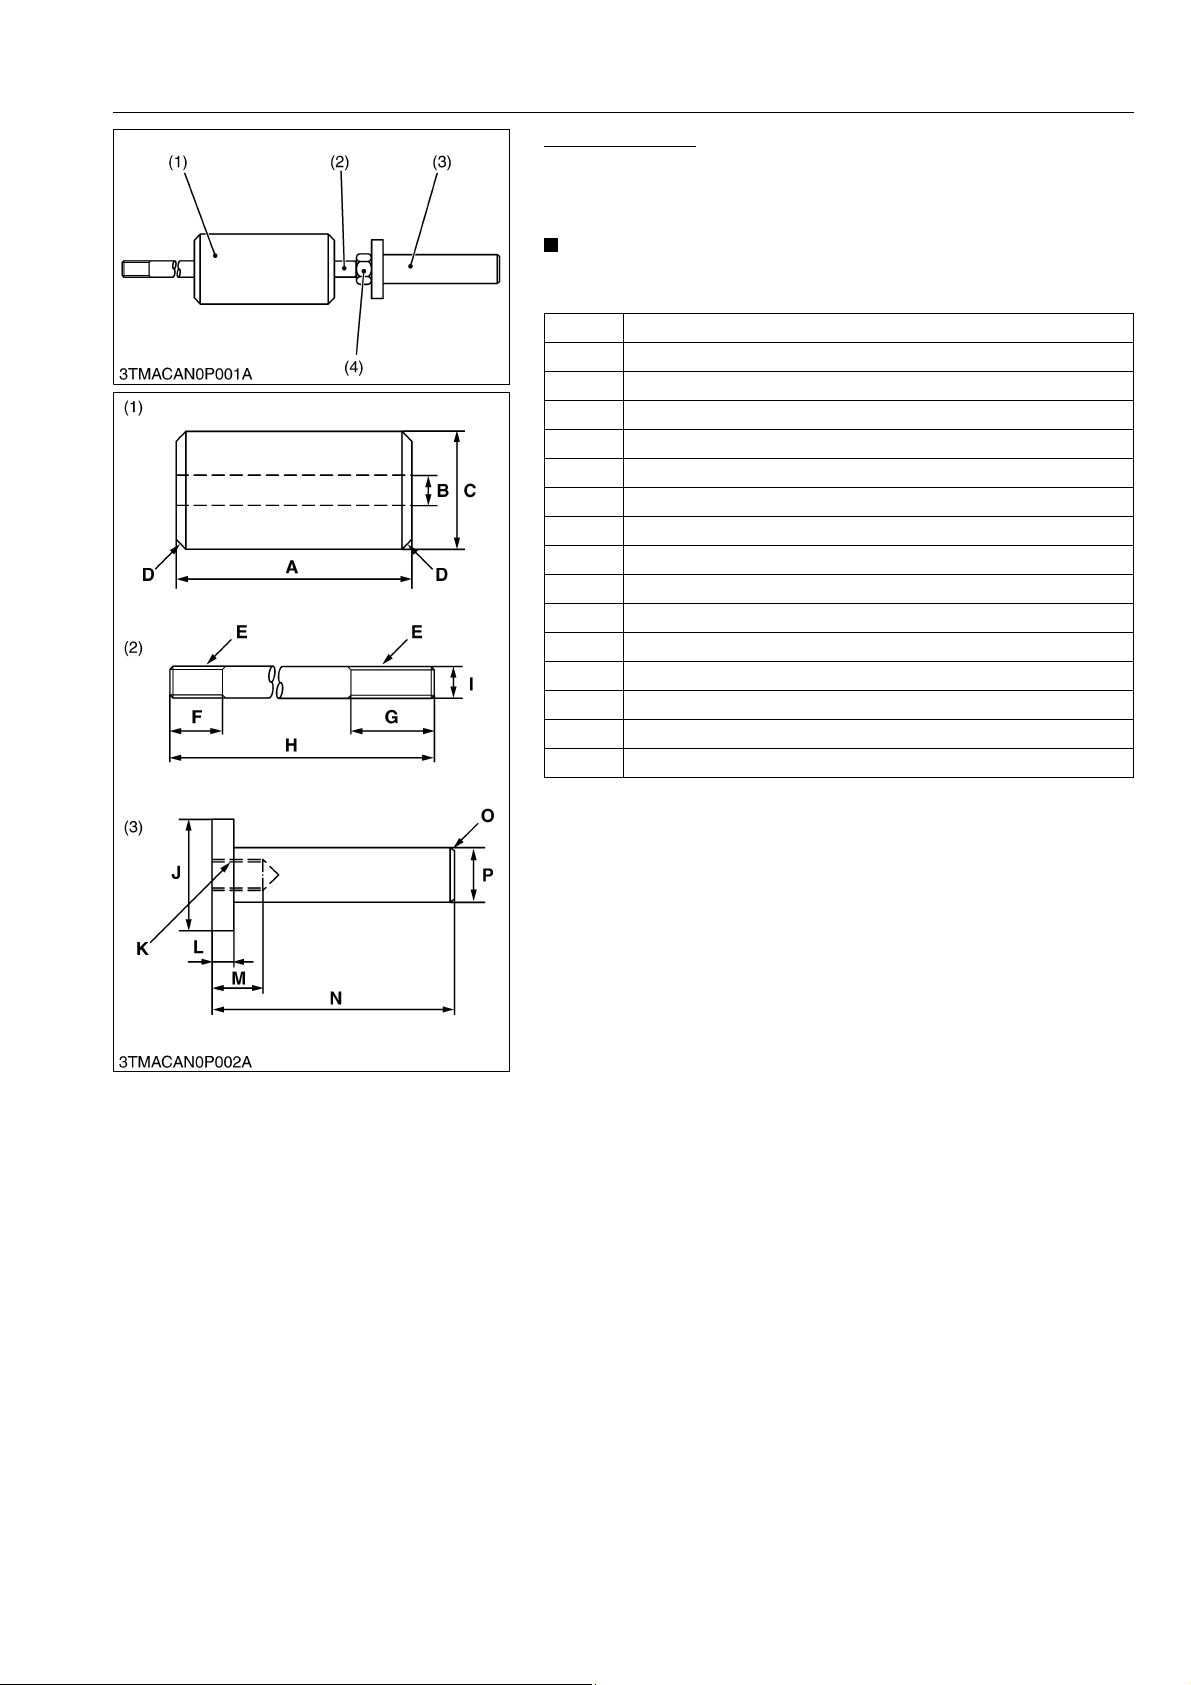
M6040, M7040, WSM
NOTE
KiSC issued 07, 2012 A
GENERAL
Sliding Hammer
Application
• Use to removing the bevel pinion shaft with adaptor for front
axle.
• The following special tools are not provided, so make them
referring to the figure.
A 120 mm (4.72 in.)
B 14.5 mm dia. (0.57 in. dia.)
C 60 mm dia. (2.36 in. dia.)
D Chamfer 5 mm (0.20 in.)
E M14 × P1.5
F 25 mm (0.98 in.)
G 40 mm (1.57 in.)
H 450 mm (17.72 in.)
I 14 mm dia. (0.55 in. dia.)
J 50 mm dia. (1.97 in. dia.)
K M14 × P1.5
L 10 mm (0.39 in.)
M 30 mm (1.18 in.)
N 110 mm (4.3 in.)
O Chamfer 2 mm (0.08 in.)
P 25 mm dia. (0.98 in. dia.)
(1) Hammer
(2) Sliding Shaft
(3) Handle
(4) Nut (M14 × P1.5)
9Y1210143GEG0095US0
G-65
Page 87
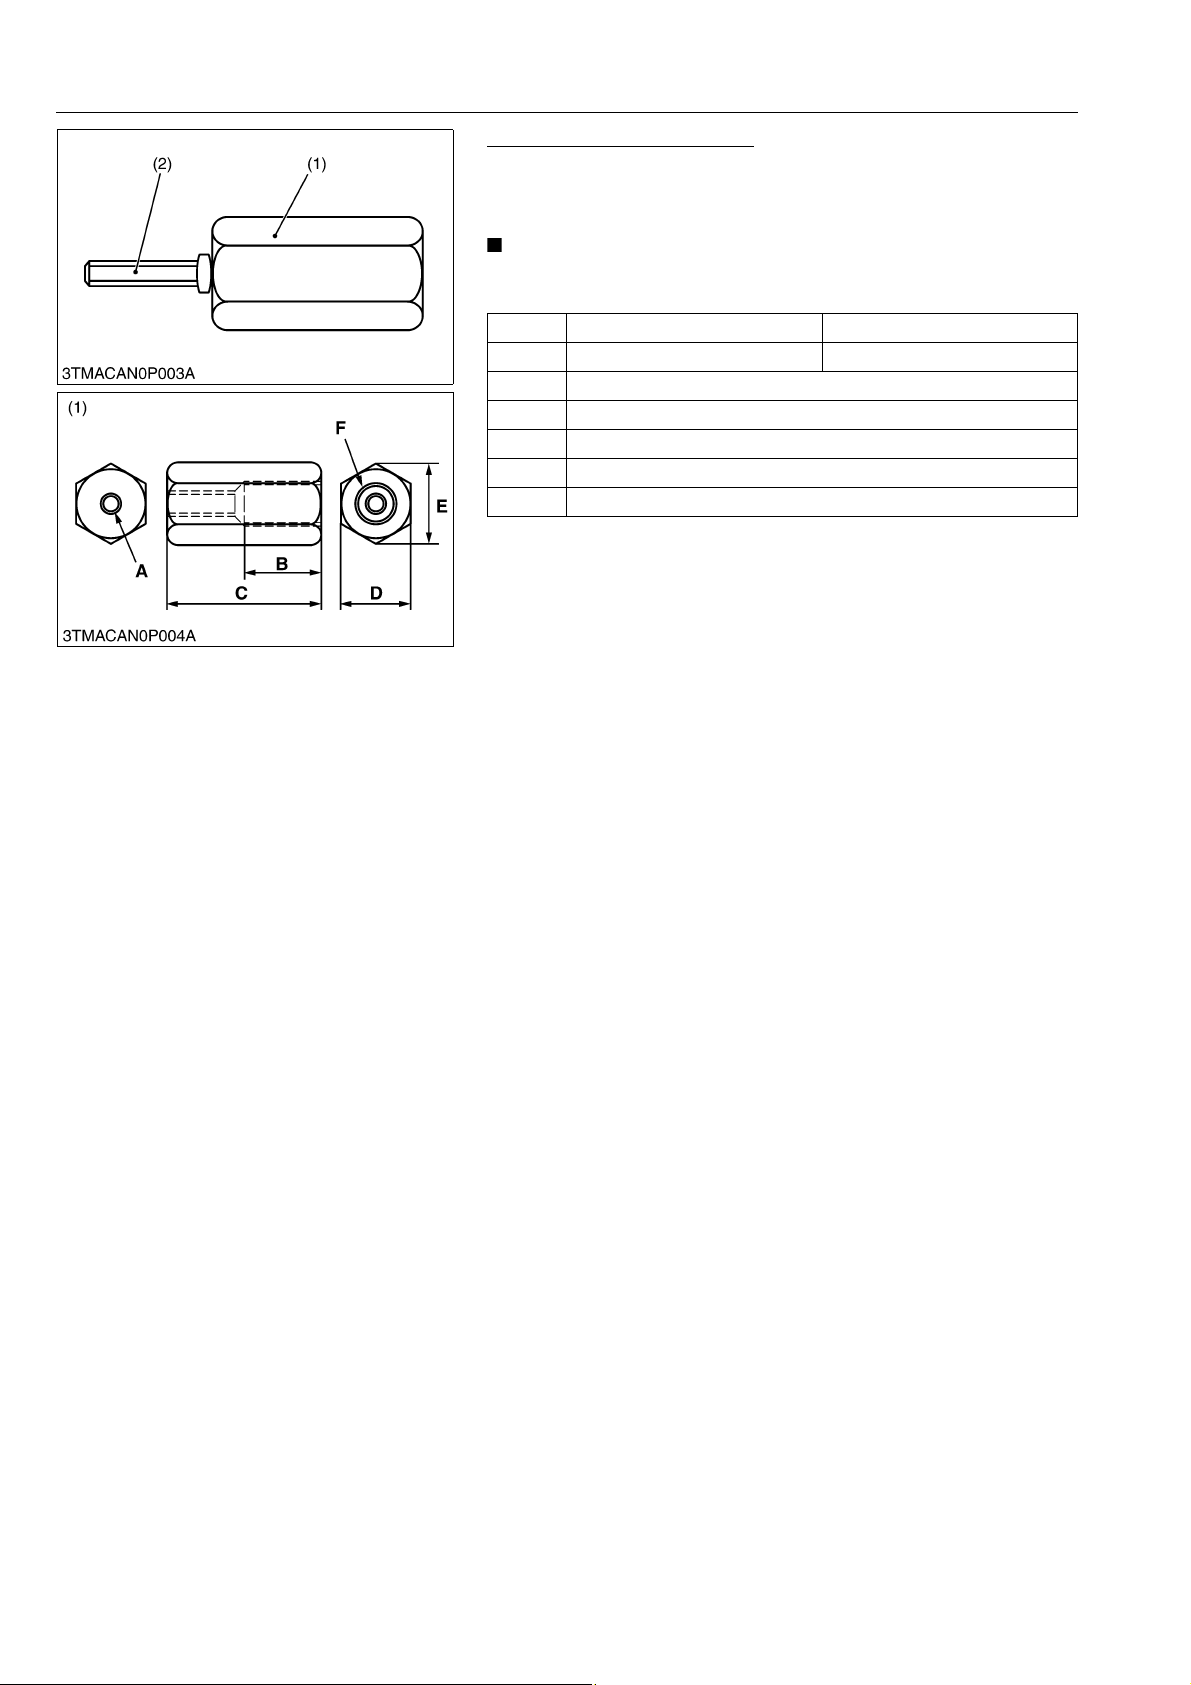
M6040, M7040, WSM
NOTE
KiSC issued 07, 2012 A
GENERAL
Adaptor for Sliding Hammer
Application
• Use to removing the front axle bevel pinion shaft and hydraulic
pump drive gear pin with sliding hammer.
• The following special tools are not provided, so make them
referring to the figure.
Front axle bevel pinion shaft Hydraulic pump drive gear pin
A M6 × P1.0 M8 × P1.25
B 25 mm (0.98 in.)
C 50 mm (1.97 in.)
D 23 mm (0.91 in.)
E 27 mm (1.06 in.)
F M14 × P1.5
(1) Adaptor (M6) (2) Stud Bolt (M6 × P1.0)
Stud Bolt (M8 × P1.25)
9Y1210143GEG0096US0
G-66
Page 88
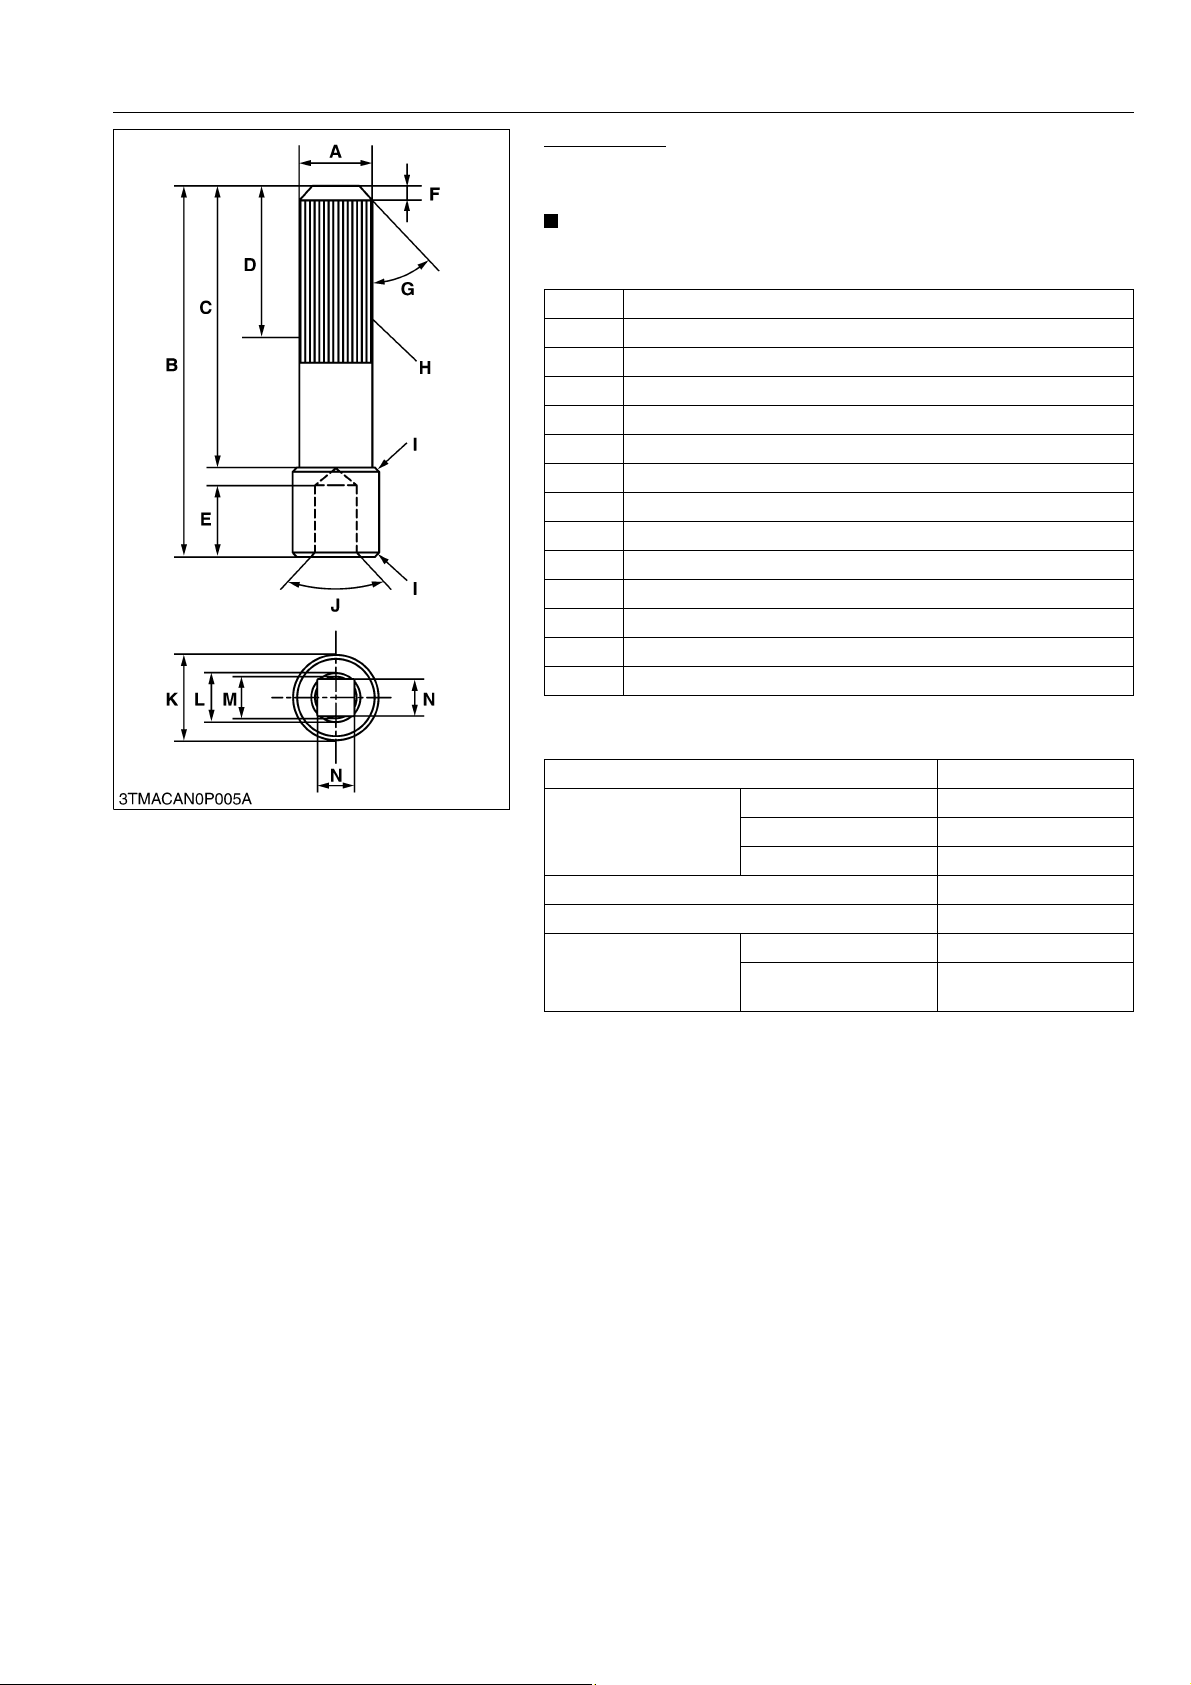
M6040, M7040, WSM
NOTE
KiSC issued 07, 2012 A
GENERAL
LSD Adaptor
Application
• Use for measuring the turning torque of LSD.
• The following special tools are not provided, so make them
referring to the figure.
A 24.65 to 24.80 mm dia. (0.970 to 0.976 in. dia.)
B 131.85 to 132.15 mm (5.19 to 5.20 in.)
C 99.25 to 100.75 mm (3.91 to 3.97 in.)
D 54 to 60 mm full spline (2.12 to 2.36 in. full spline)
E 22.4 to 28.4 mm (0.88 to 1.11 in.)
F 4 to 6 mm (0.16 to 0.23 in.)
G 0.52 rad (30 °)
H Involute spline (refer to below)
I Chamfer 3.0 mm (0.12 in.)
J 1.05 rad (60 °)
K 29.5 to 30.5 mm dia. (1.16 to 1.20 in. dia.)
L 17.87 mm dia. (0.7 in. dia.)
M 13.95 to 14.25 mm dia. (0.55 to 0.56 in. dia.)
N 12.75 to 12.90 mm square (0.50 to 0.51 in. square)
(Involute Spline)
• EXTERNAL 25 × 24Z × 1.0 m × 30
Coefficient of profile shifting 0.000
Tooth form Stub tooth
Tool
Number of teeth 24
Diameter of basic pitch circle 24 mm
Tooth thickness
Module 1.00
Pressure angle 0.52 rad (30 °)
Grade Class a
Over pitch diameter
26.534 to 26.645 mm
(Pin diameter = 1.8 mm)
(Reference)
• This tool can be made by welding the yoke shaft R.H.
(3C091-43210) and socket wrench.
9Y1210143GEG0097US0
G-67
Page 89
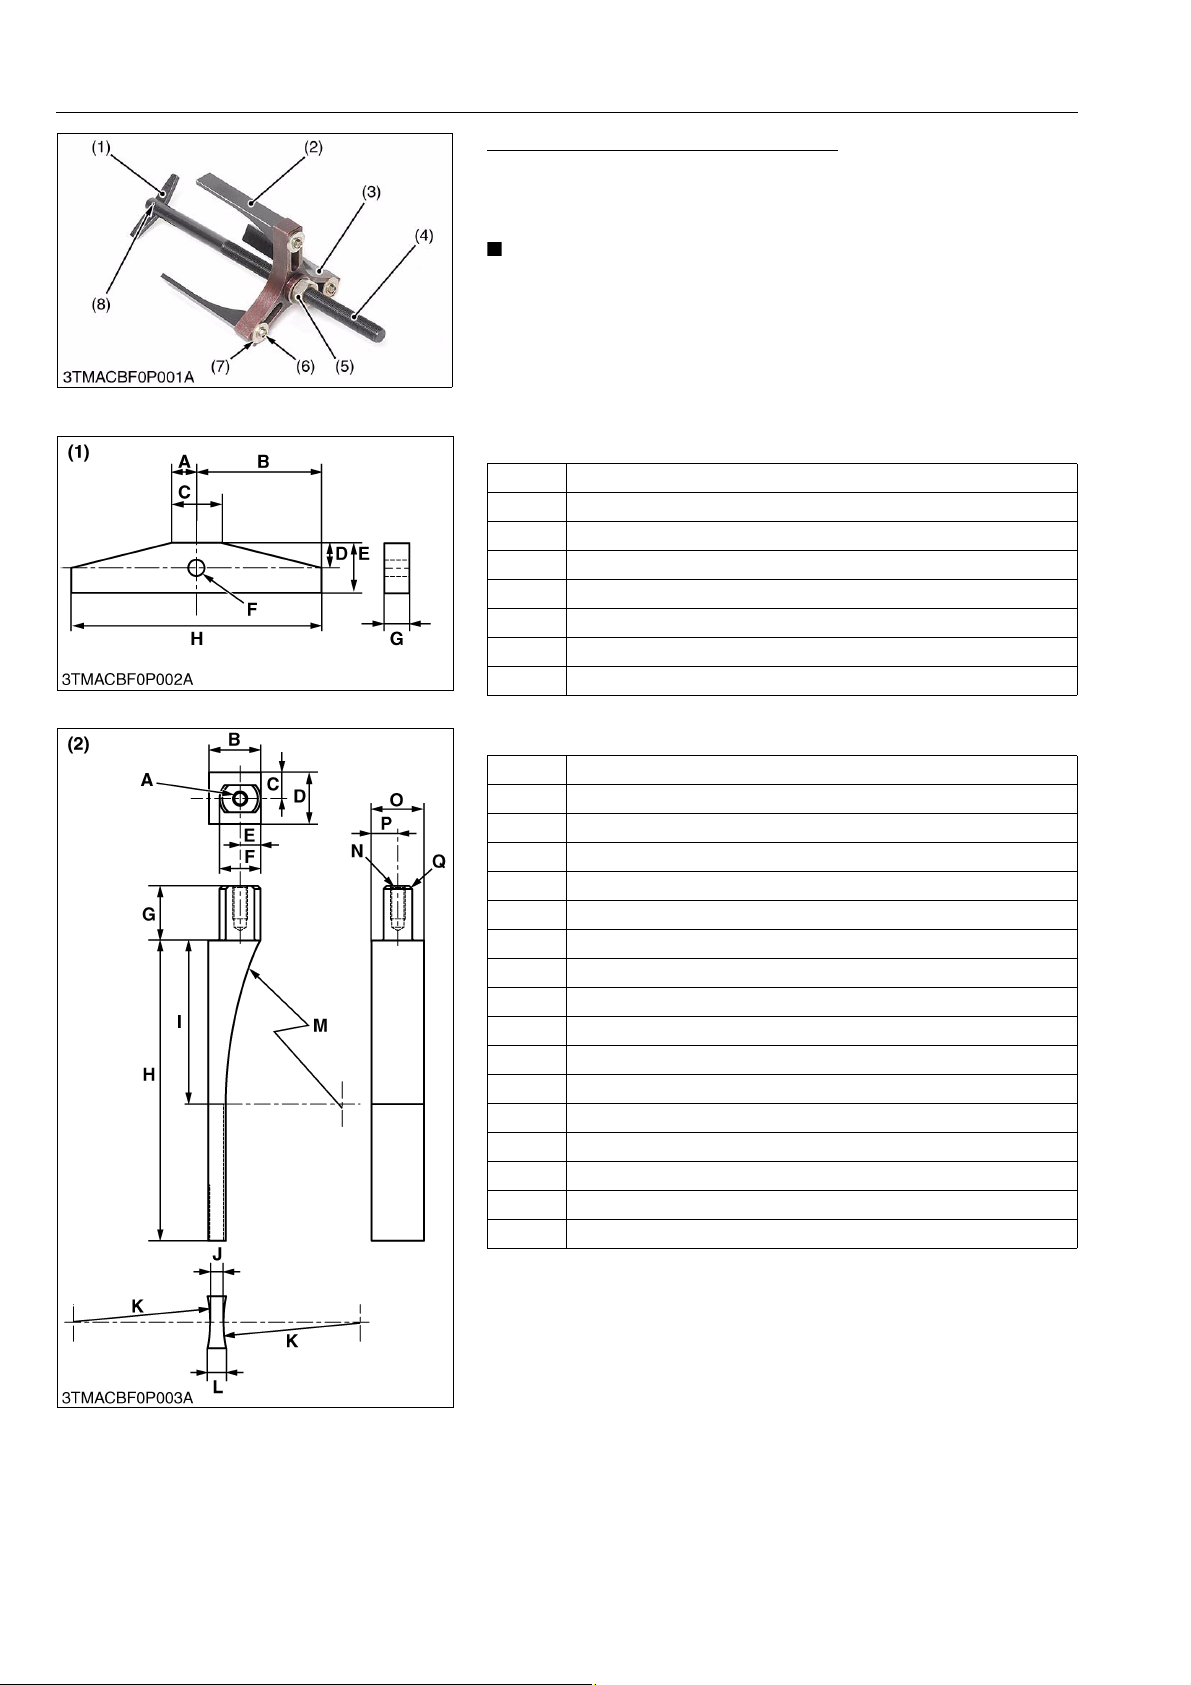
M6040, M7040, WSM
NOTE
KiSC issued 07, 2012 A
GENERAL
Hydraulic Clutch Spring Compressor
Application
• Use exclusively for pushing the spring, to remove the circlip for
hydraulic clutch.
• The following special tools are not provided, so make them
referring to the figure.
(1) Tool 4 (Plate)
(2) Tool 3 (Claw)
(3) Tool 1 (Body)
(4) Tool 2 (Center Bar)
(5) Nut (M16 x P1.5 mm)
(6) Screw (M5 x P1.0 - L10 mm)
(7) Washer (M5)
(8) Spring Pin (5.0 mm dia. - L16 mm)
9Y1210143GEG0128US0
(1) Tool 4 (Plate)
A 8 mm (0.3 in.)
B 40 mm (1.6 in.)
C 16 mm (0.63 in.)
D 8 mm (0.3 in.)
E 16 mm (0.63 in.)
F 5.2 mm dia. (0.20 in. dia.)
G 5.70 to 5.90 mm (0.225 to 0.232 in.)
H 80 mm (3.1 in.)
9Y1210143GEG0098US0
(2) Tool 3 (Clow): 3 pcs.
A M5 × P1.0 × 12 mm depth (0.47 in. depth)
B 19 mm (0.75 in.)
C 5 mm (0.2 in.)
D 9.73 to 10.0 mm (0.383 to 0.393 in.)
E 7.5 mm (0.30 in.)
F 15 mm dia. (0.59 in. dia.)
G 20.05 to 20.10 mm (0.7894 to 0.7913 in.)
H 110 mm (4.33 in.)
I 60 mm (2.4 in.)
J 5 mm (0.2 in.)
K 50 mm (2.0 in.)
L 6.8 mm (0.27 in.)
M Radius 150 to 160 mm (5.91 to 6.29 in.)
N 4.2 mm dia. × 15 mm depth (0.17 in. dia. × 0.59 in. depth)
O 19 mm (0.75 in.)
P 9.5 mm (0.37 in.)
Q Chamfer 1.0 mm (0.039 in.)
9Y1210143GEG0099US0
G-68
Page 90
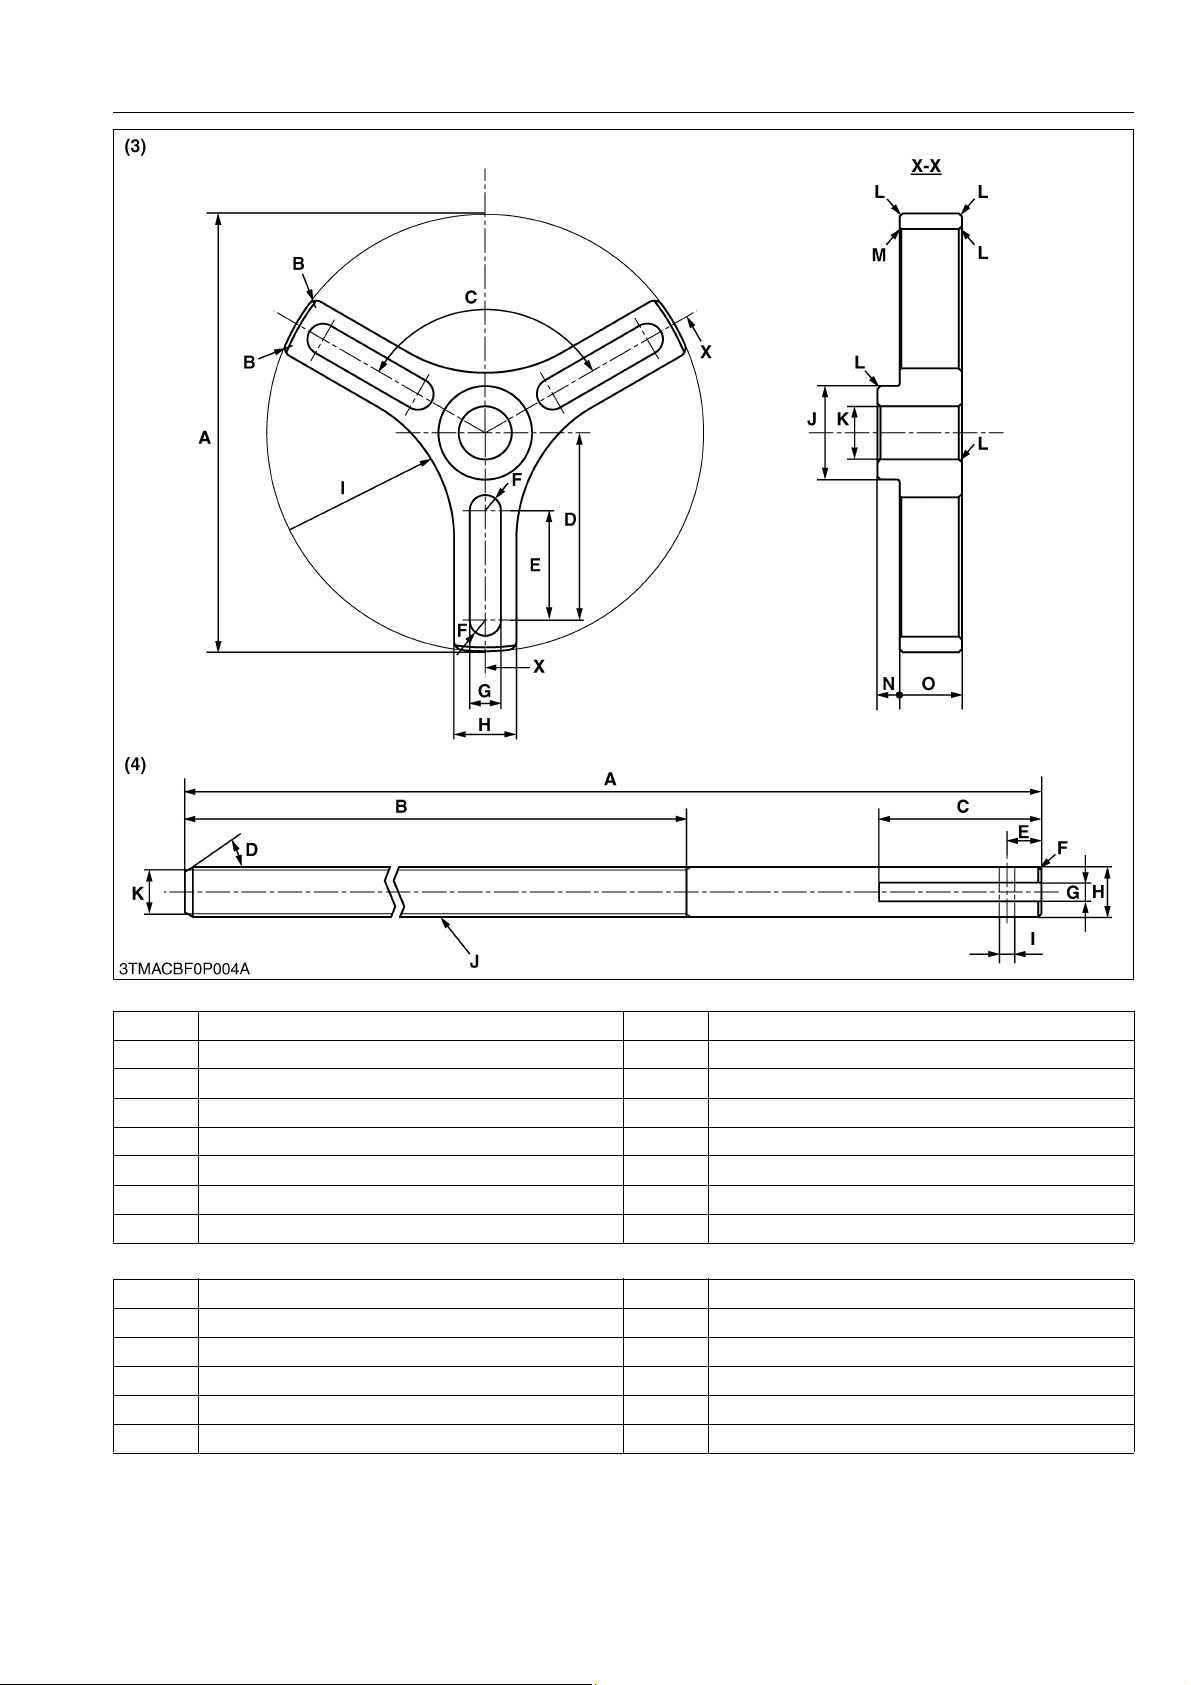
M6040, M7040, WSM
KiSC issued 07, 2012 A
GENERAL
(3) Tool 1 (Body)
A 140 mm dia. (5.51 in. dia.) I Radius 50 mm (2.0 in.)
B Radius 3 mm (0.1 in.) J 30 mm dia. (1.2 in. dia.)
C 2.09 rad (120 °) K 17 mm dia. (0.67 in. dia.)
D 60 mm (2.4 in.) L Chamfer 1.0 mm (0.039 in.)
E 35 mm (1.4 in.) M Chamfer 0.5 mm (0.02 in.)
F Radius 5 mm (0.2 in.) N 7 mm (0.3 in.)
G 10.00 to 10.27 mm (0.3937 to 0.4043 in.) O 20 mm (0.79 in.)
H 20 mm (0.79 in.) X (X-X) View direction
(4) Tool 2 (Center Bar)
A 330 mm (13.0 in.) G 6.00 to 6.58 mm (0.237 to 0.259 in.)
B 210 mm (8.27 in.) H 16 mm dia. (0.63 in. dia.)
C 52 mm (2.0 in.) I 5.00 to 5.18 mm dia. (0.197 to 0.203 in. dia.)
D 0.52 rad (30 °) J M16 × P1.5 mm
E 11 mm (0.43 in.) K 13 mm dia. (0.51 in. dia.)
F Chamfer 1.0 mm (0.039 in.)
9Y1210143GEG0100US0
G-69
Page 91
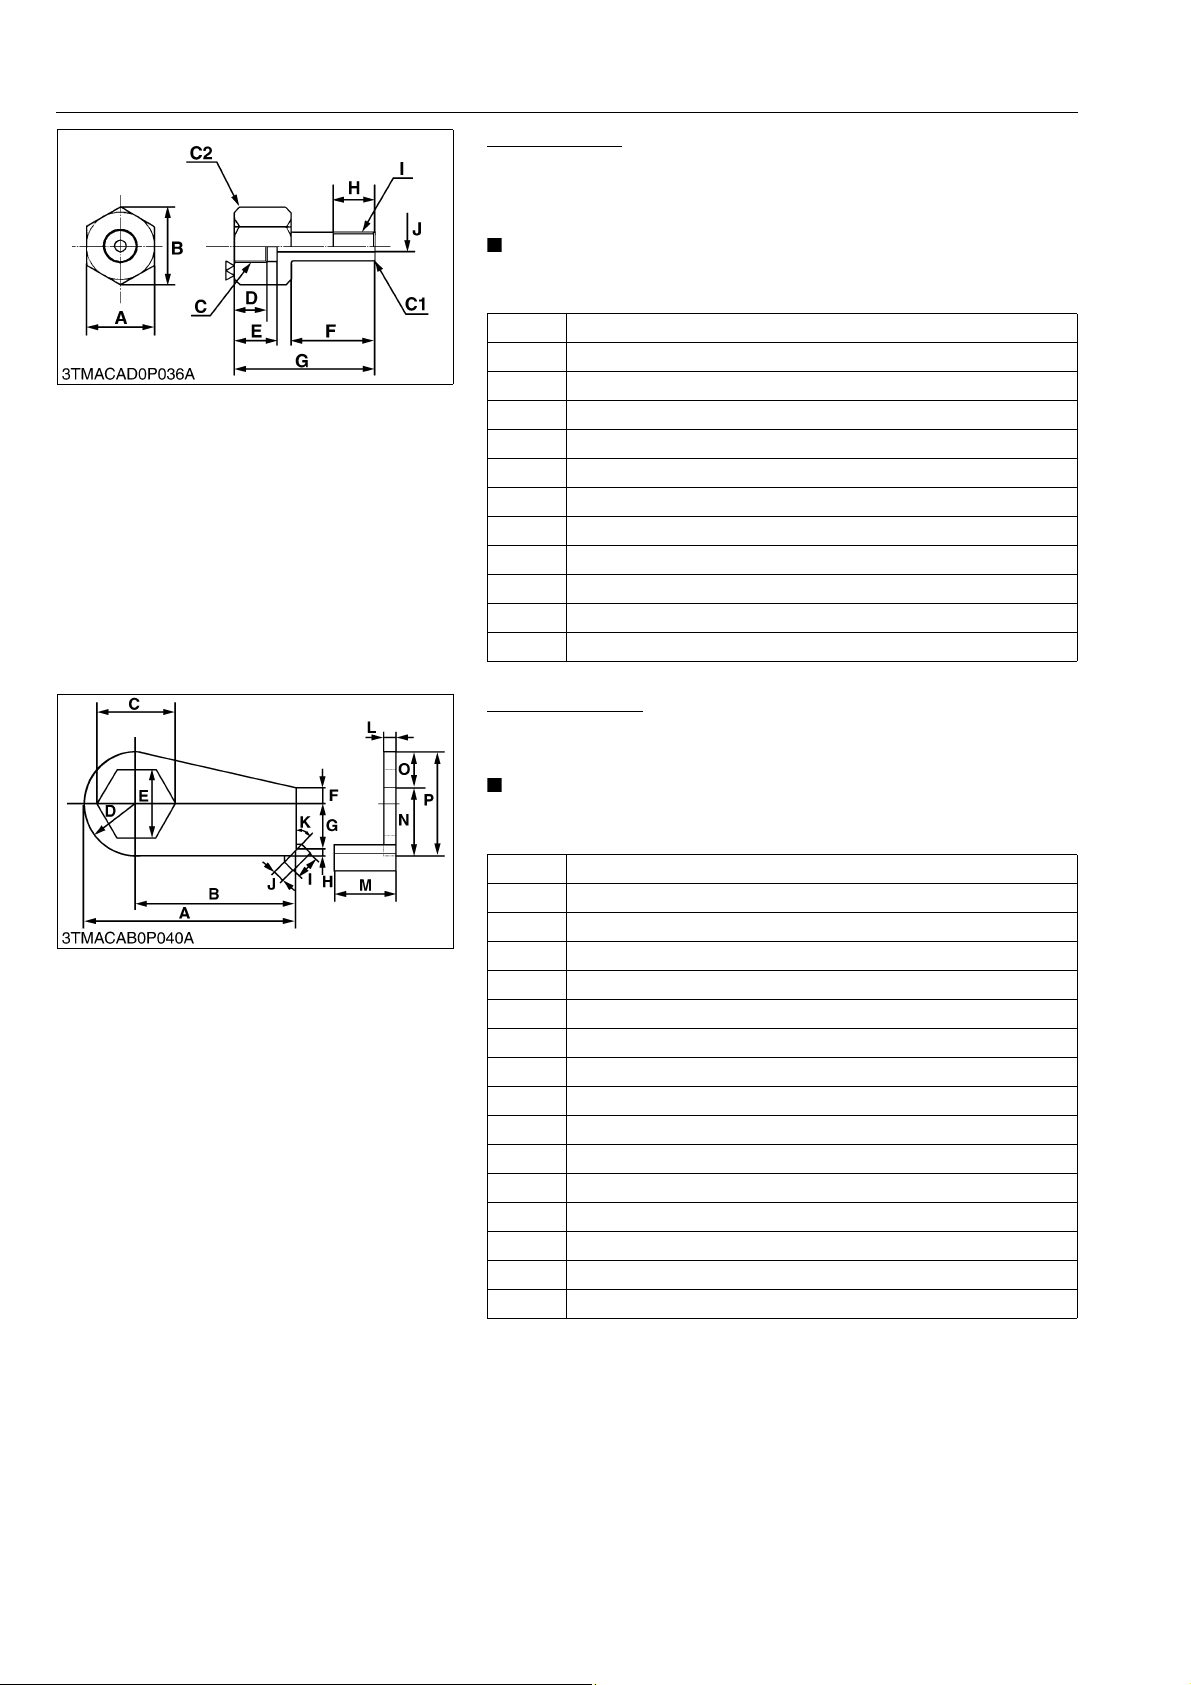
M6040, M7040, WSM
NOTE
NOTE
KiSC issued 07, 2012 A
GENERAL
Valve Adaptor
Application
• Use for measuring the system pressure of shuttle valve, 4WD
and PTO clutch valve.
• The following special tools are not provided, so make them
referring to the figure.
A 24 mm (0.94 in.)
B 27.7 mm (1.09 in.)
C PS1/4
D 11 mm (0.43 in.)
E 15 mm (0.59 in.)
F 40 mm (1.57 in.)
G 60 mm (2.36 in.)
H 15 mm (0.59 in.)
I PT1/8
J 4 mm dia. (0.15 in. dia.)
C1 Chamfer 1 mm (0.039 in.)
C2 Chamfer 2 mm (0.079 in.)
9Y1210143GEG0101US0
Locking Wrench
Application
• Use for locking pinion nut.
• The following special tools are not provided, so make them
referring to the figure.
A 170 mm (6.69 in.)
B 130 mm (5.12 in.)
C 63.5 mm (2.5 in.)
D 40 mm radius (1.57 in. radius)
E 55 mm (2.17 in.)
F 15 mm (0.59 in.)
G 35 mm (1.38 in.)
H 5 mm (0.2 in.)
I 20 mm (0.55 in.)
J 10 mm (0.39 in.)
K 0.78 rad (45 °)
L 10 mm (0.39 in.)
M 50 mm (1.97 in.)
N 55 mm (2.17 in.)
O 25 mm (0.97 in.)
P 80 mm (3.15 in.)
9Y1210143GEG0102US0
G-70
Page 92
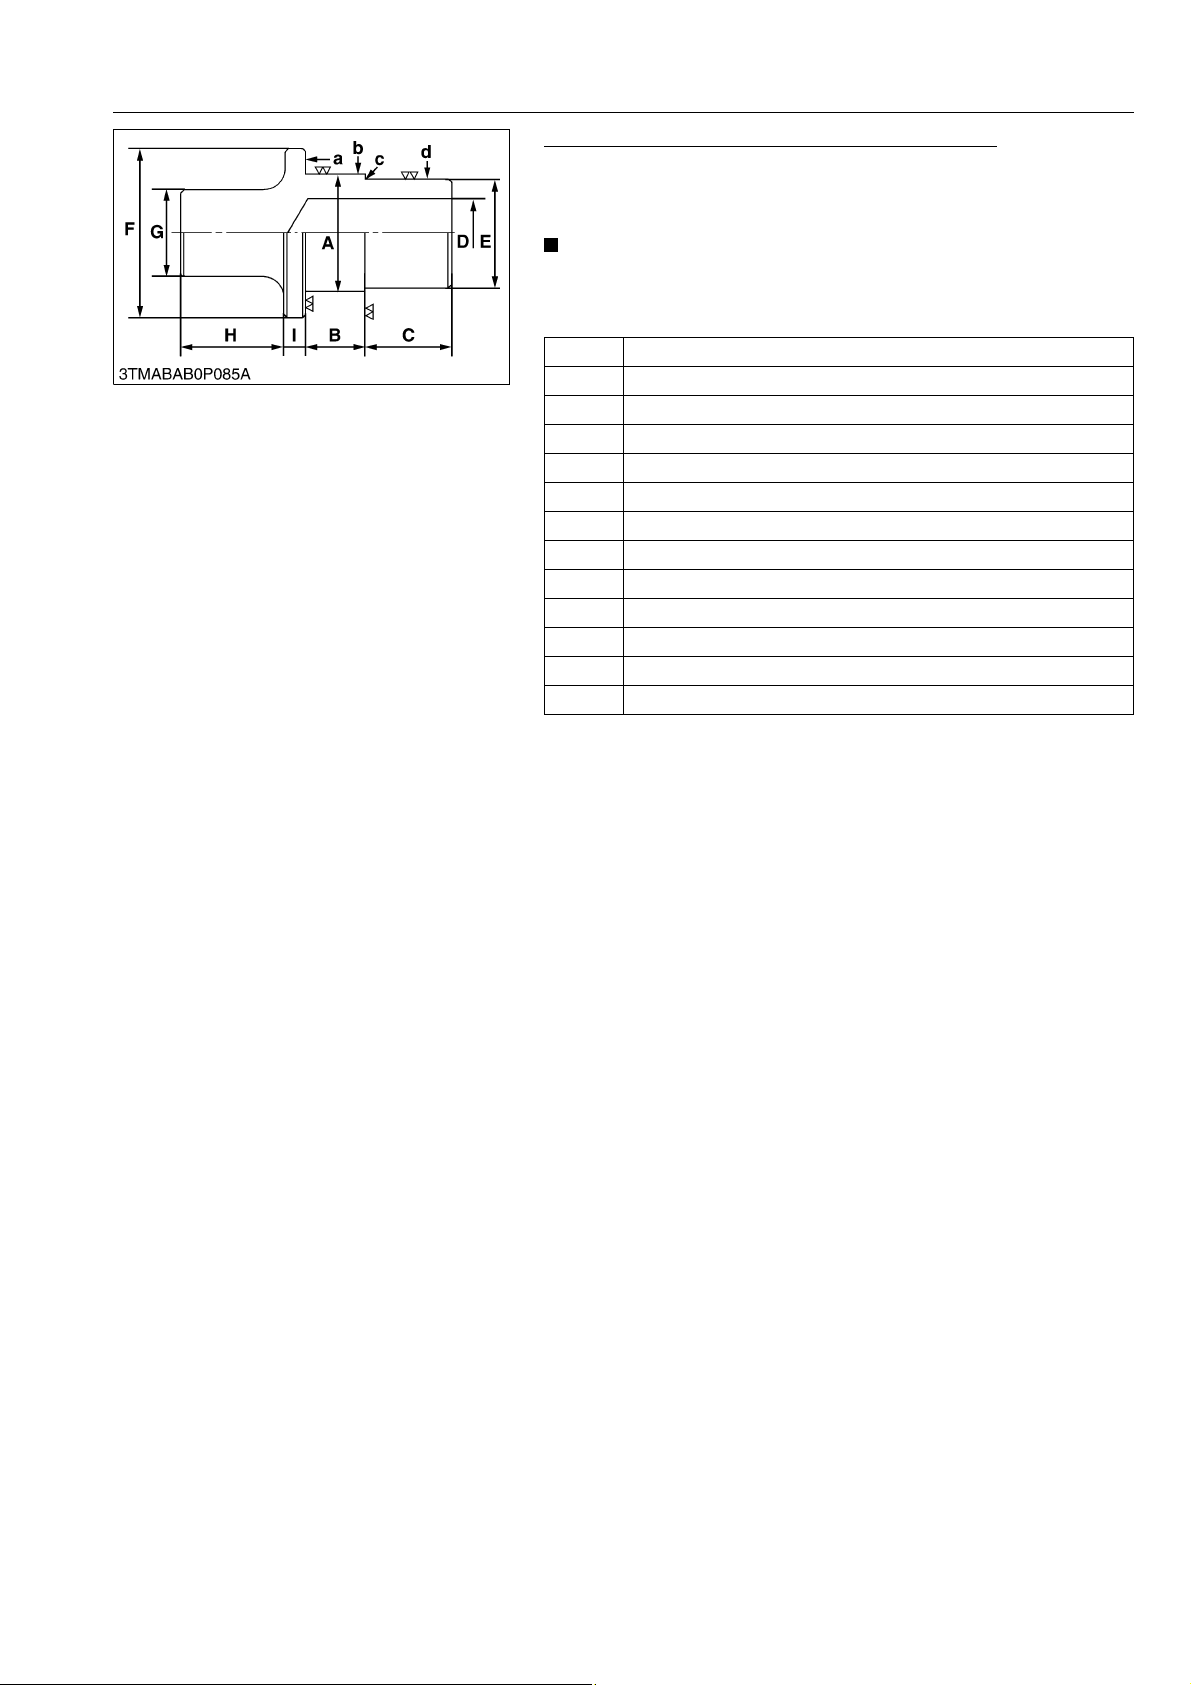
M6040, M7040, WSM
NOTE
KiSC issued 07, 2012 A
GENERAL
Hydraulic Arm Shaft Bushing Press-Fitting Tool
Application
• Use for replacing the hydraulic arm shaft bushings in the
hydraulic cylinder body.
• The following special tools are not provided, so make them
referring to the figure.
• Unless otherwise specified: All surface 12.5 µm (0.0005 in.)
A 49.85 to 49.95 mm (1.963 to 1.966 in.)
B 15 mm (0.59 in.)
C 50 mm (1.969 in.)
D 30 mm (1.18 in.)
E 44.85 to 44.95 mm (1.766 to 1.770 in.)
F 78 mm dia. (3.07 in. dia.)
G 40 mm dia. (1.57 in. dia.)
H 50 mm (1.97 in.)
I 20 mm (0.79 in.)
a 6.3 µm (0.00025 in.)
b 6.3 µm (0.00025 in.)
c 6.3 µm (0.00025 in.)
d 6.3 µm (0.00025 in.)
9Y1210143GEG0103US0
G-71
Page 93
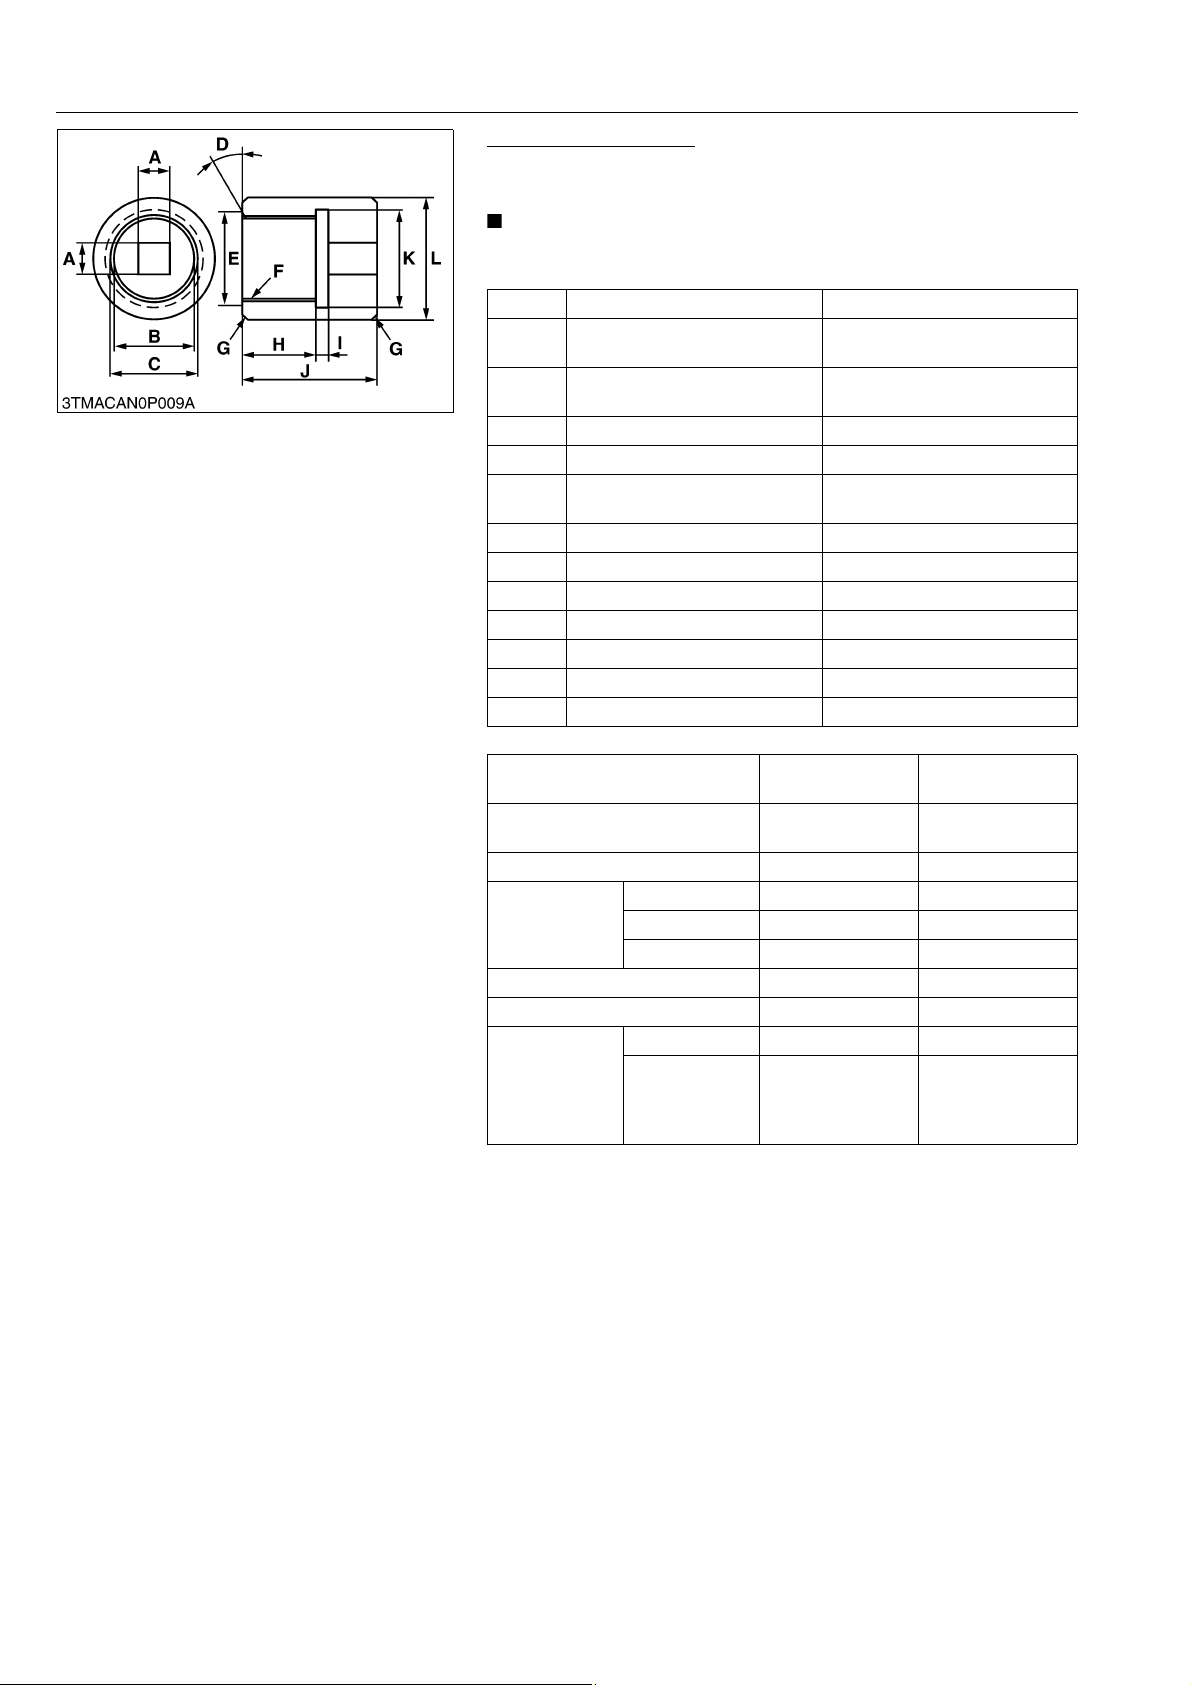
M6040, M7040, WSM
NOTE
KiSC issued 07, 2012 A
GENERAL
Bevel Gear Shaft Tool
Application
• Use for measuring and tightening the bevel gear shaft.
• The following special tools are not provided, so make them
referring to the figure.
Bevel gear for front axle Bevel gear for rear axle
12.75 to 12.90 mm square
A
(0.50 to 0.51 in. square)
B 25 mm dia. (0.984 in. dia.)
C 22.5 mm dia. (0.886 in. dia.) 32.5 mm dia. (1.28 in. dia.)
D 0.52 rad (30 °) 0.52 rad (30 °)
E 26.0 mm dia. (1.02 in. dia.)
F Involute spline (refer to below) Involute spline (refer to below)
G Chamfer 1.0 mm (0.039 in.) Chamfer 1.0 mm (0.039 in.)
H 30 mm (1.18 in.) 30 mm (1.18 in.)
I 5 mm (0.19 in.) 5 mm (0.19 in.)
J 55 mm (2.17 in.) 55 mm (2.17 in.)
K 30 mm dia. (1.18 in. dia.) 40 mm dia. (1.57 in. dia.)
L 40 mm dia. (1.57 in. dia.) 50 mm dia. (1.97 in. dia.)
12.75 to 12.90 mm square
(0.50 to 0.51 in. square)
30.000 to 30.025 mm dia.
(1.1811 to 1.1821 in. dia.)
32.6 to 33.0 mm dia.
(1.28 to 1.29 in. dia.)
(Involute Spline)
Bevel gear for front
axle
Spline (Internal)
Coefficient of profile shifting +0.800 +0.800
Tooth form Stub tooth Stub tooth
Tool
Number of teeth 18 24
Diameter of basic pitch circle 22.5 mm 30.0 mm
Tooth thickness
Module 1.250 1.250
Pressure angle 0.35 rad (20 °) 0.35 rad (20 °)
Grade Class a Class a
Over pitch
diameter
25 × 18Z × 1.25m × 2032.5 × 24Z × 1.25m
20.084 to
20.155 mm
(Pin diameter
= 2.50 mm)
Bevel gear for rear
axle
× 20
27.584 to
27.656 mm
(Pin diameter
= 2.50 mm)
(Reference)
• This tool can be made by welding the coupling (33710-41310)
and socket wrench for front bevel gear shaft.
• This tool can be made by welding the coupling (3C001-32010)
and socket wrench for rear bevel gear shaft.
9Y1210143GEG0104US0
G-72
Page 94
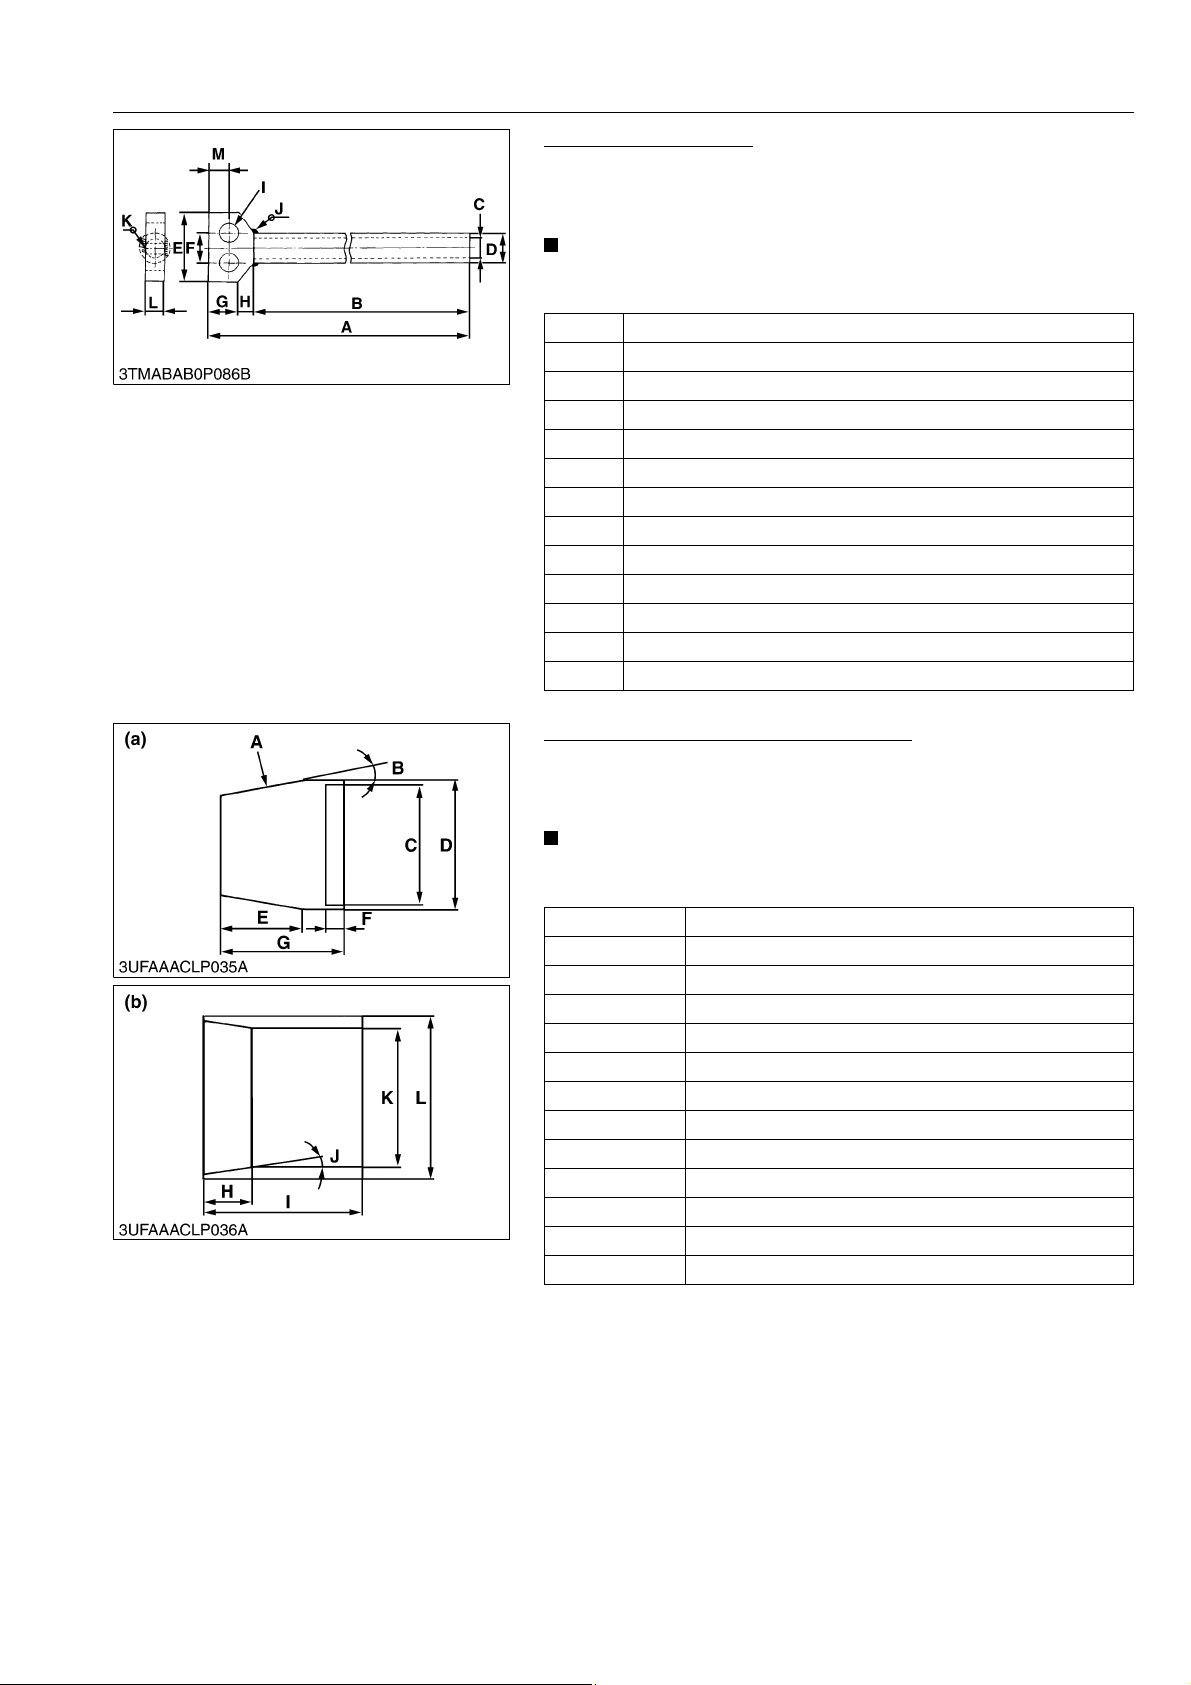
M6040, M7040, WSM
NOTE
NOTE
KiSC issued 07, 2012 A
GENERAL
Draft Control Test Bar
Application
• Use for checking the lift range and floating range of hydraulic
draft control.
• The following special tools are not provided, so make them
referring to the figure.
A 1045 mm (41.14 in.)
B 1000 mm (29.37 in.)
C 20 mm dia. (0.79 in. dia.)
D 30 mm dia. (1.18 in. dia.)
E 100 mm (3.94 in.)
F 35.5 mm (1.4 in.)
G 30 mm (1.18 in.)
H 15 mm (0.59 in.)
I 20 mm dia. (0.79 in. dia.)
J Weld all around
K Weld all around
L 20 mm (0.79 in.)
M 26 mm (1.02 in.)
9Y1210143GEG0105US0
Hydraulic Cylinder Piston Sealing Tool
Application
•Tool (a): Use for installing the piston seals to the piston.
•Tool (b): Use for installing the piston to the cylinder.
• The following special tools are not provided, so make them
referring to the figure.
Cylinder Size 55 mm (2.17 in.)
A 80 √
B 0.16 rad (9.0 °)
C 55.18 mm (2.172 in.)
D 56.18 mm (2.212 in.)
E 42 mm (1.7 in.)
F 10 mm (0.39 in.)
G 58.5 mm (2.30 in.)
H 14 mm (0.55 in.)
I 35 mm (1.4 in.)
J 0.12 rad (7.0 °)
K 55.0 mm (2.17 in.)
L 63.9 mm (2.52 in.)
9Y1210143GEG0106US0
G-73
Page 95
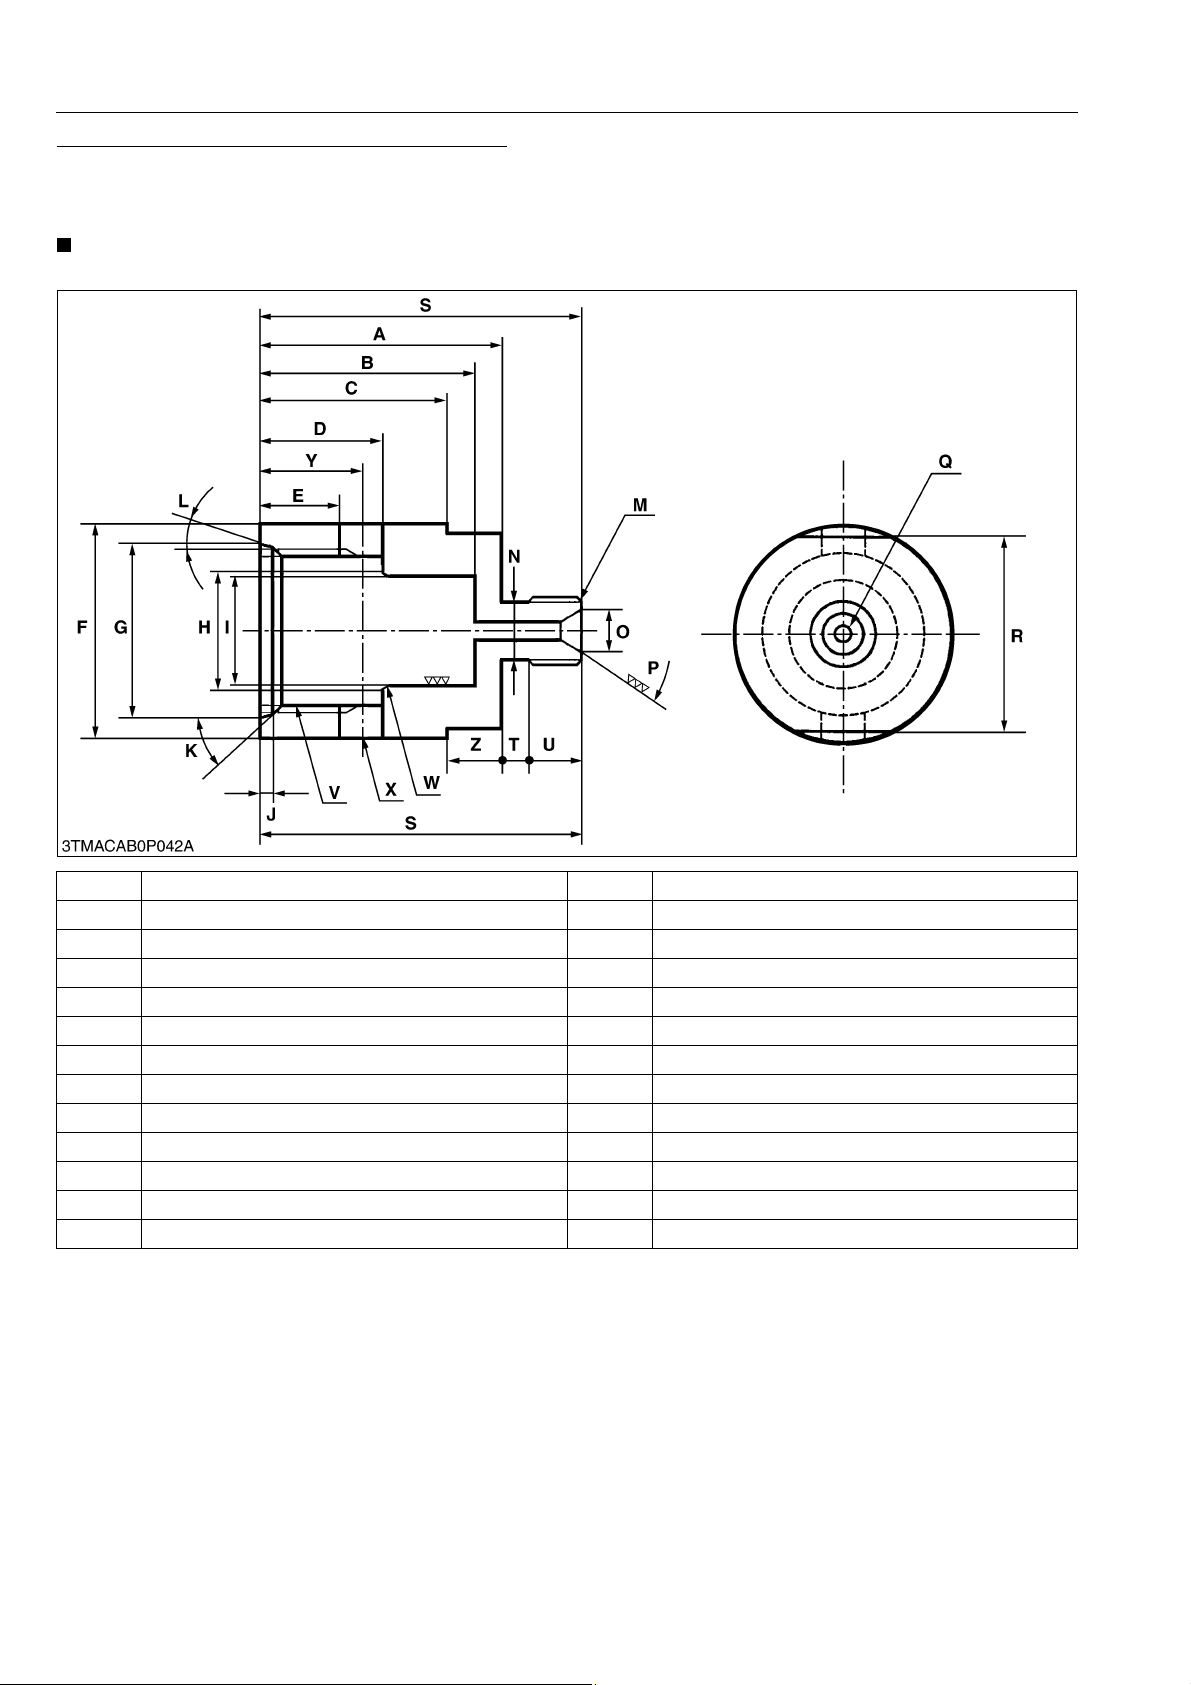
M6040, M7040, WSM
NOTE
KiSC issued 07, 2012 A
GENERAL
Cylinder Safety Valve Setting Pressure Adaptor
Application
• Use to adapt the safety valve to the nozzle tester to measure cracking pressure and test the check valve on the
safety valves.
• The following special tools are not provided, so make them referring to the figure.
A 45 mm (1.77 in.) N 10 mm dia. (0.39 in. dia.)
B 40 mm (1.58 in.) O 7.5 mm dia. (0.3 in. dia.)
C 35 mm (13.8 in.) P 1.05 rad (60 °)
D 23 to 23.3 mm (0.9055 to 0.9713 in.) Q 3 mm dia. (1.18 in. dia.)
E 16 mm (0.63 in.) R 36 mm (1.18 in.)
F 40 mm dia. (1.58 in. dia.) S 60 mm (2.36 in.)
G 32.4 to 32.7 mm dia. (1.2756 to 1.2874 in. dia.) T 5 mm (0.20 in.)
H 21 mm dia. (0.83 in. dia.) U 10 mm (0.39 in.)
I 20 to 20.05 mm dia. (0.7874 to 0.7894 in. dia.) V M30 × P1.5
J 2.5 to 2.59 mm (0.0984 to 0.1097 in.) W 0.52 rad (30 °)
K 0.79 rad (45 °) X 8 mm dia. (0.32 in. dia.)
L 0.26 rad (15 °) Y 19 mm (0.75 in.)
M M12 × P1.5 Z 10 mm (0.39 in.)
9Y1210143GEG0107US0
G-74
Page 96
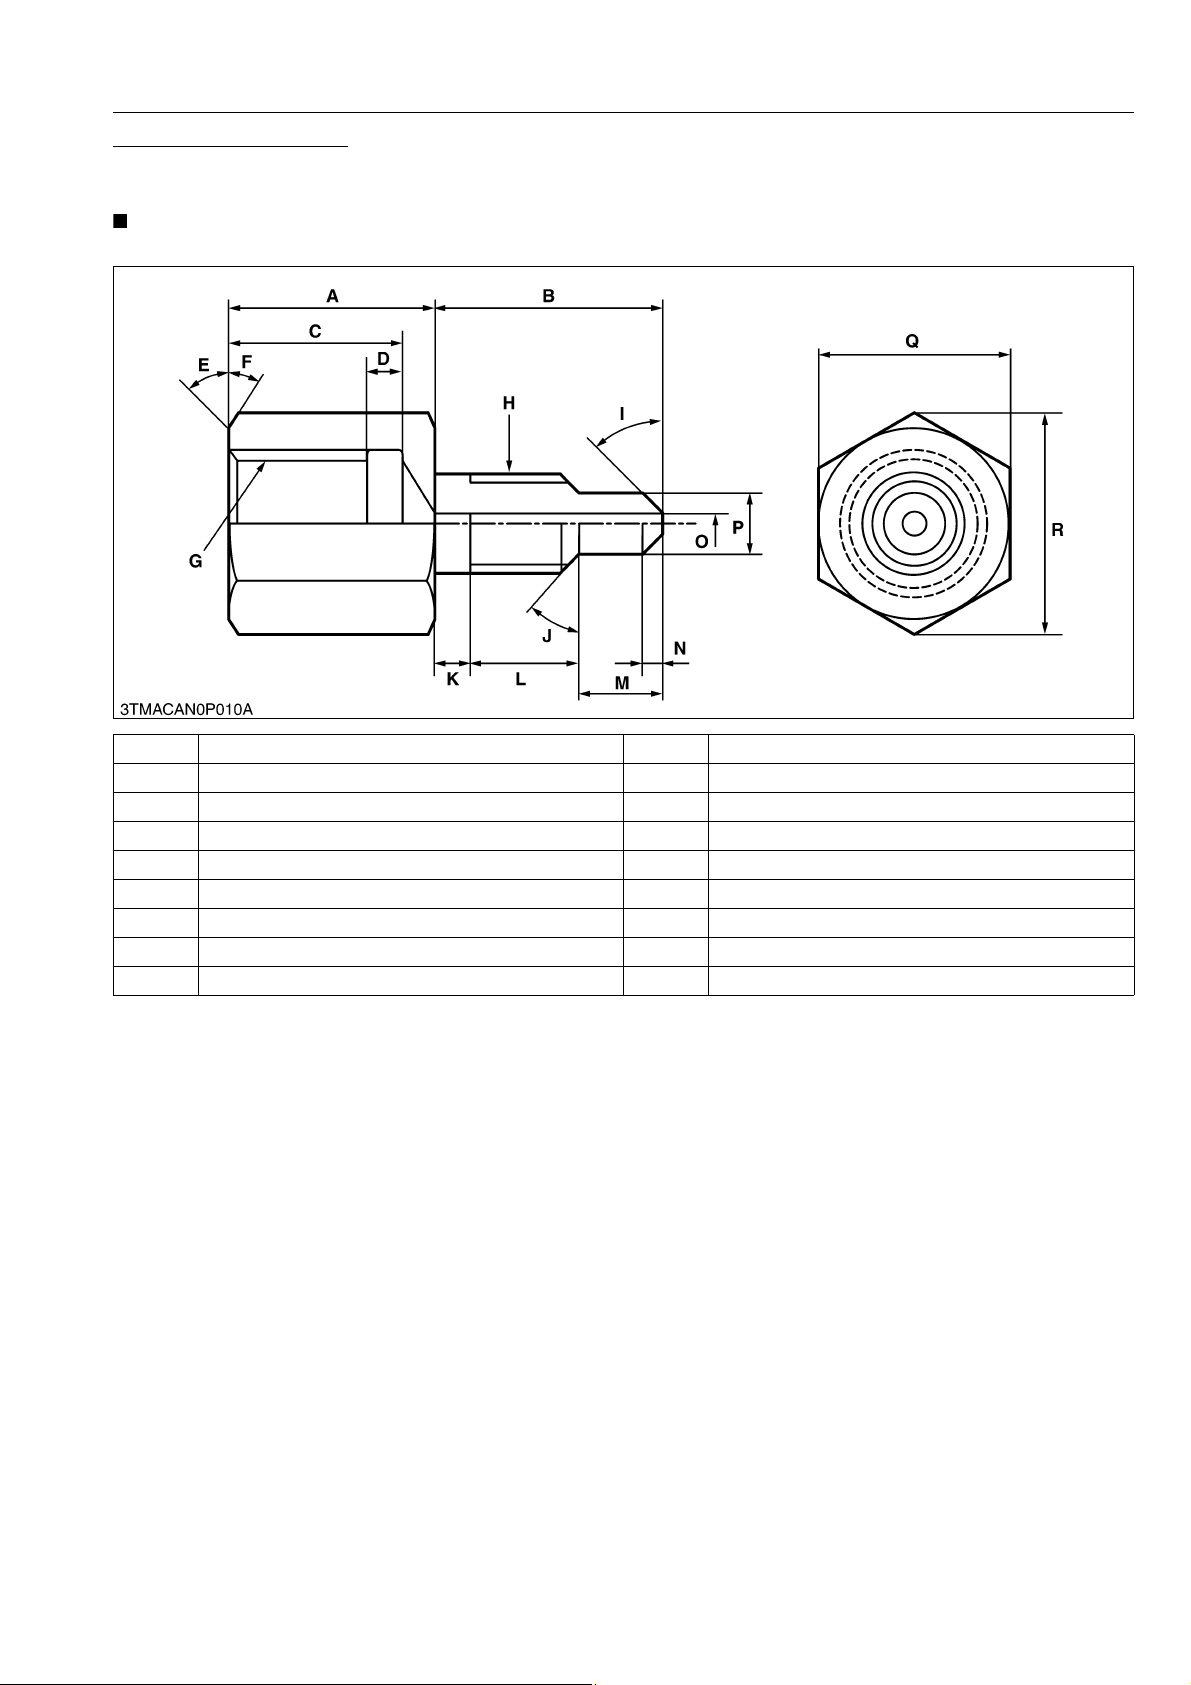
M6040, M7040, WSM
NOTE
KiSC issued 07, 2012 A
Hydraulic Brake Adaptor
Application
• Use for testing the hydraulic brake oil linkage.
• The following special tools are not provided, so make them referring to the figure.
GENERAL
A 18 mm (0.71 in.) J 0.79 rad (45 °)
B 15 mm (0.59 in.) K 6 mm (0.24 in.)
C 15 mm (0.59 in.) L 5 mm (0.20 in.)
D 3 mm (0.12 in.) M 4 mm (0.16 in.)
E 0.79 rad (45 °) N 2 mm (0.079 in.)
F 0.52 rad (30 °) O 2 mm dia. (0.079 in. dia.)
G PS 1/4 P 5 mm dia. (0.20 in. dia.)
H M7 × P1.0 Q 17 mm (0.67 in.)
I 0.79 rad (45 °) R 19.6 mm (0.77 in.)
9Y1210143GEG0108US0
G-75
Page 97
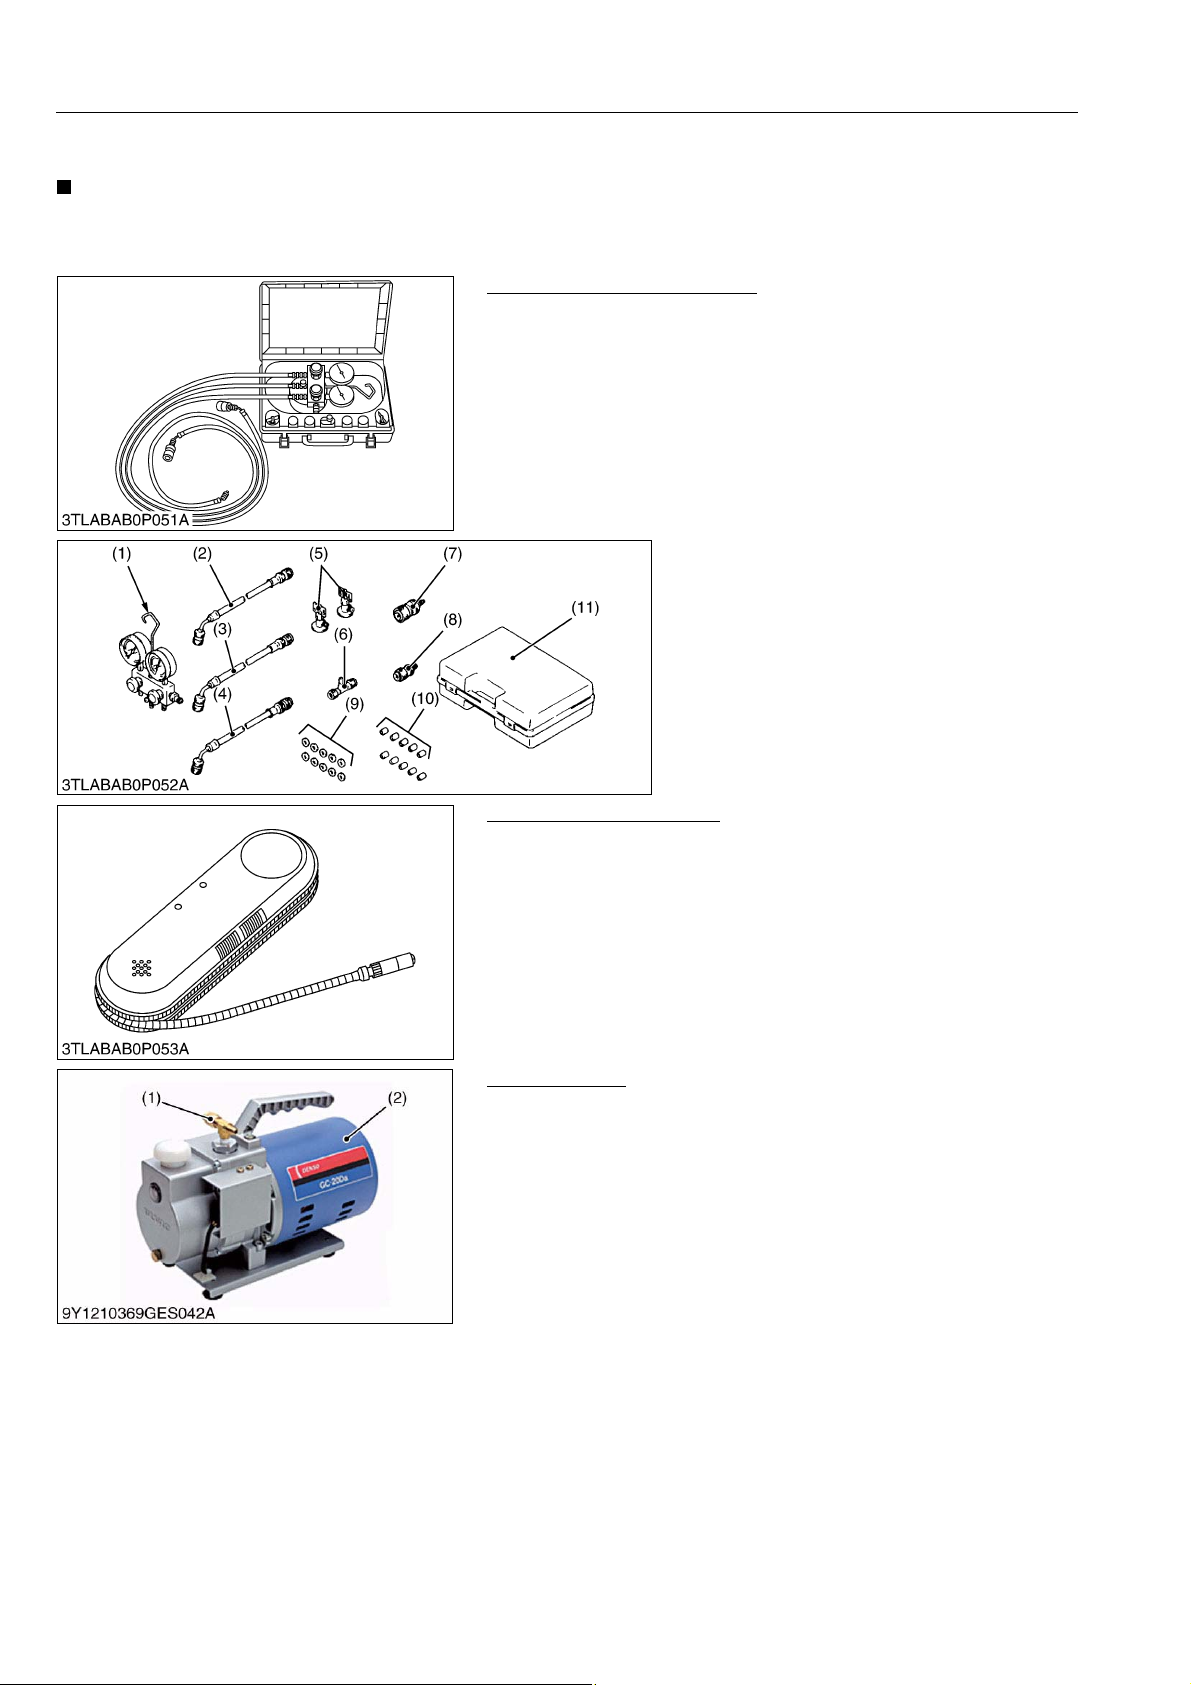
M6040, M7040, WSM
NOTE
KiSC issued 07, 2012 A
GENERAL
[3] SPECIAL TOOLS FOR AIR CONDITIONER UNIT
• Special tools for R134a refrigerant air conditioning system introduced below are available from DENSO
CO. LTD.
9Y1210143GEG0109US0
Air Conditioner Service Tool
Code No.
• DENSO 95048-00063
Application
• Use for charging, testing or discharging the air conditioning
system.
(1) Manifold Gauge Assembly (95048-10090)
(2) Charging Hose (Red: HI) (95948-10270)
(3) Charging Hose (Blue: LO) (95948-10280)
(4) Charging Hose (Green) (95948-10260)
(5) Can Tap Valve (95048-10150)
(6) T Joint (95048-10160)
(7) Quick Coupler (HI) (95048-10130)
(8) Quick Coupler (LO) (95048-10140)
(9) Service Valve Packing (95906-10310)
(10) Charging Hose Packing (95906-10300)
(11) Tool Case (95949-10610)
WSM000001GEG0042US0
Electric Gas Leak Tester
Code No.
• DENSO 95146-00060
Application
• Use for gas leak testing the air conditioning system.
WSM000001GEG0043US0
Vacuum Pump
Code No.
• DENSO 95046-00130 (AC220V)
• DENSO 95046-00140 (AC240V)
Application
• Use for evacuating the air conditioning system.
(1) Adaptor (For 134a) (2) Vacuum Pump
WSM000001GEG0044US0
G-76
Page 98
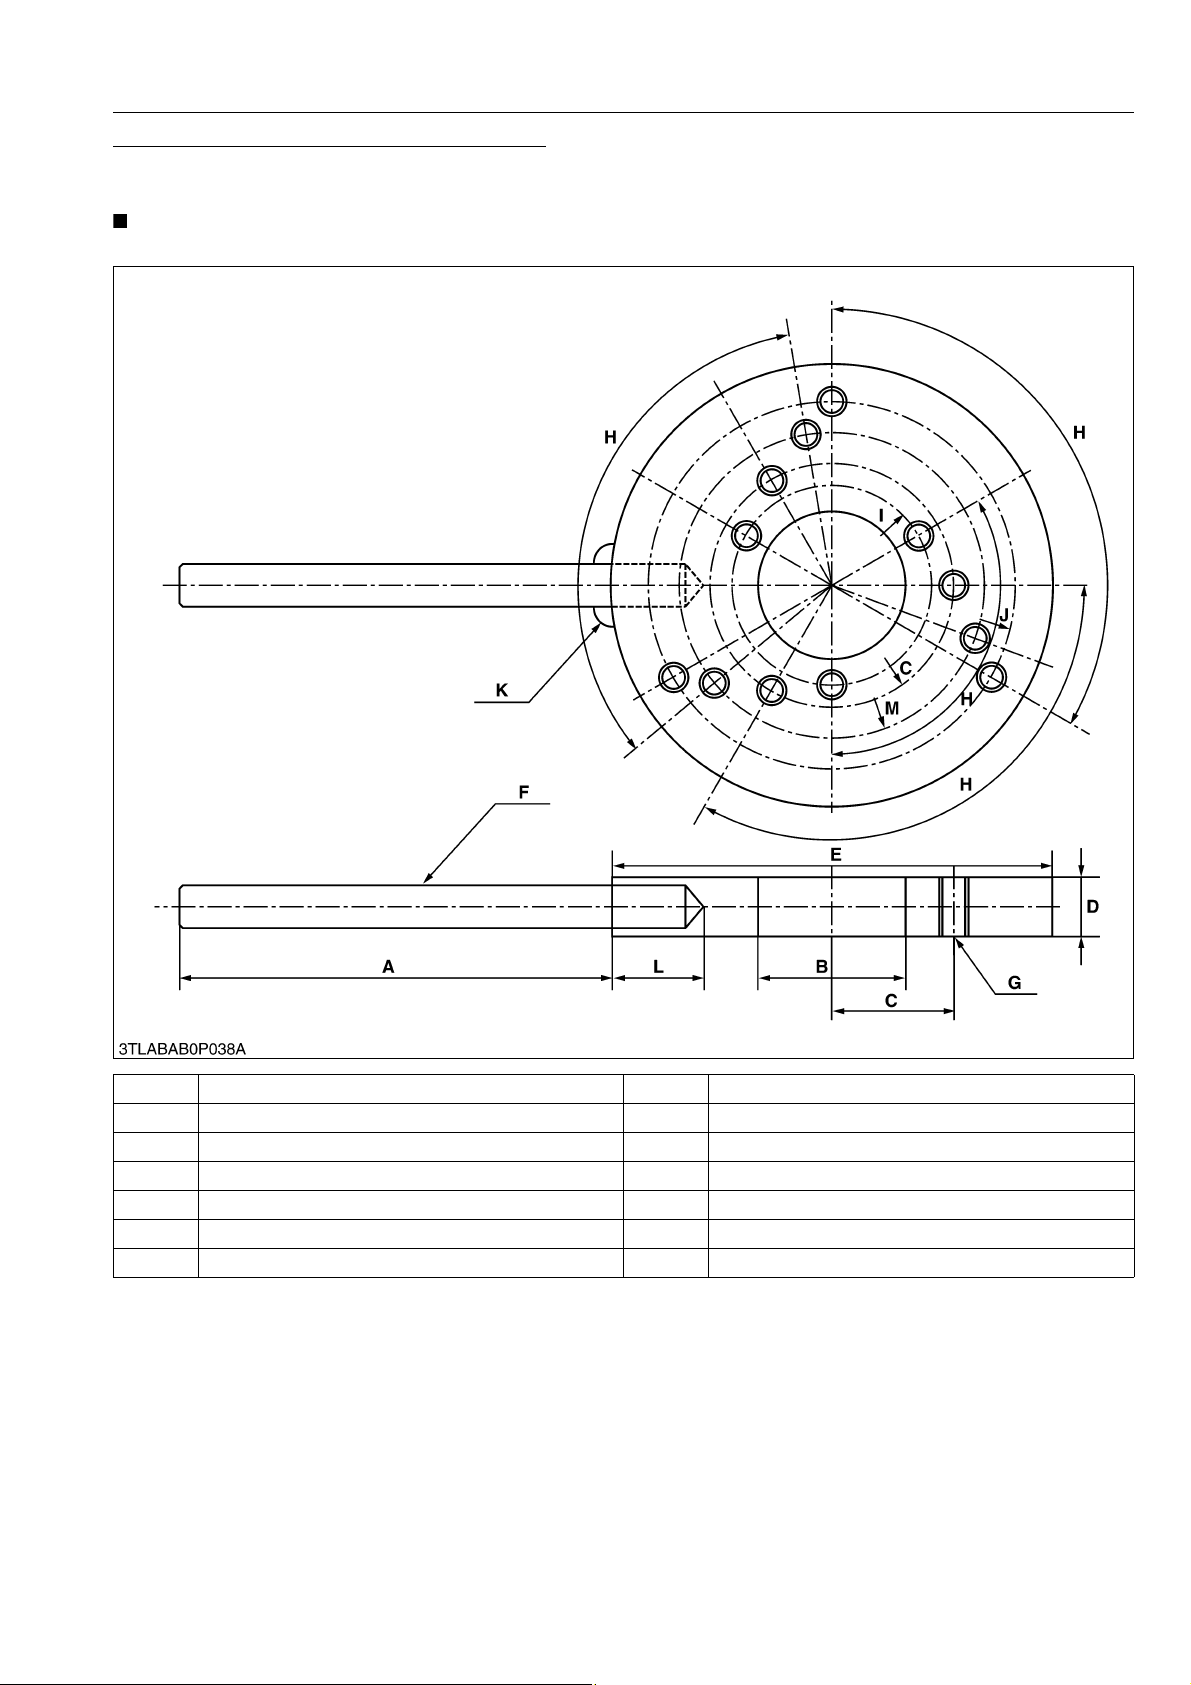
M6040, M7040, WSM
NOTE
KiSC issued 07, 2012 A
Stopper Magnet Clutch (For A/C Compressor)
Application
• Use to loosen and tighten the magnet clutch mounting nut. (Use radius M)
• The following special tools are not provided, make them referring to the figure.
GENERAL
A 125 mm (4.92 in.) H 4.52 rad (120 °)
B 40 mm dia. (1.57 in. dia.) I Radius 27 mm (Radius 1.06 in.)
C Radius 33 mm (Radius 1.30 in.) J Radius 50 mm (Radius 1.97 in.)
D 16 mm (0.63 in.) K Weld all around
E 120 mm dia. (4.72 in. dia.) L 20 mm (0.78 in.)
F 12 mm dia. (0.47 in. dia.) M Radius 41 mm (Radius 1.61 in.)
G 3 × M8 × 1.25 All screws
9Y1210143GEG0111US0
G-77
Page 99
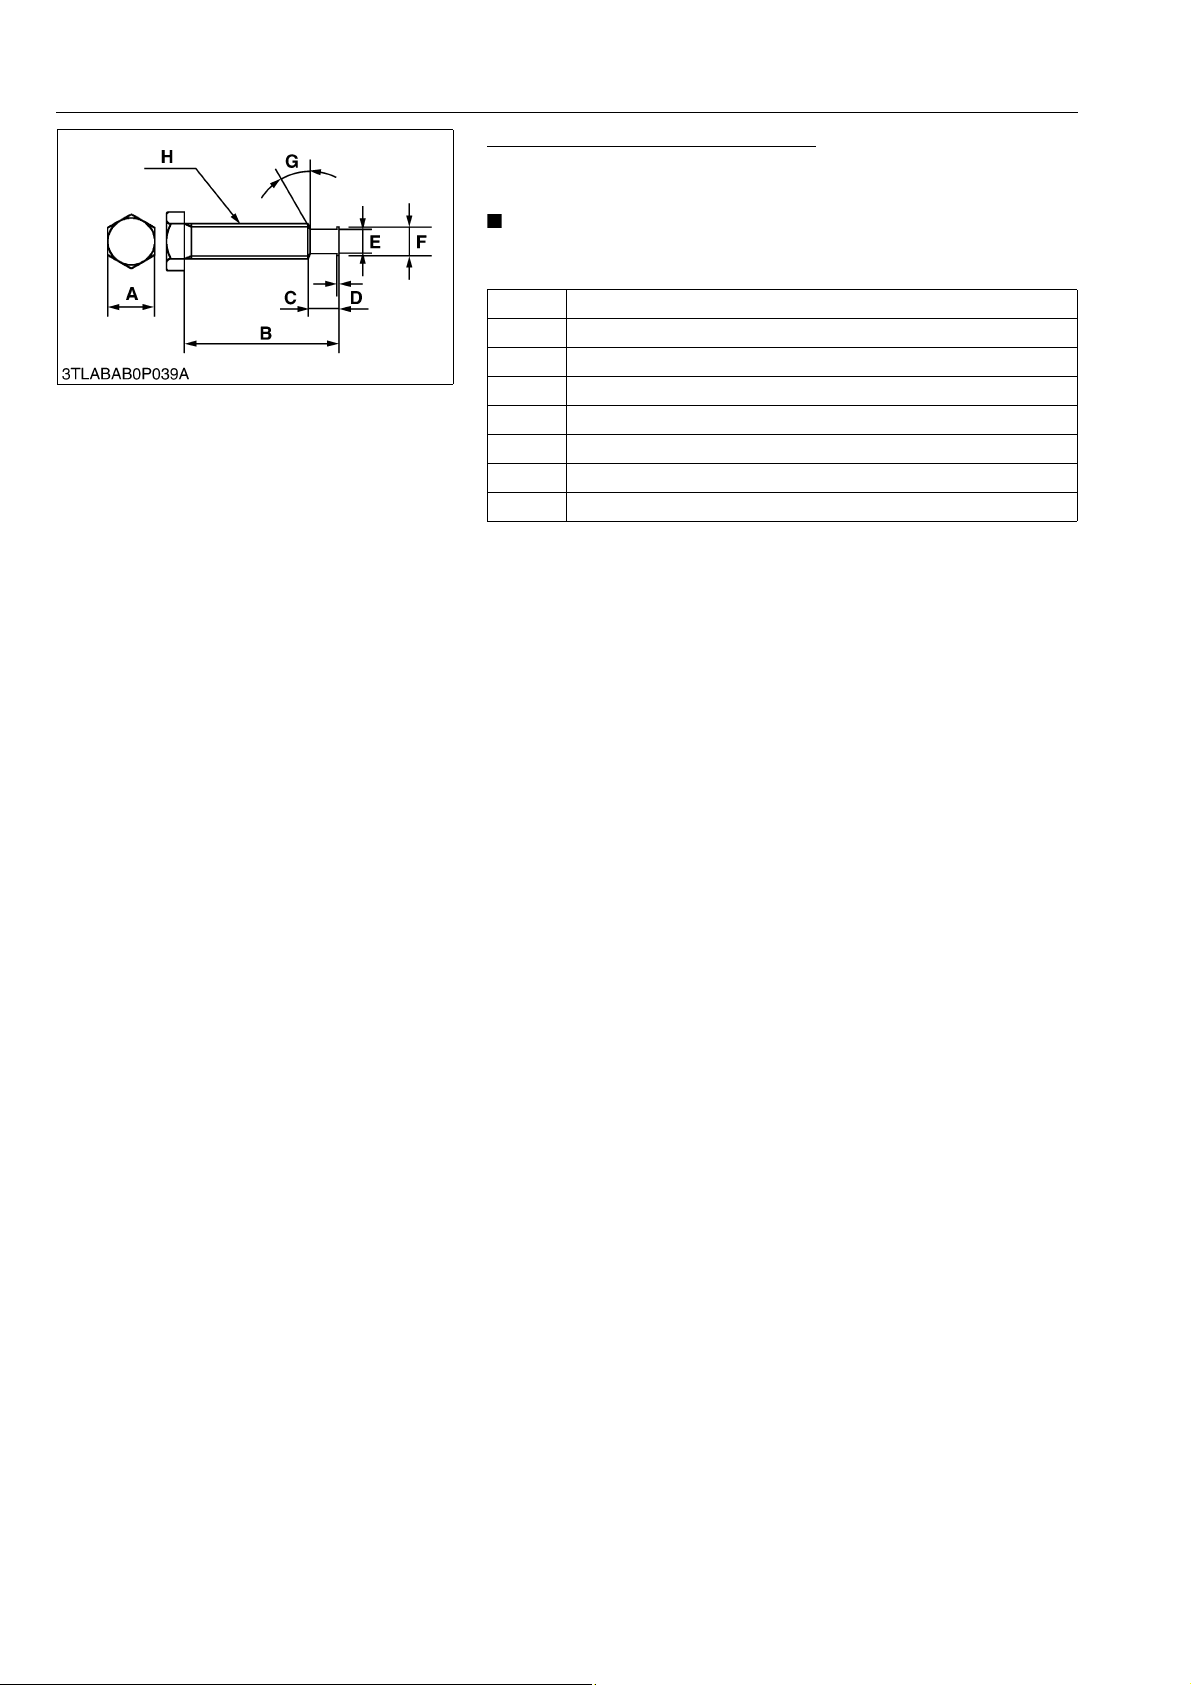
M6040, M7040, WSM
NOTE
KiSC issued 07, 2012 A
GENERAL
Stopper Bolt (for A/C Compressor)
Application
• Use with the stopper magnet clutch.
• The following special tools are not provided, make them
referring to the figure.
A 12 mm (0.47 in.)
B 35 mm (1.38 in.)
C 7 mm (0.28 in.)
D 0.4 mm (0.016 in.)
E 5.5 mm dia. (0.22 in. dia.)
F 6.5 mm dia. (0.26 in. dia.)
G 0.52 rad (30 °)
H M8 × P1.25
9Y1210143GEG0112US0
G-78
Page 100
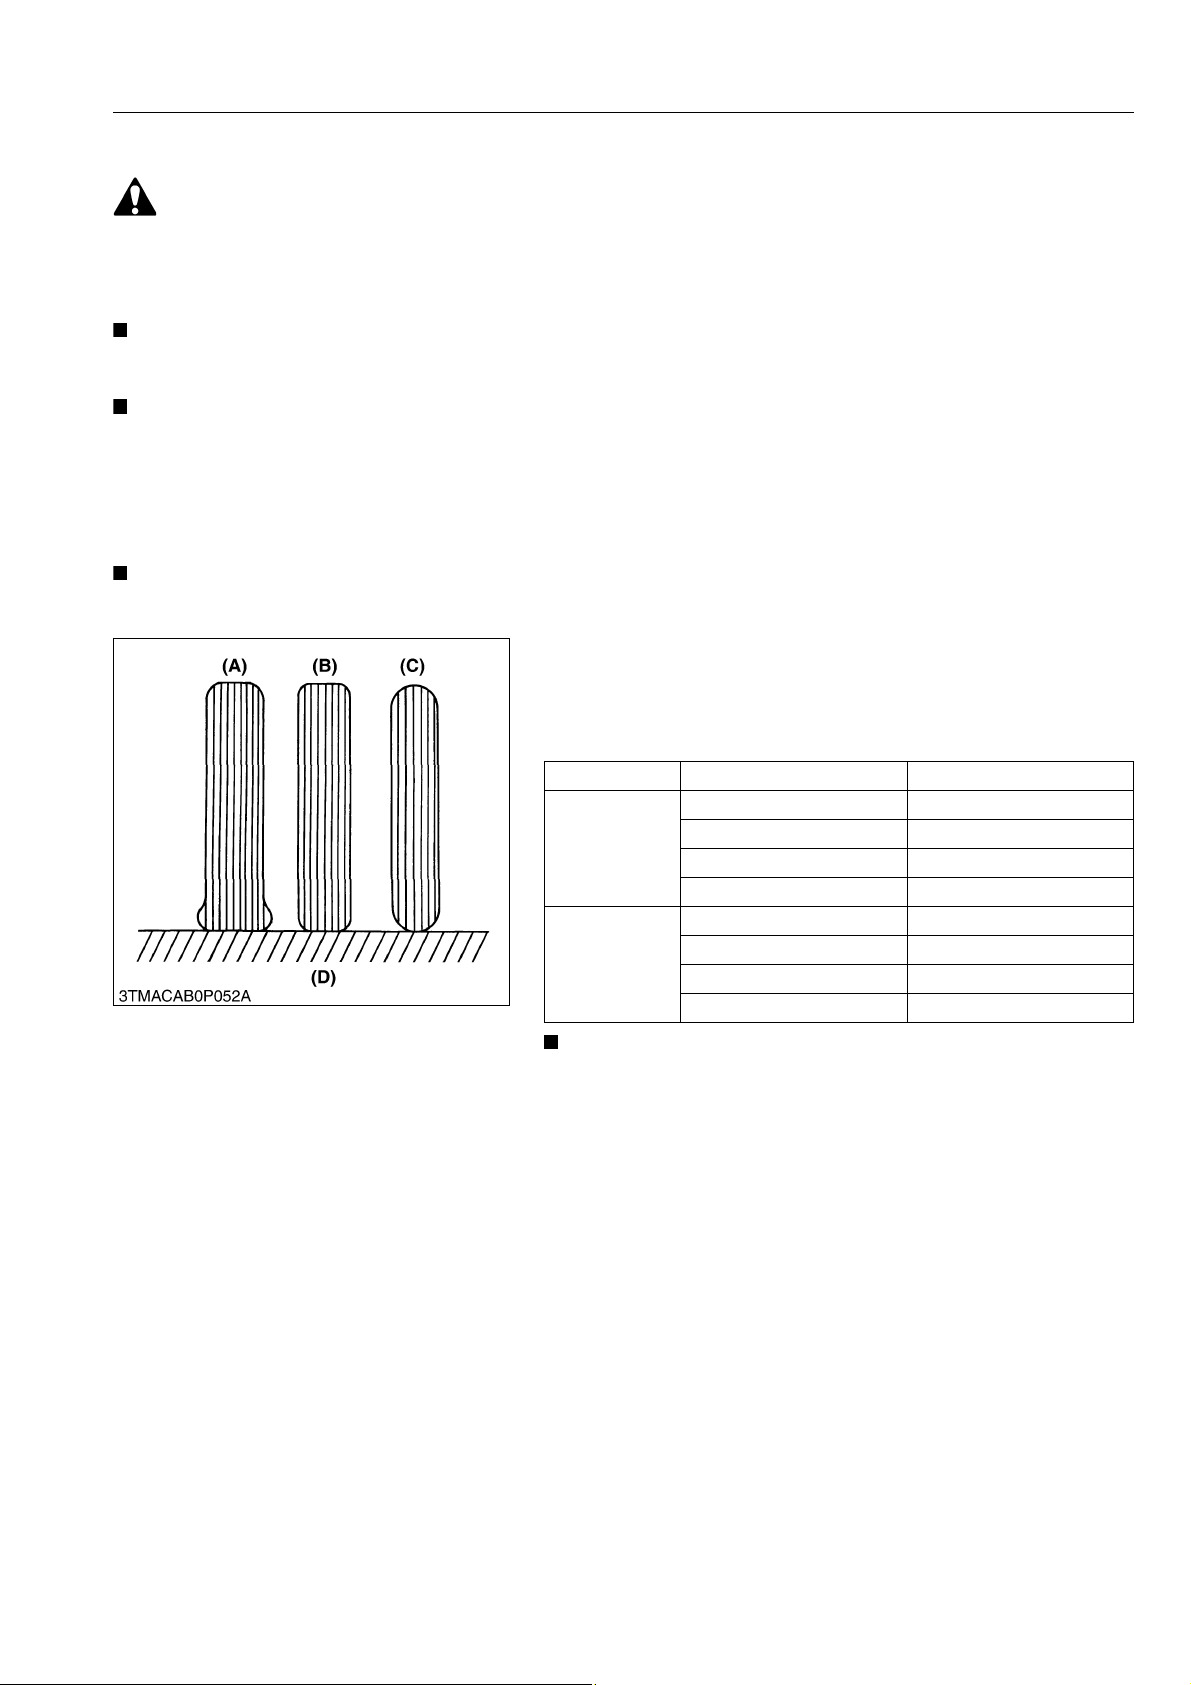
M6040, M7040, WSM
WARNING
IMPORTANT
NOTE
IMPORTANT
NOTE
KiSC issued 07, 2012 A
GENERAL
9. TIRES
• Do not attempt to mount a tire on a rim. This should be done by a qualified person with the proper
equipment.
• Always maintain the correct tire pressure. Do not inflate tires above the recommended pressure show in
the operator's manual.
• Do not use tires other than those approved by KUBOTA.
• Dual tires are not approved.
• When optional different-diameter tires are fitted on the machine, the travel speed display mode must be
changed. Otherwise the travel speed will not get correctly displayed. Such mode switching is also needed
when the original tires are back on the machine. (See page 9-S22.)
9Y1210143GEG0113US0
[1] TIRE SIZE AND INFLATION PRESSURE
• Excessive wear of tires may occur due to improper gear ratio.
9Y1210143GEG0114US0
Through the tire pressure is factory-set to the prescribed level,
it naturally drops slowly in the course of time. Thus, check it every
day and inflate as necessary.
Recommended Inflation Pressure
• Maintain the pressure shown below for normal use.
Tire Sizes Inflation pressure
2
, 30 psi)
2
, 60 psi)
2
, 20 psi)
2
, 20 psi)
2
, 20 psi)
2
, 24 psi)
2
, 18 psi)
2
, 18 psi)
Front
Rear
9.5-R20 210 kPa (2.1 kgf/cm
12.5 / 80-18 420 kPa (4.3 kgf/cm
320 / 70R20 140 kPa (1.4 kgf/cm
320 / 85R20 (12.4-20) 140 kPa (1.4 kgf/cm
380 / 85R28 (14.9-28) 140 kPa (1.4 kgf/cm
18.4-26 170 kPa (1.7 kgf/cm
420 / 70R28 120 kPa (1.2 kgf/cm
420 / 85R30 (16.9-30) 120 kPa (1.2 kgf/cm
• Maintain the maximum pressure in front tires, if using a
front loader of when equipped with lots of front weight.
(A) Insufficient
(B) Standard
(C) Excessive
(D) Ground
9Y1210143GEG0115US0
G-79
 Loading...