

Page 1
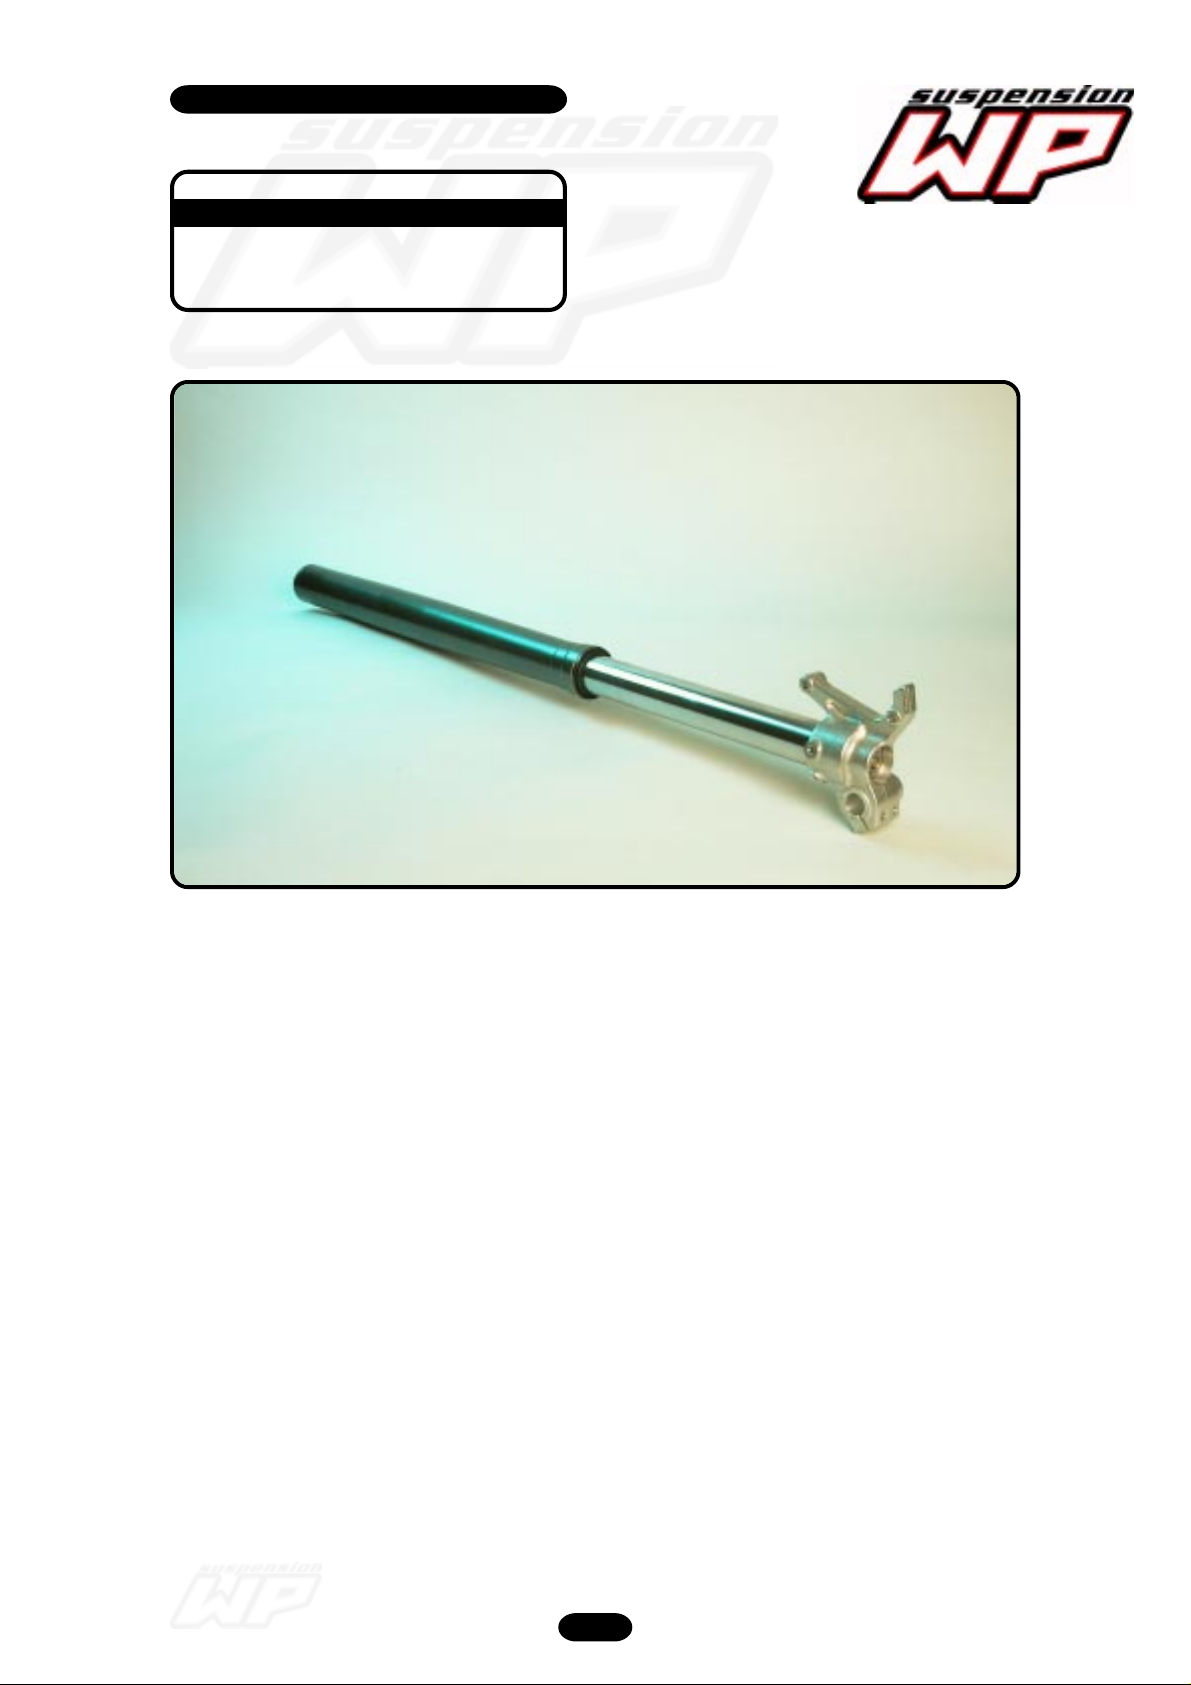
Workshop manual
4860 MXMA
Product
Exploded View
Disassembly & Assembling
12_234
Frontfork 4860 MXMA 2003 05/2002
Frontfork
4860 MX Multi Adjuster 2003
Introduction 2
Exploded view 3
Disassembly forkleg 4
Disassembly cartridge 17
Disassembly compression holder 21
Assembling compression holder 24
Disassembly tap rebound 27
Assembling tap rebound 31
Assembling cartridge 34
Assembling forkleg 37
1
Page 2

Workshop manual
4860 MXMA
Product
Exploded View
Disassembly & Assembling
General notice:
Pay attention to the following notes, when you are
working with WP Suspension products as described in
this workshop manual.
Always use clean and professional tools.
Regular you need next to the general equipment, the
special tools of WP Suspension.
These tools with a unique “T” number (available at
WP Suspension) protect you from damaging the parts.
Introduction
Always use aluminium protector-plates, when clamping
our products or parts in the vice.
Always replace damaged or worn parts.
Clean all parts before assembling.
Caution:
Many times it is necesarry to assemble parts with
T131, T132 and T163.
These parts must dry for at least four hours!!
Frontfork 4860 MXMA 2003 05/2002
2
Page 3
Workshop manual
4860 MXMA
Product
Exploded View
Disassembly & assembling
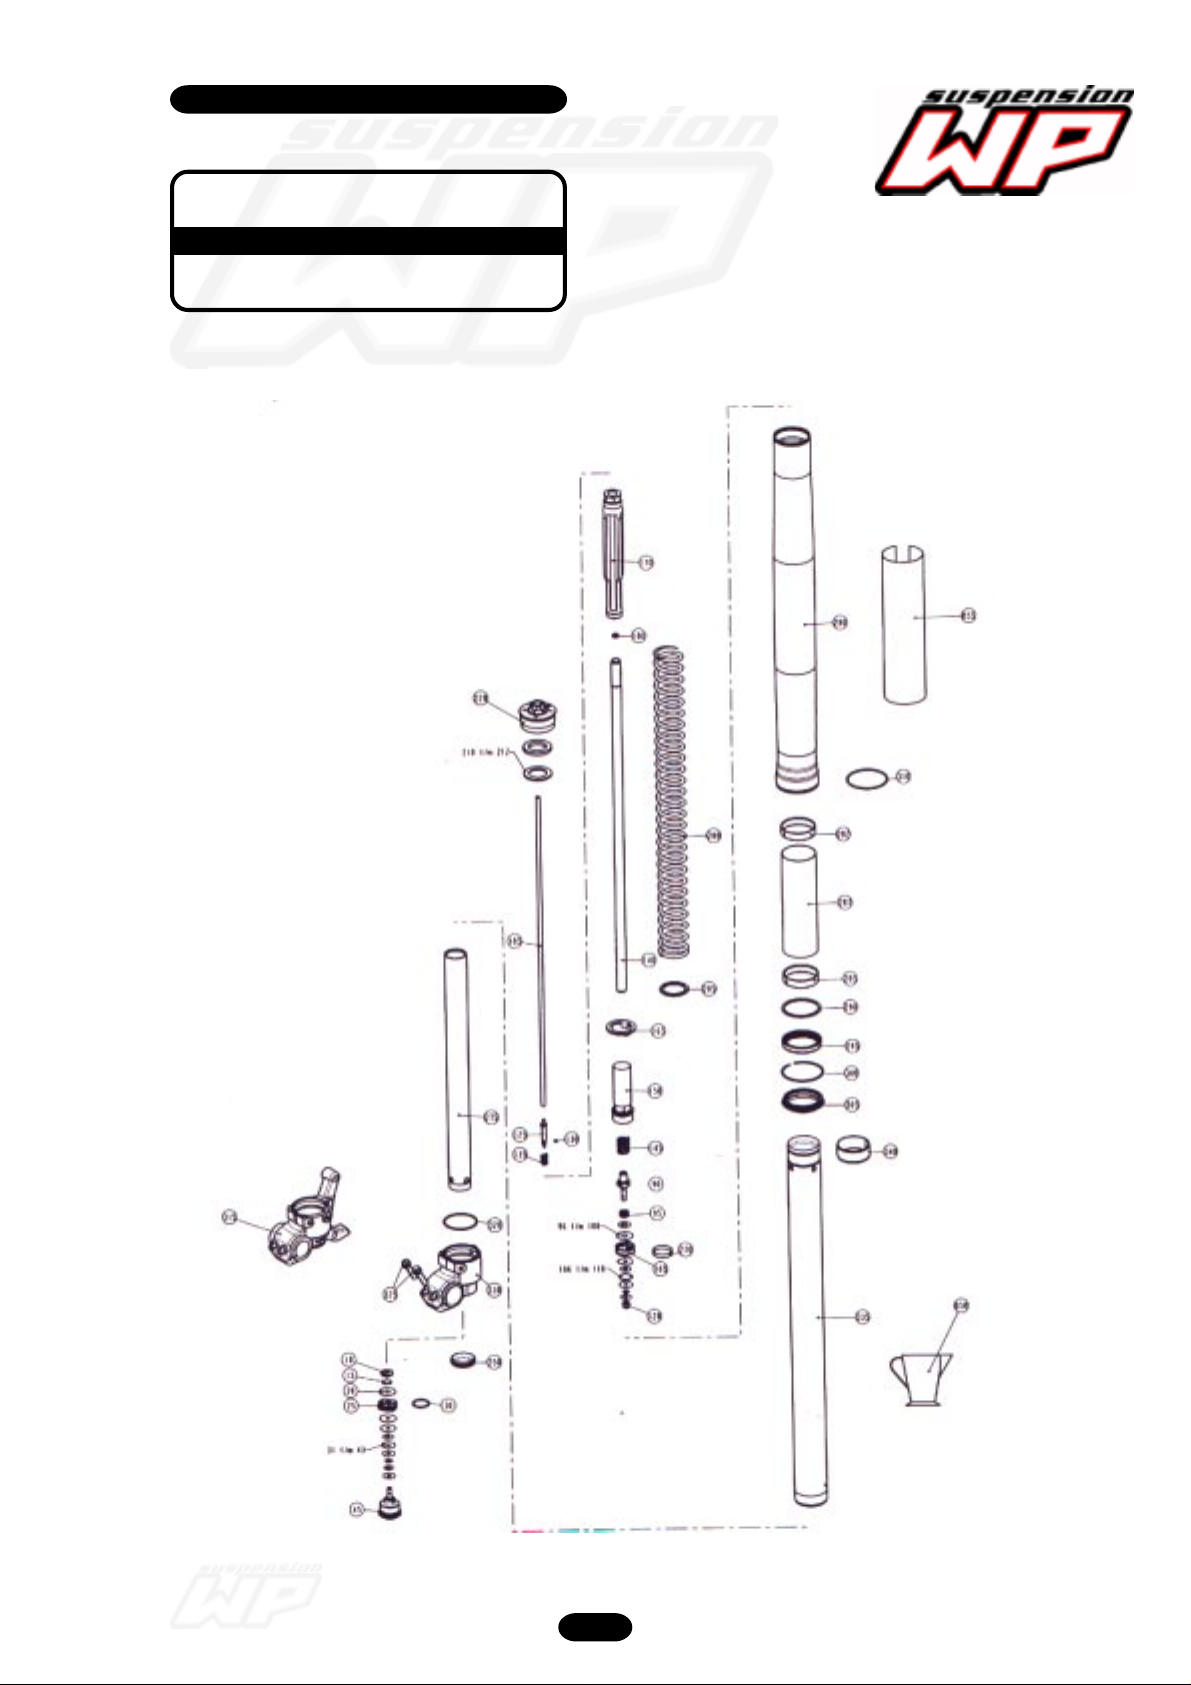
Exploded view
Frontfork 4860 MXMA 2003 05/2002
3
Page 4
Workshop manual
4860 MXMA
Product
Exploded View
Disassembly & Assembling
12_062
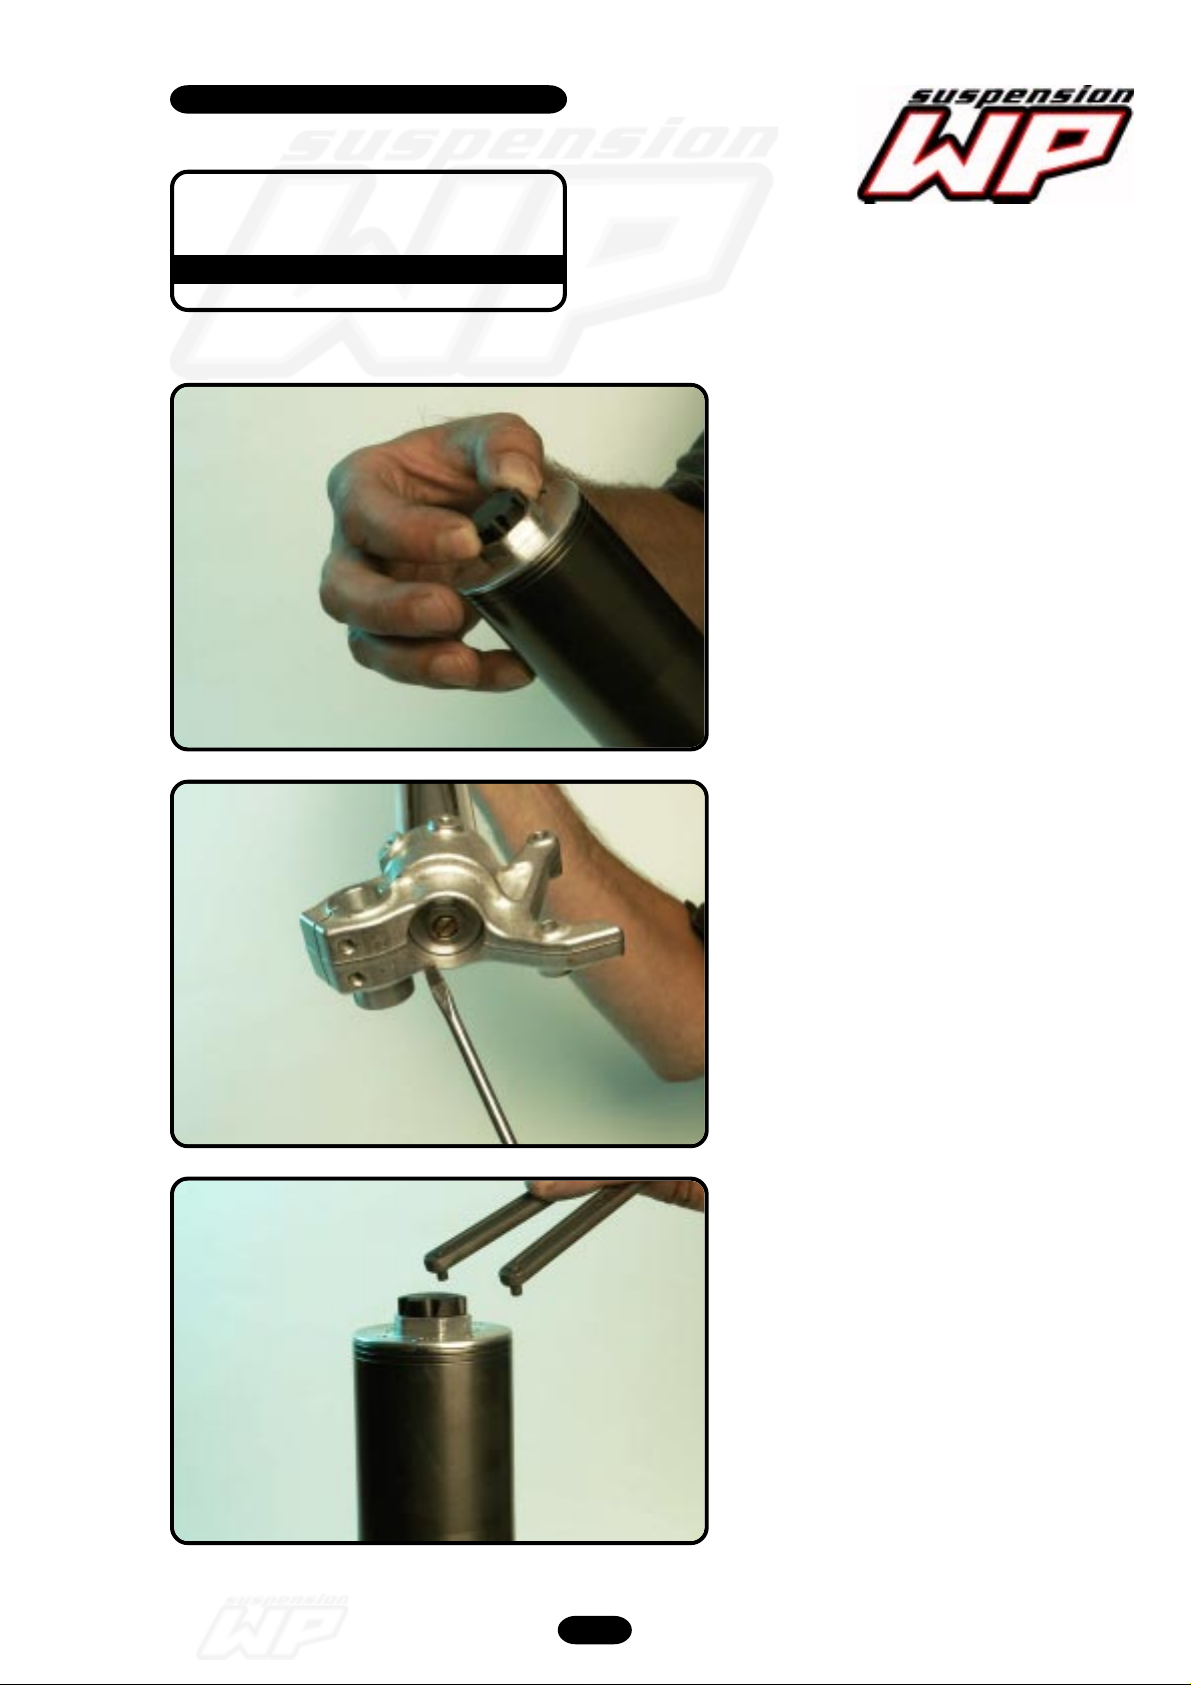
Disassembly forkleg
Note the rebound position by turning the
knob to the right.
12_063
After removing the rubber cap.
Note the compression position by
turning the screw to the right.
Clamp the outer-tube in T1403S and
unscrew the screw-cap PA with T103.
Frontfork 4860 MXMA 2003 05/2002
4
Page 5
Workshop manual
4860 MXMA
Product
Exploded View
Disassembly & Assembling
12_067
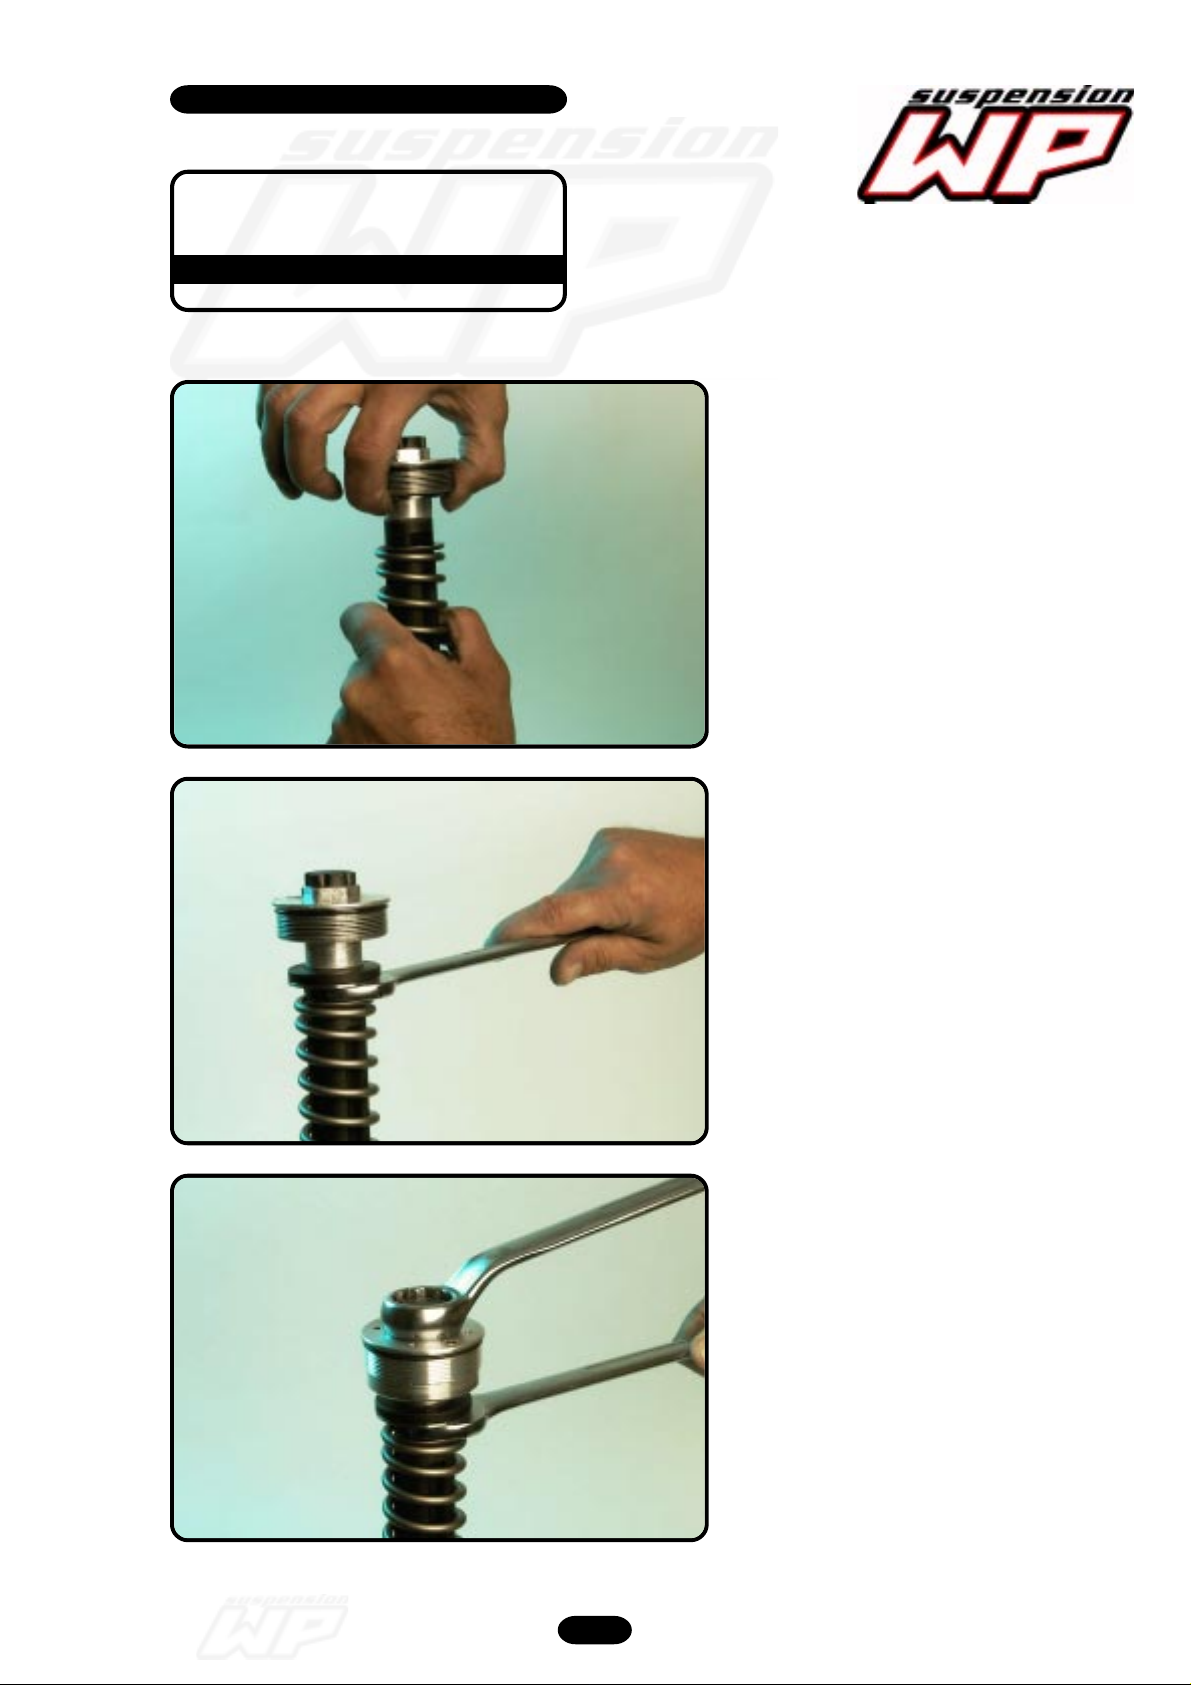
Clamp the forkleg (axle-clamp) in the
vice and let the outer-tube down.
Pull the spring downwards...
12_068
...and place open-end spanner (size 22)
on the hydraulic stop.
Unscrew the screw-cap.
Frontfork 4860 MXMA 2003 05/2002
5
Page 6
Workshop manual
4860 MXMA
Product
Exploded View
Disassembly & Assembling
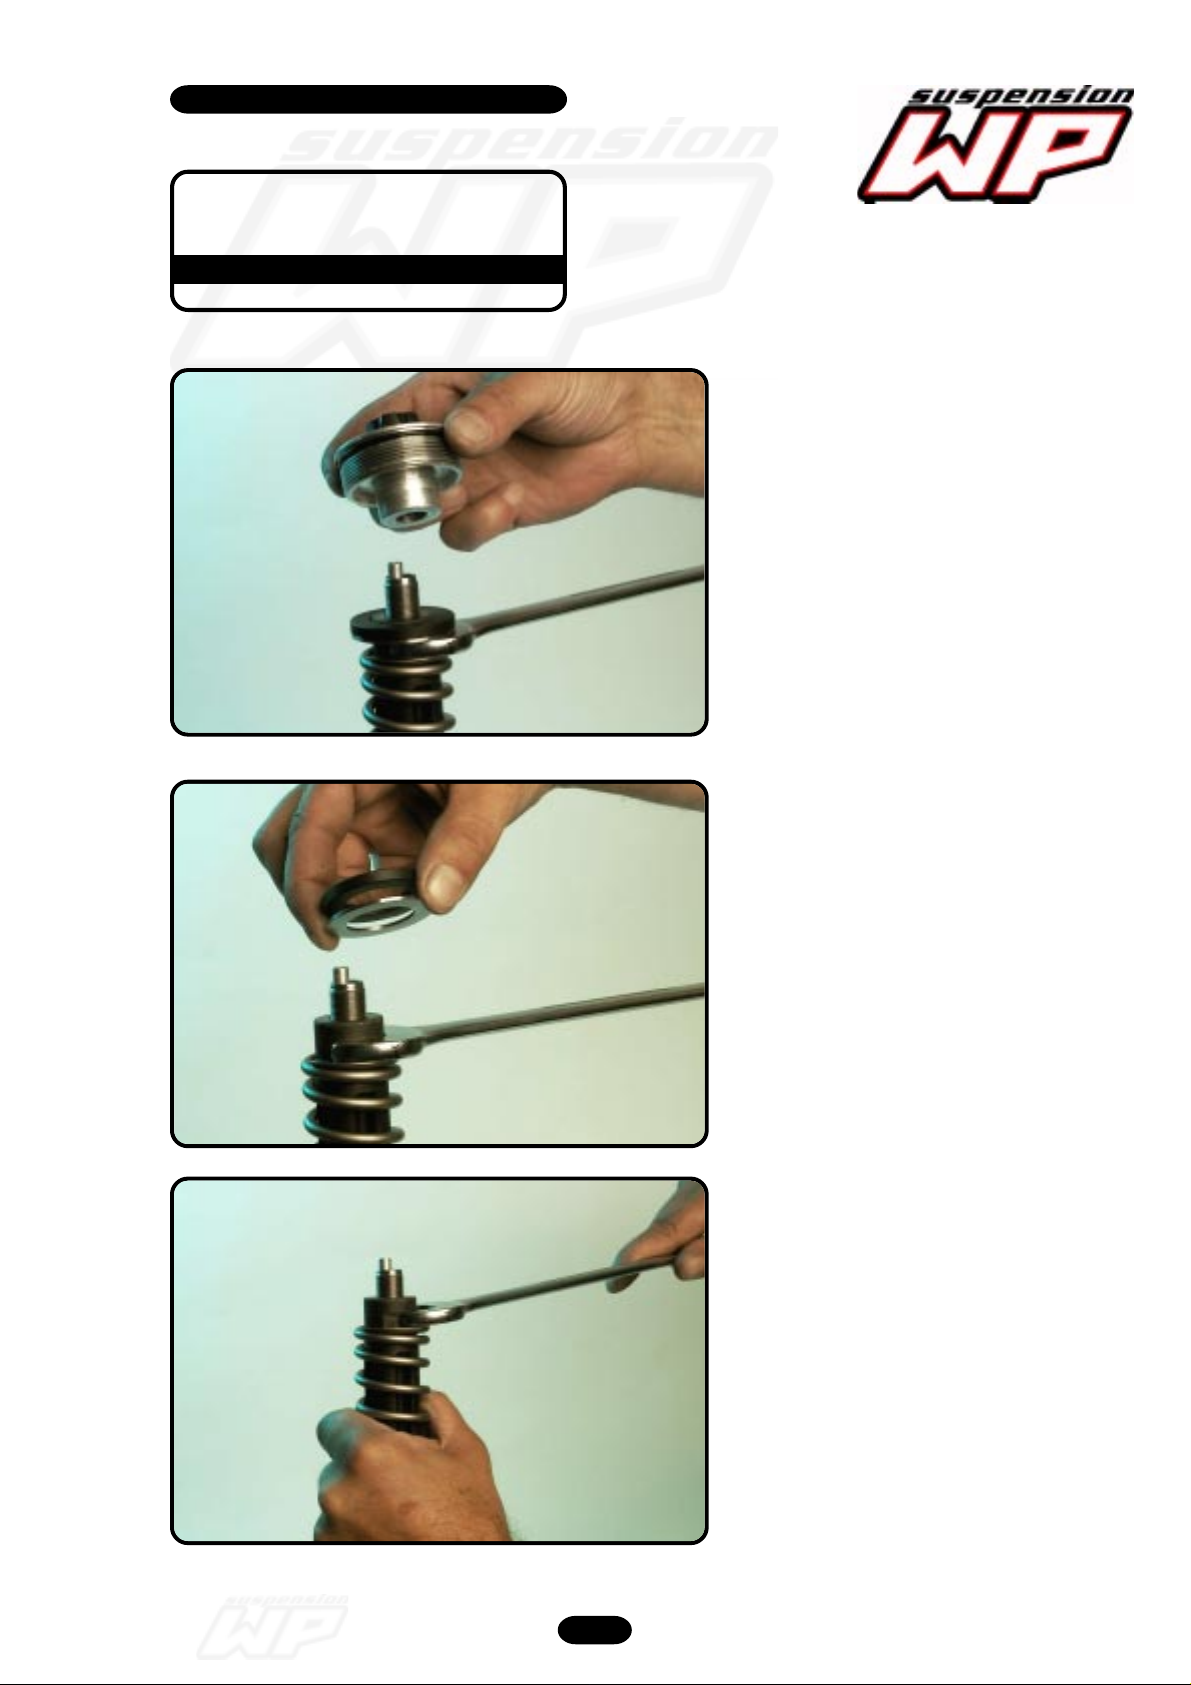
12_070
Remove the screw-cap from the
piston- rod.
12_074
12_075
Remove the preload spacers.
Pull the spring downwards and remove
the spanner.
Frontfork 4860 MXMA 2003 05/2002
6
Page 7
Workshop manual
4860 MXMA
Product
Exploded View
Disassembly & Assembling
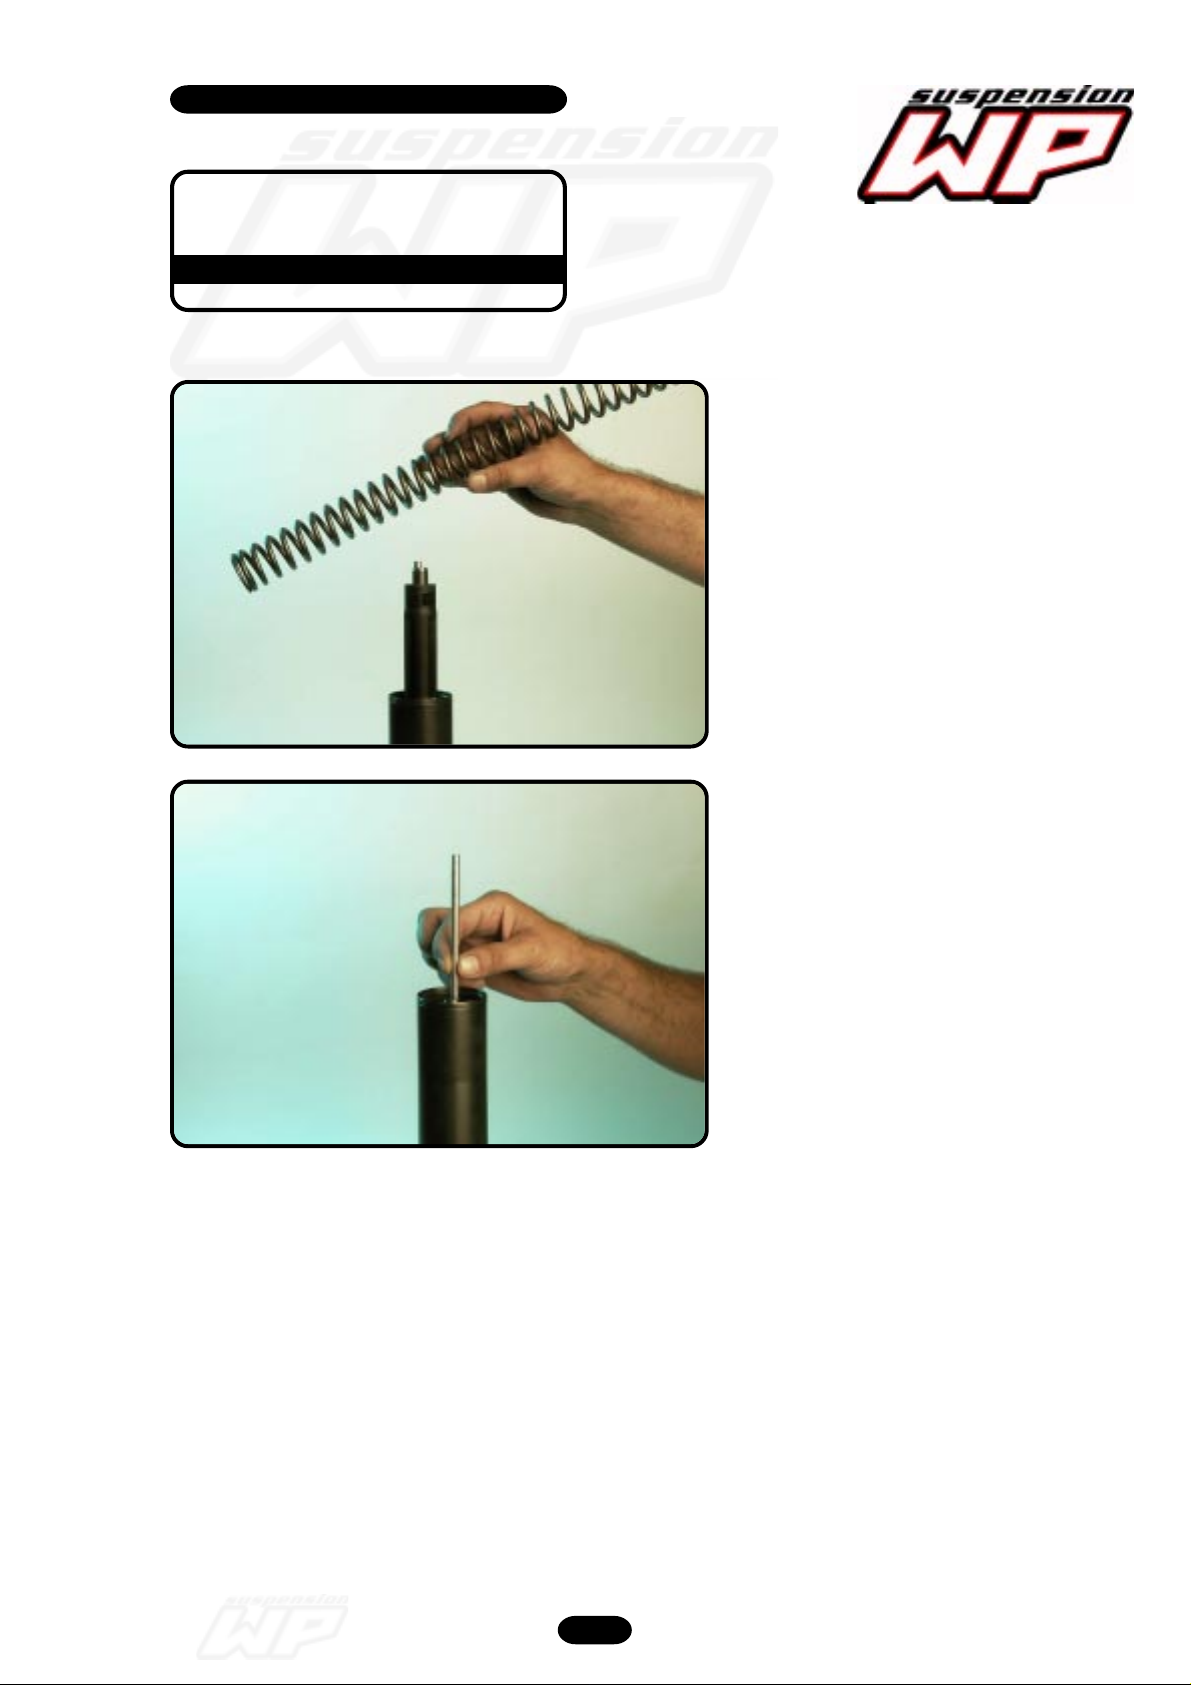
12_076
Remove the spring.
12_089
Remove the adjustment tube with the
O-ring.
Frontfork 4860 MXMA 2003 05/2002
7
Page 8
Workshop manual
4860 MXMA
Product
Exploded View
Disassembly & Assembling
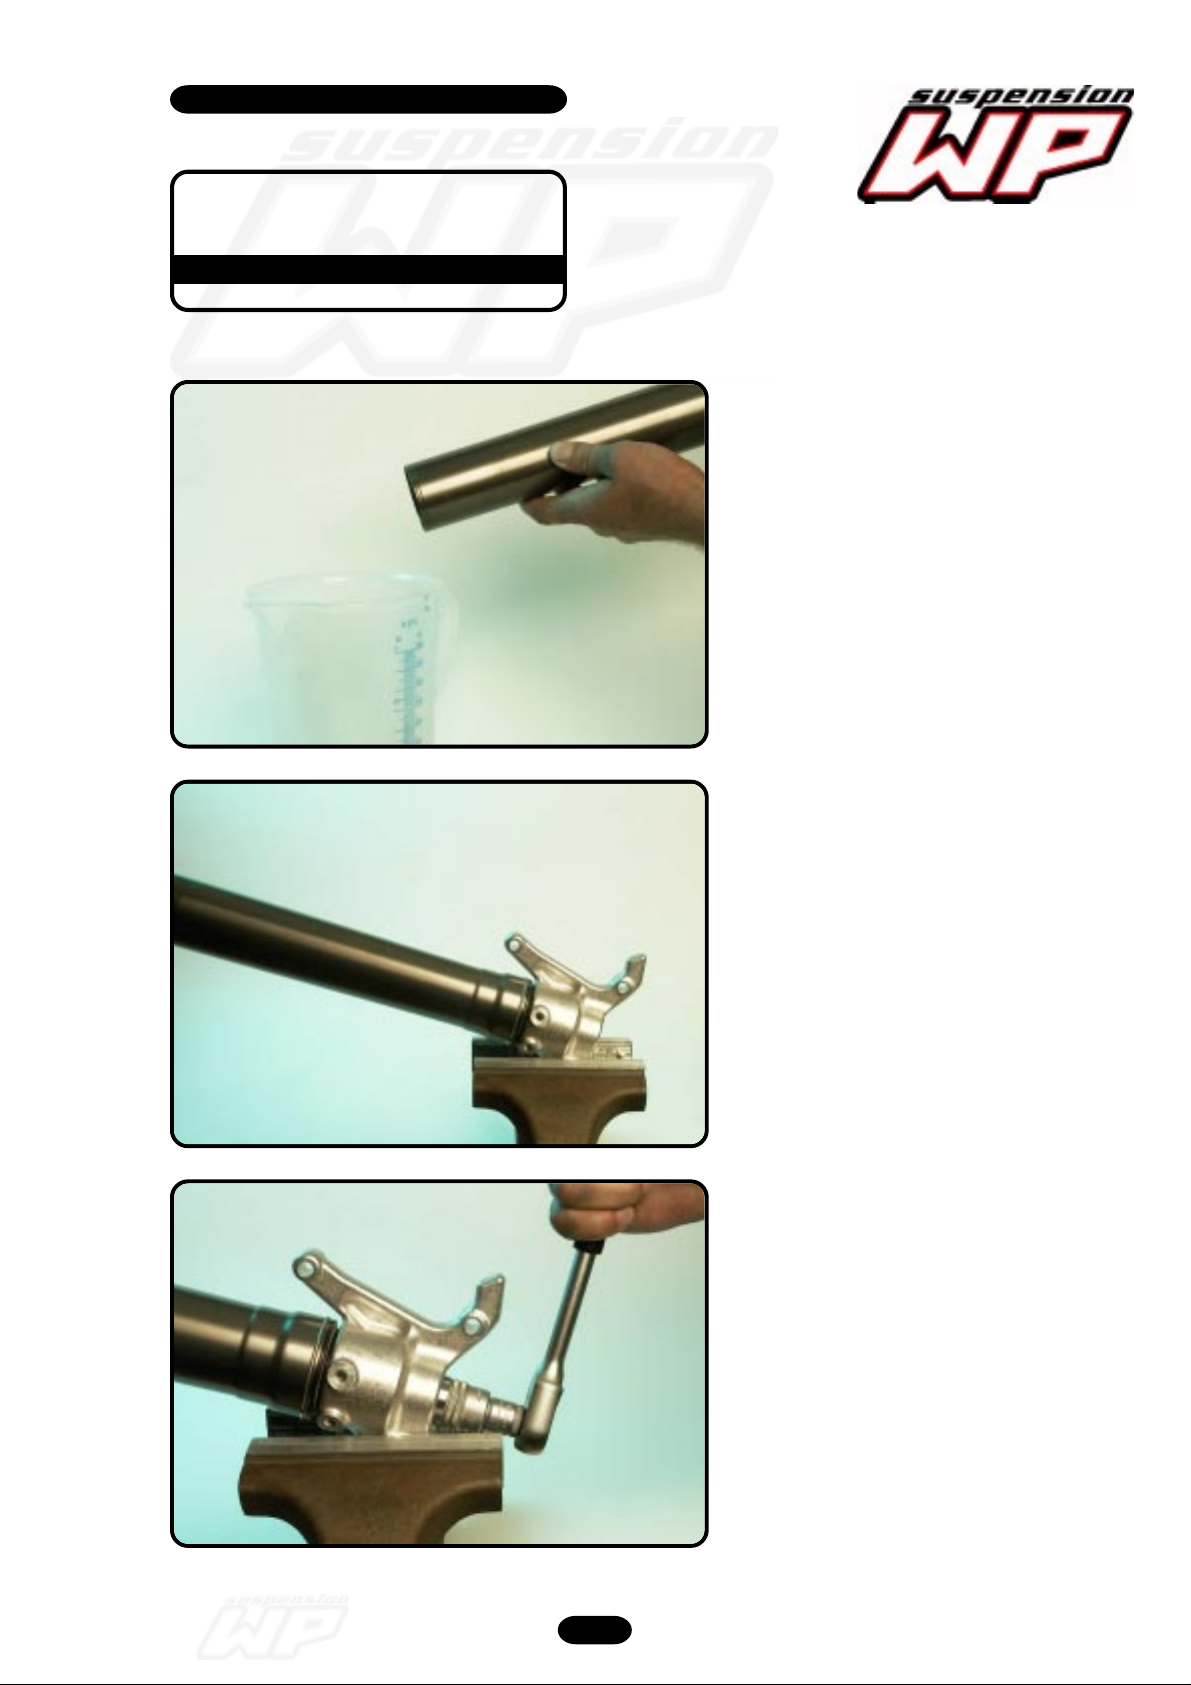
12_094
Drain the oil out the forkleg.
12_095
Clamp the axle-clamp in the vice so that
the forkleg is at an angle of ±45 degrees.
Unscrew the compression holder out of
the axle-clamp. (size 19)
(when the cartridge is rotating with the
holder, bend the piston- rod a little bit to
the side)
Frontfork 4860 MXMA 2003 05/2002
12_096
8
Page 9
Workshop manual
4860 MXMA
Product
Exploded View
Disassembly & Assembling
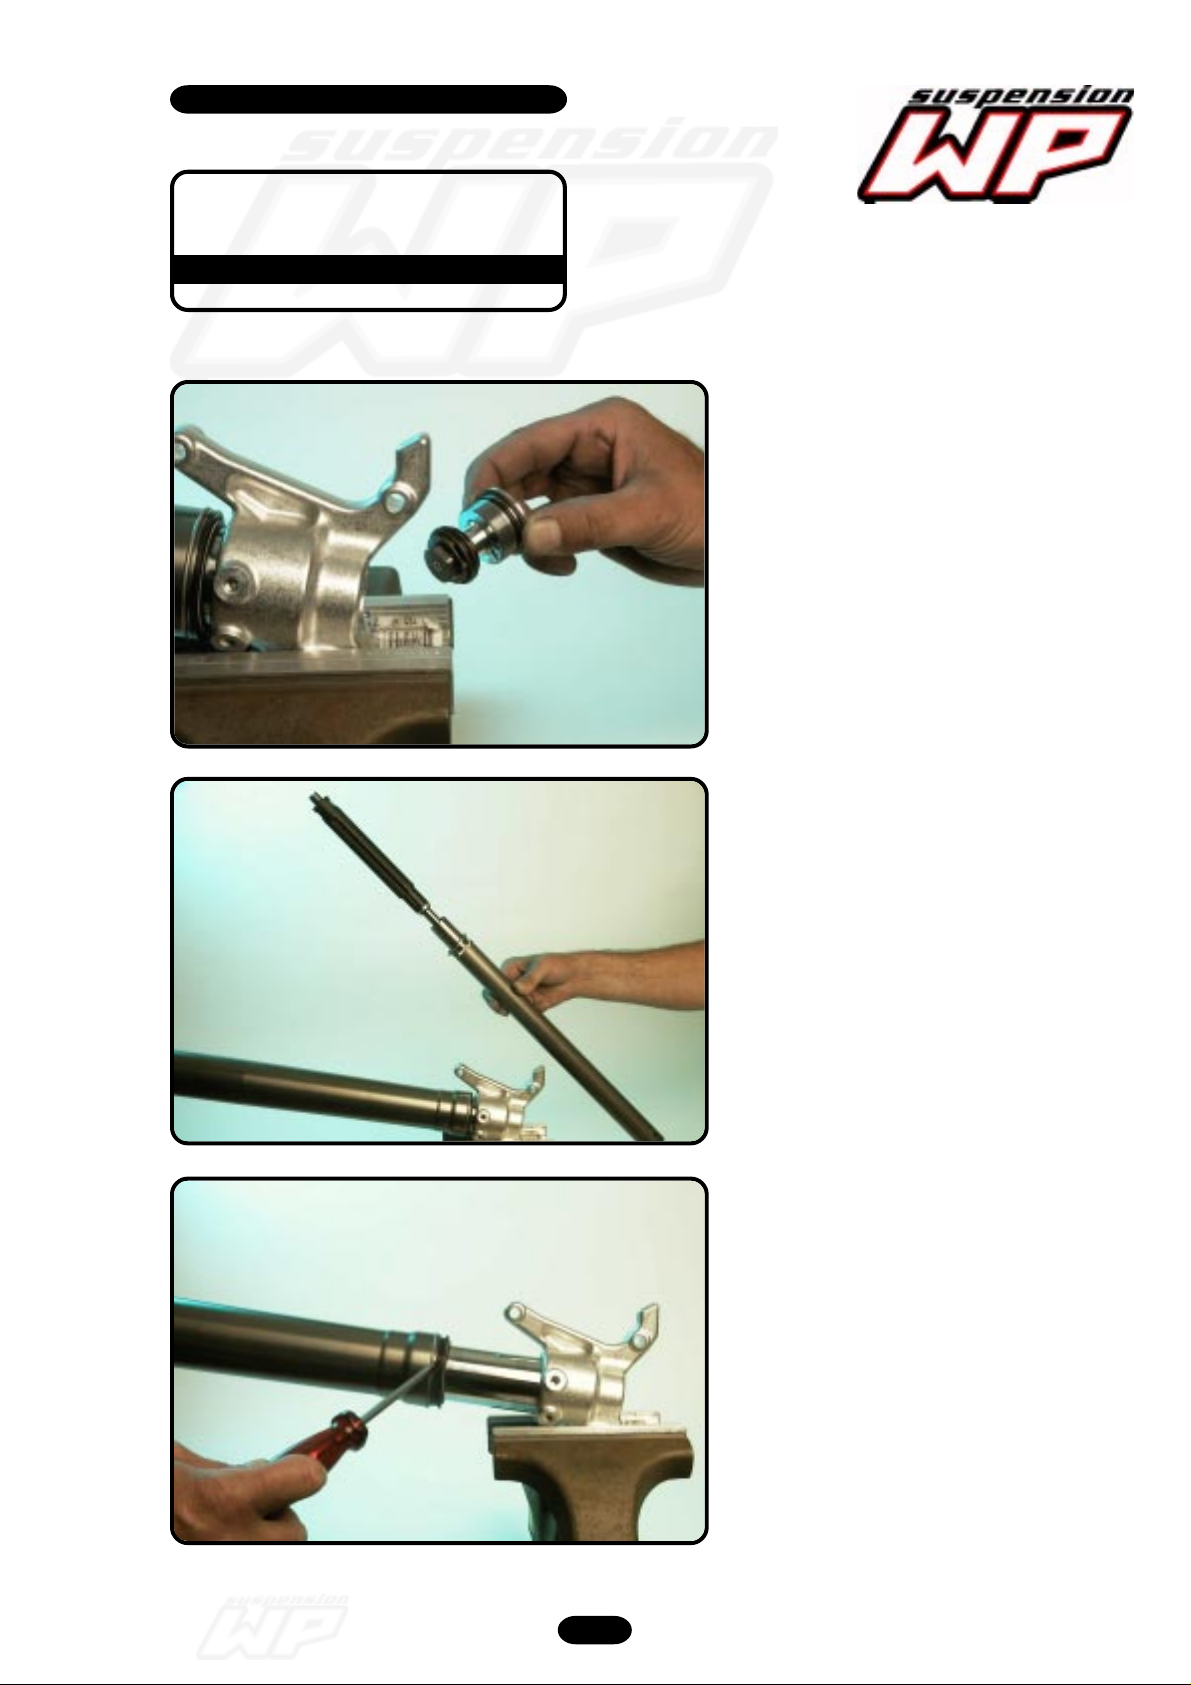
12_097
Remove holder compression.
Caution: oil iscoming out the cartridge.
12_098
Disassemble the cartridge out the
forkleg.
Disassemble the dust-wiper.
Frontfork 4860 MXMA 2003 05/2002
12_099
9
Page 10
Workshop manual
4860 MXMA
Product
Exploded View
Disassembly & Assembling
12_100
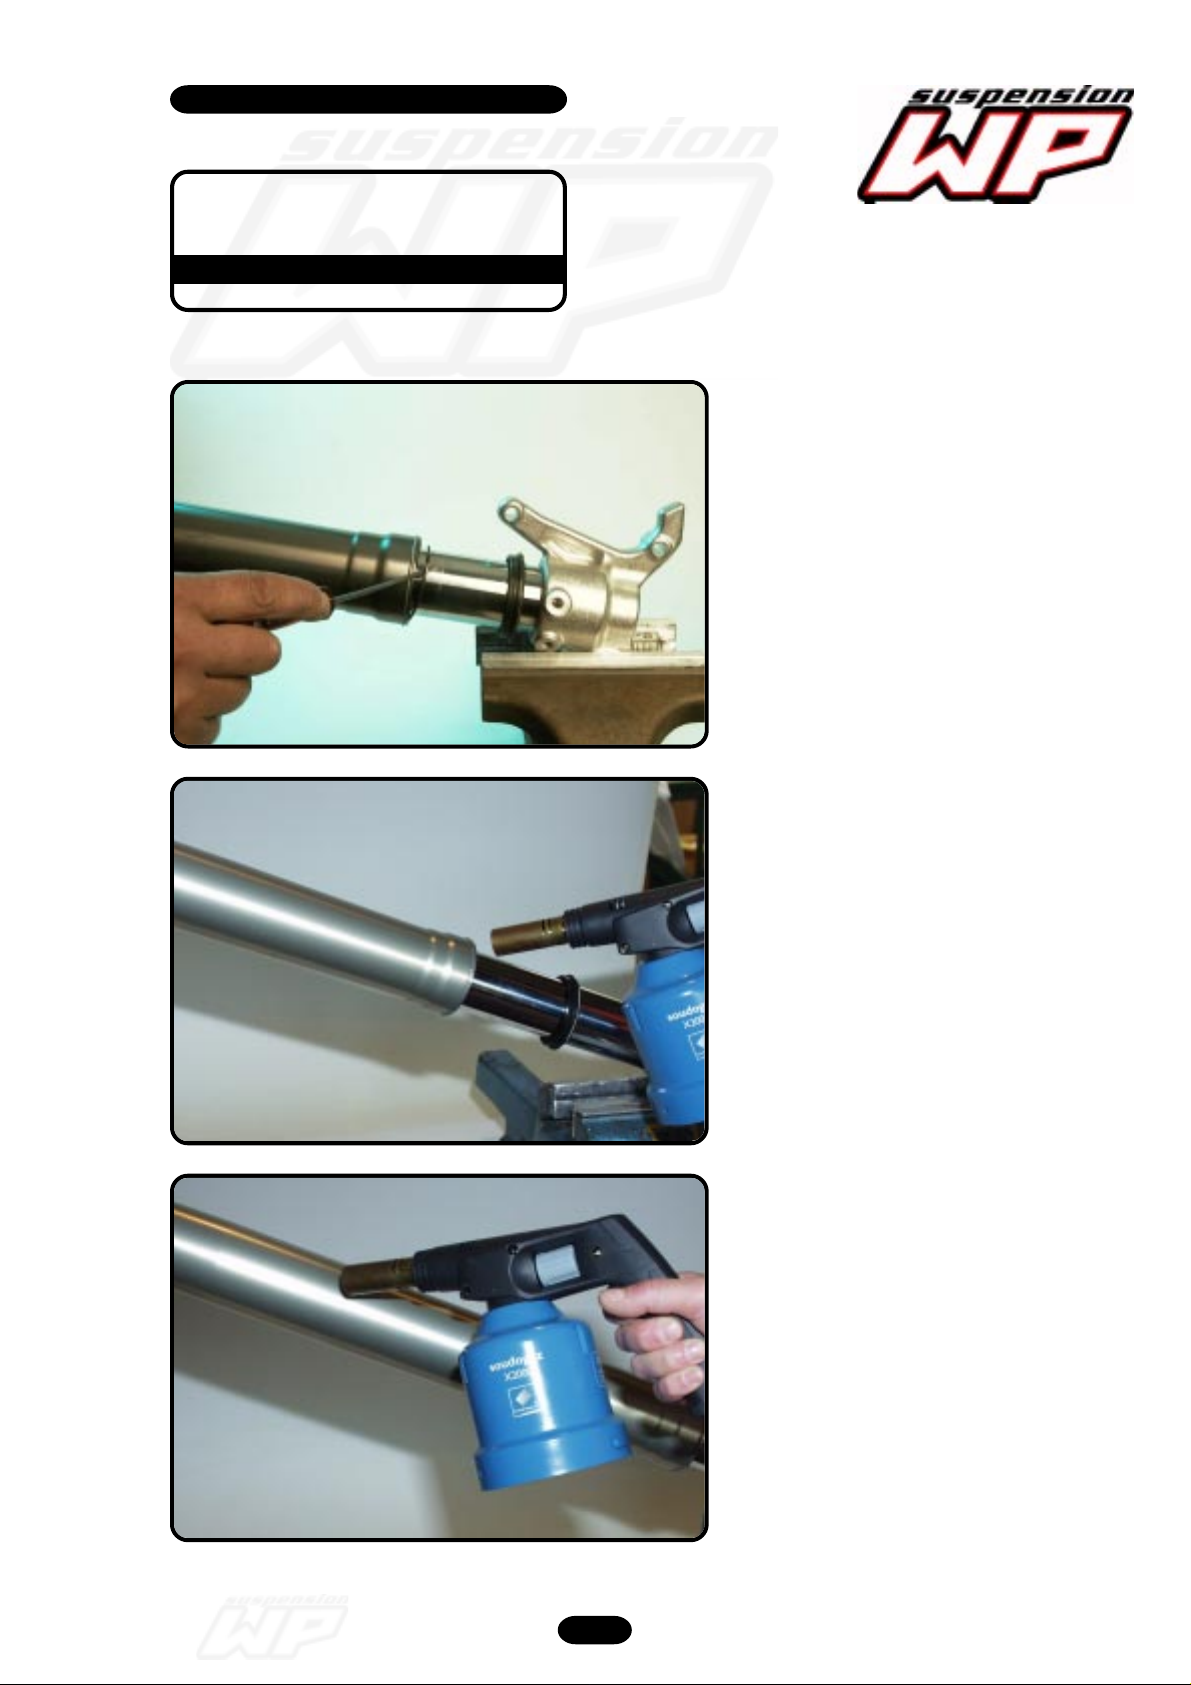
Disassemble the circlip.
Heat the outer-tube near the oilseal.
(not too hot)
Heat the outer-tube at this level..
Frontfork 4860 MXMA 2003 05/2002
10
Page 11
Workshop manual
4860 MXMA
Product
Exploded View
Disassembly & Assembling
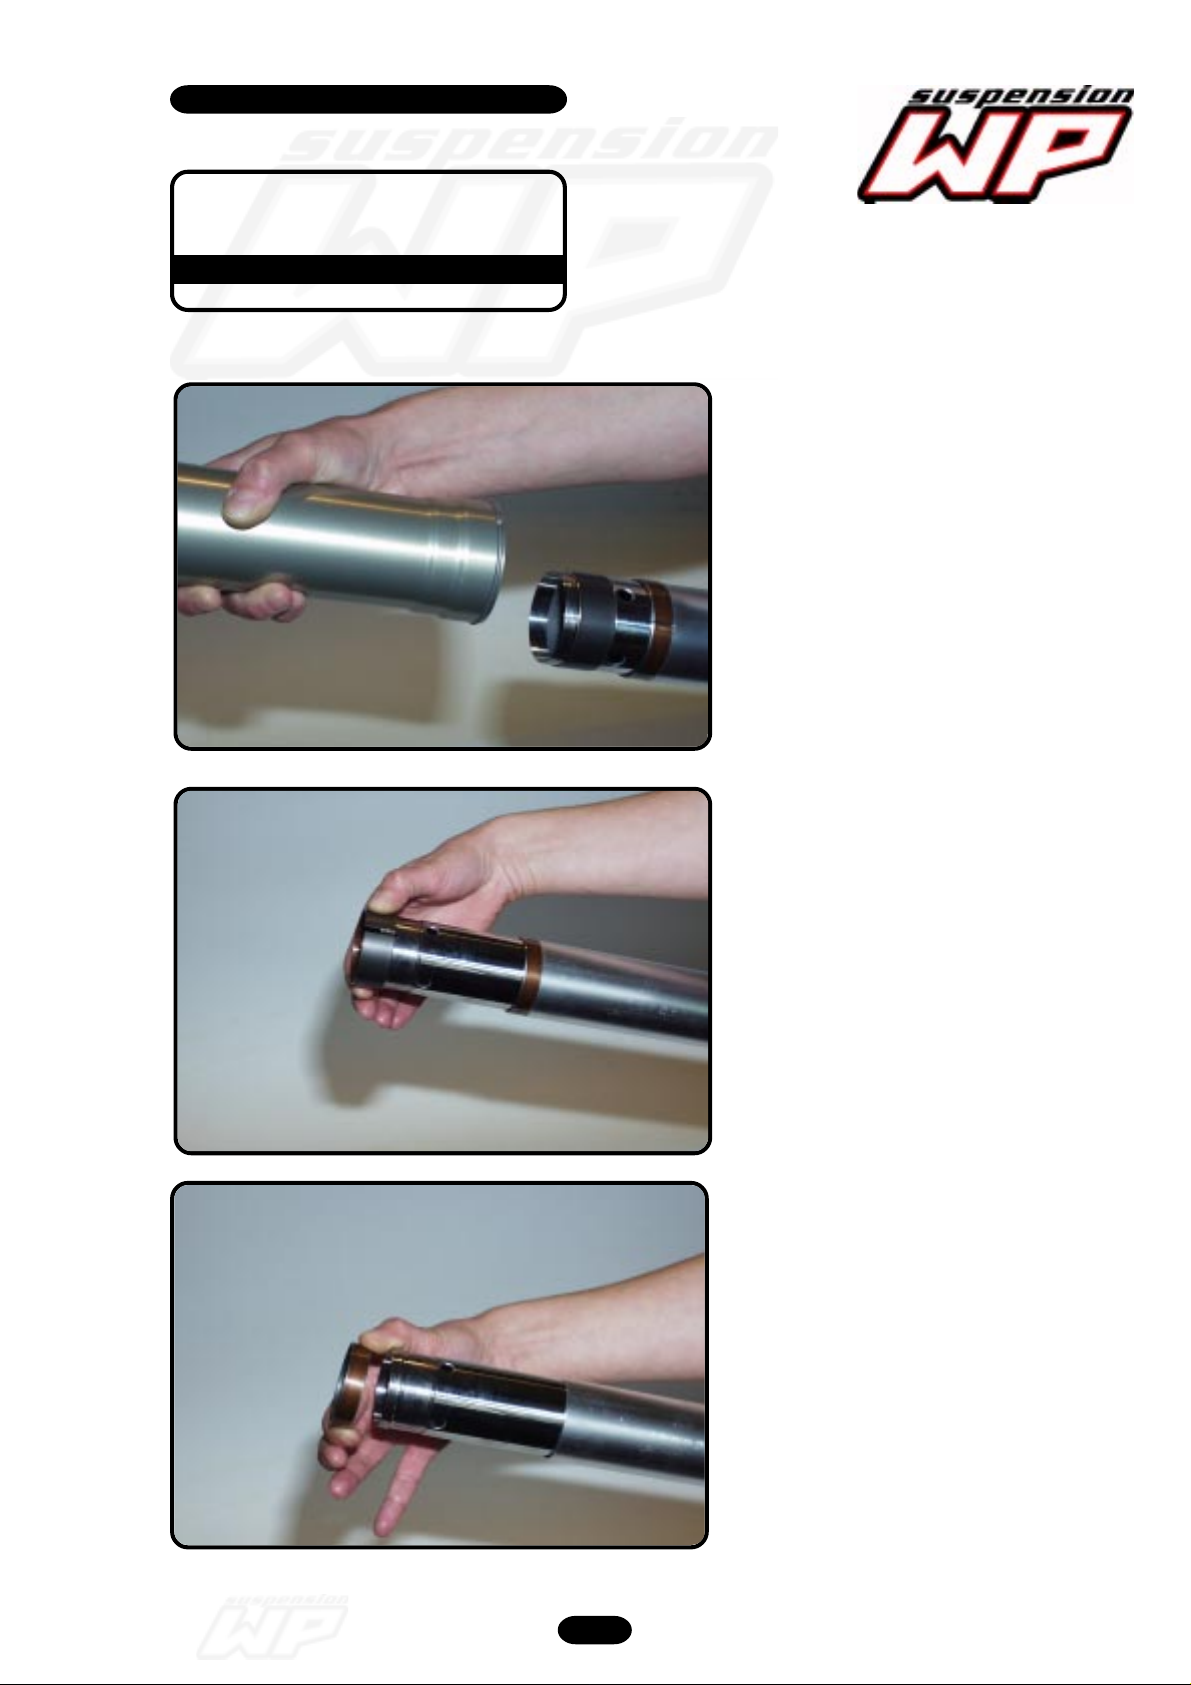
Pull with both hands the outer-tube from
the inner-tube.
Remove DU-bush inner-tube.
1. Remove DU-bush.
Frontfork 4860 MXMA 2003 05/2002
11
Page 12
Workshop manual
4860 MXMA
Product
Exploded View
Disassembly & Assembling
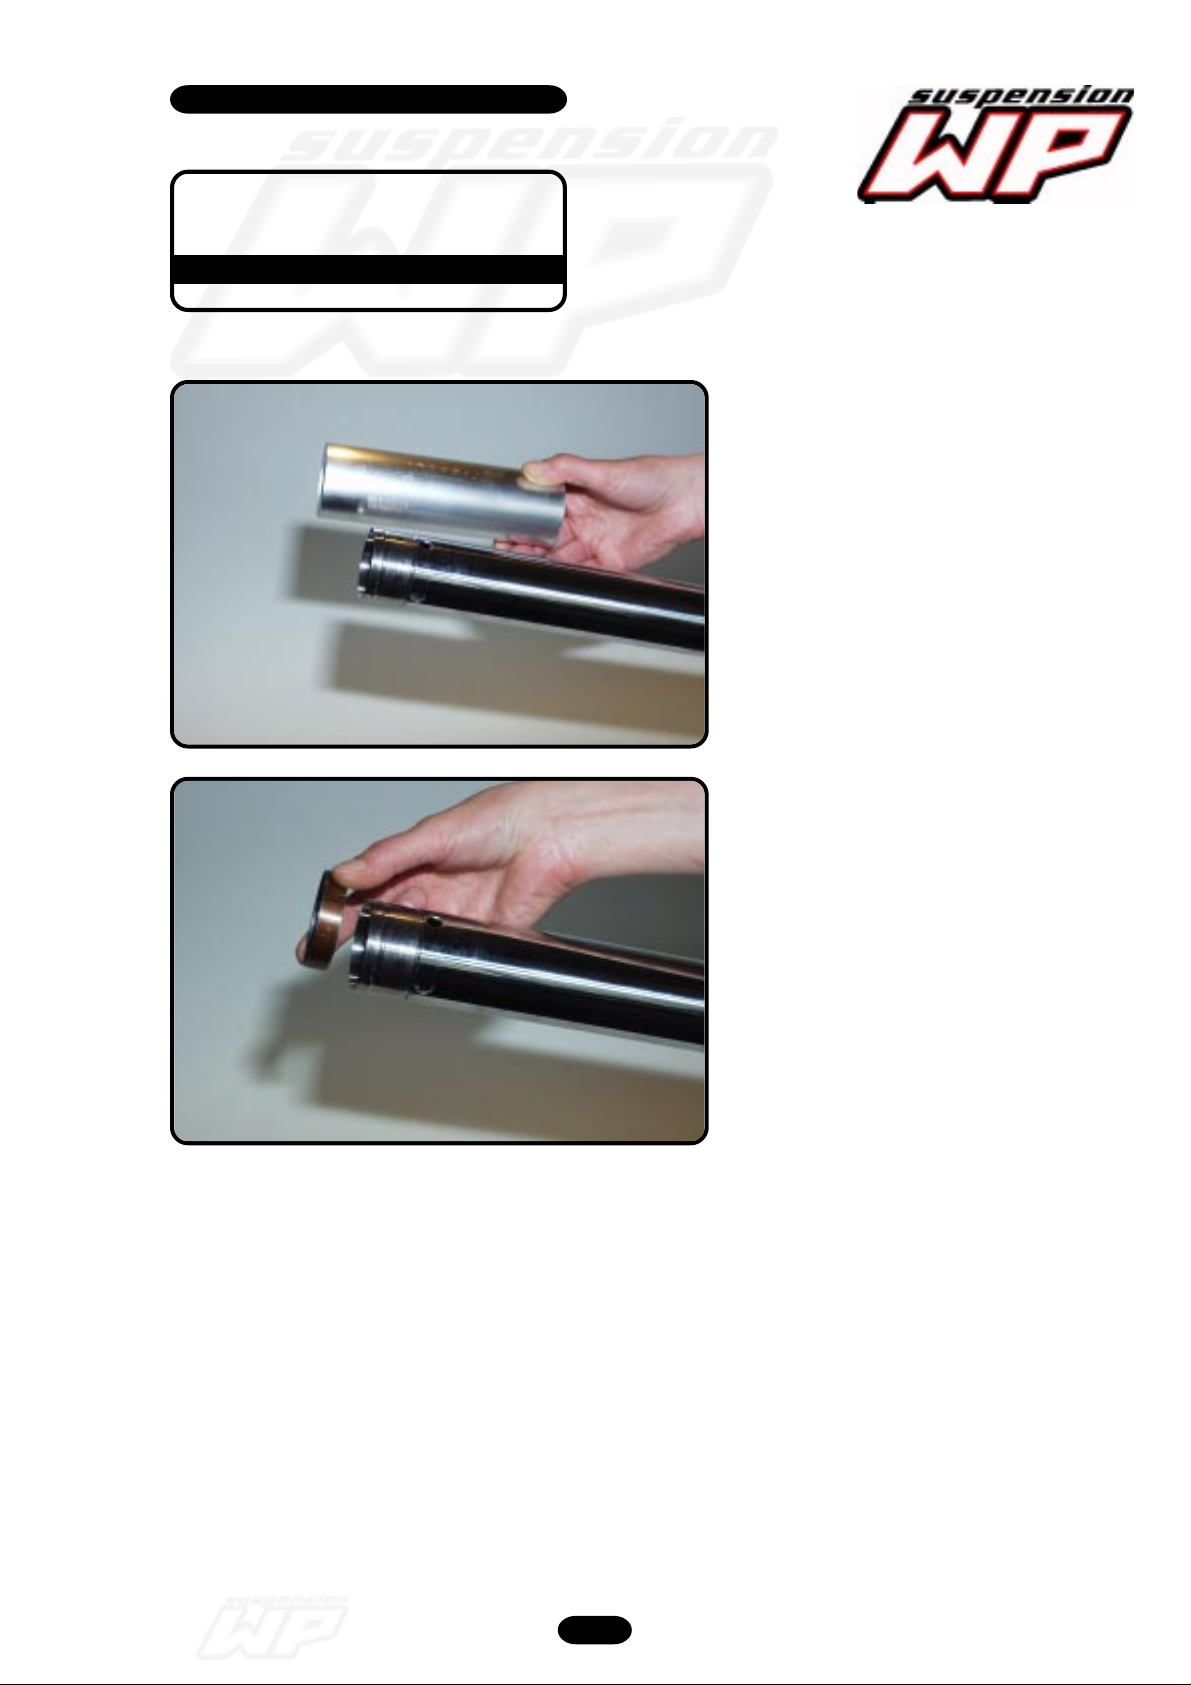
Remove DU-bush inner-tube.
Remove DU-bush outer-tube.
Frontfork 4860 MXMA 2003 05/2002
12
Page 13
Workshop manual
4860 MXMA
Product
Exploded View
Disassembly & Assembling
12_105
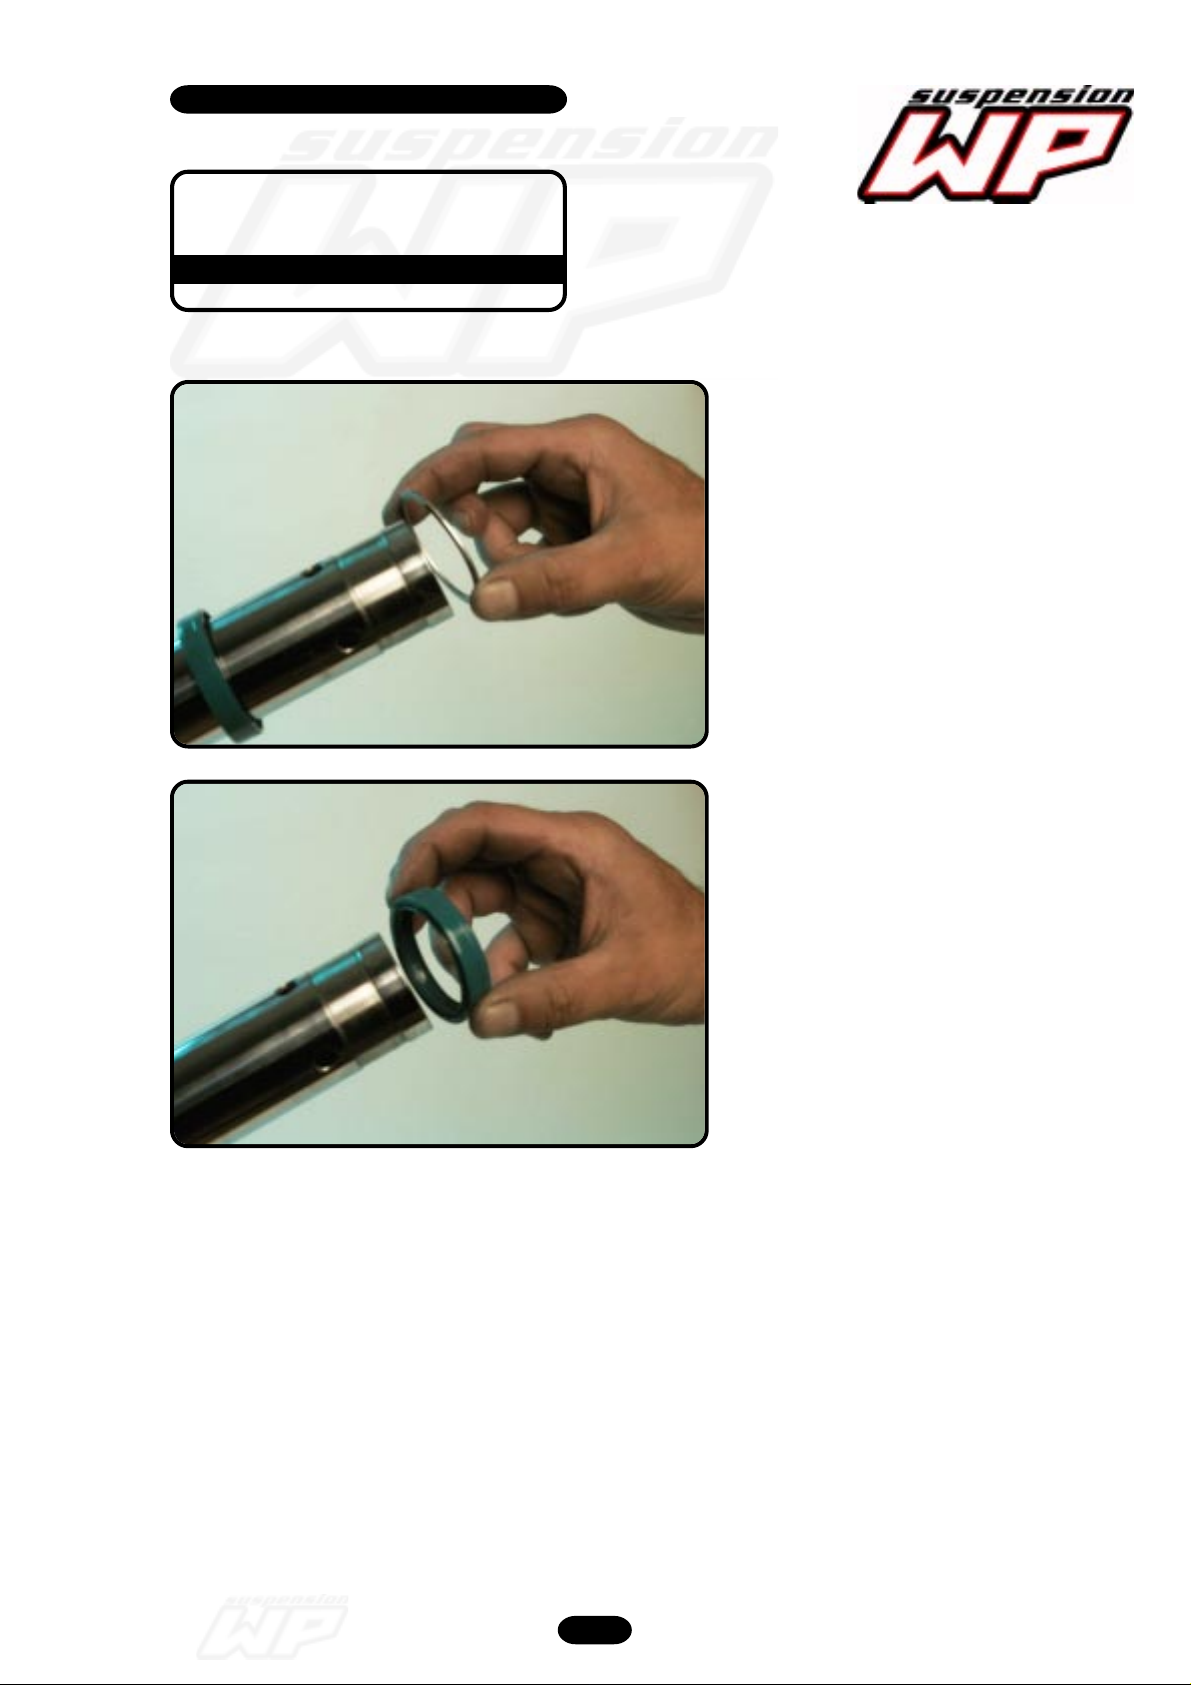
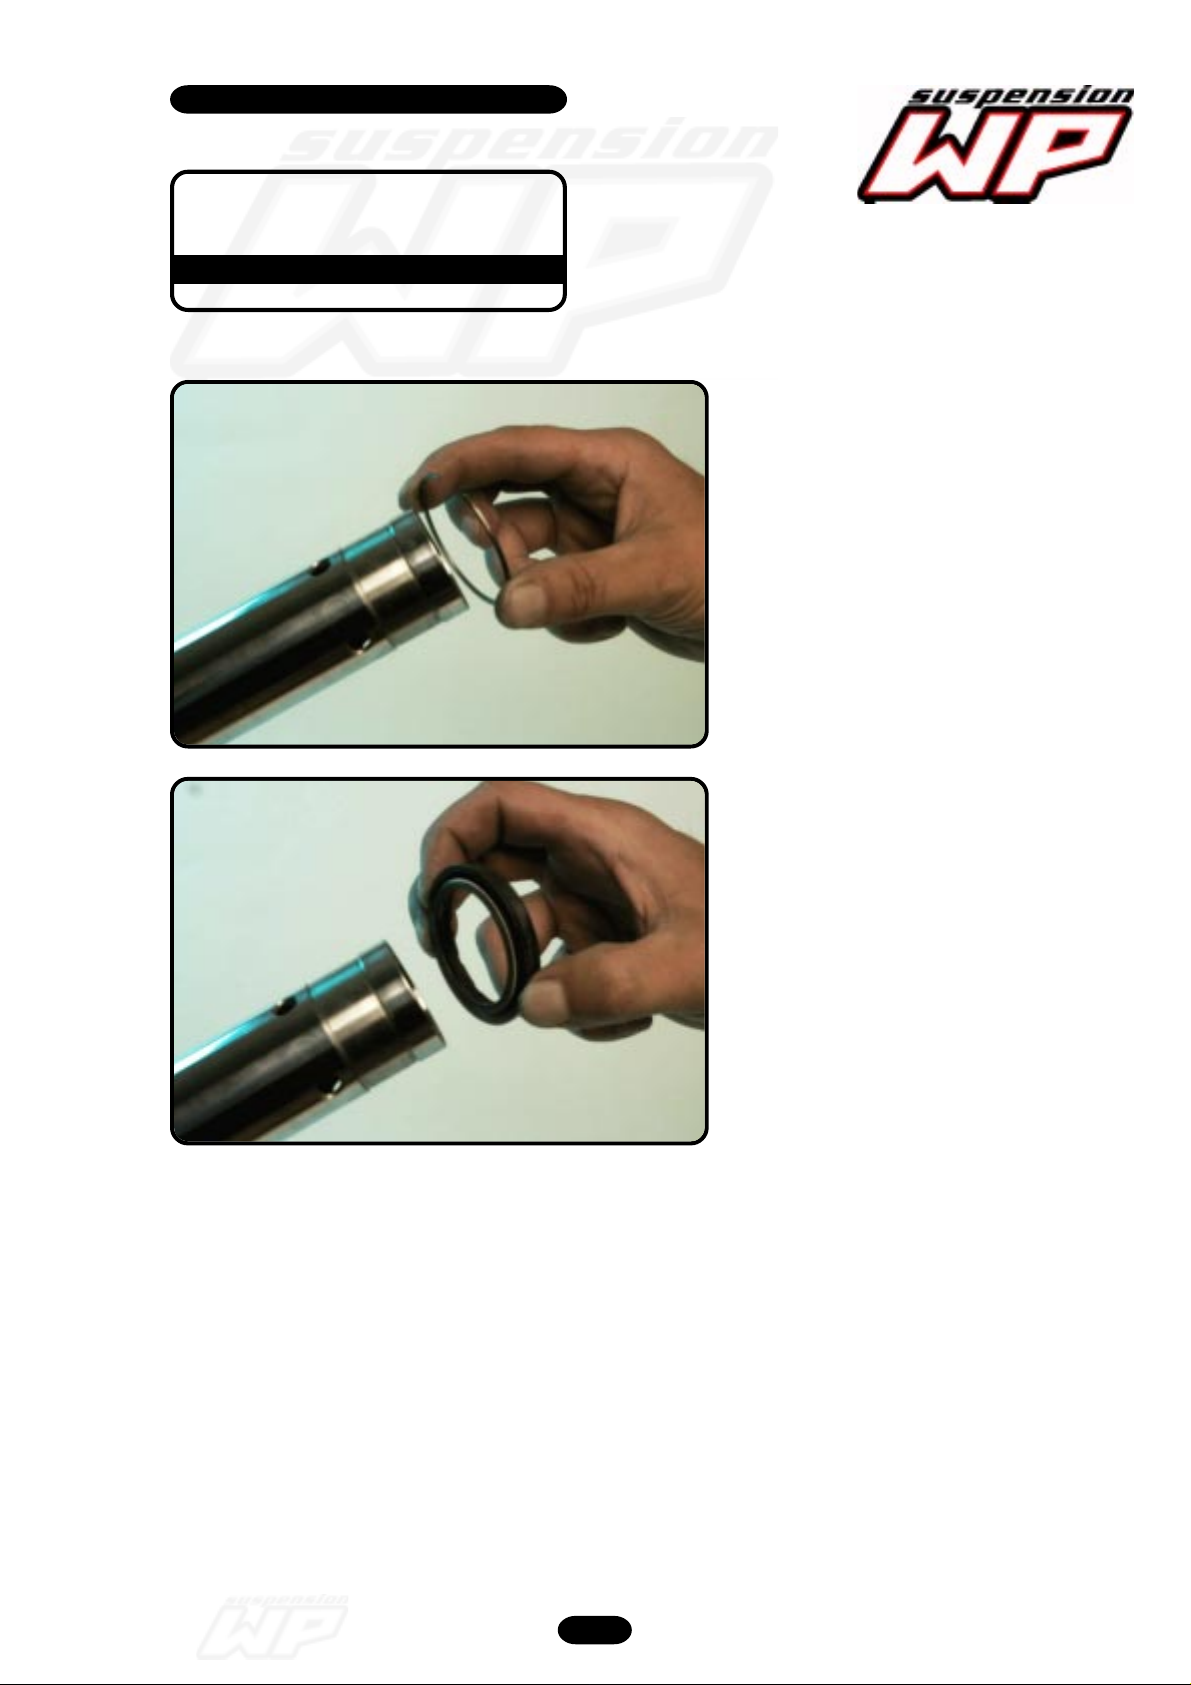
Remove support ring.
12_106
Disassemble the oilseal.
Pay attention to the assembling
direction!!!
Frontfork 4860 MXMA 2003 05/2002
13
Page 14
Workshop manual
4860 MXMA
Product
Exploded View
Disassembly & Assembling
12_107
Remove the circlip.
12_108
Remove the dust wiper.
Frontfork 4860 MXMA 2003 05/2002
14
Page 15
Workshop manual
4860 MXMA
Product
Exploded View
Disassembly & Assembling
12_111
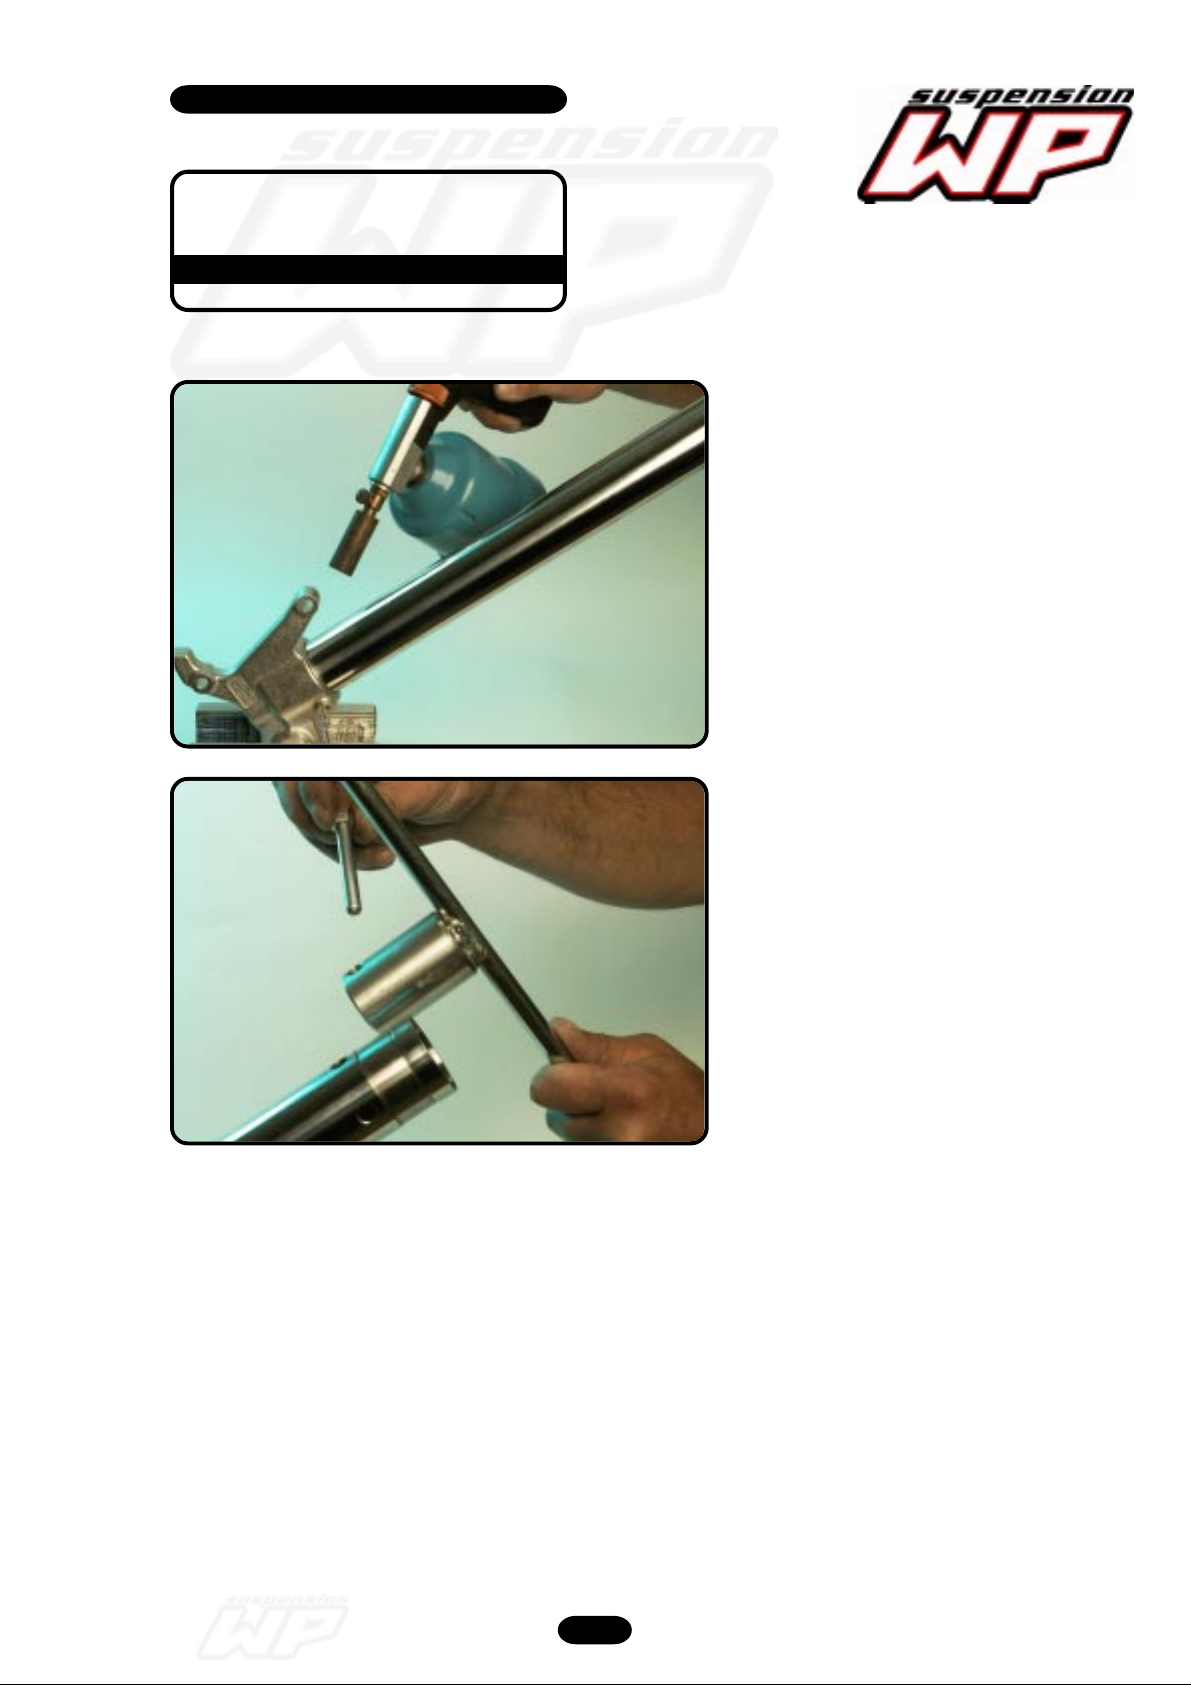
Heat the axle-clamp.
12_112
Use T1404S...
Frontfork 4860 MXMA 2003 05/2002
15
Page 16
Workshop manual
4860 MXMA
Product
Exploded View
Disassembly & Assembling
12_113
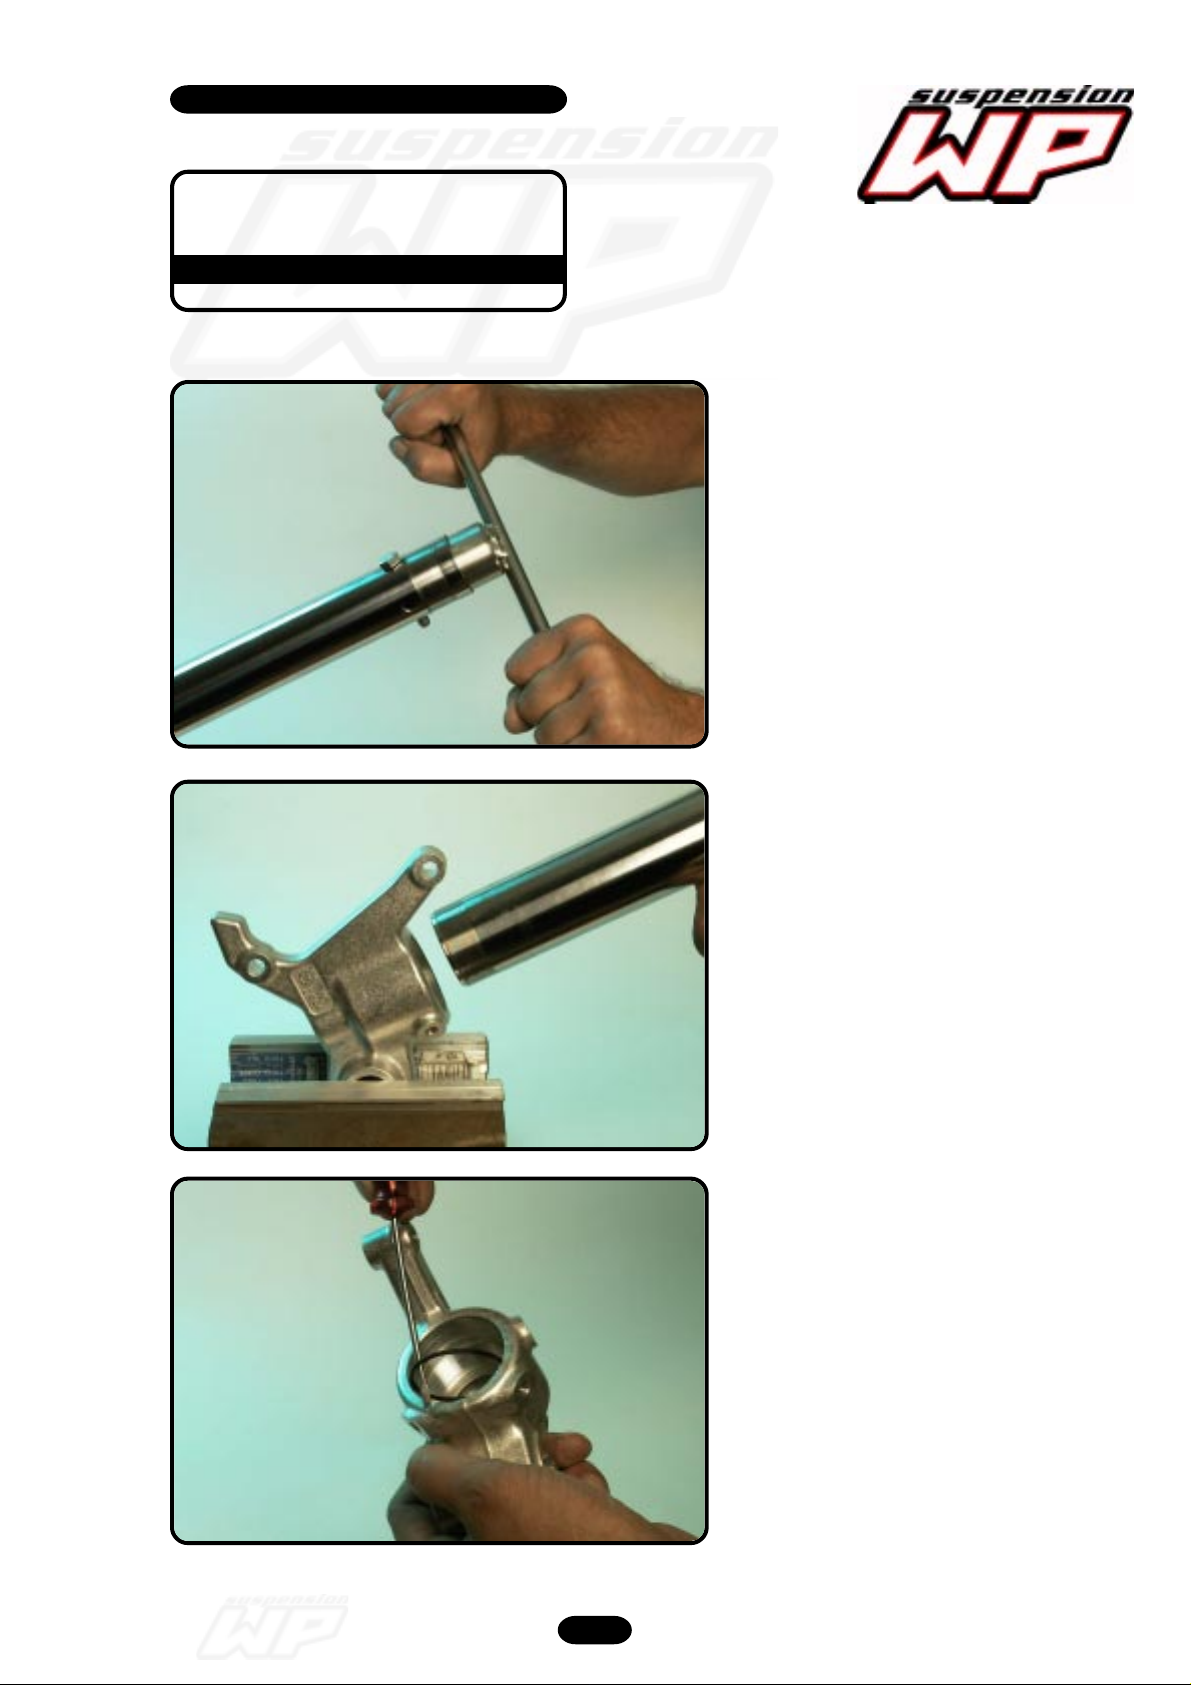
...and unscrew the inner-tube from the
axle-clamp.
12-114
12_115
Remove the inner-tube.
Remove the O-ring out the groove of the
axle-clamp.
Frontfork 4860 MXMA 2003 05/2002
16
Page 17
Workshop manual
4860 MXMA
Product
Exploded View
Disassembly & Assembling
12_116
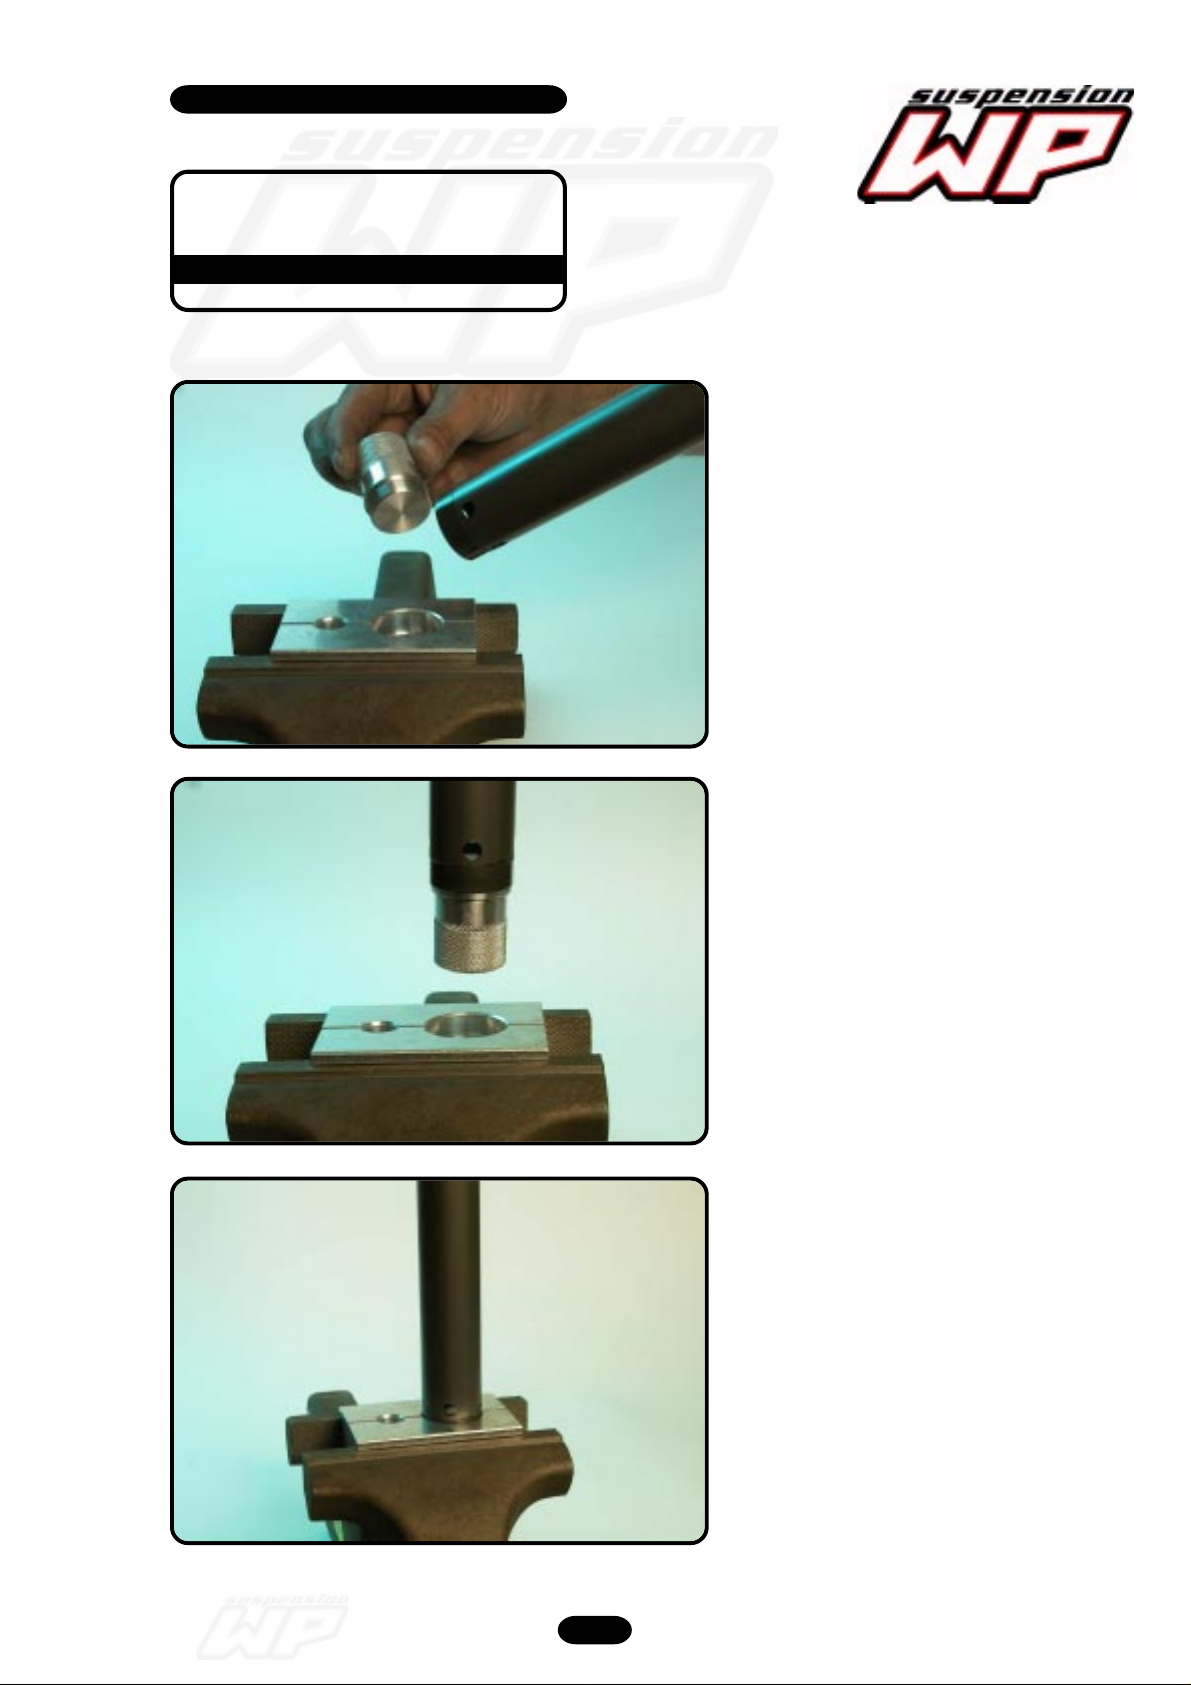
Disassembly cartridge
1. Clamp the tube with plug in the
clamping-block (Tool T508S + T509).
12_117
12_118
2.
3.
Frontfork 4860 MXMA 2003 05/2002
17
Page 18
Workshop manual
4860 MXMA
Product
Exploded View
Disassembly & Assembling
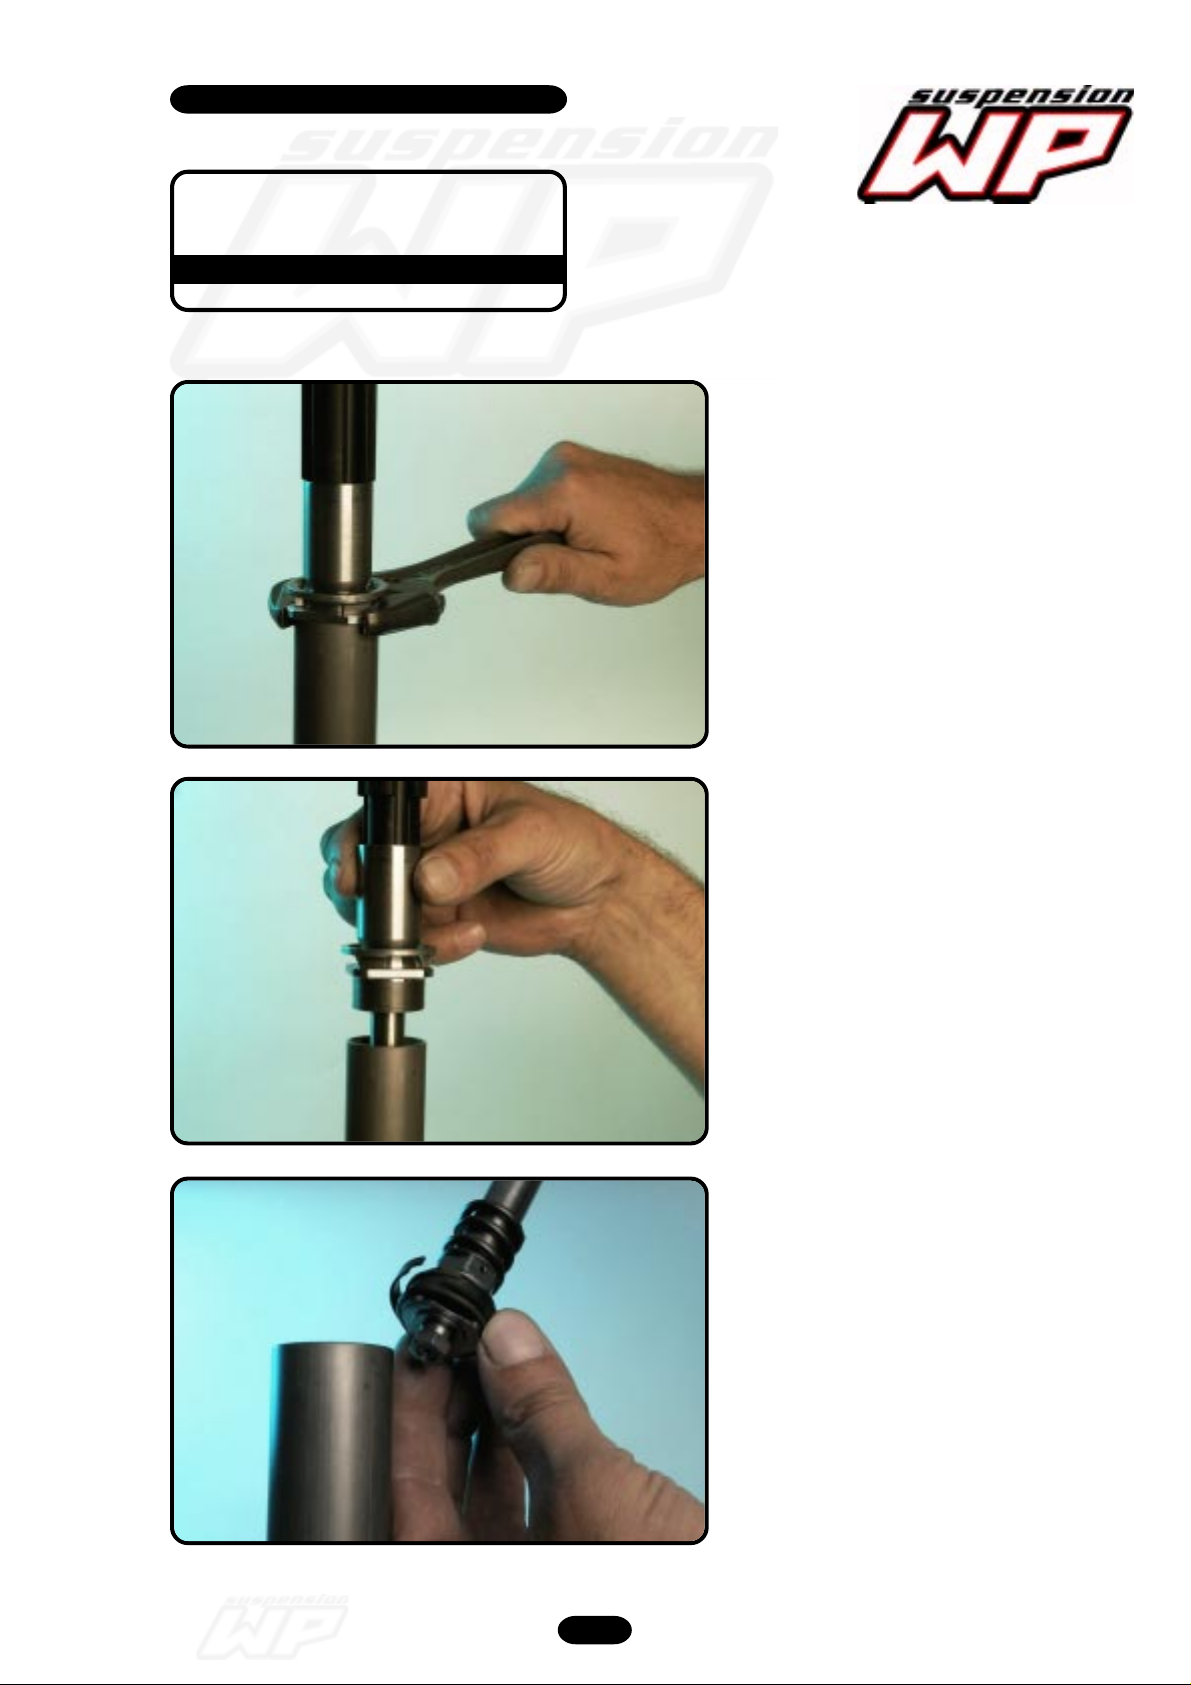
12_119
Unscrew the screw sleeve (size 22).
12_120
12_121
Turn the screw sleeve out of the tube.
Disassemble the piston-rod “complete”.
Pay attention to the piston ring!!!
Frontfork 4860 MXMA 2003 05/2002
18
Page 19
Workshop manual
4860 MXMA
Product
Exploded View
Disassembly & Assembling
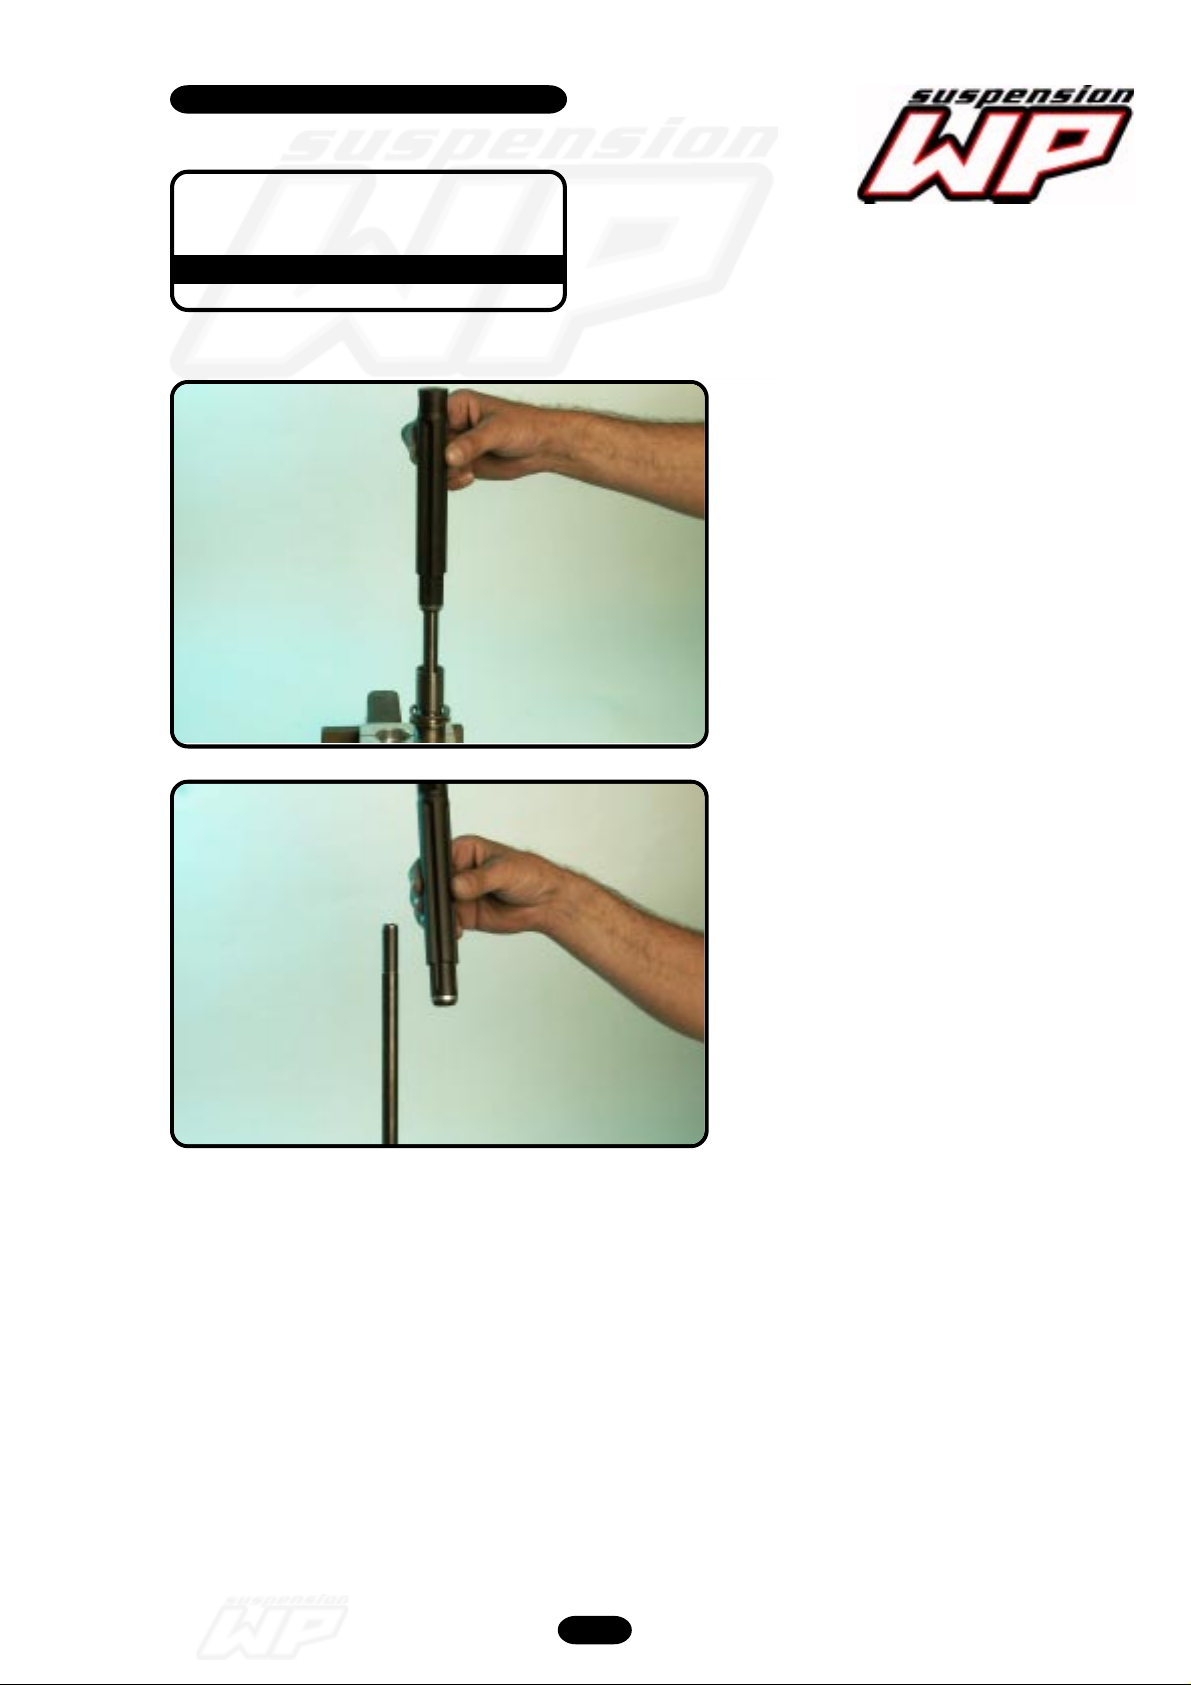
12_164
Clamp the piston rod in T508S “not too
tight” and unscrew the hydraulic stop
from the piston-rod.
12_165
Remove the hydraulic stop.
Frontfork 4860 MXMA 2003 05/2002
19
Page 20
Workshop manual
4860 MXMA
Product
Exploded View
Disassembly & Assembling
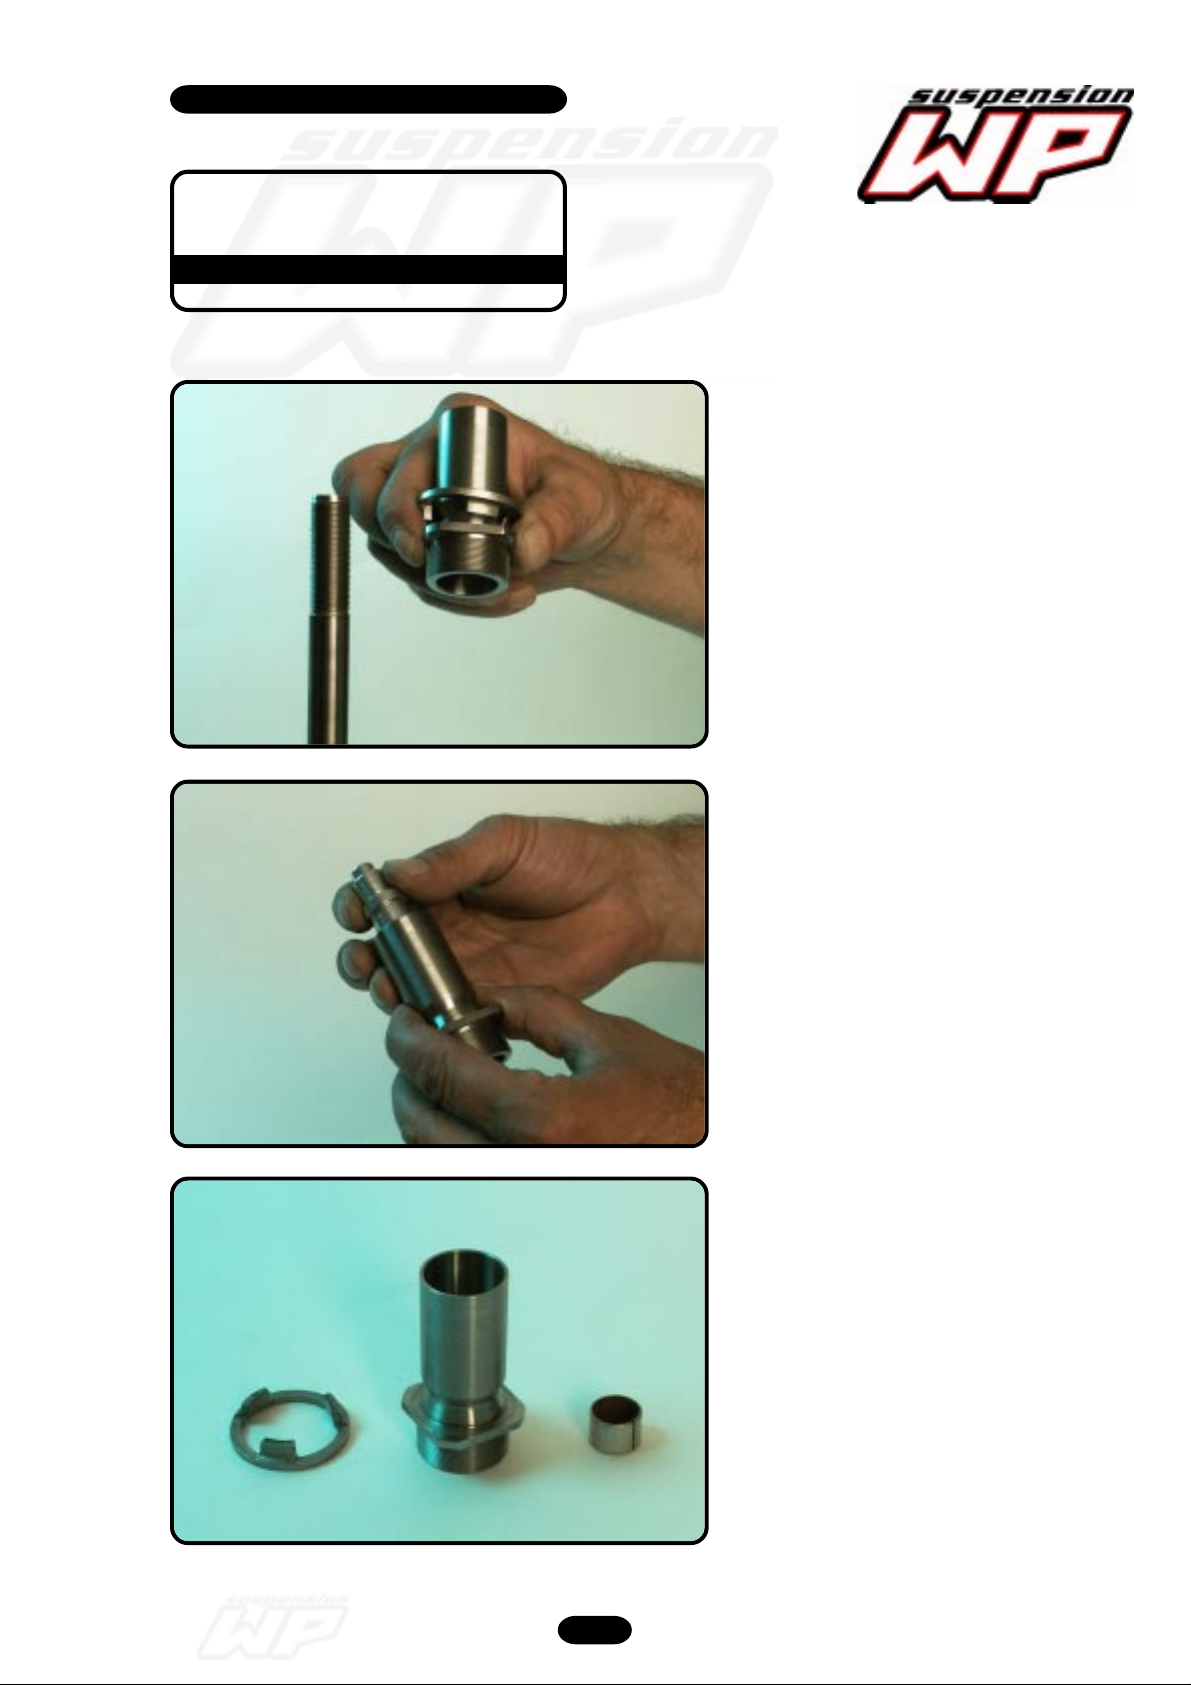
12_167
Remove the screw sleeve with spring
retainer.
12_168
12_169
Disassemble the DU-bush with
T507 and press it out the screw sleeve
with support of the vice.
- Spring retainer
- screw sleeve
- DU-bush
Frontfork 4860 MXMA 2003 05/2002
20
Page 21
Workshop manual
4860 MXMA
Product
Exploded View
Disassembly & Assembling
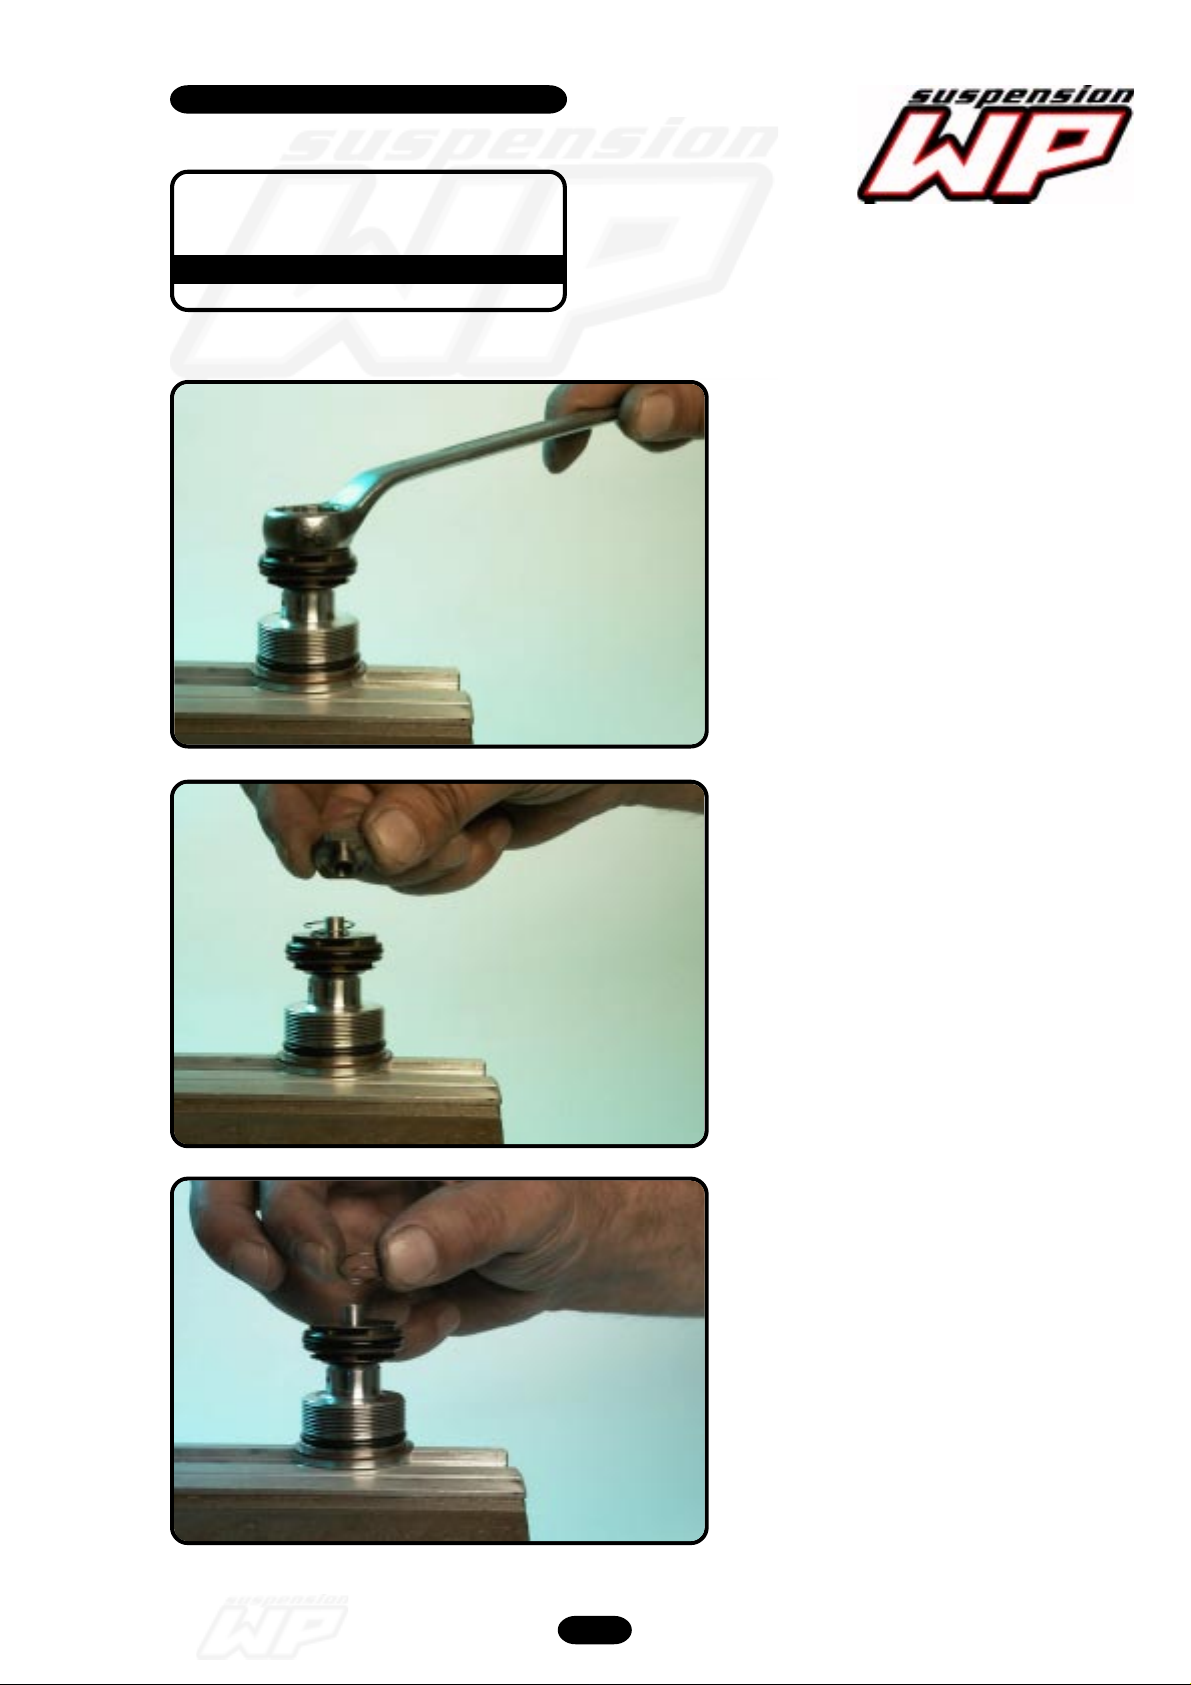
12_124
Disassembly holder
compression
Clamp the compression holder in the
vice and unscrew the check-valve nut.
(size 17)
Version with a locking: remove the
locking with a file.
12_125
12_126
Remove the check-valve nut.
Remove the check-valve spring.
Pay attention to the assembling
direction!!!
Frontfork 4860 MXMA 2003 05/2002
21
Page 22
Workshop manual
4860 MXMA
Product
Exploded View
Disassembly & Assembling
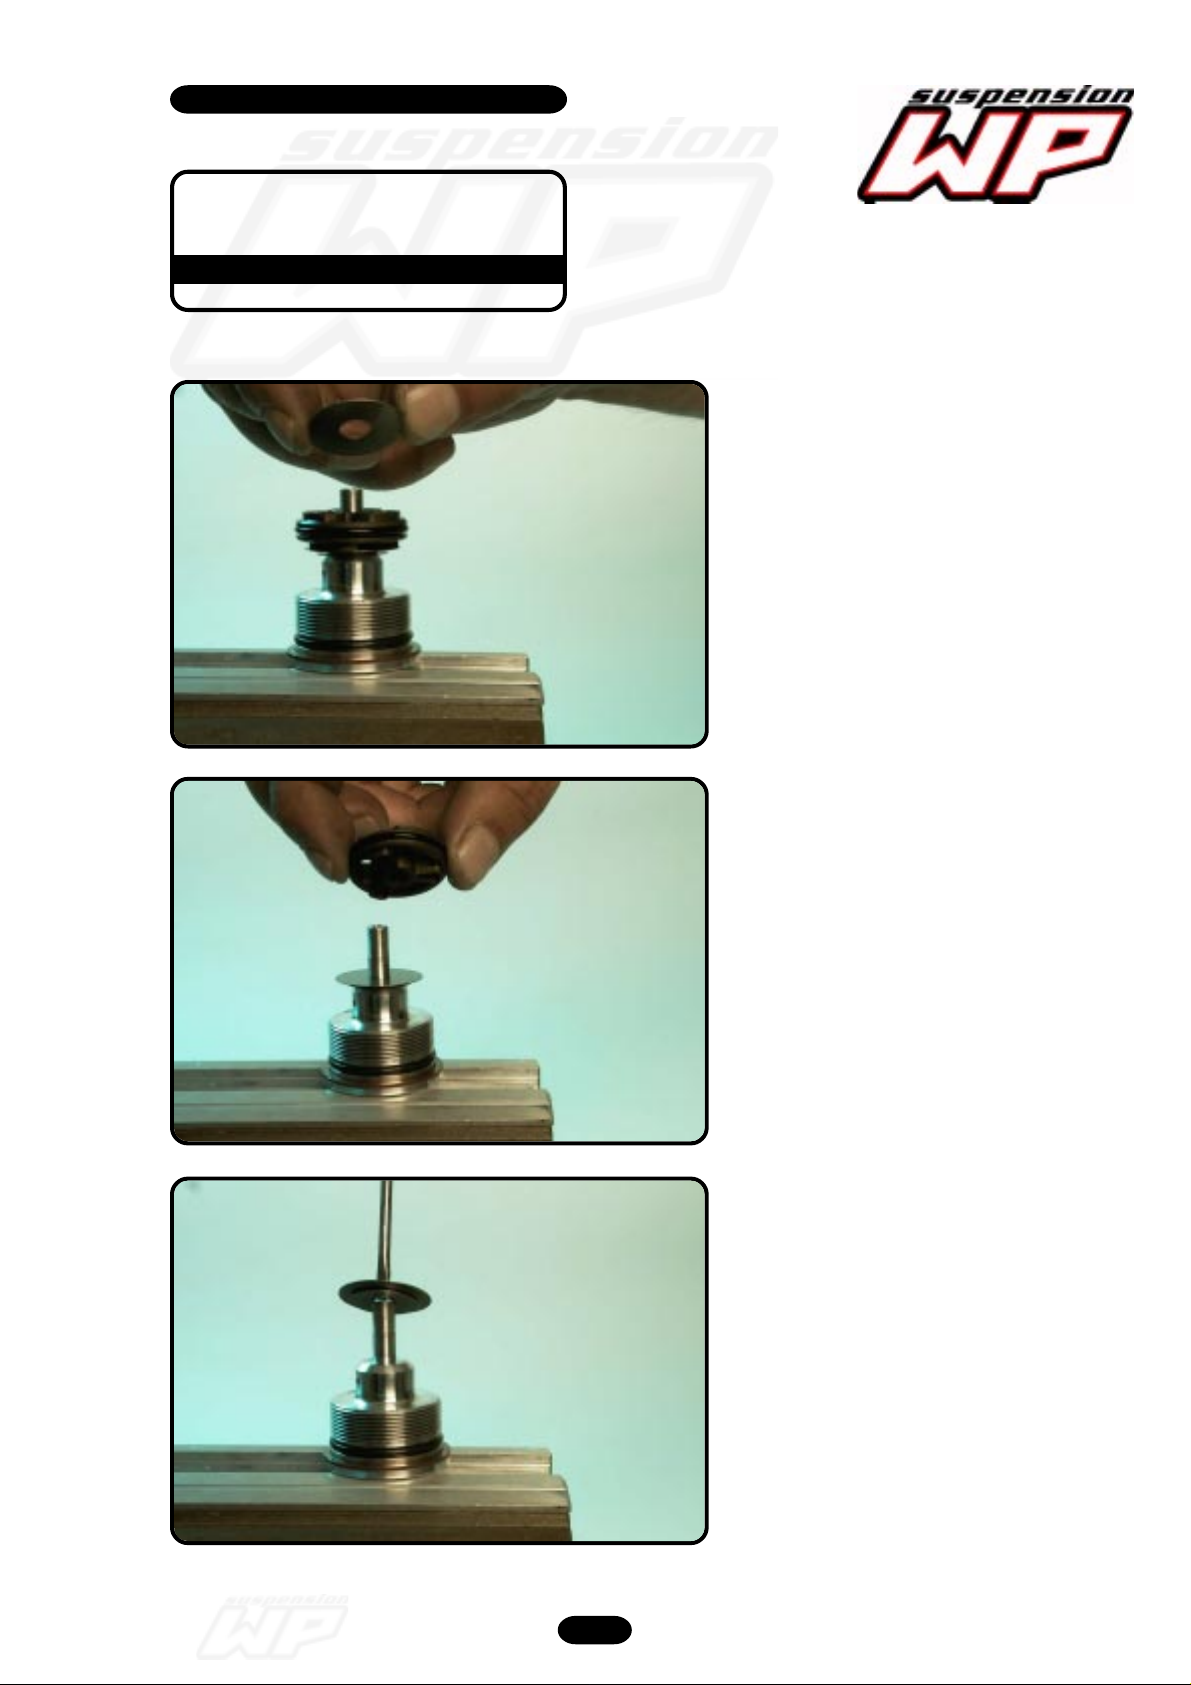
12_127
Remove the check-valve shim.
12_128
12_129
Disassemble the compression
piston with O-ring.
Pay attention to the assembling
direction!!!
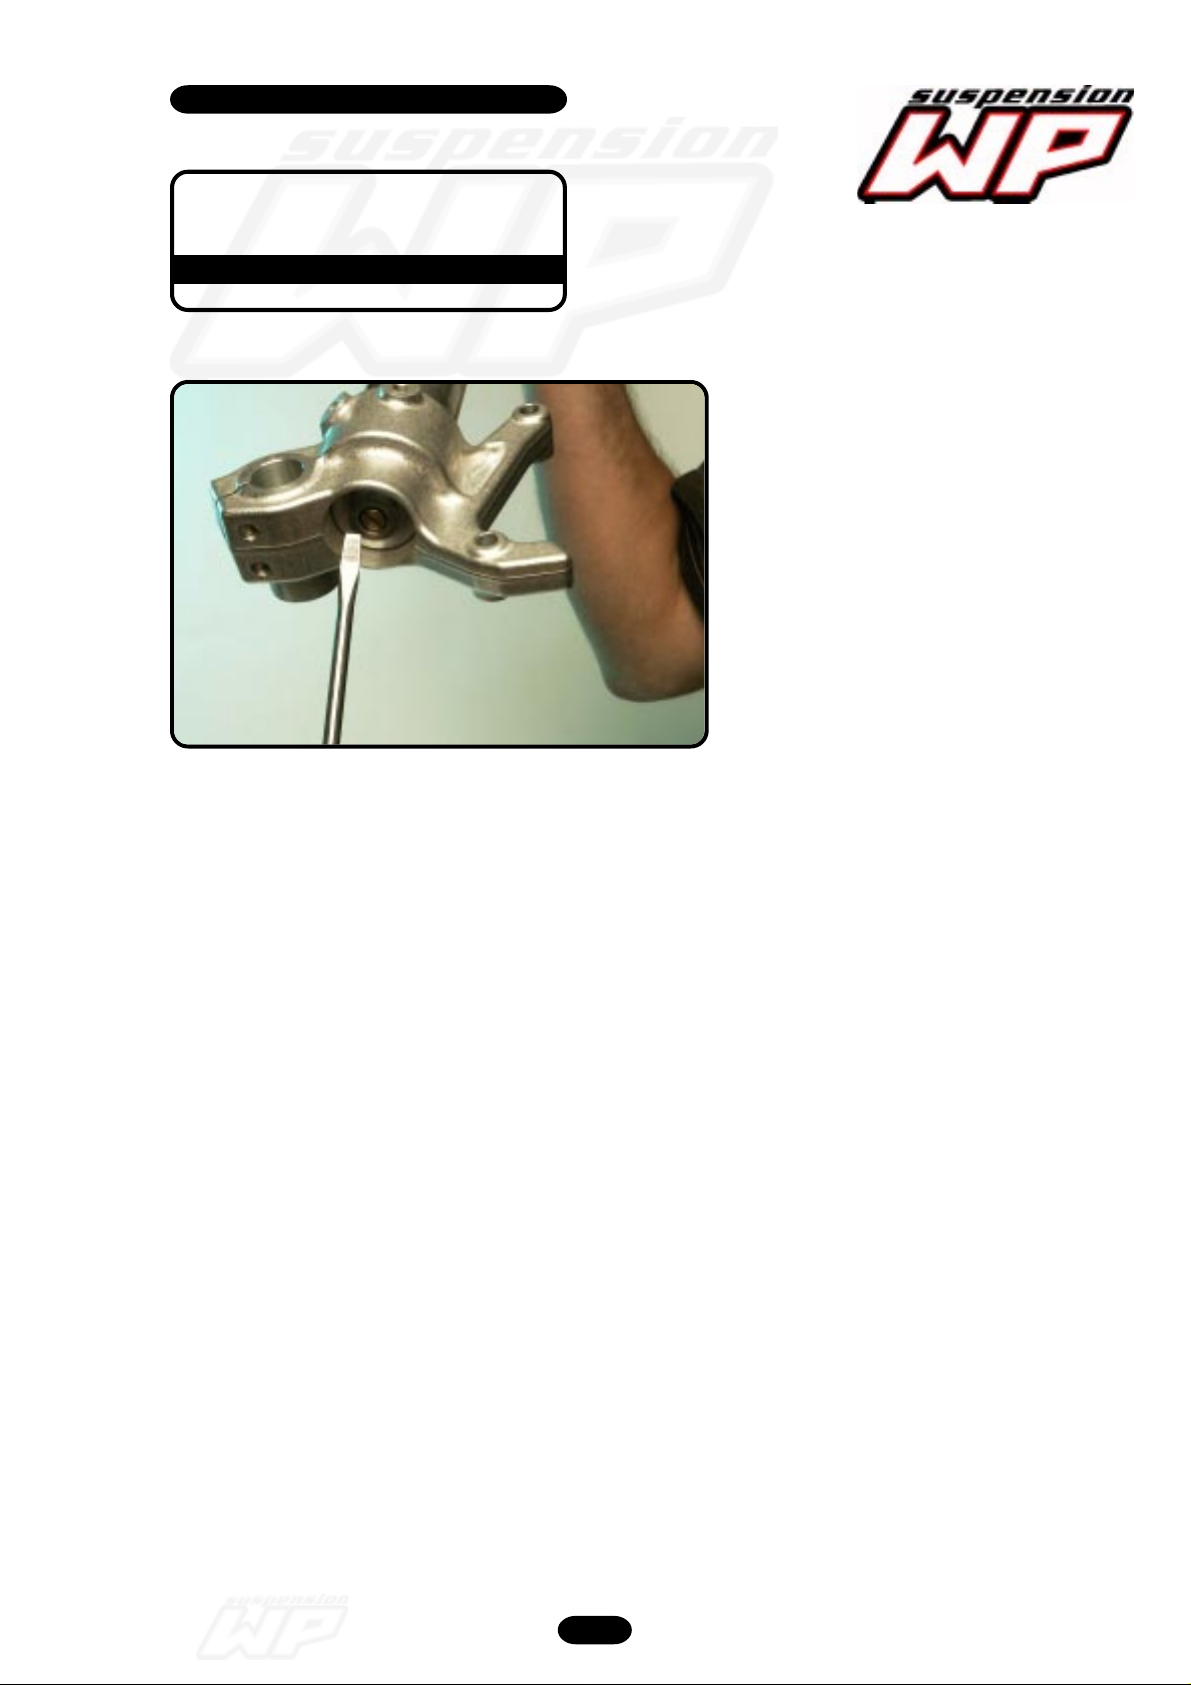
Place a screwdriver on top of the holder
and remove the entire shim packet.
Frontfork 4860 MXMA 2003 05/2002
22
Page 23
Workshop manual
4860 MXMA
Product
Exploded View
Disassembly & Assembling
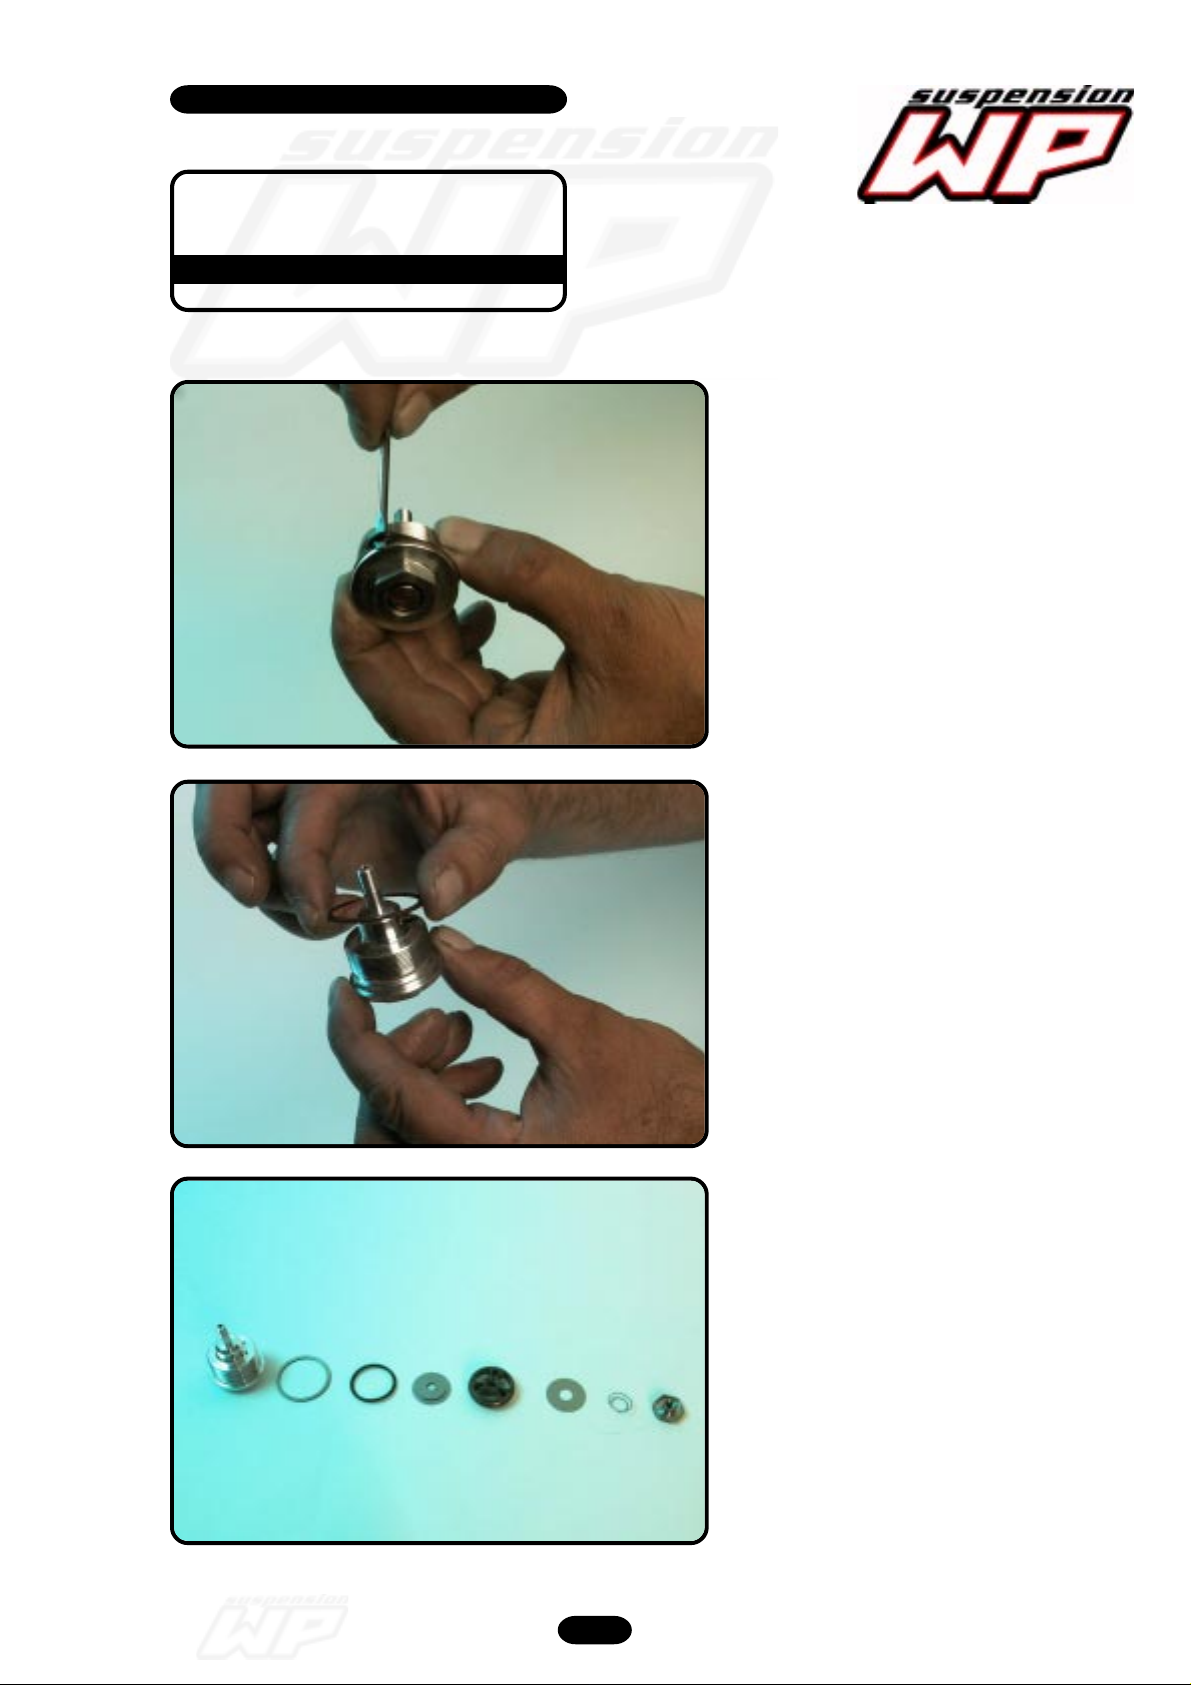
12_130
Disassemble the O-ring.
12_131
12_132
Remove the copper washer.
- Holder compression
- copper washer
- O-ring
- shims compression
- piston compression with O ring
- shim check-valve
- spring check-valve
- nut check-valve
Frontfork 4860 MXMA 2003 05/2002
23
Page 24
Workshop manual
4860 MXMA
Product
Exploded View
Disassembly & Assembling
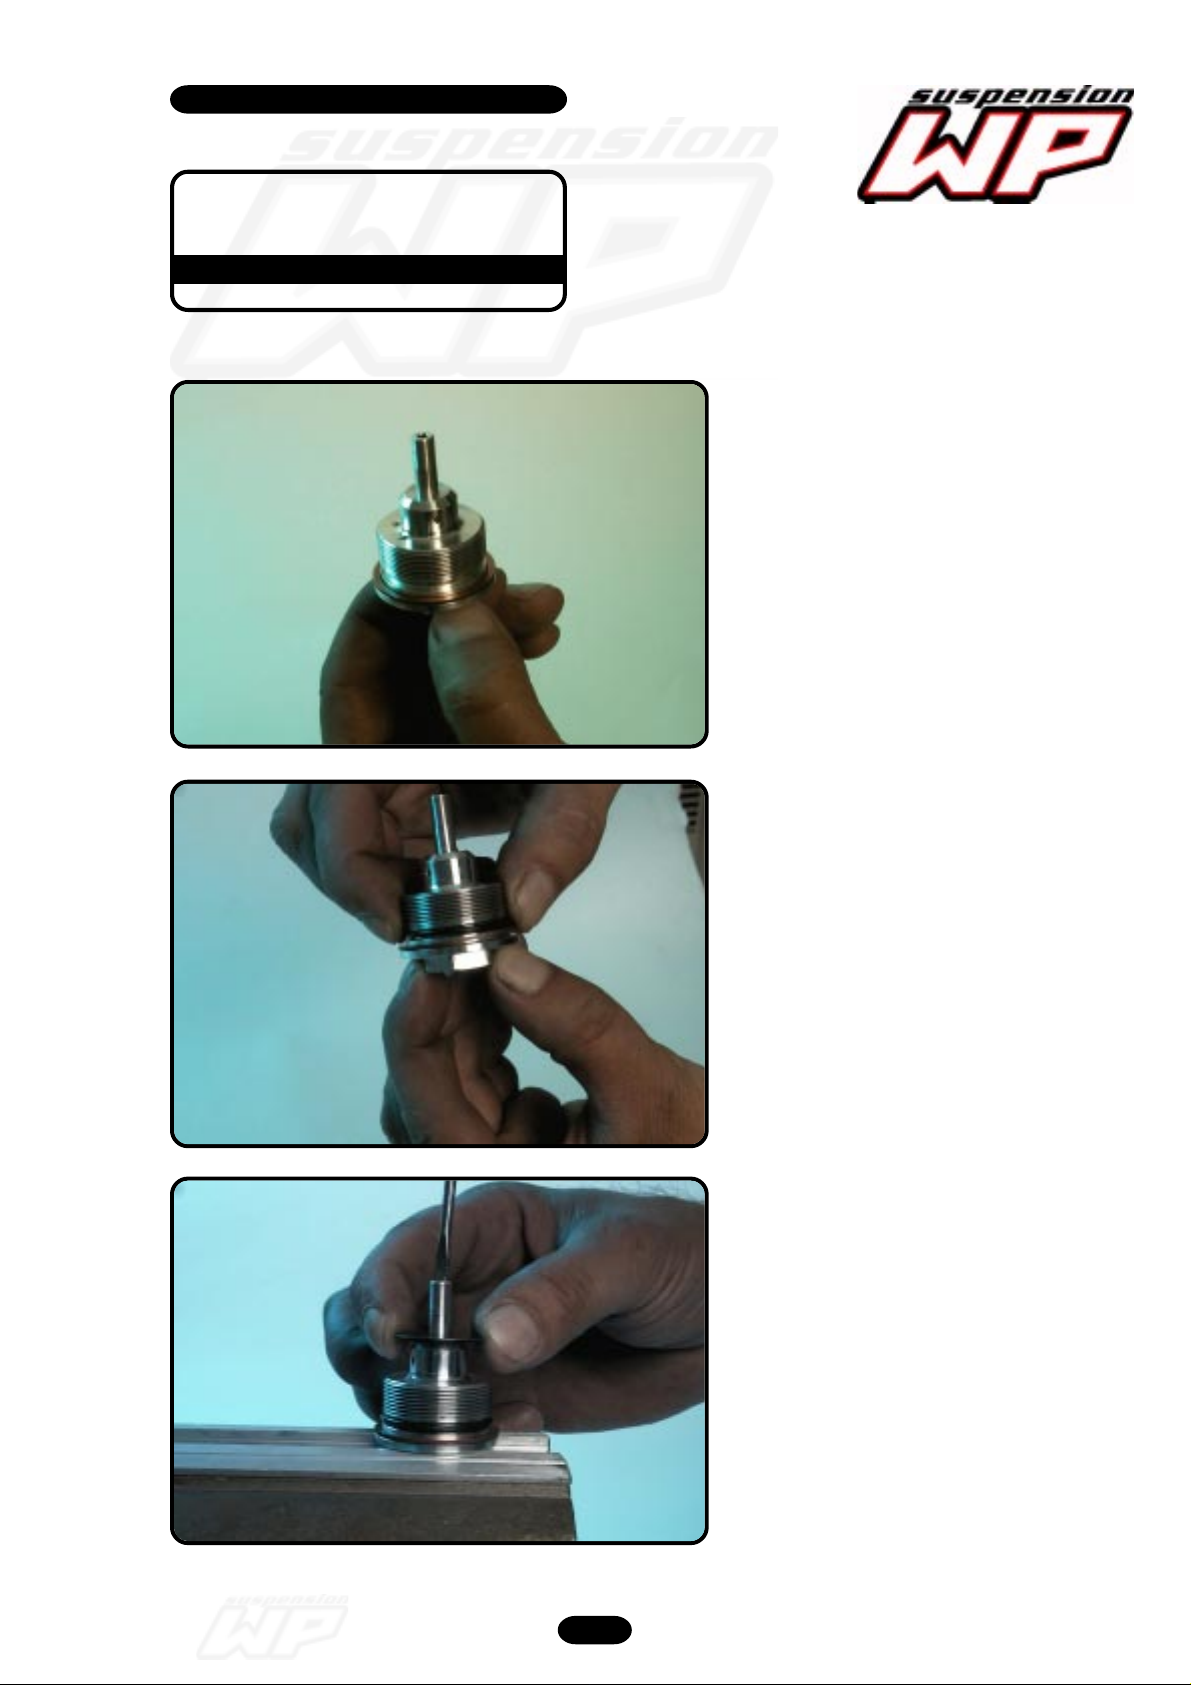
12_133
Assembling holder
compression
Replace copper washer.
12_134
12_135
Assemble the O-ring.
Replace the entire shim packet.
Frontfork 4860 MXMA 2003 05/2002
24
Page 25
Workshop manual
4860 MXMA
Product
Exploded View
Disassembly & Assembling
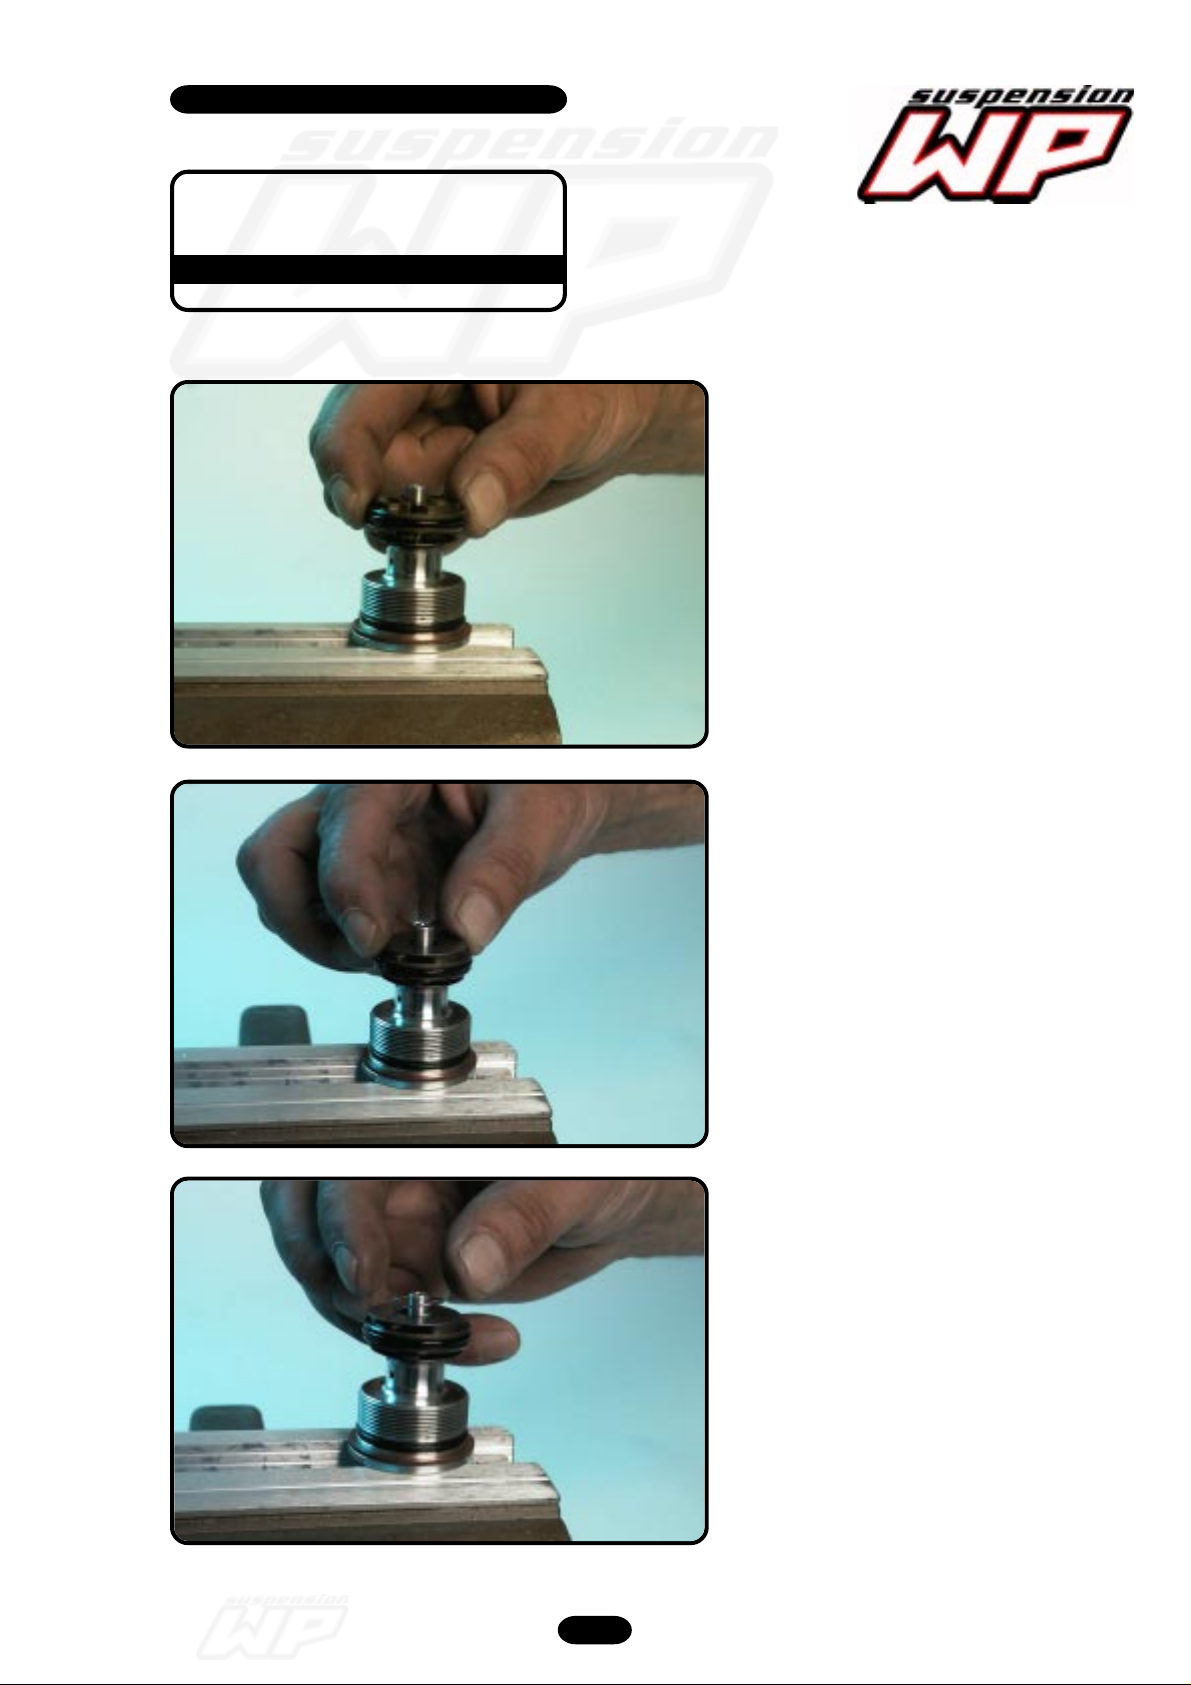
12_136
Replace piston.
Pay attention to the assembling
direction!!!
12_137
12_138
Replace shim check-valve.
Replace spring check-valve.
Pay attention to the assembling
direction!!!
Frontfork 4860 MXMA 2003 05/2002
25
Page 26
Workshop manual
4860 MXMA
Product
Exploded View
Disassembly & Assembling
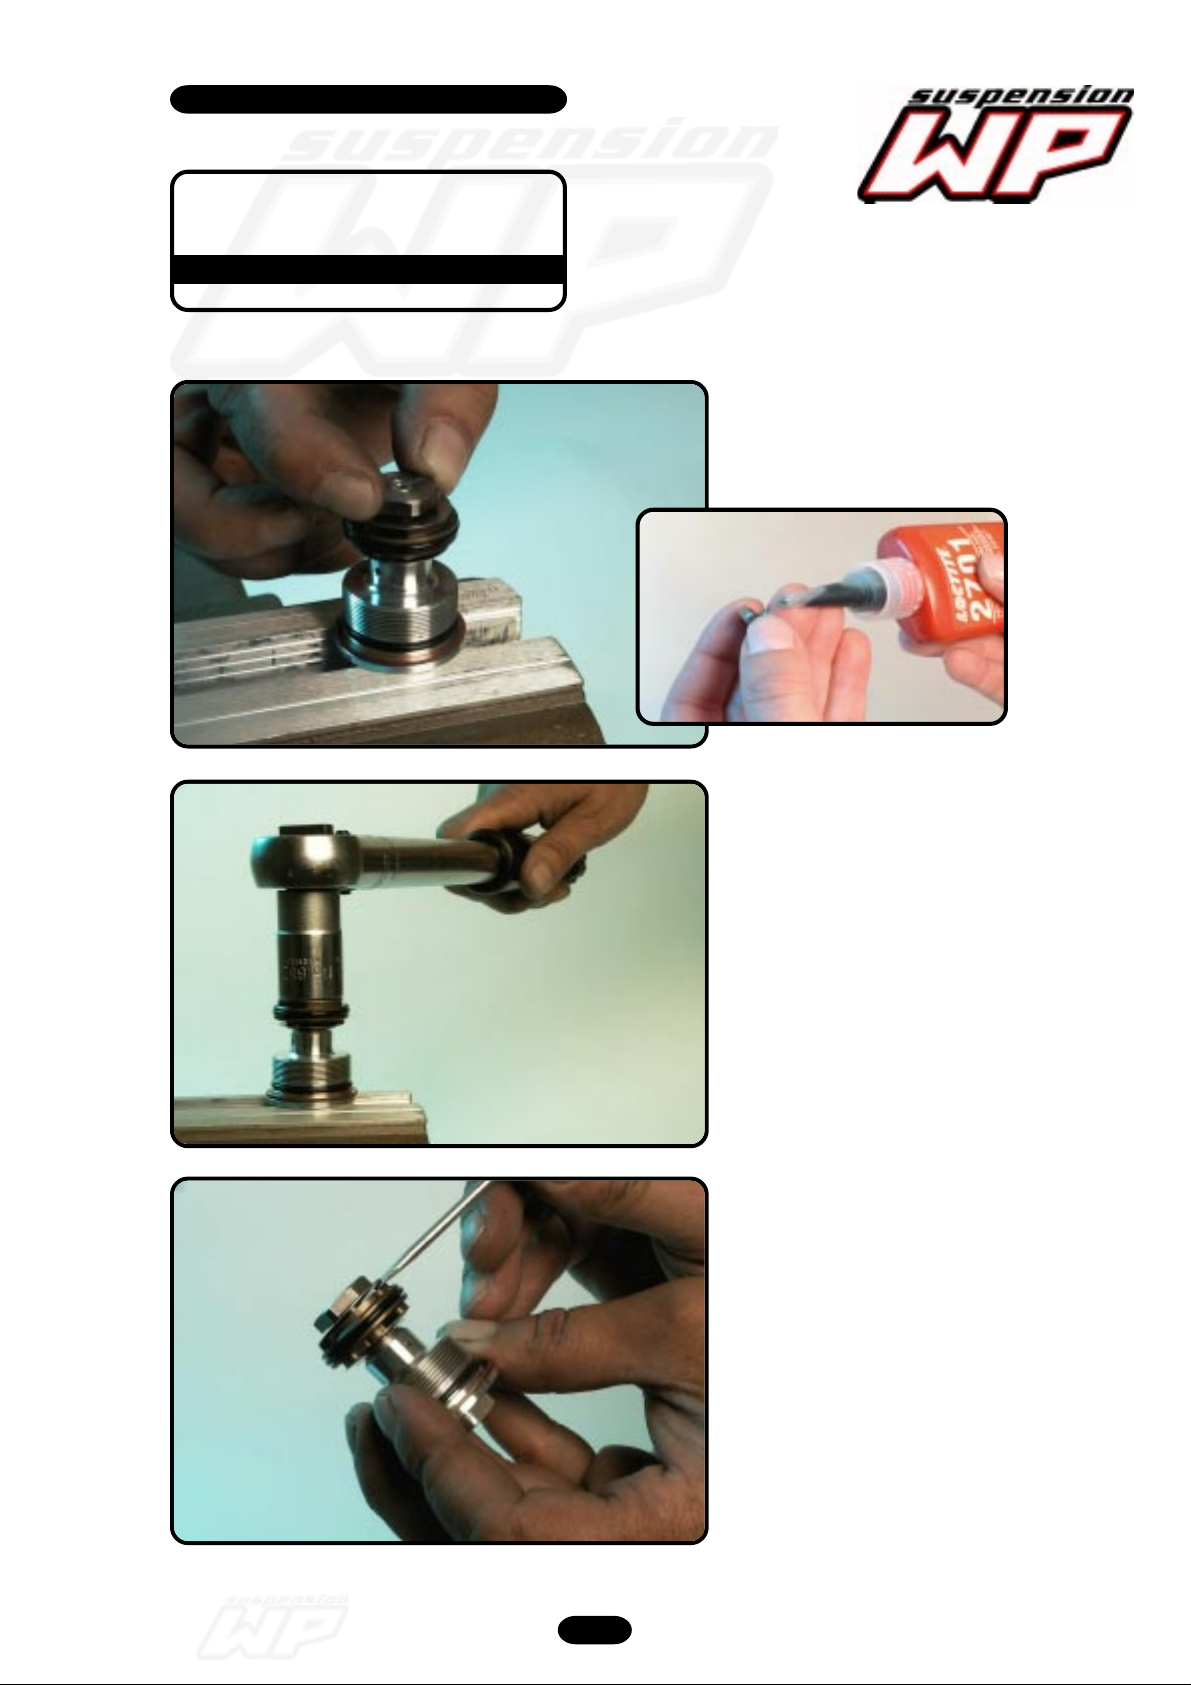
12_140
Wetting the thread of the nut with T132
and tighten it...
12_141
12_142
...to a torque of 5Nm.
Check if the spring is correctly placed
in the chamber of the nut.
Frontfork 4860 MXMA 2003 05/2002
26
Page 27
Workshop manual
4860 MXMA
Product
Exploded View
Disassembly & Assembling
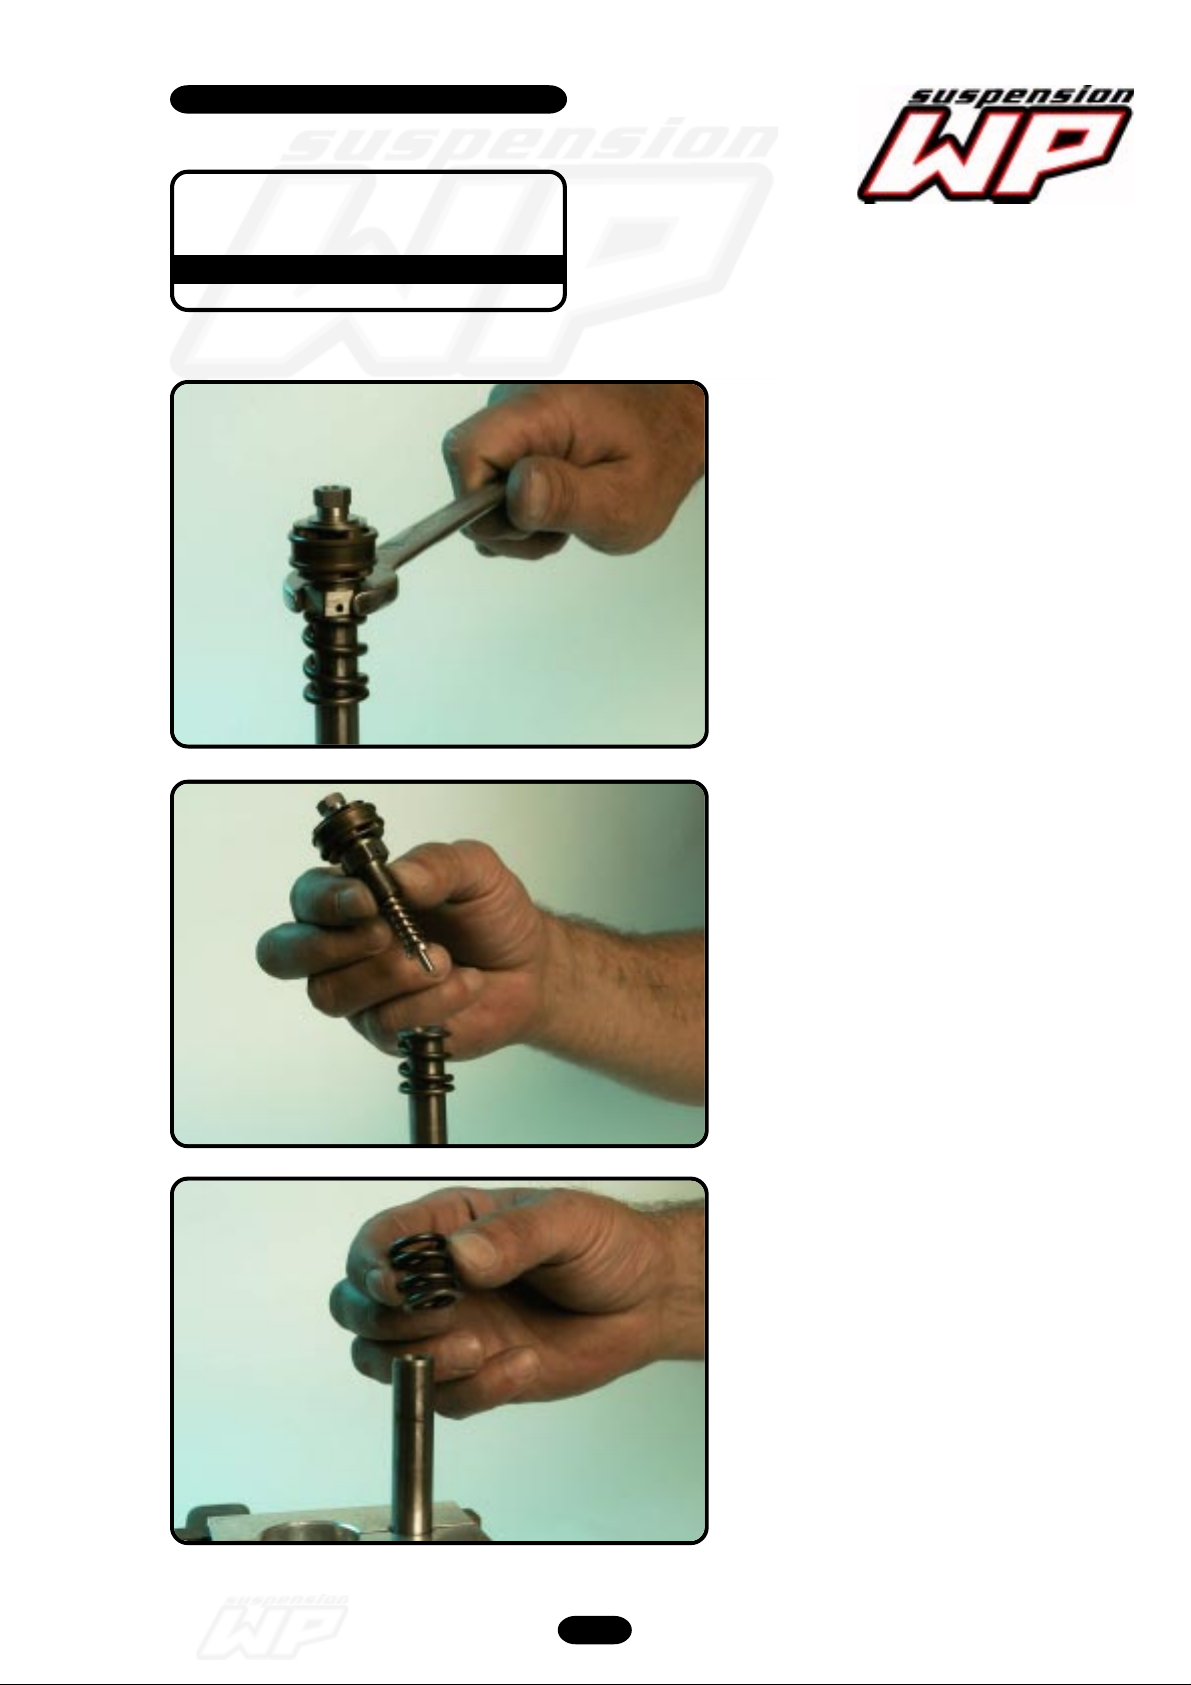
12_143
Disassembly tap rebound
Clamp the piston-rod (at the level where
the hydraulic stop is mounted) in T508S
and unscrew the rebound tap.
(Size 17)
12_144/
145/146 -
posterize
12_147
Remove the rebound tap “complete”.
Remove the rebound spring.
Frontfork 4860 MXMA 2003 05/2002
27
Page 28
Workshop manual
4860 MXMA
Product
Exploded View
Disassembly & Assembling
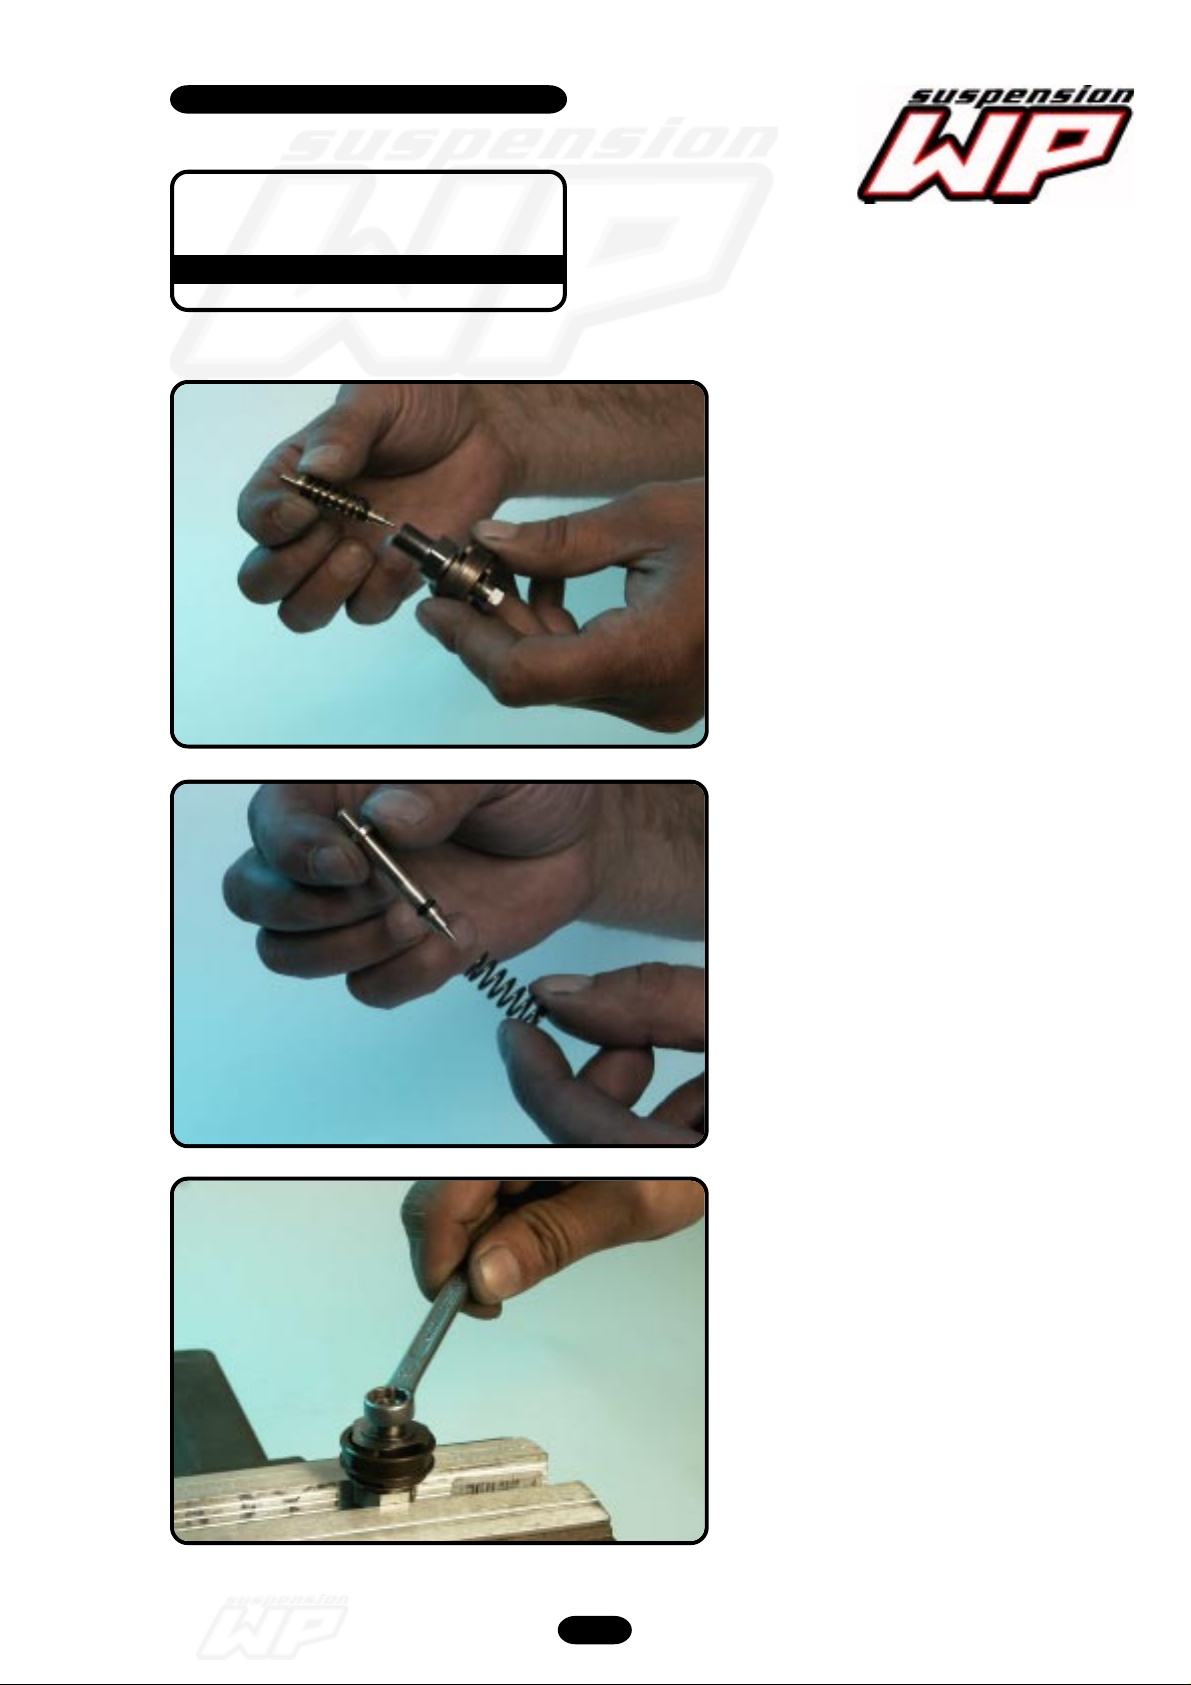
12_148
Pull the rebound needle with spring out
of the tap rebound.
12_149
12_150
Check the O-ring.
Pay attention to the position of the
triangular shims on the piston!!!
Clamp the tap in the vice and unscrew
the nut. (Size 10)
Version with locking: Remove the
locking with a file.
Frontfork 4860 MXMA 2003 05/2002
28
Page 29
Workshop manual
4860 MXMA
Product
Exploded View
Disassembly & Assembling
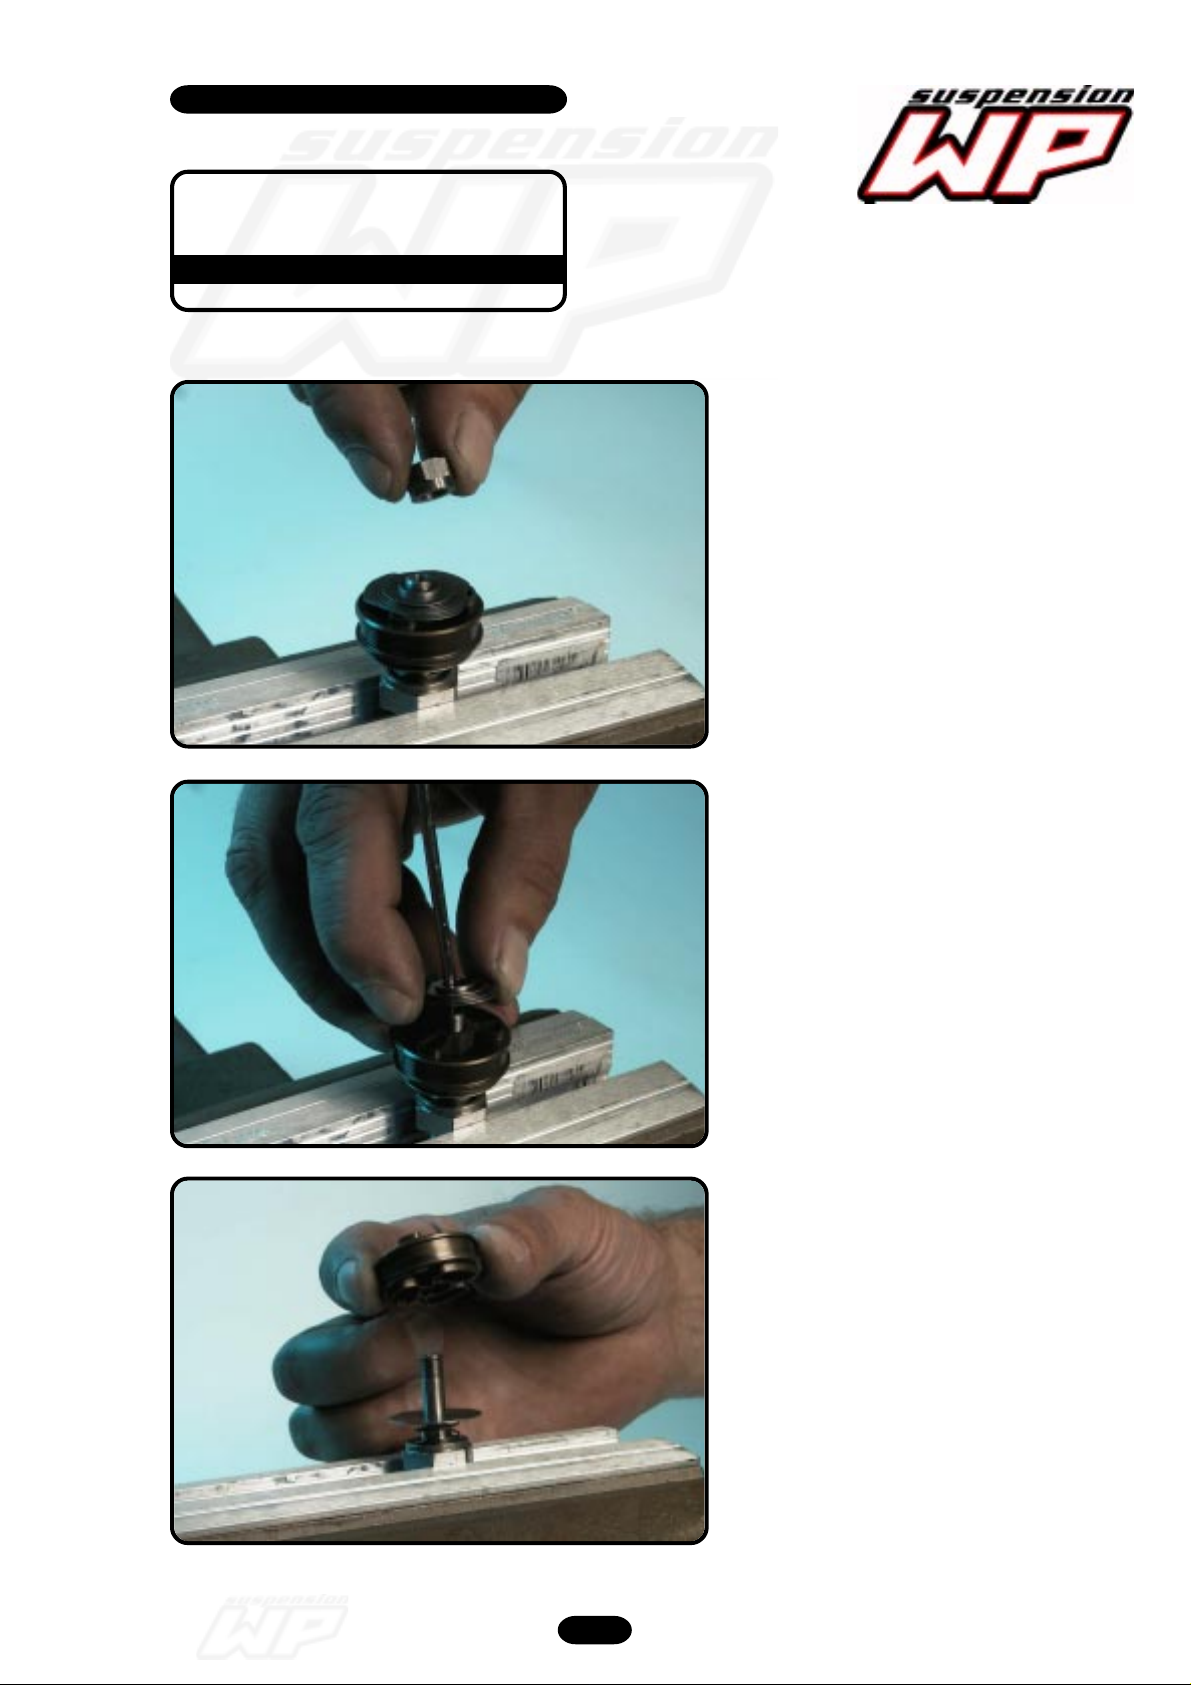
12_151
Remove the nut.
Pay attention to the assembling
direction!!!
12_152
12_153
Place a screwdriver on top of the tap
and remove the entire shim packet.
Remove piston rebound.
Pay attention to the assembling
direction!!!
Frontfork 4860 MXMA 2003 05/2002
29
Page 30
Workshop manual
4860 MXMA
Product
Exploded View
Disassembly & Assembling
12_154
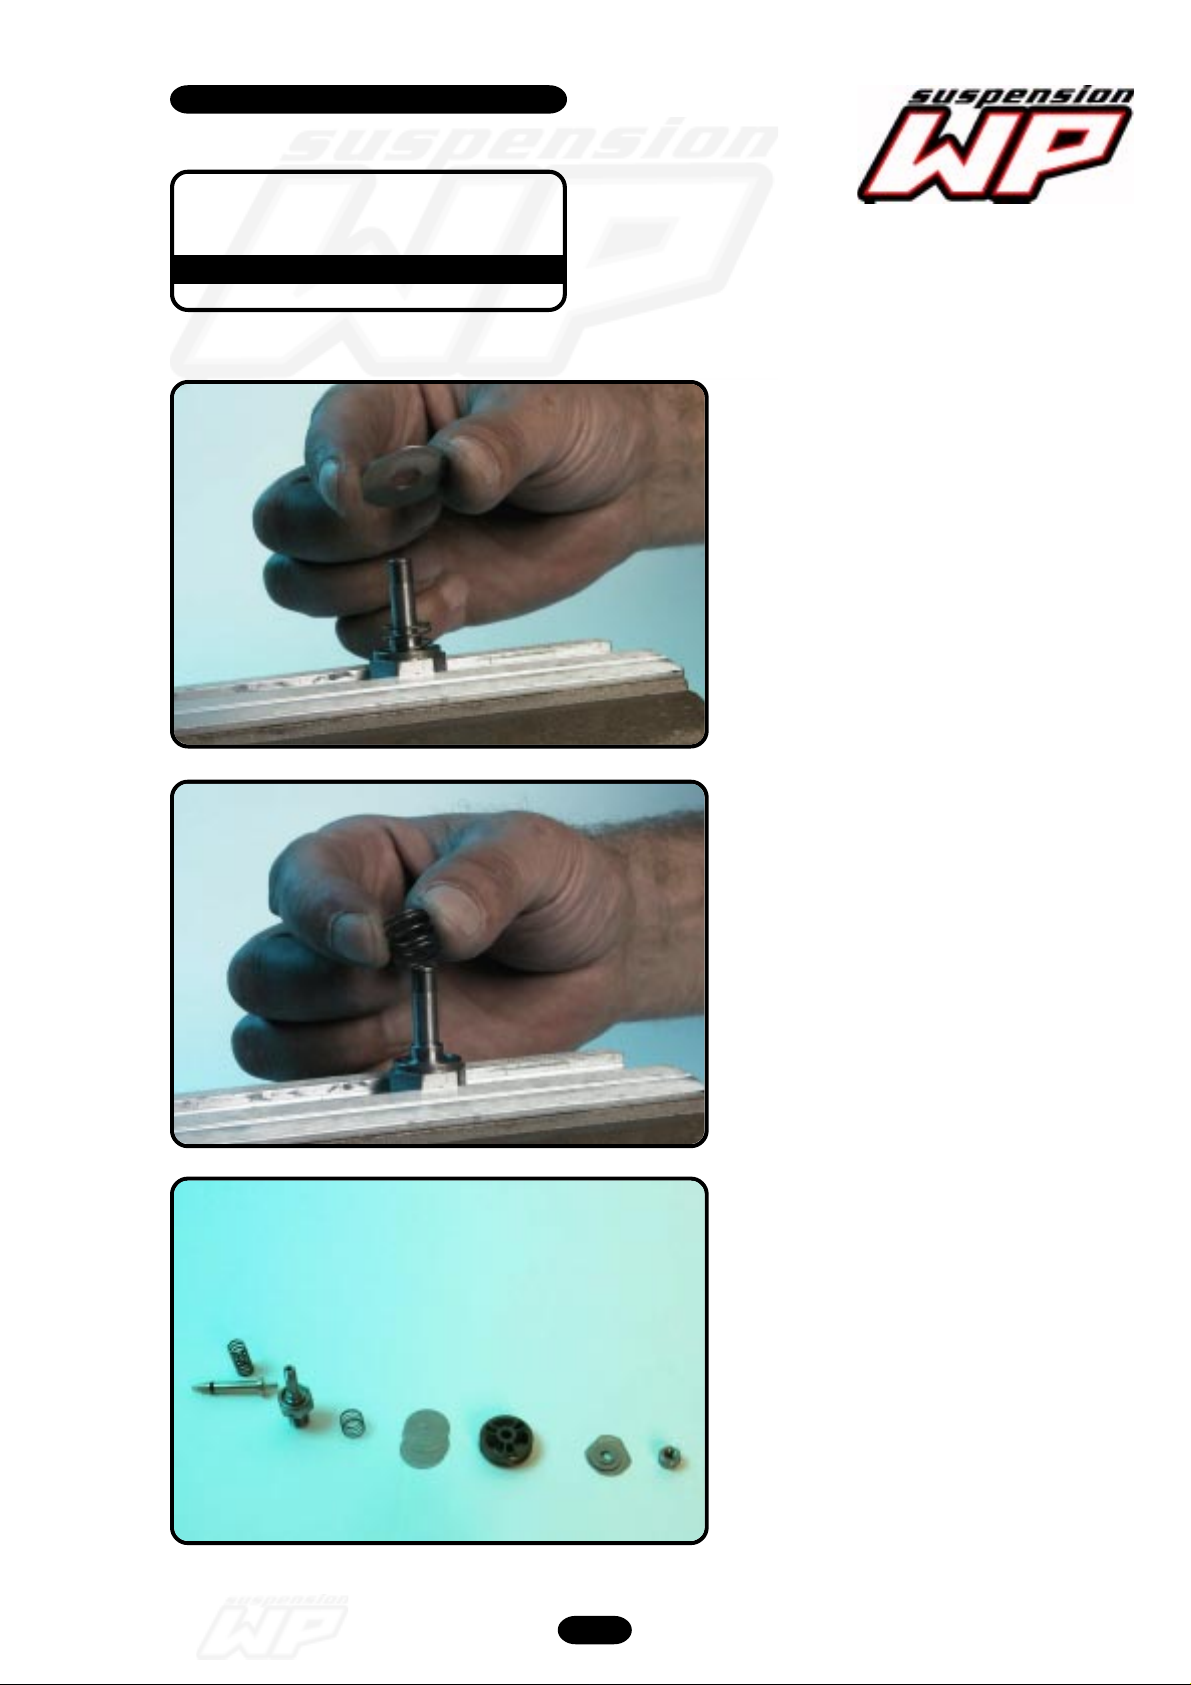
Remove check-valve shims.
12_155
12_156
Remove spring check-valve.
- Rebound adjustment needle with
O-ring
- spring
- tap rebound
- spring check-valve
- shims check-valve
- piston rebound
- shims
- nut M6x0.5
Frontfork 4860 MXMA 2003 05/2002
30
Page 31
Workshop manual
4860 MXMA
Product
Exploded View
Disassembly & Assembling
12_157
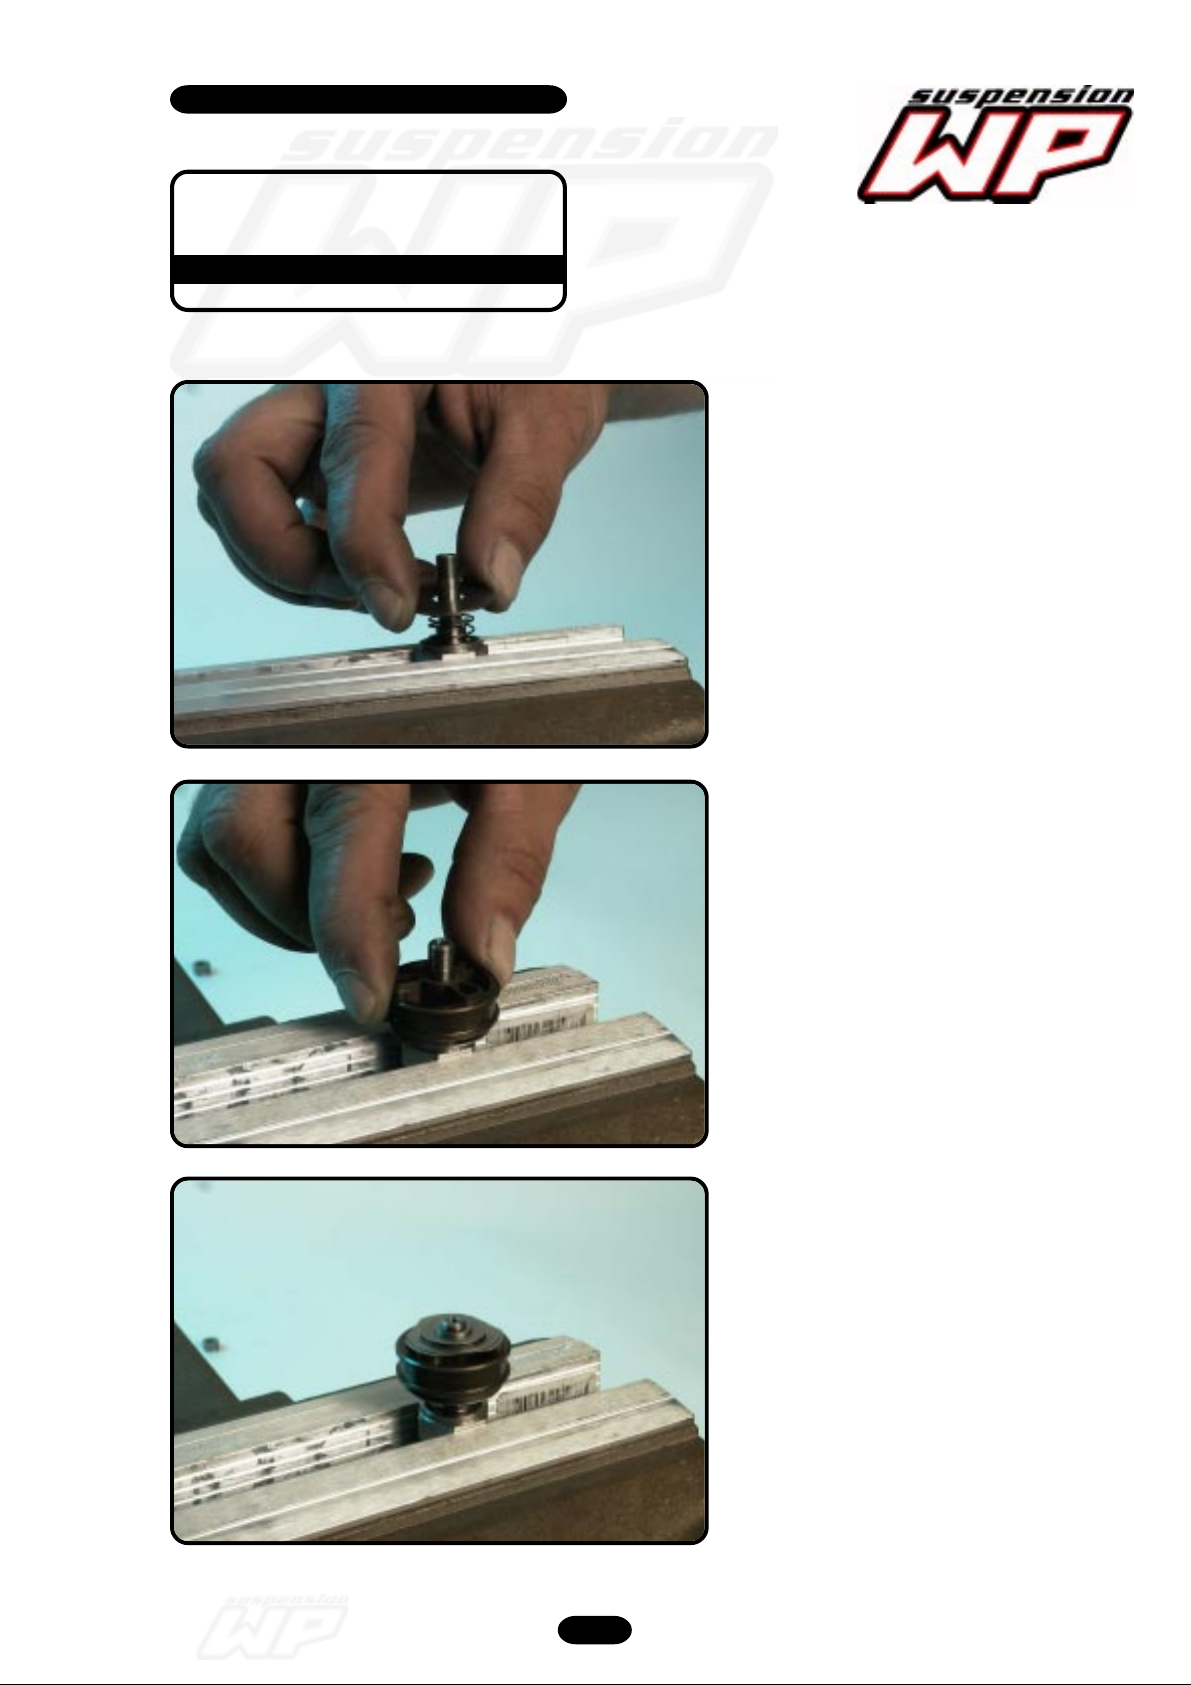
Assembling tap rebound
Assemble the spring and shims checkvalve.
12_158
12_159
Assemble the piston rebound.
Pay attention to the assembling
direction!!!
Replace the shims.
Pay attention to the position of the
triangular shims on the piston!!!
Frontfork 4860 MXMA 2003 05/2002
31
Page 32
Workshop manual
4860 MXMA
Product
Exploded View
Disassembly & Assembling
12_160
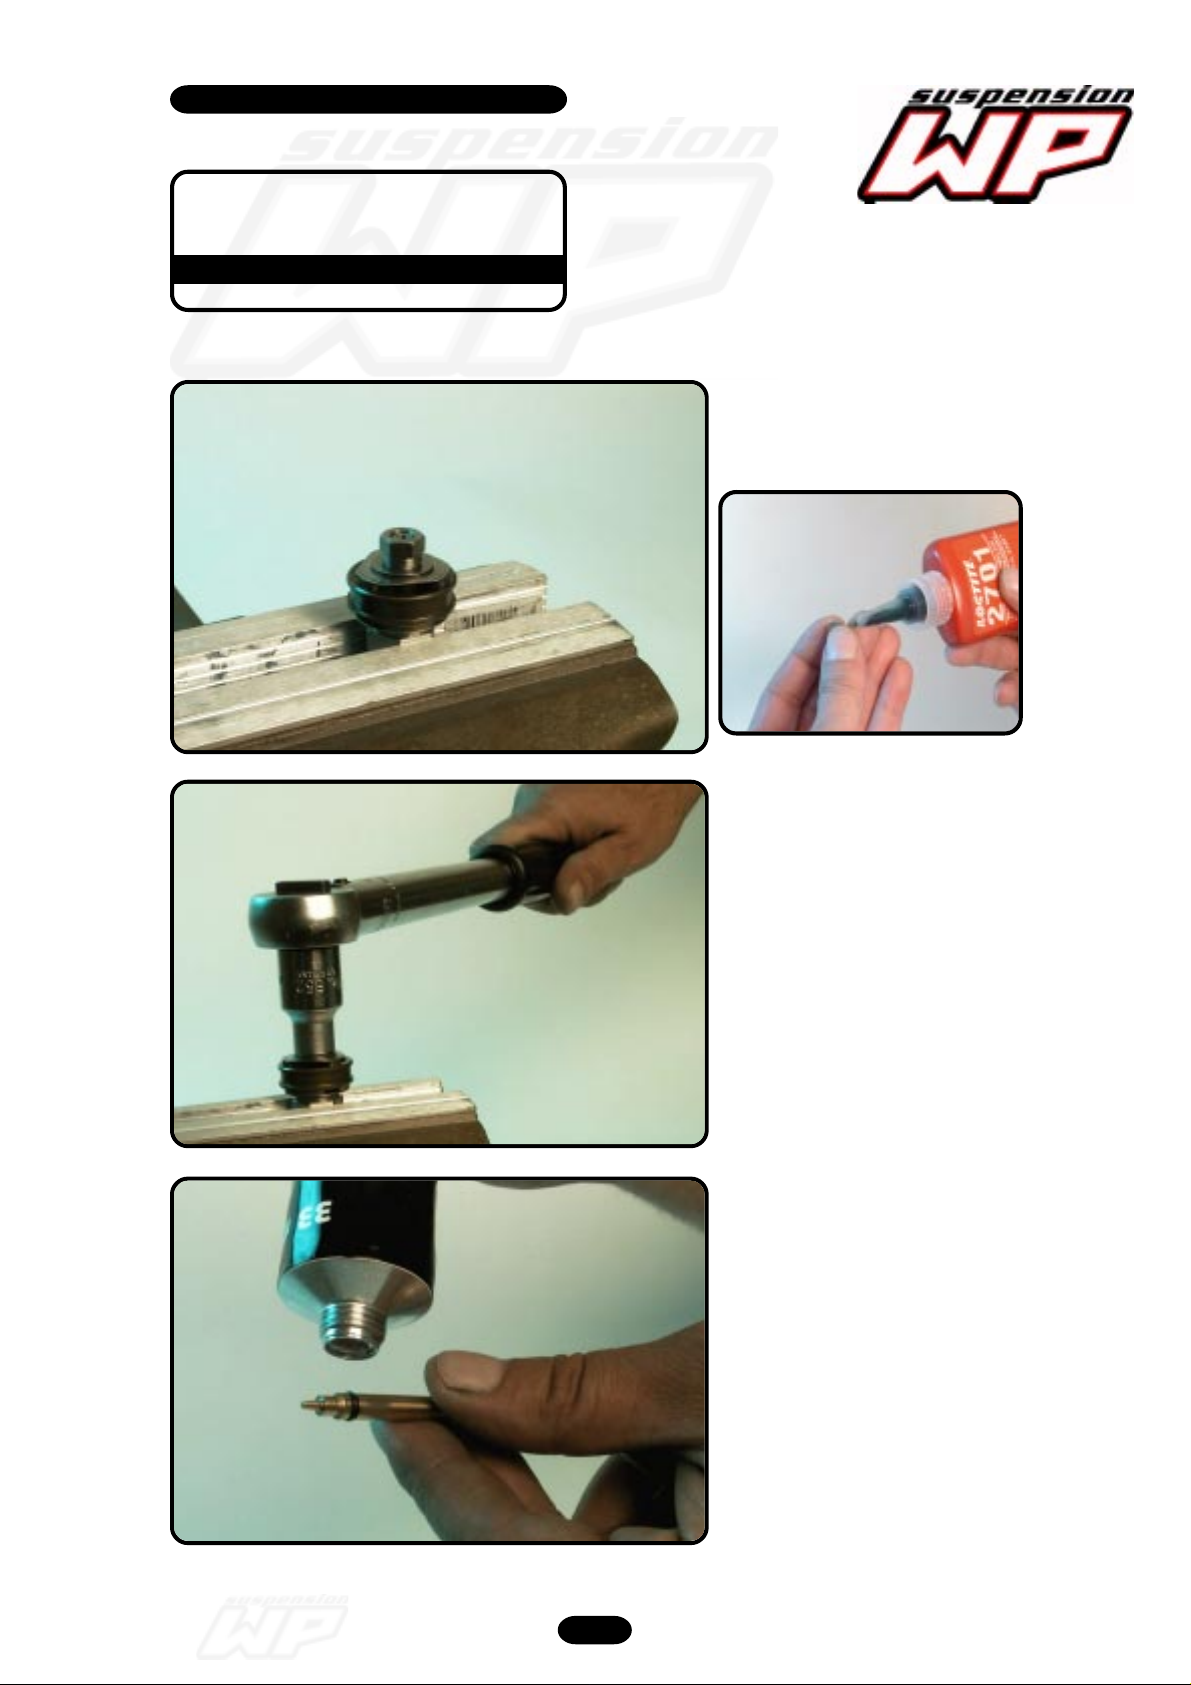
Wetting the thread of the nut with T132.
Screw the nut on the tap...
12_161
12_162
...tighten the nut to a torque of 5 Nm.
Grease the O-ring of the adjustment
needle with T158.
Frontfork 4860 MXMA 2003 05/2002
32
Page 33
Workshop manual
4860 MXMA
Product
Exploded View
Disassembly & Assembling
12_163
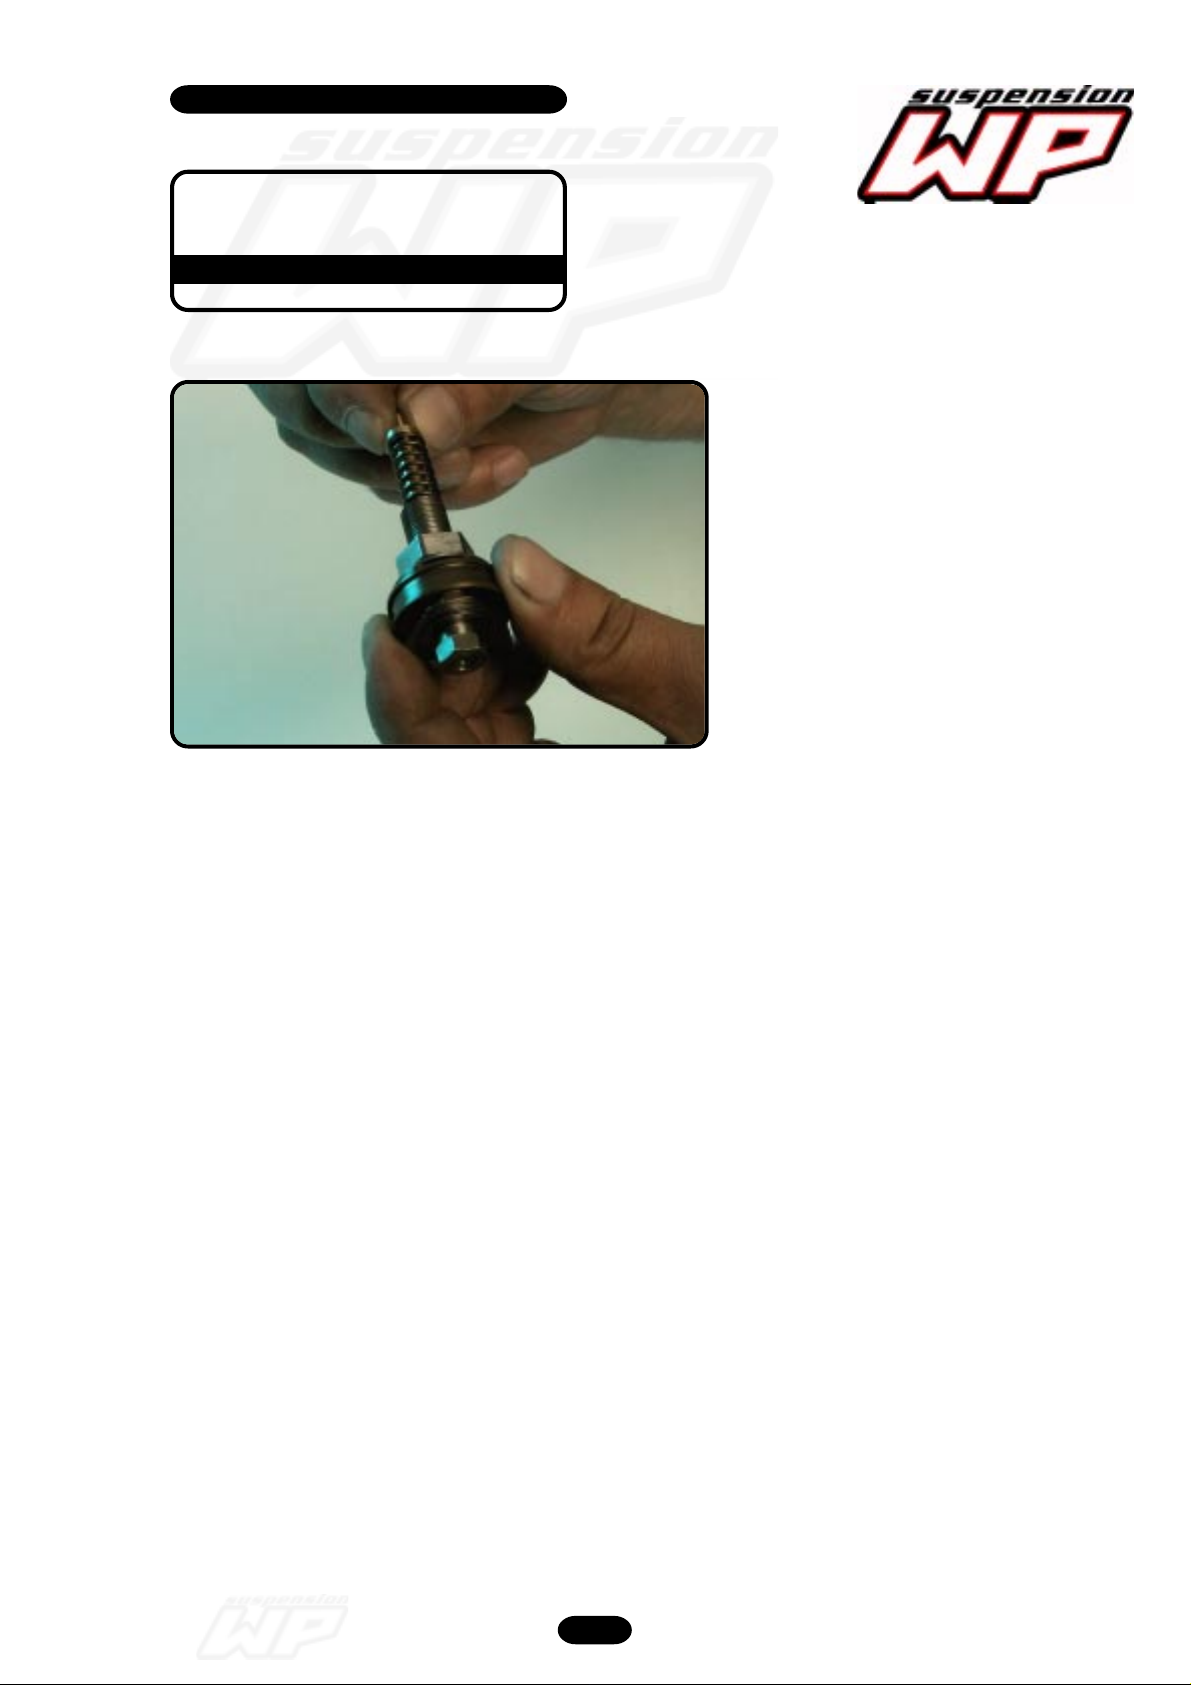
Mount the needle with spring into the tap
rebound.
Frontfork 4860 MXMA 2003 05/2002
33
Page 34
Workshop manual
4860 MXMA
Product
Exploded View
Disassembly & Assembling
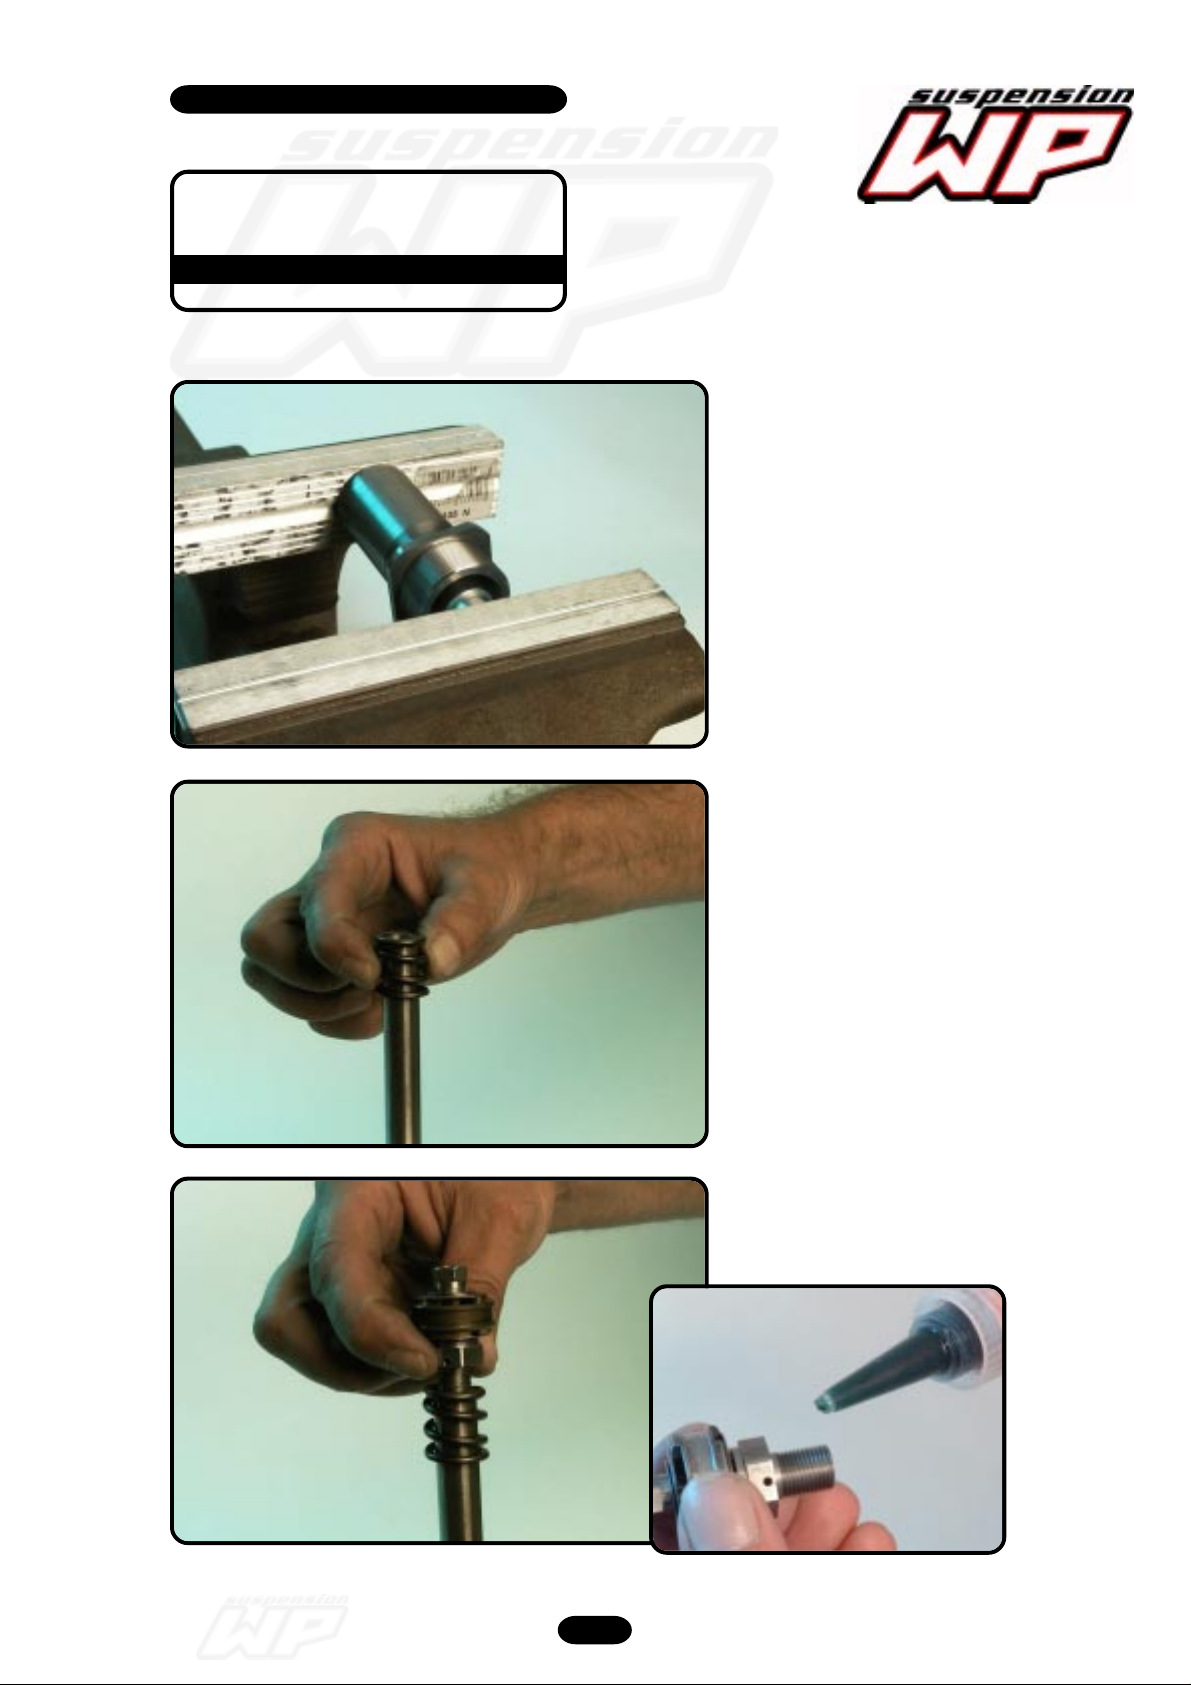
12_171
Assembling cartridge
Press with T507 the DU-bush into the
screw sleeve.
12_172
12_173
Clamp the piston-rod in T508S.
At the level where the hydraulic stop is
mounted.
Wetting the thread with T131.
And screw the tap in the piston-rod.
Frontfork 4860 MXMA 2003 05/2002
34
Page 35
Workshop manual
4860 MXMA
Product
Exploded View
Disassembly & Assembling
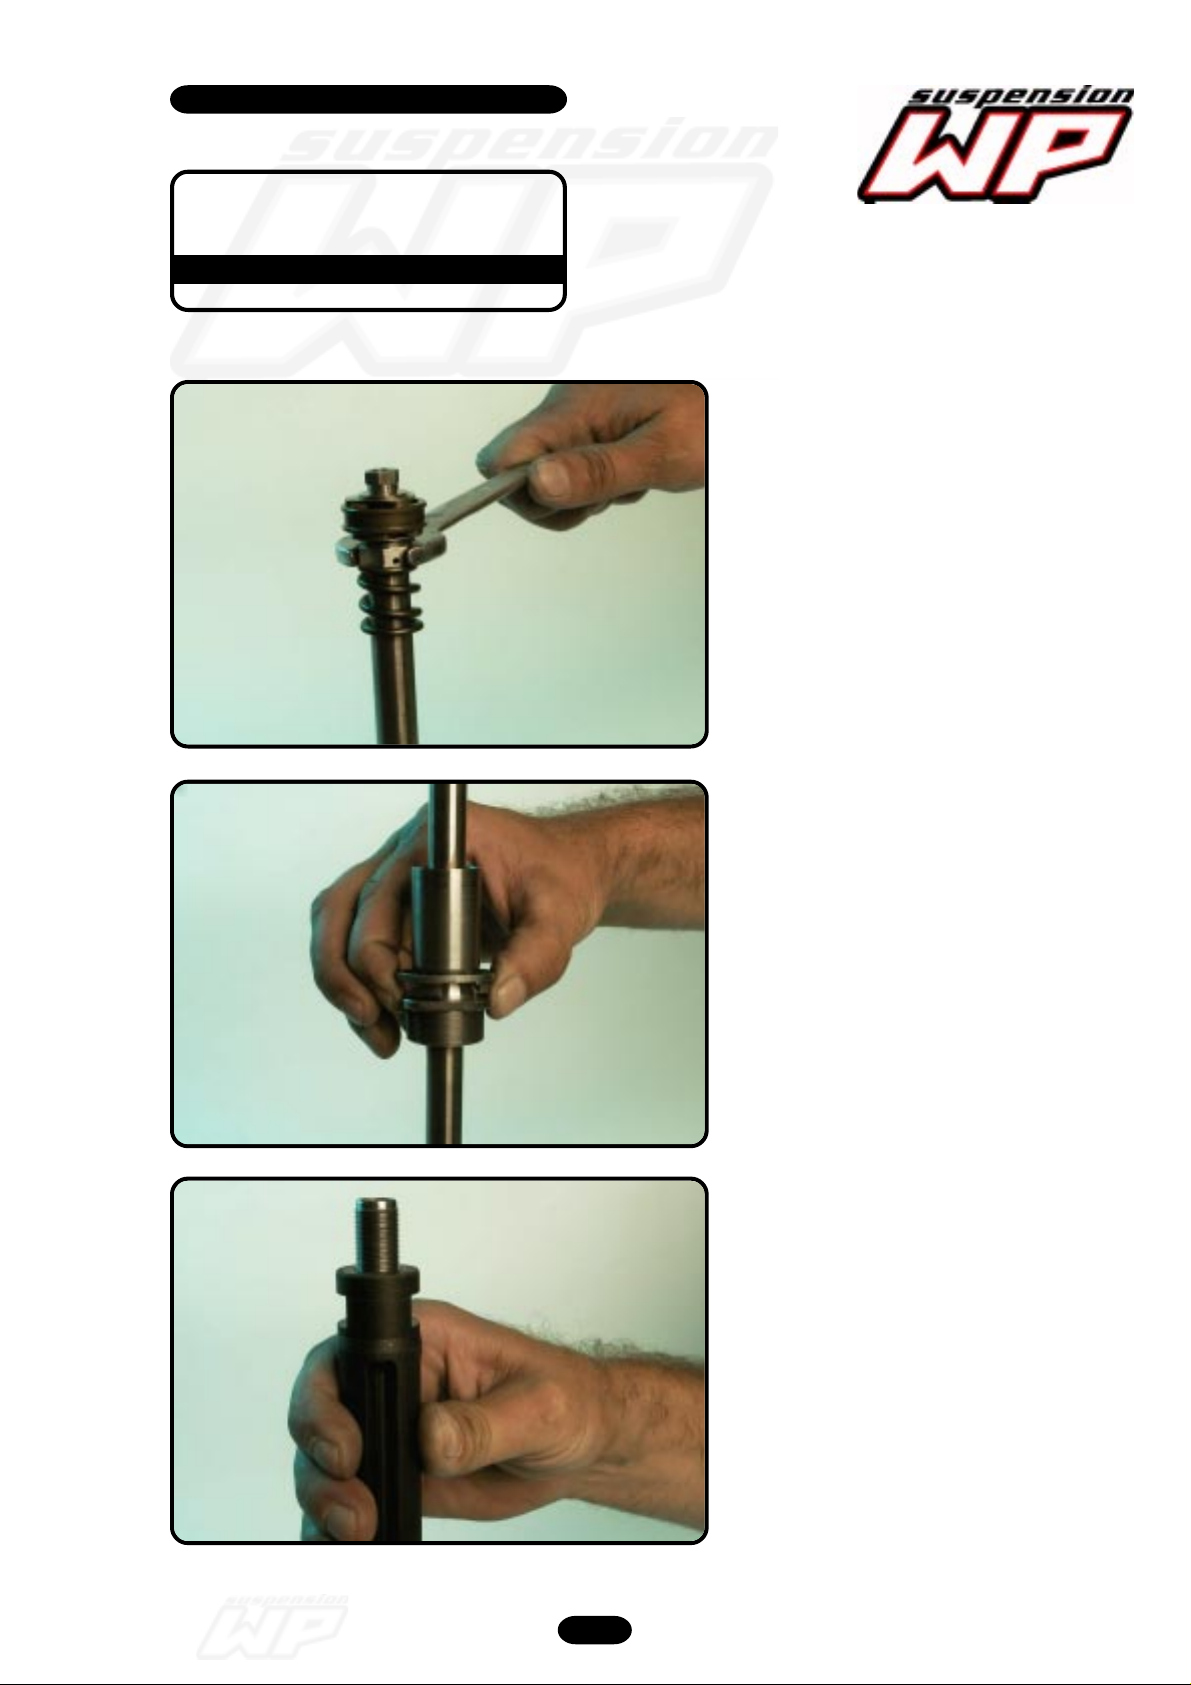
12_174
Tighten the tap rebound.
12_175
12_176
Clamp the piston-rod “not too tight” in
at the other side and replace the screw
sleeve with spring retainer.
Screw the hydraulic stop “hand tight” to
the end of the thread of the piston-rod.
Frontfork 4860 MXMA 2003 05/2002
35
Page 36

Workshop manual
4860 MXMA
Product
Exploded View
Disassembly & Assembling
12_177
Clamp the tube with plug in the
clamping block (T508S and T509) and
assemble the piston-rod “cpl.” into the
tube.
Guide the piston ring!!!
12_178
12_179
Before assembling wet the thread of
the screw sleeve with T131.
Screw the screw sleeve into the tube.
Tighten the screw sleeve.
Frontfork 4860 MXMA 2003 05/2002
36
Page 37
Workshop manual
4860 MXMA
Product
Exploded View
Disassembly & Assembling
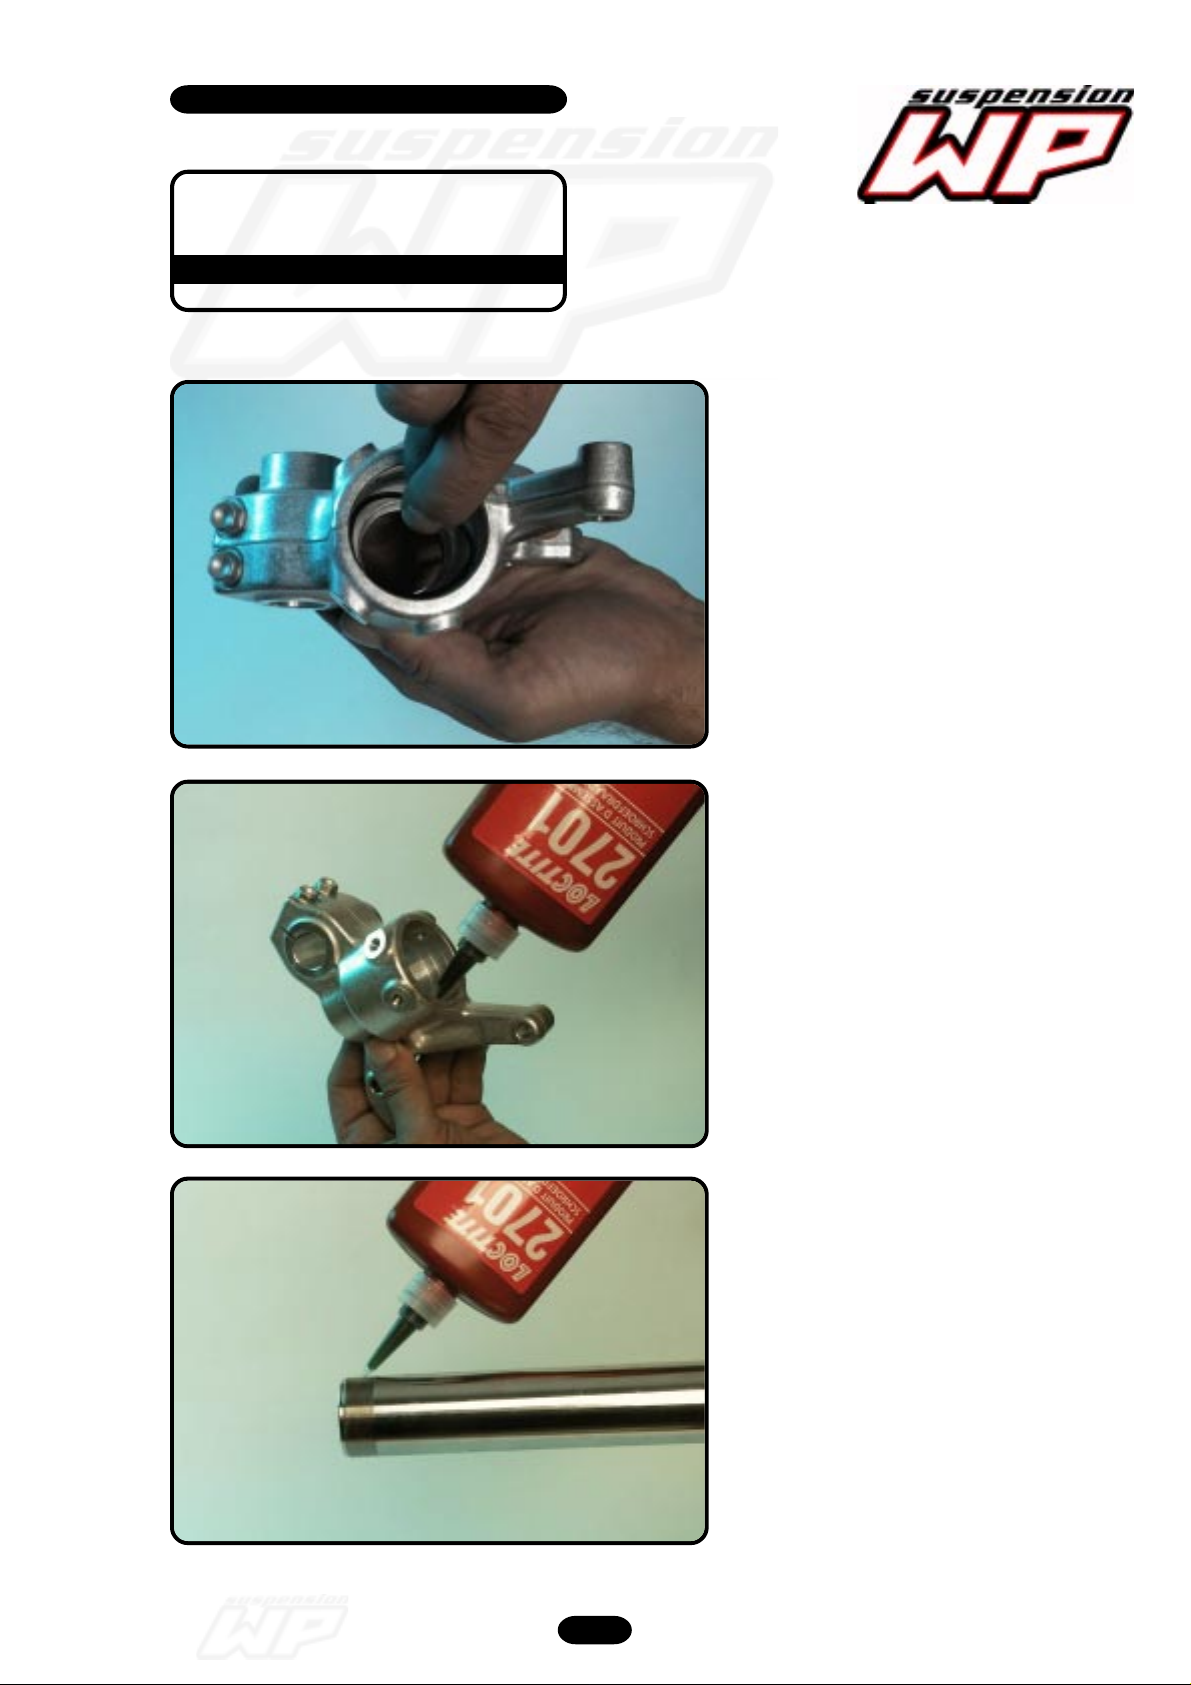
12_180
Assembling forkleg
Replace a new O-ring in the groove of
the axle-clamp.
12_181
12_182
Wetting the thread of the axle-clamp
with T132.
Wetting the thread of the inner-tube with
T132.
Frontfork 4860 MXMA 2003 05/2002
37
Page 38
Workshop manual
4860 MXMA
Product
Exploded View
Disassembly & Assembling
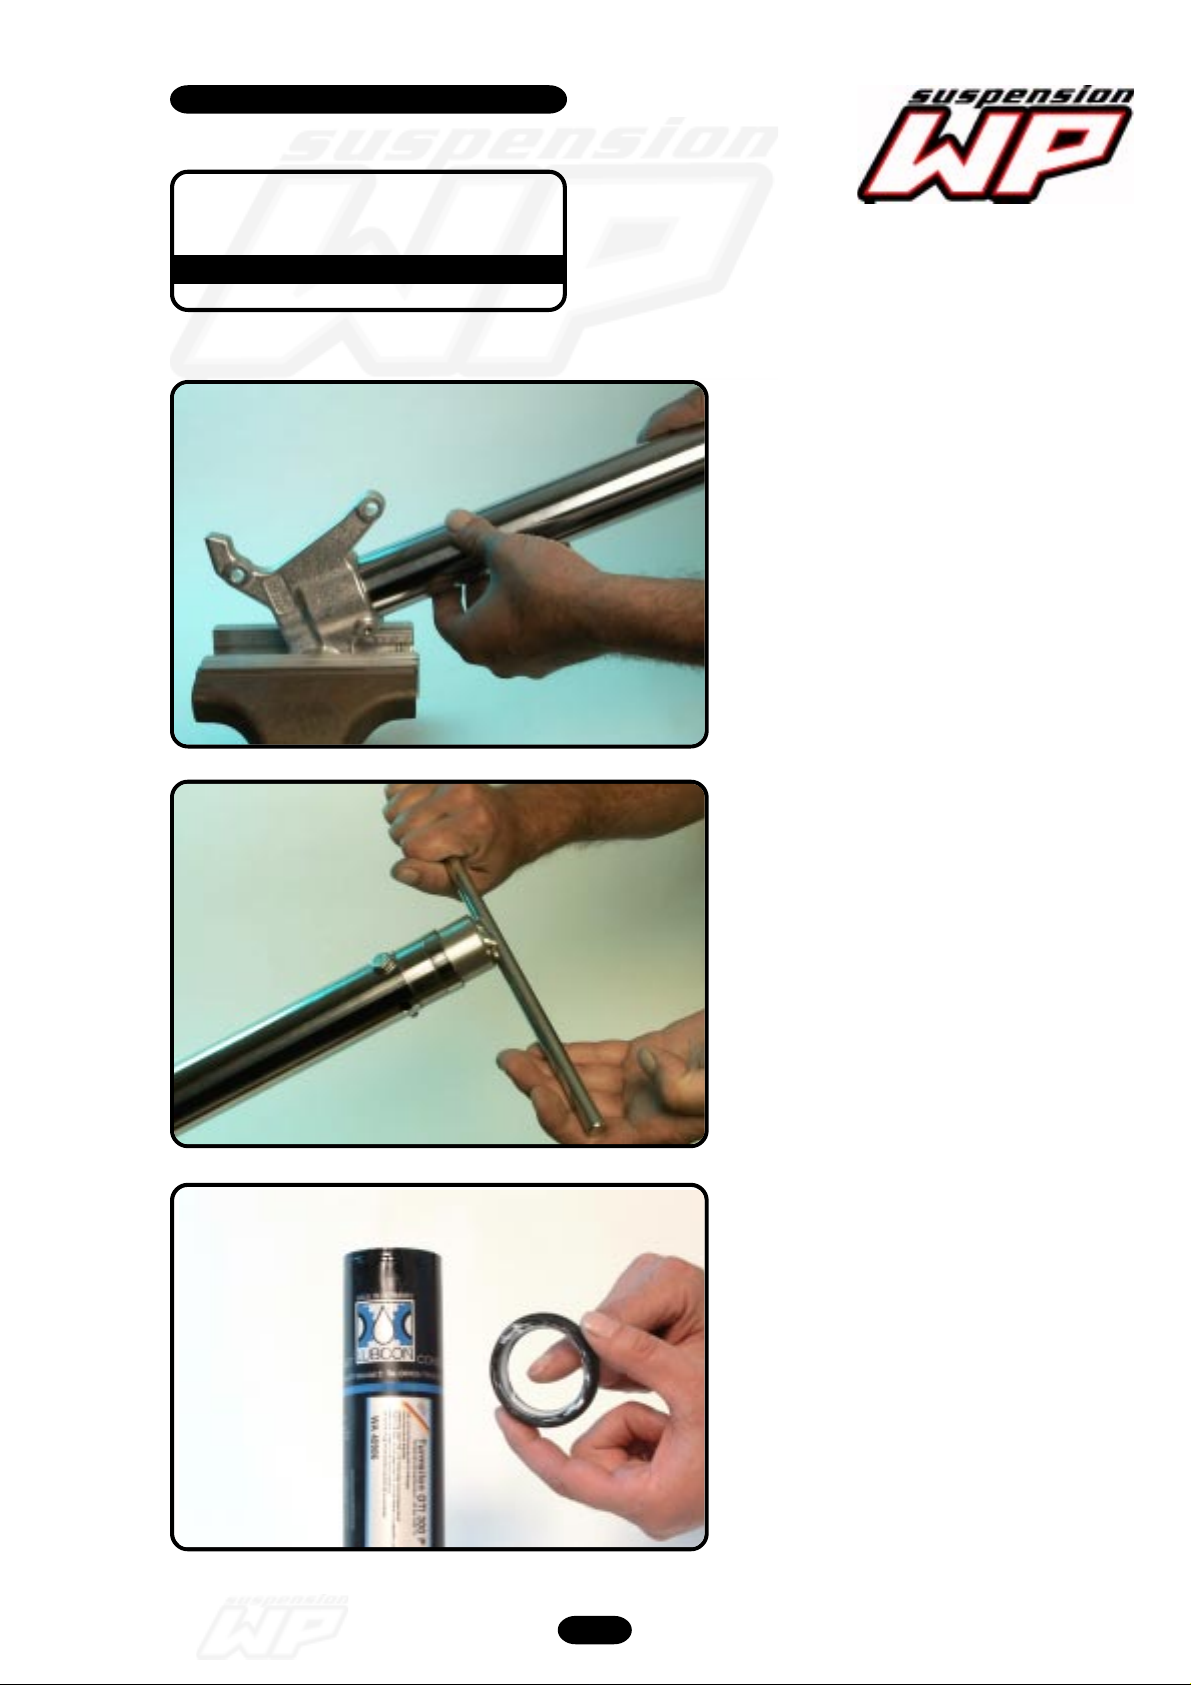
12_183
Assemble the inner-tube in the axleclamp.
12_184
14_0007
Screw very tight the inner-tube with
T503S / T1404S.
Apply the dust wiper with T51 1.
Frontfork 4860 MXMA 2003 05/2002
38
Page 39
Workshop manual
4860 MXMA
Product
Exploded View
Disassembly & Assembling
14_0008
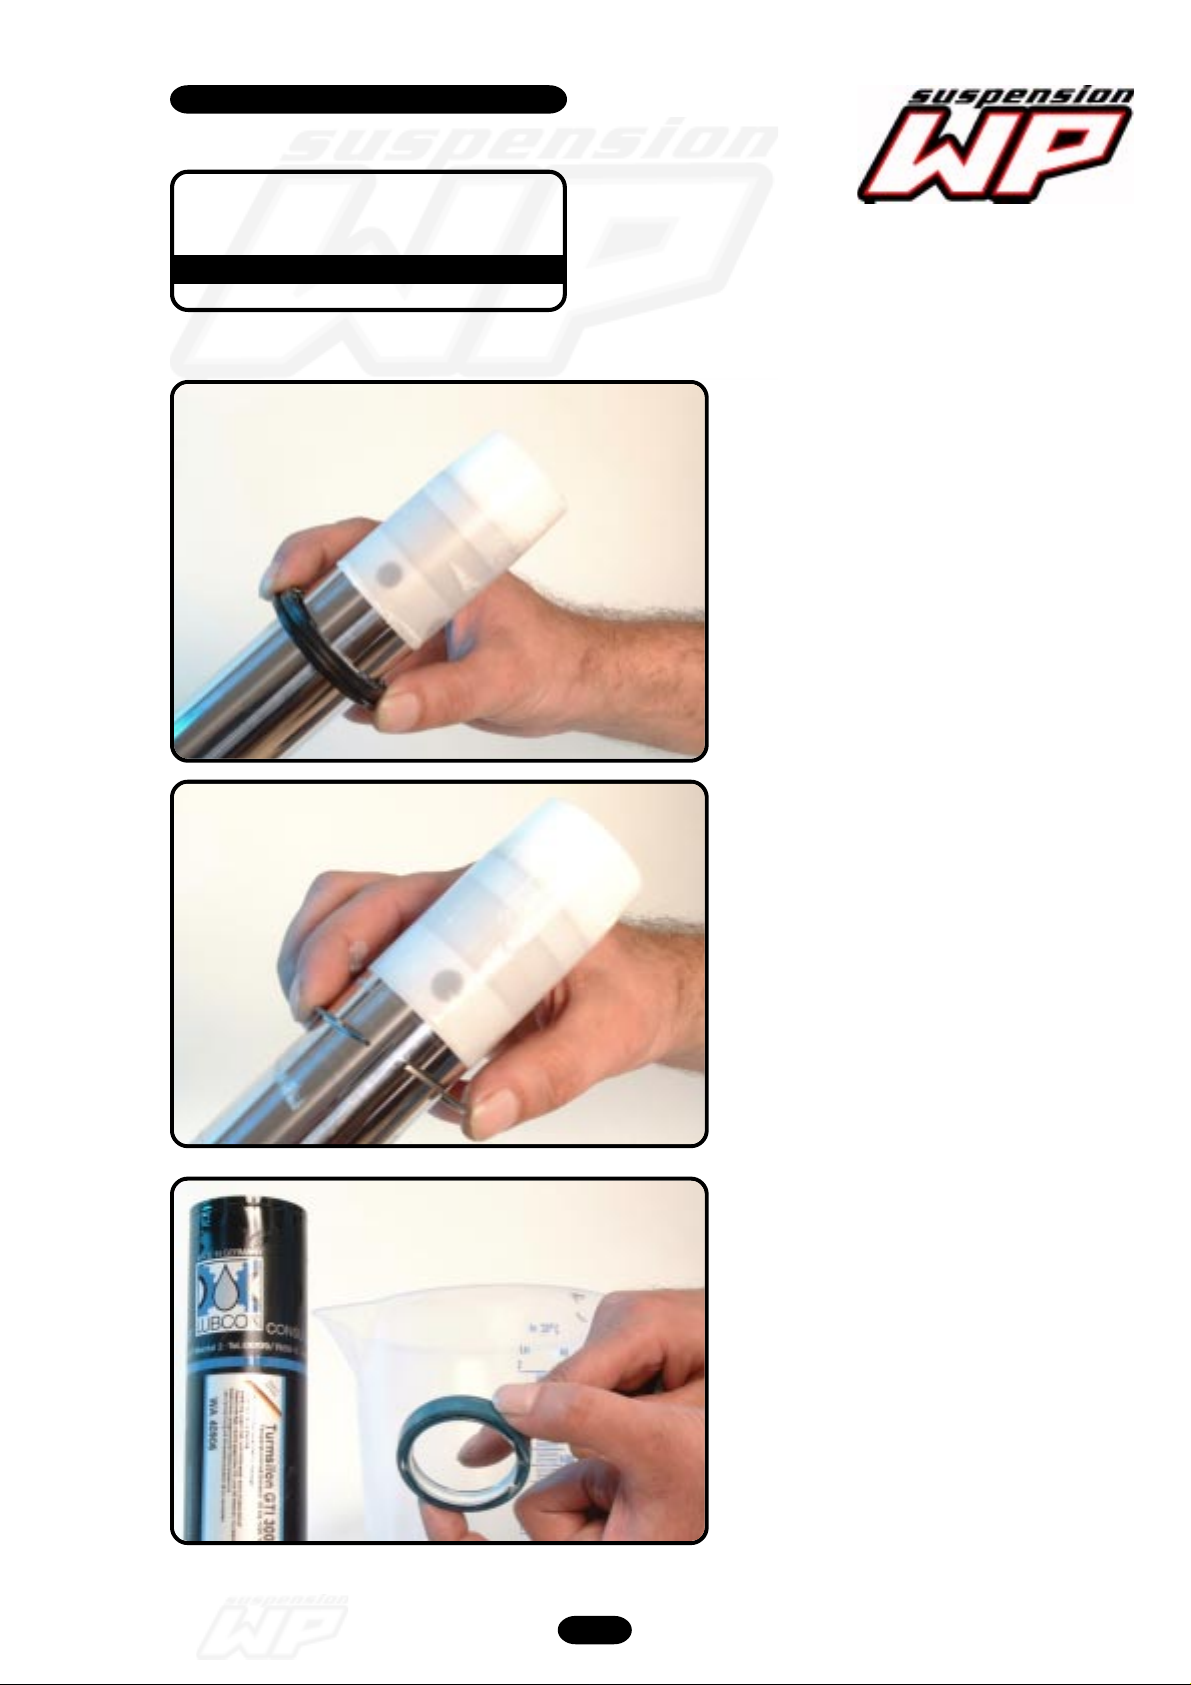
Place T1401 over the inner-tube and
assemble the dust wiper.
14_0011
14_0010
Replace the circlip.
Apply the innerside of the oilseal with
T51 1 and the outerside with frontfork oil.
Frontfork 4860 MXMA 2003 05/2002
39
Page 40
Workshop manual
4860 MXMA
Product
Exploded View
Disassembly & Assembling
14_0012
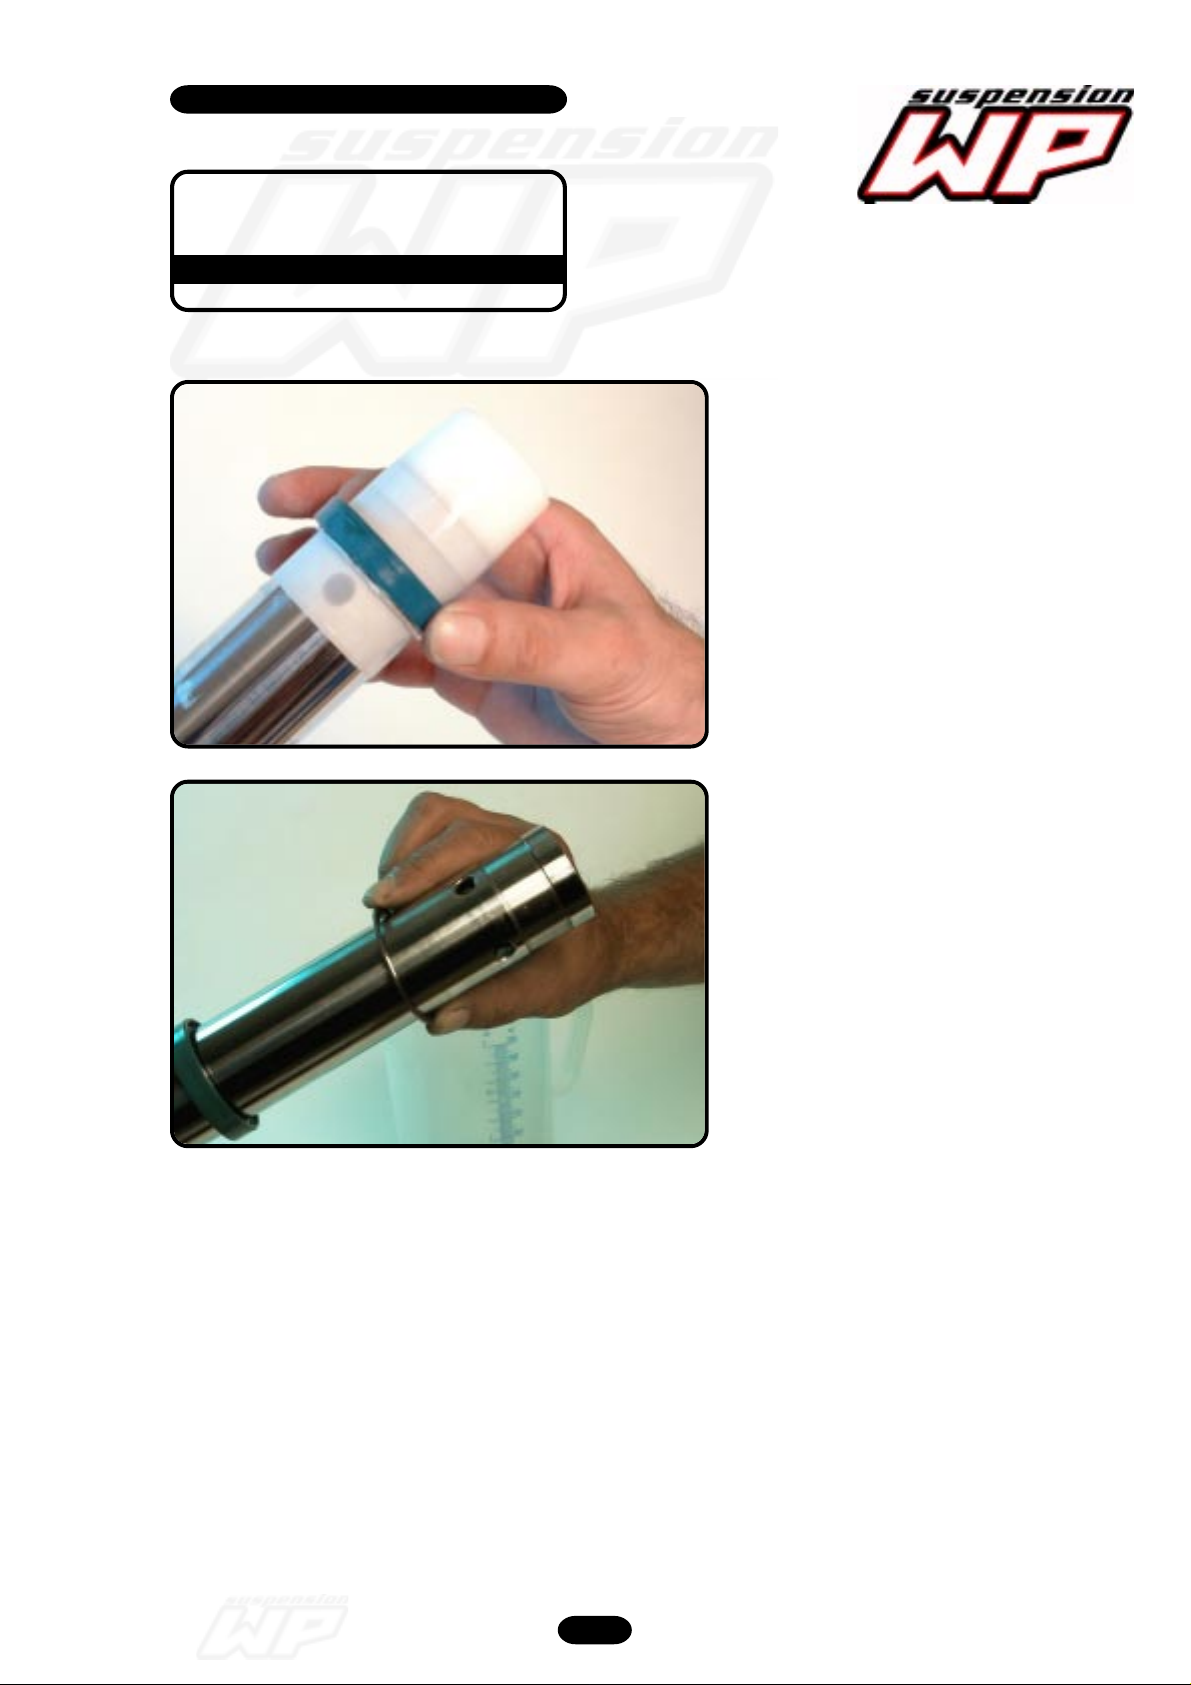
Assemble the oilseal.
Pay attention to the assembling
direction!!!
12_190
Remove the tool and replace the
support ring.
Frontfork 4860 MXMA 2003 05/2002
40
Page 41
Workshop manual
4860 MXMA
Product
Exploded View
Disassembly & Assembling
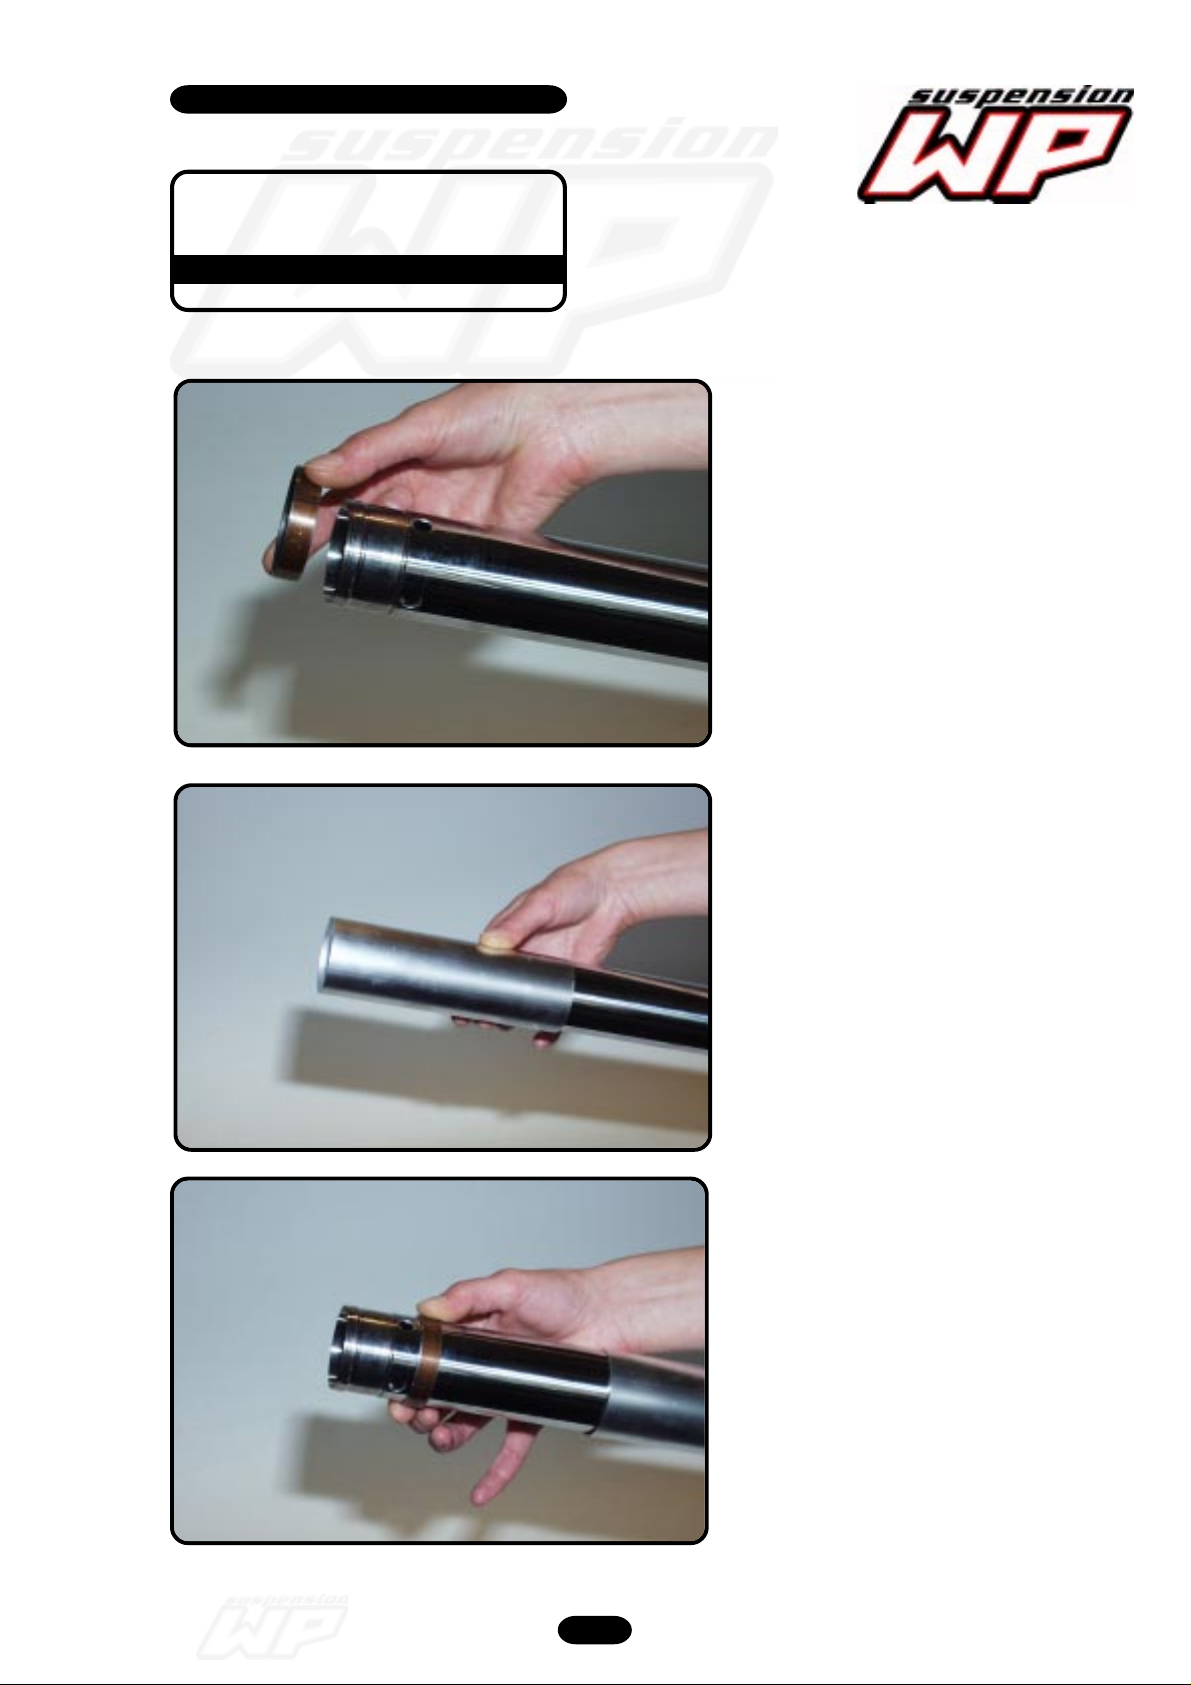
Replace the DU-bush.
Replace the tube.
Replace the DU-bush.
Frontfork 4860 MXMA 2003 05/2002
41
Page 42
Workshop manual
4860 MXMA
Product
Exploded View
Disassembly & Assembling
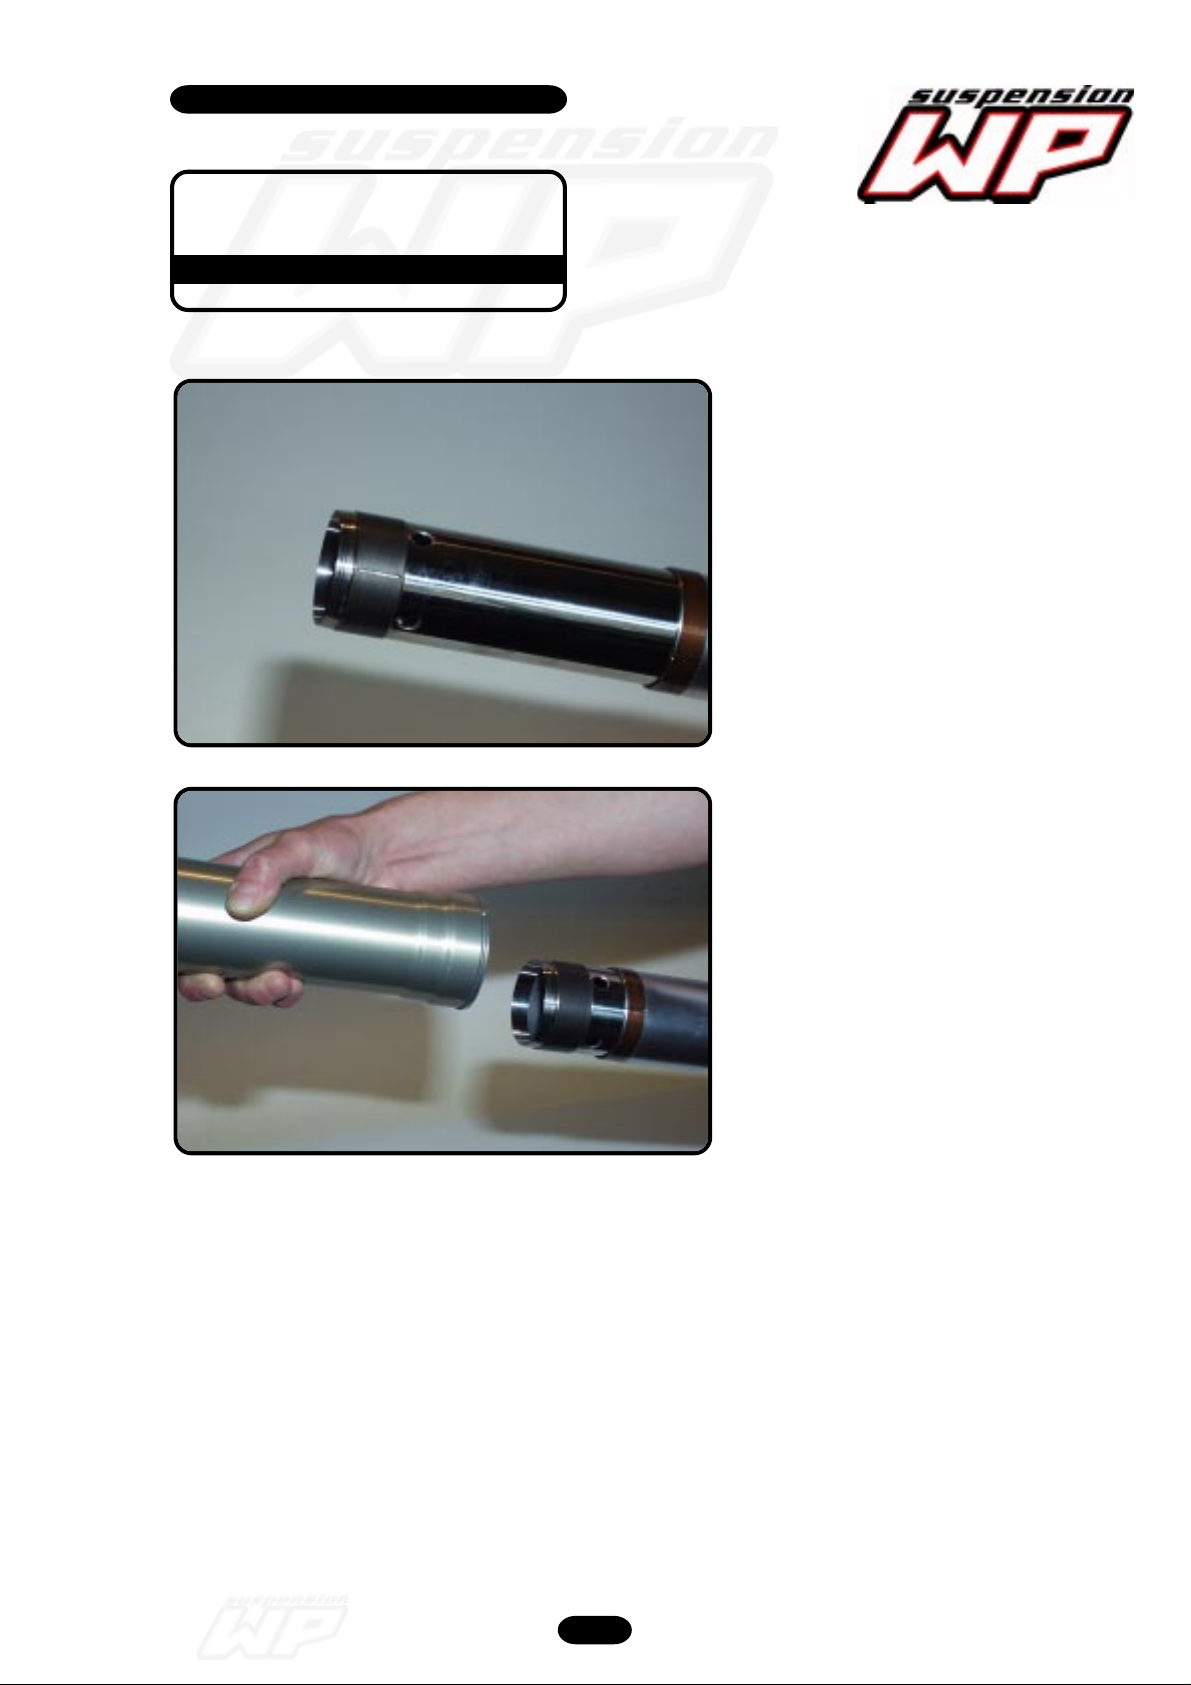
Replace the DU-bush on the inner-tube.
Slide carefully the outer-tube over the
inner-tube.
Frontfork 4860 MXMA 2003 05/2002
42
Page 43
Workshop manual
4860 MXMA
Product
Exploded View
Disassembly & Assembling
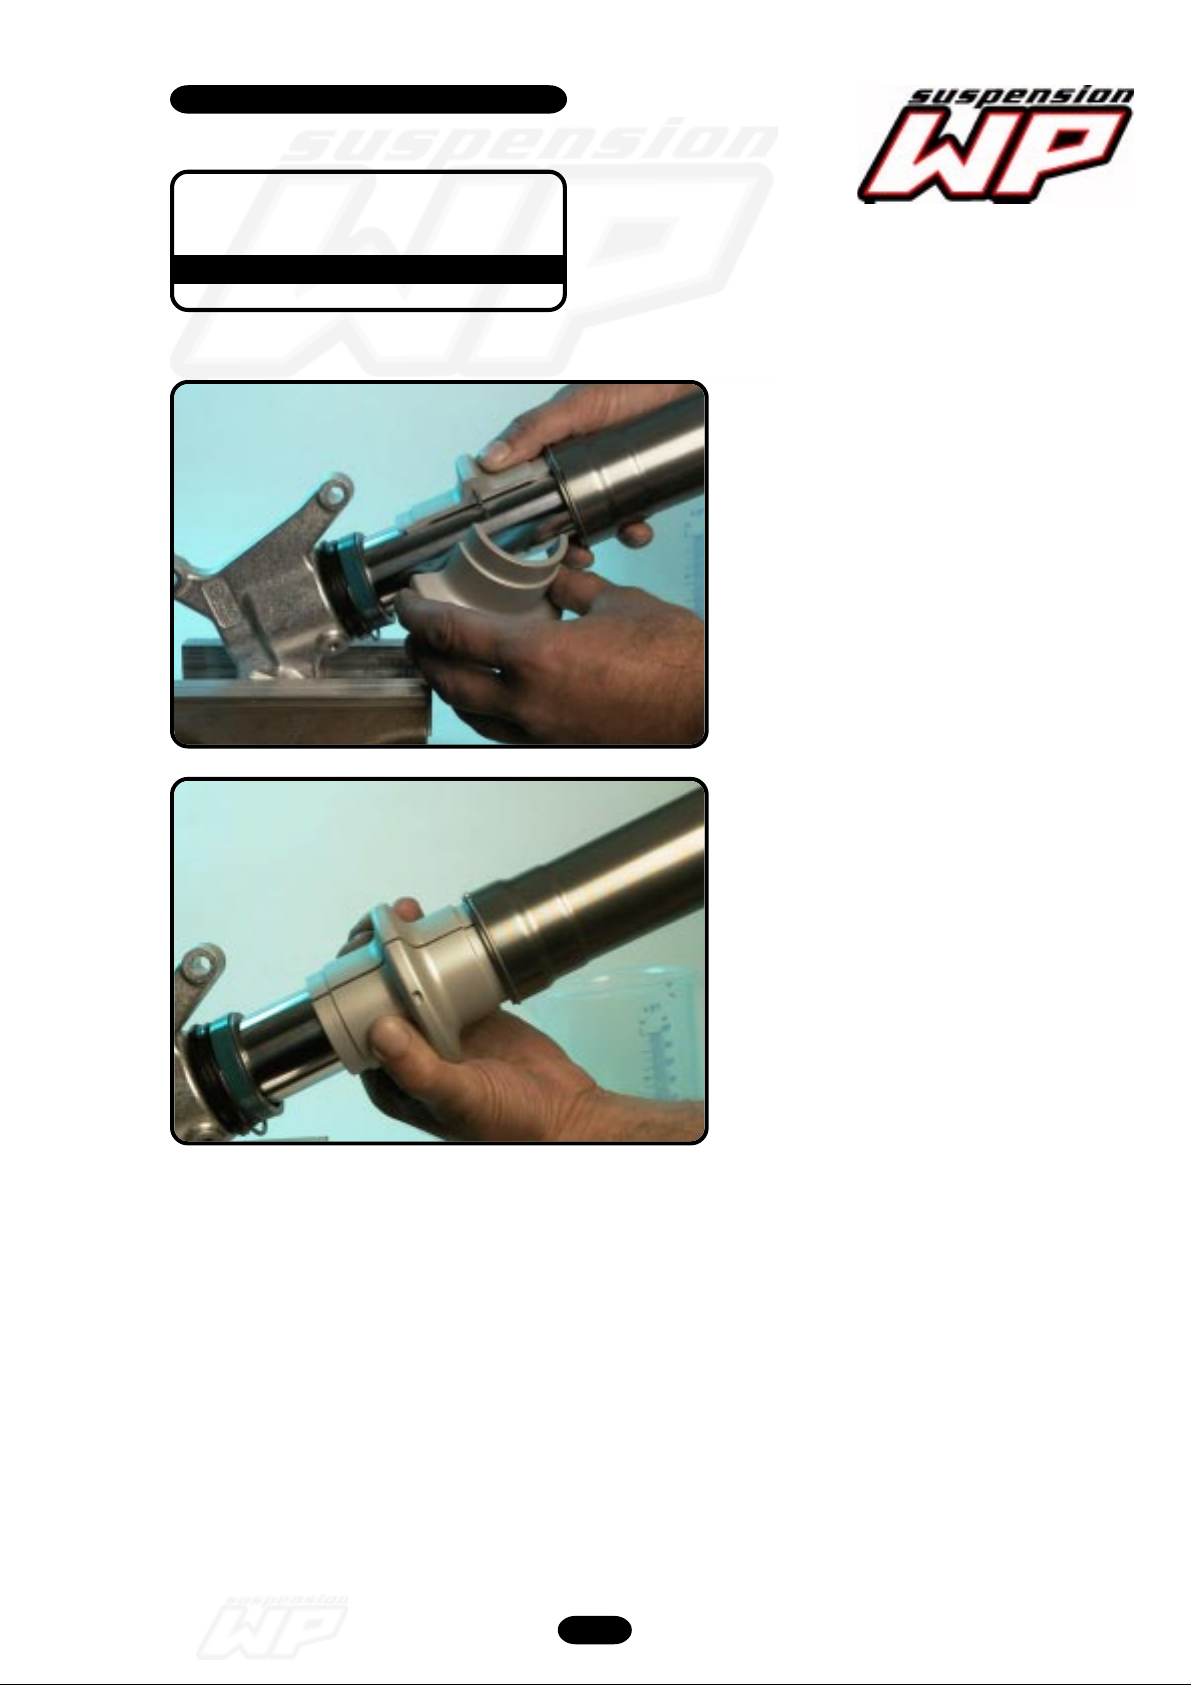
12_194
Assemble with T1402S the DU-bush with the flat side- and...
12_195
...tap or push it into the outer-tube.
Frontfork 4860 MXMA 2003 05/2002
43
Page 44
Workshop manual
4860 MXMA
Product
Exploded View
Disassembly & Assembling
12_196
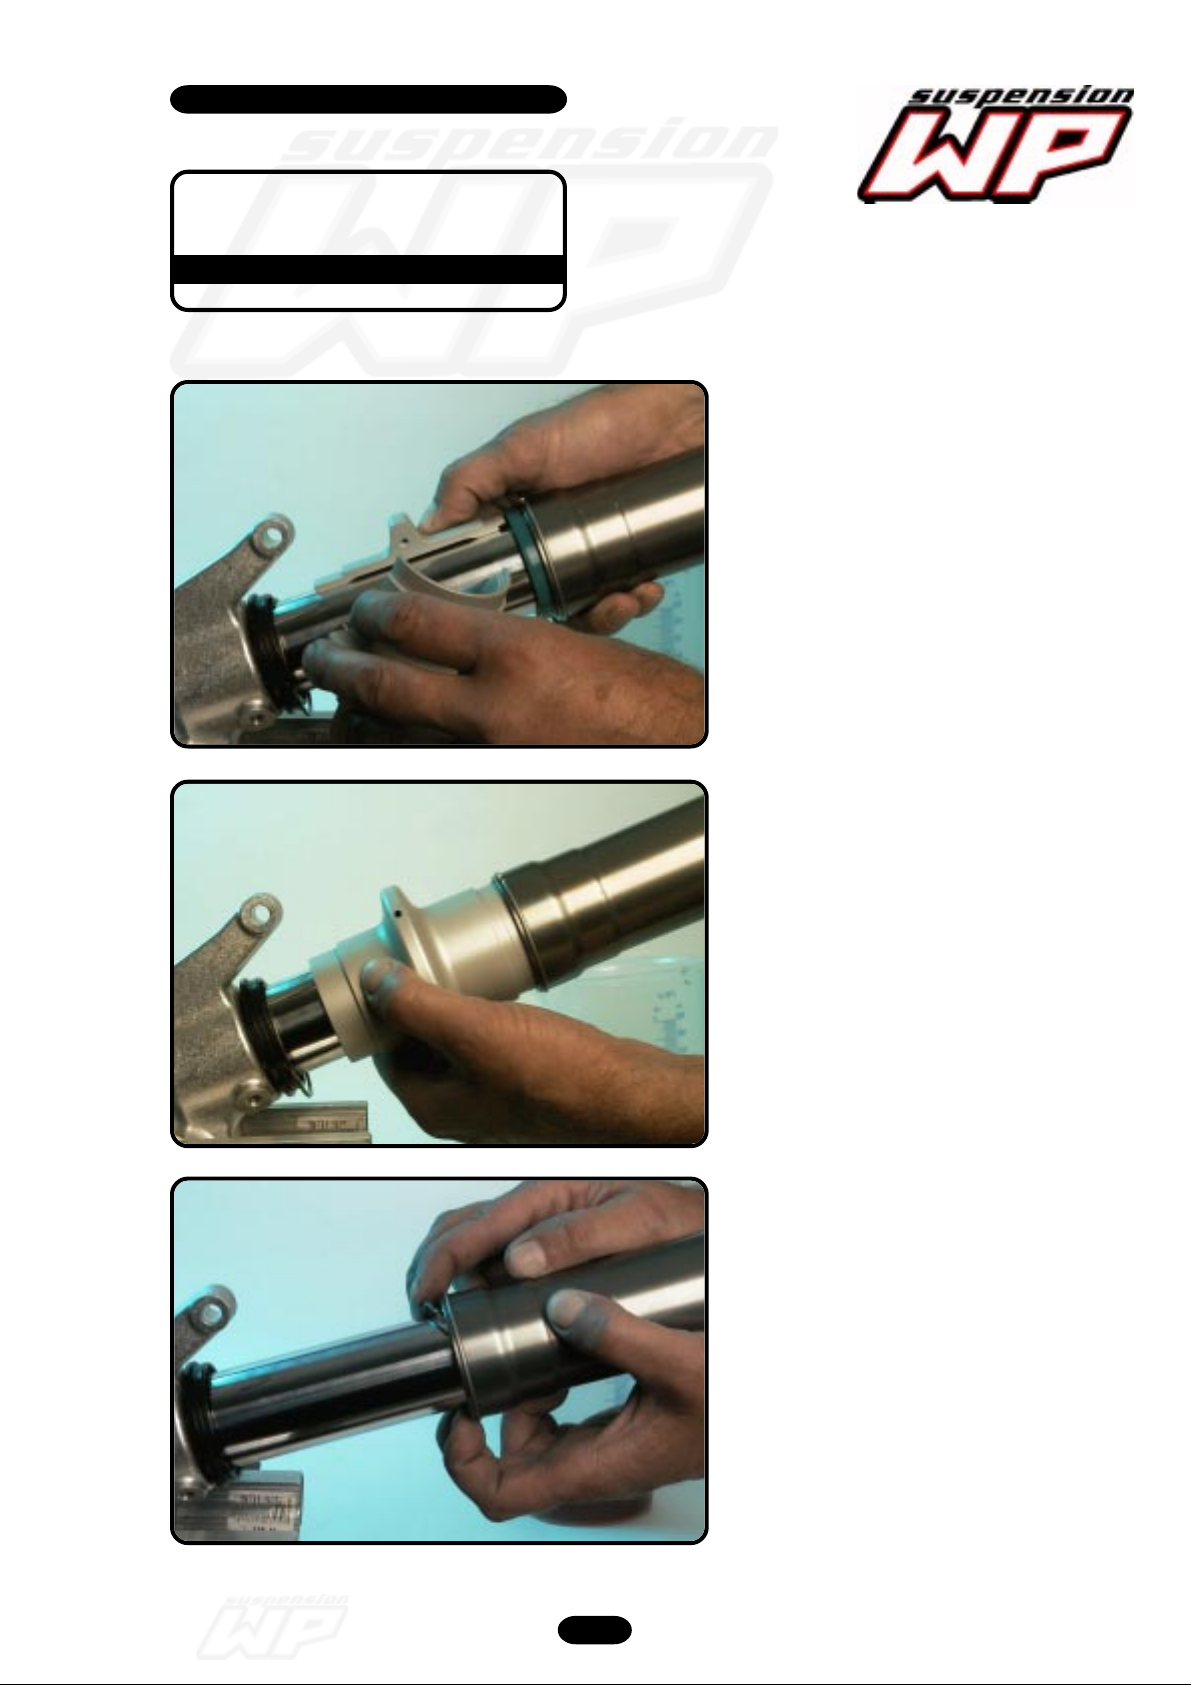
Use the other side of T1402S...
12_197
12_198
...and tap the oilseal into the outer-tube.
Assemble the circlip into the groove of
the outer-tube.
Important: Check this very
carefully!!!
Frontfork 4860 MXMA 2003 05/2002
44
Page 45
Workshop manual
4860 MXMA
Product
Exploded View
Disassembly & Assembling
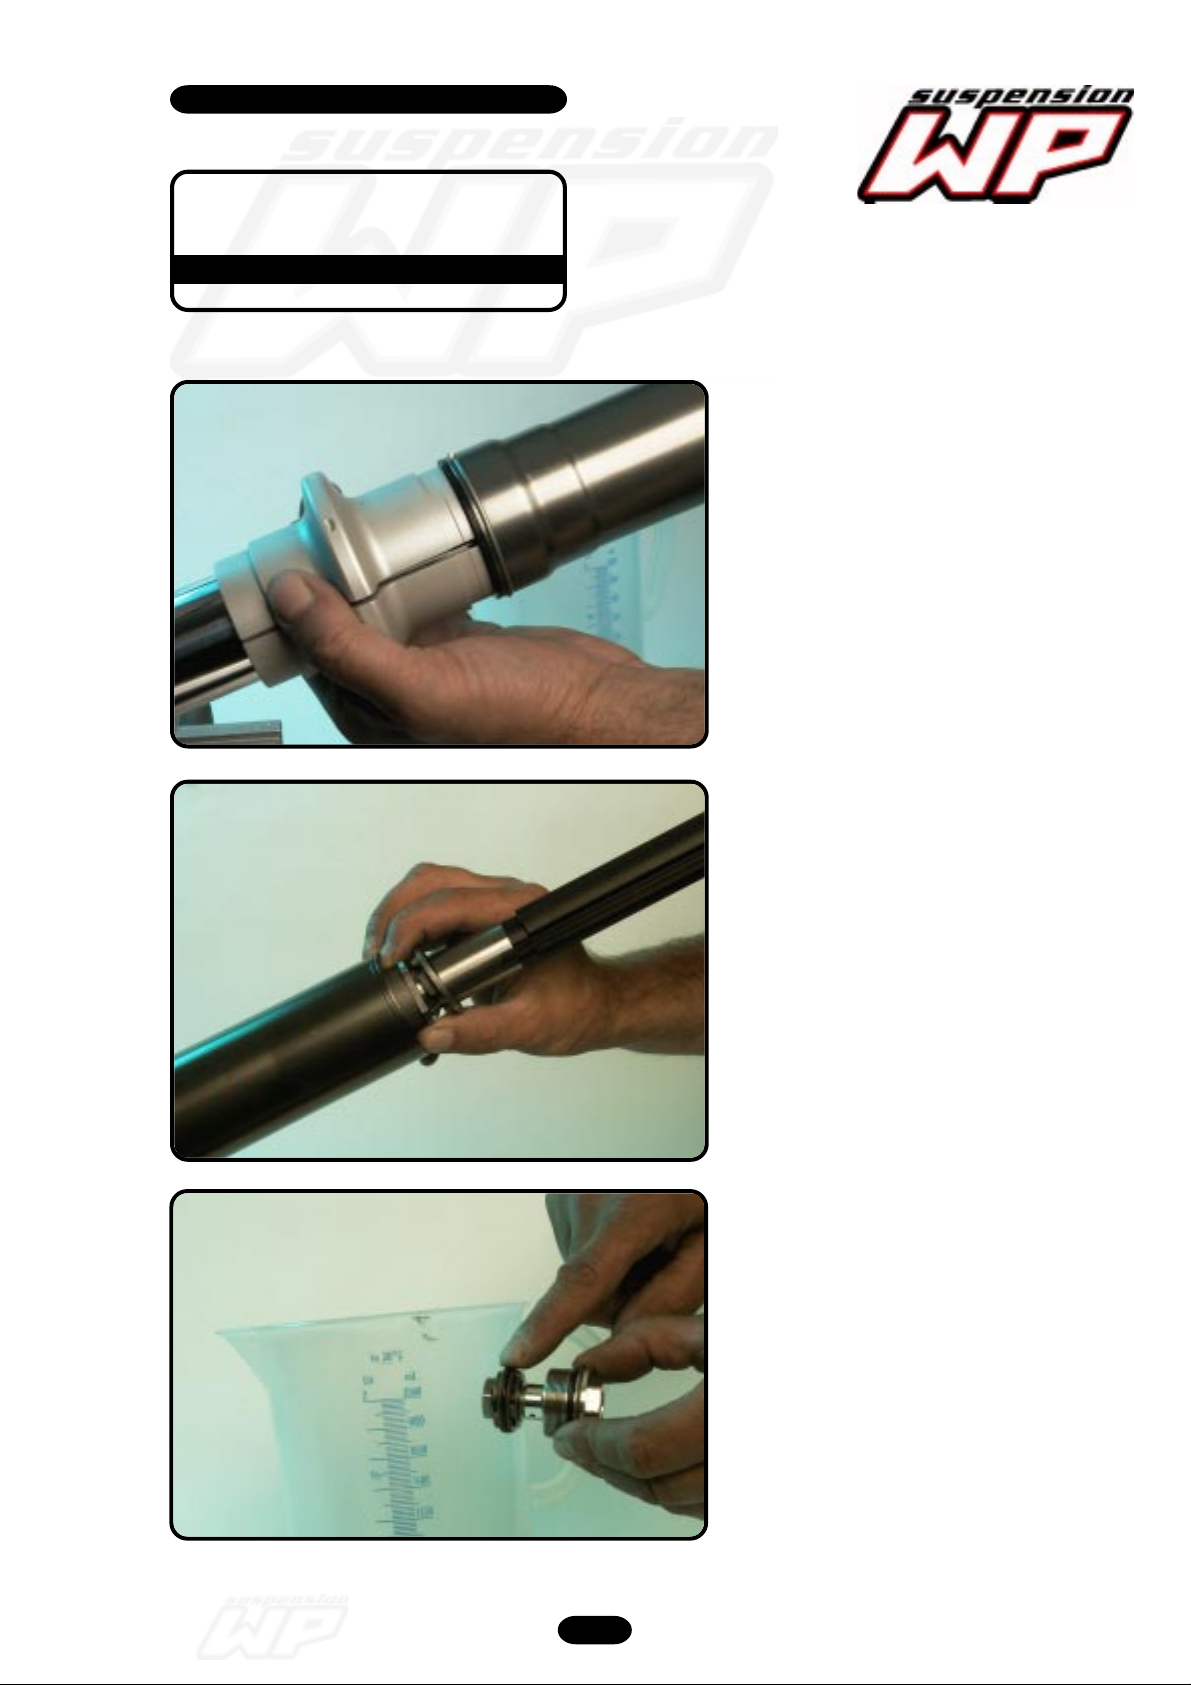
12_199
Assemble the dust wiper with T1402S.
12_202
Place the cartridge into the forkleg.
Apply the O-ring of the compression
piston with frontfork oil.
Frontfork 4860 MXMA 2003 05/2002
45
Page 46
Workshop manual
4860 MXMA
Product
Exploded View
Disassembly & Assembling
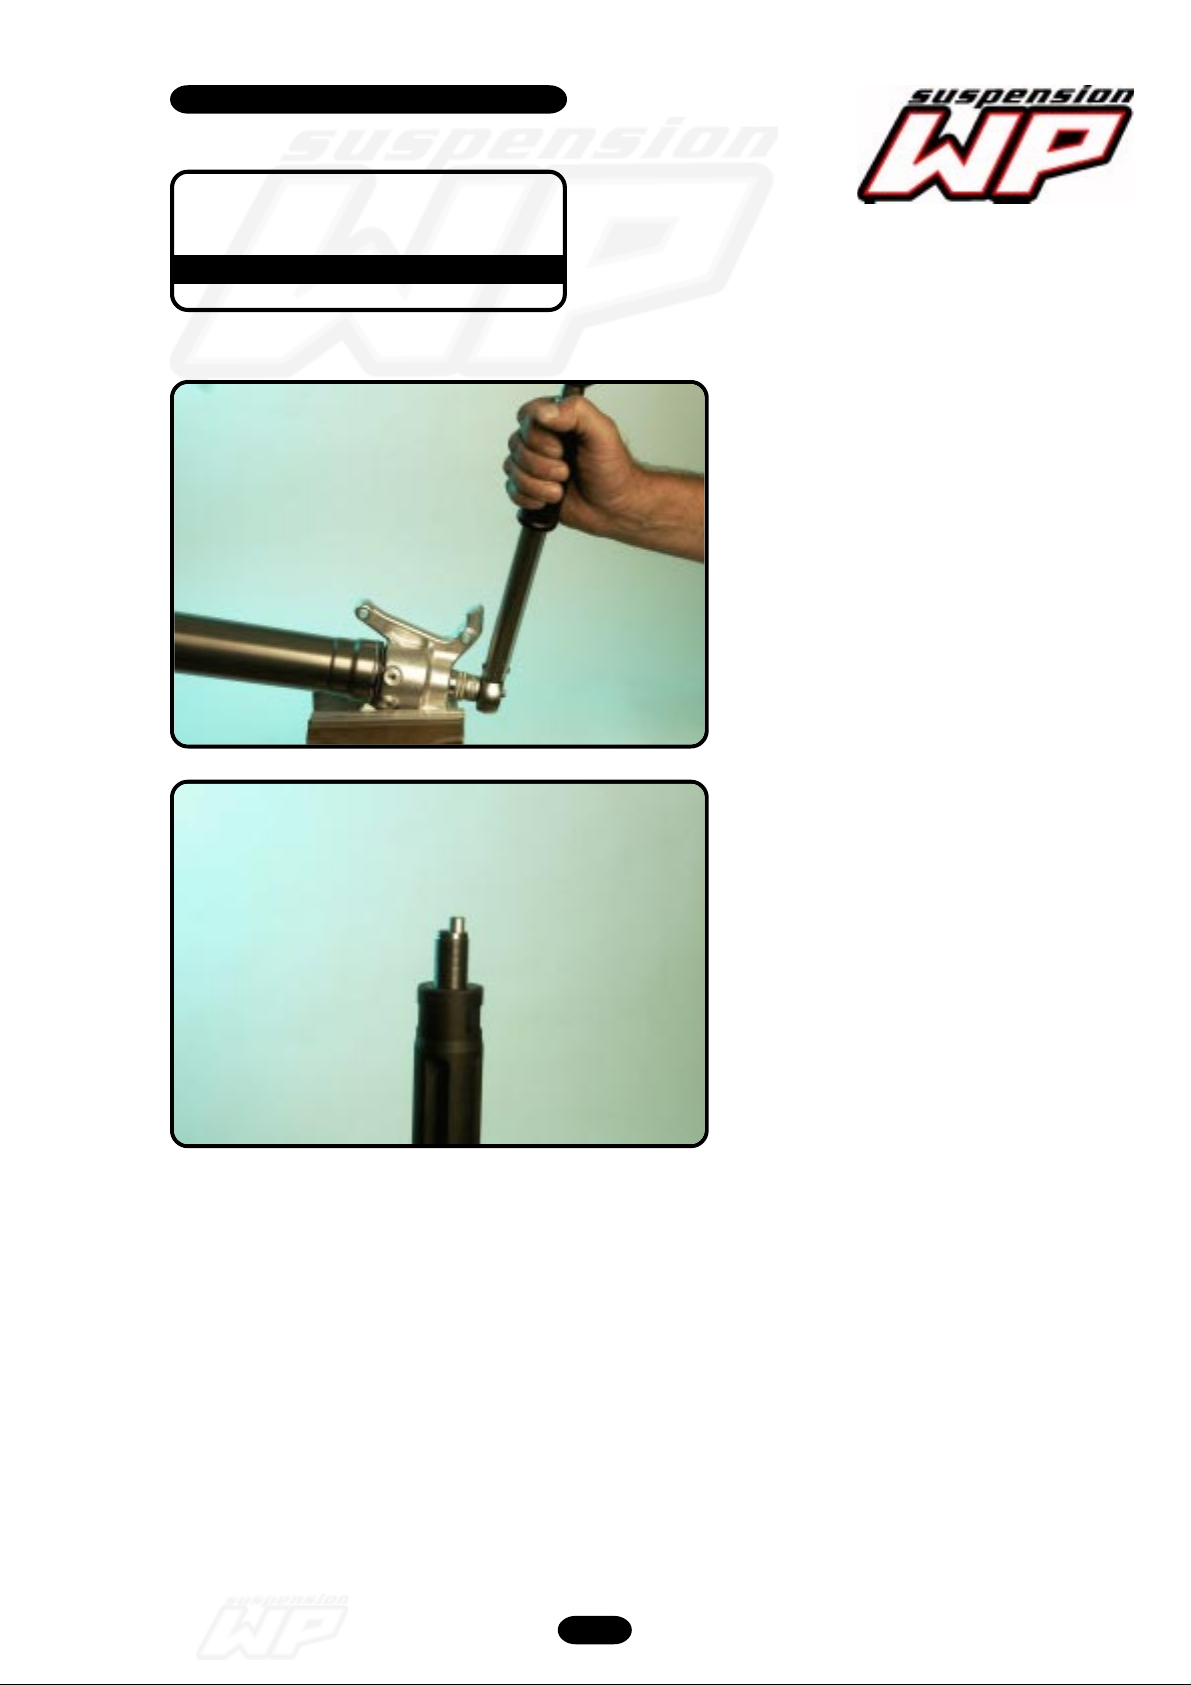
12_203
Assemble the cartridge in the center of
the axle-clamp and tighten the holder
compression to a torque of 25Nm.
12_204
Assemble the adjustment tube with the
O-ring into the piston-rod.
Frontfork 4860 MXMA 2003 05/2002
46
Page 47
Workshop manual
4860 MXMA
Product
Exploded View
Disassembly & Assembling
12_206
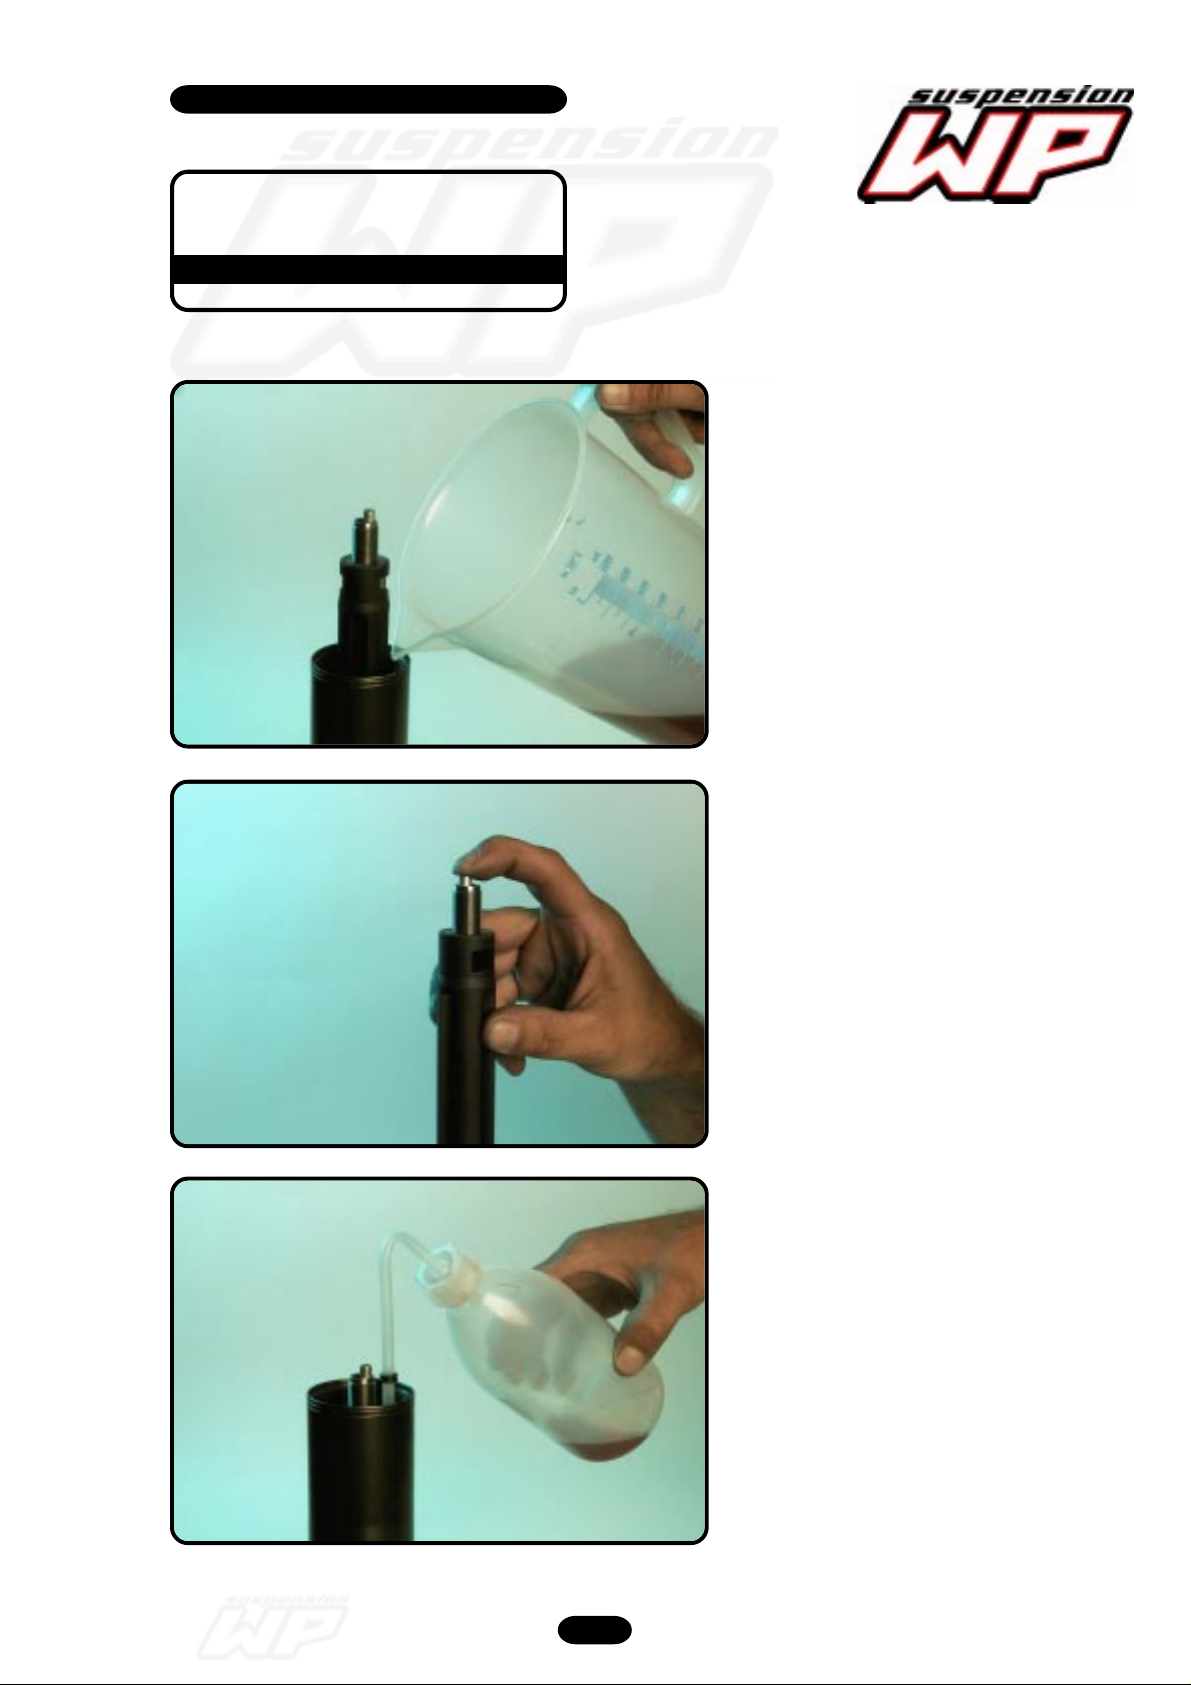
Keep the outer-tube down and the
piston- rod a little bit extended (like
picture), fill the forkleg with oil till the
edge of the outer-tube, wait a few
moments, you will see air bubbles rising
up.
The oil must stay
above the 4 holes of
the inner-tube, if necesarry fill some
extra oil in the forkleg.
12_208
12_209
Move the piston-rod (keep the
adjustment tube on his place) several
times up and down till you feel that the
cartridge is full with oil, (the damping is
smooth over the entire stroke) mostly it
is necesarry to fill some (not too much)
extra oil in the forkleg.
Now compress the piston-rod and outertube fully down, and fill the forkleg with
oil till about 25mm
under the 4 holes of
the inner-tube. Move the piston-rod and
the outer-tube at the same time several
times up and down over the entire
stroke.
Push the piston-rod and outer-tube fully
down and adjust the oil level
(airchamber) with T137S.
Frontfork 4860 MXMA 2003 05/2002
47
Page 48
Workshop manual
4860 MXMA
Product
Exploded View
Disassembly & Assembling
12_211
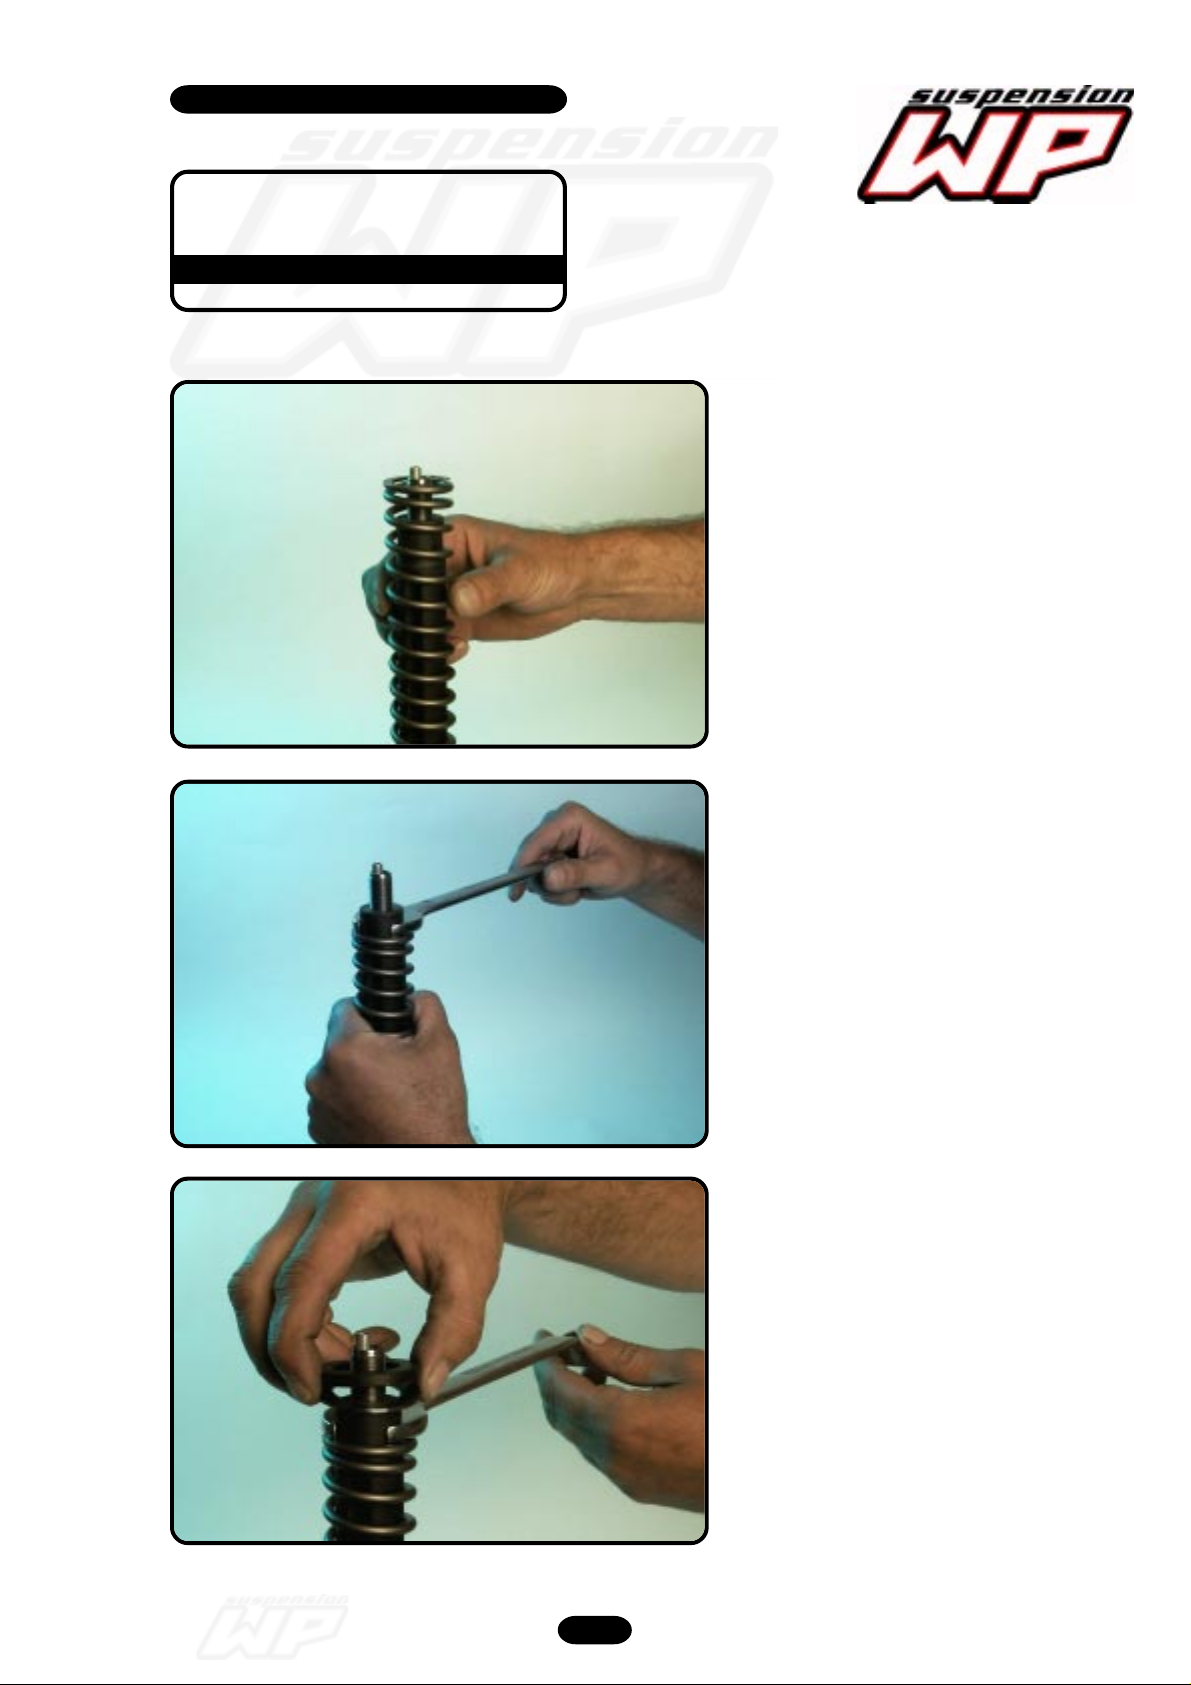
Pull the piston-rod out and assemble the
spring.
12_212
12_213
Pull the spring downwards and place
open-end spanner 22 on the hydraulic
stop.
Replace first the steel washer on the
spring, then the preload spacer(s).
Frontfork 4860 MXMA 2003 05/2002
48
Page 49
Workshop manual
4860 MXMA
Product
Exploded View
Disassembly & Assembling
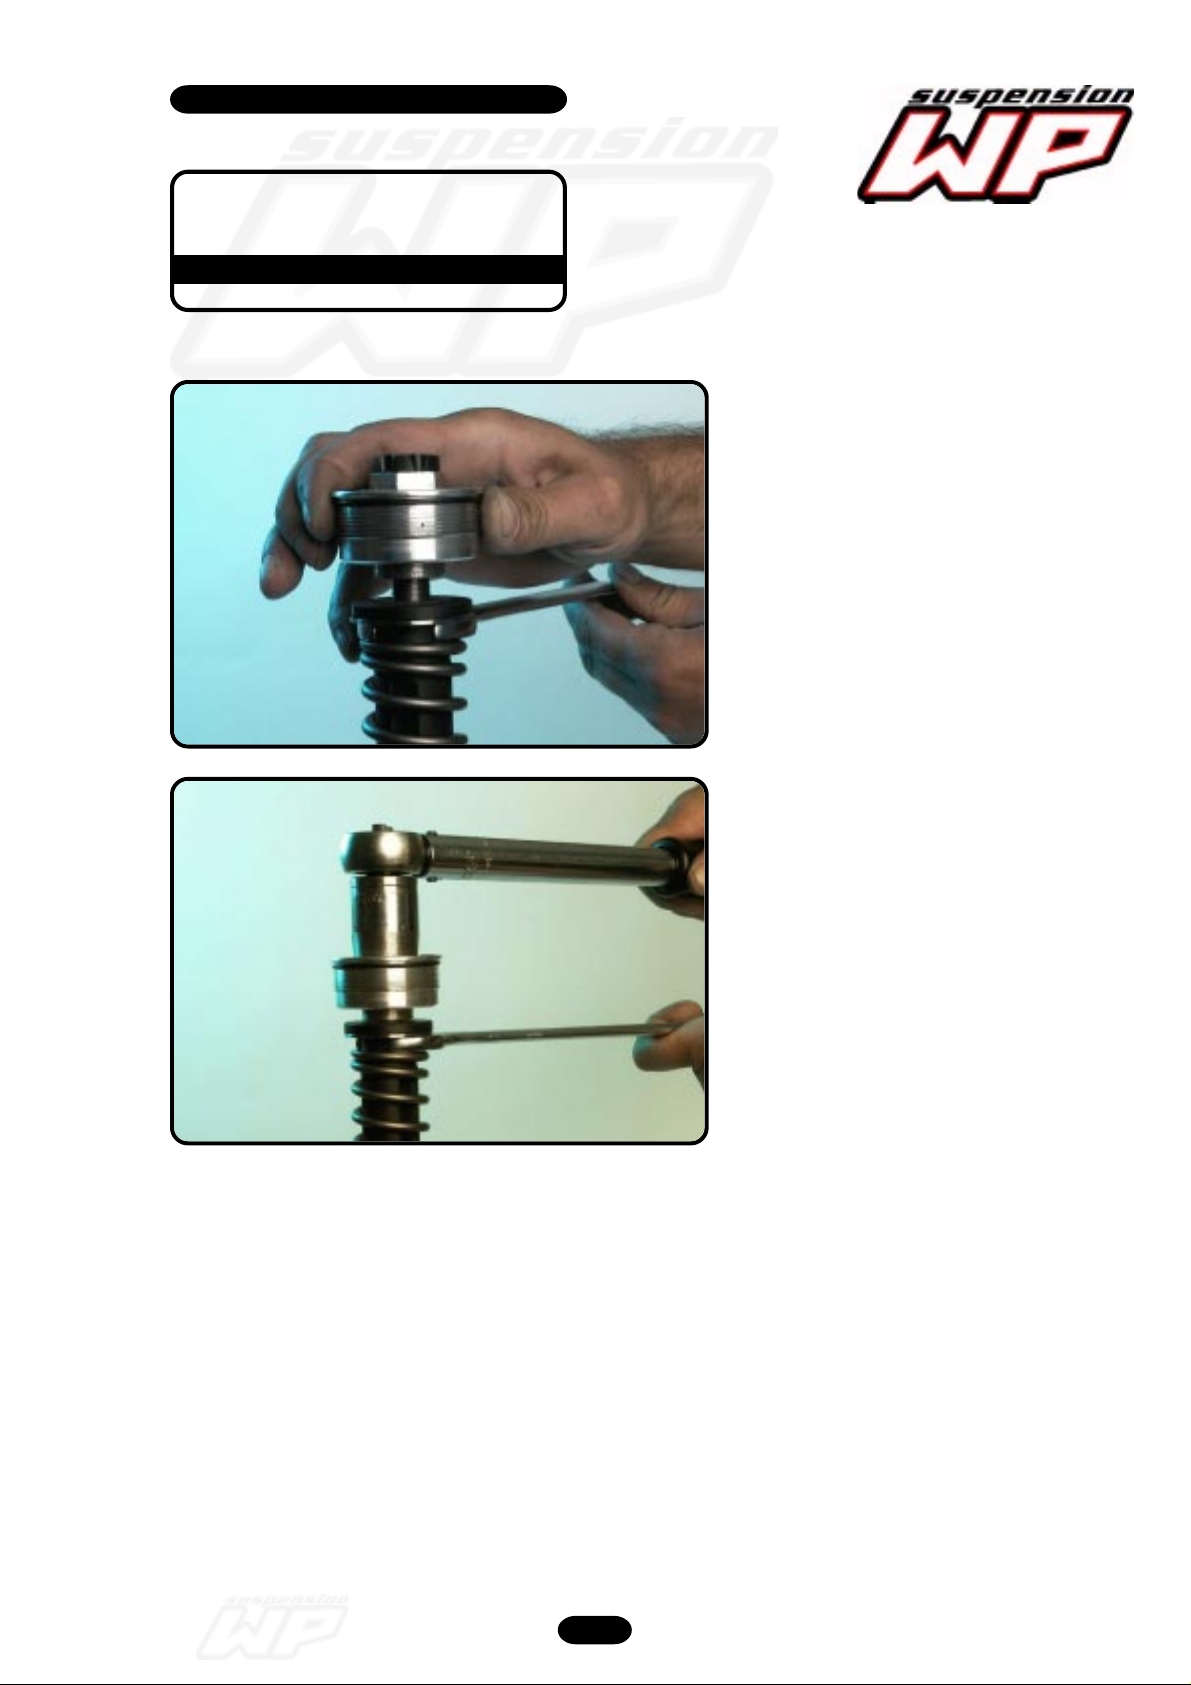
Screw handtight the screw-cap on the
piston-rod.
Screw down the screw-cap, till the hydr.
stop is against the screw-cap and
tighten it to a torque of 25Nm.
Frontfork 4860 MXMA 2003 05/2002
49
Page 50
Workshop manual
4860 MXMA
Product
Exploded View
Disassembly & Assembling
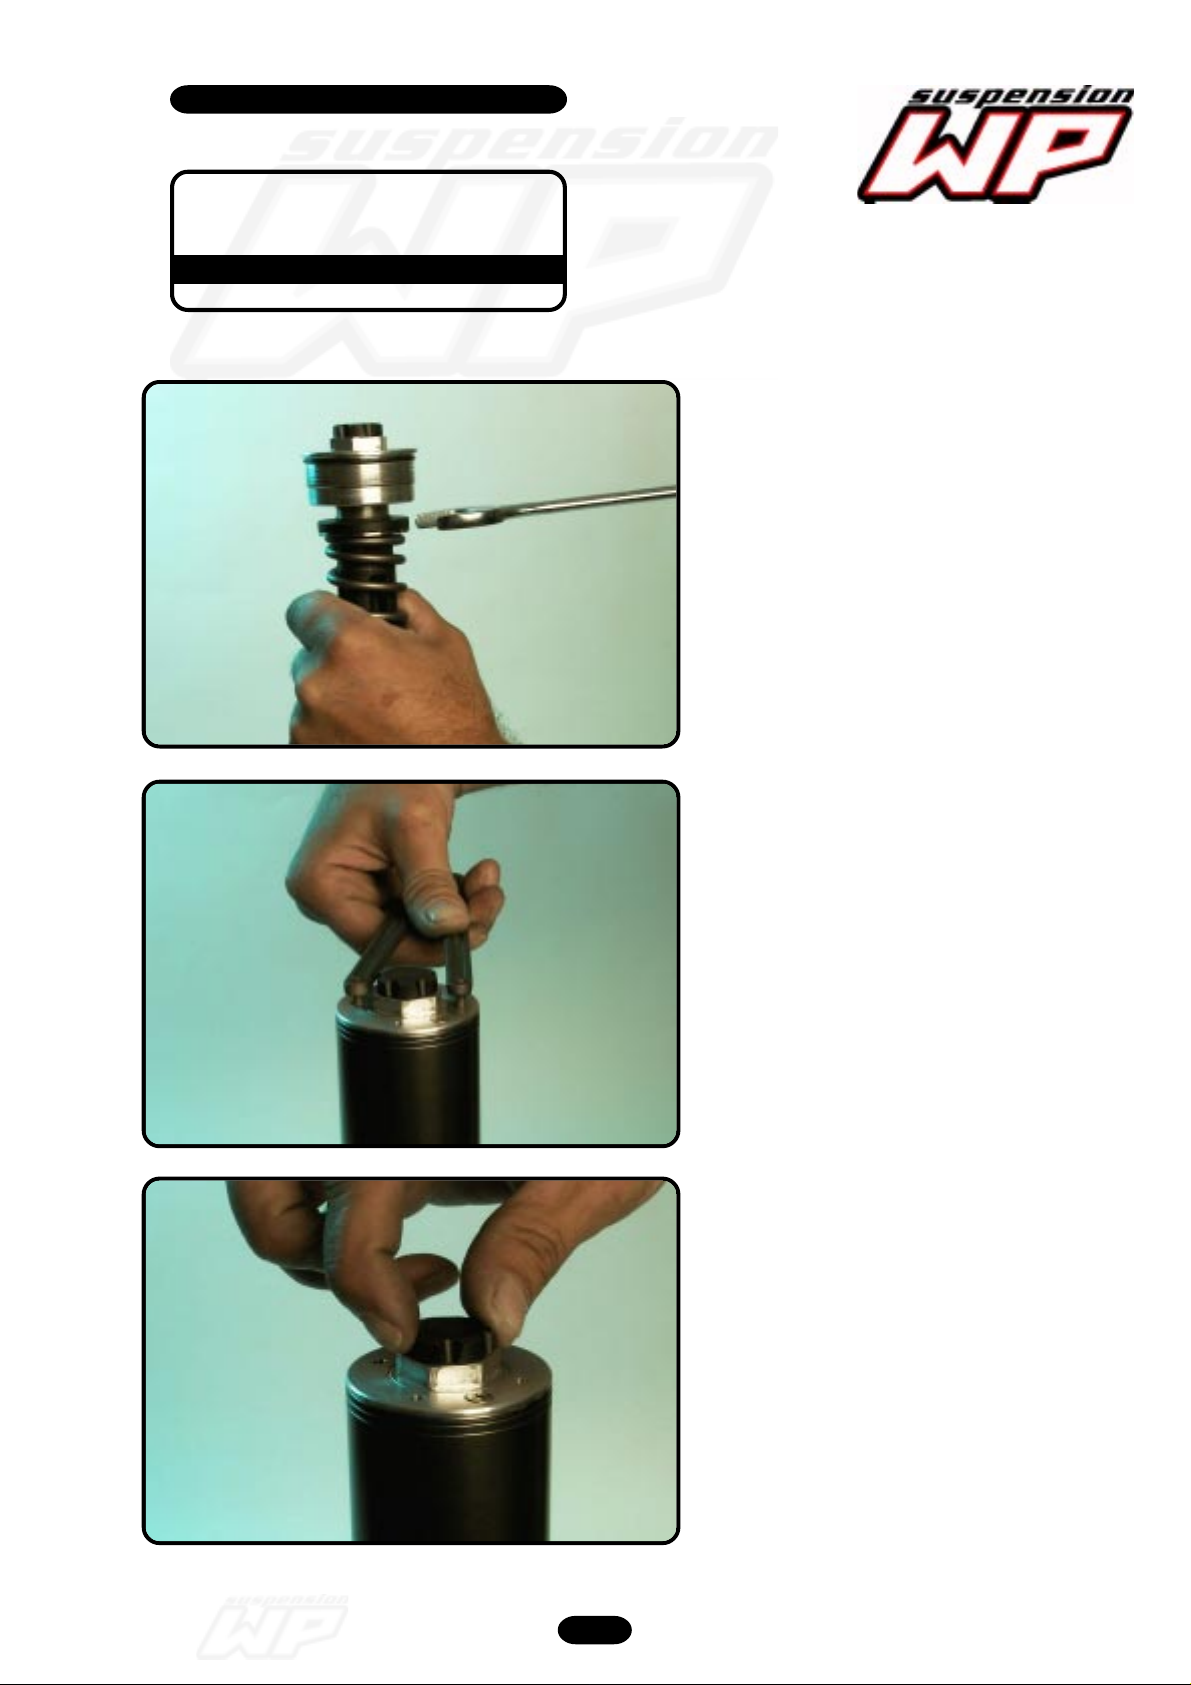
Pull the spring downwards and remove
the spanner.
Tighten the screw-cap with T103.
Position rebound!
Frontfork 4860 MXMA 2003 05/2002
50
Page 51
Workshop manual
4860 MXMA
Product
Exploded View
Disassembly & Assembling
12_226
Position compression!
And replace the rubber cap.
Frontfork 4860 MXMA 2003 05/2002
51
 Loading...