


Belt
Sander ENG
Ponceuse À Courroie F
Lijadora De Correa ES
Pag 02
Pag 12
Pag 24
WT661K
3
x18
NA-WT661k-M-050802.indd 1 2005-8-2 10:53:02

Belt Sander WT661K
WARNING! Read and understand all instructions.
SAVE THESE INSTRUCTIONS
a) Keep your work area clean and well lit.
fl ammable liquids, gases or dusts.
c) Keep by-standers, children, and visitors away while operating a power tool.
a) Double Insulated tools are equipped with a polarized plug (one blade is wider than
the other.) This plug will fi t in a polarized outlet only one way. If the plug does not
fi t fully in the outlet, reverse the plug. If it still does not fi t, contact a qualifi ed
electrician to install a polarized outlet. Do not change the plug in any way.
the voltage marked on the nameplate. Do not use “AC only” rated tools with a DC power
and refrigerators.
There is an increased risk of electric shock if your body is grounded. If
further enhance your personal safety.
c) Don’t expose power tools to rain or wet conditions.
Water entering a power tool will
d) Do not abuse the cord. Never use the cord to carry the tools or pull the plug from
an outlet.
e) When operating a power tool outside, use an outdoor extension cord marked “W-
A” or “W”.
These cords are rated for outdoor use and reduce the risk of electric shock. Refer
to the “Recommended sizes of Extension Cords” in the Accessory section of this manual.
f) Grounded tools must be plugged into an outlet properly installed and grounded
Never remove the grounding prong or
you are in doubt as to whether the outlet is properly grounded. If the tool should electrically
3. PERSONAL SAFETY
a) Stay alert, watch what you are doing and use common sense when operating a
or medication.
A moment of inattention while operating power tools may result in serious
your hair, clothing, and gloves away from moving parts.
Loose clothes, jewelry, or
02
NA-WT661k-M-050802.indd 2 2005-8-2 10:53:03

Belt Sander WT661K
c) Avoid accidental starting. Be sure switch is “OFF” before plugging in.
tools with your fi nger on the switch or plugging in tools that have the switch “ON” invites
d) Remove all adjusting keys and wrenches.
wrenches, etc. are removed from the tool before turning it “ON”.
e) Do not overreach. Keep proper footing and balance at all times.
f) Use safety equipment. Always wear eye protection.
Dust mask, non-skid safety shoes,
g) Keep hands away from all cutting edges and moving parts.
4. TOOL USE AND CARE
a) Use clamps or other practical way to secure and support the work-piece to a
stable platform.
to loss of control.
The correct tool will
c) Do not use tool if switch does not turn it “ON” or “OFF”.
A tool that cannot be
d) Disconnect the tool from the power source before making any adjustments,
changing accessories, or storing the tool.
Such preventative safety measures reduce
the risk of starting the tool accidentally.
e) Store idle tools out of reach of children and other untrained persons.
Tools are
f) Maintain tools with care. Keep cutting tools sharp and clean.
Properly maintained
tools, with sharp cutting edges, are less likely to bind and easier to control.
g) Check for misalignment or binding of moving parts, breakage of parts, and any
other condition that may affect the tool’s operation.
serviced before using.
Many accidents are caused by poorly maintained tools.
Accessories that may be suitable for one tool may create a risk of injury when used on
a) Tool service must be performed only by qualifi ed repair personnel.
Use of unauthorized parts or failure to
follow Maintenance Instructions may create a risk of electric shock or injury.
WARNING! Failure to follow these rules may result in serious personal injury.
03
NA-WT661k-M-050802.indd 3 2005-8-2 10:53:04
Belt Sander WT661K
cutting tools may contact hidden wiring or its own cord.
Contact with a “live” wire will
Wear safety glasses for eye protection, wear hearing
3) Clamp or secure work-piece when sanding.
4) Always disconnect the plug from the power supply before changing sanding belts.
WARNING: Use of this tool can generate and disburse dust or other airborne
carcinogens. Always operate tool in a well ventilated area and provide for proper
dust removal and collection.
Accidental start-
WARNING! Some dust created by power sanding, sawing, grinding, drilling and
other construction activities contains chemicals known to cause cancer, birth
defects or other reproductive harm.
• Lead from lead-based paint
• Crystalline silica from bricks and cement and other masonry products
• Arsenic and chromium from chemically-treated lumber
Your risk to these exposures varies, depending on how often you do this type of work. To reduce
your exposure to these chemicals:
• Work in a well ventilated area
• Work with approved safety equipment, such as those dust masks that are specifi cally designed
to fi lter out microscopic particles.
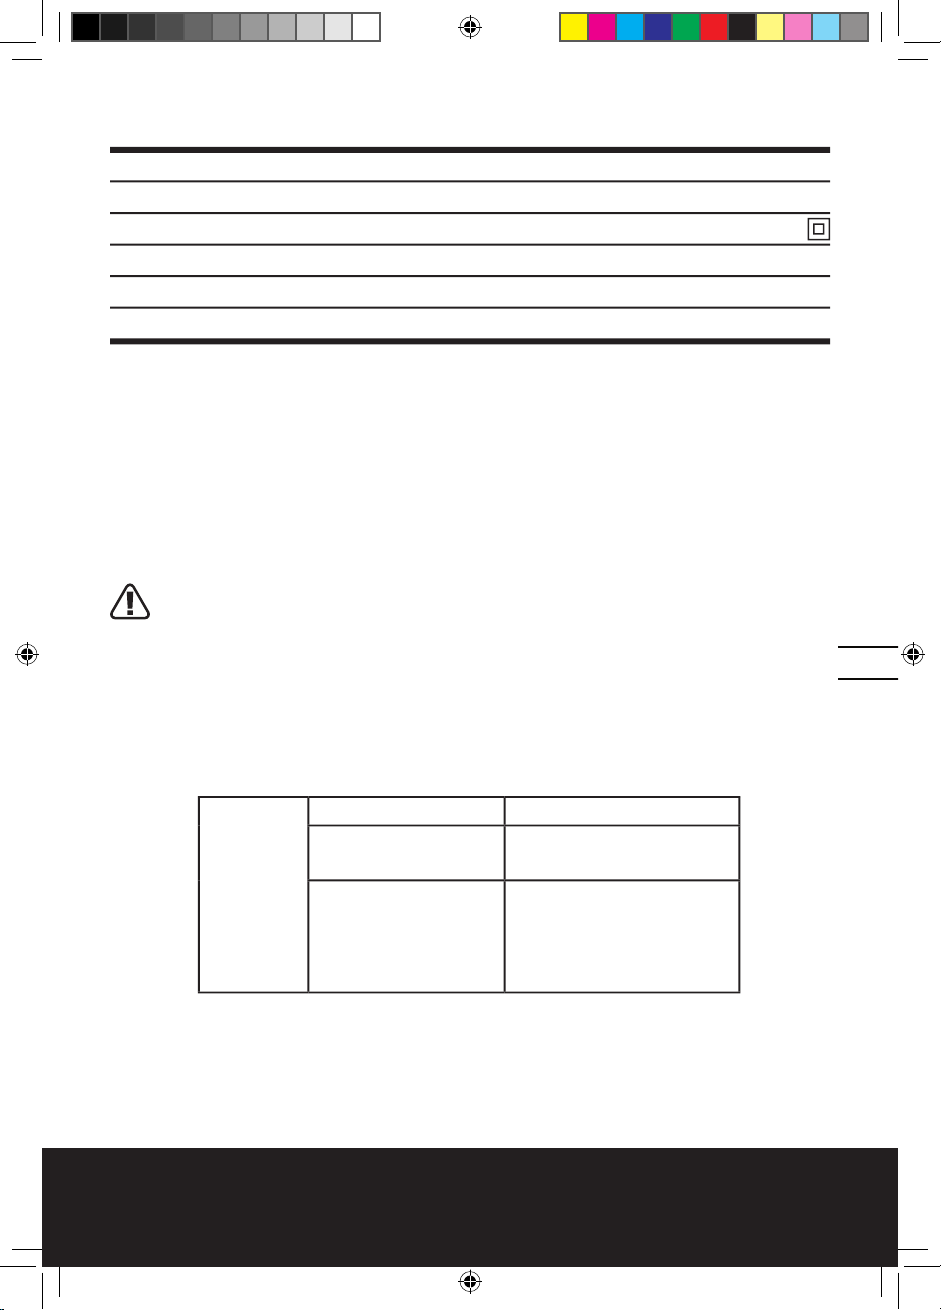
The label on your tool may include the following symbols:
V
A
04
NA-WT661k-M-050802.indd 4 2005-8-2 10:53:05
Belt Sander WT661K
Warning
Wear safety goggles, dust mask
05
NA-WT661k-M-050802.indd 5 2005-8-2 10:53:05
Belt Sander WT661K
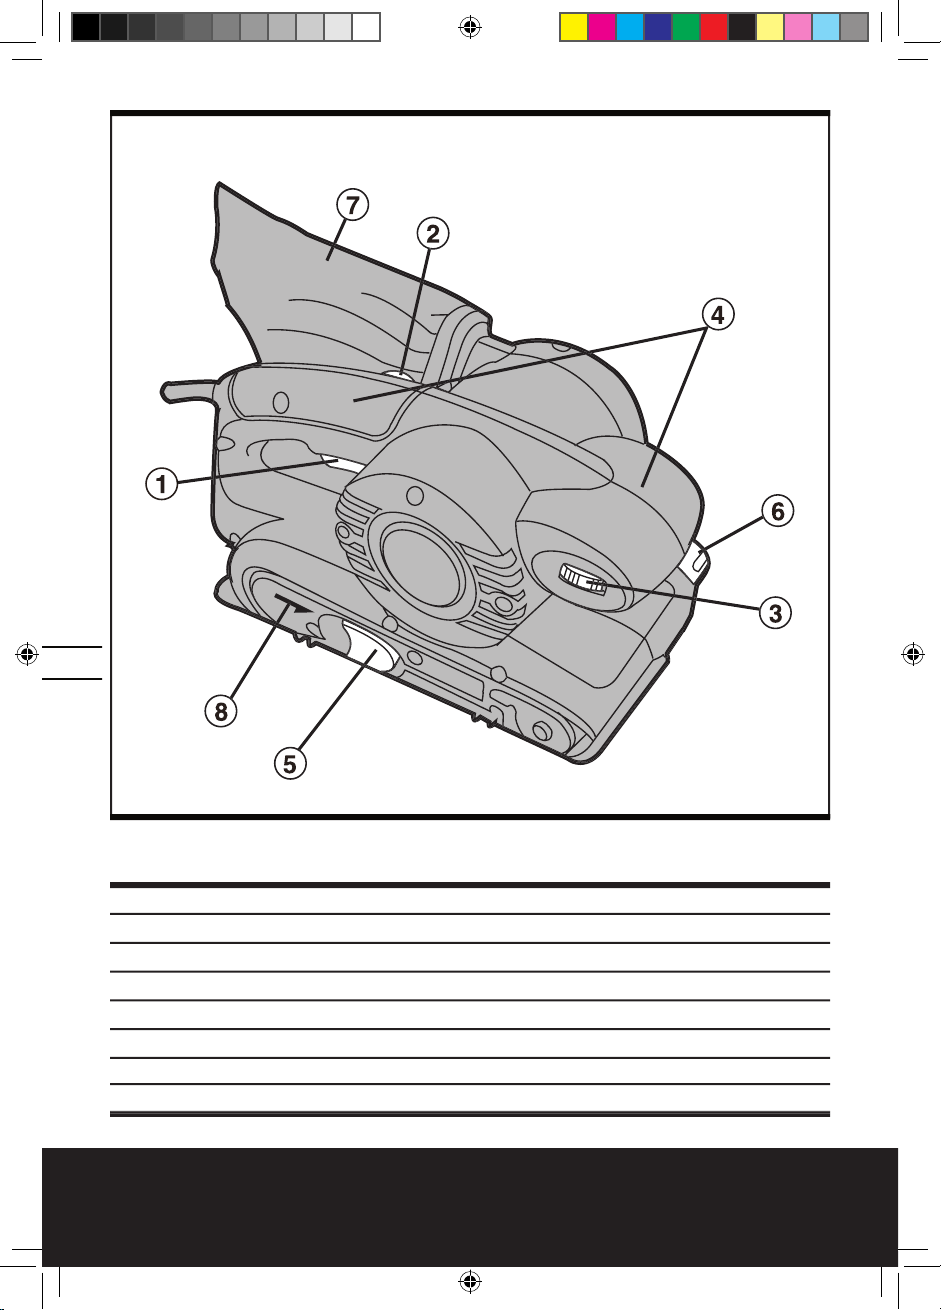
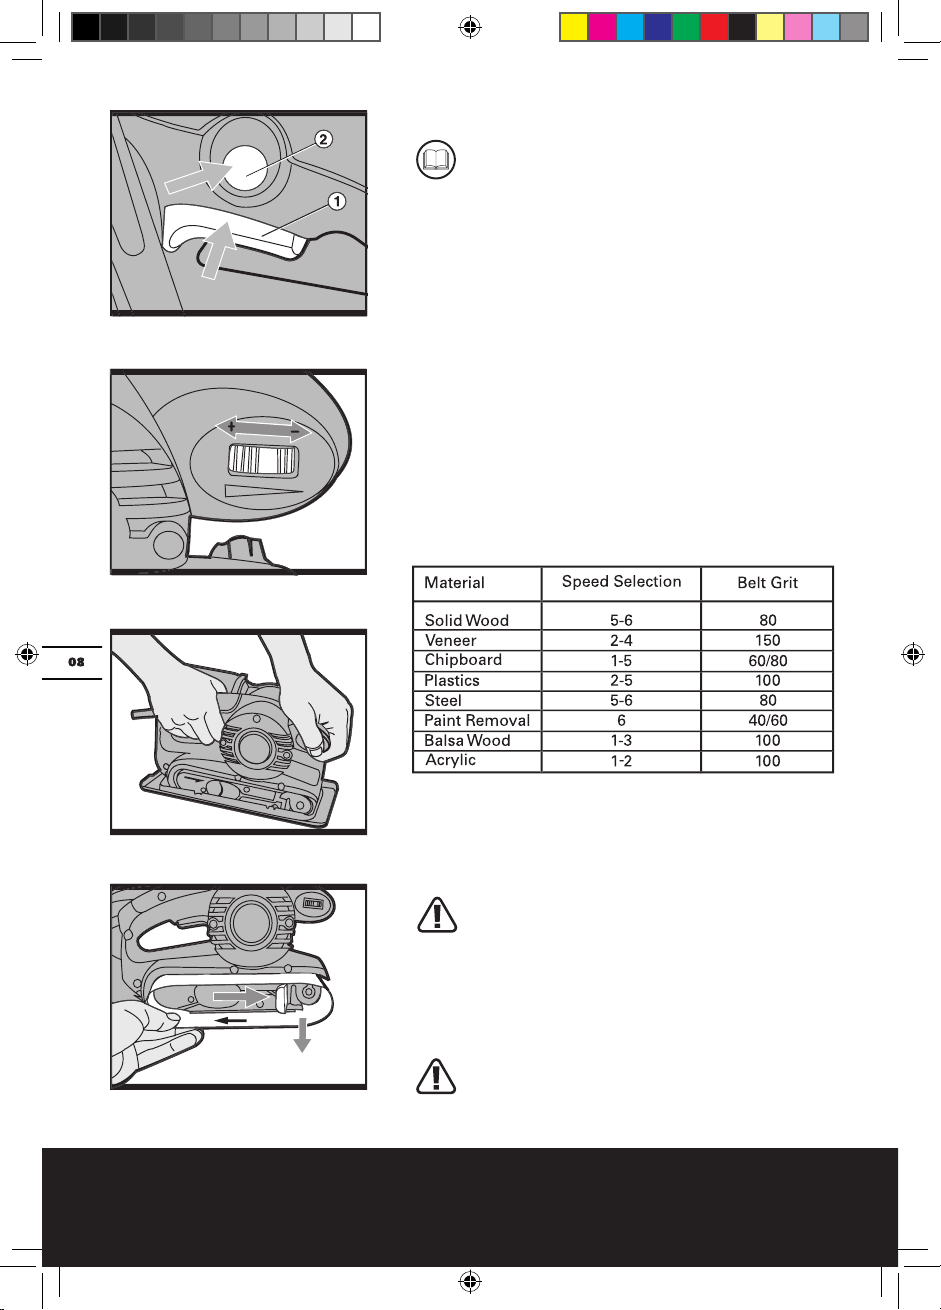
3. VARIABLE SPEED CONTROL DIAL
4. HAND GRIP AREAS
06
NA-WT661k-M-050802.indd 6 2005-8-2 10:53:07
Belt Sander WT661K
Voltage: 120V~60Hz
Sanding Belt
We recommend that you purchase your accessories from the same store that sold you the tool.
to the work you intend to undertake. Refer to the accessory packaging for further details. Store
Warning
voltage, resulting in loss of power and overheating. If in doubt, use the next heavier gauge. The
TOOLS
07
Tool’s
Ampere
Cord Size in A.W.G.
Wire Sizes in mm
Cord Length in Feet
- - - -
NA-WT661k-M-050802.indd 7 2005-8-2 10:53:07
Belt Sander WT661K
OTE:
Your switch is now locked on for continuous use. To
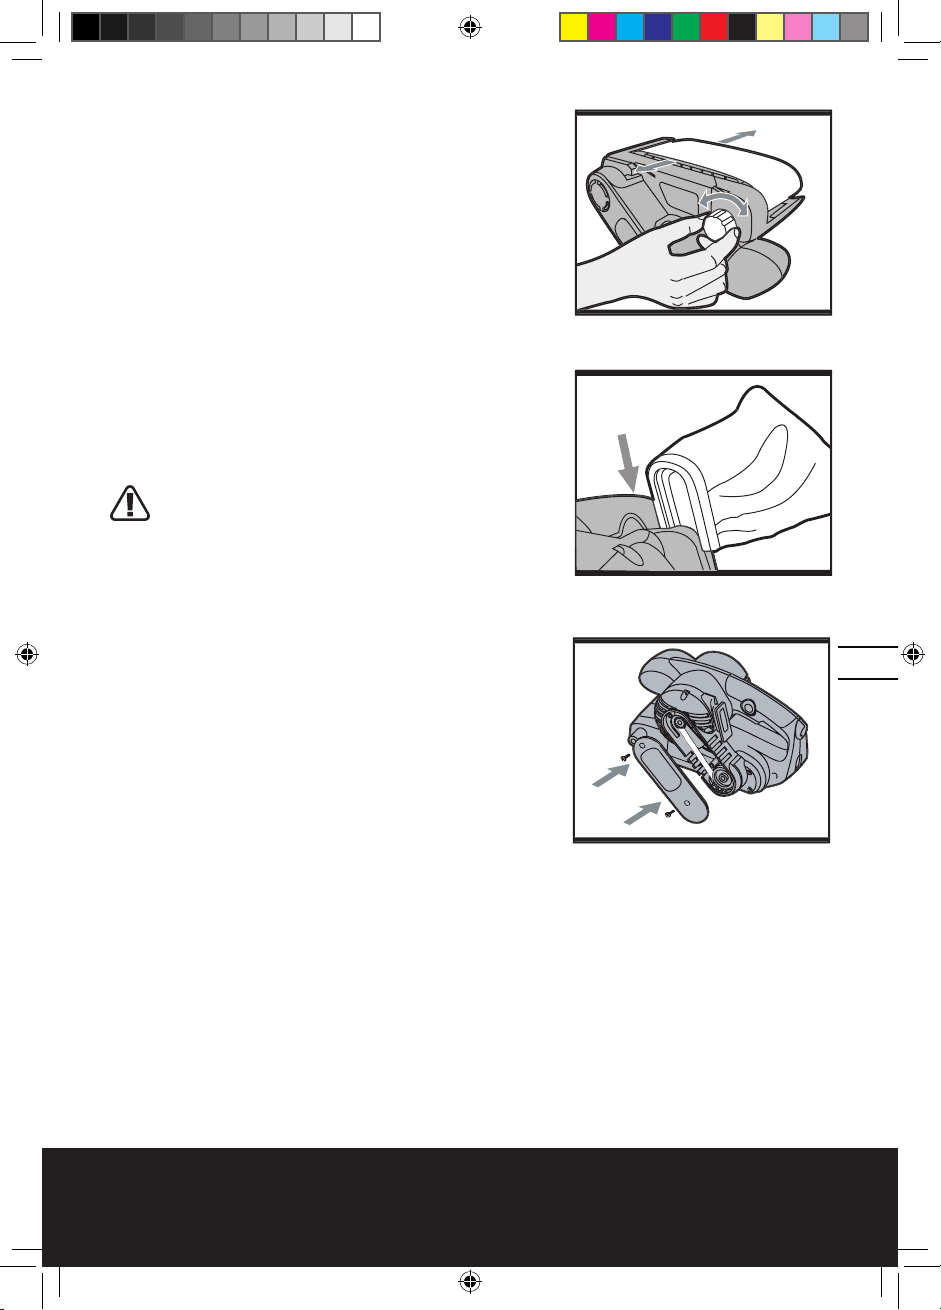
3. VARIABLE SPEED CONTROL DIAL
Adjust the variable speed control dial (3) to increase or
4. HAND GRIP AREAS
Always hold your belt sander fi rmly with both hands
when operating (See Fig 3).
Warning! Remove the power plug from the
socket before changing sanding belt.
fi t a new belt over both rollers (See Fig 4). Ensure the
Warning! Wear eye protection before carrying
out a belt centering adjustment.
08
NA-WT661k-M-050802.indd 8 2005-8-2 10:53:10
Belt Sander WT661K
Turn the machine upside down, hold it fi rmly with one
Adjust the belt until the outer edge of the belt is even
with the outer edge of the base-plate . Belt life will be
You must use the dust collection bag provided to collect
the dust produced during sanding. The dust collection
the belt sander (See Fig 6). When the dust collection bag
the dust collection bag (7).
Warning! Remove the power plug from
the socket before carrying out a drive belt
the
two
with no load for 2-3 minutes to cool the motor.
wish to sand.
f) Start your sander before sanding and turn off only
For best results sand wood in the direction of
the grain. Do not start sanding without the sanding belt
fi tted. Empty the dust bag every 5 minutes or sooner to
09
NA-WT661k-M-050802.indd 9 2005-8-2 10:53:13

Belt Sander WT661K
facility.
Your power tool requires no additional lubrication or
your power tool. Never use water or chemical cleaners
to clean your power tool. Wipe clean with a dry cloth.
Always store your power tool in a dry place. Keep the
free of dust. If you see some sparks fl ashing in the
ventilation slots, this is normal and will not damage your
and return all original equipment
The manufacturer warrants that, for
from the date of purchase, this product shall be free of
WHAT IS NOT COVERED
This warranty applies only to the original purchaser at
This warranty does NOT cover service or replacement of
This warranty does NOT cover accessories or battery
NA-WT661k-M-050802.indd 10 2005-8-2 10:53:14

Belt Sander WT661K
This warranty does NOT cover malfunction, failure or
with the operations manual
The manufacturer makes no warranties, representations
warranty.
WORX (9679) (Mon.- Sat. 9am to 9pm EST)
to receive
ADDITIONAL LIMITATIONS
This warranty is only valid for products purchased and
two years
from the
for direct, indirect, incidental or consequential damages
This warranty gives you specifi c legal rights, and you
The manufacturer declines any responsibility in regards
to civil liability arising from abusive use or not in
After the purchase, the manufacturer recommends
the operator’s manual before using the machine.
NA-WT661k-M-050802.indd 11 2005-8-2 10:53:15

Ponceuse À Courroie WT661K
AVERTISSEMENT! Lisez et assimilez toutes les instructions.
CONSERVEZ CES INSTRUCTIONS
a) Veillez à ce que l’aire de travail soit propre et bien éclairée.
exemple en présence de liquides, de gaz ou de poussières infl ammables.
triques créent des étincelles qui pourraient enfl ammer les poussières ou les vapeurs.
c) Gardez à distance les curieux, les enfants et les visiteurs lorsque vous travaillez avec un
outil électrique.
a) Les outils à double isolation sont munis d’une fi che polarisée (une des broches
est plus large que l’autre). Cette fi che ne peut se brancher que d’une seule façon
dans une prise polarisée. Si la fi che n’entre pas parfaitement dans la prise, inver-
sez sa position; si elle n’entre toujours pas bien, demandez à un électricien quali-
fi é d’installer une prise de courant polarisée. Ne modifi ez pas la fi che de l’outil.
teurs, cuisinières, réfrigérateurs, etc.).
votre corps est en contact avec la terre. Si l’utilisation de l’outil électrique dans un endroit
vantage votre sécurité personnelle.
c) N’exposez pas les outils électriques à la pluie ou à l’eau.
d) Ne maltraitez pas le cordon. Ne transportez jamais l’outil par son cordon et ne
débranchez jamais la fi che en tirant sur le cordon. N’exposez pas le cordon à la
chaleur, à des huiles, à des arrêtes vives ou à des pièces en mouvement. Rem-
e) Lorsque vous utilisez un outil électrique à l’extérieur, employez un cordon de ral-
vous aux << Calibres recommandés des cordons de rallonge >> dans la section Accessoires
f) Les outils mis à la terre doivent être branchés dans une prise de courant cor-
Ne modifi ez jamais la fi che de quelque façon que ce soit, par exemple
NA-WT661k-M-050802.indd 12 2005-8-2 10:53:15

Ponceuse À Courroie WT661K
3. SÉCURITÉ DES PERSONNES
a) Restez alerte, concentrez-vous sur votre travail et faites preuve de bon sens.
drogues, d’alcool ou de médicaments.
c) Évitez les démarrages accidentels. Avant de brancher l’outil, assurez-vous que
son interrupteur est à la position <<OFF>> (Arrêt).
fonctionne pas normalement
d) Retirez les clés de réglage.
e) Ne vous penchez pas trop en avant. Maintenez un bon appui et restez en équilibre
en tout temps.
f) Utilisez des accessoires de sécurité. Portez toujours une protection oculaire.
g) Tenez les mains à l’écart des arrêtes tranchantes et des pièces en mouvement.
4. UTILISATION ET ENTRETIEN DE L’OUTIL
a) Immobilisez le matériau travaillé sur une surface stable au moyen de serre-joints
ou de toute autre façon adéquate.
c) N’utilisez pas un outil si l’interrupteur ne le met pas en marche ou ne peut l’arrêter.
d) Débranchez la fi che de l’outil de sa prise d’alimentation avant d’effectuer un ré-
glage, de changer d’accessoire ou de ranger l’outil.
e) Rangez les outils hors de la portée des enfants et d’autres personnes inexpéri-
Les outils sont dangereux dans les mains d’utilisateurs novices.
f) Prenez soin de bien entretenir les outils. Les outils de coupe doivent être toujours
Des outils bien entretenus, dont les arrêtes sont bien tranchantes,
g) Soyez attentif à tout désalignement ou coincement des pièces en mouvement,
à tout bris ou à toute autre condition préjudiciable au bon fonctionnement de
NA-WT661k-M-050802.indd 13 2005-8-2 10:53:17

Ponceuse À Courroie WT661K
vous en servir.
Ne forcez pas l’outil ni l’accessoire en
tentant d’effectuer une tâche pour laquelle ils n’ont pas été conçus.
a) L’entretien ou la réparation de l’outil doit être réalisé seulement par du personnel
qualifi é.
Suivez les directives fournies dans la section <<Entretien>> du présent manuel.
AVERTISSEMENT! Le non respect de ces règles peut conduire à des blessures
graves.
en contact avec les fi ls cachés ou son propre cordon, tenez l’outil par ses surfaces
Portez des lunettes de sécurité à coques la-
térales pour protéger vos yeux, portez une protection auditive pour protéger vos oreilles et
3) Assurez vous que l’ouvrage est bien retenu ou fi xez le en place à l’aide de serres
4) Débranchez toujours la ponceuse de sa prise avant de remplacer la courroie de
AVERTISSEMENT!
tions spéciales en ponçant le bois d’œuvre traité chimiquement par pression, la
agents cancérigènes. Faites toujours fonctionner l’outil dans un espace bien ventilé
et prévoyez l’évacuation/collection de la poussière.
ceuse à bande afi n de prévenir une perte de contrôle.
Un démarrage imprévu peut causer des blessures.
AVERTISSEMENT! Les travaux à la machine tel que ponçage, sciage, meulage,
des produits chimiques qui sont des causes reconnues de cancer, de malformation
congénitale ou d’autres problèmes reproductifs.
NA-WT661k-M-050802.indd 14 2005-8-2 10:53:18

Ponceuse À Courroie WT661K
Avertissement
• Le plomb provenant des peintures á base de plomb
• Les cristaux de silices provenant des briques, du ciment et d’autres produits de maçonnerie
• L’arsenic et le chrome provenant des bois traités chimiquement
fi ltrer les particules microscopiques.
V
A
Ampère
NA-WT661k-M-050802.indd 15 2005-8-2 10:53:19

Ponceuse À Courroie WT661K
3. CADRAN DE RÉGLAGE DE VITESSE
4. ZONES DE PRÉHENSION
NA-WT661k-M-050802.indd 16 2005-8-2 10:53:20

Ponceuse À Courroie WT661K
Tension: 120V~60Hz
Ampérage Nominal: 7,0A
Vitesse À Vide: 490-1,050pi/min
Sac à poussière 1
CORDONS DE RALLONGE
Avertissement:
Utiliser les bons cordons de rallonge. S’assurer que le cordon de rallonge
de l’outil
Calibre A. W.G.
Calibre en mm
15 30 60 120
1.0 2.5 4.0 -
- - - -
NA-WT661k-M-050802.indd 17 2005-8-2 10:53:21

Ponceuse À Courroie WT661K
Avant d’utiliser cet outil, assurez-
vous de lire attentivement le manuel d’utilisation
Appuyez sur la détente de l’interrupteur pour faire dé-
Appuyez sur l’interrupteur de marche/arrêt (1) et bloquez
faites qu’appuyer sur la détente de l’interrupteur de
3. CADRAN DE RÉGLAGE DE VITESSE
tableau 1 ci-après. Évitez toute utilisation prolongée à
faible vitesse car cela pourrait endommager le moteur
4. AIRES DE PRÉHENSION
Tenez toujours la machine fermement avec les deux
ÇAGE
Avertissement! Avant de travailler sur la
NA-WT661k-M-050802.indd 18 2005-8-2 10:53:23

Ponceuse À Courroie WT661K
Avertissement! Pour faire le centrage d’une
courroie, portez toujours une protection oc-
Tournez la machine sens dessus dessous, tenez la fer-
vie des courroies sera de beaucoup supérieure si leur
Avertissement! Avant de travailler sur la
vous gardant de son relâchement, et retirez la de la pon-
faites le fonctionner à vide pendant 2 à 3 minutes afi n de
COURROIE
NA-WT661k-M-050802.indd 19 2005-8-2 10:53:26

Ponceuse À Courroie WT661K
f) Démarrez et arrêtez votre ponceuse à vide seulement,
jamais lorsque sa bande est en contact avec la surface
vice après-vente autorisé.
Votre outil ne nécessite aucune lubrifi cation ou entretien
ventilation du moteur. Si vous remarquez des étincelles
té. Pour obtenir un outil de remplacement vous devez
20
NA-WT661k-M-050802.indd 20 2005-8-2 10:53:28

Ponceuse À Courroie WT661K
et retourner l’outil
GARANTIE LIMITÉE DE DEUX (2) ANS
à partir de la date d’achat, ce produit sera libre de
vert que de la période de garantie restant sur la durée de
CE QUI EST EXCLUS DE LA GARANTIE
tion faite ailleurs qu’à un centre de service autorisé.
tion ou promesse relatives à la qualité ou performance
ASSISTANCE
NA-WT661k-M-050802.indd 21 2005-8-2 10:53:28

Ponceuse À Courroie WT661K
de la date d’achat. Le manufacturier
votre cas. Cette garantie vous donne des droits légaux
varient d’un état ou province à l’autre.
Après l’achat, le manufacturier suggère de lire le
NA-WT661k-M-050802.indd 22 2005-8-2 10:53:29

23
NA-WT661k-M-050802.indd 23 2005-8-2 10:53:29

Lijadora De Correa WT661K
CONSERVE ESTAS INSTRUCCIONES
a) Mantenga su lugar de trabajo limpio y bien iluminado.
c) Mantenga a los espectadores, niños y visitantes a una distancia prudente cuando
esté utilizando una herramienta eléctrica.
a) Las herramientas con doble aislamiento están equipadas con un enchufe polariza-
do (una pata es más ancha que la otra). Este enchufe entrará en un tomacorriente
tomacorriente, délo vuelta. Si sigue sin entrar, póngase en contacto con un elec-
tricista competente para instalar un tomacorriente polarizado. No haga ningún
tipo de cambio en el enchufe.
El doble aislamiento elimina la necesidad del sistema de
tuberías, radiadores, estufas de cocina y refrigeradores.
y calzado para electricista aumentarán más su seguridad personal.
c) No exponga las herramientas eléctricas a la lluvia ni a los ambientes húmedos.
d) No abuse del cable.
Nunca use el cable para transportar las herramientas ni para sacar el
e) Al utilizar una herramienta eléctrica a la intemperie, utilice un cable de extensión
f) Las herramientas conectadas a tierra deben estar enchufadas en un tomacor-
todos los códigos y ordenanzas vigentes.
NA-WT661k-M-050802.indd 24 2005-8-2 10:53:30

Lijadora De Correa WT661K
25
tricista capacitado si tiene dudas para asegurar que el tomacorriente esté correctamente co-
3. SEGURIDAD PERSONAL
a) Manténgase alerta, fíjese en lo que está haciendo y use el sentido común cuando
encuentre bajo la infl uencia de drogas, alcohol o medicamentos.
La ropa
c) Evite el arranque accidental. Asegúrese de que el interruptor esté en la posición
“OFF” (apagado) antes de enchufar la herramienta.
d) Retire todas las llaves y calibradores.
Hágase el hábito de verifi car que todas las llaves,
e) No intente alcanzar demasiado lejos. Mantenga un apoyo de los pies y un equi-
f) Utilice equipo de seguridad. Use siempre protección ocular.
g) Mantenga las manos retiradas de bordes cortantes y partes en movimiento.
4. USO Y CUIDADO DE LA HERRAMIENTA
a) Utilice abrazaderas u otro modo práctico de asegurar y apoyar el material de tra-
desea.
c) No utilice la herramienta si el interruptor no la enciende o apaga.
Toda herramienta
d) Desconecte el enchufe de la fuente de alimentación antes de hacer cualquier
ajuste, cambiar accesorios o guardar la herramienta.
e) Guarde las herramientas que no esté usando fuera del alcance de los niños y otras
f) Mantenga las herramientas con cuidado. Conserve las herramientas de corte
afi ladas y limpias.
NA-WT661k-M-050802.indd 25 2005-8-2 10:53:31

Lijadora De Correa WT661K
g) Compruebe la desalineación o el atasco de las piezas móviles, la ruptura de piezas
y cualquier otra situación que pueda afectar el funcionamiento de las herramien-
tas. Si la herramienta está dañada, hágala arreglar antes de usarla.
tes son causados por herramientas mantenidas defi cientemente. Establezca un programa
a) La reparación de una herramienta debe ser realizada únicamente por personal
competente.
operación en la que la herramienta de corte pueda entrar en contacto con cables
ocultos o con su propio cable.
3) Fije o asegure la pieza de trabajo al lijar.
Al fi jar la pieza de trabajo se evita que ésta salga
4) Desenchufe siempre el cable del tomacorriente antes de cambiar la cinta lijadora.
o cualquier otro material que pueda contener cancerígenos. Utilice siempre la her-
de polvo.
evitar la pérdida de control.
26
NA-WT661k-M-050802.indd 26 2005-8-2 10:53:32

Lijadora De Correa WT661K
Advertencia
ADVERTENCIA! El polvo creado al lijar, serruchar, pulir, taladrar o realizar otras
actividades de la construcción, contiene substancias químicas que se sabe
Algunos ejemplos de esos productos químicos son:
• El plomo de las pinturas a base de plomo
• La sílice cristalina de los ladrillos, del cemento y de otros productos de albañilería
• El arsénico y el cromo de la madera tratada químicamente
• Trabaje en un área bien ventilada
• Utilice un equipo de seguridad reglamentario, tal como una máscara contra el polvo especial-
V
Amperes
NA-WT661k-M-050802.indd 27 2005-8-2 10:53:33

Lijadora De Correa WT661K
28
3. PERILLA DEL CONTROL VARIABLE DE VELOCIDAD
4. ÁREA DE PRENSIÓN
NA-WT661k-M-050802.indd 28 2005-8-2 10:53:34

Lijadora De Correa WT661K
29
Voltios: 120V~60Hz
Velocidad Sin Carga: 490-1,050pies/min
Tamaño de Cinta: 3” x 18” (76mm x 457mm)
Cinta de Lijado 1
CABLES DE EXTENSIÓN
Advertencia:
Utilice cables de extensión apropiados. Asegúrese de que el cable de exten-
TAMAÑOS RECOMENDADOS DE CORDONES DE EXTENSION HERRAMIENTAS DE 120
V CORRIENTE ALTERNA
Capacidad
amperios de
Tamaño del cordón en A.W.G
Tamaños del cable en mm
2
15 30 60 120
NA-WT661k-M-050802.indd 29 2005-8-2 10:53:35

Lijadora De Correa WT661K
Antes de usar la herramienta, lea atenta-
y suelte el gatillo.
3. CONTROL VARIABLE DE VELOCIDAD
Ajuste la perilla de control variable de velocidad (3) para
4. ÁREAS DE AGARRE
30
NA-WT661k-M-050802.indd 30 2005-8-2 10:53:38

Lijadora De Correa WT661K
31
ajustar el centrado de la cinta.
tará considerablemente la vida útil de la cinta.
vacíela abriendo el cierre de la bolsa (7).
y empujando la correa sobre la polea chica al mismo
tiempo. Debe entrar ajustada. Coloque la cubierta y los
velocidad al máximo y hágala funcionar sin carga por
fi rmemente sujetada para evitar el movimiento.
f) Encienda la lijadora antes de comenzar a lijar y detén-
NA-WT661k-M-050802.indd 31 2005-8-2 10:53:41

Lijadora De Correa WT661K
funcionen mejor y con más seguridad. Siga las instruc-
to adicional. No posee piezas en su interior que puedan
GARANTÍA LIMITADA DE REEMPLAZO POR 60
y devolver todo el material de empaque original
junto con el producto.
GARANTÍA LIMITADA DE DOS AÑOS
término de 2 años
a
Toda herramienta eléctrica reemplazada o reparada
32
NA-WT661k-M-050802.indd 32 2005-8-2 10:53:42

Lijadora De Correa WT661K
33
tros aprobados de reparaciones.
torios o Canadá. Cualquier garantía implícita concedida
desde la fecha de compra. El fabricante no
tanto las exclusiones o limitaciones anteriores pueden
NA-WT661k-M-050802.indd 33 2005-8-2 10:53:43

Lijadora De Correa WT661K
el manual del usuario antes de usarla.
34
NA-WT661k-M-050802.indd 34 2005-8-2 10:53:43

35
NA-WT661k-M-050802.indd 35 2005-8-2 10:53:43

Conçu en Italie. Fabriqué en Chine
NA-WT661k-M-050802.indd 36 2005-8-2 10:53:44
 Loading...