

Page 1

Palm Sander ENG
Ponceuse à Main F
Lijadora de Mano ES
Pag 02
Pag 12
Pag 22
WT645K
1
/16”/2.2Amp
NA-WX645K-M-051107.indd 1 2005-11-7 9:17:27
Page 2

Palm Sander WT645K
SAFETY INSTRUCTIONS
WARNING! Read and understand all instructions. Failure to follow all instructions listed
below, may result in electric shock, fire and/or serious personal injury.
SAVE THESE INSTRUCTIONS
1. WORK AREA
a) Keep your work area clean and well lit. Cluttered benches and dark areas invite accidents.
b) Do not operate power tools in explosive atmospheres, such as in the presence of
flammable liquids, gases or dust. Power tools create sparks which may ignite the dust or
fumes.
c) Keep bystanders, children, and visitors away while operating a power tool. Distractions
can cause you to lose control.
2. ELECTRICAL SAFETY
a) Double Insulated tools are equipped with a polarized plug (one blade is wider than the
other.) This plug will fit in a polarized outlet only one way. If the plug does not fit fully in
the outlet, reverse the plug. If it still does not fit, contact a qualified electrician to install
a polarized outlet. Do not change the plug in any way. Double Insulation eliminates the
need for the three wire grounded power cord and grounded power supply system.
b) Avoid body contact with grounded surfaces such as pipes, radiators, ranges and
refrigerators. There is an increased risk of electric shock if your body is grounded.
c) Don’t expose power tools to rain or wet conditions. Water entering a power tool will
increase the risk of electric shock.
d) Do not abuse the cord. Never use the cord to carry the tools or pull the plug from an
outlet. Keep cord away from heat, oil, sharp edges or moving parts. Replace damaged
cords immediately. Damaged cords increase the risk of electric shock.
e) When operating a power tool outside, use an outdoor extension cord marked “W-A” or
“W”. These cords are rated for outdoor use and reduce the risk of electric shock.
3. PERSONAL SAFETY
a) Stay alert, watch what you are doing and use common sense when operating a power
tool. Do not use tool while tired or under the influence of drugs, alcohol, or medication.
A moment of inattention while operating power tools may result in serious personal injury.
b) Dress properly. Do not wear loose clothing or jewelry. Contain long hair. Keep your hair,
clothing, and gloves away from moving parts. Loose clothes, jewelry, or long hair can be
caught in moving parts.
c) Avoid accidental starting. Be sure switch is off before plugging in. Carrying tools with
your finger on the switch or plugging in tools that have the switch on invites accidents.
d) Remove adjusting keys or wrench before turning the tool on. A wrench or a key that is left
attached to a rotating part of the tool may result in personal injury.
e) Do not overreach. Keep proper footing and balance at all times. Proper footing and
balance enables better control of the tool in unexpected situations.
f) Use safety equipment. Always wear eye protection. Dust mask, non-skid safety shoes,
hard hat, or hearing protection must be used for appropriate conditions.
4. TOOL USE AND CARE
a) Use clamps or other practical way to secure and support the workpiece to a
stable platform. Holding the work by hand or against your body is unstable and may lead
to loss of control.
NA-WX645K-M-051107.indd 2 2005-11-7 9:17:28
Page 3

Palm Sander WT645K
b) Do not force tool. Use the correct tool for your application. The correct tool will do
the job better and safer at the rate for which it is designed.
c) Do not use tool if switch does not turn it on or off. Any tool that cannot be controlled
with the switch is dangerous and must be repaired.
d) Disconnect the plug from the power source before making any adjustments,
changing accessories, or storing the tool. Such preventive safety measures reduce the
risk of starting the tool accidentally.
e) Store idle tools out of reach of children and other untrained persons. Tools are
dangerous in the hands of untrained users.
f) Maintain tools with care. Keep cutting tools sharp and clean. Properly maintained
tools, with sharp cutting edges are less likely to bind and are easier to control.
g) Check for misalignment or binding of moving parts, breakage of parts, and any
other condition that may affect the tools operation. If damaged, have the tool
serviced before using. Many accidents are caused by poorly maintained tools.
h) Use only accessories that are recommended by the manufacturer for your model.
Accessories that may be suitable for one tool, may become hazardous when used on another
tool.
5. SERVICE
a) Tool service must be performed only by qualified repair personnel. Service or
maintenance performed by unqualified personnel could result in a risk of injury.
b) When servicing a tool, use only identical replacement parts. Follow instructions
in the Maintenance section of this manual. Use of unauthorized parts or failure to follow
Maintenance Instructions may create a risk of electric shock or injury
6. SPECIFIC SAFETY RULES
a) Hold tool by insulated gripping surfaces when performing an operating where the
cutting tools may contact hidden wiring or its own cord. Contact with a “live” wire
will make exposed metal parts of the tool “live” and shock the operator.
ADDITIONAL SPECIFIC SAFETY INSTRUCTIONS FOR BELT
SANDER
1. Remove the plug from the socket before carrying out any adjustment, servicing or
maintenance.
2. Fully unwind cable drum extensions to avoid potential overheating.
3. When an extension cable is required you must ensure it has the correct ampere rating for your
power tool and is in a safe electrical condition.
4. Ensure your mains supply voltage is the same as indicated on the rating plate.
5. Your tool is double insulated for additional protection against a possible electrical insulation
failure within the tool.
6. Always check walls, floors and ceilings to avoid hidden power cables and pipes.
7. After long working period external metal parts and accessories could be hot.
8. Wear eye protection when operating this tool.
9. If possible ensure the workpiece is firmly clamped to prevent movement.
10. Your finishing sander is a hand held tool, do not clamp your finishing sander.
11. Before sanding check the area is free of nails, screws, etc.
12. Never stop the finishing sander paper by applying a force to the paper.
13. Only use paper in good condition. Do not use with a torn or worn paper.
0302
NA-WX645K-M-051107.indd 3 2005-11-7 9:17:28
Page 4
Palm Sander WT645K
14. Do not sand material containing asbestos due to a health risk.
15. Do not sand lead based paint due to the risk of lead poisoning.
16. Do not eat or drink in the working area of the sander.
17. Do not allow people to enter the working area without wearing the correct type of mask.
18. Where possible seal off the working area to contain the dust for later removal.
19. Always wear a dust mask.
20. Your tool is designed for dry sanding only, not wet sanding.
21. Your tool is designed for general-purpose light polishing of wood and metals.
22. Do not sand magnesium material due to the risk of fire.
WARNING! Some dust created by power sanding, sawing, grinding, drilling and other
construction activities contains chemicals known to cause cancer, birth defects or
other reproductive harm. Some examples of these chemical are:
• Lead from lead-based paint
• Crystalline silica from bricks and cement and other masonry products
• Arsenic and chromium from chemically-treated lumber
Your risk to these exposures varies, depending on how often you do this type of work. To reduce
your exposure to these chemicals:
• Work in a well ventilated area
• Work with approved safety equipment, such as those dust masks that are specifically designed
to filter out microscopic particles.
The label on your tool may include the following symbols:
V...................................................................................................................................................................Volts
A..................................................................................................................................................................Amps
Hz.................................................................................................................................................................Hertz
~..........................................................................................................................................Alternating current
no ...............................................................................................................................................No-load speed
................................................................................................Class II Construction / Double insulation
SYMBOLS
Read the manual
Warning
Wear safety goggles, dust mask
and ear protection
Use inside only
Double insulation
Do not expose to rain or water
Do not burn
NA-WX645K-M-051107.indd 4 2005-11-7 9:17:29
Page 5

Palm Sander WT645K
0504
1. ON-OFF SWITCH
2. HAND GRIP AREA
3. SANDPAPER CLAMP
4. CLAMP LEVER
5. CLAMP LEVER LOCK
6. DUST BAG
7. PAPER PUNCH
8. BASE PLATE
NA-WX645K-M-051107.indd 5 2005-11-7 9:17:30
Page 6

Palm Sander WT645K
TECHNICAL DATA
Rated volts: 120V~60Hz
Rated Amps: 2.2A
Rated no-load speed: 15000opm
Sanding paper size: 1/4 sheet
Orbit diameter: 1/16” (1.6mm)
Base plate size: 4” x 4-3/8” (103mm x110mm)
Machine weight: 2.7lbs (1.2Kg)
ACCESSORIES
Sander paper 3pcs (60#/80#/120#)
Paper hole punch 1pc
Dust bag 1pc
Use 1/4 sheet sanding paper of the following size:
4” x 4-3/8”with dust holes or without dust holes.
If using sanding paper without dust holes, you must use the paper punch to make holes.
We recommend that you buy all your accessories from the store where you purchased the tool. Use
good quality accessories marked with a well-known brand name. Choose the grade according to the
work you intend to undertake. Refer to the accessory packaging for further details. Store personnel
can also help and advise.
EXTENSION CORDS
Warning: Use proper extension cords. Make sure your extension cord is in good condition
and is a 2-wire extension cord matching receptacle which will accept the machine’s plug.
When using an extension cord, be sure to use one heavy enough to carry the current of the machine. An undersized cord will cause a drop in line voltage, resulting in loss of power and overheating. If in doubt, use the next heavier gauge. The smaller the gauge number, the heavier the cord.
RECOMMENDED SIZES OF EXTENSION CORDS 120 VOLT AL TERNATING CURRENT
TOOLS
Tool’s
Ampere
Rating
3-6
6-8
8-10
10-12
12-16
Cord Size in A.W.G. Wire Sizes in mm
2
Cord Length in Feet
25 50 100 150
Feet to Meters
15 30 60 120
18 16 16 14
18 16 14 12
18 16 14 12
16 16 14 12
14 12 - -
.75 .75 1.5 2.5
.75 1.0 2.5 4.0
.75 1.0 2.5 4.0
1.0 2.5 4.0 -
- - - -
NA-WX645K-M-051107.indd 6 2005-11-7 9:17:31
Page 7
Palm Sander WT645K
0706
OPERATING INSTRUCTIONS
1. ON /OFF SWITCH
To start your sander, depress the protective cover over
the switch at the position marked“I”.To stop your sander,
depress the protective cover at the position marked “0”.
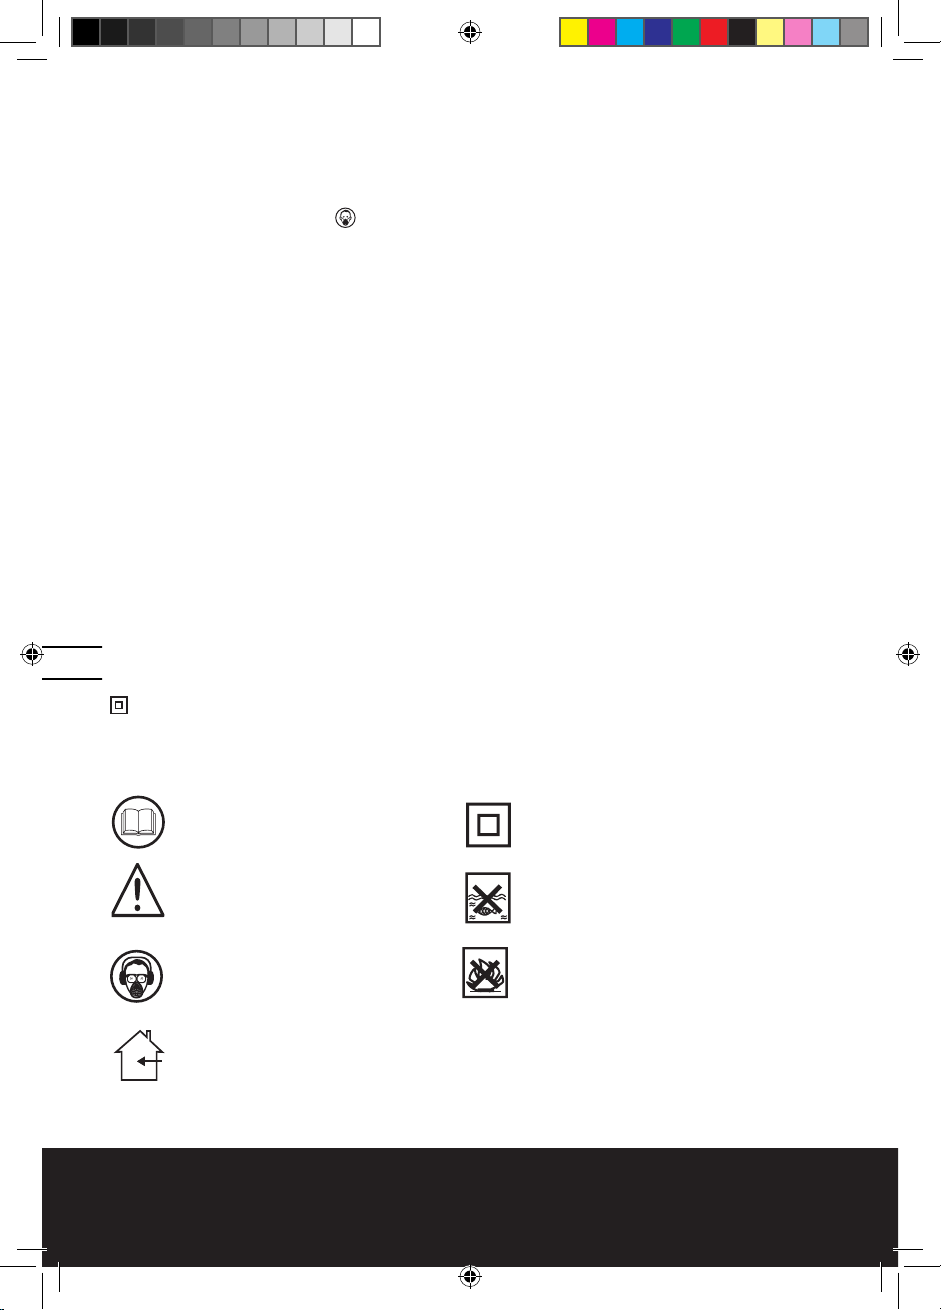
2. HAND GRIP AREA
You can operate your sander with one hand (See Fig 1).
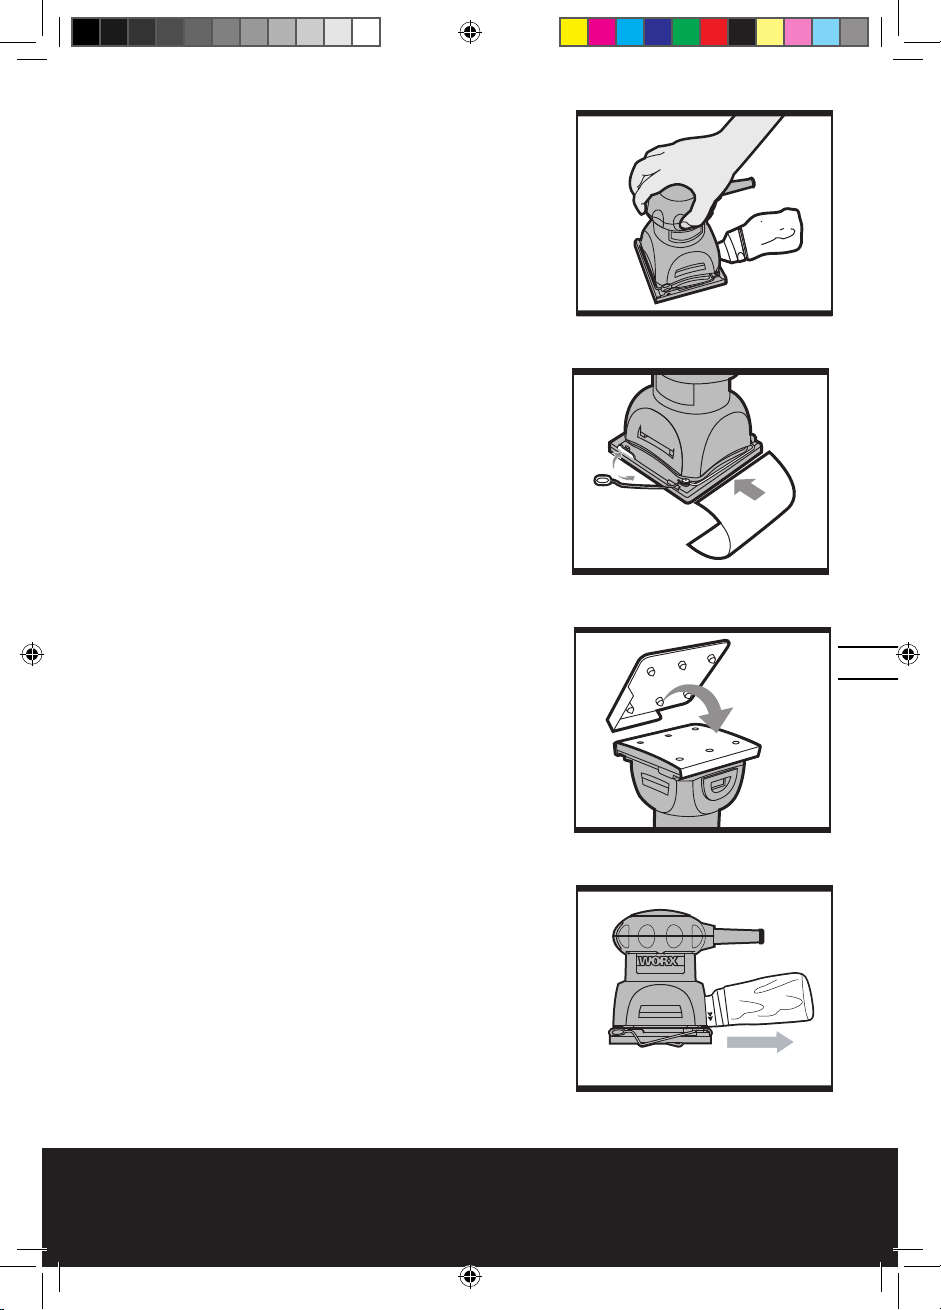
3. CHANGING THE SANDING PAPER
To remove the sandpaper, lift up the clamp lever (4)
and move away from the lever lock (5) (See Fig 2). The
sandpaper clamp (3) is now loose. Repeat with the other
clamp on the opposite side of your sander.
To fit new sandpaper, insert approximately 5mm of one
end of the sandpaper under the sandpaper clamp (3) until
the paper contacts the housing wall (See Fig 2). Lift up the
clamp lever (4) and move it to the lever lock position.
Press the sandpaper around the base-plate shape as tight
as possible and fix the end under the other sandpaper
clamp (3). Check the sandpaper is square to the baseplate, If not correct., remove and refit it again .
Always, ensure the sandpaper is tight over the base-plate
and secured underneath both locked clamps (3). This will
ensure safe and efficient sanding performance.
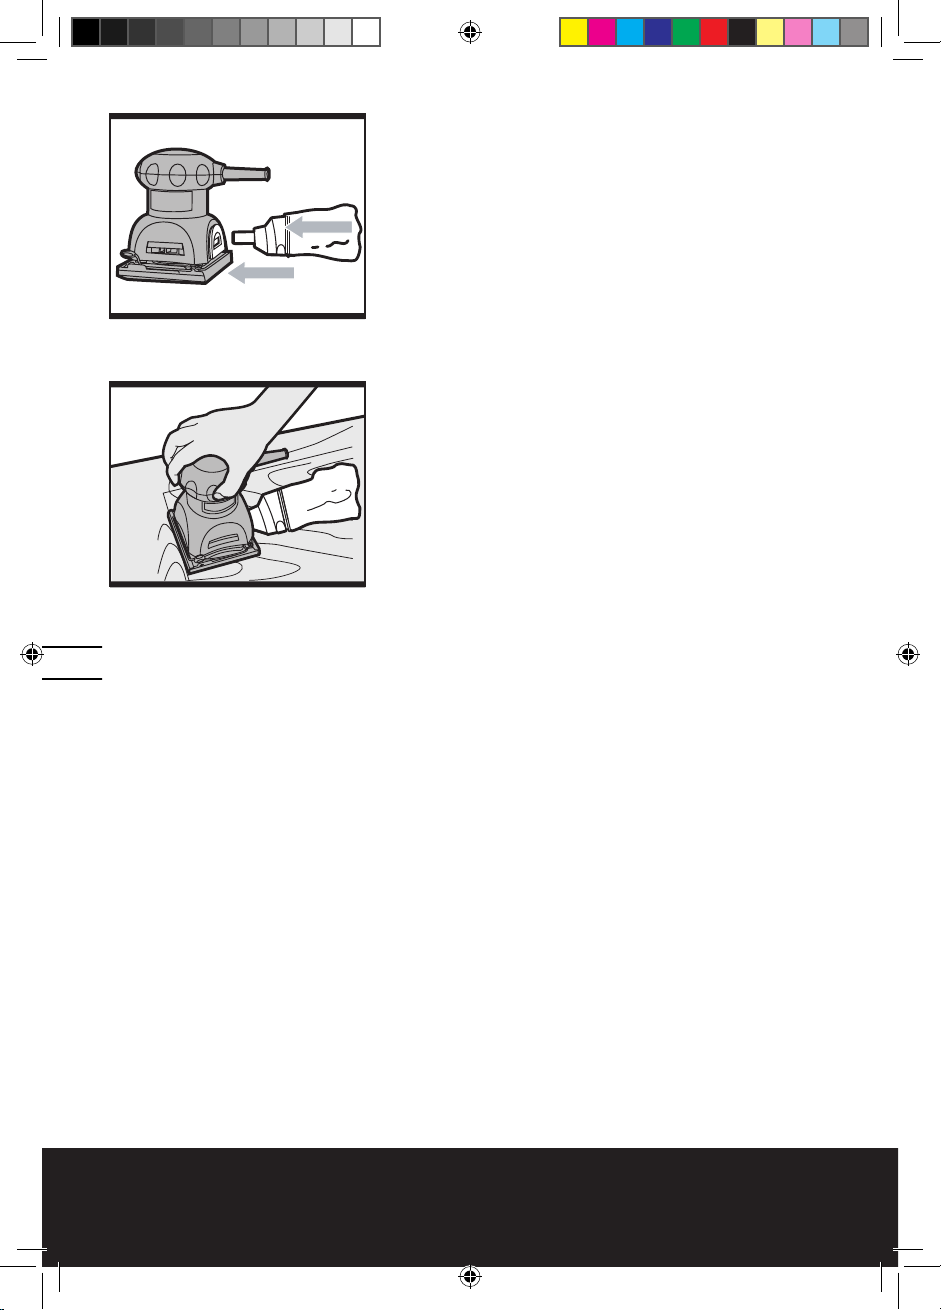
4. PAPER PUNCH
If using sanding paper without dust holes, use the paper
punch (7) to perforate the holes to ensure correct dust
extraction. Position the punch over the base-plate (8) with
the punch sides on the edges of the base-plate (See Fig 3).
Press the punch into the base-plate to punch holes into the
sanding paper. Then remove the punch and check all the
holes have been formed correctly.
5. DUST BAG
Always operate your sander with the dust bag fitted. For
the best performance always empty the dust bag in time.
Open the zip and empty the dust from the bag. To remove
the bag (See Fig 4). To refit the bag, firmly push the
mounting bracket into the location on the sander housing
(See Fig 5).
6. FLUSH SANDING FACILITY
Your sander can sand flush on three sides of the baseplate which allows easy access to corners and edges of
moulding (See Fig 6).
7. ORBITAL SANDING
Your sander operates in a small circular rotation which
Fig 1
Fig 2
Fig 3
Fig 4
NA-WX645K-M-051107.indd 7 2005-11-7 9:17:32
Page 8
Palm Sander WT645K
allows efficient material removal.
Operate your sander in long sweeping movements across
your workpiece and even across the grain. For a finer
finish, always use a fine type sand paper and only move
the sander in the direction of the grain and never across
the grain.
Do not allow your sander to remain in the same position
otherwise you will remove material and create an uneven
surface.
WORK HINTS FOR YOUR PALM
SANDER
If your power tool becomes too hot, especially when used
at low speed, set the speed to maximum and run it with
no load for 2-3 minutes to cool the motor. Avoid prolonged
usage at very low speeds. Always use sand paper that is
suitable for the material you want to sand.
Always ensure the work-piece is firmly held or clamped to
prevent movement.
Any movement of the material may affect the quality of
the sanding finish.
Start your sander before sanding and turn it off only after
you stop sanding. For the best results, sand wood in the
direction of the grain.
Do not start sanding without having the sandpaper fitted.
Do not allow the sandpaper to wear away it will damage
the base-plate. The guarantee does not cover base-plate
wear and tear.
Use coarse grit paper to sand rough surfaces, medium grit
for smooth surfaces and
fine grit for the final surfaces. If necessary, first make a test
run on scrap material.
Use only good quality sandpaper.
The sandpaper controls the sanding efficiency, not the
amount of force you apply to
the tool. Excessive force will reduce the sanding efficiency
and cause motor overload. Replacing the sandpaper
regularly will maintain optimum sanding efficiency.
MAINTAIN TOOLS WITH CARE
Keep tools sharp and clean for better and safer
performance. Follow instructions for lubricating and
changing accessories. Inspect tool cords periodically and
if damaged, have repaired by authorized service facility.
Your power tool requires no additional lubrication or
maintenance. There are no user serviceable parts in
your power tool. Never use water or chemical cleaners
Fig 5
Fig 6
NA-WX645K-M-051107.indd 8 2005-11-7 9:17:33
Page 9

Palm Sander WT645K
0908
to clean your power tool. Wipe clean with a dry cloth.
Always store your power tool in a dry place. Keep the
motor ventilation slots clean. Keep all working controls
free of dust. If you see some sparks flashing in the
ventilation slots, this is normal and will not damage your
power tool.
WARRANTY
LIMITED 60-DAY EXCHANGE POLICY
During the first 60 days after date of purchase, you may
exchange a tool which does not work properly due to
defects in materials or workmanship by returning the
power tool to the retailer where it was purchased. To
receive a replacement power tool, you must present a
dated proof of purchase and return all original equipment
packaged with the original product.
LIMITED TWO YEAR WARRANTY
The manufacturer warrants that, for a period of 2 years
from the date of purchase, this product shall be free of
defects in materials and workmanship. We will repair
or replace, at our option, this tool during the warranty
period, and we may require that the tool be sent
postage prepaid to an approved service center with all
original equipment and a dated proof of purchase. Any
replacement or repaired power tool will only be covered
by the limited warranty for the balance of the warranty
period from the date of the original purchase.
WHAT IS NOT COVERED
This warranty applies only to the original purchaser at
retail and is not transferable.
This warranty does NOT cover service or replacement of
parts resulting from normal wear.
This warranty does NOT cover accessories or battery
packs.
This warranty does NOT cover malfunction, failure or
defects due to:
- abnormal use, abuse, neglect, or use not in accordance
with the operations manual
- damage resulting from accidents, drops or mishandling
of the tool
- alteration or repairs by other than approved service
centers
- commercial or rental use.
The manufacturer makes no warranties, representations
or promises as to the quality or performance of its
power tools other than those specifically stated in this
warranty.
NA-WX645K-M-051107.indd 9 2005-11-7 9:17:34
Page 10

Palm Sander WT645K
FOR SERVICE
Contact our toll-free consumer service line at 1-866-354WORX (9679) (Mon.- Sat. 9am to 9pm EST) to receive a
replacement tool or to be directed to an approved service
center . When you make a warranty claim or send the
tool for warranty service, you must also include a dated
proof of purchase.
ADDITIONAL LIMITATIONS
This warranty is only valid for products purchased and
used in the United States of America, its territories or
Canada. Any implied warranty granted under state law,
including warranties of merchantability or fitness for a
particular purpose, are limited to two years from the
date of purchase. The manufacturer is not responsible
for direct, indirect, incidental or consequential damages
including, but not limited to, liability for loss of income
arising from the purchase or use of the product. Some
states and provinces do not allow limitations on how
long an implied warranty lasts and/or do not allow the
exclusion or limitation of incidental damages, so the
above limitations and exclusions may not apply to you.
This warranty gives you specific legal rights, and you
may also have other rights which vary from state to state
or province to province.
The manufacturer declines any responsibility in regards
to civil liability arising from abusive use or not in
conformity with proper use and maintenance of the
machine as described in the operator’s manual.
After the purchase, the manufacturer recommends
proper maintenance of the machine and to read
the operator’s manual before using the machine.
NA-WX645K-M-051107.indd 10 2005-11-7 9:17:34
Page 11

1110
NA-WX645K-M-051107.indd 11 2005-11-7 9:17:35
Page 12

Ponceuse à Main WT645K
1312
MESURES DE SECURITE
AVERTISSEMENT Lire toutes les instructions. Si les instructions ne sont pas respectées, il
existe un risque de décharges électriques, d’incendie et/ou de blessures graves.
CONSERVER CES INSTRUCTIONS
1. ZONE DE TRAVAIL
a) Maintenir votre espace de travail propre. Les espaces et établis mal rangés favorisent les
accidents.
b) Ne pas utiliser les outils motorisés dans des atmosphères explosives, telles qu’en
présence de liquides inflammables, de gaz ou de poussières. Les outils motorisés
produisent des étincelles qui pourraient enflammer les poussières ou les vapeurs.
c) Maintenir les enfants et les spectateurs éloignés lors du fonctionnement de
l’outil. Des éléments perturbateurs pourraient provoquer la perte de contrôle de l’outil.
2. SÉCURITÉ ÉLECTRIQUE
a) Les prises des outils motorisés doivent être adaptées aux sorties de courant.
Ne jamais modifier une prise de quelques façons qui soient. Ne pas utiliser un
adaptateur de prise avec des outils motorisés reliés à la terre. Les prises non modifiées et
les sorties de courant adaptées réduisent le risque de décharges électriques.
b) Eviter tout contact avec des surfaces reliées à la terre telles que les tuyaux, les
radiateurs, les cuisinières et les réfrigérateurs. Le risque de décharge électrique est
plus important si votre corps est relié à la terre.
c) Ne pas exposer les outils motorisés à la pluie et ne pas les laisser dans des
endroits humides. Le risque de décharge électrique est plus important si de l’eau pénètre
dans l’outil.
d) Ne pas maltraiter le cordon. Ne jamais utiliser le cordon pour transporter, tirer
ou débrancher l’outil motorisé. Maintenir le cordon à l’abri de la chaleur, de l’huile, des
bords coupants et des parties mobiles. Un cordon endommagé ou emmêlé favorise les
risques de décharge électrique.
e) Lors de l’utilisation d’un outil motorisé à l’extérieur, utiliser une rallonge adaptée
pour une utilisation extérieure. Utiliser une rallonge adaptée pour un usage extérieur
réduit le risque de décharge électrique.
3. SÉCURITÉ PERSONNELLE
a) Etre vigilant, regarder ce que l’on fait en permanence et faire preuve de bon
sens lors de l’utilisation d’un outil motorisé. Ne pas utiliser un outil motorisé dans un
état de fatigue ou sous l’influence de drogues, d’alcool ou de médicaments. Un moment
d’inattention pendant le fonctionnement de l’outil peut être la cause de blessures graves.
b) Utiliser un équipement de sécurité. Toujours porter des lunettes de protection. Les
équipements de sécurité tels que les masques anti-poussière, les chaussures antidérapantes,
les couvre-chefs durs ou les casques anti-bruit utilisés de façon appropriée réduisent les
risques de blessures corporelles.
c) Eviter tout démarrage accidentel. S’assurer que l’interrupteur est sur la position arrêt
avant de brancher l’outil. Transporter l’outil avec le doigt sur l’interrupteur ou brancher l’outil
avec l’interrupteur sur la position marche favorise les accidents.
d) Retirer les clés d’ajustements et les commutateurs avant de mettre l’outil en
marche. Un commutateur ou une clé toujours attaché à une des parties rotatives de l’outil
peut provoquer des blessures corporelles.
e) Ne pas présumer de ses forces. Garder en permanence une position et un équilibre
correct. Cela permet de mieux contrôler l’outil dans des situations inattendues.
NA-WX645K-M-051107.indd 12 2005-11-7 9:17:35
Page 13

1312
Ponceuse à Main WT645K
1312
f) S’habiller correctement. Ne pas porter de vêtements larges ou des bijoux. Tenir les
cheveux, les vêtements et les gants éloignés des parties mobiles. Les vêtements larges, les
bijoux ou les cheveux longs peuvent se prendre dans les parties mobiles.
g) Si un système d’extraction et d’aspiration de la poussière est fourni, s’assurer
qu’il est connecté correctement et utilisé de façon appropriée. L’utilisation de ce
système peut réduire les dangers liés à la poussière.
4. ENTRETIEN DE L’OUTIL MOTORISÉ
a) Ne pas forcer sur l’outil. Utiliser l’outil approprié pour l’opération souhaitée. L’outil
approprié fera un meilleur travail et en toute sécurité s’il est utilisé pour ce quoi il a été
conçu.
b) Ne pas utiliser l’outil si l’interrupteur de marche/arrêt ne fonctionne pas. Tout outil
qui ne peut pas être contrôlé par l’intermédiaire de l’interrupteur est dangereux et doit être
réparé.
c) Débrancher l’outil de la source d’alimentation avant d’effectuer des réglages,
de changer des accessoires ou de le ranger. Une telle mesure de sécurité réduit les
risques de démarrages accidentels de l’outil.
d) Ranger les outils inutilisés hors de portée des enfants et ne pas laisser un étranger
en possession de l’outil ou de ces instructions manipuler l’outil. Les outils motorisés
sont dangereux dans les mains de personnes inexpérimentées.
e) Entretenir l’outil. Vérifier que les parties mobiles ne soient pas mal alignées, tordues,
cassées ou dans tout autre état qui pourrait affecter le fonctionnement de l’outil. S’il est
endommagé, le faire réparer avant de l’utiliser. Beaucoup d’accidents sont dus à des outils
mal entretenus.
f) Maintenir les outils coupants propres et aiguisés. Les outils coupants correctement
entretenus avec des bords bien aiguisés se tordent moins facilement et sont plus faciles à
contrôler.
g) Utiliser l’outil, les accessoires et les mèches etc., selon ces instructions et de la
façon indiquée pour chaque outil, en prenant en compte les conditions de travail
et le travail à réaliser. L’utilisation de l’outil pour des opérations différentes de celles pour
lesquelles il a été conçu peut être à l’origine de situations dangereuses.
5. RÉPARATION
a) Faire réparer l’outil motorisé par un personnel qualifié en utilisant uniquement
des pièces de rechange identiques. Cela assurera le maintient de la sécurité de l’outil.
6. MESURES DE SECURITE SPECIALES
a) Tenir l’outil par les surfaces antidérapantes et isolées lorsque l’outil de coupe
risque d’entrer en contact avec des câbles cachés. L’entrée en contact d’un câble
sous tension rendra les parties en métal de l’outil également sous tension et l’utilisateur
pourrait subir une décharge électrique.
MESURES DE SECURITE SUPPLEMENTAIRES POUR LA
PONCEUSE ORBITALE
1. Débrancher la prise de la source d’alimentation avant d’effectuer des réglages, des réparations
ou d’entretenir l’outil.
2. Dérouler entièrement le cordon d’extension afin d’éviter toute surchauffe éventuelle.
3. Lorsqu’une rallonge est nécessaire, s’assurer qu’elle a le bon ampérage pour l’outil motorisé
et qu’elle est en bon état.
NA-WX645K-M-051107.indd 13 2005-11-7 9:17:36
Page 14

Ponceuse à Main WT645K
1514
4. S’assurer que le voltage de la source d’alimentation principale est le même que celui indiqué
sur la semelle.
5. L’outil possède une double isolation pour une meilleure protection contre les éventuelles
défaillances d’isolations électrique à l’intérieur de l’outil.
6. Toujours vérifier les murs, les sols et les plafonds afin de découvrir d’éventuels câbles
électriques et tuyaux cachés.
7. Après de longues périodes de travail, les parties externes métalliques et les accessoires
pourraient être chauds.
8. Porter des lunettes de protection lors du fonctionnement de l’outil.
9. S’assurer, si possible, que l’ouvrage est fermement fixé afin de l’empêcher de bouger.
10. La ponceuse de finition est un outil à main, ne pas la fixer.
11. Avant de poncer, vérifier que la zone est dépourvue de clous, vis, etc.
12. Ne jamais arrêter la ponceuse de finition en appliquant une force sur la semelle.
13. Utiliser uniquement du papier en bon état. Ne pas utiliser de papier déchiré ou usagé.
14. Ne pas poncer des matériaux contenant de l’amiante afin d’éviter des problèmes de santé.
15. Ne pas poncer la peinture à base de plomb afin d’éviter tout risque d’empoisonnement au
plomb.
16. Ne pas manger ou boire dans les zones de travail de la ponceuse.
17. N’autoriser personne qui ne porte pas un masque anti-poussière à pénétrer dans la zone de
travail.
18. Là où c’est possible, sceller la zone de travail pour contenir la poussière pour l’enlever plus tard.
19. Toujours porter un masque anti-poussière.
20. L’outil est conçu pour le ponçage à sec et non pour le ponçage humide.
21. L’outil est conçu le ponçage léger du bois et des métaux.
22. Ne pas poncer des matériaux en magnésium afin d’éviter tout risque d’incendie.
AVERTISSEMENT! Les travaux à la machine tel que ponçage, sciage, meulage,
perçage et autres travaux du bâtiment peuvent créer des poussières contenant
des produits chimiques qui sont des causes reconnues de cancer, de malformation
congénitale ou d’autres problèmes reproductifs. Ces produits chimiques sont, par
exemple:
• Le plomb provenant des peintures á base de plomb
• Les cristaux de silices provenant des briques, du ciment et d’autres produits de maçonnerie
• L’arsenic et le chrome provenant des bois traités chimiquement
Le niveau de risque dû à cette exposition varie avec la fréquence de ces types de travaux. Pour
réduire l’exposition à ces produits chimiques, il faut travailler dans un lieu bien ventilé et porter un
équipement de sécurité approprié tel que certains masques à poussière conçus spécialement pour
filtrer les particules microscopiques.
L’étiquette de l’outil peut comprendre les symboles suivants
V...................................................................................................................................................................Volts
A..............................................................................................................................................................Ampère
Hz.................................................................................................................................................................
Hertz
~..............................................................................................................................................Courant alternatif
no ...............................................................................................................................................Vitesse à vide
....................................................................................................Construction classe II / Double isolation
NA-WX645K-M-051107.indd 14 2005-11-7 9:17:37
Page 15

1514
Ponceuse à Main WT645K
1514
SYMBOLES
Lisez le manuel
Avertissement
Portez des lunettes de sécurité,
un masque antipoussière et une
protection antibruit
Pour usage à l’intérieur seule
-
ment
Double isolation
Ne pas exposez pas à la pluie et à
l’eau
Ne pas jeter pas au feu
NA-WX645K-M-051107.indd 15 2005-11-7 9:17:38
Page 16

Ponceuse à Main WT645K
1716
1. INTERRUPTEUR MARCHE/ARRET
2. ZONE DE PRISE
3. SERRE-PAPIER
4. LEVIER DU DISPOSITIF DE SERRAGE
5. VERROUILLAGE DU LEVIER DE SERRAGE
6. SAC A POUSSIERE
7. PERFORATEUR POUR PAPIER
8. SEMELLE
NA-WX645K-M-051107.indd 16 2005-11-7 9:17:39
Page 17

1716
Ponceuse à Main WT645K
1716
CARACTERISTIQUES TECHNIQUES
Tension : 120V~60Hz
Ampérage : 2,2A
Vitesse à vide: 15000opm
Taille du papier abrasif : 1/4 de feuille
Diamètre de l’orbite : 1/16” (1.6mm)
Taille de la semelle : 4” x 4-3/8” (103mm x110mm)
Poids de la machine : 2.7lbs (1.2kg)
ACCESSOIRES
Papier abrasif 3 (60#/80#/120#)
Perforateur pour papier 1
Sac à poussière 1
Utiliser ¼ de feuille du papier abrasif de la taille suivante :
4” x 4-3/8” avec trous pour la poussière ou sans.
Si vous utilisez du papier abrasif dépourvu de trous pour la poussière, vous devez
utiliser le perforateur pour faire des trous.
Nous recommandons d’acheter tous les accessoires dans le magasin où l’outil a été acheté. Utilisez
des accessoires de bonne qualité et de marque.
Choisissez les mèches adaptées au travail à réaliser. Reportez vous à l’emballage pour de plus amples
informations. Le personnel du magasin peut apporter aide et conseils.
CORDONS DE RALLONGE
Avertissement: Utiliser les bons cordons de rallonge. S’assurer que le cordon de rallonge
est en bon état, qu’il comporte trois fils, une fiche à trois broches et une prise à trois cavités
pouvant recevoir la fiche de la machine. Lorsqu’un cordon de rallonge est utilisé, s’assurer que
celui-ci soit d’un calibre qui convient au courant utilisé par la machine. Un cordon de calibre
insuffisant entraînera une perte de tension d’où une perte de puissance et la surchauffe. S’il y a un
doute, utiliser un cordon d’un calibre supérieur. Plus le chiffre est petit, plus le fil est gros.
DIMENSIONS DE RALLONGES RECOMMANDÉES OUTILS 120 VOLTS COURANT ALTE
RNATIF
Intensité
nominale
de l’outil
3-6
6-8
8-10
10-12
12-16
Longueur en pieds Longueur en métres
Calibre A. W.G.
25 50 100 150
Calibre en mm
2
15 30 60 120
18 16 16 14
18 16 14 12
18 16 14 12
16 16 14 12
14 12 - -
.75 .75 1.5 2.5
.75 1.0 2.5 4.0
.75 1.0 2.5 4.0
1.0 2.5 4.0 -
- - - -
NA-WX645K-M-051107.indd 17 2005-11-7 9:17:39
Page 18

Ponceuse à Main WT645K
1918
FONCTIONNEMENT
1. INTERRUPTEUR MARCHE/ARRET
Pour mettre en marche la ponceuse, abaissez le capot
de protection sur l’interrupteur sur la position “I”. Pour
arrêter la ponceuse, abaissez le capot de protection sur
la position “0”.
2. ZONE DE PRISE
Vous pouvez utiliser la ponceuse d’une main (Voir Fig 1).
3. CHANGER LE PAPIER ABRASIF
Pour retirer le papier abrasif, soulevez le levier de
serrage (4) et éloignez-le du dispositif de verrouillage du
levier (5) (Voir Fig 2). Le serre-papier (3) est maintenant
relâché. Répétez ces opérations avec l’autre dispositif de
serrage de l’autre côté de la ponceuse.
Pour mettre en place un nouveau papier abrasif, insérez
environ 5 mm d’une extrémité du papier abrasif sous le
serre-papier (3) jusqu’à ce que le papier touche la paroi
du boîtier (Voir Fig 2). Soulevez le levier de serrage (4) et
le placer en position verrouillée.
Pressez le papier abrasif autour de la semelle le plus
fermement possible et fixez l’extrémité sous l’autre
serre-papier (3). Vérifiez que le papier abrasif s’aligne
avec la semelle et s’il est mal disposé, retirez-le et
réinstallez-le. Assurez-vous toujours que le papier
abrasif est fermement fixé sur la semelle et sécurisé
sous les deux serre-papier verrouillés (3). Cela garantit
un fonctionnement efficace et sûr de la ponceuse.
4. PERFORATEUR
Si vous utilisez du papier abrasif sans trous pour la
poussière, utilisez le perforateur (7) pour réaliser des
trous afin de garantir la bonne évacuation de la poussière.
Placez le perforateur par-dessus la semelle (8) avec les
côtés à perforer sur les bords de la semelle (Voir Fig 3).
Appuyez le perforateur sur la semelle pour percer des
trous dans le papier abrasif. Puis retirez le perforateur et
vérifiez que tous les trous ont été correctement
formés.
5. SAC A POUSSIERE
Utilisez toujours la ponceuse avec un sac à poussière.
Pour retirer le sac (Voir Fig 4). Ouvrez la fermetureéclair et videz la poussière du sac. Pour un meilleur
fonctionnement, videz régulièrement le sac à poussière.
Pour remettre le sac en place, poussez fermement le
support de montage dans l’emplacement sur le boîtier
de la ponceuse (Voir Fig 5).
Fig 1
Fig 2
Fig 3
Fig 4
NA-WX645K-M-051107.indd 18 2005-11-7 9:17:41
Page 19

1918
Ponceuse à Main WT645K
1918
6. DISPOSITIF DE PONCAGE A RAS
La ponceuse peut poncer à ras sur trois côtés de la
semelle, ce qui permet un accès plus facile aux coins et
bords des moulures (Voir Fig 6).
7. PONCAGE ORBITAL
La ponceuse fonctionne selon une petite rotation circulaire
qui permet un ponçage efficace des matériaux.
Poncez en effectuant de longs mouvements de balayage
à travers la pièce à travailler et à travers le grain. Pour
une meilleure finition, utilisez toujours un papier abrasif
à grain fin et poncez uniquement dans le sens du grain
et jamais en travers.
Ne laissez pas la ponceuse dans la même position sinon
trop de matériau sera retiré et cela risque de créer une
surface inégale.
CONSEILS D’UTILISATION POUR
LA PONCEUSE A MAIN
Si l’outil motorisé devient trop chaud, le faire tourner à
vide pendant 2-3 minutes afin de refroidir le moteur.
Toujours s’assurer que la pièce à travailler est fermement
maintenue ou fixée afin de l’empêcher de bouger.
Tout mouvement du matériau pourrait affecter la qualité
du ponçage de finition.
Démarrer la ponceuse avant de commencer à poncer et
l’éteindre uniquement après avoir arrêté de poncer. Pour
de meilleurs résultats, poncer le bois dans le sens du
grain.
Ne pas commencer à poncer si le papier abrasif n’est pas
fixé.
Ne pas utiliser du papier abrasif usagé, cela
endommagerait la semelle. La garantie ne couvre pas
l’usure de la semelle.
Utiliser du papier abrasif à gros grain pour poncer des
surfaces rugueuses, du papier à grain moyen pour des
surfaces lisses et du papier à grain fin pour les surfaces
de finition. Si nécessaire, effectuer d’abord un test sur
des déchets de coupe.
Utiliser uniquement du papier abrasif de bonne qualité.
L’efficacité de ponçage est contrôlée par le papier abrasif
et non par la force de la pression appliquée à l’outil.
Une force excessive réduira l’efficacité de ponçage et
provoquera une surcharge du moteur.
Pour conserver une efficacité de ponçage optimale,
remplacer régulièrement le papier abrasif.
Fig 5
Fig 6
NA-WX645K-M-051107.indd 19 2005-11-7 9:17:42
Page 20

Ponceuse à Main WT645K
2120
PRENEZ SOIN DE VOS OUTILS ET
ENTRETENEZ LES BIEN
En les gardant bien affûtés et propres, vous en obtiendrez
le rendement maximum dans des conditions optimales
de sécurité. Suivez les instructions pour le graissage ou
la pose et le démontage des accessoires. Inspectez les
cordons d’alimentation à intervalles réguliers et, s’ils sont
endommagés, faites-les réparer à un centre de service
après-vente autorisé.
Votre outil ne nécessite aucune lubrification ou entretien
supplémentaire. Il ne comporte aucune pièce à réparer
ou à entretenir par l’utilisateur. N’utilisez jamais de
l’eau ou des nettoyants chimiques pour nettoyer l’outil.
Essuyez-le avec un chiffon sec. Rangez toujours votre outil
dans un endroit sec. Gardez propres les ouvertures de
ventilation du moteur. Si vous remarquez des étincelles
dans les ouvertures de ventilation, ceci est normal et
n’endommagera pas votre outil.
GARANTIE
POLITIQUE D’ÉCHANGE LIMITÉE DE SOIXANTE
(60) JOURS
Un outil qui ne fonctionne pas correctement à cause d’un
défaut de pièce ou de main-d’œuvre est échangeable
durant les soixante (60) premiers jours après la date
d’achat en rapportant l’outil au détaillant où il a été
acheté. Pour obtenir un outil de remplacement vous
devez présenter une preuve d’achat datée et retourner
l’outil dans son emballage original.
GARANTIE LIMITÉE DE DEUX (2) ANS
Nous garantissons que durant une période de deux (2)
ans à partir de la date d’achat, ce produit sera libre de
défaut de matériaux de fabrication et de main d’œuvre.
Nous réparerons ou remplacerons, à notre seule option,
cet outil durant la période de garantie et nous pouvons
exiger qu’il soit expédié, frais de port payés, à un de
nos centres de service autorisés, accompagné d’une
preuve d’achat datée. Tout outil remplacé ou réparé ne
sera couvert que de la période de garantie restant sur la
durée de deux (2) ans depuis la date d’achat.
CE QUI EST EXCLUS DE LA GARANTIE
Cette garantie n’est valide que pour l’acheteur original et
n’est pas transférable.
Cette garantie ne couvre PAS l’entretien ou le remplacement
de pièces usées qui est normalement requis.
Cette garantie ne couvre PAS les accessoires ou les
NA-WX645K-M-051107.indd 20 2005-11-7 9:17:43
Page 21

2120
Ponceuse à Main WT645K
2120
blocs-piles.
Cette garantie ne couvre PAS :
- le mauvais fonctionnement, pannes ou défauts causés par
un usage anormal, l’abus, la négligence ou une utilisation
ne suivant pas les directives du manuel d’utilisation.
- l’endommagement résultant d’accidents, d’échappements
au sol ou de mauvais traitements de l’outil
- les problèmes causés par une modification ou réparation
faite ailleurs qu’à un centre de service autorisé.
- les problèmes dus à l’utilisation commerciale ou de
location.
Le manufacturier ne fait pas de garantie, représentation
ou promesse relatives à la qualité ou performance de ses
outils autres que celles décrites en toutes lettres dans la
présente garantie.
ASSISTANCE
Pour faire remplacer votre outil et obtenir l’adresse d’un
centre de service autorisé, contactez notre personnel
d’assistance à la clientèle au numéro sans frais 1-866354-WORX (9679) (du lundi au samedi entre 9:00 h et
21:00 h, heure normale de l’Est). Lorsque vous faites
une réclamation de garantie ou retournez l’outil pour
réparation sous garantie, vous devez également inclure
une preuve d’achat datée.
LIMITATIONS ADDITIONNELLES
Cette garantie n’est valide que pour les produits achetés
et utilisés aux États-Unis d’Amérique, ses territoires,
et au Canada. Toute garantie tacite aux lois étatiques
ou provinciales (n’incluant pas les garanties de qualité
marchande ou de capacité dédiée à une application
particulière) est limitée à deux ans de la date d’achat. Le
manufacturier ne sera pas responsable des dommages
accessoires directs et indirects incluant (mais ne se
limitant pas à) la perte de revenus résultant de l’achat
ou de l’utilisation du produit. Certains états et provinces
n’autorisent pas la limitation de durée de garantie tacite
et/ou ne permettent pas l’exclusion ou la limitation des
dommages accessoires directs, alors les limitations
et exclusions énumérées ci-dessus peuvent ne pas
s’appliquer dans votre cas. Cette garantie vous donne des
droits légaux spécifiques et vous avez peut-être d’autres
droits qui varient d’un état ou province à l’autre.
Le manufacturier décline toute responsabilité civile de
dommages provenant d’une utilisation abusive ou n’étant
pas conforme à la bonne utilisation ou à l’entretien de la
machine décrits au manuel de l’utilisateur.
Après l’achat, le manufacturier suggère de lire
le manuel de l’utilisateur avant de se servir de la
machine et d’en faire l’entretien recommandé.
NA-WX645K-M-051107.indd 21 2005-11-7 9:17:43
Page 22

Lijadora de Mano WT645K
2322
INSTRUCCIONES DE SEGURIDAD
¡ ADVERTENCIA ! ¡CUIDADO! Lea y comprenda todas las instrucciones. El no seguir todas
las instrucciones a continuación puede dar lugar a descargas eléctricas, incendios y/o daños
corporales serios
GUARDAR ESTAS INSTRUCCIONES
1. ZONA DE TRABAJO
a) Mantener su lugar de trabajo limpio y bien iluminado. Bancos de trabajo desordenados
y lugares oscuros invitan a los accidentes.
b) No utilizar herramientas eléctricas en atmósferas explosivas, como por ejemplo
en presencia de líquidos inflamables, gases o polvo. Las herramientas eléctricas crean
chispas que pueden encender el polvo o los vapores.
c) Mantener alejados a los niños y visitantes mientras opera una herramienta
eléctrica. Las distracciones pueden hacerle perder el control.
2. SEGURIDAD ELÉCTRICA
a) Los enchufes de la herramienta eléctrica deben encajar perfectamente en el
tomacorriente. Nunca modificar el enchufe de ninguna manera. No utilizar adaptadores
con herramientas eléctricas conectadas a tierra. Los enchufes no modificados y los que
encajan perfectamente en el tomacorriente reducirán el riesgo de descarga eléctrica.
b) Evitar el contacto del cuerpo con superficies conectadas a tierra tales como
caños, radiadores, cocinas y heladeras. Existe un riesgo creciente de descarga eléctrica
si su cuerpo queda conectado a tierra.
c) No exponer las herramientas eléctricas a la lluvia y no guardar en lugares húmedos.
El agua que penetra en ellas aumentará el riesgo de una descarga eléctrica.
d) No abusar del cable. Nunca utilizar el cable para transportar, tirar o desenchufar la
herramienta eléctrica. Mantener el cable alejado del calor, del aceite, de bordes agudos o
piezas móviles. Los cables dañados o enredadas aumentan el riesgo de descarga eléctrica.
e) Cuando utilice su herramienta eléctrica al aire libre, emplear un prolongador apto
para uso en exteriores. El empleo de cables para uso al aire libre reduce el riesgo de
descarga eléctrica.
3. SEGURIDAD PERSONAL
a) Mantenerse alerta, poner atención en lo que está haciendo y utilice el sentido
común mientras opera una herramienta eléctrica. No emplear la herramienta cuando
se encuentre cansado o bajo la influencia de drogas, alcohol o medicación. Un momento
de falta de atención durante el manejo de herramientas eléctricas puede dar lugar a daños
corporales serios.
b) Utilizar equipo de seguridad. Usar siempre protección ocular. Equipo de seguridad
como máscaras contra el polvo, zapatos antideslizantes de seguridad, sombrero o protección
auditiva para condiciones apropiadas reducirá daños corporales.
c) Evitar el arranque accidental. Asegurarse de que el interruptor esté en la posición de
apagado antes de enchufar la herramienta. Transportar herramientas con el dedo en el
interruptor o enchufar la herramienta cuando el interruptor está encendido invitan a los
accidentes.
d) Retire llaves de ajuste o llaves inglesas antes de poner la herramienta en
funcionamiento. Una llave que queda unida a una pieza móvil de la herramienta puede
originar daños corporales.
NA-WX645K-M-051107.indd 22 2005-11-7 9:17:44
Page 23

2322
Lijadora de Mano WT645K
2322
e) No extralimitarse. Mantenerse firme y con buen equilibrio en todo momento. Esto
permite un mejor control de la herramienta en situaciones inesperadas.
f) Vestirse apropiadamente. No usar ropa suelta ni alhajas. Mantener su cabello, ropa y
guantes alejados de las piezas móviles. La ropa suelta, las alhajas o el cabello largo pueden
ser atrapados por las piezas móviles.
g) Si se proporcionan dispositivos para la extracción y recolección de polvo,
asegurarse de que estos estén conectados y utilizados correctamente. El uso de
estos dispositivos puede reducir peligros relacionados con el polvo.
4. USO Y CUIDADO DE LA HERRAMIENTA ELÉCTRICA
a) No forzar la herramienta eléctrica. Utilizar la herramienta eléctrica correcta para
su aplicación. La herramienta eléctrica correcta hará el trabajo mejor y más seguro a la
velocidad para la cual fue diseñada.
b) No utilizar la herramienta eléctrica si el interruptor no la enciende o apaga.
Cualquier herramienta eléctrica que no pueda ser controlada con el interruptor es peligrosa
y debe ser reparada.
c) Desconectar el enchufe de la fuente de energía antes de hacer cualquier ajuste,
cambiar accesorios o guardar herramientas eléctricas. Tales medidas de seguridad
preventivas reducen el riesgo de arranque accidental de la herramienta.
d) Mantener las herramientas eléctricas que no usa fuera del alcance de los niños
y no permita que personas no familiarizadas con la herramienta o con estas
instrucciones maneje la herramienta eléctrica. Las herramientas eléctricas son
peligrosas en manos de usuarios inexpertos.
e) Revisar las herramientas eléctricas. Comprobar si hay desalineamiento o atascamiento
de piezas móviles, rotura de piezas en general y cualquier otra condición que pueda afectar
la operación normal de la herramienta. Si se verifican daños, recurra a un service calificado
antes de volver a usar la herramienta. Las herramientas mal mantenidas causan muchos
accidentes.
f) Mantener las piezas de corte limpias y afiladas, puesto que son menos probables de
atascarse y más fáciles de controlar.
g) Utilizar la herramienta eléctrica, accesorios y brocas etc., de acuerdo con estas
instrucciones y de la manera prevista para el tipo particular de herramienta
eléctrica, teniendo en cuenta las condiciones de trabajo y el trabajo a ser realizado.
El uso de la herramienta eléctrica para otras operaciones distintas de lo previsto podría dar
lugar a una situación peligrosa.
5. REPARACIÓN
a) Permitir que el mantenimiento de su herramienta eléctrica sea efectuado por
una persona calificada usando solamente piezas de recambio idénticas. Esto es
primordial para mantener la seguridad de la herramienta eléctrica.
6. CONSIGNAS ESPECÍFICAS DE SEGURIDAD
a) Sostener la herramienta por empuñaduras aislantes cuando realice una operación
donde la herramienta de corte puede entrar en contacto con cables ocultos.
El contacto con un cable “vivo” también hará que las partes expuestas del metal de la
herramienta “vivan”, ocasionando una descarga eléctrica al operador.
NA-WX645K-M-051107.indd 23 2005-11-7 9:17:45
Page 24

Lijadora de Mano WT645K
2524
TÓPICOS ADICIONALES DE SEGURIDAD PARA SU LIJADORA
ORBITAL
1. Desconecte el enchufe del tomacorriente antes de hacer cualquier ajuste, service o
mantenimiento.
2. Desenrolle completamente los prolongadores para evitar un eventual recalentamiento.
3. Cuando se requiera de un prolongador, debe asegurarse de que tenga el amperaje correcto
para su herramienta eléctrica y que esté en perfectas condiciones de seguridad eléctrica.
4. Cerciórese de que el voltaje de la fuente de alimentación sea el mismo que el voltaje de la
herramienta.
5. Su herramienta presenta doble aislamiento para protección adicional contra una posible falla
del aislamiento eléctrico en el interior de la herramienta.
6. Verifique siempre las paredes y los techos para evitar caños y cables eléctricos ocultos.
7. Luego de largos períodos de trabajo, los accesorios y las piezas metálicas externas pueden
recalentarse.
8. Emplee protección ocular cuando use esta herramienta.
9. De ser posible, cuide de que la pieza de trabajo quede firmemente afianzada para impedir el
movimiento.
10. Su lijadora de banda es una herramienta manual; no la sujete con abrazaderas.
11. Antes del lijado, verifique que la superficie esté libre de clavos, tornillos, etc.
12. Nunca detenga la lijadora aplicando fuerza sobre la placa base.
13. Utilice únicamente papel en buenas condiciones. No utilice papel usado o rasgado.
14. No lije material que contenga asbestos, debido a riesgos para su salud.
15. No lije pintura a base de plomo, debido a riesgo de envenenamiento por plomo.
16. No coma ni beba en el área de trabajo de la lijadora.
17. No permita que ingrese gente en el área de trabajo sin usar máscara para polvo.
18. En lo posible, aísle el área de trabajo a fin de contener el polvo para posterior remoción.
19. Use siempre una máscara anti-polvo.
20. Su herramienta está diseñada para lijar en seco solamente, no materiales húmedos.
21. Su herramienta está diseñada para pulido ligero de madera y metales para propósito general.
22. No lije material que contenga magnesio debido a riesgo de incendio.
¡ADVERTENCIA! El polvo creado al lijar, serruchar, pulir, taladrar o realizar otras
actividades de la construcción, contiene substancias químicas que se sabe
producen cáncer, defectos de nacimiento u otros defectos del sistema reproductor.
Algunos ejemplos de esos productos químicos son:
• El plomo de las pinturas a base de plomo
• La sílice cristalina de los ladrillos, del cemento y de otros productos de albañilería
• El arsénico y el cromo de la madera tratada químicamente
El riesgo que se corre a causa del contacto con esos productos varía según la frecuencia con
que usted realice este tipo de trabajos. Con el fin de reducir su exposición a esas substancias
químicas:
• Trabaje en un área bien ventilada
• Utilice un equipo de seguridad reglamentario, tal como una máscara contra el polvo especialmente
diseñada para filtrar partículas microscópicas.
V......................................................................................................................................................Voltios
A.........................................................................................................................................................Amperes
Hz................................................................................................................................Ciclos por Segundo
~..............................................................................................................................................Corriente alterna
no .......................................................................................................................................Velocidad sin carga
.............................................................................................Construcción de clase II / Doble aislamiento
NA-WX645K-M-051107.indd 24 2005-11-7 9:17:45
Page 25

2524
Lijadora de Mano WT645K
2524
SÍMBOLOS
Lea el manual
Advertencia
Use lentes de seguridad, máscara contra el polvo y protec
-
ción auditiva
Uso en el interior solamente
Doble aislamiento
No exponer a la lluvia ni al agua
No arrojar al fuego
NA-WX645K-M-051107.indd 25 2005-11-7 9:17:46
Page 26

Lijadora de Mano WT645K
2726
1. INTERRUPTOR DE ENCENDIDO-APAGADO
2. ÁREA DE EMPUÑADURA MANUAL
3. PIEZA DE SUJECIÓN PARA EL PAPEL DE LIJA
4. PALANCA DE LA PIEZA DE SUJECIÓN
5. TRABA DE LA PALANCA DE LA PIEZA DE SUJECIÓN
6. FILTRO PARA EL POLVO
7. PERFORADOR PARA EL PAPEL
8. PLACA BASE
NA-WX645K-M-051107.indd 26 2005-11-7 9:17:47
Page 27

2726
Lijadora de Mano WT645K
2726
DATOS TÉCNICOS
Clasificado Voltios: 120V~60Hz
Corriente Nominal: 2.2A
Velocidad sin carga: 15.000/min
Tamaño de la base: 4” x 4-3/8” (103mm x110mm)
Diámetro orbital: 1/16” (1.6mm)
Peso: 2.7lbs (1.2kg)
ACCESORIOS
Papel de lija 3 piezas (60#/80#/120#)
Perforador para el papel 1 pieza
Caja para el polvo 1 pieza
Utilice 1/4 hoja de papel de lija del siguiente tamaño:
4” x 4-3/8” con o sin orificios para el polvo.
Si emplea papel de lija sin orificios para el polvo, debe usar el perforador de papel
para practicar los mismos.
Recomendamos que adquiera todos sus accesorios en el mismo comercio donde compró la
herramienta. Utilice accesorios de buena calidad y de marca reconocida. Elija la calidad según el
trabajo que desea realizar. Consulte los estuches de los accesorios para más detalles. El personal
del comercio también puede ayudar y aconsejar.
CABLES DE EXTENSIÓN
Advertencia: Utilice cables de extensión apropiados. Asegúrese de que el cable de extensión
esté en buenas condiciones y enchúfelo en un tomacorriente de 2 patas. Cuando utilice un
cable de extensión, asegúrese de emplear uno que tenga la capacidad suficiente como para manejar
la corriente de la máquina. Un cable de menor capacidad causará una caída en la tensión de la línea
eléctrica que dará como resultado pérdida de potencia y recalentamiento. En caso de duda, utilice
el siguiente calibre más grueso. Cuanto más pequeño sea el número de calibre, más grueso será el
cable.
TAMAÑOS RECOMENDADOS DE CORDONES DE EXTENSION HERRAMIENTAS DE 120 V
CORRIENTE ALTERNA
Capacidad
nominal en
amperios de
la herramien-
ta
3-6
6-8
8-10
10-12
12-16
Tamaño del cordón en A.W.G Tamaños del cable en mm
2
Longitud del cordón en pies
25 50 100 150
Longitud del cordón en metros
15 30 60 120
18 16 16 14
18 16 14 12
18 16 14 12
16 16 14 12
14 12 - -
.75 .75 1.5 2.5
.75 1.0 2.5 4.0
.75 1.0 2.5 4.0
1.0 2.5 4.0 -
- - - -
NA-WX645K-M-051107.indd 27 2005-11-7 9:17:48
Page 28

Lijadora de Mano WT645K
2928
INSTRUCCIONES DE
FUNCIONAMIENTO
1. INTERRUPTOR DE ENCENDIDO/APAGADO
Para encender su lijadora, presione la cubierta protectora
del interruptor a la posición marcada como “I”. Para
apagar su lijadora, presione la cubierta protectora a la
posición marcada como “0”.
2. AREA DE EMPUÑADURA MANUAL
La lijadora puede ser manejada con una sola mano
(véase Fig 1).
3. CAMBIO DEL PAPEL DE LIJA
Para retirar el papel de lija, levante la palanca de la pieza
de sujeción (4) y desplácela fuera de la posición de traba
(5) (véase Fig. 2). La pieza de sujeción del papel de lija (3)
ahora está suelta. Repita el procedimiento con la pieza
de sujeción situada del otro lado de la lijadora.
Para colocar un nuevo papel de lija, inserte
aproximadamente 5 mm de un extremo del mismo bajo
la pieza de sujeción (3) hasta que toque la pared de la
carcaza (véase Fig. 2). Levante la palanca de la pieza de
sujeción (4) y desplácela hacia la posición de traba.
Presione el papel de lija alrededor de la placa base tan
fuerte como pueda y fije el extremo bajo la otra pieza
de sujeción (3). Verifique que el papel quede en forma
cuadrada respecto de la placa base; de lo contrario,
retírelo y vuelva a instalarlo.
Cerciórese siempre de que el papel esté firmemente
adosado a la placa base y asegurado con ambas piezas
de sujeción (3). Esto le brindará un rendimiento seguro
y eficiente.
4. PERFORADOR PARA EL PAPEL
Si usa papel de lija sin orificios para el polvo, utilice el
perforador para el papel (7) a fin de practicar los orificios,
de modo de asegurar una correcta extracción del polvo.
Coloque el perforador sobre la placa base (8) con los
pivotes sobre los bordes de ésta (véase la Fig. 3). Presione
el perforador sobre la placa base para hacer los orificios
en el papel de lija. Luego retire el perforador y compruebe
que todos los orificios tengan la forma correcta.
5. FILTRO PARA EL POLVO
Siempre haga funcionar su lijadora con el filtro para
polvo instalado. Para vaciar el filtro, tire de la tapa del
extremo (véase Fig. 4) y vacíe el contenido. Coloque
nuevamente la tapa antes de encender su lijadora. No
Fig 1
Fig 2
Fig 3
Fig 4
NA-WX645K-M-051107.indd 28 2005-11-7 9:17:49
Page 29

2928
Lijadora de Mano WT645K
2928
es necesario retirar el filtro.
Si alguna vez necesitara retirar el filtro, proceda como
sigue. Deslice el receptáculo plástico hacia arriba y
extráigalo de la conexión a la carcaza (véase Fig. 5).
Para colocarlo nuevamente, deslice el receptáculo hacia
abajo a fin de fijarlo a la conexión de la carcaza.
Para un mejor funcionamiento vacíe siempre el filtro
para el polvo cuando esté a medio llenar.
6. DISPOSITIVO PARA LIJADO AL RAS
Su lijadora puede lijar al ras sobre tres lados de la placa
base, lo que permite un fácil acceso a las esquinas y
bordes de moldeados (véase la Fig. 6).
7. LIJADO ORBITAL
Su lijadora funciona en rotaciones circulares pequeñas,
lo que permite la remoción eficiente del material.
Accione su lijadora en movimientos de barrido a lo largo
de la pieza de trabajo e incluso a través del grano. Para
un acabado más fino, utilice siempre un papel de lija de
grano fino y desplace la lijadora sólo en la dirección del
grano y nunca transversalmente.
No permita que su lijadora permanezca en la misma
posición, o de lo contrario extraerá material creando una
superficie despareja.
CONSEJOS DE TRABAJO PARA SU
LIJADORA DE MANO
Si su herramienta eléctrica se recalienta demasiado,
hágala funcionar sin carga durante 2-3 minutos para
enfriar el motor.
Asegúrese siempre de que la pieza de trabajo esté
firmemente sujeta -con o sin abrazaderas- para evitar el
movimiento.
Cualquier movimiento del material puede afectar la
calidad de acabado.
Encienda su lijadora antes de lijar y apáguela recién
después de haber terminado. Para mejores resultados,
lije la madera en dirección del grano del papel.
No comience a lijar si no tiene instalado el papel.
No permita que el papel se desgaste, ya que dañará la placa
base. La garantía no cubre el deterioro de la placa base.
Utilice papel de grano grueso para lijar superficies
groseras, de grano medio para superficies lisas y de
grano fino para acabados. De ser necesario, primero
haga una prueba sobre material de desecho.
Utilice únicamente papel de lija de buena calidad.
La eficiencia de lijado es controlada por el papel de lija,
no por la fuerza que Ud. aplique a la herramienta. La
Fig 5
Fig 6
NA-WX645K-M-051107.indd 29 2005-11-7 9:17:50
Page 30

Lijadora de Mano WT645K
3130
fuerza excesiva reducirá la eficiencia de lijado y causará
la sobrecarga del motor. El reemplazo periódico del
papel de lija mantendrá una óptima eficiencia de lijado.
MANTENGA LAS HERRAMIENTAS
CON CUIDADO
Conserve las herramientas afiladas y limpias para
que funcionen mejor y con más seguridad. Siga las
instrucciones para lubricar y cambiar los accesorios.
Inspeccione periódicamente los cables de las
herramientas y si están dañados hágalos reparar por un
centro de servicio autorizado.
Su herramienta no requiere lubricación ni mantenimiento
adicional. No posee piezas en su interior que puedan ser
reparadas por el usuario. Nunca emplee agua o productos
químicos para limpiar su herramienta. Use simplemente
un paño seco. Guarde siempre su herramienta en un
lugar seco. Mantenga limpias las ranuras de ventilación
del motor. La observación de chispas que destellan bajo
las ranuras de ventilación, indica operación normal que
no dañará su herramienta.
GARANTÍA
GARANTÍA LIMITADA DE REEMPLAZO POR 60
DÍAS
Durante los primeros 60 días luego de la fecha de
compra, podrá reemplazar una herramienta que no
funcione correctamente debido a defectos de material o
fabricación devolviendo la herramienta a la tienda donde
la haya comprado. Para recibir una herramienta de
reemplazo, deberá presentar un comprobante fechado
de compra y devolver todo el material de empaque
original junto con el producto.
GARANTÍA LIMITADA DE DOS AÑOS
El fabricante garantiza que, por el término de 2 años
a partir de la fecha de compra, este producto no debe
fallar por defectos de materiales o fabricación. Nosotros
repararemos o reemplazaremos, a nuestra opción,
esta herramienta durante el período de garantía y
podríamos solicitar que envíe la herramienta, con los
gastos pagados, a un centro aprobado de reparaciones
con todo el equipo original y un comprobante fechado
de compra. Toda herramienta eléctrica reemplazada
o reparada quedará cubierta por la garantía limitada
durante lo que quede del período de la garantía desde la
fecha original de compra.
NA-WX645K-M-051107.indd 30 2005-11-7 9:17:51
Page 31

3130
Lijadora de Mano WT645K
3130
LO QUE NO ESTÁ CUBIERTO
Esta garantía es válida únicamente para el comprador
original y no es transferible.
Esta garantía NO cubre la reparación o reemplazo de
partes debido al desgaste normal.
Esta garantía NO cubre accesorios o baterías.
Esta garantía NO cubre fallas, roturas o defectos debidos
a:
- uso anormal, abuso, negligencia o uso que no esté de
acuerdo con el manual de instrucciones.
- daños resultantes de accidentes, caídas o uso
inadecuado de la herramienta.
- modificaciones o reparaciones no realizadas por
centros aprobados de reparaciones.
- uso comercial o de alquiler.
El fabricante no ofrece ninguna otra garantía,
representación o promesa con respecto a la calidad o
rendimiento de sus herramientas eléctricas que no estén
específicamente mencionadas en esta garantía.
PARA OBTENER SERVICIO
Llame a nuestra línea gratuita de servicio al cliente
al 1-866-354-WORX (9679) (de lunes a viernes de 9
a 21, hora del Este)para recibir una herramienta de
reemplazo o para que lo dirijan a un centro aprobado
de reparaciones. Al efectuar un reclamo de garantía o
al enviar la herramienta para ser reparada bajo garantía,
deberá incluir un comprobante fechado de compra.
LIMITACIONES ADICIONALES
Esta garantía es válida únicamente para productos
comprados y usados en los Estados Unidos, sus
territorios o Canadá. Cualquier garantía implícita
concedida por las leyes estatales, incluyendo garantías
de calidad o de idoneidad para un fin determinado
está limitada a dos años desde la fecha de compra. El
fabricante no se hace responsable por daños directos,
indirectos, incidentales o consecuentes incluyendo,
pero sin limitación, la responsabilidad por pérdida
de ingresos como consecuencia de la compra o uso
de este producto. Algunos estados y provincias no
permiten limitaciones con respecto a cuanto dura una
garantía implícita y/o la exclusión o limitación de daños
imprevistos, por lo tanto las exclusiones o limitaciones
anteriores pueden no aplicarse en su caso. Esta garantía
le otorga derechos legales específicos, y usted puede
también tener otros derechos los que varían de estado a
estado o de provincia a provincia.
El fabricante rechaza toda responsabilidad con respecto
NA-WX645K-M-051107.indd 31 2005-11-7 9:17:51
Page 32

a la responsabilidad civil emergente del uso abusivo
o que no esté de acuerdo con el uso y mantenimiento
adecuado de la máquina tal como se lo describe en el
manual del usuario.
Luego de la compra, el fabricante recomienda el
mantenimiento adecuado de la máquina y el leer
el manual del usuario antes de usarla.
Designed in Italy. Made in China
Conçu en Italie. Fabriqué en Chine
Diseñado en Italia. Fabricado en China
NA-WX645K-M-051107.indd 32 2005-11-7 9:17:51
 Loading...