

Page 1

Cordless Circular Saw ENG
Scie Circulaire Sans Cordon F
Sierra Circular Inalámbrica ES
Pag 02
Pag 18
Pag 36
5 1/
2
”
/18V
WT525
NA-WT525-M-050727.indd 1 2005-7-27 17:45:56
Page 2

Cordless Circular Saw WT525
SAFETY INSTRUCTIONS
WARNING! Read and understand all instructions. Failure to follow all instructions
listed below, may result in electric shock, fire and/or serious personal injury.
SAVE THESE INSTRUCTIONS
1. WORK AREA
a) Keep your work area clean and well lit. Cluttered benches and dark areas invite ac-
cidents.
b) Do not operate power tools in explosive atmospheres, such as in the presence of
flammable liquids, gases or dusts. Power tools create sparks which may ignite the dust
or fumes.
c) Keep by-standers, children, and visitors away while operating a power tool. Dis-
tractions can cause you to lose control.
2. ELECTRICAL SAFETY
a) A battery operated tool with integral batteries or a separate battery pack must be
recharged only with the specified charger for the battery. A charger that may be suit-
able for one type of battery may create a risk of fire when used with another battery.
b) Use battery operated tool only with specifically designated battery pack. Use of
any other batteries may create a risk of fire.
3. PERSONAL SAFETY
a) Stay alert, watch what you are doing and use common sense when operating a
power tool. Do not use tool while tired or under the influence of drugs, alcohol,
or medication. A moment of inattention while operating power tools may result in serious
personal injury.
b) Dress properly. Do not wear loose clothing or jewelry. Contain long hair. Keep
your hair, clothing, and gloves away from moving parts. Loose clothes, jewelry, or
long hair can be caught in moving parts. Keep handles dry, clean and free from oil and
grease. Rubber gloves and non-skid footwear are recommended when working outdoors.
c) Avoid accidental starting. Be sure switch is in the locked or “OFF” position before
inserting battery pack. Carrying tools with your finger on the switch or inserting the bat-
tery pack into a tool with the switch “ON” invites accidents.
d) Remove all adjusting keys and wrenches. Make a habit of checking that adjusting keys,
wrenches, etc. are removed from the tool before turning it “ON”.
e) Do not overreach. Keep proper footing and balance at all times. Proper footing and
balance enable better control of the tool in unexpected situations.
f) Use safety equipment. Always wear eye protection. Dust mask, non-skid safety shoes,
hard hat, or hearing protection may be used for appropriate conditions.
g) Keep hands away from all cutting edges and moving parts.
h) If devices are provided for the connection of dust extraction and collection facili-
ties, ensure these are connected and properly used. Use of these devices can reduce
dust-related hazards.
4. TOOL USE AND CARE
a) Use clamps or other practical way to secure and support the work-piece to a
stable platform. Holding the work by hand or against your body is unstable and may lead to loss
of control.
b) Do not force tool. Use the correct tool for your application. The correct tool will do the
NA-WT525-M-050727.indd 2 2005-7-27 17:45:57
Page 3

Cordless Circular Saw WT525
job better and safer at the rate for which it is designed. Excessive force only causes operator fatigue,
increased wear and reduced control.
c) Do not use tool if switch does not turn it “ON” or “OFF”. A tool that cannot be con-
trolled with the switch is dangerous and must be repaired.
d) Disconnect battery pack from tool or place the switch in the “LOCKED” or “OFF”
position before making any adjustments, changing accessories, or storing the
tool. Such preventive safety measures reduce the risk of starting the tool accidentally.
e) Store idle tools out of reach of children and other untrained persons. Tools are
dangerous in the hands of untrained users.
f) When battery pack is not in use, keep it away from other metal objects like: pa-
per clips, coins, keys, nails, screws, or other small metal objects that can make a
connection from one terminal to another. Shorting the battery terminals together may
cause sparks, burns, or a fire.
g) Maintain tools with care. Keep cutting tools sharp and clean. Properly maintained
tools, with sharp cutting edges, are less likely to bind and easier to control.
h) Check for misalignment or binding of moving parts, breakage of parts, and any
other condition that may affect the tool’s operation. If damaged, have the tool
serviced before using. Many accidents are caused by poorly maintained tools.
i) Use only accessories that are recommended by the manufacturer for your model.
Accessories that may be suitable for one tool may create a risk of injury when used on another tool.
j) Use the right tool. Do not force the tool or attachment to do a job for which it was not
designed
5. SERVICE
a) Tool service must be performed only by qualified repair personnel. Service or main-
tenance performed by unqualified personnel could result in a risk of injury.
b) When servicing a tool, use only identical replacement parts. Follow instructions
in the Maintenance section of this manual. Use of unauthorized parts or failure to fol-
low Maintenance Instructions may create a risk of electric shock or injury.
ADDITIONAL SAFETY RULES - FOR CORDLESS CIRCULAR
SAWS
WARNING! Failure to follow these rules may result in serious personal injury.
1) Hold tool by insulated gripping surfaces when performing an operation where the
cutting tools may contact hidden wiring or its own cord. Contact with a “live” wire will
make exposed metal parts of the tool “live” and shock the operator.
2) Always keep your hands away from cutting area. Do not reach under the material being
cut because the nearness of the blade to your hand is hidden from your sight.
3) Always wear eye protectors when using tool. Use a dust mask or respirator for ap-
plications which generate dust.
4) Do not use dull or damaged blades. Sharp blades will do the job better and safer. Bent
blades can break easily or cause kickback.
5) The base plate must always be held firmly against the material being cut to reduce
saw vibration, blade jumping and blade breakage.
6) Never stop the cutting blade by applying side pressure to the blade.
7) Only withdraw the blade from the cut when the blade has stopped moving.
0302
NA-WT525-M-050727.indd 3 2005-7-27 17:45:58
Page 4
Cordless Circular Saw WT525
8) Do not reach underneath the work-piece while cutting. The guard cannot protect you
from the blade below the work-piece.
9) Your circular saw is a hand-held tool, do not clamp your circular saw.
10) Before cutting, check the cutting line is free of nails, screws, etc.
11) Do not cut small work-pieces with a circular saw. If possible, use a jigsaw.
12) Only use blades that the rated speed exceeds the saw no load speed.
13) Never remove the guard system. Never use the saw if the guard system does not func-
tion correctly. Never lock the moving guard open. The guard must move freely.
14) ALWAYS check lower guard to ensure proper closing before each use. Do not op-
erate saw if lower guard does not move freely and close instantly. Never clamp or
tie the lower guard in the open position. If saw is accidentally dropped, lower guard may be
bent. Raise the lower guard with the Lower Guard Lever and make sure guard moves freely
and does not touch the blade or any other part of the saw, in any angle and depth of cut.
15) Always check walls, floors and ceilings to avoid hidden power cable and pipes.
16) Do not cut material containing asbestos.
17) Do not use metal or stone saw blades. Only use wood saw blades.
18) Do not use circular saw to cut tree limbs or logs.
19) Do not use any abrasive wheels.
20) Keep your body positioned to either side of the saw, but not in-line with the saw
blade. KICKBACK could cause the saw to jump backwards.
21) Be aware that this tool is always in an operating condition because it does not
have to be plugged into an electrical outlet.
22) Disconnect battery pack from the tool or place switch in the “LOCKED” or “OFF”
position before making any assembly, adjustments or changing accessories. Such
preventive safety measures reduce the risk of starting the tool accidentally.
23) Save these instructions. Refer to them frequently and use them to instruct others who
may use this tool. If someone borrows this tool, make sure they have these instructions.
WARNING! Some dust created by power sanding, sawing, grinding, drilling and
other construction activities contains chemicals known to cause cancer, birth
defects or other reproductive harm. Some examples of these chemical are:
• Lead from lead-based paint
• Crystalline silica from bricks and cement and other masonry products
• Arsenic and chromium from chemically-treated lumber
Your risk to these exposures varies, depending on how often you do this type of work. To reduce
your exposure to these chemicals:
• Work in a well ventilated area
• Work with approved safety equipment, such as those dust masks that are specifically designed to
filter out microscopic particles.
BATTERY / CHARGER
1. Do not dispose of batteries in fire, or with household waste. Return exhausted batter-
ies to your local collection or recycling point.
2. Before using battery charger, read all instructions and cautionary markings on (1)
battery charger, (2) battery pack, and (3) product using battery.
3. CAUTION: To reduce the risk of injury, a WORX charger should only be used to
charge a WORX battery pack. Other types of batteries may burst causing personal injury
and damage. Do not charge a WORX battery pack with any other charger.
4. Do not store the battery pack in temperatures over +102ºF (39ºC).
NA-WT525-M-050727.indd 4 2005-7-27 17:45:58
Page 5
Cordless Circular Saw WT525
0504
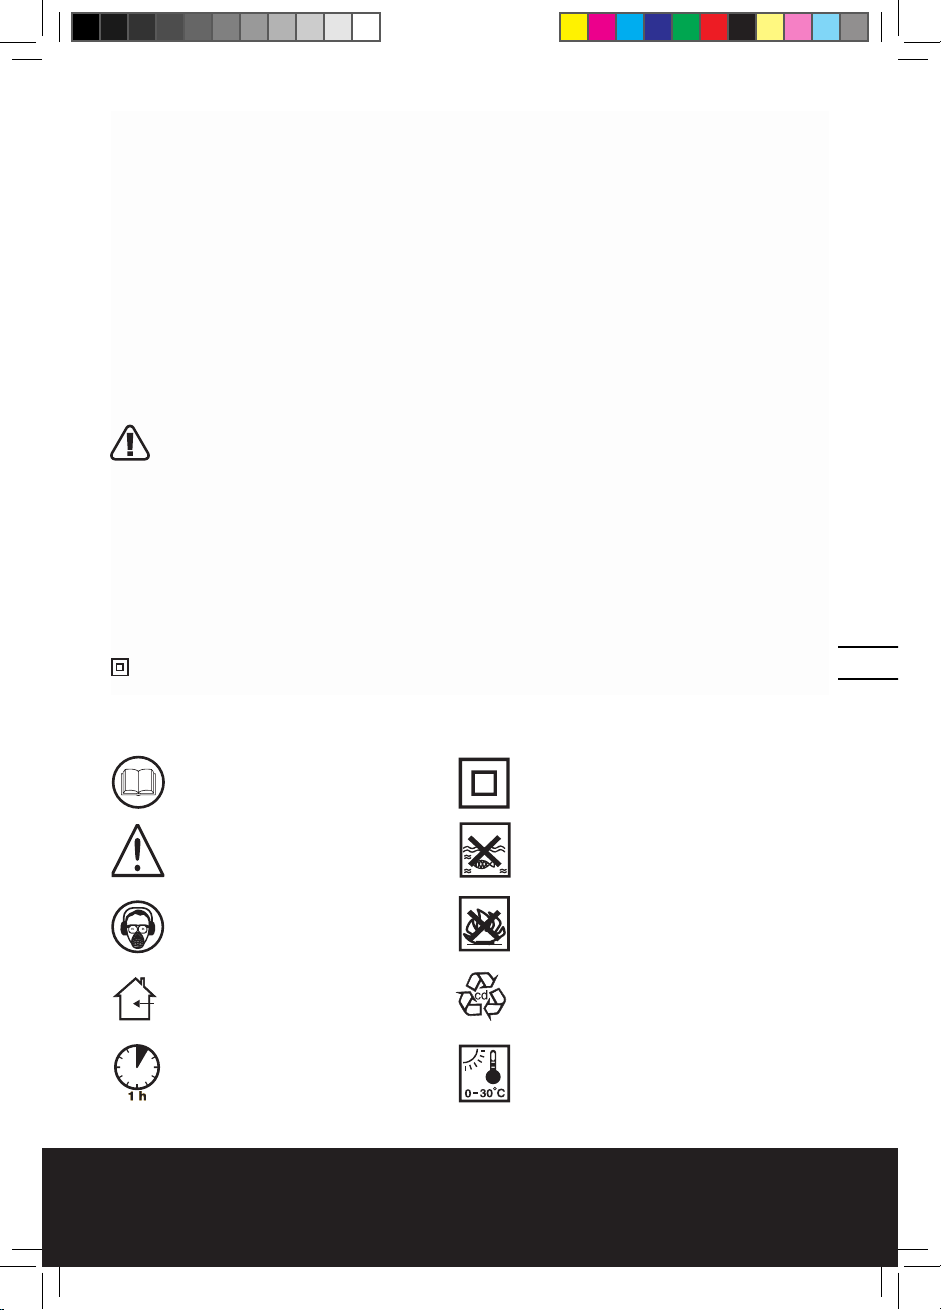
Read the manual
Warning
Wear safety goggles, dust mask
and ear protection
Use inside only
1-Hour Charging Time
Double insulation
Do not expose to rain or water
Do not burn
Do not dispose of batteries. Return
exhausted batteries to your local col
-
lection or recycling point.
Always charge battery between 36ºF
- 95ºF (2ºC -35ºC)
5. Always charge the battery pack between temperatures 36ºF to 95ºF (2ºC to 35
ºC). Ideal charging temperature is 65ºF to 84ºF (18ºC to 29ºC).
6. Avoid short circuit of the battery pack connections (screws & nails).
7. Charger is double insulated for additional electrical safety.
8. Do not expose charger to rain or water.
9. Charger is for indoor use only.
10. Do not incinerate or burn the battery pack, it may explode.
11. Do not charge a damaged battery pack.
12. Do not charge non-rechargeable batteries.
13. Replace any damaged power supply cords on your charger.
14. Always disconnect the charger power supply before making or breaking the con-
nections to the battery pack.
15. Battery pack and charger will be warm during charging, this is normal.
16. When not in use, remove a charged battery pack from the charger.
17. Always remove the battery pack from the charger immediately after re-charging is
completed.
WARNING: A small amount of electrolyte could leak from the battery pack under
extremes of temperature or after heavy use. Avoid contact with skin and eyes.
Wash off immediately from your skin and hands using clean water. For eye contact,
rinse thoroughly with clean water and seek medical treatment immediately.
The label on your tool may include the following symbols:
V...................................................................................................................................................................Volts
A.................................................................................................................................................................Amps
Hz.................................................................................................................................................................Hertz
~..........................................................................................................................................Alternating current
no ...............................................................................................................................................No load speed
................................................................................................Class II Construction / Double insulation
SYMBOLS
NA-WT525-M-050727.indd 5 2005-7-27 17:46:00
Page 6
Cordless Circular Saw WT525
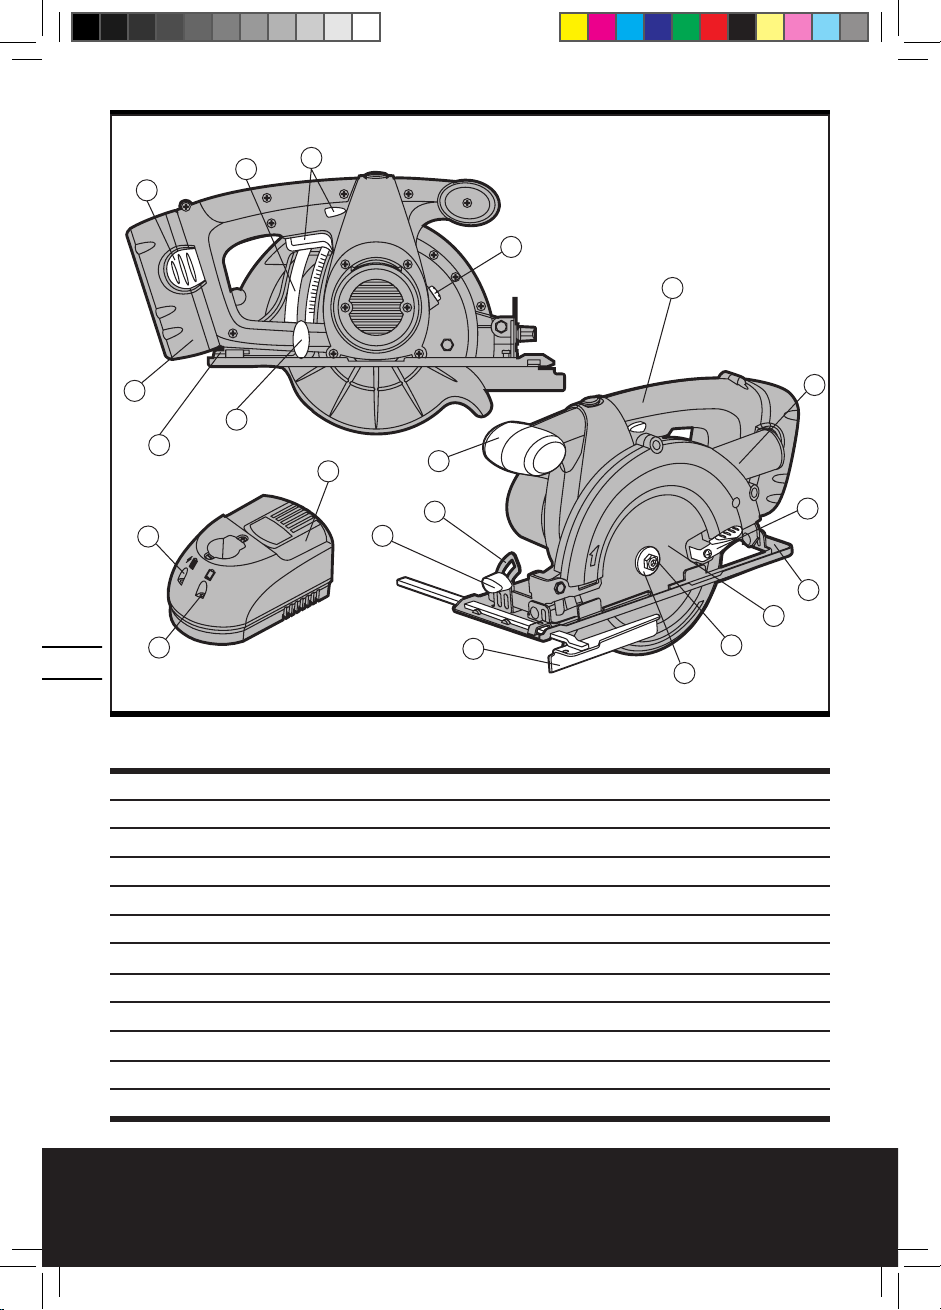
1. SAFETY ON/OFF SWITCH
2. FRONT HANDLE
3. SAW BLADE
4. DEPTH OF CUT SCALE
5. BASE PLATE
6. BASE PLATE ANGLE SCALE
7. PARALLEL GUIDE
8. DUST EXTRACTION OUTLET
9. SPINDLE LOCK BUTTON
10. OUTER FLANGE
11. BLADE BOLT
12. LOWER GUARD LEVER
16
15
20
13
18
19
17
14
10
11
12
8
21
3
5
9
6
7
2
4
1
NA-WT525-M-050727.indd 6 2005-7-27 17:46:02
Page 7

Cordless Circular Saw WT525
0706
13. DEPTH OF CUT ADJUSTMENT LEVER
14. BASE PLATE BEVEL LOCK
15. BATTERY PACK
16. BATTERY PACK RELEASE LATCH
17. CHARGER
18. CHARGED INDICATOR LIGHT (GREEN)
19. CHARGING INDICATOR LIGHT (RED)
20. HEX KEY HOLDER
21. MAIN HANDLE
TECHNICAL DATA
Voltage rating: 18V
No load speed: 3,300rpm
Bevel Capacity: 0-50º
Blade Size: 5 1/2” (140mm)
Blade Bore: 3/8” (10mm)
Maximum Cutting Capacity:
Cutting Capacity at 90º 1 5/8” (41.5mm)
Cutting Capacity at 45º 1 3/16” (30mm)
Machine Weight: 7.7lbs (3.5Kg)
ACCESSORIES
Batteries two(2)18V - 2.0Ah Ni-Cd (WT525/WT940K)
1-Hour Charger Voltage 120V~60Hz
Hex Key 1pc
Parallel Guide 1pc
We recommend that you purchase your accessories from the same store that sold you the tool.
Use good quality accessories marked with a well-known brand name. Choose the type according
to the work you intend to undertake. Refer to the accessory packaging for further details. Store
personnel can assist you and offer advice.
NA-WT525-M-050727.indd 7 2005-7-27 17:46:03
Page 8

Cordless Circular Saw WT525
OPERATING INSTRUCTIONS
NOTE: Before using the tool, read the instruction
book carefully.
KICKBACK
Further safety instructions for all saws
Causes and operator prevention of kickback:
- kickback is a sudden reaction to pinched, bound or misalign saw blade, causing an uncontrolled saw to lift up
and out of the work-piece toward the operator;
- when the blade is pinched or bound tightly by the kerf
closing down, the blade stalls and the motor reaction
drives the unit rapidly back toward the operator;
- if the blade becomes twisted or misaligned in the cut,
the teeth at the back edge of the blade can dig into the
top surface of the wood causing the blade to climb out of
the kerf and jump back toward the operator.
Kickback is the result of saw misuse and/or incorrect operating procedures or conditions and can be avoided by
taking proper precautions as given below.
a. Maintain a firm grip with both hands on the saw and
position your arms to resist kickback forces. Position your
body to either side of the blade, but not in line with the
blade. Kickback could cause the saw to jump backwards,
but kickback forces can be controlled by the operator, if
proper precautions are taken.
b. When blade is binding, or when interrupting a cut for
any reason, release the trigger and hold the saw motionless in the material until the blade comes to a complete
stop. Never attempt to remove the saw from the work
or pull the saw backward while the blade is in motion or
kickback may occur. Investigate and take corrective actions to eliminate the cause of blade binding.
c. When restarting a saw in the work-piece, center the
saw blade in the kerf and check that saw teeth are not
engaged into the material. If saw blade is binding, it may
walk up or kickback from the work-piece as the saw is
restarted.
d. Support large panels to minimize the risk of blade
pinching and kickback.
Large panels tend to sag under their own weight. Supports must be placed under the panel on both sides, near
the line of cut and near the edge of the panel.
e. Do not use dull or damaged blades. Unsharpened or
improperly set teeth produce narrow kerf causing excessive friction, blade binding and kickback.
f. Blade depth and bevel adjusting locking levers must be
tight and secure before making cut. If blade adjustment
shifts while cutting, it may cause binding and kickback.
NA-WT525-M-050727.indd 8 2005-7-27 17:46:03
Page 9

Cordless Circular Saw WT525
g. Use extra caution when making a “pocket cut” into
existing walls or other blind areas. The protruding blade
may cut objects that can cause kickback.
POCKET CUTTING
Pocket cutting (soft materials only) This operation requires much skill with a saw and must only be carried
out by a competent person.
Warning: the blade teeth are exposed during this
operation so proceed with extreme caution.
a. Clearly mark the area to be cut.
b. Set the depth of cut on the saw.
c. Position the saw over the marked area with the front
edge of the base plate resting on the work surface and
cutting guide aligned with marked line on work-piece
(See Fig 8).
d. Ensure the blade is not touching but is close to the
work surface. The moving lower guard must be rotated
open by using lever (5).
e. Switch the saw on and gently swing the blade down
into the material but maintain a pivoting force on the
front edge of the base. The moving lower guard can now
be released for normal action of the guard.
BLADE GUARDS
a. Check lower guard for proper closing before
each use. Do not operate the saw if lower guard
does not move freely and close instantly. Never
clamp or tie the lower guard into the open position. If saw is accidentally dropped, lower guard may be
bent. Raise the lower guard with the retracting handle
and make sure it moves freely and does not touch the
blade or any other parts, in all angles and depths of cut.
b. Check the operation of the lower guard spring.
If the guard and the spring are not operating properly, they must be serviced before use. Lower guard
may operate sluggishly due to damaged parts, gummy
deposits, or a build-up of debris.
c. Lower guard should be retracted manually only
for special cuts such as “plunge cuts” and “compound cuts”. Raise lower guard by retracting handle and as soon as blade enters the material, the
lower guard must be released. For all other sawing,
the lower guard should operate automatically.
d. Always observe that the lower guard is covering the blade before placing saw down on bench
or floor. An unprotected, coasting blade will cause the
saw to walk backwards, cutting whatever is in its path. Be
aware of the time it takes for blade to stop after switch
is released.
0908
NA-WT525-M-050727.indd 9 2005-7-27 17:46:04
Page 10
Cordless Circular Saw WT525
1. BEFORE USING YOUR CORDLESS CIRCULAR
SAW
Your battery pack is UNCHARGED and you must charge
once before use. Your battery pack will not be fully
charged until you have performed several charge and
discharge operations by charging & working with your
saw. After this your battery pack performance will improve.
Warning: The charger and battery pack are specif-
ically designed to work together so do not attempt
to use any other devices. Never insert or allow metallic
objects into your charger or battery pack connections because an electrical failure and hazard will occur.
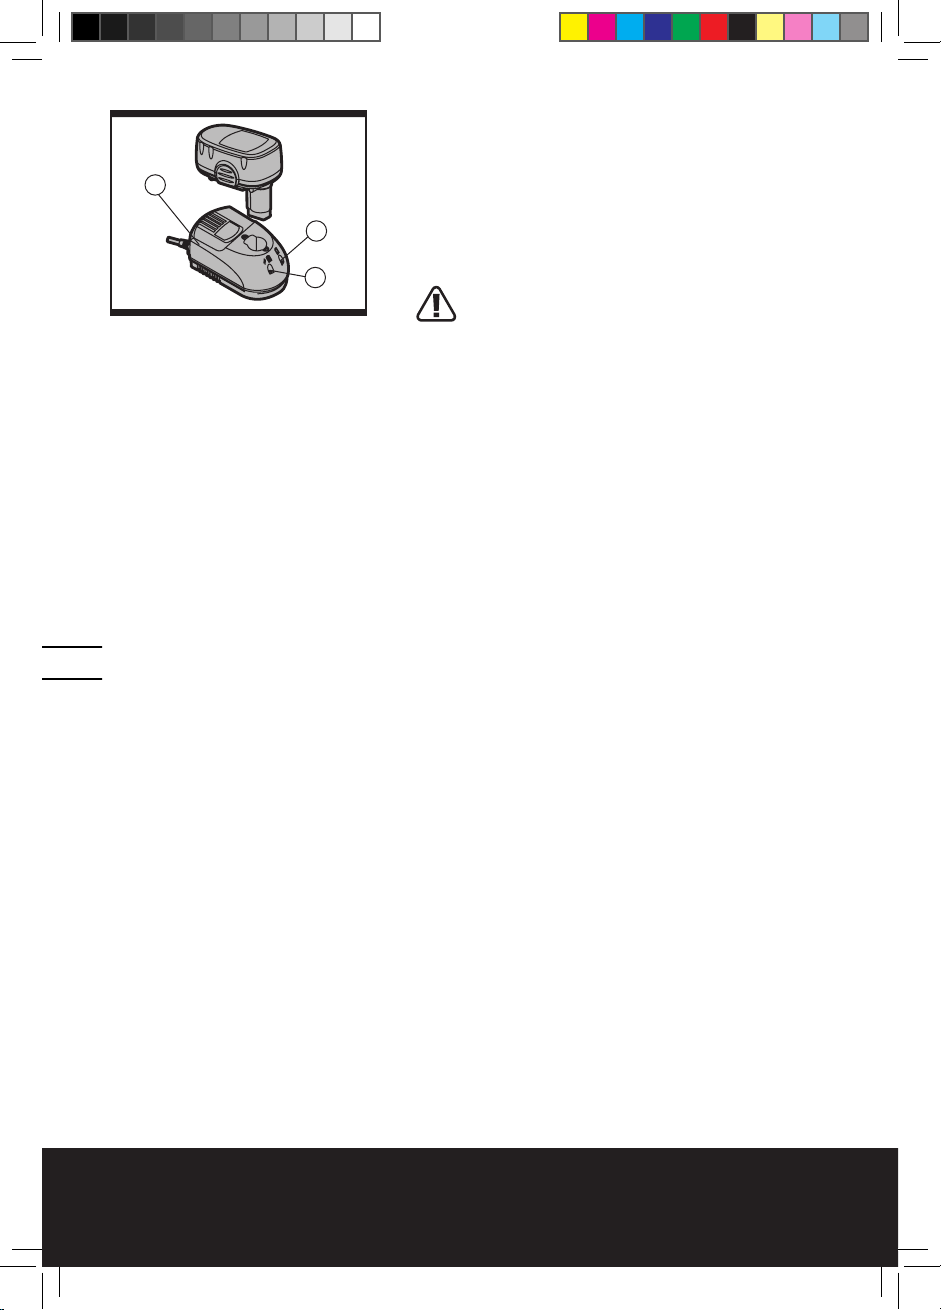
2. HOW TO CHARGE YOUR BATTERY PACK (See
Fig 1)
1) Connect the battery charger to the power supply. The
red light will illuminate for 3 seconds and then it will go
out.
Note: If the red light flashes at a rapid rate (approx. 5
flashes per second), this means that the charger has
failed and must be replaced.
2) Fully insert the battery pack into the charger. With
a normal charging process, only the red light will illuminate to show charging has started. The red light will
remain on during the charging process. A discharged
battery at normal ambient temperature will take approximately 1 hour to reach full charge.
Note: If the battery temperature is lower than 32ºF (0ºC),
the green light will flash slowly (approximately 2 flashes
per second). Remove the battery and allow the battery
to warm-up to a charging temperature between 36ºF to
95ºF (2ºC and 35ºC).
If the battery temperature is over 140ºF (60ºC), the green
light will flash rapidly (approximately 5 flashes per second). Remove the battery and allow the battery to cooldown to a charging temperature between 36ºF to 95ºF
(2ºC and 35ºC).
If the battery temperature is over 176ºF (80ºC), the charging process will be stopped, and the red light will flash
with a low speed (approximately 2 flashes per second).
The battery must be replaced.
3) When the charging is complete, only the green light
will illuminate.
Note: When the battery is under charging and its voltage cannot reach 4V in 2 minutes, we consider the battery to be “dead”, and the red light will flash with a low
speed (approximately 2 flashes per second). Remove the
Fig 1
18
19
17
NA-WT525-M-050727.indd 10 2005-7-27 17:46:05
Page 11
Cordless Circular Saw WT525
“dead” battery from the charger and replace with a new
battery.
4) When the charging process is finished, the battery is
still charging with a current 50mA.
Note: The charger timer-circuit and battery pack temperature safety-cutout device prevents overcharging of the
battery pack. However, it is recommended to remove the
battery from the charger when the charging cycle has
been completed as indicated by the illumination of the
green light.
3. TO REMOVE OR INSTALL BATTERY PACK
Locate latches on side of battery pack and depress both
sides to release battery pack from your saw. Remove
battery pack from your saw. After recharge insert the
battery pack into saw’s battery port. A simple push
and slight pressure will be sufficient.
4. SAFETY ON/OFF SWITCH
Your switch is locked off to prevent accidental starting.
Depress lock off button (a) then on/off switch (b) and release lock off button (a). Your switch is now on. To switch
off just release the on/off switch (See Fig 2).
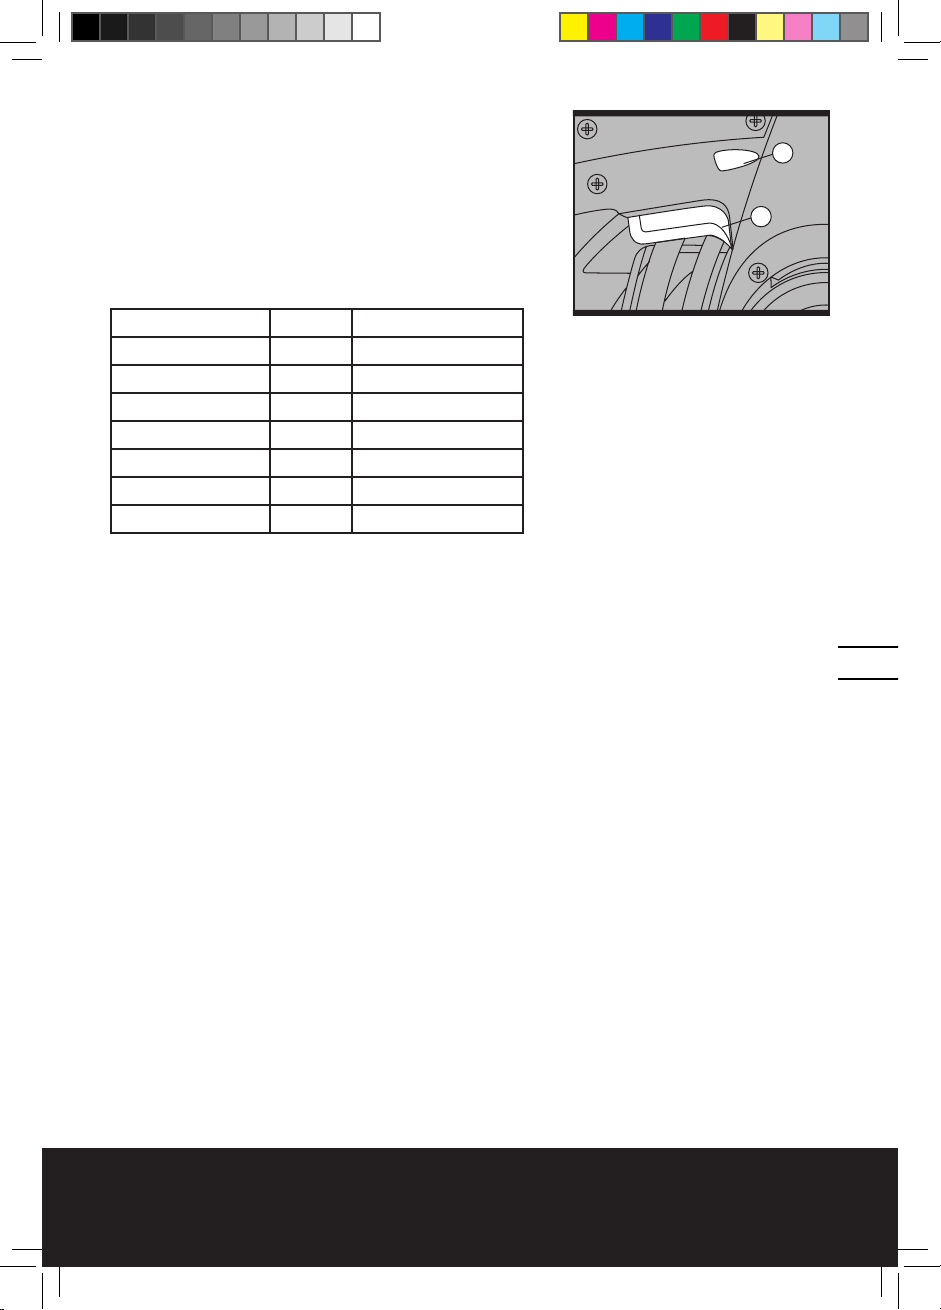
5. CHANGING A SAW BLADE
Loosen the locking lever (13) and raise the saw body
away from the base plate. Take out the Hex key (20) from
the base plate. Press the spindle lock button (9) and
use the hex key provided to remove the bolt and outer
flange. Rotate lower guard counter-clockwise and hold
open using the lever (12) while changing the saw blade.
Ensure the blade bore is located on the inner flange and
the blade direction arrow points in the same direction
as the lower guard arrow. Check that the blade surface
and flanges are clean. Press the spindle lock again and
re-fit the outer flange over the spindle flats, bolt with 1/4
turn more than finger tight. Check the blade is securely
clamped (See Fig 3).
1110
Fig 2
a
b
Status Light ON/OFF/Flash
Battery charging red on
Charger failure red fast flash (5/sec)
Battery <32ºF (0ºC) green slow flash (2/sec)
Battery + 140ºF (60ºC) green fast flash (5/sec)
Battery + 176ºF (80ºC) red slow flash (2/sec)
Battery dead red slow flash (2/sec)
Charging complete green on
NA-WT525-M-050727.indd 11 2005-7-27 17:46:06
Page 12
Cordless Circular Saw WT525
Warning: Blade teeth are very sharp. Wear gloves
when changing saw blades. For best cutting results ensure you use a saw blade suited to the material
and cut quality you need. Ensure the blade is suitable
for the rated speed of the tool. Only use carbide-tipped
blades in this tool.
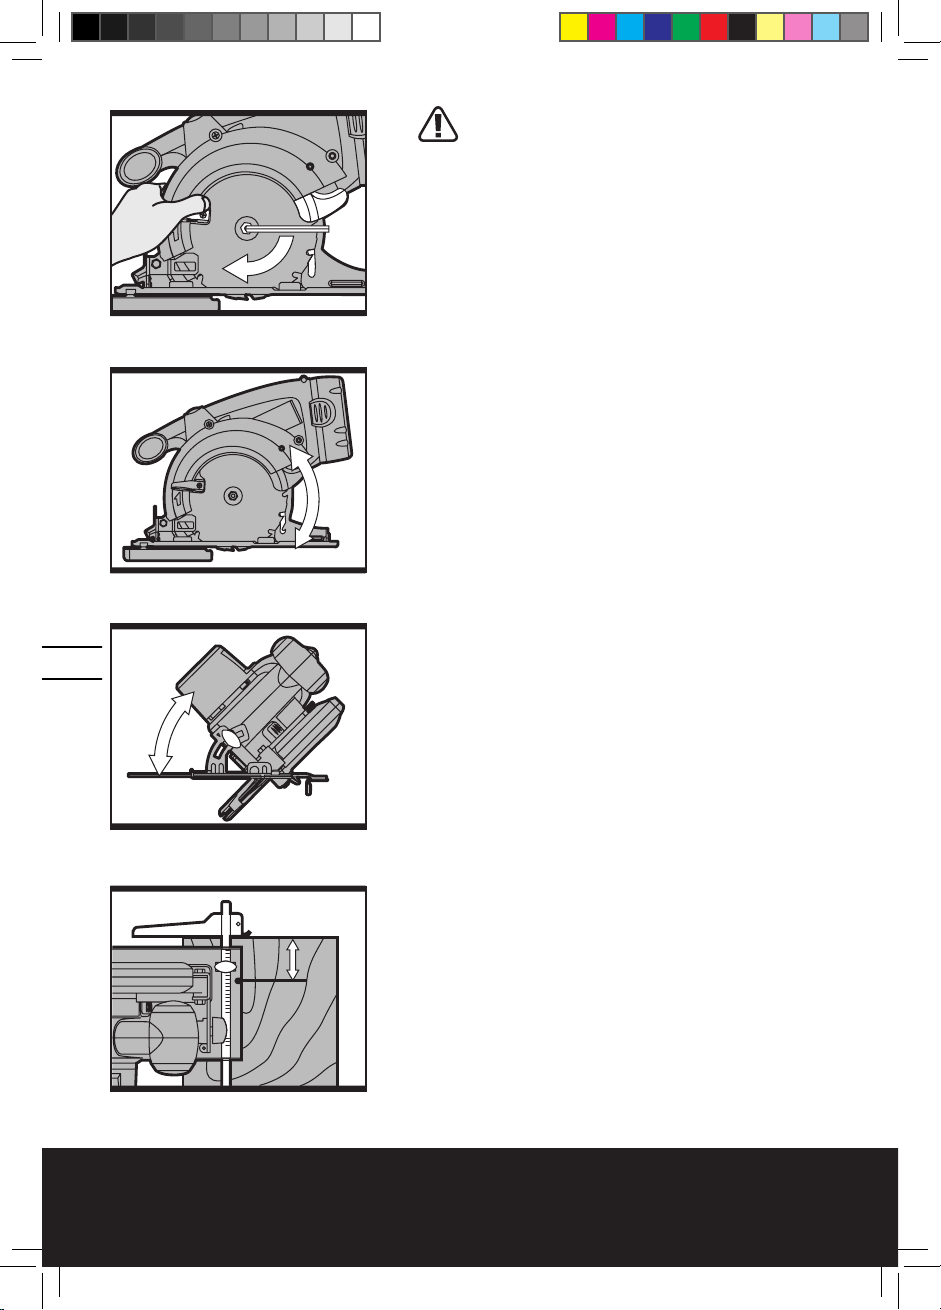
6. DEPTH OF CUT ADJUSTMENT
Lift the depth of cut locking lever (13) and raise the saw
body away from the base plate (5). Set the depth of cut
using the scale (4) and push the lever down to lock (See
Fig 4). Always add 1/8” (3mm) to your depth of cut so
the blade can cut through the material. The riving knife
automatically adjusts position when the depth of cut is
changed.
7. BASE PLATE
Adjusting the angle of the base plate (5) enables bevel cutting. The base plate must always be held firmly
against the material being cut to reduce saw vibration,
blade jumping or blade breakage.
8. BASE PLATE ANGLE ADJUSTMENT
Loosen the base plate bevel lock knob (14) and rotate the
base plate (5) to set the bevel angle using the base plate
angle scale (6). Then clamp the base plate (6) in position
using the lock knobs (14) (See Fig 5). Finally, check the
angle and ensure the base plate is firmly clamped. The
angle markings on the angle scale are accurate for most
general purposes but it is recommended, for accurate
work, to set the angle with a protractor and make a test
cut on other material. Do not use the depth of cut scale
when making bevel cuts due to possible inaccuracy.
9. PARALLEL GUIDE ADJUSTMENT
The parallel guide is used for making cuts parallel to a
work-piece edge at a chosen distance. Slide the parallel guide (7) arm through both fixtures to achieve the
required cutting distance and tighten screw to lock into
position (See Fig 6). It can be used from both sides of
the base plate (5). The cutting distance is shown on the
guide scale and by using the 90º or 45º notch edge on
the base plate (5). Always make a trial cut to check the
setting.
10. DUST EXTRACTION OUTLET
To remove sawdust, connect a suitable external dust extraction device (e.g. vacuum cleaner) to the dust extraction outlet (8) using a flexible hose connection. Ensure
the hose connection is secure.
Fig 6
Fig 3
Fig 4
Fig 5
NA-WT525-M-050727.indd 12 2005-7-27 17:46:07
Page 13

Cordless Circular Saw WT525
1312
11. DISPOSAL OF AN EXHAUSTED BATTERY PACK
To preserve natural resources, please recycle or dis-
pose of the battery pack properly. This battery pack
contains nickel-cadmium batteries. Consult your local
waste authority for information regarding available recycling and/or disposal options. Discharge your battery
pack by operating your saw, then remove the battery
pack from the saw housing and cover the battery pack
connections with heavy duty adhesive tape to prevent
short circuit and energy discharge. Do not attempt to
open or remove any of the components.
WORKING HINTS FOR YOUR CIRCULAR SAW
a) If your power tool becomes too hot, run your circular
saw no load for 2-3 minutes to cool the motor. Avoid
prolonged usage at very low speeds.
b) Always use a blade suited to the material and material
thickness to be cut. The quality of cut will improve as the
number of blade teeth increase.
c) Always ensure the work-piece is firmly held or
clamped to prevent movement.
d) Support large panels close to the cut line. Any movement of the material may affect the quality of the cut.
e) The blade cuts on the upward stroke and may chip the
uppermost surface or edges of your work piece. When
cutting, ensure your uppermost surface is a non-visible
surface when your work is finished. Feeding too fast significantly reduces the performance of the machine and
shortens the life of the saw blade. Always face the good
side of the work-piece down, to ensure minimum splintering. Only use sharp saw blades of the correct type.
FREQUENTLY ASKED QUESTIONS
1. WHY DOES THE SAW NOT TURN ON WHEN YOU
PRESS THE SWITCH?
The safety on/off switch (b) is locked and you must depress the button (a) first (See Fig 2).
2. THE SAW ROTATES SLOW. WHY?
If the battery is not fully charged, recharge the battery
with the supplied battery charger.
Note: Do not charge the battery with a different charger.
Charge battery pack only with the charger provided.
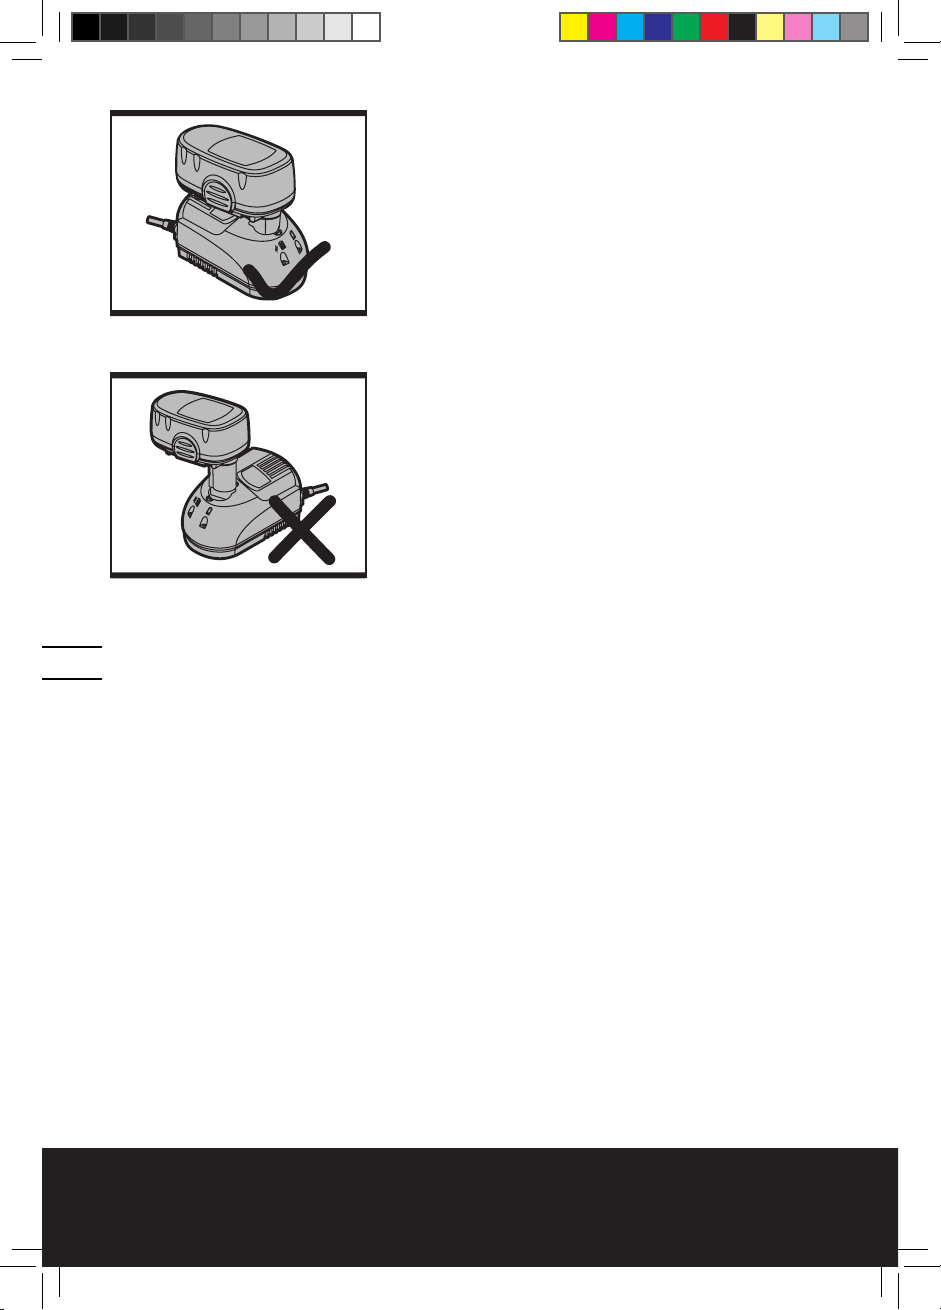
3. I CANNOT FIT THE BATTERY INTO THE BAT-
NA-WT525-M-050727.indd 13 2005-7-27 17:46:08
Page 14
Cordless Circular Saw WT525
TERY CHARGER.WHY?
The battery can be inserted into the charger only in one
direction. Turn the battery around until it can be inserted
into the slot, the red LED light should turn on when the
battery is charging (See Fig 7.1, 7.2).
4. REASONS FOR DIFFERENT CHARGING TIMES.
Your charge time can be affected by many reasons which are not defects in your product. If the battery pack
is only partly discharged it may be re-charged in less than
1 hour. If the battery pack and ambient temperature are
very cold then re-charging may take 1 to 1 1/2 hours. If
the battery pack is very hot it will not re-charge because
the internal temperature safety cut-out will prevent it. If
hot you must remove your battery pack from the charger and allow your battery pack to cool first to ambient
temperature and then recharging can be started. If you
charge a second battery pack immediately after the first
then the charger can be over-heated. Always allow at
least 15 minutes rest between battery pack charging.
5. REASONS FOR DIFFERENT BATTERY PACK
WORKING TIMES
Charging time problems, as above, and having not used
a battery pack for a prolonged time will reduce the battery pack working time. This can be corrected after several charge and discharge cycles by charging & working
with your saw. Do not re-charge your battery pack below
36OF and above 95OF (2OC and above 35OC) as this will
affect performance.
MAINTAIN TOOLS WITH CARE
Keep tools sharp and clean for better and safer performance. Follow instructions for lubricating and changing
accessories. Inspect tool cords periodically and if damaged, have repaired by authorized service facility.
Your power tool requires no additional lubrication or
maintenance. There are no user serviceable parts in
your power tool. Never use water or chemical cleaners
to clean your power tool. Wipe clean with a dry cloth.
Always store your power tool in a dry place. Keep the
motor ventilation slots clean. Keep all working controls
free of dust. If you see some sparks flashing in the ventilation slots, this is normal and will not damage your
power tool.
Fig 7.1
Fig 7.2
NA-WT525-M-050727.indd 14 2005-7-27 17:46:08
Page 15

Cordless Circular Saw WT525
1514
WARRANTY
LIMITED 60-DAY EXCHANGE POLICY
During the first 60 days after date of purchase, you may
exchange a tool which does not work properly due to
defects in materials or workmanship by returning the
power tool to the retailer where it was purchased. To
receive a replacement power tool, you must present a
dated proof of purchase and return all original equipment packaged with the original product.
LIMITED TWO YEAR WARRANTY
The manufacturer warrants that, for a period of 2 years
from the date of purchase, this product shall be free of
defects in materials and workmanship. We will repair
or replace, at our option, this tool during the warranty
period, and we may require that the tool be sent postage
prepaid to an approved service center with all original
equipment and a dated proof of purchase. Any replacement or repaired power tool will only be covered by the
limited warranty for the balance of the warranty period
from the date of the original purchase.
WHAT IS NOT COVERED
This warranty applies only to the original purchaser at
retail and is not transferable.
This warranty does NOT cover service or replacement of
parts resulting from normal wear.
This warranty does NOT cover accessories or battery
packs.
This warranty does NOT cover malfunction, failure or
defects due to:
- abnormal use, abuse, neglect, or use not in accordance
with the operations manual
- damage resulting from accidents, drops or mishandling of the tool
- alteration or repairs by other than approved service
centers
- commercial or rental use.
The manufacturer makes no warranties, representations or promises as to the quality or performance of its
power tools other than those specifically stated in this
warranty.
FOR SERVICE
Contact our toll-free consumer service line at 1-866-354WORX (9679) (Mon.- Sat. 9am to 9pm EST) to receive a
replacement tool or to be directed to an approved service center. When you make a warranty claim or send
the tool for warranty service, you must also include a
dated proof of purchase.
NA-WT525-M-050727.indd 15 2005-7-27 17:46:09
Page 16

Cordless Circular Saw WT525
ADDITIONAL LIMITATIONS
This warranty is only valid for products purchased and
used in the United States of America, its territories or
Canada. Any implied warranty granted under state law,
including warranties of merchantability or fitness for a
particular purpose, are limited to two years from the
date of purchase. The manufacturer is not responsible
for direct, indirect, incidental or consequential damages
including, but not limited to, liability for loss of income
arising from the purchase or use of the product. Some
states and provinces do not allow limitations on how
long an implied warranty lasts and/or do not allow the
exclusion or limitation of incidental damages, so the
above limitations and exclusions may not apply to you.
This warranty gives you specific legal rights, and you
may also have other rights which vary from state to state
or province to province.
The manufacturer declines any responsibility in regards
to civil liability arising from abusive use or not in conformity with proper use and maintenance of the machine
as described in the operator’s manual.
After the purchase, the manufacturer recommends
proper maintenance of the machine and to read
the operator’s manual before using the machine.
NA-WT525-M-050727.indd 16 2005-7-27 17:46:09
Page 17

1716
NA-WT525-M-050727.indd 17 2005-7-27 17:46:10
Page 18

Scie Circulaire Sans Cordon WT525
CONSIGNES DE SÉCURITÉ
AVERTISSEMENT! Lisez et assimilez toutes les instructions. Le non-respect des instructions ci-après peut entraîner un risque de choc électrique, d’incendie et/ou de blessures
graves.
CONSERVEZ CES INSTRUCTIONS
1. AIRE DE TRAVAIL
a) Veillez à ce que l’aire de travail soit propre et bien éclairée. Le désordre et le manque de
lumière favorisent les accidents.
b) N’utilisez pas d’outils électriques dans un milieu présentant un risque d’explosion, par
exemple en présence de liquides, de gaz ou de poussières inflammables. Les outils élec-
triques créent des étincelles qui pourraient enflammer les poussières ou les vapeurs.
c) Gardez à distance les curieux, les enfants et les visiteurs lorsque vous travaillez
avec un outil électrique. Ils pourraient vous distraire et vous faire faire une fausse ma-
noeuvre.
2. SÉCURITÉ ÉLECTRIQUE
a) Un outil à pile avec piles incorporées ou un bloc-pile distinct doit être rechargé
uniquement avec le chargeur indiqué pour la pile. Un chargeur qui peut être adéquat
pour un type de pile peut créer un risque d’incendie lorsqu’il est utilisé avec une autre pile.
b) Utiliser un outil à pile uniquement avec le bloc-pile désigné spécifiquement.
L’emploi de toute autre pile peut créer un risque d’incendie.
3. SÉCURITÉ DES PERSONNES
a) Restez alerte, concentrez-vous sur votre travail et faites preuve de bon sens.
N’utilisez pas un outil électrique si vous êtes fatigué ou sous l’influence de
drogues, d’alcool ou de médicaments. Un instant d’inattention lors de l’utilisation
d’outils électriques peut entraîner des blessures graves.
b) Habillez-vous convenablement. Ne portez ni vêtements flottants ni bijoux. Confi-
nez les cheveux longs. Gardez les cheveux, les vêtements et les gants éloignés des pièces
en mouvement. Les vêtements flottants, les bijoux ou les cheveux longs risquent d’être happés par des pièces en mouvement. Gardez les poignées sèches, propres et exemptes d’huile
et de graisse. Le port de gants en caoutchouc et de chaussures à semelle antidérapante est
recommandé si vous travaillez à l’extérieur.
c) Évitez les démarrages accidentels. Avant d’insérer la pile dans l’outil, assurez-
vous que sa détente est á la position “OFF” (Arrêt) ou verrouillée. Le fait de trans-
porter un outil avec le doigt sur la détente/l’interrupteur ou d’insérer la batterie dans un outil
dont la détente est á la position << ON >> (Marche) peut causer un accident.
d) Retirez les clés de réglage. Prenez l’habitude de vérifier si les clés de réglage et autres
outils sont retirés de l’outil avant de le mettre en marche.
e) Ne vous penchez pas trop en avant. Maintenez un bon appui et restez en équilibre
en tout temps. Une bonne stabilité vous permet de mieux réagir à une situation inatten-
due.
f) Utilisez des accessoires de sécurité. Portez toujours une protection oculaire. Selon
les conditions, portez aussi un masque antipoussière, des bottes de sécurité antidérapantes,
un casque protecteur et une protection antibruit.
g) Tenez les mains à l’écart des arrêtes tranchantes et des pièces en mouvement.
h) Si un sac de récupération de poussière et port pour aspirateur est fourni, assurez
vous qu’il est correctement relié et utilisé de façon appropriée. L’utilisation de ce
système réduit les dangers physiques et physiologiques liés à la poussière.
NA-WT525-M-050727.indd 18 2005-7-27 17:46:10
Page 19

1918
4. UTILISATION ET ENTRETIEN DE L’OUTIL
a) Immobilisez le matériau travaillé sur une surface stable au moyen de serre-joints
ou de toute autre façon adéquate. Le fait de tenir la pièce avec la main ou contre votre
corps n’offre pas une stabilité insuffisante et peut entraîner une perte de contrôle de l’outil.
b) Ne forcez pas l’outil. Utilisez l’outil approprié à la tâche. L’outil approprié fonctionne
mieux et de façon plus sécuritaire. Respectez aussi la vitesse de travail qui lui est propre. Un
usage excessif, en plus de fatiguer l’utilisateur, augmentera l’usure de l’outil et rendra son
maniement plus difficile.
c) N’utilisez pas un outil si l’interrupteur ne le met pas en marche ou ne peut l’arrêter.
Un outil qui ne peut être contrôlé par l’interrupteur est dangereux et doit être réparé.
d) Débranchez le bloc-pile de l’outil ou mettez son commutateur en position << OFF
>> (Arrêt) ou <<LOCKED>> (Verrouillé) avant d’effectuer un réglage, de changer
d’accessoire ou de ranger l’outil. De telles mesures de sécurité préventive réduisent le
risque de démarrage accidentel de l’outil.
e) Rangez les outils hors de la portée des enfants et d’autres personnes inexpéri-
mentées. Les outils sont dangereux dans les mains d’utilisateurs novices.
f) Lorsque le bloc-pile n’est pas en usage, tenez-le à l’écart d’autres objets métal-
liques tels que trombones, pièces de monnaie, clés, clous, vis ou autres petits
objets métalliques susceptibles d’établir une connexion d’une borne à une autre.
Le court-circuitage des bornes de batterie peut causer des étincelles, des brûlures, une explosion ou un incendie.
g) Prenez soin de bien entretenir les outils. Les outils de coupe doivent être toujours
bien affûtés et propres. Des outils bien entretenus, dont les arrêtes sont bien tranchantes,
sont moins susceptibles de se coincer et plus faciles à contrôler.
h) Soyez attentif à tout désalignement ou coincement des pièces en mouvement,
à tout bris ou à toute autre condition préjudiciable au bon fonctionnement de
l’outil. Si vous constatez qu’un outil est endommagé, faites-le réparer avant de
vous en servir. De nombreux accidents sont causés par des outils en mauvais état.
i) Utilisez seulement les accessoires recommandés par le fabricant de votre modèle.
Certains accessoires peuvent convenir à un outil, mais être dangereux avec un autre.
j) Utilisez l’outil approprié à la tâche à accomplir. Ne forcez pas l’outil ni l’accessoire en
tentant d’effectuer une tâche pour laquelle ils n’ont pas été conçus.
5. ENTRETIEN
a) L’entretien ou la réparation de l’outil doit être réalisé seulement par du personnel qualifié.
L’entretien ou la réparation d’un outil électrique, effectués par un amateur, peuvent avoir des
conséquences graves.
b) Pour l’entretien d’un outil, n’employez que des pièces de rechange identiques. Suivez les
directives fournies dans la section <<Entretien>> du présent manuel. L’emploi de pièces
non autorisées ou le non-respect des instructions d’entretien peut créer un risque de choc
électrique ou de blessures.
RÉGLES DE SÉCURITÉ SUPPLÉMENTAIRES POUR SCIES
CIRCULAIRE SANS CORDON
AVERTISSEMENT! La non observance de ces règles peut conduire à des blessures
graves.
1) Lors de l’exécution d’une opération au cours de laquelle l’outil de coupe peut venir
en contact avec les fils cachés ou son propre cordon, tenez l’outil par ses surfaces
NA-WT525-M-050727.indd 19 2005-7-27 17:46:11
Page 20

Scie Circulaire Sans Cordon WT525
isolées de préhension. Le contact avec un fil sous tension rendra les pièces métalliques
exposées de l’outil sous tension et causera des chocs à l’opérateur.
2) Gardez les mains à l’écart de la zone de coupe. Ne placez surtout pas la main sous le
matériau que vous coupez. Il est impossible de déterminer exactement la proximité de la lame
de votre main.
3) Portez toujours des lunettes à coques latérales ou des lunettes de protection en
utilisant cet outil. Utilisez un respirateur ou un masque anti-poussières pour les
applications produisant de la poussière.
4) N’utiliser pas de lames émoussées ou endommagées. Les lames bien affûtées scient
mieux et améliorent la sécurité. Les lames pliées peuvent aisément se fracturer ou causer un
rebond.
5) La base doit être maintenue fermement contre le matériau à couper afin de réduire
les vibrations de la scie, les sauts et cassures de lame.
6) N’arrêtez jamais la scie de coupe par pression latérale sur la lame.
7) Ne retirez la scie de la pièce travaillée que lorsque la lame s’est arrêtée.
8) En travaillant, ne mettez pas vos mains sous la pièce; le garde ne protège pas de la
lame en dessous de l’ouvrage.
9) La scie circulaire est un outil à main, ne pas la fixer.
10) Avant la coupe, vérifier que la ligne de coupe est dépourvue de clous, vis, etc.
11) Ne pas couper de petites pièces avec la scie circulaire. Utiliser plutôt une scie sau-
teuse.
12) N’utilisez que des lames dont la vitesse nominale de rotation dépasse la vitesse à
vide de la scie.
13) Ne jamais enlever le système de capot protecteur. Ne jamais utiliser la scie si le sys-
tème de capot protecteur ne fonctionne pas correctement. Ne jamais verrouiller le capot mobile sur la position ouverte. Le capot doit bouger librement.
14) Avant chaque emploi, vérifiez TOUJOURS si le garde-lame inférieur se ferme cor-
rectement. N’utilisez pas la scie si le garde-lame inférieur ne pivote pas librement
et ne se ferme pas instantanément. Ne fixez/attachez jamais le garde-lame inférieur en
position ouverte. Si vous échappez accidentellement a scie, le garde-lame inférieur peut se
tordre. Relevez le avec le levier de rétraction. Assurez-vous que le garde se déplace librement
et qu’il ne touche pas la lame ni aucune autre pièce sous tout angle et profondeur de coupe.
15) Toujours vérifier les murs, sols et plafonds afin de voir s’il existe des câbles et
tuyaux cachés.
16) Ne pas couper de matériaux contenant de l’amiante.
17) Ne pas utiliser des lames pour métal ou pierre. Utiliser uniquement des lames pour
bois.
18) Ne pas utiliser la scie circulaire pour couper des branches d’arbre ou des bûches.
19) Ne pas utiliser de meules.
20) Positionnez vous d’un côté ou de l’autre de la scie et non directement derrière
celle-ci. Un saisissement de lame pourrait projeter l’outil vers l’arrière.
21) Rappelez vous que cet outil est toujours en état de fonctionnement possible parce
qu’il ne doit pas être branché dans une prise de courant.
22) Sortez le bloc pile de l’outil ou placez son commutateur en position << OFF >> (Ar-
rêt) ou <<LOCKED>> (Verrouillé) avant d’y faire un travail quelconque, d’effectuer un
réglage ou de changer d’accessoire. Une telle mesure de sécurité préventive préviendra le
démarrage accidentel de l’outil.
23) Conservez ces instructions. Reportez-vous y fréquemment et utilisez-les pour informer
d’autres personnes qui pourraient utiliser cet outil. Si une autre personne utilise cet outil, assurez-vous de lui fournir ces instructions.
NA-WT525-M-050727.indd 20 2005-7-27 17:46:11
Page 21

2120
AVERTISSEMENT! Les travaux à la machine tel que ponçage, sciage, meulage,
perçage et autres travaux du bâtiment peuvent créer des poussières contenant
des produits chimiques qui sont des causes reconnues de cancer, de malformation congénitale ou d’autres problèmes reproductifs. Ces produits chimiques sont, par exemple:
• Le plomb provenant des peintures á base de plomb
• Les cristaux de silices provenant des briques, du ciment et d’autres produits de maçonnerie
• L’arsenic et le chrome provenant des bois traités chimiquement
Le niveau de risque dû à cette exposition varie avec la fréquence de ces types de travaux. Pour
réduire l’exposition à ces produits chimiques, il faut travailler dans un lieu bien ventilé et porter un
équipement de sécurité approprié tel que certains masques à poussière conçus spécialement pour
filtrer les particules microscopiques.
PILE / CHARGEUR DE PILE
1. Ne pas jeter les piles dans le feu ou avec les ordures ménagères. Rapporter les piles
usagées dans le centre de collecte ou de recyclage le plus proche.
2. Avant d’utiliser le chargeur de pile, lisez toutes les consignes et tous les marquages
d’avertissement sur : (1) le chargeur de pile, (2) le bloc-pile et (3) le produit utilisant
la pile.
3. ATTENTION : Afin de réduire le danger de blessure, le chargeur de batteries WORX
doit seulement être utilisé pour charger le bloc-piles de WORX. Toutes autres marques
de blocs-piles risquent en effet d’exploser et de causer de graves blessures ainsi que des dégàts matériaux. Ne chargez pas le bloc-piles de WORX avec d’autres chargeurs.
4. Ne pas exposer la pile à des températures supérieures à 39°C (102ºF).
5. Toujours recharger la pile dans des ambiances de température comprises entre 2
°C et 35°C (36ºF et 95ºF). La température idéale de chargement se situe entre 18°C
et 29°C (65ºF et 84ºF).
6. Evitez les courts-circuits des connexions de la pile (vis et clous).
7. Pour une meilleure sécurité électrique, le chargeur possède une double isolation.
8. Ne pas exposer le chargeur à la pluie ou à l’eau.
9. Le chargeur a été conçu pour une utilisation l’intérieur uniquement.
10. Ne pas incinérer ou brûler la pile, elle pourrait exploser.
11. Ne pas recharger une pile endommagée.
12. Ne pas recharger des piles non rechargeables.
13. Remplacer tout cordon endommagé sur le chargeur.
14. Toujours débrancher la prise du chargeur avant de brancher ou de débrancher les
connexions à la pile.
15. Il est normal que la pile et le chargeur soient chauds pendant le chargement.
16. Lorsqu’elle est inutilisée, retirez la pile chargée du chargeur.
17. Toujours retirer la batterie du chargeur immédiatement après que celle-ci est rechargée.
AVERTISSEMENT : Une petite quantité d’électrolyte pourrait couler de la batterie après
une exposition à de fortes températures ou après une utilisation prolongée. Évitez tout contact avec la peau et les yeux. Laver immédiatement la peau et les mains en utilisant de l’eau propre. En cas de contact avec les yeux, rincer abondamment à l’eau et consulter immédiatement un
médecin.
NA-WT525-M-050727.indd 21 2005-7-27 17:46:12
Page 22

Scie Circulaire Sans Cordon WT525
L’étiquette de l’outil peut comprendre les symboles suivants
V...................................................................................................................................................................Volts
A..............................................................................................................................................................Ampère
Hz.................................................................................................................................................................
Hertz
~..........................................................................................................................................Courant Alternatif
no ...............................................................................................................................................Vitesse à vide
....................................................................................................Construction classe II / Double isolation
Lisez le manuel
Avertissement
Portez des lunettes de sécurité,
un masque antipoussière et une
protection antibruit
Pour usage à l’intérieur seule
-
ment
Durée de recharge de 1 heure
Double isolation
Ne pas exposez pas à la pluie et à
l’eau
Ne pas jeter au feu
Ne jetez pas les batteries. Retournez
les blocs-piles usés au service de recyclage ou de collecte de votre localité.
Rechargez toujours le bloc-piles à des
températures entre 2ºC - 35ºC (36ºF
- 95ºF)
SYMBOLES
NA-WT525-M-050727.indd 22 2005-7-27 17:46:13
Page 23

2322
1. INTERRUPTEUR MARCHE/ARRÊT
2. POIGNÉE AVANT
3. LAME DE SCIE
4. ÉCHELLE DE PROFONDEUR DE COUPE
5. SOCLE
6. ÉCHELLE D’INCLINAISON DE LA TABLE
7. GUIDE PARALLÈLE
8. SORTIE D’ÉJECTION DE BRAN DE SCIE
9. BOUTON POUR BLOCAGE DE L’ARBRE
10. RONDELLE EXTÉRIEURE
11. ECROU DE SERRAGE DE LAME
12. LEVIER DU GARDE LAME INFÉRIEUR
16
15
20
13
18
19
17
14
10
11
12
8
21
3
5
9
6
7
2
4
1
NA-WT525-M-050727.indd 23 2005-7-27 17:46:13
Page 24

Scie Circulaire Sans Cordon WT525
13. LEVIER DE RÉGLAGE DE PROFONDEUR DE COUPE
14. VIS DE RÉGLAGE DE L’ANGLE DE CHANFREINAGE
15. BLOC-PILES
16. MÉCANISME DE RETENUE DU BLOC-PILES
17. CHARGEUR
18. TÉMOIN LUMINEUX VERT (PILE CHARGÉE)
19. TÉMOIN LUMINEUX ROUGE (PILE EN CHARGE)
20. PORTE CLÉ HEXAGONALE
21. POIGNÉE PRINCIPALE
TECHNICAL DATA
Tension nominale: 18 V
Vitesse à vide: 3,300tr/min
Angle de chanfreinage: 0-50º
Diamètre de lame: 5 1/2po (140mm)
Alésage: 3/8po (10mm)
Profondeur maximale de coupe:
à 90º 1 5/8po (41,5mm)
à 45º 1 3/16po (30mm)
Poids: 7,7lb (3,5Kg)
ACCESSORIES
Bloc-piles deux (2)18 V-2.0 Ah (Ni-Cd) (WT525/WT940K)
Chargeur de 1-heure Tension 120 V~60 Hz
Clé 1
Guide parallèle 1
Nous vous recommandons d’acheter tous vos accessoires du même magasin qui vous a vendu
l’outil. N’utilisez que des accessoires de bonne qualité de marque renommée. Choisissez le type
d’outil approprié au travail que vous désirez entreprendre. Pour de plus amples renseignements,
consultez l’emballage de l’accessoire. Le personnel du magasin peut également vous conseiller.
NA-WT525-M-050727.indd 24 2005-7-27 17:46:14
Page 25

2524
INSTRUCTIONS D’UTILISATION
REMARQUE: Avant d’utiliser cet outil, assurezvous de lire attentivement le manuel d’utilisation
REBOND
Mesures de sécurité supplémentaires pour tout type de
scie
Causes et prévention des effets de rebond:
- L’effet de rebond est une réaction soudaine d’une lame
de scie mal alignée, tordue ou grippée qui dévie la scie
de la pièce de bois vers l’utilisateur.
-Lorsque la lame est pincée ou grippée à l’extrémité
du trait de scie, la lame se bloque et la réaction du
moteur ramène très rapidement l’unité en direction de
l’utilisateur.
- Si la lame se tord ou s’aligne mal dans la coupe, la dent
de l’extrémité arrière de la lame peut plonger dans la
surface supérieure du bois et la lame peut sortir du trait
de scie pour être projetée vers l’utilisateur.
L’effet de rebond est le résultat d’une mauvaise utilisation de la scie et/ou de procédures ou de conditions
d’utilisation incorrectes et peut être évité en suivant les
instructions ci-dessous.
a. Maintenir fermement la scie avec les deux mains et
positionner les bras pour résister aux forces de l’effet
de rebond. Positionner le corps de chaque côté de la
lame mais non dans le prolongement de celle-ci. L’effet
de rebond pourrait faire sauter la scie en arrière mais
ces forces peuvent être contrôlées par l’utilisateur si les
mesures nécessaires sont prises.
b. Lorsque la lame se grippe ou lorsque la coupe est interrompue pour quelques raisons, relâcher l’interrupteur
et maintenir la scie dans la pièce de bois jusqu’à l’arrêt
complet de l’outil. Ne jamais essayer de retirer la scie du
travail ou de tirer la scie en arrière lorsque la lame est
en marche ou un effet de rebond pourrait se produire.
Chercher la cause du grippage de la lame et prendre les
mesures correctives.
c. Lors du redémarrage de la scie dans la pièce de bois,
centrer la scie dans la ligne de coupe et vérifier que les
dents de la scie ne sont pas engagées dans la pièce. Si la
lame de scie est grippée, elle pourrait sauter hors de la
pièce de bois lors du redémarrage de la scie.
d. Supporter les gros panneaux afin de réduire le risque
de pincement ou de retour en arrière de la lame.
Les gros panneaux ont tendance à fléchir sous leur
propre poids. Des supports doivent être placés sous la
planche de chaque côté, près de la ligne de coupe et près
du bord de la planche.
NA-WT525-M-050727.indd 25 2005-7-27 17:46:15
Page 26

Scie Circulaire Sans Cordon WT525
e. Ne pas utiliser de lames émoussées ou endommagées. Des lames non aiguisées ou incorrectes produisent
des lignes de coupe étroites provoquant un frottement
excessif, un grippage de la lame ou un effet de rebond.
f. Les verrous de réglage de la profondeur de la lame
et de l’angle de chanfreinage doivent être fixés fermement et en toute sécurité avant d’effectuer la coupe. Si
les leviers de serrage de la lame se desserraient pendant
la coupe, cela pourrait provoquer le grippage de la lame
ou un effet de rebond.
g. Être davantage prudent lors de la réalisation d’une
“ coupe en plongée” sur des murs existants ou sur
d’autres surfaces opaques. Si la saillie de lame entre en
contact avec d’autres objets en arrière de la surface ceci
pourrait provoquer un rebond de la scie.
COUPE POCHETTTE (au centre d’une surface)
Cette opération exige de pouvoir bien manipuler la scie
(à effectuer que sur matériaux non durs) et ne doit être
effectuée que par une personne capable et habile à ce
faire.
Avertissement : Lors de cette opération, les
dents de scie sont exposées, alors faites preuve
d’extrême prudence en appliquant cette procédure.
a. Avec un marqueur, délimitez clairement la surface à
ouvrir.
b. Réglez la profondeur de coupe de la scie.
c. Positionnez la scie au dessus d’une limite de la surface
en plaçant de devant de la base sur la surface et alignez
le guide de coupe sur la marque (se référer à la Figure
8).
d. En vous assurant que la lame ne touche pas la surface
(tout en étant près d’elle), pousser le levier (5) du protecteur de lame pour faire pivoter le protecteur hors de
prévenir la coupe.
e. Faites démarrer la scie et descendez lentement la lame
sur le matériel en maintenant une force sur le devant
de la base pour produire un mouvement de pivotement
insérant la lame dans le matériel. Lorsque la lame commence à pénétrer dans surface, relâchez le protecteur
inférieur pour une protection normale de travail.
PROTECTEURS DE LAME
a. Avant chaque utilisation, vérifiez que le protecteur rétractable soit bien refermé. Ne pas
mettre la scie en marche si le protecteur inférieur
ne bouge pas librement et ne se ferme pas instantanément. Ne jamais bloquer ou attacher le protecteur inférieur en position ouverte. Si la scie est
accidentellement échappée, le protecteur inférieur peut
NA-WT525-M-050727.indd 26 2005-7-27 17:46:15
Page 27

2726
se tordre. Faites pivoter le protecteur inférieur par son
levier et assurez-vous qu’il bouge librement et ne touche
pas la lame ni aucune autre partie, dans tous les angles
et profondeurs de coupe.
b. Vérifier le bon fonctionnement du ressort du
protecteur inférieur. Si le protecteur et le ressort
ne fonctionnent pas correctement, ils doivent
être réparés avant toute utilisation. Le protecteur
inférieur peut fonctionner lentement à cause de parties
endommagées, de dépôts gommeux ou d’un amoncellement de débris.
c. Le protecteur inférieur doit être soulevé manuellement uniquement pour des coupes spéciales telles que « les coupes en plongée » et les «
coupes composées ». Soulevez le protecteur inférieur en soulevant son levier de pivotement et
dès que la lame pénètre le matériau, le protecteur
inférieur doit être relâché. Pour toutes les autres
opérations de sciage, le protecteur inférieur devrait être
en fonction automatique.
d. Toujours s’assurer que le protecteur inférieur
recouvre la lame avant de poser la scie sur l’établi
ou sur le sol. Une lame à nue, non protégée qui n’a
pas fini de tourner fera reculer la scie qui tranchera tout
ce qui se trouve sur son passage. Prendre en compte
le temps nécessaire à la lame pour s’arrêter après que
l’interrupteur ait été relâché.
1. AVANT D’UTILISER VOTRE SCIE CIRCULAIRE
SANS FIL
Votre bloc-pile n’est PAS CHARGÉ. If faut donc le re-
charger une fois avant d’utiliser l’outil. Votre bloc-pile ne
se rechargera pas complètement tant que vous ne l’aurez
pas rechargé quelques fois à la suite de décharges complète. La performance de la pile s’améliorera après ces
décharges et recharges consécutives.
Avertissement: Le chargeur et la batterie sont
spécifiquement conçus pour être utilisés ensemble, ne faites pas usage d’autres articles. N’insérez jamais d’objets métalliques et ne laissez pas non plus de
tels objets entrer en contact avec les bornes de la batterie/chargeur. Ceci est dangereux et entraînera une panne
du chargeur.
2. COMMENT RECHARGER LE BLOC-PILE(se référer aux Figure 1)
1) Branchez le chargeur dans une prise d’alimentation.
Le témoin rouge s’allumera durant 3 secondes.
Note : Si le témoin rouge clignote rapidement (env. 5
clignotements par sec.), c’est que le chargeur est dé-
Fig 1
18
19
17
NA-WT525-M-050727.indd 27 2005-7-27 17:46:16
Page 28

Scie Circulaire Sans Cordon WT525
fectueux et devra être remplacé.
2) Insérez le bloc-piles à fond dans le chargeur. Normalement, seulement le témoin rouge s’allumera, indiquant
que le chargeur est en fonctionnement. Le témoin rouge
restera allumé durant la durée de recharge. À température ambiante, un bloc-piles complètement déchargé
prendra environ 1 heure pour être complètement rechargé.
Note : Si la température du bloc-piles est en dessous de
32°F (0°C), le témoin vert clignotera lentement (environ 2
clignotements par seconde). Dans ce cas, sortez le blocpiles du chargeur et laissez le atteindre une température
au dessus de 36°F (2°C) (n’excédant pas 95°F (35°C)). Si
en recharge la température du bloc-piles atteint 140°F
(60°C), le témoin vert clignotera rapidement (environ 5
clignotements par seconde). Dans ce cas, retirez le du
chargeur et laissez sa température descendre entre 75°F
(35°C) et 36°F (2°C). Si en recharge la température du
bloc-piles atteint 176°F (80°C), la charge s’interrompra
et le témoin rouge clignotera lentement (environ 2
clignotements par seconde). Dans ce cas, le bloc-piles
est en défaut et devra être remplacé.
3) Lorsque la recharge est complétée, seule le témoin
vert sera allumé.
Note : Lorsque le bloc-piles est en recharge et que sa
tension ne peut atteindre 14 V en moins de deux (2) minutes, le bloc-piles est considéré avoir atteint sa fin de vie
utile et le témoin rouge clignotera lentement (environ 2
clignotements par seconde). Dans ce cas, remplacez le.
4) Lorsque le bloc-piles est complètement rechargé, le
chargeur se met en mode d’entretien de la pile en lui
fournissant un faible courant de 50 mA.
Note : La minuterie du chargeur et son circuit de détection de température/débranchement du bloc-piles,
prévient la surcharge du bloc-piles. Cependant, il est recommandé de retirer le bloc-piles du chargeur à la fin du
cycle de recharge lorsque le témoin vert s’allume.
État Témoin Taux de
Clignotement
Bloc-piles en recharge rouge allumé
Chargeur en panne rouge rapide (5/sec)
B-P < 32ºF (0ºC) vert lent (2/sec)
B-P > 140ºF (60ºC) vert rapide (5/sec)
B-P > 176ºF (80ºC) rouge lent (2/sec)
Fin de vie utile rouge lent (2/sec)
Recharge complétée vert allumé
NA-WT525-M-050727.indd 28 2005-7-27 17:46:17
Page 29

2928
Fig 2
a
b
3. RETRAIT/RÉINSTALLATION DU BLOC-PILE
Repérez les verrous sur les côtés du bloc-pile et appuyez
des deux verrous pour dégager le bloc-pile de la scie
circulaire. Retirez le bloc-pile. Après l’avoir rechargé, réinsérez le dans son emplacement sur la scie circulaire.
Une simple pression d’insertion sera suffisante.
4. INTERRUPTEUR MARCHE/ARRÉT DE SÉCURITÉ
Afin d’éviter les démarrages accidentels un système
de sécurité de l’interrupteur Marche – Arrêt est installé
sur cette scie circulaire. Pour démarrer votre scie circulaire, appuyez sur le bouton de sécurité (a) puis sur
l’interrupteur Marche – Arrêt (b). L’interrupteur Marche
– Arrêt est alors actif et vous pouvez relâcher la pression
sur le bouton de verrouillage (a). Lorsque vous relâchez
complètement l’interrupteur Marche – Arrêt votre machine s’arrête et le système de sécurité de l’interrupteur
Marche – Arrêt se ré-active (se référer aux Figure 2).
5. REMPLACEMENT DE LAME
Desserrez le levier de blocage de profondeur de coupe
(13) et soulevez le corps de la scie pour l’éloigner de la
base. Sortez la clé hexagonale (20) de sa place de rangement sur la base. Appuyez dur le bouton de blocage de
l’arbre (9) et utilisez la clé hexagonale fournie pour dévisser le boulon puis retirez la rondelle extérieure. Repoussez le levier d’actionnemnt du garde inférieur (12)
en sens horaire et gardez le garde dégagé de la lame
durant son remplacement. Assurez vous que la direction
de la flèche de la nouvelle lame est dans le même sens
que la flèche sur le garde inférieur et placez la lame sur
l’arbre en l’appuyant sur la rondelle intérieure. Soyez
certain que les surfaces des rondelles et de la lame sont
propres. Engagez le verrou de rotation d’arbre à nouveau et replacez la rondelle extérieure sur les méplats
de l’arbre puis serrez le boulon de 1/4 de tour de plus
qu’un serrage manuel. Vérifiez que la lame tient bien en
place (se référer à la Figure 3).
Avertissement : Les dents de scie sont très
acérées, portez des gants protecteurs lors de leurs
remplacements. Pour de meilleurs résultats, assurezvous de l’utilisation d’une lame appropriée au matériau
et à la qualité de coupe souhaitée. Assurez vous que la
lame est conçue pour la vitesse nominale de l’outil. Dans
cet outil, n’utilisez que des lames à dents carburées.
6. RÉGLAGE DE LA PROFONDEUR DE COUPE
Soulevez le levier de verrouillage de la profondeur de
coupe (13), et vous pouvez alors éloigner manuellement
le corps de votre scie circulaire de la base (5). En vous
Fig 3
NA-WT525-M-050727.indd 29 2005-7-27 17:46:17
Page 30

Scie Circulaire Sans Cordon WT525
référant à l’échelle graduée (4), réglez la profondeur de
coupe désirée et abaissez le levier de verrouillage (se
référer aux Figure 4). Ajoutez toujours 3 mm (1/8 po) à
la profondeur désirée pour que la lame puisse traverser
l’épaisseur du matériel. La position du couteau diviseur
s’ajuste automatiquement en même temps que la profondeur de coupe est changée.
7. BASE ou TABLE
Le réglage de l’angle de la base (5) permet le chanfreinage. La table de votre scie circulaire doit toujours être
maintenue fermement contre le matériau à couper afin
de réduire : les vibrations de la scie, les casses de lame.
8. RÉGLAGE DE L’ANGLE DE COUPE
Desserrez le bouton de serrage (14) pour régler l’angle
de chanfreinage et vous pourrez alors incliner manuellement le corps de votre scie circulaire par rapport à sa
base (5). En fonction de l’inclinaison de la table par rapport à la scie circulaire, un rapporteur vous indique la
valeur de l’angle choisi. Resserrez ensuite le bouton de
verrouillage (6) (se référer aux Figure 5). Assurez vous
ensuite que l’angle est exact et que la base est bien serrée. Ces valeurs d’angles indiquées sont assez précises
pour la plupart des utilisations, néanmoins lorsqu’il
s’agit d’un ouvrage exigeant une grande précision, il
est recommandé de régler l’angle avec un rapporteur
séparé et de procéder à un essai de coupe préliminaire.
Note : l’échelle de profondeur de coupe n’est plus exacte
en inclinaison pour chanfreinage.
9. RÉGLAGE DU GUIDE PARALLÈLE
Le guide parallèle sert à faire une coupe parallèle à une
distance donnée d’une arrête de la pièce travaillée. Faîtes glisser le bras du guide parallèle (7) au travers des
deux dispositifs de façon à obtenir la distance désirée
et serrez la vis de blocage (se référer aux Figure 6). Le
bras peut être utilisé des deux côtés de la base (5). Le
bras du guide est gradué de façon à ce que vous choisissiez la distance de coupe en vous référant au rebord de
l’encoche de coupe à 90° ou à 45° sur la base (5). Faites
toujours un essai préliminaire pour vérifier le réglage.
10. SORTIE POUR ASPIRATION DE POUSSIÈRES
Pour extraire le bran de scie, mettez en place un récupérateur de poussière approprié (c.à.d. un aspirateur)
à l’orifice d’extraction de poussières (8) en utilisant un
tuyau flexible. Assurez-vous le raccordement du tuyau
est serré.
Fig 6
Fig 4
Fig 5
NA-WT525-M-050727.indd 30 2005-7-27 17:46:18
Page 31

3130
11. DISPOSITION DE BLOCS-PILES
Afin de préserver les ressources naturelles, recyclez
ou jetez le bloc-piles de façon appropriée. Ce blocpiles contient des piles au nickel-cadmium. Consultez
les autorités locales de recyclage pour connaître les solutions de recyclage ou de disposition des déchets disponibles. Déchargez le bloc-piles en faisant fonctionner
l’outil, puis retirez le du boîtier de la scie circulaire et recouvrez les bornes de connexion de la batterie avec une
bande adhésive très résistante pour éviter les court circuits et les décharges d’énergie. N’essayez pas d’ouvrir
ou d’enlever ses différents composants.
CONSEILS POUR L’UTILISATION
DE VOTRE SCIE CIRCULAIRE
a) Si votre scie circulaire chauffe de manière excessive,
faites la fonctionner à vide pendant 2 à 3 minutes afin
de refroidir le moteur. Evitez l’usage prolongé de votre
machine à très faible vitesse.
b) Utilisez toujours une lame qui correspond au type de
matériau à couper et de son épaisseur. Plus le nombre
de dents de la lame utilisée est important, plus la qualité
de la coupe sera bonne.
c) Assurez-vous toujours que la pièce travaillée est correctement fixée pour ne pas qu’elle se déplace.
d) Supportez les pièces de grandes dimensions près de
la ligne de coupe. Un déplacement de la pièce affectera
la qualité de coupe.
e) La lame coupe vers le haut et peut affecter la finition
du dessus de la surface à son arrête. Placez toujours
cette surface/arrête sur un coin non visible de votre
projet. Placez toujours la surface à utiliser en bas pour
assurer le minimum d’écaillage lors de la coupe. Le déplacement trop rapide de la scie réduira de beaucoup
le rendement de la machine et écourtera la durée des
lames. N’utilisez que des lames bien affûtées et du type
approprié au travail.
FOIRE AUX QUESTIONS
1. POURQUOI LA MACHINE NE DÉMARRE-T-ELLE
PAS QUAND J’APPUIE SUR LA DÉTENTE?
La détente (b) est verrouillée. Vous devez en premier lieu
appuyer sur le bouton du verrou (a) pour débloquer la
détente (se référer à la Figure 2).
NA-WT525-M-050727.indd 31 2005-7-27 17:46:18
Page 32

Scie Circulaire Sans Cordon WT525
2. POURQUOI LA SCIE TOURNE-T-ELLE LENTEMENT?
Si le bloc-piles n’est pas complètement chargé, rechargez-le à l’aide du chargeur fourni.
Note:Ne chargez pas le bloc-piles avec un autre chargeur;
ne chargez qu’avec celui fourni.
3. POURQUOI NE PUIS-JE INSÉRER LE BLOCPILES DANS LE CHARGEUR?
Le bloc-piles ne peut être inséré dans le chargeur que
dans un sens. Retournez celui-ci jusqu’à ce qu’il s’insère
correctement. Le voyant rouge doit s’allumer quand la
pile est en charge (se référer à la Figures 7.1, 7.2)
4. QUELLES SONT LES RAISONS DES DIFFÉRENTS
TEMPS DE RECHARGE?
Le temps de charge peut être affecté par de nombreux
paramètres sans que votre produit ne soit défectueux. Si
la pile n’est que partiellement déchargée, il est possible
qu’elle se recharge en moins d’une heure.
Si la température ambiante et la pile sont très froides,
alors la charge peut prendre 1 heure ou 1 heure et demie. Si le bloc-piles est très chaud, la charge ne commencera pas en raison de sa sécurité thermique interne.
Si le bloc-piles est très chaud, vous devez le retirer du
chargeur et le laisser se refroidir pour qu’il atteigne la
température ambiante avant de le remettre en charge.
Si vous chargez une 2ème pile immédiatement après la
première, le chargeur peut surchauffer. Laissez celui-ci
au repos au moins 15 minutes entre les charges.
5. QUELLES SONT LES RAISONS POUR LA DIFFÉRENCE D’AUTONOMIE DES BLOCS-PILES?
Des situations de charge comme celles mentionnées ci-haut et de stockage prolongé peuvent réduire
l’autonomie et la durée de vie du bloc-piles. Ceci peut
être corrigé après plusieurs cycles de charge et de
décharge. Des conditions de travail sévères, par exemple
le vissage de grosses vis dans du bois dur, déchargera
plus rapidement le bloc-piles que des conditions moins
sévères. Ne rechargez pas votre pile sous 2°C ni au-dessus de 35°C (36°F ni au-dessus de 95°F) car ceci affectera
ses performances.
PRENEZ SOIN DE VOS OUTILS ET
ENTRETENEZ LES BIEN
En les gardant bien affûtés et propres, vous en obtiendrez
le rendement maximum dans des conditions optimales
de sécurité. Suivez les instructions pour le graissage ou
Fig 7.1
Fig 7.2
NA-WT525-M-050727.indd 32 2005-7-27 17:46:19
Page 33

3332
la pose et le démontage des accessoires. Inspectez les
cordons d’alimentation à intervalles réguliers et, s’ils
sont endommagés, faites-les réparer à un centre de service après-vente autorisé.
Votre outil ne nécessite aucune lubrification ou entretien
supplémentaire. Il ne comporte aucune pièce à réparer
ou à entretenir par l’utilisateur. N’utilisez jamais de l’eau
ou des nettoyants chimiques pour nettoyer l’outil. Essuyez-le avec un chiffon sec. Rangez toujours votre outil
dans un endroit sec. Gardez propres les ouvertures de
ventilation du moteur. Si vous remarquez des étincelles
dans les ouvertures de ventilation, ceci est normal et
n’endommagera pas votre outil.
GARANTIE
POLITIQUE D’ÉCHANGE LIMITÉE DE SOIXANTE
(60) JOURS
Un outil qui ne fonctionne pas correctement à cause
d’un défaut de pièce ou de main-d’œuvre est échangeable durant les soixante (60) premiers jours après la date
d’achat en rapportant l’outil au détaillant où il a été acheté. Pour obtenir un outil de remplacement vous devez
présenter une preuve d’achat datée et retourner l’outil
dans son emballage original.
GARANTIE LIMITÉE DE DEUX (2) ANS
Nous garantissons que durant une période de deux (2)
ans à partir de la date d’achat, ce produit sera libre de
défaut de matériaux de fabrication et de main d’œuvre.
Nous réparerons ou remplacerons, à notre seule option,
cet outil durant la période de garantie et nous pouvons
exiger qu’il soit expédié, frais de port payés, à un de nos
centres de service autorisés, accompagné d’une preuve
d’achat datée. Tout outil remplacé ou réparé ne sera couvert que de la période de garantie restant sur la durée de
deux (2) ans depuis la date d’achat.
CE QUI EST EXCLUS DE LA GARANTIE
Cette garantie n’est valide que pour l’acheteur original et
n’est pas transférable.
Cette garantie ne couvre PAS l’entretien ou le remplacement de pièces usées qui est normalement requis.
Cette garantie ne couvre PAS les accessoires ou les
blocs-piles.
Cette garantie ne couvre PAS :
- le mauvais fonctionnement, pannes ou défauts causés par un usage anormal, l’abus, la négligence ou
une utilisation ne suivant pas les directives du manuel
NA-WT525-M-050727.indd 33 2005-7-27 17:46:19
Page 34

Scie Circulaire Sans Cordon WT525
d’utilisation.
- l’endommagement résultant d’accidents, d’échappements
au sol ou de mauvais traitements de l’outil
- les problèmes causés par une modification ou réparation faite ailleurs qu’à un centre de service autorisé.
- les problèmes dus à l’utilisation commerciale ou de
location.
Le manufacturier ne fait pas de garantie, représentation ou promesse relatives à la qualité ou performance
de ses outils autres que celles décrites en toutes lettres
dans la présente garantie.
ASSISTANCE
Pour faire remplacer votre outil et obtenir l’adresse d’un
centre de service autorisé, contactez notre personnel
d’assistance à la clientèle au numéro sans frais 1-866354-WORX (9679) (du lundi au samedi entre 9:00 h et
21:00 h, heure normale de l’Est). Lorsque vous faites une
réclamation de garantie ou retournez l’outil pour réparation sous garantie, vous devez également inclure une
preuve d’achat datée.
LIMITATIONS ADDITIONNELLES
Cette garantie n’est valide que pour les produits achetés et utilisés aux États-Unis d’Amérique, ses territoires,
et au Canada. Toute garantie tacite aux lois étatiques ou
provinciales (incluant les garanties de qualité marchande
ou de capacité dédiée à une application particulière) est
limitée à deux ans de la date d’achat. Le manufacturier
ne sera pas responsable des dommages accessoires directs et indirects incluant (mais ne se limitant pas à) la
perte de revenus résultant de l’achat ou de l’utilisation
du produit. Certains états et provinces n’autorisent pas
la limitation de durée de garantie tacite et/ou ne permettent pas l’exclusion ou la limitation des dommages
accessoires directs, alors les limitations et exclusions
énumérées ci-dessus peuvent ne pas s’appliquer dans
votre cas. Cette garantie vous donne des droits légaux
spécifiques et vous avez peut-être d’autres droits qui
varient d’un état ou province à l’autre.
Le manufacturier décline toute responsabilité civile de
dommages provenant d’une utilisation abusive ou n’étant
pas conforme à la bonne utilisation ou à l’entretien de la
machine décrits au manuel de l’utilisateur.
Après l’achat, le manufacturier suggère de lire le
manuel de l’utilisateur avant de se servir de la machine et d’en faire l’entretien recommandé.
NA-WT525-M-050727.indd 34 2005-7-27 17:46:20
Page 35

3534
NA-WT525-M-050727.indd 35 2005-7-27 17:46:20
Page 36

Sierra Circular Inalámbrica WT525
INSTRUCCIONES DE SEGURIDAD
¡CUIDADO! Lea y comprenda todas las instrucciones. El no seguir todas las instrucciones a continuación puede ocasionar descargas eléctricas, incendios y/o heridas graves.
CONSERVE ESTAS INSTRUCCIONES
1. ÁREA DE TRABAJO
a) Mantenga su lugar de trabajo limpio y bien iluminado. Bancos de trabajo desordena-
dos y lugares oscuros invitan a los accidentes.
b) No utilice herramientas eléctricas en atmósferas explosivas, como por ejemplo en
presencia de líquidos, inflamables, gases o polvo. Las herramientas eléctricas crean
chispas que pueden encender el polvo o los vapores.
c) Mantenga a los espectadores, niños y visitantes a una distancia prudente cuando
esté utilizando una herramienta eléctrica. Las distracciones pueden hacerle perder el
control.
2. SEGURIDAD ELÉCTRICA
a) Una herramienta accionada a baterías que tenga baterías integradas o un paquete
de baterías separado se debe recargar solamente con el cargador especificado
para la batería. Un cargador que puede ser adecuado para un tipo de batería puede crear
un peligro de incendio cuando se usa con otra batería.
b) Utilice la herramienta accionada a baterías solamente con el paquete de baterías
designado específicamente. El uso de cualquier otra batería puede crear un peligro de
incendio.
3. SEGURIDAD PERSONAL
a) Manténgase alerta, fíjese en lo que está haciendo y use el sentido común cuando
utilice una herramienta eléctrica. No use la herramienta cuando esté cansado o se
encuentre bajo la influencia de drogas, alcohol o medicamentos. Un momento de
distracción al utilizar herramientas eléctricas puede dar lugar a lesiones personales graves.
b) Vístase apropiadamente. No se ponga ropa holgada ni joyas. Recójase el cabello
largo. Mantenga su cabello, ropa y guantes alejados de las piezas móviles. La ropa
holgada, las joyas o el pelo largo pueden quedar atrapados en las piezas móviles. Mantenga
los mangos secos, limpios y libres de aceite y grasa. Se recomiendan guantes de caucho y
calzado antideslizante cuando se trabaja a la intemperie.
c) Evite el arranque accidental. Asegúrese de que el interruptor esté en la posición
de trabado o de apagado antes de instalar el paquete de baterías. Transportar her-
ramientas con el dedo en el interruptor o instalar el paquete de batería cuando el interruptor
está encendido invitan a los accidentes.
d) Retire todas las llaves y calibradores. Hágase el hábito de verificar que todas las llaves,
calibradores, etc. hayan sido removidos de la herramienta antes de operarla.
e) No intente alcanzar demasiado lejos. Mantenga un apoyo de los pies y un equi-
librio adecuados en todo momento. El apoyo de los pies y el equilibrio adecuados per-
miten un mejor control de la herramienta en situaciones inesperadas.
f) Utilice equipo de seguridad. Use siempre protección ocular. Se debe utilizar una
máscara antipolvo, zapatos de seguridad antideslizantes, casco o protección auditiva según
lo requieran las condiciones.
g) Mantenga las manos retiradas de bordes cortantes y partes en movimiento.
h) Si se proporcionan dispositivos para la extracción y recolección de polvo,
asegúrese que estos estén conectados y utilizados correctamente. El uso de estos
NA-WT525-M-050727.indd 36 2005-7-27 17:46:20
Page 37

Sierra Circular Inalámbrica WT525
3736
dispositivos puede reducir peligros relacionados con el polvo.
4. USO Y CUIDADO DE LA HERRAMIENTA
a) Utilice abrazaderas u otro modo práctico de asegurar y apoyar el material de tra-
bajo sobre una plataforma estable. Sostener el material de trabajo en la mano o contra
su cuerpo es inestable y puede conducir a la pérdida de control.
b) No fuerce la herramienta. Emplee la herramienta correcta para la aplicación que
desea. La herramienta correcta hará el trabajo mejor y con más seguridad a la capacidad
nominal para la que está diseñada. Forzándola solamente causará fatiga al operario, mayor
desgaste y menor control.
c) No utilice la herramienta si el interruptor no la enciende o apaga. Toda herramienta
que no se pueda controlar con el interruptor es peligrosa y debe ser reparada.
d) Desconecte la batería de la herramienta o ponga el interruptor en la posición de
trabado o de apagado antes de hacer cualquier ajuste, cambio de accesorios o
guardar la herramienta. Estas medidas de seguridad preventivas reducen el riesgo de
encender la herramienta accidentalmente.
e) Guarde las herramientas que no esté usando fuera del alcance de los niños y otras
personas no capacitadas. Las herramientas son peligrosas en las manos de los usuarios
no capacitados.
f) Cuando la batería no se usa, manténgala alejada de otros objetos metálicos como:
sujetapapeles, monedas, clavos, tornillos u otros pequeños objetos de metal capaces de hacer una conexión entre los terminales. El cortocircuito de los terminales
de una batería puede causar chispas, quemaduras o incendio.
g) Mantenga las herramientas con cuidado. Conserve las herramientas de corte afi-
ladas y limpias. Las herramientas mantenidas adecuadamente, con bordes de corte afila-
dos, tienen menos probabilidades de atascarse y son más fáciles de controlar.
h) Compruebe la desalineación o el atasco de las piezas móviles, la ruptura de piezas
y cualquier otra situación que pueda afectar el funcionamiento de las herramientas. Si la herramienta está dañada, hágala arreglar antes de usarla. Muchos acciden-
tes son causados por herramientas mantenidas deficientemente.
i) Utilice únicamente accesorios que estén recomendados por el fabricante de su
modelo. Los accesorios que pueden ser adecuados para una herramienta pueden volverse
peligrosos cuando se utilizan en otra herramienta.
j) Utilice la herramienta adecuada. No utilice una herramienta o accesorio para hacer traba-
jos para los que no está diseñada ni recomendada.
5. REPARACIÓN
a) La reparación de una herramienta debe ser realizada únicamente por personal
competente. La reparación o mantenimiento realizado por personal no competente podría
ocasionar peligro de que se produzcan lesiones.
b) Al reparar una herramienta, utilice únicamente piezas de repuesto idénticas. Siga
las instrucciones que aparecen en la sección Mantenimiento de este manual. El
uso de piezas no autorizadas o el incumplimiento de las instrucciones de Mantenimiento
pueden ocasionar peligro de que se produzcan descargas eléctricas o lesiones.
NORMAS DE SEGURIDAD ADICIONALES PARA SIERRA CIRCULAR INALÁMBRICA
¡ADVERTENCIA! El no seguir estas normas podría ocasionar lesiones graves.
NA-WT525-M-050727.indd 37 2005-7-27 17:46:21
Page 38

Sierra Circular Inalámbrica WT525
1) Sujete la herramienta por las superficies de agarre aisladas cuando realice una
operación en la que la herramienta de corte pueda entrar en contacto con cables
ocultos o con su propio cable. El contacto con un cable que tenga corriente hará que ésta
pase a las partes metálicas descubiertas de la herramienta y que el operador reciba descargas eléctricas.
2) Mantenga las manos alejadas del área de corte. No ponga la mano debajo del material
que se está cortando. La proximidad de la hoja a la mano queda oculta a la vista.
3) Use siempre gafas de seguridad o protección ocular cuando utilice esta herramienta. Use una máscara antipolvo o un respirador para aplicaciones que generan
polvo.
4) No utilice hojas desfiladas ni dañadas. Las hojas afiladas harán el trabajo mejor y con
más seguridad. Una hoja doblada puede romperse fácilmente o causar retroceso.
5) La base giratoria debe mantenerse firmemente contra el material cortado con el fin
de reducir las vibraciones de la sierra, los saltos y las rupturas de la hoja.
6) Nunca detenga la hoja de corte aplicando presión por el costado de la hoja.
7) Retire la hoja del corte únicamente cuando haya dejado de moverse.
8) No ponga la mano debajo de la pieza de trabajo al cortar. La cubierta no lo protegerá
contra la hoja por debajo de la pieza de trabajo.
9) Su sierra circular es una herramienta de mano; no la asegure con abrazaderas.
10) Antes de cortar, compruebe que la línea del corte esté libre de clavos, tornillos,
etc.
11) No corte pieza de trabajos pequeños con una sierra circular. Si es posible, utilice una
sierra caladora.
12) No utilice una hoja a menos que la velocidad de la misma exceda la de la velocidad
sin carga de la sierra.
13) Nunca retire el sistema de guardas protectoras. Nunca utilice la sierra si el sistema
de guardas protectoras no funciona correctamente. Nunca trabe las guardas en posición de
abierto. Estas deben moverse libremente.
14) Verifique SIEMPRE el cierre de la cubierta inferior antes de cada uso. No opere
la sierra si la cubierta inferior no se mueve libremente y cierra instantáneamente.
Jamás trabe ni ate la cubierta inferior en su posición abierta. Si la sierra se cayese accidentalmente, la cubierta inferior podría doblarse. Levante la cubierta inferior usando
la palanca. Asegúrese de que la cubierta se mueva libremente y que no toque la hoja ni
ninguna otra pieza en todos los ángulos y profundidades de corte.
15) Verifique siempre las paredes y los techos para evitar caños y cables eléctricos
ocultos.
16) No corte material que contenga asbestos.
17) No utilice hojas de sierra de metal o piedra. Utilice solamente hojas de sierra de made-
ra.
18) No utilice la sierra circular para cortar troncos o ramas de árbol.
19) No utilice ningún tipo de ruedas abrasivas.
20) Mantenga su cuerpo en uno de los costados de la sierra, no en línea con la hoja de
la sierra. Un CONTRAGOLPE puede hacer que la sierra salte hacia atrás.
21) Tenga en cuenta que esta herramienta está siempre en condiciones de funcionamiento ya que no necesita enchufarse en un tomacorriente.
22) Saque la batería de la herramienta o coloque la llave en “Trabado” o “Apagado”
antes de cualquier armado, ajuste o cambio de accesorios. Esta medida preventiva
de seguridad reduce el riesgo de que la herramienta se encienda accidentalmente.
23) Conserve estas instrucciones. Consúltelas con frecuencia y úselas para enseñarles a las
otras personas que podrían usar esta herramienta. Si le presta esta herramienta a alguien,
NA-WT525-M-050727.indd 38 2005-7-27 17:46:22
Page 39

Sierra Circular Inalámbrica WT525
3938
asegúrese de que tenga estas instrucciones.
¡ADVERTENCIA! El polvo creado al lijar, serruchar, pulir, taladrar o realizar otras
actividades de la construcción, contiene substancias químicas que se sabe pro
-
ducen cáncer, defectos de nacimiento u otros daños al sistema reproductor. Algunos
ejemplos de esos productos químicos son:
• El plomo de las pinturas a base de plomo
• La sílice cristalina de los ladrillos, del cemento y de otros productos de albañilería
• El arsénico y el cromo de la madera tratada químicamente
El riesgo que se corre a causa del contacto con esos productos varía según la frecuencia con que
usted realice este tipo de trabajos. Con el fin de reducir su exposición a esas substancias químicas:
• Trabaje en un área bien ventilada
• Utilice un equipo de seguridad adecuado, tal como una máscara contra el polvo especialmente
diseñada para filtrar partículas microscópicas.
BATERÍA / CARGADOR
1. No arroje las baterías al fuego o a la basura doméstica. Lleve las baterías agotadas a
su lugar de recolección o reciclado local.
2. Antes de utilizar el cargador de baterías, lea todas las instrucciones e indicaciones
de precaución que se encuentran en (1) el cargador de baterías, (2) el paquete de
baterías y (3) el producto que utiliza las baterías.
3. PRECAUCIÓN: Para reducir el riesgo de herida personal, el cargador, de WORX se
debe usar solamente para cargar la batería, de WORX. Otros tipos de baterías pueden
estallar y causar daños y heridas personales. No cargue las baterías, de WORX con ningún
otro cargador.
4. No guarde la batería a temperaturas por encima de los +102ºF (39ºC).
5. Cargue siempre el pack de la batería bajo temperaturas de entre 36ºF y 95º (2º C y
35ºC). La temperatura ideal de carga es entre 65ºF et 84ºF (18ºC y 29ºC).
6. Evite el cortocircuito de las conexiones de la batería (tornillos y clavos).
7. El cargador está doblemente aislado para seguridad eléctrica adicional.
8. No exponga un cargador a la lluvia o al agua.
9. El cargador debe ser usado en interiores solamente.
10. No incinere ni queme la batería, ya que puede estallar.
11. No cargue baterías que no sean recargables
12. Reemplace cualquier cable dañado de su cargador.
13. Sustituya cualquier cable dañado de su cargador.
14. Desconecte siempre la fuente de alimentación del cargador antes de establecer o
interrumpir las conexiones de la batería.
15. Tanto la batería como el cargador se recalentarán durante la carga; esto es normal.
16. Cuando no esté en uso, saque la batería cargada del cargador.
17. Una vez que la recarga haya terminado, saque siempre la batería cargada del cargador.
¡ADVERTENCIA! Podría derramarse una pequeña cantidad de electrolito de la batería en
condiciones extremas de uso o temperatura. Evite el contacto con la piel y los ojos. Lávese
inmediatamente la piel y manos con agua limpia. Si entra en contacto con sus ojos, lávelos bien
con agua limpia y busque asistencia médica inmediata.
NA-WT525-M-050727.indd 39 2005-7-27 17:46:22
Page 40

Sierra Circular Inalámbrica WT525
La etiqueta de su herramienta puede incluir los siguientes símbolos:
V................................................................................................................................................................Voltios
A............................................................................................................................................................Amperes
Hz.......................................................................................................................................Ciclos por Segundo
~...............................................................................................................................................Corriente alterna
no .......................................................................................................................................Velocidad sin carga
...........................................................................................Construcción de clase II / Doble aislamiento
Lea el manual
Advertencia
Use lentes de seguridad, máscara contra el polvo y protección auditiva
Úsela en el interior solamente
Tiempo de carga de uno hora
Doble aislamiento
No exponer a la lluvia ni al agua
No arrojar al fuego
No arroje las baterías. Devuelva las
baterías agotadas para su recolección local o llévelas a algún centro de
reciclado.
Cargue siempre la batería bajo temperaturas de entre 2ºC - 35ºC (36ºF
- 95ºF)
SÍMBOLOS
NA-WT525-M-050727.indd 40 2005-7-27 17:46:23
Page 41

Sierra Circular Inalámbrica WT525
4140
1. INTERRUPTOR ENCENDIDO/APAGADO
2. MANGO DELANTERO
3. HOJA DE SIERRA
4. INDICADOR DE PROFUNDIDAD DE CORTE
5. BASE
6. INDICADOR DE INCLINACIÓN DE LA BASE
7. GUÍA PARALELA
8. ORIFICIO PARA EXTRACCIÓN DEL ASERRÍN
9. BOTÓN DE BLOQUEO DEL EJE
10. REBORDE EXTERIOR
11. TUERCA DE AJUSTE DE LA HOJA
12. PALANCA DE LA PROTECCIÓN INFERIOR
16
15
20
13
18
19
17
14
11
12
8
21
3
5
9
6
7
2
4
1
NA-WT525-M-050727.indd 41 2005-7-27 17:46:24
Page 42

Sierra Circular Inalámbrica WT525
13. PALANCA DE AJUSTE DE LA PROFUNDIDAD DE CORTE
14. TORNILLO DE AJUSTE DEL ÁNGULO DE CORTE
15. PAQUETE DE BATERÍAS
16. LENGÜETAS DE LIBERACIÓN DE LAS BATERÍAS
17. CARGADOR
18. LUZ INDICADORA DE CARGA COMPLETA (VERDE)
19. LUZ INDICADORA DE CARGA (ROJA)
20. SOPORTE DE LLAVE HEXAGONAL
21. MANGO PRINCIPAL
DATOS TÉCNICOS
Tensión nominal: 18V
Velocidad sin Carga: 3,300rpm
Capacidad de Biselado: 0-50º
Diámetro de la Hoja: 5 1/2“(140mm)
Agujero de la Hoja: 3/8”(10mm)
Capacidad máxima de Corte:
Altura de corte a 90º 1 5/8”(41.5mm)
Altura de corte a 45º 1 3/16”(30mm)
Peso: 7.7libras(3.5Kg)
Accesorios incluidos:
Baterías dos (2) 18V - 2.0Ah Ni-Cd(WT525/WT940K)
Cargador de 1-Hora Voltios 120V~60Hz
Llave 1
Guía paralela 1
Le recomendamos que compre todos los accesorios en la tienda donde adquirió la
herramienta. Use accesorios de buena calidad una marca bien conocida. Seleccione
los que más convengan al trabajo que intenta hacer. Consulte el empaque de los ac
cesorios para obtener más detalles. El personal de la tienda también puede ayudarle
y aconsejarle.
NA-WT525-M-050727.indd 42 2005-7-27 17:46:25
Page 43

Sierra Circular Inalámbrica WT525
4342
INSTRUCCIONES DE USO
NOTA: Antes de usar la herramienta, lea atenta-
mente el manual de instrucciones
CONTRAGOLPES
Más instrucciones de seguridad para todas las sierras
Causas y prevención del operador contra el contragolpe:
- El contragolpe es una reacción repentina a hojas de
sierra pellizcadas, atascadas o mal alineadas, causando
que una sierra sin control salte por encima de la pieza de
trabajo hacia el operador;
- Cuando la hoja es pellizcada o atascada firmemente
por la muesca, se atora y la reacción del motor conduce
la unidad rápidamente hacia el operador;
- Si la hoja se tuerce o está mal alineada durante el corte,
los dientes del extremo trasero pueden incrustarse en la
superficie superior de la madera haciéndola saltar de la
muesca y proyectarse hacia el operador.
El contragolpe es el resultado del uso incorrecto de la
sierra y/o de procedimientos o condiciones de funcionamiento incorrectos y puede ser evitado tomando precauciones apropiadas según se describe a continuación.
a. Mantenga una empuñadura firme con ambas manos
sobre la sierra y coloque sus brazos para resistir las fuerzas del contragolpe. Coloque su cuerpo a cualquier lado
de la hoja, pero nó alineado con la hoja. El contragolpe
podría hacer que la sierra salte al revés, pero las fuerzas
del contragolpe pueden ser controladas por el operador
si se toman las precauciones apropiadas.
b. Cuando la hoja se atasca o cuando se interrumpe un
corte por cualquier razón, suelte el gatillo y sostenga la
sierra en el material sin moverla hasta que la hoja se
haya detenido completamente. Nunca trate de sacar la
sierra de la pieza de trabajo o tire de la sierra al revés
mientras la hoja esté en movimiento, ya que podría
ocurrir un contragolpe. Investigue y tome acciones correctivas para eliminar la causa del atascamiento de la
hoja.
c. Al reiniciar el trabajo sobre la pieza correspondiente,
centre la hoja de sierra en la muesca y compruebe que
los dientes de la sierra no estén incrustados en el material. Si la hoja de sierra está atascada, cuando se enciende nuevamente la sierra puede saltar o producir un
contragolpe desde la pieza de trabajo.
d. Fije paneles grandes para reducir al mínimo el riesgo
de que la hoja pellizque o provoque un contragolpe.
Los paneles grandes tienden a ceder bajo su propio
peso. Los soportes deben ser colocados debajo del pan-
NA-WT525-M-050727.indd 43 2005-7-27 17:46:25
Page 44

Sierra Circular Inalámbrica WT525
el a ambos lados, cerca de la línea de corte y del borde
del panel.
e. No utilice hojas desafiladas o dañadas. Las hojas con
dientes desafilados o colocados incorrectamente producen una muesca estrecha causando fricción excesiva,
atascamiento de la hoja y contragolpe.
f. Las palancas de traba de profundidad y de inclinación
de la hoja deben estar ajustadas y aseguradas antes de
efectuar un corte. Si el ajuste de la hoja cambia durante
el corte, puede causar atascamiento y contragolpe.
g. Tenga cuidado adicional al hacer cortes mediante descenso vertical en paredes y otros lugares ciegos. La
hoja que sobresale puede cortar objetos capaces de
causar un contragolpe.
CORTE DE CAVIDAD
Corte de cavidad (sólo para materiales blandos).
Advertencia: Los dientes de la hoja quedan expuestos durante esta operación, por lo tanto debe
tener mucho cuidado.
a. Marque claramente el área a cortar.
b. Ajuste la profundidad de corte en la sierra.
c. Coloque la sierra sobre el área marcada con el borde
delantero de la base apoyado en la superficie de trabajo
y con la guía de corte alineada con la línea marcada en
la pieza de trabajo ( ver Figura . 8).
d. Verifique que la hoja no esté tocando, pero que esté
cerca de la pieza de trabajo. La cubierta de seguridad
inferior debe mantenerse abierta usando la palanca (5).
e. Encienda la sierra y mueva lentamente la hoja hacia
el material manteniendo un pivote en el borde frontal
de la base. Ahora puede soltar la cubierta de seguridad
inferior para que funcione normalmente.
CUBIERTAS DE SEGURIDAD
a. Verifique que la cubierta de seguridad inferior
cierre correctamente antes de cada uso. No accione la sierra si la cubierta de seguridad inferior
no se mueve libremente ni se cierra inmediatamente. Nunca ate o fije con abrazaderas la cubierta inferior en la posición abierta. Si la sierra se cae
accidentalmente, la cubierta inferior puede doblarse.
Levántela con el mango retráctil y cerciórese de que se
mueva libremente y que no toque la hoja u otras partes
en todos los ángulos y profundidades de corte.
b. Compruebe el funcionamiento del resorte de la
cubierta inferior. Si la cubierta y el resorte no están funcionando correctamente, deben ser repa-
NA-WT525-M-050727.indd 44 2005-7-27 17:46:26
Page 45

Sierra Circular Inalámbrica WT525
4544
rados antes del uso. La cubierta inferior puede fun-
cionar lentamente debido a piezas dañadas, depósitos
gomosos o acumulación de desechos.
c. La cubierta inferior debe ser retraída manualmente solo en casos de cortes especiales como
cortes mediante descenso vertical o cortes compuestos. Levante la cubierta inferior por el mango
retráctil y cuando la hoja penetre en el material suelte la
cubierta. Para las demás operaciones de corte, la cubi-
erta inferior debe funcionar automáticamente.
d. Siempre verifique que la cubierta inferior esté
cubriendo la hoja antes de colocar la sierra sobre el banco o el piso. Una hoja desprotegida o que
resbala hará que la sierra vaya al revés, cortando lo que
esté en su trayectoria. Tome nota del tiempo que tarda la
hoja en detenerse una vez que suelte el gatillo.
1. ANTES DE UTILIZAR EL SIERRA CIRCULAR INALÁMBRICA
Su batería está DESCARGADA y debe cargarla antes de
usarla. No estará totalmente cargada hasta que no haya
realizado varias operaciones de carga y descarga; ello
se logra cargando la batería y usando el sierra circular.
Después de esto mejorará el rendimiento de la batería.
Advertencia: El cargador y las baterías están
diseñados especialmente para funcionar juntos;
por lo tanto, no intente utilizar otros dispositivos. Nunca
inserte o permita que objetos metálicos se introduzcan
en el cargador o en las conexiones de las baterías, dado
que ello provocará una falla eléctrica y situación de peligro.
2. CÓMO CARGAR LA BATERÍA(ver Figura 1)
1) Conecte el cargador a la fuente de alimentación. La
luz roja se encenderá durante 3 segundos y luego se
apagará.
Nota: Si existe un cortocircuito en el cargador, la luz roja
continuará destellando rápidamente (aproximadamente
5 veces por segundo). Deberá reemplazar el cargador.
2) Inserte completamente el paquete de batería dentro
del cargador. Durante el proceso de carga normal, únicamente la luz roja se encenderá para indicar que se está
realizando la carga. La luz roja permanecerá encendida
durante el proceso de carga. Una batería descargada tardará aproximadamente 1 hora para cargarse completamente a temperatura ambiente normal.
Nota: Si la temperatura de la batería es menor que 32ºF
(0ºC), la luz verde destellará lentamente (aproximadamente 2 veces por segundo). Saque la batería y permita
que se caliente hasta una temperatura de carga entre 36ºF
Fig 1
18
19
17
NA-WT525-M-050727.indd 45 2005-7-27 17:46:26
Page 46

Sierra Circular Inalámbrica WT525
y 95ºF (2ºC y 35ºC).
Si la temperatura de la batería es mayor que 140ºF
(60ºC), la luz verde destellará rápidamente (aproximadamente 5 veces por segundo). Saque la batería y permita
que se enfríe hasta una temperatura de carga entre 36ºF
y 95ºF (2ºC y 35ºC).
Si la temperatura de la batería es mayor que 176ºF (80ºC),
se detendrá el proceso de carga, y la luz roja destellará
lentamente (aproximadamente 2 veces por segundo).
Deberá reemplazar la batería.
3) Una vez que la carga haya terminado, únicamente la
luz verde permanecerá encendida.
Nota: Cuando se esté cargando la batería y su voltaje no
llegue a 4V en 2 minutos, se considerará que la batería
está agotada y la luz roja destellará lentamente (aproximadamente 2 veces por segundo). Saque la batería
agotada del cargador y reemplácela por una nueva.
4) Una vez que el proceso de carga haya terminado, la batería continuará cargándose con una corriente de 50mA.
Nota: El circuito temporizador del cargador y el dispositivo de seguridad de protección contra temperatura de la
batería evitan la sobrecarga. Sin embargo, le recomendamos sacar la batería del cargador una vez que se haya
completado el ciclo de carga indicado por la luz verde.
3. PARA EXTRAER O INSTALAR LA BATERÍA
Ubique las trabas en el costado del paquete de baterías
y oprima ambos lados para sacarlo del sierra circular.
Retire el paquete de baterías del sierra circular. Después
de haberse cargado, insértelo en la cavidad para las baterías de su sierra circular. Basta con deslizarlo y ejercer
una leve presión.
4. LLAVE DE ENCENDIDO/APAGADO DE SEGURIDAD
El gatillo está trabado para evitar el encendido accidental. Presione el botón para destrabarlo (a) luego el gatillo
Acción Luz Encend ida/Apagada/
Destello
Carga roja Encendida
Cortocircuito roja Destello rápido (5/seg)
Batería < 32ºF (0ºC) verde Destello lento (2/seg)
Batería > 140ºF (60ºC) verde Destello rápido (5/seg)
Batería > 176ºF (80ºC) roja Destello lento (2/seg)
Batería agotada roja Destello lento (2/seg)
Carga completa verde Encendida
NA-WT525-M-050727.indd 46 2005-7-27 17:46:27
Page 47

Sierra Circular Inalámbrica WT525
4746
Fig 2
a
b
Fig 3
(b) y suelte el botón para destrabarlo (a). La sierra se encenderá. Para apagarla, suelte el gatillo (ver Figura 2).
5. PARA CAMBIAR LA HOJA
Afloje la palanca de ajuste (13) y levante el cuerpo de la
sierra con respecto a la base. Saque la llave hexagonal
(20) de la base. Presione el botón de bloqueo del eje (9) y
use la llave hexagonal incluida para sacar el tornillo y el
reborde exterior. Gire la cubierta interna en sentido contra horario y sosténgala abierta con la palanca (12) mientras cambia la hoja. Verifique que el orificio de la hoja
esté colocado sobre el reborde interno y que la dirección
de la flecha de la hoja apunte en la misma dirección que
la de la cubierta interna. Verifique que la superficie y rebordes de la hoja estén limpios. Presione nuevamente el
botón de bloqueo del eje y vuelva a colocar el reborde
externo sobre el eje, ajústelo con ¼ de vuelta más de lo
que pueda ajustarlo a mano. Verifique que la hoja esté
bien enganchada ( ver Figura 3).
Advertencia: Los dientes de la hoja son muy filo-
sos. Use guantes al cambiar la hoja. Para obtener
los mejores resultados de corte asegúrese de usar una
hoja adecuada para el tipo de material y calidad de corte
que necesite. Verifique que la hoja sea adecuada para la
velocidad de la sierra. Use únicamente hojas con dientes
de carburo.
6. PROFUNDIDAD DE CORTE
Levante la palanca de ajuste de la profundidad de corte,
luego puede separar manualmente el cuerpo de su sierra circular de su base.
Separando la base con relación al cuerpo de la sierra
circular, las graduaciones (4) le indican a qué profundidad se producirá el corte, cuando elija su profundidad,
apriete la palanca de ajuste (13) para trabarla (ver Figura
4). La cuchilla ajusta automáticamente su posición al
cambiar la profundidad de corte.
Estos valores de distancia son bastante precisos para
la mayoría de los casos, sin embargo cuando la pieza
exija una gran precisión, se recomienda hacer un corte
de prueba.
Observaciones: Cuando realice cortes al sesgo, es necesario hacer ajustes de profundidad de corte, proceder a
intentos, los valores de profundidad de corte son exactos únicamente en el caso de cortes rectos.
7. BASE
La base de su sierra circular debe mantenerse siempre
firmemente contra el material a cortar con el fin de re-
Fig 4
NA-WT525-M-050727.indd 47 2005-7-27 17:46:28
Page 48

Sierra Circular Inalámbrica WT525
ducir las vibraciones de la sierra circular o las roturas
de hoja.
8. ÁNGULO DE CORTE
Afloje el tornillo de ajuste del ángulo de corte (14), luego
puede inclinar manualmente el cuerpo de su sierra circular con relación a su base (5). Ajuste la inclinación de
la base con relación a la sierra circular, la graduación le
indica el valor del ángulo al cual se realizará el corte ( ver
Figura 5). Estos valores de ángulo son bastante precisos para la mayoría de los casos, sin embargo cuando la
pieza exija una gran precisión, se recomienda ajustar el
ángulo con la graduación y hacer un corte de prueba.
9. GUÍA PARALELA
Deslice la guía paralela por los dos soportes (Ver figura
al lado). La guía está graduada para elegir la distancia
de corte.
Después de haber ajustado esta distancia, atornille firmemente el dispositivo de cierre. Estos valores de distancia
son bastante precisos para la mayoría de los casos, sin
embargo, cuando la pieza exija una gran precisión, se
recomienda hacer un corte de prueba ( ver Figura 6).
10. CONEXIÓN PARA ASPIRADORA
Para extraer el aserrín, conecte una aspiradora al orificio
de extracción del aserrín (8) utilizando un tubo flexible.
Asegúrese de que el conjunto se monte correctamente.
11. CÓMO DESECHAR UNA BATERÍA AGOTADA
Para preservar los recursos naturales, recicle o
deseche el paquete de baterías de manera apropiada. Este paquete de baterías contiene baterías de níquel
cadmio. Para obtener mayor información acerca de las
diferentes opciones de reciclaje y desecho, consulte con
la autoridad local en materia de control de residuos.
Descargue el paquete de baterías haciendo funcionar el
sierra circular, luego extráigalo y cubra las conexiones
con cinta adhesiva de alta resistencia para evitar un cortocircuito y la descarga de energía. No intente abrir o
sacar ninguno de sus componentes.
CONSEJOS PARA TRABAJAR CON
SU SIERRA CIRCULAR
a) Si su herramienta eléctrica se calienta demasiado,
hágala funcionar sin carga durante 2-3 minutos para
enfriar el motor. Evite el uso prolongado a velocidades
muy bajas.
Fig 5
Fig 6
NA-WT525-M-050727.indd 48 2005-7-27 17:46:28
Page 49

Sierra Circular Inalámbrica WT525
4948
b) Cuanto mayor sea el número de dientes de la hoja
utilizada mejor será la calidad de corte.
c) Asegúrese siempre de sostener firmemente la pieza
de trabajo -con o sin abrazaderas- para prevenir el movimiento.
d) Verifique que las aberturas de ventilación del motor
no estén obstruidas. Nunca arranque su sierra circular
cuando la hoja toca la pieza a trabajar (es importante
hacer funcionar su máquina sin carga hasta que alcance
su velocidad máxima antes de empezar el trabajo).
PREGUNTAS FRECUENTES
1. ¿POR QUÉ NO GIRA LA SIERRA AL PRESIONAR
EL GATILLO?
La llave de seguridad (b) está trabada y debe presionar
antes el botón (a) ( ver Figura 2).
2. LA SIERRA GIRA LENTAMENTE. ¿POR QUÉ?
Si la batería no está completamente cargada, recárguela
con el cargador suministrado.
Nota: No cargue la batería no otro cargador. Cárguela
únicamente con el cargador suministrado.
3. NO PUEDO INSTALAR LA BATERÍA DENTRO DEL
CARGADOR CORRESPONDIENTE. ¿POR QUÉ?
La batería se inserta en el cargador en una sola dirección. Dé vuelta la batería hasta que pueda ser insertada
en la ranura. La luz roja debe encenderse mientras la
batería se está cargando ( ver Figura 7.1, 7.2).
4. RAZONES DE LOS DISTINTOS TIEMPOS DE
CARGA.
El tiempo de carga puede ser afectado por varias razones que no implican defectos en su producto. Si el
paquete de batería está parcialmente descargado, puede recargarse en menos de 1 hora. La recarga puede
llevar 1-1,5 horas cuando el paquete de batería está frío
y la temperatura ambiente es muy baja. Si el paquete de
batería está muy caliente no podrá recargarse, ya que se
lo impedirá el sistema interno de seguridad de corte por
temperatura. En dicho caso, debe extraer el paquete de
batería del cargador y dejar que se enfríe a temperatura
ambiente; luego puede comenzarse la recarga. Si se recarga un segundo paquete de batería inmediatamente
después del primero, el cargador podría recalentarse.
Siempre espere por lo menos 15 minutos entre recargas.
Fig 7.1
Fig 7.2
NA-WT525-M-050727.indd 49 2005-7-27 17:46:29
Page 50

Sierra Circular Inalámbrica WT525
5. RAZONES DE LOS DISTINTOS TIEMPOS DE
FUNCIONAMIENTO DEL PAQUETE DE BATERÍA
Los problemas de tiempo de carga, como se señaló arriba, y el hecho de no haber usado la batería por un largo
tiempo reducen el rendimiento del paquete de batería.
Esto puede remediarse luego de varios ciclos de carga/
descarga, utilizando su taladro. Condiciones severas de
trabajo, como por ejemplo tornillos grandes en madera
dura, agotarán más rápido la energía de la batería que
si se trabajara en condiciones más suaves. No recargue
su paquete de batería por debajo de 36ºF(2ºC) ni por encima de 95ºF(35ºC), ya que esto afectará el rendimiento.
MANTENGA LAS HERRAMIENTAS
CON CUIDADO
Conserve las herramientas afiladas y limpias para que
funcionen mejor y con más seguridad. Siga las instrucciones para lubricar y cambiar los accesorios. Inspeccione periódicamente los cables de las herramientas y si
están dañados hágalos reparar por un centro de servicio
autorizado.
Su herramienta no requiere lubricación ni mantenimiento adicional. No posee piezas en su interior que puedan
ser reparadas por el usuario. Nunca emplee agua o
productos químicos para limpiar su herramienta. Use
simplemente un paño seco. Guarde siempre su herramienta en un lugar seco. Mantenga limpias las ranuras
de ventilación del motor. La observación de chispas que
destellan bajo las ranuras de ventilación, indica operación normal que no dañará su herramienta.
GARANTÍA
GARANTÍA LIMITADA DE REEMPLAZO POR 60
DÍAS
Durante los primeros 60 días luego de la fecha de compra,
podrá reemplazar una herramienta que no funcione correctamente debido a defectos de material o fabricación
devolviéndola a la tienda donde la haya comprado. Para
recibir una herramienta de reemplazo, deberá presentar
un comprobante fechado de compra y devolver todo el
material de empaque original junto con el producto.
GARANTÍA LIMITADA DE DOS AÑOS
El fabricante garantiza que, por el término de 2 años a
partir de la fecha de compra, este producto no debe fallar por defectos de materiales o fabricación. Nosotros
NA-WT525-M-050727.indd 50 2005-7-27 17:46:29
Page 51

Sierra Circular Inalámbrica WT525
5150
repararemos o reemplazaremos, a nuestra opción, esta
herramienta durante el período de garantía y podríamos
solicitar que envíe la herramienta, con los gastos pagados, a un centro aprobado de reparaciones con todo el
equipo original y un comprobante fechado de compra.
Toda herramienta eléctrica reemplazada o reparada
quedará cubierta por la garantía limitada durante lo que
quede del período de la garantía desde la fecha original
de compra.
LO QUE NO ESTÁ CUBIERTO
Esta garantía es válida únicamente para el comprador
original y no es transferible.
Esta garantía NO cubre la reparación o reemplazo de
partes debido al desgaste normal.
Esta garantía NO cubre accesorios o baterías.
Esta garantía NO cubre fallas, roturas o defectos debidos a:
- uso anormal, abuso, negligencia o uso que no esté de
acuerdo con el manual de instrucciones.
- daños resultantes de accidentes, caídas o uso inadecuado de la herramienta.
- modificaciones o reparaciones no realizadas por centros aprobados de reparaciones.
- uso comercial o de alquiler.
El fabricante no ofrece ninguna otra garantía, representación o promesa con respecto a la calidad o rendimiento
de sus herramientas eléctricas que no estén específicamente mencionadas en esta garantía.
PARA OBTENER SERVICIO
Llame a nuestra línea gratuita de servicio al cliente al 1866-354-WORX (9679) (de lunes a viernes de 9 a 21, hora
del Este) para recibir una herramienta de reemplazo o
para que lo dirijan a un centro aprobado de reparaciones. Al efectuar un reclamo de garantía o al enviar la
herramienta para ser reparada bajo garantía, deberá incluir un comprobante fechado de compra.
LIMITACIONES ADICIONALES
Esta garantía es válida únicamente para productos
comprados y usados en los Estados Unidos, sus territorios o Canadá. Cualquier garantía implícita concedida
por las leyes estatales, incluyendo garantías de calidad
o de idoneidad para un fin determinado está limitada
a dos años desde la fecha de compra. El fabricante no
se hace responsable por daños directos, indirectos, incidentales o consecuentes incluyendo, pero sin limit-
NA-WT525-M-050727.indd 51 2005-7-27 17:46:30
Page 52

Sierra Circular Inalámbrica WT525
ación, la responsabilidad por pérdida de ingresos como
consecuencia de la compra o uso de este producto. Algunos estados y provincias no permiten limitaciones
con respecto a cuanto dura una garantía implícita y/o
la exclusión o limitación de daños imprevistos, por lo
tanto las exclusiones o limitaciones anteriores pueden
no aplicarse en su caso. Esta garantía le otorga derechos
legales específicos, y usted puede también tener otros
derechos los que varían de estado a estado o de provincia a provincia.
El fabricante rechaza toda responsabilidad con respecto
a la responsabilidad civil emergente del uso abusivo
o que no esté de acuerdo con el uso y mantenimiento
adecuado de la máquina tal como se lo describe en el
manual del usuario.
Luego de la compra, el fabricante recomienda el
mantenimiento adecuado de la máquina y el leer
el manual del usuario antes de usarla.
NA-WT525-M-050727.indd 52 2005-7-27 17:46:30
Page 53

5352
NA-WT525-M-050727.indd 53 2005-7-27 17:46:30
Page 54

Designed in Italy. Made in China
Conçu en Italie. Fabriqué en Chine
Diseñado en Italia. Fabricado en China
NA-WT525-M-050727.indd 54 2005-7-27 17:46:30
 Loading...