

Page 1

ENG
F
ES
Pag 02
Pag 16
Pag 30
6 A
WT460K
Jigsaw
Scie Sauteuse
Sierra Caladora
NA WT460K M 050727.indd 1 2005-7-27 18:01:39
Page 2

Jigsaw WT460K
SAFETY INSTRUCTIONS
WARNING! Read and understand all instructions. Failure to follow all instructions
listed below, may result in electric shock, fire and/or serious personal injury.
SAVE THESE INSTRUCTIONS
1. WORK AREA
a) Keep your work area clean and well lit. Cluttered benches and dark areas invite accidents.
b) Do not operate power tools in explosive atmospheres, such as in the presence of
flammable liquids, gases or dusts. Power tools create sparks which may ignite the dust
or fumes.
c) Keep by-standers, children, and visitors away while operating a power tool.
Distractions can cause you to lose control.
2. ELECTRICAL SAFETY
a) Double Insulated tools are equipped with a polarized plug (one blade is wider than
the other.) This plug will fit in a polarized outlet only one way. If the plug does not
fit fully in the outlet, reverse the plug. If it still does not fit, contact a qualified
electrician to install a polarized outlet. Do not change the plug in any way. Double
Insulation eliminates the need for the three wire grounded power cord and grounded power
supply system. Before plugging in the tool, be certain the outlet voltage supplied is within
the voltage marked on the nameplate. Do not use “AC only” rated tools with a DC power
supply.
b) Avoid body contact with grounded surfaces such as pipes, radiators, ranges
and refrigerators. There is an increased risk of electric shock if your body is grounded. If
operating the power tool in damp locations is unavoidable, a Ground Fault Circuit Interrupter
must be used to supply the power to your tool. Electrician’s rubber gloves and footwear will
further enhance your personal safety.
c) Don’t expose power tools to rain or wet conditions. Water entering a power tool will
increase the risk of electric shock.
d) Do not abuse the cord. Never use the cord to carry the tools or pull the plug from
an outlet. Keep cord away from heat, oil, sharp edges or moving parts. Replace damaged
cords immediately. Damaged cords increase the risk of electric shock.
e) When operating a power tool outside, use an outdoor extension cord marked “W-
A”or“W”. These cords are rated for outdoor use and reduce the risk of electric shock. Refer
to the “Recommended sizes of Extension Cords” in the Accessory section of this manual.
f) Grounded tools must be plugged into an outlet properly installed and grounded
in accordance with all codes and ordinances. Never remove the grounding prong or
modify the plug in any way. Do not use any adapter plugs. Check with a qualified electrician if
you are in doubt as to whether the outlet is properly grounded. If the tool should electrically
malfunction or break down, grounding provides a low resistance path to carry electricity
away from the user.
3. PERSONAL SAFETY
a) Stay alert, watch what you are doing and use common sense when operating a
power tool. Do not use tool while tired or under the influence of drugs, alcohol,
or medication. A moment of inattention while operating power tools may result in serious
personal injury.
b) Dress properly. Do not wear loose clothing or jewelry. Contain long hair. Keep
your hair, clothing, and gloves away from moving parts. Loose clothes, jewelry, or
NA WT460K M 050727.indd 2 2005-7-27 18:01:40
Page 3

Jigsaw WT460K
long hair can be caught in moving parts. Keep handles dry, clean and free from oil and
grease. Rubber gloves and non-skid footwear are recommended when working outdoors.
c) Avoid accidental starting. Be sure switch is “OFF” before plugging in. Carrying
tools with your finger on the switch or plugging in tools that have the switch “ON” invites
accidents. Do not use a tool if the power switch does not turn it “ON” and “OFF”.
d) Remove all adjusting keys and wrenches. Make a habit of checking that adjusting
keys, wrenches, etc. are removed from the tool before turning it “ON”.
e) Do not overreach. Keep proper footing and balance at all times. Proper footing and
balance enable better control of the tool in unexpected situations.
f) Use safety equipment. Always wear eye protection. Dust mask, non-skid safety
shoes, hard hat, or hearing protection may be used for appropriate conditions.
g) Keep hands away from all cutting edges and moving parts.
h) If devices are provided for the connection of dust extraction and collection
facilities, ensure these are connected and properly used. Use of these devices can
reduce dust-related hazards.
4. TOOL USE AND CARE
a) Use clamps or other practical way to secure and support the work-piece to a
stable platform. Holding the work by hand or against your body is unstable and may lead
to loss of control.
b) Do not force tool. Use the correct tool for your application. The correct tool will
do the job better and safer at the rate for which it is designed. Excessive force only causes
operator fatigue, increased wear and reduced control.
c) Do not use tool if switch does not turn it “ON” or “OFF”. A tool that cannot be
controlled with the switch is dangerous and must be repaired.
d) Disconnect the tool from the power source before making any adjustments,
changing accessories, or storing the tool. Such preventative safety measures reduce
the risk of starting the tool accidentally.
e) Store idle tools out of reach of children and other untrained persons. Tools are
dangerous in the hands of untrained users.
f) Maintain tools with care. Keep cutting tools sharp and clean. Properly maintained
tools, with sharp cutting edges, are less likely to bind and easier to control.
g) Check for misalignment or binding of moving parts, breakage of parts, and any
other condition that may affect the tool’s operation. If damaged, have the tool
serviced before using. Many accidents are caused by poorly maintained tools.
h) Use only accessories that are recommended by the manufacturer for your model.
Accessories that may be suitable for one tool may create a risk of injury when used on
another tool.
i) Use the right tool. Do not force the tool or attachment to do a job for which it was not
designed.
5. SERVICE
a) Tool service must be performed only by qualified repair personnel. Service or
maintenance performed by unqualified personnel could result in a risk of injury.
b) When servicing a tool, use only identical replacement parts. Follow instructions
in the Maintenance section of this manual. Use of unauthorized parts or failure to
follow Maintenance Instructions may create a risk of electric shock or injury.
0302
NA WT460K M 050727.indd 3 2005-7-27 18:01:40
Page 4
Jigsaw WT460K
ADDITIONAL SAFETY RULES - FOR JIGSAWS
WARNING! Failure to follow these rules may result in serious personal injury.
1) Hold tool by insulated gripping surfaces when performing an operation where the
cutting tools may contact hidden wiring or its own cord. Contact with a “live” wire will
make exposed metal parts of the tool “live” and shock the operator.
2) Always keep your hands away from cutting area. Do not reach under the material being
cut because the nearness of the blade to your hand is hidden from your sight.
3) Do not use dull or damaged blades. Sharp blades will do the job better and safer. Bent
blades can break easily or cause kick back.
4) Secure material before cutting. Never hold it in your hand or across your legs.
5) Always wear eye protectors when using tool. Use a dust mask or respirator for
applications which generate dust.
6) Always check walls and ceiling to avoid hidden power cables and pipes.
7) Make sure the power switch is not “ON” before you plug the tool in. Accidental start-
ups could cause injury.
8) Use clamps or a vise to hold work-piece whenever possible.
9) The base plate must always be held firmly against the material being cut to reduce
saw vibration, blade jumping and blade breakage.
10) Never stop the cutting blade by applying side pressure to the blade.
11) Only withdraw the blade from the cut when the blade has stopped moving.
12) Your jigsaw is a hand held tool, do not clamp your jigsaw
13) Before cutting, check the cutting line is free of nails, screws, etc.
14) Save these instructions. Refer to them frequently and use them to instruct others who may
use this tool. If someone borrows this tool, make sure they have these instructions.
WARNING! Some dust created by power sanding, sawing, grinding, drilling and
other construction activities contains chemicals known to cause cancer, birth
defects or other reproductive harm. Some examples of these chemicals are:
• From lead-based paint
• Crystalline silica from bricks and cement and other masonry products
• Arsenic and chromium from chemically-treated lumber
Your risk to these exposures varies, depending on how often you do this type of work. To reduce
your exposure to these chemicals:
• Work in a well ventilated area
• Work with approved safety equipment, such as those dust masks that are specifically designed to
filter out microscopic particles.
The label on your tool may include the following symbols:
V...................................................................................................................................................................Volts
A..................................................................................................................................................................Amps
Hz.................................................................................................................................................................Hertz
~..........................................................................................................................................Alternating current
no .................................................................................................................................................Noload speed
.......................................................................................................Class II construction/ Double insulation
NA WT460K M 050727.indd 4 2005-7-27 18:01:41
Page 5
Jigsaw WT460K
SYMBOLS
Read the manual
Warning
Wear safety goggles, dust mask
and ear protection
Use inside only
Double insulation
Do not expose to rain or water
Do not burn
0504
NA WT460K M 050727.indd 5 2005-7-27 18:01:42
Page 6
Jigsaw WT460K
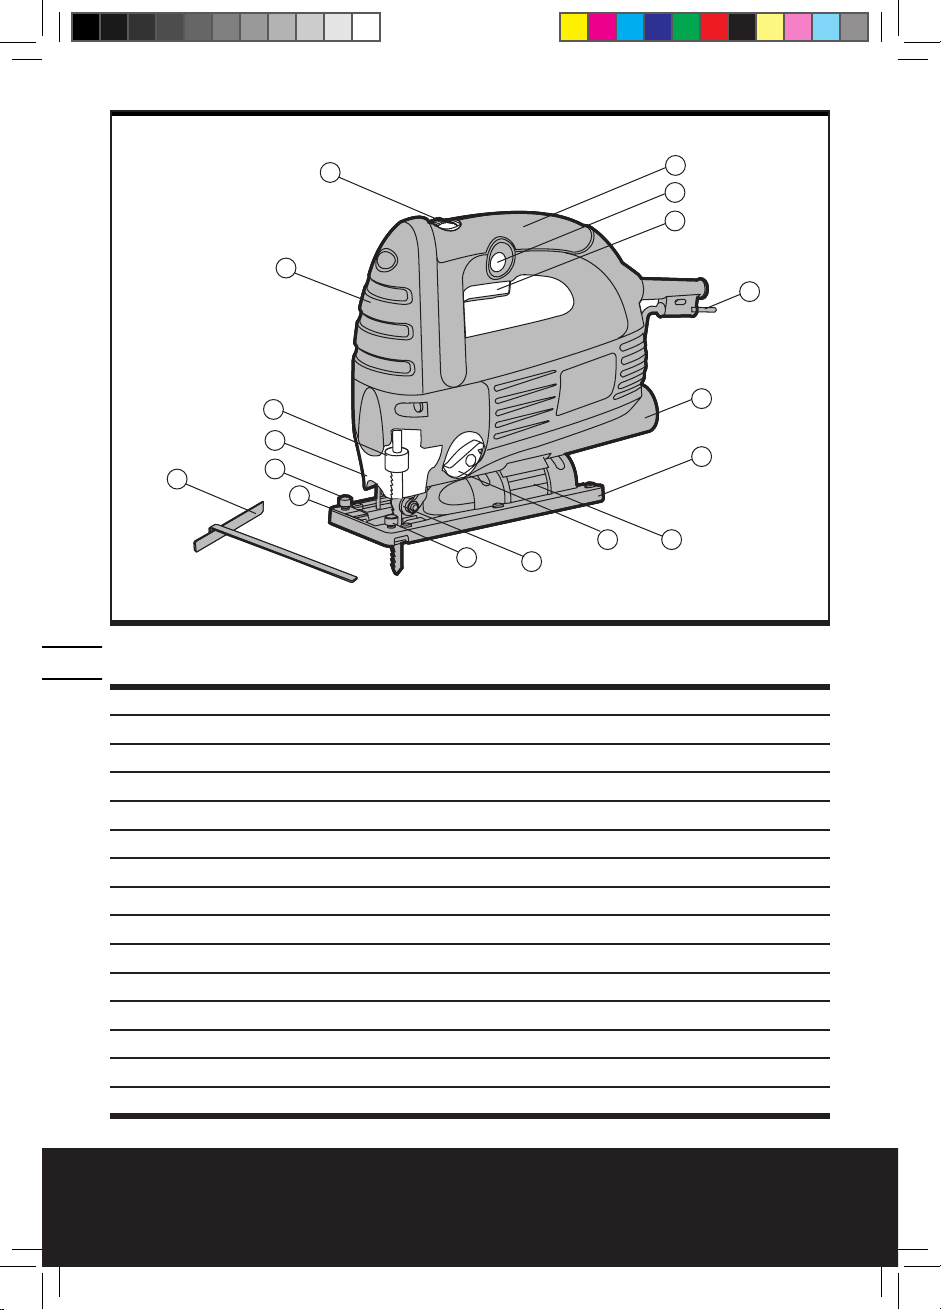
1. ON/OFF TRIGGER SWITCH
2. LOCK-ON BUTTON
3. VARIABLE SPEED CONTROL DIAL
4. HAND GRIP AREAS
5. DUST COVER
6. TOOL FREE BLADE HOLDER
7. PARALLEL GUIDE HOLDER
8. BLADE GUIDE
9. ORBITAL (PENDULUM) ACTION CONTROL LEVER
10. BASE PLATE
11. BEVEL PLATE
12. DUST EXTRACTION ADAPTER
13. PARALLEL GUIDE
14. HEX KEY
15. ANTI-SPLINTERING INSERT
4
2
1
14
12
10
119
8
7
6
5
7
13
4
3
15
NA WT460K M 050727.indd 6 2005-7-27 18:01:42
Page 7

Jigsaw WT460K
120 V~ 60Hz
6,0A
500-3,000spm
15/16” (24mm)
4” (100mm)
3/8” (10mm)
13/16” (20mm)
0±45º
4
T-Shank
5,6 lbs (2,8Kg)
TECHNICAL DATA
Voltage:
Rated Current:
Double Insulated:
No Load Speed:
Stroke Length:
Maximum Cutting Capacity:
Wood:
Steel:
Aluminum:
Bevel Capacity:
Orbital Settings:
Blade Type:
Machine Weight:
ACCESSORIES
Assorted blades
Hex key
Parallel Cutting Guide
Dust Tube
Anti-Splintering Insert
We recommend that you purchase your accessories from the same store that sold you the tool.
Use good quality accessories marked with a well-known brand name. Choose the type according
to the work you intend to undertake. Refer to the accessory packaging for further details. Store
personnel can assist you and offer advice.
EXTENSION CORDS
Warning: Use proper extension cords. Make sure your extension cord is in good condition
and is a 3-wire extension cord which has a 3-prong grounding type plug and matching
receptacle which will accept the machine’s plug. When using an extension cord, de sure to use
one heavy enough to carry the current of the machine. An undersized cord will cause a drop in line
voltage, resulting in loss of power and overheating. If in doubt, use the next heavier gauge. The
smaller the gauge number, the heavier the cord.
0706
3pcs
1pc
1pc
1pc
1pc
NA WT460K M 050727.indd 7 2005-7-27 18:01:43
Page 8

Jigsaw WT460K
Tool’s
Ampere
Rating
3-6
6-8
8-10
10-12
12-16
Cord Size in A.W.G. Wire Sizes in mm
2
Cord Length in Feet
25 50 100 150
Feet to Meters
15 30 60 120
18 16 16 14
18 16 14 12
18 16 14 12
16 16 14 12
14 12 - -
.75 .75 1.5 2.5
.75 1.0 2.5 4.0
.75 1.0 2.5 4.0
1.0 2.5 4.0 -
- - - -
RECOMMENDED SIZES OF EXTENSION CORDS 120 VOLT AL TERNATING CURRENT
TOOLS
NA WT460K M 050727.indd 8 2005-7-27 18:01:44
Page 9
Jigsaw WT460K
OPERATING INSTRUCTIONS
NOTE: Before using the tool, read the instruction
book carefully.
1. ON/OFF SWITCH
Depress to start and release to stop your tool.
2. SWITCH LOCK-ON BUTTON
Depress on/off switch (1) then lock-on button (2) (See Fig
1), release on/off switch first and lock-on button second.
Your switch is now locked on for continuous use. To
switch off your tool just depress and release the on/off
switch.
3. VARIABLE SPEED CONTROL
Adjust the thumb-wheel to increase or decrease the
speed (See Fig 2) according to the material, material
thickness and blade specification to be used (also
possible during no load operation). See Chart 1 for
general Guidance on speed selection.
Chart 1
Material Speed Setting
Wood 5-6
Metal 3-4
Aluminum 3-5
PVC 3-4
Ceramic 3-5
Avoid prolonged use at very low speed as this may
damage your jigsaw’s motor.
4. HAND GRIP AREAS
Always ensure you maintain a firm grip while operating
your jigsaw.
5. DUST COVER
When operating your jigsaw the dust cover must be
closed to allow the dust extraction system to work
efficiently. The dust cover can be lifted to improve access
for cleaning, blade fitting, etc (See Fig 3).
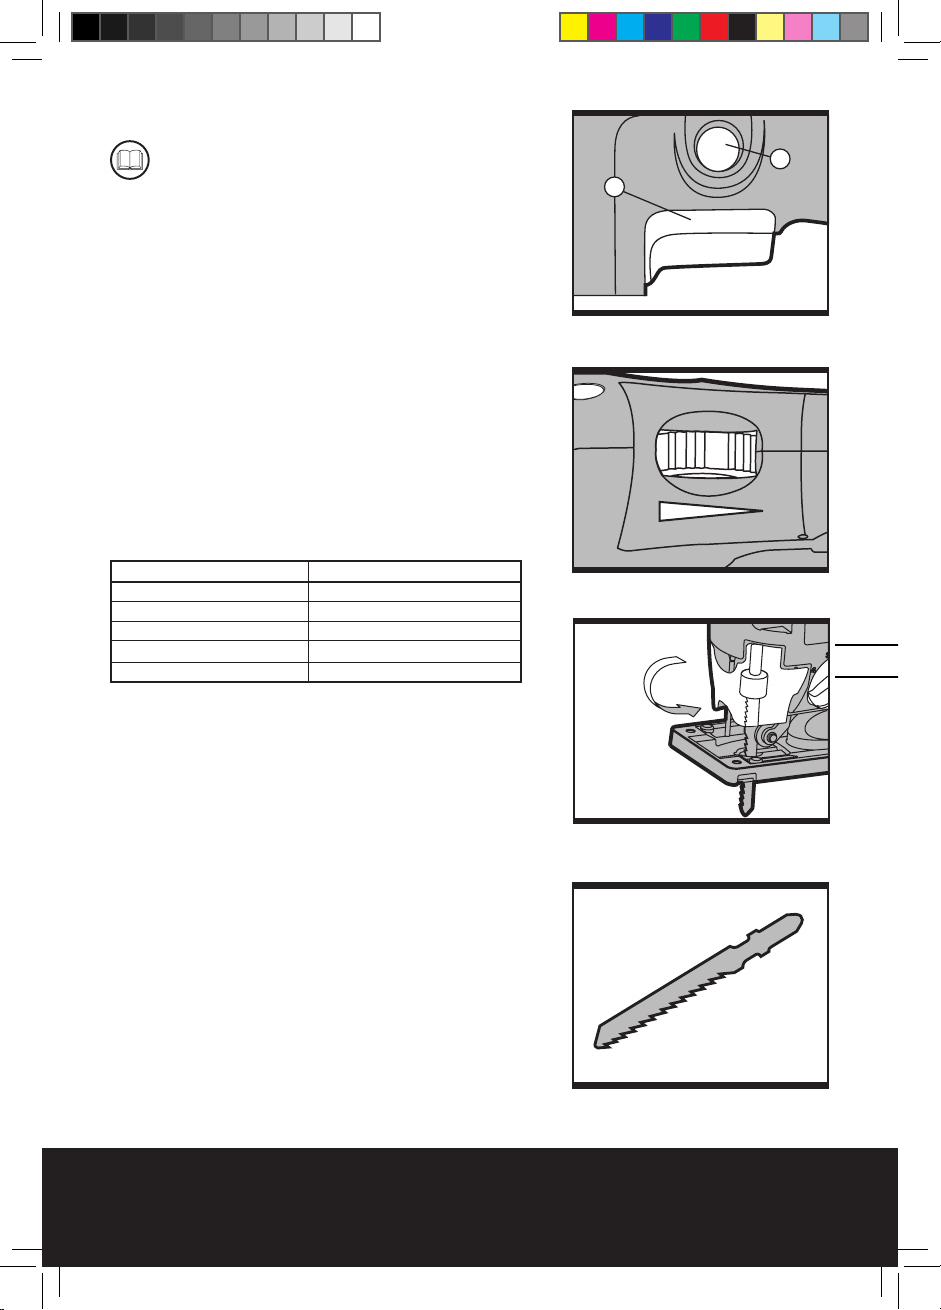
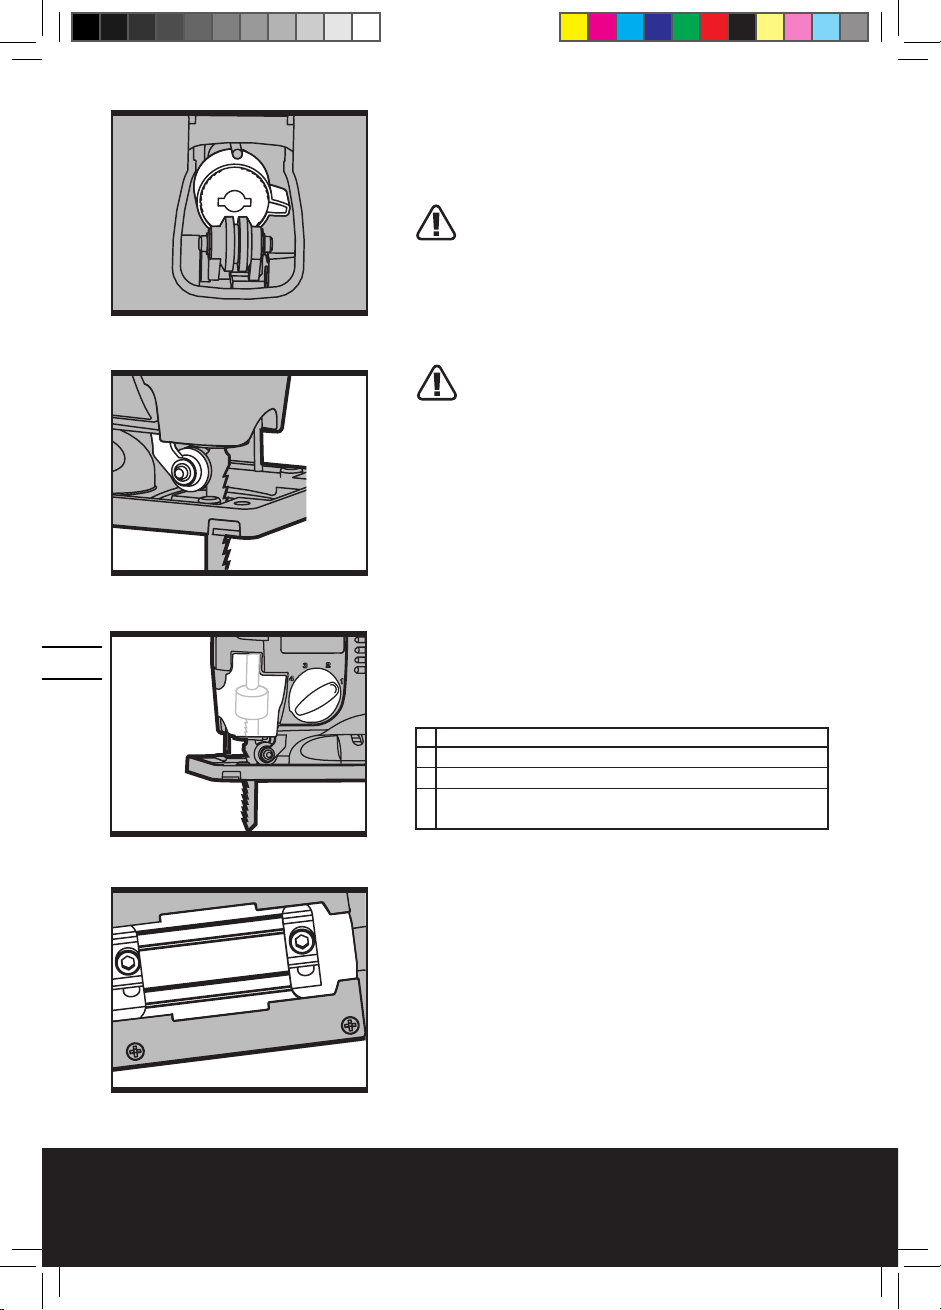
6. BLADE FITTING
You can only use the blade type shown in Fig 4. To open
the blade holder (6) rotate the ring counter-clockwise
(Jigsaw upside down) and hold in position (See Fig 5).
Then fully insert the blade into the blade holder slot with
blade teeth facing forward and release the ring, which
will self rotate and clamp over the top of the blade. Push
the blade into the blade holder again to ensure it is locked
Fig 2
Fig 1
0908
Fig 3
Fig 4
2
1
NA WT460K M 050727.indd 9 2005-7-27 18:01:44
Page 10
Jigsaw WT460K
Fig 6
Fig 5
Fig 7
Fig 8
in position. Ensure the edge of the blade is located in the
groove of the blade guide (See Fig 6). To remove a blade,
hold the blade and rotate the blade holder ring countericlockwise then lift out the blade (blade could be spring
ejected).
Warning: Blade teeth are very sharp. For best
cutting results ensure you use a blade suited to
the material and cut quality you need.
7. PARALLEL GUIDE FIXTURES
Slide the parallel guide (13) arm through both fixtures to
achieve the required cutting distance and tighten both
screws to lock into position.
Warning: The parallel guide as well as the
splintering protector can only be used for
the 00 (normal) position.
8. BLADE GUIDE
Ensure the blade is located and runs smoothly in the
groove (See Fig 6) otherwise the pendulum function will
not work correctly and the blade will not be supported
during cutting.
9. PENDULUM ACTION CONTROL
The pendulum action varies the forward cutting angle of
the blade for increased cutting efficiency. This can also
be adjusted during no load running. Refer to the chart 2
for more details. Do not use excessive blade force when
cutting with the pendulum action. The blade cuts on the
upward stroke only (See Fig 7).
Chart 2
1 Thin materials. Fine cuts. Tight curves.
2 Hard materials, (e.g. steel & chipboard).
3 Thick materials ( e.g. wood ) & plastic.
4 Fast cuts (e.g. softwood). Cutting in the direction
of the wood grain.
10. BASE PLATE
Adjusting the angle of the base plate (10) enables bevel
cutting. The base plate must always be held firmly
against the materials being cut to reduce saw vibration,
blade jumping or blade breakage.
11. BASE PLATE ANGLE ADJUSTMENT
Using a Hex key (14), loosen the bolts securing the base
plate (See Fig 8). For pre-set angles rotate the base so
the angle markings on the base plate line up with the
markings on the angle plate (11) for preset angles (0°,
15°, 30°, 45°) (See Fig 9). For other miter angles, rotate to
your desired angle (use a protractor scale). Following one
NA WT460K M 050727.indd 10 2005-7-27 18:01:45
Page 11

Jigsaw WT460K
of the above procedures, hold the base plate in position
and firmly tighten the bolts to clamp the base plate at
the desired angle. Finally, check the angle and ensure the
base plate is firmly clamped. The angle markings on the
base plate are accurate for most general purpose cutting
but it is recommended for accurate work to set the angle
with a protractor and make a test cut on a piece of scrap
material.
12. DUST EXTRACTION ADAPTER
The adapter (12) rotates counter-clockwise inside the
housing and locks into position through the use of a
groove inside the housing (See Fig 10). The adapter must
then be connected to a suitable external dust extraction
machine.
13. BLADE PROTECTION BAR
The blade protection bar is located in front of the blade
holder. While working, it will help prevent accidental
contact with the moving blade.
14. DUST BLOWER AIR HOLE
This is a small hole located underneath the housing
just behind the blade guide. Ensure this is kept clean to
allow the air flow to continually blow dust away from
the cutting area.
15. SPLINTERING PROTECTOR
The splintering protector (15) prevents the splintering of
the surface when sawing in wooden materials. Press the
splintering protector from below into the base plate (See
Fig 11).
WORKING HINTS FOR YOUR
JIGSAW
If your power tool becomes too hot, set the speed to
maximum and run no load for 2-3 minutes to cool the
motor.
GENERAL
Always use a blade suited to the material and material
thickness to be cut. Always ensure the work–piece is
firmly held or clamped to prevent movement. For easier
control, use low speed to start cutting, then increase to
correct speed.
Any movement of the material may affect the quality of
the cut. The blade cuts on the upward stroke and may chip
the uppermost surface. Ensure your uppermost surface
is a non-visible surface when your work is finished.
Fig 9
1110
Fig 10
Fig 11
15
NA WT460K M 050727.indd 11 2005-7-27 18:01:46
Page 12
Jigsaw WT460K
CUTTING LAMINATES
Use a fine tooth blade when cutting most laminates and
thin wood materials. To reduce edge chipping, clamp
pieces of waste wood at both ends and on both sides
and cut through the wood during cutting.
CIRCLE CUTTING
Do not use the pendulum (orbital) action when cutting
tight circles or angles
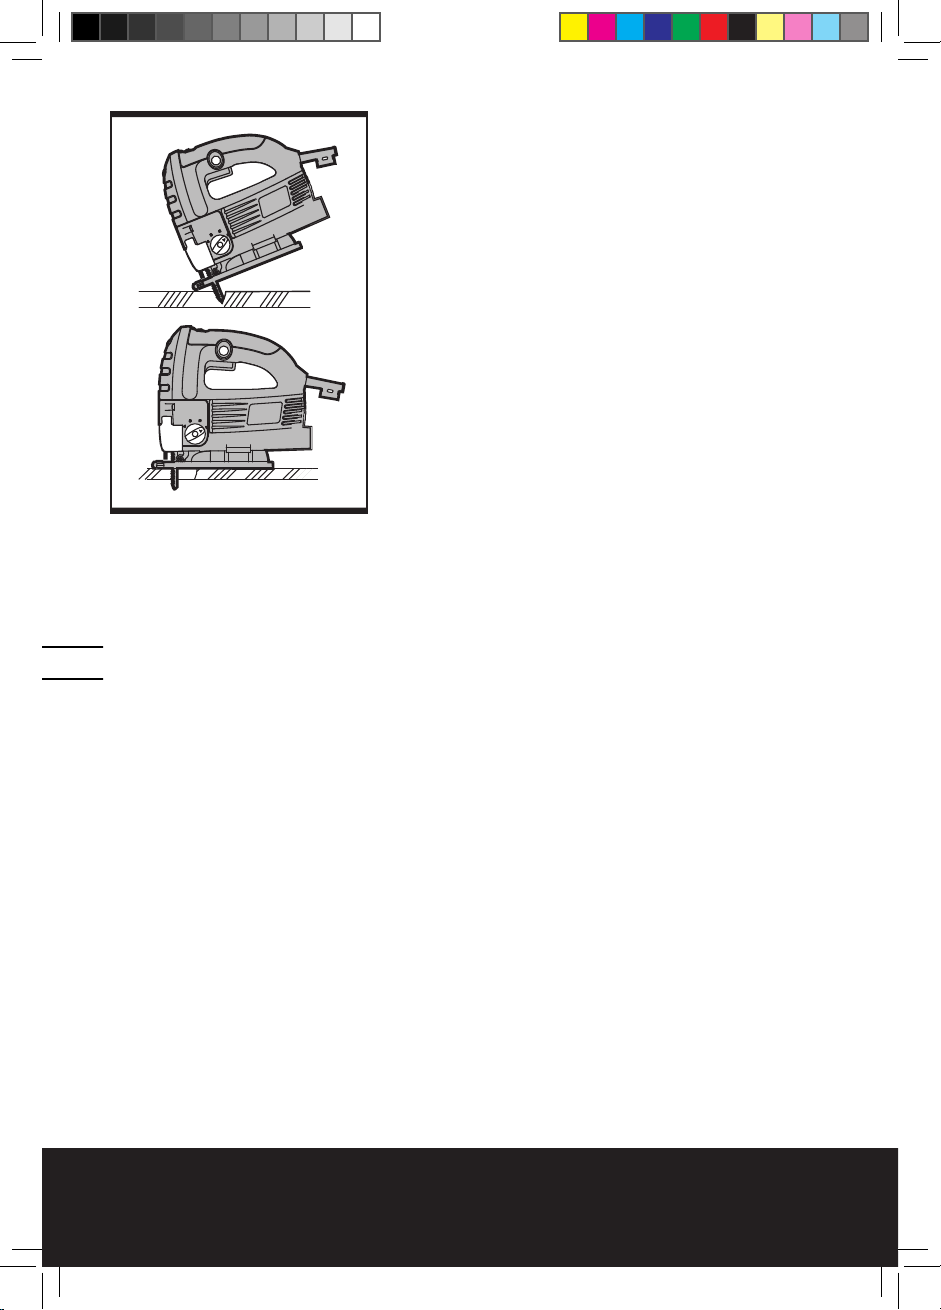
POCKET CUTTING (SOFT MATERIALS ONLY)
To cut material out, either drill a hole large enough to
insert the jig saw blade or proceed as follows. Clearly
mark the area to be cut. Position the jigsaw over the
marked area with the rounded front edge of the base
plate resting on the surface (See Fig 12). Ensure the
blade is not touching but is close to the work surface.
Switch the jigsaw on and gently swing the blade down
into the material but maintain a pivoting force on the
front edge of the base. Only when the blade has fully
penetrated the material and the full length of the base
plate is firmly resting on the work surface, you move the
jigsaw forward for normal cutting.
METAL CUTTING
Use a finer tooth blade for ferrous metals and a coarse
tooth blade for non-ferrous metals. When cutting thin
sheet metals always clamp wood on both sides of the
sheet to reduce vibration or tearing of the sheet metal.
Both wood and sheet metal must be cut. Do not force
the cutting blade when cutting thin metal or sheet steel
as they are harder materials and will take longer to cut.
Excessive blade force may reduce the life of the blade or
damage the motor. To reduce heat during metal cutting,
add a little lubricant along the cutting line.
MAINTAIN TOOLS WITH CARE
Keep tools sharp and clean for better and safer
performance. Follow instructions for lubricating and
changing accessories. Inspect tool cords periodically
and if damaged, have repaired by authorized service
facility.
Your power tool requires no additional lubrication or
maintenance. There are no user serviceable parts in
your power tool. Never use water or chemical cleaners
to clean your power tool. Wipe clean with a dry cloth.
Always store your power tool in a dry place. Keep the
motor ventilation slots clean. Keep all working controls
Fig 12
NA WT460K M 050727.indd 12 2005-7-27 18:01:47
Page 13

Jigsaw WT460K
free of dust. If you see some sparks flashing in the
ventilation slots, this is normal and will not damage your
power tool.
WARRANTY
LIMITED 60-DAY EXCHANGE POLICY
During the first 60 days after date of purchase, you may
exchange a tool which does not work properly due to
defects in materials or workmanship by returning the
power tool to the retailer where it was purchased. To
receive a replacement power tool, you must present a
dated proof of purchase and return all original equipment
packaged with the original product.
LIMITED TWO YEAR WARRANTY
The manufacturer warrants that, for a period of 2 years
from the date of purchase, this product shall be free of
defects in materials and workmanship. We will repair
or replace, at our option, this tool during the warranty
period, and we may require that the tool be sent
postage prepaid to an approved service center with all
original equipment and a dated proof of purchase. Any
replacement or repaired power tool will only be covered
by the limited warranty for the balance of the warranty
period from the date of the original purchase.
WHAT IS NOT COVERED
This warranty applies only to the original purchaser at
retail and is not transferable.
This warranty does NOT cover service or replacement of
parts resulting from normal wear.
This warranty does NOT cover accessories or battery
packs.
This warranty does NOT cover malfunction, failure or
defects due to:
- abnormal use, abuse, neglect, or use not in accordance
with the operations manual
- damage resulting from accidents, drops or mishandling
of the tool
- alteration or repairs by other than approved service
centers
- commercial or rental use.
The manufacturer makes no warranties, representations
or promises as to the quality or performance of its
power tools other than those specifically stated in this
warranty.
FOR SERVICE
Contact our toll-free consumer service line at 1-866-354-
1312
NA WT460K M 050727.indd 13 2005-7-27 18:01:48
Page 14

Jigsaw WT460K
WORX (9679) (Mon.- Sat. 9am to 9pm EST) to receive a
replacement tool or to be directed to an approved service
center . When you make a warranty claim or send the
tool for warranty service, you must also include a dated
proof of purchase.
ADDITIONAL LIMITATIONS
This warranty is only valid for products purchased and
used in the United States of America, its territories or
Canada. Any implied warranty granted under state law,
including warranties of merchantability or fitness for a
particular purpose, are limited to two years from the
date of purchase. The manufacturer is not responsible
for direct, indirect, incidental or consequential damages
including, but not limited to, liability for loss of income
arising from the purchase or use of the product. Some
states and provinces do not allow limitations on how
long an implied warranty lasts and/or do not allow the
exclusion or limitation of incidental damages, so the
above limitations and exclusions may not apply to you.
This warranty gives you specific legal rights, and you
may also have other rights which vary from state to state
or province to province.
The manufacturer declines any responsibility in regards
to civil liability arising from abusive use or not in
conformity with proper use and maintenance of the
machine as described in the operator’s manual.
After the purchase, the manufacturer recommends
proper maintenance of the machine and to read
the operator’s manual before using the machine.
NA WT460K M 050727.indd 14 2005-7-27 18:01:48
Page 15

1514
NA WT460K M 050727.indd 15 2005-7-27 18:01:49
Page 16

Scie Sauteuse WT460K
CONSIGNES DE SÉCURITÉ
AVERTISSEMENT! Lisez et assimilez toutes les instructions. Le non-respect des
instructions ci-après peut entraîner un risque de choc électrique, d’incendie et/ou de
blessures graves.
CONSERVEZ CES INSTRUCTIONS
1. AIRE DE TRAVAIL
a) Veillez à ce que l’aire de travail soit propre et bien éclairée. Le désordre et le manque de
lumière favorisent les accidents.
b) N’utilisez pas d’outils électriques dans un milieu présentant un risque d’explosion, par
exemple en présence de liquides, de gaz ou de poussières inflammables. Les outils
électriques créent des étincelles qui pourraient enflammer les poussières ou les vapeurs.
c) Gardez à distance les curieux, les enfants et les visiteurs lorsque vous travaillez avec un
outil électrique. Ils pourraient vous distraire et vous faire faire une fausse manoeuvre.
2. SÉCURITÉ ÉLECTRIQUE
a) Les outils à double isolation sont munis d’une fiche polarisée (une des broches
est plus large que l’autre). Cette fiche ne peut se brancher que d’une seule façon
dans une prise polarisée. Si la fiche n’entre pas parfaitement dans la prise, inversez
sa position; si elle n’entre toujours pas bien, demandez à un électricien qualifié
d’installer une prise de courant polarisée. Ne modifiez pas la fiche de l’outil. La
double isolation élimine le besoin d’un cordon d’alimentation à trois fils avec mise à la terre
ainsi que d’une prise de courant mise à la terre. Avant de brancher l’outil, assurez-vous que
la tension de la prise correspond, à celle indiquée sur la plaque signalétique. N’utilisez pas
d’outils prévus «pour courant alternatif seulement» sur une source de courant continu.
b) Évitez tout contact corporel avec des surfaces mises à la terre (tuyauterie,
radiateurs, cuisinières, réfrigérateurs, etc.). Le risque de choc électrique est plus grand
si votre corps est en contact avec la terre. Si l’utilisation de l’outil électrique dans un endroit
humide est inévitable, un disjoncteur de fuite à la terre doit être utilisé pour alimenter votre
outil. Des chaussures et des gants en caoutchouc d’électricien contribueront à accroître
davantage votre sécurité personnelle.
c) N’exposez pas les outils électriques à la pluie ou à l’eau. La présence d’eau dans un
outil électrique augmente le risque de choc électrique.
d) Ne maltraitez pas le cordon. Ne transportez jamais l’outil par son cordon et ne
débranchez jamais la fiche en tirant sur le cordon. N’exposez pas le cordon à la
chaleur, à des huiles, à des arrêtes vives ou à des pièces en mouvement. Remplacez
immédiatement un cordon endommagé. Un cordon endommagé augmente le risque de
choc électrique.
e) Lorsque vous utilisez un outil électrique à l’extérieur, employez un cordon de
rallonge pour l’extérieur portant la mention << W-A >> ou << W >>. Ces cordons sont
prévus pour être utilisés à l’extérieur et pour réduire le risque de choc électrique. Reportezvous aux << Calibres recommandés des cordons de rallonge >> dans la section Accessoires
du présent manuel.
f) Les outils mis à la terre doivent être branchés dans une prise de courant
correctement installée et mise à la terre conformément à tous les codes et
règlements pertinents. Ne modifiez jamais la fiche de quelque façon que ce soit, par
exemple en enlevant la broche de mise à la terre. N’utilisez pas d’adaptateur de fiche. Si
vous n’êtes pas certain que la prise de courant est correctement mise à la terre, adressezvous à un électricien qualifié. En cas de défaillance ou de défectuosité électrique de l’outil,
NA WT460K M 050727.indd 16 2005-7-27 18:01:49
Page 17

Scie Sauteuse WT460K
une mise à la terre offre un trajet de faible résistance à l’électricité qui autrement risquerait
de traverser l’utilisateur.
3. SÉCURITÉ DES PERSONNES
a) Restez alerte, concentrez-vous sur votre travail et faites preuve de bon sens.
N’utilisez pas un outil électrique si vous êtes fatigué ou sous l’influence de
drogues, d’alcool ou de médicaments. Un instant d’inattention lors de l’utilisation
d’outils électriques peut entraîner des blessures graves.
b) Habillez-vous convenablement. Ne portez ni vêtements flottants ni bijoux. Confinez
les cheveux longs. Gardez les cheveux, les vêtements et les gants éloignés des pièces en
mouvement. Les vêtements flottants, les bijoux ou les cheveux longs risquent d’être happés
par des pièces en mouvement. Gardez les poignées sèches, propres et exemptes d’huile et
de graisse. Le port de gants en caoutchouc et de chaussures à semelle antidérapante est
recommandé si vous travaillez à l’extérieur.
c) Évitez les démarrages accidentels. Avant de brancher l’outil, assurez-vous que
son interrupteur est à la position <<OFF>> (Arrêt). Le fait de transporter un outil avec le
doigt sur la détente/l’interrupteur ou de brancher un outil dont l’interrupteur est à la position
<< ON >> (Marche) peut entraîner des accidents. N’utilisez pas un outil dont l’interrupteur ne
fonctionne pas normalement
d) Retirez les clés de réglage. Prenez l’habitude de vérifier si les clés de réglage et autres
outils sont retirés de l’outil avant de le mettre en marche.
e) Ne vous penchez pas trop en avant. Maintenez un bon appui et restez en
équilibre en tout temps. Une bonne stabilité vous permet de mieux réagir à une situation
inattendue.
f) Utilisez des accessoires de sécurité. Portez toujours une protection oculaire. Selon
les conditions, portez aussi un masque antipoussière, des bottes de sécurité antidérapantes,
un casque protecteur et une protection antibruit.
g) Tenez les mains à l’écart des arrêtes tranchantes et des pièces en mouvement.
h) Si un système d’extraction et d’aspiration de la poussière est fourni, s’assurer
qu’il est connecté correctement et utilisé de façon appropriée. L’utilisation de ce
système peut réduire les dangers liés à la poussière.
4. UTILISATION ET ENTRETIEN DE L’OUTIL
a) Immobilisez le matériau travaillé sur une surface stable au moyen de serre-joints
ou de toute autre façon adéquate. Le fait de tenir la pièce avec la main ou contre votre
corps n’offre pas une stabilité insuffisante et peut entraîner une perte de contrôle de l’outil.
b) Ne forcez pas l’outil. Utilisez l’outil approprié à la tâche. L’outil approprié fonctionne
mieux et de façon plus sécuritaire. Respectez aussi la vitesse de travail qui lui est propre. Un
usage excessif, en plus de fatiguer l’utilisateur, augmentera l’usure de l’outil et rendra son
maniement plus difficile.
c) N’utilisez pas un outil si l’interrupteur ne le met pas en marche ou ne peut l’arrêter.
Un outil qui ne peut être contrôlé par l’interrupteur est dangereux et doit être réparé.
d) Débranchez la fiche de l’outil de sa prise d’alimentation avant d’effectuer un
réglage, de changer d’accessoire ou de ranger l’outil. De telles mesures préventives
de sécurité réduisent le risque de démarrage accidentel de l’outil.
e) Rangez les outils hors de la portée des enfants et d’autres personnes
inexpérimentées. Les outils sont dangereux dans les mains d’utilisateurs novices.
f) Prenez soin de bien entretenir les outils. Les outils de coupe doivent être toujours
bien affûtés et propres. Des outils bien entretenus, dont les arrêtes sont bien tranchantes,
sont moins susceptibles de se coincer et plus faciles à contrôler.
1716
NA WT460K M 050727.indd 17 2005-7-27 18:01:50
Page 18

Scie Sauteuse WT460K
g) Soyez attentif à tout désalignement ou coincement des pièces en mouvement,
à tout bris ou à toute autre condition préjudiciable au bon fonctionnement de
l’outil. Si vous constatez qu’un outil est endommagé, faites-le réparer avant de
vous en servir. De nombreux accidents sont causés par des outils en mauvais état.
h) Utilisez seulement les accessoires recommandés par le fabricant de votre modèle.
Certains accessoires peuvent convenir à un outil, mais être dangereux avec un autre.
i) Utilisez l’outil approprié à la tâche à accomplir. Ne forcez pas l’outil ni l’accessoire en
tentant d’effectuer une tâche pour laquelle ils n’ont pas été conçus.
5. ENTRETIEN
a) L’entretien ou la réparation de l’outil doit être réalisé seulement par du personnel
qualifié. L’entretien ou la réparation d’un outil électrique, effectués par un amateur, peuvent
avoir des conséquences graves.
b) Pour l’entretien d’un outil, n’employez que des pièces de rechange identiques.
Suivez les directives fournies dans la section <<Entretien>> du présent manuel.
L’emploi de pièces non autorisées ou le non-respect des instructions d’entretien peut créer
un risque de choc électrique ou de blessures.
RÉGLES DE SÉCURITÉ SUPPLÉMENTAIRES - POUR LES SCIES
SAUTEUSES
AVERTISSEMENT! La non observance de ces règles peut conduire à des blessures
graves.
1) Lors de l’exécution d’une opération au cours de laquelle l’outil de coupe peut venir
en contact avec les fils cachés ou son propre cordon, tenez l’outil par ses surfaces
isolées de préhension. Le contact avec un fil sous tension rendra les pièces métalliques
exposées de l’outil sous tension et causera des chocs à l’opérateur.
2) Gardez les mains à l’écart de la zone de coupe. Ne placez surtout pas la main sous le
matériau que vous coupez. Il est impossible de déterminer exactement la proximité de la lame
de votre main.
3) N’utiliser pas de lames émoussées ou endommagées. Les lames bien affûtées scient
mieux et améliorent la sécurité. Les lames pliées peuvent aisément se fracturer ou causer un
rebond.
4) Il importe de bien assujettir la pièce sur laquelle vous travaillez. Ne la tenez jamais
dans votre main ou sur vos jambes.
5) Portez toujours des lunettes à coques latérales ou des lunettes de protection en
utilisant cet outil. Utilisez un respirateur ou un masque anti-poussières pour les applications
produisant de la poussière.
6) Inspectez toujours les murs et plafonds pour éviter les câbles électriques ou
tuyaux cachés.
7) Vérifiez bien que l’interrupteur de départ est en position « OFF » avant de brancher
l’outil. Un démarrage imprévu peut causer des blessures.
8) À chaque fois que c’est possible, utilisez un étrier ou un étau pour tenir la pièce
à travailler.
9) La plaque de base de l’outil doit toujours être maintenue fermement contre
le matériau découpé (pour réduire les vibrations de la scie, les sauts de lame et les
cassures).
10) Ne jamais arrêter la lame en y exerçant une pression latérale.
11) Retirer la lame de la coupe uniquement après qu’elle se soit arrêtée.
12) Cette scie sauteuse est un outil à main, ne pas la fixer.
13) Avant d’effectuer la coupe, vérifier qu’il n’y a pas de clous, vis ou autres sous la
NA WT460K M 050727.indd 18 2005-7-27 18:01:50
Page 19

Scie Sauteuse WT460K
1918
SYMBOLES
Lisez le manuel
Avertissement
Portez des lunettes de sécurité,
un masque antipoussière et une
protection antibruit
Pour usage à l’intérieur seulement
Double isolation
Ne pas exposez pas à la pluie et à
l’eau
Ne pas jeter pas au feu
ligne de coupe
14) Conservez ces instructions. Reportez-vous y fréquemment et utilisez-les pour informer
d’autres personnes qui pourraient utiliser cet outil. Si une autre personne utilise cet outil,
assurez-vous de lui fournir ces instructions.
AVERTISSEMENT! Les travaux à la machine tel que ponçage, sciage, meulage,
perçage et autres travaux du bâtiment peuvent créer des poussières contenant
des produits chimiques qui sont des causes reconnues de cancer, de malformation
congénitale ou d’autres problèmes reproductifs. Ces produits chimiques sont, par
exemple:
• Le plomb provenant des peintures á base de plomb
• Les cristaux de silices provenant des briques, du ciment et d’autres produits de maçonnerie
• L’arsenic et le chrome provenant des bois traités chimiquement
Le niveau de risque dû à cette exposition varie avec la fréquence de ces types de travaux. Pour
réduire l’exposition à ces produits chimiques, il faut travailler dans un lieu bien ventilé et porter un
équipement de sécurité approprié tel que certains masques à poussière conçus spécialement pour
filtrer les particules microscopiques.
L’étiquette de l’outil peut comprendre les symboles suivants
V...................................................................................................................................................................Volts
A............................................................................................................................................................Ampère
Hz.................................................................................................................................................................Hertz
~............................................................................................................................................Courant Alternatif
no ..................................................................................................................................................Vitesse à vide
....................................................................................................Construction classe II / Double isolation
NA WT460K M 050727.indd 19 2005-7-27 18:01:51
Page 20

Scie Sauteuse WT460K
1. DÉTENTE DE L’INTERRUPTEUR MARCHE-ARRÊT
2. BOUTON DE BLOCAGE EN MARCHE
3. CADRAN DE RÉGLAGE DE VITESSE
4. ZONES DE PRÉHENSION
5. COUVERCLE ANTI-POUSSIÈRES
6. SERRE LAME MANUEL (AUCUN OUTIL REQUIS)
7. FIXATION DU GUIDE PARALLÈLE
8. GUIDE DE LAME
9. LEVIER DE COMMANDE DE L’ACTION PENDULAIRE DE COUPE ORBITALE
10. PLAQUE DE BASE
11. GUIDE D’ANGLE DE CHANFREINAGE
12. ADAPTATEUR POUR ASPIRATEUR DE POUSSIÈRE
13. GUIDE PARALLÈLE
14. CLÉ ALLEN
15. PIÈCE ANTI-ÉCAILLAGE INSÉRÉE
4
2
1
14
12
10
119
8
7
6
5
7
13
4
3
15
NA WT460K M 050727.indd 20 2005-7-27 18:01:52
Page 21

Scie Sauteuse WT460K
2120
DONNÉES TECHNIQUES
Tension: 120 V~60Hz
Ampérage nominal: 6,0A
Double isolation:
Vitesse à vide: 500-3,000spm
Course: 15/16po (24mm)
Capacité de coupe maximale:
Bois: 4po (100mm)
Acier: 3/8po (10mm)
Aluminium: 13/16po (20mm)
Angle de chanfreinage: 0±45º
Nbre de réglages orbitaux: 4
Type de lames: Tiges en T
Poids: 5,6lb (2,8Kg)
ACCESSOIRES
Lames assorties
Clé Allen
Guide parallèle
Tube adaptateur pour aspiration de poussières
Dispositif anti-écaillage
Nous vous recommandons d’acheter tous vos accessoires du même magasin qui vous a vendu
l’outil. N’utilisez que des accessoires de bonne qualité de marque renommée. Choisissez le type
d’outil approprié au travail que vous désirez entreprendre. Consultez l’emballage des accessoires
pour de plus amples renseignements. Le personnel du magasin peut également vous conseiller.
CORDONS DE RALLONGE
Avertissement: Utiliser les bons cordons de rallonge. S’assurer que le cordon de rallonge
est en bon état, qu’il comporte trois fils, une fiche à trois broches et une prise à trois cavités
pouvant recevoir la fiche de la machine. Lorsqu’un cordon de rallonge est utilisé, s’assurer que
celui-ci soit d’un calibre qui convient au courant utilisé par la machine. Un cordon de calibre
insuffisant entraînera une perte de tension d’où une perte de puissance et la surchauffe. S’il y a un
doute, utiliser un cordon d’un calibre supérieur. Plus le chiffre est petit, plus le fil est gros.
3 article
1 article
1 article
1 article
1 article
NA WT460K M 050727.indd 21 2005-7-27 18:01:52
Page 22

Scie Sauteuse WT460K
DIMENSIONS DE RALLONGES RECOMMANDÉES OUTILS 120 VOLTS COURANT ALTER
NATIF
Intensité
nominale
de l’outil
3-6
6-8
8-10
10-12
12-16
Longueur en pieds Longueur en métres
Calibre A. W.G.
25 50 100 150
Calibre en mm
2
15 30 60 120
18 16 16 14
18 16 14 12
18 16 14 12
16 16 14 12
14 12 - -
.75 .75 1.5 2.5
.75 1.0 2.5 4.0
.75 1.0 2.5 4.0
1.0 2.5 4.0 -
- - - -
NA WT460K M 050727.indd 22 2005-7-27 18:01:53
Page 23

Scie Sauteuse WT460K
INSTRUCTIONS D’UTILISATION
REMARQUE: Avant d’utiliser cet outil, assurezvous de lire attentivement le manuel d’utilisation
1. INTERRUPTEUR DE MARCHE/ARRÊT
Appuyez sur la détente de l’interrupteur pour faire
démarrer et relâchez la pour arrêter l’outil.
2. BOUTON DE BLOCAGE EN MARCHE
Appuyez sur l’interrupteur de marche/arrêt (1) et bloquez
le bouton (2) (se référer à la figure 1) et puis relâchez
l’interrupteur de départ/arrêt en premier et ensuite le
bouton de blocage. Votre outil est maintenant verrouillé
en marche pour travail continu. Pour arrêter l’outil, ne
faites qu’appuyer sur la détente de l’interrupteur de
marche/arrêt.
3. COMMANDE DE VITESSE
Ajustez la molette pour augmenter ou diminuer la vitesse
(se référer à la Fig 2) selon le matériau, son épaisseur
et les spécifications de la lame (également possible à
vide). Référez-vous au tableau ci-dessous pour une aide
générale sur le choix de la vitesse.
Tableau 1
Matériau Réglage de la vitesse
Bois
Métal
Aluminium
PVC
Céramique
Évitez toute utilisation prolongée à une vitesse très
faible car cela pourrait endommager le moteur de la scie
sauteuse.
4. ZONE DE PRÉHENSION
Assurez-vous toujours d’avoir une prise ferme lors du
fonctionnement de la scie sauteuse.
5. PROTECTEUR ANTI-POUSSIÈRE
Lors du fonctionnement de la scie sauteuse, le protecteur
anti-poussière doit être fermé pour permettre au système
d’extraction de la poussière de fonctionner correctement.
Le protecteur anti-poussière peut être soulevé afin de
pouvoir le nettoyer, de monter des lames, etc. (se référer
à la Fig 3).
6. MONTAGE DE LA LAME
Utilisez seulement le type de lames montré à la Figure
Fig 2
Fig 1
2322
Fig 3
Fig 4
2
1
5-6
3-4
3-5
3-4
3-5
NA WT460K M 050727.indd 23 2005-7-27 18:01:53
Page 24

Scie Sauteuse WT460K
4. Pour ouvrir le porte-lame (6) faîtes pivoter l’anneau
dans le sens contraire des aiguilles d’une montre (scie
sauteuse à l’envers) et gardez la position (se référer à
la Fig 5). Puis insérez entièrement la lame dans la fente
du porte-lame avec les dents tournées vers l’avant et
relâchez l’anneau, qui tournera de lui-même et se fixera
sur le haut de la lame. Poussez de nouveau la lame
dans le porte-lame pour s’assurer qu’elle est verrouillée.
Assurez-vous que le bord de la lame est placé dans la
rainure du guide de lame (se référer à la Fig 6). Pour
retirer une lame, tenez la lame et faîtes pivoter l’anneau
du porte-lame dans le sens inverse des aiguilles d’une
montre puis sortir la lame (prenez garde à l’éjection
possible de la lame).
Avertissement ! Les dents de la lame sont
très coupantes. Pour de meilleurs résultats,
assurez-vous de l’utilisation d’une lame appropriée au
matériau et à la qualité de coupe souhaitée.
7 DISPOSITIF DE FIXATION DU GUIDE
PARALLÈLE
Faîtes glisser le bras du guide parallèle (13) à travers les
deux dispositifs de fixation pour atteindre la distance de
coupe nécessaire puis serrez les deux vis pour verrouiller
la lame en position.
Avertissement: Le guide parallèle ainsi que
le pare-éclats ne peuvent être utilisés que
dans la position normale (0°).
8. GUIDE DE LAME
Assurez-vous que la lame est bien positionnée et
qu’elle se déplace librement dans la rainure (se référer
à la Fig 6) sinon l’action pendulaire ne fonctionnera pas
correctement et la lame ne sera pas supportée pendant
la coupe.
9. COMMANDE DE L’ACTION PENDULAIRE
L’action pendulaire fait varier l’angle de coupe avant
de la lame pour améliorer l’efficacité de la coupe. Elle
peut également être réglée lors du fonctionnement à
vide. Pour de plus amples informations, reportez-vous
au tableau 2. Lors la lame est angulée pour coupes
orbitales, n’exercez pas une force excessive sur la lame.
La lame coupe uniquement sur sa course supérieure(se
référer à la Fig 7).
Fig 6
Fig 5
Fig 7
Fig 8
NA WT460K M 050727.indd 24 2005-7-27 18:01:54
Page 25

Scie Sauteuse WT460K
Tableau 2
Réglage
1 Matériaux minces. Coupes précises.
Courbes serrées.
2 Matériaux durs (ex. Acier et aggloméré de bois).
3 Matériaux épais (ex. bois et plastique).
4 Coupes rapides (ex. Bois mous). Couper dans le
sens du grain du bois.
10. PLAQUE DE BASE
L’ajustement de l’angle de la base (10) permet de
couper en biseau. La base doit toujours être maintenue
fermement contre le matériau découpé afin de réduire
les vibrations de la scie, les sauts et cassures de lame.
11. RÉGLAGE DE L’ANGLE DE LA SEMELLE
Utilisez la clé Allen (14). Dévissez les vis qui fixent la base
(se référer à la Fig 8). Pour des angles préréglés, faîtes
pivoter la base (11) sur l’angle désiré (0°, 15°, 30°, 45°) (se
référer à la Fig 9). Pour autres coupes à onglet, utilisez
un rapporteur d’angle. Pour n’importe lequel des angles,
maintenez la base et vissez fermement les vis pour la
fixer sur cet angle. Enfin, vérifiez l’angle et assurez-vous
que la base tient fermement. Les repères d’angles sur la
base sont précis pour la plupart des travaux mais il est
recommandé pour les travaux de grandes précisions de
régler l’angle avec un rapporteur d’angle et de réaliser
un test de coupe sur une pièce d’essai.
12. ADAPTATEUR POUR ASPIRATION DE POUSSIÈRES
L’adaptateur (12) pivote en sens antihoraire à l’intérieur
de la carcasse et s’y verrouille dans une rainure prévue à
cet effet (se référer à la Figure 10). Il doit ensuite être relié
à une machine d’extraction de poussières appropriée.
13. BARRE DE SÉCURITÉ
Située sur l’avant du porte-lame, elle permet, pendant le
travail, d’éviter tout contact accidentel avec la lame en
mouvement.
14. PRISE D’AIR POUR SOUFFLAGE DE LA POUSSIÈRE
C’est une petite ouverture située sous le boîtier juste
derrière le guide de lame. Assurez-vous qu’elle est
toujours propre pour permettre à l’air d’évacuer en
permanence la poussière de la zone de coupe.
2524
Fig 9
Fig 10
Fig 11
15
NA WT460K M 050727.indd 25 2005-7-27 18:01:55
Page 26

Scie Sauteuse WT460K
15. DISPOSITIF DE PRÉVENTION D’ÉCAILLAGE
Le dispositif de prévention d’écaillage (15) empêche la
surface de s’écailler lors du sciage de bois. Insérez le
dispositif en le pressant sous la plaque de base de la scie
(se référer à la Figure 11).
CONSEILS DE TRAVAIL AVEC
VOTRE SCIE SAUTEUSE
Si votre outil motorisé devient trop chaud, réglez la
vitesse au maximum et opérez le à vide durant 2 à 3
minutes pour refroidir le moteur.
GÉNÉRALITÉS
Utilisez toujours une lame adaptée au matériau et à son
épaisseur. Assurez-vous que l’ouvrage est fermement
maintenu ou fixé pour empêcher tout déplacement.
Pour un contrôle plus aisé, utilisez une vitesse faible
pour débuter la coupe et ensuite augmentez à la vitesse
adéquate. Tout déplacement du matériau pourrait affecter
la qualité de la coupe. La lame coupe sur la course vers
le haut et pourrait écailler la partie supérieure. Assurezvous que la surface supérieure ne sera pas visible
lorsque le projet sera terminé.
COUPE DE STRATIFIÉS
Pour la plupart des stratifiés et panneaux minces de bois,
utilisez une lame à dents fines. Pour réduire l’écaillage
des bords, serrez la pièce à travailler “en sandwich”
entre deux pièces de bois de rebut et sciez au travers
des trois épaisseurs.
COUPE DE POCHETTE AU CENTRE D’UNE
SURFACE (MATÉRIAUX NON DURS SEULEMENT)
Pour effectuer des coupes en plein bois, percez un trou
suffisamment large pour y insérer la lame de scie ou
procédez comme indiqué ci-dessous. Marquez clairement
la zone à découper. Positionnez la scie sauteuse sur la
zone marquée avec le bord avant arrondi de la base
appuyé sur la surface (se référer à la 12). Assurez-vous
que la lame n’est pas en contact mais proche de la
surface de travail. Mettez la scie sauteuse en marche et
faîtes doucement pénétrer la scie dans le matériau mais
conservez une force pivotante sur le bord avant de la
base. Ne faites avancer la scie en avant pour une coupe
normale uniquement lorsque la lame a entièrement
pénétré dans le matériau et que toute la longueur de la
base est fermement appuyée sur la surface de travail.
Fig 12
NA WT460K M 050727.indd 26 2005-7-27 18:01:55
Page 27

Scie Sauteuse WT460K
COUPE DE MÉTAUX
Utilisez une lame à dents plus fines pour les métaux
ferreux et une lame à grosses dents pour les métaux non
ferreux. Lors de la coupe de feuilles de métal mince, serrez
toujours des planches de bois de chaque côté de la feuille
pour réduire les vibrations ou pour éviter que la feuille de
métal ne se déchire. Le bois et la feuille de métal doivent
être traversés. Ne forcez pas la lame lors du découpage de
métal fin ou de feuilles de métal. Ce sont des matériaux
plus durs et il faudra plus de temps pour les couper. Une
force excessive sur la lame réduira la longévité de celle-ci
ou endommagera le moteur. Pour réduire les risques de
surchauffe lors de coupes de métaux, rajoutez un peu de
lubrifiant sur la ligne de coupe.
GARANTIE
POLITIQUE D’ÉCHANGE LIMITÉE DE SOIXANTE
(60) JOURS
Un outil qui ne fonctionne pas correctement à cause d’un
défaut de pièce ou de main-d’œuvre est échangeable
durant les soixante (60) premiers jours après la date
d’achat en rapportant l’outil au détaillant où il a été
acheté. Pour obtenir un outil de remplacement vous
devez présenter une preuve d’achat datée et retourner
l’outil dans son emballage original.
GARANTIE LIMITÉE DE DEUX (2) ANS
Nous garantissons que durant une période de deux (2)
ans à partir de la date d’achat, ce produit sera libre de
défaut de matériaux de fabrication et de main d’œuvre.
Nous réparerons ou remplacerons, à notre seule option,
cet outil durant la période de garantie et nous pouvons
exiger qu’il soit expédié, frais de port payés, à un de
nos centres de service autorisés, accompagné d’une
preuve d’achat datée. Tout outil remplacé ou réparé ne
sera couvert que de la période de garantie restant sur la
durée de deux (2) ans depuis la date d’achat.
CE QUI EST EXCLUS DE LA GARANTIE
Cette garantie n’est valide que pour l’acheteur original et
n’est pas transférable.
Cette garantie ne couvre PAS l’entretien ou le remplacement
de pièces usées qui est normalement requis.
Cette garantie ne couvre PAS les accessoires ou les
blocs-piles.
Cette garantie ne couvre PAS :
- le mauvais fonctionnement, pannes ou défauts causés
par un usage anormal, l’abus, la négligence ou une
utilisation ne suivant pas les directives du manuel
2726
NA WT460K M 050727.indd 27 2005-7-27 18:01:56
Page 28

Scie Sauteuse WT460K
d’utilisation.
-l’endommagement résultant d’accidents,
d’échappements au sol ou de mauvais traitements de
l’outil
- les problèmes causés par une modification ou réparation
faite ailleurs qu’à un centre de service autorisé.
-les problèmes dus à l’utilisation commerciale ou de
location.
Le manufacturier ne fait pas de garantie, représentation
ou promesse relatives à la qualité ou performance de
ses outils autres que celles décrites en toutes lettres
dans la présente garantie.
ASSISTANCE
Pour faire remplacer votre outil et obtenir l’adresse d’un
centre de service autorisé, contactez notre personnel
d’assistance à la clientèle au numéro sans frais 1-866354-WORX (9679) (du lundi au samedi entre 9:00 h et
21:00, heure normale de l’Est). Lorsque vous faites
une réclamation de garantie ou retournez l’outil pour
réparation sous garantie, vous devez également inclure
une preuve d’achat datée.
LIMITATIONS ADDITIONNELLES
Cette garantie n’est valide que pour les produits achetés
et utilisés aux États-Unis d’Amérique, ses territoires, et
au Canada. Toute garantie tacite aux lois étatiques ou
provinciales (incluant les garanties de qualité marchande
ou de capacité dédiée à une application particulière) est
limitée à deux ans de la date d’achat. Le manufacturier ne
sera pas responsable des dommages accessoires directs
et indirects incluant (mais ne se limitant pas à) la perte de
revenus résultant de l’achat ou de l’utilisation du produit.
Certains états et provinces n’autorisent pas la limitation
de durée de garantie tacite et/ou ne permettent pas
l’exclusion ou la limitation des dommages accessoires
directs, alors les limitations et exclusions énumérées cidessus peuvent ne pas s’appliquer dans votre cas. Cette
garantie vous donne des droits légaux spécifiques et
vous avez peut-être d’autres droits qui varient d’un état
ou province à l’autre.
Le manufacturier décline toute responsabilité civile de
dommages provenant d’une utilisation abusive ou n’étant
pas conforme à la bonne utilisation ou à l’entretien de la
machine décrits au manuel de l’utilisateur.
Après l’achat, le manufacturier suggère de lire
le manuel de l’utilisateur avant de se servir de la
machine et d’en faire l’entretien recommandé.
NA WT460K M 050727.indd 28 2005-7-27 18:01:57
Page 29

2928
NA WT460K M 050727.indd 29 2005-7-27 18:01:57
Page 30

Sierra Caladora WT460K
INSTRUCCIONES DE SEGURIDAD
CUIDADO! Lea y comprenda todas las instrucciones. El no seguir todas las
instrucciones a continuación puede dar lugar a descargas eléctricas, incendios y/o daños
corporales serios.
CONSERVE ESTAS INSTRUCCIONES
1. ÁREA DE TRABAJO
a) Mantenga su lugar de trabajo limpio y bien iluminado. Bancos de trabajo desordenados
y lugares oscuros invitan a los accidentes.
b) No utilice herramientas eléctricas en atmósferas explosivas, como por ejemplo en
presencia de líquidos, inflamables, gases o polvo. Las herramientas eléctricas crean
chispas que pueden encender el polvo o los vapores.
c) Mantenga a los espectadores, niños y visitantes a una distancia prudente cuando
esté utilizando una herramienta eléctrica. Las distracciones pueden hacerle perder el
control.
2. SEGURIDAD ELÉCTRICA
a) Las herramientas con doble aislamiento están equipadas con un enchufe polarizado
(una pata es más ancha que la otra). Este enchufe entrará en un tomacorriente
polarizado solamente de una manera. Si el enchufe no entra por completo en
el tomacorriente, délo vuelta. Si sigue sin entrar, póngase en contacto con un
electricista competente para instalar un tomacorriente polarizado. No haga
ningún tipo de cambio en el enchufe. El doble aislamiento elimina la necesidad del
sistema de cable de tres hilos conectado a tierra y tomacorriente conectado a tierra. Antes
de enchufar la herramienta, asegúrese de que la tensión suministrada por el tomacorriente
se encuentre dentro del margen de tensión especificada en la placa del fabricante. No utilice
herramientas marcadas “CA solamente” (“AC only”) con una fuente de energía de CC (DC).
b) Evite el contacto del cuerpo con las superficies conectadas a tierra tales como
tuberías, radiadores, estufas de cocina y refrigeradores. Existe mayor riesgo de que
se produzcan descargas eléctricas si su cuerpo está conectado a tierra. Si la utilización de
la herramienta eléctrica en lugares húmedos es inevitable, se debe usar un interruptor de
circuito por fallas a tierra (GFCI) para suministrar energía a la herramienta. Guantes de goma
y calzado para electricista aumentarán más su seguridad personal.
c) No exponga las herramientas eléctricas a la lluvia ni a los ambientes húmedos.
La entrada de agua en una herramienta eléctrica aumenta el riesgo de que se produzcan
descargas eléctricas.
d) No abuse del cable. Nunca use el cable para transportar las herramientas ni para sacar
el enchufe de un tomacorriente. Mantenga el cable alejado del calor, el aceite, los bordes
afilados o las piezas móviles. Cambie los cables dañados inmediatamente. Los cables
dañados aumentan el riesgo de que se produzcan descargas eléctricas.
e) Al utilizar una herramienta eléctrica a la intemperie, utilice un cable de extensión
para intemperie marcado “W-A” o “W”. Estos cordones tienen capacidad nominal para
uso a la intemperie y reducen el riesgo de que se produzcan descargas eléctricas. Consulte
“Tamaños recomendados de los cables de extensión” en la sección Accesorios de este
manual.
f) Las herramientas conectadas a tierra deben estar enchufadas en un tomacorriente
que esté instalado correctamente y conectado a tierra de acuerdo con todos los
códigos y ordenanzas vigentes. Nunca saque la pata de conexión a tierra o modifique
el enchufe de ninguna manera. No use enchufes adaptadores. Consulte a un electricista
NA WT460K M 050727.indd 30 2005-7-27 18:01:58
Page 31

Sierra Caladora WT460K
capacitado si tiene dudas para asegurar que el tomacorriente esté correctamente conectado
a tierra. Si las herramientas sufren fallas eléctricas, la conexión a tierra proporciona una
trayectoria de baja resistencia para que el usuario no quede expuesto a la electricidad.
3. SEGURIDAD PERSONAL
a) Manténgase alerta, fíjese en lo que está haciendo y use el sentido común cuando
utilice una herramienta eléctrica. No use la herramienta cuando esté cansado o se
encuentre bajo la influencia de drogas, alcohol o medicamentos. Un momento de
distracción al utilizar herramientas eléctricas puede dar lugar a lesiones personales graves.
b) Vístase apropiadamente. No se ponga ropa holgada ni joyas. Recójase el cabello
largo. Mantenga su cabello, ropa y guantes alejados de las piezas móviles. La ropa
holgada, las joyas o el pelo largo pueden quedar atrapados en las piezas móviles. Mantenga
los mangos secos, limpios y libres de aceite y grasa. Se recomiendan guantes de caucho y
calzado antideslizante cuando se trabaja a la intemperie.
c) Evite el arranque accidental. Asegúrese de que el interruptor esté en la posición
“OFF” (apagado) antes de enchufar la herramienta. El llevar las herramientas con el
dedo en el interruptor o el enchufar herramientas que tengan el interruptor en la posición
“ON” (encendido) invita a que se produzcan accidentes. No utilice la herramienta si tiene el
interruptor dañado y éste no enciende ni apaga la herramienta correctamente.
d) Retire todas las llaves y calibradores. Hágase el hábito de verificar que todas las llaves,
calibradores, etc. hayan sido removidos de la herramienta antes de operarla.
e) No intente alcanzar demasiado lejos. Mantenga un apoyo de los pies y un equilibrio
adecuados en todo momento. El apoyo de los pies y el equilibrio adecuados permiten un
mejor control de la herramienta en situaciones inesperadas.
f) Utilice equipo de seguridad. Use siempre protección ocular. Se debe utilizar una
máscara antipolvo, zapatos de seguridad antideslizantes, casco o protección auditiva según
lo requieran las condiciones.
g) Mantenga las manos retiradas de bordes cortantes y partes en movimiento.
h) Si se proporcionan dispositivos para la extracción y recolección de polvo,
asegúrese que estos estén conectados y utilizados correctamente. El uso de
estos dispositivos puede reducir peligros relacionados con el polvo.
4. USO Y CUIDADO DE LA HERRAMIENTA
a) Utilice abrazaderas u otro modo práctico de asegurar y apoyar el material de
trabajo sobre una plataforma estable. Sostener el material de trabajo en la mano o
contra su cuerpo es inestable y puede conducir a la pérdida de control.
b) No fuerce la herramienta. Emplee la herramienta correcta para la aplicación que
desea. La herramienta correcta hará el trabajo mejor y con más seguridad a la capacidad
nominal para la que está diseñada. Forzándola solamente causará fatiga al operario, mayor
desgaste y menor control.
c) No utilice la herramienta si el interruptor no la enciende o apaga. Toda herramienta
que no se pueda controlar con el interruptor es peligrosa y debe ser reparada.
d) Desconecte el enchufe de la fuente de alimentación antes de hacer cualquier
ajuste, cambiar accesorios o guardar la herramienta. Estas medidas de seguridad
preventivas reducen el riesgo de encender la herramienta accidentalmente.
e) Guarde las herramientas que no esté usando fuera del alcance de los niños y otras
personas no capacitadas. Las herramientas son peligrosas en las manos de los usuarios
no capacitados.
f) Mantenga las herramientas con cuidado. Conserve las herramientas de corte
afiladas y limpias. Las herramientas mantenidas adecuadamente, con bordes de corte
3130
NA WT460K M 050727.indd 31 2005-7-27 18:01:58
Page 32

Sierra Caladora WT460K
afilados, tienen menos probabilidades de atascarse y son más fáciles de controlar. Toda
alteración o modificación constituye un uso incorrecto y puede tener como resultado una
situación peligrosa.
g) Compruebe la desalineación o el atasco de las piezas móviles, la ruptura de piezas
y cualquier otra situación que pueda afectar el funcionamiento de las herramientas.
Si la herramienta está dañada, hágala arreglar antes de usarla. Muchos accidentes
son causados por herramientas mantenidas deficientemente. Establezca un programa de
mantenimiento periódico para la herramienta.
h) Utilice únicamente accesorios que estén recomendados por el fabricante de su
modelo. Los accesorios que pueden ser adecuados para una herramienta pueden volverse
peligrosos cuando se utilizan en otra herramienta.
i) Utilice la herramienta adecuada. No utilice una herramienta o accesorio para hacer
trabajos para los que no está diseñada ni recomendada.
5. REPARACIÓN
a) La reparación de una herramienta debe ser realizada únicamente por personal
competente. La reparación o mantenimiento realizado por personal no competente podría
ocasionar peligro de que se produzcan lesiones.
b) Al reparar una herramienta, utilice únicamente piezas de repuesto idénticas. Siga
las instrucciones que aparecen en la sección Mantenimiento de este manual. El
uso de piezas no autorizadas o el incumplimiento de las instrucciones de Mantenimiento
pueden ocasionar peligro de que se produzcan descargas eléctricas o lesiones.
NORMAS DE SEGURIDAD ADICIONALES - PARA SIERRAS
CALADORAS
ADVERTENCIA! El no seguir estas normas podría ocasionar lesiones graves.
1) Sujete la herramienta por las superficies de agarre aisladas cuando realice una
operación en la que la herramienta de corte pueda entrar en contacto con cables
ocultos o con su propio cable. El contacto con un cable que tenga corriente hará que ésta
pase a las partes metálicas descubiertas de la herramienta y que el operador reciba descargas
eléctricas.
2) Mantenga las manos alejadas del área de corte. No ponga la mano debajo del material
que se está cortando. La proximidad de la hoja a la mano queda oculta a la vista.
3) Use siempre gafas de seguridad o protección ocular cuando utilice esta herramienta.
Use una máscara antipolvo o un respirador para aplicaciones que generan polvo.
4) No utilice hojas desfiladas ni dañadas. Las hojas afiladas harán el trabajo mejor y con más
seguridad. Una hoja doblada puede romperse fácilmente o causar retroceso.
5) Revise siempre las paredes y techos para evitar cables y tuberías eléctricas
ocultas.
6) Fije el material antes de cortar. Nunca lo tenga en la mano ni sobre las piernas.
7) Verifique que la llave de encendido no esté en “ON” antes de enchufar la herramienta.
Los arranques accidentales pueden causar heridas.
8) Siempre que pueda, use abrazaderas o mordazas para sujetar la pieza de trabajo.
9) Fije el material antes de cortar. No lo sostenga nunca con la mano ni sobre las piernas.
10) Conserve estas instrucciones. Consúltelas con frecuencia y úselas para enseñarles a las
otras personas que podrían usar esta herramienta. Si le presta esta herramienta a alguien,
asegúrese de que tenga estas instrucciones.
NA WT460K M 050727.indd 32 2005-7-27 18:01:59
Page 33

Sierra Caladora WT460K
3332
SÍMBOLOS
Lea el manual
Advertencia
Use lentes de seguridad, máscara contra el polvo y protec
-
ción auditiva
Usela en el interior solamente
Doble aislamiento
No exponer a la lluvia ni al agua
No arrojar al fuego
ADVERTENCIA! El polvo creado al lijar, serruchar, pulir, taladrar o realizar otras
actividades de la construcción, contiene substancias químicas que se sabe
producen cáncer, defectos de nacimiento u otros defectos del sistema reproductor.
Algunos ejemplos de esos productos químicos son:
• El plomo de las pinturas a base de plomo
• La sílice cristalina de los ladrillos, del cemento y de otros productos de albañilería
• El arsénico y el cromo de la madera tratada químicamente
El riesgo que se corre a causa del contacto con esos productos varía según la frecuencia con
que usted realice este tipo de trabajos. Con el fin de reducir su exposición a esas substancias
químicas:
• Trabaje en un área bien ventilada
• Utilice un equipo de seguridad reglamentario, tal como una máscara contra el polvo especialmente
diseñada para filtrar partículas microscópicas.
La etiqueta de su herramienta puede incluir los siguientes símbolos:
V......................................................................................................................................................Voltios
A.........................................................................................................................................................Amperes
Hz.................................................................................................................................................................
Hertz
~...............................................................................................................................................Corriente alterna
no .......................................................................................................................................Velocidad sin carga
.............................................................................................Construcción de clase II / Doble aislamiento
NA WT460K M 050727.indd 33 2005-7-27 18:01:59
Page 34

Sierra Caladora WT460K
4
2
1
14
12
10
119
8
7
6
5
7
13
4
3
15
1. GATILLO DE ENCENDIDO/APAGADO
2. BOTÓN DE BLOQUEO EN MARCHA
3. PERILLA DEL CONTROL VARIABLE DE VELOCIDAD
4. ÁREA DE AGARRE
5. CUBIERTA CONTRA EL POLVO
6. SOPORTE DE LA HOJA
7. SOPORTE DE LA GUÍA PARALELA
8. GUÍA DE LA HOJA
9. PALANCA DE CONTROL DE ACCIÓN ORBITAL (PÉNDULO)
10. BASE
11. GUÍA DE ÁNGULO
12. CONECTOR PARA LA EXTRACCIÓN DE POLVO
13. GUÍA PARALELA
14. LLAVE ALLEN
15. INSERTO CONTRA ASTILLADO
NA WT460K M 050727.indd 34 2005-7-27 18:02:00
Page 35

Sierra Caladora WT460K
DATOS TÉCNICOS
Voltios: 120 V ~ 60Hz
Corriente nominal: 6,0A
Aislamiento doble:
Velocidad sin carga: 500-3,000SPM
Longitud de la carrera: 15/16” (24mm)
Capacidad de corte máximas:
Madera: 4” (100mm)
Acero: 3/8” (10mm)
Aluminio: 13/16“ (20mm)
Capacidad de Biselado: 0±45º
Ajustes Orbitales: 4
Tipo de Hoja: Vàstago T
Peso: 5,6 libras (2,8Kg)
ACCESORIOS
Hojas varias 3
Llave Allen 1
Guía paralela 1
Tubo para extractor de polvo 1
Inserto contra astillado 1
Le recomendamos que compre todos los accesorios en la tienda donde adquirió la herramienta.
Use accesorios de buena calidad estampados con una marca bien conocida. Seleccione las brocas
que más convengan al trabajo que intenta hacer. Consulte el empaque de los accesorios para
obtener más detalles. El personal de la tienda también puede ayudarle y aconsejarle.
CABLES DE EXTENSIÓN
Advertencia: Utilice cables de extensión apropiados. Asegúrese de que el cable de extensión
esté en buenas condiciones y de que tenga 3 conductores con un enchufe de 3 patas y enchúfelo
en un tomacorriente de 3 patas. Cuando utilice un cable de extensión, asegúrese de emplear uno que
tenga la capacidad suficiente como para manejar la corriente de la máquina. Un cable de menor
capacidad causará una caída en la tensión de la línea eléctrica que dará como resultado pérdida de
potencia y recalentamiento. En caso de duda, utilice el siguiente calibre más grueso. Cuanto más
pequeño sea el número de calibre, más grueso será el cable.
3534
NA WT460K M 050727.indd 35 2005-7-27 18:02:01
Page 36

Sierra Caladora WT460K
TAMAÑOS RECOMENDADOS DE CORDONES DE EXTENSION HERRAMIENTAS DE 120 V
CORRIENTE ALTERNA
Capacidad
nominal en
amperios de
la herra-
mienta
3-6
6-8
8-10
10-12
12-16
Tamaño del cordón en A.W.G Tamaños del cable en mm
2
Longitud del cordón en pies
25 50 100 150
Longitud del cordón en metros
15 30 60 120
18 16 16 14
18 16 14 12
18 16 14 12
16 16 14 12
14 12 - -
.75 .75 1.5 2.5
.75 1.0 2.5 4.0
.75 1.0 2.5 4.0
1.0 2.5 4.0 -
- - - -
NA WT460K M 050727.indd 36 2005-7-27 18:02:01
Page 37

Sierra Caladora WT460K
INSTRUCCIONES DE
FUNCIONAMIENTO
NOTA: Antes de usar la herramienta, lea atentamente el manual de instrucciones.
1. GATILLO DE ENCENDIDO/APAGADO
Presione para encender y suelte para apagar su
herramienta.
2. BOTÓN DE BLOQUEO EN MARCHA
Presione el gatillo (1) luego el botón de bloqueo en
marcha (2) (Ver Fig 1), suelte primero el gatillo y luego el
botón de bloqueo en marcha. El gatillo quedará trabado
para uso continuo. Para apagar la herramienta, presione
y suelte el gatillo.
3. CONTROL DE VELOCIDAD VARIABLE
Aumente o disminuya Para aumentar o disminuir la
velocidad (Ver Fig 2) de acuerdo con el material, el grosor
del mismo y especificaciones de la hoja a emplearse
(esto también es posible durante operación sin carga).
Véa la Tabla 1 para guía general en la selección de la
velocidad.
Tabla 1
Material Ajuste de velocidad
Madera
Metal
Aluminio
PVC
Cerámica
Evite el uso prolongado a velocidad muy baja, ya que
esto puede dañar el motor de su sierra.
4. ÁREAS DE AGARRE
Asegúrese siempre de mantener una firme empuñadura
mientras opera su sierra.
5. CUBIERTA CONTRA EL POLVO
AL usar su sierra, la cubierta contra polvo debe estar
cerrada para permitir que el sistema de extracción de
polvo funcione eficientemente. Puede abrirla para
efectuar la limpieza, colocar la hoja, etc (Ver Fig 3).
6. COLOCACIÓN DE LA HOJA
Puede usar únicamente el tipo de hoja mostrado en la
(Ver Fig 4). Para abrir el soporte de la hoja (6) gire el aro
en sentido contra horario (sierra al revés) y manténgalo
3736
Fig 2
Fig 1
Fig 3
Fig 4
2
1
5-6
3-4
3-5
3-4
3-5
NA WT460K M 050727.indd 37 2005-7-27 18:02:02
Page 38

Sierra Caladora WT460K
en esa posición (Ver Fig 5). Luego inserte la hoja
completamente en la ranura del soporte con los dientes
mirando hacia adelante y suelte el aro, el que girará y
se ajustará por encima de la hoja. Empuje nuevamente
la hoja dentro del soporte para asegurarse de que esté
trabada en esa posición. Asegúrese de que el canto de la
hoja esté situado en la ranura de la guía de la hoja (Ver
Fig 6). Para retirar una hoja, sosténgala y gire el aro del
soporte en sentido contra horario, luego saque la hoja
(podría ser eyectada por un resorte).
Advertencia: los dientes de la hoja son muy
filosos. Para mejores resultados en el corte use
una hoja adecuada al material y a la calidad de corte que
Ud. necesita.
7. FIJACIÓN DE LA GUÍA PARALELA
Deslice el brazo (13) de la guía paralela a lo largo de
ambos soportes para lograr la distancia de corte
requerida y ajuste ambos tornillos para fijarla en esa
posición.
Advertencia: Tanto la guía paralela así como
el inserto contra astillado deben usarse
solamente en la posición de 0O (normal).
8. GUÍA DE HOJA
Compruebe que la hoja esté situada en la ranura y se
deslice perfectamente por este (Ver Fig 6) de lo contrario,
la función péndulo no trabajará correctamente y la hoja
no quedará sostenida durante el corte.
9. CONTROL DE ACCIÓN DEL PÉNDULO
La acción del péndulo varía el ángulo de corte hacia
adelante de la hoja para una mayor eficiencia de corte.
Esto también se puede ajustar durante el funcionamiento
sin carga. Consulte la Tabla 2 para más detalles. No utilice
una fuerza excesiva de la hoja al cortar con la acción del
péndulo. La hoja corta sólo en movimiento ascendente
(Ver Fig 7).
Tabla 2
Fig 6
Fig 5
Fig 7
Fig 8
Materiales delgados. Cortes finos. Curvas cerradas.
Materiales duros (ej. Acero y madera aglomerada)
Materiales gruesos (ej. Madera) y plástico.
Cortes rápidos (ej. Madera blanda). Cortes en el
sentido de las vetas de la madera.
1
2
3
4
NA WT460K M 050727.indd 38 2005-7-27 18:02:03
Page 39

Sierra Caladora WT460K
10. BASE
El ajuste del ángulo de la base (10) permite cortes
biselados. La base siempre se debe sostener firmemente
contra el material que se está cortando para reducir la
vibración de la sierra y el salto o ruptura de la hoja.
11. AJUSTE DEL ÁNGULO DE LA BASE
Con una llave allen (14), afloje los tornillos que aseguran
la base (Ver Fig 8). Para ángulos prefijados, gire la base
hasta alinearla con el ángulo deseado de la placa de
ángulos (11) (0, 15, 30, 45) (Ver Fig 9). Para otros cortes de
inglete, gire la base usando un transportador. Siguiendo
uno de los procedimientos anteriores, sostenga la base
en posición y ajuste firmemente los tornillos para fijarla a
ese ángulo. Finalmente, verifique el ángulo y asegúrese
de que la base esté firmemente ajustada. Las marcas
de ángulo sobre la base son exactas para propósitos
generales, pero se recomienda que para un trabajo
más preciso se fije el ángulo con un transportador y se
efectúe un corte de prueba en una pieza de desecho.
12. CONECTOR PARA LA EXTRACCIÓN DE
POLVO
El conector (12) gira en sentido contra horario dentro
de la cubierta y se traba en posición por una ranura en
el interior de la cubierta (Ver Fig 10). Luego debe ser
conectado a una máquina extractora de polvo externa
adecuada.
13. BARRA DE SEGURIDAD DE LA HOJA
Está situada delante del soporte de la hoja. Cuando
la máquina se encuentra en funcionamiento, ayuda
a prevenir el contacto accidental con la hoja en
movimiento.
14. ABERTURA DEL SOPLADOR DE POLVO
Es un pequeño agujero situado debajo de la caja justo
detrás de la guía de la hoja. Asegúrese de mantener el
agujero siempre limpio para permitir el flujo de aire que
removerá continuamente el polvo del área de corte.
15. INSERTO CONTRA ASTILLADO
El inserto contra astillado (15) evita el astillado de la
superficie al cortar madera. Coloque el inserto contra
astillado por debajo de la base (Ver Fig 11).
3938
Fig 9
Fig 10
Fig 11
15
NA WT460K M 050727.indd 39 2005-7-27 18:02:03
Page 40

Sierra Caladora WT460K
CONSEJOS PARA USAR SU SIERRA
CALADORA
Si su herramienta eléctrica se calienta demasiado, ajuste
la velocidad al máximo y hágalo funcionar sin carga por
2-3 minutos para enfriar el motor.
GENERAL
Utilice siempre una hoja adecuada al material y al
grosor del material a ser cortado. Asegúrese siempre de
que la pieza de trabajo esté firmemente afianzada para
prevenir el movimiento.
Para mayor control, utilice baja velocidad al comenzar
a cortar y después auméntela hasta lograr la velocidad
correcta. Cualquier movimiento del material puede
afectar la calidad del corte. La hoja corta en movimiento
ascendente y puede astillar la superficie superior.
Cerciórese de que la superficie superior no sea una
superficie visible cuando el trabajo esté terminado.
CORTE DE LAMINADOS
Utilice una hoja de diente fino cuando deba cortar
laminados y maderas delgadas. Para reducir el astillado
de los bordes, fije piezas de madera de descarte a ambos
extremos o ambos lados y corte a través de la madera.
CORTE EN CÍRCULO
No utilice la acción del péndulo al cortar círculos o
ángulos cerrados.
Para hacer una cavidad, haga un orificio con un taladro
lo suficientemente grande como para insertar la hoja
de sierra o proceda de la siguiente manera. Marque
claramente el área a cortar. Coloque la sierra sobre el
área marcada con el borde delantero redondeado de
la base apoyado sobre la superficie (Ver Fig 12). Cuide
que la hoja no toque pero esté cerca de la superficie de
trabajo. Encienda la sierra y mueva lentamente la hoja
hacia el material manteniendo un pivote en el borde
frontal de la base. Una vez que la hoja haya penetrado
completamente en el material y toda la base se encuentre
apoyada sobre la superficie de trabajo, puede mover la
sierra hacia adelante para efectuar el corte.
CORTE DE METAL
Utilice una hoja de dientes más finos para metales
ferrosos y una hoja de dientes mas gruesos para metales
no ferrosos. Cuando corte láminas metálicas delgadas
siempre sujete maderas a ambos lados de la lámina
para reducir la vibración o el rasgado de la misma. Tanto
Fig 12
NA WT460K M 050727.indd 40 2005-7-27 18:02:04
Page 41

Sierra Caladora WT460K
la madera como la lámina de metal deben ser cortadas.
No fuerce la hoja cuando corte metal fino o láminas de
acero, ya que son materiales más duros y el corte llevará
más tiempo. La fuerza excesiva puede reducir la vida útil
de la hoja o dañar el motor. Para reducir el calentamiento
durante el corte de metal, agregue un poco de lubricante
a lo largo de la línea de corte.
MANTENGA LAS HERRAMIENTAS
CON CUIDADO
Conserve las herramientas afiladas y limpias para
que funcionen mejor y con más seguridad. Siga las
instrucciones para lubricar y cambiar los accesorios.
Inspeccione periódicamente los cables de las
herramientas y si están dañados hágalos reparar por un
centro de servicio autorizado.
Su herramienta no requiere lubricación ni mantenimiento
adicional. No posee piezas en su interior que puedan ser
reparadas por el usuario. Nunca emplee agua o productos
químicos para limpiar su herramienta. Use simplemente
un paño seco. Guarde siempre su herramienta en un
lugar seco. Mantenga limpias las ranuras de ventilación
del motor. La observación de chispas que destellan bajo
las ranuras de ventilación, indica operación normal que
no dañará su herramienta.
GARANTÍA
GARANTÍA LIMITADA DE REEMPLAZO POR 60
DÍAS
Durante los primeros 60 días luego de la fecha de
compra, podrá reemplazar una herramienta que no
funcione correctamente debido a defectos de material o
fabricación devolviendo la herramienta a la tienda donde
la haya comprado. Para recibir una herramienta de
reemplazo, deberá presentar un comprobante fechado
de compra y devolver todo el material de empaque
original junto con el producto.
GARANTÍA LIMITADA DE DOS AÑOS
El fabricante garantiza que, por el término de 2 años
a partir de la fecha de compra, este producto no debe
fallar por defectos de materiales o fabricación. Nosotros
repararemos o reemplazaremos, a nuestra opción,
esta herramienta durante el período de garantía y
podríamos solicitar que envíe la herramienta, con los
gastos pagados, a un centro aprobado de reparaciones
con todo el equipo original y un comprobante fechado
4140
NA WT460K M 050727.indd 41 2005-7-27 18:02:05
Page 42

Sierra Caladora WT460K
de compra. Toda herramienta eléctrica reemplazada
o reparada quedará cubierta por la garantía limitada
durante lo que quede del período de la garantía desde la
fecha original de compra.
LO QUE NO ESTÁ CUBIERTO
Esta garantía es válida únicamente para el comprador
original y no es transferible.
Esta garantía NO cubre la reparación o reemplazo de
partes debido al desgaste normal.
Esta garantía NO cubre accesorios o baterías.
Esta garantía NO cubre fallas, roturas o defectos debidos
a:
- uso anormal, abuso, negligencia o uso que no esté de
acuerdo con el manual de instrucciones.
- daños resultantes de accidentes, caídas o uso
inadecuado de la herramienta.
- modificaciones o reparaciones no realizadas por
centros aprobados de reparaciones.
- uso comercial o de alquiler.
El fabricante no ofrece ninguna otra garantía,
representación o promesa con respecto a la calidad
o rendimiento de sus herramientas eléctricas que no
estén específicamente mencionadas en esta garantía.
PARA OBTENER SERVICIO
Llame a nuestra línea gratuita de servicio al cliente
al 1-866-354-WORX (9679) (de lunes a viernes de 9
a 21, hora del Este) para recibir una herramienta de
reemplazo o para que lo dirijan a un centro aprobado
de reparaciones. Al efectuar un reclamo de garantía o
al enviar la herramienta para ser reparada bajo garantía,
deberá incluir un comprobante fechado de compra.
LIMITACIONES ADICIONALES
Esta garantía es válida únicamente para productos
comprados y usados en los Estados Unidos, sus
territorios o Canadá. Cualquier garantía implícita
concedida por las leyes estatales, incluyendo garantías
de calidad o de idoneidad para un fin determinado
está limitada a dos años desde la fecha de compra. El
fabricante no se hace responsable por daños directos,
indirectos, incidentales o consecuentes incluyendo,
pero sin limitación, la responsabilidad por pérdida
de ingresos como consecuencia de la compra o uso
de este producto. Algunos estados y provincias no
permiten limitaciones con respecto a cuanto dura una
garantía implícita y/o la exclusión o limitación de daños
NA WT460K M 050727.indd 42 2005-7-27 18:02:05
Page 43

Sierra Caladora WT460K
4342
imprevistos, por lo tanto las exclusiones o limitaciones
anteriores pueden no aplicarse en su caso. Esta garantía
le otorga derechos legales específicos, y usted puede
también tener otros derechos los que varían de estado a
estado o de provincia a provincia.
El fabricante rechaza toda responsabilidad con respecto
a la responsabilidad civil emergente del uso abusivo
o que no esté de acuerdo con el uso y mantenimiento
adecuado de la máquina tal como se lo describe en el
manual del usuario.
Luego de la compra, el fabricante recomienda el
mantenimiento adecuado de la máquina y el leer
el manual del usuario antes de usarla.
NA WT460K M 050727.indd 43 2005-7-27 18:02:05
Page 44

Designed in Italy. Made in China
Conçu en Italie. Fabriqué en Chine
Diseñado en Italia. Fabricado en China
NA WT460K M 050727.indd 44 2005-7-27 18:02:05
 Loading...