

Page 1

Auto-adjusts to your walking speed
Cordless self-propelled lawn mower EN
Tondeuse à gazon autotractée sans fil F
Cortacésped de autopropulsión inalámbrica ES
HELPLINE NUMBER
HELPLINE NUMBER
1-866-354-WORX (9679)
WG789
P07
P20
P35
Page 2

Page 3

Page 4
1
2
3
4
6
7
8
17
9
5
6
11
10
Page 5

15
16
f
b
1
2
c
e
d
2
1
c
b
19
a
18
5
14
A B1 B2
C1 C2 D1
D2 D3 E1
E2 F G1
G2 G3 H
Page 6
P-1
P-2
P-3
O-1
O-2
O-3
17
13
9
e
2
2
1
1
2
2
R-1
R-2
R-3
R-4
R-5
R-0
2
1
12
12
I1 I2 J
K1 K2 L
M1 M2
N1
N2 O P
Q R S
Page 7

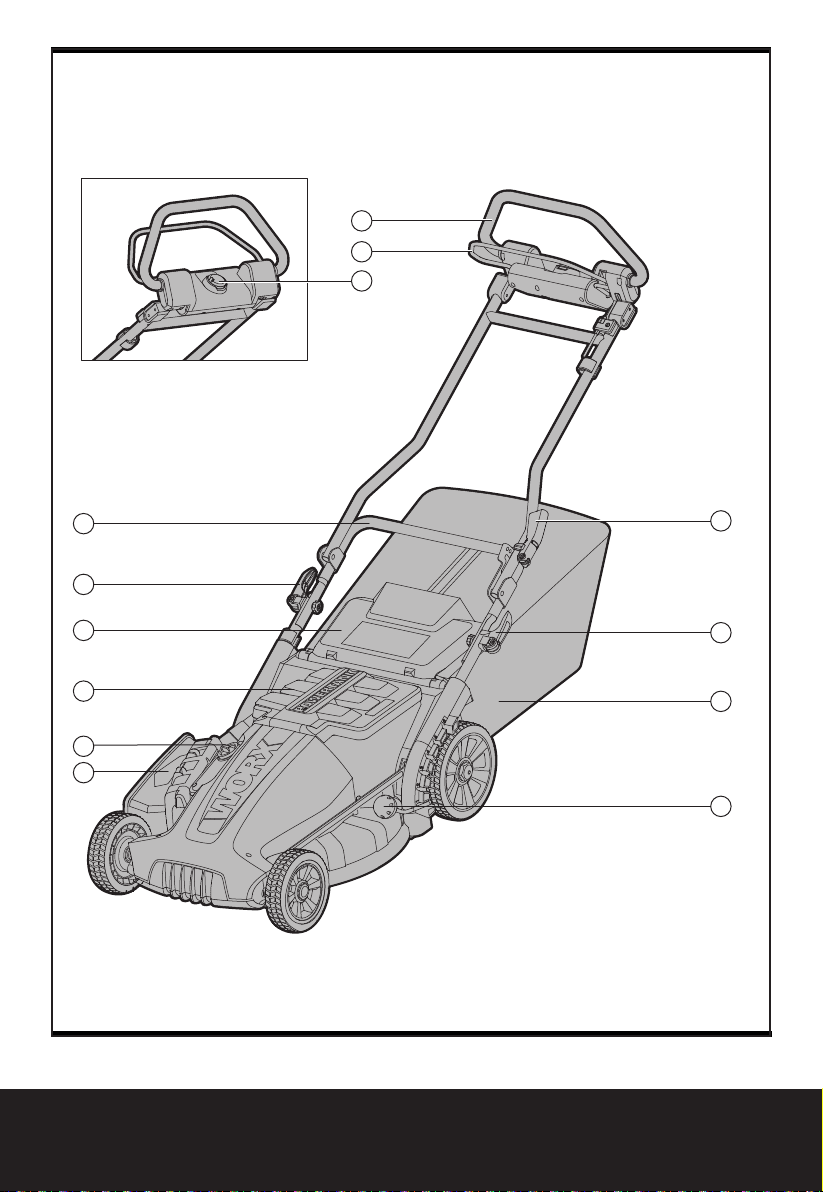
1. UPPER HANDLE
2. SAFETY BAIL
3. SAFETY KEY
4. LOWER HANDLE
5. HANDLE HEIGHT ADJUSTMENT LEVER
6. LOCKING CAM LEVER
7. SAFETY GUARD
8. BATTERY HOUSING COVER
9. SIDE-DISCHARGE COVER
10. CUTTING HEIGHT ADJUSTMENT LEVER
11. GRASS COLLECTION BAG
12. MULCHING PLUG (See K1)
13. SIDE-DISCHARGE CHUTE (See M1)
14. SCREW KNOB (See C2)
15. BATTERY PACK (See B)
16. CHARGER (See B)
17. WORK MODE DIAL (See L)
18. CHARGED INDICATOR LIGHT (GREEN) (See B2)
19. CHARGING INDICATOR LIGHT (RED) (See B2)
76
Cordless self-propelled lawn mower EN
Page 8

Cordless self-propelled lawn mower EN
98
TECHNICAL DATA
Power input 36V
Deck diameter 19’’ (48cm)
Cutting diameter 18"(46cm)
Front wheel diameter 7" (178mm)
Rear wheel diameter 8-1/4" (210mm)
Cutting height 1.5”-3.5” (38 – 88mm)
Cutting height positions 6
Grass collection capacity 1.6bushels(55L)
Battery type Lead acid
Battery model WA3220
Charging time 16 hrs
Charger model WA3722
Charger rating Input: AC 120V~60Hz,45W Output: 42.5V 1.0A
Machine weight 41.1kg (90.6lbs)
ACCESSORIES
Grass collection bag 1
Charger (WA3722) 1
Side-discharge chute 1
Mulching plug 1
Battery pack (WA3220) 1
Safety key 1
We recommend that you purchase your accessories from the same store that sold you the tool.
Use good quality accessories marked with a well-known brand name. Choose the type according
to the work you intend to undertake. Refer to the accessory packaging for further details. Store
personnel can assist you and offer advice.
Page 9
98
Cordless self-propelled lawn mower EN
98
SAFETY INSTRUCTIONS
WARNING! Some dust created by
power sanding, sawing, grinding,
drilling and other construction activities
contains chemicals known to the state of
California to cause cancer, birth defects
or other reproductive harm. Some
examples of these chemicals are:
• Lead from lead-based paints,
• Crystalline silica from bricks and cement
and other masonry products, and
• Arsenic and chromium from
chemically-treated lumber.
Your risk from these exposures
varies, depending on how often you
do this type of work. To reduce your
exposure to these chemical:
• Work in a well ventilated area,
• Work with approved safety equipment,
such as those dust masks that are specially
designed to filter out microscopic particles.
READ ALL INSTRUCTIONS
WARNING: When using electric lawn
mowers, basic safety precautions should
always be followed to reduce the risk of fire,
electric shock, and personal injury, including
the following:
WARNING: Risk of injury could occur if
the lawn mower is operated without the
catcher assembly attached.
WARNING: The use of any other accessory or
attachment might increase the risk of injury
CAUTION: For battery-operated
lawn mowers use only identical
replacement batteries. When reordering specify the battery type and
manufacturer model number. Devices
for retaining extension cords are also
available.
FOR ALL LAWN MOWERS
1) Avoid Dangerous Environment - Don’t
use lawn mowers in damp or wet
locations.
2) Don’t Use In Rain.
3) Keep Children Away - All visitors should
be kept a safe distance from work area.
4) Dress Properly - Do not wear loose
clothing or jewelry. They can be caught in
moving parts. Use of rubber gloves and
footwear is recommended when working
outdoors.
5) Use Safety Glasses - Always use face or
dust mask if operation is dusty.
6) Use Right Appliance - Do not use lawn
mower for any job except that for which it
is intended.
7) Don’t Force Lawn Mower - It will do the
job better and safer at the rate for which it
was designed.
8) Don’t Overreach - Keep proper footing
and balance at all times.
9) Stay Alert - Watch what you are doing.
Use common sense. Do not operate lawn
mower when you are tired.
10) Store Idle Lawn Mower Indoors - When
not in use, lawn mower should be stored
in an indoor dry and locked-up place - out
of reach of children.
11) Maintain Lawn Mower With Care - Keep
cutting edges sharp and clean for
best and safest performance. Follow
instructions for lubricating and changing
accessories. Inspect lawn mower cord
periodically and if damaged, have it
repaired by an authorized service facility.
Inspect extension cords periodically and
replace if damaged. Keep handles dry,
clean, and free from oil and grease.
12) Keep guards in place and in working
order.
13) Keep blades sharp.
14) Keep hands and feet away from cutting
deck.
15) Objects struck by the lawn mower blade
can cause severe injuries to persons. The
cutting area should always be carefully
examined and cleared of all objects prior
to each mowing.
16) If lawn mower strikes a foreign object,
follow these steps:
i) Stop lawn mower. Release the switch.
ii) Inspect for damage.
iii) Repair any damage before restarting
and operating the lawn mower.
17) Use identical replacement blades only.
Page 10

Cordless self-propelled lawn mower EN
1110
SUPPLEMENT SA-BATTERY-OPERATED
LAWN MOWERS
a) Do not charge lawn mower in rain, or in
wet locations.
b) Do not use battery-operated lawn mower in
rain.
c) When replacing batteries, all batteries
should be replaced at the same time.
Mixing fresh and discharged batteries
could increase internal cell pressure and
rupture the discharge battery(ies). (Applies
to products employing more than one
separately replaceable primary battery.)
d) When inserting batteries into this product,
the proper polarity or direction must be
observed. Reverse insertion of batteries
can result in leakage or explosion. (Applies
to product employing more than one
separately replaceable primary battery.)
e) Remove or disconnect battery before
servicing, cleaning, or removing material
from the lawn mower.
FOR ALL BATTERY-OPERATED
PRODUCTS EMPLOYING A DETACHABLE
OR SEPARABLE BATTERY
a) Use only the following type and model
battery (ies): WA3220
b) Do not dispose of the battery(ies) in a
fire. The cell may explode. Check with
local codes for possible special disposal
instructions.
c) Do not open or mutilate the battery(ies).
Released electrolytes are corrosive and
may cause damage to the eyes or skin. It
may be toxic if swallowed.
d) Exercise care in handling batteries in order
not to short the battery with conducting
materials such as rings, bracelets, and
keys. The battery or conductor may
overheat and cause burns.
FOR A BATTERY-OPERATED LAWN
MOWER EMPLOYING A VENTED WET
CELL BATTERY SUPPLY INTENDED TO BE
INITIALLY OR PERIODICALLY FILLED BY
THE USER:
CAUTION: The electrolyte is a dilute sulfuric
acid that is harmful to the skin and eyes. It
is electrically conductive and corrosive. The
following procedures should be observed:
a) Wear full eye protection and protective
clothing.
b) If electrolyte contacts the skin, wash it off
immediately with water.
c) If electrolyte contacts the eyes, flush
thoroughly and immediately with water.
Seek medical attention.
SAFE PRACTICES FOR WALK-BEHIND
MOWERS
I. GENERAL OPERATION
1. Read, understand, and follow all
instructions on the machine and in the
manual(s) before starting.
2. Do not put hands or feet near or under
the machine. Keep clear of the discharge
opening at all times.
3. Only allow responsible adults, who are
familiar with the instructions, to operate
this machine.
4. Clear the area of objects such as rocks,
wire, toys, etc., which could be thrown by
the blade. Stay behind the handle when
the engine (motor) is running.
5. Be sure the area is clear of bystanders
before operating. Stop machine if anyone
enters the area.
6. Do not operate machine barefooted or
while wearing sandals. Always wear
substantial footwear.
7. Do not pull machine backward unless
absolutely necessary. Always look down
and behind before and while mowing
backward.
8. Never direct discharged material toward
anyone. Avoid discharging material
against a wall or obstruction. Material
may ricochet back toward the operator.
Stop the blade when crossing gravel
surfaces.
9. Do not operate machine without the
entire grass catcher, discharge guard, rear
guard, or other safety protective devices
in place and working.
10. Never leave a running machine
unattended.
11. Stop the engine (motor), wait until the
blade comes to a complete stop, and then
remove the safety key before cleaning
Page 11

1110
Cordless self-propelled lawn mower EN
1110
the machine, removing grass catcher, or
unclogging the discharge guard.
12. Operate machine only in daylight or good
artificial light.
13. Do not operate machine while under the
influence of alcohol or drugs.
14. Never operate mower in wet grass.
Always be sure of your footing; walk;
never run.
15. Disengage the drive system, if so
equipped, before starting the engine
(motor).
16. If the machine should start to vibrate
abnormally, stop the engine (motor)
and check for the cause immediately.
Vibration is generally a warning of
trouble.
17. Always wear eye protection when
operating machine.
18. See manufacturer’s instructions for
proper operation and installation of
accessories. Only use accessories
approved by the manufacturer.
II. SLOPE OPERATION
Slopes are a major factor related to slip and
fall accidents, which can result in severe
injury. Operation on all slopes requires extra
caution. If you feel uneasy on a slope, do not
mow it.
1. Mow across the face of slopes; never up
and down. Exercise extreme caution when
changing direction on slopes.
2. Watch for holes, ruts, bumps, rocks, or
other hidden objects. Uneven terrain could
cause a slip and fall accident. Tall grass can
hide obstacles.
3. Do not mow on wet grass or excessively
steep slopes. Poor footing could cause a
slip and fall accident.
4. Do not mow near drop-offs, ditches, or
embankments. You could lose your footing
or balance.
III. CHILDREN
Tragic accidents can occur if the operator is
not alert to the presence of children. Children
are often attracted to the machine and the
mowing activity. Never assume that children
will remain where you last saw them.
1. Keep children out of the mowing area and
under the watchful care of a responsible
adult other than the operator.
2. Be alert and turn mower off if a child enters
the area.
3. Never allow children to operate the
machine.
4. Use extra care when approaching blind
corners, shrubs, trees, or other objects that
may block your view of a child.
IV. SERVICE
GENERAL SERVICE
1. Keep all nuts and bolts tight to be sure the
equipment is in safe working condition.
2. Never tamper with safety devices. Check
their proper operation regularly.
3. Keep machine free of grass, leaves, or
other debris build-up.
4. If you strike a foreign object, stop and
inspect the machine. Repair, if necessary,
before re- starting.
5. Never make any adjustments or repairs
with the engine (motor) running.
6. Check grass catcher components and the
discharge guard frequently and replace
with manufacturer’s recommended parts,
when necessary.
7. Mower blades are sharp. Wrap the blade or
wear gloves, and use extra caution when
servicing them.
8. Maintain or replace safety and instruction
labels, as necessary.
SAVE THESE INSTRUCTIONS
SAFE OPERATION PRACTICES FOR
WALK-BEHIND MOWERS
1. SAFETY INSTRUCTIONS
1.1 TRAINING
a) Read the operating and service instruction
manual carefully. Be thoroughly familiar
with the controls and the proper use of the
equipment.
b) Never allow children to operate a power
mower.
c) Keep the area of operation clear of all
persons, particularly small children, and
pets.
d) Do not use a mower for any job except that
Page 12

Cordless self-propelled lawn mower EN
1312
for which it is intended.
1.2 PREPARATION
a) Thoroughly inspect the area where the
equipment is to be used and remove all
stones, sticks, wires, bones, and other
foreign objects.
b) Do not operate the equipment when
barefoot or wearing sandals. Always wear
substantial footwear.
c) Disengage the self-propelled mechanism
or drive clutch on units so equipped before
starting the motor.
d) Never attempt to make a wheel height
adjustment while the motor is running.
e) Mow only in daylight or in good artificial
light.
f) Never operate the equipment on wet grass.
Always be sure of your footing. Keep a firm
hold on the handle and walk, never run.
1.3 OPERATION
a) Do not put hands or feet near or under
rotating parts. Keep clear of the discharge
opening at all times.
b) Stop the blade(s) when crossing gravel
drives, walks, or roads.
c) After striking a foreign object, stop the
motor, unplug, thoroughly inspect the
mower for any damage, and repair the
damage before restarting and operating
the mower.
d) If the equipment should start to vibrate
abnormally, stop the motor and check
immediately for the cause. Vibration is
generally a warning of trouble.
e) Stop the motor and unplug whenever you
leave the equipment, before cleaning the
mower housing, and before making any
repairs or inspections.
f) Shut the motor off and wait until the blade
comes to a complete stop before removing
the grass catcher or before unclogging the
chute.
g) Mow across the face of slopes, never up
and down. Exercise extreme caution when
changing direction on slopes. Do not mow
excessively steep slopes.
h) Never operate the mower without proper
guards, plates, or other safety protective
devices in place.
i) Do not wash with a hose, avoid getting
water in motor and electrical connections.
1.4 MAINTENANCE
a) Check the blade and the engine mounting
bolts at frequent intervals for proper
tightness.
b) Keep all nuts, bolts, and screws tight to
be sure the equipment is in safe working
condition.
c) Check bag frequently for deterioration and
wear, and replace worn bags. Check that
replacement bags comply with the original
manufacturer’s recommendations or
specifications.
d) Replace the blade if it is bent or cracked.
An unbalanced blade causes vibration
that could damage the motor drive unit or
cause personal injury.
e) Sharpen a dull blade equally at each end to
maintain the balance.
f) Clear the blade thoroughly and check its
balance by supporting it horizontally on a
thin nail through its center hole. The nail
should also be in a horizontal position. If
either end of the blade rotates downward,
remove some metal from the heavy or
lower end until the blade is balanced. It is
balanced when neither end drops.
Page 13
1312
Cordless self-propelled lawn mower EN
1312
SYMBOLS CHARGER SAFETY RULES
1. Plug the charger directly into an electrical
outlet. DO NOT ABUSE THE CORD. Never
carry charger by cord. Do not disconnect
the charger from the outlet or mower by
pulling it by the cord.
2. CAUTION: To reduce the risk of fire,
electrical shock, or personal injury do
not attempt to use this charger with any
other product.
Likewise, do not attempt to charge the
mower with any other charger.
3. Do not service mower with charger or
safety key installed.
4. Do not operate a damaged charger. Replace
damaged cords or charger immediately
by calling the WORX Helpline at 1-866-354-
9679.
5. Always charge the mower in a dry area
protected from the weather. Do not expose
the mower or charger to rain. Do not charge
in wet locations. Do not charge mower
when temperature is above 104°F (40°C) or
below 41°F (5°C).
6. Keep the mower and charger away from
water, heat sources, (Such as radiators,
heaters, stoves...etc.) flames, or chemicals.
Be careful not to damage the charger cord,
by keeping cord away from sharp edges.
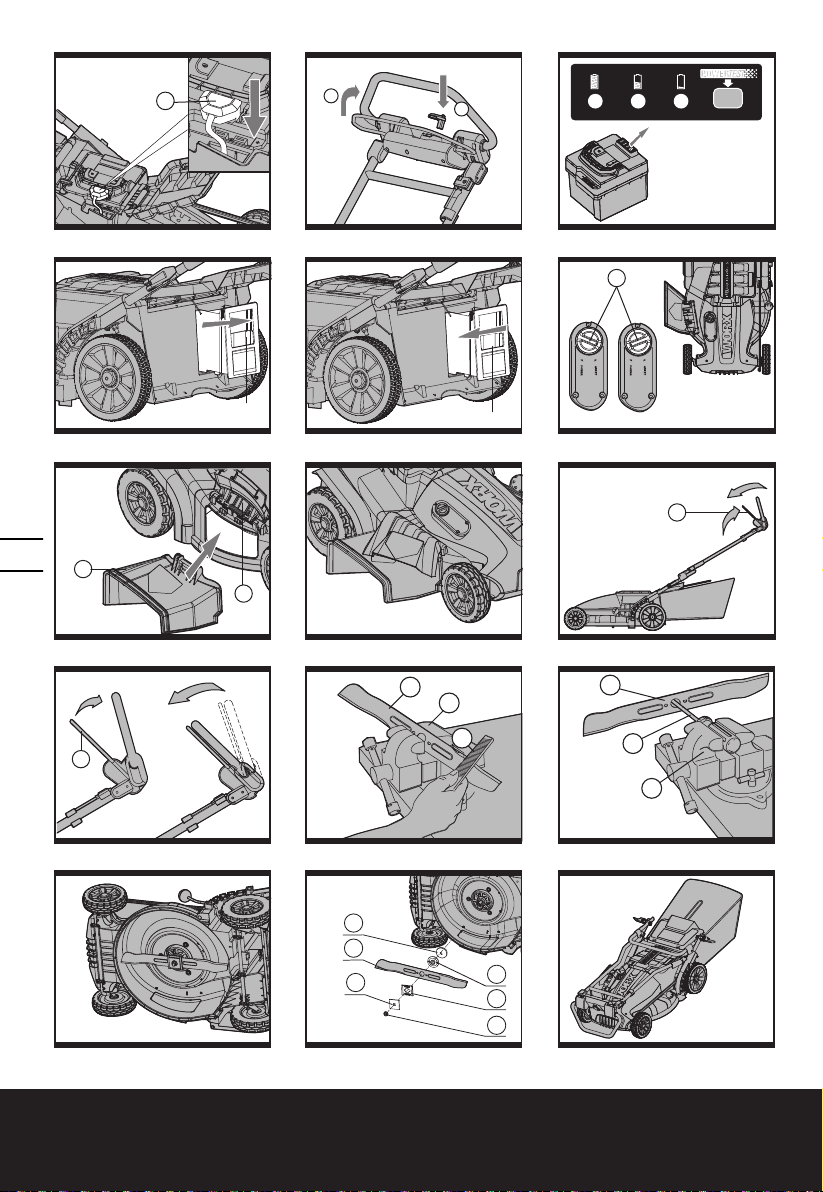
CHARGING PROCEDURE (See A, B1, B2)
1. Charging can be carried out either with the
battery FITTED (See A) or REMOVED from
the machine (See B1).
2. Plug in the charger connector into the
receptacle on the battery. (See A, B1).
3. Insert the plug of the charger into the wall
receptacle.
4. Press the button (a) on the charger for
several seconds till the red light come on
indicating that you have power and the
battery is being charged.(See B2).
5. The red light (19) will turn off and the green
light (18) will come on when charging
is complete (approximately 16 hours to
charge a fully discharged battery) (See B2)
6. After the battery is fully charged the green
light will turn on and stay on for 15 seconds
to indicate a full charge. After 15 seconds the
green light and charger will turn off to save
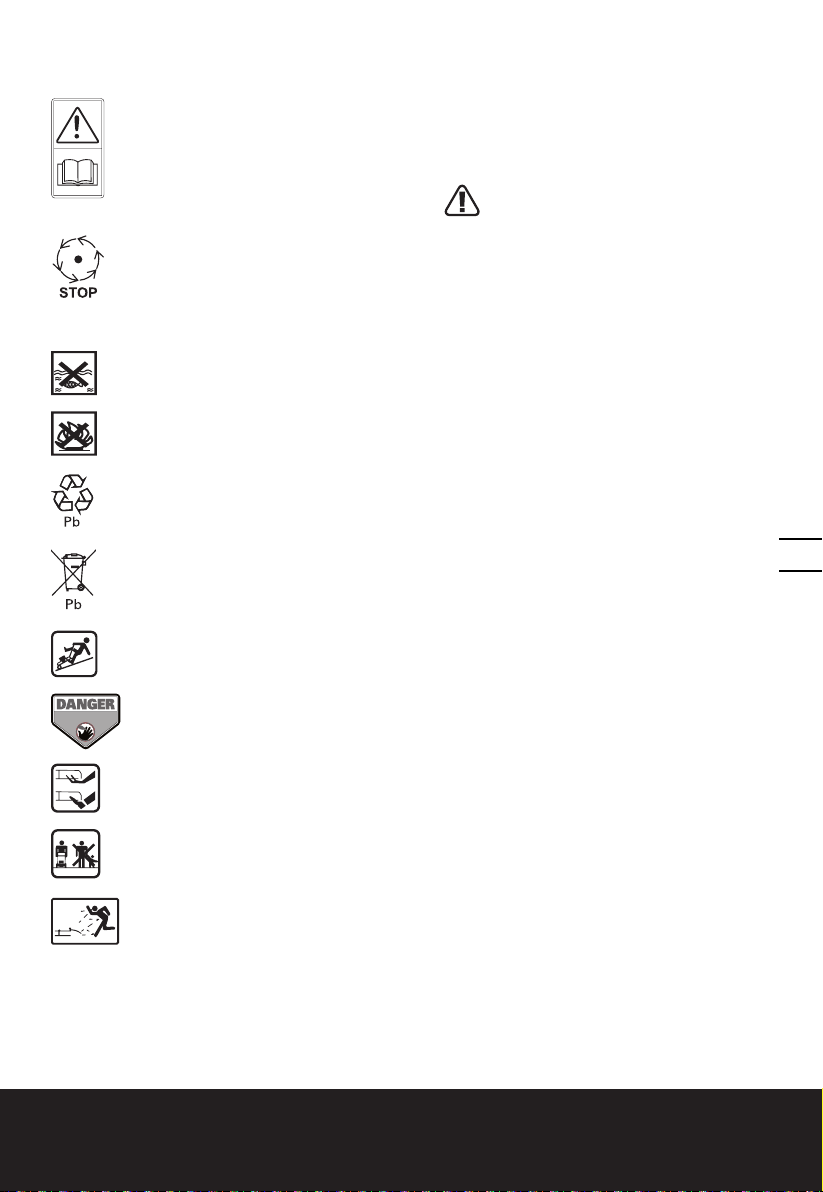
KEEP HANDS AND FEET AWAY
GARDER MAINS ET PIEDS À DISTANCE
Safety alert
Read the operator’s manual
Blade continues to rotate after
the machine is switched off. Wait
until all machine components
have completely stopped before
touching them.
Do not expose to rain or water
Do not burn
Do not dispose of batteries. Return
exhausted batteries to your local
collection or recycling point.
Contains lead-acid battery. Battery
must be recycled or disposed of
properly.
Slip on slope
CPSC Danger label
Severing of toes or fingers-Rotary
mower blade.
Keep bystanders/children away.
Thrown objects from mower deck.
Page 14

Cordless self-propelled lawn mower EN
1514
power.
NOTE: if the battery is defective, the
red light on the charger will flash.
The lights will only function when
the charger is connected to both the
battery and wall receptacle.
7. The charger is a smart charger and can
stay connected to the battery and wall
receptacle for extended periods of time
without fear of damaging the battery or
charger. The charger will automatically
cycle on and off periodically to ensure the
battery is fully charged.
The cam lever (6) pressure can be adjusted by
rotating the screw knob (14) clockwise/counterclockwise. DO NOT OVER TIGHTEN.
2. ASSEMBLING THE GRASSBAG (See
D1, D2 & D3)
1) Before starting to assemble the grass bag
to the frame (b), check that the grass bag is
positioned to slip over the frame.
2) Slide the grass bag onto the frame.
3) Assemble the top clips to the frame, then
assemble the two side clips and the bottom
clip.
BATTERY CARE
The battery in your cordless lawnmower is a
36-volt sealed lead acid system. The mower
can be stored in any position without fear of
leakage.
• For optimal battery life and performance
the battery should be fully charged every 2
months during storage
• For optimal battery life and performance
the battery should be fully charged after
each use
• Store the battery in a cool dry location.
• The battery can be safely stored down to
14°F (-10°C).
• The battery does not need to be fully
discharged before recharging.
• Initially 2 to 3 charging cycles may
be required after purchase to achieve
maximum run time capacity.
The battery is maintenance free.
ADDITIONAL BATTERIES can be obtained
from the Customer Helpline 1-866-354-
9679.
ASSEMBLY/ADJUSTMENT
WARNING! Do not connect the battery
and/or the safety key before product is
completely assembled.
1. ASSEMBLING THE HANDLE (See C1,
C2)
Remove the packaging endcap (see C1).
Raise the handle section into place and secure
by tightening the two locking cam levers.
Check that the handle is FULLY secured.
3. FITTING/REMOVING BATTERY (See
E1, E2)
REMOVING BATTERY
Disconnect the battery connector (e), then
rotate the battery locking knob (d) counterclockwise. Remove the battery by lifting it out
of the mower by the battery handle. (See E2)
NOTE: Be careful not to drop the battery onto
your foot or on the ground when removing it.
FITTING BATTERY
Put the battery into the battery container,
connect the battery connector (e) and then
rotate the battery locking knob clockwise (d).
(See E1)
4. HANDLE ADJUSTMENT (See F)
The upper handle can be adjusted to 3
different height positions. Depress the locking
cam lever, set the upper handle to one of the
three height positions, and make sure to insert
the pin into the hole. Then release the locking
cam lever.
NOTE: Always check that the upper handle is
fixed firmly.
5. INSTALLING THE GRASS BAG (See
G1, G2 & G3)
FITTING
1) Turn the mower off, wait until blade stops
and remove safety key.
2) Raise the safety flap and hold it up, ensure
that the mulching insert has been removed.
3) Pick up the grass bag by the handle, and
position grass bag on the two lower
grommets (f) on the bottom edge of the
mower deck. Raise the bag to its full
Page 15
1514
Cordless self-propelled lawn mower EN
1514
horizontal position.
4) Release the safety guard to lock the grass
bag into position. Lift the handle slightly to
ensure the grass bag is installed securely.
REMOVING/EMPTYING
Lift the safety guard and hold it up. The grass
bag will drop automatically.
6. ADJUSTING THE CUTTING HEIGHT
(See H)
WARNING! Stop, release safety bail and
wait until the motor stops before
adjusting height. The blade will continue to
rotate after the machine is switched off, a
rotating blade can cause injury.
CAUTION: Do not touch rotating blade.
For the first cutting of the season, a high
cutting adjustment should be selected.
The lawnmower can be set to 6 cutting heights
between 1.5” (38mm) and 3.5” (88mm)..
For this purpose, move the cutting height
adjustment lever outwards then choose the
preferred position. Each position will raise or
lower the mower to the desired height.
OPERATION
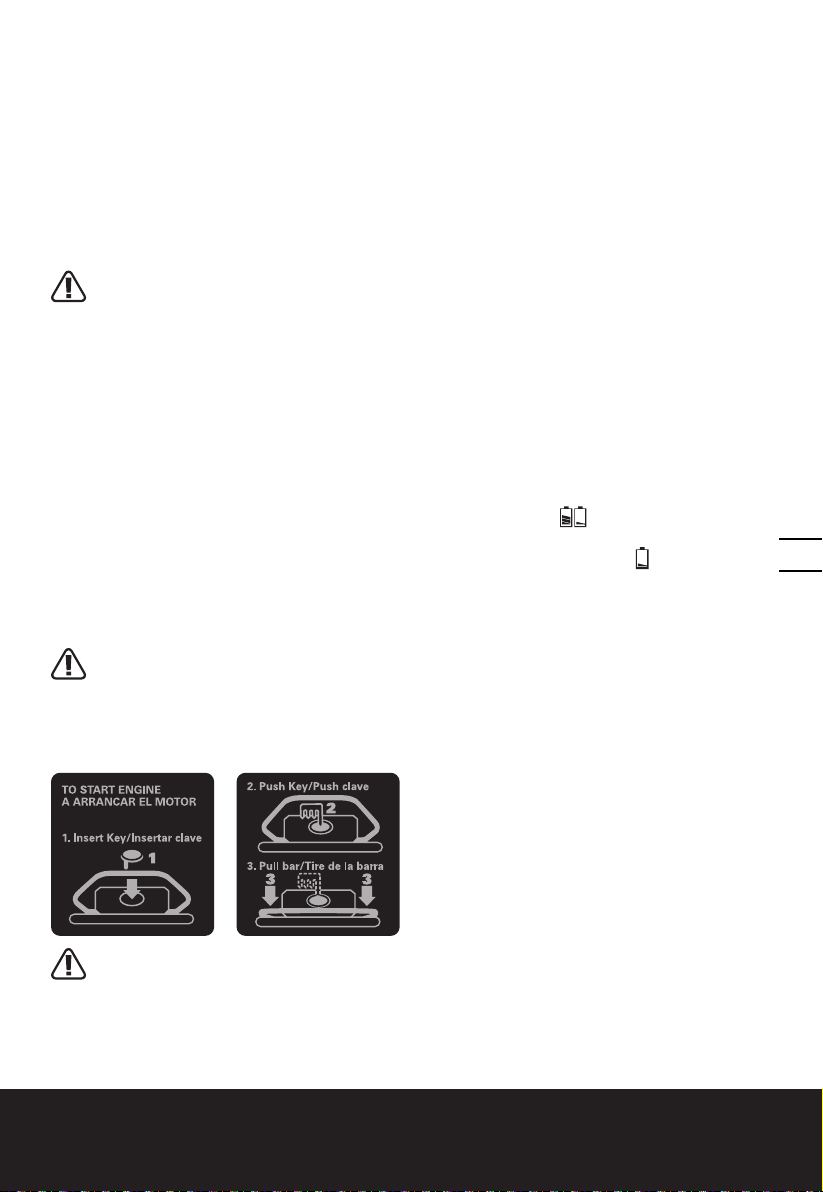
1. STARTING AND STOPPING (See I1, I2)
WARNING! The blade will continue
to rotate for a few seconds after the
machine is switched off. Allow the motor/blade
to stop rotating before switching “on” again.
Do not rapidly switch off and on.
STARTING:
1) Insert safety key into the housing of the
switch box.
2) Push the safety key until it is fully seated
inside the housing.
3) Press down and hold the safety key,
squeeze the safety bail towards the handle
and the mower will start.
STOPPING
Release the safety bail. Mower will
automatically turn OFF.
2. BATTERY STATUS LED’S (See J)
NOTE: Battery Status LED’s are
not active in charging mode. The
Status LED’s will indicate the
battery condition when the button
on the battery is pressed.
The LED’s constantly senses and displays
the battery condition as follows:
Press the button “POWERTEST”,
the light button is illuminated.
When the three green lights are illuminated,
the battery is in a highly charged condition.
When two lights (
battery is in a moderately charged condition.
When only one green light ( ) is
illuminated, the battery charge is depleted.
Before using your new mower for the
first time, it is recommended that the
unit be charged overnight to ensure
that the battery is fully charged.
IMPORTANT
When only one light is illuminated,
your battery is overly discharged, even
though the mower may still be capable
of cutting grass. Continuing to operate
your lawnmower with the battery in this
discharged condition may reduce the
life and performance of your battery.
) are illuminated, the
3. REMOVING MULCHING PLUG (See K1)
To remove the mulching plug (12) so
that you can bag the grass or discharge
with the optional discharge chute,
WARNING! The battery is disconnected
from your lawn mower and you must
insert the connector into the battery socket
before use.
follow the steps listed below:
1) Shut the mower off, wait until the blade
stops and remove the safety key.
2) Raise the safety guard and hold it up.
3) Grasp the middle of the plug, lift and
pull out the mulching plug completely.
Page 16

Cordless self-propelled lawn mower EN
1716
4) The safety guard is spring loaded.
When you release it, the guard will
return to the closed position.
NOTE: The Pacesetter™ drive
system will operate with or without
the mower blade turned on.
4. INSTALLING MULCHING
PLUG (See K2)
1) Turn the mower off, wait until the blade
stops and remove the safety key.
2) Raise the safety guard and hold it up.
3) Slide the mulching plug (12) into
the discharge opening until it is
firmly in contact with the deck.
4) Release safety guard and ensure
it is properly closed.
5. CUTTING MODE DIAL
SELECTION (See L)
QUIET MODE
Select QUIET mode (17) when mowing
in everyday conditions, removing
approximately 1 inch of grass at a time.
POWER MODE
Set the dial to POWER mode (17) when
cutting dense or overgrown grass.
6. INSTALLING SIDE-DISCHARGE
CHUTE (See M1 & M2)
Using the mulching insert and sidedischarge chute (13), the grass can be
discharged from the side of the machine.
To assemble the side-discharge insert, raise
the side-discharge cover (9) and hold it up,
position the side-discharge chute (13) onto
the hooks, then release the cover to lock
the side-discharge insert into position.
7. PACESETTERTM SELF-PROPEL
DRIVE (See N1 & N2)
To operate the self-propel drive, squeeze
the Safety bail (2) toward the handle
and hold it, and then push both the
handle and the Safety bail (2).
To disengage the self-propel drive,
release the safety bail (2).
NOTE: The Pacesetter™ drive system
with rear wheel drive, automatically sets
the pace based on the operators walking
speed. Walk faster and the mower self
propels faster to match your pace.
8. MOWING TIPS
NOTE: Always inspect area where
mower is to be used and remove
all stones, sticks, wire, metal
and other debris which might be
thrown by the rotating blade.
1) Mow across the face of slopes, never
up-and-down. Exercise extreme caution
when changing direction on slopes. Do
not mow excessively steep slopes. Always
maintain good footing and balance.
2) Release safety bail to turn the mower
“OFF” when crossing any graveled area
(stones can be thrown by the blade).
3) Set mower at highest cutting height
when mowing on rough ground or
in tall weeds. Removing too much
grass at one time can cause circuit
breaker to trip, which stops mower.
4) If a grass bag is used during the fast
growing season, the grass may tend to
clog up at the discharge opening. Release
switch lever to turn mower “OFF” and
remove the safety key. Remove the grass
bag and shake the grass down to the back
end of the bag. Also clean out any grass
or debris which may be packed around the
discharge opening. Replace the grass bag.
5) If mower should start to vibrate
abnormally, release safety bail to turn
mower “OFF” and remove safety key.
Check immediately for cause of vibration.
Vibration is usually a warning sign of
trouble. Do not operate mower until
a service check has been made.
6) ALWAYS RELEASE SAFETY BAIL TO
TURN MOWER “OFF” AND REMOVE
SAFETY KEY WHEN LEAVING IT
UNATTENDED FOR ANY PERIOD OF TIME.
9. MULCHING MOWING TIPS
While mulching, your new mower is
designed to cut the grass clippings into
small pieces and distribute them back into
the lawn. Under normal conditions, the
mulched grass will biodegrade quickly
Page 17

1716
Cordless self-propelled lawn mower EN
1716
to provide nutrients to the lawn.
Please review the following recommendations
for optimum mulching performance.
1) Avoid mowing when the grass is
wet from rain or dew. Wet grass may
form clumps which interfere with the
mulching action and reduce runtime.
The best time to mow grass is in
the late afternoon when the grass is
dry and the newly cut area will not
be exposed to direct sunlight.
2) For best mulching performance, set
the cutting height to remove about one
third of the grass blade length, ideally
no more than 1.5 inch at one time.
If the lawn is overgrown, it may be
necessary to increase the cut height to
reduce the pushing effort and prevent
overloading the motor. For extremely
heavy mulching, it is advisable to first
cut at a high cut height setting, and then
re-cut to the final cut height. Otherwise,
make narrower cuts and mow slowly.
NOTE: The motor is protected by a safety
cut out which is activated when the
blade becomes jammed or if the motor
is overloaded. The safety cut out will
only reset when the safety bail 2 is
released. Clear any obstruction and
wait for a few minutes for the safety
cut out to reset before continuing
to use the mower. At this time do
not operate the safety bail 2 as this
will prolong the reset time of the
safety cut out. If the mower cuts
out again increase the height of cut
to reduce the load on the motor.
3) For best performance, keep the mower
housing free of built-up grass. From time
to time turn off mower and wait for the
blade to come to a complete stop. Then
unplug the safety key and turn mower on
its side. Using an object such as a stick,
wipe out any accumulation of grass in
the blade area. Be careful of the sharp
edges of the blade. Clean often in wet,
new grass, and always after every use.
4) Certain types of grass or grass
conditions may require that an area be
mulched a second time to fully disperse
the grass throughout the lawn.
If cutting a second time, it is advisable
to cut perpendicular (across) the first
cut pattern. DO NOT CHANGE CUT
PATTERN IN ANY WAY THAT WOULD
CAUSE MOWING DOWN A HILL.
5) Change your cutting pattern from
week to week. This will help prevent
matting and graining of the lawn.
MAINTENANCE
WARNING: Stop the mower
and remove the safety key
before removing the grass bag.
NOTE: To ensure long and reliable service,
perform the following maintenance
procedures regularly. Check for obvious
defects such as a loose, dislodged or a
damaged blade, loose fittings, and worn
or damaged components. Check that the
covers and guards are all undamaged and
are correctly attached to mower. Carry
out any necessary maintenance or repairs
before operating mower. If the mower
should happen to fail despite regular
maintenance, please call our customer
helpline for advice, 1-866-354-9679.
BLADE SHARPENING
KEEP THE BLADE SHARP FOR BEST MOWER
PERFORMANCE. A DULL BLADE DOES NOT
CUT GRASS CLEANLY OR MULCH PROPERLY.
WEAR PROPER EYE PROTECTION
WHILE REMOVING, SHARPENING,
AND INSTALLING BLADE. ENSURE
THAT SAFETY KEY IS REMOVED.
Sharpening the blade twice during a mowing
season is usually sufficient under normal
circumstances. Sand causes the blade to dull
quickly. If your lawn has sandy soil, more
frequent sharpening may be required.
REPLACE BENT OR DAMAGED
BLADE IMMEDIATELY.
WHEN SHARPENING THE BLADE:
1. Make sure blade remains balanced.
2. Sharpen the blade at the
original cutting angle.
Page 18

Cordless self-propelled lawn mower EN
1918
3. Sharpen cutting edges on both ends of the
blade to keep it balanced, removing equal
amounts of material from both ends.
TO SHARPEN BLADE IN A VISE (See O)
1. Be sure the switch lever is released, the
blade has stopped and the safety key
removed before removing the blade.
2. Remove blade from mower.
See instructions for removing
and attaching blade.
3. Secure blade O-1 in a vise O-2.
4. Wear safety glasses and
heavy work gloves.
5. Carefully file the cutting edges
of the blade with a fine tooth file
O-3 or sharpening stone.
6. Check balance of blade. See
instructions for blade balancing.
7. Replace blade on mower and tighten
securely. Refer to instructions below.
BLADE BALANCING (See P)
Check balance of blade by placing
center hole in blade (P-1) over a nail
or screwdriver shank (P-2), clamped
horizontally in a vise (P-3). If either
end of the blade rotates downward, file
that end. Blade is properly balanced when
neither end drops and the blade stays level.
BLADE MAINTENANCE (See Q & R)
Replace your metal blade after 50 hours
mowing or 2 years, which ever is the
sooner-regardless of condition.
Follow these procedures to remove and
replace the blade. You will need garden
gloves (not provided) and a spanner wrench
(not provided) to remove the blade. Hold the
blade (R-2) and unscrew the blade nut (R-5)
counter-clockwise using a spanner wrench.
Remove blade nut (R-5), square washer (R-4),
insulator washer (R-3), and blade (R-2).
To re-assemble, first position the blade
with the cutting edges towards the
ground. Assemble the components.
Ensure that the edges of the insulator
washer hook over the edge of the blade.
Align the flats on the square washer
(R-4) with the flats on the shaft.
Then securely tighten the blade nut.
NOTE: If the blade and insulator
washer (R-3) are cracked or damaged,
replace with new ones.
STORAGE (See S)
Stop the mower and always remove
the safety key. Clean the exterior of the
machine thoroughly using a soft brush
and cloth. Do not use water, solvents or
polishes. Remove all grass and debris,
especially from the ventilation slots.
Turn the machine on its side and clean
the blade area. If grass cuttings are
compacted in the blade area, remove
with a wooden or plastic implement.
Store the mower in a dry place. Do not
place other objects on top of the mower.
To aid storage, press the handle
height adjustment knob, and fold
the upper handle forward.
TROUBLE SHOOTING
PROBLEM SOLUTION
1. Mower doesn’t run
when switch lever is
activated.
A. Check to make sure safety key has been installed and is fully seated
and that button on switch housing is being completely pushed.
B. Release switch lever to turn mower off. Remove safety key, turn
mower over and check that blade is free to turn. Clear any obstruction.
If not free, return to an authorized servicer. Blade should turn freely.
C. Has battery been fully charged? Plug in charger and wait for green
light to come on.
Page 19

1918
Cordless self-propelled lawn mower EN
1918
PROBLEM SOLUTION
2. Motor stops while
mowing.
3. Mower runs but
cutting performance
is unsatisfactory, or
does not cut entire
lawn.
4. Mower is too hard
to push.
5. Mower is
abnormally noisy
and vibrates.
6. Battery charger
LED’s not on.
7. Battery charger
LED does not flip to
green.
8. Mower not picking
up clippings with
bag.
9. When mulching
there are clippings
visible.
10. Low or
diminished run-time
after many uses
A. Release switch lever to turn mower off. Remove safety key, turn
mower over and check that blade is free to turn. Clear any obstruction.
If not free, return to an authorized servicer. Blade should turn freely.
B. Raise cutting height of wheels to highest position and start mower.
C. Has battery been fully charged? Plug in charger and wait for green
light to come on.
D. Avoid overloading the mower. Slow down the cutting pace by
pushing mower slower or raise the cut height. Or both.
A. Has battery been fully charged? Plug in charger and wait for green
light to come on.”
B. Release switch lever to turn mower off. Remove safety key. Turn
mower over and check: Blade for sharpness - Keep blade sharp. Deck
and discharge chute for clogging.
C. Wheel height adjustment may be set too low for grass condition.
Raise cutting height.
A. Raise cutting height to reduce deck drag on grass. Check each wheel
for free rotation.
A. Release switch lever to turn mower off. Remove safety key. Turn
mower on side and check blade to ensure it has not been bent or
damaged. If blade is damaged, replace with a replacement blade. If
the underside of the deck is damaged return mower to a Authorized
service center.
B. If there is no visible damage to the blade and the mower still
vibrates: Release switch lever to turn mower off, remove safety key and
remove blade. Rotate blade 180 degrees and retighten. If mower still
vibrates, return the mower to an authorized service center.
A. Check plug connection.
B. Replace charger.
A. Battery needs to be diagnosed. Take to authorized service center.
A. Remove mulch plate when bagging.
B. Chute clogged. Release switch lever to turn mower off. Remove
safety key. Clear chute of grass clippings.
C. Too much cut grass. Raise cutting height of wheels to shorten length
of the cut.
D. Bag full. Empty bag more often.
A. Too much cut grass. Raise cutting height of wheels to shorten length
of the cut. Do not cut off more than 1/3 of total length.
B. Check blade for sharpness. Always keep blade sharp.
A. Return to Authorized Service location - may need new battery.
Page 20

Tondeuse à gazon autotractée sans fil F
2120
1. POIGNÉE SUPÉRIEURE
2. LEVIER DU COMMUTATEUR
3. CLÉ DE SÉCURITÉ
4. POIGNÉE INFÉRIEURE
5. LEVIER DE RÉGLAGE DE LA HAUTEUR DE LA POIGNÉE
6. LEVIER DE BLOCAGE
7. BAVETTE DE SÉCURITÉ
8. PROTECTION POUR LA BATTERIE
9. BAVETTE D’ÉJECTION LATÉRALE
10. LEVIER DE RÉGLAGE DE LA HAUTEUR DE COUPE
11. SAC À HERBE
12. DISPOSITIF DE PAILLAGE (Voir K1)
13. ACCESSOIRE D’ÉJECTION LATÉRALE (Voir M1)
14. GRIFFE À VIS (Voir C2)
15. BLOCS* (Voir B)
16. CHARGEUR* (Voir B)
17. COMMUTATEUR DE MODE DE FONCTIONNEMENT (Voir L)
18. TÉMOIN LUMINEUX VERT (PILE CHARGÉE) (Voir B2)
19. TÉMOIN LUMINEUX ROUGE (PILE EN CHARGE) (Voir B2)
* Les accessoires illustrés ou décrits ne sont pas tous compris dans le cadre de la
livraison standard.
Page 21

2120
Tondeuse à gazon autotractée sans fil F
2120
DONNÉES TECHNIQUES
Puissance assignée 36V
Diamètre du châssis 19po (48cm)
Diamètre de coupe 18po(46cm)
Diamètre des roues avant 7po(178mm)
Diamètre des roues arrière 8-1/4po (210mm)
Hauteur de coupe 1.5po -3.5po (38 – 88 mm)
Nombre de hauteurs de coupe 6
Capacité de cueillette de gazon 1.6 boisseaux (55L)
Type de batterie au plomb
Modèle de batterie l WA3220
Temps de recharge normal 16 heures
Modèle de chargeur WA3722
Valeurs nominales du chargeur Entrée: AC 120V~60Hz, 45W, Sortie : 42.5V 1.0A
Poids de la machine 90.6lbs (41.1kg)
ACCESSORIES
Sac à herbe 1
Chargeur (WA3722) 1
Bavette d’éjection latérale 1
Dispositif de déchiquetage 1
Blocs-piles (WA3220) 1
Clé de sécurité 1
Nous vous recommandons d’acheter tous vos accessoires du même magasin qui vous a vendu
l’outil. N’utilisez que des accessoires de bonne qualité de marque renommée. Choisissez le type
d’outil approprié au travail que vous désirez entreprendre. Pour de plus amples renseignements,
consultez l’emballage de l’accessoire. Le personnel du magasin peut également vous conseiller.
Page 22

Tondeuse à gazon autotractée sans fil F
2322
CONSIGNES DE SÉCURITÉ
AVERTISSEMENT! des produits
chimiques connus de l’état de Californie
pour causer des cancers et des anomalies
congénitales ou autre trouble reproductif. Voici
des exemples de ces produits chimiques:
• Plomb issu de peinture à base de plomb
• Silice crystalline issue de briques et du
ciment et autres produits de maçonnerie
• Arsenic et chrome issus de bois traité
chimiquement
Votre risque de ces expositions varie en
fonction de la fréquence à laquelle vous
effectuez ce travail. Pour réduire votre
exposition à ces produits chimiques:
• Travaillez dans une zone bien ventilée;
• Portez un équipement de sécurité
approuvé, tel que des masques
antipoussières spécialement conçus pour
éliminer les particules microscopiques par
filtrage.
LISEZ ET ASSIMILEZ
TOUTES LES
INSTRUCTIONS
AVERTISSEMENT! Lors de l’utilisation
d’appareils électriques de jardinage, des
précautions de base doivent être observées
afin de réduire les risques de feu, choc
électrique, et blessure grave, incluant ce qui
suit :
AVERTISSEMENT! L’emploi de la
tondeuse sans sac de ramassage peut
provoquer des risques de blessure.
AVERTISSEMENT! L’emploi de tout
autre accessoire ou dispositif est
susceptible d’augmenter les risques de
blessure
AVERTISSEMENT! Pour les tondeuses
à batterie, ne remplacez la batterie que
par un modèle de remplacement identique,
du même type et du même fabricant; installez
également les accessoires fournis pour retenir
les rallonges électriques, le cas échéant.
POUR TOUTES LES TONDEUSES À
GAZON
1) Évitez les environnements dangereux.N’utilisez pas les appareils dans des
endroits très humides ou mouillés.
2) N’utilisez pas sous la pluie.
3) Tenez les enfants éloignés.-Tous les
visiteurs devraient être tenus éloignés de
l’aire de travail.
4) Habillez-vous convenablement.-Ne portez
pas des vêtements lousses ou des bijoux.
Ils peuvent se prendre dans des pièces
en mouvement. L’utilisation de gants de
caoutchouc et chaussures épaisses est
recommandée lors de travaux extérieurs.
Portez une protection pour cheveux afin de
contenir les cheveux longs.
5) Utilisez des lunettes de sécurité.-Toujours
porter un masque de visage ou de
poussière si l’opération est poussiéreuse.
6) Utilisez le bon appareil.-N’utilisez pas
l’appareil pour tout autre travail que pour
celui auquel il est destiné.
7) Ne forcez pas l’appareil-Il va faire un
meilleur travail et avec moins de risques de
blessure en travaillant au taux de charge
pour lequel il a été conçut.
8) N’essayez pas d’utiliser l’appareil hors
de votre portée normale.-Gardez votre
équilibre et les pieds bien ancrés en tout
temps.
9) Restez alerte.-Faites attention à ce que vous
faites. Utilisez le bon sens. N’utilisez pas
l’appareil lorsque vous êtes fatigué.
10) Entreposez à l’intérieur les appareils qui
ne sont pas utilisés.-Lorsqu’inutilisés,
les appareils devraient êtres entreposés
à l’intérieur dans un endroit sec, élevé
et gardé sous clef, hors de la portée des
enfants.
11) Entretenez les appareils avec soins.-Gardez
les arêtes de coupe aiguisées et propres
pour une meilleure performance et des
risques réduits de blessure. Suivez les
instructions pour lubrifier et changer les
accessoires. Gardez les poignées sèches,
propres, et libres d’huile et graisse.
12) Maintenez les gardes en place et en bon
ordre de fonctionnement.
13) Gardez les lames aiguisées.
Page 23

2322
Tondeuse à gazon autotractée sans fil F
2322
14) Gardez les mains et les pieds hors de l’aire
de coupe.
Les objets frappés par la lame de la
tondeuse à gazon peuvent causer des
blessures graves aux gens.
15) La pelouse devrait toujours être examinée
avec soin et débarrassée de tous objets
avant chaque tonte.
16) Si la tondeuse à gazon frappe un corps
étranger, suivez ces étapes :
i) Arrêtez la tondeuse à gazon. Relâchez le
commutateur.
ii) Inspectez pour dommages possibles.
iii) Réparez tout dommage avant de
redémarrer et d’opérer la tondeuse à
gazon.
17) Utilisez seulement des lames identiques de
remplacement.
INSTRUCTIONS DE SÉCURITÉ POUR LES
TONDEUSES À BATTERIE
a) Ne rechargez pas la tondeuse sous la pluie
ou dans un endroit humide.
b) N’utilisez pas la tondeuse à batterie sous la
pluie.
c) Lors de remplacement des piles, remplacez
les toutes en même temps. Le mélange
de piles neuves et déchargées pourrait
faire accroître la pression interne de la/des
pile(s) déchargée et causer la rupture de
son enveloppe.
(Pour produits utilisant plus d’une pile
primaire remplaçable).
d) Lors de l’insertion de piles neuves dans cet
appareil, observez la bonne polarité.
L’inversion d’une pile pourrait causer la
fuite de son électrolyte ou son explosion.
(Pour produits utilisant plus d’une pile
primaire remplaçable).
e) Retirez ou débranchez la batterie avant
d’effectuer une opération de maintenance,
de nettoyage ou avant de démonter la
tondeuse.
POUR TOUS LES APPAREILS
FONCTIONNANT SUR BATTERIES,
EMPLOYEZ UNE BATTERIE AMOVIBLE
OU SÉPARABLE:
a) N’utilisez que ce type de batterie : WA3220.
b) Ne jetez pas la batterie au feu. Les cellules
pourraient en effet exploser. Vérifiez les
réglementations locales pour connaître les
instructions de recyclage.
c) Ne tentez pas de démonter ou de modifier
la batterie. L’électrolyte qui se trouve
dans la batterie est corrosive et peut être
dangereuse pour la peau et pour les yeux.
Elle peut également être toxique si avalée.
d) Faites toujours très attention en manipulant
la batterie afin de ne pas la mettre en courtcircuit avec des matériaux conducteurs,
comme une bague, un bracelet, ou
des clefs. La batterie et le conducteur
risqueraient de surchauffer et de causer
des brûlures.
POUR LES TONDEUSES À GAZON
ÉQUIPÉES D’UNE BATTERIE LIQUIDE
VENTILÉE CONÇUE POUR ÊTRE
REMPLIE AU DÉPART OU DE MANIÈRE
PÉRIODIQUE PAR L’UTILISATEUR :
ATTENTION
L’électrolyte est un acide sulfurique
dilué qui peut être dangereux pour la peau et
pour les yeux. C’est un conducteur électrique
et il est corrosif. Observez les procédures de
sécurité suivantes:
a) Portez des lunettes et des vêtements de
protection.
b) Si l’électrolyte venait en contact avec la
peau, lavez immédiatement à l’eau claire.
c) Si l’électrolyte venait en contact avec
les yeux, rincez immédiatement et
abondamment à l’eau claire. Consultez un
médecin sans tarder.
INSTRUCTIONS DE SÉCURITÉ POUR LES
TONDEUSES POUSSÉES
I. FONCTIONNEMENT GÉNÉRAL
1. Lisez, comprenez et suivez toutes les
instructions concernant la machine et
contenues dans le(s) manuel(s) avant de
démarrer.
2. Ne placez pas les mains ou les pieds à
proximité de la machine ou en dessous.
Restez à distance de l’ouverture d’éjection
à tout instant.
3. N’autorisez que des adultes responsables
qui sont familiers avec les instructions à
opérer cette machine.
Page 24

Tondeuse à gazon autotractée sans fil F
2524
4. Dégagez la zone d’objets comme des
pierres, des câbles ou des jouets, etc.… ,
qui pourraient être propulsés par la lame.
Restez derrière la poignée quand le moteur
tourne.
5. Assurez-vous qu’il n’y a pas de spectateurs
dans la zone avant l’opération. Arrêtez la
machine si quelqu’un pénètre dans la zone.
6. N’opérez pas la machine pieds nus ou si
vous portez des sandales. Portez toujours
des chaussures robustes.
7. Ne tirez pas la machine en arrière, à moins
que ce soit indispensable. Regardez
toujours vers le bas et en arrière avant et
pendant un déplacement en arrière.
8. Ne dirigez jamais les matériaux éjectés
vers quelqu’un. Évitez d’éjecter des
matériaux contre un mur ou un obstacle.
Les matériaux peuvent ricocher sur
l’opérateur. Arrêtez la lame lorsque vous
traverser des surfaces de gravier.
9. N’opérez pas la machine sans le ramasseherbe, la chicane de décharge, la protection
arrière ou autres dispositifs de protection
de sécurité complets en place et en
fonctionnement.
10. Ne laissez jamais une machine fonctionner
sans surveillance.
11. Arrêtez le moteur et attendez que la lame
s’arrête totalement avant de nettoyez la
machine, de retirer le ramasse-herbe ou de
dégager la chicane de décharge.
12. Opérez la machine à la lumière du
jour ou sous un bon éclairage artificiel
uniquement.
13. N’opérez pas la machine lorsque vous
êtes sous l’influence d’alcool ou de
médicaments.
14. N’opérez jamais la tondeuse dans de
l’herbe humide. Soyez toujours sûr(e) de
votre appui ; marchez, ne courez jamais.
15. Débrayez le système d’entraînement, s’il y
a, avant de démarrer le moteur.
16. Si la machine se met à vibrer de manière
anormale, arrêtez le moteur et vérifiez
immédiatement la cause. Les vibrations
indiquent généralement un problème.
17. Portez toujours une protection pour les
yeux quand vous opérez la machine.
18. Consultez les instructions du fabricant
pour installer et opérer les accessoires
de manière appropriée. N’utilisez que les
accessoires approuvés par le fabricant.
II. FONCTIONNEMENT DANS UNE PENTE
Les pentes constituent un facteur majeur
d’accidents par glissage et par chute, ce qui
peut entraîner des blessures graves. Opérer
dans des pentes exige une prudence extrême.
Si vous ne vous sentez pas à l’aise dans une
pente, ne la tondez pas.
1. Tondez la surface des pentes
transversalement, jamais de haut en bas ou
vice-versa. Soyez extrêmement vigilent(e)
lorsque vous changez de sens dans des
pentes.
2. Faites attention aux trous, ornières, bosses,
pierres ou autres objets dissimulés. Un
terrain inégal peut entraîner un accident
par glissade et par chute. L’herbe haute
peut dissimuler des obstacles.
3. Ne tondez pas de l’herbe humide ou dans
des pentes excessivement raides. De
mauvaises chaussures peuvent entraîner
un accident par glissade et par chute.
4. Ne tondez pas à proximité de fossés, de
rigoles ou de remblais. Vous pourriez
perdre appui ou perdre l’équilibre.
III. ENFANTS
Des accidents graves peuvent survenir si
l’opérateur n’est pas alerté de la présence
d’enfants. Les enfants sont souvent attirés
par la machine et par l’activité de tonte. Ne
supposez jamais que des enfants resteront au
dernier endroit où vous les avez vus.
1. Gardez les enfants à distance de la zone
de tonte et sous la surveillance d’un adulte
responsable autre que l’opérateur.
2. Soyez alerté(e) et éteignez la tondeuse si
un enfant pénètre dans la zone.
3. Ne laissez jamais les enfants opérer la
machine.
4. Soyez extrêmement prudent(e) lorsque
vous vous approchez de tournants sans
visibilité, d’arbustes, d’arbres ou autres
objets qui pourraient vous empêcher de
voir la présence d’un enfant.
Page 25

2524
Tondeuse à gazon autotractée sans fil F
2524
IV. ENTRETIEN
ENTRETIEN GÉNÉRAL
1. Gardez tous les écrous et les boulons
serrés pour être certain(e) que l’état de
marche de l’équipement est sécurisé.
2. N’altérez jamais des dispositifs de sécurité.
Vérifiez régulièrement qu’ils fonctionnent
correctement.
3. Ne laissez pas d’herbe, de feuilles ou
autres débris s’accumuler dans la machine.
4. Si vous heurtez un objet étranger, arrêtez
la machine et inspectez-la. Le cas échéant,
effectuez une réparation avant de démarrer.
5. Ne procédez jamais à des réglages
ou des réparations avec le moteur en
fonctionnement.
6. Vérifiez fréquemment les composants
du ramasse-herbe et la chicane de
décharge et remplacez-les avec des pièces
recommandées par le fabricant lorsque
c’est nécessaire.
7. Les lames de la tondeuse sont très
coupantes. Emballez-les ou portez des
gants et soyez extrêmement prudent(e)
lorsque vous effectuez une procédure
d’entretien sur les lames.
8. Maintenez ou remplacez les étiquettes de
sécurité et de consignes selon les besoins.
CONSERVEZ CES INSTRUCTIONS
PRATIQUES SÉCURITAIRES POUR LES
TONDEUSES POUSSÉES
1. CONSIGNES DE SÉCURITÉ
1.1 ENTRAÎNEMENT
a) Lisez attentivement le manuel
d’instructions d’utilisation et d’entretien.
Familiarisez-vous avec les commandes et
l’utilisation adéquate de l’appareil.
b) Ne laissez jamais un enfant utiliser une
tondeuse à moteur.
c) Tenez toutes les personnes, en particuliers
les jeunes enfants, ainsi que les animaux, à
distance de votre lieu de travail.
d) N’utilisez une tondeuse que pour
l’utilisation pour laquelle elle a été conçue.
1.2 PRÉPARATION
a) Inspectez attentivement la zone où vous
passerez la tondeuse, et retirez les pierres,
bâtons, câbles, os et autres objets.
b) N’employez jamais la tondeuse pieds nus
ou en ne portant que des sandales. Portez
toujours une paire de souliers qui vous
protègent suffisamment.
c) Débrayez le système d’entraînement, s’il y
a, avant de démarrer le moteur.
d) Ne tentez jamais d’ajuster la hauteur des
roues alors que le moteur tourne.
e) Utilisez l’outil uniquement à la lumière
du jour ou sous un éclairage artificiel
approprié.
f) N’opérez jamais la tondeuse dans de
l’herbe humide. Assurez-vous toujours de
vous tenir fermement sur vos pieds. Tenez
fermement la poignée, et marchez ; ne
courrez jamais.
1.3 OPÉRATION
a) Ne mettez pas les mains ou les pieds
près de ou sous les pièces rotatives de
l’appareil. Ne restez jamais à proximité de
la zone d’évacuation.
b) Arrêtez la/les lame(s) lorsque vous
traversez une allée, un chemin ou une
route pleine de gravier.
c) Après avoir heurté un objet, arrêtez le
moteur, débranchez la prise électrique,
inspectez soigneusement la tondeuse
et assurez-vous qu’elle n’est pas
endommagée, puis réparez les dommages,
le cas échéant, avant de redémarrer et
d’utiliser la tondeuse.
d) Si l’appareil commence à vibrer de façon
anormale, arrêtez le moteur et tentez
immédiatement d’en déceler la cause. Les
vibrations indiquent généralement qu’un
problème existe.
e) Arrêtez le moteur chaque fois que vous
quittez l’appareil, et également avant de
réparer ou d’inspecter l’appareil.
f) Arrêtez le moteur et attendez que la
lame s’arrête complètement avant de
retirer l’herbe coincée dans le sac de
ramassage ou avant de déboucher la chute
d’évacuation.
g) Tondez en traversant les pentes dans le
sens de la longueur, jamais de haut en bas
ou de bas en haut. Soyez extrêmement
prudent lorsque vous changez de direction
dans une pente. Ne tondez pas sur des
Page 26

Tondeuse à gazon autotractée sans fil F
2726
pentes trop abruptes.
h) N’utilisez jamais la tondeuse si celle-ci n’est
pas équipée des dispositifs de protection et
des plaques correspondantes.
i) Ne lavez pas l’appareil à l’aide d’un tuyau ;
évitez que l’eau ne pénètre dans le moteur
et au niveau des connexions électriques.
SYMBOLES
Restez sur vos gardes.
Lisez le manuel
1.4 ENTRETIEN
a) Vérifiez de façon périodique que la lame
soit bien serrée.
b) Assurez-vous que tous les écrous, boulons
et vis sont bien serrés afin que l’appareil
fonctionne en toute sécurité.
c) Vérifiez régulièrement le sac de ramassage
de l’herbe et assurez-vous qu’il n’est
pas endommagé ou usé. Remplacezle le cas échéant. Vérifiez que le sac
de remplacement est conforme aux
recommandations ou aux spécifications du
fabricant.
d) Remplacez la lame si elle est courbée ou
fendue. Une lame déséquilibrée fera vibrer
le système d’entraînement du moteur ou
pourra causer des blessures.
e) Aiguisez les lames émoussées de manière
égale à chaque extrémité pour en préserver
l’équilibre.
f) Nettoyez adéquatement la lame et vérifiez
qu’elle est bien équilibrée en la posant
à l’horizontale sur un clou placé dans
son trou central. Le clou doit également
être placé à l’horizontale. Si l’une des
extrémités de la lame penche vers le bas,
meulez un peu de métal du côté qui penche
vers le bas, jusqu’à ce que la lame soit
bien équilibrée. La lame est équilibrée
lorsqu’aucune extrémité ne s’abaisse.
KEEP HANDS AND FEET AWAY
GARDER MAINS ET PIEDS À DISTANCE
La lame continue de tourner une
fois la machine arrêtée. Attendez
que toutes les pièces de la
tondeuse se soient arrêtées avant
de les toucher.
N’exposez pas à la pluie et à l’eau
Ne pas jeter au feu
Ne jetez pas les piles au rebut.
Retournez les au service de
recyclage ou de collecte de votre
localité.
Contient une batterie au Pb. La
batterie doit être recyclée ou
disposée de façon adéquate.
Pente glissante.
Étiquettes de danger CPSC
Sectionnement d’orteils ou de
doigts – lame de tondeuse en
rotation
Tenez les enfants éloignés
Objets propulsés depuis la plateforme de la tondeuse
Page 27

2726
Tondeuse à gazon autotractée sans fil F
2726
MESURES RELATIVES AU
CHARGEUR
1. Brancher le chargeur directement dans une
prise. NE PAS MANIPULER LE CORDON
DE FAÇON ABUSIVE. Ne jamais
transporter le. Chargeur par le cordon,
ni tirer sur ce dernier pour débrancher le
chargeur de la prise ou de la tondeuse.
2. MISE EN GARDE: Ne jamais tenter
d’utiliser le chargeur avec un autre
produit afin de minimiser les risques
d’incendies, de secousses électriques ou de
blessures. De même, ne jamais charger la
tondeuse avec un autre chargeur.
3. Ne pas effectuer l’entretien de la tondeuse
lorsque la clé de sécurité ou le chargeur
sont en place.
4. N’utilisez pas un chargeur qui est
endommagé. Remplacez les cordons ou
le chargeur endommagés immédiatement
tout en appelant le numéro d’assistance
WORX : 1-866-354-9679.
5. Toujours charger la tondeuse dans un
endroit sec à l’abri des intempéries.
Protéger la tondeuse et le chargeur de la
pluie. Ne pas charger la tondeuse lorsque
la température ambiante est supérieure à
104°F (40°C) ou inférieure à 41°F (5°C).
6. Éloigner la tondeuse et le chargeur des
sources d’eau et de chaleur (comme des
radiateurs, des dispositifs de chauffage et
des fours), des flammes ou des produits
chimiques. Prendre soin de ne pas
endommager le cordon du chargeur en
l’éloignant des arêtes tranchantes.
CHARGEMENT (Voir A, B1, B2)
1. La charge peut être effectuée soit
avec la batterie INSTALLÉE (Voir A) ou
DÉBRANCHÉE de la tondeuse (Voir B1).
2. Branchez le connecteur du chargeur dans la
prise de la tondeuse. (Voir A, B1).
3. Insérez la fiche du chargeur dans la prise
murale.
4. Enfoncez le bouton du chargeur. Le témoin
rouge doit s’allumer pour indiquer que le
chargeur est alimenté et que la charge de la
batterie est en cours. (Voir B2)
5. Le témoin rouge s’éteint et le témoin vert
s’allume lorsque la charge est terminée
(il faut compter environ 16 heures pour
charger une batterie vide). (Voir B2)
6. Une fois la batterie rechargée, le témoin
vert s’allume et reste allumé 15 secondes
pour indiquer que la batterie est pleine.
Une fois le délai de 15 secondes écoulé, le
témoin vert s’éteint et le chargeur s’arrête
pour économiser de l’énergie.
REMARQUE : si la batterie est
défectueuse, le témoin rouge clignote.
Les témoins ne fonctionnent que
lorsque le chargeur est branché dans
une prise murale et à la batterie.
7. Le chargeur est un dispositif intelligent qui
peut rester connecté à la batterie et dans la
prise murale sans crainte d’endommager
la batterie ou le chargeur. Le chargeur
s’allume automatiquement pour vérifier
que la batterie est pleinement chargée.
SOIN DE LA BATTERIE
La pile de la tondeuse sans fil consiste en
un système scellé au plomb de 36 volts. La
tondeuse peut être rangée dans n’importe
quelle position sans risque de fuite.
• Pour optimiser la vie et la performance
de la batterie elle devrait être chargée
entièrement tous les 2 mois durant
l’entreposage
• Pour optimiser la vie et la performance de
la batterie elle devrait être chargée après
chaque utilisation Entreposez la batterie
dans un endroit sec et frais.
• La température de rangement minimale est
de - 4°F (-20°C).
• Il n’est pas nécessaire de décharger
complètement la pile avant de la recharger.
• Il peut être nécessaire de recharger la pile
à 2 ou 3 reprises (après l’achat) avant que
celle-ci n’atteigne son plein rendement.
La pile ne nécessite aucun entretien.
D’AUTRES BATTERIES peuvent être achetées
auprès du service à la clientèle au 1-866-354-
9679.
Page 28

Tondeuse à gazon autotractée sans fil F
2928
ASSEMBLAGE / RÉGLAGE
AVERTISSEMENT! Ne branchez pas
la batterie et/ou la clef de sécurité avant
d’avoir fini d’assembler la tondeuse.
1. ASSEMBLAGE DE LA POIGNÉE
(Voir C1,C2)
Retirez en premier le capuchon situé au
bout du levier. (Voir C1)
Montez la section de la poignée à sa place
puis xez-la à l’aide des deux leviers de
blocage.
Vérifiez que la poignée est bien fixée.
La pression du levier de blocage peut être
réglée en tournant la griffe vis (14) dans le
sens des aiguilles d’une montre ou dans le
sens inverse. Ne pas serrer avec excès.
2. ASSEMBLAGE DU SAC À HERBE
(Voir D1, D2 & D3)
1) Avant de commencer l’assemblage du sac
de ramassage de l’herbe sur le châssis (b),
vériez qu’il est placé de façon à se glisser
sur le châssis.
2) Glissez le sac de ramassage sur le châssis.
3) Commencer par fixer les pinces
supérieures, puis les deux pinces latérales
et, enfin, la pince inférieure.
sur l’une des trois positions de hauteur, et
assurez-vous d’insérer la broche dans le trou.
Ensuite, remettez le levier de blocage dans sa
position intiale.
REMARQUE: Vérifiez toujours que la poignée
supérieure est bien fixée.
5. INSTALLATION DU SAC DE
RAMASSAGE DE L’HERBE (Voir G1, G2
& G3)
INSTALLATION
1) Éteignez la tondeuse, attendez que la lame
s’arrête complètement puis retirez la clef
de sécurité.
2) Soulevez et tenez la bavette de sécurité
puis vérifiez que le dispositif de
déchiquetage n’est pas installé.
3) Tenez le sac de ramassage par la poignée,
puis placez-le sur les crochets inférieurs (f)
du châssis.
4) Relâchez la bavette de sécurité pour
bloquer le sac de ramassage. Vérifiez que
le sac est bien installé.
REMARQUE: Enfoncez légèrement le sac de
ramassage pour vous assurer qu’il est bien
installé.
RETRAIT/VIDAGE DU SAC
Soulevez et tenez la bavette de sécurité. Le sac
de ramassage de l’herbe tombe tout seul.
3. RETRAIT/ INSTALLATION DE LA
BATTERIE (Voir E1, E2)
RETRAIT DE LA BATTERIE
Tirez le connecteur de la batterie, puis tournez
le bouton de blocage de la batterie dans le
sens inverse des aiguilles d’une montre, puis
tirez sur la poignée de la batterie pour la sortir.
(Voir E2)
REMARQUE: Faites attention de ne pas
échapper la batterie sur vos pieds ou au sol
lorsque vous la retirez.
INSTALLATION DE LA BATTERIE
Placez la batterie dans son emplacement,
puis enfoncez le connecteur de la batterie et
tournez le bouton de blocage de la batterie.
(Voir E1)
4. RÉGLAGE DU GUIDON (Voir F)
Vous pouvez régler la poignée supérieure à
trois hauteurs différentes. Relâchez le levier
de blocage, mettez la poignée supérieure
6. RÉGLAGE DE LA HAUTEUR DE COUPE
(Voir H)
AVERTISSEMENT! Arrêtez
l’interrupteur de la tondeuse et attendez
que le moteur s’arrête complètement avant de
régler la hauteur de coupe. La lame continue
de tourner après l’arrêt du moteur. Elle peut
donc encore provoquer des blessures.
MISE EN GARDE: Ne touchez pas la
larme lorsqu’elle tourne.
Pour la première tonte de la saison, vous
devriez couper l’herbe assez haut.
La tondeuse peut être réglée à 6 hauteurs de
coupe, de 1,5po (38mm) à 3,5 po (88mm).
Déplacez pour cela le levier de réglage de
la hauteur vers l’extérieur, puis réglez à la
hauteur de coupe désirée.
Page 29

2928
Tondeuse à gazon autotractée sans fil F
2928
FONCTIONNEMENT
1. DÉMARRAGE ET ARRÊT (Voir I1,I2)
AVERTISSEMENT! La lame continue
de tourner pendant quelques secondes
après l’arrêt de la tondeuse. Laissez le moteur
et la lame s’arrêter de tourner avant d’allumer
à nouveau la tondeuse. Ne rallumez pas la
tondeuse immédiatement après l’avoir arrêtée.
DÉMARRAGE:
AVERTISSEMENT: La batterie est
déconnectée de votre tondeuse à gazon
et vous devez insérer le connecteur dans la
prise de la batterie avant l’utilisation.
1) Insérez la clef de sécurité dans son
emplacement.
2) Enfoncez la clef jusqu’à ce qu’elle soit
complètement enfoncée dans son
emplacement.
3) Enfoncez la clef, puis tirez sur le levier de
démarrage vers la poignée. La tondeuse
doit démarrer.
ARRÊT
Relâchez le levier de démarrage. La tondeuse
s’éteindra automatiquement.
2. TÉMOINS D’ÉTAT DE LA BATTERIE
(Voir J)
REMARQUE: Les témoins d’état de la
batterie ne sont pas actives durant la
charge. Ils indiquent l’état de la batterie
lorsque vous enfoncez le bouton de la
batterie.
Le témoin affiche alors l’état de la batterie
ainsi :
Enfoncez le bouton “PRESS”, puis les témoins
s’allument.
Lorsque les trois voyants verts sont allumés,
c’est que la batterie est entièrement chargée.
Lorsque deux voyants ( ) sont allumés,
c’est que la batterie est modérément chargée.
Lorsqu’un seul voyant vert ( ) est allumé,
c’est que la batterie est faible.Avant d’utiliser
la première fois votre nouvelle tondeuse, nous
vous recommandons de charger la batterie
toute la nuit afin de bien la charger.
IMPORTANT
Lorsqu’un seul voyant est allumé, votre
batterie est trop déchargée, même si
la tondeuse peut encore être capable
de couper l’herbe. De continuer à faire
fonctionner votre tondeuse avec la
batterie dans cette condition déchargée
peut réduire la vie et la performance de
votre batterie.
3. RETRAIT DE LA PLAQUE DE
DÉCHIQUETAGE (Voir K1)
Pour enlever la plaque de déchiquetage
(lorsqu’on préfère utiliser un sac à herbe
ou projeter les brins d’herbe par le couloir
d’éjection
facultatif), il suffit de respecter les étapes
suivantes.
1) Mettre la tondeuse hors tension, attendre
l’immobilisation de la lame et retirer la clé
de sécurité.
2) Soulevez et tenez la bavette de sécurité.
3) Tenez le dispositif au milieu, puis sortez le
dispositif de déchiquetage.
4) La bavette de sécurité est montée sur un
ressort. Lorsque vous la lâchez, la bavette
revient en position fermée.
4. INSTALLATION DE LA PLAQUE DE
DÉCHIQUETAGE (Voir K2)
1) Éteignez la tondeuse, attendez que la lame
s’arrête complètement puis retirez la clef de
sécurité.
2) Soulevez et tenez la bavette de sécurité.
3) Faire glisser la plaque de déchiquetage
dans l’ouverture d’éjection jusqu’à ce
qu’elle repose fermement contre le tablier.
4) Relâchez la bavette de sécurité et vérifiez
qu’elle est bien fermée.
5. COMMUTATEUR DE MODE DE
FONCTIONNEMENT (Voir L)
État 1 : Mode SILENCIEUX
Sélectionnez le mode SILENCIEUX lorsque
vous tondez régulièrement. Ce mode coupe
environ 1po (20mm) d’herbe à la fois.
Page 30

Tondeuse à gazon autotractée sans fil F
3130
État 2 : Mode PUISSANCE
Réglez le commutateur en mode PUISSANCE
pour couper de l’herbe dense ou très haute.
6. BAVETTE D’ÉJECTION LATÉRALE
(Voir M1 & M2)
À l’aide du dispositif de déchiquetage et du
dispositif d’éjection latérale, l’herbe peut être
éjectée sur le côté de la machine.
Pour assembler le dispositif d’éjection latérale,
soulevez et tenez la bavette latérale, puis
placez le dispositif de déchiquetage latéral sur
les crochets et relâchez la bavette pour bloquer
le dispositif.
7. SYSTÈME AUTOTRACTÉ
PACESETTERTM (Voir N1 & N2)
Pour activer le système autotracté, enfoncez
et tenez la poignée de sécurité (2) vers la
poignée, puis poussez à la fois sur la poignée
et la poignée de sécurité (2).
Pour arrêter le système autotracté, relâchez la
poignée de sécurité (2).
NOTE: Le système à propulsion
Pacesetter™ règle automatiquement la
vitesse de la tondeuse en fonction du
pas de l’opérateur. Marchez plus vite et
la tondeuse accélèrera à votre vitesse.
NOTE: Le système de motorisation
Pacesetter TM fonctionne en tout temps, que la
lame de la tondeuse soit activée ou non.
8. CONSEILS RELATIFS À LA
NOTE: Toujours vérifier la zone où on
utilise la tondeuse et en enlever tous les
cailloux, bâtons, fils, os ou autres débris
qui pourraient être projetés par la lame
en mouvement.
1) Tondre en travers dans le cas d’une pente
et non en va-et-vient vertical. Faire attention
lorsqu’on change de sens sur une pente.
Ne pas tondre les pentes abruptes. Toujours
garder son équilibre.
2) Relâchez le levier de démarrage pour
éteindre la tondeuse lorsque vous traversez
une zone de graviers (ceux-ci risquent
d’être projetés par la lame).
3) Lorsque la surface est rugueuse ou l’herbe
est haute, choisir la position de coupe la
plus élevée.
Si vous coupez trop d’herbe à chaque
passage, le disjoncteur risque de sauter et
d’arrêter la tondeuse.
4) Lorsqu’on utilise un sac à herbe pendant la
saison de croissance rapide, celui-ci peut
se bloquer à l’orice d’évacuation. Relâchez
le levier de démarrage pour éteindre la
tondeuse, puis retirez la clef de sécurité.
Enlever le sac à herbe et le secouer de
sorte que les brins du sac. De plus, nettoyer
l’orifice d’évacuation. Remettre le sac en
place.
5) Lorsque la tondeuse commence à vibrer
de façon anormale, mettre la tondeuse
HORS TENSION et retirer la clé de
sécurité. Rechercher immédiatement la
cause des vibrations. Ces dernières sont
habituellement un signe de dérangement.
Ne pas utiliser la tondeuse avant de l’avoir
vérifiée.
6) RELÂCHEZ TOUJOURS LE LEVIER DE
DÉMARRAGE POUR ÉTEINDRE LA
TONDEUSE, PUIS RETIREZ LA CLEF
LORSQUE VOUS LAISSEZ LA TONDEUSE
SANS SURVEILLANCE, MÊME POUR UNE
COURTE DURÉE.
9. CONSEILS RELATIFS À LA
DÉSINTÉGRATION DES BRINS D’HERBE
En mode de déchiquetage, la tondeuse coupe
les brins d’herbe en petites pièces et les
distribue sur la pelouse. Dans des conditions
normales, l’herbe déchiquetée se décompose
rapidement afin de nourrir la pelouse.
Prière de relire les recommandations suivantes
afin d’optimiser le rendement du mode de
déchiquetage.
1) Éviter de tondre l’herbe lorsqu’elle est
mouillée par la pluie ou la rosée. Les brins
d’herbe mouillés forment des touffes
difciles à déchiqueter et leur coupe réduit
la durée de fonctionnement . Le meilleur
moment pour tondre l’herbe consiste en
la fin de l’après-midi alors que l’herbe est
sèche et que la pelouse fraîchement tondue
n’est pas exposée aux rayons directs du
soleil.
2) Afin d’optimiser les résultats, régler la
hauteur de coupe de la tondeuse de sorte
que celle-ci ne coupe que le tiers de la
Page 31

3130
Tondeuse à gazon autotractée sans fil F
3130
hauteur des brins d’herbe (idéalement,
pas plus de 1,5po(38mm) à la fois).
Lorsque l’herbe est haute, il peut être
nécessaire d’augmenter la hauteur de
coupe afin de réduire les efforts et de
prévenir la surcharge du moteur. Lorsque le
déchiquetage est intense, il est préférable
de couper d’abord l’herbe à une hauteur
élevée, puis de repasser à la hauteur
voulue. Sinon, faire des coupes étroites et
lentes.
NOTE: Le moteur est protégé par le
déclenchement d’un coupe-circuit de
sécurité lorsque la lame se bloque ou si le
moteur est surchargé. Le coupe-circuit
ne se peut être remis en fonction
qu’en relâchant le levier d’interrupteur
2. Enlever toute obstruction et
attendre quelques minutes pour
que le coupe-circuit se remette en
fonction avant de continuer à utiliser
la tondeuse. À ce moment-ci, ne pas
utiliser le levier d’interrupteur 2, car
ceci pourrait prolonger le délai de
remise en fonction du coupe-circuit de
sécurité. Si la tondeuse s’interrompt
encore, relever la hauteur de coupe
afin de réduire la charge sur le moteur.
3) Afin d’optimiser le rendement, nettoyer
toute accumulation d’herbe du tablier de
la tondeuse. De temps en temps, arrêter
la tondeuse et attendre l’immobilisation
complète de la lame. Puis retirer la clé de
sécurité et retourner la tondeuse sur le côté.
Utiliser un objet comme un bâton pour
enlever les accumulations de brins d’herbe
autour de la lame. Prendre soin de ne pas
se blesser sur les arêtes tranchantes de la
lame. La nettoyer souvent lorsque l’herbe
est mouillée au printemps et toujours la
nettoyer après chaque utilisation.
4) Selon le type d’herbe et les conditions
prévalant, il peut être nécessaire de passer
la déchiqueteuse une deuxième fois sur une
surface afin de désintégrer complètement
les brins d’herbe. Pour la deuxième passe,
tondre dans le sens perpendiculaire à celui
de la première passe. NE PAS TONDRE
DE FAÇON PERPENDICULAIRE LORSQUE
CELA NÉCESSITE LA TONTE DE L’HERBE
DE HAUT EN BAS D’UNE PENTE.
5) Modier le plan de coupe d’une semaine à
l’autre. Cette mesure prévient la formation
d’une couche de brins d’herbe sur la
pelouse.
ENTRETIEN
ATTENTION: Arrêtez la tondeuse
et retirez la clef de sécurité avant
d’enlever le sac de ramassage de l’herbe.
NOTE: An d’assurer un service à long
terme et fiable, effectuez régulièrement la
procédure d’entretien qui suit. Vérifiez pour
des défectuosités évidentes telles qu’une lame
lousse, délogée ou endommagée, des pièces
de fixation lousses, et des composantes usées
ou endommagées. Vérifiez que les couvercles
et gardes sont tous sans dommages et
correctement attachés à la tondeuse. Effectuez
tout entretien ou réparation nécessaire avant
d’opérer la tondeuse. Si la tondeuse en venait
à défaillir en dépit d’un entretien régulier, s’il
vous plaît appelez notre ligne d’aide pour des
conseils, 1-866-354-9679.
AFFÛTAGE DE LA LAME
S’ASSURER QUE LA LAME EST TOUJOURS
AFFÛTÉE AFIN D’OPTIMISER LE RENDEMENT
DE LA TONDEUSE. UNE LAME ÉMOUSSÉE NE
COUPE PAS L’HERBE UNIFORMÉMENT.
PORTER DES LUNETTES DE SÉCURITÉ
LORSQU’ON RETIRE, INSTALLE OU AFFÛTE
LA LAME. S’ASSURER DU RETRAIT DE LA CLÉ
DE SÉCURITÉ.
Dans la plupart des cas, il suffit d’affûter la
lame deux fois pendant la saison de coupe.
Lorsque le sol est sablonneux, il est conseillé
de l’affûter plus souvent puisque le sable
émousse la lame.
REMPLACER IMMÉDIATEMENT UNE LAME
PLIÉE OU ENDOMMAGÉE.
AFFÛTAGE DE LA LAME
1. S’assurer que la lame est toujours
équilibrée.
2. Affûter dans l’angle original de coupe de la
lame.
3. Affûter les arêtes tranchantes des deux
Page 32

Tondeuse à gazon autotractée sans fil F
3332
extrémités de la lame en retirant une
quantité égale de matériau aux deux
extrémités.
AFFÛTAGE D’UNE LAME DANS UN ÉTAU
(Voir O)
1. S’assurer du dégagement du levier de
l’interrupteur, de l’immobilité de la lame
et du retrait de la clé de sécurité avant
d’enlever la lame.
2. Enlever la lame de la tondeuse. Consulter
les rubriques relatives au retrait et à
l’installation de la lame.
3. Fixer la lame (O-1) dans un étau (O-2).
4. Porter des lunettes de sécurité et prendre
soin de ne pas se couper.
5. Limer avec soin les arêtes tranchantes de
la lame avec une lime à dents nes (O-3)
ou une meule.
6. Vérifier l’équilibrage de la lame (consulter
la rubrique appropriée).
7. Remettre la lame en place et bien la serrer.
Voir les directives plus loin.
ÉQUILIBRAGE DE LA LAME (Voir P)
Vérifiez l’équilibrage de la lame en accrochant
cette dernière par son trou central (P-1)
sur un clou ou un tournevis (P-2) retenu
horizontalement dans un étau (P-3).
Lorsqu’une extrémité de la lame s’abaisse,
meulez ou limez cette extrémité. La lame est
bien équilibrée lorsqu’aucune extrémité ne
s’abaisse.
Vérifiez que les bords de la rondelle
d’isolation s’accrochent sur le côté de la lame.
Alignez les côtés plats de la rondelle carrée
(R-4) avec les côtés plats de l’arbre.
Serrez complètement l’écrou de la lame.
REMARQUE: Si la lame et la rondelle
d’isolation (R-3) sont fissurées ou
endommagées, remplacez-les par des neuves.
ENTREPOSAGE (Voir S)
Arrêtez la tondeuse et retirez toujours la
clef de sécurité. Nettoyez complètement
l’extérieur de la machine en utilisant une
brosse douce et un linge. N’utilisez pas d’eau,
des solvants ou des polis. Enlevez tout le
gazon et les débris, spécialement des fentes
de ventilation.
Tournez la machine sur le côté et nettoyez
l’aire de la lame. Les coupures de gazon sont
compactées dans l’aire de la lame, enlevez-les
avec un bout de bois ou de plastic.
Entreposez la machine dans un endroit sec.
Ne placez pas d’autres objets sur la machine.
Pour faciliter l’entreposage, enfoncez le
bouton de réglage de la hauteur de la
poignée, puis tournez ou pliez la poignée
supérieure.
MAINTENANCE DE LA LAME (Voir Q & R)
Aiguisez la lame après 50 heures d’utilisation
ou tous les 2 ans, selon le premier des deux
cas – et quelque soit l’état de la lame.
Veuillez suivre ces procédures pour démonter
et remonter la lame. Portez des gants de
jardin (non fournis) et utilisez une tricoise
(non fournie) pour démonter la lame. Tenez
la lame (R-2) et dévissez le boulon (R-5) dans
le sens inverse des aiguilles d’une montre à
l’aide d’une tricoise. Retirez l’écrou (R-5), la
rondelle carrée (R-4), la rondelle d’isolation
(R-3) et la lame (R-2).
Pour remonter la lame, placez d’abord celle-ci
avec les côtés coupants tournés vers le sol.
Assemblez le composants.
Page 33

3332
Tondeuse à gazon autotractée sans fil F
3332
GUIDE DE DÉPANNAGE
PROBLÈME SOLUTION
1. La tondeuse ne
fonctionne pas quand
l'anse est activée.
2. Le moteur s'arrête en
cours de coupe.
3. La tondeuse fonctionne,
mais le rendement
est insatisfaisant ou la
tondeuse ne coupe pas
toute la pelouse.
4. Il est trop difficile de
pousser la tondeuse.
5. La tondeuse produit des
sons anormaux et vibre.
6. Le voyant du chargeur de
piles est éteint.
A. Vérifier que la clé de sûreté est correctement insérée et
enfoncée complètement et que le bouton sur le contact est bien
enfoncé.
B. Relacher l’anse pour éteindre la tondeuse. Retirer la clé de
sûreté, retourner la tondeuse et vérifier que la lame tourne
librement. En cas de blocage, retourner à un réparateur autorisé.
La lame devrait tourner librement.
C. Est-ce que la pile est à pleine charge? Brancher le chargeur et
attendre que le voyant vert s’illumine.
A. Relacher l’anse pour éteindre la tondeuse. Retirer la clé de
sûreté, retourner la tondeuse et vérifier que la lame tourne
librement. En cas de blocage, retourner à un réparateur autorisé.
La lame devrait tourner librement.
B. Relever la hauteur de coupe des roues à la position la plus
élevée et commencer la tonte.
C. Est-ce que la pile est à pleine charge? Brancher le chargeur et
attendre que le voyant vert s’illumine.
D. Éviter de surcharger la tondeuse. Ralentir la tonte en poussant
moins vite la tondeuse, augmenter la hauteur de coupe ou les
deux.
A. Est-ce que la pile est à pleine charge? Brancher le chargeur et
attendre que le voyant vert s’illumine.
B. Relacher l’anse pour éteindre la tondeuse. Retirer la clé de
sûreté et le bloc-piles. Retourner la tondeuse et vérifier : Le
tranchant de la lame. Maintenir la lame affûtée. La présence
éventuelle d’un bourrage de la
goulotte de vidange ou du chassis.
C. Le réglage de la hauteur des roues pourrait être trop bas pour
l’état de la pelouse. Augment er la hauteur de coupe.
A. Augmenter la hauteur de coupe pour réduire le frottement du
chassis sur l’herbe. Vérifier que chaque roue tourne librement.
A. Relacher l’anse pour éteindre la tondeuse. Retirer la clé de
sûreté. Placer la tondeuse sur le côté et vérifier que la lame n’est
pas tordue ou endommagée.
Si la lame est endommagée, la remplacer avec une lame de
rechange. Si la face inférieure du chassis est endommagée,
coner la réparation à un centre de réparations autorisé.
B. Si aucun dommage visible à la lame n’est déterminé et que
la tondeuse vibre toujours : relacher l’anse pour éteindre la
tondeuse, retirer la clé de sûreté et retirer la lame. Tourner la
lame sur 180 degrés et la resserrer. Si la tondeuse vibre toujours,
coner la réparation à un centre de réparations autorisé.
A. Vérifier le branchement de la fiche.
B. Remplacer le chargeur.
Page 34

PROBLÈME SOLUTION
7. Le voyant du chargeur de
piles ne passe pas au vert.
8. La tondeuse ne ramasse
pas l'herbe coupée dans
le sac.
9. Au déchiquetage, l'herbe
coupée est visible.
10. Durée de
fonctionnement courte
ou réduite après de
nombreuses utilisations.
A. La pile doit être diagnostiquée. La faire vérifier dans un centre
de réparation autorisé.
A. Retirer la plaque de déchiqueteuse lors de l’ensachage.
B. La goulotte est encrassée. Relacher l’anse pour éteindre la
tondeuse. Retirer la clé de sûreté. Vider la goulotte de l’herbe
coupée.
C. Trop d’herbe coupée. Relever la hauteur de coupe des roues
pour en couper moins.
D. Le sac est plein. Vider le sac plus souvent.
A. Trop d’herbe coupée. Relever la hauteur de coupe des
roues pour en couper moins. Ne pas couper plus du tiers de la
longueur totale.
B. Vérifier le tranchant de la lame. Toujours maintenir la lame
affûtée.
A. Retourner à un centre de réparation agréé; une batterie neuve
peut être requise.
Tondeuse à gazon autotractée sans fil F
Page 35

1. MANGO SUPERIOR
2. PALANCA DE ENCENDIDO
3. LLAVE DE SEGURIDAD
4. MANGO INFERIOR
5. PALANCA DE AJUSTE DE ALTURA DEL MANGO
6. PALANCA DE BLOQUEO DE LEVA
7. TAPA DE SEGURIDAD
8. TAPA DEL COMPARTIMENTO DE LA BATERÍA
9. TAPA DE DESCARGA LATERAL
10. PALANCA DE AJUSTE DE ALTURA DE CORTE
11. BOLSA PARA PASTO
12. INSERTO PARA MANTILLO (Ver K1)
13. ACCESORIO DE DESCARGA LATERAL (Ver M1)
14. MANDO ENROSCABLE (Ver C2)
15. BATERÍA * (Ver B)
16. CARGADOR * (Ver B)
17. SELECTOR DEL MODO DE TRABAJO (Ver L)
18. LUZ INDICADORA DE CARGA COMPLETA (VERDE) (Ver B2)
19. LUZ INDICADORA DE CARGA (ROJA) (Ver B2)
* No todos los accesorios ilustrados o descritos se incluyen junto con el producto
estándar.
3534
3534
Cortacésped de autopropulsión inalámbrica
ES
Page 36

Cortacésped de autopropulsión inalámbrica
ES
3736
DATOS TÉCNICOS
Potencia nominal 36V
Diámetro de la plataforma 19’’ (48cm)
Diámetro de corte 18”(46cm)
Diámetro de la rueda delantera 7” (178mm)
Diámetro de la rueda trasera 8-1/4” (210mm)
Altura de corte 1.5”-3.5” (38 – 88mm)
Posiciones de altura de corte 6
Capacidad de recolección de pasto 1.6 fanegas(55L)
Tipo de batería Ácido-plomo
Modelo de la batería WA3220
Tiempo normal de carga 16 Hora
Modelo del cargador WA3722
Clasificación de voltaje del cargador AC 120V~60Hz, 45W, Salida: 42.5V1.0A
Peso de la máquina 90.6 libras (41.1kg)
ACCESORIOS
Bolsa para pasto 1
Cargador (WA3722) 1
Accesorio de descarga lateral 1
Accesorio de abono 1
Baterías (WA3220) 1
Llave de seguridad 1
Le recomendamos que compre todos los accesorios en la tienda donde adquirió la herramienta.
Use accesorios de buena calidad una marca bien conocida. Seleccione los que más convengan
al trabajo que intenta hacer. Consulte el empaque de los accesorios para obtener más detalles. El
personal de la tienda también puede ayudarle y aconsejarle.
Page 37

3736
Cortacésped de autopropulsión inalámbrica
ES
3736
INSTRUCCIONES DE
SEGURIDAD
¡ADVERTENCIA! El polvo creado al
lijar, serruchar, pulir, taladrar o realizar
otras actividades de la construcción, contiene
substancias químicas que se sabe producen
cáncer, defectos de nacimiento u otros daños
al sistema reproductor. Algunos ejemplos de
esos productos químicos son:
• l El plomo de las pinturas a base de plomo
• l la sílice cristalina de los ladrillos,
del cemento y de otros productos de
albañilería.
• l El arsénico y el cromo de la madera
tratada químicamente.
El riesgo que se corre a causa del contacto
con esos productos varía según la frecuencia
con que usted realice este tipo de trabajos.
Con el fin de reducir su exposición a esas
substancias químicas:
• l trabaje en un área bien ventilada.
• l utilice un equipo de seguridad adecuado,
tal como una máscara contra el polvo
especialmente diseñada para filtrar
partículas microscópicas.
LEA Y COMPRENDA TODAS
LAS INSTRUCCIONES
¡ADVERTENCIA! Cuando se emplean
herramientas eléctricas para jardinería,
siempre deben seguirse ciertas pautas básicas
de seguridad a fin de reducir el riesgo de
incendio, descarga eléctrica o lesión seria,
incluyendo las siguientes:
¡ADVERTENCIA! Podría ocurrir un
riesgo de lesión si la cortacésped se
utiliza sin el conjunto del receptor colocado.
¡ADVERTENCIA! La utilización de
cualquier otro accesorio podría aumentar
el riesgo de lesión.
¡ADVERTENCIA! Para aquellas
cortacésped a batería, utilice sólo
baterías de reemplazo idénticas y el tipo y
fabricante de batería especificado. Además,
existen disponibles dispositivos para
conservar los cables de extensión.
PARA TODOS LOS CORTACÉSPEDES
1) Evite Ambientes Peligrosos-No use
artefactos en lugares húmedos o
mojados.
2) No lo use bajo la lluvia.
3) Manténgalo fuera del alcance de los
niños.-Todos los espectadores deben
permanecer alejados de la zona de
trabajo.
4) Use ropa adecuada-No use ropa suelta o
joyas. Pueden llegar a engancharse en las
partes móviles. Le recomendamos usar
guantes de goma y calzado resistente al
trabajar en el exterior.
5) Use Gafas Protectoras-Use siempre una
máscara para la cara o contra el polvo si
la operación produce polvo.
6) Use el Artefacto Adecuado-No use ningún
artefacto para un trabajo para el cual no
ha sido diseñado.
7) No Fuerce el Artefacto-Hará un mejor
trabajo y con menor posibilidad de
accidentes si la utiliza de la forma para la
que fue diseñada.
8) No se Extienda de Más-Mantenga una
buena postura y equilibro todo el tiempo.
9) Manténgase Alerta-Fíjese en lo que está
haciendo. Use el sentido común. No use
el artefacto cuando esté cansado.
10) Guarde los Artefactos que no Utilice en el
Interior-Cuando no los use, los artefactos
deben guardarse en el interior, en un
lugar seco y alto, o bajo llave – fuera del
alcance de los niños.
11) Mantenga los Artefactos con CuidadoMantenga los bordes de corte afilados y
limpios para obtener el mejor resultado
y reducir el riesgo de heridas. Siga las
instrucciones de lubricación y cambio de
accesorios. Mantenga las manos secas,
limpias y sin aceite o grasa.
12) Mantenga las cubiertas en su lugar y en
buen estado.
13) Mantenga las hojas afiladas.
14) Mantenga las manos y los pies lejos del
área de corte.
15) Los objetos despedidos por la hoja de la
podadora pueden causar heridas graves.
Siempre debe examinar cuidadosamente
el césped y remover todos los objetos
Page 38

Cortacésped de autopropulsión inalámbrica
ES
3938
antes de podarlo.
16) Si la podadora de césped golpea con un
objeto extraño, siga los siguientes pasos:
i) Detenga la podadora. Suelte la barra
de encendido.
ii) Revísela por daños.
iii) Repare cualquier daño antes de volver
a encender la podadora.
17) Use las mismas hojas de reemplazo
únicamente.
INSTRUCCIONES DE SEGURIDAD PARA
CORTACÉSPEDES A BATERÍA
a) No cargue la cortacésped bajo la lluvia o en
lugares con mucha humedad.
b) No utilice un cortacésped a batería bajo la
lluvia.
c) Cuando cambie las baterías, debe sustituir
todas al mismo tiempo. Si se mezclan
baterías nuevas con baterías descargadas
podría aumentar la presión interna de la
celda, causando la rotura de la/s batería/s
descargada/s. (Esto es aplicable a los
productos que emplean más de una batería
primaria reemplazable.)
d) Al insertar las baterías en este producto,
debe tenerse en cuenta la polaridad o
dirección apropiada. Si las baterías son
insertadas al revés, existe riesgo de
fuga o explosión. (Esto es aplicable a los
productos que emplean más de una batería
primaria reemplazable.)
e) Retire o desconecte la batería antes de
realizar operaciones de mantenimiento,
limpieza o extracción de algún material de
la cortacésped.
PARA TODOS LOS PRODUCTOS A
BATERÍA QUE EMPLEEN UNA BATERÍA
EXTRAÍBLE O INDEPENDIENTE:
a) Utilice únicamente el siguiente tipo y
tamaño de batería: WA3220
b) No arroje la batería al fuego. Podría
explotar. Compruebe la legislación local
para más información acerca de las
instrucciones especiales destrucción.
c) No abra ni divida las baterías. El electrolito
liberado es corrosivo y podría provocar
daños en los ojos o la piel. Podría ser
tóxico si se ingiere.
d) Tenga cuidado al manipular las baterías
para no cortocircuitarlas con objetos como
anillos, pulseras o llaves. La batería o
el conductor podrían sobrecalentarse y
causar quemaduras.
PARA UNA CORTACÉSPED A BATERÍA
QUE UTILIZA UN SUMINISTRO DE
BATERÍA DE CELDAS HÚMEDAS
VENTILADA DISEÑADA PARA QUE EL
USUARIO LA RELLENE AL PRINCIPIO O
DE FORMA PERIÓDICA:
PRECAUCIÓN “El electrolito es ácido
sulfúrico diluido y resulta dañino
para los ojos y la piel. Es conductor de la
electricidad y corrosivo. Deben respetarse los
siguientes procedimientos:
a) Utilice protección ocular y ropas
protectoras.
b) Si el electrolito entra en contacto con la
piel, lávelo inmediatamente con agua.
c) Si el electrolito entra en contacto con los
ojos, lávelo inmediatamente y a conciencia
con agua. Busque ayuda médica”.
INSTRUCCIONES DE SEGURIDAD PARA
CORTACÉSPEDES DE USO DE PIE
I. FUNCIONAMIENTO GENERAL
1. Lea, comprenda, y siga todas las
instrucciones que aparecen en la
máquina y en el(los) manual(es) antes de
comenzar.
2. No coloque las manos o pies cerca o
debajo de la máquina. Mantenga libre
siempre el orificio de descarga.
3. Sólo pueden utilizar esta máquina
adultos responsables que conozcan las
instrucciones.
4. Limpie el área de objetos como rocas,
cables, juguetes, etc. que podrían ser
expulsados por la hoja. Manténgase
detrás del mango cuando esté
funcionando el motor.
5. Asegúrese de que no existan personas
alrededor del área del trabajo antes
de comenzar con el funcionamiento.
Detenga la máquina en caso de que
alguna persona ingrese en el área de
trabajo.
6. No utilice la máquina descalzo o con
Page 39

3938
Cortacésped de autopropulsión inalámbrica
ES
3938
sandalias. Utilice siempre un calzado
sólido.
7. No mueva la máquina hacia atrás a
menos que sea absolutamente necesario.
Mire siempre hacia abajo y atrás antes
y durante el movimiento de la máquina
hacia atrás.
8. Nunca apunte el material descargado
hacia alguna persona. Evite descargar el
material contra una pared u obstrucción.
El material puede rebotar hacia el
operador. Detenga la hoja cuando cruce
superficies de gravilla.
9. No utilice la máquina sin que el receptor
de pasto, guarda de descarga, guarda
trasera u otros dispositivos de protección
de seguridad se encuentren colocados en
su lugar y funcionando.
10. Nunca deje el motor funcionando sin
supervisión.
11. Detenga el motor y espere a que la hoja
se detenga por completo antes de limpiar
la máquina, retirar el receptor de pasto o
eliminar las obstrucciones de la guarda
de descarga.
12. Utilice la máquina sólo con la luz del día o
con buena luz artificial.
13. No utilice la máquina bajo la influencia de
alcohol o drogas.
14. No utilice la cortadora de pasto sobre
pasto mojado. Mantenga siempre la
estabilidad. Camine y nunca corra.
15. Desconecte el sistema de manejo, si se
encuentra colocado, antes de arrancar el
motor.
16.Si la máquina comienza a vibrar de manera
anormal, detenga el motor y verifique la
causa de inmediato. Generalmente, la
vibración es una advertencia acerca de un
problema.
17. Utilice siempre protección ocular durante
la utilización de la máquina.
18. Consulte las instrucciones del fabricante
para obtener información acerca del
funcionamiento correcto de la máquina
y de la instalación de los accesorios.
Sólo utilice accesorios aprobados por el
fabricante.
II. UTILIZACIÓN DE LA MÁQUINA EN
PENDIENTES
Las pendientes son un factor importante
relacionado con accidentes de resbalones y
caídas que pueden causar lesiones graves.
La utilización de la máquina en pendientes
requiere de precaución adicional. Si no se
siente seguro sobre una pendiente, no utilice
la máquina.
1. Corte el pasto a través del frente de las
pendientes y nunca hacia arriba o abajo.
Tenga extremo cuidado cuando cambie la
dirección sobre las pendientes.
2. Observe si existen orificios, surcos,
baches, rocas u otros objetos escondidos.
El terreno desparejo puede causar un
resbalón y caída. El pasto alto puede
ocultar obstáculos.
3. No utilice la cortadora de pasto sobre pasto
mojado o en pendientes con demasiada
inclinación. Una estabilidad escasa puede
causar un resbalón o caída.
4. No utilice la cortadora de pasto cerca de
bajadas, zanjas o malecones ya que puede
perder la estabilidad.
III. NIÑOS
Pueden ocurrir accidentes trágicos si el
operador no se encuentra alertado acerca
de la presencia de niños. Generalmente, los
niños se encuentran atraídos por la máquina
y la actividad de corte de pasto. Nunca
presuponga que los niños permanecerán en el
mismo lugar donde los vio por última vez.
1. Mantenga a los niños alejados del área
de corte de pasto y bajo el cuidado alerta
de un adulto responsable que no sea el
operador.
2. Esté alerta y apague la cortadora de pasto
si un niño ingresa en el área.
3. Nunca permita que los niños utilicen la
máquina.
4. Tenga sumo cuidado cuando se acerca a
esquinas ciegas, arbustos, árboles u otros
objetos que podrían no permitirle visualizar
a un niño.
IV. MANTENIMIENTO
MANTENIMIENTO GENERAL
1. Mantenga todas las tuercas y pernos
Page 40

Cortacésped de autopropulsión inalámbrica
ES
4140
ajustados con el fin de asegurarse de que
la máquina se encuentra en condiciones de
funcionamiento seguro.
2. Nunca altere los dispositivos de seguridad.
Verifique su funcionamiento correcto
periódicamente.
3. Mantenga la máquina libre de pasto, hojas
u otra acumulación de restos.
4. Si golpea a un objeto extraño, detenga el
funcionamiento e inspeccione la máquina.
Si es necesario, realice la reparación antes
de comenzar a utilizar nuevamente la
máquina.
5. Nunca realice ajustes o reparaciones con el
motor funcionando.
6. Revise periódicamente los componentes
del receptor de pasto y la guarda de
descarga. En caso de que sea necesario,
realice el reemplazo utilizando las partes
recomendadas por el fabricante.
7. Las hojas de la cortadora de pasto son
filosas. Envuelva la hoja o utilice guantes
y tenga sumo cuidado cuando realice el
mantenimiento de éstas.
8. En caso de que sea necesario, mantenga
o reemplace las etiquetas de seguridad e
instrucciones.
CONSERVE ESTAS INSTRUCCIONES
PRÁCTICAS DE FUNCIONAMIENTO
SEGURO PARA LA CORTACÉSPED PARA
CAMINAR DESDE ATRÁS
1. INSTRUCCIONES DE SEGURIDAD
1.1 CAPACITACIÓN
a) Lea detenidamente el manual
de instrucciones de operación
y mantenimiento. Familiarícese
correctamente con los controles y el uso
correcto de la herramienta.
b) Nunca permita que los niños utilicen una
cortacésped motorizada.
c) Mantenga el área de limpieza sin personas,
especialmente niños pequeños y mascotas.
d) No utilice una cortacésped para ningún
trabajo para el que no ha sido diseñada.
1.2 PREPARACIÓN
a) Inspeccione minuciosamente el área donde
se utilizará la herramienta y extraiga todas
las piedras, maderas, cables, huesos y
otros objetos extraños.
b) No utilice la herramienta con los pies
descalzos o en sandalias. Utilice siempre
calzado sólido.
c) Desconecte el sistema de manejo, si se
encuentra colocado, antes de arrancar el
motor.
d) Nunca intente realizar el ajuste de la
altura de una rueda con el motor en
funcionamiento.
e) Utilice la herramienta sólo a la luz del día o
con una luz artificial adecuada.
f) No utilice la cortadora de pasto sobre
pasto mojado.. Párese siempre de forma
correcta. Sujete firmemente el mango y
camine, nunca corra.
1.3 OPERACIÓN
a) No coloque las manos ni los pies cerca o
debajo de las piezas giratorias.
b) Detenga la hoja(s) al cruzar por calles,
caminos o calzadas de gravilla.
c) Luego de golpear un objeto extraño,
detenga el motor, desenchufe la
herramienta, inspeccione minuciosamente
para comprobar si existen daños y repare
los daños antes de volver a arrancar y
utilizar la herramienta.
d) Si la herramienta comienza a vibrar
de forma anormal, detenga el motor
y verifique de inmediato la causa.
Generalmente, la vibración es un síntoma
de problemas.
e) Detenga el motor cada vez que deje la
herramienta sin supervisión y antes de
efectuar una reparación o inspección.
f) Apague el motor y espere a que la hoja
se detenga por completo antes de extraer
el receptor de césped o antes de quitar la
obstrucción del tubo de descarga.
g) Corte el césped desde el frente de las
laderas, nunca de arriba o abajo. Tenga
sumo cuidado al cambiar la dirección en
las laderas. No corte el césped en laderas
excesivamente empinadas.
h) Nunca utilice la cortacésped sin las
guardas, placas u otros dispositivos
de protección de seguridad adecuados
colocados en su lugar.
i) No lave la herramienta con una manguera.
Page 41

4140
Cortacésped de autopropulsión inalámbrica
ES
4140
Evite que el agua ingrese en el motor y en
las conexiones eléctricas.
SÍMBOLOS
1.4 MANTENIMIENTO
a) Compruebe la cuchilla a intervalos
regulares para verificar su correcta tensión.
b) Mantenga todas las tuercas, pernos y
tornillos apretados a fin de asegurarse de
que la herramienta esté en condiciones
seguras de funcionamiento.
c) Periódicamente, compruebe la bolsa
en búsqueda de deterioro y desgaste,
y reemplace las bolsas desgastadas.
Compruebe que las bolsas de reemplazo
cumplan con las recomendaciones o
especificaciones del fabricante original.
d) Sustituya la cuchilla si se encuentra
doblada o agrietada. Una cuchilla
desequilibrada provoca vibraciones que
podrían dañar el motor o derivar en
lesiones personales.
e) Afile las cuchillas desafiladas
uniformemente por ambos extremos para
mantener su equilibrio.
f) Limpie minuciosamente la hoja y
compruebe su balance colocándola
horizontalmente sobre un clavo delgado
a través de su orificio central. El clavo
también deberá estar en posición
horizontal. Si alguno de los extremos de la
hoja gira hacia atrás, extraiga algo de metal
desde el extremo pesado o inferior hasta
que la hoja quede balanceada, que ocurre
cuando ninguno de los extremos se cae.
KEEP HANDS AND FEET AWAY
GARDER MAINS ET PIEDS À DISTANCE
Alerta de seguridad
Lea el manual
Las cuchillas continuarán girando
después de que la máquina se
apague. Espere hasta que todos
los componentes de la máquina
se hayan detenido completamente
antes de tocarlos.
No exponer a la lluvia ni al agua
No arrojar al fuego
No arroje las baterías. Devuelva
las baterías agotadas para su
recolección local o llévelas a algún
centro de reciclado.
Contiene una batería de Pb.
La batería debe ser reciclada o
desechada de forma apropiada.
Resbalón en pendiente
Etiqueta de peligro CPSCl
Corte de dedos del pie o de
la mano – Hoja giratoria de la
cortadora de pasto
Mantenga alejados a los niños
Objetos expulsados desde la
cubierta de la cortadora de pasto
Page 42

Cortacésped de autopropulsión inalámbrica
ES
4342
REGLAS DE SEGURIDAD
PARA EL CARGADOR
1. Conecte el cargador directamente a una
toma de corriente. NO MALTRATE EL
CABLE. Nunca acarree el cargador por
el cable. No desconecte el cargador de la
toma de corriente o de la podadora tirando
del cable.
2. PRECAUCION: No intente usar este
cargador con ningún otro producto
para evitar riesgos de choque eléctrico,
incendio y lesions personales. De la misma
manera, no intente recargar su podadora
con otro cargador.
3. No haga servicio a la podadora con el
cargador o con la llave de seguridad
instalados.
4. No utilice un cargador dañado. Cambie
los cables dañados o el cargador
inmediatamente llamando a la línea de
asistencia de WORX al número 1-866-354-
9679.
5. Siempre cargue la podadora en un
lugar seco protegido del mal tiempo. No
exponga el cargador o la podadora a la
lluvia. No cargue la podadora cuando la
temperatura se superior a 104°F (40°C) o
inferior a 41°F (5°C).
6. Aleje la podadora y el cargador de agua y
fuentes de calor (radiadores, calentadores,
estufas, etc.), flamas y productos químicos.
Tenga cuidado de no dañar el cable del
cargador, aléjelo de bordes cortantes.
PROCEDIMIENTO DE CARGA
(Ver A, B1, B2)
1. La carga debe realizarse con la batería
INSTALADA (Ver A) o EXTRAÍDA de la
máquina (Ver B1).
2. Inserte el conector del cargador en el
receptáculo de la podadora. (Ver A,B1)
3. Conecte la clavija para cargador a la toma
de corriente de pared.
4. Presione el botón en el cargador y se
deberá encender la luz roja para indicar
que posee alimentación y se está cargando
la batería. (Ver B2).
5. La luz roja se apagará y se encenderá
la verde cuando se complete la carga
(aproximadamente 16 horas para cargar
una batería totalmente descargada). (Ver
B2).
6. Luego de que la batería esté totalmente
cargada, se encenderá la luz verde durante
15 segundos para indicar la carga completa.
Luego de 15 segundos, la luz verde y la
carga se apagarán para ahorrar energía.
NOTA: Si la batería posee daños, la
luz roja parpadeará. Las luces sólo
funcionarán cuando el cargador
esté conectado a la batería y al
tomacorriente de pared.
7. El cargador es un cargador inteligente y
puede permanecer conectado a la batería y
al tomacorriente de pared durante períodos
extensos de tiempo sin causar daños
a la batería o al cargador. El cargador
se encenderá automáticamente para
garantizar que la batería esté totalmente
cargada.
MANTENIMIENTO DE LA BATERÍA
La batería de su podadora inalámbrica es un
sistema de 36 volts de ácido de plomo sellado.
La cortacésped se puede almacenar en
cualquier posición sin peligro de fugas.
• Para lograr una vida útil y funcionamiento
óptimos de la batería, se deberá cargar la
batería por completo cada 2 meses cuando
el producto esté almacenado.
• Para lograr una vida útil y funcionamiento
óptimos de la batería, se deberá cargar
la batería por completo luego de cada
utilización.
• Almacene la batería en una ubicación seca
y fresca.
• La batería se puede guardar con seguridad
hasta en temperaturas de - 4°F (-20°C).
• La batería no necesita descargarse
completamente antes de recargarse.
• Pueden requerirse 2 o 3 ciclos de carga
(después de la compra) para alcanzar la
capacidad de corte máxima.
La batería no necesita mantenimiento.
PUEDEN CONSEGUIRSE BATERÍAS
ADICIONALES por medio de la línea de
asistencia al cliente 1-866-354-9679.
Page 43

4342
Cortacésped de autopropulsión inalámbrica
ES
4342
MONTAJE/AJUSTE
¡ADVERTENCIA! No conecte la batería
y/o la llave de seguridad antes de montar
completamente el producto.
1. MONTAJE DEL ASA (Ver C1)
Retire en primer lugar la cubierta situada
en el extremo del espeque. (Ver C1).
Levante la sección del asa y asegúrela
apretando las dos palancas de bloqueo.
Compruebe que el asa queda completamente
firme.
La presión de la palanca se puede ajustar
variando la posición del mando enroscable
(14) hacia la derecha/izquierda. NO APRIETE
DEMASIADO.
2. ENSAMBLAJE DE LA BOLSA PARA
PASTO (Ver D1, D2 & D3)
1) Antes de comenzar a montar la bolsa para
pasto en el soporte (b), compruebe que la
bolsa para pasto se ha colocado de forma
que pueda deslizarse sobre el soporte.
2) Deslice la bolsa sobre el soporte.
3) Monte las pinzas superiores en el soporte,
monte después las dos pinzas laterales, y
por último la pinza inferior.
3. EXTRAER/ INSTALAR LA BATERÍA
(Ver E1, E2)
EXTRAER LA BATERÍA
Tire del conector de la batería y gire el mando
de bloqueo de la batería hacia la izquierda.
Utilice entonces el mango de la batería para
extraerla. (Ver E2)
NOTA: Tenga cuidado de que la batería no
caiga sobre sus pies o al suelo al extraerla.
INSTALAR LA BATERÍA
Coloque la batería en el compartimento de
batería. Presione el conector de batería y gire
el mando de bloqueo. (Ver E1)
4. AJUSTES AL MANGO (Ver F)
El mango superior puede ajustarse en 3
posiciones de altura diferentes. Libere la
palanca de bloqueo, fije el asa superior en
alguna de las tres posiciones de altura y
asegúrese de insertar el pasador en el orificio.
Vuelva a colocar entonces la palanca de
bloqueo.
NOTA: Compruebe siempre que el mango
superior se ha fijado firmemente.
5. INSTALAR LA BOLSA PARA PASTO
(Ver G1 y G2)
INSTALACIÓN
1) Apague la cortacésped, espere a que las
cuchillas se detengan y extraiga la llave de
seguridad.
2) Levante la pestaña de seguridad y
manténgala arriba, asegurándose de
extraer el accesorio de abono.
3) Coja la bolsa para pasto por el asa y
colóquela en los ganchos inferiores (f) de
la plataforma de la cortacésped. Levante
la bolsa hasta su posición completamente
horizontal.
4) Libere el seguro para bloquear la bolsa
para pasto en su posición.
NOTA: Presione ligeramente la bolsa para
pasto para asegurarse de que se encuentra
completamente instalada. Asegúrese de que
la bolsa para pasto se encuentra instalada
firmemente.
EXTRACCIÓN/VACIADO
Levante el seguro y manténgalo arriba. La
bolsa para pasto caerá automáticamente.
6. AJUSTE DEL ALTURA DE CORTE
(Ver H)
¡ADVERTENCIA! Deténgase, suelte
la palanca y espere a que el motor
se detenga antes de ajustar la altura. Las
cuchillas continuarán girando después
de apagar la máquina. Una cuchilla en
movimiento podría causar una lesión.
PRECAUCIÓN: No toque las cuchillas en
movimiento.
Al realizar el primer corte de la temporada,
seleccione una altura de corte alta.
La cortacésped puede ajustarse a seis alturas
de corte, entre 1,5” (38mm) y 3,5” (88mm).
Para ello, mueva la palanca de altura de corte
hacia fuera y ajuste la posición que prefiera.
Cada posición subirá o bajará la cortacésped a
la altura deseada.
Page 44

Cortacésped de autopropulsión inalámbrica
ES
4544
OPERACION
1. ENCENDIDO Y APAGADO (Ver I1,I2)
¡ADVERTENCIA! La cuchilla continuará
girando durante algunos segundos
después de apagar la máquina. Deje que se
detengan el motor y las cuchillas antes de
volver encenderla. No apague la máquina y
vuelva encenderla rápidamente.
ENCENDIDO
¡ADVERTENCIA : La batería se
encuentra desconectada de su
cortacésped, por lo que es necesario insertar
el conector en la toma de batería antes del
uso.
1) Inserte la llave de seguridad en el
compartimento de arranque.
2) Presione la llave hacia abajo hasta que
quede completamente asentada dentro del
compartimento.
3) Mantenga presionada la llave de seguridad
y mueva la palanca de arranque hacia el
mango para arrancar la cortacésped.
APAGADO
Suelte la palanca de arranque. La cortacésped
se apagará de forma automática.
2. LED DE ESTADO DE LA BATERÍA (Ver J)
NOTA: Los LEDs de estado de la
batería no se activarán en el modo de
carga. Los LEDs de estado indicarán la
condición de la batería al presionar el
botón de la batería.
Los LEDs indican constantemente la
condición de la batería de la siguiente
manera:
Al presionar el botón “POWERTEST” se
iluminará el botón luminoso.
Si se iluminan tres luces verdes, la batería se
encuentra completamente cargada.
Si se iluminan dos luces ( ), la batería se
encuentra moderadamente cargada.
Si solamente se ilumina una luz verde (
carga de la batería está agotada.
Antes de utilizar su nuevo cortacésped por
primera vez, se recomienda cargar por
completo la batería durante una noche para
garantizar que se encuentre completamente
cargada.
IMPORTANTE
Cuando sólo se enciende una luz, la
batería está excesivamente descargada,
a pesar de que la cortacésped puede
continuar cortando césped. Si se
continúa utilizando la cortacésped con
la batería descargada, es posible que
exista una reducción en la vida útil y en
el rendimiento de la batería.
3. PARA QUITAR EL INSERTO DE
DESBROCE (Ver K1)
Para quitar el inserto de desbroce para poder
empacar el pasto o descargarlo `por medio
del canal de descarga opcional, siga los pasos
enlistados a continuación:
1) Apague la podadora, espere a que se
detenga la cuchilla y quite la llave de
seguridad.
2) Levante la protección de seguridad y
manténgala arriba.
3) Tome la parte central del accesorio,
levántela y tire completamente del
accesorio de abono.
4) La protección de seguridad contiene un
resorte. Si la suelta, la protección volverá a
cerrarse.
4. INSTALACIÓN DEL INSERTO DE
DESBROCE (Ver K2)
1) Apague la cortacésped, espere a que las
cuchillas se detengan y extraiga la llave de
seguridad.
2) Levante la protección de seguridad y
manténgala arriba.
3) Deslice el inserto de desbroce en la
abertura de descarga hasta que esté en
contacto firme con la cubierta.
4) Suelte la protección de seguridad
y asegúrese de que se encuentra
correctamente cerrada.
), la
Page 45

4544
Cortacésped de autopropulsión inalámbrica
ES
4544
5. SELECTOR DEL MODO DE TRABAJO
(Ver L)
Estado1: Modo SILENCIOSO
Seleccione el modo SILENCIOSO al cortar
césped en condiciones diarias, cortando
aproximadamente 1‘’(20mm) de césped por
vez.
Estado1: Modo POTENCIA
Coloque el selector en el modo POTENCIA al
cortar césped denso o sumamente crecido.
6. TAPA DE DESCARGA LATERAL (Ver
M1 y M2)
Utilizando el accesorio de abono y el
accesorio de descarga lateral, la hierba puede
descargarse a través del lateral de descarga
de la máquina.
Para montar el accesorio de descarga
lateral, levante la tapa de descarga lateral
y manténgala arriba. Coloque el accesorio
de descarga lateral en el gancho y suelte
la cubierta para bloquear el accesorio de
descarga lateral en posición.
7. SISTEMA DE AUTOPROPULSIÓN
PACESETTERTM (Ver N1 & N2)
Para utilizar el sistema de autopropulsión,
apriete la palanca de seguridad (2) hacia el
mango y sosténgala. A continuación, presione
el mango y la palanca de seguridad (2).
Para desactivar el sistema de autopropulsión,
suelte la palanca de seguridad (2).
NOTA: El sistema de propulsión
Pacesetter™, junto con la tracción
de la rueda trasera, establecen
automáticamente el ritmo en función
de la velocidad de desplazamiento
del usuario. Al caminar más rápido, la
cortacésped tendrá una propulsión más
rápida para igualarse con su ritmo.
NOTA: El sistema de impulsión PacesetterTM
funcionará con o sin la hoja de la cortacésped
activada.
8. RECOMENDACIONES PARA PODADO
NOTA: siempre inspeccione el area
donde se va a utilizar la podadora
y elimine todas las piedras, varas,
alambres, huesos y otros desechos que
puedan ser arrojados por la cuchilla
giratoria.
1) Pode en sentido perpendicular a las
pendientes, nunca hacia arriba y hacia
abajo. Tenga cuidado extremo cuando
cambie de dirección en las pendientes. No
pode pendientes demasiado pronunciadas.
Apoye bien los pies.
2) Suelte la palanca para apagar la
cortacésped mientras atraviesa una zona
con gravilla (las piedras podrían dañar las
cuchillas).
3) Coloque la podadora en la posición de
corte más alta cuando pode en tierra
o donde haya hierbas altas. Cortar
demasiada hierba de una vez podría hacer
saltar el interruptor de circuito y detener la
cortacésped.
4) Si utiliza un depósito para pasto durante
la temporada de crecimiento rápido, el
pasto puede tender a tapar el canal de
descarga. Suelte la palanca para apagar la
cortacésped y extraer la llave de seguridad.
Quite la bolsa para pasto y haga que éste
se vaya hacia el, extreme de la bolsa.
Limpie también el pasto y cualquier otro
desecho que se haya acumulado alrededor
del canal de descarga. Vuelva a colocar
el depósito de pasto. Limpie a menudo
cuando pode pasto húmedo, en primavera,
y siempre después de cada uso.
5) Si la podadora vibra anormalmente,
apáguela y quite la llave de seguridad.
Busque la causa inmediatamente. Las
vibraciones son aviso de problemas. No
opere la podadora hasta que le hayan
efectuado una revisión de servicio.
6) SUELTE SIE
A PA
LA LLAVE DE SEGURIDAD SI PIENSA
DEJAR LA CORTACÉSPED DESATENDIDA,
AUNQUE SÓLO SEA DURANTE UN
PERIODO CORTO DE TIEMPO.
9. RECOMENDACIONES PARA
DESBROZAR
Cuando desbroce, su nueva podadora está
diseñada para recortar los trozos de pasto en
pequeñas piezas y distribuirlas por todo el
césped. Bajo condiciones normales, el pasto
recortado se degradará rápidamente para
MPRE LA PALANCA PARA
GAR LA CORTACÉSPED Y EXTRAIGA
Page 46

Cortacésped de autopropulsión inalámbrica
ES
4746
proporcionarle nutrientes a su césped. Para
obtener el mejor funcionamiento, revise las
siguientes recomendaciones para desbrozar.
1) Evite podar el césped cuando esté mojado
debido a la lluvia o al rocío. El pasto
húmedo tiende a formar grupos que
interfieren con la acción de desbroce y
reducen el tiempo de operación. La mejor
hora para podar el césped es ya avanzada
la tarde, cuando el pasto esté seco y el
área recién cortada no quede expuesta a la
luz directa del sol.
2) Para obtener mejores resultados, ajuste la
altura de podado para que corte solamente
el tercio superior, idealmente no más de
1,5 ‘’(38mm) de una pasada. Si el césped
está demasiado largo, será necesario
ajustar la podadora. Puede ser necesario
disminuir la altura de corte para reducir el
esfuerzo de empuje y evitar sobrecargar el
motor. Para desbrozar áreas muy pesadas,
es recomendable hacer un primer corte a
una altura elevada, y después recortar a la
altura final deseada. De otra manera, haga
cortes angostos y pode lentamente.
NOTA: El motor está protegido por un
disyuntor de seguridad que se activa
cuando la hoja se atasca o si existe una
sobrecarga del motor. El disyuntor
de seguridad sólo se restablecerá
cuando se suelte la palanca del
interruptor 2. Elimine cualquier
obstrucción y espere algunos
minutos para que el disyuntor de
seguridad se restablezca antes de
continuar utilizando la cortacésped.
En este momento, no utilice la
palanca del interruptor 2 ya que, de
lo contrario, se prolongará el tiempo
de restablecimiento del disyuntor
de seguridad. Si la cortacésped se
detiene nuevamente, aumente la
altura del corte para reducir la carga
del motor.
3) Para mejor rendimiento, conserve la
carcaza de la podadora libre de pasto
acumulado. Quite la llave de seguridad
y gire la podadora de cabeza. Elimine el
pasto acumulado en la zona de la cuchilla
con un objeto similar a una vara. Tenga
cuidado con los filos de la cuchilla. Si
utiliza un depósito para pasto durante la
temporada de crecimiento rápido, el pasto
puede tender a tapar el canal de descarga.
Apague el interruptor y quite la llave de
seguridad. Quite la bolsa para pasto y haga
que éste se vaya hacia el extremo de la
bolsa. Limpie también el pasto y cualquier
otro desecho que se haya acumulado
alrededor del canal de descarga. Vuelva a
colocar el depósito de pasto.
4) Ciertos tipos de césped y las condiciones
del pasto pueden requerir que el área
se desbroce por segunda ocasión para
ocultar completamente los restos.
Cuando efectúe el segundo corte, pode
perpendicularmente al primer tramo. NO
PODE PERPENDICULARMENTE SI ESTO
LE OBLIGA A CAMINAR A TRAVES DE UNA
COLINA.
5) Cambie su patrón de corte cada semana.
Esto le ayudará a evitar maltratar su
césped.
MANTENIMIENTO
ADVERTENCIA: Detenga la
cortacésped y extraiga la llave de
seguridad antes de retirar la bolsa de
pasto.
NOTA: Para asegurar un servicio duradero y
confiable, realice el siguiente procedimiento
de mantenimiento periódicamente. Revísela
por defectos obvios como la hoja floja,
dislocada o dañada, tornillos flojos, y
componentes gastados o dañados. Verifique
que las cubiertas y protecciones no estén
dañadas y estén correctamente colocadas en
la podadora. Realice todo el mantenimiento
o reparaciones necesarias antes de usarla.
Si la podadora presenta una falla a pesar
del mantenimiento, llame a nuestra línea de
ayuda al cliente por asesoramiento,1-866-354-
9679.
AFILADO DE LA CUCHILLA
CONSERVE AFILADA LA CUCHILLA PARA
OBTENER MEJOR RENDIMIENTO DE LA
PODADORA. UNA CUCHILLA DESAFILADA
Page 47

4746
Cortacésped de autopropulsión inalámbrica
ES
4746
NO CORTA EL CESPED UNIFORMEMENTE.
UTILICE PROTECCION PARA LOS OJOS
SIEMPRE QUE QUITE, AFILE O INSTALE LA
CUCHILLA. ASE GURESE DE HABER QUITADO
LA LLAVE DE SEGURIDAD.
En la mayoría de las zonas, la cuchilla debe
afilarse dos veces durante la temporada de
podado. En zonas con suelos arenosos, se
puede requerir afilado más frecuentemente,
ya que la arena acaba con el filo de la cuchilla
más rápidamente.
REEMPLACE UNA CUCHILLA DOBLADA O
DAÑADA INMEDIATAMENTE.
CUANDO AFILE LA CUCHILLA:
1. Asegúrese que la cuchilla quede
balanceada.
2. Afile la cuchilla en el ángulo de corte
original.
3. Afile los bordes en ambos extremos de
la cuchilla, rebaje la misma cantidad de
material en ambos extremos.
PARA AFILAR LA CUCHILLA EN UNA
PRENSA (Ver O)
1. Asegúrese de haber liberado la palanca
del interruptor, de que la cuchilla se haya
detenido y de quitar la llave de seguridad.
2. Saque la cuchilla de la podadora. Vea las
instrucciones para la remoción y colocación
de la cuchilla.
3. Asegure la cuchilla O-1 en una prensa O-2.
4. Use anteojos de seguridad y tenga cuidado
de no cortarse.
5. Afile cuidadosamente los bordes cortantes
de la cuchilla con una lima de dientes finos
O-3 o con una piedra de afilar.
6. Verifique el balance de la cuchilla. Vea las
instrucciones para balancear la cuchilla.
7. Vuelva a colocar la cuchilla en la podadora
y apriete con firmeza. Consulte las
instrucciones siguientes.
BALANCEO DE LA CUCHILLA (Ver P)
Verifique el balance de la cuchilla colocando la
perforación central P-1 sobre un clavo o sobre
el vástago de un destornillador P-2 sujetado en
una prensa P-3. Si cualquiera de los extremos
gira hacia abajo, afile ese extremo. La cuchilla
está balanceada correctamente cuando
ninguno de los extremos cae.
MANTENIMIENTO DE LAS CUCHILLAS
(Ver Q y R)
Cambie la cuchilla metálica después de 50
horas de corte o 2 años, lo que ocurra antes,
independientemente de la condición de las
mismas.
Siga el procedimiento siguiente para extraer
y reemplazar la cuchilla. Necesitará guantes
de jardín (no suministrados) y una llave
(no suministrada) para extraer la cuchilla.
Sostenga la cuchilla (R-2) y desenrosque el
perno de la cuchilla (R-5) hacia la izquierda
utilizando una llave. Extraiga la tuerca de la
cuchilla (R-5), la arandela la cuadrada (R-4), la
arandela aislante (R-3) y la cuchilla (R-2).
Para volver a montar la cuchilla, coloque
primero la cuchilla con los lados cortantes
orientados hacia el suelo. Monte los
componentes.
Asegúrese de que los bordes de la arandela
aislante se enganchan al borde de la cuchilla.
Alinee la parte plana de la arandela cuadrada
(R-4) con la parte plana del eje.
Apriete entonces firmemente la tuerca de la
cuchilla.
NOTA: Si la arandela aislante (R -3) o la
cuchilla están agrietadas o dañadas, cámbielas
por otras nuevas.
ALMACENAMIENTO (Ver S)
Detenga la cortacésped y extraiga siempre la
llave de seguridad. Limpie bien el exterior de
la máquina con un cepillo blando y un trapo.
No use agua, solventes o pulidores. Quite
todo el pasto y desechos, especialmente de las
ranuras de ventilación.
Ponga la máquina de costado y limpie el área
de la hoja. Si hay cortes de pasto compactados
en la zona de la hoja, quítelos con un trozo de
madera o plástico.
Guarde la máquina en un lugar seco. No
coloque objetos encima de la máquina.
Para facilitar el almacenamiento, presione el
mando de ajuste de altura y gire o pliegue el
mango superior.
Page 48

Cortacésped de autopropulsión inalámbrica
ES
4948
GUÍA DE SOLUCIÓN DE PROBLEMAS
PROBLEMA SOLUCIÓN
1. La podadora no funciona
al activar la palanca de
seguridad.
2. El motor se detiene
mientras está cortando el
césped.
3. La podadora funciona,
pero el rendimiento de
corte no es satisfactorio o
no corta el césped en su
totalidad.
4. Cuesta mucho empujar
la podadora.
5. La podadora produce
vibraciones y ruidos
anormales.
A. Verifique para asegurarse de que la llave de seguridad ha sido
instalada y está completamente asentada, y que el botón del
alojamiento del interruptor esté completamente oprimido.
B. Suelte la palanca del interruptor para apagar la podadora.
Retire la llave de seguridad, voltee la podadora y verifique que la
hoja pueda girar libremente. Si no está libre, devuelva la unidad
a un centro de mantenimiento autorizado. La hoja debe girar
libremente.
C. Se ha cargado la batería por completo? Enchufe el argador y
espere hasta que se encienda la luz verde.
A. Suelte la palanca del interruptor para apagar la podadora.
Retire la llave de seguridad. Voltee la podadora y verifique que la
hoja pueda girar libremente.Si no está libre, devuelva la unidad
a un centro de mantenimiento autorizado de. La hoja debe girar
libremente.
B. Eleve la altura de corte de las ruedas a la posición más alta y
encienda la podadora.
C. ¿Se ha cargado la batería por completo? Enchufe el argador y
espere hasta que se prenda la luz verde.
D. Evite sobrecargar la podadora. Reduzca el ritmo de corte
empujando la podadora con mayor lentitud o eleve la altura de
corte. También puede hacer ambas cosas.
A. ¿Se ha cargado la batería por completo? Enchufe el cargador y
espere hasta que se prenda la luz verde.
B. Suelte la palanca del interruptor para apagar la podadora.
Retire la llave de seguridad. Voltee la podadora y verifique que:
El filo de la hoja. Mantenga la hoja afilada. No haya
obstrucciones en la plataforma o en el conducto de descarga
C. Es posible que el ajuste de altura de las ruedas se haya fijado
demasiado bajo para el estado del césped. Eleve la altura de
corte.
A. Eleve la altura de corte para reducir el rozamiento de la
plataforma contra el césped. Verifique que cada rueda gire
libremente.
A. Suelte la palanca del interruptor para apagar la podadora.
Retire la llave de seguridad. Voltee la podadora sobre el costado
y verifique la hoja para asegurarse de que no esté doblada o
dañada. Si la hoja está dañada, reemplácela por una hoja de
repuesto. Si la parte inferior de la plataforma está dañada, envíe
la podadora a un centro de mantenimiento autorizado.
B. Si no hay daños visibles en la hoja y la podadora aún vibra:
Suelte la palanca del interruptor para apagar la unidad, retire la
llave de seguridad, y retire la hoja. Haga girar la hoja 180 grados
y vuelva a ajustarla. Si la podadora sigue vibrando, envíela a un
centro de mantenimiento autorizado.
Page 49

4948
Cortacésped de autopropulsión inalámbrica
ES
4948
PROBLEMA SOLUCIÓN
6. El LED del cargador de la
batería no se enciende.
7. El LED del cargador de la
batería no cambia a verde.
8. La podadora no recoge
los recortes de césped con
la bolsa.
9. Al realizar el mantillo los
recortes quedan a la vista.
10. El tiempo de
funcionamiento será bajo
o reducido después de
muchos usos.
A. Verifique la conexión del enchufe.
B. Reemplace el cargador.
A. Se debe someter la batería a diagnóstico. Llévela a un centro
de mantenimiento autorizado.
A. Retire la placa desbrozadora al usar la bolsa recolectora.
B. El conducto está obstruido. Suelte la palanca del interruptor
para apagar la podadora. Retire la llave de seguridad. Elimine los
recortes de césped del conducto.
C. Demasiado césped cortado. Eleve la altura de corte de las
ruedas para acortar la longitud del corte.
D. La bolsa está llena. Vacíe la bolsa con mayor frecuencia.
A. Demasiado césped cortado. Eleve la altura de corte de las
ruedas para acortar la longitud del corte. No corte más de 1/3 de
la longitud total.
B. Verifique el filo de la hoja. Siempre mantenga la hoja afilada.
A. Devuelva la unidad a un centro de mantenimiento autorizado.
Es posible que necesite una batería nueva.
Page 50

Page 51

Page 52

Designed in Italy. Made in China
Conçu en Italie. Fabriqué en Chine
Diseñado en Italia. Fabricado en China
Copyright © 2010, Positec. All Rights Reserved.
 Loading...