


3-in-1 Cordless Lawn Mower
Tondeuse À Gazon Sans Fil 3 En 1
Cortacesped De Bateria 3 En 1
HELPLINE NUMBER
HELPLINE NUMBER
1-866-354-WORX (9679)
EN
F
ES
P07
P21
P36
WG787

2
3
4
5
6
7
9
10
11
18
8
1
12
10
17
a
16
Front Part
Back Part
I
II
III
b
b
A1 A2 A3
B1 B2 B3
B4 B5 C1
C2 C3 C4

9
I
I
II
FrontRear
I
II
c
13
D1 D2 D3
E F1 F2
F3 F4 G1
G2 G3 H
a
b
N-1
N-2
N-3
O-1
O-2
O-3
1
2
15
14
I J K
L M N
O P1 P2
P3 Q

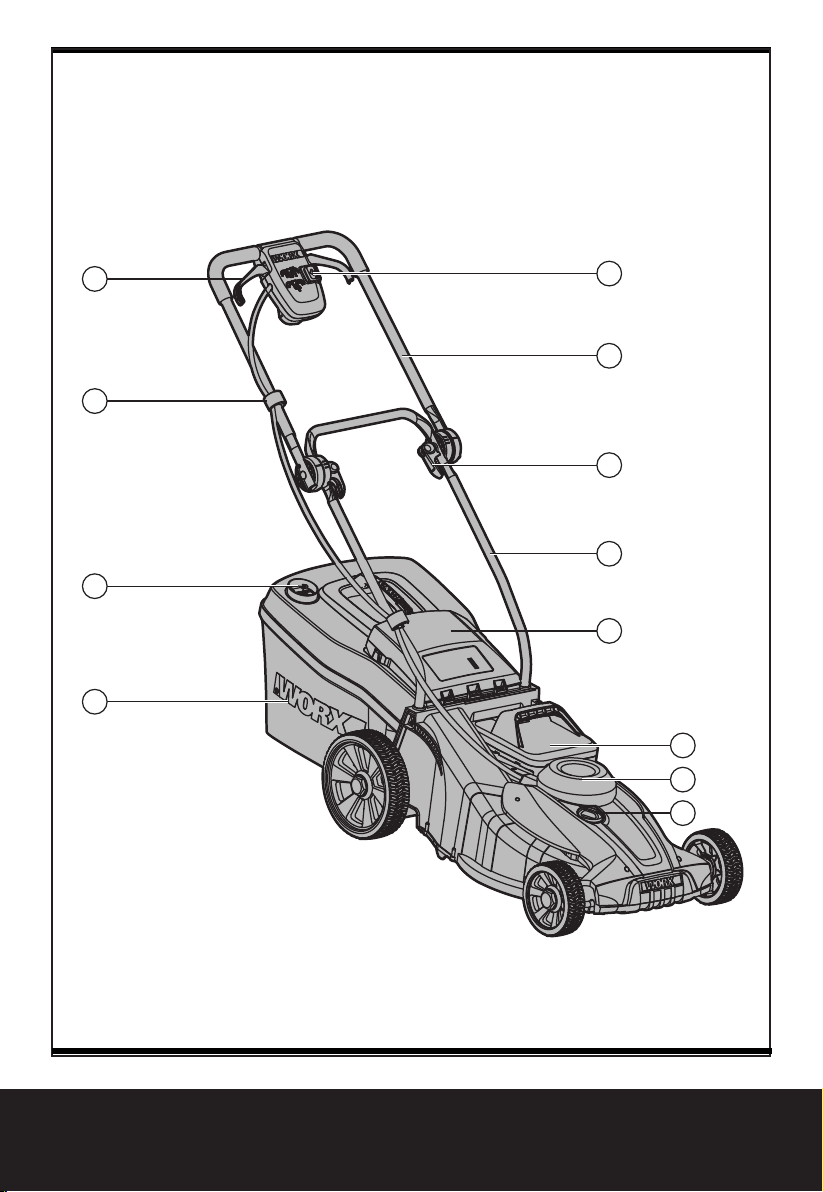
1. SWITCH LEVER
2. CABLE CLIP
3. GRASS BAG FILLING INDICATOR
4. GRASS COLLECTION BAG
5. SAFETY KEY
6. UPPER HANDLE
7. LOCK CAM LEVER
8. LOWER HANDLE
9. SAFETY FLAP
10. BATTERY PACK*
11. MOTOR COVER
12. CHARGER*(See Fig A2)
13. MULCH PLUG (See Fig H)
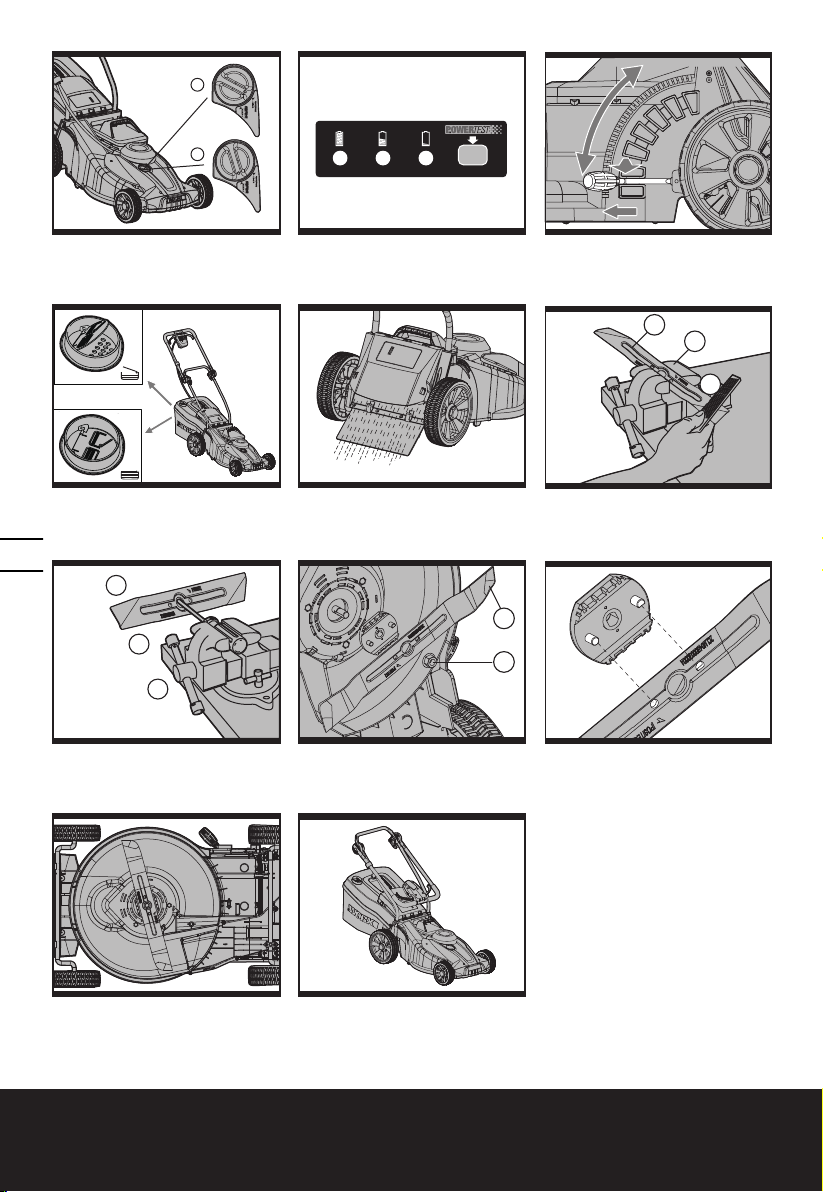
14. BLADE BOLT (See Fig P1)
15. BLADE (See Fig P1)
16. CHARGED INDICATOR LIGHT (GREEN) (See Fig.A3)
17. CHARGING INDICATOR LIGHT (RED) (See Fig.A3)
18. INTELLICUT DIAL
* Not all the accessories illustrated or described are included in standard delivery.
76
3-in-1 Cordless Lawn Mower
EN

3-in-1 Cordless Lawn Mower
EN
98
TECHNICAL DATA
Power input 24V
Deck diameter 17”
Cutting diameter 16”
Front wheel diameter 5-7/8”
Rear wheel diameter 8-5/8”
Cutting height 1-1/2"~3-1/2"
Cutting height positions 6
Grass collection capacity 1.4bushels
Battery type Lead acid
Battery model WA3218
Charging time 10-12hrs
Charger model WA3721
Charger rating Input: AC 120V~60Hz, 45W
Output: 29.5V , 1.0A
Machine weight 50lbs
ACCESSORY
Battery pack (WA3218) 1
Charger (WA3721) 1
Grass collection bag 1
Mulch plug 1
We recommend that you purchase your accessories from the same store that sold you the tool.
Use good quality accessories marked with a well-known brand name. Choose the type according
to the work you intend to undertake. Refer to the accessory packaging for further details. Store
personnel can assist you and offer advice.

98
98
3-in-1 Cordless Lawn Mower
EN
SAFETY INSTRUCTIONS
WARNING! Some dust created by
power sanding, sawing, grinding, drilling
and other construction activities contains
chemicals known to the state of California
to cause cancer, birth defects or other
reproductive harm. Some examples of these
chemicals are:
• lead from lead-based paints,
• Crystalline silica from bricks and cement
and other masonry products, and
• Arsenic and chromium from chemically-
treated lumber.
Your risk from these exposures varies,
depending on how often you do this type
of work. To reduce your exposure to these
chemical:
• Work in a well ventilated area,
• Work with approved safety equipment,
such as those dust masks that are specially
designed to filter out microscopic particles.
READ ALL INSTRUCTIONS
WARNING! When using electric lawn
mowers, basic safety precautions should
always be followed to reduce the risk of fire,
electric shock, and personal injury, including
the following:
WARNING: Risk of injury could occur if
the lawn mower is operated without the
catcher assembly attached.
WARNING: The use of any other
accessory or attachment might increase
the risk of injury
CAUTION: For battery-operated lawn
mowers, use only identical replacement
batteries and specifying the battery type
and manufacturer, and devices for retaining
extension cords are available.
FOR ALL LAWN MOWERS
1) Avoid Dangerous Environment - Don’t use
lawn mowers in damp or wet locations.
2) Don’t Use In Rain.
3) Keep Children Away - All visitors should be
kept a safe distance from work area.
4) Dress Properly - Do not wear loose clothing
or jewelry. They can be caught in moving
parts. Use of rubber gloves and footwear is
recommended when working outdoors.
5) Use Safety Glasses - Always use face or
dust mask if operation is dusty.
6) Use Right Appliance - Do not use lawn
mower for any job except that for which it
is intended.
7) Don’t Force Lawn Mower - It will do the job
better and safer at the rate for which it was
designed.
8) Don’t Overreach - Keep proper footing and
balance at all times.
9) Stay Alert - Watch what you are doing.
Use common sense. Do not operate lawn
mower when you are tired.
10) Store Idle Lawn Mower Indoors - When not
in use, lawn mower should be stored in
an indoor dry and locked-up place - out of
reach of children.
11) Maintain Lawn Mower With Care - Keep
cutting edges sharp and clean for best and
safest performance. Follow instructions
for lubricating and changing accessories.
Inspect lawn mower cord periodically and if
damaged, have it repaired by an authorized
service facility. Inspect extension cords
periodically and replace if damaged. Keep
handles dry, clean, and free from oil and
grease.
12) Keep guards in place and in working order.
13) Keep blades sharp.
14) Keep hands and feet away from cutting
area.
15) Objects struck by the lawn mower blade
can cause severe injuries to persons. The
lawn should always be carefully examined
and cleared of all objects prior to each
mowing.
16) If lawn mower strikes a foreign object,
follow these steps:
i) Stop lawn mower. Release the switch.
ii) Inspect for damage.
iii) Repair any damage before restarting
and operating the lawn mower.
17) Use identical replacement blades only.
SUPPLEMENT SA-BATTERY-OPERATED
LAWN MOWERS
a) Do not charge lawn mower in rain, or in
wet locations.

3-in-1 Cordless Lawn Mower
EN
1110
b) Do not use battery-operated lawn mower in
rain.
c) When replacing batteries, all batteries
should be replaced at the same time.
Mixing fresh and discharged batteries
could increase internal cell pressure and
rupture the discharge battery(ies). (Applies
to products employing more than one
separately replaceable primary battery.)
d) When inserting batteries into this product,
the proper polarity or direction must be
observed. Reverse insertion of batteries
can result in leakage or explosion. (Applies
to product employing more than one
separately replaceable primary battery.)
e) Remove or disconnect battery before
servicing, cleaning, or removing material
from the lawn mower.
FOR ALL BATTERY-OPERATED
PRODUCTS EMPLOYING A DETACHABLE
OR SEPARABLE BATTERY
a) Use only the following type and model
battery(ies): WA3218(WG787)
b) Do not dispose of the battery(ies) in a
fire. The cell may explode. Check with
local codes for possible special disposal
instructions.
c) Do not open or mutilate the battery(ies).
Released electrolyte is corrosive and may
cause damage to the eyes or skin. It may
be toxic if swallowed.
d) Exercise care in handling batteries in order
not to short the battery with conducting
materials such as rings, bracelets, and
keys. The battery or conductor may
overheat and cause burns.
FOR A BATTERY-OPERATED LAWN
MOWER EMPLOYING A VENTED WET
CELL BATTERY SUPPLY INTENDED TO BE
INITIALLY OR PERIODICALLY FILLED BY
THE USER:
CAUTION: The electrolyte is a dilute sulfuric
acid that is harmful to the skin and eyes. It
is electrically conductive and corrosive. The
following procedures should be observed:
a) Wear full eye protection and protective
clothing.
b) If electrolyte contacts the skin, wash it off
immediately with water.
c) If electrolyte contacts the eyes, flush
thoroughly and immediately with water.
Seek medical attention.”
SAFE PRACTICES FOR WALK-BEHIND
MOWERS
I. GENERAL OPERATION
1) Read, understand, and follow all
instructions on the machine and in the
manual(s) before starting.
2) Do not put hands or feet near or under
the machine. Keep clear of the discharge
opening at all times.
3) Only allow responsible adults, who are
familiar with the instructions, to operate
this machine.
4) Clear the area of objects such as rocks,
wire, toys, etc., which could be thrown by
the blade. Stay behind the handle when the
engine (motor) is running.
5) Be sure the area is clear of bystanders
before operating. Stop machine if anyone
enters the area.
6) Do not operate machine barefooted or
while wearing sandals. Always wear
substantial footwear.
7) Do not pull machine backward unless
absolutely necessary. Always look down
and behind before and while moving
backward.
8) Never direct discharged material toward
anyone. Avoid discharging material against
a wall or obstruction. Material may ricochet
back toward the operator. Stop the blade
when crossing gravel surfaces.
9) Do not operate machine without the entire
grass catcher, discharge guard, rear guard,
or other safety protective devices in place
and working.
10) Never leave a running machine unattended.
11) Stop the engine (motor) and wait until the
blade comes to a complete stop before
cleaning the machine, removing grass
catcher, or unclogging the discharge guard.
12) Operate machine only in daylight or good
artificial light.
13) Do not operate machine while under the
influence of alcohol or drugs.
14) Never operate mower in wet grass. Always

1110
1110
3-in-1 Cordless Lawn Mower
EN
be sure of your footing; walk; never run.
15) Disengage the drive system, if so equipped,
before starting the engine (motor).
16) If the machine should start to vibrate
abnormally, stop the engine (motor) and
check for the cause immediately. Vibration
is generally a warning of trouble.
17) Always wear eye protection when
operating machine.
18) See manufacturer’s instructions for proper
operation and installation of accessories.
Only use accessories approved by the
manufacturer.
II. SLOPE OPERATION
Slopes are a major factor related to slip and
fall accidents, which can result in severe injury.
Operation on all slopes requires extra caution.
If you feel uneasy on a slope, do not mow it.
1) Mow across the face of slopes; never up
and down. Exercise extreme caution when
changing direction on slopes.
2) Watch for holes, ruts, bumps, rocks, or
other hidden objects. Uneven terrain could
cause a slip and fall accident. Tall grass can
hide obstacles.
3) Do not mow on wet grass or excessively
steep slopes. Poor footing could cause a
slip and fall accident.
4) Do not mow near drop-offs, ditches, or
embankments. You could lose your footing
or balance.
III. CHILDREN
Tragic accidents can occur if the operator is
not alert to the presence of children. Children
are often attracted to the machine and the
mowing activity. Never assume that children
will remain where you last saw them.
1) Keep children out of the mowing area and
under the watchful care of a responsible
adult other than the operator.
2) Be alert and turn mower off if a child enters
the area.
3) Never allow children to operate the
machine.
4) Use extra care when approaching blind
corners, shrubs, trees, or other objects that
may block your view of a child.
IV. SERVICE
GENERAL SERVICE
1) Keep all nuts and bolts tight to be sure the
equipment is in safe working condition.
2) Never tamper with safety devices. Check
their proper operation regularly.
3) Keep machine free of grass, leaves, or other
debris build-up.
4) If you strike a foreign object, stop and
inspect the machine. Repair, if necessary,
before starting.
5) Never make any adjustments or repairs
with the engine (motor) running.
6) Check grass catcher components and the
discharge guard frequently and replace
with manufacturer’s recommended parts,
when necessary.
7) Mower blades are sharp. Wrap the blade or
wear gloves, and use extra caution when
servicing them.
8) Maintain or replace safety and instruction
labels, as necessary.
SAVE THESE INSTRUCTIONS
SAFE OPERATION PRACTICES FOR
WALK-BEHIND MOWERS
1. Safety Instructions
1.1 Training
a) Read the operating and service instruction
manual carefully. Be thoroughly familiar
with the controls and the proper use of the
equipment.
b) Never allow children to operate a power
mower.
c) Keep the area of operation clear of all
persons, particularly small children, and
pets.
d) Do not use a mower for any job except that
for which it is intended.
1.2 Preparation
a) Thoroughly inspect the area where the
equipment is to be used and remove all
stones, sticks, wires, bones, and other
foreign objects.
b) Do not operate the equipment when
barefoot or wearing sandals. Always wear
substantial footwear.
c) Disengage the self-propelled mechanism
or drive clutch on units so equipped before

3-in-1 Cordless Lawn Mower
EN
1312
starting the motor.
d) Never attempt to make a wheel height
adjustment while the motor is running.
e) Mow only in daylight or in good artificial
light.
f) Never operate the equipment on wet grass.
Always be sure of your footing. Keep a firm
hold on the handle and walk, never run.
1.3 Operation
a) Do not put hands or feet near or under
rotating parts. Keep clear of the discharge
opening at all times.
b) Stop the blade(s) when crossing gravel
drives, walks, or roads.
c) After striking a foreign object, stop the
motor, unplug, thoroughly inspect the
mower for any damage, and repair the
damage before restarting and operating the
mower.
d) If the equipment should start to vibrate
abnormally, stop the motor and check
immediately for the cause. Vibration is
generally a warning of trouble.
e) Stop the motor and unplug whenever you
leave the equipment, before cleaning the
mower housing, and before making any
repairs or inspections.
f) Shut the motor off and wait until the blade
comes to a complete stop before removing
the grass catcher or before unclogging the
chute.
g) Mow across the face of slopes, never up
and down. Exercise extreme caution when
changing direction on slopes. Do not mow
excessively steep slopes.
h) Never operate the mower without proper
guards, plates, or other safety protective
devices in place.
i) Do not wash with a hose, avoid getting
water in motor and electrical connections.
wear, and replace worn bags. Check that
replacement bags comply with the original
manufacturer’s recommendations or
specifications.
d) Replace the blade if it is bent or cracked.
An unbalanced blade causes vibration that
could damage the motor drive unit or cause
personal injury.
e) Sharpen a dull blade equally at each end to
maintain the balance.
f) Clear the blade thoroughly and check its
balance by supporting it horizontally on a
thin nail through its centre hole. The nail
should also be in a horizontal position. If
either end of the blade rotates downward,
remove some metal from the heavy or
lower end until the blade is balanced. It is
balanced when neither end drops.
1.4 Maintenance
a) Check the blade and the engine mounting
bolts at frequent intervals for proper
tightness.
b) Keep all nuts, bolts, and screws tight to
be sure the equipment is in safe working
condition.
c) Check bag frequently for deterioration and

1312
1312
3-in-1 Cordless Lawn Mower
EN
SYMBOLS CHARGER SAFETY RULES
1. Plug charger directly into an electrical
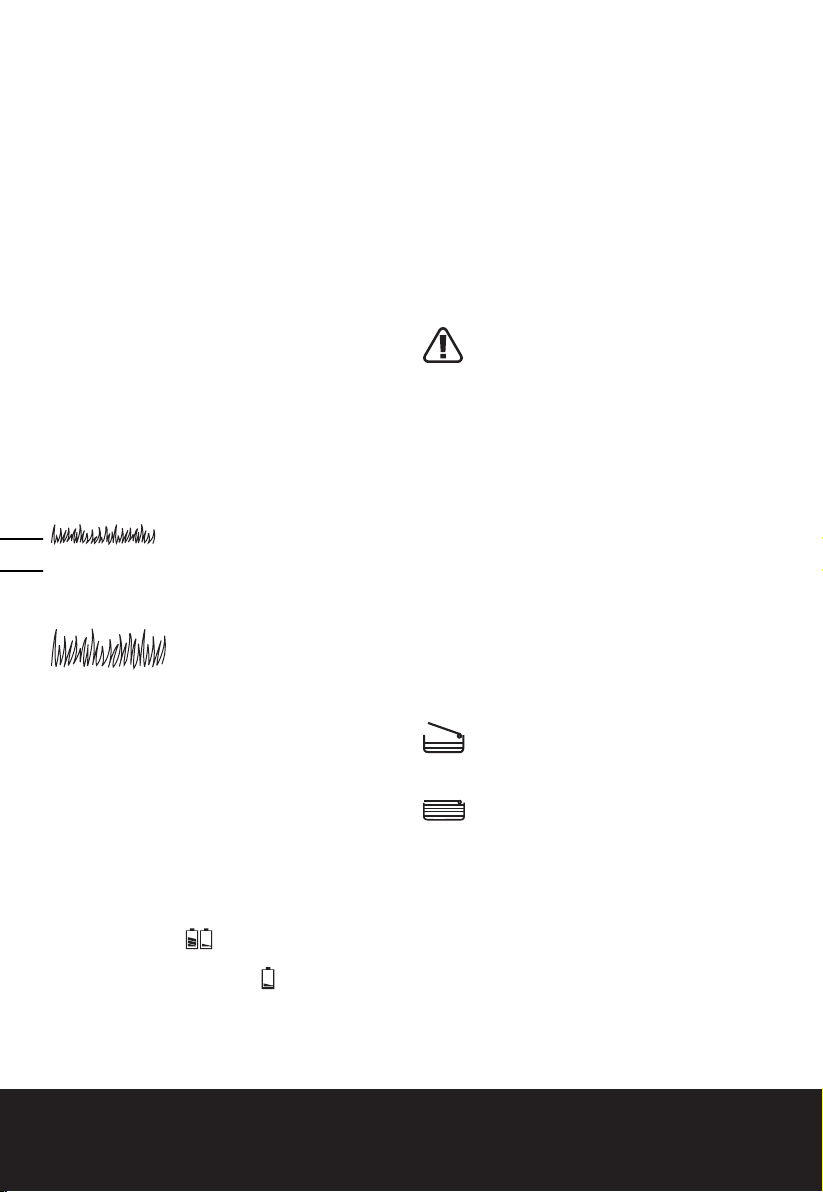
Read the operator’s manual
Safety alert
Blade continues to rotate after
the machine is switched off. Wait
until all machine components
have completely stopped before
touching them.
Do not expose to rain or water
Do not burn
Do not dispose of batteries. Return
exhausted batteries to your local
collection or recycling point.
Contains Pb battery. Battery must
be recycled or disposed of properly.
outlet. DO NOT ABUSE THE CORD.
Never carry charger by cord. Do not
disconnect the charger from the outlet or
mower by pulling it by the cord.
2. CAUTION: To reduce the risk of fire,
electrical shock, or personal injury
do not attempt to use this charger with any
other product.
Likewise, do not attempt to charge the
battery with any other charger.
3. Do not service mower with charger or
safety key installed.
4. Do not operate a damaged charger.
Replace damaged cords or charger
immediately by calling the WORX Helpline
at 1-866-354-9679.
5. Always charge the mower in a dry area
protected from the weather. Do not expose
the mower or charger to rain. Do not
charge in wet locations. Do not charge
mower when temperature is above 104°F
(40°C) or below 41°F (5°C).
6. Keep the mower and charger away from
water, heat sources, (Such as radiators,
heaters, stoves...etc.) flames, or chemicals.
Be careful not to damage the charger cord,
by keeping cord away from sharp edges.
Slip on slope
CHARGING PROCEDURE
(See A1,A2,A3)
CPSC Danger label.
Severing of toes or fingers-Rotary
mower blade.
Keep bystanders/children away
Thrown objects from mower deck.
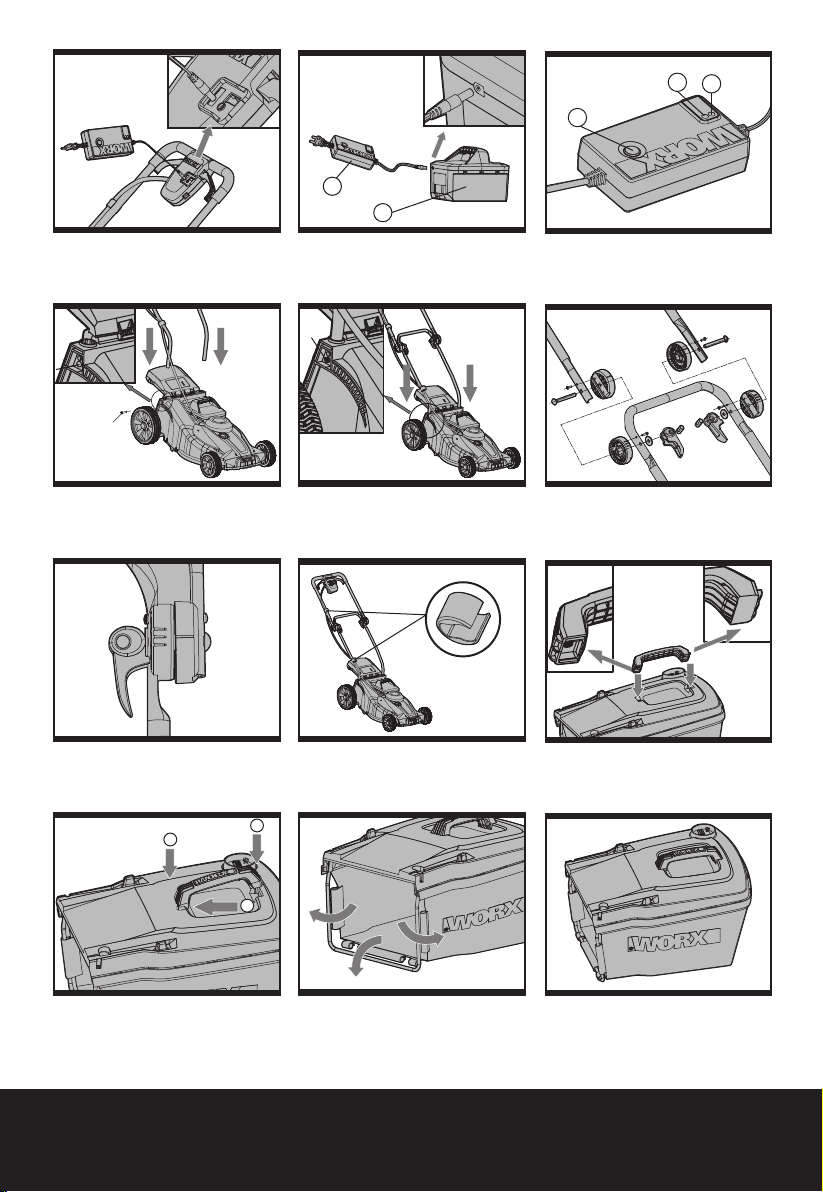
1. Charging can be carried out either with the
battery FITTED (See A1) or REMOVED from
the machine (See A2).
2. Plug the charger connector into the
receptacle on the handle bar controls. (See
A1), or plug the charger connector into the
receptacle on the battery. (See A2)
3. Insert the plug of the charger into the wall
receptacle.
4. Press the button (a) on the charger until
the red light (17) becomes lit, indicating
the charger has power and the battery is
being charged. (See A3) The light may take
up to 30 seconds to become lit.
5. The red light (17) will turn off and the
green light (16) will come on when

3-in-1 Cordless Lawn Mower
EN
1514
charging is complete (approximately 10-12
hours to charge a fully discharged battery)
6. After the battery is fully charged the green
light will turn on and charge it on for 15
seconds to indicate a full charge. After 15
seconds the green light and charges will
turn off to save power.
Note: if the battery is defective, the
red light on the charger will flash.
The red and green lights will only
function when the charger is
connected to both the battery and
wall receptacle.
7. The charger is a smart charger and can
stay connected to the battery and wall
receptacle for extended periods of time
without fear of damaging the battery or
charger. The charger will automatically
turn on and off periodically to ensure the
battery is fully charged.
BATTERY CARE
The battery in your cordless lawnmower is a
24-volt sealed lead acid system. The battery
can be stored in any position without fear of
leakage.
• For optimal battery life and performance
the battery should be fully charged every 2
months during storage.
• For optimal battery life and performance
the battery should be fully charged after
each use.
• Store the battery in a cool dry location.
• The battery can be safely stored down to
14°F (-10°C).
• The battery does not need to be fully
discharged before recharging.
• Initially 2 to 3 charging cycles may
be required after purchase to achieve
maximum run time capacity.
The battery is maintenance free. ADDITIONAL
BATTERIES can be obtained from the
Customer Helpline 1-866-354-9679.
ASSEMBLY
IMPORTANT! Before you assemble
the lawn mower, check the accessories
according to the information, make sure the
accessories are complete.
1. FITTING THE HANDLE (See Fig.B1- B5)
1) Remove the screws (b) on the both side of
deck. (Fig B1)
2) Insert the lower handle (8) into the holes on
the deck provided. Be sure to carefully align
the screw holes found on the lower handles
with the screws holes found on the deck
(b). (See Fig B1, B2)
3) Secure the lower handle bars to the deck
with the screws (b) provided. (See Fig B2)
4) Attach the upper handle (6) with the bolts
and lock cam lever (7) to the lower handle
(8). (Fig B3)
5) Tightening the two Lock cam levers. Check
that the handle is FULLY secured.
The cam lever pressure can be adjusted
by rotating the lock cam lever (7) or (8)
clockwise/counter-clockwise. DO NOT OVER
TIGHTEN.(Fig. B4)
NOTE: Ensure the bolts are fully inserted
through the handles before adjusting or
tightening the cam levers.
6) Attach the cable clips (2) provided, to the
upper and lower handle. Insert the cable
into the clips ensuring there is enough
cable slack. (Fig B5)
2. GRASS COLLECTION BAG ASSEMBLY
1) Attach the grass bag handle to the grass
bag assembly as shown in F ig C1-C4.
a. Identify the front and rear of both the
handle and the grass bag assembly.
(Fig C1)
b. Insert the front (I) portion of the handle into
position. (Fig C2)
c. Secure the front portion of the handle in
place by pushing the front portion of the
handle forward (II). (Fig C2)
d. Insert and secure the rear portion of the
handle in position by pushing down on the
back (III) of the handle ensuring it “clicks”
into position. (Fig C2)
2) Clip the plastic clips of the grass bag over
the metal frame. (Fig C3)
WARNING: Make sure to not fit the
handle in the reverse direction as it
will not remain secure. Make sure to fit

1514
1514
3-in-1 Cordless Lawn Mower
EN
the handle as shown in Fig C1.
3. ATTACHING THE GRASS BAG TO THE
MOWER (See Fig D1, D2, D3)
NOTE: The grass bag is held in place by
the safety flap.
1) Switch the mower off, remove the safety
key (5) and wait until the mower blade has
stopped.
2) Raise the safety flap (9) and hold it in the
upward position while the grass bag is
properly located below it (Fig. D1)
3) Position the lower edge of the grass bag
on the plastic tabs (c) found below the rear
discharge chute on the mower deck.
(Fig. D2)
4) While holding the grass bag in position
lower the safety flap into its’ final position.
It should rest on top of the grass bag with
the tabs of the grass bag being inserted
into the safety flap. Ensure the safety flap
locks securely into position with the grass
bag. (Fig. D3)
NOTE: The two parts should smoothly slide
together with little force. They WILL NOT
“click” together.
4. REMOVING/EMPTYING THE GRASS
BAG
1) Switch the mower off, remove the safety
key (5) and wait until the mower blade has
stopped.
2) Hold the grass bag handle.
3) Raise the safety flap (9) upward and hold it
in the upward position until the grass bag is
removed (Fig. D1).
WARNING! Before each use, always
check that the safety flap closes securely
over the rear discharge chute. Never lift the
safety flap (9) when the lawn mower is in
operation. The blade must be completely at
rest before handling the safety flap.
5. HANDLE ADJUSTMENT (See Fig E)
The upper handle can be adjusted to 3
different height positions. Release the locking
cam lever, set the upper handle to one of the
three height positions, and make sure to insert
the pin into the hole. Then reset the locking
cam lever.
NOTE: Always check that the upper handle is
fixed firmly.
6. FITTING/REMOVING THE BATTERY
(See F1, F2, F3, F4)
REMOVING BATTERY (10)
1) While gripping the battery handle lift it
upward without twisting or turning it.
(See F1)
FITTING BATTERY
1) Locate the front and rear of the battery
(Fig F2)
2) Lower the battery into position. (See F3)
NOTE: For a secure fit, make sure the
battery tray is free of debris and the
contacts on the battery and in the
battery tray are clean (use a dry cloth to
clean) (F4)
NOTE: When fitting or removing the
battery be careful not to drop the battery onto
your foot or the ground.
OPERATION
1. STARTING AND STOPPING
(See Fig G1, G2, G3)
WARNING! The blade continues
to rotate for a few seconds after the
machine is switched off. Allow the motor/blade
to stop rotating before switching “on” again.
Do not rapidly switch off and on.
STARTING
1) Insert safety key(5) into the housing of the
switch box. (See Fig G1)
2) Slide the key to the right and hold in
position. (See Fig G2)
3) Pull the switch lever towards the handle bar
and the mower will start.
4) Release the safety key and begin mowing.
NOTE: The safety key will stay in the “on”
position as long as the operator holds the
lever tightly against the handlebar.
STOPPING
Release the switch lever and remove the safety
ke y.
2. INSTALLING MULCH PLUG (13) (See H)
1) Turn the mower off, wait until the blade
stops and remove the safety key (5).
3-in-1 Cordless Lawn Mower
EN
1716
2) Raise the safety flap and hold it up.
3) Slide the mulch plug into the discharge
opening until it is firmly in contact with the
deck.
4) Release safety flap and ensure it is properly
closed.
3. REMOVING MULCH PLUG (13) (See H)
Remove the mulch plug when you desire to
either collect grass or discharge grass from the
rear of the mower.
1) Shut the mower off, wait until the blade
stops and remove the safety key (5).
2) Raise the safety flap and hold it in the up
position.
3) Grasp the handle on the mulch plug (13)
then lift upward and pull it out.
4) Release safety flap and ensure it is properly
closed.
4. INTELLICUT CUTTING MODE SELECTION
(See I)
QUIET MODE
Select QUIET mode (18) when mowing in
everyday conditions, removing approximately
1 inch of grass at a time.
POWER MODE
Set the dial to POWER mode (18) when cutting
dense or overgrown grass.
time, it is recommended that the unit be
charged overnight to ensure that the battery is
fully charged.
IMPORTANT
When only one light is illuminated, your
battery is discharged, even though the
mower may still be capable of cutting
grass. Continuing to operate your
lawnmower with the battery in this
discharged condition may reduce the life
and performance of your battery.
6. ADJUSTING THE CUTTING HEIGHT
(See K)
WARNING!
and wait until the motor stops before
adjusting height. The blades continue to rotate
after the machine is switched off, a rotating
blade can cause injury.
CAUTION:
For the first cutting of the season, a high
cutting adjustment should be selected. The
lawnmower can be set to 6 cutting heights
between 1.5” (38mm) and 3.5” (88mm).
For this purpose, move the cutting height
adjustment lever outwards then adjust to the
preferred position.
7. GRASS BAG FILLING INDICATOR (See L)
To alert you that the grass bag is full, the
mower provides an grass bag level indicator
on the top of bag.
Empty status: flap float (a)
Stop, release switch lever
Do not touch rotating blades.
5. BATTERY STATUS LED’S (See J)
NOTE: The Status LED’s will indicate the
battery condition when the button on the
battery is pressed.
The LED’s displays the battery condition as
follows:
Press the button “POWERTEST”, the power
level light(s) button is illuminate.
When the three green lights are illuminated,
the battery is in a highly charged condition.
When two lights ( ) are illuminated, the
battery is in a moderately charged condition.
When only one green light ( ) is illuminated,
the battery charge is very low and should be
recharged.
Before using your new mower for the first
Fully status: flap fall down (b)
8. REAR DISCHARGE (See M)
The mower provides a rear discharge function,
so that you can mow collecting or mulching
the grass. Grass clippings will be discharged
from the rear chute of the mower and exit
below the safety flap.
9. MOWING TIPS
NOTE: Always inspect area where mower
is to be used and remove all stones,
 Loading...