

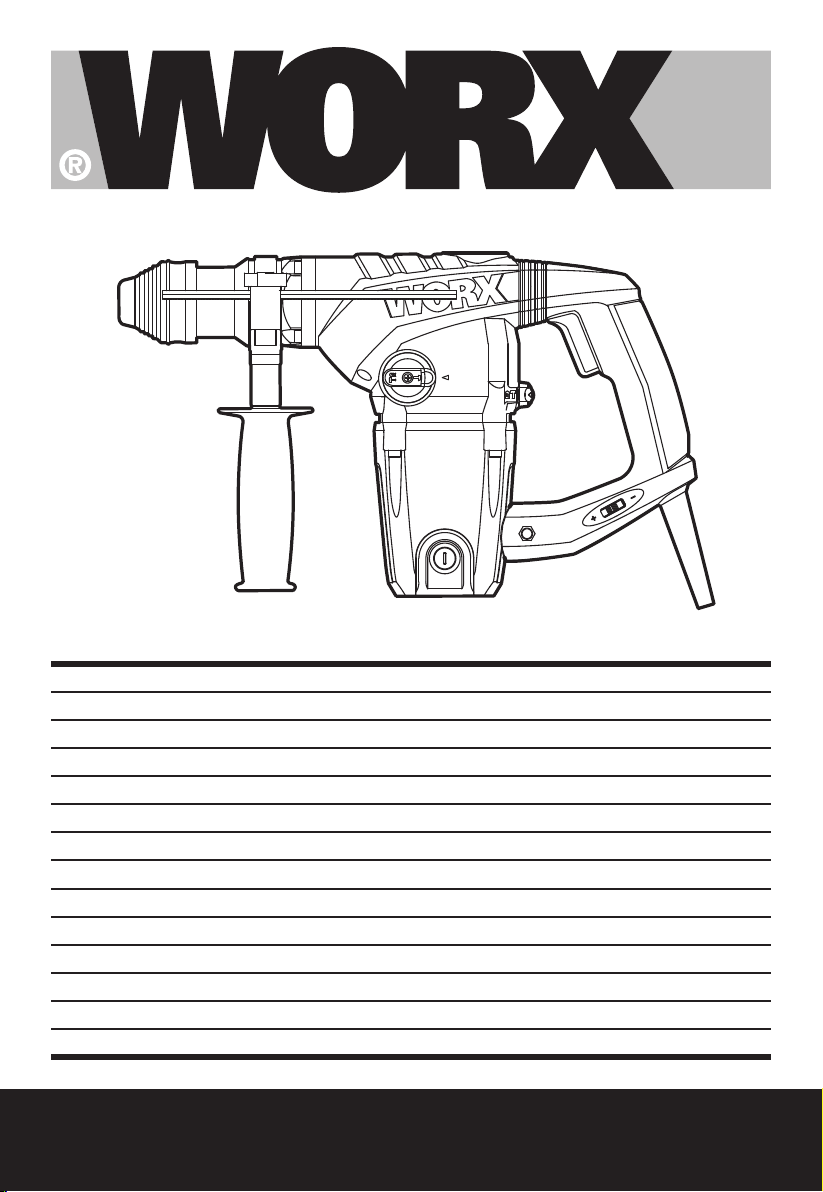
Page 1
Rotary hammer
Bohrhammer
Marteau Perforateur
Martello rotante
Martillo rotatorio
Boorhamer
Młot obrotowy
Pneumatikus fúrókalapács
Ciocan articulat
Rotační kladivo
Otočné kladivo
Martelo rotativo
Rotorhammare
Rotacijski vrtalnik
WX333
EN
ES
NL
PL
HU
RO
CZ
SK
PT
SV
SL
P07
D
F
I
P15
P23
P30
P38
P45
P52
P59
P66
P73
P80
P87
P94
P101
Page 2

Original instructions EN
Originalbetriebsanleitung D
Notice originale F
Istruzioni originali I
Manual original ES
Oorspronkelijke gebruiksaanwijzing NL
Tłumaczenie oryginalnych instrukcji PL
Eredeti használati utasítás HU
Traducerea instrucţiunilor iniţiale RO
Překlad původních pokynů CZ
Preklad pôvodných pokynov SK
Manual original PT
Bruksanvisning i original SV
Izvorna navodila SL
Page 3
2
1
3
4
5
6
14
13
7
8
9
101112
Page 4

A
B1
B2
D
C
E
A
Page 5
A
F
G
A
H
J
I
A
K
Page 6

A
J
K
L
M
N
Page 7

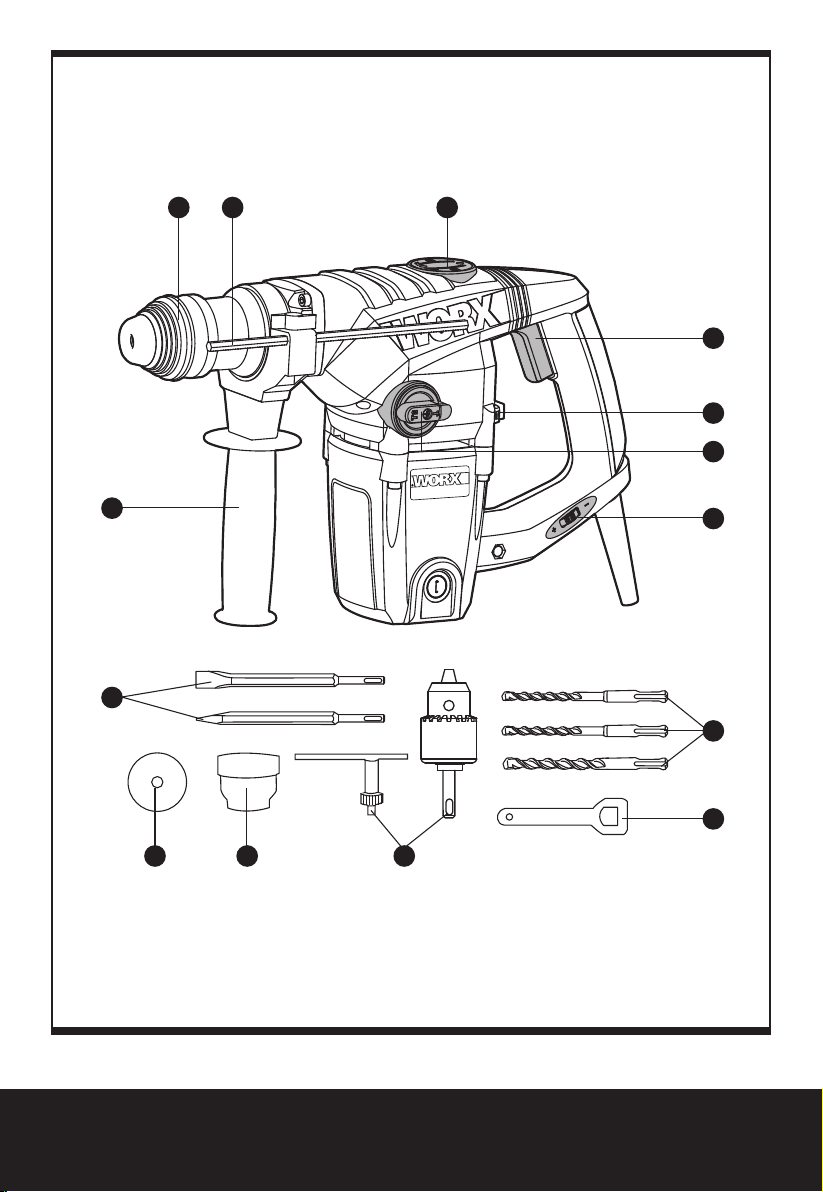
1. LOCKING SLEEVE
2. DEPTH GAUGE
3. GREASE BOX COVER
4. ON/OFF SWITCH
5. HAMMER OR DRILLING ACTION SELECTOR SWITCH
6. HAMMER OR CHISEL ACTION SELECTOR SWITCH
7. VARIABLE SPEED CONTROL
8. SDS DRILL BITS*
9. SPANNER
10. KEY CHUCK WITH ADAPTOR, CHUCK KEY*
11. PLASTIC CONTAINER GREASE*
12. DUST COVER*
13. CHISELS (POINT & FLAT)*
14. AUXILIARY HANDLE
*Not all the accessories illustrated or described are included in standard delivery.
TECHNICAL DATA
Type WX333 (330~359-designation of machinery, representative of Rotary hammer)
Voltage 220-240V~50/60Hz
Power input 1250W
No load speed 0-750/min
Impact rate 0-3700/min
Impact energy 5.0J
Chuck type SDS-plus
Max drilling capacity Steel 13mm
Masonry 32mm
Wood 40mm
Protection class
Machine weight 6.1kg
/II
76
Rotary hammer EN
Page 8
NOISE INFORMATION
A weighted sound pressure LpA: 90dB(A)
A weighted sound power L
3.0dB(A)
K
pA&KwA
: 101dB(A)
wA
Wear ear protection when sound pressure is over 80dB(A)
VIBRATION INFORMATION
Vibration total values (triax vector sum) determined according to EN 60745:
Hammer drilling into concrete
Chiselling
Vibration emission value a
Uncertainty K=1.5m/s
Vibration emission value a
Uncertainty K=1.5m/s
The declared vibration total value may be used for comparing one tool with another, and may
also be used in a preliminary assessment of exposure.
WARNING: The vibration emission value during actual use of the power tool can differ
from the declared value depending on the ways in which the tool is used dependant on
the following examples and other variations on how the tool is used:
How the tool is used and the materials being cut or drilled.
The tool being in good condition and well maintained.
The use the correct accessory for the tool and ensuring it is sharp and in good condition.
The tightness of the grip on the handles and if any anti vibration accessories are used.
And the tool is being used as intended by its design and these instructions.
2
2
= 17.4m/s2
h,HD
= 14.3m/s2
h,Cheq
This tool may cause hand-arm vibration syndrome if its use is not adequately
managed.
WARNING: To be accurate, an estimation of exposure level in the actual conditions of
use should also take account of all parts of the operating cycle such as the times when
the tool is switched off and when it is running idle but not actually doing the job. This may
significantly reduce the exposure level over the total working period.
Helping to minimise your vibration exposure risk.
ALWAYS use sharp chisels, drills and blades.
Maintain this tool in accordance with these instructions and keep well lubricated (where
appropriate).
If the tool is to be used regularly then invest in anti vibration accessories.
Avoid using tools in temperatures of 100C or less.
Plan your work schedule to spread any high vibration tool use across a number of days.
Rotary hammer EN
Page 9

ACCESSORIES
Auxiliary handle 1
Depth gauge 1
SDS drill bits (8 10 12x150mm) 3
SDS chisel (point & flat 250mm) 2
Dust cover 1
Spanner 1
Key chuck with adaptor, chuck key 1
Plastic container grease 1
We recommend that you purchase your accessories listed in the above list from the same store
that sold you the tool. Refer to the accessory packaging for further details. Store personnel can
assist you and offer advice.
98
Rotary hammer EN
Page 10
HAMMER SAFETY
WARNINGS
1. Wear ear protectors. Exposure to noise
can cause hearing loss.
2. Use auxiliary handle(s), if supplied
with the tool. Loss of control can cause
personal injury.
3. Hold power tool by insulated
gripping surfaces, when performing
an operation where the cutting
accessory may contact hidden wiring
or its own cord. Cutting accessory
contacting a “live” wire may make
exposed metal parts of the power tool
“live” and could give the operator an
electric shock.
SYMBOLS
To reduce the risk of injury, user
must read instruction manual
Double insulation
Warning
Wear ear protection
Wear eye protection
Wear dust mask
Waste electrical products should
not be disposed of with household
waste. Please recycle where
facilities exist. Check with your
Local Authority or retailer for
recycling advice.
Rotary hammer EN
Page 11
OPERATING
INSTRUCTIONS
NOTE: Before using the tool, read the
instruction book carefully.
INTENDED USE
The machine is intended for hammer drilling
in concrete, brick and stone as well as for light
chiseling work. It is also suitable for drilling without
impact in wood, metal, ceramic and plastic.
1. ADJUSTING THE AUXILIARY HANDLE
(See Fig. A )
For your personal safety we recommend using
the auxiliary handle at all times.
To adjust the handle, rotate the bottom of the
handle anti-clockwise and rotate the handle
around the hammer collar until the handle is
in the desired position. Tighten fully.
2. USING THE DEPTH GAUGE (See Fig. A)
The depth gauge can be used to set a constant
depth to the drill.
Rotate the locking screw on the top of the
handle anti-clockwise to loosen, insert the
depth stop into the handle. Adjust it to the
desired depth. Rotate the locking screw
clockwise to tighten.
3. FITTING BITS OR CHUCK (See Fig. B1)
Clean the bit shank and apply grease before
installing the bit. Hold the rotary grip, pull
back the lock sleeve and insert the bits or
chuck into the bit holder. Turn the bit and push
it in until a resistance is felt. The shaft drops
completely into the bit holder. Once you are
satisfied that it has been seated, release the
black lock sleeve. This would lock the bits or
chuck into position.
After installing, always make sure that the tool
or chuck is securely held in the bit holder by
trying to pull it out.
If the bits or chuck is not located well, repeat
the operation again.
4. REMOVE BITS OR KEY CHUCK
(See Fig. B1)
To remove the tool or chuck, pull back the lock
sleeve, hold and pull the tool or chuck out.
NOTE: The bits or chuck are gripped firmly
by the shank and can not be removed once
locked in position.
5. USING THE CHUCK
For added convenience, your rotary hammer
drill now comes with a 3-jaw chuck. It enables
you to work with non-SDS drill bits/tools.
W
ARNING! The 3-jaw chuck is
designed for wood and metal
DRILLING work only. NEVER use this
chuck with rotary hammer or chisel. THIS
CHUCK CAN BE DAMAGED IF YOU DO SO.
Inserting a drill bit into chuck. (See Fig. B2)
Before installing drill bit, remove mains plug
from mains supply.
Place chuck key into chuck, turn key anticlockwise to undo/loosen chuck, insert drill/
tool and firmly tighten chuck by turning key
clockwise. Remove key and replace in Blow
Mould Case.
6. OPERATING THE ON/OFF SWITCH
(See Fig. C)
Depress the switch to start the tool and release
it to stop your tool.
7. USING THE VARIABLE SPEED
CONTROL (See Fig. D)
The speed increases as you turn the switch
towards the higher number and decreases on
the lower number.
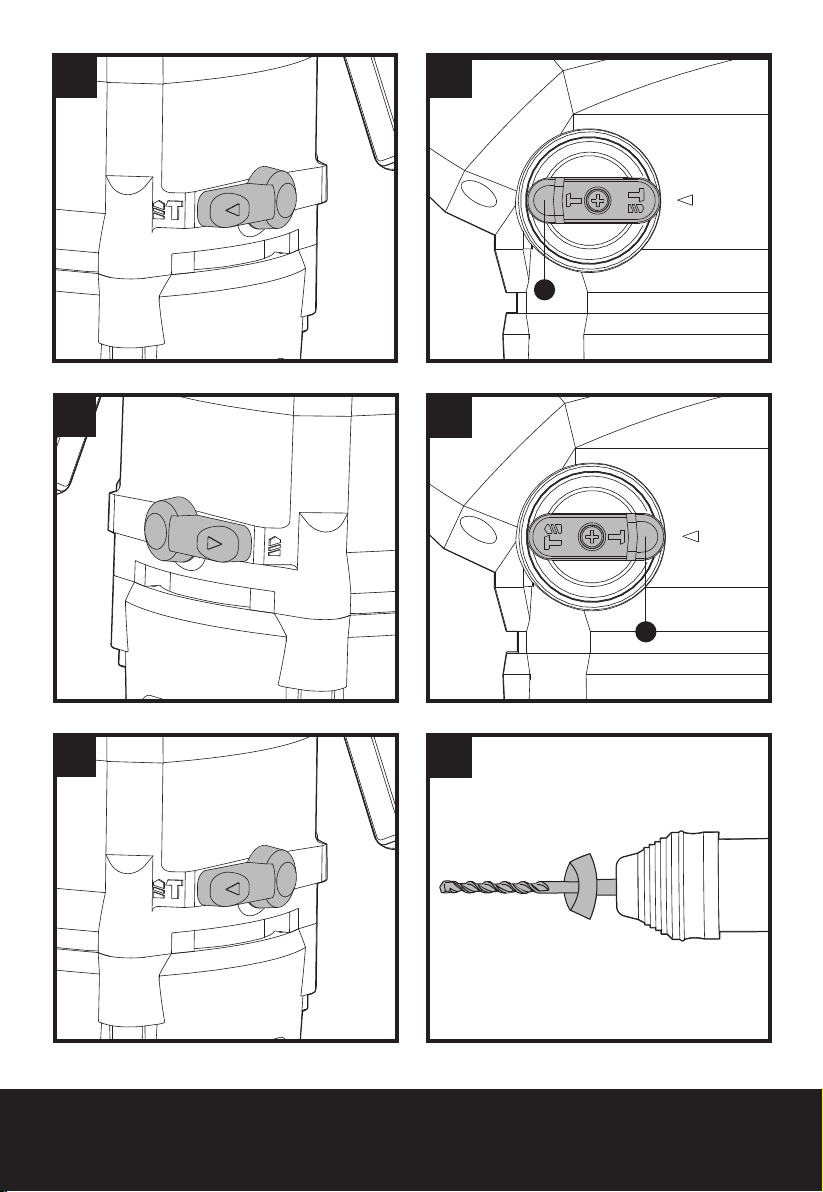
8. HAMMER DRILL FUNCTION (See Fig.
E, F)
1)For drilling concrete, masonry etc, press the
lock button (A) and rotate the selector switch
to make sign “
(See Fig. E)
NOTE: You must press the selector switch lock
button before adjusting the selector switch. If
the selector switch cannot go into the required
position, switch on your hammer a little, then
adjust the selector switch again.
2)Turn the hammer or drilling action selector
switch pointing to the hammer action “ “
position. (See Fig. F)
3)You are now set up for hammer drilling into
masonry.
“ point to the triangle.
1110
Rotary hammer EN
Page 12
9. DRILLING FUNCTION (See Fig. G, H)
1)Press the lock button (A) and rotate the
selector switch to make sign “ “ point to
the triangle. (See Fig. G)
2)Turn the hammer or drilling action selector
switch pointing to the drilling action “ “
position. (See Fig. H)
3)You are now set up for drilling function.
10. CHISEL FUNCTION (See I, J)
1)For chipping, grooving or demolition
operation, press the lock button (A) and then
rotate the selector switch make sign “ “
pointing to the triangle. (See Fig. I)
2)Turn the hammer or drilling action selector
switch pointing to the hammer action “ “
position. (See Fig. J)
3)You are now set up for chisel work using
Chisel action.
WARNING: You must make
sure that the selector switch
is positively locked in chisel mode
position. If not, it could cause a hazard.
11. DUST COVER (See Fig. K)
Use the dust cover to prevent dust from
falling over the tool and on your self when
performing overhead drilling operations.
Attach the dust cover to the bit as shown in
the K.
12. LUBRICATION MACHINE (See Fig. L)
The machine is grease-lubricated. A grease
refill is only required during hammer work
efficiency is low. Open the grease box lid
at the top of the hammer using the pin
spanner provided. Then refill approx 30g
grease provided with your tool. The grease
specification is general purpose lithium based.
Use only Worx genuine hammer grease
(optional accessory).
CAUTION: Keep the container of grease
away from children.
13. TO REPLACE THE BRUSHES
(See Fig. M, N)
Disconnect the plug from the power supply.
Unscrew the carbon brush cap with
screwdriver.
Remove the carbon brush. Check the length
of the brush and replace if under 6mm. When
brushes need replacement always renew both
brushes, even if one is still more than 6mm
long.
Completely screw down the carbon brush cap.
Check that the tool is working. Before use,
allow it run for a few minutes to enable the
brushes to settle.
WORKING HINTS FOR
YOUR TOOL
1. Reduce the pressure on the drill bit when it
is about to break through. This will prevent
the drill from jamming.
2. When drilling a large hole, first drill a pilot
hole using a smaller drill bit.
3. Always apply pressure to your drill bit in a
straight line, and if possible at right angles
to the workpiece.
4. Never change the operating mode whilst
the drill is running.
5. Do not apply excessive pressure to the tool
when chiseling. Expressive force does not
speed up the work.
MAINTENANCE
Remove the plug from the socket before
carrying out any adjustment, servicing or
maintenance.
There are no user serviceable parts in your
power tool. Never use water or chemical
cleaners to clean your power tool. Wipe clean
with a dry cloth. Always store your power tool
in a dry place. Keep the motor ventilation slots
clean. Keep all working controls free of dust.
Occasionally you may see sparks through the
ventilation slots. This is normal and will not
damage your power tool.
If the supply cord is damaged, it must be
replaced by the manufacturer, its service
agent or similarly qualified persons in order to
avoid a hazard.
Rotary hammer EN
Page 13

TROUBLESHOOTING
firmly clamped
1. If your power tool does not start, check the
plug on the power supply first.
2. If your hammer becomes too hot in use,
set the hammer switch to the drill mode
and allow your drill to operate at maximum
speed without load for 2 minutes.
3. If your hammer work efficiency is too low,
please add sufficient grease in the grease
box.
4. If your hammer use in low efficiency,
please check whether the tool is blunt.
5. If a fault can not be rectified, return the tool
to an authorized dealer for repair.
ENVIRONMENTAL
PROTECTION
Waste electrical products should not
be disposed of with household waste.
Please recycle where facilities exist.
Check with your Local Authority or retailer for
recycling advice.
PLUG REPLACEMENT
(UK & IRELAND ONLY)
If you need to replace the fitted plug then
follow the instructions below.
IMPORTANT
The wires in the mains lead are colored in
accordance with the following code:
BLUE = NEUTRAL
Brown = Live
As the colors of the wires in the mains lead of
this appliance may not correspond with the
colored markings identifying the terminals
in your plug, proceed as follows. The wire
which is colored blue must be connected to
the terminal which is marked with N. The wire
which is colored brown must be connected to
the terminal which is marked with L.
WARNING: Never connect live or
neutral wires to the earth terminal of the
plug. Only fit an approved 13ABS1363/A plug
and the correct rated fuse.
NOTE: If a moulded plug is fitted and has to
be removed take great care in disposing of the
plug and severed cable, it must be destroyed
to prevent engaging into a socket.
13 Amp fuse approved
to BS1362
Connect
Blue to N
(neutral)
Brown L (live)
1312
Outer sleeve
Cable grip
Rotary hammer EN
Page 14

DECLARATION OF
CONFORMITY
We,
POSITEC Germany GmbH
Konrad-Adenauer-Ufer 37
50668 Köln
Declare that the product,
Description WORX Rotary Hammer
Type WX333 (330~359-designation of
machinery, representative of Rotary
hammer)
Function Hammering various materials
Complies with the following Directives,
2006/42/EC
2004/108/EC
2011/65/EU
Standards conform to
EN 55014-1
EN 55014-2
EN 61000-3-3
EN 61000-3-2
EN 60745-2-6
EN 60745-1
The person authorized to compile the technical
file,
Name: Russell Nicholson
Address: Positec Power Tools (Europe)
Ltd, PO Box 152, Leeds, LS10 9DS, UK
Suzhou 2015/10/27
Allen Ding
Deputy Chief Engineer,Testing & Certification
Rotary hammer EN
Page 15

1. ARRETIERHÜLSE
2. BOHRTIEFENANSCHLAG
3. SCHMIERMITTELBEHÄLTERDECKEL
4. EIN/AUS-SCHALTER
5. HÄMMERN/BOHREN-UMSCHALTER
6. HAMMER /MEISSEL-UMSCHALTER
7. VARIABLER GESCHWINDIGKEITSREGLER
8. SDS BOHRER*
9. SCHRAUBENSCHLÜSSEL
10. ZAHNKRANZBOHRFUTTERSATZ MIT ADAPTER, BOHRFUTTERSCHLÜSSEL*
11. SCHMIERFETTPLASTIKBEHÄLTER*
12. STAUBSCHUTZHAUBE*
13. SPITZMEISSEL & FLACHMEISSEL*
14. ZUSATZHANDGRIFF
*Abgebildetes oder beschriebenes Zubehör gehört teilweise nicht zum Lieferumfang.
TECHNISCHE DATEN
Typ WX333 (330~359-Bezeichnung der Maschine, Repräsentant Bohrhammer)
Spannung 220-240V~50/60Hz
Nennaufnahmeleistung 1250W
Leerlaufdrehzahl 0-750/min
Nennschlagzahl 0-3700/min
Nenn-Schlagenergie 5.0J
Bohrfutter-Typ SDS-plus
Max. Bohrleistung Stahl 13mm
Mauerwerk 32mm
Holz 40mm
Schutzisolation
Gewicht 6.1kg
/II
1514
1514
Bohrhammer D
Page 16
INFORMATIONEN ÜBER LÄRM
Gewichteter Schalldruck LpA: 90dB(A)
Gewichtete Schallleistung L
3.0dB(A)
K
pA&KwA
: 101dB(A)
wA
Tragen Sie bei einem Schalldruck über einen Gehörschutz 80dB(A)
INFORMATIONEN ÜBER VIBRATIONEN
Vibrationsgesamtmesswertermittlung gemäß EN 60745
Schlagbohren in Beton
Meißeln
Vibrationsemissionswert a
Unsicherheit K=1.5m/s
Vibrationsemissionswert a
Unsicherheit K=1.5m/s
Der Schwingungsgesamtwert kann zum Vergleichen eines Werkzeugs mit einem anderen
verwendet werden, ebenso für eine vorläufige Beurteilung von Belastungen.
WARNUNG: Der Vibrationsemissionswert während des tatsächlichen Gebrauchs
des Elektrowerkzeugs kann vom angegebenen Wert abweichen, je nachdem, wie
das Werkzeug gemäß folgender Beispiele und anderweitiger Verwendungsmöglichkeiten
eingesetzt wird:
Wie das Werkzeug verwendet wird und Materialen geschnitten oder angebohrt werden.
Das Werkzeug ist in gutem Zustand und gut gepflegt.
Verwendung des richtigen Zubehörs für das Werkzeug und Gewährleistung seiner Schärfe und
seines guten Zustands.
Die Festigkeit der Handgriffe und ob Antivibrationszubehör verwendet wird.
Und ob das verwendete Werkzeug dem Design und diesen Anweisungen entsprechend
verwendet wird.
2
2
= 17.4m/s2
h,HD
= 14.3m/s²
h,Cheq
Wird dieses Werkzeug nicht anemessen gehandhabt, kann es ein Hand-ArmVibrationssyndrom erzeugen.
WARNUNG: Um genau zu sein, sollte ein Abschätzung des Belastungsgrades aller
Arbeitsabschnitte während tatsächlicher Verwendung berücksichtigt werden, z.B. die
Zeiten, wenn das Werkzeug ausgeschaltet ist, und wenn es sich im Leerlauf befindet und
eigentlich nicht eingesetzt wird. Auf diese Weise kann der Belastungsgrad während der
gesamten Arbeitszeit wesentlich gemindert werden.
Minimieren Sie Ihr Risiko, dem Sie bei Vibrationen ausgesetzt sind.
Verwenden Sie IMMER scharfe Meissel, Bohrer und Sägeblätter.
Pflegen Sie dieses Werkzeug diesen Anweisungen entsprechend und achten Sie auf eine gute
Bohrhammer D
Page 17

Einfettung (wo erforderlich).
Bei regelmäßiger Verwendung dieses Werkzeugs sollten Sie in Antivibrationszubehör
investieren.
Vermeiden Sie den Einsatz von Werkzeugen bei Temperaturen von 10ºC oder darunter.
Machen Sie einen Arbeitsplan, um die Verwendung von hochvibrierenden Werkzeugen auf
mehrere Tage zu verteilen.
ZUBEHÖRTEILE
Zusatzhandgriff 1
Bohrtiefenanschlag 1
SDS Bohrer (8 10 12x150mm) 3
SDS Spitzmeißel & Flachmeißel (250mm) 2
Staubschutzhaube 1
Schraubenschlüssel 1
Zahnkranzbohrfuttersatz mit Adapter, Bohrfutterschlüssel 1
Schmierfettplastikbehälter 1
Wir empfehlen Ihnen, sämtliche Zubehörteile beim selben Fachhändler zu beziehen, bei dem Sie
auch Ihr Elektrowerkzeug gekauft haben.. Weitere Informationen finden Sie auf der Verpackung
der Zubehörteile. Auch Ihr Fachhändler berät Sie gerne.
1716
Bohrhammer D
Page 18
SICHERHEITSHINWEISE
FÜR HÄMMER
1. Tragen Sie Gehörschutz, Wenn Sie
die Schlagbohrmaschine benutzen.
Lärmaussetzung kann Gehörverlust
verursachen.
2. Benutzen Sie den zusätzlichen
Handgriff, der mit dem Werkzeug
geliefert wird. Kontrollverlust kann
Personenschäden zufolge haben.
3. Halten Sie das Werkzeug nur an den
isolierten griffigen Oberflächen, wenn
Sie einen Einsatz durchführen, bei
dem Schneidwerkzeuge eventuell
versteckte Kabel berühren könnten.
Berührung mit einem unter Strom
stehenden Kabel kann auch die Metallteile
des Gerätes unter Strom setzen und
dem Bedienenden einen Stromschlag
versetzen.
SYMBOLE
Zur Reduzierung der
Verletzungsgefahr bitte die
Bedienungsanleitung durchlesen
Schutzisolation
WARNUNG
Tragen Sie einen Gehörschutz
Tragen Sie eine Schutzbrille
Tragen Sie eine Staubschutzmaske
Elektroprodukte dürfen nicht mit
dem normalen Haushaltsmüll
entsorgt werden, sondern
sollten nach Möglichkeit zu einer
Recyclingstelle gebracht werden.
Ihre zuständigen Behörden oder Ihr
Fachhändler geben Ihnen hierzu
gerne Auskunft.
Bohrhammer D
Page 19
HINWEISE ZUM BETRIEB
HINWEIS: Lesen Sie das Handbuch
vor Inbetriebnahme des Werkzeuges
sorgfältig durch.
Bohrfutter absolut fest im Bithalter sitzt - dazu
versuchen Sie es herauszuziehen; es darf sich
nicht herausziehen lassen.
Falls das Bit oder das Bohrfutter nicht richtig
fixiert sein sollte, beginnen Sie von vorne.
Bestimmungsgemäßer Gebrauch
Das Gerät ist bestimmt zum Hammerbohren
in Beton, Ziegel und Gestein sowie für leichte
Meißelarbeiten. Es ist ebenso geeignet zum
Bohren ohne Schlag in Holz, Metall, Keramik
und Kunststoff.
1. ZUSATZGRIFF EINSTELLEN (Siehe A )
Aus Sicherheitsgründen sollte der zusatzgriff
immer verwendet werden.
Zum Einstellen lösen Sie den GriffArretierknopf durch Drehen gegen den
Uhrzeigersinn. Drehen Sie den Griff um seine
Achse oder das gesamte Griffstück um das
Werkzeug herum – siehe Abb. A. Ziehen Sie
den Arretierknopf wieder fest an.
2. TIEFENANSCHLAG VERWENDEN
(Siehe A)
Mit dem Tiefenanschlag können Sie eine
konstante Bohrtiefe vorgeben.
Drehen Sie die Arretierschraube am
Oberteil des Handgriffs zum Lösen gegen
den Uhrzeigersinn, schieben Sie den
Tiefenanschlag in den Griff ein. Stellen
Sie die gewünschte Tiefe ein. Drehen Sie
die Arretierschraube zum Fixieren im
Uhrzeigersinn.
3. BITS ODER BOHRFUTTER ANBRINGEN
(Siehe B1)
Reinigen Sie den Meißelschaft und tragen Sie
etwas Schmiermittel auf, ehe Sie den Meißel
einsetzen. Fassen Sie den drehbaren Griff,
ziehen Sie die Arretierhülse zurück, setzen Sie
ein Bit oder das Bohrfutter in den Bithalter
ein. Schieben Sie den Meißel drehend
ein, bis Sie einen Widerstand spüren – der
Schaft sitzt komplett in der Meißelhalterung.
Wenn der Meißel richtig sitzt, lassen Sie die
Arretierhülse los. Dadurch werden Bit oder
Bohrfutter fixiert.
Nach der Installation vergewissern Sie sich
grundsätzlich, dass das Werkzeug oder das
4. BITS ODER BOHRFUTTER
HERAUSNEHMEN (Siehe B1)
Zum Herausnehmen des Werkzeugs oder
Bohrfutters ziehen Sie die Arretierhülse
zurück, halten sie in dieser Position und
nehmen das Werkzeug oder Bohrfutter
heraus.
HINWEIS: Bit oder Bohrfutter werden am
Schaft gehalten und können im fixierten
Zustand nicht herausgenommen werden.
5. BOHRFUTTER VERWENDEN
Zur vielseitigen Anwendung wird Ihr
Bohrhammer mit einem 3-Backen-Bohrfutter
geliefert. Dadurch können Sie auch mit
anderen als mit SDS-Werkzeugen/-Bits
arbeiten.
WARNUNG! Das 3-Backen-
Bohrfutter ist ausschließlich zum
BOHREN in Holz und Metall geeignet.
Benutzen Sie dieses Bohrfutter
NIEMALS zum Schlagbohren oder
Meißeln. IN DIESEM FALL KANN DAS
BOHRFUTTER BESCHÄDIGT WERDEN.
Bohrerbits in das Bohrfutter einsetzen.
(Siehe B2)
Trennen Sie das Gerät von der
Stromversorgung, bevor Sie Bohrerbits
einsetzen.
Stecken Sie den Spannschlüssel in das
Bohrfutter und drehen Sie ihn entgegen
dem Uhrzeigersinn, um das Bohrfutter
loszuschrauben, fügen Sie den Bohrer/das
Werkzeug ein und ziehen Sie das Bohrfutter
fest an, in dem Sie den Spannschlüssel im
Uhrzeigersinn drehen. Entfernen Sie den
Spannschlüssel und legen Sie ihn in den
Blasformkoffer zurück.
6. BEDIENUNG DES EIN-/
AUSSCHALTERS (Siehe C)
Drücken Sie, um das Werkzeug zu starten und
lassen Sie los, um es abzuschalten.
1918
Bohrhammer D
Page 20
7. SCHALTER FÜR VARIABLE
DREHZAHLSTEUERUNG (Siehe D)
Bei höheren Einstellungszahlen steigt die
Drehzahl, bei niedrigeren Einstellungszahlen
sinkt die Drehzahl entsprechend.
11. STAUBSAMMLER (Siehe K)
Der Staubsammler verhindert, dass Staub bei
Überkopfarbeiten auf das Werkzeug oder auf
Sie rieselt. Bringen Sie den Staubsammler wie
in Abb. K gezeigt am Meißel an.
8. BOHRHAMMERFUNKTION (Siehe E,F)
1)Zum Bohren in Beton, Mauerwerk und
ähnliche Materialien drücken Sie die
Freigabetaste (A) und drehen den Umschalter,
bis das Dreieck auf das Symbol “ “ zeigt.
(Siehe E)
HINWEIS: Vor dem Drehen des Umschalters
muss die Freigabetaste gedrückt werden. Falls
sich der Umschalter nicht in die gewünschte
Position bringen lassen sollte, lassen Sie den
Bohrhammer kurz anlaufen und drehen den
Umschalter danach erneut.
2)Drehen Sie den Hämmern/BohrenUmschalter in die Hämmern-Position “ “ .
(Siehe F)
3)Ihr Bohrhammer ist nun auf Bohren in
Mauerwerk eingestellt.
9. BOHREN (Siehe G,H)
1)Drücken Sie die Freigabetaste (A) und
drehen Sie den Umschalter, bis das Dreieck
auf das Symbol “ “ zeigt. (Siehe G)
2)Drehen Sie den Hämmern/BohrenUmschalter in die Bohren-Position “ “ .
(Siehe H)
3)Ihr Bohrhammer ist nun auf Bohren
eingestellt.
10. MEIßELN (Siehe I,J)
1)Zum Zerspanen, Auskehlen oder
Zertrümmern drücken Sie die Freigabetaste
(A) und drehen den Umschalter, bis das
Dreieck am Schmiermittelbehälterdeckel auf
das Symbol “ “ zeigt. (Siehe I)
2)Drehen Sie den Hämmern/BohrenUmschalter in die Hämmern-Position “ “ .
(Siehe J)
3)Ihr Werkzeug ist nun auf Meißeln eingestellt.
WARNUNG: Achten Sie in jedem
Fall darauf, dass der Umschalter
in der Meißeln-Position einrastet.
Ansonsten besteht Unfallgefahr!
12. SCHMIERUNG (Siehe L)
Das Gerät ist ölgeschmiert. Schmiermittel
muss nur nachgefüllt werden, wenn die
Arbeitseffizienz des Hammers nachläßt.
Öffnen Sie dazu die Schmierkappe an
der Oberseite des Hammers mithilfe des
beiliegenden Schlüssels. Dann füllen Sie ca.
30g des beiliegenden Schmiermittels ein.
Die Spezifikationen des Schmiermittels sind
Universalschmiermittel auf Lithium-Basis.
Dabei ist unbedingt das vorgesehene Worx Öl
zu verwenden.
ACHTUNG: Schmiermittel und
-behälter von Kindern fernhalten!
13. DIE KOHLEBÜRSTEN ERSETZEN
(Siehe M,N)
Ziehen Sie den Netzstecker.
Lösen Sie die Kohlebürstenkappe mit einem
Schraubendreher.
Entnehmen Sie die Kohlebürste. Prüfen Sie
die Länge der Bürste; tauschen Sie sie aus,
wenn die Länge weniger als 6 mm beträgt.
Beim Austausch wechseln Sie immer beide
Bürsten auf einmal aus; auch dann, wenn
die Länge einer Bürste noch mehr als 6 mm
beträgt.
Schrauben Sie die Kohlebürstenkappe wieder
vollständig auf. Überzeugen Sie sich davon,
dass das Werkzeug arbeitet. Ehe Sie mit der
Arbeit beginnen, lassen Sie das Werkzeug ein
paar Minuten laufen, damit sich die Bürsten
etwas einschleifen können.
TIPPS ZUR ARBEIT MIT
IHREM WERKZEUG
1. Vermindern Sie den Druck auf das Bit,
wenn es kurz vor dem Durchbruch steht.
Dadurch vermeiden Sie ein Verklemmen
des Bohrers.
2. Bei größeren Löchern bohren Sie zuerst ein
Führungsloch mit einem kleineren Bohrer.
Bohrhammer D
Page 21

3. Üben Sie immer nur senkrechten Druck auf
den Bohrer aus; idealerweise rechtwinklig
zum Werkstück.
4. Schalten Sie niemals den Betriebsmodus
um, während das Gerät läuft.
5. Üben Sie beim Meißeln keinen
übermäßigen Druck aus. Mehr Druck
beschleunigt das Arbeiten nicht.
WARTUNG
Ziehen Sie grundsätzlich den
Netzstecker, bevor Sie Einstell-,
Reparatur- oder Wartungstätigkeiten
ausführen.
Es enthält keine Teile, die Sie warten müssen.
Reinigen Sie Ihr Werkzeug niemals mit Wasser
oder chemischen Loesungsmitteln. Wischen
Sie es mit einem trockenen Tuch sauber.
Lagern Sie Ihr Werkzeug immer an einem
trockenen Platz. Sorgen Sie dafür, dass bei
staubigen Arbeiten die Lüftungsöffnungen
frei sind. Falls es erforderlich sein sollte, den
Staub zu entfernen, trennen Sie zuerst das
Elektrowerkzeug vom Stromversorgungsnetz.
Verwenden Sie nichtmetallische Objekte zum
Entfernen von Staub und vermeiden Sie das
Beschädigen innerer Teile. Gelegentlich sind
durch die Lüftungsschlitze hindurch Funken zu
sehen. Dies ist normal und wird Ihr Werkzeug
nicht beschädigen.
Wenn ein Ersatz von Stecker oder
Anschlussleitung erforderlich ist, dann ist
dies von unserer Servicestelle oder einer
Elektrofachwerkstatt durchzuführen, um
Sicherheitsgefährdungen zu vermeiden.
Lassen Sie Reparaturen nur durch unsere
Servicestelle oder durch eine Fachwerkstatt
mit Originalersatzteilen durchführen.
3. Sollte das Werkzeug mit geringerer Leistung
arbeiten, füllen Sie Schmiermittel nach.
4. Bei schlechteren Ergebnissen prüfen Sie
nach, ob das Werkzeug stumpf geworden ist.
5. Falls sich Fehler nicht beheben lassen
sollten, lassen Sie das Werkzeug bei einem
autorisierten Händler reparieren.
UMWELTSCHUTZ
Elektroprodukte dürfen nicht mit dem
normalen Haushaltsmüll entsorgt
werden, sondern sollten nach
Möglichkeit zu einer Recyclingstelle gebracht
werden. Ihre zuständigen Behörden oder
Ihr Fachhändler geben Ihnen hierzu gerne
Auskunft.
2120
FEHLERBEHEBUNG
1. Falls Ihr Elektrowerkzeug nicht anlaufen
sollte, überprüfen Sie zuerst, ob der Stecker
richtig in die Steckdose eingesteckt ist.
2. Falls sich Ihr Werkzeug bei der Arbeit stark
erwärmen sollte, halten Sie es an, schalten
auf Bohren um und lassen das Werkzeug 2
Minuten ohne Belastung laufen.
Bohrhammer D
Page 22
KONFORMITÄTSERKLÄRUNG
Wir,
POSITEC Germany GmbH
Konrad-Adenauer-Ufer 37
50668 Köln
Erklären hiermit, dass unser Produkt
Beschreibung WORX Bohrhammer
Typ WX333 (330~359-Bezeichnung der
Maschine, Repräsentant Bohrhammer)
Funktion Hämmern verschiedener
Materialien
Den Bestimmungen der folgenden Richtlinien
entspricht:
2006/42/EC
2004/108/EC
2011/65/EU
Werte nach
EN 55014-1
EN 55014-2
EN 61000-3-3
EN 61000-3-2
EN 60745-2-6
EN 60745-1
Zur Kompilierung der technischen Datei
ermächtigte Person,
Name: Russell Nicholson
Anschrift: Positec Power Tools (Europe)
Ltd, PO Box 152, Leeds, LS10 9DS, UK
Suzhou 2015/10/27
Allen Ding
Stellvertretender Chefingenieur, Prüfung und
Zertifizierung
Bohrhammer D
Page 23

1. VERROU DE FERMETURE
2. BUTÉE DE PROFONDEUR
3. COUVERCLE DU RÉSERVOIR À GRAISSE
4. COMMUTATEUR MARCHE/ARRÊT
5. COMMANDE DE MARTEAU OU DE PERCEUSE
6. COMMUTATEUR DE MODE MARTEAU OU BURIN
7. BOUTON DE VARIATION DE VITESSE
8. MÈCHES SDS*
9. CLÉ
10. MANDRIN À CLÉ AVEC ADAPTATEUR, CLÉ DE MANDRIN*
11. BOÎTIER À ENDUIS EN PLASTIQUE*
12. COUVERCLE À POUSSIÈRE*
13. BURINS (À POINTE ET PLAT)*
14. POIGNÉE AUXILIAIRE
* Les accessoires reproduits ou décrits ne sont pas tous compris avec le modèle
standard livré.
CARACTÉRISTIQUES TECHNIQUES
Type WX333 (330~359-désignations des pièces, illustration de la Marteau
Perforateur)
2322
2322
Tension nominale-fréquence 220-240V~50/60Hz
Puissance 1250W
Vitesse à vide 0-750/min
Amplitude de vibration 0-3700/min
Puissance nominale 5.0J
Type de foret SDS-plus
Capacité max. de perçage Acier 13mm
Béton 32mm
Bois 40mm
Double isolation
Poids de la machine 6.1kg
Marteau Perforateur F
/II
Page 24
DONNÉES SUR LE BRUIT ET LES VIBRATIONS
Niveau de pression acoustique LpA: 90dB(A)
Niveau de puissance acoustique L
3.0dB(A)
K
pA&KwA
: 101dB(A)
wA
Porter des protections auditives lorsque la pression sonore est supérieure à 80dB(A)
INFORMATIONS RELATIVES AUX VIBRATIONS
Valeurs totales de vibrations déterminées selon l’ EN 60745
Perçage à percussion dans du béton
Burinage
Valeur d'émission de vibrations a
Incertitude K=1.5m/s
2
Valeur d'émission de vibrations a
Incertitude K=1.5m/s
2
= 17.4m/s
h.HD
= 14.3m/s2
h.Cheq
Il est possible d’utiliser la valeur totale déclarée des vibrations pour comparer cet outil à un
autre outil, et il est aussi possible d’utiliser cette valeur pour une appréciation préliminaire de
l’exposition.
AVERTISSEMENT: La valeur d’émission de vibrations pendant l’utilisation réelle de
l’outil électrique peut différer de la valeur déclarée selon la façon dont l’outil est utilisé,
selon les exemples suivants et d’autres variations sur la façon dont l’outil est utilisé:
Comment l’outil est utilisé et quels matériaux sont percés.
L’outil est en bon état et bien entretenu.
L’utilisation du bon accessoire pour l’outil et l’assurance qu’il est affuté et en bon état.
Le serrage du grip sur les poignées et le cas échéant les accessoires anti-vibrations utilisés.
Et l’outil est utilisé comme prévu dans sa conception et dans les présentes instructions.
2
Cet outil peut causer un syndrome de vibration du bras et de la main s’il n’est pas
correctement géré.
AVERTISSEMENT: Pour être précise, une évaluation du niveau d’exposition en
conditions réelles d’utilisation doit également tenir compte de toutes les parties du cycle
d’utilisation telles que les moments où l’outil est éteint, et ceux où il fonctionne au ralenti
mais ne réalise pas réellement de tâche. Ceci peut réduire de façon significative le niveau
d’exposition et la période de fonctionnement totale.
Aider à minimiser le risque d’exposition aux vibrations.
Utilisez TOUJOURS des ciseaux, des forets et des lames affutés.
Entretenez cet outil en accord avec les présentes instructions et maintenez-le lubrifié (si
approprié).
Si l’outil doit être utilisé régulièrement, alors investissez dans des accessoires anti-vibrations.
Évitez d’utiliser des outils à des températures de 10oC ou moins.
Planifiez votre travail pour étaler toute utilisation d’outil à fortes vibrations sur plusieurs jours.
Marteau Perforateur F
Page 25

ACCESSOIRES
Poignée auxiliaire 1
Butée de profondeur 1
Mèches SDS (8 10 12x150mm) 3
Burins SDS (plat et pointu 250mm) 2
Couvercle à poussière 1
Clé 1
Mandrin à clé avec adaptateur, clé de mandrin 1
Boîtier à enduis en plastique 1
Nous recommandons d’acheter tous les accessoires dans le magasin d’acquisition de la machine.
Pour plus d’informations, se référer à l’emballage des accessoires. Le personnel du magasin est
également là pour vous conseiller.
2524
Marteau Perforateur F
Page 26
AVERTISSEMENTS DE
SÉCURITÉ POUR LES
MARTEAUX
1. Porter une protection pour les
oreilles. L’exposition au bruit peut causer
une perte d’audition.
2. Veuillez utiliser les poignées
auxiliaires fournies avec l’outil. La
perte de contrôle peut engendrer des
blessures.
3. Tenir l’outil par ses surfaces
antidérapantes et isolées si l’outil
de coupe risque d’entrer en contact
avec des câbles cachés. L’entrée en
contact avec un câble sous tension rendra
les parties en métal de l’outil également
sous tension et l’utilisateur pourrait
recevoir une décharge électrique.
SYMBOLES
Pour réduire le risque de blessure,
l’utilisateur doit lire le manuel
d’instructions
Classe de protection
Avertissement
Porter une protection pour les
oreilles
Porter une protection pour les yeux
Porter un masque contre la
poussière
Les déchets d’équipements
électriques et électroniques ne
doivent pas être déposés avec les
ordures ménagères. Ils doivent
être collectés pour être recyclés
dans des centres spécialisés.
Consultez les autorités locales ou
votre revendeur pour obtenir des
renseignements sur l’organisation
de la collecte.
Marteau Perforateur F
Page 27
FONCTIONNEMENT
REMARQUE: Avant d’utiliser cet outil,
lire attentivement les instructions.
l’outil ou le foret est bien enclenché dans la
porte mèche en tirant dessus pour le faire sortir.
Si l’outil ou le foret n’est pas bien inséré, le
réinstaller.
RESTRICTIONS D’UTILISATION
L’appareil est conçu pour les travaux de
perçage en frappe dans le béton, la brique et
la pierre ainsi que pour de petits travaux de
burinage. Il est également approprié pour le
perçage sans frappe dans le bois, le métal, la
céramique et les matières plastiques.
1. AJUSTEMENT DE LA POIGNÉE
AUXILIAIRE (Voir A)
Pour votre sécurité, il est recommander de
toujours utiliser les poignées auxiliaires.
Pour ajuster la poignée, desserrer le bouton
sous la poignée dans le sens inverse des
aiguilles d’une montre et tourner la poignée
atours de l’axe de la poignée jusqu’à
l’obtention de la position désirée. Serrer
fortement.
2. UTILISER LA JAUGE DE PROFONDEUR
(Voir A)
La jauge de profondeur peut être utilisée pour
régler une profondeur constante du foret.
Pivoter l’écrou de fermeture sur le dessus
de la poignée dans le sens inverse des
aiguilles d’une montre pour desserrer, insérer
le témoin de profondeur dans la poignée.
Ajuster le à la profondeur de perçage
souhaitée. Tourner l’écrou de fermeture dans
le sens des aiguilles d’une montre pour
resserrer.
3. INSTALLATION DES OUTILS OU DU
MANDARIN (Voir B1)
Nettoyer la tige de la mèche et appliquer de
la graisse lubrifiante avant de l’utiliser.Tenir la
poignée rotative, tirer en arrière sur le verrou
et insérer l’outil ou la mèche dans le mandrin.
Tourner le foret et pousser le dedans jusqu’à
ressentir une résistance. L’axe s’abaisse
complètement dans le mandrin. Lorsque vous
êtes satisfait de la position, relâcher le verrou
de fermeture noire. Cela fermera l’outil ou le
foret dans cette position.
Après l’avoir installé, toujours s’assurer que
4. RETIRER L’OUTIL OU LE MANDARIN À
CLÉ (Voir B1)
Pour enlever l’outil ou le foret, tirer en arrière
sur le verrou, prendre l’outil ou le foret et le
retirer.
REMARQUE: Le foret ou l’outil sont
fermement fixés par le manche et ne peuvent
être retirés une fois le verrou fermé.
5. UTILISER LE FORET
Pour plus de confort, votre marteau
perforateur est accompagné d’un mandrin
à trois mâchoires. Cela vous permettra de
travailler avec des forets et outils non SDS.
AVERTISSEMENT! Le mandarin à
trois mâchoires est destiné aux
travaux de PERCAGE sur bois et métaux
uniquement. NE JAMAIS utiliser ce
mandarin avec un marteau perforateur
ou un foret. CE MANDRIN POURRAIT
ETRE ENDOMMAGE SI VOUS FAITES
CELA.
Insérer un foret dans le mandarin.
(Voir B2)
Avant d’installer le foret, débrancher le câble
d’alimentation.
Placer la clé à mandrin sur le mandrin,
tourner la clé dans le sens inverse des
aiguilles d’une montre pour le desserrer,
insérer le foret/l’outil et serrer fermement le
mandrin avec la clé à mandrin dans le sens
des aiguilles d’une montre. Enlever la clé et la
remettre dans son coffret.
6. UTILISATION DU BOUTON MARCHE/
ARRÊT (Voir C)
Appuyer sur le bouton pour démarrer l’outil et
relâcher pour l’arrêter.
7. UTILISATION DE L’INTERRUPTEUR DE
VARIATION DE VITESSE (Voir D)
La vitesse augmente en tournant le bouton
vers les chiffres les plus élevés et descend en
le tournant vers les chiffres les plus petits.
2726
Marteau Perforateur F
Page 28
8. FONCTION PERCEUSE À CIMENT
(Voir E, F)
1)Pour bien forer, perçage dans le béton etc,
appuyez sur le bouton de verrouillage (A) et
tournez le bouton sélecteu pour que le signe
“ “ pointe vers le triangle. (Voir E)
REMARQUE: Appuyer sur le verrou du
bouton de sélection pour pouvoir ajuster le
bouton de sélection. Si le bouton de sélection
ne peut pas s’enclencher dans la position
voulue, mettez en marche un peu la machine
et réajuster le bouton de sélection une
nouvelle fois.
2)Tourner le bouton de sélection marteau
ou perceuse vers la position “ “ sur le
couvercle du réservoir a graisse. (Voir F)
3)Vous êtes maintenant préparé pour percer
le béton.
9. FONCTION FORAGE (Voir G, H)
1)Appuyez sur le bouton de verrouillage (A) et
tournez le bouton sélecteu pour que le signe
“ “ pointe vers le triangle. (Voir G)
2)Tourner le bouton de sélection marteau ou
perçage vers la position Action perçage
“ “ . (Voir H)
3)Vous avez réglé la fonction forage.
10. FONCTION BURIN (Voir I, J)
1)Pour ébrécher, canneler ou détruire, appuyez
sur le bouton de verrouillage (A) et tournez le
bouton sélecteu pour que le signe “ “ pointe
vers le triangle. (Voir I)
2)Tourner le bouton de sélection de la fonction
perçage ou marteau vers la position Action
marteau “ “ . (Voir J)
3)Vous venez d’installer l’action Burin pour les
travaux au burin.
AVERTISSEMENT: Etre bien sûr
d’avoir enclenché le bouton de
sélection dans la position action Burin.
Si ce n’est pas le cas, cela pourrait
provoquer un accident.
11. COUVERCLE À POUSSIÈRE (Voir K)
Utiliser le couvercle à poussière pour
empêcher la poussière de tomber sur vous et
l’outil lorsque vous effectuez des travaux de
perçage en hauteur. Attacher le couvercle à
poussière à la mèche comme indiqué sur la K.
12. LUBRIFICATION DE LA MACHINE
(Voir L)
L’appareil est graissé à l’huile. Il n’est
nécessaire de rajouter de la graisse que
lorsque la productivité du marteau baisse.
Ouvrez le couvercle du compartiment à
graisse qui se trouve au sommet du marteau
à l’aide de la clé à ergots fournie. Ajoutez
environ 30 g de la graisse fournie avec votre
outil. La graisse doit être une graisse au
lithium de type générique. L’utilisation de
l’huile prévue par Worx est obligatoire.
ATTENTION: Tenir le récipient à graisse
éloigné des enfants.
13. REMPLACEMENT DES BALAIS
(Voir M, N)
Débranchez la prise de l’alimentation.
Dévissez le capot des charbons à l’aide d’un
tournevis.
Retirez le charbon. Vérifi ez la taille du charbon
et remplacez-le si sa longueur
est inférieure à 6 mm. Remplacez toujours les
charbons par paire, même si l’un des deux
charbons mesure plus de 6 mm de long.
Revissez le capot. Vérifi ez que l’outil
fonctionne avant de l’utiliser, en le laissant
fonctionner pendant quelques minutes.
ASTUCES CONCERNANT
VOTRE OUTIL
1. Réduire la pression sur le foret lorsque la
surface va être percée de manière à éviter
d’empêcher le foret de gripper.
2. Lors du forage d’un grand trou, d’abord
percer un trou pilote en utilisant un foret
plus petit.
3. Toujours enfoncer le foret en ligne droite,
et si possible en formant un angle droit
avec la surface à forer.
4. Ne jamais changer de mode opératoire
pendant que le foret est en marche.
5. Ne pas exercer une trop forte pression sur
l’outil lors du cisèlement. Une pression
trop forte sur l’outil ne fait pas avancer le
travail plus rapidement.
Marteau Perforateur F
Page 29
ENTRETIEN
Retirer la fiche de la prise avant de
procéder à un réglage, une réparation ou
un entretien.
Il n’y a pas de pièces réparables par
l’utilisateur dans cet outil. Ne jamais utiliser
d’eau ou de nettoyants chimiques pour
nettoyer l’outil. Nettoyer avec un chiffon
sec. Toujours conserver l’outil motorisé
dans un endroit sec. Maintenir les fentes de
ventilation du moteur propres. Empêcher que
les commandes de marche soient couvertes
de sciure. Il est normal que des étincelles
soient visibles dans les fentes de ventilation,
cela n’endommagera pas l’outil motorisé.
Si l’alimentation est endommagée, elle doit
être remplacée par le fabricant, son agent de
maintenance ou une personne qualifiée de
façon similaire, afin d’éviter tout danger.
DÉCLARATION DE
CONFORMITÉ
Nous,
POSITEC Germany GmbH
Konrad-Adenauer-Ufer 37
50668 Köln
Déclarons ce produit,
Description WORX Marteau Perforateur
Type WX333 (330~359-désignations
des pièces, illustration de la Marteau
Perforateur)
Fonction Martelage de différents
matériaux
Est conforme aux directives suivantes:
2006/42/CE
2004/108/CE
2011/65/EU
DÉPANNAGE
1. Si votre outil électrique ne démarre pas,
vérifiez d’abord la fiche d’alimentation
secteur.
2. Si votre marteau perforateur devenait trop
chaud pendant le travail, régler l’outil en
mode perçage et le laisser tourner à la
vitesse maximum à vide pendant deux
minutes.
3. Si l’efficacité de fonctionnement de votre
marteau piqueur est trop faible, veuillez
ajouter de la graisse lubrifiante dans le
réservoir à graisse.
4. Si votre marteau fonctionne peu
efficacement, veuillez vérifier que l’outil n’
est pas émoussé.
5. Si la panne ne peut être corrigée, renvoyez
la défonceuse à un agent agréé pour les
réparations.
PROTECTION DE
L’ENVIRONNEMENT
Les déchets d’équipements électriques
et électroniques ne doivent pas être
déposés avec les ordures ménagères.
Ils sont collectés pour être recyclés dans des
centres spécialisés. Consultez les autorités
locales ou votre revendeur pour obtenir des
renseignements sur l’organisation de la collecte.
Et conforme aux normes
EN 55014-1
EN 55014-2
EN 61000-3-3
EN 61000-3-2
EN 60745-2-6
EN 60745-1
La personne autorisée à compiler le dossier
technique,
Nom: Russell Nicholson
Adresse: Positec Power Tools (Europe)
Ltd, PO Box 152, Leeds, LS10 9DS, UK
Suzhou 2015/10/27
Allen Ding
Ingénieur en chef adjoint, Essais &
Certification
2928
Marteau Perforateur F
Page 30

1. MANICOTTO PER BLOCCAGGIO
2. ASTA DI PROFONDITÀ
3. COPERCHIO SCOMPARTO LUBRIFICANTE
4. INTERRUTTORE D’ACCENSIONE/SPEGNIMENTO
5. SELETTORE FUNZIONE MARTELLO O TRAPANO
6. SELETTORE FUNZIONE MARTELLO O SCALPELLO
7. CONTROLLO VARIABILE DELLA VELOCITÀ
8. PUNTE SDS*
9. CHIAVE
10. MANDRINO A CHIAVE CON ADATTATORE E CHIAVE*
11. RECIPIENTE DI PLASTICA PER GRASSO*
12. PROTEZIONE ANTI-POLVERE*
13. SCALPELLO A PUNTA & SCALPELLO PIANO*
14. IMPUGNATURA SUPPLEMENTARE
*Accessori illustrati o descritti non fanno necessariamente parte del volume di
consegna.
DATI TECNICI
Codice WX333 (330~359-designazione del macchinario rappresentativo del
Martello rotativo)
Tensione nominale 220-240V~50/60Hz
Potenza nominale 1250W
Velocità a vuoto 0-750/min
Velocità nominale impatto 0-3700/min
Energia di impatto 5.0J
Tipo di mandrino SDS-plus
Perforazione max. Acciaio 13mm
Calcestruzzo 32mm
Legno 40mm
Classe protezione
Peso macchina 6.1kg
Martello rotante I
/II
Page 31

INFORMAZIONI SUL RUMORE
Pressione acustica ponderata A LpA: 90dB(A)
Potenza acustica ponderata A L
3.0dB(A)
K
pA&KwA
: 101dB(A)
wA
Indossare protezione per le orecchie quando la pressione acustica è superiore a 80dB(A)
INFORMAZIONI SULLA VIBRAZIONE
I valori totali di vibrazione sono determinati secondo lo standard EN 60745
Perforazione a percussione su cemento
Scalpellatura
Valore emissione vibrazioni a
Incertezza K=1.5m/s
2
Valore emissione vibrazioni a
Incertezza K= 1.5m/s
2
Il valore totale dichiarato delle vibrazioni può essere utilizzato per confrontare un utensile con un
altro e in una valutazione di esposizione preliminare.
AVVERTENZA: Il valore delle vibrazioni emesse durante il reale utilizzo dello strumento
possono differire dal valore dichiarato in base ai modi con cui viene usato lo strumento,
ai seguenti esempi e ad altre variabili:
Come viene usato l’apparecchio e i materiali forati.
Le condizioni e la buona manutenzione dello strumento.
L’uso dell’accessorio corretto per il taglio e la sua affilatura, nonché le sue buone condizioni.
La stretta sull’impugnatura e l’eventuale utilizzo di accessori antivibrazione.
L’adeguatezza dell’utilizzo dell’utensile rispetto a quanto previsto.
= 17.4m/s2
h.HD
= 14.3m/s2
h.Cheq
3130
Questo strumento potrebbe causare la sindrome della vibrazione dell’avambraccio se
il suo utilizzo non viene gestito correttamente.
AVVERTENZA: Per essere precisi, una stima del livello di esposizione nelle attuali
condizioni di utilizzo dovrebbe anche tenere conto di tutte le parti del ciclo operativo,
come le volte in cui lo strumento viene spento e il tempo in cui viene lasciato girare a vuoto
senza realmente fare il suo lavoro. Questo potrebbe ridurre significativamente il livello di
esposizione sul periodo di lavoro totale.
Un aiuto a minimizzare il proprio rischio di esposizione alle vibrazioni.
Usare sempre scalpelli, trapani e lame affilati.
Conservare questo strumento sempre in conformità a queste istruzioni e mantenerlo ben
lubrificato (dove appropriato).
Se lo strumento deve essere usato regolarmente, investire in accessori antivibrazione.
Evitare l’utilizzo dello strumento a temperature di 10oC o inferiori.
Pianificare il programma di lavoro in modo da suddividere i lavori che implicano le maggiori
vibrazioni nell’arco di più giorni.
Martello rotante I
Page 32

ACCESSORI
Impugnatura supplementare 1
Asta di profondità 1
Punte SDS (8 10 12x150mm) 3
SDS scalpello a punta & scalpello piano (250mm) 2
Protezione anti-polvere 1
Chiave 1
Mandrino a chiave con adattatore e chiave 1
Recipiente di plastica per grasso 1
Si raccomanda di acquistare tutti gli accessori nello stesso negozio in cui è stato acquistato
l’attrezzo. Fare riferimento alla confezione dell’accessorio per altri dettagli. Il personale del
negozio può aiutarvi e consigliarvi.
Martello rotante I
Page 33

INDICAZIONI DI
SICUREZZA PER
MARTELLI
1. Indossare protezione per le orecchie.
L’esposizione al rumore può provocare la
perdita dell’udito.
2. Usare le impugnature ausiliarie
fornite in dotazione all’attrezzo. La
perdita di controllo può provocare lesioni
personali.
3. Afferrare lo strumento per le apposite
maniglie quando si eseguono
operazioni durante le quali l’attrezzo
potrebbe entrare in contatto con cavi
nascosti. Il contatto con cavi elettrici in
tensione espone l’operatore al rischio di
scosse elettriche.
SIMBOLI
Per ridurre il rischio di
lesioni, l’utente deve leggere
il manuale di istruzioni
Classe protezione
Attenzione
Indossare protezione per le orecchie
Indossare protezione per gli occhi
Indossare una mascherina
antipolvere
3332
I prodotti elettrici non possono
essere gettati tra i rifiuti
domestici. L’apparecchio da
rottamare deve essere portato
al centro di riciclaggio per un
corretto trattamento. Controllare
con le autorità locali o con il
rivenditore per localizzare il
centro di riciclaggio più vicino.
Martello rotante I
Page 34

PROCEDURA PER LA
CARICA
NOTA: Leggere scrupolosamente il
manuale delle istruzioni prima di usare
l’attrezzo.
USO CONFORME ALLE NORME
La macchina è idonea per l’esecuzione di
forature battenti in mattoni, nel calcestruzzo e
nel materiale minerale e così pure per leggeri
lavori di scalpellatura. Essa è adatta anche per
forature non battenti nel legno, nel metallo,
nella ceramica ed in materiali sintetici.
1. IMPUGNATURA AUSILIARIA (Vedi A )
Per sicurezza personale si raccomanda
sempre l’utilizzo dell’impugnatura ausiliaria.
Per regolare l’impugnatura, ruotare la base
dell’impugnatura in senso antiorario e ruotare
la maniglia attorno all’anello del martello fino
a che l’impugnatura raggiunga la posizione
desiderata. Serrare con decisione.
2. USO DELL’INDICATORE DI
PROFONDITÀ (Vedi A)
L’indicatore di profondità può essere utilizzato
per fare in modo che il trapano effettui
perforazioni a una profondità costante.
Ruotare la vite bloccante sulla sommità
dell’impugnatura in senso antiorario per
allentarla, inserire l’arresto di profondità
dentro l’impugnatura. Regolarlo alla
profondità desiderata. Ruotare la vite
bloccante in senso orario per stringere.
3. INSERIMENTO DELLE PUNTE O DEL
MANDRINO (Vedi B1)
Pulire il codolo della punta e applicare del
grasso lubrificante prima di installare la
punta. Tenere ferma l’impugnatura girevole,
tirare indietro il manicotto di blocco e inserire
le punte o il mandrino nel portapunte.
Far girare la punta e spingerla fino a che
non si avverte resistenza. L’albero affonda
completamente nel portapunta. Quando si è
posizionato in modo soddisfacente, rilasciare
il manicotto nero di blocco. Ciò bloccherà in
posizione le punte o il mandrino.
Dopo l’installazione, accertarsi sempre che
l’attrezzo o il mandrino siano inseriti in modo
sicuro nel portapunte cercando di tirarli fuori.
Se le punte o il mandrino non sono posizionati
bene, ripetere nuovamente l’operazione.
4. RIMUOVERE LE PUNTE O IL
MANDRINO A CHIAVE (Vedi B1)
Per asportare il componente o il mandrino,
tirare indietro il manicotto di blocco, afferrare
e tirar fuori la punta o il mandrino.
NOTA: Le punte o il mandrino sono trattenuti
saldamente nel codolo e una volta bloccati in
posizione non possono essere asportati.
5. UTILIZZO DEL MANDRINO
Per ulteriore comodità, il trapano martello
rotante viene ora fornito con un mandrino a 3
ganasce. Ciò consente di lavorare con punte/
elementi che non siano SDS.
ATTENZIONE! Il mandrino a 3
ganasce è progettato unicamente
per TRAPANARE legno e metallo.
Non usare MAI questo mandrino
con un martello o uno scalpello
rotante. FACENDO CIÒ SI POTREBBE
DANNEGGIARE IL MANDRINO.
Inserimento di una punta nel mandrino.
(Vedi B2)
Prima di installare una punta per trapano,
togliere il collegamento con la rete elettrica.
Inserire la chiave del mandrino nel mandrino,
far ruotare la chiave in senso anti-orario
per aprire/allentare il mandrino, inserire il
trapano/attrezzo e serrare con fermezza il
mandrino girando la chiave in senso orario.
Togliere la chiave e riporla nuovamente nella
Custodia a scomparti.
6. FUNZIONAMENTO
DELL’INTERRUTTORE DI ACCENSIONE/
SPEGNIMENTO (Vedi C)
Premerlo per avviare l’attrezzo e rilasciarlo per
disattivarlo.
7. UTILIZZO DEL COMANDO DI
VELOCITÀ VARIABILE (Vedi D)
La velocità aumenta girando l’interruttore
verso il numero più alto e diminuisce
girandolo verso il numero più basso.
Martello rotante I
Page 35

8. FUNZIONE TRAPANO A PERCUSSIONE
(Vedi E, F)
1)Per trapanare calcestruzzo, muratura ecc.,
premere il pulsante di blocco (A) e ruotare il
selettore in modo che l’indicazione “ “ sia
puntata verso il triangolo. (Vedi E)
NOTA: Prima di regolare il selettore bisogna
premere il pulsante di blocco. Se il selettore
non riesce ad andare nella posizione
desiderata, accendere per un poco il martello,
poi regolare nuovamente il selettore.
2)Fare in modo che il selettore del martello o
del trapano punti verso la posizione martello
“ “ . (Vedi F)
3)A questo punto si è completata la
configurazione per utilizzare la funzione di
martello con le murature.
9. FUNZIONE DI TRAPANATURA
(Vedi G, H)
1)Premere il pulsante di blocco (A) e ruotare il
selettore facendo in modo che l’indicazione
“ “ punti verso il triangolo.(Vedi G)
2)Fare in modo che il selettore del martello o
del trapano punti verso la posizione trapano
“ “ .(Vedi H)
3)A questo punto si è completata la
configurazione per utilizzare la funzione
trapano.
10. FONCTION BURIN (Voir I, J)
1)Per scalpellare, incidere o effettuare delle
operazioni di demolizione, premere il pulsante
di blocco (A) poi far ruotare il selettore in
modo che l’indicazione “ “ sia puntata verso
il triangolo. (Vedi I)
2)Far ruotare il selettore della funzione martello
o trapano in modo che l’indicazione “ “
punti verso la posizione martello. (Vedi J)
3)A questo punto si è completata la
configurazione per effettuare lavori di
scalpello facendo ricorso alla funzione
Scalpello.
ATTENZIONE: Accertarsi che
il selettore sia effettivamente
bloccato in posizione modalità scalpello.
In caso contrario potrebbe generare
pericoli.
11. PROTEZIONE ANTI-POLVERE
(Vedi K)
Usare la protezione antipolvere per evitare
che la polvere cada sull’attrezzo o sull’utente
quando effettua delle operazioni di
trapanatura sopra la propria testa. Collegare
la protezione antipolvere alla punta come
illustrato alla sezione K.
12. APPARECCHIATURA LUBRIFICANTE
(Vedi L)
La macchina viene lubrificata con olio. È
necessario sostituire il grasso solo nel caso
in cui l’efficienza del martello risulta ridotta.
Aprire il coperchio della scatola del grasso
nella parte superiore del martello utilizzando
la chiave fornita. Rifornire con 30g di grasso
fornito con lo strumento. La specifica del
grasso è a base di litio per uso generico. Per
la lubrificazione è assolutamente necessario
utilizzare l’olio Worx previsto.
ATTENZIONE: Tenere il contenitore
del grasso lontano dalla portata dei
bambini.
13. SOSTITUZIONE DELLE SPAZZOLE
(Vedi M,N)
Togliere la spina dalla presa di corrente.
Svitare con l’ausilio di un cacciavite il
coperchio di copertura della spazzola al
carbonio.
Asportare la spazzola al carbonio. Controllare
la lunghezza della spazzola e sostituirla se è
scesa al di sotto di 6mm. Quando le spazzole
devono essere sostituite rinnovarle sempre
entrambe, anche se una è comunque più
lunga di 6mm.
Svitare completamente il coperchio di
copertura della spazzola al carbonio.
Controllare che lo strumento funzioni. Prima
dell’uso lasciar funzionare per qualche minuto
per consentire alle spazzole di assestarsi.
3534
Martello rotante I
Page 36

CONSIGLI PER IL LAVORO
CON L’ATTREZZO
1. Ridurre la pressione sulla punta del trapano
quando sta per effettuare il foro. Ciò eviterà
che il trapano si inceppi.
2. Quando si trapana un foro di rilevante
diametro, trapanare prima un foro di prova
utilizzando una punta per trapano più
piccola.
3. Esercitare sempre sul trapano una
pressione in linea retta e, se possibile,
perpendicolare al pezzo da lavorare.
4. Non cambiare mai la modalità di
funzionamento mentre il trapano è in
funzione.
5. Non applicare una pressione eccessiva
sull’attrezzo mentre lo si sta usando come
scalpello. Il ricorso a una forza eccessiva
non accelera la velocità dell’operazione.
MANUTENZIONE
Rimuovere la spina dalla presa di
corrente prima di eseguire qualsiasi
regolazione, riparazione o manutenzione.
All’interno dell’attrezzo non ci sono parti
riparabili da parte dell’utente. Non usare mai
acqua o detergenti chimici per pulire l’attrezzo.
Pulire con un panno asciutto. Immagazzinare
sempre gli attrezzi elettrici in luoghi asciutti.
Tenere pulite le aperture di ventilazione del
motore. Tenere puliti dalla polvere tutti i
controlli operativi. La formazione di scintille
all’interno delle aperture di ventilazione, è
un fenomeno normale che non crea danni
all’attrezzo.
Se il cavo d’alimentazione è danneggiato,
deve essere sostituito dal produttore, il suo
distributore o persona egualmente qualificata
per evitare pericoli.
trapano funzioni a velocità massima a
vuoto per 2 minuti.
3. Se l’efficienza di lavoro del martello è
troppo bassa, aggiungere grasso sufficiente
nello scomparto lubrificanti.
4. Se il martello ha una ridotta efficienza,
controllare se l’attrezzo è spuntato.
5. Se non si riesce a sanare un guasto,
consegnare l’attrezzo a un rivenditore
autorizzato affinché provveda alla
riparazione.
TUTELA AMBIENTALE
I prodotti elettrici non possono
essere gettati tra i rifiuti domestici.
L’apparecchio da rottamare deve essere
portato al centro di riciclaggio per un corretto
trattamento. Controllare con le autorità locali
o con il rivenditore per localizzare il centro di
riciclaggio più vicino.
RISOLUZIONE GUASTI
1. Se l’attrezzo elettrico non si avvia,
controllare prima la presa o l’alimentazione.
2. Se con l’uso il martello si scalda troppo,
impostare l’interruttore del martello in
modalità trapano e fare in modo che il
Martello rotante I
Page 37

DICHIARAZIONE DI
CONFORMITÀ
Noi,
POSITEC Germany GmbH
Konrad-Adenauer-Ufer 37
50668 Köln
Dichiara che l’apparecchio ,
Descrizione WORX Martello rotante
Codice WX333 (330~359-designazione
del macchinario rappresentativo del
Martello rotativo)
Funzione Perforazione di vari materiali
È conforme alle seguenti direttive,
2006/42/EC
2004/108/EC
2011/65/EU
Conforme a,
EN 55014-1
EN 55014-2
EN 61000-3-3
EN 61000-3-2
EN 60745-2-6
EN 60745-1
Il responsabile autorizzato alla compilazione
della documentazione tecnica,
Nome: Russell Nicholson
Indirizzo: Positec Power Tools (Europe)
Ltd, PO Box 152, Leeds, LS10 9DS, UK
3736
Suzhou 2015/10/27
Allen Ding
Vice capo ingegnere, testing e certificazione
Martello rotante I
Page 38

1. FUNDA DE INSERCIÓN
2. TOPE DE PROFUNDIDAD
3. TAPA DE LA CAJA DE CIGÜEÑAL
4. INTERRUPTOR DE ENCENDIDO/APAGADO
5. SELECTOR DE GIRO
6. SELECTOR DEPERCUSIÓN
7. VARIADOR DE VELOCIDAD
8. BROCAS SDS*
9. LLAVE
10. MANDRIL CON ADAPTADOR, LLAVE DE MANDRIL*
11. RECIPIENTE PLÁSTICO DE GRASA*
12. GUARDAPOLVO*
13. FORMÓN (PLANO Y EN PUNTA)*
14. EMPUÑADURA AUXILIAR
*Los accesorios ilustrados o descritos pueden no corresponder al material
suministrado de serie con el aparato.
CARACTERÍSTICAS TÉCNICAS
Modelo WX333 (330~359-denominaciones de maquinaria, representantes de
Martillo rotatorio)
Voltaje nominal 220-240V~50/60Hz
Potencia nominal 1250W
Velocidad nominal sin carga 0-750/min
Frecuencia de impactos 0-3700/min
Energía nominal 5.0J
Tipo de portabrocas SDS-plus
Máxima capacidad de taladrado Acero 13mm
Cemento 32mm
Madera 40mm
Doble aislamiento
Peso de la máquina 6.1kg
/II
Martillo rotatorio ES
Page 39

INFORMACIÓN DE RUIDO
Nivel de presión acústica de ponderación LpA: 90dB(A)
Nivel de potencia acústica de ponderación L
3.0dB(A)
K
pA&KwA
: 101dB(A)
wA
Úsese protección auditiva cuando la presión acústica sea mayor a 80dB(A)
INFORMACIÓN DE VIBRACIÓN
Los valores totales de vibración se determinan según la norma EN 60745:
Perforación percutora en cemento
Cincelado
Valor de emisión de vibración a
Incertidumbre K=1.5m/s
2
Valor de emisión de vibración a
Incertidumbre K=1.5m/s
2
= 17.4m/s
h,HD
= 14.3m/s
h,Cheq
El nivel de vibraciones declarado puede utilizarse para realizar comparaciones entre
herramientas y para la evaluación preliminar de la exposición.
ADVERTENCIA: El valor de emisión de vibraciones durante el uso de la herramienta
podría diferir del valor declarado dependiendo de la forma en que se use la herramienta
según los ejemplos siguientes, y otras variaciones sobre el uso de la herramienta:
Cómo se utiliza la herramienta y se perforan los materiales.
Si la herramienta se encuentra en buenas condiciones de mantenimiento.
Si se utiliza el accesorio correcto para la herramienta y se garantiza que está afilado y en buenas
condiciones.
Si se agarran las asas firmemente y se utilizan accesorios antivibración.
Y si la herramienta se utiliza según su diseño y estas instrucciones.
2
2
3938
Esta herramienta podría causar síndrome de vibración del brazo y la mano si no se
utiliza correctamente.
ADVERTENCIA: Para conseguir una mayor precisión, debe tenerse en cuenta una
estimación del nivel de exposición en condiciones reales de todas las partes del ciclo
de uso, como los tiempos durante los que la herramienta está apagado o cuando esta en
funcionamiento pero no está realizando ningún trabajo. Ello podría reducir notablemente el
nivel de exposición sobre el periodo de carga total.
Ayuda a minimizar el riesgo de exposición a la vibración.
Utilice SIEMPRE cinceles, brocas y cuchillas afiladas.
Mantenga esta herramienta de acuerdo con estas instrucciones y bien lubricada (si es necesario).
Si la herramienta se utiliza regularmente, invierta en accesorios antivibración.
Evite el uso de herramientas a temperaturas de 10ºC o menos.
Planifique su programa de trabajo para distribuir el uso de la herramienta a lo largo de varios días.
Martillo rotatorio ES
Page 40

ACCESORIOS
Empuñadura auxiliar 1
Tope de profundidad 1
Brocas SDS (8 10 12x150mm) 3
Formón SDS (plano y en punta 250mm) 2
Guardapolvo 1
Llave 1
Mandril con adaptador, llave de mandril 1
Recipiente plástico de grasa 1
Recomendamos que adquiera todos sus accesorios en el mismo comercio donde compró la
herramienta. Consulte los estuches de los accesorios para más detalles. El personal del comercio
también puede ayudar y aconsejar.
Martillo rotatorio ES
Page 41

INSTRUCCIONES DE
SEGURIDAD PARA
MARTILLOS
1. Utilíce protección auditiva. Estar
expuesto a altos niveles de ruido puede
causar perdida de audición.
2. Utilice las empuñaduras auxiliares
suministradas con la herramienta. La
pérdida de control puede causar lesiones
personales.
3. Sostenga la herramienta por las
empuñaduras aislantes cuando realice
una operación donde la herramienta
de corte puede entrar en contacto
con cableado oculto. El contacto con
un cable con corriente también hará
que las partes expuestas del metal de
la herramienta puedan transmitirle una
descarga eléctrica.
SÍMBOLOS
Para reducir el riesgo de lesión, lea
el manual de instrucciones
Clase de protección
Advertencia
Utilíce protección auditiva
Utilice protección ocular
Utilice una máscara antipolvo
Los residuos de aparatos
eléctricos y electrónicos no
deben depositarse en la basura
doméstica. Se deben reciclar en
las instalaciones especializadas.
Consulte a las autoridades locales o
el establecimiento para saber cómo
reciclar estos productos.
4140
Martillo rotatorio ES
Page 42

FUNCIONAMIENTO
NOTA: Antes de utilizar la herramienta,
lea detenidamente el manual de
instrucciones.
UTILIZACIÓN REGLAMENTARIA
El aparato ha sido proyectado para taladrar
con percusión en hormigón, ladrillo y piedra,
así como para realizar trabajos ligeros de
cincelado. Además es igualmente adecuado
para taladrar sin percutir en madera, metal,
cerámica y material sintético.
Si la herramienta o el portabrocas no están
correctamente colocados, repita la operación.
4. DESINSTALAR HERRAMIENTAS O
PORTABROCAS (Ver B1)
Para retirar la herramienta o portabrocas,
empuje la funda de inserción hacia
atrás, sostenga y tire de la herramienta o
portabrocas.
NOTA: Las herramientas o portabrocas
están firmemente sujetas por la espiga y no
se pueden retirar una vez bloqueadas en su
posición.
1. AJUSTAR LA EMPUÑADURA
AUXILIAR (Ver A)
Para su seguridad, le recomendamos usar
siemprela empuñadura auxiliar.
Para ajustar la empuñadura , afloje su parte
inferior en sentido antihorario y rote la
empuñadura alrededor de la abrazadera de
la empuñadura hasta llegar a la posición
deseada. Apriételo completamente.
2. USAR EL SELECTOR DE
PROFUNDIDAD (Ver A)
El tope de profundidad sirve para ajustar
una profundidad constante en la función de
perforación.
Gire la tuerca de bloqueo de la empuñadura
auxiliar en sentido antihorario para aflojarla,
e inserte el tope de profundidad en su
alojamiento. Ajústelo a la profundidad
deseada. Gire la tuerca de bloqueo en
sentido horario para bloquearlo.
3. INSTALAR HERRAMIENTAS O
PORTABROCAS (Ver B1)
Limpie la espiga de la broca y engrásela antes
de instalarla. Sostenga el enganche, empuje
la funda de inserción e inserte la herramienta
o el portabrocas . Gire la broca y empújela
hasta que note una resistencia. La espiga
encaja completamente en su alojamientola
Cuando esté satisfecho de la posición, libere
la funda de inserción . Eso bloqueará la
herramienta o el portabrocas en la posición.
Después , asegúrese siempre que
la herramienta o portabrocas está
correctamente sujeto tirando de ellos.
5. USO DEL PORTABROCAS
Para mayor comodidad, su martillo
combinado está provisto de un portabrocas
para broca cilíndrica, que le permite trabajar
con brocas o herramientas que no sean SDS.
ATENCIÓN! El portabrocas está
diseñado exclusivamente para
TALADRAR madera o metal. No la use
NUNCA con la percusión accionada. EL
PORTABROCAS PUEDE DAÑARSE SI LO
HACE.
Insertar una broca en el portabrocas.
(Ver B2)
Antes de instalar una broca, desenchufe el
aparato de la red eléctrica.
Ponga la llave en el portabrocas y gírela en
sentido antihorario para aflojarlo Inserte la
brocay apriete el portabrocas girando la llave
en sentido horario. Retire la llave y póngala
en la caja del martillo.
6. USAR EL INTERRUPTOR ON/OFF
(Ver C)
Presione el interruptor para encender la
herramienta y suéltelo para apagarla.
7. USAR EL VARIADOR DE VELOCIDAD
(Ver D)
La velocidad aumentará a medida que gire
el variador hacia los números más altos y
disminuirá en los números bajos.
8. FUNCIÓN DE MARTILLO
PERFORADOR (Ver E, F)
1)Para perforar hormigón, mampostería etc,
Martillo rotatorio ES
Page 43

pulse el botón de bloqueo (A) y gire el selector
para que la señal “ “ apunte hacia el
triángulo. (Ver E)
NOTA: Debe apretar el botón de bloqueo
del selector antes de ajustar el selector. Si el
selector no puede ir a la posición deseada,
apriete levemente el interruptor para hacer
girar despacio el motor y ajuste de nuevo el
selector.
2)Ponga el selector de giro señalando la
posición martillo “ “ . (Ver F)
3)Ya está listo para perforar mampostería u
hormigón.
9. FUNCIÓN DE PERFORACIÓN (Ver G,H)
1)Pulse el botón de bloqueo (A) y gire el
selector para que la señal “ “ apunte hacia
el triángulo.(Ver G)
2)Ponga el selector de giro señalando la
posiciónde perforación “ “ .(Ver H)
3)Ya está listo para utilizar su martillo en
función de perforación.
10. FUNCIÓN DE CINCEL (Ver I, J)
1)Para operaciones de picado, cincelado,
rozado o demolición, pulse el botón de
bloqueo (A) y gire el selector para que la señal
“ “ apunte hacia el triángulo. (Ver I)
2)Ponga el selector de giro señalando la
posición martillo “ “ . (Ver J)
3)Ya está listo para usar la función de Picado.
ATENCIÓN: Debe asegurarse que
el selector está bloqueado en la
posición de martillo. Si no lo está, podría
ser peligroso.
11. CUBIERTA DE POLVO (Ver K)
Use el plato para taladrado vertical para
evitar que el polvo caiga por encima de la
herramienta o por encima suyo cuando esté
realizando trabajos por encima de su cabeza.
Adjunte el plato a la broca como se muestra
en la K.
12. SISTEMA DE LUBRICACIÓN (Ver L)
El aparato va lubricado por aceite. La
aplicación de grasa sólo es necesaria si
se aprecia una reducción en la eficiencia
del percutor durante su uso. Abra el
compartimento de grasa situado en la
parte superior del percutor usando la llave
de espigas suministrada. A continuación,
aplique aproximadamente 30 g de la grasa
suministrada con la herramienta. El tipo de
grasa que debe aplicarse es grasa multiusos
con base de litio. Es imprescidible emplear
para ello el tipo de aceite que Worx prescribe.
PRECAUCIÓN: Deje el bote de grasa
lejos del alcance de niños.
13. REEMPLAZO DE LAS ESCOBILLAS
(Ver M, N)
Desconecte el enchufe de la toma de
suministro.
Desenrosque la tapa del cepillo de carbono
con un destornillador.
Extraiga el cepillo de carbono. Compruebe la
longitud del cepillo y cámbielo si es inferior
a 6 mm. Si es necesario cambiar los cepillos,
cambie siempre los dos, aunque uno de ellos
tenga más de 6 mm de largo.
Enrosque completamente la tapa del cepillo
de carbón. Compruebe si funciona la
herramienta. Antes del uso, déjela funcionar
unos minutos para que el cepillo se asiente.
4342
CONSEJOS DE TRABAJO
PARA SU HERRAMIENTA
1. Reduzca la presión sobre emartillo cuando
esté cerca de atravesar la masa o bloque
que esté demoliendo o perforando pieza de
trabajo. Eso evitará que la broca, puntero
o cincel queden bloqueados dentro del
material.
2. Cuando realice taladros de gran diametro,
le recomendamos que realice taladros
previos de menor diámetro antes de utilizar
una broca mayor
3. Aplique siempre presión sobre el martillo
en línea recta, y si es posible en ángulo
recto respecto la pieza de trabajo.
4. No cambiar nunca el modo de
funcionamiento con el martillo en marcha.
5. No aplique una presión excesiva cuando
cincele. Una fuerza excesiva no acelera el
trabajo.
Martillo rotatorio ES
Page 44

MANTENIMIENTO
Retire el enchufe de la toma de corriente
antes de efectuar cualquier ajuste,
reparación o mantenimiento.
No posee piezas en su interior que deban
ser reparadas por el usuario. Nunca emplee
agua o productos químicos para limpiar
su herramienta. Use simplemente un paño
seco. Guarde siempre su herramienta en un
lugar seco. Mantenga limpias las ranuras de
ventilación del motor. Mantenga todos los
controles de funcionamiento libres de polvo.
La observación de chispas que destellan
bajo las ranuras de ventilación indica un
funcionamiento normal que no dañará su
herramienta.
Si el cable de alimentación está dañado
deberá ser reemplazado por el fabricante,
su agente de servicio o por alguna persona
cualificada para evitar riesgos.
RESOLUCIÓN DE
PROBLEMAS
1. Si la herramienta no funciona, compruebe
la toma eléctrica en primer lugar.
2. Si su martillo se calienta demasiado,
ponga el selector en modo taladro y hágalo
trabajar en vacío a velocidad máxima
durante 2 minutos.
3. Si la eficiencia de su martillo es demasiado
baja añada grasa en la caja de grasa.
4. Si su martillo es poco eficiente, compruebe
si la herramienta está desafilada.
5. Si no es posible solucionar cualquier
anomalia en su minitaladro, encargue su
revisión a un distribuidor autorizado para
su reparación.
DECLARACIÓN DE
CONFORMIDAD
Los que reciben,
POSITEC Germany GmbH
Konrad-Adenauer-Ufer 37
50668 Köln
Declaran que el producto,
Descripcón WORX Martillo rotatorio
Modelo WX333 (330~359
-denominaciones de maquinaria,
representantes de Martillo rotatorio)
Función Martillando varios materiales
Cumple con las siguientes Directivas,
2006/42/EC
2004/108/EC
2011/65/EU
Normativas conformes a
EN 55014-1
EN 55014-2
EN 61000-3-3
EN 61000-3-2
EN 60745-2-6
EN 60745-1
La persona autorizada para componer el
archivo técnico,
Firma: Russell Nicholson
Dirección: Positec Power Tools (Europe)
Ltd, PO Box 152, Leeds, LS10 9DS, UK
PROTECCION
AMBIENTAL
Los residuos de equipamientos eléctricos
y electrónicos no deben depositarse con
las basuras domésticas. Se recogen para
reciclarse en centros especializados. Consulte
las autoridades locales o su distribuidor para
obtener informacion sobre la organización de la
recogida.
Suzhou 2015/10/27
Allen Ding
Ingeniero Jefe Adjunto. Pruebas y
Certificación.
Martillo rotatorio ES
Page 45

1. BORGMOF BOORKOP
2. DIEPTESTOP
3. KAPJE VETBAK
4. AAN-/UITSCHAKELAAR
5. BOORHAMER OF BOOR INSTELLING
6. HAMER OF BEITEL KEUZESCHAKELAAR
7. VARIABELE SNELHEIDSCONTROLE
8. SDS BOREN*
9. SPANNER
10. BOORHOUDER MET VERLOOPSTUK EN SLEUTEL*
11. VETBAK*
12. STOFKAP*
13. BEITELS (PUNTIG EN VLAK)*
14. EXTRA HANDVAT
*Abgebildetes oder beschriebenes Zubehör gehört teilweise nicht zum Lieferumfang.
TECHNISCHE GEGEVENS
Type WX333 (330~359-aanduiding van machinerie, kenmerkend voor Boorhamer)
Spanning 220-240V~50/60Hz
Opgenomen vermogen 1250W
Toerental onbelast 0-750/min
Impactfrequentie 0-3700/min
Gemeten energie 5.0J
Boorkop SDS-plus
Max. boordiameter Staal 13mm
Steen 32mm
Hout 40mm
Dubbele isolatie
Gewicht machine 6.1kg
/II
4544
4544
Boorhamer NL
Page 46

GELUIDSPRODUCTIE
A-gewogen geluidsdruk LpA: 90dB(A)
A-gewogen geluidsvermogen L
3.0dB(A)
K
pA&KwA
: 101dB(A)
wA
Gebruik gehoorbescherming indien de geluidsdruk hoger is dan 80dB(A)
TRILLINGSGEGEVENS
Totaal trillingsniveau volgens EN 60745
Hamerboren in beton
Beitelen
Trillingswaarde a
Fout K=1.5 m/s
Trillingswaarde a
Fout K=1.5 m/s
De aangegeven totale trillingswaarde kan worden gebruikt om het ene gereedschap te vergelijken
met het andere, en kan ook worden gebruikt in een voorlopige beoordeling van de blootstelling.
WAARSCHUWING: De mate van trilling tijdens gebruik van deze vermogensmachine
kan verschillen van de nominale waarde, afhankelijk van de wijze waarop de machine
wordt gebruikt, zoals in de volgende voorbeelden:
Hoe de machine gebruikt wordt en hoe het materiaal gesneden of geboord wordt.
De conditie en de onderhoudstoestand van de machine.
Gebruik van de juiste toebehoren. Zorg ervoor dat ze scherp zijn en in goede conditie.
De wijze waarop de handvatten worden vastgehouden en het gebruik van toebehoren die
trillingen verminderen.
De machine moet gebruik worden zoals door de ontwerper bedoeld is en in overeenstemming
met deze instructies.
h.HD
2
h.Cheq
2
= 17.4m/s2
= 14.3m/s2
Deze machine kan een trillingssyndroom in hand en arm veroorzaken als hij niet op de
juiste wijze gehanteerd wordt.
WAARSCHUWING: Voor de nauwkeurigheid moet bij een schatting van het
blootstellingsniveau in de feitelijke gebruiksomstandigheden rekening worden
gehouden met alle delen van de bewerking, zoals het moment dat de machine wordt
uitgeschakeld en de tijden waarop de machine loopt zonder daadwerkelijk gebruikt te worden.
Dit kan het blootstellingsniveau over de totale werkperiode aanzienlijk verminderen.
De blootstelling aan trillingen verminderen.
Gebruik ALTIJD scherpe beitels, boren en zaagbladen.
Onderhoud de machine volgens deze instructies en houd hem goed gesmeerd (voor zover van toepassing).
Wordt de machine geregeld gebruikt, schaf dan toebehoren tegen trillingen aan.
Vermijd het gebruik bij temperaturen van 10oC of minder.
Plan de werkzaamheden zodat de taken met veel trillingen over een aantal dagen verspreid worden.
Boorhamer NL
Page 47

ACCESSOIRES
Extra handvat 1
Dieptestop 1
SDS boren (8 10 12x150mm) 3
SDS beitels (puntig en vlak 250mm) 2
Stofkap 1
Spanner 1
Boorhouder met verloopstuk en sleutel 1
Vetbak 1
Wij adviseren u alle accessoires te kopen in de winkel waar u het gereedschap heeft gekocht.
Kijk op de verpakking van het accessoire voor meer informatie. Ook het winkelpersoneel kan u
helpen en adviseren.
4746
Boorhamer NL
Page 48

VEILIGHEIDSVOORSCHRIFTEN VOOR
HAMERS
1. Draag oorbescherming. Blootstelling
aan lawaai kan gehoorverlies veroorzaken.
2. Gebruik de hulphandvatten die met
het gereedschap zijn meegeleverd.
Controleverlies kan persoonlijke kwetsuur
veroorzaken.
3. Houd het gereedschap vast bij
de geïsoleerde handvatten als u
een actie onderneemt waarbij het
priemende gereedschap in contact
kan komen met verborgen kabels.
Contact met een kabel waar spanning
op staat zet tevens spanning op metalen
onderdelen van het apparaat en geeft de
gebruiker een schok.
SYMBOLEN
Om het risico op letsels
te beperken, moet u de
gebruikershandleiding lezen
Veiligheidsklasse
Waarschuwing
Draag oorbescherming
Draag oogbescherming
Draag een stofmasker
Afgedankte elektrische producten
kunt u niet met het normale
huisafval weggooien. Breng deze
producten, indien mogelijk, naar
een recyclecentrum bij u in de
buurt. Vraag de verkoper of de
gemeente naar informatie en advies
over het recyclen van elektrische
producten.
Boorhamer NL
Page 49

BEDIENINGS
INSTRUCTIES
OPMERKING: Lees voor het gebruik
van het gereedschap aandachtig het
instructieboekje.
GEBRUIK VOLGENS BESTEMMING
De machine is bestemd voor het hamerboren
in baksteen, beton en steen en voor lichte
hakwerkzaamheden. De machine is eveneens
geschikt voor het boren zonder slag in hout,
metaal, keramiek en kunststof.
1. HET HULPHANDVAT VERSTELLEN
(Zie A)
We adviseren u voor uw veiligheid altijd het
hulphandvat te gebruiken.
Draai, om het handvat te verstellen, de
onderkant hiervan tegen de klok in los, en
draai het handvat om het halsstuk tot het
handvat in de gewenste positie staat. Zet
volledig strak.
Herhaal de actie als het gereedschap of de
boorkop niet goed zitten.
4. GEREEDSCHAP OF BOORKOP
VERWIJDEREN (Zie B1)
Trek de vergrendelingssleuf terug om het
gereedschap of de boorkop te verwijderen.
ONTHOUD: Het gereedschap of de boorkop
worden stevig vastgehouden door de schacht
en kan niet worden verwijderd wanneer
vastgezet.
5. DE BOORKOP GEBRUIKEN
Voor extra gemak wordt u boorhamer met
een cilindrische boorkop geleverd. Dit stelt
u in staat te werken met niet-SDS boren/
gereedschap.
WAARSCHUWING! De cilindrische
boorkop is alleen ontworpen voor
het BOREN van hout en metaal. Gebruik
deze boorkop NOOIT met de boorhamer
of de beitel. DEZE BOORKOP KAN IN
DAT GEVAL BESCHADIGD WORDEN.
2. DE DIEPTEMETER GEBRUIKEN (Zie A)
De dieptemeter kan worden gebruikt om de
boor op een constante diepte in te stellen.
Draai de vergrendelende schroef aan de
bovenkant van het handvat tegen de klok in
om los te maken, voer de dieptestop in het
handvat in. Stel de meter in op de gewenste
diepte. Draai de vergrendelende schroef met
de klok mee om het handvat weer vast te
zetten.
3. GEREEDSCHAP OF BOORKOP
INPASSEN (Zie B1)
Maak de schacht van de boor schoon
en vet de boor in voor gebruik. Houd de
draaigreep vast, vergrendelingssleuf terug
en voer het gereedschap of de boorkop in
de houder. Draai de boor en druk deze in
tot u weerstand voelt. De schacht zet zich
geheel vast in de houder. Als u er tevreden
mee bent met hoe de boor vast zit laat u de
zwarte vergrendelingssleuf los. Dit zet het
gereedschap of de boorkop vast.
Zorg er na installatie voor dat het
gereedschap of de boorkop goed vast zit door
eraan te trekken.
Een boor in de boorkop invoeren (Zie B2)
Haal de stekker uit het stopcontact voor u een
boor invoert.
Draai de boorkop tegen de klok in los, voer
gereedschap of een boor en draai de boorkop
met de klok mee weer vast. Verwijder de
sleutel en leg deze weer in de koffer.
6. DE AAN/UITSCHAKELAAR BEDIENEN
(Zie C)
Druk in om het gereedschap te starten en laat
los om het gereedschap te stoppen.
7. DE VARIABELE SNELHEIDS
SCHAKERLAAR GEBRUIKEN (Zie D)
De snelheid neemt toe zodra u de schakelaar
naar een hoger nummer draait en neemt af bij
een lager nummer.
8. HAMERBOOR FUNCTIE (Zie E, F)
1)Voor het boren van beton, bakstenen, enz.
drukt u op vergrendelingsknop (A) en draait u
de selectieschakelaar zodat het teken “
naar de driehoek is gericht. (Zie E)
ONTHOUD: U moet de vergrendelingsknop
van de keuzeschakelaar indrukken voor u deze
“
4948
Boorhamer NL
Page 50

verstelt. Als de schakelaar niet in de gewenste
positie kan komen, moet u de hamer even aan
zetten en de keuzeschakelaar dan opnieuw
verstellen.
2)Draai de hamer of boor keuzeschakelaar
naar de hamerstand op de “ “ positie.
(Zie F)
3)U bent nu klaar om in steen te boren.
9. BOORFUNCTIE (Zie G, H)
1)Druk op de vergrendelingsknop (A) en draai
de selectieschakelaar zodat het teken “ “
naar de driehoek is gericht. (Zie G)
2)Zet de hamer- of boorkeuze schakelaar op de
boorstand “ “ . (Zie H)
3)Het apparaat staat nu op de boorstand.
10. BEITELFUNCTIE (Zie I, J)
1)Voor het beitelen, groeven of afbreken, drukt
u op vergrendelingsknop (A) en draait u de
selectieschakelaar zodat het teken “ “ naar
de driehoek is gericht. (Zie I)
2)Draai de hamer- of boorstand
keuzeschakelaar naar de hamerstand “ “ .
(Zie J)
3)U bent nu klaar om te beitelen met de Beitel
stand.
WAARSCHUWING: U moet er zeker
van zijn dat de keuzeschakelaar
vast staat op de beitelstand. Zo niet, kan
het gevaarlijk zijn.
11. STOFKAPJE (Zie K)
Gebruik het stofkapje om te voorkomen dat
stof over het gereedschap en op uzelf valt
wanneer u boven uw hoofd boort. Zet het
stofkapje vast zoals getoond in K.
12. SMEERMACHINE (Zie L)
De machine is met olie gesmeerd. Het vet
hoeft alleen maar te worden aangevuld als de
hamer niet efficiënt werkt. Open het deksel
van de vetcontainer bovenop de hamer met
de meegeleverde pensleutel. Vul ongeveer
30 g bij met het meegeleverde vet. De
vetspecificatie is gebaseerd op lithium voor
algemene toepassingen. Daarbij
moet beslist de daarvoor bedoelde olie van
Worx worden gebruikt.
LET OP: Houd de vethouder uit het
bereik van kinderen.
13. DE BORSTELS VERVANGEN (Zie M, N)
Trek de stekker uit het stopcontact.
Schroef de kap van de koolborstel los met de
schroevendraaier.
Verwijder de koolborstel. Controleer de lengte
van de borstel en vervang deze als de lengte
minder is dan 6 mm. Wanneer u de borstels
vervangt, moet u ze altijd allebei vervangen,
zelfs als een van beide langer is dan 6 mm.
Schroef de kap van de koolborstel volledig in.
Controleer of het gereedschap werkt; Laat het
enkele minuten draaien voordat u het gebruikt
zodat de borstels de kans krijgen zich aan te
passen.
TIPS VOOR HET WERKEN
MET UW APPARAAT
1. Verminder de druk op de boor als de
boor op het punt staat door te breken. Dit
voorkomt dat de boor vast gaat zitten.
2. Boor, als u een groot gat boort, eerst een
proefgat met een kleinere boor.
3. Pas altijd druk in een rechte lijn toe op uw
boor, en zo mogelijk met rechte hoeken
naar het werkstuk.
4. Verander de bedieningsstand nooit als de
boor loopt.
5. Pas geen excessieve druk toe als u de
beitelfunctie gebruikt. Hoge druk versnelt
het werk niet.
ONDERHOUD
Trek de voedingskabel uit de aansluiting
voordat u eventuele aanpassingen,
reparaties of onderhoud uitvoert.
Dit gereedschap bevat geen onderdelen
waaraan de gebruiker onderhoud kan of moet
uitvoeren. Gebruik nooit water of chemische
reinigingsmiddelen voor het schoonmaken
van uw elektrische gereedschap. Veeg het
schoon met een droge doek. Bewaar uw
elektrische gereedschap altijd op een droge
plek. Houd de ventilatiegleuven van de motor
schoon. Houd alle bedieningselementen vrij
Boorhamer NL
Page 51

van stof. Er kunnen vonken zichtbaar zijn in de
ventilatiegleuven. Dit is normaal en leidt niet
tot beschadiging van uw gereedschap.
Is de voedingskabel beschadigd, dan moet hij,
om risico te voorkomen, worden vervangen
door de fabrikant, zijn vertegenwoordiger of
een ander bevoegd persoon.
PROBLEMEN OPLOSSEN
1. Als uw elektrisch gereedschap niet start,
moet u eerst de stekker in het stopcontact
controleren.
2. Als uw hamer tijdens gebruik te heet wordt
moet u de schakelaar naar de boorstand
zetten en uw boor 2 minuten lang zonder
werklading laten draaien.
3. Vul het vet in het vetbakje bij als de
efficiëntie van uw hamer te laag is.
4. Controleer of het gereedschap bot is als uw
hamer niet efficiënt meer is.
5. Als u een fout niet kunt herstellen kunt u
het gereedschap terugbrengen naar een
geautoriseerd verkooppunt vor reparatie.
BESCHERMING VAN HET
MILIEU
Afgedankte elektrische producten
kunt u niet met het normale huisafval
weggooien. Breng deze producten,
indien mogelijk, naar een recyclecentrum bij u
in de buurt. Vraag de verkoper of de gemeente
naar informatie en advies over het recyclen
van elektrische producten.
CONFORMITEITVERKLARING
Wij,
POSITEC Germany GmbH
Konrad-Adenauer-Ufer 37
50668 Köln
Verklaren dat het product,
Beschrijving WORX Boorhamer
Type WX333 (330~359-aanduiding
van machinerie, kenmerkend voor
Boorhamer)
Functie Verschillende materialen
hameren
Overeenkomt met de volgende richtlijnen,
2006/42/ EG
2004/108/ EG
2011/65/EU
Standaards in overeenstemming met,
EN 55014-1
EN 55014-2
EN 61000-3-3
EN 61000-3-2
EN 60745-2-6
EN 60745-1
De persoon die bevoegd is om het technische
bestand te compileren,
Naam: Russell Nicholson
Adres: Positec Power Tools (Europe) Ltd,
PO Box 152, Leeds, LS10 9DS, UK
5150
Suzhou 2015/10/27
Allen Ding
Plaatsvervangend Chief Ingenieur, Testen en
Certificering
Boorhamer NL
Page 52

1. BLOKOWANIE RĘKAW
2. OGRANICZNIK GŁĘBOKOŚCI
3. POKRYWA ZBIORNICZKA ZE SMAREM
4. WŁĄCZNIK / WYŁĄCZNIK
5. WYBIERAK TRYBU WIERCENIA UDAROWEGO LUB WIERCENIA
6. WYBIERAK TRYBU WIERCENIA UDAROWEGO LUB DŁUTA
7. REGULACJA PRĘDKOŚCI OBROTOWEJ
8. SDS WIERTŁA *
9. KLUCZ DO NAKRĘTEK
10. KEY UCHWYT WIERTARSKI Z ADAPTEREM, KLUCZ DO UCHWYTU *
11. POJEMNIK Z TWORZYWA SZTUCZNEGO * SMAR
12. OSŁONA PYŁOWA*
13. DŁUTA (PUNKTOWE I PŁASKIE)*
14. RĘKOJEŚĆ
*
Nie wszystkie pokazane na ilustracji akcesoria są dostarczane standardowo.
DANE TECHNICZNE
Typ: WX333 (330~359- oznaczenie urządzenia, reprezentuje Młot obrotowy)
Napięcie znamionowe
Moc znamionowa
Prędkość znamionowa bez obciążenia
Udarów
Energia uderzenia
Typ uchwytu SDS-plus
Maks. Zdolność wiercenia
Kamieniarstwo
Podwójna izolacja
Masa urządzenia
Stal
Drewno
220-240V~50/60Hz
1250W
0-750/min
0-3700/min
5.0J
13mm
32mm
40mm
6.1kg
Młot obrotowy PL
/II
Page 53

DANE DOTYCZĄCE HAŁASU I WIBRACJI
Ważone ciśnienie akustyczne LpA:90dB(A)
Ważona moc akustyczna L
& KWA 3.0dB(A)
K
PA
: 101dB(A)
wA
Gdy ciśnienie akustyczne przekracza 80dB (A), należy używać ochrony słuchu
INFORMACJE WIBRACJE
Łączne wartości wibracji, określone według EN 60745:
Wiercenie udarowe w betonie
Dłutowanie
Wartość emisji wibracji α
Niepewność K=1.5m/s
Wartość emisji wibracji α
Niepewność K=1.5m/s
Zadeklarowana całkowita wartość wibracji może być wykorzystana do porównania jednego narzędzia
z innym oraz może być użyta we wstępnej ocenie narażenia.
OSTRZEŻENIE: Wartość emisji wibracji w czasie rzeczywistego używania elektronarzędzia
może się różnić od zadeklarowanej, w zależności od sposobu używania narzędzia w
następujących przykładach i innych sposobach używania narzędzia:
Jak używane jest narzędzie oraz, czy materiał jest cięty czy wiercony.
Czy narzędzie jest w dobrym stanie i czy jest prawidłowo konserwowane.
Czy używane są prawidłowe akcesoria narzędzia i czy narzędzie jest właściwie naostrzone oraz w
dobrym stanie.
Czy dokręcone są szczęki na uchwycie i czy używane są jakiekolwiek akcesoria antybiracyjne.
Oraz, czy narzędzie jest używane zgodnie z przeznaczeniem i według instrukcji.
h,HD
2
h,Cheq
2
=17.4m/s2
=14.3m/s
2
5352
Niepawidłowe prowadzenie tego narzędzia może spowodować syndrom wibracji
rąk.
OSTRZEŻENIE: W szczególności, oszacowanie poziomu ekspozycji w rzeczywistych
warunkach używania powinno brać także pod uwagę wszystkie elementy cyklu działania, takie
jak czasy wyłączenia narzędzia i czas bezczynności, ale nie rzeczywiście wykonywaną pracę. Może
to znacznie zmniejszyć poziom ekspozycji w całym okresie pracy.
Pomoc w minimalizacji narażenia na wibracje.
Należy ZAWSZE używać ostrych dłut, wierteł i ostrzy
Narzędzie należy konserwować z godnie z instrukcjami i prawidłowo smarować (w odpowiednich
miejscach)
Jeśli narzędzie jest używane regularnie należy zakupić akcesoria antywibracyjne.
Należy unikać używania narzędzi w temperaturach 10oC lub niższych
Należy zaplanować harmonogram pracy w celu rozłożenia używania narzędzi wytwarzających wysoki
poziom drgań na kilka dni.
Młot obrotowy PL
Page 54

AKCESORIA /ILOŚĆ
Rękojeść 1
Głębokości wiercenia 1
Końcówki SDS wiertła (8 10 12x150mm) 3
SDS wiertniczy (point & płaskie 250mm) 2
Pokrywa 1
Klucz do nakrętek 1
Key uchwyt wiertarski z adapterem, klucz do uchwytu 1
Plastikowy pojemnik ze smarem 1
Zaleca się zakup wszystkich akcesoriów w sklepie, gdzie zakupiono narzędzie. Więcej szczegółów
można znaleźć w rozdziale „Porady” w niniejszej instrukcji lub w opakowaniu akcesoriów. Personel
sklepu może również udzielić pomocy i porad.
Młot obrotowy PL
Page 55

WSKAZÓWKI
DOTYCZĄCE
BEZPIECZEŃSTWA
PRACY Z MŁOTAMI
1. Używać ochrony słuchu z
wiertarkami udarowymi. Hałas może
spowodować utratę słuchu.
2. Używać dodatkowych uchwytów
dostarczonych wraz z narzędziem.
Utrata kontroli może spowodować obrażenia
ciała.
3. Jeśli narzędzie tnące może mieć
kontakt z ukrytym okablowaniem,
podczas działania narzędzie należy
trzymać za izolowane powierzchnie.
Kontakt z ‘aktywnym’ okablowaniem może
także spowodować obnażenie metalowych
elementów i porażenie operatora prądem
elektrycznym.
SYMBOLE
Aby zmniejszyć niebezpieczeństwo
odniesienia obrażeń, użytkownik
powinien przeczytać podręcznik z
instrukcjami
Podwójna izolacja
Ostrzeżenie
Używać ochrony słuchu
Używać ochrony wzroku
Używać maski przeciwpyłowej
Odpady wyrobów elektrycznych nie
powinny być wyrzucane razem z
odpadami gospodarstwa domowego.
Należy je poddawać recyklingowi
w odpowiednich zakładach. Porady
dotyczące recyklingu można uzyskać
u władz lokalnych lub sprzedawcy
detalicznego.
5554
Młot obrotowy PL
Page 56

OBSŁUGA
UWAGA: Przed użyciem narzędzia należy
uważnie przeczytać instruk.
PRZEZNACZENIE
Urządzenie jest przeznaczone do wiercenia
udarowego w betonie, cegle i kamieniu, jak
również do lekkich prac kucia. Nadaje się
również do wiercenia bez udaru w drewnie,
metalu, ceramice i tworzywach sztucznych.
1. UCHWYT DODATKOWY (Zob. A)
Ze względów bezpieczeństwa zalecamy, aby
zawsze używać dodatkowej rękojeści.
Aby ustawić rękojeść, obracaj jej dolną część w
kierunku przeciwnym do ruchu wskazówek zegara i obróć rękojeść wokół kołnierza młota tak,
by znalazła się w żądanych położeniu. Mocno
dokręć.
2. KORZYSTANIE Z MIERNIKA
GŁĘBOKOŚCI (Zob. A)
Miernik głębokości może być stosowany do
ustawienia stałej głębokości wiercenia.
Obrócić śrubę blokującą u góry rękojeści w kierunku przeciwnym do ruchu wskazówek zegara
w celu poluzowania oraz umieścić w niej miernik
głębokości. Ustawić odpowiednią głębokość.
Obrócić śrubę blokującą w kierunku zgodnym z
ruchem wskazówek zegara w celu dokręcenia.
3. MOCOWANIE KOŃCÓWEK LUB UCHWYTU (Zob. B1)
Przed zamocowaniem końcówki wyczyścić
jej trzon i nałożyć smar. Trzymając uchwyt
obrotowy odciągnąć tuleję blokującą do tyłu,
umieścić końcówki lub uchwyt w uchwycie wiertarskim. Obrócić końcówkę do momentu poczucia oporu. Wał zostanie całkowicie obniżony
w uchwycie wiertarskim. Po prawidłowym
osadzeniu zwolnić czarną tuleję blokującą. Spowoduje to zablokowanie końcówek lub uchwytu
w miejscu.
Po zamocowaniu należy zawsze upewnić się, że
narzędzie lub uchwyt są bezpiecznie zamocowane w uchwycie wiertarskim poprzez podjęcie
próby ich wyciągnięcia.
Jeśli końcówki lub uchwyt nie są zamocowane
prawidłowo, należy powtórzyć procedurę.
4. WYJMOWANIE KOŃCÓWEK LUB
UCHWYTU KLUCZYKOWEGO (Zob. B1)
W celu wyjęcia narzędzia lub uchwytu
pociągnąć tuleję blokującą, przytrzymać i
wyciągnąć narzędzie lub uchwyt.
UWAGA: Końcówki lub uchwyt są mocno
osadzone w trzonie i nie można ich usunąć po
zablokowaniu w miejscu.
5. KORZYSTANIE Z UCHWYTU
W celu zwiększenia wygody pracy wiertarkę
udarową wyposażono w 3-szczękowy uchwyt.
Dzięki niemu można pracować z wiertłami/
narzędziami o mocowaniu innym niż SDS.
OSTRZEŻENIE! Uchwyt
3-szczękowy jest przeznaczony
jedynie do WIERCENIA w drewnie lub
metalu. NIGDY nie należy używać
tego uchwytu w trybie pracy wiertarki
udarowej lub dłuta. W PRZECIWNYM
WYPADKU MOŻE DOJŚĆ DO USZKODZENIA UCHWYTU.
MOCOWANIE WIERTŁA W UCHWYCIE.
(Zob. B2)
Przed zamocowaniem wiertła odłączyć wtyczkę
od zasilania.
Umieścić kluczyk w uchwycie, obrócić go w kierunku przeciwnym do ruchu wskazówek zegara
i odkręcić/poluzować uchwyt, włożyć wiertło/
narzędzie i mocno dokręcić uchwyt obracając
kluczyk w kierunku zgodnym z ruchem wskazówek zegara. Usunąć kluczyk i umieścić w
skrzynce narzędziowej na swoim miejscu.
6. OBSŁUGA ON / OFF przełącznika (C)
Naciśnij przełącznik, aby uruchomić narzędzie i
zwolnij go, aby zatrzymać narzędzie.
7. UŻYWANIE REGULATORA
PRĘDKOŚCI (Zob. D)
Obracanie pokrętła w kierunku wyższej wartości
powoduje zwiększenie prędkości, a obracanie
go w kierunku mniejszej wartości – zmniejszenie
prędkości.
8. FUNKCJA WIERTARKI UDAROWEJ
(Zob. E、F)
1) W celu wiercenia w betonie, kamieniu, itp.
wcisnąć przycisk blokady (A) i obrócić wybierak
tak, aby trójkąt wskazywał na znak „ ”. (Zob. E)
Młot obrotowy PL
Page 57

UWAGA: Przed ustawieniem wybieraka w
odpowiedniej pozycji należy wcisnąć przycisk
blokady wybieraka. Jeśli wybieraka nie można
ustawić w wymaganej pozycji, należy włączyć na
chwilę wiertarkę udarową, a następnie ponownie
ustawić wybierak w odpowiedniej pozycji.
2)Obrócić wybierak trybu pracy wiertarki udarowej lub wiercenia do pozycji wiertarki udarowej
„ ”. (Zob. F)
3) Funkcja wiertarki udarowej do pracy w kamieniu została ustawiona.
13. WYMIANA SZCZOTEK (Patrz M, N)
Odłącz wtyczkę od sieci zasilającej.
Odkręć wkrętakiem pokrywkę szczotki węglowej.
Jeśli szczotki wymagają wymiany, zawsze
wymieniaj je w komplecie.
Wkręć pokrywkę szczotki węglowej do oporu.
Sprawdź, czy elektronarzędzie działa. Przed
rozpoczęciem pracy uruchom elektronarzędzie
na biegi luzem na kilka minut, aby szczotki
właściwie osiadły.
9. FUNKCJA WIERCENIA (Zob. G、H)
1) Wcisnąć przycisk blokady (A) i obrócić wybierak tak, aby trójkąt wskazywał na znak „ ”.
(Zob. G)
2)Obrócić wybierak trybu pracy wiertarki udarowej lub wiercenia do pozycji wiercenia „ ”.
(Zob. H)
3) Funkcja wiercenia została ustawiona.
10. FUNKCJA DŁUTA (Zob. I、J)
1) W celu dłutowania, wycinania lub kruszenia
wcisnąć przycisk blokady (A) i obrócić wybierak
tak, aby trójkąt wskazywał na znak „ ”. (Zob. I)
2)Obrócić wybierak trybu pracy wiertarki udarowej lub wiercenia do pozycji wiertarki udarowej
„ ”. (Zob. J)
3)Funkcja dłutowania została ustawiona.
OSTRZEŻENIE: Należy upewnić
się, że wybierak jest dobrze zablokowany w pozycji dłuta. W przeciwnym
wypadku grozi to niebezpieczeństwem.
11. OSŁONA PYŁOWA (Zob. K)
Należy użyć osłony pyłowej w celu uniknięcia
spadania pyłu na narzędzie oraz użytkownika
podczas wiercenia nad poziomem głowy.
Założyć osłonę pyłową na wiertle, jak pokazano
na rys. K.
12. SMAROWANIE MASZYNY (Zob. L)
Maszynę należy smarować smarem stałym.
Uzupełnienie smaru jest wymagane tylko przy
niskiej sprawności dłutowania. Otwórz pokrywę
smarownicy na wierzchu młota kluczem do
nakrętek okrągłych z wcięciami. Następnie dodaj
około 30 g smaru.
OSTRZEŻENIE: Przechowuj pojemnik
ze smarem poza zasięgiem dzieci.
ZALECENIA
DOTYCZĄCE PRACY Z
ELEKTRONARZĘDZIEM
1. Zmniejsz nacisk na wiertło tuż przed wyjściem
na drugą stronę ścianki. Zapobiegnie to zakleszczeniu narzędzia.
2. Przy wykonywaniu otworów o dużej średnicy,
należy najpierw mniejszym wiertłem wywiercić
otwór prowadzący.
3. Nacisk na wiertło zawsze wywieraj wzdłuż
linii prostej i w miarę możliwości pod kątem
prostym do powierzchni obrabianego przedmiotu.
4. Nie zmieniaj nigdy trybu roboczego podczas
pracy narzędzia.
5. Nie wywieraj zbyt dużego nacisku na
narzędzie podczas dłutowania. Zbyt duży
nacisk nie zwiększa wydajności pracy.
KONSERWACJA
Przed dokonywaniem jakichkolwiek
regulacji, obsługi technicznej lub
konserwacji należy wyjąć wtyczkę z
gniazdka.
Narzędzie to nie wymaga żadnego dodatkowego
smarowania czy konserwacji.
W narzędziu nie ma żadnych części, które
wymagałyby serwisowania przez użytkownika.
Nigdy nie należy używać wody czy środków
czyszczących do czyszczenia narzędzia z
napędem elektrycznym. Czyścić suchą szmatką.
Zawsze należy przechowywać narzędzie w
suchym miejscu. Utrzymywać w czystości otwory
wentylacyjne silnika. Utrzymywać wszystkie
urządzenia sterujące w czystości.
5756
Młot obrotowy PL
Page 58

Jeśli uszkodzony zostanie przewód zasilający,
aby uniknąć niebezpieczeństwa powinien zostać
wymieniony przez producenta, przedstawiciela
serwisu lub inną wykwalikowaną osobę.
ROZWIĄZYWANIE
PROBLEMÓW
1. Jeśli elektronarzędzie nie włącza się, w
pierwszej kolejności należy sprawdzić
wtyczkę zasilania.
2. Jeśli wiertarka jest zbyt gorąca, należy
ustawić wybierak w trybie wiercenia i
uruchomić wiertarkę przy maksymalnej
prędkości na biegu jałowym przez 2 minuty.
3. Jeśli wydajność pracy wiertarki jest zbyt
niska, należy dodać odpowiednią ilość smaru
do zbiorniczka.
4. Jeśli wydajność pracy wiertarki jest niska,
należy sprawdzić narzędzie pod kątem
stępienia.
5. Jeśli usterki nie można naprawić, należy
przekazać narzędzie do upoważnionego
sprzedawcy w celu dokonania naprawy.
DEKLARACJA
ZGODNOŚCI
My,
POSITEC Germany GmbH
Konrad-Adenauer-Ufer 37
50668 Köln
Deklarujemy, że produkt,
Opis: WORX Młot obrotowy
Typ: WX333 (330~359- oznaczenie
urządzenia, reprezentuje Młot obrotowy)
Funkcja: Kucie w różnych materiałach
jest zgodny z następującymi dyrektywami,
2006/42/EC
2004/108/EC
2011/65/EU
Normy są zgodne z
EN 55014-1
EN 55014-2
EN 61000-3-2
EN 61000-3-3
EN 60745-1
EN 60745-2-6
OCHRONA
ŚRODOWISKA
Odpady wyrobów elektrycznych nie
powinny być wyrzucane razem z odpadami
gospodarstwa domowego. Należy je
poddawać recyklingowi w odpowiednich
zakładach. Porady dotyczące recyklingu można
uzyskać u władz lokalnych lub sprzedawcy
detalicznego.
Osoba upoważniona do kompilacji pliku
technicznego,
Nazwa: Russell Nicholson
Adres: Positec Power Tools (Europe)Ltd,
PO Box 152,Leeds,LS10 9DS,UK
Suzhou 2015/1027
Allen Ding
Zastępca głównego inżyniera, testowanie i
certykacja
Młot obrotowy PL
Page 59

1. ZÁRÓKARIMÁT
2. MÉLYSÉGMÉRŐ
3. KENŐANYAGTARTÓ FEDELE
4. ON / OFF KAPCSOLÓ
5. ÜTVEFÚRÓ VAGY FÚRÓ FUNKCIÓVÁLASZTÓ KAPCSOLÓ
6. ÜTVEFÚRÓ VAGY VÉSŐ FUNKCIÓVÁLASZTÓ KAPCSOLÓ
7. VÁLTOZTATHATÓ SEBESSÉGSZABÁLYOZÁS
8. SDS FÚRÓ *
9. CSAVARKULCS
10. KULCSOS TOKMÁNY ADAPTERREL, TOKMÁNYKULCS*
11. MŰANYAG KENŐANYAGTARTÁLY*
12. PORFOGÓ*
13. VÉSŐK (HEGYES ÉS LAPOS)*
14. PÓTFOGANTYÚ
Nem minden készülék tartalmazza valamennyi, a fentiekben felsorolt alkatrészt.
*
MŰSZAKI ADATOK
Típus: WX333 (330-359 kijelölésének gép képviselő fúrókalapács)
Feszültség
Bemenő teljesítmény
Terhelés nélküli sebesség
Ütésszám
Ütési energia
Chuck típus SDS-plus
Fúrási teljesítmény max
Kőművesmunka
Védelmi osztály
A készülék súlya
Acél
Erdő
220-240V~50/60Hz
1250W
0-750/min
0-3700/min
5.0J
13mm
32mm
40mm
6.1kg
5958
5958
/II
Pneumatikus fúrókalapács HU
Page 60

ZAJ ÉS REZGÉS ADATOK
A-súlyozású hangnyomásszint LpA:90dB(A)
A-súlyozású hangerő L
& KWA 3.0dB(A)
K
PA
: 101dB(A)
wA
Viseljen fülvédelmet, ha a hangnyomásszint meghaladja a következő értéket 80dB(A)
REZGÉSÉRTÉKEK
Az EN 60745 szabvány szerint meghatározott összes rezgés (háromtengelyű vektoriális összeg) a
következő:
Hammer fúrás betonba
Chiselling
Rezgés kibocsátási érték α
Bizonytalanság K=1.5m/s
Rezgés kibocsátási érték α
Bizonytalanság K=1.5m/s
A hivatalos összesített rezgésszint a szerszámok összehasonlítására, illetve a kitettség előzetes
felmérésére használható.
FIGYELEM: Az elektromos kéziszerszám használata során a rezgéskibocsátás eltérhet a fenti
értéktől attól függően, hogy a szerszámot hogyan használják. Az érték függhet az alábbiaktól:
Hogyan használják a szerszámot, milyen anyagokat vágnak vagy fúrnak.
Az eszköz jó állapotban van-e, megfelelően karbantartják-e.
Megfelelő tartozékokat használnak-e az eszközhöz, vigyáznak-e, hogy hegyes legyen és jó
állapotban maradjon.
A markolat megfelelően rögzül-e, használnak-e rezgéscsillapító tartozékokat.
A szerszámot rendeltetésszerűen, kialakításának és a jelen utasításoknak megfelelően használják-e.
=17.4m/s2
h,HD
2
h,Cheq
2
=14.3m/s
2
Ha a szerszámot nem kezelik megfelelően, kéz-kar vibrációs szindrómát okozhat.
FIGYELEM: A pontosság érdekében az expozíciós szint becsült értékéhez a valós használati
körülmények között gyelembe kell venni a működési ciklus valamennyi elemét, így azt az időt
is, amikor a szerszám ki van kapcsolva, és amikor üresjáratban működik. Ez a teljes munkaidőszak
viszonylatában jelentősen csökkentheti az expozíciós szintet.
A rezgéskockázatnak való kitettséget az alábbiakkal csökkentheti:
MINDIG éles vésőt, pengét, és hegyes fúrófejet használjon.
Az eszközt jelen utasításoknak megfelelően tartsa karban, és vigyázzon a megfelelő kenésre (ahol
erre szükség van).
Ha rendszeresen használja az eszközt, vásároljon rezgéscsillapító tartozékokat.
Kerülje az eszköz használatát 10oC vagy alacsonyabb hőmérsékleten.
Úgy tervezze meg a munkáját, hogy a magas rezgésszámú eszközök használatát igénylő feladatokat
több napra ossza el.
Pneumatikus fúrókalapács HU
Page 61

TARTOZÉKOK
Pótfogantyú 1
Mélységmérő 1
SDS fúró (8 10 12x150mm) 3
SDS véső (pont és lapos 250mm) 2
Porvédő fedél 1
Villáskulcs 1
Key tokmány adapter, tokmánykulcsot 1
Műanyag kenőanyagtartáy 1
Javasoljuk, hogy a tartozékokat ugyanabból a boltból vásárolja meg, ahol a szerszámot is vásárolta.
További részleteket a tartozék csomagolásán talál. Kérjen segítséget és tanácsot a bolti eladóktól.
6160
Pneumatikus fúrókalapács HU
Page 62

BIZTONSÁGI
ELŐÍRÁSOK A
KALAPÁCSOK
SZÁMÁRA
1. Viseljen fülvédőt. A zaj halláskárosodást
okozhat.
2. Ha az eszközhöz kiegészítő
markolato(ka)t mellékeltek,
használja az(oka)t. A kontrollvesztés
személyi sérülést eredményezhet.
3. Tartsa az elektromos szerszámot
a szigetelt markolófelületeinél
ha olyan munkát végez, ahol a
befogott tartozék rejtett kábeleket
vagy a készülék saját kábelét. Ha a
vágótartozék feszültség alatt álló vezetéket
érint, az elektromos kéziszerszám külső
fémalkatrészei feszültség alá kerülhetnek,
aminek hatására a szerszám működtetője
áramütést szenvedhet.
SZIMBÓLUMOK
A sérülésveszély csökkentése
érdekében a felhasználónak el kell
olvasnia az utasításokat
Dupla szigetelés
Figyelmeztetés
Viseljenszemvédőt
Viseljen fülvédőt
Viseljen pormaszkot
A leselejtezett elektromos
készülékek nem dobhatók ki a
háztartási hulladékkal. Ha van a
közelben elektromos hulladék gyűjtő
udvar, vigye oda a készüléket. Az
újrahasznosítási lehetőségekről
tájékozódjon a helyi hatóságoknál
vagy a kereskedőnél.
Pneumatikus fúrókalapács HU
Page 63

HASZNÁLATI
UTASÍTÁSOK
MEGJEGYZÉS: Mielőtt a szerszámot
használná, olvassa el gyelmesen az
utasításokat.
RENDELTETÉSSZERŰ HASZNÁLAT
Az elektromos kéziszerszám ütvefúrásra beton,
tégla és kő, valamint könnyű vésési munkák.
Ugyancsak alkalmas a fúrásra fa, fém, kerámia
és műanyag.
1. A SEGÉDFOGANTYÚ BEÁLLÍTÁSA
(Lásd A. Ábra )
Személyes biztonsága érdekében minden esetben javasolt a segédfogantyú használata.
A fogantyú beállításához forgassa a fogantyú
alsó részét az óramutató járásával ellentétes
irányba, és forgassa a fogantyút az ütvefúró
nyaka körül, míg a fogantyú a kívánt helyzetbe
kerül. Szorítsa meg.
2. A MÉLYSÉGMÉRŐ HASZNÁLATA
(Lásd A. Ábra)
A mélységmérő segítségével beállítható a fúrás
állandó mélysége.
Forgassa a fogantyú felső részén található
rögzítőcsavart az óramutató járásával ellentétes irányban a lazításhoz, majd illessze be a
mélységmérőt a fogantyúba. Állítsa a kívánt mélységre. Forgassa a rögzítőcsavart az óramutató
járásával megegyező irányba a szorításhoz.
4. A BITFEJEK VAGY A TOKMÁNY ELTÁVOLÍTÁSA (Lásd B1. Ábra)
A bitfej vagy a tokmány eltávolításához húzza
hátra a rögzítőhüvelyt, tartsa meg és húzza ki a
bitfejet vagy a tokmányt.
MEGJEGYZÉS: A bitfejek vagy a tokmány szilárdan rögzül a nyaknál, és nem lehet eltávolítani
rögzített pozícióban.
5. A TOKMÁNY HASZNÁLATA
A nagyfokú kényelem érdekében ütvefúrója
hárompofás tokmánnyal érkezik. Ez lehetővé
teszi a nem SDS befogású bitfejekkel/eszközökkel való munkát is.
FIGYELEM! A hárompofás tok-
mány csak fa és fém FÚRÁSÁRA
alkalmas. SOHA ne használja ezt a tokmányt fúrókalapáccsal vagy vésővel.
ELLENKEZŐ ESETBEN A TOKMÁNY
SÉRÜLNI FOG.
Fúrófej beillesztése a tokmányba.
(Lásd B2. Ábra)
A fúrófej beillesztését megelőzően húzza ki a
készüléket az áramból.
Helyezze a tokmánykulcsot a tokmányba, fordítsa el az óramutató járásával ellentétes irányba a
tokmány kinyitásához/meglazításához, helyezze
be a fúrót/eszközt, és erősen szorítsa meg a
tokmányt a kulcsnak az óramutató járásával
megegyező irányba történő elfordításával. Vegye
ki a kulcsot, és helyezze vissza a szerszámostáskába.
6362
3. A BITFEJEK VAGY A TOKMÁNY
BEILLESZTÉSE (Lásd B1. Ábra)
Tisztítsa meg a bitfej nyakát, és beillesztés
előtt kenje meg kenőanyaggal. Tartsa meg a
markolatot, húzza hátra a rögzítőhüvelyt, majd
illessze be a bitfejeket vagy a tokmányt a bittartóba. Forgassa és nyomja be a bitfejet, amíg
ellenállásba nem ütközik. A bitfej teljesen besüllyed a bittartóba. Amint elégedett a behelyezéssel, engedje ki a rögzítőhüvelyt. Ez az aktuális
pozícióban rögzíti a bitfejeket vagy a tokmányt.
Beillesztés után mindig ellenőrizze, hogy a
bitfej vagy tokmány biztosan rögzül, úgy, hogy
próbálja meg kihúzni.
Ha a bitfejek vagy a tokmány nem jól helyezkedik el, ismételje meg a műveletet.
6. A KI/BEKAPCSOLÓ GOMB
MŰKÖDTETÉSE (Lásd C. Ábra)
A szerszám elindításához nyomja le a
kapcsológombot, a leállításhoz engedje fel.
7. A VÁLTOZTATHATÓ SEBESSÉG SZABÁLYOZÓ HASZNÁLATA
(Lásd D. Ábra)
A sebesség nő, ha a gombot a nagyobb szám
irányába fordítja, és csökken, ha a kisebb szám
irányába fordítja.
8. ÜTVEFÚRÓ FUNKCIÓ (Lásd E, F.
Ábra)
1) Beton, falazat stb. fúrásához nyomja meg a
rögzítőgombot (A), és forgassa a választókapcsolót úgy, hogy a(z) „ ” jel a háromszögre
Pneumatikus fúrókalapács HU
Page 64

mutasson. (Lásd E. Ábra)
MEGJEGYZÉS: A választókapcsoló beállítása előtt meg kell nyomnia a választókapcsoló
rögzítőgombját. Ha a választókapcsoló nem
kerül a kívánt pozícióba, kapcsolja be kis időre a
szerszámot, majd állítsa be újra a választókapcsolót.
2) Fordítsa el az ütvefúró vagy fúró funkcióválasztó kapcsolót úgy, hogy az ütvefúró
funkció „ ” irányába álljon. (Lásd F. Ábra)
3) Most már készen áll a falazat ütvefúrására.
9. FÚRÓ FUNKCIÓ (Lásd G、H. Ábra)
1) Nyomja meg a rögzítőgombot (A), és forgassa
a választókapcsolót úgy, hogy a „ ” jel a
háromszögre mutasson. (lásd G. ábra)
2) Fordítsa az ütvefúró vagy fúró funkcióválasztó
kapcsolót úgy, hogy a fúró funkció „ ” irányába
álljon. (Lásd H. Ábra)
3) Most már készen áll a fúró funkció használatára.
10. VÉSŐ FUNKCIÓ (Lásd I、J. Ábra)
1) Töréshez, véséshez és bontáshoz nyomja
meg a rögzítőgombot (A), és forgassa a választókapcsolót úgy, hogy a „ ” jel a háromszögre
mutasson. (Lásd I. Ábra)
2) Fordítsa az ütvefúró vagy fúró funkcióválasztó
kapcsolót úgy, hogy az ütvefúró funkció „ ”
irányába álljon. (Lásd J. Ábra)
3) Most már készen áll a véső munka végzésére
a Véső funkció segítségével.
FIGYELEM: Győződjön meg ar-
ról, hogy a választókapcsoló
kiegészítő rögzítésű a véső mód
pozícióban. Ellenkező esetben veszély
állhat fenn.
11. PORFOGÓ (Lásd K. Ábra)
Használja a porfogót annak érdekében, hogy ne
hullhasson por a szerszámra, illetve önre, amikor
fej fölötti fúrásokat végez. Rögzítse a porfogót a
bitfejre a K. ábra szerint.
12. KENŐGÉP (Lásd L. Ábra)
A gép kenőanyaggal működik. A kenőanyaggal
való újratöltésre csak akkor van szükség,
amikor az ütvefúró kis hatékonysággal működik.
Nyissa fel a szerszám felső részén található
kenőanyagtartó fedelét a tartozék csapos
csavarkulcs segítségével. Helyezzen bele kb.
30 g kenőanyagot, mely a szerszám tartozéka.
A kenőanyag adatai: általános célú, lítium
alapú. Csak eredeti Worx ütvefúróhoz alkalmas
kenőanyagot használjon (opcionális tartozék).
FIGYELEM: A kenőanyagtartályt tartsa
távol a gyermekektől.
13. A KEFÉK CSERÉJE (Lásd M, N.
Ábra)
Húzza ki az eszközt az áramból.
Csavarhúzó segítségével csavarozza le a szénkefe tetejét.
Vegye ki a szénkefét. Ellenőrizze a kefe hosszát,
és amennyiben 6 mm alatt van, cserélje ki.
Amikor a kefék cseréje szükségessé válik, minden esetben cserélje ki mindkettőt, még akkor is,
ha az egyik hosszabb, mint 6 mm.
Teljesen csavarozza vissza a szénkefe tetejét. Ellenőrizze, hogy a szerszám működik-e.
Használat előtt néhány percig járassa üresben a
kefék elhelyezkedése érdekében.
A SZERSZÁM
HASZNÁLATÁVAL
KAPCSOLATOS
JAVASLATOK
1. Csökkentse a fúrófejre nehezedő nyomást
az áttörés előtt. Ez megakadályozza a fúró
elakadását.
2. Amikor nagy lyukat fúr, először fúrjon egy
próbalyukat egy kisebb fúrófej segítségével.
3. Mindig egyenes vonalban alkalmazzon
nyomást a fúrófejre, és lehetőség szerint
egyenesszögben a munkadarabra.
4. Soha ne változtassa a működési módot a
fúrógép használata közben.
5. Vésés során ne alkalmazzon túl nagy
nyomást a szerszámra. A túlzott erő nem
gyorsítja fel a munkát.
Pneumatikus fúrókalapács HU
Page 65

KARBANTARTÁS
Húzza ki a dugót a konnektorból Mielőtt
bármilyen beállítás, vagy karbantartási.
Nincsenek a felhasználó által javítható alkatrész
a szerszámot. Soha ne használjon vizet vagy
vegyi tisztítószereket a szerszámot. Törölje le
egy száraz ruhával. Mindig tárolja a szerszámot
száraz helyen. Tartsa a motor szellőzőnyílásait.
Tartsa a munka ellenőrzése a portól. Néha lehet
látni szikrák a szellőzőnyílásokat. Ez normális, és
nem károsítja a szerszámot.
Ha a tápkábel sérült, ki kell cserélni a gyártó, a
hivatalos márkaszerviz vagy hasonlóan képzett
személyeket, hogy a kockázatok elkerülése.
HIBAELHÁRÍTÁS
1. Ha a szerszám nem indul, először ellenőrizze
a dugót.
2. Amennyiben az ütvefúró használat
közben túlságosan felmelegedik, állítsa a
kapcsolót fúró módba, és járassa maximális
sebességen terhelés nélkül 2 percig.
3. Amennyiben ütvefúrójának teljesítménye túl
alacsony, helyezzen megfelelő mennyiségű
kenőanyagot a kenőanyagtartóba.
4. Amennyiben ütvefúrójának teljesítménye túl
alacsony, ellenőrizze, hogy a szerszám nem
tompult-e el.
5. Ha nem találja a hiba okát, juttassa vissza a
szerszámot a kereskedőhöz javítás céljából.
MEGFELELŐSÉGI
NYILATKOZAT
A gyártó:
POSITEC Germany GmbH
Konrad-Adenauer-Ufer 37
50668 Köln
Kijelenti, hogy a termék:
Leírás: WORX Pneumatikus fúrókalapács
Típus: WX333 (330-359 kijelölésének gép
képviselő fúrókalapács)
Funkció: Kalapálás különböző anyagok
Megfelel a következő irányelveknek:
2006/42/EC
2004/108/EC
2011/65/EC
Az alábbi normáknak:
EN 55014-1
EN 55014-2
EN 61000-3-2
EN 61000-3-3
EN 60745-1
EN 60745-2-6
A műszaki dokumentáció összeállítására jogosult
személy:
Név: Russell Nicholson
Cím: Positec Power Tools (Europe)Ltd,
PO Box 152,Leeds,LS10 9DS,UK
6564
KÖRNYEZETVÉDELEM
A leselejtezett elektromos készülékek
nem dobhatók ki a háztartási hulladékkal.
Ha van a közelben elektromos hulladék
gyűjtő udvar, vigye oda a készüléket. Az
újrahasznosítási lehetőségekről tájékozódjon a
helyi hatóságoknál vagy a kereskedőnél.
Suzhou 2015/10/27
Allen Ding
Helyettes főmérnöke, Tesztelés és minősítés
Pneumatikus fúrókalapács HU
Page 66

1. BLOCARE MANECA
2. ECARTAMENT ADÂNCIME
3. CAPAC PENTRU GRESOR
4. PE COMUTATOR / OPRIT
ÎNTRERUPĂTOR SELECTOR PENTRU ACŢIONARE CA CIOCAN SAU CA MAŞINĂ DE GĂURIT
5.
6. ÎNTRERUPĂTOR SELECTOR PENTRU ACŢIONARE CA CIOCAN SAU CA DALTĂ
7. CONTROL VARIABIL AL VITEZEI
8. SDS DRILL BIŢI *
9. CHEIE DE PIULIŢE
10. MANDRINĂ CHEIE CU ADAPTOR, CHUCK CHEIE*
11. PLASTIC GRĂSIME CONTAINER*
12. CAPAC DE PROTECŢIE CONTRA PRAFULUI*
13. DĂLŢI (ASCUŢITĂ ŞI LATĂ)*
14. MÂNERUL AUXILIAR
Nu toate accesoriile ilustrate sau descrise sunt incluse în livrarea standard.
*
DATE TEHNICE
Tip: WX333 (330~359 –denumirea echipamentului, reprezentând Ciocan articulat)
Tensiune nominalã
Putere nominalã
Turaþie nominalã fãrã sarcinã
Numãr lovituri
Energie lovituri
Tipul de chuck SDS-plus
Capacitate gãurire max.
Clasã de protecþie
Greutate maºinã
Oþel
Zidãrie
Lemn
220-240V~50/60Hz
1250W
0-750/min
0-3700/min
5.0J
13mm
32mm
40mm
6.1kg
Ciocan articulat RO
/II
Page 67

INFORMAÞII VIBRAÞIE / ZGOMOT
Presiune sonorã ponderatã A LpA:90dB(A)
Putere sonorã ponderatã A L
& KWA 3.0dB(A)
K
PA
: 101dB(A)
wA
Purtaţi protecţie pentru urechi când presiunea acustică este peste 80dB(A)
INFORMAŢII PRIVIND VIBRAŢIILE
Valorile totale ale vibraţiei stabilite conform EN 60745:
Găurire cu percuţie în beton
Dăltuire
Valoare emisie vibraţii α
Marjă de eroare K=1.5m/s
Valoare emisie vibraţii α
Marjă de eroare K=1.5m/s
Valoarea totală declarată a vibraţiilor poate utilizată pentru compararea unei unelte cu o alta şi, de
asemenea, poate utilizată în cazul unei evaluări preliminare a expunerii.
AVERTISMENT: Valoarea de emisie a vibraţiei în timpul folosirii efective a sculei electrice
poate diferi de valoarea declarată în funcţie de modurile în care este folosită scula, ce depind de
exemplele următoare şi de variaţii ale modului de utilizare a sculei:
Modul în care scula este folosită şi tipul de materiale tăiate sau sfredelite.
Scula este în stare bună de funcţionare şi bine întreţinută
Folosirea accesoriului corect pentru sculă şi păstrarea acesteia în condiţii bune.
Strângerea corespunzătoare a mânerelor şi dacă se folosesc accesorii anti-vibraţie.
Scula este folosită conform indicaţiilor din fabrică şi conform acestor instrucţiuni.
=17.4m/s2
h,HD
2
=14.3m/s
h,Cheq
2
2
6766
Această sculă poate cauza sindromul vibraţie mână-braţ dacă nu este folosită în
mod corespunzător.
AVERTISMENT: Pentru a corectă, estimarea nivelului de expunere în condiţii concrete de
folosire trebuie să ia în considerare toate părţile ciclului de operare cum ar de câte ori scula
este oprită şi cât timp este pornită dar nu lucrează. Acest lucru poate reduce semnicativ nivelul de
expunere de-a lungul perioadei de lucru totale.
Ajută la micşorarea riscului de expunere le vibraţii.
Folosiţi ÎNTOTDEAUNA dalte, burghiuri şi lame ascuţite
Păstraţi acest aparat în conformitate cu aceste instrucţiuni şi păstraţi-l bine gresat (dacă e cazul)
Dacă acest aparat este folosit în mod constant, atunci cumprăaţi accesorii anti-vibraţie.
Evitaţi folosirea aparaturii la temperaturi mai joase de 10oC
Planicaţi-vă programul de lucru pentru a folosi sculele cu număr mare de vibraţii de-a lungul a mai
multe zile.
Ciocan articulat RO
Page 68

ACCESORII / CANTITATE
Mâner suplimentar 1
Ecartament adâncime 1
SDS burghie (8 10 12x150 mm) 3
SDS dalta (punct și plat 250 mm) 2
Capac de praf 1
Ch e i e 1
Mandrină cheie cu adaptor, cheia mandrinei 1
Recipient de plastic pentru unsoare 1
Recomandăm cumpărarea accesoriilor din acelaşi magazin care v-a vândut scula. Consultaţi
ambalajul accesoriilor pentru detalii suplimentare. Personalul vânzãtor vã poate ajuta ºi oferi sfaturi.
Ciocan articulat RO
Page 69

INSTRUCŢIUNI DE
SIGURANŢĂ PENTRU
CIOCANE
1. Purtaţi aparat de protecţie
auditivă. Expunerea la zgomot poate duce
la pierderea auzului.
2. Folosiţi mânerul(ele) auxiliar(e),
dacă este/sunt furnizat(e) cu
unealta. Pierderea controlului poate duce
la răniri.
3. Ţineţi unealta electrică de
suprafeţele de prindere izolate
atunci când efectuaţi o operaţiune
în care accesoriul de tăiere poate
intra în contact cu re ascunse.
Accesoriul de tăiere care intră în contact
cu un r aat sub tensiune poate pune sub
tensiune componentele metalice neizolate
ale maşinii electrice şi poate produce un şoc
electric asupra operatorului.
SIMBOLURI
Pentru reducerea riscului de
accidentare, utilizatorul trebuie să
citească manualul de instrucţiuni.
Izolaþie dublã
Avertisment
Purtaþi dispozitiv de protecþia auzului
Purtaþi ochelari de protecþie
Purtaþi mascã de praf
Deşeurile de produse electrice
nu trebuie eliminate împreună cu
deşeurile menajere. Vă rugăm
reciclaţi acolo unde există instalaţii.
Consultaţi autorităţile locale sau
vânzătorul în privinţa reciclării.
6968
Ciocan articulat RO
Page 70

INSTRUCÞIUNI DE
EXPLOATARE
NOTÃ: Înainte de utilizarea sculei, citiþi
manualul de instrucþiuni cu atenþie.
DOMENIU DE UTILIZARE:
Scula electrică este destinată găuririi cu percuţie
în beton, cărămidă şi piatră cat şi pentru
lucrări uşoare de dăltuire. Este deasemeni
adecvată pentru găurirea fără percuţie în lemn,
metal,ceramică şi material plastic.
1. REGLAREA mânerul auxiliar
(Consultaţi Fig. A)
Pentru siguranţa dumneavoastră personal vă
recomandăm să utilizaţi mânerul auxiliar în orice
moment.
Pentru a regla mâner şi rotiţi partea de jos a
mânerului în sens antiorar şi rotiţi mânerul jurul
guler ciocan până când mânerul este în poziţia
dorită. Strângeţi complet.
MANDRINEI CU CHEIE
(Consultaţi Fig. B1)
Pentru a demonta burghiul sau mandrina, trageţi
spre înapoi manşonul de blocare, ţineţi de
mandrină sau burghiu şi trageţi în afară.
NOTĂ: Burghiele sau mandrina sunt prinse
ferm de tijă şi nu pot scoase după ce au fost
blocate în poziţie.
5. UTILIZAREA MANDRINEI
Pentru mai mult confort, ciocanul
dumneavoastră rotopercutor este acum prevăzut
cu o mandrină cu 3 fălci. Aceasta vă permite să
lucraţi cu burghie/accesorii non-SDS.
AVERTISMENT! Mandrina cu
3 fălci este destinată doar
lucrărilor de GĂURIRE a lemnului şi
metalului. Nu utilizaţi NICIODATĂ
această mandrină atunci când folosiţi
unealta ca ciocan rotopercutor sau
daltă. ÎN CAZ CONTRAR MANDRINA SE
POATE DEFECTA.
2. UTILIZAREA INDICATORULUI DE
ADÂNCIME (Consultaţi Fig. A)
Indicatorul de adâncime poate utilizat pentru a
stabili o adâncime constantă de găurire.
Rotiţi în sens invers acelor de ceasornic şurubul
de blocare de pe partea superioară a mânerului
pentru a-l slăbi şi introduceţi indicatorul de
adâncime în mâner. Reglaţi-l la adâncimea
dorită. Rotiţi şurubul de blocare în sensul acelor
de ceasornic pentru a-l strânge.
3. MONTAREA BURGHIELOR SAU
MANDRINEI (Consultaţi Fig. B1)
Curăţaţi tija burghiului şi aplicaţi unsoare înainte
de montarea burghiului. Ţineţi de mânerul rotativ,
trageţi înapoi manşonul de blocare şi introduceţi
burghiele sau mandrina în portsculă. Rotiţi
burghiul şi apăsaţi-l în interior până când simţiţi
rezistenţă. Axul va intra complet în portsculă.
După ce obţineţi o instalare corespunzătoare,
eliberaţi manşonul de blocare negru. În acest fel,
burghiele sau mandrina vor blocate în poziţie.
După montare, asiguraţi-vă întotdeauna că
burghiul sau mandrina sunt xate în siguranţă în
portsculă, încercând să trageţi de acestea în afară.
Dacă burghiele sau mandrina nu sunt poziţionate
corect, repetaţi operaţia.
4. DEMONTAREA BURGHIELOR SAU
Introducerea unui burghiu în mandrină.
(Consultaţi FIG. B2)
Înainte de montarea burghiului, decuplaţi cablul
de alimentare de la priza de alimentare cu curent
electric.
Introduceţi cheia pentru mandrină în mandrină,
rotiţi cheia în sens invers acelor de ceasornic
pentru a demonta/slăbi mandrina, introduceţi
burghiul/accesoriul şi strângeţi ferm mandrina
rotind cheia în sensul acelor de ceasornic.
Scoateţi cheia şi introduceţi-o în trusa de scule.
6. UTILIZAREA ON / OFF (Consultaţi
Fig. C)
Apãsaþi pentru pornire ºi eliberaþi pentru oprirea
sculei.
7. UTILIZAREA BUTONULUI DE
TURAŢIE VARIABILĂ (Consultaţi Fig. D)
Turaţia creşte pe măsură ce rotiţi comutatorul
spre un număr mai mare şi se reduce când rotiţi
la un număr mai mic.
8. FUNCŢIA DE GĂURIRE CU PERCUŢIE
(Consultaţi Fig. E, F)
1) Pentru găurirea betonului, zidăriei etc, apăsaţi
butonul de blocare (A) şi rotiţi comutatorul de
selectare astfel încât simbolul „ ” să indice
Ciocan articulat RO
Page 71

spre triunghi. (Consultaţi E)
NOTĂ: Trebuie să apăsaţi butonul de blocare
a comutatorului de selectare înainte de a regla
comutatorul de selectare. În cazul în care
comutatorul de selectare nu ajunge în poziţia
dorită, porniţi pentru un scurt interval de timp
ciocanul şi apoi reglaţi comutatorul de selectare
din nou.
2) Rotiţi comutatorul de selectare a acţiunii de
utilizare ca ciocan sau pentru găurire în poziţia
„ ” pentru utilizare ca ciocan. (Consultaţi Fig. F)
3) Puteţi începe acum găurirea cu percuţie în
zidărie.
12. LUBRIFIEREA MAŞINII (Consultaţi
Fig.L)
Asiguraţi-vă întotdeauna că există sucientă
unsoare în cutia de unsoare înainte de utilizare
Vericaţi la ecare 5 ore de utilizare. Deschideţi
capacul cutiei de unsoare din partea de sus a
burghiului utilizând cheia cu dinte furnizată. Apoi,
umpleţi cutia de unsoare (capacitate de 20 gm
max.) utilizând unsoarea furnizată cu unealta.
Această unsoare este o unsoare bazată pe litiu,
pentru uz general.
ATENŢIE: Nu lăsaţi recipientul cu unsoare la îndemâna copiilor.
9. FUNCŢIA DE GĂURIRE (Consultaţi
Fig. G, H)
1) Apăsaţi butonul de blocare (A) şi rotiţi
comutatorul de selectare astfel încât simbolul
„ ” să indice spre triunghi. (Consultaţi Fig. G)
2) Rotiţi comutatorul de selectare a acţiunii de
utilizare ca ciocan sau pentru găurire în poziţia
„ ” pentru acţiunea de găurire. (Consultaţi Fig. H)
3) Puteţi începe acum utilizarea funcţiei de
găurire.
10. FUNCŢIA DE DALTĂ (Consultaţi Fig.
I, J)
1) Pentru operaţii de aşchiere, canelare sau
demolare, apăsaţi butonul de blocare (A) şi
apoi rotiţi comutatorul de selectare astfel încât
simbolul „ ” să indice spre triunghi. (Consultaţi
Fig. I)
2) Rotiţi comutatorul de selectare a acţiunii de
utilizare ca ciocan sau pentru găurire în poziţia
„ ” pentru utilizare ca ciocan. (Consultaţi Fig. J)
3) Puteţi începe acum lucrările de dăltuire
utilizând modul Daltă.
AVERTISMENT: Trebuie să vă
asiguraţi că aţi blocat comutatorul
de selectare în poziţia de mod daltă. În
caz contrar, pot rezulta pericole.
11. CAPAC DE PROTECŢIE CONTRA
PRAFULUI (Consultaţi Fig. K)
Utilizaţi capacul de protecţie contra prafului
pentru a preveni căderea prafului pe unealtă şi pe
dumneavoastră atunci când efectuaţi operaţii de
găurire mai sus de nivelul capului. Ataşaţi capacul
de protecţie contra prafului pe burghiu, în modul
prezentat în gura K.
13. PENTRU A ÎNLOCUI PERIILE
(Consultaţi Fig. M, N)
Deconectaţi cablul electric de la sursa de alimentare.
Deşurubaţi capacul periei de cărbune cu
şurubelniţa.
Demontaţi peria de cărbune. Vericaţi lungimea
periei şi înlocuiţi-o dacă aceasta este sub 6 mm.
Când o perie trebuie înlocuită, înlocuiţi întotdeauna ambele perii, chiar dacă una dintre acestea are
încă o lungime mai mare de 6 mm.
Înşurubaţi complet capacul periei de cărbune.
Vericaţi dacă unealta funcţionează. Înainte de
utilizare, lăsaţi unealta să funcţioneze câteva
minute pentru a permite aranjarea periilor.
SFATURI DE LUCRU
PENTRU MAªINA DE
GÃURIT CU PERCUÞIE
1. Reduce presiunea asupra burghiul atunci
când este vorba de a sparge prin intermediul.
Acest lucru va preveni foraj de bruiaj.
2. Când o gaura mare, faceţi mai întâi o gaură
pilot cu un burghiu mai mic.
3. Întotdeauna se aplică presiune pentru bit ta
forare în linie dreaptă, iar dacă este posibil, în
unghi drept faţă de piesa de prelucrat.
4. Nu schimba modul de operare în timp ce de
foraj se execută.
5. Nu aplicaţi presiune excesivă a acestui instrument atunci când cizelare. Forţa expresivă nu
accelera munca.
7170
Ciocan articulat RO
Page 72

ÎNTREÞINEREA
Scoateþi ºa din prizã înainte de
efectuarea oricãrei reglãri, lucrãri de
servisare sau întreþinere.
Nu există componente de schimb în scula
electrică. Nu folosiţi niciodată apă sau chimice
pentru a curăţa maţina dumneavoastră de putere.
Ştergeţi cu o cârpă uscată. Nu lăsaţi niciodată
scula electrică într-un loc uscat. Fantele de
aerisire cu motor curat. Păstraţi toate comenzile
de lucru lipsit de praf. Ocazional, puteţi vedea
scântei prin fantele de ventilaţie. Acest lucru este
normal şi nu va deteriora scula electrică.
În cazul în care cablul de alimentare este
deteriorat, acesta trebuie înlocuit de către
producător, agentul său de service sau de
personal calicat în domeniu pentru a evita orice
pericol.
DEPANAREA
1. În cazul în care unealta electrică nu porneşte,
vericaţi mai întâi ştecherul cablului de
alimentare.
2. Dacă ciocanul devine prea erbinte în timpul
utilizării, poziţionaţi comutatorul ciocanului la
modul de găurire şi lăsaţi-l să funcţioneze la
turaţie maximă în gol timp de 2 minute.
3. Dacă ecienţa lucrului cu ciocanul scade, vă
rugăm să adăugaţi sucientă unsoare în cutia
de unsoare.
4. Dacă ecienţa lucrărilor efectuate cu ciocanul
scade, vă rugăm să vericaţi dacă accesoriul
utilizat nu este tocit.
5. În cazul în care un defect nu poate
remediat, returnaţi unealta la un distribuitor
autorizat pentru reparaţie.
DECLARAÞIE DE
CONFORMITATE
My,
POSITEC Germany GmbH
Konrad-Adenauer-Ufer 37
50668 Köln
Declarãm cã produsul
Descriere: WORX Ciocan articulat
Tip: WX333 (330~359 –denumirea
echipamentului, reprezentând Ciocan
articulat)
Funcţie Ciocănire a diverselor materiale
Este conform cu urmãtoarele directive
2006/42/EC
2004/108/EC
2011/65/UE
Standardele sunt conforme cu
EN 55014-1
EN 55014-2
EN 61000-3-2
EN 61000-3-3
EN 60745-1
EN 60745-2-6
Persoana responsabilă pentru elaborarea şei
tehnice,
Nume: Russell Nicholson
Adresă: Positec Power Tools (Europe)
Ltd, PO Box 152,Leeds,LS10 9DS,UK
PROTECÞIA MEDIULUI
Deºeurile de produse electrice nu trebuie
eliminate împreunã cu deºeurile menajere.
Vã rugãm reciclaþi acolo unde existã
instalaþii. Consultaþi autoritãþile locale sau
vânzãtorul în privinþa reciclãrii.
Suzhou 2015/10/27
Allen Ding
Adjunct Inginer şef, Testare si certicare
Ciocan articulat RO
Page 73

1. POJISTNÁ OBJÍMKA
2. HLOUBKOVÝ DORAZ
3. KRYT ZÁSOBNÍKU MAZIVA
4. SÍŤOVÝ VYPÍNAČ ON/OFF
5. VOLIČ PŘÍKLEPU NEBO VRTÁNÍ
6. VOLIČ PŘÍKLEPU NEBO SEKÁNÍ
7. OVLÁDÁNÍ OTÁČEK
8. VRTÁKY SDS*
9. KLÍČ
10. SKLÍČIDLO S ADAPTÉREM, KLIČKA SKLÍČIDLA*
11. PLASTOVÁ NÁDOBKA S MAZIVEM*
12. PRACHOVÝ KRYT*
13. SEKÁČE (ŠPIČATÝ A PLOCHÝ)*
14. POMOCNÉ DRŽADLO
*
Standardní dodávka nemusí obsahovat veškeré vyobrazené či popsané příslušenství.
TECHNICKÉ ÚDAJE
Typ: WX333 (330~359-označení stroje, zástupce Rotační kladivo)
Jmenovité napětí
Jmenovitý výkon
Jmenovité volnoběžné otáčky
Jmenovitý počet příklepů
Jmenovitá energie rázu
Typ sklíčidla SDS-plus
Max. průměr vrtání
Třída ochrany
Hmotnost přístroje
Ocel
Zdivo
Dřevo
220-240V~50/60Hz
1250W
0-750/min
0-3700/min
5.0J
13mm
32mm
40mm
6.1kg
7372
7372
/II
Rotační kladivo CZ
Page 74

ÚDAJE O HLUKU A VIBRACÍCH
Naměřená hladina akustického tlaku LpA:90dB(A)
Naměřený akustický výkon L
& KWA 3.0dB(A)
K
PA
: 101dB(A)
wA
Použijte ochranu sluchu, přesáhne-li akustický tlak 80dB(A)
INFORMACE O VIBRACÍCH
Celkové hodnoty vibrací (trojosé nebo vektorové součtové měření) stanovené v souladu s EN 60745:
Vrtání s příklepem do betonu
Sekání
Hodnota vibračních emisí α
Kolísání K=1.5m/s
2
Hodnota vibračních emisí α
Kolísání K=1.5m/s
2
Deklarovaná celková hodnota vibrací může být použita pro srovnání jednoho nářadí s ostatními a
může být také použita k předběžnému stanovení doby působení těchto vibrací.
VÝSTRAHA: Hodnota vibračních emisí během praktického používání tohoto elektrického
nástroje se může lišit od deklarované hodnoty v závislosti na způsobech, jakými je nástroj
používán v závislosti na následujících podmínkách a dalších možnostech použití nástroje:
=17.4m/s2
h,HD
=14.3m/s
h,Cheq
2
Způsob, jakým je nástroj používán, a povaha narušovaných nebo vrtaných materiálů.
Dobrý stav nástroje a řádné provádění jeho údržby
Používání správného příslušenství s nástrojem, ostrost a dobrý stav příslušenství.
Utažení úchopu na rukojetích a použití antivibračního příslušenství.
Používání nástroje k účelům určeným konstrukcí a v souladu s těmito pokyny.
Při nesprávném používání může tento nástroj způsobit syndrom vibrací rukou a paží.
VÝSTRAHA: Je třeba upřesnit, že při odhadu výše rizika vibrací v praxi je nutno rovněž
zohlednit všechny fáze pracovního cyklu, například dobu, kdy je nástroj vypnutý a kdy běží
naprázdno, ale nevykonává práci. To může podstatně snížit působení vibrací v rámci celkového
pracovního času.
Zásady pro omezení rizika působení vibrací:
Provádějte údržbu tohoto nástroje v souladu s těmito pokyny a nástroj (příslušným způsobem) dobře
promazávejte.
Má-li být tento nástroj používán pravidelně, zakupte antivibrační příslušenství.
Nepoužívejte nástroje při teplotě 10oC nebo nižší.
Naplánujte práci tak, aby bylo provádění úkolů, které vyžadují silné vibrace nástroje, rozloženo do
několika dní.
Rotační kladivo CZ
Page 75

PŘÍSLUŠENSTVÍ
Přídavná rukojeť 1
Doraz 1
Vrtáky sds (8, 10, 12x150mm) 3
Sekáče sds (špičatý a plochý 250mm) 2
Prachový kryt 1
Klíč 1
Sklíčidlo vrtačky s adaptérem a klíčem sklíčidla 1
Plastová nádobka s mazivem 1
Doporučujeme, abyste si příslušenství zakoupili od stejného prodejce, u kterého jste koupili nářadí.
Pro další detaily prostudujte obal příslušenství. V případě potřeby požádejte personál prodejny o
pomoc a radu.
7574
Rotační kladivo CZ
Page 76

BEZPEČNOSTNÍ
VÝSTRAHY PRO
PŘÍKLEP
1. Připojte napájecí kabel do sítě
pouze pokud je kladivo připraveno k
práci. Pokud kladivo nepoužíváte, odpojte
ho od el.sítě.
2. Přívodní kabel veďte vždy směrem
od přístroje.
3. Pokud provádíte práce, při kterých
může příklepový nástroj zasáhnout
skrytá elektrická vedení nebo
vlastní síťový kabel, pak držte
elektrické nářadí za izolované
plochy rukojeti. Kontakt s vedením pod
napětím může přivést napětí i na kovové
díly elektrického nářadí a způsobit úraz
elektrickým proudem.
SYMBOLY
Pro omezení nebezpečí zranění si
uživatel musí přečíst návod k obsluze.
Dvojitá izolace
Výstraha
Používejte pomůcky pro ochranu
sluchu.
Používejte pomůcky pro ochranu očí.
Používejte respirátor.
Elektrické výrobky se nesmí
likvidovat spolu s domácím odpadem.
Recyklujte ve sběrných místech na
tento účel zařízených. O možnosti
recyklace se informujte u místních
úřadů nebo u prodejce.
Rotační kladivo CZ
Page 77

NÁVOD K POUŽITÍ
POZNÁMKA: Před tím než začnete
nářadí používat, přečtěte si pečlivě
manuál.
URČUJCÍ POUŽITÍ
Toto nářadí je určeno pro příklepové vrtání do
betonu, cihel a kamene. Je rovněž vhodné pro
nepříklepové vrtání dřeva, kovu, keramiky a
plastů. Nástroje s elektronickým ovládáním a
pravým/levým otáčením jsou rovněž vhodné pro
šroubování.
1. NASTAVENÍ POMOCNÉHO DRŽADLA
(Viz Obr. A)
Pro vaši bezpečnost doporučujeme vždy
používat pomocné držadlo.
Chcete-li polohu držadla nastavit, otočte dolní
částí držadla proti směru pohybu hodinových
ručiček a natočte držadlo na vrtacím kladivu do
požadované polohy. Pevně utáhněte.
2. POUŽÍVÁNÍ HLOUBKOMĚRU
(Viz Obr. A)
Hloubkoměr lze používat pro nastavení neměnné
hloubky vrtaných otvorů.
Otočením proti směru pohybu hodinových
ručiček povolte pojistný šroub na horní části
držadla a vložte do držadla doraz hloubkoměru.
Nastavte požadovanou hloubku. Otočením ve
směru pohybu hodinových ručiček utáhněte
pojistný šroub.
3. UPNUTÍ VRTÁKU NEBO SEKÁČE
(Viz Obr. B1)
Před upnutím stopku vrtáku očistěte a namažte.
Uchopte otočné držadlo, posuňte pojistnou
objímku směrem dozadu a vložte vrták nebo
sekáč do sklíčidla. Vrtákem otáčejte a zasunujte
jej do sklíčidla, dokud neucítíte odpor. Stopka
musí být zcela zasunuta do sklíčidla. Po
správném usazení nástroje uvolněte pojistnou
objímku. Tím dojde k upnutí vrtáku nebo sekáče
ve sklíčidle.
Po upnutí vždy zkuste nástroj ze sklíčidla
vytáhnout, abyste zkontrolovali, zda je bezpečně
upnutý.
Není-li vrták nebo sekáč správně upnutý,
opakujte postup znovu.
4. VYJMUTÍ VRTÁKU NEBO SEKÁČE
(Viz Obr. B1)
Vrták nebo sekáč lze ze sklíčidla vyjmout
posunutím pojistné objímky směrem dozadu a
vytažením nástroje ven.
POZNÁMKA: Sekáče nebo vrtáky jsou pevně
upnuty za stopku a po upnutí je nelze vyjmout.
5. POUŽÍVÁNÍ SKLÍČIDLA
Pro vyšší univerzálnost je nyní vrtací kladivo
dodáváno také s 3čelisťovým sklíčidlem.
Sklíčidlo umožňuje používat také nástroje s
konvenčním upínáním (ne SDS).
UPOZORNĚNÍ: 3čelisťové sklíčidlo
je určeno pouze pro VRTÁNÍ do
dřeva a kovu bez příklepu. NIKDY
nepoužívejte toto sklíčidlo pro příklep
nebo sekání. V opačném případě může
dojít k poškození sklíčidla.
VLOŽTE VRTÁK DO SKLÍČIDLA.
(Viz Obr. B2)
Před vkládáním vrtáku odpojte přívodní kabel ze
zásuvky.
Vložte do sklíčidla kličku a otáčením proti směru
pohybu hodinových ručiček čelisti roztáhněte.
Zasuňte do sklíčidla vrták a otáčením kličkou
ve směru pohybu hodinových ručiček sklíčidlo
utáhněte. Kličku vyjměte a uložte ji do
plastového pouzdra.
6. OBSLUHA VYPÍNAČE (Viz Obr. C)
Stisknutím vypínače vrtací kladivo zapnete a
uvolněním vypínače vypnete.
7. POUŽÍVÁNÍ OVLÁDÁNÍ OTÁČEK
(Viz Obr. D)
Otáčením ovladače směrem k vyššímu číslu se
otáčky zvyšují a otáčením směrem k nižšímu
číslu snižují.
8. VRTÁNÍ S PŘÍKLEPEM
(Viz Obr. E, F)
1) Pro vrtání do betonu, zdiva apod. stiskněte
aretační tlačítko (A) a otočte volič značkou
“ ” směrem k trojúhelníku. (Viz Obr. E)
POZNÁMKA: Před nastavením voliče musíte
stisknout aretační tlačítko. Pokud volič nelze
natočit do požadované polohy, velmi krátkým
stisknutím vypínače pootočte vřeteno a poté
7776
Rotační kladivo CZ
Page 78

zkuste volič nastavit znovu.
2) Otočte volič příklepu nebo vrtání do polohy pro
příklep “ ”. (Viz Obr. F)
3) Nyní je vrtací kladivo nastaveno na vrtání do
zdiva s příklepem.
9. VRTÁNÍ (Viz Obr. G, H)
1) Stiskněte aretační tlačítko (A) a otočte volič
značkou “ ”směrem k trojúhelníku. (Viz
Obr. G)
2) Otočte volič příklepu nebo vrtání do polohy pro
vrtání “ ”. (Viz Obr. H)
3) Nyní je vrtací kladivo nastaveno na vrtání bez
příklepu.
10. SEKÁNÍ (Viz Obr. I, J)
1) Pro sekání, vysekávání drážek nebo bourání
stiskněte aretační tlačítko (A) a otočte volič
značkou “ ” směrem k trojúhelníku. (Viz Obr. I)
2) Otočte volič příklepu nebo vrtání do polohy pro
příklep “ ” . (Viz Obr. J)
3) Nyní je vrtací kladivo nastaveno na sekání
sekáčem bez vrtání.
UPOZORNĚNÍ: Zkontrolujte, zda
je volič příklepu nebo sekání
nastaven do polohy sekání. V opačném
případě hrozí nebezpeční zranění.
11. PRACHOVÝ KRYT (Viz Obr. K)
Prachový kryt chrání nářadí a pracovníka před
prachem padajícím shora při vrtání nad hlavou.
Prachový kryt připevněte k vrtáku podle obrázku K.
12. MAZÁNÍ (Viz Obr. L)
Před použitím vrtacího kladiva vždy zkontrolujte,
zda je v zásobníku dostatečné množství maziva.
Mazivo kontrolujte po každých 5 hodinách
používání. Otevřete uzávěr zásobníku maziva na
horní straně vrtačky dodaným klíčem. Naplňte
zásobník mazivem (max. 20 g) dodávaným k
nářadí. Jako mazivo se používá univerzální
lithiová vazelína.
POZOR: Nádobu s mazivem udržujte
mimo dosah dětí.
13. VÝMĚNA KARTÁČŮ (Viz Obr. M, N)
Odpojte přívodní kabel ze zásuvky.
Šroubovákem odšroubujte krytku uhlíkového
kartáče.
Vyjměte uhlíkový kartáč. Zkontrolujte délku
kartáče a pokud je kratší než 6 mm, vyměňte jej.
Pokud je třeba některý kartáč vyměnit, vyměňte
vždy oba kartáče, i když je druhý kartáč delší než
6 mm.
Zašroubujte krytku uhlíkového kartáče. Zkontrolujte funkci nářadí. Před použitím nechte nářadí
několik minut běžet na prázdno, aby se kartáče
usadily.
TIPY PRO PRÁCI S
NÁŘADÍM
1. Při vrtání skrz snižte před provrtáním otvoru
tlak na vrták. Zabráníte tím zaseknutí vrtáku.
2. Při vrtání velkého otvoru vyvrtejte nejprve
vodicí otvor vrtákem menšího průměru.
3. Na vrták vždy tlačte pouze v jeho ose a
pokud je to možné, kolmo k povrchu vrtaného
předmětu.
4. Nikdy nepřepínejte provozní režimy za chodu.
5. Při sekání nevyvíjejte příliš velký tlak. Zvýšení
tlaku nemá vliv na rychlost práce.
ÚDRŽBA
Před prováděním nastavení, servisních
prací nebo údržbě vyjměte z nářadí
baterii.
Vaše elektrické nářadí neobsahuje žádné
komponenty, jejichž údržbu může provádět
uživatel. Elektrické nářadí nikdy nečistěte vodou
ani chemikáliemi. Čistěte je suchou tkaninou.
Nářadí vždy ukládejte na suchém místě. Udržujte
ventilační drážky elektromotoru čisté. Všechny
ovládací prvky chraňte před prachem. Ve
ventilačních drážkách můžete někdy spatřit jiskry.
Jde o normální jev, který vaše nářadí nepoškoz
uje.
Poškozený přívodní kabel je z bezpečnostních
důvodů nutné nechat vyměnit u výrobce nářadí, v
jeho servisním středisku nebo podobné servisní
organizaci.
Rotační kladivo CZ
Page 79

ODSTRAŇOVÁNÍ ZÁVAD
1. Pokud nářadí nereaguje na zapnutí,
zkontrolujte nejprve zapojení přívodního
kabelu do zásuvky.
2. Pokud se vrtací kladivo při práci příliš zahřeje,
nastavte volič do režimu vrtání a nechte
kladivo 2 minuty běžet naprázdno v režimu
vrtání při maximálních otáčkách.
3. Pokud je pracovní účinnost kladiva příliš
nízká, doplňte do zásobníku dostatečné
množství maziva.
4. Pokud je pracovní účinnost kladiva příliš
nízká, zkontrolujte, zda není sekáč tupý.
5. Pokud problém nelze vyřešit, nechte nářadí
opravit u autorizovaného prodejce.
PROHLÁŠENÍ O SHODĚ
My,
POSITEC Germany GmbH
Konrad-Adenauer-Ufer 37
50668 Köln
Prohlašujeme, že tento výrobek,
Popis: WORX Rotační kladivo
Typ: WX333 (330~359-označení stroje,
zástupce Rotační kladivo)
Funkce: Sekání v různých materiálech
Splňuje následující směrnice:
2006/42/ES
2004/108/ES
2011/65/EU
OCHRANA ŽIVOTNÍHO
PROSTŘEDÍ
Elektrické výrobky se nesmí likvidovat
spolu s domácím odpadem. Recyklujte ve
sběrných místech na tento účel zařízených.
O možnosti recyklace se informujte u místních
úřadů nebo u prodejce.
Splňované normy
EN 55014-1
EN 55014-2
EN 61000-3-2
EN 61000-3-3
EN 60745-1
EN 60745-2-6
7978
Osoba oprávněná uspořádat technický soubor:
Název: Russell Nicholson
Adresa: Positec Power Tools (Europe)
Ltd, PO Box 152,Leeds,LS10 9DS,UK
Suzhou 2015/10/27
Allen Ding
Zástupce vrchní konstrukční kanceláře, Testování
& Certikace
Rotační kladivo CZ
Page 80

1. UZAMYKACÍ MECHANIZMUS
2. HĹBKOMER
3. KRYT ZÁSOBNÍKA NA MAZIVO
4. VYPÍNAČ
5. PREPÍNAČ ČINNOSTI KLADIVA ALEBO VŔTANIA
6. PREPÍNAČ ČINNOSTI KLADIVA ALEBO DLÁTA
7. OVLÁDANIE PREMENLIVEJ RÝCHLOSTI
8. VRTÁKY SDS*
9. SKRUTKOVÝ KĽÚČ
10. KĽÚČOVÉ SKĽUČOVADLO S NÁSTAVCOM, KĽÚČ SKĽUČOVADLA*
11. MAZIVO V PLASTOVEJ NÁDOBE*
12. PROTIPRACHOVÝ KRYT*
13. DLÁTA (ŠPICATÉ A PLOCHÉ)*
14. POMOCNÁ RÚČKA
* Štandardná dodávka neobsahuje všetko zobrazené, či popísané príslušenstvo.
TECHNICKÉ ÚDAJE
80
Typ WX333(330~359–označenie zariadenia, zástupca Rotačné kladivo)
Napätie nabíjačky menovitý výkon
Menovitý výkon pri nulovom zaťažení
Čas nabíjania
Menovitá nárazová energia
Energia úderu
Typ skľučovadla SDS-plus
Max. vŕtací výkon
Trieda ochrany
Hmotnosť náradia
Oceľ
Murivo
Drevo
220-240V~50/60Hz
1250W
0-750/min
0-3700/min
5.0J
13mm
32mm
40mm
6.1kg
Otočné kladivo SK
/II
Page 81

INFORMÁCIE O HLUKU/VIBRÁCIÁCH
Nameraný akustický tlak LpA:90dB(A)
Nameraný akustický tlak L
& KWA 3.0dB(A)
K
PA
: 101dB(A)
wA
Použite chrániče sluchu, ak akustický tlak presiahne 80dB(A)
INFORMÁCIE O VIBRÁCIÁCH
Výsledné celkové hodnoty pre vibrácie (suma pre trojosový vektor) stanovené podľa normy
EN 60745:
Vŕtanie s príklepom do betónu
Sekanie
Hodnota emisie vibráciíα
Nepresnosť K=1,5m/s
Hodnota emisie valueα
Nepresnosť K=1,5m/s
h,HD
2
h,Cheq
2
=17,4m/s2
=14,3m/s
2
Deklarovaná celková hodnota vibrácií sa môže použiť na porovnanie jedného náradia s ostatnými a
môže sa tiež použiť na predbežné stanovenie času pôsobenia týchto vibrácií.
VÝSTRAHA: Hodnota emisie vibrácií počas skutočného používania elektrického náradia sa
môže odlišovať od deklarovanej hodnoty, a to v závislosti od spôsobu používania náradia a v
závislosti od nasledujúcich príkladov odchýlok od spôsobu používania náradia:
Akým spôsobom sa náradie používa a aké materiály budú rezané alebo vŕtané.
Náradie je v dobrom stave a je dobre udržiavané.
Používanie správneho príslušenstva v spojení s náradím a zabezpečenie jeho ostrosti a dobrého stavu.
Tesnosť zovretia rukovätí a používanie doplnkov proti vibráciám.
Používanie náradia na účel určený podľa konštrukcie a v súlade s pokynmi.
Toto náradie môže vyvolávať syndróm trasenia rúk a ramien, pokiaľ jeho
používanie nie je správnym spôsobom riadené.
VÝSTRAHA: Kvôli presnosti by mal odhad úrovne expozície v skutočných podmienkach
používania obsahovať tiež všetky súčasti prevádzkového cyklu, ako sú časy, keď je náradie
vypnuté a počas ktorých beží na voľnobehu, a to okrem skutočného vykonávania práce. Tým môže
dôjsť k značnému zníženiu úrovne expozície počas celkového prevádzkového času.
Pomôžte minimalizovať riziko expozície účinkom vibrácií.
VŽDY používajte ostré sekáče a čepele.
Náradie udržiavajte v súlade s týmto návodom a udržiavajte ho dobre namazané (ak je to potrebné).
Ak sa náradie používa často, investujte do príslušenstva zabraňujúceho vibráciám.
Vyhnite sa používaniu náradia pri teplote 10°C a menej.
Prácu si naplánujte tak, aby ste akékoľvek používanie náradia pri vysokých vibráciách rozdelili do
niekoľkých dní.
81
Otočné kladivo SK
Page 82

PRÍSLUŠENSTVO
Prídavná rukoväť 1
Vypínač 1
Vrtáky sds (8, 10, 12x150mm) 3
Dláta sds (špicaté a ploché 250mm) 2
Protiprachový kryt 1
Skrutkový kľúč 1
Skľučovadlo s adaptérom a kľúčom 1
Mazivo v plastovej nádobe 1
Odporúčame príslušenstvo kúpiť v rovnakom obchode ako samotné náradie. Podrobnejšie informácie
sú pribalené k jednotlivému príslušenstvu. Odborní predavači vám pomôžu a poradia.
82
Otočné kladivo SK
Page 83

BEZPEČNOSTNÉ
POKYNY PRE KLADIVÁ
1. Používajte chrániče sluchu.
Vystavenie nadmernému hluku môže
spôsobiť stratu sluchu.
2. Používajte prídavné rukoväti,
dodané s náradím. Ak stratíte nad
náradím kontrolu, môže dôjsť k zraneniu
osôb.
3. Pri vykonávaní takej práce, pri
ktorej by mohol nástroj natrať na
skryté elektrické vedenia alebo
zasiahnuť samotnú prívodnú
šnúru náradia, držte náradie len za
izolované plochy rukovätí. Kontakt s
elektrickým vedením, ktoré je pod napätím,
môže dostať pod napätie aj kovové súčiastky
náradia a spôsobiť zásah elektrickým
prúdom.
SYMBOLY
Kvôli zníženiu rizika poranenia je
potrebné, aby si používateľ najprv
prečítal návod
Dvojitá izolácia
Výstraha
Používajte ochranu sluchu
Používajte ochrannéočí
Používajte protiprachovú masku
Elektrické výrobky sa nesmú
likvidovať spolu s domácim odpadom.
Recyklujte v zberných miestach na
tento účel zriadených. O možnosti
recyklácie sa informujte na miestnych
úradoch alebo u predajcu.
83
Otočné kladivo SK
Page 84

NÁVOD NA POUŽITIE
POZNÁMKA: Pred tým, ako náradie
použijete, prečítajte si návod na použitie.
POUŽÍVANIE PODĽA URČENIA
Účel použitia
Táto vŕtačka je určená na príklepové vŕtanie
do betónu, tehál a kameňa. Je tiež vhodná na
vŕtanie bez príklepu do dreva, kovu, keramiky
a plastu. Vŕtačky s elektronickou reguláciou
otáčania doprava a doľava sú vhodné aj na
skrutkovanie. (Pozri Obr. B2)
1. PRISPÔSOBENIE POMOCNEJ RÚČKY
(Pozri Obr. A)
V záujme vašej osobnej bezpečnosti
odporúčame po celý čas využívať pomocnú
rúčku.
Ak chcete rúčku prispôsobiť, otočte jej spodnú
časť proti smeru hodinových ručičiek a
otáčajte rúčkou okolo prstenca kladiva, až do
požadovanej polohy. Plne ju utiahnite.
2. POUŽÍVANIE OBMEDZOVACEJ PÄTKY
(Pozri Obr. A)
84
Pomocou obmedzovacej pätky je možné nastaviť
jednotnú hĺbku vŕtania.
Otočením proti smeru hodinových ručičiek
uvoľnite upevňovaciu skrutku na vrchnej časti
držiaka a do držiaka vložte obmedzovaciu
pätku. Prispôsobte ju na požadovanú hĺbku.
Upevňovaciu skrutku upevnite otočením v smere
hodinových ručičiek.
3. UPEVŇOVANIE VRTÁKA ALEBO
SKĽUČOVADLA (Pozri Obr. B1)
Než upevníte vrták, očistite držiak vrtáka a
naneste mazivo. Podržte rotačnú upínaciu hlavu,
potiahnite uzamykací mechanizmus dozadu a do
držiaka vrtákov vložte vrták alebo skľučovadlo.
Vrták otočte a zatlačte ho, až kým nepocítite
odpor. Hriadeľ do držiaka vrtákov úplne zapadne.
Keď ste spokojní s tým, ako sedí, uvoľnite čierny
uzamykací mechanizmus. Tým vrták alebo
skľučovadlo uzamknete v danej polohe.
Po namontovaní sa vždy uistite, či príslušný
nástroj alebo skľučovadlo pevne sedia v držiaku
vrtákov tým, že sa ho pokúsite vytiahnuť.
Ak vrták alebo skľučovadlo pevne nesedí, postup
zopakujte znova.
4. ODMONTOVANIE VRTÁKA ALEBO
KĽÚČOVÉHO SKĽUČOVADLA
(Pozri Obr. B1)
Ak chcete nástroj alebo skľučovadlo vybrať,
potiahnite uzamykací mechanizmus dozadu,
podržte a nástroj alebo skľučovadlo vytiahnite.
POZNÁMKA: Vrták alebo skľučovadlo sú
pevne uchytené v držiaku a nie je ich možné
vytiahnuť, ak sú v danej polohe uzamknuté.
5. POUŽÍVANIE SKĽUČOVADLA
V záujme ešte väčšieho pohodlia teraz k
vŕtaciemu kladivu dostanete aj trojčelusťové
skľučovadlo. Pomocou neho môžete pracovať aj
s vrtákmi či nástrojmi s iným úchytom ako SDS.
UPOZORNENIE: Trojčelusťové
skľučovadlo je určené iba na
VŔTANIE do dreva a kovu. Toto
skľučovadlo NIKDY nepoužívajte
s vŕtacím kladivom alebo dlátom.
SKĽUČOVADLO BY SA TÝM MOHLO
POŠKODIŤ.
VKLADANIE VRTÁKU DO
SKĽUČOVADLA. (Pozri Obr. B2)
Kým začnete s vkladaním vrtáka, odpojte
konektor napájania od prívodu energie.
Kľúč skľučovadla vložte do skľučovadla,
otočením kľúča proti smeru hodinových ručičiek
skľučovadlo uvoľnite/odpojte, vložte vrták/nástroj
a otočením kľúča v smere hodinových ručičiek
skľučovadlo poriadne upevnite. Kľúč vytiahnite a
uložte ho na jeho miesto v puzdre.
6. POUŽÍVANIA TLAČIDLA ZAPNUTIA/
VYPNUTIA (Pozri Obr. C)
Stlačením tlačidla nástroj spustíte, uvoľnením
tlačidla činnosť nástroja zastavte.
7. POUŽÍVANIE OVLÁDANIA
PREMENLIVEJ RÝCHLOSTI (Pozri Obr. D)
Rýchlosť sa zvyšuje otáčaním prepínača
smerom k vyšším číslam a znižuje smerom k
nižším číslam.
8. FUNKCIA VŔTACIEHO KLADIVA
(Pozri Obr. E, F)
1) Ak chcete vŕtať do betónu, muriva atď., stlačte
tlačidlo uzamknutia (A) a prepínač otočte tak,
aby symbol“ ” smeroval na trojuholník. (Pozri
Obr. E)
Otočné kladivo SK
Page 85

POZNÁMKA: Tlačidlo uzamknutia prepínača
musíte stlačiť skôr, než prepínačom otočíte. Ak
prepínač nie je možné otočiť do požadovanej
polohy, kladivo na okamih spustite a potom
skúste prepínač otočiť znova.
2) Otočte prepínač činnosti kladiva alebo vŕtania
tak, aby ukazoval na polohu činnosti kladiva “
”. (Pozri Obr. F)
3) Teraz je vŕtacie kladivo nastavené na prácu s
murivom.
9. FUNKCIA VŔTANIA (Pozri Obr. G, H)
1) Stlačte tlačidlo uzamknutia (A) a prepínač
otočte tak, aby symbol “ ”smeroval na
trojuholník.(Pozri Obr. G)
2) Otočte prepínač činnosti kladiva alebo vŕtania
tak, aby ukazoval na polohu činnosti vŕtania “ ”.
(Pozri Obr. H)
3) Teraz je nastavená funkcia vŕtania.
10. FUNKCIA DLÁTA (Pozri Obr. I, J)
1) Ak chcete sekať, drážkovať alebo demolovať,
stlačte tlačidlo uzamknutia (A) a prepínač otočte
tak, aby symbol “ ” smeroval na trojuholník.
(Pozri Obr. I)
2) Otočte prepínač činnosti kladiva alebo vŕtania
tak, aby ukazoval na polohu činnosti kladiva “
” . (Pozri Obr. J)
3) Teraz je nastavená funkcia na prácu s
dlátom.
UPOZORNENIE: Je nutné
skontrolovať, či je prepínač plne
uzamknutý v polohe režimu na prácu
s dlátom. Ak nie, mohlo by dôjsť k
ohrozeniu.
Ide o mazivo na báze lítia, určené na všeobecné
využitie.
POZOR: Nádobu s mazivom uschovávajte mimo dosahu detí.
13. VÝMENA KEFY (Pozri Obr. M, N)
Odpojte konektor od zdroja napájania.
Pomocou skrutkovača odskrutkujte viečko
uhlíkovej kefy.
Vyberte uhlíkovú kefu. Skontrolujte dĺžku
uhlíkovej kefy, a ak je kratšia ako 6 mm, vymeňte
ju. Ak treba kefku vymeniť, vždy vymeňte obidve,
i v prípade, že je jedna dlhšia ako 6 mm.
Úplne priskrutkujte viečko uhlíkovej kefky.
Skontrolujte, či nástroj funguje. Pred najbližším
použitím nechajte zariadenie niekoľko minút
bežať, aby sa nové kefky usadili.
TIPY NA PRÁCU S
NÁSTROJOM
1. Tesne pred tým, ako vrták prejde na druhú
stranu, znížte tlak, ktorým naň pôsobíte.
Zabránite tým zaseknutiu vŕtačky.
2. Pri vŕtaní veľkej diery najprv vyvŕtajte
skúšobnú dieru pomocou menšieho vrtáka.
3. Pri pôsobení tlakom na vrták vždy tlačte
priamo, a ak je to možné, pod pravým uhlom
na opracovávaný kus.
4. Prevádzkový režim nikdy nemeňte počas
prebiehajúceho vŕtania.
5. Počas sekania na nástroj nikdy nepôsobte
prílišným tlakom. Neúmerným použitím sily
sa rýchlosť práce nezvýši.
85
11. PROTIPRACHOVÝ KRYT (Pozri Obr. K)
Pomocou protiprachového krytu zabráňte tomu,
aby na nástroj a na vás padal prach počas vŕtania
nad úrovňou hlavy. Protiprachový kryt upevnite
na vrták tak, ako je ukázané na obrázku K.
12. MAZACIE ZARIADENIE (Pozri Obr. L)
Vždy pred použitím skontrolujte, či je v zásobníku
na mazivo dostatok maziva. Stav kontrolujte
po každých 5 hodinách používania. Pomocou dodaného čapíkového kľúča otvorte kryt
zásobníka na mazivo na vrchnej strane vŕtačky.
Následne pomocou maziva dodaného spolu s
nástrojom doplňte zásobník (max. kapacita 20 g).
ÚDRŽBA
Pred vykonaním akéhokoľvek
nastavovania, opráv a údržby odpojte
vŕtačku od siete.
Tento elektrický nástroj neobsahuje žiadne
súčasti, ktorých servis by mohol vykonávať sám
používateľ. Na čistenie elektrického nástroja
nikdy nepoužívajte vodu ani chemické čistiace
prostriedky. Očistite ho pomocou suchej
handričky. Elektrický nástroj vždy uchovávajte
na suchom mieste. Vetracie drážky motora ničím
nezakrývajte. Do ovládacích prvkov nenechajte
preniknúť žiadny prach. Vo vetracích drážkach je
Otočné kladivo SK
Page 86

občas možné spozorovať iskry. Tento jav je bežný
a nemôže elektrické zariadenie poškodiť.
Ak je napájací kábel poškodený, musí ho v
záujme zabráneniu rizika vymeniť výrobca,
poskytovateľ servisu alebo podobne kvalikovaná
osoba.
RIEŠENIE PROBLÉMOV
1. Ak elektrické zariadenie nie je možné spustiť,
najprv skontrolujte prívod napájania.
2. Ak sa kladivo počas používania príliš zohreje,
nastavte jeho prepínač do režimu vŕtania
a nechajte vŕtačku bežať bez zaťaženia pri
maximálnej rýchlosti 2 minúty.
3. Ak kladivo nefunguje dostatočne efektívne,
pridajte do zásobníka dostatok maziva.
4. Ak kladivo beží pri príliš nízkej frekvencii,
skontrolujte, či nástroj nie je tupý.
5. Ak nedokážete nájsť žiadnu chybu, vráťte
nástroj autorizovanému predajcovi, aby
zabezpečil opravu.
OCHRANA ŽIVOTNÉHO
PROSTREDIA
Elektrické výrobky sa nesmú likvidovať
spolu s domácim odpadom. Recyklujte v
zberných miestach na tento účel zriadených.
O možnosti recyklácie sa informujte na miestnych
úradoch alebo u predajcu.
VYHLÁSENIE O ZHODE
My,
POSITEC Germany GmbH
Konrad-Adenauer-Ufer 37
50668 Köln
Vyhlasujeme, že tento výrobok,
Popis: WORX
Typ: WX333(330~359–označenie
zariadenia, zástupca Otočné kladivo)
Funkcia: Používanie kladiva na rôzne
materiály
Zodpovedá nasledujúcim smerniciam:
2006/42/EC
2004/108/EC
2011/65/EU
Spĺňa posudzované normy:
EN 55014-1
EN 55014-2
EN 61000-3-2
EN 61000-3-3
EN 60745-1
EN 60745-2-6
Osoba oprávnená za zostavenie technického
súboru
Názov: Russell Nicholson
Adresa: Positec Power Tools (Europe)
Ltd, P. O. Box 152, Leeds, LS10 9DS, UK
Otočné kladivo
Suzhou 2015/10/27
Allen Ding
Zástupca vrchnej konštrukčnej kancelárie,
Testovanie & Certikácia
Otočné kladivo SK
Page 87

1. ACOPLAMENTO DE TRAVA
2. PARAGEM DE PROFUNDIDADE
3. TAMPA DA CAIXA DE LUBRIFICAÇÃO
4. INTERRUPTOR ON / OFF
5. SELECTOR BERBEQUIM OU MARTELO
6. BOTÃO SELECTOR DE ACÇÃO DE MARTELO OU CINZEL
7. BOTÃO DE VELOCIDADE VARIÁVEL
8. SDS BROCAS*
9. CHAVE DE FIXAÇÃO
10. MANDRIL DE CHAVE COM ADAPTADOR E CHAVE*
11. TANQUE DE LUBRIFICANTE*
12. PROTECÇÃO CONTRA PÓ*
13. CINZÉIS (DE PONTA E PLANO)*
14. MANIVELA AUXILIAR
*Acessórios ilustrados ou descritos não estão totalmente abrangidos no fornecimento.
DADOS TÉCNICOS
Tipo WX333(330~359—designação de máquinas, representantes do Martelo Rotativo)
Tensão nominal 220-240V~50/60Hz
Potência nominal 1250W
Velocidade nominal em vazio 0-750/min
Taxa de Impacto avaliada 0-3700/min
Energia de impacto 5.0J
Tipo de encaixe SDS-plus
Capacidade máx. De perfuração Aço 13mm
Alvenaria 32mm
Madeira 40mm
Classe de protecção
Peso de máquina 6.1kg
/II
8786
Martelo rotativo PT
Page 88

DADOS SOBRE RUÍDOS E VIBRAÇÕES
Pressão de som avaliada LpA: 90dB(A)
Potência de som avaliada L
3.0dB(A)
K
pA&KwA
: 101dB(A)
wA
Use protecção de ouvidos quando a pressão for superior a 80dB(A)
INFORMAÇÃO DE VIBRAÇÃO
Os valores totais de vibração são determinados de acordo com a normativa EN 60745:
Perfuração com martelo em betão
Instabilidade K=1.5 m/s
2
Valor da emissão da vibração a
Valor da emissão da vibração a
Cinzelamento
Instabilidade K=1.5 m/s
2
O valor total declarado da vibração poderá ser utilizado para comparar uma ferramenta com
outra e poderá também ser utilizado numa avaliação preliminar de exposição.
AVISO: Os valores de emissão de vibração durante a utilização da ferramenta podem
divergir dos valores declarados, dependendo da forma como a ferramenta é utilizada,
dependendo dos exemplos seguintes e de outros modos de utilização:
O modo como a ferramenta é utilizada, os materiais a cortar ou perfurar.
A ferramenta estar em boas condições e bem conservada.
A utilização do acessório correcto para a ferramenta e a garantia de que está afiada e em boas
condições.
A firmeza com que se segura nas pegas e se quaisquer acessórios vibratórios são utilizados
Se a ferramenta é utilizada para o objectivo para a qual foi concebida e segundo as instruções.
=17.4 m/s2
h,HD
=14.3m/s2
h,Cheq
Esta ferramenta pode causar síndrome de vibração mão-braço, se não for
adequadamente utilizada.
AVISO: Para ser preciso, uma estimativa do nível de exposição nas condições actuais
de utilização devem ter em conta todas as partes do ciclo de operação, como tempos em
que a ferramenta está desligada e quando está em funcionamento, mas inactiva, ou seja, não
realizando o seu trabalho. Isto poderá reduzir significativamente o nível de exposição durante
o período total de trabalho.
Como minimizar o seu risco de
Utilize SEMPRE formões, brocas e lâminas afiadas.
Mantenha esta ferramenta de acordo com as instruções e bem lubrificada (quando aplicável)
Se a ferramenta for utilizada regularmente, invista em acessórios anti-vibração.
Evite utilizar ferramentas a temperaturas de 100C ou inferior.
Planeie o seu horário de trabalho de forma a distribuir a utilização de ferramentas de alta
vibração ao longo de vários dias.
Martelo rotativo PT
Page 89

ACESSÓRIOS
Manivela auxiliar 1
Paragem de profundidade 1
SDS Brocas (8 10 12 x 150mm) 3
SDS Cinzéis (de ponta e plano 250mm) 2
Protecção contra pó 1
Chave de fixação 1
mandril de chave com adaptador e chave 1
Tanque de lubrificante 1
Recomendamos-lhe que compre todos os acessórios no fornecedor onde tenha adquirido a
ferramenta. Para mais pormenores, consulte a embalagem destes. Os comerciais também pode
ajudar e aconselhar.
8988
Martelo rotativo PT
Page 90

AVISOS DE SEGURANÇA
DO MARTELO
1. Use protetores auriculares. A
exposição ao barulho pode causar perda
de audição.
2. Use as pegas auxiliares fornecidas
com a ferramenta. A perda de controlo
pode causar danos pessoais.
3. Segure a ferramenta agarrando as
superfícies isoladas ao executar uma
operação onde a ferramenta cortante
pode entrar em contacto com fios
eléctricos escondidos ou com o seu
próprio cabo eléctrico. O contacto
com um fio com corrente fará com que as
peças de metal expostas da ferramenta
fiquem com corrente e dêem choque ao
operador.
SÍMBOLOS
Para reduzir o risco de ferimentos
o utilizador deve ler o manual de
instruções
Duplo isolamento
Atenção
Usar protecção para os ouvidos
Usar protecção ocular
Usar máscara contra o pó
Os equipamentos eléctricos não
devem ser depositados com o
lixo doméstico. Se existirem
instalações adequadas deve
reciclá-los. Consulte a sua
autoridade local para tratamento
de lixos ou fornecedor para obter
aconselhamento sobre reciclagem.
Martelo rotativo PT
Page 91

FUNCIONAMENTO
NOTA: Antes de utilizar a ferramenta,
leia atentamente o livro de instruções.
UTILIZAÇÃO CONFORME AS
DISPOSIÇÕES
A máquina destina-se à perfuração com
martelo em betão, tijolo e pedra, bem como
a trabalhos de cinzelamento leves. Também
é adequada para perfuração sem impacto na
madeira, metal, cerâmica e plástico.
1. AJUSTAR A PEGA AUXILIAR
(Ver Fig. A )
Para sua segurança, recomendamos o uso do
cabo auxiliar o tempo inteiro.
Para ajustar o cabo, solte o botão do cabo em
sentido anti-horário e gire o cabo ao redor
do eixo até que esteja na posição desejada.
Aperte completamente.
2. USAR O MEDIDOR DE PROFUNDIDADE
(Ver Fig. A)
O limitador de profundidade pode ser usado
para se ajustar uma profundidade constante
de furo.
Gire o parafuso de trava no topo do cabo em
sentido anti-horário para soltá-lo e insira o
limitador de profundidade no cabo. Ajuste a
profundidade desejada. Gire o parafuso de
trava no sentido horário para apertar.
3. ENCAIXANDO FERRAMENTAS OU
ENCAIXE (Ver Fig.B1)
Limpe a broca e aplique lubrificante antes
de instalá-la. Segure o martelo rotativo,
puxe para trás a trava do encaixe e insira
a ferramenta no encaixe. Gire a broca e
empurre-a até que haja uma resistência. O
encaixe da broca encaixa inteiramente no
buraco. Ao ver que está bem colocada, solte
a trava de cor preta. Isto travaria a ferramenta
na posição.
Após instalar, certifique-se sempre que a
ferramenta está segura no encaixe tentando
retirá-la de lá.
Se a ferramenta não estiver bem colocada,
repita a operação.
4. REMOVENDO FERRAMENTAS OU
ENCAIXE (Ver Fig.B1)
Para remover a ferramenta, puxe a trava,
segure-a e puxe a ferramenta para fora.
NOTA: A ferramenta é firmemente segura, e
não pode ser removida se estiver travada na
posição.
5. USANDO O ENCAIXE
Para a sua conveniência, o seu martelo
rotatório agora vem com um encaixe de
3 bocas, que lhe permite trabalhas com
ferramentas/brocas não SDS.
AVISO! O encaixe de 3 bocas
foi feito para trabalho em metal
e madeira apenas. JAMAIS use este
encaixe com um martelo rotatório
ou cinzel. O ENCAIXE PODE SER
DANIFICADO SE VOCÊ O FIZER.
Inserindo uma broca no encaixe (Ver Fig.
B2)
Antes de instalar a broca, retire o fio da
tomada.
Coloque a chave do encaixe no encaixe e
gire-a em sentido anti-horário para retirar/
soltar a encaixe. Insira a ferramenta/broca e
aperte o encaixe com firmeza girando a chave
em sentido horário. Retire a chave e coloque-a
de volta no lugar.
6. INTERRUPTOR DE ON/OFF (Ver Fig. C)
Pressione para começar e liberte para parar a
sua ferramenta.
7. USANDO O BOTÃO DE VELOCIDADE
VARIÁVEL (Ver Fig. D)
A velocidade aumenta à medida que o botão
é girado até um número mas alto, e diminui
quando girado para os números menores.
8. FUNÇÃO DE MARTELO (Ver Fig. E, F)
1) Para furar concreto, alvenaria, etc, prima o
botão de fixação (A) e rode o botão selector
de forma a que o sina “ “ aponte para o
triângulo.. (Ver Fig. E)
Nota: deve-se apertar a trava do botão
selector antes de ajustá-lo. Se o selector não
chegar à posição desejada, ligue o martelo um
pouco, e então ajuste o selector novamente.
9190
Martelo rotativo PT
Page 92

2) Gire o selector, apontando-o para a posição
“ “ de acção do martelo.. (Ver Fig. F)
3) A ferramenta agora está pronta para furar
alvenaria.
9. FUNÇÃO DE FURADORA (Ver Fig. G,H)
1) Prima o botão de fixação (A) e rode o botão
selector de forma a que o sinal “ “ aponte
para o triângulo. (Ver Fig. G)
2) Gire o botão selector para a posição
“ “ de furadora.. (Ver Fig. H)
3) A ferramenta agora está pronta para furar.
10. FUNÇÃO DE CINZEL (Ver Fig. I, J)
1) Para lascar, ranhurar ou demolir, prima o
botão de fixação (A) e rode o botão selector
de forma a que o sinal “ “ aponte para o
triângulo (Ver Fig. I)
2) Gire o botão selector para a posição“ “
de martelo. (Ver Fig. J)
3) A ferramenta agora está preparada para
usar os Cinzéis.
AVISO: Certifique-se que o selector
esteja travado no modo cinzel.
Caso contrário, pode ser perigoso.
11. PROTECÇÃO CONTRA PÓ(Ver Fig. K)
Use a protecção contra para evitar que caia
poeira na ferramenta ou no usuário ao usar a
ferramenta para operação em um nível acima
da cabeça. Anexe a protecção à protecção
como mostrado na K.
12. MÁQUINA DE LUBRIFICAÇÃO (Ver
Fig. L)
O aparelho é lubrificado com óleo. Se a
eficiência do martelo diminuir, será necessário
colocar mais massa lubrificante. Abra a tampa
da caixa de lubrificação na parte superior do
martelo utilizando a chave de pinos fornecida.
Depois, coloque aproximadamente 30g
da massa lubrificante fornecida com a sua
ferramenta. A massa lubrificante é de uso
geral à base de lítio. Para isto è imprescindível
utilizar o oleo Worx previsto.
CUIDADO: Mantenha o tanque de
lubrificação longe de crianças.
13. PARA SUBSTITUIR AS ESCOVAS (Ver
Fig. M, N)
Desligue a ficha da tomada eléctrica.
Desaperte a tampa da escova de carvão
usando uma chave de parafusos.
Remova a escova de carvão. Verifique as
dimensões da escova e proceda à sua
substituição se a mesma tiver menos de 6
mm. Quando for necessário substituir uma
escova, substitua sempre ambas as escovas
mesmo que uma delas tenha mais de 6 mm
de comprimento.
Volte a aparafusar a tampa da escova de
carvão. Verifique se a ferramenta funciona
normalmente. Antes de usar a ferramenta,
deixe-a funcionar durante uns minutos para
permitir que as escovas assentem.
SUGESTÕES DE
TRABALHO PARA A SUA
BROCA
1. Reduza a pressão na broca quando estiver
prestes a atravessar a superfície. Isso
evitará que a broca fique sobrecarregada.
2. Ao furar um grande buraco, faça primeiro
um buraco guia usando uma broca menor.
3. Sempre faça pressão na sua broca em
linha recta e, se possível, em ângulo recto
com a superfície.
4. Nunca mude o modo de operação
enquanto a broca estiver funcionando.
5. Não aplique pressão demais na ferramenta
ao usar o cinzel. Um excesso de força não
acelera o trabalho.
MANUTENÇÃO
Retire o cabo de alimentação da
tomada antes de efectuar quaisquer
ajustamentos, reparações ou
manutenção.
Na sua ferramenta eléctrica, não existem
componentes susceptíveis de serem
substituídos pelo utilizador. Nunca utilize
água ou produtos químicos para limpar a sua
ferramenta. Limpe-a com um pano macio
e seco. Guarde sempre a sua ferramenta
Martelo rotativo PT
Page 93

num local seco. Mantenha as ranhuras de
ventilação do motor devidamente limpas.
Se observar a ocorrência de faíscas nas
ranhuras de ventilação, isso é normal e não
danificará a sua ferramenta.
Se o cabo de alimentação estiver danificado,
este deve ser substituído pelo fabricante,
seu agente autorizado ou pessoal técnico
qualificado para evitar qualquer situação de
perigo.
RESOLUÇÃO DE
PROBLEMAS
1. Se a ferramenta não ligar, comece por
verificar a ligação da ficha à tomada
eléctrica.
2. Se o seu martelo ficar muito quente
durante o uso, mude o botão do martelo
para o modo de furadora e deixe que
funcione sozinho na velocidade máxima
por 2 minutos.
3. Se a eficácia da ferramenta estiver muito
baixa, coloque mais massa lubrificante.
4. Se a eficácia estiver baixa, confira se a
ferramenta não está sem corte.
5. Se houver uma falha que não pode ser
consertada, devolva a ferramenta a um
agente autorizado para conserto.
PROTECÇÃO AMBIENTAL
Os equipamentos eléctricos não devem
ser depositados com o lixo doméstico.
Se existirem instalações adequadas
deve reciclá-los. Consulte a sua autoridade
local para tratamento de lixos ou fornecedor
para obter aconselhamento sobre reciclagem.
DECLARAÇÃO DE
CONFORMIDADE
Nós,
POSITEC Germany GmbH
Konrad-Adenauer-Ufer 37
50668 Köln
Declaramos que o produto,
Descrição
Martelo Rotativo WORX
Tipo WX333 (330~359--designação de
máquinas, representantes do Martelo
Rotativo)
Função Martelamento de vários materiais
Cumpre as seguintes Directivas:
2006/42/EC
2004/108/EC
2011/65/EU
Normas em conformidade com:
EN 60745-1
EN 60745-2-6
EN 55014-1
EN 55014-2
EN 61000-3-2
EN 61000-3-3
Pessoa autorizada a compilar o ficheiro
técnico,
Nome Russell Nicholson
Endereço Positec Power Tools (Europe)
Ltd, PO Box 152,Leeds,LS10 9DS,UK
9392
Suzhou 2015/10/27
Allen Ding
Engenheiro-chefe adjunto, Teste e Certificação
Martelo rotativo PT
Page 94

1. LÅSSPAK
2. DJUPSTOPP
3. LOCK TILL SMÖRJLÅDA
4. PÅ/AV-KNAPP
5. HAMMARE ELLER BORRAKTIVITET VALKNAPP
6. HAMMARE ELLER KISELAKTIVITET VALKNAPP
7. VARIABEL HASTIGHETSKONTROLL
8. SDS BORRBITS*
9. SKRUVNYCKEL
10. UPPSÄTTNING NYCKELCHUCK MED ADAPTER, CHUCKNYCKEL*
11. PLASTBEHÅLLARFETT*
12. DAMMSKYDD*
13. PLATT MEJSEL& SPETSIG MEJSEL*
14. HJÄLPHANDTAG
*Alla de tillbehör som illustreras eller beskrivs ingår inte i standardpaketet.
TEKNISK INFORMATION
Typ WX333 (330~359– maskinbeteckning, anger Rotorhammare)
Spänning 220-240V~50/60Hz
Effekt 1250W
Hastighet utan belastning 0-750/min
Nominellt anslagsvärde 0-3700/min
Slagenergi 5.0J
Typ av chuck SDS-plus
Max. borrkapacitet Stål 13mm
Betong och tegel 32mm
Trä 40mm
Dubbel isolering
Maskinens vikt 6.1kg
/II
Rotorhammare SV
Page 95

LJUD- OCH VIBRATIONSDATA
Ett uppmätt ljudtryck LpA: 90dB(A)
En uppmätt ljudstyrka L
Osäkerhet 3.0dB(A)
Använd hörselskydd när ljudtrycket är över 80dB(A)
: 101dB(A)
wA
INFORMAÇÃO DE VIBRAÇÃO
Vibration totala värden fastställda enligt EN60745
Hammarborr i betong
Mejsling
Det angivna totala vibrationsvärdet kan användas för att jämföra olika verktyg med varandra
samt vid en preliminär exponeringsutvärdering.
VARNING: Vibrationsvärde vid verklig användning av maskinverktyget kan skilja sig
åt från det deklarerade värdet beroende på hur verktyget används och beroende på
följande exempel och andra variationer om hur verktyget används:
Hur verktyget används och materialet som skärs eller borras.
Verktyget är i bra skick och bra underhållet.
Användning av korrekt tillbehör för verktyget och säkerställ att de är skarpa och i bra skick.
Åtdragningsgraden av greppet på handtaget och om några antivibrationstillbehör används.
Och att verktyget används såsom avsett enligt dess konstruktion och dessa instruktioner.
Vibrationsutsändningsvärde a
Osäkerhet K=1.5m/s
Vibrationsutsändningsvärde a
Osäkerhet K=1.5m/s
2
2
=17.4 m/s2
h.HD
=14.3m/s2
h.Cheq
9594
Detta verktyg kan orsaka hand-arm vibrationssyndrom om det används på felaktigt
sätt.
VARNING: För att vara korrekt bör en beräkning av exponeringsnivån under verkliga
förhållanden vid användning också tas med för alla delar av hanteringscykeln såsom
tiden när verktyget är avstängt och när det körs på tomgång utan att utföra något arbete.
Detta kan betydligt minska exponeringsnivån över den totala arbetsperioden.
Hjälp för att minimera risken för vibrationsexponering.
Använd ALLTID skarpa mejslar, borrar och blad.
Underhåll verktyget i enlighet med dessa instruktioner och håll det välsmort (där så behövs)
Om verktyget ska användas regelbundet, investera i antivibrationstillbehör.
Undvik att använda verktygen i temperaturer på 100C eller lägre
Planera ditt arbetsschema för att sprida ut användning av kraftigt vibrerande verktyg över flera
dagar.
Rotorhammare SV
Page 96

TILLBEHÖR
Hjälphandtag 1
Djupstopp 1
SDS Borrbits (8 10 12x150mm) 3
SDS Platt Mejsel& Spetsig Mejsel (250mm) 2
Dammskydd 1
Skruvnyckel 1
Uppsättning nyckelchuck med adapter, chucknyckel 1
Plastbehållarfett 1
Vi rekommenderar att du köper alla dina tillbehör från samma affär där du köpte verktyget.
Se avsnittet med arbetstips i denna bruksanvisning eller tillbehörets förpackning för mer
information. Affärspersonalen kan också hjälpa dig och ge dig råd.
Rotorhammare SV
Page 97

VERKTYGETS
SÄKERHETSVARNINGAR
1. Använd hörselskydd. Buller kan orsaka
hörselskador.
2. Använd hjälphandtag som följde med
verktyget. Om du förlorar kontrollen över
verktyget kan det medföra personskador.
3. Håll verktyget med isolerade
greppytor när du utför ett arbete där
sågverktyget kan komma i kontakt
med dolda sladdar eller sin egen
sladd. Kommer man i kontakt med en
strömförande sladd kommer det att leda
in ström i verktygets metalldelar och ge
användaren en elchock.
SYMBOLER
För att minska risken för
skador måste användaren läsa
bruksanvisningen
Skyddsklass
Varning
Använd hörselskydd
Använd skyddsglasögon
Använd skyddsmask mot damm
Uttjänade elektriska produkter får
inte kasseras som hushållsavfall.
Återanvänd där det finns
anläggningar för det. Kontakta
dina lokala myndigheter eller
ĺterförsäljare för ĺtervinningsrĺd.
9796
Rotorhammare SV
Page 98

DRIFTSINSTRUKTIONER
OBS: Förre användning av vertyget läs
bruksanvisningen noggrannt.
eller chucken.
OBS: Borrbitar eller chuck greppas med ett
fast grepp runt skaftet och kan inte tas bort när
det väl har låsts i position.
ÄNDAMÅLSENLIG ANVÄNDNING
Maskinen är avsedd för borrhamring i betong,
tegel och sten samt för lätt mejsling. Den
är även lämplig för borrning utan slag i trä,
metall, keramik och plast.
1. JUSTERA HJÄLPHANDTAGET (Se A )
För din egen personliga säkerhets skull
rekommenderar vi att du alltid använder
hjälphandtaget.
För att justera handtaget roterar du botten
på handtaget motors, och roterar handtaget
runt hammarkragen tills dess att handtaget
befinner sig i önskad position. Dra åt
ordentligt.
2. ANVÄNDA DJUPMÅTTET (Se A)
Djupmåttet kan användas för att ställa in ett
konstant djup för borret.
Rotera låsskruven ovanpå handtaget motors,
för in djupstoppet i handtaget. Justera till
önskat djup. Rotera låsskruven medurs och
dra åt.
3. TILLPASSA BORRBIT ELLER
CHUCKBYTE (Se B1)
Rengör borrskaftet och tillsätt smörjmedel
innan du installerar bottsvängen. Håll i
roteringshandtaget, dra baker låsspaken och
för in borrbiten eller chucken in i borrhållaren.
Vrid på borren och trycj in den tills du känner
ett motstånd. Skaftet faller helt och hållet ner i
borrhållaren. När du är nöjd med hur det sitter
fast släpper du den svarta låsspaken. Det här
kommer att låsa borrbiten eller chucken i läge.
Efter installation ska du alltid kontrollera
att verktyget eller chucken halls säkert fast i
borrhållaren genom att försöka dra ut den.
Om borrbiten eller hållspalen inte är riktigt
placerat upprepar du proceduren igen.
4. TA BORT BORRBIT ELLER
CHUCKNYCKEL (Se B1)
För att ta bort verktyget eller chucken drar du
tillbaka låsspaken, håller och drar ut verktyget
5. ANVÄNDA CHUCKEN
För ytterligare bekvämlighet kommer nu
din rotorhammare med en 3-käftschuck. Det
gör det möjligt för dig att arbeta med ickeSDSborrbitar/-verktyg.
VARNING! 3-käftschucken
är utformad för trä- och
metallBORRarbete endast. Använd
ALDRIG den här chucken tillsammans
med rotationshammare eller kisel.
CHUCKEN KAN SKADAS OM SÅ SKER
För in en borrbit i chucken. (Se B2)
Innan du installerar borrbiten ska du ta bort
huvudkontakterna från huvudförsörjningen.
Placera chucknyckeln i chucken, vrid nyckeln
motors och gör om/lossa på chucken, för in
borr/verktyg och dra ordentligt åt chucken
genom att vrida på nyckeln moturs. Ta bort
nyckeln och byt ut i Blåsformbehållaren.
6. HANTERA PÅ/AV-KNAPPEN (SE C)
Tryck på knappen för att starta verktyget och
släpp upp den för att stoppa verktyget.
7. ANVÄNDA NUMMERSKIVAN VARIABEL
HASTIGHET (SE D)
Hastigheten ökar när du vrider på knappen
mot högre nummer, och minskar mot lägre
nummer.
8. SLAGBORRFUNKTION (Se E, F)
1)För att borra i betong, murverk etc, tryck på
låsknappen (A) och snurra selektorbrytaren tills
märket “ “ a pekar mot triangeln. (Se E)
Obs: Du måste trycka ner
valknappslåsknappen innan du justerar
valknappen Om valknappen inte kan gå in i
önskad position sätter du på hammaren lite
grann, och justerar sedan valknappen igen.
2)Sätt på hammaren eller
borraktivitetsvalknappen som pekar mot
hammaraktiviteten“ “ position. (Se F)
3)Du är nu redo för slagborr i murbruk.
Rotorhammare SV
Page 99

9. BORRFUNKTION (Se G, H)
1)Tryck på låsknappen (A) och snurra
selektorbrytaren tills märket “ “ apekar
mot triangeln. (Se G)
2)Sätt på hammaren eller
borraktivitetsvalknappen så att den pekar på
borraktiviteten“ “ ositionen. (Se H)
3) Du är nu redo för borraktivitet.
10. KISELFUNKTION (Se I, J)
1) För flisning, räffling eller demoleringsbruk,
tryck på låsknappen (A) och snurra
selektorbrytaren tills märket “ “ pekar mot
triangeln. (Se I)
2) Vrid hammaren eller
borraktivitetsvalknappen så att den pekar på
hammaraktiviteten“ “ positionen. (Se J)
3) Du är nu redo för kiseljobb med hjälp av
Kiselaktiviteten.
VARNING: Du måste kontrollera
så att valknappen är riktigt last I
kiselläge. Om inte kan det orsaka fara.
11. DAMMHÖLJE (Se K)
Använd dammhöljet för att förhindra att
damm faller över verktyget och på di själv
när du utför borrarbeten över huvudet. Fäst
dammhöljet till biten som visas i K.
12. INSMÖRJNINGSMASKIN (Se L)
Maskinen är oljesmord. En fettpåfyllning
krävs endast när hammarens arbetseffektivitet
är låg. Öppna locket till fettboxen ovanpå
hammaren med medföljande stiftnyckel. Fyll
sedan på ungefär 30 g fett som medföljde
verktyget. Fettspecifikationen är för
allmänna ändamål litiumbaserat. Härvid ska
ovillkorligen av Worx godkänd olja användas.
FARA: Håll behållaren med
smörjmedel ur barns räckhåll.
13. BYTE AV BORSTAR (Se M, N)
Ta bort kontakten från eluttaget.
Skruva loss kolborstens lock med skruvmejsel.
Ta bort kolborsten. Kontrollera borstens längd
och by tom den är mindre än 6mm.
När borstarna behöver bytas ska alltid nya
borstar användas, även om en fortfarande är
längre än 6mm.
Skruva ner kolborstens lock helt. Kontrollera
att verktyget fungerar. Innan det används
ska verktyget gå några minuter för att låta
borstarna sätta sig.
ARBETSTIPPS FÖR DIT
VERKTYG
1. Minska trycket på borren när den ska bryta
igenom. Det förhindrar att borren fastnar.
2. När du borrar ett stort hål ska du först
borra ett test med hjälp av en mindre
borrbit.
3. Tryck alltid på borren i rak linje och om
möjligt i rät vinkel mot arbetsdelen.
4. Byt aldrig arbetsläge när borren är igång.
5. Tillämpa inte överdrivet tryck på verktyget
när du kislar. Överdrivet tryck snabbar inte
på arbetet.
UNDERHÅLL
Ta bort pluggen från hållaren innan du
gör några anpassningar, servis eller
underhåll.
Det finns inga delar som kan repareras
av användaren i verktyget. Använd aldrig
vatten eller kemiska medel för att rengöra
verktyget. Torka rent med en torr trasa.
Förvara alltid verktyget på en torr plats. Håll
motorns ventileringsöppningar rena. Håll alla
arbetskontroller fria från damm. Ser du gnistor
i ventileringsöppningarna, är det normalt och
kommer inte att skada till verktyg.
Om strömkabeln är skadad och att undvika
fara, måste den ersättas av tillverkaren, servis
agenten eller liknande kvalifiserad person.
FELSÖKNING
1. Om ditt verktyg inte arbetar, kontrollera
säkringen och ström på huvud pluggen.
2. Om din hammare blir för varm när den
används ska du ställa in hammarknappen
på borrläge och köra borren i maximal
hastighet utan belastning under 2 minuter.
3. Om din hammararbetseffektivitet är för låg
ska du tillsätta tillräckligt med smörjmedel i
smörjlådan.
9998
Rotorhammare SV
Page 100

4. Om din hammararbetseffektivitet är för låg
ska du kontrollera om verktyget är trubbigt.
5. Om du inte hittar felet lämna verktyget till
en godkännd handlare för reparation.
MILJÖSKYDD
Uttjänade elektriska produkter får
inte kasseras som hushållsavfall.
Återanvänd där det finns anläggningar
för det. Kontakta dina lokala myndigheter eller
ĺterförsäljare för ĺtervinningsrĺd.
DEKLARATION OM
ÖVERENSSTÄMMELSE
Vi,
POSITEC Germany GmbH
Konrad-Adenauer-Ufer 37
50668 Köln
Förklarar att denna produkt,
Beskrivning WORX Rotorhammare
Typ WX333 (330~359–
maskinbeteckning, anger Rotorhammare)
Funktion Slagborrning i olika material
Uppfyller följande direktiv,
2006/42/EC
2004/108/EC
2011/65/EU
Standarder överensstämmer med:
EN 60745-1
EN 60745-2-6
EN 55014-1
EN 55014-2
EN 61000-3-2
EN 61000-3-3
Personen som godkänts att sammanställa den
tekniska filen.
Namn Russell Nicholson
Adress Positec Power Tools (Europe)Ltd,
PO Box 152,Leeds,LS10 9DS,UK
Suzhou 2015/10/27
Allen Ding
Vice chefsingenjör, tester och certifiering
Rotorhammare SV
 Loading...