

Page 1
INSTALLATION
GUIDE
Page 2

Page 3

Installation guide EN P04
Installationsanleitung D P18
Guide d'installation F P32
Guida d'installazione I P46
Guía de instalación ES P60
Installationsvejledning DK P74
Asennusopas FIN P88
Installasjonsguide NOR P102
Monteringshandbok SV P116
Page 4

4
EN
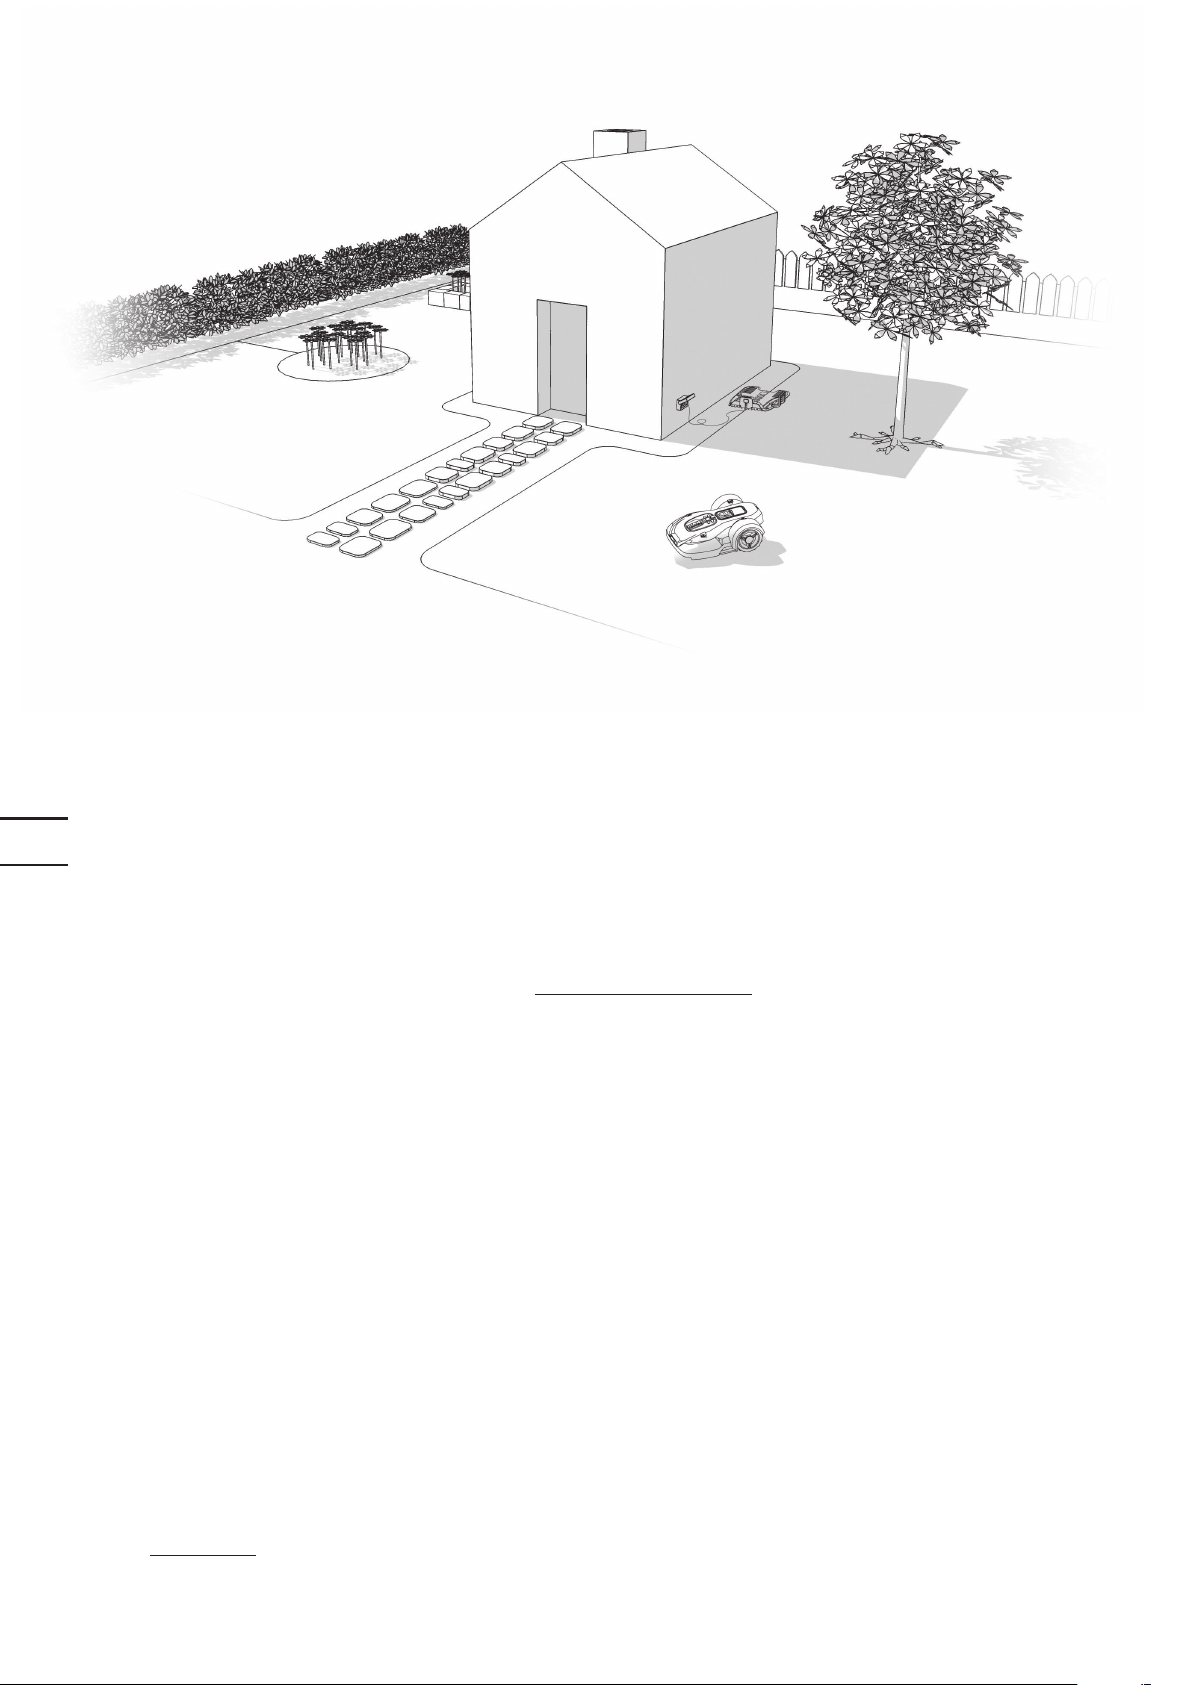
How to install your Landroid®L
The installation of the Landroid®L is easy. Depending on the size of your garden, the entire process only takes
a short amount of time. If your are like us, you hate having to waste your precious free time mowing your lawn.
®
The Landroid
You can watch the installation demo video at www.worxlandroid.com.
L will prove to be your best investment eliminating the need to mow your lawn ever again.
The Landroid®L loves to mow
It is designed to mow often, maintaining a healthier and better looking lawn than ever before. Depending on the
®
size of your lawn, the Landroid
is here to work for you.
L may be programmed to operate at any time or frequency with no restrictions. It
Operating costs
Worried about your electricity bill? Let’s do the math: if you let your Landroid®L work 3 hours a day, 5 days a week,
®
25 weeks a year, your Landroid
you would spend in petrol for your noisy, polluting petrol mower.
* Source: www.energy.eu
L will cost you approximately £4 in electricity*. Yes, £4 a year. A fraction of what
Page 5
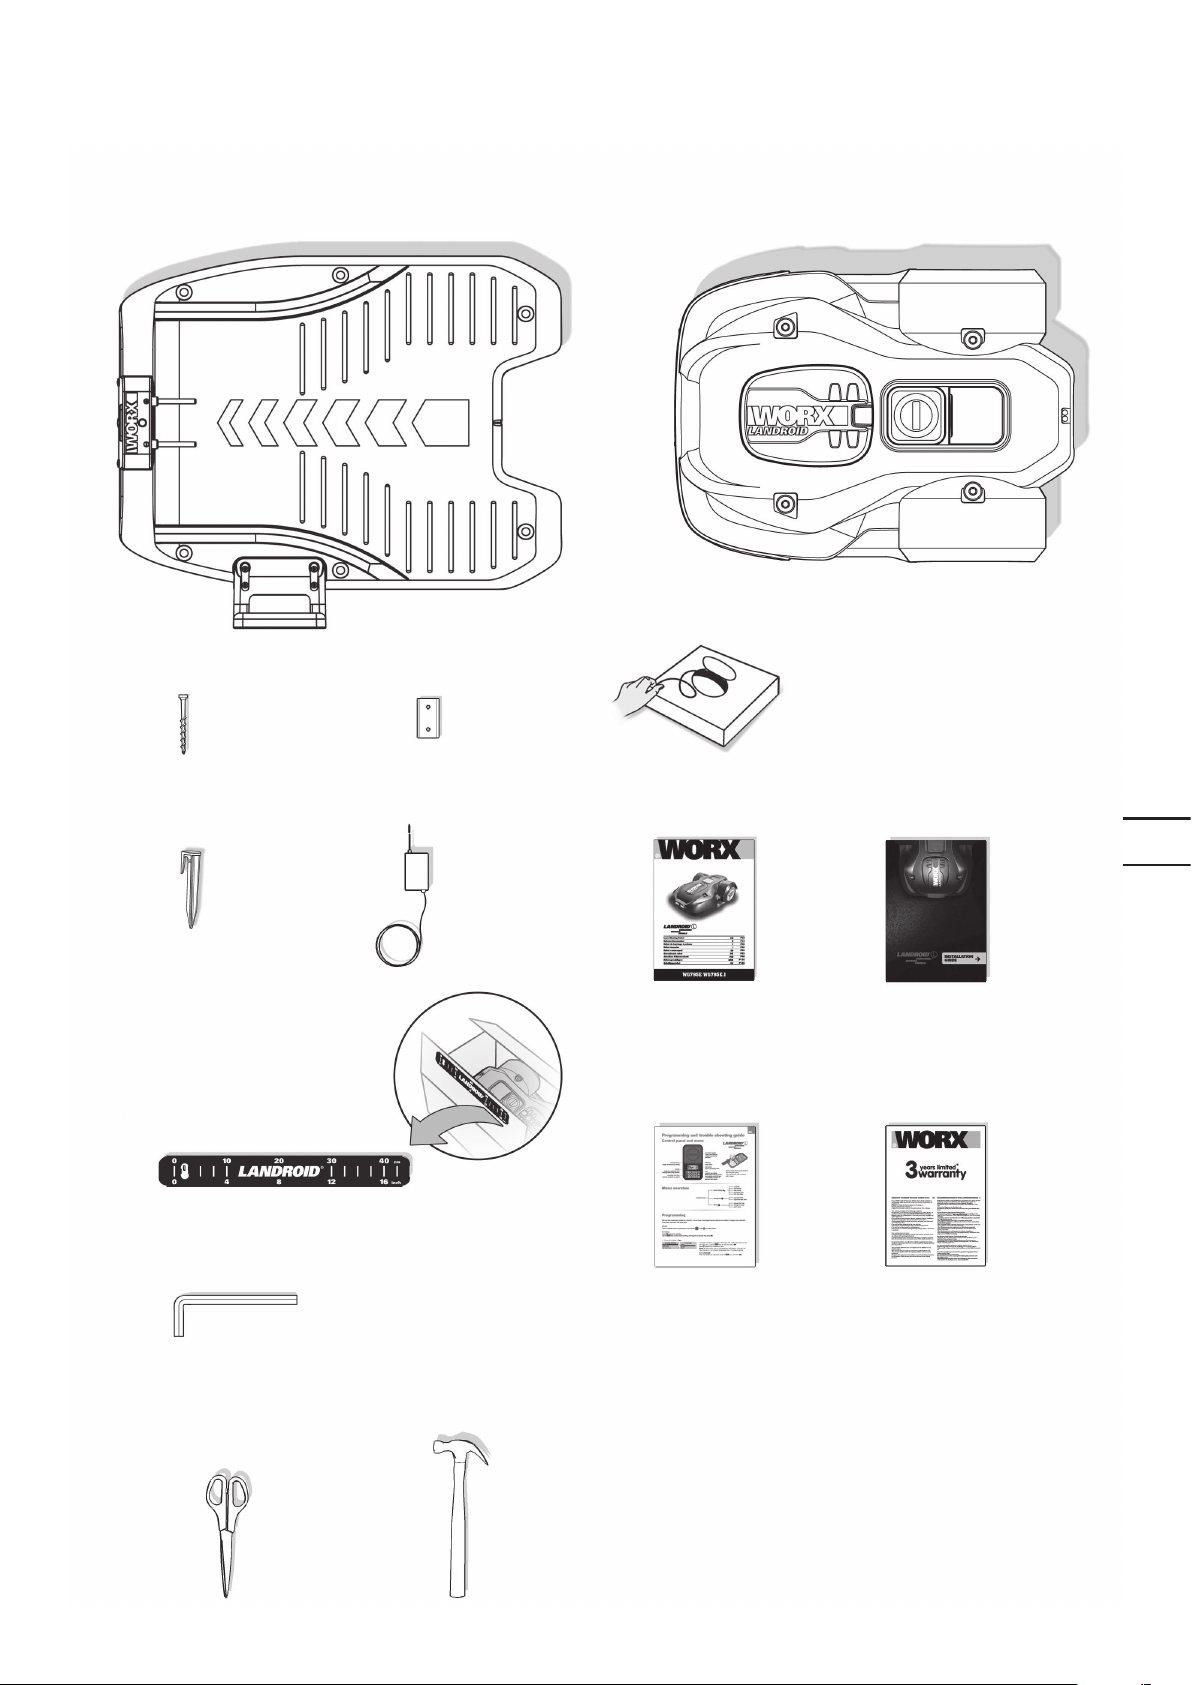
Preparation
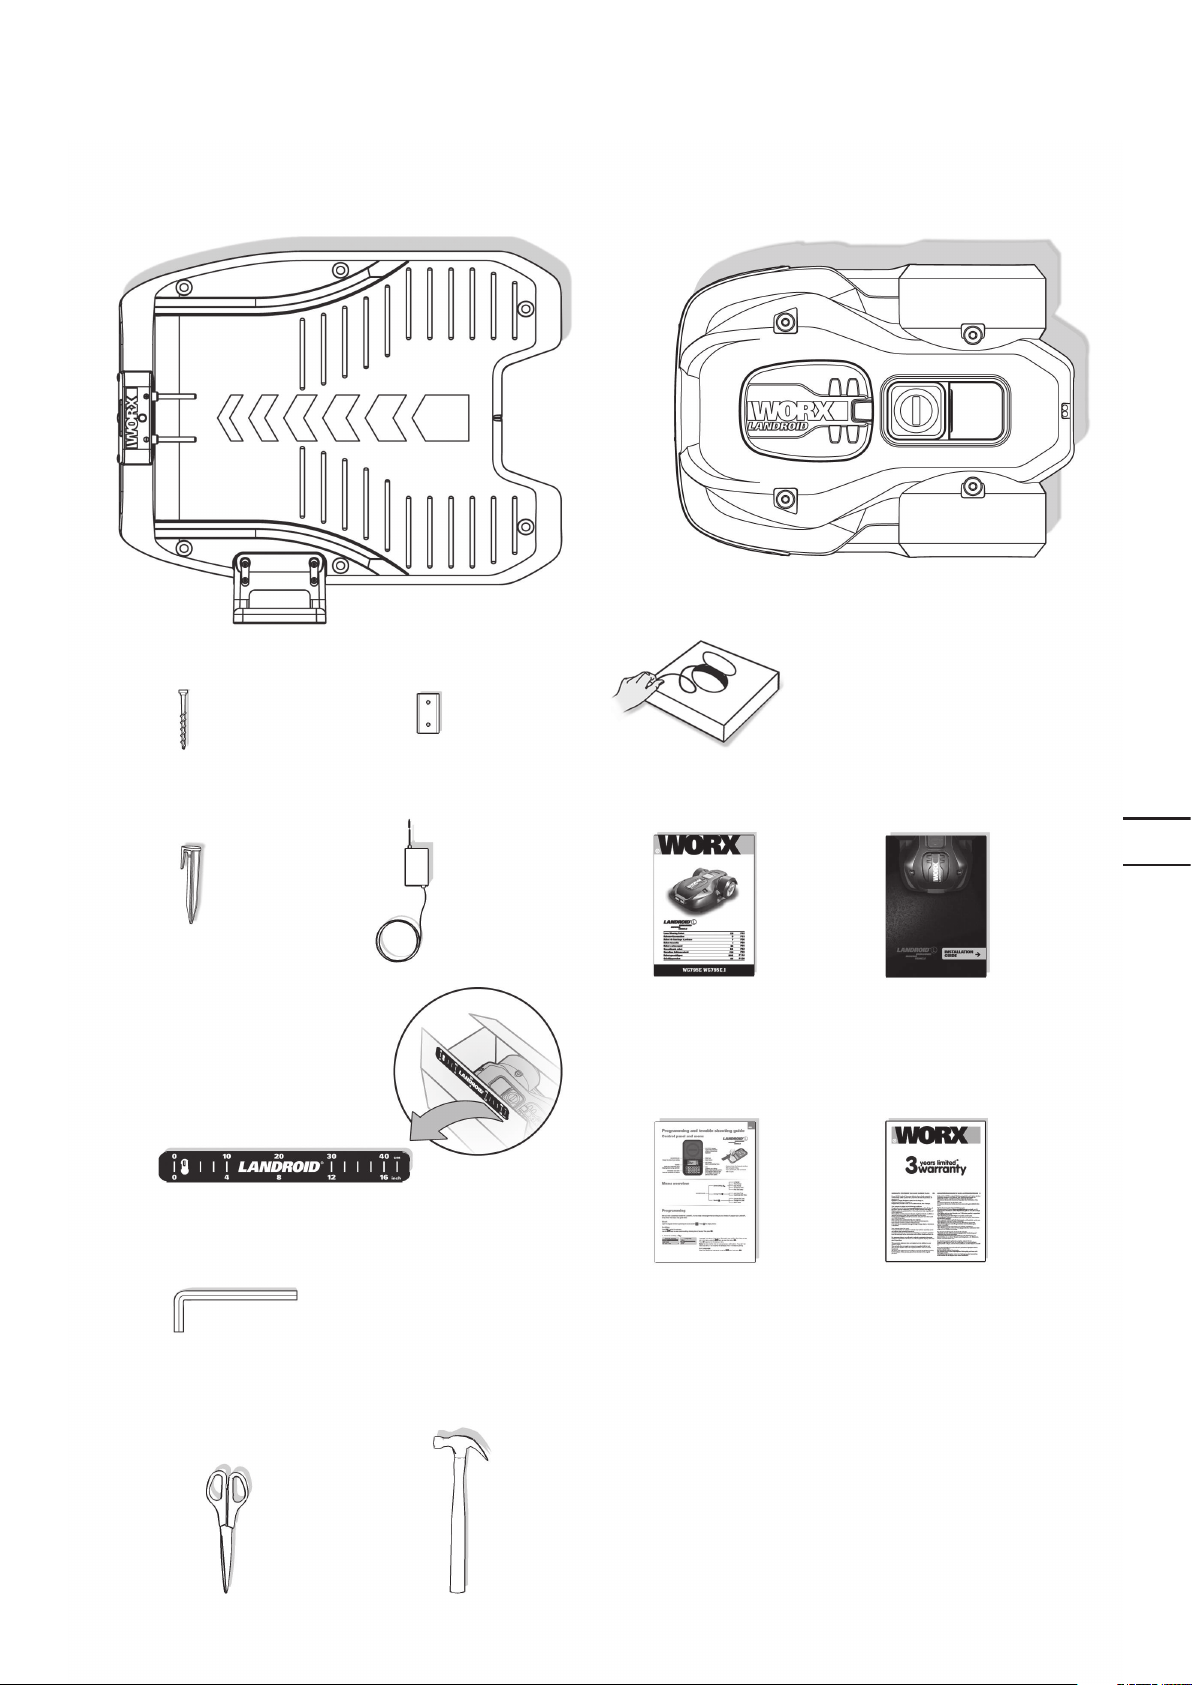
In the box
Landroid
®
LCharging base
6 Base
retention
pegs
250
Boundary
Pegs
Distance gauge
9 Spare blades
(3 kits)
Power cord
with AC/DC
transformer
Owner’s manual
Boundary
wire reel 200m
5
EN
Installation
guide
Hex key
From your shed
Scissors Hammer
Programming and
trouble shooting
guide
Warranty
statement
Page 6
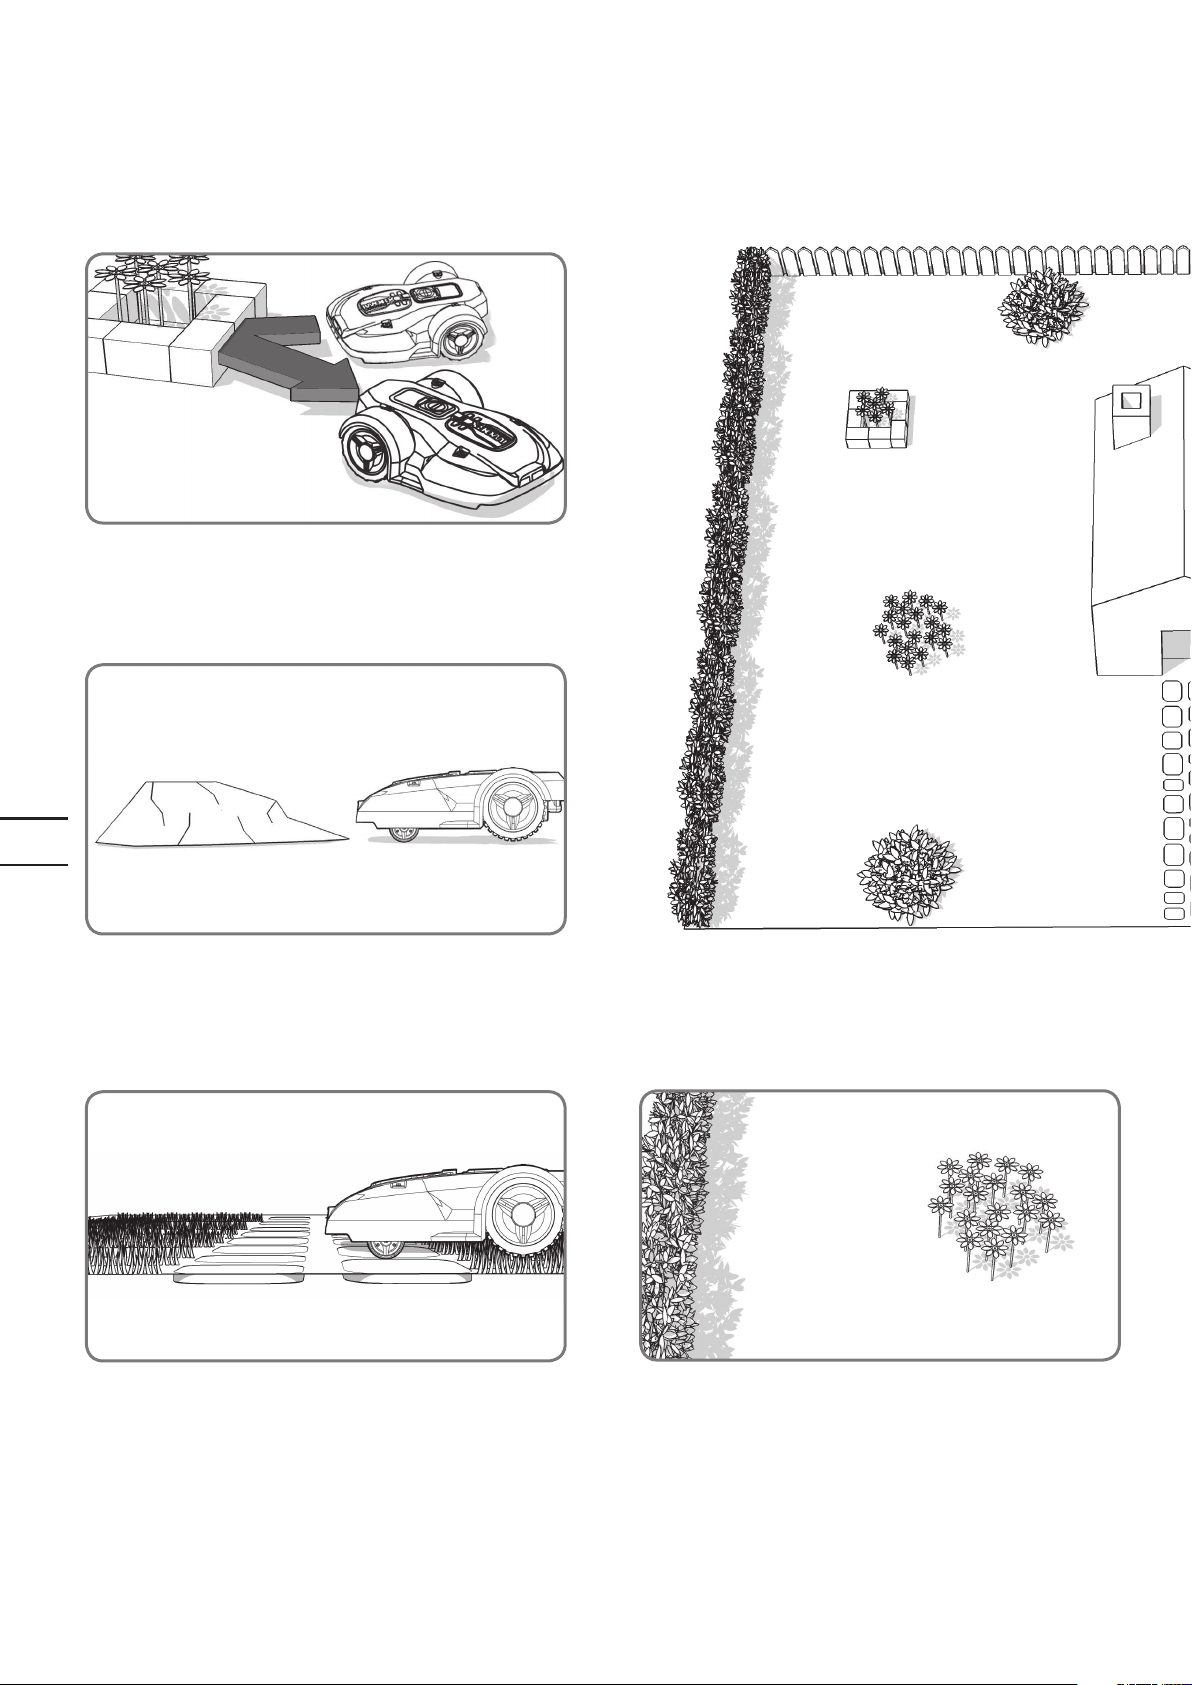
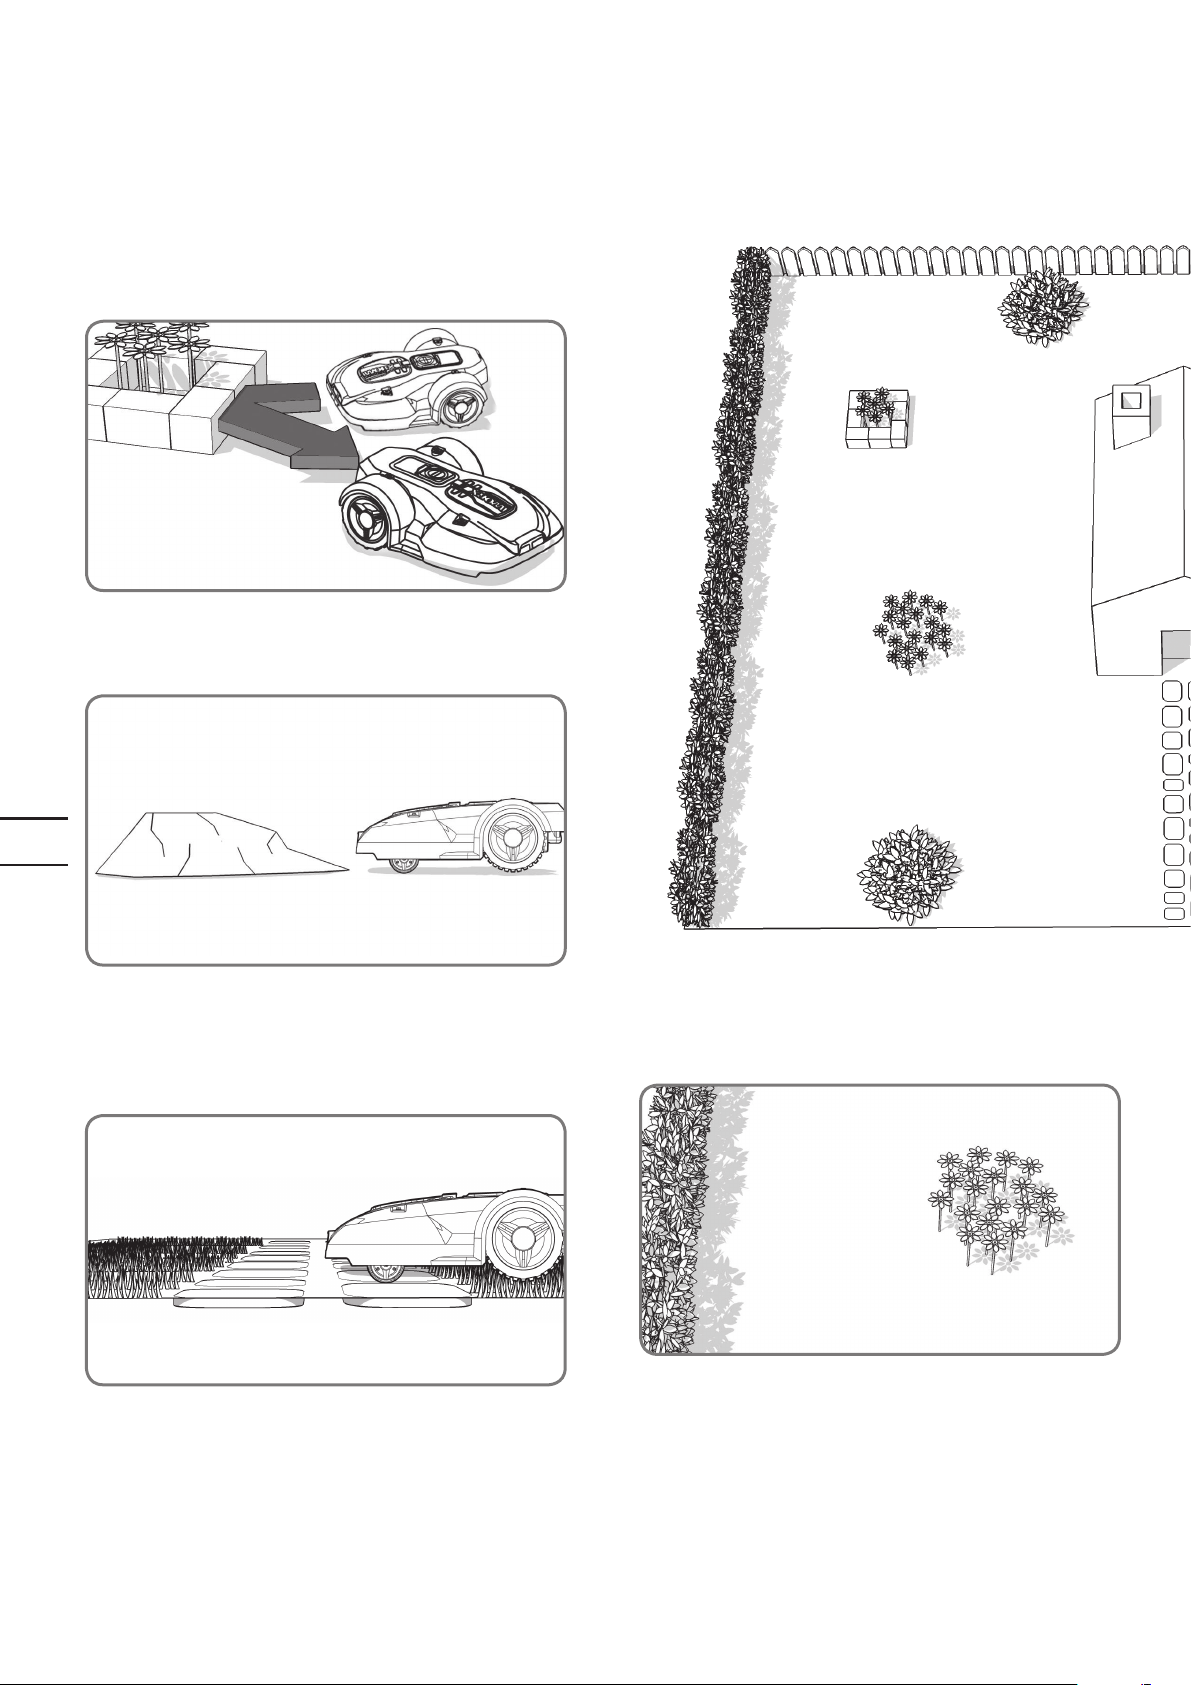
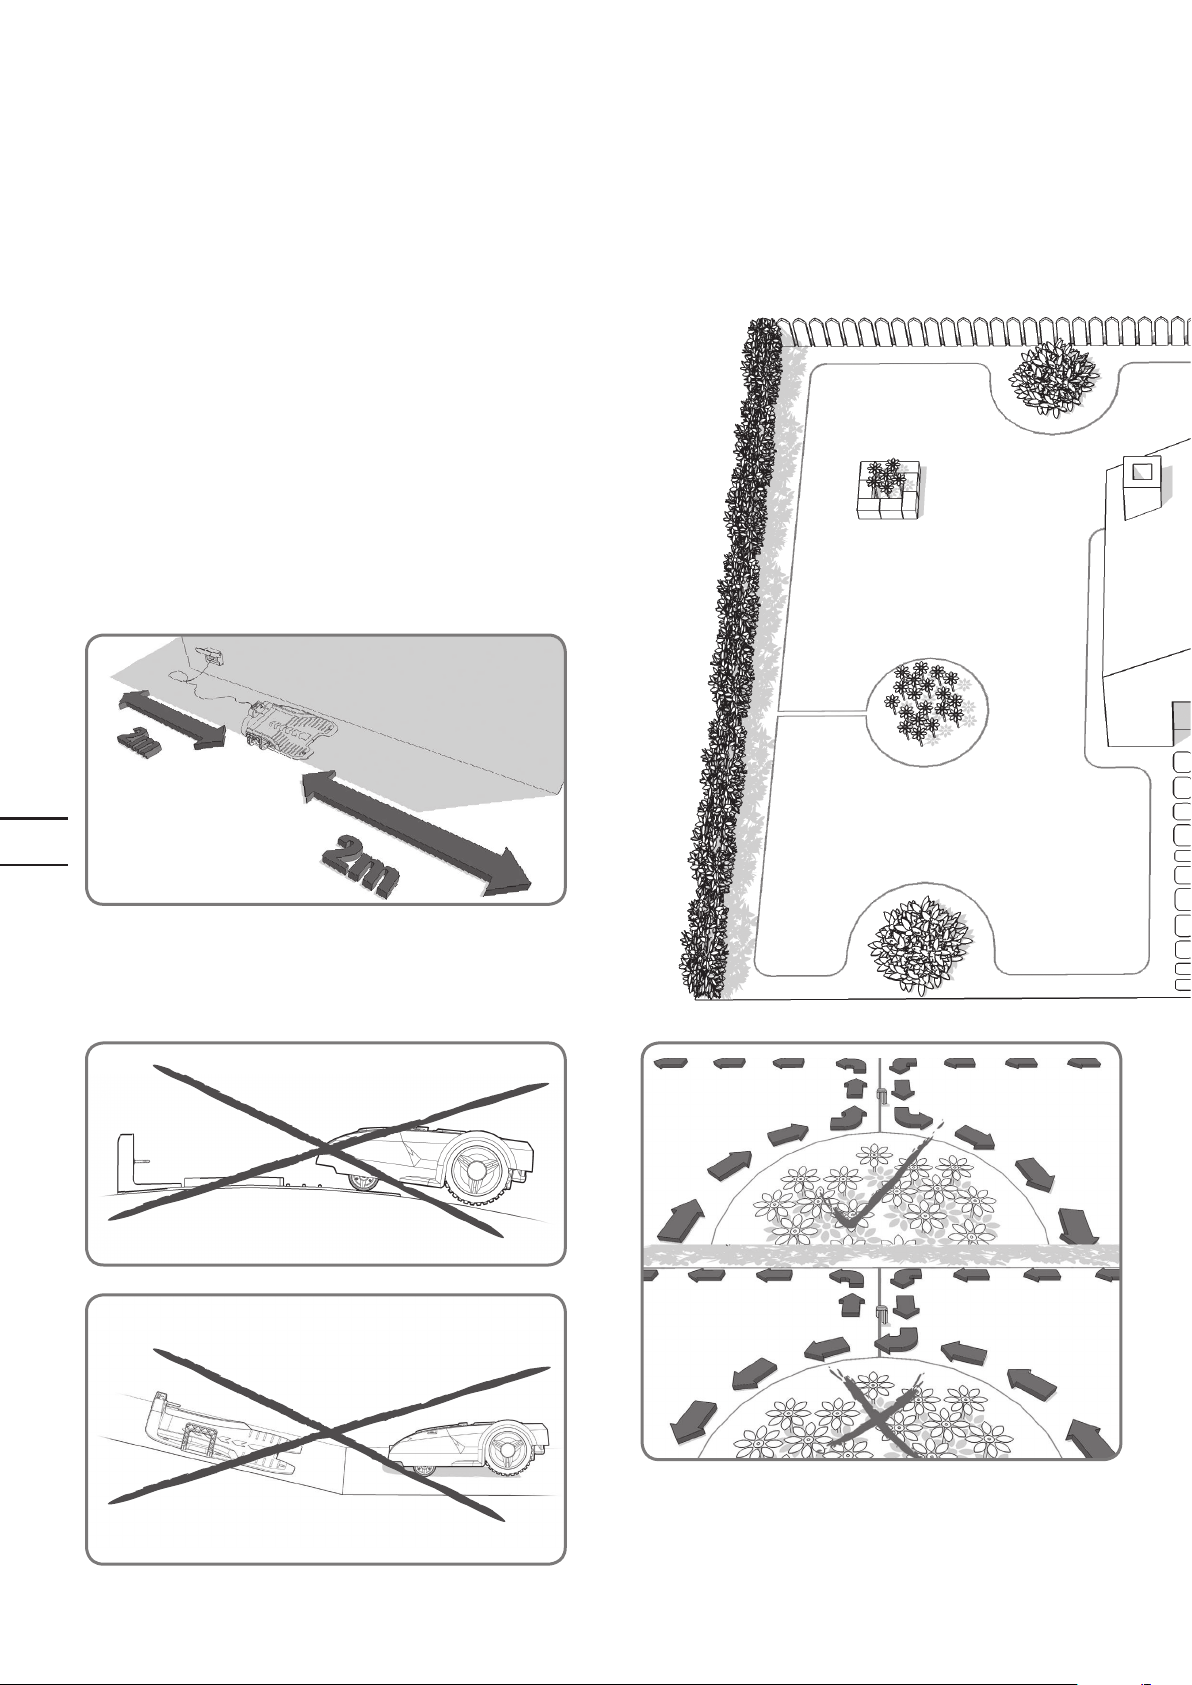
Landroid®L's new home-your garden
Let's start by having a closer look at Landroid®L's new home—your lawn—highlighting the areas where it can safely
®
go and areas it’s best for Landroid
Obstacles that can be hit
When hitting any obstacle that’s rigid, stable and taller than
15cm—such as a wall or a fence—your Landroid
stop and re-direct away from the obstacle.
L to avoid.
®
L will simply
6
EN
Stones
Stones that are heavy enough not to be moved by your
Landroid
inclined surface that your Landroid
remove it or exclude from the working area.
®
L can be safely hit. However, if any stone has an
®
L can climb, you should either
Driveways
If your driveway is level with your lawn, without any protruding
surface, the Landroid
Landroid
Boundary Wire and the driveway is needed.
If it’s covered with gravel, you should not allow the Landroid
to travel over it, using the distance gauge in this case, keeping a
45cm* space between the boundary wire and the driveway.
*This is the recommended distance. Use the provided distance
gauge to ensure proper installation.
®
L to avoid it, then only a 10cm* space between the
®
L can freely run over it. If you'd like the
®
L
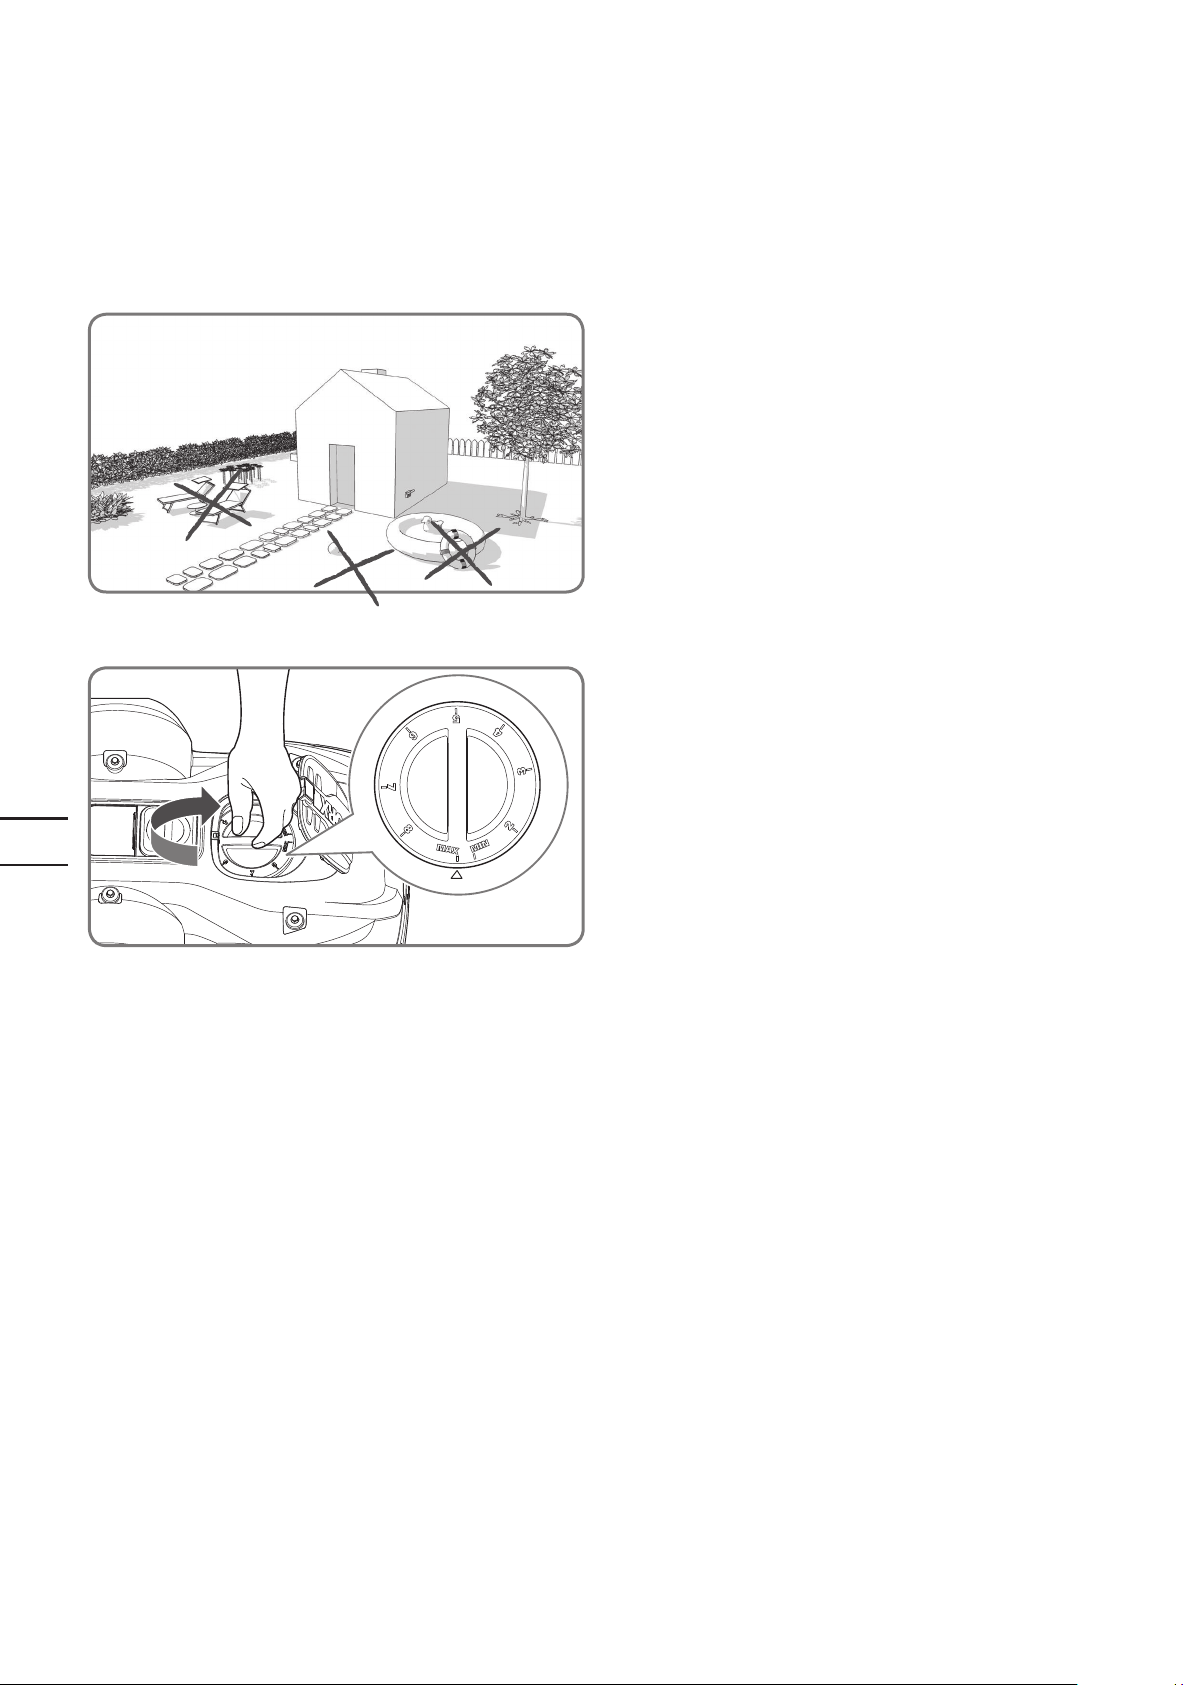
Flowerbeds, ponds, pools...
You certainly don’t want your Landroid®L to mow your flowers, or
fall into the water. These areas should be avoided.
Page 7

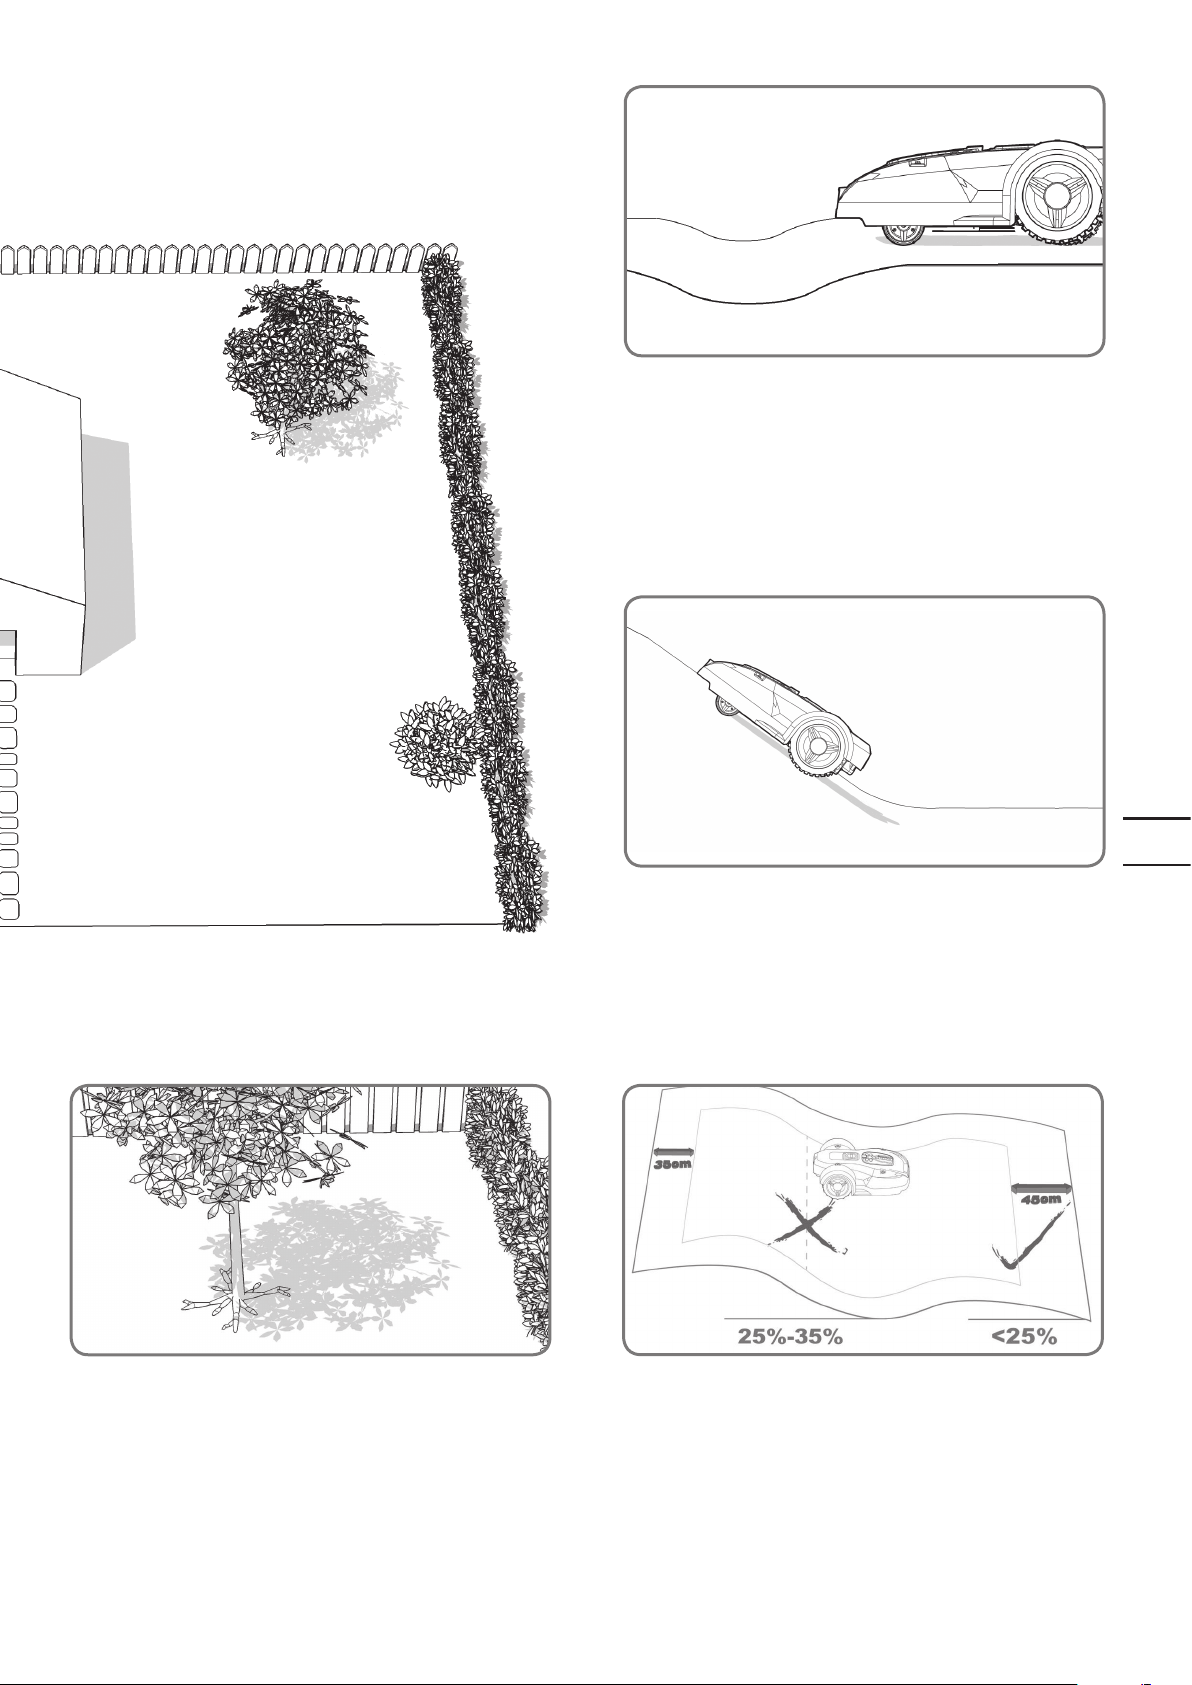
Depressions and bumps
In the case of large bumps or dips, please consider if the blades
could touch the ground; if this is the case, either make the
®
inclines smoother or exclude those areas from your Landroid
operation.
L’s
Trees
If there are roots emerging from the ground, this area should be
avoided in order not to damage the roots.
35% (20°)
Slopes
Your Landroid®L has the ability to safely climb slopes up to 35%
(20°), so just avoid anything steeper than this.
Upper boundary wire
Wire
Lower boundary
Placement of Boundary Wire on slopes
The Upper Boundary Wire should NOT be placed on slopes
steeper than 35% (20°). The Upper Boundary Wire should have
a distance of at least 35cm between any obstacles. The Lower
Boundary Wire should NOT be placed on slopes steeper than
25% (15°). The Lower
Boundary Wire should have a distance of at least 45cm between
any obstacles when it is positioned on a slope that is 25%.
upper boundary wire
7
EN
Page 8
Marking out Landroid®L’s
territory within your garden
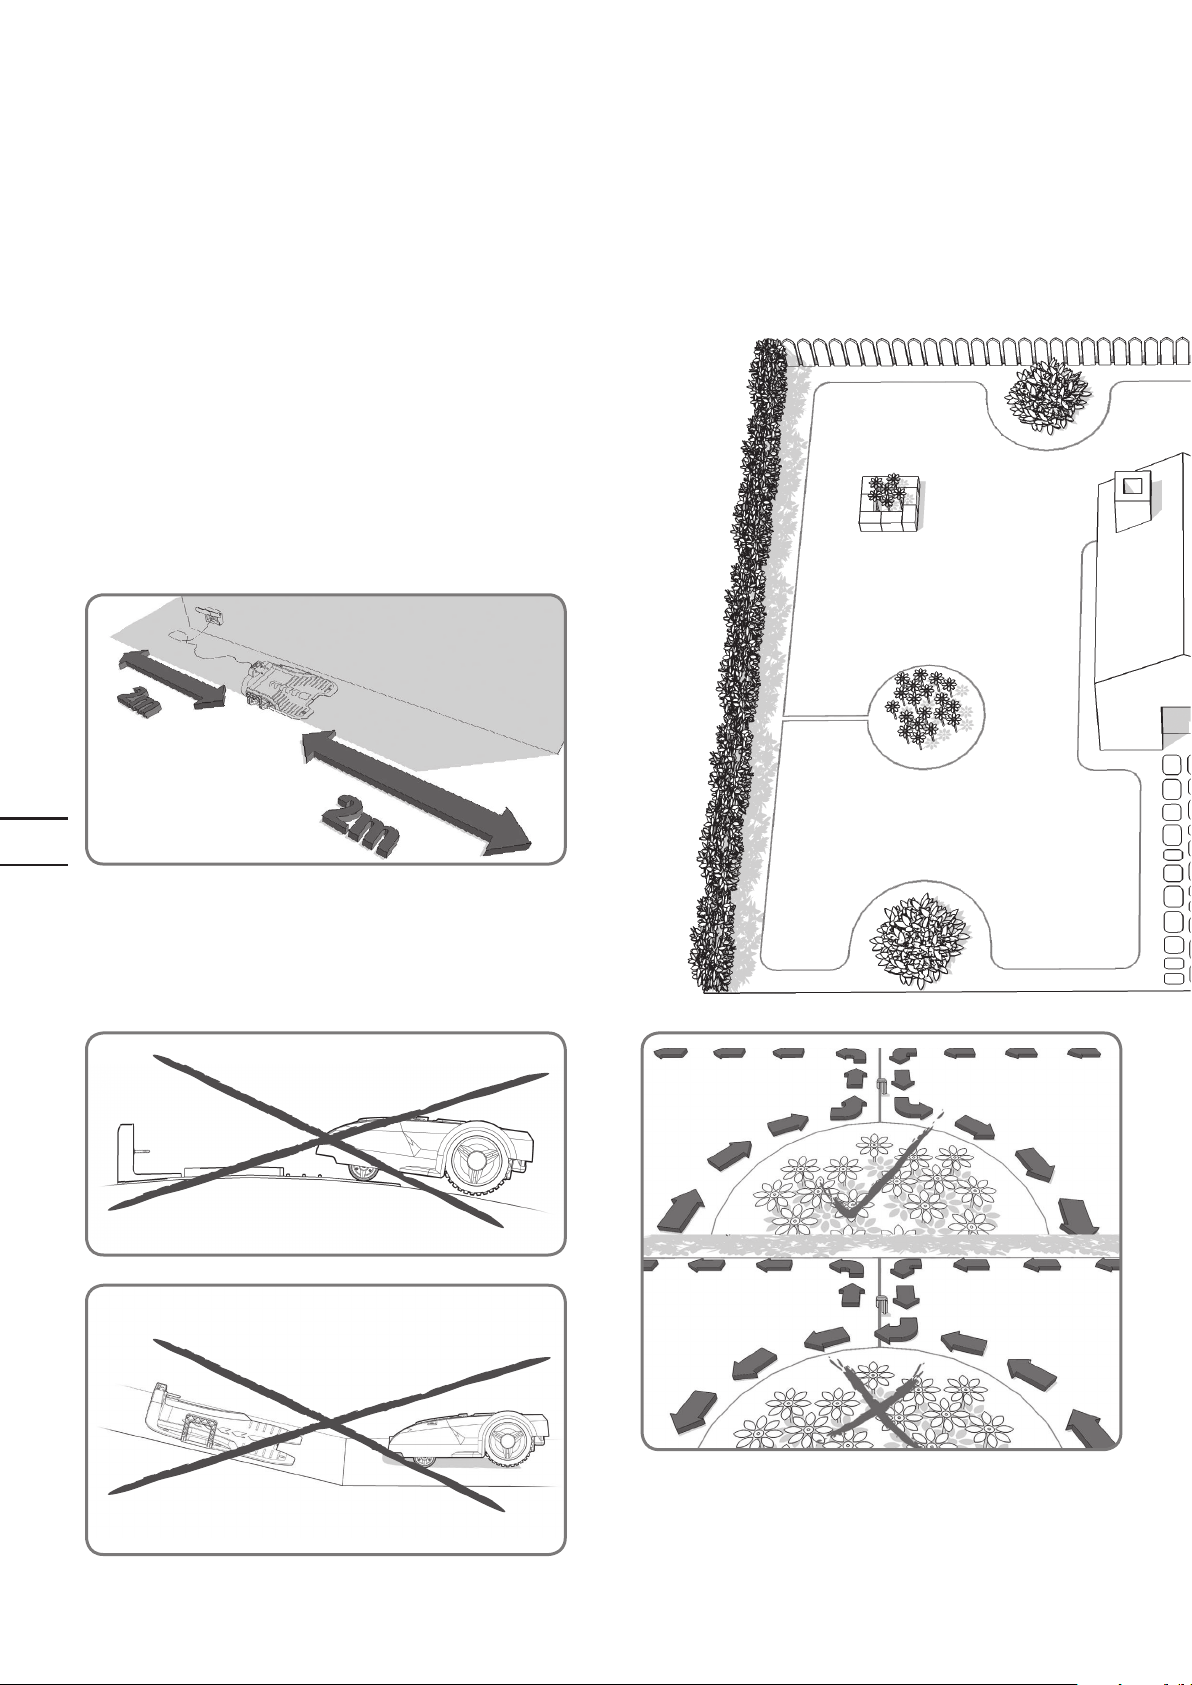
Your Landroid®L needs to know where to mow. This is why you have to mark its working area with a boundary
®
wire that will form an invisible fence. This wire will also guide your Landroid
®
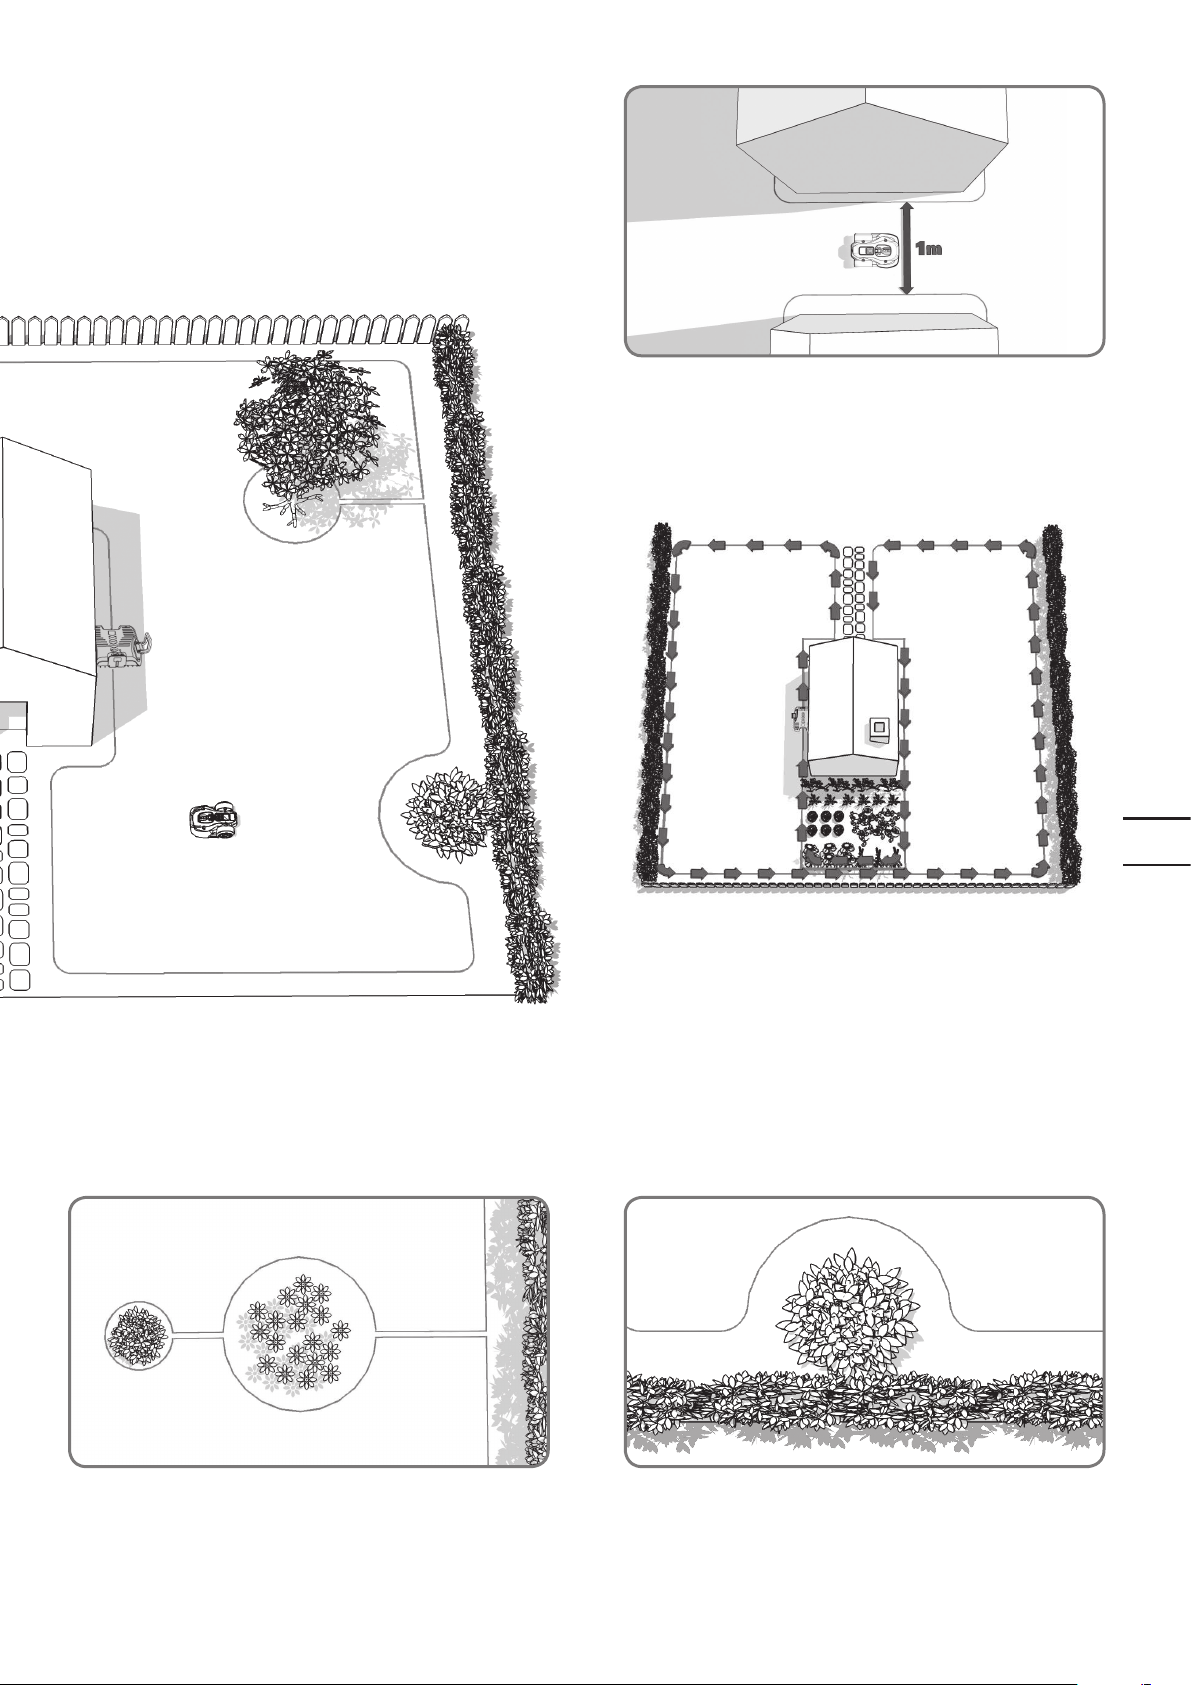
If your neighbor also uses a Landroid
L, then you must keep a space of at least 2metres between your Boundary
Wire and your neighbors.
®
Please be aware that your Landroid
L will not be able to receive
a signal from the Boundary Wire beyond the distance of 25m.
First of all, locate the best spot for the charging base, taking
into account where your nearest outdoor electricity socket is.
The charging base has a 15m power cord.
NOTE: Make sure the transformer and the electrical socket
are kept in a dry area at all times.
L to its charging base.
8
EN
The charging base should be placed along a straight line—allow
2 meters at both the front and the back. If possible, place the
charging base in the shade—batteries are better recharged in a
cool place.
Make sure it is on a flat area, clear of any obstacles.
An island is an area that sits inside your lawn where you don't
®
want Landroid
mowing boundary, goes straight to the island, around it and
back to the boundary as shown by the arrows on the picture.
L to go. The boundary wire starts from the
Page 9
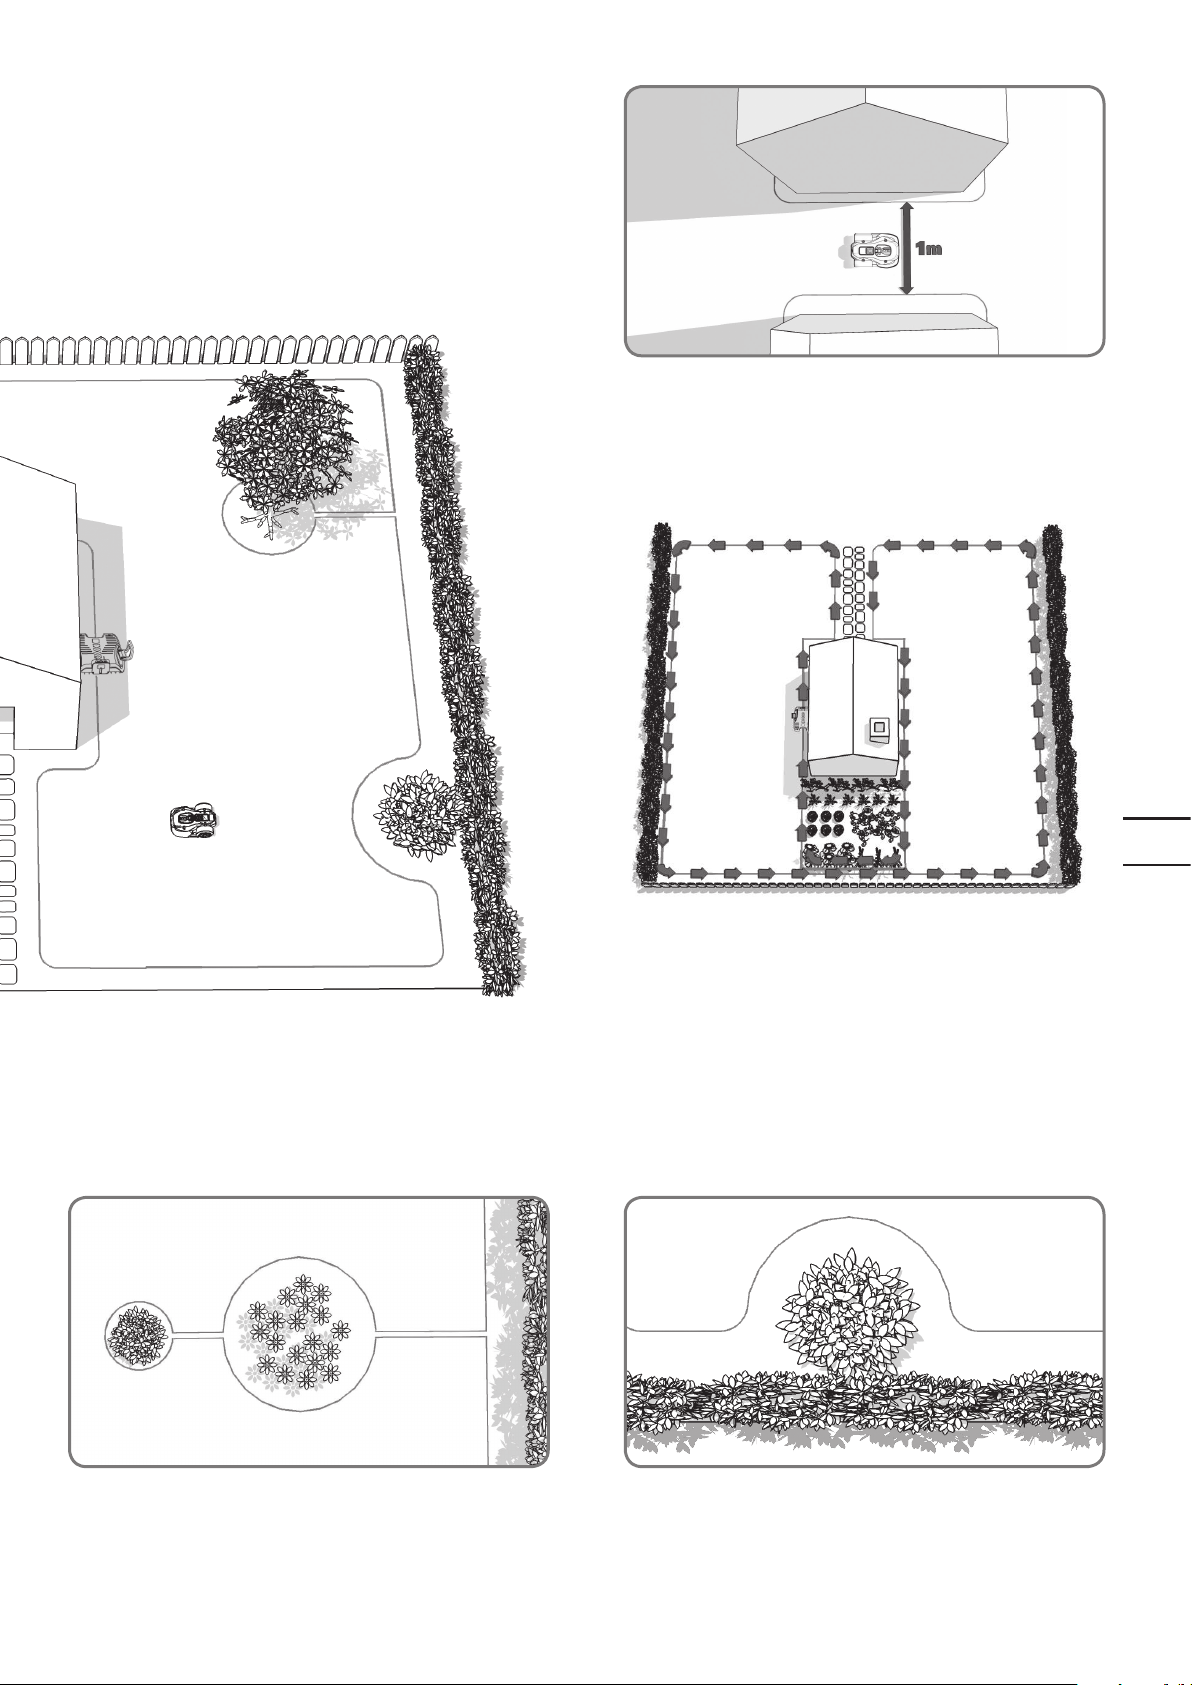
If your lawn has two or more separate areas connected to each
other by means of a corridor, this should be at least 1 meters wide.
If your lawns are not connected by a corridor that's wide enough,
®
then you'll have to pick your Landroid
®
lawn. Landroid
L will mow this lawn no problem, but you'll have to
L up and move it to the other
bring it back to the charging base when the battery runs out.
9
EN
In the case of two islands that are close to each other, it would be
convenient to lay out the wire as illustrated above.
®
The Landroid
L can travel freely over the boundary wire in
between the islands and the mowing boundary.
A forbidden area that's close to the mowing boundary should
be a part of the boundary itself, as shown in the picture.
Page 10

Installation
Pegging your boundary wire
We recommend that you first mow the lawn where the wire is to be laid using a normal lawn mower or a grass
®
trimmer. This ensures that the wire is laid as close to the ground as possible so the Landroid
cut the wire. The boundary wire is powered with a very low voltage so that it is totally safe to human beings and
pets.
1
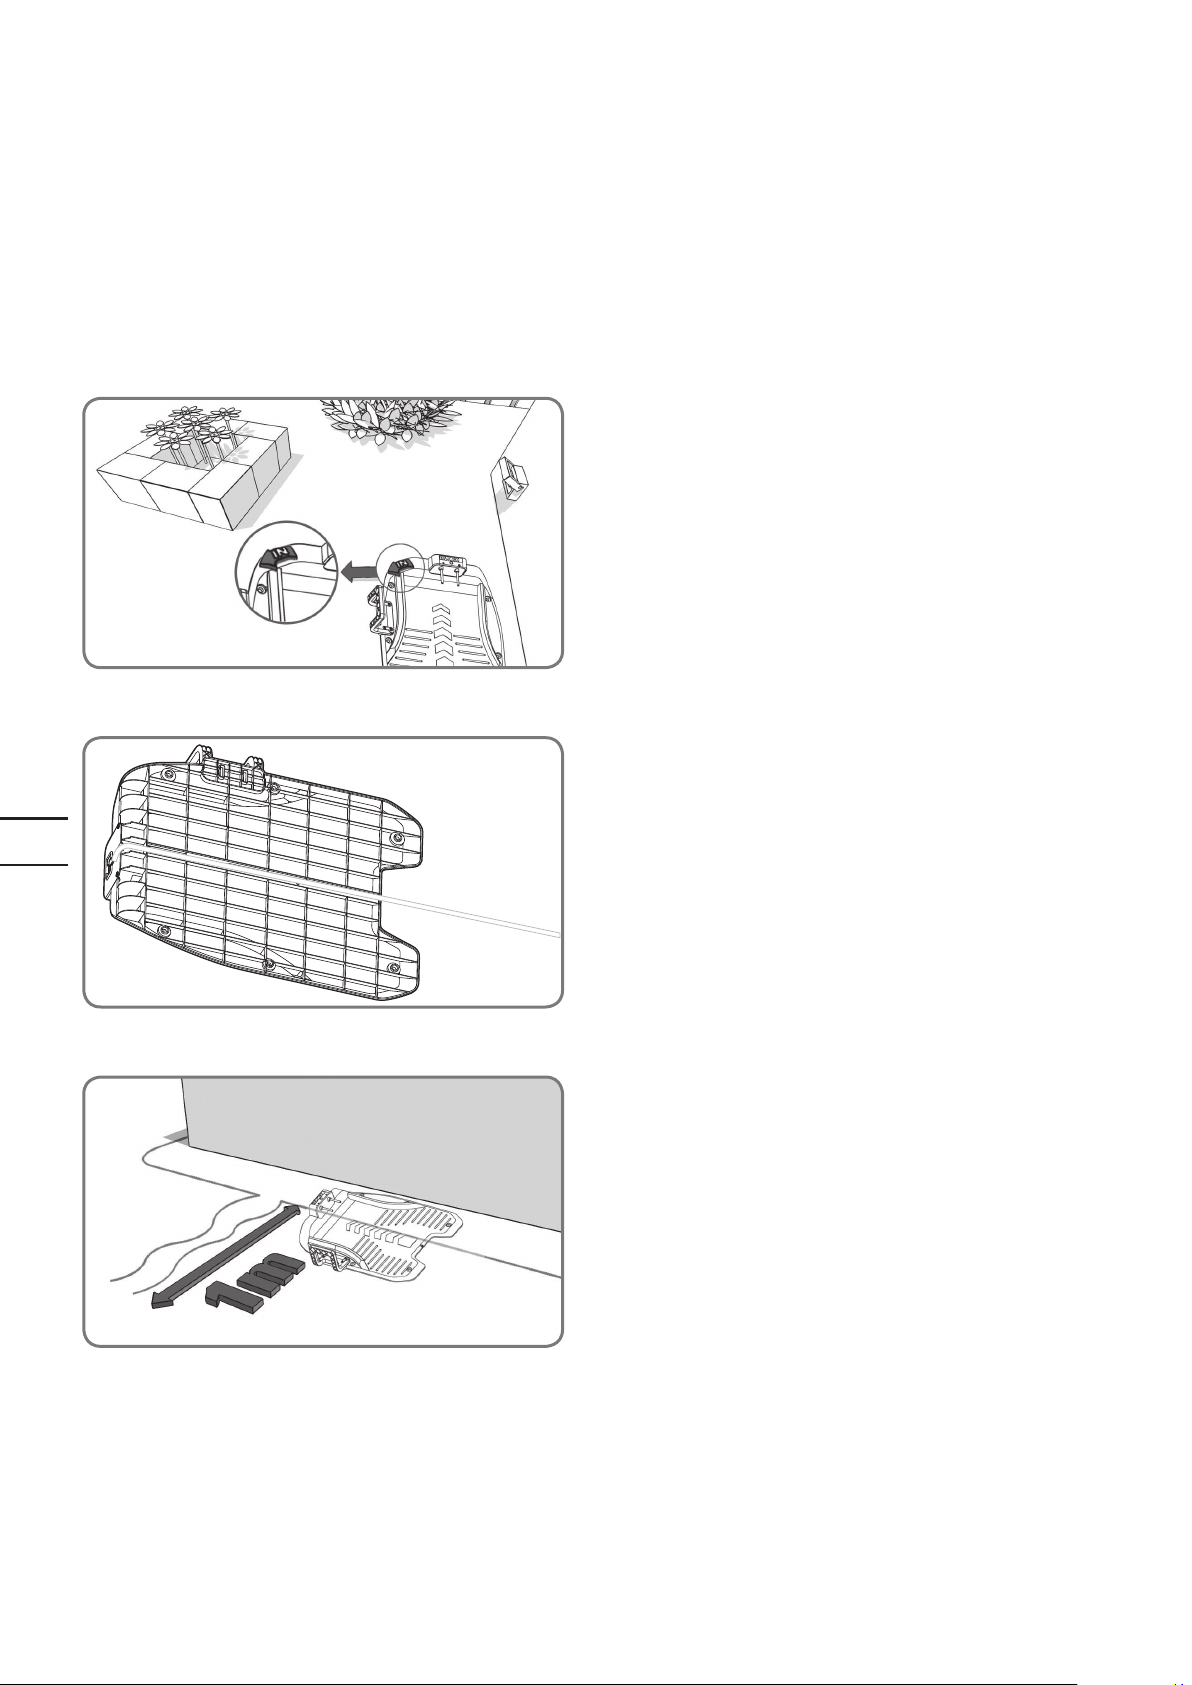
Place the Charging Base in its designated spot, without fixing it
permanently. The “IN” arrow should be oriented so that it indicates
the inside of your lawn.
L does not accidentally
10
EN
2
Feed the boundary wire through the tunnel underneath the charging
base.
3
Leaving about 1 meter in length of extra wire, start from the rear of
your charging base and begin pegging the wire along the boundary.
When you’ve finished laying the wire along the boundary back to the
charging base, leave another meter of extra wire and then cut it.
Page 11

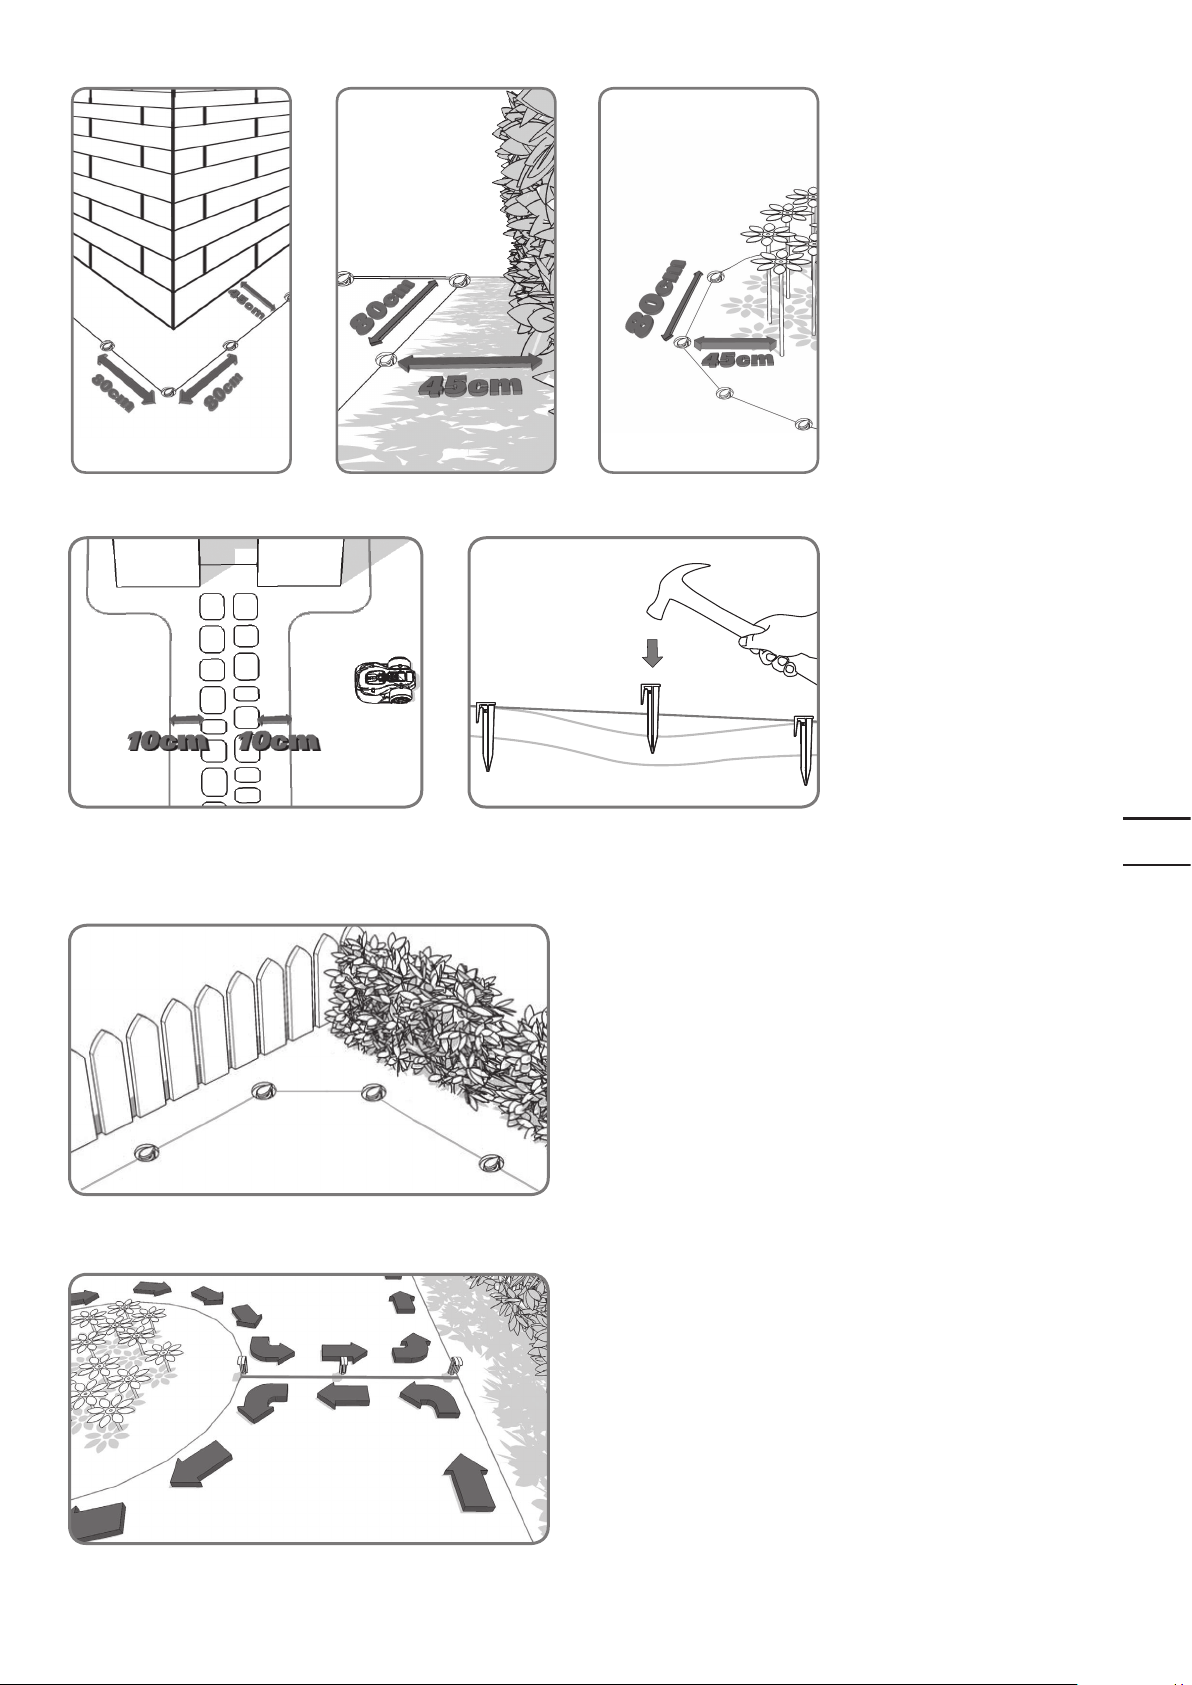
4
When laying the boundary wire,
use the distance gauge to keep a
45cm* space between the wire
and the boundary. However, in
the case of an obstacle that is
level with ground and safe for the
®
Landroid
driveway or sidewalk, then only a
10cm* space is needed.
Each boundary peg should be
placed around 80cm apart.
Knock the boundary pegs tight to
the ground with the help of the
hammer, although avoid putting
too much pressure on the wire.
Keep the boundary wire straight
and tight between the pegs, there
should not be any slack wire.
* This is the recommended
distance. Use the provided
distance gauge to ensure proper
installation.
L to run over, such as a
5
Ensure the Boundary Wire is perfectly straight in each corner.
6
When making an island with the boundary wire, follow the path as
shown. The wire should run from the perimeter to outline the defined
island and then return back to the perimeter. The boundary wire in
between the island and perimeter should be laid close together
and held in place by the same boundary peg. During operation, the
®
Landroid
L will be able to freely pass over this part of the wire.
11
EN
Page 12

Connect the base to the boundary wire
OUT
IN
OUT
IN
OUT
IN
1
Cut the two ends of the wire to a length that’s appropriate
convenient for reaching the clamps.
Strip the two ends of the wire.
2
When connecting to the charging base there will be an IN-wire
and an OUT-wire, as shown. Connect the IN-wire to the red
clamp of the charging base and the OUT-wire to the black clamp.
Then close the cover.
12
EN
Page 13
3
a
b
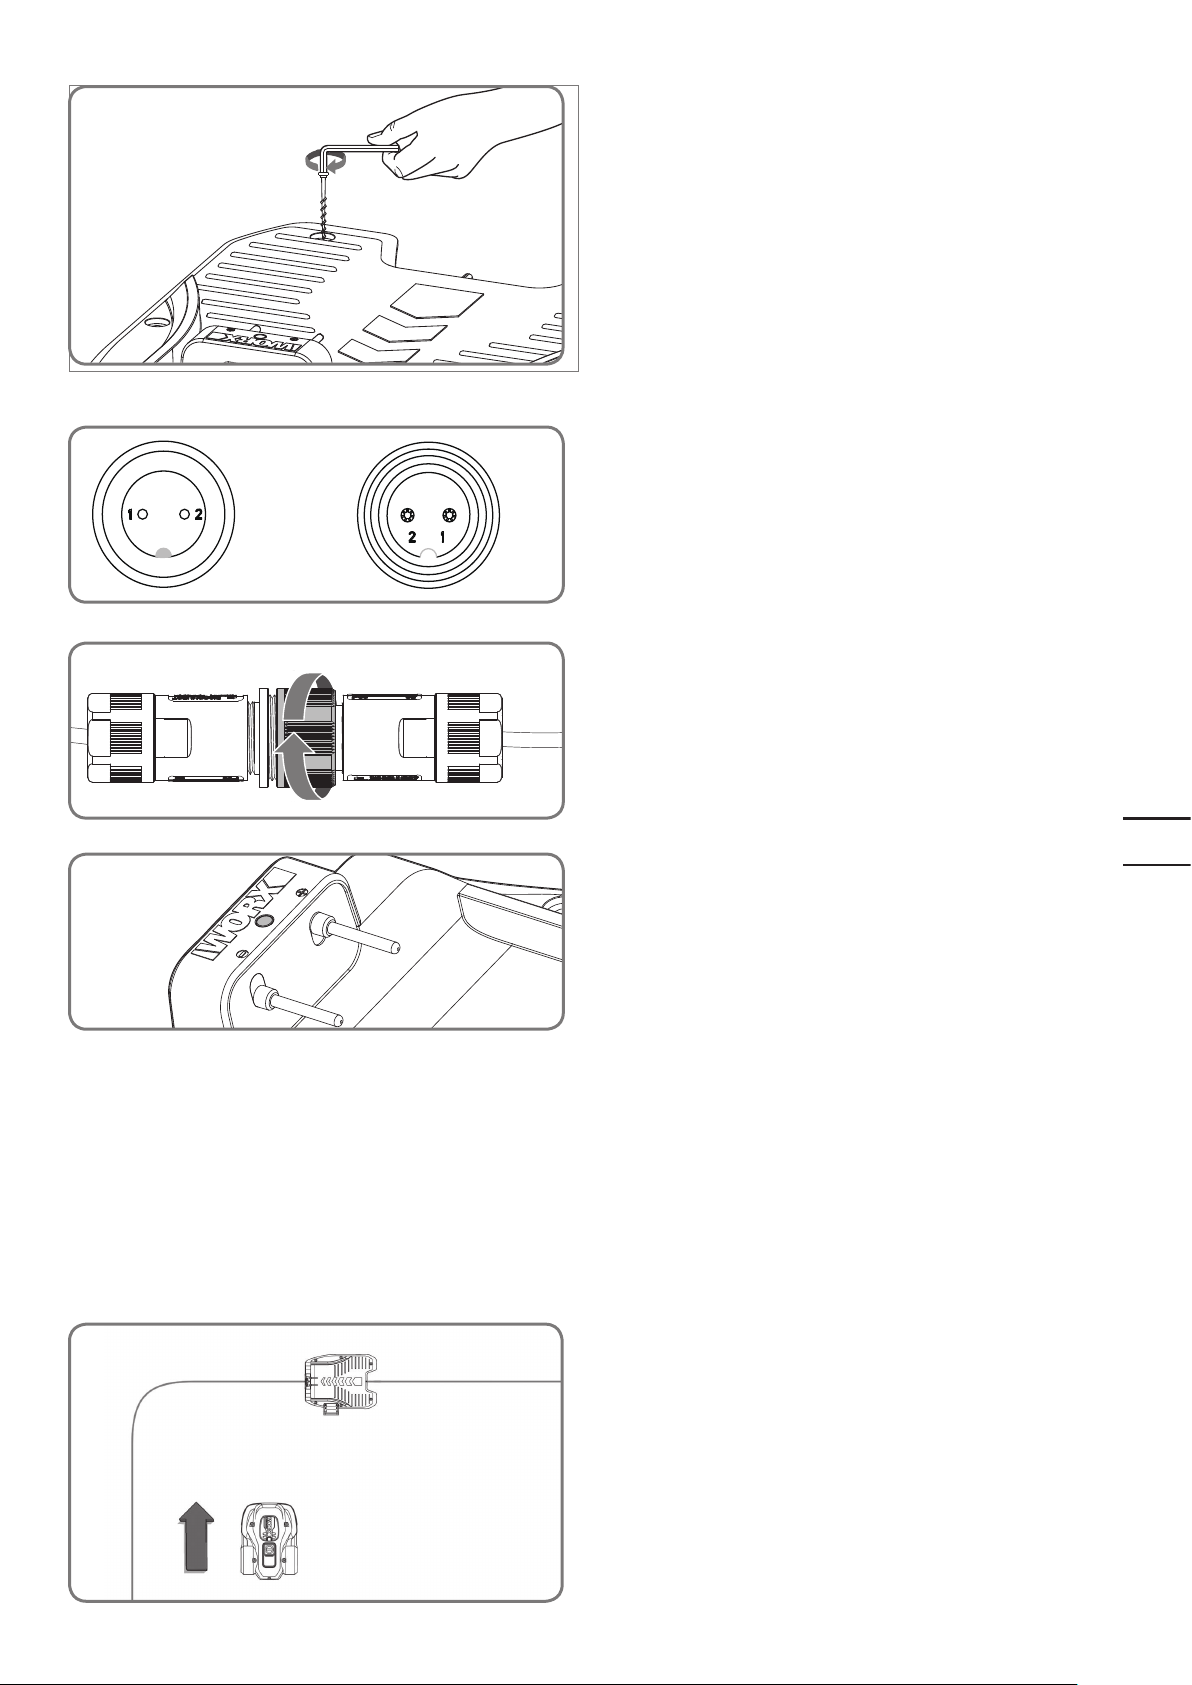
You can now permanently fix the charging base on the ground
by tightening the supplied Base Retention Pegs with the
supplied Hex key.
NOTE: Make sure the IN-wire is running straight through
the tunnel underneath the charging base.
4
Connect the power cord to the transformer and then to the AC
electrical socket, the LED on the charging base will turn on. If
the LED is off, please refer to the Trouble shooting guide.When
connecting, align the notch on the power cord connector (a)
with the groove on the transformer connector (b).
Make sure to only screw or unscrew the highlighted piece of
the connector.
If the green light does not come on, then check the power
connections.
In case the power cord is within the working area, you may bury
it as needed.
13
Turn on and test the installation
This is the exciting part where you can turn your Landroid®L on for the first time.
1
Place your Landroid®L inside the
working area, a few meters from
the back of the charging base.
EN
Page 14
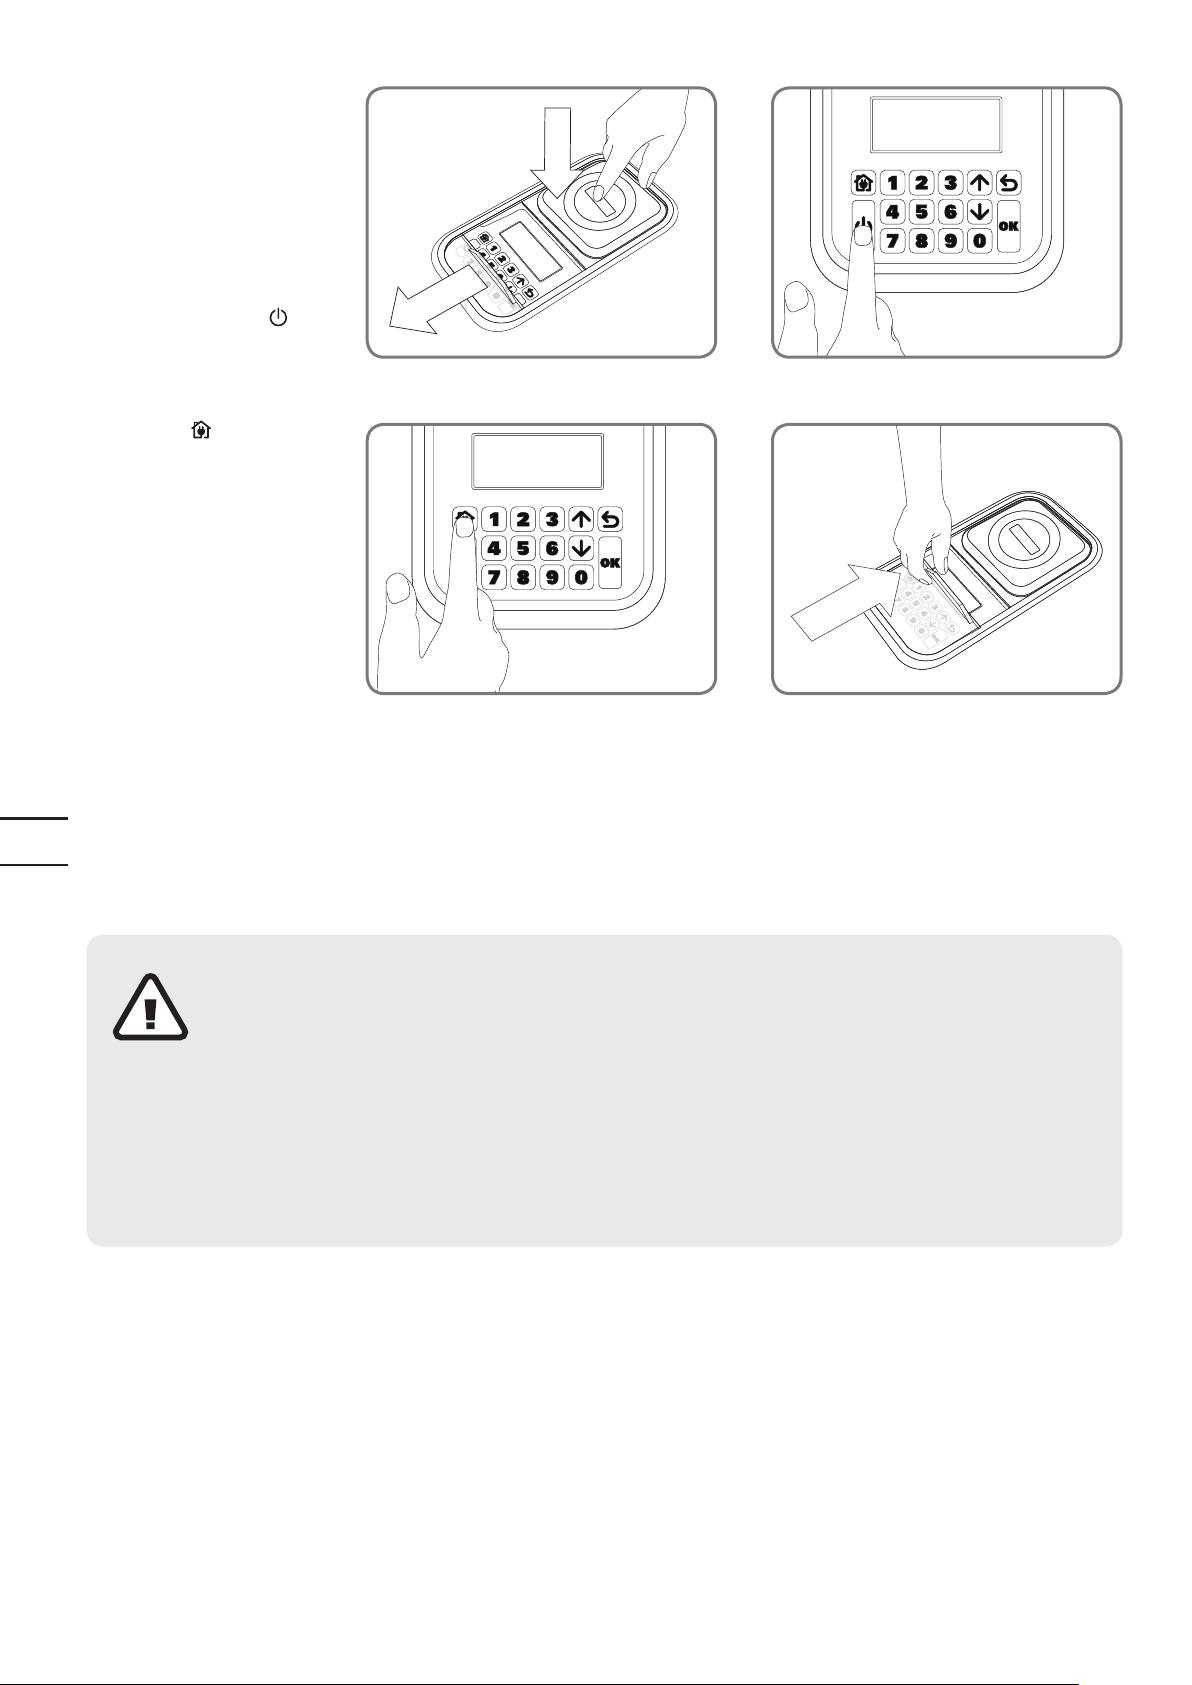
Open the keypad window
by pressing the ACCESS
button on the top of your
Landroid
Press and hold down the
Power ON/OFF
®
until the Landroid
L turns on.
2
®
key
L.
14
EN
Press the
key and close
the keypad window: your
Landroid
®
L will now find its
way to the charging base.
Watch the Landroid
®
L as it
returns to the charging base
and modify the positioning
of the boundary wire if
necessary. When the
Landroid
®
L successfully
returns to the charging base,
this means the installation has
been successfully completed!
Now your Landroid
®
L will start
to fully charge.
®
NOTE: If your Landroid
L is in the charging base during a time you have programmed it to mow, then simply press the
ACCESS button and close keypad window to send it back to mowing.
®
L is
Warning
• If your Landroid®L is
outside its territory, it
will not move and the
display will indicate
”out of cutting area”
error. Just move it inside
its territory and repeat
step 2.
• If your Landroid
inside its territory but
the display says “out
of cutting area”, and the
LED is on, it means you
clamped the boundary
wire ends incorrectly.
Just reverse them.
®
• Your Landroid
L should
always remain switched
on. If you ever need to
turn it off, then make sure
you place it within its
boundary area before you
switching it back on again.
®
• Should your Landroid
L
stop operating
unexpectedly, just press
the ACCESS button, open
its keypad window, press
its ON/OFF key to ON,
correct the problems,
press
0 button, close its keypad
window.
NOTE: Please refer to the Programming and Troubleshooting Guide for more information.
Page 15

Programming
Having finished the installation, it is now time to program the Landroid®L when you want it to go to work by using the keypad
display shown below. Please refer to the Programming and Troubleshooting Guide included in the packaging.
You could find more details about default work time of Landroid®L in following table:
Landroid®L WG795E - Auto mowing time schedule.
Auto mowing
Area m
2
runtime-hours
100 1.5 7:00-8:30 / / 7:00-8:30 / / /
200 5 7:00-8:00 7:00-8:00 7:00-8:00 7:00-8:00 7:00-8:00 / /
300 6 7:00-8:12 7:00-8:12 7:00-8:12 7:00-8:12 7:00-8:12 / /
400 7.5 7:00-8:30 7:00-8:30 7:00-8:30 7:00-8:30 7:00-8:30 / /
500 10 7:00-9:00 7:00-9:00 7:00-9:00 7:00-9:00 7:00-9:00 / /
600 11 7:00-9:12 7:00-9:12 7:00-9:12 7:00-9:12 7:00-9:12 / /
700 13 7:00-9:36 7:00-9:36 7:00-9:36 7:00-9:36 7:00-9:36 / /
800 15 7:00-10:00 7:00-10:00 7:00-10:00 7:00-10:00 7:00-10:00 / /
900 16.5 7:00-10:18 7:00-10:18 7:00-10:18 7:00-10:18 7:00-10:18 / /
1000 18 7:00-10:36 7:00-10:36 7:00-10:36 7:00-10:36 7:00-10:36 / /
1100 20 7:00-11:00 7:00-11:00 7:00-11:00 7:00-11:00 7:00-11:00 / /
Monday
mowing
hours
Tuesday
mowing
hours
Wednesday
mowing
hours
Thursday
mowing
hours
Friday
mowing
hours
Saturday
mowing
hours
Sunday
mowing
hours
15
EN
1200 22.5 7:00-11:30 7:00-11:30 7:00-11:30 7:00-11:30 7:00-11:30 / /
1300 25 7:00-12:00 7:00-12:00 7:00-12:00 7:00-12:00 7:00-12:00 / /
1400 26.5 7:00-12:18 7:00-12:18 7:00-12:18 7:00-12:18 7:00-12:18 / /
1500 28 7:00-12:48 7:00-12:48 7:00-12:48 7:00-12:48 7:00-12:48 / /
Page 16

Ready to go?
20
25
30
35
40
45
50
55
60
The Landroid®L is designed for maintaining your grass at a perfect length during the season, but is not designed for deforesting a
jungle.
Before starting it for the first time,
1. You should mow your lawn to the desired height.
2. Make sure the operating area is clear from objects such as toys and branches...
3. Adjust the cutting height to its maximum level for the first mow and then adjust to your preferred lawn grass height.
16
EN
Next Spring, let your Landroid
®
L start mowing early, when the grass is still short, so that you can avoid a preliminary grass cut.
Page 17
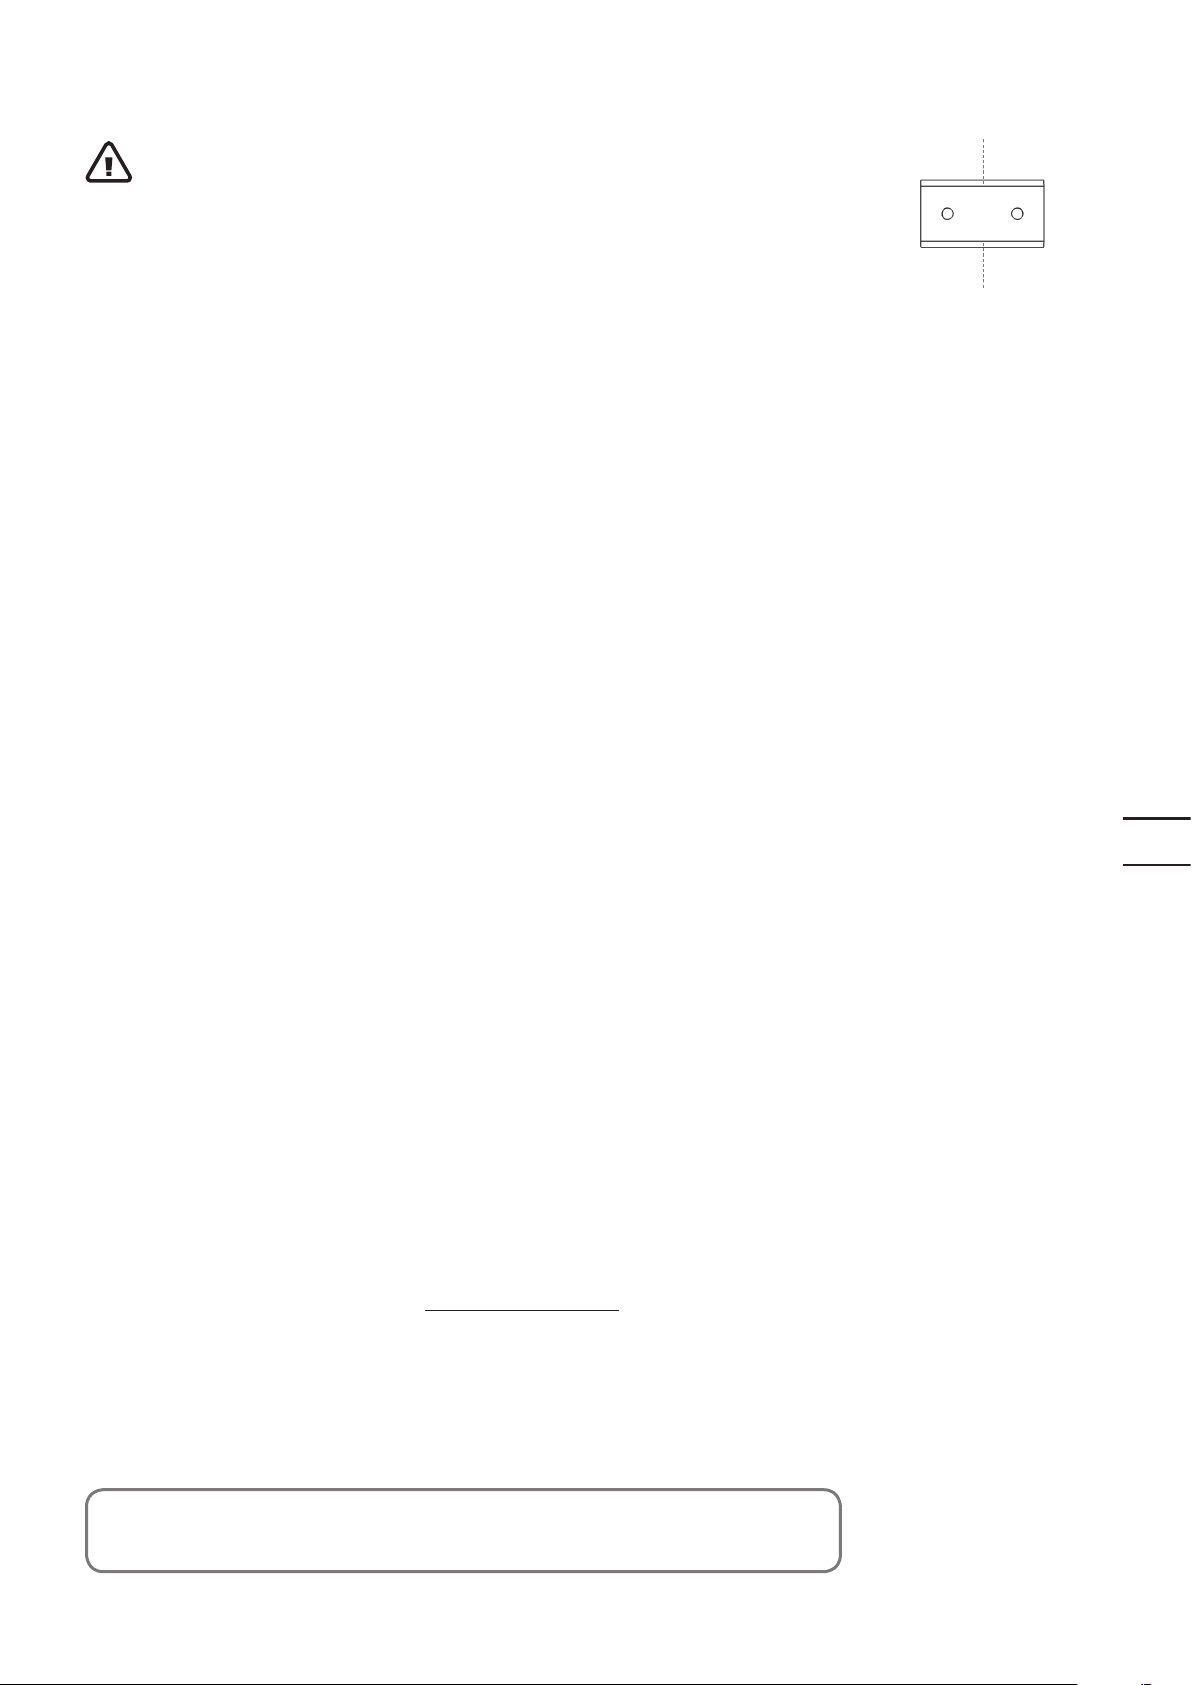
Keep it sharp
Always wear gloves when adjusting the blades.
®
Each blade of your Landroid
mows your lawn, the cutting blades will need to be flipped/rotated periodically for a new cutting edge.
®
If your Landroid
be rotated monthly for the best mowing results. Each cutting blade will last up to 4 months when
it is programmed to mow every day. When the cutting blades are dull and worn out, they should be
replaced with the spare blades provided with your Landroid
nearest WORX retailer.
L is programmed to mow the lawn every day then the cutting blades will need to
L has 4 cutting edges. Depending on the frequency the Landroid®L
®
L. Spare blades are also available at your
Maintenance
Your Landroid®L is engineered and built to stay outdoor regardless of adverse conditions. Just
®
periodically clean its deck from grass clipping build ups and your Landroid
free, year after year, season after season. Don’t wash the machine with high pressure squirt gun. This
may cause damage of the battery or the machine.
L will mow for you trouble-
Winter storage
1
3
2
4
Even though it is tough, we would recommend that you store your Landroid®L in your shed or garage
®
during the Winter. Before storing it, give your Landroid
from damage. You can then disconnect the plug of the charging base. A good tip to prolong the life of
the battery is to periodically re-charge it during the Winter. A full charge every 3 months will be fine.
We'd also suggest that you cover the base with a nylon sheet in Winter time.
L a full recharge that will preserve its battery
Safety
Your Landroid®L is safe to human beings and pets. First of all, there’s a large clearance between the
outer border of the machine and the blade. Moreover, the tilt sensors will instantly stop the blades if
the unit is lifted from the ground.
Security
Your Landroid®L is protected by a PIN code. This PIN code prevents unauthorised people from being
able to use it. Once it’s taken outside its territory, it will not be possible to re-start it by anyone who
®
does not know the PIN code. This also means that you will not able to start your Landroid
forget your PIN code! We strongly recommend that you write your PIN code here for future reference.
®
Even better, register your Landroid
there. You'll be able to access your PIN code online any time.
L online at www.worxlandroid.com and record your PIN code
L if you
17
EN
Write your PIN code here
Page 18
So installieren Sie Ihren Landroid®L
18
D
Die Installation des Landroid®L ist ganz einfach. Je nach Größe Ihres Gartens nimmt der ganze Vorgang nur kurze
Zeit in Anspruch. Wahrscheinlich hassen Sie es so wie wir, Ihre kostbare Freizeit damit zu vergeuden, den Rasen zu
®
mähen. Der Landroid
müssen.
Sie können das Demo-Video zur Installation unter www.worxlandroid.com ansehen.
L wird garantiert Ihre beste Investition sein, da Sie nun nie mehr den Rasen selbst mähen
Der Landroid®L liebt das Mähen
Er ist zum häufigen Mähen bestimmt – er hält Ihren Rasen gesund und dieser wird gepflegter aussehen als je
®
zuvor. Je nach Größe des Rasens kann der Landroid
und mit jeder beliebigen Frequenz uneingeschränkt arbeitet. Er ist dazu da, für Sie zu arbeiten.
L so programmiert werden, dass er zu jeder beliebigen Zeit
Betriebskosten
Sie sorgen sich wegen der Stromrechnung? Rechnen wir das doch einmal durch: Wenn Sie Ihren Landroid®L 5
Stunden pro Tag, 5 Tage pro Woche, 25 Wochen pro Jahr arbeiten lassen, kostet Sie das etwa 8 euro an Strom*.
Ja, 8 euro pro Jahr. Ein Bruchteil dessen, was Sie an Benzin für Ihren lauten, schmutzigen Motormäher ausgeben
müssten.
* Quelle: www.energy.eu
Page 19
Vorbereitung
Im Lieferumfang
6 BasisHaltenägel
250
Begrenzungsnägel
BegrenzungskabelAbstandlehre
9
Ersatzmesser
(3 Sätze)
Netzkabel mit
Netzteil
Bedienungsanleitung
Landroid
Begrenzungskabelrolle
200m
Installationsanleitung
®
LLadebasis
19
D
Inbusschlüssel
Aus Ihrem Schuppen
Schere Hammer
Programmierungs- und
Problemlösungsanleitung
Garantieerklärung
Page 20
Landroid®L`s Neues Zuhause–Ihr Garten
Lassen Sie uns zunächst einen Blick auf das neue Zuhause Ihres
®
Landroid
insbesondere die Stellen, die der Landroid
befahren kann – und welche er besser meiden sollte.
Hindernisse, die zu Kollisionen einladen
Bei festen, stabilen Hindernissen, die höher als 15cm sind (wie
Mauern oder Zäune) hält Ihr Landroid
eine andere Richtung.
L werfen: Ihren Garten. Betrachten wir uns
®
L problemlos
®
L einfach an und fährt in
20
D
Steine
Steine, die so schwer sind, dass sie nicht vom Landroid®L
umgeworfen oder verschoben werden können, sind kein Problem.
Falls Steine aber wie eine Rampe wirken und den Landroid
Klettern verleiten könnten, sollten diese entweder entfernt oder aus
dem Arbeitsbereich ausgeschlossen werden.
®
L zum
Zufahrten und Fahrwege
Wenn Ihre Zufahrt auf einer Ebene mit dem Rasen liegt, also
nicht darüber hinaus ragt, kann sie vom Landroid
überfahren werden. Wenn Sie wollen, dass der Landroid
Einfahrt vermeidet, benötigen Sie nur einen Zwischenraum von
10cm* zwischen dem Begrenzungsdraht und der Einfahrt.
Mit Kies bedeckte Zufahrten sollten nicht vom Landroid
überfahren werden. wobei ein Zwischenraum von 45cm* zwischen
dem Begrenzungsdraht und der Einfahrt eingehalten werden soll.
* Dies ist ein empfohlener Abstand, Sorgen Sie mit der
mitgelieferten Abstandlehre für die richtigen Entfernungen.
®
L problemlos
®
L Ihre
®
L
Blumenbeete, Teiche, Pools...
Sie möchten ganz bestimmt nicht, dass Ihr Landroid®L die
Blumen mäht oder ein Vollbad nimmt. Daher sollten solche
Stellen gemieden werden.
Page 21
Senken und Buckel
Bei großen Senken oder Buckeln sollten Sie abschätzen, ob
die Messer den Boden berühren können. Falls dies der Fall ist,
können Sie die Bodenneigung entweder verflachen oder solche
®
Stellen für den Landroid
L zum Sperrgebiet erklären.
Bäume
Falls aber Wurzeln aus dem Boden ragen, sollte der Landroid®L
solche Stellen meiden, damit die Wurzeln nicht geschädigt
werden.
35% (20°)
21
D
Steigungen
Ihr Landroid®L bewältigt Steigungen bis 35% (20°) problemlos;
meiden Sie daher einfach alles, was steiler ist.
Oberer Begrenzungsdraht
Begrenzungsdraht
Unterer
Oberer
Begrenzungsdraht
Verlegung des Begrenzungsdrahtes auf
Steigungen
Der obere Begrenzungsdraht sollte NICHT auf Gefällen verlegt
werden, die 35% (20°) überschreiten. Der Abstand zwischen
dem oberen Begenzungsdraht und etwaigen Hindernissen sollte
mindestens 35cm betragen. Der untere Begenzungsdraht sollte
NICHT auf Gefällen verlegt werden, die 25% (15°) überschreiten.
Der Abstand zwischen dem unteren Begenzungsdraht und
etwaigen Hindernissen sollte mindestens 45cm betragen, wenn
er auf einer 25%igen Steigung verlegt wird.
Page 22
Arbeitsbereich im Garten
markieren
In Landroid®L muss wissen, wo er arbeiten soll. Daher müssen Sie seinen Arbeitsbereich mit einem
Begrenzungskabel markieren, das wie ein unsichtbarer Zaun wirkt. Dieses Kabel leitet Ihren Landroid
zurück zu seiner Ladebasis.
Falls Ihr Nachbar auch einen
Sie zwischen Ihrem Begrenzungsdraht und dem des Nachbarn
einen Abstand von mindestens 2 metern halten.
Bitte achten Sie darauf, dass Ihr
Begrenzungsdraht jenseits eines Abstands von 25 metern erhält.
Zu allererst wählen Sie die richtige Stelle für die Ladebasis aus;
dabei sollte natürlich eine Steckdose in der Nähe sein. Das
Netzkabel der Ladebasis ist 15 metern lang.
HINWEIS: Stellen Sie sicher, dass sich der Transformator und
die Elektrosteckdose stets in einem trockenen Bereich befinden.
Landroid®L
Landroid®L
benutzt, müssen
kein Signal vom
®
L auch
22
D
Vor und hinter der Ladebasis sollten jeweils 2 metern frei
bleiben. Stellen Sie die Ladebasis wenn möglich im Schatten auf
– Akkus lassen sich am besten an einem kühlen Ort aufladen.
Achten Sie auf eine flache Stelle ohne jegliche Hindernisse.
®
Eine Insel ist ein Bereich Ihres Rasens, die der Landroid
befahren soll. Der Begrenzungsdraht beginnt an der Mähgrenze,
verläuft dann gerade zur Insel, um sie herum und dann zurück
zum Rand, wie es die Pfeile in der Abbildung anzeigen.
L nicht
Page 23
Falls Ihr Rasen aus mehreren getrennten, aber miteinander
verbundenen Flächen besteht, sollte der Korridor dazwischen
mindestens 1m breit sein.
Falls der Verbindungsweg zwischen Ihren Rasenflächen nicht breit
®
genug sein sollte, müssen Sie Ihren Landroid
den zweiten Rasen setzen. Der Landroid
L aufheben und auf
®
L mäht diesen Rasen
mühelos; allerdings müssen Sie ihn wieder zu seiner Ladebasis
zurückbringen, wenn ihm die Energie ausgeht.
23
D
Bei zwei nahe beieinander liegenden Inseln ist es sinnvoll, das
Kabel wie oben gezeigt zu verlegen.
®
Der Landroid
L kann sich frei über das Begrenzungskabel
zwischen Insel und Mähgrenze bewegen.
Ein gesperrter Bereich, der sich nahe an der Mähgrenze
befindet, sollte selbst Teil der Grenze sein, siehe Abbildung.
Page 24
Installation
Begrenzungskabel abstecken
Wir empfehlen, zunächst die Stellen des Rasens, an denen das Begrenzungskabel verlegt werden soll, mit einem
normalen Rasenmäher oder einem Trimmer zu mähen oder zu kürzen. Dadurch kann das Kabel so nahe wie möglich
®
am Boden verlegt werden, damit es vom Landroid
führt nur eine sehr niedrige Spannung, stellt daher absolut keine Gefahr für Menschen oder Tiere dar.
L nicht aus Versehen zerschnitten wird. Das Begrenzungskabel
1
Stellen Sie die Ladebasis zunächst provisorisch an der gewünschten
Stelle auf; noch nicht fixieren. Der „IN“-Pfeil sollte dabei zum Rasen
zeigen.
24
D
2
Verlegen Sie den Begrenzungsdraht durch das Tunnel unter der
Ladestation.
3
Lassen Sie etwa einen Meter Extradraht übrig und fangen Sie von der
Rükseite der Ladestation aus an, den Draht der Begrenzung entlang
festzupflocken. Wenn Sie mit dem Verlegen des Drahtes entlang der
Begrenzung zurück zur Ladestation fertig sind, lassen Sie nochmals
einen Meter Extradraht übrig und schneiden Sie dann den Draht ab.
Page 25
4
Setzen Sie beim Verlegen
des Begrenzungskabels die
Abstandlehre ein, damit stets
45 cm* Platz zwischen Kabel
und Grenze verbleiben. Bei
Hindernissen auf Bodenhöhe,
®
die problemlos vom Landroid
überfahren werden können (z.
B. Zufahrten oder Gehwege)
ist lediglich 10cm* Abstand
erforderlich.
Die Begrenzungsnägel sollten in
einem Abstand von etwa 80cm
platziert werden.
Schlagen Sie die Begrenzungsstifte
mithilfe des Hammers fest in
den Boden, vermeiden Sie dabei
jedoch zu viel
Halten Sie das Begrenzungskabel
zwischen den Begrenzungsnägeln
straff gespannt und gerade.
* Dies ist ein empfohlener
Abstand, Sorgen Sie mit der
mitgelieferten Abstandlehre für
die richtigen Entfernungen.
Druck auf den Draht.
L
25
D
5
Stellen Sie sicher, dass das Begrenzungskabel in den Ecken keinen
rechten Winkel aufweist.
6
Wenn Sie mit dem Begrenzungsdraht eine Insel legen, folgen
Sie dem in der Abbildung angezeigten Pfad. Der Draht sollte
vom äußeren Rand aus so verlaufen ,dass er die Konturen der
jeweiligen Insel zeichnet und dann zum äußeren Rand zurückkehrt.
Die Begrenzungsdrähte zwischen der Insel und dem Rand sollten
nahe aneinander verlegt und mit demselben Nagel fixiert werden.
®
Während des Betriebs kann dann der Landroid
dieses Stück Draht fahren.
L ungehindert über
Page 26

Begrenzungskabel an die Basis anschließen
OUT
IN
OUT
IN
OUT
IN
1
Schneiden Sie die beiden Enden des Kabels so weit ab, dass Sie
die Klemmen noch bequem erreichen.
Isolieren Sie die beiden Kabelenden ab.
2
Die Kabelenden werden wie abgebildet als Eingangskabel (IN)
und als Ausgangskabel (OUT) an die Ladebasis angeschlossen.
Verbinden Sie den IN-Draht mit der roten Klemme an der
Ladestation und den OUT-Draht mit der schwarzen Klemme.
Schließen Sie anschließend die Abdeckung.
26
D
Page 27

3
a
b
Sie können die Ladestation nun dauerhaft am Boden fixieren,
indem Sie die mitgelieferten Basishalterungsstifte mit dem
mitgelieferten Inbusschlüssel festdrehen.
HINWEIS: Stellen Sie sicher, dass der IN-Draht unterhalb
der Mitte der Ladestation geradlinig verläuft.
4
Schließen Sie das Netzteil über das Netzkabel an die
Steckdose an; die LED an der Ladebasis leuchtet auf. Sollte
die LED-Anzeige nicht aufleuchten, so schlagen Sie bitte in
der Störungsbehebung nach.Achten Sie beim Anschluss des
Netzteils darauf, dass die Nase am Netzteilstecker (a) in die
Aussparung am Netzteilanschluss (b) greift.
Verschrauben oder lösen Sie ausschließlich den markierten Teil
des Verbinders.
Wenn das grüne Licht nicht aufleuchtet, sind die
Stromverbindungen zu überprüfen
Falls das Netzkabel durch den Arbeitsbereich verlaufen sollte,
können Sie es bei Bedarf eingraben.
27
Einschalten und Installation ausprobieren
Jetzt wird es spannend – Sie können Ihren Landroid®L nun zum ersten Mal einschalten.
1
Setzen Sie Ihren Landroid®L
in den Arbeitsbereich, ein paar
Meter von der Rückseite der
Ladebasis entfernt.
D
Page 28

2
Öffnen Sie das Tastaturfenster
mit einem Druck auf die große
rote Taste am Landroid
Halten Sie die Ein-/Austaste
gedrückt, bis sich der
Landroid
®
L einschaltet.
®
Oberteil.
L
28
D
Drücken Sie die Taste
schließen Sie dann das
Tastaturfenster:
Ihr Landroid
®
L sucht sich nun
einen Weg zur Ladebasis.
Beobachten Sie, wie der
Landroid
®
L zur Ladesation
zurückkehrt, und ändern Sie die
Position des Begrenzungsdrahts,
falls erforderlich. Wenn der
Landroid
®
L seinen Weg zur
Ladestation zurückfindet,
bedeutet das, dass Sie
die Installation erfolgreich
durchgeführt haben! Jetzt
fängt der Landroid
®
L an, sich
vollständig aufzuladen.
®
HINWEIS: Falls sich Ihr Landroid
L zu einem Zeitpunkt, zu dem er laut Programmierung eigentlich mähen sollte, in der
Ladebasis aufhält, drücken Sie einfach die Zugangstaste und schließen das Tastaturfenster gleich wieder, um ihn zurück an die
Arbeit zu schicken.
®
L
Warnung
• Falls sich Ihr
®
Landroid
L außerhalb
seines Arbeitsbereiches
herumtreibt, bleibt
er stehen und zeigt
die Fehlermeldung
„Arbeitsbereich
überschritten“ an.
Bringen Sie ihn einfach
in seinen Arbeitsbereich
zurück, wiederholen Sie
dann Schritt 2.
• Sollte sich Ihr
®
Landroid
L innerhalb
seines Arbeitsbereichs
befinden, aber das
Display “außerhalb des
Mähbereichs” anzeigen
und die LED-Anzeige
aufleuchten, so bedeutet
dies, dass Sie die Enden
des Begrenzungsdrahts
falsch abgeklemmt
haben. Einfach wieder
®
• Ihr Landroid
L sollte
stets eingeschaltet
bleiben. Falls Sie ihn
jemals abschalten
müssen, achten Sie
darauf, ihn vor dem
Einschalten wieder in
seinen Arbeitsbereich zu
setzen.
• Falls Ihr Landroid
seine Arbeit unerwartet
einstellen sollte, drücken
Sie die Zugangstaste,
öffnen das Tastaturfenster,
schalten ihn mit der Ein-/
Austaste ein, beheben
die Probleme, drücken die
0-Taste und schließen das
Tastaturfenster wieder.
vertauschen.
HINWEIS: Weitere Hinweise finden Sie in der Programmierungs- und Problemlösungsanleitung.
Page 29

Programmieren
Wenn Sie die die Installation abgeschlossen haben, ist es an der Zeit, den Landroid®L zu programmieren und ihm zu sagen, wann er
starten soll, indem Sie die unten angezeigte Tastatur benutzen. Bitte schlagen Sie im beigefügten Leitfaden zur Programmierung und
Störungsbehebung nach.
Nähere Einzelheiten zur normalen Arbeitszeit des Landroid®L finden Sie in der folgenden Tabelle:
Landroid®L WG795E - ZEITPLAN FÜR AUTOMATISCHE MÄHZEIT
AUTOMAT.
BEREICH
2
m
100 1.5 7:00-8:30 / / 7:00-8:30 / / /
200 5 7:00-8:00 7:00-8:00 7:00-8:00 7:00-8:00 7:00-8:00 / /
300 6 7:00-8:12 7:00-8:12 7:00-8:12 7:00-8:12 7:00-8:12 / /
400 7.5 7:00-8:30 7:00-8:30 7:00-8:30 7:00-8:30 7:00-8:30 / /
500 10 7:00-9:00 7:00-9:00 7:00-9:00 7:00-9:00 7:00-9:00 / /
600 11 7:00-9:12 7:00-9:12 7:00-9:12 7:00-9:12 7:00-9:12 / /
700 13 7:00-9:36 7:00-9:36 7:00-9:36 7:00-9:36 7:00-9:36 / /
800 15 7:00-10:00 7:00-10:00 7:00-10:00 7:00-10:00 7:00-10:00 / /
900 16.5 7:00-10:18 7:00-10:18 7:00-10:18 7:00-10:18 7:00-10:18 / /
1000 18 7:00-10:36 7:00-10:36 7:00-10:36 7:00-10:36 7:00-10:36 / /
1100 20 7:00-11:00 7:00-11:00 7:00-11:00 7:00-11:00 7:00-11:00 / /
MÄH-
LAUFZEIT –
STUNDEN
MONTAG
MÄH-
STUNDEN
DIEN-
STAGMÄH-
STUNDEN
MITTWOCH
MÄH-
STUNDEN
DON-
NERSTAG
MÄH-
STUNDEN
FREITAG
MÄH-
STUNDEN
SAMSTAG
MÄH-
STUNDEN
SONNTAG
MÄH-
STUNDEN
29
D
1200 22.5 7:00-11:30 7:00-11:30 7:00-11:30 7:00-11:30 7:00-11:30 / /
1300 25 7:00-12:00 7:00-12:00 7:00-12:00 7:00-12:00 7:00-12:00 / /
1400 26.5 7:00-12:18 7:00-12:18 7:00-12:18 7:00-12:18 7:00-12:18 / /
1500 28 7:00-12:48 7:00-12:48 7:00-12:48 7:00-12:48 7:00-12:48 / /
Page 30
Kann es losgehen?
20
25
30
35
40
45
50
55
60
Der Landroid®L sorgt während der Saison für eine perfekte Höhe Ihres Rasens, ist allerdings nicht zum Roden eines Urwaldes
vorgesehen.
Vor dem ersten Einsatz:
1. Mähen Sie Ihren Rasen noch einmal auf herkömmliche Weise.
2. Achten Sie darauf, dass sich keine Fremdkörper wie Spielzeuge oder Äste im Arbeitsbereich befinden.
3. Stellen Sie die Schnitthöhe beim ersten Mähen maximal ein, stellen Sie dann die bevorzugte Rasenhöhe ein.
30
D
®
Im nächsten Frühjahr lassen Sie Ihren Landroid
L möglichst früh (nämlich dann, wenn das Gras noch kurz ist) mit dem Mähen
beginnen; so können Sie sich den Vorschnitt sparen.
Page 31

Immer schön scharf
Tragen Sie beim Einstellen der Messer grundsätzlich Schutzhandschuhe.
®
Jedes Messer Ihres Landroid
®
Landroid
damit eine neue Schneide ihre Arbeit aufnehmen kann. Falls Ihr Landroid
sollten Sie die Messer monatlich drehen, damit die Leistung nicht nachlässt. Die einzelnen Messer
halten bis zu vier Monate, wenn täglich gemäht wird. Wenn die Messer stumpf und verschlissen
sind, sollten sie durch die Ersatzmesser ersetzt werden, die mit Ihrem Landroid
Ersatzmesser erhalten Sie auch beim WORX-Händler in Ihrer Nähe.
L Ihren Rasen mäht, müssen die Messer früher oder später gedreht/umgedreht werden,
L ist mit vier Schneiden ausgestattet. Je nachdem, wie häufig der
®
L den Rasen täglich mäht,
®
L geliefert wurden.
Wartung
Ihr Landroid®L ist ein wahrer Naturbursche, der auch bei widrigen Wetterbedingungen gerne im Freien
bleibt. Untersuchen Sie ihn lediglich hin und wieder auf Grasschnittablagerungen und entfernen Sie
®
diese. So mäht der Landroid
Maschinen nicht mit Hochdruckspritzpistolen, da dies dem Akku bzw. dem Gerät Schaden zufügen
könnte.
L für Sie problemlos Jahr für Jahr, Saison für Saison.Waschen Sie die
Überwintern
1
3
2
4
Obwohl der Landroid®L ein zäher Bursche ist, sollten Sie ihm im Winter einen Platz im Schuppen oder
®
in der Garage zugestehen. Laden Sie den Landroid
der Akku keinen Schaden nimmt. Anschließend können Sie die Ladebasis von der Stromversorgung
trennen. Damit der Akku möglichst lange hält, laden Sie ihn in Winter hin und wieder nach. Eine volle
Ladung alle drei Monate reicht aus. Zusätzlich kann es nicht schaden, die Ladebasis im Winter mit einer
Nylonplane abzudecken.
L - Akku vor dem Überwintern komplett auf, damit
Sicherheit
Ihr Landroid®L ist keine Gefahr für Menschen oder Tiere. Zunächst gibt es einen großen Abstand
zwischen den Außenkanten des Gerätes und den Messern. Zusätzlich stoppen die Neigungssensoren
die Messer sofort, falls das Gerät vom Boden abgehoben wird.
Schutz vor Missbrauch
Ihr Landroid®L wird mit einem PIN-Code geschützt. Dieser PIN-Code verhindert den Einsatz durch
®
Unbefugte. Sobald der Landroid
starten, wenn nicht der richtige PIN-Code eingegeben wird. Das bedeutet aber auch, dass auch
®
Sie Ihren Landroid
dringend, den PIN-Code hier zu notieren, damit Sie bei Bedarf nachschlagen können. Noch besser:
Registrieren Sie Ihren Landroid
Code dort. So können Sie Ihren PIN-Code jederzeit online abrufen.
L nicht mehr starten können, falls Sie den PIN-Code vergessen! Wir empfehlen
L aus seinem Arbeitsbereich entfernt wird, lässt er sich nicht mehr
®
L online unter www.worxlandroid.com, hinterlegen Sie Ihren PIN-
31
D
PIN-Code hier notieren
Page 32

Installation du Landroid®L
32
F
Le Landroid®L est facile à installer. L'ensemble de la procédure est très rapide, mais dépend de la taille de votre
jardin. Comme tout le monde, vous n'aimez pas perdre votre précieux temps à tondre votre pelouse. Avec ce
®
Landroid
de la tondre!
La vidéo de démonstration d'installation est disponible sur notre site www.worxlandroid.com.
L, vous venez de réaliser un très bon investissement puisque grâce à lui, vous n'aurez plus jamais besoin
Le Landroid®L adore bouger
Il est conçu pour tondre fréquemment la pelouse de manière à la garder plus belle et plus saine que jamais
®
auparavant. Selon la taille de votre pelouse, le Landroid
quel moment et avec n'importe quelle fréquence, sans aucune limitation. Il est là pour travailler à votre place!
L peut être programmé de manière à travailler à n'importe
Coûts de fonctionnement
Votre facture d'électricité vous préoccupe? Un peu de mathématiques: Si vous faites fonctionner le Landroid®L
pendant 3 heures par jour, 5 jours par semaine et 25 semaines par an, il vous coûtera approximativement... 8 €
en électricité! Eh oui, seulement 8 €
essence bruyante et polluante sur la même période!
* Source: www.energy.eu
par an! Une fraction insignifiante de ce que vous coûterait votre tondeuse à
Page 33

Préparation
Contenu
6 Chevilles
de rétention
de la base
250
Chevilles de
bord
Jauge de distance du
fil-barrière
recharge
9 Lames de
rechange
(3 kits)
Câble
d'alimentation avec
transformateur
AC/DC
Manuel de
l’utilisateur
Bobine de fil de
bord 200m
Guide
d'installation
Landroid
®
LSocle de
33
F
Clef Allen
De votre garage
Ciseaux Marteau
Guide de
programmation et
de dépannage
Conditions de
garantie
Page 34

La nouvelle demeure du
votre jardin
Pour commencer, examinons en détail ce qui sera la nouvelle
®
demeure de votre Landroid
les endroits où il pourra aller et les endroits qu'il devra éviter.
Obstacles sans danger
Lorsqu'il heurte un obstacle rigide et stable dont la hauteur est
supérieure à 15cm (ex: un mur ou une barrière), le Landroid
s'arrête et s'en écarte.
L: votre jardin. Faisons le tri entre
®
L
Landroid®L:
34
F
Rochers
Les rochers suffisamment lourds pour ne pas être déplacés par le
Landroid
si un rocher comporte un plan incliné sur lequel leLandroid
risquerait de monter, enlevez-le ou excluez-le de la zone de travail.
®
L ne constituent pas des obstacles à risque. Cependant,
®
L
Allées
Si les allées sont au même niveau que le gazon et ne comportent
aucune surface saillante, le Landroid
toute sécurité. Si vous souhaitez que le Landroid
allée, un espace de 10cm* suffit entre l'allée et le fil-barrière.
Si l'allée est recouverte de gravier, ne laissez pas le Landroid®L rouler
dessus: pour mesurer une distance de 45cm* entre le fil et le bord.
*C'est la distance recommandée. Utilisez la jauge de distance
fournie pour assurer une bonne installation.
®
L peut passer dessus en
®
L évite une
Parterres, bassins, étangs...
Il va de soi que vous ne voulez pas que le Landroid®L tonde vos
fleurs, de même que vous ne souhaitez pas le voir tomber dans
l'eau! Ces endroits sont donc à éviter.
Page 35

Creux et bosses
Dans le cas de creux importants ou de bosses volumineuses,
vérifiez s'il existe un risque que la lame touche le sol; si c'est le
cas, réduisez l'inclinaison des pentes ou excluez cette surface de
®
la zone de travail du Landroid
L.
Arbres
Si des racines dépassent du sol, il est cependant préférable
®
que le Landroid
racines.
L évite cette zone car il risquerait d'abîmer les
35% (20°)
Pentes
Le Landroid®L est en mesure de monter des pentes de (20°);
toute pente plus raide doit donc être évitée.
C
âble périphérique supérieur
Pose du câble périphérique sur les pentes
Le câble périphérique supérieur NE DOIT PAS être placé sur
des pentes plus raides que 35% (20°). Le câble périphérique
supérieur doit être placé à une distance d'au moins 35cm
des obstacles. Le câble périphérique inférieur NE DOIT PAS
être placé sur des pentes plus raides que 25% (15°). Le câble
périphérique inférieur doit être placé à une distance d'au moins
45cm des obstacles lorsqu'il est positionné sur une pente à
25%.
inférieur
périphérique
C
âble
C
supérieur
âble périphérique
35
F
Page 36

Marquage du territoire du
Landroid®L dans le jardin
Votre Landroid®L a besoin de savoir où il est censé tondre. Il est donc indispensable de délimiter sa zone de
travail grâce au fil fourni, qui constituera une sorte de barrière invisible. Ce fil permettra également de guider le
®
Landroid
Si votre voisin utilise également un Landroid
un espace d'au moins 2 mètres entre votre fil périphérique et
celui de vos voisins.
Veuillez garder à l'esprit que votre Landroid
mesure de recevoir un signal provenant du fil périphérique
au-delà d'une distance de 25m.
Pour commencer, choisissez un emplacement idéal pour le
socle de recharge, en prenant en compte la distance qui le
sépare de la prise de courant la plus proche. Le câble du socle
de recharge fait 15m de long.
REMARQUE: Le transformateur et la prise électrique ne
doivent en aucun cas être exposés à l'humidité.
L vers son socle de recharge.
®
L, vous devez garder
®
L ne sera pas en
36
F
Le socle de recharge doit être placée le long d'une ligne droite, à
au moins 2 mètres de chaque extrémité. Mettez-le à l'ombre si
possible: les batteries se rechargent mieux dans un endroit frais.
La surface sur laquelle il est posé doit être plane et libre de tout
obstacle.
Un îlot est un espace situé au milieu du gazon dans lequel vous
ne voulez pas que le
à angle droit du bord de la pelouse en direction de l'îlot, faire le
tour de celui-ci puis repartir en ligne droite vers le bord, comme
indiqué par les flèches sur l'illustration.
Landroid®L
pénètre. Le fil-barrière doit partir
Page 37

Si la pelouse est divisée en deux parties ou plus, séparées entre
elles par un couloir, celui-ci doit faire au moins 1 mètres de large.
Si le couloir entre les deux parties n'est pas assez large, vous
devrez ramassez le Landroid®L et le porter vers l'autre partie du
gazon, et une fois cette autre partie entièrement tondue, vous
devrez rapporter vous-même le Landroid®L sur le socle si la batterie
est épuisée.
37
F
Dans le cas de deux îlots situés trop près l'un de l'autre, il est
préférable de poser le fil de la manière indiquée ci-dessus.
Le Landroid®L pourra ainsi passer par-dessus le fil situé entre les
îlots d'une part, et entre les îlots et le bord du gazon d'autre part.
Une zone interdite située à proximité du bord de la pelouse
est à considérer comme faisant partie du bord (voir illustration
ci-dessus).
Page 38

Installation
Pose du fil-barrière
Avant de poser le fil, il est recommandé de tondre la pelouse au préalable, avec une tondeuse conventionnelle ou
®
un coupe-gazon. Ainsi, le fil sera situé le plus près du sol possible et le Landroid
accidentellement. Le fil-barrière est électrifié avec une tension très basse et est donc totalement inoffensif pour les
personnes et les animaux domestiques.
1
Placez le socle de recharge sur son emplacement désigné, sans le
fixer définitivement. La flèche "IN" doit être orientée vers l'intérieur de
la pelouse.
L ne risquera pas de le trancher
38
F
2
Faites passer le câble périphérique à travers le tunnel sous la base de
charge.
3
En laissant environ 1 mètre de longueur de fil supplémentaire,
commencez à partir de l'arrière de votre base de charge et attachez
le fil le long de la frontiére. Quand vous avez fini de placer le câble le
long de la frontière, revenez vers la base de charge, laissez un autre
mètre de câble supplémentaire, puis coupez-le.
Page 39

4
Lors de la pose du fil-barrière,
laissez un espace de 45cm* entre
le fil et le bord (utilisez la jauge de
distance). Dans le cas d'obstacles
situés au niveau du sol et ne
représentant pas de danger pour
®
le Landroid
une allée), un espace de 10cm*
suffit.
Les piquets doivent être espacés
d'au moins 80cm.
Enfoncez fermement les tiges
dans le du sol avec l'aide du
marteau, en évitant toutefois de
mettre trop de pression sur le
câble.Le fil doit être bien tendu
entre chaque piquet: il ne doit pas
y avoir de mou.
* C'est la distance recommandée,
Utilisez la jauge de distance
fournie pour assurer une bonne
installation.
L (ex: un trottoir ou
5
Assurez-vous que le fil du bord est parfaitement droit dans chaque
coin.
6
Pour poser le fil autour d'un îlot, procédez de la manière suivante: Le
fil-barrière doit partir à angle droit du bord de la pelouse en direction
de l'îlot, faire le tour de celui-ci puis repartir en ligne droite vers le
bord. Les deux portions de fil entre l'îlot et le bord doivent être très
proches l'une de l'autre et être fixées sous le même piquet. Au cours
®
du travail, le Landroid
cette partie du fil.
L pourra ainsi passer librement par-dessus
39
F
Page 40

Connexion du fil au socle de recharge
OUT
IN
OUT
IN
OUT
IN
1
Coupez les bouts du fil à une longueur permettant d'atteindre
facilement les bornes.
2
L'un des bouts du fil sera relié à la borne IN du socle de recharge,
tandis que l'autre sera relié à la borne OUT (voir schéma).
Connectez le câble d’ENTRÉÉ à la pince rouge de la base de
chargement et le câble de SORTIE à la pince noire.
Puis, refermez le couvercle.
40
F
Page 41

3
a
b
Vous pouvez maintenant fixer définitivement la base de
chargement sur le sol en resserrant les tiges de maintien de la
base fournies avec la clé hexagonale incluse.
REMARQUE: Faites attention à bien faire passer le fil IN
sous le milieu du socle.
4
Reliez le câble d'alimentation au transformateur, puis branchezle sur une prise de courant AC; la LED du socle de recharge
s'allume. Si la LED est éteinte, référez-vous au guide de
dépannage. Lors de la connexion, alignez l'encoche du
connecteur du câble (a) avec la rainure située sur le connecteur
du transformateur (b).
Seule la partie surlignée du connecteur doit être vissée ou
dévissée.
Si le voyant vert ne s'allume pas, vérifiez les connections
électriques.
Si le câble d'alimentation passe par la zone de travail, vous
pouvez éventuellement l'enterrer si nécessaire.
41
Mise en marche et test d'installation
Le moment fatidique est arrivé: vous allez mettre en marche votre Landroid®L pour la première fois!
1
Placez le Landroid®L à l'intérieur
de la zone de travail, quelques
mètres derrière le socle de
recharge.
F
Page 42

2
Ouvrez le couvercle du clavier
en appuyant sur le gros bouton
®
rouge situé sur le Landroid
Maintenez enfoncé le bouton
marche/arrêt
jusqu'à ce que
le Landroid
®
L s'allume.
L.
42
F
Appuyez sur la touche
et fermez le couvercle du
clavier: votre Landroid
®
L
doit maintenant se diriger
automatiquement vers le
socle de recharge. Regardez
le trajet emprunté par le
Landroid
®
L pour revenir sur le
socle et modifiez le tracé du
fil-barrière si nécessaire. Si le
Landroid
®
L réussit à revenir
sur le socle, cela veut dire
que l'installation est achevée
avec succès! Maintenant, le
Landroid
®
L restera sur le socle
jusqu'à ce que la batterie soit
entièrement rechargée.
®
REMARQUE: Si le Landroid
L se trouve sur le socle de recharge à une heure à laquelle vous l'avez programmé pour qu'il
travaille, il vous suffit d'appuyer sur la touche ACCESS et de refermer le couvercle du clavier pour qu'il retourne au travail.
®
L
Avertissement
• Si le Landroid®L se
trouve à l'extérieur de
son périmètre, il reste
immobile et l'écran
indique le message
d'erreur "hors de
la zone de coupe".
Remettez-le dans son
périmètre et répétez
l'étape 2.
• Si l'écran indique "hors
de la zone de coupe"
®
alors que le Landroid
L
est dans son périmètre
et que la LED est
allumée, cela signifie
que vous avez inversé
les branchements des
bouts du fil-barrière.
Rebranchez-les dans le
bon sens.
®
• Le Landroid
L doit
rester allumé en
permanence. Si vous
devez l'éteindre, n'oubliez
pas de le remettre dans
son périmètre avant de le
rallumer.
• Si votre Landroid
arrête de fonctionner
normalement, appuyez
simplement sur le bouton
ACCÈS, ouvrez la fenêtre
du clavier, appuyez sur la
touche MARCHE/ARRÊT
pour mettre en MARCHE,
rectifiez les problèmes,
appuyez sur la touche 0,
fermez la fenêtre du clavier.
REMARQUE: Pour plus d'informations, veuillez vous référer au Guide de programmation et de dépannage.
Page 43

Programmation
Une fois l'installation terminée, vous devez programmer les heures de travail de votre
dessous. Référez-vous au Guide de programmation et de dépannage inclus.
Vous trouverez plus d'informations sur le temps de travail par défaut de Landroid®L dans le tableau suivant:
Landroid®L WG795E - Emploi du temps de tonte automatique.
Surface
2
m
Durée de
tonte auto -
heures
Heures de
tonte lundi
Heures
de tonte
mardi
Heures
de tonte
mercredi
Heures de
tonte jeudi
Landroid®L
Heures
de tonte
vendredi
à l'aide du clavier affiché ci-
Heures
de tonte
samedi
de tonte
dimanche
Heures
100 1.5 7:00-8:30 / / 7:00-8:30 / / /
200 5 7:00-8:00 7:00-8:00 7:00-8:00 7:00-8:00 7:00-8:00 / /
300 6 7:00-8:12 7:00-8:12 7:00-8:12 7:00-8:12 7:00-8:12 / /
400 7.5 7:00-8:30 7:00-8:30 7:00-8:30 7:00-8:30 7:00-8:30 / /
500 10 7:00-9:00 7:00-9:00 7:00-9:00 7:00-9:00 7:00-9:00 / /
600 11 7:00-9:12 7:00-9:12 7:00-9:12 7:00-9:12 7:00-9:12 / /
700 13 7:00-9:36 7:00-9:36 7:00-9:36 7:00-9:36 7:00-9:36 / /
800 15 7:00-10:00 7:00-10:00 7:00-10:00 7:00-10:00 7:00-10:00 / /
900 16.5 7:00-10:18 7:00-10:18 7:00-10:18 7:00-10:18 7:00-10:18 / /
1000 18 7:00-10:36 7:00-10:36 7:00-10:36 7:00-10:36 7:00-10:36 / /
1100 20 7:00-11:00 7:00-11:00 7:00-11:00 7:00-11:00 7:00-11:00 / /
1200 22.5 7:00-11:30 7:00-11:30 7:00-11:30 7:00-11:30 7:00-11:30 / /
1300 25 7:00-12:00 7:00-12:00 7:00-12:00 7:00-12:00 7:00-12:00 / /
43
F
1400 26.5 7:00-12:18 7:00-12:18 7:00-12:18 7:00-12:18 7:00-12:18 / /
1500 28 7:00-12:48 7:00-12:48 7:00-12:48 7:00-12:48 7:00-12:48 / /
Page 44

Prêt?
20
25
30
35
40
45
50
55
60
Le Landroid®L est conçu pour maintenir votre gazon à une hauteur parfaite pendant toute la saison; il ne peut pas servir pour
débroussailler une jungle!
Avant de commencer à utiliser l'appareil,
1. Vous devez tondre votre pelouse à la hauteur souhaitée.
2. Vous devez vous assurer que la zone de travail ne comporte aucun objet étranger (ex: jouets, branches etc.).
3. Tondez une première fois avec le réglage de hauteur maximal, puis une deuxième fois à la hauteur souhaitée.
44
F
Au printemps suivant, commencez à utiliser le Landroid
n'aurez pas besoin de tondre la pelouse au préalable.
®
L le plus tôt possible, lorsque l'herbe est encore courte; ainsi, vous
Page 45

Affûtage
Portez toujours des gants de protection lorsque vous ajustez les lames.
®
Chaque lame de votre Landroid
votre pelouse, les lames devront être tournées/retournées périodiquement pour utiliser un nouveau
bord coupant. Si votre Landroid
lames devront être tournées tous les mois pour des meilleurs résultats. Chaque lame va durer jusqu'à
4 mois quand il est programmé pour tondre la pelouse tous les jours. Lorsque les lames sont usées
et ne coupent plus bien, elles doivent être remplacées par les lames de rechange fourni avec votre
®
Landroid
proche.
L. Des lames de rechange sont également disponibles chez votre détaillant WORX le plus
L a 4 bords coupants. Selon la fréquence que le Landroid®L tond
®
L est programmé pour tondre la pelouse tous les jours, alors les
Entretien
Votre Landroid®L est conçu pour rester dehors quelles que soient les conditions météorologiques. Tout ce
que vous avez à faire est de vérifier régulièrement l'intérieur et d'enlever les dépôts de coupures d'herbe,
®
et votre Landroid
lavez pas la machine avec un pistolet à jet haute pression. Cela pourrait endommager la batterie ou la
machine.
L vous fournira un travail irréprochable, saison après saison, année après année! Ne
1
3
2
4
Repos hivernal
Bien que le Landroid®L soit un appareil très solide, nous vous recommandons néanmoins de le ranger
dans une remise ou dans un garage pendant l'hiver. Avant de le ranger, laissez la batterie se recharger
entièrement; cela lui évitera de s'abîmer. Puis débranchez le socle de recharge. Le fait de recharger
régulièrement la batterie au cours de l'hiver est une bonne chose car cela permet de prolonger sa durée
de vie. Il est raisonnable de la recharger entièrement une fois tous les 3 mois. D'autre part, nous vous
conseillons également de recouvrir le socle avec une bâche en nylon pendant l'hiver.
Sécurité
Le Landroid®L ne représente aucun danger pour les animaux et les personnes. D'une part, il existe
un espace très large entre les lames et le bord extérieur de la machine. D'autre part, les capteurs
d'inclinaison arrêtent automatiquement les lames lorsque l'appareil est soulevé.
Protection
Votre Landroid®L est protégé par un code PIN. Ce code permet d'en interdire l'utilisation aux
®
personnes non autorisées. Une fois le Landroid
redémarrer sans connaître le code PIN. Mais cela signifie également que vous ne pourrez pas le
redémarrer non plus si vous oubliez votre code PIN! C'est pourquoi nous vous recommandons
fortement de noter votre code PIN sur cette page afin de pouvoir vous y référer en cas d'oubli. Ou
®
mieux encore, inscrivez votre Landroid
votre code PIN. Vous pourrez ainsi y accéder à tout moment.
L sur le site Internet www.worxlandroid.com et enregistrez
L sorti de son périmètre, il est impossible de le
45
F
Écrivez votre code PIN ici
Page 46

Come installare Landroid®L
46
L’installazione di Landroid®L è facile. In base alle dimensioni del giardino, l’intera procedura impiega un periodo breve
I
di tempo. Se sei come noi, non ami sprecare prezioso tempo libero per falciare il prato. Landroid
ottimo investimento perché non dovrai mai più falciare il prato.
Puoi guardare il video dimostrativo dell’installazione su: www.worxlandroid.com.
®
L si dimostrerà un
Landroid®L ama falciare il prato
È progettato per falciare spesso, mantenendo il prato più vigoroso e bello che mai. In base alle dimensioni del prato,
®
Landroid
Fa il lavoro al posto tuo.
L può essere programmato per funzionare in qualsiasi orario e con qualsiasi frequenza, senza limitazioni.
Costi operativi
Vi preoccupa il consumo elettrico? Facciamo un paio di conti: se fate lavorare Landroid®L 3 ore al giorno per 5 giorni
la settimana, 25 settimane all'anno, il costo annuale di energia elettrica per il funzionamento di Landroid
di circa 8 €. Avete letto bene, 8 € all'anno. Una frazione di quello che spendereste in benzina per un rumoroso e
inquinante tosaerba a scoppio.
®
L sarà
* Fonte: www.energy.eu
Page 47

Preparazione
Nella confezione
ricarica
Landroid
®
LBase di
6 Chiodi di
ancoraggio
250 Chiodi
perimetrali
Distanziatore del filo
perimetrale
9 Lame di
ricambio
(3 set)
Cavo di
alimentazione con
trasformatore
CA/CC
Manuale
dell'utente
Bobina di filo
perimetrale 200m
47
I
Guida
d'installazione
Chiave allen
Dal tuo garage
Forbici Martello
Guida alla
programmazione e
alla risoluzione dei
problemi
Dichiarazione di
garanzia
Page 48

La nuova casa di Landroid®L: il
vostro giardino
Iniziamo con uno sguardo più da vicino alla nuova casa di
Landroid®L, il vostro prato, evidenziando le aree dove può
tranquillamente andare e quelle che è meglio che Landroid®L eviti.
Ostacoli che possono essere urtati
Quando Landroid®L urta un ostacolo rigido, stabile e più alto di
15cm (ad esempio un muro o una palizzata), semplicemente si
arresta e si dirige lontano dall'ostacolo.
48
I
Pietre
Pietre sufficientemente pesanti da non essere spostate da
Landroid
inclinate su cui Landroid
rimosse o escluse dall’area di lavoro.
®
L possono essere urtate, ma se presentano superfici
®
L può arrampicarsi, devono essere
Vialetti
Se il vialetto è allo stesso livello del prato, senza nessuna
sporgenza, Landroid
Se si vuole che Landroid
10cm* tra il filo perimetrale e il vialetto.
Se invece il vialetto è in ghiaia, è necessario evitare che
Landroid
lasciando uno spazio di 45cm*
*Questa è la distanza consigliata. Utilizzare il distanziatore per
un'installazione adeguata.
®
L si muova su di esso, utilizzando un distanziatore e
®
L può tranquillamente passarci sopra.
®
L lo eviti, basta solo uno spazio di
Aiuole, laghetti, piscine…
Sicuramente non vorrete che Landroid®L tagli i fiori né che cada in
acqua, quindi queste aree devono essere escluse.
Page 49

Avvallamenti e dossi
In caso di pendii accentuati, si dovrà valutare se le lame possano
toccare il terreno. In tal caso, bisognerà procedere a smussare
gli spigoli oppure a escludere queste zone dall’area di lavoro di
®
Landroid
L.
Alberi
Tuttavia, se vi sono radici che emergono dal terreno, l’area
deve essere esclusa per evitare di danneggiarle.
35% (20°)
Superfici inclinate
Landroid®L può arrampicarsi su superfici inclinate fino a 35%
(20°). Evitare pertanto superfici con un'inclinazione maggiore.
Cavo di confine superiore
inferiore
Cavo di confine
Sistemazione dei cavi di confine sui pendii
Il cavo del confine superiore NON va sistemato su pendenze
superiori al 35% (20°). Il cavo di confine superiore deve avere una
distanza di almeno 35cm dagli ostacoli. Il cavo di confine inferiore
NON va sistemato su pendenze superiori al 25% (15°). Il cavo di
confine inferiore si deve trovare a una distanza di almeno 45cm
dagli ostacoli quando si trova su una pendenza del 25%.
Cavo di confine
superiore
49
I
Page 50

Delimitazione dell’area di lavoro
di Landroid®L nel giardino
Landroid®L deve sapere dove tosare. Ecco perché è necessario delimitare la sua area di lavoro con il filo
®
perimetrale che formerà una sorta di limite invisibile e che guiderà inoltre Landroid
Se anche i vostri vicini usano un Landroid®L, occorre mantenere una distanza di almeno 2 metri tra il cavo
di confine e loro.
®
Tenere presente che il vostro Landroid
L, non riuscirà a ricevere
un segnale dal cavo di confine se la distanza supera i 25 mt.
Prima di tutto, individuare il posto migliore in cui collocare la
base di ricarica, tenendo in considerazione il punto in cui si
trova la più vicina presa elettrica. La base di ricarica dispone di
un cavo di alimentazioni di 15m.
NOTA: Assicurarsi che il trasformatore e la presa di corrente
siano sempre all’asciutto.
L alla base di ricarica.
50
La base di ricarica deve essere collocata su una linea retta,
I
con uno spazio di 2 metri sulla parte anteriore e posteriore. Se
possibile, posizionare la base di ricarica all'ombra, in quanto le
batterie si ricaricano più efficientemente in un posto fresco.
La base di ricarica deve essere collocata su una superficie piatta,
priva di ostacoli.
Chiameremo “isola” un’area all’interno del prato cui Landroid
non avrà accesso. Il cavo perimetrale parte dal perimetro,
prosegue dritto all’isola, la aggira e torna al perimetro, come
mostrato dalle frecce nell’immagine.
®
L
Page 51

Se il prato è formato da due o più aree separate collegate da un
passaggio, quest’ultimo deve essere largo almeno 1 metri.
Se i prati non sono collegati da un passaggio sufficientemente
®
ampio, spostare manualmente Landroid
®
Landroid
L toserà il prato senza problemi, ma sarà necessario
L sull'altro prato.
riportarlo alla base di ricarica una volta scaricata la batteria.
51
I
Nel caso di due isole ravvicinate, sarà conveniente stendere il filo
perimetrale come illustrato in precedenza.
®
Landroid
L è in grado di muoversi liberamente sul filo perimetrale
tra le isole e il perimetro stesso.
Una zona proibita che è vicina al perimetro deve essere parte
del perimetro stesso, come mostrato nell’immagine.
Page 52

Installazione
Per fissare il filo perimetrale
Si consiglia di tosare per la prima volta il prato nel punto in cui si deve stendere il filo utilizzando un normale
tosaerba per prati. Questo assicurerà di stendere il filo il più vicino possibile al terreno in modo che Landroid
non tagli accidentalmente il filo. Il filo perimetrale è alimentato a bassissima tensione ed è pertanto
completamente sicuro per esseri umani e animali domestici.
1
Collocare la base di ricarica nel posto stabilito, senza fissarla in modo
definitivo. La freccia “IN” dovrà essere rivolta verso l’interno del
prato.
®
L
52
2
Fare passare il cavo di confine nel tunnel sotto la base di ricarica.
I
3
Lasciare circa 1 mt di cavo extra a partire dalla parte posteriore della
base di ricarica e iniziare a fissare il cavo lungo il perimetro. Quando
avete terminato di posare il cavo lungo il confine
fino alla base di ricarica , lasciare un altro metro di cavo extra e poi
tagliare.
Page 53

4
Quando si stende il filo
perimetrale, utilizzare il
distanziatore per mantenere
uno spazio di 45cm* tra il filo e il
perimetro. Tuttavia, in presenza di
un ostacolo a livello del terreno
e sicuro da percorrere per
®
Landroid
o un marciapiede, è necessario
solo uno spazio di 10cm*.
Ciascun picchetto deve essere
posizionato ad una distanza di
circa 80cm.
Inserire saldamente i picchetti nel
terreno con il martello evitando
di esercitare eccessiva pressione
sul filo. Tenere il filo perimetrale
e serrare i picchetti per evitare
che si allenti.
* Questa è la distanza
consigliata. Utilizzare il
distanziatore per un'installazione
adeguata.
L, come una vialetto
53
5
Assicurarsi che il filo sia teso.
6
Quando si crea un’isola col cavo perimetrale, seguire il percorso
mostrato. Il cavo deve partire dal perimetro, definire l’isola, e poi
tornare al perimetro. Il cavo perimetrale di andata deve essere
posato adiacente a quello di ritorno tra l’isola ed il perimetro
e deve essere fissato usando lo stesso picchetto. Durante il
®
funzionamento Landroid
sopra questa parte di cavo.
L sarà capace di transitare liberamente
I
Page 54

Collegare la base al filo perimetrale
OUT
IN
OUT
IN
OUT
IN
1
Katkaise johtojen kaksi päätä pituuteen, jolla ne voi liittää helposti
kiristimiin.
Kuori johtojen päät.
2
Kun liität latausalustan, huomioin IN (Sisään) -johto ja OUT (Ulos)
-johto, kuten kuvassa. Collegare il filo IN al morsetto rosso della
base di ricarica e il filo OUT al morsetto nero.
Quindi chiudere il coperchio.
54
I
Page 55

3
a
b
Ora si può procedere a fissare in maniera permanente la base di
ricarica sul terreno serrando i picchetti di ancoraggio della base
con la chiave esagonale in dotazione.
NOTA: Assicurarsi che la sezione d’ingresso del cavo sia
diritta e si trovi sotto la parte centrale della base.
4
Collegare il cavo di alimentazione al trasformatore e quindi alla
presa di rete CA. Il LED della base di ricarica si accende. Se il
LED è spento, fare riferimento alla Guida alla risoluzione dei
problemi.Quando si effettua il collegamento, allineare la tacca
sul connettore del cavo di alimentazione (a) con la scanalatura
sul connettore del trasformatore (b).
Assicurarsi di avvitare o svitare solo il pezzo evidenziato del
connettore.
Se la luce verde non si accende controllare i collegamenti
elettrici.
Se il cavo di alimentazione si trova all'interno dell'area di lavoro,
potrebbe essere necessario interrarlo.
55
I
Accendere e testare l'installazione
Questa è la parte eccitante in cui si accende Landroid®L per la prima volta.
1
Posizionare Landroid®L all'interno
dell'area di lavoro, a pochi metri
di distanza dal retro della base di
ricarica.
Page 56

2
Aprire la finestra tastiera
premendo il grande pulsante
rosso sopra Landroid
Tenere premuto il tasto ON/
OFF
di accensione finché
Landroid
®
L non si accende.
®
L.
56
Premere il tasto
e chiudere
la finestra tastiera:
Landroid
®
L quindi si muoverà
fino alla base di ricarica.
Guardare Landroid
®
L mentre
torna alla base e modificare la
posizione del cavo perimetrale,
se necessario. Quando
Landroid
®
L torna regolarmente
alla base, significa che
l’installazione è stata
completata correttamente!
Adesso Landroid
®
L inizierà a
caricarsi.
®
NOTA: Se Landroid
L è nella base di ricarica nel momento in cui si è programmata la tosatura, basta premere il pulsante di
ACCESSO e chiudere la finestra tastiera per riprendere il taglio.
I
Attenzione
• Se Landroid®L è
all’esterno dell’area di
lavoro, non si azionerà
e sul display viene
visualizzato il messaggio
di errore “fuori area
di taglio”. Riportare
®
Landroid
L all’interno
dell’area di lavoro e
ripetere la fase 2.
• Se Landroid
all’interno del suo
territorio ma il display
visualizza il messaggio
“Fuori area di taglio”
e la luce LED è
accesa,, significa che
le estremità del cavo
perimetrale sono state
collegare in modo
sbagliato.Invertire i
collegamenti.
®
L è
®
• Landroid
L deve
rimanere sempre acceso.
In caso di spegnimento,
assicurarsi che alla
riaccensione si trovi
all’interno dell’area di
lavoro.
®
• Se Landroid
L dovesse
fermarsi accidentalmente,
premere il tasto di
ACCESSO, aprire lo
sportello, e premere
sul tasto ON/OFF per
riaccenderlo, correggere i
problemi e premere su 0
e chiudere lo sportello.
NOTA: Per ulteriori informazioni, consultare la Guida alla programmazione e alla risoluzione dei problemi.
Page 57

Programmazione
Una volta terminata l’installazione è ora di passare alla programmazione del percorso di Landroid®L usando il tastierino, come
mostrato di seguito. Fare riferimento alla Guida alla programmazione ed alla Guida alla risoluzione dei problemi fornite in
dotazione.
È possibile trovare ulteriori particolari sui tempi di lavoro di default del Landroid®L nella tabella che segue:
Landroid®L WG795E – Durata rasatura automatica.
Durata
2
Area m
100 1.5 7:00-8:30 / / 7:00-8:30 / / /
200 5 7:00-8:00 7:00-8:00 7:00-8:00 7:00-8:00 7:00-8:00 / /
300 6 7:00-8:12 7:00-8:12 7:00-8:12 7:00-8:12 7:00-8:12 / /
400 7.5 7:00-8:30 7:00-8:30 7:00-8:30 7:00-8:30 7:00-8:30 / /
500 10 7:00-9:00 7:00-9:00 7:00-9:00 7:00-9:00 7:00-9:00 / /
600 11 7:00-9:12 7:00-9:12 7:00-9:12 7:00-9:12 7:00-9:12 / /
700 13 7:00-9:36 7:00-9:36 7:00-9:36 7:00-9:36 7:00-9:36 / /
800 15 7:00-10:00 7:00-10:00 7:00-10:00 7:00-10:00 7:00-10:00 / /
900 16.5 7:00-10:18 7:00-10:18 7:00-10:18 7:00-10:18 7:00-10:18 / /
1000 18 7:00-10:36 7:00-10:36 7:00-10:36 7:00-10:36 7:00-10:36 / /
1100 20 7:00-11:00 7:00-11:00 7:00-11:00 7:00-11:00 7:00-11:00 / /
rasatura auto
Ore
Lunedì
Ore di
rasatura
Martedì
ore di
rasatura
Mercoledì
Ore di rasa-
tura
Giovedì ore
di rasatura
Venerdì ore
di rasatura
Sabato ore
di rasatura
Domenica
ore di ra-
satura
57
I
1200 22.5 7:00-11:30 7:00-11:30 7:00-11:30 7:00-11:30 7:00-11:30 / /
1300 25 7:00-12:00 7:00-12:00 7:00-12:00 7:00-12:00 7:00-12:00 / /
1400 26.5 7:00-12:18 7:00-12:18 7:00-12:18 7:00-12:18 7:00-12:18 / /
1500 28 7:00-12:48 7:00-12:48 7:00-12:48 7:00-12:48 7:00-12:48 / /
Page 58

Pronti a partire?
20
25
30
35
40
45
50
55
60
Landroid®L è progettato per mantenere l’erba all’altezza perfetta per tutta la stagione, ma non per deforestare una giungla.
In occasione del primo taglio,
1. È necessario tosare l’erba all’altezza desiderata.
2. Assicurarsi che l'area di lavoro sia priva di oggetti quali giocattoli e rami...
3. Alla prima tosatura, regolare l'altezza di taglio al livello massimo, quindi regolarla all'altezza preferita.
58
I
La prossima stagione fate in modo che Landroid
evitare il taglio preliminare.
®
L venga messo in funzione presto, quando l’erba è ancora corta, in modo da
Page 59

Mantenere affilate le lame
Indossare sempre i guanti quando si regolano le lame.
®
Ogni lama del Landroid
tosa l'erba del giardino e per ottenere un taglio perfetto, le lame devono essere periodicamente
capovolte/ruotate. Ad esempio se Landroid
devono essere ruotate ogni mese per garantire una tosatura ottimale. Ogni lama durerà 4 mesi se il
dispositivo è programmato per tagliare l'erba ogni giorno. Quando le lame sono smussate e usurate
devono essere sostituite dalle lame di ricambio fornite con Landroid
anche disponibili dal rivenditore WORX più vicino.
L ha 4 estremità taglienti. A seconda della frequenza con cui Landroid®L
®
L è programmato per rasare l'erba ogni giorno, le lame
®
L. Le lame di ricambio sono
Manutenzione
Landroid®L è progettato e costruito per rimanere all’esterno, incurante delle condizioni atmosferiche
®
avverse. Landroid
per una tosatura senza problemi, anno dopo anno, stagione dopo stagione. Non lavare l’apparecchio
con pistole ad alta pressione. Possono danneggiarne la batteria.
L necessita soltanto di una pulizia periodica dai frammenti d’erba che si accumulano
Rimessaggio invernale
1
3
2
4
Sebbene sia resistente, si consiglia di riporre Landroid®L nella rimessa o nel garage durante l'inverno.
®
Prima del rimessaggio invernale, effettuare una carica completa di Landroid
danni alla batteria. Sarà quindi possibile scollegare la spina della base di carica. Un buon sistema per
prolungare la vita utile della batteria è di ricaricarla periodicamente durante l’inverno. Una carica completa
ogni 3 mesi sarà sufficiente. Si consiglia inoltre di coprire la base con un foglio di nylon durante l’inverno.
L per prevenire possibili
Sicurezza
Landroid®L è sicuro per esseri umani e animali domestici. Prima di tutto, vi è una grande distanza tra il
bordo esterno della macchina e le lame. Inoltre, i sensori di inclinazione arrestano immediatamente le
lame se l'unità viene sollevata dal terreno.
Protezione
Landroid®L è protetto con un codice PIN, che impedisce l'utilizzo del prodotto da parte di persone
non autorizzate. Una volta portato fuori dalla sua area di lavoro, non potrà essere riavviato da nessuno
che non conosce il codice PIN. Ciò significa che il proprietario stesso non sarà in grado di riavviare
®
Landroid
riferimenti futuri. Meglio ancora: registrare Landroid
registrare il codice PIN. Sarà sempre possibile accedere al proprio codice PIN online.
L nel caso in cui dimentichi il PIN! Si consiglia caldamente di annotare il codice PIN qui per
®
L online sul sito www.worxlandroid.com e
59
I
Annotare qui il codice PIN
Page 60

Cómo instalar el Landroid®L
60
ES
La instalación de Landroid®L es sencilla. Según el tamaño de su jardín, tardará muy poco en llevar a cabo todo el
proceso. Al igual que nosotros, es muy probable que odie tener que malgastar su valioso tiempo libre cortando el
®
césped. Landroid
Puede ver el vídeo de demostración de instalación en www.worxlandroid.com.
L le demostrará ser su mejor inversión, ya que no tendrá que cortar el césped nunca más.
A Landroid®L le encanta cortar el césped
Se ha diseñado para cortar el césped con frecuencia, permitiéndole disfrutar de un césped más verde y de mejor
®
aspecto como nunca antes. Según el tamaño de su jardín, Landroid
cualquier momento o con la frecuencia que desee sin ningún tipo de restricción. Hará el trabajo por usted.
L puede programarse para funcionar en
Coste de funcionamiento
¿Preocupado por la factura de la luz? Hagamos unos cálculos: si deja que su Landroid®L trabaje 3 horas al día, 5
®
días a la semana, 25 semanas al año, su Landroid
fracción de lo que su ruidoso y contaminante cortacésped gastaría en gasóleo.
L le costará alrededor de 8€ en electricidad*. Sí, 8€ al año. Una
* Fuente: www.energy.eu
Page 61

Preparación
En la caja
6 Estacas de
sujeción de
la base
250 Estacas
delimitadoras
Medidor de distancia del
cable delimitador
9 Hojas de
repuesto
(3 juegos)
Cable de
alimentación con
transformador
AC/DC
Manual del propietario
Carrete de alambre
delimitador 200m
Guía de
instalación
Landroid
®
LBase de carga
61
ES
Llave allen
Del cobertizo
Tijeras Martillo
Guía de
programación y
de solución de
problemas
Eclaración de
garantía
Page 62

El nuevo hogar de su Landroid®L
- su jardín
Empecemos por echar un vistazo más de cerca al nuevo hogar de su Landroid®L, su césped, destacando aquellas
zonas dónde puede ir con seguridad y las zonas que es mejor evitar.
Obstáculos con los que puede chocar
Al chocar contra cualquier obstáculo que sea rígido, estable y
más alto de 15cm, como un muro o una valla, su Landroid
simplemente se detendrá y se alejará del obstáculo.
®
L
62
ES
Piedras
Las piedras que son lo suficientemente pesadas como para
no moverse con la acción del Landroid
de forma segura. Sin embargo, si la piedra tiene una superficie
inclinada en la que su Landroid
o excluirla de la zona de trabajo.
®
L se pueden alcanzar
®
L puede subir, debería eliminarla
Entradas de vehículos
Si su camino es a nivel del césped, sin ninguna superficie que
sobresalga, el Landroid
quiere que Landroid
10cm* entre el cable delimitador y la entrada.
Si está cubierto de grava, no debe permitir que el Landroid
desplace sobre ella. Utilice el medidor de distancia de separación
en este caso, manteniendo una distancia de 45cm* entre el
cable delimitador y la entrada.
* Esta es la distancia recomendada.
Utilice el calibre de distancia proporcionado para garantizar la
instalación adecuada.
®
L puede moverse libremente sobre él. Si
®
L la evite, solo es necesaria una distancia de
®
L se
Parterres, estanques, piscinas ...
Seguro que no quiere que su Landroid®L corte las flores o caiga
en el agua. Estas zonas tienen que evitarse.
Page 63

Protuberancias y depresiones
En el caso de bultos y hoyos grandes, tenga en cuenta si las
®
hojas del Landroid
o bien suavizar la rampa, o bien excluir esas áreas de la zona
de trabajo de su Landroid
L pueden tocar el suelo. Si este es el caso,
®
L.
Árboles
Sin embargo, si hay raíces que sobresalen del terreno, esta
zona debe evitarse para no dañar las raíces.
35% (20°)
Pendientes
Su Landroid®L tiene la capacidad de subir de forma segura
por pendientes de hasta 35% (20°), por lo que evite
pendientes más pronunciadas que estas.
Cable delimitador
delimitador
Cable
Instalación del Cable Delimitador en pendientes
El Cable Delimitador Superior NO debe ser colocado en
pendientes con una inclinación superior al 35% (20°). El Cable
Delimitador Superior debe respetar una distancia minima de
35cm respecto a cualquier obstáculo. El Cable Delimitador Inferior
NO debe ser colocado en pendientes con una inclinación superiror
al 25% (15°). El Cable Delimitador Inferior debe respetar una
distancia minima de 45cm respecto a cualquier obstáculo cuando
esté colocado en una pendiente con una inclinación de un 25%.
Cable delimitador
superior
63
ES
Page 64

Delimitar el territorio del
Landroid®L en su jardín
Su Landroid®L necesita saber dónde tiene que cortar el césped. Por eso tiene que marcar la zona de trabajo con el
®
cable delimitador que formará una barrera invisible. Este cable también orientará a su Landroid
Si su negocio también utiliza un Landroid®L, entonces debe guardar una distancia de por lo menos 2 metros
entre su Cable Delimitador y sus vecinos.
®
Tenga presente que su Landroid
L no podrá recibir una
señal del Cable Delimitador a una distancia superior a 25m.
En primer lugar, localice el mejor sitio para la base de carga
teniendo en cuenta la situación del enchufe exterior más
cercano. La base de carga tiene un cable de 15m.
NOTA: Asegúrese de que el transformador y la toma de
corriente se encuentren en un lugar seco en todo momento.
L hacia la base de carga.
64
ES
El cargador se debe colocar a lo largo de una línea recta, con 2
metros de margen tanto en la parte delantera como en la parte
posterior. Si es posible, coloque la base de carga a la sombra, las
baterías se recargan mejor en un lugar fresco.
Asegúrese de que la superficie es plana y libre de obstáculos.
Una isla es un área que se encuentra dentro de su césped en
el que no quiere que el Landroid
comienza en el límite de corte, sigue recto hasta la isla, la rodea
y vuelve al límite, tal y como se muestra en las flechas de la
ilustración.
®
L vaya. El cable delimitador
Page 65

Si su césped tiene dos áreas o más separadas entre sí por medio
de un pasillo, este debe ser por lo menos de 1 metros de ancho.
Si sus áreas de césped no están conectadas por un pasillo
lo suficientemente ancho, entonces tendrá que coger su
®
Landroid
L y llevarlo al otro césped. El Landroid®L cortará el
césped sin problema, pero tendrá que llevarlo de vuelta a la
base de carga cuando la batería se agote.
65
ES
En el caso de que hayan dos islas cerca una de la otra, sería
conveniente colocar el cable como se ilustra en la figura de arriba.
®
El Landroid
L puede desplazarse libremente a lo largo del cable
delimitador que hay entre las islas y el perímetro de trabajo.
Una zona prohibida, que se encuentra próxima al límite de
corte, debe formar parte del propio límite, tal y como se
muestra en la ilustración.
Page 66

Instalación
Fijación del cable delimitador
Le recomendamos que primero corte el césped de la zona donde vaya a colocarse el cable mediante un
cortacésped normal o una podadora. Esto asegura que el cable se coloca lo más cerca posible del suelo para
®
que el Landroid
lo que es totalmente seguro para las personas y animales domésticos.
L no lo corte accidentalmente. El cable delimitador se alimenta con una tensión muy baja por
1
Coloque la base de carga en el lugar designado sin fijarla de forma
definitiva. La flecha “IN” debe orientarse hacia la parte interior
de su césped.
66
ES
2
Introduzca el cable delimitador a través del túnel bajo la base de
recarga.
3
Dejando cerca de 1 metro de longitud de cable extra, desde la
parte posterior de su base de recarga comience a sujetar el cable
a lo largo del límite de su terreno. Cuando haya finalizado de
extender el cable alrededor del límite de su terreno y de vuelta
a la base de recarga, deje otro metro extra de cable y entonces
córtelo.
Page 67

4
Al colocar el cable delimitador,
utilice el medidor de distancia para
mantener un espacio de 45cm*
entre el cable y el perímetro. Sin
embargo, en el caso de que haya
un obstáculo a nivel de suelo y
seguro para el desplazamiento del
®
Landroid
acera, entonces solo se necesita
un espacio de 10cm*.
El espacio entre las clavijas del
cable delimitador debe ser de 80cm
Clave con firmeza las clavijas
de protección en el suelo con
la ayuda de un martillo, aunque
evite ejercer demasiada presión
sobre el cable.Mantenga el cable
delimitador recto y ajustado entre
las clavijas, no debería haber
ningún cable flojo.
*
Utilice el calibre de distancia
proporcionado para garantizar la
instalación adecuada.
L, como una entrada o
Esta es la distancia recomendada.
67
ES
5
Asegúrese de que el alambre de limitador está perfectamente
estirado en cada esquina.
6
Al crear una isla con el cable delimitador, siga la ruta tal y como se
indica. El cable debe ir desde el perímetro para trazar la isla definida
y volver de nuevo al perímetro. El cable delimitador ubicado entre
la isla y el perímetro debe colocarse en una situación cercana y
sujetarse con el mismo pasador delimitador. En funcionamiento,
®
Landroid
L podrá pasar sin problemas por esta parte del cable.
Page 68

Conectar la base al cable delimitador
OUT
IN
OUT
IN
OUT
IN
1
Corte los dos extremos del cable con la longitud adecuada para
llegar a las pinzas.
Despoje los dos extremos del cable.
2
Cuando se conecte a la base de carga habrá un cable de entrada
y un cable de salida, tal como se muestra en la figura. Conecte el
cable de entrada (IN) a la abrazadera de color rojo de la base de
carga y el cable de salida (OUT) a la abrazadera de color negro.
A continuación, cierre la cubierta.
68
ES
Page 69

3
a
b
Ahora puede fijar de forma permanente la base de carga en el
suelo apretando las clavijas de retención de la base con la llave
hexagonal suministrada.
NOTA: Asegúrese de que el cable de entrada pasa en línea
recta por debajo del centro de la base de carga.
4
Conecte el cable de alimentación al transformador y luego a la
toma de corriente AC, el LED de la base de carga se encenderá.
Si el indicador LED está apagado, consulte la Guía de solución
de problemas. Al conectar, alinee la muesca en el conector
del cable de alimentación (a) con la ranura en el conector del
transformador (b).
Asegúrese de que solo enrosca o desenrosca la parte
destacada del conector.
Si no se enciende la luz verde, compruebe las conexiones de
alimentación.
En caso de que el cable de alimentación esté dentro de la zona
de trabajo, puede enterrarlo lo que sea necesario.
69
Encender y probar la instalación
Esta es la parte emocionante en la que podrá poner en marcha su Landroid®L por primera vez.
1
Coloque el Landroid®L dentro del
área de trabajo, a pocos metros
de la parte posterior de la base
de carga.
ES
Page 70

Abra el panel del teclado
pulsando el gran botón rojo
que hay en la parte superior
del Landroid
Pulse y mantenga pulsado la
tecla ON/OFF
Landroid
hasta que el
®
L se encienda.
Pulse la tecla y cierre
el panel del teclado: su
®
Landroid
L buscará el camino
hacia la base de carga.
Observe como Landroid
vuelve a la base de carga
y modifica la posición del
cable delimitador, si fuera
necesario. Si Landroid
vuelve con éxito a la base
de carga, esto significa que
la instalación se ha llevado a
cabo correctamente. Ahora
®
su Landroid
L comenzará a
cargarse por completo.
2
®
®
®
L.
L
L
70
ES
®
NOTA: Si su Landroid
L está en la base de carga durante un tiempo que lo había programado para cortar el césped,
simplemente presione el botón de ACCESO y cierre el panel del teclado para enviar el aparato de nuevo a cortar el césped.
®
L
Advertencia
• Si su Landroid®L está
fuera de su territorio, no
se moverá y la pantalla
mostrará el error "fuera
del área de trabajo".
Colóquelo otra vez
dentro de su territorio y
repita el paso 2.
®
• Si su Landroid
L se
encuentra dentro de su
territorio, pero la pantalla
indica “fuera de la zona
de corte” y el indicador
LED está encendido,
esto significa que ha
sujetado los extremos
del cable delimitador
de forma incorrecta.
Inviértalos.
®
• El Landroid
L debe
permanecer siempre
encendido. Si alguna
vez tiene que apagarlo,
entonces asegúrese
de colocarlo dentro del
perímetro de trabajo
antes de volverlo a
encender.
• Si su Landroid
deja de funcionar
inesperadamente,
simplemente presione
el botón ACCEDER, abra
su ventana de teclado
numérico, coloque su
botón ENCENDIDO/
APAGADO en la posición
de ENCENDIDO, corrija
los problemas, presione el
botón 0 y cierre su ventana
de teclado numérico.
NOTA: Consulte la Guía de programación y resolución de problemas para obtener más información.
Page 71

Programación
Una vez finalizada la instalación, ha llegado el momento de programar
funcionamiento, utilizando la pantalla de teclado mostrada a continuación. Consulte la Guía de programación y solución de problemas
incluida en la caja.
Puede consultar más detalles acerca del horario de trabajo predeterminado del Landroid®L en la tabla siguiente:
Landroid®L WG795E – Horario de segado automático.
Área m
Horario
de segado
2
automático -
horas
Lunes
Horario de
segado
Martes
horario de
segado
Landroid®L
Miércoles
horario de
segado
para configurar cuando quiere que se ponga en
Jueves
horario de
segado
Viernes
horario de
segado
Sábado
Horario de
segado
Domingo
horario de
segado
100 1.5 7:00-8:30 / / 7:00-8:30 / / /
200 5 7:00-8:00 7:00-8:00 7:00-8:00 7:00-8:00 7:00-8:00 / /
300 6 7:00-8:12 7:00-8:12 7:00-8:12 7:00-8:12 7:00-8:12 / /
400 7.5 7:00-8:30 7:00-8:30 7:00-8:30 7:00-8:30 7:00-8:30 / /
500 10 7:00-9:00 7:00-9:00 7:00-9:00 7:00-9:00 7:00-9:00 / /
600 11 7:00-9:12 7:00-9:12 7:00-9:12 7:00-9:12 7:00-9:12 / /
700 13 7:00-9:36 7:00-9:36 7:00-9:36 7:00-9:36 7:00-9:36 / /
800 15 7:00-10:00 7:00-10:00 7:00-10:00 7:00-10:00 7:00-10:00 / /
900 16.5 7:00-10:18 7:00-10:18 7:00-10:18 7:00-10:18 7:00-10:18 / /
1000 18 7:00-10:36 7:00-10:36 7:00-10:36 7:00-10:36 7:00-10:36 / /
1100 20 7:00-11:00 7:00-11:00 7:00-11:00 7:00-11:00 7:00-11:00 / /
1200 22.5 7:00-11:30 7:00-11:30 7:00-11:30 7:00-11:30 7:00-11:30 / /
1300 25 7:00-12:00 7:00-12:00 7:00-12:00 7:00-12:00 7:00-12:00 / /
71
ES
1400 26.5 7:00-12:18 7:00-12:18 7:00-12:18 7:00-12:18 7:00-12:18 / /
1500 28 7:00-12:48 7:00-12:48 7:00-12:48 7:00-12:48 7:00-12:48 / /
Page 72

¿Está listo?
20
25
30
35
40
45
50
55
60
El Landroid®L está diseñado para mantener el césped en una longitud perfecta durante la temporada, pero no está diseñado para
deforestar una selva.
Antes de usar por primera vez,
1. Debería cortar el césped a la altura deseada.
2. Asegúrese de que el área de trabajo está limpia de objetos tales como juguetes y ramas...
3. Ajuste la altura de corte de césped a su nivel máximo la primera vez y luego ajústela a su altura de preferida.
72
ES
La próxima primavera ponga el Landroid
de césped preliminar.
®
L a cortar césped un poco antes, cuando la hierba es todavía baja, así puede evitar el corte
Page 73

Mantenerlo afilado
Utilice siempre guantes cuando ajuste las hojas.
®
Cada hoja de su Landroid
®
Landroid
para trabajar con un nuevo borde de corte. Si su Landroid
todos los días, entonces será necesario girar las hojas de corte mensualmente para conseguir los
mejores resultados en la siega. Cada hoja de corte tendrá una duración de hasta 4 meses cuando la
siega se realice diariamente. Cuando la hoja de corte esté roma o desgastada, se debe cambiar por
una hoja de repuesto proporcionada con su Landroid
en su distribuidor de WORX más cercano.
L siegue el césped, la hoja de corte necesitarán darse la vuelta o girarse periódicamente
L tiene 4 bordes de corte. Dependiendo con la frecuencia con la que su
®
L está programado para segar el césped
®
L. También puede obtener las hojas de repuesto
Mantenimiento
El Landroid®L se ha diseñado y construido para permanecer al aire libre, independientemente de las
condiciones adversas. Periódicamente limpie la plataforma de la acumulación y restos de hierba y su
®
Landroid
con una pistola de alta presión. Podría ocasionar daños en la batería o en la máquina.
L cortará césped sin problemas, año tras año, temporada tras temporada. No lave la máquina
Hibernación
1
3
2
4
Aunque es pesado, le recomendamos que durante el invierno guarde su Landroid®L en el cobertizo o
®
en el garaje. Antes de guardar su Landroid
sufra daño. A continuación, puede desconectar el enchufe de la base de carga. Un buen consejo para
prolongar la vida de la batería es recargarla periódicamente durante el invierno. Una carga completa cada
3 meses estará bien. También le recomendamos que en invierno cubra la base con un tejido de nylon.
L, haga una recarga completa de la batería para evitar que
Seguridad
El Landroid®L es seguro para las personas y animales domésticos. En primer lugar, hay una gran
distancia entre el borde exterior de la máquina y las hojas. Por otra parte, los sensores de inclinación
detendrán automáticamente las hojas si la unidad se eleva del suelo.
Protección
Su Landroid®L está protegido por un código PIN. Este código PIN evita que puedan usarlo personas
no autorizadas. Una vez que se lleve fuera de su territorio, ninguna persona que desconozca el código
®
PIN podrá reiniciarlo. ¡Esto también significa que usted no podrá iniciar su Landroid
código PIN! Le recomendamos encarecidamente que escriba el código PIN aquí como referencia
®
para el futuro. Mejor aún, registre su Landroid
código PIN allí. Usted tendrá acceso al código PIN en línea en cualquier momento.
L en línea a www.worxlandroid.com e introduzca su
L si se olvida del
73
ES
Escriba su código PIN aquí
Page 74

Sådan kommer du i gang med din
Landroid®L
74
DK
Installationen af din Landroid®L er let. Afhængig af størrelsen af din have, tager hele processeen kun et kort
®
stykke tid. Hvis du ligesom os hader at spilde din kostbare tid med at slå græs. Vil Landroid
bedste investering, der eliminerer behovet for at slå græsset igen.
Du kan seen demo video på www.worxlandroid.com.
Landroid®L
Den er designet til at slå græs ofte, for at vedligeholde en sundere og bedre udseende plæne end nogensinde
før. Afhængig af størrelsen af din plæne, kan Landroid
uden nogen restiktioner. Den er her for at arbejde for dig.
elsker at slå græs
®
L programmeres til at operere til enhver tid eller frekvens
L vise sig at være din
Omkostninger
Bekymrer du dig for elregningen? Lad os regne lidt på det: Hvis du lader din Landroid®L køre i 3 timer hver dag,
®
5 dage om ugen i 25 uger om året, så vil din Landroid
er kun en brøkdel af, hvad du ville bruge på benzin til din larmende og forurenende benzingræsslåmaskine.
L koste ca. 62 kr. i elektricitet*. Ja, kun 62 kr. om året. Det
* Kilde: www.energy.eu
Page 75

Forberedelse
I kassen
6 Pløkker til
opladestationen
250
Pløkker til
grænsekabel
Afstandsmåler til
grænsekablet
9 Ekstra
klinger (3 sæt)
El-ledning med AC/
DC transformer
Brugsvejledning
Rulle til grænsekabel
200m
Installationsvejledning
Landroid
®
LOpladestation
75
DK
Allennøgle
Fra dit skur
En saks En hammer
Programmering og
fejlfindingsvejledning
Garantierklæring
Page 76

Din Landroid®L's nye hjem–din have
Lad os starte med et kik på din Landroid®L's nye hjem – din have – her skal du finde de områder, hvor den
sikkert kan køre, og de områder, som helt skal undgås.
Forhindringer som kan rammes
Hvis din Landroid®L rammer genstande, som er solide, stabile
og højere end 15cm - såsom en væg eller et hegn - vil den blot
stoppe og dreje væk fra genstanden.
76
DK
Sten
Din Landroid®L kan sikker køre mod en sten, som er for stor til
at den kan flytte den. Men hvis stenen har en skrå overflade,
som din Landroid
fjerne den helt fra området.
®
L kan køre op ad, skal du flytte stenen eller
Indkørsler
Hvis din indkørsel er plan med græsplænen, og der ikke stikker
noget op mellem dem, kan du Landroid
problemer. Hvis du ønsker at Landroid
berhøves der kun 10cm* afstand imellem grænsekablet og plænen.
Hvis indkørslen er grusbelagt, må din Landroid®L ikke køre over
den, holdende en 45cm* afstand imellem grænsekablet og
plænen.
*Dette er den anbefalede afstand.
Brug afstandsmåleren, som følger med, så du sikre en ordentlig
opsætning.
®
L køre over den uden
®
L skal undgå det. Så
Blomsterbed, kær, swimmingpools…
Du vil nok helst ikke have, at din Landroid®L køre over din
blomster eller køre i vandet. Så disse områder skal undgås.
Page 77

Fordybninger og bump
Hvis der er større bump eller fordybninger, skal du vurdere om
klingerne kan nå jorden. Hvis dette ikke er tilfældet, skal du enten
udjævne overfladen eller udeluk området.
Træer
Men hvis træets rødder stikker op ad jorden, bedes du undgå
disse områder, da du ikke ønsker at ødelægge rødderne.
35% (20°)
Bakker
Din Landroid®L er i stand til at køre op ad bakker op til 35% (20°),
så du skal blot undgå stejlere bakker end disse.
Ø
vre afgrænsningstråd
Placering af afgrænsningstråd på skråninger
Den øvre afgrænsningstråd må IKKE placeres på skråninger,
som er stejlere end 35% (20°). Den øvre afgrænsningstråd skal
have en afstand på mindst 35cm til andre genstande. Den nedre
afgrænsningstråd må IKKE placeres på skråninger, som er stejlere
end 25% (15°).
Den nedre afgrænsningstråd skal have en afstand på mindst
45cm til andre genstande, når den placeres på en skråning på
25%.
afgrænsningstråd
N
edre
Ø
vre afgrænsningstråd
77
DK
Page 78

Afmærkning af græsområdet,
som skal slås i din have
Din Landroid®L skal vide hvor den skal slå græsset. Det er derfor du skal afmærke dens arbejdsområde ved brug
af grænsekablet, som laver et form for usynligt hegn. Dette kabel leder også din Landroid
Hvis din nabo også bruger
Landroid®L
, skal du holde en afstand på mindst 2 meter mellem dit
afgrænsningskabel og din nabos.
Vær venligst opmærksom på, at din
Landroid®L
ikke kan
modtage signaler fra afgrænsningskablet, hvis afstanden er
større end 25m.
Du skal først finde det bedste sted til opladestationen, og tag i
betragtning hvor din nærmeste stikkontakt er. Opladestationen
kommer med en 15m lang el-ledning.
BEMÆRK: Forvis dig om at transformeren og det elektriske
stik altid holdes på et tørt sted.
®
L til dens opladestation.
78
DK
Opladestationen skal være på en lige linje – sørg for, at der
er mindst 2 meter til hver sin side. Hvis muligt, skal du stille
opladestationen i skyggen – batterier oplades bedre, når de er på
et køligt sted.
Sørg for, at det er på et plan område, og fri for forhindringer.
En ø er et område på midten af din græsplæne, hvor du ikke
®
ønsker at din Landroid
slågrænsen, og går lige til ø’en, rundt om den og tilbage til
grænsen, som vist med pilene på billedet.
L skal køre. Grænsekablet starter fra
Page 79

Hvis din græsplæne flere separate områder, som er forbundet med
en gang, skal denne gang være mindst 1 meter bred.
Hvis gangen ikke er bred nok, så bliver du nød til, at flytte
®
din Landroid
L mellem græsplænerne. Din Landroid®L kan
godt slå denne græsplane, men du skal flytte den tilbage til
opladestationen når batteriet er fladt.
79
DK
Hvis ud har to øer, som ligger tæt på hinanden, anbefaler vi at du
ligger kablet som vist nedenfor.
®
Din Landroid
L kan frit køre over grænsekablet mellem øerne og
kanten.
Et forbudt område, der er tæt på slå grænsen skal være en del
af grænsen i sig selv, som vist på billedet.
Page 80

Installation
Sådan pløkkes grænsekablet til jorden
Vi anbefaler, at du først slår græsset der hvor kablet skal trækkes med en normal græsslåmaskine eller
®
græstrimmer. Det sikrer, at kablet ligger så tæt på jorden som muligt, så din Landroid
den og klipper den ved et uheld. Grænsekablet har en meget lav spænding gennem sig, som er sikker for
mennesker og dyr.
1
Stil opladestationen på det ønskede sted, men ud at fastgøre den
permanent. “IN” pilen skal vende sådan, at den indikere indersiden
af din plæne.
L ikke kører over
80
DK
2
Før afgrænsningskablet igennem passagen under opladningssoklen.
3
Efterlad omkring 1 meters ekstra kabellængde, begynd fra enden af
opladningssoklen og gør kablet fast langs med grænsen. Når du er
færdig med at afgrænse området med kablet og har ført det tilbage
til opladningssoklen, efterlad en ekstra meter kabel og skær det
over.
Page 81

4
Når du trækker grænsekablet,
skal du bruge afstandsmålerne til
at holde 45cm* afstand mellem
kablet og kanten. Men hvis der er
en forhindring, som er plan med
®
jorden og sikker for din Landroid
at køre over, såsom en indkørsel
eller et fortov, skal du kun holde en
afstand på 10cm*.
Der skal være ca. 80cm mellem
pløkkerne.
Slå pløkkerne i jorden med en
hammer, men sørg for at kablet
ikke klemmes for meget. Hold
grænsekablet lige og udstrakt
mellem pløkkerne. Kablet må ikke
sidde løst nogen steder.
* Dette er den anbefalede afstand,
®
da din Landroid
beregnet afstanden.
Brug afstandsmåleren, som følger
med, så du sikre en ordentlig
opsætning.
L ikke selv kan
L
81
5
Sørg for afgrænsningskablet er fuldkommen lige i hvert hjørne.
6
Når den laves en ø med grænsekablet, følges stien som vist. Kablet
skal løbe langs med omkredsen for at omkredse den definerede
ø og derefter vende tilbage til omkredsen. Grænsekablet imellem
ø’en og omkredsen skal lægges tæt sammen og hjælpe med at
®
placere den samme grænsepæl. Under drift, vil Landroid
stand til at passere frit over denne del af kablet.
L være i
DK
Page 82

Tilslutning af stationen til grænsekablet
OUT
IN
OUT
IN
OUT
IN
1
Klip enderne på kablet til en længde, så deres længde passer til
klemmerne.
Klip beskyttelseselementet af enderne på kablet.
2
Når du forbinder kablet til opladestationen, er der en IN-kabel
og en OUT-kabel, som vist på billedet. Forbind IN-kanlet til
den røde klemme på opladebasen, og OUT-kablet til den sorte
klemme.
Luk herefter låget.
82
DK
Page 83

3
a
b
Du kan nu fastspænde opladestationen permanent til
jorden, ved at spænde de medfølgende pløkker på med
umbraconøglen.
BEMÆRK: Forvis dig om at IN-kablet løber lige under
centeret af opladebasen.
4
Slut el-ledningen til transformeren, og herefter til stikkontakten,
hvorefter skærmen på opladestationen tænder. Hvis LED
er slukket, referer venligst til fejlfindingsguiden. Når du
tilslutter, skal hakket på el-stikket (a) være på linje med rillen på
transformerstikket (b).
Sørg for, at du kun skruer på de fremhævede dele på stikket.
Hvis den grønne lampe ikke lyser, skal du kontrollere
strømledningen og forbindelserne.
Hvis el-ledningen er inden for arbejdsområdet, kan du også
grave den ned, hvis nødvendigt.
Opstart og afprøvning
Nu kommer den spændende del, hvor du for første gang kan tænde for din Landroid®L.
1
Stil din Landroid®L inde i
arbejdsområdet, et par meter
væk fra opladestationens
bagside.
83
DK
Page 84

2
Åbn tastatur-vinduet
Ved at trykke på den store
røde knap oven på din
Landroid
Hold tænd/sluk
nede indtil din Landroid
knappen
tænder.
®
L.
®
L
84
DK
Tryk på
tasten og luk
tastatur-vinduet:
Din Landroid
®
L vil nu finde
dens vej til opladestationen.
Se efter Landroid
®
L, når
den vender tilbage til
opladestationen og modificerer
positionen til grænsekablet
hvis nødvendigt. Når
Landroid
®
L vender succesfuldt
tilbage til opladestationen,
betyder dette at installationen
er blevet udført med succes.
Nu vil din Landroid
®
L starte
med at oplade fuldstændigt.
®
BEMÆRK: Hvis din Landroid
L er i opladestationen på det tidspunkt, som du har indstillet den til at slå græs, skal du blot
trykke på ADGANG knappen, og lukke tastatur-vinduet, hvorefter den går i gang med at slå græsset.
Advarsel
• Hvis din Landroid®L er
udenfor dens område,
vil den stå stille og
der står ”udenfor
klippeområde” på
skærmen. Du skal
blot flytte den til
klippeområdet, og
gentag trin 2.
®
• Hvis din Landroid
L
er indenfor dens
territorium, men
displayet viser “uden
for klippeområdet” og
LED er tændt betyder
det at du har klampet
grænsekablet til at slutte
ukorrekt. Du skal bytte
• Du Landroid
være tændt. Hvis du får
brug for at slukke for den,
skal du sørge for at den er
indenfor klippeområdet,
når du tænder den igen.
®
L skal altid
om på enderne.
®
• Hvis din Landroid
L
pludselig holder op
med, at virke, skal du
blot trykke på ADGANG
knappen, åbn tastaturvinduet, stil tænd/sluk
knappen på tændt ,
ret problemet, tryk på
0-knappen og luk tastaturvinduet igen.
BEMÆRK: Se venligst Programmering og Fejlfinding for yderligere oplysninger.
Page 85

Programmering
Nu du har afsluttet instrallationen, er det nu tid til at programmere
at bruge tastaturskærmen vist herunder. Referer venligst til Programmerings- og Fejlfindingsguiden, der følger med i pakken.
Du kan finde yderligere oplysninger om standardarbejdstiden for Landroid®L i følgende tabel:
Landroid®L WG795E - Tidsplan for automatisk græsklipning.
Område
2
m
Automatisk
græsklipning
kørselstid -
timer
Mandag
græsklip-
ning timer
Tirsdag
græsklip-
ning timer
Landroid®L
Onsdag
græsklip-
ning timer
, når du ønsker at den skal begynde at arbejde, ved
Torsdag
græsklip-
ning timer
Fredag
græsklip-
ning timer
Lørdag
græsklip-
ning timer
græsklip-
ning timer
Søndag
100 1.5 7:00-8:30 / / 7:00-8:30 / / /
200 5 7:00-8:00 7:00-8:00 7:00-8:00 7:00-8:00 7:00-8:00 / /
300 6 7:00-8:12 7:00-8:12 7:00-8:12 7:00-8:12 7:00-8:12 / /
400 7.5 7:00-8:30 7:00-8:30 7:00-8:30 7:00-8:30 7:00-8:30 / /
500 10 7:00-9:00 7:00-9:00 7:00-9:00 7:00-9:00 7:00-9:00 / /
600 11 7:00-9:12 7:00-9:12 7:00-9:12 7:00-9:12 7:00-9:12 / /
700 13 7:00-9:36 7:00-9:36 7:00-9:36 7:00-9:36 7:00-9:36 / /
800 15 7:00-10:00 7:00-10:00 7:00-10:00 7:00-10:00 7:00-10:00 / /
900 16.5 7:00-10:18 7:00-10:18 7:00-10:18 7:00-10:18 7:00-10:18 / /
1000 18 7:00-10:36 7:00-10:36 7:00-10:36 7:00-10:36 7:00-10:36 / /
1100 20 7:00-11:00 7:00-11:00 7:00-11:00 7:00-11:00 7:00-11:00 / /
1200 22.5 7:00-11:30 7:00-11:30 7:00-11:30 7:00-11:30 7:00-11:30 / /
1300 25 7:00-12:00 7:00-12:00 7:00-12:00 7:00-12:00 7:00-12:00 / /
85
DK
1400 26.5 7:00-12:18 7:00-12:18 7:00-12:18 7:00-12:18 7:00-12:18 / /
1500 28 7:00-12:48 7:00-12:48 7:00-12:48 7:00-12:48 7:00-12:48 / /
Page 86

Klar til at gå i gang?
20
25
30
35
40
45
50
55
60
Din Landroid®L er beregnet til, at vedligeholde længden på din græsplæne over sommeren, og den er ikke beregnet til at nedlægge en hel
jungle.
Før du starter den for første gang,
1. Skal du først slå græsset til den ønskede højde.
2. Skal du sørge for, at græsplænen er fri for genstande, såsom legetøj og tykke grene…
®
3. Stil klippehøjden på den maksimale højde, når din Landroid
L først skal klippe græsset, og stil herefter højden efter eget ønske.
86
DK
Og foråret efter kan du sætte din Landroid®L i gang tidligt på året, når græsset stadig er kort, så du ikke selv skal slå græsset igen.
Page 87

Hold den skarp
Brug altid sikkerhedshandsker, når du skal justere klingerne.
®
Hver klinge på din Landroid
skærekanter også bruges, afhængig af hvor meget du bruger din Landroid
programmeret til, at slå græsset hver dag, skal du vende klingerne om hver måned, så du opnår det
bedste resultat. Hver klinge vil holde i op til 4 måneder, hvis din Landroid
klingerne er døve og nedslidte, skal de skiftes med de nye klinger, som følger med din Landroid
kan også købe ekstra klinger hos din lokale WORX forhandler.
L har 4 skærekanter. Klingerne skal af og til vendes om, så de andre
®
L. Hvis din Landroid®L er
®
L slår græsset hver dag. Når
®
L. Du
Vedligeholdelse
Din Landroid®L er fremstillet og bygget til, at blive udendørs, uanset vejrforholdene. Du skal blot
®
rengøre overfladen fra græs, hvorefter din Landroid
efter år. Maskinen må ikke vaskes med et højtryksanlæg. Dette kan forårsage skader på batteriet
eller maskinen.
L slår græsset for dig, sæson efter sæson, år
Om vinteren
Så selvom det er hårdt, så anbefaler vi at du gemmer din Landroid®L i dit skur eller garage vinteren
®
over. Lad din Landroid
til opladestationen ud. Et godt tip til, at forlænge batterilivet, er at genoplade det en gang i mellem
over vinteren. En fuld opladning hver 3. måned vil være fint. Vi anbefaler også, at du tildækker
opladestationen med et nylonstykke vinteren over.
L helt op før du gemmer den væk, så batteriet ikke ødelægges. Træk stikket
1
3
2
4
87
DK
Sikkerhed
Din Landroid®L er sikker for mennesker og dyr. Der er først og fremmest langt fra kanten af maskinen
til klingerne. Plus, tilt-sensorerne vil automatisk stoppe klingerne, hvis enheden løftes op.
Sikkerhed
Din Landroid®L er beskyttet med en PIN-kode. PIN-koden forhindre uautoriserede personer i at bruge
enheden. Hvis enheden flyttes udenfor dens område, vil den ikke kunne startes igen af nogen som
helst, hvis de ikke kender PIN-koden. Dette betyder også, at du ikke vil være i stand til at starte din
®
Landroid
senere kan finde den. Eller du kan registrere din Landroid
gemme din PIN-kode der. Herefter vil du altid kunne se din PIN-kode online.
L, hvis du glemmer din PIN-kode! Vi anbefaler stærkt, at du skriver din PIN-kode ned, så du
®
L online på www.worxlandroid.com, og
Skriv din PIN-kode her
Page 88

Landroid®L -ruohonleikkurin asentaminen
88
FIN
Landroid®L asennus on helppoa. Puutarhasi koon mukaan koko toimenpide kestää vain hetken. Jos olet
®
yhtään kuin me, et pidä ajatuksesta käyttää kallisarvoista aikaasi nurmikon leikkaamiseen. Landroid
osoittautumaan parhaaksi investoinniksesi, joka poistaa tarpeen leikata nurmikko a enää koskaan.
Katso asennuksen esittelyvideo osoitteessa www.worxlandroid.com.
L tulee
Landroid®L rakastaa nurmikon leikkuuta
Se on suunniteltu leikkaamaan nurmikko usein, joten nurmikko pysyy terveempänä ja paremman näköisenä kuin
®
koskaan aikaisemmin. Nurmikon koon mukaan Landroid
®
miten usein tahansa. Landroid
L on palveluksessanne.
L voi ohjelmoida toimimaan ilman rajoitusta milloin ja
Käyttökustannukset
Huolettaako sähkölasku? Tehdäänpä laskutoimituksia: Jos annat Landroid®L työskennellä 3 tuntia päivässä, 5
®L
päivää viikossa, 25 viikkoa vuodessa, Landroid
Kyllä, 8€ vuodessa. Murto-osa siitä, minkä joudut maksamaan meluisan, saastuttavan polttoainekäyttöisen
ruohonleikkurin polttoaineesta.
käytön osuus sähkölaskusta tulee olemaan noin 8€ vuodessa*.
* Lähde: www.energy.eu
Page 89

Valmistelut
Laatikon sisältö
6 Alustan
kiinnikkeet
250
Kehäjohdon
kiinnikkeet
Kehäjohdon etäisyysmitta
9 Varaterät
(3 sarjaa)
Virtajohto ja AC/
DC-muuntaja
Omistajan käsikirja
Kehäjohtokela
200m
Asennusopas
Landroid
®
LLatausalusta
89
FIN
kuusiokoloavain
Vajastasi
Sakset Vasara
Ohjelmointi- ja
vianetsintäopas
Takuuehdot
Page 90

Landroid®L in uusi koti – sinun
puutarhasi
Aloittakaamme tutkimalla tarkemmin Landroid®L uutta kotia - sinun
nurmikkoasi - korostaen alueita, joihin se voi mennä turvallisesti ja
alueita, jota Landroid®L on parasta välttää.
Esteet, joihin voi osua
Osuessaan esteeseen, joka on kova, kiinteä ja korkeampi kuin
15cm - kuten seinä tai aita - Landroid
ja muuttaa suuntaansa pois päin esteestä.
®
L yksinkertaisesti pysähtyy
90
FIN
Kivet
Kiviin, jotka ovat liian painavia Landroid®L siirrettäväksi, on
turvallista osua. Jos kivi on kaltevapintainen, jolle Landroid
voi kiivetä, se on poistettava tai kohta on suljettava pois
työskentelyalueesta.
®L
Ajotiet
Jos ajotie on samalla tasolla kuin nurmikko ja ilman esiin kohoavaa
pintaa, Landroid
Landroid
ajotien välissä.
Jos ajotie on sorapintainen, Landroid®L on estettävä sen päällä
kulkeminen käyttäen etäisyysmittaa tilan jättämiseksi tässä
tapauksessa, säilyttäen 45cm:n* välin kehäjohdon ja ajotien välillä.
*Tämä on suositeltu etäisyys.
Käytä toimitukseen kuuluvaa mittaa varmistamaan oikea asennus.
®
®
L pystyy kulkemaan sen yli vapaasti. Jos haluat
L välttävän sitä, tarvitaan vain 10cm:n* väli kehäjohdon ja
Kukkapenkit, lammikot, altaat…
Et varmaankaan halua Landroid®L leikkaavan kukkiasi tai
putoavan veteen. Näitä alueita on vältettävä.
Page 91

Kuopat ja töyssyt
Jos töyssyt tai kuopat ovat suuria, tarkista voivatko terät
koskettaa maata; jos näin on, tee pinnasta kaltevampi tai erota
®L
alue Landroid
käyttöalueesta.
Puut
35% (20°)
Rinteet
Landroid®L pystyy kiipeämään turvallisesti rinnettä, jonka
kallistus on enintään 35% (20°), joten vältä tätä jyrkempiä
rinteitä.
Y
lempi rajajohto
Rajajohtojen asettaminen rinteisiin
A
lempi rajajohto
Y
lempi rajajohto
91
FIN
Jos kuitenkin juuria kohoaa maasta, aluetta tulee välttää, jotteivät
juuret vahingoitu.
Ylempää rajajohtoa EI saa asettaa 35%(20°) jyrkempiin rinteisiin.
Ylemmän rajajohdon tulee olla vähintään 35cm:n etäisyydellä
kaikista esteistä. Alempaa rajajohtoa EI saa asettaa 25%(15°)
jyrkempiin rinteisiin. Alempi Rajajohdon tulee olla vähintään
45cm:n etäisyydellä kaikista esteistä, kun se on sijoitettu
rinteeseen, jonka jyrkkyys on 25%.
Page 92

Landroid®L in alueen
merkitseminen puutarhaan
Landroid®L on tiedettävä, missä sen on leikattava nurmikkoa. Siksi sinun on merkittävä sen työskentelyalue
®L
kehäjohdolla, joka muodostaa näkymättömän aidan. Tämä johto myös opastaa Landroid
Jos naapurillasi on myös käytössään Landroid®L, sinun ja naapurisi rajajohtojen välissä tulee olla ainakin 2
metriä.
®
Ole hyvä ja huomioi, että Landroid
L ei kykene
vastaanottamaan signaalia rajajohdosta, jos etäisyys on yli 25m.
Määritä ensin paras paikka latausalustalle ottaen huomioon
lähimmän ulkona olevan pistorasian sijainti. Latausalustalla on
15m:n virtajohto.
HUOMAA: Varmista, että muuntaja ja pistorasia pysyvät aina
kuivalla alueella.
latausalustalle.
92
FIN
Latausalusta tulee sijoittaa suoralle linjalle - jätä 2 metriä johtoa
suoraan eteen ja taakse. Jos mahdollista, sijoita latausjalusta
varjoon – akut latautuvat paremmin viileässä paikassa.
Varmista, että alue on tasainen ja vailla mitään esteitä.
®
Saari on nurmikolla oleva alue, jolle et halua Landroid
menevän. Kehäjohto alkaa leikkausrajasta, jatkuu suoraan
saareen, kiertää sen ympäri ja palaa rajalle, kuten kuvan nuolet
osoittavat.
L
Page 93

Jos nurmikkoon kuulu kaksi tai useampia erillistä aluetta, joiden
välillä on käytävä, tämän tulisi olla vähintään 1 metriä leveä.
Jos nurmikkojen välillä ei ole tarpeeksi leveää käytävää,
®
Landroid
Landroid
L on nostettava ja siirrettävä toiselle nurmikolle.
®
L leikkaa tämän nurmikon ongelmitta, mutta se on
vietävä latausalustalle, kun akku kuluu loppuun.
93
FIN
Jos kaksi saarta sijaitsevat lähekkäin, on helpointa vetää johto
kuten yllä olevassa kuvassa.
®
Landroid
L pystyy kulkemaan vapaasti kehäjohdon yli saarten ja
leikkausrajan välillä.
Kielletyn alueen, joka on lähellä nurmikon leikkausrajaa, tulee
olla osa kehää itseään, kuten kuvassa.
Page 94

Asennus
Kehäjohdon kiinnittäminen
On suositeltavaa leikata nurmikko kohdalta, johon johto lasketaan, tavallisella ruohonleikkurilla tai trimmerillä.
®
Tämä varmistaa, että johto lasketaan niin lähellä maata kuin mahdollista, jottei Landroid
vahingossa. Kehäjohdossa on hyvin matala jännite, joten se on täysin vaaraton ihmisille ja lemmikkieläimille.
1
Aseta latausalusta sille varatulle paikalle kiinnittämättä sitä vielä
pysyvästi. ”IN” (Sisään) -nuoli tulee suunnata osoittamaan nurmikon
sisälle.
L leikkaa sitä
94
FIN
2
Syötä rajajohto latausaseman pohjassa olevan käytävän läpi.
3
Jätä noin 1 metrin mitta ylimääräistä johtoa ja aloita johdon kiinnitys
rajaa pitkin latausaseman takaa. Kun olet kiinnittänyt johdon rajan
pituudelta ja saavuttanut jälleen latausaseman, jätä johtoa vielä
toinen ylimääräinen metri ja katkaise johto.
Page 95

4
Kun kehäjohtoa lasketaan,
käytä etäisyysmittaa 45cm:n*
etäisyyden säilyttämiseksi
johdon ja rajan välillä. Jos
alueella on kuitenkin este,
joka on maan tasalla, ja
®
jonka Landroid
vaarattomasti, kuten ajotie tai
käytävä, vain 10cm:n* väli on
tarpeen.
Kehäjohdon kiinnikkeet on
sijoitettava 80cm:n päähän
toisistaan.
Napauta kehäjohdon kiinnikkeet
vasaralla tiukasti maahan
kohdistamatta liikaa painetta
johtoon. Pidä kehäjohto suorassa
ja kiristä kiinnikkeiden väliin
jättämättä yhtään löysää.
* Tämä on suositeltu etäisyys.
Käytä toimitukseen kuuluvaa
mittaa varmistamaan oikea
asennus.
L voi kulkea
95
5
Varmista että rajoitekaapeli on suora kuitenkin minimi 20º
jokaisessa kulmassa.
6
Kun muodostat kehäjohdolla saaren, noudata reittiä, kuten kuvassa.
Johdon tulee kulkea ulkokehältä saaren määritellylle ääriviivalle ja
palata sitten takaisin ulkokehälle. Kehäjohto saaren ja ulkokehän
välillä tulee laskea lähelle toisiaan ja ne pidetään paikoillaan samalla
®
kiinnikkeellä. Nurmikkoa leikatessaan Landroid
tämän johdon osan vapaasti.
L pystyy ylittämään
FIN
Page 96

Latausalustan liittäminen kehäjohtoon
OUT
IN
OUT
IN
OUT
IN
1
Katkaise johtojen kaksi päätä pituuteen, jolla ne voi liittää helposti
kiristimiin.
Kuori johtojen päät.
2
Kun liität latausalustan, huomioin IN (Sisään) -johto ja OUT
(Ulos) -johto, kuten kuvassa. Liitä IN (Tulo) -johto latausalustan
punaiseen päätteeseen ja OUT (Lähtö) -johto mustaan.
Sulje sen jälkeen kansi.
96
FIN
Page 97

3
a
b
Nyt voi kiinnittää latausalustan pysyvästi kiristämällä
toimitukseen kuuluvat alustan kiinnikkeet kuusiokulmaavaimella.
HUOMAA: Varmista, että IN (Sisään) -johto kulkee suoraan
latausalustan keskikohdan ali.
4
Liitä virtajohto muuntajaan ja sitten seinäpistorasiaan.
Latausalustan LED-merkkivalo syttyy. Jos LED-valo ei pala,
katso ohje vianetsintäoppasta. Kun suoritat liitoksen, kohdista
virtapistokkeen ura (a) muuntajan liitännän uran kanssa (b).
Varmista, että ruuvaat tai avaat vain korostetun osan liittimestä.
Jos vihreä valo ei syty, tarkista virtaliitännät.
Jos virtajohto on työskentelyalueella, se on kaivettava tarpeen
mukaan maahan.
97
FIN
Asennuksen käynnistäminen ja testaaminen
Tämä on jännittävä osuus, jossa voit kytkeä Landroid®L in päälle ensimmäistä kertaa.
1
Aseta Landroid®L
työskentelyalueen sisäpuolelle
muutama metri latausalustan
taakse.
Page 98

Avaa näppäimistön ikkuna
painamalla suurta punaista
painiketta Landroid
®L
Pidä Power Virta päälle/pois
-painiketta
kunnes Landroid
painettuna,
®
L käynnistyy.
2
päällä.
98
FIN
Paina
-näppäintä
ja sulje näppäimistön ikkuna:
®
Landroid
L löytää nyt tiensä
latausalustalle.
®
Tarkkaile, kun Landroid
Lpalaa
latausalustalle, ja muuta
kehäjohdon sijoittelua
®
tarvittaessa. Jos Landroid
L
onnistuu palaamaan
latausalustale, asennus on
®
onnistunut. Nyt Landroid
L
alkaa ladata itseään täyteen.
®
HUOMAUTUS: Jos Landroid
L on latausalustalla sen ajan, kun ohjelmoit sitä leikkaamaan nurmikkoa, paina Käyttö
-painiketta ja sulje ikkuna lähettääksesi Landroid
Varoitus
• Jos Landroid®L on
aluuensa ulkopuolella,
se ei liiku ja näytössä
näkyy ”Leikkausalueen
ulkopuolella”virheilmitus. Siirrä laite
takaisin alueelle ja toista
vaihe 2.
• Jos Landroid
alueensa sisäpuolella,
mutta näytössä näkyy
”Leikkausalueen
ulkopuolella” ja LEDvalo palaa, se tarkoittaa,
että olet kiinnittänytyt
kehäjohdon päät väärin.
Vaihda vain johtojen
paikkaa.
®L
takaisin leikkaamaan nurmikkoa.
®
L on
• Landroid
olla kytkettynä päälle.
Jos se on sammutettava,
varmista, että asetat
sen paikaan, joka on
leikkausalueen sisällä
ennen kuin kytket sen
takaisin päälle.
®L
tulee aina
®
• Jos Landroid
L lakkaa
käymästä odottamatta,
paina Käyttö -painiketta,
avaa sen näppäimistön
ikkuna, paina Päälle/Pois
-painike Päälle -asentoon,
korjaa ongelmat, paina
0-painiketta ja sulje
näppäimistön ikkuna.
HUOMAUTUS: Katso lisätietoja Ohjelmointi- ja vianetsintäoppaasta.
Page 99

Ohjelmointi
Kun olet lopettanut asentamisen, on aika ohjelmoida alla näytetyllä näppäimistöllä ja näytöllä Landroid®L ohjeet, milloin haluat sen
menevän töihin. Katso lisätietoja toimitukseen kuuluvasta Ohjelmointi- ja vianetsintäoppaasta.
Löydät lisätietoja Landroid®L:n oletustyöskentelyajasta seuraavasta taulukosta:
Landroid®L WG795E - Automaattisen ruohonleikkuun aikataulu.
Automaattisen
ruohonleikku-
Alue m
2
un toiminta-
aika - tunteina
100 1.5 7:00-8:30 / / 7:00-8:30 / / /
200 5 7:00-8:00 7:00-8:00 7:00-8:00 7:00-8:00 7:00-8:00 / /
300 6 7:00-8:12 7:00-8:12 7:00-8:12 7:00-8:12 7:00-8:12 / /
400 7.5 7:00-8:30 7:00-8:30 7:00-8:30 7:00-8:30 7:00-8:30 / /
500 10 7:00-9:00 7:00-9:00 7:00-9:00 7:00-9:00 7:00-9:00 / /
600 11 7:00-9:12 7:00-9:12 7:00-9:12 7:00-9:12 7:00-9:12 / /
700 13 7:00-9:36 7:00-9:36 7:00-9:36 7:00-9:36 7:00-9:36 / /
800 15 7:00-10:00 7:00-10:00 7:00-10:00 7:00-10:00 7:00-10:00 / /
900 16.5 7:00-10:18 7:00-10:18 7:00-10:18 7:00-10:18 7:00-10:18 / /
1000 18 7:00-10:36 7:00-10:36 7:00-10:36 7:00-10:36 7:00-10:36 / /
Maa-
nantai -
ruohonleik
kuutunnit
Tiistai -
ruohonleik
kuutunnit
Keski-
viikko -
ruohonleik
kuutunnit
Torstai -
ruohonleik
kuutunnit
Perjantai -
ruohonleik
kuutunnit
Lauantai -
ruohonleik
kuutunnit
ruohonleik
kuutunnit
Sun-
nuntai -
99
FIN
1100 20 7:00-11:00 7:00-11:00 7:00-11:00 7:00-11:00 7:00-11:00 / /
1200 22.5 7:00-11:30 7:00-11:30 7:00-11:30 7:00-11:30 7:00-11:30 / /
1300 25 7:00-12:00 7:00-12:00 7:00-12:00 7:00-12:00 7:00-12:00 / /
1400 26.5 7:00-12:18 7:00-12:18 7:00-12:18 7:00-12:18 7:00-12:18 / /
1500 28 7:00-12:48 7:00-12:48 7:00-12:48 7:00-12:48 7:00-12:48 / /
Page 100

Valmiina?
20
25
30
35
40
45
50
55
60
Landroid®L on suunniteltu ylläpitämään nurmikkosi täsmällisessä pituudessa kasvukauden, mutta viettävän muun ajan talviunessa.
Ennen kuin käynnistät laitteen ensimmäistä kertaa:
1. Nurmikko tulee leikata halutun pituiseksi.
2. Varmista, ettei käyttöalueella ole esineitä kuten leluja tai oksia...
3. Säädä leikkauskorkeus maksimitasolle ensimmäistä ruohonleikkausta varten ja säädä haluamasi nurmikon ruohon korkeus.
100
FIN
Seuraavana keväänä Landroid
enää tarpeen.
®
L alkaa leikata nurmikkoa aikaisin, kun ruoho on vielä lyhyttä, joten alustava ruohon lyhentäminen ei ole
 Loading...