

Page 1

Programming guide
Control Panel and menu
Programming
After you have successfully installed the
Landroid®M
, it is now ready to be programmed according to your schedule. To program your
Landroid®M
, simply
follow the step by step guide below.
Menu overview
RETURN
Back to proceeding menu
HOMEPAGE
Displays the state of your setting
Select up
Select down
OK
Confirms any setting.
Note: Make sure you
confirm your selection
within 30 secs or the
display will return to
previous menu.
POWER ON/OFF
Turns the Landroid®M on and off
NUMBER PAD
Input numbers to set
time, date
HOME
Sends the Landroid®M to its
charging base during operation
and activates charging
START
Shortcut key to start mowing.
STOP
To stop the Landroid®M during
normal operation and charging.
EN
HOMEPAGE
Language
Time Format
Date Format
Set Date & Time
Rain Start Delay
Auto Work Time
Customize Work Time
Customize Work Area
Enable boundary cut
Change PIN Code
Alarm Level
General Setting
Working Time
Security
Start
To quick start your Landroid®M, first press until the Landroid®M turns on and input the default PIN 0000, then press .
is the shortcut button to command your Landroid®M to start mowing. Press and close the cover to keep working and press and close the cover to make
Landroid
®
M go back for charging and mow the grass near boundary wire at the same time. The Landroid®M will work continuously until it’s out of battery and then it will
return to the charging base. Once charging is complete, the Landroid
®
M will automatically resume mowing or if it has finished mowing it will stay in the charging base.
The factory default setting is 800m2 – refer to the Auto Mowing Time Schedule. if the time is not in the schedule, press START and close cover to start.
If you want to change the working time and other settings, please follow the steps below.
Setting
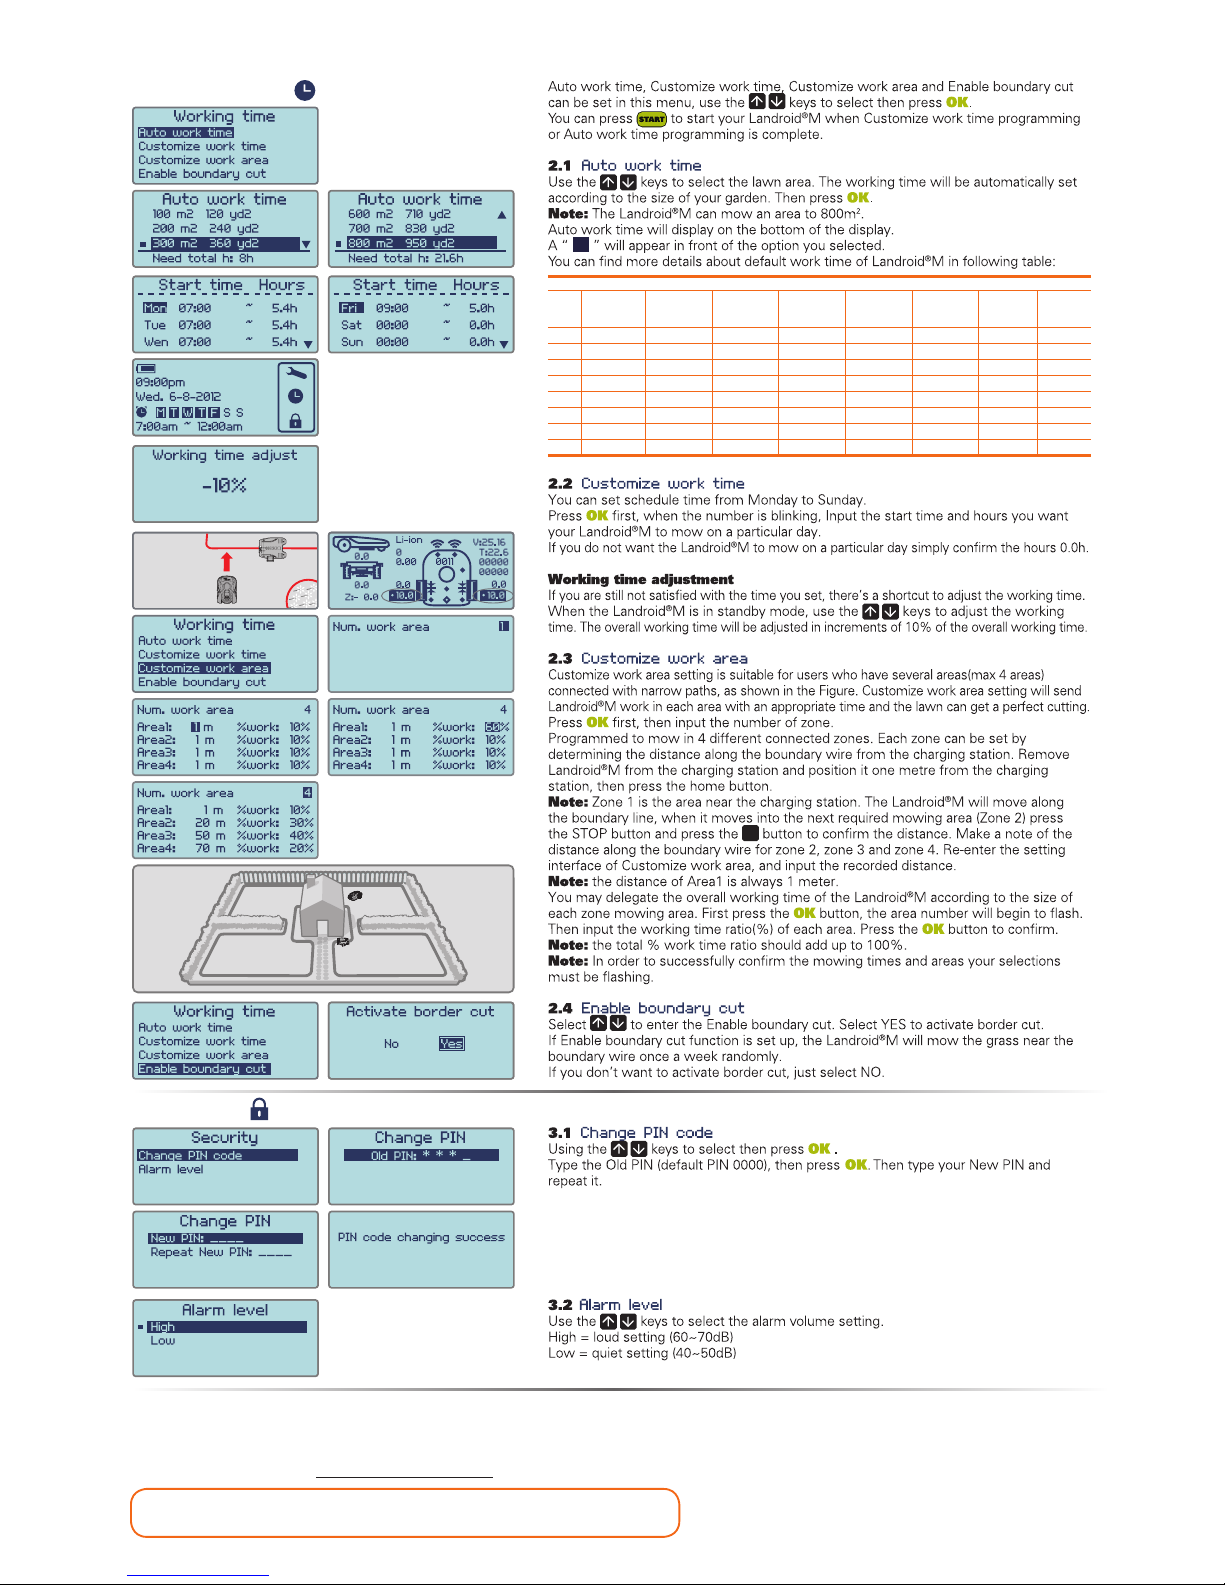
Press OK to enter the submenu. Use the keys to select General setting, Working time or Security. Then press OK.
1. General setting ( )
Always close the panel cover after
programming, your Landroid
®
M
will not move with it open.
WG790E
Page 2
NOTE: If you input the wrong PIN code, the Landroid®M will be turned off automatically. Press On/Off key to On, input the correct PIN code, then the
Landroid
®
M will turn on again.
WARNING: If you decide to change the PIN code, be aware there’s no way to restore the Landroid
®
M if you forget the PIN code. Please write your PIN code
here and store this sheet in a safe place for future reference. Even better, register your Landroid
®
M online and enter your PIN code there. You will always be
able to find your PIN online at www.worxlandroid.com.
Your PIN code
2. Working time ( )
3. Security (
)
Landroid®M WG790E - Auto mowing time schedule.
Area
m
2
Auto mowing runtime
- hours
Monday
mowing
hours
Tuesday
mowing
hours
Wednesday
mowing
hours
Thursday
mowing
hours
Friday
mowing
hours
Saturday
mowing
hours
Sunday
mowing
hours
100 3 7:00-8:30 / / 7:00-8:30 / / /
200 7 7:00-8:24 7:00-8:24 7:00-8:24 7:00-8:24 7:00-8:24 / /
300 8 7:00-8:36 7:00-8:36 7:00-8:36 7:00-8:36 7:00-8:36 / /
400 11 7:00-9:12 7:00-9:12 7:00-9:12 7:00-9:12 7:00-9:12 / /
500 13.5 7:00-9:42 7:00-9:42 7:00-9:42 7:00-9:42 7:00-9:42 / /
600 16.5 7:00-10:18 7:00-10:18 7:00-10:18 7:00-10:18 7:00-10:18 / /
700 19 7:00-10:48 7:00-10:48 7:00-10:48 7:00-10:48 7:00-10:48 / /
800 21.6 7:00-11:18 7:00-11:18 7:00-11:18 7:00-11:18 7:00-11:18 / /
ZONE 3
20%
ZONE 4
25%
ZONE 1
30%
ZONE 2
25%
2
Page 3

Notes
• If the above error messages appear on the display, correct the problems first, then press “O” to reset.
• Before turning power on, always check the Landroid®M is inside its territory. If not, the message “outside working area” will be displayed. This message is
displayed also when the Landroid®M is sitting over the boundary wire when turned on.
• If for any reason—i.e. a party, children playing...—you want to park your Landroid®M in the charging base: press the key with the home symbol
. The
Landroid®M will go to its base and stay there. Please note the Landroid®M will now wait until the next scheduled mowing session. If you want to re-start it:
turn power on. Landroid®M will now resume its scheduled mowing session.
• If an error repeatedly occurs in the same area of your lawn, you might have a problem with the boundary wire so please refer to the previous installation
instructions and check your set up with its help.
•
If your lawn is divided in two separated areas, connected by a corridor less than 1m, one of which is not provided with the charging base: when the Landroid®M runs
out of charge, take it manually to the charging base, turn power on, press the key with the home symbol and the charge process will start.
• If the
Landroid®M
runs abnormally once in a while, please try to restart it. If the problem cannot be solved, please contact WORX Service Agent for help.
• Do not wash the machine with a high pressure washer. This could cause damage to the battery or the machine.
• Your
Landroid®M
software can be updated when new versions become available. The software version will be displayed in the bottom right hand corner of
the display. The manual in box is based on the default software in the mass production. Some new features/functions in the new version may not exist in
the manual. If you found some settings not in the manual, please visit www.worxlandroid.com to download the latest manual. You can check the software
version installed on your machine by pressing the ON/OFF button.
Function messages
Cutting grass according to the program setting.
When it senses rain, the Landroid
®
M will return to the Charging Base and stay there for the time you have
programmed it to do so. When dry, the Landroid®M CPU will automatically begin the delay and countdown and
then return to mowing. If you want Landroid®M to mow before this, simply turn it off then on again, but only
when the rain sensor is dry or you can set the delay time to 0 min.
Needs to recharge—during the journey to the base, the cutting blade is stopped in order to save energy.
Charge is in progress—charge percentage are displayed.
Stand-by, will start according to program set.
Error messages
1. If the Landroid®M is actually outside its territory: turn power off, take the Landroid®M inside its territory.
Turn power on.
2. If the Landroid®M is inside its territory: check the LED on the charging base is on. If not, check the plug
connection to the mains socket. If the LED is still off, check the boundary wire is well connected to the
clamps on the charging base.
3. If the problem persists, check that the boundary wire hasn’t been cut.
Refer to the "Programming" section to re-set your PIN.
1. Turn power off.
2. Turn the
Landroid®M
upside down and check if there’s anything preventing the blade disc to rotate.
3. Remove any possible obstruction.
4. Turn the
Landroid®M
upright and take it to an area with short grass or adjust the cutting height.
5. Turn power on.
1. Turn power off: take the Landroid®M in an area free from obstacles.
2. Turn power on.
3. If the error message is still displayed; turn power off; turn the Landroid®M upside-down and check if there’s
anything preventing the wheels from rotating.
4. Remove any possible obstruction, turn the Landroid®M upright, turn power on.
1. Turn power off.
2. Take the
Landroid®M
in an area free from obstacles.
3. Turn power on.
4. If the error message is still displayed; turn power off; turn the
Landroid®M
upside-down and check if there’s any
debris causing a blockage in the top cover.
5. Remove any possible obstruction, turn the
Landroid®M
upright, turn power on.
1. Turn power off.
2. Take the Landroid®M to an area clear of obstacles, turn power on.
3. If the error message is still displayed: turn power off, turn the Landroid®M upside-down and check there’s
nothing trapped.
4. Remove any possible object, turn the Landroid®M upright, turn power on.
Turn the
Landroid®M
upright.
1. The contact between the Charging and Contact Pins may be obstructed in some way.
2. Wipe off the Charging and Contact Pins, making sure there is not an object obstructing them, then place your
Landroid®M in the charging base and check that the Pins make good connection.
1. This means that there is low battery voltage.
2. In this case you must place the
Landroid®M
in the Charging Base , then press the ON/OFF key to start charging.
 Loading...