

Page 1

Battery-powered Chain Saw
Batteridrevet motorsav
Akkukäyttöinen moottorisaha
Batteridrevet motorsag
Batteridriven motorsåg
WG368E WG368E.9
EN
DK
FIN
NOR
SV
P07
P23
P40
P57
P73
Page 2

Original instructions EN
Original brugsanvisning DK
Alkuperäiset ohjeet FIN
Original driftsinstruks NOR
Bruksanvisning i original SV
Page 3
2
1
11
5 63
10
21
17
9
8
7
13 15
12 14
13
20
16
4 18
Page 4
17
12
13
14
78
16
A B C
10
11
11
D E F1
3-6mm
19
a
F2 F3 G
3
2
H I J
18
Page 5
18
H I J
K L M
Y
a
Z
Z
kg
Y
N O P
Q R S
1
2/3
2
1/3
50 mm
X
W
Z
Y
50 mm
111
2 2
1
1/3
2
2/3
T U V
Page 6
1
2
1/3
2/3
2
2/3
1
1/3
2 2
W
Y
Z
X
50 mm
50 mm
111
Z
Y
kg
Z
Y
a
a
K L M
N O P
Q R S
T U V
W X
Page 7

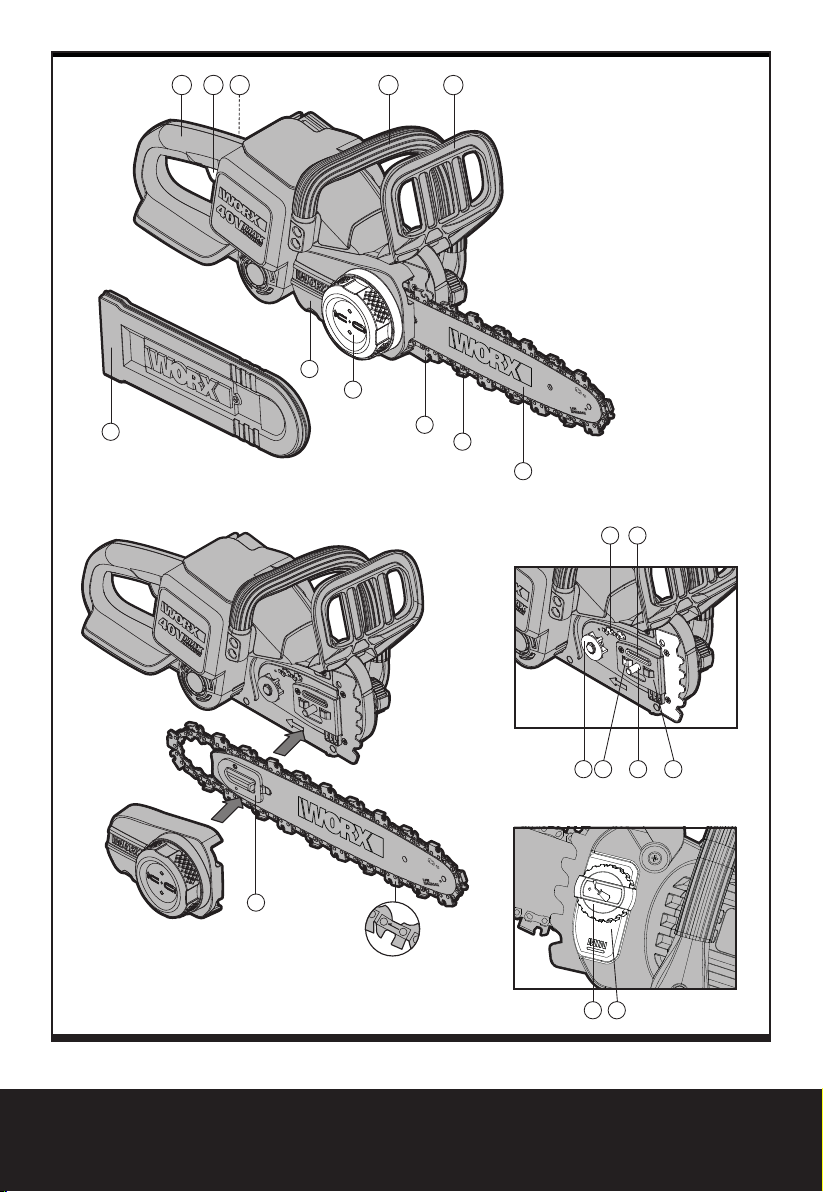
1. REAR HANDLE
2. ON/OFF SWITCH
3. LOCK-OFF BUTTON
4. OIL FILLER CAP
5. FRONT HANDLE
6. HAND GUARD
7. GUIDE BAR
8. CHAIN
9. BUMPER SPIKE
10. CHAIN TENSIONING KNOB
11. CHAIN COVER
12. DRIVE SPROCKET
13. CHAIN DIRECTION SYMBOL
14. BAR LOCATING TABS
15. OIL OUTLET
16. FASTENING BAR BOLT
17. BAR TENSIONING PLATE
18. OIL LEVEL WINDOW
19. CHAIN CATCH
20. BAR CLAMP
21. BLADE PROTECTION COVER*
7
* Not all the accessories illustrated or described are included in standard delivery.
Battery-powered Chain Saw EN
Page 8
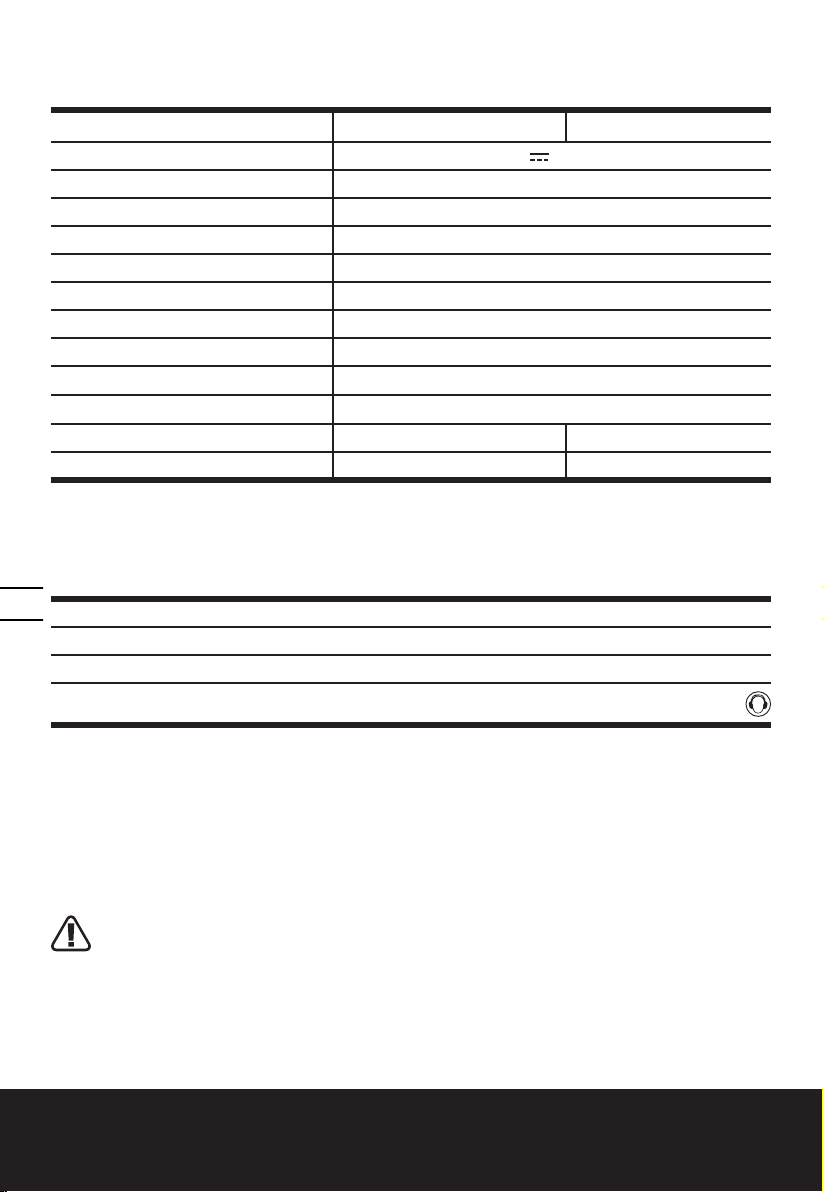
TECHNICAL DATA
Type WG368E WG368E.9 (3-designation of machinery, representative of Chain Saw)
WG368E WG368E.9
Voltage 40V
Bar length 30cm
Cutting length 25cm
Chain speed 3.8m/s
Oil tank capacity 100ml
Chain pitch 9.5mm
Number of chain links 45
Chain gauge 1.1mm
Saw chain type
Bar type
Charging time 1hr /
Weight( chain & bar included) 3.8kg 3.0kg
Oregon
Max**
Oregon
®
: 124MLEA041
®
: 90PX
**Voltage measured without workload. Initial battery voltage reaches maximum of
40 Volts.Nominal voltage is 36 Volts.
NOISE INFORMATION
8
A weighted sound pressure LpA:85dB(A)
A weighted sound power L
K
pA
Wear ear protection
wA.d
:100dB(A)
3.0dB(A)
VIBRATION INFORMATION
Vibration total values (triax vector sum) determined according to EN 60745:
Vibration emission value: ah = 3.5m/s2 Uncertainty K = 1.5m/s²
The declared vibration total value may be used for comparing one tool with another, and may
also be used in a preliminary assessment of exposure.
WARNING: The vibration emission value during actual use of the power tool can differ
from the declared value depending on the ways in which the tool is used dependant on the
following examples and other variations on how the tool is used:
How the tool is used and the materials are cut or drilled.
The tool being in good condition and well maintained
The use the correct accessory for the tool and ensuring it is sharp and in good condition.
Battery-powered Chain Saw EN
Page 9
The tightness of the grip on the handles and any anti vibration accessories are used.
And the tool is being used as intended by its design and these instructions.
This tool may cause hand-arm vibration syndrome if its use is not adequately
WARNING: To be accurate, an estimation of exposure level in the actual conditions of use
should also take account of all parts of the operating cycle such as the times when the tool
is switched off and when it is running idle but not actually doing the job. This may significantly
reduce the exposure level over the total working period.
Help to minimize your vibration exposure risk.
ALWAYS use sharp chisels, drills and blades.
Maintain this tool in accordance with these instructions and keep well lubricated (where
appropriate).
If the tool is to be used regularly then invest in anti vibration accessories.
Avoid using tools in temperatures of 10ºC or less.
Plan your work schedule to spread any high vibration tool use across a number of days.
managed.
ACCESSORIES
WG368E WG368E.9
Lubrication oil (100ml) 1 1
Blade Protection Cover 1 1
Charger (WA3735) 1 /
Battery Pack (WA3536) 1 /
We recommend that you purchase your accessories from the same store that sold you the tool.
Use good quality accessories marked with a well-known brand name. Choose the type according
to the work you intend to undertake. Refer to the accessory packaging for further details. Store
personnel can assist you and offer advice.
9
Battery-powered Chain Saw EN
Page 10

GENERAL POWER TOOL
SAFETY WARNINGS
WARNING Read all safety warnings
and all instructions. Failure to follow the
warnings and instructions may result in electric
shock, fire and/or serious injury.
outdoor use reduces the risk of electric
shock.
f) If operating a power tool in a damp
location is unavoidable, use a residual
current device (RCD) protected supply.
Use of an RCD reduces the risk of electric
shock.
Save all warnings and instructions for
future reference.
The term “power tool” in the warnings refers
to your mains-operated (corded) power tool or
battery-operated (cordless) power tool.
1) WORK AREA SAFETY
a) Keep work area clean and well lit.
Cluttered or dark areas invite accidents.
b) Do not operate power tools in
explosive atmospheres, such as in the
presence of flammable liquids, gases or
dust. Power tools create sparks which may
ignite the dust or fumes.
c) Keep children and bystanders
away while operating a power tool.
Distractions can cause you to lose control.
2) ELECTRICAL SAFETY
a) Power tool plugs must match the
10
outlet. Never modify the plug in any
way. Do not use any adapter plugs
with earthed (grounded) power tools.
Unmodified plugs and matching outlets will
reduce risk of electric shock.
b) Avoid body contact with earthed or
grounded surfaces, such as pipes,
radiators, ranges and refrigerators.
There is an increased risk of electric shock if
your body is earthed or grounded.
c) Do not expose power tools to rain or
wet conditions. Water entering a power
tool will increase the risk of electric shock.
d) Do not abuse the cord. Never use the
cord for carrying, pulling or unplugging
the power tool. Keep cord away from
heat, oil, sharp edges or moving parts.
Damaged or entangled cords increase the
risk of electric shock.
e) When operating a power tool outdoors,
use an extension cord suitable for
outdoor use. Use of a cord suitable for
3) PERSONAL SAFETY
a) Stay alert, watch what you are
doing and use common sense when
operating a power tool. Do not use
a power tool while you are tired or
under the influence of drugs, alcohol or
medication. A moment of inattention while
operating power tools may result in serious
personal injury.
b) Use personal protective equipment.
Always wear eye protection. Protective
equipment such as dust mask, non-skid
safety shoes, hard hat, or hearing protection
used for appropriate conditions will reduce
personal injuries.
c) Prevent unintentional starting. Ensure
the switch is in the off-position before
connecting to power source and/or
battery pack, picking up or carrying the
tool. Carrying power tools with your finger
on the switch or energising power tools that
have the switch on invites accidents.
d) Remove any adjusting key or wrench
before turning the power tool on. A
wrench or a key left attached to a rotating
part of the power tool may result in personal
injury.
e) Do not overreach. Keep proper
footing and balance at all times. This
enables better control of the power tool in
unexpected situations.
f) Dress properly. Do not wear loose
clothing or jewellery. Keep your hair,
clothing and gloves away from moving
parts. Loose clothes, jewellery or long hair
can be caught in moving parts.
g) If devices are provided for the
connection of dust extraction and
collection facilities, ensure these are
connected and properly used. Use of
dust collection can reduce dust-related
hazards.
Battery-powered Chain Saw EN
Page 11

4) POWER TOOL USE AND CARE
a) Do not force the power tool. Use the
correct power tool for your application.
The correct power tool will do the job
better and safer at the rate for which it was
designed.
b) Do not use the power tool if the switch
does not turn it on and off. Any power
tool that cannot be controlled with
the switch is dangerous and must be
repaired.
c) Disconnect the plug from the power
source and/or the battery pack from
the power tool before making any
adjustments, changing accessories, or
storing power tools. Such preventive
safety measures reduce the risk of
starting the power tool accidentally.
d) Store idle power tools out of the reach
of children and do not allow persons
unfamiliar with the power tool or these
instructions to operate the power
tool. Power tools are dangerous in the
hands of untrained users.
e) Maintain power tools. Check for
misalignment or binding of moving
parts, breakage of parts and any other
condition that may affect the power
tool’s operation. If damaged, have
the power tool repaired before use.
Many accidents are caused by poorly
maintained power tools.
f) Keep cutting tools sharp and clean.
Properly maintained cutting tools with
sharp cutting edges are less likely to
bind and are easier to control.
g) Use the power tool, accessories and
tool bits etc. in accordance with these
instructions, taking into account the
working conditions and the work to
be performed. Use of the power tool for
operations different from those intended
could result in a hazardous situation.
5) BATTERY TOOL USE AND CARE
a) Recharge only with the charger
specified by the manufacturer. A charger
that is suitable for one type of battery pack
may create a risk of fire when used with
another battery pack.
b) Use power tools only with specifically
designated battery packs. Use of any
other battery packs may create a risk of
injury and fire.
c) When battery pack is not in use, keep
it away from other metal objects, like
paper clips, coins, keys, nails, screws
or other small metal objects, that can
make a connection from one terminal
to another. Shorting the battery terminals
together may cause burns or a fire.
d) Under abusive conditions, liquid may
be ejected from the battery; avoid
contact. If contact accidentally occurs,
flush with water. If liquid contacts
eyes, additionally seek medical help.
Liquid ejected from the battery may cause
irritation or burns.
6) SERVICE
a) Have your power tool serviced by
a qualified repair person using only
identical replacement parts. This will
ensure that the safety of the power tool is
maintained.
CHAIN SAW SAFETY
WARNINGS
1. Keep all parts of the body away from
the saw chain when the chain saw is
operating. Before you start the chain
saw, make sure the saw chain is not
contacting anything. A moment of
inattention while operating chain saws may
cause entanglement of your clothing or
body with the saw chain.
2. Always hold the chain saw with your
right hand on the rear handle and
your left hand on the front handle.
Holding the chain saw with a reversed hand
configuration increases the risk of personal
injury and should never be done.
3. Hold the power tool by insulated
gripping surfaces only, because the
saw chain may contact hidden wiring.
Saw chains contacting a “live” wire may
make exposed metal parts of the power
tool “live” and could give the operator an
electric shock.
11
Battery-powered Chain Saw EN
Page 12

4. Wear safety glasses and hearing
protection. Further protective
equipment for head, hands, legs
and feet is recommended. Adequate
protective clothing will reduce personal
injury by flying debris or accidental contact
with the saw chain.
5. Do not operate a chain saw in a tree.
Operation of a chain saw while up in a tree
may result in personal injury.
6. Always keep proper footing and
operate the chain saw only when
standing on fixed, secure and level
surface. Slippery or unstable surfaces such
as ladders may cause a loss of balance or
control of the chain saw.
7. When cutting a limb that is under
tension be alert for spring back. When
the tension in the wood fibres is released
the spring loaded limb may strike the
operator and/or throw the chain saw out of
control.
8. Use extreme caution when cutting
brush and saplings. The slender material
may catch the saw chain and be whipped
toward you or pull you off balance.
9. Carry the chain saw by the front
12
handle with the chain saw switched
off and away from your body. When
transporting or storing the chain saw
always fit the guide bar cover. Proper
handling of the chain saw will reduce the
likelihood of accidental contact with the
moving saw chain.
10.Follow instructions for lubricating,
chain tensioning and changing
accessories. Improperly tensioned
or lubricated chain may either break or
increase the chance for kickback.
11.Keep handles dry, clean, and free from
oil and grease. Greasy, oily handles are
slippery causing loss of control.
12.Cut wood only. Do not use chain
saw for purposes not intended. For
example: do not use chain saw for
cutting plastic, masonry or non-wood
building materials. Use of the chain saw
for operations different than intended could
result in a hazardous situation.
CAUSES AND OPERATOR PREVENTION
OF KICKBACK:
Kickback may occur when the nose or tip of
the guide bar touches an object, or when the
wood closes in and pinches the saw chain in
the cut.
Tip contact in some cases may cause a
sudden reverse reaction, kicking the guide bar
up and back towards the operator.
Pinching the saw chain along the top of the
guide bar may push the guide bar rapidly back
towards the operator.
Either of these reactions may cause you to
lose control of the saw which could result in
serious personal injury. Do not rely exclusively
upon the safety devices built into your saw.
As a chain saw user, you should take several
steps to keep your cutting jobs free from
accident or injury.
Kickback is the result of tool misuse and/or
incorrect operating procedures or conditions
and can be avoided by taking proper
precautions as given below:
- Maintain a firm grip, with thumbs
and fingers encircling the chain saw
handles, with both hands on the saw
and position your body and arm to
allow you to resist kickback forces.
Kickback forces can be controlled by the
operator, if proper precautions are taken.
Do not let go of the chain saw.
- Do not overreach and do not cut
above shoulder height. This helps
prevent unintended tip contact and
enables better control of the chain saw in
unexpected situations.
- Only use replacement bars
and chains specified by the
manufacturer. Incorrect replacement
bars and chains may cause chain
breakage and/or kickback.
- Follow the manufacturer’s
sharpening and maintenance
instructions for the saw chain.
Decreasing the depth gauge height can
lead to increased kickback.
Battery-powered Chain Saw EN
Page 13

SAFETY WARNINGS FOR
BATTERY PACK
a) Do not dismantle, open or shred cells
or battery pack.
b) Do not short-circuit a battery
pack. Do not store battery packs
haphazardly in a box or drawer where
they may short-circuit each other
or be short-circuited by conductive
materials. When battery pack is not
in use, keep it away from other metal
objects, like paper clips, coins, keys, nails,
screws or other small metal objects, that
can make a connection from one terminal
to another. Shorting the battery terminals
together may cause burns or a fire.
c) Do not expose battery pack to
heat or fire. Avoid storage in direct
sunlight.
d) Do not subject battery pack to
mechanical shock.
e) In the event of battery leaking, do not
allow the liquid to come into contact
with the skin or eyes. If contact has
been made, wash the affected area
with copious amounts of water and
seek medical advice.
f) Seek medical advice immediately
if a cell or battery pack has been
swallowed.
g) Keep battery pack clean and dry.
h) Wipe the battery pack terminals with
a clean dry cloth if they become
dirty.
i) Battery pack needs to be charged
before use. Always refer to this
instruction and use the correct
charging procedure.
j) Do not maintain battery pack on
charge when not in use.
k) After extended periods of storage,
it may be necessary to charge
and discharge the battery pack
several times to obtain maximum
performance.
l) Battery pack gives its best
performance when it is operated at
normal room temperature (20°C±5°C).
m) When disposing of battery packs,
keep battery packs of different
electrochemical systems separate
from each other.
n) Recharge only with the charger
specified by WORX. Do not use any
charger other than that specifically
provided for use with the equipment.
A charger that is suitable for one type of
battery pack may create a risk of fire when
used with another battery pack.
o) Do not use any battery pack which
is not designed for use with the
equipment.
p) Keep battery pack out of the reach of
children.
q) Retain the original product literature
for future reference.
r) Remove the battery from the
equipment when not in use.
s) Dispose of properly.
13
Battery-powered Chain Saw EN
Page 14
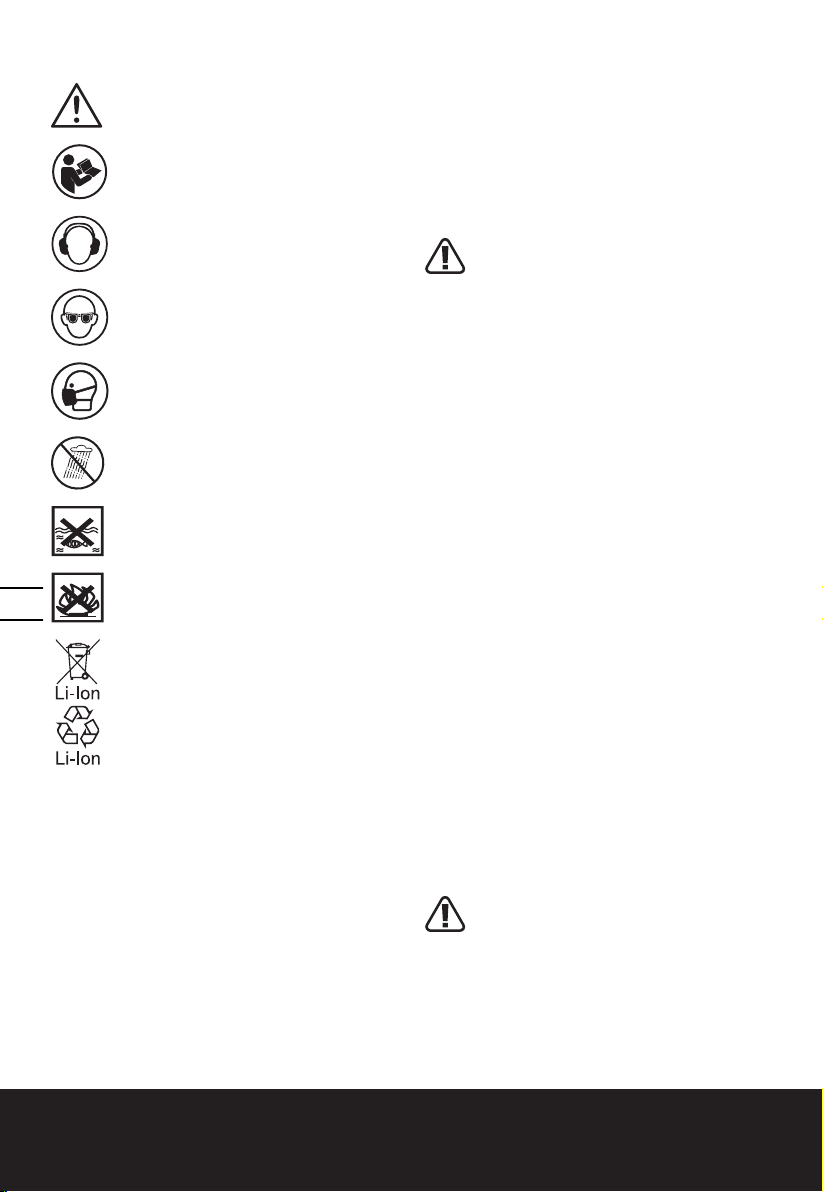
SYMBOLS
WARNING
To reduce the risk of injury, user
must read instruction manual
Wear ear protection
Wear eye protection
INTENDED USE
The chain saw is intended for sawing of trees,
tree trunks, branches, wooden beams, planks,
etc. Cuts can be sawed with or across the
grain. This product is not suitable for sawing
mineral materials.
ASSEMBLY
WARNING! Before touching
the chain or making any other
adjustments, make sure that the tool is
switched off and the battery is removed.
Always use gloves when handling the
chain.
14
Wear dust mask
Do not expose to moisture.
Do not expose to rain or water
Do not burn
Do not dispose of batteries. Return
exhausted batteries to your local
collection or recycling point.
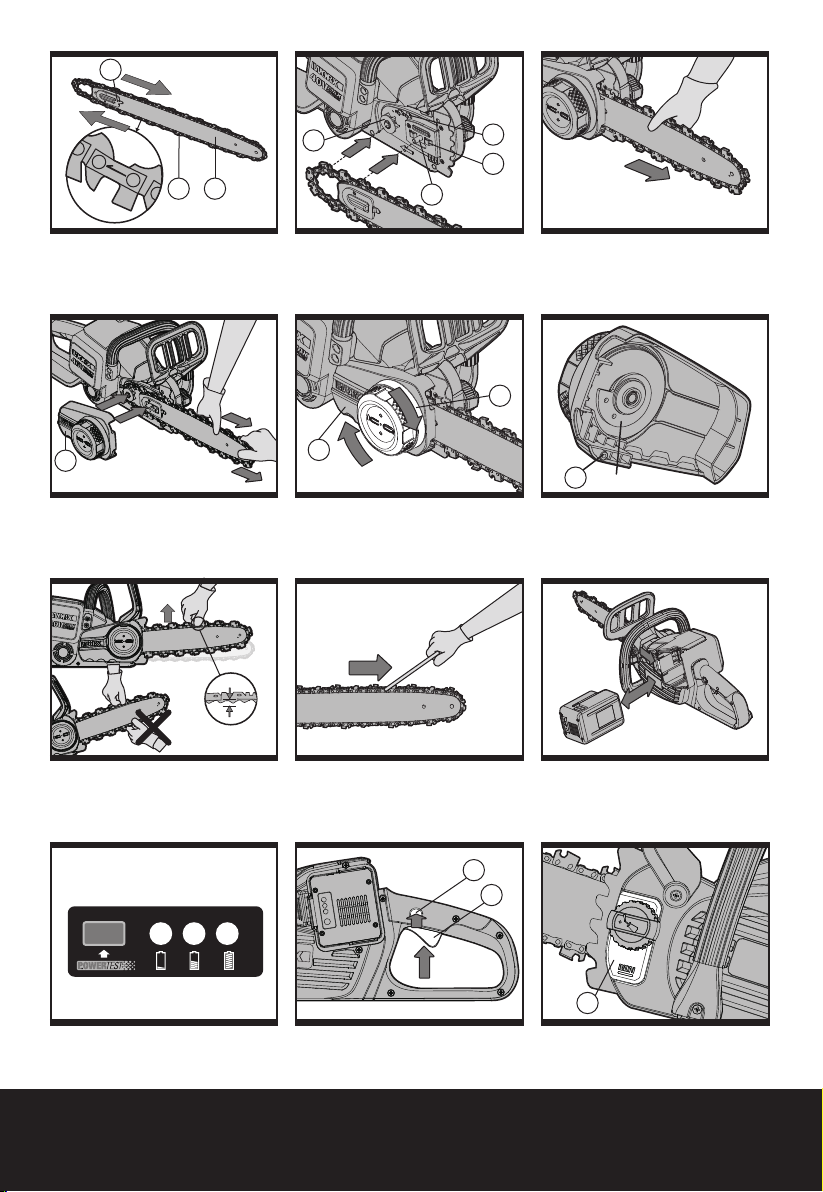
CHAIN AND GUIDE BAR ASSEMBLY
1. Unpack all parts carefully.
2. Place the chain saw on any suitable flat
surface.
3. Use only genuine WORX chains designed
for chainbar.
4. Slide the Chain (8) in the slot around the
Guide Bar (7). Ensure the Chain is in correct
running direction by comparing it to the
Chain Direction Symbol (13) found on
the saw body (See Fig. B). Ensure the Bar
Tensioning Plate (17) is facing outward.
(See Fig. A)
5. Fit the Chain onto the Drive Sprocket
(12), so that the Fastening Bar Bolt (16)
and the two Bar Locating Tabs (14) on the
Bar Clamp (20) fit into the keyway of the
opening on the Guide Bar (7). (See Fig. B)
6. Check to see if all parts are seated properly.
(See Fig. C)
7. Fit the Chain Cover (11), ensure that the
Chain Catch (19) slides properly into the
Chain Cover (11). (See Fig. D)
8. Tighten the Chain Cover (11) by turning the
Chain Tensioning Knob (10) clockwise until
it is tight. (See Fig. E)
WARNING: The chain is not yet
tensioned. Tensioning the chain
applies as described under “Tensioning
chain”. The chain now needs to be
inspected to make sure it is properly
tensioned.
Battery-powered Chain Saw EN
Page 15
TENSIONING CHAIN
New saw chains will stretch. Check chain
tension frequently when first used and tighten
when Chain becomes loose around the Guide
Bar (7).
WARNING: Remove the battery
from the tool before adjusting saw
chain tension.
WARNING: Cutting edges on chain
are sharp. Use protective gloves
when handling chain.
WARNING: Maintain proper chain
tension always. A loose chain will
increase the risk of kickback. A loose
chain may jump out of guide bar groove.
This may injure operator and damage
chain. A loose chain will cause chain,
bar, and sprocket to wear rapidly.
1. Place the chain saw on any suitable flat
surface.
2. Turn the Chain Tensioning Knob (10)
clockwise until it is hand tight. The tension
is automatically set while the Chain
Tensioning Knob is being tightened.
The ratchet mechanism (a) prevents the
chain tension from loosening. (See Fig. F1)
3. Double check the tension set by the
automatic Chain Tensioning Knob. The
correct chain tension is reached when the
Chain (8) can be raised approx. 3-6mm
from the Guide Bar (7) in the center (the
chain links should just remain in the bar
track). This should be done by using one
hand to raise the chain against the weight
of the machine. (See Fig. F2)
Use a screwdriver to move chain around
Guide Bar to ensure kinks do not exist. The
chain should rotate freely. (See Fig. F3 )
4. When the chain looses, unscrew the Chain
Tensioning Knob absolutely and then
Screw on the cover plate with the locking
knob tightly again.
will result in extensive damage to the
product.
NOTE: Chain life and cutting capacity depend
on optimum lubrication. Therefore, the chain
is automatically oiled during operation.
Filling oil tank:
1. Set chain saw on any suitable surface with
Oil Filler Cap (4) facing upward.
2. Clean area around the Oil Filler Cap with
cloth unscrew cap.
3. Add bar and chain oil until reservoir is full.
ISO VG32 Bar and chain oil of any brand
can be used.
4. Avoid dirt or debris entering oil tank, refit
the Oil Filler Cap and tighten.
IMPORTANT: To allow venting of
the oil reservoir, small breather
channels are provided between the oil
filler cap and the strainer, to prevent
leakage ensure machine is left in a
horizontal position (Oil Filler Cap (4)
uppermost) when not in use.
It is important to use only the
recommended oil to avoid damage to the
chain saw. Never use recycled/old oil.
Use of non approved oil will invalidate
the warranty.
15
CHECKING THE AUTOMATIC OILER
Proper functioning of the automatic oiler can
be checked by running the chain saw and
pointing the tip of the Guide Bar (7) towards a
piece of cardboard or paper on the ground.
If an increasing oil pattern develops on the
cardboard, the automatic oiler is operating
fine. If there is no oil pattern, despite a full
oil reservoir, contact WORX customer service
agent or WORX approved service agent.
CAUTION: Do not touch the ground
with the chain. Ensure safety clearance
of 30cm.
OPERATION
LUBRICATION
IMPORTANT: He chain saw is
not supplied filled with oil. It is
essential to fill with oil before use. Never
operate the chain saw without chain
oil or at an empty oil tank level, as this
1. BEFORE USING YOUR CORDLESS
TOOL
ATTENTION: The charger and
battery pack are specially designed
to work together so do not attempt to
use any other devices. Never insert or
Battery-powered Chain Saw EN
Page 16
allow metallic objects into your charger
or battery pack connections because
of an electrical failure and hazard will
occur.
NOTE: Your battery pack is UNCHARGED and
you must charge once before use.
The battery charger supplied is matched to
the Li-Ion battery installed in the machine. Do
not use another battery charger.
2. CHARGING YOUR BATTERY PACK
The Li-ion battery is protected against deep
discharging. When the battery is empty,
the machine is switched off by means of a
protective circuit.
In a warm environment or after heavy use, the
battery pack may become too hot to permit
charging. Allow time for the battery to cool
down before recharging.
3. TO REMOVE OR INSTALL BATTERY
PACK (See Fig. G)
Depress the Battery Pack Release Button to
remove the Battery Pack from your tool. After
recharging, insert the Battery Pack into battery
port (See Fig. G). A simple push and slight
pressure will be sufficient until a click is heard.
Check to see if the battery is fully secured.
16
NOTE: When removing the battery pack,
hold it firmly to avoid dropping and
injury.
4. BATTERY STATUS LED’S (See Fig. H)
NOTE: The Status LED’s will indicate the
battery condition when the button on
the battery is pressed.
The LED’s constantly senses and displays the
battery condition as follows:
Press the button “POWERTEST”, the light
button is illuminated.
When the three green lights are illuminated,
the battery is in a highly charged condition.
When two lights ( ) are illuminated, the
battery is in a moderately charged condition.
When only one green light ( ) is illuminated,
the battery charge is depleted.
IMPORTANT: When only one light is
illuminated, your battery is overly
discharged, even though the tool may
still be capable of working. Continuing
to operate your tool with the battery in
this discharged condition may reduce
the life and performance of your battery.
5. SWITCHING ON AND OFF (See Fig. I)
For switching on the machine, press the
Lock-off Button (3), then fully press the On/Off
Switch (2) and hold in this position. The LockOff Button (3) can now be released.
For switching off, release the On/Off Switch (2).
Cutting
IMPORTANT: Is the oil reservoir
filled? Check the Oil Level Window
(18) prior to starting and regularly
during operation. Refill oil when oil level
is low. A full oil tank will last approx. 20
minutes depending on sawing intensity
and stops (See Fig. J).
Check recent replaced chain tension
about every 10 minutes during
operation.
1. Install the battery pack into the machine
(See Fig. G).
2. Make sure section of log to be cut is not
laying on the ground. This will keep the
Chain (8) from touching the ground as it
cuts through the log. Touching the ground
while the Chain is moving is dangerous
and will dull the Chain.
3. Use both hands to grip saw. Always use
left hand to grip front handle and right
hand to grip rear handle. Use a firm grip.
Thumbs and fingers must wrap around
saw handles (See Fig. K).
4. Make sure your footing is firm. Keep feet
shoulder width apart. Divide your weight
evenly on both feet.
5. When ready to make a cut, push the
Lock-off Button (3) completely in with the
right thumb and squeeze the trigger. This
will turn the saw on. Releasing the trigger
will turn the saw off. Make sure the saw is
running at full speed before starting a cut.
6. When starting a cut, slowly place the
moving chain against the wood. Hold saw
firmly in place to avoid possible bouncing
or skating (sideways movement) of saw.
7. Guide the saw using light pressure and
do not put excessive force on the saw. The
Battery-powered Chain Saw EN
Page 17
motor will overload and can burn out. It
will do the job better and safer at the rate
for which it was intended.
8. Remove the saw from a cut with the saw
running at full speed. Stop the saw by
releasing the On/Off Switch. Make sure the
Chain has stopped before setting the saw
down.
9. Keep practicing on scrap logs in a secure
working area until you get the hang of
it and can saw with ease, using a fluid
motion and a steady cutting rate.
2. Hold the chain saw at the right-hand side
of your body (See Fig. L).
3. The Chain (8) must be running at full speed
before it makes contact with the wood.
4. Use the metal Gripping Teeth (9) to secure
the saw onto the wood before starting to cut.
5. Use the Gripping Teeth as a leverage point
(a) while cutting. (See Fig. M)
6. Do not operate the chain saw with arms
fully extended, attempt to saw areas which
are difficult to reach, or stand on a ladder
while sawing (See Fig. N).
Kickback safety devices on this saw
This saw has a low-kickback chain and
reduced kickback Guide Bar. Both items
reduce the chance of kickback. However,
kickback can still occur with this saw.
The following steps will reduce the risk of
kickback.
• Use both hands to grip saw while saw is
running. Use firm grip. Thumbs and fingers
must wrap around saw handles.
• Keep all safety items in place on saw.
Make sure they work properly.
• Do not overreach or cut above shoulder
height.
• Keep solid footing and balance at all times.
• Stand slightly to left side of saw. This keeps
your body from being in direct line with
chain.
• Do not let guide bar nose touch anything
when chain is moving.
• Never try cutting through two logs at same
time. Only cut one log at a time.
• Do not bury the Guide Bar nose or try
plunge cut (boring into wood using guide
bar nose).
• Watch for shifting of wood or other forces
that may pinch chain.
• Use extreme caution when reentering a
previous cut.
• Use only the low-kickback chain and guide
bar that were supplied with this chain saw.
• Never use a dull or loose chain. Keep chain
sharp with proper tension.
How to use saw safely
1. Use the chain saw only with secure
footing.
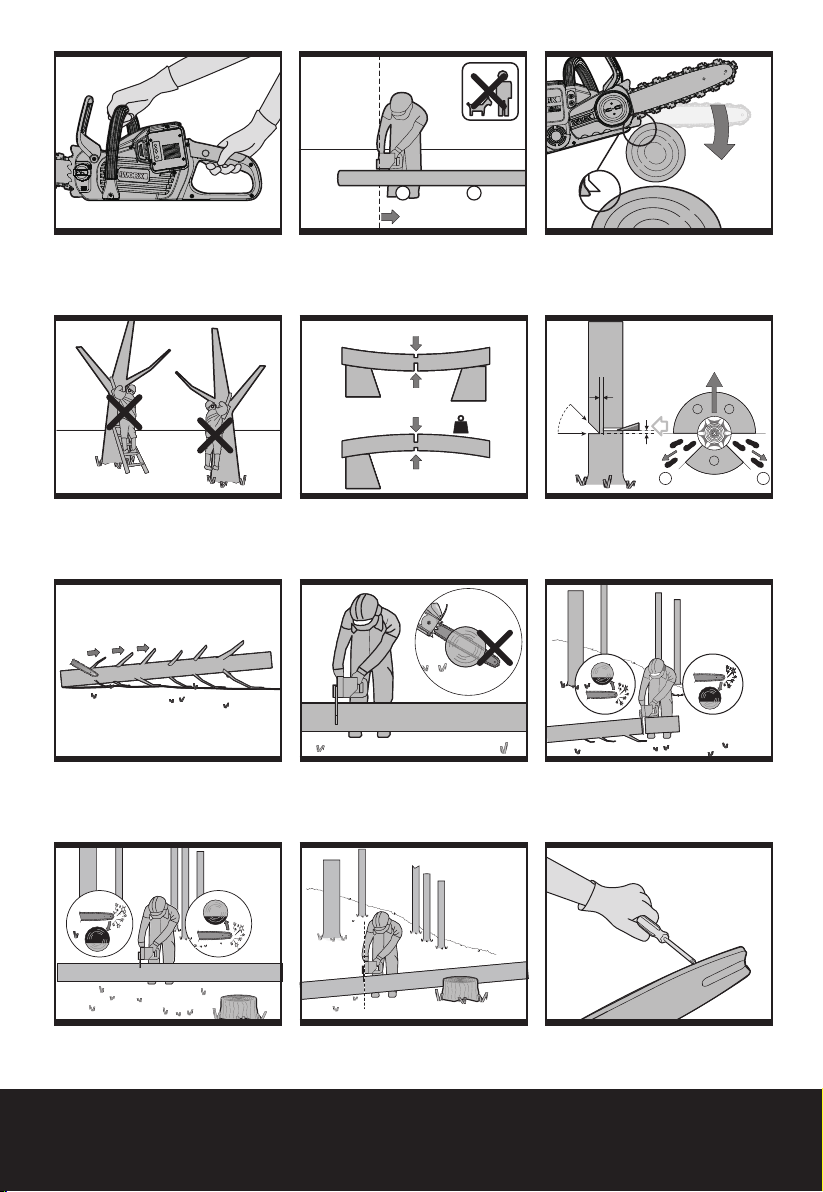
CUTTING WOOD UNDER TENSION (See
Fig. O)
WARNING: When cutting a limb
that is under tension, use extreme
caution. Be alert for wood springing
back. When wood tension is released,
limb could spring back and strike
operator causing severe injury or death.
When sawing logs supported on both ends,
start the cut from above(Y) about 1/3 of the
diameter into the log and then finish the cut
(Z) from below, in order to avoid contact of
the chain saw with the ground. When sawing
logs supported on only one end, start the cut
from below (Y) about 1/3 of the diameter into
the log and finish the cut from above (Z) in
order to avoid log splitting or jamming of the
chain saw.
FELLING TREES (See Fig. P)
Always wear hard hat to protect head
against falling branches.
The chain saw can only be used to fell
trees smaller in diameter than the length
of the guide bar.
Secure work area. Ensure no persons
or animals are in the vicinity of the
falling tree.
Never attempt to free a jammed saw
with the motor running. Use wooden
wedges to free chain and guide bar.
When cutting and felling operations are being
performed by two or more persons, at the
same time, the felling operations should be
separated from the cutting operation by a
distance of at least twice the height of the
tree being felled. Trees should not be felled in
17
Battery-powered Chain Saw EN
Page 18
a manner that would endanger any person,
strike any utility line or cause any property
damage. If the tree does make contact with
any utility line, the company should be
notified immediately.
The chain saw operator should keep on the
uphill side of the terrain as the tree is likely to
roll or slide downhill after it is felled.
An escape path should be planned and
cleared as necessary before cuts are started. The
escape path should extend back and diagonally
to the rear of the expected line of fall.
Before felling is started, consider the
natural lean of the tree, the location of larger
branches and the wind direction to judge
which way the tree will fall.
Remove dirt, stones, loose bark, nails staples,
and wire from the tree.
Notching undercut: Make the notch (x-w)
1/3 the diameter of the tree, perpendicular
to the direction of falls as make the lower
horizontal notching cut first. This will help to
avoid pinching either the saw chain or the
guide bar when the second notch is being
made.
Felling back cut: Make the felling back cut
(Y) at least 50 mm higher than the horizontal
18
notching cut. Keep the felling back cut parallel
to the horizontal notching cut. Make the felling
back cut so enough wood is left to act as a
hinge. The hinge wood keeps the tree from
twisting and falling in the wrong direction. Do
not cut through the hinge.
As the felling gets close to the hinge the tree
should begin to fall. If there is any chance
that the tree may not fall in desired direction
or it may rock back and bind the saw chain,
stop cutting before the felling back cut is
complete and use wedges of wood, plastic, or
aluminum to open the cut and drop the tree
along the desired line of fall.
When the tree begins to fall remove the chain
saw from the cutting, stop the motor, put the
chain saw down, and then use the retreat path
planned. Be alert for overhead limbs falling
and watch your footing.
To complete the felling operation, drive a
wedge (Z) into the horizontal cut.
Beware of falling branches when the tree
starts to move.
LIMBING A TREE (See Fig. Q)
Limbing is removing the branches from a fallen
tree. When limbing leave larger lower limbs
to support the log off the ground. Remove the
small limbs in one cut as illustrated. Branches
under tension should be cut from the bottom
up to avoid binding the chain saw.
BUCKING A LOG (See Fig. R)
Bucking is cutting a log into lengths. It is
important to make sure your footing is firm
and your weight is evenly distributed on both
feet. When possible, the log should be raised
and supported by the use of limbs, logs or
chocks. Follow the simple directions for easy
cutting.
When the log is supported along its entire as
illustrated, it is cut from the top (overbuck).
When the log is supported on one end,
as illustrated, cut 1/3 the diameter from
the underside (underbuck). Then make the
finished cut by overbucking to meet the first
cut. (See Fig. S)
When the log is supported on both ends, as
illustrated, cut 1/3 the diameter from the top
(overbuck). Then make the finished cut by
underbucking the lower 2/3 to meet the first
cut. (See Fig. T)
WARNING: (See Fig. U)
• If on slope, make sure log will not
roll down hill. Secure log by using
wooden stakes. Drive wooden stakes
into ground on downhill side of log.
Stand on uphill side of log while
cutting. Log may roll after cutting.
• Never try cutting through two logs
at same time. This could increase the
risk of kickback.
• While cutting log, never hold log with
your hand, leg, or foot.
• While cutting log, never allow another
person to hold log.
• Turn off and remove the battery pack
from the saw before moving from one
place to another.
Battery-powered Chain Saw EN
Page 19
SAW MAINTENANCE AND
KICKBACK SAFETY
Follow maintenance instructions in this manual.
Proper cleaning of saw and chain and guide bar
maintenance can reduce chances of kickback.
Inspect and maintain saw after each use. This
will increase the service life of your saw.
NOTE: Even with proper sharpening, risk of
kickback can increase with each sharpening.
BAR MAINTENANCE
To maximize bar life, the following bar
maintenance is recommended.
The bar rails that carry the chain should be
cleaned before storing the tool or if the bar or
chain appear to be dirty.
The rails should be cleaned every time the
chain is removed.
Turn the bar over, top rail becoming bottom
and bottom rail becoming top, around every 5
hours of use.
MAINTENANCE AND
STORAGE OF CHAIN SAW
1. Remove the battery pack from the saw
• When not in use.
• Before moving from one place to another
• Before servicing.
• Before changing accessories or attachments,
such as saw chain and guard bar.
2. Inspect chain saw before and after each
use. Check saw closely if guard or other part
has been damaged. Check for any damage
that may affect operator safety or operation
of saw. Check for alignment or binding of
moving parts. Check for broken or damaged
parts. Do not use chain saw if damage affects
safety or operation. Have damage repaired
by authorized service center. To locate an
authorized service center, visit
www.worx.com
3. Maintain chain saw with care.
• Never expose saw to rain.
• Keep chain sharp, clean, and lubricated for
better and safer performance.
• Follow steps outlined in this manual to
sharpen chain.
• Keep handles dry, clean, and free of oil and
grease.
• Keep all screws and nuts tight.
4. When servicing, use only identical
replacement parts.
5. When not in use, always store chain saw
• In a high or locked place, out of children’s
reach.
• In a dry place.
TO CLEAN THE BAR RAILS:
1. Remove chain cover and bar and chain.
(see section ASSEMBLY)
2. Using a wire brush, screwdriver or similar
suitable tool, clear the residue from the
rails of the bar. (See Fig. V)
3. Make sure to clean oil passages
thoroughly.
CONDITIONS WHICH REQUIRE GUIDE
BAR MAINTENANCE:
• Saw cuts to one side or at an angle.
• Saw has to be forced through the cut.
• Inadequate supply of oil to the bar and
chain.
Check the condition of the guide bar each time
the chain is sharpened. A worn guide bar will
damage the chain and make cutting difficult.
After each use, with unit disconnected from
power source, clean all sawdust from the
guide bar and sprocket hole.
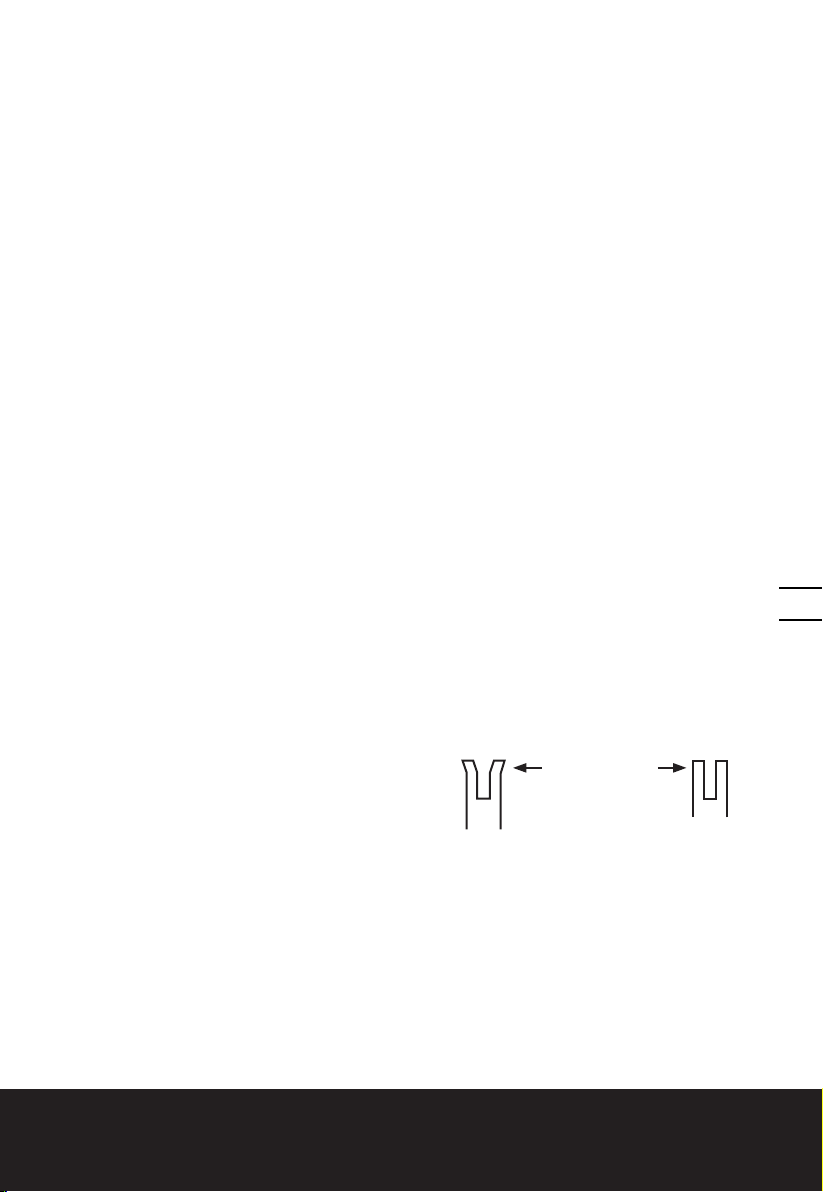
When rail top is uneven, use a flat file to
restore square edges and sides.
File Rail Edges
and Sides
Square
Worn Groove Correct Groove
Replace the guide bar when the groove is
worn, the guide bar is bent or cracked, or
when excess heating or burring of the rails
occurs. If replacement is necessary, use only
the guide bar specified for your saw in the
repair parts list or on the decal located
on the chain saw.
REPLACING BAR & CHAIN
Fit the chain and guide bar as described in
19
Battery-powered Chain Saw EN
Page 20
“Assembly and Tensioning Chain”.
The circular groove of the guide bar will wear
particularly on the lower edge with time.
When replacing the chain turn the chain bar
180° to allow even wear, thus extending chain
bar life.
Check drive sprocket. If it is worn out or
damaged due to strain, have it exchanged by
an authorized service agent.
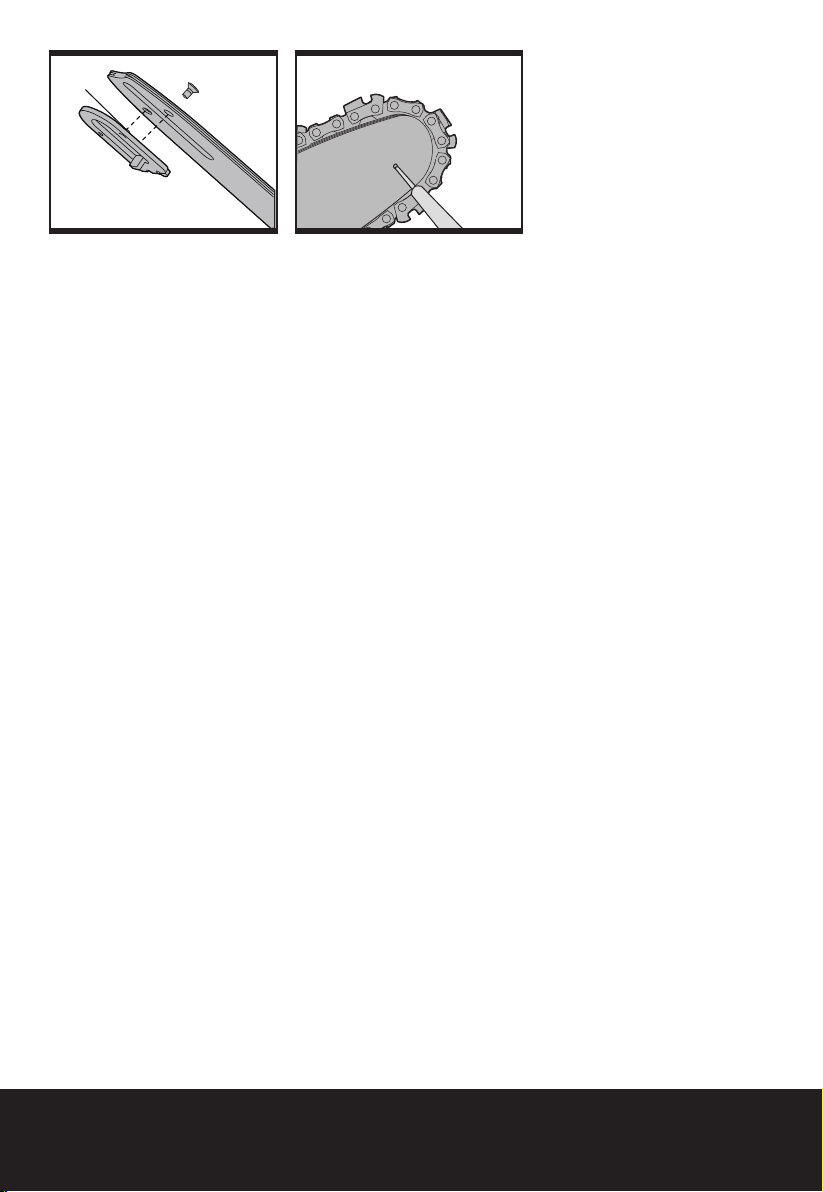
If the chain bar is worn out or damaged,
take the chain tensioning catch off the bar
by loosing the screw anti-clockwise. Then
fit the tensioning catch into the new bar by
tightening the screw clockwise. The catch
protrude (a) must be fitted into the bar hole.
(See Fig. W)
SHARPENING CHAIN
WARNING: Remove the battery
pack from the saw before
servicing. Severe injury or death could
occur from electrical shock or body
contact with moving chain.
Cutting edges on chain are sharp. Use
protective gloves when handling chain.
Keep chain sharp. Your saw will cut faster and
more safely. A dull chain will cause undue
sprocket, guide bar, chain, and motor wear. If
20
you must force chain into wood and cutting
creates only sawdust with few large chips,
chain is dull.
LUBRICATE SPROCKET
WARNING: Wear heavy duty gloves
when performing an maintenance or
service to this tool.
Always remove the battery pack from the saw
before performing any service or maintenance
on this tool.
NOTE: It is not necessary to remove the chain
or bar when lubricating the sprocket.
1. Clean the bar and sprocket.
2. Using a grease gun, insert the tip of the
gun into the lubrication hole and inject
grease until it appears at the outside edge
of the sprocket tip. (See Fig. X)
3. To rotate the sprocket release the chain
stop and pull the chain by hand until the
ungreased side of the sprocket is in line
with the grease hole. Repeat the lubrication
procedure.
CLEANING/STORAGE
Clean the moulded plastic housing of the
chain saw using a soft brush and clean
cloth. Do not use water, solvents or polishes.
Remove all debris, especially from the motor
cooling vents.
Remove and brush clean the cover plate,
chain and chain bar after 1 to 3 hours of use.
Clean the area under the cover plate, the drive
sprocket and chain bar assembly using a soft
brush. Clean oil outlet with a clean cloth.
If the chain saw is to be stored for a longer
period of time, clean chain and chain bar.
Store in a secure, dry place out of the reach of
children.
Do not place other objects on the chain saw.
To prevent leakage ensure machine is left in a
horizontal position (oil filler cap 4 uppermost).
When storing machine in original packaging
the oil tank must be completely emptied.
ENVIRONMENTAL
PROTECTION
This product has been marked with a
symbol relating to removing electric
and electronic waste. This means that
this product shall not be discarded with
household waste but that it shall be returned
to a collection system which conforms to the
European Directive 2012/19/EU . It will then
be recycled or dismantled in order to reduce
the impact on the environment. Electric and
electronic equipment can be hazardous for the
environment and for human health since they
contain hazardous substances.
Battery-powered Chain Saw EN
Page 21

TROUBLESHOOTING
Symptom Possible Causes Possible Solution
Chain saw fails to
operate
Chain saw operates
intermittently
Dry chain
Kickback Brake / Run
down brake
Chain/chain bar
overheats
Chain saw rips, vibrates,
does not saw properly
Never use tools with defective On/Off switches or defective Kickback brake(Hand Guard).
In the case of all other types of technical faults, please contact helpline or local service center.
Out of battery
Fuse faulty
Loose connection
Internal wiring defective
On/Off switch defective
No oil in reservoir
Vent in oil filler cap clogged
Oil passage clogged
Brake does not stop chain Contact service agent
No oil in reservoir
Vent in oil filler cap clogged
Oil passage clogged
Chain is over tensioned
Dull chain
Chain tension too loose
Dull chain
Chain worn out
Chain teeth are facing in the
wrong direction
Charge the battery pack
Replace fuse
Contact service agent
Contact service agent
Contact service agent
Refill oil
Clean cap
Clean oil passage outlet
Refill oil
Clean cap
Clean oil passage outlet
Adjust locking knob
Sharpen chain or replace
Adjust locking knob
Sharpen chain or replace
Replace chain
Reassemble with chain in correct
direction
21
Battery-powered Chain Saw EN
Page 22

DECLARATION OF
CONFORMITY
We,
POSITEC Germany GmbH
Konrad-Adenauer-Ufer 37
50668 Köln
Declare that the product,
Description: WORX Battery-powered Chain
Saw
Type: WG368E WG368E.9 (3-designation
of machinery, representative of Chain
Saw)
Function: Cutting wood
Complies with the following Directives,
2006/42/EC, 2004/108/EC, 2011/65/EU,
2000/14/EC amended by 2005/88/EC
The notified body involved
Name: Intertek Deutschland GmbH
(Notified body 0905)
Address: Stangenstraße 1, 70771
LEINFELDEN-ECHTERDINGEN
2000/14/EC amended by 2005/88/EC:
- Conformity assessment procedure as per
22
Annex V
- Measured Sound Power Level 96.1dB(A)
- Declared Guaranteed Sound Power Level
100dB(A)
Standards conform to:
EN 60745-1 EN 60745-2-13
EN ISO 3744 EN 55014-1
EN 55014-2
The person authorized to compile the technical file,
Name: Russell Nicholson
Address: Positec Power Tools (Europe)
Ltd, PO Box 152, Leeds, LS10 9DS, UK
2014/04/21
Leo Yue
POSITEC Quality Manager
Battery-powered Chain Saw EN
Page 23

1. BAGESTE HÅNDGREB
2. START-STOP-KONTAKT
3. KONTAKTSPÆRRE
4. OLIETANKDÆKSEL
5. FORRESTE HÅNDGREB
6. HÅNDBESKYTTELSE
7. SVÆRD
8. SAVEKÆDE
9. KLOANSLAG
10. KÆDESPÆNDEKNAP
11. KÆDEDÆKSEL
12. KÆDEHJUL
13. RETNINGSSYMBOL FOR KÆDEN
14. STYREPALERNE FOR SVÆRD
15. OLIEDYSE
16. FASTGØRELSE AF SVÆRDBOLTE
17. TILSPÆNDINGSPLADE FOR SVÆRD
18. OLIESTANDSVINDUE
19. KÆDEFANGBOLT
20. SVÆRDKLEMME
21. BESKYTTELSESSKÆRM FOR KLINGE*
23
* Illustreret eller beskrevet tilbehør er kun delvis indeholdt i leverancen.
Batteridrevet motorsav DK
Page 24
TEKNISK DATA
Type WG368E WG368E.9 (3- udpegning af maskiner, repræsentant for Kædesav)
WG368E WG368E.9
Nominel Spænding 40V
Sværdlængde 30cm
Skærelængde 25cm
Kædehastighed 3.8m/s
Påfyldningsmængde oliebeholder 100ml
Kædedeling 9.5mm
Antal drivled 45
Kædevidde 1.1mm
Savekædetype
Sværdtype
Opladningstid 1hr /
Maskinvægt ( chain & bar included) 3.8kg 3.0kg
Oregon
Max**
®
Oregon
®
: 124MLEA041
: 90PX
** Spændingen er målt uden arbejdsbelastning. Den indledende batterispænding når
maksimalt op på 40 volt. Nominel spænding er 36 volt.
STØJINFORMATION
24
A-vægtet lydtryksniveau LpA:85dB(A)
A-vægtet lydeffektniveau L
K
pA
Bær høreværn.
:100dB(A)
wA.d
3.0dB(A
VIBRATIONSINFORMATION
Den totale værdi for vibration (triax vektor sum) målt ifølge EN 60745:
Værdi for vibration: ah = 3.5m/s2 Usikkerhed K = 1.5m/s²
Den erklærede samlede vibrationsstyrke kan bruges til at sammenligne et værktøj med et andet,
og kan også bruges til en foreløbig vurdering af eksponeringen.
ADVARSEL: Vibrationsværdien under den faktiske brug af maskinværktøjet kan afvige fra
den opgivne værdi afhængigt af måderne, værktøjet benyttes på. Se følgende eksempler
på, hvad vibrationerne kan afhænge af:
Hvordan værktøjet bruges og materialerne, der skæres eller bores i.
Værktøjets stand og vedligeholdelse.
Anvendelse af korrekt tilbehør og kontrol med, at det er skarpt og i en i det hele taget god
tilstand.
Batteridrevet motorsav DK
Page 25

Hvor kraftigt, der holdes fast i håndtaget og, om der benyttes antivibrationsudstyr.
Om værktøjet anvendes i henhold til dets konstruktion og nærværende anvisninger.
Værktøjet kan medføre et hånd/arm-vibrationssyndrom, hvis det ikke bruges på rigtig
måde.
ADVARSEL: En vurdering af udsættelsesgraden under det aktuelle brug skal
omfatte alle dele af arbejdscyklussen, hherunder antallet af gange værktøjet slås til
og fra, og tomgangsdriften uden for selve arbejdsopgaven. Dette kan afgørende reducere
udsættelsesniveauet i den samlede arbejdsperiode.
Sådan kan du minimiere risikoen for udsættelse for vibrationer:
Brug ALTID skarpe mejsler, bor og blade.
Vedligehold værktøjet i overensstemmelse med disse instruktioner og hold det korrekt smurt
(hvor det er nødvendigt).
Hvis værktøjet bruges ofte, bør du anskaffe antivibrationsudstyr.
Brug ikke værktøjet i temperaturer på 10oC eller lavere.
Planlæg dit arbejde, så du kan fordele arbejde med kraftige vibrationer over flere dage.
TILBEHØR
WG368E WG368E.9
Kædesavsolie (100ml) 1 1
Beskyttelseskappe til sværdet 1 1
Oplader (WA3735) 1 /
Batterienhed (WA3536) 1 /
25
Det anbefales, at alt udstyr købes i samme butik som maskinen. Anvend udstyr af god kvalitet og
af et velkendt mærke. Vælg typen afhængigt af det arbejde, du vil foretage. Se på emballagen til
tilbehøret for at få yderligere oplysninger. Få hjælp og råd i butikken.
Batteridrevet motorsav DK
Page 26

GENERELLE ADVARSLER
I FORBINDELSE MED
MASKINVÆRKTØJ
ADVARSEL! Læs samtlige anvisninger.
Manglende overholdelse af
nedenstående anvisninger kan resultere i
elektrisk stød, brand og/eller alvorlig
personskade.
Gem alle advarsler og instruktioner for
fremtidig reference.
Udtrykket “elværktøj” i nedenstående
advarsler henviser til dit eldrevne (med
ledning) eller batteridrevne (uden ledning)
værktøj.
1) ARBEJDSOMRÅDE
a) Sørg for, at arbejdsområdet er rent og
godt oplyst. Rodede arbejdsområder kan
forårsage personskade.
b) Anvend ikke elværktøj i eksplosive
atmosfærer, f.eks. i nærheden af
brændbare væsker, gasser eller støv.
Elværktøj frembringer gnister, der kan
antænde støv eller dampe.
c) Hold børn og tilskuere på afstand,
26
når elværktøjet bruges. Hvis du bliver
distraheret, kan du miste kontrollen over
værktøjet.
2) ELSIKKERHED
a) Elværktøjets stik skal svare til
stikkontakten. Du må ikke ændre
stikket på nogen måde. Brug ikke
adapterstik til elværktøj med
jordforbindelse. Hvis du bruger
uændrede stik og stikkontakter, der passer
til stikkene, mindskes risikoen for elektrisk
stød.
b) Undgå at røre ved overflader med
jordforbindelse, f.eks. rør, radiatorer,
komfurer og køleskabe. Risikoen for
elektrisk stød øges, hvis din krop får
jordforbindelse.
c) Brug ikke elværktøj i våde eller
fugtige omgivelser. Hvis der trænger
vand ind i elværktøjet, øges risikoen for
elektrisk stød.
d) Undgå at udsætte ledningen for
overlast. Bær ikke værktøjet i
ledningen, og træk ikke i ledningen,
når du tager stikket ud af
stikkontakten. Hold ledningen væk
fra varme, olie, skarpe kanter og
bevægelige dele. Beskadigede eller
filtrede ledninger øger risikoen for elektrisk
stød.
e) Brug altid forlængerledninger til
udendørs brug, når du anvender
værktøjet udendørs. Risikoen
for elektrisk stød mindskes, hvis
forlængerledningen er egnet til udendørs
brug.
f) Hvis det elektriske værktøj anvendes i
fugtige omgivelser, skal der ubetinget
anvendes en strømforsyning, der er
beskyttet mod reststrøm. Det mindsker
risikoen for elektriske stød.
3) PERSONLIG SIKKERHED
a) Vær opmærksom, hold altid øje med
værktøjet, og brug din sunde fornuft
ved brug af elværktøjet. Brug ikke
elværktøjet, hvis du er træt eller
påvirket af narkotika, alkohol eller
medicin. Et øjebliks koncentrationssvigt
ved brug af elværktøj kan medføre alvorlig
personskade.
b) Brug beskyttelsesudstyr. Brug altid
sikkerhedsbriller. Sikkerhedsudstyr
som støvmaske, skridsikre sikkerhedssko,
sikkerhedshjelm eller høreværn mindsker
risikoen for personskade.
c) Undgå at starte utilsigtet. Kontroller,
at kontakten står i stillingen OFF,
inden udstyret tilsluttes en strømkilde
og/eller batteripakke, samles op eller
transporteres. Hvis du bærer elværktøj
med fingeren på afbryderen eller sætter
stikket i stikkontakten, mens afbryderen er
tændt, er der risiko for ulykker.
d) Fjern justeringsnøgler og lignende
fra elværktøjet, før du tænder
det. Justeringsnøgler, der sidder på
elværktøjets roterende dele, kan resultere i
personskade.
e) Undgå at række for langt. Sørg for at
have et godt fodfæste og underlag.
Det giver bedre kontrol over elværktøjet i
Batteridrevet motorsav DK
Page 27

uventede situationer.
f) Vær korrekt påklædt. Undlad at
bære løstsiddende tøj eller smykker.
Hold hår, tøj og handsker på afstand af
de bevægelige dele. Løstsiddende tøj,
smykker eller langt hår kan blive fanget af
de bevægelige dele.
g) Hvis værktøjet leveres med støvpose
og adapter til støvudsugning, skal
du kontrollere, at delene er tilsluttet
korrekt. Disse enheder mindsker risikoen
for skader på grund af støv.
4) BRUG OG VEDLIGEHOLDELSE AF
ELVÆRKTØJ
a) Undlad at presse elværktøjet. Brug
det korrekte elværktøj til opgaven. Du
opnår en bedre og mere sikker drift, hvis
du anvender det korrekte elværktøj ved den
anbefalede hastighed.
b) Undlad at bruge elværktøjet, hvis
afbryderen ikke slår værktøjet til og
fra. Elværktøj, der ikke kan kontrolleres
ved hjælp af afbryderen, er farligt og skal
repareres.
c) Træk stikket på værktøjet ud fra
strømkilden og/eller batteripakken,
inden der foretages justeringer,
udskiftning af dele eller opbevaring af
værktøjet. Disse forholdsregler mindsker
risikoen for utilsigtet start af elværktøjet.
d) Opbevar elværktøj utilgængelig for
børn, og lad aldrig personer, der ikke
er fortrolige med elværktøjet eller
disse anvisninger, bruge elværktøjet.
Elværktøj er farligt, hvis det bruges forkert.
e) Vedligehold elværktøjet. Kontrollér,
om de bevægelige dele er korrekt
justeret eller går tungt, om dele
er gået i stykker og enhver anden
tilstand, som kan påvirke elværktøjets
funktion. Hvis elværktøjet er
beskadiget, skal det repareres inden
brug. Mange ulykker forårsages af dårligt
vedligeholdt elværktøj.
f) Hold værktøjet skarpt og rent. Korrekt
vedligeholdt elværktøj med skarpe klinger
sætter sig ikke fast og er nemmere at
kontrollere.
g) Brug elværktøjet, tilbehøret og
eventuelle bits i henhold til disse
anvisninger og på en passende
måde for den pågældende type
elværktøj. Tag altid højde for
arbejdsomgivelserne og den
forhåndenværende opgave. Hvis
elværktøjet bruges til andre opgaver end
den, det er beregnet til, kan det medføre
farlige situationer.
5) BRUG OG ANVENDELSE AF
BATTERIVÆRKTØJ
a) Oplad kun med den oplader, der er
angivet af producenten. En oplader,
der passer til en type batterienhed kan
forårsage risiko for brand, hvis den bruges
sammen med en anden batterienhed.
b) Brug kun de el-værktøjer, der er
specifikt angivet til batterienhederne.
Brug af andre batterienheder kan udgøre
en risiko for skade og brand.
c) Når batterienheden ikke bruges,
skal du holde den væk fra andre
metalgenstande som f.eks. papirclips,
mønter, nøgler, søm, skruer eller andre
mindre metalgenstande, der kan skabe
forbindelse mellem en klemme til en
anden. Kortslutning af batteriklemmer kan
forårsage brandsår eller brand.
d) Ved forkert brug kan der sprøjte
væske ud af batteriet; undgå kontakt.
Hvis der sker kontakt ved et uheld,
skal du straks skylle med vand. Hvis
der kommer væske i øjnene, skal
du også søge lægehjælp. Væske, der
sprøjtes ud fra batteriet, kan medføre
irritation eller forbrænding.
6) SERVICE
a) Service på elværktøjet skal udføres
af en autoriseret reparatør ved hjælp
af originale reservedele. Dette sikrer, at
elværktøjet er sikkert at bruge.
ADVARSELSHENVISNINGER
TIL KÆDESAVE
1. Hold alle legemsdele væk fra
savkæden, når saven er tændt.
27
Batteridrevet motorsav DK
Page 28

Kontrollér at savkæden ikke berører
noget, før saven startes. Når der
arbejdes med kædesaven, kan et øjebliks
uopmærksom medføre, at tøj eller
legemsdele fanges af savkæden.
2. Hold fast i kædesaven med den højre
hånd på det bageste håndgreb og
med den venstre hånd på det forreste
håndgreb. Holdes kædesaven fast på en
anden måde, øges risikoen for kvæstelser;
af den grund bør en sådan holdning
undgås.
3. Hold el-værktøjet i de isolerede
gribeflader, når du udfører arbejde, hvor
indsatsværktøjet kan ramme bøjede
strømledninger eller el-værktøjets eget
kabel. Kontakt med en spændingsførende
ledning kan også sætte elværktøjets
metaldele under spænding, hvilket kan føre
til elektrisk stød.
4. Brug beskyttelsesbriller og høreværn.
Det anbefales at bruge yderligere
udstyr til beskyttelse af hoved,
hænder, ben og fødder. Passende
beskyttelsestøj educerer kvæstelsesfaren
fra omkringflyvende spånmateriale og
tilfældig berøring af savekæden.
5. Brug ikke kædesaven, når der arbejdes
28
på et træ. Bruges kædesaven på et træ,
kan du blive kvæstet.
6. Sørg altid for at stå rigtigt og anvend
kun kædesaven, når du står på fast,
sikker og lige undergrund. Glat eller
ustabil undergrund kan medføre, at
man taber kontrollen over balancen og
kædesaven, hvis man star på en stige.
7. Når der saves i en gren, der er under
spænding, skal du regne med, at den
fjedrer tilbage. Når spændingen frigøres i
træfibrene, kan den spændte gren ramme
den person, der bruger saven, og/eller du
taber kontrollen over kædesaven.
8. Vær særlig forsigtig, når der saves
i undertræ og unge træer. Det tynde
materiale kan sættes sig fast I savkæden og
slå på dig eller bringe dig ud af ligevægt.
9. Bær kædesaven i det forreste greb
med stillestående savkæde og
med bagudvisende styreskinne.
Kædesaven skal altid være forsynet
med beskyttelsesafdækning, når
den transporteres eller lægges til
opbevaring. Omhyggelig omgang med
kædesaven forringer sandsynligheden for
tilfældig berøring af savkæden, mens den
er i gang.
10.Overhold instrukserne for smøring,
kædespænding og skift af tilbehør. En
kæde, der er spændt eller smurtforkert,
kan enten gå i stykker eller øge risikoen for
tilbageslag.
11.Hold grebene tørre, rene og fri for olie
og fedt. Fedtede, oliesmurte greb er glatte
og medfører, at man taber kontrollen.
12.Sav kun i træ. Brug kun kædesaven til
arbejde, den er beregnet til – Eksempel:
Brug ikke kædesaven til at save i plast,
murværk eller byggematerialer, der
ikke er af træ. Brug af kædesaven til
formål, den ikke er beregnet til, kan føre til
farlige situationer.
ÅRSAGER TIL ET TILBAGESLAG OG
HVORDEN ET SÅDANT UNDGÅS
Tilbageslag kan optræde, hvis spidsen på
styreskinnen berører en genstand eller hvis
træet bøjer sig og savkæden sætter sig fast i
snittet.
En berøring med skinnespidsen kan i nogle
tilfælde fore til en uforventet, bagudrettet
reaktion, hvor styreskinnen slås opad og hen
imod den person, der betjener saven.
Sætter savkæden sig fast i styreskinnens
overkant, kan skinnen hurtigt støde tilbage i
den retning, hvor brugeren befinder sig.
Hver enkelt af disse reaktioner kan medføre,
at du taber kontrollen over saven og at
du muligvis bliver alvorligt kvæstet. Stol
ikke udelukkende på det sikkerhedsudstyr,
der er monteret i kædesaven. Som bruger
af en kædesav bør du træffe forskellige
foranstaltninger for at undgå uheld og
kvæstelser.
Et tilbageslag skyldes forkert eller fejlagtig
brug af el-værktøjet. Det kan forhindres ved at
træffe egnede ikkerhedsforanstaltninger, der
beskrives i det følgende:
– Hold fast i saven med begge hænder,
så tommelfinger og fingre omslutter
kædesavens greb. Sørg for at stå
Batteridrevet motorsav DK
Page 29

sikkert og positionér armene på
en sådan måde, at du kan modstå
tilbageslagskræfter. Er egnede
foranstaltninger truffet, kan brugeren
beherske tilbageslagskræfterne. Slip aldrig
kædesaven.
– Undgå en anormal legemsposition
og sav ikke over skulderhøjde.
Derved undgås en utilsigtet berøring
med skinnespidsen og en bedre kontrol
af kædesaven muliggøres i uventede
situationer.
– Brug altid de af fabrikanten
foreskrevede reserveskinner og
savkæder. Forkerte reserveskinner og
savkæder kan føre til ødelæggelse af
kæden eller tilbageslag.
– Overhold fabrikantens instrukser
mht. slibning og vedligeholdelse af
savkæden. For lave dybdebegrænsere
øger tendensen til tilbageslag.
SIKKERHEDSFORSKRIFTER
TIL BATTERISÆT
a) Sekundærelementer eller batterisæt
må ikke skilles ad, åbnes eller knuses.
b) Et batterisæt må ikke kortsluttes.
Batterisæt må ikke opbevares
lemfældigt i en kasse eller skuffe,
hvor de kan kortslutte hinanden eller
kortsluttes af ledende genstande. Når
batterisættet ikke er i brug, skal det holdes
væk fra andre metalgenstande, såsom
papirclips, mønter, nøgler, søm, skruer eller
andre små metalgenstande, der kan skabe
en forbindelse fra en pol til en anden,
Kortslutning af batteripoler kan medføre
forbrændinger eller brand.
c) Batterisæt må ikke udsættes for
varme eller ild. Må ikke opbevares i
direkte sollys.
d) Batterisæt må ikke udsættes for
mekaniske stød.
e) I tilfælde af at et batteri lækker, må
væsken ikke komme i kontakt med
huden eller øjne. Hvis der er sket
kontakt, skal det berørte område
vaskes med rigelige mængder vand,
hvorefter der søges lægehjælp.
f) Søg straks lægehjælp, hvis et element
eller batterisæt er nedsvælget.
g) Opbevar batterisæt på et rent og tørt
sted.
h) Aftør batterisættets poler med en tør
klud, hvis de bliver snavsede.
i) Batterisæt skal oplades før
anvendelsen. Anvend altid den
korrekte oplader, og læs producentens
anvisninger eller brugervejledning for,
hvordan batterierne oplades korrekt.
j) Et batterisæt må ikke efterlades til
opladning i længere tid, hvis det ikke
anvendes.
k) Efter længere opbevaringsperioder
kan det være nødvendigt at oplade
eller aflade batterisættet flere gange
for at op den optimale ydelse.
l) Batterisæt yder mest optimalt, når de
anvendes ved normal stuetemperatur
(20°C ± 5°C).
m) Ved bortskaffelse af batterisæt,
skal batterisæt af forskellige
elektrokemiske systemer holdes
adskilte fra hinanden.
n) Genoplad kun med laderen
specificeret af WORX. Anvend ingen
anden oplader end den, der specifikt
er beregnet til brug med udstyret. En
oplader, der passer til en type batterisæt
kan skabe risiko for brand ved brug med et
andet batterisæt.
o) Brug kun det korrekte batteri til udstyret.
p) Batterisættet skal opbevares utilgængeligt
for børn.
q) Opbevar den originale produktlitteratur til
fremtidig brug.
r) Batterisættet skal fjernes fra udstyret, når
det ikke er i brug.
s) Bortskaffes på en miljørigtig måde.
29
Batteridrevet motorsav DK
Page 30

SYMBOLER MONTERING
PAS PÅ! Sørg for at værktøjet er
slukket, og batteriet er fjernet, før
du rører kæden eller foretages andre
justeringer.
Brug altid handsker, når du håndterer med
savekæden.
MONTERING AF SVÆRD OG SAVEKÆDE
1. Pak alle dele forsigtigt ud.
2. Læg kædesaven fra på en lige flade.
3. Bruk kun originele WORX-kjeder som er
laget for kjedesverdet.
4. Læg savekæden (8) ind i den omløbende
not på sværdet (7). Kontrollér
løberetningen. Sammenlign kæden med
løberetningssymbolet (13). Kontroller at
kjedespenningslåsen (17) vender utover.
(Se. Fig A)
5. Læg kædeleddene omkring kædehjulet
(12) og anbring sværdet (16) på en sådan
måde, at fastgørelsesbolten (14) og de to
sværdføringspunkter (20) griber ind i det
aflange hul på sværdet (7). (Se Fig. B)
6. Sørg for, at alle delene sidder rigtigt
(Se. Fig.C)
7. Påsæt kædedækslet (11), og kontroller,
at kædekrogen (19) glider korrekt ind i
kædedækslet (11).
8. Stram kædedækslet (11) ved at dreje
kædestramningsknappen (10) med uret,
indtil den sidder fast. (Se.Fig. E)
PAS PÅ! Kjedet er ikke strammet
til ennå. Tilstramming av kjeden
beskrives under “Stramming av kjede”.
Kontroller nu at kæden er korrekt
spændt.
30
Advarsel
For at undgå risikoen for
personskader skal brugeren læse
brugervejledningen
Bær høreværn
Bær øjenværn
Bær støvmaske
Udsæt ikke værktøj for regn.
Må ikke brændes
Må ikke udsættes for regn eller
vand.
Ke de brugte batterier væk,
Returner udbrændte batterier på
dit lokale opsamlingssted eller
genbrugsstation.
SPÆND SAVEKÆDEN
Nye savkæder vil strække sig. Kontroller
kædespændingen ofte ved første anvendelse
og stram kæden når den er løs rundt om
Savsværdet (7).
PAS PÅ!: Fjern batteriet fra
værktøjet før justering af
kædespændingen.
PAS PÅ! Skjærekantene på kjedet
er skarpe. Bruk vernehansker nå du
håndterer kjedet.åndterer kjedet.
Batteridrevet motorsav DK
Page 31

PAS PÅ! Sørg alltid for riktig
stramming av kjedet. Et for løst
kjede kan øke risikoen for tilbakeslag.
Et for løst kjede kan hoppe ut av
kjedesporet. Det kan skade brukeren og
kjedet. Et løst kjede kan føre til at kjedet,
sverdet og tannhjulene slites fortere.
1. Læg kædesaven fra på en lige flade.
2. Drej kædestramningsknappen strammes
(10) med uret indtil den er stram.
Spændingen indstilles automatisk mens
kædestramningsknap strammes.
Sperrehaken gjør at strammingen ikke blir
løsere. (Se Fig. F1)
3. Dobbelttjek tilspændingen af den
automatiske kædestramningsknap. The
correct chain tension is reached when the
Savekæden (8) er spændt rigtigt, når den
kan løftes ca. 3 – 6 mm i midten. Dette
gennemføres med en hånd ved at trække
savekæden op mod maskinens egenvægt.
(Se Fig. F2)
Brug en skruetrækker til at flytte kæden
rundt om sværdet for at sikre at der ikke er
nogen bugtninger. Kæden bør rotere frit.
(Se Fig. F3)
4. Når kjedet er for løst kan du skru opp
låseknotten/ kjedestrammingsknotten helt
og så skru dekselet på igjen med låseknott.
olietanken. Skru olietankdækslet (4) på igen
og luk det rigtigt.
VIGTIGT: Små udligningskanaler
findes på olietankens lås for at
muliggøre luftudveksling mellem olietank
og omgivelser. Stil altid saven fra på
et vandret underlag, når den ikke er
i brug, da olie ellers kan strømme ud
(olietankens lås 4 peger opad).
Brug udelukkende biologisk nedbrydelig
kædesavsolie for at undgå en
beskadigelse af kædesaven. Brug aldrig
genbrugsolie eller gammel olie. Brug
af forkert olie medfører, at garantien
bortfalder.
KONTROL AF OLIE-AUTOMATIK
Funktionen af den automatiske kædesmøring
kan kontrolleres ved at tænde for saven og
holde savens spids mod et stykke karton eller
papir, der er anbragt på jorden.
Hvis der opstår et større oliespor, arbejder
olieautomatikken rigtigt. Hvis der ikke ses
noget oliespor, selv om olietanken er fyldt op,
læs da under „Fejlsøgning“ eller kontakt Worxserviceafdelingen.
PAS PÅ: Kæden må ikke berøre jorden,
overhold en sikkerhedsafstand på 30 cm
31
KÆDESMØRING
VIGTIGT: Kædesaven er ikke fyldt med
kædesavsolie ved leveringen. Det er
derfor vigtigt, at kædesaven fyldes med olie,
før den tages i brug.
VIGTIGT: Kædesaven beskadiges, hvis
kædesaven benyttes uden kædesavsolie
eller hvis olieniveauet er under minmarkeringen.
Filling oil tank:
1. Stil kædesaven fra på et egnet underlag
med olietankdækslet opad.(4(
2. Rengør området omkring olietankdækslet
med en klud og skru låget af.
3. Tilføj sværd- og kædeolie indtil beholderen
er fuld. ISO VG32 Sværd- og kædeolie af
alle mærker kan bruges.
4. Sørg for at der ikke kommer snavs ned i
BETJENINGSVEJLEDNING
1.FØR DU BRUGER DIT LEDNINGSFRIE
VÆRKTØJ
ADVARSEL! Oplader og
batterienhed er specielt beregnet
til at blive brugt sammen. Brug ikke
andre batterienheder eller opladere. Sæt
aldrig metalgenstande ind i opladeren
eller batterienheden. Dette kan føre til
elektrisk fejl, der kan medføre fare.
VIGTIGT: Batteriet skal først oplades inden
det tages i brug, da det leveres helt uden
strøm.
Den medfølgende batterioplader matcher det
installerede Li-ion batteri på maskinen. Brug
ikke en anden batterioplader.
2. OPLAD BATTERIET
Li-Ion batteriet er beskyttet mod fuldstændig
Batteridrevet motorsav DK
Page 32

afladning. Når batteriet er afladet,
bliver maskinen slukket ved hjælp af et
beskyttelseskredsløb.
I varme omgivelser eller efter heftig brug,
kan batteripakken blive for varm til at
tillade opladning. Lad batteriet køle ned før
opladning.
3. SÅDAN FJERNES ELLER ISÆTTES
BATTERIENHEDEN (Se Fig. G)
Tryk på batterienhedens udløsningsknap
og fjern enheden fra værktøjet. Efter
opladning skal batterienheden sættes tilbage
i batteribås. Det er nok med et enkelt og let
tryk. Kontroller, at batteriet sidder helt fast.
NOTER: Når du tager batteripakken af,
skal du holde godt fast i den, så du ikke
taber den.
4. BATTERIETS STATUSLAMPER
(Se Fig.H)
NOTER: Statuslamperne angiver
batteritilstanden, når der trykkes på
knappen til batteriet.
Lamperne overvåger og viser hele tiden
batteritilstanden som følger:
Tryk på knappen “POWERTEST”, hvorved
statuslampen tændes.
32
Når de 3 grønne lamper lyser, er batteriet
ladet fuldt op.
Når de 2 lamper( ) lyser, er batteriet ladet
moderat op.Når der kun lyser én grøn lampe
( ) ,er batteriet ved at være fladt.
Før ibrugtagning ved første anvendelse
anbefales det, at batterienheden oplades
natten over, så batteriet lades fuldstændigt op.
VIGTIGT: Når der kun lyser en grøn
lampe, er batteriet ved at være
kørt fuldkommen fladt, selv om
plæneklipperen stadig kan klippe
græsset. Hvis der fortsættes med
plæneklipning i den tilstand, kan det
forkorte livstiden og mindske ydelsen på
batteriet betydeligt.
5. TÆND OG SLUK (Se Fig.I)
Maskinen tændes ved at trykke ind på
kontaktspærren (3) og derefter trykke startstop-kontakten (2) I bund og holde den i denne
stilling. Nu kan kontaktspærren (3) slippes
igen.
Maskinen slukkes ved at slippe start-stopkontakten (2).
Arbejde med kædesaven
VIGTIGT :Er olietanken fyldt på?
Kontrollér olieniveauet (18), før
savearbejdet påbegyndes og hereafter
med regelmæssige mellemrum
under savearbejdet.Påfyld olie, når
olieniveauet har nået underkanten i
kontrolvinduet. Tankvoluminet rækker
til ca. 20 minutter, afhængigt af antallet
af pauser og arbejdets intensivitet. (Se
Fig.J)Kontroller kædespændingen på nye
kæder ca. hver 10ende minutter.
1. Montér batteriet i maskinen (Se Fig. G).
2. Sørg for at det afsnit af stammen der skal
skæres ikke ligger på jorden. Dette holder
kæden (8) fra at rører jorden mens den
gennemskærer loggen. Det at farligt hvis
kæden rører jorden mens den kører og det
vil sløve kæden.
3. Brug begge hænder til at holde på saven.
Brug altid venstre hånd til at holde på
det forreste håndtag og højre hånd på
det bageste håndtag. Brug et fast greb.
Tommelfingre og fingre skal vikles
omkring savens håndtag (se fig. K).
4. Sørg for at du har solidt fodfæste. Spred
fødderne med en skulderbreddes afstand.
Fordel vægten jævnt på begge fødder.
5. Når du er klar til at save, så tryk
knappen lås-fra (3) held ned med højre
tommelfinger og tryk på udløseren. Dette
vil starte saven. Slip udløseren for at
standse saven. Sørg for, at saven kører ved
fuld hastighed, før du starter med at save.
6. Når du starter med at save, skal du placére
den bevægende kæde mod træet. Hold
saven fast på stedet for at undgå mulig
hoppen eller skøjten (sidelæns bevægelse)
af saven.
7. Bevæg saven med et let tryk og læg ikke
for meget kraft på saven. Motor bliver
overbelastet og kan brænde ud. Den vil
gøre arbejdet bedre og sikrere ved den
hastighed som den var beregnet til.
8. Fjern saven fra skæret mens saven stadig
Batteridrevet motorsav DK
Page 33

kører ved fuld hastighed. Stop saven ved
at slippe tænd/sluk-kontakten. Sørg for, at
kæden er stoppet før saven sættes ned.
9. Fortsæt med at træne på en sikker
arbejdsplads indtil du er blevet fortrolig
med det og nemt kan save med en
glidende bevægelse og konstant
savehastighed.
Sikkerhedsudstyr mod tilbageslag på
denne sav
Denne sav har en kæden med lav risiko for
tilbageslag og en savsværd med reduceret
tilbageslag. Begge dele reducerer chancen
for tilbageslag. Men tilbageslag kan stadig
forekomme med denne sav.
De følgende trin vil reducere risikoen for
tilbageslag.
Zur Vermeidung von Sägenrückschlag:
• Brug begge hænder til, at holde saven når
den kører. Hold ordentligt fat om saven.
Hold dine tommeltotter og fingre fast om
håndtagene.
• Hold alle sikkerhedsdelene på plads på
saven. Sørg for, at de virker ordentligt.
Ræk ikke for langt og sav ikke over
skulderhøjde.
• Stå fast på jorden med dine fødder, og
hold hele tiden balancen.
• Stå lidt på venstre side af saven.Dette gør,
at din krop ikke er i direkte linje med saven.
• Undgå, at røre noget med næsen af
sværdet, når saven er i gang.
• Prøv aldrig at skærer gennem to stammer
på samme tid. Sav kun én logfil ad gangen.
• Undgå, at begrave næsen af sværdet, eller
bore næsen af sværdet ind i et træ.
• Hold øje med om træet bevæger sig eller
om der er andre kræfter der kan klemme
kæden.
• Vær ekstrem forsigtig, når du igen
begynder at save i et snit.
• Brug kun kæden med lav risiko for
tilbageslag og sværdet som saven var
udstyret med.
• Brug aldrig en døv eller løs savkæde. Sørg
for, at savkæden altid sidder stram og altid
er skarp.
Sådan bruger du saven sikkert
1. Sørg for at stå sikkert under savearbejdet.
2. Hold saven på højre side af din krop (Se
Fig. L).
3. Kæden skal køre for fuld hastighed, før den
rammer træet.
4. Brug kloanslaget (9) til at fastgøre
kædesaven til træet.
5. Brug kloanslaget som arm under
savearbejdet. (Se Fig. M)
6. Brug aldrig kædesaven med udstrakte
arme. Forsøg ikke at save i vanskeligt
tilgængelige steder eller mens du står på
en stige. (Se Fig. N).
SAVNING I TRÆ, DER ER UNDER
SPÆNDING
du være yderst forsigtig. Vær forsigtigt
med hensyn til tilbagespringende træ.
Når trykket udløses, kan grenen springe
tilbage og ramme brugeren, som kan
føre til alvorlige skader eller dødsfald.
Hvis begge ender på træstammen hviler
på en genstand, saves træstammen først
en tredjedel igennem oppefra (Y) og ned
og herefter helt igennem nedefra (Z) og op
(sammesteds). Herved undgås splinter og en
fastklemning af saven. Saven må ikke komme
i kontakt med jorden under dette arbejde.
Hvis kun den ene ende af træstammen
hviler på en genstand, saves træstammen
først en tredjedel igennem nedefra (Y) og
op (sammesteds) og hereafter helt igennem
oppefra (Z) og ned. Herved undgås splinter og
en fastklemning af saven.
FÆLDNING AF TRÆER (Se Fig. P)
Brug altid en hjelm for at beskytte
hovedet mod nedfaldende grene.
Kædesaven må kun benyttes til at fælde
træer med en stammediameter, der er
mindre end sværdets længde.
Sikre arbejdsområdet. Sørg for at
personer og dyr ikke opholder sig i det
område, hvor træstammen kan falde hen.
Forsøg aldrig at befri en fastklemt sav,
mens motoren går. Brug trækiler til at
befri savekæden.
(Se Fig
.O)
ADVARSEL: Hvis du skal skære
en gren, der er under tryk, skal
33
Batteridrevet motorsav DK
Page 34

Udføres tilskærings- og fældearbejde af
to eller flere personer på samme tid, skal
afstanden mellem de personer, der fælder og
tilskærer, være mindst den dobbelte højde
på det træ, der fældes. Under fældningen
skal man være opmærksom på, at andre
personer ikke udsættes for fare, at de ikke
rammes af forsyningsledninger og at der
ikke opstår tingskader. Kommer et træ i
berøring med en forsyningsledning, kontaktes
energiforsyningsselskabet med det samme.
Ved savearbejde på skråninger skal brugeren
af kædesaven opholde sig højere oppe
end det træ, der skal fældes, da træet
sandsynligvis ruller eller glider ned ad
skråningen efter fældningen.
Før fældningen bør der være planlagt en
flugtvej og evt. gjort fri. Flugtvejen bør føre
skråt bagud væk fra den forventede faldlinje.
Før træet fældes, skal der tages højde for
træets naturlige hældning, positionen af de
største grene og vindretningen for at kunne
vurdere træets faldretning Snavs, sten, løse
barkstykker, søm, klammer og tråd skal fjernes
fra træet.
Kærvsnit gennemføres: Sav en kæv i
en ret vinkel til træets faldretning (X – W)
34
med en dybde på 1/3 af træets diameter.
Gennemfør først det nedeste, vandrette
kærvsnit. Derved undgås det, at savekæden
eller føringsskinnen kommer i klemme, når
det andet kærvsnit gennemføres.
Fældesnit gennemføres: Gennemfør
fældesnittet (Y) mindst 50 mm over det
vandrette kævsnit. Udfør fældesnittet
parallelt med det vandrette kærvsnit. Sav
kun fældesnittet så dybt, at der bliver et
holdestykke af stammen tilbage (fældeliste),
der virker som et hængsel. Holdestykket
forhindrer, at træet drejer sig og falder i den
forkerte retning. Sav ikke holdestykket over.
Når fældesnittet nærmer sig holdestykket,
bør træet begynde at falde. Skulle det
vise sig, at træet muligvis ikke falder i den
ønskede retning eller hælder tilbage, hvorved
savekæden kommer i klemme, afbrydes
fældesnittet og bruges kiler af træ, plast eller
aluminium for at åbne snittet og omlægge
træet i den øsnkede faldlinje.
Når træet begynder at falde, fjernes
kædesaven fra snittet, hvorefter den slukkes
og lægges fra, før det farlige område forlades
ad den planlagte flugtvej.
Vær opmærksom på nedfaldende grene og
undgå at snuble.
Når kilen (Z) drives ind i det vandrette snit,
skal træstammen begynde at falde.
Vær opmærksom på nedfaldende grene og
kviste, når træet begynder at falde.
AFGRENING (Se Fig.Q)
Herved forstås at grene fjernes fra fældede
træer. Store grene, der vender nedad og
som støtter træet, skal i første omgang blive
stående. Små grene saves over i et snit som
vist på billedet. Grene, der er under spænding,
bør saves nedefra og op for at undgå, at saven
sætter sig i klemme.
TRÆSTAMME AFKORTES(Se Fig. R)
Herved forstås at det fældede træ deles
i afsnit. Sørg for at stå sikkert og at
legemsvægten er fordelt jævnt på begge
fødder. Hvis det er muligt, bør stamen
understøttes af grene, bjælker eller kile.
Overhold de nemme instruktioner for let
savning.
Ligger hele træstammens længde jævnt som
vist på billedet, saves oppefra.
Ligger træstammen op mod en ende som vist
på billedet, saves først 1/3 af stamdiameteren
fra undersiden, hvorefter resten saves oppefra
på højde med undersnittet. (Se Fig. S)
Ligger træstammen op mod begge ender som
vist på billedet, saves først 1/3 af stammens
diameter fra oversiden, hvorefter 2/3 saves
fra undersiden på højde med oversnittet. (Se
Fig. T)
ADVARSEL: (Se Fig.U)
Hvis du befinder dig på en
skråning, så sørg for at stammen ikke
triller ned ad bakke. Hold stammen
på plads ved hjælp af træpæle. Slå
træpælene i jorden på neden for
stammen på skråningen. Stå ovenfor på
skråningen mens der saves. Stammen vil
måske rulle efter opskæring.
• Prøv aldrig at skærer gennem to
stammer på samme tid. Dette kan øge
Batteridrevet motorsav DK
Page 35

risikoen for tilbageslag.
• Mens du skærer en stamme skal du
aldrig stammen med hånden, benet
eller foden.
• Mens du skærer en stamme må du
aldrig tillade en anden person til at
holde stammen.
• Slå tændingen fra, og tag batteriet ud
af saven før du flytter fra ét sted til et
andet.
VEDLIGEHOLDELSE AF
SAVEN OG SIKKERHED
Følg vedligeholdelsesinstruktionerne i denne
vejledning. Korrekt rengøring af sav og kæde
og sværd kan reducere risikoen for tilbageslag.
Efterse og vedligehold saven efter hver brug.
Dette forlænger savens levetid. Bemærk:
Risikoen for tilbageslag forøges hver gang
saven slibes, også selvom den slibes rigtigt..
VEDLIGEHOLDELSE
OG OPBEVARING AF
MOTORSAV
1. Fjern batteripakken fra saven
• Når den ikke bruges.
Før du flytter fra ét sted til et andet
• Før servicering.
• Før du skifter tilbehør eller andre dele,
såsom savkæden eller sværdet.
2. Efterse motorsaven før og efter hver brug.
Tjek saven grundigt, hvis afskærmningen
eller anden dele er blevet beskadiget.
Tjek for eventuelle skader, der kan påvirke
førerens sikkerhed eller betjeningen af saven.
Tjek justeringen og de bevægelige dele.
Tjek for beskadigede eller ødelagte dele.
Brug ikke motorsaven hvis skader påvirker
sikkerheden eller driften. Få skaden repareret
af et autoriseret servicecenter. For at finde
et autoriseret servicecenter, kan du besøge
www.worx.com
3. Vedligehold motorsaven med omhu.
• Udsæt aldrig saven for regn.
• Hold kæden skarp, ren og smurt for bedre
og mere sikker ydeevne.
• Følg de trin, der er beskrevet i denne
manual angående at holde kæden skarp.
• Hold håndtagene tørre, rene og fri for olie
og fedt.
• Sørg for, at alle skruerne og møtrikkerne er
fastspændte.
4. Brug kun identiske reservedele, når
apparatet skal repareres.
5. Læg saven til opbevaring, opbevar altid
motorsaven.
• Opbevar den på et højt eller lukket sted,
ude af børns rækkevidde.
• Opbevar den på et tørt sted.
VEDLIGEHOLDELSE AF SVÆRDET
For at maksimere levetiden af sværdet,
anbefales følgende vedligeholdelse af
sværdet.
Sværdskinnerne der bærer kæden skal
rengøres før opbevaring af værktøjet eller
hvis sværdet eller kæde synes at være
beskidt.
Skinnerne skal rengøres hver gang kæden
fjernes.
Vend sværdet rundt så den øverste skinne
bliver den nederste skinne, efter ca. hver 5
timers brug
SÅDAN RENGØRES SVÆRDETS
SKINNER
1. Afmontér kædedækslet og sværdet og
kæden. (Se afsnittet SAMLING)
2. Rengør ved hjælp af en stålbørste,
skruetrækker eller lignende egnet værktøj,
skidt fra skinnerne. (Se fig V)
3. Sørg for at rense oliekanalerne grundigt
BETINGELSER, SOM KRÆVER
VEDLIGEHOLDELSE AF SVÆRDET
• Saven saver til den ene side eller i en
vinkel.
• Saven skal tvinges for at komme igennem
snittet.
• Utilstrækkelig olieforsyning til sværdet og
kæden.
Tjek tilstanden af sværdet hver gang kæden
slibes. Et slidt sværd vil beskadige kæden og
35
Batteridrevet motorsav DK
Page 36

gør det svært at save.
Efter hver brug med enhed frakoblet fra
strømforsyningen, skal den rengøres for al
savsmuld på sværdet og tandhjulshullet.
File Rail Edges
and Sides
Square
Worn Groove Correct Groove
Brug en flad fil til at gendanne lige kanter og
sider, hvis skinnen foroven er ujævn.
Udskift sværdet når rillen er slidte, sværdet er
bøjet eller knækket, eller når den overophedes
eller afgratning af skinnerne opstår. Hvis
udskiftning er nødvendig, så anvend
kun det sværd der er angivet for saven i
reservedelslisten eller på mærkaten
på motorsaven.
UDSKIFTNING/VENDING AF SAVEKÆDE
OG SVÆRD
Kontrollér savekæde og sværd iht. afsnittet
„Spænding af savekæde“.
Styrenoten på sværdet slides med tiden. Når
savekæden skiftes, drejes sværdet 180° for at
udligne sliddet.
36
Hvis sverdet er slitt eller skadet, ta
kjedestrammingslåsen av sverdet ved å
løsne skruen mot klokken. Plasser deretter
strammingslåsen i det nye sverdet ved å
stramme til med klokken. Den utstikkende
låsen (a) må passe i huller i sverdet.
SLIBNING AF SAVEKÆDEN
ADVARSEL:
Fjern batteripakken fra saven før
eftersyn. Alvorlig skade eller dødsfald
kan forekomme, som følge af elektrisk
stød eller kropskontakt med en kæde i
bevægelse.
• Skærekanterne på kæden er meget
skarpe. Brug beskyttelseshandsker,
når du skal røre ved kæden.
Hold kæden skarp. Din sav vil save hurtigere
og mere sikkert. En sløv kæde vil medføre
unødig slid på kædehjul, sværd , kæde og
motor. Hvis du skal tvinge kæden ind i et træ
og savning kun skaber savsmuld med få store
spåner, er kæden sløv.
Smør tandhjul
ADVARSEL: Benyt kraftige handsker
ved udførelse af vedligeholdelse eller
service på dette værktøj
Fjern altid batteriet fra saven inden der
udføres service eller vedligeholdelse på dette
værktøj.
BEMÆRK:
Det er ikke nødvendigt at afmontere kæden
eller sværdet ved smøring af tandhjulet
1. Rengøring sværdet og tandhjulet
2. Brug en smørepistol, sæt spidsen af
pistolen i smørehullet og indsprøjt fedt
indtil den vises på den udvendige kant af
tandhjulets tand. (Se fig X)
3. For at dreje tandhjulet skal du frigøre
kædestoppet og trække kæden med
hånden indtil den usmurte bagside af
tandhjulet er på linje med smørehullet.
Gentag denne procedure for smøring.
RENGØRING/OPBEVARING
Rengør det formede kunststofhus på
kædesaven med en blød børste og en ren
klud. Det er ikke tilladt at benytte vand,
opløsningsmidler og poleringsmidler. Fjern al
snavs, især fra motorens ventilationsåbninger
. Når saven har været brugt i 1 til 3 timer:
Demontér beskyttelsen , sværdet og kæden
og rengør det hele med en børste.Brug en
børste til at befri området under beskyttelsen
, kædehjulet og sværdfastgørelsen for snavs.
Rengør oliedysen med en ren klud. Savekæde
og sværd skal rengøres, før kædesaven
opbevares i længere tid.Opbevar kædesaven
på et sikkert sted, som skal være tørt og uden
for børns rækkevidde. Værktøjet skal altid
fralægges vandret for at forhindre
udløb (oliepåfyldningsskruen 4 skal pege
opad).
Olietanken skal altid være tømt helt, hvis
saven opbevares i salgsemballagen
Bei Aufbewahrung in der Verkaufsverpackung
muss der Öltank restlos entleert werden.
Batteridrevet motorsav DK
Page 37

MILJØBESKYTTELSE
Dette produkt er blevet mærket med
et symbol i relation til bortskaffelse af
elektrisk og elektronisk udstyr. Dette
betyder at dette produkt ikke må bortskaffes
sammen med husholdningsaffald, men at det
skal returneres til et opsamlingssystem, der
overholder det Europæiske Direktiv 2012/19/
EU . Det vil da blive genbrugt eller adskilt
for at reducere påvirkningerne på miljøet.
Elektrisk og elektronisk udstyr kan være
skadelig for miljøet og for den menneskelige
sundhed eftersom de indeholder farlige
substanser.
37
Batteridrevet motorsav DK
Page 38

FEJLFINDING
Symptom Mulig årsag Afhjælpning
Kædesaven fungerer
ikke
Kædesaven tænder og
slukker hele tiden
Savekæden er tør
Rückschlagbremse/
Auslaufbremse
Kæden/styreskinnen er
varm
38
Kædesaven hopper,
vibrerer eller saver ikke
rigtigt
Batteri fladt
Sikringen er defekt
Ekstern løs forbindelse
Intern løs forbindelse
Start-stop-kontakten er defekt
Olietanken er tom
Ventilationsåbningen i
olietankdækslet
er tilstoppet
Olieudløbskanalen er
tilstoppet
Problemer med
koblingsmekanismen i
den forreste håndbeskyttelse
Olietanken er tom
Ventilationsåbningen i
olietankdækslet
er tilstoppet
Olieudløbskanalen er
tilstoppet
Kædespændingen er for høj
Kæden er uskarp
Kædespændingen er for løs
Kæden er uskarp
Kæden er slidt
Savetænderne peger i den
forkerte
retning
Oplad batteriet
Udskift sikringen
Kontakt et autoriseret værksted
Kontakt et autoriseret værksted
Kontakt et autoriseret værksted
Fyld tanken op med olie
Rengør olietankdækslet
Rens olieudløbskanalen
Kontakt et autoriseret værksted
Fyld tanken op med olie
Rengør olietankdækslet
Rens olieudløbskanalen
Indstil kædespændingen
Slib eller udskift kæden
Indstil kædespændingen
Slib eller udskift kæden
Erstat kæden
Montér savekæden igen, så
tænderne
vender i den rigtige retning
Bruk aldri verktøy med feil på AV/PÅ-knappen eller feil på tilbakeslagsberemsen(håndvern).
Ved alle andre typer tekniske feil kan du kontakte hjelpetelefonen eller det lokale servicesenteret.
Batteridrevet motorsav DK
Page 39

KONFORMITÄTSERKLÄRUNG
Vi,
POSITEC Germany GmbH
Konrad-Adenauer-Ufer 37
50668 Köln
Erklærer herved, at produktet
Beskrivelse WORX batteridrevet
motorsav
Type WG368E WG368E.9 (3- udpegning
af maskiner, repræsentant for Kædesav)
Funktion skæring i træ
Er i overensstemmelse med følgende
direktiver:
2006/42/EF, 2004/108/EF, 2011/65/EU,
2000/14/EF ændret af 2005/88/EF
Afprøvningsorgan involveret
Navn: Intertek Deutschland GmbH
(Afprøvningsorgan 0905)
Elektromagnetiske
kompatibilitetsdirektiv
2000/14/EF ændret ved 2005/88/EF
– Konformitetstestprocedure pr. Annex V
– Målt niveau for lydeffekt 96.1dB(A)
– Deklareret garanteret niveau for lydeffekt
100dB(A)
39
Standarder i overensstemmelse med:
EN 60745-1 EN 60745-2-13
EN ISO 3744 EN 55014-1
EN 55014-2
Personen, autoriseret til at udarbejde den tekniske
fil,
Navn: Russell Nicholson
Adresse: Positec Power Tools (Europe)
Ltd, PO Box 152, Leeds, LS10 9DS, UK
2014/04/21
Leo Yue
POSITEC Kvalitetschef
Batteridrevet motorsav DK
Page 40

1. TAAEMPI KAHVA
2. KÄYNNISTYSKYTKIN
3. KÄYNNISTYSVARMISTIN
4. ÖLJYSÄILIÖN KANSI
5. ETUMMAINEN KAHVA
6. KÄSISUOJUS
7. LAIPPA
8. TERÄKETJU
9. PIIKKILISTA
10. KETJUN KIRISTINNUPPI
11. KETJUSUOJUS
12. KETJUPYÖRÄ
13. KETJUN SUUNNAN SYMBOLI
14. LEVYN SIJOITUSTAPIT
15. ÖLJYSUUTIN
16. KIINNITYSPULTTI
17. LEVYN JÄNNITYSLEVY
18. ÖLJYTASON IKKUNA
19. KETJUSIEPPO
40
20. LEVYN KIINNIKE
21. TERÄSUOJUS*
* Käyttöohjeissa kuvatut lisätarvikkeet eivät välttämättä sisälly toimitukseen!
Akkukäyttöinen moottorisaha FIN
Page 41

TEKNISET TIEDOT
Tyyppi WG368E WG368E.9 (3-koneen määritykset, esimerkki moottorisaha)
WG368E WG368E.9
Nimellisjännite 40V
Laipan pituus 30cm
Leikkauspituus 25cm
Ketjun nopeus 3.8m/s
Öljysäiliön tilavuus 100ml
Ketjun jako 9.5mm
Ve Öljysäiliön tilavuus tolenkkien
lukumäärä
Ketjukoko 1.1mm
Teräketjun tyyppi
Laippatyyppi
Latausaika 1hr /
Paino( sisältää ketjun ja laipan) 3.8kg 3.0kg
Oregon
**Jännite mitattu ilman kuormitusta. Akun alkujännite saavuttaa enintään 40 volttia.
Nimellisjännite on 36 volttia.
Max**
45
Oregon
®
: 124MLEA041
®
: 90PX
MELU-JA TÄRINÄARVOT
A-painotettu äänenpaine LpA:85dB(A)
A-painotettu ääniteho L
K
pA
Käytä kuulonsuojaimia
:100dB(A)
wA.d
3.0dB(A)
TÄRINÄTIEDOT
Tärinän kokonaisarvot (kolmen suunnan vektorisumma) määritettiin EN 60745:n mukaan:
Tärinän päästöarvo: ah = 3,5m/s2 Epävarmuus K = 1,5m/s²
Näissä ohjeissa mainittu värähtelytaso standardoidun mittausmenetelmän mukaisesti ja sitä
voidaan käyttää sähkötyökalujen vertailussa.Se soveltuu myös värähtelyrasituksen äliaikaiseen
arviointiin.
VAROITUS: Työkalun käytön todelliset tärinäarvot saattavat poiketa annetuista arvoista
riippuen työkalun käyttötavoista seuraavien määritelmien muiden käyttötapojen
perusteella:
Kuinka työkalua käytetään ja mitä materiaaleja lahataan tai porataan.
Onko työkalu hyvässä kunnossa ja hyvin huollettu.
Akkukäyttöinen moottorisaha FIN
41
Page 42

Käytetäänkö työkalussa oikeita lisävarustetia ja ovatko ne teräviä ja hyväkuntoisia.
Kahvojen otteen pitävyys, jos työkalussa käytetään tärinää estäviä lisävarusteita.
Käytetäänkö työkalua asianmukaisesti ja näitä ohjeita noudattaen.
Tämä työkalu saattaa aiheuttaa käsien/käsivarsien tärinäsyndrooman, jos laitetta ei
käytetä oikein.
VAROITUS: Altistustason arvioinnissa tulee tarkkuuden vuoksi ottaa huomioon todelliset
käyttöolosuhteet, mukan lukien aika, kun työkalu on kytketty pois päältä ja kun se käy
joutokäynnillä. Tämä saattaa vähentää koko työajan yhteenlaskettua altistusaikaa huomattavasti.
Tärinälle altistumisriskin vähentäminen.
Käytä AINA teräviä talttoja, poria ja teriä.
Huolla tätä työkalua ohjeiden mukaisesti ja pidä työkalu hyvin voideltuna (soveltuvissa kohdissa).
Jos työkalua käytetään säännöllisesti, hanki tärinää estävät lisävarusteet.
Vältä työkalun käyttämistä 10oC lämpötiloissa tai sitä viileämmässä.
Suunnittele työt siten, että paljon tärinää aiheuttavien töiden suorittaminen jakautuu usealle
päivälle.
VARUSTEET
WG368E WG368E.9
Tartunta-teräöljy(100ml) 1 1
Terän suojus 1 1
Laturi (WA3735) 1 /
42
Akkupakkaus (WA3536) 1 /
Suosittelemme ostamaan kaikki tarvikkeet samasta liikkeestä, josta hankit koneen. Käytä
hyvälaatuisia merkkitarvikkeita. Valitse karkeus käsillä olevan työn mukaan. Katso tarkemmat
tiedot kyseisen tarvikkeen pakkauksesta. Saat apua ja neuvoja myös myymälän henkilökunnalta.
Akkukäyttöinen moottorisaha FIN
Page 43

MOOTTORITYÖKALUN YLEISET
TURVALLISUUSVAROITUKSET
VAROITUS! Lue kaikki ohjeet.
Varoitusten ja ohjeiden noudattamatta
jättämisestä voi olla seurauksena sähköisku,
tulipalo ja/tai vakava tapaturma.
VAROITUS: Lue kaikki ohjeet sekä
kaikki varoitukset, jotka on merkitty
symbolilla.
Tallenna kaikki varoitukset ja ohjeet
myöhempää käyttoä varten.
Seuraavissa ohjeissa käytetty termi “kone”
viittaa verkkokäyttöiseen (liitäntäjohdolla
varustettuun) tai akkukäyttöiseen
(johdottomaan) sähkötyökaluun.
1) MOOTTORITYÖKALUN YLEISET
TURVALLISUUSVAROITUKSET
-TYÖYMPÄRISTÖ
a) Pidä työympäristö siistinä ja huolehdi
hyvästä valaistuksesta. Sotkuiset
ja hämärät työympäristöt ovat
tapaturma-alttiita.
b) Älä käytä koneita
räjähdysvaarallisissa, palavia nesteitä,
kaasuja tai pölyä sisältävissä tiloissa.
Koneissa syntyy kipinöitä, jotka voivat
sytyttää pölyn tai höyryt.
c) Huolehdi konetta käyttäessäsi, että
lapset ja sivulliset pysyvät loitolla.
Häiriötekijät saattavat aiheuttaa koneen
hallinnan menettämisen.
2) MOOTTORITYÖKALUN YLEISET
TURVALLISUUSVAROITUKSET
-SÄHKÖTURVALLISUUS
a) Koneen liitäntäjohdon pistokkeen
pitää sopia pistorasiaan. Älä
muuta pistoketta millään tavoin.
Älä käytä sovittimia (jakorasioita)
suojamaadoitettujen koneiden kanssa.
Pistorasiaan sopiva alkuperäinen pistoke
vähentää sähköiskun vaaraa.
b) Älä koske maadoitettuihin pintoihin,
kuten putkiin, lämpöpattereihin, liesiin
ja jääkaappeihin. Sähköiskun vaara on
suurempi, jos kehosi on maadoitettu.
c) Älä altista koneita sateelle tai
kosteudelle. Koneeseen pääsevä vesi
lisää sähköiskun vaaraa.
d) Varo vahingoittamasta liitäntäjohtoa.
Älä kanna tai vedä konetta
liitäntäjohdosta äläkä irrota
pistoketta johdosta vetämällä. Suojaa
liitäntäjohto kuumuudelta, öljyltä,
teräviltä reunoilta ja liikkuvilta
osilta. Vaurioituneet tai sotkeentuneet
liitäntäjohdot lisäävät sähköiskun vaaraa.
e) Käytä ulkona työskenneltäessä vain
ulkokäyttöön sopivaa jatkojohtoa.
Ulkokäyttöön sopivan jatkojohdon käyttö
vähentää sähköiskun vaaraa.
f) Jos sähkötyökalun käyttö kosteassa tilassa
on välttämätöntä, jäännösvirtaa sisältävän
laitteen (RCD) suojattua virtaa. RCD:n
käyttö vähentää sähköiskun vaaraa.
3) MOOTTORITYÖKALUN YLEISET
TURVALLISUUSVAROITUKSET
- KÄYTTÄJÄN TURVALLISUUS
a) Ole valpas, keskity siihen, mitä olet
tekemässä, ja käytä järkeä koneen
kanssa työskennellessäsi. Älä käytä
konetta väsyneenä tai huumeiden,
alkoholin, tai lääkkeiden vaikutuksen
alaisena. Hetken hajamielisyys koneita
käytettäessä saattaa aiheuttaa vakavan
tapaturman.
b) Käytä suojavarusteita. Käytä aina
suojalaseja. Suojavarusteiden, kuten
hengityssuojaimien, pitäväpohjaisten
turvakenkien, suojakypärän ja
kuulonsuojaimien, tarkoituksenmukainen
käyttö vähentää tapaturmia.
c) Estä tahaton käynnistyminen.
Varmista, että kytkin on off-asennossa
ennen liittämistä virtalähteeseen ja/tai
akkuun ja ennen työkalun nostamista
tai kantamista. Koneen kantaminen sormi
käynnistyskytkimellä tai liitäntäjohdon
kytkeminen käynnistyskytkimen ollessa
päällä altistaa tapaturmille.
d) Varmista ennen koneen
käynnistämistä, että kaikki
säätöavaimet ja muut työkalut on
poistettu. Pyörivään osaan kiinni jätetty
avain saattaa aiheuttaa tapaturman.
e) Älä kurkottele. Säilytä koko ajan
43
Akkukäyttöinen moottorisaha FIN
Page 44

tukeva asento ja hyvä tasapaino.
Tällöin hallitset koneen paremmin
odottamattomissa tilanteissa.
f) Pukeudu asianmukaisesti. Älä käytä
löysiä vaatteita tai koruja. Pidä hiuksesi,
vaatteesi ja käsineesi kaukana liikkuvista
osista. Väljät vaatteet, korut tai pitkät
hiukset voivat tarttua liikkuviin osiin.
g) Jos koneessa on liitännät pölynpoisto
- ja keruulaitteille, varmista, että ne on
kytketty ja että niitä käytetään oikein.
Näiden laitteiden käyttö voi vähentää
pölyyn liittyviä vaaroja.
4) MOOTTORITYÖKALUN YLEISET
TURVALLISUUSVAROITUKSET
-KONEEN KÄYTTÖ JA HOITO
a) Älä ylikuormita konetta. Käytä työhön
sopivaa konetta. Oikea kone tekee
työn paremmin ja turvallisemmin sillä
nopeudella, jolle se on suunniteltu.
b) Älä käytä konetta, jos sitä ei voi
käynnistää ja pysäyttää kytkimellä.
Jos konetta ei voi ohjata käynnistys-/
pysäytyskytkimellä, se on vaarallinen ja
pitää korjata.
c) Irrota sähkötyökalun pistoke
44
virtalähteestä ja/tai akusta ennen
säätöjen tekemistä, lisäosien
vaihtamista tai sähkötyökalujen
varastointia. Tämä ennalta ehkäisevä
turvatoimi estää koneen käynnistymisen
vahingossa.
d) Säilytä koneet lasten
ulottumattomissa äläkä anna
koneeseen tai näihin ohjeisiin
tutustumattoman henkilön käyttää
konetta. Koneet ovat vaarallisia
tottumattomien käyttäjien käsissä.
e) Pidä koneet kunnossa. Tarkista
esiintyykö liikkuvissa osissa heittoa
tai takertelua ja näkyykö osissa
vauriota tai jotain muuta, joka voi
vaikuttaa koneen toimintaan. Jos kone
on vahingoittunut, korjauta se ennen
käyttöä. Monet tapaturmat johtuvat
huonokuntoisista koneista.
f) Pidä terät terävinä ja puhtaina.
Asianmukaisesti hoidetut terät, joissa
on terävät leikkuureunat, toimivat
todennäköisemmin takertelematta ja ovat
helpommin hallittavissa.
g) Käytä konetta, varusteita ja
teriä/kärkiä näiden ohjeiden
mukaisesti ja kyseisen konetyypin
suunniteltuun tarkoitukseen ottaen
huomioon työskentelyolosuhteet ja
suoritettava työ. Koneen suunnitellusta
käyttötarkoituksesta poikkeava käyttö voi
aiheuttaa vaarallisen tilanteen.
h) Pidä kahvat kuivina, puhtaina,
öljyttöminä ja rasvattomina.
Liukkaat kahvat voivat aiheuttaa
odottamattomia tilanteita käsittelyssä,
minkä vuoksi työkalun käytöstä voi
tulla turvatonta.
5) MOOTTORITYÖKALUN YLEISET
TURVALLISUUSVAROITUKSET
-HUOLTO
a) Huollata kone valtuutetussa
huollossa käyttäen vain alkuperäisiä
varaosia. Tämä varmistaa koneen
turvallisuuden säilymisen.
Ketjusahojen varo-ohjeet:
1. Pidä kaikki kehon osat loitolla
sahanterästä sahan ollessa käynnissä.
Varmista ennen sahan käynnistämistä,
että teräketju ei kosketa mitään.
Ketjusahan kanssa työskenneltäessä voi
hetken varomattomuus johtaa siihen, että
vaatteet tai kehonosa osuu teräketjuun.
2. Pidä ketjusahaa oikea käsi
takakahvassa ja vasen käsi
etukahvassa. Ketjusahan pitäminen
eri tavalla työn aikana, kasvattaa
loukkaantumisriskiä, eikä sitä saa käyttää.
3. Pitele konetta eristetyistä
kädensijoista/tartuntapinnoista, kun
teet töitä, joissa terä saattaa osua
rakenteissa oleviin sähköjohtoihin
tai koneen liitäntäjohtoon. Osuminen
jännitteelliseen johtimeen tekee
myös koneen paljaista metalliosista
jännitteellisiä, ja käyttäjä saa niistä
sähköiskun.
4. Käytä suojalaseja ja kuulonsuojaimia.
Lisäsuojavarusteita pään, käsien,
Akkukäyttöinen moottorisaha FIN
Page 45

säärien ja jalkojen suojaksi
suositellaan. Sopiva suojapuku pienentää
loukkaantumisvaaran, joka syntyy
ympäristöön sinkoutuvista lastuista ja
teräketjun tahattomasta kosketuksesta.
5. Älä koskaan työskentele ketjusahan
kanssa kasvavassa puussa. Ketjusahan
käyttö puunkaadossa synnyttää
loukkaantumisvaaran.
6. Varmista aina tukeva seisoma-asento
ja käytä ketjusahaa ainoastaan,
kun seisot kiinteällä, turvallisella
ja tasaisella alustalla. Liukas tai
epätasainen alusta saattaa, tikkaita
käytettäessä, johtaa tasapainon ja
ketjusahan hallinnan menettämiseen.
7. Ota huomioon, että jännityksessä
oleva oksa ponnahtaa takaisin
sahattaessa. Puun kuitujen jännityksen
poistuessa, saattaa jännityksessä ollut oksa
osua sahaajaan ja/tai riistää ketjusahan
käyttäjän hallinnasta.
8. Ole erityisen varovainen, kun sahaat
alusmetsikköä ja nuoria puita. Ohut
puu saattaa tarttua teräketjuun ja iskeä
sinuun tai saattaa sinut menettämään
tasapainosi.
9. Kanna ketjusahaa etukahvasta, sahan
ollessa pysähdyksissä ja terälevyn
osoittaessa taaksepäin. Asenna aina
suojus terään, kun kuljetat tai säilytät
ketjusahaa. Ketjusahan huolellinen käsittely
vähentää todennäköisyyttä koskettaa
liikkuvaa teräketjua epähuomiossa.
10. Noudata voitelua, ketjun kiristystä
ja lisätarvikkeiden vaihtoa koskevia
ohjeita. Asiaankuulumattomasti kiristetty
tai voideltu ketju voi revetä tai kasvattaa
takaiskuriskiä.
11. Pidä kahvat kuivina, puhtaina
ja vapaana öljystä sekä rasvasta.
Rasvaiset, öljyiset kahvat ovat liukkaita ja
johtavat hallinnan menetykseen.
12. Sahaa vain puuta. Käytä ketjusahaa
vain töihin, joihin se on tarkoitettu
– esimerkki: Älä käytä ketjusahaa
muovin, muurauksen tai muiden kuin
puisten rakennusaineiden sahaukseen.
Ketjusahan käyttö muihin
kuin määräyksenmukaisiin töihin saattaa
johtaa vaarallisiin tilanteisiin.
TAKAISKUN SYY JA MITEN SEN ESTÄT:
Takaisku saattaa syntyä terälevyn kärjen
osuessa esineeseen tai puun taipuessa ja
teräketjun jäädessä puristukseen sahausuraan.
Terälevyn kärjen kosketus saattaa monessa
tapauksessa johtaa odottamattomaan
taaksepäin suuntautuvaan vastavoimaan,
jolloin terälevy iskeytyy ylöspäin ja
käyttäjää kohti.
Teräketjun jäädessä puristukseen
yläreunastaan, se nopeasti iskeä taaksepäin
käyttäjää kohti.
Jokainen näistä vastavoimista voivat johtaa
siihen, että menetät sahan hallinnan ja voit
loukkaantua vakavasti. Älä luota yksinomaan
ketjusahan turvalaitteisiin. Ketjusahan
käyttäjänä tulisi sinun ryhtyä määrättyihin
toimenpiteisiin, voidaksesi työskennellä ilman
onnettomuutta ja loukkaantumista.
Takaisku johtuu sähkötyökalun väärinkäytöstä
tai käytöstä väärään tarkoitukseen. Se voidaan
estää sopivin varotoimin, joita selostetaan
seuraavassa:
– Pidä sahaa tiukasti kahdella
kädellä niin, että peukalo ja sormet
ympäröivät ketjusahan kahvoja. Saata
kehosi ja käsivartesi asentoon, jossa
pystyt vastustamaan takaiskuvoimia.
Kun suoritetaan tarkoituksenmukaisia
toimenpiteitä, pystyy käyttäjä hallitsemaan
takaiskuvoimia. Älä koskaan irrota otetta
ketjusahasta.
– Vältä epänormaalia kehon
asentoa äläkä koskaan sahaa yli
olkakorkeuden. Näin voidaan estää
tahaton kosketus terälevyn kärjellä ja
mahdollistetaan ketjusahan parempi
hallinta odottamattomissa tilanteissa.
– Käytä aina valmistajan määräämiä
varaterälevyjä ja teräketjuja.
Vääränlaiset terälevyt ja teräketjut voivat
johtaa ketjun repeytymiseen tai takaiskuun.
– Noudata valmistajan ohjeita koskien
teräketjun kiristystä ja hoitoa. Liian
matala syvyyssäädin kasvattaa taipumusta
takaiskuun.
45
Akkukäyttöinen moottorisaha FIN
Page 46

AKUN TURVAOHJEET
a) Älä pura, avaa tai revi nappiparistoja
tai akkua.
b) Älä aiheuta akkuun oikosulkuja. Älä
säilytä akkuja sattumanvaraisesti
laatikossa tai kaapissa, jossa ne
voivat joutua oikosulkuun toistensa
tai muiden metalliesineiden kanssa.
Kun akku ei ole käytössä, pidä se
kaukana muista metalliesineistä, kuten
paperiliittimistä, kolikoista, avaimista,
nauloista, ruuveista tai muista pienistä
metalliesineistä, jotka voivat muodostaa
yhteyden päätteiden välille. Akkujen
päätteiden yhteiset oikosulut voivat
aiheuttaa palovammoja tai tulipalon.
c) Älä altista akkua kuumuudelle tai
tulelle. Älä säilytä sitä suorassa
auringonvalossa.
d) Älä kohdista akkuun mekaanisia iskuja
e) Jos paristo vuotaa, älä päästä nestettä
kosketuksiin ihon tai silmien kanssa.
Jos näin käy, huuhtele kosketusalue
runsaalla vedellä ja hakeudu lääkärin
hoitoon
f) Jos nappiparisto tai akku tulee
46
niellyksi, hakeudu välittömästi lääkärin
vastaanotolle.
g) Pidä akku puhtaana ja kuivana.
h) Pyyhi akun päätteet puhtaalla, kuivalla
liinalla, jos ne ovat likaantuneet.
i) Akku on ladattava ennen käyttöä.
Käytä aina oikeaa laturia ja oikeita
latausmenetelmiä.
j) Älä jätä akkua ladattavaksi pitkään, jos
sitä ei käytetä.
k) Pitkän varastointiajan jälkeen voi
olla välttämätöntä ladata ja purkaa
akku useita kertoja maksimaalisen
suorituskyvyn saavuttamiseksi.
l) Akku antaa parhaan tehon,
kun sitä käytetään normaalissa
huonelämpötilassa (20°C ± 5°C).
m) Kun hävität akut, pidä erilaisen
sähkökemiallisen yhdistelmän omaavat
järjestelmät erillään toisistaan.
n) Lataa vain WORX in määrittelemällä
laturilla. Älä käytä mitään muuta
kuin laitteen toimitukseen kuuluvaa
laturia. Laturi, joka sopii yhteen akkuun
voi aiheuttaa tulipalon vaaran, jos sitä
käytetään toisenlaisessa akussa.
o) Älä käytä mitään akkua, jota ei ole
suunniteltu käytettäväksi kyseisessä
laitteistossa.
p) Pidä akku lasten ulottumattomissa.
q) Säilytä tuotteen alkuperäiset asiakirjat
tulevaa käyttöä varten.
r) Poista akku laitteesta, kun laitetta ei
käytetä.
s) Hävitä käytetty akku oikein.
Akkukäyttöinen moottorisaha FIN
Page 47

SYMBOLIT
VAROITUS
Lue käyttöohje.
ASIANMUKAINEN KÄYTTÖ
Saha on tarkoitettu puiden kaatoon sekä
runkojen, oksien, puupalkkien, lautojen jne.
sahaukseen, ja sitä voidaan käyttää sahauksiin
sekä syiden suunnassa että kohtisuoraan syitä
vasten. Saha ei sovellu kivennäisaineiden
sahaukseen.
Käytä kuulosuojaimia
Käytä suojalaseja
Käytä pölysuojainta
Suojaa sateelta.
Älä jätä laitetta sateeseen tai veteen
Ei avotuleen
Älä hävitä paristoja tai akkuja.
Palauta loppuun käytetyt akut ja
paristot paikalliseen keräys- tai
kierrätyspisteeseen.
ASENNUS
VAROITUS! Ennen kuin kosket
ketjuun tai teet mitään muita
säätöjä, varmista, että työkalu on
kytketty pois päältä ja että akku on
irrotettu.
Käytä aina suojakäsineitä, kun käsittelet
teräketjua.
LAIPAN JA TERÄKETJUN ASENNUS
1. Ota varovasti kaikki osat esille
pakkauksesta.
2. Aseta ketjusaha tasaiselle alustalle.
3. Käytä vain aitoja ketjulaippaan
suunniteltuja WORX-ketjuja.
4. Aseta teräketju (8) laippaa (7) kiertävään
uraan. Tarkista, että kulkusuunta on oikea.
Vertaile ketjua kulkusuuntamerkkiin (13).
Varmista, että ketjunkiristyssakara (17)
suuntautuu ulospäin (Katso kuva A)
5. Aseta ketjun hahlot ketjupyörän (12)
ympäri ja aseta terälevy (16) niin, että
kiinnityspultti (14) ja kaksi terälevyn
ohjausporrasta (20) tarttuvat terälevyn (7).
(Katso kuva B)
6. Tarkista että kaikki osat ovat oikein
paikoillaan.( Katso kuva. C)
7. Sovita ketjusuojus (11) paikalleen, varmista,
että ketjusieppo (19) liukuu oikein
ketjusuojukseen (11).
8. Kiristä ketjusuojus (11) kääntämällä ketjun
kiristysnuppia (10) myötäpäivään, kunnes
se on kireä. (Katso kuva. E)
VAROITUS: Ketjua ei ole vielä
kiristetty. Ketjun kiristäminen
tapahtuu, kuten alla kuvataan kohdassa
“Ketjun kiristys”.
Ketju tarvitsee nyt tarkistaa ja varmistaa,
että sen kireys on oikea.
47
Akkukäyttöinen moottorisaha FIN
Page 48

TERÄKETJUN KIRISTYS
Uudet sahaketjut venyvät. Tarkista ketjun
kireys usein, kun sitä käytetään ensimmäisiä
kertoja, ja kiristä kun ketju löystyy terälevyn
(7) ympärillä.
VAROITUS:
Poista akku työkalusta ennen kuin
säädät ketjun kireyttä.
HUOMIO! Ketjun katkaisureunat
ovat terävät. Käytä suojakäsineitä
sahaa käsitellessäsi.
HUOMIO! Säilytä aina oikea ketjun
kireys. Löysä ketju lisää takapotkun
riskiä. Löysä ketju saattaa hypätä
pois terälevyn urasta. Tämä saattaa
vahingoittaa käyttäjää ja ketjua. Löysä
ketju saattaa aiheuttaa ketjun, laipan ja
ketjupyörän nopean kulumisen.
1. Aseta ketjusaha tasaiselle alustalle.
2. Käännä ketjun kiristysnuppia (10)
myötäpäivään, kunnes se liikkuu kevyesti
käsin pyöritettäessä. Kireys asetetaan
automaattisesti, kun ketjun kiristysnuppia
kiristetään. (Katso kuva. F1)
3. Tarkista automaattisen ketjun kiristysnupin
asettama kireys. Ketjun kireys on oikea, kun
ketjua (8) voi nostaa noin
3 – 6 mm. Tämä tulisi tehdä yhdellä kädellä,
48
vetämällä teräketjua ylös sahan painon
toimiessa vastavoimana. (Katso kuva.
F2) (ketjun lenkkien tulee juuri pysyä
ohjausurassa).
Siirrä ketjua terälevyssä ja varmista, että
kierteitä ei ole. Ketjun tulee liikkua vapaasti.
(Katso kuva. F3)
4. Kun ketju höllenee, ruuvaa ehdottomasti
lukitusnuppi / ketjun kireyden nuppi auki ja
ruuvaa sitten peitelevy päälle lukitusnupilla
jälleen.
KETJUN VOITELU
TÄRKEÄÄ: Ketjusahaa ei toimiteta
täytettynä teräöljyllä. On tärkeää
täyttää teräöljyä ennen käyttöä.
Ketjusahan käyttö ilman teräöljyä tai jos
teräöljyä on alle minimimerkin,
johtaa sahan vaurioitumiseen.
HUOM: Teräketjun elinikä ja sahausteho
riippuu optimaalisesta voitelusta. Siksi
teräketjuun johdetaan automaattisesti
teräöljyä käytön aikana
Öljysäiliön täyttäminen :
1. Aseta ketjusaha tasaiselle alustalle
öljysäiliön(4) kansi ylöspäin.
2. Uhdista aluetta öljysäiliön kannen ympäri
rievulla ja avaa kansi.
3. Lisää teräketjuöljyä, kunnes säiliö on
täynnä. Minkä tahansa merkkistä ISO VG32
-öljyä voi käyttää.
4. Varo, ettei öljysäiliöön pääse likaa. Kierrä
öljysäiliön kansi paikoilleen ja sulje se.
IMPORTANT:Tärkeää: Ilmanvaihdon
mahdollistamiseksi öljysäiliön ja
ympäristön välillä, öljysäiliön kannessa
on pienet tasauskanavat. Jotta öljyn
vuotaminen säiliöstä estyisi, tulisi aina
varmistaa, että saha on vaakatasossa,
kun sitä ei käytetä (öljysäiliön kansi 4
osoittaa ylöspäin).
Käytä yksinomaan suositeltua
biologisesti hajoavaa ketjuöljyä, jotta
ketjusaha ei vaurioituisi. Älä koskaan
käytä kierrätettyä öljyä tai jäteöljyä.
Kielletyn öljyn käyttö johtaa takuun
raukeamiseen.
ÖLJY-AUTOMATIIKAN TARKISTUS
Automaattinen ketjunvoitelu voidaan tarkistaa
käynnistämällä saha ja pitämällä sen kärki
maassa olevan pahvin tai paperin suunnassa.
Jos paperiin tulee kasvava öljyjälki,
öljyautomatiikkaa toimii moitteettomasti. Jos
täydestä öljysäiliöstä huolimatta ei öljyjälkeä
näy, tulee lukea ”Vianetsintä” tai kääntyä
Worx-asiakaspalvelun puoleen.
HUOM: Älä kosketa maata teräketjulla,
pidä 30 cm turvaetäisyys.
LATAAMINEN
1. ENNEN KUIN KÄYTÄT
AKKUKÄYTTÖISTÄ PENSASTRIMMERIÄ,
AKKU ON LADATTAVA TÄYTEEN
VAROITUS: Laturi ja akkupakkaus
on erityisesti suunniteltu toimimaan
yhdessä. Älä käytä muita akkupakkauksia
tai latureita. Älä koskaan työnnä tai
Akkukäyttöinen moottorisaha FIN
Page 49

anna pudota metalliesineitä laturiin
tai akkupakkaukseen. Se voi johtaa
mahdollisesti vaaratilanteen aiheuttavan
sähkövian syntymiseen.
Akkupaketti toimitetaan LATAAMATTOMANA,
joten se on ladattava kerran ennen käyttöä.
Toimitukseen kuuluva akkulaturi on laitteen
Litium-ioni-akun mukainen. Älä käytä muuta
akkulaturia.
2. AKKUPAKKAUKSEN LATAUS
Litium-ioni-akku on suojattu
liikapurkautumista vastaan. Kun akku on tyhjä,
laite kytketyy pois päältä sulojaavan virtapiirin
asiosta
Lämpimässä ympäristössä tai raskaan käytön
jälkeen akkupakkauksesta voi tulla liian kuuma
lataamiseen. Anna akun jäähtyä aikansa
ennen uudelleenlatausta.
3. AKKUPAKKAUKSEN POISTO TAI
ASENNUS (Katso Kuva. G)
Paina alas akkuyksikön vapautuspainike
poistaaksesi akkuyksikön työkalustasi. Työnnä
latauksen jälkeen akkupakkaus takaisin poran
akustopäähän. Kevyt työntö on riittävä.
Tarkista, että akku on kunnolla kiinni.
HUOMAUTUS: Kun poistat akun, pidä
sitä lujasti välttääksesi pudottamisen ja
vamman.
4. AKUN TILAN LED-VALOT
(Katso Kuva. H)
HUOMAUTUS: Tilan LED-valot ilmoittavat
akun tilan, kun akun painiketta painetaan.
LED-valot ilmoittavat akun tilan seuraavasti:
Paina painiketta “POWERTEST” (Paina), niin
valopainike syttyy.
Kun kolme vihreää valoa palaa, akussa on
paljon virtaa.
Kun kaksi valoa ( ) palaa, akussa on
kohtalaisesti virtaa.
Kun vain yksi vihreä valo ( ) palaa, akun virta
on lopussa.
TÄRKEÄÄ
Kun vain yksi vihreä valo palaa,
akun virta on liian vähissä, vaikka
ruohonleikkuri voisikin yhä leikata
ruohoa. Ruohonleikkurin käytön
jatkaminen tällaisessa alilataustilassa
saattaa lyhentää akun käyttöikää ja
heikentää akun suorituskykyä
5. KÄYNNISTYS JA PYSÄYTYS
(Katso Kuva. I)
Käynnistä saha painamalla
käynnistysvarmistinta (3), painamalla sitten
käynnistyskytkin (2) pohjaan ja pitämälle se
tässä asennossa. Käynnistysvarmistin (3)
voidaan nyt päästää vapaaksi.
Pysäytä saha irrottamalla ote
käynnistyskytkimestä (2).
Työskentely ketjusahalla
VAROITUS: Onko öljysäiliö
täytetty? Tarkista öljymäärän
osoitin (18) ennen työtä ja säännöllisesti
työn aikana. Täytä öljyä, jos öljyn pinta
on saavuttanut öljylasin alareunan.
Täyttö riittää n. 16 minuutiksi, riippuen
työn intensiteetistä ja tauoista. (Katso
kuva. J)
Ketjun kireys tulee tarkistaa 10 minuutin
välein sahauksen aikana.
1. Asenna akkuyksikkö laitteeseen (katso kuva
G).
2. Varmista, että puun leikattava osa ei makaa
maassa. Näin ketju (8) ei osu maahan, kun
se leikkaan puun läpi. Ketjun osuminen
maahan on vaarallista ja tylsistyttää ketjun.
3. Tartu sahaan molemmilla käsillä. Tartu
etukahvaan aina vasemmalla kädellä ja
oikealla kädellä takakahvaan. Pidä ote
vakaana. Peukaloiden ja sormien täytyy
kiertyä sahan kahvojen ympäri (katso kuva
K).
4. Varmista, että seisot vakaasti. Pidä jalat
olkapään leveyden verran etäällä toisistaan.
Jaa painosi tasaisesti molemmille jaloille.
5. Kun olet valmis sahaamaan, työnnä
lukituspainike (3) kokonaan sisään oikealla
peukalolla ja purista . Saha käynnistyy.
Kun liipaisin vapautetaan, saha sammuu.
Varmista, että saha pyörii täydellä
nopeudella ennen kuin aloitat katkaisua.
6. Kun aloitat katkaisua, aseta liikkuva ketju
hitaasti puuta vasten. Pidä saha vakaasti
paikallaan, jotta vältät sahan mahdollisen
ponnahduksen tai sivuliikkeen.
49
Akkukäyttöinen moottorisaha FIN
Page 50

7. Ohjaa sahaa painamalla kevyesti äläkä
käytä liikaa voimaa. Moottori ylikuumenee
tai leikkaa kiinni. Se tekee työn paremmin
ja turvallisemmin nopeudella, johon se oli
tarkoitettu.
8. Poista saha katkaisukohdasta sahan vielä
liikkuessa täydellä nopeudella. Pysäytä
saha vapauttamalla virtakytkin. Varmista,
että ketju on pysähtynyt ennen kuin laitat
sahan maahan.
9. Harjoittele roskapuulla turvallisessa
paikassa, kunnes pääset perille
sahan käytöstä ja voit sahata helposti
käyttämällä tasaisia liikkeitä ja vakaata
leikkausnopeutta.
Takapotkun turvalaitteet tässä sahassa
Sahassa on alhaisen takapotkun ketju ja
takapotkua vähentävä terälevy. Molemmat
vähentävät takapotkun mahdollisuutta.
Takapotku voi silti tapahtua tämänkin sahan
kanssa.
Seuraavat vaiheet vähentävät takapotkun
riskiä.
• Käytä molempia käsiä sahan pitämiseen,
kun saha on käynnissä. Pidä ote vakaana.
Peukaloiden ja sormien täytyy kiertyä
50
sahan kahvojen ympäri.
• Pidä kaikki turvavälineet paikallaan
sahassa. Varmista, että ne toimivat oikein.
• Älä kurota liikaa tai sahaa olkapään
korkeuden yläpuolella.
• Pidä vakaa jalansija ja tasapaino aina.
• Seiso hieman sahan vasemmalla puolella.
Näin vartalosi ei ole suorassa linjassa
ketjun kanssa.
• Älä anna terälevyn kärjen koskettaa mitään,
kun terä liikkuu.
• Älä koskaan yritä katkaista kahta puuta
samanaikaisesti. Katkaise vain yksi puu
kerrallaan.
• Älä upota terälevyn kärkeä tai yritä
porautua puuhun terälevyn kärkeä
käyttämällä.
• Varo puun siirtymistä tai muita voimia,
jotka voivat puristaa ketjua.
• Ole erittäin varovainen, kun asetat terän
uudelleen vanhan leikkuukohtaan.
• Käytä vain alhaisen takapotkun ketjua
ja terälevyä, jotka toimitettiin tämän
moottorisahan mukana.
• Älä koskaan käytä tylsää tai löysää ketjua.
Pidä ketju terävänä ja oikealla kireydellä.
Sahan turvallinen käyttö
1. Käytä ketjusahaa vain voidessasi seistä
tukevasti.
2. Pidä sahaa oman kehon oikealla puolella.
(Katso kuva. L).
3. Ketjun tulee liikkua täydellä nopeudella,
ennen kuin se koskettaa puuta.(8)
4. Käytä piikkilistaa (9)kiinnittämään saha
puuhun.
5. Käytä sahauksessa piikkilistaa vipuna.(a)
(Katso kuva. M)
6. Älä koskaan käytä ketjusahaa suorilla
käsivarsilla. Älä yritä sahata vaikeasti
päästäviä kohteita, tai tikapuilla seisten.
(Katso kuva. N).
JÄNNITYKSESSÄ OLEVAN PUUN
SAHAAMINEN (Katso Kuva .O)
VAROITUS: Kun katkaiset jännitteen
alaisena olevaa puunhaaraa, ole
äärimmäisen varovainen. Ole varuillasi
puun ponnahtamisesta taaksepäin. Kun
puun jännite laukeaa, puunhaara voi
ponnahtaa taaksepäin ja iskeä käyttäjää
ja aiheuttaa vakavan vamman tai
loukkaantumisen.
Jos puu on tuettu kummastakin päästä, tulee
ensin sahata kolmannes rungosta päältäpäin
(Y) ja sitten suorittaa katkosahaus samasta
kohdasta, altapäin (Z) puun repeytymisen ja
sahan puristukseen joutumisen välttämiseksi.
Varo tällöin koskettamasta maata teräketjulla.
Jos puu on tuettu vain toisesta päästä, tulee
ensin sahata kolmannes rungosta altapäin
(Y) ja sitten suorittaa katkosahaus samasta
kohdasta, päältäpäin (Z) puun repeytymisen ja
sahan puristukseen joutumisen välttämiseksi.
PUUN KAATO(Katso Kuva .P)
Käytä aina kypärää suojaamaan
putoavilta oksilta.
Ketjusahalla saa ainoastaan kaataa puita,
joiden läpimitta on pienempi kuin sahan
laipan pituus.
Varmista työalue. Tarkista, että
puun kaatoalueella ei ole ihmisiä tai
Akkukäyttöinen moottorisaha FIN
Page 51

eläimiä. Älä koskaan yritä irrottaa
puristukseen jäänyttä sahaa moottorin
käydessä. Käytä puukiiloja teräketjun
vapauttamiseksi.
Jos kaksi tai useampi henkilö samanaikaisesti
sahaa ja kaataa, tulee etäisyys kaatavien ja
leikkaavien henkilöiden välissä olla vähintään
kaksi kertaa kaadettavan puun korkeuden
verran. Puunkaadossa on otettava huomioon,
ettei aiheuta vaaraa muille henkilöille, ettei
osuta syöttöjohtoihin eikä aiheuteta aineellista
vahinkoa. Jos puu joutuu kosketukseen
sähkölinjan kanssa, on välittömästi
ilmoitettava siitä paikalliselle sähkölaitokselle.
Sahattaessa rinteessä tulee ketjusahan
käyttäjän sijaita maastossa kaadettavan
puun yläpuolella, koska puu kaadettuaan
todennäköisesti pyörii tai liukuu rinnettä
alaspäin.
Ennen kaatamista on suunniteltava
pakoväylä ja tarvittaessa raivata sellainen.
Pakoväylän tulisi kulkea vinosti taaksepäin
odotetusta kaatosuunnasta.
Ennen kaatamista on otettava huomioon
rungon luonnollinen kaltevuus suurempien
oksien asento ja tuulen suunta, jotta puun
kaatosuunta voidaan määrittää. Lika, kivet,
irtonainen kuori, naulat, sinkilät ja langat on
poistettava puusta.
Kaatoloven teko: Sahaa suorassa kulmassa
kaatosuuntaan nähden lovi (X – W), jonka
syvyys on 1/ 3 puun läpimitasta. Ensin
tehdään alempi vaakasuora sahaus. Täten
vältytään teräketjun tai laipan puristukseen
joutumiselta sahattaessa loven toinen reuna.
Kaatosahaus: Kaatosahaus (Y) tehdään
vähintään 50 mm vaakasuoran sahausloven
yläpuolelle. Kaatosahaus tehdään
samansuuntaisena kaatoloven vaakasuoran
pinnan kanssa. Kaatosahaus tehdään vain
niin syvälle, että puuhun vielä jää uuma
(kaatoreuna), joka toimii saranana. Uuma
estää puun kiertymisen ja kaatumisen väärään
suuntaan. Älä sahaa uumaa pois.
Kun kaatosahaus lähenee kaatolovea, tulisi
puun ruveta kaatumaan. Jos näyttää siltä,
että puu mahdollisesti ei kaadu haluttuun
suuntaan tai kallistuu taaksepäin ja saattaa
teräketjun puristukseen, tulee kaatosahaus
keskeyttää ja käyttää puu-, muovi- tai
alumiinikiilaa sahauksen avaamiseksi ja
puun kaatosuunnan kääntämiseksi haluttuun
suuntaan.
Kun puu aloittaa kaatumisen, ketjusaha
poistetaan kaatosahauksesta, pysäytetään,
asetetaan pois ja siirrytään pois
vaaravyöhykkeeltä suunniteltua pakoväylää
pitkin. Varo putoavia oksia, äläkä kompastu.
Iskemällä kiila (Z) vaakasuoraan sahausuraan
kaadetaan nyt puu.
Puun kaatuessa on varottava putoavia oksia ja
oksanhaaroja.
OKSITUS(Katso Kuva. Q)
Tällä tarkoitetaan oksien katkaisu kaadetusta
puusta. Oksittaessa suurempia alaspäin
suunnattuja oksia, jotka tukevat runkoa,
jätetään ne toistaiseksi paikoilleen. Katkaise
pienemmät oksat yhdellä sahauksella,
kuvan osoittamalla tavalla. Oksat, jotka ovat
jännityksessä, tulee sahata alhaalta ylöspäin,
sahan puristukseen jäämisen estämiseksi.
PUUNRUNGON PÄTKIMINEN
(Katso Kuva. R)
Tällä tarkoitetaan kaadetun puunrungon
katkaiseminen kappaleisiin. Varmista
tukeva asento ja kehon painon
jakautuminen tasaisesti kummallekin jalalle.
Mahdollisuuksien mukaan tulisi runkoa tukea
altapäin oksilla, palkeilla tai kiiloilla. Noudata
helpon sahauksen yksinkertaisia ohjeita.
Jos puunrunko koko pituudeltaan on tasaisesti
tuettu, kuvan osoittamalla tavalla, sahataan
ylhäältäpäin.
Jos puunrunko, kuvan osoittamalla tavalla,
on tuettu toisesta päästä, sahataan ensin 1/3
rungon läpimitasta alapuolelta ja sitten loput
ylhäältäpäin alasahauksen korkeudella. (Katso
kuva .S)
Jos puunrunko, kuvan osoittamalla tavalla, on
tuettu kummastakin päästä, sahataan ensin 1/3
rungon läpimitasta yläpuolelta ja sitten loput
2/3 alapuolelta yläsahauksen korkeudella.
(Katso kuva. T)
VAROITUS: (Katso Kuva .U)
Jos katkaistava puu on rinteessä,
varmista, että puu ei vieri mäkeä alas.
51
Akkukäyttöinen moottorisaha FIN
Page 52

Varmista tukki käyttämällä puisia
tolppia. Upota puiset tolpat maahan
tukin alarinteen puolelle. Seiso tukin
ylärinteen puolella katkaistessasi. Tukki
saattaa vieriä katkaisun jälkeen.
• Älä koskaan yritä katkaista kahta
puuta samanaikaisesti. Se voi lisätä
takapotkun vaaraa.
• Kun leikkaat tukkia, älä koskaan tue
tukkia kädellä, jalalla tai jalkaterällä.
• Älä koskaan anna toisen henkilön
pitää kiinni tukista, kun katkaiset
tukkia.
• Sammuta ja poista akkuyksikkö
sahasta ennen kuin siirryt paikasta
toiseen.
turvallisuuteen tai toimintaan. Anna
valtuutetun huoltokeskuksen korjata vauriot.
Etsi valtuutettu huoltokeskus osoitteesta
www.worx.com
3. Ylläpidä moottorisahaa huolellisesti.
• Älä koskaan altista sahaa sateelle.
• Pidä ketju terävänä, puhtaana ja
voideltuna paremman ja turvallisemman
suorituskyvyn varmistamiseksi.
• Noudata tässä käyttöohjeessa annettuja
ohjeita ketjun terottamiseksi.
• Pidä kahvat kuivina, puhtaina sekä
öljyttöminä ja rasvattomina
• Pidä kaikki ruuvit ja mutterit kireinä.
4. Kun sahaa huolletaan, käytä vain
samanlaisia vaihto-osia.
SAHAN YLLÄPITO JA
TAKAPOTKUTURVALLISUUS
Noudata tämän käyttöohjeet ylläpito-ohjeita.
Sahan ja ketjun oikea puhdistus ja terälevyn
ylläpitoa voivat vähentää takapotkun
mahdollisuutta. Tarkasta ja huolla saha jokaisen
käytön jälkeen. Se pidentää sahasi käyttöikää.
HUOM: Vaikka sahaa terotettaisiin oikein,
52
takapotkun riski kasvaa jokaisen terotuksen
myötä.
MOOTTORISAHAN
YLLÄPITO JA SÄILYTYS
1. Irrota akkuyksikkö sahasta
• Kun se ei ole käytössä,
• Ennen siirtymistä paikasta toiseen,
• Ennen huoltoa,
• Ennen lisäosien tai lisävarusteiden
vaihtamista, kuten sahaketju ja terälevy.
2. Tarkista ennen käyttöä ja jokaisen
käytön jälkeen. Tarkista saha huolellisesti
varmistaaksesi, että suojus tai muu osa
ei ole vahingoittunut. Tarkista vaurioiden
varalta, jotka voivat vaikuttaa käyttäjän
turvallisuuteen tai sahan toimintaan. Tarkista
liikkuvien osien kohdistus tai kiinnitys. Tarkista
rikkoontuneet tai vahingoittuneet osat. Älä
käytä moottorisahaa, jos vauriot vaikuttavat
5. Kun moottorisahaa ei käytetä, säilytä se
aina
• Korkealla tai lukitussa paikassa poissa
lasten ulottuvilta,
• Kuivassa paikassa.
LEVYN YLLÄPITO
Terälevyn käyttöiän maksimoimiseksi
suositellaan seuraavaa ylläpitoa.
Levyn ohjausurat, joissa ketju kulkee, tulee
puhdistaa ennen työkalun varastointia tai jos
levy tai ketju vaikuttavat likaisilta.
Urat tulee puhdistaa joka kerta, kun ketju
poistetaan.
Käännä levy ympäri, niin että yläurasta tulee
alaura ja päinvastoin aina viiden käyttötunnin
jälkeen
POUR NETTOYER LES RAILS DE
GUIDAGE:
1. Enlevez le cache de la chaîne et déposez
la barre et la chaîne. (voir le paragraphe
MONTAGE)
2. Avec une brosse métallique, un tournevis
ou un outil similaire, enlevez les déchets et
les saletés des rails de la barre. (Voir V)
3. N’oubliez pas de nettoyer complètement
les passages d’huile.
OHJAUSURIEN PUHDISTUS
1. Irrota ketjusuojus ja ketju. (katso osa
KOKOONPANO)
Akkukäyttöinen moottorisaha FIN
Page 53

2. Puhdista jäämät levyn urista käyttämällä
teräsharjaa, ruuvimeisseliä ja muuta
sopivaa työkalua. (Katso kuva V)
3. Varmista, että puhdistat öljykanavat
huolellisesti
OLOSUHTEET, JOLLOIN TERÄLEVY
VAATII HUOLTOA:
• Saha leikkaa toiselle puolelle tai kulmassa.
• Saha täytyy pakottaa katkaisuun.
• Öljyn riittämätön syöttö levyyn ja ketjuun.
Tarkista terälevyn kunto joka kerta, kun ketju
terotetaan. Kulunut terälevy vahingoittaa
ketjua ja tekee katkaisusta vaikeaa.
Jokaisen käytön jälkeen, yksikkö on irrotettu
virtalähteestä, puhdista kaikki sahajauho
terälevystä ja hammasrattaan reiästä.
Kun uran yläreuna on epätasainen, käytä
litteää viilaa ja palauta reunat ja sivut suoriksi.
File Rail Edges
and Sides
Square
TERÄKETJUN TEROITUS
VAROITUS:
Irrota akkuyksikkö sahasta ennen
huoltoa. Sähköisku tai liikkuvaan ketjuun
koskeminen voi aiheuttaa vakavan
vamman tai kuoleman.
Ketjun leikkaavat reunat ovat teräviä.
Käytä suojakäsineitä, kun käsittelet
ketjua.
Pidä ketju terävänä. Sahasi leikkaa
nopeammin ja turvallisemmin. Tylsä ketju
aiheuttaa hammaspyörän, terälevyn, ketjun ja
moottorin kohtuutonta kulumista. Jos sinun
täytyy pakottaa ketju puuhun ja katkaisu
aiheuttaa vain sahanpurua ja muutaman
suuren sahalastun, ketju on tylsä.
VOITELE HAMMASPYÖRÄ
HUOM: Käytä paksuja käsineitä, kun
teet ylläpito- tai huoltotoimia tällä
työkalulla
Poista aina akkuyksikkö sahasta ennen kuin
ylläpito- tai huoltotoimia tällä työkalulla.
Worn Groove Correct Groove
Vaihda terälevy, kun ura on kulunut, terälevy
vääntynyt tai lohjennut tai kun syntyy liiallista
kuumuutta tai pursetta. Jos vaihtaminen on
tarpeen, käytä vain varaosaluettelossa tai
moottorisahassa olevassa tarrassa sahallesi
määritettyä terälevyä.
TERÄKETJUN JA LAIPAN VAIHTO/
KÄÄNTÄMINEN
Tarkista teräketju ja laippa luvussa ”Teräketjun
kiristys” selostetulla tavalla.
Laipan ohjainura kuluu ajan mittaan.
teräketjua vaihdettaessa tulee laippa kääntää
180°, kulumisen tasaamiseksi.
Tarkista ketjupyörä. Jos se on kulunut tai
vioittunut suuren kuormituksen johdosta, tulee
se vaihtaa sopimushuollossa.
Jos ketjulaippa on kulunut loppuun tai
vioittunut, ota ketjunkiristyssakara pois
laipasta hölläämällä ruuvia vastapäivään. Laita
sitten kiristyssakara uuteen laippaan kiristäen
ruuvia myötäpäivään. Sakaran kohouman (a)
tulee mennä laipan reikään.( Katso kuva. W)
HUOM: Ketjua tai levyä ei tarvitse poistaa,
kun hammasratasta voidellaan
1. Puhdista levy ja hammasratas
2. Käytä rasvaprässiä ja laita prässin kärki
voiteluaukkoon ja purista rasvaa, kunnes
sitä näkyy hammasrattaan ulkoreunalla.
(Katso kuva X)
3. Jotta voi kiertää hammasratasta, vapauta
ketjun pysäytin ja vedä ketjua käsin,
kunnes hammasrattaan rasvaamaton puoli
on samassa linjassa rasvausreiän kanssa.
Toista rasvaus.
PUHDISTUS/VARASTOINTI
Puhdista ketjusahan muovikotelo ulkoa
pehmeällä harjalla ja puhtaalla rievulla.
Vettä, liuotinta tai kiillotusainetta ei saa
käyttää. Poista kaikki lika, erityisesti moottorin
tuuletusaukoista .
Pura suojus , laippa ja ketju ja puhdista ne
harjan avulla 1 – 3 tunnin käytön jälkeen.
Poista harjalla kaikki lika suojuksen ,alta,
ketjupyörästä ja terälevyn kiinnityspinnoista.
Puhdista öljysuutin puhtaalla rievulla.
Jos ketjusaha tullaan varastoimaan pidemmän
53
Akkukäyttöinen moottorisaha FIN
Page 54

aikaa, tulee teräketju ja terälevy puhdistaa.
Varastoi ketjusaha turvallisessa paikassa,
kuivana ja lasten ulottumattomissa.
Vuodon estämiseksi tulee varmistaa, että
laite asetetaan pois vaaka-asentoon (öljyn
täyttöruuvi 4 ylöspäin suunnattuna). Jos saha
säilytetään myyntipakkauksessa, on öljysäiliö
tyhjennettävä kokonaan.
PROTECTION DE
L’ENVIRONNEMENT
Tämä tuote on merkitty symbolilla
liittyen sähkö- ja elektroniikkajätteen
hävittämiseen. Tämä tarkoittaa, että tätä
tuotetta ei saa hävittää talousjätteen mukana,
vaan se pitää palauttaa keräysjärjestelmään,
joka on eurooppalaisen direktiivin 2012/19/
EU mukainen. Sen jälkeen se kierrätetään tai
puretaan tarkoituksena vähentää vaikutusta
ympäristöön. Sähkö- ja elektroniikkalaitteet
voivat olla vaarallisia ympäristölle ja ihmisen
terveydelle, koska ne sisältävät vaarallisia
aineita.
54
Akkukäyttöinen moottorisaha FIN
Page 55

VIANETSINTÄ
Oire Mahdolliset syyt Korjaustoimenpide
Ketjusaha ei toimi
Ketjusaha toimii
ajoittaisesti
Teräketju on kuiva
Ketjujarru/
käynnistysjarru
Ketju/laipan ohjainkisko
kuuma
Ketjusaha nyhtää,
tärisee
tai ei sahaa kunnolla
Akku loppu
Varoke viallinen
Huono kosketus ulkoisesti
Huono kosketus sisäisesti
Käynnistyskytkin viallinen
Ei öljyä öljysäiliössä
Öljysäiliön kannessa
sijaitseva tuuletusaukko
tukossa
Öljyn virtauskanava tukossa
Ongelma etummaisen
käsisuojuksen
kytkentämekanismissa
Ei öljyä öljysäiliössä
Öljysäiliön kannessa
sijaitseva tuuletusaukko
tukossa
Öljyn virtauskanava tukossa
Ketju on liian kireä
Ketju tylsä
Ketju liian löysä
Ketju tylsä
Ketju kulunut
Ketjun hampaat osoittavat
väärään
suuntaan
Vaihda akkuyksikkö
Vaihda varoke
Käänny keskushuollon puoleen
Käänny keskushuollon puoleen
Käänny keskushuollon puoleen
Lisää öljyä
Puhdista öljysäiliön kansi
Avaa öljyn virtauskanava
Käänny keskushuollon puoleen
Lisää öljyä
Puhdista öljysäiliön kansi
Avaa öljyn virtauskanava
Aseta ketjun kireys
Teroita ketju tai vaihda uuteen
Aseta ketjun kireys
Teroita ketju tai vaihda uuteen
Vaihda ketju
Asenna ketju uudelleen oikeaan
suuntaan
55
Älä koskaan käytä työkaluja, joissa on vialliset On/Off-kytkimet tai viallinen takapotkujarru
(käsisuojus).
Jos on muun tyyppisiä teknisiä vikoja, ota yhteyttä paikalliseen huoltopisteeseen.
Akkukäyttöinen moottorisaha FIN
Page 56

VAATIMUSTENMUKAISUUSVAKUUTUS
Me,
POSITEC Germany GmbH
Konrad-Adenauer-Ufer 37
50668 Köln
Vakuutamme täten, että tuote
Selostus: Akkukäyttöinen WORX-
moottorisaha
Tyyppi: WG368E WG368E.9 (3-koneen
määritykset, esimerkki moottorisaha)
Tominto: Puun sahaamiseen
Täyttää seuraavien direktiivien määräykset:
2006/42/EC, 2004/108/EC, 2011/65/EU,
2000/14/EC amended by 2005/88/EC
Asiaankuuluva viranomainen
Nimi: Intertek Deutschland GmbH
(Asiaankuuluva viranomainen 0905)
Address: Stangenstraße 1, 70771
LEINFELDEN-ECHTERDINGEN
2000/14/EC amended by 2005/88/EC:
- Yhdenmukaisuuden arviointi perusteilla:
Liite V
- Mitattu äänenvoimakkuuden taso
56
96.1dB(A)
- Ilmoitettu taattu äänenvoimakkuuden taso
100dB(A)
Yhdenmukaisuusstandardit:
EN 60745-1 EN 60745-2-13
EN ISO 3744 EN 55014-1
EN 55014-2
Henkilö valtuutettu kääntämään teknisen
tiedoston,
Nimi: Russell Nicholson
Osoite: Positec Power Tools (Europe)Ltd,
PO Box 152, Leeds, LS10 9DS, UK
2014/04/21
Leo Yue
POSITEC Laatupäällikkö
Akkukäyttöinen moottorisaha FIN
Page 57

1. BAKRE HÅNDTAK
2. PÅ-/AV-BRYTER
3. INNKOBLINGSSPERRE
4. OLJETANKDEKSEL
5. FREMRE HÅNDTAK
6. HÅNDVERN
7. SVERD
8. SAGKJEDE
9. BARKSTØTTE
10. KJEDESTRAMMEKNAPP
11. KJEDEDEKSEL
12. KJEDEHJUL
13. KJEDERETNINGSSYMBOL
14. STANGLOKALISERINGSTAPPER
15. OLJEDYSE
16. FESTESTANGBOLT
17. STANGFORSPENNINGSPLATE
18. OLJENIVÅVINDU
19. KJEDESTOPPER
20. STANGKLEMME
21. BLADVERNDEKSEL*
57
*Tilbehør som er beskrevet og illustrert I bruksanvisningen inngår ikke alltid i
leveransen.
Batteridrevet motorsag NOR
Page 58

TEKNISKE DATA
Type WG368E WG368E.9 (3- betegner maskin, angir motorsag)
WG368E WG368E.9
Merkespenning 40V
Sverdlengde 30cm
Kuttelengde 25cm
Kjedehastighet 3.8m/s
Påfyllingsmengde oljebeholder 100ml
Kjededeling 9.5mm
Antall drivledd 45
Kjedemåler 1.1mm
Sagkjedetype
Sverdtype
Ladetid 1hr /
Vekt ( kjede og sverd medfølger) 3.8kg 3.0kg
Oregon
*Spenning målt uten arbeidsbyrde. Innledende batterispenning når maksimalt 40 volt.
Nominell spenning er 36 volt.
NOISE INFORMATION
58
Belastning lydtrykk LpA:85dB(A)
Belastning lydeffekt L
K
pA
Bruk hørselsvern
Max*
Oregon
®
: 124MLEA041
®
: 90PX
:100dB(A)
wA.d
3dB(A)
VIBRASJONSINFORMASJON
Totale vibrasjonsverdier (triax vektorsum) fastsatt i henhold til EN 60745:
Vibrasjonsutslippsverdi: ah = 3.5m/s2 Usikkerhet K = 1.5m/s²
Den egner seg til en foreløbig vurdering av svingningsbelastningen.
Men hvis elektroverktøyet brukes til andre anvendelser, med avvikende innsatsverktøy eller
utilstrekkelig vedlikehold, kan svingningsnivået avvike.
Vibrasjonsutslippsverdien under faktisk bruk av kraftverktøyet kan avvike fra oppgitt verdi,
avhengig av måtene verktøyet brukes og følgende eksemplene og andre variasjoner i
hvordan verktøyet brukes:
Hvordan verktøyet brukes og materialene som blir kuttet eller drillet.
Verktøyet er i god stand og godt veldlikeholdt.
Batteridrevet motorsag NOR
Page 59

Bruk av riktig tilbehør for verktøyet, og sørge for at det er skarpt og i god stand.
Hvor stramt grepet på håndtakene er, og om det brukes antivibrasjonstilbehør.
Og at verktøyet blir brukt til det formålet det er tilsiktet i henhold til designet og disse
instruksjonene.
Dette verktøyet kan forårsake hånd-arm vibrasjonssyndrom, hvis det ikke bruken er
forvaltes på en god måte.
ADVARSEL: For å være nøyaktig, bør også et overslag over eksponeringsnivå under
faktiske bruksforhold også tas med i betraktning i alle deler av driftssyklusen, slik som
når verktøyet er skrudd av og når det går på tomgang, men ikke faktisk gjør jobben. Dette kan
redusere eksponeringsnivået betraktelig over hele arbeidsperioden.
For å hjelpe til å minimere risikoen for vibrasjonseksponering.
Bruk ALLTID skarpe meisler, driller og blad.
Vedlikehold verktøyet i henhold til disse instruksjonene og sørg for at det er godt smurt (der det
er hensiktsmessig).
Hvis verktøyet skal brukes regelmessig, invester i antivibrasjonstilbehør.
Unngå å bruke verktøy i temperaturer på 10oC eller lavere.
Planlegg arbeidstimeplanen din slik at du sprer bruk av høyvibrasjonsverktøy utover flere dager.
TILLEGGSUTSTYR
WG368E WG368E.9
Lubrication Oil (100ml) 1 1
Blade Protection Cover 1 1
Lader (WA3735) 1 /
Batteripakke (WA3536) 1 /
59
Vi anbefaler at du kjøper alt ekstrautstyr fra butikken der du kjøpte dette verktøyet. Anvend godt
kvalitetsekstrautstyr, merket med et velkjent varemerke. Velg kvalitet i henhold til det arbeidet du
akter å gå i gang med. Henviser til tilbehørspakningen for videre detaljer. Butikkpersonalet kan
også gi hjelp og råd.
Batteridrevet motorsag NOR
Page 60

GENERELLE
SIKKERHETS-ADVARSLER
FOR ELEKTROVERKTØY
ADVARSEL! Les alle instruksjoner.
Hvis du unnlater å følge instruksjonene
under, kan det resultere i elektrisk støt, brann
og/eller alvorlig skade.
ADVARSEL:
sikkerhetsadvarsel merket med
symbolet og alle instruksjoner.
Ta vare på alle advarsler og veiledninger for
fremtidig referanse.
Uttrykket “elektrisk verktøy” i alle advarslene
som er listet opp viser til verktøyet ditt som er
koblet til strømforsyningen (med ledning) eller
batteriverktøy (uten ledning).
1) GENERELLE
SIKKERHETS-ADVARSLER FOR
ELEKTROVERKTØY -ARBEIDSOMRÅDE
a) Hold arbeidsområdet ryddig og
opplyst. Overfylte og mørke områder
inviterer til ulykker.
b) Ikke bruk det elektriske verktøyet
60
i eksplosiv atmosfære, slik som i
nærheten av brennbare væsker, gasser
eller støv. Elektrisk verktøy lager gnister,
noe som kan antenne støv eller damp.
c) Hold barn og de omkringstående unna
når du bruker det elektriske verktøyet.
Distrahering kan forårsake at du mister
kontrollen.
2) GENERELLE SIKKERHETS-ADVARSLER
FOR ELEKTROVERKTØY -ELEKTRISK
SIKKERHET
a) Støpselet til verktøyet må passe til
uttaket. Forandre aldri støpselet på
noen måte. Ikke bruk adapterplugger
i forbindelse med jordet elektrisk
verktøy. Uendrede støpsel og passende
uttak vil redusere risikoen for elektrisk støt.
b) Unngå kroppskontakt med jordet
overflater slike som rør, radiatorer,
komfyrer og kjøleskap. Det er en økt
risiko for elektrisk støt hvis kroppen din er
jordet..
c) Ikke utsett det elektriske verktøyet
Les alle
for regn eller våte omstendigheter.
Tilførsel av vann i et elektrisk verktøy, øker
risikoen for elektrisk støt.
d) Ikke påfør ledningen skade. Bruk aldri
ledningen til å bære, trekke eller ta ut
støpselet til det elektriske verktøyet.
Hold ledningen unna varme, skarpe
kanter eller bevegelige deler. Skadede
eller sammenfiltrede ledninger øker
risikoen for elektrisk støt.
e) Når du bruker et elektrisk verktøy
utendørs, bruk en skjøteledning som
er beregnet for utendørsbruk. Ved å
bruke en skjøteledning som er beregnet for
utendørs bruk, reduserer du risikoen for
elektrisk støt.
f) Når man håndterer et elektrisk verktøy
i fuktige omgivelser, bør man bruke
en strømforsyning som er utstyrt med
en spenningsavledende mekanisme
(RCD). Ved å bruke RCD unngår man
elektriske støt.
3) GENERELLE SIKKERHETS-ADVARSLER
FOR ELEKTROVERKTØY -PERSONLIG
SIKKERHET
a) Vær årvåken, følg med på hva du
gjør og bruk sunn fornuft når du
behandler et elektrisk verktøy. Ikke
bruk et elektrisk verktøy når du
er trett eller påvirket av narkotika,
alkohol eller medisiner. Et øyeblikk
av uoppmerksomhet når du bruker det
elektriske verktøyet kan resultere i alvorlig
personskade.
b) Bruk sikkerhetsutstyr. Bruk alltid
vernebriller. Sikkerhetsutstyr som
støvmaske, sklisikre vernesko, hjelm
eller hørselsvern brukt i passende
sammenhenger vil redusere personskader.
c) Unngå utilsiktet oppstart. Se til at
bryteren står i avslått stilling før
du kobler til strømkilden og/eller
batteripakken, eller før du tar opp
eller bærer verktøyet. Det å bære
verktøyet med fingeren på bryteren eller
sette i støpselet til et elektrisk verktøy som
står på, inviterer til ulykker.
d) Fjern alle justeringsnøkler eller
skrunøkler før du slår på det
Batteridrevet motorsag NOR
Page 61

elektriske verktøyet. En skrunøkkel
eller en annen nøkkel som er festet til
det elektriske verktøyet kan resultere i
personskade.
e) Ikke strekk deg over. Ha godt fotfeste
og balanse hele tiden. Dette muliggjør
bedre kontroll over det elektriske verktøyet
i uventede situasjoner.
f) Kle deg skikkelig. Ikke bruk
løstsittende klær eller smykker.
Hold håret, klærne og hanskene vekk fra
bevegelige deler. Løse klær, smykker eller
langt hår kan bli fanget i bevegelige deler.
g) Hvis utstyret er utstyrt for
tilkobling med støvutblåsing og
innsamlingsfasiliteter, sikre deg at
disse er tilkoblet og forsvarlig brukt.
Ved bruk av dette utstyret kan du redusere
støvrelaterte skader.
4) GENERELLE SIKKERHETS-ADVARSLER
FOR ELEKTROVERKTØY -ELEKTRISK
VERKTØY, BRUK OG VEDLIKEHOLD
a) Ikke bruk makt på det elektriske
verktøyet. Bruk det riktige elektriske
verktøy til din anvendelse. Det riktige
elektriske verktøyet vil gjøre jobben bedre
og sikrere når det blir brukt til det, det er
beregnet for.
b) Ikke bruk det elektriske verktøyet
hvis bryteren ikke slår på og av. Ett
hvert elektrisk verktøy som ikke kan bli
kontrollert med bryteren, er farlig og må
repareres.
c) Ta ut støpslet fra strømkilden og/
eller batteripakken fra det elektriske
verktøyet før du gjør noen justeringer,
endrer noe tilleggsutstyr eller lagrer
elektriske apparater. Slike forebyggende
sikkerhetstiltak reduserer risikoen for å
starte det elektriske verktøyet ved et uhell.
d) Lagre elektrisk verktøy som ikke er
i bruk, utenfor barns rekkevidde, og
ikke tillat personer som er ukjent med
disse instruksjonene å bruke det.
Elektrisk verktøy er farlig i hendene på
utrenede brukere.
e) Vedlikehold elektrisk verktøy. Sjekk
for feiljusteringer eller binding av
bevegelige deler, brekkasje av deler
og eventuelle andre forhold som
kan påvirke verktøyets operasjoner.
Hvis skade, få verktøyet reparert før bruk.
Mange ulykker er forårsaket av dårlig
vedlikeholdt, elektrisk verktøy.
f) Hold skjæreverktøy skarpe og rene.
Godt vedlikeholdte skjæreverktøy med
skarpe egger er mindre tilbøyelig for å
knipe og er lettere å kontrollere.
g) Bruk det elektriske verktøyet,
rekvisitter og verktøydeler etc.,
i henhold til disse instruksene
og måten som er tilsiktet det
spesielle verktøyet, i henhold til
arbeidsforholdene og arbeidet som
skal utføres. Bruk av det elektriske
verktøyet til operasjoner det ikke er
beregnet for, kan resultere i farlige
situasjoner.
h) Hold håndtaker tørre, rene og fri fra
olje og fett. Glatte håndtak fører til en
utrygg situasjon og manglende kontroll
over verktøyet, som kan føre til ulykker.
5) GENERELLE SIKKERHETS-ADVARSLER
FOR ELEKTROVERKTØY - SERVICE
a) Sørg for at det elektriske verktøyet
får service av en kvalifisert reparatør
som bare benytter originale
reservedeler. Dette vil sikre at sikkerheten
til verktøyet blir ivaretatt.
ADVARSLER FOR
KJEDESAGER
1. Hold alle kroppsdeler unna sagkjedet
når sagen går. Forviss deg om at
sagkjedet ikke berører noe før du
starter sagen. Ved arbeid med kjedesagen
kan ett øyeblikks uoppmerksomhet føre
til at klær eller kroppsdeler kommer inn i
sagkjedet.
2. Hold kjedesagen fast i bakre håndtak
med din høyre hånd og ta tak i fremre
håndtak med venstre hånd. Hvis
du holder kjedesagen fast i en annen
arbeidsposisjon øker dette risikoen for
skader og må derfor ikke brukes slik.
3. Hold verktøyet med en isolerende
61
Batteridrevet motorsag NOR
Page 62

gripeoverflate når du utfører en
operasjon der skjæreverktøyet kan
komme i kontakt med skulte ledninger
eller sin egen ledning. Kontakt med en
“levende” ledninger vil utsette metalldeler
til verktøyet og operatøren for støt.
4. Bruk vernebriller og hørselvern.
Ytterligere verneutstyr for hode,
hender, ben og føtter anbefales.
Passende verneantrekk reduserer faren for
skade på grunn av sponmateriell som flyr
omkring og hvis sagkjedet berøres ved en
feiltagelse.
5. Du må ikke arbeide med kjedesagen i
et tre. Ved bruk av en kjedesag i et tre er
det fare for skader.
6. Pass alltid på å stå stødig og bruk
kjedesagen kun når du står på en fast,
sikker og plan undergrunn. Glatt eller
ustabil undergrunn kan føre til at du
mister balansen og kontrollen over
kjedesagen når du står på en stige.
7. Når du sager en gren som står under
spenning må du regne med at denne
springer tilbake. Når spenningen i
trefibrene frigjøres, kan den spente grenen
treffe brukeren og/eller kjedesagen kan ikke
62
lenger kontrolleres.
8. Vær derfor spesielt forsiktig ved saging
av buskas og unge trær. Det tynne
materialet kan komme inn i sagkjedet og
slå mot deg eller få deg ut av balansen.
9. Bær kjedesagen i fremre håndtak
med stillestående sagkjede og
bakoverpekende føringsskinne. Ved
transport eller oppbevaring av kjedesagen
må alltid vernedekselet settes på. Hvis
kjedesagen brukes med omhu er det
mindre sannsynlig at man kommer i
kontakt med et løpende sagkjede.
10.Følg anvisningene for smøring,
kjedestramming og utskifting av
tilbehør. Et usakkyndig strammet eller
smørt kjede kan enten revne eller øke
risikoen for tilbakeslag.
11.Hold håndtakene tørre, rene og fri for
olje og fett. Fette, oljete håndtak sklir og
fører til kontrolltap.
12.Sag kun tre. Bruk kjedesagen kun til
arbeider den er beregnet til – eksempel:
Bruk ikke kjedesagen til saging av
plast, murverk eller bygningsmaterialer
som ikke er av tre. Hvis kjedesagen
brukes til andre arbeider enn det den
er beregnet til kan det oppstå farlige
situasjoner.
ÅRSAKER TIL TILBAKESLAG OG
HVORDAN TILBAKESLAG KAN UNNGÅS:
Tilbakeslag kan oppstå når spissen på en
føringsskinne berører en gjenstand eller hvis
treet bøyer seg og sagkjedet klemmes fast i
snittet.
En berøring med skinnespissen kan i noen
tilfeller føre til en uventet reaksjon bakover,
mens føringsskinnen slås oppover og i retning
av brukeren.
Ved fastklemming av sagkjedet på overkanten
av føringsskinnen kan skinnen slå hurtig
tilbake i retning av brukeren.
Hver av disse reaksjonene kan føre til at du
mister kontrollen over sagen og eventuelt
påfører deg alvorlige skader. Ikke stol
utelukkende på ikkerhetsinnretningene
som er innebygget i kjedesagen. Som bruker
av en kjedesag bør du utføre visse tiltak for
å kunne arbeide uten uhell og skader. Et
tilbakeslag er resultat av en gal eller feilaktig
bruk av elektroverktøyet. Det kan unngås ved
å følge egnede sikkerhetstiltak som beskrevet
nedenstående:
– Hold sagen fast med begge hendene,
la tommelen og fingrene gripe godt
rundt håndtakene på kjedesagen.
Hold kroppen og armene dine i
en stilling, der du kan stå imot
tilbakeslagskreftene. Hvis man sørger
for egnede tiltak, kan brukeren beherske
tilbakeslagskreftene som oppstår. Slipp
aldri kjedesagen.
– Unngå unormale posisjoner og sag
ikke over skulderhøyden. Slik unngås
en uvilkårlig berøring av skinnespissen
og kjedesagen kan kontrolleres bedre i
uventede situasjoner.
– Bruk alltid reserveskinner og
sagkjeder som anbefales av
produsenten. Gale reserveskinner og
sagkjeder kan føre til at kjedet revner eller
at det oppstår tilbakeslag.
– Følg produsentens anvisninger om
Batteridrevet motorsag NOR
Page 63

sliping og vedlikehold av sagkjedet.
For lav dybdebegrensning øker tendensen
til tilbakeslag.
SIKKERHETSANVISNINGER
FOR BATTERIPAKKE
a) Ikke demonter, åpne eller riv opp
sekundære celler eller batteripakker.
b) Ikke kortslutt en celle eller en
batteripakke. Ikke oppbevar celler
eller batteripakke løst i en boks
eller skuff hvor de kan kortslutte
hverandre eller bli kortsluttet
av andre metallgjenstander. Når
batteripakken ikke er i bruk skal den holdes
adskilt fra andre metallgjenstander som
binders, mynter, nøkler, spiker, skruer eller
andre små metallobjekter. Kortslutning av
batteriet kan forårsake skader eller brann.
c) Ikke utsett celler eller batteripakke
for varme eller ild. Unngå
oppbevaring i direkte sollys.
d) Ikke utsett celler eller batteripakke
for mekanisk støt.
e) Hvis du opplever cellelekkasje, ikke
la væsken komme i kontakt med
huden eller øynene. Dersom kontakt
har oppstått, vask området med
rikelige mengder vann og oppsøk
medisinsk hjelp.
f) Søk medisinsk hjelp umiddelbart hvis
en celle eller batteripakke har blitt
svelget.
g) Hold batteripakken ren og tørr.
h) Tørk batteripakkekontaktene med en
ren, tørr klut hvis de blir skitne.
i) Batteripakken må lades før bruk.
Bruk denne instruksjonen og korrekt
ladeprosedyre.
j) Ikke ha batteripakken til ladning når
den ikke er i bruk.
k) Etter en lang lagringsperiode kan
det være nødvendig å lade og utlade
batteripakken flere ganger for å
oppnå maksimal ytelse.
l) Batteripakken gir best ytelse når den
oppbevares i normal romtemperatur
(20°C±5°C).
m) Når du kaster en batteripakke,
hold batterier fra forskjellige
elektrokjemiske systemer adskilt fra
hverandre.
n) Bruk kun batterilader spesifisert av
WORX. Bruk ikke andre ladere enn de
som er levert for bruk med utstyret.
En type lader som er egnet for en type
batteripakke kan skape brannfare hvis den
brukes med en annen type batterier.
o) Tikke bruk batteripakker som ikke er
beregnet for bruk sammen med utstyret.
p) Hold batteripakken utenfor barns
rekkevidde.
q) Ta vare på den originale bruksanvisningen
for fremtidig bruk
r) Ta ut batteriene fra utstyret når det ikke er i
bruk
s) Kvitt deg med produktet på forsvarlig måte.
63
Batteridrevet motorsag NOR
Page 64

SYMBOLER
ADVARSEL
For å redusere risikoen for
personskade, må brukeren lese
instruksjonsveiledningen
FORMÅLSMESSIG BRUK
Maskinen er beregnet til felling av trær og til
saging av stammer, grener, trebjelker, bord
osv. og kan brukes til skjæring på langs og
tvers av treets fiberretning. Denne maskinen
er ikke egnet til saging av mineralske
materialer.
64
Bruk hørselsvern
Bruk vernebriller
Bruk støvmaske
Unngå bruk I våte eller fuktige
forhold.
Ikke utsett for regn eller vann
Ikke brenn
Ikke kast batteriene. Lever utladede
batterier til ditt lokale oppsamlingsog resirkuleringssted.
MONTERING
OBS! Sørg for at verktøyet er
slått av og batteriet tatt ut før
kjedet berøres, eller det gjøres andre
justeringer.
MONTERING AV SVERD OG SAGKJEDE
1. Pakk alle deler forsiktig ut.
2. Legg kjedesagen på en rett flate.
3. Bruk kun originele WORX-kjeder som er
laget for kjedesverdet.
4. Legg sagkjede (8) inn i den omløpende
noten til sverd (7). Gi akt på korrekt
løperetning. Sammenlign kjedet med
løperetningssymbol (13). Kontroller at
kjedespenningslåsen (17) vender utover.
(Se fig. A)
5. Legg kjedeleddene rundt kjedehjulet (12)
og sett sverdet (16) slik på at festebolten
(14) og de to sverd-føringskantene (20)
griper inn i det avlange hullet på sverdet
(7). (Se fig. B)
6. Kontroller for å se om alle deler sitter som
de skal. (Se Fig. C)
7. Fest kjededekslet (11), sikre at
kjedestopperen (19) glir korrekt inn på
kjededekslet (11).(Se Fig. D)
8. Stram kjededekslet (11) ved å dreie
kjedespenneknappen (10) med
klokkeretningen til den er stram.(Se Fig. E)
ADVARSEL: Kjedet er ikke
strammet til ennå. Tilstramming av
kjeden beskrives under “Stramming av
kjede”.
Kjedet må nå inspiseres for å sikre at det
er korrekt strammet.
STRAMMING AV SAGKJEDET
Nye sagkjeder vil strekkes. Sjekk kjedespenning
ofte når den først brukes, og stram når kjedet
blir løst rundt styrestangen
(7).
Batteridrevet motorsag NOR
Page 65

ADVARSEL: Fjern batteriet
fra verktøyet før justering av
sagekjedespenning.
OBS! Skjærekantene på kjedet er
skarpe. Bruk vernehansker nå du
håndterer kjedet.
OBS! Sørg alltid for riktig
stramming av kjedet. Et for løst
kjede kan øke risikoen for tilbakeslag.
Et for løst kjede kan hoppe ut av
kjedesporet. Det kan skade brukeren og
kjedet. Et løst kjede kan føre til at kjedet,
sverdet og tannhjulene slites fortere.
1. Legg kjedesagen på en rett flate.
2. Drei kjedestrammeknappen (10) med
klokkeretningen til den er håndstram.
Spenningen settes automatisk mens
kjedespenneknappen strammes.(Se fig. F1)
3. Dobbelsjekk spenningen som er satt med
den automatiske kjedespenneknappen.
Korrekt kjedespenning er nådd når kjedet
(8) kan heves ca.(kjedeleddene bør akkurat
bli i stangsporet).
3. Dette skal gjøres med en hånd ved å trekke
sagkjedet opp mot maskinens egen vekt.
(Se Fig. F2)
Bruk en skrutrekker til å bevege kjedet
rundt styrestangen for å sikre at det ikke er
knekker. Kjedet bør rotere fritt. (Se Fig. F3)
4. Når kjedet er for løst kan du skru opp
låseknotten/ kjedestrammingsknotten helt
og så skru dekselet på igjen med låseknott.
KJEDESMØRING
VIKTIG: Kjedesagen leveres ikke
fylt med sagkjedeolje. Det er viktig
at den fylles
med olje før bruk. Bruk av kjedesagen
uten sagkjedeolje eller med et oljenivå
under minimum- merket medfører skader
på kjedesagen.
MERK: Levetiden og skjæreytelsen til
kjedet er avhengig av optimal smøring.
Derfor smøres sagkjedet automatisk med
sagkjedeolje under drift .
Påfylling av oljetanken:
1. Sett kjedesagen med oljetankdeksel
oppover på et egnet underlag.(4)
2. Rengjør området rundt oljetankdeksel med
en klut og skru opp dekselet.
3. Fyll stang- og kjedeolje til beholderen
er full. ISO VG32 stang- og kjedeolje kan
brukes, uansett merke.
4. Pass på at det ikke kommer smuss inn i
oljetanken. Skru oljetankdeksel på igjen og
steng det.
VIKTIG: For å muliggjøre
luftsirkulasjon mellom oljetanken
og omgivelsene, finnes det små
utlikningskanaler am oljetankdekselet.
For å unngå at det lekker ut olje
må man alltid passe på at sagen
plasseres vannrett når den ikke brukes
(oljetankdekselet 4 peker oppover).
Bruk kun anbefalt, biologisk nedbrytbar
olje for å unngå skader på kjedesagen.
Bruk aldri resirkulert olje eller brukt olje.
Ved bruk av ikke godkjent olje mister
garantien sin gyldighet.
ONTROLL AV OLJE-AUTOMATIKKEN
Funksjonen til den automatiske
kjedesmøringen kan kontrolleres ved å slå på
sagen og holde spissen I retning av en kartong
eller et papir på bakken.
Hvis det da vises et stadig større oljespor,
arbeider olje-automatikken feilfritt. Hvis det til
tross for full oljetank ikke vises et oljespor, les
«Feilsøking
» eller gå til Bosch-kundeservice.
OBS: Ikke berør bakken med kjedet,
hold en sikkerhetsavstand på 30 cm.
OPERATION
1. FØR DU BRUKER DITT OPPLADBARE
VERKTØY
EL:Laderen og batteripakken
er spesifikt laget for å brukes
sammen. Ikke bruk andre batteripakker
eller ladere. La aldri metallgjenstander
komme inn i laderen eller batteripakken.
Dette kan føre til en elektrisk feil som
kan være farlig.
MERK: Batteripakken er ULADET og du må
lade den opp før bruk.
Batteriladeren som leveres er tilpasset Li-ion
65
Batteridrevet motorsag NOR
Page 66

batteriet i maskinen. Ikke bruk noen annen
lader.
2. LADING AV BATTERIPAKKEN
Li-ion batteriet er beskyttet mot dyp utladning.
når batteriet er tomt, slås maskinen av ved
hjelp av en beskyttelseskrets
I varme miljøer eller etter tung bruk kan
batteripakken bli for varm til å kunne lades. Gi
batteriet tid til å kjøle seg ned.
3.FJERNING ELLER INSTALLERING AV
BATTERIPAKKE (Se Fig. G)
Trykk på låsen på batteripakken og fjern
batteripakken fra verktøyet. Etter lading
sett batteripakken tilbake på plass i drillens
batteriåpning. Det er tilstrekkelig å skyve med
et lett trykk. Kontroller for å se om batteriet
sitter fast.
MERK : Når du fjerner batteripakken,
hold den fast for å unngå å miste den og
forårsake skade.
4. BATTERI STATUS LED’S (SE FIG.H)
MERK: Status LED’s indikerer batteri
tilstand når knappen til batteriet er trykt.
LED’s konstante sanser og viser batteri tilstand
som følgende:
66
Trykk knappen “POWERTEST” når lys knappen
er opplyst.
Når de tre grønne lysine er opplyst har
batteriet oppnådd en høyt ladet tilstand.
Når de to lysene er opplyst ( ), har batteriet
oppnådd en moderat ladet tilstand.
Når kun det ene grønne lyst ( ), er opplyst er
batteri ladningen tappet.
VIKTIG: Når kun det ene grønne lyset
er opplyst er batteriet ditt fullstendig
utladet, selv om gressklipperen
fremdeles er i stand til å klippe gress.
Fortsatt bruk av din gressklipper med et
batteri i denne utladede tilstanden kan
redusere livet og ytelse av ditt batteri.
5. BRUKSVEILEDNING (Se Fig. I)
Til igangsetting av maskinen trykker du
innkoblingssperren (3), deretter trykker du på-/
av-bryteren (2) helt inn og holder disse trykt
inne. Innkoblingssperren (3) kan nå slippes.
Til utkobling slippes på-/av-bryteren (2).
Arbeid med kjedesagen
VIKTIG: Er oljetanken fylt?
Kontroller oljenivåindikator (18)
før arbeidet påbegynnes og med jevne
mellomrom i løpet av arbeidet. Fyll på
olje når oljenivået har nådd underkanten
av vinduet. Påfyllingsmengden er
tilstrekkelig for ca. 20 minutters bruk,
avhengig av pausene og arbeidets
intensitet. (Se fig. J) Kjedespenningen
må kontrolleres med 10-minutters
mellomrom under sagingen.
1. Sett batteripakken inn i maskinen (Se Fig.
G).
2. Sørg for at delen av kubben som skal
kuttes ikke ligger på bakken. Dette vil
hindre at kjedet (8) berører bakken når
det kutter gjennom kubben. Berøring av
bakken mens kjedet beveger seg er farlig,
og vil skjemme kjedet.
3. Bruk begge hender til å gripe sagen. Bruk
alltid venstre hånd til å gripe det fremre
håndtaket, og høyre hånd til å gripe det
bakre håndtaket. Bruk et fast grep. Tommel
og fingre må gripe rundt saghåndtakene
(se fig. K).
4. Sørg for at du har godt fotfeste. Hold
føttene en skulderbredde fra hverandre.
Fordel vekten din jevnt på begge føttene.
5. Når du er klar til å gjøre kuttet, trykkes
avlåsingsknappen (3) helt inn med høyre
tommel, og utløseren klemmes. Dette vil
starte sagen. Hvis utløseren slippes vil
sagen stoppe. Sørg for at sagen kjører i full
hastighet før et kutt startes.
6. Når et kutt startes plasseres det bevegende
kjedet sakte mot treet. Hold sagen godt
på plass for å unngå mulige hopp eller
sidelengs bevegelse av sagen.
7. Før sagen med lett trykk og ikke bruk
overdreven kraft på sagen. Motoren vil
overbelastes og kan brenne opp. Den
vil gjøre jobben bedre og tryggere ved
hastigheten den var tiltenkt for.
8. Fjern sagen fra et kutt med sagen kjørende
i full hastighet. Stopp sagen ved å slippe
på-/av-bryteren. Sørg for at kjedet har
stoppet før sagen settes ned.
9. Øv deg på forkastede kubber i et sikkert
arbeidsområde til du håndterer det, og kan
Batteridrevet motorsag NOR
Page 67

sage med enkelhet, med en jevn bevegelse
og en stødig kuttehastighet.
Sikkerhetsinnretninger for tilbakeslag på
denne sagen
Denne sagen har et lav-tilbakeslagskjede
og en styrestang med redusert tilbakeslag.
Begge innretningene reduserer sjansen
for tilbakeslag. Imidlertid kan tilbakeslag
fremdeles skje med denne sagen.
Følgende steg vil redusere risikoen for
tilbakeslag.
• Bruk begge hender til å gripe sagen når
sagen kjører. Bruk fast grep. Tommel og
fingre må gripe rundt saghåndtakene.
• Ha alle sikkerhetsinnretninger på plass på
sagen. Sørg for at de fungerer korrekt.
• Ikke forstrekk deg eller kutt over
skulderhøyde.
• Ha godt fotfeste og balanse til alle tider.
• Stå litt til venstre for sagen. Dette hindrer
kroppen din fra å være i direkte linje med
kjedet.
• Ikke la styrestangens nese berøre noe når
kjedet er i bevegelse.
• Forsøk aldri å kutte gjennom to kubber
samtidig. Kutt kun en kubbe av gangen.
• Ikke begrav styrestangens nese eller
prøv på styrtekutt (bore inn i tre med
styrestangens nese).
• Vær oppmerksom på forytning av tre eller
andre krefter som kan klemme kjedet.
• Bruk ekstrem forsiktighet når du går inn i et
tidligere kutt.
• Bruk kun lav-tilbakeslagskjedet og
-styrestangen som ble levert med denne
motorsagen.
• Bruk aldri et sløvt eller løst kjede. Hold
kjedet skarpt med korrekt spenning.
Hvordan bruke sagen trygt
1. Bruk kjedesagen kun når du står stødig.
2. Hold kjedesagen noe til høyre for din egen
kropp. (Se Fig. L).
3. Kjedet må være i full fart før det berører
veden.(8)
4. Bruk da barkstøtte (9) til låsing av
kjedesagen på veden.
5. Bruk barkstøtten som spak under sagingen.
(a) (Se Fig. M)
6. Bruk kjedesagen aldri med utstrekte armer.
Ikke forsøk å sage på dårlig tilgjengelige
steder eller mens du står på en stige. (Se
Fig. N).
SAGING AV TRE UNDER SPENNING
(Se Fig. O)
ADVARSEL: Ved kutting av en gren
som er under spenning må ekstrem
forsiktighet utvises. Vær oppmerksom
på at treet kan hoppe tilbake. Når
spenningen i treet frigjøres, kan grenen
hoppe tilbake og treffe operatøren, og
føre til alvorlig skade eller død.
Hvis trestammen ligger mot noe på begge
sider, må du først skjære ovenfra (Y) gjennom
en tredjedel av stammens diameter og
deretter kappe stamen nedenfra (Z) på samme
stedet, for å unngå splintring og fastklemming
av sagen. Unngå da at sagkjedet har kontakt
med bakken. Hvis trestammen kun ligger mot
noe på én side, må du først skjære nedenfra
(Y) og oppover gjennom en tredjedel av
stamens diameter og deretter kappe stammen
ovenfra (Z) på samme stedet, for å unngå
splintring og fastklemming av sagen.
FELLING AV TRÆR (Se Fig.P)
Bruk alltid hjelm til beskyttelse mot
greener som faller ned.
Med kjedesagen må det kun felles trær
med en stammediameter som er mindre
enn sverdets lengde.
Arbeidsområdet må sikres. Pass på at
det ikke oppholder seg personer eller
dyr i området der treet faller.
Forsøk aldri å få en fastklemt sag fri med
løpende motor. Bruk trekiler for å frigjøre
sagkjedet.
Hvis to eller flere personer kutter og feller på
same tid, bør avstanden mellom de fellende
og kuttende personene være på minst
dobbel høyde av treet som felles. Ved felling
av trær må man passe på at ingen andre
personer utsettes for fare, ingen ledninger
treffes og ingen materielle skader oppstår.
Hvis et tre berører en strømledning, må
elektrisitetsverket straks informeres.
Ved saging i helninger bør brukeren av
kjedesagen oppholde seg ovenfor treet som
67
Batteridrevet motorsag NOR
Page 68

skal felles, fordi treet antagelig kommer til å
rulle eller skli nedover etter fellingen.
Før fellingen må man planlegge
og eventuelt frigjøre en rømningsvei.
Rømningsveien skal føre på skrå bakover bort
fra forventet fallelinje.
Før du begynner med fellingen må du ta
hensyn til treets naturlige helning, posisjonen
til store greener og vindretningen, for å kunne
vurdere treets falleretning. Smuss, steiner, løs
bark, spikre, klemmer og tråd må fjernes fra
treet.
Lage innsnitt: Sag først et kjerv (X – W)
med en dybde på 1/3 av treets diameter i
rett vinkel til falleretningen. Utfør først det
nedre vannrette innsnittet. Slik unngås det at
sagkjedet eller føringsskinnen klemmes fast
når du lager det andre innsnittet.
Lage fellesnitt: Lag fellesnittet (Y) minst 50
mm over vannrett kjervesnitt. Utfør fellesnittet
parallelt til vannrett innsnitt. Sag fellesnittet
kun så langt inn at det blir stående en kant
igjen (fellelist) som kan fungere som hengsel.
Kanten forhindrer at treet dreier seg og faller i
gal retning. Ikke sag gjennom kanten.
Når fellesnittet nærmer seg kanten skal treet
begynne å falle. Hvis det viser seg at treet
68
muligens ikke faller i ønsket retning eller
heller bakover og sagkjedet klemmes fast, må
fellesnittet avbrytes og du må bruke kiler av
tre, kunststoff eller aluminium til
å åpne snittet og legge treet i ønsket fallelinje.
Når treet begynner å falle, må kjedesagen
fjernes fra snittet, slås av, legges ned og
du må forlate fareområdet via planlagt
rømningsvei. Pass på grener som faller ned og
at du ikke stubler.
Ved å sette en kil (Z) inn i det vannrette snittet
får du så treet til å falle.
Når treet begynner å falle, må du gi akt på
grener eller kvister som faller ned.
skal sages ovenfra, for å unngå at sagen
klemmes fast.
KAPPING AV TRESTAMMEN (Se Fig. O)
Dette vil si oppdeling av det felte treet i avsnitt.
Pass på å stå stødig og at kroppsvekten din
er jevnt fordelt på begge føttene. Hvis det er
mulig, skal stammen støttes av grener, bjelker
eller kiler. Følg de enkle anvisningene for lett
saging.
Hvis hele lengden til trestammen ligger jevnt –
som vist på bildet – sages det ovenfra.
Hvis trestammen ligger på en ende som vist
på bildet, må først 1/3 av stammediameteren
sages fra undersiden, og deretter resten
ovenfra på same høyde som undersnittet. (Se
fig. S)
Hvis trestammen ligger på en ende som vist
på bildet, må først 1/3 av stammediameteren
sages fra undersiden, og deretter resten
ovenfra på same høyde som undersnittet. (Se
fig. T)
ADVARSEL: (Se Fig. U)
• Hvis arbeidet foregår i en bakke,
må det sikres at kubben ikke ruller
nedover. Sikre kubben med trestaker.
Kjør trestaker i bakken nedenfor
kubben. Stå på oversiden av kubben
ved kutting. Kubben kan rulle etter
kutting.
• Forsøk aldri å kutte gjennom to
kubber samtidig. Dette kan øke
risikoen for tilbakeslag.
• Når en kubbe kuttes må den aldri
holdes med hånden, beinet eller foten.
• Når en kubbe kuttes må en annen
person holde den.
• Slå av og fjern batteripakken fra sagen
før den flyttes fra et sted til et annet.
Grenskjæring (Se fig. Q)
Dette vil si fjerning av grener på et felt tre.
Ved grenskjæring må du la grener som peker
nedover og som støtter treet først bli stående.
Mindre greener kappes med ett snitt som vist
på bildet. Grener som står under spenning
VEDLIKEHOLD AV SAG OG
TILBAKESLAGSSIKKERHET
Følg vedlikeholdsinstruksjonene i denne
manualen. Korrekt rengjøring av sag samt
kjede- og styrestangsvedlikehold kan redusere
sjansene for tilbakeslag. Inspiser og vedlikehold
Batteridrevet motorsag NOR
Page 69

sagen etter hver bruk. Dette vil øke levetiden for
sagen din.
MERK: Selv med korrekt kvessing kan risikoen
for tilbakeslag øke ved hver kvessing.
VEDLIKEHOLD OG LAGRING
AV MOTORSAG
1. Fjern batteripakken fra sagen.
• Når den ikke er i bruk
• Før ytting fra et sted til et annet
• Før vedlikehold
• Før bytte av tilbehør eller ekstrautstyr, som
sagkjede og styrestang.
før lagring av verktøyet, eller hvis stang eller
kjede er skittent.
Skinnene bør rengjøres hver gang kjedet
fjernes.
Snu stangen slik at toppskinne blir bunn og
bunnskinne blir topp, ved omtrent hver 5.
driftstime
FOR Å RENGJØRE STANGSKINNENE:
1. Fjern kjededeksel samt stang og kjede. (se
del MONTERING)
2. Bruk en stålbørste, skrutrekker eller
lignende passende verktøy til å fjerne
rester fra skinnene på stangen. (Se fig. V)
3. Sørg for å rengjøre oljekanaler grundig
2. Inspiser motorsagen før og etter hver bruk.
Kontroller sagen nøye hvis vern eller andre
deler har blitt skadet. Kontroller for skade som
kan påvirke operatørs sikkerhet eller drift av
sagen. Kontroller for innretting eller binding
av bevegelige deler. Kontroller for ødelagte
eller skadde deler. Ikke bruk motorsagen hvis
skade påvirker sikkerhet eller drift. Få skade
reparert ved autorisert servicesenter.For å
finne et autorisert servicesenter, gå til www.
worx.com
3. Vedlikehold motorsagen godt.
• Utsett aldri sagen for regn.
• Hold kjedet skarpt, rent og smurt for bedre
og tryggere ytelse.
• Følg stegene i denne manualen for å
kvesse kjedet.
• Hold håndtak tørre, rene og frie for olje og
smørefett.
• Hold alle skruer og mutre stramme.
4. Ved vedlikehold må det bare brukes
originale reservedeler.
5. Når motorsagen ikke er i bruk, må den
alltid lagres
• På et høyt eller låst sted, utenfor barns
rekkevidde
• På et tørt sted
STANGVEDLIKEHOLD
For å maksimere stanglevetid, anbefales
følgende stangvedlikehold.
Stangskinnene som fører kjedet bør rengjøres
FORHOLD SOM KREVER
STYRESTANGVEDLIKEHOLD:
• Sagen kutter til en side eller i vinkel.
• Sagen må tvinges gjennom kuttet.
• Utilstrekkelig tilførsel av olje til stangen og
kjedet.
Kontroller tilstanden på styrestangen hver
gang kjedet kvesses. En slitt styrestang vil
skade kjedet og gjøre kutting vanskelig.
Etter hver bruk, og med enheten koblet
fra strømkilden, fjernes all sagmugg fra
styrestangen og styrehullet.
Bruk en flatfil til å gjenopprette kvadratiske
kanter og sider når skinnetoppen er ujevn.
File Rail Edges
and Sides
Square
Worn Groove Correct Groove
Bytt ut styrestangen når sporet er slitt,
styrestangen er bøyd eller sprukket, eller
når overdreven oppvarming eller avgratning
av skinnene inntreffer. Hvis erstatning er
nødvendig, må det kun brukes styrestangen
spesifisert for din sag i reservedelslisten eller
på merket plassert mpå motorsagen.
UTSKIFTING/SNUING AV SAGKJEDET
OG SVERDET
Sagkjedet og sverdet kontrolleres som angitt i
avsnitt «Stramming av sagkjedet».
Sverdets føringsnot slites med tiden. Når
69
Batteridrevet motorsag NOR
Page 70

sagkjedet skiftes ut skal sverdet dreies 180°,
for å utlikne slitasjen.
Kontroller kjedehjul. Hvis det er slitt eller
skadet på grunn av den høye belastningen,
må det skiftes ut av et serviceverksted.
Hvis sverdet er slitt eller skadet, ta
kjedestrammingslåsen av sverdet ved å
løsne skruen mot klokken. Plasser deretter
strammingslåsen i det nye sverdet ved å
stramme til med klokken. Den utstikkende
låsen (a) må passe i huller i sverdet. (Se fig. W)
SLIPING AV SAGKJEDET
ADVARSEL:
Fjern batteripakken fra sagen før
vedlikehold. Alvorlig skade eller død
kan inntreffe fra elektrisk støt eller
kroppskontakt med kjedet i bevegelse.
Eggene på kjedet er skarpe. Bruk
vernehansker ved håndtering av kjedet.
Hold kjedet skarpt. Sagen din vil kutte raskere
og tryggere. Et sløvt kjede vil medføre
overdreven slitasje på kjedehjul, styrestang og
motor. Hvis du må tvinge kjedet inn i treet, og
kutting kun lager sagmugg med få store biter,
er kjedet sløvt.
SMØR KJEDEHJUL
70
ADVARSEL: Bruk kraftige hansker når
det utføres vedlikehold eller service på
dette verktøyet
Fjern alltid batteripakken fra sagen før utføring
av service eller vedlikehold på dette verktøyet.
MERK: Det er ikke nødvendig å fjerne kjedet
eller stangen ved smøring av kjedehjulet
1. Rengjør stangen og kjedehjulet
2. Bruk en fettpresse og før spissen på
pressen inn i smørehullet og sprøyt inn
fett til det vises på den ytre kanten av
kjedehjulets spiss. (Se fig. X)
3. For å rotere kjedehjulet frigjøres
kjedestopperen, og kjedet dras for hånd
til den usmurte siden av kjedehullet
er innrettet med smørehullet. Gjenta
smøreprosedyren.
RENGJØRING/LAGRING
Det formede kunststoffhuset til kjedesagen må
rengjøres grundig med en myk børste og en
ren klut. Det må ikke brukes vann, løsemidler
og polermidler. Fjern all smuss, rengjør
særskilt ventilasjonssprekkene til motoren.
Etter en brukstid på 1 til 3 timer skal deksel ,
sverdet og kjedet demonteres og rengjøres
med en børste. Fjern alle rester fra området
rundt dekselet , kjedehjulet og sverdfestet
med en børste. Rengjør oljedysen med en ren
klut. Hvis kjedesagen skal lagres i lengre tid
må sagkjedet og sverdet rengjøres.
Kjedesagen skal lagres tørt på en sikker plass
og utilgjengelig for barn. For å unngå at oljen
renner ut, må du passe på at maskinen legges
ned i vannrett posisjon (oljepåfyllingsskruen
4 peker oppover). Ved oppbevaring i
salgsforpakningen må oljetanken tømmes
helt.
MILJØVERNTILTAK
Dette produktet er merket med et
symbol som er knyttet til avhending
av elektrisk og elektronisk avfall. Dette
betyr at produktet ikke skal kastes med
husholdningsavfall men at det skal returneres
til et innsamlingssystem som samsvarer
med EU-direktiv 2012/19/EU. Det vil deretter
resirkuleres eller demonteres for å redusere
innvirkningen på miljøet. Elektrisk og
elektronisk utstyr kan være skadelig overfor
miljøet og for menneskers helse siden de
inneholder farlige stoffer.
Batteridrevet motorsag NOR
Page 71

FEILSØKING
Symptomer Mulig årsak Utbedring
Kjedesagen fungerer
ikke
Kjedesagen arbeider
intermitterende
Tørt sagkjede
Tilbakeslagsbremse/
startbremse
Varmt kjede/
føringsskinne
Kjedesagen hugger,
vibrerer eller sager ikke
riktig
Bruk aldri verktøy med feil på AV/PÅ-knappen eller feil på tilbakeslagsberemsen(håndvern).
Ved alle andre typer tekniske feil kan du kontakte hjelpetelefonen eller det lokale servicesenteret.
Batteri tomt
Defekt sikring
Ekstern løskontakt
Intern løskontakt
På-/av-bryter defekt
ngen olje i oljetanken
Utluftingen i oljetankdekselet
er tettet
Tettet oljeutløpskanal
Problem med
koblingsmekanisme i
fremre håndbeskyttelse
Ingen olje i oljetanken
Utluftingen i oljetankdekselet
er tettet
Tettet oljeutløpskanal
For høy kjedespenning
Butt kjede
For løs kjedespenning
Butt kjede
Slitt kjede
Sagtennene peker i gal
retning
Lad batteripakken
Skift ut sikringen
Gå til et -serviceverksted
Gå til et -serviceverksted
Gå til et -serviceverksted
Fyll på olje
Rengjør oljetankdekselet
Gjør oljeutløpskanalen fri
Gå til et serviceverksted
Fyll på olje
Rengjør oljetankdekselet
Gjør oljeutløpskanalen fri
Innstill kjedespenningen
Slip eller skift ut kjedet
Innstill kjedespenningen
Slip eller skift ut kjedet
Utskifting av kjedet
Monter sagkjedet på nytt med
tennene
i korrekt retning
71
Batteridrevet motorsag NOR
Page 72

SAMSVARSERKLÆRING
Vi,
POSITEC Germany GmbH
Konrad-Adenauer-Ufer 37
50668 Köln
Erklærer at produktet,
Beskrivelse WORX batteridrevet
motorsag
Type WG368E WG368E.9 (3- betegner
maskin, angir motorsag)
Funksjon kutte tre
Samsvarer med følgende direktiver,
2006/42/EC, 2004/108/EC, 2011/65/EU,
2000/14/EC endret av 2005/88/EC
Den notifiserte gruppen involvert
Navn: Intertek Deutschland GmbH (Den
notifiserte gruppen involvert 0905)
Adresse: Stangenstraße 1, 70771
LEINFELDEN-ECHTERDINGEN
2000/14/EC endret av 2005/88/EC:
– Tilpassningsbedømmelse Utført ifølge
Annex V
– Målt Lydkraftnivå 96.1dB(A)
72
– Erklært Garantert Lydkraftnivå 100dB(A)
Standardene samsvarer med
EN 60745-1 EN 60745-2-13
EN ISO 3744 EN 55014-1
EN 55014-2
Personen som er autorisert til å utarbeide den
tekniske filen,
Navn Russell Nicholson
Adresse Positec Power Tools (Europe)
Ltd, PO Box 152, Leeds, LS10 9DS, UK
2014/04/21
Leo Yue
POSITEC Direttore Qualità
Batteridrevet motorsag NOR
Page 73

1. BAKRE HANDTAG
2. STRÖMSTÄLLARE TILL/FRÅN
3. INKOPPLINGSSPÄRR
4. OLJETANKLOCK
5. FRÄMRE HANDTAG
6. HANDSKYDD
7. SVÄRD
8. SÅGKEDJA
9. TAGGANSLAG
10. KEDJESPÄNNKNAPP
11. KEDJESKYDD
12. KEDJEHJUL
13. KEDJERIKTNINGSSYMBOL
14. LOKALISERINGSFLIKAR
15. OLJEMUNSTYCKE
16. FÄSTBULT
17. SPÄNNPLATTA
18. OLJENIVÅFÖNSTER
19. KEDJESPÄRR
20. KLÄMMA
21. KLINGSKYDD*
73
* I bruksanvisningen avbildat och beskrivet tillbehör ingår inte alltid I leveransen!
Batteridriven motorsåg SV
Page 74

TEKNISK INFORMATION
Typ WG368E WG368E.9 (3-maskinbeteckning, anger Kedjesåg)
WG368E WG368E.9
Spänning 40V
Svärdlängd 30cm
Kaplängd: 25cm
Kedjehastighet 3.8m/s
Oljebehållarens volym 100ml
Kedjedelning
Antal drivlänkar 45
Kedjemått 1.1mm
Sågkedjetyp Oregon
Skentyp Oregon
Laddningstid 1hr /
Maskinens vikt (kedja och skena inkluderad)
**Spänning mäts utan arbetsbelastning. Initial batterispänning når maximalt 40 volt. Nominell spänning
är 36 volt.
74
NOISE INFORMATION
3.8kg 3.0kg
Max**
9.5mm
®
: 90PX
®
: 124MLEA041
Ett uppmätt ljudtryck LpA:85dB(A)
En uppmätt ljudstyrka
K
pA
Använd hörselskydd
L
wA.d
:100dB(A)
3.0dB(A)
VIBRATIONSINFORMATION
Vibration totalvärde (triaxvektor-summa) fastställd i enlighet med EN 60745:
Vibrationsemissionsvärde: ah= 3,5 m/s2 Osäkerhet K = 1,5m/s²
Mätningen av den vibrationsnivå som anges I denna anvisning har utförts enligt en mätmetod som är
standardiserad och kan användas vid jämförelse av olika elverktyg.Mätmetoden är även lämplig för
preliminär bedömning av vibrationsbelastningen.
VARNING: Vibrationsvärde vid verklig användning av maskinverktyget kan skilja sig åt från det
deklarerade värdet beroende på hur verktyget används och beroende på följande exempel och
andra variationer om hur verktyget används:
Hur verktyget används och materialet som skärs eller borras.
Verktyget är i bra skick och bra underhållet.
Batteridriven motorsåg SV
Page 75

Användning av korrekt tillbehör för verktyget och säkerställ att de är skarpa och i bra skick.
Åtdragningsgraden av greppet på handtaget och om några antivibrationstillbehör används.
Och att verktyget används såsom avsett enligt dess konstruktion och dessa instruktioner.
Detta verktyg kan orsaka hand-arm vibrationssyndrom om det används på felaktigt
sätt
VARNING: För att vara korrekt bör en beräkning av exponeringsnivån under verkliga
förhållanden vid användning också tas med för alla delar av hanteringscykeln såsom tiden när
verktyget är avstängt och när det körs på tomgång utan att utföra något arbete. Detta kan betydligt
minska exponeringsnivån över den totala arbetsperioden.
Hjälp för att minimera risken för vibrationsexponering.
Använd ALLTID skarpa mejslar, borrar och blad.
Underhåll verktyget i enlighet med dessa instruktioner och håll det välsmort (där så behövs)
Om verktyget ska användas regelbundet, investera i antivibrationstillbehör.
Undvik att använda verktygen i temperaturer på 10oC eller lägre
Planera ditt arbetsschema för att sprida ut användning av kraftigt vibrerande verktyg över era dagar.
TILLBEHÖR
WG368E WG368E.9
Lubrication Oil (100ml) 1 1
Blade Protection Cover 1 1
Laddare (WA3735) 1 /
Batteripaket (WA3536) 1 /
75
Vi rekommenderar att du köper alla dina tillbehör från samma affär där du köpte verktyget. Använd
bra kvalitetstillbehör av ett välkänt märke. Se avsnittet med arbetstips i denna bruksanvisning eller
tillbehörets förpackning för mer information. Affärspersonalen kan också hjälpa dig och ge dig råd.
Batteridriven motorsåg SV
Page 76

GENERELLA
SÄKERHETSVARNINGAR
FÖR ELVERKTYG
VARNING! Läs alla instruktioner.
Följs inte alla nedanstående instruktioner
kan det leda till elektriska stötar, brand och/eller
allvarliga skador.
VARNING: Läs igenom alla
säkerhetsinstruktioner betecknade
med symbolen och alla instruktioner.
Spara alla varningar och instruktioner
för framtida bruk.
Termane “strömförande verktyg” i alla
varningsmeddelande nedan avser ditt
(sladdverktyg) strömförande verktyg eller
batteridrivna (sladdlösa) strömförande verktyg.
1. GENERELLA
SÄKERHETSVARNINGAR FÖR
upplyst. Skräpiga och mörka
b) Använd inte strömförande verktyg
i explosiva miljöer, som nära
76
brandfarliga vätskor, gaser eller
damm. Strömförande verktyg skapar gnistor
som kan antända damm eller ĺngor.
använder ett strömförande verktyg.
Distraktioner kan göra att du förlorar
kontrollen.
2) GENERELLA
SÄKERHETSVARNINGAR FÖR
ELVERKTYG -ELSÄKERHET
inte adapterkontakter i samband
med jordade strömförande verktyg.
Omodierade stickkontakter och matchande
eluttag minskar risken för elstötar.
b) Undvik kroppskontakt med jordade
ytor som rör, element, spisar och
Det nns en större risk för elstötar
om din kropp är jordad.
c) Exponera inte strömförande verktyg
Kommer det in vatten i ett strömförande
verktyg ökar det risken för elstötar.
d) Missbruka inte sladden. Använd
aldrig sladden för att bära, dra
eller dra ut stickkontakten för det
eller rörliga delar. Skadade eller
tilltrasslade sladdar ökar risken för elstötar.
e) När du använder ett strömförande
verktyg utomhus använder du en
förlängningssladd som lämpar sig
för utomhus bruk. Använder du en sladd
för utomhus bruk reducerar du risken för
elstötar.
f) Om det inte går att undvika att
driva ett elverktyg I en fuktig lokal,
använd då en restströmsskyddad
(RCD) strömtillförselanordning.
Användning av en RCD minskar risken för
elektriska stötar.
3) GENERELLA
SÄKERHETSVARNINGAR FÖR
ELVERKTYG -PERSONLIG
SÄKERHET
vad du gör och använd sunt förnuft
när du använder ett strömförande
verktyg. Använd inte ett
strömförande verktyg när du är trött
eller läkemedel. En kort stund av
ouppmärksamhet med strömförande verktyg
kan resultera i allvarliga personskador.
b) Använd säker utrustning.
Använd alltid skyddsglasögon.
Säkerhetsutrustning som munskydd, halkfria
skor, skyddshjälm eller hörselskydd som
används när det behövs kommer att reducera
personskador.
c) Förhindra ofrivillig start. Se till att
kontakten är i off-läge innan du
ansluter till strömkälla och/eller
batterienhet, tar upp eller bär med
dig verktyget. Bär du strömförande
verktyg med ngret pĺ kontakten eller sätter i
stickkkontakten i elluttaget när kontakten är i
PĹ-läge utgör det en skaderisk.
d) Ta bort alla skiftnycklar eller
strömförande verktyget. En skift - eller
skruvnyckel som lämnas kvar pĺ en roterande
Batteridriven motorsåg SV
Page 77

del pĺ ett strömförande verktyg kan orsaka
personskador.
alltid fotfästet och balansen. Detta
gör att du kan kontrollera verktyget bättre i
oväntade situationer.
f) Klä dig rätt. Använd inte löst
sittande kläder eller smycken. Hĺll ditt
hĺr, dina kläder och handskar borta frĺn rörliga
delar. Lösa kläder, smycket eller lĺngt hĺr kan
snärjas in i rörliga delar.
anslutning för dammutsug och
dammuppsamling ser du till att de
är anslutna och används korrekt.
Använder du dessa anordningar reducerar
det dammrelaterade faror.
4) GENERELLA
SÄKERHETSVARNINGAR FÖR
ELVERKTYG -ANVÄNDNING OCH
VERKTYG
1) Forcera inte det strömförande
verktyget. Använd korrekt verktyg
för arbetet. Det korrekta verktyget kommer
att göra jobbet bättre och säkrare med den
hastighet den tillverkats för.
2) Använd inte verktyget om kontakten
Alla strömförande verktyg som inte kan
kontrolleras med kontakten är farliga och
mĺste repareras.
3) Koppla från stickkontakten från
strömkällan och/eller batterienheten
från elverktyget innan du utför några
justeringar, ändrar I tillbehören eller
magasinerar elverktygen. Sĺdana
förebyggande säkerhetsĺtgärder reducerar
risken för att du startar verktyget oavsiktligt.
4) Förvara verktyget som inte används
inte känner till verktyget eller dessa
anvisningar. Strömförande verktyg är
farliga i händerna pĺ outbildade användare.
Kontrollera inriktningen eller fästet
för rörliga delar, defekta delar och
användningen av elverktyget. Om
repareras före användning. Mĺnga
olyckor orsakas av felaktigt underhĺllna
elverktyg.
Korrekt underhĺllna skärverktyg med skarpa
egg kommer inte att köra fast lika ofta och är
enklare att kontrollera.
7) Använd elverktyget, tillbehören
och verktygsbitsen etc. i enlighet
det sätt som avsetts för varje typ
skall utföras. Använder du elverktyg för
ĺtgärder som skiljer sig det avsedda arbetet
kan det resultera i riskfyllda situationer.
8) Håll handtagen torra, rena och fria
från olja och fett. Hala handtag försvårar
säker hantering och kontroll av verktyget i
oväntade situationer.
5) GENERELLA
SÄKERHETSVARNINGAR FÖR
a) Låt ditt elverktyg underhållas
bara använder äkta reservdelar.
Det kommer att garantera att elverktygets
säkerhet bibehĺlls.
77
VARNINGSANVISNINGAR
FÖR KEDJESÅGAR
1. När sågen är igång håll kroppen
på betryggande avstånd från
sågkedjan. Kontrollera innan
sågen startas att sågkedjan går
fritt. Under arbete med en kedjesåg kan
en kort oaktsamhet leda till att kläder eller
kroppsdelar råkar in i sågkedjan.
2. Håll i kedjesågen med högra handen
på bakre handtaget och med vänstra
handen på framer handtaget. Om
kedjesågen hålls i ett annat arbetsläge ökar
risken för kroppsskada och får därför inte
användas.
greppytor när du utför ett arbete där
med dolda sladdar eller sin egen
sladd. Kommer man i kontakt med en
strömförande sladd kommer det att leda
Batteridriven motorsåg SV
Page 78

in ström i verktygets metalldelar och ge
användaren en elchock.
4. Bär skyddsglasögon och
hörselskydd. Vid rekommenderar
ytterligare skyddsutrustnin för
huvud, händer, ben och fötter.
Lämplig skyddutrustning minskar risken för
kroppsskada som kan orsakas av utkastat
spånmaterial och oavsiktlig beröring av
sågkedjan.
5. Arbeta inte med kedjesågen
uppklättrad i ett träd. Risk för
kroppsskada om kedjesågen används i ett
träd.
6. Se till att du står stadigt och använd
kedjesågen endast när du står på
ett fast, säkert och plant underlag.
Halt och instabilt underlag kan t.ex. vid
användning av stege leda till att man förlorar
balansen och kontrollen över kedjesågen.
7. Räkna med att en gren som är under
spanning vid sågning kan fjädra
tillbaka. När spänningen I träbrerna
avlastas kan grenen träffa användaren och/
eller göra kedjesågen okontrollerbar.
8. Var särskilt försiktig vid sågning av
snårskog och unga träd. Tunt material
kan hänga upp sig I sågkedjan och slå dig
78
eller få dig ur jämvikt.
9. Bär kedjesågen i främre greppet
med frånkopplad sågkedja och med
bakåt riktat svärd. För transport
och lagring av kedjesågen skall
svärdskyddet sättas på. En omsorgsfull
hantering av kedjesågen reducerar risken
för en oavsiktlig beröring med den roterande
sågkedjan.
10. Följ anvisningarna för smörjning,
kedjespänning och tillbehörsbyte. En
icke fackmässigt spänd eller smord
sågkedja kan brista eller öka risken
för bakslag.
11. Håll handtagen torra, rena och fria
från olja och fett. Med fett eller olja
nedsmorda handtag är hala och kan leda till
att kontrollen förloras.
12. Endast trävirke får sågas. Använd
kedjesågen endast för de arbeten
den är avsedd för – exempel:
Kedjesågen får inte användas för
sågning av plast, murverk eller
byggmaterial som inte är I trä. Om
kedjesågen används för icke ändamålsenliga
arbeten kan farliga situationer uppstå.
ORSAKER FÖR OCH ELIMINERING AV
BAKSLAG:
Bakslag kan uppstå när svärdets nos berör ett
föremål eller om virket böjer sig och sågkedjan
kläms fast.
En beröring med svärdnosen kan ofta leda till en
oväntad bakåtriktad reaktion varvid svärdet slår
uppåt och mot användaren.
Om sågkedjan kommer i kläm på styrskenans
over kant kan svärdet slå bakåt mot användaren.
Alla dessa reaktioner kan leda till att du förlorar
kontrollen över sågen och i värsta fall skadas. Lita
inte uteslutande på den säkerhetsutrustning som
nns monterad på kedjesågen. När du använder
kedjesågen bör du själv vidta vissa åtgärder
för att kunna arbeta utan olyckor och skador.
Bakslag uppstår till följd av missbruk eller felaktig
hantering av elverktyget. Detta kan undvikas
genom skyddsåtgärder som beskrivs nedan:
– Håll i sågen med båda händerna
omsluta kedjesågens handtag.
Håll kroppen och armarna i ett
läge som är lämpligt för att motstå
bakslagskrafter. Om lämpliga åtgärder
vidtagits kan användaren behärska
bakslagskrafterna. Släpp aldrig greppet om
kedjesågen.
– Undvik en onormal kroppsställning
och såga inte över skulderhöjd.
Härvid undviks en oavsiktlig beröring med
svärdsnosen och möjliggör en bättre kontroll
över kedjesågen i oväntade situationer.
– Använd alltid de reservsvärd
och sågkedjor som tillverkaren
föreskrivit. Andra reservsvärd och
sågkedjor kan leda till att kedjan brister eller
till bakslag.
– Följ tillverkarens anvisningar
för skärpning och underhåll av
sågkedjan. För låg djupgångsbegränsning
ökar risken för bakslag.
Batteridriven motorsåg SV
Page 79

SÄKERHETSFÖRESKRIFTER FÖR
BATTERIET
a) Ta inte isär batteriet, öppna inte
heller batteriet eller sära på
battericeller.
b) Kortslut inte batteriet. Förvara inte
batteriet på ett slarvigt sätt i en
låda där det kan kortslutas eller
skadas av ledande material. När
batteriet inte används, håll det borta från
metallobjekt, såsom pappersgem, pengar,
nycklar, naglar, skruvar eller andra små
metallobjekt som kan leda ström från en
terminal till en annan. Om batteriterminalerna
kortsluter varandra kan de förorsaka
brandrisk.
c) Exponera inte batteriet för eld eller
värme. Undvik förvaring i direkt
solljus.
d) Utsätt inte batteriet för mekanisk
chock.
e) Om batteriet läcker, låt inte vätskan
komma i kontakt med hud eller
ögon. Om så ändå skulle hända,
skölj med mycket vatten och sök
läkarhjälp.
f) Sök omedelbar läkarhjälp om
någon har svalt en battericell eller
batteriet.
g) Håll batteriet rent och torrt.
h) Torka av batteriet om det blir
smutsigt med en torr, ren trasa.
i) Batteriet måste laddas före
användning. Använd den här
bruksanvisningen för att ladda
batteriet korrekt.
j) Låt inte batteriet stå på laddning
när det inte används.
k) Efter lång tids användning kan det
bli nödvändigt att ladda och ladda
ur batterieet många gånger för att
nå maximal prestanda.
l) Batterier fungerar bäst när de
används vid normal rumstemperatur
(20°C±5°C).
m) När du kasserar batteriet, se
till att hålla batterier med olika
elektrokemiska system ifrån
varandra.
n) Ladda endast med laddare av
varumärket WORX. Använd
ingen annan laddare än den som
batteriet. En laddare som passar för en
viss typ av batteri kan förorsaka brandrisk
vid användning tillsammans med ett annat
batteri.
o) Använd inte ett batteri som inte är avsett för
användning med det här verktyget.
p) Håll batteriet borta från barn.
q) Behåll den ursprungliga bruksanvisningen för
framtida användning.
r) Plocka ur batteriet från verktyget då det inte
används.
s) Kassera batteriet på rätt sätt.
79
Batteridriven motorsåg SV
Page 80

SYMBOLER
80
VARNING
För att minska risken för skador måste
användaren läsa bruksanvisningen.
Använd hörselskydd
Använd skyddsglasögon
Använd skyddsmask mot damm
Skydda mot regn.
Får ej brännas
Utsätt inte för regn eller vatten
Kasta inte förbrukade batterier.
Återlämna förbrukade batterier till
din lokala batteriinsamling eller
återvinningsstation.
ÄNDAMÅLSENLIG ANVÄNDNING
Kedjesågen är avsedd för fällning av träd samt
kapning av stockar, kvistar, plank, brädor mm och
kan användas för snitt längs och tvärs mot virkets
berriktning. Sågen är inte lämplig för sågning av
mineraliska material.
MONTERING
OBS! Kedjesågen får anslutas till
nätströmmen först sedan den är
fullständigt monterad.
När sågkedjan hanteras ska alltid
skyddshandskar användas.
MONTERING AV SVÄRD OCH
SÅGKEDJA
1. Packa försiktigt upp alla komponenter.
2. Ställ upp kedjesågen på en plan yta.
3. Använd alltid äkta WORX kedjor som
konstruerats för kedjeskena.
4. Lägg in sågkedjan (8) i spåret som löper
runtom svärdet (7). Kontrollera rätt löpriktning.
Jämför kedjan med löpriktningssymbolen (13).
Se till att kedjespänningshaken (17) är riktad
utåt (se gur A)
5. Lägg kedjelänkarna kring kedjehjulet (12) och
lägg upp svärdet (16) så att fästbulten (14)
och svärdets båda styrnockar (20) griper in i
de ovala hålen på svärdet (7) (se gur B)
6. Kontrollera om alla delar sitter fast ordentligt.
(se gur C)
7. Montera kedjeskyddet (11), se till att
kedjespärren (19) glider rätt in i kedjeskyddet
(11). (se gur D)
8. Dra åt kedjeskyddet (11) genom att vrida
kedjesträckarknoppen (10) medurs tills den är
spänd. (se gur E)
VARNING: Kedjan är ännu inte
spänd. Spänning av kedjan
beskrivs under “Kedjespänning”.
Kedjan behöver nu inspekteras för att
se till att den är ordentligt spänd.
SPÄNNING AV SÅGKEDJA
Nya sågkedjor kommer att sträckas. Kontrollera
kedjespänningen ofta första gången den används
och dra åt när kedjan blir lös runt svärdet (7).
Batteridriven motorsåg SV
Page 81

VARNING!
Ta ut batteriet ur verktyget innan
du justerar sågkedjans spänning.
OBS! Skären på kedjan är vassa.
Använd skyddshandskar när
kedjan hanteras.
OBS! Se till att alltid ha korrekt
kedjespänning. En lös kedja kan
öka risken för rekyler. En lös kedja kan
hoppa av styrskenans spår. Detta kan
skada operatören och kedjan. En lös
kedja gör att kedjan, kedjeskenan och
tänderna slits mycket fortare.
1. Ställ upp kedjesågen på en plan yta.
2. Vrid kedjesträckarknoppen (10) medurs tills
den spänd. Spänningen ställs in automatiskt
när kedjesträckarsknoppen dras åt.
Spärrhakmekanismen förhindrar att
kedjespänningen lossar. (Se gur. F1)
3. Dubbelkolla spänningen som ställts in av
den automatiska kedjesträckarknoppen.
Rätt kedjespänning uppnås när kedjan (8)
kan höjas ca.(kedjelänkarna bör vara kvar i
spåret).
För kontroll dra upp sågkedjan med en hand
mot sågens egenvikt.( Se gur . F2)
Använd en skruvmejsel för att ytta kedjan
runt svärdet för att kontrollera att den går
jämnt. Kedjan ska rotera fritt. (Se gur .F3)
4. När kedjan lossar skruva loss låsvredet/
kedjespänningsvredet helt och skruva
sedan på täckplattan med låsvredet
åtdragen igen.
uppåt på ett lämpligt underlag.(4)
2. Rengör partiet kring oljetanklocket med en
trasa och skruva sedan bort locket.
3. Tillsätt kedjeolja tills behållaren är full. ISO
VG32 Kedjeolja av alla fabrikat kan användas.
4. Se till att smuts inte tränger in i oljetanken.
Skruva åter fast tanklocket (4).
VIKTIGT: För luftutbyte mellan
oljetanken och omgivningen har
små kompensationskanaler tagits upp
på oljetankslocket. För att undvika att
olja rinner ut, bör man se till
att sågen efter användning läggs i
vågrätt läge (oljetankslocket 4 ska vara
riktat uppåt).
Använd uteslutande rekommenderad,
biologiskt nedbrytbar smörjolja för att
undvika skada på kedjesågen. Använd
aldrig återvunnen olja eller spillolja.
Om icke godkänd olja används, lämnas
ingen garanti.
Kontroll av oljeautomatik
Den automatiska kedjesmörjningens funktion kan
enklast kontrolleras genom att starta sågen och
sedan hålla sågnosen mot ett papp eller papper
på marken.
Om oljespåret tilltar fungerar oljeautomatiken
felfritt. Om olja inte matas ut även om oljetanken
är full, slå upp under ”Felsökning” eller uppsök
Worx-serviceverkstad.
OBS! Berör inte marken med sågkedjan, håll ett
säkerhetsavstånd på 30 cm.
81
KEDJESMÖRJNING
VIKTIGT: Kedjesågen levereras
utan sågkedjeolja. Kom ihåg att
fylla på olja innan sågen tas i bruk.
Används kedjesågen utan sågkedjeolja
eller med en oljenivå som ligger under
kedjesågen skadas.
OBS: Kedjans livslängd och snitteffekt är
beroende av att den smörjs optimalt. Därför
smörjs sågkedjan under drift automatiskt med
sågkedjeolja
Påfyllning av oljetank:
1. Lägg upp kedjesågen med oljetanklocket
DRIFT INSTRUKTIONER
1.INNAN DU ANVÄNDER DITT
TRÅDLÖSA VERKTYG
VARNING: Laddaren och
batteripaketet är särskilt
konstruerade för att fungera
tillsammans. Använd inget annat
batteripaket eller någon annan laddare.
Se till att inga metallföremål kommer in
i laddaren eller batteripaketet. Det kan
orsaka elektriska fel som kan medföra
fara.
OBS:Ditt batteripaket är OLADDAT och du måste
ladda det en gang innan användning.
Batteridriven motorsåg SV
Page 82

Den medföljande batteriladdaren matchar det
litiumjonbatteri som sitter i enheten. Använd ingen
annan batteriladdare.
2.LADDNING AV BATTERIPAKETET
Litiumjonbatteriet har skydd mot djup urladdning.
När batteriet är tomt stängs enheten av med hjälp
av en skyddskrets
I en varm miljö eller efter massiv användning,
kan batteripaketet blir alltför varmt för att kunna
laddas. Låt batteriet svalna före laddning.
3. TA BORT ELLER SÄTTA I
BATTERIPAKETET (Se Figur G)
Tryck på batteripaketets spärrhake och ta bort
batteriet från ditt verktyg.(4) När batteripaketet
har laddats sätts det tillbaka i borrmaskinens
batterifack. (se gur .G). Det glider lätt in och
kräver bara ett lätt tryck på slutet. Kontrollera att
batteriet är helt fastsatt.
OBS : När batteripaketet tas bort, hål
fast det för att undvika skador och att
det tappas.
4 BATTERI STATUS LED (Se Figur H)
OBS: Status LED kommer att indikera
batteriets kondition när knappen på
batteriet trycks ned.
82
LED känner kontinuerligt av och visar batteriets
kondition enlig följande:
Tryck på knappen “POWERTEST”, lampan på
knappen lyser.
När de tre gröna lamporna lyser är batteriet
fulladdat.
När två gröna lamporna ( ) yser är batteriet
delvis laddat.
När endast en grön lampa ( )lyser är
batteriladdningen förbrukad.
Innan du använder klipparen första gången
rekommenderar vi att enheten laddas över natten
för att garantera att batteriet är fulladdat.
VIKTIGT
När endast en grön lampan lyser är
ditt batteri alltför urladdat även om
klipparen fortfarande klarar av att klipp
gräs. Om du fortsätter att använda din
gräsklippare med batteriet i denna
urladdade kondition kan det reducera
batteriets livslängd om dess prestanda.
5. IN- OCH URKOPPLING (Se Figur I)
För start av sågen tryck in inkopplingsspärren (3),
tryck sedan ned strömställaren Till/Från (2) och
hall den i detta läge. Inkopplingsspärren (3) kan
nu släppas.
För frånkoppling släpp strömställaren Till/Från (2).
Så här används kedjesågen
VIKTIGT: Är oljetanken påfylld?
Kontrollera oljenivån I synglaset
(18) innan arbetet påbörjas och
regelbundet under arbetets gång.
Fyll på olja när oljenivån sjunkit till
synglasets undre kant. Full tank
räcker för ca.20 minuter sågning, men
är givetvis beroende av pauser och
arbetets intensitet. (Se Figur J)
Kedjespänningen ska kontrolleras innan
arbetet påbörjas, efter ett par snitt
och under sågning i intervaller om 10
minuter.
1. Montera batteriet i maskinen (se gur G).
2. Se till att den del som ska sågas av inte
ligger på marken. Detta förhindrar kedjan
(8) att vidröra marken när den skär genom
arbetsstycket. Det är farligt att vidröra marken
medan kedjan är i rörelse, och det kommer
dessutom att göra kedjan slö.
3. Använd båda händerna för att ta tag i sågen.
Använd alltid vänster hand för att ta tag i det
främre handtaget och höger hand för att ta tag
i det bakre handtaget. Använd ett fast grepp.
Se till att ngrarna håller ett fast grepp runt
sågens handtag (se gur K).
4. Se till att du står stadigt. Håll fötterna axelbrett.
Fördela din vikt jämnt på båda fötterna.
5. När du är redo att göra ett snitt, tryck in
låsknappen (3)helt med höger tumme och
krama avtryckaren. Då slås sågen på. Släpp
avtryckaren så stängs sågen av. Se till att
sågen är igång för fullt innan du börjar med
sågningen.
6. När du startar ett snitt, placera sakta den
rörliga kedjan mot träet. Håll sågen stadigt på
plats för att undvika eventuellt studsande eller
slirande (sidledes rörelse) av sågen.
7. Styr sågen med hjälp av ett lätt tryck och
applicera inteonödig kraft på sågen. Motorn
kan då överbelastas och brännas ut. Sågen
gör arbetet bättre och säkrare vid den
hastighet för vilken den konstruerades.
Batteridriven motorsåg SV
Page 83

8. Borttagning av sågen från ett snitt när sågen
är igång med full fart. Stoppa sågen genom att
släppa På/av-knappen. Se till att kedjan har
stannat innan du sätter ned sågen.
9. Fortsätt att öva på provbitar i ett säkert
arbetsområde tills du får kläm på det och kan
såga med lätthet, med hjälp av en ytande
rörelse och en stabil skärhastighet.
Kast-säkerhetsanordningar på denna
såg
Denna såg har en lå- kast-kedja och svärd för
minskat kast. Båda dessa minskar risken för kast.
Däremot kan kast ändå uppstå med denna såg.
Följande steg kommer att minska risken för kast.
• Använd båda händerna för att greppa sågen
när sågen är igång. Använd ett fast grepp.
Se till att ngrarna håller ett fast grepp runt
sågens handtag.
• Behåll alla säkerhetsanordningar på plats på
sågen. Se till att de fungerar korrekt.
• Luta dig inte för långt eller såga ovanför
axelhöjd.
• Bibehåll alltid ordentligt fotfäste och balans.
• Stå lite till vänster om sågen. Detta hindrar
kroppen från att vara i direkt linje med kedjan.
• Låt inte svärdsnosen röra någonting när
kedjan är i rörelse.
• Försök aldrig att skära genom två
arbetsstycken på samma gång. Kapa bara ett
arbetsstycke i taget.
• Borra inte in svärdsnosen eller prova instick
(borrning i trä med hjälp av svärdsnosen).
• Se upp för växling av trä eller andra krafter
som kan nypa tag i kedjan.
• Var ytterst försiktig när du är återgår till ett
tidigare snitt.
• Använd endast lågkast-kedjan och svärdet
som medföljde denna motorsåg.
• Använd aldrig en slö eller lös kedja. Håll
kedjan spänd med rätt spänning.
Hur du använder sågen säkert
1. Se till att du under sågning står stadigt.
2. Håll kedjesågen något till höger om kroppen.
(se gur .L).
3. Kedjan måste rotera med full hastighet innan
den läggs an mot virket. (8)
4. Använd tagganslaget (9) för att xera
kedjesågen på virket.
5. Använd under sågning tagganslaget som
hävarm.(a) (se gur.M)
6. Försök inte sträcka dig mot svåråtkomliga
ställen och saga aldrig uppklättrad på en
stege. (se gur. N).
SÅGNING AV VIRKE UNDER SPÄNNING
(Se Figur .O)
VARNING: När du kapar ett
arbetsstycke som är under
spänning, var extremt försiktig. Var
uppmärksam på trä som snäpper
tillbaka. När träspänningen släpper kan
arbetsstycket studsa tillbaka och slå till
operatören vilket kan orsaka allvarlig
skada eller dödsfall.
Stöds virket på båda sidorna, såga först uppifrån
(Y) en tredjedel av stammens diameter och kapa
därefter från undre sidan (Z) på samma ställe för
att hindra
att virket splittras och sågen kommer i kläm.
Undvik att beröra marken med sågkedjan.
Stöds virket endast på den ena sidan, såga först
från under sidan (Y) en tredjedel av stammens
diameter uppåt och kapa sedan stammen från
övre sidan (Z) på samma ställe för att hindra att
virket splittras och sågen kommer i kläm.
FÄLLNING AV TRÄD (Se Figur .P)
Använd alltid en hjälm som skydd mot
nedfallande grenar.
Med kedjesågen får endast träd fällas
vars stamdiameter är mindre än
svärdets längd.
Säkra arbetsområdet. Kontrollera att
varken personer eller djur uppehåller
sig inom trädets fallområde.
Försök aldrig få loss en inklämd såg
med motorn igång. Använd träkilar för
att få ut sågkedjan.
Om två eller era personer arbetar inom samma
område ska avståndet mellan personerna vara
minst dubbelt så långt som trädet. Vid fällning av
träd bör man se till att andra personer inte utsätts
för risker, att distributionsledningar inte skadas
och att inga sakskador uppstår. Om ett träd råkar
beröra en distributionsledning ska energiverket
underrättas omedelbart.
Vid sågning på sluttning ska kedjesågens
användare stå ovanför det träd som fälls,
eftersom det fällda trädet troligen kommer att rulla
83
Batteridriven motorsåg SV
Page 84

eller slira nedför sluttningen.
Före fällning bör en reträttväg planeras och
eventuellt röjas. Reträttvägen bör väljas snett
bakåt från väntad fallinje.
Före fällning bör hänsyn tas till trädets naturliga
lutning, grenarnas lägen och vindriktningen för att
kunna bedöma trädets fällriktning. Ta bort smuts,
stenar, lös bark, spikar och ståltrådar från trädet.
Om trädstammen enligt figur ligger an endast
på en ända, såga först 1/3 av stammens
diameter från undre sidan och sedan resten
uppifrån mot underskäret.( se figur .S)
Om trädstammen enligt figur ligger an mot
båda ändorna, såga först 1/3 av stammens
diameter från övre sidan och sedan 2/3 från
undre sidan mot överskäret. (se figur .T)
Riktskär: Såga ett skär (X – W) till ett djup
på en 1/ 3 av trädets diameter i rät vinkel mot
fällriktningen. Såga först det undre vågräta
riktskäret. Härvid undviks inklämning av sågkedja
eller styrskena vid sågning av övre riktskär.
Fällskär: Fällskäret (Y) måste sågas minst 50
mm ovanför det vågräta riktskäret. Fällskäret
bör vara parallellt med riktskäret. Gör fällskäret
endast så djupt att en brytmån blir kvar (brytlist)
som fungerar som ett gångjärn. Brytmånen
hindrar trädet från att vrida sig och falla i fel
riktning. Såga inte av brytmånen.
När fällskäret närmar sig brytmånen bör trädet
börja falla. Om det visar sig att trädet inte kommer
att falla i önskad riktning eller det lutar bakåt
och eventuellt klämmer fast sågkedjan, ska
sågningen avbrytas och skäret öppnas med hjälp
av kilar i trä, plast eller aluminium.så att trädet
faller i önskad riktning.
84
När trädet börjar falla, ska kedjesågen tas ur
skäret, frånkopplas och läggas bort samt den
som sågat ska lämna riskområdet via planerad
reträttväg. Se till att du inte snavar över grenar
och kvistar som fallit ned.
Genom inslagning av en kil (Z) i vågräta snittet
måste nu trädet fällas.
Se upp för nedfallande grenar och kvistar när
trädet börjar falla.
KVISTNING(Se Figur .Q)
Vid kvistning kapas kvistarna på fällt träd. Kapa
sist större kvistar som är riktade nedåt och som
stöder trädet. Kapa mindre kvistar med ett snitt
som bilden visar. Kvistar som står under spänning
ska kapas underifrån uppåt för att undvika att
sågen kläms fast.Vid kapning sågas fällt träd i bitar.
Se till att du står stadigt och fördelar kroppsvikten
lika på båda fötterna. Om möjligt ska stammen
stödas med kvistar, balkar eller kilar. Följ de enkla
anvisningarna för lätt sågning.
Om trädstammen över hela längden ligger an mot
underlaget kapas stammen uppifrån.
PRZERZYNKA PNIA (Patrz R)
Pod tym pojęciem rozumie się dzielenie ściętego
uprzednio drzewa na odcinki. Należy dbać o
stabilną pozycję przy pracy i na równomierne
rozłożenie wagi ciała na obie stopy. Jeżeli istnieje
taka możliwość, należy podeprzeć drzewo
konarami, belkami lub klinami. Należy kierować
się wskazówkami, ułatwiającymi cięcie.
Jeżeli drzewo oparte jest równomiernie całą swą
długością (por. rys.), należy ciąć od góry.
Jeżeli drzewo oparte jest tylko jednym końcem
(por. rys.), należy przeciąć najpierw 1/3 średnicy
pnia, tnąc od dołu, a następnie dokończyć cięcia,
tnąc od góry na wysokości rzazu. (Patrz S)
Jeżeli drzewo oparte jest oboma końcami (por.
rys.), należy przeciąć najpierw 1/3 średnicy pnia,
tnąc od góry, a pozostałe 2/3 przeciąć od dołu,
tnąc na wysokości rzazu. (Patrz T)
WARNING: (SE FIGUR .U)
arbetsstycket inte kan rulla ner för
backen. Säkra arbetsstycket med
träkilar. Kör träkilar i marken på den
nedre sidan av arbetsstycket. Stå i
uppförssidan av arbetsstycket under
kapningen. Abetsstycket kan börja
rulla efter kapning.
arbetsstycken på samma gång. Detta
skulle kunna öka risken för kast.
aldrig i arbetsstycket med handen,
benet eller foten.
aldrig en annan person hålla
arbetsstyckena.
annan.
Batteridriven motorsåg SV
Page 85

UNDERHÅLL AV SÅGEN
OCH KASTSÄKERHET
Följ underhållsanvisningarna i den här handboken.
Korrekt rengöring och underhåll av såg, kedja och
svärd kan minska risken för kast. Inspektera och
utför underhåll på sågen efter varje användning.
Detta kommer att öka livslängden på din motorsåg.
UNDERHÅLL OCH
FÖRVARING AV
MOTORSÅG
1. Ta bort batteriet från sågen
• När den inte används
• Innan du yttar från en plats till en annan
• Innan service
• Innan du byter tillbehör eller tillsatser, såsom
sågkedja och skyddsbygel.
2. Inspektera motorsågen före och efter
varje användning. Kontrollera sågen noga
om skyddet eller annan del har skadats.
Kontrollera om det nns skador som kan
påverka operatörens säkerhet eller drift av
sågen. Kontrollera justering eller bindning av
rörliga delar. Kontrollera om det nns trasiga
eller skadade delar. Använd inte motorsågen
om skadan påverkar säkerhet eller funktion.
Låt skador repareras av auktoriserad
verkstad. För att hitta ett auktoriserat
servicecenter, besök www.worx.com
3. Underhåll motorsågen med omsorg.
• Utsätt aldrig sågen för regn.
• Håll kedjan skarp, ren och smord för bättre
och säkrare resultat.
• Följ stegen i den här handboken för att slipa
kedjan.
• Håll handtagen torra, rena, och fria från olja
och fett.
• Dra åt alla skruvar och muttrar hårt.
4. Vid service, använd bara identiska
reservdelar.
5. När den inte används, förvara alltid
motorsågen
• På en hög eller låst plats utom räckhåll för
barn
• På en torr plats
UNDERHÅLL AV SVÄRD
För att maximera svärdets livslängd
rekommenderas följande underhållsåtgärder:
Skenorna som bär kedjan bör rengöras innan
du ställer undan verktyget eller om svärdet eller
kedjan verkar vara smutsig.
Skenorna ska rengöras varje gång kedjan tas
bort.
Vänd svärdet så att den övre skenan kommer
längst ner och bottenskenan längst upp, efter var
5:e timmas användning
RENGÖRING AV SKENORNA:
1. Ta bort kedjeskyddet samt svärd och kedja.
(Se avsnitt MONTERING)
2. Använd en stålborste, skruvmejsel eller
liknande lämpligt verktyg och rensa bort rester
från spåren på svärdet. (se gur .V)
3. Se till att rensa oljekanalerna ordentligt
FÖRHÅLLANDEN SOM KRÄVER
UNDERHÅLL AV SVÄRDET:
• Sågning av snitt till en sida eller i en vinkel.
• Sågen måste tvingas genom snittet.
• Otillräcklig försörjning av olja till svärd och
kedja.
Kontrollera skicket på svärdet varje gång kedjan
slipas. Ett slitet svärd skadar kedjan och gör
kapningen svår.
Efter varje användning, och med enheten
bortkopplad från strömkällan, ta bort alla sågspån
från svärdet och kugghjulshålet.
Om skenans ovansida är ojämn kan du använda
en atl för att återställa raka kanter och sidor.
File Rail Edges
and Sides
Square
Worn Groove Correct Groove
Byt ut svärdet när spåret är utslitet, om svärdet
är böjt eller sprucket, eller när överskottsvärme
eller kraftiga hack uppstår i spåret. Om byte är
nödvändigt, använd bara svärdet som anges för
din såg i reservdelslistan eller på etiketten som
sitter på motorsågen.
85
Batteridriven motorsåg SV
Page 86

BYTE/VÄNDNING AV SÅGKEDJA OCH
Kontrollera sågkedjan och svärdet enligt avsnitt
”Spänning av sågkedja”.
Svärdets styrspår slits med tiden. Vid byte av
sågkedja sväng svärdet 180° för att kompensera
förslitningen.
Kontroll av kedjehjul. Om kedjehjulet till följd av
hög belastning slitits eller skadats måste det
bytas ut på en serviceverkstad.
Om kedjeskenan är sliten eller skadad ta loss
kedjehaken genom att lossa skruvarna motors.
Fäst sdan spänningshaken i den nya skenan
genom att dra åt skruvarna medurs. Hakens
utskjutande del (a) måste inpassas i skenhålet.
(se gur .W)
SKÄRPNING AV SÅGKEDJA
VARNING!
Ta bort batteriet från sågen innan
service. Allvarlig skada eller dödsfall
kan uppstå från elektriska stötar eller
kroppskontakt med rörlig kedja.
Skäreggarna på kedjan är vassa.
Använd skyddshandskar vid hantering
av kedjan.
Håll kedjan vass. Din såg skär snabbare och
säkrare. En slö kedja kommer att orsaka onödigt
86
slitage på kedjehjul, svärd, kedja och motor.
Om du måste tvinga kedjan i trä och kapningen
endast genererar sågspån med några få stora
agor är kedjan slö.
SMÖRJ KEDJEHJULET
VARNING: Bär kraftiga handskar när
du utför underhåll eller service på detta
verktyg
Ta alltid ut batteriet ur sågen innan du utför
service eller underhåll på detta verktyg.
OBSERVERA: Det är inte nödvändigt att ta bort
kedjan eller svärdet vid smörjning av kedjehjulet
1. Rengör svärd och kedjehjul
2. Använd en fettspruta, sätt in spetsen på
sprutan i smörjhålet och injicera fett tills det
tränger ut på den yttre kanten av kedjehjulets
spets. (se gur .X)
3. För att rotera kedjehjulet frigör kedjestoppet
och dra i kedjan för hand tills den osmorda
sidan av kedjehjulet är i linje med smörjhålet.
Upprepa smörjprocessen.
RENGÖRING/LAGRING
Rengör kedjesågens plasthus med en mjuk
borste och en ren trasa. Använd varken vatten,
lösningsmedel eller polermedel. Avlägsna
alla föroreningar, speciellt då från motorns
ventilationsöppningar.
Efter 1 till 3 timmars drift ska skyddskåpan,
svärdet och kedjan demonteras och rengöras
med en borste.
Rengör området under skyddskåpan, kedjehjulet
och svärdfästet från föroreningar. Rengör
oljemunstycket med en ren trasa. Om kedjesågen
ska lagras under en längre tid, rengör sågkedjan
och svärdet.
Kedjesågen ska lagras på ett säkert och torrt
ställe som är oåtkomligt för barn.
För att undvika utrinnande olja rinner ska sågen
läggas bort i vågrätt läge (oljepåfyllningsskruven
riktad uppåt).
Vid förvaring i säljförpackningen måste oljetanken
vara fullständigt tömd.
MILJÖSKYDD
Denna produkt är märkt med en symbol
som gäller kassering av elektriskt och
elektroniskt avfall. Detta innebär att denna
produkt inte får kastas i hushållssoporna utan
måste lämnas in till en återvinningscentral
enligt det europeiska direktivet 2012/19/
EU.Därefter kommer produkten att återvinnas
eller demonteras på ett miljövänligt sätt. Elektrisk
och elektronisk utrustning kan påverka miljön
och människors hälsa negativt eftersom den
innehåller farliga substanser.
Batteridriven motorsåg SV
Page 87

FELSÖKNING
Symptom Möjliga orsaker Åtgärd
Kedjesågen fungerar inte
Kedjesågen arbetar
intermittent
Sågkedjan torr
Backslagsbroms/
startbroms
Kedjan/styrskenan heta
Kedjesågen rycker,
vibrerar
eller sågar ej korrekt
Använd aldrig verktyg med defekta På/Av brytare eller defekt kedjebroms(Handskydd).
Vid eventuella andra typer av tekniska fel kontakta vår hjälplinje eller ett lokalt servicecenter.
Slut på batteri
Säkring defekt
Extern glappkontakt
Intern glappkontakt
Strömställaren defekt
Ingen olja i oljetanken
Oljetanklockets ventilationshål
tilltäppta
Oljeutloppskanalen tilltäppt
Problem med
kopplingsmekanism i
främre handskyddet
Ingen olja i oljetanken
Oljetanklockets ventilationshål
tilltäppta
Oljeutloppskanalen tilltäppt
Kedjespänningen för hög
Kedjan är oskarp
Kedjespänningen för lös
Kedjan är oskarp
Kedjan försliten
Sågtänderna riktade åt fel håll
Ladda batteriet
Byt ut säkringen
Uppsök serviceverkstad
Uppsök serviceverkstad
Uppsök serviceverkstad
Fyll på olja
Rengör oljetanklocket
Åtgärda oljeutloppskanalen
Uppsök serviceverkstad
Fyll på olja
Rengör oljetanklocket
Åtgärda oljeutloppskanalen
Ställ in kedjespänningen
Efterslipa eller byt ut kedjan
Ställ in kedjespänningen
Efterslipa eller byt ut kedjan
Byt ut kedjan
Montera sågkedjan på nytt med
tänderna
i rätt riktning
87
Batteridriven motorsåg SV
Page 88

DEKLARATION OM
ÖVERENSSTÄMMELSE
Vi,
POSITEC Germany GmbH
Konrad-Adenauer-Ufer 37
50668 Köln
Förklarar att denna produkt,
Beskrivning WORX Batteridriven motorsåg
Typ: WG368E WG368E.9
(3-maskinbeteckning, anger Kedjesåg)
Funktion: Kapning av trä
Uppfyller följande direktiv,
2006/42/EC 2004/108/EC 2011/65/EU,
2000/14/EC ändrad av 2005/88/EC
Berört notierat organ
Namn: Intertek Deutschland GmbH
Address: Stangenstraße 1, 70771
LEINFELDEN-ECHTERDINGEN
2000/14/EC ändrad av 2005/88/EC:
- Konformitetsutvärderingsprocedur enligt
Bilaga VI
- Uppmätt bullernivå 96.1dB(A)
- Deklarerad garanterad bullernivå
88
100 dB(A)
Standarder överensstämmer med:
EN 60745-1 EN 60745-2-13
EN ISO 3744 EN 55014-1
EN 55014-2
Personen som godkänts att sammanställa den
tekniska len.
Namn Russell Nicholson
Adress Positec Power Tools (Europe)
Ltd, PO Box 152, Leeds, LS10 9DS, UK
2014/04/21
Leo Yue
POSITEC Kvalitetsdirektör
Batteridriven motorsåg SV
Page 89

Page 90

Page 91

Page 92

Copyright © 2014, Positec. All Rights Reserved.
2CCS02APK11004A0
 Loading...