

Page 1

Cordless Chain Saw
Akku-Kettensäge
Tronçonneuse sans fil
Sega a catena senza filo
Motosierra inalámbrica
Draadloze kettingzaag
Bezprzewodowa piła łańcuchowa
Akkus láncfűrész
Ferăstrău cu lanţ cu acumulator
Akumulátorová řetězová pila
Akumulátorová reťazová píla
Motosserra sem fios
Sladdlös motorsåg
Brezžična verižna žaga
EN
ES
NL
PL
HU
RO
CZ
SK
PT
SV
SL
D
F
I
P106
P122
P137
P153
P168
P183
P199
P213
WG322E WG322E.9 WG323E WG323E.9
P10
P24
P41
P57
P74
P90
Page 2

Original instructions EN
Originalbetriebsanleitung D
Notice originale F
Istruzioni originali I
Manual original ES
Oorspronkelijke gebruiksaanwijzing NL
Instrukcja oryginalna PL
Eredeti használati utasítás HU
Instrucţiuni originale RO
Původní návod k používání CZ
Pôvodný návod na použitie SK
Manual original PT
Bruksanvisning i original SV
Izvirna navodila SL
Page 3
5
4
3
2
1
6
7
12
11*
18
10*
16 171921 20
8
9
13
25*
15
14
22
30*
24*
31*
32*
29*
28*
27*
26*
Page 4
B1A
23
1
16
20
21
19
C1B2
2
Kink
DC2
89
Page 5
1
E2E1
2
Bar
F2F1
G2G1
1
2
1
1
3
2
Page 6
14
WG322E
WG323E
2
2
3
1
1
2
1
K1J
I3I2
I1H
Page 7
13
LK2
NM
P10
Y
Z
Z
Y
kg
Page 8

P3P2
P5P4
P7P6
1
2
Page 9
P8
Z
15 cm
Y
Y
X
W
5 to 10cm
1/3
R S
Q
a
Injecting grease to lubricate
Page 10

GENERAL POWER TOOL
SAFETY WARNINGS
WARNING: Read all safety warnings and
all instructions. Failure to follow the
warnings and instructions may result in
electric shock, fire and/or serious injury.
Save all warnings and instructions for future
reference.
The term “power tool” in the warnings refers to your
mains-operated (corded) power tool or batteryoperated (cordless) power tool.
1. WORK AREA SAFETY
a) Keep work area clean and well lit.
Cluttered or dark areas invite accidents.
b)
Do not operate power tools in explosive
atmospheres, such as in the presence of
flammable liquids, gases or dust. Power tools
create sparks which may ignite the dust or fumes.
c) Keep children and bystanders away while
operating a power tool. Distractions can
cause you to lose control.
2. ELECTRICAL SAFETY
a)
Power tool plugs must match the outlet.
Never modify the plug in any way. Do
not use any adapter plugs with earthed
(grounded) power tools. Unmodified plugs and
matching outlets will reduce risk of electric shock.
b) Avoid body contact with earthed or
10
grounded surfaces, such as pipes,
radiators, ranges and refrigerators. There is
an increased risk of electric shock if your body is
earthed or grounded.
c) Do not expose power tools to rain or wet
conditions. Water entering a power tool will
increase the risk of electric shock.
d)
Do not abuse the cord. Never use the cord
for carrying, pulling or unplugging the
power tool. Keep cord away from heat, oil,
sharp edges or moving parts. Damaged or
entangled cords increase the risk of electric shock.
e) When operating a power tool outdoors, use
an extension cord suitable for outdoor use.
Use of a cord suitable for outdoor use reduces
the risk of electric shock.
f) If operating a power tool in a damp
location is unavoidable, use a residual
current device (RCD) protected supply. Use
of an RCD reduces the risk of electric shock.
3. PERSONAL SAFETY
a) Stay alert, watch what you are doing and
use common sense when operating a
power tool. Do not use a power tool while
you are tired or under the influence of
drugs, alcohol or medication. A moment of
inattention while operating power tools may
result in serious personal injury.
b)
Use personal protective equipment. Always
wear eye protection. Protective equipment
such as dust mask, non-skid safety shoes, hard
hat, or hearing protection used for appropriate
conditions will reduce personal injuries.
c) Prevent unintentional starting. Ensure
the switch is in the off-position before
connecting to power source and/or battery
pack, picking up or carrying the tool.
Carrying power tools with your finger on the
switch or energising power tools that have the
switch on invites accidents.
d) Remove any adjusting key or wrench
before turning the power tool on. A wrench
or a key left attached to a rotating part of the
power tool may result in personal injury.
e)
Do not overreach. Keep proper footing and
balance at all times. This enables better control
of the power tool in unexpected situations.
f) Dress properly. Do not wear loose clothing
or jewellery. Keep your hair, clothing and
gloves away from moving parts. Loose
clothes, jewellery or long hair can be caught in
moving parts.
g) If devices are provided for the connection
of dust extraction and collection facilities,
ensure these are connected and properly
used. Use of dust collection can reduce dust-
related hazards.
4. POWER TOOL USE AND CARE
a) Do not force the power tool. Use the
correct power tool for your application.
The correct power tool will do the job better and
safer at the rate for which it was designed.
b) Do not use the power tool if the switch
does not turn it on and off. Any power tool
that cannot be controlled with the switch is
dangerous and must be repaired.
c) Disconnect the plug from the power
source and/or the battery pack from the
power tool before making any adjustments,
changing accessories, or storing power
tools. Such preventive safety measures reduce
the risk of starting the power tool accidentally.
d) Store idle power tools out of the reach
of children and do not allow persons
unfamiliar with the power tool or these
instructions to operate the power tool.
Power tools are dangerous in the hands of
untrained users.
e) Maintain power tools. Check for
misalignment or binding of moving parts,
breakage of parts and any other condition
that may affect the power tool’s operation.
If damaged, have the power tool repaired
before use. Many accidents are caused by
poorly maintained power tools.
f) Keep cutting tools sharp and clean.
Properly maintained cutting tools with sharp
cutting edges are less likely to bind and are
easier to control.
g) Use the power tool, accessories and
tool bits etc. in accordance with these
instructions, taking into account the
Cordless Chain Saw
EN
Page 11

working conditions and the work to
be performed. Use of the power tool for
operations different from those intended could
result in a hazardous situation.
5. BATTERY TOOL USE AND CARE
a) Recharge only with the charger specified
by the manufacturer. A charger that is suitable
for one type of battery pack may create a risk of
fire when used with another battery pack.
b) Use power tools only with specifically
designated battery packs. Use of any other
battery packs may create a risk of injury and fire.
c) When battery pack is not in use, keep it
away from other metal objects, like paper
clips, coins, keys, nails, screws or other
small metal objects, that can make a
connection from one terminal to another.
Shorting the battery terminals together may
cause burns or a fire.
d) Under abusive conditions, liquid may be
ejected from the battery; avoid contact.
If contact accidentally occurs, flush with
water. If liquid contacts eyes, additionally
seek medical help. Liquid ejected from the
battery may cause irritation or burns.
6. SERVICE
a) Have your power tool serviced by a
qualified repair person using only identical
replacement parts. This will ensure that the
safety of the power tool is maintained.
CHAIN SAW SAFETY
WARNINGS
1. Keep all parts of the body away from
the saw chain when the chain saw is
operating. Before you start the chain saw,
make sure the saw chain is not contacting
anything. A moment of inattention while
operating chain saws may cause entanglement
of your clothing or body with the saw chain.
2.
Always hold the chain saw with your right
hand on the rear handle and your left hand
on the front handle. Holding the chain saw
with a reversed hand configuration increases the
risk of personal injury and should never be done.
3. Hold the power tool by insulated gripping
surfaces only, because the saw chain may
contact hidden wiring. Saw chains contacting
a live wire may make exposed metal parts of the
power tool live and could give the operator an
electric shock.
4. Wear safety glasses and hearing
protection. Further protective equipment
for head, hands, legs and feet is
recommended. Adequate protective clothing
will reduce personal injury by flying debris or
accidental contact with the saw chain.
5. Do not operate a chain saw in a tree.
Operation of a chain saw while up in a tree may
result in personal injury.
6. Always keep proper footing and operate
the chain saw only when standing on fixed,
secure and level surface. Slippery or unstable
surfaces such as ladders may cause a loss of
balance or control of the chain saw.
7. When cutting a limb that is under tension
be alert for spring back. When the tension
in the wood fibres is released the spring loaded
limb may strike the operator and/or throw the
chain saw out of control.
8. Use extreme caution when cutting brush
and saplings. The slender material may catch
the saw chain and be whipped toward you or
pull you off balance.
9. Carry the chain saw by the front handle
with the chain saw switched off and away
from your body. When transporting or
storing the chain saw always fit the guide
bar cover. Proper handling of the chain saw will
reduce the likelihood of accidental contact with
the moving saw chain.
10. Follow instructions for lubricating, chain
tensioning and changing accessories.
Improperly tensioned or lubricated chain may
either break or increase the chance for kickback.
11. Keep handles dry, clean, and free from oil
and grease. Greasy, oily handles are slippery
causing loss of control.
12.
Cut wood only. Do not use chain saw for
purposes not intended. For example: do not
use chain saw for cutting plastic, masonry
or non-wood building materials. Use of the
chain saw for operations different than intended
could result in a hazardous situation.
CAUSES AND OPERATOR
PREVENTION OF KICKBACK:
Kickback may occur when the nose or tip of the guide
bar touches an object, or when the wood closes in
and pinches the saw chain in the cut.
Tip contact in some cases may cause a sudden
reverse reaction, kicking the guide bar up and back
towards the operator.
Pinching the saw chain along the top of the guide
bar may push the guide bar rapidly back towards the
operator.
Either of these reactions may cause you to lose
control of the saw which could result in serious
personal injury. Do not rely exclusively upon the
safety devices built into your saw. As a chain saw
user, you should take several steps to keep your
cutting jobs free from accident or injury.
Kickback is the result of tool misuse and/or incorrect
operating procedures or conditions and can be
avoided by taking proper precautions as given below:
- Maintain a firm grip, with thumbs and
fingers encircling the chain saw handles,
with both hands on the saw and position
11
Cordless Chain Saw
EN
Page 12

your body and arm to allow you to resist
kickback forces. Kickback forces can be
controlled by the operator, if proper precautions
are taken. Do not let go of the chain saw.
- Do not overreach and do not cut above
shoulder height. This helps prevent unintended
tip contact and enables better control of the chain
saw in unexpected situations.
- Only use replacement bars and chains
specified by the manufacturer. Incorrect
replacement bars and chains may cause chain
breakage and/or kickback.
- Follow the manufacturer’s sharpening and
maintenance instructions for the saw chain.
Decreasing the depth gauge height can lead to
increased kickback.
RESIDUAL RISKS
Even with the intended use of the appliance there
is always a residual risk, which can not prevented.
According to the type and construction of the
appliance the following potential hazards might apply:
- Contact with exposed saw teeth of the saw chain
(cutting hazards)
- Access to the rotating saw chain (cutting hazards)
- Unforeseen, abrupt movement of the guide bar
(cutting hazards)
- Flung out of parts from the saw chain (Cutting /
12
injection hazards)
- Flung out of parts of the work piece
- Skin contact with the oil
- Loss of hearing, if no required ear protection
used during work
FOR CHAIN SAW WITH THE
EXTENDED POLE SAFETY
WARNINGS
1. Do not use the machine when the operator is
tired, ill or under the influence of alcohol or other
drugs.
2. To reduce the risk, please keep bystanders at
a safe distance from the machine during its
operation.
3. Be aware of the dangerous of operating
positions, as well as the risk of being struck by
falling branches or branches that, having hit the
ground, rebound, the operator may be struck
by falling branches or by those that rebound
after hitting the ground. Remove the branches in
sections.
4. Keep a firm footing and balance during operating.
Use the harness provided.
5. Keep the machine a sufficient distance away from
overhead electrical power lines.
SAFETY WARNINGS FOR
BATTERY PACK
a) Do not dismantle, open or shred cells or
battery pack.
b) Do not short-circuit a battery pack. Do not
store battery packs haphazardly in a box or
drawer where they may short-circuit each
other or be short-circuited by conductive
materials. When battery pack is not in use, keep
it away from other metal objects, like paper
clips, coins, keys, nails, screws or other small
metal objects, that can make a connection from
one terminal to another. Shorting the battery
terminals together may cause burns or a fire.
c) Do not expose battery pack to heat or fire.
Avoid storage in direct sunlight.
d) Do not subject battery pack to mechanical
shock.
e) In the event of battery leaking, do not
allow the liquid to come into contact
with the skin or eyes. If contact has been
made, wash the affected area with copious
amounts of water and seek medical advice.
f) Seek medical advice immediately if a cell or
battery pack has been swallowed.
g) Keep battery pack clean and dry.
h) Wipe the battery pack terminals with a
clean dry cloth if they become dirty.
i) Battery pack needs to be charged before
use. Always refer to this instruction and
use the correct charging procedure.
j) Do not maintain battery pack on charge
when not in use.
k) After extended periods of storage, it may
be necessary to charge and discharge
the battery pack several times to obtain
maximum performance.
l) Battery pack gives its best performance
when it is operated at normal room
temperature (20 °C ± 5 °C).
m) When disposing of battery packs, keep
battery packs of different electrochemical
systems separate from each other.
n) Recharge only with the charger specified
by WORX. Do not use any charger other
than that specifically provided for use with
the equipment. A charger that is suitable for
one type of battery pack may create a risk of fire
when used with another battery pack.
o) Do not use any battery pack which is not
designed for use with the equipment.
p) Keep battery pack out of the reach of
children.
q) Retain the original product literature for
future reference.
r) Remove the battery from the equipment
when not in use.
s) Dispose of properly.
Cordless Chain Saw
EN
Page 13
SAVE THESE INSTRUC-
3
2
2
W
Y
Z
X
50mm
50mm
1
1
1
Fig.1
3
2
2
Y
Z
X
50mm
50mm
1
1
1
TIONS
Instructions concerning the proper techniques
for basic felling, limbing, and cross-cutting
1. Felling a tree
When bucking and felling operations are being
performed by two or more persons at the same time,
the felling operations should be separated from the
bucking operation by a distance of at least twice the
height of the tree being felled. Trees should not be
felled in a manner that would endanger any person,
strike any utility line or cause any property damage.
If the tree does make contact with any utility line, the
company should be notified immediately.
The chain saw operator should keep on the uphill
side of the terrain as the tree is likely to roll or slide
downhill after it is felled.
An escape path should be planned and cleared as
necessary before cuts are started. The escape path
should extend back and diagonally to the rear of the
expected line of fall as illustrated in Figure 1.
Before felling is started, consider the natural lean of
the tree, the location of larger branches and the wind
direction to judge which way the tree will fall.
Remove dirt, stones, loose bark, nails, staples and
wire from the tree.
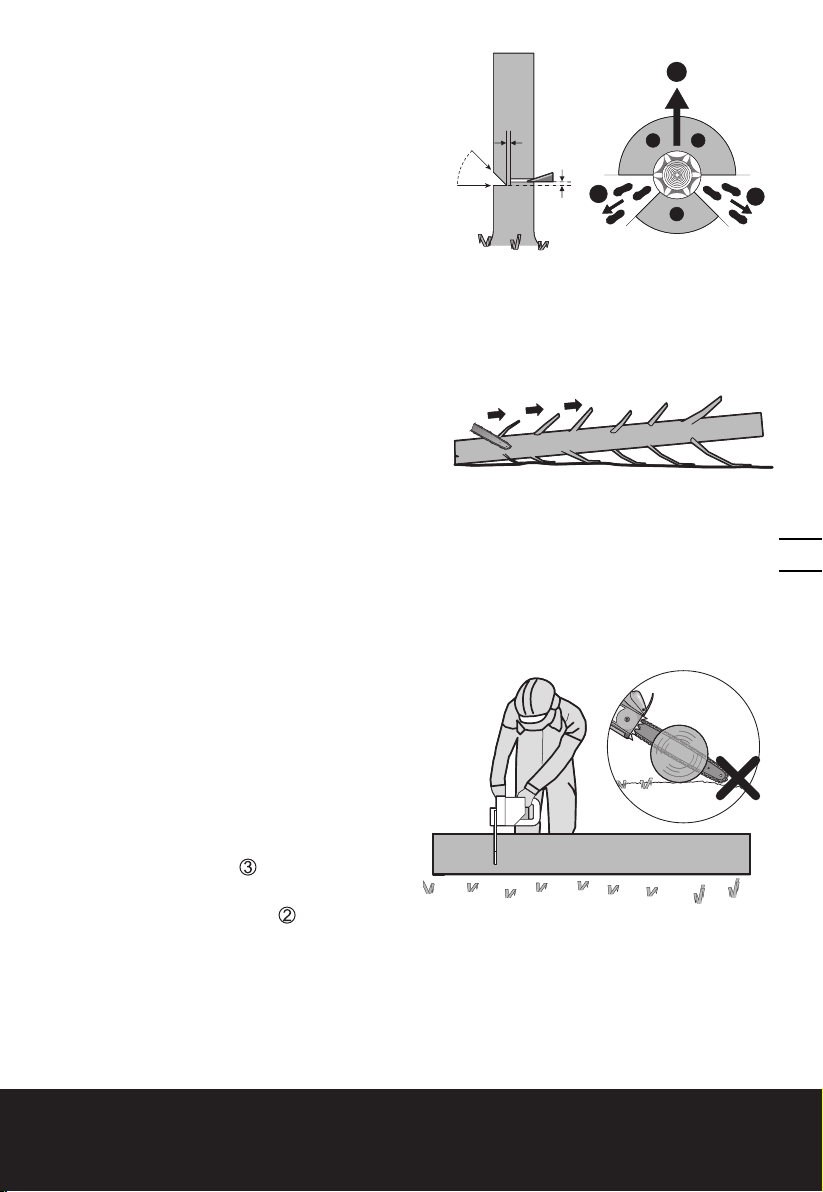
2. Notching undercut
Make the notch 1/3 the diameter of the tree,
perpendicular to the direction of falls as illustrated in
Figure 1. Make the lower horizontal notching cut (W)
first. This will help to avoid pinching either the saw
chain or the guide bar when the second notch (X) is
being made.
3. Felling back cut
Make the felling back cut (Y) at least 50 mm higher
than the horizontal notching cut as illustrated in
Figure 1. Keep the felling back cut parallel to the
horizontal notching cut. Make the felling back cut
so enough wood is left to act as a hinge. The hinge
wood keeps the tree from twisting and falling in the
wrong direction. Do not cut through the hinge.
As the felling gets close to the hinge, the tree should
begin to fall. If there is any chance that the tree may
not fall in desired direction or it may rock back and
bind the saw chain, stop cutting before the felling
back cut is complete and use wedges of wood, plastic
or aluminium (Z) to open the cut and drop the tree
along the desired line of fall ( ).
When the tree begins to fall remove the chain saw
from the cut, stop the motor, put the chain saw down,
then use the retreat path planned ( ). Be alert for
overhead limbs falling and watch your footing. (See
Figure 1)
Fig.1
50mm
X
Z
W
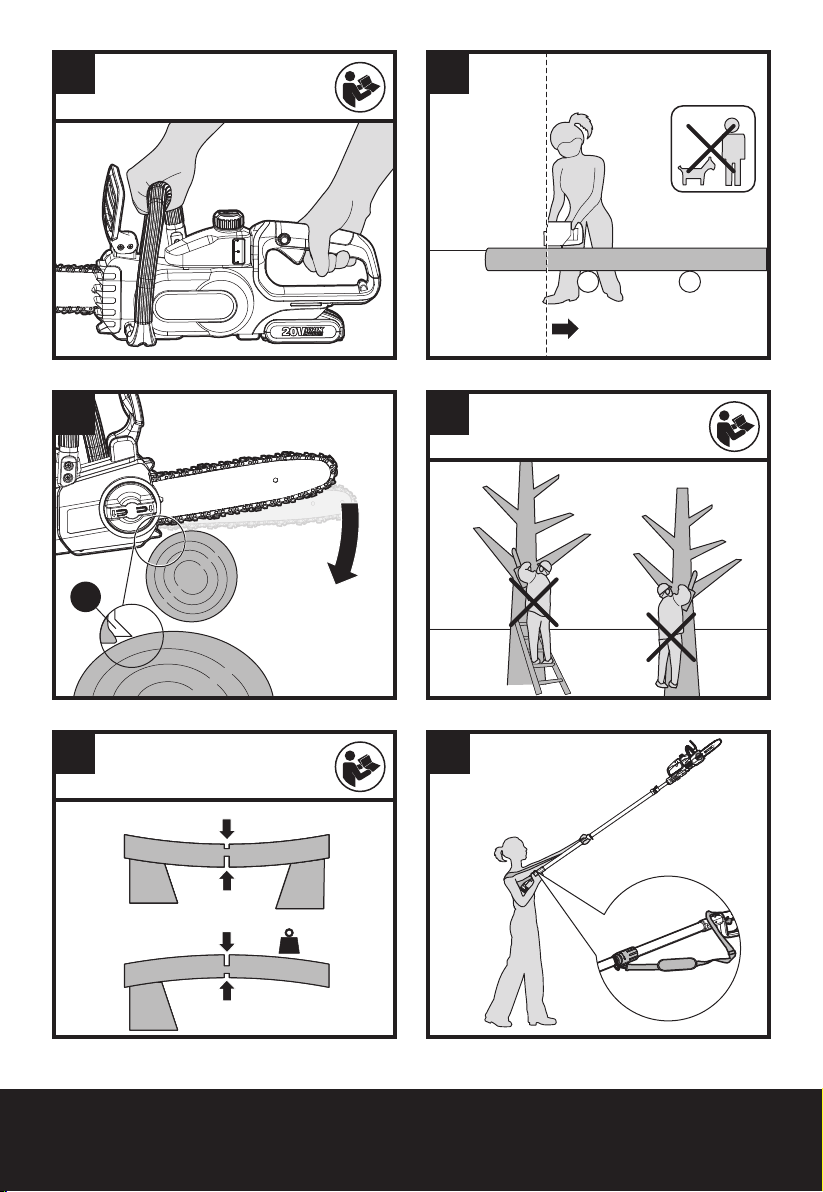
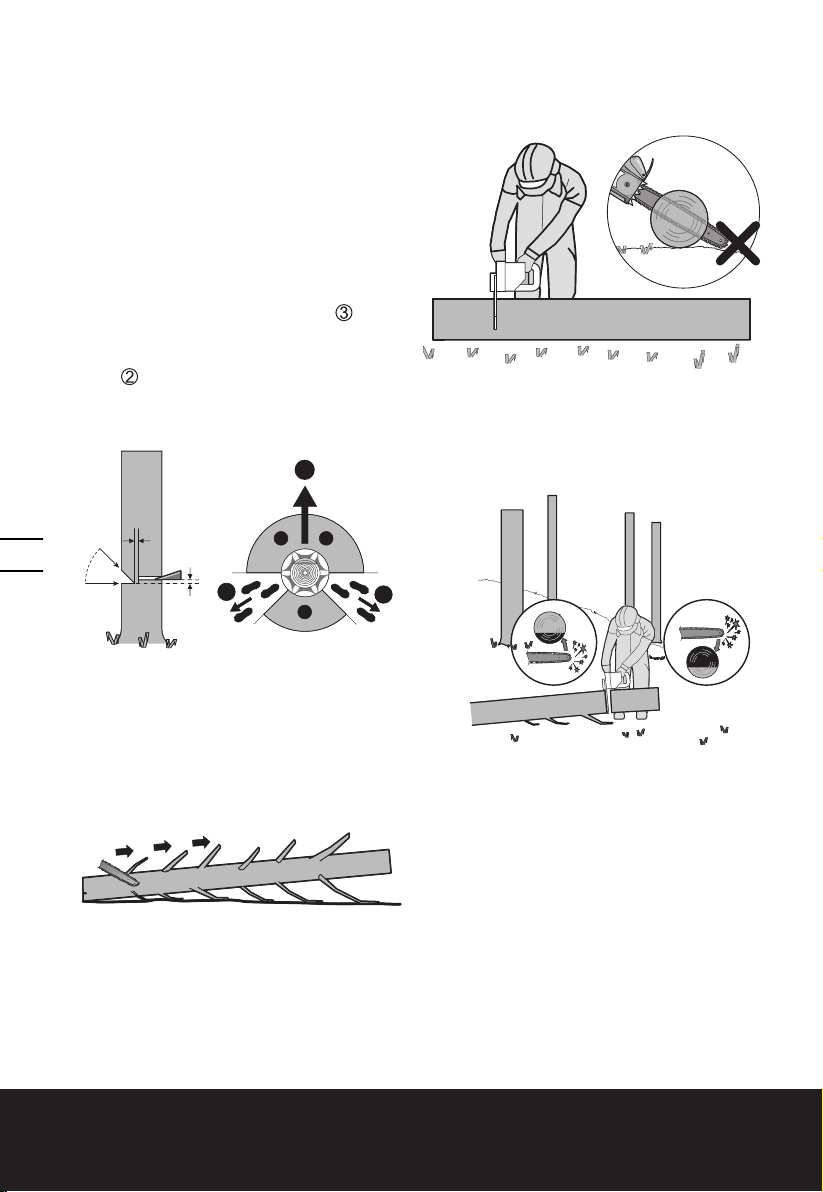
4. Limbing a tree
Limbing is removing the branches from a fallen tree.
When limbing leave larger lower limbs to support the
log off the ground. Remove the small limbs in one
cut as illustrated in Figure 2. Branches under tension
should be cut from the bottom up to avoid binding
the chain saw.
Fig.2
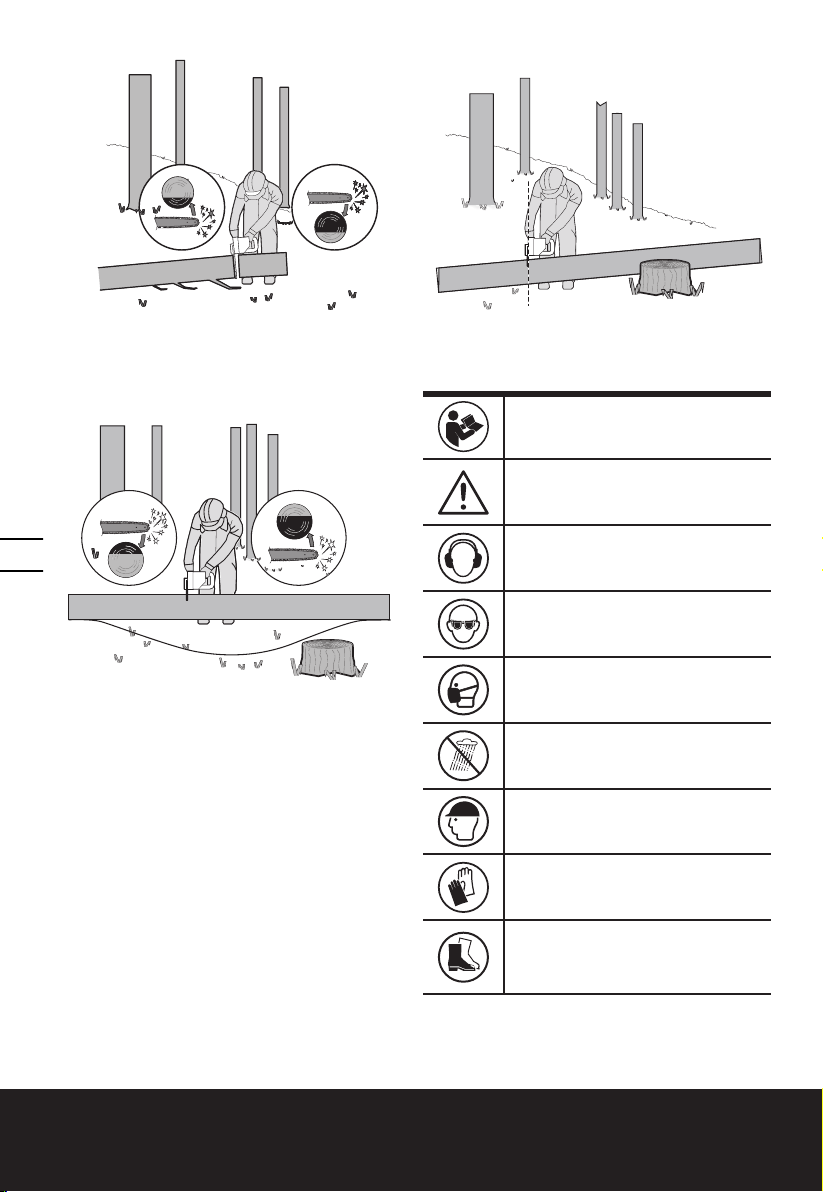
5. Bucking a log
Bucking is cutting a log into lengths. It is important
to make sure your footing is firm and your weight is
evenly distributed on both feet. When possible, the
log should be raised and supported by the use of
limbs, logs or chocks. Follow the simple directions for
easy cutting.
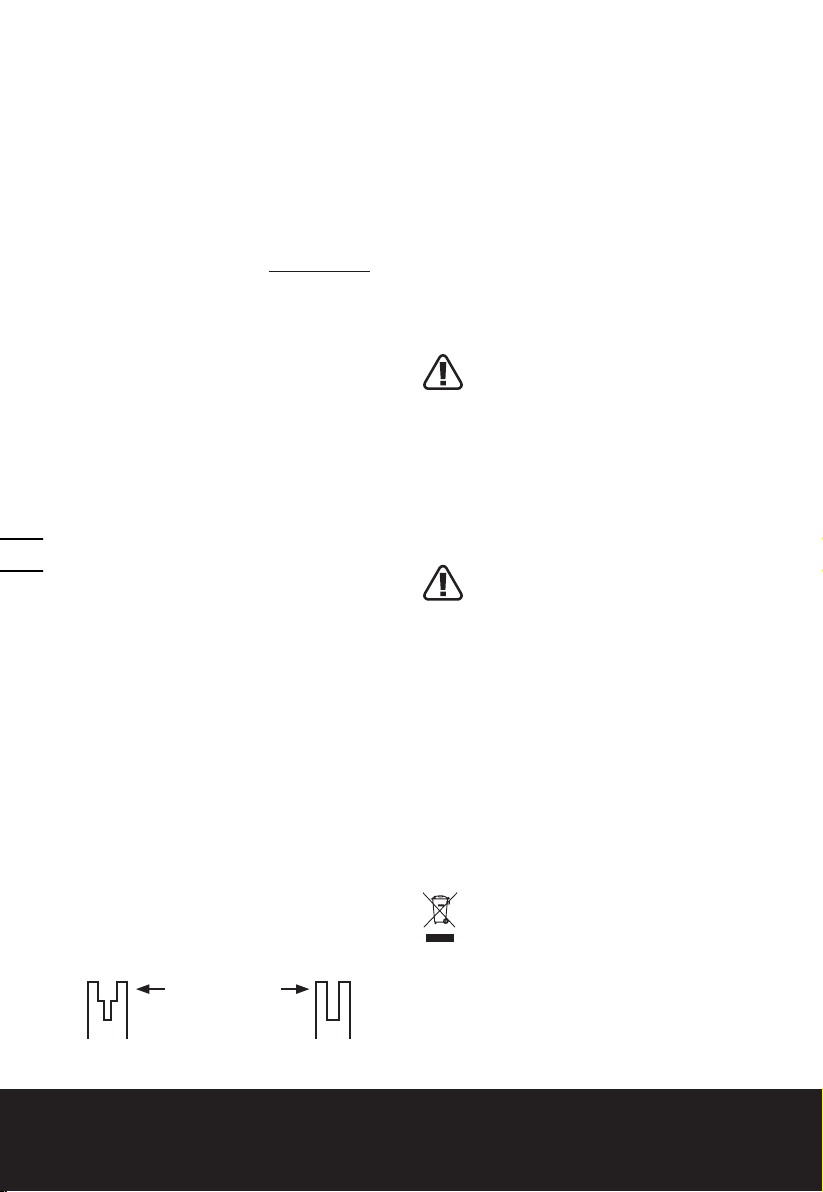
When the log is supported along its entire length
as illustrated in Figure 3, it is cut from the top
(overbuck), avoid contacting ground as this will
greatly reduce the chain sharpness.
Y
2
50mm
3
1
1
2
1
13
When the log is supported on one end, as illustrated
in Figure 4, cut 1/3 the diameter from the underside
( underbuck) (1). Then make the finished cut by
overbucking (2) to meet the first cut.
Cordless Chain Saw
EN
Page 14
2
2
W
Y
Z
X
50mm
50mm
1
1
1
Fig.2
Fig.3
2
2/3
1
1/3
Fig.2
Fig.3
Fig.4
2
2/3
1
1/3
1
2
2/3
1/3
Fig.3
Fig.4
1
1/3
When the log is supported on both ends, as
illustrated in Figure 5, cut 1/3 the diameter from the
top (overbuck) (1). Then make the finished cut by
underbucking (2) the lower 2/3 to meet the first cut.
Fig.5
2
14
1
1/3
2
2/3
SYMBOLS
To reduce the risk of injury, user must
read instruction manual
WARNING
2/3
Wear ear protection
When bucking on a slope always stand on the uphill
side of the log, as illustrated in Figure 6. When
“cutting through”, to maintain complete control
release the cutting pressure near the end of the
cut without relaxing your grip on the chain saw
handles. Don’t let the chain contact the ground. After
completing the cut, wait for the saw chain to stop
before you move the chain saw. Always stop the
motor before moving from tree to tree.
Cordless Chain Saw
Wear eye protection
Wear dust mask
Do not expose to rain
Wear head protection
Wear protective gloves
Wear protective footwear
EN
Page 15

m
0
1
Warning of danger from overhead
electric-power lines
Waste electrical products must not be
disposed of with household waste.
Please recycle where facilities exist.
Check with your local authorities or
retailer for recycling advice.
Do not dispose of batteries. Return
exhausted batteries to your local
collection or recycling point.
Do not burn
Do not expose to rain or water.
Contact of the guide bar tip with any
object should be avoided.
15
Tip contact can cause the guide
bar to move suddenly upward and
backward, which can cause serious
injury
Always use two hands when
operating the chain saw
xINR18/65-y: Cylindrical lithium
Ion battery cells with max diameter
of 18mm and max height of 65mm;
“x” represents a number cells serial
connected, blank if 1; “-y” represents
a number of cells paralleled
connected, blank if 1.
Cordless Chain Saw
EN
Page 16

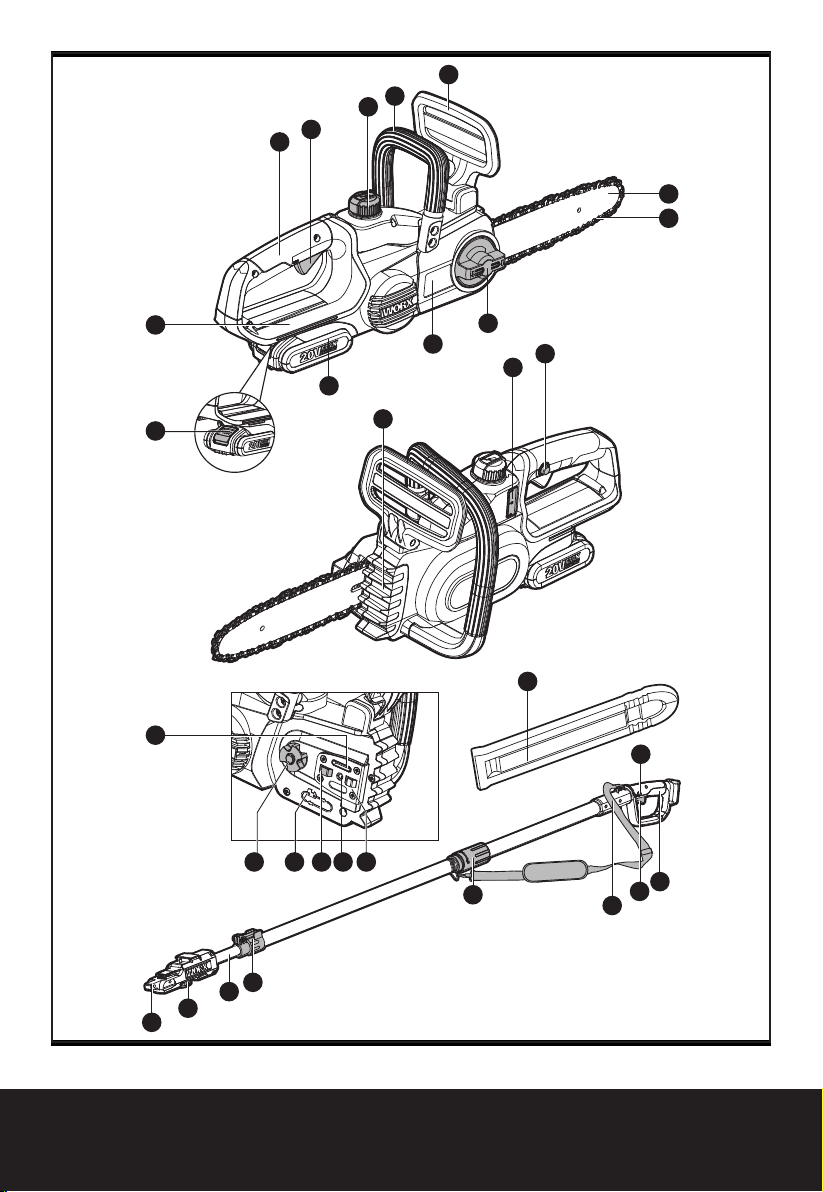
COMPONENT LIST
1. REAR HANDLE
2. ON/OFF SWITCH
3. OIL FILLER CAP
4. FRONT HANDLE
5. HAND GUARD
6. GUIDE BAR
7. CHAIN
8. CHAIN TENSIONING KNOB
9. CHAIN COVER
10. BATTERY PACK*
11. BATTERY PACK RELEASE BUTTON*
12. REAR HAND GUARD
13. BUMPER SPIKE
14. OIL LEVEL WINDOW
15. LOCK-OUT BUTTON
16. DRIVE SPROCKET
17. CHAIN DIRECTION SYMBOL
16
18. OIL OUTLET
19. BAR PAD
20. FASTENING BAR HOLE
21. BAR LOCATING TABS
22. BAR AND CHAIN STORAGE/TRANSPORTATION COVER*(SHEATH)
23. BAR TENSIONING PLATE (SEE FIG. A)
24. EXTENSION POLE HANDLE *
25. LOCKING KNOB*
26. CLAMPING LEVER*
27. INNER POLE*
28. LOCKING KNOB*
29. EXTENSION POLE CONNECTION BRACKET*
30. LOCK-OUT BUTTON ON EXTENSION POLE HANDLE*
31. ON/OFF SWITCH ON EXTENSION POLE HANDLE*
32. SHOULDER STRAP*
* Not all the accessories illustrated or described are included in standard delivery.
Cordless Chain Saw
EN
Page 17

TECHNICAL DATA
Type WG322E WG322E.9 WG323E WG323E.9 (3 - designation of machinery, representative of chain
saw and pole saw)
WG322E WG322E.9 WG323E WG323E.9
Voltage 20V Max**
Bar length 25cm
Chain speed 3.8m/s
Oil tank capacity 130ml
Chain pitch 3/8"
Number of chain drive links 40
Chain gauge 0.043”
Adaptive Chain type ES: 3/8.043-40E/ QIRUI : A0(T)-40E/ OREGON: 90PX040G
Adaptive Bar type ES: ES104SDEA041/ QIRUI : PO10-43SR(T) / OREGON: 104MLEA041
Charging time 5hrs
Weight (chain & bar included): 2.8kg 2.4kg 4.6kg 4.2kg
**Voltage measured without workload. Initial battery voltage reaches maximum of 20 volts. Nominal voltage is
18 volts.
ACCESSORIES
WG322E WG322E.9 WG323E WG323E.9
Chain 1 1 1 1
Bar 1 1 1 1
Transportation Cover 1 1 1 1
Extension pole(WA0166) / / 1 1
Charger(WA3760) 1 / 1 /
Battery(WA3551) 1 / 1 /
Shoulder strap / / 1 1
We recommend that you purchase your accessories from the same store that sold you the tool. Refer to the
accessory packaging for further details. Store personnel can assist you and offer advice.
17
Cordless Chain Saw
EN
Page 18
NOISE INFORMATION
WG322E
WG322E.9
A weighted sound
pressure
A weighted sound
power
KPA =3.0 dB(A)
Wear ear protection
LpA= 87.9 dB(A) LpA= 85.7 dB(A)
LwA= 96 dB(A) LwA= 96 dB(A)
VIBRATION INFORMATION
Vibration total values (triax vector sum) determined
according to EN 60745:
Vibration emission value
ah < 2.5 m/s2
The declared vibration total value may be used for
comparing one tool with another, and may also be
used in a preliminary assessment of exposure.
WARNING: The vibration emission value
18
during actual use of the power tool can differ
from the declared value depending on the
ways in which the tool is used dependant on the
following examples and other variations on how the
tool is used:
How the tool is used and the materials being cut or
drilled.
The tool being in good condition and well maintained.
Using the correct accessory for the tool and ensuring it
is sharp and in good condition.
The tightness of the grip on the handles and if any anti
vibration accessories are used.
And the tool is being used as intended by its design
and these instructions.
This tool may cause hand-arm vibration
syndrome if its use is not adequately managed
WARNING: To be accurate, an estimation of
exposure level in the actual conditions of use
should also take account of all parts of the
operating cycle such as the times when the tool is
switched off and when it is running idle but not
actually doing the job. This may significantly reduce
the exposure level over the total working period.
Helping to minimise your vibration exposure risk.
ALWAYS use sharp chisels, drills and blades.
Maintain this tool in accordance with these
instructions and keep well lubricated (where
appropriate).
If the tool is to be used regularly then invest in anti
Uncertainty K = 1.5 m/s²
WG323E
WG323E.9
vibration accessories.
Plan your work schedule to spread any high vibration
tool use across a number of days.
INTENDED USE
The chain saw is intended for sawing of trees, tree
trunks, branches, wooden beams, planks, etc. Cuts can
be sawed with or across the grain. This product is not
suitable for sawing mineral materials .
ASSEMBLY
WARNING! Do not install the battery pack
before it has been completely assembled.
Always use gloves when handling the chain.
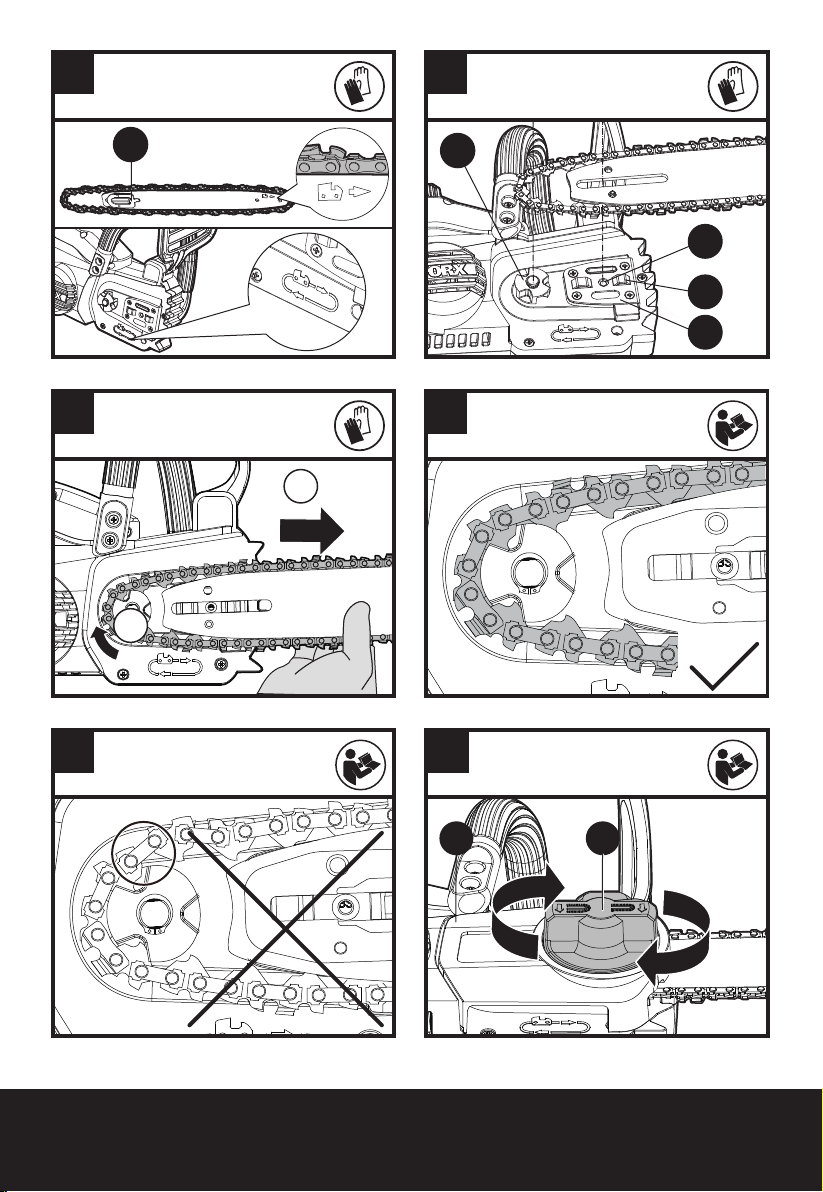
CHAIN AND GUIDE BAR ASSEMBLY
1. Unpack all parts carefully.
2. Place the chain saw on a solid, level surface.
3. Use only genuine WORX chains or those
recommended for Guide Bar.
4. Slide the Chain (7) in the slot around the Guide Bar
(6). Ensure the Chain is in correct running direction
by comparing it to the chain icon on the guide bar,
or referring to the Chain Direction Symbol (17)
found on the saw body. Ensure the Bar Tensioning
Plate (24) is facing outward. (See Fig. A)
5. Fit the Chain onto the Drive Sprocket (16), so
that the Fastening Bar hole (20) and the two Bar
Locating Tabs (21) on the Bar Pad (19) fit into the
keyway of the opening on the Guide Bar (6). (See
Fig. B1, B2)
6. Assure all parts are seated properly. Make sure the
drive links are fully seated in the drive sprocket
(See Fig. C1), avoiding a kink as shown in Fig. C2.
If kink occurs, pick up on the chain at the guide bar
just ahead of the kink and then pull the kink out.
NOTE: Chain should rotate freely and be free of
kinks.
7. Fit the Chain Cover (9) and tighten the Chain Cover
by turning the Chain Tensioning Knob (8) clockwise
until it is tight. (See Fig. D)
WARNING: The chain is not yet tensioned.
Tensioning the chain applies as described
under “TENSIONING CHAIN”. The chain
now needs to be inspected to make sure it is
properly tensioned.
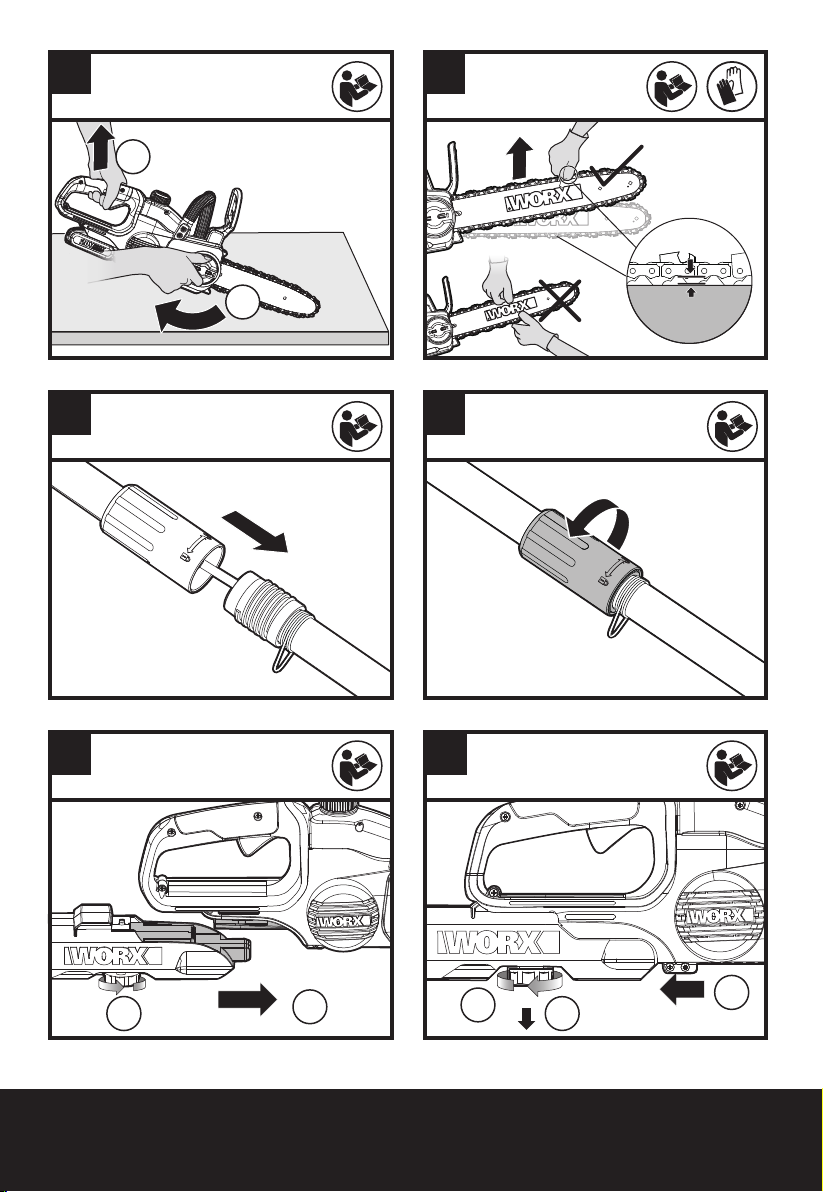
TENSIONING CHAIN (See Fig. E1, E2)
NOTE: New saw chains will stretch. Check the chain
tension frequently when first used and tighten when
the Chain (7) becomes loose around the Guide Bar (6).
WARNING:
● Removing the battery pack before adjusting saw
chain tension.
● Cutting edges on chain are sharp. Use protective
gloves when handling chain.
● Maintain proper chain tension always. A loose
chain will increase the risk of kickback. A loose
chain may jump out of guide bar groove. This may
injure operator and damage chain. A loose chain
Cordless Chain Saw
EN
Page 19
will cause chain, bar, and sprocket to wear rapidly.
1. Place the chain saw on any suitable flat surface.
2. Turn the Chain Tensioning Knob (8) clockwise until
it is hand tight.
NOTE: The tension is automatically increased while
the Chain Tensioning Knob (8) is being turned in a
clockwise direction. The built-in ratchet mechanism
prevents the chain tension from loosening.
3. Tilt the saw forward (See E1) where the Guide Bar
(6) tip is pushed in an upward direction. This will
remove slack from the chain.
4. Fully tighten the Chain Tensioning Knob (8) by
turning it clockwise.
5. Double check the tension set by the automatic
Chain Tensioning Knob. The correct chain tension is
reached when the Chain (7) can be raised approx.
half the drivelink depth from the Guide Bar (6)
in the center. This should be done by using one
hand to raise the chain against the weight of the
machine. (See Fig. E2)
NOTE: The Chain (7) is properly tensioned when it can
be lifted off of the Guide Bar (6) and the drivelink is
within the rail of the Guide Bar (6).
NOTE: The Chain (7) will stretch while cutting and
lose proper tension. When the chain becomes loose,
completely unscrew the Chain Tensioning Knob
(8) or turn the knob around three full turns in a
counter-clockwise direction, then retighten the Chain
Tensioning Knob (8) to properly reset the chain tension
by repeating Steps 1-4 listed above.
ASSEMBLING THE EXTENSION POLE (Only for
WG323E, WG323E.9)
Align and insert the handle of extension pole into the
shaft. Rotate the locking knob clockwise to lock. (SEE
Fig. F1, F2)
NOTE: Make sure that the shaft is firmly locked in
place.
ASSEMBLING THE EXTENSION POLE TO THE
MACHINE (See Fig G1)
Step1: Align and insert the pole connection bracket
(29) into the saw.
Step2: Turn the Locking Knob (28) counterclockwise to
tighten the extension pole to the machine.
NOTE: Make sure the extension pole is locked
into position securely before operation.
REMOVING THE EXTENSION POLE (See Fig. G2)
Step1: Turn the Locking Knob (28) clockwise to loosen
and pull it out.
Step2: Slide saw to disconnect the extension pole with
the saw.
WARNING!
• When using this machine with the Extension
Pole, make sure that the battery pack has been
removed.
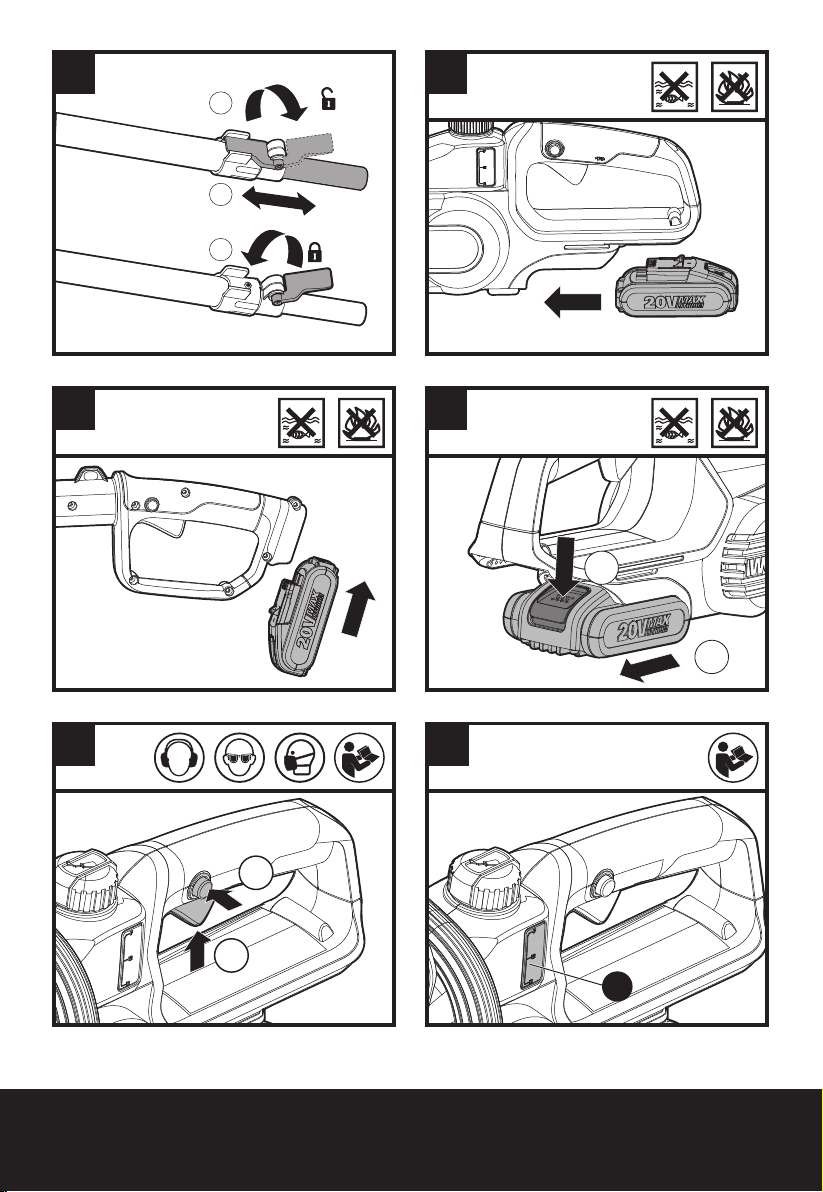
Adjusting pole length
The pole saw has a telescoping pole assembly that
will extend from 2m (fully retracted) to 2.7m (fully
extended).
Clamping level (26) is used to hold the pole in position
at any extended length.
1. To extend the pole, loosen the clamping lever as
shown in Fig H. Pole will slide freely.
2. Pull inner pole section out to desired length of
extension. Note: only extend pole to minimum
length required to reach limb that is being cut.
3. To lock pole in position, tighten clamping lever as
shown in Fig. H.
LUBRICATION
IMPORTANT: The chain saw is not filled
with oil. It is essential to fill with oil
before use. Never operate the chain saw
without chain oil or at an empty oil tank level,
as this will result in extensive damage to the
product.
NOTE: Chain life and cutting capacity depend
on optimum lubrication. Therefore, the chain is
automatically oiled during operation.
FILLING OIL TANK:
WARNING: Removing the battery pack
before filling the oil tank.
1. Set chain saw on any suitable surface with Oil Filler
Cap (3) facing upward.
2. Clean area around the Oil Filler Cap with cloth and
unscrew the cap by turning it counter clockwise.
3. Add bar and chain oil until tank is full.
4. Avoid dirt or debris entering oil tank, refit Oil Filler
Cap (3) and tighten by turning clockwise until hand
tight.
IMPORTANT: To allow venting of the oil
tank, small breather channels are
provided between the Oil Filler Cap and
the strainer, to prevent leakage, and ensure
machine is left in a horizontal position (Oil Filler
Cap (6) uppermost) when not in use.
It is important to use only the recommended
standard bar and chain oil (Grade: ISO VG32)
to avoid damage to the chain saw. This can be
found at the location where you purchased this
saw or your local hardware store. Never use
recycled/old oil. Use of non approved oil will
void the warranty.
Do not swallow. If swallowed, call a physician
immediately. Keep out of reach of children.
Store away from heat or open flame.
CHECKING THE AUTOMATIC OILER
Proper functioning of the automatic oiler can be
checked by running the chain saw and pointing the
tip of the Guide chain bar (6) towards a piece of
cardboard or paper on the ground. If an increasing oil
pattern develops on the cardboard, the automatic oiler
is operating fine. If there is no oil pattern, despite a full
oil reservoir, contact WORX customer service agent or
WORX approved service agent.
CAUTION: Do not touch the ground with
the chain. Ensure safety clearance of
30cm.
19
Cordless Chain Saw
EN
Page 20
OPERATION
1. BEFORE USING YOUR CORDLESS TOOL
WARNING! The charger and battery pack are
specially designed to work together so do not
attempt to use any other devices. Never insert
or allow metallic objects into your charger or battery
pack connections because of an electrical failure and
hazard will occur.
NOTE: Your battery pack is UNCHARGED and you
must charge once before use.
The battery charger supplied is matched to the Li-ion
battery installed in the machine. Do not use another
battery charger.
2. CHARGING YOUR BATTERY PACK
The Li-ion battery is protected against deep
discharging. When the battery is empty, the machine is
switched off by means of a protective circuit.
In a warm environment or after heavy use, the battery
pack may become too hot to permit charging. Allow
time for the battery to cool down before recharging.
3. TO REMOVE OR INSTALL BATTERY PACK
(See Fig. I1, I2, I3)
Depress the Battery Pack Release Button to remove the
Battery Pack from your tool. After recharging, insert
the Battery Pack into the battery port. A simple push
and slight pressure will be sufficient until a click is
heard. Check to see if the battery is fully secured.
NOTE: When removing the battery pack, hold it
20
firmly to avoid dropping and injury.
4. Switching on and off (See Fig. J)
ATTENTION: Check the battery pack
before using your cordless tool. Only use
the battery pack listed in the accessories
section.
For switching on the tool, press the Lock-Out
Button (15), then fully press the On/Off Switch (2) and
hold in this position. The Lock-Out Button can now be
released.
For switching off, release the On/Off Switch.
5. CUTTING
IMPORTANT: Is the oil tank filled? Check
the Oil Level Window (14) prior to
starting and regularly during operation
(See Fig. K1). Refill oil when oil level is low. A
full oil tank will last approx. 12 minutes of
cutting depending on sawing intensity and
stops.
Check recent replaced chain tension about
every 10 minutes during operation.
1) Installing the battery pack into the machine.
2) Make sure section of log to be cut is not laying
on the ground. This will keep the chain (7) from
touching the ground as it cuts through the log.
Touching the ground while the Chain is moving is
dangerous and will dull the Chain.
3) Use both hands to grip saw. Always use left hand
to grip Front Handle(4) and right hand to grip Rear
Handle (1). Use a firm grip. Thumbs and fingers
must wrap around saw handles. (See Fig. K2)
4) Make sure your footing is firm. Keep feet-shoulder
width apart. Distribute your weight evenly on both
feet.
5) When ready to make a cut, push the Lock-Out
Button (15) completely in with the right thumb
and squeeze the trigger. This will turn saw on.
Releasing the trigger will turn the saw off. Make
sure the saw is running at full speed before
starting a cut.
6) When starting a cut, slowly place moving chain
against the wood. The wood should be as close to
the saw body as possible. Hold saw firmly in place
to avoid possible bouncing or skating (sideways
movement) of saw.
7) Guide the saw using light pressure and do not put
excessive force on the saw, letting the saw do its
work. The motor will overload and can burn out. It
will do the job better and safer at the rate for which
it was intended.
8) Remove the saw from a cut with the saw running at
full speed. Stop the saw by releasing the On/off Switch
(2). Make sure the chain has stopped before setting
the saw down.
9) Keep practicing on scrap logs in a secure working
area until you are comfortable, using a fluid motion
and a steady cutting rate.
Kickback Safety Devices On This Saw
This saw has a low-kickback chain and reduced
kickback Guide Bar. Both items reduce the chance of
kickback. However, kickback can still occur with this
saw.
The following steps will reduce the risk of kickback.
• Use both hands to grip saw while saw is running.
Use firm grip. Thumbs and fingers must wrap
around saw handles.
• Keep all safety items in place on saw. Make sure
they work properly.
• Do not overreach or cut above shoulder height.
• Keep solid footing and balance at all times.
• Stand slightly to the left side of saw. This keeps
your body from being in direct line with chain.
• Do not let Guide Bar nose touch anything when
chain is moving.
• Never try cutting through two logs at same time.
Only cut one log at a time.
• Do not bury the Guide Bar nose or try plunge cut
(boring into wood using Guide Bar nose).
• Watch for shifting of wood or other forces that may
pinch chain.
• Use extreme caution when reentering a previous
cut.
• Use only the low-kickback chain and Guide Bar
(6) that were supplied with this chain saw or
recommended.
• Never use a dull or loose chain. Keep chain sharp
with proper tension.
How to use Saw Safely
1. Use the chain saw only with secure footing.
2. Hold the chain saw at the right-hand side of your
Cordless Chain Saw
EN
Page 21
body (See Fig. L).
3. The Chain (7) must be running at full speed before
it makes contact with the wood.
4. Use the Bumper Spikes (13) to secure the saw onto
the wood before starting to cut.
5. Use the Bumper Spikes as a leverage point while
cutting. (See Fig. M)
6. Do not operate the chain saw with arms fully
extended, attempt to saw areas which are difficult
to reach, or stand on a ladder while sawing (see
Fig. N).
Never use the chain saw above shoulder height
CUTTING WOOD UNDER TENSION (See fig. O)
WARNING: When cutting a limb that is
under tension, use extreme caution. Be
alert for wood springing back. When
wood tension is released, limb could spring
back and strike operator causing severe injury
or death.
When sawing logs supported on both ends, start
the cut from above(Y) about 1/3 of the diameter into
the log (overbuck) and then finish the cut (Z) from
below, in order to avoid contact of the chain saw with
the ground. When sawing logs supported on only
one end, start the cut from below (Y) about 1/3 of
the diameter into the log (underbuck) and finish the
cut from above (Z) in order to avoid log splitting or
jamming of the chain saw.
OPERATION FOR POLE SAW (ONLY FOR
WG323E, WG323E.9)
Cutting with shoulder strap (See Fig. P1)
The extension pole is supplied with a shoulder strap
that gives extra support when hoisting the Pole Saw in
the air. Hook the shoulder strap to the extension pole
and wrap around your shoulder. The shoulder strap
can also soften the impact if the Pole Saw is dropped
after the completion of a cut.
Cutting with extension pole
1. Install the battery pack into the machine.
2. Before cutting a high branch, consider all the same
points detailed in the previous section “Trimming
Branches” but pay particular attention to the likely
path of the falling branch.
WARNING: Do not stand directly below
a branch being cut. Keep bystanders far
away. Do not stand on a ladder or other type
of unstable support while using the tool. Do
not use the tool near cable, electrical power or
telephone lines. Keep 3m(10 ft) away from all
power lines. (See Fig. P2-P5)
3. Use both hands to grip Pole Saw. Use only
designated grip areas when operating Pole Saw
(See Fig. P6). Use firm grip. Thumbs and fingers
must wrap around Pole Saw handle and pole.
4. Make sure your footing is firm. Keep feet apart.
Divide your weight evenly on both feet.
5. When ready to make a cut, press the Lock-out
Button (30), then fully press the On/off Switch (31)
(See Fig. P7). This will turn Pole Saw on. Releasing
On/off Switch will turn Pole Saw off. Make sure
saw is running at full speed before starting a cut.
6. When starting a cut, place moving chain
against wood. Hold Pole Saw firmly in place to
avoid possible bouncing or skating (sideways
movement) of saw.
7. Guide Pole Saw using light pressure. Do not force
Pole Saw. The motor will overload and can burn
out. It will do the job better and safer at the rate for
which it was intended.
8. Remove Pole Saw from a cut with saw running
at full speed. Stop Pole Saw by releasing trigger.
Make sure chain has stopped before setting Pole
Saw down.
TRIMMING A TREE (PRUNING)
WARNING: Avoid kickback. Kickback can
result in severe injury or death.
See Kickback, to avoid risk of kickback.
WARNING: Do not operate Pole Saw while
• in a tree
• on a ladder or any other unstable surface
• in any awkward position
You may lose control of Pole Saw causing
severe injury.
WARNING: Do not extend arms above
shoulders when using Pole Saw.
CAUTION: Seek professional help if facing
conditions beyond your ability.
Trimming a tree is the process of cutting limbs from a
living tree. Make sure your footing is firm. Keep feet
apart. Divide your weight evenly on both feet.
Follow directions below to trim a tree.
1. Make first cut 15cm from tree trunk on underside
of limb. Use top of guide bar to make this cut. Cut
1/3 through diameter of limb (See Fig. P8).
2. Move 5 to 10cm farther out on limb. Make second
cut from above limb. Continue cut until you cut
limb off.
3. Make third cut as close to tree trunk as possible
on underside of limb stub. Use top of guide bar to
make this cut. Cut 1/3 through diameter of stub.
4. Make fourth cut directly above third cut. Cut down
to meet third cut. This will remove limb stub.
SAW MAINTENANCE
Follow maintenance instructions in this manual.
Proper cleaning of saw and chain and Guide Bar
maintenance can reduce chances of kickback. Inspect
and maintain saw after each use. This will increase the
service life of your saw.
NOTE: Even with proper sharpening, risk of kickback
can increase with each sharpening.
MAINTENANCE AND
STORAGE OF CHAIN SAW
1. Remove the battery pack
21
Cordless Chain Saw
EN
Page 22
• When not in use
• Before moving from one place to another
• Before servicing
• Before changing accessories or attachments, such
as saw chain and guard
2. Inspect chain saw before and after each use.
Check saw closely if guard or other part has been
damaged. Check for any damage that may affect
operator safety or operation of saw. Check for
alignment or binding of moving parts. Check for
broken or damaged parts. Do not use chain saw if
damage affects safety or operation. Have damage
repaired by authorized service center. To locate an
authorized service center, visit www.worx.com
3. Maintain chain saw with care.
• Never expose saw to rain or direct moisture.
• Keep chain sharp, clean, and lubricated for better
and safer performance.
• Follow steps outlined in this manual to sharpen
chain.
• Keep handles dry, clean, and free of oil and grease.
• Keep all screws and nuts tight.
• Keep battery pack from heat, oil, and sharp ed ges .
4. When servicing, use only identical
replacement parts.
5. When not in use, always store chain saw
• in a high or locked place, out of children’s reach
• in a dry place
• with Bar and Chain Storage/Transportation Cover
(9) in place
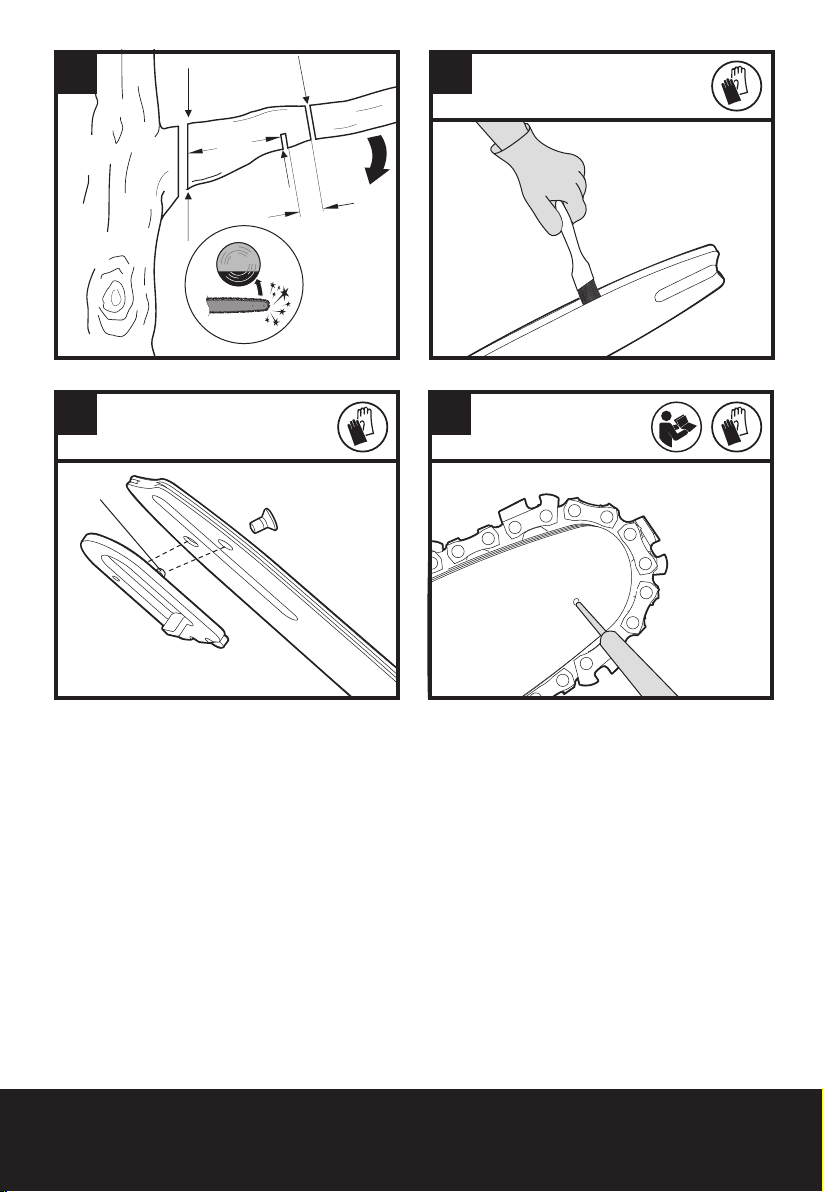
Bar Maintenance
To maximize bar life, the following bar maintenance is
22
recommended.
The bar rails that carry the chain should be cleaned
before storing the tool or if the bar or chain appear to
be dirty.
The rails should be cleaned every time the chain is
removed.
To clean the Bar rails:
1. Remove chain cover and bar and chain. (see
section ASSEMBLY)
2. Using a wire brush, screwdriver or similar tool,
clear the residue from the inner groove of the bar
(See Fig. Q).
3. Make sure to clean oil passages thoroughly
Conditions which require Chain (7) and Guide
Bar (6) maintenance:
• Saw cuts to one side or at an angle.
• Saw has to be forced through the cut.
• Inadequate supply of oil to the bar and chain.
Check the condition of the guide bar each time the
chain is sharpened. A worn guide bar will damage the
chain and make cutting difficult.
After each use, with unit disconnected from power
source, clean all sawdust from the guide bar and
sprocket hole.
When rail top is uneven, use a flat file to restore
square edges and sides.
File Rail Edges
and Sides
Square
Worn Groove Correct Groove
Replace the guide bar when the groove is worn, the
guide bar is bent or cracked, or when excess heating or
burring of the rails occurs. If replacement is necessary,
use only the guide bar specified for your saw in the
repair parts list or on the decal located on the chain
saw.
Replacing Bar & Chain
Replace chain when cutters are too worn to sharpen or
when chain stops. Only use replacement chain noted
in this manual.
Inspect Guide Bar before sharpening chain. A worn or
damaged Guide Bar is unsafe. A worn or damaged Guide
Bar will damage chain. It will also make cutting harder.
Fit the Bar Tensioning Plate (23) Tab into the new bar
by tightening the screw clockwise. The tab protrusion
(a) must be fitted into the bar hole. (See Fig R)
SHARPENING SAW CHAIN
WARNING: Remove the battery pack
before servicing. Severe injury or death
could occur from electrical shock or body
contact with moving chain.
Cutting edges on chain are sharp. Use
protective gloves when handling chain.
Keep chain sharp. Your saw will cut faster and more
safely. A dull chain will cause undue sprocket, guide
bar, chain, and motor wear. If you must force chain
into wood and cutting creates only sawdust with few
large chips, chain is dull.
LUBRICATE SPROCKET
WARNING: Wear heavy duty gloves when
performing any maintenance or service to
this tool. Always remove the battery pack
before performing any service or maintenance
on this tool.
NOTE: It is not necessary to remove the chain or bar
when lubricating the guide bar sprocket.
1. Clean the bar and sprocket
2. Using a grease gun, insert the tip of the gun
into the lubrication hole and inject grease until
it appears at the outside edge of the sprocket tip
(See Fig. S).
3. To rotate the sprocket pull the chain by hand until
the ungreased side of the sprocket is in line with
the grease hole. Repeat the lubrication procedure.
ENVIRONMENTAL
PROTECTION
Waste electrical products must not be disposed
of with household waste. Please recycle where
facilities exist. Check with your local authorities
or retailer for recycling advice.
TROUBLESHOOTING TABLE
The following table gives checks and actions that
you can perform if your machine does not operate
Cordless Chain Saw
EN
Page 23

correctly. If these do not identify/remedy the problem, contact your service agent. WARNING: Switch off and
remove plug from power source before investigating fault.
Symptom Possible Cause Remedy
Chain saw fails to
operate
Chain saw
operates
intermittently
Dry chain No oil in reservoir
Chain/chain bar
over-heats
Chain saw rips,
vibrates, does not
saw properly
Out of battery.
Fuse faulty.
Over heating
Applying too much pressure while
cutting.
Loose connection.
Internal wiring defective.
On/Off switch defective.
Vent in oil filler cap clogged
Oil passage clogged
No oil in reservoir
Vent in oil filler cap clogged
Oil passage clogged
Chain is over tensioned
Dull chain
Chain tension too loose
Dull chain
Chain worn out
Chain teeth are facing in the wrong
direction
Charge the battery pack.
Replace fuse.
Place the machine in a cool, ventilated
place to cool it down.
Applying relatively less pressure while
cutting.
Contact service agent.
Contact service agent.
Contact service agent.
Refill oil
Clean cap
Clean oil passage outlet
Refill oil
Clean cap
Clean oil passage outlet
Adjust chain tension
Sharpen chain or replace
Adjust chain tension
Sharpen chain or replace
Replace chain
Reassemble with chain in correct
direction
DECLARATION OF
CONFORMITY
We,
POSITEC Germany GmbH
Konrad-Adenauer-Ufer 37
50668 Köln
Declare that the product
Description Battery-powered chain saw and pole
saw
Type WG322E WG322E.9 WG323E WG323E.9
(3 - designation of machinery, representative of
chain saw and pole saw)
Function Cutting wood
Complies with the following Directives:
2006/42/EC 2014/30/EU
2011/65/EU
2000/14/EC amended by 2005/88/EC
The notified body involved
Name: Intertek Deutschland GmbH (Notified
body 0905)
Address: Stangenstraße 1, 70771 LEINFELDENECHTERDINGEN
Certification No.: 17SHW1086-01 (WG322E
WG322E.9) 17SHW1166-01 (WG323E
WG323E.9)
WG322E WG322E.9
2000/14/EC amended by 2005/88/EC:
- Conformity Assessment Procedure as per Annex V
- Measured Sound Power Level 94.7 dB(A)
- Declared Guaranteed Sound Power Level 96 dB(A)
WG323E WG323E.9
2000/14/EC amended by 2005/88/EC:
- Conformity Assessment Procedure as per Annex V
- Measured Sound Power Level 95.2 dB(A)
- Declared Guaranteed Sound Power Level 96 dB(A)
Standards conform to
EN 60745-1 EN 60745-2-13
EN ISO 3744 EN 55014-1
EN 55014-2 Parts of EN ISO11680-1
The person authorized to compile the technical file,
Name Russell Nicholson
Address Positec Power Tools (Europe)Ltd,
PO Box 6242, Newbury, RG14 9LT, UK
Suzhou 2017/07/27
Allen Ding
Deputy Chief Engineer, Testing & Certification
23
Cordless Chain Saw
EN
Page 24

ALLGEMEINE
SICHERHEITSHINWEISE
FÜR ELEKTROWERKZEUGE
WARNUNG! Lesen Sie alle
Sicherheitshinweise und Anweisungen.
Versäumnisse bei der Einhaltung der
Sicherheitshinweise und Anweisungen können
elektrischen Schlag, Brand und/oder schwere
Verletzungen verursachen.
Bewahren Sie alle Sicherheitshinweise und
Anweisungen für die Zukunft auf.
Der in den Sicherheitshinweisen verwendete Begriff
„Elektrowerkzeug“ bezieht sich auf akkubetriebene
Elektrowerkzeuge (ohne Netzkabel).
1. ARBEITSPLATZSICHERHEIT
a) Halten Sie Ihren Arbeitsbereich sauber und
gut beleuchtet. Unordnung oder unbeleuchtete
Arbeitsbereiche können zu Unfällen führen.
b) Arbeiten Sie mit dem Elektrowerkzeug
nicht in explosionsgefährdeter Umgebung,
in der sich brennbare Flüssigkeiten, Gase
oder Stäube befinden. Elektrowerkzeuge
erzeugen Funken, die den Staub oder die Dämpfe
entzünden können.
c) Halten Sie Kinder und andere
Personen während der Benutzung des
24
Elektrowerkzeugs fern. Bei Ablenkung können
Sie die Kontrolle über das Gerät verlieren.
2. ELEKTRISCHE SICHERHEIT
a) Der Anschlussstecker des
Elektrowerkzeuges muss in die Steckdose
passen. Der Stecker darf in keiner
Weise verändert werden. Verwenden Sie
keine Adapterstecker gemeinsam mit
schutzgeerdeten Elektrowerkzeugen.
Unveränderte Stecker und passende Steckdosen
verringern das Risiko eines elektrischen Schlages.
b) Vermeiden Sie Körperkontakt mit geerdeten
Oberflächen wie von Rohren, Heizungen,
Herden und Kühlschränken. Es besteht ein
erhöhtes Risiko durch elektrischen Schlag, wenn
Ihr Körper geerdet ist.
c) Halten Sie Elektrowerkzeuge von Regen
oder Nässe fern. Das Eindringen von Wasser
in ein Elektrowerkzeug erhöht das Risiko eines
elektrischen Schlages.
d) Zweckentfremden Sie das Kabel nicht,
um das Elektrowerkzeug zu tragen,
aufzuhängen oder um den Stecker aus der
Steckdose zu ziehen. Halten Sie das Kabel
fern von Hitze, Öl, scharfen Kanten oder
sich bewegenden Geräteteilen. Beschädigte
oder verwickelte Kabel erhöhen das Risiko eines
elektrischen Schlages.
e) Wenn Sie mit einem Elektrowerkzeug
im Freien arbeiten, verwenden Sie nur
Verlängerungskabel, die auch für den
Außenbereich geeignet sind. Die Anwendung
eines für den Außenbereich geeigneten
Verlängerungskabels verringert das Risiko eines
elektrischen Schlages.
f) Wenn der Betrieb des Elektrowerkzeuges
in feuchter Umgebung nicht
vermeidbar ist, verwenden Sie einen
Fehlerstromschutzschalter. Der Einsatz eines
Fehlerstromschutzschalters vermindert das Risiko
eines elektrischen Schlages.
3. SICHERHEIT VON PERSONEN
a) Seien Sie aufmerksam, achten Sie darauf,
was Sie tun, und gehen Sie mit Vernunft
an die Arbeit mit einem Elektrowerkzeug.
Benutzen Sie kein Elektrowerkzeug, wenn
Sie müde sind oder unter dem Einfluss
von Drogen, Alkohol oder Medikamenten
stehen. Ein Moment der Unachtsamkeit beim
Gebrauch des Elektrowerkzeuges kann zu
ernsthaften Verletzungen führen.
b) Tragen Sie persönliche Schutzausrüstung
und immer eine Schutzbrille. Das Tragen
persönlicher Schutzausrüstung, wie Staubmaske,
rutschfeste Sicherheitsschuhe, Schutzhelm
oder Gehörschutz, je nach Art und Einsatz des
Elektrowerkzeuges, verringert das Risiko von
Verletzungen.
c) Vermeiden Sie eine unbeabsichtigte
Inbetriebnahme. Vergewissern Sie sich,
dass das Elektrowerkzeug ausgeschaltet
ist, bevor Sie es an den Akku anschließen,
es aufnehmen oder tragen. Wenn Sie beim
Tragen des Elektrowerkzeuges den Finger am
Schalter haben oder das Gerät eingeschaltet an
die Stromversorgung anschließen, kann dies zu
Unfällen führen.
d) Entfernen Sie Einstellwerkzeuge oder
Schraubenschlüssel, bevor Sie das
Elektrowerkzeug einschalten. Ein Werkzeug
oder Schlüssel, der sich in einem drehenden
Geräteteil befindet, kann zu Verletzungen führen.
e) Vermeiden Sie eine abnormale
Körperhaltung. Sorgen Sie für einen
sicheren Stand und halten Sie jederzeit
das Gleichgewicht. Dadurch können Sie das
Elektrowerkzeug in unerwarteten Situationen
besser kontrollieren.
f) Tragen Sie geeignete Kleidung. Tragen
Sie keine weite Kleidung oder Schmuck.
Halten Sie Haare, Kleidung und Handschuhe
fern von sich bewegenden Teilen. Lockere
Kleidung, Schmuck oder lange Haare können von
sich bewegenden Teilen erfasst werden.
g) Wenn Staubabsaug- und
-auffangeinrichtungen montiert werden
können, vergewissern Sie sich, dass diese
angeschlossen sind und richtig verwendet
werden. Verwendung einer Staubabsaugung
kann Gefährdungen durch Staub verringern.
4. VERWENDUNG UND BEHANDLUNG DES
ELEKTROWERKZEUGES
a) Überlasten Sie das Gerät nicht. Verwenden
Akku-Kettensäge D
Page 25

Sie für Ihre Arbeit das dafür bestimmte
Elektrowerkzeug. Mit dem passenden
Elektrowerkzeug arbeiten Sie besser und sicherer
im angegebenen Leistungsbereich.
b) Benutzen Sie kein Elektrowerkzeug, dessen
Schalter defekt ist. Ein Elektrowerkzeug, das
sich nicht mehr ein- oder ausschalten lässt, ist
gefährlich und muss repariert werden.
c) Entfernen Sie den Akku, bevor Sie
Geräteeinstellungen vornehmen,
Zubehörteile wechseln oder das Gerät
weglegen. Diese Vor sichtsmaßnahme
verhindert den unbeabsichtigten Start des
Elektrowerkzeuges.
d) Bewahren Sie unbenutzte Elektrowerkzeuge
außerhalb der Reichweite von Kindern
auf. Lassen Sie Personen das Gerät nicht
benutzen, die mit diesem nicht vertraut
sind oder diese Anweisungen nicht gelesen
haben. Elektrowerkzeuge sind gefährlich, wenn
Sie von unerfahrenen Personen benutzt werden.
e) Pflegen Sie Elektrowerkzeuge mit Sorgfalt.
Kontrollieren Sie, ob bewegliche Teile
einwandfrei funktionieren und nicht
klemmen, ob Teile gebrochen oder so
beschädigt sind, dass die Funktion des
Elektrowerkzeuges beeinträchtigt ist.
Lassen Sie beschädigte Teile vor dem
Einsatz des Gerätes reparieren. Viele Unfälle
haben ihre Ursache in schlecht gewarteten
Elektrowerkzeugen.
f) Halten Sie Schneidwerkzeuge scharf
und sauber. Sorgfältig gepflegte
Schneidwerkzeuge mit scharfen
Schneidkanten verklemmen sich weniger und
sind leichter zu führen.
g) Verwenden Sie Elektrowerkzeug, Zubehör,
Einsatzwerkzeuge usw. entsprechend
diesen Anweisungen. Berücksichtigen
Sie dabei die Arbeitsbedingungen
und die auszuführende Tätigkeit. Der
Gebrauch von Elektrowerkzeugen für andere
als die vorgesehenen Anwendungen kann zu
gefährlichen Situationen führen.
5. VERWENDUNG UND BEHANDLUNG DES
AKKUWERKZEUGS
a) Laden Sie die Akkus nur in Ladegeräten auf,
die vom Hersteller empfohlen werden. Für
ein Ladegerät, das für eine bestimmte Art von
Akkus geeignet ist, besteht Brandgefahr, wenn es
mit anderen Akkus verwendet wird.
b) Verwenden Sie nur die dafür vorgesehenen
Akkus in den Elektrowerkzeugen. Der
Gebrauch von anderen Akkus kann zu
Verletzungen und Brandgefahr führen.
c) Halten Sie den nicht benutzten Akku fern
von Büroklammern, Münzen, Schlüsseln,
Nägeln, Schrauben oder anderen kleinen
Metallgegenständen, die eine Überbrückung
der Kontakte verursachen könnten. Ein
Kurzschluss zwischen den Akkukontakten kann
Verbrennungen oder Feuer zur Folge haben.
d)
Bei falscher Anwendung kann Flüssigkeit
aus dem Akku austreten. Vermeiden Sie den
Kontakt damit. Bei zufälligem Kontakt mit
Wasser abspülen. Wenn die Flüssigkeit in die
Augen kommt, nehmen Sie zusätzlich ärztliche
Hilfe in Anspruch. Austretende Akkuflüssigkeit kann
zu Hautreizungen oder Verbrennungen führen.
6. SERVICE
a) Lassen Sie Ihr Elektrowerkzeug nur von
qualifiziertem Fachpersonal und nur mit
Original-Ersatzteilen reparieren. Damit wird
sichergestellt, dass die Sicherheit des Gerätes
erhalten bleibt.
SICHERHEITSHINWEISE
FÜR KETTENSÄGEN
1. Halten Sie bei laufender Säge alle
Körperteile von der Sägekette fern.
Vergewissern Sie sich vor dem Starten der
Säge, dass die Sägekette nichts berührt.
Beim Arbeiten mit einer Kettensäge kann ein
Moment der Unachtsamkeit dazu führen, dass
Bekleidung oder Körperteile von der Sägekette
erfasst werden.
2.
Halten Sie die Kettensäge mit Ihrer rechten
Hand am hinteren Handgriff und mit
Ihrer linken Hand am vorderen Handgriff
fest. Das Festhalten der Kettensäge in einer
anderen Arbeitshaltung erhöht das Risko von
Verletzungen und darf nicht angewendet werden.
3. Halten Sie das Elektrowerkzeug
ausschließlich an den isolierten
Griffflächen, da es vorkommen kann, dass
die Kettensäge mit verdeckter Verkabelung
in Berührung gerät. Falls Kettensägen mit
Strom führenden Leitern in Berührung kommen,
können frei liegende Teile des Elektrowerkzeuges
unter Spannung gesetzt werden und
Stromschläge verursachen.
4. Tragen Sie Schutzbrille und Gehörschutz.
Weitere Schutzausrüstung für Kopf, Hände,
Beine und Füße wird empfohlen. Passende
Schutzbekleidung mindert die Verletzungsgefahr
durch umherfliegendes Spanmaterial und
zufälliges Berühren der Sägekette.
5. Arbeiten Sie mit der Kettensäge nicht auf
einem Baum. Bei Betrieb einer Kettensäge auf
einem Baum besteht Verletzungsgefahr.
6. Achten Sie immer auf einen festen Stand
und benutzen Sie die Kettensäge nur, wenn
Sie auf gefestigtem, sicheren und ebenen
Untergrund stehen. Rutschiger oder instabiler
Untergrund kann bei Benutzung von Leitern zum
Verlust der Kontrolle über die Balance und der
Kettensäge führen.
7. Rechnen Sie beim Schneiden eines unter
Spannung stehenden Astes damit, das
dieser zurückfedert. Wenn die Spannung in
den Holzfasern freikommt, kann der gespannte
25
Akku-Kettensäge D
Page 26

Ast die Bedienperson treffen und/oder die
Kettensäge der Kontrolle entreißen.
8. Seien Sie besonders vorsichtig beim
Schneiden von Unterholz und jungen
Bäumen. Das dünne Material kann sich in der
Sägekette verfangen und auf Sie schlagen oder
Sie aus dem Gleichgewicht bringen.
9. Tragen Sie die Kettensäge am vorderen
Griff mit stillstehender Sägekette und
nach hinten zeigender Führungsschiene.
Bei Transport oder Aufbewahrung der
Kettensäge stets die Schutzabdeckung
aufziehen. Sorgfältiger Umgang mit der
Kettensäge verringert die Wahrscheinlichkeit
einer versehentlichen Berührung mit der
laufenden Sägekette.
10.
Befolgen Sie Anweisungen für die
Schmierung, die Kettenspannung und das
Wechseln von Zubehör. Eine unsachgemäß
gespannte oder geschmierte Kette kann entweder
reißen oder das Rückschlagrisiko erhöhen.
11. Halten Sie Griffe trocken, sauber und frei
von Öl und Fett. Fettige, ölige Griffe sind
rutschig und führen zum Verlust der Kontrolle.
12. Nur Holz sägen. Die Kettensäge nur
für Arbeiten verwenden, für die sie
bestimmt ist – Beispiel: Verwenden Sie die
Kettensäge nicht zum Sägen von Plastik,
Mauerwerk oder Baumaterialien, die nicht
aus Holz sind. Die Verwendung der Kettensäge
für nicht bestimmungsgemäße Arbeiten kann zu
26
gefährlichen Situationen führen.
URSACHEN UND
VERMEIDUNG EINES
RÜCKSCHLAGS:
Ein Rückschlag kann auftreten, wenn die Spitze der
Führungsschiene einen Gegenstand berührt oder
wenn das Holz sich biegt und die Sägekette im
Schnitt festklemmt.
Eine Berührung mit der Schienenspitze kann
in manchen Fällen zu einer unerwarteten nach
hinten gerichteten Reaktion führen, bei der die
Führungsschiene nach oben und in Richtung der
Bedienperson geschlagen wird.
Bei Verklemmen der Sägekette an der Oberkante
der Führungsschiene kann die Schiene rasch in
Bedienerrichtung zurückstoßen.
Jede dieser Reaktionen kann dazu führen, dass
Sie die Kontrolle über die Säge verlieren und
sich möglicherweise schwer verletzen. Verlassen
Sie sich nicht ausschließlich auf die in der
Kettensäge eingebauten Sicherheitseinrichtungen.
Als Benutzer einer Kettensäge sollten Sie
verschiedene Maßnahmen ergreifen, um unfall- und
verletzungsfrei arbeiten zu können.
Ein Rückschlag ist die Folge eines falschen oder
fehlerhaften Gebrauchs des Elektrowerkzeugs. Er
kann durch geeignete Vorsichtsmaßnahmen, wie
nachfolgend beschrieben, verhindert werden:
- Halten Sie die Säge mit beiden Händen fest,
wobei Daumen und Finger die Griffe der
Kettensäge umschließen. Bringen Sie Ihren
Körper und die Arme in eine Stellung, in
der Sie den Rückschlagkräften standhalten
können. Wenn geeignete Maßnahmen
getroffen werden, kann die Bedienperson die
Rückschlagkräfte beherrschen. Niemals die
Kettensäge loslassen.
- Vermeiden Sie eine abnormale
Körperhaltung und sägen Sie nicht
über Schulterhöhe. Dadurch wird
ein unbeabsichtigtes Berühren mit der
Schienenspitze vermieden und eine bessere
Kontrolle der Kettensäge in unerwarteten
Situationen ermöglicht.
- Verwenden Sie stets vom Hersteller
vorgeschriebene Ersatzschienen und
Sägeketten. Falsche Ersatzschienen und
Sägeketten können zum Reißen der Kette oder zu
Rückschlag führen.
- Halten Sie sich an die Anweisungen
des Herstellers für das Schärfen und
die Wartung der Sägekette. Zu niedrige
Tiefenbegrenzer erhöhen die Neigung zum
Rückschlag.
RESTRISIKEN
Auch bei der bestimmungsgemäßen Verwendung
des Gerätes besteht immer ein Restrisiko, das nicht
verhindert werden kann. Je nach Art und Aufbau des
Gerätes können folgende Gefährdungen auftreten:
- Kontakt mit sichtbaren Sägezähnen der Sägekette
(Schneidgefahren)
- Zugang zur rotierenden Sägekette
(Schneidgefahr)
- Unvorhergesehene, abrupte Bewegung der
Führungsschiene (Schneidgefahr)
- Aus der Sägekette herausgeschleuderte Partikel
(Schneid- / Stechgefahren)
- Aus dem Werkstück herausgeschleuderte Partikel
- Hautkontakt mit dem Öl
- Verlust des Gehörs, wenn kein erforderlicher
Gehörschutz während der Arbeit verwendet wird
SICHERHEITSHINWEISE
FÜR JAW SAW MIT
VERLÄNGERUNGSSTANGE
1. Verwenden Sie die Maschine nicht, wenn der
Bediener müde oder krank ist oder unter dem
Einfluss von Alkohol oder anderen Drogen steht.
2. Um Gefahren zu verringern, halten Sie bei der
Arbeit an der Maschine einen sicheren Abstand
zu anderen Person ein.
3. Achten Sie auf die mit den Betriebspositionen
verbundenen Risiken, da die Gefahr besteht,
dass der Bediener durch herabfallende Äste oder
Akku-Kettensäge D
Page 27

Zweige oder solche, die den Boden berühren
und zurückschnellen, getroffen und verletzt wird.
Entfernen Sie die Zweige in den Abschnitten.
4. Bewahren Sie beim Betrieb stets einen sicheren
Stand und das Gleichgewicht. Verwenden Sie den
beiliegenden Tragegurt.
5. Halten Sie einen ausreichenden Abstand zu
überirdisch verlegten Stromleitungen ein.
SICHERHEITS HINWEISE
FÜR AKKUPACK
a) Zellen bzw. Akkupack nicht zerlegen, öffnen
oder zerdrücken.
b) Akkupack nicht kurzschließen. Akkupacks
nicht wahllos in einer Schachtel oder
Schublade aufbewahren, wo sie einander
kurzschließen oder durch andere leitfähige
Materialien kurzgeschlossen werden
könnten. Bei Nichtverwendung des Akkupacks ist
dieses von Metallgegenständen fernzuhalten, wie
etwa Büroklammern, Münzen, Nägeln, Schrauben
oder anderen kleinen Metallgegenständen, wo
sich die Batterieklemmen berühren könnten.
Das Kurzschließen der Batterieklemmen kann
Verbrennungen bzw. einen Brand verursachen.
c) Zellen bzw. Akkupacks nicht Hitze oder
Feuer aussetzen. Lagerung in direktem
Sonnenlicht vermeiden.
d) Akkupack nicht mechanischen Stößen
aussetzen.
e) Im Fall, dass Flüssigkeit aus dem Akku
austritt, darf diese nicht in Kontakt mit
der Haut oder den Augen kommen. Sollte
dies dennoch geschehen, den betroffenen
Bereich sofort mit viel Wasser spülen und
einen Arzt aufsuchen.
f) Beim Verschlucken einer Zelle oder
eines Akkupacks muss sofort ein Arzt
herangezogen werden.
g) Akkupack sauber und trocken halten.
h) Sollten die Klemmen des Akkupacks
schmutzig werden, diese mit einem
sauberen, trockenen Tuch abwischen.
i) Akkupackmuss vor Gebrauch aufgeladen
werden. Immer dieses Anweisungen
beachten und den korrekten Ladevorgang
ausführen.
j) Akkupack bei Nichtverwendung nicht
längere Zeit aufladen lassen.
k) Nach längerer Lagerung des Gerätes ist es
eventuell notwendig, die Zellen oder das
Akkupack mehrere Male aufzuladen und
zu entladen, um eine optimale Leistung zu
erhalten.
l) Akkupacks funktionieren bei normaler
Zimmertemperatur (20°C ± 5°C) am besten.
m) Beim Entsorgen von Akkupacks
sollten Akkupacks mit verschiedenen
elektrochemischen Systemen voneinander
getrennt gehalten werden.
n) Nur mit dem von WORX bezeichneten
Ladegerät aufladen. Kein Ladegerät
verwenden, das nicht ausdrücklich für den
Gebrauch mit dem Gerät vorgesehen ist.
Ein Ladegerät, das für eine bestimmte Art von
Akkupackgeeignet ist, kann bei Verwendung
mit einem anderen Akkupack eine Brandgefahr
darstellen.
o)
Kein Akkupack verwenden, das nicht für den
Gebrauch mit dem Gerät vorgesehen ist.
p) Akkupacks von Kindern fernhalten.
q) Die originalen Produktunterlagen zum
späteren Nachschlagen aufbewahren.
r) Den Akku bei Nichtverwendung aus dem
Gerät nehmen.
s) Ordnungsgemäß entsorgen.
BEWAHREN SIE DIESE ANWEISUNGEN AUF
Grundlegende Anweisungen für korrekte
Methoden zum Fällen, Entasten und Quersägen
1. Bäume fällen
Wird von zwei oder mehreren Personen gleichzeitig
zugeschnitten und gefällt, so sollte der Abstand
zwischen den fällenden und zuschneidenden
Personen mindestens die doppelte Höhe des
zu fällenden Baumes betragen. Achten Sie
beim Fällen von Bäumen darauf, dass andere
Personen keiner Gefahr ausgesetzt werden,
keine Versorgungsleitungen getroffen und keine
Sachschäden verursacht werden. Sollte ein Baum mit
einer Versorgungsleitung in Berührung kommen, so
ist das Energieversorgungsunternehmen sofort in
Kenntnis zu setzen.
Bei Sägearbeiten am Hang sollte sich der Bediener
der Kettensäge im Gelände oberhalb des zu fällenden
Baum aufhalten, da der Baum nach dem Fällen
wahrscheinlich bergab rollen oder rutschen wird.
Vor dem Fällen sollte ein Fluchtweg geplant und
wenn nötig freigemacht werden. Der Fluchtweg
sollte nach hinten und diagonal zur Rückseite
der erwarteten Falllinie erweitert werden, wie in
Abbildung 1 dargestellt.
Vor dem Fällen ist die natürliche Neigung
des Baumes, die Lage größerer Äste und die
Windrichtung in Betracht zu ziehen, um die
Fallrichtung des Baumes beurteilen zu können.
Schmutz, Steine, lose Rinde, Nägel, Klammern und
Draht sind vom Baum zu entfernen.
2. Kerbschnitt setzen
Setzen Sie einen Kerbschnitt, der ein Drittel des
Stammdurchmessers ausmacht, im rechten Winkel
zur Fallrichtung, wie in Abbildung 1 dargestellt.
Zuerst den unteren waagrechten Kerbschnitt
durchführen (W). Dadurch wird das Einklemmen der
Sägekette oder der Führungsschiene beim Setzen des
zweiten Kerbschnitts vermieden (X).
27
Akku-Kettensäge D
Page 28
3
2
2
W
Y
Z
X
50mm
50mm
1
1
1
Abbildung.1
Abbildung.2
3
2
2
Y
Z
X
50mm
50mm
1
1
1
2
2
W
Y
Z
X
50mm
50mm
1
1
1
Abbildung.2
Abbildung.3
Abbildung.4
3. Fällschnitt setzen
Setzen Sie den Fällschnitt 50 mm höher als den
waagerechten Kerbschnitt (Y), wie in Abbildung 1
dargestellt. Den Fällschnitt parallel zum waagrechten
Kerbschnitt ausführen. Den Fällschnitt nur so tief
einsägen, dass noch ein Steg (Fällleiste) stehen
bleibt, der als Scharnier wirken kann. Der Steg
verhindert, dass sich der Baum dreht und in die
falsche Richtung fällt. Sägen Sie den Steg nicht durch.
Bei Annäherung des Fällschnitts an den Steg sollte
der Baum zu fallen beginnen. Wenn sich zeigt, dass
der Baum möglicherweise nicht in die gewünschte
Richtung fällt oder sich zurück neigt und die
Sägekette festklemmt, den Fällschnitt unterbrechen
und zur Öffnung des Schnitts und zum Umlegen des
Baumes in die gewünschte Falllinie Keile aus Holz,
Kunststoff oder Aluminium verwenden (Z) ( ).
Wenn der Baum zu fallen beginnt, die Kettensäge
aus dem Schnitt entfernen, ausschalten, ablegen und
den Gefahrenbereich über den geplanten Fluchtweg
verlassen ( ). Auf herunterfallende Äste achten und
nicht stolpern. (Siehe Abb. 1)
Abbildung.1
28
4. Entasten
Hierunter versteht man das Abtrennen der Äste
vom gefällten Baum. Beim Entasten größere nach
unten gerichtete Äste, die den Baum stützen, vorerst
stehen lassen. Entfernen Sie die kleinen Äste wie in
Abbildung 2 dargestellt in einem Schnitt. Äste, die
unter Spannung stehen, sollten von unten nach oben
gesägt werden, um ein Einklemmen der Säge zu
vermeiden.
5. Baumstamm ablängen
Hierunter versteht man das Teilen des gefällten
Baumes in Abschnitte. Achten Sie auf Ihren sicheren
Stand und die gleichmäßige Verteilung Ihres
Körpergewichts auf beide Füße. Falls möglich,
sollte der Stamm durch Äste, Balken oder Keile
unterlegt und gestützt sein. Folgen Sie den einfachen
Anweisungen für leichtes Sägen.
Wenn der Baumstamm wie in Abbildung 3 dargestellt
50mm
X
Z
W
Y
50mm
1
2
auf seiner gesamten Länge abgestützt ist, muss
er von oben geschnitten werden (Vorhandschnitt),
vermeiden Sie Kontakt mit dem Boden, da die
Kettenschärfe dadurch erheblich beeinträchtigt wird.
Wenn der Baumstamm gemäß Abbildung 4 an einem
Ende abgestützt ist, schneiden Sie ein Drittel des
3
1
Stammdurchmessers von unten ein (Rückhandschritt)
(1). Führen Sie anschließend den endgültigen Schnitt
im Vorhandschnitt durch (2), um auf den ersten zu
treffen.
2
1
Wenn der Baumstamm gemäß Abbildung 5 an
beiden Enden abgestützt ist, sägen Sie ein Drittel des
Stammdurchmessers von oben ein (Vorhandschnitt)
(1). Führen Sie anschließend den endgültigen Schnitt
(2) durch, indem Sie die unteren zwei Drittel des
Stammes von unten sägen, um auf den ersten Schnitt
zu treffen.
1
1/3
2
2/3
Akku-Kettensäge D
Page 29
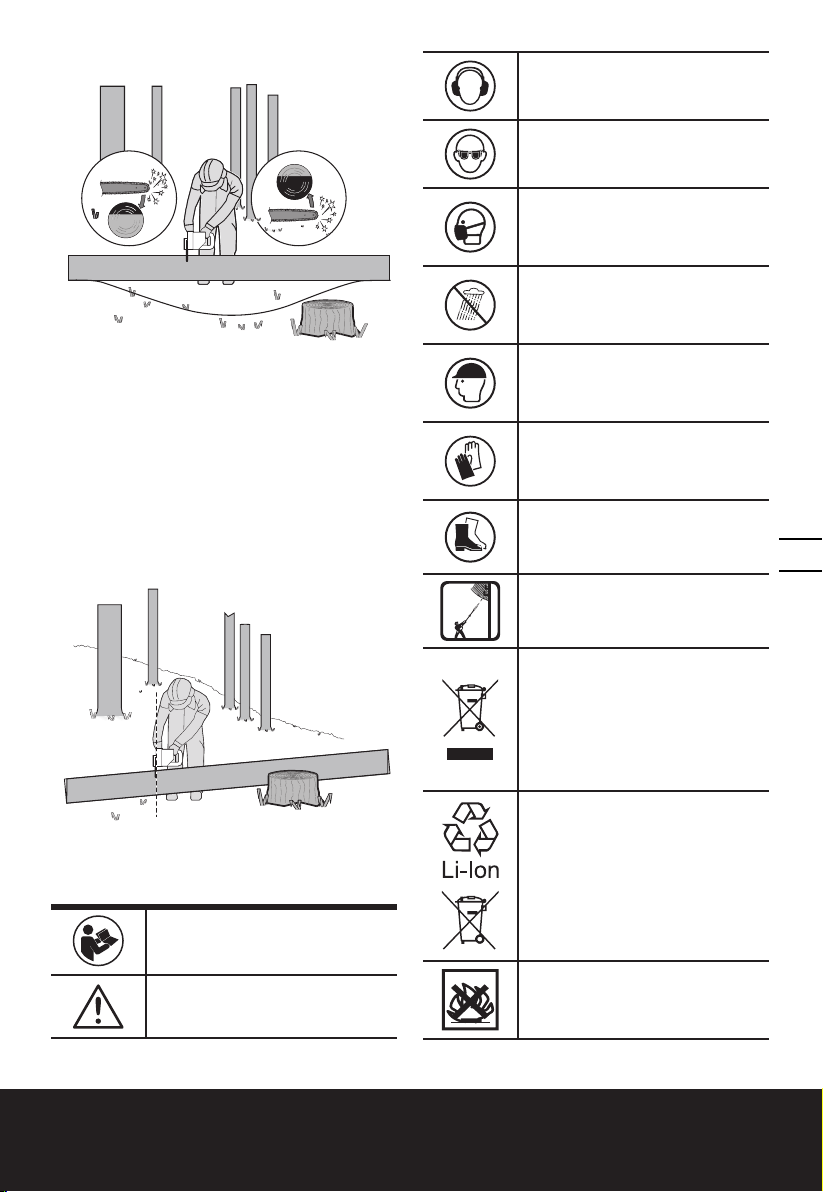
2
2/3
1
1/3
Abbildung.3
Abbildung.4
Abbildung.5
2
2/3
1
1/3
1
2
2/3
1/3
Tragen Sie einen Gehörschutz
1
1/3
2
Wenn Sie sich beim Sägen auf einer Neigung
befinden, stehen Sie immer auf der hangaufwärts
gerichteten Seite des Baumstamms, gemäß
Abbildung 6. Um im Moment des “Durchsägens” die
volle Kontrolle zu behalten, gegen Ende des Schnitts
den Anpressdruck reduzieren, ohne den festen Griff
an den Handgriffen der Kettensäge zu lösen. Darauf
achten, dass die Sägekette nicht den Boden berührt.
Nach Fertigstellung des Schnitts den Stillstand der
Sägekette abwarten, bevor man die Kettensäge
dort entfernt. Den Motor der Kettensäge immer
ausschalten, bevor man von Baum zu Baum wechselt.
Tragen Sie eine Schutzbrille
2/3
Tragen Sie eine Staubmaske
Vor Regen und Feuchtigkeit
schützen
Tragen Sie Schutzausrüstung für
den Kopf.
Tragen Sie Schutzhandschuhe
Tragen Sie Schutzstiefel.
29
Warnung vor Gefahren
m
0
1
durch überirdisch verlegte
Stromleitungen.
Elektroprodukte dürfen nicht mit
dem normalen Haushaltsmüll
entsorgt werden, sondern
sollten nach Möglichkeit zu einer
Recyclingstelle gebracht werden.
Ihre zuständigen Behörden oder
Ihr Fachhändler geben Ihnen hierzu
gerne Auskunft.
Akku nicht im Haushaltsmüll
SYMBOLE
entsorgen. Bringen Sie den leeren/
defekten Akku zu Ihrer lokalen
Sammel- oder Recyclingstelle
Zur Reduzierung der Verletzungsgefahr bitte die Bedienungsanleitung
durchlesen.
WARNUNG
Nicht verbrennen
Akku-Kettensäge D
Page 30
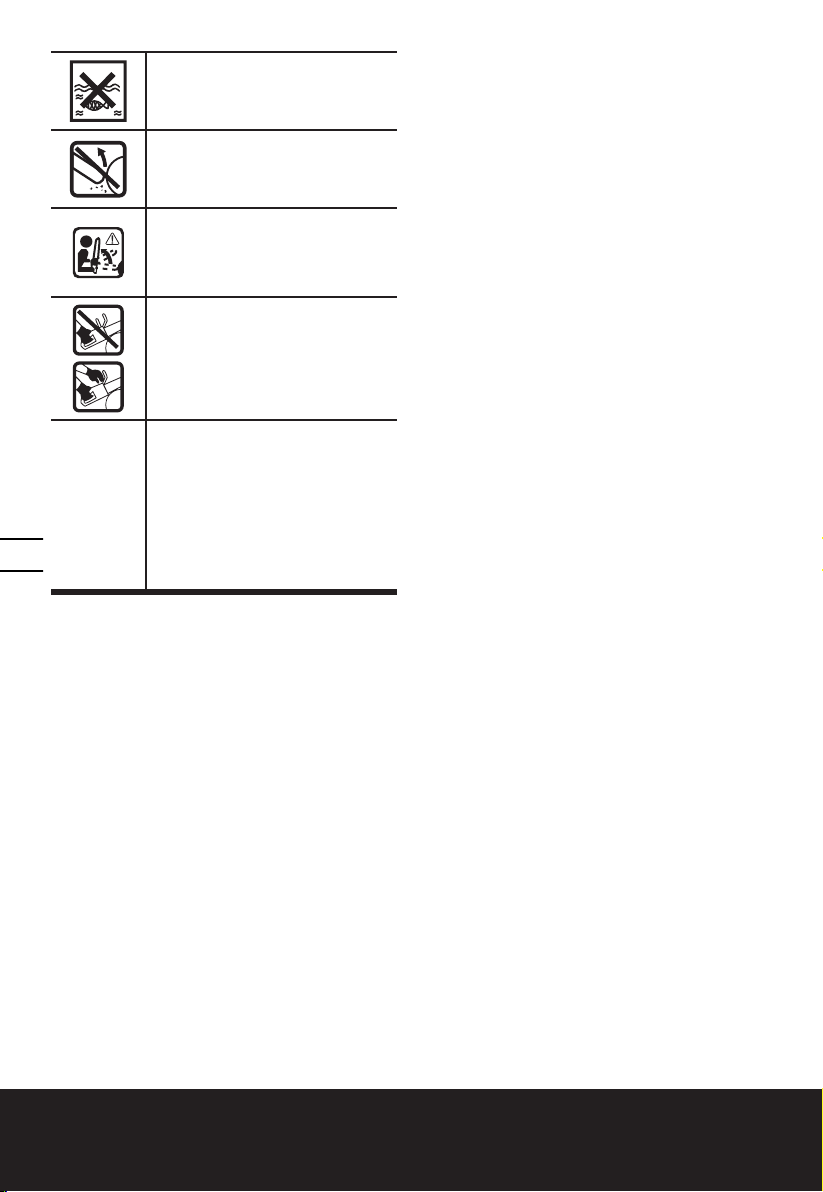
30
Vor Regen und Feuchtigkeit
schützen
Kontakt der Kettenschwert-Spitze
mit anderen Objekten vermeiden.
Bei Kontakt an der Spitze kann das
Kettenschwert plötzlich nach oben
oder hinten schnellen, dies kann zu
schweren Verletzungen führen.
Die Kettensäge immer mit zwei
Händen verwenden.
xINR18/65-y: Zylindrische
Lithium-Ionen-Akkuzellen mit
einem max. Durchmesser von
18 mm und einer Höhe von 65
mm, “x” ist die Zahl der in Reihe
geschalteten Zellen, wenn leer = 1
; “-y” ist die die Zahl der parallel
geschalteten Zellen, wenn leer = 1 .
Akku-Kettensäge D
Page 31

KOMPONENTEN
1. HINTERER HANDGRIFF
2. EIN-/AUSSCHALTER
3. ÖLTANKVERSCHLUSS
4. VORDERER HANDGRIFF
5. HANDSCHUTZ
6. SCHWERT
7. SÄGEKETTE
8. KETTENSPANNKNOPF
9. ABDECKUNG
10. AKKU *
11. AKKUVERRIEGELUNG *
12. HINTERER HANDSCHUTZ
13. ANSCHLAGKRALLE
14. ÖLSTANDSANZEIGE
15. EINSCHALTSPERRE
16. KETTENRAD
17. LAUFRICHTUNGS- UND SCHNEIDRICHTUNGSSYMBOL
18. ÖLDÜSE
19. KRALLENANSCHLAG
20. BOHRUNG FÜR BEFESTIGUNGSSCHIENE
21. SCHWERT-FÜHRUNGSSTEG
22. * SCHNEIDGARNITUR-AUFBEWAHRUNG/TRANSPORTABDECKUNG*(BLATTSCHEIDE)
23. KETTENSPANNERBEFESTIGUNG (SIEHE ABB. A)
24. GRIFF FÜR VERLÄNGERUNGSSTANGE
25. VERRIEGELUNGSKNOPF*
26. KLEMMHEBEL*
27. INNERE STANGE*
28. VERRIEGELUNGSKNOPF*
29. ANSCHLUSSBACKE FÜR VERLÄNGERUNGSSTANGE*
30. ARRETIERUNGSTASTE FÜR VERLÄNGERUNGSSTANGENGRIFF*
31. EIN/AUS-SCHALTER AM VERLÄNGERUNGSSTANGENGRIFF*
32. SCHULTERRIEMEN*
31
* Abgebildetes oder beschriebenes Zubehör gehört teilweise nicht zum Lieferumfang.
Akku-Kettensäge D
Page 32

TECHNISCHE DATEN
Typ WG322E WG322E.9 WG323E WG323E.9 (3 - Bezeichnung des Gerätes, Vertreter der Kettensäge und des Hoch-Entasters)
WG322E WG322E.9 WG323E WG323E.9
Nennspannung 20V Max**
Schwertlänge 25cm
Kettengeschwindigkeit 3.8m/s
Füllmenge Öl-Vorratsbehälter 130ml
Kettenteilung 3/8"
Anzahl der Treibglieder 40
Kettenbreite 0.043”
Adaptiver Kettentyp ES: 3/8.043-40E/ QIRUI : A0(T)-40E/ OREGON: 90PX040G
Adaptiver Stangentyp ES: ES104SDEA041/ QIRUI : PO10-43SR(T) / OREGON: 104MLEA041
Ladezeit 5hrs
Gewicht (inkl. Ketten & Schwert) 2.8kg 2.4kg 4.6kg 4.2kg
**Spannung ohne Arbeitslast gemessen. Anfangsakkuspannung erreicht maximal 20 Volt. Nennspannung ist
18 Volt.
ZUBEHÖRTEILE
32
WG322E WG322E.9 WG323E WG323E.9
Sägekette 1 1 1 1
Schiene 1 1 1 1
Transportabdeckung 1 1 1 1
Verlängerung (WA0166) / / 1 1
Ladegerät (WA3760) 1 / 1 /
Akku (WA3551) 1 / 1 /
Schulterriemen / / 1 1
Wir empfehlen Ihnen, sämtliche Zubehörteile beim selben Fachhändler zu beziehen, bei dem Sie auch Ihr
Elektrowerkzeug gekauft haben. Weitere Informationen finden Sie auf der Verpackung der Zubehörteile. Auch
Ihr Fachhändler berät Sie gerne.
Akku-Kettensäge D
Page 33

INFORMATIONEN ÜBER
LÄRM
WG322E
WG322E.9
Gewichteter
Schalldruck
Gewichtete
Schallleistung
KpA = 3.0 dB(A)
Tragen Sie einen Gehörschutz.
LpA= 87.9 dB(A) LpA= 85.7 dB(A)
LwA= 96 dB(A) LwA= 96 dB(A)
WG323E
WG323E.9
INFORMATIONEN ÜBER
VIBRATIONEN
Vibrations gesamt messwertermittlung gemäß EN
60745:
Vibrationsemissionswert
ah < 2.5 m/s
Der angegebene Gesamtvibrationswert kann zum
Vergleich eines Werkzeugs mit einem anderen
und auch zur vorläufigen Expositionsbewertung
verwendet werden.
Elektrowerkzeugs vom angegebenen Wert abweichen,
je nachdem, wie das Werkzeug gemäß folgenden
Beispielen und weiteren Verwendungsmöglichkeiten
eingesetzt wird:
Die Verwendung des Werkzeugs und die Art, wie die
Materialien geschnitten oder angebohrt werden.
Der Pflege- und Wartungszustand des Werkzeugs.
Die Verwendung des richtigen Zubehörs und dessen
Schärfe und Zustand.
Die Festigkeit der Handgriffe und die Benutzung von
Antivibrationszubehör.
Der bestimmungsgemäß eund diesen Anweisungen
entsprechende Gebrauch.
Wird dieses Werkzeug nicht angemessen
gehandhabt, kann es zum Auftreten des HandArm-Vibrationssyndroms kommen.
Belastungsrad abzuschätzen. Auf diese Weise kann
der Belastungsgrad während der gesamten Arbeitszeit
möglicherweise wesentlich gemindert werden.
So minimieren Sie das Risiko, dem Sie bei
Vibrationen ausgesetzt sind.
Verwenden Sie IMMER scharfe Meißel, Bohrer und
Sägeblätter.
Pflegen Sie dieses Werkzeug den Anweisungen
2
WARNUNG: Der Vibrationsemissionswert kann
während des tatsächlichen Gebrauchs des
WARNUNG: Sie sollten die tatsächlichen
Arbeitsabschnitte genau ermitteln, um so den
Unsicherheit
K = 1.5 m/s²
entsprechend und achten Sie stets auf eine gutes
Einfetten (an erforderlichen Stellen).
Bei regelmäßiger Verwendung von Elektrowerkzeug
sollten Sie in Antivibrationszubehör investieren.
Erstellen Sie einen Arbeitsplan, um die Verwendung
von hochvibrierenden Werkzeugen auf mehrere Tage
zu verteilen.
BESTIMMUNGSGEMÄSSER GEBRAUCH
Die Kettensäge ist für das Sägen von Bäumen
bestimmt, Baumstämme, Äste, Balken, Bohlen, etc.
Cuts kann mit oder quer zur Faser gesägt werden.
Dieses Produkt eignet sich nicht für das Sägen von
mineralischen Stoffen.
MONTAGE
WARNUNG! Legen Sie das Akkupack
nicht ein, bevor es vollständig montiert
wurde.
Bei Handhabung der Sägekette stets
Schutzhandschuhe tragen.
MONTAGE VON SCHWERT UND SÄGEKETTE
1. Alle Teile vorsichtig auspacken.
2. Stellen Sie die Kettensäge auf eine stabile, ebene
Oberfläche.
3.
Verwenden Sie nur Original WORX-Ketten oder
solche, die für die Führungsschiene ausgelegt sind.
Die Sägekette (7) in die umlaufende Nut des
Schwertes (6) einlegen. Stellen Sie sicher, dass
die Kette in der korrekten Laufrichtung ist,
indem Sie diese mit dem Kettensymbol auf der
Führungsschiene vergleichen, bzw. beachten
Sie das Kettenrichtungssymbol (17) auf dem
Sägegehäuse. Achten Sie darauf, dass die
Kettenspannerbefestigung (23) nach außen zeigt.
(Siehe Abb. A)
5. Die Kettenglieder um das Kettenrad (16) so legen,
dass der Befestigungsbolzen (20) und die beiden
Schwert-Führungsstege (21) in das Langloch (19)
des Schwertes passen (6). (Siehe B1, B2)
6.
Prüfen Sie, ob alle Teile gut platziert sind. Stellen
Sie sicher, dass die Antriebsglieder vollständig im
Antriebsrad (Siehe Abb. C1) einrasten, vermeiden
Sie Knicke wie in Abb. C2. Wird ein Knick erkannt,
heben Sie die Kette auf der Führungsschiene exakt
über dem Knick an, und ziehen Sie ihn heraus.
HINWEIS: Die Kette muss sich frei drehen können
und darf keine Knicke aufweisen.
7. Montieren Sie den Kettenschutz (9) und ziehen
Sie diesen fest, indem Sie den KettenspannungsEinstellknopf (8) im Uhrzeigersinn drehen, bis er
fest ist. (Siehe Abb. D)
WARNUNG: Die Kette ist noch nicht
gespannt. Spannen Sie die Kette wie
unter „Spannen der Sägekette“ beschrieben.
Überprüfen Sie nun, dass die Kette richtig
gespannt ist.
SPANNEN DER SÄGEKETTE (SIEHE ABB. E1,
E2)
HINWEIS: Neue Sägeketten können sich dehnen.
33
Akku-Kettensäge D
Page 34

Prüfen Sie die Kettenspannung nach der ersten
Nutzung regelmäßig und ziehen Sie die Kette (7) fest,
wenn Sie sich um die Führungsschiene (6) löst.
WARNUNG:
● Entfernen Sie den Akku vom Gerät, bevor Sie die
Kettenspannung einstellen.
● Die Schneidezähne der Kette sind scharf.
Verwenden Sie Schutzhandschuhe beim
Handhaben der Kette.
● Achten Sie stets auf eine ordnungsgemäße
Kettenspannung. Eine lose Kette erhöht das
Risiko eines Rückschlags. Eine lose Kette kann
aus der Kettenführung springen. Dies kann zu
Verletzungen und Kettenbeschädigungen führen.
Eine lose Kette führt zu erhöhtem Verschleiß von
Kette, Kettenschwert und Kettenrad.
1. Legen Sie die Kettensäge auf einer geeigneten
flachen Oberfläche ab.
2.
Den Kettenspannknopf (8) im Uhrzeigersinn
drehen, bis die richtige Kettenspannung erreicht ist.
HINWEIS: Die Spannung wird automatisch erhöht,
wenn der Kettenspannknopf (8) im Uhrzeigersinn
gedreht wird. Der Ratschenmechanismus verhindert
ein Nachlassen der Kettenspannung.
3. Kippen Sie die Säge nach vorn (Siehe Abb. E1),
wobei die Spitze der Führungsschiene (6) nach
oben gerichtet ist. Somit wird der Durchhang der
Kette entfernt.
4. Ziehen Sie den Kettenspannknopf (8) durch
34
Drehen im Uhrzeigersinn vollständig fest.
5. Die vom automatischen Kettenspannknopf
eingestellte Spannung nochmals überprüfen.
Die korrekte Kettenspannung ist erreicht, wenn
die Kette (7) in der Mitte ca. um die Hälfte der
Antriebsglied-Tiefe von der Führungsschiene (6)
abgehoben werden kann. Das sollte mit einer
Hand erfolgen, um die Maschine gegen das
Gewicht der Maschine anzuheben. (Siehe Abb. E2)
HINWEIS: Die Kette (7) ist ordnungsgemäß
gespannt, wenn diese von der Führungsschiene (6)
abgehoben werden kann und sich das Antriebsglied
innerhalb der Führung der Führungsschiene (6)
befindet.
HINWEIS: Die Kette (7) wird sich beim Schneiden
dehnen und die korrekte Spannung verlieren.
Wenn sich die Kette lockert, schrauben Sie den
Kettenspannknopf (8) vollständig ab oder drehen Sie
den Einstellknopf drei volle Umdrehungen gegen den
Uhrzeigersinn; ziehen Sie den Kettenspannknopf (8)
anschließend wieder fest, um die Kettenspannung
zurückzusetzen, indem Sie die oben aufgeführten
Schritte 1-4 wiederholen.
MONTIEREN DER VERLÄNGERUNG (nur bei
WG323E, WG323E.9)
Richten Sie den Griff der Verlängerungsstange
aus, und setzen sie diese in den Schaft ein. Drehen
Sie den Verriegelungsknopf zum Arretieren im
Uhrzeigersinn. (Siehe Abb. F1, F2)
HINWEIS: Stellen Sie sicher, dass der Schaft fest
arretiert ist.
MONTAGE DER VERLÄNGERUNGSSTANGE AN
DER MASCHINE (Siehe Abb. G1)
Schritt 1: Richten Sie die Halterung für den
Stangenanschluss (29) aus, und setzen Sie diese in
die Säge ein.
Schritt 2: Drehen Sie den Verriegelungsknopf
(28) gegen den Uhrzeigersinn, um die
Verlängerungsstange an der Maschine festzuziehen.
HINWEIS: Stellen Sie vor dem Betrieb sicher,
dass die Verlängerungsstange in Position
arretiert ist.
AUSBAU DER VERLÄNGERUNGSSTANGE
(Siehe Abb. G2)
Schritt 1: Drehen Sie den Verriegelungsknopf (28)
zum Lösen im Uhrzeigersinn, und ziehen Sie diesen
heraus.
Schritt 2: Schieben Sie die Säge, um die
Verlängerungsstange von der Säge zu trennen.
WARNUNG!
• Wenn Sie diese Maschine mit der
Verlängerungsstange verwenden, stellen Sie
sicher, dass das Akkupack entfernt wurde.
Stangenlänge einstellen
Der Hoch-Entaster verfügt über eine Teleskopstange,
die von 2m (vollständig eingefahren) auf 2.7m
(vollständig ausgefahren) erweitert werden kann.
Der Klemmhebel (26) wird verwendet, um die Stange
in beliebiger Länge in Position zu halten.
1. Um die Stange zu verlängern, lösen Sie den
Klemmhebel wie in Abb H dargestellt. Die Stange
wird frei gleiten.
2. Ziehen Sie die innere Stange bis zur gewünschten
Verlängerung heraus. Hinweis: Verlängern Sie
die Stange nur bis zur Mindestlänge, die zum
Schneiden der Äste zwingend erforderlich ist.
3. Um die Stange in Position zu fixieren, ziehen Sie
den Klemmhebel wie in Abb. H dargestellt fest.
KETTENSCHMIERUNG
WICHTIG: Die Kettensäge wird nicht mit
Sägekettenhaftöl befüllt geliefert. Es ist
wichtig sie vor dem Gebrauch mit Öl zu
füllen. Die Benutzung der Kettensäge ohne
Sägekettenhaftöl oder bei einem Ölstand
unterhalb der Minimum- Markierung führt zur
Beschädigung der Kettensäge.
HINWEIS: Die Lebensdauer und Schnittleistung
der Kette hängt von der optimalen Schmierung
ab. Deswegen wird während des Betriebes
automatisch mit Sägekettenhaftöl geschmiert.
ÖLTANK FÜLLEN:
WARNUNG: Entfernen Sie das Akkupack,
bevor Sie den Öltank befüllen.
1. Die Kettensäge mit dem Öltankverschluss (3) nach
oben auf einer geeigneten Unterlage abstellen.
2. Mit einem Lappen den Bereich um den
Öltankverschluss säubern und den Verschluss
aufschrauben.
3.
Geben Sie Kettensägenöl hinzu, bis der Tank voll ist.
Akku-Kettensäge D
Page 35

4. Darauf achten, dass kein Schmutz in den Öltank
gelangt, bringen Sie den Öltankverschluss (3)
wieder an, und ziehen Sie ihn im Uhrzeigersinn
mit der Hand fest.
WICHTIG: Um den Luftaustausch
zwischen Öltank und Umgebung zu
ermöglichen, sind am Öltankverschluss
kleine Ausgleichskanäle vorhanden. Um
einen Ölaustritt zu vermeiden immer darauf
achten, dass die Säge bei Nichtgebrauch
waagrecht abgestellt wird (Öltankverschluss
(3) zeigt nach oben).
Ausschließlich empfohlenes, biologisch
abbaubares Haftöl verwenden, um eine
Beschädigung der Kettensäge zu vermeiden.
(Grade: ISO VG32). Dieses finden Sie bei der
Verkaufsstelle, in der Sie diese Säge erworben
haben oder im Eisenwarenhandel vor Ort.
Niemals recyceltes Öl oder Altöl verwenden.
Bei Verwendung von nicht zugelassenem Öl
erlischt die Garantie.
Nicht verschlucken. Beim Verschlucken muss
sofort ein Arzt aufgesucht werden.Darf nicht in
die Hände von Kindern gelangen. Lagern Sie es
entfernt von Wärmequellen oder offenem Feuer.
ÜBERPRÜFEN DER AUTOMATISCHEN
ÖLVORRICHTUNG
Die einwandfreie Funktion der automatischen
Ölvorrichtung lässt sich leicht überprüfen, in
dem man die Kettensäge mit der Spitze der
Führungsschiene (6) über einem auf den Boden
gelegten Bogen Karton oder Papier laufen lässt.
Bildet sich ein größer werdender Ölfleck auf dem
Papier, so arbeitet die Ölvorrichtung einwandfrei.
Bildet sich trotz eines gefüllten Ölbehälters kein
Ölfleck, so setzen Sie sich mit ihrem Worx-Händler
oder einem von WORX zugelassenen Kundendienst
in Verbindung.
VORSICHT: Achten Sie darauf, dass die
Kette nicht den Boden berührt. Halten
Sie einen Sicherheitsabstand von etwa
30 cm ein.
BETRIEB
1. EHE SIE IHR AKKU-WERKZEUG BENUTZEN
WARNUNG! Das Ladegerät und der Akku sind
aufeinander abgestimmt und sollten nur
gemeinsam verwendet werden. Versuchen Sie
nicht, andere Geräte oder Akkus zu verwenden.
Achten Sie darauf, dass keine Metallteile o. ä. die
Anschlüsse des Ladegeräts oder des Akkus berühren;
andernfalls kann es zu einem gefährlichen
Kurzschluss kommen.
HINWEIS: Der Akku ist NICHT GELADEN und muss
vor dem ersten Gebrauch aufgeladen werden.
Das mitgelieferte Akku-Ladegerät ist dem in
der Maschine eingebauten Lithium-Ionen-Akku
angepasst. Verwenden Sie kein anderes AkkuLadegerät.
2. LADEN DES AKKUS
Der Lithium-Ionen-Akku ist gegen übermäßiges
Entladen geschützt. Wenn der Akku leer ist, wird die
Maschine von einem Schutzkreis ausgeschaltet.
In einer warmen Umgebung oder nach extremem
Gebrauch könnte der Akku zu heiss geworden sein,
um einen Ladevorgang einzuleiten. Lassen Sie den
Akku sich erst gut abkühlen, bevor Sie ihn aufladen.
3. ANBRINGEN UND ENTFERNEN DES AKKUS
(Siehe Abb. I1, I2, I3)
Drücken Sie auf den Verschlussknopf des
Batteriefachs ihres Werkzeugs. Öffnen Sie das Fach,
nehmen Sie den Akku heraus und setzen Sie ihn in
das Ladegerät ein. Setzen Sie den Akku, nachdem er
voll geladen ist, wieder in das Batteriefach ein. Durch
leichten Druck rastet der Akku mit einem hörbaren
Klick ein. Überprüfen Sie, dass der Akku wirklich fest
sitzt.
HINWEIS: Halten Sie das Akkupack beim
Herausnehmen fest, um zu vermeiden, dass Sie
es fallen lassen und sich verletzen.
4. Ein- und Ausschalten (Siehe Abb. J)
ACHTUNG: Prüfen Sie das Akkupack,
bevor Sie Ihr Akku-Werkzeug verwenden.
Verwenden Sie nur das Akkupack, das im
Zubehörbereich aufgelistet ist.
Zur Inbetriebnahme des Gerätes die Einschaltsperre
(15) eindrücken, dann den Ein-/Ausschalter (2)
durchdrücken und in dieser Stellung festhalten. Die
Einschaltsperre kann jetzt losgelassen werden.
Zum Ausschalten den Ein-/Ausschalter loslassen.
5. ARBEITEN
WICHTIG: Ist der Öltank gefüllt? Die
Ölstandsanzeige (14) vor der Arbeit und
regelmäßig während der Arbeit
überprüfen. (Siehe Abb. K1) Das Öl nachfüllen,
wenn der Ölpegel die Unterkante im
Sichtfenster erreicht hat. Die Füllung reicht für
ca. 12 Minuten, abhängig von den Pausen und
der Intensität der Arbeit.
Die Kettenspannung während dem Sägen alle
10 Minuten überprüfen.
1) Einsetzen des Akkus in die Säge.
2) Achten Sie darauf, dass das zu sägende Holz beim
Sägen nicht auf dem Boden liegt, damit die Kette
(7) beim Austreten aus dem Holz nicht mit dem
Boden in Berührung kommt.
Das Berühren des Bodens mit der in Bewegung
befindlichen Kette ist einmal gefährlich und macht
andererseits die Kette sehr schnell stumpf.
3) Greifen Sie die Säge fest mit beiden Händen.
Greifen Sie mit der linken Hand immer die
vordere (4) und mit der rechten Hand immer die
hintere (1) Griffposition. Halten Sie sie kräftig
fest. Mit Daumen und Finger die Griffe jederzeit
umschließen. (Siehe Abb. K2)
4) Vergewissern Sie sich, dass Sie einen festen
Stand haben. Stehen Sie breitbeinig. Verteilen Sie
ihr Gewicht gleichmäßig auf beide Füße.
5) Wenn Sie bereit für den ersten Schnitt sind,
35
Akku-Kettensäge D
Page 36

drücken Sie den Entriegelungsknopf (15) mit
dem rechten Daumen ganz hinein und betätigen
dann den Einschalter. Hierdurch wird die Säge
eingeschaltet. Wird der Einschalter wieder
freigegeben, wird die Säge ausgeschaltet.
Vergewissern sie sich, bevor Sie zu sägen
anfangen, dass die Säge mit voller Drehzahl läuft.
6) Führen Sie bei Arbeitsbeginn die laufende Säge
langsam an das Holz heran. Das Holz sollte sich
so nahe wie möglich am Sägegehäuse befinden.
Halten Sie die Säge gut fest, damit sie nicht
zurückspringen oder seitlich ausweichen kann.
7) Führen Sie die Säge mit leichtem Druck,
vermeiden Sie zu starken Druck, und lassen Sie
die Säge die Arbeit verrichten, da der Motor dann
überlastet werden und durchbrennen kann. Die
Säge arbeitet effizienter, wenn sie mit hoher
Drehzahl läuft.
8) Nehmen Sie die Säge nur bei voller Drehzahl aus
dem Schnitt. Stillgesetzt wird die Säge in dem
Sie den Ein-/Ausschalter freigegeben (2). Legen
Sie die Säge erst ab, wenn die Kette völlig zum
Stillstand gekommen ist.
9) Üben Sie in einem sicheren Arbeitsbereich an
Reststücken, bis Sie sich damit vertraut gemacht
haben, nutzen Sie flüssige Bewegungen und
konstante Schnittgeschwindigkeiten.
Rückschlagsicherung der Säge
Sägeketten und Führungsschiene der Säge sind
rückschlagarm ausgeführt, so dass Rückschläge
weitgehend vermieden werden aber unter
36
bestimmten Umständen doch möglich sind.
Zur Vermeidung eines Rückschlages beachten Sie die
folgenden Punkte:.
• Greifen Sie die Säge, wenn sie läuft, mit beiden
Händen. Halten Sie sie kräftig fest. Mit Daumen
und Finger die Griffe jederzeit umschließen.
• Entfernen Sie an der Säge keine
Sicherheitseinrichtungen. Prüfen Sie, ob sie alle
korrekt arbeiten.
• Arbeiten Sie mit der Kettensäge nicht mit
ausgestreckten Armen und nicht über
Schulterhöhe.
• Sorgen Sie für einen sicheren Stand und halten
Sie jederzeit das Gleichgewicht.
• Stehen Sie (als Rechtshänder) immer etwas links
neben der Kettensäge, sodass ihr Körper sich
nicht direkt in einer Linie mit der Kette befindet.
• Achten Sie darauf, dass die Kettenführung nichts
berührt, wenn sich die Kette bewegt.
• Versuchen Sie nie zwei Stämme gleichzeitig zu
durchtrennen. Zersägen Sie immer nur einen
Stamm nach dem anderen.
• Sägen Sie nie mit der Kettenführungsspitze und
versuchen Sie keinen Eintauchschnitt (die Spitze
der Kettenführung in das Holz bohren).
• Achten Sie auf die Bewegung des geschnittenen
Astes und auf andere Kräfte, die dazu führen
könnten, dass sich der Schnittspalt schließt
und die Kette einklemmt oder dass Holz in die
laufende Kette fällt.
• Arbeiten Sie mit höchster Vorsicht, wenn Sie
die Säge in einen vorhandenen Schnittspalt
einführen.
• Arbeiten Sie nur mit rückschlagarmen Ketten
und Führungsschienen (6), wie sie für diese
Kettensäge geliefert werden.
• Niemals mit lockerer, ausgeweiteter oder stark
verschlissener Sägekette arbeiten.
Sichere Benutzung der Säge
1. Arbeiten Sie mit der Kettensäge nur dann, wenn
sie einen sicheren Stand haben.
2. Halten Sie die Kettensäge immer seitlich von
Ihrem Körper (Siehe Abb. L).
3. Die Sägekette (7) muss mit voller Geschwindigkeit
laufen wenn sie das Holz berührt.
4.
Verwenden Sie die Krallen (13), um die Säge auf
dem Holz zu fixieren, bevor Sie den Schnitt starten.
5. Nutzen Sie die Anschlagkrallen beim Schneiden
als Hebelpunkt. (Siehe Abb. M)
6. Arbeiten Sie nie mit ausgestreckten Armen mit
der Kettensäge. Versuchen Sie nicht an schwierig
zu erreichenden Stellen zu sägen und benutzen
Sie die Kettensäge nicht, wenn Sie auf einer Leiter
stehen. (Siehe Abb. N).
Verwenden Sie die Kettensäge niemals über
Schulterhöhe.
SÄGEN VON HOLZ UNTER SPANNUNG (SIEHE
ABB. O)
ACHTUNG: Beim Sägen von unter
Spannung stehendem Holz, Ästen oder
Bäumen besteht erhöhte Unfallgefahr.
Hier ist äußerste Vorsicht geboten. Machen Sie
sich beim Durchtrennen eines Astes unter
Spannung auf das Zurückschnellen gefasst.
Sobald die Spannung in den Holzfasern
freigesetzt wird, kann der Ast den Bediener
treffen und/oder gegen das Gerät schlagen und
dieses außer Kontrolle bringen.
Liegt Holz auf beiden Seiten auf, zuerst von oben
(Y) ein Drittel des Durchmessers durch den Stamm
schneiden(Vorhandschritt) und dann von unten (Z)
an gleicher Stelle den Stamm durchtrennen, um
Splittern und Festklemmen der Säge zu vermeiden.
Dabei den Kontakt der Sägekette mit dem Boden
vermeiden. Liegt das Holz nur einseitig auf, zuerst
von unten (Y) ein Drittel des Durchmessers nach oben
sägen(Rückhandschnitt) und dann an gleicher Stelle
von oben (Z) den Stamm durchtrennen, um Splittern
und Festklemmen der Säge zu vermeiden.
BEDIENUNG DES HOCH-ENTASTERS (NUR BEI
WG323E, WG323E.9)
Schneidarbeiten mit Schulterriemen (Siehe
Abb. P1)
Der Verlängerungsschaft wird mit einem
Schulterriemen geliefert, der beim Anheben der
Kettensäge für zusätzliche Stabilität sorgt. Haken
Sie den Schulterriemen am Verlängerungsschaft
ein, schlingen Sie den Riemen um Ihre Schulter. Der
Schulterriemen hilft auch, die Kettensäge nach dem
Durchtrennen von Ästen besser halten zu können, da
er einen Teil des Gerätegewichtes auffängt.
Akku-Kettensäge D
Page 37

Schneiden mit Verlängerungsstange
1. Einsetzen des Akkus in die Säge.
2. Bedenken Sie, bevor Sie einen hohen Ast
absägen, alle Punkte, die im vorhergehenden
Absatz “Äste beschneiden” detailliert beschrieben
wurden, aber achten Sie besonders auf den Weg,
den der herabstürzende Ast nehmen wird.
WARNUNG: Stellen Sie sich nie unter
den Ast, den Sie absägen wollen. Achten
Sie darauf, dass andere Personen Abstand
halten. Stellen Sie sich nicht auf eine Leiter
oder einen anderen nicht stabilen Gegenstand,
wenn Sie die Säge benutzen. Verwenden
Sie die Säge nicht in der Nähe von Kabeln,
Überlandleitungen oder Telefonkabeln. Halten
Sie zu allen Stromleitungen 3 Meter Abstand.
(Siehe Abb. P2-P5)
3. Greifen Sie die Säge fest mit beiden Händen.
Verwenden Sie nur die ausgewiesenen
Griffbereiche zur Bedienung des Hoch-Entasters
(Siehe Abb. P6). Halten Sie sie kräftig fest.
Mit Daumen und Finger die Griffe jederzeit
umschließen.
4. Vergewissern Sie sich, dass Sie einen festen
Stand haben. Stehen Sie breitbeinig. Verteilen Sie
ihr Gewicht gleichmäßig auf beide Füße.
5. Wenn Sie bereit für den ersten Schnitt sind,
drücken Sie den Entriegelungsknopf (30) mit,
drücken Sie dann den Ein/Aus-Schalter (31)
vollständig durch (Siehe Abb. P7). Hierdurch
wird die Säge eingeschaltet. Wird der Einschalter
wieder freigegeben, wird die Säge ausgeschaltet.
Vergewissern sie sich, bevor Sie zu sägen
anfangen, dass die Säge mit voller Drehzahl läuft.
6. Führen Sie bei Arbeitsbeginn die laufende Säge
langsam an das Holz heran. Halten Sie die Säge
gut fest, damit sie nicht zurückspringen oder
seitlich ausweichen kann.
7. Führen Sie die Säge mit leichtem Druck,
vermeiden Sie zu starken Druck, da der Motor
dann überlastet werden und durchbrennen kann.
Die Säge arbeitet effizienter, wenn sie mit hoher
Drehzahl läuft.
8. Nehmen Sie die Säge nur bei voller Drehzahl aus
dem Schnitt. Stillgesetzt wird die Säge in dem Sie
den Ein-/Ausschalter freigegeben. Legen Sie die
Säge erst ab, wenn die Kette völlig zum Stillstand
gekommen ist.
TRIMMEN EINES BAUMS (ENTASTEN)
WARNUNG: Vermeiden Sie Rückschläge.
Der Rückschlag kann zu schweren Siehe
„Rückschlag“, um die Rückschlaggefahr
einzudämmen.
WARNUNG: Bedienen Sie den Hoch-Entaster
nicht, während Sie
• in einem Baum sind
• auf einer Leiter oder anderen instabilen
Oberfläche stehen
• sich in einer ungewöhnlichen Position
befinden
Sie können die Kontrolle über den HochEntaster verlieren und sich schwere
Verletzungen zuziehen.
WARNUNG: Reichen Sie beim Einsatz des
Hoch-Entasters mit den Armen nicht über
Schulterhöhe hinaus.
VORSICHT: Suchen Sie professionelle Hilfe
auf, wenn Sie Bedingungen vorfinden, die Ihre
Fähigkeiten übersteigen.
Das Trimmen eines Baums ist ein Prozess, bei dem
Äste von einem lebenden Baum geschnitten werden.
Vergewissern Sie sich, dass Sie einen festen Stand
haben. Stehen Sie breitbeinig. Verteilen Sie ihr
Gewicht gleichmäßig auf beide Füße.
Halten Sie sich an die nachfolgenden Anweisungen,
um den Baum zu trimmen.
1. Führen Sie den ersten Schnitt 15 cm vom
Baumstamm unterhalb des Astes durch. Nutzen
Sie die Oberseite der Führungsschiene, um diesen
Schnitt durchzuführen. Schneiden Sie 1/3 durch
den Astdurchmesser (Siehe Abb. P8).
2. Bewegen Sie sich 5 bis 10 cm weiter vom Ast
weg. Führen Sie einen zweiten Schnitt über
dem Ast durch. Fahren Sie fort, bis der Ast
abgeschnitten wurde.
3. Machen Sie einen Schnitt so nahe wie möglich am
Baumstamm, auf der Unterseite des Stumpfes.
Nutzen Sie die Oberseite der Führungsschiene,
um diesen Schnitt durchzuführen. Schneiden Sie
1/3 durch den Durchmesser des Stumpfes.
4. Führen Sie einen vierten Schnitt direkt oberhalb
des dritten Schnitts durch. Schneiden Sie nach
unten, um den dritten Schnitt zu treffen. Dadurch
wird der Aststumpf entfernt.
WARTUNG DER SÄGE
Befolgen Sie die indem Handbuch aufgeführten
Wartungshinweise. Regelmäßiges Säubern von Säge
und Kette sowie die Wartung der Kettenführung kann
die Gefahr von Rückschlägen reduzieren. Inspizieren
und warten Sie die Säge nach jedem Gebrauch.
Hierdurch können Sie die Lebensdauer der Säge
verlängern.
HINWEIS: Selbst bei korrektem Nachschleifen steigt
das Risiko von Rückschlägen mit jedem Schärfen.
WARTUNG UND LAGERUNG
DER KETTENSÄGE
1. Entfernen Sie den Akkupack von der Säge
• wenn sie nicht verwendet wird
• ehe Sie die Säge transportieren
• bevor sie gewartet wird.
• vor dem Austauschen von Zubehör oder
Aufsätzen, wie etwa der Sägekette und der
Führungsschiene.
2. Inspizieren Sie die Säge vor und nach jedem
Gebrauch. Überprüfen Sie sorgfältig, ob eine
Schutzvorrichtung oder ein sonstiges Teil der
Säge beschädigt ist. Überprüfen Sie die Säge auf
Schäden, die die Sicherheit des Bedieners oder
37
Akku-Kettensäge D
Page 38

die Funktionsfähigkeit der Säge beeinträchtigen
können. Überprüfen Sie die Ausrichtung und
Kopplung von beweglichen Teilen. Überprüfen Sie
die Säge auf beschädigte oder gebrochene Teile.
Verwenden Sie keine Kettensäge, deren Sicherheit
oder Funktionsfähigkeit durch beschädigte Teile
beeinträchtigt ist. Lassen Sie Beschädigungen
von einem zugelassenen Kundendienst beheben.
Unsere zugelassenen Kundendienste finden auf
der Webseite www.worx.com
3. Halten Sie Ihre Kettensäge immer in
einwandfreiem Pflegezustand.
• Setzen Sie die Säge niemals Regen oder direkter
Feuchtigkeit aus.
• Sorgen Sie dafür, dass die Kette scharf, sauber
und geölt ist, um eine gute, sichere Funktion zu
gewährleisten.
• Folgen Sie den hier beschriebenen Schritten,
wenn Sie die Kette schärfen wollen.
• Halten Sie alle Griffe sauber, trocken und frei von
Öl und Fett.
• Sorgen Sie dafür, dass alle Schrauben und
Muttern fest angezogen sind.
4. Verwenden Sie bei der Wartung nur
Originalersatzteile.
5. Lagern Sie die Kettensäge bei
Nichtgebrauch an einem geeigneten trockenen
Ort.
• An einem hohen oder verschließbaren Platz,
außerhalb der Reichweite von Kindern
• An einem trockenen Platz
• Mit installierter Schiene und Kettenabdeckung (9)
38
Wartung der Führungsschiene
Damit Ihre Führungsschiene eine möglichst lange
Gebrauchslebensdauer erreicht, werden folgende
Wartungsarbeiten empfohlen:
Die Führungsschiene, auf der die Kette läuft, muss
vor dem Einlagern oder wenn die Kette oder die
Führungsschiene verschmutzt ist, gereinigt werden.
Ferner sollten die Führungsschiene bei jedem
Abnehmen der Kette gesäubert werden.
Reinigen der Führungsschiene:
1. Bauen Sie die Kettenabdeckung, die
Führungsschiene und die Kette ab. (siehe
Abschnitt Zusammenbau)
2. Mit einer Drahtbürste, einem schmalen
Schraubendreher oder einem ähnlichen Werkzeug
werden dann alle Rückstände in der Führungsnut
und von der Führungsschiene entfernt. (Siehe
Abb. Q)
3. Achten Sie auch darauf, dass alle Ölbohrungen
sorgfältig gereinigt werden.
Zustände, die eine Wartung der Kette (7) und
Führungsschiene (6) erfordern:
• Sägeschnitte einseitig oder im Winkel.
• Die Säge muss durch den Schnitt gedrückt
werden.
• Unzureichende Ölversorgung von
Führungsschiene und Kette.
Überprüfen Sie bei jedem Schärfen der Kette
auch den Zustand der Führungsschiene. Eine
ausgearbeitete Führungsschiene führt zur
Beschädigung der Kette und erschwert das Sägen.
Nach jedem Gebrauch sollte das gesamte Gerät,
insbesondere das Kettenradgehäuse und die
Führungsschiene, bei ausgebauter Batterie, von allen
Sägemehlrückständen gereinigt werden.
Unebenheiten der Laufschienen der Kette sind mit
einer feinen Flachfeile so zu beheben, dass wieder
rechtwinklige Kanten und Seiten vorhanden sind.
Kanten und
Seiten der
Führungsschiene
rechtwinklig feilen
Ausgearbeitete Nut Einwandfreie Nut
Ist die Führungsnut verschlissen, die Führungsschiene
verbogen oder gerissen oder tritt übermäßige
Erhitzung oder Gratbildung an der Führungsschiene
auf, muss das diese ausgewechselt werden. Es
darf nur eine in der Ersatzteilliste oder auf dem
Aufkleber an der Säge für dieses Gerät zugelassene
Führungsschiene verwendet werden.
Sägekette und Schwert auswechseln/wenden
Tauschen Sie die Kette aus, wenn die Messer
zu verschlissen sind oder die Kette gebrochen
ist. Verwenden Sie nur die in diesem Handbuch
erwähnten Ketten.
Inspizieren Sie die Kettenführung bevor Sie die Kette
nachschleifen. Eine verschlissene oder beschädigte
Führung ist nicht sicher. Eine verschlissene oder
beschädigte Führung kann die Kette beschädigen.
Befestigen Sie die Kettenspannungsbefestigung
am neuen Schwert (23), indem Sie die Schraube im
Uhrzeigersinn festziehen. Der Vorsprung (a) muss in
die Nut des Schwertes passen. (Siehe Abb. R)
SCHÄRFEN DER SÄGEKETTE
Achtung: Entfernen Sie den Akkupack
vor Reparaturarbeiten vom Gerät.
Anderenfalls kann es zu schweren
Verletzungen oder zum Tod durch Stromschlag
oder Kontakt mit der laufenden Kette kommen.
Die Schneidzähne der Kette sind scharf.
Verwenden Sie Schutzhandschuhe beim
Handhaben der Kette.
Halten Sie Schneidwerkzeuge scharf und sauber. Ihre
Säge schneidet schneller und sicherer. Eine stumpfe
Kette kann Zähne abbrechen sowie Kettenführung,
Kette und Motor verschleißen. Wenn Sie die Kette in
das Holz zwingen müssen und es entstehen große
Sägespäne, ist die Kette stumpf.
SCHMIEREN DES KETTENRADES
ACHTUNG: Tragen Sie bei der Wartung
der Kettensäge feste Arbeitshandschuhe.
Entfernen Sie das Akkupack aus dem
Werkzeug, bevor Sie Einstellungen, Serviceoder Wartungsarbeiten daran durchführen.
HINWEIS: Beim Schmieren des Antriebsrads ist es
nicht notwendig, die Kette oder Schiene zu entfernen.
1. Reinigen Sie die Schiene und das Antriebsrad.
2. Verwenden Sie eine Fettpresse, und führen Sie
die Spitze dieser in die Schmierbohrung ein.
Spritzen Sie Schmierfett ein, bis es an der
Akku-Kettensäge D
Page 39

Außenkante der Antriebsradspitze austritt. (Siehe
Abb. S)
3. Um das Antriebsrad zu drehen, ziehen Sie die
Kette mit der Hand, bis die noch nicht geschmierte
Seite des Antriebsrads mit der Schmierbohrung
ausgerichtet ist. Wiederholen Sie das Verfahren
für die Schmierung.
UMWELTSCHUTZ
Elektroprodukte dürfen nicht mit dem
normalen Haushaltsmüll entsorgt werden,
sondern sollten nach Möglichkeit zu einer
Recyclingstelle gebracht werden. Ihre zuständigen
Behörden oder Ihr Fachhändler geben Ihnen hierzu
gerne Auskunft.
PROBLEMLÖSUNG
Wenn Ihr Elektrowerkzeug nicht einwandfrei funktioniert, zeigt Ihnen die folgende Tabelle Fehlersymptome,
mögliche Ursachen sowie Maßnahmen zur Abhilfe. Können Sie damit das Problem nicht identifizieren und
beseitigen, wenden Sie sich an Ihre Service-Werkstatt.
ACHTUNG: Schalten Sie vor der Fehlersuche das Elektrowerkzeug aus und entnehmen Sie den
Akku.
Symptome Mögliche Ursache Abhilfe
Kettensäge funktioniert
nicht..
Kettensäge arbeitet
intermittierend.
Sägekette trocken.
Kette/Führungsschiene
heiß.
Kettensäge rupft,
vibriert
oder sägt nicht richtig.
Akku leer.
Sicherung defekt.
Überhitzung
Beim Sägen zu viel Druck ausgeübt.
Lose Verbindung.
Interner Wackelkontakt.
Ein-/Ausschalter defekt.
Kein Öl im Öltank.
Entlüftung im Öltankverschluss
verstopft.
Ölausflusskanal verstopft.
Kein Öl im Öltank.
Entlüftung im Öltankverschluss
verstopft.
Ölausflusskanal verstopft.
Kettenspannung zu hoch.
Kette stumpf.
Kettenspannung zu locker.
Kette stumpf.
Kette verschlissen.
Sägezähne zeigen in die falsche
Richtung.
Akkupack aufladen.
Sicherung wechseln.
Bringen Sie die Maschine in einen kühlen,
belüfteten Raum, um diese abzukühlen.
Wenden Sie beim Sägen verhältnismäßig
weniger Druck an.
Kundendienst aufsuchen.
Kundendienst aufsuchen.
Kundendienst aufsuchen.
Öl nachfüllen.
Öltankverschluss reinigen.
Ölausflusskanal frei machen.
Öl nachfüllen.
Öltankverschluss reinigen.
Ölausflusskanal frei machen.
Kettenspannung einstellen.
Kette nachschleifen oder ersetzen.
Kettenspannung einstellen.
Kette nachschleifen oder ersetzen.
Kette ersetzen.
Sägekette neu montieren mit Zähnen in
korrekter Richtung.
39
Akku-Kettensäge D
Page 40

KONFORMITÄTSERKLÄRUNG
WIR,
POSITEC Germany GmbH
Konrad-Adenauer-Ufer 37
50668 Köln
Erklären hiermit, dass unser Produkt
Beschreibung Batteriebetriebene Kettensäge
und Hoch-Entaster
Typ WG322E WG322E.9 WG323E WG323E.9
(3 - Bezeichnung des Gerätes, Vertreter der
Kettensäge und des Hoch-Entasters)
Funktionen Holz sägen
Den Bestimmungen der folgenden Richtlinien
entspricht:
2006/42/EC
2014/30/EU
2011/65/EU
2000/14/EC geändert durch 2005/88/EC
Zertifizierungsstelle
Name: Intertek Deutschland GmbH (notifizierte
Stelle 0905)
Anschrift: Stangenstraße 1, 70771
LEINFELDEN-ECHTERDINGEN
Bescheinigungsnummer: 17SHW1086-01
(WG322E WG322E.9) 17SHW1166-01
(WG323E WG323E.9)
40
WG322E WG322E.9
2000/14/EC geändert durch 2005/88/EC:
- Konformitätsbewertungsverfahren nach Anhang V
- Gemessene Schallleistung 94.7dB(A)
- Garantierte Schallleistung 96 dB(A)
WG323E WG323E.9
2000/14/EC geändert durch 2005/88/EC:
- Konformitätsbewertungsverfahren nach Anhang V
- Gemessene Schallleistung 95.2 dB(A)
- Garantierte Schallleistung 96 dB(A)
Werte nach,
EN 60745-1
EN 60745-2-13
EN ISO 3744
EN 55014-1
EN 55014-2
Teile von EN ISO11680-1
Zur Kompilierung der technischen Datei ermächtigte
Person,
Name Russell Nicholson
Anschrift Positec Power Tools (Europe)Ltd,
PO Box 6242, Newbury, RG14 9LT, UK
Suzhou 2017/07/27
Allen Ding
Stellvertretender Chefingenieur, Prüfung und
Zertifizierung
Akku-Kettensäge D
Page 41

AVERTISSEMENTS DE
SÉCURITÉ GÉNÉRAUX POUR
L’OUTIL
AVERTISSEMENT! Lire tous les
avertissements de sécurité et toutes les
instructions. Ne pas suivre les avertissements et
instructions peut donner lieu à un choc électrique, un
incendie et/ou une blessure sérieuse.
Conserver tous les avertissements et toutes
les instructions pour pouvoir s’y reporter
ultérieurement.
Le terme «outil» dans les avertissements fait référence
à votre outil électrique alimenté par le secteur (avec
cordon d’alimentation) ou votre outil fonctionnant sur
batterie (sans cordon d’alimentation).
1. SÉCURITÉ DE LA ZONE DE TRAVAIL
a) Conserver la zone de travail propre et bien
éclairée. Les zones en désordre ousombres sont
propices aux accidents.
b) Ne pas faire fonctionner les outils électriques
en atmosphère explosive, par exemple
en présence de liquides inflammables, de
gaz ou de poussières. Les outils électriques
produisent des étincelles qui peuvent enflammer
les poussières ou les fumées.
c) Maintenir les enfants et les personnes
présentes à l’écart pendant l’utilisation de
l’outil. Les distractions peuvent vous faire perdre
le contrôle de l’outil.
2. SÉCURITÉ ÉLECTRIQUE
a) Il faut que les fiches de l’outil électrique
soient adaptées au socle. Ne jamais modifier
la fiche de quelque façon que ce soit. Ne
pas utiliser d’adaptateurs avec des outils à
branchement de terre. Des fiches non modifiées
et des socles adaptés réduiront le risque de choc
électrique.
b) Eviter tout contact du corps avec des
surfaces reliées à la terre telles que les
tuyaux, les radiateurs, les cuisinières et les
réfrigérateurs. Il existe un risque accru de choc
électrique si votre corps est relié à la terre.
c) Ne pas exposer les outils à la pluie ou à des
conditions humides. La pénétration d‘eau à
l’intérieur d’un outil augmentera le risque de choc
électrique.
d) Ne pas maltraiter le cordon. Ne jamais
utiliser le cordon pour porter, tirer ou
débrancher l’outil. Maintenir le cordon à
l’écart de la chaleur, du lubrifiant, des arêtes
ou des parties en mouvement. Des cordons
endommagés ou emmêlés augmentent le risque
de choc électrique.
e) Lorsqu’on utilise un outil à l’extérieur,
utiliser un prolongateur adapté à l’utilisation
extérieure. L’utilisation d’un cordon adapté à
l’utilisation extérieure réduit le risque de choc
électrique.
f) Si l’usage d’un outil dans un emplacement
humide est inévitable, utiliser une
alimentation protégée par un dispositif à
courant différentiel résiduel (DDR). L’usage
d’un DDR réduit le risque de choc électrique.
3. SÉCURITÉ DES PERSONNES
a) Restez vigilant, regardez ce que vous êtes
en train de faire et faites preuve de bon
sens dans votre utilisation de l’outil. Ne pas
utiliser un outil lorsque vous êtes fatigué ou
sous l’emprise de drogues, d’alcool ou de
médicaments. Un moment d’inattention en cours
d’utilisation d’un outil peut entraîner des blessures
graves des personnes.
b) Utiliser un équipement de sécurité. Toujours
porter une protection pour les yeux. Les
équipements de sécurité tels que les masques
contre les poussières, les chaussures de sécurité
antidérapantes, les casques ou les protections
acoustiques utilisés pour les conditions
appropriées réduiront les blessures de personnes.
c) Éviter tout démarrage intempestif. S’assurer
que l’interrupteur est en position arrêt avant
de brancher l’outil au secteur et/ou au bloc
de batteries, de le ramasser ou de le porter.
Porter les outils en ayant le doigt sur l’interrupteur
ou brancher des outils dont l’interrupteur est en
position marche est source d’accidents.
d) Retirer toute clé de réglage avant de mettre
l’outil en marche. Une clé laissée fixée sur une
partie tournante de l’outil peut donner lieu à des
blessures de personnes.
e) Ne pas se précipiter. Garder une position
et un équilibre adaptés à tout moment. Cela
permet un meilleur contrôle de l’outil dans des
situations inattendues.
f) S’habiller de manière adaptée. Ne pas porter
de vêtements amples ou de bijoux. Garder
les cheveux, les vêtements et les gants à
distance des parties en mouvement. Des
vêtements amples, des bijoux ou les cheveux longs
peuvent être pris dans des parties en mouvement.
g) Si des dispositifs sont fournis pour
le raccordement d’équipements pour
l’extraction et la récupération des
poussières, s’assurer qu’ils sont connectés
et correctement utilisés. Utiliser des collecteurs
de poussière peut réduire les risques dus aux
poussières.
4. UTILISATION ET ENTRETIEN DE L’OUTIL
a) Ne pas forcer l’outil. Utiliser l’outil adapté à
votre application. L’outil adapté réalisera mieux
le travail et de manière plus sûre au régime pour
lequel il a été construit.
b) Ne pas utiliser l’outil si l’interrupteur ne
permet pas de passer de l’état de marche à
arrêt et vice versa. Tout outil qui ne peut pas
être commandé par l’interrupteur est dangereux et
il faut le réparer.
c) Débrancher la fiche de la source
d’alimentation en courant et/ou le bloc
41
Tronçonneuse sans fil F
Page 42

de batteries de l’outil avant tout réglage,
changement d’accessoires ou avant de
ranger l’outil. De telles mesures de sécurité
préventives réduisent le risque de démarrage
accidentel de l’outil.
d) Conserver les outils à l’arrêt hors de la
portée des enfants et ne pas permettre à
des personnes ne connaissant pas l’outil
ou les présentes instructions de le faire
fonctionner. Les outils sont dangereux entre les
mains d’utilisateurs novices.
e) Observer la maintenance de l’outil. Vérifier
qu’il n’y a pas de mauvais alignement ou
de blocage des parties mobiles, des pièces
cassées ou toute autre condition pouvant
affecter le fonctionnement de l’outil. En cas
de dommages, faire réparer l’outil avant de
l’utiliser. De nombreux accidents sont dus à des
outils mal entretenus.
f) Garder affûtés et propres les outils
permettant de couper. Des outils destinés à
couper correctement entretenus avec des pièces
coupantes tranchantes sont moins susceptibles de
bloquer et sont plus faciles à contrôler.
g) Utiliser l’outil, les accessoires et les lames
etc., conformément à ces instructions, en
tenant compte des conditions de travail et du
travail à réaliser. L’utilisation de l’outil pour des
opérations différentes de celles prévues pourrait
donner lieu à des situations dangereuses.
5. UTILISATION DES OUTILS FONCTIONNANT
42
SUR BATTERIES ET PRÉCAUTIONS D’EMPLOI
a) Ne recharger qu’avec le chargeur spécifié
par le fabricant. Un chargeur qui est adapté à un
type de bloc de batteries peut entraîner un risque
d’incendie lorsqu’il est utilisé avec un autre type de
bloc de batteries.
b) N’utiliser les outils qu’avec des blocs de
batteries spécifiquement désignés. L’utilisation
de tout autre bloc de batteries peut entraîner un
risque de blessure et d’incendie.
c) Lorsqu’un bloc de batteries n’est pas utilisé,
le maintenir à l’écart de tout autre objet
métallique, par exemple trombones, pièces
de monnaie, clés, clous, vis ou autres objets
de petite taille qui peuvent donner lieu à une
connexion d’une borne à une autre. Le court-
circuitage des bornes d’une batterie entre elles
peut causer des brûlures ou un incendie.
d) Dans de mauvaises conditions, du liquide
peut être éjecté de la batterie; éviter tout
contact. En cas de contact accidentel,
nettoyer à l’eau. Si le liquide entre en
contact avec les yeux, rechercher en plus
une aide médicale. Le liquide éjecté des batteries
peut causer des irritations ou des brûlures.
6. MAINTENANCE ET ENTRETIEN
A) Faire entretenir l’outil par un réparateur
qualifié utilisant uniquement des pièces de
rechange identiques. Cela assurera le maintien
de la sécurité de l’outil.
AVERTISSEMENTS DE
SÉCURITÉ DE LA SCIE À
CHAÎNE
1. Tenir toutes les parties du corps à distance
de la chaîne, lorsque la tronçonneuse
tourne. Avant la mise en service, s’assurer
que la chaîne ne touché rien. Lors du
travail avec la tronçonneuse, dans un moment
d’inattention, des vêtements ou des parties du
corps peuvent être happés par la chaîne.
2. Tenir la tronçonneuse à chaîne à deux mains,
la main droite sur la poignée arrière et la
main gauche sur la poignée avant. Une autre
position de travail lors de la mise en service de la
tronçonneuse à chaîne n’est pas admissible, vue
que cela augmenterait le risque de blessures.
3. Saisissez toujours la scie par ses points
isolés, au cas où la chaîne heurterait
des câbles électriques cachés. En cas
de contact avec un câble “sous tension”, les
parties métalliques de la machine s’électrisent
immédiatement, exposant alors l’utilisateur à un
risque d’électrocution.
4. Porter des lunettes de protection ainsi
qu’une protection acoustique. Nous
conseillons également le port d’un
équipement de protection pour la tête, les
mains, les jambes et les pieds. Des vêtements
de protection appropriés diminuent le risque de
blessure par les copeaux projetés dans tous les
sens ou par un contact intempestif avec la chaîne
de la scie.
5. Ne travaillez pas sur un arbre avec la
tronçonneuse. En cas d’utilisation de la
tronçonneuse sur un arbre, il y a risque de
blessures.
6. Toujours veiller à garder une position stable
et équilibrée et n’utiliser la tronçonneuse
que lorsque vous vous trouvez sur un sol
ferme et plan. Si vous utilisez une échelle, un sol
glissant ou instable peut entraîner une perte de
contrôle de l’équilibre et de la tronçonneuse.
7. Lors de la coupe d’une branche tendre,
s’attendre à ce qu’elle revienne comme un
ressort. Quand la tension dans les fibres de bois
se relâche, la branche sous tension peut frapper
l’utilisateur et/ou lui faire perdre le contrôle de la
tronçonneuse.
8. Etre spécialement vigilant lors de la coupe
de broussailles et de jeunes arbres. Les
branches fines peuvent être happées par la
tronçonneuse et vous frapper ou vous faire perdre
l’équilibre.
9. Porter la tronçonneuse par la poignée avant,
la chaîne étant à l’arrêt et le rail de guidage
orienté vers l’arrière. Lors du transport ou
le stockage de la tronçonneuse, toujours
placer le capot de protection. En utilisant la
tronçonneuse avec précaution, il y a peu de risque
de toucher par mégarde la chaîne en rotation.
10. Suivre les instructions concernant le
Tronçonneuse sans fil F
Page 43

graissage, le serrage de la chaîne et le
remplacement d’accessoires. Une chaîne
qui n’est pas tendue ou graissée comme il faut
peut se rompre ou augmenter le risqué d’un
contrecoup.
11. Maintenir les poignées sèches, propres et
exemptes de graisse et d’huile. Les poignées
couvertes de graisse et d’huile sont glissantes et
entraînent une perte de contrôle.
12. Ne scier que du bois. N’utiliser la
tronçonneuse que pour les travaux pour
lesquels elle est conçue – par exemple : Ne
jamais utiliser la tronçonneuse pour scier
des matières plastiques, de la maçonnerie
ou des matériaux de construction qui
ne sont pas en bois. L’utilisation de la
tronçonneuse pour des travaux non conformes
peut entraîner des situations dangereuses.
RAISONS POSSIBLES D’UN
CONTRECOUP ET MOYENS
DE L’ÉVITER :
Un contrecoup peut se produire si la pointe du rail de
guidage touche un objet ou que le bois s’arque et que
la tronçonneuse se coince dans le tracé.
Dans certains cas, un contact avec la pointe du rail
peut entraîner une réaction inattendue vers l’arrière,
pendant laquelle le rail de guidage se dirige vers le
haut dans la direction de l’utilisateur.
Un coinçage de la chaîne au niveau du bord supérieur
du rail de guidage peut tout à coup repousser le rail
vers l’arrière en direction de l’utilisateur.
Chacune de ces réactions peut entraîner une perte de
contrôle de la tronçonneuse et causer des blessures
graves. Ne pas se fier exclusivement aux dispositifs de
sécurité incorporés dans la tronçonneuse. L’utilisateur
d’une tronçonneuse doit prendre différentes measures
pour pouvoir travailler sans risque d’accidents et de
blessures.
Un contrecoup est la suite d’une mauvaise utilisation
ou d’une utilisation incorrecte de l’appareil
électroportatif. Il peut être évité en respectant les
précautions décrites ci-dessous:
- Tenir la tronçonneuse des deux mains, le
pouce et les doigts entourant les poignées
de la tronçonneuse. Mettre votre corps
et vos bras dans une position qui vous
permettra de résister aux forces exercées
par un contrecoup. Si des mesures appropriées
ont été prises, l’utilisateur peut contrôler les forces
exercées par un contrecoup. Ne jamais lâcher la
tronçonneuse.
- Éviter les positions du corps anormales et ne
pas scier en levant les bras au-dessus des
épaules. Ceci ermet d’éviter un contact accidentel
avec la pointe du rail et assure un meilleur contrôle
de la tronçonneuse ans des situations inattendues.
- Toujours utiliser les rails de rechange et
chaînes indiqués ar le fabricant. D’autres
rails et chaînes peuvent ntraîner une rupture de la
chaîne ou un contrecoup.
- Suivre les instructions du fabricant
concernant l’affûtage t l’entretien de la
tronçonneuse. Les limiteurs e profondeur trop
bas augmentent les risques de contrecoup.
RISQUES RÉSIDUELS
Même avec l’utilisation prévue de l’appareil, il existe
toujours un risque résiduel qui ne peut être évité.
Selon le type et la construction de l’appareil, les
risques potentiels suivants pourraient s’appliquer :
- Contact avec les dents de scie exposées de la
chaîne de sciage (risques de coupe)
- Accès à la chaîne de sciage rotative (risques de
coupe)
- Mouvement imprévu et brutal de la barre de
guidage (risques de coupe)
- Les pièces projetées de la chaîne de sciage (risques
de coupe / d’injection)
- Les pièces projetées de l’ouvrage
- Contact cutané avec l’huile
- Perte d’audition, si aucune protection auditive
requise n’est utilisée pendant le travail
CONSIGNES DE SÉCURITÉ
POUR LA TRONÇONNEUSE À
PERCHE
1. N’utilisez pas la machine en cas de fatigue, de
maladie ou sous l’influence de l’alcool ou d’autres
drogues.
2. Pour réduire le risque, veuillez maintenir les
spectateurs à une distance de sécurité de la
machine pendant son fonctionnement.
3. Soyez conscient du danger des positions de
fonctionnement, ainsi que du risque d’être frappé
par les branches qui tombent ou qui, après avoir
touché le sol, rebondissent, l’opérateur peut être
frappé par les branches qui tombent ou par celles
qui rebondissent, après avoir frappé le sol. Retirer
les branches en sections.
4. Maintenez-vous dans une position stable et
conservez l’équilibre au cours de l’utilisation.
Utilisez le harnais fourni.
5. Maintenez la machine à une distance suffisante des
lignes électriques aériennes.
MISES EN GARDE CONCERNANT LA BATTERIE
a) La batterie et les piles secondaires ne
doivent pas être ouvertes, démontées ou
broyées.
b) La batterie ne doit pas être court-circuitée.
Évitez de mettre la batterie en vrac dans une
boîte ou dans un tiroir où elles risqueraient
43
Tronçonneuse sans fil F
Page 44

de se court-circuiter entre elles ou au contact
d’autres objets métalliques. Après usage, évitez
tout contact de la batterie avec d’autres objets
métalliques de petite taille (trombones, pièces, clés,
clous, vis etc.) susceptibles de court-circuiter les
pôles. Un court-circuit entre les pôles de la batterie
peut être à l’origine de brûlures ou d’un incendie.
c) La batterie ne doit pas être exposée au feu et
à la chaleur. Évitez de la ranger à la lumière
du soleil.
d) La batterie et les piles ne doivent pas être
soumises à des chocs mécaniques.
e) En cas de fuite des piles, évitez tout contact
du liquide avec la peau et les yeux. En
cas de contact, rincez abondamment la
surface touchée avec de l’eau et appelez les
urgences.
f) En cas d’ingestion d’une pile ou d’une
batterie, appelez immédiatement les
urgences.
g) La batterie et les piles doivent rester propres
et sèches.
h) Si la batterie ou les piles se salissent,
essuyez-les avec un chiffon propre et sec.
i) La batterie et les piles doivent être chargées
avant usage. Utilisez toujours le chargeur
adéquat, et respectez les instructions du
fabricant ou le mode d’emploi de l’appareil
concernant la procédure de recharge.
j) Évitez de laisser une batterie se charger
pendant trop longtemps lorsqu’elle n’est pas
44
utilisée.
k) Après de longues périodes d’inutilisation, il
peut être nécessaire de charger et décharger
la batterie et les piles à plusieurs reprises
avant que celles-ci ne retrouvent leur
capacité maximale.
l) La batterie et les piles fonctionnent au
mieux de leur capacité dans une température
ambiante normale, comprise entre +15°C et
+25°C environ.
m) Les batteries fonctionnant avec des
systèmes électrochimiques différents doivent
être mis au rebut séparément.
n) N’utilisez pas d’autre chargeur que celui
spécifié par WORX. N’utilisez pas d’autre
chargeur que celui spécifiquement fourni
avec l’appareil. Un chargeur destiné à un type de
batterie donné peut être à l’origine d’un incendie
s’il est utilisé avec une autre batterie.
o) N’utilisez en aucun cas une batterie autre que
celle prévue pour cet appareil.
p) La batterie doit être tenue hors de portée des
enfants.
q) Gardez la documentation d’origine du produit
afin de pouvoir vous y référer ultérieurement.
r) Enlevez la batterie de l’appareil lorsque vous
ne l’utilisez pas.
s) Respectez les procédures de mise au rebut.
CONSERVEZ CE MODE
D’EMPLOI
Consignes portant sur les bonnes techniques
d’abattage, d’entaille et de coupe d’abattage
élémentaires.
1. Abattage d’arbres
Lors des opérations de tronçonnage et d’abattage
par deux ou plusieurs personnes en même temps,
séparer les opérations d’abattage de l’opération de
tronçonnage par une distance d’au moins le double
de la hauteur de l’arbre soumis à l’abattage. Lors
de l’abattage d’arbres, veillez à ne pas exposer
d’autres personnes à des dangers, à ne pas toucher
des conduites d’alimentation et à ne pas causer des
dommages matériels. Au cas où un arbre toucherait
un câble d’alimentation, immédiatement informer le
distributeur d’énergie.
L’opérateur de la tronçonneuse à chaîne doit se
maintenir en amont du terrain étant donné que l’arbre
pourrait rouler ou glisser vers le bas après l’abattage.
Prévoir et dégager un chemin d’évacuation autant que
nécessaire avant de commencer les coupes. Le chemin
d’évacuation doit s’étendre à l’arrière et diagonalement
derrière la ligne de chute prévue comme illustré à la
Figure 1.
Avant de commencer l’abattage, prendre en
considération l’inclinaison naturelle de l’arbre, la
position des plus grandes branches et le sens du vent
pour évaluer la façon dont l’arbre tombera.
Eliminer de l’arbre la saleté, les pierres, les morceaux
d’écorce, les clous agrafes, et les fils.
2. Exécuter une entaille
Pratiquez une entaille égale à 1/3 du diamètre de
l’arbre, perpendiculaire à la direction de chute comme
illustré à la Figure 1. D’abord effectuer l’entaille
inférieure horizontale (W). Cela évite que la chaîne ou
la barre de guidage ne se coince pendant l’exécution
de la deuxième entaille (X).
3. Exécuter une coupe d’abattage
Pratiquez une coupe d’abattage (Y) d’au moins 50 mm
plus grande que l’entaille horizontale comme illustré à
la Figure 1. Effectuer la coupe parallèlement à l’entaille
horizontale. Scier de façon qu’il reste un dos (latte de
coupe) qui sert de charnière. Cette charnière évite que
l’arbre ne tourne et tombe dans la mauvaise direction.
Ne pas scier complètement le dos.
Lorsque la coupe d’abattage approche du dos,
l’arbre devrait commencer à tomber. S’il s’avère que
l’arbre ne tombe probablement pas dans la direction
souhaitée ou qu’il se penche vers l’arrière et que la
chaîne de la tronçonneuse coince, interrompre la
coupe et utiliser des coins en bois, en matière plastique
ou en aluminium (Z)pour faire revenir l’arbre dans la
direction souhaitée et pour ouvrir la coupe ( ).
Lorsque l’arbre commence à tomber, sortir la
tronçonneuse de la coupe, l’arrêter, la poser par terre
et quitter la zone de danger par la voie d’issue prévue (
). Faire attention aux branches qui tombent et à ne
pas trébucher. (Voir Fig. 1)
Tronçonneuse sans fil F
Page 45

3
2
2
W
Y
Z
X
50mm
50mm
1
1
1
Fig.1
3
2
2
Y
Z
X
50mm
50mm
1
1
1
2
2
W
Y
Z
X
50mm
50mm
1
1
1
Fig.2
Fig.3
2
2/3
1
1/3
Fig.2
Fig.3
Fig.4
Fig.1
50mm
X
W
4. Ebranchage
Il s’agit ici du découpage des branches d’un arbre
abattu. Lors de l’ébranchage, ne pas commencer
par le découpage des grosses branches inférieures.
Ces dernières soutiennent l’arbre. Retirer les petites
branches en une coupe comme illustré à la Figure 2.
Les branches sous tension devraient être sciées du bas
vers le haut afin d’éviter que la scie ne se coince.
Y
Z
50mm
Fig.2
5. Tronçonner les troncs d’arbre
Il s’agit du découpage en tronçons de l’arbre abattu.
Veiller à maintenir une position stable et à répartir
le poids de votre corps uniformément sur vos deux
pieds. Si possible, caler et soutenir le tronc au moyen
de branches, de poutres ou de cales. Suivre les
instructions simples pour sciage facile.
Lorsque le tronc est soutenu sur toute la longueur
comme illustré à la Figure 3, il faut le couper par le
haut (coupe par le haut), éviter de toucher le sol car
cela réduira fortement l’affûtage de la chaîne.
1
2
3
1
1
Fig.4
1
2
Lorsque le tronc est soutenu par les deux extrémités,
comme illustré à la Figure 5, coupez 1/3 du diamètre
depuis le haut (coupe par le haut) (1). Ensuite,
pratiquez la coupe de finition depuis le bas sur les 2/3
inférieurs (2) pour rejoindre la première coupe.
1/3
2
2/3
Fig.5
1
1/3
2
2/3
45
Lorsque le rondin est soutenu par une extrémité,
comme illustré sur la Figure 4, coupez 1/3 du diamètre
de la face du dessous (depuis le bas) (1). Puis, terminez
la coupe en coupant par le haut (2) pour rejoindre la
première coupe.
Lorsque le tronçonnage a lieu sur une pente, vous
devez toujours vous placer vers le sommet de la pente
par rapport au tronc, comme illustré à la Figure 6.
Afin d’assurer le contrôle complet au moment où le
tronc est « complètement scié », réduire la pression
appliquée en fin de coupe tout en continuant à
maintenir une prise ferme sur les poignées de la
tronçonneuse. Veiller à ce que la chaîne de la scie ne
touche pas le sol. Une fois la coupe terminée, attendre
l’arrêt total de la chaîne de la scie avant de retirer
la tronçonneuse. Toujours mettre le moteur de la
tronçonneuse hors fonctionnement avant de passer à
l’arbre suivant.
Tronçonneuse sans fil F
Page 46

2
2/3
1
1/3
1
2
2/3
1/3
Fig.3
SYMBOLES
46
Pour réduire le risque de blessure, l’utilisateur doit lire le mode
d’emploi.
Avertissement
Porter une protection pour les
oreilles
Porter une protection pour les yeux
Les déchets d’équipements
électriques et électroniques ne
doivent pas être déposés avec les
ordures ménagères. Ils doivent
être collectés pour être recyclés
dans des centres spécialisés.
Consultez les autorités locales ou
votre revendeur pour obtenir des
renseignements sur l’organisation
de la collecte.
Ne pas jeter les batteries. Les
batteries usagées doivent être
déposées dans un centre de
collecte local ou dans un centre de
recyclage.
Ne pas brûler.
Ne pas exposer à la pluie ou à
l’eau.
Le contact de l’extrémité du guidechaîne avec tout objet doit être
évité.
Porter un masque contre la
poussière
Ne pas exposer à la pluie ou à
l’eau.
Le contact du bout de la lame peut
faire soudain bondir le guidechaîne vers le haut et vers l’avant,
et cela peut blesser gravement
l’utilisateur.
Utilisez toujours la tronçonneuse à
Portez une protection pour la tête
Portez des gants de protection
deux mains.
xINR18/65-y: Les cellules
cylindriques de la batterie au
lithium avec un diam max de
Portez des chaussures de
protection.
18mm et une hauteur max de
65mm; “x” représente un nombre
de cellules connectées en série,
vide si 1; “-y” représente un
m
0
1
Avertissement de danger dû aux
lignes électriques aériennes.
numéro de cellules connectées en
parallèle, vide si 1.
Tronçonneuse sans fil F
Page 47

LISTE DES COMPOSANTS
1. POIGNÉE ARRIÈRE
2. INTERRUPTEUR MARCHE/ARRÊT/AMORCE
3. COUVERCLE RÉSERVOIR D’HUILE
4. POIGNÉE AVANT
5. PROTÈGE-MAIN
6. BARRE GUIDE
7. CHAÎNE
8. BOUTON DE RÉGULATION DE LA TENSION DE CHAÎNE
9. CAPOT
10. PACK BATTERIE *
11. VERROU DE PACK BATTERIE *
12. PROTECTEUR DE MAIN ARRIÈRE
13. PIC DE BUTÉE
14. JAUGE DU NIVEAU DE L’HUILE
15. VERROUILLAGE DE MISE EN MARCHE
16. PIGNON DE CHAÎNE
17. SYMBOLE SENS DE ROTATION ET DE COUPE
18. BUSE D’HUILE
19. BARRE DE SERRAGE
20. TROU DE LA BARRE DE SERRAGE
21. GOUPILLE DE POSITIONNEMENT DU GUIDE
22. RANGEMENT CHAÎNE ET BARRE / PROTECTION DE TRANSPORT*(FOURREAU)
23. CLIQUET DE TENSION DE LA CHAÎNE (VOIR FIG. A)
24. POIGNÉE DE RALLONGE DU MANCHE*
25. BOUTON DE VERROUILLAGE*
26. LEVIER DE SERRAGE*
27. MANCHE INTÉRIEUR*
28. BOUTON DE VERROUILLAGE*
29. SUPPORT DE RACCORDEMENT DE LA RALLONGE DU MANCHE*
30. BOUTON DE VERROUILLAGE SUR LA POIGNÉE DE LA RALLONGE DU MANCHE*
31. INTERRUPTEUR MARCHE / ARRÊT SUR LA POIGNÉE DE LA RALLONGE DU MANCHE*
32. BANDOULIÈRE*
47
* Les accessoires reproduits ou décrits ne sont pas forcément fournis avec la appareil.
Tronçonneuse sans fil F
Page 48

CARACTÉRISTIQUES TECHNIQUES
Modèle WG322E WG322E.9 WG323E WG323E.9 (3 - Désignation de machines, représentant la
scie à chaîne et la scie à rallonge)
WG322E WG322E.9 WG323E WG323E.9
Tension 20V Max**
Longueur du guide 25cm
Vitesse de coupe 3.8m/s
Quantité d’huile dans le
réservoir
Pas de chaîne 3/8"
Nombre de maillons 40
Echelle limnométrique à chaîne 0.043”
Type de chaîne d’adaptation ES: 3/8.043-40E/ QIRUI : A0(T)-40E/ OREGON: 90PX040G
Type de barre d’adaptation ES: ES104SDEA041/ QIRUI : PO10-43SR(T) / OREGON: 104MLEA041
Temps de chargement 5hrs
Masse (chaîne & guide inclus) 2.8kg 2.4kg 4.6kg 4.2kg
**Tension mesurée sans charge. La tension de la batterie initiale atteint un maximum de 20 volts. La tension
nominale est de 18 volts.
48
ACCESSOIRES
WG322E WG322E.9 WG323E WG323E.9
Chaîne 1 1 1 1
Barre guide 1 1 1 1
Protection de transport 1 1 1 1
Perche (WA0166) / / 1 1
Chargeur (WA3760) 1 / 1 /
Pack batterie (WA3551) 1 / 1 /
Bandoulière / / 1 1
130ml
Nous recommandons d’acheter tous les accessoires dans le magasin d’acquisition de l’outil. Pour plus
d’informations, se référer à l’emballage des accessoires. Le personnel du magasin est également là pour vous
conseiller.
Tronçonneuse sans fil F
Page 49

INFORMATIONS RELATIVES
AU BRUIT
WG322E
WG322E.9
Niveau de pression acoustique
pondéré A
Niveau de puissance acoustique
pondéré A
KpA= 3.0 dB(A)
Porter une protection pour les oreilles.
LpA= 87.9 dB(A) LpA= 85.7 dB(A)
LwA= 96 dB(A) LwA= 96 dB(A)
WG323E
WG323E.9
Afin de minimiser le risque d’exposition aux
vibrations :
Utilisez TOUJOURS des burins, des forets et des
lames affûtés.
Entretenez cet outil de manière conforme au mode
d’emploi et maintenez-le lubrifié (le cas échéant).
Si l’outil doit être utilisé régulièrement, investissez
dans des accessoires anti-vibrations.
Planifiez votre travail pour étaler l’utilisation des
outils à forte vibration sur plusieurs jours.
UTILISATION CONFORME
L’appareil est conçu pour abattre les arbres ainsi que
pour scier des troncs, des branches, des pouters
en bois, des planches, etc. et peut être utilize pour
des coupes longitudinales et transversales. Cet
appareil n’est pas approprié à scier des matériaux
essentiellement composés de minéraux.
INFORMATIONS RELATIVE
AUX VIBRATIONS
Valeurs totales de vibrations déterminées selon la
norme EN 60745:
Valeur d’émission de
vibrations ah < 2.5 m/s2
La valeur totale de vibration déclarée peut être
utilisée pour comparer un outil à un autre, et
peut également être utilisé dans une évaluation
préliminaire de l’exposition.
AVERTISSEMENT: La valeur d’émission de
vibrations pendant l’utilisation réelle de l’outil
électrique peut différer de la valeur déclarée selon la
manière dont l’outil est utilisé, selon les exemples
suivants et d’autres variations sur la manière dont
l’outil est utilisé:
Comment l’outil est utilisé et quels matériaux sont
coupés ou percés.
L’outil est en bon état et bien entretenu.
L’utilisation du bon accessoire pour l’outil et
l’assurance qu’il est affûté et en bon état.
La bonne tenue des poignées et, le cas échéant, les
accessoires anti-vibrations utilisés.
L’outil est utilisé comme prévu dans sa conception et
dans le présent mode d’emploi.
Cet outil peut causer un syndrome
des vibrations main-bras s’il n’est pas
correctement géré.
AVERTISSEMENT: Pour être précise, une
évaluation du niveau d’exposition en conditions
réelles d’utilisation doit également tenir compte de
toutes les parties du cycle d’utilisation telles que les
moments où l’outil est éteint, et ceux où il fonctionne
au ralenti mais ne réalise pas réellement de tâche.
Ceci peut réduire de manière significative le niveau
d’exposition et la durée d’utilisation totale.
Incertitude K = 1.5 m/s²
MONTAGE
AVERTISSEMENT! N’installez pas
la batterie avant qu’elle ne soit
complètement assemblée.
Pour toute manipulation de la chaîne, utiliser
toujours des gants de protection.
MONTAGE DU GUIDE ET DE LA CHAÎNE
1. Sortir avec précaution toutes les pièces de
l’emballage.
2. Placer la tronçonneuse sur une surface plate et
ferme.
3. Utiliser les chaînes WORX originales ou celles
recommandées pour le guide uniquement.
4. Monter la chaîne (7) dans la rainure périphérique
du guide (6). Assurez-vous que la chaîne soit
mise dans le bon sens en comparant son sens
à celui de l’icone de la chaîne sur le guide ou en
consultant le symbole du sens de rotation de la
chaîne (17) situé sur le corps de la tronçonneuse.
Assurez-vous que le cliquet de tension de la
chaîne (23) est orienté vers l’extérieur. (Voir Fig. A)
5. Poser les mailles de la chaîne autour du pignon de
la chaîne (16) de sorte que le boulon de fixation
(20) et les deux goupilles de positionnement (21)
prennent dans le trou longitudinal du guide (6).
(Voir Fig. B1, B2)
6. Contrôler si toutes les pièces sont correctement
positionnées. S’assurer que les maillons sont à
leur place sur le pignon (Voir Fig. C1). Éviter les
plis comme montrer à la Fig. C2. S’il y a un pli,
prendre la chaîne au niveau du guide juste avant
le pli et tirer le pli.
REMARQUE: La chaîne doit tourner librement
sans pli.
7. Placer la protection de la chaîne (9) et la serrer en
tournant le bouton de tension de la chaîne (8) vers
la droite jusqu’à ce qu’elle soit tendue. (Voir Fig. D)
AVERTISSEMENT: La chaîne n’est pas
tendue. Tendez la chaîne de la manière
décrite dans le chapitre « Tension de la chaîne
49
Tronçonneuse sans fil F
Page 50

». La tension de la chaîne doit alors être
contrôlée.
TENSION DE LA CHAÎNE (VOIR FIG. E1, E2)
REMARQUE: La nouvelle chaîne se détend. Vérifier
la tension de la chaîne à intervalles réguliers avant
de l’utiliser pour la première fois et serrer quand la
chaîne (7) se desserre autour du guide (6).
AVERTISSEMENT:
● Enlevez la batterie hors de l’outil avant d’ajuster
la tension de la chaîne.
● Les bords coupants de la chaîne sont affûtés.
Utilisez des gants de protection pour manipuler la
chaîne.
● Conservez toujours la tension de chaîne
appropriée. Une chaîne lâche augmentera les
risques de rebond. Une chaîne lâche peut sauter
hors de la rainure du guide-chaîne. Cela peut
blesser gravement l’utilisateur et provoquer des
dégâts matériels. Une chaîne lâche provoquera
l’usure rapide de la châine, du guide-chaîne et de
la roue dentées.
1. Poser la tronçonneuse à chaîne sur une surface
plane.
2. Tourner progressivement, et dans le sens des
aiguilles d’une montre, le bouton de régulation de
la tension de chaîne (8) jusqu’à ce que la chaîne
ait la bonne tension.
REMARQUE: La tension augmente
50
automatiquement quand le bouton de régulation de
la tension de la chaîne (8) est tourné vers la droite.
Le mécanisme du cliquet empêche la chaîne de se
desserrer.
3. Basculez la tronçonneuse en arrière (Voir Fig. E1)
pour que l’extrémité du guide (6) soit orientée
vers le haut. Ceci permettra de retendre la chaîne.
4. Serrer complètent le bouton rotatif de régulation
de la tension de la chaîne (8) en le tournant vers la
droite.
5. Contrôlez la tension établie par le bouton de mise
en tension automatique de la chaîne. La chaîne
(7) est tendue correctement quand elle peut être
levée à environ la moitié de la profondeur du
lien d’entraînement de la barre de guidage (6) au
centre. (Voir Fig. E2)
REMARQUE: La chaîne (7) est bien tendue quand
elle peut être levée de la barre de guidage (6) et que
le lien d’entraînement est dans le rail de la barre de
guidage (6).
REMARQUE: La chaîne (7) s’étire pendant la coupe
et perd sa tension. Lorsqu’elle est détendue, dévisser
complétement le bouton de régulation de la tension
de la chaîne (8) ou tournez complètement le bouton
trois fois vers la gauche, puis resserrer le bouton de
régulation de la tension (8) de tension de la chaîne
pour rétablir une tension de la chaîne adéquate en
répétant les étapes susmentionnées de 1 à 4.
MONTAGE DE LA PERCHE (uniquement pour
WG323E, WG323E.9)
Alignez et insérez la poignée de la rallonge
du manche dans l’arbre. Tournez le bouton de
verrouillage dans le sens horaire pour procéder au
verrouillage. (Voir Fig. F1, F2)
REMARQUE: Assurez-vous que l’arbre est
fermement verrouillé en place.
MONTAGE DE LA RALLONGE DU MANCHE SUR
LA MACHINE (Voir Fig. G1)
Étape 1 : alignez et insérez le support du raccord du
manche (29) dans la scie.
Étape 2 : tournez le bouton de verrouillage (28) dans
le sens antihoraire pour serrer la rallonge du manche
sur la machine.
REMARQUE: Assurez-vous que la rallonge du
manche est fermement verrouillée en place
avant la mise en marche.
RETRAIT DE LA RALLONGE DU MANCHE (Voir
Fig. G2)
Étape 1 : tournez le bouton de verrouillage (28) dans
le sens horaire pour le desserrer et le retirer.
Étape 2 : faites glisser la scie pour retirer la rallonge
du manche avec la scie.
AVERTISSEMENT!
• Lorsque vous utilisez cette machine avec
la rallonge du manche, assurez-vous que la
batterie a été retirée.
Ajustement de la longueur du manche
La scie à manche long dispose d’un manche
télescopique qui s’étend de 2m (entièrement rétracté)
à 2.7m (complètement étendu).
Le niveau de serrage (26) est utilisé pour maintenir le
manche en position à n’importe quelle longueur de
rallonge.
1. Pour rallonger le manche, desserrer le levier
de serrage tel qu’illustré à la Fig. H. Le manche
glissera librement.
2. Tirez sur la section intérieure du manche jusqu’à
la longueur de rallonge souhaitée. Remarque:
rallongez uniquement de la longueur minimale
nécessaire pour atteindre la branche à découper.
3. Pour verrouiller le manche en position, serrez le
levier de serrage tel qu’illustré sur la Fig. H.
GRAISSAGE DE LA CHAÎNE
IMPORTANT : A sa livraison, la
tronçonneuse à chaîne n’est pas remplie
d’huile adhérente pour chaîne. Il est
important de la remplir d’huile avant de
l’utiliser. L’utilisation de la tronçonneuse à
chaîne sans huile adhérente pour chaîne ou
avec un niveau d’huile en dessous du
marquage minimum entraîne un
endommagement de la appareil.
REMARQUE: La durée de vie et la puissance
de coupe de la chaîne dépendent d’un
graissage optimal. C’est la raison pour laquelle,
durant son fonctionnement, la chaîne est
automatiquement graissée d’huile adhérente
pour chaîne.
Tronçonneuse sans fil F
Page 51

REMPLIR LE RÉSERVOIR D’HUILE:
AVERTISSEMENT: retrait de la batterie
avant le remplissage du réservoir d’huile.
1. Déposer la tronçonneuse à chaîne sur un support
approprié, le couvercle du réservoir d’huile (3)
orienté vers le haut.
2. Nettoyer l’endroit autour du couvercle du
réservoir d’huile à l’aide d’un torchon et dévisser
le couvercle.
3. Mettez de l’huile pour chaîne jusqu’à remplir en
entier le réservoir.
4. Veiller à ce qu’aucune saleté n’entre dans le
réservoir d’huile, remettre le bouchon d’huile (3)
et le serrer bien fermement en le tournant vers la
droite.
IMPORTANT : Pour permettre un
échange d’air entre le réservoir d’huile et
l’environnement, le couvercle du
réservoir d’huile a été équipé de petits canaux
de compensation. Pour éviter que de l’huile ne
sorte, veiller toujours à poser la scie
horizontalement lorsqu’elle n’est pas utilisée
(le couvercle du réservoir d’huile (3) est
orienté vers le haut).
Utiliser exclusivement l’huile adhérente pour
chaîne biodégradable recommandée afin de
ne pas endommager la tronçonneuse à chaîne
(Grade: ISO VG32). L’huile peut être disponible
dans le magasin où vous avez acheté la
tronçonneuse ou chez votre fournisseur local.
Ne jamais utiliser d’huile recyclée ou d’huile
usée. L’utilisation d’une huile non autorisée
entraîne la perte du bénéfice de la garantie.
Ne pas avaler. En cas d’ingestion, appeler
immédiatement un médecin. Tenir hors de
la portée des enfants. Stocker à l’abri de la
chaleur ou de flammes nues.
CONTRÔLE DU GRAISSEUR AUTOMATIQUE
Il est possible de contrôler le fonctionnement correct
du graisseur automatique en faisant fonctionner la
tronçonneuse et en plaçant l’extrémité du guide (6)
au-dessus d’un morceau de carton ou de papier au
sol. Si vous constatez une tache d’huile grandissante
sur le carton, le graisseur automatique fonctionne
correctement. Si vous ne constatez pas de tache bien
que le réservoir d’huile soit plein, contactez un agent
du Service Clients WORX.
ATTENTION : Ne mettez pas la chaîne en
contact avec le sol. Gardez une distance
de sécurité de 30 cm.
FONCTIONNEMENT
1. AVANT D’UTILISER VOTRE OUTIL SANS FIL
AVERTISSEMENT: Le chargeur et la batterie
ont été spécialement conçus pour fonctionner
ensemble, ne pas utiliser d’autres dispositifs.
Ne jamais insérer d’objets métalliques dans le
chargeur ou dans les connexions de la batterie, cela
pourrait provoquer un court circuit ou être une
source de danger.
REMARQUE: La batterie N’EST PAS CHARGEE et il
faut la charger une fois avant de l’utiliser.
Le chargeur de batterie fourni est adapté à la batterie
Li-ion installé dans l’instrument. N’utilisez pas d’autre
chargeur de batterie.
2. CHARGE DE VOTRE BATTERIE
La batterie Li-ion est protégée contre les fortes
décharges. Lorsque la batterie est vide, l’instrument
s’éteint via un circuit de protection.
En environnement chaud ou après une utilisation
intensive, le pack batterie peut devenir trop chaud
pour permettre la charge. Laissez le temps à la
batterie de refroidir avant de recharger.
3. ENLEVER OU INSTALLER LA BATTERIE (Voir
Fig. I1, I2, I3)
Enfoncez la languette du bloc de batterie pour le
dégager et faites-le glisser hors de l’outil. Après le
rechargement, faites-le glisser en place sur l’outil. Un
simple coulissement et une légère pression seront
suffisant. Vérifiez que la batterie est solidement fixée.
REMARQUE: Lorsque vous retirez la batterie,
tenez-la fermement afin d’éviter toute chute ou
blessure.
4. Mise en fonctionnement/Arrêt (Voir Fig. J)
ATTENTION : vérifiez la batterie avant
d’utiliser votre outil sans fil. Utilisez
uniquement la batterie énumérée dans la
section d’accessoires.
Afin de mettre en marche l’appareil, pousser le
verrouillage de mise en marche (15), puis presser à
fond l’interrupteur Marche/Arrêt (2) et le maintenir
dans cette position. Maintenant, le verrouillage de
mise en marche peut être relâché.
Afin d’arrêter l’appareil, relâcher l’interrupteur
Marche/Arrêt.
5. TRAVAILLER
IMPORTANT : Le réservoir d’huile est-il
rempli ? Contrôler le voyant du niveau
d’huile (14) avant de commencer le
travail, et, à intervalles réguliers, durant le
sciage (Voir Fig. K1). Rajouter de l’huile dès
que le niveau d’huile a atteint le bord inférieur
du voyant de contrôle. La quantité contenue
dans le réservoir suffit pour 12 minutes env. et
dépend des pauses et de l’intensité du travail.
Durant le sciage, contrôler la tension de la
chaîne toutes les 10 minutes.
1) Montez le pack de batterie dans la tronçonneuse.
2) Vérifiez que la section de la bûche à couper ne
repose pas au sol pour empêcher la chaîne (7) de
venir en contact avec le sol pendant la coupe.
Le contact avec le sol lorsque la chaîne tourne est
dangereux et abîme la chaîne.
3) Saisissez fermement la scie avec vos deux mains,
la main gauche sur la poignée avant (4) et la main
droite sur la poignée arrière (1). Un minimum
de force est nécessaire. Tenir en permanence les
51
Tronçonneuse sans fil F
Page 52

poignées serrées avec les doigts et le pouce. (Voir
Fig. K2)
4) Vérifiez que vous êtes fermement appuyé au
sol. Écartez vous de la largeur des épaules.
Répartissez régulièrement votre poids sur vos
pieds.
5) Lorsque vous êtes prêt à couper, appuyez à fond
avec le pouce sur le bouton de déverrouillage (15)
et appuyez sur la gâchette pour faire tourner la
chaîne de coupe. Relâchez la gâchette pour arrêter
la rotation de la chaîne. Vérifiez que la chaîne
tourne à pleine vitesse avant de commencer à
couper.
6) Lorsque vous commencez à couper, placez la
chaîne en mouvement contre le bois. Le bois
doit être le plus proche possible du corps de
la tronçonneuse. Maintenez la tronçonneuse
fermement en place pour éviter un retour ou un
dérapage (latéral) de la machine.
7) Guidez la machine en appuyant légèrement et
n’exercez pas d’effort excessif sur la chaîne, en
laissant la tronçonneuse faire son travail, ce qui
peut entraîner une surcharge qui fait griller le
moteur. Le travail est plus sûr et meilleur à la
vitesse prévue pour la machine.
8) Enlevez la machine d’une coupe lorsqu’elle
tourne à pleine vitesse. Relâchez le bouton On/Off
(2) pour arrêter la machine. Vérifiez que la chaîne
est arrêtée avant de poser la tronçonneuse.
9) Continuez de couper des rondins de rebut dans
une zone sécurisée jusqu’à ce que vous soyez à
52
l’aise et coupiez facilement avec un mouvement
souple et une vitesse de coupe constante.
Sécurités anti-retour sur cette tronçonneuse
Cette tronçonneuse est équipée d’une chaîne de
sécurité et d’un guide réduisant son retour. Ces deux
caractéristiques diminuent le risque de retour qui est
néanmoins toujours possible avec cette machine.
Pour éviter le recul de l’appareil.
• Saisissez la scie avec vos deux mains pour
découper les branches. Un minimum de force
est nécessaire pour maintenir fermement votre
machine-outil. Tenir en permanence les poignées
serrées avec les doigts et le pouce.
• Vérifiez que tous les éléments de sécurité sont en
place et qu’ils fonctionnent correctement.
• Ne travaillez pas dans des conditions
déraisonnables et ne coupez pas au-dessus de
vos épaules.
• Garder une position et un équilibre adaptés à tout
moment.
• Tenez-vous debout légèrement à gauche de la
tronçonneuse pour éviter que votre corps se
trouve directement dans l’alignement de la chaîne
• Veillez à ce que l’extrémité du guide ne touche
rien lorsque la chaîne tourne.
• N’essayez jamais de couper deux branches en
même temps. Votre scie n’a pas été conçue pour
cela.
• Ne plongez pas l’extrémité du guide dans la terre
ni n’effectuez de découpes plongeantes (percer le
bois à l’aide de l’extrémité du guide).
• Faites attention aux branches en mouvement ou
aux autres forces qui pourraient refermer une
entaille et pincer ou entraver la chaîne.
• Soyez extrêmement prudent lorsque vous
réinsérez la chaîne dans une entaille déjà
entamée.
• Utilisez uniquement la chaîne (6) et le guide de
sécurité fournis avec cette tronçonneuse.
• Ne jamais travailler avec une chaîne lâche,
détendue ou fortement usée. Faire attention à la
bonne tension de la chaîne.
Utilisation sûre de la chaîne
1. Utilisez la tronçonneuse uniquement lorsque
votre appui au sol est stable et sûr.
2. Tenez la tronçonneuse à droite de votre corps
(Voir Fig. L).
3. La chaîne (7) doit tourner à pleine vitesse avant
d’entrer en contact avec le bois.
4. Utiliser les pics de butée (13) pour sécuriser la
scie sur le bois avant de commencer à le couper.
5. Utiliser les pics de butée comme point de levier
pendant la coupe (Voir Fig. M)
6. N’utilisez pas la tronçonneuse avec les bras
complètement tendus. N’essayez pas d’atteindre
des endroits difficilement accessibles. Ne vous
perchez sur une échelle pendant la coupe (Voir
Fig. N).
Ne jamais utiliser la tronçonneuse au-delà de la
hauteur des épaules.
SCIAGE DU BOIS SOUS TENSION (VOIR FIG. O)
AVERTISSEMENT: Lors de la coupe d’une
branche tendre, s’attendre à ce qu’elle
revienne comme un ressort. Quand la
tension dans les fibres de bois se relâche, la
branche sous tension peut frapper l’utilisateur
et/ou lui faire perdre le contrôle de la
tronçonneuse.
Si le bois repose des deux côtés, couper d’abord par
le haut un tiers du diamètre du tronc (Y) (coupe par le
fond), puis tronçonner le tronc au même endroit par
le bas (Z) afin d’éviter des éclats ou le coinçage de
la tronçonneuse à chaîne. Faire attention cependant
à ne pas toucher le sol. Si, par contre, le bois ne
repose que d’un seul côté, couper d’abord par en
bas un tiers du diamètre du tronc (Y) (coupe par le
haut), puis tronçonner le tronc au même endroit par
le haut (Z) afin d’éviter des éclats ou le coinçage de la
tronçonneuse à chaîne.
FONCTIONNEMENT DE LA SCIE À MANCHE
LONG (UNIQUEMENT POUR WG323E,
WG323E.9)
Coupe avec la bandoulière (Voir Fig. P1)
Le tube de rallonge est fourni avec une bandoulière
permettant une meilleure tenue de la scie lorsque
vous la soulevez au-dessus de la tête. Accrochez la
bandoulière au tube de rallonge et passez-la sur votre
épaule. La bandoulière permet également d’amortir
la chute lorsque la scie tombe brusquement à la fin
d’une coupe.
Tronçonneuse sans fil F
Page 53

Découpe à l’aide d’une scie à manche long
1. Montez le pack de batterie dans la tronçonneuse.
2. Avant de couper une branche en hauteur,
reprenez toutes les recommandations de la
section “Taillage des branches”, avec une attention
plus particulière pour le chemin de chute de la
branche.
AVERTISSEMENT: Ne vous tenez pas
directement sous la branche que vous
coupez. Tenez toutes les personnes éloignées.
N’utilisez jamais votre scie lorsque votre
position est instable, par exemple sur une
échelle. N’utilisez jamais votre scie à proximité
de câble, de lignes électriques et de lignes
téléphoniques. Respectez une distance de
sécurité de 3m(10pieds) avec les lignes
électriques aériennes. (Voir Fig. P2-P5)
3. Saisissez fermement la scie avec vos deux mains.
N’utiliser que les zones de préhension désignées
lorsque vous utilisez une scie à manche long (Voir
Fig. P6). Un minimum de force est nécessaire.
Tenir en permanence les poignées serrées avec
les doigts et le pouce.
4. Vérifiez que vous êtes fermement appuyé au
sol. Écartez vous de la largeur des épaules.
Répartissez régulièrement votre poids sur vos
pieds.
5. Lorsque vous êtes prêt à couper, appuyez à fond
avec le pouce sur le bouton de déverrouillage
(30), puis appuyez complètement sur
l’interrupteur Marche/Arrêt (31) (Voir Fig. P7).
Cela transforme la scie à perche sur. Relâchez
la gâchette pour arrêter la rotation de la chaîne.
Vérifiez que la chaîne tourne à pleine vitesse
avant de commencer à couper.
6. Lorsque vous commencez à couper, placez la
chaîne en mouvement contre le bois. Maintenez
la tronçonneuse fermement en place pour éviter
un retour ou un dérapage (latéral) de la machine.
7. Guidez la machine en appuyant légèrement et
n’exercez pas d’effort excessif sur la chaîne, ce
qui peut entraîner une surcharge qui fait griller
le moteur. Le travail est plus sûr et meilleur à la
vitesse prévue pour la machine.
8. Enlevez la machine d’une coupe lorsqu’elle
tourne à) pleine vitesse. Relâchez le bouton On/
Off pour arrêter la machine. Vérifiez que la chaîne
est arrêtée avant de poser la tronçonneuse.
ÉBRANCHAGE D’UN ARBRE (ÉLAGAGE)
AVERTISSEMENT : évitez le rebond. Le
rebond peut entraîner des blessures
graves ou la mort.
Voir Rebond, pour éviter tout risque de rebond.
AVERTISSEMENT : n’utilisez pas de scie à
manche long tant que vous êtes
• sur un arbre
• sur une échelle ou toute autre surface
instable
• dans une position difficile
Vous pouvez perdre le contrôle de la scie à
manche long et entraîner de graves blessures.
AVERTISSEMENT : n’étendez pas les bras
au-dessus des épaules lors de l’utilisation
d’une scie à manche long.
MISE EN GARDE : cherchez l’aide d’un
professionnel si vous rencontrez des difficultés
qui dépassent vos capacités.
L’ébranchage d’un arbre consiste à découper les
branches d’un arbre vivant. Vérifiez que vous êtes
fermement appuyé au sol. Écartez vous de la largeur
des épaules. Répartissez régulièrement votre poids
sur vos pieds.
Suivez les instructions ci-dessous pour ébrancher un
arbre.
1. Réalisez d’abord une première coupe de 15 cm
depuis le tronc d’arbre sur la partie inférieure
de la branche. Utilisez le haut de la barre de
guidage pour effectuer cette coupe. Coupez 1/3 du
diamètre de la branche (Voir Fig. P8).
2. Déplacez-vous 5 à 10 cm plus loin sur la branche.
Réalisez une deuxième coupe depuis la branche
supérieure. Poursuivez la coupe jusqu’à ce que
vous découpiez la branche.
3. Réalisez une troisième coupe le plus près possible
du tronc d’arbre dans la mesure du possible sur
la partie inférieure de la souche de la branche.
Utilisez le haut de la barre de guidage pour
réaliser cette coupe. Coupez 1/3 du diamètre de la
souche.
4. Réalisez une quatrième coupe directement audessus de la troisième coupe. Procédez à la coupe
nécessaire pour atteindre la troisième coupe. Ceci
éliminera la souche de la branche.
ENTRETIEN DE LA
TRONÇONNEUSE
Exécutez les instructions d’entretien rapportées dans
ce guide. Un nettoyage convenable de la scie et de
la chaîne, et un entretien régulier du guide peuvent
réduire les risques de rebond. Vérifiez et nettoyez la
scie après chaque utilisation. Ces recommandations
peuvent suffire pour garder votre machine-outil en
bon état pendant longtemps.
REMARQUE: Chaque affutage des dents de la chaîne
augmente le risque de rebond.
53
Tronçonneuse sans fil F
Page 54

MAINTENANCE ET
STOCKAGE DE LA
TRONÇONNEUSE
1. Retirer le boîtier de la batterie de la
tronçonneuse
• lorsque vous ne l’utilisez pas
• Avant de vous déplacer d’un endroit à un autre
• Avant de la réparer
• Avant de changer un accessoire ou une pièce,
telle que la chaîne de scie ou la barre de
protection.
2. Avant et après chaque découpe avec votre
scie, vérifiez. Vérifiez soigneusement si
la protection ou une autre pièce a été
endommagée. Recherchez toute détérioration
qui peut nuire à la sécurité de l’utilisateur ou
au fonctionnement de la machine. Vérifiez
l’alignement ou la liaison des pièces mobiles.
Vérifiez si des pièces sont cassées ou
endommagées. N’utilisez pas la tronçonneuse
si des détériorations nuisent à sa sécurité
d’utilisation. Faites réparer la machine par un
centre technique agréé. Pour trouver un centre
technique, visitez le site www.worx.com
3. Entretenez soigneusement la tronçonneuse.
• Ne jamais exposer directement la tronçonneuse à
la pluie ou la moisissure directe.
• Pour obtenir les meilleures performances de votre
54
machine-outil et l’utiliser en toute sécurité, veillez
à ce que la chaîne soit toujours propre, affûtée et
lubrifiée.
• Conformez-vous aux instructions de ce guide
pour affuter les dents de la chaîne.
• Les poignées doivent être sèches, propres et
exemptes d’huile et de graisse.
• Vérifiez régulièrement que les vis et les écrous
sont suffisamment serrés.
4. Faire entretenir l’outil par un réparateur
qualifié utilisant uniquement des pièces de
rechange identiques.
5. Rangez toujours la tronçonneuse lorsque
vous ne l’utilisez pas.
• En hauteur, dans un endroit qui ferme à clé pour
rester hors de portée des enfants
• Dans un endroit sec.
• Avec protection de la chaîne (9) et de la barre en
position.
Entretien de la barre de guidage
Pour une durée de vie maximale de la barre
de guidage, il est recommandé d’appliquer les
procédures suivantes.
Les rails de guidage de la barre qui maintiennent
la chaîne doivent être nettoyés avant de ranger la
machine ou si la barre ou la chaîne est sale.
Les rails de guidage doivent être nettoyés à chaque
démontage de la chaîne.
Pour nettoyer les rails de guidage:
1. Enlevez le cache de la chaîne et déposez la barre
et la chaîne. (voir le paragraphe MONTAGE)
2. Avec une brosse métallique, un tournevis ou un
outil similaire, enlevez les déchets et les saletés
des rails de la barre. (Voir Fig. Q)
3. N’oubliez pas de nettoyer complètement les
passages d’huile.
Conditions qui nécessitent d’entretenir la
chaîne(7) et la barre de guidage (6):
• La tronçonneuse coupe d’un côté ou en angle.
• La tronçonneuse doit être forcée dans la coupe.
• Arrivée d’huile insuffisante sur la barre et la
chaîne.
Vérifiez l’état de la barre de guidage à chaque
affûtage de la chaîne. Une barre de guidage usée
endommage la chaîne et rend la coupe difficile.
Après chaque utilisation, la machine étant
débranchée d’une source de courant, nettoyez toute
la sciure sur la barre de guidage et dans le trou du
pignon d’entraînement.
Lorsque la partie supérieure du rail de guidage est
irrégulière, utilisez une lime plate pour refaire des
bords et des côtés droits.
Limez
d’équerre les
bords et les
Rainure usée Rainure correcte
Remplacez la barre de guidage lorsque la rainure
est usée, lorsque la barre est courbée ou fissurée ou
lorsque les rails chauffent ou grincent excessivement.
Si le remplacement est indispensable, utilisez
uniquement la barre de guidage prévue pour votre
tronçonneuse dans la nomenclature des pièces
de réparation ou sur l’autocollant situé sur la
tronçonneuse.
Remplacement/changement de la chaîne et du
guide
Remplacez la chaîne lorsque les couteaux sont trop
usés pour être affutés ou en cas de rupture de la
chaîne. La nouvelle chaîne doit présenter toutes les
caractéristiques techniques mentionnées dans ce
guide.
Travailler avec un guide usé ou endommagé vous
expose à un risque de blessures, expose la chaîne à
des dommages et rend la coupe plus difficile.
Placer le cliquet de tension de la chaîne (23) en
l’insérant dans la nouvelle barre en serrant les vis
vers la droite. La partie saillante du cliquet (a) doit
être rentrée dans le trou du guide. (Voir Fig. R)
CONTRÔLE DU GRAISSAGE AUTOMATIQUE
AVERTISSEMENT: Enlevez le boîtier de
batterie hors de la scie avant de
procéder à un entretien. Une
électrocution ou le contact avec la chaîne en
mouvement peut entraîner des blessures
graves ou la mort.
Les bords coupants de la chaîne sont affûtés.
Utilisez des gants de protection pour manipuler
la chaîne.
Garder affûtés et propres les outils permettant de
couper. Vous travaillez plus rapidement et diminuez
les risques. Une chaîne aux dents émoussées
accélère l’usure de la couronne d’entraînement, du
côtés du rail
Tronçonneuse sans fil F
Page 55

guide, de la chaîne et du moteur. Les dents sont
probablement émoussées lorsque vous devez
forcer la scie dans le bois ou lorsque la découpe
produit uniquement de la sciure avec quelques gros
morceaux.
LUBRIFICATION DU PIGNON
AVERTISSEMENT: Portes des gants de
travail lorsque vous effectuez une
opération d’entretien sur cette machine.
Enlevez toujours le pack de batterie de
la tronçonneuse avant toute intervention
d’entretien sur cette machine.
REMARQUE: Il n’est pas nécessaire d’enlever la
chaîne ou le guide pour graisser le pignon.
1. Nettoyez le guide et le pignon.
2. Insérez la pointe du pistolet de graissage à
l’intérieur du trou de graissage et injectez la
graisse jusqu’à ce qu’elle apparaisse sur le bord
extérieur des pointes d’engrenage. (Voir Fig. S)
3. Faites tourner le pignon en tirant la chaîne à la
main, de manière à amener le côté non graissé du
pignon en face du trou de graissage; puis répétez
la procédure.
PROTECTION DE
L’ENVIRONNEMENT
Les déchets d’équipements électriques et
électroniques ne doivent pas être déposés
avec les ordures ménagères. Ils doivent
être collectés pour être recyclés dans des centres
spécialisés. Consultez les autorités locales ou votre
revendeur pour obtenir des renseignements sur
l’organisation de la collecte.
GUIDE DE DÉPANNAGE
Au cas où votre outil électroportatif ne fonctionnerait pas correctement, le tableau suivant vous montre les
types de pannes et les causes possibles et vous indique comment vous pouvez y remédier. Si malgré cela
vous n’arrivez pas à identifier le problème et à le résoudre, contactez votre Service Après-Vente. ATTENTION :
Avant de dépister la panne, arrêtez l’outil électroportatif et sortez l’accu.
Problème Cause possible Remède
La tronçonneuse à
chaîne ne fonctionne pas.
La tronçonneuse à
chaîne travaille par
intermittence.
Chaîne trop sèche. Pas d’huile dans le réservoir.
Chaîne/glissière trop
chaude.
La tronçonneuse à chaîne
broute, génère des
vibrations ou ne scie pas
correctement.
La batterie est à plat.
Fusible défectueux.
Surchauffe
La pression exercée lors de la coupe est
trop forte.
Raccord lâche.
Mauvais contact interne.
Interrupteur Marche/Arrêt défectueux.
Obturation du dispositif d’aération dans
le couvercle du réservoir d’huile.
Tuyau de sortie d’huile obturé.
Pas d’huile dans le réservoir.
Obturation du dispositif d’aération dans
le couvercle du réservoir d’huile.
Tuyau de sortie d’huile obturé.
Tension trop grande de la chaîne.
Chaîne émoussée.
Tension trop faible de la chaîne.
Chaîne émoussée.
Chaîne usée.
Dents de la chaîne orientées dans la
mauvaise direction.
Chargez le boîtier de la batterie.
Remplacer le fusible.
Placer l’outil à un endroit frais et
ventilé pour qu’il refroidisse.
Exercer une pression moindre lors de
la coupe.
Contacter un service après-vente.
Contacter un service après-vente.
Contacter un service après-vente.
Rajouter de l’huile
Nettoyer le couvercle du réservoir
d’huile.
Déboucher le tuyau de sortie d’huile
Rajouter de l’huile.
Nettoyer le couvercle du réservoir
d’huile.
Déboucher le tuyau de sortie d’huile.
Régler la tension de la chaîne.
Réaffûter la chaîne ou la remplacer.
Régler la tension de la chaîne.
Réaffûter la chaîne ou la remplacer.
Remplacer la chaîne.
Monter à nouveau la chaîne en mettant
les dents dans la bonne direction.
55
Tronçonneuse sans fil F
Page 56

DÉCLARATION DE
CONFORMITÉ
Nous,
POSITEC Germany GmbH
Konrad-Adenauer-Ufer 37
50668 Köln
Déclarons ce produit,
Description Scie à chaîne et scie à rallonge à
batterie
Modèle WG322E WG322E.9 WG323E
WG323E.9 (3 - Désignation de machines,
représentant la scie à chaîne et la scie à
rallonge)
Fonctions Découpe de bois
Est conforme aux directives suivantes,
2006/42/EC
2014/30/EU
2011/65/EU
2000/14/EC modifiée par 2005/88/EC
Notification réalisée par
Nom: Intertek Deutschland GmbH (Organisme
notifié 0905)
Adresse: Stangenstraße 1, 70771 LEINFELDENECHTERDINGEN
No de certification: 17SHW1086-01 (WG322E
WG322E.9) 17SHW1166-01 (WG323E
WG323E.9)
56
WG322E WG322E.9
2000/14/EC modifiée par 2005/88/EC:
- Procédure d’évaluation de la conformité
conformément à Annex V
- Niveau de pression acoustique 94.7 dB(A)
- Niveau d’intensité acoustique 96 dB(A)
WG323E WG323E.9
2000/14/EC modifiée par 2005/88/EC:
- Procédure d’évaluation de la conformité
conformément à Annex V
- Niveau de pression acoustique 95.2 dB(A)
- Niveau d’intensité acoustique 96 dB(A)
Et conforme aux normes,
EN 60745-1
EN 60745-2-13
EN ISO 3744
EN 55014-1
EN 55014-2
Soumis à EN ISO11680-1
La personne autorisée à compiler le dossier
technique,
Nom Russell Nicholson
Adresse Positec Power Tools (Europe) Ltd, PO
Box 6242, Newbury, RG14 9LT, UK
Suzhou 2017/07/27
Allen Ding
Ingénieur en chef adjoint, Essais & Certification
Tronçonneuse sans fil F
Page 57

AVVISI GENERALI PER
LA SICUREZZA DEGLI
UTENSILI A MOTORE
ATTENZIONE! È assolutamente necessario
leggere attentamente tutte le istruzioni.
Eventuali errori nell’adempimento delle istruzioni
qui di seguito riportate potranno causare scosse
elettriche, incendi e/o lesioni gravi.
Conservare tutti gli avvisi e le istruzioni per
poterle consultare quando necessario.
Il termine qui di seguito utilizzato«utensile
elettrico» si riferisce ad utensili elettrici alimentati
dalla rete (con linea di allacciamento), nonché ad
utensili elettrici alimentati a pile (senza linea di
allacciamento).
1. POSTO DI LAVORO
a) Mantenere pulito ed ordinato il posto di
lavoro. Il disordine e le zone di lavoro non
illuminate possono essere fonte di incidenti.
b) Evitare d’impiegare l’utensile in ambienti
soggetti al rischio di esplosioni nei quali si
trovino liquidi, gas o polveri infiammabili.
Gli utensili elettrici producono scintille che
possono far infiammare la polvere o i gas.
c) Mantenere lontani i bambini ed alter
persone durante l’impiego dell’utensile
elettrico. Eventuali distrazioni potranno
comportare la perdita del controllo sull’utensile.
2. SICUREZZA ELETTRICA
a) La spina per la presa di corrente
dovrà essere adatta alla presa. Evitare
assolutamente di apportare modifiche alla
spina. Non impiegare spine adattatrici
assieme ad utensili con collegamento a
terra. Le spine non modificate e le prese adatte
allo scopo riducono il rischio di scosse elettriche.
b) Evitare il contatto fisico con superfici
collegate a terra, come tubi, riscaldamenti,
cucineelettriche e frigoriferi. Sussiste un
maggior rischio di scosse elettriche nel momento
in cui il corpo é messo a massa.
c) Custodire l’utensile al riparo dalla pioggia o
dall’umidità. L’eventuale infiltrazione di acqua
in un utensile elettrico va ad aumentare il rischio
d’insorgenza di scosse elettriche.
d) Non usare il cavo per scopi diversi da quelli
previsti al fine di trasportare o appendere
l’apparecchio, oppure di togliere la spina
dalla presa di corrente. Mantenere l’utensile
al riparo da fonti di calore, dall’olio, dagli
spigolio da parti di strumenti in movimento.
I cavi danneggiati o aggrovigliati aumentano il
rischio d’insorgenza di scosse elettriche.
e) Qualora si voglia usare l’utensile
all’aperto,impiegare solo ed esclusivamente
cavi di prolunga omologati per l’impiego
all’esterno. L’uso di un cavo di prolunga
omologato per l’impiego all’esterno riduce il
rischio d’insorgenza di scosse elettriche.
f) Se si deve utilizzare l’utensile a motore
in un luogo umido, utilizzare una fonte di
alimentazione con protezione a corrente
residua. L’uso di un dispositivo a corrente
residua reduce il rischio di folgorazioni elettriche.
3. SICUREZZA DELLE PERSONE
a) È importante concentrarsi su ciò che si
sta facendo e a maneggiare con giudizio
l’utensile elettrico durante le operazioni
di lavoro. Non utilizzare l’utensile in caso
di stanchezza o sotto l’effetto di droghe,
bevande alcoliche e medicinali. Un attimo
di distrazione durante l’uso dell’utensile potrà
causare lesioni gravi.
b) Indossare sempre equipaggiamento
protettivo individuale, nonché guanti
protettivi. Se si avrà cura d’indossare
equipaggiamento protettivo individuale
come la maschera antipolvere, la calzatura
antisdrucciolevole di sicurezza, il casco protettivo
o la protezione dell’udito, a seconda dell’impiego
previsto per l’utensile elettrico, si potrà ridurre il
rischio di ferite.
c) Evitare avviamenti involontari. Controllare
che l’interruttore sia nella posizione off
prima di effettuare il collegamento a una
sorgente di alimentazione/batteria, e prima
di sollevare o trasportare l’utensile. Il fatto di
tenere il dito sopra all’interruttore o di collegare
l’utensile accesso all’alimentazione di corrente
potrà essere causa di incidenti.
d) Togliere gli attrezzi di regolazione o
la chiave inglese prima di accendere
l’utensile. Un utensile o una chiave inglese che
si trovino in una parte di strumento in rotazione
potranno causare lesioni.
e) È importante non sopravvalutarsi. Avere
curadi mettersi in posizione sicura e di
mantenere l’equilibrio. In tale maniera sarà
possibile controllare meglio l’apparecchio in
situazioni inaspettate.
f) Indossare vestiti adeguati. Evitare di
indossare vestiti lenti o gioielli. Tenere
i capelli, i vestiti ed i guanti lontani da
pezzi in movimento. Vestiti lenti, gioielli o
capelli lunghi potranno impigliarsi in pezzi in
movimento.
g) Se sussiste la possibilità di montare
dispositivi di aspirazione o di captazione
della polvere, assicurarsi che gli stessi
siano stati installati correttamente e
vengano utilizzati senza errori. L’impiego
dei suddetti dispositivi diminuisce il pericolo
rappresentato dalla polvere.
4. Maneggio ed impiego accurato di utensili
elettrici
a) Non sovraccaricare l’utensile. Impiegare
l’utensile elettrico adatto per sbrigare il
lavoro. Utilizzando l’utensile elettrico adatto si
57
Sega a catena senza filo I
Page 58

potrà lavorare meglio e con maggior sicurezza
nell’ambito della gamma di potenza indicata.
b) Non utilizzare utensili elettrici con
interruttori difettosi. Un utensile elettrico che
non si può più accendere o spegnere è pericoloso
e dovrà essere riparato.
c) Scollegare la spina dalla sorgente di
alimentazione e/o la batteria dall’utensile
prima di effettuare regolazione, cambiare
accessori, o riporre gli utensili a motore.
Tale precauzione eviterà che l’apparecchio possa
essere messo in funzione inavvertitamente.
d) Custodire gli utensili elettrici non utilizzati
al di fuori della portata dei bambini. Non
fare usare l’apparecchio a persone che non
sono abituate ad usarlo o che non abbiano
letto le presenti istruzioni. Gli utensili elettrici
sono pericolosi se utilizzati da persone inesperte.
e) Effettuare accuratamente la manutenzione
dell’apparecchio. Verificare che le
parti mobili dello strumento funzionino
perfettamente e non s’inceppino, che non
ci siano pezzi rotti o danneggiati al punto
tale da limitare la funzione dell’apparecchio
stesso. Far riparare le parti danneggiate
prima d’impiegare l’apparecchio. Numerosi
incidenti vengono causati da utensili elettrici
la cui manutenzione è stata effettuata poco
accuratamente.
f)
Mantenere affilati e puliti gli utensili da
taglio. Gli utensili da taglio curati con particolare
58
attenzione e con taglienti affilati s’inceppano meno
frequentemente e sono più facili da condurre.
g)
Utilizzare utensili elettrici, accessori,
attrezzi,ecc. in conformità con le presenti
istruzioni e secondo quanto previsto per
questo tipo specifico di apparecchio.
Osservare le condizioni di lavoro ed il lavoro
da eseguirsi durante l’impiego. L’impiego di
utensili elettrici per usi diversi da quelli consentiti
potrà dar luogo a situazioni di pericolo.
5. MANEGGIO ED IMPIEGO ACCURATO DI
ACCUMULATORI
a) Caricare l’accumulatore solo ed
esclusivamente nei dispositivi di carica
consigliati dal produttore. Per un dispositivo
di carica previsto per un determinato tipo di
accumulatore, sussiste pericolo di incendio, se
utilizzato con un accumulatore di tipo diverso.
b) Utilizzare negli utensili elettrici solo ed
esclusivamente gli accumulatori previsti
allo scopo. L’uso di accumulatori di tipo diverso
potrà dare insorgenza a lesioni e comportare il
rischio d’incendi.
c) Tenere l’accumulatore non utilizzato
lontano da graffette, monete, chiavi,
chiodi, viti o da altri oggetti in metallo di
piccole dimensioni che potrebbero causare
un ponte tra i contatti. Un eventuale corto
circuito tra i contatti dell’accumulatore potrà
dare origine a bruciature o ad incendi.
d) In caso di impiego sbagliato, potranno
insorgere fuoriuscite di liquido
dall’accumulatore.Evitarne il contatto. In
caso di contatto casuale, sciacquare con
acqua. Qualora il liquido dovesse entrare in
contatto con gli occhi, chiedere immediato
consiglio al medico. Il liquido fuoriuscito
dall’accumulatore potrà causare irritazioni
cutanee o bruciature.
6. ASSISTENZA
a) Fare riparare l’apparecchio solo ed
esclusivamente da personale specializzato
e solo impiegando pezzi di ricambio
originali. In tale maniera potrà essere
salvaguardata la sicurezza dell’apparecchio.
INDICAZIONI DI SICUREZZA
PER SEGHE A CATENA
1. Quando la sega è in azione tenere tutte le
parti del corpo lontane dalla catena della
sega. Prima di avviare la sega assicurarsi
che la catena della sega non possa arrivare
a toccare niente. Lavorando con una sega a
catena vi è il serio pericolo che in un attimo di
distrazione la catena della sega possa far presa
su un indumento oppure su parti del corpo.
2. Tenere la sega a catena ben ferma
afferrando con la mano destra
l’impugnatura posteriore e con la mano
sinistra l’impugnatura anteriore. Tenendo
la sega a catena in un’altra posizione operativa
si viene ad aumentare il rischio di incidenti e,
quindi, non può essere utilizzata.
3. Impugnare l’utensile elettrico solo dalle
superfici isolate idonee per essere
impugnate, poiché la motosega può
venire a contatto con cavi nascosti. In
caso di contatto della motosega con cavi sotto
tensione, le parti metalliche a vista dell’utensile
potrebbero essere sotto tensione ed esporre
l’operatore al rischio di folgorazione elettrica.
4. Portare occhiali e cuffie di protezione.
Si consiglia di utilizzare ulteriori
equipaggiamenti di protezione per la
testa, le mani, le gambe ed i piedi. Tramite
indumenti di protezione adatti si riduce il
rischio di incidenti dovuto a materiale di scarto
scaraventato per l’aria o a contatti accidentali
con la catena della sega.
5. Non lavorare mai con la sega a catena su
un albero. Utilizzando impropriamente una
sega a catena su un albero si vengono a creare
seri rischi di incidenti.
6. Accertarsi sempre una posizione operativa
sicura ed utilizzare la sega a catena
unicamente su una base che sia ben solida,
sicura e piana. In caso di utilizzo di scale, una
base scivolosa oppure instabile può provocare
una perdita del controllo sull’equilibrio e sulla
sega a catena.
Sega a catena senza filo I
Page 59

7. Durante il taglio di un ramo che si trova
sotto sollecitazione, calcolare sempre la
possibilità che possa scattare all’indietro.
Liberando la tensione delle fibre del legno
è possibile che il ramo teso possa colpire
l’operatore e/o fargli perdere il controllo sulla
sega a catena.
8. Si raccomanda di operare con la dovuta
attenzione quando si taglia legname nel
sottobosco ed alberi giovani. Il materiale
sottile può rimanere impigliato nella catena della
sega e colpire l’operatore facendogli perdere
l’equilibrio.
9. Portare la sega a catena tenendola
all’impugnatura anteriore con la catena
della sega ferma ed il binario di guida
rivolto verso l’indietro. Trasportando
oppure conservando la sega a catena
applicare sempre la copertura di
protezione. Un trattamento accurato con
la sega a catena contribuisce a ridurre la
probabilità di un contatto accidentale con la
catena della sega in funzione.
10. Attenersi alle istruzioni relative alla
lubrificazione, alla tensione della catena
ed alla sostituzione di accessori opzionali.
Una catena che non sia tesa oppure lubrificata
correttamente può rompersi oppure aumentare
il rischio di un contraccolpo.
11.
Avere cura di tenere le impugnature sempre
asciutte, pulite e completamente libere
da olio e da materiale grasso. Impugnature
sporche di grasso e di olio sono scivolose e
possono comportare la perdita del controllo.
12. Tagliare solo ed esclusivamente legname.
Utilizzare la sega a catena solo per lavori
per i quali essa è esplicitamente prevista
– Esempio: Non utilizzare la sega a catena
per tagliare materiali sintetici, murature
oppure altri materiali costruttivi che non
siano di legno. Utilizzando la sega a catena
per lavori non consentiti si possono provocare
situazioni molto pericolose.
guida in direzione dell’operatore.
Ognuna di queste reazioni può comportare la perdita
di controllo sulla sega ed il pericolo concreto di seri
incidenti. Mai fare affidamento esclusivamente sui
dispositivi di sicurezza di cui dispone la sega a catena.
Lavorando con una sega a catena si devono adottare
diverse precauzioni in modo da poter operare con
sicurezza ed evitare di creare situazioni pericolose.
Un contraccolpo è la conseguenza di un utilizzo non
appropriato oppure non corretto dell’elettroutensile.
Esso può essere evitato soltanto prendendo misure
adatte di sicurezza come dalla descrizione che segue:
- Tenere la sega ben saldamente con
entrambe le mani e con i pollici e le dita
che afferrano saldamente le impugnature
della sega a catena. Portare il proprio
corpo e le braccia in una posizione che
permetta di resistere bene ad ogni forza
di contraccolpo. Adottando misure adatte
l’operatore è in grado di controllare pienamente
le forze di contraccolpo che si possono
sviluppare. Mai lasciare la sega a catena in modo
incontrollato.
- Evitare una posizione anomala del corpo
e non eseguire tagli oltre l’altezza della
spalla. Questa accortezza consente di evitare
che si possa toccare involontariamente la punta
del binario di guida rendendo possibile un
miglior controllo della sega a catena quando si
presentano situazioni inaspettate.
- Utilizzare sempre guide di ricambio e
catene della sega esplicitamente prescritte
dalla casa costruttrice. In caso di guide di
ricambio e catene della sega non appropriate vi
è il pericolo che la catena possa rompersi oppure
provocare un contraccolpo.
- Per quanto riguarda l’affilatura e la
manutenzione della catena della sega,
attenersi alle istruzioni della casa
costruttrice. Limitatori di profondità troppo
bassi aumentano la tendenza a provocare
contraccolpi.
59
POSSIBILI CAUSE
ED ACCORGIMENTI
PER IMPEDIRE UN
CONTRACCOLPO
Un contraccolpo si può verificare quando la punta
del binario di guida tocca un oggetto oppure quando
il legname si piega e la catena della sega resta
bloccata nel taglio.
Toccando la punta del binario di guida si può in
alcuni casi provocare una reazione improvvisa
all’indietro nel corso della quale il binario di
guida viene sollevato e scaraventato in direzione
dell’operatore.
Il blocco della catena della sega sul bordo superiore
del binario di guida può far ribaltare rapidamente la
Anche se l’apparecchiatura viene utilizzata
come previsto, esiste sempre un rischio residuo
non evitabile. In base al tipo e alla struttura
dell’apparecchio, potrebbero sussistere i seguenti
pericoli potenziali:
- Contatto con i denti esposti della motosega
(pericolo di taglio)
- Accesso alla catena in rotazione (pericolo di
taglio)
- Movimento imprevedibile e improvviso della
barra (pericolo di taglio)
- Proiezione di parti dalla motosega (pericolo di
taglio/ferimento)
- Proiezione di parti del pezzo lavorato
- Contatto tra pelle e olio
- Perdita di udito se non vengono utilizzate le
protezioni acustiche prescritte durante il lavoro
Sega a catena senza filo I
RISCHI RESIDUI
Page 60

AVVERTENZE DI
SICUREZZA PER LA SEGA
ELETTRICA A CATENA CON
ASTA DI PROLUNGA
1. Non utilizzare la macchina se l’operatore è stanco,
ammalato o sotto l’effetto di alcol o sostanze
stupefacenti.
2. Per ridurre i rischi, mantenere le persone presenti
a una distanza di sicurezza dalla macchina
durante questa operazione.
3. Tenere in considerazione il pericolo delle posizioni
di lavoro e il rischio che l’operatore venga colpito
dai rami che cadono dall’albero o che rimbalzano
dopo essere caduti a terra. Rimuovere i rami
tagliandoli in sezioni.
4. Mantenere sempre i piedi saldi a terra e un buon
equilibrio durante l’uso. Utilizzare l’imbracatura
fornita in dotazione.
5. Mantenere la macchina a una distanza sufficiente
da linee elettriche aeree.
ISTRUZIONI PER LA SICUREZZA DEL PACCO BATTERIA
a) Non smontare, aprire o strappare le cellule
60
secondarie o il pacco batteria.
b) Non cortocircuitare un pacco batteria.
Non conservare un pacco batteria
disordinatamente in una scatola o un
cassetto in cui potrebbero cortocircuitarsi
tra essi o essere cortocircuitati da altri
oggetti metallici. Quando il pacco batteria non
è in uso, tenerlo lontano da altri oggetti metallici
come graffette, monete, chiavi, chiodi, viti e altri
piccoli oggetti metallici, potrebbe avverarsi un
collegamento tra i due terminali. Collegare i
terminali della batteria potrebbe causare incendi
o ustioni.
c) Non esporre il pacco batteria a calore o
fuoco. Evitare di conservarli alla luce diretta
del sole.
d) Non sottoporre il pacco batteria a scosse
meccaniche.
e) In caso di perdite da una cellula, evitare
che il liquido entri in contatto con la pelle
o gli occhi. In caso di contatto, lavare
l’area interessata con abbondante acqua e
consultare un medico.
f) Se si ingerisce una cellula o un pacco
batteria, consultare immediatamente un
medico.
g) Tenere le cellule e il pacco batteria puliti e
asciutti.
h) Pulire i terminali delle cellule e del pacco
batteria con un panno pulito e asciutto nel
caso in cui si sporchino.
i) Il pacco batteria deve essere caricato prima
dell’uso. Utilizzare sempre il caricatore
corretto e consultare le istruzioni.
j) Non lasciare un pacco batteria in carica se
non in uso.
k) Dopo lunghi periodi di conservazione,
potrebbe essere necessario caricare e
scaricare le cellule o il pacco batteria
diverse volte per ottenere le massime
prestazioni.
l) Il pacco batteria offre prestazioni ottimali
se utilizzate ad una temperatura ambiente
normale (20°C ± 5°C).
m) Quando si smaltiscono i pacchi batteria,
tenere i pacchi batteria con diversi sistemi
elettrochimici separati gli uni dagli altri.
n) Ricaricare solo con il caricatore specificato
da WORX. Non utilizzare caricatori diversi
da quelli forniti per l’uso specifico con
l’apparecchiatura. Un caricatore adatto ad un
tipo di pacco batteria potrebbe provocare rischi
d’incendi quando è usato con un altro pacco
batteria.
o) Non utilizzare un pacco batteria non
progettato per l’uso con l’apparecchiatura.
p) Tenere il pacco batteria fuori dalla portata
dei bambini.
q) Conservare i documenti originali del
prodotto per riferimenti futuri.
r) Rimuovere la batteria dall’apparecchiatura,
se non in uso.
s) Smaltire adeguatamente.
SALVARE LE PRESENTI ISTRUZIONI
Istruzioni riguardanti le tecniche corrette
per l’abbattimento, la sramatura e il taglio
trasversale
1. Taglio di alberi
Se vi sono due o più persone che tagliano i rami ed
abbattono alberi contemporaneamente, la distanza
tra gli operatori che tagliano i rami e quelli che
tagliano il tronco dell’albero deve corrispondere
almeno al doppio dell’altezza dell’albero che
si sta abbattendo. Quando si abbattono alberi
si deve stare attenti ad evitare di esporre altre
persone a qualunque tipo di pericolo, a non
colpire nessuna linea di alimentazione ed a non
provocare nessun tipo di danno materiale. Se
un albero dovesse arrivare a toccare una linea di
alimentazione, informare immediatamente l’ente di
approvvigionamento dell’energia.
In caso di lavori di taglio eseguiti su pendii, chi opera
con la sega a catena sul terreno deve prendere
posizione nella parte superiore dell’albero che si
intende abbattere perché il tronco dell’albero dopo il
taglio probabilmente rotolerà oppure scivolerà verso
il basso.
Prima di iniziare l’operazione di abbattimento di un
albero si deve predisporre una via di fuga che sia
agibile in caso d’emergenza e, se necessario, se
Sega a catena senza filo I
Page 61

ne dovrà preparare una. La via di fuga deve essere
3
2
2
W
Y
Z
X
50mm
50mm
1
1
1
Figura.1
3
2
2
W
Y
Z
X
50mm
50mm
1
1
1
tracciata alle spalle dell’operatore e diagonalmente
rispetto alla linea di caduta dell’albero, come
illustrato nella Figura 1.
Per poter determinare la direzione della caduta
dell’albero, prima dell’abbattimento è necessario
prendere in considerazione la pendenza naturale
dell’albero, la posizione dei rami più grossi e la
direzione del vento.
Liberare l’albero da ogni tipo di sporcizia, materiale
pietroso, corteccia staccata dal tronco, chiodi, graffe
e fili di ferro.
2. Esecuzione di intaglio a tacche
Praticare un intaglio pari a 1/3 del diametro, come
illustrato nella Figura 1. Eseguire prima l’intaglio a
tacche inferiore orizzontale (W). Questa procedura
consente di evitare che la catena della sega oppure il
binario di guida possano imanere incastrati quando
ci si accinge ad eseguire il secondo intaglio a tacche
(X).
3. Esecuzione del taglio di abbattimento
Praticare il taglio di abbattimento almeno (Y) 50 mm
sopra l’intaglio direzionale orizzontale, come illustrato
nella Figura 1. Eseguire il taglio di abbattimento
in posizione parallela rispetto all’intaglio a tacche
orizzontale. Eseguire il taglio di abbattimento con una
profondità tale da far rimanere soltanto una striscia
ritagliata (striscia di abbattimento) che possa fungere
da cerniera. La striscia ritagliata ha la funzione di
impedire che l’albero possa girare su se stesso e
cadere nella direzione sbagliata. Non tagliare mai
completamente la striscia ritagliata.
Quando il taglio di abbattimento si avvicina alla
cerniera l’albero dovrebbe cominciare a cadere. In
caso dovesse essere chiaro che l’albero potrebbe
non cadere nella direzione richiesta oppure potrebbe
piegarsi all’indietro e bloccare la catena della sega,
interrompere il taglio di abbattimento e inserire nel
taglio cunei di legno, di materiale sintetico o di lega
leggera (Z) in modo da aprire ulteriormente il taglio e
dare all’albero la linea di caduta richiesta ( ).
Quando l’albero inizia a cadere, togliere la sega a
catena dal taglio, spegnere la macchina, posarla ed
abbandonare l’area di pericolo utilizzando la via di
fuga precedentemente determinata ( ). Attenzione
a rami che potrebbero cadere dall’alto ed evitare di
inciampare. (Vedi Fig. 1)
Figura.1
X
W
50mm
Z
Y
50mm
1
2
4. Sramatura
Con questo termine si intende il taglio di rami
dal tronco dell’albero abbattuto. Nel corso della
sramatura, non tagliare mai prima i rami più grandi
che indicano verso il basso e sui quali l’albero
poggia. Rimuovere i rami più piccoli con un taglio
solo, come illustrato nella Figura 2. In caso di rametti
che si trovano sotto sollecitazione, tagliarli dalla parte
inferiore verso l’alto in modo da evitare che la sega
possa incastrarsi.
Figura.2
5. Taglio di tronco d’albero
Con questo termine si intende il taglio sulla
lunghezza richiesta dell’albero abbattuto. Assicurarsi
sempre una posizione operativa sicura ed una
distribuzione uniforme del peso del corpo su
entrambi i piedi. Se possibile, il tronco dovrebbe
poggiare su rami, travi oppure cunei. Seguire le
istruzioni semplici previste per facili operazioni di
taglio.
Quando il tronco è sostenuto per l’intera lunghezza,
come illustrato nella Figura 3, praticare il taglio finale
dall’alto (soprataglio), evitando di toccare il terreno,
in quanto la catena diventerebbe molto meno affilata.
Figura.3
Quando il tronco è supportato su un lato, come
illustrato in figura 4, tagliare 1/3 del diametro dalla
parte inferiore (sottostrato) (1). Quindi praticare il
taglio finito tramite il sottostrato per incontrare (2) il
primo taglio.
61
3
1
1
2
Sega a catena senza filo I
Page 62

2
2
W
Y
Z
X
50mm
50mm
1
1
1
Figura.2
Figura.3
2
2/3
1
1/3
Figura.2
Figura.3
Figura.4
2
2/3
1
1/3
1
2
2/3
1/3
Figura.3
Figura.4
1
1/3
Quando il tronco è supportato da entrambe le
estremità, come illustrato nella Figura 5, tagliare
1/3 del diametro dall’alto (soprataglio) (1); Quindi
praticare il taglio finale tagliando i 2/3 inferiori per
incontrare (2) il primo taglio.
Figura.5
2
2/3
SYMBOLI
Per ridurre il rischio di lesioni,
l’utente deve leggere il manuale di
istruzioni.
Attenzione
62
1
1/3
2
Durante il taglio su terreni pendenti, l’operatore
deve posizionarsi sempre a monte del tronco, come
illustrato nella Figura 6. Per poter mantenere il
controllo completo al momento del “taglio completo”,
quando ci si avvicina alla fine del taglio ridurre la
pressione esercitata senza allentare minimamente
la presa sulle impugnature della sega a catena.
Fare sempre in modo che la catena della sega
non arrivi a toccare il terreno. Una volta terminato
completamento il taglio, prima di allontanare la sega
a catena dal punto di taglio, attendere che la catena
della sega si sia fermata completamente. Prima di
passare da un albero all’altro, spegnere sempre il
motore della sega a catena.
2/3
Indossare protezione per le orecchie.
Indossare protezione per gli occhi.
Indossare una mascherina
antipolvere.
Non esporre alla pioggia o all’acqua.
Indossare un dispositivo di
protezione per il capo.
Indossare guanti protettivi.
Calzature protettive.
Sega a catena senza filo I
Page 63

m
0
1
Avvertenza di pericolo da linee
elettriche aeree.
I prodotti elettrici non possono
essere gettati tra i rifiuti domestici.
L’apparecchio da rottamare deve
essere portato al centro di riciclaggio
per un corretto trattamento.
Controllare con le autorità locali o
con il rivenditore per localizzare il
centro di riciclaggio più vicino.
Non smaltire le batterie. Portare le
batterie scariche presso un punto
locale di riciclaggio o di raccolta.
Non bruciare.
Non esporre alla pioggia o all’acqua.
Deve essere evitato il contatto
dell’estremità della barra con
qualsiasi oggetto.
Il contatto con l’estremità può
provocare l’improvviso movimento
della barra verso l’alto o il
basso provocando gravi lesioni
all’operatore.
Usare sempre due mani quando si
adopera la motosega.
xINR18/65-y: Batterie cilindriche
agli ioni di litio con diametro di 18
mm e altezza max di 65 mm; “x”
rappresenta un numero di batterie
collegate in serie, vuoto se 1; “-y”
rappresenta un numero di batterie
collegate in parallelo, vuoto se 1.
63
Sega a catena senza filo I
Page 64

ELENCO DEI COMPONENTI
1. IMPUGNATURA POSTERIORE
2. INTERRUTTORE DI AVVIO/ARRESTO
3. TAPPO DEL SERBATOIO PER L’OLIO
4. IMPUGNATURA ANTERIORE
5. PROTEZIONE MANO
6. LAMA
7. CATENA DELLA SEGA
8. MANOPOLA PER TENSIONE DELLA CATENA
9. CUFFIA DI PROTEZIONE
10. UNITÀ BATTERIA *
11. SERRATURA A SCATTO UNITÀ BATTERIA *
12. PROTEZIONE POSTERIORE PER LA MANO
13. RAMPONE
14. INDICATORE DEL LIVELLO DELL’OLIO
15. PULSANTE DI SICUREZZA
16. ROCCHETTO PER CATENA
17. SIMBOLO DELLA DIREZIONE DI MARCIA E DI TAGLIO
64
18. UGELLO PER L’OLIO
19. MORSETTO A BARRA
20. FORO DI FISSAGGIO PER LA BARRA
21. TRAVERSINO DI GUIDA PER LA LAMA
22. COPRICATENA/CUSTODIA PER IL TRASPORTO*(FODERO)
23. FERMO DI TENSIONATURA DELLA CATENA (VEDI FIG. A)
24. IMPUGNATURA ASTA DI PROLUNGA*
25. POMELLO DI BLOCCAGGIO*
26. LEVA DI FISSAGGIO*
27. SEZIONE INTERNA DELL'ASTA*
28. POMELLO DI BLOCCAGGIO*
29. STAFFA DI ATTACCO ASTA DI PROLUNGA*
30. PULSANTE DI SICUREZZA SULL'IMPUGNATURA DELL'ASTA DI PROLUNGA*
31.
INTERRUTTORE DI ACCENSIONE/SPEGNIMENTO SULL'IMPUGNATURA ASTA DI PROLUNGA*
32.
TRACOLLA*
* Gli accessori illustrati o descritti nelle istruzioni per l’uso non sono sempre compresi nella
fornitura.
Sega a catena senza filo I
Page 65

DATI TECNICI
Codice WG322E WG322E.9 WG323E WG323E.9 (3 - designazione del macchinario, rappresentativa di motosega e potatore)
WG322E WG322E.9 WG323E WG323E.9
Tensione 20V Max**
Lunghezza della lama 25cm
Velocità della catena 3.8m/s
Capacità del serbatoio di scorta olio 130ml
Passo della catena 3/8"
Quantità degli elementi di trazione 40
Calibro della catena 0.043”
Tipo catena adattativo ES: 3/8.043-40E/ QIRUI : A0(T)-40E/ OREGON: 90PX040G
Tipo barra adattativo ES: ES104SDEA041/ QIRUI : PO10-43SR(T) / OREGON: 104MLEA041
Tempo di ricarica 5hrs
Peso (catena e barra inclusa) 2.8kg 2.4kg 4.6kg 4.2kg
**Voltaggio misurato senza carico. Il voltaggio iniziale della batteria raggiunge un massimo di 20 volt. Il voltaggio nominale è di 18 volt.
ACCESSORI
WG322E WG322E.9 WG323E WG323E.9
Catena per la sega 1 1 1 1
Barra 1 1 1 1
Custodia per il trasporto 1 1 1 1
Asta di prolunga (WA0166) / / 1 1
Caricabatteria (WA3760) 1 / 1 /
Unità batteria (WA3551) 1 / 1 /
Tracolla / / 1 1
Si raccomanda di acquistare tutti gli accessori nello stesso negozio in cui è stato acquistato l’attrezzo. Fare
riferimento alla confezione dell’accessorio per altri dettagli. Il personale del negozio può aiutarvi e consigliarvi .
65
Sega a catena senza filo I
Page 66

INFORMAZIONI SUL
RUMORE
WG322E
WG322E.9
Pressione sonora
ponderata A
Potenza sonora
ponderata A
KpA = 3.0 dB(A)
Indossare protezione per le orecchie.
LpA= 87.9 dB(A) LpA= 85.7 dB(A)
LwA= 96 dB(A) LwA= 96 dB(A)
WG323E
WG323E.9
INFORMAZIONI SULLA
VIBRAZIONE
Un aiuto a minimizzare il proprio rischio di
esposizione alle vibrazioni.
USARE sempre scalpelli, trapani e lame affilati.
Conservare questo strumento sempre in conformità
a queste istruzioni e mantenerlo ben lubrificato (dove
appropriato).
Se lo strumento deve essere usato regolarmente,
investire in accessori antivibrazione.
Pianificare il programma di lavoro in modo da
suddividere i lavori che implicano le maggiori
vibrazioni nell’arco di più giorni.
USO CONFORME ALLE NORME
La macchina è idonea per abbattere alberi come
anche per tagliare tronchi di alberi, rami, travi di
legno, tavole, ecc. e può essere utilizzata per eseguire
tagli longitudinalmente e trasversalmente rispetto
alla direzione delle fibre del legname. La macchina
non è adatta per l’esecuzione di tagli di materiali
minerali.
I valori totali di vibrazione sono determinati secondo
lo standard EN 60745:
Valore emissione
vibrazioni ah < 2.5 m/s2
Si può usare il valore totale della vibrazione
dichiarata per rapportare un attrezzo all’altro e anche
come verifica preliminare dell’espoziione.
66
AVVERTENZA: Il valore delle vibrazioni
emesse durante il reale utilizzo dello strumento
può differire dal valore dichiarato in base ai modi con
cui viene usato lo strumento, ai seguenti esempi e ad
altre variabili:
Come viene usato l’apparecchio e i materiali tagliati
o forati.
Le condizioni e la buona manutenzione dello
strumento.
L’uso dell’accessorio corretto per il taglio e la sua
affilatura, nonché le sue buone condizioni.
La stretta sull’impugnatura e l’eventuale utilizzo di
accessori antivibrazione.
L’adeguatezza dell’utilizzo dell’utensile rispetto a
quanto previsto.
Questo strumento potrebbe causare la
sindrome da vibrazioni mano-braccio se il suo
utilizzo non viene gestito correttamente.
AVVERTENZA: Per essere precisi, una stima
del livello di esposizione nelle attuali condizioni
di utilizzo dovrebbe anche tenere conto di tutte le
parti del ciclo operativo, come le volte in cui lo
strumento viene spento e il tempo in cui viene
lasciato girare a vuoto senza realmente fare il suo
lavoro. Questo potrebbe ridurre significativamente il
livello di esposizione sul periodo di lavoro totale.
Incertezza K = 1.5 m/s²
MONTAGGIO
AVVERTENZA! Non installare la
batteria prima che sia stata assemblata
completamente.
Maneggiando la catena della sega avere cura di
portare sempre dei guanti di protezione.
MONTAGGIO DELLA LAMA FISSA E DELLA
CATENA DELLA SEGA
1. Estrarre con attenzione tutti i componenti
dall’imballaggio.
2. Collocare la motosega su una superficie piana e
compatta.
3. Utilizzare esclusivamente catene WORX originali o
catene raccomandate per la barra di guida.
4. Posare la catena della sega (7) nella scanalatura
rotante della lama (6). Assicurarsi che la catena si
trovi nella direzione di funzionamento mettendola
a confronto con l’icona della catena sulla barra
di guida, oppure facendo riferimento al simbolo
della direzione della catena (17) sul corpo della
sega. Assicurarsi che il fermo di tensionatura della
catena (23) sia rivolto verso l’esterno. (Vedi Fig. A)
5. Posizionare le maglie di catena attorno al
rocchetto per catena (16) in modo tale che il
bullone di fissaggio (21) ed entrambi i traversi
di guida per la lama (19) arrivino a fare presa nel
foro longitudinale della lama (6). (Vedi Fig. B1, B2)
6. Controllare se tutte le parti sono posizionate
correttamente. Accertarsi che ci siano 3 maglie in
presa sul pignone motore (Vedi Fig. C1), evitare
pieghe come illustrato in Fig. C2. In caso di
pieghe, afferrare la catena sulla barra di guida
appena davanti alla piega e stendere la piega.
NOTA: la catena deve girare liberamente e non
avere pieghe.
7. Installare il copricatena (9) e serrare ruotando la
manopola tendicatena (8) in senso orario. (Vedi
Fig. D)
Sega a catena senza filo I
Page 67

AVVERTENZA: La catena non è ancora in
tensione. Applicare tensione alla catena
come descritto nella sezione “Tensionamento
della catena”. Ora è necessario ispezionare
la catena per assicurarsi che sia tesa
correttamente.
SERRAGGIO DELLA CATENA DELLA SEGA (Vedi
Fig. E1, E2)
NOTA: le catene nuove tenderanno ad allungarsi.
Verificare frequentemente il tensionamento della
catena dopo la prima installazione e serrare
opportunamente quando la catena (7) non aderisce
alla barra di guida (6).
AVVERTENZA:
● Rimuovere la batteria dall’apparecchio prima di
regolare la tensione della catena.
● Le lame della catena sono affilate. Usare ganti
protettivi quando si maneggia la catena.
● Mantenere sempre la tensione appropriata. Una
catena allentata aumenta i rischi di contraccolpi.
Una catena allentata può uscire dalla scanalatura
della barra. Questo può provocare lesioni
all’operatore e danneggiare la catena. Una catena
allentata provoca il rapido consumo di catena,
barra e pignone.
1. Poggiare la sega a catena su una superficie piana.
2. Ruotare la manopola per tensione della catena (8)
in senso orario fino a quando sarà stata raggiunta
la corretta tensione della catena.
NOTA: La tensione aumenta automaticamente
ruotando in senso orario la manopola per tensione
della catena (8). Il meccanismo d’arresto previene
l’allentamento della tensione della catena.
3. Per eliminare l’allentamento della catena,
inclinare la sega in avanti (Vedi Fig. E1) con la
punta della barra di guida (6) rivolta verso l’alto.
Ceci supprimera le mou de la chaîne.
4. Stringere completamente la manopola per
tensione catena (8) ruotandola in senso orario.
5. Ricontrollare la tensione regolata tramite la
manopola di tensionamento automatico della
catena. La corretta tensione della catena viene
raggiunta quando è possibile alzare la catena (7)
dalla barra (6) di circa la metà della profondità
della maglia di trazione, nel centro. Questa prova
deve essere eseguita sollevando la catena con
una mano, senza aggiungere altra forza al peso
della macchina. (Vedi Fig. E2)
NOTA: La tensione della catena (7) è corretta quando
è possibile sollevare quest’ultima dalla barra (6) e la
maglia di trazione si trova all’interno del binario della
barra (6).
NOTA: Durante il taglio la catena (7) si allenta,
perdendo la tensione corretta. Se la catena è
allentata, svitare completamente la manopola
per tensione della catena (8) o farle compiere tre
giri completi in senso antiorari, quindi serrare la
manopola (8) di nuovo per regolare la tensione della
catena ripetendo i passaggi 1-4 elencati sopra.
ASSEMBLARE L’ASTA CON PROLUNGA (solo
per WG323E, WG323E.9)
Allineare e inserire l’impugnatura dell’asta di
prolunga nell’albero. Ruotare il pomello di bloccaggio
in senso orario per bloccarla. (Vedi Fig. F1, F2)
NOTA: assicurarsi che l’albero sia saldamente
bloccato in posizione.
ASSEMBLAGGIO DELL’ASTA DI PROLUNGA
ALLA MACCHINA (Vedi Fig. G1)
Passaggio 1 Allineare e inserire la staffa di attacco
dell’asta di prolunga (29) nella sega.
Passaggio 2 Ruotare il pomello di bloccaggio (28) in
senso antiorario per bloccare l’asta di prolunga alla
macchina.
NOTA: assicurarsi che l’asta di prolunga sia
bloccata in posizione prima di mettere in
funzione la sega.
RIMOZIONE DELL’ASTA DI PROLUNGA (Vedi
Fig. G2)
Passaggio 1 Ruotare il pomello di bloccaggio (28) in
senso orario per sbloccare l’asta di prolunga tirarla
verso l’esterno
Passaggio 2 Fare scorrere la sega per staccare l’asta
di prolunga e rimuoverla.
AVVERTENZA!
• Quando si utilizza la macchina con l’asta di
prolunga, assicurarsi che la batteria sia stata
rimossa.
Regolazione della lunghezza dell’asta telescopica
Questa sega è dotata di un’asta telescopica che si
allunga da 2m (asta completamente ritratta) a 2.7m
(asta completamente estesa).
La leva di fissaggio (26) serve per mantenere l’asta
telescopica a qualsiasi lunghezza.
1. Per allungare l’asta telescopica, allentare l’asta
telescopica, come illustrato nella Fig H. L’asta
telescopica scorrerà liberamente.
2. Estrarre la sezione interna dell’asta fino a ottenere
la lunghezza di prolunga desiderata. Nota:
estendere l’asta telescopica solo alla lunghezza
minima necessaria per raggiungere il ramo da
tagliare.
3. Per bloccare l’asta telescopica in posizione,
serrare la leva di fissaggio, come illustrato nella
Fig. H.
LUBRIFICAZIONE DELLA CATENA
IMPORTANTE: Al momento della
consegna della sega a catena, il
contenitore per l’olio adesivo è vuoto.
Prima di utilizzare la macchina, è quindi
importante riempire il contenitore versandovi
l’apposito l’olio. Se si utilizza la sega a catena
senza l’olio adesivo per seghe a catena oppure
quando il livello dell’olio dovesse essere al di
sotto della marcatura del minimo i arrecano
seri danni alla catena.
NOTA: La lunga durata e le buone prestazioni
di taglio della catena dipendono da una
lubrificazione ottimale. Per questo motivo,
67
Sega a catena senza filo I
Page 68

durante l’esercizio, la lubrificazione della
catena della sega avviene automaticamente.
RIEMPIMENTO DELL’OLIO:
AVVERTENZA: rimuovere la batteria
prima di riempire il serbatoio dell’olio.
1. Poggiare su una superficie adatta la sega a catena
con il tappo del serbatoio per l’olio (3) rivolto
verso l’alto.
2. Pulire con uno straccio la zona intorno al tappo
del serbatoio per l’olio e svitare il tappo.
3. Aggiungere olio per motoseghe finché il serbatoio
è pieno.
4. Accertarsi che nel serbatoio dell’olio non possa
penetrarvi sporcizia, ricollocare il tappo dell’olio
(3) e serrarlo manualmente in senso orario.
IMPORTANTE: per consentire la
ventilazione tra il serbatoio per l’olio e la
zona circostante vi sono sul tappo del
serbatoio per l’olio piccoli canali di
compensazione. Al fine di evitare una
fuoriuscita di olio prestare sempre attenzione
affinché la sega, in caso di inattività, sia posata
sempre in posizione orizzontale (tappo del
serbatoio per l’olio (3) rivolto verso l’alto).
Al fine di evitare danni alla sega a catena,
utilizzare esclusivamente il raccomandato olio
biodegradabile adesivo (Grade: ISO VG32).
Questo è disponibile presso il negozio nel
quale è stata acquistata la motosega o in
qualsiasi altra ferramenta. Mai utilizzare olio
68
riciclato oppure olio vecchio. In caso di utilizzo
di olio non omologato si viene a perdere ogni
diritto di garanzia.
Non ingerire. Se il prodotto dovesse essere
ingerito, rivolgersi immediatamente a un
medico. Tenere fuori della portata dei bambini.
Conservare lontano da calore e fiamme libere.
CONTROLLO DELL’INGRASSATORE
AUTOMATICO
È possibile verificare il funzionamento corretto
dell’ingrassatore automatico mettendo in funzione la
motosega e puntando l’estremità della Barra di guida
(6) verso un pezzo di cartone o carta per terra.
Se si sviluppa un motivo crescente di lubrificante
sul cartone, l’ingrassatore automatico funziona
correttamente. Se non è presente alcun motivo
di lubrificante, nonostante il serbatoio sia pieno,
contattare l’agente del servizio clienti WORX o un
agente autorizzato dell’assistenza WORX.
ATTENZIONE: assicurarsi che la catena
non tocchi per terra. Lasciare uno spazio
di sicurezza di 30 cm.
FUNZIONAMENTO
1. PRIMA DI UTILIZZARE L’UTENSILE A
BATTERIA
ATTENZIONE Il caricabatteria e il gruppo
batteria sono progettati specificamente per
funzionare insieme; non tentare di utilizzare
altri dispositivi. Non inserire o far entrare oggetti
metallici nelle connessioni del caricabatteria o del
gruppo batteria; può verificarsi un guasto elettrico
pericoloso.
NOTA: L’unità batteria fornita è SCARICA ed è
necessario caricarla prima di utilizzarla.
Il caricatore fornito in dotazione è adatto alla batteria
agli ioni di Litio installata sulla macchina. Non usare
altri tipi di caricatore.
2. CARICAMENTO DELL’UNITÀ BATTERIA
La batteria agli ioni di Litio è protetta per impedire
che si scarichi completamente. Quando la batteria
è scarica, la macchina si spegne automaticamente
grazie d un circuito di protezione.
In ambienti caldi, dopo usi prolungati, il pacco
batteria può diventare troppo caldo per consentire il
caricamento. Consentire alla batteria di raffreddarsi
prima di ricaricarla.
3. RIMOZIONE E INSTALLAZIONE DELL’UNITÁ
BATTERIA (Vedi Fig. I1, I2, I3)
Premere il pulsante di rilascio del pacco batteria per
rimuoverlo dall’utensile. Dopo la ricarica, inserire
il pacco batteria nello sportello della batteria. Sarà
sufficiente una leggera pressione finché non si
sente un clic. Verificare che la batteria sia fissata
saldamente.
NOTA: Quando lo si rimuove tenere fermo il
pacco batterie per evitrare di lasciarlo cadere e
di farsi male.
4. Avviare ed arrestare la macchina (Vedi Fig.
J)
ATTENZIONE: prima di utilizzare
l’utensile senza filo controllare la
batteria. Utilizzare la batteria riportata
nell’elenco nella sezione degli accessori.
Per accendere la macchina, premere verso
l’interno il pulsante di sicurezza (15), poi premere
completamente l’interruttore di avvio/arresto (2) e
tenerlo in questa posizione. A questo punto si può
rilasciare il pulsante di sicurezza.
Per spegnere la macchina rilasciare l’interruttore
avvio/arresto.
5. TAGLIO
IMPORTANTE: Il serbatoio dell’olio è
pieno? Prima di iniziare a lavorare ed ad
intervalli regolari durante i lavori,
controllare l’indicatore del livello dell’olio (14).
(Vedi Fig. K1) Aggiungere dell’altro olio,
quando il livello dell’olio ha raggiunto il bordo
inferiore nella finestrella di controllo. Il
contenuto del serbatoio è sufficiente per circa
12 minuti, a seconda delle pause e
dell’intensità del lavoro.
Durante i lavori di taglio, controllare la tensione
della catena ogni 10 minuti.
Sega a catena senza filo I
Page 69

1) Inserire il pacco batteria nella macchina.
2) Assicurarsi che la sezione di tronco da tagliare
non giaccia per terra. Questo impedirà alla catena
(7) di toccare per terra mentre taglia il tronco.
Toccare per terra mentre la catena si muove è
pericoloso e smusserà la catena.
3) Utilizzare entrambe le mani per afferrare la sega
con sicurezza. Utilizzare sempre la mano sinistra
per afferrare la maniglia frontale (4) e la mano
destra per afferrare la maniglia posteriore (1). La
presa deve essere soldia. Afferrare saldamente le
impugnature tenendo le mani sempre ben serrate
(Vedi Fig. K2).
4) Accertarsi di avere un equilibrio stabile. Tenere i
piedi e lespalle ben divaricati. Distribuire il peso
in modo uniforme su entrambi i piedi.
5) Quando si è pronti a praticare un taglio, premere
il pulsante di sblocco (15) completamente in
dentro con il pollice destro e premere il grilletto.
Questo accenderà la sega. Rilasciare l’interruttore
per spegnere la sega. Assicurarsi che la sega
funzioni alla massima velocità prima di iniziare un
taglio.
6) Quando si inizia un taglio, posizionare lentamente
la catena in movimento contro il legno. Il legno
dovrebbe essere il più vicino possibile al corpo
della sega. Tenere la sega saldamente in posizione
per evitare possibili rimbalzi o scivolamenti
(movimento laterale) della sega.
7) Guidare la sega utilizzando una leggera pressione
e non esercitare una forza eccessiva sulla sega,
lasciando che la sega compia il proprio lavoro. Il
motore si sovraccaricherà e potrebbe bruciarsi.
La sega funzionerà meglio e più sicuramente se
utilizzato alla giusta velocità.
8) Rimuovere la sega da un taglio con la sega
funzionante alla massima velocità. Arrestare
la sega rilasciando il pulsante di accensione/
spegnimento (2). Assicurarsi che la catena si sia
arrestata prima di posare la sega.
9) Continuare a fare pratica su ciocchi di scarto in
un’area di lavoro sicura fino a quando ci si sente
a proprio agio, utilizzando un movimento fluido e
una velocità di taglio stabile.
Dispositivi di sicurezza anti-rinculo su questa
sega
Questa sega è dotata di una catena a basso rinculo
e di una barra di guida a rinculo ridotto. Entrambi gli
elementi riducono le probabilità di rinculo. Tuttavia,
può ancora verificarsi il rinculo con questa sega.
Per evitare il pericolo di contraccolpi della sega.
• Utilizzare entrambe le mani per afferrare la sega
quando è in funzione. La presa deve essere
soldia. Afferrare saldamente le impugnature
tenendo le mani sempre ben serrate.
• Fare in modo che tutti gli strumenti di sicurezza
siano in posizione sulla sega. Assicurarsi che
funzionino correttamente.
• Non inclinarsi eccessivamente in avanti né
tagliare tenendo la motosega più alta delle spalle.
• Avere cura di mettersi in posizione sicura e di
mantenere l’equilibrio.
• Tenere una posizione in piedi leggermente a
sinistra della sega. Questo fa sì che il corpo non
sia in linea diretta con la catena.
• Fare in modo che la punta della guida non tocchi
nulla quando la catena è in movimento.
• Non tentare mai di tagliare due tronchi allo stesso
tempo. Tagliare un solo tronco alla volta.
• Non affondare la punta della guida o non tentare
di eseguire tagli troppo angolati (incidendo il
legno utilizzando la punta della guida).
• Prestare attenzione allo spostamento di rami e
ad altre forze che possono chiudere il taglio e
bloccare o rallentare la catena.
• Utilizzare estrema cautela quando si reinserisce il
potatore in un taglio precedentemente iniziato.
• Utilizzare esclusivamente la catena e la barra di
guida (6) a basso rinculo fornite in dotazione con
questa sega a catena.
• Mai lavorare con una catena allentata, allargata
oppure eccessivamente consumata. Fare
attenzione ad avere sempre la corretta tensione
della catena.
Come utilizzare la sega in modo sicuro
1. Usare la motosega solo con un equilibrio saldo.
2. Tenere la motosega sul lato destro del corpo (Vedi
Fig. L).
3. La catena (7) deve essere in funzione alla
massima velocità prima di entrare a contatto con
il legno.
4. Utilizzare i ramponi (13) per fissare la motosega
nel legno prima di iniziare il taglio.
5. Utilizzare i ramponi come punto di leva durante il
taglio. (Vedi Fig. M)
6. Non utilizzare la motosega con le braccia
completamente estese, non tentare di segare
zone difficili da raggiungere e non stare in piedi
su una scala a pioli durante il taglio (Vedi Fig. N).
Mai utilizzare la motosega al di sopra
dell’altezza delle spalle.
TAGLIO DI LEGNAME SOTTO SOLLECITAZIONE
(VEDI FIG. O)
AVVERTENZA: Durante il taglio di un
ramo che si trova sotto sollecitazione,
calcolare sempre la possibilità che possa
scattare all’indietro. Liberando la tensione delle
fibre del legno è possibile che il ramo teso
possa colpire l’operatore e/o fargli perdere il
controllo sulla sega a catena.
Se il legno poggia su entrambi i lati, tagliare prima
da sopra (Y) (soprataglio) per un terzo attraverso
il tronco e poi tagliare il tronco completamente da
sotto (Z) allo stesso punto al fine di evitare che la
sega possa scheggiare oppure restare bloccata.
Così facendo, evitare che la catena della sega possa
arrivare a toccare per terra. Se il legname è posato su
un solo lato, tagliare prima da sotto (Y) (sottostrato)
per un terzo verso l’alto e poi tagliare il tronco
completamente da sopra (Z) allo stesso punto al
fine di evitare che la sega possa scheggiare oppure
restare bloccata.
69
Sega a catena senza filo I
Page 70

USO DELLA SEGA CON ASTA TELESCOPICA
(SOLO PER WG323E, WG323E.9)
Taglio con tracolla (Vedi Fig. P1)
Il palo di prolunga è fornito con una tracolla che dà
un sostegno supplementare quando si solleva sega a
catena. Agganciare la tracolla al palo di prolunga ed
attorno alla spalla. La tracolla può anche attenuare
l’impatto se sega a catena cadute al termine di un
taglio.
Taglio con l’asta di prolunga
1. Inserire il pacco batteria nella macchina.
2. Prima di tagliare un ramo alto, considerare tutti i
punti elencati nella sezione precedente “Potare i
rami” ma presta particolare attenzione al percorso
che potrebbe compiere il ramo cadendo.
ATTENZIONE: non posizionarsi
direttamente sotto un ramo che
viene tagliato. Fare in modo che i passanti
rimangano lontani. Non salire su una scala o
qualsiasi tipo di supporto instabile durante
l’utilizzo dell’utensile. Non utilizzare la sega
in prossimità di cavi, linee elettriche e
telefoniche. Mantenersi ad una distanza di
3m(10 piedi) da tutte le linee elettriche. (Vedi
Fig. P2-P5)
3. Assicurarsi che la sezione di tronco da tagliare
non giaccia per terra. Quando si utilizza la
sega con asta telescopica afferrare solo le zone
specificamente designate (Vedi Fig. P6). La
70
presa deve essere soldia. Afferrare saldamente
le impugnature tenendo le mani sempre ben
serrate.
4. Accertarsi di avere un equilibrio stabile. Tenere i
piedi e lespalle ben divaricati. Distribuire il peso
in modo uniforme su entrambi i piedi.
5. Quando si è pronti a praticare un taglio, premere
il pulsante di sblocco (30) completamente, quindi
premere a fondo l’interruttore di accensione/
spegnimento (31) (Vedi Fig. P7). Questo
accenderà la sega. Rilasciare l’interruttore per
spegnere la sega. Assicurarsi che la sega funzioni
alla massima velocità prima di iniziare un taglio.
6. Quando si inizia un taglio, posizionare lentamente
la catena in movimento contro il legno. Tenere la
sega saldamente in posizione per evitare possibili
rimbalzi o scivolamenti (movimento laterale) della
sega.
7. Guidare la sega utilizzando una leggera pressione
e non esercitare una forza eccessiva sulla sega.
Il motore si sovraccaricherà e potrebbe bruciarsi.
La sega funzionerà meglio e più sicuramente se
utilizzato alla giusta velocità.
8. Rimuovere la sega da un taglio con la sega
funzionante alla massima velocità. Arrestare
la sega rilasciando il pulsante di accensione/
spegnimento. Assicurarsi che la catena si sia
arrestata prima di posare la sega.
POTATURA DI UN ALBERO
AVVERTENZA: evitare i contraccolpi. Un
contraccolpo può dare luogo a lesioni
personali gravi o a un decesso.
Per evitare il rischio di contraccolpi, consultare
la sezione “Contraccolpi”.
AVVERTENZA: Non utilizzare la sega con asta
telescopica se l’operatore si trova:
• su un albero;
• su una scala o in qualsiasi altra posizione
instabile;
• in qualsiasi posizione scomoda.
Si potrebbe perdere il controllo della sega con
la possibilità che si verifichino lesioni personali
gravi.
AVVERTENZA: mentre si utilizza la sega
con asta telescopica non allungare le
braccia al di sopra delle spalle.
AVVERTENZA: rivolgersi a un professionista se
ci si trova ad affrontare condizioni operative
aldilà della proprie capacità.
La potatura di un albero consiste nel tagliare rami
di un albero in vita. Accertarsi di avere un equilibrio
stabile. Tenere i piedi e lespalle ben divaricati.
Distribuire il peso in modo uniforme su entrambi i
piedi.
Per potare un albero seguire le istruzioni descritte di
seguito.
1. Praticare il primo taglio a 15 cm dal tronco
dell’albero sulla parte inferiore del ramo
principale. Per effettuare questo taglio utilizzare la
barra di guida Tagliare 1/3 del diametro del ramo
(Vedere la Fig. P8).
2. Spostarsi da 5 a 10 cm verso l’esterno del ramo.
Effettuare un secondo taglio da sopra il ramo.
Continuare a tagliare finché il ramo si stacca
completamente dall’albero.
3. Eseguire un terzo taglio il più vicino possibile
al tronco nella parte inferiore del moncone del
ramo. Per effettuare questo taglio utilizzare
la barra di guida Tagliare 1/3 del diametro del
moncone del ramo.
4. Eseguire il quarto taglio direttamente sopra al
terzo Tagliare verso il basso per incontrare il terzo
taglio. In questo modo il moncone del ramo sarà
rimosso.
MANUTENZIONE DELLA
SEGA
Seguire le istruzioni per la manutenzione in questo
manuale. Il rischio di contraccolpi può essere ridotto
pulendo la sega ed effettuando la manutenzione della
guida. Ispezionare ed eseguire la manutenzione della
sega dopo ogni utilizzo. In questo modo si migliorano
le condizioni della sega.
NOTA: anche con la corretta affilatura, il rischio di
contraccolpi può aumentare ad ogni affilatura.
Sega a catena senza filo I
Page 71

MANUTENZIONE E
CONSERVAZIONE DELLA
MOTOSEGA
1. Rimuovere il pacco batteria
• Quando non viene utilizzata
• Prima di spostarsi da un luogo all’altro
• Prima di effettuarne la manutenzione
• Prima di cambiare gli accessori come la catena e
la barra di protezione.
2. Ispezionare la sega prima e dopo ogni
utilizzo. Ispezionare la sega da vicino
per vedere se la protezione o un altro
componente si sono danneggiati. Verificare
la presenza di eventuali danni che possono
compromettere la sicurezza dell’operatore
o il funzionamento della sega. Controllare
l’allineamento o inceppamento delle parti mobili.
Controllare la presenza di componenti rotti o
danneggiati. Non utilizzare la motosega se i danni
compromettono la sicurezza o il funzionamento.
Far riparare i danni da un centro di assistenza
autorizzato. Per trovare un centro di assistenza
autorizzato, visitare www.worx.com.
3. Mantenere la motosega con cura.
• Non esporre la sega alla pioggia o all’umidità.
• Mantenere la catena affilata, pulita e lubrificata
per prestazioni migliori e più sicure.
• Seguire le istruzioni di questo manuale per
affilare la catena.
• Tenere le maniglie asciutte, pulite e libere da olio
e grasso.
• Tutte le viti e i dadi devono essere serrati.
4. Fare riparare l’apparecchio solo ed
esclusivamente da personale specializzato e
solo impiegando pezzi di ricambio originali.
5. Ritirare sempre la motosega quando non è
in uso.
• in alto e sotto chiave, per evitare che possano
arrivarci i bambini
• in un luogo asciutto
• con la barra e il copricatena (9) in posizione
Manutenzione della barra
Per massimizzare la durata della barra, si consiglia di
seguire questi accorgimenti di manutenzione.
Le guide della barra che trasportano la catena
devono essere pulite prima di ritirare l’utensile o se è
presente sporcizia sulla barra o sulla catena.
Le guide devono essere pulite ogni volta che viene
rimossa la catena.
Per pulire le guide della barra
1. Rimuovere il coperchio della catena, la barra e la
catena. (vedere la sezione ASSEMBLAGGIO)
2. Utilizzando una spazzola metallica, un cacciavite
o un simile strumento adatto, rimuovere i residui
dalle guide della barra. (Vedi Fig. Q)
3. Assicurarsi di pulire accuratamente i passaggi
dell’olio.
Condizioni che richiedono la manutenzione
della catena (7) e della barra di guida (6):
• La sega taglia su un lato o a un angolo.
• È necessario forzare la sega per praticare il taglio.
• Fornitura di lubrificante inadeguata alla barra e
alla catena.
Verificare la condizione della barra di guida ogni volta
che si affila la catena. Una barra di guida usurata
danneggerà la catena e renderà difficoltoso il taglio.
Dopo ogni uso, con l’unità disconnessa dalla
sorgente di alimentazione, rimuovere tutta la
segatura dalla barra di guida e dal foro del dente.
Quando la parte superiore della guida è irregolare,
utilizzare una lima piatta per ripristinare le estremità
e i lati quadrati.
Limare le
estremità della
guida e i lati
Scanalatura usurata Scanalatura corretta
Sostituire la barra di guida quando la scanalatura
è usurata, la barra di guida è piegata o incrinata
o quando si verifica un surriscaldamento o una
sbavatura eccessiva delle guide. Se è necessaria
la sostituzione, utilizzare soltanto la barra di guida
specificata per la sega nell’elenco delle parti di
riparazione o sull’etichetta posta sulla motosega.
Sostituire/girare la catena della sega e la lama
Sostituire la catena quando i denti siano troppo
logorati per essere affilati o quando la catena si
rompa. Utilizzare soltanto le catene di ricambio
indicate in questo manuale.
Ispezionare la guida prima di affilare la catena. Una
guida logora o danneggiata è pericolosa e rende
l’operazione di taglio più difficile.
Poi installare il fermo di tensionamento (23) sulla
nuova barra stringendo in senso orario la vite. La
protuberanza del fermo (a) deve essere infilata nel
foro della barra. (Vedi Fig. R)
Affilatura della catena della sega
AVVERTENZA: Rimuovere il pacco
batteria dalla sega prima delle operazioni
di manutenzione. Lesioni gravi o morte
possono essere causate da folgorazione o
contatto del corpo con la catena in movimento.
Le lame della catena sono affilate. Usare ganti
protettivi quando si maneggia la catena.
Mantenere affilati e puliti gli utensili da taglio. La
sega eseguirà il suo lavoro in maniera più veloce
e più sicura. Una catena smussata causerà un
deterioramento eccessivo dei denti, della guida, della
catena e del motore. Se è necessario spingere con
forza la catena nel legno e se tagliando si producono
soltanto segatura e poche grandi schegge, vuol dire
che la catena è smussata.
LUBRIFICARE IL DENTE
AVVERTENZA Indossare guanti per
applicazioni intensive quando si esegue
la manutenzione o riparazione di questo
utensile.
Rimuovere sempre il pacco batteria dalla
sega prima di eseguire qualsiasi riparazione o
manutenzione sull’utensile.
squadrati
71
Sega a catena senza filo I
Page 72

NOTA: Non è necessario rimuovere la catena
o la barra per lubrificare il pignone della barra
di guida.
1. Pulire la barra ed il pignone.
2. Usando un ingrassatore a pressione, inserire il
puntale nel foro di lubrificazione ed iniettare il
grasso finché fuoriesce dai lati del pignone. (Vedi
Fig. S)
3. Ruotare il pignone e tirare la catena a mano
finché il lato ingrassato del pignone è in linea col
foro di lubrificazione. Ripetere la procedura di
lubrificazione.
TUTELA AMBIENTALE
I prodotti elettrici non possono essere gettati
tra i rifiuti domestici. L’apparecchio da
rottamare deve essere portato al centro di
riciclaggio per un corretto trattamento. Controllare
con le autorità locali o con il rivenditore per
localizzare il centro di riciclaggio più vicino.
INDIVIDUAZIONE DEI GUASTI
Qualora l’elettroutensile non dovesse funzionare correttamente, la tabella che segue illustra problemi che si
evidenziano in caso di guasto le possibili cause e le misure da adottare a rimedio del problema. Se non fosse
possibile, in base alla stessa, identificare ed eliminare il problema, rivolgersi all’officina Service di fiducia.
ATTENZIONE: Prima di iniziare la ricerca della causa del guasto spegnere l’elettroutensile ed
estrarre la batteria ricaricabile.
Problema Possibili cause Rimedi
La sega a catena
non funziona
La sega a catena
lavora
ad intermittenza.
72
Catena della sega
asciutta.
Catena/binario di
guida troppo caldi.
La sega a catena si
inceppa, vibra
oppure
non taglia
correttamente.
Batteria scarica.
Valvola di sicurezza difettosa.
Surriscaldamento
Pressione eccessiva applicata durante
il taglio.
Allentare l’attacco.
Contatto interno labile.
Interruttore avvio/arresto difettoso.
Manca olio nel serbatoio dell’olio.
La disaerazione nel tappo del serbatoio
per l’olio è otturata.
Canale della fuoriuscita dell’olio otturato.
Manca olio nel serbatoio dell’olio.
La disaerazione nel tappo del serbatoio
per l’olio è otturata.
Canale della fuoriuscita dell’olio
otturato.
Tensione della catena troppo alta.
Catena non più affilata.
Tensione della catena troppo lenta.
Catena non più affilata.
Catena eccessivamente consumata.
Dentatura della sega indica nella
direzione sbagliata.
Caricare il pacco batteria.
Sostituire la valvola.
Posizionare la macchina in un logo fresco e
ventilato per farla raffreddare
Applicare una pressione relativamente
inferiore durante il taglio.
Rivolgersi ad un’officina specializzata.
Rivolgersi ad un’officina specializzata.
Rivolgersi ad un’officina specializzata.
Versare dell’olio riempiendo il serbatoio.
Pulire il tappo del serbatoio per l’olio.
Liberare il canale della fuoriuscita dell’olio.
Versare dell’olio riempiendo il serbatoio.
Pulire il tappo del serbatoio per l’olio.
Liberare il canale della fuoriuscita dell’olio.
Regolare la tensione della catena.
Riaffilare la catena oppure sostituirla.
Regolare la tensione della catena.
Riaffilare la catena oppure sostituirla.
Sostituire la catena.
Montare di nuovo la catena della sega con la
dentatura che indica nella direzione corretta.
Sega a catena senza filo I
Page 73

DICHIARAZIONE DI
CONFORMITÀ
Noi,
POSITEC Germany GmbH
Konrad-Adenauer-Ufer 37
50668 Köln
Dichiariamo che l’apparecchio,
Descrizione Motosega e potatore a batteria
Codice WG322E WG322E.9 WG323E
WG323E.9 (3 - designazione del macchinario,
rappresentativa di motosega e potatore)
Funzioni Taglio legno
È conforme alle seguenti direttive,
2006/42/EC
2014/30/EU
2011/65/EU
2000/14/EC modificato da 2005/88/EC
L’organismo competente
Nome: Intertek Deutschland GmbH (organismo
notificato 0905)
Indirizzo: Stangenstraße 1, 70771
LEINFELDEN-ECHTERDINGEN
Certificazione N.: 17SHW1086-01 (WG322E
WG322E.9) 17SHW1166-01 (WG323E
WG323E.9)
WG322E WG322E.9
2000/14/EC modificato da 2005/88/EC:
- Procedura di conformità come da Annex V
- Potenza acustica pesata 94.7 dB(A)
- Massima potenza di rumore garantita 96 dB(A)
WG323E WG323E.9
2000/14/EC modificato da 2005/88/EC:
- Procedura di conformità come da Annex V
- Potenza acustica pesata 95.2 dB(A)
- Massima potenza di rumore garantita 96 dB(A)
Conforme a,
EN 60745-1
EN 60745-2-13
EN ISO 3744
EN 55014-1
EN 55014-2
Parti di EN ISO11680-1
Il responsabile autorizzato alla compilazione della
documentazione tecnica,
Nome Russell Nicholson
Indirizzo Positec Power Tools (Europe) Ltd, PO
Box 6242, Newbury, RG14 9LT, UK
Suzhou 2017/07/27
Allen Ding
Vice capo ingegnere, testing e certificazione
73
Sega a catena senza filo I
Page 74

ADVERTENCIA DE
SEGURIDAD GENERALES
SOBRE HERRAMIENTAS
ELÉCTRICAS
¡ Advertencia! Leer todas las
instrucciones. Si no se respetan las
instrucciones, existe un riesgo de descargas
eléctricas, de incendio y/o de graves heridas.
Conserve todas las advertencias e
instrucciones para futuras consultas.
El término “herramienta eléctrica” en todas las
advertencias siguientes corresponde a la herramienta
eléctrica con o sin cable.
1. ZONA DE TRABAJO
a) Mantener su lugar de trabajo limpio y bien
iluminado. Bancos de trabajo desordenados y
lugares oscuros invitan a los accidentes.
b)
No utilizar herramientas eléctricas en
atmósferas explosivas, como por ejemplo en
presencia de líquidos inflamables, gases o
polvo. Las herramientas eléctricas crean chispas
que pueden encender el polvo o los vapores.
c)
Mantener alejados a los niños y visitantes
mientras opera una herramienta eléctrica.
Las distracciones pueden hacerle perder el control.
2. SEGURIDAD ELÉCTRICA
74
a) Los enchufes de la herramienta eléctrica
deben encajar perfectamente en el
tomacorriente. Nunca modificar el enchufe
de ninguna manera. No utilizar adaptadores
con herramientas eléctricas conectadas
a tierra. Los enchufes no modificados y los
que encajan perfectamente en el tomacorriente
reducirán el riesgo de descarga eléctrica.
b) Evitar el contacto del cuerpo con
superficies conectadas a tierra tales como
caños, radiadores, cocinas y heladeras.
Existe un riesgo creciente de descarga eléctrica si
su cuerpo queda conectado a tierra.
c) No exponer las herramientas eléctricas a la
lluvia y no guardar en lugares húmedos. El
agua que penetra en ellas aumentará el riesgo de
una descarga eléctrica.
d)
No abusar del cable. Nunca utilizar el cable
para transportar, tirar o desenchufar la
herramienta eléctrica. Mantener el cable
alejado del calor, del aceite, de bordes agudos
o piezas móviles. Los cables dañados o enredadas
aumentan el riesgo de descarga eléctrica.
e)
Cuando utilice su herramienta eléctrica al
aire libre, emplear un prolongador apto para
uso en exteriores. El empleo de cables para uso
al aire libre reduce el riesgo de descarga eléctrica.
f) Si es necesario utilizar la herramienta
motorizada en un lugar muy húmedo, utilice
una fuente de alimentación con dispositivo
de corriente residual (RCD). El uso de un RCD
reduce el riesgo de descarga eléctrica.
3. SEGURIDAD PERSONAL
a) Mantenerse alerta, poner atención en lo que
está haciendo y utilice el sentido común
mientras opera una herramienta eléctrica.
No emplear la herramienta cuando se
encuentre cansado o bajo la influencia de
drogas, alcohol o medicación. Un momento
de falta de atención durante el manejo de
herramientas eléctricas puede dar lugar a daños
corporales serios.
b)
Utilizar equipo de seguridad. Usar siempre
protección ocular. Equipo de seguridad como
máscaras contra el polvo, zapatos antideslizantes
de seguridad, sombrero o protección auditiva para
condiciones apropiadas reducirá daños corporales.
c)
Evite el arranque accidental. Asegúrese de que
el interruptor se encuentra desactivado antes
de enchufar la máquina o colocar la batería,
al tomar la herramienta o transportarla.
Transportar herramientas con el dedo en el
interruptor o enchufar la herramienta cuando el
interruptor está encendido invitan a los accidentes.
d) Retire llaves de ajuste o llaves inglesas
antes de poner la herramienta en
funcionamiento. Una llave que queda unida a
una pieza móvil de la herramienta puede originar
daños corporales.
e) No extralimitarse. Mantenerse firme y con
buen equilibrio en todo momento. Esto
permite un mejor control de la herramienta en
situaciones inesperadas.
f) Vestirse apropiadamente. No usar ropa
suelta ni alhajas. Mantener su cabello, ropa
y guantes alejados de las piezas móviles. La
ropa suelta, las alhajas o el cabello largo pueden
ser atrapados por las piezas móviles.
g) Si se proporcionan dispositivos para
la extracción y recolección de polvo,
asegurarse de que estos estén conectados
y utilizados correctamente. El uso de estos
dispositivos puede reducir peligros relacionados
con el polvo.
4. MANTENIMIENTO DE LA HERRAMIENTA
MOTORIZADA
a) No forzar la herramienta eléctrica. Utilizar
la herramienta eléctrica correcta para su
aplicación. La herramienta eléctrica correcta
hará el trabajo mejor y más seguro a la velocidad
para la cual fue diseñada.
b)
No utilizar la herramienta eléctrica si el
interruptor no la enciende o apaga. Cualquier
herramienta eléctrica que no pueda ser controlada
con el interruptor es peligrosa y debe ser reparada.
c) Desconecte el enchufe de la toma eléctrica
y/o la batería de la herramienta antes
de realizar cualquier ajuste, cambiar un
accesorio o guardar la herramienta. Tales
medidas de seguridad preventivas reducen el
Motosierra inalámbrica ES
Page 75

riesgo de arranque accidental de la herramienta.
d) Mantener las herramientas eléctricas que
no usa fuera del alcance de los niños y no
permita que personas no familiarizadas con
la herramienta o con estas instrucciones
maneje la herramienta eléctrica. Las
herramientas eléctricas son peligrosas en manos
de usuarios inexpertos.
e) Revisar las herramientas eléctricas.
Comprobar si hay desalineamiento o
atascamiento de piezas móviles, rotura de
piezas en general y cualquier otra condición
que pueda afectar la operación normal de la
herramienta. Si se verifican daños, recurra
a un service calificado antes de volver a
usar la herramienta. Las herramientas mal
mantenidas causan muchos accidentes.
f) Mantener las piezas de corte limpias y
afiladas. Puesto que son menos probables de
atascarse y más fáciles de controlar.
g) Utilizar la herramienta eléctrica, accesorios
y brocas etc., de acuerdo con estas
instrucciones y de la manera prevista para
el tipo particular de herramienta eléctrica,
teniendo en cuenta las condiciones de
trabajo y el trabajo a ser realizado. El uso de
la herramienta eléctrica para otras operaciones
distintas de lo previsto podría dar lugar a una
situación peligrosa.
5. UTILIZACIÓN Y MANTENIMIENTO DE LA
BATERÍA
a)
Recargar solamente con el cargador indicado
por el fabricante. Un cargador adaptado a un
tipo de batería podría crear un riesgo de incendio
si se utiliza con una diferente batería.
b)
Utilizar las herramientas eléctricas
solamente con baterías especialmente
adaptadas. La utilización de cualquier otra batería
podría causar un riesgo de incendio o herida.
c) Cuando la batería no está en uso, tenerla
lejos de los objetos metálicos como los
trombones, las piezas de moneda, las
llaves, los clavos, los tornillos, o cualquier
otro pequeño objeto metálico susceptibles
de establecer una conexión de un terminal
a otra. El cortocircuito de un terminal a otra
puede causar quemaduras o un incendio.
d) Hay una fuga de líquido de la batería. Evitar
todo contacto. Si entre accidentalmente en
contacto con este líquido, lavar con agua
limpia. En caso de contacto con los ojos,
consultar a un médico. El líquido presente
en las baterías puede causar irritaciones o
quemaduras.
6. REPARACIÓN
a)
Permitir que el mantenimiento de su
herramienta eléctrica sea efectuado por una
persona calificada usando solamente piezas
de recambio idénticas. Esto es primordial para
mantener la seguridad de la herramienta eléctrica.
INSTRUCCIONES DE
SEGURIDAD PARA SIERRAS
DE CADENA
1. Mantenga alejadas todas las partes
del cuerpo de la cadena de sierra en
funcionamiento. Antes de poner en marcha
la sierra cerciórese primero de que la
cadena de sierra no toque en ningún lado.
Un momento de distracción al trabajar con la
sierra de cadena puede causar que la cadena de
sierra se enganche con su vestimenta o alguna
parte del cuerpo.
2.
Sujete la sierra de cadena agarrando la
empuñadura posterior con la mano derecha y
la empuñadura anterior con la mano izquierda.
La sujeción de la sierra de cadena en una posición
de trabajo diferente, aumenta el riesgo de accidente
y, por lo tanto, no debe aplicarse.
3. La cubierta de esta motosierra podría
entrar en contacto con conductores
eléctricos ocultos durante el uso;
sosténgala exclusivamente por sus
superficies de empuñadura aisladas. Una
motosierra que entrase en contacto con un
conductor eléctrico “activo” podría transmitir
electricidad a sus piezas metálicas externas y
derivar en una descarga eléctrica al usuario.
4.
Colóquese unas gafas de protección y
unos protectores auditivos. Se recomienda
emplear un equipo de protección adicional
para la cabeza, manos, piernas y pies. Un
equipo de protección adecuado reduce el riesgo
de accidente al salir violentamente lanzadas las
virutas o al tocar fortuitamente la cadena de sierra.
5.
No trabaje con la sierra de cadena estando
subido a un árbol. La utilización de la sierra de
cadena sobre un árbol puede provocar un accidente.
6.
Siempre preste atención a trabajar
manteniendo una postura estable, y
solamente use la sierra de cadena si se
encuentra sobre un firme consistente,
seguro, y plano. Al utilizar una escalera en firmes
resbaladizos o inestables puede llegar a perder el
equilibrio, y el control sobre la sierra de cadena.
7. Esté prevenido al cortar una rama que
se encuentre bajo tensión, ya que podría
retroceder elásticamente. A medida que
va cortando la rama puede que la tensión a la
que está sometida haga que ésta se desgarre
bruscamente y golpee al usuario o/y que le haga
perder el control sobre la sierra de cadena.
8. Proceda con especial cautela al cortar
matorrales y árboles jóvenes. El material
fino puede engancharse con la cadena de sierra
y golpearle o hacerle perder el equilibrio.
9. Transporte la sierra de cadena sujetándola
por la empuñadura delantera con la cadena
de sierra detenida y la espada señalando
hacia atrás. Al transportar y guardar la
sierra de cadena montar siempre la funda
protectora. El manejo con precaución de
75
Motosierra inalámbrica ES
Page 76

la sierra de cadena reduce el riesgo de un
contacto accidental con la cadena de sierra en
funcionamiento.
10.
Aténgase a las instrucciones de lubricación,
tensado de la cadena, y cambio de los
accesorios. Una cadena incorrectamente
tensada o insuficientemente lubricada puede
romperse, o ser más propensa al rechazo.
11.
Mantenga las empuñaduras secas, limpias
y libres de aceite o grasa. Las empuñaduras
manchadas de aceite o grasa son resbaladizas y
pueden hacerle perder el control sobre el aparato.
12. Únicamente serrar madera. Solamente
emplear la sierra de cadena para aquellos
trabajos para los que fue concebida –
Ejemplo: No utilice la sierra de cadena para
serrar plástico, ladrillos, o materiales de
construcción si éstos no son de madera. La
utilización de la sierra de cadena para trabajos
para los que no ha sido concebida puede
conducir a situaciones de peligro.
CAUSAS Y PREVENCIÓN
CONTRA EL RECHAZO DE
LA SIERRA:
El rechazo puede producirse si la punta de la espada
alcanza a tocar un objeto, o si la ranura de corte se
estrecha al ceder la madera que se está cortando,
76
hacienda que se atasque la cadena de sierra.
Si la punta de la espada alcanza a tocar un objeto,
ello puede provocar una fuerza de reacción
inesperada hacia atrás, haciendo que la espada sea
impulsada hacia arriba en dirección al usuario.
Al atascarse la cadena de sierra en el borde superior
de la espada ello puede provocar que la espada se
proyectada bruscamente en dirección al usuario.
Cada una de las reacciones descritas puede hacerle
perder el control sobre la sierra y causarle un
accidente grave. No trabaje confiando exclusivamente
en los dispositivos de seguridad que incorpora la
sierra de cadena. Como usurario de una sierra de
cadena deberá tomar diversas medidas preventivas
para poder trabajar sin accidentarse ni lesionarse.
El rechazo es ocasionado por la aplicación o manejo
incorrecto de la herramienta eléctrica. Es posible
evitarlo ateniéndose a las medidas preventivas que a
continuación se detallan:
- Sujete la sierra con ambas manos y
abarcando las empuñaduras de la sierra de
cadena con el pulgar y los dedos. Coloque
su cuerpo y brazos en una postura que le
permita oponerse a las fuerzas de rechazo.
Tomando unas medidas oportunas, el usuario es
capaz de controlar las fuerzas de rechazo. Jamás
suelte la sierra de cadena.
- Evite posturas anormales y no sierre por
encima de la altura del hombro. De esta
manera se evita el contacto fortuito con la punta
de la espada y además se alcanza un mejor
control de la sierra de cadena al presentarse unas
situaciones inesperadas.
- Siempre utilice las espadas y cadenas
de sierra de repuesto que el fabricante
prescribe. Las espadas y cadenas de sierra
incorrectas pueden provocar la rotura de la
cadena o un rechazo.
- Respete las instrucciones del fabricante
para el afilado y mantenimiento de
la cadena de sierra. Los limitadores de
profundidad demasiado bajos aumentan el riesgo
de que se origine un rechazo.
RIESGOS RESIDUALES
Aunque el aparato se utilice de forma adecuada,
siempre existen riesgos residuales imposibles
de prevenir. Dependiendo del tipo y el diseño del
producto, pueden existir los peligros potenciales que
se indican a continuación:
- Contacto con los dientes de sierra expuestos
(peligro de corte)
- Acceso a la sierra rotativa de la cadena (peligro
de corte)
- Movimiento brusco e imprevisible de la guía
(peligro de corte)
- Expulsión de piezas desde la cadena de la sierra
(peligro de corte/penetración)
- Expulsión de trozos de la pieza de trabajo
- Contacto del aceite con la piel
- Pérdida de capacidad auditiva, si no se utiliza una
protección auditiva adecuada durante el trabajo
ADVERTENCIAS DE
SEGURIDAD PARA
LA MOTOSIERRA DE
MORDAZA CON EL POSTE
TELESCÓPICO
1. La máquina no se debe utilizar cuando el
operador esté cansado, enfermo o bajo la
influencia del alcohol u otras drogas.
2. Para reducir el riesgo, mantenga a los
transeúntes a una distancia segura de la máquina
mientras esta esté en funcionamiento.
3. Sea consciente del peligro que suponen las
posiciones de funcionamiento, así como el riesgo
de ser golpeado por ramas que caen o ramas
que, una vez golpeen el suelo, rebotan. El usuario
puede ser golpeado por ramas que caen o por
aquellas que rebotan después de golpear en el
suelo. Quite las ramas de las secciones.
4. Mantenga un equilibrio firme durante el uso de la
máquina. Utilice el arnés proporcionado.
5. Mantenga la máquina alejada una distancia
suficiente de tendidos eléctricos elevados.
Motosierra inalámbrica ES
Page 77

ADVERTENCIAS DE SEGURIDAD PARA LA BATERÍA
a) No desmonte, abra o destruya las pilas o las
baterías recargables.
b) No provoque un cortocircuito en la
batería. No almacene las baterías de forma
descuidada en una caja o cajón donde
podría provocar un cortocircuito entre ellas
o mediante otros objetos metálicos. Cuando
la batería no esté siendo utilizada, manténgala
alejada de objetos metálicos, como clips de papel,
monedas, llaves, clavos, tornillos u otros objetos
metálicos pequeños, que pueden posibilitar
la conexión de un borne con otro. Al provocar
un cortocircuito con los bornes de la batería se
pueden sufrir quemaduras o generar un incendio.
c)
No exponga las baterías al calor o al fuego.
No las guarde expuestas directamente al sol.
d) No exponga las baterías a impactos
mecánicos.
e) En caso de que la batería tenga fugas de
líquido, no permita que el líquido entre
en contacto con la piel o los ojos. Si se
produce el contacto, lave la zona afectada
con grandes cantidades de agua y acuda a
un médico.
f) Acuda a un médico inmediatamente si se ha
ingerido una pila o una batería.
g) Mantenga las baterías limpias y secas.
h) Limpie los bornes de la batería con un paño
limpio si se ensucian.
i) Cargue la batería antes de utilizarla.
Consulte siempre estas instrucciones
y aplique el procedimiento de carga
adecuado.
j) No deje la batería cargándose durante
prolongados períodos de tiempo cuando no
se utilice.
k) Después de prolongados períodos de
almacenamiento, puede que sea necesario
cargar y descargar la batería varias veces
para obtener el máximo rendimiento.
l) Las baterías recargables proporcionan
mejor rendimiento cuando se utilizan a
temperatura ambiente normal (20ºC ± 5 ºC).
m) Al eliminar las baterías, mantenga las
baterías de distinto sistema electroquímico
separadas unas de otras.
n)
Recargue solo con el cargador indicado por
WORX. No utilice ningún otro cargador que
no sea el específicamente proporcionado
para el uso con este equipo. El cargador
adecuado para un tipo de baterías puede provocar
un incendio si se utiliza con otro tipo de baterías.
o) No utilice ninguna batería distinta a la
diseñada para utilizarse con el aparato.
p) Mantenga la batería fuera del alcance de los
niños.
q) Conserve la documentación original del
producto por si tuviera que consultarla en
otro momento.
r) Extraiga la batería del aparato cuando no lo
utilice.
s) Deshágase del producto correctamente.
GUARDE ESTAS INSTRUCCIONES
Instrucciones para la realización correcta de
operaciones de talado, poda y corte de cuña
1. Talado de árboles
Si los trabajos de troceado y de tala son realizados
al mismo tiempo por varias personas, la separación
entre las personas dedicadas a trocear y aquellas
encargadas de talar deberá ser al menos igual al
doble de la altura del árbol a talar. Cuide que al talar
árboles no ponga en peligro a otras personas, que
no puedan dañarse tendidos eléctricos, y que no
se provoquen daños materiales. En caso de que un
árbol alcance a tocar un tendido eléctrico, deberá
informarse de inmediato a la compañía eléctrica.
Al serrar en declives, se recomienda que el usuario
se sitúe en lado de arriba del árbol a talar, ya que una
vez talado, éste tenderá a rodar o deslizar hacia abajo.
Antes de talar el árbol deberá planificarse y
despejarse, si procede, la trayectoria de escape.
Dicha vía de escape debe ir diagonalmente en
dirección opuesta a la dirección de caída prevista, tal
como puede verse en la Figura 1.
Antes del talado deberá tenerse en cuenta la
inclinación natural del árbol, la posición de las ramas
más grandes, y el sentido en que sopla el viento para
poder predecir la dirección de caída del árbol.
La suciedad, piedras, corteza suelta, clavos, grapas y
alambre deberán retirarse del árbol.
2. Corte de la cuña
Realice un corte de 1/3 del diámetro del árbol en
sentido perpendicular a la dirección de caída, tal
como se muestra en la figura 1. Realice primero el
corte inferior horizontal (W). Con ello se evita que la
cadena de sierra o la espada se atasquen al efectuar
el corte inclinado de la cuña (X).
3. Corte de talado
Realice el corte de talado (Y), como mínimo, 50
mm más alto que el corte de muesca, tal como
puede verse en la figura 1. Sierre el corte de talado
paralelamente al corte inferior horizontal de la cuña.
Profundice el corte de talado cuidando que quede
todavía una costilla que pueda actuar a modo de
bisagra. Esta costilla de madera evita que el árbol
pueda girarse y se desplome en dirección incorrecta.
No sierre esta costilla de madera.
Al profundizar el corte hasta el grosor indicado para
la costilla de madera, el árbol debería comenzar a
desplomarse. En caso de apreciar que el árbol tiende
a caer en una dirección diferente de la prevista, o
que se incline hacia atrás y aprisione la cadena de
sierra, interrumpa el corte e inserte en éste cuñas de
madera, plástico o aluminio (Z) para obligar al árbol a
caer en la dirección prevista ( ).
77
Motosierra inalámbrica ES
Page 78

3
2
2
W
Y
Z
X
50mm
50mm
1
1
1
Figura.1
3
2
2
Y
Z
X
50mm
50mm
1
1
1
2
2
W
Y
Z
X
50mm
50mm
1
1
1
Figura.2
Figura.3
Figura.4
2
2/3
1
1/3
Figura.2
Figura.3
Figura.4
Al comenzar a desplomarse el árbol, saque la sierra
de cadena del corte, desconéctela, deposítela, y
abandone el área de peligro siguiendo la trayectoria
de escape prevista ( ). Tenga cuidado con las ramas
que puedan caer y procure no tropezar. (Ver Fig. 1)
Figura.1
Si el tronco está apoyado por un extremo, tal como
se muestra en la figura 4, corte 1/3 del diámetro por
la parte inferior (1). A continuación, realice el corte de
acabado cortando por la parte superior hasta llegar al
primer corte (2).
3
50mm
X
Z
Y
50mm
W
4. Poda
Este trabajo consiste en cortar a ras con el tronco las
ramas del árbol ya talado. Al podar el árbol, no corte
por el momento aquellas ramas grandes sobre las
que está apoyado el árbol. Retire las ramas pequeñas
de un solo corte, tal como se muestra en la figura
2. Las ramas en tensión deberán cortarse de abajo
hacia arriba para evitar que la cadena de sierra se
atasque.
1
2
Figura.2
78
5. Troceado del tronco
Este trabajo consiste en ir cortando en trozos el árbol
talado. Observe en mantener una posición estable y
distribuya por igual entre ambos pies el peso de su
cuerpo. Siempre que sea posible, el tronco deberá
reposar sobre ramas, vigas o cuñas. Podrá serrar
con mayor facilidad si se atiene a estas sencillas
indicaciones.
Si el tronco está apoyado en toda su longitud, tal
como se muestra en la figura 3, se corta desde arriba
(corte superior); evite el contacto con el suelo, ya que
esto perjudicaría al filo de la cadena.
Figura.3
1
1
1/3
2
1
Si el tronco está apoyado por ambos extremos,
tal como se muestra en la figura 5, corte 1/3 del
diámetro desde la parte superior (corte superior) (1).
A continuación, finalice el corte cortando por la parte
inferior los 2/3 restantes hasta encontrarse con el
primer corte (2).
2
2/3
Figura.5
1
1/3
Para cortar en una pendiente, colóquese siempre
en la parte superior del tronco, tal como se muestra
en la figura 6. Para mantener plenamente el control
sobre el aparato al finalizar el corte, ir reduciendo
poco antes la presión de aplicación, sin dejar de
sujetar con igual firmeza las empuñaduras de la
sierra de cadena. Preste atención a que la cadena
de sierra no toque el suelo. Una vez finalizado el
corte, espere a que se haya detenido la cadena de
sierra antes de retirar la sierra de cadena. Siempre
desconecte el motor de la sierra de cadena antes de
trasladarse a otro punto.
2
2/3
Motosierra inalámbrica ES
Page 79

2
2/3
1
1/3
1
2
2/3
1/3
Figura.3
SÍMBOLOS
m
0
1
Peligro con las líneas eléctricas
aéreas.
Los residuos de aparatos
eléctricos y electrónicos no
deben depositarse en la basura
doméstica. Se deben reciclar en
las instalaciones especializadas.
Consulte a las autoridades locales o
el establecimiento para saber cómo
reciclar estos productos.
No tirar las baterías. Las baterías
agotadas deben llevarse al punto
local de
recogida o reciclaje de residuos.
Para reducir el riesgo de lesión, lea el
manual de instrucciones.
ADVERTENCIA
Utilícese protección auditiva
No quemar
No exponer a la lluvia o al agua
79
Se debe evitar el contacto de la punta
Utilícese protección ocular
de la barra guía con cualquier tipo de
objetos.
El contacto de la punta puede
Utilícese máscara antipolvo
causar que la barra guía se mueva
repentinamente hacia arriba y abajo,
lo que
podría causar lesiones graves para
el usuario.
Proteger el aparato de la lluvia.
Utilice ambas manos para operar la
Llevar casco.
sierra.
xINR18/65-y: Celdas de batería de
Llevar guantes protectores
ion-litio cilíndricas con un diámetro
y altura máximos de 18 y 65 mm,
respectivamente; la “x” representa
un número de celdas conectadas
Llevar calzado de seguridad
en serie (en blanco si es 1);“-y”
representa un número de celdas
conectadas en paralelo (en blanco
si es 1).
Motosierra inalámbrica ES
Page 80

LISTA DE COMPONENTES
1. EMPUÑADURA POSTERIOR
2. INTERRUPTOR DE CONEXIÓN/DESCONEXIÓN
3. TAPÓN DEL DEPÓSITO DE ACEITE
4. EMPUÑADURA DELANTERA
5. PROTECCIÓN PARA LAS MANOS
6. ESPADA
7. CADENA DE SIERRA
8. BOTÓN TENSOR DE LA CADENA
9. CUBIERTA
10. BATERÍA *
11. BLOQUEO DE LA BATERÍA*
12. PROTECTOR DE MANOS TRASERO
13. PUNTA AMORTIGUADORA
14. MEDIDOR DEL NIVEL DE ACEITE
15. BLOQUEADOR DE CONEXIÓN
16. RUEDA DE CADENA
17. SÍMBOLOS INDICADORES DEL SENTIDO DE MARCHA Y CORTE
80
18. BOQUILLA DE ACEITE
19. ABRAZADERA DE BARRA
20. TORNILLO DE FIJACIÓN DE LA ESPADA
21. NERVIO-GUÍA DE LA ESPADA
22. ALOJAMIENTO DE LA ESPADA Y LA CADENA/CUBIERTA DE TRANSPORTE*(FUNDA)
23. PESTILLO DE LA TENSIÓN DE LA CADENA (VER FIG. A)
24. MANGO DE LA PÉRTIGA DE EXTENSIÓN*
25. MANDO DE BLOQUEO*
26. PALANCA DE FIJACIÓN*
27. PÉRTIGA INTERIOR*
28. MANDO DE BLOQUEO*
29. SOPORTE DE CONEXIÓN DE LA PÉRTIGA DE EXTENSIÓN*
30. BOTÓN DE BLOQUEO DEL MANGO DE LA PÉRTIGA DE EXTENSIÓN*
31. INTERRUPTOR DE ENCENDIDO Y APAGADO DEL MANGO DE LA PÉRTIGA DE EXTENSIÓN*
32. CORREAS PARA EL HOMBRO*
*¡Los accesorios descritos e ilustrados no corresponden en parte al material que se adjunta!
Motosierra inalámbrica ES
Page 81

CARACTERÍSTICAS TÉCNICAS
Modelo WG322E WG322E.9 WG323E WG323E.9 (3 - denominación de la máquina, representa la
sierra pértiga y la motosierra)
WG322E WG322E.9 WG323E WG323E.9
Tensión 20V Max**
Longitud de la espada 25cm
Velocidad de la cadena 3.8m/s
Capacidad del depósito de aceite 130ml
Paso de la cadena 3/8"
Número de elementos de arrastre 40
Espesor de la cadena 0.043”
Tipo de cadena adaptable ES: 3/8.043-40E/ QIRUI : A0(T)-40E/ OREGON: 90PX040G
Tipo de barra adaptable ES: ES104SDEA041/ QIRUI : PO10-43SR(T) / OREGON: 104MLEA041
Tiempo de carga 5hrs
Peso (cadena y barra incluidas) 2.8kg 2.4kg 4.6kg 4.2kg
**Voltaje medido sin carga de trabajo. El voltaje inicial de la batería alcanza un máximo de 20 voltios. El voltaje
nominal es 18 voltios.
ACCESORIOS
WG322E WG322E.9 WG323E WG323E.9
Cadena 1 1 1 1
Espada 1 1 1 1
Cubierta de transporte 1 1 1 1
Barra de extensión (WA0166) / / 1 1
Cargador (WA3760) 1 / 1 /
Batería de Litio (WA3551) 1 / 1 /
Correas para el hombro / / 1 1
Recomendamos que adquiera todos sus accesorios en el mismo establecimiento donde compró la
herramienta. Consulte los estuches de los accesorios para más detalles. El personal del establecimiento
también puede ayudar y aconsejar.
81
Motosierra inalámbrica ES
Page 82

INFORMACIÓN SOBRE EL
RUIDO
WG322E
WG322E.9
Nivel de presión
acústica ponderada
Nivel de potencia
acústica ponderada
KpA = 3.0 dB(A)
Utilíce protección auditiva.
LpA= 87.9 dB(A) LpA= 85.7 dB(A)
LwA= 96 dB(A) LwA= 96 dB(A)
INFORMACIÓN SOBRE LAS
VIBRACIONES
Los valores totales de vibración se determinan
según la norma EN 60745:
Valor de emisión de
vibración ah < 2.5 m/s2
El valor total de vibración declarado se puede utilizar
82
para comparar una herramienta con otra y también
en una evaluación preliminar de exposición.
ADVERTENCIA: El valor de emisión de
vibraciones durante el uso de la herramienta
podría ser distinto al valor declarado dependiendo de
la forma en que se use la herramienta según las
condiciones siguientes, y otras variaciones sobre el
uso de la herramienta:
El modo de uso de la herramienta y los materiales
que se cortan o perforan.
El estado general y las condiciones de
mantenimiento de la herramienta
La utilización del accesorio correcto para la
herramienta y su correcto mantenimiento afilado y
en buenas condiciones.
La firme sujeción de las empuñaduras y la utilización
de accesorios antivibración.
El uso de la herramienta conforme a su diseño y
estas instrucciones.
Esta herramienta podría causar síndrome
de vibración mano-brazo si no se utiliza
correctamente.
ADVERTENCIA: Para conseguir una mayor
precisión, debe tenerse en cuenta una
estimación del nivel de exposición en condiciones
reales de todas las partes del ciclo de uso, como los
tiempos durante los que la herramienta está apagada
o el tiempo que está funcionando al ralentí sin
Incertidumbre K = 1.5
m/s²
WG323E
WG323E.9
realizar ningún trabajo. Esto podría reducir
notablemente el nivel de exposición durante el
periodo completo de trabajo.
Cómo minimizar el riesgo de exposición a la
vibración.
Utilice SIEMPRE cinceles, brocas y cuchillas afiladas.
Mantenga esta herramienta de acuerdo con estas
instrucciones y bien lubricada (si es necesario).
Si la herramienta se utiliza regularmente, invierta en
accesorios antivibración.
Planifique su programa de trabajo para distribuir el
uso de la herramienta a lo largo de varios días.
USO INDICADO
El aparato ha sido proyectado para talar árboles y
para aserrar troncos, ramas, vigas de madera, tablas,
etc. y puede emplearse para realizar cortes a favor
y transversal al sentido de la fibra de la madera.
Este aparato no es adecuado para aserrar materials
minerales.
MONTAJE
ADVERTENCIA! No instale la
batería hasta que se haya montado
completamente.
Al manipular en la cadena de sierra deben
usarse siempre guantes de protección.
MONTAJE DE LA ESPADA Y LA CADENA DE
SIERRA
1. Desembalar cuidadosamente todas las partes.
2. Colocar la motosierra sobre una superficie plana
y firme.
3. Utilice únicamente cadenas WORX o cadenas
recomendadas para la espada.
4. Insertar la cadena de sierra (7) en la ranura de
la espada (6). Verifique que la cadena gire en la
dirección correcta comparándola con el símbolo
de la cadena que hay en la espada, o mirando el
símbolo indicador de marcha de la cadena (17)
que hay en el cuerpo de la sierra. Asegúrese de
que el pestillo de tensión de la cadena (23) esté
apuntando hacia afuera. (Ver Fig. A)
5. Colocar la cadena en torno a la rueda de cadena
(16) de manera que el perno de sujeción (20) y
ambos nervios-guía (21) de la espada (19) queden
alojados en el agujero rasgado de la espada,
observando en ello que el perno tensor de cadena
penetre en el respectivo orificio de la espada (6).
(Ver Fig. B1, B2)
6. Observar que todas las partes estén
correctamente colocadas. Asegurarse de que las
articulaciones de accionamiento estén asentadas
completamente en el piñón de accionamiento
(Ver Fig. C1), evitando que se tuerzan, tal como
se muestra en la Fig. C2. Si se tuercen, sujetar
la cadena por la espada justo delante de la
torcedura y tirar para deshacerla.
Motosierra inalámbrica ES
Page 83

NOTA: La cadena debe girar libremente y sin
torcerse.
7. Colocar la cubierta de la cadena (9) y apretarla
girando el botón tensor de la cadena (8) en
sentido horario hasta que esté firme. (Ver Fig. D)
ADVERTENCIA: La cadena todavía no
se encuentra tensada. El tensado de la
cadena se describe en la sección “Tensado
de la cadena”. Ahora la cadena necesita
inspeccionarse para asegurarse de que la
tensión es la correcta.
TENSADO DE LA CADENA DE SIERRA (Ver Fig.
E1, E2)
NOTA: Las sierras de cadena nuevas se dilatan.
Comprobar la tensión de la cadena periódicamente la
primera vez que se utilice y tensar la cadena (7) si se
afloja alrededor de la espada (6).
ADVERTENCIA:
● Quite la batería de la herramienta antes de ajustar
la tensión de la cadena de la motosierra.
● Los bordes de corte de la cadena son sumamente
filosos. Utilice guantes de protección cuando
manipule la cadena.
● Mantenga siempre la cadena con la tensión
correcta. Una cadena suelta aumentará el riesgo
de repulsiones. Una cadena suelta podría soltarse
de la ranura de la espada y esta situación puede
causar lesiones al usuario y dañar la cadena. Una
cadena suelta hará que la cadena, la barra de
la cadena y la rueda dentada se desgasten más
rápidamente.
1. Depositar la sierra de cadena sobre una superficie
plana.
2. Gire el botón tensor de la cadena (8) hacia la
derecha con la mano hasta que esté apretado
firmemente.
NOTA: La tensión se aumenta automáticamente
mientras el botón tensor de la cadena (8) se gira
hacia la derecha. El mecanismo de trinquete evita
que la cadena se afloje.
3. Incline la sierra hacia adelante (Ver Fig. E1) donde
la guía (6) de la punta de la barra es empujada
hacia arriba. Esto eliminará la holgura de la
cadena.
4. Apriete completamente el botón tensor de la
cadena (8) girándolo hacia la derecha.
5. Compruebe minuciosamente la tensión ajustada
por el mando de tensado automático de la
cadena. La cadena (7) está tensada correctamente
cuando puede levantarse aproximadamente una
distancia equivalente a la mitad de la profundidad
del eslabón de accionamiento de la barra guía
(6) en el centro. Para realizar esta comprobación
debe utilizarse una mano para levantar la cadena
contra el peso de la máquina. (Ver Fig. E2)
NOTA: La cadena (7) está tensada correctamente si
puede levantarse de la barra guía (6) y el eslabón de
accionamiento está dentro del raíl de la barra guía (6).
NOTA: Con las operaciones de corte, la cadena (7)
se estira y se destensa. Cuando la cadena esté floja,
desenrosque completamente el botón tensor de
la cadena (8) o gírelo tres vueltas completas hacia
la izquierda y, a continuación, vuelva a apretar
el botón tensor de la cadena (8) para restablecer
correctamente la tensión de la cadena, repitiendo los
pasos 1-4 indicados arriba.
MONTAJE DE LA BARRA DE EXTENSIÓN (solo
para WG323E, WG323E.9)
Alinee el mango de la pértiga de extensión e insértelo
en el eje. Gire el mando de bloqueo en sentido
horario para bloquear. (Ver Fig. F1, F2)
NOTA: Compruebe que el eje esté bloqueado
firmemente.
INSTALACIÓN DE LA PÉRTIGA DE EXTENSIÓN
EN LA MÁQUINA (Ver Fig. G1)
Paso 1: Alinee el soporte de conexión de la pértiga
(29) e introdúzcalo en la sierra.
Paso 2: Gire el mando de bloqueo (28) en sentido
antihorario para fijar la pértiga de extensión a la
máquina.
NOTA: Compruebe que la pértiga de extensión
esté bloqueada firmemente antes de empezar
a trabajar.
DESMONTAJE DE LA PÉRTIGA DE EXTENSIÓN
(Ver Fig. G2)
Paso 1: Gire el mando de bloqueo (28) en sentido
horario para desbloquear y tire hacia fuera.
Paso 2: Empuje la sierra para soltar la pértiga de
extensión de la sierra.
ADVERTENCIA!
• Para utilizar esta máquina con la pértiga de
extensión, compruebe que se haya extraído la
batería.
Ajuste la longitud de la pértiga
La sierra de pértiga tiene un conjunto telescópico que
puede alargarse de 2m (totalmente replegado) hasta
2.7m (totalmente extendido).
La palanca de fijación (26) permite fijar la pértiga en
cualquier posición de extensión.
1. Para extender la pértiga, suelte la palanca de
fijación tal como se muestra en la Fig. H. La
pértiga se deslizará con suavidad.
2. Extraiga la sección interior de la pértiga hasta la
longitud que desee. Nota: La pértiga solo debe
extenderse hasta la longitud mínima necesaria
para llegar a la rama que se quiere cortar.
3. Para bloquear la pértiga en una posición, apriete
la palanca de fijación tal como se muestra en la
Fig. H.
LUBRICACIÓN
IMPORTANTE: La sierra de cadena se
suministra con el depósito de aceite
vacío. Por ello, es imprescindible llenarlo
con aceite antes de utilizarla por primera vez.
Si se trabaja con la sierra de cadena sin tener
aceite en el depósito, o con un nivel inferior al
mínimo, se daña la sierra de cadena.
NOTA: La vida útil y el rendimiento de corte
83
Motosierra inalámbrica ES
Page 84

de la cadena dependen de que su lubricación
sea óptima. Por ello, la cadena de sierra
es lubricada automáticamente durante su
funcionamiento.
LLENADO DEL DEPÓSITO DE ACEITE:
ADVERTENCIA: Extraiga la batería antes
de llenar el depósito de aceite.
1. Depositar la sierra de cadena sobre una base
adecuada de manera que el tapón del depósito de
aceite (3) quede arriba.
2. Limpiar con un paño el área en torno al tapón del
depósito de aceite y abrir el tapón.
3. Agregue aceite para sierra de cadena hasta que el
depósito esté lleno.
4. Prestar a atención a que no penetre suciedad en
el depósito de aceite, volver a colocar el tapón (3)
del depósito de aceite y apretarlo girándolo en
sentido horario hasta que esté firme.
IMPORTANTE: Para permitir la
ventilación del depósito de aceite, el
tapón del mismo va provisto de unos
pequeños canales de aireación. Para evitar un
derrame de aceite, prestar atención a depositar
siempre la sierra en posición horizontal (con el
tapón de cierre del depósito de aceite (3)
mirando hacia arriba).
Utilizar exclusivamente el aceite para sierra
biodegradable recomendado para evitar
deterioros en la sierra de cadena (Grade: ISO
84
VG32). Puede adquirirse a través del comercio
donde compró la sierra o en una ferretería
local. Jamás deberá emplearse aceite reciclado
o aceite usado. En caso de aplicarse un aceite
diferente del recomendado se anula la garantía.
No ingerir. En caso de ingestión, buscar ayuda
médica inmediatamente. Manténgase fuera del
alcance de los niños. Guardar lejos de fuentes
de calor y llamas abiertas.
COMPROBAR EL ENGRASADOR AUTOMÁTICO
El funcionamiento adecuado de engrasador
automático se puede comprobar poniendo en
marcha la motosierra y apuntando con la punta de
la barra directriz (6) hacia un trozo de cartón o papel
en el suelo. Si se crea un patrón de aceite creciente
en el cartón, el engrasador automático funciona
correctamente. Si no hay patrón de aceite, a pesar
de que el depósito de aceite está lleno, póngase
en contacto con el agente de servicio de atención
al cliente de WORX o con el agente de servicio
autorizado de WORX.
PRECAUCIÓN: No toque el suelo con la
cadena. Asegúrese de que hay una
distancia de seguridad de 30 cm.
FUNCIONAMIENTO
1. ANTES DE UTILIZAR LA HERRAMIENTA
INALÁMBICA
ADVERTENCIA! El cargador y el pack de
batería han sido específicamente diseñados
para funcionar juntos, de modo que no
procure utilizar ningún otro dispositivo. Nunca
inserte o permita objetos metálicos en las conexiones
del cargador o el pack de batería, ya que podrían
ocurrir fallas y riesgos eléctricos.
NOTA: Al cargar una batería nueva o que no haya
sido utilizada durante un largo periodo de tiempo.
El cargador suministrado es adecuado para cargar la
batería de iones de litio instalada en la máquina. No
utilice otro cargador de baterías.
2. CARGAR LA BATERÍA
La batería de iones de litio se encuentra protegida
contra descarga profunda. Si la batería se vacía,
la máquina se apaga por medio de un circuito
preventivo.
En un entorno cálido o después de un uso intenso, la
batería podría estar demasiado caliente para volver
a ser cargada. Deje que la batería se enfríe antes de
volver a cargarla.
3. EXTRAER O INSTALAR EL PACK DE BATERÍA
(Ver Fig. I1, I2, I3)
Presione el botón de liberación de la batería para
extraer la batería de la herramienta. Después de la
recarga, inserte la batería en el puerto de la misma.
Una simple pulsación y una presión ligera serán
suficientes hasta que oiga un clic. Asegúrese de que
la batería esté completamente fijada.
NOTA: Cuando extraiga la batería, sosténgala
firmemente para evitar caídas y daños
personales.
4. Conexión y desconexión (Ver Fig. J)
ATENCIÓN: Compruebe la batería antes
de utilizar la herramienta inalámbrica.
Utilice únicamente la batería
especificada en la sección de accesorios.
Para la puesta en marcha del aparato presionar
el bloqueo de conexión (15), y a continuación,
accionar y mantener en esa posición el interruptor
de conexión /desconexión (2). Soltar entonces el
bloqueo de conexión.
Para la desconexión soltar el interruptor de
conexión/desconexión.
5. CORTAR
IMPORTANTE: ¿Está lleno el depósito de
aceite? Verificar el nivel de aceite (14)
antes de comenzar a aserrar y observarlo
continuamente durante el trabajo (Ver Fig. K1).
Rellenar aceite si el nivel ha alcanzado el borde
inferior de la mirilla. Trabajando normalmente,
un depósito lleno alcanza aprox. unos 12
minutos.
Verificar periódicamente cada 10 minutos
de operación, si la tensión de la cadena es
correcta. Especialmente.
1) Instalar la batería en la máquina.
Motosierra inalámbrica ES
Page 85

2) Asegúrese de que la sección del tronco que desea
cortar no está en el suelo. Esta medida evitará
que la cadena (7) toque el suelo cuando corte el
tronco.
Si la cadena toca el suelo mientras aquella está
en movimiento es peligroso y dañará su filo.
3)
Utilice ambas manos para asir con firmeza la sierra.
Utilice siempre la mano izquierda para asir el
mango delantero (4) y la mano derecha para asir el
mango trasero (1). Agárrela con firmeza. Mantenga
bien abarcadas siempre las empuñaduras con el
pulgar y los dedos (Ver Fig. K2).
4) Asegúrese de que su equilibrio es firme.
Mantenga los pies separados a la anchura de
los hombros. Divida el peso uniformemente en
ambos pies.
5) Cuando esté preparado para hacer un
corte, empuje el botón de seguridad (15)
completamente hacia adentro con el pulgar
derecho y apriete el gatillo. Esta operación
encenderá la motosierra. Si suelta el gatillo la
motosierra se apagará. Asegúrese de que al
motosierra funciona a plena velocidad antes de
iniciar un corte.
6) Cuando inicie un corte, desplace lentamente
la cadena en movimiento contra la madera.
La madera debe estar lo más cerca posible
del cuerpo de la sierra. Sujete la motosierra
firmemente en su lugar para evitar que la
motosierra rebote o patine (movimiento lateral).
7) Guíe la sierra presionando ligeramente y no
ejerza una presión excesiva en la motosierra,
permitiendo que la sierra haga su trabajo.
El motor se sobrecargará y se puede comer.
La sierra funcionará mejor y más segura a la
velocidad para la que ha sido diseñada.
8) Quite la motosierra de un corte cuando aquella
funcione a plena velocidad. Detenga la motosierra
liberando el conmutador de encendido (2) y
apagado. Asegúrese de que la cadena se ha
detenido antes de dejar la sierra.
9) Practique utilizando leños inservibles en un lugar
seguro hasta que se sienta cómodo, utilizando
un movimiento fluido y una velocidad de corte
constante.
Dispositivos de seguridad antirretroceso de
esta motosierra
Esta sierra tiene una cadena de bajo retroceso y
una barra directriz de retroceso reducido. Ambos
elementos reducen la posibilidad de retroceso. Sin
embargo, el retroceso puede seguir ocurriendo con
esta motosierra.
Cómo evitar el rechazo de la sierra.
• Utilice ambas manos para asir la sierra mientas
esta esté en funcionamiento. Agárrela con
firmeza. Mantenga bien abarcadas siempre las
empuñaduras con el pulgar y los dedos.
• Mantenga todos los elementos de seguridad en
su lugar en la sierra. Asegúrese de que funcionan
correctamente.
• No intente llegar donde no puede ni cortar por
encima de la altura del hombro.
• Mantenerse firme y con buen equilibrio en todo
momento.
• Colóquese ligeramente al lado izquierdo de
la motosierra. Esto impide que el cuerpo se
encuentre en la misma línea de la cadena.
• No deje que el extremo de la espada entré en
contacto con nada mientras la cadena esté en
movimiento.
• No intente nunca cortar dos troncos al mismo
tiempo. Corte sólo un tronco a la vez.
• No introduzca bruscamente el extremo de la
espada ni intente cortar utilizando la fuerza
(penetrando la madera con el extremo de la
espada).
• Permanezca atento a las ramas movedizas y a
otras fuerzas que pudieran cerrar un corte o caer
sobre la cadena.
• Tenga sumo cuidado cuando reanude un corte
iniciado anteriormente.
• Utilice solamente la cadena de bajo retroceso
y la barra (6) directriz suministrados con esta
motosierra.
• Nunca trabajar con cadenas de sierra
destensadas, distendidas, o muy desgastadas.
Observe que la tensión de la cadena sea correcta.
Cómo utiliza la motosierra de forma segura
1. Utilice la motosierra solamente cuando esté en
equilibrio
2. Sujete la motosierra en el lado derecho del
cuerpo (Ver Fig. L).
3. La cadena (7) debe funcionar a plena velocidad
antes de entrar en contacto con la madera.
4. Utilice las puntas amortiguadoras (13) para
sujetar la sierra a la madera antes de empezar a
cortar.
5. Utilice las puntas amortiguadoras como un punto
de palanca durante el corte. (Ver Fig. M)
6. No utilice la motosierra con los brazos totalmente
extendidos, no intente serrar áreas de difícil
acceso ni se coloque en una escalera durante el
serrado (Ver Fig. N).
No utilice nunca la motosierra por encima de la
altura de los hombros.
ASERRADO DE MADERA EN TENSIÓN (VER
FIG. O)
ADVERTENCIA: Esté prevenido al cortar
una rama que se encuentre bajo tensión,
ya que podría retroceder elásticamente.
A medida que va cortando la rama puede que
la tensión a la que está sometida haga que ésta
se desgarre bruscamente y golpee al usuario
o/y que le haga perder el control sobre la sierra
de cadena.
Si el tronco es soportado por ambos extremos,
comenzar a serrar primero por arriba (Y), hasta
un tercio de su diámetro (corte superior), y a
continuación terminar de cortar desde abajo (Z)
de manera que coincidan las ranuras de corte,
evitándose así que el tronco se astille o que se
agarrote la sierra. Al realizar esto deberá cuidarse
que la cadena de sierra no toque el suelo. Si el tronco
85
Motosierra inalámbrica ES
Page 86

solamente se apoya por un extremo serrar primero
por abajo (Y) hasta un tercio de su diámetro (corte
inferior) y cortar después completamente desde
arriba (Z) de manera que coincidan las ranuras de
corte, evitándose así que el tronco se astille o que se
agarrote la sierra.
USO DE LA SIERRA DE PÉRTIGA (SOLO PARA
WG323E, WG323E.9)
Corte con correas para el hombro (Ver Fig. P1)
El mástil de extensión incluye una correa para el
hombro que ofrece apoyo adicional al sostener la
sierra eléctrica en el aire. Enganche la correa para el
hombro al mástil de extensión y colóquela sobre su
hombro. La correa para el hombro puede, además,
suavizar el impacto que podría sufrir la sierra
eléctrica al caer tras finalizar un corte.
Cortar con la sierra de pértiga
1. Instalar la batería en la máquina.
2. Antes de cortar una rama alta, tenga en cuenta
todos los puntos explicados en la sección anterior
“Podado de ramas” y preste especial atención a
la posible trayectoria que seguirá la rama al caer.
ADVERTENCIA: No permanezca nunca de
pie bajo una rama que se está cortando.
Procure que las personas que pasen por la
zona permanezcan alejadas. No permanezca
sobre una escalera u otro tipo de soporte
inestable mientras utiliza la herramienta. No
utilice la herramienta cerca de cables, tendido
eléctrico o cables de telefonía. Manténgase a
86
una distancia de 3m (10ft) de cualquier cable
eléctrico. (Ver P2-P5)
3. Utilice ambas manos para asir con firmeza la
sierra. Para trabajar con la sierra de pértiga,
sujétela solo por las zonas de agarre especificadas
(Ver Fig. P6). Agárrela con firmeza. Mantenga
bien abarcadas siempre las empuñaduras con el
pulgar y los dedos.
4. Asegúrese de que su equilibrio es firme.
Mantenga los pies separados a la anchura de
los hombros. Divida el peso uniformemente en
ambos pies.
5. Cuando esté preparado para hacer un
corte, empuje el botónde seguridad (30)
completamente, y, a continuación, presione por
complete el interruptor de encendido y apagado
(31) (Ver Fig. P7). Esta operación encenderá la
motosierra. Si suelta el gatillo la motosierra se
apagará. Asegúrese de que al motosierra funciona
a plena velocidad antes de iniciar un corte.
6.
Cuando inicie un corte, desplace lentamente la
cadena en movimiento contra la madera. Sujete la
motosierra firmemente en su lugar para evitar que
la motosierra rebote o patine (movimiento lateral).
7. Guíe la sierra presionando ligeramente y no
ejerza una presión excesiva en la motosierra.
El motor se sobrecargará y se puede comer.
La sierra funcionará mejor y más segura a la
velocidad para la que ha sido diseñada.
8. Quite la motosierra de un corte cuando aquella
funcione a plena velocidad. Detenga la motosierra
liberando el conmutador de encendido y
apagado. Asegúrese de que la cadena se ha
detenido antes de dejar la sierra.
PODAR UN ÁRBOL
ADVERTENCIA: Evite los golpes de
retroceso, ya que pueden provocar
lesiones graves o incluso mortales. Para
aprender a evitar los golpes de retroceso,
consulte Golpes de retroceso.
ADVERTENCIA: No utilice la sierra de pértiga
en las siguientes situaciones:
• Desde un árbol
• Desde una escalera o cualquier otra
superficie inestable
• Desde una posición inestable
Podría perder el control de la sierra de pértiga
y alguien podría resultar herido de gravedad.
ADVERTENCIA: No levante los brazos por
encima de la altura de los hombros cuando
utilice la sierra de pértiga.
PRECAUCIÓN: Si las condiciones a las que se
enfrenta exceden su nivel de habilidad, solicite
ayuda a un profesional.
El proceso de poda consiste en cortar las ramas de
un árbol vivo. Asegúrese de que su equilibrio es
firme. Mantenga los pies separados a la anchura
de los hombros. Divida el peso uniformemente en
ambos pies.
Para podar un árbol, siga estas instrucciones:
1. Realice el primer corte a 15 cm del árbol del
tronco, en la parte inferior de la rama que se
quiere cortar. Utilice la parte superior de la cadena
para realizar este corte. Corte 1/3 del diámetro de
la rama (véase la Fig. P8).
2. Avance entre 5 y 10 cm hacia fuera en la rama.
Realice el segundo corte por la parte superior
de la rama y no se detenga hasta que esté
completamente cortada.
3. Realice un tercer corte lo más cerca que pueda del
tronco por la parte inferior del muñón de la rama
que queda. Corte 1/3 del diámetro del muñón.
4. Realice un cuarto corte justo encima del tercero y
descienda hasta encontrarse con el tercer corte.
De esta forma se desprenderá el muñón de la
rama.
MANTENIMIENTO DE LA
SIERRA
Siga las instrucciones de mantenimiento en este
manual. La limpieza adecuada de la sierra y cadena
así como el mantenimiento de la espada pueden
reducir la posibilidad de retroceso. Examine y
proceda al mantenimiento de la sierra después de
cada uso. Con ello aumentará la vida útil de su sierra.
NOTA: Incluso con un afilado adecuado, el riesgo de
retroceso puede aumentar con cada afilado.
Motosierra inalámbrica ES
Page 87

MANTENIMIENTO Y
ALMACENAMIENTO DE LA
MOTOSIERRA
1. Extraiga la batería de la sierra.
• Cuando no la esté utilizando
• Antes de trasladar la cadena de un lugar a otro
• Antes de su reparación
• Antes de cambiar cualquier accesorio o
extensión, como la cadena de la motosierra y la
barra de seguridad.
2. Examine la sierra después de cada uso.
Compruebe la motosierra meticulosamente
si la protección o cualquier otra pieza ha
resultado dañada. Compruebe si hay algún
daño que pueda afectar a la seguridad del
operario o al funcionamiento de la motosierra.
Compruebe si las piezas móviles están bien
alineadas o bloqueadas. Compruebe si hay piezas
rotas o dañadas. No utilice la motosierra si los
daños afectan a la seguridad o al funcionamiento.
Pida al centro de servicio autorizado que reparen
los daños. Para buscar un centro de servicio
autorizado, visite www.worx.com
3. Realice tareas de mantenimiento en la
motosierra con cuidado
• Nunca exponga la motosierra a la lluvia.
•
Mantenga la cadena afilada, limpia y lubricada
para asegurar un funcionamiento óptimo y seguro.
• Siga los pasos descritos en este manual para
afilar la cadena.
• Mantenga las manos secas, limpias y sin aceite o
grasa.
• Mantenga todos los tornillos y tuercas
firmemente apretados.
4. Permitir que el mantenimiento de su
herramienta eléctrica sea efectuado por una
persona calificada usando solamente piezas de
recambio idénticas.
5. Guarde siempre la motosierra cuando no la
utilice.
• En un lugar alto o bajo llave, fuera del alcance de
los niños.
• En un lugar seco.
• Con la espada y la cubierta (9) colocadas
Mantenimiento de la barra
Para maximizar el período de vida útil de la barra, es
recomendable realizar el siguiente mantenimiento.
Los rieles de la barra que transportan la cadena
deben limpiarse antes de guardar la herramienta o si
la barra o la cadena están sucias.
Los rieles se deben limpiar cada vez que quite la
cadena.
Para limpiar los rieles de la barra:
1. Quite la cubierta de la cadena, la barra y la propia
cadena. (Consulte la ENSAMBLAJE)
2. Mediante una carda, un destornillador o
herramienta adecuada similar, limpie los residuos
de los rieles de la barra. (Ver Fig. Q)
3. Asegúrese de limpiar los conductos de aceite
completamente.
Condiciones que requieren un mantenimiento
de la cadena (7) y de la espada (6):
• La motosierra corta en un lado o en ángulo
• La motosierra se ha forzado a través del corte
• Suministro inadecuado de aceite a la barra y a la
cadena.
Compruebe el estado de la barra directriz cada vez
que la cadena se afila. Una barra directriz desgastada
dañará la cadena y dificultará el corte
Después de cada uso, con la unidad desconectada de
la fuente de alimentación, limpie todo el serrín de la
barra directriz y del orificio del piñón.
Cuando la parte superior del riel sea irregular, utilice
una lima plana para restaurar los laterales y bordes
cuadrados.
Ranura desgastada Ranura correcta
Cambie la barra directriz cuando la ranura esté
desgastada, la barra directriz esté doblada o agrietada
o cuando los rieles se sobrecalienten o presenten
rebabas. Si es necesario realizar el cambio, utilice
solamente la barra directriz especificada para la
motosierra en la lista de piezas de repuesto o en el
sello ubicado en la motosierra.
Cómo Sustituir O Dar La Vuelta A La Cadena De
Sierra Y A La Espada
Sustituya la cadena cuando la parte cortante esté
demasiado gastada para afilarla o cuando se
rompa la cadena. Utilice sólo la cadena de repuesto
recomendada en este manual.
Examine la espada antes de afilar la cadena. Una
espada gastada o dañada resultará peligrosa.
Una espada gastada o dañada dañará la cadena.
Asimismo, el corte resultará más difícil.
Luego, coloque el pestillo de la tensión de la cadena
en la nueva barra (23) apretando el tornillo en el
sentido de las agujas del reloj. Se deberá colocar el
saliente del pestillo (a) en el orificio de la barra. (Ver
Fig. R)
AFILADO DE LA CADENA DE SIERRA
ADVERTENCIA: Extraiga la batería de la
motosierra antes de realizar tareas de
servicio. Pueden producirse severas
lesiones o la muerte como resultado de
descarga eléctrica o por contacto del cuerpo
con la cadena en movimiento.
Mantenga las herramientas de corte limpias y
afiladas. Su sierra cortará más rápidamente y de
forma más segura. Una cadena mal afilada causará
desgaste en el piñón, la espada, la cadena y el
motor. Si se ve obligado a introducir la cadena por la
fuerza en la madera y el corte sólo produce aserrín
y escasos fragmentos grandes, la cadena está mal
afilada.
LUBRIQUE EL PIÑÓN
ADVERTENCIA: Utilice guantes
profesionales cuando realice tareas de
Lime los
laterales y los
bordes del riel para
hacerlos cuadrados
87
Motosierra inalámbrica ES
Page 88

mantenimiento o servicio en esta herramienta.
Quite siempre la batería de la motosierra
antes de realizar cualquier tara de servicio o
mantenimiento en esta herramienta.
NOTA: No es necesario extraer la cadena o la barra
para lubricar el piñón
1. Limpie la barra y el piñón.
2. Utilice una engrasadora, insertando la punta en el
orificio de lubricación e inyecte grasa hasta que
salga por el borde exterior de la punta del piñón.
(Ver Fig. S)
3. Rote el piñón y tire de la cadena a mano hasta
que el lado sin grasa del piñón esté alineado con
el orificio de lubricación. Repita el proceso de
lubricación.
PROTECCIÓN AMBIENTAL
Los residuos de aparatos eléctricos y
electrónicos no deben depositarse en la
basura doméstica. Se deben reciclar en
las instalaciones especializadas. Consulte a las
autoridades locales o el establecimiento para saber
cómo reciclar estos productos.
INVESTIGACIÓN DE AVERÍAS
En la siguiente tabla se indican los síntomas, posibles causas y soluciones para ayudarle en el caso de que su
herramienta eléctrica no funcione correctamente. Si ello no le permite identificar o subsanar el fallo diríjase a
su taller de servicio habitual.
ATENCIÓN: Antes de tratar de localizar el fallo desconecte la herramienta eléctrica y retire el
acumulador.
Síntomas Posible causa Solución
La sierra de cadena
no funciona.
La sierra de cadena
trabaja
88
de forma
intermitente.
Cadena de sierra sin
lubricar.
Cadena o carril guía
calientes.
La sierra de cadena
marcha
de forma irregular,
vibra o no corta correctamente.
Batería agotada.
Fusible defectuoso.
Sobrecalentamiento
Se ejerce demasiada presión al cortar.
Conexión suelta.
Contacto falso interno.
Interruptor de conexión/desconexión
defectuoso.
No hay aceite en el depósito.
El taladro de aireación que lleva el tapón
del depósito de aceite está obturado.
Canal de salida de aceite obturado.
No hay aceite en el depósito.
El taladro de aireación que lleva el tapón
del depósito de aceite está obturado.
Canal de salida de aceite obturado.
Tensión de la cadena excesiva.
Cadena mellada.
La tensión de la cadena es muy baja.
Cadena mellada.
Cadena desgastada.
El sentido del filo de los dientes de sierra es
contrario al sentido de marcha.
Cargue la batería.
Cambiar el fusible.
Coloque la máquina en un lugar fresco
y bien ventilado y deje que se enfríe.
Ejerza menos presión al cortar.
Acudir a un taller especializado.
Acudir a un taller especializado.
Acudir a un taller especializado.
Rellenar con aceite.
Limpiar el tapón del depósito de
aceite.
Desatascar el canal de salida de aceite.
Rellenar con aceite.
Limpiar el tapón del depósito de
aceite.
Desatascar el canal de salida de aceite.
Ajustar la tensión de la cadena.
Reafilar la cadena o sustituirla
Ajustar la tensión de la cadena.
Reafilar la cadena o sustituirla.
Sustituir la cadena.
Darle la vuelta a la cadena de sierra
para que el filo de los dientes quede
en sentido de marcha.
Motosierra inalámbrica ES
Page 89

DECLARACIÓN DE
CONFORMIDAD
Los que reciben,
POSITEC Germany GmbH
Konrad-Adenauer-Ufer 37
50668 Köln
Declaran que el producto,
Descripción Sierra pértiga y motosierra a
batería
Modelo WG322E WG322E.9 WG323E
WG323E.9 (3 - denominación de la máquina,
representa la sierra pértiga y la motosierra)
Funciones Cortar madera
Cumple con las siguientes Directivas:
2006/42/EC
2014/30/EU
2011/65/EU
2000/14/EC enmendado por 2005/88/EC
Notificación realizada por:
Nombre: Intertek Deutschland GmbH (cuerpo
notificado 0905)
Dirección: Stangenstraße 1, 70771
LEINFELDEN-ECHTERDINGEN
Nº de certificado: 17SHW1086-01 (WG322E
WG322E.9) 17SHW1166-01 (WG323E
WG323E.9)
WG322E WG322E.9
2000/14/EC enmendado por 2005/88/EC:
- Procedimiento de evaluación de la conformidad de
acuerdo con Annex V
- Nivel de presión acústica 94.7 dB(A)
- Nivel de intensidad acústica 96 dB(A)
WG323E WG323E.9
2000/14/EC enmendado por 2005/88/EC:
- Procedimiento de evaluación de la conformidad de
acuerdo con Annex V
- Nivel de presión acústica 95.2 dB(A)
- Nivel de intensidad acústica 96 dB(A)
Cumple las normativas:
EN 60745-1
EN 60745-2-13
EN ISO 3744
EN 55014-1
EN 55014-2
Partes de EN ISO11680-1
La persona autorizada para componer el archivo
técnico,
Nombre Russell Nicholson
Dirección Positec Power Tools (Europe)Ltd,
PO Box 6242, Newbury, RG14 9LT, UK
Suzhou 2017/07/27
Allen Ding
Ingeniero Jefe Adjunto. Pruebas y Certificación
89
Motosierra inalámbrica ES
Page 90

ALGEMENE
VEILIGHEIDSWAARSCHUWINGEN VOOR VERMOGENSMACHINE
WAARSCHUWING! Lees alle instructies
zorgvuldig door. Indien u zich niet aan alle
onderstaande instructies houdt, kan dat leiden tot
een elektrische schok, brand en/of ernstig letsel.
Bewaar alle waarschuwingen en instructies
voor latere naslag.
De term “(elektrisch) gereedschap” in de
waarschuwingen hieronder, verwijst naar uw
op netspanning werkende gereedschap (met
stroomdraad) of uw accugereedschap (draadloos).
1. WERKGEBIED
a) Houd uw werkgebied schoon en zorg
ervoor dat deze goed verlicht is. In
rommelige en slecht verlichte werkgebieden
gebeuren sneller ongelukken.
b) Gebruik elektrisch gereedschap niet in
explosieve atmosferen, zoals in de nabijheid
van ontvlambare vloeistoffen, gassen
of stof. Elektrisch gereedschap veroorzaakt
vonken die de stof of de gassen kunnen doen
ontvlammen.
c) Houd kinderen en omstanders uit de buurt
90
terwijl u met elektrisch gereedschap werkt.
Afleidingen kunnen ervoor zorgen dat u de
controle over het gereedschap verliest.
2. ELEKTRISCHE VEILIGHEID
a) De stekker van het elektrisch gereedschap
moet passen in het stopcontact. Pas de
stekker op geen enkele manier aan om
te zorgen dat hij wel past. Gebruik geen
adapterstekkers terwijl u geaard elektrisch
gereedschap gebruikt. Onaangepaste stekkers
die in het stopcontact passen, verminderen de
kans op een elektrische schok.
b) Vermijd lichamelijk contact met geaarde
of gegronde oppervlakken, zoals buizen,
radiatoren, fornuizen en koelkasten. Als uw
lichaam geaard of gegrond is, is er een grotere
kans op een elektrische schok.
c) Stel uw elektrische gereedschap niet bloot
aan regen of natte omstandigheden. Water
dat elektrisch gereedschap kan binnendringen,
vergroot de kans op een elektrische schok.
d) Gebruik de stroomdraad niet op een andere
manier dan waarvoor deze gemaakt is. Trek
niet aan de stroomdraad, ook niet om de
stekker uit het stopcontact te krijgen en
draag het gereedschap niet door het aan
de stroomdraad vast te houden. Houd de
stroomdraad uit de buurt van hitte, olie,
scherpe hoeken en bewegende onderdelen.
Beschadigde of verwarde stroomdraden
vergroten de kans op een elektrische schok.
e) Wanneer u het elektrische gereedschap
buitenshuis gebruikt, dient u te zorgen
voor een verlengsnoer dat geschikt is
voor gebruik buitenshuis. Het gebruik van
een verlengsnoer dat geschikt is voor gebruik
buitenshuis, vermindert de kans op een
elektrische schok.
f) Moet een krachtmachine in een vochtige
locatie worden gebruikt, gebruik dan een
aardlekschakelaar (ALS). Een ALS vermindert
het gevaar op elektrische schokken.
3. PERSOONLIJKE VEILIGHEID
a)
Blijf alert, kijk waar u mee bezig bent en
gebruik uw gezonde verstand wanneer u
met elektrisch gereedschap werkt. Gebruik
geen elektrisch gereedschap wanneer u moe
bent of onder de invloed van drugs, alcohol
of medicijnen. Een moment van onoplettendheid
bij het gebruik van elektrisch gereedschap kan
leiden tot ernstig persoonlijk letsel.
b) Gebruik een veiligheidsuitrusting.
Draag altijd oogbescherming. Een
veiligheidsuitrusting, zoals een stofmasker,
schoenen met antislipzolen, een veiligheidshelm,
of oorbescherming die onder de juiste
omstandigheden gebruikt wordt, vermindert de
kans op persoonlijk letsel.
c) Pas op dat het apparaat niet onbedoeld
wordt gestart. Zorg ervoor dat de
schakelaar uit staat voordat u de voeding
en/of batterij aansluit, en als u de machine
oppakt en draagt. Gereedschap dragen terwijl
u uw vinger op de schakelaar houdt, of de stekker
in het stopcontact steken terwijl het gereedschap
ingeschakeld staat, is vragen om ongelukken.
d) Verwijder inbussleutels of moersleutels
voordat u het gereedschap inschakelt. Een
sleutel die nog in of op een draaiend onderdeel
van het elektrische gereedschap zit, kan leiden tot
ernstig persoonlijk letsel.
e) Werk niet boven uw macht. Zorg er altijd
voor dat u stevig staat en goed in balans
bent. Hierdoor heft u betere controle over het
gereedschap in onverwachte situaties.
f) Draag geschikte kleding. Draag geen
loszittende kleding of sieraden. Houd uw
haar, kleding en handschoenen uit de buurt
van bewegende onderdelen. Loszittende
kleding, sieraden of lang haar kan vast komen te
zitten in bewegende onderdelen.
g) Wanneer er apparaten worden bijgeleverd
voor stofafzuiging en –opvang, zorg er dan
voor dat deze aangesloten zijn en op de
juiste manier gebruikt worden. Het gebruik
van deze apparaten vermindert de gevaren die
door stof kunnen ontstaan.
4. GEBRUIK EN ONDERHOUD VAN
ELEKTRISCH GEREEDSCHAP
a) Forceer het gereedschap niet. Gebruik
gereedschap dat voor de toepassing
Draadloze kettingzaag NL
Page 91

geschikt is. Het gebruik van geschikt
gereedschap levert beter werk af en werkt veiliger
als het gebruikt wordt op de snelheid waar het
voor ontworpen is.
b) Gebruik het gereedschap niet wanneer
de aan/uitschakelaar niet functioneert.
Gereedschap dat niet kan worden bediend met
behulp van de schakelaar is gevaarlijk en dient te
worden gerepareerd.
c) Neem de stekker uit het stopcontact en/of
verwijder de batterij voordat u instellingen
veranderd, toebehoren vervangt of
de machine opbergt. Deze preventieve
veiligheidsmaatregelen verminderen de kans op
het ongewild inschakelen van het gereedschap.
d)
Berg gereedschap dat niet gebruikt
wordt buiten het bereik van kinderen
op en laat personen die niet bekend
zijn met het gereedschap of met deze
veiligheidsinstructies het gereedschap niet
bedienen. Elektrisch gereedschap kan in de
handen van ongetrainde gebruikers gevaarlijk zijn.
e) Onderhoud elektrisch gereedschap op
de juiste wijze. Controleer of bewegende
onderdelen nog goed uitgelijnd staan, of
ze niet ergens vastzitten en controleer
op elke andere omstandigheid die ervoor
kan zorgen dat het gereedschap niet goed
functioneert. Wanneer het gereedschap
beschadigd is, dient u het te repareren
voordat u het in gebruik neemt. Veel
ongelukken worden veroorzaakt door slecht
onderhouden elektrisch gereedschap.
f) Houd snijdend gereedschap schoon
en scherp. Goed onderhouden snijdend
gereedschap met scherpe zaagbladen/messen
zal minder snel vastlopen en is makkelijker te
bedienen.
g) Gebruik het gereedschap, de accessoires,
de bitjes, enz. in overeenstemming met
deze instructies en op de manier zoals
bedoeld voor het specifieke type elektrisch
gereedschap, rekening houdend met de
werkomstandigheden en het uit te voeren
werk. Het gereedschap gebruiken voor andere
doeleinden dan waar deze voor ontworpen is, kan
gevaarlijke situaties opleveren.
5. GEBRUIK EN ONDERHOUD VAN
ACCUGEREEDSCHAP
a) Laad het accupack alleen op met de door de
fabrikant aangegeven oplader. Een oplader
die geschikt is voor het ene type accupack, kan
brand veroorzaken wanneer die gebruikt wordt
voor een ander type accupack.
b) Gebruik het gereedschap uitsluitend met
het aangegeven accupack. Door het gebruik
van andere accupacks ontstaat de kans op
letsel of brand.
c) Wanneer het accupack niet gebruikt wordt,
dient u het uit de buurt te houden van
metalen voorwerpen, zoals paperclips,
munten, sleutels, spijkers, schroeven of
andere kleine metalen voorwerpen die
een verbinding kunnen maken tussen
de contactpunten van de terminal. Het
kortsluiten van de accuterminals kan zorgen voor
brandwonden of brand.
d) Onder extreme omstandigheden kan
er vloeistof uit de accu lopen; raak
deze vloeistof niet aan. Wanneer u toch
onverhoopt met de vloeistof in aanraking
komt, dient u dit onmiddellijk af te spoelen
met water. Wanneer de vloeistof in de ogen
komt, dient u zo snel mogelijk een arts te
raadplegen. Vloeistof die afkomstig is uit de accu
kan irritatie of brandwonden veroorzaken.
6. SERVICE
a)
Laat uw elektrisch gereedschap repareren
door een bevoegde reparateur die alleen
originele reserveonderdelen gebruikt. Zo bent
u er zeker van dat uw gereedschap veilig blijft.
VEILIGHEIDSVOORSCHRIFTEN VOOR KETTINGZAGEN
1. Houd bij een lopende zaag alle
lichaamsdelen uit de buurt van de
zaagketting. Controleer voor het
starten van de zaag dat de zaagketting
niets aanraakt. Bij werkzaamheden met
een kettingzaag kan een moment van
onoplettendheid ertoe leiden dat kleding of
lichaamsdelen door de zaagketting worden
meegenomen.
2.
Houd de kettingzaag met uw rechterhand
aan de achterste handgreep en met uw
linkerhand aan de voorste handgreep vast.
Als u de kettingzaag anders vasthoudt, loopt u een
hoger risico op verwondingen. Houd de kettingzaag
daarom alleen zoals voorgeschreven vast.
3.
Houd het gereedschap alleen aan de
geïsoleerde handgrepen vast, omdat de
kettingzaag in aanraking kan komen met
verborgen bedrading. Als de zaagketting een
onder stroom staande draad aanraakt, zorgt
dit er voor dat niet-geïsoleerde delen van het
gereedschap ook onder stroom komen, waardoor
de gebruiker een elektrische schok kan krijgen.
4. Draag een veiligheidsbril en
gehoorbescherming. Overige
beschermende uitrusting voor hoofd,
handen, benen en voeten wordt
geadviseerd. Passende beschermende
kleding vermindert het verwondingsgevaar
door rondvliegend spaanmateriaal en toevallig
aanraken van de zaagketting.
5. Werk met de kettingzaag niet op een
boom. Bij gebruik van een kettingzaag op een
boom bestaat verwondingsgevaar.
6. Let er altijd op dat u stevig staat en
gebruik de kettingzaag alleen als u op een
stevige en vlakke ondergrond staat. Een
91
Draadloze kettingzaag NL
Page 92

gladde of instabiele ondergrond kan, in het
bijzonder bij het gebruik van een ladder, tot het
verlies van de controle over uw evenwicht en de
kettingzaag leiden.
7. Houd er bij het afzagen van een onder
spanning staande tak rekening mee dat
deze terugveert. Als de spanning in de
houtvezels vrijkomt, kan de gespannen tak de
bediener raken, of kan deze de bediener de
controle over de kettingzaag doen verliezen.
8.
Wees bijzonder voorzichtig bij het zagen van
laag houtgewas en jonge bomen. Het dunne
materiaal kan in de zaagketting blijven hangen en
op u slaan of u uit het evenwicht brengen.
9. Draag de kettingzaag aan de voorste
handgreep met stilstaande zaagketting
en naar achteren wijzende geleidingsrail.
Breng altijd de veiligheidsafscherming
aan voordat u de kettingzaag vervoert
of opbergt. Een zorgvuldige omgang met de
kettingzaag vermindert de kans op per ongeluk
aanraken van de lopende zaagketting.
10. Volg de aanwijzingen voor het smeren,
de kettingspanning en het wisselen van
toebehoren op. Een onjuist gespannen
of gesmeerde ketting kan breken of het
terugslagrisico verhogen.
11. Houd handgrepen droog, schoon en vrij
van olie en vet. Vettige grepen met olie zijn
glad en leiden tot het verlies van de controle
over de kettingzaag.
12. Zaag alleen hout. Gebruik de kettingzaag
92
alleen voor werkzaamheden waarvoor
deze bestemd is. Voorbeeld: Gebruik de
kettingzaag niet voor het zagen van plastic,
metselwerk of bouwmaterialen die niet van
hout zijn. Het gebruik van de kettingzaag voor
werkzaamheden waarvoor deze niet bestemd is,
kan tot gevaarlijke situaties leiden.
OORZAKEN EN VOORKOMING
VAN EEN TERUGSLAG:
Terugslag kan optreden als de punt van de
geleidingsrail een voorwerp raakt of als het
hout buigt en de zaagketting in de groef wordt
vastgeklemd.
Een aanraking met de punt van de geleidingsrail
kan in veel gevallen tot een onverwachte en
naar achteren gerichte actie leiden, waarbij de
geleidingsrail omhoog en in de richting van de
bediener wordt geslagen.
Het vastklemmen van de zaagketting aan de
bovenkant van de geleidingsrail kan de geleidingrail
snel in de richting van de bediener terugstoten.
Elk van deze reacties kan ertoe leiden dat u
de controle over de zaag verliest en u zich
mogelijk ernstig verwondt. Vertrouw niet
uitsluitend op de in de kettingzaag ingebouwde
veiligheidsvoorzieningen. Als gebruiker van een
kettingzaag dient u verschillende maatregelen
te treffen om zonder ongevallen en zonder
verwondingen te kunnen werken.
Een terugslag is het gevolg van het verkeerd
gebruik of onjuiste gebruiksomstandigheden van
het elektrische gereedschap. Terugslag kan worden
voorkomen door geschikte voorzorgsmaatregelen,
zoals hieronder beschreven:
- Houd de zaag met beide handen vast,
waarbij duim en vinger de grepen van
de kettingzaag omsluiten. Neem een
zodanige lichaamshouding in en houd
uw armen in een zodanige positie, dat u
stand kunt houden ten opzichte van de
terugslagkrachten. Als geschikte maatregelen
worden getroffen, kan de bediener de
terugslagkrachten beheersen. Laat de kettingzaag
nooit los.
- Voorkom een abnormale lichaamshouding
en zaag niet boven schouderhoogte.
Daardoor wordt per ongeluk aanraken met punt
van de kettinggeleider voorkomen en kan de
kettingzaag in onverwachte situaties beter onder
controle worden gehouden.
- Gebruik altijd de door de fabrikant
voorgeschreven vervangende
kettinggeleiders en zaagkettingen. Verkeerde
vervangende kettinggeleiders en zaagkettingen
kunnen tot kettingbreuk en terugslag leiden.
- Houd u aan de aanwijzingen van de
fabrikant voor het slijpen en het onderhoud
van de zaagketting. Te lage dieptebegrenzers
verhogen de neiging tot terugslag.
RESTRISICO’S
Zelfs als het apparaat zoals beoogd wordt gebruikt, is
er altijd een restrisico dat niet kan worden vermeden.
Afhankelijk van het type en bouw van het apparaat
kunnen de volgende mogelijke gevaren voorkomen:
- Contact met zaagtanden van de kettingzaag
(snijgevaar)
- Contact met de roterende zaagketting (snijgevaar)
- Onvoorziene, abrupte beweging van de
geleidestang (snijgevaar)
- Rondvliegende stukjes van kettingzaag (snij-,
prikgevaar)
- Rondvliegende stukjes van werkstuk
- Contact tussen huid en olie
- Gehoorverlies, als tijdens het werk geen
gehoorbescherming wordt gedragen
VEILIGHEIDSWAARSCHUWINGEN VOOR BEKZAAG MET
VERLENGSTUK
1. Gebruik de machine niet wanneer de bediener
moe of ziek is, of onder invloed van alcohol of
drugs is.
2. Houd omstanders op een veilige afstand tijdens
Draadloze kettingzaag NL
Page 93

het werken met de machine om risico’s te
minimaliseren.
3. Wees u bewust van het gevaar van de
verschillende werkhoudingen, evenals van het
risico te worden getroffen door vallende takken
of takken die de grond geraakt hebben en
terugspringen. De bediener kan getroffen worden
door vallende takken of takken die opspringen
nadat ze de de grond geraakt hebben. Verwijder
de takken in de secties.
4. Zoek tijdens het gebruik een stevige positie van
de voeten en een goede balans. Gebruik de
bijgeleverde bescherming.
5. Houd de machine op voldoende afstand van
elektrische leidingen.
VEILIGHEIDSINSTRUCTIES
VOOR HET ACCUPACK
a) Batterijcellen en accupacks mogen niet
gedemonteerd, geopend of vernietigd
worden.
b) Sluit accupacks niet kort. Bewaar
accupacks niet willekeurig in een doos of
lade waar ze elkaar kunnen kortsluiten of
door geleidende voorwerpen kortgesloten
kunnen worden. Houd het accupack op een
afstand van andere metalen voorwerpen als
paperclips, muntstukken, sleutels, nagels,
schroeven en andere kleine metalen voorwerpen
die de contacten van de accupack kunnen
verbinden. Kortgesloten contacten van accupacks
kunnen brandwonden of brand veroorzaken.
c) Stel accupacks niet bloot aan warmte of
vuur. Vermijd opslag in direct zonlicht.
d) Stel accupacks niet bloot aan mechanische
schokken.
e) Als een accu lekt dient men voorzichtig
te zijn dat de vloeistof niet in contact
komt met de huid of de ogen. Als dat toch
gebeurt spoelt men de huid onder stromend
water en raadpleegt men een arts.
f) Raadpleeg meteen een arts wanneer een
batterij of accupack is ingeslikt .
g) Houd batterijcellen en accupacks schoon en
droog.
h) Veeg de aansluitingen van het accupack
schoon met een droge doek als ze vuil zijn
geworden.
i) Accupacks moeten voor gebruik worden
opgeladen. Lees de gebruiksaanwijzing voor
de juiste laadinstructies.
j) Laat accupacks niet langdurig opladen als
ze niet worden gebruikt.
k) Na een lange opslagperiode kan het nodig
zijn het accupack enkele keren op te laden
en te ontladen voor een optimale prestatie.
l) Accupacks presteren het best bij normale
kamertemperatuur (20°C ± 5°C).
m) Wanneer u accupacks wegwerpt,
dient u accupacks van verschillende
elektrochemische systemen van elkaar
afgezonderd te houden.
n) Laad alleen op met een lader met de
technische gegevens van WORX. Gebruik
geen andere lader dan de lader die specifiek
voor dat doel met de apparatuur is
meegeleverd. Een lader voor één type accupack
geschikt is kan een brandgevaar inhouden
wanneer gebruikt met een ander type.
o) Gebruikt geen accupack dat niet bedoeld is
voor gebruik met deze apparatuur.
p) Houd accupacks buiten het bereik van
kinderen.
q) Bewaar de oorspronkelijke instructies van
het product voor latere gebruik.
r) Verwijder het batterijpakket uit de
apparatuur als het niet in gebruik is.
s) Volg de juiste procedure voor
afvalverwijdering na afdanken van dit
apparaat .
BEWAAR DEZE INSTRUCTIES
Instructies voor toepassing van de juiste
techniek van vellen, snoeien en doorzagen
1. Bomen vellen
Als u met twee of meer personen tegelijkertijd zaagt
en velt, houd dan als afstand tussen de vellende
en de zagende personen minstens de dubbele
hoogte aan van de te vellen boom. Let er bij het
vellen van bomen op, dat u andere personen niet
blootstelt aan gevaar, u geen leidingen raakt en geen
materiële schade veroorzaakt. Als een boom met een
stroomleiding in aanraking komt, breng dan direct de
energiemaatschappij hiervan op de hoogte.
Stel u als bediener van de kettingzaag, bij
zaagwerkzaamheden op een helling, boven de
te vellen boom op, omdat de boom na de val
waarschijnlijk bergaf zal rollen of glijden.
Voor het vellen dient een vluchtweg te worden
gepland en wanneer nodig vrijgemaakt te worden.
TDe vluchtweg dient te reiken tot het uiterste punt
van de verwachte vallijn zoals wordt getoond door
Afbeelding 1.
Houd voor het vellen rekening met de natuurlijke
helling van de boom, de plaats van grote takken en
de windrichting, om de valrichting van de boom te
kunnen beoordelen.
Verwijder vuil, stenen, losse schors, spijkers, nieten
en draad van de boom.
2. Inkepingen zagen
Maak een inkeping tot 1/3 van de diameter van de
boom, loodrecht op de vallijn zoals getoond wordt op
Figuur 1. Zaag eerst de onderste horizontale inkeping
(W). Hierdoor voorkomt u het vastklemmen van de
kettingzaag of van de geleidingsrails bij het zagen
van de tweede inkeping (X).
3. Inkeping voor het vellen van de boom zagen
Zaag de inkeping (Y) voor terugvallen ten minste
50 mm hoger dan dan de horizontale inkeping,
93
Draadloze kettingzaag NL
Page 94

3
2
2
W
Y
Z
X
50mm
50mm
1
1
1
Afbeelding 1
3
2
2
Y
Z
X
50mm
50mm
1
1
1
2
2
W
Y
Z
X
50mm
50mm
1
1
1
Afbeelding 2
Afbeelding 3
zoals getoond wordt op Afbeelding 1. Zaag de
inkeping voor het vellen van de boom parallel aan
de horizontale inkeping. Zaag de inkeping slechts
zo diep in, dat er nog een verbindingsstuk (valrand)
blijft staan, dat als scharnier kan werken. Het
verbindingsstuk verhindert, dat de boom draait en in
de verkeerde richting valt. Zaag het verbindingsstuk
niet door.
Als de inkeping voor het vellen van de boom in de
buurt van het verbindingsstuk komt, moet de boom
met vallen beginnen. Als het erop lijkt, dat de boom
mogelijkerwijs niet in de gewenste richting valt of
terugbuigt en de zaagketting vastklemt, onderbreekt
u het zagen van de inkeping voor het vellen van de
boom en gebruikt u een spie van hout, kunststof of
aluminium (Z) om de inkeping te openen en om de
boom in de gewenste valrichting te doen omslaan
( ).
Als de boom begint te vallen, verwijdert u de
kettingzaag uit de inkeping, schakelt u de zaag uit,
legt u deze neer en verlaat u het gevarenbereik via
de geplande vluchtroute ( ). Let op naar beneden
vallende takken en struikel niet. (Zie afb. 1)
Afbeelding 1
94
50mm
X
Z
W
Y
50mm
1
2
aanwijzingen om gemakkelijk te zagen.
Als de stam over de gehele lengte wordt
ondersteund, zoals getoond wordt in Afbeelding 3,
wordt vanaf de bovenkant gezaagd (overbuck) , zorg
dat u niet in de aarde zaagt aangezien dit de scherpte
van de ketting zal verminderen.
Als het werkstuk aan één zijde wordt ondersteund,
zoals is aangegeven in Figuur 4, zaag dan 1/3 van
3
1
de diameter in aan één zijde (schraag) (1). Zaag
dan vanaf de andere zijde (2) in om bij de eerste
zaagsnede te komen.
Afbeelding 4
2
1
1
4. Takken van de gevelde boom afzagen
Na het vellen zaagt u de takken van de gevelde
boom. Laat grote, naar beneden gerichte takken
eerst nog staan wanneer u takken van de gevelde
boom afzaagt. Verwijder kleine takken in een enkele
zaagebeweging, zoals wordt getoond op Afbeelding
2. Zaag onder spanning staande takken van onderen
naar boven om vastklemmen van de zaag te
voorkomen.
Afbeelding 2
5. Boomstam in stukken zagen
Vervolgens zaagt u de gevelde boom in stukken.
Zorg ervoor dat u stevig staat en verdeel uw
lichaamsgewicht gelijkmatig over beide voeten
wanneer u de gevelde boomstam in stukken zaagt.
Leg indien mogelijk takken, balken of spieën onder
de stam om deze te steunen. Houdt u aan de
Als de stam aan beide zijden wordt ondersteund,
zoals getoond wordt op Afbeelding 5, maak dan een
inkeping tot 1/3 van de diameter van de bovenzijde
(overbuck) (1). Maak dan de volgende inkeping (2)
door vanaf de onderzijde in te zagen tot 2/3 deel om
de eerste inkeping te raken.
1/3
Draadloze kettingzaag NL
2
2/3
Page 95

2
2/3
1
1/3
Afbeelding 3
Afbeelding 4
Afbeelding 5
2
2/3
1
1/3
1
2
2/3
1/3
Draag oorbescherming
1
1/3
2
Als u op een helling zaagt, sta dan altijd aan de
bovenzijde van de stam, zoas getoond wordt op
Afbeelding 6. Verminder de aandrukkracht wanneer
de stam bijna is doorgezaagd en blijf de handgrepen
van de kettingzaag stevig vasthouden, zodat u
tijdens het moment van doorzagen de controle over
de machine behoudt. Let erop dat de zaagketting
de grond niet raakt. Wacht na het doorzagen tot de
zaagketting tot stilstand is gekomen, voordat u de
kettingzaag verwijdert. Schakel de motor van de
kettingzaag altijd uit voordat u naar een andere boom
gaat.
Draag een veiligheidsbril
2/3
Draag een stofmasker
Niet blootstellen aan regen of
water
Draag hoofdbescherming
Draag beschermende
handschoenen.
Draag veiligheidsschoeisel.
m
0
1
Waarschuwing: gevaar door
95
bovengrondse elektrische kabels.
Afgedankte elektrische producten
mogen niet bij het normale
huisafval terechtkomen. Breng deze
producten waar mogelijk naar een
recyclecentrum bij u in de buurt.
Vraag de verkoper of de gemeente
informatie en advies over het
recyclen van elektrische apparatuur.
Batterijen niet weggooien.
Breng lege accu’s naar een
recyclecentrum of inzamelpunt
SYMBOLEN
voor chemisch afval bij u in de
buurt.
Lees de gebruikershandleiding om
het risico op letsels te beperken
Niet verbranden.
Waarschuwing
Draadloze kettingzaag NL
Page 96

96
Niet blootstellen aan regen of
water.
Pas op dat de punt van het
zwaard niet met enig voorwerp in
aanraking komt
Door aanraken kan het zwaard
plotseling omhoog en naar
achteren komen, waardoor er
ernstig letsel ontstaat.
Bedien de kettingzaag altijd
met twee handen.
xINR18/65-y: Cilindrische
lithiumionbatterijcellen met
maximale diameter van 18mm en
maximale hoogte van 65mm; “x”
staat voor een aantal cellen dat in
serie is aangesloten, blanco indien
1; “-y” staat voor een aantal cellen
dat parallel is aangesloten, leeg
indien 1.
Draadloze kettingzaag NL
Page 97

ONDERDELENLIJST
1. ACHTERSTE HANDGREEP
2. AAN/UITSCHAKELAAR
3. OLIETANKDOP
4. VOORSTE HANDGREEP
5. HANDBESCHERMING
6. ZWAARD
7. ZAAGKETTING
8. KETTINGSPANKNOP
9. AFSCHERMING
10. ACCUPACK *
11. ONTGRENDELPAL ACCU*
12. ACHTERSTE HANDAFSCHERMING
13. BUMPERPUNT
14. AANDUIDING VAN OLIENIVEAU
15. INSCHAKELBLOKKERING
16. KETTINGWIEL
17. LOOPRICHTING- EN SNIJRICHTINGSYMBOOL
18. OLIESPROEIER
19. STAAFKLEM
20. GAT BEVESTIGINGSSTAAF
21. ZWAARDGELEIDINGSBRUG
22. STAAF EN KETTINGOPSLAG/AFSCHERMING TRANSPORT*(SCHEDE)
23. KETTINGVANGER (ZIE AFB. A)
24. HANDVAT VAN HET VERLENGSTUK*
25. VERGRENDELKNOP*
26. KLEMHENDEL*
27. BINNENSTE VERLENGSTUK*
28. AANDRAAIKNOP*
29. VERBINDINGSKLEM VAN HET VERLENGSTUK*
30. ONTGRENDELKNOP OP HET HANDVAT VAN HET VERLENGSTUK*
31. AAN-/UITSCHAKELAAR OP HET HANDVAT VAN HET VERLENGSTUK*
32. SCHOUDERRIEM*
97
* Niet alle afgebeelde of beschreven toebehoren worden standaard meegeleverd.
Draadloze kettingzaag NL
Page 98

TECHNISCHE GEGEVENS
Type WG322E WG322E.9 WG323E WG323E.9 (3 - benoeming van machine, vertegenwoordiger
van kettingzaag en stokzaag)
WG322E WG322E.9 WG323E WG323E.9
Spanning 20V Max**
Zwaardlengte 25cm
Kettingsnelheid 3.8m/s
Inhoud olievoorraadreservoir 130ml
Kettingmaat 3/8"
Aantal kettingschakels 40
Kettingmeting 0.043”
Type adaptieve ketting ES: 3/8.043-40E/ QIRUI : A0(T)-40E/ OREGON: 90PX040G
Type adaptieve stang ES: ES104SDEA041/ QIRUI : PO10-43SR(T) / OREGON: 104MLEA041
Oplaadtijd 5hrs
Gewicht (inclusief ketting en zwaard) 2.8kg 2.4kg 4.6kg 4.2kg
**Voltage gemeten zonder belasting. De initiële accuspanning bereikt maximaal 20 volt. De nominale spanning
bedraagt 18 volt.
TOEBEHOREN
98
WG322E WG322E.9 WG323E WG323E.9
Zaagketting 1 1 1 1
Zwaard 1 1 1 1
Transporthoes 1 1 1 1
Verlengstok (WA0166) / / 1 1
Lader (WA3760) 1 / 1 /
Accupack (WA3551) 1 / 1 /
Schouderriem / / 1 1
Wij adviseren u alle accessoires te kopen in de winkel waar u het gereedschap heeft gekocht. Kijk op de
verpakking van het accessoire voor meer informatie. Ook het winkelpersoneel kan u helpen en adviseren.
Draadloze kettingzaag NL
Page 99

GELUIDSPRODUCTIE
WG322E
WG322E.9
A-gewogen geluidsdruk
A-gewogen geluidsniveau
KpA = 3.0 dB(A)
Draag oorbescherming.
LpA= 87.9 dB(A) LpA= 85.7 dB(A)
LwA= 96 dB(A) LwA= 96 dB(A)
TRILLINGSGEGEVENS
WG323E
WG323E.9
Help de blootstelling aan trillingen te minimaliseren.
Gebruik ALTIJD scherpe beitels, boren en messen.
Onderhoud het gereedschap in overeenstemming
met deze instructies en houd het goed gesmeerd
(indien van toepassing).
Schaf antivibratie-accessoires aan wanneer u het
gereedschap geregeld gebruikt.
Plan de werkzaamheden zodat de taken met veel
trillingen over een aantal dagen verspreid worden.
BEOOGD GEBRUIK
De machine is bestemd voor het vellen van bomen
en het zagen van stammen, takken, houten balken,
planken etc. en kan worden gebruikt voor schulpen
(in de lengte van de houtnerf) en afkorten (dwars op
de houtnerf). Deze machine is niet geschikt voor het
zagen van minerale materialen.
Totale trillingswaarden (triax vector-som) volgens
EN 60745:
Trillingsemissiewaarde
ah < 2.5 m/s2
De opgegeven totale trillingswaarde kan worden
gebruikt om een gereedschap met een ander te
vergelijken en kan ook dienen als een voorlopige
beoordeling van de blootstelling.
WAARSCHUWING: De trillingsemissiewaarde
tijdens het feitelijke gebruik van dit elektrisch
gereedschap kan afwijken van de opgegeven waarde,
afhankelijk van de wijze waarop het gereedschap
wordt gebruikt, zoals in de volgende voorbeelden:
Hoe het gereedschap wordt gebruikt en welk
materiaal wordt gesneden of geboord.
Of het gereedschap in goede staat verkeerd en
correct wordt onderhouden.
Gebruik van de juiste toebehoren voor het
gereedschap en of deze scherp zijn en in goede staat
verkeren.
De stevigheid van de grip op de handgrepen en het
eventuele gebruik van antivibratie-accessoires.
En of het gereedschap wordt gebruikt waarvoor
het ontworpen is en in overeenstemming met deze
instructies.
Dit gereedschap kan een trillingssyndroom in
de handen en armen veroorzaken als het niet
op de juiste wijze gehanteerd wordt.
WAARSCHUWING: Voor de nauwkeurigheid
moet bij een schatting van het
blootstellingsniveau in de feitelijke
gebruiksomstandigheden rekening worden
gehouden met alle delen van de bedrijfscyclus, zoals
het moment waarop het gereedschap wordt
uitgeschakeld en terwijl het gereedschap in werking
is zonder daadwerkelijk gebruikt te worden. Dit kan
het blootstellingsniveau over de totale werkperiode
aanzienlijk verminderen.
Onzekerheid K = 1.5
m/s²
MONTAGE
WAARSCHUWING! Installeer het
accupack niet, voordat dit geheel in
elkaar gezet is.
Draag altijd werkhandschoenen bij de omgang
met de zaagketting.
MONTAGE VAN ZWAARD EN ZAAGKETTING
1. Pak alle delen voorzichtig uit.
2. Plaats de kettingzaag op een vlak oppervlak.
3. Gebruik alleen originele WORX-kettingen of die
geschikt zijn voor de geleidebalk.
4.
Leg de zaagketting (7) in de rondlopende sleuf
van het zwaard (6). Zorg dat de ketting in de juiste
richting draait door deze te vergelijken met het
pictogram op de geleidebalk of raadpleeg het
symbool Richting ketting (17) dat u op de zaag
kunt vinden. Controleer of de vanger van de
kettingspanner (23) naar buiten gericht is. (Zie afb. A)
5. Leg de kettingschakels om het kettingwiel (16) zo
aan dat de bevestigingsbouten (20) en de beide
zwaardgeleidingsbruggen (21) in het langgat van
het zwaard (6). (Zie afb. B1, B2)
6. Controleer of alle delen goed geplaatst zijn. Zorg
dat de aandrijftanden goed in het aandrijfwiel
zitten (Zie afb. C1), vermijd knikken zoals op Afb.
C2. Als er een knik is, neem de ketting van de
geleidebalk net voor de knik en trek de knik uit.
OPMERKING: De ketting moet vrij kunnen
draaien en vrij zijn van knikken.
7. Monteer de kettingafscherming (9) en draai de
kettingafscherming aan door de knop om de
ketting aan te spannen (8) naar rechts te draaien
totdat deze vastzit. (Zie afb. D)
WAARSCHUWING: De ketting is nog
niet gespannen. De ketting moet
gespannen worden zoals beschreven is
onder “De kettnig spannen”. De ketting moet
worden geïnspecteerd om zeker te zijn dat de
geschikte spanning aanwezig is.
ZAAGKETTING SPANNEN (Zie afb. E1, E2)
OPMERKING: Nieuwe zaagkettingen zullen
99
Draadloze kettingzaag NL
Page 100

uitrekken. Controleer regelmatig de kettingspanning
bij het eerste gebruik en draai bij de ketting (7) aan
wanneer deze los rond het zaagblad (6) komt te zitten.
WAARSCHUWING:
● Verwijder de batterij uit het gereedschap
voordat U de spanning van de zaagketting
aanpast.
● De snijranden van de zaagketting zijn
scherp. Gebruik handschoenen als u de
ketting hanteert.
● Zorg altijd voor de juiste kettingspanning.
Een losse ketting geeft een hoger risico op
terugslag. Een losse ketting kan uit de groef
van het zwaard springen. Dit veroorzaakt
verwonding voor de gebruiker en schade
aan de ketting. Een losse ketting geeft
hogere slijtage aan ketting, zwaard en
tandwiel.
1. Leg de kettingzaag neer op een recht oppervlak.
2. Draai de kettingspanknop (8) in de richting van de
wijzers van de klok tot de juiste kettingspanning is
bereikt.
OPMERKING: De spanning wordt automatisch
verhoogd als de knop voor de kettingspanning (8)
naar rechts wordt gedraaid. Het ratelmechanisme
verhindert dat de spanning te los is.
3. Kantel de zaag naar voren (Zie afb. E1) zodat de
punt van de geleidebalk (6) in een opwaartse
richting wordt geduwd. Dit zal speling van de
ketting te verwijderen.
4. Draai de knop van de kettingspanning (8) vast
100
door deze naar links te draaien.
5. Controleer de spanning die door de automatische
kettingspanknop is ingesteld. De juiste
kettingspanning is bereikt, als de ketting (7)
kan worden verhoogd over ca. een halve
schakellengte vanaf de geleidingsstang (6) in
het midden. Daartoe moet moet de ketting met
één hand tegen het gewicht van de machine in
opgetild worden. (Zie afb. E2)
OPMERKING: De ketting (7) is goed aangespannen
als hij van de geleidingsstang (6) kan worden
opgetild en als de schakel zich in het spoor van de
geleidingsstang (6) bevindt.
OPMERKING: De ketting (7) zal uitrekken door
gebruik en onvoldoende zijn aangespannen. Als de
ketting komt los te zitten, maak de knop (8) om de
ketting aan te spannen los of draai de knop drie keer
naar links, span vervolgens de knop (8) opnieuw aan
om de kettingspanning te herstellen door stap 1 - 4
hierboven te herhalen.
DE VERLENGSTOK MONTEREN (alleen voor
WG323E, WG323E.9)
Plaats het handvat van het verlengstuk in de steel.
Draai de vergrendelingsknop met de wijzers van de
klok mee om te vergrendelen. (Zie afb. F1, F2)
OPMERKING: Zorg ervoor dat de steel goed
vergrendeld is.
HET VERLENGSTUK AAN DE MACHINE
KOPPELEN (Zie afb. G1)
Stap 1: Plaats de verbindingsklem van het
verlengstuk (29) in de zaag
Stap 2: Draai de vergrendelingsknop (28) tegen de
wijzers van de klok in om het verlengstuk tegen de
machine te klemmen.
OPMERKING: Zorg ervoor dat het verlengstuk
vóór gebruik goed op zijn plaats zit en
vergrendeld is.
HET VERLENGSTUK VERWIJDEREN (Zie afb.
G2)
Stap1: Draai de vergrendelingsknop (28) los met de
wijzers van de klok mee en trek hem uit.
Stap2: Schuif de zaag weg om het verlengstuk van de
zaag te ontkoppelen.
WAARSCHUWING!
• Zorg ervoor dat het accupack verwijderd
is als u deze machine met het verlengstuk
gebruikt.
De lengte van de stok afstellen.
De stokzaag heeft een telescopische stokconstructie
die van 2m (geheel ingetrokken) tot 2.7m (geheel
uitgetrokken) reikt.
Klemhendel (26) wordt gebruikt om de stok bij elke
verlenging in positie te houden.
1. Maak de klemhendel los als getoond op afb. De
stok zal vrij kunnen glijden.
2. Trek het binnenste gedeelte tot de gewenste
lengte uit. Opmerking: stel de minimale lengte
in die nodig is om af het te zagen gedeelte te
kunnen bereiken.
3. Vergrendel met de klemhendel de stok in positie,
zoals getoond wordt op afb. H.
KETTINGSMERING
BELANGRIJK: De kettingzaag wordt niet
met zaagkettinghechtolie gevuld
geleverd. Het is belangrijk om de
kettingzaag voor gebruik met olie te vullen.
Het gebruik van de kettingzaag zonder
zaagkettinghechtolie of bij een oliepeil onder
de minimummarkering leidt tot beschadiging
van de kettingzaag.
OPMERKING: De levensduur en de
snijcapaciteit van de ketting hangt af van
de optimale smering. Daarom wordt tijdens
het gebruik de zaagketting automatisch met
zaagkettinghechtolie gesmeerd.
OLIETANK VULLEN:
WAARSCHUWING: Het accupack
verwijderen vóórdat de brandstoftank
gevuld wordt.
1. Plaats de kettingzaag met de olietankdop (3) naar
boven op een geschikte ondergrond.
2. Maak met een doek de omgeving van de
olietankdop schoon, schroef de dop los en
verwijder deze.
3. Giet er kettingzaagolie in tot het reservoir vol is.
4. Let erop dat er geen vuil in de olietank
terechtkomt, plaats opnieuw de oliedop (3) en
Draadloze kettingzaag NL
 Loading...